Embed Size (px)
Citation preview

Copyright © 2016 Solibri, Inc. All rights reserved
Solibri Solution Center
Guide for Account Administrators
Solibri Solution Center Guide for Account Administrators
Copyright © 2017 Solibri, Inc.
All rights reserved
Content Solibri Solution Center .......................................................................................................................... 1
1 Terminology ....................................................................................................................................... 2
2 Accessing the Solibri Solution Center .................................................................................................. 4
2.1 Account Registration ........................................................................................................................... 4
2.1.1 New Customer ............................................................................................................................................. 4
2.1.2 Existing Customer with Known Account Number ........................................................................................ 5
2.2 Updating a Trial Account to a Paying Account .................................................................................... 6
3 Summary and Billing Tabs ................................................................................................................... 7
4 Users Tab ............................................................................................................................................ 8
4.1 Adding Users ........................................................................................................................................ 8
4.1.1 Adding Users One by one ............................................................................................................................. 8
4.1.2 Adding Users with the Help of an Excel Template ....................................................................................... 9
4.1.3 Adding an Existing User ............................................................................................................................. 10
4.2 Export to Excel ................................................................................................................................... 12
4.3 Editing Users ...................................................................................................................................... 12
4.3.1 Editing Users One by One .......................................................................................................................... 12
4.3.2 Editing Users with the Help of an Excel Template ..................................................................................... 13
4.4 Removing Users ................................................................................................................................. 15
4.4.1 Removing Users with the Help of an Excel Template ................................................................................ 16
4.5 Reporting Identity ............................................................................................................................. 17
5 Users License Details Tab .................................................................................................................. 17
6 License Tab ....................................................................................................................................... 18
6.1 Owned and Assigned Licenses........................................................................................................... 19
6.2 Purchasing Products and Extensions ................................................................................................. 19
7 License Assignment Tab .................................................................................................................... 25
7.1 Assign ................................................................................................................................................. 25
7.2 Upgrade ............................................................................................................................................. 27
7.3 Assign All ............................................................................................................................................ 28

Solibri Solution Center Guide for Account Administrators
Copyright © 2017 Solibri, Inc.
All rights reserved
7.4 Solibri Model Viewer Pro licensing view ........................................................................................... 29
8 User Pool Management Tab ............................................................................................................. 30
8.1 About License Pools........................................................................................................................... 30
8.2 Your License Pools ............................................................................................................................. 30
8.3 Adding a License Pool ........................................................................................................................ 31
9 License Statistics Tab ........................................................................................................................ 32
9.1 Peak Reports ...................................................................................................................................... 33
9.2 Usage per User Reports ..................................................................................................................... 34
9.3 Used Version Report ......................................................................................................................... 34
9.4 Amount of Users ................................................................................................................................ 35
9.5 Exporting Reports to Excel ................................................................................................................ 35
10 Company Extensions ....................................................................................................................... 37
10.1 How to upload Company Extensions? ............................................................................................. 37
11 Products View ................................................................................................................................ 39
12 Solibri Model Checker Registration ................................................................................................. 40
12.1 User Registration ............................................................................................................................. 40
12.2 Firewall and Proxy Settings ............................................................................................................. 42
12.3 Borrowing a Floating License .......................................................................................................... 43
13 FAQ – Frequently Asked Questions ................................................................................................. 44
14 Contact Us ...................................................................................................................................... 44

1 (47)
Solibri Solution Center Guide for Account Administrators
Copyright © 2017 Solibri, Inc.
All rights reserved
Solibri Solution Center The Solibri Solution Center (SSC) is a cloud based meeting point to access the latest solutions for Quality Assurance and Quality Control. This customized content will come from Solibri, its partners, 3rd party developers and multiple BIM organizations. Content will be updated frequently and as BIM continues to evolve, there will be a wide range of content to choose from.
Easy License Administration on the Cloud – Previously, license downloads needed specific administration servers and user profiles that took time to create. With Version 9, licenses can be created online and administrators have direct access to user licenses and the selected add-ons. This allows user pools to be more easily managed and this can be done remotely. License monitoring tools are also available. In the near future, we will provide more licensing options enabled by the cloud-based licensing system.
The following browsers are supported:
- Edge - Google Chrome 23-47 - Internet Explorer 8-11 - Mozilla Firefox 18-43 - Mozilla Firefox 17 ESR, 24 ESR, 31 ESR, 38 ESR - Opera 16-34 - Safari 6-8

2 (47)
Solibri Solution Center Guide for Account Administrators
Copyright © 2017 Solibri, Inc.
All rights reserved
1 Terminology Administrator
- The Admin role gives you the ability to manage your company’s Solibri Solution Center account - You can add, edit and remove users - You can purchase products and extensions - You can assign what products and extensions users can download and use - You can manage licenses and license pools - You can access the products view of Solibri Solution Center and download products and extensions that
have been assigned to you
Buyer
- The Buyer role gives you the ability to purchase products and extensions from the Solibri Solution Center - You can assign purchased products and extensions to users, who have wished for them. Otherwise, if no
wishes exist, the administrator may assign the products to the users. - You can access the products view of the Solibri Solution Center and download products and extensions
that your administrator has assigned to you
User
- You can access the products view of the Solibri Solution Center and download products and extensions that your administrator has assigned to you
Floating Licenses
- Floating licenses can be assigned to more users than there are existing licenses - When a user starts the software, a license is checked out from the Solibri Solution Center. When the user
closes the software, the license is checked in to the Solibri Solution Center for others to use it. - If all the floating licenses are in use, the user can use the viewing version of the software (Solibri Model
Viewer) - An internet connection is required to get a floating license. If you need to work without the internet
connection, you can borrow a license for a maximum duration of 14 days.
Rental Licenses
- Rental licenses can be purchased from Solibri Solution Center Web shop - They are valid minimum for three months at a time. Can be purchased with or without subscription. - Rental licenses are locked to a specific license pool. They cannot be moved to your normal license pool. - You need to move users to the rental license pool in order them to access the rental licenses - Otherwise rental licenses work like floating licenses
3 (47)
Solibri Solution Center Guide for Account Administrators
Copyright © 2017 Solibri, Inc.
All rights reserved
Workstation License
- Workstation license can only be assigned to as many users as there are licenses - The license is locked to a specific computer with a specific username and password - An internet connection is required when setting a workstation license and every two months - Moving the license from one computer to another requires actions from Solibri support. In this case,
please contact Solibri support using [email protected].
Workstation License – Offline
- For computers not allowed to connect to the internet - Can only be purchased with a separate and specific request that needs to be approved by Solibri - The license is locked to a specific computer with a specific username and password. - There is a separate application available for calculating a key in the computer outside the internet - User credentials are required - The key is sent to Solibri support and a license file will be returned - The user must set the license by using the same application as in calculating the key - Moving the license from one computer to another requires actions from Solibri support. In this case,
please contact Solibri support using [email protected].
Temporary License (for example for training)
- Solibri support creates temporary licenses when needed - In case you need temporary licenses, please contact Solibri support using [email protected] - An end date is set for these licenses
License Pool
- License pools are for managing licenses and users - If your company has floating and workstation licenses, these licenses are in separate license pools. It’s not
allowed to move a license from a floating pool to a workstation pool or vice versa. - Each user needs to belong to a specific license pool. Each user can belong to only one license pool at a
time. A user can be moved from a license pool to another, if needed. - In a floating pool, there may be more users than existing licenses. In a workstation pool, there can only be
as many users as there are licenses. - You can create multiple license pools and divide Solibri Model Checker licenses between these license
pools. License Pools are explained in more detail in User Pool Management. - By default, every account has at least one license pool with one or more licenses - The first license pool is created by Solibri

4 (47)
Solibri Solution Center Guide for Account Administrators
Copyright © 2017 Solibri, Inc.
All rights reserved
2 Accessing the Solibri Solution Center To access the Solibri Solution Center go to https://solution.solibri.com and log in with your username (=email address) and password. The login page is the same for both users and administrators. However, the landing page will be different for the users and for the administrators. The users will only have access to the Products View.
2.1 Account Registration If you don’t have a username and a password, you will get them after registering an account. Select Create new account for your company (see ).
Figure 1
There are two ways to register an account. If you don’t have an account number, select New Customer and follow instructions from the chapter New Customer. If you already have an account number we have sent to you, select Existing Customer with Known Account Number and follow instructions from the chapter Existing Customer with Known Account Number (see Figure 2).
Figure 2
2.1.1 New Customer After selecting New customer, a form opens (see Figure 3). Fill in the form.
NOTE: The person doing the registration will be the first administrator of the company. One company can have multiple administrators.
Billing details and payment option can be modified also after registering the account. Note that VAT ID is required for companies registered in EU countries.
5 (47)
Solibri Solution Center Guide for Account Administrators
Copyright © 2017 Solibri, Inc.
All rights reserved
When the form is correctly filled, click Register and you will be logged in to the Solibri Solution Center.
Figure 3
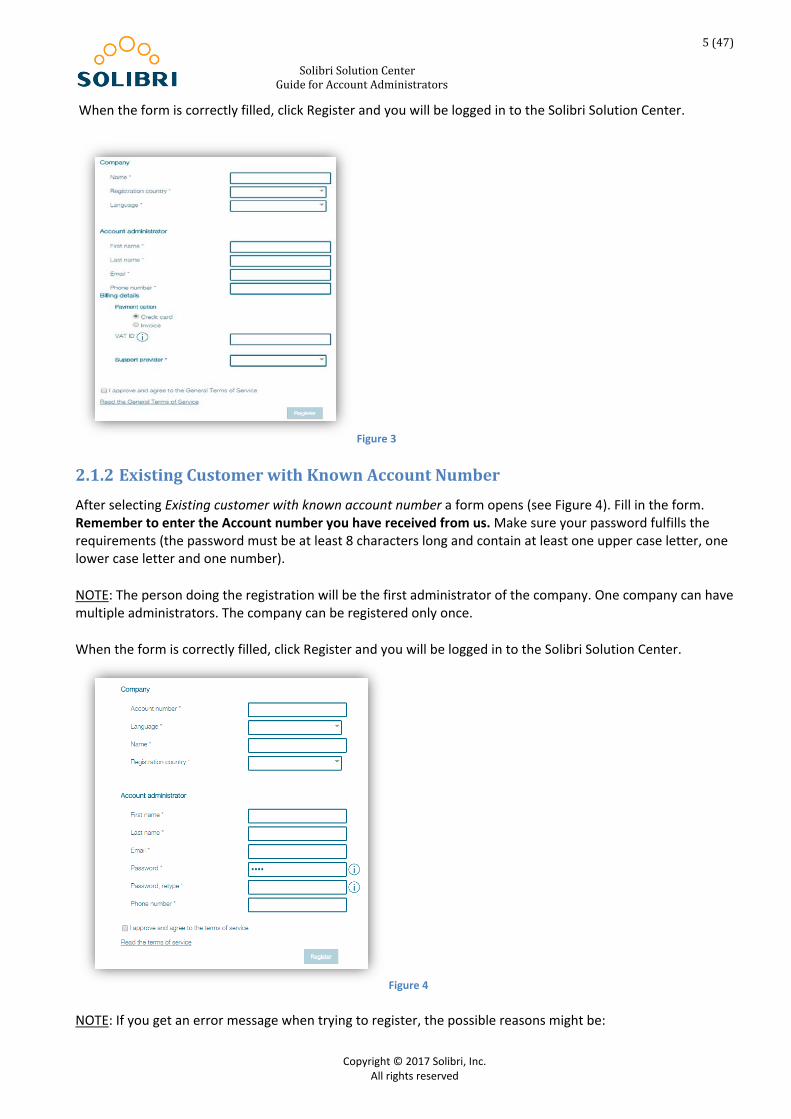
2.1.2 Existing Customer with Known Account Number After selecting Existing customer with known account number a form opens (see Figure 4). Fill in the form. Remember to enter the Account number you have received from us. Make sure your password fulfills the requirements (the password must be at least 8 characters long and contain at least one upper case letter, one lower case letter and one number).
NOTE: The person doing the registration will be the first administrator of the company. One company can have multiple administrators. The company can be registered only once.
When the form is correctly filled, click Register and you will be logged in to the Solibri Solution Center.
Figure 4
NOTE: If you get an error message when trying to register, the possible reasons might be:

6 (47)
Solibri Solution Center Guide for Account Administrators
Copyright © 2017 Solibri, Inc.
All rights reserved
- The account number is incorrect or someone has already registered the company - You have used the same email address for registering a trial (please see Updating a Trial Account to a
Paying Account) - Your password does not fulfill the requirements.
2.2 Updating a Trial Account to a Paying Account
If you want to use the same email address that you have used for registering a trial, you need to do the following:
Go to https://solution.solibri.com and log in with your trial account username and password. At the top of the page you find the Become Paying Customer button. Click it (see Figure 5).
Figure 5
A form opens (see Figure 6). Enter the account number you have received from us. When you have filled in the form, click Register. You are asked to log in again. If you get an error message when trying to register, a possible reason might be that the account number is incorrect or someone else has already registered the company.
Figure 6
NOTE: The person doing the registration will be the first administrator of the company. One company can have multiple administrators. The company can be registered only once.

7 (47)
Solibri Solution Center Guide for Account Administrators
Copyright © 2017 Solibri, Inc.
All rights reserved
3 Summary and Billing Tabs After logging in you will land on the Summary tab (see Figure 7). On the Summary tab, you can see the company details and account administrators.
To change the language of the user interface, select a language from the pull-down menu at the top of the screen.
From the bottom of the page you can find an Available languages pull-down menu. Based on the language you have selected, you will see different products and extensions on the License Assignment tab.
If you edit the company details, remember to save the changes by clicking Update at the bottom of the page.
Figure 7
On the Billing Details tab, you can set your most used payment option (Credit card or Invoice) for Solibri Solution Center Webshop (see Figure 8). If it is Invoice, you can pre-fill the invoicing details. You can also fill in the invoicing details during the purchasing process. Click ’Save’ to save your changes.
Figure 8

8 (47)
Solibri Solution Center Guide for Account Administrators
Copyright © 2017 Solibri, Inc.
All rights reserved
4 Users Tab You will be required to add all individual users. As is the case in web based systems in general, users need to have user identifiers and this is true with the Solibri Solution Center, as well. This is the first time the new licensing system is used and this requires adding users’ email addresses as user identifiers.
4.1 Adding Users
To see current users and to add new users, go to the Users tab (see Figure 9). There are two ways to add new users:
a) one by one b) with the help of an Excel sheet
NOTE: If you try to add a user that already exists in the Solibri Solution Center (the user has registered as a trial user or the user belongs to another account), you get a pop-up notification about it. Please see Adding an Existing User for more information.
Figure 9
4.1.1 Adding Users One by one
At the bottom of the page you have an Add button (see Figure 10). By clicking it you can add one user at a time. Users can have the same first and last names, but the email addresses need to be unique for each user.
By default, the user has a User role. If you want, you can give the user an Admin or a Buyer role. In case you have created multiple license pools select the correct pool for the user from the Select User Pool pull-down menu.
Each user needs to belong to a specific license pool. Each user can belong to only one license pool at a time. A user can be moved from a license pool to another, if needed. If all available workstation licenses in a workstation pool are assigned, this pool is not visible in the pull-down menu.
A country is set for each user. By default, it is the country you have selected when registering the company. You can also select another country from the pull-down menu.

9 (47)
Solibri Solution Center Guide for Account Administrators
Copyright © 2017 Solibri, Inc.
All rights reserved
When saving the user, he/she will receive an email containing a link to set his/her personal password. Once they have set their password, they can log in to the Solibri Solution Center. Depending on their role, they will have access only to the Products view or also to the Admin view.
Figure 10
NOTE: If the user hasn’t received a registration email, the email has been deleted or sent to junk email, the user needs to go to the Solibri Solution Center’s login page (https://solution.solibri.com) and select Forgot your password? A new registration link will be sent to the user.
NOTE: If you get a notification saying that the user already exists, it means that the user exists on another account (for example on a trial account). See Adding an Existing User.
4.1.2 Adding Users with the Help of an Excel Template
If you want to add multiple users at the same time, download a User Excel Template from the link at the bottom of the page (see Figure 11).
Figure 11
Fill in the Excel sheet and save it. The Excel sheet contains tips to enter the right information to each field (see Figure 12). At least you need to fill in First name, Last name, Username, License pool and Country fields for every user. After that, browse the Excel and upload it to the Solibri Solution Center. Each user needs to belong to a specific license pool. Each user can belong to only one license pool at a time. If needed, a user can be moved from a license pool to another.
NOTE: Users will have the User role by default, if you haven’t selected (x) Admin or Buyer.

10 (47)
Solibri Solution Center Guide for Account Administrators
Copyright © 2017 Solibri, Inc.
All rights reserved
Figure 12
After the Excel sheet is successfully uploaded to the Solibri Solution Center, the users will receive an email containing a link to set his/her personal password.
NOTE: If the user hasn’t received a registration email, the email has been deleted or sent to junk email, the user needs to go to the Solibri Solution Center’s login page (https://solution.solibri.com) and select “Forgot your password?”. A new registration link will be sent to the user.
NOTE: If you get an error message when trying to upload the Excel sheet, one or more of the users might already exist on your account or on some other account in the Solibri Solution Center. These users need to be removed from the Excel sheet and added one by one. See Adding an Existing User.
4.1.3 Adding an Existing User
If you are trying to add a user who already exists in the Solibri Solution Center (the user might have registered as a trial user or the user might belong to another account), you will get a notification after clicking Save (see Figure 13).
Figure 13
The notification tells you that the user already exists in another account. You can send a request to the user to be added to your account by clicking Yes. If you don’t want to proceed, click No.
NOTE: After sending the request, you can withdraw it by clicking Withdraw at the end of the row (see Figure 14).
If you click Yes, the user will appear with the button “Withdraw” on the Users tab. At the same time, the user will receive the email shown below:

11 (47)
Solibri Solution Center Guide for Account Administrators
Copyright © 2017 Solibri, Inc.
All rights reserved
Dear <user’s name>
An administrator of <account’s name> has requested that you join their account at the Solibri Solution Center. To accept or reject the request please log on to the Solibri Solution Center at https://solution.solibri.com. Your username at the Solibri Solution Center is <user’s email address>.
Figure 14
The next time the user logs in to the Solibri Solution Center, he/she will get a notification (see Figure 15).
Figure 15
The notification tells the user that he/she has been requested to join another account. If the user accepts the request, he/she will be asked to log in again. If the user rejects the request, he/she will continue using his/her existing account.
If the user rejects the request, the user will disappear from the Users tab. The administrator won’t receive any separate notification whether the user has accepted or rejected the request. Changes will appear on the Users tab.
NOTE: Once the user has accepted or rejected the request, the Withdraw button will disappear from the end of the row.
NOTE: After user has accepted the request you can edit the user’s role and license pool.

12 (47)
Solibri Solution Center Guide for Account Administrators
Copyright © 2017 Solibri, Inc.
All rights reserved
4.2 Export to Excel It is possible to export the user list to Excel. To do this, click Export to Excel (see Figure 16).
Figure 16
NOTE: The current view is exported to Excel. If you want both active and deleted users to be exported to Excel, click the Show deleted users box before clicking Export to Excel (see Figure 17.)
Figure 17
4.3 Editing Users
There are two ways to edit users:
a) one by one b) with the help of an Excel template
4.3.1 Editing Users One by One
Select the user you want to edit by clicking the row (see ). Click Edit and an Edit user window opens.
Figure 18

13 (47)
Solibri Solution Center Guide for Account Administrators
Copyright © 2017 Solibri, Inc.
All rights reserved
You can edit the user’s first and last names, role, user pool and country. Save changes by clicking Save (see Figure 19).
The role Trial, is only reserved for actual SMC trial users, therefore this role cannot be chosen by Admins.
Figure 19
NOTE: You can’t edit user’s email address. If you have entered a wrong email address, you need to remove that user and add a new user.
NOTE: You can’t edit user’s user pool, if the user is using Solibri Model Checker. When user has closed Solibri Model Checker and the license has been returned to Solibri Solution Center you can edit the user pool.
4.3.2 Editing Users with the Help of an Excel Template Export the current users to Excel by clicking the Export to Excel… button (see Figure 16). Edit the Excel sheet and save it (see Figure 20).
Figure 20
Go back to the Solibri Solution Center > Users tab, Choose the file > Upload the file (see Figure 21).

14 (47)
Solibri Solution Center Guide for Account Administrators
Copyright © 2017 Solibri, Inc.
All rights reserved
Figure 21
You will get a notification if the file has been uploaded successfully (see Figure 22). You will also get a result of the import to your email address. It tells you which rows were successfully added, updated or failed.
Figure 22
To see the edited view in the Solibri Solution Center, click the Refresh button (see Figure 23).
Figure 23
NOTE: While editing users, you can also add new users. When adding, new users remember to fill in the following columns: First name, Last name, Email, Pool and Country.
15 (47)
Solibri Solution Center Guide for Account Administrators
Copyright © 2017 Solibri, Inc.
All rights reserved
4.4 Removing Users
To remove a user, select the user by clicking the row and then by clicking Remove. The user won’t receive any separate notification that he/she has been removed.
NOTE: A user can’t be removed, if the user is currently using a Solibri Model Checker license. If you try to remove a user currently using a license, you will receive an error message.
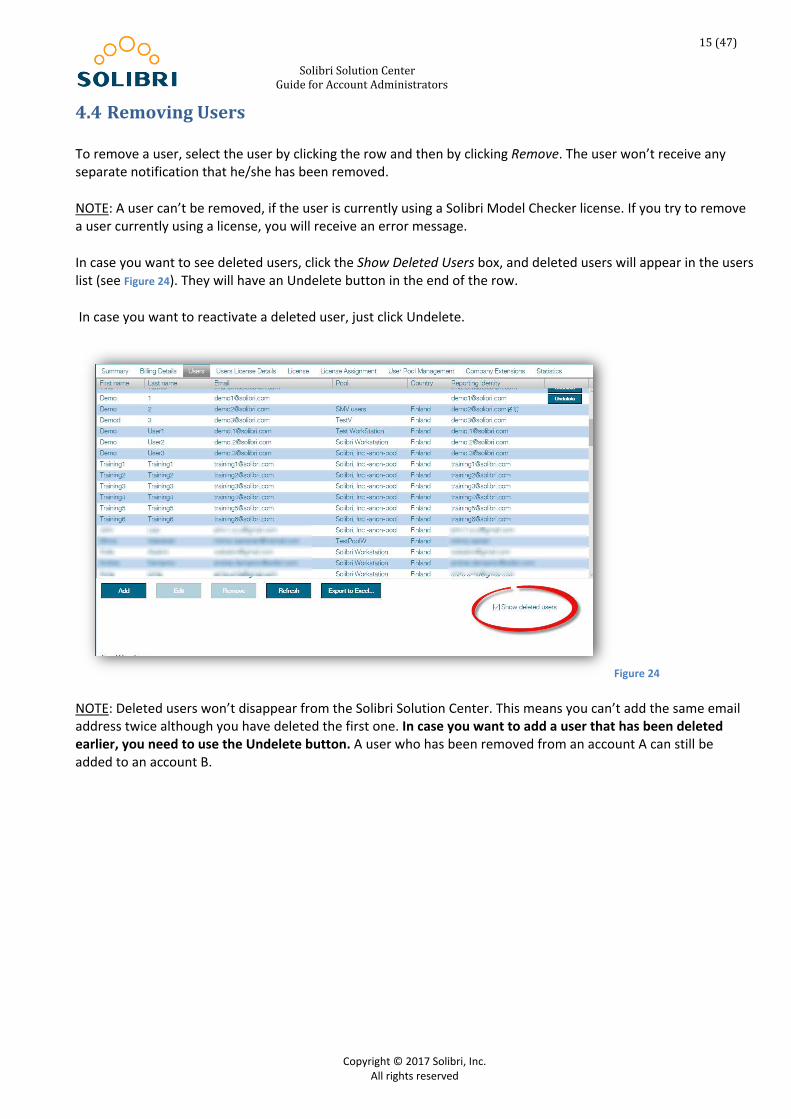
In case you want to see deleted users, click the Show Deleted Users box, and deleted users will appear in the users list (see Figure 24). They will have an Undelete button in the end of the row.
In case you want to reactivate a deleted user, just click Undelete.
Figure 24
NOTE: Deleted users won’t disappear from the Solibri Solution Center. This means you can’t add the same email address twice although you have deleted the first one. In case you want to add a user that has been deleted earlier, you need to use the Undelete button. A user who has been removed from an account A can still be added to an account B.

16 (47)
Solibri Solution Center Guide for Account Administrators
Copyright © 2017 Solibri, Inc.
All rights reserved
4.4.1 Removing Users with the Help of an Excel Template If you want to remove multiple users at the same time, download a User Excel Template from the link at the bottom of the page (see Figure 25).
Figure 25
Fill in the Excel sheet and save it. The Excel sheet contains tips to enter the right information to each field (see Figure 26). Select field Remove with an x. After that, browse the Excel and upload it to the Solibri Solution Center.
Figure 26
After the Excel sheet is successfully uploaded to the Solibri Solution Center, you will receive a “successfully deleted” email.
Figure 27

17 (47)
Solibri Solution Center Guide for Account Administrators
Copyright © 2017 Solibri, Inc.
All rights reserved
4.5 Reporting Identity Reporting identity is user information shown in issue handling and exported reports. As a default the reporting identity is set as an email address (=username). This can be changed by editing the user information. This feature is available for SMC and SMVPro users.
Figure 28
5 Users License Details Tab To see who is using a license or who has borrowed a license, take a look at Users License Details tab (see ). The license type (floating/workstation/borrowed) is visualized with a color and a text in License Details column.
A floating license has a green background color, a workstation license has a blue background color and a borrowed license has a yellow background color. In case it is a borrowed license also the return time is shown.
NOTE: Checkout details are not automatically updated. Click the Refresh button to see the current situation.
NOTE: In the License Details column, you can see the date and time when the checkout details were last updated (see ). If you encounter an issue with the Users License Details tab and send us a screenshot of the tab, please include this date and time information in the screenshot.
NOTE: If you get a red error message saying Error fetching user data, please wait a minute and click the Refresh button.

18 (47)
Solibri Solution Center Guide for Account Administrators
Copyright © 2017 Solibri, Inc.
All rights reserved
Figure 29
6 License Tab To see what products and extensions you have and how many, go to the License tab (see Figure 30). To purchase more licenses, click the blue Go to Shop button.
Figure 30

19 (47)
Solibri Solution Center Guide for Account Administrators
Copyright © 2017 Solibri, Inc.
All rights reserved
6.1 Owned and Assigned Licenses
The Owned column tells you how many licenses can be used at the same time (Solibri Model Checker), or how many products (e.g. Solibri Model Viewer) and extensions (e.g. NS 3940: Area and Volume Calculation) have been purchased from the Solibri Solution Center.
The Assigned column tells you how many users can use the product or extension simultaneously.
6.2 Purchasing Products and Extensions
The visibility of products and extensions available for users in the Solibri Solution Center is controlled by you. You or a buyer needs to buy and assign the products and the extensions that are relevant to your organization. This applies also to the current free content including the Solibri Model Checker installer.
For all products and extensions that you find relevant, do the following:
1. First go to the Products view by clicking Go to Shop or by clicking Go to Products View (see Figure 31).
Figure 31
Figure 32
20 (47)
Solibri Solution Center Guide for Account Administrators
Copyright © 2017 Solibri, Inc.
All rights reserved
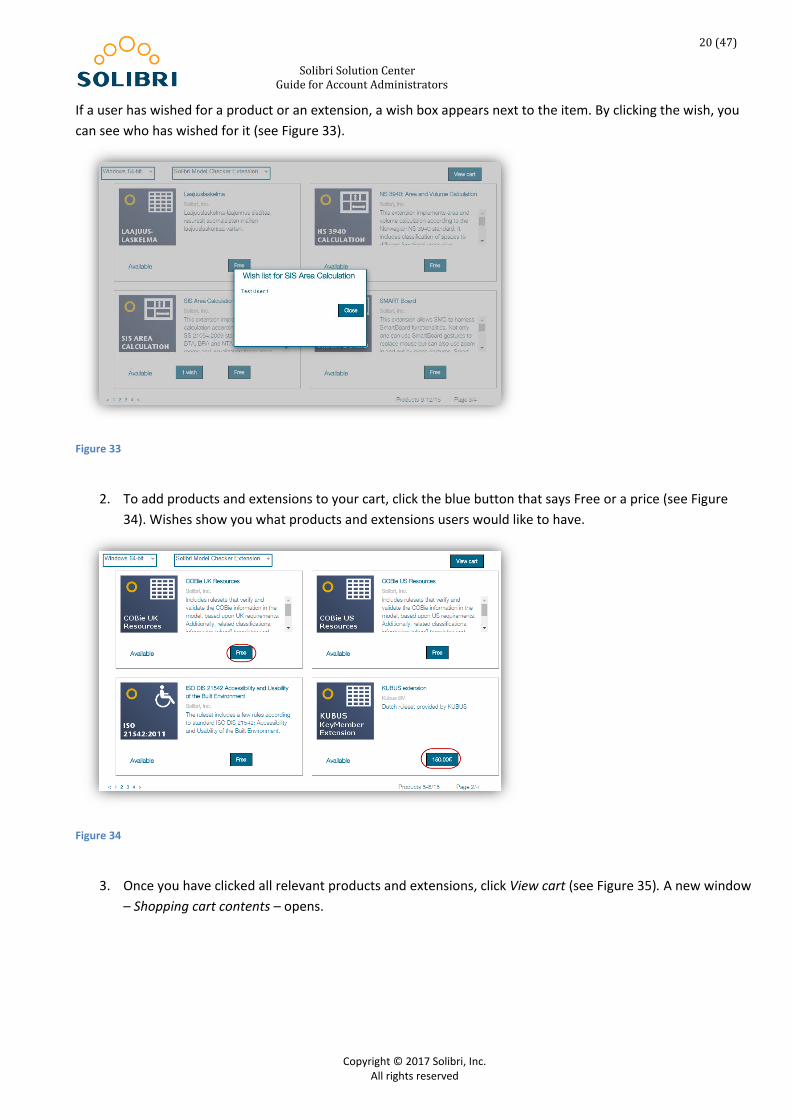
If a user has wished for a product or an extension, a wish box appears next to the item. By clicking the wish, you can see who has wished for it (see Figure 33).
Figure 33
2. To add products and extensions to your cart, click the blue button that says Free or a price (see Figure
34). Wishes show you what products and extensions users would like to have.
Figure 34
3. Once you have clicked all relevant products and extensions, click View cart (see Figure 35). A new window
– Shopping cart contents – opens.

21 (47)
Solibri Solution Center Guide for Account Administrators
Copyright © 2017 Solibri, Inc.
All rights reserved
Figure 35
4. Shopping cart contents. You can see the products and extensions you have selected. You have the
possibility to adjust the number of items in the shopping cart (see Figure 36). If you need to add more products or extensions to the shopping cart, click Return to shop.
Figure 36
5. Once you have adjusted the number of items, select whether you are paying with a Credit card or with an
Invoice (see Figure 37). Please note, using a Voucher is only possible when paying with a credit card. Proceed by clicking Next.

22 (47)
Solibri Solution Center Guide for Account Administrators
Copyright © 2017 Solibri, Inc.
All rights reserved
Figure 37
6. Confirm order. Depending on what products and extensions you are purchasing and what payment option you are using, one of the following happens:
If you purchased only free products and extensions, you are automatically taken back to the Admin view and to the License Assignment tab. There you can assign correct licenses to correct users. You can always switch back to the Admin View by clicking the Go to Admin View link at the top left of the page (see Figure 38).
a. If you purchased products and extensions with a price and selected credit card to be your payment option, you will first need to complete the payment process before you get access to these items (see Figure 39).
Figure 38

23 (47)
Solibri Solution Center Guide for Account Administrators
Copyright © 2017 Solibri, Inc.
All rights reserved
Figure 39
If your payment was approved, you will shortly have access to the new products and extensions (see Figure 40). You can navigate to the Admin view and to the License Assignment tab to assign correct licenses to correct users.
Figure 40
b. If you purchased products and extensions with a price and selected invoice to be your payment
option, you will first need to provide your invoice details (see Figure 41). Please note that country can only be changed in the Admin view.

24 (47)
Solibri Solution Center Guide for Account Administrators
Copyright © 2017 Solibri, Inc.
All rights reserved
Figure 41
You will receive an invoice within 3 business days (see Figure 42). After completing the payment, the products and extensions are added to your account. You can then log in to Solibri Solution Center and go the License Assignment tab to assign correct licenses to correct users.
Figure 42

25 (47)
Solibri Solution Center Guide for Account Administrators
Copyright © 2017 Solibri, Inc.
All rights reserved
7 License Assignment Tab On the License Assignment tab (see Figure 43) it is possible to manage user assignments of products and extensions. You can add, remove and change as well as upgrade user assignments.
Figure 43
7.1 Assign
To assign a product to users, first select Products (see Figure 44) and then select one product from the pull-down menu. After that select one or more versions from the Version table and click the Refresh button.
Figure 44
To assign an extension to users select Extensions (see Figure 45). Then select one or more extensions from the Extension table. After this click the Refresh button.

26 (47)
Solibri Solution Center Guide for Account Administrators
Copyright © 2017 Solibri, Inc.
All rights reserved
Figure 45
When clicking the Refresh button, you will get a list of all users (see Figure 46). In the first column, you can see their usernames and in the second column what versions they are using. After that come the selected products or extensions.
When assigning a product or an extension to a user, remember to confirm the changes by clicking the Assign button.
Figure 46
NOTE: Floating licenses can be assigned to more users than there are existing licenses. Workstation license can only be assigned to as many users as there are licenses.
NOTE: Users are able to see and wish extensions in Solibri Solution Center only in case Solibri Model Checker is assigned to them.
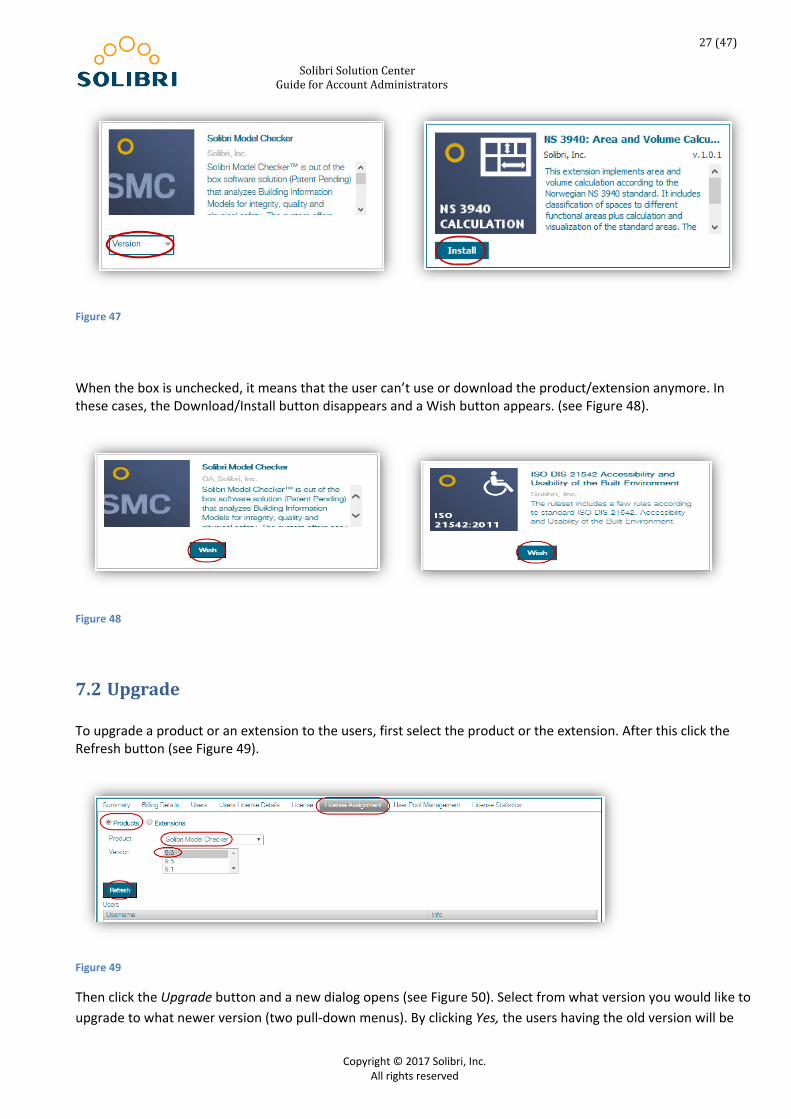
When a box is checked, it means that the user has the right to use that particular product/extension and version. It also means that the user can download that product from the Product view in Solibri Solution Center. Or in case of an extension the user can download it from Solibri Model Checker (the extension and an Install button appear in File > Solution Center). (see Figure 47)
27 (47)
Solibri Solution Center Guide for Account Administrators
Copyright © 2017 Solibri, Inc.
All rights reserved
Figure 47
When the box is unchecked, it means that the user can’t use or download the product/extension anymore. In these cases, the Download/Install button disappears and a Wish button appears. (see Figure 48).
Figure 48
7.2 Upgrade
To upgrade a product or an extension to the users, first select the product or the extension. After this click the Refresh button (see Figure 49).
Figure 49
Then click the Upgrade button and a new dialog opens (see Figure 50). Select from what version you would like to upgrade to what newer version (two pull-down menus). By clicking Yes, the users having the old version will be

28 (47)
Solibri Solution Center Guide for Account Administrators
Copyright © 2017 Solibri, Inc.
All rights reserved
upgraded to the new version instead (license assignments are moved from the old version to the new version). By clicking No, the dialog will close without any changes.
Figure 50
7.3 Assign All
If you want to assign a product or an extension to all the users, you can use Assign All button. In case you don’t have enough licenses to assign all, you will get the following warning message (see Figure 51).
Figure 51
E.g. in this case, if you select Yes, the first 3 non-assigned users will get the extension. If you select No, no new assigns will appear. Look at chapter Purchasing Products and Extensions for purchasing more licenses.
NOTE: License assignment for more than 100 users is done in a queue to avoid unnecessary waiting. You will get the following notification (see Figure 52).
Figure 52

29 (47)
Solibri Solution Center Guide for Account Administrators
Copyright © 2017 Solibri, Inc.
All rights reserved
7.4 Solibri Model Viewer Pro licensing view You can assign Solibri Model Viewer Pro licenses to users in the following table. The table has as columns different sets of Solibri Model Viewer Pro licenses that are bought to the company. The column headers indicate the expiration date of the column and the number of licenses in it.
Figure 53
To assign a product to users, first select Products (see Figure 53) and then select “Solibri Model Viewer Pro” from the pull-down menu. After that select one or more versions from the Version table and click the Refresh button.

30 (47)
Solibri Solution Center Guide for Account Administrators
Copyright © 2017 Solibri, Inc.
All rights reserved
8 User Pool Management Tab 8.1 About License Pools You can create multiple license pools in the Solibri Solution Center. The main idea of the license pools is to divide Solibri Model Checker licenses between different user groups.
As an example, your company has 10 floating licenses and you have 20 Solibri Model Checker users. Three of them (e.g. BIM Coordinators) should ALWAYS have access to Solibri Model Checker. You can create a separate floating license pool for them, and move three of your floating licenses to that pool. So, there will be three floating licenses for these three users -> They will always have a floating license available (see Figure 53).
Figure 54
8.2 Your License Pools
You can see your license pools on the User Pool Management tab (see Figure 54). By default, every account has at least one license pool with one or more licenses. The first license pool is created by Solibri.
In case you have floating licenses and workstation licenses you find them in separate license pools. It’s not possible to move a license from a floating pool to a workstation pool or vice versa. In a floating pool, there may be more users than existing licenses. In a workstation pool, there can only be as many users as there are licenses.
Figure 55

31 (47)
Solibri Solution Center Guide for Account Administrators
Copyright © 2017 Solibri, Inc.
All rights reserved
8.3 Adding a License Pool
To manage licenses, go to the User Pool Management tab. You can create new license pools by clicking Add Pool. Give a name to the pool and click Add (see Figure 55).
NOTE: If you want to add a floating pool, you need to have the “Solibri Model Checker – floating” option selected from the pull-down menu. If you want to add a workstation pool, you need to have the “Solibri Model Checker – workstation” option selected from the pull-down menu.
Figure 56
Once you have added a new license pool, you can add users to it on the Users Tab. Select the user you want to add by clicking the row and then by clicking Edit. Select the new license pool from the Select User Pool pull-down menu (see Figure 56). Save changes by clicking Save.
Figure 57
When you purchase more Solibri Model Checker licenses, you need to manually add the licenses to one of your license pools. The licenses don’t go automatically to a license pool. Add the licenses to a license pool with the arrow buttons.
After making changes remember to save them by clicking Update License Assignment.

32 (47)
Solibri Solution Center Guide for Account Administrators
Copyright © 2017 Solibri, Inc.
All rights reserved
When you want to change the number of licenses in your license pools, you need to first reduce the number of licenses in one license pool before adding more licenses to another license pool. You can change the license count in a license pool with the arrow buttons.
9 License Statistics Tab There is a tab in Solibri Solution Center admin view called License Statistics (see Figure 57). There you can create four different kind of reports for floating licenses. They are:
- Peak- report - Usage per user- report - Used version- Report - Amount of users
Figure 58
The Peak report and the Usage per user report are for finding out the daily peak usage for a chosen period of time. The report contains usage information of pool licenses per day.
NOTE: The data is not the real-time situation, but it is never older than 30 minutes.
33 (47)
Solibri Solution Center Guide for Account Administrators
Copyright © 2017 Solibri, Inc.
All rights reserved
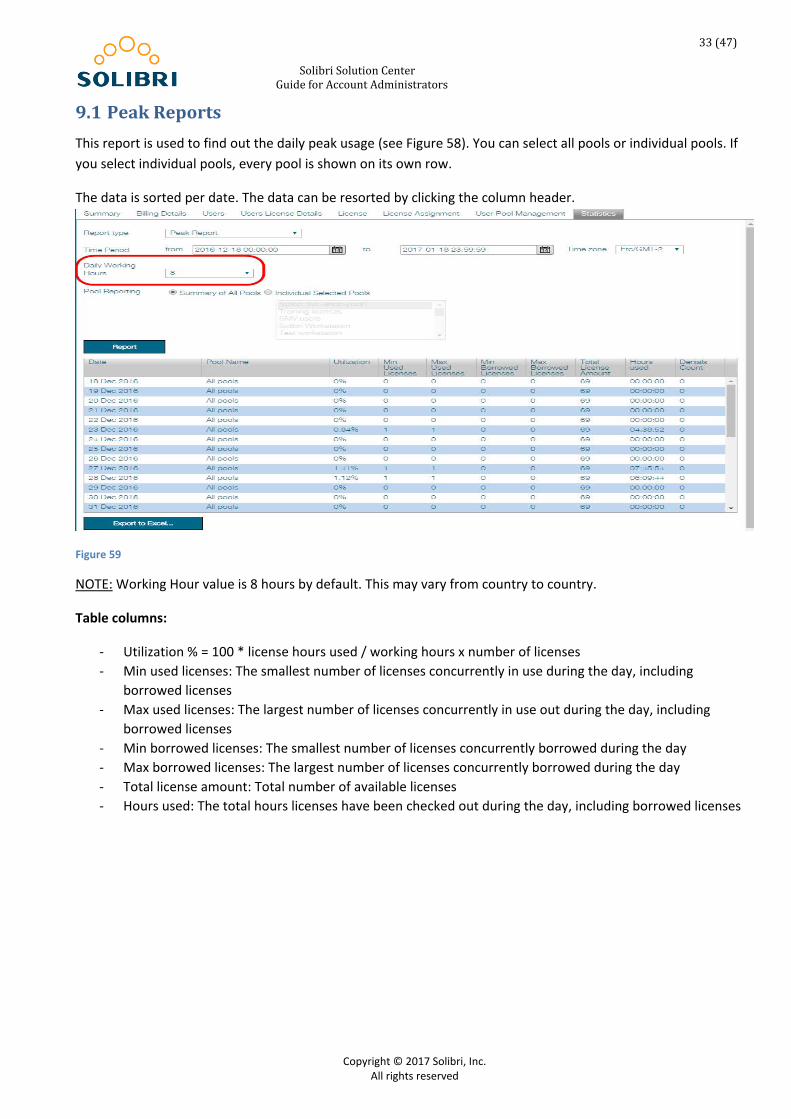
9.1 Peak Reports This report is used to find out the daily peak usage (see Figure 58). You can select all pools or individual pools. If you select individual pools, every pool is shown on its own row.
The data is sorted per date. The data can be resorted by clicking the column header.
Figure 59
NOTE: Working Hour value is 8 hours by default. This may vary from country to country.
Table columns:
- Utilization % = 100 * license hours used / working hours x number of licenses - Min used licenses: The smallest number of licenses concurrently in use during the day, including
borrowed licenses - Max used licenses: The largest number of licenses concurrently in use out during the day, including
borrowed licenses - Min borrowed licenses: The smallest number of licenses concurrently borrowed during the day - Max borrowed licenses: The largest number of licenses concurrently borrowed during the day - Total license amount: Total number of available licenses - Hours used: The total hours licenses have been checked out during the day, including borrowed licenses

34 (47)
Solibri Solution Center Guide for Account Administrators
Copyright © 2017 Solibri, Inc.
All rights reserved
9.2 Usage per User Reports The usage per user report contains usage information of users on chosen period (see Figure 60). You can select all pools or individual pools. The data is sorted per username. The data can be resorted by clicking the column header.
Figure 60
Table columns:
- Hours used: The total hours of licenses have been in use during the day, including borrowed licenses - Hours borrowed: Number of hours a license has been borrowed - Denials: Number of unsuccessful license checkouts
NOTE: When creating a report from individual pools and you don’t get any data, it means the licenses in those pools haven’t been used.
9.3 Used Version Report Administrators can now see what SMC versions have been used by their staff. This feature can be used to encourage users to upgrade to the latest version of SMC to support the use of statistics within the company for maximizing efficiency.
35 (47)
Solibri Solution Center Guide for Account Administrators
Copyright © 2017 Solibri, Inc.
All rights reserved
Figure 61
NOTE: Borrowed licenses are not included
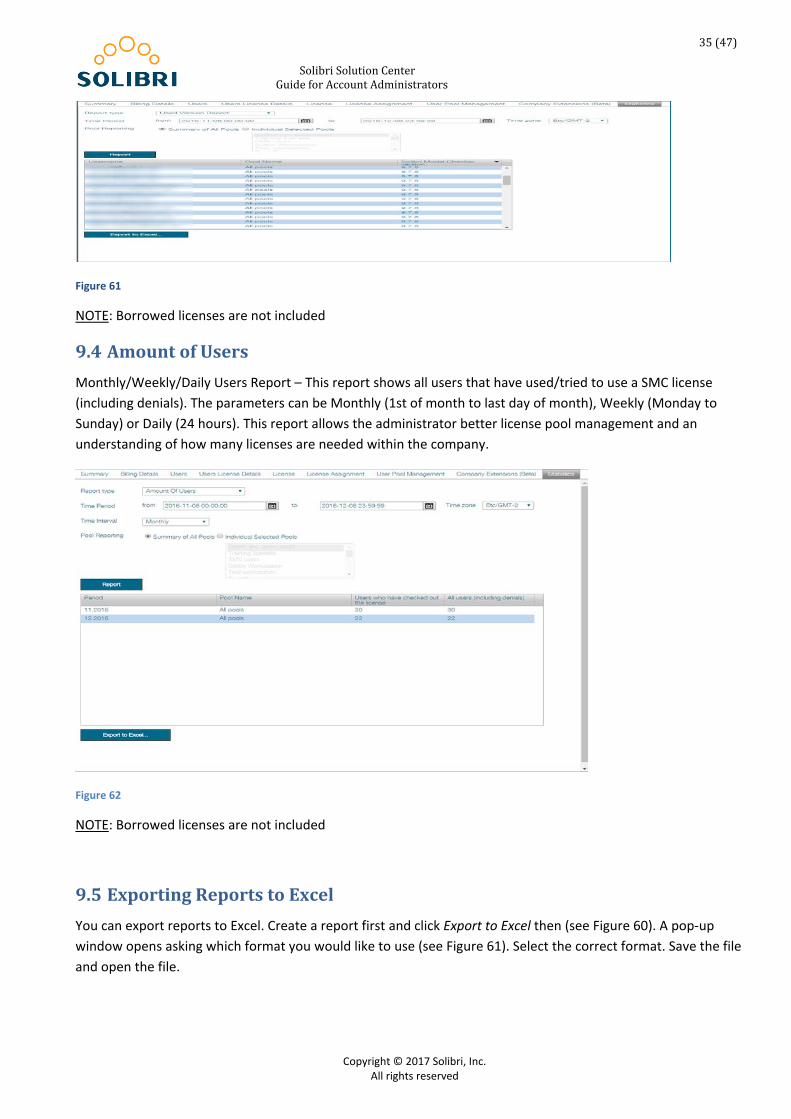
9.4 Amount of Users Monthly/Weekly/Daily Users Report – This report shows all users that have used/tried to use a SMC license (including denials). The parameters can be Monthly (1st of month to last day of month), Weekly (Monday to Sunday) or Daily (24 hours). This report allows the administrator better license pool management and an understanding of how many licenses are needed within the company.
Figure 62
NOTE: Borrowed licenses are not included
9.5 Exporting Reports to Excel You can export reports to Excel. Create a report first and click Export to Excel then (see Figure 60). A pop-up window opens asking which format you would like to use (see Figure 61). Select the correct format. Save the file and open the file.

36 (47)
Solibri Solution Center Guide for Account Administrators
Copyright © 2017 Solibri, Inc.
All rights reserved
Figure 63
After saving the file you can close the pop-up window from Cancel.
Figure 64

37 (47)
Solibri Solution Center Guide for Account Administrators
Copyright © 2017 Solibri, Inc.
All rights reserved
10 Company Extensions The new version of Solibri Solution Center will have a new tab for Admins: “Private sections” where company admins can upload a package to be used by all the users of that company. These extensions are only for internal use for the company, therefore these extensions are not seeable for external users.
Others than Admins can use the “wish” procedure with Company extensions; works the similar way as normal licensing system.
SMC9.7 has a separate tool to create these packages – The SRE tool is located next to Rule Set Manager.
10.1 How to upload Company Extensions? Select Company Extensions from Admin view and there at the bottom of the page you can see the Add Company Extension button (see Figure 62). By clicking it you can add your own extensions.
Figure 65
After selecting Add Company Extension a new form opens (see Figure 63).
NOTE: Uploaded file must be an JAR file. Also, Short Description and Version fields are mandatory.

38 (47)
Solibri Solution Center Guide for Account Administrators
Copyright © 2017 Solibri, Inc.
All rights reserved
Figure 66 Figure 67
After filling up the form, you may press Generate Extension (see Figure 64). After this you will get a notification that the upload has succeeded.
When the extension is ready to be downloaded, you will receive e-mail confirmation:
Figure 68
After this you will find your extensions from Solibri Solution Center in alphabetical order.

39 (47)
Solibri Solution Center Guide for Account Administrators
Copyright © 2017 Solibri, Inc.
All rights reserved
11 Products View To see products that are available for downloading, click the Products View link on the top right corner of the page (see Figure 66).
Figure 69
This is the view that users with a User role can access. From the pull-down menus you can change what products are shown. Note also that there are products on several pages. Change the page from the bottom of the page (see Figure 67).
Figure 70
To change back to the administrator view, click Admin View link at the top of the page. To log out click the Logout button at the top right corner of the page.

40 (47)
Solibri Solution Center Guide for Account Administrators
Copyright © 2017 Solibri, Inc.
All rights reserved
12 Solibri Model Checker Registration Solibri Model Checker licenses are administrated in the Solibri Solution Center.
For floating licenses, every time a user starts Solibri Model Checker, a message is sent to the Solibri Solution Center and a license is authorized. When the user stops using Solibri Model Checker, the license is returned.
For workstation licenses, when a user starts Solibri Model Checker for the first time, a message is sent to the Solibri Solution Center and a license is locked to the user’s computer with the user’s username and password. When the user stops using Solibri Model Checker, the license stays locked on the user’s computer.
One user can run multiple Solibri Model Checker sessions in one computer using only one license. However, one user can run Solibri Model Checker only on one computer at a time.
12.1 User Registration
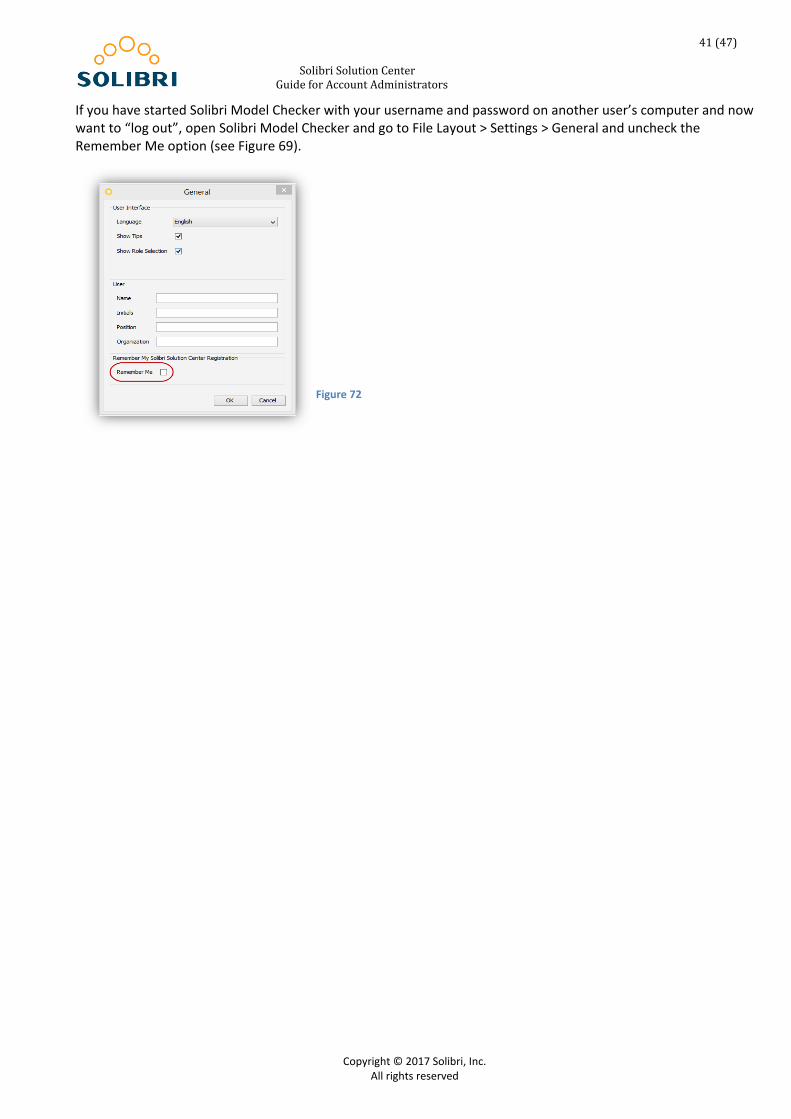
When you start Solibri Model Checker for the first time your username (=email address) and password are requested. The information is asked only once unless you uncheck Remember Me option (see Figure 68).
NOTE: Information of credentials is saved to user’s home directory. User must have access to his/her home directory always when using Solibri Model Checker.
Figure 71
41 (47)
Solibri Solution Center Guide for Account Administrators
Copyright © 2017 Solibri, Inc.
All rights reserved
If you have started Solibri Model Checker with your username and password on another user’s computer and now want to “log out”, open Solibri Model Checker and go to File Layout > Settings > General and uncheck the Remember Me option (see Figure 69).
Figure 72

42 (47)
Solibri Solution Center Guide for Account Administrators
Copyright © 2017 Solibri, Inc.
All rights reserved
12.2 Firewall and Proxy Settings
In some cases, firewall or proxy settings can block licensing of Solibri Model Checker. If this happens during the registration, you’ll get the following kind of message (see Figure 70):
Figure 73
If you are using proxy, you can specify it in the Proxy Server Settings that you can specify in the same dialog (see Figure 71).
Figure 74
43 (47)
Solibri Solution Center Guide for Account Administrators
Copyright © 2017 Solibri, Inc.
All rights reserved
Administrators can set the default proxy settings that Solibri Model Checker uses by installing an .ini file to the Solibri Model Checker installation directory, (e.g. C:\Program Files\Solibri\SMCv9.x). The proxysettings.ini file should contain the following lines:
# Uncomment the next two lines and fill them with proxy information, if you want to use proxy #proxyHost=proxyhostURL #proxyPort=10 # Uncomment the next two lines, and fill them with correct information, if your proxy needs username and password #proxyUser=someUserName #proxyPassword=somePassword
By uncommenting the corresponding lines and setting the correct values, the default values for the proxy settings can be set. If the user changes the proxy settings, the user’s changes will override the defaults.
NOTE: The proxysettings.ini file needs to be encoded in ANSI. That is, it mustn’t have two byte characters.
If your firewall blocks access to the servers that Solibri Model Checker wants to communicate with, you need to allow the traffic to the following addresses:
license.solibri.com (port 80) ws1.solibri.com (port 443) ws2.solibri.com (port 443) download.solibri.com (port 443)
NOTE: These addresses are used in Solibri Model Checker v9.0.10 or newer. If you have an older version of SMCv9 please update it first from the Solibri Solution Center.
If you are using proxy, you should ensure that the addresses above are listed in your proxy settings.
12.3 Borrowing a Floating License
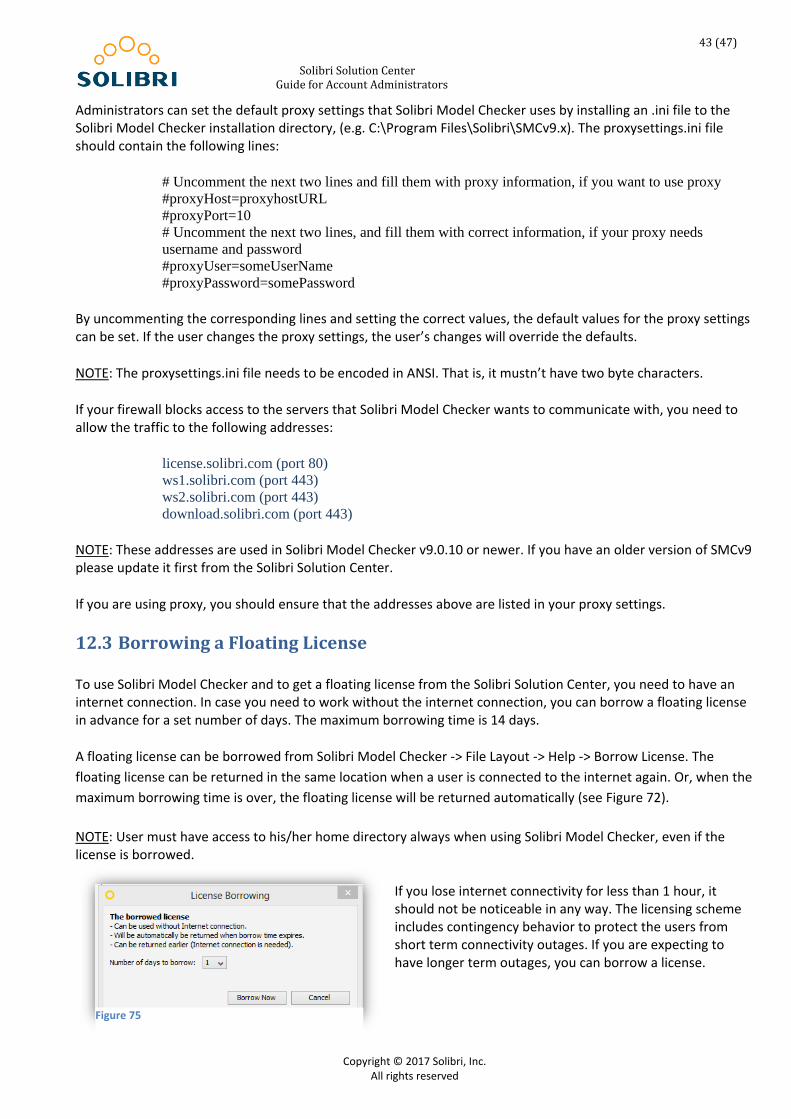
To use Solibri Model Checker and to get a floating license from the Solibri Solution Center, you need to have an internet connection. In case you need to work without the internet connection, you can borrow a floating license in advance for a set number of days. The maximum borrowing time is 14 days.
A floating license can be borrowed from Solibri Model Checker -> File Layout -> Help -> Borrow License. The floating license can be returned in the same location when a user is connected to the internet again. Or, when the maximum borrowing time is over, the floating license will be returned automatically (see Figure 72).
NOTE: User must have access to his/her home directory always when using Solibri Model Checker, even if the license is borrowed.
If you lose internet connectivity for less than 1 hour, it should not be noticeable in any way. The licensing scheme includes contingency behavior to protect the users from short term connectivity outages. If you are expecting to have longer term outages, you can borrow a license.
Figure 75

44 (47)
Solibri Solution Center Guide for Account Administrators
Copyright © 2017 Solibri, Inc.
All rights reserved
13 FAQ – Frequently Asked Questions Q: What is the role of the Solibri Solution Center (SSC) in the licensing scheme? A: SSC is the client organization’s administration tool for licensing. Using SSC clients can themselves manage their users, purchase and reassign licenses for their users, all in a self-service manner.
Q: Is Solibri monitoring how I use Solibri Model Checker (SMC) or plugins installed to SMC using the SSC? A: No information sent to the SSC will contain information on the manner in which the tool is used. The SSC monitors that the user has the proper licenses to allow usage and to prevent unlawful usage.
Q: What information will be transmitted to the SSC when using SMC? A: Products using the new licensing scheme will be identified by a text string (“SMC” in the case of Solibri Model Checker). The user is identified with a username which is the same as the users given email. There is other data transmitted as well, although it cannot be tracked back to a single user or organization, exact details on these are not disclosed due to security reasons.
Q: Will someone outside my organization be able to track our usage of SMC due to its communication with the SSC? A: All traffic with the license server is masked as http requests, thus it would be difficult to identify it as anything other than normal web browsing. Additionally, all communication is encrypted using a 2048-bit key SSL encryption.
Q: Where is the SSC physically located? A: Due to security reasons, we do not disclose these details regarding the SSC.
Q: What information on users is stored in the SSC? A: The SSC provides storing of the individual users, email (which is also their usernames when logging in to the SSC), name and user roles. The only information that must be provided as such is the end users email addresses.
Q: How is the storage of information secured in the SSC? A: The data is stored in a secure location, for security reasons we are not disclosing information on the actual technology solution. The infrastructure and hardware of the data center where the data is stored is PCI DSS 2.0 compliant.
Q: What is the availability commitment of the SSC? A: The data center that hosts our cloud solution aims at an availability of 99%. In our own operations, we aim to keep necessary maintenance breaks on weekends to minimize impact on client operations.
Q: Is the SSC built for managing and sharing BIM files? A: No, this functionality is not currently possible
14 Contact Us In case you have questions about the Solibri Solution Center please send email to [email protected].