Embed Size (px)
Citation preview

PrecautionThe nameplate is located on the rear of the remote control.If you need to check it, detach the belt.
Parts and controls Terminal section (on/standby) button CHG (Charge) lamp LCD screen UP/DOWN button REC/ENTER button REC/Wi-Fi lamp MENU button
•To reset the remote control, press the MENU button, the REC/ENTER button and the DOWN button simultaneously.
Screen Display Wi-Fi connection setting Bluetooth connection status GPS receiving status of a
camera Clock time Battery level of a camera Battery level of the remote
control Button Hold function ON/OFF Operation guide
Live-View display
Owner’s RecordThe model and serial numbers are located on the bottom. Record the serial number in the space provided below. Refer to these numbers whenever you call your Sony dealer regarding this product.
Model No. RM-LVR3Serial No.
© 2016 Sony Corporation Printed in Chinahttp://www.sony.net/
Zoom ratio Angle SteadyShot setting Image quality (Frame rate) Movie format
Recordable time/Recording time
Shooting mode Audio recording ON/OFF Warning of camera's
temperature increaseNote•The display varies depending on which camera is connected.
Charging the remote control
1 Check that the power of the remote control is OFF.
2 Attach the remote control to the cradle (supplied).
Note• If the terminal section of the remote control is wet or dirty, wipe away the
moisture or dust before attaching.
3 Connect the cradle to an activated computer with the micro USB cable (supplied).
Lights in amber while charging
Micro USB cable
The CHG (Charge) lamp turns off when charging is completed.
Notes•You can charge the remote control even if it is not completely discharged. Also,
even if the remote control is not fully charged, you can use the partial charge capacity of the battery pack as is.
•When the power of the remote control is on, it is supplied with power but not charged.
•When the remote control is fully charged, the CHG (Charge) lamp turns off immediately.
Setting the date and time/area
1 Press the (on/standby) button to turn on the remote control.
When the remote control is turned on for the first time, the date and time/area setting screen is displayed.
2 Set the date and time/area.
Press the UP button or DOWN button to select the desired item, then press the REC/ENTER button to execute. The date and time/area setting screen switches in the following order.
Area setting Date format
Daylight saving time (summer time) setting
Year-Month-Day setting
Date & time/area setting confirmationClock time setting
Press the REC/ENTER button in the date & time/area setting confirmation screen to confirm the desired item, then the Wi-Fi standby screen will be displayed.
Hints•Regions are defined by the time difference between Greenwich Mean Time
(GMT) and the standard time of your home. For details on the time difference, refer to "The list of time differences for world capitals" in the “Help Guide” (web manual).
•To set the date and time again, press the MENU button of the remote control to select (Date & time setting)/ (Area setting)/ (Daylight saving time (summer time) setting) from (Remote control settings).
Connecting the remote control to a cameraThis manual describes how to connect the remote control to a single camera.For details about how to connect the remote control to multiple cameras, refer to the “Help Guide” (web manual).For details about how to operate a camera, refer to the operating instructions of the camera.
1 Turn on the remote control.
When activating the remote control, the Wi-Fi standby screen will be displayed.
2 Turn on the camera, then check the camera settings.
Check that a Wi-Fi mark is displayed on the display panel of the camera.
3 Select a camera you want to connect to the remote control, then press the REC/ENTER button.
4 Register the remote control to the camera.
When is displayed on the display panel of a camera, select [OK], then press the REC/ENTER button of a camera.
Note• If is not displayed on the display panel of a camera, restart a
camera and try again from step 2.
The connection to the camera is complete when the LCD screen on the remote control switches to the Live-View screen.
Note• If the connection to a camera is not completed, the signal traffic may be
heavy. In this case, move to another location and try again.
Switching shooting modes
1 Press the MENU button to select (Shooting mode), then press the REC/ENTER button.
2 Press the UP button or DOWN button to select the shooting mode, then press the REC/ENTER button.
The shooting mode icon will be displayed on the bottom left of the display.
Shooting
On shooting moviesFor details on the following operations, refer to the “Help Guide” (web manual) or the operating instructions of the camera.•Still images•Time-lapse capture•Loop recording
1 Press the REC/ENTER button to start recording.
The REC/Wi-Fi lamp turns from blue to red.
2 Press the REC/ENTER button again to stop recording.
The REC/Wi-Fi lamp turns from red to blue.
Setting the camera
1 Press the MENU button to select (Shooting settings), then press the REC/ENTER button.
2 Press the UP button or DOWN button to select the shooting item, then press the REC/ENTER button.
Icons Setting items
Image quality setting
Movie format
Time-lapse capture image size
Loop recording time
Still image mode switching
Still image shooting interval
Self-timer
Time-lapse shooting interval
Time-lapse shot number
SteadyShot (Movie)
Icons Setting items
SteadyShot (Still)
Angle setting
Zoom setting
Flip
AE shift
Time-lapse AE mode
Scene
White balance
Color mode
Audio recording setting
Wind noise reduction
For details about setting items, refer to the “Help Guide” (web manual).http://rd1.sony.net/help/cam/1650/h_zz/
Note•Which items can be set depends on the shooting mode.
Setting the remote control
Turning the camera on/off along with the power of the remote controlWhen the remote control is turned on/off, the corresponding camera is also turned on/off.To set this function to OFF, press the MENU button on the camera, then press the UP button or DOWN button to select (Camera Settings)
(Bluetooth remote controller power setting) .
Automatically turning off the LCD screen display while shootingTo reduce the battery consumption, the LCD screen display automatically turns off while shooting.To set this function to OFF, press the MENU button, then press the UP button or DOWN button to select (Remote control settings)
(Auto monitor off while shooting) .
Attaching the remote controlPlease attach and use the remote control in the bundled accessory.
Attaching the remote control to the belt Align the protruding portion of the remote control with the concave
portion of the belt, while pulling the release lever on the rear of the belt toward the opposite side with your finger.
Make sure that the remote control is set into the belt, then remove your finger from the release lever.•The release lever returns to the original position and the remote control is
attached to the belt.
Attaching the belt to your armPass the one end of the belt through the hole on the other end of the belt, and fasten the belt with . Then slide to hold the belt securely.
Attaching the remote control to the Mount Adaptor Align the protruding portion of the remote control with the concave
portion of the Mount Adaptor, while pulling the release lever toward the opposite side with your finger.
Make sure that the remote control is set into the Mount Adaptor, then remove your finger from the release lever.•The release lever returns to the original position and the remote control is
attached to the Mount Adaptor.
4-588-898-11(1)
Live-View Remote
Startup Guide
RM-LVR3
This manual describes the basic operations of the Live-View Remote RM-LVR3.
Before use, it is necessary to connect to a camera via Wi-Fi as described in this manual.
For details, refer to the “Help Guide” (web manual).http://rd1.sony.net/help/cam/1650/h_zz/
WARNING
To reduce the risk of fire or electric shock,1) do not expose the unit to rain or moisture.2) do not place objects filled with liquids, such as vases, on the apparatus.
Do not expose the batteries to excessive heat such as sunshine, fire or the like.
CAUTION
Observe the following cautions, as there may be a risk of heat generation, fire or explosion.
* Lithium-ion battery is built into the product.•Charge the product by the designated charging method.•Do not place the product in or near fire, or put the product in a
microwave.•Do not leave the product in a car in hot weather.•Do not store or use the product in a hot and humid place such as in a
sauna bath.•Do not disassemble, crush or pierce the product.•Do not expose the product to excessive shock such as dropping from
a high place.•Do not expose the product to high temperatures above 60 °C (140 °F).•Keep the product dry.Dispose of the product appropriately.Charge the product by the designated charging method in the instruction manual.
AC Adaptor (sold separately)Use the nearby wall outlet (wall socket) when using the AC Adaptor (sold separately). Disconnect the AC Adaptor (sold separately) from the wall outlet (wall socket) immediately if any malfunction occurs while using the apparatus.
For customers in the U.S.A. and CANADA
The available scientific evidence does not show that any health problems are associated with using low power wireless devices. There is no proof, however, that these low power wireless devices are absolutely safe. Low power Wireless devices emit low levels of radio frequency energy (RF) in the microwave range while being used. Whereas high levels of RF can produce health effects (by heating tissue), exposure of low-level RF that does not produce heating effects causes no known adverse health effects. Many studies of low-level RF exposures have not found any biological effects. Some studies have suggested that some biological effects might occur, but such findings have not been confirmed by additional research. This equipment has been tested and found to comply with FCC/IC radiation exposure limits set forth for an uncontrolled environment and meets the FCC radio frequency (RF) Exposure Guidelines and RSS-102 of the IC radio frequency (RF) Exposure rules.
RECYCLING LITHIUM-ION BATTERIES
Lithium-Ion batteries are recyclable. You can help preserve our environment by returning your used rechargeable batteries to the collection and recycling location nearest you.
For more information regarding recycling of rechargeable batteries, call toll free1-800-822- 8837, or visit http://www.call2recycle.org/
Caution: Do not handle damaged or leaking Lithium-Ion batteries.
For supplied accessoriesThis device complies with Part 15 of the FCC Rules. Operation is subject to the following two conditions:(1) This device may not cause harmful interference, and (2) this device must accept any interference received, including interference that may cause undesired operation.
CAN ICES-3 B/NMB-3 B
For Customers in the U.S.A.
If you have any questions about this product, you may call:Sony Customer Information Center 1-800-222-SONY (7669)The number below is for the FCC related matters only.
Regulatory Information
Declaration of ConformityTrade Name: SONYModel No.: RM-LVR3Responsible Party: Sony Electronics Inc.Address: 16535 Via Esprillo, San Diego, CA 92127 U.S.A.Telephone No.: 858-942-2230
This device complies with Part 15 of the FCC Rules. Operation is subject to the following two conditions: (1) This device may not cause harmful interference, and (2) this device must accept any interference received, including interference that may cause undesired operation.
This equipment must not be co-located or operated in conjunction with any other antenna or transmitter.
CAUTIONYou are cautioned that any changes or modifications not expressly approved in this manual could void your authority to operate this equipment.
NoteThis equipment has been tested and found to comply with the limits for a Class B digital device, pursuant to Part 15 of the FCC Rules.These limits are designed to provide reasonable protection against harmful interference in a residential installation. This equipment generates, uses, and can radiate radio frequency energy and, if not installed and used in accordance with the instructions, may cause harmful interference to radio communications.However, there is no guarantee that interference will not occur in a particular installation. If this equipment does cause harmful interference to radio or television reception, which can be determined by turning the equipment off and on, the user is encouraged to try to correct the interference by one or more of the following measures:
– Reorient or relocate the receiving antenna. – Increase the separation between the equipment and receiver. – Connect the equipment into an outlet on a circuit different from that to which the receiver is connected.
– Consult the dealer or an experienced radio/TV technician for help.
The supplied interface cable must be used with the equipment in order to comply with the limits for a digital device pursuant to Subpart B of Part 15 of FCC Rules.
For Customers in Canada
This device complies with Industry Canada’s licence-exempt RSSs. Operation is subject to the following two conditions: (1) This device may not cause interference; and (2) This device must accept any interference, including interference that may cause undesired operation of the device.
For Customers in Europe
Notice for the customers in the countries applying EU DirectivesManufacturer: Sony Corporation, 1-7-1 Konan Minato-ku Tokyo, 108-0075 JapanFor EU product compliance: Sony Belgium, bijkantoor van Sony Europe Limited, Da Vincilaan 7-D1, 1935 Zaventem, Belgium
NoticeIf static electricity or electromagnetism causes data transfer to discontinue midway (fail), restart the application or disconnect and connect the communication cable (USB, etc.) again.
Hereby, Sony Corporation, declares that this equipment is in compliance with the essential requirements and other relevant provisions of Directive 1999/5/EC. For details, please access the following URL: http://www.compliance.sony.de/
This product has been tested and found compliant with the limits set out in the EMC regulation for using connection cables shorter than 3 meters (9.8 feet).
The electromagnetic fields at the specific frequencies may influence the picture and sound of this unit.
Disposal of waste batteries and electrical and electronic equipment (applicable in the European Union and other European countries with separate collection systems)
This symbol on the product, the battery or on the packaging indicates that the product and the battery shall not be treated as household waste. On certain batteries this symbol might be used in combination with a chemical symbol.
The chemical symbols for mercury (Hg) or lead (Pb) are added if the battery contains more than 0.0005% mercury or 0.004% lead. By ensuring these products and batteries are disposed of correctly, you will help prevent potentially negative consequences for the environment and human health which could otherwise be caused by inappropriate waste handling. The recycling of the materials will help to conserve natural resources.In case of products that for safety, performance or data integrity reasons require a permanent connection with an incorporated battery, this battery should be replaced by qualified service staff only. To ensure that the battery and the electrical and electronic equipment will be treated properly, hand over these products at end-of-life to the applicable collection point for the recycling of electrical and electronic equipment. For all other batteries, please view the section on how to remove the battery from the product safely. Hand the battery over to the applicable collection point for the recycling of waste batteries. For more detailed information about recycling of this product or battery, please contact your local Civic Office, your household waste disposal service or the shop where you purchased the product or battery.
For Customers in Singapore
For Customers in U.A.E.
For Customers in Malaysia
Note on using
[Live-View Remote]Attaching the remote controlAttach the remote control to the belt or Mount Adaptor securely. Otherwise, it may fall off and result in injury or breakage.Do not use/store the remote control in the following places•In an extremely hot place
In places such as in a car parked in the sun, the remote control body may become deformed and this may cause a malfunction.
•In direct sunlight or near a heater If you store the remote control in direct sunlight or near a heater, the remote control may become discolored or deformed, and these may cause a malfunction.
•In a location subject to strong vibration•Near strong magnetic fields•In sandy or dusty places
Be careful not to let sand or dust get into the remote control. This may cause the remote control to malfunction, and in some cases may be irreparable.
Wi-Fi/Bluetooth function•Use the remote control in accordance with the regulations of the area
of use.
•You cannot use the Wi-Fi/Bluetooth function of the remote control underwater.
Security in the use of wireless LAN devices•To avoid hacking, access by malicious third parties, and other
vulnerabilities, confirm that the wireless LAN is always secure.•It is very important to set up security on a wireless LAN.•If a problem occurs due to inadequate security measures or due to
foreseeable circumstances, Sony Corporation is not responsible for any resulting damage.
On moisture condensationIf the remote control is brought directly from a cold to a warm location, moisture may condense inside or outside the remote control. This moisture condensation may cause a malfunction of the remote control.
If moisture condensation occursTurn off the remote control and wait about an hour for the moisture to evaporate.Operating temperature•The remote control is designed for use in temperatures between -10
°C and +40 °C (14 °F and 104 °F). Using in extremely cold or hot places outside this range is not recommended.
•The LCD screen and the cabinet become warm during operation. This is normal.
Handling the LCD screen•Do not leave the LCD screen facing the sun as it may be damaged. Be
careful when placing the remote control by a window.•If the remote control is used in a cold place, horizontal lines or a
residual image may appear on the LCD screen. This is not a malfunction. The LCD screen returns to normal when the remote control warms up.
About the water-proof performance of the remote controlThe remote control is designed to be water-proof. Damage caused by misuse, abuse, or improper maintenance is not covered by the limited warranty.•Do not subject the remote control to pressurized water, such as from
a tap.•Do not use in hot springs.•Use the remote control in the water temperature range of 0 °C to 40
°C (32 °F to 104 °F).
Notes before using the remote control under/near water•If dirt or sand gets on the terminal section of the remote control
(where it connects to the cradle), wipe the area clean with a soft cloth that does not leave behind any fibers.
•If you have used the remote control near water or with wet or sandy hands, perform the procedure described in “Cleaning after using the remote control under/near water" before charging the remote control with the cradle.
Notes on using the remote control under/near water•Do not subject the remote control to shock such as by jumping into
water.•The remote control sinks in water. Use the belt supplied with the
remote control to prevent it from sinking.•Bubbles may appear when the remote control is placed underwater.
This is not a malfunction.
Cleaning after using the remote control under/near water•Always clean the remote control with water within 60 minutes of use.
Sand or water may get inside where it cannot be seen, and will degrade water-proof performance if not rinsed out.
•Allow the remote control to sit in pure water poured into a cleaning bowl for about 5 minutes. Then, gently shake the remote control and press each button under the water to clean away any salt, sand or other matter lodged around the buttons.
•After rinsing, wipe away any drops of water with a soft cloth. Allow the remote control to dry completely in a shady location with good ventilation. Do not blow dry with a hair dryer as there is a risk of deformation and/or degraded water-proof performance.
•Wipe away any drops of water or dust with a soft dry cloth.•Attach the remote control to the cradle when the remote control is
completely dry.•The remote control body may become discolored if it comes into
contact with sunscreen or suntan oil. If the remote control does come into contact with sunscreen or suntan oil, quickly wipe it clean.
•Do not allow the remote control to sit with salt water inside it or on its surface. This may lead to corrosion or discoloration, and degradation of the water-proof performance.
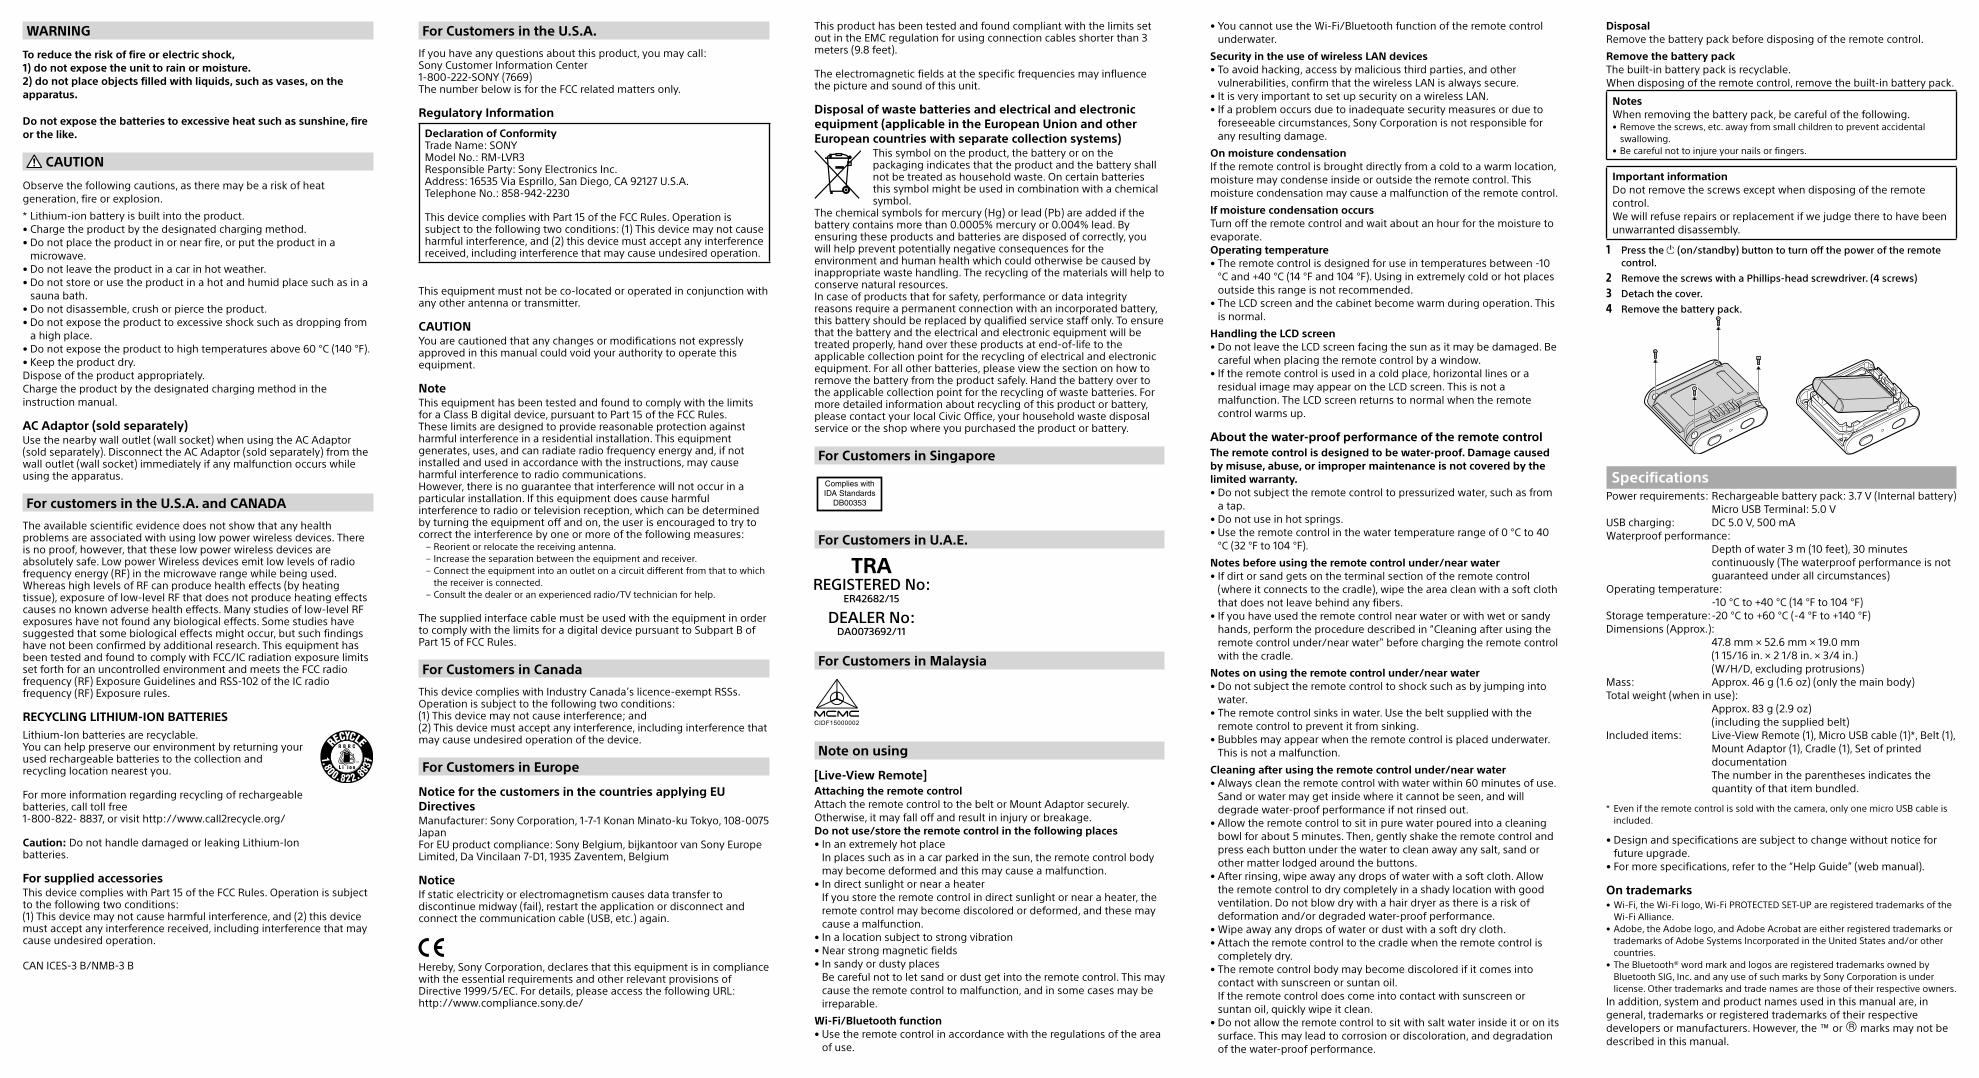
DisposalRemove the battery pack before disposing of the remote control.
Remove the battery packThe built-in battery pack is recyclable.When disposing of the remote control, remove the built-in battery pack.
NotesWhen removing the battery pack, be careful of the following.•Remove the screws, etc. away from small children to prevent accidental
swallowing.•Be careful not to injure your nails or fingers.
Important informationDo not remove the screws except when disposing of the remote control.We will refuse repairs or replacement if we judge there to have been unwarranted disassembly.
1 Press the (on/standby) button to turn off the power of the remote control.
2 Remove the screws with a Phillips-head screwdriver. (4 screws)
3 Detach the cover.
4 Remove the battery pack.
SpecificationsPower requirements: Rechargeable battery pack: 3.7 V (Internal battery) Micro USB Terminal: 5.0 VUSB charging: DC 5.0 V, 500 mAWaterproof performance: Depth of water 3 m (10 feet), 30 minutes
continuously (The waterproof performance is not guaranteed under all circumstances)
Operating temperature: -10 °C to +40 °C (14 °F to 104 °F)Storage temperature: -20 °C to +60 °C (-4 °F to +140 °F)Dimensions (Approx.): 47.8 mm × 52.6 mm × 19.0 mm
(1 15/16 in. × 2 1/8 in. × 3/4 in.) (W/H/D, excluding protrusions)
Mass: Approx. 46 g (1.6 oz) (only the main body)Total weight (when in use): Approx. 83 g (2.9 oz)
(including the supplied belt)Included items: Live-View Remote (1), Micro USB cable (1)*, Belt (1),
Mount Adaptor (1), Cradle (1), Set of printed documentation The number in the parentheses indicates the quantity of that item bundled.
* Even if the remote control is sold with the camera, only one micro USB cable is included.
•Design and specifications are subject to change without notice for future upgrade.
•For more specifications, refer to the “Help Guide” (web manual).
On trademarks•Wi-Fi, the Wi-Fi logo, Wi-Fi PROTECTED SET-UP are registered trademarks of the
Wi-Fi Alliance.•Adobe, the Adobe logo, and Adobe Acrobat are either registered trademarks or
trademarks of Adobe Systems Incorporated in the United States and/or other countries.
•The Bluetooth® word mark and logos are registered trademarks owned by Bluetooth SIG, Inc. and any use of such marks by Sony Corporation is under license. Other trademarks and trade names are those of their respective owners.
In addition, system and product names used in this manual are, in general, trademarks or registered trademarks of their respective developers or manufacturers. However, the ™ or marks may not be described in this manual.
![Dijital YÇ Video Kamera Kaydedici 3 HD ﺔﻴﻤﻗر ﻮﻳﺪﻴﻓ …di.update.sony.net/HDR/Xv5NN3qTuG/as100v_og_manual_ar_ct_kr_tr.pdfxxx/tpoz/ofu0qn0 e@5 @ M>M ]S" PaEè](https://img.pdfslide.net/doc/110x75/608960fef13e91127e6db394/dijital-y-video-kamera-kaydedici-3-hd-iiii-iiiii-di-xxxtpozofu0qn0.jpg)


![Micro USB cable (1) 4 Rechargeable battery pack (NP …di.update.sony.net/HDR/Xv5NN3qTuG/as100v_og_manual_us.pdfThe menu may change depending on the camera operating conditions. [TC/UB]](https://img.pdfslide.net/doc/110x75/5b07a9517f8b9a79538e39ca/micro-usb-cable-1-4-rechargeable-battery-pack-np-di-menu-may-change-depending.jpg)