Embed Size (px)
Citation preview

@ 2015 5 Minutes for Mom
PDF Sewing Pattern for Girl’s size small to x-large, 18” and 15” Dolls
Skill Level: Beginner
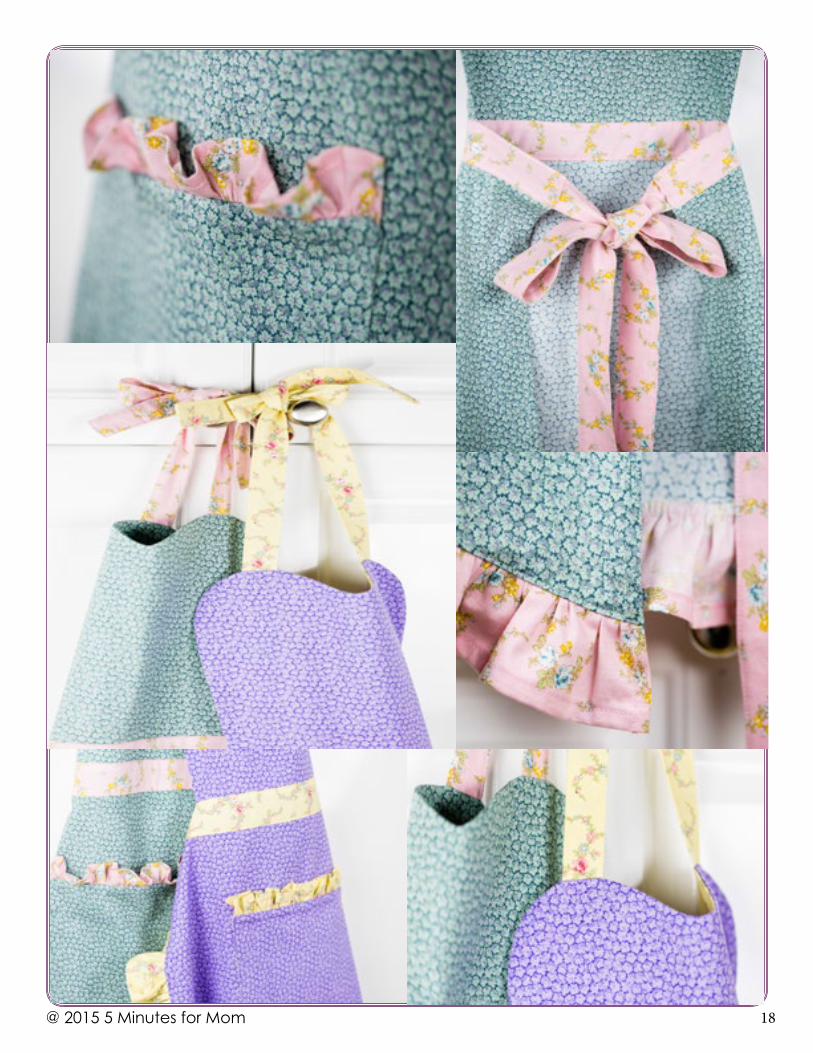
Sugar & Spice Apron by 5 Minutes for Mom

@ 2015 5 Minutes for Mom 2
Sugar & Spice ApronFabric Requirements (in Yards)*S M L XL Doll
Bodice 1/4 yard 1/3 yard 1/3 yard 1/3 yard Fat QuarterSkirt 7/8 yard 1 yard 1 yard 1 yard Fat Quarter
Waistband 1/8 yard 1/8 yard 1/8 yard 1/8 yard Fat QuarterWaistband Ties 1/4 yard 1/4 yard 1/4 yard 1/4 yard 1/8 yard
Pocket Fat Quarter Fat Quarter Fat Quarter Fat Quarter Fat QuarterRuffles 1/4 yard 1/4 yard 1/4 yard 1/4 yard 1/4 yard
Neck strap 1/8 yard 1/8 yard 1/8 yard 1/8 yard 1/4 yard* Fabric Requirements based on 44” wide fabric
Suggested Fabrics
Designed for cotton, cotton blends, broad-cloth, chambray, denim (stretch denim may
work best), and twill
Glossary Baste: Sewing with long, loose stitches to hold material in place until the final sewing.
Finishing seam edges: There are three ways to achieve a professional seam inside your
garment with this pattern.
1. Use a serger when stitching the seams.
2. Use an overlock stitch or a zig-zag stitch on your sewing machine when stitching the
seams.
3. Use french seams to enclose the raw edges.
Top Stitch: A sewing technique used most often on garment edges such as necklines and
hems, where it helps facings to stay in place and gives a crisp edge. Typically the line is sewn
1/8” from the edge.
NotionsThread

@ 2015 5 Minutes for Mom 32
Finished Garment Measurements
GIRLS S M L XL
Length 26” 28” 30” 32”
DOLLS 15” 18”
Length 7” 9”
Cutting out Sugar & Spice Apron • Cut two (2) bodice pieces
• Cut one (1) skirt piece
• Cut two (2) pocket pieces
• Cut out waistband, waistband ties, neck strap and ruffles according to chartS
length x width M
length x widthL
length x widthXL
length x width Doll (both sizes)
Waistband(cut 2) 15.5” x 2” 16.5” x 2” 17.5” x 2” 18.5” x 2” 5” x 1.5”
Waistband Ties(cut 2) 28” x 3.5” 30” x 3.5” 32” x 3.5” 34” x 3.5” 18” x 2.5”
Neck strap(cut 1) 36” x 4” 38” x 4” 40” x 4” 44” x 4” 20” x 2”
Ruffle (skirt)(cut 2) 42” x 3” 43” x 3” 44” x 3” 44” x 3” 16” x 1.75”
Ruffle (Pocket) (cut 1) 12” x 2” 14” x 2” 16” x 2” 18” x 2” 6.5” x. 1.25”

4@ 2015 5 Minutes for Mom
Printing and assembling PatternBEFORE PRINTING AND SEWING
Please read all printing and sewing instructions prior to starting your apron. If you are unsure of a step please take the time to research that step or reach out via e-mail or facebook and we can directly clarify any questions. We are happy to help!
5 Minutes for Mom cannot be held responsible for any printing error, human error or customer craftsmanship.
PATTERN LAYER FUNCTION (re-quires Adobe Acrobat Reader)
1. Select the layers icon on the left hand side of your PDF page. A layers menu then opens showing all sizes for the pattern.
2. Each size has a corresponding box, de-select the sizes you DO NOT want to use by clicking on the “eye” icon. The remaining visible icons, those with the “eye” next to them will be the only sizes to print.
PRINTINGWe recommend only printing the pattern piec-es and then viewing the instructions on your computer, tablet or even phone! This step saves us not only printer ink and paper but also can help save a tree!
Always remember to check the scale to en-sure the pattern will print correctly. To check the scale print page one of the pattern piec-es. On this page there is a test square and you will want to measure it to ensure everything is scaled properly before printing the complete pattern. As in the picture here, make sure print size and handling is ACTUAL SIZE and your ori-entation is auto portrait/landscape. You may choose to print in color or black and white. Please refer to your printer manual/setting if you are not sure how to change those features.
TilingTo put the pattern together you will need to cut the edges of your sheets and match up all the pattern lines as shown in the diagram on pg. 19. You may tape or glue pattern sheets together. We suggest cutting the top edges and left side edges of all sheets and then using a glue stick to paste the pieces together!

4 5@ 2015 5 Minutes for Mom
aPron ConstruCtion IMPORTANT: All seam allowances, unless otherwise stated, are 1/2”. For the doll versions construction is the same but seam allowance is 1/4”.
SKIRT CONSTRUCTION
1. Place the two skirt ruffle pieces on top of each other, right sides together. Sew one of the short ends of the two ruffle pieces together to form one long strip of fabric and finish seam edges.
2. Hem ruffle by folding over 1/4” and then another 1/4” (for doll version 1/8” and then another 1/8”) and stitching. Gather the ruffle with your preferred gathering method. Fold the large skirt piece in half lengthwise and mark the center of the bottom of the skirt with a pin, fabric chalk or washable fabric marker.
3. With right sides together, match the center of the ruffle (the seam between the two pieces of fabric) to the marked bottom center of the apron skirt piece. Distribute the gathers evenly being sure to leave 1/2” flat at each end of the ruffle for finishing purposes and pin in place.
6@ 2015 5 Minutes for Mom
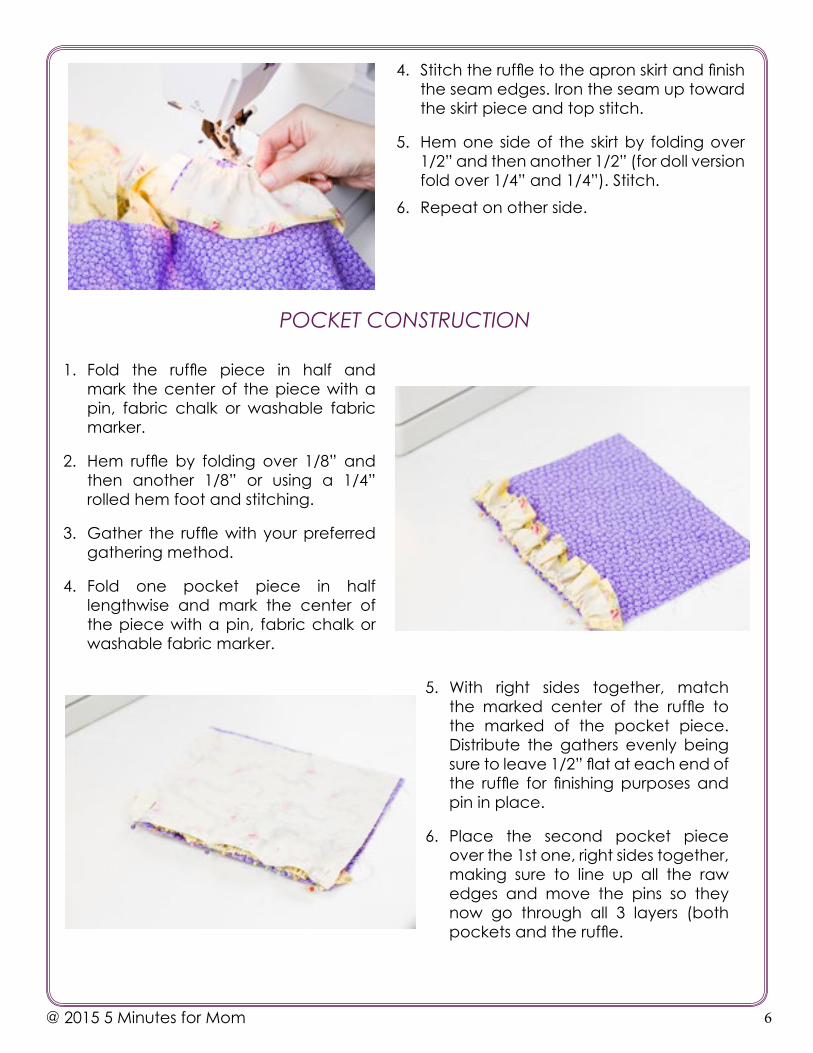
4. Stitch the ruffle to the apron skirt and finish the seam edges. Iron the seam up toward the skirt piece and top stitch.
5. Hem one side of the skirt by folding over 1/2” and then another 1/2” (for doll version fold over 1/4” and 1/4”). Stitch.
6. Repeat on other side.
POCKET CONSTRUCTION
1. Fold the ruffle piece in half and mark the center of the piece with a pin, fabric chalk or washable fabric marker.
2. Hem ruffle by folding over 1/8” and then another 1/8” or using a 1/4” rolled hem foot and stitching.
3. Gather the ruffle with your preferred gathering method.
4. Fold one pocket piece in half lengthwise and mark the center of the piece with a pin, fabric chalk or washable fabric marker.
5. With right sides together, match the marked center of the ruffle to the marked of the pocket piece. Distribute the gathers evenly being sure to leave 1/2” flat at each end of the ruffle for finishing purposes and pin in place.
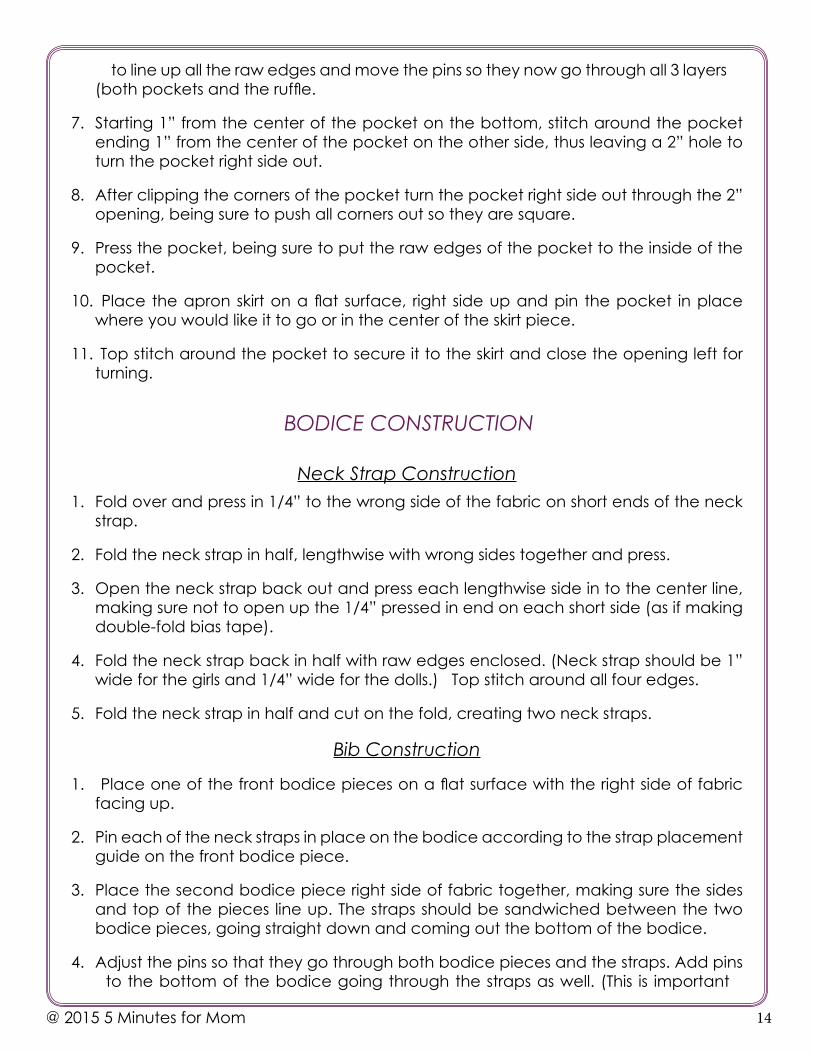
6. Place the second pocket piece over the 1st one, right sides together, making sure to line up all the raw edges and move the pins so they now go through all 3 layers (both pockets and the ruffle.

6 7@ 2015 5 Minutes for Mom
7. Starting 1” from the center of the pocket on the bottom, stitch around the pocket ending 1” from the center of the pocket on the other side, thus leaving a 2” hole to turn the pocket right side out.
8. After clipping the corners of the pocket turn the pocket right side out through the 2” opening, being sure to push all corners out so they are square.
9. Press the pocket, being sure to put the raw edges of the pocket to the inside of the pocket.
10. Place the apron skirt on a flat surface, right side up and pin the pocket in place where you would like it to go or in the center of the skirt piece.
11. Top stitch around the pocket to secure it to the skirt and close the opening left for turning.

8@ 2015 5 Minutes for Mom
BODICE CONSTRUCTION
Neck Strap Construction
1. Fold over and press in 1/4” to the wrong side of the fabric on short ends of the neck strap.
2. Fold the neck strap in half, lengthwise with wrong sides together and press.
3. Open the neck strap back out and press each lengthwise side in to the center line, making sure not to open up the 1/4” pressed in end on each short side (as if making double-fold bias tape).

8 9@ 2015 5 Minutes for Mom
4. Fold the neck strap back in half with raw edges enclosed. (Neck strap should be 1” wide for the girls and 1/4” wide for the dolls.) Top stitch around all four edges.
5. Fold the neck strap in half and cut on the fold, creating two neck straps.
Bib Construction
1. Place one of the front bodice pieces on a flat surface with the right side of fabric facing up.
2. Pin each of the neck straps in place on the bodice according to the strap placement guide on the front bodice piece.
3. Place the second bodice piece right side of fabric together, making sure the sides and top of the pieces line up. The straps

10@ 2015 5 Minutes for Mom
should be sandwiched between the two bodice pieces, going straight down and coming out the bottom of the bodice.
4. Adjust the pins so that they go through both bodice pieces and the straps. Add pins to the bottom of the bodice going through the straps as well. (This is important because it ensures that the bodice and straps will not move since any shift in the straps could cause them to be crooked.)
5. Stitch around the side, top and other side of the bodice, making sure not to catch the straps in any of the seams.
6. After ensuring the straps are straight, clip the curves of the top of the bodice. Clip into the seam allowance every 1/2” - 3/4” along the curve, being very careful to not clip into your seam. (For the dolls every 1/4” to 1/2”). Be sure to cut a small triangle out where the dip is in the bodice so that area will lay flat as well. Also be sure to clip your corners at an angle.
7. Turn the bodice right side out being sure to push the corners out. Press well.
8. Top stitch both sides and the top of the bodice, making sure to not get the straps caught in any of the top stitching.
9. Baste the bottom raw edges together, if preferred.
WAISTBAND CONSTRUCTIONWaistband Ties
1. Take one strap and fold in half lengthwise, right sides together and press.
2. Sew along one short end USING A 1/4” SEAM ALLOWANCE and the entire length leaving the other short end open.

10 11@ 2015 5 Minutes for Mom
3. After clipping the corners so they lie flat, use a dowel, chopstick or quick turn tool turn the waistband tie right side out.
4. Press the waistband ties so they lie flat.
5. Top stitch around the waistband tie, leaving the raw end untopstitched.
6. Repeat with second waistband tie.
Waistband and Apron Construction
1. Fold over and press in 1/4” to the wrong side of the fabric on short ends on each of the waistband pieces.
2. Keeping the pressing from step 1 above in place, fold over and press one of the long edges in 1/4” on each of the waistband pieces.
3. Place one of the waistband pieces with the raw unpressed long side at the top and right side of the fabric up on a flat surface.
4. Lay the skirt piece right side down on top of the waistband piece, line the raw edge of the skirt up with the raw unpressed edge of the waistband piece.
5. Take the remaining waist band piece and lay it right side down on top of the other waist band piece with the raw unpressed edge at the top and the skirt piece. Making sure that all three raw, unpressed edges line up and the edges of the waistbands (with the 1/4” pressed in) meet

@ 2015 5 Minutes for Mom
the hemmed edges of the skirt. Pin in place being sure to catch all 3 layers.
6. Stitch in place USING A 1/4” SEAM ALLOWANCE.
7. Press both waistband pieces up, being sure to leave the pressing from step 1 and 2 in place.
8. Place the skirt with the waistband attached right side up on a flat surface and carefully fold down one side of the waistband.
9. Take the bodice piece, right side up and line the raw edge of the bodice bottom up with the raw edge of the waistband piece that has been ironed down. Be sure to line up the center of the bodice with the center of the waist band as the bodice will not go all the way to the edges of the waistband.
10. Being careful not to move the bodice piece already laid down fold the front piece of the waistband back up, so that it encases all the raw edges and pin in place making sure to catch all layers of the waistband and the bodice.
11. After making sure the bodice is held in place with the pins, carefully place one waistband tie in each end of the waist band, attempting to match the raw edges of the waistband tie to the raw edges of the waistband pieces that had been folded and pressed in. If necessary you can remove the pins holding the edge of the waistband and the bodice together to help place the waistband ties and then replace those pins.
12. Top stitch around all 4 edges of the waistband.
12

13@ 2015 5 Minutes for Mom
aPron ConstruCtion (just the words)IMPORTANT: All seam allowances, unless otherwise stated, are 1/2”. For the doll versions construction is the same but seam allowance is 1/4”.
SKIRT CONSTRUCTION
1. Place the two skirt ruffle pieces on top of each other, right sides together. Sew one of the short ends of the two ruffle pieces together to form one long strip of fabric and finish seam edges.
2. Hem ruffle by folding over 1/4” and then another 1/4” (for doll version 1/8” and then another 1/8”) and stitching.
3. Gather the ruffle with your preferred gathering method.
4. Fold the large skirt piece in half lengthwise and mark the center of the bottom of the skirt with a pin, fabric chalk or washable fabric marker.
5. With right sides together, match the center of the ruffle (the seam between the two pieces of fabric) to the marked bottom center of the apron skirt piece. Distribute the gathers evenly being sure to leave 1/2” flat at each end of the ruffle for finishing purposes and pin in place.
6. Stitch the ruffle to the apron skirt and finish the seam edges.
7. Iron the seam up toward the skirt piece and top stitch. 8. Hem one side of the skirt by folding over 1/2” and then another 1/2” (for doll version
fold over 1/4” and 1/4”). Stitch.
9. Repeat on other side.
POCKET CONSTRUCTION1. Fold the ruffle piece in half and mark the center of the piece with a pin, fabric chalk
or washable fabric marker.
2. Hem ruffle by folding over 1/8” and then another 1/8” or using a 1/4” rolled hem foot and stitching.
3. Gather the ruffle with your preferred gathering method.
4. Fold one pocket piece in half lengthwise and mark the center of the piece with a pin, fabric chalk or washable fabric marker.
5. With right sides together, match the marked center of the ruffle to the marked of the pocket piece. Distribute the gathers evenly being sure to leave 1/2” flat at each end of the ruffle for finishing purposes and pin in place.
6. Place the second pocket piece over the 1st one, right sides together, making sure
@ 2015 5 Minutes for Mom 14
to line up all the raw edges and move the pins so they now go through all 3 layers (both pockets and the ruffle.
7. Starting 1” from the center of the pocket on the bottom, stitch around the pocket ending 1” from the center of the pocket on the other side, thus leaving a 2” hole to turn the pocket right side out.
8. After clipping the corners of the pocket turn the pocket right side out through the 2” opening, being sure to push all corners out so they are square.
9. Press the pocket, being sure to put the raw edges of the pocket to the inside of the pocket.
10. Place the apron skirt on a flat surface, right side up and pin the pocket in place where you would like it to go or in the center of the skirt piece.
11. Top stitch around the pocket to secure it to the skirt and close the opening left for turning.
BODICE CONSTRUCTION
Neck Strap Construction1. Fold over and press in 1/4” to the wrong side of the fabric on short ends of the neck
strap.
2. Fold the neck strap in half, lengthwise with wrong sides together and press.
3. Open the neck strap back out and press each lengthwise side in to the center line, making sure not to open up the 1/4” pressed in end on each short side (as if making double-fold bias tape).
4. Fold the neck strap back in half with raw edges enclosed. (Neck strap should be 1” wide for the girls and 1/4” wide for the dolls.) Top stitch around all four edges.
5. Fold the neck strap in half and cut on the fold, creating two neck straps.
Bib Construction
1. Place one of the front bodice pieces on a flat surface with the right side of fabric facing up.
2. Pin each of the neck straps in place on the bodice according to the strap placement guide on the front bodice piece.
3. Place the second bodice piece right side of fabric together, making sure the sides and top of the pieces line up. The straps should be sandwiched between the two bodice pieces, going straight down and coming out the bottom of the bodice.
4. Adjust the pins so that they go through both bodice pieces and the straps. Add pins to the bottom of the bodice going through the straps as well. (This is important

15@ 2015 5 Minutes for Mom14
because it ensures that the bodice and straps will not move since any shift in the straps could cause them to be crooked.)
5. Stitch around the side, top and other side of the bodice, making sure not to catch the straps in any of the seams.
6. After ensuring the straps are straight, clip the curves of the top of the bodice. Clip into the seam allowance every 1/2” - 3/4” along the curve, being very careful to not clip into your seam. (For the dolls every 1/4” to 1/2”). Be sure to cut a small triangle out where the dip is in the bodice so that area will lay flat as well. Also be sure to clip your corners at an angle.
7. Turn the bodice right side out being sure to push the corners out. Press well.
8. Top stitch both sides and the top of the bodice, making sure to not get the straps caught in any of the top stitching.
9. Baste the bottom raw edges together, if preferred.
WAISTBAND CONSTRUCTIONWaistband Ties
1. Take one strap and fold in half lengthwise, right sides together and press.
2. Sew along one short end USING A 1/4” SEAM ALLOWANCE and the entire length leaving the other short end open.
3. After clipping the corners so they lie flat, use a dowel, chopstick or quick turn tool turn the waistband tie right side out.
4. Press the waistband ties so they lie flat. 5. Top stitch around the waistband tie, leaving the raw end untopstitched.6. Repeat with second waistband tie.
Waistband and Apron Construction 1. Fold over and press in 1/4” to the wrong side of the fabric on short ends on each of
the waistband pieces.
2. Keeping the pressing from step 1 above in place, fold over and press one of the long edges in 1/4” on each of the waistband pieces.
3. Place one of the waistband pieces with the raw unpressed long side at the top and right side of the fabric up on a flat surface.
4. Lay the skirt piece right side down on top of the waistband piece, line the raw edge of the skirt up with the raw unpressed edge of the waistband piece.
5. Take the remaining waist band piece and lay it right side down on top of the other waist band piece with the raw unpressed edge at the top and the skirt piece. Making sure that all three raw, unpressed edges line up and the edges of the waistbands
16@ 2015 5 Minutes for Mom
(with the 1/4” pressed in) meet the hemmed edges of the skirt. Pin in place being sure to catch all 3 layers.
6. Stitch in place USING A 1/4” SEAM ALLOWANCE.
7. Press both waistband pieces up, being sure to leave the pressing from step 1 and 2 in place.
8. Place the skirt with the waistband attached right side up on a flat surface and carefully fold down one side of the waistband.
9. Take the bodice piece, right side up and line the raw edge of the bodice bottom up with the raw edge of the waistband piece that has been ironed down. Be sure to line up the center of the bodice with the center of the waist band as the bodice will not go all the way to the edges of the waistband.
10. Being careful not to move the bodice piece already laid down fold the front piece of the waistband back up, so that it encases all the raw edges and pin in place making sure to catch all layers of the waistband and the bodice.
11. After making sure the bodice is held in place with the pins, carefully place one waistband tie in each end of the waist band, attempting to match the raw edges of the waistband tie to the raw edges of the waistband pieces that had been folded and pressed in. If necessary you can remove the pins holding the edge of the waistband and the bodice together to help place the waistband ties and then replace those pins.
12. Top stitch around all 4 edges of the waistband.

16 @ 2015 5 Minutes for Mom
By 5 Minutes for Mom, Janice Croze and Carissa Haning. For personal use only. All rights reserved. Copyright © November 2015. No part of this pattern may be
reproduced or copied without permission in writing from the author/Authors.
Thank you for your purchase of this pattern. Special thanks to my wonderful tes-ters. This would not be possible without all of your help!
Fair use of this pattern are subject to the following conditions:
There can be NO resale or reproduction of this pattern in part or whole without written consent from the designer Carissa Haning. This includes sharing, tracing, or
forwarding the pattern to anyone except the original purchaser.
If you sell garments made using this pattern, in consideration of the many hours spent on the design, please always give credit to 5 Minutes for Mom as the designer (i.e. “Sugar & Spice Apron” pattern by 5 Minutes for Mom,
https://5minutesformom.com). No mass production is permitted using this pattern.
Sugar & SpiceApron
by 5 Minutes for Mom
17
18@ 2015 5 Minutes for Mom

18
Tiling Diagram For Girls Pattern

1FOLDSu
gar &
Spi
ce A
pron
5 M
inut
es fo
r Mom
Apr
on B
odic
eC
ut 2
on
the
fold
2”Square
SizesSmall -- Medium -- Large -- X-Large --

1 2FOLD
FOLDSu
gar &
Spi
ce A
pron
5 M
inut
es fo
r Mom
Apr
on B
odic
eC
ut 2
on
the
fold
2 3Sugar & Spice Apron
5 Minutes for Mom
Apron Skirt Cut 1
on the fold

3 4

5Sugar & Spice Apron5 Minutes for Mom
Apron Pocket Cut 2

5 6 FOLD

6 7Sugar & Spice Apron
5 Minutes for Mom
Apron Skirt Cut 1
on the fold

7 8

Sugar & Spice Apron5 Minutes for Mom
Apron Pocket Cut 2
Sugar & Spice Apron5 Minutes for Mom
Apron Pocket18” Doll Cut 2
2”Square
Sugar & Spice Apron5 Minutes for Mom
Apron Skirt18” Doll Cut 1
on the fold
Sugar & Spice Apron5 Minutes for Mom
Apron Bodice18” Doll Cut 2
on the fold
FOLD
FOLD

2”Square
Sugar & Spice Apron5 Minutes for Mom
Apron Bodice15” Doll Cut 2
on the fold
FOLD
Sugar & Spice Apron5 Minutes for Mom
Apron Pocket15” Doll Cut 2
Sugar & Spice Apron5 Minutes for Mom
Apron Skirt15” Doll Cut 1
on the fold
FOLD