Embed Size (px)
Citation preview

1 SWR
Swiftwater Rescue: An Introduction
October, 2012
2 SWR
This manual is intended to serve as a guide for those who want to enter the wondrous world of Swi water Rescue! It can only serve as a re-source and any real learning must take place on river while running ‘the meat’. There is no subs -tute for hands-on training, your own prac ce and experience, and developing good river judgment. *This training is based on the American Canoe Associa ons (ACA) Swi water Rescue – Level 4 ACA Swi water Rescue (Level 4) teaches recogni-on and avoidance of common river hazards, ex-
ecu on of self-rescue techniques, and rescue techniques for paddlers in distress. Emphasis is placed both on personal safety and on simple, commonly used skills. Techniques for dealing with hazards that carry greater risks for both vic-m and rescuer, such as strainers, rescue vest ap-
plica ons, entrapments, and pins, also are prac-ced. Scenarios will provide an opportunity for
par cipants to prac ce their skills both individu-ally and within a team/group context.

3 SWR
Table O’ Contents:
The River – Intro to Hydrology Interna onal Scale of River Difficulty Characteris cs of Swi water Variables of Swi water
Hazards & River features Rescue Philosophies Rescue Priori es
Speech Reach Throw Row Go
Rescue Types Shore-based Boat-assisted Boat-based In-water contact
SWR Equipment Essen als Personal Group Leader
River Orienta on, Communica on Ropes
Packing Se ng Rope Deployment Catching Safety
Wading Single Person Line astern Wedge People Pivot
Swimming Whitewater Swimmers Posi on Aggressive Swimming Swi water Entry
Strainer strategies Contact rescues
Vic m Psychology Contact Rescues Live Bait V-Lower
Foot & body entrapments Scene Management
Incident Command System
4 SWR
The River – Intro to Hydrology INTERNATIONAL SCALE OF RIVER DIFFICULTY
Class I
Fast moving water with riffles and small waves. Few obstruc ons, all obvious and easily missed with li le training. Risk to swimmers is slight; self-rescue is easy.
Class II: Novice
Straigh orward rapids with wide, clear channels which are evident without scou ng. Occasional maneuvering may be required, but rocks and medium-sized waves are easily missed by trained paddlers. Swimmers are seldom injured and group assistance, while helpful, is seldom needed. Rapids that are at the upper end of this difficulty range are designated “Class II+”.
Class III: Intermediate
Rapids with moderate, irregular waves which may be difficult to avoid and which can swamp an open canoe. Complex maneuvers in fast current and good boat control in ght passages or around ledges are o en required; large waves or strainers may be present but are easily avoided. Strong eddies and powerful current effects can be found, par cularly on large-volume rivers. Scou ng is advisable for inexperienced par es. Injuries while swimming are rare; self-rescue is usually easy but group assistance may be required to avoid long swims. Rapids that are at the lower or upper end of this difficulty range are designated “Class III-” or “Class III+” respec vely.
Class IV: Advanced
Intense, powerful but predictable rapids requiring precise boat han-dling in turbulent water. Depending on the character of the river, it may feature large, unavoidable waves and holes or constricted pas-sages demanding fast maneuvers under pressure. A fast, reliable eddy turn may be needed to ini ate maneuvers, scout rapids, or rest. Rapids may require “must” moves above dangerous hazards. Scou ng may be necessary the first me down. Risk of injury to swimmers is moderate to high, and water condi ons may make self-rescue difficult. Group assistance for rescue is o en essen al but requires prac ced skills. A strong eskimo roll is highly recommended. Rapids that are at the lower or upper end of this difficulty range are designated “Class IV-” or “Class IV+” respec vely.
5 SWR
Class V: Expert Extremely long, obstructed, or very violent rapids which expose a paddler to added risk. Drops may contain** large, unavoidable waves and holes or steep, congested chutes with complex, demand-ing routes. Rapids may con nue for long distances between pools, demanding a high level of fitness. What eddies exist may be small, turbulent, or difficult to reach. At the high end of the scale, several of these factors may be combined. Scou ng is recommended but may be difficult. Swims are dangerous, and rescue is o en difficult even for experts. A very reliable eskimo roll, proper equipment, extensive experience, and prac ced rescue skills are essen al. Because of the large range of difficulty that exists beyond Class IV, Class 5 is an open-ended, mul ple-level scale designated by class 5.0, 5.1, 5.2, etc… each of these levels is an order of magnitude more difficult than the last. Example: increasing difficulty from Class 5.0 to Class 5.1 is a sim-ilar order of magnitude as increasing from Class IV to Class 5.0. Characteris cs of Swi water
Swi water is powerful!
Strong stuff! One CFS weighs approx. 62.4 lbs. Swi water is relentless!
River currents push against objects in the water con nuous-ly.
Swi water is predictable.
Know learn and know hot to read whitewater to determine hazards, fun, and safe spots.
Variables of Swi water
The nature of a river is determined by many things: -The amount of water -How fast it moves -What’s on the river bed and its banks -Volume – Cubic Feet per Second (CFS). How much water is
passing a certain point during a given period of me. -Gradient – Feet per Mile (FPM). The amount of drop between
two given points. If you change any of these variables, the river will change. Mother
Nature can do this at any me!
6 SWR
Flow Types Laminar – Laminar flow is most of the water that flows down-stream. Think laminator (sheets). The top most sheet is the fastest, and then it gets slower as you go down in layers. The fric on of the bank and obstruc ons in the river slows water on the bo om and sides; so the fastest water is in the center just below the surface of the river. Helical – Helical flow is a corkscrew mo on downstream. Fric-on of water against the banks causes water against it to flow in
a corkscrew mo on downstream between bank/rocks/eddies/etc. and the main current.
How to Determine a River’s Volume
To determine a river’s volume, mul ply the width by the depth mes the speed of the current. For example, a channel ten feet
deep and twenty feet wide moving at a velocity of five fps equals a volume of 1,000 cfs (10 x 20 x 5 = 1,000). Doubling the speed of the current doubles the volume. "When a river is constricted, such as by narrow banks or a shallow sec on, the water must speed up to move the same amount of water through the re-duced space. Conversely, when the size of the riverbed is in-creased, as in a wide sec on or a deep pool, the water flows more slowly.
Hazards & River features
Hydraulics/holes
A hole forms as water flows over an obstruc on that is usu-ally near or above the surface of the water. As the water pours over that boulder/obstruc on water fills the drop/area behind it causing a recircula on on the other side. This recircula on, or hole, is a frothy and aerated feature that actually flows or pushes upstream. This means that kayaks, canoes, and ra s can actually get stopped and stuck in holes. As the river flows downstream the hole will be “holding” the paddler as it pushes them upstream and recirculates them.
*Holes can be fun. Hydraulics can be deadly. The dis nc on between holes and hydraulics is wishy-washy
(pun intended). Think of a hydraulic as a stronger, more reten ve, and poten ally dangerous hole.
7 SWR
Tongue – the tongue of a hole is the (usually) smooth down-stream V entering the hole. This is the main current. Some of this water is ge ng recirculated, while some of it is flush-ing out underneath the hole.
Boil line – the boil line marks from where the water is recir-cula ng upstream. The Further the boil line from the actual hole, the stronger the hole.
Backwash – the backwash is water that is being recirculated into the hole from the boil line.
The more backwash the stronger the hole.
Outwash – the outwash is the water that is escaping the holes grasp.
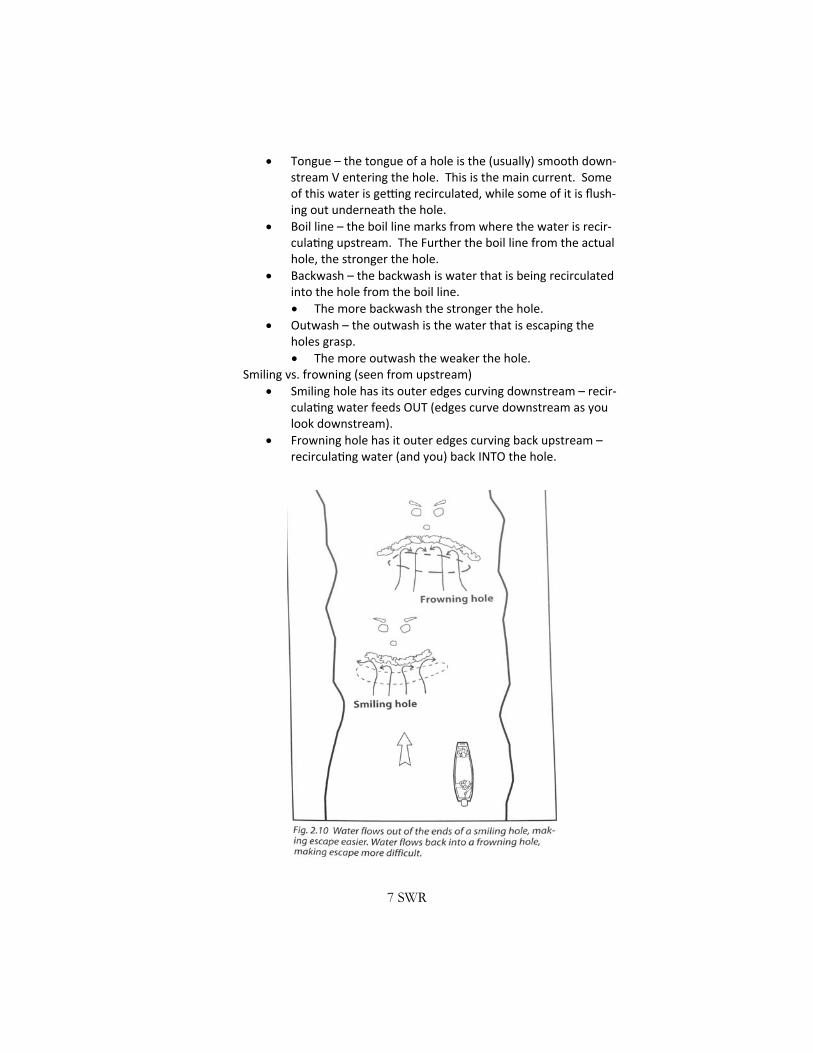
The more outwash the weaker the hole. Smiling vs. frowning (seen from upstream)
Smiling hole has its outer edges curving downstream – recir-cula ng water feeds OUT (edges curve downstream as you look downstream).
Frowning hole has it outer edges curving back upstream – recircula ng water (and you) back INTO the hole.
8 SWR
Geography of riverbed
Some rivers are more prone to sieves, sharp rocks, crevices that are angled upstream (rather than down), narrow con-nuous whitewater, or lack of eddies than others.
Cracks and crevices in a riverbed can lead to entrapments. The can include body or foot entrapments.
Foot entrapments
Foot (or other body/gear part) gets jammed into crevice, submerged object, or other underwater feature. Force of current holds swimmer under.
*One of the biggest killers in whitewater! Undercuts
A rock or ledge in the current that is cut away under the surface. This allows water to come through but could trap objects. Usually iden fiable by the lack of an upstream pil-low of water on the rocks upstream side and water rushing from the rock on the downstream side (lots of moving water in eddy or no eddy). Swimmers, boats, gear, etc. can be-come entrapped/pinned if forced into it by the current.
Strainers
Just like straining water out of spaghe . The noodles get trapped but the water flows through.
A strainer is any object (natural or manmade) that lets water through but catches objects (you, your boat, and your gear).
The force of the current can hold objects against the strain-er…very deadly
ALWAYS AVOID STRAINERS
Strainers are usually trees/debris Sieves
Sieves are like strainers; they filter water through but catch other objects. Usually made of boulders (boulder sieve) as opposed to downed trees and fences which may make up strainers.
Sieves and strainers can be hidden below the waters sur-face.
Cold water
Different water temperatures can make for very different experiences in numerous ways.
Hypothermia, fa gue, and different rates of drown-ing survival are great risks at different tempera-tures.
Always plan ahead and prepare.
Cold weather is also a factor.
9 SWR
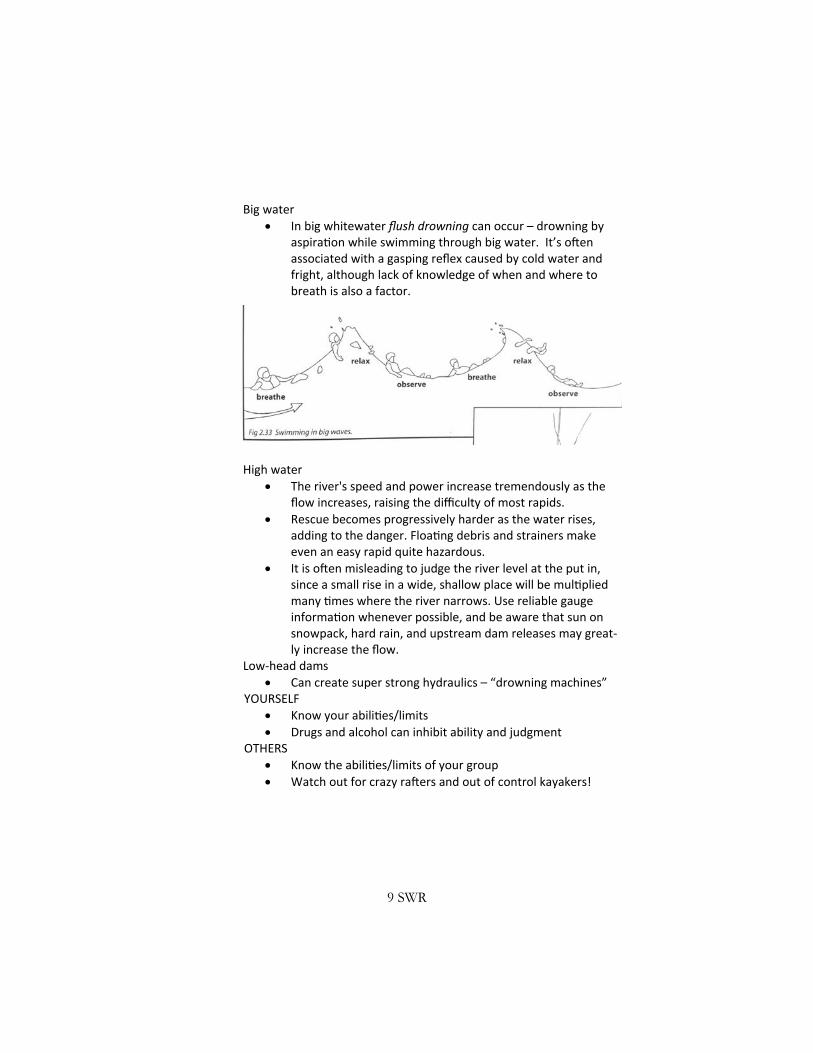
Big water
In big whitewater flush drowning can occur – drowning by aspira on while swimming through big water. It’s o en associated with a gasping reflex caused by cold water and fright, although lack of knowledge of when and where to breath is also a factor.
High water
The river's speed and power increase tremendously as the flow increases, raising the difficulty of most rapids.
Rescue becomes progressively harder as the water rises, adding to the danger. Floa ng debris and strainers make even an easy rapid quite hazardous.
It is o en misleading to judge the river level at the put in, since a small rise in a wide, shallow place will be mul plied many mes where the river narrows. Use reliable gauge informa on whenever possible, and be aware that sun on snowpack, hard rain, and upstream dam releases may great-ly increase the flow.
Low-head dams
Can create super strong hydraulics – “drowning machines” YOURSELF
Know your abili es/limits
Drugs and alcohol can inhibit ability and judgment OTHERS
Know the abili es/limits of your group
Watch out for crazy ra ers and out of control kayakers!
10 SWR
Other River Features Rapid
A rapid is a series of whitewater river features that are strung together. While it could refer to just a wave or two, the word rapid generally refers to 3 or more connected river features in a sec on of river.
Line
Very generically, a line in whitewater is the path that the paddler will want to take through any rapid, wave, hole, or other river feature.
Horizon Line
As a paddler approaches a drop they usually cannot see the river below. This makes the drop itself look like a line going across the river. This is called a horizon line. A kayaker, ca-noeist, or ra er should never paddle over a horizon line without knowing what is on the other side of it. While near-ly all river features can be dangerous, this type of white-water river feature is par cularly dangerous.
Pool
A pool of water can be a sec on of river with no rapids and slow moving water. Pools can follow rapids, especially on a ‘pool-drop’ river.
Flat-water
Flat-water is a sec on of river that has no rapids. However, this doesn’t always mean that there is not a current. The river can be moving quickly and s ll be flat.
Downstream V
A downstream V usually indicates the current’s path be-tween two obstacles. This usually is the best place to go or ‘the line’. The ‘V’ is created by two object upstream, sub-merged or otherwise. The ‘V’ is open at the top and closes downstream.
Upstream V
An upstream V usually indicates an object in the water. Try to avoid lone upstream V’s. They open downstream, so the ‘V’ points upstream to the object.
Pillows
A pillow can be formed on an exposed rock. Water rises on the upstream face of a rock (but doesn’t go over). The wa-ter is then shed around the sides.
11 SWR
Pour-over's
A pour-over is a rock in which water pours over the en re surface. O en mes, a hole is created on the downstream side of a pour over.
Ledges
A ledge is a sec on of river that has an obvious drop below it. A ledge can be as wide as the river or just a por on of a rapid or line. Holes and eddies can form behind ledges.
Eddy
An eddy is an area of calm water that is created by an ob-struc on upstream. This can be behind exposed boulders or on the sides of rivers around bends. As the river flows by these areas it can create an effect that causes the water in the eddy to flow upstream. Eddies are usually calm spots that kayaks, ra s, and canoes can sit in while the rest of the river flows downstream.
Anything in the river can make and eddy, including a person or group of people…
Eddy line
An eddy line marks the difference between the eddy and the downstream current. They can o en be violent or calm and are usually iden fiable.
The eddy itself. You can be high or low in the pocket. Waves
Wave train
A wave train is a series of waves in succession. Wave trains usually consist of three or more waves. The effect of pad-dling through a wave train is o en that of riding a roller coaster. Wave trains usually indicate deep water. This is the rivers method of giving off energy.
Tongue
The tongue is the downstream V that enter the wave. Trough
The trough is the lowest point in between (or leading to) a wave(s).
Peak
The peak is the tallest point of a wave. Upstream Face
The face of the wave on the upstream side (ramp leading up from trough to peak).
Downstream Face
The face on the downstream side of the wave (ramp leading down from peak to trough).
12 SWR
Pool-drop
This phrase can be misleading. The word “pool” is before “drop,” leading one to believe that this is the order in which the river features will be encountered. However when a whitewater paddler uses the phrase pool-drop, they are referring to a drop that falls into a pool. This is significant, as whitewater kayakers and canoeists want to know if they will have recovery me upon surfacing from a drop, should they flip over or be off balance. Pool-drop rivers allow more me between rapids as opposed to ‘con nuous whitewater’.
Rescue Philosophies
Four building blocks for a successful swi water rescue.
Training
Prac ce
Experience
Judgment
No two river rescues are alike. Be adaptable and understand that every river unique situa on.
Emphasize training over equipment Value simplicity and speed Minimize risk where possible
Rescue Priori es You may want to jump right in to save your friend or par cipant, but always priori ze the rescue to the simplest form… *Value simplicity and speed & Minimize risk where possible) *The safety of the rescuer always comes first – before that of the vic m! Rescue 3 reminds us that “self-sacrifice in rescue services is tradi on-al and commendable…and a useless waste. Rescue instructors would rather appear as expert witnesses to tes fy why nothing was done, than as to why a rescuer was injured or killed” Speech
Can you talk to the person and coach them to self-rescue?
Ex. “SWIM TO SHORE! SWIM THIS WAY!”
13 SWR
Reach
Can you reach the person? Can you reach them with your paddle or a tree branch?
Throw
Can you safely and successfully throw them a rope?
This is third on the list because it’s not the simplest tool in the box…and Ropes are a HUGE hazard in the water.
Row
Paddle to them. Can you tow them on you bow or stern? Can you paddle to them to cut a line or assist in other ways?
Go
Can you swim to them for a contact rescue? Helo
Can we call in a helicopter to remedy the situa on? (probably body removal at this point…)
Rescue Types
Shore-based rescues
Any rescue where the rescuers remain on shore is safer than one in the water.
Most common are when rescuers on land coach a swimmer, reach a swimmer, or throw ropes to a swimmer.
Boat-assisted rescues
Risk increases when leaving shore.
Boat can be used to ferry equipment, pa ent evacua on, etc.
Boat-based rescues
Boat is used for the actual rescue.
This requires more skill and creates more danger. In-water contact rescue
The rescuer may enter the water and contact the vic m directly.
This is a last resort op on.
14 SWR
SWR Equipment Essen als Boat & Paddle PFD
4 F’s
Fit (good fit)
Flota on (adequate floata on)
Fashion (color, visibility, reflec on)
Func on (uses, rescue, etc.) Helmet – whitewater - composite or plas c Footwear – wetsuit boo es or appropriate whitewater shoes (we must have closed-toed shoes) Fox 40 whistle (mounted on PFD) Rescue knife (mounted on PFD) Thermal protec on
Wetsuit or dry suit, helmet liner, gloves, extra thermal pro-tec on
Rescue rope – recommend - 75’ 3/8 diameter spectra or “grabline” Throwbags, waist belts, etc.
Pin Kit
4 Locking carabineers
3 pulleys
2 prussiks
1 length of webbing Leader Kit
A leader kit includes all of the above AND
First Aid Kit
Extra food
Extra water
Communica on device (whistle, cell phone, etc.)
Light source
EAP’s (w/ maps, evac procedures, medical info)
Extra thermal protec on (hypo bag)
15 SWR
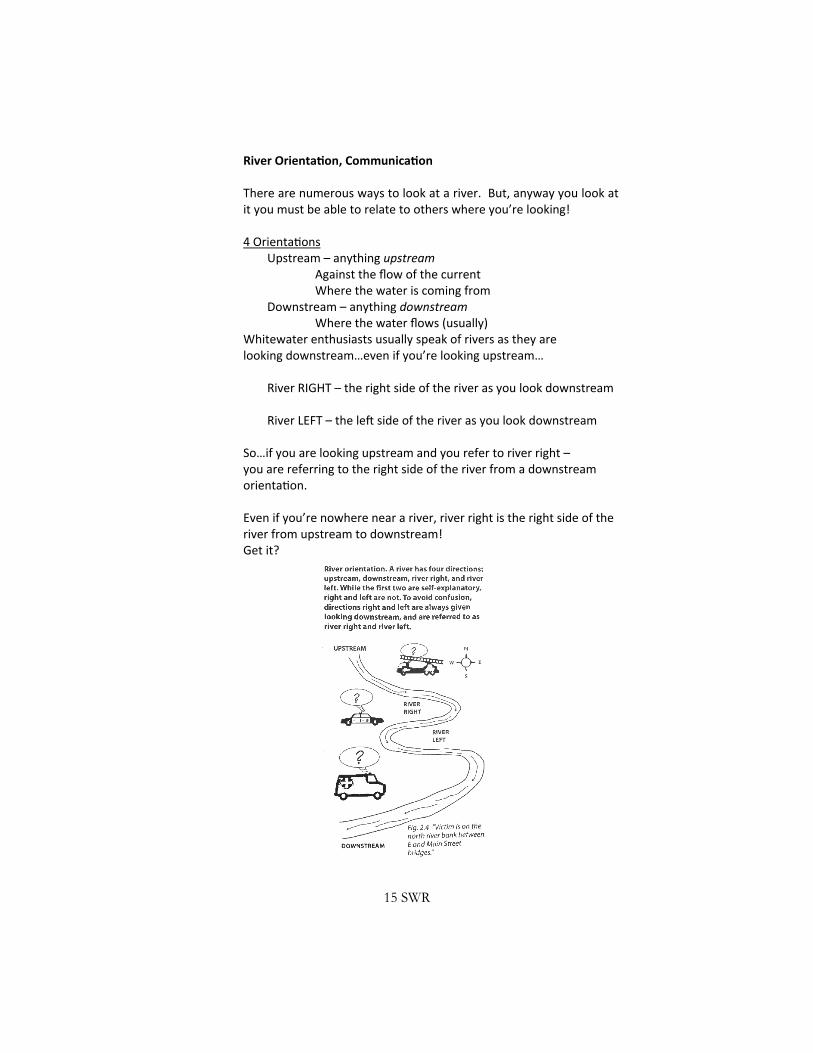
River Orienta on, Communica on There are numerous ways to look at a river. But, anyway you look at it you must be able to relate to others where you’re looking! 4 Orienta ons
Upstream – anything upstream Against the flow of the current Where the water is coming from
Downstream – anything downstream Where the water flows (usually)
Whitewater enthusiasts usually speak of rivers as they are looking downstream…even if you’re looking upstream…
River RIGHT – the right side of the river as you look downstream River LEFT – the le side of the river as you look downstream
So…if you are looking upstream and you refer to river right – you are referring to the right side of the river from a downstream orienta on. Even if you’re nowhere near a river, river right is the right side of the river from upstream to downstream! Get it?
16 SWR
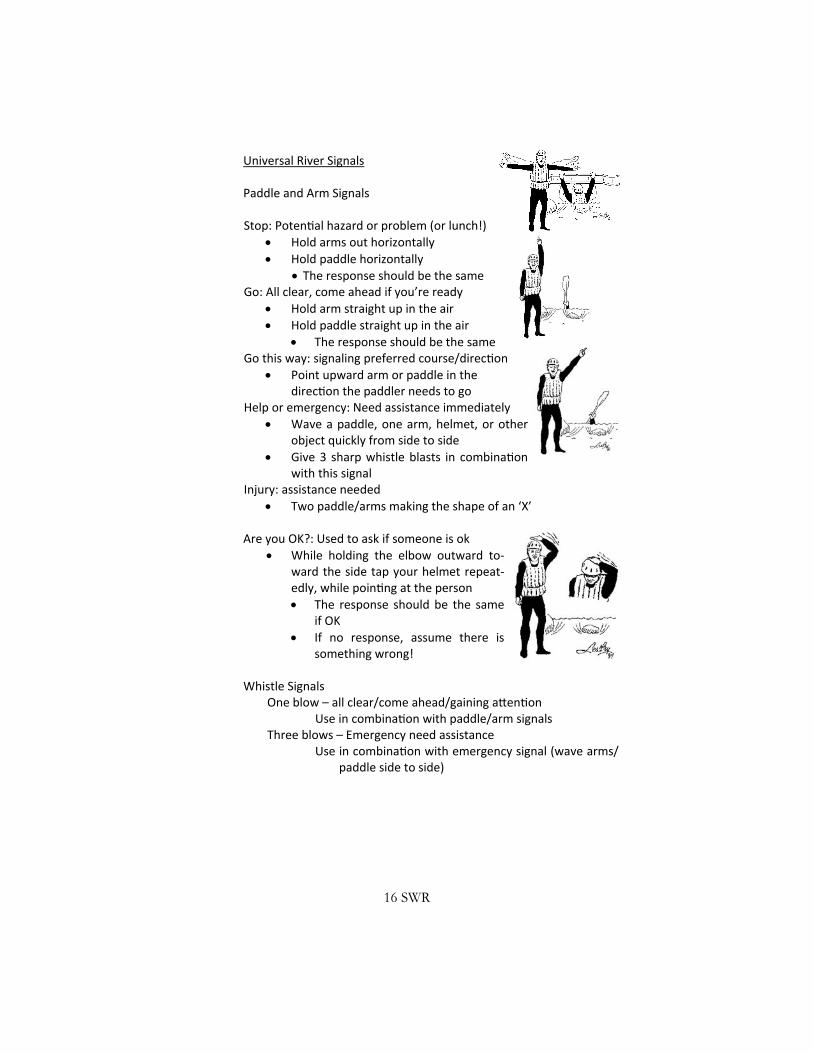
Universal River Signals Paddle and Arm Signals
Stop: Poten al hazard or problem (or lunch!)
Hold arms out horizontally
Hold paddle horizontally
The response should be the same Go: All clear, come ahead if you’re ready
Hold arm straight up in the air
Hold paddle straight up in the air
The response should be the same Go this way: signaling preferred course/direc on
Point upward arm or paddle in the direc on the paddler needs to go
Help or emergency: Need assistance immediately
Wave a paddle, one arm, helmet, or other object quickly from side to side
Give 3 sharp whistle blasts in combina on with this signal
Injury: assistance needed
Two paddle/arms making the shape of an ‘X’
Are you OK?: Used to ask if someone is ok
While holding the elbow outward to-ward the side tap your helmet repeat-edly, while poin ng at the person
The response should be the same if OK
If no response, assume there is something wrong!
Whistle Signals
One blow – all clear/come ahead/gaining a en on Use in combina on with paddle/arm signals
Three blows – Emergency need assistance Use in combina on with emergency signal (wave arms/
paddle side to side)
17 SWR
Group Assessment Always bring the right equipment. Remember your 5 essen als:
Helmet
PFD
Skirt
Paddle
Boat
Within our program do not forget closed toed shoes; for the rescuer (Leader) this is something that’s both good to swim in and hike someone out in the case of an evacua on. Don’t forget water, food, rescue equipment, communica on, first aid, etc. (YOUR LEADER KIT) You want to make sure that you have a good assessment of both your own skills and those within your group. When you’re leading a group down a river and unfamiliar with the other paddlers within the group, it’s very important that you’re able to make a quick assess-ment of their skills. There are many ways to do that once you’re on the water. Things to assess:
A tude in Pre-Trip mee ngs
Ability in Roll Session
See how well someone rolls, how frequently they have to roll, how o en they aren’t trying their roll
If they’re switching hands with the canoe paddle, extra wobbly in the canoe
Measure how many ques ons they’re asking about the run – do they seem confident or hesitant and unfamiliar
Things to monitor:
Are they ge ng too cold
Ge ng red
Or ge ng hungry or cranky
Are they ‘guarding’/rubbing a body part or stretching o en If there are any weaker paddlers in the group, be sure to con nue to assess and monitor them. Also, keep them ‘contained’. Put experi-ence in front – both downstream and in eddies along the way, also, in back sweeping the group. Now with this experience surrounding the group they can corral and surround the less experienced pad-dlers.
18 SWR
Containing the group:
Upstream
Downstream
And in eddies along the way, preferably on both sides Always know what you are ge ng yourself into. Check water levels and the weather. Remember: BACK Bring: Make sure your group is properly equipped before ge ng on the
river. Assess: Review the skill level of your group on and off the river. Contain: Monitor and protect your group while traveling down the river. Know: Have the proper info to safely navigate the river prior to pu ng
on. Ropes Packing
Become familiar with the specific type of throw bag you’re using.
*Always repack a throw bag before each trip, especially if you weren’t the one who packed it!
Feed line in inch by inch, stacking rope in on top of itself. Do not coil and shove into bag.
This allows for rapid, flawless deployment. Se ng Ropes The act of posi oning throw ropes on shore is usually called ‘se ng rope’. The knowledge of where to set them is as important as how to use them.
Where do you think a rope will be needed? Where is an accident most likely to happen?
What will happen a er the accident?
Are there any hazards below this point?
Is there a good place for the swimmer to be recovered? Where will they land?
What will happen once the swimmer grabs hold? Can you anchor yourself? Get a solid base.
19 SWR
Deployment *Never wrap wrists or e rope to yourself or other objects
Loosen retainer cord, pull out end of rope
Hold the bag in the hand that you plan to throw with. Remove the end of the rope from the other hand and hold it firmly.
Establish contact
Preferably eye contact and always yell “ROPE” or give 1 whistle blast to get the swimmers a en on.
Aim and throw
Throw over the vic m if possible – this presents the swim-mer with the rope and not the rope bag. It also puts more rope out for the swimmer to find and grab.
“Lead” the swimmer by aiming slightly downstream of them. Wait un l the swimmer is closest to you, but s ll slightly upstream, before you throw.
There is some argument as to whether it is be er to miss upstream or downstream of the vic m. If the rope lands upstream of the vic m, they can’t see it. Howev-er, it will probably float faster on the surface than a person in the water, especially if they are backstroking against the current. Hence it will be easier for them to catch.
On the other hand, if the rope is thrown downstream of the vic m, they can see it but, in order to catch it, they may have to swim forward to get it, and thus come out of the whitewater swimmers posi on.
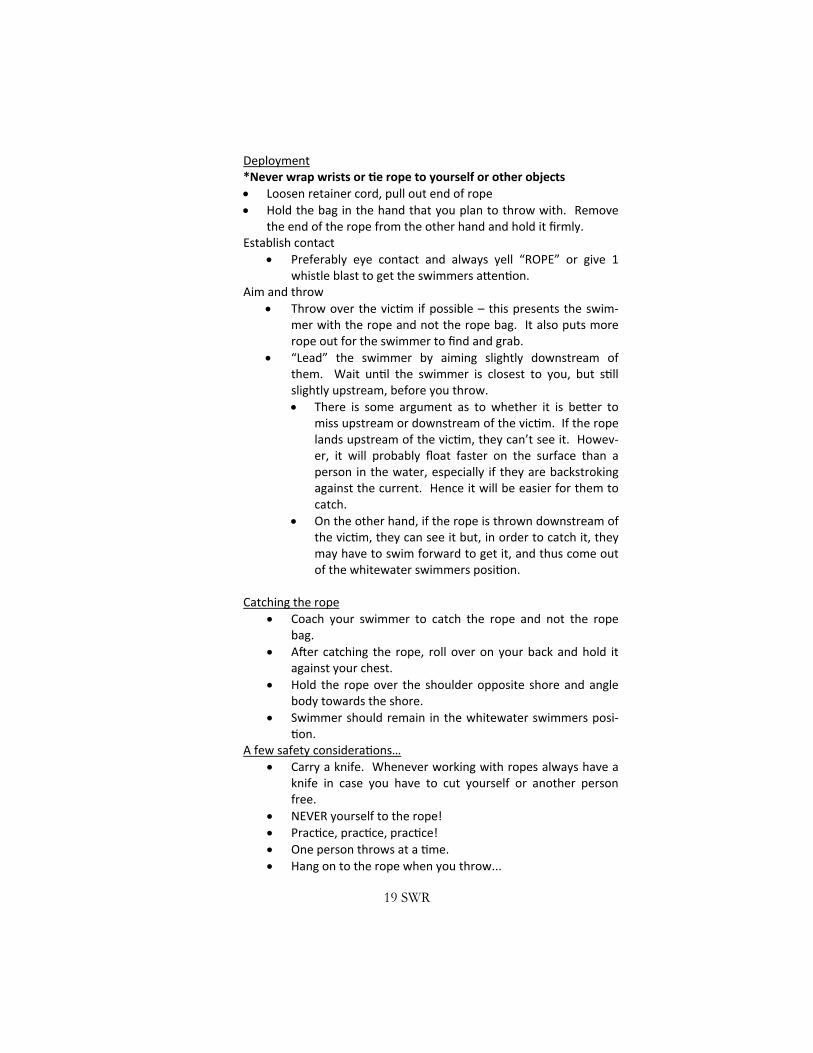
Catching the rope
Coach your swimmer to catch the rope and not the rope bag.
A er catching the rope, roll over on your back and hold it against your chest.
Hold the rope over the shoulder opposite shore and angle body towards the shore.
Swimmer should remain in the whitewater swimmers posi-on.
A few safety considera ons…
Carry a knife. Whenever working with ropes always have a knife in case you have to cut yourself or another person free.
NEVER yourself to the rope!
Prac ce, prac ce, prac ce!
One person throws at a me.
Hang on to the rope when you throw...
20 SWR
If rope thrower is in danger – let go of rope. BUT never leave a rope
in the river. Try everything you can to retrieve it!
Wading Wading is not the first op on for river rescue.
It can usually end in a swim, which puts the rescuer in danger. *Consider what’s downstream before wading.
It also contradicts never standing in swi water…
And it is limited by the river depth and strength of current.
If you slip while wading immediately assume the whitewater swimmers posi on.
One Person Wading
You will need something to lean on – paddle or s ck (s ck is nice, in case you swim you won’t have to worry)
Face upstream and lean forward dras cally on your staff
Move one of your three points of contact at a me (feet, s ck)
Make sure your foot plants with each step
Move staff quickly and replant, as to not lose its angle
If using a paddle to wade, using the bladed end has pros and cons
It can create a small eddy, the force of the current can pin it in place
Feather the blade to move it sideways or plant it drama cally upstream to avoid it being washed into you.
Line astern
Same principles of single person wading
Each subsequent wader pulls down and braces forward on persons PFD straps
Communicate – “stepping…plant…stepping…plant”
21 SWR
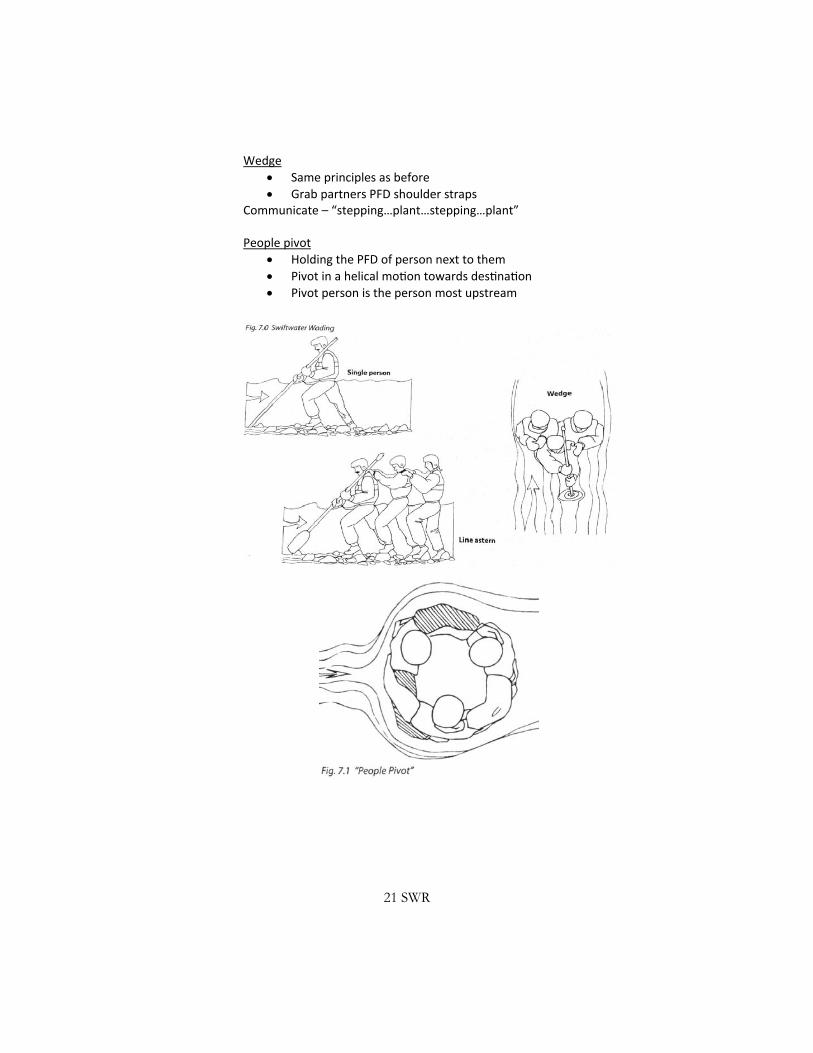
Wedge
Same principles as before
Grab partners PFD shoulder straps Communicate – “stepping…plant…stepping…plant” People pivot
Holding the PFD of person next to them
Pivot in a helical mo on towards des na on
Pivot person is the person most upstream
22 SWR
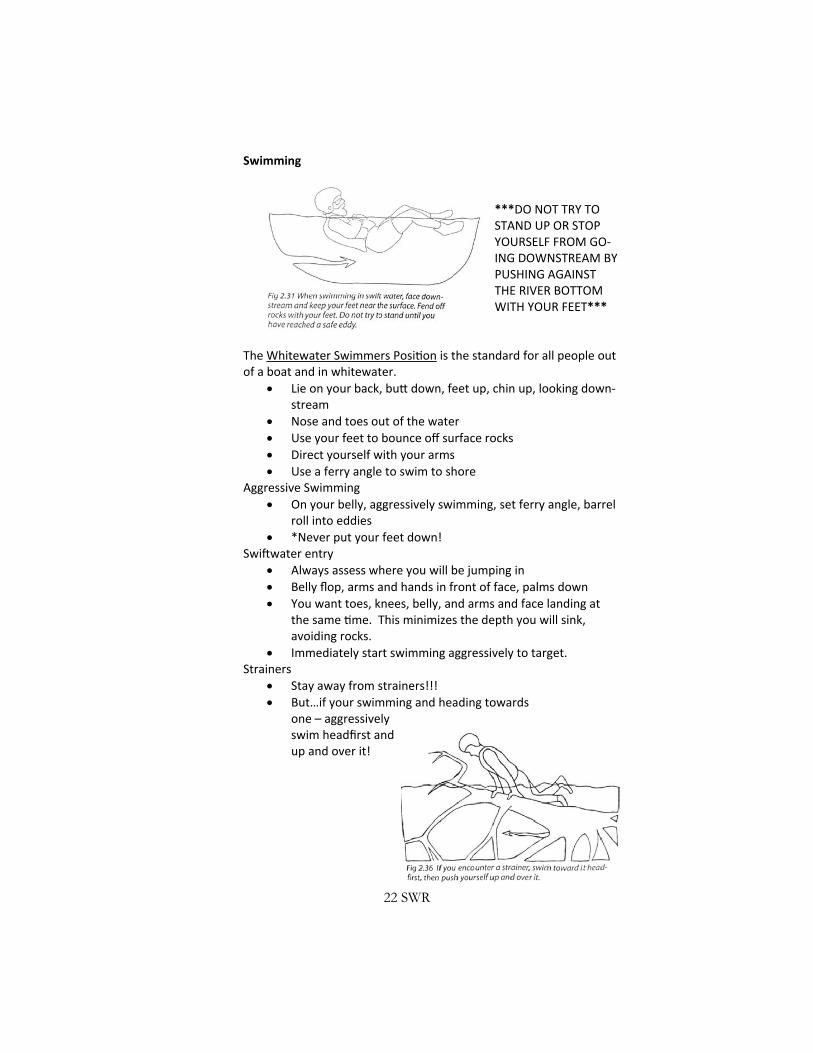
Swimming ***DO NOT TRY TO STAND UP OR STOP YOURSELF FROM GO-ING DOWNSTREAM BY PUSHING AGAINST THE RIVER BOTTOM WITH YOUR FEET***
The Whitewater Swimmers Posi on is the standard for all people out of a boat and in whitewater.
Lie on your back, bu down, feet up, chin up, looking down-stream
Nose and toes out of the water
Use your feet to bounce off surface rocks
Direct yourself with your arms
Use a ferry angle to swim to shore Aggressive Swimming
On your belly, aggressively swimming, set ferry angle, barrel roll into eddies
*Never put your feet down! Swi water entry
Always assess where you will be jumping in
Belly flop, arms and hands in front of face, palms down
You want toes, knees, belly, and arms and face landing at the same me. This minimizes the depth you will sink, avoiding rocks.
Immediately start swimming aggressively to target. Strainers
Stay away from strainers!!!
But…if your swimming and heading towards one – aggressively swim headfirst and up and over it!
23 SWR
In‐water Rescues Vic m Psychology
A vic m can be in various stages of panic. This can affect the rescue and the rescuer. Some of the principle causes of panic are:
Sensory overload. There is too much sensory input about the dangers and too li le me to process it.
Lack of knowledge about the situa on the vic m sud-denly finds themselves in, and of appropriate responses and defenses.
The percep on that death or serious injury is imminent and that escape has been cut off or that rescue is not possible.
Any vic m will do whatever they feel is necessary to survive, including grabbing or climbing on top of a prospec ve rescu-er.
Panic can be controlled by a number of factors – educa on program, pre-trip mee ng, pre-river safety beach speech, or even giving instruc ons to a vic m in the water. If so, the instruc ons must be clear and simple. Let them know that they’re OK and rescue is on the way.
Contact Rescues
A contact rescue is any rescue where the rescuer makes direct contact with the swimmer.
How to perform a contact rescue
The rescuers goal is to get the vic m into the proper posi-on for rescue swimming: facing away from the rescuer and
on their downstream side
Make contact – grabbing the swimmer’s shoulder straps
Turn the vic m around, facing downstream and away from the rescuer
Place one arm across the vic m’s chest (you can also grab through their arm and across chest)(cross-chest carry)
Head for shore with free arm side stroke while kicking
This is called “Reverse and ready”
Let the vic m know how they can help and explain what’s going on, if possible.

24 SWR
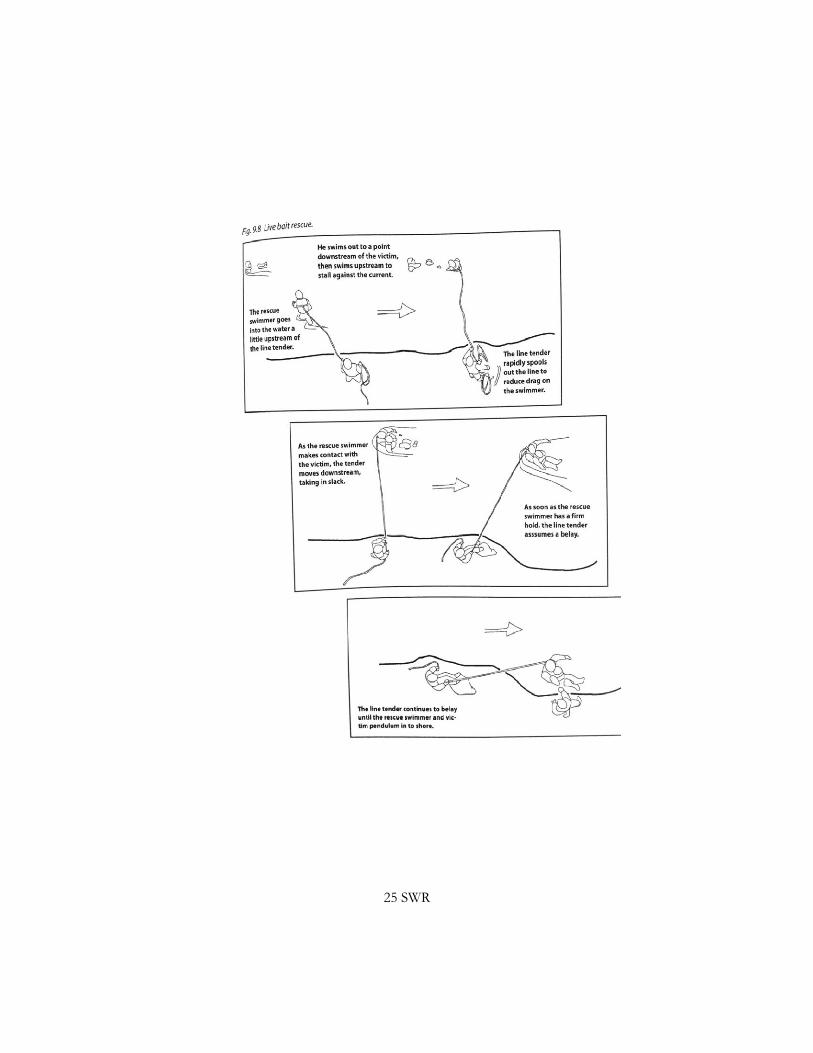
Live Bait
Contact rescues have obvious drawbacks. The ‘live bait’ method allows for a rescuer to make contact and then be reeled into shore with the use of a rescue vest.
Disadvantages include: the rope snagging obstacles, rope drag, limit to length.
Live bait should be considered to the equivalent of throw-bags, except with a life a ached to the end…
Any ‘live bait’ swimmer must be equipped with a rescue harness.
The rescuer clips their harness to the shore line, either di-rectly or by means of a cow’s tail.
If the swimmer clips directly to the harness, he should use a locking carabineer to avoid inadvertently clipping them-selves to one of the harness loops (which won’t allow the releasable harness to deploy).
See Live Bait diagram on next page
25 SWR
26 SWR
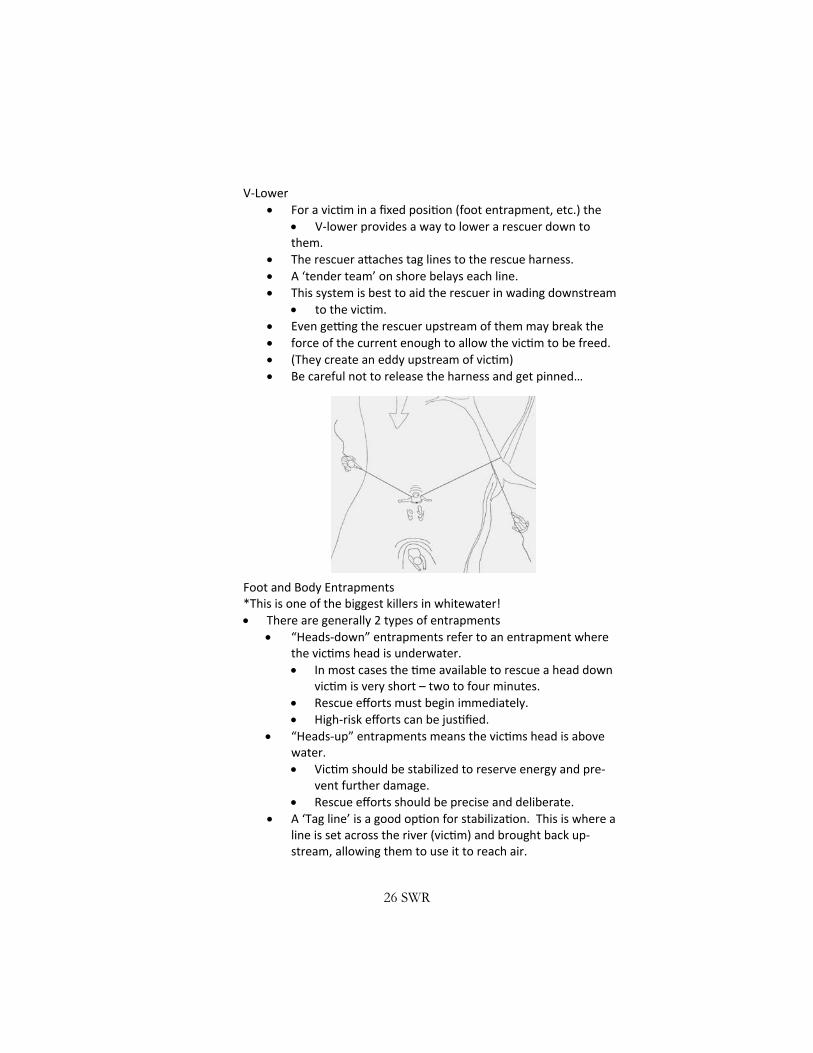
V-Lower
For a vic m in a fixed posi on (foot entrapment, etc.) the
V-lower provides a way to lower a rescuer down to them.
The rescuer a aches tag lines to the rescue harness.
A ‘tender team’ on shore belays each line.
This system is best to aid the rescuer in wading downstream
to the vic m.
Even ge ng the rescuer upstream of them may break the
force of the current enough to allow the vic m to be freed.
(They create an eddy upstream of vic m)
Be careful not to release the harness and get pinned… Foot and Body Entrapments *This is one of the biggest killers in whitewater!
There are generally 2 types of entrapments
“Heads-down” entrapments refer to an entrapment where the vic ms head is underwater.
In most cases the me available to rescue a head down vic m is very short – two to four minutes.
Rescue efforts must begin immediately.
High-risk efforts can be jus fied.
“Heads-up” entrapments means the vic ms head is above water.
Vic m should be stabilized to reserve energy and pre-vent further damage.
Rescue efforts should be precise and deliberate.
A ‘Tag line’ is a good op on for stabiliza on. This is where a line is set across the river (vic m) and brought back up-stream, allowing them to use it to reach air.
27 SWR
In some cases the stabiliza on line will also act as an extrac-on line.
A second line can be added, in addi on to the stabiliza-on line, to snag the vic ms foot and pulled back up-
stream. Other extrac on op ons
Wading to the swimmer can be an op on if the water is shallow enough.
The wader(s) can create an eddy upstream of the vic m which releases the currents pressure
You can also deploy a V-lower or a fixed line
Tethered canoes can be lowered to aid vic ms Scene Management To perform a successful rescue, not only do you need trained rescu-ers and equipment, but a way to control their use – an Incident Com-mand System. Incident Command System:
Set priori es
Allocates resources
Organizes and provides leadership for the rescuers The Incident Commanders (IC) responsibility is to
Ensure the safety of the rescuers
Choose the correct rescue systems
Organize the rescue site
Supervise the rescue and subsequent evacua on The IC is in charge of the big picture. They need not be the most skilled rescuer – it might be be er to use them in the rescue! They need to delegate du es and authority but will hold the ul mate re-sponsibility. The IC can be in charge of a number of people. These include:
Site spo ers – there are two spo ers: upstream and down-stream.
The upstream safety has two jobs. They keep others from entering the scene (other boats, river traffic). If there are unstoppable things coming (logs, stray boats, etc.) they warn the rescuers that something is coming.
The downstream safety makes sure vic ms and gear wash down past them. They are the last line of defense. They should always be equipped with throw ropes or other res-cue gear that may be needed.

28 SWR
Safety Officer – this person can be an invaluable asset as lots of
things are happening on the scene of a rescue. Their only duty is to roam the rescue site looking for unsafe prac ces (no PFD, rope abrasion, knots improperly ed, rescuers be-coming red or hypo, etc.). They should either correct these problems or no fy the IC.
Extrica on – these people are assigned to the actual rescue. They should be the most experienced and knowledgeable and also be in good physical fitness.
Medical – this person treats the vic m a er or during the res-cue.
Evacua on – in charge of both evacua on from the water and the river corridor.
Communica on – this person helps coordinates rescue efforts between the actual rescuer and backup rescue units (Forest Service, Park Service, Police, etc.)
Support – these people help handle further logis cs. Keeping people warm, ge ng extra gear, etc.
These are suggested roles. A simpler way to think about it is…
Leader – IC
Rigger – handles logis cs of the rescue
Gofer – ‘jack of all trades’
Rescuer – handles the actual rescue For our program just think
IC
Upstream & downstream spo ers
Rescuers
Medical response
Communica on

29 SWR
Resources American Canoe Associa on – www.americancanoe.org R3 – Rescue for River Runners www.about.com Swi water Rescue By: Slim Ray The Nantahala Outdoor Center