Embed Size (px)
Citation preview

Use
rM
an
ua
l
SysKonnect SK-98xx V2.0Gigabit Ethernet Adapter


SysKonnect SK-98xx V2.0 Gigabit Ethernet Adapter
SysKonnect SK-98xx V2.0 Gigabit Ethernet Adapter
User Manual
(v2.10 17 February, 2003)
Visit our web site: http://www.syskonnect.com

4
Copyright � SysKonnect GmbH, 2003. All rights reserved.
This manual refers to SysKonnect SK-9821 V2.0 Gigabit Ethernet 10/100/1000Base-T Adapter andSK-9843 V2.0 Gigabit Ethernet 1000Base-SX Adapter. Contents are subject to change. Productand brand names are (registered) trademarks of their appropriate owners.
Send your comments on this documentation to:
SysKonnect GmbHA Marvell®CompanyInformation DevelopmentSiemensstraße 2376275 Ettlingen / Germany
Fax: +49 7243 502 989E-Mail: [email protected]
German and French versions of this manual are available on the SysKonnect installation CD-ROMand on our web site.
SysKonnect SK-98xx V2.0 Gigabit Ethernet Adapter
ConventionsThe following conventions apply in this manual.
Warnings and Notes
Font Styles applied
Used to indicate a potentially hazardous situation which, if not avoided, could result in deathor serious injury. Example: dangerous tension.
Used to indicate a potentially hazardous situation which, if not avoided, may result in minor ormoderate injury. Example: electrostatic discharge.
i Used for additional information and advice.
Courier: Used to identify terminal input to be entered by the user and output to beissued by the system. Examples: Enter sk98diag.
If the test was succesful, the message passed is issued.
Italics: Used when new technical terms are introduced. Example: The station is operated in Repeat Mode.
SMALL CAPS: Used to identify menu options to be selected by the user and buttons to beclicked by the user.
Examples: In the main menu, select EXIT.
Click NEXT.
Underline: Used to identify hyperlinks, which, if clicked by the user, jump to the desig-nated link.
Example: Visit our web site: www.syskonnect.com

6 Conventions
SysKonnect SK-98xx V2.0 Gigabit Ethernet Adapter
Table of ContentsConventions 5
Warnings and Notes 5Font Styles applied 5
1 Getting started 11Handling 11Safety Instructions 11
2 Installation of the Network Adapter 13
3 Connection of the Network Adapter 15Transmission Distances 15Connection to the Network 15
4 Installation of the Driver Software 17Windows 18
Windows NT 4.0 18Windows 98 Second Edition 19Windows Millennium Edition 19Windows 2000 20Windows XP 22SysKonnect Network Driver Installation Package for Windows 2000 and Windows XP 23
Linux 24Sun Solaris 26HP-UX 28IBM AIX 30
Automatic installation on AIX 4.3.3, AIX 5.1, and AIX 5.2 30Manual installation on AIX 4.3.3 31Manual installation on AIX 5.1 and AIX 5.2 31
Novell NetWare 32Installation on Novell NetWare 4.20 32Installation on Novell NetWare 5 and 6 33
5 Features 35Types of Adapters 35Operating System Support 36High Performance 36
Jumbo Frames 36TCP, UDP and IP checksum calculation 36Dynamic Interrupt Moderation 36
Promiscuous Mode / Multicast Support 36Advanced Power Management / Wake on LAN 37Reliability 37
Link Aggregation 37Redundant Switch Failover 38PCI Hot Plug 38Parity 39Sensors 39
User Diagnostics (DOS) 39SysKonnect Network Control for Windows 2000 and Windows XP 39Virtual LAN (VLAN) support 42Virtual Cable Tester™ (VCT) 42

8 Table of Contents
6 Testing the Network Adapter 45Diagnostics Program 45
Loopback Test for Fiber Adapters 45Repeater Test for Copper Adapters 47Failure of a Test 48
Additional Functions of the Diagnostics Program 49Checking Other Displays and Data 49Main Program 49Reading Sensor Data 50Reading Configuration Data 50Reading VPD Data 51Sample Usage of VPD Data/Asset Tag 52
7 Troubleshooting 55Searching for errors 55LED Displays 56
8 Important Information 57Technical Support 57Returning an Adapter for Repair 58Additional Documentation and Updates 58Technical Specifications 59
Appendix A. License and Warranty Information 61The Americas, Asia, Australia, New Zealand, Pacific 61Europe 62Deutschland, Schweiz, Österreich, Liechtenstein 63
Appendix B. Compliance Statements 65FCC Declaration of Conformity Compliance Information Statement - Class B 65VCCI Statement (Japan) 65

SysKonnect SK-98xx V2.0 Gigabit Ethernet Adapter
Table of FiguresFigure 1: Insertion of the adapter into the computer 14Figure 2: Connection of fiber-optic cables/plugs 16Figure 3: Adapter Overview in “SysKonnect Network Control” 41Figure 4: Display after a VCT test 43Figure 5: Setup for loopback testing 45Figure 6: Typical screen display after a successful test 46Figure 7: Typical error message from the diagnostics program 48Figure 8: Diagnostics program, main menu 49Figure 9: Display of configuration data 51Figure 10: VPD Data menu 51Figure 11: Display of VPD data 52Figure 12: Screen showing updated asset tag 53Figure 13: Location of the LEDs 56

10 Table of Figures

SysKonnect SK-98xx V2.0 Gigabit Ethernet Adapter
1 Getting startedTo install the network adapter, observe the following instructions.
Handling
To avoid damaging the network adapter:• Switch off the computer and disconnect the power cord from the power outlet.• Do not open the antistatic bag until you are ready to install the network adapter.• We recommend to wear an antistatic wrist strap when installing the network adapter.• Remove the computer cover and connect the wrist straps (electrically conductive) to the com-
puter chassis.• Do not connect the wrist strap to the ground terminal of the power supply. Faulty wiring could
make this terminal live and potentially lethal.• Hold the antistatic packaging of the network adapter against the bracket of an expansion slot on
your computer for at least two seconds.This reduces the static charge in the packaging and in your body.
• Do not touch any circuits on the network adapter or any of its port contacts.• Do not place the network adapter on the computer cover or any other metal surface.• Do not allow anyone else to touch the network adapter.• Avoid unnecessary movement since this can increase electrostatic charge.• Never use force when working with the network adapter or the PCI bus.• If you need to place the network adapter somewhere after removing it from the antistatic bag,
make sure that you place it on the antistatic bag and on a level surface.
Safety Instructions
To avoid potential shock hazards:• Do not carry out any installation, maintenance or (re)configuration work during a thunderstorm.• Do not connect or disconnect any power cables during a thunderstorm.• For installation in a Hot Plug system, observe the safety instructions specific to this system.
Read the relevant documentation. Electrical installations must comply with the safety regulations of the country in which they areoperated.
Electrostatic discharge!Electrostatic discharge may damage or destroy the network adapter.
Electrical current!Electrical current from power, phone, and communications cables can be hazardous.

12 1 Getting started
For 1000Base-SX adapters observe the following:
The laser components on the network adapter are Class 1 laser components. Class 1 lasers areconsidered incapable of producing damaging radiation levels during normal operation or mainte-nance and is, therefore, determined to be eye safe.
To avoid damaging your eyes and to continue safe operation in case of abnormal circumstances:• Never look directly into the outlets of fiber-optic cables or fiber-optic transmission components
with unprotected eyes!• Never allow fiber-optic transmission paths to operate until all the connections have been made.• Always fit protective plugs to any unused ports on the switch or the network adapter.
Laser light!Laser light from fiber-optic transmission cables and components can damage your eyes.
Radiation!The use of controls or adjustments or performance of procedures other than those specified hereinmay result in hazardous radiation exposure.

SysKonnect SK-98xx V2.0 Gigabit Ethernet Adapter
2 Installation of the Network AdapterThe installation procedure in Hot Plug systems may differ from the following. For Hot Plug systemsread the corresponding documentation. Have the computer manual ready and if necessary, a keyand/or screwdriver to open the cover and remove the bracket.
To install the adapter in the computer, proceed as follows:1. Switch off the computer in which the network adapter is to be installed.2. Disconnect the power cord from the power outlet.
Observe the safety instructions (see page 11).3. Open the computer cover as described in your computer manual.
You may need a screwdriver or similar tool to remove the screws from the cover. If you are installing a network adapter in a tower computer, we recommend to put the computeron its side in order to be able to apply the correct force to insert the adapter into the PCI busslot.
4. Locate a free PCI bus slot on the motherboard (or on the designated component respectively). 5. Consult the section in your computer manual that describes how to install expansion cards.
6. Remove the bracket (if applicable) from the expansion slot. Follow the instructions in your computer manual.
7. Remove the network adapter from the antistatic bag.Follow the handling instructions on page 11.
8. Insert the network adapter into the PCI bus slot as described in your computer manual (also seefigure 1 "Insertion of the adapter into the computer"). Make sure that the contacts of the network adapter are correctly aligned with the PCI bus sloton the motherboard (or on the designated component respectively).
9. Push the network adapter down vertically into the slot until it is firmly seated.10. If available, tighten the locking screw on the fixing bracket until the adapter is firmly connected
to the computer cover (or to the attachment provided for expansion cards).11. Replace the computer cover.12. Replace and tighten all screws.13. Reconnect the power supply.
Observe the safety instructions (see page 11).
iSysKonnect PCI adapters can be installed in (short) 32-bit or (long) 64-bit PCI/PCI-X bus slots at 33MHz or 66 MHz. Best performance, however, is reached with a 64-bit/66 MHz bus.

14 2 Installation of the Network Adapter
Figure 1. Insertion of the adapter into the computer
SysKonnect SK-98xx V2.0 Gigabit Ethernet Adapter
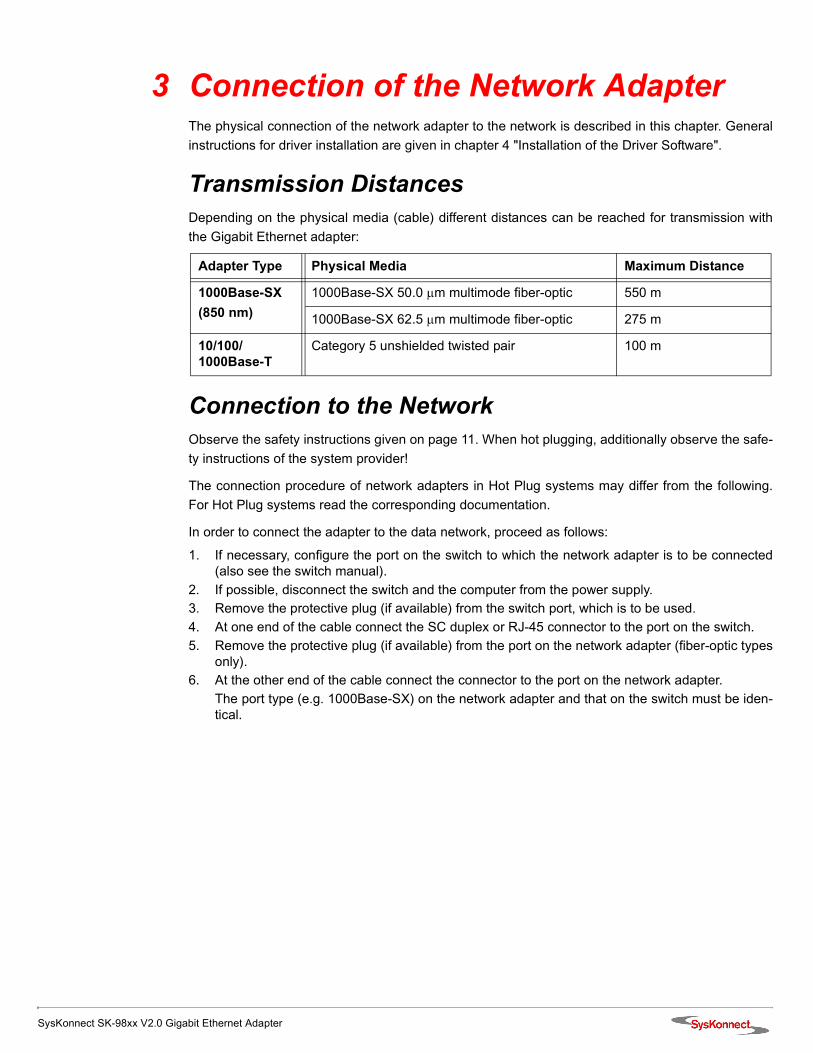
3 Connection of the Network AdapterThe physical connection of the network adapter to the network is described in this chapter. Generalinstructions for driver installation are given in chapter 4 "Installation of the Driver Software".
Transmission DistancesDepending on the physical media (cable) different distances can be reached for transmission withthe Gigabit Ethernet adapter:
Connection to the NetworkObserve the safety instructions given on page 11. When hot plugging, additionally observe the safe-ty instructions of the system provider!
The connection procedure of network adapters in Hot Plug systems may differ from the following.For Hot Plug systems read the corresponding documentation.
In order to connect the adapter to the data network, proceed as follows:
1. If necessary, configure the port on the switch to which the network adapter is to be connected(also see the switch manual).
2. If possible, disconnect the switch and the computer from the power supply. 3. Remove the protective plug (if available) from the switch port, which is to be used.4. At one end of the cable connect the SC duplex or RJ-45 connector to the port on the switch.5. Remove the protective plug (if available) from the port on the network adapter (fiber-optic types
only).6. At the other end of the cable connect the connector to the port on the network adapter.
The port type (e.g. 1000Base-SX) on the network adapter and that on the switch must be iden-tical.
Adapter Type Physical Media Maximum Distance
1000Base-SX(850 nm)
1000Base-SX 50.0 �m multimode fiber-optic 550 m
1000Base-SX 62.5 �m multimode fiber-optic 275 m
10/100/1000Base-T
Category 5 unshielded twisted pair 100 m

16 3 Connection of the Network Adapter
Figure 2. Connection of fiber-optic cables/plugs
7. Switch on the computer and the switch.If no protocol driver has been loaded, go to chapter 4 "Installation of the Driver Software". Afterdriver installation, return to step 8 of this list.If a protocol driver has been loaded, continue with step 8.
8. Check the correct polarity with the green link LED on the network adapter.If the LED is illuminated, the connection is established and active.
9. For fiber-optic SC Duplex connection: If the green link LED does not light, power off the com-puter and the switch.
10. Remove the SC duplex connector either from the computer (network adapter) or from theswitch.
11. Reverse the positions of TX and RX and re-connect.12. Repeat steps 7 and 8 from this list.13. Mark the correct polarity on the connector or the cable.
If there is still no indication that a connection has been established, you will need to check thenetwork adapter more closely (for details, refer to section "Diagnostics Program" on page 45).If a connection to the network is established, the installation of the network adapter is complete.Keep this manual with your computer manual for future reference.
iThe network adapter will not be fully operational until suitable drivers have been loaded. See chap-ter 4 "Installation of the Driver Software" for details.

SysKonnect SK-98xx V2.0 Gigabit Ethernet Adapter
4 Installation of the Driver SoftwareThe network drivers are located in the appropriate product directory on the enclosed installation CD-ROM. This directory is organized into a number of subdirectories for the various operating systems.The subdirectories contain the driver files and the corresponding readme files. The readme files areavailable as ASCII text and in HTML format. Any last-minute changes are documented in the “Re-lease Notes” (if applicable) and on the driver site of the SysKonnect web site.
To install a driver, follow the instructions given below and in the corresponding readme files.
There are two possibilities to view the readme files:• with an internet browser• with a text editor
Use an internet browser
If you have an internet browser (or any other HTML viewer) installed on your computer, we recom-mend to use it for viewing the readme files.
To view the readme files with an internet browser, proceed as follows:
1. Insert the installation CD-ROM into your CD-ROM drive. 2. If the browser is not automatically launched, click START.HTM on the installation CD-ROM.
The start page of the installation CD-ROM is displayed.3. Click DRIVERS.
A list showing all available network technologies is displayed.4. Select your preferred network technology, e.g. GIGABIT ETHERNET.5. Select the appropriate product family, e.g. SK-98XX GIGABIT ETHERNET ADAPTERS.
A list showing all available network adapters of this product family is displayed.6. Select your network adapter, e.g. SK-9821.
A list showing all available drivers for this adapter is displayed.7. Click the operating system for which you want to install the driver, e.g. WINDOWS XP.
The readme file is opened. Here, you will find detailed instructions on how to install the driver.
Use a text editor To view a text file, proceed as follows:
1. Insert the installation CD-ROM into your CD-ROM drive.2. Go to the appropriate product directory, e.g. SK-982X.
A list of all available operating systems this network adapter supports is displayed.3. Select the operating system for which you want to install the driver, e.g. SOLARIS > SPARC.4. Open the corresponding text file, e.g. SKGE.TXT.
iThe installation procedures described below are only valid for SysKonnect SK-98xx V2.0 GigabitEthernet Adapters. For details on the installation of other SysKonnect adapters, refer to the corre-sponding readme files.
18 4 Installation of the Driver Software
WindowsSysKonnect offers drivers for Windows 2000, Windows XP, Windows Me, Windows 98 SE, andWindows NT 4.0. Additionally, a value added package is available for Windows 2000 andWindows XP enabling Virtual LAN (VLAN) and link aggregation support. This package also includesa utility program for easy installation and configuration. For details, refer to section "SysKonnectNetwork Driver Installation Package for Win-dows 2000 and Windows XP" and section "SysKonnectNetwork Control for Windows 2000 and Windows XP".
Drivers downloaded from our web site are available in a packed format (.zip files). The downloadedfile has to be unpacked before installation.
Windows NT 4.0The NDIS 4.0 32-bit Miniport driver for the SysKonnect SK-98xx family supports Windows NT 4.0.This driver does not support Windows NT 3.51 or below. It is recommended to install the latestWindows NT 4.0 Service Pack after successful installation of the driver.
To install the driver, proceed as follows:
1. After you have installed the adapter in your computer, boot Windows NT 4.0 (for details, seechapter 2 "Installation of the Network Adapter").
2. Select START > SETTINGS > CONTROL PANEL.The window “Control Panel“ is displayed.
3. Select NETWORK.The window “Network“ is displayed.
4. Select the tab ADAPTERS.5. Click ADD....6. Click HAVE DISK....7. Depending on the type of installation medium used (CD-ROM, floppy disk, network drive), type
the path to the driver, e.g. e:\SK-982x\Windows\Nt4, where ”e” is the designation of theCD-ROM drive on your system.
8. Click OK.The window “Select Network Adapter“ is displayed.
9. Select the adapter for which the driver is to be installed.10. Click OK.
The window “Card Setup“ is displayed.11. Configure the adapter (for details, refer to the corresponding readme file).12. When you have finished the configuration, click OK.13. After successful installation of the driver, install the latest Windows NT 4.0 Service Pack.14. Restart your system.
For more information, refer to the corresponding readme file.
SysKonnect SK-98xx V2.0 Gigabit Ethernet Adapter
Windows 19
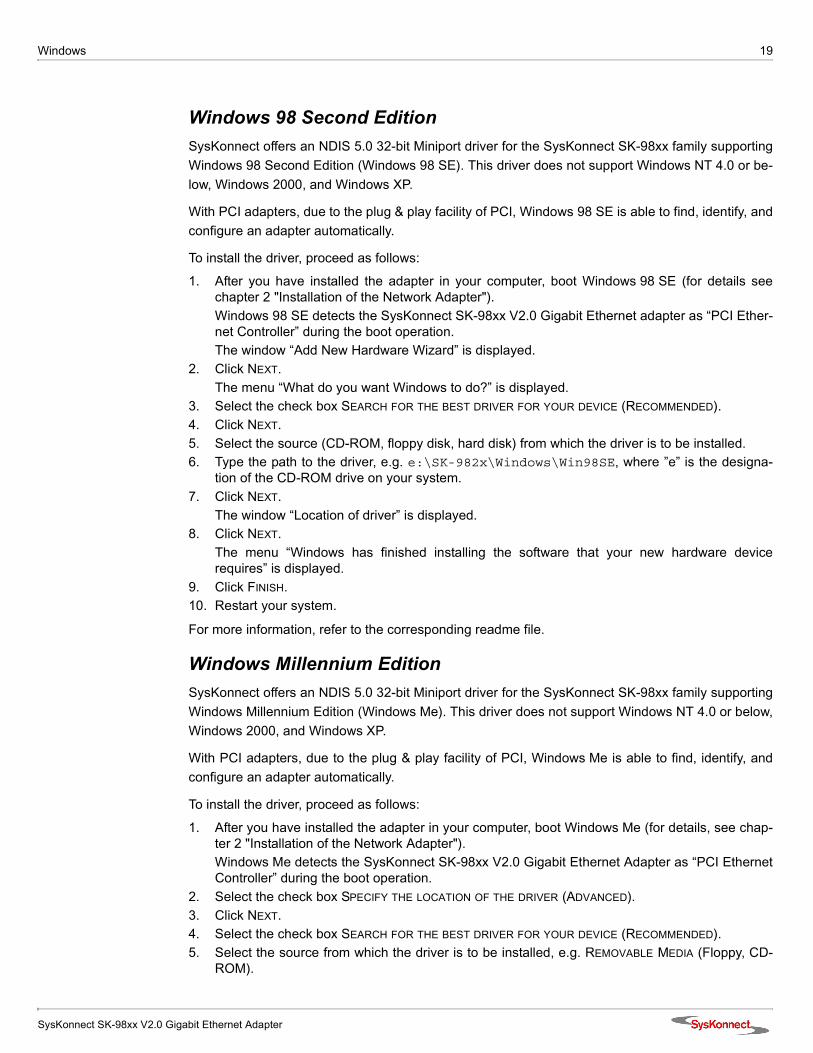
Windows 98 Second EditionSysKonnect offers an NDIS 5.0 32-bit Miniport driver for the SysKonnect SK-98xx family supportingWindows 98 Second Edition (Windows 98 SE). This driver does not support Windows NT 4.0 or be-low, Windows 2000, and Windows XP.
With PCI adapters, due to the plug & play facility of PCI, Windows 98 SE is able to find, identify, andconfigure an adapter automatically.
To install the driver, proceed as follows:
1. After you have installed the adapter in your computer, boot Windows 98 SE (for details seechapter 2 "Installation of the Network Adapter").Windows 98 SE detects the SysKonnect SK-98xx V2.0 Gigabit Ethernet adapter as “PCI Ether-net Controller” during the boot operation.The window “Add New Hardware Wizard” is displayed.
2. Click NEXT.The menu “What do you want Windows to do?” is displayed.
3. Select the check box SEARCH FOR THE BEST DRIVER FOR YOUR DEVICE (RECOMMENDED).4. Click NEXT.5. Select the source (CD-ROM, floppy disk, hard disk) from which the driver is to be installed.6. Type the path to the driver, e.g. e:\SK-982x\Windows\Win98SE, where ”e” is the designa-
tion of the CD-ROM drive on your system.7. Click NEXT.
The window “Location of driver” is displayed.8. Click NEXT.
The menu “Windows has finished installing the software that your new hardware devicerequires” is displayed.
9. Click FINISH.10. Restart your system.
For more information, refer to the corresponding readme file.
Windows Millennium EditionSysKonnect offers an NDIS 5.0 32-bit Miniport driver for the SysKonnect SK-98xx family supportingWindows Millennium Edition (Windows Me). This driver does not support Windows NT 4.0 or below,Windows 2000, and Windows XP.
With PCI adapters, due to the plug & play facility of PCI, Windows Me is able to find, identify, andconfigure an adapter automatically.
To install the driver, proceed as follows:
1. After you have installed the adapter in your computer, boot Windows Me (for details, see chap-ter 2 "Installation of the Network Adapter").Windows Me detects the SysKonnect SK-98xx V2.0 Gigabit Ethernet Adapter as “PCI EthernetController” during the boot operation.
2. Select the check box SPECIFY THE LOCATION OF THE DRIVER (ADVANCED).3. Click NEXT.4. Select the check box SEARCH FOR THE BEST DRIVER FOR YOUR DEVICE (RECOMMENDED).5. Select the source from which the driver is to be installed, e.g. REMOVABLE MEDIA (Floppy, CD-
ROM).

20 4 Installation of the Driver Software
6. Select the check box SPECIFY A LOCATION.7. Type the path to the driver, e.g. e:\SK-982x\Windows\WinME, where ”e” is the designation
of the CD-ROM drive on your system.8. Click NEXT.
The menu “Windows has found multiple software packages that should work for this device.What would you like to install?” is displayed.
9. If Windows Me has detected the adapter you have installed in your computer, select the checkbox THE UPDATED SOFTWARE (RECOMMENDED).
10. Click NEXT.The window “Location of driver” is displayed.
11. Click NEXT to continue the installation.The menu “Windows has finished installing the new hardware device” is displayed.
12. Click FINISH.13. Restart your computer.
For more information, refer to the corresponding readme file.
Windows 2000SysKonnect offers an NDIS 5.0 32-bit Miniport driver for the SysKonnect SK-98xx family supportingWindows 2000. SysKonnect also offers the “Network Driver Installation Package for Windows 2000and Windows XP”. For details on this package, refer to section "SysKonnect Network Driver Installa-tion Package for Win-dows 2000 and Windows XP".
Install the driver To install the driver, proceed as follows:
1. After you have installed the adapter in your computer, boot Windows 2000 (for details, seechapter 2 "Installation of the Network Adapter").Windows 2000 detects the SysKonnect SK-98xx V2.0 Gigabit Ethernet Adapter as “EthernetController” during the boot operation.The window „Found New Hardware Wizard“ is displayed.
2. Click NEXT.In the same window, the menu „Install Hardware Device Drivers“ is displayed.
3. Select the check box SEARCH FOR A SUITABLE DRIVER FOR MY DEVICE (RECOMMENDED).4. Click NEXT.
The menu “Locate Driver Files” is displayed.5. Select the source from which the driver is to be installed (Floppy disk drives, CD-ROM drives, or
Specify a location).6. Click NEXT.
The menu “Driver Files Search Results” is displayed, listing the found driver and its location.7. To install the driver, click NEXT.
In case the driver does not have a Microsoft Digital Signature yet, the window “Digital SignatureNot Found” is displayed.
8. To continue the installation, click YES.The window ”Completing the Found New Hardware Wizard” is displayed.
9. Click FINISH to complete the installation.
Update the driver To update the driver, proceed as follows:
1. On the desktop, right-click the MY COMPUTER icon.2. Select MANAGE.
The window “Computer Management“ is displayed.3. Select DEVICE MANAGER from the list on the left side of the window.

SysKonnect SK-98xx V2.0 Gigabit Ethernet Adapter
Windows 21
4. On the right side of this window, select NETWORK ADAPTERS.5. Right-click the adapter which is to be updated.6. Select PROPERTIES.7. Select the tab DRIVER.8. Click UPDATE DRIVER....
The window “Upgrade Device Driver Wizard“ is displayed.9. Click NEXT.
In the same window, the menu “Install Hardware Device Drivers” is displayed.10. Select the check box DISPLAY A LIST OF THE KNOWN DRIVERS FOR THIS DEVICE SO THAT I CAN
CHOOSE A SPECIFIC DRIVER.11. Click NEXT.
The menu “Hardware Type“ is displayed.12. Select NETWORK ADAPTER.13. Click NEXT.
The menu “Select Network Adapter“ is displayed.14. Select the adapter for which the driver is to be installed.15. Click HAVE DISK...
The window “Install from Disk“ is displayed.16. Type the path to the driver.17. Click OK.
The menu “Select Network Adapter“ is displayed again.18. Select the adapter for which the driver is to be installed.19. Click NEXT.
The menu “Start Device Driver Installation“ is displayed.20. To install the driver, click NEXT.
In case the driver does not have a Microsoft Digital Signature yet, the window “Digital SignatureNot Found” is displayed.
21. To continue the installation, click YES.The window “Upgrade Device Driver Wizard“ is displayed.The menu ”Completing the Upgrade Device Driver Wizard” is displayed.
22. Click FINISH to complete the installation.
For more information, refer to the corresponding readme files.
iIf the driver for one SysKonnect SK-98xx adapter is updated, all SysKonnect SK-98xx adaptersinstalled in your system should be updated.

22 4 Installation of the Driver Software
Windows XPSysKonnect offers an NDIS 5.1 32-bit Miniport driver for the SysKonnect SK-98xx family supportingWindows XP.
Install the driver To install the driver, proceed as follows:
1. After you have installed the adapter in your computer, boot Windows XP (for details, see chap-ter 2 "Installation of the Network Adapter").Windows XP detects the SysKonnect SK-98xx V2.0 Gigabit Ethernet Adapter as “EthernetController” during the boot operation.The window “Found New Hardware Wizard“ is displayed.
2. Select the check box INSTALL THE SOFTWARE AUTOMATICALLY (RECOMMENDED).3. Click NEXT.
The menu “Please choose your search and installation options“ is displayed.4. Select the check box SEARCH FOR THE BEST DRIVER IN THESE LOCATIONS.5. Select the check box INCLUDE THIS LOCATION IN THE SEARCH.6. Type the path to the driver.7. Click NEXT.
In case the adapter has not passed Windows Logo testing to verify its compatibility with Win-dows XP, the window “Hardware Installation” is displayed.
8. To continue the installation, click CONTINUE ANYWAY.In the window ”Found New Hardware Wizard”, the menu “Completing the Found New HardwareWizard” is displayed.
9. Click FINISH to complete the installation.
Update the driver To update the driver, proceed as follows:
1. Click START.2. Right-click MY COMPUTER.3. Select MANAGE.
The window “Computer Management” is displayed.4. Select DEVICE MANAGER.5. On the right side of this window, select NETWORK ADAPTERS.6. Double-click the adapter which is to be updated.7. Select the tab DRIVER.8. Click UPDATE DRIVER....
The window “Hardware Update Wizard“ is displayed.9. Select the check box INSTALL FROM A LIST OR SPECIFIC LOCATION (ADVANCED).10. Click NEXT.
The menu “Please choose your search and installation options“ is displayed.11. Select the check box DON’T SEARCH. I WILL CHOOSE THE DRIVER TO INSTALL.12. Click NEXT.
The menu “Select Network Adapter“ is displayed.13. Select the adapter for which the driver is to be installed.14. Click HAVE DISK...
The window “Install From Disk” is displayed.15. Type the path to the driver.16. Click OK.
The menu “Select Network Adapter“ is displayed again.

SysKonnect SK-98xx V2.0 Gigabit Ethernet Adapter
Windows 23
17. Click NEXT.In case the adapter has not passed Windows Logo testing to verify its compatibility with Win-dows XP, the window “Hardware Installation” is displayed.
18. To continue the installation, click CONTINUE ANYWAY.The window “Confirm File Replace” is displayed.
19. Click YES.In the window ”Hardware Update Wizard”, the menu “Completing the Hardware Update Wizard”is displayed.
20. Click FINISH to complete the installation.
For more information, refer to the corresponding readme file.
SysKonnect Network Driver Installation Package for Win-dows 2000 and Windows XPThe “SysKonnect Network Driver Installation Package” for the SysKonnect SK-98xx family containsthe NDIS 5.0 and 5.1 32-bit Miniport drivers, the Virtual LAN (VLAN) intermediate driver, the LinkAggregation (LAGG) intermediate driver, and the utility program “SysKonnect Network Control”. Thepackage supports Windows 2000 and Windows XP. The installation process is identical forWindows 2000 and Windows XP. It is described for Windows 2000.
To install the package on Windows 2000, proceed as follows:
1. After you have installed the adapter in your computer, boot Windows 2000 (for details, seechapter 2 "Installation of the Network Adapter").Windows 2000 detects the SysKonnect SK-98xx V2.0 Gigabit Ethernet Adapter as “EthernetController” during the boot operation.The window “Found New Hardware Wizard“ is displayed.
2. Click CANCEL to continue the package installation.3. Go to the folder where the “SysKonnect Network Driver Installation Package” (setupsknet.exe)
is stored.4. Double-click SETUPSKNET.EXE to start the installation of the package.
The window “Welcome to the SysKonnect Network Installation Package Installation Wizard“ isdisplayed.
5. Click NEXT to continue the installation.The window “License Agreement“ is displayed.
6. Select the check box I ACCEPT THE LICENSE AGREEMENT.7. Click NEXT.
The window “Readme Information“ is displayed.8. Click NEXT.
The window “Destination Folder“ is displayed.9. Select a folder where the application is to be installed.
The default destination folder is D:\Program Files\SysKonnect\. To install in a different folder,click BROWSE and select a different folder.
10. Click NEXT.The window “Ready to install the application“ is displayed.
11. Click NEXT to continue the installation.The window “Updating System - Installation of updated drivers“ is displayed.
12. Click NEXT to continue the installation.In case the driver does not have a Microsoft Digital Signature yet, the window “Digital SignatureNot Found” is displayed (in Windows XP, the window “Software Installation” is displayed).
24 4 Installation of the Driver Software
13. To continue the installation, click YES (in Windows XP, click CONTINUE ANYWAY).The window “Updating System - Scan for New Hardware” is displayed.
14. Click NEXT to continue the installation.The menu “SysKonnect Network Installation Package has been successfully installed” is dis-played.
15. Click FINISH to exit the installation program.16. If the system requests a reboot, restart your computer.
The “SysKonnect Network Control” can now be started from the Control Panel window: START > SETTINGS > CONTROL PANEL > SYSKONNECT NETWORK CONTROL (in Windows XP:START > CONTROL PANEL > SYSKONNECT NETWORK CONTROL.)
For more information, refer to the corresponding readme file.
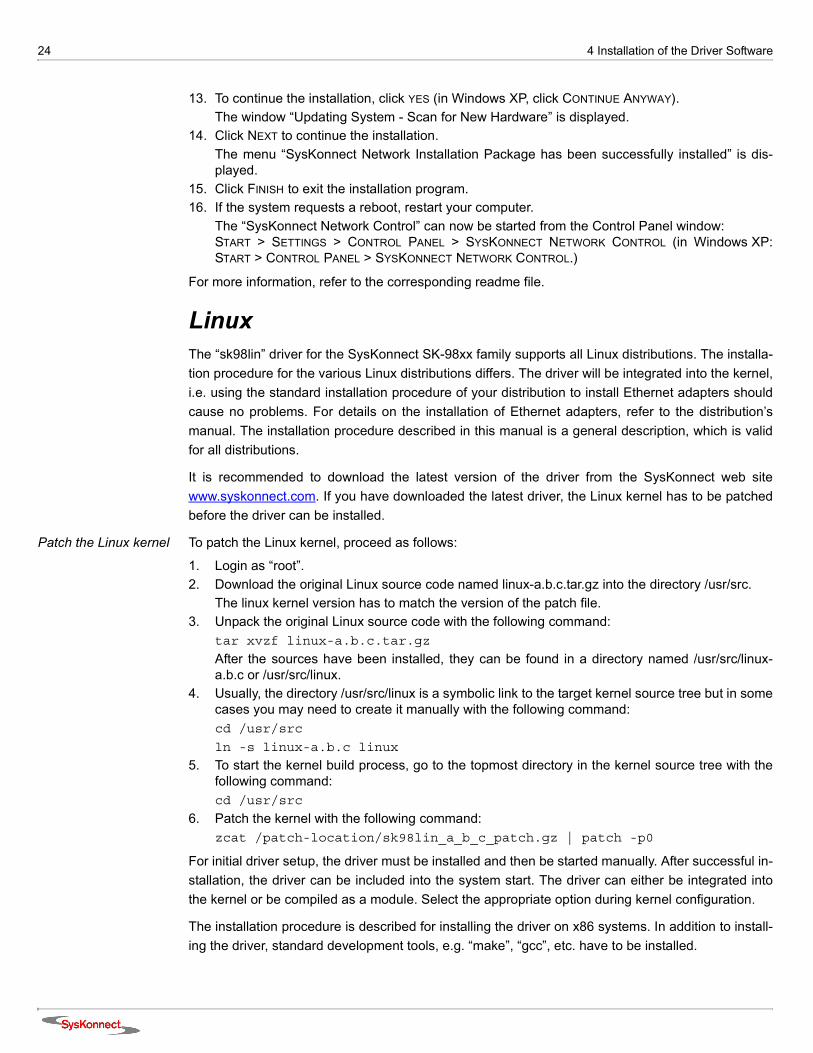
LinuxThe “sk98lin” driver for the SysKonnect SK-98xx family supports all Linux distributions. The installa-tion procedure for the various Linux distributions differs. The driver will be integrated into the kernel,i.e. using the standard installation procedure of your distribution to install Ethernet adapters shouldcause no problems. For details on the installation of Ethernet adapters, refer to the distribution’smanual. The installation procedure described in this manual is a general description, which is validfor all distributions.
It is recommended to download the latest version of the driver from the SysKonnect web sitewww.syskonnect.com. If you have downloaded the latest driver, the Linux kernel has to be patchedbefore the driver can be installed.
Patch the Linux kernel To patch the Linux kernel, proceed as follows:
1. Login as “root”.2. Download the original Linux source code named linux-a.b.c.tar.gz into the directory /usr/src.
The linux kernel version has to match the version of the patch file.3. Unpack the original Linux source code with the following command:
tar xvzf linux-a.b.c.tar.gz
After the sources have been installed, they can be found in a directory named /usr/src/linux-a.b.c or /usr/src/linux.
4. Usually, the directory /usr/src/linux is a symbolic link to the target kernel source tree but in somecases you may need to create it manually with the following command:cd /usr/src
ln -s linux-a.b.c linux
5. To start the kernel build process, go to the topmost directory in the kernel source tree with thefollowing command:cd /usr/src
6. Patch the kernel with the following command:zcat /patch-location/sk98lin_a_b_c_patch.gz | patch -p0
For initial driver setup, the driver must be installed and then be started manually. After successful in-stallation, the driver can be included into the system start. The driver can either be integrated intothe kernel or be compiled as a module. Select the appropriate option during kernel configuration.
The installation procedure is described for installing the driver on x86 systems. In addition to install-ing the driver, standard development tools, e.g. “make”, “gcc”, etc. have to be installed.

SysKonnect SK-98xx V2.0 Gigabit Ethernet Adapter
Linux 25
Install the driver To use the driver as a module or integrate it into the kernel, proceed as follows:
1. After you have installed the adapter in your computer, boot your Linux system (for details, seechapter 2 "Installation of the Network Adapter").
2. Login as “root”.3. Go to the directory /usr/src/linux.4. Execute the command: make menuconfig for the console mode, or
execute the command: make xconfig for the graphical mode.The kernel configuration menu (Main Menu) is displayed.
5. Select NETWORK DEVICE SUPPORT.6. Select ETHERNET (1000 MBIT).7. To integrate the driver permanently into the kernel, mark SYSKONNECT SK-98XX SUPPORT with
(*).To compile the driver as a module, mark SYSKONNECT SK-98XX SUPPORT with (M).
8. Select EXIT.The Main Menu is displayed.
9. Select LOADABLE MODULE SUPPORT.The menu “Loadable module support“ is displayed.
10. Select ENABLE LOADABLE MODULE SUPPORT.11. Select KERNEL MODULE LOADER.12. Select EXIT.13. Configure other options, e.g. SCSI, file systems, etc.14. To quit the configuration, select EXIT.15. When the message “Do you wish to save your new kernel configuration” is dis-
played, select YES.Now build a new kernel by executing the following commands:
16. Execute the command: make dep.17. Execute the command: make clean bzImage.18. Execute the command: make modules.19. Execute the command: make modules_install.20. If you use “lilo” as a boot loader, execute the command:
make bzlilo.If no errors occurred, the new kernel is installed in the “root” directory.
21. Go to the “root” directory by executing the command: cd /.22. Copy the new kernel into your boot directory by executing the commands:
cp vmlinuz /boot/<name of the new kernel> andcp System.map /boot/.
23. Edit the boot loader configuration file to boot the new kernel, e.g. “lilo.conf”.24. If you use “lilo” as a boot loader, execute the command: lilo.25. Reboot your system with the new kernel.26. If you use the driver as a module, continue with “Load the module”.
If you integrated the driver into the kernel, continue with “Assign an IP address”.
Load the module If you use the driver as a module, the module has to be loaded manually.
To load the module manually, proceed as follows:
1. Execute the following command: modprobe sk98lin.2. If the SysKonnect adapter is installed in your computer and you have a /proc file system, exe-
cute the command:ls /proc/net/sk98lin. This should produce an output containing a line with the following format:

26 4 Installation of the Driver Software
eth0 eth1 ...
which indicates that your adapter has been found and initialized.If several SysKonnect adapters are installed in your system, the adapters will be listed as“eth0”, “eth1”, “eth2”, etc. The mapping is executed automatically.The module installation message (displayed either in a system log file or on the console) out-puts a line for each adapter found containing the corresponding “ethX”.
3. Assign an IP address (see below).
Assign an IP address
In order for the adapter to work, an IP address has to be assigned. For each adapter, repeat steps 1and 2 below.
To assign an IP address, proceed as follows:
1. Select an IP address by assigning it to the respective adapter:ifconfig eth0 <ip-address>.With this command, the adapter is connected to the Ethernet. If your adapter is connected tothe data network or another station, the green link LED is active after assigning the IP address.In addition, you will receive a status message on the console stating “ethX: network connectionup using port Y” and showing the selected connection parameters. Now your adapter should befully operational.
2. Execute ping <other station> to verify the connection to other computers on your net-work.
For more information, refer to the corresponding readme file.
Sun SolarisThe “SKGEsol” driver package supports the SysKonnect SK-98xx family on Solaris 7 and higher.Both SPARC and x86 systems (Solaris 9 does not support x86) are supported by the respectivedriver version. For all supported Solaris SPARC versions, there is also a 64-bit version.
There are two tools for installing the driver package: • ”pkgadd”, which runs from the command line• ”admintool”, which uses a GUI
The following description of the driver installation is based on an installation on Solaris SPARC in32-bit mode. It is valid for all Sun Solaris systems.
In order to perform the installation, you need “root” access.
Driver packages downloaded from our web site are available in a compressed format (.tar.Z files).The package has to be uncompressed before installation.
Uncompress the driver
To uncompress the downloaded driver package, proceed as follows:
1. Go to the directory where the compressed driver package is located, e.g. /usr/SKGE/skgesol_sparcv6.00.tar.Z for the SPARC Edition.
2. Uncompress the file with the following command:uncompress skgesol_sparcv6.00.tar.Z
The result is the file “skgesol_sparcv6.00.tar”.3. Untar this file with the following command:
tar -xvf skgesol_sparcv6.00.tar
i If you are in doubt about the IP addresses, ask your network administrator for assistance.

SysKonnect SK-98xx V2.0 Gigabit Ethernet Adapter
Sun Solaris 27
The result is the subdirectory “SKGEsol” containing the driver package and the readme files“skge.html” and “skge.txt”.The driver package is now ready to be installed.
Install the driver with “pkgadd”
To install the driver using ”pkgadd”, proceed as follows:
1. After you have installed the adapter in your computer, boot your Sun Solaris system (for details,see chapter 2 "Installation of the Network Adapter").
2. Go to the directory where the subdirectory “SKGEsol” is located.3. Execute ”pkgadd”:
pkgadd -d . SKGEsol
A shell window is displayed asking whether you want to configure IP interfaces during installa-tion or not.
4. If yes, type y.If no, type n.
5. Press <Enter>.If you have typed y in step 4, continue with step 6. If you have typed n in step 4, only the driver will be loaded and all interfaces have to be config-ured manually. For details, refer to the corresponding readme file.
6. Enter the following values for every interface you want to configure as the system requeststhem:• the new interface's name (e.g. host), • the IP address (e.g. 192.9.121.59), and• the netmask (e.g. 255.255.255.0).Once you have entered all information, the message “Are these settings OK (y/n)?” isdisplayed.
7. If all settings are OK, type y.8. Press <Enter>.
The message “Do you have more SysKonnect Gigabit Ethernet interfaceadapters installed (y/n)?” is displayed.
9. If yes, type y.If no, type n.
10. Press <Enter>If you have typed y in step 9, repeat steps 6 to 8.If you have typed n, continue with step 11.
11. When the message “Do you want to continue with the installation of <SKGE-sol> [y, n, ?]” is displayed, type y.The driver package is installed.”pkgadd” will prompt you to reboot after successful installation, but this may be ignored.
Install the driver with “admintool”
To install the driver using ”admintool”, proceed as follows:
1. After you have installed the adapter in your computer, boot your Sun Solaris system (for details,see chapter 2 "Installation of the Network Adapter").
2. Start ”admintool”.The window “Admintool: Users” is displayed.
3. Select BROWSE > SOFTWARE.The window “Admintool: Software”, listing all available software, is displayed.
4. Select EDIT > ADD.The dialog box “Admintool: Set Source Media“ is displayed.
5. Select the location of the “SKGEsol” subdirectory.6. Click OK.

28 4 Installation of the Driver Software
In the displayed window, the left panel shows the available software packages.7. Select SYSKONNECT SK-98XX FAMILY.8. Click ADD.
The shell window “Admintool: Add Software” is displayed asking whether you want to configureIP interfaces during installation or not.
9. If yes, type y.If no, type n.
10. Press <Enter>.If you have typed y in step 9, continue with step 11.If you have typed n in step 9, only the driver will be loaded and you have to configure all inter-faces manually. For details, refer to the corresponding readme file.
11. Enter the following values for every interface you want to configure as the system requeststhem:• the new interface's name (e.g. host), • the IP address (e.g. 192.9.121.59), and• the netmask (e.g. 255.255.255.0).Once you have entered all information, the message “Are these settings OK (y/n)?” isdisplayed.
12. If all settings are OK, type y.13. Press <Enter>.
The message “Do you have more SysKonnect Gigabit Ethernet interfaceadapters installed (y/n)?” is displayed.
14. If yes, type y.If no, type n.
15. Press <Enter>.If you have typed y in step 14, repeat steps 11 to 13.If you have typed n, continue with step 16.
16. When the message “Do you want to continue with the installation of <SKGE-sol> [y, n,?]” is displayed, type y.The driver package is installed.”Admintool” will prompt you to reboot after successful installation, but this may be ignored.
For more information, refer to the corresponding readme file.
HP-UXThe driver supports the SysKonnect SK-98xx family on HP-UX 11 systems. The driver package forHP-UX can be either installed using the administration/installation GUI or a shell command.
To perform the following tasks, you need “root” access.
Drivers downloaded from our web site are available in a packed format (.tar.gz files). The download-ed package has to be unpacked before installation.
Unpack the driver To unpack the downloaded driver package, proceed as follows:
1. Go to the directory where the packed driver package “<package file>.tar.gz” is located.2. Unpack the file with the following command:
gunzip <package file>.tar.gz
The unpacked file has the format “<package file>.tar”.3. Untar this file with the following command:
tar -xf <package file>.tar

SysKonnect SK-98xx V2.0 Gigabit Ethernet Adapter
HP-UX 29
The result is the file “<package file>.depot” and the readme file in “.txt” and “.html” format.The driver package is now ready to be installed.
Use the GUI You can either use “sam” or “swinstall”. “sam” also calls “swinstall”, i.e. the installation is identical(from step 3 onwards). In the following, the installation with “sam” is described.
To install the driver package, proceed as follows:
1. After you have installed the adapter in your computer, boot the HP-UX system (for details, seechapter 2 "Installation of the Network Adapter").
2. Start “sam”.3. In “sam”, select SOFTWARE MANAGEMENT > INSTALL SOFTWARE TO LOCAL HOST.4. Specify the SOURCE DEPOT TYPE by selecting LOCAL DIRECTORY.5. Specify the SOURCE HOST NAME by entering the <host name>, e.g. hpdev.6. Specify the SOURCE DEPOT PATH by typing the full path to the package file and the name of the
package file, e.g. usr/tmp/skge_HPUX11.00_64b_v6.00.depot.
7. Specify the SOFTWARE FILTERS by entering None.8. Confirm with OK.9. Select SKGE.10. Select ACTIONS > INSTALL (ANALYSIS).11. When the analysis is finished, confirm with OK.12. Click YES.
The following message will be displayed: “The system will be rebooted as soon asInstallation is complete. Do you still wish to start Installation?”.
13. Confirm with YES.14. After the installation is completed, click DONE.15. Click OK to reboot.
The driver has been installed and the network adapter can now be configured.
Use the command line To install the driver from the command line, proceed as follows:
1. After you have installed the adapter in your computer, boot the HP-UX system (for details, seechapter 2 "Installation of the Network Adapter").
2. Execute the following command from a shell:swinstall -s <package file> -x autoreboot=true skge
The package file must include the full path to the package.3. Press <Enter>.
The system will install the package and then reboot.
For more information, refer to the corresponding readme file.

30 4 Installation of the Driver Software
IBM AIX The drivers support the SysKonnect SK-98xx family on AIX 4.3.3, AIX 5.1, and AIX 5.2 operatingsystems. For correct driver access, the corresponding Ethernet protocol interface must be installedfor TCP/IP configuration. The drivers can not be installed on machines with less than 256 MB mem-ory. We recommend to install the drivers on machines offering at least 512 MB memory.
There are two possibilities to install the driver packages on IBM AIX:• Automatic installation with “smitty” and the configuration manager• Manual installation with “smitty”
The installation follows the general guidelines of IBM AIX 4.3 and 5.1/5.2 operating systems for soft-ware package installation of third party device drivers.
Driver packages downloaded from our web site are available in a compressed format (.Z files). Thedownloaded package has to be uncompressed before installation.
Uncompress the driver
To uncompress the downloaded driver package, proceed as follows:
1. Go to the directory where the compressed driver package <filename>.pck.Z is located, e.g.sk98a4x3p.pck.Z for AIX 4.3.3.
2. Uncompress the file with the following command:uncompress <filename>.pck.Z
The uncompressed driver package has the format <filename>.pck and is ready for installation.
Install from CD-ROM on AIX 4.3.3
If the driver is to be installed from CD-ROM on an AIX 4.3.3 operating system, the following stepshave to be executed prior to the driver installation:
1. Boot AIX 4.3.3.2. Login as “root”.3. Insert the SysKonnect installation CD-ROM into your CD-ROM drive.4. Copy the driver file <filename>.pck to any directory on your AIX 4.3.3 operating system with the
following command:cp <cd-rom path>/<filename>.pck /tmp/<filename>.pck
Automatic installation on AIX 4.3.3, AIX 5.1, and AIX 5.2The following description of the installation process refers to ”smitty” executed from the console log-in. The automatic installation on AIX 4.3.3, AIX 5.1, and AIX 5.2 is identical.
To install the driver automatically, proceed as follows:
1. After you have installed the adapter in the computer, boot the corresponding AIX operating sys-tem (for details, see chapter 2 "Installation of the Network Adapter").
2. Login as “root”.3. Start “smitty” and the configuration manager by executing
smitty cfgmgr
The menu “Install/Configure Devices Added After IPL” is displayed.4. For AIX 5.1/5.2: Type the path to the driver, e.g. /tmp/<filename>.pck, or
to install the driver from CD-ROM, press <F4> and select /DEV/CD0.For AIX 4.3.3: Type the path to the driver, e.g. /tmp/<filename>.pck.
5. Press <Enter>.The automatic installation process starts. When finished, the network device driver is loadedautomatically.

SysKonnect SK-98xx V2.0 Gigabit Ethernet Adapter
IBM AIX 31
6. When the installation process has been finished successfully, check that the network devicedriver is available for further network configuration:lsdev -C | grep SysKonnect
Executing this command displays a list of available network devices similar to the following:ent1 Available 04-03 SysKonnect SK-9821 Gigabit Ethernet Adapter
ent2 Available 04-02 SysKonnect SK-9843 Gigabit Ethernet Adapter
For further network configuration, refer to the system manual pages for the corresponding Ethernetnetwork protocol (en0, en1 ...).
The manual installation for operating systems AIX 4.3.3 and AIX 5.1/AIX 5.2 differs. Both proce-dures are described in the two following sections.
Manual installation on AIX 4.3.3To install the driver manually on AIX 4.3.3, proceed as follows:
1. After you have installed the adapter in the computer, boot AIX 4.3.3 (for details, see chapter 2"Installation of the Network Adapter").
2. Login as “root”.3. Start ”smitty” by executing smitty.4. Select SOFTWARE INSTALLATION AND MAINTENANCE.5. Select INSTALL AND UPDATE SOFTWARE.6. Select INSTALL AND UPDATE FROM LATEST AVAILABLE SOFTWARE.7. Type the path to the driver, e.g. /tmp/<filename>.pck.8. Press <Enter>.9. To view the contents of the install package in the menu “Install and Update from Latest Avail-
able Software”, select SOFTWARE TO INSTALL with <F4>.The menu “Software to install” is displayed.
10. Select the driver to be installed with <F7>, orselect DEVICES.PCI with <F7> for all packages.
11. Press <Enter>.The menu “Install and Update from Latest Available Software” is displayed.
12. Press <Enter>.The message “Are you sure?” is displayed.
13. Press <Enter> to start the installation process.14. Once the installation has been completed, start the configuration manager ”cfgmgr” from the
command line by entering cfgmgr.This command executes a search for installed adapters and loads the corresponding drivers.
For more information, refer to the corresponding readme file.
Manual installation on AIX 5.1 and AIX 5.2To install the driver manually on AIX 5.1 or AIX 5.2, proceed as follows:
1. After you have installed the adapter in the computer, boot AIX 5.1 or AIX 5.2 (for details, seechapter 2 "Installation of the Network Adapter").
2. Login as “root”.3. Start ”smitty” by executing smitty.4. Select SOFTWARE INSTALLATION AND MAINTENANCE.5. Select INSTALL AND UPDATE SOFTWARE.6. Select INSTALL SOFTWARE.

32 4 Installation of the Driver Software
7. Type the full path to the driver, e.g. /tmp/<filename>.pck, orto install the driver from CD-ROM, press <F4> and select /DEV/CD0.
8. Press <Enter>.9. To view the contents of the install package in the menu “Install Software”, select SOFTWARE TO
INSTALL with <F4>.The menu “Software to Install” is displayed.
10. Select the driver to be installed with <F7>, orselect DEVICES.PCI with <F7> for all packages.
11. Press <Enter>.The menu “Install Software” is displayed.
12. Press <Enter> to install the driver.The message “Are you sure?” is displayed.
13. Press <Enter> to start the installation process.14. Once the installation has been completed, start the configuration manager ”cfgmgr” from the
command line by entering cfgmgr.This command executes a search for installed adapters and loads the corresponding drivers.
For more information, refer to the corresponding readme file.
Novell NetWareThe driver is a 32-bit ODI HSM Novell NetWare server driver for the SysKonnect SK-98xx family.The driver supports NetWare 4.20, NetWare 5.0 and 5.1, and NetWare 6.0.
To perform the installation, you must have access to the server console.
Drivers downloaded from our web site are available in a packed format (.zip files). The downloadedfile has to be unpacked before installation.
Installation on Novell NetWare 4.20To install the network driver on Novell NetWare 4.20, proceed as follows:
1. After you have installed the adapter in your computer, boot NetWare 4.20 (for details, see chap-ter 2 "Installation of the Network Adapter").
2. On the console, execute the following command: load install.3. Select DRIVER OPTIONS (LOAD/UNLOAD DISK AND NETWORK DRIVERS).
The menu “Driver Options” is displayed.4. Select CONFIGURE NETWORK DRIVERS.
The menu “Additional Driver Actions” is displayed.5. Select DISCOVER AND LOAD ADDITIONAL DRIVERS.
The system detects the SysKonnect adapter as “PCI Lan Controller 1148.4320....”.6. To get a list of available drivers, press <Enter>.
The menu “Select a driver” is displayed.7. To install an unlisted driver, press <Insert> (the SysKonnect driver is not listed).8. To specify the path to the driver, press <F3>.
The window “Specify a directory path” is displayed.
i
The setting for MINIMUM PACKET RECEIVE BUFFERS in the startup.ncf must be increased to atleast 120 per adapter (e.g. for three adapters you should add “Set Minimum Packet
Receive Buffers = 360“ to startup.ncf). On SMP systems, you may have to multiply thisnumber with the number of active processors.

SysKonnect SK-98xx V2.0 Gigabit Ethernet Adapter
Novell NetWare 33
9. Type the path to the driver.If you are installing from CD-ROM, the menu “Select an action” is displayed. Here, select CON-TINUE AND ACCESS THE CD-ROM.The menu “Select a driver to install” is displayed.
10. Select the driver for your network adapter.The message “Do you want to copy driver <driver name>.LAN?” is displayed.
11. To copy the driver to the server, select YES.If an older version of a SysKonnect driver is installed on the system, the messages “Saveexisting file SYS:SYSTEM\<driver name.LAN?” and “Save existing fileSYS:SYSTEM\<driver name>.LDI?” are displayed.
12. To continue, select the desired options (YES or NO).The menu “Board SK-98NW_1 (Driver <driver name>) Actions” is displayed.
13. Select SELECT MODIFY DRIVER PARAMETERS/PROTOCOLS.14. Configure the protocols to be used.15. Configure the parameters, e.g. “slot number”.16. After the parameters have been configured, select SAVE PARAMETERS AND LOAD DRIVER.
The driver is loaded.Once the driver has been installed, the adapter parameters or bindings can be changed in theautoexec.nfc file using the “Install” tool.
For more information, refer to the corresponding readme file.
Installation on Novell NetWare 5 and 6The installation procedure for NetWare 5 and 6 is identical.
To install the network driver on Novell NetWare 5 or 6, proceed as follows:
1. After you have installed the adapter in your computer, boot NetWare 5 or 6 (for details, seechapter 2 "Installation of the Network Adapter").NetWare detects the new adapter and tries to install a driver.
2. To get a list of available drivers, press <Enter>.The menu “Select a driver” is displayed.
3. To install an unlisted driver, press <Insert> (the SysKonnect driver is not listed).4. To specify the path to the driver, press <F3>.
The window “Specify a directory path” is displayed.5. Type the path to the driver.
If you are installing from CD-ROM, the menu “Select an action” is displayed. Here, select CON-TINUE AND ACCESS THE CD-ROM.The menu “Select a driver to install” is displayed.
6. Select the driver for your network adapter.The message “Do you want to copy driver <driver name>.LAN?” is displayed.
7. To copy the driver to the server, select YES.If an older version of a SysKonnect driver is installed on the system, the messages “Saveexisting file SYS:SYSTEM\<driver name.LAN?” and “Save existing fileSYS:SYSTEM\<driver name>.LDI?” are displayed.
8. To continue, select the desired options (YES or NO).The menu “Board SK-98NW_1 (Driver <driver name>) Actions” is displayed.
9. Select SELECT MODIFY DRIVER PARAMETERS/PROTOCOLS.10. Configure the protocols to be used.11. Configure the parameters, e.g. “slot number”.

34 4 Installation of the Driver Software
12. After the parameters have been configured, select SAVE PARAMETERS AND LOAD DRIVER.The driver is loaded.Once the driver has been installed, the adapter parameters or bindings can be changed in theautoexec.nfc file using the “Nwconfig” tool.
For more information, refer to the corresponding readme file.
SysKonnect SK-98xx V2.0 Gigabit Ethernet Adapter
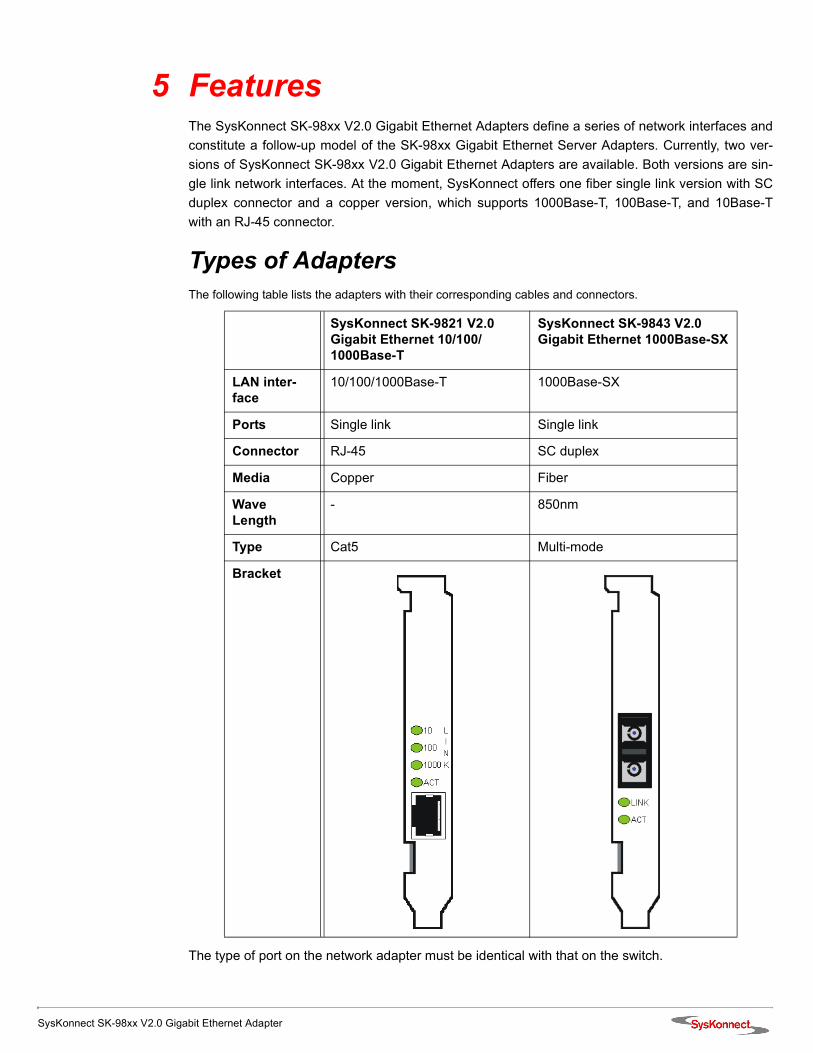
5 FeaturesThe SysKonnect SK-98xx V2.0 Gigabit Ethernet Adapters define a series of network interfaces andconstitute a follow-up model of the SK-98xx Gigabit Ethernet Server Adapters. Currently, two ver-sions of SysKonnect SK-98xx V2.0 Gigabit Ethernet Adapters are available. Both versions are sin-gle link network interfaces. At the moment, SysKonnect offers one fiber single link version with SCduplex connector and a copper version, which supports 1000Base-T, 100Base-T, and 10Base-Twith an RJ-45 connector.
Types of AdaptersThe following table lists the adapters with their corresponding cables and connectors.
The type of port on the network adapter must be identical with that on the switch.
SysKonnect SK-9821 V2.0 Gigabit Ethernet 10/100/1000Base-T
SysKonnect SK-9843 V2.0 Gigabit Ethernet 1000Base-SX
LAN inter-face
10/100/1000Base-T 1000Base-SX
Ports Single link Single link
Connector RJ-45 SC duplex
Media Copper Fiber
Wave Length
- 850nm
Type Cat5 Multi-mode
Bracket
36 5 Features
Operating System SupportThe drivers for the SysKonnect SK-98xx V2.0 Gigabit Ethernet Adapters support the following oper-ating systems: • Windows NT 4.0, Windows 98 Second Edition, Windows Millennium Edition, Windows 2000,
and Windows XP• Linux kernel 2.2.x and 2.4.x• Novell NetWare 4.20 or higher, Novell NetWare 5 and 6 • Sun Solaris 7, 8, and 9 on SPARC systems as well as Solaris 7 and 8 on X86 systems• IBM AIX 4.3.3, AIX 5.1, and AIX 5.2• HP-UX 11.00 (PA-RISC 32/64-bit), HP-UX 11.11 (PA-RISC 64-bit), and HP-UX 11.20 (IA-64)
High PerformanceThe SysKonnect SK-98xx V2.0 Gigabit Ethernet Adapters are high performance and highly reliableadapters. Best performance is reached with a 64-bit/66 MHz bus. In full-duplex mode, wire speedcan be achieved.
Jumbo FramesThe SysKonnect SK-98xx V2.0 Gigabit Ethernet Adapters support 9 KB Jumbo frames. They aretested according to the prevailing standard and switches on the market.
TCP, UDP and IP checksum calculationThe adapter supports the calculation of TCP, UDP, and IP checksums. These calculations are inte-grated in the hardware of the Gigabit Ethernet adapters. The checksums are calculated without timeloss by the MAC controller for both the receive and the transmit path. This improves the overall per-formance of the system and shifts these CPU-intensive tasks away from the host CPU.
Dynamic Interrupt ModerationIf the network is running at gigabit speeds and small packets are being transferred, there may in ex-treme cases be more than 100,000 interrupts per second. To reduce the load on the CPU, the Giga-bit Ethernet adapters can use interrupt moderation to group these interrupts so that several datapackets can be handled per interrupt.
For more information, refer to the White Paper “SK-NET GE Gigabit Ethernet Server Adapter”,which can be found on the installation CD-ROM and on our web site.
Promiscuous Mode / Multicast SupportThe SysKonnect SK-98xx V2.0 Gigabit Ethernet Adapter supports promiscuous mode for analyzers.
The adapters support multicast for special applications, which use multicast addresses. In addition,two unicast addresses are supported by the hardware. By default, the promiscuous mode is turnedoff.
SysKonnect SK-98xx V2.0 Gigabit Ethernet Adapter
Advanced Power Management / Wake on LAN 37
Advanced Power Management / Wake on LANThe SysKonnect SK-9821 V2.0 Gigabit Ethernet Adapter supports power management as definedin the PCI Bus Power Management Interface Specification V1.1 and Network Device Class PowerManagement Reference Specification V2.0. The power management features are implemented ac-cording to the Advanced Configuration and Power Interface Specification V2.0.
The SysKonnect SK-9821 V2.0 Gigabit Ethernet Adapter utilizes an auxiliary power supply to keepsome parts running. This setting enables the PCI network device to “Wake on LAN”.
The Wake on LAN functionality uses three mechanisms to create a wake up event:• OnNow Pattern Match Detect
Incoming packets are compared to up to seven patterns stored in a pattern matching table. Amatch causes a wake up event.
• Magic PacketTM DetectThe incoming data stream is searched for a so-called magic packet frame that consists of 6bytes of 0xFF followed by 16 iterations of the adapter’s MAC address. If this sequence is found,a wake up event is created.
• Link Change DetectAny change of the link status will cause a wake up event.
Wake on LAN is supported by Windows 2000 and Windows XP.
ReliabilityThe SysKonnect SK-98xx V2.0 Gigabit Ethernet Adapter comes with a variety of reliability features.They aim at maintaining a connection as long as possible. This is reached by redundant or groupedlinks (link aggregation). The on-board sensors and driver functions help to monitor the health ofadapters and their ports enabling pro-active network management. The reliability features are de-scribed in the following sections.
Link AggregationLink aggregation or trunking is a method of combining physical network links into a single logical linkfor increased bandwidth. With link aggregation, it is possible to increase the capacity and availabilityof the communications channel between devices (both switches and end stations) using existingFast Ethernet and Gigabit Ethernet technology. Two or more Gigabit Ethernet connections are com-bined into a team in order to increase the bandwidth capability and to create resilient and redundantlinks. A set of multiple parallel physical links between two devices is grouped together to form a sin-gle logical link. Link aggregation offers an efficient and low-cost solution to increase bandwidth be-tween server and switch. Another advantage it provides is that if a connection fails completely theremaining links can take over the traffic and thus replace the broken line.
Link aggregation also provides load balancing where the processing and communications activity isdistributed across several links so that no single link is overwhelmed.
By taking multiple LAN connections and treating them as a unified, aggregated link, practical bene-fits can be achieved in many applications.
38 5 Features
Link aggregation provides the following important benefits:• Higher link availability• Increased link capacity• Improvements are obtained using existing hardware (no upgrading to higher-capacity link tech-
nology is necessary)
Demanding applications running in high-performance environments like servers in enterprises, webservers, and intranet servers gain particularly from the high-bandwidth and duplex capabilities of linkaggregation.
All SysKonnect Gigabit Ethernet adapters support link aggregation according to the IEEE standard802.3ad. At the moment, SysKonnect provides a link aggregation driver for Windows 2000 andWindows XP. The drivers for Linux are able to support link aggregation according to theIEEE standard 802.3ad by installing third party open source modules. For details, refer to the corre-sponding readme file. In the future, link aggregation support according to IEEE 802.3ad will be im-plemented in SysKonnect drivers for other operating systems such as Linux, Sun Solaris, HP-UX,and IBM AIX. For driver updates, refer to our web site: http://www.syskonnect.com
For more information on link aggregation, refer to the white paper “Link Aggregation according toIEEE 802.3ad”, which can be found on the SysKonnect installation CD-ROM and on our web site.
Redundant Switch FailoverBeyond the features required for link aggregation in the IEEE 802.3ad standard, SysKonnect driverssupport an additional failover feature, the so-called Redundant Switch Failover (RSF). If a switchfails completely, RSF can move the link to a different switch which then takes over the traffic.
At the moment, this feature is implemented in the driver package for Windows 2000 andWindows XP but will be available for other operating systems in the future. The standard requiresthat all links of a link aggregation group (team) are connected to the same partner (usually a switchsupporting 802.3ad). With SysKonnect’s link aggregation driver, one team (group of logical links)can comprise several aggregators (sub-group beneath team level). If a team has several aggrega-tors, which are connected to separate switches, the failover feature is utilized. Data is transferred viaone aggregator, and is, if this aggregator fails, automatically switched over to another aggregator inthe same team.
For more information on RSF, refer to the white paper “Link Aggregation according to IEEE802.3ad”, which can be found on the SysKonnect installation CD-ROM and on our web site.
PCI Hot PlugAs a member of the PCI Special Interest Group, SysKonnect participated in the standardization ofthe insertion and removal of PCI computer cards during normal server operation. Like all SysKon-nect PCI cards, the Gigabit Ethernet adapters comply with the Hot Plug PCI standard. This technol-ogy increases the availability of the server(s) used.
Hot Plug enables the replacement of failed devices in a running system.

SysKonnect SK-98xx V2.0 Gigabit Ethernet Adapter
User Diagnostics (DOS) 39
The following conditions have to be met in order for Hot Plug to work on SysKonnect Gigabit Ether-net adapters:• The target system has PCI Hot Plug slots, i.e. the power can be switched on and off under the
control of the operating system.• The adapter is installed in one of the PCI Hot Plug slots.• The operating system supports PCI Hot Plug on the target system.The drivers for the following operating systems support PCI Hot Plug:• Windows 2000, Windows XP• NetWare 4.20 and higher• Solaris 7 and higher
ParityThe PCI bus parity is checked/generated on data paths of the receive/transmit data entering/leavingthe chip. This includes the PCI interface and the RAM buffer. Parity on the PCI bus is generated,checked, and reported according to the PCI specification.
SensorsThe on-board sensors monitor all important voltages and the temperature on the network adapter.The sensors are checked by the software. Upper and lower thresholds determine the area of safeoperation. Voltages and temperatures beyond the safe area will lead to appropriate error messages.
User Diagnostics (DOS)The offline user diagnostics program (during diagnosis, the operation of the adapter can not bemaintained) provides system administrators and engineers with a profound tool to analyze the net-work adapter and check adapter specific data (for details, see section "Diagnostics Program").
SysKonnect Network Control for Windows 2000 and Windows XPSysKonnect offers a utility program for Windows 2000 and Windows XP. The “SysKonnect NetworkControl” is part of the “SysKonnect Network Driver Installation Package” available for Windows 2000and Windows XP. With the “SysKonnect Network Control” all SysKonnect adapters can be con-trolled and configured. This tool displays the current configuration and status of the SysKonnect SK-98xx family.
Predominantly, the “SysKonnect Network Control” helps to perform the following tasks:• Configuration of the adapters and their corresponding ports• Monitoring of the status of the adapter(s) installed• Establishment of VLANs• Building of teams / Enabling of link aggregation according to IEEE 802.3ad• Enabling of RSF• Enabling of RLMT for dual link adapters• Monitoring of the voltage and temperature sensors• Examining the attached cables by means of Virtual Cable Tester™ (VCT)

40 5 Features
The “SysKonnect Network Control” is started from the Control Panel window: START > SETTINGS >CONTROL PANEL > SYSKONNECT NETWORK CONTROL.
The various tabs contain trees showing the currently installed adapters and their configuration:• The “Adapter” tab displays the network adapters available in your system with their correspond-
ing ports. It shows the ports, which have been configured as VLANs, for RLMT and those,which have been aggregated into a team.This tab only serves as an overview. For configuration of the adapter, select one of the othertabs.
• The “Virtual LAN” tab lists all configured virtual LANs along with the corresponding ports andthe ports, which may be bound by VLANs.In this tab, the user can add, remove, and configure VLANs and set VLAN specific parameters.
• The “Team” tab shows all links or ports which may be aggregated in a team or have alreadybeen aggregated to form a team.In this tab, the user can add, remove, rename, and configure teams.
• The “RLMT” tab offers the possibility to configure dual link adapters for Redundant Link Man-agement Technology (RLMT). RLMT monitors the status of both ports. If the link of the activeport fails, RLMT automatically switches to the standby link and the connection is maintained.In this tab, the user can add and remove RLMT to/from the ports and set RLMT specific param-eters.
• The “Protocol” tab shows all entities (port, VLAN, RLMT, Team) and the protocols, which havebeen bound to these entities.
• The “Power Management” tab shows the current power management settings of all installedadapters.
• The “Statistics” tab lists statistic values, e.g. Transmit Packet OK (XMIT OK), etc.• The “Sensors” tab shows the values of the voltage and temperature sensors.• The “Specifications” tab lists fixed values during operating time, e.g. Hardware Revision, Soft-
ware version, Max. Frame Size, etc.• The tab "VCT“ (Virtual Cable Tester™) offers the possibility to examine the quality and charac-
teristics of the attached cables. The VCT technology is only available for SysKonnect SK-9821V2.0 Adapters.
• The “Support” tab provides information on how to reach the SysKonnect Technical Support.
SysKonnect SK-98xx V2.0 Gigabit Ethernet Adapter
SysKonnect Network Control for Windows 2000 and Windows XP 41
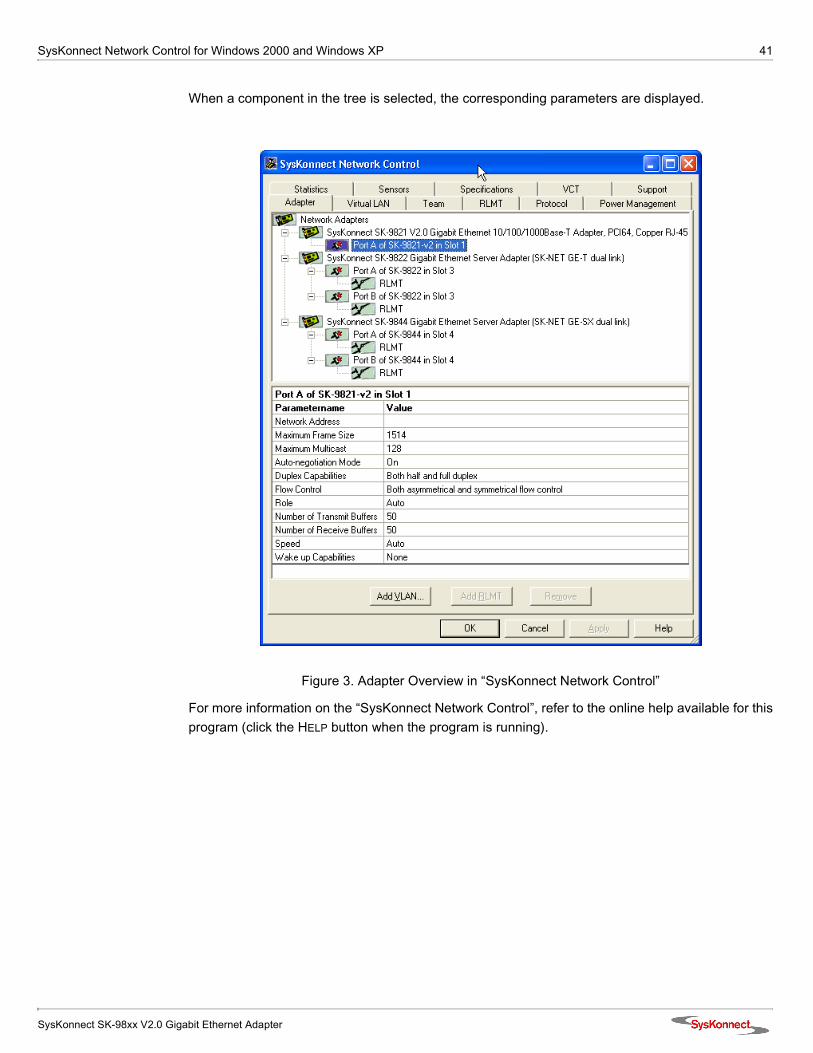
When a component in the tree is selected, the corresponding parameters are displayed.
Figure 3. Adapter Overview in “SysKonnect Network Control”
For more information on the “SysKonnect Network Control”, refer to the online help available for thisprogram (click the HELP button when the program is running).
42 5 Features
Virtual LAN (VLAN) supportA Virtual LAN is a group of network devices that belong to the same network segment, regardless ofthe physical network structure. A logical network structure based on business requirements is possi-ble. With virtual networks, physical location no longer specifies the network a user is assigned to:user clients with similar networking requirements can be united in one network group, or VLAN. ThisVLAN can be established to meet a wide variety of organizational or technical needs. All membersof a department can, for example, be gathered into a network group, even if they are distributed overseveral buildings. Colleagues working on the same project can be united in a common VLAN, evenif they belong to different departments in different buildings or even different locations. Other net-work groups can be made invisible to these users. Using Virtual LANs can improve network perfor-mance, limit broadcast storms, minimize security problems and ease the management task.
By means of frame tagging, SysKonnect SK-98xx V2.0 Gigabit Ethernet Adapters can support up to64 IP address assignments in a single network connection. Thus, multiple VLANs can be configuredfor one port. Stations can be accessed from systems in multiple IP sub nets without traversing rout-ers. Additionally, multiple application VLANs can be defined to isolate traffic for performance and se-curity purposes. For this reason, the server can be physically connected to a single switch port butstill belong to several VLANs. The Gigabit Ethernet adapter can receive tagged packets and is ableto tag outgoing packets. The switch the adapter is connected to must support VLAN tagging accord-ing to IEEE 802.1q.
For several operating systems, SysKonnect offers drivers that support VLAN tagging and thus canbe applied for VLAN servers and terminal units.
For more information on Virtual LANs, refer to the White Paper “Virtual Networks”, which can befound on the installation CD-ROM under “White Papers” or on our web site under “Technology”.Also see the corresponding readme files for the respective drivers.
Virtual Cable Tester™ (VCT)The VCT technology utilizes Time Domain Reflectometry (TDR) technology to remotely diagnosethe quality and characteristics of the attached cables. Using this technology it is possible to detectand report potential cabling issues such as cable opens, cable shorts or any impedance mismatch-es in the cable and accurately report - within one meter - the distance to the fault. The VCT technol-ogy enables the IT manager or the end user to quickly identify the failing mechanism and isolate thesource of the problem.
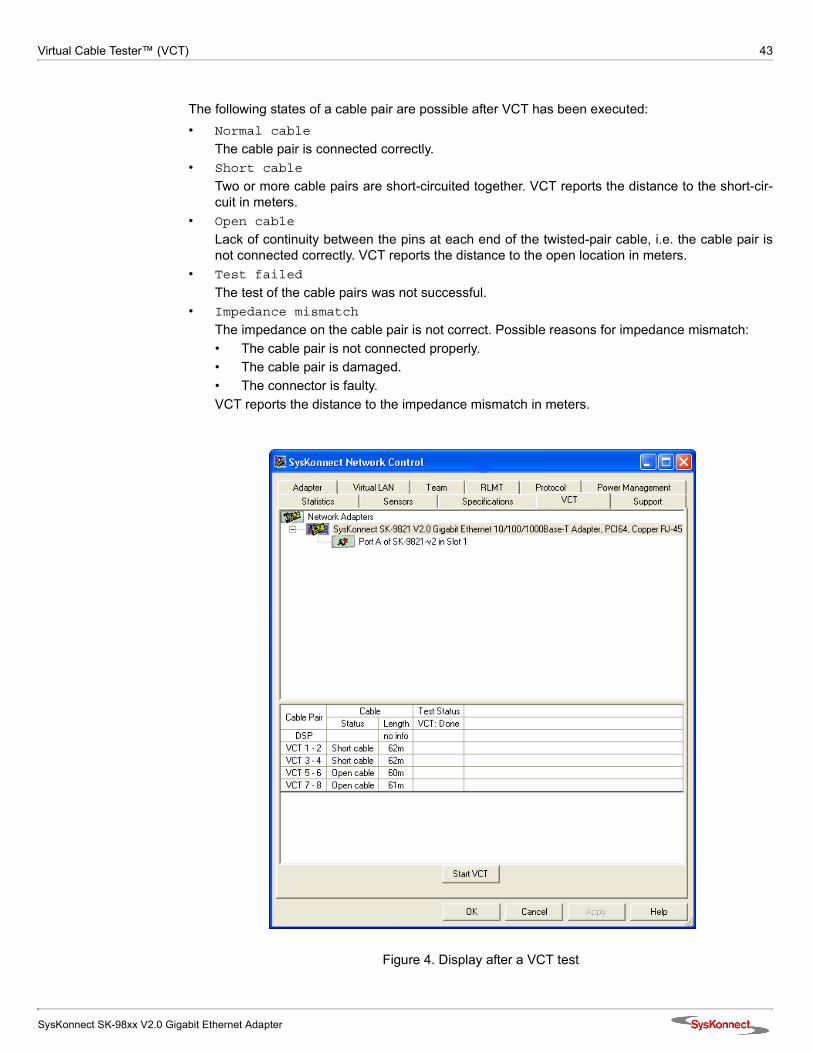
The VCT feature is only available for SysKonnect SK-9821 V2.0 Gigabit Ethernet 10/100/1000Base-T Adapters. If the port of a SysKonnect SK-9821 V2.0 Gigabit Ethernet Adapter is selected in theVCT tab of the SysKonnect Network Control, a table is displayed, which lists the cable pairs, the sta-tus of the corresponding cable pair, the distance to the fault (length), and the status of the test (seefigure 4). If at the selected adapter a link is up, DSP (Digital Signal Processor) is activated, whichreports the speed of the connection and the length of the cable (only if link is at Gigabit speed). VCTcannot be started if the link is active.
SysKonnect SK-98xx V2.0 Gigabit Ethernet Adapter
Virtual Cable Tester™ (VCT) 43
The following states of a cable pair are possible after VCT has been executed:• Normal cable
The cable pair is connected correctly.• Short cable
Two or more cable pairs are short-circuited together. VCT reports the distance to the short-cir-cuit in meters.
• Open cable
Lack of continuity between the pins at each end of the twisted-pair cable, i.e. the cable pair isnot connected correctly. VCT reports the distance to the open location in meters.
• Test failed
The test of the cable pairs was not successful.• Impedance mismatch
The impedance on the cable pair is not correct. Possible reasons for impedance mismatch:• The cable pair is not connected properly.• The cable pair is damaged.• The connector is faulty.VCT reports the distance to the impedance mismatch in meters.
Figure 4. Display after a VCT test

44 5 Features

SysKonnect SK-98xx V2.0 Gigabit Ethernet Adapter
6 Testing the Network AdapterDiagnostics ProgramThe network adapter can be tested with the supplied diagnostics program (running on DOS). Thediagnostics program runs offline, i.e. normal operation of the network adapter can not be main-tained. During testing the link of the tested port will be down, i.e. no data can be transferred. The fol-lowing tests are available:• Simple test without loopback:
This test covers all components but not the port (socket including components for transmitting/receiving the data signals).
• Comprehensive port test with loopback:All components are tested, including the port.
Loopback Test for Fiber AdaptersTo perform the loopback test on fiber adapters, you will need a loopback connector (seefigure 5 "Setup for loopback testing").
Figure 5. Setup for loopback testing
To test the adapter, proceed as follows:
1. Switch off the computer. 2. If the computer is still connected to the data network, unplug the data cable from the network
adapter’s port.
i The tests do not run in a Windows NT DOS box.
i Observe the safety instructions given in section "Safety Instructions".

46 6 Testing the Network Adapter
3. Connect the network adapter as follows:• For the simple test: Insert the protective plugs into the ports.• For the loopback test: Insert the loopback connector into the port.
4. Boot to DOS.Wait until the operating system is loaded and the DOS prompt is displayed.
5. Insert the installation CD-ROM into the CD-ROM drive.6. Go to the appropriate product directory.7. Type sk98diag.8. Press <Enter>.9. From the main menu of the diagnostics program, select one of the following:
• DIAGNOSTICS for the simple test (no loopback)• LOOPB. WRAP PLUG for the loopback test or• LOOPB. PORT TO PORT for the port-to-port test (only with dual link adapters).The various components will now be tested; this will take between one and two minutes. If thetest was successful, the following window (or similar) will be displayed:
Figure 6. Typical screen display after a successful test
You can follow the progress of the test in the right-hand window. Each test is displayed as it isbeing performed (e.g. BOARD REGISTER CHECK).If the test is successful, the word passed is issued at the end of the line and the next test isstarted. If there is a problem, the word failed is issued.If errors are reported, follow the instructions that are displayed.
10. Check the configuration and, if necessary, repeat the test (see section "Failure of a Test").11. To continue testing, press any key.12. To quit the diagnostics program, select EXIT in the main menu.13. Remove the loopback connector from the port.14. (Re)connect the ports to the data network.
If the adapter is not connected immediately to the data network, insert the protective plug for safetyreasons (otherwise laser light may be emitted) and as a protection against dust and dirt.

SysKonnect SK-98xx V2.0 Gigabit Ethernet Adapter
Diagnostics Program 47
Repeater Test for Copper AdaptersFor the SK-982x adapter series the test via wrap plug is not available. However, loopback testingmay be carried out by connecting the adapter to another adapter installed in a second computer run-ning in repeater mode (further known as the “repeater computer”). The computer in which the adapt-er is installed, which is to be tested, is called “test computer”.
To carry out the test, proceed as follows:
1. Install a copper adapter in the “repeater computer”.2. Boot the “repeater computer” to DOS.
Wait until the operating system is loaded and the DOS prompt is displayed.3. Insert the installation CD-ROM into the CD-ROM drive.4. Go to the product directory.5. Type sk98diag.6. Press <Enter>.7. From the main menu of the diagnostics program, select REPEATER MODE.8. Select the port which is to be tested, e.g. A (for single link adapters, only A is available).9. Press <Enter>.
The window “Repeater Mode Port A” is displayed.10. Install a copper adapter in the “test computer”.11. Connect the adapter in the “repeater computer” to the adapter in the “test computer”. Use a cat-
egory 5 cable with RJ-45 plugs.12. Boot the “test computer” to DOS.
Wait until the operating system is loaded and the DOS prompt is displayed.13. Insert the installation CD-ROM into the CD-ROM drive.14. Go to the product directory.15. Type sk98diag.16. Press <Enter>.17. From the main menu of the diagnostics program, select LOOPB. WRAP PLUG.18. Press <Enter>.
When the test was successful, the message “All tests passed successfully” is dis-played.When the test fails, the message “failed” is displayed. The further procedure is described insection "Failure of a Test".
19. Press any key to continue.20. On the “test computer”, quit the diagnostics program with EXIT.21. On the “repeater computer”, quit the diagnostics program with EXIT.

48 6 Testing the Network Adapter
Failure of a Test
Figure 7. Typical error message from the diagnostics program
For a test to be completed successfully, each of the following conditions must be met:• The network adapter operates correctly.• The network adapter is cabled correctly for the test or is equipped with the correct connectors.• The network adapter has been installed correctly in the computer.
The message failed does not necessarily imply that the network adapter is faulty.
If the message failed is issued, proceed as follows:
1. Follow the instructions that are displayed in the window below the list of tests.2. Make sure that the adapter is inserted correctly and the ports are connected properly (connec-
tors are firmly seated, the correct end of the cable is connected).
If it is necessary to install the network adapter again, proceed as follows:
1. Switch off the computer. Observe the safety and handling instructions (see page 11).
2. Remove the computer cover. Follow the instructions in the computer manual.You may need a screwdriver to loosen the screws from the cover.
3. Make sure the network adapter is properly seated in the PCI bus slot on the motherboard. 4. If not, do not remove the network adapter completely but raise it sufficiently to withdraw it from
the PCI bus slot. 5. Carefully realign the bus connector on the network adapter with the PCI bus slot.6. Press the network adapter until it is firmly seated in the slot. 7. Return to step 7 of the loopback test and to step 5 of the repeater test (”Type sk98diag”).8. Repeat the test.
If the defect persists, contact your vendor. If you wish to return faulty material directly toSysKonnect, follow the instructions given in section "Returning an Adapter for Repair".
9. To quit the diagnostics program, select EXIT in the main menu.10. If necessary, remove the loopback connector from the port. 11. (Re)connect the ports to the data network.

SysKonnect SK-98xx V2.0 Gigabit Ethernet Adapter
Additional Functions of the Diagnostics Program 49
Additional Functions of the Diagnostics ProgramChecking Other Displays and DataIn addition to performing the three network adapter tests, the diagnostics program can also read outnetwork adapter-specific data that may be useful for pinpointing the causes of failure.
You can • read sensor data,• read configuration data,• read and write VPD data,• read and write Flash EPROM data.
Main ProgramTo start the main program, proceed as follows:
1. Boot to DOS.Wait for the prompt.
2. Insert the installation CD-ROM into the CD-ROM drive of the computer in which the networkadapter is installed.
3. Type the letter of your CD-ROM drive (e.g. D:)4. Go to the appropriate product directory.5. Type sk98diag.6. Press <Enter>.
The main menu will be displayed:
Figure 8. Diagnostics program, main menu
7. Select the appropriate item from the menu (see figure 8).8. To quit the program, select EXIT in the main menu.
This option is automatically offered for selection if you did not select a menu item previously.

50 6 Testing the Network Adapter
Reading Sensor DataTo read sensor data, proceed as follows:
1. Start the main program (see page 49).2. Select SHOW SENSORS in the main menu.
A separate window will be displayed for the following sensor data: • Temperature of the board• Voltage on the PCI card• Voltage on the PCI I/O lines• Other supply voltagesIn the main menu, SHOW SENSORS changes to HIDE SENSORS.
3. You can close the window by selecting HIDE SENSORS in the main menu.Other windows may be opened while this window is still open, e.g. the window displaying theconfiguration data.
Reading Configuration Data To read configuration data, proceed as follows:
1. Start the main program (see page 49).2. Select SHOW CONFIGURATION in the main menu.
A separate window will be displayed showing:• Device code (Device)• Various vendor codes (Vendor)• Interrupt no. (IRQ)• Cache Line Size (CLS) • Latency (Lat.)• RAM size (RAM)• PCI slot index and size (Slot and Slot size)• PCI bus clock (clk)• MAC address (MAC Addr)• Port type (PMD-Type)• Connector (connector)• Hardware revision (HW Rev)• Chip ID (Chip Id)In the main menu, SHOW CONFIGURATION changes to HIDE CONFIGURATION.
3. You can close the window by selecting HIDE CONFIGURATION in the main menu. Other windows may be displayed while this window is still open, e.g. the window displaying thesensor data.
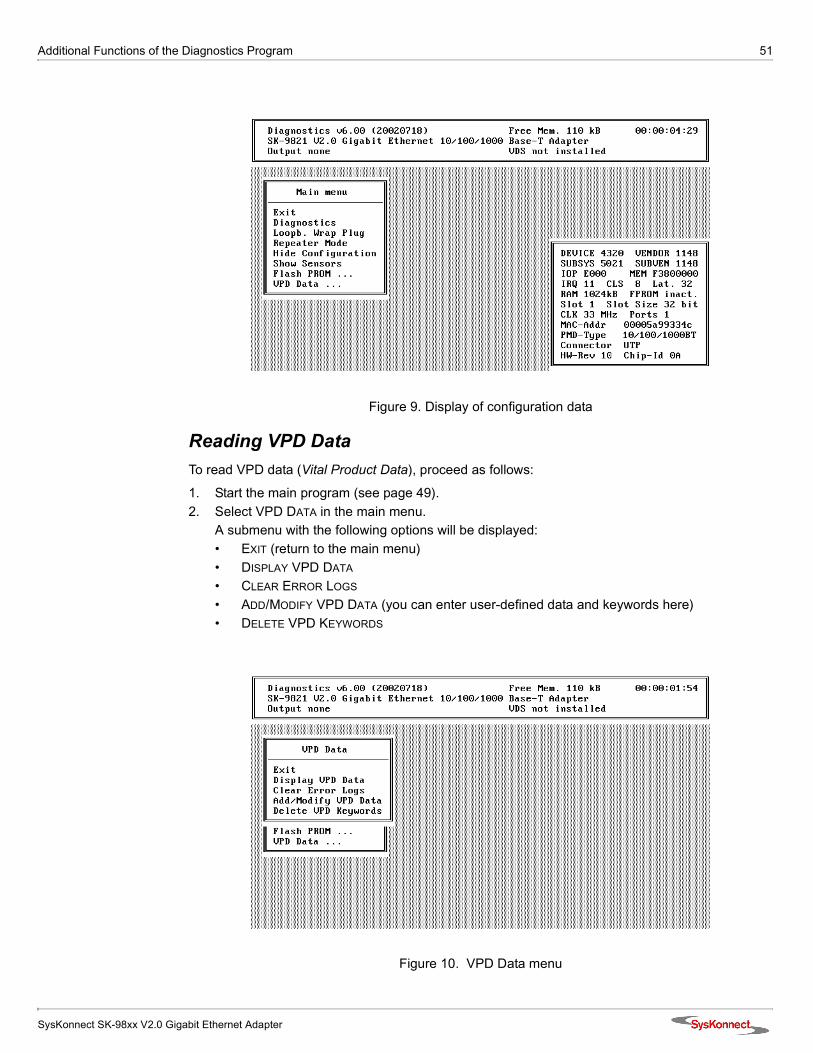
SysKonnect SK-98xx V2.0 Gigabit Ethernet Adapter
Additional Functions of the Diagnostics Program 51
Figure 9. Display of configuration data
Reading VPD DataTo read VPD data (Vital Product Data), proceed as follows:
1. Start the main program (see page 49).2. Select VPD DATA in the main menu.
A submenu with the following options will be displayed:• EXIT (return to the main menu)• DISPLAY VPD DATA
• CLEAR ERROR LOGS
• ADD/MODIFY VPD DATA (you can enter user-defined data and keywords here)• DELETE VPD KEYWORDS
Figure 10. VPD Data menu

52 6 Testing the Network Adapter
3. Select the desired optionor Return to the main menu by selecting EXIT (default option).
Sample Usage of VPD Data/Asset TagExample You want to store the inventory number of the network interface adapter (123-45) in the asset tag.
To store the inventory number, proceed as follows:
1. Look at all the VPD data to determine the code for the asset tag.2. Start the main program (see page 49).3. Select VPD DATA > DISPLAY VPD DATA.
The following screen is displayed:
Figure 11. Display of VPD data
The keyword codes are shown in brackets. Here, the code is YA.4. To return to the VPD DATA menu, press <Esc>.5. Now select ADD > MODIFY VPD DATA.
A dialog window will be displayed.6. Enter the code YA.7. Press <Enter>.
A further dialog window will be displayed.8. Enter the inventory number: Invent. No. 123-45 9. Press <Enter>.10. To return to the VPD DATA menu, press <Esc>.
You can now check the entry. 11. Go to DISPLAY VPD DATA again.

SysKonnect SK-98xx V2.0 Gigabit Ethernet Adapter
Additional Functions of the Diagnostics Program 53
After modifying the asset tag your screen should display the following:
Figure 12. Screen showing updated asset tag
For more information on the diagnostics program, refer to the readme file.
To open the readme file, proceed as follows:
1. Insert the installation CD-ROM into your CD-ROM drive.2. On the start page of the CD-ROM, click DRIVERS.3. Select GIGABIT ETHERNET.4. Select SK-98XX GIGABIT ETHERNET ADAPTERS.
A window showing all Gigabit Ethernet network adapters is displayed.5. Select your network adapter, e.g. SK-9821.6. Click ADAPTER DIAGNOSTICS.
The readme file for the diagnostics program is displayed.

54 6 Testing the Network Adapter
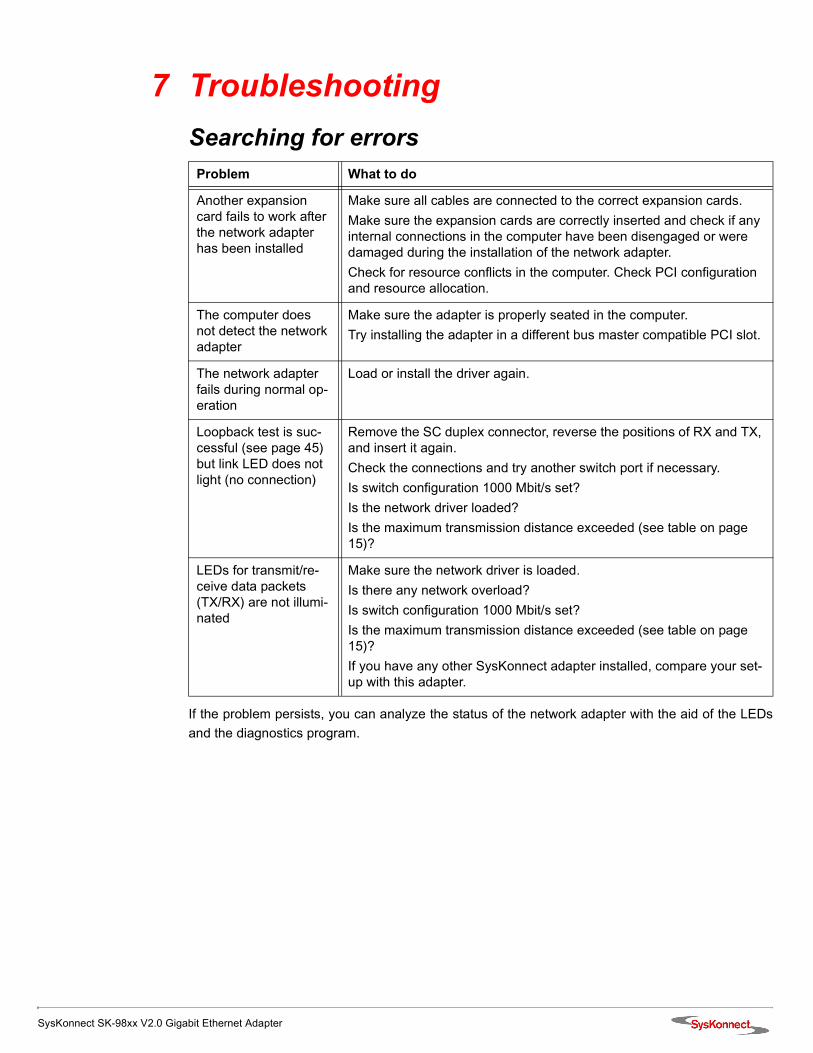
SysKonnect SK-98xx V2.0 Gigabit Ethernet Adapter
7 TroubleshootingSearching for errors
If the problem persists, you can analyze the status of the network adapter with the aid of the LEDsand the diagnostics program.
Problem What to do
Another expansion card fails to work after the network adapter has been installed
Make sure all cables are connected to the correct expansion cards.Make sure the expansion cards are correctly inserted and check if any internal connections in the computer have been disengaged or were damaged during the installation of the network adapter.Check for resource conflicts in the computer. Check PCI configuration and resource allocation.
The computer does not detect the network adapter
Make sure the adapter is properly seated in the computer.Try installing the adapter in a different bus master compatible PCI slot.
The network adapter fails during normal op-eration
Load or install the driver again.
Loopback test is suc-cessful (see page 45) but link LED does not light (no connection)
Remove the SC duplex connector, reverse the positions of RX and TX, and insert it again.Check the connections and try another switch port if necessary.Is switch configuration 1000 Mbit/s set?Is the network driver loaded?Is the maximum transmission distance exceeded (see table on page 15)?
LEDs for transmit/re-ceive data packets (TX/RX) are not illumi-nated
Make sure the network driver is loaded.Is there any network overload?Is switch configuration 1000 Mbit/s set?Is the maximum transmission distance exceeded (see table on page 15)?If you have any other SysKonnect adapter installed, compare your set-up with this adapter.
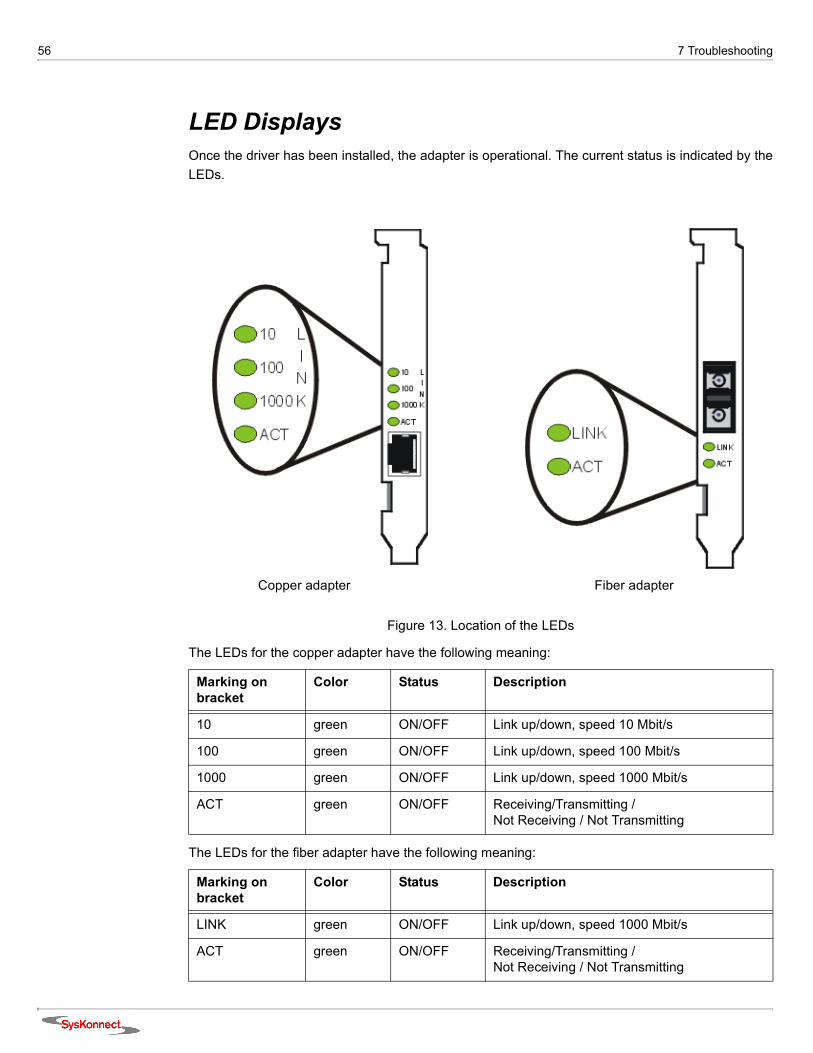
56 7 Troubleshooting
LED DisplaysOnce the driver has been installed, the adapter is operational. The current status is indicated by theLEDs.
Figure 13. Location of the LEDs
The LEDs for the copper adapter have the following meaning:
The LEDs for the fiber adapter have the following meaning:
Marking on bracket
Color Status Description
10 green ON/OFF Link up/down, speed 10 Mbit/s
100 green ON/OFF Link up/down, speed 100 Mbit/s
1000 green ON/OFF Link up/down, speed 1000 Mbit/s
ACT green ON/OFF Receiving/Transmitting / Not Receiving / Not Transmitting
Marking on bracket
Color Status Description
LINK green ON/OFF Link up/down, speed 1000 Mbit/s
ACT green ON/OFF Receiving/Transmitting / Not Receiving / Not Transmitting
Copper adapter Fiber adapter

SysKonnect SK-98xx V2.0 Gigabit Ethernet Adapter
8 Important InformationTechnical SupportIf you encounter any problems, read the relevant sections of the manual and the readme files on theCD-ROM. If you cannot solve your problems, consult our technical support.
If you contact our technical support engineers, have the following information ready: • adapter type• driver version• operating system• configuration of your computer• type of cabling
Our support team can be reached as follows:
Calls received outside office hours in Europe are serviced by an answering machine and will bedealt with as soon as possible.
North/South America, Pacific Rim Europe
Office hours 24 hours support via paging service Mon-Thu 8:00 AM - 6:00 PM Fri 8:00 AM - 03:30 PM (CET)
Phone +1 866 782 2507 (toll free in the USA)+1 408 222 0666(toll number for international callers)+1 408 787 5395 (pager)
+49 7243 502 330
Fax +1 408 752 9029 +49 7243 502 364
WWW http://www.syskonnect.com http://www.syskonnect.com
E-mail [email protected] [email protected]
Address SysKonnect, Inc.A Marvell®Company 700 First AvenueSunnyvale, CA 94089USA
SysKonnect GmbHA Marvell®CompanySiemensstr. 23D-76275 Ettlingen Germany

58 8 Important Information
Returning an Adapter for RepairIf you want to return a faulty product to SysKonnect, follow these steps:
1. Contact us by phone, fax, or e-mail.
We will send you an RMA (Return Material Authorization) form by fax or e-mail.2. Complete the form.3. Return the form to us.
We will send you a unique reference number and inform you if the product is still under war-ranty.
4. Send us the faulty product packed in an antistatic bag, with a copy of the completed formenclosed in its original packaging (or comparable packaging).
5. Write the reference number issued by SysKonnect clearly visible on the outer packaging.
Additional Documentation and UpdatesOn the installation CD-ROM additional information is available, i.e. about other SysKonnect prod-ucts or other language versions of this manual.
To view a document on the CD-ROM, proceed as follows:
1. Insert the installation CD-ROM into your CD-ROM drive.2. On the start page of the CD-ROM, click DOCUMENTATION.
A list with the available manuals is displayed.3. Click the appropriate document.
The PDF file is displayed.
SysKonnect maintains a site on the World Wide Web where you can find the latest information onour product range and our customer support services. The latest drivers are also provided on theSysKonnect web site.
To download the latest drivers from our web site, proceed as follows:
1. Visit our web site: http://www.syskonnect.com.2. Click the button DRIVER LIBRARY.
The latest drivers, sorted by product groups, can be found here.3. Click the appropriate network technology, e.g. GIGABIT ETHERNET.4. Select the product family, e.g. SK-98XX GIGABIT ETHERNET ADAPTER.
North/South America, Pacific Rim European and other countries
Phone +1 866 782 2507 (toll free)+1 408 222 0666 (toll number)
+49 7243 502 476
Fax +1 408 752 9029 +49 7243 502 364
E-mail [email protected] [email protected]
iSysKonnect cannot accept any returned product without an RMA number on the outer packaging.The warranty does not apply to products that have been damaged by electrostatic discharge orinadequate packaging.

SysKonnect SK-98xx V2.0 Gigabit Ethernet Adapter
Technical Specifications 59
The available drivers for this product family are displayed.5. Click the appropriate driver.6. Click the diskette symbol to download the driver.
Technical Specifications
Network interface standard
IEEE 802.3z, IEEE 802.3ab, IEEE 802.3x, IEEE 802.1p, IEEE 802.1q, IEEE 802.3, IEEE 802.3u, IEEE 802.3ac, IEEE 802.3ad
Supported buses 32- and 64-bit PCI/PCI-X slots with clock speeds from 16 MHz (PCI 33) to 66 MHz (PCI 66)
Bus width 64-bit; supports 32-bit operation in 32-bit PCI slot
RAM 128 KB RAM on-chip buffer
Flash EPROM 128 KB
Serial EEPROM Maximum size: 2 KBEEPROM contains VPD
Power management Advanced Power Management according to PCI Bus Power Manage-ment Interface Specification, Revision 1.1 or later and Network Device Class Power Management Reference Specification V2.0
Safety standards Europe: EN60950 – IEC 60950 – VDE 0805USA/Canada: cULus listed accessory (UL 60950, CSA C22.2)International: CB certification
Safety standard Transceiver
USA: Transceiver complies with U.S. 21CFR, 1040.10, 1040.11
Approved use SK-98xx V2.0 adapters are intended for use with UL-listed Personal Computers
EMC standards Europe: EN55022; IEC – CISPR-22 Class BEN 55024USA: FCC, CFR 47 Part 15, Declaration of Conformity, Class B
Power consumption SysKonnect SK-9821 V2.0 Gigabit Ethernet 10/100/1000Base-T, RJ-45:@ + 5V / VCC_I/O: max. 7.5W@ +3.3V(aux)/+5V: max. 375mA SysKonnect SK-9843 V2.0 Gigabit Ethernet 1000Base-SX, SC:@ + 5V / VCC_I/O: max. 7.5W
Measures (max.) 167.7mm x 64.41mm
Temperature range Operation: 0°C to +50°CStorage: -20°C to +70°C
Relative humidity Operation: 30% to 80% non-condensingStorage: 10% to 95% non-condensing
Warranty 5 years

60 8 Important Information

SysKonnect SK-98xx V2.0 Gigabit Ethernet Adapter
Appendix A. License and Warranty InformationThe Americas, Asia, Australia, New Zealand, PacificDear Customer,
if you acquired your SysKonnect product in the UNITED STATES, CANADA or any other country in the AMERICAS, ASIA, AUSTRALIA, NEWZEALAND, PACIFIC, the following license and purchase agreement applies to you.
This is a legal agreement between you, the end user and SysKonnect Incorporation, a California U.S.A. Incorporation (SysKonnect Inc.).
SysKonnect Inc. License and Purchase AgreementBy opening the sealed disk package and taking possession of the hardware, you are agreeing to be bound by the terms of this Agreement. Ifyou do not agree to the terms of this Agreement, promptly return the unopened and unused disk package and hardware with the accompanyingitems (including all written materials and other accessories) to the place of purchase for a full refund.
Grant of Software LicenseThis SysKonnect Inc. License Agreement (License) permits you to use one copy of the SysKonnect Inc. software product acquired with thisLicense (“SOFTWARE”) on any single computer, provided the SOFTWARE is in use on only one computer at any time. If you have multipleLicenses for the SOFTWARE, then at any time, you may have as many copies of the SOFTWARE in use as you have Licenses. The SOFT-WARE is “in use” on a computer when it is loaded into the temporary memory (i.e. RAM) or installed into the permanent memory (e.g. hard diskor other storage device) of that computer, except that a copy installed on a network server for the sole purpose of distribution to other comput-ers is not “in use”. If the anticipated number of users of the SOFTWARE will exceed the number of applicable Licenses, then you must have areasonable mechanism or process in place to assure that the number of persons using the SOFTWARE concurrently does not exceed thenumber of Licenses. If the SOFTWARE is permanently installed on the hard disk or other storage device of a computer (other than a networkserver) and one person uses that computer more than 80% of the time it is in use, then that person may also use the SOFTWARE on a portableor home computer.
CopyrightThe SOFTWARE is owned by SysKonnect Inc. or its suppliers and is protected against copying by copyright laws, international treaty provi-sions and other national laws.
If the SOFTWARE is not copy protected you may either make one copy of the SOFTWARE solely for backup or archival purposes, or transferthe SOFTWARE to a single hard disk provided you keep the original solely for backup or archival purposes.
You may not copy the Product Manual(s) or written materials accompanying the SOFTWARE or HARDWARE.
Other RestrictionsYou may not rent or lease the SOFTWARE or HARDWARE, but you may transfer your rights under this SysKonnect Inc. License and PurchaseAgreement on a permanent basis provided you transfer all copies of the SOFTWARE and all written materials, and the recipient agrees to theterms of this Agreement. You may not reverse engineer, decompile or disassemble the SOFTWARE. Any transfer must include the most recentupdate and all prior versions.
HardwareSysKonnect Inc. warrants, that the hardware will be delivered free from defect and in working condition. SysKonnect Inc. does not assume lia-bility for nor warrant damage to the hardware after delivery. SysKonnect also does not warrant total applicability for specific applications or cus-tomer Network environments.
Limited Warranty for Hardware and SoftwareLimited WarrantySysKonnect Inc. warrants that the SOFTWARE will perform substantially in accordance with the accompanying Product Manual(s) for a periodof 90 days from the date of receipt.
SysKonnect warrants
that NETWORK INTERFACE CARDS will be free from defects in materials and workmanship under normal use and service for a period of 5years from the date of receipt, that NETWORK INFRASTRUCTURE COMPONENTS (e.g., hubs, switches, concentrators) will be free fromdefects in materials and workmanship under normal use and service for a period of 2 years from the date of receipt, and other HARDWARE fora period of 6 months from the date of receipt respectively.
This warranty is given by SysKonnect Inc. as producer of the PRODUCT; possible legal warranty or liability claims against the dealer, whomyou have acquired your SOFTWARE or HARDWARE product from, shall neither replaced by nor limited through this warranty.
Customer RemediesSysKonnect's entire liability and your exclusive remedy shall be, at SysKonnect's option, either return of the price paid, or repair or replacementof the SOFTWARE or HARDWARE that does not meet SysKonnect's Limited Warranty and which is returned to SysKonnect Inc. with a copy ofyour receipt. This Limited Warranty is void if failure of the SOFTWARE or HARDWARE has resulted from accident, abuse, or misapplication.Any replacement SOFTWARE will be warranted by SysKonnect Inc. only for the remainder of the original warranty period or 30 days, which-ever is longer. Any replacement HARDWARE will be warranted for the remainder of the original warranty period or 6 months, whichever is

62 Appendix A. License and Warranty Information
longer.
No other WarrantiesSysKonnect Inc. disclaims all other warranties or liabilities with respect to the SOFTWARE, the HARDWARE, the accompanying Product Man-ual(s) and other written materials and any other accessories.
No Liability for Consequential DamagesSysKonnect Inc. does not warrant the software and hardware for a specific application, nor does SysKonnect Inc. accept any consequentialdamages due to the use of the hardware or software. SysKonnect Inc. and its suppliers shall not be liable for any other damages whatsoever(including, without limitation, damages for loss of business profits, business interruption, loss of business information or data, property loss orother financial loss), arising out of the use of or the inability to use this SysKonnect Inc. product, even if SysKonnect Inc. has been advised ofthe possibility of such damages. In any case, SysKonnect's entire liability shall be limited to the amount actually paid by you for the product.
OtherThis agreement is governed by the procedural and substantive laws of the State California, U.S.A. UN Trade Laws shall not be applicable inany case.
Should individual stipulations of this Agreement be or become invalid, this invalid stipulation shall be replaced by a stipulation, which is as closeas possible to the invalid stipulation.
Should you have any questions concerning this Agreement, or if you desire to contact SysKonnect Inc. for any reason, please use the addressinformation enclosed in this product or write to: SysKonnect Inc., A Marvell®Company, 700 First Avenue, Sunnyvale, CA 94089.
U.S. Government UseUse, duplication, or disclosure by the United States Government is subject to restrictions as set forth in FAR § 52.227-14 (June 1987) AlternateIII(g)(3) (June 1987), FAR § 52.227-19 (June 1987), or DFARS § 52.227-7013 (c)(1)(!!) (June 1988), as applicable. Contractor / Manufacturer isSysKonnect, Inc., A Marvell®Company, 700 First Avenue, Sunnyvale, CA 94089.
EuropeDear Customer,
if you acquired your SysKonnect product in EUROPE, the following license and purchase agreement applies to you: This is a legal agreementbetween you, the end user and SysKonnect GmbH, incorporated in Ettlingen/Federal Republic of Germany.
SysKonnect License and Purchase AgreementBy opening the sealed disk package and taking possession of the hardware, you are agreeing to be bound by the terms of this Agreement. Ifyou do not agree to the terms of this Agreement, promptly return the unopened and unused disk package and hardware with the accompanyingitems (including all written materials and other accessories) to the place of purchase for a full refund.
Grant of Software LicenseThis SysKonnect License Agreement (License) permits you to use one copy of the SysKonnect software product acquired with this License(“SOFTWARE”) on any single computer, provided the SOFTWARE is in use on only one computer at any time. If you have multiple Licenses forthe SOFTWARE, then at any time, you may have as many copies of the SOFTWARE in use as you have Licenses. The SOFTWARE is “in use”on a computer when it is loaded into the temporary memory (i.e. RAM) or installed into the permanent memory (e.g. hard disk or other storagedevice) of that computer, except that a copy installed on a network server for the sole purpose of distribution to other computers is not “in use”.If the anticipated number of users of the SOFTWARE will exceed the number of applicable Licenses, then you must have a reasonable mecha-nism or process in place to assure that the number of persons using the SOFTWARE concurrently does not exceed the number of Licenses. Ifthe SOFTWARE is permanently installed on the hard disk or other storage device of a computer (other than a network server) and one personuses that computer more than 80% of the time it is in use, then that person may also use the SOFTWARE on a portable or home computer.
CopyrightThe SOFTWARE is owned by SysKonnect or its suppliers and is protected against copying by copyright laws, international treaty provisionsand other national laws.
If the SOFTWARE is not copy protected you may either make one copy of the SOFTWARE solely for backup or archival purposes, or transferthe SOFTWARE to a single hard disk provided you keep the original solely for backup or archival purposes.
You may not copy the Product Manual(s) or written materials accompanying the SOFTWARE or HARDWARE.
Other RestrictionsYou may not rent or lease the SOFTWARE or HARDWARE, but you may transfer your rights under this SysKonnect License and PurchaseAgreement on a permanent basis provided you transfer all copies of the SOFTWARE and all written materials, and the recipient agrees to theterms of this Agreement. You may not reverse engineer, decompile or disassemble the SOFTWARE. Any transfer must include the most recentupdate and all prior versions.
HardwareThe risk passes to you, the end user, upon taking possession (hand over) of the HARDWARE. Total qualities were not warranted.

SysKonnect SK-98xx V2.0 Gigabit Ethernet Adapter
Deutschland, Schweiz, Österreich, Liechtenstein 63
Limited Warranty for Hardware and SoftwareLimited WarrantySysKonnect warrants that the SOFTWARE will perform substantially in accordance with the accompanying Product Manual(s) for a period of90 days from the date of receipt if you have created the required technical preconditions.
SysKonnect warrants that NETWORK INTERFACE CARDS will be free from defects in materials and workmanship under normal use and ser-vice for a period of 5 years from the date of receipt, that NETWORK INFRASTRUCTURE COMPONENTS (e.g., hubs, switches, concentrators)will be free from defects in materials and workmanship under normal use and service for a period of 2 years from the date of receipt, and otherHARDWARE for a period of 6 months from the date of receipt respectively.
Any implied warranties on the SOFTWARE are limited to 90 days, to 5 years on the NETWORK INTERFACE CARDS, to 2 years on the NET-WORK INFRASTRUCTURE COMPONENTS and to 6 months on all other hardware. This warranty is given by SysKonnect as producer of thePRODUCT; possible legal warranty or liability claims against the dealer, whom you have acquired your SOFTWARE or HARDWARE productfrom, shall neither replaced by nor limited through this warranty.
Customer RemediesSysKonnect's entire liability and your exclusive remedy shall be, at SysKonnect's option, either
return of the price paid, or repair or replacement of the SOFTWARE or HARDWARE that does not meet SysKonnect's Limited Warranty andwhich is returned to SysKonnect with a copy of your receipt. This Limited Warranty is void if failure of the SOFTWARE or HARDWARE hasresulted from accident, abuse, or misapplication. Any replacement SOFTWARE will be warranted by SysKonnect only for the remainder of theoriginal warranty period or 30 days, whichever is longer. Any replacement HARDWARE will be warranted for the remainder of the original war-ranty period or 6 months, whichever is longer.
No other WarrantiesSysKonnect disclaims all other warranties or liabilities with respect to the SOFTWARE, the HARDWARE, the accompanying Product Manual(s)and other written materials and any other accessories.
No Liability for Consequential DamagesSysKonnect does not warrant the software and Hardware for a specific application, nor does SysKonnect accept any consequential damagesdue to the use of the hardware or software. SysKonnect and its suppliers shall not be liable for any other damages whatsoever (including, with-out limitation, damages for loss of business profits, business interruption, loss of business information or data, property loss or other pecuniaryloss), arising out of the use of or the inability to use this SysKonnect product, even if SysKonnect has been advised of the possibility of suchdamages. In any case, SysKonnect's entire liability shall be limited to the amount actually paid by you for the product.
OtherThis agreement is governed by the procedural and substantive laws of the Federal Republic of Germany. UN Trade Laws shall not be applica-ble in any case. Place of litigation is Karlsruhe, FRG, as far as this can be agreed upon operatively in this way.
Should individual stipulations of this Agreement be or become invalid, this invalid stipulation shall be replaced by a stipulation, which is as closeas possible to the invalid stipulation.
Should you have any questions concerning this Agreement, or if you desire to contact SysKonnect for any reason, please use the addressinformation enclosed in this product or write to: SysKonnect GmbH, Siemensstrasse 23, D-76275 Ettlingen.
Deutschland, Schweiz, Österreich, LiechtensteinVerehrte Kundin, verehrter Kunde
wenn Sie Ihr SysKonnect Produkt in DEUTSCHLAND, in der SCHWEIZ, in ÖSTERREICH oder in LIECHTENSTEIN erworben haben, gilt fürSie der folgende Lizenz- und Kaufvertrag. Dies ist ein rechtsgültiger Vertrag zwischen Ihnen, dem Endanwender, und der SysKonnect GmbHmit Sitz in Ettlingen/Bundesrepublik Deutschland.
SysKonnect Lizenz- und KaufvertragDurch Öffnen der versiegelten Diskettenpackung und durch die Inbesitznahme der Hardware erklären Sie sich an die Bestimmungen der nach-folgenden Vereinbarung gebunden. Wenn Sie mit den Bestimmungen dieses Vertrages nicht einverstanden sind, geben Sie bitte die Disketten-packung und die Hardware ungeöffnet und unbenutzt mit den Begleitgegenständen (einschließlich aller schriftlichen Unterlagen und demsonstigen Zubehör) unverzüglich gegen volle Rückerstattung des Preises an die Stelle zurück, von der Sie sie bezogen haben.
Einräumung einer Software-LizenzDiese SysKonnect Lizenzvereinbarung (Lizenz) gibt Ihnen die Berechtigung, eine Kopie des SysKonnect Software Produktes, das mit dieserLizenz (Software) erworben wurde, auf einem Einzelcomputer unter der Voraussetzung benutzen, dass die Software zu jeder beliebigen Zeitauf nur einem einzigen Computer verwendet wird. Wenn Sie Mehrfachlizenzen für die Software erworben haben, dürfen Sie immer nur höchs-tens so viele Kopien in Benutzung haben, wie Sie Lizenzen besitzen. Die Software ist auf einem Computer “in Benutzung”, wenn Sie in denZwischenspeicher (d.h., RAM) geladen oder in einem Permanentspeicher (z.B. einer Festplatte oder einer anderen Speichervorrichtung)dieses Computers gespeichert ist, mit der Ausnahme, dass eine Kopie, die auf einem Netzserver zu dem alleinigen Zweck der Verteilung anandere Computer installiert ist, nicht “in Benutzung” ist. Wenn die voraussichtliche Zahl der Benutzer der Software die Zahl der erworbenen Liz-enzen übersteigt, müssen Sie angemessene Mechanismen oder Verfahren bereithalten, um sicherzustellen, dass die Zahl der Personen, diedie Software gleichzeitig benutzen, nicht die Zahl der Lizenzen übersteigt. Wenn die Software permanent auf einer Festplatte oder eineranderen Speichervorrichtung eines Computers, der kein Netzserver ist, installiert wird und eine einzige Person diesen Computer zu mehr als80 % der Zeit benutzt, die er in Benutzung ist, darf diese eine Person die Software auch auf einem tragbaren Computer oder einem Heimcom-puter benutzen.
64 Appendix A. License and Warranty Information
Urheberrecht Die Software ist Eigentum von SysKonnect oder deren Lieferanten und ist durch Urheberrechtsgesetze, internationale Verträge und anderenationale Rechtsvorschriften gegen Kopieren geschützt.
Wenn die Software nicht mit einem technischen Schutz gegen Kopieren ausgestattet ist, dürfen Sie entweder eine einzige Kopie der Softwareausschließlich für Sicherungs- oder Archivierungszwecken machen die Software auf eine einzige Festplatte übertragen, sofern Sie das Originalausschließlich zu Sicherungs- und Archivierungszwecken aufbewahren.
Sie dürfen weder die Handbücher des Produktes noch anderes schriftliches Begleitmaterial zur Software oder Hardware kopieren.
Weitere Beschränkungen Sie dürfen die Software oder Hardware weder vermieten noch verleihen, aber Sie dürfen die Rechte aus diesem SysKonnect Lizenz- undKaufvertrag auf Dauer auf einen anderen übertragen, vorausgesetzt, dass Sie alle Kopien der Software und das gesamte schriftliche Begleit-material übertragen und der Empfänger sich mit den Bestimmungen dieses Vertrages einverstanden erklärt. Zurückentwickeln (Reverse Engi-neering), Dekompilieren und Entassemblieren der Software sind nicht gestattet. Eine Übertragung muß die letzte aktuelle Version (Update) undalle früheren Versionen umfassen.
Hardware Mit der Inbesitznahme (Übergabe) dieser Hardware geht die Gefahr auf Sie, den Endanwender über. Eigenschaften wurden nicht zugesichert.
Beschränkte Garantie für Hardware und SoftwareBeschränkte GarantieSysKonnect garantiert für einen Zeitraum von 90 Tagen ab Empfangsdatum, dass die Software, soweit die technischen Voraussetzungen hier-für von Ihnen geschaffen wurden, im wesentlichen gemäß der begleitenden Dokumentation arbeitet. SysKonnect garantiert für
Netzwerkadapterkarten für einen Zeitraum von 5 Jahren,
Infrastrukturkomponenten (z.B. Konzentratoren, Hubs, Switches) für einen Zeitraum von 2 Jahren und die sonstige Hardware für einen Zei-traum von 6 Monaten ab Empfangsdatum, dass die gelieferte Hardware bei normaler Benutzung und Wartung frei von Material- oder Verarbei-tungsfehlern ist. Die Garantie ist bezüglich der Software auf 90 Tage, bezüglich der Netzwerkadapter auf 5 Jahre für Infrastrukturkomponentenauf 2 Jahre und bezüglich der sonstigen Hardware auf 6 Monate beschränkt. Diese Garantie wird von SysKonnect als Hersteller des Produktesübernommen; etwaige gesetzliche Gewährleistungs- oder Haftungsansprüche gegen den Händler, von dem Sie Ihr Exemplar der Softwareoder Hardware bezogen haben, werden hierdurch weder ersetzt noch beschränkt.

SysKonnect SK-98xx V2.0 Gigabit Ethernet Adapter
Appendix B. Compliance StatementsFCC Declaration of Conformity Compliance Infor-mation Statement - Class BNOTE: This equipment has been tested and found to comply with the limits for a “Class B” digital device, pursuant to Part 15 of the FCC rules.These limits are designed to provide reasonable protection against harmful interference in a residential installation. This equipment generates,uses and can radiate radio frequency energy and, if not installed and used in strict accordance with the instructions, may cause harmful inter-ference to radio communications. However, there is no guarantee that interference will not occur in a particular installation. If this equipmentdoes cause harmful interference to radio or television reception, which can be determined by turning the equipment off and on, the user isencouraged to try to correct the interference by one or more of the following measures:
Reorient or relocate the receiving antenna.
Increase the separation between equipment and the receiver.
Connect the equipment into an outlet on a circuit different from that to which the receiver is connected.
Consult the dealer or an experienced radio/TV technician for help.
The user may find the following booklet, prepared by the Federal Communications Commission, helpful:
“How to Identify and Resolve Radio-TV Interference Problems”.
This booklet is available from the U.S. Government Printing Office, Washington, DC 20402 Stock Number 004-000-00345-4.
SysKonnect is not responsible for any radio or television interference caused by unauthorized modifications of this equipment or the substitu-tion or attachment of connecting cables and equipment other than those specified by SysKonnect. The correction of interference caused bysuch unauthorized modification, substitution or attachment will be responsibility of the user.
VCCI Statement (Japan)

Headquarters
SysKonnect GmbH
A Marvell®Company
Siemensstrasse 23
D-76275 Ettlingen
Germany
Phone:
Support:
Fax:
+ 49 7243 502 100
+ 49 7243 502 330
+ 49 7243 502 989
E-mail: [email protected] our web sitewww.syskonnect.com
Americas, Canada,
and Pacific Rim
SysKonnect, Inc.
700 First Avenue
Sunnyvale, CA 94089
A Marvell®Company
USA
Sales:
Support:
Fax:
+ 1 800 716 3334
+ 1 408 222 0809
+ 1 866 782 2507
+ 1 408 222 0666
+ 1 408 752 9040
E-mail: [email protected]
Europe, Middle East,
and Africa
SysKonnect Ltd.
55 Henley Drive
Frimley Green, Camberley
Surrey, Gu16 6NF
A Marvell®Company
United Kingdom
Phone:
Fax:
+ 44 1 252 836 467
+ 44 1 252 836 537
E-mail: [email protected]