Embed Size (px)
Citation preview

System Center 2012 R2
Lab 4: IT Service
Management
Hands-On Lab | Step-by-Step Guide
For the VMs use the following credentials:
Username: Contoso\Administrator
Password: Passw0rd!
Version: 1.5.5
Last updated: March 28, 2014
Please share any feedback with the IT Camps Planning Team: [email protected]

Copyright © 2014 by Microsoft Corporation. All rights reserved.
4 - IT Service Management 90 minutes optional (1:30 total)
1. SCSM: IT Service Management Components (15 mins)
2. SCSM: Manage Service Levels (25 mins)
3. SCSM: Manage Incidents (25 mins)
4. SCSM: Manage Change Requests (25 mins)
4.1 - SCSM: IT Service Management Components
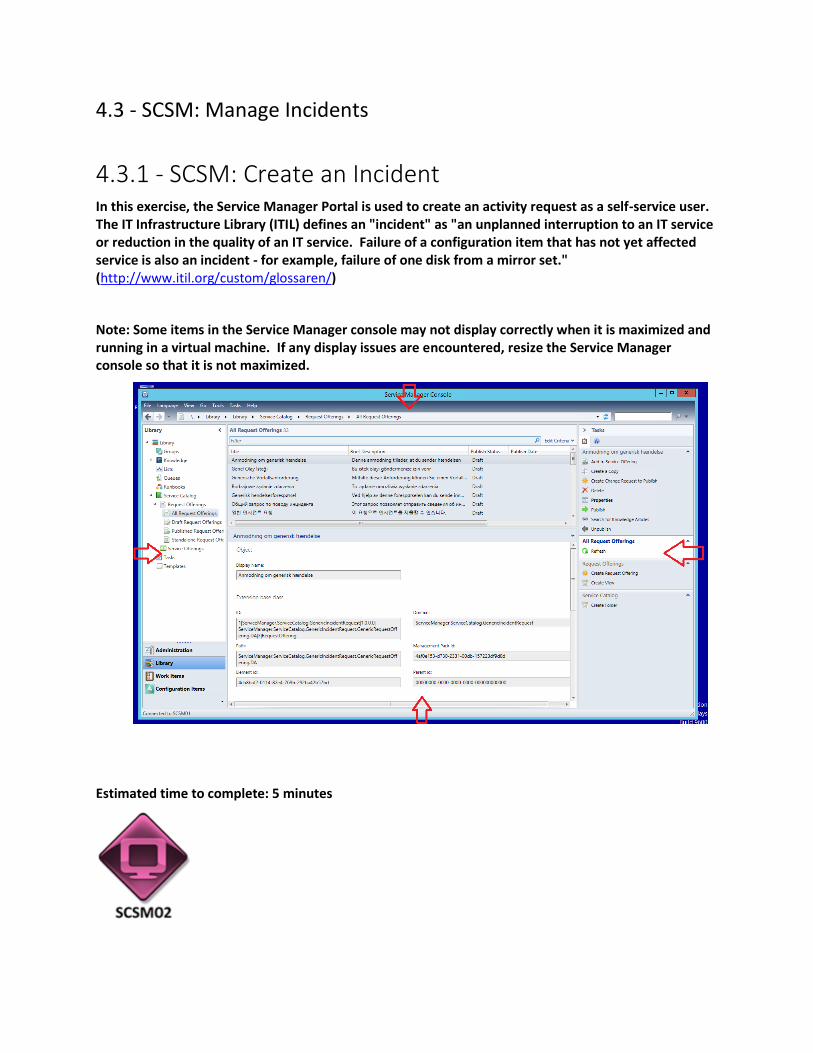
4.1.1 - SCSM: Introduction to Service Manager In this exercise, the Service Manager console is used to browse the Administration, Library, Work Items, and Configuration Items workspaces. Service Manager is used for both IT Service Management (ITSM) and self-service capabilities.
Estimated time to complete: 15 minutes
Perform the following on SCSM01
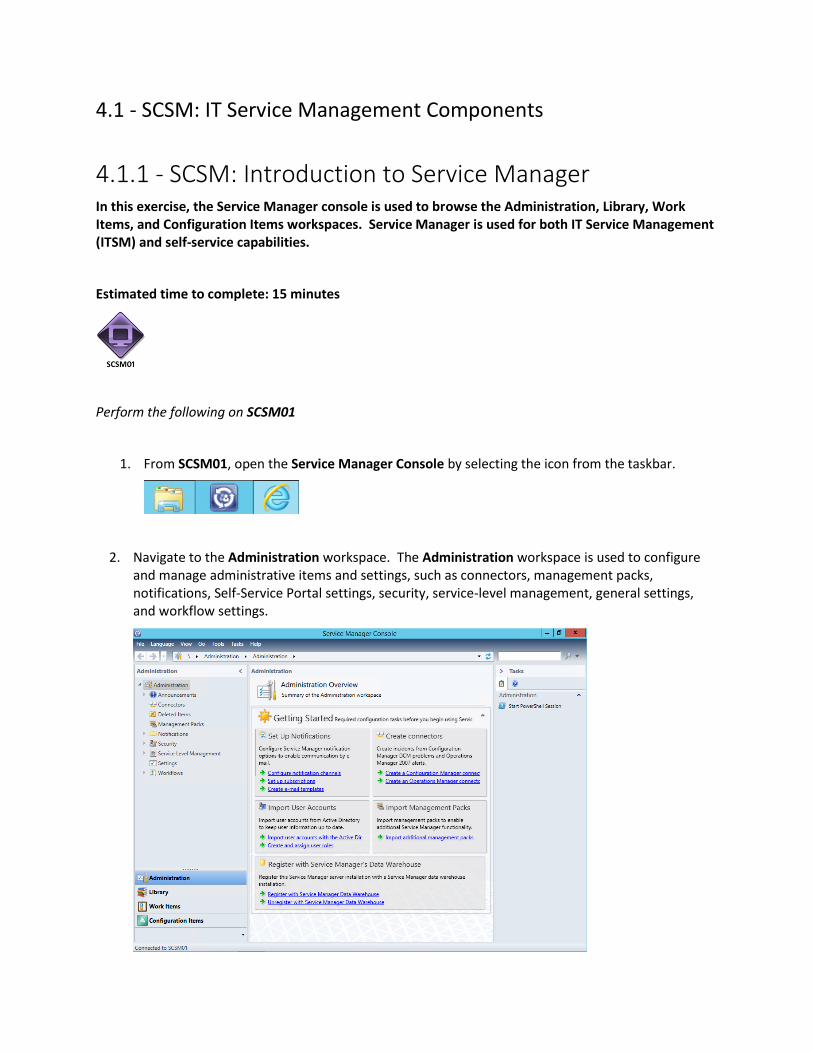
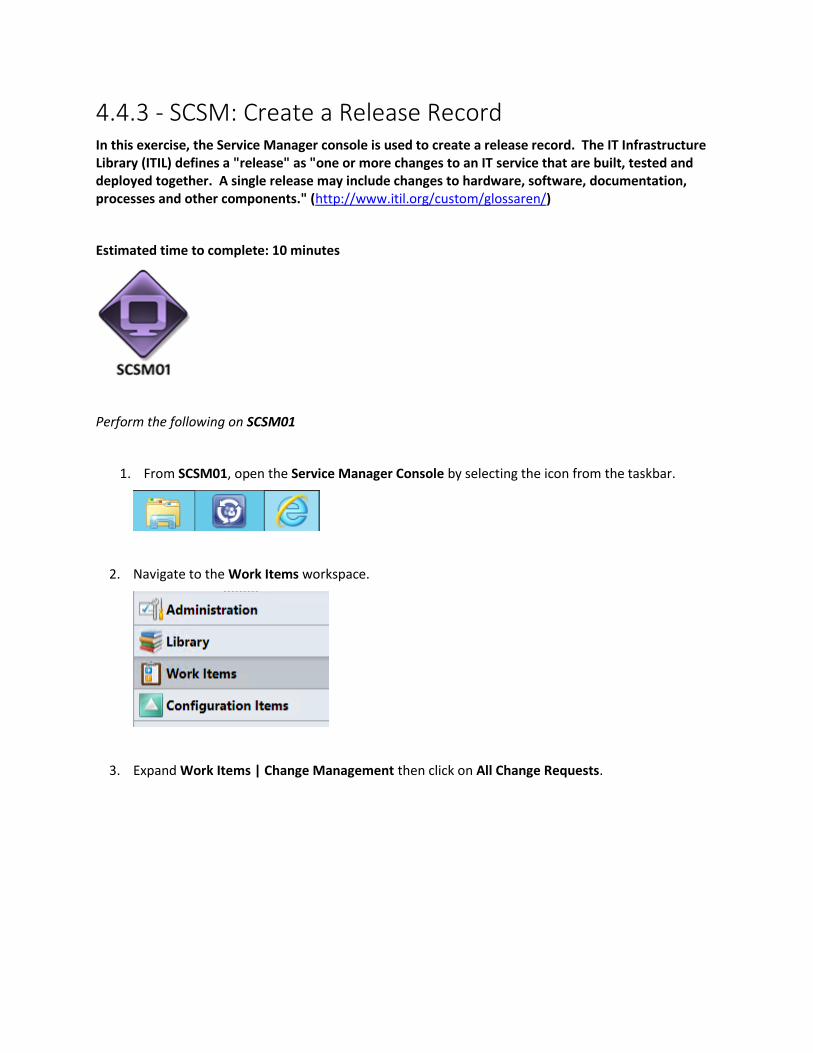
1. From SCSM01, open the Service Manager Console by selecting the icon from the taskbar.
2. Navigate to the Administration workspace. The Administration workspace is used to configure and manage administrative items and settings, such as connectors, management packs, notifications, Self-Service Portal settings, security, service-level management, general settings, and workflow settings.

3. Expand Notifications and select Templates. New Email Notifications can be created here and existing templates can be reviewed.
4. Click Connectors. Connectors are used to import data as configuration items from Active Directory Domain Services (AD DS), System Center Configuration Manager, System Center 2012 - Orchestrator, System Center 2012 – Virtual Machine Manager (VMM), and System Center Operations Manager.
5. Expand Security and click User Roles. In System Center 2012 – Service Manager, the security rights that allow users to access or update information are defined in a user role profile. A user role profile is a named collection of access rights, and it usually corresponds to an employee’s business responsibilities. Each user role profile controls access to such artifacts as knowledge articles, work items (incidents, change requests), authoring, administration, and other credentials.
6. Click Settings. Here various settings relating to services can be set.
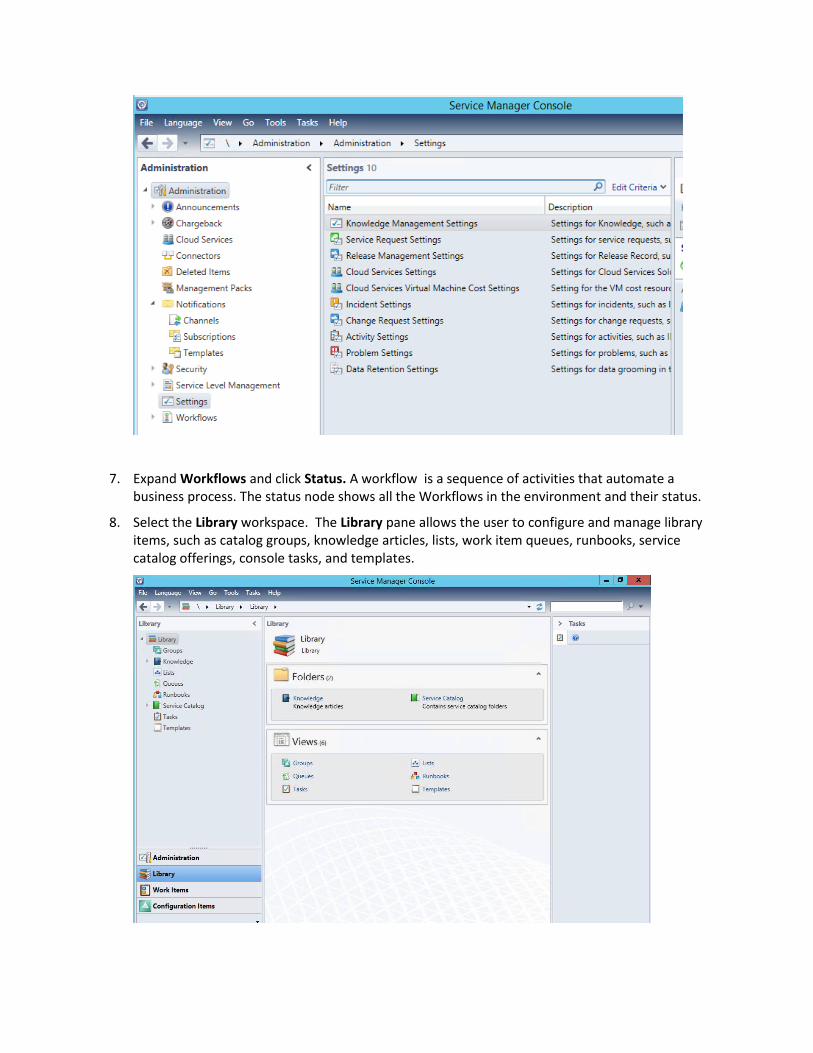
7. Expand Workflows and click Status. A workflow is a sequence of activities that automate a business process. The status node shows all the Workflows in the environment and their status.
8. Select the Library workspace. The Library pane allows the user to configure and manage library items, such as catalog groups, knowledge articles, lists, work item queues, runbooks, service catalog offerings, console tasks, and templates.

9. Select Lists. This node should be used to manage lists.
10. Click Runbooks. Runbooks contain the instructions for an automated task or process. The individual steps throughout a runbook are called activities. Within the Runbook, additional controls provide information and instructions to control the sequence of activities in the Runbook.
11. Expand Service Catalog then expand Request Offerings and click All Request Offerings. Request offerings are catalog items that describe the item, assistance, or action that is available to end users in the service catalog in System Center 2012 – Service Manager. Request offerings are normally placed in logical groups of service offerings. Both service offerings and their request offerings are available to Self-Service Portal users when the status of the offerings is set to Published and if end users have been assigned a corresponding Service Manager user role. Only users who have been assigned a user role associated with a catalog group that contains catalog items can use the Self-Service Portal to access the service catalog.
12. Expand Service Offerings and click All Service Offerings. Service offerings are logical groups of request offerings. For a service offering to appear in the Self-Service Portal, each service offering must have at least one request offering added to it. After a service offering and a request offering are published, it is a straightforward process to associate them as a collection.

13. Select the Work Items workspace to open the Work Items pane. The Work Items workspace will be used for creating and managing work items, such as activities, change requests, incidents, problem records, release records and service requests.
14. Click Activity Management. This node is used to approve a review activity, complete or fail a manual activity and skip a failed activity.
15. Click Change Management. This node is used to create a new change request, add related items to a change request, add Manual activities to a change request, edit a change request, unblock a failed change request and close a change request.
16. Click Incident Management. This node is used to create a parent incident from an incident form, link an open incident to a parent incident, resolve a parent incident, reactivate a resolved parent incident, view a parent incident from a child incident, link a new incident to a parent incident, manually create a new incident, change an existing incident, contact a user from an incident form, create an incident view and personalize it and resolve and close an incident.

17. Click Problem Management. This node is used to create and edit problem records, resolve problem records and related incidents automatically and link an incident or change request to a problem record.
18. Click Release Management. This node is used to create a release record, promote a release record to a parent release record, demote a parent release record to a child release record, link a child release record to the current release record, unlink a child release record from the current release record, create a build configuration item, create an environment configuration item, add release package information to a release record, chose changes to deploy, plan release activities, skip a failed activity and determine status and progress for a change request in the release record.
19. Click Service Request Fulfillment. This node shows services requests submitted through the Service Manager Self-Service Portal (SMPortal). It can manage service requests, create a service request using the Service Manager console, approve and complete a service request using activities, cancel a service request, close a service request and view service request details.
20. From the Navigation pane, click Configuration Items.
21. The Configuration Items pane allows the user to create and manage configurations items, such as builds, business services, computers, build environments, printers, software, software updates, and Service Manager users.

22. Click Computers. In this node of the Configuration Items workspace, user can perform tasks that are common to all configuration items.
23. Expand Computers and select All Windows Computers. This node is used to inventory all machines in the environment.
Perform the following on SCSM02
24. From SCSM02, open the Service Manager Portal by selecting the Internet Explorer icon from the taskbar.

25. If the site does not open, browse to http://SCSM02:81/SMPortal/SitePages/Service%Catalog.aspx. One or two prompts may appear. Log in with a username of contoso\Developer and a password of Passw0rd!
26. Note that the site may already be open. If so, look on the Home page, in the upper right corner, to ensure that it is logged in as contoso\Developer. If not, log out and log back in using the correct credentials.
27. While on the Home menu click List view to display customized IT service offerings that have been published by the IT Department.
28. From the menu on the left, click Help Articles. This page would display any articles published by the IT department. In this lab, this page is blank.
29. From the menu on the left, click My Requests. This page would display any requests previously made by this user. In this lab, this page is currently blank.
30. From the menu on the left, click My Activities. This page would display any actions and tasks that the user needs to perform. In tis lab, this page is currently blank.

4.2 - SCSM: Manage Service Levels
4.2.1 - SCSM: Create a Group & Queue In this exercise, the Service Manager console is used to create a group and queue. In Service Manager a group is used as a container of similar objects, such as SQL Servers. A queue is used to dynamic group similar work items that meet a specific criteria. In this exercise incidents related to SQL Server will be placed in the same queue.
Note: Some items in the Service Manager console may not display correctly when it is maximized and running in a virtual machine. If any display issues are encountered, resize the Service Manager console so that it is not maximized.
Estimated time to complete: 10 minutes
Perform the following on SCSM01
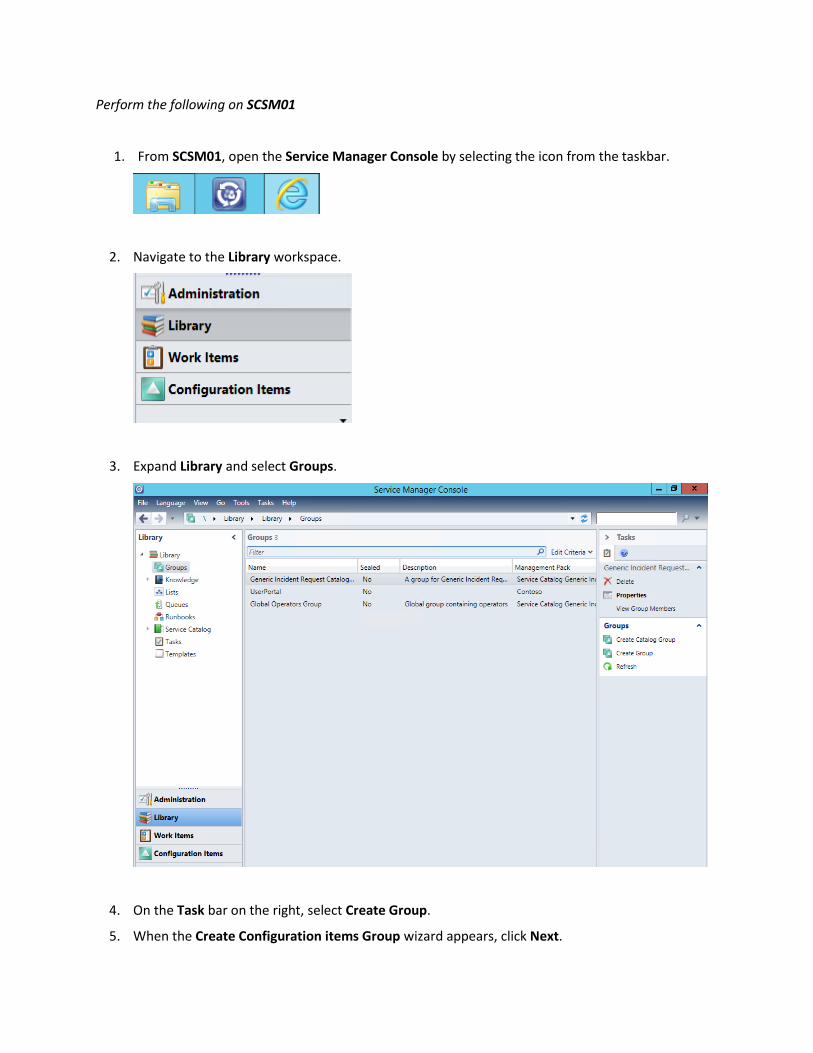
1. From SCSM01, open the Service Manager Console by selecting the icon from the taskbar.
2. Navigate to the Library workspace.
3. Expand Library and select Groups.
4. On the Task bar on the right, select Create Group.
5. When the Create Configuration items Group wizard appears, click Next.
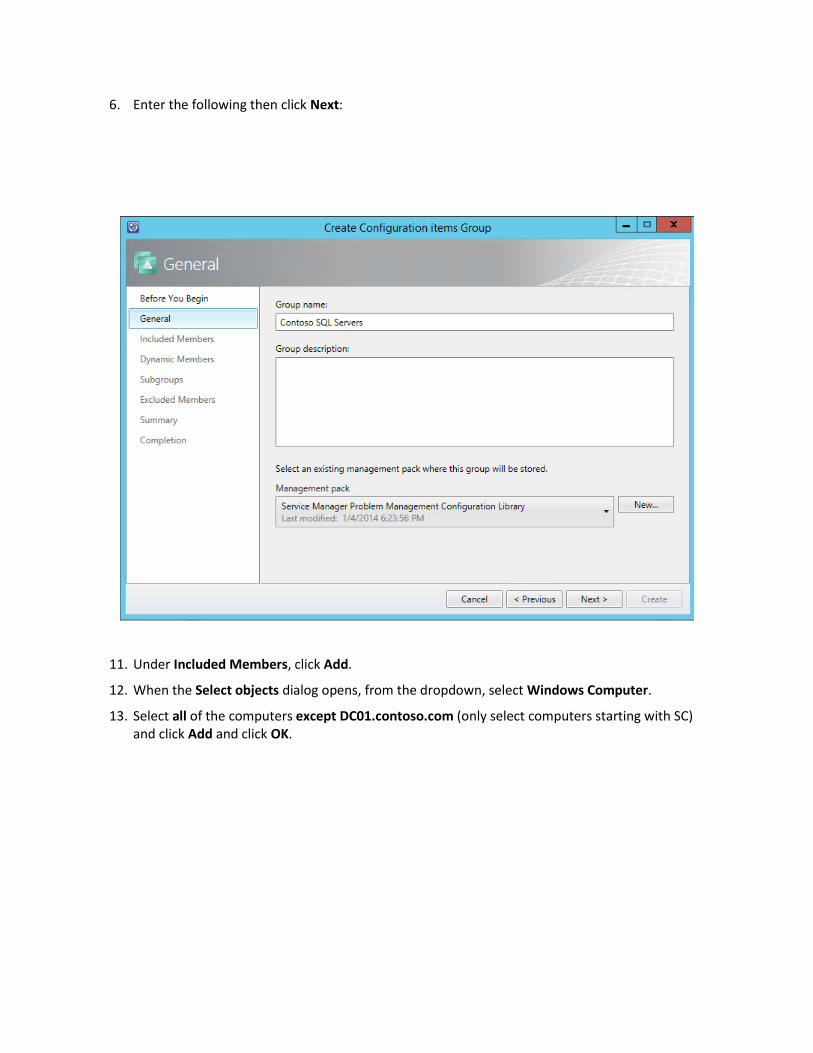
6. Enter the following then click Next:
7. Group name: 8. Contoso SQL Servers
9. Management pack:
10. Service Manager Problem Management Configuration Library
11. Under Included Members, click Add.
12. When the Select objects dialog opens, from the dropdown, select Windows Computer.
13. Select all of the computers except DC01.contoso.com (only select computers starting with SC) and click Add and click OK.

14. On the Included Members page, click Next.
15. On the Dynamic Members page, select the ellipses (…) and in the filter, type Windows Server then select Windows Server and click OK.
16. Return to the Dynamic Members page. Under Available Properties select Display Name. Click Add.
17. Under Criteria where it says Display Name, select the dropdown that says Contains. Select starts with.
18. In the dialog box to the right, which is surrounded with a red border, enter the characters SC. This means that all new Windows Server computers which are added that have a name which begins with SC are for System Center, will be added to this group because they contain a SQL server.

19. Click Next.
20. On the Subgroups page, click Next.
21. On Excluded Members, click Next.
22. On the Summary tab, ensure that all of the items match the screenshot below and click Create.

23. On the Confirmation page click Close.
24. Wait for the groups page to reload and note the newly created group for Contoso SQL Servers.
25. From the left navigation page, select Library > Queues.
26. From the Tasks pane select Create Queue.

27. On the Create a Queue wizard on the Before You Begin screen click Next.
28. From the General tab, under Queue name enter: SQL Server Items.
29. Under Description, enter All Items and tasks related to SQL server.
30. Under Work Item type select the ellipsis (…)
31. On the Select a class page, select Problem and click OK.
32. On the management pack dropdown select Service Manager Problem Management Configuration Library.
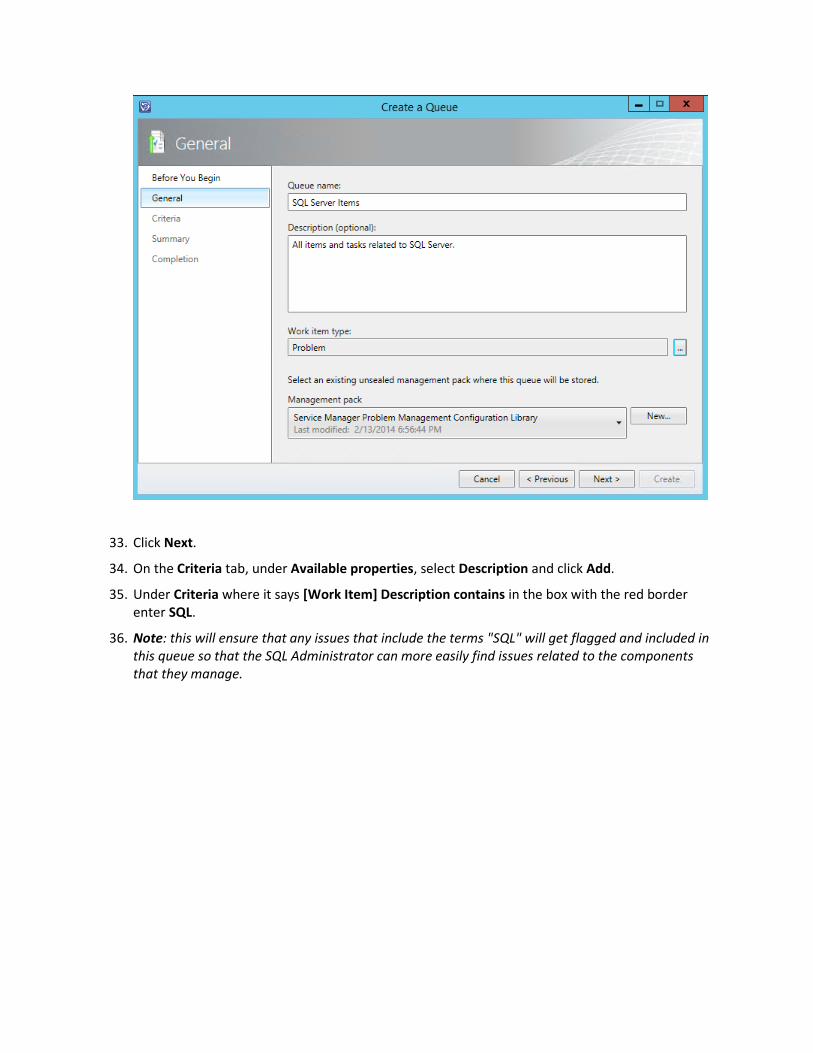
33. Click Next.
34. On the Criteria tab, under Available properties, select Description and click Add.
35. Under Criteria where it says [Work Item] Description contains in the box with the red border enter SQL.
36. Note: this will ensure that any issues that include the terms "SQL" will get flagged and included in this queue so that the SQL Administrator can more easily find issues related to the components that they manage.

37. Click Next.
38. On the Summary screen review the settings and click Create.
39. On the Completion screen click Close.
40. On the Library workspace remain on the Queues page and wait for it to refresh. The SQL Server Items in the queue is now visible.

4.2.2 - SCSM: Create a Calendar & Metric In this exercise, the Service Manager console is used to create a calendar and metric. In Service Manager a calendar is used to define work days, hours and holidays to create a work schedule for IT to resolve incidents and fulfill service requests. A metric is used to define time metrics against a calendar item, corresponding to a service level objective. A time metric is the measurement between start and end dates.
Estimated time to complete: 5 minutes
Perform the following on SCSM01
1. From SCSM01, open the Service Manager Console by selecting the icon from the taskbar.
2. Navigate to the Administration workspace.
3. Expand Administration > Service Level Management. Select the Calendar node.

4. From the Tasks pane select Create Calendar.
5. Under Title enter SQL Admin Schedule.
6. Under Working days and hours, next to Work Day select: Monday/Tuesday/Wednesday.
7. Under Start time enter 8:00AM and under End time enter 6:00PM.
8. Under Holidays click Add.
9. Under Name enter New Year's Day.
10. Under Date select January 1st of the next year and click OK.

11. Click OK to close the calendar object.
12. Once it's closed return to the Calendar view and note that the new calendar object has been created which is the work schedule of the SQL Administrator: SQL Admin Schedule.
13. Navigate to Administration > Service Level Management > Metric.
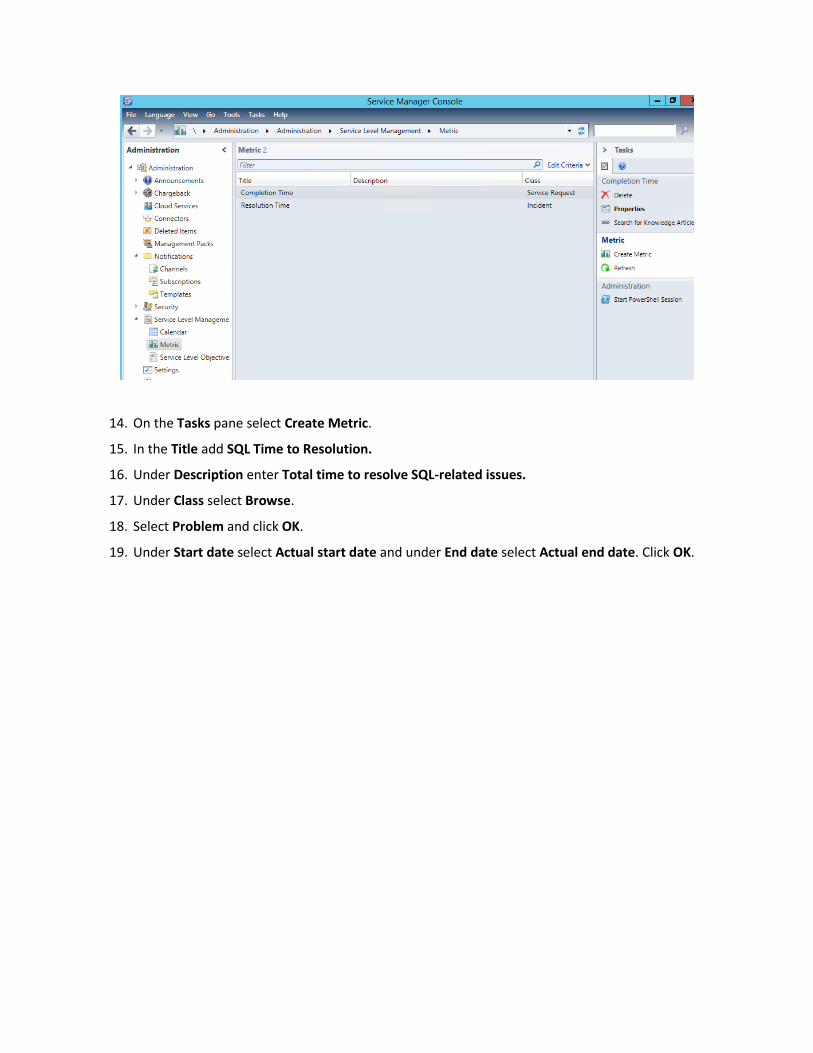
14. On the Tasks pane select Create Metric.
15. In the Title add SQL Time to Resolution.
16. Under Description enter Total time to resolve SQL-related issues.
17. Under Class select Browse.
18. Select Problem and click OK.
19. Under Start date select Actual start date and under End date select Actual end date. Click OK.

20. Return to the Metric view and note SQL Time to Resolution is now visible.

4.2.3 - SCSM: Create a Service Level Objective In this exercise, the Service Manager console is used to create a service level objective. This creates relationships between a queue and a service level, and defines the relationship between a calendar item and a time metric. This provides IT with time-based goal to complete the task and meet the service level objective.
Estimated time to complete: 10 minutes
Perform the following on SCSM01
1. From SCSM01, open the Service Manager Console by selecting the icon from the taskbar.
2. Navigate to the Administration workspace.
3. Navigate to Administration > Service Level Management > Service Level Objectives.

4. From the Tasks pane select Create Service Level Objective.
5. On the Before You Begin screen review the information and click Next.
6. In the Title enter SQL Server Resolution SLA.
7. Under Description enter Service goal to resolve all SQL server issues.
8. Under Class select Problem. Click OK.
9. Under Management pack ensure that Service Manager Problem Management Configuration Library is selected.
10. Ensure that the Enabled check box is selected and click Next.
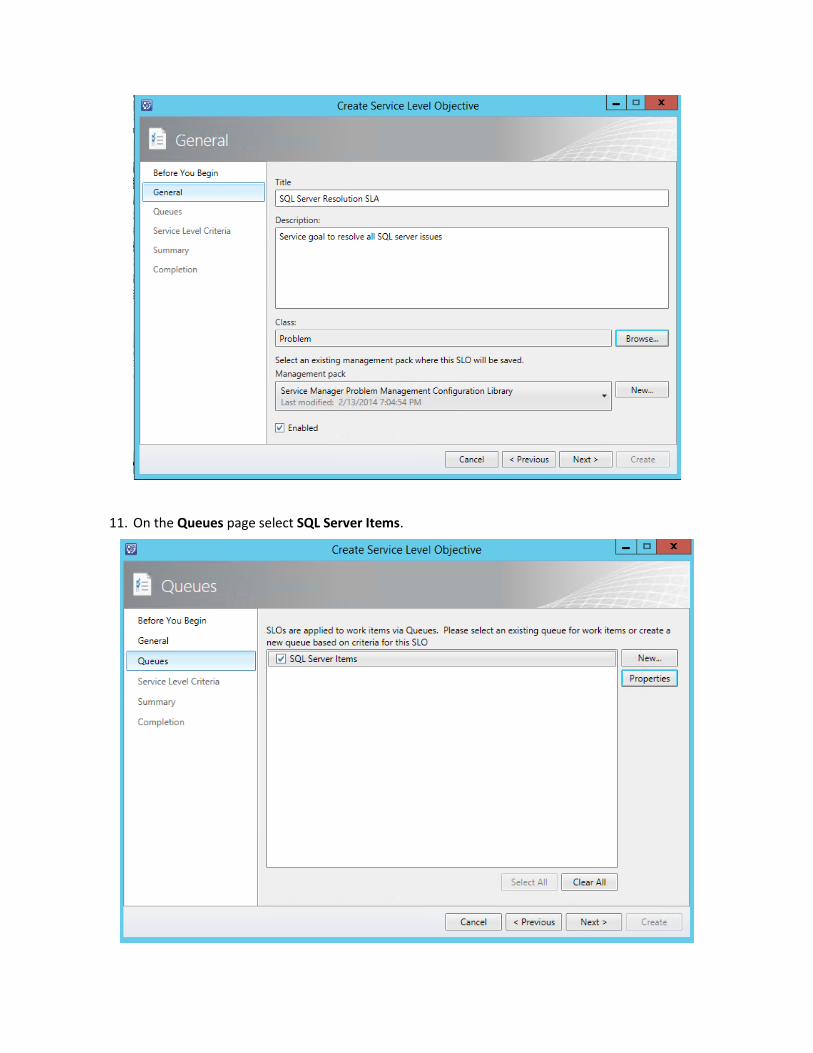
11. On the Queues page select SQL Server Items.

12. Click Properties.
13. Review the information and click OK.
14. Click Next.
15. On the Service Level Criteria page, under Calendar select SQL Admin Schedule.
16. Under Metric ensure that SQL Time to Resolution is selected.
17. Under Warning Threshold change the time to 12 hours. Click Next.
18. On the Summary screen, review the settings and click Create.
19. On the Completion screen click Close.
20. In the Service Level Objectives view note the newly created service level objective. Select it and from the Tasks pane click Enable.
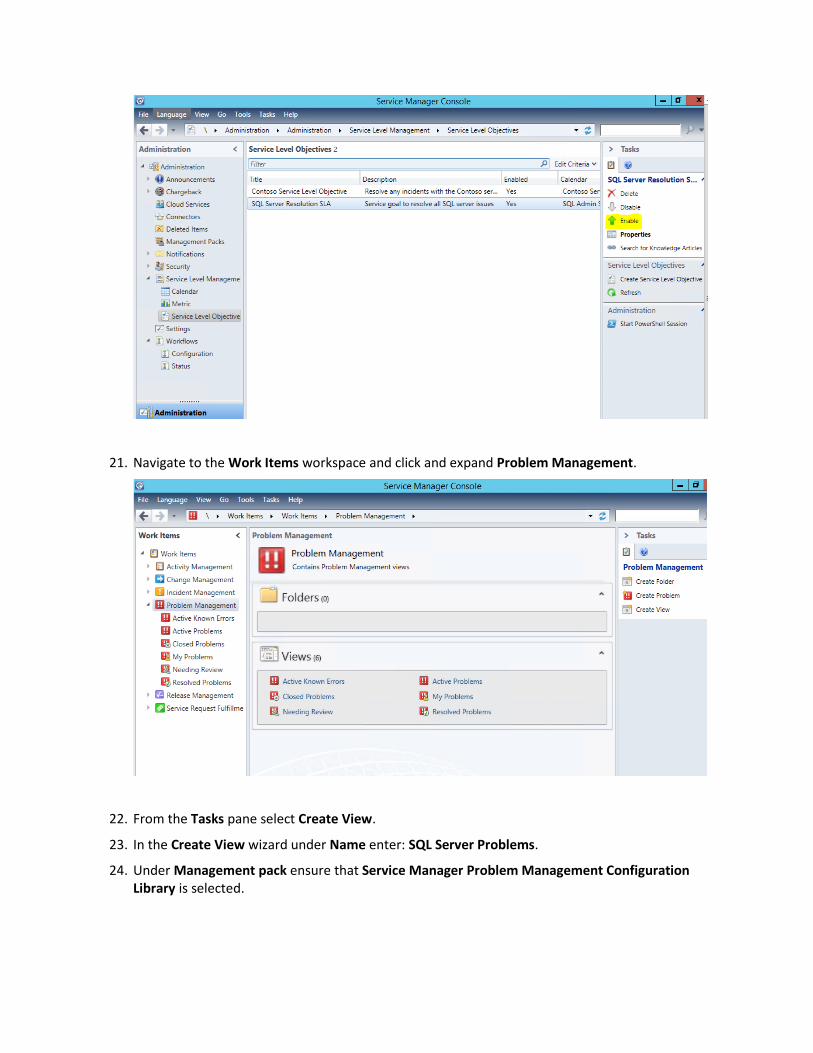
21. Navigate to the Work Items workspace and click and expand Problem Management.
22. From the Tasks pane select Create View.
23. In the Create View wizard under Name enter: SQL Server Problems.
24. Under Management pack ensure that Service Manager Problem Management Configuration Library is selected.

25. Scroll down and under Criteria under Advanced Search under Search for objects of a specific class: click the Browse button.
26. In the upper-right drop-down that says Frequently used basic classes, change that to All basic classes.
27. In the Type to filter box, enter SQL and click the search icon. Select Contoso SQL Servers and click OK.

28. Scroll down to Display. Under Display select Display Name, Full Name, Name, Notes, Object Status.

29. Click OK.
30. Once the dialog box closes, under the Work Items > Problem Management view, a new view will appear for SQL Server Problems.
31. Select SQL Server Problems and note that the group of Contoso SQL Servers appears. This has connected the SQL Server Problems to Possible SQL Servers.
4.3 - SCSM: Manage Incidents
4.3.1 - SCSM: Create an Incident In this exercise, the Service Manager Portal is used to create an activity request as a self-service user. The IT Infrastructure Library (ITIL) defines an "incident" as "an unplanned interruption to an IT service or reduction in the quality of an IT service. Failure of a configuration item that has not yet affected service is also an incident - for example, failure of one disk from a mirror set." (http://www.itil.org/custom/glossaren/)
Note: Some items in the Service Manager console may not display correctly when it is maximized and running in a virtual machine. If any display issues are encountered, resize the Service Manager console so that it is not maximized.
Estimated time to complete: 5 minutes

Perform the following on SCSM02
1. From SCSM02, open the Service Manager Portal by selecting the Internet Explorer icon from the taskbar.
2. If the site does not open, browse to http://SCSM02:81/SMPortal/SitePages/Service%Catalog.aspx. One or two prompts may appear. Log in with a username of contoso\Developer and a password of Passw0rd
3. The site may already be open. If so, look on the Home page, in the upper right corner, to ensure that it is logged in as contoso\Developer. If not, log out and log back in using the correct credentials.
4. Wait for the Server Manager Portal to load. This will take a minute to complete.
5. From the upper right corner, click the list view button.

6. Under Request name select Generic Incident Request.
7. In the upper right corner of the Generic Incident Request page click the Go to request button.
8. On the Generic Incident Request page in the Please enter the title for the issue text box enter: SQL Server performance issue.
9. In the Please describe the symptoms of the issue in details text box enter: Contoso SQL Server running slowly, please investigate.
10. In the Please select a category of the issue drop down select: Enterprise Application Problems.
11. In the How urgent is the issue drop down select Medium.
12. In the Please enter alternate contact information if needed text box enter: [email protected]
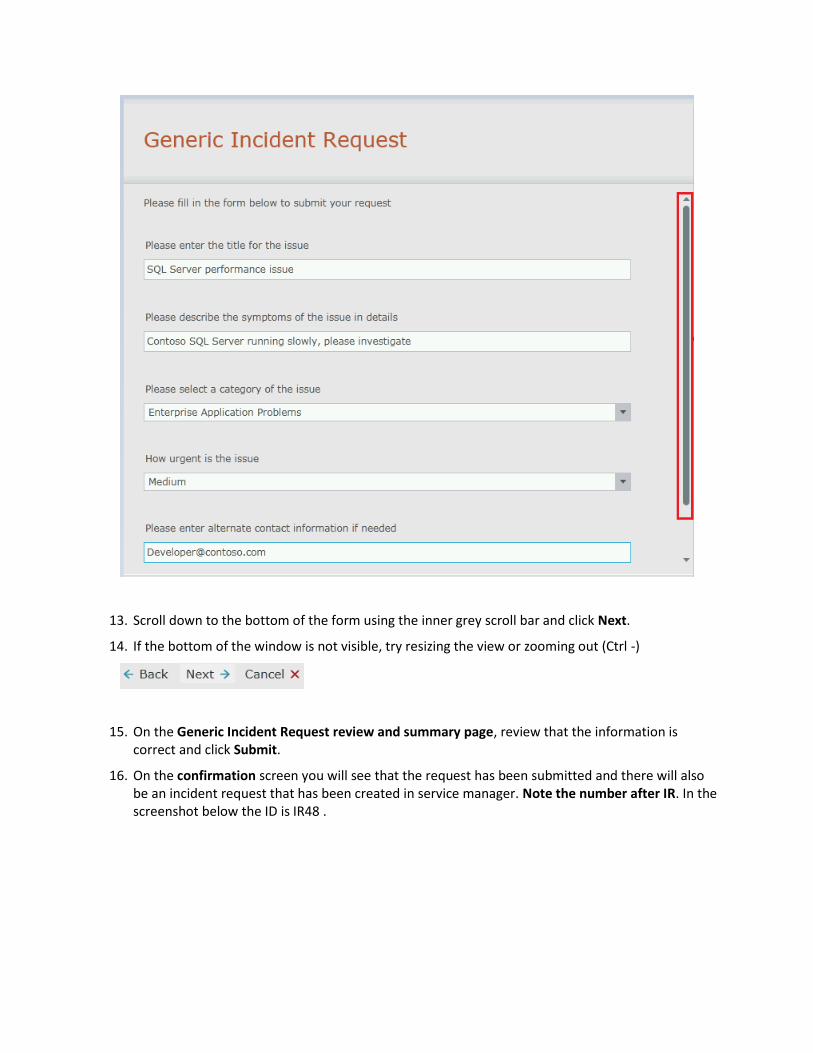
13. Scroll down to the bottom of the form using the inner grey scroll bar and click Next.
14. If the bottom of the window is not visible, try resizing the view or zooming out (Ctrl -)
15. On the Generic Incident Request review and summary page, review that the information is correct and click Submit.
16. On the confirmation screen you will see that the request has been submitted and there will also be an incident request that has been created in service manager. Note the number after IR. In the screenshot below the ID is IR48 .

17. Click View my requests.
18. Once the My Request page loads, note under SQL Server performance issue the status of the request is Active.

4.3.2 - SCSM: Review an Incident In this exercise, the Service Manager console is used to create an activity request. The IT Infrastructure Library (ITIL) defines an "activity" as "a set of actions designed to achieve a particular result. Activities are usually defined as part of processes or plans, and are documented in procedures." (http://www.itil.org/custom/glossaren/)
Estimated time to complete: 5 minutes
Perform the following on SCSM01
1. From SCSM01, open the Service Manager Console by selecting the icon from the taskbar.
2. Navigate to the Work Items workspace.
3. From the Work Items workspace expand Incident Management and select All Open Incidents.

4. Select the incident request that was created in the previous exercise. It should match the ID number that was noted earlier. In this example it is ID IR48.
5. Under tasks click Edit to open the request.
6. Review the settings on the general tab. For Support group select the drop down and click Tier 2.
7. For Assigned to select the ellipses (…) button.
8. On the Select users dialog under username select Tier2 and click OK.

9. Under Primary owner select the ellipses button.
10. On the Select users dialog under User Name select Administrator and click OK.
11. Under Affected Services click Add… and select Operations Manager Management Group and click Add then click OK.

12. Under Affected Items click Add… then select DC01.contoso.com, click Add and then select SCOM01 and click Add. Click OK.
13. Click Apply.
14. Select the Resolution tab from the top menu.
15. In the right column under Tasks click Assign then select Assign to Me.
16. Under Time Worked adjust the hours to 1 hour and click Add.

17. Click Apply then click OK.
18. On the Work Items workspace navigate to Incident Management | Assigned To Me. The incident should now appear in the center display pane.
19. In the right column under Tasks select Request User Input.
20. On the Request User Input dialog under Message type The SQL Server is slow because it running out of free capacity. Please confirm SQL Server can be taken offline at 18:00 tonight. Click OK.


4.3.3 - SCSM: Provide Incident Information In this exercise, the self-service user enters more information about the incident. After reviewing the information, the administrator acknowledges the resolution and updates the incident.
Estimated time to complete: 5 minutes
Perform the following on SCSM02
1. From SCSM02, open the Service Manager Portal by selecting the Internet Explorer icon from the taskbar.
2. If the site does not open, browse to http://SCSM02:81/SMPortal/SitePages/Service%Catalog.aspx. One or two prompts may appear. Log in with a username of contoso\Developer and a password of Passw0rd!
3. The site may already be open. If so, look on the Home page, in the upper right corner, to ensure that it is logged in as contoso\Developer. If not, log out and log back in using the correct credentials.
4. From the menu on the left select My Requests then select SQL Server performance issue. If the data does not appear wait a minute, then click refresh.
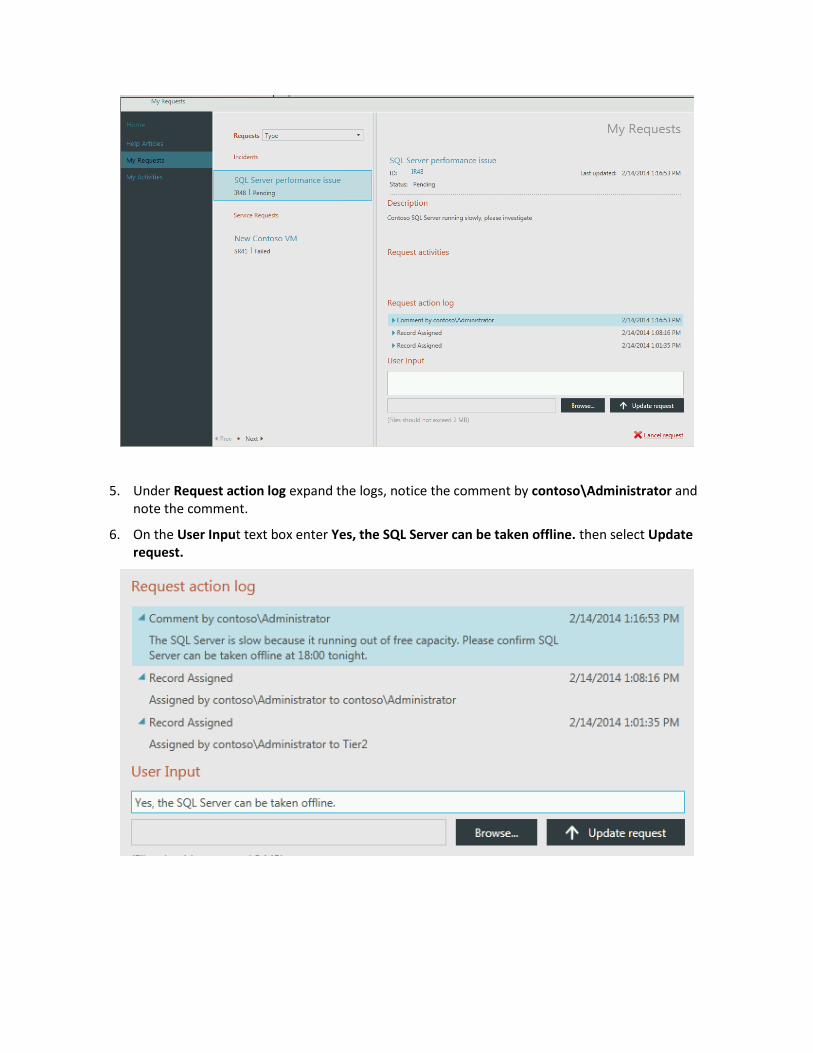
5. Under Request action log expand the logs, notice the comment by contoso\Administrator and note the comment.
6. On the User Input text box enter Yes, the SQL Server can be taken offline. then select Update request.

Perform the following on SCSM01
7. From SCSM01, open the Service Manager Console by selecting the icon from the taskbar.
8. Navigate to the Work Items workspace
9. Expand Incident Management and select Assigned To Me.
10. Select the Incident and click Edit from the Tasks pane on the right.
11. Scroll to the bottom of General tab, under Log entry expand Analyst Comment and note the text.

12. On the right side under Tasks select Change Incident Status then select Resolve.
13. On the Resolve incident window, under Resolution Category select Fixed by analyst from the dropdown.
14. Under comments enter Adding a new disk. Click OK.
15. Click OK.
Perform the following on SCSM02
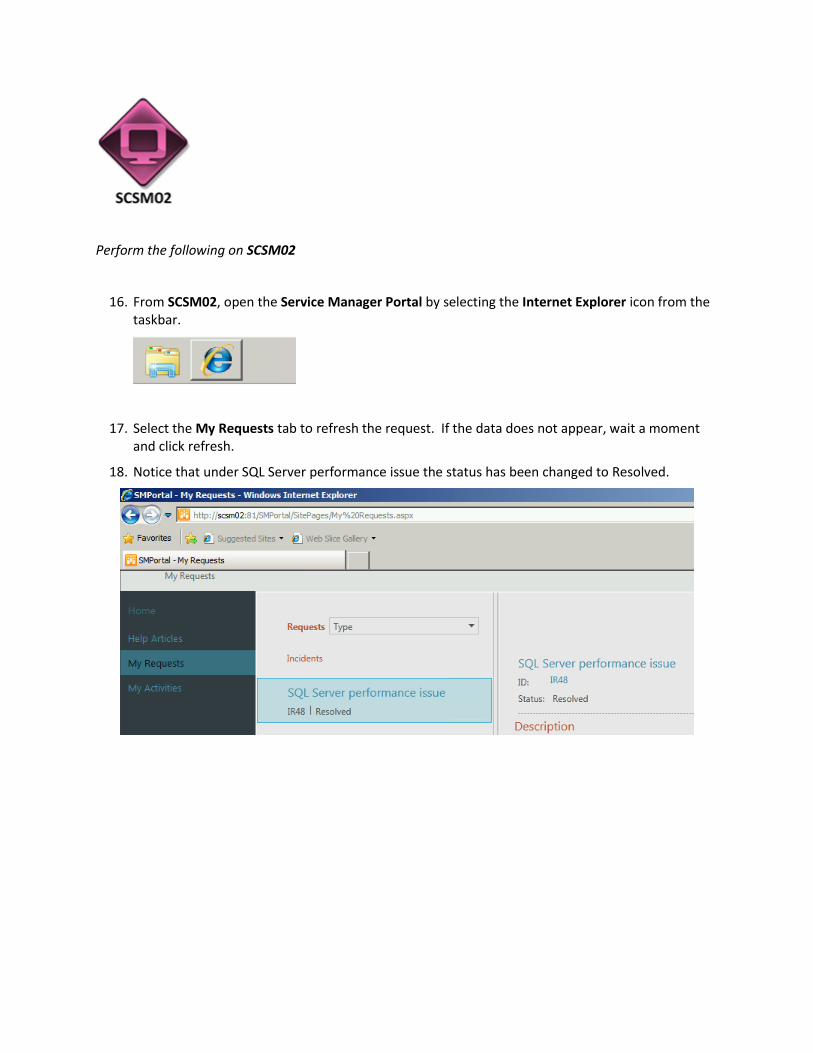
16. From SCSM02, open the Service Manager Portal by selecting the Internet Explorer icon from the taskbar.
17. Select the My Requests tab to refresh the request. If the data does not appear, wait a moment and click refresh.
18. Notice that under SQL Server performance issue the status has been changed to Resolved.

4.3.4 - SCSM: Manage a Problem In this exercise, the Service Manager console is used to create a problem in Service Manager's database so that these incidents can be tracked over time. The IT Infrastructure Library (ITIL) defines a "problem" as "a cause of one or more incidents. The cause is not usually known at the time a problem record is created, and the problem management process is responsible for further investigation." (http://www.itil.org/custom/glossaren/)
Estimated time to complete: 10 minutes
Perform the following on SCSM01
1. From SCSM01, open the Service Manager Console by selecting the icon from the taskbar.
2. Navigate to the Work Items workspace.
3. Expand Problem Management, then right-click Problem Management and select, Create Problem.

4. Once the new problem wizard pops up, enter the following information:
Title: SQL Server Disk Slow
Description: SQL Server Disk is running out of space and performing slowly
Assigned to: Tier 3
Source: Customer Request
Category: Storage
Impact: High
Urgency: Medium
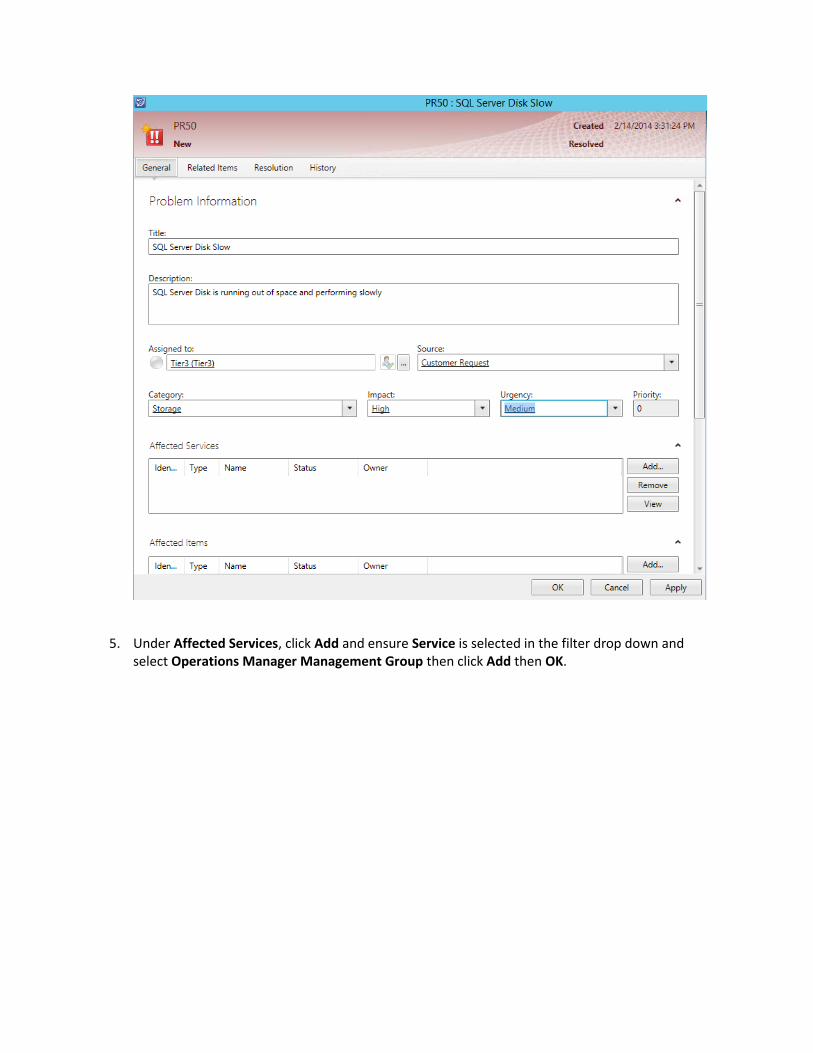
5. Under Affected Services, click Add and ensure Service is selected in the filter drop down and select Operations Manager Management Group then click Add then OK.
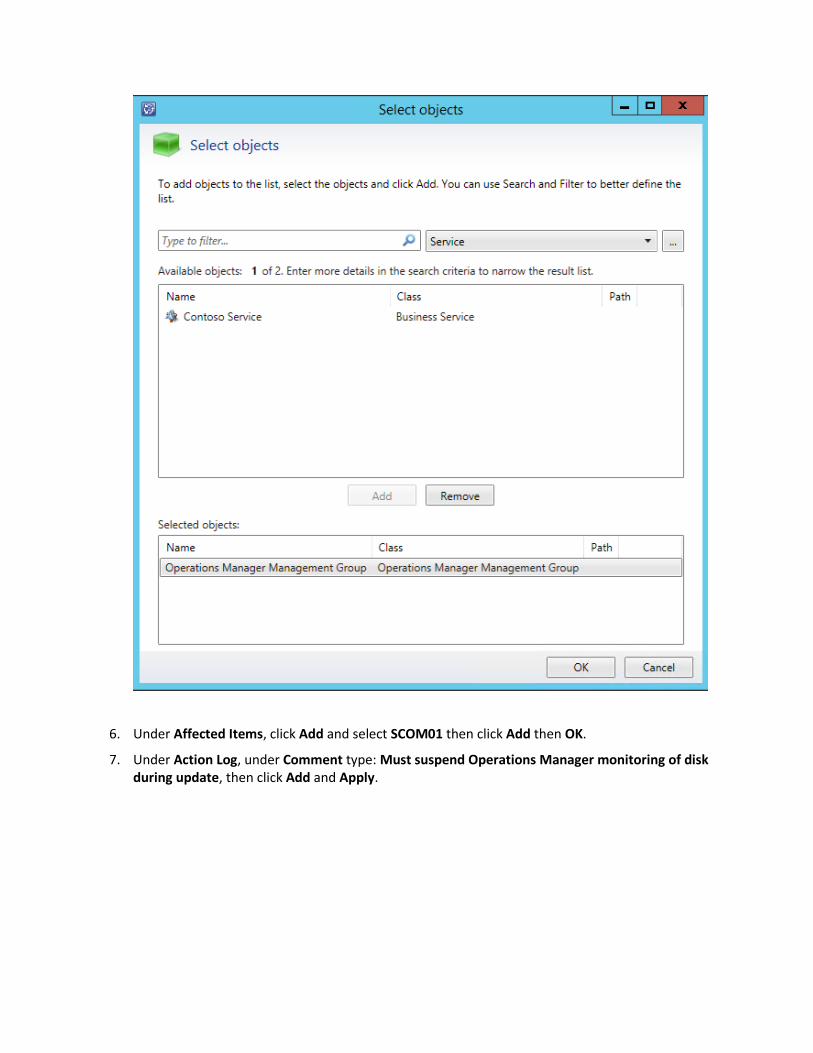
6. Under Affected Items, click Add and select SCOM01 then click Add then OK.
7. Under Action Log, under Comment type: Must suspend Operations Manager monitoring of disk during update, then click Add and Apply.

8. Under Log Entry, expand the plus symbols and note the information.
9. Select the Related Items tab from the top menu.
10. Under Work Items select Add.
11. Select the incident request which was created in the previous exercise then click Add then OK.
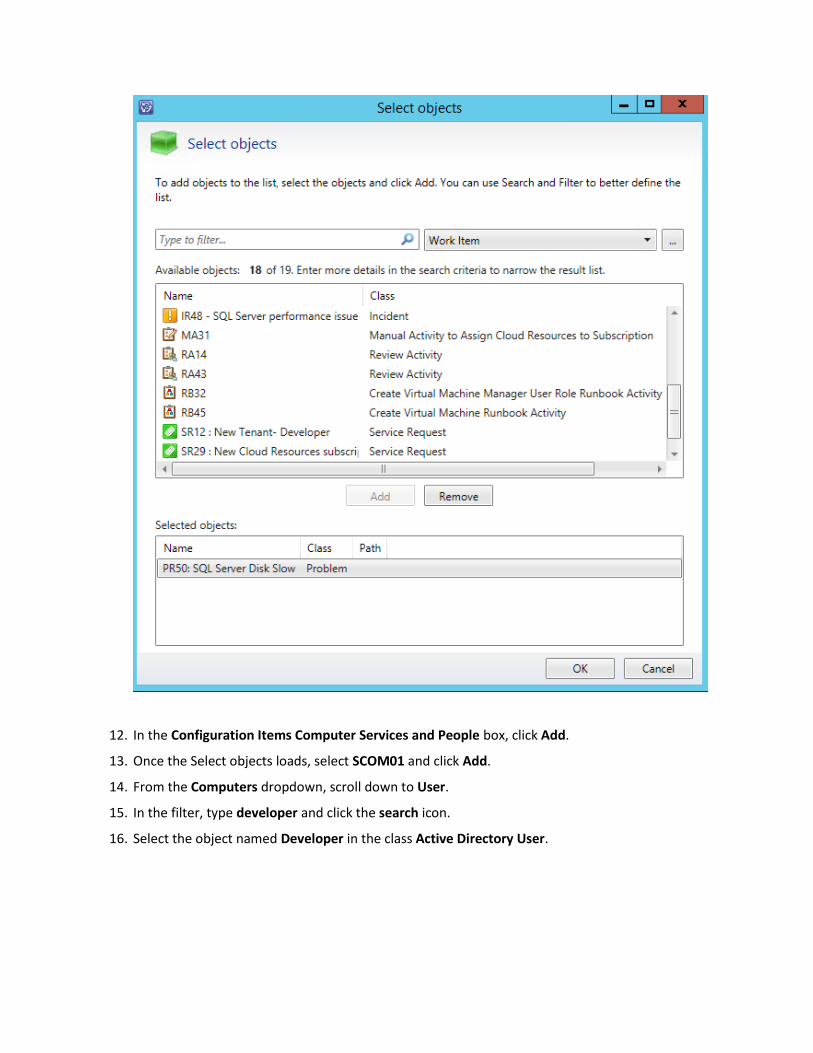
12. In the Configuration Items Computer Services and People box, click Add.
13. Once the Select objects loads, select SCOM01 and click Add.
14. From the Computers dropdown, scroll down to User.
15. In the filter, type developer and click the search icon.
16. Select the object named Developer in the class Active Directory User.

17. Click Add then click OK.
18. In the Knowledge Articles click Add.
19. Select the Knowledge Article called Contoso SQL Server Performance is Slow.

20. Click Add then click OK.
21. Select Apply, then click the Resolution tab.
22. Check the Known Error checkbox and under Error Description enter SQL server runs slowly then click Apply.

23. In the task bar on the right, click Resolve.
24. Scroll down to Resolution Details and under Resolution Category, select Hardware.
25. Under Resolution Description, type: Larger disk will be added at 18:00.
26. Select the checkbox Auto-resolve all incidents associated with this problem.
27. Click Apply and click OK.
28. Under Problem Management, navigate to Resolved Problems and note that this problem is now resolved.
29. From the Work Items workspace, navigate to Work Items | Incident Management | All Incidents.
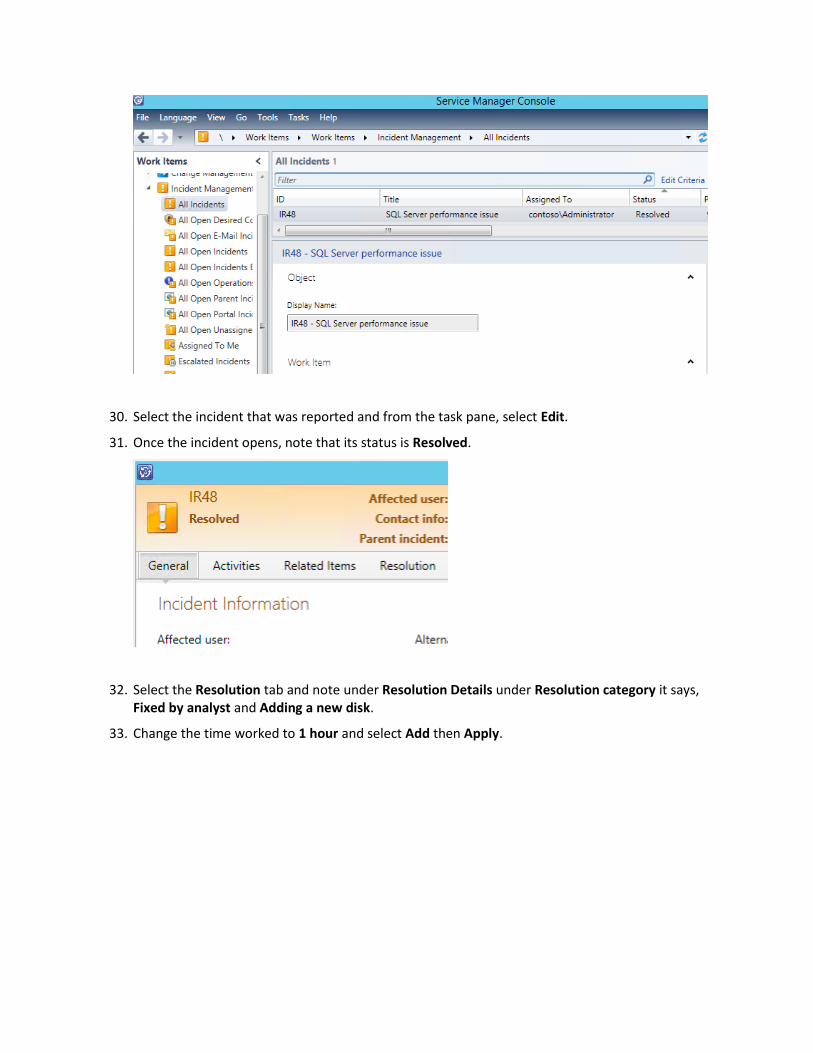
30. Select the incident that was reported and from the task pane, select Edit.
31. Once the incident opens, note that its status is Resolved.
32. Select the Resolution tab and note under Resolution Details under Resolution category it says, Fixed by analyst and Adding a new disk.
33. Change the time worked to 1 hour and select Add then Apply.

34. Note that the time updates with the additional minutes that this page has been opened.
35. Click OK to close the incident.

4.4 - SCSM: Manage Change Requests
4.4.1 - SCSM: Create a Change Request In this exercise, the Service Manager console is used to create a change request. The IT Infrastructure Library (ITIL) defines "change " as "the addition, modification or removal of anything that could have an effect on IT services. The scope should include changes to all architectures, processes, tools, metrics and documentation, as well as changes to IT services and other configuration items." (http://www.itil.org/custom/glossaren/)
Note: Some items in the Service Manager console may not display correctly when it is maximized and running in a virtual machine. If any display issues are encountered, resize the Service Manager console so that it is not maximized.
Estimated time to complete: 10 minutes

Perform the following on SCSM01
1. From SCSM01, open the Service Manager Console by selecting the icon from the taskbar.
2. Navigate to the Work Items workspace.
3. Select and expand Change Management | All Change Requests.
4. Under Tasks in the right hand pane select Create Change Request.
5. When the Select Template screen appears, select Standard Change Request and click OK.

6. When the Standard Change Request form loads, under Title enter: SQL Storage Change Request
7. Under Description enter: Increase capacity of SQL Server disk on SCOM01
8. For Reason enter: Running out of free disk space

9. Under Area, click the drop down then expand Hardware and select Storage.

10. Select the ellipses (…) next to Assigned To:
11. When the Select User dialog opens select Tier2 and press OK.
12. Scroll down, then under Config Items to Change select Add then select SCOM01 and click Add and click OK.
13. Click Apply.
14. If an error appears at any point which states Failed to execute Submit operation, then click Close. Close the change request and reopen it and repeat the steps again. To view a current change request select the All change requests tab.

15. Select the Planning tab from the top menu.
16. Select the first calendar icon and select today's date.
17. Select the second calendar icon and select today's date.
18. Under Implementation Plan enter: Place Operations Manager monitoring into maintenance. Take disk offline. Expand. Bring disk online. Resume SCOM monitoring.
19. Click Apply.
20. Select the Related Items tab. Under Work Items click Add and add the incident request from the previous exercise and the click OK. If the previous exercise was not completed, select any object and click Add.

21. Under Configuration Items click Add, select SCOM01 and click Add.
22. At the top of the Select Objects dialog select the Computer drop down, then select SQL Computers from the list.
23. Now select SQL Computers from the list of Available objects and click Add then click OK.

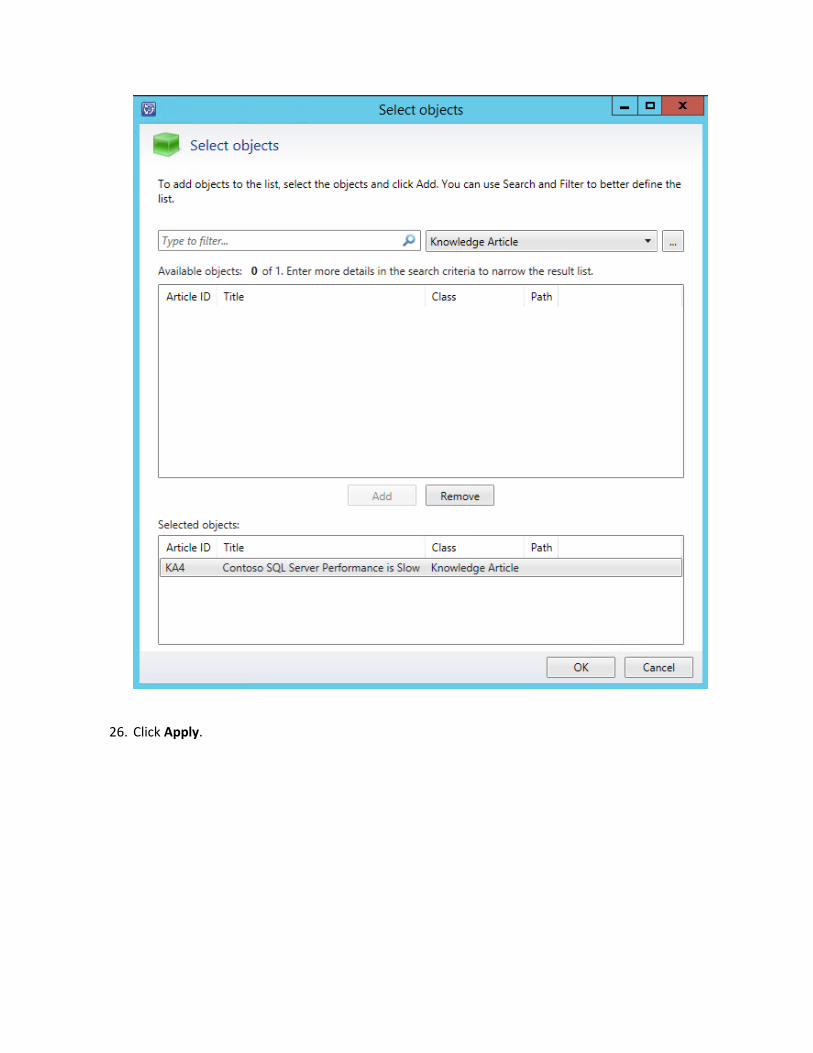
24. Under Knowledge Articles click Add.
25. Select the knowledge article called Contoso SQL Server Performance is Slow and click Add, then click OK to close Select objects.
26. Click Apply.

27. Click OK to close the Change Request form.

4.4.2 - SCSM: Review a Workflow In this exercise, a change request will be reviewed and managed. In this scenario, the Tier 2 support team is assigned a work item and a procedural workflow is reviewed.
Estimated time to complete: 5 minutes
Perform the following on SCSM01
1. From SCSM01, open the Service Manager Console by selecting the icon from the taskbar.
2. Navigate to the Work Items workspace.
3. Expand Work Items | Change Management, then click on All Change Requests.

4. Select the SQL Storage Change Request that was created in the previous exercise and from the tasks pane select Edit.
5. Select the Activities tab. This shows the approval workflow which contains two activities. The first activity is approving the change and the second activity is applying the change.
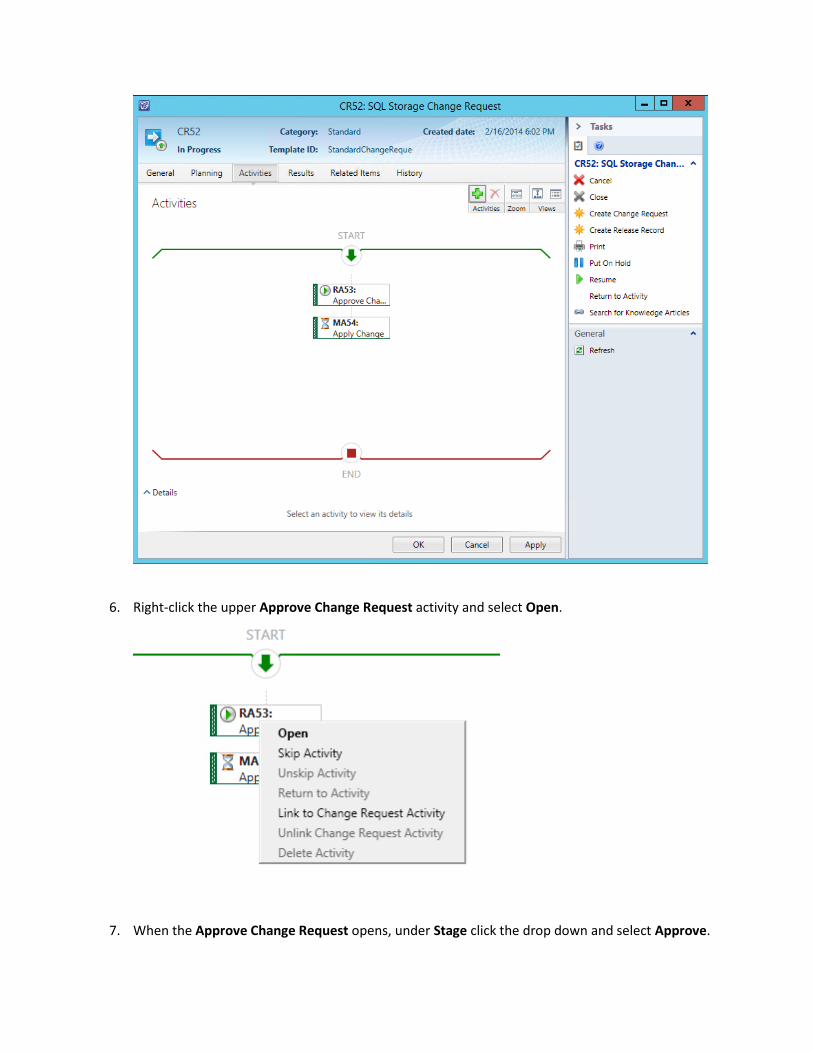
6. Right-click the upper Approve Change Request activity and select Open.
7. When the Approve Change Request opens, under Stage click the drop down and select Approve.
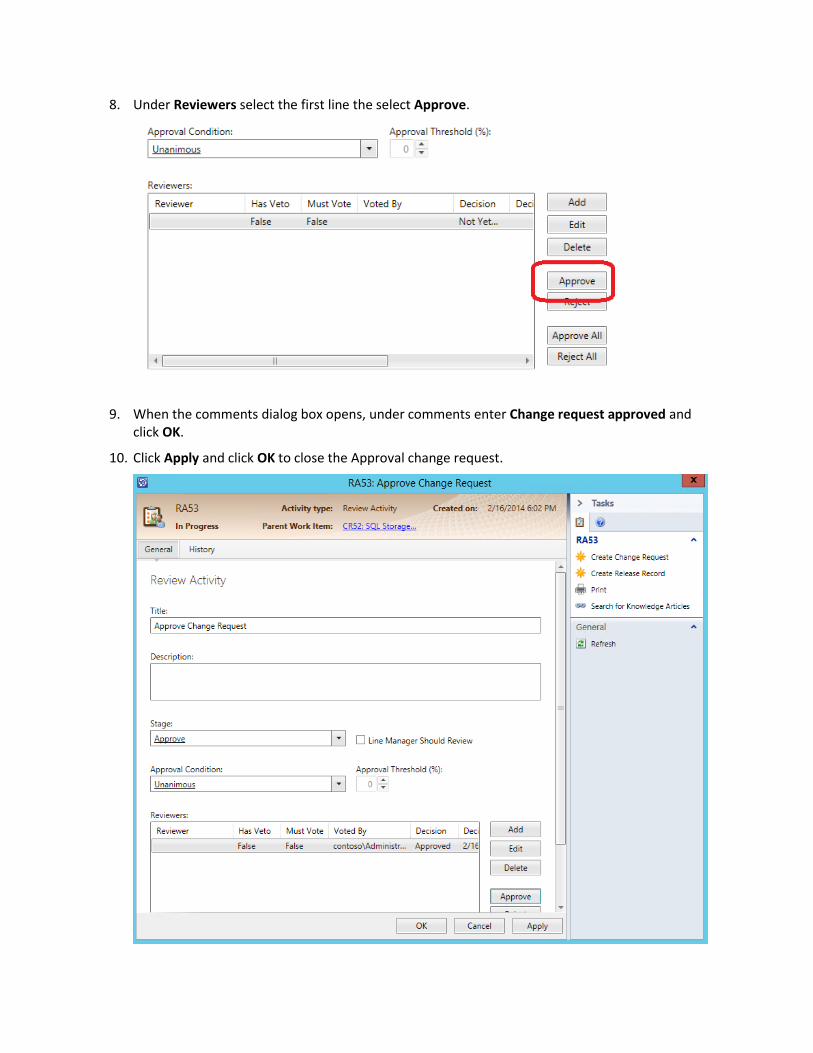
8. Under Reviewers select the first line the select Approve.
9. When the comments dialog box opens, under comments enter Change request approved and click OK.
10. Click Apply and click OK to close the Approval change request.

11. After returning to the SQL Storage Change Request, right-click on the lower Apply Change activity and select Open.
12. Change the title of the activity to Increase Disk Capacity.
13. Under Activity Implementer select the ellipses (…) when the Select User dialog opens select Tier2 and click OK.
14. Under Area click the drop down then expand Hardware and select Storage.
15. Under Priority click the drop down and select Immediate.
16. Under Stage click the drop down and select Approve.
17. Under Scheduled start date select todays date and under Scheduled end date select todays date.

18. Under Impacted Configuration Items select Add.
19. When the Select objects form loads enter SQL in the filter.

20. Select SQL Computers and click Add.
21. Select contoso\SQL Admins and click Add.
22. Select contoso\!sql and click Add.
23. Click OK and then click OK again to close the window.
24. After returning to the Activities screen right-click the Apply change activity and select Skip Activity. This activity is skipped to speed up the length of this lab.
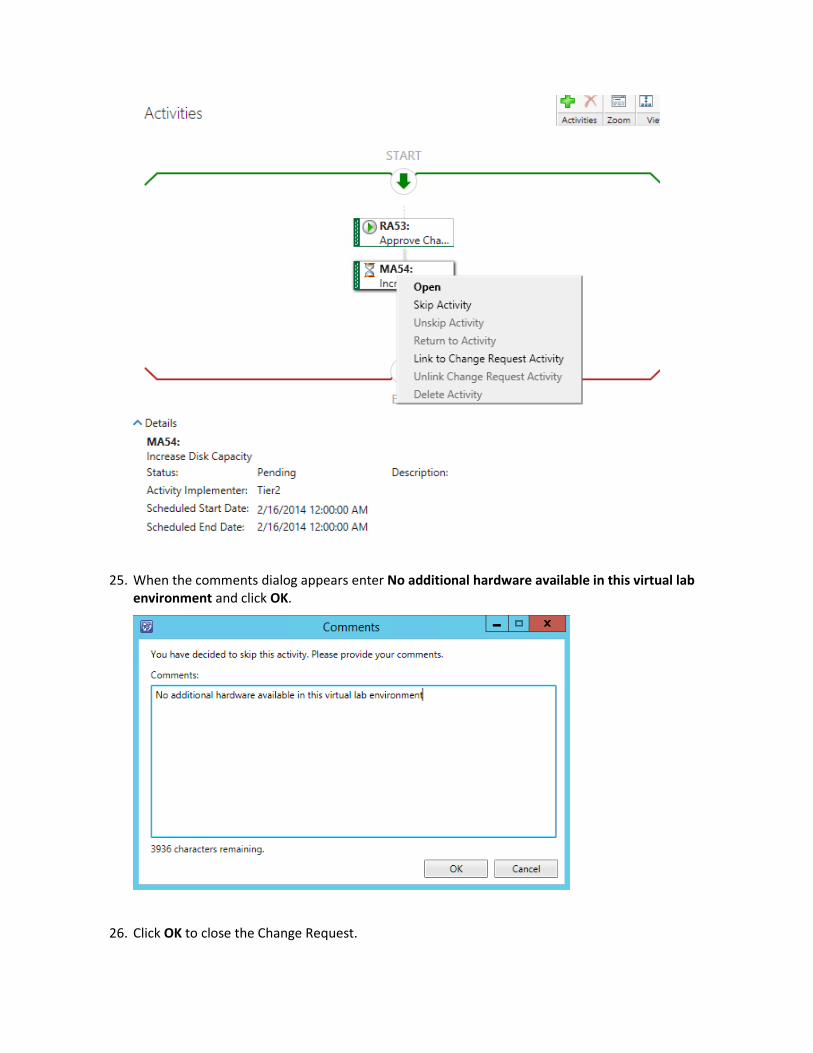
25. When the comments dialog appears enter No additional hardware available in this virtual lab environment and click OK.
26. Click OK to close the Change Request.
4.4.3 - SCSM: Create a Release Record In this exercise, the Service Manager console is used to create a release record. The IT Infrastructure Library (ITIL) defines a "release" as "one or more changes to an IT service that are built, tested and deployed together. A single release may include changes to hardware, software, documentation, processes and other components." (http://www.itil.org/custom/glossaren/)
Estimated time to complete: 10 minutes
Perform the following on SCSM01
1. From SCSM01, open the Service Manager Console by selecting the icon from the taskbar.
2. Navigate to the Work Items workspace.
3. Expand Work Items | Change Management then click on All Change Requests.

4. Select the change request titled SQL Storage Change Request then select Edit from the tasks pane.
5. When the change request opens select the Activities tab. Note that the first activity was approved and the second activity was skipped.
6. Select the Results tab, then from the Tasks tab select Create Release Record.

7. When the Select Template dialog appears, select Default Release Record then click OK.
8. When the Default Release Record form opens, change the Title to Updating SQL Disk.

9. Under Description enter Increasing SQL Disk from 3 TB SILVER to 5 TB GOLD SSD.
10. Under Type select Unplanned.
11. Under Category select Fix.
12. Under Assigned To select the ellipsis (…).
13. Select Tier2 and click OK.
14. Under Impact select Standard.
15. Under Risk select Medium.
16. Under Priority select Immediate, then click Apply.
17. Click the Release Package tab.
18. Under Configuration Items to Modify click Add then select SCOM01 and click Add. Click OK.

19. After returning to the Release Record page, under Affected Services click Add.
20. On the Select Objects page select Operations Manager Management Group and click Add then click OK.
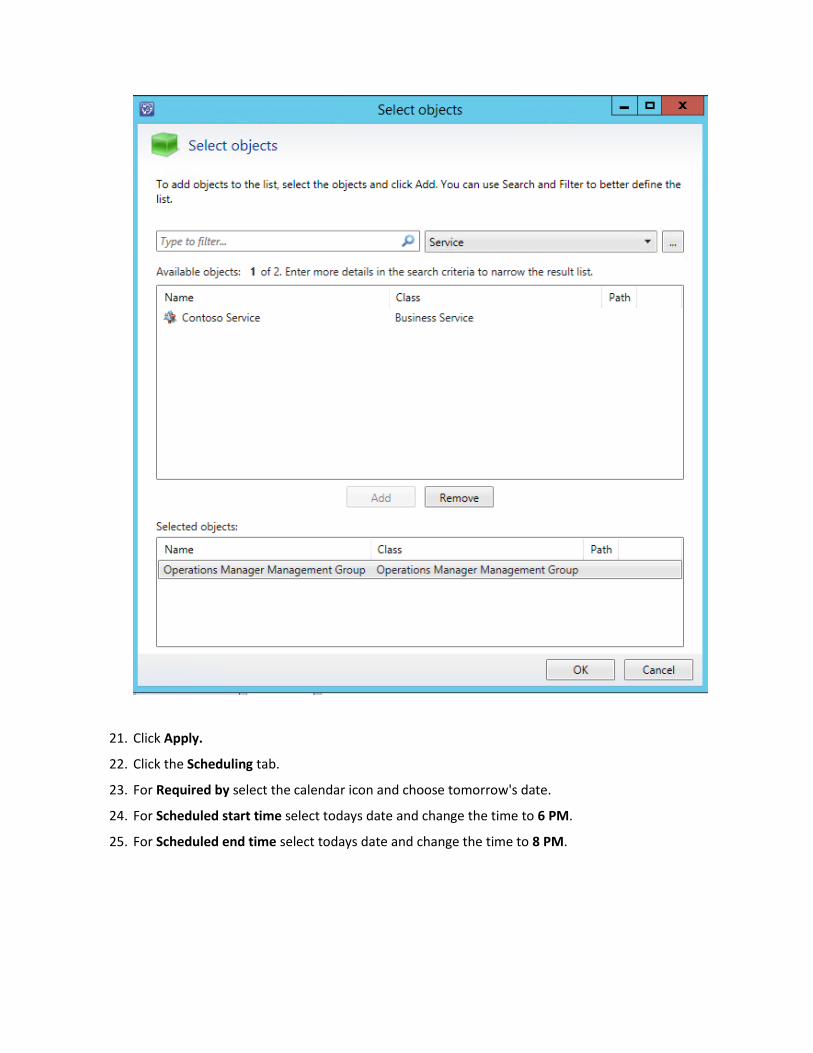
21. Click Apply.
22. Click the Scheduling tab.
23. For Required by select the calendar icon and choose tomorrow's date.
24. For Scheduled start time select todays date and change the time to 6 PM.
25. For Scheduled end time select todays date and change the time to 8 PM.
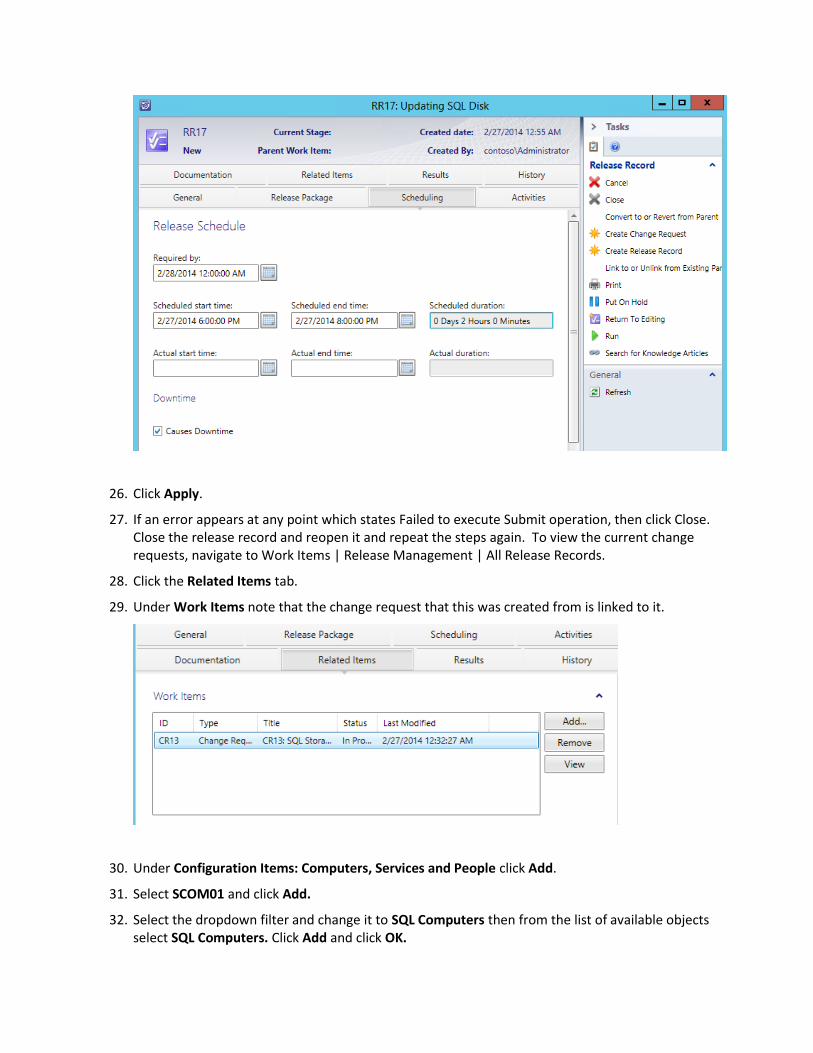
26. Click Apply.
27. If an error appears at any point which states Failed to execute Submit operation, then click Close. Close the release record and reopen it and repeat the steps again. To view the current change requests, navigate to Work Items | Release Management | All Release Records.
28. Click the Related Items tab.
29. Under Work Items note that the change request that this was created from is linked to it.
30. Under Configuration Items: Computers, Services and People click Add.
31. Select SCOM01 and click Add.
32. Select the dropdown filter and change it to SQL Computers then from the list of available objects select SQL Computers. Click Add and click OK.

33. Under Knowledge Articles click Add.
34. Select the Knowledge Article with the title Contoso SQL Server Performance is Slow. Click Add. Click OK.
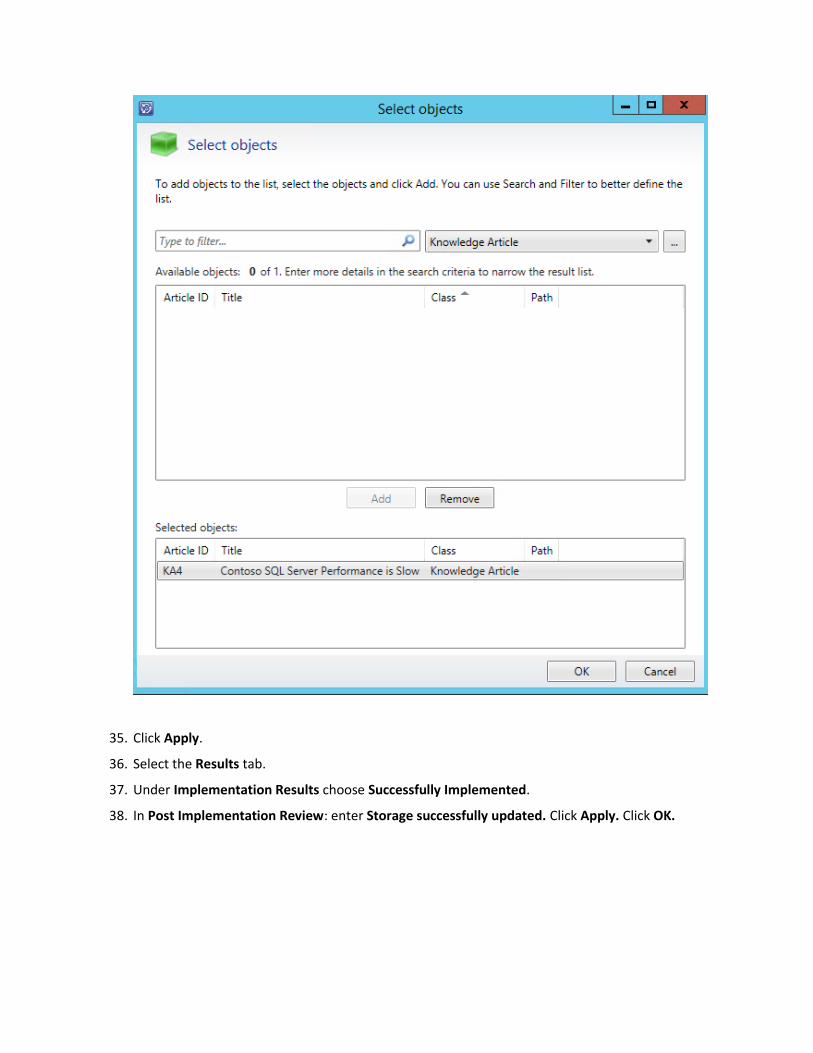
35. Click Apply.
36. Select the Results tab.
37. Under Implementation Results choose Successfully Implemented.
38. In Post Implementation Review: enter Storage successfully updated. Click Apply. Click OK.

39. Navigate to the Work Items | Release Management | Release Records: All view.
40. Review the details pane.
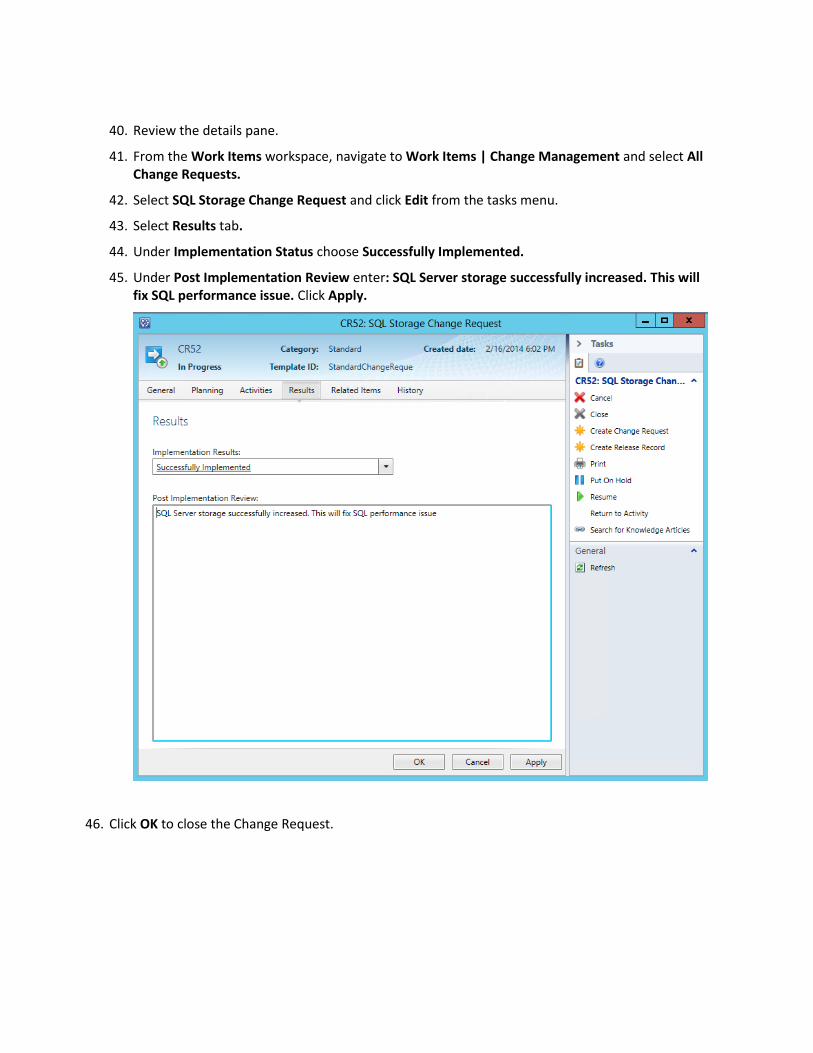
41. From the Work Items workspace, navigate to Work Items | Change Management and select All Change Requests.
42. Select SQL Storage Change Request and click Edit from the tasks menu.
43. Select Results tab.
44. Under Implementation Status choose Successfully Implemented.
45. Under Post Implementation Review enter: SQL Server storage successfully increased. This will fix SQL performance issue. Click Apply.
46. Click OK to close the Change Request.