Embed Size (px)
Citation preview
Table of ContentsLab Overview - HOL-1926-03-NET - VMware NSX-T Data Center OperationsTroubleshooting and API Consumption 2
Lab Guidance 3Module 1 - NSX-T Datacenter Operations - Use Tools within NSX-T Datacenter for Day toDay Operations (15 minutes) 9
Module Guidance 10Dashboard Counters and Statistics 11Port Connection Tool 17Traceflow 19IPFIX 21Central CLI 28Module 1 - Conclusion 32
Module 2 - NSX-T Datacenter Troubleshooting - Use Tools within NSX-T Datacenter forTroubleshooting (15 minutes) 34
Module Guidance 35Routing Tables 36MAC Address Tables 44Port Mirroring 55Module 2 - Conclusion 67
Module 3 - API Consumption - Gain Familiarity with the NSX-T API (30 minutes) 69NSX RESTful API 70Manual Consumption 75Terraform Consumption 81Module 3 Conclusion 99
HOL-1926-03-NET
Page 1HOL-1926-03-NET
Lab Overview -HOL-1926-03-NET -VMware NSX-T DataCenter Operations
Troubleshooting and APIConsumption
HOL-1926-03-NET
Page 2HOL-1926-03-NET
Lab GuidanceNote It will take more than 60 minutes to complete this lab You shouldexpect to only finish 2-3 of the modules during your time The modules areindependent of each other so you can start at the beginning of any moduleand proceed from there You can use the Table of Contents to access anymodule of your choosing
The Table of Contents can be accessed in the upper right-hand corner of theLab Manual
In this lab we will explore use cases around VMware NSX-T Datacenter operationstroubleshooting and API consumption
Lab Module List
bull (15 Minutes) - Intermediate - This module will walk you through the basics ofNSX-T Datacenter operations You will use features such as Traceflow PortConnection tool and others
bull Module 2 - NSX-T Datacenter Troubleshooting - Use tools within NSX-TDatacenter for troubleshooting (15 minutes) - Intermediate - This module willwalk you through the basics of NSX-T Datacenter troubleshooting You will viewvarious system configurations and correct misconfigurations after problemidentification
bull Module 3 - API Consumption - Gain familiarity with the NSX-T API (30minutes) - Advanced - This module will explore the basics of NSX API consumptionthrough manual interaction as well as several common configurationmanagement tools
Lab Captains
bull Module 1-3 - Kenyon Hensler Staff Systems Engineer USA
This lab manual can be downloaded from the Hands-on Labs Document site found here
httpdocsholvmwarecom
This lab may be available in other languages To set your language preference and havea localized manual deployed with your lab you may utilize this document to help guideyou through the process
httpdocsholvmwarecomannouncementsnee-default-languagepdf
HOL-1926-03-NET
Page 3HOL-1926-03-NET
Location of the Main Console
1 The area in the RED box contains the Main Console The Lab Manual is on the tabto the Right of the Main Console
2 A particular lab may have additional consoles found on separate tabs in the upperleft You will be directed to open another specific console if needed
3 Your lab starts with 90 minutes on the timer The lab can not be saved All yourwork must be done during the lab session But you can click the EXTEND toincrease your time If you are at a VMware event you can extend your lab timetwice for up to 30 minutes Each click gives you an additional 15 minutesOutside of VMware events you can extend your lab time up to 9 hours and 30
minutes Each click gives you an additional hour
Alternate Methods of Keyboard Data Entry
During this module you will input text into the Main Console Besides directly typing itin there are two very helpful methods of entering data which make it easier to entercomplex data
HOL-1926-03-NET
Page 4HOL-1926-03-NET
Click and Drag Lab Manual Content Into Console ActiveWindow
You can also click and drag text and Command Line Interface (CLI) commands directlyfrom the Lab Manual into the active window in the Main Console
Accessing the Online International Keyboard
You can also use the Online International Keyboard found in the Main Console
1 Click on the Keyboard Icon found on the Windows Quick Launch Task Bar
ltdiv class=player-unavailablegtlth1 class=messagegtAn error occurredlth1gtltdiv class=submessagegtltahref=httpwwwyoutubecomwatchv=xS07n6GzGuo target=_blankgtTry watching this video on wwwyoutubecomltagt or enableJavaScript if it is disabled in your browserltdivgtltdivgt
HOL-1926-03-NET
Page 5HOL-1926-03-NET
Click once in active console window
In this example you will use the Online Keyboard to enter the sign used in emailaddresses The sign is Shift-2 on US keyboard layouts
1 Click once in the active console window2 Click on the Shift key
Click on the key
1 Click on the key
Notice the sign entered in the active console window
HOL-1926-03-NET
Page 6HOL-1926-03-NET
Activation Prompt or Watermark
When you first start your lab you may notice a watermark on the desktop indicatingthat Windows is not activated
One of the major benefits of virtualization is that virtual machines can be moved andrun on any platform The Hands-on Labs utilizes this benefit and we are able to run thelabs out of multiple datacenters However these datacenters may not have identicalprocessors which triggers a Microsoft activation check through the Internet
Rest assured VMware and the Hands-on Labs are in full compliance with Microsoftlicensing requirements The lab that you are using is a self-contained pod and does nothave full access to the Internet which is required for Windows to verify the activationWithout full access to the Internet this automated process fails and you see this
watermark
This cosmetic issue has no effect on your lab
Look at the lower right portion of the screen
HOL-1926-03-NET
Page 7HOL-1926-03-NET
Please check to see that your lab is finished all the startup routines and is ready for youto start If you see anything other than Ready please wait a few minutes If after 5minutes your lab has not changed to Ready please ask for assistance
HOL-1926-03-NET
Page 8HOL-1926-03-NET
Module 1 - NSX-TDatacenter Operations -Use Tools within NSX-T
Datacenter for Day to DayOperations (15 minutes)
HOL-1926-03-NET
Page 9HOL-1926-03-NET
Module GuidanceThis module will review common operational activities within NSX-T Datacenter You willuse these tools to gain an understanding of what to do on a day to day basis to ensureproper functioning of the NSX-T Datacenter system
This module takes approximately 15 minutes to complete and
bull Reviews the Dashboard Counters and Statisticsbull Uses the port connection toolbull Demonstrates the use of Traceflowbull Reviews the IPFIX configurationbull Walks through parts of the Central CLI
HOL-1926-03-NET
Page 10HOL-1926-03-NET
Dashboard Counters and StatisticsThis lesson will focus on reviewing data available in NSX-T Datacenter
Open Chrome Browser from Windows Quick Launch TaskBar
1 Click on the Chrome Icon on the Windows Quick Launch Task Bar
Navigate to NSX-T Manager
1 Click on the VMware NSX | Login bookmark
Login to NSX-T Manager
HOL-1926-03-NET
Page 11HOL-1926-03-NET
Login to NSX Manager
1 Enter the username admin2 Enter the password VMware13 Click Login
Navigate to the Dashboard
1 Click the Dashboard tile
HOL-1926-03-NET
Page 12HOL-1926-03-NET
Review the Dashboard
Review each of the tiles on the dashboard
Each tile represents a component of the NSX-T Datacenter infrastructure Each of thetiles is clickable and will drill down into the status of the tiles components Hoveringover each tile will show details of the members status
Backup status for each component is also shown
HOL-1926-03-NET
Page 13HOL-1926-03-NET
Navigate to LS-Uplink Monitor
To view the Counters associated with a Logical Switch
1 Click on Switching2 Click on Switches3 Select the LS-Uplink Logical Switch4 Click on Monitor
HOL-1926-03-NET
Page 14HOL-1926-03-NET
Review Logical Switch Statistics
Review the statistics of the LS-Uplink Logical Switch The statistics shown here aresimilar to traditional statistics and counters found on traditional networking hardwareThese statistics are a summation of all ports on the logical switch The statistics in the
lab may not match the screen shot as traffic will vary based on lab uptime
Navigate to Related Ports
1 Click Related2 Click Ports
Select a Port
HOL-1926-03-NET
Page 15HOL-1926-03-NET
1 Click uplink1
Navigate to Monitor Tab
1 Click Monitor
Review Logical Port Statistics
Review the statistics of the uplink1 Logical Port The statistics shown here are similar totraditional statistics and counters found on traditional networking hardware Thesestatistics are specific to this logical port The statistics in the lab may not match thescreen shot as traffic will vary based on lab uptime
HOL-1926-03-NET
Page 16HOL-1926-03-NET
Port Connection ToolIn this lesson you will use the port connection tool to verify end to end connectivity
Navigate to the Port Connection Tool
1 Expand the Tools section2 Select Port Connection
Select the Virtual Machines
Select the db-01a and web-01a virtual machines and interfaces
1 Select db-01a2 Select the VIF3 Select web-01a4 Select the VIF
HOL-1926-03-NET
Page 17HOL-1926-03-NET
5 Click GO
Review the results
Review the results of the traceflow Each component is clickable to view the details ofthe specific component By using the Port Connection tool you can quickly verify thestatus of the Logical Interface (LIF) on the Logical Switch the Associated VirtualInterfaces (VIF) the hypervisor physical connectivity and the tunnel status between thehypervisors This information can be used to verify logical port connectivity andphysical connectivity between hypervisors The web-01a virtual machine may be on adifferent transport node than shown
HOL-1926-03-NET
Page 18HOL-1926-03-NET
TraceflowTraceflow allows for virtual machine to virtual machine connectivity mapping includingall logical components between In the lesson you will use traceflow to verifyconnectivity between two virtual machines
Navigate to Traceflow
1 Ensure the Tools section is expanded2 Select Traceflow
Select the VMs to Trace
1 Select k8s-master as the Source2 Select the Virtual Interface ending in 40003 Select web-01a as the Destination
The remaining fields will be auto populated
HOL-1926-03-NET
Page 19HOL-1926-03-NET
4 Click TRACE
Review the Traceflow results
Review the Traceflow results Notice all of the components that are inspected for trafficforwarding All of the components from VNIC to VNIC are traced including LogicalSwitches Routers Firewall and Tunnels
HOL-1926-03-NET
Page 20HOL-1926-03-NET
IPFIXIPFIX is a network monitoring protocol similar to NetFlow IPFIX allows for variablelength fields and customized data NSX-T Datacenter supports the exporting of IPFIXdata from both switches and firewalls to a collector such as vRealize Network Insight Inthis lesson students will configure IPFIX for switching data as well as firewall data Thereis no IPFIX Collector in the lab This lesson is only for demonstration of theconfiguration
Navigate to IPFIX
1 Ensure Tools is expanded2 Select IPFIX
Configure a Switch Collector
HOL-1926-03-NET
Page 21HOL-1926-03-NET
1 Click Switch IPFIX Collectors2 Click Configure Collectors3 Click Add4 Click the Pencil Icon5 Enter 192168110106 Click Save
Configure a Switch Profile
1 Click Switch IPFIX Profile2 Click Add3 Enter SW_IPFIX_Profile4 Change the Active Timeout to 60
HOL-1926-03-NET
Page 22HOL-1926-03-NET
Apply the Switch Profile
1 Click Applied To2 Select Logical Switch3 Select all Logical Switches4 Move the selected Logical Switches to Selected5 Click Save
HOL-1926-03-NET
Page 23HOL-1926-03-NET
Configure a Firewall Collector
1 Click Firewall IPFIX Collectors2 Click Add3 Enter FW_Collector4 Click Add5 Click the Pencil Icon6 Enter 192168110107 Click Save
If the Firewall IPFIX Collectors link is not visible complete the next step to change thebrowsers zoom Otherwise skip the next step
HOL-1926-03-NET
Page 24HOL-1926-03-NET
Change Browser Zoom
1 Click the Chrome Settings button2 Click the Zoom Out button
Repeat as necessary to view the DOWNLOAD VTEP TABLE link Once the table hasbeen downloaded the zoom may be reset to 100
HOL-1926-03-NET
Page 25HOL-1926-03-NET
Configure a Firewall Profile
1 Click Firewall IPFIX Profiles2 Click Add3 Enter FW_IPFIX_Profile
HOL-1926-03-NET
Page 26HOL-1926-03-NET
Apply the Firewall Profile
1 Click Applied To2 Select Logical Switch3 Select Available4 Click to move all Logical Switches to Selected5 Click Save
In this lesson you have configured IPFIX for reporting to an IPFIX collector IPFIX is anindispensable network operations and troubleshooting tool For more information onVMwares IPFIX Collector vRealize Network Insight please click here
HOL-1926-03-NET
Page 27HOL-1926-03-NET
Central CLIIn this lesson students will review the NSX-T Datacenter Central CLI The Central CLIreplaces the need to connect to individual components to perform monitoring andtesting The Central CLI operates from the NSX-T Datacenter Manager
Open Putty
1 Click on the Putty Icon
If putty is already open right-click the putty window and select ldquoputtyrdquo
nsxctrl-01acorplocal
1 Select nsxctrl-01acorplocal2 Click Load3 Click Open
HOL-1926-03-NET
Page 28HOL-1926-03-NET
Login to nsxctrl-01a
Login using the user name
admin
and password
VMware1
View Available Get Commands
1 Enter
HOL-1926-03-NET
Page 29HOL-1926-03-NET
get
Review the output for available commands
get Logical Switches
1 Enter
get logical-switches
Review the output This is a list of all logical switches configured
HOL-1926-03-NET
Page 30HOL-1926-03-NET
View LS-Web arp-table
For this step copy and paste will be useful By highlighting the UUID the text will becopied to the clipboard By right-clicking in the putty session the text in the clipboardwill be pasted
1 Record the LS-Web UUID2 Enter
get logical-switch 262dbb9b-5412-4e60-8ace-1c8b18a06715 arp-table
Review the arp-table reported via the Central CLI There are many possible commandsavailable via the Central CLI For quick operations and troubleshooting the Central CLI isa valuable tool For further reading on the Central CLI see the NSX-T Datacenter CentralCLI documentation by clicking here
HOL-1926-03-NET
Page 31HOL-1926-03-NET
Module 1 - ConclusionThis now completes Module 1 on NSX-T Datacenter Operations In this module youreviewed common operational activities within NST-T Datacenter You used these toolsto gain an understanding of what to do on a day to day basis to ensure properfunctioning of the NSX-T Datacenter system
The tools reviewed in the module were
bull Reviews the Dashboard Counters and Statisticsbull Uses the port connection toolbull Demonstrates the use of Traceflowbull Reviews the IPFIX configurationbull Walks through parts of the Central CLI
Youve finished Module 1
Congratulations on completing Module 1
If you are looking for additional information on NSX-T Datacenter Operations thenplease review the NSX-T Documentation Center via the URL below
bull Go to httpstinyurlcomyc6q794n
Proceed to any module below which interests you the most
Lab Module List
bull Module 1 - NSX-T Datacenter Operations - Use Tools within NSX-T Datacenter forDay to Day Operations (15 minutes)- Intermediate - This module will walk youthrough the basics of NSX-T Datacenter operations You will use features such asTraceflow Port Connection tool and others
bull Module 2 - NSX-T Datacenter Troubleshooting - Use Tools within NSX-T Datacenterfor Troubleshooting (15 minutes) - Intermediate - This module will walk youthrough the basics of NSX-T Datacenter troubleshooting You will view varioussystem configurations and correct misconfigurations after problem identification
bull Module 3 - API Consumption - Gain Familiarity with the NSX-T API (30 minutes)-Advanced - This module will explore the basics of NSX API consumption throughmanual interaction as well as several common configuration management tools
Lab Captain
bull Module 1-3 Kenyon Hensler Staff Systems Engineer United States
HOL-1926-03-NET
Page 32HOL-1926-03-NET
How to End Lab
To end your lab click on the END button
HOL-1926-03-NET
Page 33HOL-1926-03-NET
Module 2 - NSX-TDatacenter
Troubleshooting - UseTools within NSX-T
Datacenter forTroubleshooting (15
minutes)
HOL-1926-03-NET
Page 34HOL-1926-03-NET
Module GuidanceThis module will review common troubleshooting activities within NSX-T Datacenter Youwill use these tools to gain an understanding of what to do on a day to day basis toensure proper functioning of the NSX-T Datacenter system
This module takes approximately 15 minutes to complete and goes through
bull Show Routing Tablesbull Show MAC Tablesbull Review VTEP Tablesbull Configure Port Mirroring
HOL-1926-03-NET
Page 35HOL-1926-03-NET
Routing TablesIn this lesson you will review routing tables from NSX-T Datacenter
Open Chrome Browser from Windows Quick Launch TaskBar
1 Click on the Chrome Icon on the Windows Quick Launch Task Bar
Navigate to NSX-T Manager
1 Click on the VMware NSX | Login bookmark
Login to NSX-T Manager
HOL-1926-03-NET
Page 36HOL-1926-03-NET
Login to NSX Manager
1 Enter the username admin2 Enter the password VMware13 Click Login
Navigate to Edges
You will need the IP address of an edge node associated with the router you need totroubleshoot
1 Expand the Fabric section2 Select Nodes3 Select Edges4 Record the Management IP of the Edge associated with nsx-edge-01a
You may need to expand the Edge column to see the names of the edges
Open Putty
1 Click on the Putty icon
If putty is already open right-click the putty window and select ldquoputtyrdquo
HOL-1926-03-NET
Page 37HOL-1926-03-NET
Connect to the Edge
1 Click nsx-edge-01a2 Click Load3 Click Open
Login to the Edge
1 Enter the password VMware1
HOL-1926-03-NET
Page 38HOL-1926-03-NET
List all Logical Routers
To enter the appropriate VRF for troubleshooting you must find the appropriate VRFnumber In this instance you must use the Service Routers of the Tier 0 logical routerThis is the logical router that runs BGP and peers with the northbound router
1 Enter the command to list all logical routers
get logical-routers
2 Record the VRF number of the SERVICE_ROUTER_TIER0
Enter VRF Context Mode
In VRF context mode the router will output information specific to the VRF you enter
1 Enter the command to switch to vfr 2
vrf 2
HOL-1926-03-NET
Page 39HOL-1926-03-NET
Get Routes
1 Type the command
get route
2 Review the routes available on this T0 SR
Notice the different Flags associated with the different routes b represents a BGProute learned from the northbound router nc represents an NSX Connected route thatwas auto plumbed from a Tier 1 logical router or this Tier 1 logical router c represents aroute directly connected to this Tier 0 SR (Service Router) Notice the routes that areavailable via 16925401 this address is the Intra Tier 0 Transit Subnet This is addressspace the Tier 0 SR uses to route to the Tier 0 DR (Distributed Router) With thisinformation you will be able to determine if your Tier 0 SR has learned the appropriateroutes from the physical environment
Routes on Transport Nodes
Routes are also available on all the transport nodes To view the routes on hypervisortransport nodes the nsxcli is used
Open Putty
HOL-1926-03-NET
Page 40HOL-1926-03-NET
1 Click on the Putty icon
If putty is already open right-click the putty window and select ldquoputtyrdquo
Connect to esx-01a
1 Select esx-01acorplocal2 Click Load3 Click Open
Open nsxcli
1 Enter
nsxcli
HOL-1926-03-NET
Page 41HOL-1926-03-NET
View Logical Routers
1 Enter
get logical-routers
Review the output from the command Notice the number of LIFs and Routes associatedwith each logical router The VDR UUID listed can be matched to the ID of the logicalrouters in the NSX-T Datacenter GUI
View Logical Router Forwarding Detail
1 Enter
get logical-router af7bf4c8-aa81-4363-90dc-c68d20f13e2a forwarding
HOL-1926-03-NET
Page 42HOL-1926-03-NET
The UUID af7bf4c8-aa81-4363-90dc-c68d20f13e2a matches the ID of the Tier 0router The output of the command lists all routes available for the Tier 0 router on theesx-01a transport node By reviewing the output of the Edge Node and Transport Nodeforwarding tables administrators can quickly identify where routing problems may beoccurring To copy the command to the putty session high light the command in themanual and drag and drop it to the putty window
HOL-1926-03-NET
Page 43HOL-1926-03-NET
MAC Address TablesMany common troubleshooting techniques involve verifying that the network devicesare learning the appropriate MAC addresses from devices connected to them In thislesson students will learn the various methods to view the MAC Address Tables on thedifferent components of NSX-T Datacenter
Open Chrome Browser from Windows Quick Launch TaskBar
1 Click on the Chrome Icon on the Windows Quick Launch Task Bar
Navigate to NSX-T Manager
1 Click on the VMware NSX | Login bookmark
HOL-1926-03-NET
Page 44HOL-1926-03-NET
Login to NSX-T Manager
Login to NSX Manager
1 Enter the username admin2 Enter the password VMware13 Click Login
HOL-1926-03-NET
Page 45HOL-1926-03-NET
Download MAC-VTEP Table
1 Click Switching2 Ensure the Switches tab is selected3 Select the LS-DB Logical Switch4 Change to the Monitor tab5 Click DOWNLOAD MAC-VTEP TABLE
Download the Central Control Plane Table
1 Ensure Central Control Plane is selected2 Click Download
HOL-1926-03-NET
Page 46HOL-1926-03-NET
Administrators may want to view individual transport node MAC Tables as well This canbe achieved using the Transport Node selection and choosing the appropriate transportnode
Save the File
1 Click Save
Open the File
1 Click filecsv
Select WordPad
1 Click WordPad
HOL-1926-03-NET
Page 47HOL-1926-03-NET
Review The Results
The contents of this file include all of the MAC addresses the current VTEP that the MACaddress lives behind and the MAC address of the VTEP With these three pieces ofinformation the controllers can distribute the switching information to all transportnodes participating in the LS-DB logical switch to ensure layer 2 reachability of all VMsattached to a LIF on the LS-DB logical switch
Close WordPad
Once you have completed reviewing the table close WordPad
Download VTEP Table
1 Click DOWNLOAD VTEP TABLE
Complete the previous steps to download the Central Control Plane Table and open thefile The browser zoom may need to be adjusted to view the link If it is not visiblecomplete the next step and then complete this step Otherwise skip the next step
HOL-1926-03-NET
Page 48HOL-1926-03-NET
Change Browser Zoom
1 Click the Chrome Settings button2 Click the Zoom Out button
Repeat as necessary to view the DOWNLOAD VTEP TABLE link Once the table hasbeen downloaded the zoom may be reset to 100
Save the File
1 Click Save
The filename may be file(1)csv
Open the File
HOL-1926-03-NET
Page 49HOL-1926-03-NET
1 Click filecsv
The filename may be file(1)csv
Review the Results
The contents of the VTEP Table include all information about the VTEPs participating inthe LS-DB logical switch This includes the VTEP Label IP MAC Address and SegmentID This information is used during replication to ensure the delivery of all BUM(broadcast unknown unicast and multicast) traffic
Close WordPad
Once you have completed reviewing the table close WordPad
MAC Tables on Transport Nodes
MAC Address Tables are also available on all the transport nodes To view the MACAddress Tables on hypervisor transport nodes the nsxcli is used
Open Putty
1 Click on the Putty icon
If putty is already open right-click the putty window and select ldquoputtyrdquo
HOL-1926-03-NET
Page 50HOL-1926-03-NET
Connect to esx-01a
1 Select esx-01acorplocal2 Click Open
Open nsxcli
1 Enter
nsxcli
HOL-1926-03-NET
Page 51HOL-1926-03-NET
View Logical Switches
1 Enter
get logical-switches
This command will list all logical switches configured on the transport node
HOL-1926-03-NET
Page 52HOL-1926-03-NET
View the MAC Table
1 Enter
get logical-switch 262dbb9b-5412-4e60-8ace-1c8b18a06715 mac-table
The ID 262dbb9b-5412-4e60-8ace-1c8b18a06715 corresponds to the ID of the LS-WEBlogical switch Review the results With this table administrators can view the differentMAC Tables on the transport node The LCP Local Entry table lists the VMs MAC Addressconnected to this transport node on the LS-WEB logical switch The LCP Remote Entryrepresents the MAC Address of a VM on another transport node connected to the LS-WEB logical switch The Inner MAC represents the VMs MAC address while the OuterMAC and Outer IP represent the Transport Nodes MAC and IP Addresses The HostKernel Entry shows the distributed router ports connected to the Logical Switch
HOL-1926-03-NET
Page 53HOL-1926-03-NET
ARP Tables
1 Enter
get logical-switch 262dbb9b-5412-4e60-8ace-1c8b18a06715 arp-table
The ARP table of the transport node is also available via nsxcli The ARP table shows theIP to MAC address mapping on the transport node The entries in these tables willcorrespond to the output of the mac-tables Here administrators can view the inner IPsand MAC addresses You can copy the command to the lab by highlighting thecommand in the manual and dragging and dropping it to the putty session
HOL-1926-03-NET
Page 54HOL-1926-03-NET
Port MirroringPort mirroring is a very useful tool to allow for packet capture of a single or multipleports on a switch This allows for packet level debugging of applications and networks
Navigate to Port Mirroring
1 Expand the Tools section2 Select Port Mirroring Sessions3 Click ADD4 Click Local SPAN
HOL-1926-03-NET
Page 55HOL-1926-03-NET
Create a New Session
1 Name the session WEB-01a2 Select the ESX-TN01 Transport Node3 Select Bidirectional4 Click NEXT
HOL-1926-03-NET
Page 56HOL-1926-03-NET
Skip Source PNIC Selection
1 Click NEXT
Administrators may mirror physical NICs as well as virtual NICs In this lab only virtualNICs will be mirrored
HOL-1926-03-NET
Page 57HOL-1926-03-NET
Select Source VM
1 Select web-01a2 Click the gt button3 Click SHOW VIRTUAL INTERFACE (VNIC)
HOL-1926-03-NET
Page 58HOL-1926-03-NET
Select Interface
1 Scroll Down2 Select the only interface3 Click gt to select the interface4 Click NEXT
HOL-1926-03-NET
Page 59HOL-1926-03-NET
Select Destination VM
1 Scroll to the top2 Select k8s-node13 Click gt to select the VM4 Click SHOW VIRTUAL INTERFACE (VNIC)
HOL-1926-03-NET
Page 60HOL-1926-03-NET
Select Interface
1 Scroll to the bottom2 Select the last interface3 Click gt to select the interface4 Click SAVE
Open Putty
1 Click on the Putty icon
If putty is already open right-click the putty window and select ldquoputtyrdquo
HOL-1926-03-NET
Page 61HOL-1926-03-NET
Connect to k8s-node1
1 Select k8s-node12 Click Open
Start TCPDump
HOL-1926-03-NET
Page 62HOL-1926-03-NET
1 Enter the command
tcpdump -vvni ens192 icmp
This command starts tcpdump on the interface selected in the Port Mirroring sessionfiltering on icmp
Open an New Chrome Tab
1 Click the New Tab button
Load the vSphere Web Client
1 Click RegionA2 Click HTML5 Client
Login to the vSphere Web Client
1 Select the Use Windows session authentication checkbox2 Click Login
HOL-1926-03-NET
Page 63HOL-1926-03-NET
Open web-01a Remote Console
1 Select web-01a2 Click Launch Remote Console
Open the Console
1 Click Open VMware Remote Console
Login to web-01a
1 Enter the username
HOL-1926-03-NET
Page 64HOL-1926-03-NET
root
2 Enter the password
VMware1
Start a ping
1 Enter the command
ping 172161012
2 Press Ctrl+Alt to release your cursor
Return to the k8s-node1 session
1 Click the rootk8s-node1 putty session
HOL-1926-03-NET
Page 65HOL-1926-03-NET
Review the Output
Review the output of the tcpdump command The traffic displayed is from the monitorsession configured earlier notice there is no traffic sourced or destined for the k8s-node1 VM Only mirrored traffic is shown
HOL-1926-03-NET
Page 66HOL-1926-03-NET
Module 2 - ConclusionThis now completes Module 2 on NSX-T Datacenter Troubleshooting In this module youreviewed common troubleshooting tools and activities within NSX-T Datacenter Youused these tools to gain an understanding of what to do when troubleshooting adataplane issue within NSX-T Datacenter system
The activities reviewed in the module were
bull Routing Tablesbull MAC VTEP and ARP Tablesbull Port Mirroring
Youve finished Module 2
Congratulations on completing Module 2
If you are looking for additional information on NSX-T Datacenter Troubleshooting thenplease review the NSX-T Documentation Center via the URL below
bull Go to httpstinyurlcomyc6q794n
Proceed to any module below which interests you the most
Lab Module List
bull Module 1 - NSX-T Datacenter Operations - Use Tools within NSX-T Datacenter forDay to Day Operations (15 minutes) - Intermediate - This module will walk youthrough the basics of NSX-T Datacenter operations You will use features such asTraceflow Port Connection tool and others
bull Module 2 - NSX-T Datacenter Troubleshooting - Use Tools within NSX-T Datacenterfor Troubleshooting (15 minutes)- Intermediate - This module will walk youthrough the basics of NSX-T Datacenter troubleshooting You will view varioussystem configurations and correct misconfigurations after problem identification
bull Module 3 - API Consumption - Gain Familiarity with the NSX-T API (30 minutes) -Advanced - This module will explore the basics of NSX API consumption throughmanual interaction as well as several common configuration management tools
Lab Captain
bull Module 1 - 3 Kenyon Hensler Staff Systems Engineer United States
HOL-1926-03-NET
Page 67HOL-1926-03-NET
How to End Lab
To end your lab click on the END button
HOL-1926-03-NET
Page 68HOL-1926-03-NET
Module 3 - APIConsumption - Gain
Familiarity with the NSX-TAPI (30 minutes)
HOL-1926-03-NET
Page 69HOL-1926-03-NET
NSX RESTful APINSX is designed ground up with a RESTful API The NSX REST API can be used to bothconfigure NSX and to provision NSX logical network services The NSX REST API can becalled directly or indirectly from various programming languages Many orchestrationand automation tools such as vRealize Automation via vRealize Orchestrator can call theNSX REST API to perform Layer 2 through Layer 7 network orchestration andautomation
To demonstrate NSX RESTful API calls you will be using the RESTClient extension to theMozilla Firefox browser RESTClient is a debugger for RESTful Web Services and is auseful tool when working with various REST APIs
During this module the following tasks will be completed
bull Overview of RESTful APIsbull Overview of Powershell cmdletsbull Review of multiple NSX API callsbull Creation and deletion of NSX Objectsbull Configuration of alarming available only via the NSX API
Introduction to REST APIs
A REpresentational State Transfer (REST) API defines a set of simple principles which areloosely followed by most API implementations
HOL-1926-03-NET
Page 70HOL-1926-03-NET
bull Resource (the source of specific information)bull Global Permanent Identifier (every resource is uniquely identified ndash think HTTP
URL)bull Standard Interface (used to exchange the representation of resources ndash think
the HTTP protocol)bull Set of Constraints
REST leverages the strength of HTTP to send data (Headers and Bodies) between Clientsand Servers
The term Uniform Resource Locator (URL) and Uniform Resource Identifier (URI) can beused interchangeably when working with REST
Resources (building blocks) are linked together by embedded hyperlinks in HTMLdocuments or URI references and resources can expose the state via representationscontaining both metadata (such as size media type or character set) and content(binary image or text document)
REST Request Methods
REST Clients specify the desired interaction (HTTP request message as defined by RFC2616) Each HTTP method has specific well-defined semantics within the context of aREST APIrsquos resource model
bull GET - (The purpose of GET is to retrieve a representation of a resourcersquos state)including Response Headers and Body
bull HEAD - is used to retrieve the metadata associated with the resourcersquos state orjust the Response Headers
bull PUT - should be used to add a new resource to a store or update a resourcebull DELETE - removes a resource from its parentbull POST - should be used to create a new resource
HOL-1926-03-NET
Page 71HOL-1926-03-NET
REST Response Status Codes
The REST APIs use a HTTP response message to inform clients of their requestrsquos result(as defined in RFC 2616) Five categories are defined
bull 1xx Informational Communicates transfer protocol-level informationbull 2xx Success Indicates that the clientrsquos request was accepted successfulbull 3xx Redirection Indicates that the client must take some additional action in
order to complete their requestbull 4xx Client Error This category of error status codes points the finger at clientsbull 5xx Server Error The server takes responsibility for these error status codes
HTTP response message to inform clients of their requestrsquos result (As Defined in RFC2616)
bull 200 OKbull 201 Createdbull 202 Acceptedbull 204 No contentbull 400 Bad requestbull 401 Unauthorizedbull 403 Forbiddenbull 404 Not foundbull 405 Method Not Allowedbull 409 Conflictbull 500 Internal Server Errorbull 501 Not implementedbull 503 Service unavailable
HTTP Request Headers for the NSX RESTful API
When configuring RESTful APIs to provision NSX services the following are a list of theimportant request headers
1 Authorization The user and password credential in Base64 encoded format
HOL-1926-03-NET
Page 72HOL-1926-03-NET
2 Content-Type applicationxml Says that the request bodypayload is in xmlformat
HTTP Requests for the NSX RESTful API
1 MethodVerb GETPUTPOSTDELETE Action on the resource2 URL Resource3 Headers Authorization and Content-Type4 Body XML Payload5 Status Code 2xx For Success and 4xx and 5xx for Failures
OpenAPI Specification
The NSX-T Datacenter OpenAPI Specification is available from NSX-T Manager at
bull GET httpsltnsx-mgrgtapiv1specopenapinsx_apiyamlbull GET httpsltnsx-mgrgtapiv1specopenapinsx_apijson
HOL-1926-03-NET
Page 73HOL-1926-03-NET
This specification allows API users to quickly consume all methods available from NSX-TDatacenter This documentation is generated for every NSX-T Datacenter release
HOL-1926-03-NET
Page 74HOL-1926-03-NET
Manual ConsumptionOne of the methods to consume the NSX-T Datacenter API is through manuallyinteracting with the API This can be done with many different tools This lesson willexplore the use of Postman and cURL
Open Postman
1 Click the Windows Button2 Type Postman3 Click Postman
HOL-1926-03-NET
Page 75HOL-1926-03-NET
Close the Create a New Dialog
1 Click X
Create an Authorization Header
An authorization header will authenticate the session with the NSX-T Datacenter API
1 Switch the Type to Basic Auth2 The Username and Password will be automatically populated3 Click Update Request
Enter the URI to GET All Logical Switches
1 Ensure the method is set to GET2 Enter
httpsnsxmgr-01aapiv1logical-switches
3 Click Send
HOL-1926-03-NET
Page 76HOL-1926-03-NET
Review the Output
By reviewing the output of the request administrators can inspect all Logical Switchescreated This information includes all of the required information associated with thisLogical Switch This information can also be used as a template to create a LogicalSwitch By reviewing the required components of a Logical Switch creation in the APIGuide these values can be completed with the values of a Logical switch that meets thesame requirement as the new Logical Switch
Generate a cURL Command
Postman will generate code for many languages from your request This allows for easyscripting of API requests
1 Click Code2 Select cURL on the drop down3 Click Copy to Clipboard
HOL-1926-03-NET
Page 77HOL-1926-03-NET
Open Putty
1 Click on the Putty icon
If putty is already open right-click the putty window and select ldquoputtyrdquo
Open a Connection to api-01a
1 Enter 1921681101042 Click Open
Login to api-01a
Login using the username
HOL-1926-03-NET
Page 78HOL-1926-03-NET
admin
Password
VMware1
Execute the cURL Command
1 Paste the cURL command by right clicking in the Putty window2 Append the command with
ltSPACEgt -k
3 Be sure to include the space before -k This option ignores invalid certificates4 Execute the command
HOL-1926-03-NET
Page 79HOL-1926-03-NET
Review the Output
1 Scroll to the top of the Putty session2 Review the output This output will match the output from Postman
cURL can be used for all API functions and may be used in conjunction with othercommand line tools such as grep sed and awk to build complex create update anddestroy functions
HOL-1926-03-NET
Page 80HOL-1926-03-NET
Terraform ConsumptionTerraform is a tool that allows for the creation of sharable configuration files that createand change infrastructure Terraform has released an NSX-T Datacenter Module thatallows for the configuration of NSX-T Datacenter objects
Open Putty
If a putty session to api-01a is already open skip the step labeled Open thelogicalswitchtf File
1 Click on the Putty icon
If putty is already open right-click the putty window and select ldquoputtyrdquo
Open a Connection to api-01a
HOL-1926-03-NET
Page 81HOL-1926-03-NET
1 Select api-01acorplocal2 Click Load3 Click Open
Login to api-01a
Login using the username
admin
Password
VMware1
Open the logicalswitchtf File
1 Switch to the api1 directory
cd api1
2 Open the logicalswitchtf file
vi logicalswitchtf
HOL-1926-03-NET
Page 82HOL-1926-03-NET
Review the File
Review the file by using the arrow keys to move to the top and bottom of the fileNotice the resource section This section will create a NSX-T Datacenter Logical SwitchOnce you have completed reviewing the file exit the vi editor
1 Type
q
HOL-1926-03-NET
Page 83HOL-1926-03-NET
Verify the logicalswitchtf File
1 Enter the command
terraform plan
This command will verify the required data and plugins for terraform to complete theaction
HOL-1926-03-NET
Page 84HOL-1926-03-NET
Apply the logicalswitchtf File
1 Enter the command
terraform apply
2 Type
yes
HOL-1926-03-NET
Page 85HOL-1926-03-NET
Review the Output
The output of the command shows the Logical Switch TfLogicalSwitch was created
Open Chrome Browser from Windows Quick Launch TaskBar
1 Click on the Chrome Icon on the Windows Quick Launch Task Bar
Navigate to NSX-T Manager
1 Click on the VMware NSX | Login bookmark
HOL-1926-03-NET
Page 86HOL-1926-03-NET
Login to NSX-T Manager
Login to NSX Manager
1 Enter the username admin2 Enter the password VMware13 Click Login
HOL-1926-03-NET
Page 87HOL-1926-03-NET
View the Logical Switch
1 Click Switching2 Select the Switches tab3 Notice the Logical Switch TfLogicalSwitch
If the Logical Switch is not visibile refresh the page
Delete the Logical Switch
Delete the Logical Switch to avoid confusion in the next part of the lesson
HOL-1926-03-NET
Page 88HOL-1926-03-NET
1 Select the TfLogicalSwitch2 Click Delete3 Click Delete
Return to the Putty Session
1 Click the Putty Session
Open the infratf File
1 Switch to the api2 directory
cd api2
2 Enter the command
vi infratf
HOL-1926-03-NET
Page 89HOL-1926-03-NET
Review the File
Review the file by using the arrow keys to move to the top and bottom of the fileNotice the many resource sections This file will create a Tier 1 router connect the Tier
1 router to the Tier 0 router create a Logical Switch attach the Tier 1 router to thelogical switch and assign an IP address to the Tier 1 interface on the logical switchThis is a common action for tenant creation in an environment Once you have
completed reviewing the file exit the vi editor
1 Type
q
HOL-1926-03-NET
Page 90HOL-1926-03-NET
Verify the infratf File
1 Enter the command
terraform plan
Apply the infratf File
1 Enter the command
HOL-1926-03-NET
Page 91HOL-1926-03-NET
terraform apply
Confirm the Apply
1 Type
yes
Review the Output
Review the output of the command Many actions were preformed Scroll up to viewthe complete output
Return to NSX Manager
Return to NSX Manager to review the configuration
1 Click VMware NSX Chrome window
HOL-1926-03-NET
Page 92HOL-1926-03-NET
Login to NSX-T Manager
If the session has timed out login to NSX Manager If the session is still active skip thisstep
1 Enter the username admin2 Enter the password VMware13 Click Login
HOL-1926-03-NET
Page 93HOL-1926-03-NET
Refresh Switches
1 Click REFRESH2 Notice the TfLogicalSwitch2 Switch
HOL-1926-03-NET
Page 94HOL-1926-03-NET
Review Tier 1 Router
1 Click Routing2 Select the T1-Terraform Logical Router
Review the Summary
3 Click Configuration4 Click Router Ports
HOL-1926-03-NET
Page 95HOL-1926-03-NET
Review the IP Address Assignments
The IP address 17216401 was specified in the infratf file as a variable The nextaddress may vary by lab This address is automatically configured from a pool ofaddresses for use in connecting Tier 0 routers to Tier 1 routers
Return to the Putty Session
1 Click the Putty Session
Ping the Router Address
1 Enter
ping 17216401 -c 3
The ping should be successful This IP address is being advertised from the newlycreated Tier 1 router through the Tier 0 router to the vPOD router via BGP
HOL-1926-03-NET
Page 96HOL-1926-03-NET
Remove the configuration
Terraform will also remove previously created configurations
1 Enter the command
terraform destroy
2 Confirm the removal
yes
HOL-1926-03-NET
Page 97HOL-1926-03-NET
Review the Output
The command successfully removed the configuration This is a common action in theremoval of an application or tenant from an infrastructure as code environment
HOL-1926-03-NET
Page 98HOL-1926-03-NET
Module 3 ConclusionThis module utilized the NSX API to configure multiple NSX objects The NSX APIprovides a powerful tool for configuration troubleshooting and monitoring
Youve finished Module 3
Congratulations on completing Module 3
For additional information on the NSX API visit the URL below and select the NSX APIGuide
bull Go to httpstinyurlcomyc6q794n
Proceed to any module below or end the lab
Lab Module List
bull Module 1 - NSX-T Datacenter Operations - Use Tools within NSX-TDatacenter for Day to Day Operations (15 minutes) - Intermediate - Thismodule will walk you through the basics of NSX-T Datacenter operations You willuse features such as Traceflow Port Connection tool and others
bull Module 2 - NSX-T Datacenter Troubleshooting - Use Tools within NSX-TDatacenter for Troubleshooting (15 minutes) - Intermediate - This modulewill walk you through the basics of NSX-T Datacenter troubleshooting You willview various system configurations and correct misconfigurations after problemidentification
bull Module 3 - API Consumption - Gain Familiarity with the NSX-T API (30minutes) - Advanced - This module will explore the basics of NSX APIconsumption through manual interaction as well as several commonconfiguration management tools
Lab Captain
bull Module 1 - 3 Kenyon Hensler Staff Systems Engineer United States
How to End Lab
To end the lab click on the END button
HOL-1926-03-NET
Page 99HOL-1926-03-NET
ConclusionThank you for participating in the VMware Hands-on Labs Be sure to visithttpholvmwarecom to continue your lab experience online
Lab SKU HOL-1926-03-NET
Version 20181104-143822
HOL-1926-03-NET
Page 100HOL-1926-03-NET
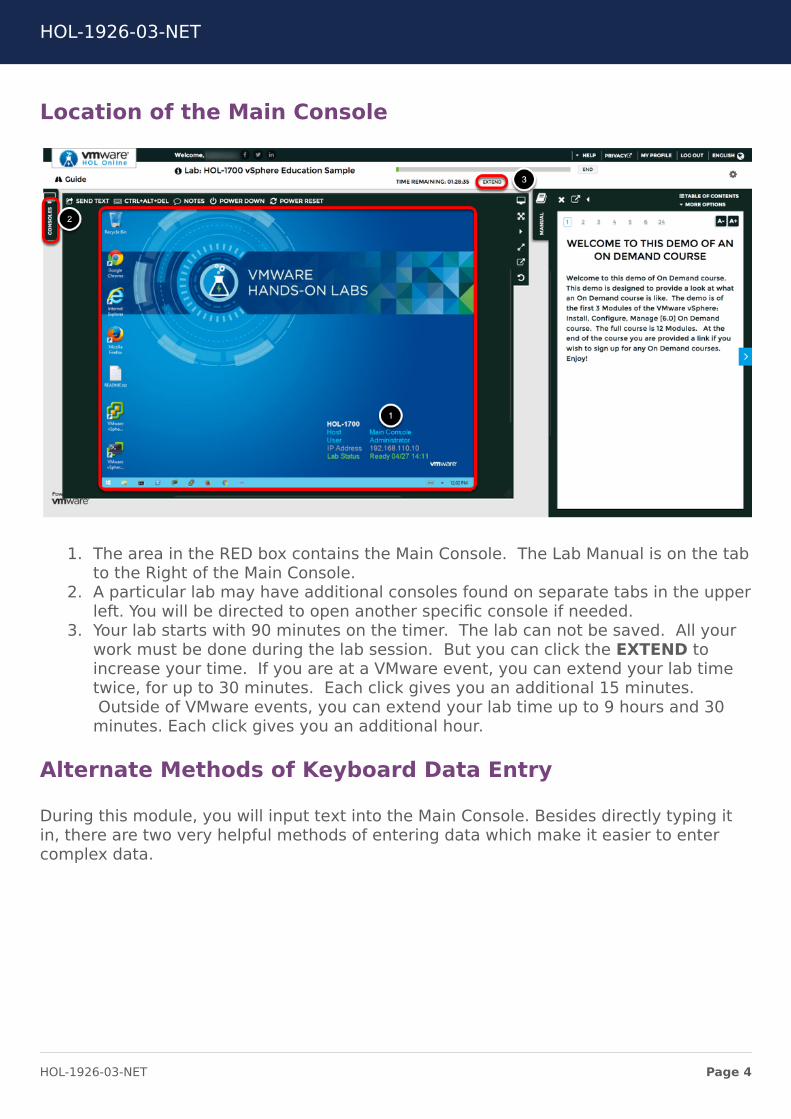
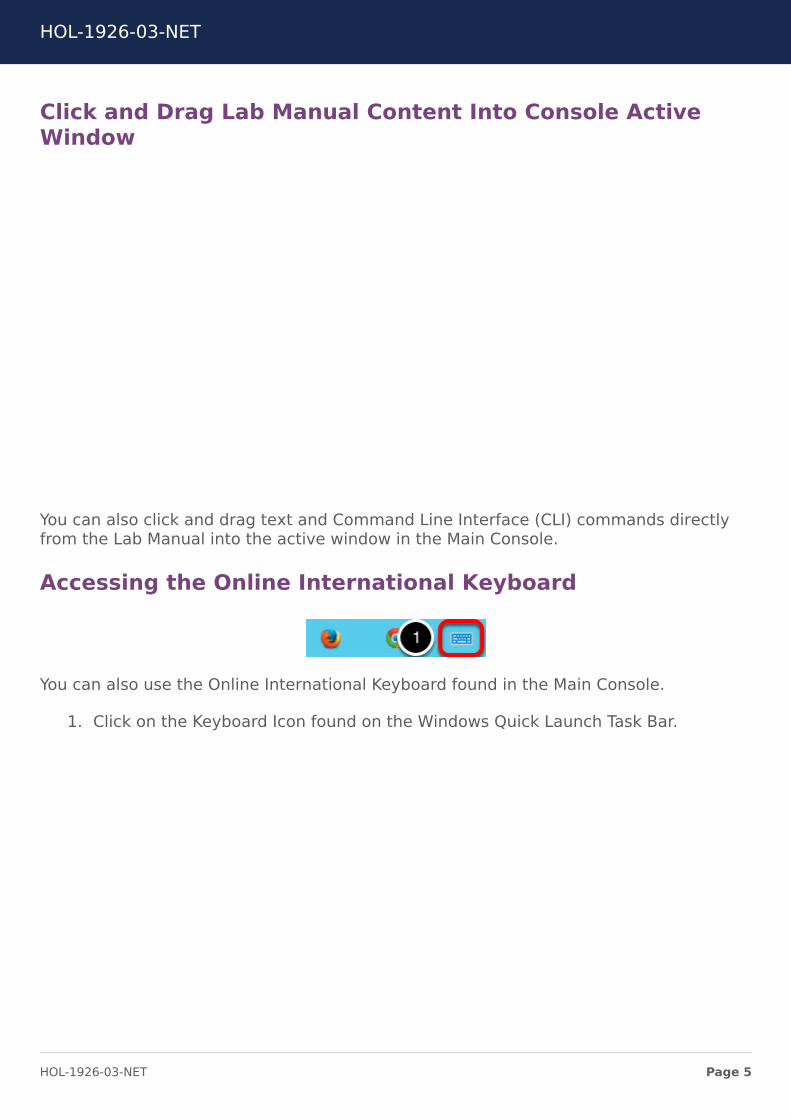
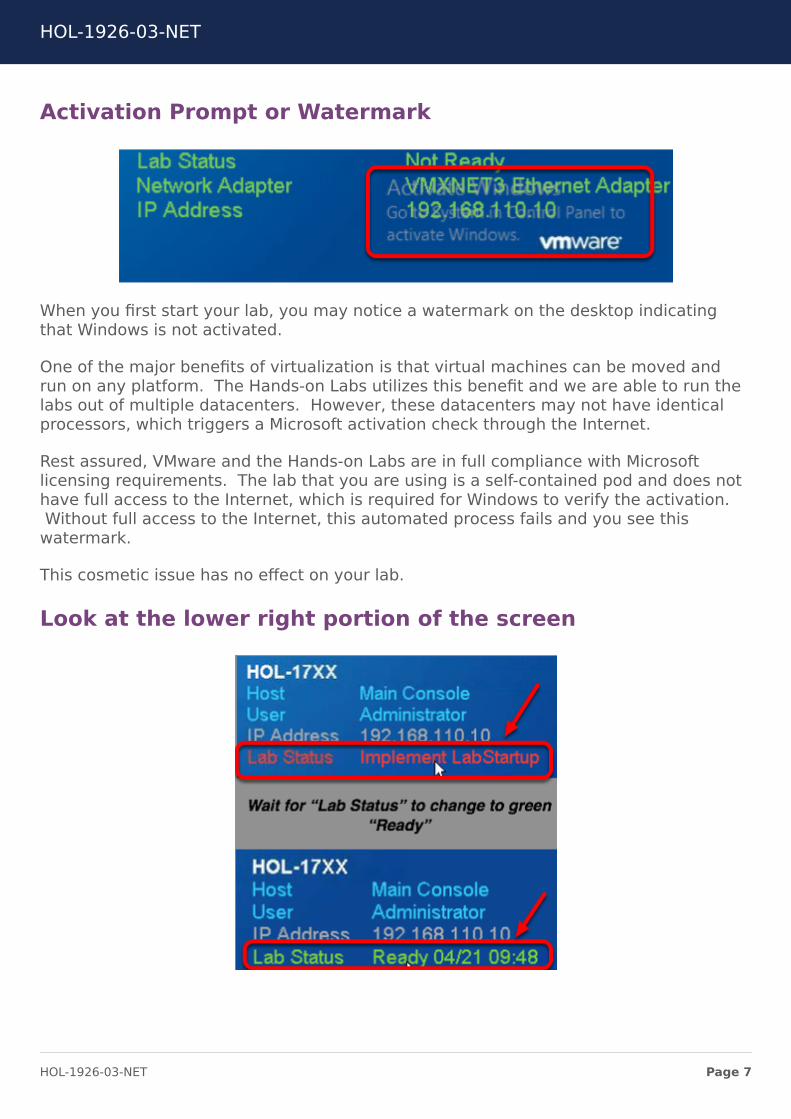
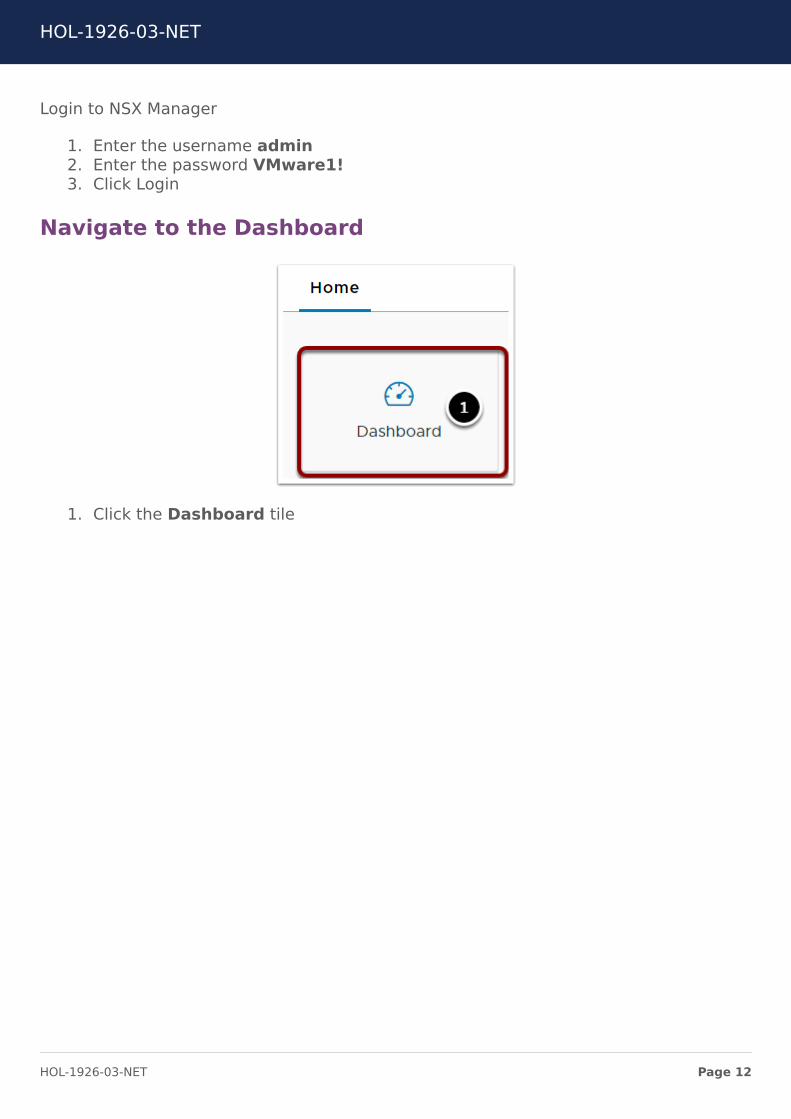
Login to NSX Manager
1 Enter the username admin2 Enter the password VMware13 Click Login
Navigate to the Dashboard
1 Click the Dashboard tile
HOL-1926-03-NET
Page 12HOL-1926-03-NET
Review the Dashboard
Review each of the tiles on the dashboard
Each tile represents a component of the NSX-T Datacenter infrastructure Each of thetiles is clickable and will drill down into the status of the tiles components Hoveringover each tile will show details of the members status
Backup status for each component is also shown
HOL-1926-03-NET
Page 13HOL-1926-03-NET
Navigate to LS-Uplink Monitor
To view the Counters associated with a Logical Switch
1 Click on Switching2 Click on Switches3 Select the LS-Uplink Logical Switch4 Click on Monitor
HOL-1926-03-NET
Page 14HOL-1926-03-NET
Review Logical Switch Statistics
Review the statistics of the LS-Uplink Logical Switch The statistics shown here aresimilar to traditional statistics and counters found on traditional networking hardwareThese statistics are a summation of all ports on the logical switch The statistics in the
lab may not match the screen shot as traffic will vary based on lab uptime
Navigate to Related Ports
1 Click Related2 Click Ports
Select a Port
HOL-1926-03-NET
Page 15HOL-1926-03-NET
1 Click uplink1
Navigate to Monitor Tab
1 Click Monitor
Review Logical Port Statistics
Review the statistics of the uplink1 Logical Port The statistics shown here are similar totraditional statistics and counters found on traditional networking hardware Thesestatistics are specific to this logical port The statistics in the lab may not match thescreen shot as traffic will vary based on lab uptime
HOL-1926-03-NET
Page 16HOL-1926-03-NET
Port Connection ToolIn this lesson you will use the port connection tool to verify end to end connectivity
Navigate to the Port Connection Tool
1 Expand the Tools section2 Select Port Connection
Select the Virtual Machines
Select the db-01a and web-01a virtual machines and interfaces
1 Select db-01a2 Select the VIF3 Select web-01a4 Select the VIF
HOL-1926-03-NET
Page 17HOL-1926-03-NET
5 Click GO
Review the results
Review the results of the traceflow Each component is clickable to view the details ofthe specific component By using the Port Connection tool you can quickly verify thestatus of the Logical Interface (LIF) on the Logical Switch the Associated VirtualInterfaces (VIF) the hypervisor physical connectivity and the tunnel status between thehypervisors This information can be used to verify logical port connectivity andphysical connectivity between hypervisors The web-01a virtual machine may be on adifferent transport node than shown
HOL-1926-03-NET
Page 18HOL-1926-03-NET
TraceflowTraceflow allows for virtual machine to virtual machine connectivity mapping includingall logical components between In the lesson you will use traceflow to verifyconnectivity between two virtual machines
Navigate to Traceflow
1 Ensure the Tools section is expanded2 Select Traceflow
Select the VMs to Trace
1 Select k8s-master as the Source2 Select the Virtual Interface ending in 40003 Select web-01a as the Destination
The remaining fields will be auto populated
HOL-1926-03-NET
Page 19HOL-1926-03-NET
4 Click TRACE
Review the Traceflow results
Review the Traceflow results Notice all of the components that are inspected for trafficforwarding All of the components from VNIC to VNIC are traced including LogicalSwitches Routers Firewall and Tunnels
HOL-1926-03-NET
Page 20HOL-1926-03-NET
IPFIXIPFIX is a network monitoring protocol similar to NetFlow IPFIX allows for variablelength fields and customized data NSX-T Datacenter supports the exporting of IPFIXdata from both switches and firewalls to a collector such as vRealize Network Insight Inthis lesson students will configure IPFIX for switching data as well as firewall data Thereis no IPFIX Collector in the lab This lesson is only for demonstration of theconfiguration
Navigate to IPFIX
1 Ensure Tools is expanded2 Select IPFIX
Configure a Switch Collector
HOL-1926-03-NET
Page 21HOL-1926-03-NET
1 Click Switch IPFIX Collectors2 Click Configure Collectors3 Click Add4 Click the Pencil Icon5 Enter 192168110106 Click Save
Configure a Switch Profile
1 Click Switch IPFIX Profile2 Click Add3 Enter SW_IPFIX_Profile4 Change the Active Timeout to 60
HOL-1926-03-NET
Page 22HOL-1926-03-NET
Apply the Switch Profile
1 Click Applied To2 Select Logical Switch3 Select all Logical Switches4 Move the selected Logical Switches to Selected5 Click Save
HOL-1926-03-NET
Page 23HOL-1926-03-NET
Configure a Firewall Collector
1 Click Firewall IPFIX Collectors2 Click Add3 Enter FW_Collector4 Click Add5 Click the Pencil Icon6 Enter 192168110107 Click Save
If the Firewall IPFIX Collectors link is not visible complete the next step to change thebrowsers zoom Otherwise skip the next step
HOL-1926-03-NET
Page 24HOL-1926-03-NET
Change Browser Zoom
1 Click the Chrome Settings button2 Click the Zoom Out button
Repeat as necessary to view the DOWNLOAD VTEP TABLE link Once the table hasbeen downloaded the zoom may be reset to 100
HOL-1926-03-NET
Page 25HOL-1926-03-NET
Configure a Firewall Profile
1 Click Firewall IPFIX Profiles2 Click Add3 Enter FW_IPFIX_Profile
HOL-1926-03-NET
Page 26HOL-1926-03-NET
Apply the Firewall Profile
1 Click Applied To2 Select Logical Switch3 Select Available4 Click to move all Logical Switches to Selected5 Click Save
In this lesson you have configured IPFIX for reporting to an IPFIX collector IPFIX is anindispensable network operations and troubleshooting tool For more information onVMwares IPFIX Collector vRealize Network Insight please click here
HOL-1926-03-NET
Page 27HOL-1926-03-NET
Central CLIIn this lesson students will review the NSX-T Datacenter Central CLI The Central CLIreplaces the need to connect to individual components to perform monitoring andtesting The Central CLI operates from the NSX-T Datacenter Manager
Open Putty
1 Click on the Putty Icon
If putty is already open right-click the putty window and select ldquoputtyrdquo
nsxctrl-01acorplocal
1 Select nsxctrl-01acorplocal2 Click Load3 Click Open
HOL-1926-03-NET
Page 28HOL-1926-03-NET
Login to nsxctrl-01a
Login using the user name
admin
and password
VMware1
View Available Get Commands
1 Enter
HOL-1926-03-NET
Page 29HOL-1926-03-NET
get
Review the output for available commands
get Logical Switches
1 Enter
get logical-switches
Review the output This is a list of all logical switches configured
HOL-1926-03-NET
Page 30HOL-1926-03-NET
View LS-Web arp-table
For this step copy and paste will be useful By highlighting the UUID the text will becopied to the clipboard By right-clicking in the putty session the text in the clipboardwill be pasted
1 Record the LS-Web UUID2 Enter
get logical-switch 262dbb9b-5412-4e60-8ace-1c8b18a06715 arp-table
Review the arp-table reported via the Central CLI There are many possible commandsavailable via the Central CLI For quick operations and troubleshooting the Central CLI isa valuable tool For further reading on the Central CLI see the NSX-T Datacenter CentralCLI documentation by clicking here
HOL-1926-03-NET
Page 31HOL-1926-03-NET
Module 1 - ConclusionThis now completes Module 1 on NSX-T Datacenter Operations In this module youreviewed common operational activities within NST-T Datacenter You used these toolsto gain an understanding of what to do on a day to day basis to ensure properfunctioning of the NSX-T Datacenter system
The tools reviewed in the module were
bull Reviews the Dashboard Counters and Statisticsbull Uses the port connection toolbull Demonstrates the use of Traceflowbull Reviews the IPFIX configurationbull Walks through parts of the Central CLI
Youve finished Module 1
Congratulations on completing Module 1
If you are looking for additional information on NSX-T Datacenter Operations thenplease review the NSX-T Documentation Center via the URL below
bull Go to httpstinyurlcomyc6q794n
Proceed to any module below which interests you the most
Lab Module List
bull Module 1 - NSX-T Datacenter Operations - Use Tools within NSX-T Datacenter forDay to Day Operations (15 minutes)- Intermediate - This module will walk youthrough the basics of NSX-T Datacenter operations You will use features such asTraceflow Port Connection tool and others
bull Module 2 - NSX-T Datacenter Troubleshooting - Use Tools within NSX-T Datacenterfor Troubleshooting (15 minutes) - Intermediate - This module will walk youthrough the basics of NSX-T Datacenter troubleshooting You will view varioussystem configurations and correct misconfigurations after problem identification
bull Module 3 - API Consumption - Gain Familiarity with the NSX-T API (30 minutes)-Advanced - This module will explore the basics of NSX API consumption throughmanual interaction as well as several common configuration management tools
Lab Captain
bull Module 1-3 Kenyon Hensler Staff Systems Engineer United States
HOL-1926-03-NET
Page 32HOL-1926-03-NET
How to End Lab
To end your lab click on the END button
HOL-1926-03-NET
Page 33HOL-1926-03-NET
Module 2 - NSX-TDatacenter
Troubleshooting - UseTools within NSX-T
Datacenter forTroubleshooting (15
minutes)
HOL-1926-03-NET
Page 34HOL-1926-03-NET
Module GuidanceThis module will review common troubleshooting activities within NSX-T Datacenter Youwill use these tools to gain an understanding of what to do on a day to day basis toensure proper functioning of the NSX-T Datacenter system
This module takes approximately 15 minutes to complete and goes through
bull Show Routing Tablesbull Show MAC Tablesbull Review VTEP Tablesbull Configure Port Mirroring
HOL-1926-03-NET
Page 35HOL-1926-03-NET
Routing TablesIn this lesson you will review routing tables from NSX-T Datacenter
Open Chrome Browser from Windows Quick Launch TaskBar
1 Click on the Chrome Icon on the Windows Quick Launch Task Bar
Navigate to NSX-T Manager
1 Click on the VMware NSX | Login bookmark
Login to NSX-T Manager
HOL-1926-03-NET
Page 36HOL-1926-03-NET
Login to NSX Manager
1 Enter the username admin2 Enter the password VMware13 Click Login
Navigate to Edges
You will need the IP address of an edge node associated with the router you need totroubleshoot
1 Expand the Fabric section2 Select Nodes3 Select Edges4 Record the Management IP of the Edge associated with nsx-edge-01a
You may need to expand the Edge column to see the names of the edges
Open Putty
1 Click on the Putty icon
If putty is already open right-click the putty window and select ldquoputtyrdquo
HOL-1926-03-NET
Page 37HOL-1926-03-NET
Connect to the Edge
1 Click nsx-edge-01a2 Click Load3 Click Open
Login to the Edge
1 Enter the password VMware1
HOL-1926-03-NET
Page 38HOL-1926-03-NET
List all Logical Routers
To enter the appropriate VRF for troubleshooting you must find the appropriate VRFnumber In this instance you must use the Service Routers of the Tier 0 logical routerThis is the logical router that runs BGP and peers with the northbound router
1 Enter the command to list all logical routers
get logical-routers
2 Record the VRF number of the SERVICE_ROUTER_TIER0
Enter VRF Context Mode
In VRF context mode the router will output information specific to the VRF you enter
1 Enter the command to switch to vfr 2
vrf 2
HOL-1926-03-NET
Page 39HOL-1926-03-NET
Get Routes
1 Type the command
get route
2 Review the routes available on this T0 SR
Notice the different Flags associated with the different routes b represents a BGProute learned from the northbound router nc represents an NSX Connected route thatwas auto plumbed from a Tier 1 logical router or this Tier 1 logical router c represents aroute directly connected to this Tier 0 SR (Service Router) Notice the routes that areavailable via 16925401 this address is the Intra Tier 0 Transit Subnet This is addressspace the Tier 0 SR uses to route to the Tier 0 DR (Distributed Router) With thisinformation you will be able to determine if your Tier 0 SR has learned the appropriateroutes from the physical environment
Routes on Transport Nodes
Routes are also available on all the transport nodes To view the routes on hypervisortransport nodes the nsxcli is used
Open Putty
HOL-1926-03-NET
Page 40HOL-1926-03-NET
1 Click on the Putty icon
If putty is already open right-click the putty window and select ldquoputtyrdquo
Connect to esx-01a
1 Select esx-01acorplocal2 Click Load3 Click Open
Open nsxcli
1 Enter
nsxcli
HOL-1926-03-NET
Page 41HOL-1926-03-NET
View Logical Routers
1 Enter
get logical-routers
Review the output from the command Notice the number of LIFs and Routes associatedwith each logical router The VDR UUID listed can be matched to the ID of the logicalrouters in the NSX-T Datacenter GUI
View Logical Router Forwarding Detail
1 Enter
get logical-router af7bf4c8-aa81-4363-90dc-c68d20f13e2a forwarding
HOL-1926-03-NET
Page 42HOL-1926-03-NET
The UUID af7bf4c8-aa81-4363-90dc-c68d20f13e2a matches the ID of the Tier 0router The output of the command lists all routes available for the Tier 0 router on theesx-01a transport node By reviewing the output of the Edge Node and Transport Nodeforwarding tables administrators can quickly identify where routing problems may beoccurring To copy the command to the putty session high light the command in themanual and drag and drop it to the putty window
HOL-1926-03-NET
Page 43HOL-1926-03-NET
MAC Address TablesMany common troubleshooting techniques involve verifying that the network devicesare learning the appropriate MAC addresses from devices connected to them In thislesson students will learn the various methods to view the MAC Address Tables on thedifferent components of NSX-T Datacenter
Open Chrome Browser from Windows Quick Launch TaskBar
1 Click on the Chrome Icon on the Windows Quick Launch Task Bar
Navigate to NSX-T Manager
1 Click on the VMware NSX | Login bookmark
HOL-1926-03-NET
Page 44HOL-1926-03-NET
Login to NSX-T Manager
Login to NSX Manager
1 Enter the username admin2 Enter the password VMware13 Click Login
HOL-1926-03-NET
Page 45HOL-1926-03-NET
Download MAC-VTEP Table
1 Click Switching2 Ensure the Switches tab is selected3 Select the LS-DB Logical Switch4 Change to the Monitor tab5 Click DOWNLOAD MAC-VTEP TABLE
Download the Central Control Plane Table
1 Ensure Central Control Plane is selected2 Click Download
HOL-1926-03-NET
Page 46HOL-1926-03-NET
Administrators may want to view individual transport node MAC Tables as well This canbe achieved using the Transport Node selection and choosing the appropriate transportnode
Save the File
1 Click Save
Open the File
1 Click filecsv
Select WordPad
1 Click WordPad
HOL-1926-03-NET
Page 47HOL-1926-03-NET
Review The Results
The contents of this file include all of the MAC addresses the current VTEP that the MACaddress lives behind and the MAC address of the VTEP With these three pieces ofinformation the controllers can distribute the switching information to all transportnodes participating in the LS-DB logical switch to ensure layer 2 reachability of all VMsattached to a LIF on the LS-DB logical switch
Close WordPad
Once you have completed reviewing the table close WordPad
Download VTEP Table
1 Click DOWNLOAD VTEP TABLE
Complete the previous steps to download the Central Control Plane Table and open thefile The browser zoom may need to be adjusted to view the link If it is not visiblecomplete the next step and then complete this step Otherwise skip the next step
HOL-1926-03-NET
Page 48HOL-1926-03-NET
Change Browser Zoom
1 Click the Chrome Settings button2 Click the Zoom Out button
Repeat as necessary to view the DOWNLOAD VTEP TABLE link Once the table hasbeen downloaded the zoom may be reset to 100
Save the File
1 Click Save
The filename may be file(1)csv
Open the File
HOL-1926-03-NET
Page 49HOL-1926-03-NET
1 Click filecsv
The filename may be file(1)csv
Review the Results
The contents of the VTEP Table include all information about the VTEPs participating inthe LS-DB logical switch This includes the VTEP Label IP MAC Address and SegmentID This information is used during replication to ensure the delivery of all BUM(broadcast unknown unicast and multicast) traffic
Close WordPad
Once you have completed reviewing the table close WordPad
MAC Tables on Transport Nodes
MAC Address Tables are also available on all the transport nodes To view the MACAddress Tables on hypervisor transport nodes the nsxcli is used
Open Putty
1 Click on the Putty icon
If putty is already open right-click the putty window and select ldquoputtyrdquo
HOL-1926-03-NET
Page 50HOL-1926-03-NET
Connect to esx-01a
1 Select esx-01acorplocal2 Click Open
Open nsxcli
1 Enter
nsxcli
HOL-1926-03-NET
Page 51HOL-1926-03-NET
View Logical Switches
1 Enter
get logical-switches
This command will list all logical switches configured on the transport node
HOL-1926-03-NET
Page 52HOL-1926-03-NET
View the MAC Table
1 Enter
get logical-switch 262dbb9b-5412-4e60-8ace-1c8b18a06715 mac-table
The ID 262dbb9b-5412-4e60-8ace-1c8b18a06715 corresponds to the ID of the LS-WEBlogical switch Review the results With this table administrators can view the differentMAC Tables on the transport node The LCP Local Entry table lists the VMs MAC Addressconnected to this transport node on the LS-WEB logical switch The LCP Remote Entryrepresents the MAC Address of a VM on another transport node connected to the LS-WEB logical switch The Inner MAC represents the VMs MAC address while the OuterMAC and Outer IP represent the Transport Nodes MAC and IP Addresses The HostKernel Entry shows the distributed router ports connected to the Logical Switch
HOL-1926-03-NET
Page 53HOL-1926-03-NET
ARP Tables
1 Enter
get logical-switch 262dbb9b-5412-4e60-8ace-1c8b18a06715 arp-table
The ARP table of the transport node is also available via nsxcli The ARP table shows theIP to MAC address mapping on the transport node The entries in these tables willcorrespond to the output of the mac-tables Here administrators can view the inner IPsand MAC addresses You can copy the command to the lab by highlighting thecommand in the manual and dragging and dropping it to the putty session
HOL-1926-03-NET
Page 54HOL-1926-03-NET
Port MirroringPort mirroring is a very useful tool to allow for packet capture of a single or multipleports on a switch This allows for packet level debugging of applications and networks
Navigate to Port Mirroring
1 Expand the Tools section2 Select Port Mirroring Sessions3 Click ADD4 Click Local SPAN
HOL-1926-03-NET
Page 55HOL-1926-03-NET
Create a New Session
1 Name the session WEB-01a2 Select the ESX-TN01 Transport Node3 Select Bidirectional4 Click NEXT
HOL-1926-03-NET
Page 56HOL-1926-03-NET
Skip Source PNIC Selection
1 Click NEXT
Administrators may mirror physical NICs as well as virtual NICs In this lab only virtualNICs will be mirrored
HOL-1926-03-NET
Page 57HOL-1926-03-NET
Select Source VM
1 Select web-01a2 Click the gt button3 Click SHOW VIRTUAL INTERFACE (VNIC)
HOL-1926-03-NET
Page 58HOL-1926-03-NET
Select Interface
1 Scroll Down2 Select the only interface3 Click gt to select the interface4 Click NEXT
HOL-1926-03-NET
Page 59HOL-1926-03-NET
Select Destination VM
1 Scroll to the top2 Select k8s-node13 Click gt to select the VM4 Click SHOW VIRTUAL INTERFACE (VNIC)
HOL-1926-03-NET
Page 60HOL-1926-03-NET
Select Interface
1 Scroll to the bottom2 Select the last interface3 Click gt to select the interface4 Click SAVE
Open Putty
1 Click on the Putty icon
If putty is already open right-click the putty window and select ldquoputtyrdquo
HOL-1926-03-NET
Page 61HOL-1926-03-NET
Connect to k8s-node1
1 Select k8s-node12 Click Open
Start TCPDump
HOL-1926-03-NET
Page 62HOL-1926-03-NET
1 Enter the command
tcpdump -vvni ens192 icmp
This command starts tcpdump on the interface selected in the Port Mirroring sessionfiltering on icmp
Open an New Chrome Tab
1 Click the New Tab button
Load the vSphere Web Client
1 Click RegionA2 Click HTML5 Client
Login to the vSphere Web Client
1 Select the Use Windows session authentication checkbox2 Click Login
HOL-1926-03-NET
Page 63HOL-1926-03-NET
Open web-01a Remote Console
1 Select web-01a2 Click Launch Remote Console
Open the Console
1 Click Open VMware Remote Console
Login to web-01a
1 Enter the username
HOL-1926-03-NET
Page 64HOL-1926-03-NET
root
2 Enter the password
VMware1
Start a ping
1 Enter the command
ping 172161012
2 Press Ctrl+Alt to release your cursor
Return to the k8s-node1 session
1 Click the rootk8s-node1 putty session
HOL-1926-03-NET
Page 65HOL-1926-03-NET
Review the Output
Review the output of the tcpdump command The traffic displayed is from the monitorsession configured earlier notice there is no traffic sourced or destined for the k8s-node1 VM Only mirrored traffic is shown
HOL-1926-03-NET
Page 66HOL-1926-03-NET
Module 2 - ConclusionThis now completes Module 2 on NSX-T Datacenter Troubleshooting In this module youreviewed common troubleshooting tools and activities within NSX-T Datacenter Youused these tools to gain an understanding of what to do when troubleshooting adataplane issue within NSX-T Datacenter system
The activities reviewed in the module were
bull Routing Tablesbull MAC VTEP and ARP Tablesbull Port Mirroring
Youve finished Module 2
Congratulations on completing Module 2
If you are looking for additional information on NSX-T Datacenter Troubleshooting thenplease review the NSX-T Documentation Center via the URL below
bull Go to httpstinyurlcomyc6q794n
Proceed to any module below which interests you the most
Lab Module List
bull Module 1 - NSX-T Datacenter Operations - Use Tools within NSX-T Datacenter forDay to Day Operations (15 minutes) - Intermediate - This module will walk youthrough the basics of NSX-T Datacenter operations You will use features such asTraceflow Port Connection tool and others
bull Module 2 - NSX-T Datacenter Troubleshooting - Use Tools within NSX-T Datacenterfor Troubleshooting (15 minutes)- Intermediate - This module will walk youthrough the basics of NSX-T Datacenter troubleshooting You will view varioussystem configurations and correct misconfigurations after problem identification
bull Module 3 - API Consumption - Gain Familiarity with the NSX-T API (30 minutes) -Advanced - This module will explore the basics of NSX API consumption throughmanual interaction as well as several common configuration management tools
Lab Captain
bull Module 1 - 3 Kenyon Hensler Staff Systems Engineer United States
HOL-1926-03-NET
Page 67HOL-1926-03-NET
How to End Lab
To end your lab click on the END button
HOL-1926-03-NET
Page 68HOL-1926-03-NET
Module 3 - APIConsumption - Gain
Familiarity with the NSX-TAPI (30 minutes)
HOL-1926-03-NET
Page 69HOL-1926-03-NET
NSX RESTful APINSX is designed ground up with a RESTful API The NSX REST API can be used to bothconfigure NSX and to provision NSX logical network services The NSX REST API can becalled directly or indirectly from various programming languages Many orchestrationand automation tools such as vRealize Automation via vRealize Orchestrator can call theNSX REST API to perform Layer 2 through Layer 7 network orchestration andautomation
To demonstrate NSX RESTful API calls you will be using the RESTClient extension to theMozilla Firefox browser RESTClient is a debugger for RESTful Web Services and is auseful tool when working with various REST APIs
During this module the following tasks will be completed
bull Overview of RESTful APIsbull Overview of Powershell cmdletsbull Review of multiple NSX API callsbull Creation and deletion of NSX Objectsbull Configuration of alarming available only via the NSX API
Introduction to REST APIs
A REpresentational State Transfer (REST) API defines a set of simple principles which areloosely followed by most API implementations
HOL-1926-03-NET
Page 70HOL-1926-03-NET
bull Resource (the source of specific information)bull Global Permanent Identifier (every resource is uniquely identified ndash think HTTP
URL)bull Standard Interface (used to exchange the representation of resources ndash think
the HTTP protocol)bull Set of Constraints
REST leverages the strength of HTTP to send data (Headers and Bodies) between Clientsand Servers
The term Uniform Resource Locator (URL) and Uniform Resource Identifier (URI) can beused interchangeably when working with REST
Resources (building blocks) are linked together by embedded hyperlinks in HTMLdocuments or URI references and resources can expose the state via representationscontaining both metadata (such as size media type or character set) and content(binary image or text document)
REST Request Methods
REST Clients specify the desired interaction (HTTP request message as defined by RFC2616) Each HTTP method has specific well-defined semantics within the context of aREST APIrsquos resource model
bull GET - (The purpose of GET is to retrieve a representation of a resourcersquos state)including Response Headers and Body
bull HEAD - is used to retrieve the metadata associated with the resourcersquos state orjust the Response Headers
bull PUT - should be used to add a new resource to a store or update a resourcebull DELETE - removes a resource from its parentbull POST - should be used to create a new resource
HOL-1926-03-NET
Page 71HOL-1926-03-NET
REST Response Status Codes
The REST APIs use a HTTP response message to inform clients of their requestrsquos result(as defined in RFC 2616) Five categories are defined
bull 1xx Informational Communicates transfer protocol-level informationbull 2xx Success Indicates that the clientrsquos request was accepted successfulbull 3xx Redirection Indicates that the client must take some additional action in
order to complete their requestbull 4xx Client Error This category of error status codes points the finger at clientsbull 5xx Server Error The server takes responsibility for these error status codes
HTTP response message to inform clients of their requestrsquos result (As Defined in RFC2616)
bull 200 OKbull 201 Createdbull 202 Acceptedbull 204 No contentbull 400 Bad requestbull 401 Unauthorizedbull 403 Forbiddenbull 404 Not foundbull 405 Method Not Allowedbull 409 Conflictbull 500 Internal Server Errorbull 501 Not implementedbull 503 Service unavailable
HTTP Request Headers for the NSX RESTful API
When configuring RESTful APIs to provision NSX services the following are a list of theimportant request headers
1 Authorization The user and password credential in Base64 encoded format
HOL-1926-03-NET
Page 72HOL-1926-03-NET
2 Content-Type applicationxml Says that the request bodypayload is in xmlformat
HTTP Requests for the NSX RESTful API
1 MethodVerb GETPUTPOSTDELETE Action on the resource2 URL Resource3 Headers Authorization and Content-Type4 Body XML Payload5 Status Code 2xx For Success and 4xx and 5xx for Failures
OpenAPI Specification
The NSX-T Datacenter OpenAPI Specification is available from NSX-T Manager at
bull GET httpsltnsx-mgrgtapiv1specopenapinsx_apiyamlbull GET httpsltnsx-mgrgtapiv1specopenapinsx_apijson
HOL-1926-03-NET
Page 73HOL-1926-03-NET
This specification allows API users to quickly consume all methods available from NSX-TDatacenter This documentation is generated for every NSX-T Datacenter release
HOL-1926-03-NET
Page 74HOL-1926-03-NET
Manual ConsumptionOne of the methods to consume the NSX-T Datacenter API is through manuallyinteracting with the API This can be done with many different tools This lesson willexplore the use of Postman and cURL
Open Postman
1 Click the Windows Button2 Type Postman3 Click Postman
HOL-1926-03-NET
Page 75HOL-1926-03-NET
Close the Create a New Dialog
1 Click X
Create an Authorization Header
An authorization header will authenticate the session with the NSX-T Datacenter API
1 Switch the Type to Basic Auth2 The Username and Password will be automatically populated3 Click Update Request
Enter the URI to GET All Logical Switches
1 Ensure the method is set to GET2 Enter
httpsnsxmgr-01aapiv1logical-switches
3 Click Send
HOL-1926-03-NET
Page 76HOL-1926-03-NET
Review the Output
By reviewing the output of the request administrators can inspect all Logical Switchescreated This information includes all of the required information associated with thisLogical Switch This information can also be used as a template to create a LogicalSwitch By reviewing the required components of a Logical Switch creation in the APIGuide these values can be completed with the values of a Logical switch that meets thesame requirement as the new Logical Switch
Generate a cURL Command
Postman will generate code for many languages from your request This allows for easyscripting of API requests
1 Click Code2 Select cURL on the drop down3 Click Copy to Clipboard
HOL-1926-03-NET
Page 77HOL-1926-03-NET
Open Putty
1 Click on the Putty icon
If putty is already open right-click the putty window and select ldquoputtyrdquo
Open a Connection to api-01a
1 Enter 1921681101042 Click Open
Login to api-01a
Login using the username
HOL-1926-03-NET
Page 78HOL-1926-03-NET
admin
Password
VMware1
Execute the cURL Command
1 Paste the cURL command by right clicking in the Putty window2 Append the command with
ltSPACEgt -k
3 Be sure to include the space before -k This option ignores invalid certificates4 Execute the command
HOL-1926-03-NET
Page 79HOL-1926-03-NET
Review the Output
1 Scroll to the top of the Putty session2 Review the output This output will match the output from Postman
cURL can be used for all API functions and may be used in conjunction with othercommand line tools such as grep sed and awk to build complex create update anddestroy functions
HOL-1926-03-NET
Page 80HOL-1926-03-NET
Terraform ConsumptionTerraform is a tool that allows for the creation of sharable configuration files that createand change infrastructure Terraform has released an NSX-T Datacenter Module thatallows for the configuration of NSX-T Datacenter objects
Open Putty
If a putty session to api-01a is already open skip the step labeled Open thelogicalswitchtf File
1 Click on the Putty icon
If putty is already open right-click the putty window and select ldquoputtyrdquo
Open a Connection to api-01a
HOL-1926-03-NET
Page 81HOL-1926-03-NET
1 Select api-01acorplocal2 Click Load3 Click Open
Login to api-01a
Login using the username
admin
Password
VMware1
Open the logicalswitchtf File
1 Switch to the api1 directory
cd api1
2 Open the logicalswitchtf file
vi logicalswitchtf
HOL-1926-03-NET
Page 82HOL-1926-03-NET
Review the File
Review the file by using the arrow keys to move to the top and bottom of the fileNotice the resource section This section will create a NSX-T Datacenter Logical SwitchOnce you have completed reviewing the file exit the vi editor
1 Type
q
HOL-1926-03-NET
Page 83HOL-1926-03-NET
Verify the logicalswitchtf File
1 Enter the command
terraform plan
This command will verify the required data and plugins for terraform to complete theaction
HOL-1926-03-NET
Page 84HOL-1926-03-NET
Apply the logicalswitchtf File
1 Enter the command
terraform apply
2 Type
yes
HOL-1926-03-NET
Page 85HOL-1926-03-NET
Review the Output
The output of the command shows the Logical Switch TfLogicalSwitch was created
Open Chrome Browser from Windows Quick Launch TaskBar
1 Click on the Chrome Icon on the Windows Quick Launch Task Bar
Navigate to NSX-T Manager
1 Click on the VMware NSX | Login bookmark
HOL-1926-03-NET
Page 86HOL-1926-03-NET
Login to NSX-T Manager
Login to NSX Manager
1 Enter the username admin2 Enter the password VMware13 Click Login
HOL-1926-03-NET
Page 87HOL-1926-03-NET
View the Logical Switch
1 Click Switching2 Select the Switches tab3 Notice the Logical Switch TfLogicalSwitch
If the Logical Switch is not visibile refresh the page
Delete the Logical Switch
Delete the Logical Switch to avoid confusion in the next part of the lesson
HOL-1926-03-NET
Page 88HOL-1926-03-NET
1 Select the TfLogicalSwitch2 Click Delete3 Click Delete
Return to the Putty Session
1 Click the Putty Session
Open the infratf File
1 Switch to the api2 directory
cd api2
2 Enter the command
vi infratf
HOL-1926-03-NET
Page 89HOL-1926-03-NET
Review the File
Review the file by using the arrow keys to move to the top and bottom of the fileNotice the many resource sections This file will create a Tier 1 router connect the Tier
1 router to the Tier 0 router create a Logical Switch attach the Tier 1 router to thelogical switch and assign an IP address to the Tier 1 interface on the logical switchThis is a common action for tenant creation in an environment Once you have
completed reviewing the file exit the vi editor
1 Type
q
HOL-1926-03-NET
Page 90HOL-1926-03-NET
Verify the infratf File
1 Enter the command
terraform plan
Apply the infratf File
1 Enter the command
HOL-1926-03-NET
Page 91HOL-1926-03-NET
terraform apply
Confirm the Apply
1 Type
yes
Review the Output
Review the output of the command Many actions were preformed Scroll up to viewthe complete output
Return to NSX Manager
Return to NSX Manager to review the configuration
1 Click VMware NSX Chrome window
HOL-1926-03-NET
Page 92HOL-1926-03-NET
Login to NSX-T Manager
If the session has timed out login to NSX Manager If the session is still active skip thisstep
1 Enter the username admin2 Enter the password VMware13 Click Login
HOL-1926-03-NET
Page 93HOL-1926-03-NET
Refresh Switches
1 Click REFRESH2 Notice the TfLogicalSwitch2 Switch
HOL-1926-03-NET
Page 94HOL-1926-03-NET
Review Tier 1 Router
1 Click Routing2 Select the T1-Terraform Logical Router
Review the Summary
3 Click Configuration4 Click Router Ports
HOL-1926-03-NET
Page 95HOL-1926-03-NET
Review the IP Address Assignments
The IP address 17216401 was specified in the infratf file as a variable The nextaddress may vary by lab This address is automatically configured from a pool ofaddresses for use in connecting Tier 0 routers to Tier 1 routers
Return to the Putty Session
1 Click the Putty Session
Ping the Router Address
1 Enter
ping 17216401 -c 3
The ping should be successful This IP address is being advertised from the newlycreated Tier 1 router through the Tier 0 router to the vPOD router via BGP
HOL-1926-03-NET
Page 96HOL-1926-03-NET
Remove the configuration
Terraform will also remove previously created configurations
1 Enter the command
terraform destroy
2 Confirm the removal
yes
HOL-1926-03-NET
Page 97HOL-1926-03-NET
Review the Output
The command successfully removed the configuration This is a common action in theremoval of an application or tenant from an infrastructure as code environment
HOL-1926-03-NET
Page 98HOL-1926-03-NET
Module 3 ConclusionThis module utilized the NSX API to configure multiple NSX objects The NSX APIprovides a powerful tool for configuration troubleshooting and monitoring
Youve finished Module 3
Congratulations on completing Module 3
For additional information on the NSX API visit the URL below and select the NSX APIGuide
bull Go to httpstinyurlcomyc6q794n
Proceed to any module below or end the lab
Lab Module List
bull Module 1 - NSX-T Datacenter Operations - Use Tools within NSX-TDatacenter for Day to Day Operations (15 minutes) - Intermediate - Thismodule will walk you through the basics of NSX-T Datacenter operations You willuse features such as Traceflow Port Connection tool and others
bull Module 2 - NSX-T Datacenter Troubleshooting - Use Tools within NSX-TDatacenter for Troubleshooting (15 minutes) - Intermediate - This modulewill walk you through the basics of NSX-T Datacenter troubleshooting You willview various system configurations and correct misconfigurations after problemidentification
bull Module 3 - API Consumption - Gain Familiarity with the NSX-T API (30minutes) - Advanced - This module will explore the basics of NSX APIconsumption through manual interaction as well as several commonconfiguration management tools
Lab Captain
bull Module 1 - 3 Kenyon Hensler Staff Systems Engineer United States
How to End Lab
To end the lab click on the END button
HOL-1926-03-NET
Page 99HOL-1926-03-NET
ConclusionThank you for participating in the VMware Hands-on Labs Be sure to visithttpholvmwarecom to continue your lab experience online
Lab SKU HOL-1926-03-NET
Version 20181104-143822
HOL-1926-03-NET
Page 100HOL-1926-03-NET
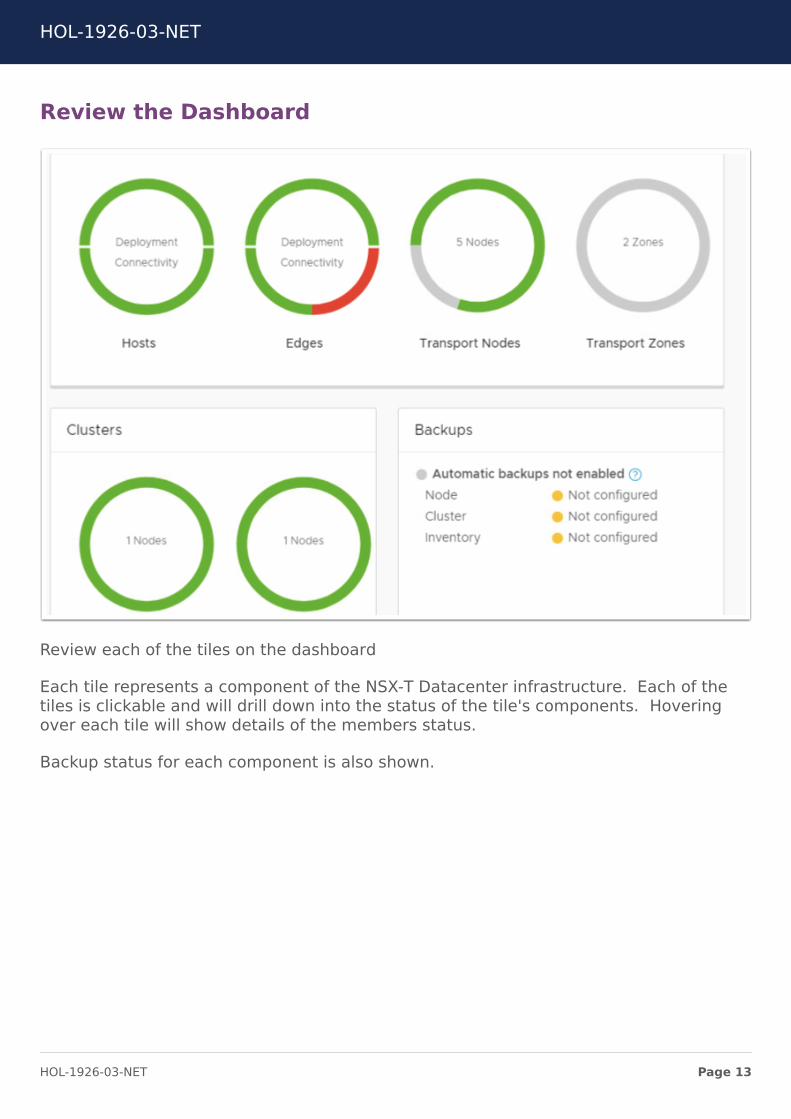
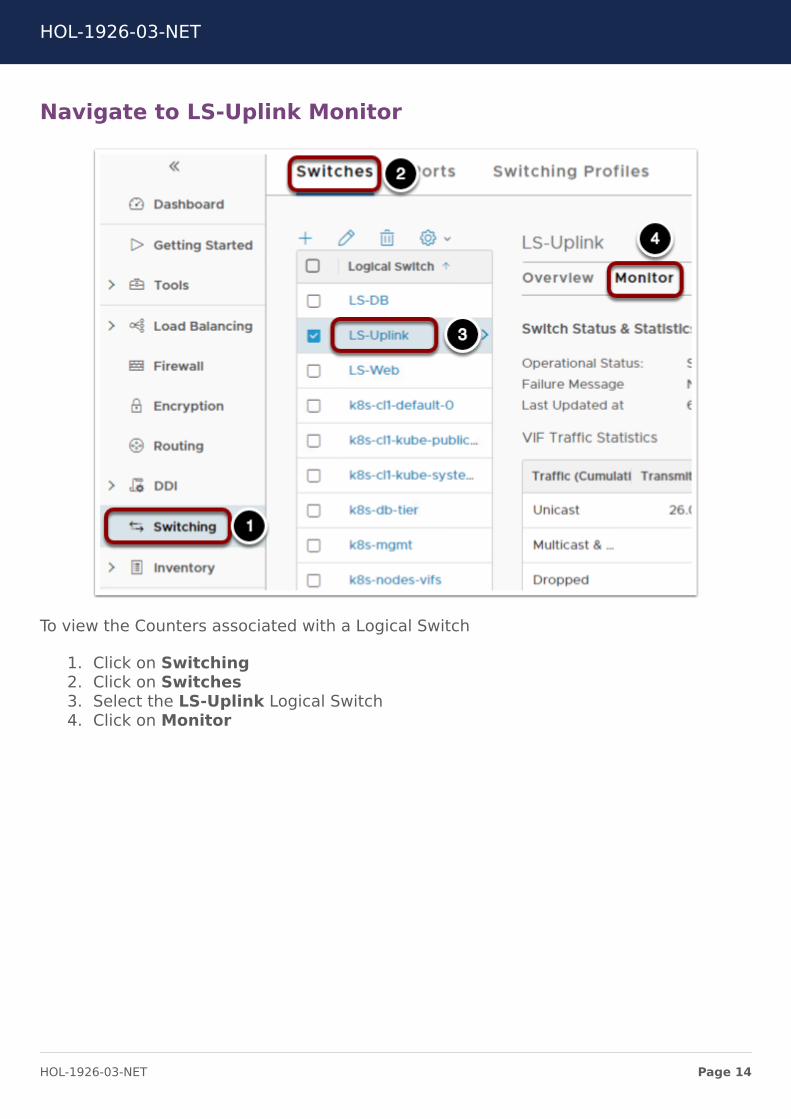
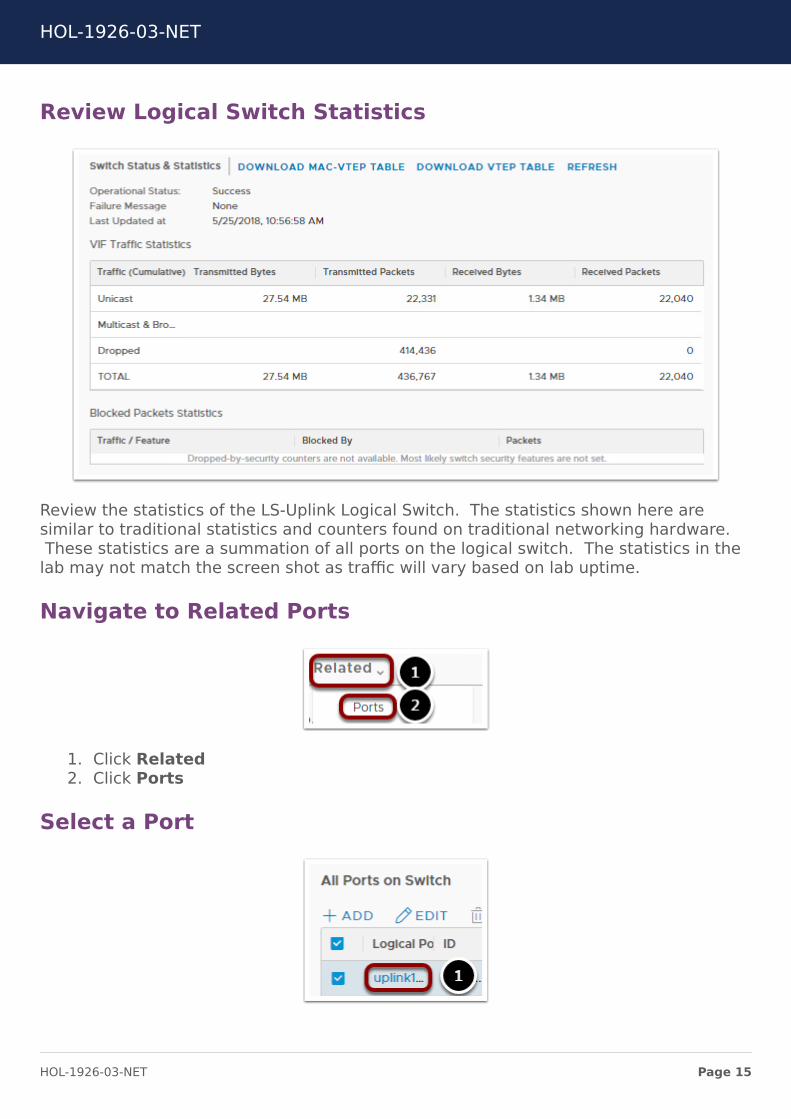
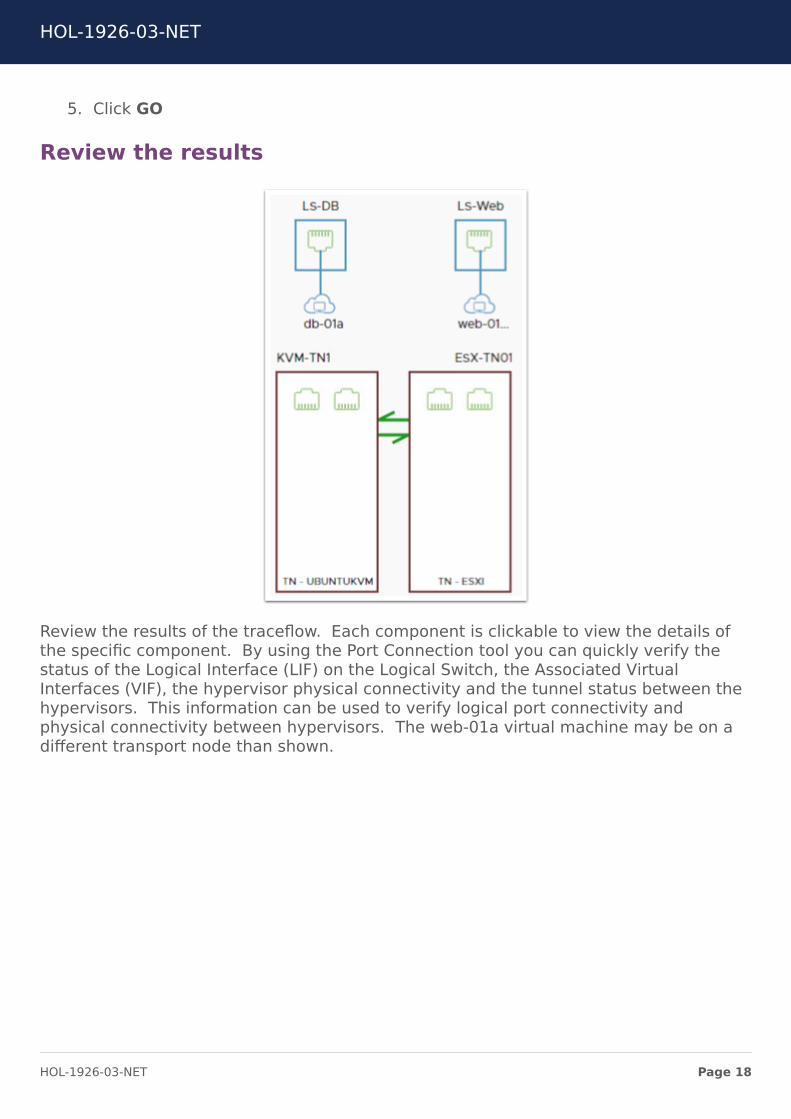
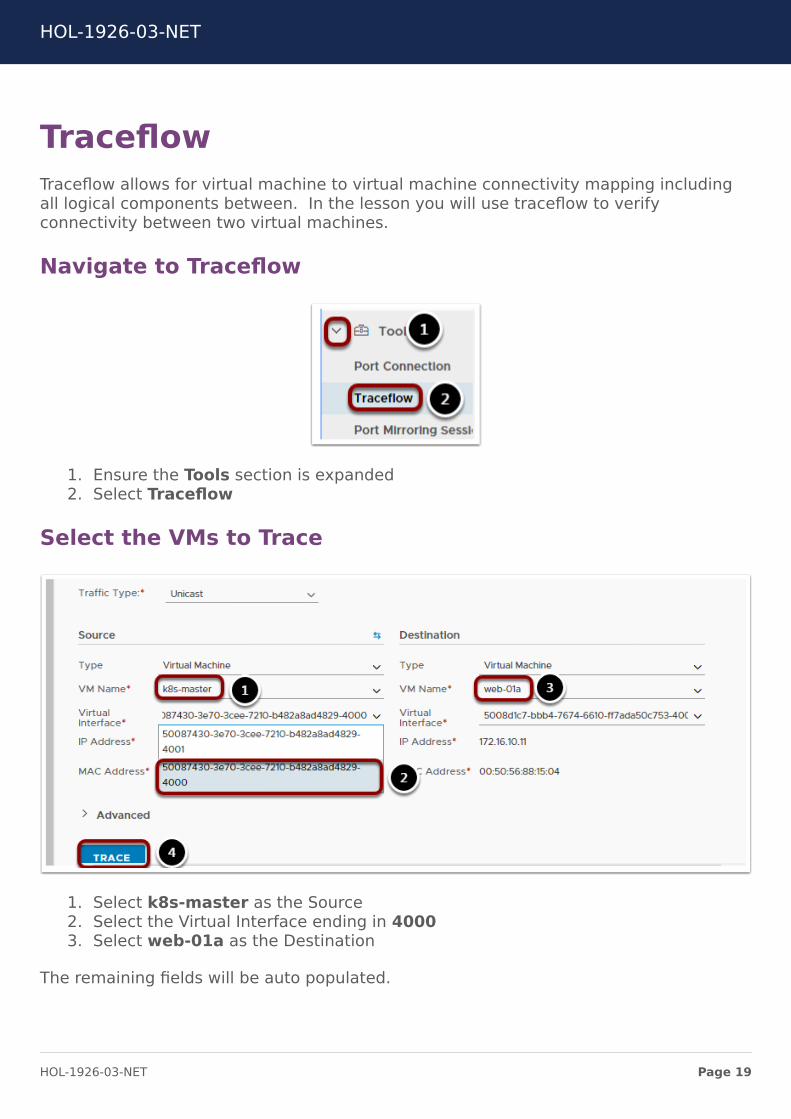
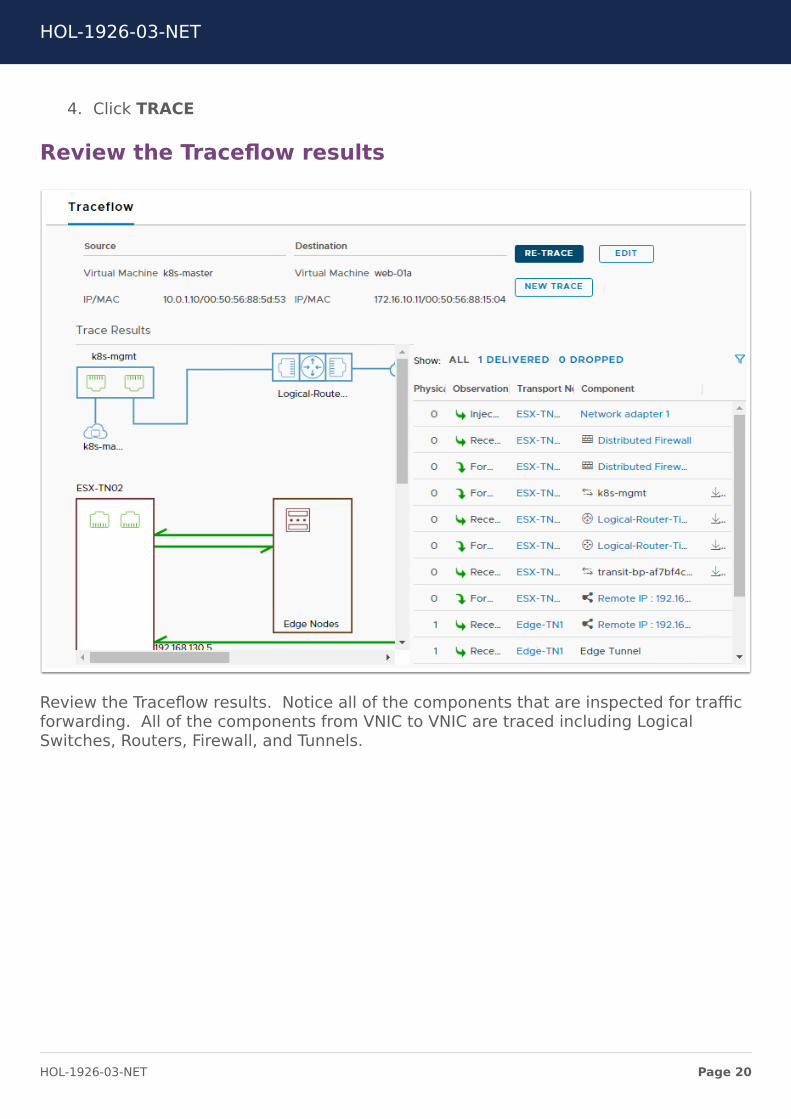
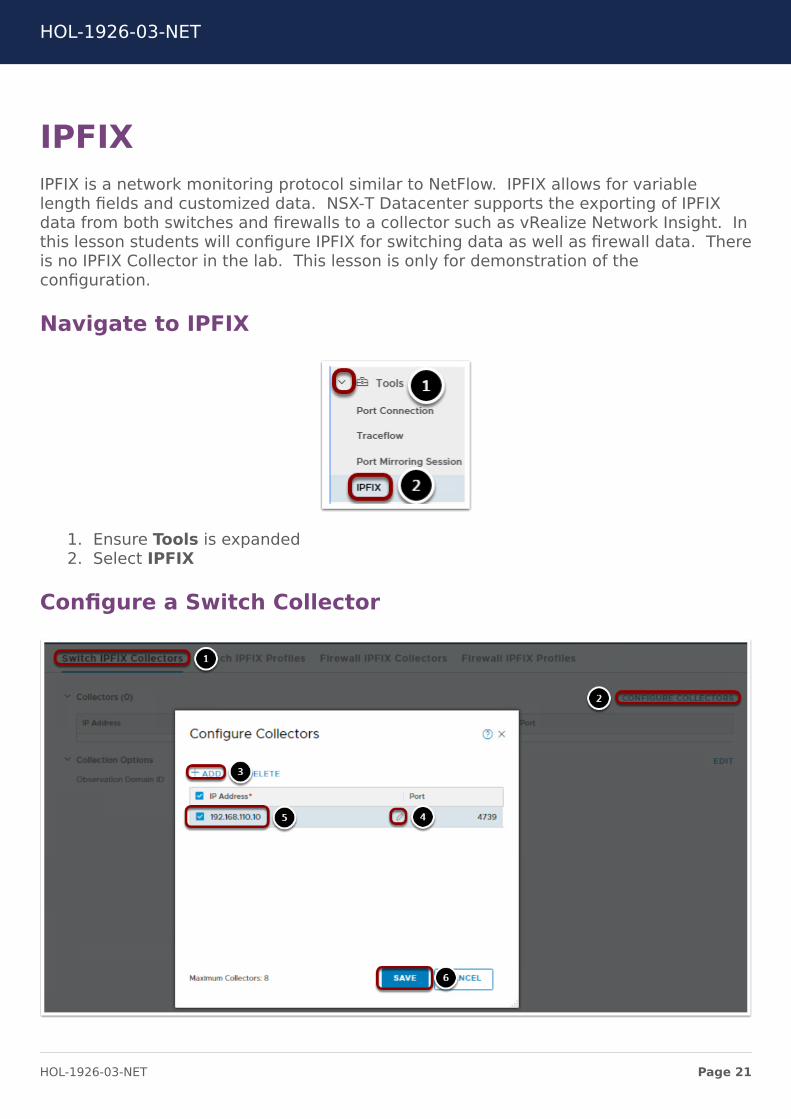
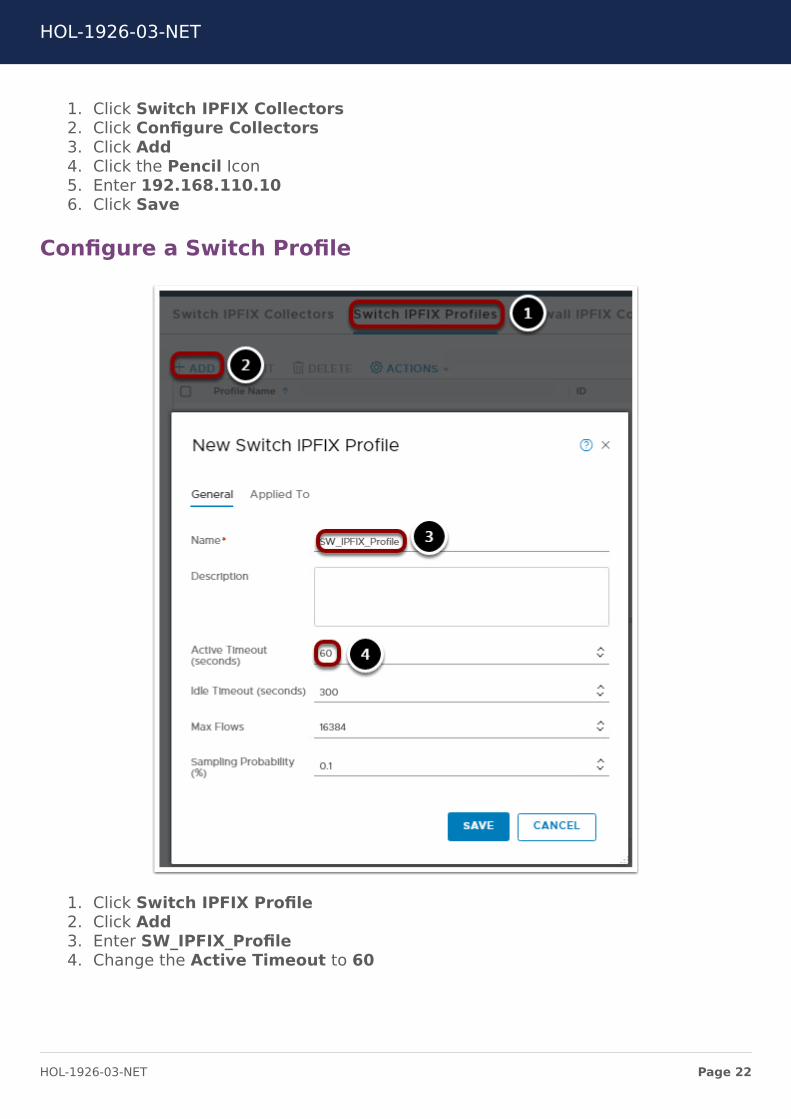
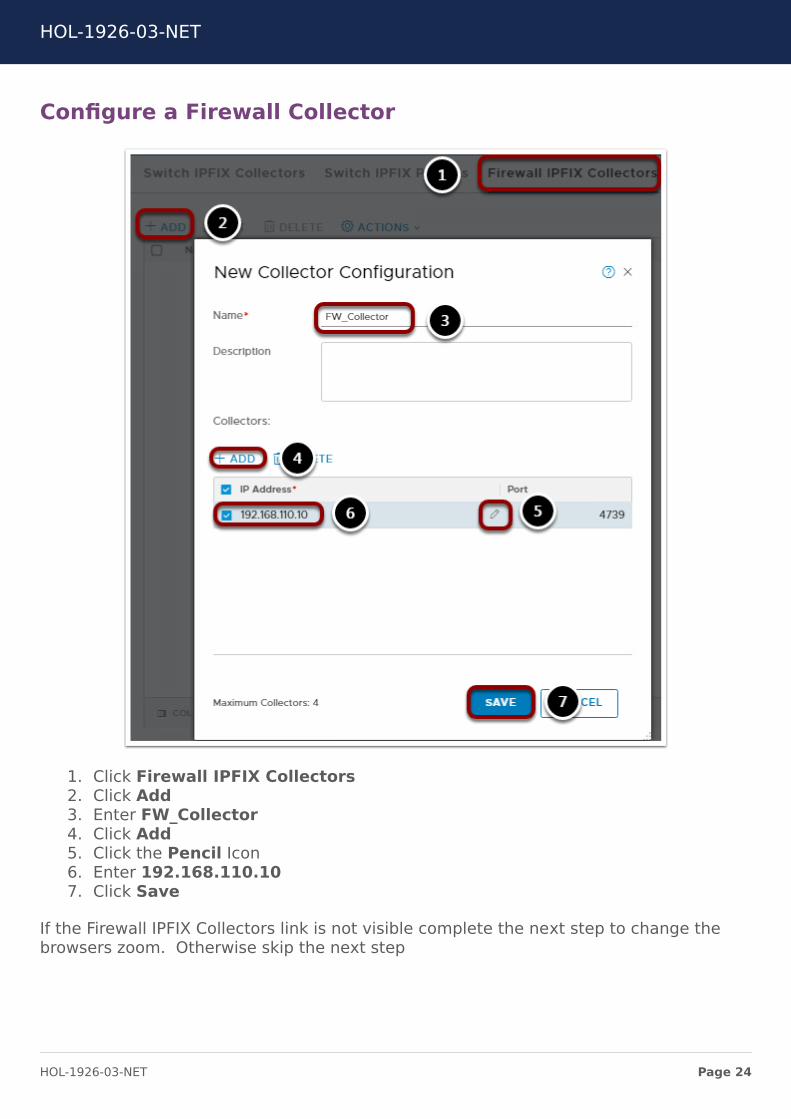
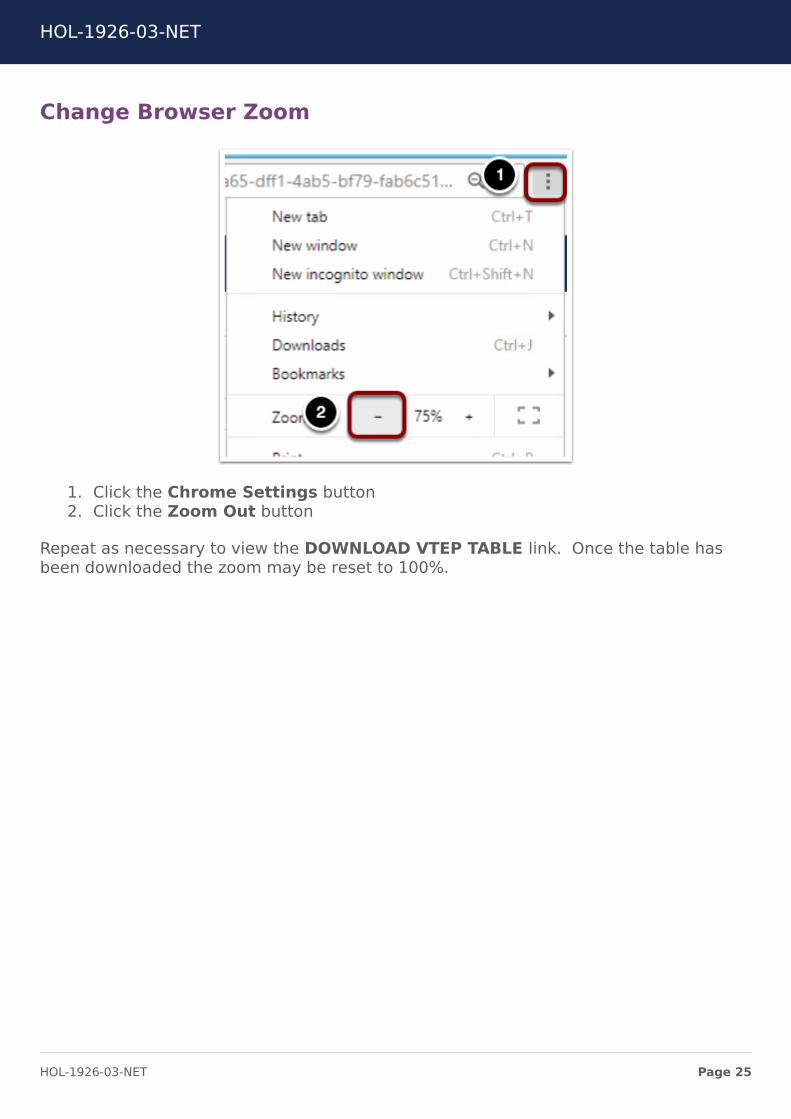
Change Browser Zoom
1 Click the Chrome Settings button2 Click the Zoom Out button
Repeat as necessary to view the DOWNLOAD VTEP TABLE link Once the table hasbeen downloaded the zoom may be reset to 100
HOL-1926-03-NET
Page 25HOL-1926-03-NET
Configure a Firewall Profile
1 Click Firewall IPFIX Profiles2 Click Add3 Enter FW_IPFIX_Profile
HOL-1926-03-NET
Page 26HOL-1926-03-NET
Apply the Firewall Profile
1 Click Applied To2 Select Logical Switch3 Select Available4 Click to move all Logical Switches to Selected5 Click Save
In this lesson you have configured IPFIX for reporting to an IPFIX collector IPFIX is anindispensable network operations and troubleshooting tool For more information onVMwares IPFIX Collector vRealize Network Insight please click here
HOL-1926-03-NET
Page 27HOL-1926-03-NET
Central CLIIn this lesson students will review the NSX-T Datacenter Central CLI The Central CLIreplaces the need to connect to individual components to perform monitoring andtesting The Central CLI operates from the NSX-T Datacenter Manager
Open Putty
1 Click on the Putty Icon
If putty is already open right-click the putty window and select ldquoputtyrdquo
nsxctrl-01acorplocal
1 Select nsxctrl-01acorplocal2 Click Load3 Click Open
HOL-1926-03-NET
Page 28HOL-1926-03-NET
Login to nsxctrl-01a
Login using the user name
admin
and password
VMware1
View Available Get Commands
1 Enter
HOL-1926-03-NET
Page 29HOL-1926-03-NET
get
Review the output for available commands
get Logical Switches
1 Enter
get logical-switches
Review the output This is a list of all logical switches configured
HOL-1926-03-NET
Page 30HOL-1926-03-NET
View LS-Web arp-table
For this step copy and paste will be useful By highlighting the UUID the text will becopied to the clipboard By right-clicking in the putty session the text in the clipboardwill be pasted
1 Record the LS-Web UUID2 Enter
get logical-switch 262dbb9b-5412-4e60-8ace-1c8b18a06715 arp-table
Review the arp-table reported via the Central CLI There are many possible commandsavailable via the Central CLI For quick operations and troubleshooting the Central CLI isa valuable tool For further reading on the Central CLI see the NSX-T Datacenter CentralCLI documentation by clicking here
HOL-1926-03-NET
Page 31HOL-1926-03-NET
Module 1 - ConclusionThis now completes Module 1 on NSX-T Datacenter Operations In this module youreviewed common operational activities within NST-T Datacenter You used these toolsto gain an understanding of what to do on a day to day basis to ensure properfunctioning of the NSX-T Datacenter system
The tools reviewed in the module were
bull Reviews the Dashboard Counters and Statisticsbull Uses the port connection toolbull Demonstrates the use of Traceflowbull Reviews the IPFIX configurationbull Walks through parts of the Central CLI
Youve finished Module 1
Congratulations on completing Module 1
If you are looking for additional information on NSX-T Datacenter Operations thenplease review the NSX-T Documentation Center via the URL below
bull Go to httpstinyurlcomyc6q794n
Proceed to any module below which interests you the most
Lab Module List
bull Module 1 - NSX-T Datacenter Operations - Use Tools within NSX-T Datacenter forDay to Day Operations (15 minutes)- Intermediate - This module will walk youthrough the basics of NSX-T Datacenter operations You will use features such asTraceflow Port Connection tool and others
bull Module 2 - NSX-T Datacenter Troubleshooting - Use Tools within NSX-T Datacenterfor Troubleshooting (15 minutes) - Intermediate - This module will walk youthrough the basics of NSX-T Datacenter troubleshooting You will view varioussystem configurations and correct misconfigurations after problem identification
bull Module 3 - API Consumption - Gain Familiarity with the NSX-T API (30 minutes)-Advanced - This module will explore the basics of NSX API consumption throughmanual interaction as well as several common configuration management tools
Lab Captain
bull Module 1-3 Kenyon Hensler Staff Systems Engineer United States
HOL-1926-03-NET
Page 32HOL-1926-03-NET
How to End Lab
To end your lab click on the END button
HOL-1926-03-NET
Page 33HOL-1926-03-NET
Module 2 - NSX-TDatacenter
Troubleshooting - UseTools within NSX-T
Datacenter forTroubleshooting (15
minutes)
HOL-1926-03-NET
Page 34HOL-1926-03-NET
Module GuidanceThis module will review common troubleshooting activities within NSX-T Datacenter Youwill use these tools to gain an understanding of what to do on a day to day basis toensure proper functioning of the NSX-T Datacenter system
This module takes approximately 15 minutes to complete and goes through
bull Show Routing Tablesbull Show MAC Tablesbull Review VTEP Tablesbull Configure Port Mirroring
HOL-1926-03-NET
Page 35HOL-1926-03-NET
Routing TablesIn this lesson you will review routing tables from NSX-T Datacenter
Open Chrome Browser from Windows Quick Launch TaskBar
1 Click on the Chrome Icon on the Windows Quick Launch Task Bar
Navigate to NSX-T Manager
1 Click on the VMware NSX | Login bookmark
Login to NSX-T Manager
HOL-1926-03-NET
Page 36HOL-1926-03-NET
Login to NSX Manager
1 Enter the username admin2 Enter the password VMware13 Click Login
Navigate to Edges
You will need the IP address of an edge node associated with the router you need totroubleshoot
1 Expand the Fabric section2 Select Nodes3 Select Edges4 Record the Management IP of the Edge associated with nsx-edge-01a
You may need to expand the Edge column to see the names of the edges
Open Putty
1 Click on the Putty icon
If putty is already open right-click the putty window and select ldquoputtyrdquo
HOL-1926-03-NET
Page 37HOL-1926-03-NET
Connect to the Edge
1 Click nsx-edge-01a2 Click Load3 Click Open
Login to the Edge
1 Enter the password VMware1
HOL-1926-03-NET
Page 38HOL-1926-03-NET
List all Logical Routers
To enter the appropriate VRF for troubleshooting you must find the appropriate VRFnumber In this instance you must use the Service Routers of the Tier 0 logical routerThis is the logical router that runs BGP and peers with the northbound router
1 Enter the command to list all logical routers
get logical-routers
2 Record the VRF number of the SERVICE_ROUTER_TIER0
Enter VRF Context Mode
In VRF context mode the router will output information specific to the VRF you enter
1 Enter the command to switch to vfr 2
vrf 2
HOL-1926-03-NET
Page 39HOL-1926-03-NET
Get Routes
1 Type the command
get route
2 Review the routes available on this T0 SR
Notice the different Flags associated with the different routes b represents a BGProute learned from the northbound router nc represents an NSX Connected route thatwas auto plumbed from a Tier 1 logical router or this Tier 1 logical router c represents aroute directly connected to this Tier 0 SR (Service Router) Notice the routes that areavailable via 16925401 this address is the Intra Tier 0 Transit Subnet This is addressspace the Tier 0 SR uses to route to the Tier 0 DR (Distributed Router) With thisinformation you will be able to determine if your Tier 0 SR has learned the appropriateroutes from the physical environment
Routes on Transport Nodes
Routes are also available on all the transport nodes To view the routes on hypervisortransport nodes the nsxcli is used
Open Putty
HOL-1926-03-NET
Page 40HOL-1926-03-NET
1 Click on the Putty icon
If putty is already open right-click the putty window and select ldquoputtyrdquo
Connect to esx-01a
1 Select esx-01acorplocal2 Click Load3 Click Open
Open nsxcli
1 Enter
nsxcli
HOL-1926-03-NET
Page 41HOL-1926-03-NET
View Logical Routers
1 Enter
get logical-routers
Review the output from the command Notice the number of LIFs and Routes associatedwith each logical router The VDR UUID listed can be matched to the ID of the logicalrouters in the NSX-T Datacenter GUI
View Logical Router Forwarding Detail
1 Enter
get logical-router af7bf4c8-aa81-4363-90dc-c68d20f13e2a forwarding
HOL-1926-03-NET
Page 42HOL-1926-03-NET
The UUID af7bf4c8-aa81-4363-90dc-c68d20f13e2a matches the ID of the Tier 0router The output of the command lists all routes available for the Tier 0 router on theesx-01a transport node By reviewing the output of the Edge Node and Transport Nodeforwarding tables administrators can quickly identify where routing problems may beoccurring To copy the command to the putty session high light the command in themanual and drag and drop it to the putty window
HOL-1926-03-NET
Page 43HOL-1926-03-NET
MAC Address TablesMany common troubleshooting techniques involve verifying that the network devicesare learning the appropriate MAC addresses from devices connected to them In thislesson students will learn the various methods to view the MAC Address Tables on thedifferent components of NSX-T Datacenter
Open Chrome Browser from Windows Quick Launch TaskBar
1 Click on the Chrome Icon on the Windows Quick Launch Task Bar
Navigate to NSX-T Manager
1 Click on the VMware NSX | Login bookmark
HOL-1926-03-NET
Page 44HOL-1926-03-NET
Login to NSX-T Manager
Login to NSX Manager
1 Enter the username admin2 Enter the password VMware13 Click Login
HOL-1926-03-NET
Page 45HOL-1926-03-NET
Download MAC-VTEP Table
1 Click Switching2 Ensure the Switches tab is selected3 Select the LS-DB Logical Switch4 Change to the Monitor tab5 Click DOWNLOAD MAC-VTEP TABLE
Download the Central Control Plane Table
1 Ensure Central Control Plane is selected2 Click Download
HOL-1926-03-NET
Page 46HOL-1926-03-NET
Administrators may want to view individual transport node MAC Tables as well This canbe achieved using the Transport Node selection and choosing the appropriate transportnode
Save the File
1 Click Save
Open the File
1 Click filecsv
Select WordPad
1 Click WordPad
HOL-1926-03-NET
Page 47HOL-1926-03-NET
Review The Results
The contents of this file include all of the MAC addresses the current VTEP that the MACaddress lives behind and the MAC address of the VTEP With these three pieces ofinformation the controllers can distribute the switching information to all transportnodes participating in the LS-DB logical switch to ensure layer 2 reachability of all VMsattached to a LIF on the LS-DB logical switch
Close WordPad
Once you have completed reviewing the table close WordPad
Download VTEP Table
1 Click DOWNLOAD VTEP TABLE
Complete the previous steps to download the Central Control Plane Table and open thefile The browser zoom may need to be adjusted to view the link If it is not visiblecomplete the next step and then complete this step Otherwise skip the next step
HOL-1926-03-NET
Page 48HOL-1926-03-NET
Change Browser Zoom
1 Click the Chrome Settings button2 Click the Zoom Out button
Repeat as necessary to view the DOWNLOAD VTEP TABLE link Once the table hasbeen downloaded the zoom may be reset to 100
Save the File
1 Click Save
The filename may be file(1)csv
Open the File
HOL-1926-03-NET
Page 49HOL-1926-03-NET
1 Click filecsv
The filename may be file(1)csv
Review the Results
The contents of the VTEP Table include all information about the VTEPs participating inthe LS-DB logical switch This includes the VTEP Label IP MAC Address and SegmentID This information is used during replication to ensure the delivery of all BUM(broadcast unknown unicast and multicast) traffic
Close WordPad
Once you have completed reviewing the table close WordPad
MAC Tables on Transport Nodes
MAC Address Tables are also available on all the transport nodes To view the MACAddress Tables on hypervisor transport nodes the nsxcli is used
Open Putty
1 Click on the Putty icon
If putty is already open right-click the putty window and select ldquoputtyrdquo
HOL-1926-03-NET
Page 50HOL-1926-03-NET
Connect to esx-01a
1 Select esx-01acorplocal2 Click Open
Open nsxcli
1 Enter
nsxcli
HOL-1926-03-NET
Page 51HOL-1926-03-NET
View Logical Switches
1 Enter
get logical-switches
This command will list all logical switches configured on the transport node
HOL-1926-03-NET
Page 52HOL-1926-03-NET
View the MAC Table
1 Enter
get logical-switch 262dbb9b-5412-4e60-8ace-1c8b18a06715 mac-table
The ID 262dbb9b-5412-4e60-8ace-1c8b18a06715 corresponds to the ID of the LS-WEBlogical switch Review the results With this table administrators can view the differentMAC Tables on the transport node The LCP Local Entry table lists the VMs MAC Addressconnected to this transport node on the LS-WEB logical switch The LCP Remote Entryrepresents the MAC Address of a VM on another transport node connected to the LS-WEB logical switch The Inner MAC represents the VMs MAC address while the OuterMAC and Outer IP represent the Transport Nodes MAC and IP Addresses The HostKernel Entry shows the distributed router ports connected to the Logical Switch
HOL-1926-03-NET
Page 53HOL-1926-03-NET
ARP Tables
1 Enter
get logical-switch 262dbb9b-5412-4e60-8ace-1c8b18a06715 arp-table
The ARP table of the transport node is also available via nsxcli The ARP table shows theIP to MAC address mapping on the transport node The entries in these tables willcorrespond to the output of the mac-tables Here administrators can view the inner IPsand MAC addresses You can copy the command to the lab by highlighting thecommand in the manual and dragging and dropping it to the putty session
HOL-1926-03-NET
Page 54HOL-1926-03-NET
Port MirroringPort mirroring is a very useful tool to allow for packet capture of a single or multipleports on a switch This allows for packet level debugging of applications and networks
Navigate to Port Mirroring
1 Expand the Tools section2 Select Port Mirroring Sessions3 Click ADD4 Click Local SPAN
HOL-1926-03-NET
Page 55HOL-1926-03-NET
Create a New Session
1 Name the session WEB-01a2 Select the ESX-TN01 Transport Node3 Select Bidirectional4 Click NEXT
HOL-1926-03-NET
Page 56HOL-1926-03-NET
Skip Source PNIC Selection
1 Click NEXT
Administrators may mirror physical NICs as well as virtual NICs In this lab only virtualNICs will be mirrored
HOL-1926-03-NET
Page 57HOL-1926-03-NET
Select Source VM
1 Select web-01a2 Click the gt button3 Click SHOW VIRTUAL INTERFACE (VNIC)
HOL-1926-03-NET
Page 58HOL-1926-03-NET
Select Interface
1 Scroll Down2 Select the only interface3 Click gt to select the interface4 Click NEXT
HOL-1926-03-NET
Page 59HOL-1926-03-NET
Select Destination VM
1 Scroll to the top2 Select k8s-node13 Click gt to select the VM4 Click SHOW VIRTUAL INTERFACE (VNIC)
HOL-1926-03-NET
Page 60HOL-1926-03-NET
Select Interface
1 Scroll to the bottom2 Select the last interface3 Click gt to select the interface4 Click SAVE
Open Putty
1 Click on the Putty icon
If putty is already open right-click the putty window and select ldquoputtyrdquo
HOL-1926-03-NET
Page 61HOL-1926-03-NET
Connect to k8s-node1
1 Select k8s-node12 Click Open
Start TCPDump
HOL-1926-03-NET
Page 62HOL-1926-03-NET
1 Enter the command
tcpdump -vvni ens192 icmp
This command starts tcpdump on the interface selected in the Port Mirroring sessionfiltering on icmp
Open an New Chrome Tab
1 Click the New Tab button
Load the vSphere Web Client
1 Click RegionA2 Click HTML5 Client
Login to the vSphere Web Client
1 Select the Use Windows session authentication checkbox2 Click Login
HOL-1926-03-NET
Page 63HOL-1926-03-NET
Open web-01a Remote Console
1 Select web-01a2 Click Launch Remote Console
Open the Console
1 Click Open VMware Remote Console
Login to web-01a
1 Enter the username
HOL-1926-03-NET
Page 64HOL-1926-03-NET
root
2 Enter the password
VMware1
Start a ping
1 Enter the command
ping 172161012
2 Press Ctrl+Alt to release your cursor
Return to the k8s-node1 session
1 Click the rootk8s-node1 putty session
HOL-1926-03-NET
Page 65HOL-1926-03-NET
Review the Output
Review the output of the tcpdump command The traffic displayed is from the monitorsession configured earlier notice there is no traffic sourced or destined for the k8s-node1 VM Only mirrored traffic is shown
HOL-1926-03-NET
Page 66HOL-1926-03-NET
Module 2 - ConclusionThis now completes Module 2 on NSX-T Datacenter Troubleshooting In this module youreviewed common troubleshooting tools and activities within NSX-T Datacenter Youused these tools to gain an understanding of what to do when troubleshooting adataplane issue within NSX-T Datacenter system
The activities reviewed in the module were
bull Routing Tablesbull MAC VTEP and ARP Tablesbull Port Mirroring
Youve finished Module 2
Congratulations on completing Module 2
If you are looking for additional information on NSX-T Datacenter Troubleshooting thenplease review the NSX-T Documentation Center via the URL below
bull Go to httpstinyurlcomyc6q794n
Proceed to any module below which interests you the most
Lab Module List
bull Module 1 - NSX-T Datacenter Operations - Use Tools within NSX-T Datacenter forDay to Day Operations (15 minutes) - Intermediate - This module will walk youthrough the basics of NSX-T Datacenter operations You will use features such asTraceflow Port Connection tool and others
bull Module 2 - NSX-T Datacenter Troubleshooting - Use Tools within NSX-T Datacenterfor Troubleshooting (15 minutes)- Intermediate - This module will walk youthrough the basics of NSX-T Datacenter troubleshooting You will view varioussystem configurations and correct misconfigurations after problem identification
bull Module 3 - API Consumption - Gain Familiarity with the NSX-T API (30 minutes) -Advanced - This module will explore the basics of NSX API consumption throughmanual interaction as well as several common configuration management tools
Lab Captain
bull Module 1 - 3 Kenyon Hensler Staff Systems Engineer United States
HOL-1926-03-NET
Page 67HOL-1926-03-NET
How to End Lab
To end your lab click on the END button
HOL-1926-03-NET
Page 68HOL-1926-03-NET
Module 3 - APIConsumption - Gain
Familiarity with the NSX-TAPI (30 minutes)
HOL-1926-03-NET
Page 69HOL-1926-03-NET
NSX RESTful APINSX is designed ground up with a RESTful API The NSX REST API can be used to bothconfigure NSX and to provision NSX logical network services The NSX REST API can becalled directly or indirectly from various programming languages Many orchestrationand automation tools such as vRealize Automation via vRealize Orchestrator can call theNSX REST API to perform Layer 2 through Layer 7 network orchestration andautomation
To demonstrate NSX RESTful API calls you will be using the RESTClient extension to theMozilla Firefox browser RESTClient is a debugger for RESTful Web Services and is auseful tool when working with various REST APIs
During this module the following tasks will be completed
bull Overview of RESTful APIsbull Overview of Powershell cmdletsbull Review of multiple NSX API callsbull Creation and deletion of NSX Objectsbull Configuration of alarming available only via the NSX API
Introduction to REST APIs
A REpresentational State Transfer (REST) API defines a set of simple principles which areloosely followed by most API implementations
HOL-1926-03-NET
Page 70HOL-1926-03-NET
bull Resource (the source of specific information)bull Global Permanent Identifier (every resource is uniquely identified ndash think HTTP
URL)bull Standard Interface (used to exchange the representation of resources ndash think
the HTTP protocol)bull Set of Constraints
REST leverages the strength of HTTP to send data (Headers and Bodies) between Clientsand Servers
The term Uniform Resource Locator (URL) and Uniform Resource Identifier (URI) can beused interchangeably when working with REST
Resources (building blocks) are linked together by embedded hyperlinks in HTMLdocuments or URI references and resources can expose the state via representationscontaining both metadata (such as size media type or character set) and content(binary image or text document)
REST Request Methods
REST Clients specify the desired interaction (HTTP request message as defined by RFC2616) Each HTTP method has specific well-defined semantics within the context of aREST APIrsquos resource model
bull GET - (The purpose of GET is to retrieve a representation of a resourcersquos state)including Response Headers and Body
bull HEAD - is used to retrieve the metadata associated with the resourcersquos state orjust the Response Headers
bull PUT - should be used to add a new resource to a store or update a resourcebull DELETE - removes a resource from its parentbull POST - should be used to create a new resource
HOL-1926-03-NET
Page 71HOL-1926-03-NET
REST Response Status Codes
The REST APIs use a HTTP response message to inform clients of their requestrsquos result(as defined in RFC 2616) Five categories are defined
bull 1xx Informational Communicates transfer protocol-level informationbull 2xx Success Indicates that the clientrsquos request was accepted successfulbull 3xx Redirection Indicates that the client must take some additional action in
order to complete their requestbull 4xx Client Error This category of error status codes points the finger at clientsbull 5xx Server Error The server takes responsibility for these error status codes
HTTP response message to inform clients of their requestrsquos result (As Defined in RFC2616)
bull 200 OKbull 201 Createdbull 202 Acceptedbull 204 No contentbull 400 Bad requestbull 401 Unauthorizedbull 403 Forbiddenbull 404 Not foundbull 405 Method Not Allowedbull 409 Conflictbull 500 Internal Server Errorbull 501 Not implementedbull 503 Service unavailable
HTTP Request Headers for the NSX RESTful API
When configuring RESTful APIs to provision NSX services the following are a list of theimportant request headers
1 Authorization The user and password credential in Base64 encoded format
HOL-1926-03-NET
Page 72HOL-1926-03-NET
2 Content-Type applicationxml Says that the request bodypayload is in xmlformat
HTTP Requests for the NSX RESTful API
1 MethodVerb GETPUTPOSTDELETE Action on the resource2 URL Resource3 Headers Authorization and Content-Type4 Body XML Payload5 Status Code 2xx For Success and 4xx and 5xx for Failures
OpenAPI Specification
The NSX-T Datacenter OpenAPI Specification is available from NSX-T Manager at
bull GET httpsltnsx-mgrgtapiv1specopenapinsx_apiyamlbull GET httpsltnsx-mgrgtapiv1specopenapinsx_apijson
HOL-1926-03-NET
Page 73HOL-1926-03-NET
This specification allows API users to quickly consume all methods available from NSX-TDatacenter This documentation is generated for every NSX-T Datacenter release
HOL-1926-03-NET
Page 74HOL-1926-03-NET
Manual ConsumptionOne of the methods to consume the NSX-T Datacenter API is through manuallyinteracting with the API This can be done with many different tools This lesson willexplore the use of Postman and cURL
Open Postman
1 Click the Windows Button2 Type Postman3 Click Postman
HOL-1926-03-NET
Page 75HOL-1926-03-NET
Close the Create a New Dialog
1 Click X
Create an Authorization Header
An authorization header will authenticate the session with the NSX-T Datacenter API
1 Switch the Type to Basic Auth2 The Username and Password will be automatically populated3 Click Update Request
Enter the URI to GET All Logical Switches
1 Ensure the method is set to GET2 Enter
httpsnsxmgr-01aapiv1logical-switches
3 Click Send
HOL-1926-03-NET
Page 76HOL-1926-03-NET
Review the Output
By reviewing the output of the request administrators can inspect all Logical Switchescreated This information includes all of the required information associated with thisLogical Switch This information can also be used as a template to create a LogicalSwitch By reviewing the required components of a Logical Switch creation in the APIGuide these values can be completed with the values of a Logical switch that meets thesame requirement as the new Logical Switch
Generate a cURL Command
Postman will generate code for many languages from your request This allows for easyscripting of API requests
1 Click Code2 Select cURL on the drop down3 Click Copy to Clipboard
HOL-1926-03-NET
Page 77HOL-1926-03-NET
Open Putty
1 Click on the Putty icon
If putty is already open right-click the putty window and select ldquoputtyrdquo
Open a Connection to api-01a
1 Enter 1921681101042 Click Open
Login to api-01a
Login using the username
HOL-1926-03-NET
Page 78HOL-1926-03-NET
admin
Password
VMware1
Execute the cURL Command
1 Paste the cURL command by right clicking in the Putty window2 Append the command with
ltSPACEgt -k
3 Be sure to include the space before -k This option ignores invalid certificates4 Execute the command
HOL-1926-03-NET
Page 79HOL-1926-03-NET
Review the Output
1 Scroll to the top of the Putty session2 Review the output This output will match the output from Postman
cURL can be used for all API functions and may be used in conjunction with othercommand line tools such as grep sed and awk to build complex create update anddestroy functions
HOL-1926-03-NET
Page 80HOL-1926-03-NET
Terraform ConsumptionTerraform is a tool that allows for the creation of sharable configuration files that createand change infrastructure Terraform has released an NSX-T Datacenter Module thatallows for the configuration of NSX-T Datacenter objects
Open Putty
If a putty session to api-01a is already open skip the step labeled Open thelogicalswitchtf File
1 Click on the Putty icon
If putty is already open right-click the putty window and select ldquoputtyrdquo
Open a Connection to api-01a
HOL-1926-03-NET
Page 81HOL-1926-03-NET
1 Select api-01acorplocal2 Click Load3 Click Open
Login to api-01a
Login using the username
admin
Password
VMware1
Open the logicalswitchtf File
1 Switch to the api1 directory
cd api1
2 Open the logicalswitchtf file
vi logicalswitchtf
HOL-1926-03-NET
Page 82HOL-1926-03-NET
Review the File
Review the file by using the arrow keys to move to the top and bottom of the fileNotice the resource section This section will create a NSX-T Datacenter Logical SwitchOnce you have completed reviewing the file exit the vi editor
1 Type
q
HOL-1926-03-NET
Page 83HOL-1926-03-NET
Verify the logicalswitchtf File
1 Enter the command
terraform plan
This command will verify the required data and plugins for terraform to complete theaction
HOL-1926-03-NET
Page 84HOL-1926-03-NET
Apply the logicalswitchtf File
1 Enter the command
terraform apply
2 Type
yes
HOL-1926-03-NET
Page 85HOL-1926-03-NET
Review the Output
The output of the command shows the Logical Switch TfLogicalSwitch was created
Open Chrome Browser from Windows Quick Launch TaskBar
1 Click on the Chrome Icon on the Windows Quick Launch Task Bar
Navigate to NSX-T Manager
1 Click on the VMware NSX | Login bookmark
HOL-1926-03-NET
Page 86HOL-1926-03-NET
Login to NSX-T Manager
Login to NSX Manager
1 Enter the username admin2 Enter the password VMware13 Click Login
HOL-1926-03-NET
Page 87HOL-1926-03-NET
View the Logical Switch
1 Click Switching2 Select the Switches tab3 Notice the Logical Switch TfLogicalSwitch
If the Logical Switch is not visibile refresh the page
Delete the Logical Switch
Delete the Logical Switch to avoid confusion in the next part of the lesson
HOL-1926-03-NET
Page 88HOL-1926-03-NET
1 Select the TfLogicalSwitch2 Click Delete3 Click Delete
Return to the Putty Session
1 Click the Putty Session
Open the infratf File
1 Switch to the api2 directory
cd api2
2 Enter the command
vi infratf
HOL-1926-03-NET
Page 89HOL-1926-03-NET
Review the File
Review the file by using the arrow keys to move to the top and bottom of the fileNotice the many resource sections This file will create a Tier 1 router connect the Tier
1 router to the Tier 0 router create a Logical Switch attach the Tier 1 router to thelogical switch and assign an IP address to the Tier 1 interface on the logical switchThis is a common action for tenant creation in an environment Once you have
completed reviewing the file exit the vi editor
1 Type
q
HOL-1926-03-NET
Page 90HOL-1926-03-NET
Verify the infratf File
1 Enter the command
terraform plan
Apply the infratf File
1 Enter the command
HOL-1926-03-NET
Page 91HOL-1926-03-NET
terraform apply
Confirm the Apply
1 Type
yes
Review the Output
Review the output of the command Many actions were preformed Scroll up to viewthe complete output
Return to NSX Manager
Return to NSX Manager to review the configuration
1 Click VMware NSX Chrome window
HOL-1926-03-NET
Page 92HOL-1926-03-NET
Login to NSX-T Manager
If the session has timed out login to NSX Manager If the session is still active skip thisstep
1 Enter the username admin2 Enter the password VMware13 Click Login
HOL-1926-03-NET
Page 93HOL-1926-03-NET
Refresh Switches
1 Click REFRESH2 Notice the TfLogicalSwitch2 Switch
HOL-1926-03-NET
Page 94HOL-1926-03-NET
Review Tier 1 Router
1 Click Routing2 Select the T1-Terraform Logical Router
Review the Summary
3 Click Configuration4 Click Router Ports
HOL-1926-03-NET
Page 95HOL-1926-03-NET
Review the IP Address Assignments
The IP address 17216401 was specified in the infratf file as a variable The nextaddress may vary by lab This address is automatically configured from a pool ofaddresses for use in connecting Tier 0 routers to Tier 1 routers
Return to the Putty Session
1 Click the Putty Session
Ping the Router Address
1 Enter
ping 17216401 -c 3
The ping should be successful This IP address is being advertised from the newlycreated Tier 1 router through the Tier 0 router to the vPOD router via BGP
HOL-1926-03-NET
Page 96HOL-1926-03-NET
Remove the configuration
Terraform will also remove previously created configurations
1 Enter the command
terraform destroy
2 Confirm the removal
yes
HOL-1926-03-NET
Page 97HOL-1926-03-NET
Review the Output
The command successfully removed the configuration This is a common action in theremoval of an application or tenant from an infrastructure as code environment
HOL-1926-03-NET
Page 98HOL-1926-03-NET
Module 3 ConclusionThis module utilized the NSX API to configure multiple NSX objects The NSX APIprovides a powerful tool for configuration troubleshooting and monitoring
Youve finished Module 3
Congratulations on completing Module 3
For additional information on the NSX API visit the URL below and select the NSX APIGuide
bull Go to httpstinyurlcomyc6q794n
Proceed to any module below or end the lab
Lab Module List
bull Module 1 - NSX-T Datacenter Operations - Use Tools within NSX-TDatacenter for Day to Day Operations (15 minutes) - Intermediate - Thismodule will walk you through the basics of NSX-T Datacenter operations You willuse features such as Traceflow Port Connection tool and others
bull Module 2 - NSX-T Datacenter Troubleshooting - Use Tools within NSX-TDatacenter for Troubleshooting (15 minutes) - Intermediate - This modulewill walk you through the basics of NSX-T Datacenter troubleshooting You willview various system configurations and correct misconfigurations after problemidentification
bull Module 3 - API Consumption - Gain Familiarity with the NSX-T API (30minutes) - Advanced - This module will explore the basics of NSX APIconsumption through manual interaction as well as several commonconfiguration management tools
Lab Captain
bull Module 1 - 3 Kenyon Hensler Staff Systems Engineer United States
How to End Lab
To end the lab click on the END button
HOL-1926-03-NET
Page 99HOL-1926-03-NET
ConclusionThank you for participating in the VMware Hands-on Labs Be sure to visithttpholvmwarecom to continue your lab experience online
Lab SKU HOL-1926-03-NET
Version 20181104-143822
HOL-1926-03-NET
Page 100HOL-1926-03-NET
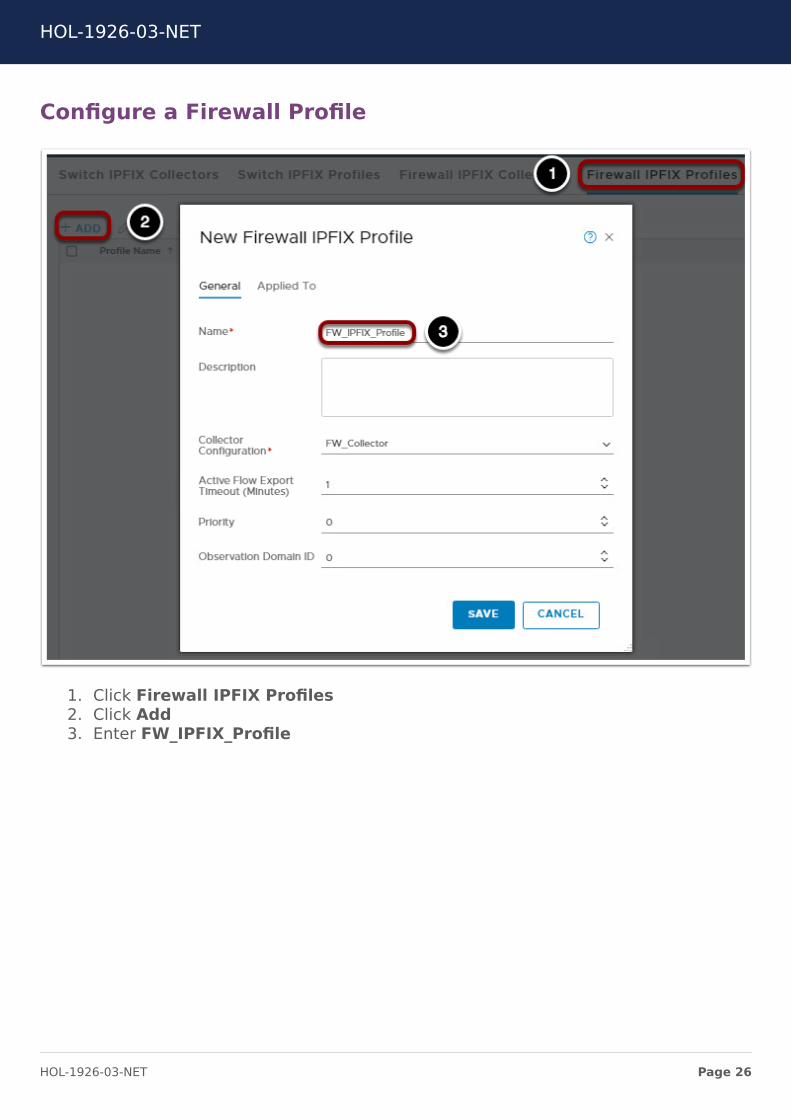
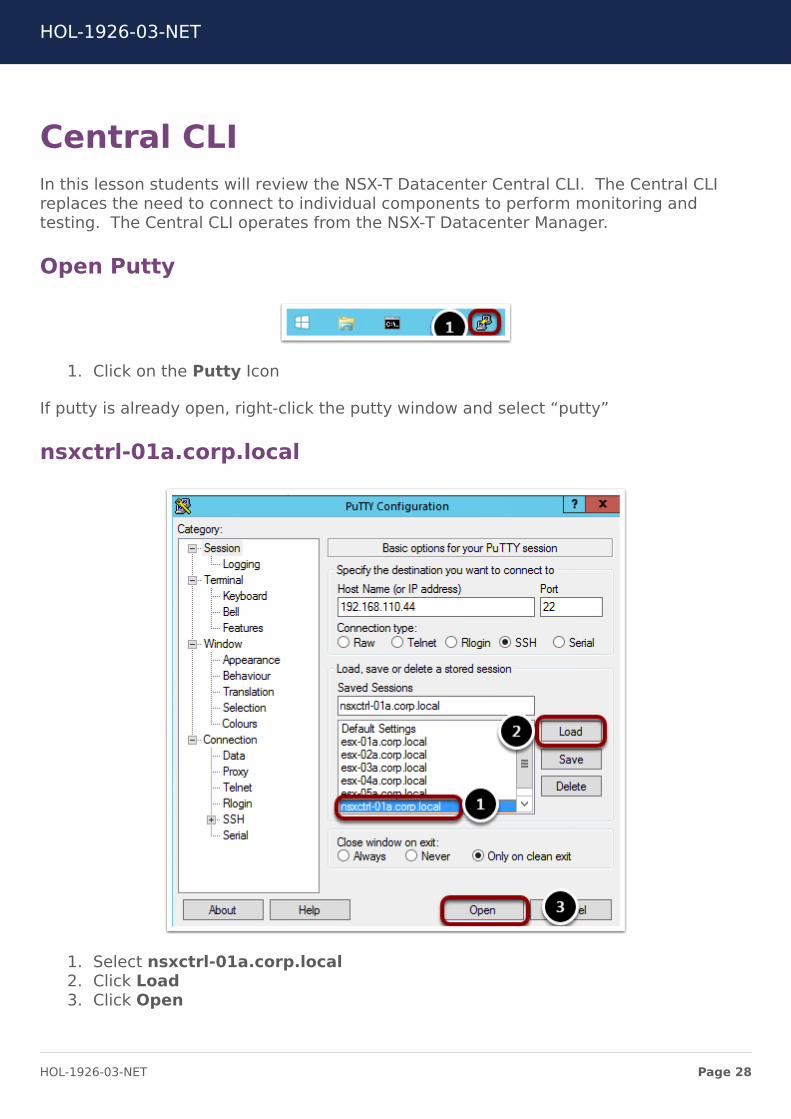
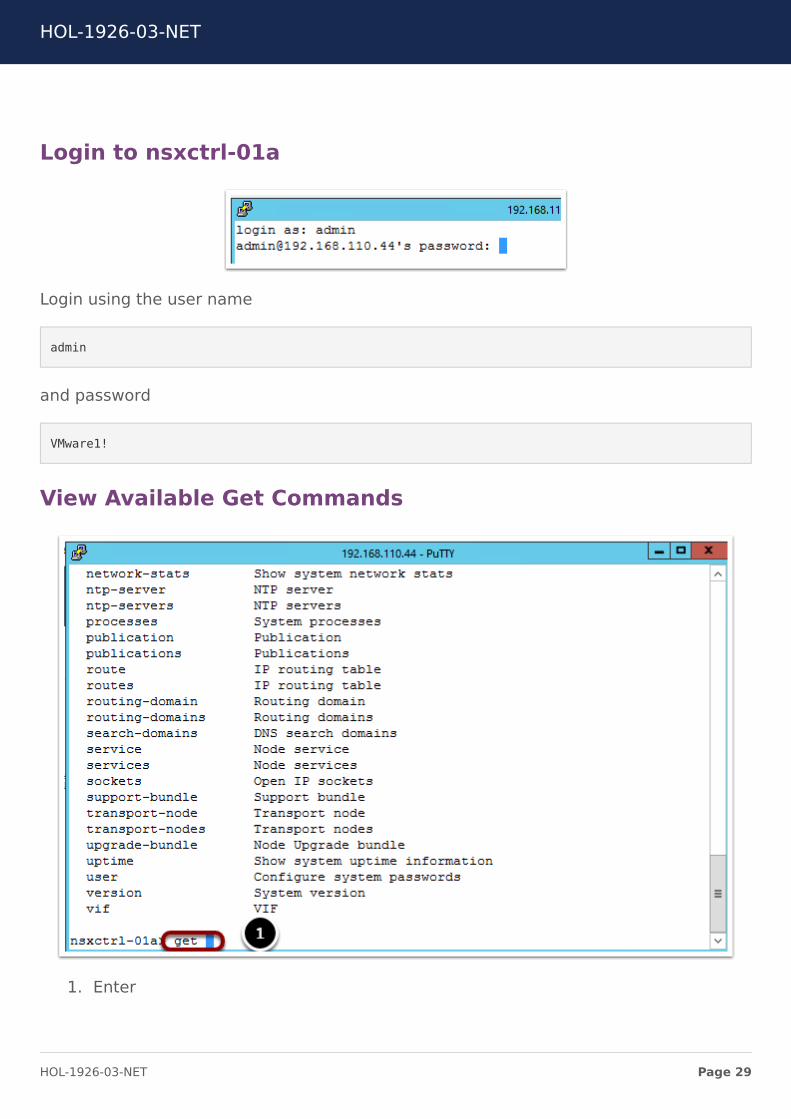
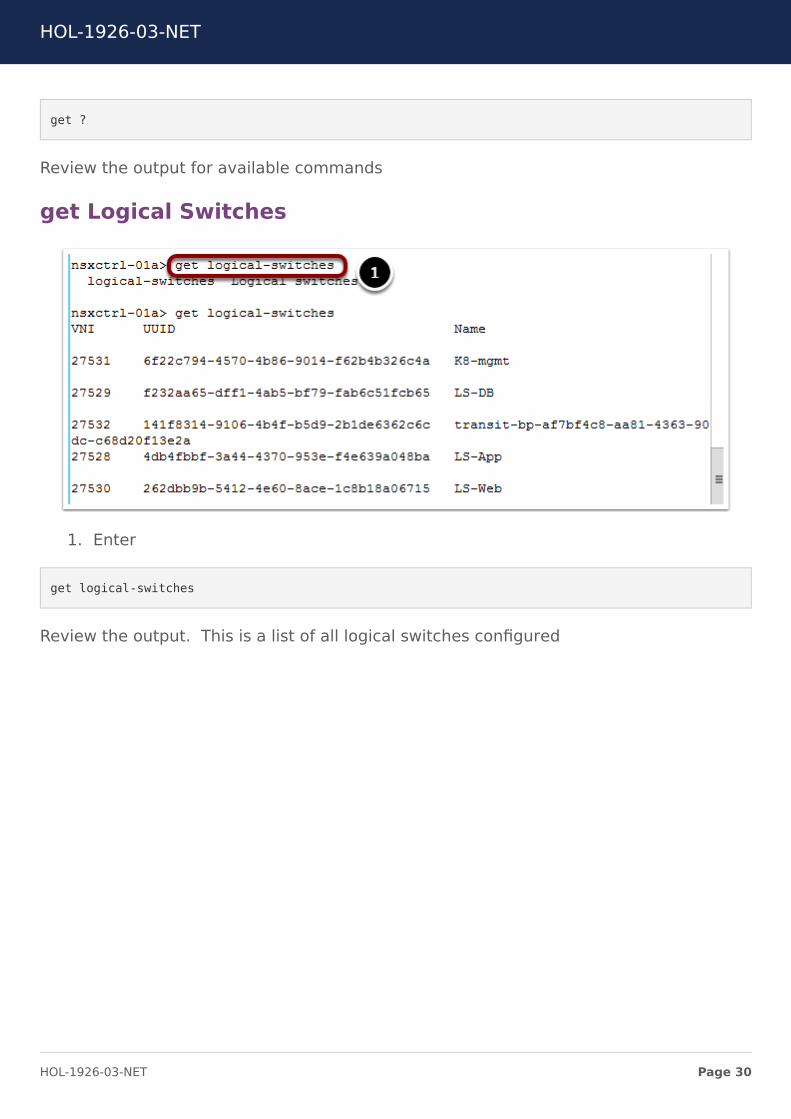
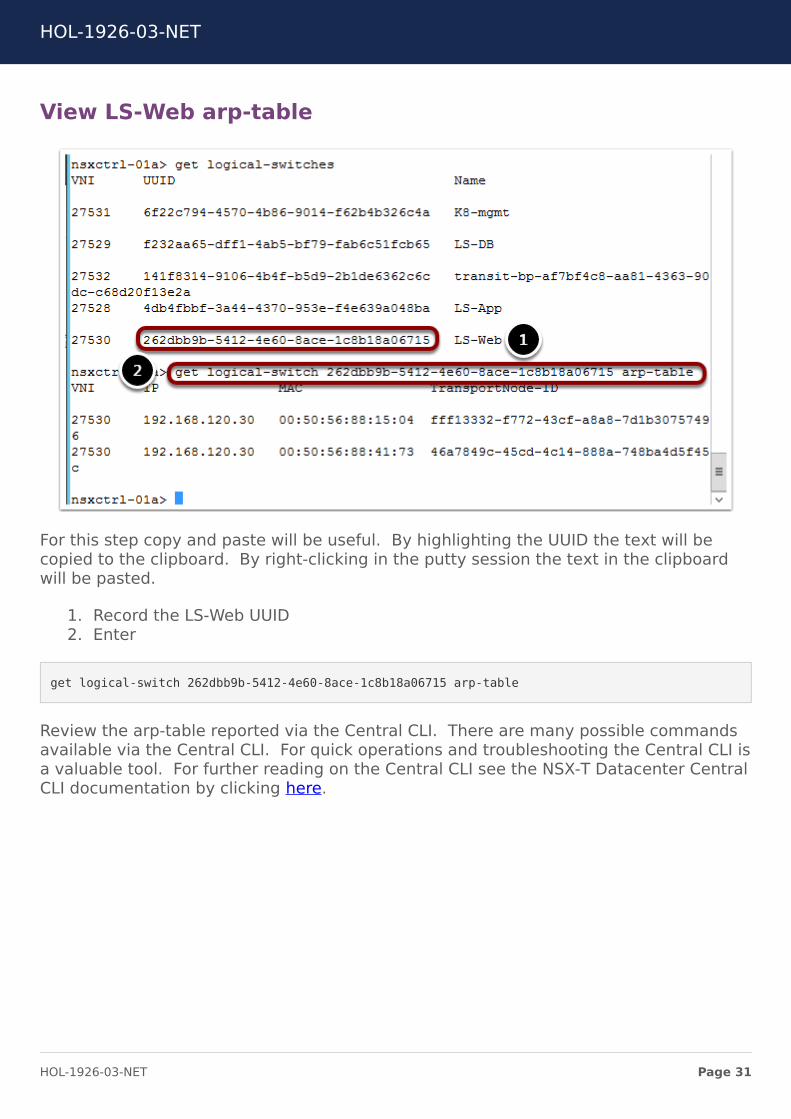

How to End Lab
To end your lab click on the END button
HOL-1926-03-NET
Page 33HOL-1926-03-NET
Module 2 - NSX-TDatacenter
Troubleshooting - UseTools within NSX-T
Datacenter forTroubleshooting (15
minutes)
HOL-1926-03-NET
Page 34HOL-1926-03-NET
Module GuidanceThis module will review common troubleshooting activities within NSX-T Datacenter Youwill use these tools to gain an understanding of what to do on a day to day basis toensure proper functioning of the NSX-T Datacenter system
This module takes approximately 15 minutes to complete and goes through
bull Show Routing Tablesbull Show MAC Tablesbull Review VTEP Tablesbull Configure Port Mirroring
HOL-1926-03-NET
Page 35HOL-1926-03-NET
Routing TablesIn this lesson you will review routing tables from NSX-T Datacenter
Open Chrome Browser from Windows Quick Launch TaskBar
1 Click on the Chrome Icon on the Windows Quick Launch Task Bar
Navigate to NSX-T Manager
1 Click on the VMware NSX | Login bookmark
Login to NSX-T Manager
HOL-1926-03-NET
Page 36HOL-1926-03-NET
Login to NSX Manager
1 Enter the username admin2 Enter the password VMware13 Click Login
Navigate to Edges
You will need the IP address of an edge node associated with the router you need totroubleshoot
1 Expand the Fabric section2 Select Nodes3 Select Edges4 Record the Management IP of the Edge associated with nsx-edge-01a
You may need to expand the Edge column to see the names of the edges
Open Putty
1 Click on the Putty icon
If putty is already open right-click the putty window and select ldquoputtyrdquo
HOL-1926-03-NET
Page 37HOL-1926-03-NET
Connect to the Edge
1 Click nsx-edge-01a2 Click Load3 Click Open
Login to the Edge
1 Enter the password VMware1
HOL-1926-03-NET
Page 38HOL-1926-03-NET
List all Logical Routers
To enter the appropriate VRF for troubleshooting you must find the appropriate VRFnumber In this instance you must use the Service Routers of the Tier 0 logical routerThis is the logical router that runs BGP and peers with the northbound router
1 Enter the command to list all logical routers
get logical-routers
2 Record the VRF number of the SERVICE_ROUTER_TIER0
Enter VRF Context Mode
In VRF context mode the router will output information specific to the VRF you enter
1 Enter the command to switch to vfr 2
vrf 2
HOL-1926-03-NET
Page 39HOL-1926-03-NET
Get Routes
1 Type the command
get route
2 Review the routes available on this T0 SR
Notice the different Flags associated with the different routes b represents a BGProute learned from the northbound router nc represents an NSX Connected route thatwas auto plumbed from a Tier 1 logical router or this Tier 1 logical router c represents aroute directly connected to this Tier 0 SR (Service Router) Notice the routes that areavailable via 16925401 this address is the Intra Tier 0 Transit Subnet This is addressspace the Tier 0 SR uses to route to the Tier 0 DR (Distributed Router) With thisinformation you will be able to determine if your Tier 0 SR has learned the appropriateroutes from the physical environment
Routes on Transport Nodes
Routes are also available on all the transport nodes To view the routes on hypervisortransport nodes the nsxcli is used
Open Putty
HOL-1926-03-NET
Page 40HOL-1926-03-NET
1 Click on the Putty icon
If putty is already open right-click the putty window and select ldquoputtyrdquo
Connect to esx-01a
1 Select esx-01acorplocal2 Click Load3 Click Open
Open nsxcli
1 Enter
nsxcli
HOL-1926-03-NET
Page 41HOL-1926-03-NET
View Logical Routers
1 Enter
get logical-routers
Review the output from the command Notice the number of LIFs and Routes associatedwith each logical router The VDR UUID listed can be matched to the ID of the logicalrouters in the NSX-T Datacenter GUI
View Logical Router Forwarding Detail
1 Enter
get logical-router af7bf4c8-aa81-4363-90dc-c68d20f13e2a forwarding
HOL-1926-03-NET
Page 42HOL-1926-03-NET
The UUID af7bf4c8-aa81-4363-90dc-c68d20f13e2a matches the ID of the Tier 0router The output of the command lists all routes available for the Tier 0 router on theesx-01a transport node By reviewing the output of the Edge Node and Transport Nodeforwarding tables administrators can quickly identify where routing problems may beoccurring To copy the command to the putty session high light the command in themanual and drag and drop it to the putty window
HOL-1926-03-NET
Page 43HOL-1926-03-NET
MAC Address TablesMany common troubleshooting techniques involve verifying that the network devicesare learning the appropriate MAC addresses from devices connected to them In thislesson students will learn the various methods to view the MAC Address Tables on thedifferent components of NSX-T Datacenter
Open Chrome Browser from Windows Quick Launch TaskBar
1 Click on the Chrome Icon on the Windows Quick Launch Task Bar
Navigate to NSX-T Manager
1 Click on the VMware NSX | Login bookmark
HOL-1926-03-NET
Page 44HOL-1926-03-NET
Login to NSX-T Manager
Login to NSX Manager
1 Enter the username admin2 Enter the password VMware13 Click Login
HOL-1926-03-NET
Page 45HOL-1926-03-NET
Download MAC-VTEP Table
1 Click Switching2 Ensure the Switches tab is selected3 Select the LS-DB Logical Switch4 Change to the Monitor tab5 Click DOWNLOAD MAC-VTEP TABLE
Download the Central Control Plane Table
1 Ensure Central Control Plane is selected2 Click Download
HOL-1926-03-NET
Page 46HOL-1926-03-NET
Administrators may want to view individual transport node MAC Tables as well This canbe achieved using the Transport Node selection and choosing the appropriate transportnode
Save the File
1 Click Save
Open the File
1 Click filecsv
Select WordPad
1 Click WordPad
HOL-1926-03-NET
Page 47HOL-1926-03-NET
Review The Results
The contents of this file include all of the MAC addresses the current VTEP that the MACaddress lives behind and the MAC address of the VTEP With these three pieces ofinformation the controllers can distribute the switching information to all transportnodes participating in the LS-DB logical switch to ensure layer 2 reachability of all VMsattached to a LIF on the LS-DB logical switch
Close WordPad
Once you have completed reviewing the table close WordPad
Download VTEP Table
1 Click DOWNLOAD VTEP TABLE
Complete the previous steps to download the Central Control Plane Table and open thefile The browser zoom may need to be adjusted to view the link If it is not visiblecomplete the next step and then complete this step Otherwise skip the next step
HOL-1926-03-NET
Page 48HOL-1926-03-NET
Change Browser Zoom
1 Click the Chrome Settings button2 Click the Zoom Out button
Repeat as necessary to view the DOWNLOAD VTEP TABLE link Once the table hasbeen downloaded the zoom may be reset to 100
Save the File
1 Click Save
The filename may be file(1)csv
Open the File
HOL-1926-03-NET
Page 49HOL-1926-03-NET
1 Click filecsv
The filename may be file(1)csv
Review the Results
The contents of the VTEP Table include all information about the VTEPs participating inthe LS-DB logical switch This includes the VTEP Label IP MAC Address and SegmentID This information is used during replication to ensure the delivery of all BUM(broadcast unknown unicast and multicast) traffic
Close WordPad
Once you have completed reviewing the table close WordPad
MAC Tables on Transport Nodes
MAC Address Tables are also available on all the transport nodes To view the MACAddress Tables on hypervisor transport nodes the nsxcli is used
Open Putty
1 Click on the Putty icon
If putty is already open right-click the putty window and select ldquoputtyrdquo
HOL-1926-03-NET
Page 50HOL-1926-03-NET
Connect to esx-01a
1 Select esx-01acorplocal2 Click Open
Open nsxcli
1 Enter
nsxcli
HOL-1926-03-NET
Page 51HOL-1926-03-NET
View Logical Switches
1 Enter
get logical-switches
This command will list all logical switches configured on the transport node
HOL-1926-03-NET
Page 52HOL-1926-03-NET
View the MAC Table
1 Enter
get logical-switch 262dbb9b-5412-4e60-8ace-1c8b18a06715 mac-table
The ID 262dbb9b-5412-4e60-8ace-1c8b18a06715 corresponds to the ID of the LS-WEBlogical switch Review the results With this table administrators can view the differentMAC Tables on the transport node The LCP Local Entry table lists the VMs MAC Addressconnected to this transport node on the LS-WEB logical switch The LCP Remote Entryrepresents the MAC Address of a VM on another transport node connected to the LS-WEB logical switch The Inner MAC represents the VMs MAC address while the OuterMAC and Outer IP represent the Transport Nodes MAC and IP Addresses The HostKernel Entry shows the distributed router ports connected to the Logical Switch
HOL-1926-03-NET
Page 53HOL-1926-03-NET
ARP Tables
1 Enter
get logical-switch 262dbb9b-5412-4e60-8ace-1c8b18a06715 arp-table
The ARP table of the transport node is also available via nsxcli The ARP table shows theIP to MAC address mapping on the transport node The entries in these tables willcorrespond to the output of the mac-tables Here administrators can view the inner IPsand MAC addresses You can copy the command to the lab by highlighting thecommand in the manual and dragging and dropping it to the putty session
HOL-1926-03-NET
Page 54HOL-1926-03-NET
Port MirroringPort mirroring is a very useful tool to allow for packet capture of a single or multipleports on a switch This allows for packet level debugging of applications and networks
Navigate to Port Mirroring
1 Expand the Tools section2 Select Port Mirroring Sessions3 Click ADD4 Click Local SPAN
HOL-1926-03-NET
Page 55HOL-1926-03-NET
Create a New Session
1 Name the session WEB-01a2 Select the ESX-TN01 Transport Node3 Select Bidirectional4 Click NEXT
HOL-1926-03-NET
Page 56HOL-1926-03-NET
Skip Source PNIC Selection
1 Click NEXT
Administrators may mirror physical NICs as well as virtual NICs In this lab only virtualNICs will be mirrored
HOL-1926-03-NET
Page 57HOL-1926-03-NET
Select Source VM
1 Select web-01a2 Click the gt button3 Click SHOW VIRTUAL INTERFACE (VNIC)
HOL-1926-03-NET
Page 58HOL-1926-03-NET
Select Interface
1 Scroll Down2 Select the only interface3 Click gt to select the interface4 Click NEXT
HOL-1926-03-NET
Page 59HOL-1926-03-NET
Select Destination VM
1 Scroll to the top2 Select k8s-node13 Click gt to select the VM4 Click SHOW VIRTUAL INTERFACE (VNIC)
HOL-1926-03-NET
Page 60HOL-1926-03-NET
Select Interface
1 Scroll to the bottom2 Select the last interface3 Click gt to select the interface4 Click SAVE
Open Putty
1 Click on the Putty icon
If putty is already open right-click the putty window and select ldquoputtyrdquo
HOL-1926-03-NET
Page 61HOL-1926-03-NET
Connect to k8s-node1
1 Select k8s-node12 Click Open
Start TCPDump
HOL-1926-03-NET
Page 62HOL-1926-03-NET
1 Enter the command
tcpdump -vvni ens192 icmp
This command starts tcpdump on the interface selected in the Port Mirroring sessionfiltering on icmp
Open an New Chrome Tab
1 Click the New Tab button
Load the vSphere Web Client
1 Click RegionA2 Click HTML5 Client
Login to the vSphere Web Client
1 Select the Use Windows session authentication checkbox2 Click Login
HOL-1926-03-NET
Page 63HOL-1926-03-NET
Open web-01a Remote Console
1 Select web-01a2 Click Launch Remote Console
Open the Console
1 Click Open VMware Remote Console
Login to web-01a
1 Enter the username
HOL-1926-03-NET
Page 64HOL-1926-03-NET
root
2 Enter the password
VMware1
Start a ping
1 Enter the command
ping 172161012
2 Press Ctrl+Alt to release your cursor
Return to the k8s-node1 session
1 Click the rootk8s-node1 putty session
HOL-1926-03-NET
Page 65HOL-1926-03-NET
Review the Output
Review the output of the tcpdump command The traffic displayed is from the monitorsession configured earlier notice there is no traffic sourced or destined for the k8s-node1 VM Only mirrored traffic is shown
HOL-1926-03-NET
Page 66HOL-1926-03-NET
Module 2 - ConclusionThis now completes Module 2 on NSX-T Datacenter Troubleshooting In this module youreviewed common troubleshooting tools and activities within NSX-T Datacenter Youused these tools to gain an understanding of what to do when troubleshooting adataplane issue within NSX-T Datacenter system
The activities reviewed in the module were
bull Routing Tablesbull MAC VTEP and ARP Tablesbull Port Mirroring
Youve finished Module 2
Congratulations on completing Module 2
If you are looking for additional information on NSX-T Datacenter Troubleshooting thenplease review the NSX-T Documentation Center via the URL below
bull Go to httpstinyurlcomyc6q794n
Proceed to any module below which interests you the most
Lab Module List
bull Module 1 - NSX-T Datacenter Operations - Use Tools within NSX-T Datacenter forDay to Day Operations (15 minutes) - Intermediate - This module will walk youthrough the basics of NSX-T Datacenter operations You will use features such asTraceflow Port Connection tool and others
bull Module 2 - NSX-T Datacenter Troubleshooting - Use Tools within NSX-T Datacenterfor Troubleshooting (15 minutes)- Intermediate - This module will walk youthrough the basics of NSX-T Datacenter troubleshooting You will view varioussystem configurations and correct misconfigurations after problem identification
bull Module 3 - API Consumption - Gain Familiarity with the NSX-T API (30 minutes) -Advanced - This module will explore the basics of NSX API consumption throughmanual interaction as well as several common configuration management tools
Lab Captain
bull Module 1 - 3 Kenyon Hensler Staff Systems Engineer United States
HOL-1926-03-NET
Page 67HOL-1926-03-NET
How to End Lab
To end your lab click on the END button
HOL-1926-03-NET
Page 68HOL-1926-03-NET
Module 3 - APIConsumption - Gain
Familiarity with the NSX-TAPI (30 minutes)
HOL-1926-03-NET
Page 69HOL-1926-03-NET
NSX RESTful APINSX is designed ground up with a RESTful API The NSX REST API can be used to bothconfigure NSX and to provision NSX logical network services The NSX REST API can becalled directly or indirectly from various programming languages Many orchestrationand automation tools such as vRealize Automation via vRealize Orchestrator can call theNSX REST API to perform Layer 2 through Layer 7 network orchestration andautomation
To demonstrate NSX RESTful API calls you will be using the RESTClient extension to theMozilla Firefox browser RESTClient is a debugger for RESTful Web Services and is auseful tool when working with various REST APIs
During this module the following tasks will be completed
bull Overview of RESTful APIsbull Overview of Powershell cmdletsbull Review of multiple NSX API callsbull Creation and deletion of NSX Objectsbull Configuration of alarming available only via the NSX API
Introduction to REST APIs
A REpresentational State Transfer (REST) API defines a set of simple principles which areloosely followed by most API implementations
HOL-1926-03-NET
Page 70HOL-1926-03-NET
bull Resource (the source of specific information)bull Global Permanent Identifier (every resource is uniquely identified ndash think HTTP
URL)bull Standard Interface (used to exchange the representation of resources ndash think
the HTTP protocol)bull Set of Constraints
REST leverages the strength of HTTP to send data (Headers and Bodies) between Clientsand Servers
The term Uniform Resource Locator (URL) and Uniform Resource Identifier (URI) can beused interchangeably when working with REST
Resources (building blocks) are linked together by embedded hyperlinks in HTMLdocuments or URI references and resources can expose the state via representationscontaining both metadata (such as size media type or character set) and content(binary image or text document)
REST Request Methods
REST Clients specify the desired interaction (HTTP request message as defined by RFC2616) Each HTTP method has specific well-defined semantics within the context of aREST APIrsquos resource model
bull GET - (The purpose of GET is to retrieve a representation of a resourcersquos state)including Response Headers and Body
bull HEAD - is used to retrieve the metadata associated with the resourcersquos state orjust the Response Headers
bull PUT - should be used to add a new resource to a store or update a resourcebull DELETE - removes a resource from its parentbull POST - should be used to create a new resource
HOL-1926-03-NET
Page 71HOL-1926-03-NET
REST Response Status Codes
The REST APIs use a HTTP response message to inform clients of their requestrsquos result(as defined in RFC 2616) Five categories are defined
bull 1xx Informational Communicates transfer protocol-level informationbull 2xx Success Indicates that the clientrsquos request was accepted successfulbull 3xx Redirection Indicates that the client must take some additional action in
order to complete their requestbull 4xx Client Error This category of error status codes points the finger at clientsbull 5xx Server Error The server takes responsibility for these error status codes
HTTP response message to inform clients of their requestrsquos result (As Defined in RFC2616)
bull 200 OKbull 201 Createdbull 202 Acceptedbull 204 No contentbull 400 Bad requestbull 401 Unauthorizedbull 403 Forbiddenbull 404 Not foundbull 405 Method Not Allowedbull 409 Conflictbull 500 Internal Server Errorbull 501 Not implementedbull 503 Service unavailable
HTTP Request Headers for the NSX RESTful API
When configuring RESTful APIs to provision NSX services the following are a list of theimportant request headers
1 Authorization The user and password credential in Base64 encoded format
HOL-1926-03-NET
Page 72HOL-1926-03-NET
2 Content-Type applicationxml Says that the request bodypayload is in xmlformat
HTTP Requests for the NSX RESTful API
1 MethodVerb GETPUTPOSTDELETE Action on the resource2 URL Resource3 Headers Authorization and Content-Type4 Body XML Payload5 Status Code 2xx For Success and 4xx and 5xx for Failures
OpenAPI Specification
The NSX-T Datacenter OpenAPI Specification is available from NSX-T Manager at
bull GET httpsltnsx-mgrgtapiv1specopenapinsx_apiyamlbull GET httpsltnsx-mgrgtapiv1specopenapinsx_apijson
HOL-1926-03-NET
Page 73HOL-1926-03-NET
This specification allows API users to quickly consume all methods available from NSX-TDatacenter This documentation is generated for every NSX-T Datacenter release
HOL-1926-03-NET
Page 74HOL-1926-03-NET
Manual ConsumptionOne of the methods to consume the NSX-T Datacenter API is through manuallyinteracting with the API This can be done with many different tools This lesson willexplore the use of Postman and cURL
Open Postman
1 Click the Windows Button2 Type Postman3 Click Postman
HOL-1926-03-NET
Page 75HOL-1926-03-NET
Close the Create a New Dialog
1 Click X
Create an Authorization Header
An authorization header will authenticate the session with the NSX-T Datacenter API
1 Switch the Type to Basic Auth2 The Username and Password will be automatically populated3 Click Update Request
Enter the URI to GET All Logical Switches
1 Ensure the method is set to GET2 Enter
httpsnsxmgr-01aapiv1logical-switches
3 Click Send
HOL-1926-03-NET
Page 76HOL-1926-03-NET
Review the Output
By reviewing the output of the request administrators can inspect all Logical Switchescreated This information includes all of the required information associated with thisLogical Switch This information can also be used as a template to create a LogicalSwitch By reviewing the required components of a Logical Switch creation in the APIGuide these values can be completed with the values of a Logical switch that meets thesame requirement as the new Logical Switch
Generate a cURL Command
Postman will generate code for many languages from your request This allows for easyscripting of API requests
1 Click Code2 Select cURL on the drop down3 Click Copy to Clipboard
HOL-1926-03-NET
Page 77HOL-1926-03-NET
Open Putty
1 Click on the Putty icon
If putty is already open right-click the putty window and select ldquoputtyrdquo
Open a Connection to api-01a
1 Enter 1921681101042 Click Open
Login to api-01a
Login using the username
HOL-1926-03-NET
Page 78HOL-1926-03-NET
admin
Password
VMware1
Execute the cURL Command
1 Paste the cURL command by right clicking in the Putty window2 Append the command with
ltSPACEgt -k
3 Be sure to include the space before -k This option ignores invalid certificates4 Execute the command
HOL-1926-03-NET
Page 79HOL-1926-03-NET
Review the Output
1 Scroll to the top of the Putty session2 Review the output This output will match the output from Postman
cURL can be used for all API functions and may be used in conjunction with othercommand line tools such as grep sed and awk to build complex create update anddestroy functions
HOL-1926-03-NET
Page 80HOL-1926-03-NET
Terraform ConsumptionTerraform is a tool that allows for the creation of sharable configuration files that createand change infrastructure Terraform has released an NSX-T Datacenter Module thatallows for the configuration of NSX-T Datacenter objects
Open Putty
If a putty session to api-01a is already open skip the step labeled Open thelogicalswitchtf File
1 Click on the Putty icon
If putty is already open right-click the putty window and select ldquoputtyrdquo
Open a Connection to api-01a
HOL-1926-03-NET
Page 81HOL-1926-03-NET
1 Select api-01acorplocal2 Click Load3 Click Open
Login to api-01a
Login using the username
admin
Password
VMware1
Open the logicalswitchtf File
1 Switch to the api1 directory
cd api1
2 Open the logicalswitchtf file
vi logicalswitchtf
HOL-1926-03-NET
Page 82HOL-1926-03-NET
Review the File
Review the file by using the arrow keys to move to the top and bottom of the fileNotice the resource section This section will create a NSX-T Datacenter Logical SwitchOnce you have completed reviewing the file exit the vi editor
1 Type
q
HOL-1926-03-NET
Page 83HOL-1926-03-NET
Verify the logicalswitchtf File
1 Enter the command
terraform plan
This command will verify the required data and plugins for terraform to complete theaction
HOL-1926-03-NET
Page 84HOL-1926-03-NET
Apply the logicalswitchtf File
1 Enter the command
terraform apply
2 Type
yes
HOL-1926-03-NET
Page 85HOL-1926-03-NET
Review the Output
The output of the command shows the Logical Switch TfLogicalSwitch was created
Open Chrome Browser from Windows Quick Launch TaskBar
1 Click on the Chrome Icon on the Windows Quick Launch Task Bar
Navigate to NSX-T Manager
1 Click on the VMware NSX | Login bookmark
HOL-1926-03-NET
Page 86HOL-1926-03-NET
Login to NSX-T Manager
Login to NSX Manager
1 Enter the username admin2 Enter the password VMware13 Click Login
HOL-1926-03-NET
Page 87HOL-1926-03-NET
View the Logical Switch
1 Click Switching2 Select the Switches tab3 Notice the Logical Switch TfLogicalSwitch
If the Logical Switch is not visibile refresh the page
Delete the Logical Switch
Delete the Logical Switch to avoid confusion in the next part of the lesson
HOL-1926-03-NET
Page 88HOL-1926-03-NET
1 Select the TfLogicalSwitch2 Click Delete3 Click Delete
Return to the Putty Session
1 Click the Putty Session
Open the infratf File
1 Switch to the api2 directory
cd api2
2 Enter the command
vi infratf
HOL-1926-03-NET
Page 89HOL-1926-03-NET
Review the File
Review the file by using the arrow keys to move to the top and bottom of the fileNotice the many resource sections This file will create a Tier 1 router connect the Tier
1 router to the Tier 0 router create a Logical Switch attach the Tier 1 router to thelogical switch and assign an IP address to the Tier 1 interface on the logical switchThis is a common action for tenant creation in an environment Once you have
completed reviewing the file exit the vi editor
1 Type
q
HOL-1926-03-NET
Page 90HOL-1926-03-NET
Verify the infratf File
1 Enter the command
terraform plan
Apply the infratf File
1 Enter the command
HOL-1926-03-NET
Page 91HOL-1926-03-NET
terraform apply
Confirm the Apply
1 Type
yes
Review the Output
Review the output of the command Many actions were preformed Scroll up to viewthe complete output
Return to NSX Manager
Return to NSX Manager to review the configuration
1 Click VMware NSX Chrome window
HOL-1926-03-NET
Page 92HOL-1926-03-NET
Login to NSX-T Manager
If the session has timed out login to NSX Manager If the session is still active skip thisstep
1 Enter the username admin2 Enter the password VMware13 Click Login
HOL-1926-03-NET
Page 93HOL-1926-03-NET
Refresh Switches
1 Click REFRESH2 Notice the TfLogicalSwitch2 Switch
HOL-1926-03-NET
Page 94HOL-1926-03-NET
Review Tier 1 Router
1 Click Routing2 Select the T1-Terraform Logical Router
Review the Summary
3 Click Configuration4 Click Router Ports
HOL-1926-03-NET
Page 95HOL-1926-03-NET
Review the IP Address Assignments
The IP address 17216401 was specified in the infratf file as a variable The nextaddress may vary by lab This address is automatically configured from a pool ofaddresses for use in connecting Tier 0 routers to Tier 1 routers
Return to the Putty Session
1 Click the Putty Session
Ping the Router Address
1 Enter
ping 17216401 -c 3
The ping should be successful This IP address is being advertised from the newlycreated Tier 1 router through the Tier 0 router to the vPOD router via BGP
HOL-1926-03-NET
Page 96HOL-1926-03-NET
Remove the configuration
Terraform will also remove previously created configurations
1 Enter the command
terraform destroy
2 Confirm the removal
yes
HOL-1926-03-NET
Page 97HOL-1926-03-NET
Review the Output
The command successfully removed the configuration This is a common action in theremoval of an application or tenant from an infrastructure as code environment
HOL-1926-03-NET
Page 98HOL-1926-03-NET
Module 3 ConclusionThis module utilized the NSX API to configure multiple NSX objects The NSX APIprovides a powerful tool for configuration troubleshooting and monitoring
Youve finished Module 3
Congratulations on completing Module 3
For additional information on the NSX API visit the URL below and select the NSX APIGuide
bull Go to httpstinyurlcomyc6q794n
Proceed to any module below or end the lab
Lab Module List
bull Module 1 - NSX-T Datacenter Operations - Use Tools within NSX-TDatacenter for Day to Day Operations (15 minutes) - Intermediate - Thismodule will walk you through the basics of NSX-T Datacenter operations You willuse features such as Traceflow Port Connection tool and others
bull Module 2 - NSX-T Datacenter Troubleshooting - Use Tools within NSX-TDatacenter for Troubleshooting (15 minutes) - Intermediate - This modulewill walk you through the basics of NSX-T Datacenter troubleshooting You willview various system configurations and correct misconfigurations after problemidentification
bull Module 3 - API Consumption - Gain Familiarity with the NSX-T API (30minutes) - Advanced - This module will explore the basics of NSX APIconsumption through manual interaction as well as several commonconfiguration management tools
Lab Captain
bull Module 1 - 3 Kenyon Hensler Staff Systems Engineer United States
How to End Lab
To end the lab click on the END button
HOL-1926-03-NET
Page 99HOL-1926-03-NET
ConclusionThank you for participating in the VMware Hands-on Labs Be sure to visithttpholvmwarecom to continue your lab experience online
Lab SKU HOL-1926-03-NET
Version 20181104-143822
HOL-1926-03-NET
Page 100HOL-1926-03-NET
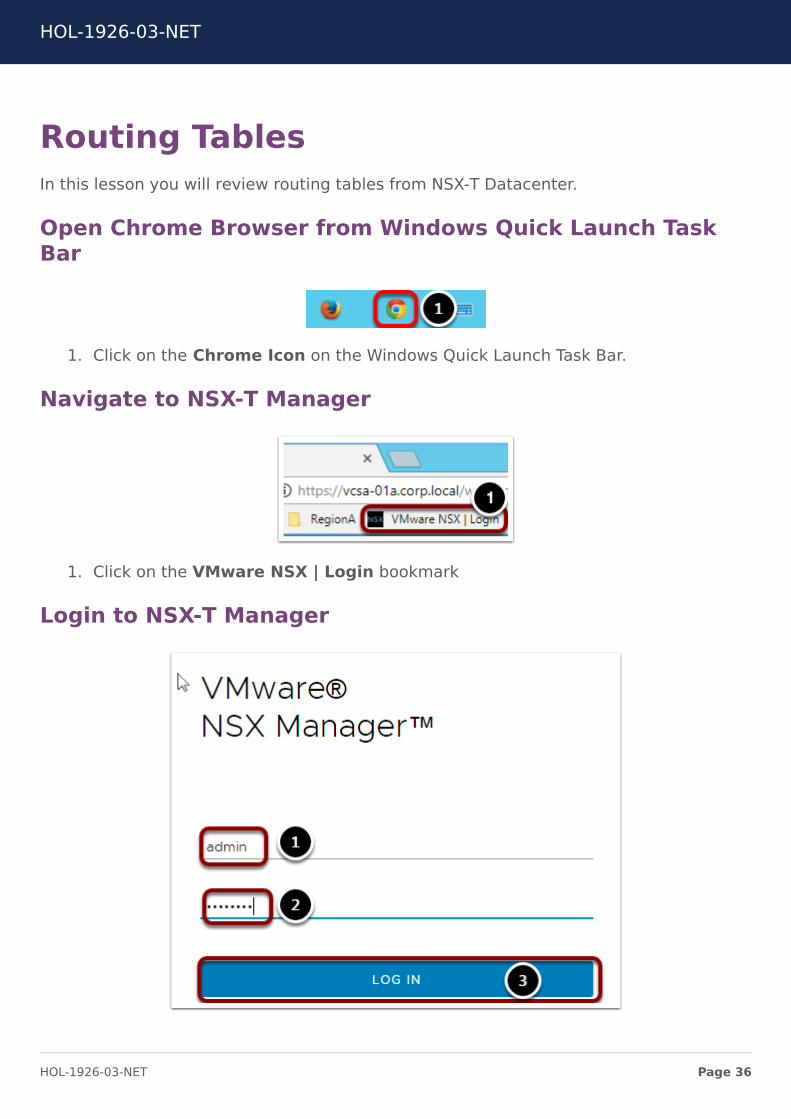
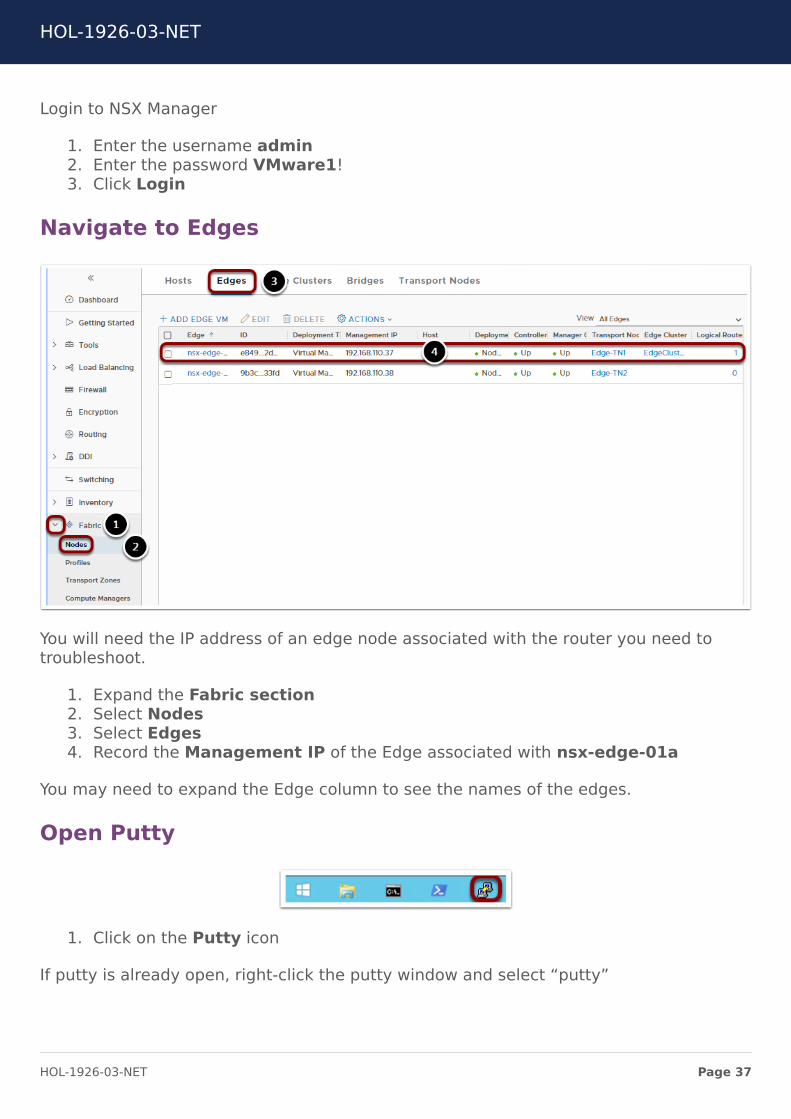
Login to NSX Manager
1 Enter the username admin2 Enter the password VMware13 Click Login
Navigate to Edges
You will need the IP address of an edge node associated with the router you need totroubleshoot
1 Expand the Fabric section2 Select Nodes3 Select Edges4 Record the Management IP of the Edge associated with nsx-edge-01a
You may need to expand the Edge column to see the names of the edges
Open Putty
1 Click on the Putty icon
If putty is already open right-click the putty window and select ldquoputtyrdquo
HOL-1926-03-NET
Page 37HOL-1926-03-NET
Connect to the Edge
1 Click nsx-edge-01a2 Click Load3 Click Open
Login to the Edge
1 Enter the password VMware1
HOL-1926-03-NET
Page 38HOL-1926-03-NET
List all Logical Routers
To enter the appropriate VRF for troubleshooting you must find the appropriate VRFnumber In this instance you must use the Service Routers of the Tier 0 logical routerThis is the logical router that runs BGP and peers with the northbound router
1 Enter the command to list all logical routers
get logical-routers
2 Record the VRF number of the SERVICE_ROUTER_TIER0
Enter VRF Context Mode
In VRF context mode the router will output information specific to the VRF you enter
1 Enter the command to switch to vfr 2
vrf 2
HOL-1926-03-NET
Page 39HOL-1926-03-NET
Get Routes
1 Type the command
get route
2 Review the routes available on this T0 SR
Notice the different Flags associated with the different routes b represents a BGProute learned from the northbound router nc represents an NSX Connected route thatwas auto plumbed from a Tier 1 logical router or this Tier 1 logical router c represents aroute directly connected to this Tier 0 SR (Service Router) Notice the routes that areavailable via 16925401 this address is the Intra Tier 0 Transit Subnet This is addressspace the Tier 0 SR uses to route to the Tier 0 DR (Distributed Router) With thisinformation you will be able to determine if your Tier 0 SR has learned the appropriateroutes from the physical environment
Routes on Transport Nodes
Routes are also available on all the transport nodes To view the routes on hypervisortransport nodes the nsxcli is used
Open Putty
HOL-1926-03-NET
Page 40HOL-1926-03-NET
1 Click on the Putty icon
If putty is already open right-click the putty window and select ldquoputtyrdquo
Connect to esx-01a
1 Select esx-01acorplocal2 Click Load3 Click Open
Open nsxcli
1 Enter
nsxcli
HOL-1926-03-NET
Page 41HOL-1926-03-NET
View Logical Routers
1 Enter
get logical-routers
Review the output from the command Notice the number of LIFs and Routes associatedwith each logical router The VDR UUID listed can be matched to the ID of the logicalrouters in the NSX-T Datacenter GUI
View Logical Router Forwarding Detail
1 Enter
get logical-router af7bf4c8-aa81-4363-90dc-c68d20f13e2a forwarding
HOL-1926-03-NET
Page 42HOL-1926-03-NET
The UUID af7bf4c8-aa81-4363-90dc-c68d20f13e2a matches the ID of the Tier 0router The output of the command lists all routes available for the Tier 0 router on theesx-01a transport node By reviewing the output of the Edge Node and Transport Nodeforwarding tables administrators can quickly identify where routing problems may beoccurring To copy the command to the putty session high light the command in themanual and drag and drop it to the putty window
HOL-1926-03-NET
Page 43HOL-1926-03-NET
MAC Address TablesMany common troubleshooting techniques involve verifying that the network devicesare learning the appropriate MAC addresses from devices connected to them In thislesson students will learn the various methods to view the MAC Address Tables on thedifferent components of NSX-T Datacenter
Open Chrome Browser from Windows Quick Launch TaskBar
1 Click on the Chrome Icon on the Windows Quick Launch Task Bar
Navigate to NSX-T Manager
1 Click on the VMware NSX | Login bookmark
HOL-1926-03-NET
Page 44HOL-1926-03-NET
Login to NSX-T Manager
Login to NSX Manager
1 Enter the username admin2 Enter the password VMware13 Click Login
HOL-1926-03-NET
Page 45HOL-1926-03-NET
Download MAC-VTEP Table
1 Click Switching2 Ensure the Switches tab is selected3 Select the LS-DB Logical Switch4 Change to the Monitor tab5 Click DOWNLOAD MAC-VTEP TABLE
Download the Central Control Plane Table
1 Ensure Central Control Plane is selected2 Click Download
HOL-1926-03-NET
Page 46HOL-1926-03-NET
Administrators may want to view individual transport node MAC Tables as well This canbe achieved using the Transport Node selection and choosing the appropriate transportnode
Save the File
1 Click Save
Open the File
1 Click filecsv
Select WordPad
1 Click WordPad
HOL-1926-03-NET
Page 47HOL-1926-03-NET
Review The Results
The contents of this file include all of the MAC addresses the current VTEP that the MACaddress lives behind and the MAC address of the VTEP With these three pieces ofinformation the controllers can distribute the switching information to all transportnodes participating in the LS-DB logical switch to ensure layer 2 reachability of all VMsattached to a LIF on the LS-DB logical switch
Close WordPad
Once you have completed reviewing the table close WordPad
Download VTEP Table
1 Click DOWNLOAD VTEP TABLE
Complete the previous steps to download the Central Control Plane Table and open thefile The browser zoom may need to be adjusted to view the link If it is not visiblecomplete the next step and then complete this step Otherwise skip the next step
HOL-1926-03-NET
Page 48HOL-1926-03-NET
Change Browser Zoom
1 Click the Chrome Settings button2 Click the Zoom Out button
Repeat as necessary to view the DOWNLOAD VTEP TABLE link Once the table hasbeen downloaded the zoom may be reset to 100
Save the File
1 Click Save
The filename may be file(1)csv
Open the File
HOL-1926-03-NET
Page 49HOL-1926-03-NET
1 Click filecsv
The filename may be file(1)csv
Review the Results
The contents of the VTEP Table include all information about the VTEPs participating inthe LS-DB logical switch This includes the VTEP Label IP MAC Address and SegmentID This information is used during replication to ensure the delivery of all BUM(broadcast unknown unicast and multicast) traffic
Close WordPad
Once you have completed reviewing the table close WordPad
MAC Tables on Transport Nodes
MAC Address Tables are also available on all the transport nodes To view the MACAddress Tables on hypervisor transport nodes the nsxcli is used
Open Putty
1 Click on the Putty icon
If putty is already open right-click the putty window and select ldquoputtyrdquo
HOL-1926-03-NET
Page 50HOL-1926-03-NET
Connect to esx-01a
1 Select esx-01acorplocal2 Click Open
Open nsxcli
1 Enter
nsxcli
HOL-1926-03-NET
Page 51HOL-1926-03-NET
View Logical Switches
1 Enter
get logical-switches
This command will list all logical switches configured on the transport node
HOL-1926-03-NET
Page 52HOL-1926-03-NET
View the MAC Table
1 Enter
get logical-switch 262dbb9b-5412-4e60-8ace-1c8b18a06715 mac-table
The ID 262dbb9b-5412-4e60-8ace-1c8b18a06715 corresponds to the ID of the LS-WEBlogical switch Review the results With this table administrators can view the differentMAC Tables on the transport node The LCP Local Entry table lists the VMs MAC Addressconnected to this transport node on the LS-WEB logical switch The LCP Remote Entryrepresents the MAC Address of a VM on another transport node connected to the LS-WEB logical switch The Inner MAC represents the VMs MAC address while the OuterMAC and Outer IP represent the Transport Nodes MAC and IP Addresses The HostKernel Entry shows the distributed router ports connected to the Logical Switch
HOL-1926-03-NET
Page 53HOL-1926-03-NET
ARP Tables
1 Enter
get logical-switch 262dbb9b-5412-4e60-8ace-1c8b18a06715 arp-table
The ARP table of the transport node is also available via nsxcli The ARP table shows theIP to MAC address mapping on the transport node The entries in these tables willcorrespond to the output of the mac-tables Here administrators can view the inner IPsand MAC addresses You can copy the command to the lab by highlighting thecommand in the manual and dragging and dropping it to the putty session
HOL-1926-03-NET
Page 54HOL-1926-03-NET
Port MirroringPort mirroring is a very useful tool to allow for packet capture of a single or multipleports on a switch This allows for packet level debugging of applications and networks
Navigate to Port Mirroring
1 Expand the Tools section2 Select Port Mirroring Sessions3 Click ADD4 Click Local SPAN
HOL-1926-03-NET
Page 55HOL-1926-03-NET
Create a New Session
1 Name the session WEB-01a2 Select the ESX-TN01 Transport Node3 Select Bidirectional4 Click NEXT
HOL-1926-03-NET
Page 56HOL-1926-03-NET
Skip Source PNIC Selection
1 Click NEXT
Administrators may mirror physical NICs as well as virtual NICs In this lab only virtualNICs will be mirrored
HOL-1926-03-NET
Page 57HOL-1926-03-NET
Select Source VM
1 Select web-01a2 Click the gt button3 Click SHOW VIRTUAL INTERFACE (VNIC)
HOL-1926-03-NET
Page 58HOL-1926-03-NET
Select Interface
1 Scroll Down2 Select the only interface3 Click gt to select the interface4 Click NEXT
HOL-1926-03-NET
Page 59HOL-1926-03-NET
Select Destination VM
1 Scroll to the top2 Select k8s-node13 Click gt to select the VM4 Click SHOW VIRTUAL INTERFACE (VNIC)
HOL-1926-03-NET
Page 60HOL-1926-03-NET
Select Interface
1 Scroll to the bottom2 Select the last interface3 Click gt to select the interface4 Click SAVE
Open Putty
1 Click on the Putty icon
If putty is already open right-click the putty window and select ldquoputtyrdquo
HOL-1926-03-NET
Page 61HOL-1926-03-NET
Connect to k8s-node1
1 Select k8s-node12 Click Open
Start TCPDump
HOL-1926-03-NET
Page 62HOL-1926-03-NET
1 Enter the command
tcpdump -vvni ens192 icmp
This command starts tcpdump on the interface selected in the Port Mirroring sessionfiltering on icmp
Open an New Chrome Tab
1 Click the New Tab button
Load the vSphere Web Client
1 Click RegionA2 Click HTML5 Client
Login to the vSphere Web Client
1 Select the Use Windows session authentication checkbox2 Click Login
HOL-1926-03-NET
Page 63HOL-1926-03-NET
Open web-01a Remote Console
1 Select web-01a2 Click Launch Remote Console
Open the Console
1 Click Open VMware Remote Console
Login to web-01a
1 Enter the username
HOL-1926-03-NET
Page 64HOL-1926-03-NET
root
2 Enter the password
VMware1
Start a ping
1 Enter the command
ping 172161012
2 Press Ctrl+Alt to release your cursor
Return to the k8s-node1 session
1 Click the rootk8s-node1 putty session
HOL-1926-03-NET
Page 65HOL-1926-03-NET
Review the Output
Review the output of the tcpdump command The traffic displayed is from the monitorsession configured earlier notice there is no traffic sourced or destined for the k8s-node1 VM Only mirrored traffic is shown
HOL-1926-03-NET
Page 66HOL-1926-03-NET
Module 2 - ConclusionThis now completes Module 2 on NSX-T Datacenter Troubleshooting In this module youreviewed common troubleshooting tools and activities within NSX-T Datacenter Youused these tools to gain an understanding of what to do when troubleshooting adataplane issue within NSX-T Datacenter system
The activities reviewed in the module were
bull Routing Tablesbull MAC VTEP and ARP Tablesbull Port Mirroring
Youve finished Module 2
Congratulations on completing Module 2
If you are looking for additional information on NSX-T Datacenter Troubleshooting thenplease review the NSX-T Documentation Center via the URL below
bull Go to httpstinyurlcomyc6q794n
Proceed to any module below which interests you the most
Lab Module List
bull Module 1 - NSX-T Datacenter Operations - Use Tools within NSX-T Datacenter forDay to Day Operations (15 minutes) - Intermediate - This module will walk youthrough the basics of NSX-T Datacenter operations You will use features such asTraceflow Port Connection tool and others
bull Module 2 - NSX-T Datacenter Troubleshooting - Use Tools within NSX-T Datacenterfor Troubleshooting (15 minutes)- Intermediate - This module will walk youthrough the basics of NSX-T Datacenter troubleshooting You will view varioussystem configurations and correct misconfigurations after problem identification
bull Module 3 - API Consumption - Gain Familiarity with the NSX-T API (30 minutes) -Advanced - This module will explore the basics of NSX API consumption throughmanual interaction as well as several common configuration management tools
Lab Captain
bull Module 1 - 3 Kenyon Hensler Staff Systems Engineer United States
HOL-1926-03-NET
Page 67HOL-1926-03-NET
How to End Lab
To end your lab click on the END button
HOL-1926-03-NET
Page 68HOL-1926-03-NET
Module 3 - APIConsumption - Gain
Familiarity with the NSX-TAPI (30 minutes)
HOL-1926-03-NET
Page 69HOL-1926-03-NET
NSX RESTful APINSX is designed ground up with a RESTful API The NSX REST API can be used to bothconfigure NSX and to provision NSX logical network services The NSX REST API can becalled directly or indirectly from various programming languages Many orchestrationand automation tools such as vRealize Automation via vRealize Orchestrator can call theNSX REST API to perform Layer 2 through Layer 7 network orchestration andautomation
To demonstrate NSX RESTful API calls you will be using the RESTClient extension to theMozilla Firefox browser RESTClient is a debugger for RESTful Web Services and is auseful tool when working with various REST APIs
During this module the following tasks will be completed
bull Overview of RESTful APIsbull Overview of Powershell cmdletsbull Review of multiple NSX API callsbull Creation and deletion of NSX Objectsbull Configuration of alarming available only via the NSX API
Introduction to REST APIs
A REpresentational State Transfer (REST) API defines a set of simple principles which areloosely followed by most API implementations
HOL-1926-03-NET
Page 70HOL-1926-03-NET
bull Resource (the source of specific information)bull Global Permanent Identifier (every resource is uniquely identified ndash think HTTP
URL)bull Standard Interface (used to exchange the representation of resources ndash think
the HTTP protocol)bull Set of Constraints
REST leverages the strength of HTTP to send data (Headers and Bodies) between Clientsand Servers
The term Uniform Resource Locator (URL) and Uniform Resource Identifier (URI) can beused interchangeably when working with REST
Resources (building blocks) are linked together by embedded hyperlinks in HTMLdocuments or URI references and resources can expose the state via representationscontaining both metadata (such as size media type or character set) and content(binary image or text document)
REST Request Methods
REST Clients specify the desired interaction (HTTP request message as defined by RFC2616) Each HTTP method has specific well-defined semantics within the context of aREST APIrsquos resource model
bull GET - (The purpose of GET is to retrieve a representation of a resourcersquos state)including Response Headers and Body
bull HEAD - is used to retrieve the metadata associated with the resourcersquos state orjust the Response Headers
bull PUT - should be used to add a new resource to a store or update a resourcebull DELETE - removes a resource from its parentbull POST - should be used to create a new resource
HOL-1926-03-NET
Page 71HOL-1926-03-NET
REST Response Status Codes
The REST APIs use a HTTP response message to inform clients of their requestrsquos result(as defined in RFC 2616) Five categories are defined
bull 1xx Informational Communicates transfer protocol-level informationbull 2xx Success Indicates that the clientrsquos request was accepted successfulbull 3xx Redirection Indicates that the client must take some additional action in
order to complete their requestbull 4xx Client Error This category of error status codes points the finger at clientsbull 5xx Server Error The server takes responsibility for these error status codes
HTTP response message to inform clients of their requestrsquos result (As Defined in RFC2616)
bull 200 OKbull 201 Createdbull 202 Acceptedbull 204 No contentbull 400 Bad requestbull 401 Unauthorizedbull 403 Forbiddenbull 404 Not foundbull 405 Method Not Allowedbull 409 Conflictbull 500 Internal Server Errorbull 501 Not implementedbull 503 Service unavailable
HTTP Request Headers for the NSX RESTful API
When configuring RESTful APIs to provision NSX services the following are a list of theimportant request headers
1 Authorization The user and password credential in Base64 encoded format
HOL-1926-03-NET
Page 72HOL-1926-03-NET
2 Content-Type applicationxml Says that the request bodypayload is in xmlformat
HTTP Requests for the NSX RESTful API
1 MethodVerb GETPUTPOSTDELETE Action on the resource2 URL Resource3 Headers Authorization and Content-Type4 Body XML Payload5 Status Code 2xx For Success and 4xx and 5xx for Failures
OpenAPI Specification
The NSX-T Datacenter OpenAPI Specification is available from NSX-T Manager at
bull GET httpsltnsx-mgrgtapiv1specopenapinsx_apiyamlbull GET httpsltnsx-mgrgtapiv1specopenapinsx_apijson
HOL-1926-03-NET
Page 73HOL-1926-03-NET
This specification allows API users to quickly consume all methods available from NSX-TDatacenter This documentation is generated for every NSX-T Datacenter release
HOL-1926-03-NET
Page 74HOL-1926-03-NET
Manual ConsumptionOne of the methods to consume the NSX-T Datacenter API is through manuallyinteracting with the API This can be done with many different tools This lesson willexplore the use of Postman and cURL
Open Postman
1 Click the Windows Button2 Type Postman3 Click Postman
HOL-1926-03-NET
Page 75HOL-1926-03-NET
Close the Create a New Dialog
1 Click X
Create an Authorization Header
An authorization header will authenticate the session with the NSX-T Datacenter API
1 Switch the Type to Basic Auth2 The Username and Password will be automatically populated3 Click Update Request
Enter the URI to GET All Logical Switches
1 Ensure the method is set to GET2 Enter
httpsnsxmgr-01aapiv1logical-switches
3 Click Send
HOL-1926-03-NET
Page 76HOL-1926-03-NET
Review the Output
By reviewing the output of the request administrators can inspect all Logical Switchescreated This information includes all of the required information associated with thisLogical Switch This information can also be used as a template to create a LogicalSwitch By reviewing the required components of a Logical Switch creation in the APIGuide these values can be completed with the values of a Logical switch that meets thesame requirement as the new Logical Switch
Generate a cURL Command
Postman will generate code for many languages from your request This allows for easyscripting of API requests
1 Click Code2 Select cURL on the drop down3 Click Copy to Clipboard
HOL-1926-03-NET
Page 77HOL-1926-03-NET
Open Putty
1 Click on the Putty icon
If putty is already open right-click the putty window and select ldquoputtyrdquo
Open a Connection to api-01a
1 Enter 1921681101042 Click Open
Login to api-01a
Login using the username
HOL-1926-03-NET
Page 78HOL-1926-03-NET
admin
Password
VMware1
Execute the cURL Command
1 Paste the cURL command by right clicking in the Putty window2 Append the command with
ltSPACEgt -k
3 Be sure to include the space before -k This option ignores invalid certificates4 Execute the command
HOL-1926-03-NET
Page 79HOL-1926-03-NET
Review the Output
1 Scroll to the top of the Putty session2 Review the output This output will match the output from Postman
cURL can be used for all API functions and may be used in conjunction with othercommand line tools such as grep sed and awk to build complex create update anddestroy functions
HOL-1926-03-NET
Page 80HOL-1926-03-NET
Terraform ConsumptionTerraform is a tool that allows for the creation of sharable configuration files that createand change infrastructure Terraform has released an NSX-T Datacenter Module thatallows for the configuration of NSX-T Datacenter objects
Open Putty
If a putty session to api-01a is already open skip the step labeled Open thelogicalswitchtf File
1 Click on the Putty icon
If putty is already open right-click the putty window and select ldquoputtyrdquo
Open a Connection to api-01a
HOL-1926-03-NET
Page 81HOL-1926-03-NET
1 Select api-01acorplocal2 Click Load3 Click Open
Login to api-01a
Login using the username
admin
Password
VMware1
Open the logicalswitchtf File
1 Switch to the api1 directory
cd api1
2 Open the logicalswitchtf file
vi logicalswitchtf
HOL-1926-03-NET
Page 82HOL-1926-03-NET
Review the File
Review the file by using the arrow keys to move to the top and bottom of the fileNotice the resource section This section will create a NSX-T Datacenter Logical SwitchOnce you have completed reviewing the file exit the vi editor
1 Type
q
HOL-1926-03-NET
Page 83HOL-1926-03-NET
Verify the logicalswitchtf File
1 Enter the command
terraform plan
This command will verify the required data and plugins for terraform to complete theaction
HOL-1926-03-NET
Page 84HOL-1926-03-NET
Apply the logicalswitchtf File
1 Enter the command
terraform apply
2 Type
yes
HOL-1926-03-NET
Page 85HOL-1926-03-NET
Review the Output
The output of the command shows the Logical Switch TfLogicalSwitch was created
Open Chrome Browser from Windows Quick Launch TaskBar
1 Click on the Chrome Icon on the Windows Quick Launch Task Bar
Navigate to NSX-T Manager
1 Click on the VMware NSX | Login bookmark
HOL-1926-03-NET
Page 86HOL-1926-03-NET
Login to NSX-T Manager
Login to NSX Manager
1 Enter the username admin2 Enter the password VMware13 Click Login
HOL-1926-03-NET
Page 87HOL-1926-03-NET
View the Logical Switch
1 Click Switching2 Select the Switches tab3 Notice the Logical Switch TfLogicalSwitch
If the Logical Switch is not visibile refresh the page
Delete the Logical Switch
Delete the Logical Switch to avoid confusion in the next part of the lesson
HOL-1926-03-NET
Page 88HOL-1926-03-NET
1 Select the TfLogicalSwitch2 Click Delete3 Click Delete
Return to the Putty Session
1 Click the Putty Session
Open the infratf File
1 Switch to the api2 directory
cd api2
2 Enter the command
vi infratf
HOL-1926-03-NET
Page 89HOL-1926-03-NET
Review the File
Review the file by using the arrow keys to move to the top and bottom of the fileNotice the many resource sections This file will create a Tier 1 router connect the Tier
1 router to the Tier 0 router create a Logical Switch attach the Tier 1 router to thelogical switch and assign an IP address to the Tier 1 interface on the logical switchThis is a common action for tenant creation in an environment Once you have
completed reviewing the file exit the vi editor
1 Type
q
HOL-1926-03-NET
Page 90HOL-1926-03-NET
Verify the infratf File
1 Enter the command
terraform plan
Apply the infratf File
1 Enter the command
HOL-1926-03-NET
Page 91HOL-1926-03-NET
terraform apply
Confirm the Apply
1 Type
yes
Review the Output
Review the output of the command Many actions were preformed Scroll up to viewthe complete output
Return to NSX Manager
Return to NSX Manager to review the configuration
1 Click VMware NSX Chrome window
HOL-1926-03-NET
Page 92HOL-1926-03-NET
Login to NSX-T Manager
If the session has timed out login to NSX Manager If the session is still active skip thisstep
1 Enter the username admin2 Enter the password VMware13 Click Login
HOL-1926-03-NET
Page 93HOL-1926-03-NET
Refresh Switches
1 Click REFRESH2 Notice the TfLogicalSwitch2 Switch
HOL-1926-03-NET
Page 94HOL-1926-03-NET
Review Tier 1 Router
1 Click Routing2 Select the T1-Terraform Logical Router
Review the Summary
3 Click Configuration4 Click Router Ports
HOL-1926-03-NET
Page 95HOL-1926-03-NET
Review the IP Address Assignments
The IP address 17216401 was specified in the infratf file as a variable The nextaddress may vary by lab This address is automatically configured from a pool ofaddresses for use in connecting Tier 0 routers to Tier 1 routers
Return to the Putty Session
1 Click the Putty Session
Ping the Router Address
1 Enter
ping 17216401 -c 3
The ping should be successful This IP address is being advertised from the newlycreated Tier 1 router through the Tier 0 router to the vPOD router via BGP
HOL-1926-03-NET
Page 96HOL-1926-03-NET
Remove the configuration
Terraform will also remove previously created configurations
1 Enter the command
terraform destroy
2 Confirm the removal
yes
HOL-1926-03-NET
Page 97HOL-1926-03-NET
Review the Output
The command successfully removed the configuration This is a common action in theremoval of an application or tenant from an infrastructure as code environment
HOL-1926-03-NET
Page 98HOL-1926-03-NET
Module 3 ConclusionThis module utilized the NSX API to configure multiple NSX objects The NSX APIprovides a powerful tool for configuration troubleshooting and monitoring
Youve finished Module 3
Congratulations on completing Module 3
For additional information on the NSX API visit the URL below and select the NSX APIGuide
bull Go to httpstinyurlcomyc6q794n
Proceed to any module below or end the lab
Lab Module List
bull Module 1 - NSX-T Datacenter Operations - Use Tools within NSX-TDatacenter for Day to Day Operations (15 minutes) - Intermediate - Thismodule will walk you through the basics of NSX-T Datacenter operations You willuse features such as Traceflow Port Connection tool and others
bull Module 2 - NSX-T Datacenter Troubleshooting - Use Tools within NSX-TDatacenter for Troubleshooting (15 minutes) - Intermediate - This modulewill walk you through the basics of NSX-T Datacenter troubleshooting You willview various system configurations and correct misconfigurations after problemidentification
bull Module 3 - API Consumption - Gain Familiarity with the NSX-T API (30minutes) - Advanced - This module will explore the basics of NSX APIconsumption through manual interaction as well as several commonconfiguration management tools
Lab Captain
bull Module 1 - 3 Kenyon Hensler Staff Systems Engineer United States
How to End Lab
To end the lab click on the END button
HOL-1926-03-NET
Page 99HOL-1926-03-NET
ConclusionThank you for participating in the VMware Hands-on Labs Be sure to visithttpholvmwarecom to continue your lab experience online
Lab SKU HOL-1926-03-NET
Version 20181104-143822
HOL-1926-03-NET
Page 100HOL-1926-03-NET
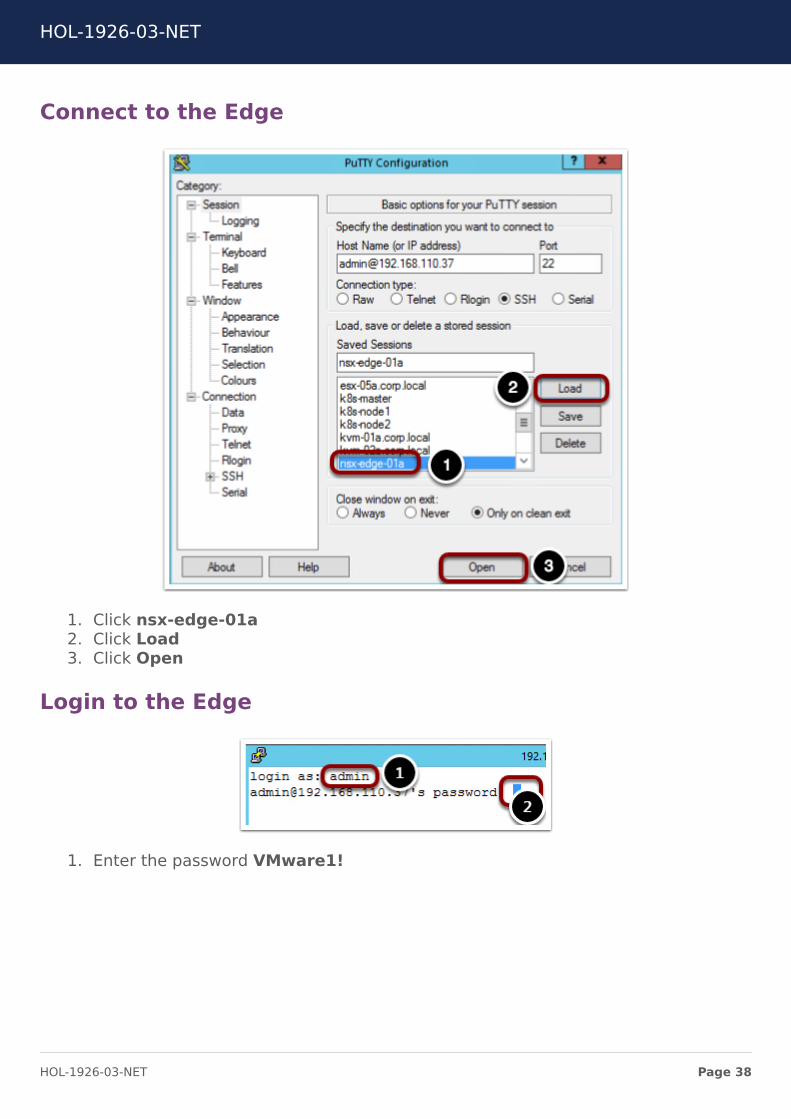
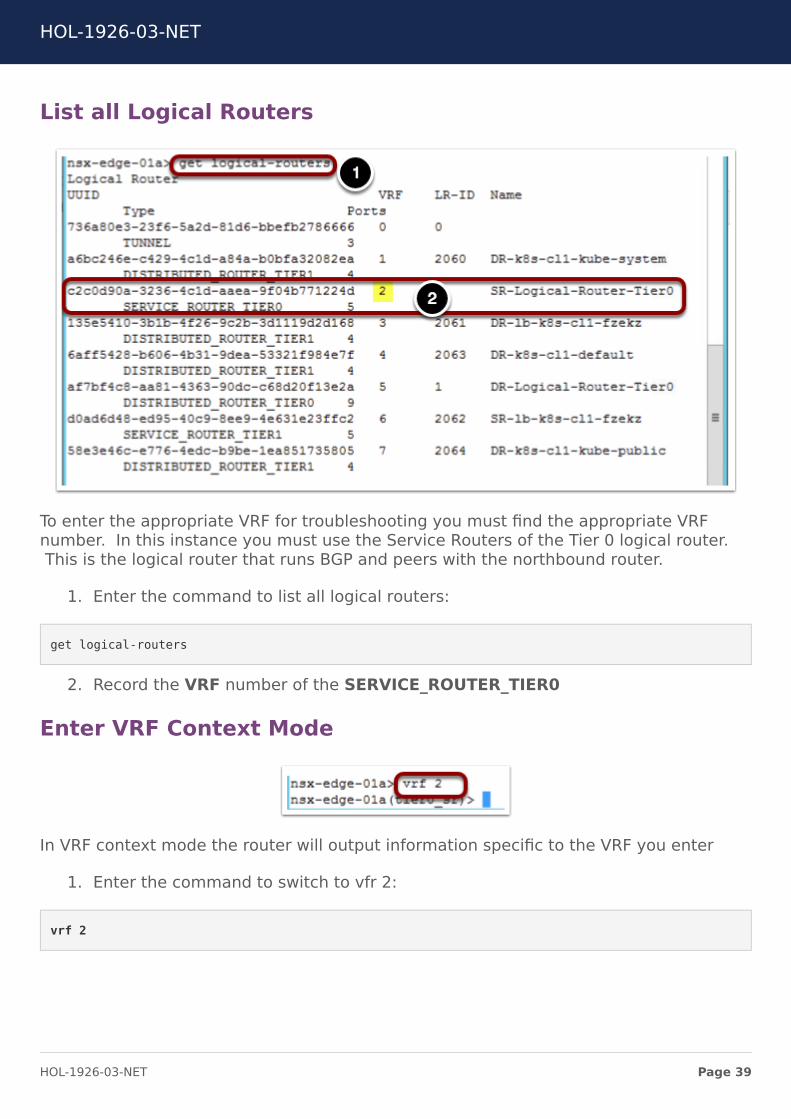
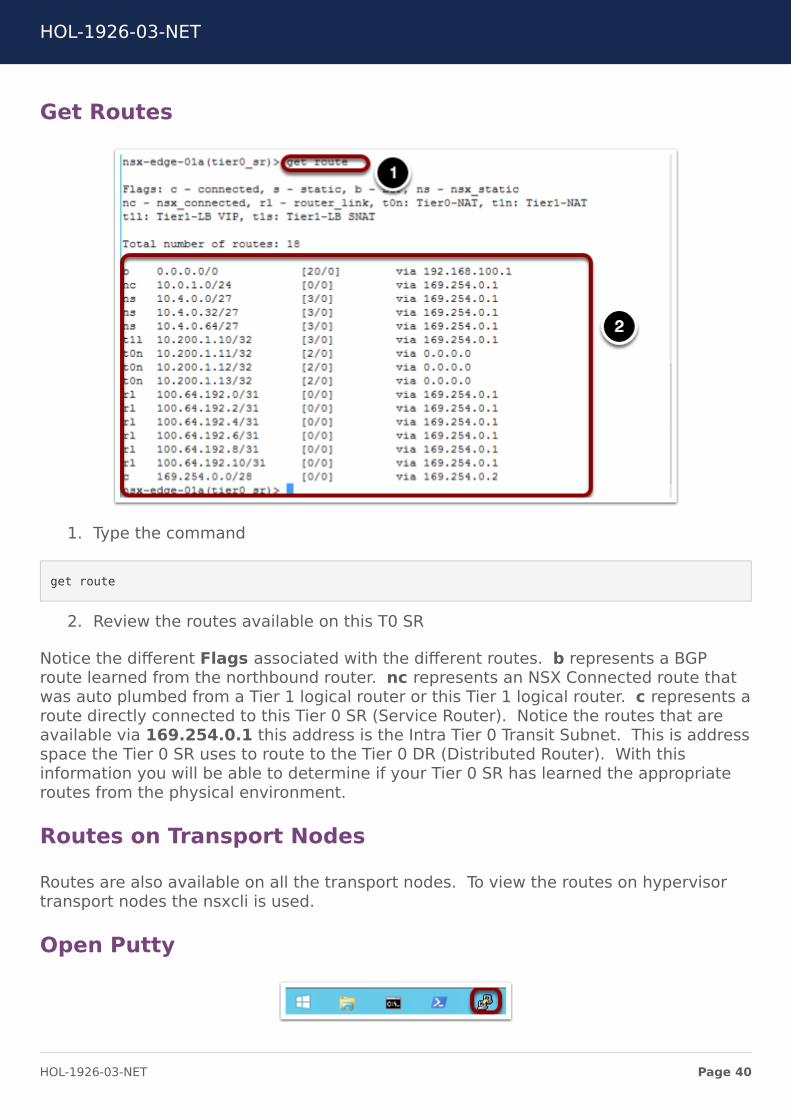
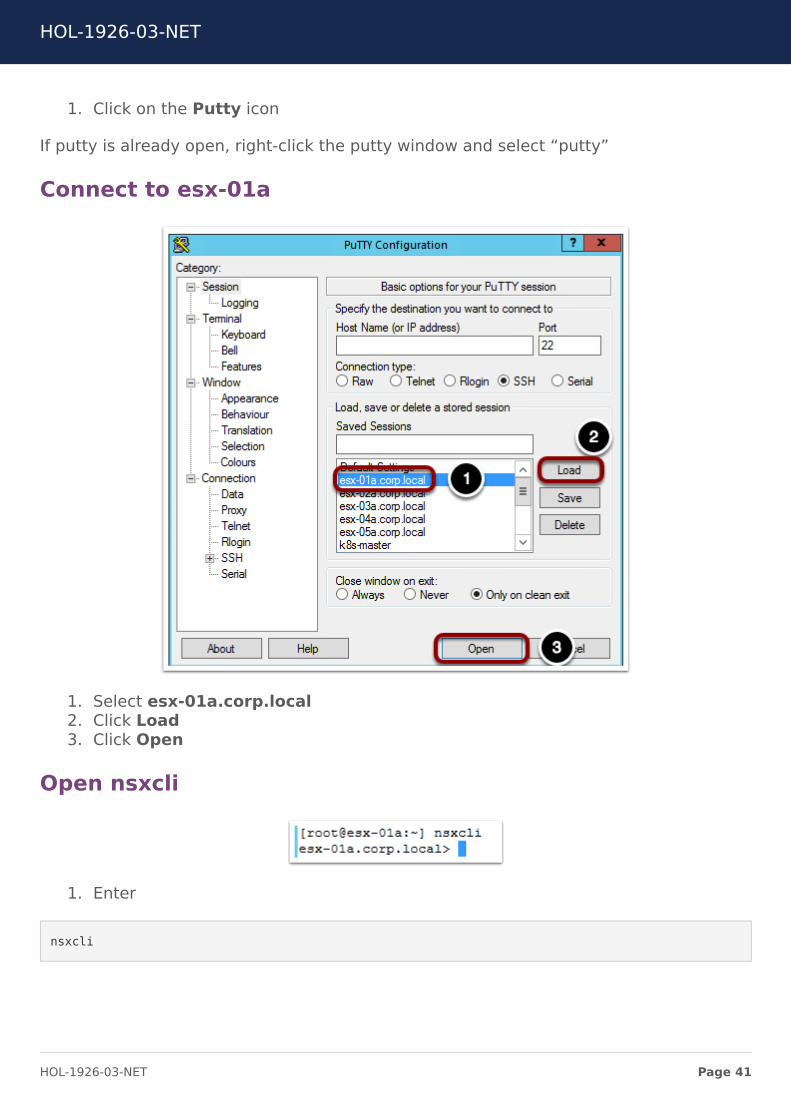
1 Click on the Putty icon
If putty is already open right-click the putty window and select ldquoputtyrdquo
Connect to esx-01a
1 Select esx-01acorplocal2 Click Load3 Click Open
Open nsxcli
1 Enter
nsxcli
HOL-1926-03-NET
Page 41HOL-1926-03-NET
View Logical Routers
1 Enter
get logical-routers
Review the output from the command Notice the number of LIFs and Routes associatedwith each logical router The VDR UUID listed can be matched to the ID of the logicalrouters in the NSX-T Datacenter GUI
View Logical Router Forwarding Detail
1 Enter
get logical-router af7bf4c8-aa81-4363-90dc-c68d20f13e2a forwarding
HOL-1926-03-NET
Page 42HOL-1926-03-NET
The UUID af7bf4c8-aa81-4363-90dc-c68d20f13e2a matches the ID of the Tier 0router The output of the command lists all routes available for the Tier 0 router on theesx-01a transport node By reviewing the output of the Edge Node and Transport Nodeforwarding tables administrators can quickly identify where routing problems may beoccurring To copy the command to the putty session high light the command in themanual and drag and drop it to the putty window
HOL-1926-03-NET
Page 43HOL-1926-03-NET
MAC Address TablesMany common troubleshooting techniques involve verifying that the network devicesare learning the appropriate MAC addresses from devices connected to them In thislesson students will learn the various methods to view the MAC Address Tables on thedifferent components of NSX-T Datacenter
Open Chrome Browser from Windows Quick Launch TaskBar
1 Click on the Chrome Icon on the Windows Quick Launch Task Bar
Navigate to NSX-T Manager
1 Click on the VMware NSX | Login bookmark
HOL-1926-03-NET
Page 44HOL-1926-03-NET
Login to NSX-T Manager
Login to NSX Manager
1 Enter the username admin2 Enter the password VMware13 Click Login
HOL-1926-03-NET
Page 45HOL-1926-03-NET
Download MAC-VTEP Table
1 Click Switching2 Ensure the Switches tab is selected3 Select the LS-DB Logical Switch4 Change to the Monitor tab5 Click DOWNLOAD MAC-VTEP TABLE
Download the Central Control Plane Table
1 Ensure Central Control Plane is selected2 Click Download
HOL-1926-03-NET
Page 46HOL-1926-03-NET
Administrators may want to view individual transport node MAC Tables as well This canbe achieved using the Transport Node selection and choosing the appropriate transportnode
Save the File
1 Click Save
Open the File
1 Click filecsv
Select WordPad
1 Click WordPad
HOL-1926-03-NET
Page 47HOL-1926-03-NET
Review The Results
The contents of this file include all of the MAC addresses the current VTEP that the MACaddress lives behind and the MAC address of the VTEP With these three pieces ofinformation the controllers can distribute the switching information to all transportnodes participating in the LS-DB logical switch to ensure layer 2 reachability of all VMsattached to a LIF on the LS-DB logical switch
Close WordPad
Once you have completed reviewing the table close WordPad
Download VTEP Table
1 Click DOWNLOAD VTEP TABLE
Complete the previous steps to download the Central Control Plane Table and open thefile The browser zoom may need to be adjusted to view the link If it is not visiblecomplete the next step and then complete this step Otherwise skip the next step
HOL-1926-03-NET
Page 48HOL-1926-03-NET
Change Browser Zoom
1 Click the Chrome Settings button2 Click the Zoom Out button
Repeat as necessary to view the DOWNLOAD VTEP TABLE link Once the table hasbeen downloaded the zoom may be reset to 100
Save the File
1 Click Save
The filename may be file(1)csv
Open the File
HOL-1926-03-NET
Page 49HOL-1926-03-NET
1 Click filecsv
The filename may be file(1)csv
Review the Results
The contents of the VTEP Table include all information about the VTEPs participating inthe LS-DB logical switch This includes the VTEP Label IP MAC Address and SegmentID This information is used during replication to ensure the delivery of all BUM(broadcast unknown unicast and multicast) traffic
Close WordPad
Once you have completed reviewing the table close WordPad
MAC Tables on Transport Nodes
MAC Address Tables are also available on all the transport nodes To view the MACAddress Tables on hypervisor transport nodes the nsxcli is used
Open Putty
1 Click on the Putty icon
If putty is already open right-click the putty window and select ldquoputtyrdquo
HOL-1926-03-NET
Page 50HOL-1926-03-NET
Connect to esx-01a
1 Select esx-01acorplocal2 Click Open
Open nsxcli
1 Enter
nsxcli
HOL-1926-03-NET
Page 51HOL-1926-03-NET
View Logical Switches
1 Enter
get logical-switches
This command will list all logical switches configured on the transport node
HOL-1926-03-NET
Page 52HOL-1926-03-NET
View the MAC Table
1 Enter
get logical-switch 262dbb9b-5412-4e60-8ace-1c8b18a06715 mac-table
The ID 262dbb9b-5412-4e60-8ace-1c8b18a06715 corresponds to the ID of the LS-WEBlogical switch Review the results With this table administrators can view the differentMAC Tables on the transport node The LCP Local Entry table lists the VMs MAC Addressconnected to this transport node on the LS-WEB logical switch The LCP Remote Entryrepresents the MAC Address of a VM on another transport node connected to the LS-WEB logical switch The Inner MAC represents the VMs MAC address while the OuterMAC and Outer IP represent the Transport Nodes MAC and IP Addresses The HostKernel Entry shows the distributed router ports connected to the Logical Switch
HOL-1926-03-NET
Page 53HOL-1926-03-NET
ARP Tables
1 Enter
get logical-switch 262dbb9b-5412-4e60-8ace-1c8b18a06715 arp-table
The ARP table of the transport node is also available via nsxcli The ARP table shows theIP to MAC address mapping on the transport node The entries in these tables willcorrespond to the output of the mac-tables Here administrators can view the inner IPsand MAC addresses You can copy the command to the lab by highlighting thecommand in the manual and dragging and dropping it to the putty session
HOL-1926-03-NET
Page 54HOL-1926-03-NET
Port MirroringPort mirroring is a very useful tool to allow for packet capture of a single or multipleports on a switch This allows for packet level debugging of applications and networks
Navigate to Port Mirroring
1 Expand the Tools section2 Select Port Mirroring Sessions3 Click ADD4 Click Local SPAN
HOL-1926-03-NET
Page 55HOL-1926-03-NET
Create a New Session
1 Name the session WEB-01a2 Select the ESX-TN01 Transport Node3 Select Bidirectional4 Click NEXT
HOL-1926-03-NET
Page 56HOL-1926-03-NET
Skip Source PNIC Selection
1 Click NEXT
Administrators may mirror physical NICs as well as virtual NICs In this lab only virtualNICs will be mirrored
HOL-1926-03-NET
Page 57HOL-1926-03-NET
Select Source VM
1 Select web-01a2 Click the gt button3 Click SHOW VIRTUAL INTERFACE (VNIC)
HOL-1926-03-NET
Page 58HOL-1926-03-NET
Select Interface
1 Scroll Down2 Select the only interface3 Click gt to select the interface4 Click NEXT
HOL-1926-03-NET
Page 59HOL-1926-03-NET
Select Destination VM
1 Scroll to the top2 Select k8s-node13 Click gt to select the VM4 Click SHOW VIRTUAL INTERFACE (VNIC)
HOL-1926-03-NET
Page 60HOL-1926-03-NET
Select Interface
1 Scroll to the bottom2 Select the last interface3 Click gt to select the interface4 Click SAVE
Open Putty
1 Click on the Putty icon
If putty is already open right-click the putty window and select ldquoputtyrdquo
HOL-1926-03-NET
Page 61HOL-1926-03-NET
Connect to k8s-node1
1 Select k8s-node12 Click Open
Start TCPDump
HOL-1926-03-NET
Page 62HOL-1926-03-NET
1 Enter the command
tcpdump -vvni ens192 icmp
This command starts tcpdump on the interface selected in the Port Mirroring sessionfiltering on icmp
Open an New Chrome Tab
1 Click the New Tab button
Load the vSphere Web Client
1 Click RegionA2 Click HTML5 Client
Login to the vSphere Web Client
1 Select the Use Windows session authentication checkbox2 Click Login
HOL-1926-03-NET
Page 63HOL-1926-03-NET
Open web-01a Remote Console
1 Select web-01a2 Click Launch Remote Console
Open the Console
1 Click Open VMware Remote Console
Login to web-01a
1 Enter the username
HOL-1926-03-NET
Page 64HOL-1926-03-NET
root
2 Enter the password
VMware1
Start a ping
1 Enter the command
ping 172161012
2 Press Ctrl+Alt to release your cursor
Return to the k8s-node1 session
1 Click the rootk8s-node1 putty session
HOL-1926-03-NET
Page 65HOL-1926-03-NET
Review the Output
Review the output of the tcpdump command The traffic displayed is from the monitorsession configured earlier notice there is no traffic sourced or destined for the k8s-node1 VM Only mirrored traffic is shown
HOL-1926-03-NET
Page 66HOL-1926-03-NET
Module 2 - ConclusionThis now completes Module 2 on NSX-T Datacenter Troubleshooting In this module youreviewed common troubleshooting tools and activities within NSX-T Datacenter Youused these tools to gain an understanding of what to do when troubleshooting adataplane issue within NSX-T Datacenter system
The activities reviewed in the module were
bull Routing Tablesbull MAC VTEP and ARP Tablesbull Port Mirroring
Youve finished Module 2
Congratulations on completing Module 2
If you are looking for additional information on NSX-T Datacenter Troubleshooting thenplease review the NSX-T Documentation Center via the URL below
bull Go to httpstinyurlcomyc6q794n
Proceed to any module below which interests you the most
Lab Module List
bull Module 1 - NSX-T Datacenter Operations - Use Tools within NSX-T Datacenter forDay to Day Operations (15 minutes) - Intermediate - This module will walk youthrough the basics of NSX-T Datacenter operations You will use features such asTraceflow Port Connection tool and others
bull Module 2 - NSX-T Datacenter Troubleshooting - Use Tools within NSX-T Datacenterfor Troubleshooting (15 minutes)- Intermediate - This module will walk youthrough the basics of NSX-T Datacenter troubleshooting You will view varioussystem configurations and correct misconfigurations after problem identification
bull Module 3 - API Consumption - Gain Familiarity with the NSX-T API (30 minutes) -Advanced - This module will explore the basics of NSX API consumption throughmanual interaction as well as several common configuration management tools
Lab Captain
bull Module 1 - 3 Kenyon Hensler Staff Systems Engineer United States
HOL-1926-03-NET
Page 67HOL-1926-03-NET
How to End Lab
To end your lab click on the END button
HOL-1926-03-NET
Page 68HOL-1926-03-NET
Module 3 - APIConsumption - Gain
Familiarity with the NSX-TAPI (30 minutes)
HOL-1926-03-NET
Page 69HOL-1926-03-NET
NSX RESTful APINSX is designed ground up with a RESTful API The NSX REST API can be used to bothconfigure NSX and to provision NSX logical network services The NSX REST API can becalled directly or indirectly from various programming languages Many orchestrationand automation tools such as vRealize Automation via vRealize Orchestrator can call theNSX REST API to perform Layer 2 through Layer 7 network orchestration andautomation
To demonstrate NSX RESTful API calls you will be using the RESTClient extension to theMozilla Firefox browser RESTClient is a debugger for RESTful Web Services and is auseful tool when working with various REST APIs
During this module the following tasks will be completed
bull Overview of RESTful APIsbull Overview of Powershell cmdletsbull Review of multiple NSX API callsbull Creation and deletion of NSX Objectsbull Configuration of alarming available only via the NSX API
Introduction to REST APIs
A REpresentational State Transfer (REST) API defines a set of simple principles which areloosely followed by most API implementations
HOL-1926-03-NET
Page 70HOL-1926-03-NET
bull Resource (the source of specific information)bull Global Permanent Identifier (every resource is uniquely identified ndash think HTTP
URL)bull Standard Interface (used to exchange the representation of resources ndash think
the HTTP protocol)bull Set of Constraints
REST leverages the strength of HTTP to send data (Headers and Bodies) between Clientsand Servers
The term Uniform Resource Locator (URL) and Uniform Resource Identifier (URI) can beused interchangeably when working with REST
Resources (building blocks) are linked together by embedded hyperlinks in HTMLdocuments or URI references and resources can expose the state via representationscontaining both metadata (such as size media type or character set) and content(binary image or text document)
REST Request Methods
REST Clients specify the desired interaction (HTTP request message as defined by RFC2616) Each HTTP method has specific well-defined semantics within the context of aREST APIrsquos resource model
bull GET - (The purpose of GET is to retrieve a representation of a resourcersquos state)including Response Headers and Body
bull HEAD - is used to retrieve the metadata associated with the resourcersquos state orjust the Response Headers
bull PUT - should be used to add a new resource to a store or update a resourcebull DELETE - removes a resource from its parentbull POST - should be used to create a new resource
HOL-1926-03-NET
Page 71HOL-1926-03-NET
REST Response Status Codes
The REST APIs use a HTTP response message to inform clients of their requestrsquos result(as defined in RFC 2616) Five categories are defined
bull 1xx Informational Communicates transfer protocol-level informationbull 2xx Success Indicates that the clientrsquos request was accepted successfulbull 3xx Redirection Indicates that the client must take some additional action in
order to complete their requestbull 4xx Client Error This category of error status codes points the finger at clientsbull 5xx Server Error The server takes responsibility for these error status codes
HTTP response message to inform clients of their requestrsquos result (As Defined in RFC2616)
bull 200 OKbull 201 Createdbull 202 Acceptedbull 204 No contentbull 400 Bad requestbull 401 Unauthorizedbull 403 Forbiddenbull 404 Not foundbull 405 Method Not Allowedbull 409 Conflictbull 500 Internal Server Errorbull 501 Not implementedbull 503 Service unavailable
HTTP Request Headers for the NSX RESTful API
When configuring RESTful APIs to provision NSX services the following are a list of theimportant request headers
1 Authorization The user and password credential in Base64 encoded format
HOL-1926-03-NET
Page 72HOL-1926-03-NET
2 Content-Type applicationxml Says that the request bodypayload is in xmlformat
HTTP Requests for the NSX RESTful API
1 MethodVerb GETPUTPOSTDELETE Action on the resource2 URL Resource3 Headers Authorization and Content-Type4 Body XML Payload5 Status Code 2xx For Success and 4xx and 5xx for Failures
OpenAPI Specification
The NSX-T Datacenter OpenAPI Specification is available from NSX-T Manager at
bull GET httpsltnsx-mgrgtapiv1specopenapinsx_apiyamlbull GET httpsltnsx-mgrgtapiv1specopenapinsx_apijson
HOL-1926-03-NET
Page 73HOL-1926-03-NET
This specification allows API users to quickly consume all methods available from NSX-TDatacenter This documentation is generated for every NSX-T Datacenter release
HOL-1926-03-NET
Page 74HOL-1926-03-NET
Manual ConsumptionOne of the methods to consume the NSX-T Datacenter API is through manuallyinteracting with the API This can be done with many different tools This lesson willexplore the use of Postman and cURL
Open Postman
1 Click the Windows Button2 Type Postman3 Click Postman
HOL-1926-03-NET
Page 75HOL-1926-03-NET
Close the Create a New Dialog
1 Click X
Create an Authorization Header
An authorization header will authenticate the session with the NSX-T Datacenter API
1 Switch the Type to Basic Auth2 The Username and Password will be automatically populated3 Click Update Request
Enter the URI to GET All Logical Switches
1 Ensure the method is set to GET2 Enter
httpsnsxmgr-01aapiv1logical-switches
3 Click Send
HOL-1926-03-NET
Page 76HOL-1926-03-NET
Review the Output
By reviewing the output of the request administrators can inspect all Logical Switchescreated This information includes all of the required information associated with thisLogical Switch This information can also be used as a template to create a LogicalSwitch By reviewing the required components of a Logical Switch creation in the APIGuide these values can be completed with the values of a Logical switch that meets thesame requirement as the new Logical Switch
Generate a cURL Command
Postman will generate code for many languages from your request This allows for easyscripting of API requests
1 Click Code2 Select cURL on the drop down3 Click Copy to Clipboard
HOL-1926-03-NET
Page 77HOL-1926-03-NET
Open Putty
1 Click on the Putty icon
If putty is already open right-click the putty window and select ldquoputtyrdquo
Open a Connection to api-01a
1 Enter 1921681101042 Click Open
Login to api-01a
Login using the username
HOL-1926-03-NET
Page 78HOL-1926-03-NET
admin
Password
VMware1
Execute the cURL Command
1 Paste the cURL command by right clicking in the Putty window2 Append the command with
ltSPACEgt -k
3 Be sure to include the space before -k This option ignores invalid certificates4 Execute the command
HOL-1926-03-NET
Page 79HOL-1926-03-NET
Review the Output
1 Scroll to the top of the Putty session2 Review the output This output will match the output from Postman
cURL can be used for all API functions and may be used in conjunction with othercommand line tools such as grep sed and awk to build complex create update anddestroy functions
HOL-1926-03-NET
Page 80HOL-1926-03-NET
Terraform ConsumptionTerraform is a tool that allows for the creation of sharable configuration files that createand change infrastructure Terraform has released an NSX-T Datacenter Module thatallows for the configuration of NSX-T Datacenter objects
Open Putty
If a putty session to api-01a is already open skip the step labeled Open thelogicalswitchtf File
1 Click on the Putty icon
If putty is already open right-click the putty window and select ldquoputtyrdquo
Open a Connection to api-01a
HOL-1926-03-NET
Page 81HOL-1926-03-NET
1 Select api-01acorplocal2 Click Load3 Click Open
Login to api-01a
Login using the username
admin
Password
VMware1
Open the logicalswitchtf File
1 Switch to the api1 directory
cd api1
2 Open the logicalswitchtf file
vi logicalswitchtf
HOL-1926-03-NET
Page 82HOL-1926-03-NET
Review the File
Review the file by using the arrow keys to move to the top and bottom of the fileNotice the resource section This section will create a NSX-T Datacenter Logical SwitchOnce you have completed reviewing the file exit the vi editor
1 Type
q
HOL-1926-03-NET
Page 83HOL-1926-03-NET
Verify the logicalswitchtf File
1 Enter the command
terraform plan
This command will verify the required data and plugins for terraform to complete theaction
HOL-1926-03-NET
Page 84HOL-1926-03-NET
Apply the logicalswitchtf File
1 Enter the command
terraform apply
2 Type
yes
HOL-1926-03-NET
Page 85HOL-1926-03-NET
Review the Output
The output of the command shows the Logical Switch TfLogicalSwitch was created
Open Chrome Browser from Windows Quick Launch TaskBar
1 Click on the Chrome Icon on the Windows Quick Launch Task Bar
Navigate to NSX-T Manager
1 Click on the VMware NSX | Login bookmark
HOL-1926-03-NET
Page 86HOL-1926-03-NET
Login to NSX-T Manager
Login to NSX Manager
1 Enter the username admin2 Enter the password VMware13 Click Login
HOL-1926-03-NET
Page 87HOL-1926-03-NET
View the Logical Switch
1 Click Switching2 Select the Switches tab3 Notice the Logical Switch TfLogicalSwitch
If the Logical Switch is not visibile refresh the page
Delete the Logical Switch
Delete the Logical Switch to avoid confusion in the next part of the lesson
HOL-1926-03-NET
Page 88HOL-1926-03-NET
1 Select the TfLogicalSwitch2 Click Delete3 Click Delete
Return to the Putty Session
1 Click the Putty Session
Open the infratf File
1 Switch to the api2 directory
cd api2
2 Enter the command
vi infratf
HOL-1926-03-NET
Page 89HOL-1926-03-NET
Review the File
Review the file by using the arrow keys to move to the top and bottom of the fileNotice the many resource sections This file will create a Tier 1 router connect the Tier
1 router to the Tier 0 router create a Logical Switch attach the Tier 1 router to thelogical switch and assign an IP address to the Tier 1 interface on the logical switchThis is a common action for tenant creation in an environment Once you have
completed reviewing the file exit the vi editor
1 Type
q
HOL-1926-03-NET
Page 90HOL-1926-03-NET
Verify the infratf File
1 Enter the command
terraform plan
Apply the infratf File
1 Enter the command
HOL-1926-03-NET
Page 91HOL-1926-03-NET
terraform apply
Confirm the Apply
1 Type
yes
Review the Output
Review the output of the command Many actions were preformed Scroll up to viewthe complete output
Return to NSX Manager
Return to NSX Manager to review the configuration
1 Click VMware NSX Chrome window
HOL-1926-03-NET
Page 92HOL-1926-03-NET
Login to NSX-T Manager
If the session has timed out login to NSX Manager If the session is still active skip thisstep
1 Enter the username admin2 Enter the password VMware13 Click Login
HOL-1926-03-NET
Page 93HOL-1926-03-NET
Refresh Switches
1 Click REFRESH2 Notice the TfLogicalSwitch2 Switch
HOL-1926-03-NET
Page 94HOL-1926-03-NET
Review Tier 1 Router
1 Click Routing2 Select the T1-Terraform Logical Router
Review the Summary
3 Click Configuration4 Click Router Ports
HOL-1926-03-NET
Page 95HOL-1926-03-NET
Review the IP Address Assignments
The IP address 17216401 was specified in the infratf file as a variable The nextaddress may vary by lab This address is automatically configured from a pool ofaddresses for use in connecting Tier 0 routers to Tier 1 routers
Return to the Putty Session
1 Click the Putty Session
Ping the Router Address
1 Enter
ping 17216401 -c 3
The ping should be successful This IP address is being advertised from the newlycreated Tier 1 router through the Tier 0 router to the vPOD router via BGP
HOL-1926-03-NET
Page 96HOL-1926-03-NET
Remove the configuration
Terraform will also remove previously created configurations
1 Enter the command
terraform destroy
2 Confirm the removal
yes
HOL-1926-03-NET
Page 97HOL-1926-03-NET
Review the Output
The command successfully removed the configuration This is a common action in theremoval of an application or tenant from an infrastructure as code environment
HOL-1926-03-NET
Page 98HOL-1926-03-NET
Module 3 ConclusionThis module utilized the NSX API to configure multiple NSX objects The NSX APIprovides a powerful tool for configuration troubleshooting and monitoring
Youve finished Module 3
Congratulations on completing Module 3
For additional information on the NSX API visit the URL below and select the NSX APIGuide
bull Go to httpstinyurlcomyc6q794n
Proceed to any module below or end the lab
Lab Module List
bull Module 1 - NSX-T Datacenter Operations - Use Tools within NSX-TDatacenter for Day to Day Operations (15 minutes) - Intermediate - Thismodule will walk you through the basics of NSX-T Datacenter operations You willuse features such as Traceflow Port Connection tool and others
bull Module 2 - NSX-T Datacenter Troubleshooting - Use Tools within NSX-TDatacenter for Troubleshooting (15 minutes) - Intermediate - This modulewill walk you through the basics of NSX-T Datacenter troubleshooting You willview various system configurations and correct misconfigurations after problemidentification
bull Module 3 - API Consumption - Gain Familiarity with the NSX-T API (30minutes) - Advanced - This module will explore the basics of NSX APIconsumption through manual interaction as well as several commonconfiguration management tools
Lab Captain
bull Module 1 - 3 Kenyon Hensler Staff Systems Engineer United States
How to End Lab
To end the lab click on the END button
HOL-1926-03-NET
Page 99HOL-1926-03-NET
ConclusionThank you for participating in the VMware Hands-on Labs Be sure to visithttpholvmwarecom to continue your lab experience online
Lab SKU HOL-1926-03-NET
Version 20181104-143822
HOL-1926-03-NET
Page 100HOL-1926-03-NET
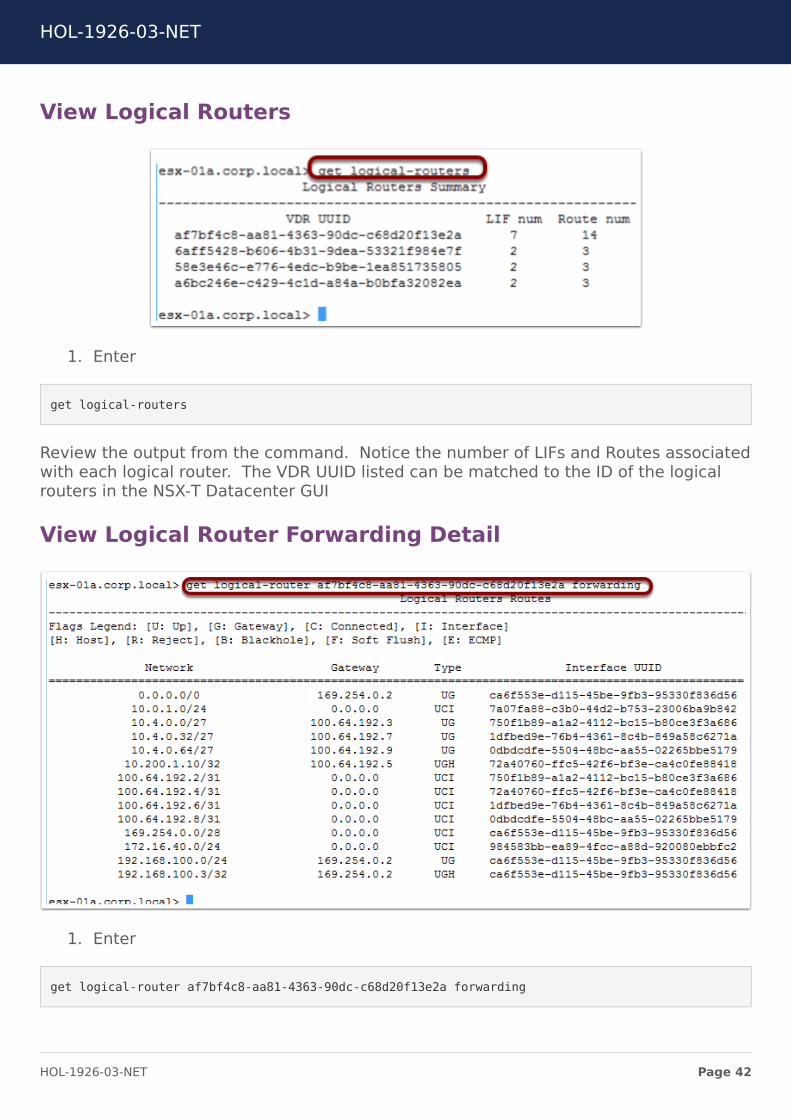
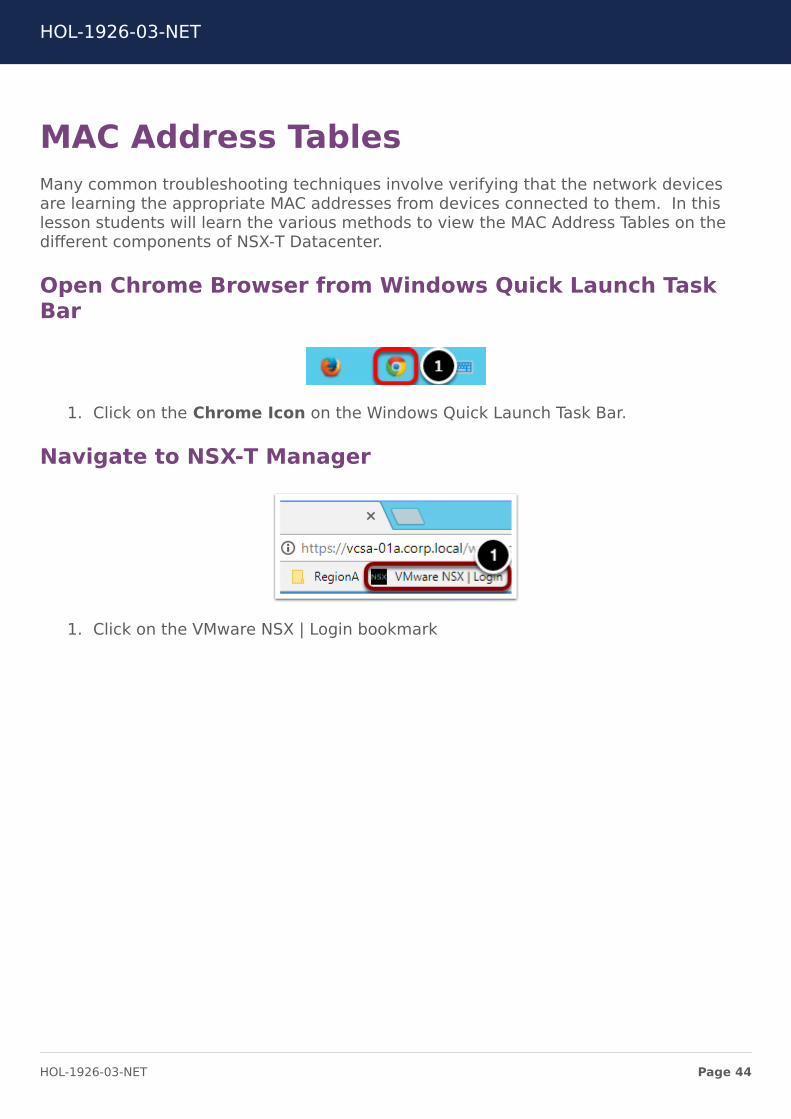
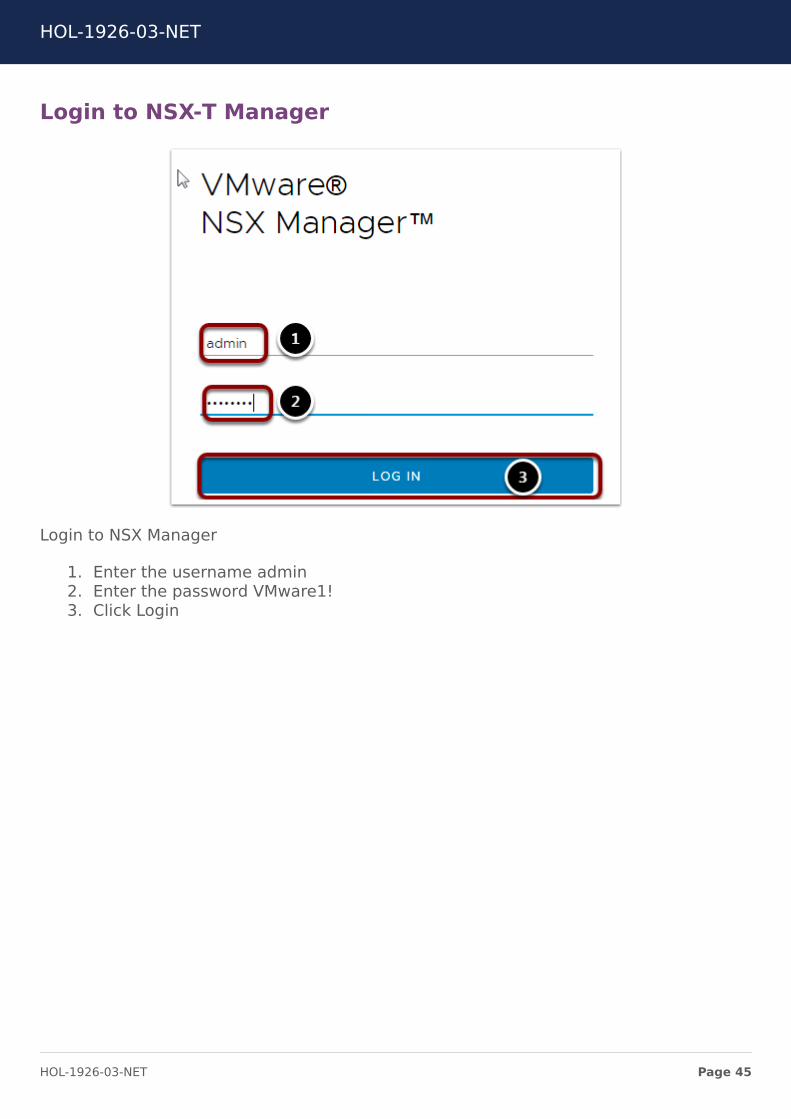
Login to NSX-T Manager
Login to NSX Manager
1 Enter the username admin2 Enter the password VMware13 Click Login
HOL-1926-03-NET
Page 45HOL-1926-03-NET
Download MAC-VTEP Table
1 Click Switching2 Ensure the Switches tab is selected3 Select the LS-DB Logical Switch4 Change to the Monitor tab5 Click DOWNLOAD MAC-VTEP TABLE
Download the Central Control Plane Table
1 Ensure Central Control Plane is selected2 Click Download
HOL-1926-03-NET
Page 46HOL-1926-03-NET
Administrators may want to view individual transport node MAC Tables as well This canbe achieved using the Transport Node selection and choosing the appropriate transportnode
Save the File
1 Click Save
Open the File
1 Click filecsv
Select WordPad
1 Click WordPad
HOL-1926-03-NET
Page 47HOL-1926-03-NET
Review The Results
The contents of this file include all of the MAC addresses the current VTEP that the MACaddress lives behind and the MAC address of the VTEP With these three pieces ofinformation the controllers can distribute the switching information to all transportnodes participating in the LS-DB logical switch to ensure layer 2 reachability of all VMsattached to a LIF on the LS-DB logical switch
Close WordPad
Once you have completed reviewing the table close WordPad
Download VTEP Table
1 Click DOWNLOAD VTEP TABLE
Complete the previous steps to download the Central Control Plane Table and open thefile The browser zoom may need to be adjusted to view the link If it is not visiblecomplete the next step and then complete this step Otherwise skip the next step
HOL-1926-03-NET
Page 48HOL-1926-03-NET
Change Browser Zoom
1 Click the Chrome Settings button2 Click the Zoom Out button
Repeat as necessary to view the DOWNLOAD VTEP TABLE link Once the table hasbeen downloaded the zoom may be reset to 100
Save the File
1 Click Save
The filename may be file(1)csv
Open the File
HOL-1926-03-NET
Page 49HOL-1926-03-NET
1 Click filecsv
The filename may be file(1)csv
Review the Results
The contents of the VTEP Table include all information about the VTEPs participating inthe LS-DB logical switch This includes the VTEP Label IP MAC Address and SegmentID This information is used during replication to ensure the delivery of all BUM(broadcast unknown unicast and multicast) traffic
Close WordPad
Once you have completed reviewing the table close WordPad
MAC Tables on Transport Nodes
MAC Address Tables are also available on all the transport nodes To view the MACAddress Tables on hypervisor transport nodes the nsxcli is used
Open Putty
1 Click on the Putty icon
If putty is already open right-click the putty window and select ldquoputtyrdquo
HOL-1926-03-NET
Page 50HOL-1926-03-NET
Connect to esx-01a
1 Select esx-01acorplocal2 Click Open
Open nsxcli
1 Enter
nsxcli
HOL-1926-03-NET
Page 51HOL-1926-03-NET
View Logical Switches
1 Enter
get logical-switches
This command will list all logical switches configured on the transport node
HOL-1926-03-NET
Page 52HOL-1926-03-NET
View the MAC Table
1 Enter
get logical-switch 262dbb9b-5412-4e60-8ace-1c8b18a06715 mac-table
The ID 262dbb9b-5412-4e60-8ace-1c8b18a06715 corresponds to the ID of the LS-WEBlogical switch Review the results With this table administrators can view the differentMAC Tables on the transport node The LCP Local Entry table lists the VMs MAC Addressconnected to this transport node on the LS-WEB logical switch The LCP Remote Entryrepresents the MAC Address of a VM on another transport node connected to the LS-WEB logical switch The Inner MAC represents the VMs MAC address while the OuterMAC and Outer IP represent the Transport Nodes MAC and IP Addresses The HostKernel Entry shows the distributed router ports connected to the Logical Switch
HOL-1926-03-NET
Page 53HOL-1926-03-NET
ARP Tables
1 Enter
get logical-switch 262dbb9b-5412-4e60-8ace-1c8b18a06715 arp-table
The ARP table of the transport node is also available via nsxcli The ARP table shows theIP to MAC address mapping on the transport node The entries in these tables willcorrespond to the output of the mac-tables Here administrators can view the inner IPsand MAC addresses You can copy the command to the lab by highlighting thecommand in the manual and dragging and dropping it to the putty session
HOL-1926-03-NET
Page 54HOL-1926-03-NET
Port MirroringPort mirroring is a very useful tool to allow for packet capture of a single or multipleports on a switch This allows for packet level debugging of applications and networks
Navigate to Port Mirroring
1 Expand the Tools section2 Select Port Mirroring Sessions3 Click ADD4 Click Local SPAN
HOL-1926-03-NET
Page 55HOL-1926-03-NET
Create a New Session
1 Name the session WEB-01a2 Select the ESX-TN01 Transport Node3 Select Bidirectional4 Click NEXT
HOL-1926-03-NET
Page 56HOL-1926-03-NET
Skip Source PNIC Selection
1 Click NEXT
Administrators may mirror physical NICs as well as virtual NICs In this lab only virtualNICs will be mirrored
HOL-1926-03-NET
Page 57HOL-1926-03-NET
Select Source VM
1 Select web-01a2 Click the gt button3 Click SHOW VIRTUAL INTERFACE (VNIC)
HOL-1926-03-NET
Page 58HOL-1926-03-NET
Select Interface
1 Scroll Down2 Select the only interface3 Click gt to select the interface4 Click NEXT
HOL-1926-03-NET
Page 59HOL-1926-03-NET
Select Destination VM
1 Scroll to the top2 Select k8s-node13 Click gt to select the VM4 Click SHOW VIRTUAL INTERFACE (VNIC)
HOL-1926-03-NET
Page 60HOL-1926-03-NET
Select Interface
1 Scroll to the bottom2 Select the last interface3 Click gt to select the interface4 Click SAVE
Open Putty
1 Click on the Putty icon
If putty is already open right-click the putty window and select ldquoputtyrdquo
HOL-1926-03-NET
Page 61HOL-1926-03-NET
Connect to k8s-node1
1 Select k8s-node12 Click Open
Start TCPDump
HOL-1926-03-NET
Page 62HOL-1926-03-NET
1 Enter the command
tcpdump -vvni ens192 icmp
This command starts tcpdump on the interface selected in the Port Mirroring sessionfiltering on icmp
Open an New Chrome Tab
1 Click the New Tab button
Load the vSphere Web Client
1 Click RegionA2 Click HTML5 Client
Login to the vSphere Web Client
1 Select the Use Windows session authentication checkbox2 Click Login
HOL-1926-03-NET
Page 63HOL-1926-03-NET
Open web-01a Remote Console
1 Select web-01a2 Click Launch Remote Console
Open the Console
1 Click Open VMware Remote Console
Login to web-01a
1 Enter the username
HOL-1926-03-NET
Page 64HOL-1926-03-NET
root
2 Enter the password
VMware1
Start a ping
1 Enter the command
ping 172161012
2 Press Ctrl+Alt to release your cursor
Return to the k8s-node1 session
1 Click the rootk8s-node1 putty session
HOL-1926-03-NET
Page 65HOL-1926-03-NET
Review the Output
Review the output of the tcpdump command The traffic displayed is from the monitorsession configured earlier notice there is no traffic sourced or destined for the k8s-node1 VM Only mirrored traffic is shown
HOL-1926-03-NET
Page 66HOL-1926-03-NET
Module 2 - ConclusionThis now completes Module 2 on NSX-T Datacenter Troubleshooting In this module youreviewed common troubleshooting tools and activities within NSX-T Datacenter Youused these tools to gain an understanding of what to do when troubleshooting adataplane issue within NSX-T Datacenter system
The activities reviewed in the module were
bull Routing Tablesbull MAC VTEP and ARP Tablesbull Port Mirroring
Youve finished Module 2
Congratulations on completing Module 2
If you are looking for additional information on NSX-T Datacenter Troubleshooting thenplease review the NSX-T Documentation Center via the URL below
bull Go to httpstinyurlcomyc6q794n
Proceed to any module below which interests you the most
Lab Module List
bull Module 1 - NSX-T Datacenter Operations - Use Tools within NSX-T Datacenter forDay to Day Operations (15 minutes) - Intermediate - This module will walk youthrough the basics of NSX-T Datacenter operations You will use features such asTraceflow Port Connection tool and others
bull Module 2 - NSX-T Datacenter Troubleshooting - Use Tools within NSX-T Datacenterfor Troubleshooting (15 minutes)- Intermediate - This module will walk youthrough the basics of NSX-T Datacenter troubleshooting You will view varioussystem configurations and correct misconfigurations after problem identification
bull Module 3 - API Consumption - Gain Familiarity with the NSX-T API (30 minutes) -Advanced - This module will explore the basics of NSX API consumption throughmanual interaction as well as several common configuration management tools
Lab Captain
bull Module 1 - 3 Kenyon Hensler Staff Systems Engineer United States
HOL-1926-03-NET
Page 67HOL-1926-03-NET
How to End Lab
To end your lab click on the END button
HOL-1926-03-NET
Page 68HOL-1926-03-NET
Module 3 - APIConsumption - Gain
Familiarity with the NSX-TAPI (30 minutes)
HOL-1926-03-NET
Page 69HOL-1926-03-NET
NSX RESTful APINSX is designed ground up with a RESTful API The NSX REST API can be used to bothconfigure NSX and to provision NSX logical network services The NSX REST API can becalled directly or indirectly from various programming languages Many orchestrationand automation tools such as vRealize Automation via vRealize Orchestrator can call theNSX REST API to perform Layer 2 through Layer 7 network orchestration andautomation
To demonstrate NSX RESTful API calls you will be using the RESTClient extension to theMozilla Firefox browser RESTClient is a debugger for RESTful Web Services and is auseful tool when working with various REST APIs
During this module the following tasks will be completed
bull Overview of RESTful APIsbull Overview of Powershell cmdletsbull Review of multiple NSX API callsbull Creation and deletion of NSX Objectsbull Configuration of alarming available only via the NSX API
Introduction to REST APIs
A REpresentational State Transfer (REST) API defines a set of simple principles which areloosely followed by most API implementations
HOL-1926-03-NET
Page 70HOL-1926-03-NET
bull Resource (the source of specific information)bull Global Permanent Identifier (every resource is uniquely identified ndash think HTTP
URL)bull Standard Interface (used to exchange the representation of resources ndash think
the HTTP protocol)bull Set of Constraints
REST leverages the strength of HTTP to send data (Headers and Bodies) between Clientsand Servers
The term Uniform Resource Locator (URL) and Uniform Resource Identifier (URI) can beused interchangeably when working with REST
Resources (building blocks) are linked together by embedded hyperlinks in HTMLdocuments or URI references and resources can expose the state via representationscontaining both metadata (such as size media type or character set) and content(binary image or text document)
REST Request Methods
REST Clients specify the desired interaction (HTTP request message as defined by RFC2616) Each HTTP method has specific well-defined semantics within the context of aREST APIrsquos resource model
bull GET - (The purpose of GET is to retrieve a representation of a resourcersquos state)including Response Headers and Body
bull HEAD - is used to retrieve the metadata associated with the resourcersquos state orjust the Response Headers
bull PUT - should be used to add a new resource to a store or update a resourcebull DELETE - removes a resource from its parentbull POST - should be used to create a new resource
HOL-1926-03-NET
Page 71HOL-1926-03-NET
REST Response Status Codes
The REST APIs use a HTTP response message to inform clients of their requestrsquos result(as defined in RFC 2616) Five categories are defined
bull 1xx Informational Communicates transfer protocol-level informationbull 2xx Success Indicates that the clientrsquos request was accepted successfulbull 3xx Redirection Indicates that the client must take some additional action in
order to complete their requestbull 4xx Client Error This category of error status codes points the finger at clientsbull 5xx Server Error The server takes responsibility for these error status codes
HTTP response message to inform clients of their requestrsquos result (As Defined in RFC2616)
bull 200 OKbull 201 Createdbull 202 Acceptedbull 204 No contentbull 400 Bad requestbull 401 Unauthorizedbull 403 Forbiddenbull 404 Not foundbull 405 Method Not Allowedbull 409 Conflictbull 500 Internal Server Errorbull 501 Not implementedbull 503 Service unavailable
HTTP Request Headers for the NSX RESTful API
When configuring RESTful APIs to provision NSX services the following are a list of theimportant request headers
1 Authorization The user and password credential in Base64 encoded format
HOL-1926-03-NET
Page 72HOL-1926-03-NET
2 Content-Type applicationxml Says that the request bodypayload is in xmlformat
HTTP Requests for the NSX RESTful API
1 MethodVerb GETPUTPOSTDELETE Action on the resource2 URL Resource3 Headers Authorization and Content-Type4 Body XML Payload5 Status Code 2xx For Success and 4xx and 5xx for Failures
OpenAPI Specification
The NSX-T Datacenter OpenAPI Specification is available from NSX-T Manager at
bull GET httpsltnsx-mgrgtapiv1specopenapinsx_apiyamlbull GET httpsltnsx-mgrgtapiv1specopenapinsx_apijson
HOL-1926-03-NET
Page 73HOL-1926-03-NET
This specification allows API users to quickly consume all methods available from NSX-TDatacenter This documentation is generated for every NSX-T Datacenter release
HOL-1926-03-NET
Page 74HOL-1926-03-NET
Manual ConsumptionOne of the methods to consume the NSX-T Datacenter API is through manuallyinteracting with the API This can be done with many different tools This lesson willexplore the use of Postman and cURL
Open Postman
1 Click the Windows Button2 Type Postman3 Click Postman
HOL-1926-03-NET
Page 75HOL-1926-03-NET
Close the Create a New Dialog
1 Click X
Create an Authorization Header
An authorization header will authenticate the session with the NSX-T Datacenter API
1 Switch the Type to Basic Auth2 The Username and Password will be automatically populated3 Click Update Request
Enter the URI to GET All Logical Switches
1 Ensure the method is set to GET2 Enter
httpsnsxmgr-01aapiv1logical-switches
3 Click Send
HOL-1926-03-NET
Page 76HOL-1926-03-NET
Review the Output
By reviewing the output of the request administrators can inspect all Logical Switchescreated This information includes all of the required information associated with thisLogical Switch This information can also be used as a template to create a LogicalSwitch By reviewing the required components of a Logical Switch creation in the APIGuide these values can be completed with the values of a Logical switch that meets thesame requirement as the new Logical Switch
Generate a cURL Command
Postman will generate code for many languages from your request This allows for easyscripting of API requests
1 Click Code2 Select cURL on the drop down3 Click Copy to Clipboard
HOL-1926-03-NET
Page 77HOL-1926-03-NET
Open Putty
1 Click on the Putty icon
If putty is already open right-click the putty window and select ldquoputtyrdquo
Open a Connection to api-01a
1 Enter 1921681101042 Click Open
Login to api-01a
Login using the username
HOL-1926-03-NET
Page 78HOL-1926-03-NET
admin
Password
VMware1
Execute the cURL Command
1 Paste the cURL command by right clicking in the Putty window2 Append the command with
ltSPACEgt -k
3 Be sure to include the space before -k This option ignores invalid certificates4 Execute the command
HOL-1926-03-NET
Page 79HOL-1926-03-NET
Review the Output
1 Scroll to the top of the Putty session2 Review the output This output will match the output from Postman
cURL can be used for all API functions and may be used in conjunction with othercommand line tools such as grep sed and awk to build complex create update anddestroy functions
HOL-1926-03-NET
Page 80HOL-1926-03-NET
Terraform ConsumptionTerraform is a tool that allows for the creation of sharable configuration files that createand change infrastructure Terraform has released an NSX-T Datacenter Module thatallows for the configuration of NSX-T Datacenter objects
Open Putty
If a putty session to api-01a is already open skip the step labeled Open thelogicalswitchtf File
1 Click on the Putty icon
If putty is already open right-click the putty window and select ldquoputtyrdquo
Open a Connection to api-01a
HOL-1926-03-NET
Page 81HOL-1926-03-NET
1 Select api-01acorplocal2 Click Load3 Click Open
Login to api-01a
Login using the username
admin
Password
VMware1
Open the logicalswitchtf File
1 Switch to the api1 directory
cd api1
2 Open the logicalswitchtf file
vi logicalswitchtf
HOL-1926-03-NET
Page 82HOL-1926-03-NET
Review the File
Review the file by using the arrow keys to move to the top and bottom of the fileNotice the resource section This section will create a NSX-T Datacenter Logical SwitchOnce you have completed reviewing the file exit the vi editor
1 Type
q
HOL-1926-03-NET
Page 83HOL-1926-03-NET
Verify the logicalswitchtf File
1 Enter the command
terraform plan
This command will verify the required data and plugins for terraform to complete theaction
HOL-1926-03-NET
Page 84HOL-1926-03-NET
Apply the logicalswitchtf File
1 Enter the command
terraform apply
2 Type
yes
HOL-1926-03-NET
Page 85HOL-1926-03-NET
Review the Output
The output of the command shows the Logical Switch TfLogicalSwitch was created
Open Chrome Browser from Windows Quick Launch TaskBar
1 Click on the Chrome Icon on the Windows Quick Launch Task Bar
Navigate to NSX-T Manager
1 Click on the VMware NSX | Login bookmark
HOL-1926-03-NET
Page 86HOL-1926-03-NET
Login to NSX-T Manager
Login to NSX Manager
1 Enter the username admin2 Enter the password VMware13 Click Login
HOL-1926-03-NET
Page 87HOL-1926-03-NET
View the Logical Switch
1 Click Switching2 Select the Switches tab3 Notice the Logical Switch TfLogicalSwitch
If the Logical Switch is not visibile refresh the page
Delete the Logical Switch
Delete the Logical Switch to avoid confusion in the next part of the lesson
HOL-1926-03-NET
Page 88HOL-1926-03-NET
1 Select the TfLogicalSwitch2 Click Delete3 Click Delete
Return to the Putty Session
1 Click the Putty Session
Open the infratf File
1 Switch to the api2 directory
cd api2
2 Enter the command
vi infratf
HOL-1926-03-NET
Page 89HOL-1926-03-NET
Review the File
Review the file by using the arrow keys to move to the top and bottom of the fileNotice the many resource sections This file will create a Tier 1 router connect the Tier
1 router to the Tier 0 router create a Logical Switch attach the Tier 1 router to thelogical switch and assign an IP address to the Tier 1 interface on the logical switchThis is a common action for tenant creation in an environment Once you have
completed reviewing the file exit the vi editor
1 Type
q
HOL-1926-03-NET
Page 90HOL-1926-03-NET
Verify the infratf File
1 Enter the command
terraform plan
Apply the infratf File
1 Enter the command
HOL-1926-03-NET
Page 91HOL-1926-03-NET
terraform apply
Confirm the Apply
1 Type
yes
Review the Output
Review the output of the command Many actions were preformed Scroll up to viewthe complete output
Return to NSX Manager
Return to NSX Manager to review the configuration
1 Click VMware NSX Chrome window
HOL-1926-03-NET
Page 92HOL-1926-03-NET
Login to NSX-T Manager
If the session has timed out login to NSX Manager If the session is still active skip thisstep
1 Enter the username admin2 Enter the password VMware13 Click Login
HOL-1926-03-NET
Page 93HOL-1926-03-NET
Refresh Switches
1 Click REFRESH2 Notice the TfLogicalSwitch2 Switch
HOL-1926-03-NET
Page 94HOL-1926-03-NET
Review Tier 1 Router
1 Click Routing2 Select the T1-Terraform Logical Router
Review the Summary
3 Click Configuration4 Click Router Ports
HOL-1926-03-NET
Page 95HOL-1926-03-NET
Review the IP Address Assignments
The IP address 17216401 was specified in the infratf file as a variable The nextaddress may vary by lab This address is automatically configured from a pool ofaddresses for use in connecting Tier 0 routers to Tier 1 routers
Return to the Putty Session
1 Click the Putty Session
Ping the Router Address
1 Enter
ping 17216401 -c 3
The ping should be successful This IP address is being advertised from the newlycreated Tier 1 router through the Tier 0 router to the vPOD router via BGP
HOL-1926-03-NET
Page 96HOL-1926-03-NET
Remove the configuration
Terraform will also remove previously created configurations
1 Enter the command
terraform destroy
2 Confirm the removal
yes
HOL-1926-03-NET
Page 97HOL-1926-03-NET
Review the Output
The command successfully removed the configuration This is a common action in theremoval of an application or tenant from an infrastructure as code environment
HOL-1926-03-NET
Page 98HOL-1926-03-NET
Module 3 ConclusionThis module utilized the NSX API to configure multiple NSX objects The NSX APIprovides a powerful tool for configuration troubleshooting and monitoring
Youve finished Module 3
Congratulations on completing Module 3
For additional information on the NSX API visit the URL below and select the NSX APIGuide
bull Go to httpstinyurlcomyc6q794n
Proceed to any module below or end the lab
Lab Module List
bull Module 1 - NSX-T Datacenter Operations - Use Tools within NSX-TDatacenter for Day to Day Operations (15 minutes) - Intermediate - Thismodule will walk you through the basics of NSX-T Datacenter operations You willuse features such as Traceflow Port Connection tool and others
bull Module 2 - NSX-T Datacenter Troubleshooting - Use Tools within NSX-TDatacenter for Troubleshooting (15 minutes) - Intermediate - This modulewill walk you through the basics of NSX-T Datacenter troubleshooting You willview various system configurations and correct misconfigurations after problemidentification
bull Module 3 - API Consumption - Gain Familiarity with the NSX-T API (30minutes) - Advanced - This module will explore the basics of NSX APIconsumption through manual interaction as well as several commonconfiguration management tools
Lab Captain
bull Module 1 - 3 Kenyon Hensler Staff Systems Engineer United States
How to End Lab
To end the lab click on the END button
HOL-1926-03-NET
Page 99HOL-1926-03-NET
ConclusionThank you for participating in the VMware Hands-on Labs Be sure to visithttpholvmwarecom to continue your lab experience online
Lab SKU HOL-1926-03-NET
Version 20181104-143822
HOL-1926-03-NET
Page 100HOL-1926-03-NET
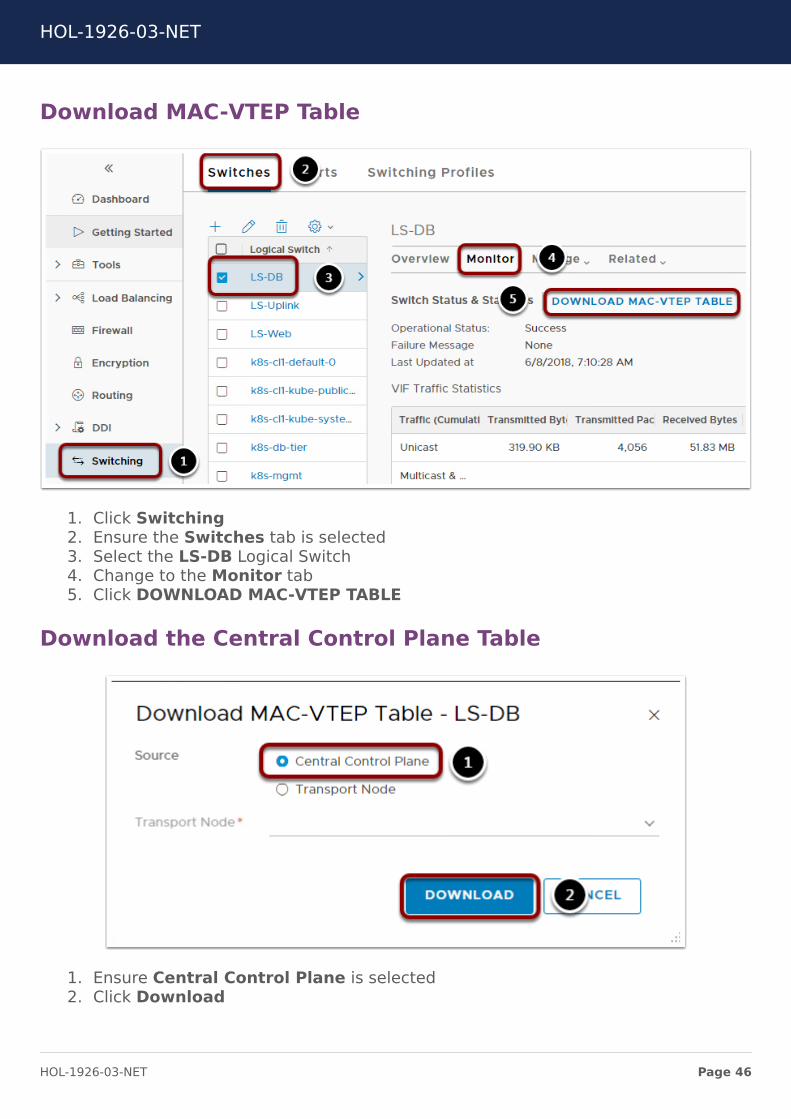
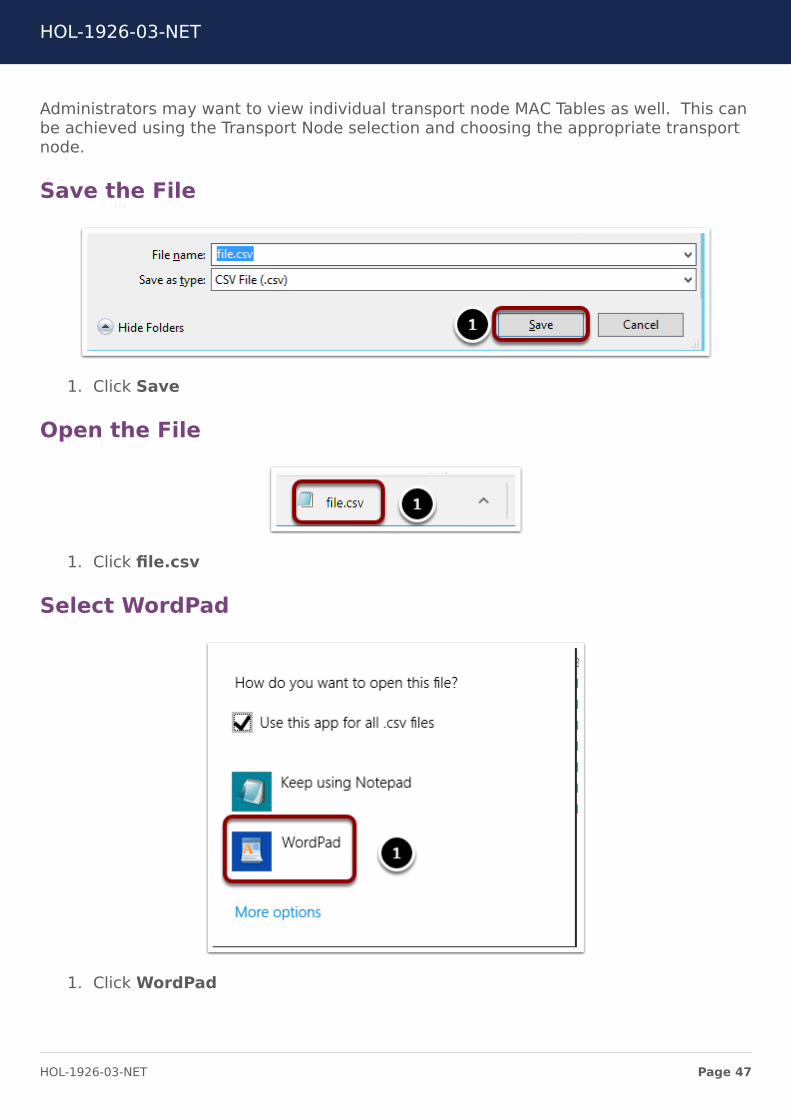
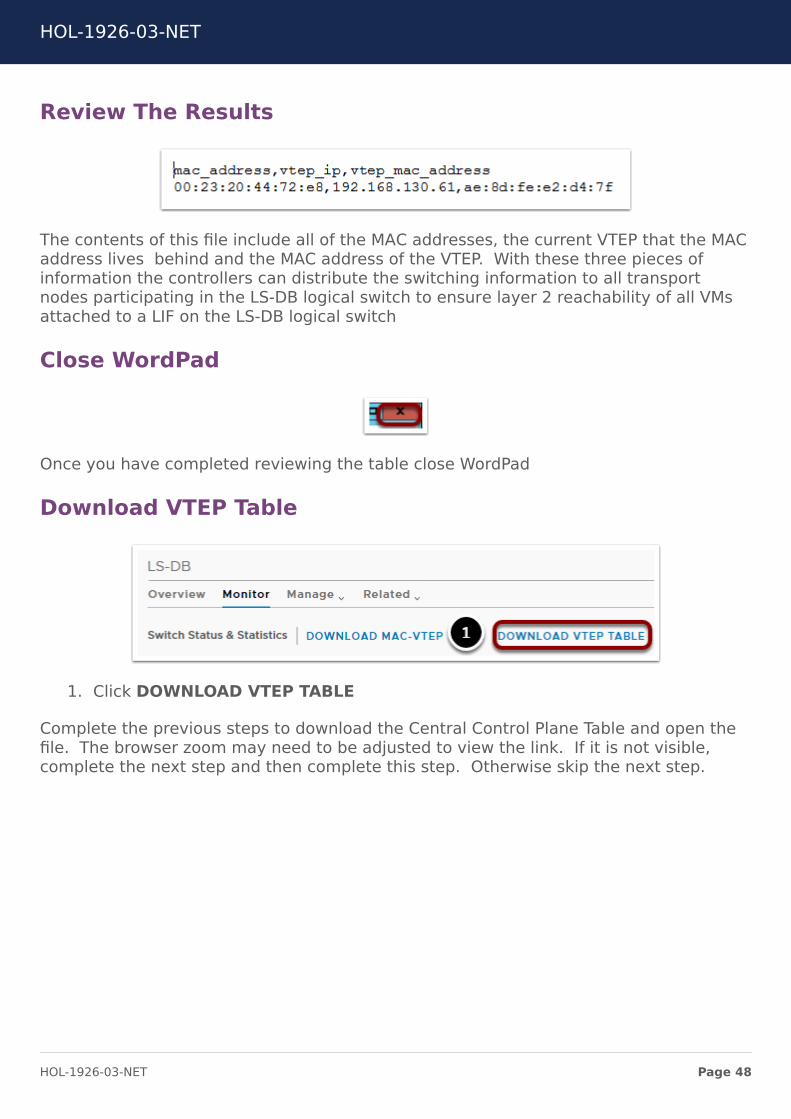
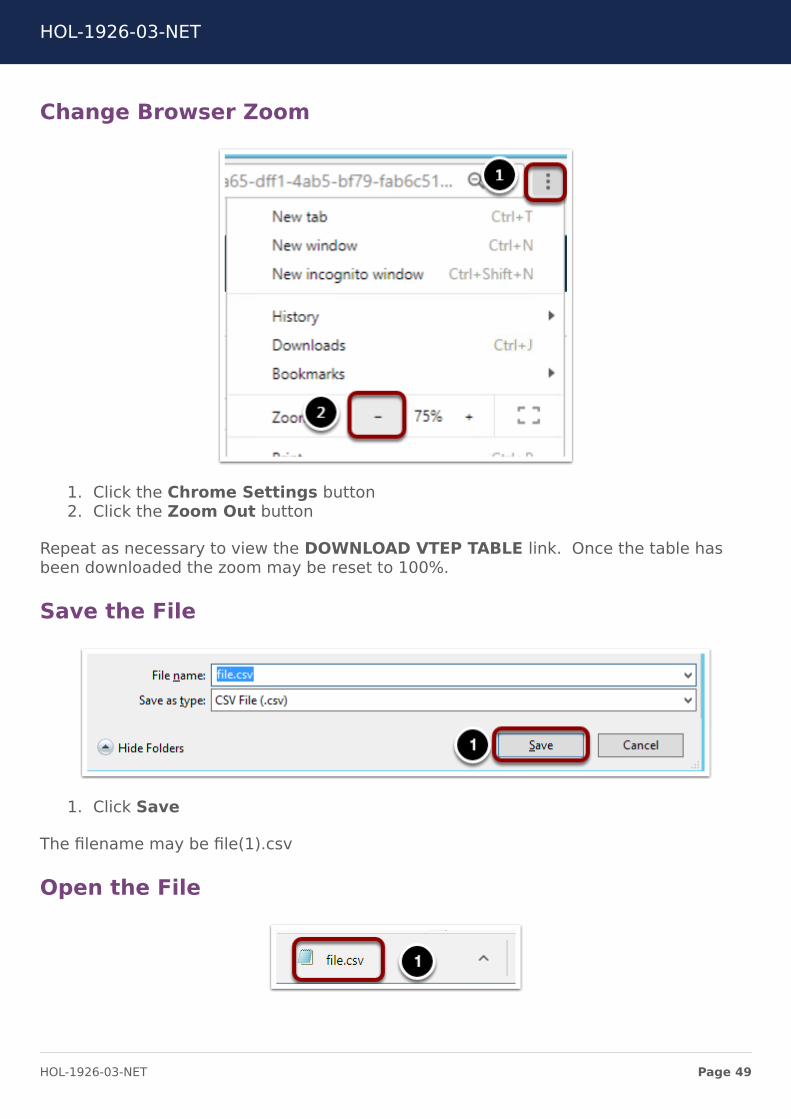
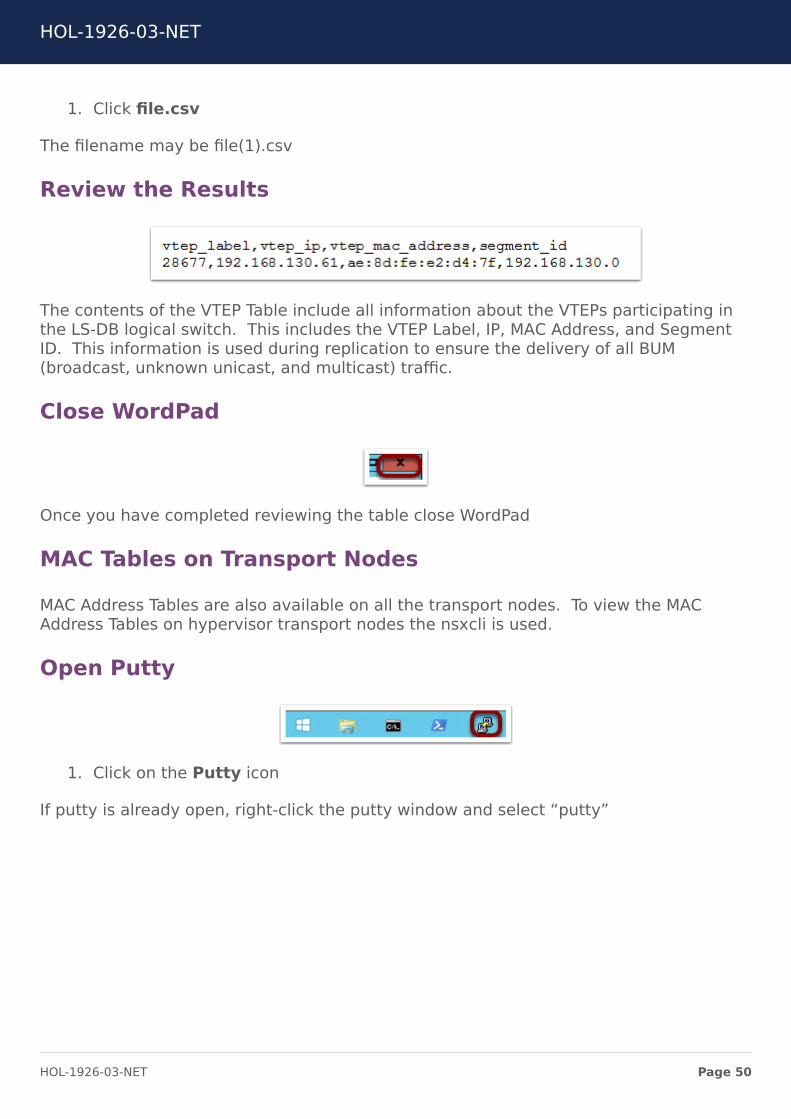
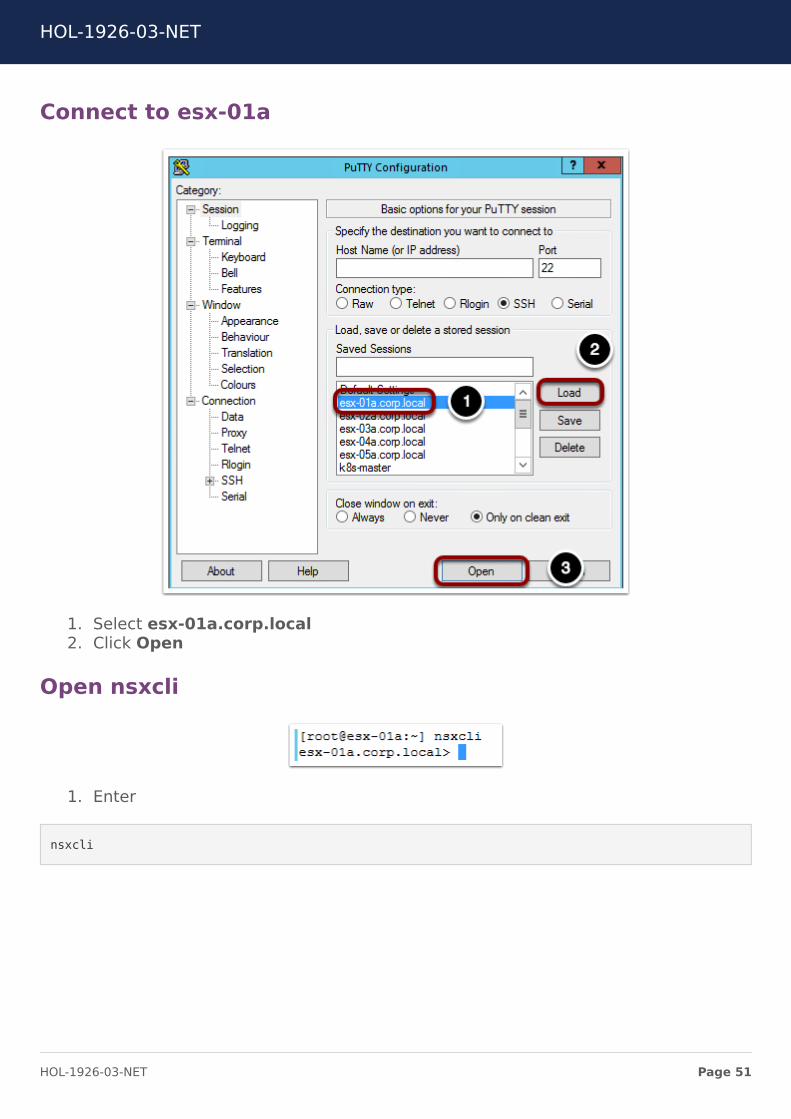
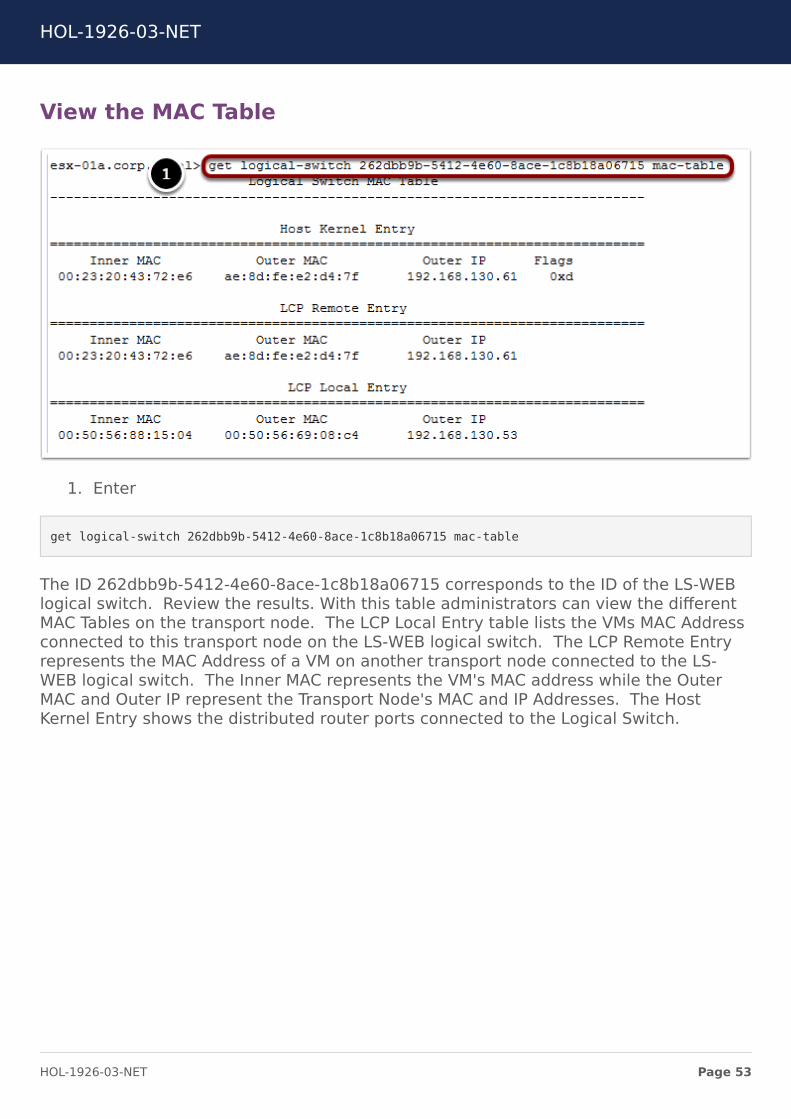
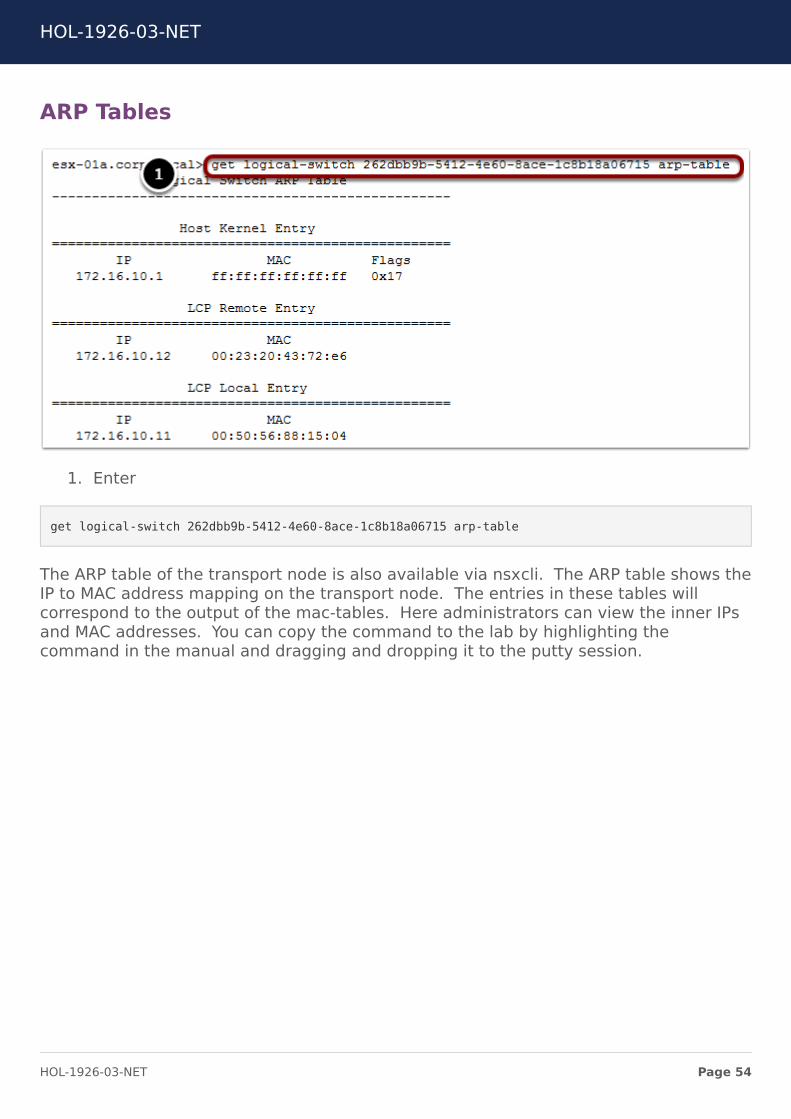
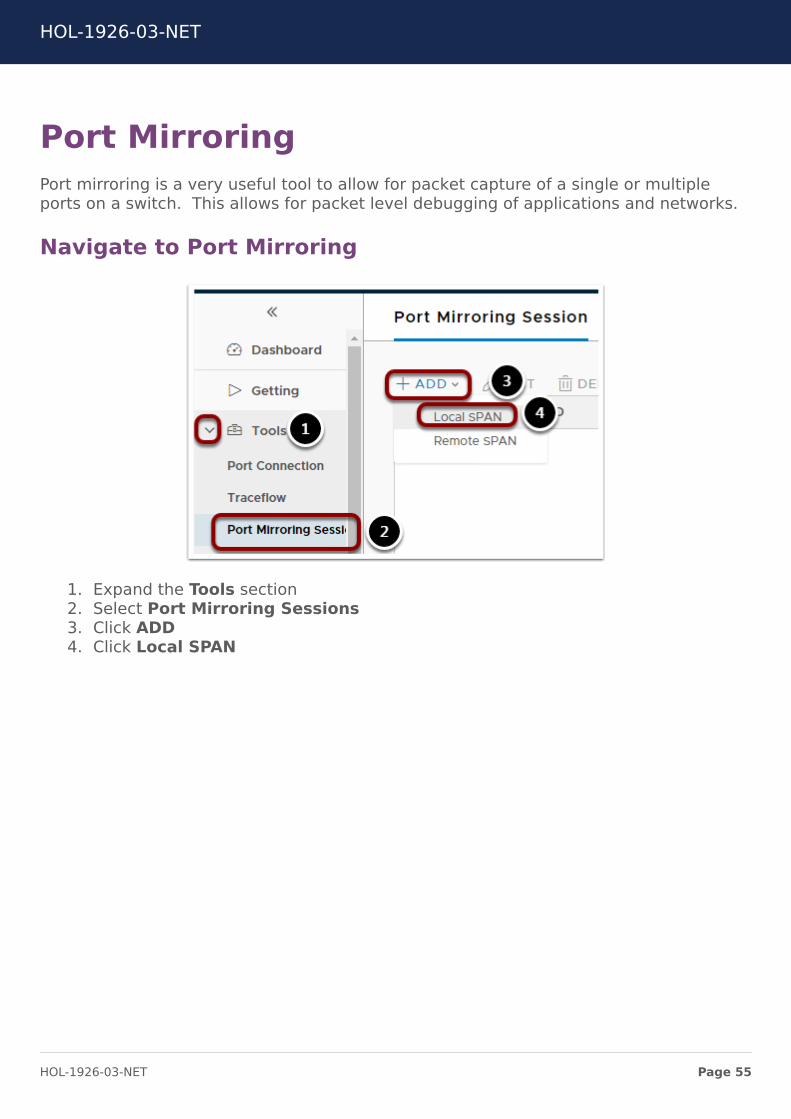
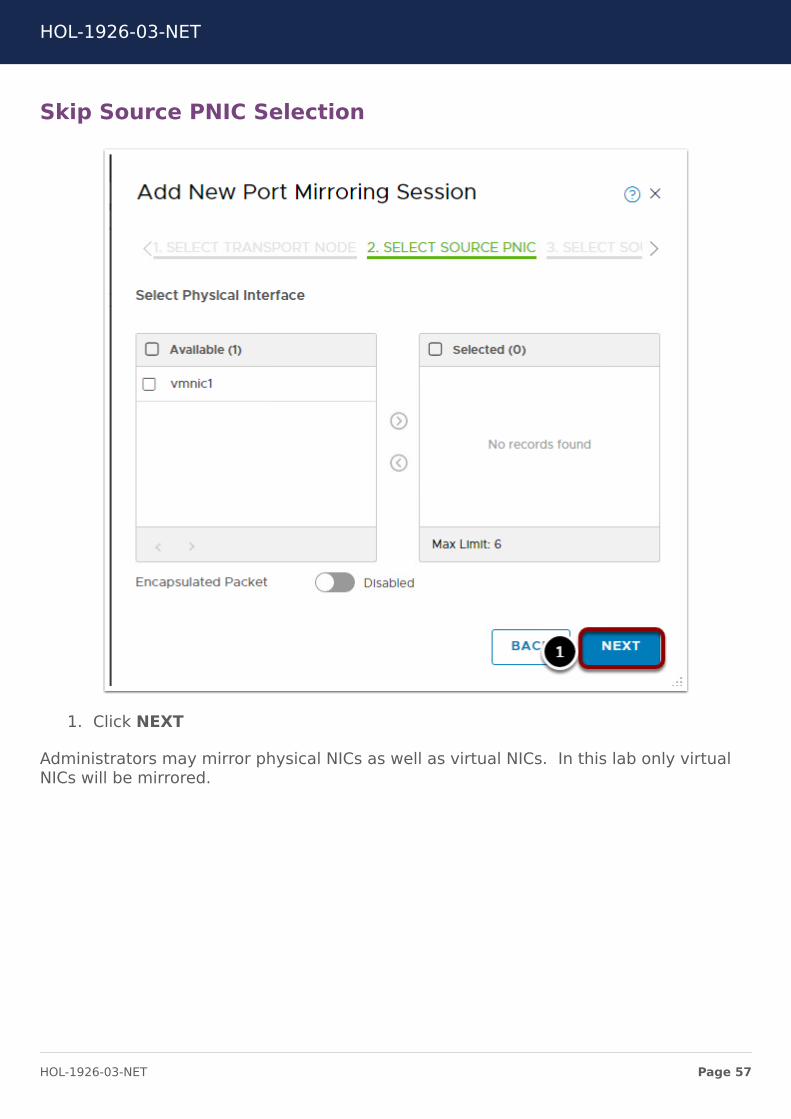
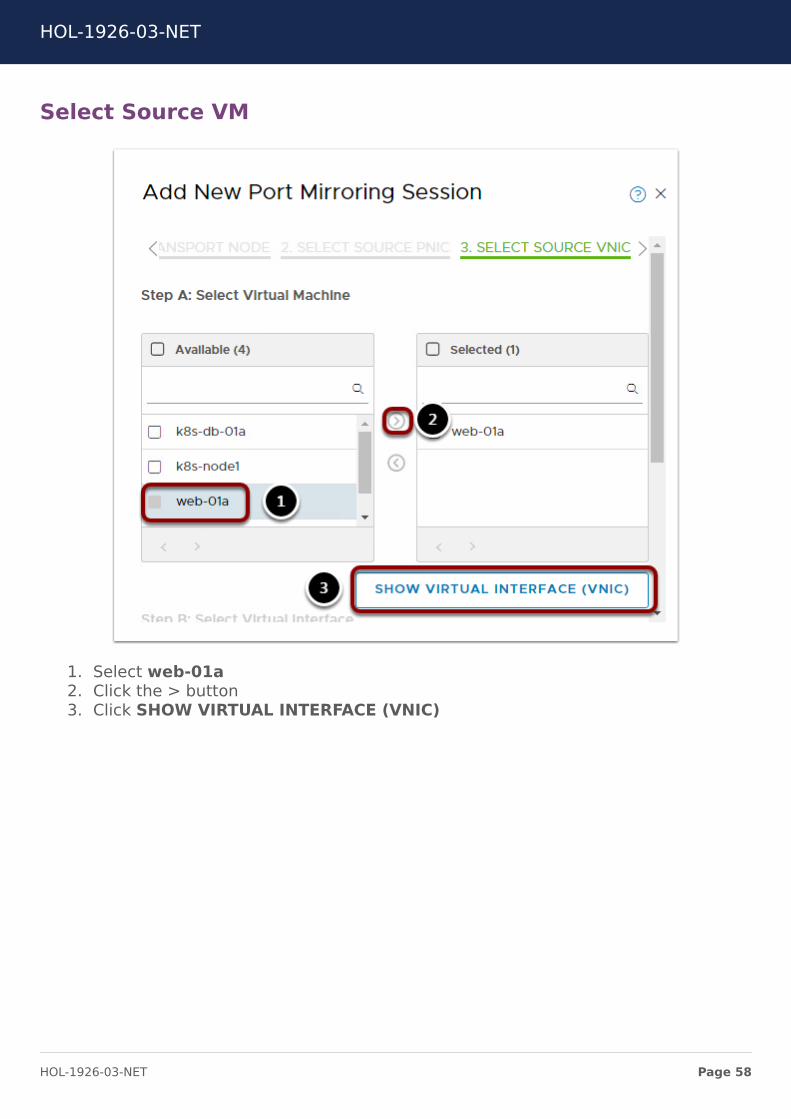
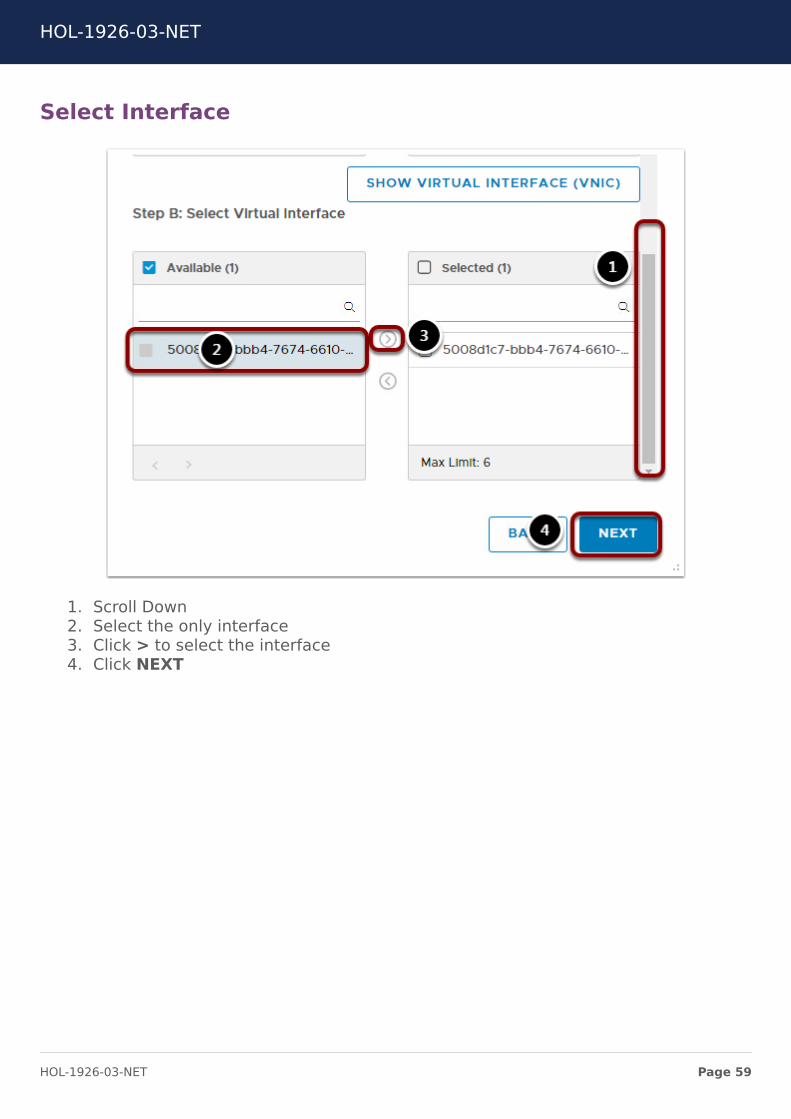
Select Interface
1 Scroll Down2 Select the only interface3 Click gt to select the interface4 Click NEXT
HOL-1926-03-NET
Page 59HOL-1926-03-NET
Select Destination VM
1 Scroll to the top2 Select k8s-node13 Click gt to select the VM4 Click SHOW VIRTUAL INTERFACE (VNIC)
HOL-1926-03-NET
Page 60HOL-1926-03-NET
Select Interface
1 Scroll to the bottom2 Select the last interface3 Click gt to select the interface4 Click SAVE
Open Putty
1 Click on the Putty icon
If putty is already open right-click the putty window and select ldquoputtyrdquo
HOL-1926-03-NET
Page 61HOL-1926-03-NET
Connect to k8s-node1
1 Select k8s-node12 Click Open
Start TCPDump
HOL-1926-03-NET
Page 62HOL-1926-03-NET
1 Enter the command
tcpdump -vvni ens192 icmp
This command starts tcpdump on the interface selected in the Port Mirroring sessionfiltering on icmp
Open an New Chrome Tab
1 Click the New Tab button
Load the vSphere Web Client
1 Click RegionA2 Click HTML5 Client
Login to the vSphere Web Client
1 Select the Use Windows session authentication checkbox2 Click Login
HOL-1926-03-NET
Page 63HOL-1926-03-NET
Open web-01a Remote Console
1 Select web-01a2 Click Launch Remote Console
Open the Console
1 Click Open VMware Remote Console
Login to web-01a
1 Enter the username
HOL-1926-03-NET
Page 64HOL-1926-03-NET
root
2 Enter the password
VMware1
Start a ping
1 Enter the command
ping 172161012
2 Press Ctrl+Alt to release your cursor
Return to the k8s-node1 session
1 Click the rootk8s-node1 putty session
HOL-1926-03-NET
Page 65HOL-1926-03-NET
Review the Output
Review the output of the tcpdump command The traffic displayed is from the monitorsession configured earlier notice there is no traffic sourced or destined for the k8s-node1 VM Only mirrored traffic is shown
HOL-1926-03-NET
Page 66HOL-1926-03-NET
Module 2 - ConclusionThis now completes Module 2 on NSX-T Datacenter Troubleshooting In this module youreviewed common troubleshooting tools and activities within NSX-T Datacenter Youused these tools to gain an understanding of what to do when troubleshooting adataplane issue within NSX-T Datacenter system
The activities reviewed in the module were
bull Routing Tablesbull MAC VTEP and ARP Tablesbull Port Mirroring
Youve finished Module 2
Congratulations on completing Module 2
If you are looking for additional information on NSX-T Datacenter Troubleshooting thenplease review the NSX-T Documentation Center via the URL below
bull Go to httpstinyurlcomyc6q794n
Proceed to any module below which interests you the most
Lab Module List
bull Module 1 - NSX-T Datacenter Operations - Use Tools within NSX-T Datacenter forDay to Day Operations (15 minutes) - Intermediate - This module will walk youthrough the basics of NSX-T Datacenter operations You will use features such asTraceflow Port Connection tool and others
bull Module 2 - NSX-T Datacenter Troubleshooting - Use Tools within NSX-T Datacenterfor Troubleshooting (15 minutes)- Intermediate - This module will walk youthrough the basics of NSX-T Datacenter troubleshooting You will view varioussystem configurations and correct misconfigurations after problem identification
bull Module 3 - API Consumption - Gain Familiarity with the NSX-T API (30 minutes) -Advanced - This module will explore the basics of NSX API consumption throughmanual interaction as well as several common configuration management tools
Lab Captain
bull Module 1 - 3 Kenyon Hensler Staff Systems Engineer United States
HOL-1926-03-NET
Page 67HOL-1926-03-NET
How to End Lab
To end your lab click on the END button
HOL-1926-03-NET
Page 68HOL-1926-03-NET
Module 3 - APIConsumption - Gain
Familiarity with the NSX-TAPI (30 minutes)
HOL-1926-03-NET
Page 69HOL-1926-03-NET
NSX RESTful APINSX is designed ground up with a RESTful API The NSX REST API can be used to bothconfigure NSX and to provision NSX logical network services The NSX REST API can becalled directly or indirectly from various programming languages Many orchestrationand automation tools such as vRealize Automation via vRealize Orchestrator can call theNSX REST API to perform Layer 2 through Layer 7 network orchestration andautomation
To demonstrate NSX RESTful API calls you will be using the RESTClient extension to theMozilla Firefox browser RESTClient is a debugger for RESTful Web Services and is auseful tool when working with various REST APIs
During this module the following tasks will be completed
bull Overview of RESTful APIsbull Overview of Powershell cmdletsbull Review of multiple NSX API callsbull Creation and deletion of NSX Objectsbull Configuration of alarming available only via the NSX API
Introduction to REST APIs
A REpresentational State Transfer (REST) API defines a set of simple principles which areloosely followed by most API implementations
HOL-1926-03-NET
Page 70HOL-1926-03-NET
bull Resource (the source of specific information)bull Global Permanent Identifier (every resource is uniquely identified ndash think HTTP
URL)bull Standard Interface (used to exchange the representation of resources ndash think
the HTTP protocol)bull Set of Constraints
REST leverages the strength of HTTP to send data (Headers and Bodies) between Clientsand Servers
The term Uniform Resource Locator (URL) and Uniform Resource Identifier (URI) can beused interchangeably when working with REST
Resources (building blocks) are linked together by embedded hyperlinks in HTMLdocuments or URI references and resources can expose the state via representationscontaining both metadata (such as size media type or character set) and content(binary image or text document)
REST Request Methods
REST Clients specify the desired interaction (HTTP request message as defined by RFC2616) Each HTTP method has specific well-defined semantics within the context of aREST APIrsquos resource model
bull GET - (The purpose of GET is to retrieve a representation of a resourcersquos state)including Response Headers and Body
bull HEAD - is used to retrieve the metadata associated with the resourcersquos state orjust the Response Headers
bull PUT - should be used to add a new resource to a store or update a resourcebull DELETE - removes a resource from its parentbull POST - should be used to create a new resource
HOL-1926-03-NET
Page 71HOL-1926-03-NET
REST Response Status Codes
The REST APIs use a HTTP response message to inform clients of their requestrsquos result(as defined in RFC 2616) Five categories are defined
bull 1xx Informational Communicates transfer protocol-level informationbull 2xx Success Indicates that the clientrsquos request was accepted successfulbull 3xx Redirection Indicates that the client must take some additional action in
order to complete their requestbull 4xx Client Error This category of error status codes points the finger at clientsbull 5xx Server Error The server takes responsibility for these error status codes
HTTP response message to inform clients of their requestrsquos result (As Defined in RFC2616)
bull 200 OKbull 201 Createdbull 202 Acceptedbull 204 No contentbull 400 Bad requestbull 401 Unauthorizedbull 403 Forbiddenbull 404 Not foundbull 405 Method Not Allowedbull 409 Conflictbull 500 Internal Server Errorbull 501 Not implementedbull 503 Service unavailable
HTTP Request Headers for the NSX RESTful API
When configuring RESTful APIs to provision NSX services the following are a list of theimportant request headers
1 Authorization The user and password credential in Base64 encoded format
HOL-1926-03-NET
Page 72HOL-1926-03-NET
2 Content-Type applicationxml Says that the request bodypayload is in xmlformat
HTTP Requests for the NSX RESTful API
1 MethodVerb GETPUTPOSTDELETE Action on the resource2 URL Resource3 Headers Authorization and Content-Type4 Body XML Payload5 Status Code 2xx For Success and 4xx and 5xx for Failures
OpenAPI Specification
The NSX-T Datacenter OpenAPI Specification is available from NSX-T Manager at
bull GET httpsltnsx-mgrgtapiv1specopenapinsx_apiyamlbull GET httpsltnsx-mgrgtapiv1specopenapinsx_apijson
HOL-1926-03-NET
Page 73HOL-1926-03-NET
This specification allows API users to quickly consume all methods available from NSX-TDatacenter This documentation is generated for every NSX-T Datacenter release
HOL-1926-03-NET
Page 74HOL-1926-03-NET
Manual ConsumptionOne of the methods to consume the NSX-T Datacenter API is through manuallyinteracting with the API This can be done with many different tools This lesson willexplore the use of Postman and cURL
Open Postman
1 Click the Windows Button2 Type Postman3 Click Postman
HOL-1926-03-NET
Page 75HOL-1926-03-NET
Close the Create a New Dialog
1 Click X
Create an Authorization Header
An authorization header will authenticate the session with the NSX-T Datacenter API
1 Switch the Type to Basic Auth2 The Username and Password will be automatically populated3 Click Update Request
Enter the URI to GET All Logical Switches
1 Ensure the method is set to GET2 Enter
httpsnsxmgr-01aapiv1logical-switches
3 Click Send
HOL-1926-03-NET
Page 76HOL-1926-03-NET
Review the Output
By reviewing the output of the request administrators can inspect all Logical Switchescreated This information includes all of the required information associated with thisLogical Switch This information can also be used as a template to create a LogicalSwitch By reviewing the required components of a Logical Switch creation in the APIGuide these values can be completed with the values of a Logical switch that meets thesame requirement as the new Logical Switch
Generate a cURL Command
Postman will generate code for many languages from your request This allows for easyscripting of API requests
1 Click Code2 Select cURL on the drop down3 Click Copy to Clipboard
HOL-1926-03-NET
Page 77HOL-1926-03-NET
Open Putty
1 Click on the Putty icon
If putty is already open right-click the putty window and select ldquoputtyrdquo
Open a Connection to api-01a
1 Enter 1921681101042 Click Open
Login to api-01a
Login using the username
HOL-1926-03-NET
Page 78HOL-1926-03-NET
admin
Password
VMware1
Execute the cURL Command
1 Paste the cURL command by right clicking in the Putty window2 Append the command with
ltSPACEgt -k
3 Be sure to include the space before -k This option ignores invalid certificates4 Execute the command
HOL-1926-03-NET
Page 79HOL-1926-03-NET
Review the Output
1 Scroll to the top of the Putty session2 Review the output This output will match the output from Postman
cURL can be used for all API functions and may be used in conjunction with othercommand line tools such as grep sed and awk to build complex create update anddestroy functions
HOL-1926-03-NET
Page 80HOL-1926-03-NET
Terraform ConsumptionTerraform is a tool that allows for the creation of sharable configuration files that createand change infrastructure Terraform has released an NSX-T Datacenter Module thatallows for the configuration of NSX-T Datacenter objects
Open Putty
If a putty session to api-01a is already open skip the step labeled Open thelogicalswitchtf File
1 Click on the Putty icon
If putty is already open right-click the putty window and select ldquoputtyrdquo
Open a Connection to api-01a
HOL-1926-03-NET
Page 81HOL-1926-03-NET
1 Select api-01acorplocal2 Click Load3 Click Open
Login to api-01a
Login using the username
admin
Password
VMware1
Open the logicalswitchtf File
1 Switch to the api1 directory
cd api1
2 Open the logicalswitchtf file
vi logicalswitchtf
HOL-1926-03-NET
Page 82HOL-1926-03-NET
Review the File
Review the file by using the arrow keys to move to the top and bottom of the fileNotice the resource section This section will create a NSX-T Datacenter Logical SwitchOnce you have completed reviewing the file exit the vi editor
1 Type
q
HOL-1926-03-NET
Page 83HOL-1926-03-NET
Verify the logicalswitchtf File
1 Enter the command
terraform plan
This command will verify the required data and plugins for terraform to complete theaction
HOL-1926-03-NET
Page 84HOL-1926-03-NET
Apply the logicalswitchtf File
1 Enter the command
terraform apply
2 Type
yes
HOL-1926-03-NET
Page 85HOL-1926-03-NET
Review the Output
The output of the command shows the Logical Switch TfLogicalSwitch was created
Open Chrome Browser from Windows Quick Launch TaskBar
1 Click on the Chrome Icon on the Windows Quick Launch Task Bar
Navigate to NSX-T Manager
1 Click on the VMware NSX | Login bookmark
HOL-1926-03-NET
Page 86HOL-1926-03-NET
Login to NSX-T Manager
Login to NSX Manager
1 Enter the username admin2 Enter the password VMware13 Click Login
HOL-1926-03-NET
Page 87HOL-1926-03-NET
View the Logical Switch
1 Click Switching2 Select the Switches tab3 Notice the Logical Switch TfLogicalSwitch
If the Logical Switch is not visibile refresh the page
Delete the Logical Switch
Delete the Logical Switch to avoid confusion in the next part of the lesson
HOL-1926-03-NET
Page 88HOL-1926-03-NET
1 Select the TfLogicalSwitch2 Click Delete3 Click Delete
Return to the Putty Session
1 Click the Putty Session
Open the infratf File
1 Switch to the api2 directory
cd api2
2 Enter the command
vi infratf
HOL-1926-03-NET
Page 89HOL-1926-03-NET
Review the File
Review the file by using the arrow keys to move to the top and bottom of the fileNotice the many resource sections This file will create a Tier 1 router connect the Tier
1 router to the Tier 0 router create a Logical Switch attach the Tier 1 router to thelogical switch and assign an IP address to the Tier 1 interface on the logical switchThis is a common action for tenant creation in an environment Once you have
completed reviewing the file exit the vi editor
1 Type
q
HOL-1926-03-NET
Page 90HOL-1926-03-NET
Verify the infratf File
1 Enter the command
terraform plan
Apply the infratf File
1 Enter the command
HOL-1926-03-NET
Page 91HOL-1926-03-NET
terraform apply
Confirm the Apply
1 Type
yes
Review the Output
Review the output of the command Many actions were preformed Scroll up to viewthe complete output
Return to NSX Manager
Return to NSX Manager to review the configuration
1 Click VMware NSX Chrome window
HOL-1926-03-NET
Page 92HOL-1926-03-NET
Login to NSX-T Manager
If the session has timed out login to NSX Manager If the session is still active skip thisstep
1 Enter the username admin2 Enter the password VMware13 Click Login
HOL-1926-03-NET
Page 93HOL-1926-03-NET
Refresh Switches
1 Click REFRESH2 Notice the TfLogicalSwitch2 Switch
HOL-1926-03-NET
Page 94HOL-1926-03-NET
Review Tier 1 Router
1 Click Routing2 Select the T1-Terraform Logical Router
Review the Summary
3 Click Configuration4 Click Router Ports
HOL-1926-03-NET
Page 95HOL-1926-03-NET
Review the IP Address Assignments
The IP address 17216401 was specified in the infratf file as a variable The nextaddress may vary by lab This address is automatically configured from a pool ofaddresses for use in connecting Tier 0 routers to Tier 1 routers
Return to the Putty Session
1 Click the Putty Session
Ping the Router Address
1 Enter
ping 17216401 -c 3
The ping should be successful This IP address is being advertised from the newlycreated Tier 1 router through the Tier 0 router to the vPOD router via BGP
HOL-1926-03-NET
Page 96HOL-1926-03-NET
Remove the configuration
Terraform will also remove previously created configurations
1 Enter the command
terraform destroy
2 Confirm the removal
yes
HOL-1926-03-NET
Page 97HOL-1926-03-NET
Review the Output
The command successfully removed the configuration This is a common action in theremoval of an application or tenant from an infrastructure as code environment
HOL-1926-03-NET
Page 98HOL-1926-03-NET
Module 3 ConclusionThis module utilized the NSX API to configure multiple NSX objects The NSX APIprovides a powerful tool for configuration troubleshooting and monitoring
Youve finished Module 3
Congratulations on completing Module 3
For additional information on the NSX API visit the URL below and select the NSX APIGuide
bull Go to httpstinyurlcomyc6q794n
Proceed to any module below or end the lab
Lab Module List
bull Module 1 - NSX-T Datacenter Operations - Use Tools within NSX-TDatacenter for Day to Day Operations (15 minutes) - Intermediate - Thismodule will walk you through the basics of NSX-T Datacenter operations You willuse features such as Traceflow Port Connection tool and others
bull Module 2 - NSX-T Datacenter Troubleshooting - Use Tools within NSX-TDatacenter for Troubleshooting (15 minutes) - Intermediate - This modulewill walk you through the basics of NSX-T Datacenter troubleshooting You willview various system configurations and correct misconfigurations after problemidentification
bull Module 3 - API Consumption - Gain Familiarity with the NSX-T API (30minutes) - Advanced - This module will explore the basics of NSX APIconsumption through manual interaction as well as several commonconfiguration management tools
Lab Captain
bull Module 1 - 3 Kenyon Hensler Staff Systems Engineer United States
How to End Lab
To end the lab click on the END button
HOL-1926-03-NET
Page 99HOL-1926-03-NET
ConclusionThank you for participating in the VMware Hands-on Labs Be sure to visithttpholvmwarecom to continue your lab experience online
Lab SKU HOL-1926-03-NET
Version 20181104-143822
HOL-1926-03-NET
Page 100HOL-1926-03-NET
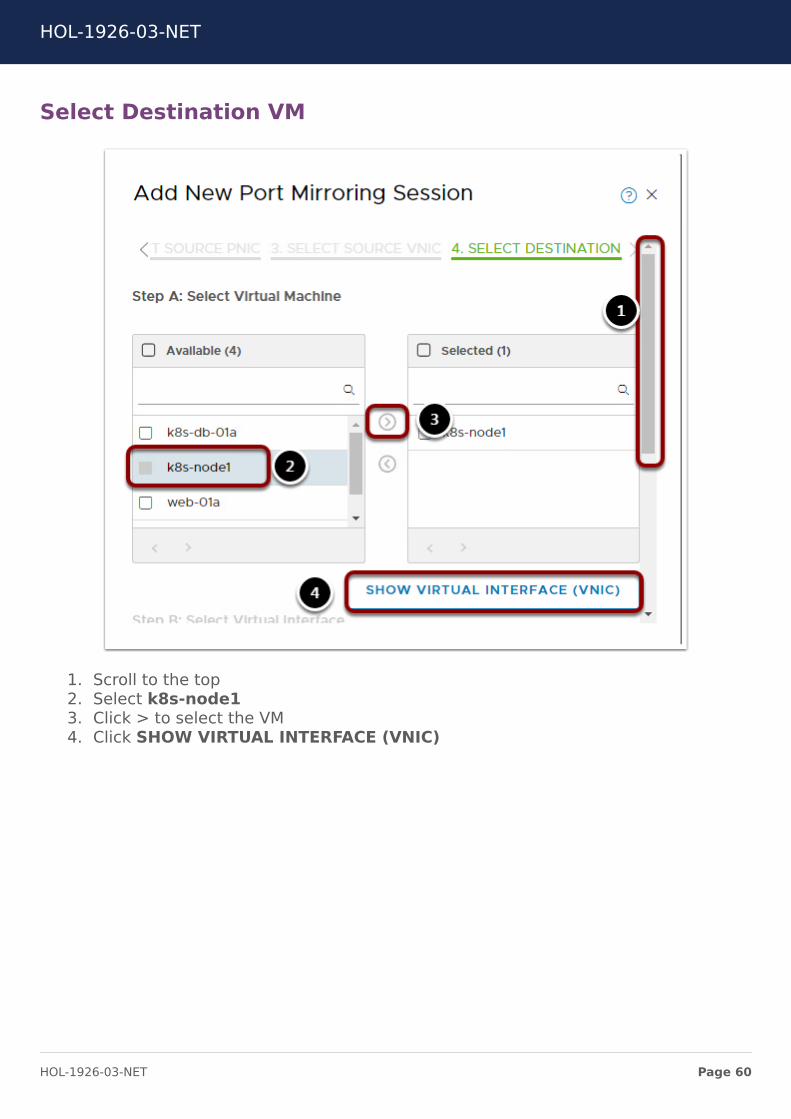
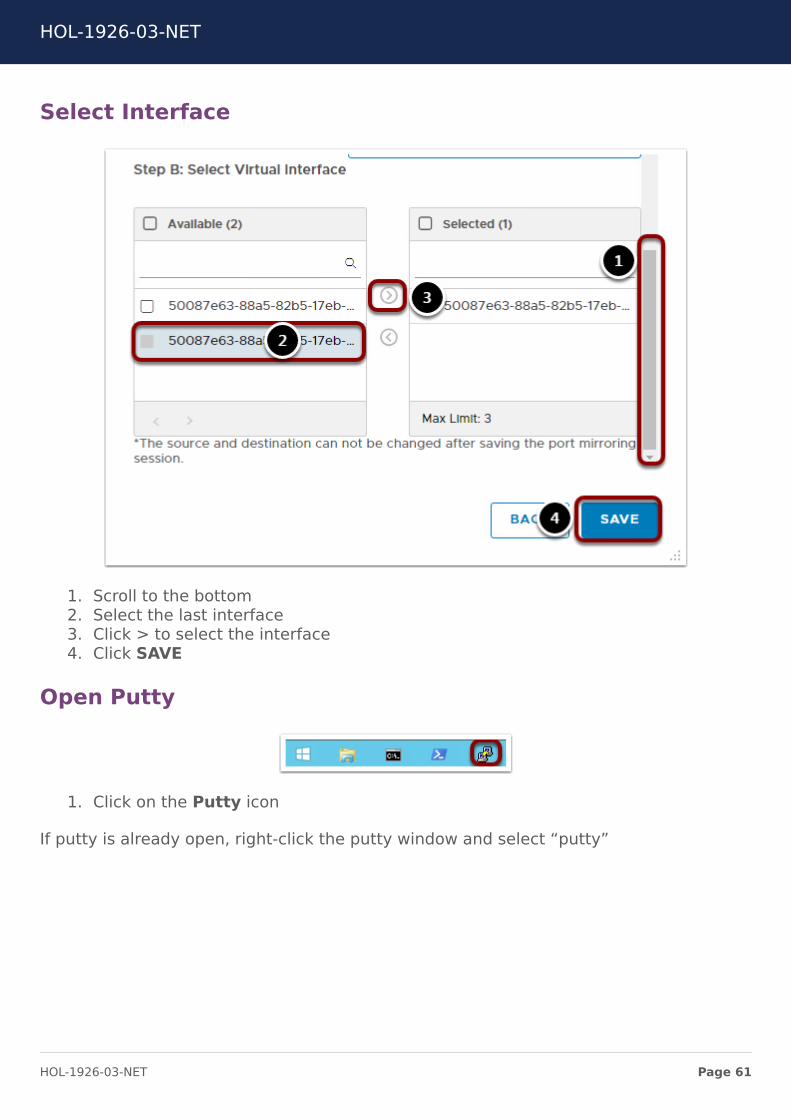
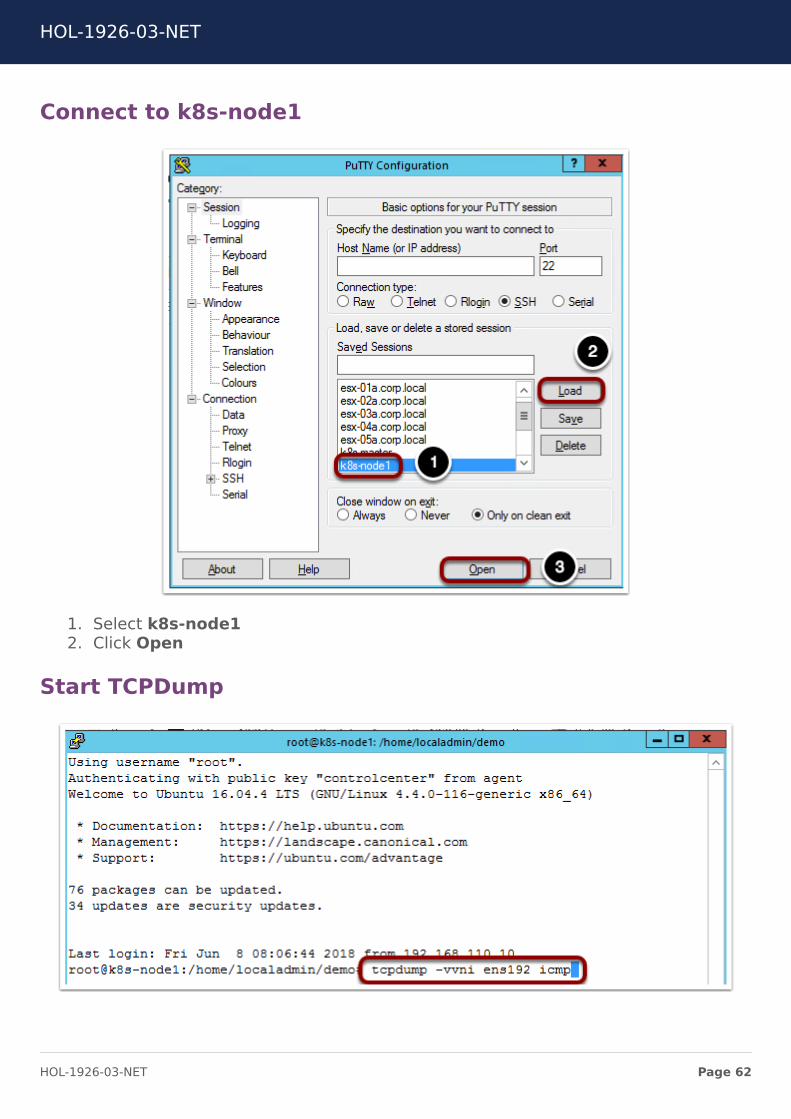

1 Enter the command
tcpdump -vvni ens192 icmp
This command starts tcpdump on the interface selected in the Port Mirroring sessionfiltering on icmp
Open an New Chrome Tab
1 Click the New Tab button
Load the vSphere Web Client
1 Click RegionA2 Click HTML5 Client
Login to the vSphere Web Client
1 Select the Use Windows session authentication checkbox2 Click Login
HOL-1926-03-NET
Page 63HOL-1926-03-NET
Open web-01a Remote Console
1 Select web-01a2 Click Launch Remote Console
Open the Console
1 Click Open VMware Remote Console
Login to web-01a
1 Enter the username
HOL-1926-03-NET
Page 64HOL-1926-03-NET
root
2 Enter the password
VMware1
Start a ping
1 Enter the command
ping 172161012
2 Press Ctrl+Alt to release your cursor
Return to the k8s-node1 session
1 Click the rootk8s-node1 putty session
HOL-1926-03-NET
Page 65HOL-1926-03-NET
Review the Output
Review the output of the tcpdump command The traffic displayed is from the monitorsession configured earlier notice there is no traffic sourced or destined for the k8s-node1 VM Only mirrored traffic is shown
HOL-1926-03-NET
Page 66HOL-1926-03-NET
Module 2 - ConclusionThis now completes Module 2 on NSX-T Datacenter Troubleshooting In this module youreviewed common troubleshooting tools and activities within NSX-T Datacenter Youused these tools to gain an understanding of what to do when troubleshooting adataplane issue within NSX-T Datacenter system
The activities reviewed in the module were
bull Routing Tablesbull MAC VTEP and ARP Tablesbull Port Mirroring
Youve finished Module 2
Congratulations on completing Module 2
If you are looking for additional information on NSX-T Datacenter Troubleshooting thenplease review the NSX-T Documentation Center via the URL below
bull Go to httpstinyurlcomyc6q794n
Proceed to any module below which interests you the most
Lab Module List
bull Module 1 - NSX-T Datacenter Operations - Use Tools within NSX-T Datacenter forDay to Day Operations (15 minutes) - Intermediate - This module will walk youthrough the basics of NSX-T Datacenter operations You will use features such asTraceflow Port Connection tool and others
bull Module 2 - NSX-T Datacenter Troubleshooting - Use Tools within NSX-T Datacenterfor Troubleshooting (15 minutes)- Intermediate - This module will walk youthrough the basics of NSX-T Datacenter troubleshooting You will view varioussystem configurations and correct misconfigurations after problem identification
bull Module 3 - API Consumption - Gain Familiarity with the NSX-T API (30 minutes) -Advanced - This module will explore the basics of NSX API consumption throughmanual interaction as well as several common configuration management tools
Lab Captain
bull Module 1 - 3 Kenyon Hensler Staff Systems Engineer United States
HOL-1926-03-NET
Page 67HOL-1926-03-NET
How to End Lab
To end your lab click on the END button
HOL-1926-03-NET
Page 68HOL-1926-03-NET
Module 3 - APIConsumption - Gain
Familiarity with the NSX-TAPI (30 minutes)
HOL-1926-03-NET
Page 69HOL-1926-03-NET
NSX RESTful APINSX is designed ground up with a RESTful API The NSX REST API can be used to bothconfigure NSX and to provision NSX logical network services The NSX REST API can becalled directly or indirectly from various programming languages Many orchestrationand automation tools such as vRealize Automation via vRealize Orchestrator can call theNSX REST API to perform Layer 2 through Layer 7 network orchestration andautomation
To demonstrate NSX RESTful API calls you will be using the RESTClient extension to theMozilla Firefox browser RESTClient is a debugger for RESTful Web Services and is auseful tool when working with various REST APIs
During this module the following tasks will be completed
bull Overview of RESTful APIsbull Overview of Powershell cmdletsbull Review of multiple NSX API callsbull Creation and deletion of NSX Objectsbull Configuration of alarming available only via the NSX API
Introduction to REST APIs
A REpresentational State Transfer (REST) API defines a set of simple principles which areloosely followed by most API implementations
HOL-1926-03-NET
Page 70HOL-1926-03-NET
bull Resource (the source of specific information)bull Global Permanent Identifier (every resource is uniquely identified ndash think HTTP
URL)bull Standard Interface (used to exchange the representation of resources ndash think
the HTTP protocol)bull Set of Constraints
REST leverages the strength of HTTP to send data (Headers and Bodies) between Clientsand Servers
The term Uniform Resource Locator (URL) and Uniform Resource Identifier (URI) can beused interchangeably when working with REST
Resources (building blocks) are linked together by embedded hyperlinks in HTMLdocuments or URI references and resources can expose the state via representationscontaining both metadata (such as size media type or character set) and content(binary image or text document)
REST Request Methods
REST Clients specify the desired interaction (HTTP request message as defined by RFC2616) Each HTTP method has specific well-defined semantics within the context of aREST APIrsquos resource model
bull GET - (The purpose of GET is to retrieve a representation of a resourcersquos state)including Response Headers and Body
bull HEAD - is used to retrieve the metadata associated with the resourcersquos state orjust the Response Headers
bull PUT - should be used to add a new resource to a store or update a resourcebull DELETE - removes a resource from its parentbull POST - should be used to create a new resource
HOL-1926-03-NET
Page 71HOL-1926-03-NET
REST Response Status Codes
The REST APIs use a HTTP response message to inform clients of their requestrsquos result(as defined in RFC 2616) Five categories are defined
bull 1xx Informational Communicates transfer protocol-level informationbull 2xx Success Indicates that the clientrsquos request was accepted successfulbull 3xx Redirection Indicates that the client must take some additional action in
order to complete their requestbull 4xx Client Error This category of error status codes points the finger at clientsbull 5xx Server Error The server takes responsibility for these error status codes
HTTP response message to inform clients of their requestrsquos result (As Defined in RFC2616)
bull 200 OKbull 201 Createdbull 202 Acceptedbull 204 No contentbull 400 Bad requestbull 401 Unauthorizedbull 403 Forbiddenbull 404 Not foundbull 405 Method Not Allowedbull 409 Conflictbull 500 Internal Server Errorbull 501 Not implementedbull 503 Service unavailable
HTTP Request Headers for the NSX RESTful API
When configuring RESTful APIs to provision NSX services the following are a list of theimportant request headers
1 Authorization The user and password credential in Base64 encoded format
HOL-1926-03-NET
Page 72HOL-1926-03-NET
2 Content-Type applicationxml Says that the request bodypayload is in xmlformat
HTTP Requests for the NSX RESTful API
1 MethodVerb GETPUTPOSTDELETE Action on the resource2 URL Resource3 Headers Authorization and Content-Type4 Body XML Payload5 Status Code 2xx For Success and 4xx and 5xx for Failures
OpenAPI Specification
The NSX-T Datacenter OpenAPI Specification is available from NSX-T Manager at
bull GET httpsltnsx-mgrgtapiv1specopenapinsx_apiyamlbull GET httpsltnsx-mgrgtapiv1specopenapinsx_apijson
HOL-1926-03-NET
Page 73HOL-1926-03-NET
This specification allows API users to quickly consume all methods available from NSX-TDatacenter This documentation is generated for every NSX-T Datacenter release
HOL-1926-03-NET
Page 74HOL-1926-03-NET
Manual ConsumptionOne of the methods to consume the NSX-T Datacenter API is through manuallyinteracting with the API This can be done with many different tools This lesson willexplore the use of Postman and cURL
Open Postman
1 Click the Windows Button2 Type Postman3 Click Postman
HOL-1926-03-NET
Page 75HOL-1926-03-NET
Close the Create a New Dialog
1 Click X
Create an Authorization Header
An authorization header will authenticate the session with the NSX-T Datacenter API
1 Switch the Type to Basic Auth2 The Username and Password will be automatically populated3 Click Update Request
Enter the URI to GET All Logical Switches
1 Ensure the method is set to GET2 Enter
httpsnsxmgr-01aapiv1logical-switches
3 Click Send
HOL-1926-03-NET
Page 76HOL-1926-03-NET
Review the Output
By reviewing the output of the request administrators can inspect all Logical Switchescreated This information includes all of the required information associated with thisLogical Switch This information can also be used as a template to create a LogicalSwitch By reviewing the required components of a Logical Switch creation in the APIGuide these values can be completed with the values of a Logical switch that meets thesame requirement as the new Logical Switch
Generate a cURL Command
Postman will generate code for many languages from your request This allows for easyscripting of API requests
1 Click Code2 Select cURL on the drop down3 Click Copy to Clipboard
HOL-1926-03-NET
Page 77HOL-1926-03-NET
Open Putty
1 Click on the Putty icon
If putty is already open right-click the putty window and select ldquoputtyrdquo
Open a Connection to api-01a
1 Enter 1921681101042 Click Open
Login to api-01a
Login using the username
HOL-1926-03-NET
Page 78HOL-1926-03-NET
admin
Password
VMware1
Execute the cURL Command
1 Paste the cURL command by right clicking in the Putty window2 Append the command with
ltSPACEgt -k
3 Be sure to include the space before -k This option ignores invalid certificates4 Execute the command
HOL-1926-03-NET
Page 79HOL-1926-03-NET
Review the Output
1 Scroll to the top of the Putty session2 Review the output This output will match the output from Postman
cURL can be used for all API functions and may be used in conjunction with othercommand line tools such as grep sed and awk to build complex create update anddestroy functions
HOL-1926-03-NET
Page 80HOL-1926-03-NET
Terraform ConsumptionTerraform is a tool that allows for the creation of sharable configuration files that createand change infrastructure Terraform has released an NSX-T Datacenter Module thatallows for the configuration of NSX-T Datacenter objects
Open Putty
If a putty session to api-01a is already open skip the step labeled Open thelogicalswitchtf File
1 Click on the Putty icon
If putty is already open right-click the putty window and select ldquoputtyrdquo
Open a Connection to api-01a
HOL-1926-03-NET
Page 81HOL-1926-03-NET
1 Select api-01acorplocal2 Click Load3 Click Open
Login to api-01a
Login using the username
admin
Password
VMware1
Open the logicalswitchtf File
1 Switch to the api1 directory
cd api1
2 Open the logicalswitchtf file
vi logicalswitchtf
HOL-1926-03-NET
Page 82HOL-1926-03-NET
Review the File
Review the file by using the arrow keys to move to the top and bottom of the fileNotice the resource section This section will create a NSX-T Datacenter Logical SwitchOnce you have completed reviewing the file exit the vi editor
1 Type
q
HOL-1926-03-NET
Page 83HOL-1926-03-NET
Verify the logicalswitchtf File
1 Enter the command
terraform plan
This command will verify the required data and plugins for terraform to complete theaction
HOL-1926-03-NET
Page 84HOL-1926-03-NET
Apply the logicalswitchtf File
1 Enter the command
terraform apply
2 Type
yes
HOL-1926-03-NET
Page 85HOL-1926-03-NET
Review the Output
The output of the command shows the Logical Switch TfLogicalSwitch was created
Open Chrome Browser from Windows Quick Launch TaskBar
1 Click on the Chrome Icon on the Windows Quick Launch Task Bar
Navigate to NSX-T Manager
1 Click on the VMware NSX | Login bookmark
HOL-1926-03-NET
Page 86HOL-1926-03-NET
Login to NSX-T Manager
Login to NSX Manager
1 Enter the username admin2 Enter the password VMware13 Click Login
HOL-1926-03-NET
Page 87HOL-1926-03-NET
View the Logical Switch
1 Click Switching2 Select the Switches tab3 Notice the Logical Switch TfLogicalSwitch
If the Logical Switch is not visibile refresh the page
Delete the Logical Switch
Delete the Logical Switch to avoid confusion in the next part of the lesson
HOL-1926-03-NET
Page 88HOL-1926-03-NET
1 Select the TfLogicalSwitch2 Click Delete3 Click Delete
Return to the Putty Session
1 Click the Putty Session
Open the infratf File
1 Switch to the api2 directory
cd api2
2 Enter the command
vi infratf
HOL-1926-03-NET
Page 89HOL-1926-03-NET
Review the File
Review the file by using the arrow keys to move to the top and bottom of the fileNotice the many resource sections This file will create a Tier 1 router connect the Tier
1 router to the Tier 0 router create a Logical Switch attach the Tier 1 router to thelogical switch and assign an IP address to the Tier 1 interface on the logical switchThis is a common action for tenant creation in an environment Once you have
completed reviewing the file exit the vi editor
1 Type
q
HOL-1926-03-NET
Page 90HOL-1926-03-NET
Verify the infratf File
1 Enter the command
terraform plan
Apply the infratf File
1 Enter the command
HOL-1926-03-NET
Page 91HOL-1926-03-NET
terraform apply
Confirm the Apply
1 Type
yes
Review the Output
Review the output of the command Many actions were preformed Scroll up to viewthe complete output
Return to NSX Manager
Return to NSX Manager to review the configuration
1 Click VMware NSX Chrome window
HOL-1926-03-NET
Page 92HOL-1926-03-NET
Login to NSX-T Manager
If the session has timed out login to NSX Manager If the session is still active skip thisstep
1 Enter the username admin2 Enter the password VMware13 Click Login
HOL-1926-03-NET
Page 93HOL-1926-03-NET
Refresh Switches
1 Click REFRESH2 Notice the TfLogicalSwitch2 Switch
HOL-1926-03-NET
Page 94HOL-1926-03-NET
Review Tier 1 Router
1 Click Routing2 Select the T1-Terraform Logical Router
Review the Summary
3 Click Configuration4 Click Router Ports
HOL-1926-03-NET
Page 95HOL-1926-03-NET
Review the IP Address Assignments
The IP address 17216401 was specified in the infratf file as a variable The nextaddress may vary by lab This address is automatically configured from a pool ofaddresses for use in connecting Tier 0 routers to Tier 1 routers
Return to the Putty Session
1 Click the Putty Session
Ping the Router Address
1 Enter
ping 17216401 -c 3
The ping should be successful This IP address is being advertised from the newlycreated Tier 1 router through the Tier 0 router to the vPOD router via BGP
HOL-1926-03-NET
Page 96HOL-1926-03-NET
Remove the configuration
Terraform will also remove previously created configurations
1 Enter the command
terraform destroy
2 Confirm the removal
yes
HOL-1926-03-NET
Page 97HOL-1926-03-NET
Review the Output
The command successfully removed the configuration This is a common action in theremoval of an application or tenant from an infrastructure as code environment
HOL-1926-03-NET
Page 98HOL-1926-03-NET
Module 3 ConclusionThis module utilized the NSX API to configure multiple NSX objects The NSX APIprovides a powerful tool for configuration troubleshooting and monitoring
Youve finished Module 3
Congratulations on completing Module 3
For additional information on the NSX API visit the URL below and select the NSX APIGuide
bull Go to httpstinyurlcomyc6q794n
Proceed to any module below or end the lab
Lab Module List
bull Module 1 - NSX-T Datacenter Operations - Use Tools within NSX-TDatacenter for Day to Day Operations (15 minutes) - Intermediate - Thismodule will walk you through the basics of NSX-T Datacenter operations You willuse features such as Traceflow Port Connection tool and others
bull Module 2 - NSX-T Datacenter Troubleshooting - Use Tools within NSX-TDatacenter for Troubleshooting (15 minutes) - Intermediate - This modulewill walk you through the basics of NSX-T Datacenter troubleshooting You willview various system configurations and correct misconfigurations after problemidentification
bull Module 3 - API Consumption - Gain Familiarity with the NSX-T API (30minutes) - Advanced - This module will explore the basics of NSX APIconsumption through manual interaction as well as several commonconfiguration management tools
Lab Captain
bull Module 1 - 3 Kenyon Hensler Staff Systems Engineer United States
How to End Lab
To end the lab click on the END button
HOL-1926-03-NET
Page 99HOL-1926-03-NET
ConclusionThank you for participating in the VMware Hands-on Labs Be sure to visithttpholvmwarecom to continue your lab experience online
Lab SKU HOL-1926-03-NET
Version 20181104-143822
HOL-1926-03-NET
Page 100HOL-1926-03-NET
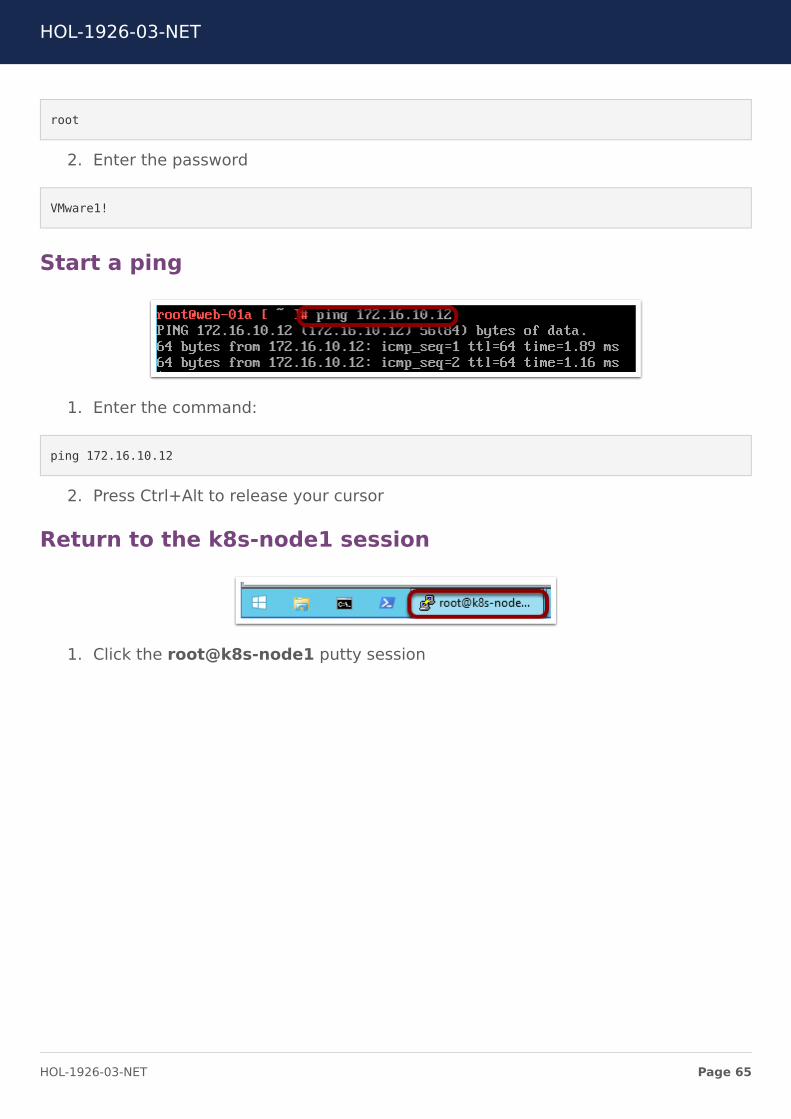

Review the Output
Review the output of the tcpdump command The traffic displayed is from the monitorsession configured earlier notice there is no traffic sourced or destined for the k8s-node1 VM Only mirrored traffic is shown
HOL-1926-03-NET
Page 66HOL-1926-03-NET
Module 2 - ConclusionThis now completes Module 2 on NSX-T Datacenter Troubleshooting In this module youreviewed common troubleshooting tools and activities within NSX-T Datacenter Youused these tools to gain an understanding of what to do when troubleshooting adataplane issue within NSX-T Datacenter system
The activities reviewed in the module were
bull Routing Tablesbull MAC VTEP and ARP Tablesbull Port Mirroring
Youve finished Module 2
Congratulations on completing Module 2
If you are looking for additional information on NSX-T Datacenter Troubleshooting thenplease review the NSX-T Documentation Center via the URL below
bull Go to httpstinyurlcomyc6q794n
Proceed to any module below which interests you the most
Lab Module List
bull Module 1 - NSX-T Datacenter Operations - Use Tools within NSX-T Datacenter forDay to Day Operations (15 minutes) - Intermediate - This module will walk youthrough the basics of NSX-T Datacenter operations You will use features such asTraceflow Port Connection tool and others
bull Module 2 - NSX-T Datacenter Troubleshooting - Use Tools within NSX-T Datacenterfor Troubleshooting (15 minutes)- Intermediate - This module will walk youthrough the basics of NSX-T Datacenter troubleshooting You will view varioussystem configurations and correct misconfigurations after problem identification
bull Module 3 - API Consumption - Gain Familiarity with the NSX-T API (30 minutes) -Advanced - This module will explore the basics of NSX API consumption throughmanual interaction as well as several common configuration management tools
Lab Captain
bull Module 1 - 3 Kenyon Hensler Staff Systems Engineer United States
HOL-1926-03-NET
Page 67HOL-1926-03-NET
How to End Lab
To end your lab click on the END button
HOL-1926-03-NET
Page 68HOL-1926-03-NET
Module 3 - APIConsumption - Gain
Familiarity with the NSX-TAPI (30 minutes)
HOL-1926-03-NET
Page 69HOL-1926-03-NET
NSX RESTful APINSX is designed ground up with a RESTful API The NSX REST API can be used to bothconfigure NSX and to provision NSX logical network services The NSX REST API can becalled directly or indirectly from various programming languages Many orchestrationand automation tools such as vRealize Automation via vRealize Orchestrator can call theNSX REST API to perform Layer 2 through Layer 7 network orchestration andautomation
To demonstrate NSX RESTful API calls you will be using the RESTClient extension to theMozilla Firefox browser RESTClient is a debugger for RESTful Web Services and is auseful tool when working with various REST APIs
During this module the following tasks will be completed
bull Overview of RESTful APIsbull Overview of Powershell cmdletsbull Review of multiple NSX API callsbull Creation and deletion of NSX Objectsbull Configuration of alarming available only via the NSX API
Introduction to REST APIs
A REpresentational State Transfer (REST) API defines a set of simple principles which areloosely followed by most API implementations
HOL-1926-03-NET
Page 70HOL-1926-03-NET
bull Resource (the source of specific information)bull Global Permanent Identifier (every resource is uniquely identified ndash think HTTP
URL)bull Standard Interface (used to exchange the representation of resources ndash think
the HTTP protocol)bull Set of Constraints
REST leverages the strength of HTTP to send data (Headers and Bodies) between Clientsand Servers
The term Uniform Resource Locator (URL) and Uniform Resource Identifier (URI) can beused interchangeably when working with REST
Resources (building blocks) are linked together by embedded hyperlinks in HTMLdocuments or URI references and resources can expose the state via representationscontaining both metadata (such as size media type or character set) and content(binary image or text document)
REST Request Methods
REST Clients specify the desired interaction (HTTP request message as defined by RFC2616) Each HTTP method has specific well-defined semantics within the context of aREST APIrsquos resource model
bull GET - (The purpose of GET is to retrieve a representation of a resourcersquos state)including Response Headers and Body
bull HEAD - is used to retrieve the metadata associated with the resourcersquos state orjust the Response Headers
bull PUT - should be used to add a new resource to a store or update a resourcebull DELETE - removes a resource from its parentbull POST - should be used to create a new resource
HOL-1926-03-NET
Page 71HOL-1926-03-NET
REST Response Status Codes
The REST APIs use a HTTP response message to inform clients of their requestrsquos result(as defined in RFC 2616) Five categories are defined
bull 1xx Informational Communicates transfer protocol-level informationbull 2xx Success Indicates that the clientrsquos request was accepted successfulbull 3xx Redirection Indicates that the client must take some additional action in
order to complete their requestbull 4xx Client Error This category of error status codes points the finger at clientsbull 5xx Server Error The server takes responsibility for these error status codes
HTTP response message to inform clients of their requestrsquos result (As Defined in RFC2616)
bull 200 OKbull 201 Createdbull 202 Acceptedbull 204 No contentbull 400 Bad requestbull 401 Unauthorizedbull 403 Forbiddenbull 404 Not foundbull 405 Method Not Allowedbull 409 Conflictbull 500 Internal Server Errorbull 501 Not implementedbull 503 Service unavailable
HTTP Request Headers for the NSX RESTful API
When configuring RESTful APIs to provision NSX services the following are a list of theimportant request headers
1 Authorization The user and password credential in Base64 encoded format
HOL-1926-03-NET
Page 72HOL-1926-03-NET
2 Content-Type applicationxml Says that the request bodypayload is in xmlformat
HTTP Requests for the NSX RESTful API
1 MethodVerb GETPUTPOSTDELETE Action on the resource2 URL Resource3 Headers Authorization and Content-Type4 Body XML Payload5 Status Code 2xx For Success and 4xx and 5xx for Failures
OpenAPI Specification
The NSX-T Datacenter OpenAPI Specification is available from NSX-T Manager at
bull GET httpsltnsx-mgrgtapiv1specopenapinsx_apiyamlbull GET httpsltnsx-mgrgtapiv1specopenapinsx_apijson
HOL-1926-03-NET
Page 73HOL-1926-03-NET
This specification allows API users to quickly consume all methods available from NSX-TDatacenter This documentation is generated for every NSX-T Datacenter release
HOL-1926-03-NET
Page 74HOL-1926-03-NET
Manual ConsumptionOne of the methods to consume the NSX-T Datacenter API is through manuallyinteracting with the API This can be done with many different tools This lesson willexplore the use of Postman and cURL
Open Postman
1 Click the Windows Button2 Type Postman3 Click Postman
HOL-1926-03-NET
Page 75HOL-1926-03-NET
Close the Create a New Dialog
1 Click X
Create an Authorization Header
An authorization header will authenticate the session with the NSX-T Datacenter API
1 Switch the Type to Basic Auth2 The Username and Password will be automatically populated3 Click Update Request
Enter the URI to GET All Logical Switches
1 Ensure the method is set to GET2 Enter
httpsnsxmgr-01aapiv1logical-switches
3 Click Send
HOL-1926-03-NET
Page 76HOL-1926-03-NET
Review the Output
By reviewing the output of the request administrators can inspect all Logical Switchescreated This information includes all of the required information associated with thisLogical Switch This information can also be used as a template to create a LogicalSwitch By reviewing the required components of a Logical Switch creation in the APIGuide these values can be completed with the values of a Logical switch that meets thesame requirement as the new Logical Switch
Generate a cURL Command
Postman will generate code for many languages from your request This allows for easyscripting of API requests
1 Click Code2 Select cURL on the drop down3 Click Copy to Clipboard
HOL-1926-03-NET
Page 77HOL-1926-03-NET
Open Putty
1 Click on the Putty icon
If putty is already open right-click the putty window and select ldquoputtyrdquo
Open a Connection to api-01a
1 Enter 1921681101042 Click Open
Login to api-01a
Login using the username
HOL-1926-03-NET
Page 78HOL-1926-03-NET
admin
Password
VMware1
Execute the cURL Command
1 Paste the cURL command by right clicking in the Putty window2 Append the command with
ltSPACEgt -k
3 Be sure to include the space before -k This option ignores invalid certificates4 Execute the command
HOL-1926-03-NET
Page 79HOL-1926-03-NET
Review the Output
1 Scroll to the top of the Putty session2 Review the output This output will match the output from Postman
cURL can be used for all API functions and may be used in conjunction with othercommand line tools such as grep sed and awk to build complex create update anddestroy functions
HOL-1926-03-NET
Page 80HOL-1926-03-NET
Terraform ConsumptionTerraform is a tool that allows for the creation of sharable configuration files that createand change infrastructure Terraform has released an NSX-T Datacenter Module thatallows for the configuration of NSX-T Datacenter objects
Open Putty
If a putty session to api-01a is already open skip the step labeled Open thelogicalswitchtf File
1 Click on the Putty icon
If putty is already open right-click the putty window and select ldquoputtyrdquo
Open a Connection to api-01a
HOL-1926-03-NET
Page 81HOL-1926-03-NET
1 Select api-01acorplocal2 Click Load3 Click Open
Login to api-01a
Login using the username
admin
Password
VMware1
Open the logicalswitchtf File
1 Switch to the api1 directory
cd api1
2 Open the logicalswitchtf file
vi logicalswitchtf
HOL-1926-03-NET
Page 82HOL-1926-03-NET
Review the File
Review the file by using the arrow keys to move to the top and bottom of the fileNotice the resource section This section will create a NSX-T Datacenter Logical SwitchOnce you have completed reviewing the file exit the vi editor
1 Type
q
HOL-1926-03-NET
Page 83HOL-1926-03-NET
Verify the logicalswitchtf File
1 Enter the command
terraform plan
This command will verify the required data and plugins for terraform to complete theaction
HOL-1926-03-NET
Page 84HOL-1926-03-NET
Apply the logicalswitchtf File
1 Enter the command
terraform apply
2 Type
yes
HOL-1926-03-NET
Page 85HOL-1926-03-NET
Review the Output
The output of the command shows the Logical Switch TfLogicalSwitch was created
Open Chrome Browser from Windows Quick Launch TaskBar
1 Click on the Chrome Icon on the Windows Quick Launch Task Bar
Navigate to NSX-T Manager
1 Click on the VMware NSX | Login bookmark
HOL-1926-03-NET
Page 86HOL-1926-03-NET
Login to NSX-T Manager
Login to NSX Manager
1 Enter the username admin2 Enter the password VMware13 Click Login
HOL-1926-03-NET
Page 87HOL-1926-03-NET
View the Logical Switch
1 Click Switching2 Select the Switches tab3 Notice the Logical Switch TfLogicalSwitch
If the Logical Switch is not visibile refresh the page
Delete the Logical Switch
Delete the Logical Switch to avoid confusion in the next part of the lesson
HOL-1926-03-NET
Page 88HOL-1926-03-NET
1 Select the TfLogicalSwitch2 Click Delete3 Click Delete
Return to the Putty Session
1 Click the Putty Session
Open the infratf File
1 Switch to the api2 directory
cd api2
2 Enter the command
vi infratf
HOL-1926-03-NET
Page 89HOL-1926-03-NET
Review the File
Review the file by using the arrow keys to move to the top and bottom of the fileNotice the many resource sections This file will create a Tier 1 router connect the Tier
1 router to the Tier 0 router create a Logical Switch attach the Tier 1 router to thelogical switch and assign an IP address to the Tier 1 interface on the logical switchThis is a common action for tenant creation in an environment Once you have
completed reviewing the file exit the vi editor
1 Type
q
HOL-1926-03-NET
Page 90HOL-1926-03-NET
Verify the infratf File
1 Enter the command
terraform plan
Apply the infratf File
1 Enter the command
HOL-1926-03-NET
Page 91HOL-1926-03-NET
terraform apply
Confirm the Apply
1 Type
yes
Review the Output
Review the output of the command Many actions were preformed Scroll up to viewthe complete output
Return to NSX Manager
Return to NSX Manager to review the configuration
1 Click VMware NSX Chrome window
HOL-1926-03-NET
Page 92HOL-1926-03-NET
Login to NSX-T Manager
If the session has timed out login to NSX Manager If the session is still active skip thisstep
1 Enter the username admin2 Enter the password VMware13 Click Login
HOL-1926-03-NET
Page 93HOL-1926-03-NET
Refresh Switches
1 Click REFRESH2 Notice the TfLogicalSwitch2 Switch
HOL-1926-03-NET
Page 94HOL-1926-03-NET
Review Tier 1 Router
1 Click Routing2 Select the T1-Terraform Logical Router
Review the Summary
3 Click Configuration4 Click Router Ports
HOL-1926-03-NET
Page 95HOL-1926-03-NET
Review the IP Address Assignments
The IP address 17216401 was specified in the infratf file as a variable The nextaddress may vary by lab This address is automatically configured from a pool ofaddresses for use in connecting Tier 0 routers to Tier 1 routers
Return to the Putty Session
1 Click the Putty Session
Ping the Router Address
1 Enter
ping 17216401 -c 3
The ping should be successful This IP address is being advertised from the newlycreated Tier 1 router through the Tier 0 router to the vPOD router via BGP
HOL-1926-03-NET
Page 96HOL-1926-03-NET
Remove the configuration
Terraform will also remove previously created configurations
1 Enter the command
terraform destroy
2 Confirm the removal
yes
HOL-1926-03-NET
Page 97HOL-1926-03-NET
Review the Output
The command successfully removed the configuration This is a common action in theremoval of an application or tenant from an infrastructure as code environment
HOL-1926-03-NET
Page 98HOL-1926-03-NET
Module 3 ConclusionThis module utilized the NSX API to configure multiple NSX objects The NSX APIprovides a powerful tool for configuration troubleshooting and monitoring
Youve finished Module 3
Congratulations on completing Module 3
For additional information on the NSX API visit the URL below and select the NSX APIGuide
bull Go to httpstinyurlcomyc6q794n
Proceed to any module below or end the lab
Lab Module List
bull Module 1 - NSX-T Datacenter Operations - Use Tools within NSX-TDatacenter for Day to Day Operations (15 minutes) - Intermediate - Thismodule will walk you through the basics of NSX-T Datacenter operations You willuse features such as Traceflow Port Connection tool and others
bull Module 2 - NSX-T Datacenter Troubleshooting - Use Tools within NSX-TDatacenter for Troubleshooting (15 minutes) - Intermediate - This modulewill walk you through the basics of NSX-T Datacenter troubleshooting You willview various system configurations and correct misconfigurations after problemidentification
bull Module 3 - API Consumption - Gain Familiarity with the NSX-T API (30minutes) - Advanced - This module will explore the basics of NSX APIconsumption through manual interaction as well as several commonconfiguration management tools
Lab Captain
bull Module 1 - 3 Kenyon Hensler Staff Systems Engineer United States
How to End Lab
To end the lab click on the END button
HOL-1926-03-NET
Page 99HOL-1926-03-NET
ConclusionThank you for participating in the VMware Hands-on Labs Be sure to visithttpholvmwarecom to continue your lab experience online
Lab SKU HOL-1926-03-NET
Version 20181104-143822
HOL-1926-03-NET
Page 100HOL-1926-03-NET
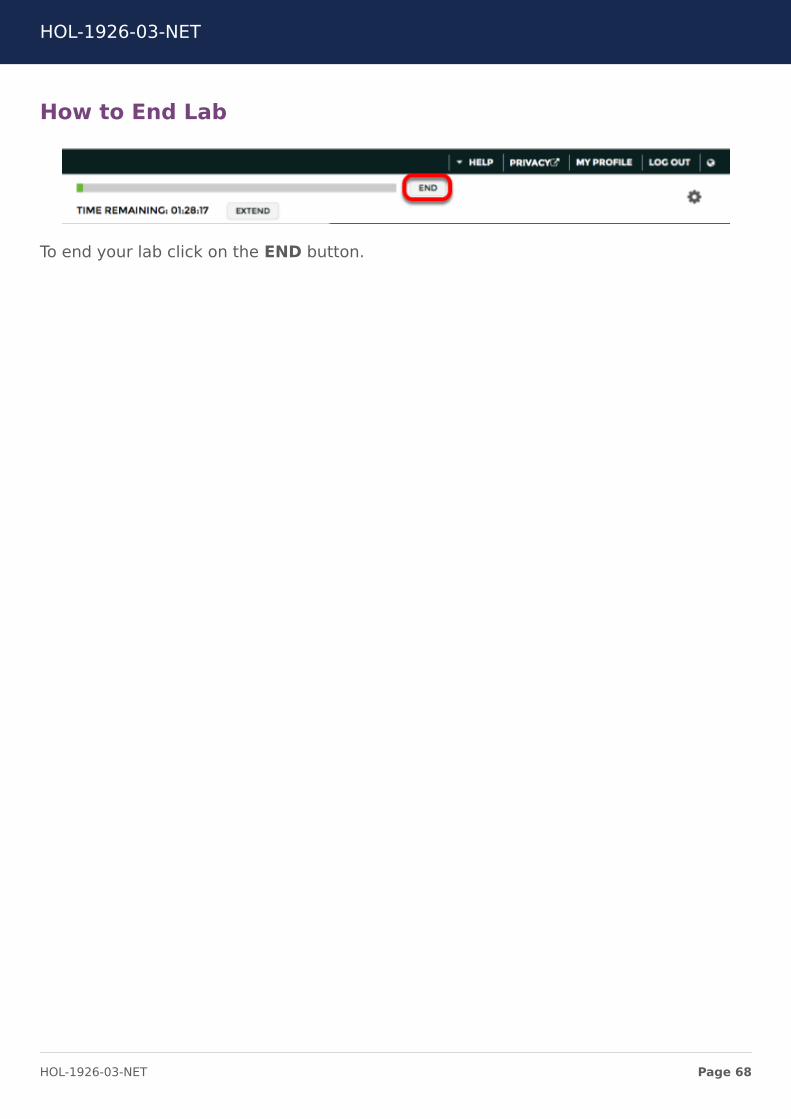
How to End Lab
To end your lab click on the END button
HOL-1926-03-NET
Page 68HOL-1926-03-NET
Module 3 - APIConsumption - Gain
Familiarity with the NSX-TAPI (30 minutes)
HOL-1926-03-NET
Page 69HOL-1926-03-NET
NSX RESTful APINSX is designed ground up with a RESTful API The NSX REST API can be used to bothconfigure NSX and to provision NSX logical network services The NSX REST API can becalled directly or indirectly from various programming languages Many orchestrationand automation tools such as vRealize Automation via vRealize Orchestrator can call theNSX REST API to perform Layer 2 through Layer 7 network orchestration andautomation
To demonstrate NSX RESTful API calls you will be using the RESTClient extension to theMozilla Firefox browser RESTClient is a debugger for RESTful Web Services and is auseful tool when working with various REST APIs
During this module the following tasks will be completed
bull Overview of RESTful APIsbull Overview of Powershell cmdletsbull Review of multiple NSX API callsbull Creation and deletion of NSX Objectsbull Configuration of alarming available only via the NSX API
Introduction to REST APIs
A REpresentational State Transfer (REST) API defines a set of simple principles which areloosely followed by most API implementations
HOL-1926-03-NET
Page 70HOL-1926-03-NET
bull Resource (the source of specific information)bull Global Permanent Identifier (every resource is uniquely identified ndash think HTTP
URL)bull Standard Interface (used to exchange the representation of resources ndash think
the HTTP protocol)bull Set of Constraints
REST leverages the strength of HTTP to send data (Headers and Bodies) between Clientsand Servers
The term Uniform Resource Locator (URL) and Uniform Resource Identifier (URI) can beused interchangeably when working with REST
Resources (building blocks) are linked together by embedded hyperlinks in HTMLdocuments or URI references and resources can expose the state via representationscontaining both metadata (such as size media type or character set) and content(binary image or text document)
REST Request Methods
REST Clients specify the desired interaction (HTTP request message as defined by RFC2616) Each HTTP method has specific well-defined semantics within the context of aREST APIrsquos resource model
bull GET - (The purpose of GET is to retrieve a representation of a resourcersquos state)including Response Headers and Body
bull HEAD - is used to retrieve the metadata associated with the resourcersquos state orjust the Response Headers
bull PUT - should be used to add a new resource to a store or update a resourcebull DELETE - removes a resource from its parentbull POST - should be used to create a new resource
HOL-1926-03-NET
Page 71HOL-1926-03-NET
REST Response Status Codes
The REST APIs use a HTTP response message to inform clients of their requestrsquos result(as defined in RFC 2616) Five categories are defined
bull 1xx Informational Communicates transfer protocol-level informationbull 2xx Success Indicates that the clientrsquos request was accepted successfulbull 3xx Redirection Indicates that the client must take some additional action in
order to complete their requestbull 4xx Client Error This category of error status codes points the finger at clientsbull 5xx Server Error The server takes responsibility for these error status codes
HTTP response message to inform clients of their requestrsquos result (As Defined in RFC2616)
bull 200 OKbull 201 Createdbull 202 Acceptedbull 204 No contentbull 400 Bad requestbull 401 Unauthorizedbull 403 Forbiddenbull 404 Not foundbull 405 Method Not Allowedbull 409 Conflictbull 500 Internal Server Errorbull 501 Not implementedbull 503 Service unavailable
HTTP Request Headers for the NSX RESTful API
When configuring RESTful APIs to provision NSX services the following are a list of theimportant request headers
1 Authorization The user and password credential in Base64 encoded format
HOL-1926-03-NET
Page 72HOL-1926-03-NET
2 Content-Type applicationxml Says that the request bodypayload is in xmlformat
HTTP Requests for the NSX RESTful API
1 MethodVerb GETPUTPOSTDELETE Action on the resource2 URL Resource3 Headers Authorization and Content-Type4 Body XML Payload5 Status Code 2xx For Success and 4xx and 5xx for Failures
OpenAPI Specification
The NSX-T Datacenter OpenAPI Specification is available from NSX-T Manager at
bull GET httpsltnsx-mgrgtapiv1specopenapinsx_apiyamlbull GET httpsltnsx-mgrgtapiv1specopenapinsx_apijson
HOL-1926-03-NET
Page 73HOL-1926-03-NET
This specification allows API users to quickly consume all methods available from NSX-TDatacenter This documentation is generated for every NSX-T Datacenter release
HOL-1926-03-NET
Page 74HOL-1926-03-NET
Manual ConsumptionOne of the methods to consume the NSX-T Datacenter API is through manuallyinteracting with the API This can be done with many different tools This lesson willexplore the use of Postman and cURL
Open Postman
1 Click the Windows Button2 Type Postman3 Click Postman
HOL-1926-03-NET
Page 75HOL-1926-03-NET
Close the Create a New Dialog
1 Click X
Create an Authorization Header
An authorization header will authenticate the session with the NSX-T Datacenter API
1 Switch the Type to Basic Auth2 The Username and Password will be automatically populated3 Click Update Request
Enter the URI to GET All Logical Switches
1 Ensure the method is set to GET2 Enter
httpsnsxmgr-01aapiv1logical-switches
3 Click Send
HOL-1926-03-NET
Page 76HOL-1926-03-NET
Review the Output
By reviewing the output of the request administrators can inspect all Logical Switchescreated This information includes all of the required information associated with thisLogical Switch This information can also be used as a template to create a LogicalSwitch By reviewing the required components of a Logical Switch creation in the APIGuide these values can be completed with the values of a Logical switch that meets thesame requirement as the new Logical Switch
Generate a cURL Command
Postman will generate code for many languages from your request This allows for easyscripting of API requests
1 Click Code2 Select cURL on the drop down3 Click Copy to Clipboard
HOL-1926-03-NET
Page 77HOL-1926-03-NET
Open Putty
1 Click on the Putty icon
If putty is already open right-click the putty window and select ldquoputtyrdquo
Open a Connection to api-01a
1 Enter 1921681101042 Click Open
Login to api-01a
Login using the username
HOL-1926-03-NET
Page 78HOL-1926-03-NET
admin
Password
VMware1
Execute the cURL Command
1 Paste the cURL command by right clicking in the Putty window2 Append the command with
ltSPACEgt -k
3 Be sure to include the space before -k This option ignores invalid certificates4 Execute the command
HOL-1926-03-NET
Page 79HOL-1926-03-NET
Review the Output
1 Scroll to the top of the Putty session2 Review the output This output will match the output from Postman
cURL can be used for all API functions and may be used in conjunction with othercommand line tools such as grep sed and awk to build complex create update anddestroy functions
HOL-1926-03-NET
Page 80HOL-1926-03-NET
Terraform ConsumptionTerraform is a tool that allows for the creation of sharable configuration files that createand change infrastructure Terraform has released an NSX-T Datacenter Module thatallows for the configuration of NSX-T Datacenter objects
Open Putty
If a putty session to api-01a is already open skip the step labeled Open thelogicalswitchtf File
1 Click on the Putty icon
If putty is already open right-click the putty window and select ldquoputtyrdquo
Open a Connection to api-01a
HOL-1926-03-NET
Page 81HOL-1926-03-NET
1 Select api-01acorplocal2 Click Load3 Click Open
Login to api-01a
Login using the username
admin
Password
VMware1
Open the logicalswitchtf File
1 Switch to the api1 directory
cd api1
2 Open the logicalswitchtf file
vi logicalswitchtf
HOL-1926-03-NET
Page 82HOL-1926-03-NET
Review the File
Review the file by using the arrow keys to move to the top and bottom of the fileNotice the resource section This section will create a NSX-T Datacenter Logical SwitchOnce you have completed reviewing the file exit the vi editor
1 Type
q
HOL-1926-03-NET
Page 83HOL-1926-03-NET
Verify the logicalswitchtf File
1 Enter the command
terraform plan
This command will verify the required data and plugins for terraform to complete theaction
HOL-1926-03-NET
Page 84HOL-1926-03-NET
Apply the logicalswitchtf File
1 Enter the command
terraform apply
2 Type
yes
HOL-1926-03-NET
Page 85HOL-1926-03-NET
Review the Output
The output of the command shows the Logical Switch TfLogicalSwitch was created
Open Chrome Browser from Windows Quick Launch TaskBar
1 Click on the Chrome Icon on the Windows Quick Launch Task Bar
Navigate to NSX-T Manager
1 Click on the VMware NSX | Login bookmark
HOL-1926-03-NET
Page 86HOL-1926-03-NET
Login to NSX-T Manager
Login to NSX Manager
1 Enter the username admin2 Enter the password VMware13 Click Login
HOL-1926-03-NET
Page 87HOL-1926-03-NET
View the Logical Switch
1 Click Switching2 Select the Switches tab3 Notice the Logical Switch TfLogicalSwitch
If the Logical Switch is not visibile refresh the page
Delete the Logical Switch
Delete the Logical Switch to avoid confusion in the next part of the lesson
HOL-1926-03-NET
Page 88HOL-1926-03-NET
1 Select the TfLogicalSwitch2 Click Delete3 Click Delete
Return to the Putty Session
1 Click the Putty Session
Open the infratf File
1 Switch to the api2 directory
cd api2
2 Enter the command
vi infratf
HOL-1926-03-NET
Page 89HOL-1926-03-NET
Review the File
Review the file by using the arrow keys to move to the top and bottom of the fileNotice the many resource sections This file will create a Tier 1 router connect the Tier
1 router to the Tier 0 router create a Logical Switch attach the Tier 1 router to thelogical switch and assign an IP address to the Tier 1 interface on the logical switchThis is a common action for tenant creation in an environment Once you have
completed reviewing the file exit the vi editor
1 Type
q
HOL-1926-03-NET
Page 90HOL-1926-03-NET
Verify the infratf File
1 Enter the command
terraform plan
Apply the infratf File
1 Enter the command
HOL-1926-03-NET
Page 91HOL-1926-03-NET
terraform apply
Confirm the Apply
1 Type
yes
Review the Output
Review the output of the command Many actions were preformed Scroll up to viewthe complete output
Return to NSX Manager
Return to NSX Manager to review the configuration
1 Click VMware NSX Chrome window
HOL-1926-03-NET
Page 92HOL-1926-03-NET
Login to NSX-T Manager
If the session has timed out login to NSX Manager If the session is still active skip thisstep
1 Enter the username admin2 Enter the password VMware13 Click Login
HOL-1926-03-NET
Page 93HOL-1926-03-NET
Refresh Switches
1 Click REFRESH2 Notice the TfLogicalSwitch2 Switch
HOL-1926-03-NET
Page 94HOL-1926-03-NET
Review Tier 1 Router
1 Click Routing2 Select the T1-Terraform Logical Router
Review the Summary
3 Click Configuration4 Click Router Ports
HOL-1926-03-NET
Page 95HOL-1926-03-NET
Review the IP Address Assignments
The IP address 17216401 was specified in the infratf file as a variable The nextaddress may vary by lab This address is automatically configured from a pool ofaddresses for use in connecting Tier 0 routers to Tier 1 routers
Return to the Putty Session
1 Click the Putty Session
Ping the Router Address
1 Enter
ping 17216401 -c 3
The ping should be successful This IP address is being advertised from the newlycreated Tier 1 router through the Tier 0 router to the vPOD router via BGP
HOL-1926-03-NET
Page 96HOL-1926-03-NET
Remove the configuration
Terraform will also remove previously created configurations
1 Enter the command
terraform destroy
2 Confirm the removal
yes
HOL-1926-03-NET
Page 97HOL-1926-03-NET
Review the Output
The command successfully removed the configuration This is a common action in theremoval of an application or tenant from an infrastructure as code environment
HOL-1926-03-NET
Page 98HOL-1926-03-NET
Module 3 ConclusionThis module utilized the NSX API to configure multiple NSX objects The NSX APIprovides a powerful tool for configuration troubleshooting and monitoring
Youve finished Module 3
Congratulations on completing Module 3
For additional information on the NSX API visit the URL below and select the NSX APIGuide
bull Go to httpstinyurlcomyc6q794n
Proceed to any module below or end the lab
Lab Module List
bull Module 1 - NSX-T Datacenter Operations - Use Tools within NSX-TDatacenter for Day to Day Operations (15 minutes) - Intermediate - Thismodule will walk you through the basics of NSX-T Datacenter operations You willuse features such as Traceflow Port Connection tool and others
bull Module 2 - NSX-T Datacenter Troubleshooting - Use Tools within NSX-TDatacenter for Troubleshooting (15 minutes) - Intermediate - This modulewill walk you through the basics of NSX-T Datacenter troubleshooting You willview various system configurations and correct misconfigurations after problemidentification
bull Module 3 - API Consumption - Gain Familiarity with the NSX-T API (30minutes) - Advanced - This module will explore the basics of NSX APIconsumption through manual interaction as well as several commonconfiguration management tools
Lab Captain
bull Module 1 - 3 Kenyon Hensler Staff Systems Engineer United States
How to End Lab
To end the lab click on the END button
HOL-1926-03-NET
Page 99HOL-1926-03-NET
ConclusionThank you for participating in the VMware Hands-on Labs Be sure to visithttpholvmwarecom to continue your lab experience online
Lab SKU HOL-1926-03-NET
Version 20181104-143822
HOL-1926-03-NET
Page 100HOL-1926-03-NET
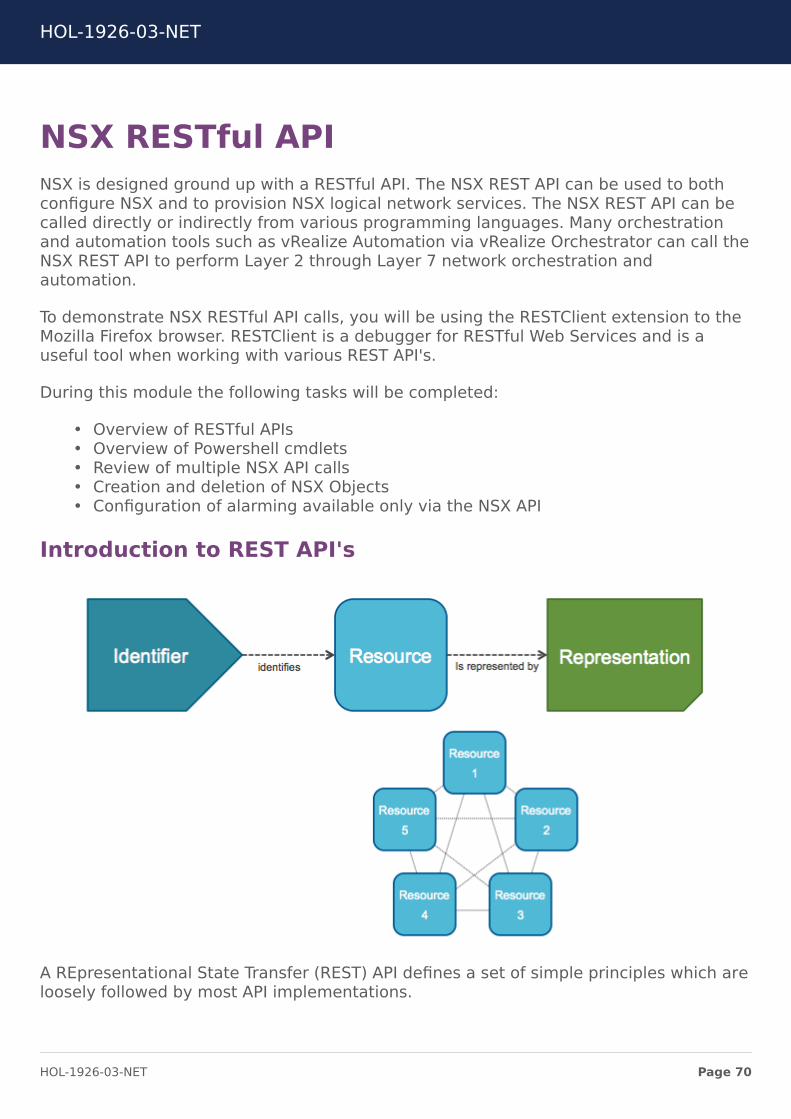
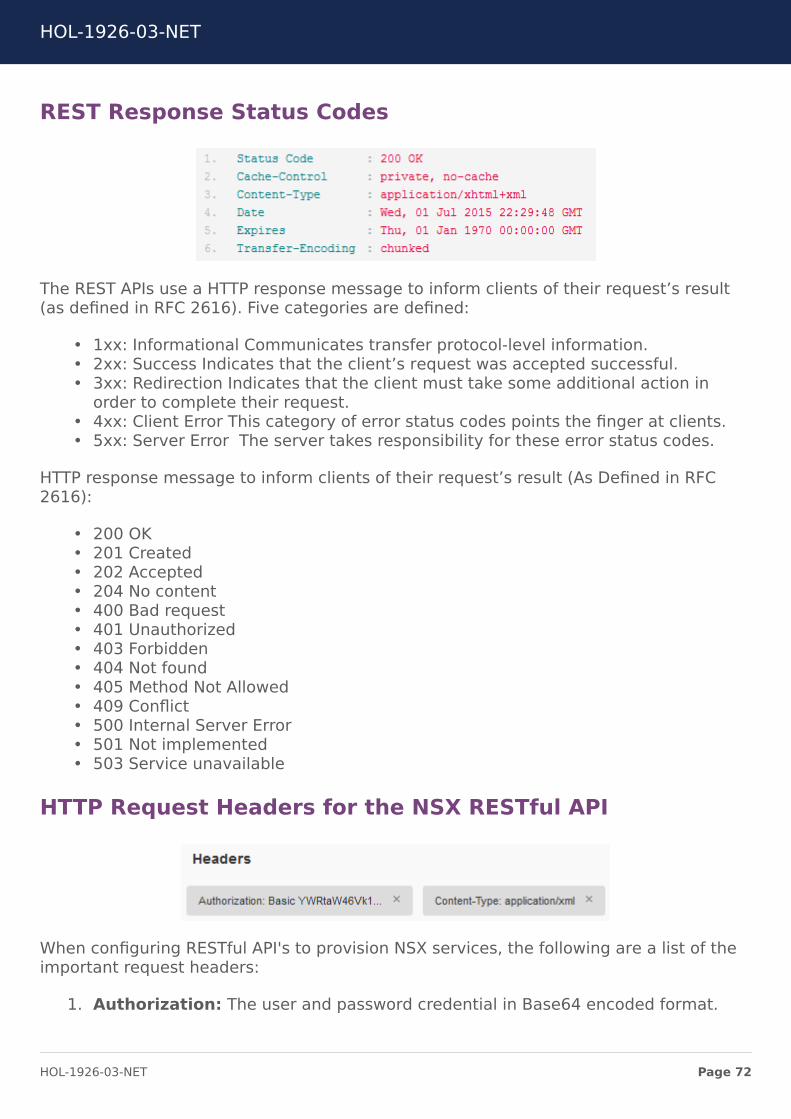
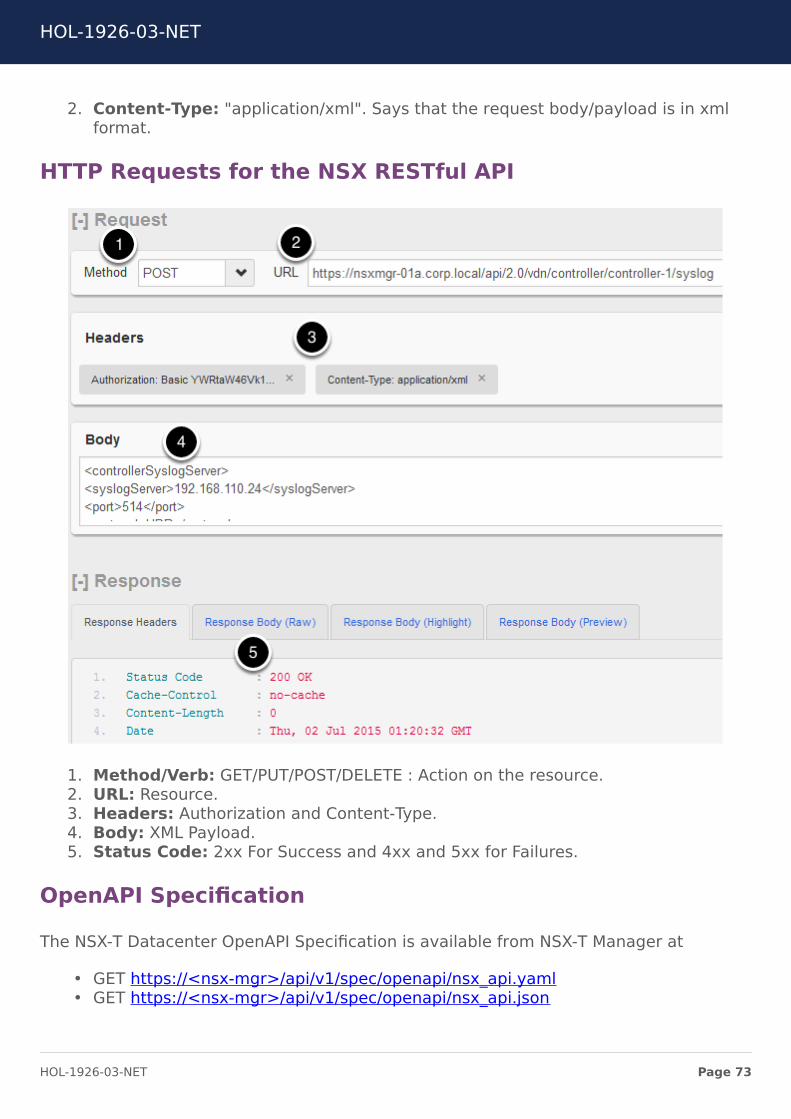
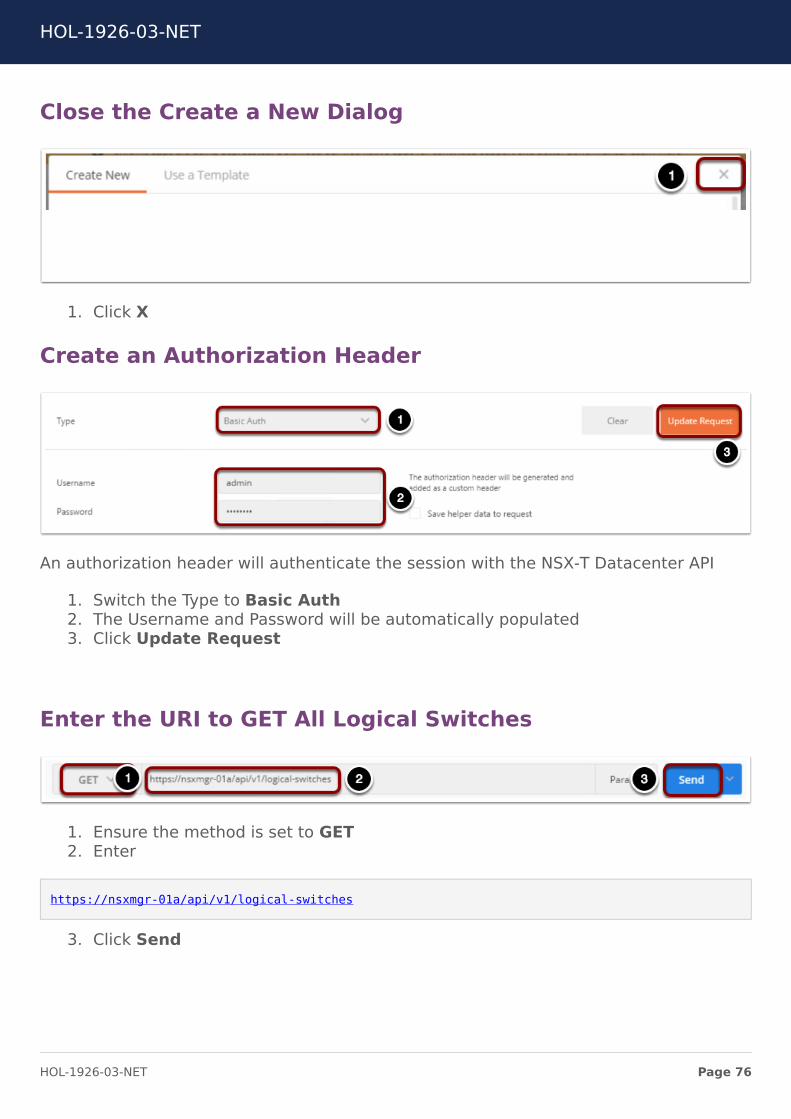
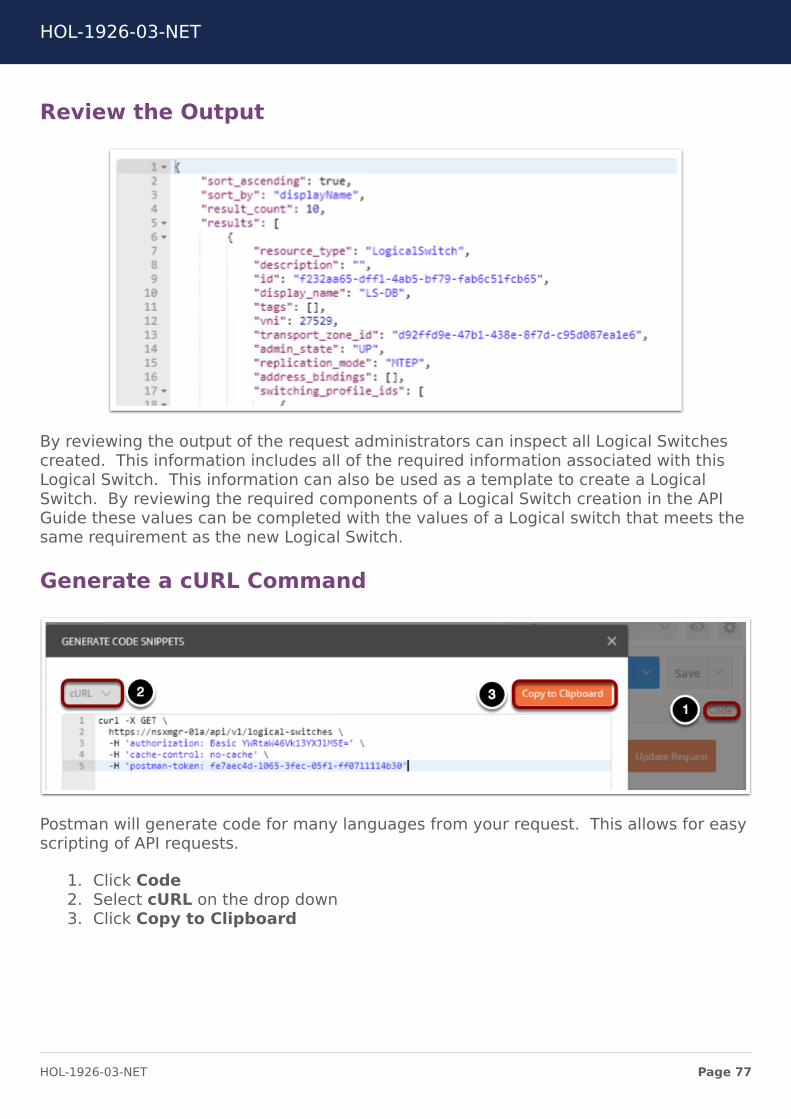
Review the Output
By reviewing the output of the request administrators can inspect all Logical Switchescreated This information includes all of the required information associated with thisLogical Switch This information can also be used as a template to create a LogicalSwitch By reviewing the required components of a Logical Switch creation in the APIGuide these values can be completed with the values of a Logical switch that meets thesame requirement as the new Logical Switch
Generate a cURL Command
Postman will generate code for many languages from your request This allows for easyscripting of API requests
1 Click Code2 Select cURL on the drop down3 Click Copy to Clipboard
HOL-1926-03-NET
Page 77HOL-1926-03-NET
Open Putty
1 Click on the Putty icon
If putty is already open right-click the putty window and select ldquoputtyrdquo
Open a Connection to api-01a
1 Enter 1921681101042 Click Open
Login to api-01a
Login using the username
HOL-1926-03-NET
Page 78HOL-1926-03-NET
admin
Password
VMware1
Execute the cURL Command
1 Paste the cURL command by right clicking in the Putty window2 Append the command with
ltSPACEgt -k
3 Be sure to include the space before -k This option ignores invalid certificates4 Execute the command
HOL-1926-03-NET
Page 79HOL-1926-03-NET
Review the Output
1 Scroll to the top of the Putty session2 Review the output This output will match the output from Postman
cURL can be used for all API functions and may be used in conjunction with othercommand line tools such as grep sed and awk to build complex create update anddestroy functions
HOL-1926-03-NET
Page 80HOL-1926-03-NET
Terraform ConsumptionTerraform is a tool that allows for the creation of sharable configuration files that createand change infrastructure Terraform has released an NSX-T Datacenter Module thatallows for the configuration of NSX-T Datacenter objects
Open Putty
If a putty session to api-01a is already open skip the step labeled Open thelogicalswitchtf File
1 Click on the Putty icon
If putty is already open right-click the putty window and select ldquoputtyrdquo
Open a Connection to api-01a
HOL-1926-03-NET
Page 81HOL-1926-03-NET
1 Select api-01acorplocal2 Click Load3 Click Open
Login to api-01a
Login using the username
admin
Password
VMware1
Open the logicalswitchtf File
1 Switch to the api1 directory
cd api1
2 Open the logicalswitchtf file
vi logicalswitchtf
HOL-1926-03-NET
Page 82HOL-1926-03-NET
Review the File
Review the file by using the arrow keys to move to the top and bottom of the fileNotice the resource section This section will create a NSX-T Datacenter Logical SwitchOnce you have completed reviewing the file exit the vi editor
1 Type
q
HOL-1926-03-NET
Page 83HOL-1926-03-NET
Verify the logicalswitchtf File
1 Enter the command
terraform plan
This command will verify the required data and plugins for terraform to complete theaction
HOL-1926-03-NET
Page 84HOL-1926-03-NET
Apply the logicalswitchtf File
1 Enter the command
terraform apply
2 Type
yes
HOL-1926-03-NET
Page 85HOL-1926-03-NET
Review the Output
The output of the command shows the Logical Switch TfLogicalSwitch was created
Open Chrome Browser from Windows Quick Launch TaskBar
1 Click on the Chrome Icon on the Windows Quick Launch Task Bar
Navigate to NSX-T Manager
1 Click on the VMware NSX | Login bookmark
HOL-1926-03-NET
Page 86HOL-1926-03-NET
Login to NSX-T Manager
Login to NSX Manager
1 Enter the username admin2 Enter the password VMware13 Click Login
HOL-1926-03-NET
Page 87HOL-1926-03-NET
View the Logical Switch
1 Click Switching2 Select the Switches tab3 Notice the Logical Switch TfLogicalSwitch
If the Logical Switch is not visibile refresh the page
Delete the Logical Switch
Delete the Logical Switch to avoid confusion in the next part of the lesson
HOL-1926-03-NET
Page 88HOL-1926-03-NET
1 Select the TfLogicalSwitch2 Click Delete3 Click Delete
Return to the Putty Session
1 Click the Putty Session
Open the infratf File
1 Switch to the api2 directory
cd api2
2 Enter the command
vi infratf
HOL-1926-03-NET
Page 89HOL-1926-03-NET
Review the File
Review the file by using the arrow keys to move to the top and bottom of the fileNotice the many resource sections This file will create a Tier 1 router connect the Tier
1 router to the Tier 0 router create a Logical Switch attach the Tier 1 router to thelogical switch and assign an IP address to the Tier 1 interface on the logical switchThis is a common action for tenant creation in an environment Once you have
completed reviewing the file exit the vi editor
1 Type
q
HOL-1926-03-NET
Page 90HOL-1926-03-NET
Verify the infratf File
1 Enter the command
terraform plan
Apply the infratf File
1 Enter the command
HOL-1926-03-NET
Page 91HOL-1926-03-NET
terraform apply
Confirm the Apply
1 Type
yes
Review the Output
Review the output of the command Many actions were preformed Scroll up to viewthe complete output
Return to NSX Manager
Return to NSX Manager to review the configuration
1 Click VMware NSX Chrome window
HOL-1926-03-NET
Page 92HOL-1926-03-NET
Login to NSX-T Manager
If the session has timed out login to NSX Manager If the session is still active skip thisstep
1 Enter the username admin2 Enter the password VMware13 Click Login
HOL-1926-03-NET
Page 93HOL-1926-03-NET
Refresh Switches
1 Click REFRESH2 Notice the TfLogicalSwitch2 Switch
HOL-1926-03-NET
Page 94HOL-1926-03-NET
Review Tier 1 Router
1 Click Routing2 Select the T1-Terraform Logical Router
Review the Summary
3 Click Configuration4 Click Router Ports
HOL-1926-03-NET
Page 95HOL-1926-03-NET
Review the IP Address Assignments
The IP address 17216401 was specified in the infratf file as a variable The nextaddress may vary by lab This address is automatically configured from a pool ofaddresses for use in connecting Tier 0 routers to Tier 1 routers
Return to the Putty Session
1 Click the Putty Session
Ping the Router Address
1 Enter
ping 17216401 -c 3
The ping should be successful This IP address is being advertised from the newlycreated Tier 1 router through the Tier 0 router to the vPOD router via BGP
HOL-1926-03-NET
Page 96HOL-1926-03-NET
Remove the configuration
Terraform will also remove previously created configurations
1 Enter the command
terraform destroy
2 Confirm the removal
yes
HOL-1926-03-NET
Page 97HOL-1926-03-NET
Review the Output
The command successfully removed the configuration This is a common action in theremoval of an application or tenant from an infrastructure as code environment
HOL-1926-03-NET
Page 98HOL-1926-03-NET
Module 3 ConclusionThis module utilized the NSX API to configure multiple NSX objects The NSX APIprovides a powerful tool for configuration troubleshooting and monitoring
Youve finished Module 3
Congratulations on completing Module 3
For additional information on the NSX API visit the URL below and select the NSX APIGuide
bull Go to httpstinyurlcomyc6q794n
Proceed to any module below or end the lab
Lab Module List
bull Module 1 - NSX-T Datacenter Operations - Use Tools within NSX-TDatacenter for Day to Day Operations (15 minutes) - Intermediate - Thismodule will walk you through the basics of NSX-T Datacenter operations You willuse features such as Traceflow Port Connection tool and others
bull Module 2 - NSX-T Datacenter Troubleshooting - Use Tools within NSX-TDatacenter for Troubleshooting (15 minutes) - Intermediate - This modulewill walk you through the basics of NSX-T Datacenter troubleshooting You willview various system configurations and correct misconfigurations after problemidentification
bull Module 3 - API Consumption - Gain Familiarity with the NSX-T API (30minutes) - Advanced - This module will explore the basics of NSX APIconsumption through manual interaction as well as several commonconfiguration management tools
Lab Captain
bull Module 1 - 3 Kenyon Hensler Staff Systems Engineer United States
How to End Lab
To end the lab click on the END button
HOL-1926-03-NET
Page 99HOL-1926-03-NET
ConclusionThank you for participating in the VMware Hands-on Labs Be sure to visithttpholvmwarecom to continue your lab experience online
Lab SKU HOL-1926-03-NET
Version 20181104-143822
HOL-1926-03-NET
Page 100HOL-1926-03-NET
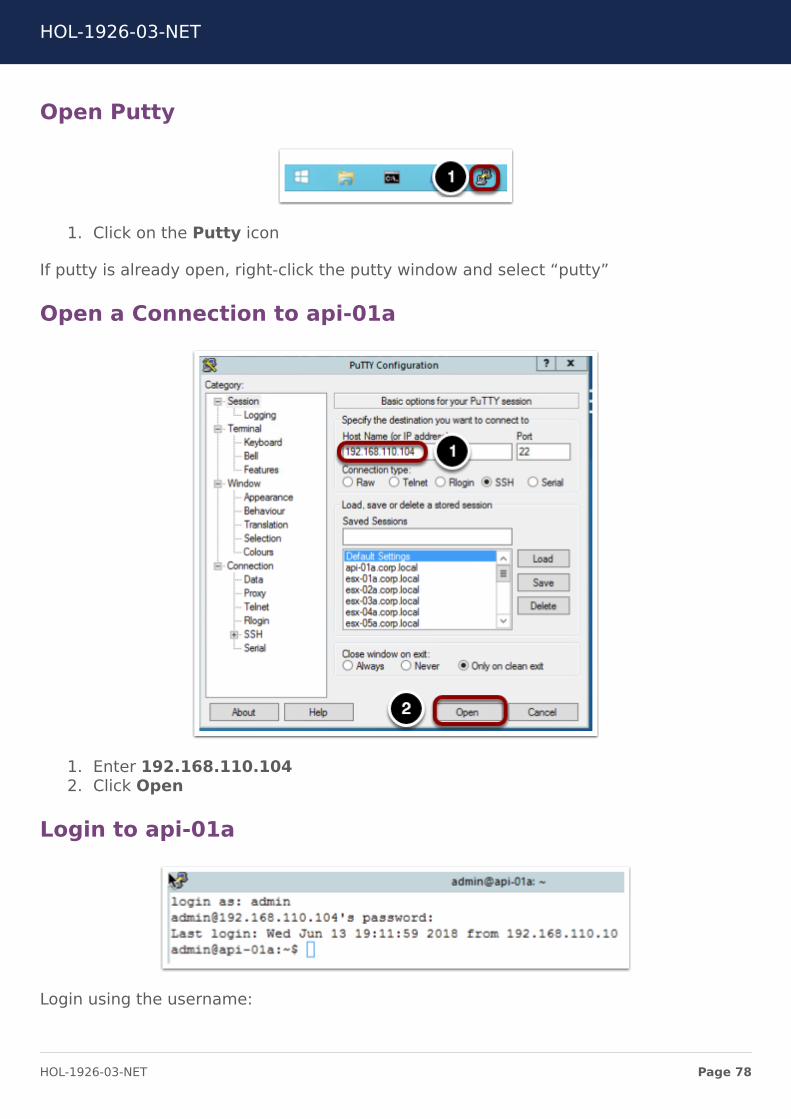
Open Putty
1 Click on the Putty icon
If putty is already open right-click the putty window and select ldquoputtyrdquo
Open a Connection to api-01a
1 Enter 1921681101042 Click Open
Login to api-01a
Login using the username
HOL-1926-03-NET
Page 78HOL-1926-03-NET
admin
Password
VMware1
Execute the cURL Command
1 Paste the cURL command by right clicking in the Putty window2 Append the command with
ltSPACEgt -k
3 Be sure to include the space before -k This option ignores invalid certificates4 Execute the command
HOL-1926-03-NET
Page 79HOL-1926-03-NET
Review the Output
1 Scroll to the top of the Putty session2 Review the output This output will match the output from Postman
cURL can be used for all API functions and may be used in conjunction with othercommand line tools such as grep sed and awk to build complex create update anddestroy functions
HOL-1926-03-NET
Page 80HOL-1926-03-NET
Terraform ConsumptionTerraform is a tool that allows for the creation of sharable configuration files that createand change infrastructure Terraform has released an NSX-T Datacenter Module thatallows for the configuration of NSX-T Datacenter objects
Open Putty
If a putty session to api-01a is already open skip the step labeled Open thelogicalswitchtf File
1 Click on the Putty icon
If putty is already open right-click the putty window and select ldquoputtyrdquo
Open a Connection to api-01a
HOL-1926-03-NET
Page 81HOL-1926-03-NET
1 Select api-01acorplocal2 Click Load3 Click Open
Login to api-01a
Login using the username
admin
Password
VMware1
Open the logicalswitchtf File
1 Switch to the api1 directory
cd api1
2 Open the logicalswitchtf file
vi logicalswitchtf
HOL-1926-03-NET
Page 82HOL-1926-03-NET
Review the File
Review the file by using the arrow keys to move to the top and bottom of the fileNotice the resource section This section will create a NSX-T Datacenter Logical SwitchOnce you have completed reviewing the file exit the vi editor
1 Type
q
HOL-1926-03-NET
Page 83HOL-1926-03-NET
Verify the logicalswitchtf File
1 Enter the command
terraform plan
This command will verify the required data and plugins for terraform to complete theaction
HOL-1926-03-NET
Page 84HOL-1926-03-NET
Apply the logicalswitchtf File
1 Enter the command
terraform apply
2 Type
yes
HOL-1926-03-NET
Page 85HOL-1926-03-NET
Review the Output
The output of the command shows the Logical Switch TfLogicalSwitch was created
Open Chrome Browser from Windows Quick Launch TaskBar
1 Click on the Chrome Icon on the Windows Quick Launch Task Bar
Navigate to NSX-T Manager
1 Click on the VMware NSX | Login bookmark
HOL-1926-03-NET
Page 86HOL-1926-03-NET
Login to NSX-T Manager
Login to NSX Manager
1 Enter the username admin2 Enter the password VMware13 Click Login
HOL-1926-03-NET
Page 87HOL-1926-03-NET
View the Logical Switch
1 Click Switching2 Select the Switches tab3 Notice the Logical Switch TfLogicalSwitch
If the Logical Switch is not visibile refresh the page
Delete the Logical Switch
Delete the Logical Switch to avoid confusion in the next part of the lesson
HOL-1926-03-NET
Page 88HOL-1926-03-NET
1 Select the TfLogicalSwitch2 Click Delete3 Click Delete
Return to the Putty Session
1 Click the Putty Session
Open the infratf File
1 Switch to the api2 directory
cd api2
2 Enter the command
vi infratf
HOL-1926-03-NET
Page 89HOL-1926-03-NET
Review the File
Review the file by using the arrow keys to move to the top and bottom of the fileNotice the many resource sections This file will create a Tier 1 router connect the Tier
1 router to the Tier 0 router create a Logical Switch attach the Tier 1 router to thelogical switch and assign an IP address to the Tier 1 interface on the logical switchThis is a common action for tenant creation in an environment Once you have
completed reviewing the file exit the vi editor
1 Type
q
HOL-1926-03-NET
Page 90HOL-1926-03-NET
Verify the infratf File
1 Enter the command
terraform plan
Apply the infratf File
1 Enter the command
HOL-1926-03-NET
Page 91HOL-1926-03-NET
terraform apply
Confirm the Apply
1 Type
yes
Review the Output
Review the output of the command Many actions were preformed Scroll up to viewthe complete output
Return to NSX Manager
Return to NSX Manager to review the configuration
1 Click VMware NSX Chrome window
HOL-1926-03-NET
Page 92HOL-1926-03-NET
Login to NSX-T Manager
If the session has timed out login to NSX Manager If the session is still active skip thisstep
1 Enter the username admin2 Enter the password VMware13 Click Login
HOL-1926-03-NET
Page 93HOL-1926-03-NET
Refresh Switches
1 Click REFRESH2 Notice the TfLogicalSwitch2 Switch
HOL-1926-03-NET
Page 94HOL-1926-03-NET
Review Tier 1 Router
1 Click Routing2 Select the T1-Terraform Logical Router
Review the Summary
3 Click Configuration4 Click Router Ports
HOL-1926-03-NET
Page 95HOL-1926-03-NET
Review the IP Address Assignments
The IP address 17216401 was specified in the infratf file as a variable The nextaddress may vary by lab This address is automatically configured from a pool ofaddresses for use in connecting Tier 0 routers to Tier 1 routers
Return to the Putty Session
1 Click the Putty Session
Ping the Router Address
1 Enter
ping 17216401 -c 3
The ping should be successful This IP address is being advertised from the newlycreated Tier 1 router through the Tier 0 router to the vPOD router via BGP
HOL-1926-03-NET
Page 96HOL-1926-03-NET
Remove the configuration
Terraform will also remove previously created configurations
1 Enter the command
terraform destroy
2 Confirm the removal
yes
HOL-1926-03-NET
Page 97HOL-1926-03-NET
Review the Output
The command successfully removed the configuration This is a common action in theremoval of an application or tenant from an infrastructure as code environment
HOL-1926-03-NET
Page 98HOL-1926-03-NET
Module 3 ConclusionThis module utilized the NSX API to configure multiple NSX objects The NSX APIprovides a powerful tool for configuration troubleshooting and monitoring
Youve finished Module 3
Congratulations on completing Module 3
For additional information on the NSX API visit the URL below and select the NSX APIGuide
bull Go to httpstinyurlcomyc6q794n
Proceed to any module below or end the lab
Lab Module List
bull Module 1 - NSX-T Datacenter Operations - Use Tools within NSX-TDatacenter for Day to Day Operations (15 minutes) - Intermediate - Thismodule will walk you through the basics of NSX-T Datacenter operations You willuse features such as Traceflow Port Connection tool and others
bull Module 2 - NSX-T Datacenter Troubleshooting - Use Tools within NSX-TDatacenter for Troubleshooting (15 minutes) - Intermediate - This modulewill walk you through the basics of NSX-T Datacenter troubleshooting You willview various system configurations and correct misconfigurations after problemidentification
bull Module 3 - API Consumption - Gain Familiarity with the NSX-T API (30minutes) - Advanced - This module will explore the basics of NSX APIconsumption through manual interaction as well as several commonconfiguration management tools
Lab Captain
bull Module 1 - 3 Kenyon Hensler Staff Systems Engineer United States
How to End Lab
To end the lab click on the END button
HOL-1926-03-NET
Page 99HOL-1926-03-NET
ConclusionThank you for participating in the VMware Hands-on Labs Be sure to visithttpholvmwarecom to continue your lab experience online
Lab SKU HOL-1926-03-NET
Version 20181104-143822
HOL-1926-03-NET
Page 100HOL-1926-03-NET
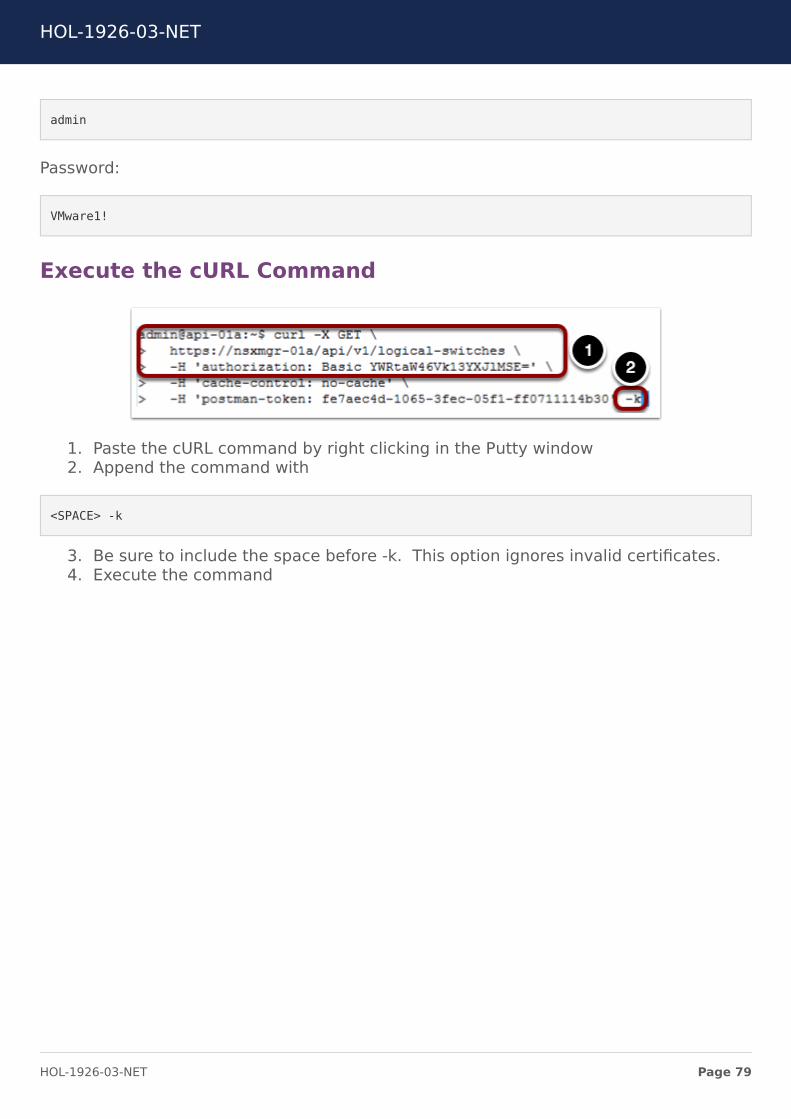
admin
Password
VMware1
Execute the cURL Command
1 Paste the cURL command by right clicking in the Putty window2 Append the command with
ltSPACEgt -k
3 Be sure to include the space before -k This option ignores invalid certificates4 Execute the command
HOL-1926-03-NET
Page 79HOL-1926-03-NET
Review the Output
1 Scroll to the top of the Putty session2 Review the output This output will match the output from Postman
cURL can be used for all API functions and may be used in conjunction with othercommand line tools such as grep sed and awk to build complex create update anddestroy functions
HOL-1926-03-NET
Page 80HOL-1926-03-NET
Terraform ConsumptionTerraform is a tool that allows for the creation of sharable configuration files that createand change infrastructure Terraform has released an NSX-T Datacenter Module thatallows for the configuration of NSX-T Datacenter objects
Open Putty
If a putty session to api-01a is already open skip the step labeled Open thelogicalswitchtf File
1 Click on the Putty icon
If putty is already open right-click the putty window and select ldquoputtyrdquo
Open a Connection to api-01a
HOL-1926-03-NET
Page 81HOL-1926-03-NET
1 Select api-01acorplocal2 Click Load3 Click Open
Login to api-01a
Login using the username
admin
Password
VMware1
Open the logicalswitchtf File
1 Switch to the api1 directory
cd api1
2 Open the logicalswitchtf file
vi logicalswitchtf
HOL-1926-03-NET
Page 82HOL-1926-03-NET
Review the File
Review the file by using the arrow keys to move to the top and bottom of the fileNotice the resource section This section will create a NSX-T Datacenter Logical SwitchOnce you have completed reviewing the file exit the vi editor
1 Type
q
HOL-1926-03-NET
Page 83HOL-1926-03-NET
Verify the logicalswitchtf File
1 Enter the command
terraform plan
This command will verify the required data and plugins for terraform to complete theaction
HOL-1926-03-NET
Page 84HOL-1926-03-NET
Apply the logicalswitchtf File
1 Enter the command
terraform apply
2 Type
yes
HOL-1926-03-NET
Page 85HOL-1926-03-NET
Review the Output
The output of the command shows the Logical Switch TfLogicalSwitch was created
Open Chrome Browser from Windows Quick Launch TaskBar
1 Click on the Chrome Icon on the Windows Quick Launch Task Bar
Navigate to NSX-T Manager
1 Click on the VMware NSX | Login bookmark
HOL-1926-03-NET
Page 86HOL-1926-03-NET
Login to NSX-T Manager
Login to NSX Manager
1 Enter the username admin2 Enter the password VMware13 Click Login
HOL-1926-03-NET
Page 87HOL-1926-03-NET
View the Logical Switch
1 Click Switching2 Select the Switches tab3 Notice the Logical Switch TfLogicalSwitch
If the Logical Switch is not visibile refresh the page
Delete the Logical Switch
Delete the Logical Switch to avoid confusion in the next part of the lesson
HOL-1926-03-NET
Page 88HOL-1926-03-NET
1 Select the TfLogicalSwitch2 Click Delete3 Click Delete
Return to the Putty Session
1 Click the Putty Session
Open the infratf File
1 Switch to the api2 directory
cd api2
2 Enter the command
vi infratf
HOL-1926-03-NET
Page 89HOL-1926-03-NET
Review the File
Review the file by using the arrow keys to move to the top and bottom of the fileNotice the many resource sections This file will create a Tier 1 router connect the Tier
1 router to the Tier 0 router create a Logical Switch attach the Tier 1 router to thelogical switch and assign an IP address to the Tier 1 interface on the logical switchThis is a common action for tenant creation in an environment Once you have
completed reviewing the file exit the vi editor
1 Type
q
HOL-1926-03-NET
Page 90HOL-1926-03-NET
Verify the infratf File
1 Enter the command
terraform plan
Apply the infratf File
1 Enter the command
HOL-1926-03-NET
Page 91HOL-1926-03-NET
terraform apply
Confirm the Apply
1 Type
yes
Review the Output
Review the output of the command Many actions were preformed Scroll up to viewthe complete output
Return to NSX Manager
Return to NSX Manager to review the configuration
1 Click VMware NSX Chrome window
HOL-1926-03-NET
Page 92HOL-1926-03-NET
Login to NSX-T Manager
If the session has timed out login to NSX Manager If the session is still active skip thisstep
1 Enter the username admin2 Enter the password VMware13 Click Login
HOL-1926-03-NET
Page 93HOL-1926-03-NET
Refresh Switches
1 Click REFRESH2 Notice the TfLogicalSwitch2 Switch
HOL-1926-03-NET
Page 94HOL-1926-03-NET
Review Tier 1 Router
1 Click Routing2 Select the T1-Terraform Logical Router
Review the Summary
3 Click Configuration4 Click Router Ports
HOL-1926-03-NET
Page 95HOL-1926-03-NET
Review the IP Address Assignments
The IP address 17216401 was specified in the infratf file as a variable The nextaddress may vary by lab This address is automatically configured from a pool ofaddresses for use in connecting Tier 0 routers to Tier 1 routers
Return to the Putty Session
1 Click the Putty Session
Ping the Router Address
1 Enter
ping 17216401 -c 3
The ping should be successful This IP address is being advertised from the newlycreated Tier 1 router through the Tier 0 router to the vPOD router via BGP
HOL-1926-03-NET
Page 96HOL-1926-03-NET
Remove the configuration
Terraform will also remove previously created configurations
1 Enter the command
terraform destroy
2 Confirm the removal
yes
HOL-1926-03-NET
Page 97HOL-1926-03-NET
Review the Output
The command successfully removed the configuration This is a common action in theremoval of an application or tenant from an infrastructure as code environment
HOL-1926-03-NET
Page 98HOL-1926-03-NET
Module 3 ConclusionThis module utilized the NSX API to configure multiple NSX objects The NSX APIprovides a powerful tool for configuration troubleshooting and monitoring
Youve finished Module 3
Congratulations on completing Module 3
For additional information on the NSX API visit the URL below and select the NSX APIGuide
bull Go to httpstinyurlcomyc6q794n
Proceed to any module below or end the lab
Lab Module List
bull Module 1 - NSX-T Datacenter Operations - Use Tools within NSX-TDatacenter for Day to Day Operations (15 minutes) - Intermediate - Thismodule will walk you through the basics of NSX-T Datacenter operations You willuse features such as Traceflow Port Connection tool and others
bull Module 2 - NSX-T Datacenter Troubleshooting - Use Tools within NSX-TDatacenter for Troubleshooting (15 minutes) - Intermediate - This modulewill walk you through the basics of NSX-T Datacenter troubleshooting You willview various system configurations and correct misconfigurations after problemidentification
bull Module 3 - API Consumption - Gain Familiarity with the NSX-T API (30minutes) - Advanced - This module will explore the basics of NSX APIconsumption through manual interaction as well as several commonconfiguration management tools
Lab Captain
bull Module 1 - 3 Kenyon Hensler Staff Systems Engineer United States
How to End Lab
To end the lab click on the END button
HOL-1926-03-NET
Page 99HOL-1926-03-NET
ConclusionThank you for participating in the VMware Hands-on Labs Be sure to visithttpholvmwarecom to continue your lab experience online
Lab SKU HOL-1926-03-NET
Version 20181104-143822
HOL-1926-03-NET
Page 100HOL-1926-03-NET
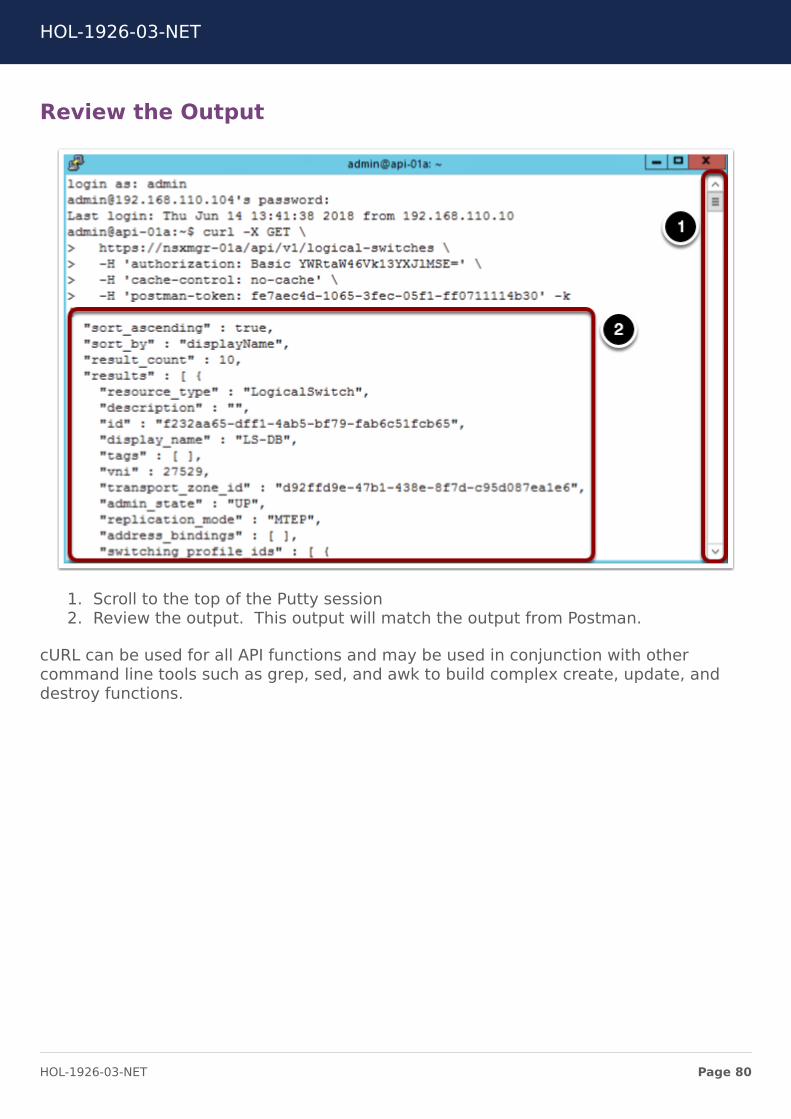
Review the Output
1 Scroll to the top of the Putty session2 Review the output This output will match the output from Postman
cURL can be used for all API functions and may be used in conjunction with othercommand line tools such as grep sed and awk to build complex create update anddestroy functions
HOL-1926-03-NET
Page 80HOL-1926-03-NET
Terraform ConsumptionTerraform is a tool that allows for the creation of sharable configuration files that createand change infrastructure Terraform has released an NSX-T Datacenter Module thatallows for the configuration of NSX-T Datacenter objects
Open Putty
If a putty session to api-01a is already open skip the step labeled Open thelogicalswitchtf File
1 Click on the Putty icon
If putty is already open right-click the putty window and select ldquoputtyrdquo
Open a Connection to api-01a
HOL-1926-03-NET
Page 81HOL-1926-03-NET
1 Select api-01acorplocal2 Click Load3 Click Open
Login to api-01a
Login using the username
admin
Password
VMware1
Open the logicalswitchtf File
1 Switch to the api1 directory
cd api1
2 Open the logicalswitchtf file
vi logicalswitchtf
HOL-1926-03-NET
Page 82HOL-1926-03-NET
Review the File
Review the file by using the arrow keys to move to the top and bottom of the fileNotice the resource section This section will create a NSX-T Datacenter Logical SwitchOnce you have completed reviewing the file exit the vi editor
1 Type
q
HOL-1926-03-NET
Page 83HOL-1926-03-NET
Verify the logicalswitchtf File
1 Enter the command
terraform plan
This command will verify the required data and plugins for terraform to complete theaction
HOL-1926-03-NET
Page 84HOL-1926-03-NET
Apply the logicalswitchtf File
1 Enter the command
terraform apply
2 Type
yes
HOL-1926-03-NET
Page 85HOL-1926-03-NET
Review the Output
The output of the command shows the Logical Switch TfLogicalSwitch was created
Open Chrome Browser from Windows Quick Launch TaskBar
1 Click on the Chrome Icon on the Windows Quick Launch Task Bar
Navigate to NSX-T Manager
1 Click on the VMware NSX | Login bookmark
HOL-1926-03-NET
Page 86HOL-1926-03-NET
Login to NSX-T Manager
Login to NSX Manager
1 Enter the username admin2 Enter the password VMware13 Click Login
HOL-1926-03-NET
Page 87HOL-1926-03-NET
View the Logical Switch
1 Click Switching2 Select the Switches tab3 Notice the Logical Switch TfLogicalSwitch
If the Logical Switch is not visibile refresh the page
Delete the Logical Switch
Delete the Logical Switch to avoid confusion in the next part of the lesson
HOL-1926-03-NET
Page 88HOL-1926-03-NET
1 Select the TfLogicalSwitch2 Click Delete3 Click Delete
Return to the Putty Session
1 Click the Putty Session
Open the infratf File
1 Switch to the api2 directory
cd api2
2 Enter the command
vi infratf
HOL-1926-03-NET
Page 89HOL-1926-03-NET
Review the File
Review the file by using the arrow keys to move to the top and bottom of the fileNotice the many resource sections This file will create a Tier 1 router connect the Tier
1 router to the Tier 0 router create a Logical Switch attach the Tier 1 router to thelogical switch and assign an IP address to the Tier 1 interface on the logical switchThis is a common action for tenant creation in an environment Once you have
completed reviewing the file exit the vi editor
1 Type
q
HOL-1926-03-NET
Page 90HOL-1926-03-NET
Verify the infratf File
1 Enter the command
terraform plan
Apply the infratf File
1 Enter the command
HOL-1926-03-NET
Page 91HOL-1926-03-NET
terraform apply
Confirm the Apply
1 Type
yes
Review the Output
Review the output of the command Many actions were preformed Scroll up to viewthe complete output
Return to NSX Manager
Return to NSX Manager to review the configuration
1 Click VMware NSX Chrome window
HOL-1926-03-NET
Page 92HOL-1926-03-NET
Login to NSX-T Manager
If the session has timed out login to NSX Manager If the session is still active skip thisstep
1 Enter the username admin2 Enter the password VMware13 Click Login
HOL-1926-03-NET
Page 93HOL-1926-03-NET
Refresh Switches
1 Click REFRESH2 Notice the TfLogicalSwitch2 Switch
HOL-1926-03-NET
Page 94HOL-1926-03-NET
Review Tier 1 Router
1 Click Routing2 Select the T1-Terraform Logical Router
Review the Summary
3 Click Configuration4 Click Router Ports
HOL-1926-03-NET
Page 95HOL-1926-03-NET
Review the IP Address Assignments
The IP address 17216401 was specified in the infratf file as a variable The nextaddress may vary by lab This address is automatically configured from a pool ofaddresses for use in connecting Tier 0 routers to Tier 1 routers
Return to the Putty Session
1 Click the Putty Session
Ping the Router Address
1 Enter
ping 17216401 -c 3
The ping should be successful This IP address is being advertised from the newlycreated Tier 1 router through the Tier 0 router to the vPOD router via BGP
HOL-1926-03-NET
Page 96HOL-1926-03-NET
Remove the configuration
Terraform will also remove previously created configurations
1 Enter the command
terraform destroy
2 Confirm the removal
yes
HOL-1926-03-NET
Page 97HOL-1926-03-NET
Review the Output
The command successfully removed the configuration This is a common action in theremoval of an application or tenant from an infrastructure as code environment
HOL-1926-03-NET
Page 98HOL-1926-03-NET
Module 3 ConclusionThis module utilized the NSX API to configure multiple NSX objects The NSX APIprovides a powerful tool for configuration troubleshooting and monitoring
Youve finished Module 3
Congratulations on completing Module 3
For additional information on the NSX API visit the URL below and select the NSX APIGuide
bull Go to httpstinyurlcomyc6q794n
Proceed to any module below or end the lab
Lab Module List
bull Module 1 - NSX-T Datacenter Operations - Use Tools within NSX-TDatacenter for Day to Day Operations (15 minutes) - Intermediate - Thismodule will walk you through the basics of NSX-T Datacenter operations You willuse features such as Traceflow Port Connection tool and others
bull Module 2 - NSX-T Datacenter Troubleshooting - Use Tools within NSX-TDatacenter for Troubleshooting (15 minutes) - Intermediate - This modulewill walk you through the basics of NSX-T Datacenter troubleshooting You willview various system configurations and correct misconfigurations after problemidentification
bull Module 3 - API Consumption - Gain Familiarity with the NSX-T API (30minutes) - Advanced - This module will explore the basics of NSX APIconsumption through manual interaction as well as several commonconfiguration management tools
Lab Captain
bull Module 1 - 3 Kenyon Hensler Staff Systems Engineer United States
How to End Lab
To end the lab click on the END button
HOL-1926-03-NET
Page 99HOL-1926-03-NET
ConclusionThank you for participating in the VMware Hands-on Labs Be sure to visithttpholvmwarecom to continue your lab experience online
Lab SKU HOL-1926-03-NET
Version 20181104-143822
HOL-1926-03-NET
Page 100HOL-1926-03-NET
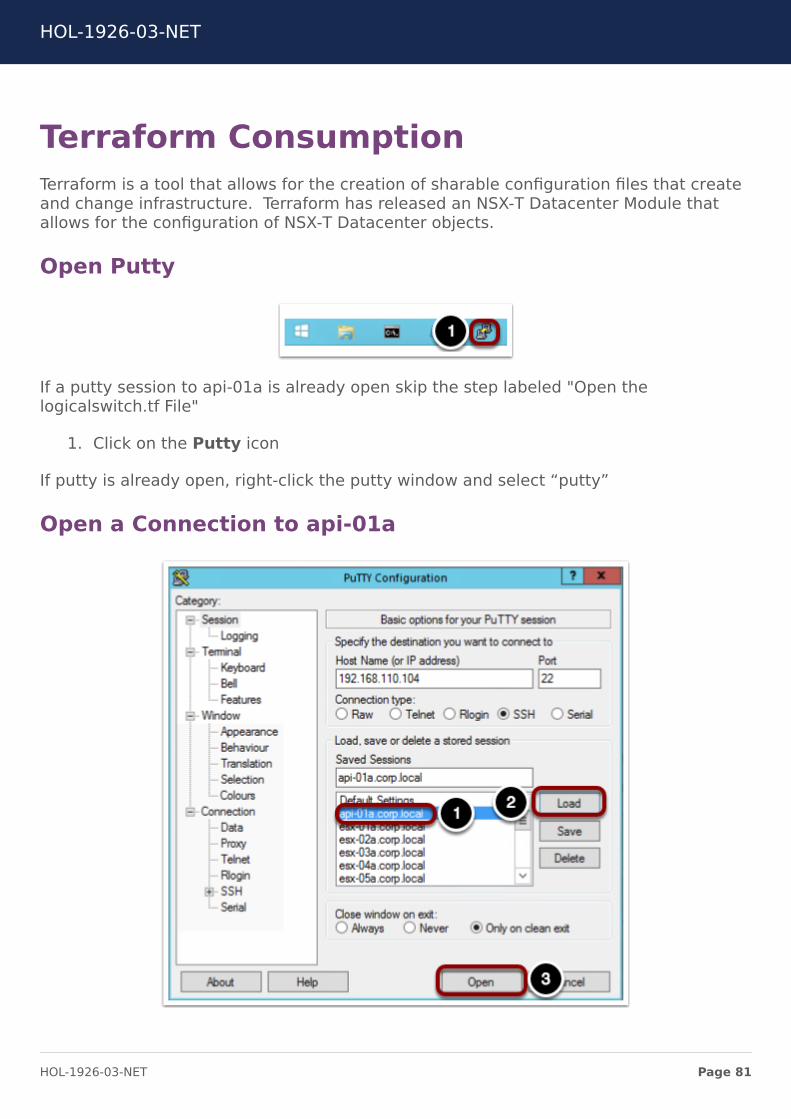
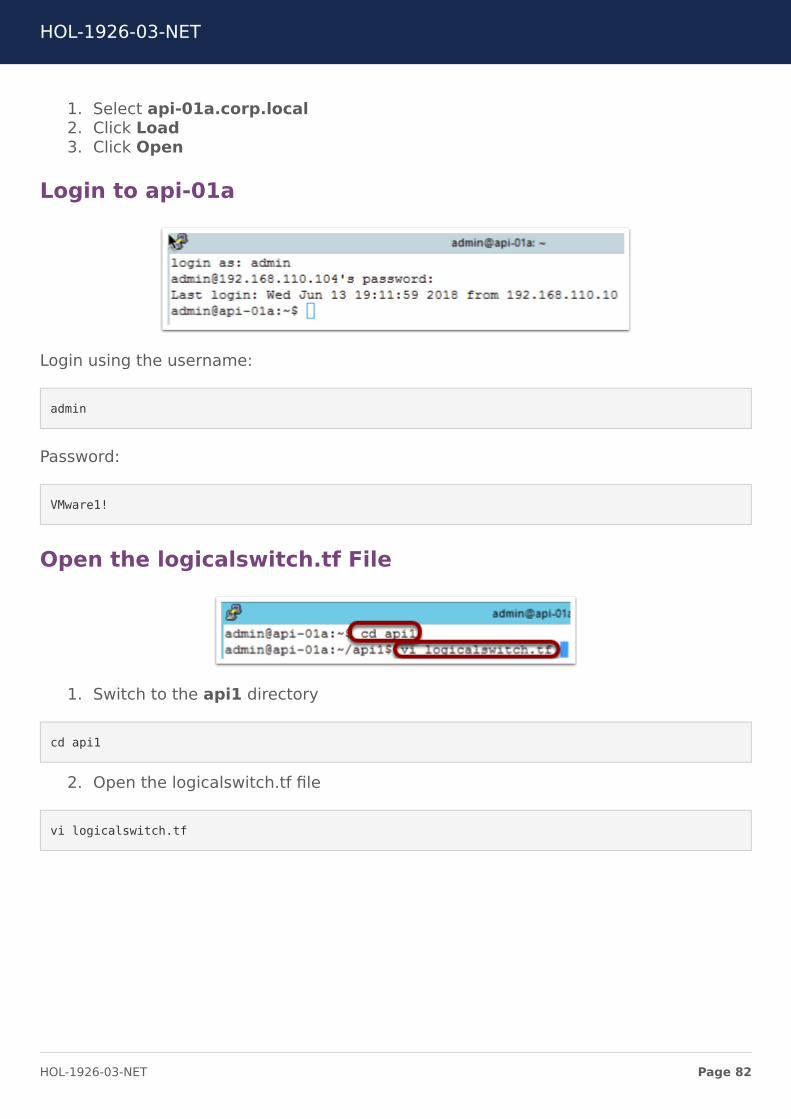
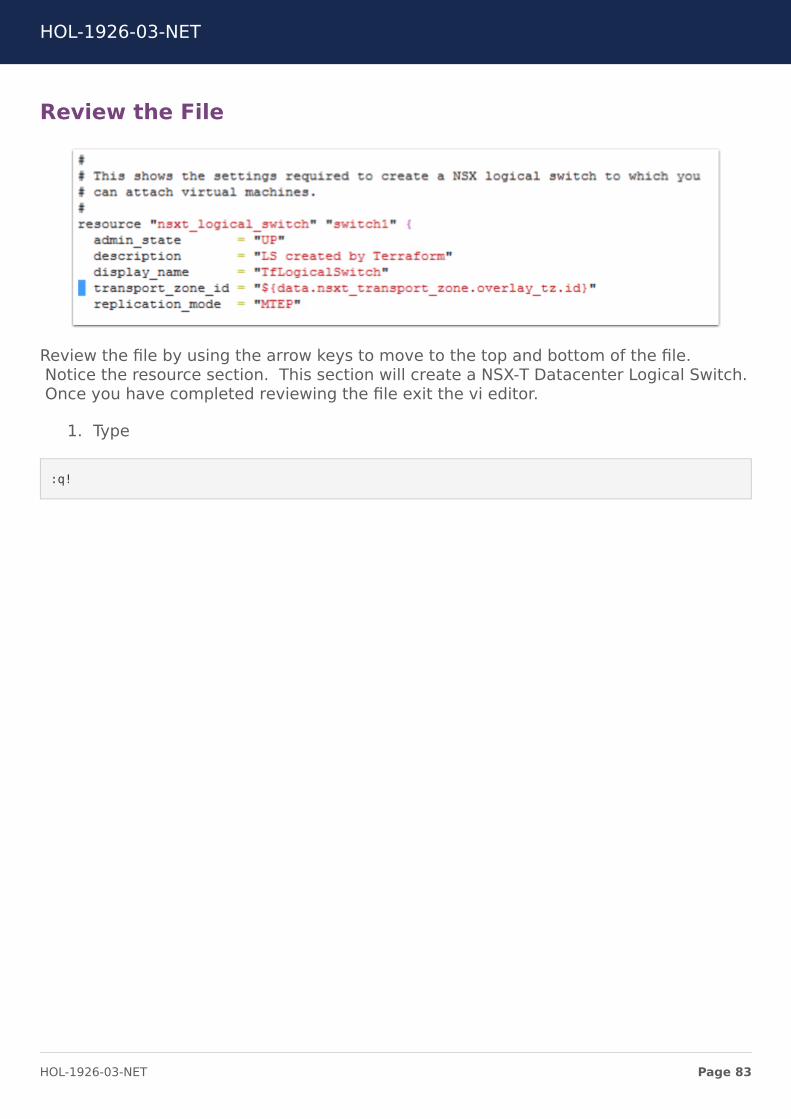
Review the File
Review the file by using the arrow keys to move to the top and bottom of the fileNotice the resource section This section will create a NSX-T Datacenter Logical SwitchOnce you have completed reviewing the file exit the vi editor
1 Type
q
HOL-1926-03-NET
Page 83HOL-1926-03-NET
Verify the logicalswitchtf File
1 Enter the command
terraform plan
This command will verify the required data and plugins for terraform to complete theaction
HOL-1926-03-NET
Page 84HOL-1926-03-NET
Apply the logicalswitchtf File
1 Enter the command
terraform apply
2 Type
yes
HOL-1926-03-NET
Page 85HOL-1926-03-NET
Review the Output
The output of the command shows the Logical Switch TfLogicalSwitch was created
Open Chrome Browser from Windows Quick Launch TaskBar
1 Click on the Chrome Icon on the Windows Quick Launch Task Bar
Navigate to NSX-T Manager
1 Click on the VMware NSX | Login bookmark
HOL-1926-03-NET
Page 86HOL-1926-03-NET
Login to NSX-T Manager
Login to NSX Manager
1 Enter the username admin2 Enter the password VMware13 Click Login
HOL-1926-03-NET
Page 87HOL-1926-03-NET
View the Logical Switch
1 Click Switching2 Select the Switches tab3 Notice the Logical Switch TfLogicalSwitch
If the Logical Switch is not visibile refresh the page
Delete the Logical Switch
Delete the Logical Switch to avoid confusion in the next part of the lesson
HOL-1926-03-NET
Page 88HOL-1926-03-NET
1 Select the TfLogicalSwitch2 Click Delete3 Click Delete
Return to the Putty Session
1 Click the Putty Session
Open the infratf File
1 Switch to the api2 directory
cd api2
2 Enter the command
vi infratf
HOL-1926-03-NET
Page 89HOL-1926-03-NET
Review the File
Review the file by using the arrow keys to move to the top and bottom of the fileNotice the many resource sections This file will create a Tier 1 router connect the Tier
1 router to the Tier 0 router create a Logical Switch attach the Tier 1 router to thelogical switch and assign an IP address to the Tier 1 interface on the logical switchThis is a common action for tenant creation in an environment Once you have
completed reviewing the file exit the vi editor
1 Type
q
HOL-1926-03-NET
Page 90HOL-1926-03-NET
Verify the infratf File
1 Enter the command
terraform plan
Apply the infratf File
1 Enter the command
HOL-1926-03-NET
Page 91HOL-1926-03-NET
terraform apply
Confirm the Apply
1 Type
yes
Review the Output
Review the output of the command Many actions were preformed Scroll up to viewthe complete output
Return to NSX Manager
Return to NSX Manager to review the configuration
1 Click VMware NSX Chrome window
HOL-1926-03-NET
Page 92HOL-1926-03-NET
Login to NSX-T Manager
If the session has timed out login to NSX Manager If the session is still active skip thisstep
1 Enter the username admin2 Enter the password VMware13 Click Login
HOL-1926-03-NET
Page 93HOL-1926-03-NET
Refresh Switches
1 Click REFRESH2 Notice the TfLogicalSwitch2 Switch
HOL-1926-03-NET
Page 94HOL-1926-03-NET
Review Tier 1 Router
1 Click Routing2 Select the T1-Terraform Logical Router
Review the Summary
3 Click Configuration4 Click Router Ports
HOL-1926-03-NET
Page 95HOL-1926-03-NET
Review the IP Address Assignments
The IP address 17216401 was specified in the infratf file as a variable The nextaddress may vary by lab This address is automatically configured from a pool ofaddresses for use in connecting Tier 0 routers to Tier 1 routers
Return to the Putty Session
1 Click the Putty Session
Ping the Router Address
1 Enter
ping 17216401 -c 3
The ping should be successful This IP address is being advertised from the newlycreated Tier 1 router through the Tier 0 router to the vPOD router via BGP
HOL-1926-03-NET
Page 96HOL-1926-03-NET
Remove the configuration
Terraform will also remove previously created configurations
1 Enter the command
terraform destroy
2 Confirm the removal
yes
HOL-1926-03-NET
Page 97HOL-1926-03-NET
Review the Output
The command successfully removed the configuration This is a common action in theremoval of an application or tenant from an infrastructure as code environment
HOL-1926-03-NET
Page 98HOL-1926-03-NET
Module 3 ConclusionThis module utilized the NSX API to configure multiple NSX objects The NSX APIprovides a powerful tool for configuration troubleshooting and monitoring
Youve finished Module 3
Congratulations on completing Module 3
For additional information on the NSX API visit the URL below and select the NSX APIGuide
bull Go to httpstinyurlcomyc6q794n
Proceed to any module below or end the lab
Lab Module List
bull Module 1 - NSX-T Datacenter Operations - Use Tools within NSX-TDatacenter for Day to Day Operations (15 minutes) - Intermediate - Thismodule will walk you through the basics of NSX-T Datacenter operations You willuse features such as Traceflow Port Connection tool and others
bull Module 2 - NSX-T Datacenter Troubleshooting - Use Tools within NSX-TDatacenter for Troubleshooting (15 minutes) - Intermediate - This modulewill walk you through the basics of NSX-T Datacenter troubleshooting You willview various system configurations and correct misconfigurations after problemidentification
bull Module 3 - API Consumption - Gain Familiarity with the NSX-T API (30minutes) - Advanced - This module will explore the basics of NSX APIconsumption through manual interaction as well as several commonconfiguration management tools
Lab Captain
bull Module 1 - 3 Kenyon Hensler Staff Systems Engineer United States
How to End Lab
To end the lab click on the END button
HOL-1926-03-NET
Page 99HOL-1926-03-NET
ConclusionThank you for participating in the VMware Hands-on Labs Be sure to visithttpholvmwarecom to continue your lab experience online
Lab SKU HOL-1926-03-NET
Version 20181104-143822
HOL-1926-03-NET
Page 100HOL-1926-03-NET
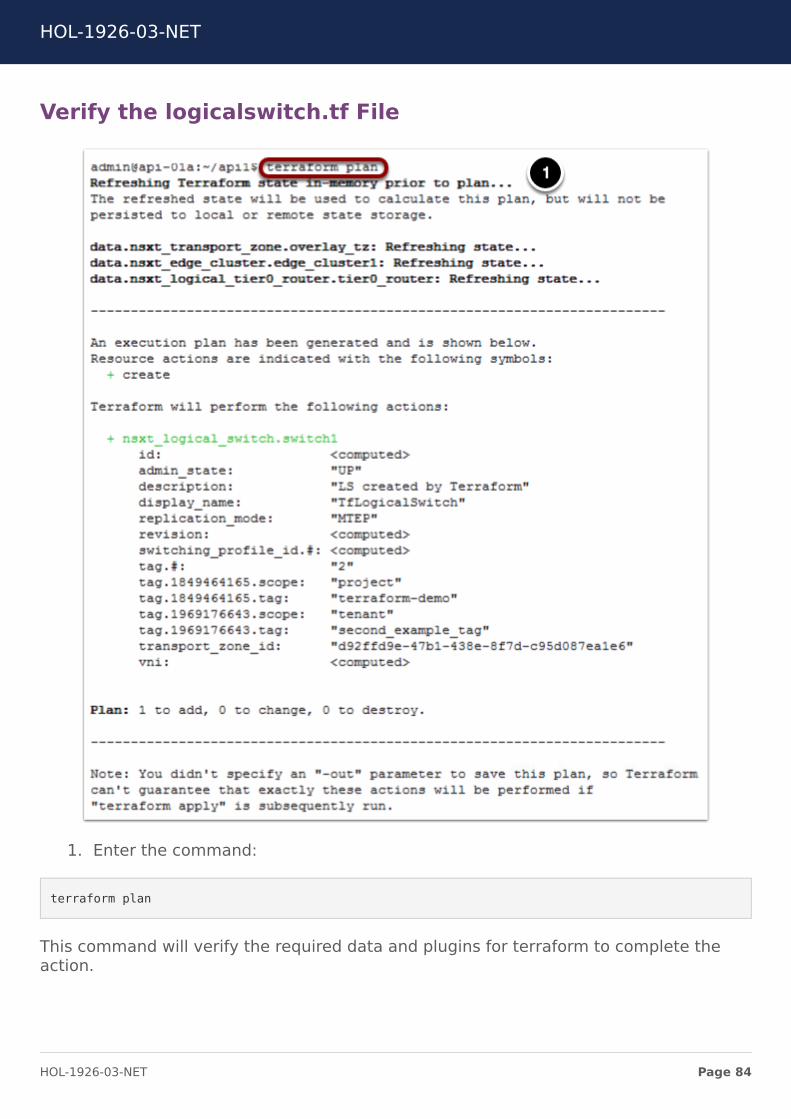
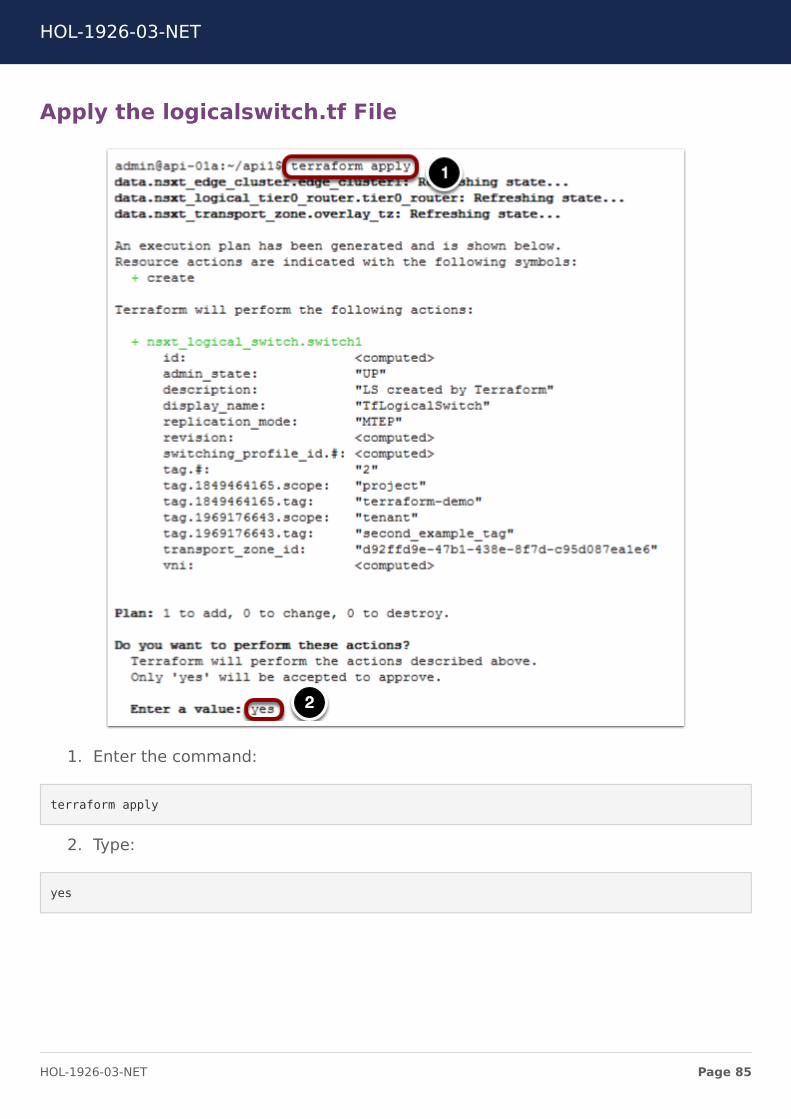
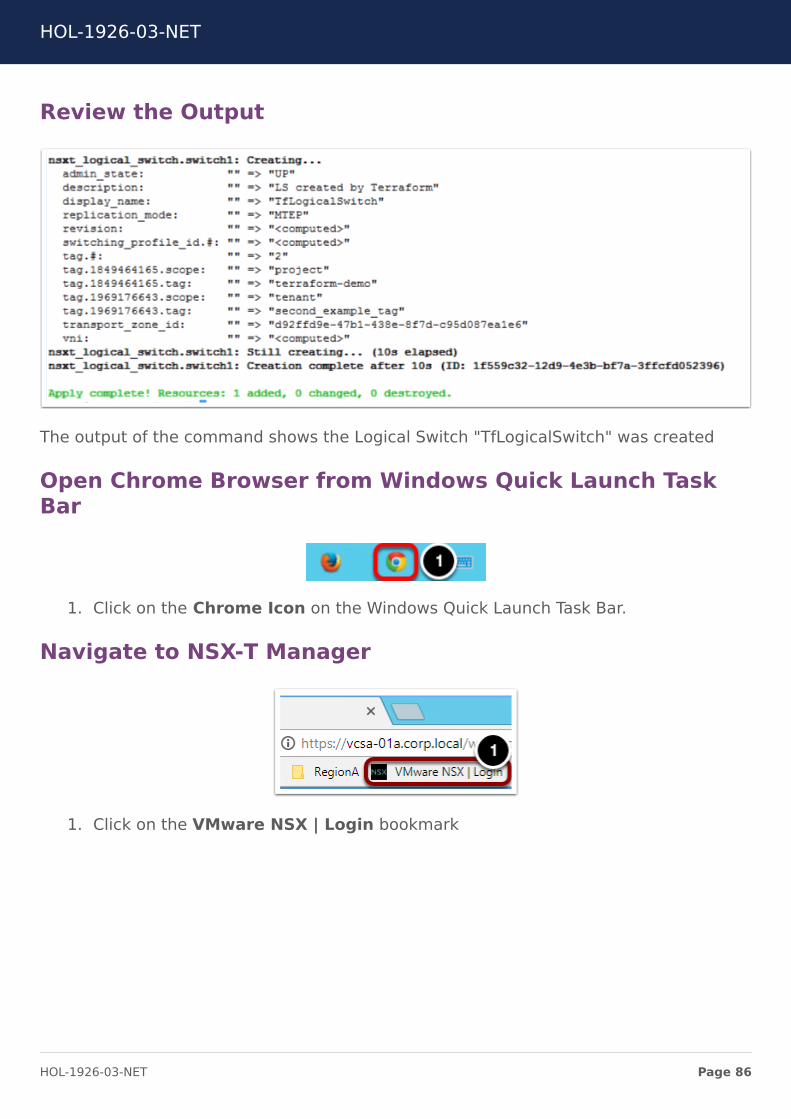
Review the Output
The output of the command shows the Logical Switch TfLogicalSwitch was created
Open Chrome Browser from Windows Quick Launch TaskBar
1 Click on the Chrome Icon on the Windows Quick Launch Task Bar
Navigate to NSX-T Manager
1 Click on the VMware NSX | Login bookmark
HOL-1926-03-NET
Page 86HOL-1926-03-NET
Login to NSX-T Manager
Login to NSX Manager
1 Enter the username admin2 Enter the password VMware13 Click Login
HOL-1926-03-NET
Page 87HOL-1926-03-NET
View the Logical Switch
1 Click Switching2 Select the Switches tab3 Notice the Logical Switch TfLogicalSwitch
If the Logical Switch is not visibile refresh the page
Delete the Logical Switch
Delete the Logical Switch to avoid confusion in the next part of the lesson
HOL-1926-03-NET
Page 88HOL-1926-03-NET
1 Select the TfLogicalSwitch2 Click Delete3 Click Delete
Return to the Putty Session
1 Click the Putty Session
Open the infratf File
1 Switch to the api2 directory
cd api2
2 Enter the command
vi infratf
HOL-1926-03-NET
Page 89HOL-1926-03-NET
Review the File
Review the file by using the arrow keys to move to the top and bottom of the fileNotice the many resource sections This file will create a Tier 1 router connect the Tier
1 router to the Tier 0 router create a Logical Switch attach the Tier 1 router to thelogical switch and assign an IP address to the Tier 1 interface on the logical switchThis is a common action for tenant creation in an environment Once you have
completed reviewing the file exit the vi editor
1 Type
q
HOL-1926-03-NET
Page 90HOL-1926-03-NET
Verify the infratf File
1 Enter the command
terraform plan
Apply the infratf File
1 Enter the command
HOL-1926-03-NET
Page 91HOL-1926-03-NET
terraform apply
Confirm the Apply
1 Type
yes
Review the Output
Review the output of the command Many actions were preformed Scroll up to viewthe complete output
Return to NSX Manager
Return to NSX Manager to review the configuration
1 Click VMware NSX Chrome window
HOL-1926-03-NET
Page 92HOL-1926-03-NET
Login to NSX-T Manager
If the session has timed out login to NSX Manager If the session is still active skip thisstep
1 Enter the username admin2 Enter the password VMware13 Click Login
HOL-1926-03-NET
Page 93HOL-1926-03-NET
Refresh Switches
1 Click REFRESH2 Notice the TfLogicalSwitch2 Switch
HOL-1926-03-NET
Page 94HOL-1926-03-NET
Review Tier 1 Router
1 Click Routing2 Select the T1-Terraform Logical Router
Review the Summary
3 Click Configuration4 Click Router Ports
HOL-1926-03-NET
Page 95HOL-1926-03-NET
Review the IP Address Assignments
The IP address 17216401 was specified in the infratf file as a variable The nextaddress may vary by lab This address is automatically configured from a pool ofaddresses for use in connecting Tier 0 routers to Tier 1 routers
Return to the Putty Session
1 Click the Putty Session
Ping the Router Address
1 Enter
ping 17216401 -c 3
The ping should be successful This IP address is being advertised from the newlycreated Tier 1 router through the Tier 0 router to the vPOD router via BGP
HOL-1926-03-NET
Page 96HOL-1926-03-NET
Remove the configuration
Terraform will also remove previously created configurations
1 Enter the command
terraform destroy
2 Confirm the removal
yes
HOL-1926-03-NET
Page 97HOL-1926-03-NET
Review the Output
The command successfully removed the configuration This is a common action in theremoval of an application or tenant from an infrastructure as code environment
HOL-1926-03-NET
Page 98HOL-1926-03-NET
Module 3 ConclusionThis module utilized the NSX API to configure multiple NSX objects The NSX APIprovides a powerful tool for configuration troubleshooting and monitoring
Youve finished Module 3
Congratulations on completing Module 3
For additional information on the NSX API visit the URL below and select the NSX APIGuide
bull Go to httpstinyurlcomyc6q794n
Proceed to any module below or end the lab
Lab Module List
bull Module 1 - NSX-T Datacenter Operations - Use Tools within NSX-TDatacenter for Day to Day Operations (15 minutes) - Intermediate - Thismodule will walk you through the basics of NSX-T Datacenter operations You willuse features such as Traceflow Port Connection tool and others
bull Module 2 - NSX-T Datacenter Troubleshooting - Use Tools within NSX-TDatacenter for Troubleshooting (15 minutes) - Intermediate - This modulewill walk you through the basics of NSX-T Datacenter troubleshooting You willview various system configurations and correct misconfigurations after problemidentification
bull Module 3 - API Consumption - Gain Familiarity with the NSX-T API (30minutes) - Advanced - This module will explore the basics of NSX APIconsumption through manual interaction as well as several commonconfiguration management tools
Lab Captain
bull Module 1 - 3 Kenyon Hensler Staff Systems Engineer United States
How to End Lab
To end the lab click on the END button
HOL-1926-03-NET
Page 99HOL-1926-03-NET
ConclusionThank you for participating in the VMware Hands-on Labs Be sure to visithttpholvmwarecom to continue your lab experience online
Lab SKU HOL-1926-03-NET
Version 20181104-143822
HOL-1926-03-NET
Page 100HOL-1926-03-NET

Login to NSX-T Manager
Login to NSX Manager
1 Enter the username admin2 Enter the password VMware13 Click Login
HOL-1926-03-NET
Page 87HOL-1926-03-NET
View the Logical Switch
1 Click Switching2 Select the Switches tab3 Notice the Logical Switch TfLogicalSwitch
If the Logical Switch is not visibile refresh the page
Delete the Logical Switch
Delete the Logical Switch to avoid confusion in the next part of the lesson
HOL-1926-03-NET
Page 88HOL-1926-03-NET
1 Select the TfLogicalSwitch2 Click Delete3 Click Delete
Return to the Putty Session
1 Click the Putty Session
Open the infratf File
1 Switch to the api2 directory
cd api2
2 Enter the command
vi infratf
HOL-1926-03-NET
Page 89HOL-1926-03-NET
Review the File
Review the file by using the arrow keys to move to the top and bottom of the fileNotice the many resource sections This file will create a Tier 1 router connect the Tier
1 router to the Tier 0 router create a Logical Switch attach the Tier 1 router to thelogical switch and assign an IP address to the Tier 1 interface on the logical switchThis is a common action for tenant creation in an environment Once you have
completed reviewing the file exit the vi editor
1 Type
q
HOL-1926-03-NET
Page 90HOL-1926-03-NET
Verify the infratf File
1 Enter the command
terraform plan
Apply the infratf File
1 Enter the command
HOL-1926-03-NET
Page 91HOL-1926-03-NET
terraform apply
Confirm the Apply
1 Type
yes
Review the Output
Review the output of the command Many actions were preformed Scroll up to viewthe complete output
Return to NSX Manager
Return to NSX Manager to review the configuration
1 Click VMware NSX Chrome window
HOL-1926-03-NET
Page 92HOL-1926-03-NET
Login to NSX-T Manager
If the session has timed out login to NSX Manager If the session is still active skip thisstep
1 Enter the username admin2 Enter the password VMware13 Click Login
HOL-1926-03-NET
Page 93HOL-1926-03-NET
Refresh Switches
1 Click REFRESH2 Notice the TfLogicalSwitch2 Switch
HOL-1926-03-NET
Page 94HOL-1926-03-NET
Review Tier 1 Router
1 Click Routing2 Select the T1-Terraform Logical Router
Review the Summary
3 Click Configuration4 Click Router Ports
HOL-1926-03-NET
Page 95HOL-1926-03-NET
Review the IP Address Assignments
The IP address 17216401 was specified in the infratf file as a variable The nextaddress may vary by lab This address is automatically configured from a pool ofaddresses for use in connecting Tier 0 routers to Tier 1 routers
Return to the Putty Session
1 Click the Putty Session
Ping the Router Address
1 Enter
ping 17216401 -c 3
The ping should be successful This IP address is being advertised from the newlycreated Tier 1 router through the Tier 0 router to the vPOD router via BGP
HOL-1926-03-NET
Page 96HOL-1926-03-NET
Remove the configuration
Terraform will also remove previously created configurations
1 Enter the command
terraform destroy
2 Confirm the removal
yes
HOL-1926-03-NET
Page 97HOL-1926-03-NET
Review the Output
The command successfully removed the configuration This is a common action in theremoval of an application or tenant from an infrastructure as code environment
HOL-1926-03-NET
Page 98HOL-1926-03-NET
Module 3 ConclusionThis module utilized the NSX API to configure multiple NSX objects The NSX APIprovides a powerful tool for configuration troubleshooting and monitoring
Youve finished Module 3
Congratulations on completing Module 3
For additional information on the NSX API visit the URL below and select the NSX APIGuide
bull Go to httpstinyurlcomyc6q794n
Proceed to any module below or end the lab
Lab Module List
bull Module 1 - NSX-T Datacenter Operations - Use Tools within NSX-TDatacenter for Day to Day Operations (15 minutes) - Intermediate - Thismodule will walk you through the basics of NSX-T Datacenter operations You willuse features such as Traceflow Port Connection tool and others
bull Module 2 - NSX-T Datacenter Troubleshooting - Use Tools within NSX-TDatacenter for Troubleshooting (15 minutes) - Intermediate - This modulewill walk you through the basics of NSX-T Datacenter troubleshooting You willview various system configurations and correct misconfigurations after problemidentification
bull Module 3 - API Consumption - Gain Familiarity with the NSX-T API (30minutes) - Advanced - This module will explore the basics of NSX APIconsumption through manual interaction as well as several commonconfiguration management tools
Lab Captain
bull Module 1 - 3 Kenyon Hensler Staff Systems Engineer United States
How to End Lab
To end the lab click on the END button
HOL-1926-03-NET
Page 99HOL-1926-03-NET
ConclusionThank you for participating in the VMware Hands-on Labs Be sure to visithttpholvmwarecom to continue your lab experience online
Lab SKU HOL-1926-03-NET
Version 20181104-143822
HOL-1926-03-NET
Page 100HOL-1926-03-NET
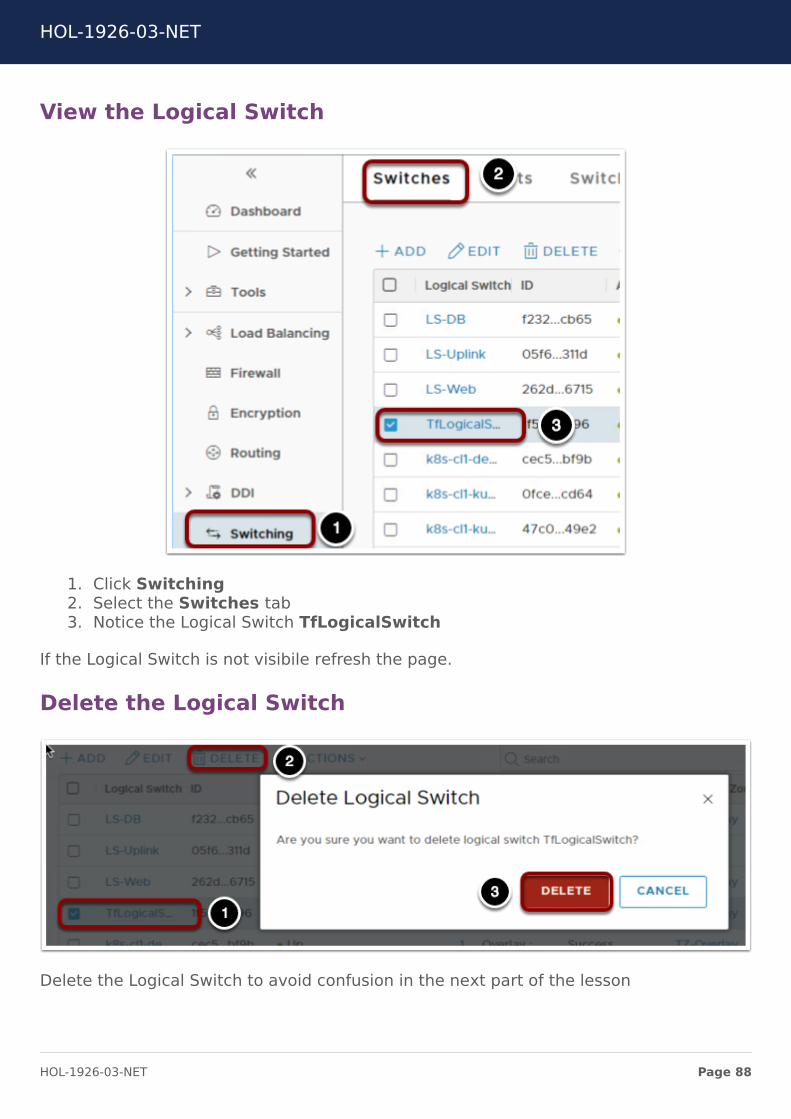
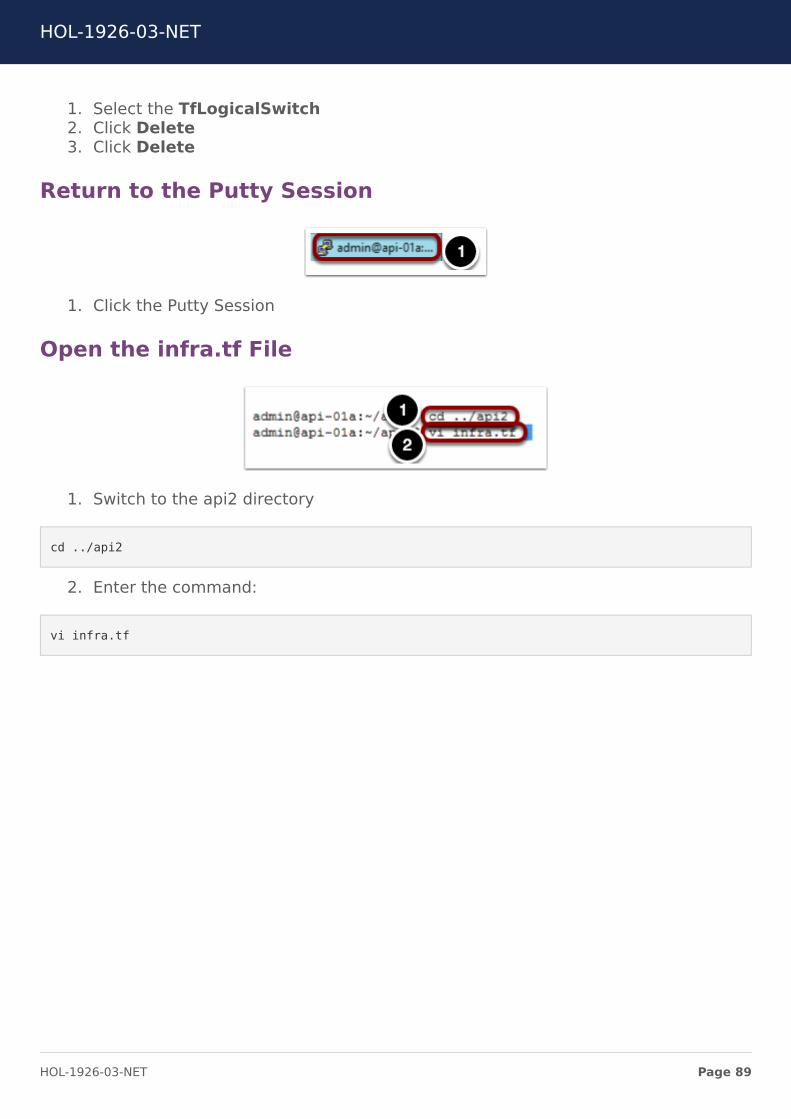
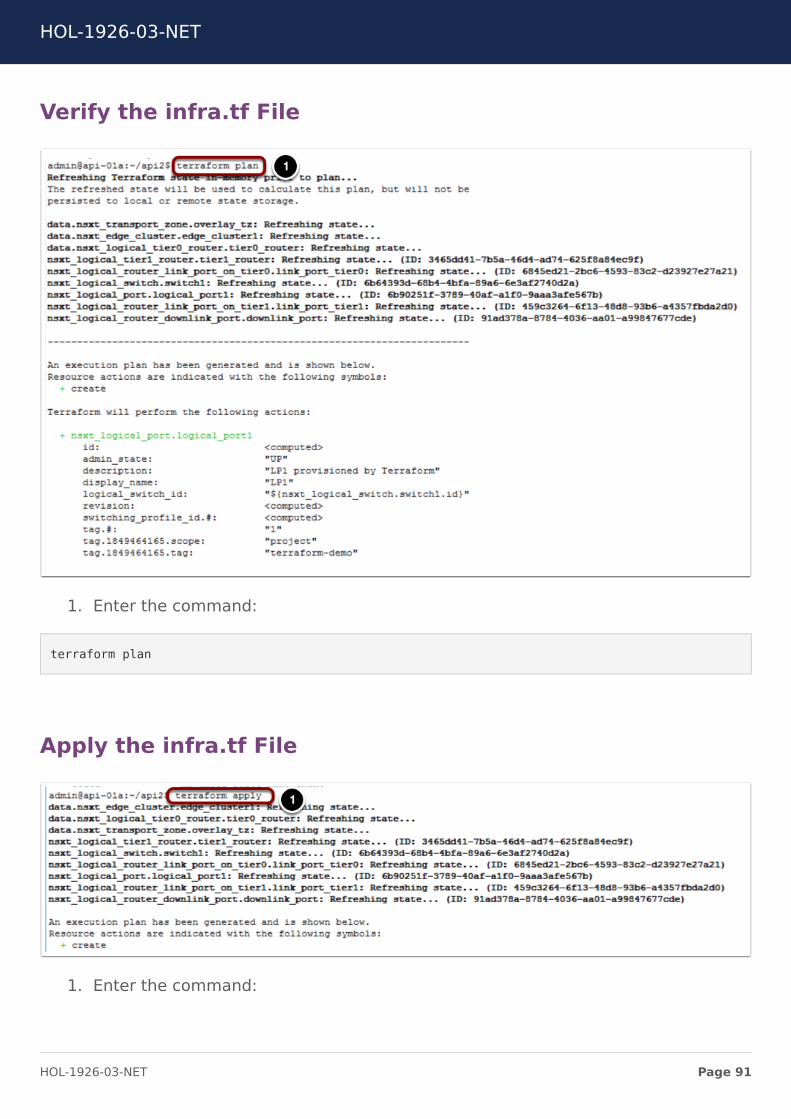
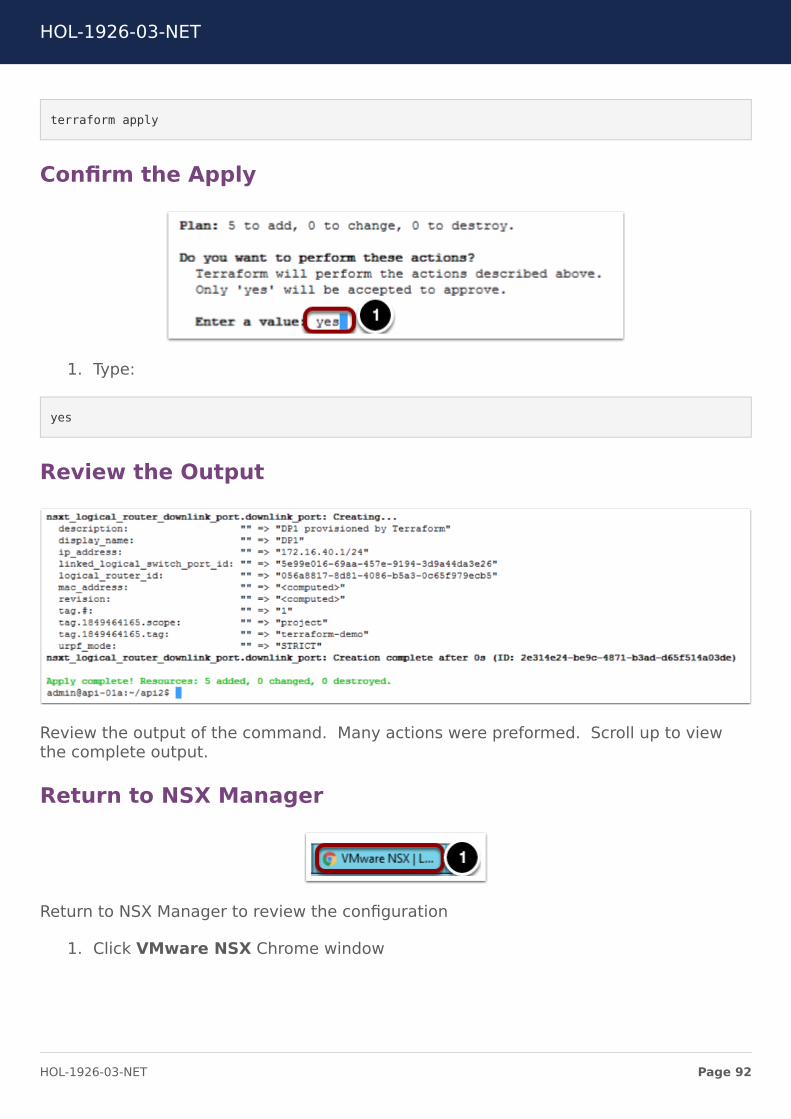
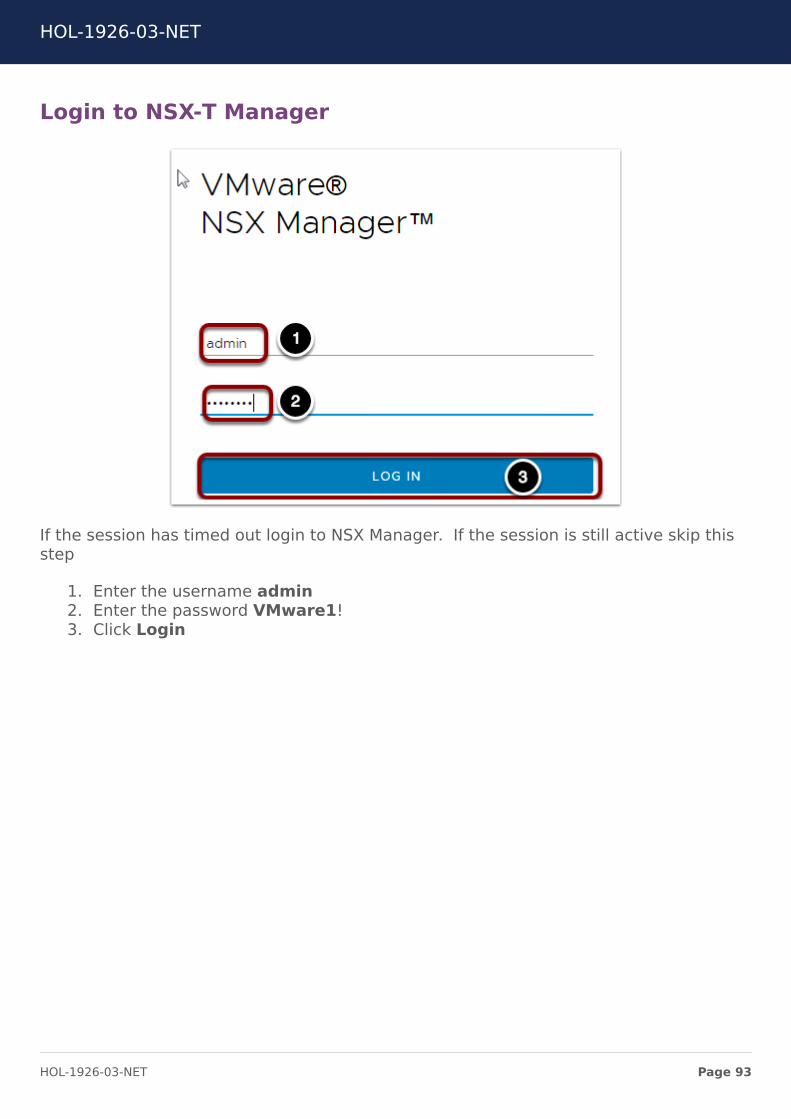
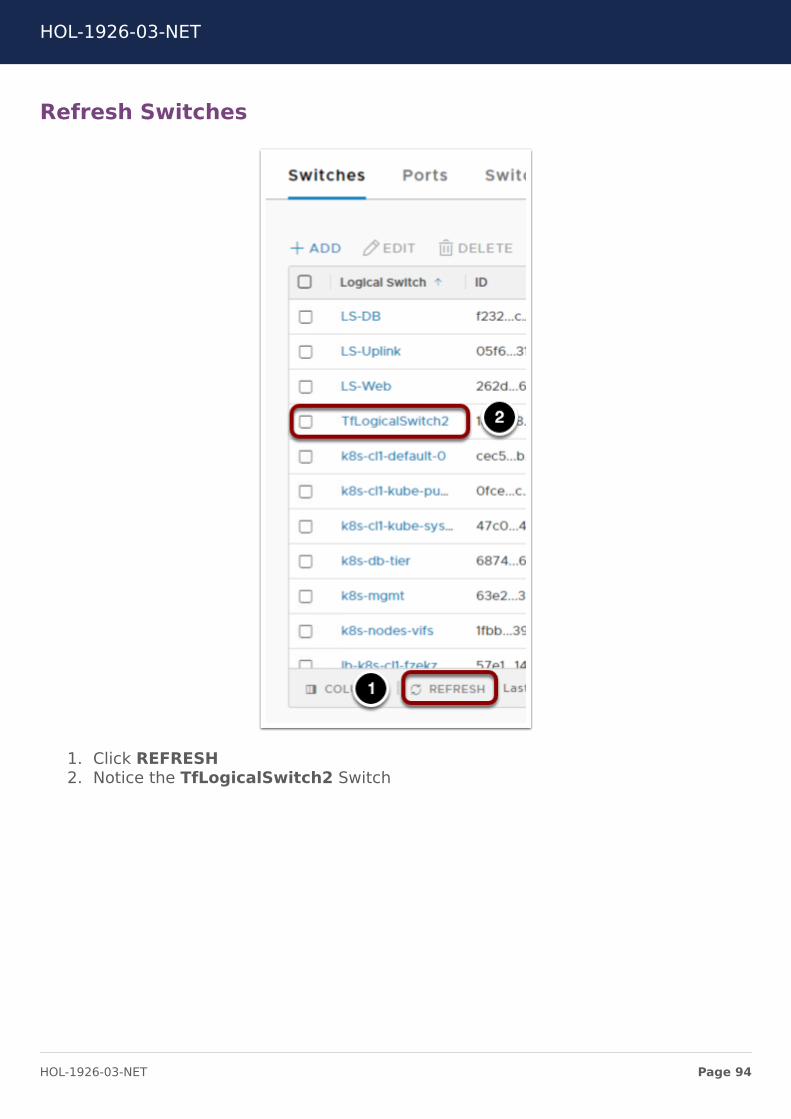
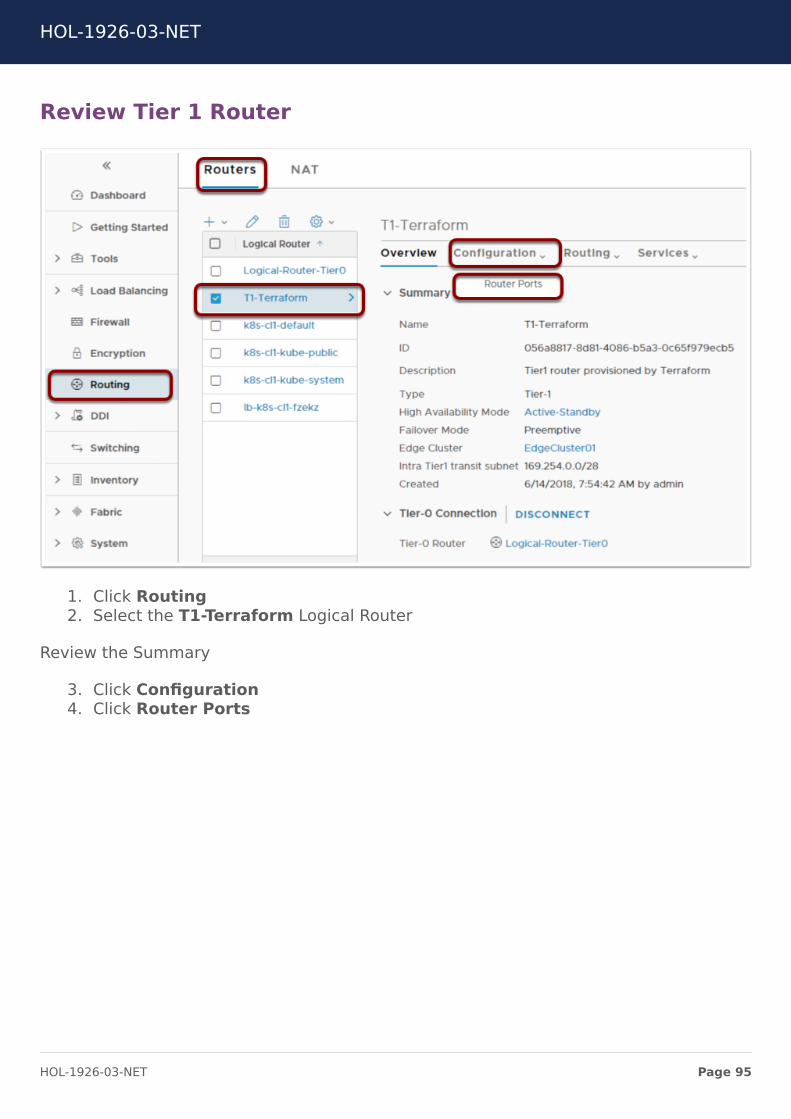
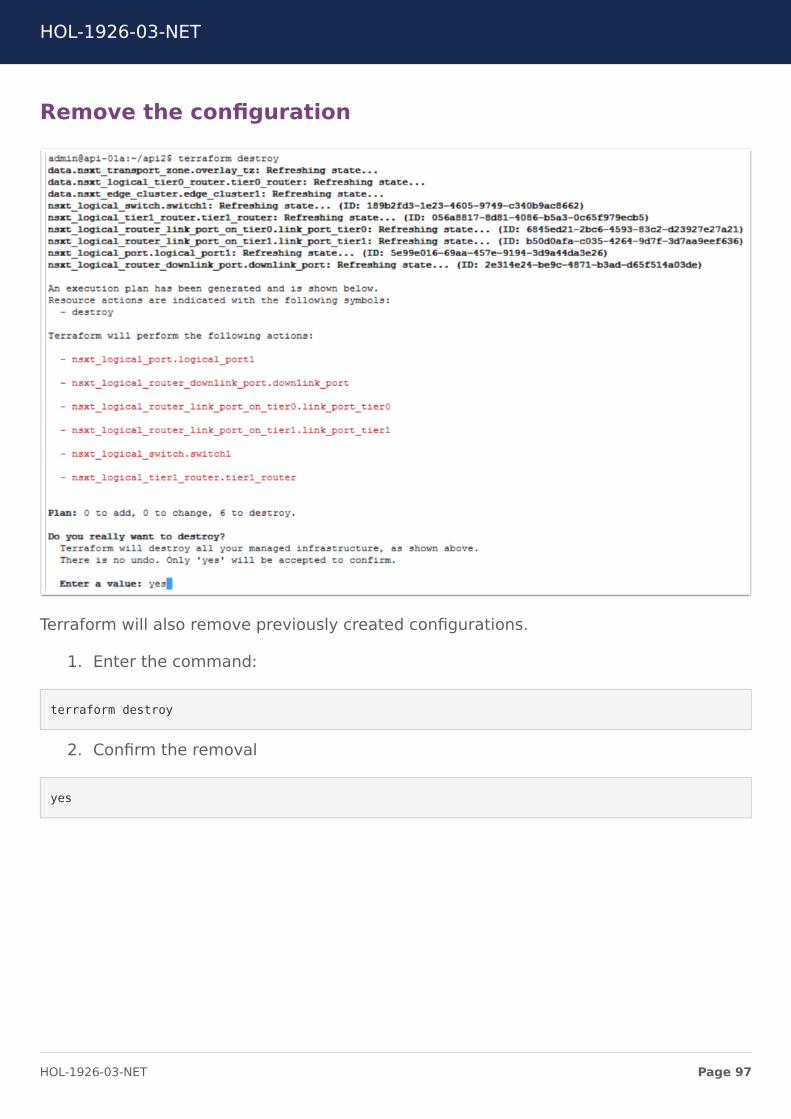
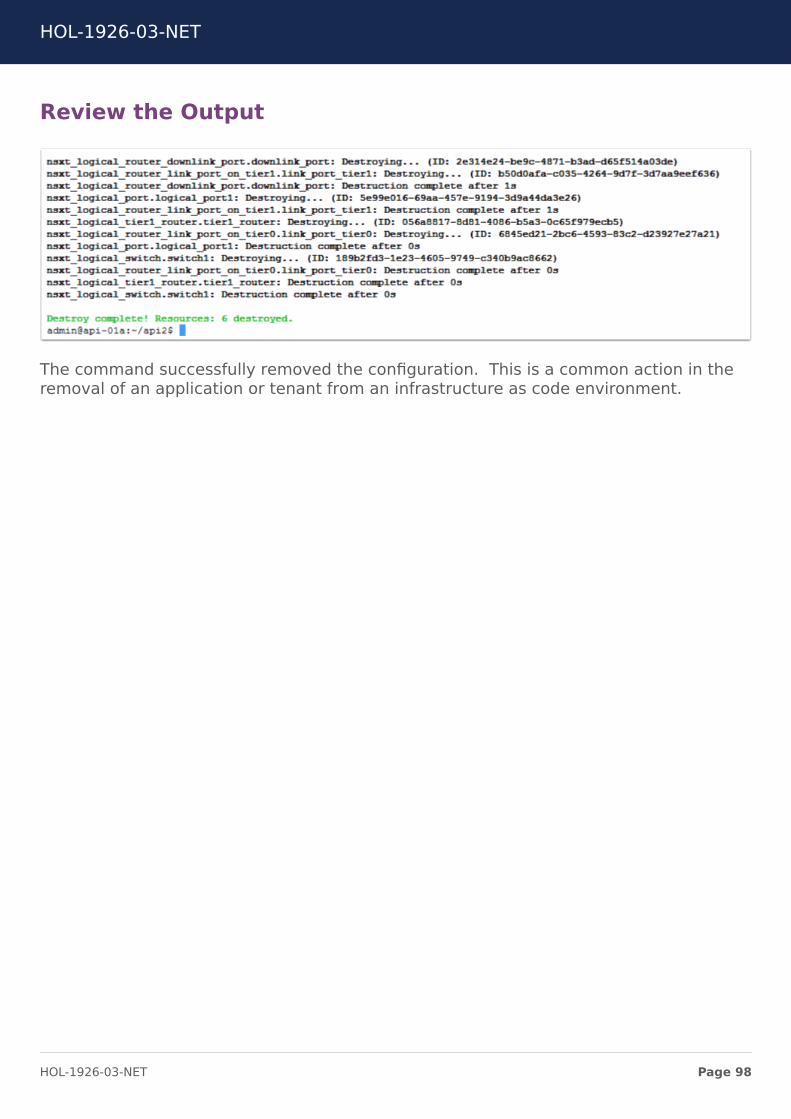
ConclusionThank you for participating in the VMware Hands-on Labs Be sure to visithttpholvmwarecom to continue your lab experience online
Lab SKU HOL-1926-03-NET
Version 20181104-143822
HOL-1926-03-NET
Page 100HOL-1926-03-NET