Embed Size (px)
Citation preview
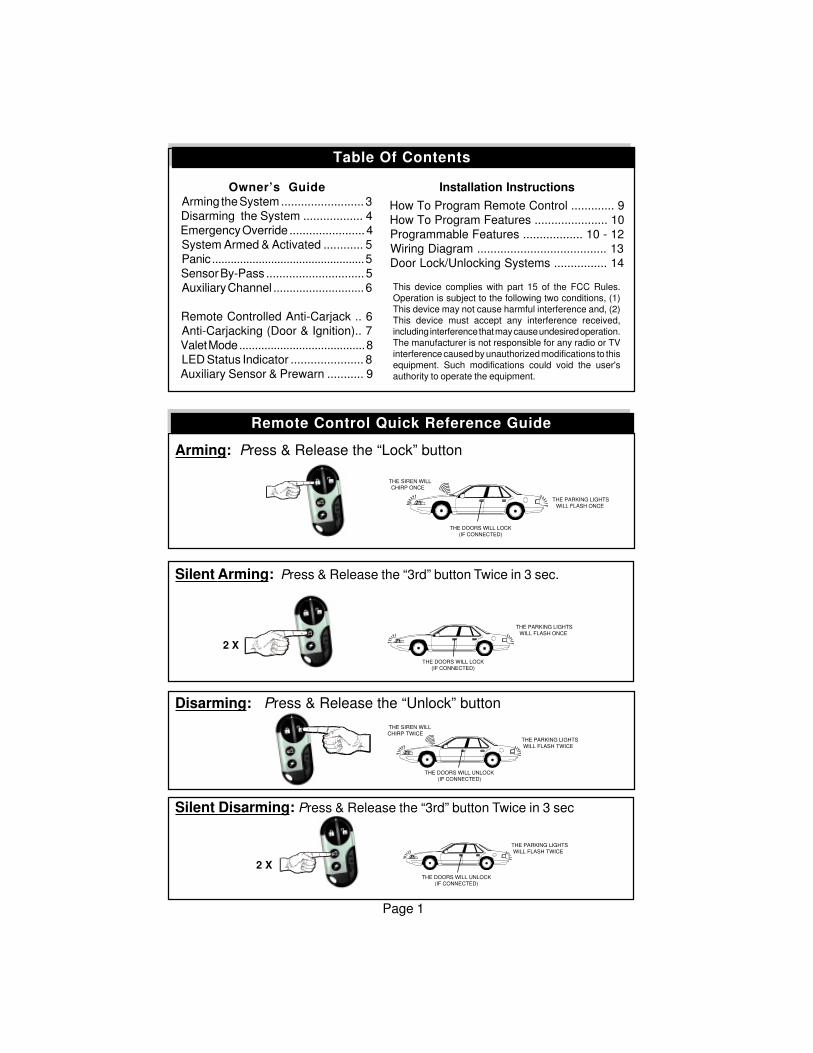
Arming: Press & Release the “Lock” button
Silent Arming: Press & Release the “3rd” button Twice in 3 sec.
Disarming: Press & Release the “Unlock” button
Silent Disarming: Press & Release the “3rd” button Twice in 3 sec
Page 1
Remote Control Quick Reference Guide
THE SIREN WILL
CHIRP ONCE
THE PARKING LIGHTS
WILL FLASH ONCE
THE DOORS WILL LOCK
(IF CONNECTED)
THE PARKING LIGHTS
WILL FLASH ONCE
THE DOORS WILL LOCK
(IF CONNECTED)
2 X
THE SIREN WILL
CHIRP TWICE THE PARKING LIGHTS
WILL FLASH TWICE
THE PARKING LIGHTS
WILL FLASH TWICE
THE DOORS WILL UNLOCK
(IF CONNECTED)
2 X
THE DOORS WILL UNLOCK
(IF CONNECTED)
Table Of Contents
Owner’s GuideArming the System ......................... 3
Disarming the System .................. 4
Emergency Override ....................... 4
System Armed & Activated ............ 5
Panic ................................................. 5
Sensor By-Pass .............................. 5
Auxiliary Channel ............................ 6
Remote Controlled Anti-Carjack .. 6
Anti-Carjacking (Door & Ignition).. 7
Valet Mode ........................................ 8
LED Status Indicator ...................... 8
Auxiliary Sensor & Prewarn ........... 9
Installation Instructions
How To Program Remote Control ............. 9
How To Program Features ...................... 10
Programmable Features .................. 10 - 12
Wiring Diagram ....................................... 13
Door Lock/Unlocking Systems ................ 14
This device complies with part 15 of the FCC Rules.
Operation is subject to the following two conditions, (1)
This device may not cause harmful interference and, (2)
This device must accept any interference received,
including interference that may cause undesired operation.
The manufacturer is not responsible for any radio or TV
interference caused by unauthorized modifications to this
equipment. Such modifications could void the user's
authority to operate the equipment.
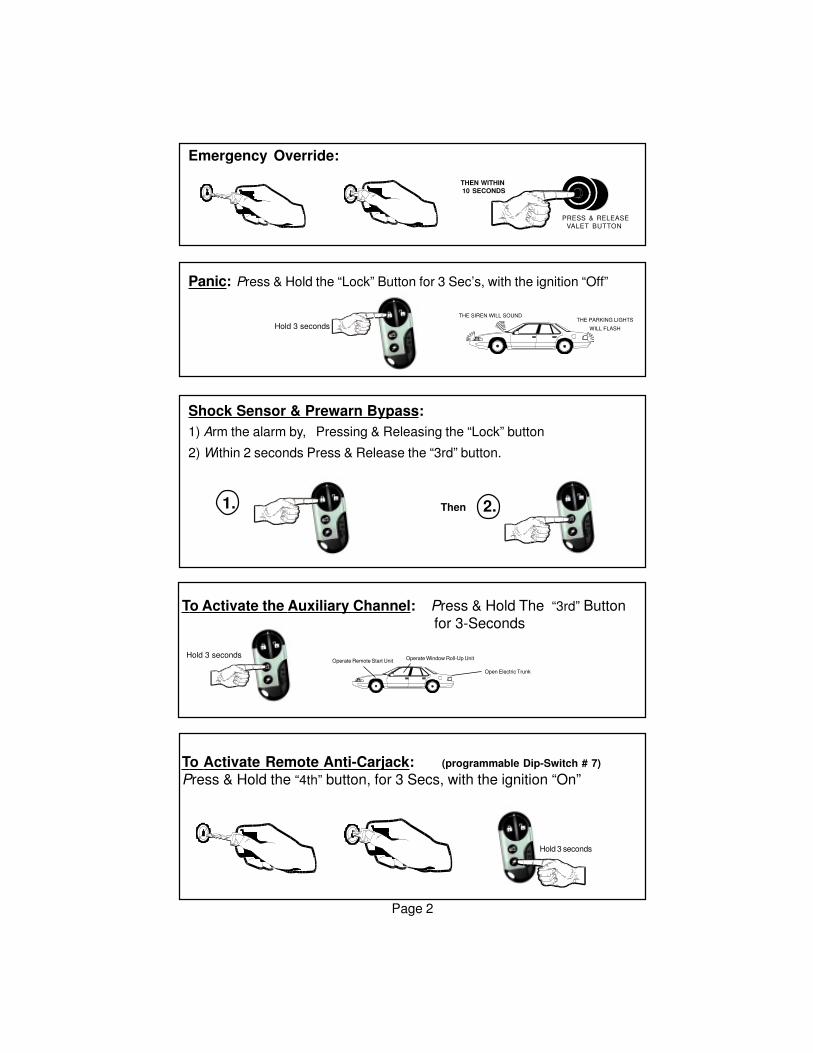
To Activate the Auxiliary Channel: Press & Hold The “3rd” Button
for 3-Seconds
To Activate Remote Anti-Carjack: (programmable Dip-Switch # 7)
Press & Hold the “4th” button, for 3 Secs, with the ignition “On”
Emergency Override:
Panic: Press & Hold the “Lock” Button for 3 Sec’s, with the ignition “Off”
Shock Sensor & Prewarn Bypass:1) Arm the alarm by, Pressing & Releasing the “Lock” button
2) Within 2 seconds Press & Release the “3rd” button.
Page 2
Hold 3 seconds
Open Electric Trunk
Operate Window Roll-Up UnitOperate Remote Start Unit
THEN WITHIN 10 SECONDS
PRESS & RELEASE
VALET BUTTON
THE SIREN WILL SOUNDTHE PARKING LIGHTS
WILL FLASH Hold 3 seconds
Then 2.1.
Hold 3 seconds
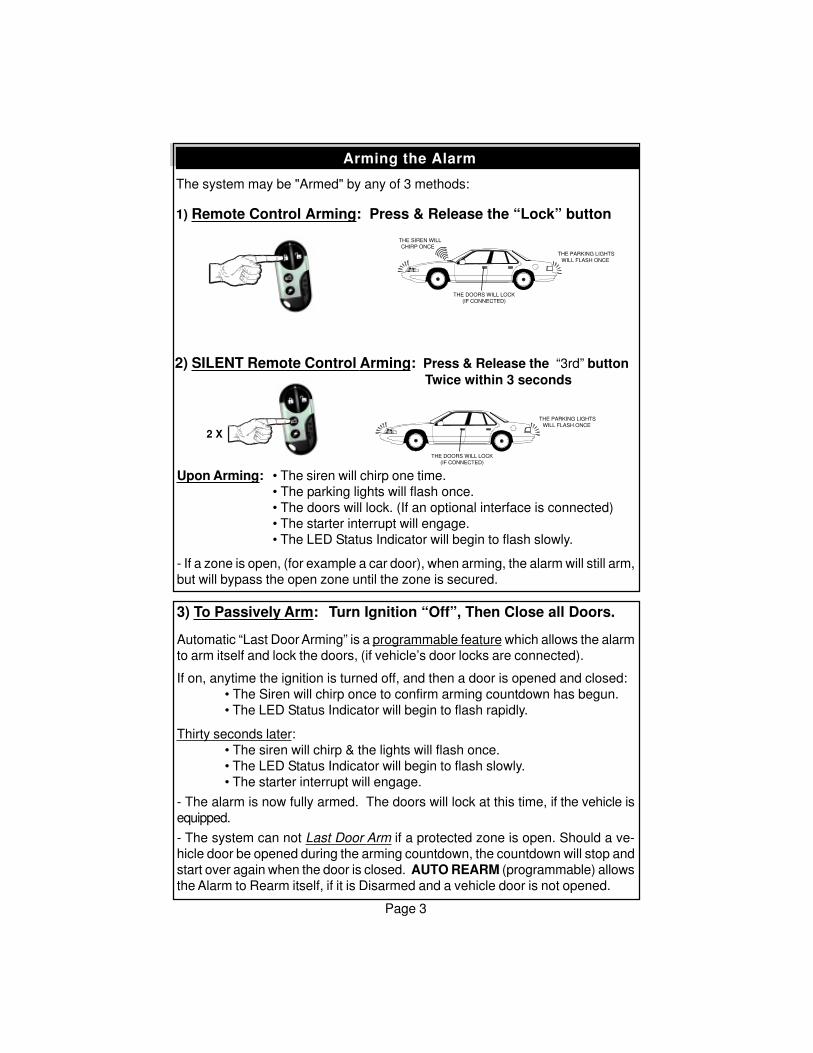
The system may be "Armed" by any of 3 methods:
1) Remote Control Arming: Press & Release the “Lock” button
Page 3
Arming the Alarm
2) SILENT Remote Control Arming: Press & Release the “3rd” button Twice within 3 seconds
Upon Arming: • The siren will chirp one time.
• The parking lights will flash once.
• The doors will lock. (If an optional interface is connected)
• The starter interrupt will engage.
• The LED Status Indicator will begin to flash slowly.
- If a zone is open, (for example a car door), when arming, the alarm will still arm,
but will bypass the open zone until the zone is secured.
3) To Passively Arm: Turn Ignition “Off”, Then Close all Doors.
Automatic “Last Door Arming” is a programmable feature which allows the alarm
to arm itself and lock the doors, (if vehicle’s door locks are connected).
If on, anytime the ignition is turned off, and then a door is opened and closed:
• The Siren will chirp once to confirm arming countdown has begun.
• The LED Status Indicator will begin to flash rapidly.
Thirty seconds later:
• The siren will chirp & the lights will flash once.
• The LED Status Indicator will begin to flash slowly.
• The starter interrupt will engage.
- The alarm is now fully armed. The doors will lock at this time, if the vehicle is
equipped.
- The system can not Last Door Arm if a protected zone is open. Should a ve-
hicle door be opened during the arming countdown, the countdown will stop and
start over again when the door is closed. AUTO REARM (programmable) allows
the Alarm to Rearm itself, if it is Disarmed and a vehicle door is not opened.
THE SIREN WILL
CHIRP ONCE
THE PARKING LIGHTS
WILL FLASH ONCE
THE DOORS WILL LOCK
(IF CONNECTED)
THE PARKING LIGHTS
WILL FLASH ONCE
THE DOORS WILL LOCK
(IF CONNECTED)
2 X
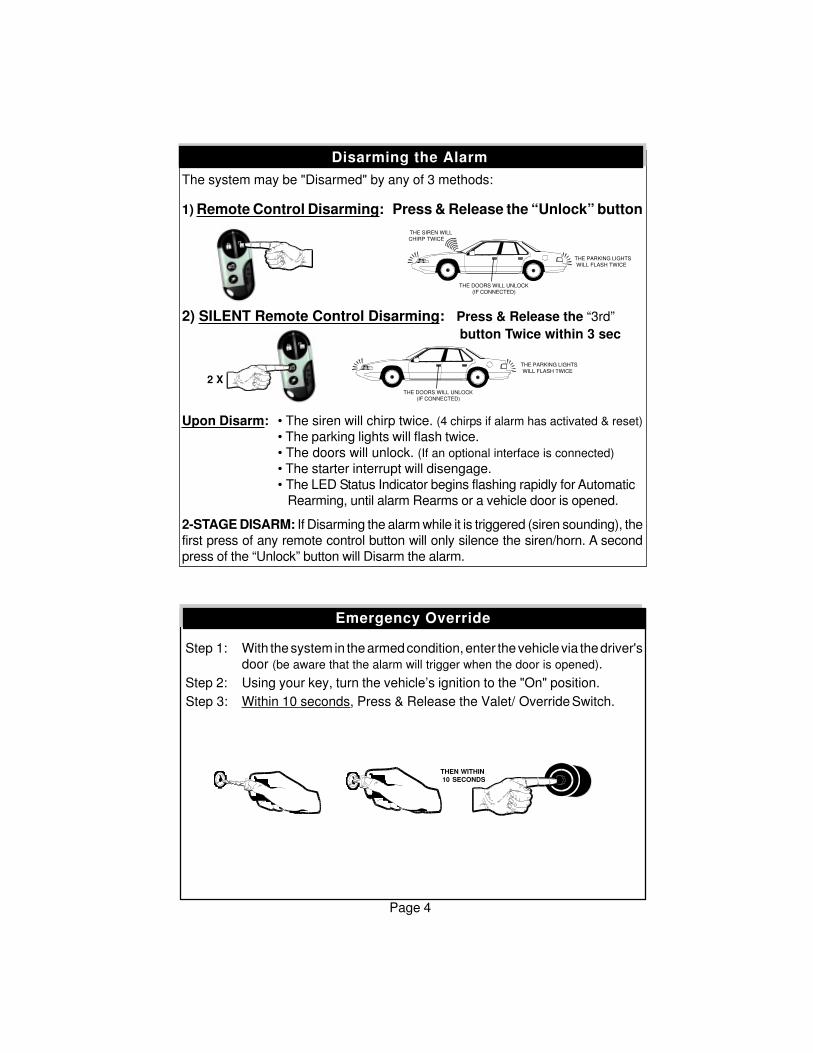
The system may be "Disarmed" by any of 3 methods:
1) Remote Control Disarming: Press & Release the “Unlock” button
2) SILENT Remote Control Disarming: Press & Release the “3rd”
button Twice within 3 sec
Upon Disarm: • The siren will chirp twice. (4 chirps if alarm has activated & reset)
• The parking lights will flash twice.
• The doors will unlock. (If an optional interface is connected)
• The starter interrupt will disengage.
• The LED Status Indicator begins flashing rapidly for Automatic
Rearming, until alarm Rearms or a vehicle door is opened.
2-STAGE DISARM: If Disarming the alarm while it is triggered (siren sounding), the
first press of any remote control button will only silence the siren/horn. A second
press of the “Unlock” button will Disarm the alarm.
Step 1: With the system in the armed condition, enter the vehicle via the driver's
door (be aware that the alarm will trigger when the door is opened).
Step 2: Using your key, turn the vehicle’s ignition to the "On" position.
Step 3: Within 10 seconds, Press & Release the Valet/ Override Switch.
Page 4
Disarming the Alarm
Emergency Override
THE SIREN WILL
CHIRP TWICE
THE PARKING LIGHTS
WILL FLASH TWICE
THE DOORS WILL UNLOCK
(IF CONNECTED)
THE PARKING LIGHTS
WILL FLASH TWICE
THE DOORS WILL UNLOCK
(IF CONNECTED)
2 X
THEN WITHIN 10 SECONDS
Regardless of method used to Arm the alarm, once Armed, the alarm will monitor
all protected zones, and if an intrusion attempt is detected it will activate, or
“trigger”.
A trigger consists of the following:
• The electronic siren, or optionally the vehicle’s horn, will start sounding.
• The exterior parking lights will flash on and off repeatedly.
An activation has a 30 second duration unless the system is disarmed using the
remote control or the Valet /Override switch. If all protected zones are secure at
the end of the trigger, the system will stop and rearm itself to detect further entry
attempts. If a protected zone is still open at the end of the trigger cycle, the alarm
will continue to re-trigger itself for up to six activated cycles before it resets itself
and ignores the violated zone.
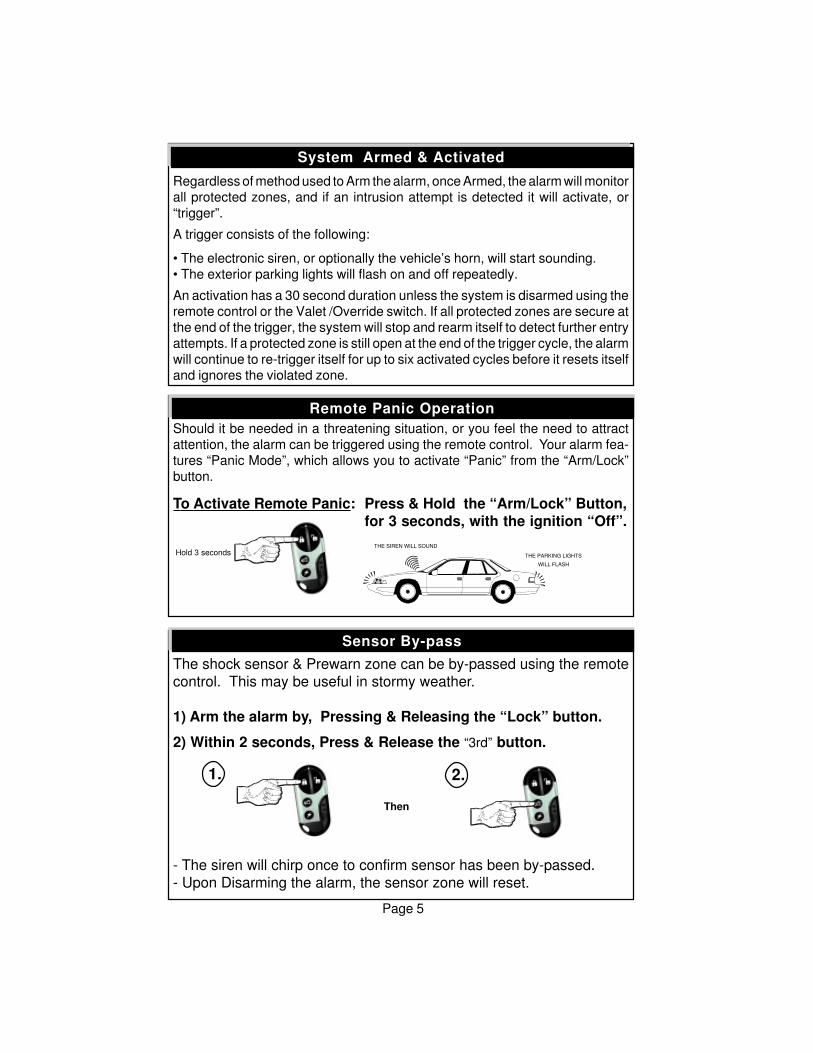
Should it be needed in a threatening situation, or you feel the need to attract
attention, the alarm can be triggered using the remote control. Your alarm fea-
tures “Panic Mode”, which allows you to activate “Panic” from the “Arm/Lock”
button.
To Activate Remote Panic: Press & Hold the “Arm/Lock” Button,for 3 seconds, with the ignition “Off”.
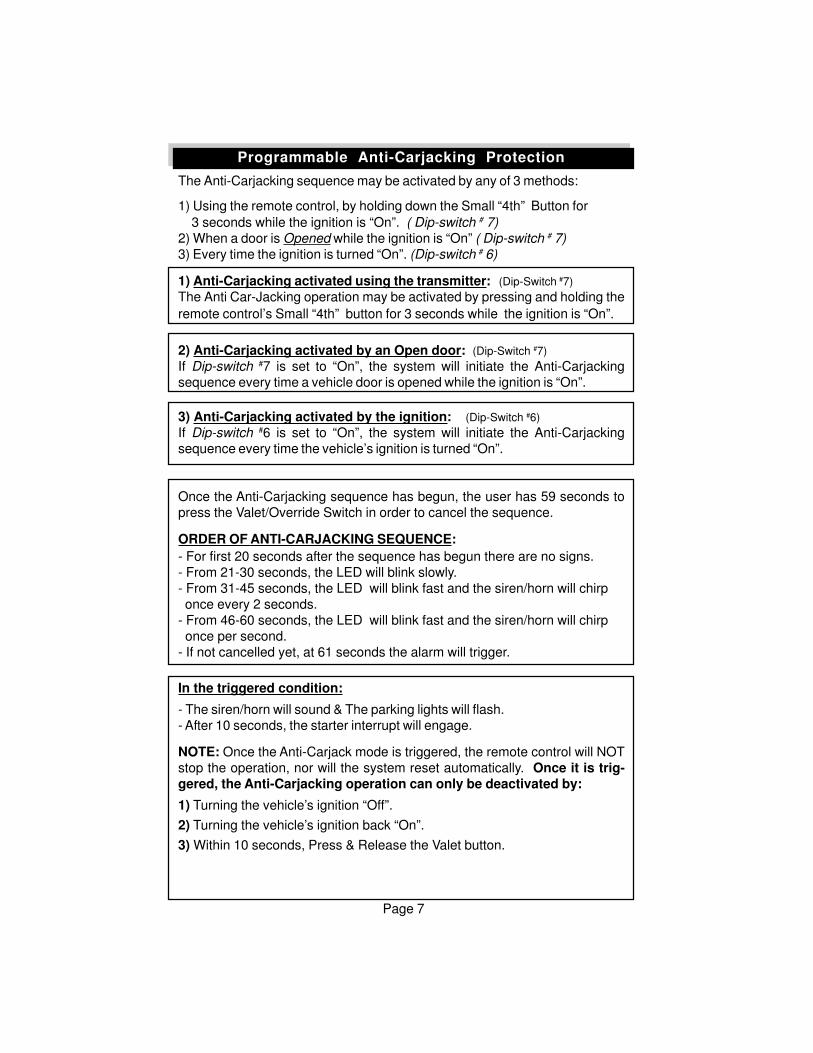
The shock sensor & Prewarn zone can be by-passed using the remote
control. This may be useful in stormy weather.
1) Arm the alarm by, Pressing & Releasing the “Lock” button.
2) Within 2 seconds, Press & Release the “3rd” button.
- The siren will chirp once to confirm sensor has been by-passed.
- Upon Disarming the alarm, the sensor zone will reset.
Sensor By-pass
System Armed & Activated
Remote Panic Operation
Page 5
THE SIREN WILL SOUND
THE PARKING LIGHTS
WILL FLASH
Hold 3 seconds
Then
1. 2.

The Auxiliary Channel may be used to operate an optional function. Possibili-
ties include remote trunk release, remote car starting, or an on-demand re-
mote window roll-up interface. Please see your Omega dealer for details on
available options.
To Activate the Auxiliary Channel:Press & Hold the “3rd” Button for 3 Seconds.
- The alarm will Disarm upon activating the Auxiliary channel.
- The Auxiliary Channel cannot be activated if the vehicle's ignition is "On".
The Anti-Carjacking mode can be activated using the remote control.
- Refer to next page for sequence details. (Programmable Dip-Switch #7)
To Activate Remote Anti-Carjack:Press & Hold The “4th” Button, For 3 Seconds, With The Ignition “On”.
Page 6
The Auxiliary Channel
Hold 3 seconds
Open Electric TrunkOpperate Window Roll-Up Unit
Opperate Remote Start Unit
Remote Anti-Carjack
Hold 3
seconds
Page 7
The Anti-Carjacking sequence may be activated by any of 3 methods:
1) Using the remote control, by holding down the Small “4th” Button for
3 seconds while the ignition is “On”. ( Dip-switch # 7)
2) When a door is Opened while the ignition is “On” ( Dip-switch # 7)
3) Every time the ignition is turned “On”. (Dip-switch # 6)
1) Anti-Carjacking activated using the transmitter: (Dip-Switch #7)
The Anti Car-Jacking operation may be activated by pressing and holding the
remote control’s Small “4th” button for 3 seconds while the ignition is “On”.
2) Anti-Carjacking activated by an Open door: (Dip-Switch #7)
If Dip-switch #7 is set to “On”, the system will initiate the Anti-Carjacking
sequence every time a vehicle door is opened while the ignition is “On”.
3) Anti-Carjacking activated by the ignition: (Dip-Switch #6)
If Dip-switch #6 is set to “On”, the system will initiate the Anti-Carjacking
sequence every time the vehicle’s ignition is turned “On”.
Once the Anti-Carjacking sequence has begun, the user has 59 seconds to
press the Valet/Override Switch in order to cancel the sequence.
ORDER OF ANTI-CARJACKING SEQUENCE:- For first 20 seconds after the sequence has begun there are no signs.
- From 21-30 seconds, the LED will blink slowly.
- From 31-45 seconds, the LED will blink fast and the siren/horn will chirp
once every 2 seconds.
- From 46-60 seconds, the LED will blink fast and the siren/horn will chirp
once per second.
- If not cancelled yet, at 61 seconds the alarm will trigger.
In the triggered condition:
- The siren/horn will sound & The parking lights will flash.
- After 10 seconds, the starter interrupt will engage.
NOTE: Once the Anti-Carjack mode is triggered, the remote control will NOT
stop the operation, nor will the system reset automatically. Once it is trig-gered, the Anti-Carjacking operation can only be deactivated by:
1) Turning the vehicle’s ignition “Off”.
2) Turning the vehicle’s ignition back “On”.
3) Within 10 seconds, Press & Release the Valet button.
Programmable Anti-Carjacking Protection
Page 8
Valet ModeValet Mode can only be entered into while the alarm is Disarmed.
Valet Mode turns off all of the alarm’s security features, (including Anti-Carjack).
Valet Mode is designed for situations in which it is not convenient for the security
portion of the alarm to be operational; for example during extended stopovers for
vehicle servicing, loaning others your vehicle, maintenance, valet parking,
washing, etc. The convenience features such as keyless entry will still operate.
To Enter Valet Mode (Alarm MUST be Disarmed):
Press & Hold the Valet Switch for 3 Seconds.
- The LED Status Indicator will light solid Blue and the siren will emit a long chirp
to confirm entry into Valet Mode. Now the system cannot become Armed.
- The vehicle's ignition may be "On" or "Off" when entering Valet Mode.
- To remind you its in Valet Mode ,The siren will chirp every time the vehicle’s
ignition is turned “Off”
To Exit Valet Mode: Simply Press & Release the Valet Switch.
- The LED will turn off and the siren will emit a long chirp to confirm that the
system has exited Valet Mode. Normal arming operations may be resumed.
- The vehicle's ignition may be "On" or "Off" when exiting Valet Mode.
The Blue LED Status Indicator visually shows the status of the alarm and alsoprovides a high level of visual deterrence. The Blue LED Status Indicator Light isnormally mounted where it can be seen by the driver, as well as from outside.
Security System Status: The primary function of the Blue LED Status IndicatorLight is to indicate the normal operating status of the security system:
Off = The system is disarmed and not performing any automatic functions. On Constant = The system is in the Valet Mode. Flashing Slow = The system is fully Armed. Flashing Fast (while Disarmed) = Last Door Arming or Automatic Rearming.
Zone Violation: Once the alarm is Disarmed, the LED will show which zonetriggered the alarm, until the ignition is turned “On” (this clears unit’s memory).
3 flash & pause = Door zone triggered alarm.4 flash & pause = Sensor zone triggered alarm.
Automatic Transmitter Verification: For the first 10 seconds after the vehicle’signition is turned "On", the LED Status Indicator will flash a number of times equalto the number of remote control transmitters which are programmed to operate thealarm. This indication can be from 1 Flash /pause up to 4 Flashes /pause, as thesystem can be operated by just one, or as many as 4 remote transmitters.
The LED Status Indicator
Page 9
Auxiliary Sensor: This security system is equipped with an On-Board dual zoneshock sensor that can be turned On/Off via programmable Dip-Switch #1, as wellas a plug-in port for an optional sensor to increase the effectiveness of the system.
The comprehensive line of optional sensors offered is comprised of impactsensors, glass tampering sensors, and microwave/radar sensors which candetect motion inside and outside the vehicle.
Prewarning Detection: This circuit requires connection to a dual zone sensoror detection device. When the sensor’s prewarn zone is triggered the siren willemit a series of chirps.
To program remote controls to operate the alarm:
Step 1: Turn "On" the vehicle's ignition.
Step 2: Within 7 seconds press the Valet/Override Switch 5 times. The alarmwill wolf the siren once to confirm entry into Remote Control Programming Mode.
Step 3: Within 10 seconds, press any Button on each remote to be programmed.The siren will chirp to confirm each time a remote has been programed.
If 10 seconds expire without any programming activity, or if the vehicle’s ignitionis turned “Off”, the system will automatically exit Remote Control ProgrammingMode. The siren will emit 2 long chirps to confirm exit.
NOTE: Up to 4 remote controls can be programed to operate the alarm. When-ever a remote control, new or existing, is programmed to the alarm, all existingcodes are erased for security. So all remote controls which are to operate thealarm, must be programmed in at the same time.
ATV: The LED Status Indicator will show the number of programmed remotecontrol transmitters for 10 seconds after the vehicle’s ignition is turned On.
As the instructions above show, programming extra transmitters to any vehiclesecurity system is easy; the exclusive patented ATV feature protects againstsomeone programming their own transmitter to operate your system.
Auxiliary Sensor & Prewarning
How to Program Remote Controls to the Alarm
ATV (Automatic Transmitter Verification)
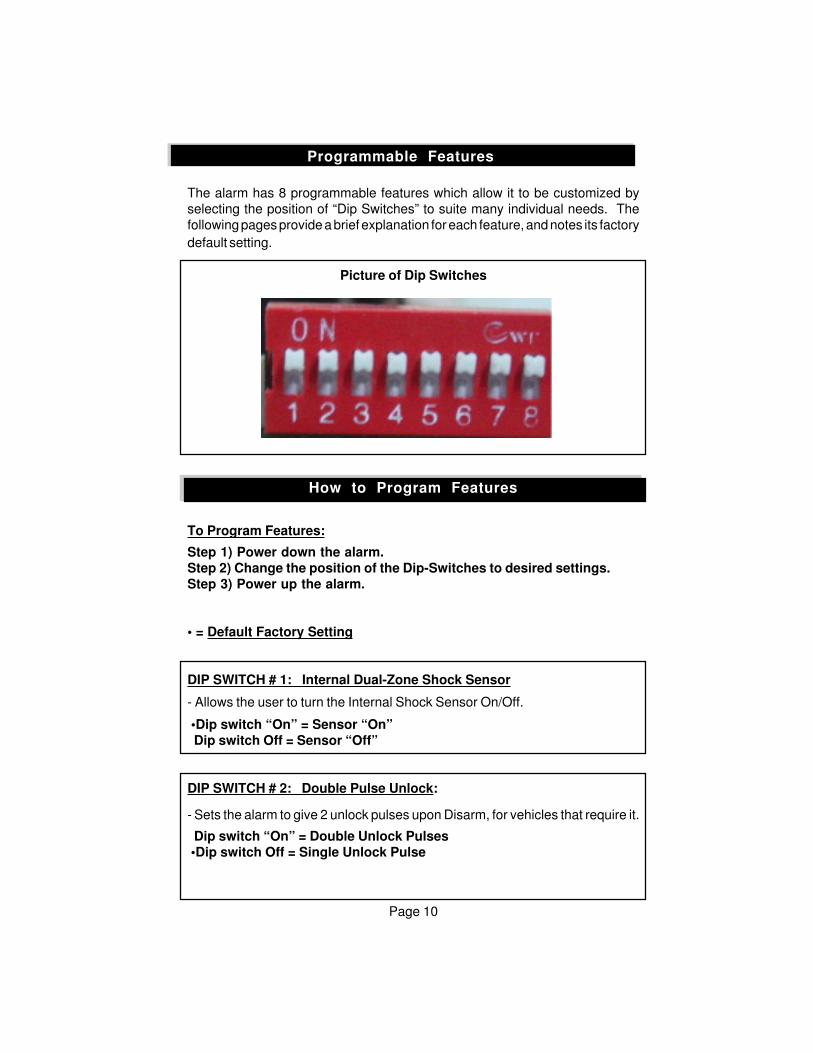
The alarm has 8 programmable features which allow it to be customized by
selecting the position of “Dip Switches” to suite many individual needs. The
following pages provide a brief explanation for each feature, and notes its factory
default setting.
Picture of Dip Switches
To Program Features:
Step 1) Power down the alarm.Step 2) Change the position of the Dip-Switches to desired settings.Step 3) Power up the alarm.
• = Default Factory Setting
DIP SWITCH # 1: Internal Dual-Zone Shock Sensor
- Allows the user to turn the Internal Shock Sensor On/Off.
•Dip switch “On” = Sensor “On” Dip switch Off = Sensor “Off”
DIP SWITCH # 2: Double Pulse Unlock:
- Sets the alarm to give 2 unlock pulses upon Disarm, for vehicles that require it.
Dip switch “On” = Double Unlock Pulses •Dip switch Off = Single Unlock Pulse
Page 10
Programmable Features
How to Program Features
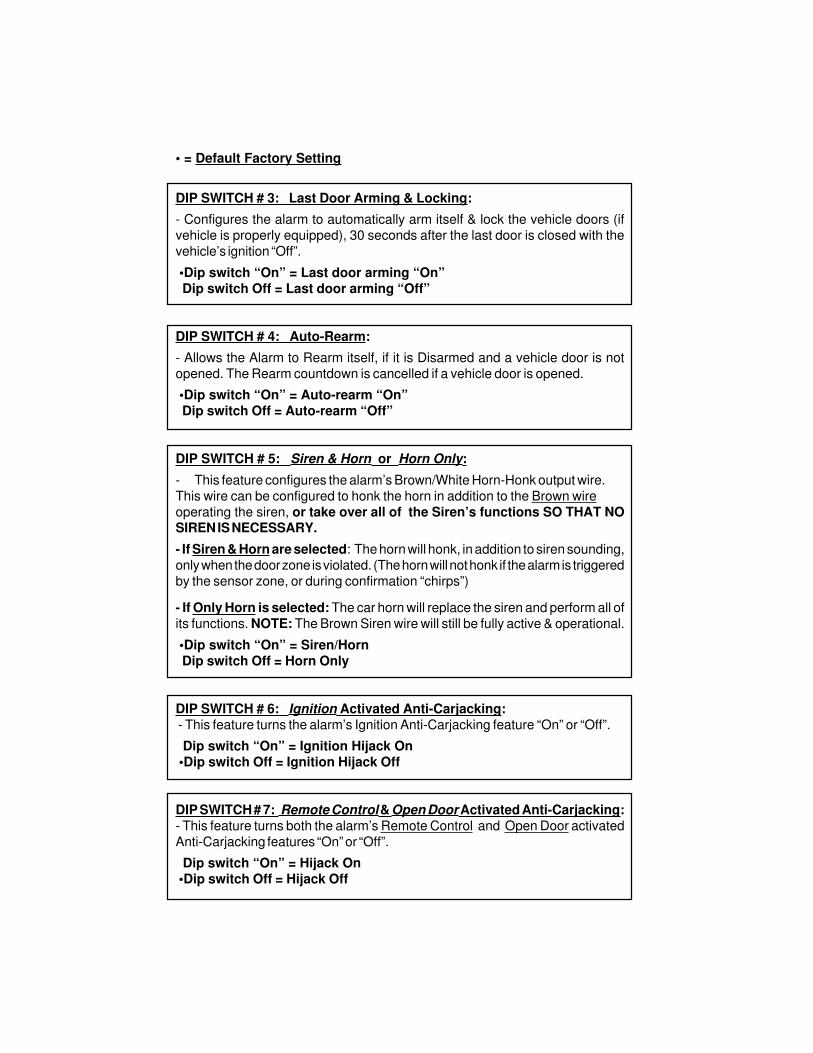
• = Default Factory Setting
DIP SWITCH # 3: Last Door Arming & Locking:
- Configures the alarm to automatically arm itself & lock the vehicle doors (if
vehicle is properly equipped), 30 seconds after the last door is closed with the
vehicle’s ignition “Off”.
•Dip switch “On” = Last door arming “On” Dip switch Off = Last door arming “Off”
DIP SWITCH # 4: Auto-Rearm:
- Allows the Alarm to Rearm itself, if it is Disarmed and a vehicle door is not
opened. The Rearm countdown is cancelled if a vehicle door is opened.
•Dip switch “On” = Auto-rearm “On” Dip switch Off = Auto-rearm “Off”
DIP SWITCH # 5: Siren & Horn or Horn Only:
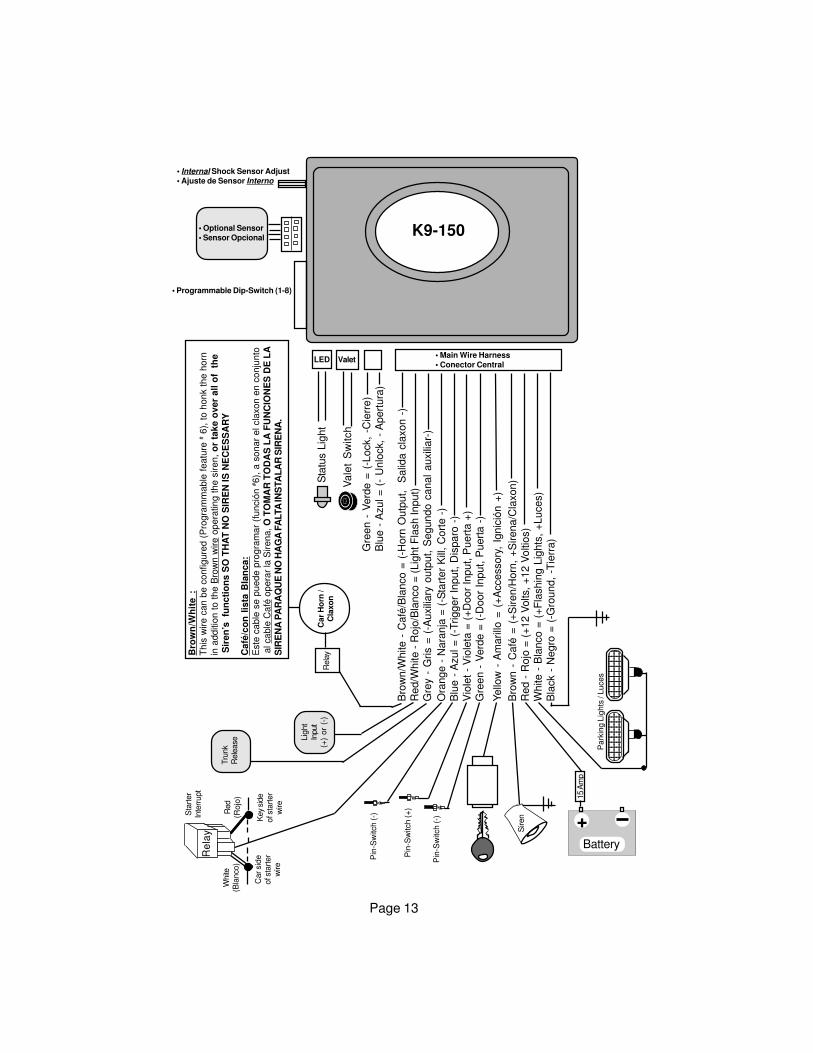
- This feature configures the alarm’s Brown/White Horn-Honk output wire.
This wire can be configured to honk the horn in addition to the Brown wire
operating the siren, or take over all of the Siren’s functions SO THAT NOSIREN IS NECESSARY.
- If Siren & Horn are selected: The horn will honk, in addition to siren sounding,
only when the door zone is violated. (The horn will not honk if the alarm is triggered
by the sensor zone, or during confirmation “chirps”)
- If Only Horn is selected: The car horn will replace the siren and perform all of
its functions. NOTE: The Brown Siren wire will still be fully active & operational.
•Dip switch “On” = Siren/Horn Dip switch Off = Horn Only
DIP SWITCH # 6: Ignition Activated Anti-Carjacking: - This feature turns the alarm’s Ignition Anti-Carjacking feature “On” or “Off”.
Dip switch “On” = Ignition Hijack On •Dip switch Off = Ignition Hijack Off
DIP SWITCH # 7: Remote Control & Open Door Activated Anti-Carjacking:- This feature turns both the alarm’s Remote Control and Open Door activated
Anti-Carjacking features “On” or “Off”.
Dip switch “On” = Hijack On •Dip switch Off = Hijack Off
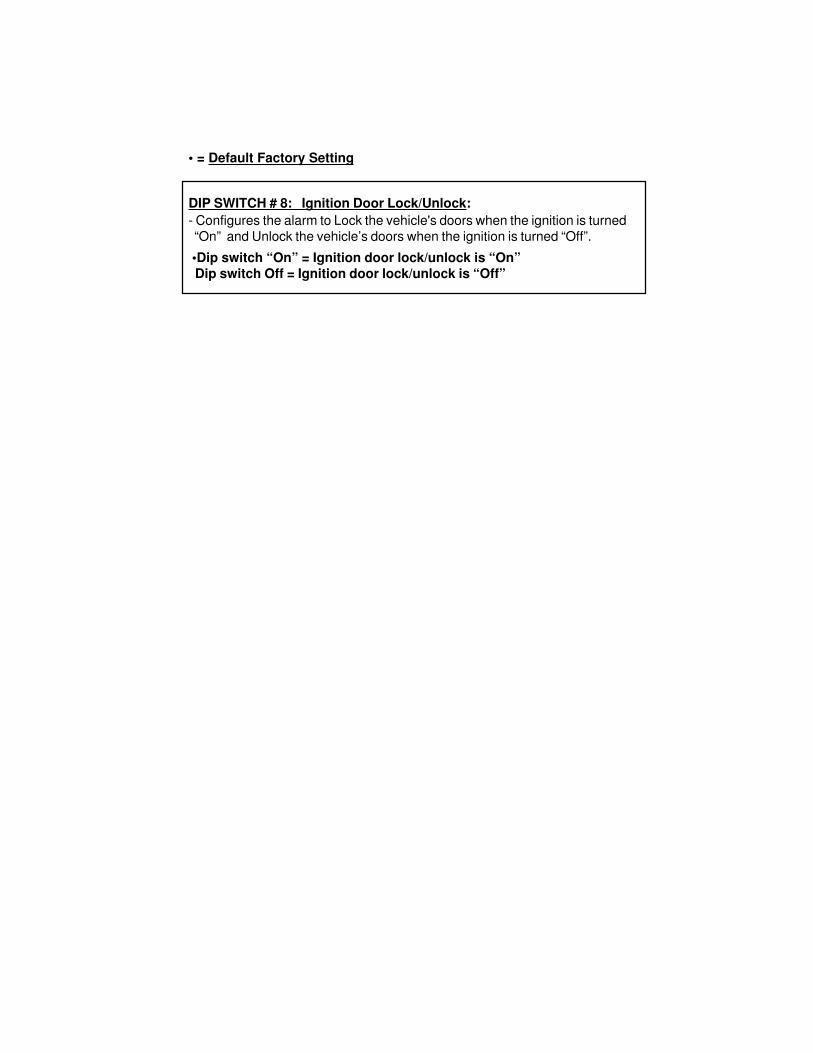
• = Default Factory Setting
DIP SWITCH # 8: Ignition Door Lock/Unlock:- Configures the alarm to Lock the vehicle's doors when the ignition is turned
“On” and Unlock the vehicle’s doors when the ignition is turned “Off”.
•Dip switch “On” = Ignition door lock/unlock is “On” Dip switch Off = Ignition door lock/unlock is “Off”
Page 13
Bro
wn
/Wh
ite
:T
his
wir
e c
an
be
co
nfig
ure
d (
Pro
gra
mm
ab
le f
ea
ture
# 6
), t
o h
on
k t
he
ho
rn
in a
dd
itio
n t
o t
he
Bro
wn w
ire
op
era
tin
g t
he
sir
en
, o
r ta
ke o
ver
all
of
th
e S
iren
’s f
un
ctio
ns
SO
TH
AT
NO
SIR
EN
IS N
EC
ES
SA
RY
Caf
é/co
n l
ista
Bla
nca
:E
ste
ca
ble
se
pu
ed
e p
rog
ram
ar
(fu
nció
n #
6),
a s
on
ar
el cla
xo
n e
n c
on
jun
to
al ca
ble
Ca
fé o
pe
rar
la S
ire
na
, O
TO
MA
R T
OD
AS
LA
FU
NC
ION
ES
DE
LA
SIR
EN
A P
AR
AQ
UE
NO
HA
GA
FA
LTA
INS
TAL
AR
SIR
EN
A.
Bro
wn/W
hite -
Café
/Bla
nco =
(-H
orn
Outp
ut,
Salid
a c
laxon -
)
Red/W
hite -
Rojo
/Bla
nco =
(Lig
ht F
lash Input)
Gre
y -
Gris =
(-A
uxili
ary
outp
ut, S
egundo c
anal
auxili
ar-
)
Ora
nge -
Nara
nja
= (
-Sta
rter
Kill
, C
ort
e -
)
Blu
e -
Azu
l =
(-T
rigger
Input, D
isparo
-)
Vio
let
- V
iole
ta =
(+
Door
Input, P
uert
a +
)
Gre
en -
Verd
e =
(-D
oor
Input, P
uert
a -
)
Yello
w -
Am
arillo
= (
+A
ccessory
, Ig
nic
ión +
)
Bro
wn -
Café
= (
+S
iren/H
orn
, +
Sirena/C
laxon)
Red -
Rojo
= (
+12 V
olts,
+12 V
oltio
s)
White -
Bla
nco =
(+
Fla
shin
g L
ights
, +
Luces)
Bla
ck -
Negro
= (
-Gro
und,
-Tie
rra)
K9-150
Gre
en -
Verd
e =
(-L
ock,
-Cie
rre)
Blu
e -
Azul =
(-
Unlo
ck,
- A
pert
ura
)
Siren
P
in-S
witch (
-)
P
in-S
witch (
-)
Battery
P
in-S
witch (
+)
15 A
mp
+
123123123123123123123123123123
Park
ing L
ights
/ L
uces
123123123123123123123123123123123123
Re
lay
Tru
nk
Rele
ase
Rela
yC
ar H
orn
/C
laxo
n
Va
let
Sw
itch
Sta
tus L
ight
Lig
ht
Input
(+)
or
(-)
Key
side
of s
tart
er
wire
Car sid
e
of s
tart
er
wire
Sta
rter
Inte
rrupt
Red
(Ro
jo)
White
(Bla
nco)
• Internal Shock Sensor Adjust• Ajuste de Sensor Interno
• Optional Sensor• Sensor Opcional
• Programmable Dip-Switch (1-8)
LED • Main Wire Harness• Conector Central
Valet
Page 14
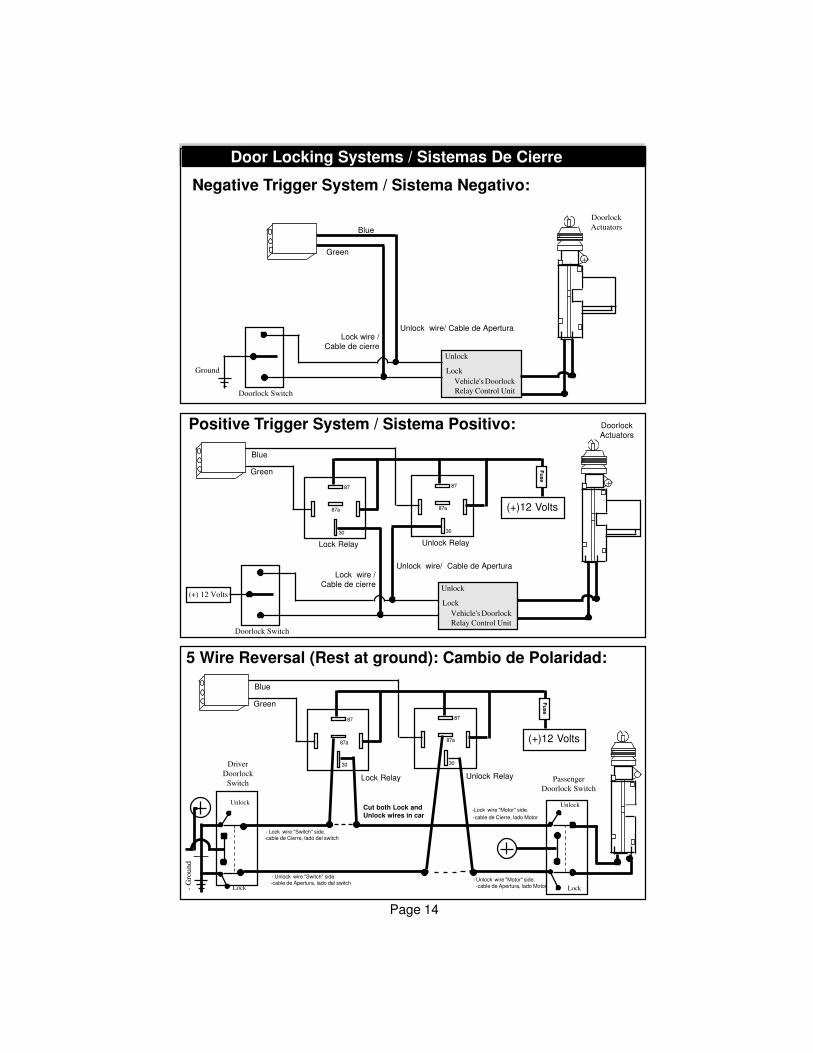
Door Locking Systems / Sistemas De Cierre
Negative Trigger System / Sistema Negativo:
Doorlock Switch
Ground
Vehicle's Doorlock
Relay Control Unit
Lock
Unlock
Lock wire /
Cable de cierre
Unlock wire/ Cable de Apertura
+
Doorlock
Actuators
5 Wire Reversal (Rest at ground): Cambio de Polaridad:
Positive Trigger System / Sistema Positivo:
Doorlock Switch
(+) 12 Volts
Vehicle's Doorlock
Relay Control Unit
Lock
Unlock
Lock wire /
Cable de cierre
Unlock wire/ Cable de Apertura
+
Doorlock
Actuators
(+)12 Volts
Unlock Unlock
Passenger
Doorlock Switch
Driver
Doorlock
Switch
- Lock wire "Switch" side.
-cable de Cierre, lado del switch
-Lock wire "Motor" side.
-cable de Cierre, lado Motor
Cut both Lock andUnlock wires in car
- Unlock wire "Switch" side.
-cable de Apertura, lado del switchLock Lock-
Gro
un
d
- Unlock wire "Motor" side.
-cable de Apertura, lado Motor
Green
Blue
Fu
se
30
87
87a
30
87
87a
Green
Blue
Lock Relay Unlock Relay
Fu
se
30
87
87a
30
87
87a
Green
Blue
Lock Relay Unlock Relay
(+)12 Volts
Pagina 12 E
• = Significa programación de fabrica.
DIP SWITCH # 7: Anti-Atraco A Través Del «Control» o «Puerta ABIERTA»
Si esta función esta encendida, el Anti-Atraco se activa usando el control
remoto, o cada vez que se Abre una puerta cuando la ignición esta encendida.
Dip switch Encendido (“On”) = Anti-Atraco activado• Dip switch Apagado = Anti-Atraco desactivado
DIP SWITCH # 7: Cierre/Apertura De Seguros con Ignición:
Esta función permite que la alarma Cierre los seguros al encender la ignición
del auto, y los abra al apagar la ignición.
•Dip switch Encendido (“On”) = Cierre/Apertura de Ignición activada Dip switch Apagado = Cierre/Apertura de Ignición desactivada
Pagina 11 E
• = Significa programación de fabrica.
DIP SWITCH # 3 Armado Automático y Cierre de Seguros :
- Permite que la alarma se Arme automaticamente y cierre los seguros del
auto, si están conectados.
•Dip switch Encendido (“On”) = Armado y Cierre Automático activado Dip switch Apagado = Armado y Cierre Automático desactivado
DIP SWITCH # 4: Rearme Automático:
- Permite que la alarma se Rearme automaticamente en caso que es desar-
mada, y todas las puertas quedan cerradas. Al abrir una puerta del auto, se
cancela la secuencia del Rearme.
•Dip switch Encendido (“On”) = Rearme activado Dip switch Apagado = Rearme desactivado
DIP SWITCH # 5: Sirena y Claxon o Solo Claxon:
Esta función permite programar el cable Café/Blanco a sonar el claxon en
conjunto al cable Café que opera la Sirena, O, TOMAR TODAS LA FUNCIO-NES DE LA SIRENA PARA QUE NO HAGA FALTA INSTALAR SIRENA.
- SIRENA Y CLAXON: Esta función permite que el claxon suene en adición a
la sirena cuando la alarma es disparada por la zona de las puertas. El claxon
no suena si la alarma es disparada por la zona del sensor, ni hace tonos
de confirmación.
- SOLO CLAXON: Si la opción de «Solo Claxon» se escoje, el claxon hace todas
las funciones de la sirena, eliminando la necesidad de instalar una sirena. En este
caso, el cable Café de la sirena, sigue funcionando en caso que desean tener
Claxon y Sirena.
•Dip switch Encendido (“On”) = Sirena y Claxon Dip switch Apagado = Solo Claxon
DIP SWITCH # 6: Anti-Atraco A Través De La Ignición : (•D)
Si esta función esta encendida, el Anti-Atraco se activa cada vez que se
enciende la ignición del vehículo.
Dip switch Encendido (“On”) = Anti-Atraco activado •Dip switch Apagado = Anti-Atraco desactivado
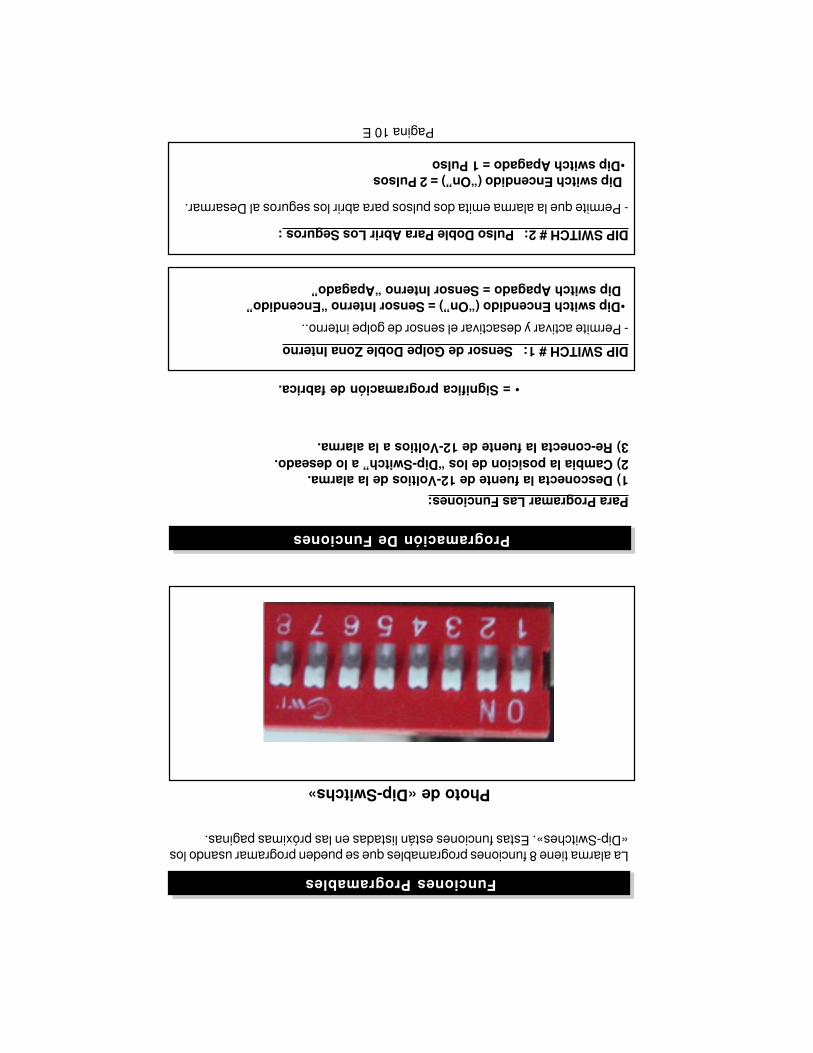
Pagina 10 E
La alarma tiene 8 funciones programables que se pueden programar usando los
«Dip-Switches». Estas funciones están listadas en las próximas paginas.
Photo de «Dip-Switchs»
Para Programar Las Funciones:
1) Desconecta la fuente de 12-Voltios de la alarma.2) Cambia la posicion de los “Dip-Switch” a lo deseado.3) Re-conecta la fuente de 12-Voltios a la alarma.
• = Significa programación de fabrica.
DIP SWITCH # 1: Sensor de Golpe Doble Zona Interno
- Permite activar y desactivar el sensor de golpe interno..
•Dip switch Encendido (“On”) = Sensor Interno “Encendido” Dip switch Apagado = Sensor Interno “Apagado”
DIP SWITCH # 2: Pulso Doble Para Abrir Los Seguros :
- Permite que la alarma emita dos pulsos para abrir los seguros al Desarmar.
Dip switch Encendido (“On”) = 2 Pulsos •Dip switch Apagado = 1 Pulso
Funciones Programables
Programación De Funciones
La Alarma viene con un sensor INTERNO de doble zona con pre-alarma. La zona
del sensor vigila contra violaciones en general. Si el sensor detecta una violación
se dispara la alarma inmediatamente. Este sensor se puede desactivar yreemplazar con un sensor Externo
Zona De Pre-Alarma: La zona de Pre-Alarma vigila contra violaciones
pequeñas. Si la zona de Pre-alarma detecta una violación, la Sirena/Claxon
emite una serie de tonos por 2-segundos.
Para programar los controles remotos:
1) Enciende la ignición del auto.
2) Antes que pasen 7 segundos, presione el botón de “Valet” 5 veces
- La Sirena/Claxon emite un tono confirmando la entrada al modo.
3) Antes que pasen 10 segundos, presione un botón de cada controlremoto por programar:
- Se puede programar hasta 4 controles remotos.
- La Sirena/Claxon emite un tono cada vez que un control se ha programado.
4) La alarma sale del modo de programación al Apagar la ignición o sipasan 10 segundos sin entrada de programación.
- La Sirena/Claxon confirma la salida del modo con 2 tonos largos.
NOTA: Se pueden programar 4 controles para operar la alarma. Cada vez que un
control se programa, todos los controles en la memoria se borran para su segu-
ridad. Es necessario programar todos los controles de una vez.
PROTECCIÓN ATV: Por los primeros 10 segundos después de que se
encienda la ignición del auto la luz LED hace una serie de intermitencias,
separada por una pausa, que corresponden al numero de controles remotos
que están programado en la memoria de la alarma.
1 intermitencia /pausa = 1 control remoto programado.
2 intermitencias /pausa = 2 controles remotos programado.
3 intermitencias /pausa = 3 controles remotos programado.
4 intermitencias /pausa = 4 controles remotos programado.
Zona Del Sensor y Pre-Aviso
Pagina 9 E
Programación De Controles Remotos A La Alarma
PROTECCIÓN ATV
Pagina 8E
Modo de ValetSolo se puede entrar al modo de Valet cuando la alarma esta Desarmada:
En el modo de “Valet” todas las funciones de seguridad quedan apagadas y
solamente las funciones de conveniencia como la apertura y el cierre de los
seguros eléctricos funcionan. El modo de Valet esta diseñado para ocasiones
en el cual seria inconveniente que la alarma este operando, por ejemplo cuando
el vehículo este en el mecánico.
Para Entrar Al Modo De “Valet”: Con la alarma Desarmada,presione el botón de Valet por 3 segundos con la ignición delvehículo encendida o apagada.
- La luz LED se enciende fijamente y la sirena emite un tono para confirmar.
- Para recordarte que la alarma esta en Valet, la sirena emite un tono cada
vez que se apaga la ignición del auto.
Para Salir Del Modo De “Valet”: Presione el botón de Valet unavez con la ignición del vehículo encendida o apagada.
- La luz LED se apaga y la sirena emite un tono largo para confirmar salida.
La luz LED tiene 3 funciones principales:
1) Muestra el “Estado” de la alarma:- Intermitencia lenta = La alarma esta Armada.
- Intermitencia rápida (alarma Desarmada) = El procesó de Armado/
Rearme automático ha comenzado.
- LED Apagado = Alarma Desarmada sin Armado/Rearme automático.
- LED Fijo = La alarma esta en el modo de “Valet”.
2) Verifica cuantos controles están programado: (Protección “ATV”) Por los primeros 10 segundos después de que se encienda la ignición , la luz
LED hace una serie de intermitencias que corresponden al numero de contro-
les remotos que están programado en la memoria de la alarma.
1 intermitencia /pausa = 1 control remoto programado.
2 intermitencias /pausa = 2 controles remotos programado.
3 intermitencias /pausa = 3 controles remotos programado.
4 intermitencias /pausa = 4 controles remotos programado.
3) Advierte que hubo un disparo y confirma cual zona fue violada: Si ha habido un disparo, al Desarmar la alarma, la luz LED indica
exactamente cual zona fue violada hasta que se encienda la ignición.
3 intermitencias /pausa = La zona de las Puertas fue violada.
4 intermitencias /pausa = La zona del Sensor fue violada.
La Luz LED
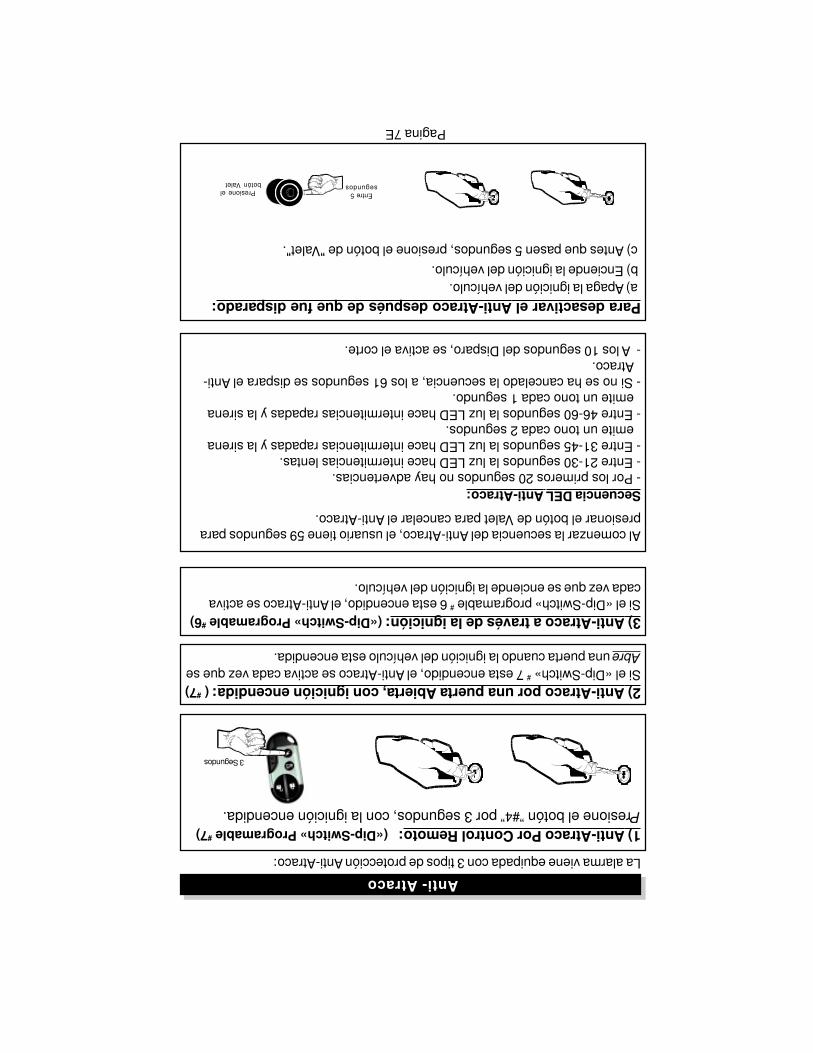
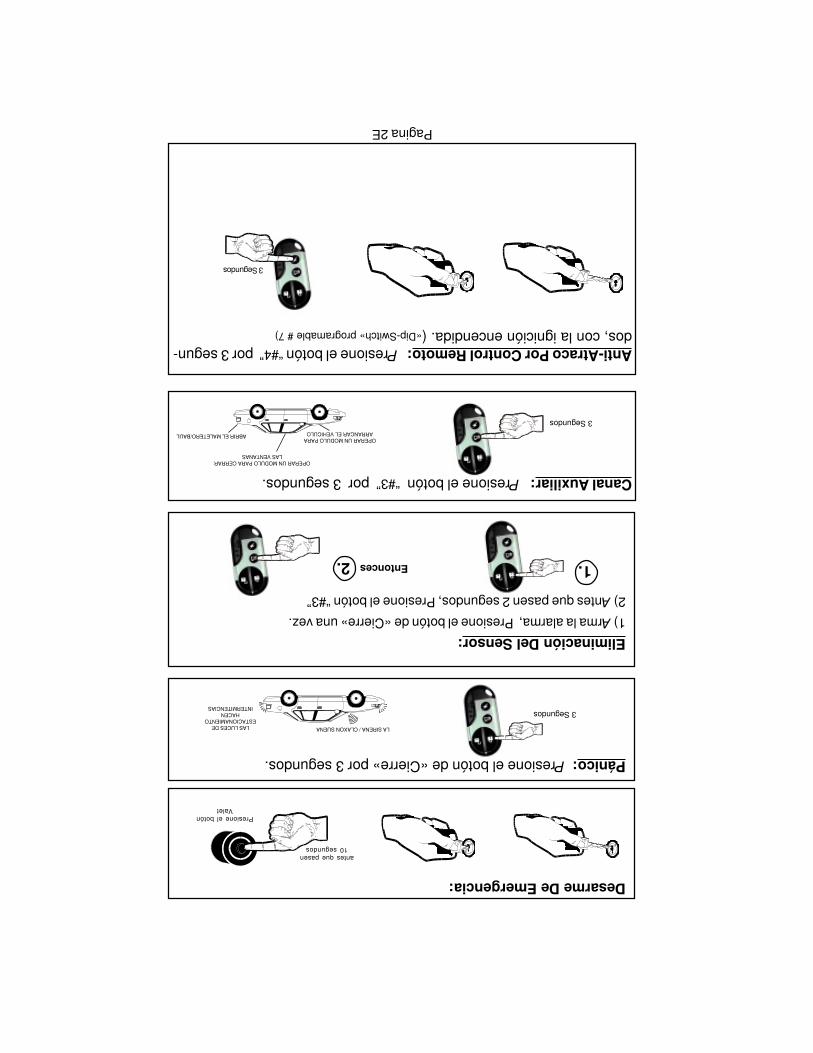
La alarma viene equipada con 3 tipos de protección Anti-Atraco:
1) Anti-Atraco Por Control Remoto: («Dip-Switch» Programable #7)
Presione el botón ”#4” por 3 segundos, con la ignición encendida.
2) Anti-Atraco por una puerta Abierta, con ignición encendida: ( #7)
Si el «Dip-Switch» # 7 esta encendido, el Anti-Atraco se activa cada vez que se
Abre una puerta cuando la ignición del vehículo esta encendida.
3) Anti-Atraco a través de la ignición: («Dip-Switch» Programable #6)
Si el «Dip-Switch» programable # 6 esta encendido, el Anti-Atraco se activa
cada vez que se enciende la ignición del vehículo.
Al comenzar la secuencia del Anti-Atraco, el usuario tiene 59 segundos para
presionar el botón de Valet para cancelar el Anti-Atraco.
Secuencia DEL Anti-Atraco:- Por los primeros 20 segundos no hay advertencias.
- Entre 21-30 segundos la luz LED hace intermitencias lentas.
- Entre 31-45 segundos la luz LED hace intermitencias rapadas y la sirena
emite un tono cada 2 segundos.
- Entre 46-60 segundos la luz LED hace intermitencias rapadas y la sirena
emite un tono cada 1 segundo.
- Si no se ha cancelado la secuencia, a los 61 segundos se dispara el Anti-
Atraco.
- A los 10 segundos del Disparo, se activa el corte.
Para desactivar el Anti-Atraco después de que fue disparado: a) Apaga la ignición del vehículo.
b) Enciende la ignición del vehículo.
c) Antes que pasen 5 segundos, presione el botón de "Valet".
Pagina 7E
Entre 5
segundos Presione el
botón Valet
Anti- Atraco
3 Segundos
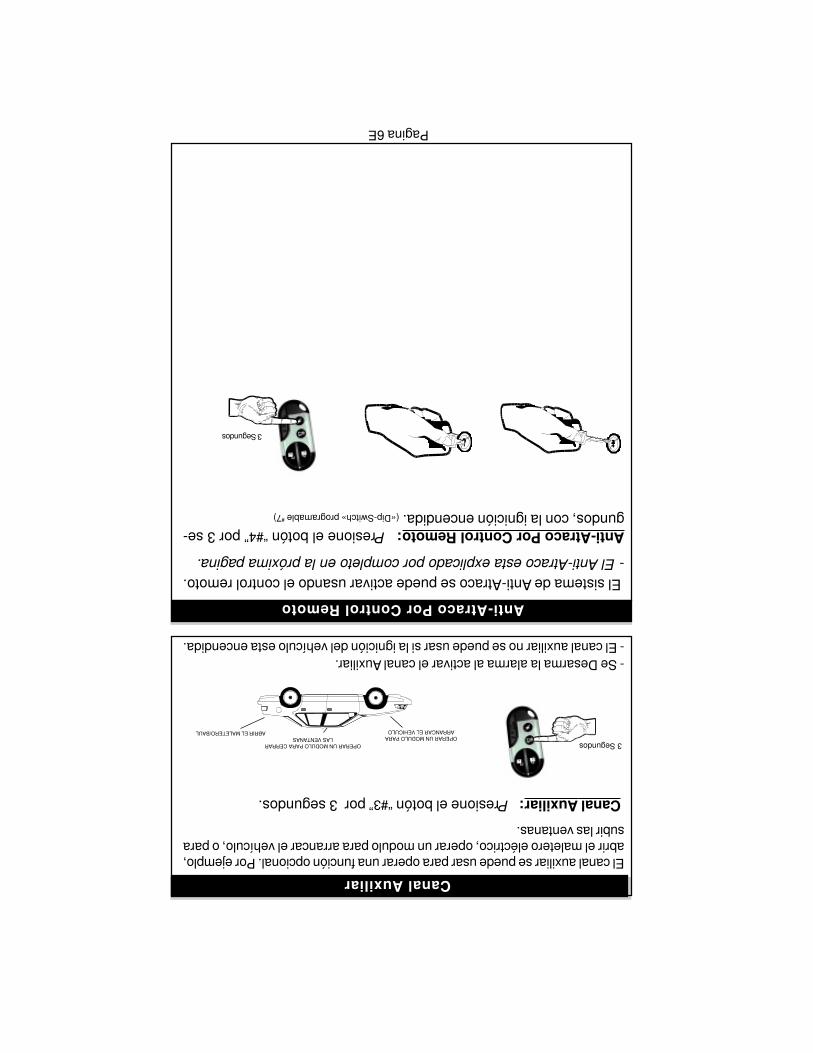
El canal auxiliar se puede usar para operar una función opcional. Por ejemplo,
abrir el maletero eléctrico, operar un modulo para arrancar el vehículo, o para
subir las ventanas.
Canal Auxiliar: Presione el botón “#3” por 3 segundos.
- Se Desarma la alarma al activar el canal Auxiliar.
- El canal auxiliar no se puede usar si la ignición del vehículo esta encendida.
El sistema de Anti-Atraco se puede activar usando el control remoto.
- El Anti-Atraco esta explicado por completo en la próxima pagina.
Anti-Atraco Por Control Remoto: Presione el botón “#4” por 3 se-
gundos, con la ignición encendida. («Dip-Switch» programable #7)
Pagina 6E
Canal Auxiliar
Anti-Atraco Por Control Remoto
3 SegundosOPERAR UN MODULO PARA
ARRANCAR EL VEHICULOABRIR EL MALETERO/BAUL
OPERAR UN MODULO PARA CERRAR
LAS VENTANAS
3 Segundos
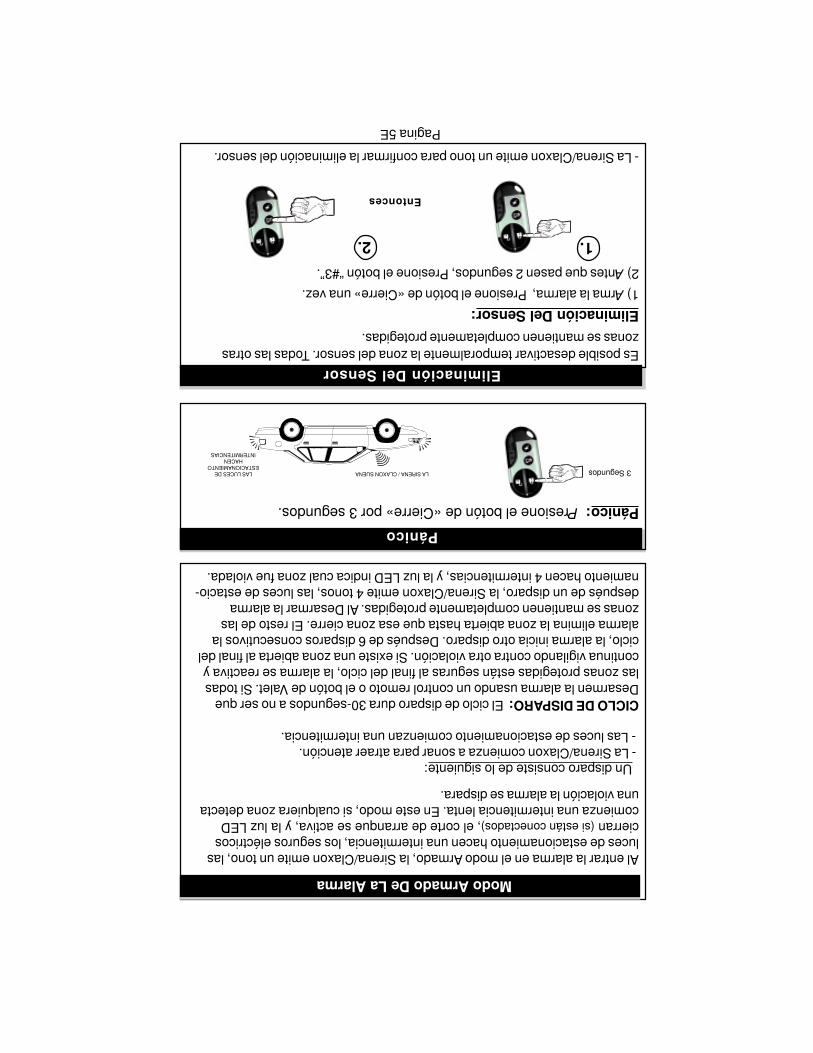
Al entrar la alarma en el modo Armado, la Sirena/Claxon emite un tono, las
luces de estacionamiento hacen una intermitencia, los seguros eléctricos
cierran (si están conectados), el corte de arranque se activa, y la luz LED
comienza una intermitencia lenta. En este modo, si cualquiera zona detecta
una violación la alarma se dispara.
Un disparo consiste de lo siguiente:
- La Sirena/Claxon comienza a sonar para atraer atención.
- Las luces de estacionamiento comienzan una intermitencia.
CICLO DE DISPARO: El ciclo de disparo dura 30-segundos a no ser que
Desarmen la alarma usando un control remoto o el botón de Valet. Si todas
las zonas protegidas están seguras al final del ciclo, la alarma se reactiva y
continua vigilando contra otra violación. Si existe una zona abierta al final del
ciclo, la alarma inicia otro disparo. Después de 6 disparos consecutivos la
alarma elimina la zona abierta hasta que esa zona cierre. El resto de las
zonas se mantienen completamente protegidas. Al Desarmar la alarma
después de un disparo, la Sirena/Claxon emite 4 tonos, las luces de estacio-
namiento hacen 4 intermitencias, y la luz LED indica cual zona fue violada.
Pánico: Presione el botón de «Cierre» por 3 segundos.
Es posible desactivar temporalmente la zona del sensor. Todas las otras
zonas se mantienen completamente protegidas.
Eliminación Del Sensor:1) Arma la alarma, Presione el botón de «Cierre» una vez.
2) Antes que pasen 2 segundos, Presione el botón “#3”.
- La Sirena/Claxon emite un tono para confirmar la eliminación del sensor.
Modo Armado De La Alarma
Eliminación Del Sensor
Pánico
Entonces
1.2.
LA SIRENA / CLAXON SUENALAS LUCES DE
ESTACIONAMIENTO
HACEN
INTERMITENCIAS
3 Segundos
Pagina 5E

La alarma se puede Desarmar de 3 maneras:
1) Desarme usando control remoto: Presione el botón del «Apertura»
2) Desarme Silente: Presione el botón “#3” 2 veces en 3 segundos.
Al Desarmar:- La Sirena/Claxon emite dos tonos. / Cuatro tonos si ha sucedido un disparo.
- Las luces de estacionamiento hacen 2 intermitencias.
- Los seguros eléctricos abren. (Si están conectados)
- El corte de arranque se desactiva.
- La luz LED comienza una intermitencia rápida para Rearme automático hasta
que se Rearma la alarma, o se habré una puerta del auto.
DESARME SEGURO DE 2 ESCALAS: Si la alarma esta disparada, presionan-
do cualquier botón del control remoto solo silencia la sirena, es necesarios
presionar el botón de «Apertura» una segunda vez.
Esta función permite Desarmar la alarma sin el uso del control remoto. Esta
función esta diseñada para ocasiones en el cual la alarma esta Armada o en
pleno disparo y el control remoto esta sin batería, roto, o perdido.
a) Enciende la ignición del vehículo con la llave.
b) Antes que pasen 10 segundos, presione el botón Valet
-La alarma se Desarma.
Pagina 4E
LAS LUCES DE
ESTACIONAMIENTO
HACEN
INTERMITENCIAS
LOS SEGUROS ELECTRICOS ABREN
(SI ESTAN CONECTADOS)
LA SIRENA / CLAXON
EMITE 2 TONOS
DE CONFIRMACION
LAS LUCES DE
ESTACIONAMIENTO
HACEN INTERMITENCIAS
LOS SEGUROS ELECTRICOS ABREN
(SI ESTAN CONECTADOS)
2 X
Desarme De Emergencia: (Desarme sin el control remoto)
Antes De 10
segundos
Presione el
botón Valet
Desarme De La Alarma
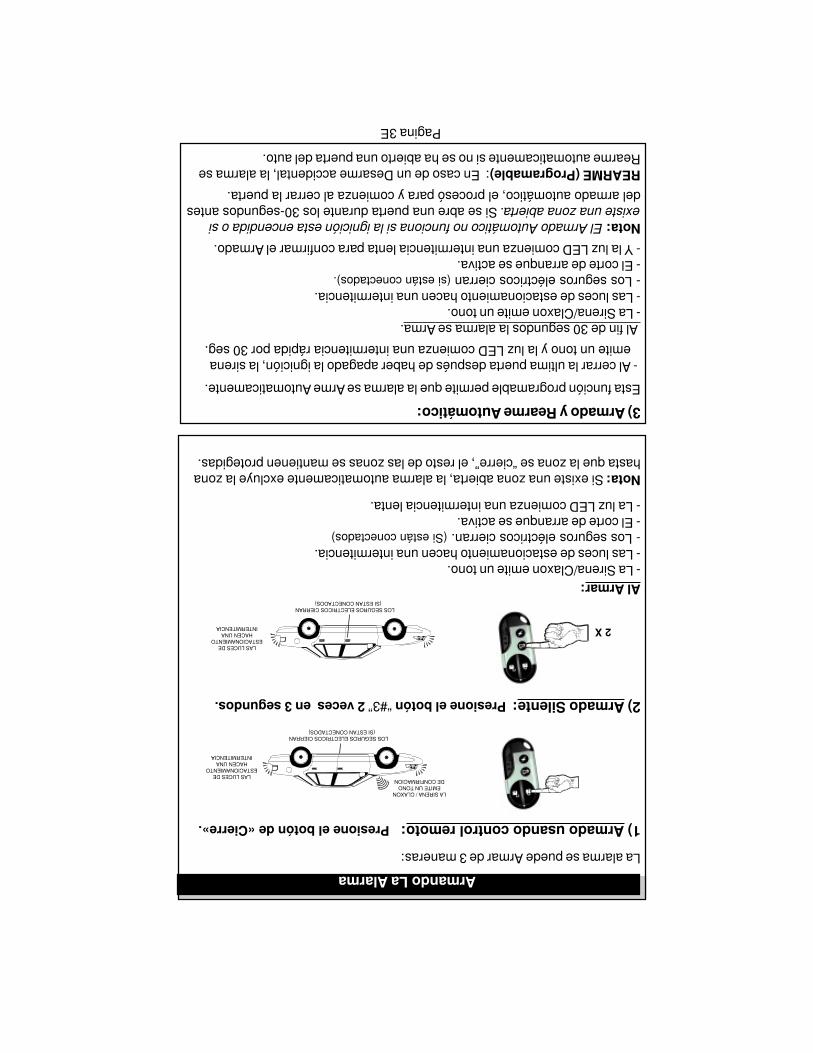
La alarma se puede Armar de 3 maneras:
1) Armado usando control remoto: Presione el botón de «Cierre».
2) Armado Silente: Presione el botón “#3” 2 veces en 3 segundos.
Al Armar:- La Sirena/Claxon emite un tono.
- Las luces de estacionamiento hacen una intermitencia.
- Los seguros eléctricos cierran. (Si están conectados)
- El corte de arranque se activa.
- La luz LED comienza una intermitencia lenta.
Nota: Si existe una zona abierta, la alarma automaticamente excluye la zona
hasta que la zona se “cierre”, el resto de las zonas se mantienen protegidas.
3) Armado y Rearme Automático:
Esta función programable permite que la alarma se Arme Automaticamente.
- Al cerrar la ultima puerta después de haber apagado la ignición, la sirena
emite un tono y la luz LED comienza una intermitencia rápida por 30 seg.
Al fin de 30 segundos la alarma se Arma.
- La Sirena/Claxon emite un tono.
- Las luces de estacionamiento hacen una intermitencia.
- Los seguros eléctricos cierran (si están conectados).
- El corte de arranque se activa.
- Y la luz LED comienza una intermitencia lenta para confirmar el Armado.
Nota: El Armado Automático no funciona si la ignición esta encendida o si
existe una zona abierta. Si se abre una puerta durante los 30-segundos antes
del armado automático, el procesó para y comienza al cerrar la puerta.
REARME (Programable): En caso de un Desarme accidental, la alarma se
Rearme automaticamente si no se ha abierto una puerta del auto.
Pagina 3E
Armando La Alarma
LA SIRENA / CLAXON
EMITE UN TONO
DE CONFIRMACIONLAS LUCES DE
ESTACIONAMIENTO
HACEN UNA
INTERMITENCIA
LOS SEGUROS ELECTRICOS CIERRAN
(SI ESTAN CONECTADOS)
LOS SEGUROS ELECTRICOS CIERRAN
(SI ESTAN CONECTADOS)
2 X
LAS LUCES DE
ESTACIONAMIENTO
HACEN UNA
INTERMITENCIA
Desarme De Emergencia:
Pánico: Presione el botón de «Cierre» por 3 segundos.
Eliminación Del Sensor:1) Arma la alarma, Presione el botón de «Cierre» una vez.
2) Antes que pasen 2 segundos, Presione el botón “#3”.
Canal Auxiliar: Presione el botón “#3” por 3 segundos.
Anti-Atraco Por Control Remoto: Presione el botón “#4” por 3 segun-
dos, con la ignición encendida. («Dip-Switch» programable # 7)
Pagina 2E
antes que pasen
10 segundos
Presione el botón
Valet
LA SIRENA / CLAXON SUENA
3 Segundos
Entonces2. 1.
LAS LUCES DE
ESTACIONAMIENTO
HACEN
INTERMITENCIAS
3 Segundos
OPERAR UN MODULO PARA
ARRANCAR EL VEHICULOABRIR EL MALETERO/BAUL
OPERAR UN MODULO PARA CERRAR
LAS VENTANAS
3 Segundos
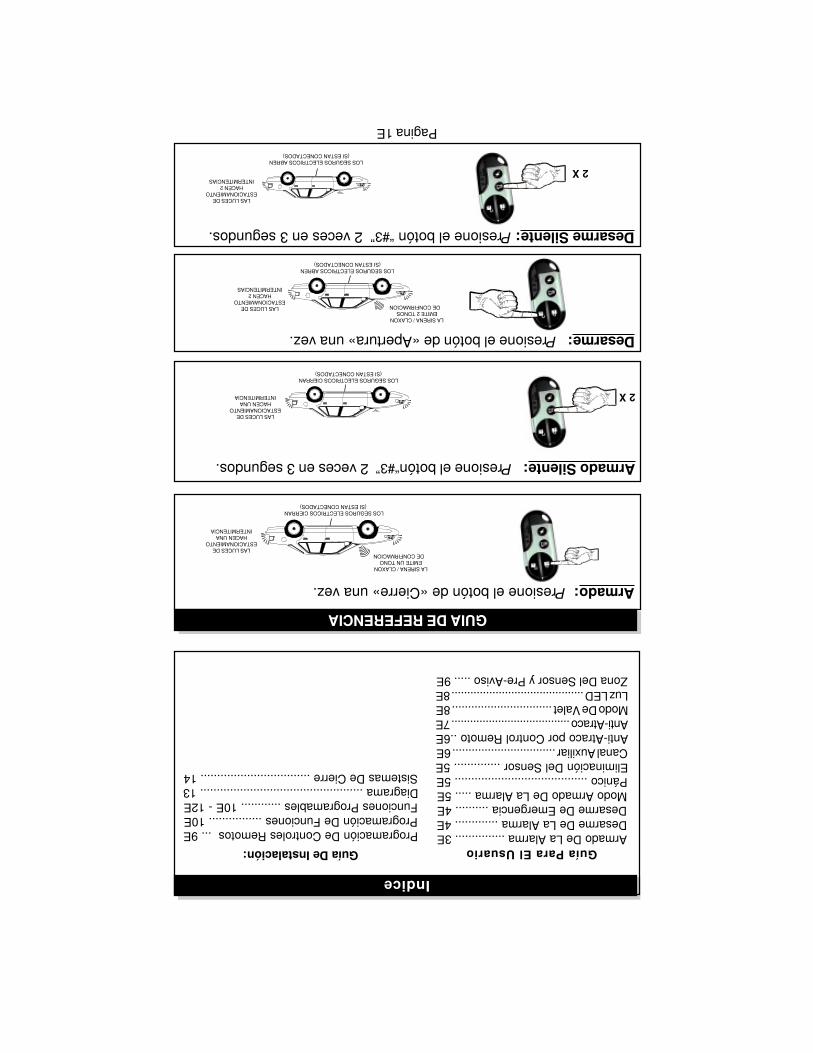
Armado: Presione el botón de «Cierre» una vez.
Armado Silente: Presione el botón“#3” 2 veces en 3 segundos.
Desarme: Presione el botón de «Apertura» una vez.
Desarme Silente: Presione el botón “#3” 2 veces en 3 segundos.
GUIA DE REFERENCIA
2 X
2 X
Indice
Guía Para El UsuarioArmado De La Alarma ............... 3E
Desarme De La Alarma ............. 4E
Desarme De Emergencia .......... 4E
Modo Armado De La Alarma ..... 5E
Pánico ........................................ 5E
Eliminación Del Sensor .............. 5E
Canal Auxiliar ................................ 6E
Anti-Atraco por Control Remoto ..6E
Anti-Atraco ...................................... 7E
Modo De Valet ............................... 8E
Luz LED .......................................... 8E
Zona Del Sensor y Pre-Aviso ..... 9E
Guía De Instalación:
Programación De Controles Remotos ... 9E
Programación De Funciones ................ 10E
Funciones Programables ............ 10E - 12E
Diagrama ................................................. 13
Sistemas De Cierre ................................. 14
LA SIRENA / CLAXON
EMITE UN TONO
DE CONFIRMACIONLAS LUCES DE
ESTACIONAMIENTO
HACEN UNA
INTERMITENCIA
LOS SEGUROS ELECTRICOS CIERRAN
(SI ESTAN CONECTADOS)
LA SIRENA / CLAXON
EMITE 2 TONOS
DE CONFIRMACIONLAS LUCES DE
ESTACIONAMIENTO
HACEN 2
INTERMITENCIAS
LOS SEGUROS ELECTRICOS CIERRAN
(SI ESTAN CONECTADOS)
LAS LUCES DE
ESTACIONAMIENTO
HACEN UNA
INTERMITENCIA
LOS SEGUROS ELECTRICOS ABREN
(SI ESTAN CONECTADOS)
LAS LUCES DE
ESTACIONAMIENTO
HACEN 2
INTERMITENCIAS
LOS SEGUROS ELECTRICOS ABREN
(SI ESTAN CONECTADOS)
Pagina 1E