Embed Size (px)
Citation preview
GoldWave Manual Copyright © 2003 GoldWave Inc.
Do not upload or include this document on a website.
October 2003
Note: Figures are available to licensed users by request.
Table of Contents I. Introduction
1. Features 2. How to Use This Manual 3. Notation
II. Getting Started 1. System Requirements 2. Installation
a. Installation From a Downloaded Program (Exe) File b. General Installation Instructions
i. Setting Audio Devices ii. Additional Settings
III. Using GoldWave 1. Interface Overview 2. Control Overview
a. Properties i. Play Properties
ii. Record Properties iii. Volume Properties iv. Visual Properties v. Device Properties
b. Playing Sounds c. Pausing Playback d. Stopping Playback e. Rewinding and Fast Forwarding f. Recording Sounds g. Volume and Balance Faders h. Speed Fader
3. Editing Overview a. Selecting Part of a Sound
b. Redrawing the Waveform with the Mouse c. Cut & Paste, Mixing and Crossfading
i. Cut & Paste ii. Mixing
iii. Crossfading 4. Storage Overview
a. Hard Drive b. RAM
5. File Overview a. File Format b. File Format Plug-ins
6. Effects Overview a. Common Controls for Effects
i. Presets ii. Shape Controls
iii. Preview Controls b. Effect Plug-ins
7. File Menu Commands a. New b. Open c. Close d. Information e. Batch Processing f. Save g. Save As h. Save Selection As i. Exit j. File History
8. Edit Menu Commands a. Undo b. Cut c. Copy d. Copy To e. Paste New f. Paste and Paste At g. Mix h. Crossfade i. Overwrite j. Replace k. Delete l. Trim
m. Mute n. Insert Silence o. Select View p. Select All q. Channel r. Marker
i. Set ii. Drop Start/Finish
iii. Recall Selection Positions
iv. Store Selection Positions v. Snap To Zero-Crossing
s. Cue Point i. Edit Cue Points
ii. Drop Cue iii. Jump To Next Cue iv. Jump To Previous Cue v. Split File
9. Effect Menu Commands a. Doppler b. Dynamics c. Echo d. Compressor/Expander e. Filter
i. Bandpass/stop ii. Equalizer
iii. Low/Highpass iv. Noise Reduction v. Parametric EQ
vi. Pop/Click vii. Silence Reduction
viii. Smoother f. Flanger g. Interpolate h. Invert i. Mechanize j. Offset k. Pitch l. Plug-in
m. Reverse n. Stereo
i. Channel Mix ii. MaxMatch
iii. Pan iv. Reduce Vocals
o. Time Warp p. Volume
i. Change ii. Fade In
iii. Fade Out iv. Match v. Maximize (Normalize)
vi. Shape q. Playback Rate r. Resample
10. View Menu Commands a. All b. Specify c. Selection d. Preset
e. Previous f. Zoom In g. Zoom Out h. Zoom 10:1 i. Zoom 1:1 j. Zoom 1 Second, 10 Seconds, 1 Minute, 1 Hour k. Vertical Zoom All l. Vertical Zoom In
m. Vertical Zoom Out n. Start and Finish
11. Tool Menu Commands a. CD Reader b. Control c. Cue Points d. Effect Chain Editor e. Expression Evaluator
12. Options Menu Commands a. Colour b. Control Properties c. File Formats d. Plug-in
i. DirectX Audio Plug-in Configuration e. Storage f. Tool Bar g. Window
13. Window Menu Commands a. Cascade, Tile, Minimize, Arrange b. Classic, Horizontal, Vertical Control c. Window List
14. Help Menu Commands a. Contents b. Manual c. About
IV. General Information 1. Warranty, Trademarks, and Copyright 2. Support and Updates
A. Appendix: An Introduction to Digital Audio 1. Digital Audio Basics
a. Samples 2. Digital Audio Attributes
a. Sampling Rate b. Bits
i. Signed and Unsigned ii. Big and Little Endian
c. Channels 3. Digital Audio Limitations
a. Aliasing b. Clipping c. Quantization
d. Noise 4. Volume Scales
a. Amplitude (y) b. Percent (%) c. Decibel (dB) d. Relative vs. Absolute
5. Frequency and Pitch a. Frequency Ranges b. Frequency Range and Sampling Rate c. Frequency Spectrum Graphs
6. File Compression a. Bitrate b. Constant Bitrate c. Variable Bitrate
B. Appendix: Keyboard Commands C. Appendix: Expression Evaluator
1. Overview 2. Evaluation Range, Variables, and Constants
a. Using Time in an Expression b. Using the Sample Index in an Expression c. User Constants x, y, and f d. Conversion Between Variables
3. Presets 4. Evaluator Operators and Functions 5. Signal Generation 6. Custom Filters
D. Appendix: Tutorial 1. From Turntable to CD-R
a. Make Connections b. Setup Recording c. Restore Audio d. Split into Tracks
E. Appendix: Troubleshooting and Q&A 1. Troubleshooting 2. Common Questions and Answers
I. Introduction GoldWave is a professional digital audio editor that plays, records, edits, processes, and converts audio on your computer. This section lists some of the features of GoldWave and outlines the notation and organization of the manual.
Features
GoldWave includes a complete set of audio processing features.
• An intuitive and customizable user interface makes editing easy. • An independent Control window provides direct access to audio devices. It contains
controls for playback, rewind & fast forward, recording, volume, balance, and speed. Real-time visuals display the sound during playback and recording.
• A multiple document interface (MDI) allows several files to be opened at one time, simplifying file-to-file editing.
• Huge files are edited efficiently using a advanced virtual editing system, with configurable hard disk or RAM based storage.
• Sounds are displayed graphically as a waveform and the level of detail can be changed by zooming in or out. The waveform can be reshaped directly with the mouse when zoomed in.
• Many audio effects, such as Dynamics, Echo, Flanger, Mechanize, Reverse, Pan, and Time Warp, enhance, distort, or alter sounds in various ways.
• Sophisticated filters such as the Noise Reduction, and Pop/Click, filters help restore and remaster audio.
• The Batch Processing command converts a group of sound files to a different format and type and applies any number of effects.
• The CD Reader tool digitally copies audio from a CD to a file on your system. • An Expression Evaluator generates everything from simple tones to complex filters.
Expressions for telephone dial tones, waves, and effects are included. • For maximum extensibility, several plug-in interfaces are supported for file formats,
visuals, and effects.
How to Use This Manual
Familiarity with the Windows interface, such as property windows, tool bars, scroll bars, etc., is recommended before reading this manual.
For those who are unfamiliar with digital audio, Appendix A briefly introduces some of the fundamentals of computer audio. Appendix D gives a tutorial for recording audio from a turntable, removing noise, and splitting the file into tracks for CD-R burning. Appendix E contains troubleshooting information and answers to common questions.
Section II: Getting Started, covers system requirements and installation. Section III: Using GoldWave explains the interface and menu structure in detail. Topics are covered in the order that they appear in GoldWave's menu. Section IV: General Information, provides support, copyright, and warranty information.
Notation
Bold or link coloured text and a vertical bar are used to denote menu commands. File | New, for example, means to select the New command from the File menu. This notation is used to refer to other sections within this manual as well. In the above example, you can find information by looking for New under the File Menu Commands section. If the first word is Start, then select the command from the main Windows task bar menu structure instead.

Options and settings are given in a fixed width font or in quotes.
Note
A information icon emphasizes helpful information and techniques.
Warning
An exclamation mark emphasizes warnings and other important information.
II. Getting Started The following sections give instructions for installing and configuring GoldWave on your computer.
System Requirements
The minimum system requirements for GoldWave are:
• Pentium based PC or compatible • Microsoft® Windows® 98, ME, 2000, XP or later • 128 Megabytes of RAM (256 MB recommended) • 10 Megabytes of hard disk space • Mouse • Sound card with a Windows compatible driver
If you need to edit large files, you will need a large amount of hard drive space. One minute of CD-quality sound requires 20 megabytes of storage. Editing a full CD requires at least 1GB of storage.
For editing audio in movie files and editing mp3 files, you must have a recent version of Windows Media Player installed.
Installation
The following section gives instructions for installing GoldWave on your system. Before running GoldWave make sure that you have an appropriate Windows sound driver installed. If you need to add one, use the "Add New Hardware" item under Start | Settings | Control Panel. The driver and installation instructions should be included with your sound card. The current settings for your sound card are listed under the "Sound, video, and game controllers" item of the Device Manager. The Device Manager is found under "My Computer" Properties or the System icon in the Control Panel.
Installation From a Downloaded Program (Exe) File

If you downloaded the self-installing version of GoldWave, simply run the download. It prompts you to provide a destination folder where GoldWave will be installed. A desktop shortcut and Windows Start menu items are created automatically, if desired.
General Installation Instructions
Check the readme.txt file for any additional information not available at the time this manual was created. New versions of GoldWave will be available from the web site:
http://www.goldwave.com
Setting Audio Devices
To choose which audio devices to use for playback and recording, use the properties Properties button on GoldWave's Control window, then choose the Device tab. Drop down
lists of installed playback and recording devices are presented. Select appropriate devices from the lists. Use the "16 bit integer" quality setting unless your card supports the higher settings.
Additional Settings
• Use Options | Storage to set a sound folder and temporary storage folder. • Use Options | Tool Bar to customize tool bars. • Use Options | Colours to change Sound window colours.
To associate file types with GoldWave, such as wav or mp3 files:
1. Run Windows Explorer 2. Choose Folder Options from the Tool menu. 3. Choose the File Types tab. 4. Select the file type or use the New button to create a file type. 5. Choose the Change button. 6. Choose the Other button. 7. Browse for the GoldWave program (usually in C:\Program Files\GoldWave). 8. Choose the Open button. 9. Choose the OK button on the Open With window. 10. Choose the OK button on the Folder Options window.
See Windows help for more information about file type associations.
III. Using GoldWave
The following sections give information about GoldWave's user interface, features, and menu structure. The first few sections provide general overviews, while subsequent sections provide details on menu commands.
Interface Overview
GoldWave is composed of three windows: the Main window, the Control window, and Sound windows. The Main window contains the main menu, two rows of tool bar buttons, and status bars (see Main Window figure). It groups together and manages all the Sound windows.
Main Window
Figure: Main Window
The tool bar buttons provide quick access to many of the frequently used commands. The upper bar holds File, Edit, View, and Tool commands, while the lower bar contains Effect commands. The function of each button is displayed in the lower status bar when the mouse pointer is positioned directly over it. Use the Options | Tool Bar command to configure the tool bar.
The status bars show attributes of the Sound window, including the sampling rate, length, selected region, channels, and general file format information. By right-clicking the mouse
pointer over any status item that has a menu icon on its right side, the unit or format for that status item can be changed. If you right-click the mouse pointer over the length item, for example, you are presented with a menu showing length in terms of storage size, time, and samples. If you right-click on the channels item, then you can select a single channel or both channels of a stereo file.
Status Bar Contents
Figure: Status Bar Contents
Sound windows are created when you open a file. These windows contain a waveform graph of the sound with a time axis near the bottom. For stereo sounds, two separate graphs are shown. The top green graph is the left channel and the bottom red graph is the right channel. The selected part of the sound is highlighted with a blue background between two cyan markers.
A cue point slot is located just below the graph. Cue points are shown as inverted yellow and blue triangles.
Near the bottom of the Sound window, a small Overview area shows the entire sound with the selected part in highlighted green and/or red with a blue background and the rest with a black background. A beveled frame indicates what part of the sound is currently displayed/zoomed. Initially, the entire sound is selected.
You can change the selection by using the mouse buttons. See Editing Overview for details. You can configure the window size and axes format of Sound windows using the Options | Window command. The Options | Colours command sets the colour scheme.
The Control window interacts directly with your sound card. It contains buttons to play and record sounds as well as controls for volume, balance, and playback speed. Real-time visuals display audio data whenever a sound is played or recorded. Detailed information about the graphical displays and controls is presented in the next section.
Control Overview
The Control window (see Control Window figure) is the interface to your audio hardware and drivers. On the bottom half of the window are visuals which display sound during playback and recording. On the top left area of the window is a standard set of audio controls, including play, stop, record, rewind, pause, and fast forward. A status visual is located just below these controls. In the top right area of the window are controls to set the playback device's volume, balance, and speed. A level visual is located just below these.
Note
The Control window can be resized to change the size of the visuals or to hide them. Use the Window Menu Commands to rearrange the controls horizontally or vertically.
Control Window
Figure: Control Window
Properties
The Properties Properties button presents the Control Properties window containing several tabs to configure playback, recording, volumes, visuals, and devices. These options are described in the following sections. After installing GoldWave, you should take a moment to see if the correct playback and recording devices are selected under the Device tab and familiarize yourself with the settings under the Play (see figure) and Record tabs.
Control Properties
Figure: Control Properties
Play Properties
The Play Properties page contains options to configure the green Green Play and yellow Yellow Play
play buttons and set the speed for rewind and fast forward. The green and yellow play options are given in the table.
Table: Green and Yellow Play Options
Option Button function
All Plays entire sound.
Selection Plays region between start and finish markers (the selected part of the file).
Unselected Plays regions outside the start and finish markers. This lets you quickly test how a cut or delete will sound without actually changing the sound. When possible, playback is confined to the region shown in the Sound window view so that the entire sound does not have to be played.
View Plays all of the sound currently shown in the Sound window view. This is useful if you zoomed in on part of the sound.
Finish Plays three seconds just before the finish marker, so you can determine if that marker is in the right place without listening to the entire selection.
Intro/loop/end This is a special playback feature that plays the sound in three sections. The beginning of the sound, outside the selection, is played first. Then the selection is played and looped. Finally the end of the sound, outside the selection, is played. This is useful for musical accompaniment or looped instrument samples.
Loop If checked, it specifies the number of times playback should be repeated. A value of 1 loops playback once, so the selection is played twice. A zero value loops forever.
Fast/Rewind Speed The playback speed of the fast forward and rewind buttons is controlled by these values. A value of 1.00 is normal speed. Entering a value of 3.00 for Rewind speed, for example, means the rewind button will play the sound backwards three times faster than normal. By entering small numbers (such as 0.1) the rewind and fast forward buttons will play very slowly. This is useful for finding pops or clicks, since the visuals will move slowly through the data.
Record Properties
The Record Properties page includes features to monitor the recording sources, start recording automatically when a sound is detected, or delay recording for a certain length of time. The basic options are given in the table.
Table: Record Options
Option Purpose
Monitor input Connects the recording source to the visuals so you can adjust volume levels before recording. See Recording Sounds for information about selecting a different recording source and setting volumes.
Ctrl key safety Prevents you from accidentally recording over a sound. To record, you must hold down the Ctrl key, otherwise a safety message appears.
Bounded to selection
Records within the selection only. Recording stops automatically at the end of the selection. If you stop recording before the end is reached, the rest of the selection is replaced with silence.
Bounded and looped
The is similar to the above option, but recording restarts automatically when the end is reached and continues to record over and over until the stop button is pressed. This is useful if you are trying to capture a sound but do not know when it might occur. By loop recording a 1 minute sound, you will always have the last minute of audio stored for recall.
Unbounded Recording starts at the start marker's position and continues recording until all storage is exhausted or until you press the record stop button. The file size is increased automatically to hold the new audio. This is useful if you do not know how long the recording will be.
Delayed Recording The Timer option delays recording until the specified time and day of the week. Use this feature to automatically record something at a later time. The time is given in 24 hour time. A time of 06:00:00 is 6:00 AM and a time of 18:00:00 is 6:00 PM. 00:30:00 is 12:30 AM or 30 minutes past midnight. When entering the time, remember to include the seconds. Entering 18:00 means 00:18:00. You must press the record button to activate the timer.
Note
Remember to press the record button to activate delayed recording (timer or level activated).

Level activated recording is useful for automatically synchronizing recording to a sound source or efficiently capturing airport or police radio where there may be a lot of silence that does not need to be recorded. It automatically starts recording when the sound source is above a given level and pauses recording when the sound is below the level. The Threshold specifies how loud a sound should be before recording begins. A value less than 0.2 is typical. The Duration time specifies how long to record after the sound becomes quiet again. Using a value of 3 allows recording to continue for three seconds after the sound goes below the specified threshold. To minimize silence, use a value of 1 second or less, but not zero. A zero value causes recording to continue without stopping once triggered. The Prebuffer time specifies the amount of audio to store prior to activation. When activation occurs, the prebuffer audio is inserted before the currently recorded audio, allowing you to hear the sound slightly before activation. The Time stamp cues option provides a way of marking the date, time, and position of each activation. Cue points with the current date and time are created and can be view under the Cue Points tool.
Volume Properties
The Volume Properties page lets you adjust recording volumes and select or unselect recording sources. Be sure to select the correct volume device that corresponds with the recording device selected under the Device tab.
Volume Properties
Figure: Volume Properties
A volume fader, edit box, and checkbox is shown for each source. To select a source, check the appropriate checkbox. If your sound card supports a master control, make sure that the Mute all option is turned off and that the master volume is not zero.
You can use the Monitor input option under the Record tab to activate the visuals without recording.
Note that volumes are changed regardless of whether you choose OK or Cancel to close the Properties window.
To select a different recording device, use the Device tab.
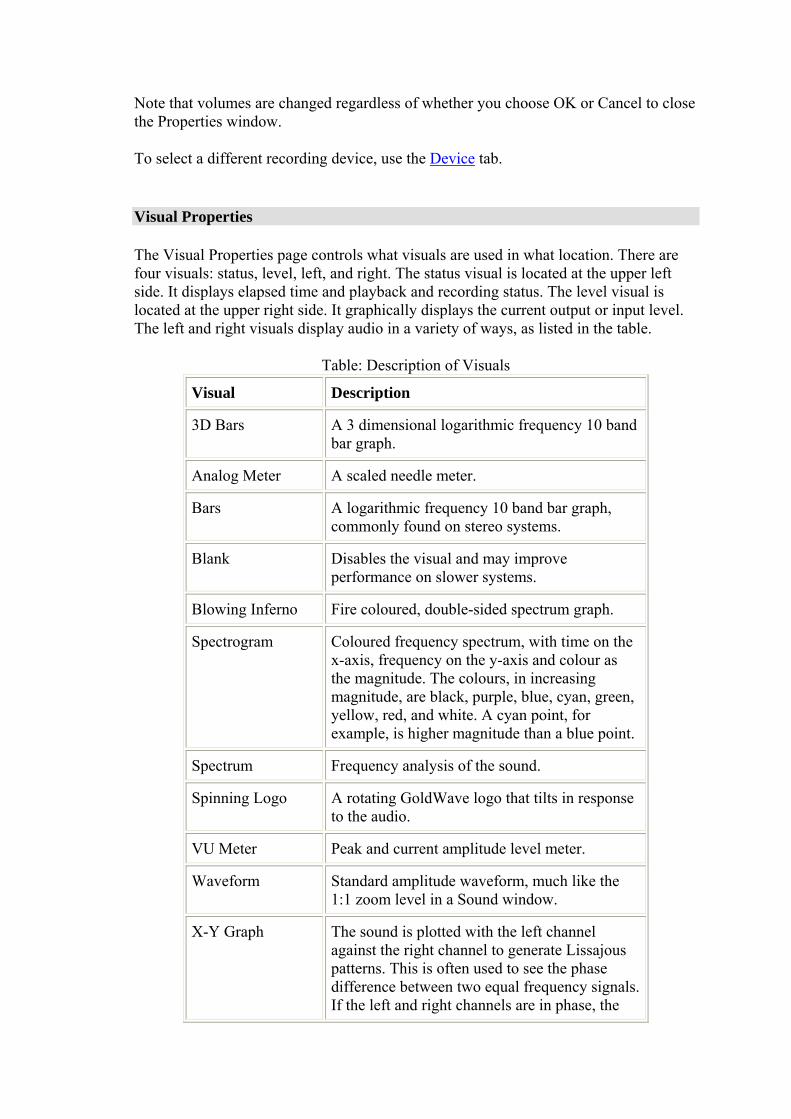
Visual Properties
The Visual Properties page controls what visuals are used in what location. There are four visuals: status, level, left, and right. The status visual is located at the upper left side. It displays elapsed time and playback and recording status. The level visual is located at the upper right side. It graphically displays the current output or input level. The left and right visuals display audio in a variety of ways, as listed in the table.
Table: Description of Visuals
Visual Description
3D Bars A 3 dimensional logarithmic frequency 10 band bar graph.
Analog Meter A scaled needle meter.
Bars A logarithmic frequency 10 band bar graph, commonly found on stereo systems.
Blank Disables the visual and may improve performance on slower systems.
Blowing Inferno Fire coloured, double-sided spectrum graph.
Spectrogram Coloured frequency spectrum, with time on the x-axis, frequency on the y-axis and colour as the magnitude. The colours, in increasing magnitude, are black, purple, blue, cyan, green, yellow, red, and white. A cyan point, for example, is higher magnitude than a blue point.
Spectrum Frequency analysis of the sound.
Spinning Logo A rotating GoldWave logo that tilts in response to the audio.
VU Meter Peak and current amplitude level meter.
Waveform Standard amplitude waveform, much like the 1:1 zoom level in a Sound window.
X-Y Graph The sound is plotted with the left channel against the right channel to generate Lissajous patterns. This is often used to see the phase difference between two equal frequency signals. If the left and right channels are in phase, the

pattern is a diagonal line running from the lower left to the upper right. If the channels are 90 degrees out of phase, the pattern is a circle. For general stereo sounds, it looks like a crazy scribble. The larger the scribble, the larger the difference between the channels. Monaural sounds always show a diagonal line since the left and right data are the same.
Some visuals have properties you can set, such as axes ranges, colours, display modes, etc. Right-click on a visual and select Properties from the popup menu to see these properties. You can resize the Control window to make the visuals larger or smaller.
Quick Select Menu Use the quick select menu list to select your favourite visuals. The selected visuals appear in the popup menu when you right-click on a visual in the Control window.
Frame Rate The frame rate sets the number of times per second that visuals are updated and drawn. A value of 60 or less gives good results, but you may want to use higher values to get an extra detailed spectrogram. The actual frame rate is limited by your system's speed. Use a lower frame rate for older systems.
FFT Window When calculating any frequency related graphs, a window function must be used to smooth out analysis at the endpoints. The Kaiser 7 or Hamming windows are usually the best, but you can try the other windows just to compare the results.
Device Properties
The Device Properties page contains drop down lists for playback and recording devices. Normally, you do not need to change these settings unless you have more than one sound card or you encounter a problem. The Playback and Record quality setting controls the bit depth to use. Most cards support 16-bit quality, but more recent cards support 24-bit quality. Sound card drivers on recent versions of Windows should support the 32-bit floating point setting, but often that is not the case, so that setting should not be used until properly supported by the industry (probably never).
The "Enable joystick control" option allows you to control playback and recording using a standard joystick or gamepad. The first available and attached joystick is used. The directions control playback with left for rewind, right for fast forward, down for pause, and up to unpause. The first button (button 1 or A) starts and stops playback. The second button (button 2 or B) starts and stops recording.
The "High latency" option helps to eliminate stuttered or intermittent playback on older systems or emulated DirectX sound drivers. It should not be needed on recent systems.

The "Alternative playback initialization" option helps to avoid some of the many problems with sound drivers and can eliminate deadlock (freezes) when previewing certain DirectX Audio Plug-ins. It eliminates a loud click that occurs at the start of playback on some drivers. This option causes the DirectX sound buffer to be recreated each time playback is started rather than reusing the same buffer. It begins playback on a separate thread without pausing or holding up the main program thread. This makes the interface seem more responsive when starting playback.
Playing Sounds
After opening a sound (see File | Open), you use the green play Green Play button or the yellow play Yellow Play button to play it. Both buttons play the selection by default, but you can configure these
buttons under the Play tab of the Control Properties window to play different parts of the file. Right-click on the button to quickly access some of those settings.
While a sound is playing, it is displayed on the visuals. The current position is displayed in the Sound window as a white, vertical line on the waveform. You can move the start and finish selection markers to the playback position by using the bracket keys, [ and ] or Edit | Marker | Drop... commands. See Editing Overview for more information about changing the selection. You can set cue points by using the Ctrl+Q key or the Edit | Cue Point | Drop Cue command.
Note
To play the entire sound, configure the Yellow play button to All. To play the selection, configure the Yellow play button to Selection.
Pausing Playback
While a sound is playing, you can pause it with the pause Pause button. Remember to use either play or stop later. Pause freezes the visuals and the current position marker so you can see the shape of the sound in the visuals or move the selection markers.
Stopping Playback
Playback can be stopped immediately with the stop Stop button. The current position is reset to the beginning. Note that recording is stopped using a different button.
Rewinding and Fast Forwarding
Use the rewind Rewind button or fast forward Fast foward button to quickly move back and forward through the sound. The current position is displayed in the Sound window as a white, vertical line on the waveform. You can adjust the speed of rewind and fast forward with the Play tab of the Control Properties window, as described previously.
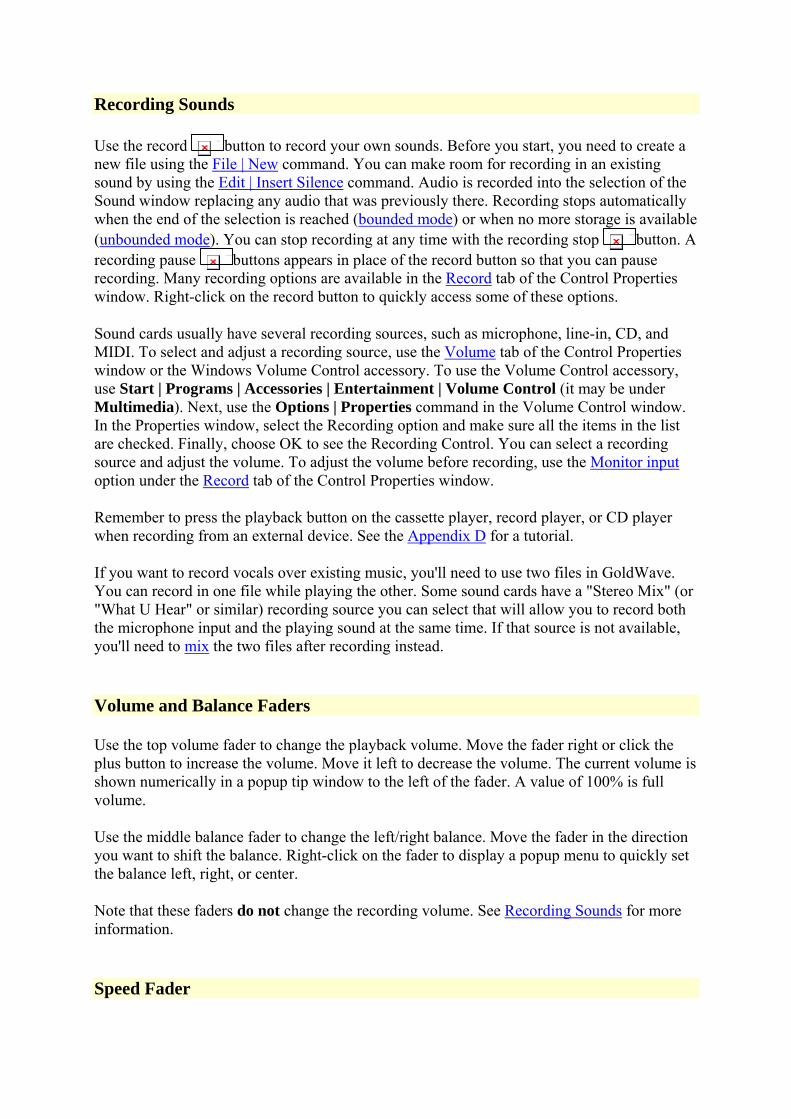
Recording Sounds
Use the record Record button to record your own sounds. Before you start, you need to create a new file using the File | New command. You can make room for recording in an existing sound by using the Edit | Insert Silence command. Audio is recorded into the selection of the Sound window replacing any audio that was previously there. Recording stops automatically when the end of the selection is reached (bounded mode) or when no more storage is available (unbounded mode). You can stop recording at any time with the recording stop Recording Stop button. A recording pause Recording Pausebuttons appears in place of the record button so that you can pause recording. Many recording options are available in the Record tab of the Control Properties window. Right-click on the record button to quickly access some of these options.
Sound cards usually have several recording sources, such as microphone, line-in, CD, and MIDI. To select and adjust a recording source, use the Volume tab of the Control Properties window or the Windows Volume Control accessory. To use the Volume Control accessory, use Start | Programs | Accessories | Entertainment | Volume Control (it may be under Multimedia). Next, use the Options | Properties command in the Volume Control window. In the Properties window, select the Recording option and make sure all the items in the list are checked. Finally, choose OK to see the Recording Control. You can select a recording source and adjust the volume. To adjust the volume before recording, use the Monitor input option under the Record tab of the Control Properties window.
Remember to press the playback button on the cassette player, record player, or CD player when recording from an external device. See the Appendix D for a tutorial.
If you want to record vocals over existing music, you'll need to use two files in GoldWave. You can record in one file while playing the other. Some sound cards have a "Stereo Mix" (or "What U Hear" or similar) recording source you can select that will allow you to record both the microphone input and the playing sound at the same time. If that source is not available, you'll need to mix the two files after recording instead.
Volume and Balance Faders
Use the top volume fader to change the playback volume. Move the fader right or click the plus button to increase the volume. Move it left to decrease the volume. The current volume is shown numerically in a popup tip window to the left of the fader. A value of 100% is full volume.
Use the middle balance fader to change the left/right balance. Move the fader in the direction you want to shift the balance. Right-click on the fader to display a popup menu to quickly set the balance left, right, or center.
Note that these faders do not change the recording volume. See Recording Sounds for more information.
Speed Fader
The playback speed of the audio device can be changed with the bottom speed fader. Move the fader right to increase the speed, and left to decrease it. The relative speed is shown numerically to the left of the fader in a popup tip window. Right-click on the fader to display a popup menu to quickly set the speed to commonly used ratios. Note that changing the speed also changes the pitch like spinning a vinyl record faster or slower.
Editing Overview
Selecting Part of a Sound
Almost all commands in GoldWave operate on the currently selected part of a sound. The selected part, or selection, is the highlighted part of the sound graph between two vertical markers (see Main Window figure). The vertical markers are cyan lines located to the left side (start marker) and right side (finish marker) of the view.
GoldWave provides several ways of setting the selection. You can:
• Use the standard click-and-drag method used in most other Windows programs. • Click the right mouse button to display a menu where you can choose Set Start Marker
or Set Finish Marker. • Click-and-drag the left mouse button over one of the cyan markers to drag it (useful
for precise adjustments of the end points). • Click-and-drag using the right mouse button, then choose Select from the menu that
appears. • Use the Edit | Marker | Set command. • Use the Edit | Channel submenu to select one channel of a stereo file.
If you just click the left mouse button without dragging, the start marker is moved. If you just click the right mouse button, a context menu appears, which can be used to start playback at any position. If you click-and-drag with the right mouse button, you can play or zoom in on that area without altering the current selection.
Additional notes and techniques:
• To use the old style of selecting part of a sound (in v4 and earlier), enable the setting under the Options | Window command. Note that none of the new selection features work if you enable that setting.
• You cannot place the finish marker before the start marker. The same is true for setting the start marker after the finish marker.
• Mouse selection methods work in both the large sound graph or in the small Overview graph.
• The Edit | Marker | Snap to zero-crossing feature helps to minimize pops and clicks between edit points by finding a point where the waveform is close to zero amplitude.
• To select a certain part of the sound while playing it by using the [ and ] (bracket) keys or the Drop commands under the Edit | Marker submenu. You can use the rewind and fast forward buttons to quickly find a sound.
• In most cases, editing and effects are performed only on the selection. Some effects, such as the Resample, and Playback Rate alter the entire sound.
Redrawing the Waveform with the Mouse
You can redraw the waveform with the mouse to remove pops/clicks or other small defects. To do this, you must first zoom in so that individual samples are visible (see View | Zoom 1:1 or View | Zoom 10:1).
1. Zoom in 1:1 or closer. 2. Place the mouse arrow directly over the waveform. The arrow will change into a target
crosshair. 3. Click and hold the left mouse button. 4. Move the mouse to redraw the waveform. 5. Release the mouse button to finish the changes.
Cut & Paste, Mixing, and Crossfading
Cutting and pasting audio in GoldWave works much the same way as cutting and pasting text in a word processor. Mixing and cross-fading involves combining two or more sound together so that they play at the same time.
Cut & Paste
The Edit | Cut command removes sections of audio. The Edit | Paste command inserts sections of audio from the clipboard. Before you can paste, you need to use Edit | Cut or Edit | Copy to place some audio into the clipboard.
To join several files together:
1. Open the first song. 2. Open the second song. 3. Choose Copy from the Edit menu. 4. Close the second song. 5. Choose End from the Edit | Paste At submenu. 6. Open the third song. 7. Choose Copy from the Edit menu. 8. Close the third song. 9. Choose End from the Edit | Paste At submenu. 10. Repeat steps 6 to 9 for each song you want to join.
If you want to split a large file into smaller section, see the Cue Points tool, which has a Split File button.
Mixing
The Edit | Mix command mixes one sound with another so they both play at the same time.
To add vocals to music:
1. Open the sound containing the vocals. 2. Choose Copy from the Edit menu. 3. Open the sound containing the music. 4. Choose Mix from the Edit menu. 5. Enter a volume to mix the vocals (0dB = full volume). 6. Adjust the mix time to align the vocals with the music, using the preview button
as needed. 7. Choose OK to process the mix.
Note
When mixing more than a couple of sounds, you should reduce the mixing volume and the destination volume to prevent clipping distortion. The volume of the destination sound can be reduced before mixing by using the Effect | Volume | Change command.
Crossfading
A crossfade occurs when one sound fades out while another sound fades in. Radio stations often use crossfades to fade out the end of one song while fading in the next song so there is no break in the music. GoldWave's Edit | Crossfade command does the same thing by using the clipboard audio as the second song. Some audio must be copied to the clipboard before this command is enabled.
To do a crossfade in GoldWave, follow these steps:
1. Open the first song (the one that will fade out at the end). 2. Open the second song (the one that will fade in at the beginning). 3. Choose Copy from the Edit menu. 4. Close the second song (or activate the first song window). 5. Choose Crossfade from the Edit menu. 6. Set Duration to 5.00 second (or whatever you prefer). 7. Select the End of file, and Linear fade curves settings. 8. Choose OK to process the mix.
In some cases, more control is needed. To do a crossfade manually in GoldWave, follow these steps:
Crossfade
Figure: Crossfade
1. Open the first song. 2. Move the start marker to select the last 3 seconds of the song.

3. Choose Fade out from the Effects | Volume sub menu and use a −160dB final volume.
4. Open the second song. 5. Move the finish marker to select the first 3 seconds of the song. 6. Choose Fade in from the Effects | Volume sub menu and use an initial volume
of −160dB. 7. Choose Select all from the Edit menu. 8. Choose Copy from the Edit menu. 9. Click on the first song to activate that Sound window. 10. Choose Mix from the Edit menu and use a volume of 0dB. 11. Choose OK to process the mix.
For extra control, use the Effect | Volume | Shape create custom fades before mixing.
Storage Overview
GoldWave supports both hard drive based editing and RAM based editing. These features are described below. Hard drive storage is enabled by default. Use the Options | Storage to configure the storage mode. For uncompressed files, GoldWave will read the audio directly from the original file. It does not copy a file to temporary storage until it is edited or modified. The original file is not changed until it is saved. For most compressed files, the data has to be decompressed to temporary storage when the file is opened.
Working with compressed files may take much more storage than expected. MP3 files, for example, have to be decompressed into temporary storage before GoldWave can edit them. Such files may require over 20 times the amount of compressed storage when opened. A 10MB MP3 file could require over 200MB of storage space.
Hard Drive
In hard drive based editing, the entire sound is stored in a temporary file on your hard drive where it can be modified. This allows you to edit huge files provided the required drive space is available. Only a small amount of RAM is required for each opened sound. The drawback is that editing and effects processing take more time since audio data must be transferred to and from the drive.
RAM
In RAM based editing, the entire sound is stored in your computer's memory. This allows you to edit and process files very quickly. It saves time and reduces the load on your hard drive. The drawback is that the size of the files must be small enough to fit in the available RAM. If you edit or record large files, Windows will start swapping memory to the hard drive, which significantly degrades performance and may cause defects when recording. Also note that in the event of a system crash, it will not be possible to recover a file stored in RAM. Editing files larger than 1GB in RAM is not recommended due to limitations in Windows.
File Overview
This section explains file formats and gives general information about how files are handled by GoldWave. Several features for storing and handling files can be configured using Options | Storage and Options | File Formats.
File Format
Sound files come in a variety of forms. Usually, the form or type of sound can be determined from its filename extension, such as .wav or .mp3. GoldWave supports all the sound types listed in the Supported File Types table, and more depending on what file format plug-ins are installed. Each file type can have several sub-formats or attributes. The .wav type for example, can hold audio encoded or compressed in dozens of different ways, including PCM, ADPCM, companded, or MPEG1 Layer 3.
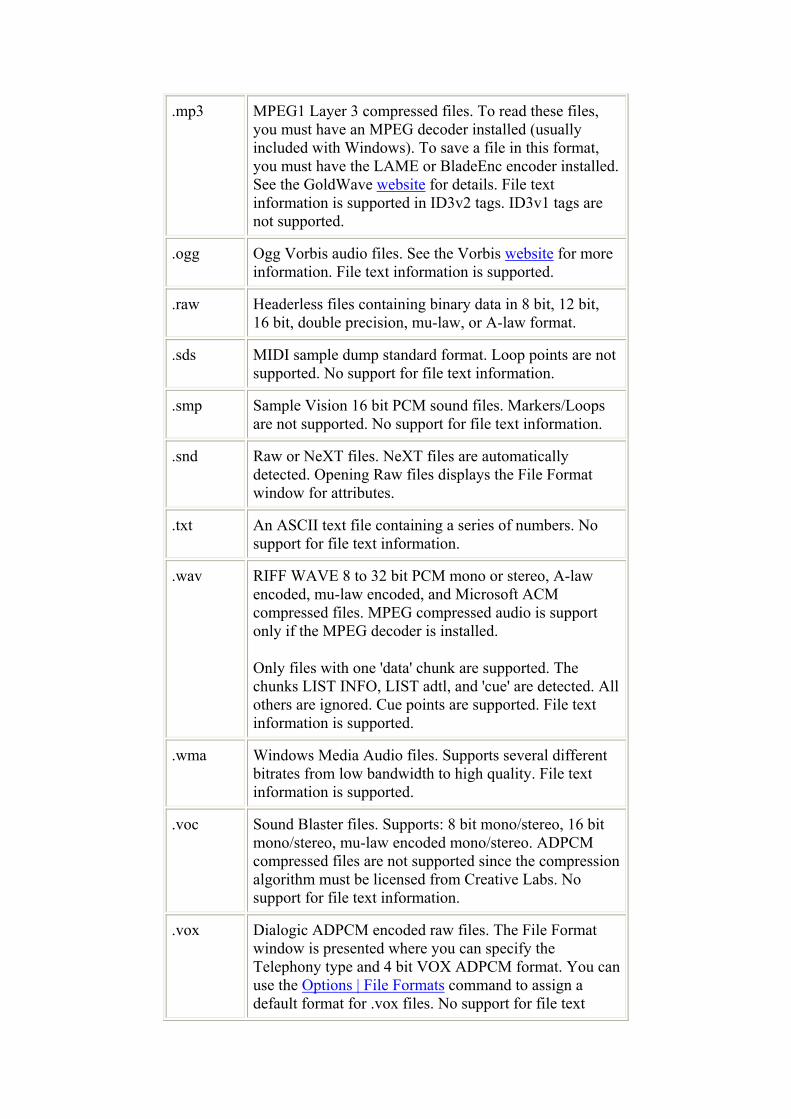
Table: Supported File Types
Extension Comments
.au Sun or NeXT files, commonly used on web pages and in Java. Supports 8 & 16 bit linear, mu-law and A-law encoded files. No support for file text information.
.aif
.afc Apple / Macintosh sound files. The blocks NAME, COPY, ANNO, and AUTH are all preserved. Compressed files are not supported. Cue points are supported. Limited support for file text information.
.asf
.avi Microsoft audio and/or video files. GoldWave can extract the audio portions of these files.
.dwd DiamondWare sound files. GoldWave supports 8 & 16 bit PCM attributes through a plug-in. No support for file text information.
.iff Amiga 8SVX files. The blocks NAME, COPY, ANNO, AUTH, and CHAN are all preserved. Limited support for file text information.
.mat Matlab files. The data must be normalized (i.e. -1.0 to 1.0) for double precision data. If the "wavedata" variable is two dimensional, the data is assumed to be stereo. GoldWave saves audio data in the "wavedata" variable and the rate in the "samplingrate" variable. A 11025Hz sampling rate is assumed if none is present. No support for file text information.
.mov Quicktime movie files (prior to v4). GoldWave can extract the audio portion from the file (if present).
.mp3 MPEG1 Layer 3 compressed files. To read these files, you must have an MPEG decoder installed (usually included with Windows). To save a file in this format, you must have the LAME or BladeEnc encoder installed. See the GoldWave website for details. File text information is supported in ID3v2 tags. ID3v1 tags are not supported.
.ogg Ogg Vorbis audio files. See the Vorbis website for more information. File text information is supported.
.raw Headerless files containing binary data in 8 bit, 12 bit, 16 bit, double precision, mu-law, or A-law format.
.sds MIDI sample dump standard format. Loop points are not supported. No support for file text information.
.smp Sample Vision 16 bit PCM sound files. Markers/Loops are not supported. No support for file text information.
.snd Raw or NeXT files. NeXT files are automatically detected. Opening Raw files displays the File Format window for attributes.
.txt An ASCII text file containing a series of numbers. No support for file text information.
.wav RIFF WAVE 8 to 32 bit PCM mono or stereo, A-law encoded, mu-law encoded, and Microsoft ACM compressed files. MPEG compressed audio is support only if the MPEG decoder is installed.
Only files with one 'data' chunk are supported. The chunks LIST INFO, LIST adtl, and 'cue' are detected. All others are ignored. Cue points are supported. File text information is supported.
.wma Windows Media Audio files. Supports several different bitrates from low bandwidth to high quality. File text information is supported.
.voc Sound Blaster files. Supports: 8 bit mono/stereo, 16 bit mono/stereo, mu-law encoded mono/stereo. ADPCM compressed files are not supported since the compression algorithm must be licensed from Creative Labs. No support for file text information.
.vox Dialogic ADPCM encoded raw files. The File Format window is presented where you can specify the Telephony type and 4 bit VOX ADPCM format. You can use the Options | File Formats command to assign a default format for .vox files. No support for file text

information.
Normally, GoldWave detects and automatically opens all the supported file types. However, there are several cases where GoldWave may not be able to open a file:
1. The file does not contain any header information and there is no file association (see Options | File Formats).
2. The file type is recognized, but the file structure is invalid or corrupt. 3. The file uses a new compression method or format that GoldWave does not recognize. 4. The file type is not supported by GoldWave or any plug-ins.
If any of these conditions occur, GoldWave presents the File Format window (shown below) so that you can specify the type and attributes manually. GoldWave lists all the file format plug-ins that support reading raw audio data. If you are working with PCM or uncompressed binary data (like CD audio), select the Raw type. If you are working with Telephony files, select the Dialogic type. Other types may be listed depending on what plug-ins you have installed.
File Format
Figure: File Format
Table: Common Format Attributes
Format Description and Attributes
PCM Audio is uncompressed 8, 12, 16, or 32 bit data. A Windows system usually creates 8 bit, unsigned or 16 bit, signed, little endian data. A Macintosh system usually creates 8 bit, signed and 16 bit, signed, big endian data. The signed attribute tells GoldWave how the bits should be interpreted. The endian attribute tells GoldWave the byte ordering of the data. Big endian has the most significant byte first. Little endian has the least significant byte first.
Telephony Audio is in a compressed format used in telephone applications. This includes mu-law, A-law, ISDN A-law (inverted A-law), and 4 bit ADPCM VOX Dialogic files.
Floating Audio is binary IEEE floating point single precision

point (32 bit) or double precision (64 bit) data. The byte ordering is usually little endian.
Text Audio is a plain text (ASCII) file containing numbers. The float attribute tells GoldWave that the numbers range from -1.0 to 1.0. The integer attribute tells GoldWave that the numbers range from -32768 to 32767.
If you do not know the format, experiment with trial-and-error. Appendix A has more information about sound attributes. Start with an 8 bit or 16 bit PCM attributes, then try the mu-law or A-law formats. Generally, sounds will be noisy if the format or number of bits is incorrect, in which case you will have to close and reopen the sound using a different format. You can leave the sampling rate unchanged since it affects only the playback speed and can be changed later using Effects | Playback Rate.
File Format Plug-ins
GoldWave supports external file format plug-ins for opening and saving files. These plug-ins are created by other developers by using the GoldWave Plug-in Development Kit to handle file types that GoldWave does not support directly.
You can use Options | File Formats to enable and disable plug-ins or to change the order in which they are used.
When you open a file in GoldWave, these steps are followed:
1. If the file type is a CD audio (CDA) track, you are advised to use the CD Reader tool and no further processing occurs.
2. For all other file types, the file is passed to each file format plug-in module until one is able to handle the file. The order is configured under the File Plug-in Precedence tab of the File Format Options window.
3. If none of the plug-ins support the file format, then the Undetectable Types list under the File Format Options window is used to determine if type and attributes have been associated with the file type. If so, the file is open automatically using those attributes.
4. If there are no associations, then the File Format window (see previous section) is displayed so that the attributes can be specified manually. Chances are that compressed files cannot be open and decoded properly unless a new plug-in is installed for that file type.
Effects Overview
Effects modify, enhance, and change sounds in a variety of ways. These commands are similar to font menu commands in word processors. For example, using font commands, you can change the size of the letters. In GoldWave, using the Volume | Change effect changes the
"size" of a sound. Changing the colour of a font would be similar to changing the pitch of a sound.
For an introduction to some of the terms used in this section, refer to the Editing Overview section and Appendix A. A variety of volume scales may be used by effects.
Most effects in GoldWave are cumulative. This means that if you use the same effect with the same settings, then the sound is changed each time. For example, if you use the Volume | Change effect with a value of -6.02dB, then the volume of the sound decreases to half its current level. If you use that effect again, the volume decrease again, giving one quarter the original volume.
Another example is the Time Warp effect. If you specify a change of 50%, then time is slowed to half and the sound is twice as long. Using the effect again at 50% makes the sound four times as long.
There are a few exceptions. The Volume | Maximize effect has an absolute setting. Maximizing the volume to 0dB sets the sound's peak volume to 0dB. Using the effect again at 0dB has no affect.
Common Controls for Effects
Many effects have similar controls such as presets and shape boxes. These are explained below.
Common Controls for Effects
Figure: Common Controls for Effects
Presets
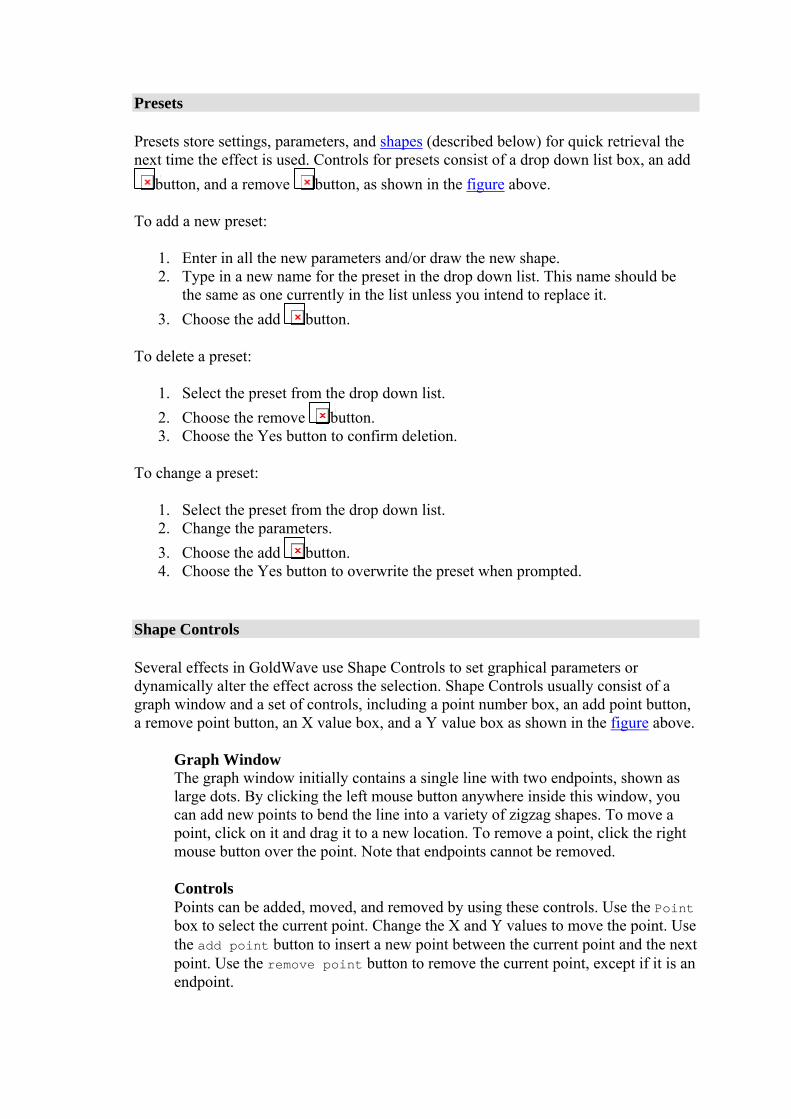
Presets store settings, parameters, and shapes (described below) for quick retrieval the next time the effect is used. Controls for presets consist of a drop down list box, an add
Add
button, and a remove Removebutton, as shown in the figure above.
To add a new preset:
1. Enter in all the new parameters and/or draw the new shape. 2. Type in a new name for the preset in the drop down list. This name should be
the same as one currently in the list unless you intend to replace it. 3. Choose the add
Add
button.
To delete a preset:
1. Select the preset from the drop down list. 2. Choose the remove
Removebutton.
3. Choose the Yes button to confirm deletion.
To change a preset:
1. Select the preset from the drop down list. 2. Change the parameters. 3. Choose the add
Add
button. 4. Choose the Yes button to overwrite the preset when prompted.
Shape Controls
Several effects in GoldWave use Shape Controls to set graphical parameters or dynamically alter the effect across the selection. Shape Controls usually consist of a graph window and a set of controls, including a point number box, an add point button, a remove point button, an X value box, and a Y value box as shown in the figure above.
Graph Window The graph window initially contains a single line with two endpoints, shown as large dots. By clicking the left mouse button anywhere inside this window, you can add new points to bend the line into a variety of zigzag shapes. To move a point, click on it and drag it to a new location. To remove a point, click the right mouse button over the point. Note that endpoints cannot be removed.
Controls Points can be added, moved, and removed by using these controls. Use the Point box to select the current point. Change the X and Y values to move the point. Use the add point button to insert a new point between the current point and the next point. Use the remove point button to remove the current point, except if it is an endpoint.

Some dynamic effects, such as Doppler, Pan, and Volume Shape start previewing audio based on the current point's time value. If the X value of the current point is 1:00, for example, then preview playback starts at that time rather than at the beginning of the selection. This lets you preview the point's settings without playing the entire selection.
To save a shape, use the Presets controls, explained above.
Preview Controls
Previewing is a way of listening to how the current effect settings will sound without having to process the entire selection first. Preview Controls consist of a play Play
button and a stop Stop button. When you press the play button previewing usually starts at the beginning of the selection. In some cases, such as effects that have time based shapes, previewing will start at the current point's time rather than at the beginning of the selection.
In most cases, you can change the effect settings while the preview plays and hear the changes as they are made. For more complex effects and most shape based effects, you will need to use the Apply button to apply the changes or shape while previewing.
Note
The Apply button is used only for previewing. It does not apply the effect to the sound file. Use the OK button.
Effect Plug-ins
Effect plug-ins are modules developed by other companies that can be used within GoldWave. These appear under the Effect | Plug-in menu. A DirectX plug-in wrapper is included with GoldWave to add support for many of the existing DirectX Audio Plug-ins. Other plug-ins are designed to work with GoldWave directly and will appear as separate items under the plug-in menu, each with its own submenu of effects. In some cases settings for effect plug-ins can be changed using the Options | Plug-in menu.
Warning
If any errors or exceptions occur while using a plug-in, you'll need to contact the plug-in creator for assistance. GoldWave Inc. does not provide support for plug-ins created by separate developers.
File Menu Commands
This section explains commands under the GoldWave's File menu. The File Overview section provides general information about how GoldWave handles files.
New
Use New to create a new sound with attributes you specify. These attributes are discussed in Appendix A. Note that GoldWave allows you to create and edit sounds that may not be playable with your audio hardware. For Web and Java applications, you should specify mono, with a sampling rate of 8000Hz. For CD quality, use stereo, with a sampling rate of 44100Hz. Several commonly used settings are provided in the "Preset quality settings" list. Use the Duration box to specify the initial length of the file. You can alter the length later with Edit | Trim or with Edit | Inserting Silence.
Open
The Open command presents a list of files in your sound folder. The sound folder can be set using the Options | Storage command. All recognized file types are listed. After you select a file, a Sound window is opened and details about the sound are displayed in the status bar. See the File Format section above if GoldWave could not open the file.
The Storage Overview section explains how the files are stored for editing. Depending on the size of the file, you may want to change the storage setting under Options | Storage.
Close
Use Close to close the current sound. If any changes were made, you are asked to save them.
Information
This command assigns or changes text information stored in the file, such as artist, title, copyright, and date. Information is stored in certain file types only, such as .wav, .aiff, .ogg and .mp3. Some file type only store a subset of all the items given in the File Information window. There is no verification of the information entered. It is up to you how to use these items and to follow any guidelines required for a particular file type.
Batch Processing
Batch Processing converts a set of files from one format to another and applies effects. Use this feature to compress all your .wav files to .mp3 to save disk space or convert from .mp3 to .wav to prepare for writing to a CD-R audio disc. You can remove pops/clicks, equalize, and maximize volume levels of all your vinyl album or tape recordings. Or you can add copyright and other text information to all your own files.
Add files with the Add Files button or drag-and-drop a group of files from Windows Explorer. Add an entire folder (including subfolders) or all the files in a folder of a specific type by using the Add Folder button. Remove items from the list by selecting one or more of them and choosing the Remove button. The Remove All button removes all files and folders from the list.
The tabbed pages along the bottom let you configure conversions, effects, destination folder, and file information. These are explained below.
When everything is configured, choose the Begin button to start processing all the files. A status window will appear showing the progress and listing any errors that occur.
Note
If you are trying to convert raw files, such as .vox, you'll need to use Options | File Formats to assign a format for that type first.
Convert Tab If you check the "Convert files to this format" box, then files are converted to the format specified on this tab. Otherwise no conversion is performed and a processed file will have the same format as the original file, if possible. If the same format cannot be used, then an error is reported.
Use the "Save as type" drop down list to select the destination format for the conversion, then use the Attributes drop down list to select the specific attributes to use for the destination type.
If the attributes allow any sampling rate to be used, you can specify the destination rate to use by checking the Rate box and entering the rate in the box. Some attributes have a fixed rate, so a separate rate cannot be specified for those. If no rate conversion is needed, make sure the Rate box is not checked. In that case, a processed file will have the same rate as the original file.
Process Tab If you want to apply effects to a group of files, use this tab to add a set of effects or chains to the list. If no effect processing is required, make sure you remove all effects by using the Remove All button on this tab. To remove a single effect from the list, select the effect and use the Remove button.
To add an effect, use the Add Effect button. It presents a tree list of all effects available and their presets. Select the preset you want to use. Effect chains can be added by using the Add Chain button. If you require different effect settings, you'll need to use the Effect menu or the Effect Chain Editor tool to create a preset or chain with the settings you require prior to using the Batch Processing feature.
Folder Tab If you want all processed files to be stored in the same folder where they currently reside, select "Store all files in their original folder".
If you want all processed files to be stored in a specific folder, select "Store all files in this folder" and specify a folder in the box provided. You can click on the folder button to browse for a folder.
To overwrite any files having the same name and folder as the processed file, check the "Overwrite existing files" box. GoldWave fully processes original files before overwriting them.
Information Tab Use this tab to control how information is processed. See File | Information. Select the "Retain information currently in each file" if you do not want the file's information to be changed. Otherwise select "Replace information in all files" and use the Set Info button to provide all the information.
Warning
Note that all processed files will have exactly the same information, so care must be taken when specifying file specific information such as Title. Also note that not all file types can store information.
Save
The sound is saved in a file using its original name and type. If memory or disk space is low, the file may not be saved successfully. GoldWave will inform you if this happens. If Save fails, try deleting some unneeded files or close other applications. Make sure that the file is saved successfully before closing GoldWave, otherwise the changes will be lost. Note that audio from video and movie files cannot be saved. You must save those files in an "audio only" format. You will see the Save As window if you need to save the file in a different type.
Warning
Cue points are saved only in certain file types. If you added cue points to a file that does not support them, you can use File | Save As to save it in a different type.
Save As
Save As saves a sound using a different filename or file type. To save the sound using a different name, simply type in the new name in the File name box. To save the sound using a different type, select the type from the "Save as type" list box, then select attributes from the Attributes list box. Since each file type supports different attributes, always select the type before selecting attributes. Java and Web sounds, for example, should be saved using the "Sun (*.au)" type and the "Java/Web" attribute.
You can use Save As to compress a sound as well. Select the "Ogg (*.ogg)" type and one of the many Vorbis attributes. The smaller the bitrate (kbps number), the smaller the file will be. Note that quality may be reduced as well.
Use Options | File Formats to assign a default format if you always prefer to use a specific file type and attributes.
Note
Unless the number of channels or sampling rate has changed, GoldWave does not use the compressed audio data after saving. It continues to use the original audio stored in temporary storage. You must close and reopen the file in GoldWave (or play it in a separate program) to hear how the compressed audio sounds. It is strongly recommended that you listen to the compressed file before discarding the original to ensure its quality is acceptable.
Warning
The correct type must be selected from the type box. Typing in a different extension by hand for the filename does not convert the sound to the type associated with that extension.
Save Selection As
Save Selection As saves the selected part of the sound to a file. Use this command to save parts of a large file. The Save As window appears where you can specify the new filename, type, and attributes for the file.
Exit
Exit closes all Sound windows then closes GoldWave. Any playback or recording is stopped. You are asked to save any changed files.
File History
A list of several recently used files is appended to the File menu. You can quickly reopen one of these files by selecting it from the menu.
Edit Menu Commands
Edit commands remove, insert, copy, and move sections of sound. For an introduction to the concepts and terms used in this section, refer to the Editing Overview section.
Undo
The Undo command reverses the most recent change made to a sound. The undo feature keeps a copy of the original data in a temporary file. The temporary folder and the number of undo levels are determined by the Options | Storage settings. To disable Undo, set the number of undo levels to zero.
Cut
Use Cut to remove the selection from the sound and put it in the clipboard. The contents of the clipboard can then be superimposed or inserted into a Sound window using Mix or Paste. If you just want to remove the selection and do not need to paste or mix it, you should use the Delete command instead.
Note that if only one channel is selected in a stereo sound, then only that channel is removed. Since it is not possible for one channel to be longer than the other, the end of the cut channel is padded with silence (this is also true for Delete).
To cut:
1. Select the part of the sound you want to cut. 2. Choose Cut from the Edit menu.
Copy
The Copy command copies the selection into the clipboard. The selection is not removed from the sound. The contents of the clipboard can then be mixed or placed into another sound using Mix, Paste, Paste New or Replace.
To copy:
1. Select the part of the sound you want to copy. 2. Choose Copy from the Edit menu or click on the Copy button.
Note
You can copy individual channels of a stereo sound by using the Edit | Channel menu to select a single channel.
Copy To
The Copy To command copies the selection to a new file. Use this command to divide a large file into smaller sections or save a piece of a file. The selection is not removed from the sound. The Save As window appears where you can specify the filename, type, and attributes for the file. This is the same as the File | Save Selection As command. To automatically split a large file into several smaller pieces, use the Cue Points tool.
To copy the selection to the file "section.wav":
1. Select the part of the sound you want to copy. 2. Choose Copy To from the Edit menu. 3. Enter the filename: section 4. Select "Wave (*.wav)" from the type list. 5. Choose Save.
Note
You can save individual channels of a stereo sound by using the Edit | Channel menu.
Paste New
The Paste New command creates a new Sound window containing the sound copied into the clipboard. The new sound will have the attributes and length of the clipboard sound. This command is useful when you need to alter or save the clipboard audio.
To paste part of a sound into a new sound:
1. Select the part of the sound you want to copy. 2. Choose Copy from the Edit menu. 3. Choose Paste New from the Edit menu.
Paste and Paste At
After copying a sound into the clipboard, you can use these commands to insert it into another sound. The Paste command inserts the clipboard at the start marker's position. Paste At inserts the clipboard at the location you specify: at the beginning of the file, at the finish marker, or at the end of the file. The length of the sound is increased so that the clipboard will fit. The clipboard is automatically converted to match the attributes of the sound.
To insert the clipboard into the sound:
1. Move the start marker to the place where you want to paste the clipboard sound. 2. Choose Paste from the Edit menu.
To append the clipboard to the end of the sound:
1. Choose Paste At from the Edit menu. 2. Choose End from the Paste At submenu.
Note
Copying a small selection and pasting it several times creates a stutter effect.
Mix
Use Mix to blend (combine) the clipboard with the sound. Note that before you can use Mix, you need to use the Copy command to copy audio into the clipboard. Mixing essentially allows two sounds to be played at the same time, such as vocals and music or voiceovers. You are prompted for the mix volume applied to the clipboard and the start time. A volume of 0dB is full volume. Lower values make the clipboard sound quieter. Adjust the start time to synchronize the clipboard audio with the Sound window audio you are mixing with.
To mix the clipboard with the sound:
1. Move the start marker to the place where you want to start mixing the clipboard. 2. Choose Mix from the Edit menu. 3. Enter the mix volume for the clipboard. 4. Adjust the start time as required. 5. Choose OK.
Crossfade
Use Crossfade to fade and mix the ends of two sounds, such as fading out one song while fading in another. Note that before you can use Crossfade, you need to use the Copy command to copy some audio or a song into the clipboard. The Duration specifies how long the transition between the clipboard audio and file audio lasts. The Clipboard position setting specifies which end of the file to fade the clipboard audio. If End of file is selected, then the clipboard is pasted and crossfaded at the end of the file. If Beginning of file is selected, then the clipboard is pasted and crossfaded at the beginning of the file. The Fade curve settings control how the audio is faded. If the song being faded out already has a fade out at the end, use the None fade out curve setting. The fade is shown graphically and can be previewed. Note that any changes made while previewing will not take effect until preview is restarted.
Note
The selection is used when performing a crossfade. Use the Edit | Select All command before using Crossfade unless you intend to crossfade within a certain part of the sound.
To crossfade a song in clipboard at the end of the sound:
1. Choose Crossfade from the Edit menu. 2. Select the End of file setting in the Clipboard position box 3. Adjust the Duration and Fade curve settings as required. 4. Choose OK.
Replace
Use Replace to replace the selection with the clipboard. The selection is deleted and the clipboard is inserted in its place. If the clipboard is longer or shorter than the selection, the length of the file is adjusted as required. To avoid changing the length of the file or altering the timing of the sound following the selection, use Overwrite instead.
To replace part of a sound with the clipboard:
1. Select the part of the sound you want to replace. 2. Choose Replace from the Edit menu.
Overwrite
Use Overwrite to overwrite part of the sound with the clipboard beginning at the start marker's position. The amount of sound overwritten depends on the length of the clipboard. The length of the file is not changed (unless the clipboard would go beyond the length of the file) and no shifting is performed. Note that if the clipboard is longer than the current selection, then some sound outside the selection will be overwritten as well. The finish marker will be placed at the end of the overwritten sound.
Use Overwrite instead of Replace when you need to preserve tempo, timing, or alignment of the sound following the selection.
To overwrite part of a sound with the clipboard:
1. Move the start marker to the beginning of the sound you want to overwrite. 2. Choose Overwrite from the Edit menu.
Delete
The Delete command removes the selection from the sound. The selection is not copied to the clipboard. You should always use Delete instead of Cut when the selection is not needed. The Delete command is faster because it does not copy the selection to the clipboard.
Note that if only one channel is selected in a stereo sound, then only that channel is removed. Since it is not possible for one channel to be longer than the other, the end of the deleted channel is padded with silence (this is also true for Cut).
To delete:
1. Select the part of the sound you want to delete. 2. Choose Delete from the Edit menu.
Trim
The Trim command removes everything outside the selection. The selection is not affected. Use this command to keep part of a sound and discard everything else. This command is frequently used after recording to trim any leading or trailing silence. Note that if only one channel of a stereo sound is trimmed, the end of that channel is padded with silence. As an alternative, you can use the Copy To command to save the selection to a separate file.
To trim:
1. Select the part of the sound you want to keep. 2. Choose Trim from the Edit menu.
Mute
The Mute command replaces the selection with silence. Unlike Delete or Cut, the length of the sound is not changed. Use this to remove offensive language from music without interrupting the overall beat.
Insert Silence
The Insert Silence command inserts some blank space in the sound at the start marker's position. You are prompted to specify the length of the silence. Use this command to make room for recording or to insert a delay.
Select View
Use Select View to select all of the sound currently shown in the Sound window's graph. The start and finish markers are moved to the far left and far right of the view.
Select All
Use Select All to select the entire sound. The start and finish markers are moved to the beginning and end of the sound.
Channel
The Channel submenu sets which channel of a stereo sound to use or modify for editing or effects. Use this feature to copy a single channel from a stereo sound or apply an effect to only one channel. The currently selected channel is shown in the status bar. When recording or using effects such as Resample, Playback Rate, or stereo effects, the channel setting does not apply and both the left and right channels are modified.
You can right-click on the channel item in the status bar to quickly select a channel or use Options | Tool Bar to add a "Channel" toggle button to the tool bar.
Marker
The Marker submenu lists commands for changing the positions of the start and finish markers for adjusting the selection.
Set
Sets the start and finish marker to an exact time or sample position. To specify a time, choose the Time option and enter the time in hours, minutes, seconds, and thousandths of a second. For example, you could enter 1:04:27.873. To specify a sample position, choose the Sample option and enter the position.
If you want the length of the selection to be aligned to a CD sector or 1 kilobyte, select the appropriate option. When the OK button is pressed, the finish marker is adjusted to align the selection length.
Drop Start/Finish

When playing or recording a file, you can drop the start or finish marker at the current position. You can use the bracket keys, [ and ] to drop the start and finish markers respectively. Note that the start marker cannot be dropped after the finish marker.
Recall Selection Positions
Moves the start and finish markers to previously stored positions. These positions are set using the Store Selection Positions command.
Store Selection Positions
Saves the current positions of the start and finish markers. Use the Recall Selection Positions command to move the markers back to these positions.
Snap To Zero-Crossing
When editing, it is important that the waveform not change suddenly from one amplitude to the next, otherwise a click will occur. This can happen when deleting the selection. The amplitude of the waveform at the start marker may be completely different from the amplitude at finish marker. After deleting the selection, these two different amplitude will be right next to each other, causing a click.
The "Snap To Zero-Crossing" feature helps to minimize the problem by making sure that the markers are always near zero amplitude samples. When you drag and release a marker, it is automatically moved to a position where the amplitude approaches zero. This means that when you delete the selection, the amplitudes at both the start and finish markers will be more closely matched (near zero).
Since stereo sounds can have very different left and right channels, it is not always possible to find an ideal zero-crossing position. However, you can use the Edit | Channel menu to limit the snap feature to a single channel.
Note that if you zoom in close enough so that the true shape of the waveform is shown (such as View | Zoom 1:1), the snap feature is automatically turned off so that markers can be placed at any position.
Cue Point
This submenu lists commands for working with cue points.
Edit Cue Points
Displays the Cue Points tool.
Drop Cue
Drops a cue point at the current playback or recording position.
Jump To Next Cue
Moves the start marker to the next cue point or to the end of the file.
Jump To Previous Cue
Moves the start marker to the previous cue point or to the beginning of the file.
Split File
Divides the file into smaller sections using cue points at split points. See Split File Button under the Cue Points tool for more information.
Effect Menu Commands
This section explains commands under the GoldWave's Effect menu. Please see the Effects Overview section for general information about how GoldWave employs effects.
Doppler
A Doppler effect is defined as a change in frequency of a wave caused by motion. You often hear it when police or ambulance sirens drop in pitch as they pass near by.
In GoldWave the Doppler effect dynamically alters or bends the pitch of the selection. It does this by altering the speed at which the waveform is played. Note that both pitch and tempo are changed. Shape Controls are presented where the pitch/speed can be varied over the selection from 0.25 to 2.0 times normal. You can use Effects | Volume | Shape to dynamically alter the volume as well.
The "Slow down" preset gives you a good idea of what it sounds like when the batteries start to fail in a portable tape player. Other presets can change your voice to a smurf ("Faster") or a giant ("Slower").
Dynamics
Dynamics alters the amplitude mapping of the selection. It can limit, compress, or expand a range of amplitudes. The amplitude mapping is set using Shape Controls, where x-axis and y-axis both have a range of -1 to 1. When the line stretches diagonally from the lower left corner

to the upper right corner, the input amplitude (x) and output amplitude (y) are the same for every point on the line. By changing the line, the output will differ from the input.
Dynamics
Figure: Dynamics
The figure shows an example of amplitude mapping for clipping distortion. Point P1 has an input value of -0.4 and an output value of -0.4. Therefore no change occurs to the amplitude. Point P2 on the other hand, has an input value of 0.8 and an output value of 0.5. In this example, all input amplitudes in the range of -0.5 to 0.5 remain unchanged. Any values outside this range will be limited to ±0.5, so that the final sound will have no amplitude magnitudes greater than 0.5. Essentially, any values that are too high are "clipped" to fit within the range.
In practical terms, dynamics can increase the volume of quiet sections of a sound without greatly increasing the loud sections as well. It can introduce mild or heavy distortion effects (such as the "Blare" or "Hiss noise" preset).
See Also Compressor/Expander
Echo
Echo produces an echo or reverb effect in the selection. The parameters are: number of echoes, echo delay, echo volume, feedback, and stereo. The number of echoes is the number of times the sound is repeated and mixed at a diminished volume with the given delay.
The delay is the amount of time it takes for the first echo to be heard. If more than one echo is used, then each subsequent echo delay is compounded by this amount again. In other words, the second echo is delayed twice as long, the third echo is delayed three times as long, and so on.
The volume controls how loud the first echo is. The volume of subsequent echoes is compounded in the same way the delay is.
Feedback makes the echo sound deeper and richer. It regenerates each echo, and the echo of those echoes, and so on, creating many more echoes than before.
The stereo option makes the echo bounce between the left and right channel of a stereo sound.
Note
To make the tail of the echo sound correct, the effect extends the selection slightly. This will increase the length of the sound.
Compressor/Expander
The Compressor/Expander effect dynamically alters the audio volume level. It is commonly used as a compressor, limiter, expander, or gate.
Note
This effect does not change the size of the file. For file compression, use File | Save As and change the type and attributes.
Compressors and limiters are used to decrease or limit the dynamic range of audio. In plain English, they reduce the volume of loud sounds while leaving the rest of the sound unchanged. Expanders and gates are used to increase the dynamic range of audio. They reduce or eliminate quiet sections while leaving louder sections unchanged, which can help to reduce background noise.
Compressors always work on loud sections and expanders always work on quiet sections. Normally, both compressors and expanders only reduce the volume. However, GoldWave also allows you to boost the volume.
The Multiplier specifies the amount of volume change. It is the scale factor applied to the sound when the threshold is met. For compressors, it is the amount to scale the loud sections. For expanders, it is the amount to scale the quiet sections. Normally a value less than 0dB should be used to reduce the volume.
The Threshold specifies the audio level to activate the expander or compressor. Compressors scale the volume level of all sounds above that level. Expanders scale the volume level of all sounds below that level.
The Attack and Release times specify how quickly the expander/compressor is activated. An attack value of 0.100 means that the audio level will have to cross the threshold for at least one tenth of a second before the multiplier is used at full strength. A release value of 0.100 means the multiplier will continue to be used for one tenth of a second after the audio level no longer crosses the threshold.
Use the Expander or Compressor mode to specify what processing is required.
The Anticipate attack setting tells the effect to scan ahead for audio that crosses the threshold. If the Attack time is set to 0.100, then the effect scans ahead by 0.100 seconds. This means that the multiplier will be at full force the instant the threshold is crossed rather than building to full force 0.100 seconds later. The Use smoother setting smooths out any sudden volume changes which may occur during processing with small attack/release times.
Compressor Example You have recorded some music that has a few loud moments, but you want to raise the
overall volume without distorting the loud parts. Select the "Reduce loud parts" preset. After compression, use the Volume | Maximize command to stretch the volume to the full dynamic range. Alternatively you could use the "Boost quiet parts" preset.
Expander Example You have recorded someone talking and notice background noise during the quiet parts. To reduce the noise, select the "Noise gate" preset or the "Reduce quite parts" preset.
See Also Dynamics
Filter
Filters are used to remove a range of frequencies from a sound and can produce a variety of effects. The submenu contains several filter related effects.
Bandpass/stop
Bandpass filters block all frequencies outside a specified range, keeping only frequencies within the range. Bandstop filters block all frequencies within a specified range, keeping all other frequencies outside the range.
Frequency Range The From and To boxes specify the initial frequency range of the filter. If the Dynamic option is selected, then a final frequency range can be given in the other From and To boxes, allowing you to fade from on frequency range to another. Otherwise the initial range remains constant for all processing.
Settings Select Bandpass if you want to keep only the frequencies within the range. Select Bandstop if you want to block all the frequencies in the range. The remaining Static, Dynamic, and Steepness options are explained under Low/Highpass filter.
Example To remove hum and hiss from a voice recording:
1. Set From to 200. 2. Set To to 3800. 3. Choose the Bandpass option. 4. Choose the Static option. 5. Set Steepness to 10 or higher. 6. Choose OK.
Equalizer
Equalizers are commonly found on stereo systems. They boost or reduces certain ranges of frequencies. Simple equalizers control only treble and bass. GoldWave's equalizer controls 7 bands, as shown in the figure.
Equalizer
Figure: Equalizer
Center frequencies for each of the 7-bands are given at the top of each fader. Adjust the faders to boost or reduce a band by +12dB to -24dB.
To change bass, adjust the two or three left-most bands. To change treble, adjust the two or three right-most bands. Several presets are included to demonstrate bass, mid, and treble changes.
More detailed equalization is possible using the Parametric EQ, described below.
Low/Highpass
Lowpass filters block high pitched, frequencies (treble) but allow low pitched frequencies (bass) to pass. They can be used to reduce high end hiss noise or remove unwanted sounds above the given cutoff frequency. If you were to apply a lowpass filter with a cutoff frequency of 1000Hz on speech, it would make it sound mumbled and deep. Lowpass filters can also be used to eliminate aliasing noise when used before downsampling.
Highpass filters block low pitch frequencies, but allow high pitched frequencies to pass. They can remove deep rumbling hum or remove unwanted sounds below the given cutoff frequency. If you were to apply a highpass filter with a cutoff frequency of 1000Hz on speech, it would make it sound thin and hollow.
Cutoff Frequency The Initial cutoff specifies the constant cutoff frequency for static filtering.
If the Dynamic option is selected (see below), then a final cutoff frequency can be given in the Final cutoff box, allowing you to fade from one cutoff to another.
Filter Options Select Lowpass if you want to keep only the frequencies below the cutoff frequency. Select Highpass if you want to keep only the frequencies above the cutoff frequency.
If you want the cutoff frequency to remain constant throughout the selection during processing, select the Static option. If you want the cutoff frequency to change from the initial value to the final value, select the Dynamic option. Note that dynamic filtering will take more processing time.
The Steepness value specifies how sharply the filter cuts off frequencies outside the cutoff frequency. A higher steepness makes the filter sharper, but it also increases processing time. In technical terms, the steepness specifies the number of second order cascade filters used.
Examples To make speech gradually become more hollow and thin:
1. Set Initial cutoff to 60. 2. Choose Dynamic. 3. Set Final cutoff to 1000. 4. Choose Highpass. 5. Choose OK.
Remove all high end hiss noise from a voice recording.
1. Set Initial cutoff to 4000. 2. Choose Lowpass. 3. Choose Static. 4. Set Steepness to 20. 5. Choose OK.
Noise Reduction
Noise Reduction uses frequency analysis techniques to remove unwanted noise, such as a background hiss, a power hum, or any continuous, consistent sound. It cannot be used to separate or remove complex or brief sounds, such as coughs, laughter and applause. It cannot remove instruments or vocals from music.
The interface, shown in the figure below, includes a frequency analysis window, with Shape and other controls. The x coordinate is the frequency in Hertz and the y coordinate is the magnitude in decibels.
Noise Reduction
Figure: Noise Reduction
The frequency analysis provides graphical information about all frequencies within the sound at the given time. For stereo sounds, the left channel is shown in green and the right channel is shown in red. The time of the frequency analysis within the sound is given in the Time box. Move the scroll bar located below the analysis window to change the analysis time to show the frequency analysis of a different part of the sound. The detail of the analysis depends on the FFT size setting, explained below.
Reduction Envelope Noise is removed using a reduction envelope. The shape of the envelope should closely match the shape of the noise you want to remove. The frequency analysis graph can help determine that shape. Change the analysis time so that it coincides with a time in the sound where only the noise is heard (use the preview button to play the file to find such a place and time). Once you have isolated the noise in the analysis graph, you can then create the envelope. The envelope can be created in four different ways, depending on the reduction envelope setting. The "Use clipboard" option generally gives the best results. Also try the presets.
Use shape Lets you manually create an envelope shape or select a preset shape. See Shape Controls for information about creating shapes. By creating a horizontal line at about 80dB, you can remove a hiss from a sound. In some cases, you'll need to trace the outline of the graph or draw completely different shapes to reduce the unwanted frequencies levels.
Use current spectrum Creates an envelope based on the shape of the graph shown in the
frequency analysis window. This is particularly useful for removing a complex buzz or hum. It is important that the analysis Time is set to a place where the noise is heard by itself initially.
Use average Applies an averaging envelope throughout noise reduction processing. The envelope is continuously updated, based on the average frequency analysis of the sound. Use this setting if the noise changes frequently throughout the sound.
Use clipboard Creates an envelope based on an analysis of the waveform in the clipboard. This is the most flexible option and usually gives the best results. Before you can use this option, you must use Edit | Copy to copy a piece of noise into the clipboard. For best results, the piece should contain only the noise you want to remove from the rest of the file. The noise can even be copied from a different file. After you copy the noise, remember to change the selection to the part of the file you want to apply the noise reduction.
Settings The FFT size determines the detail of the frequency analysis and the noise reduction envelope. Usually values of 11 or higher give the best results. The Overlap value specifies the percentage of the FFT size to overlap from one calculation to the next. A value of 88 works well. The Scale value lets you alter the reduction envelope scale. A value of 100 uses the envelope as it is. A value of 200 doubles the envelope, which doubles the amount audio removed from the sound. A value of 50 halves the envelope, which halves the amount removed. Normally it should be set to 100.
Parametric EQ
A parametric equalizer (shown below) is a flexible tool for reducing or enhancing ranges of frequencies. GoldWave presents an easy to use interface where all the parameters for up to 40 bands can be configured quickly. The presets contain some commonly used templates.
Parametric Equalizer
Figure: Parametric Equalizer
Graph window The graph shows frequency on the x-axis in Hertz and the gain on the y-axis in decibels. Each enabled band is displayed in the graph as a diamond shaped box located at its center frequency and gain. The width of the box shows the bandwidth. The currently selected band is shown in blue and its exact settings are given in edit box controls.
A short time frequency analysis graph is drawn with the left channel in green and the right channel in red. The time of the analysis can be changed using the scroll bar located at the bottom of the graph. The analysis helps determine what frequencies to boost or reduce. A high pitched squeal, for example, would appear as a spike near the right side of the graph. Whereas a low pitched hum would be a spike or bump near the left side.
Controls A band is configured by selecting its number from the Band box and adjusting the Gain, Width, and Center faders. A quicker method is to drag-and-drop the band to a new location on the graph. Note that because of the logarithmic frequency scale, the width of a diamond changes as you move it left or right. The bandwidth, however, remains constant.
Use the diamond plus button to add more bands. Use the diamond minus button remove existing bands. The current (blue) band given in the Band box is the one removed.
The "Notch" preset is effective for removing a simple tone from a sound, such as a 60Hz hum or telephone dial tones. The "Bass boost" and "Treble boost" presets work the same way as the bass and treble controls on a stereo system. Adjust the gain up or down to control them.
Pop/Click
A pop/click filter is a specially designed filter that searches for abrupt changes in the sound and eliminates them. Such a filter is often used to remove pops and clicks caused by dust and scratches when recording old vinyl records.
The Tolerance defines how abrupt a change can be before it is considered a click. It is best to start with a value near 1000%. Using a lower value will detect more clicks, but may eliminate natural clicks such as drum sticks tapping together or a conductor tapping the baton. Values less than 500% should be used on short selections only.
When a click is detected, the filter attempts to reconstruct the damaged waveform based on the surrounding waveform shape making the repair almost imperceptible. However with excessive pops and clicks or at low tolerance levels, reconstructed waveforms may overlap and sound distorted. The tolerance setting should be kept as high as possible. Using a very low setting may introduce more distortion than existed in the original. This is most noticeable in voice recordings or instrument solos, particularly trumpet solos.
The filter requires a minimum selection of 4000 samples (about one tenth of a second at CD quality) to establish a base line. Using the filter on a shorter selection has no effect.
Silence Reduction
This filter automatically removes long silences from a sound and helps save storage space. The Silence threshold specifies the volume level for the silence. Any audio below this level is considered silence and is subject to removal, provided it has a long enough duration. "Reduce to length" specifies how short to make the silence. If you use a value of 1.0, then any silences longer than one second is shortened to one second in length.
Use this effect on speeches or police/airport radio recordings to remove long pauses.
Smoother
Use this filter to reduce hiss and crackle. Length sets the length of the smoother filter. The larger the value, the more averaging is applied to the audio and the duller it will sound. Use the Volume setting to help offset the loss in volume for larger Length values.
Flanger
A flanger effect is similar to an echo effect in that the original sound is mixed with a delayed copy of itself. Unlike an echo, where the delay is constant, a flanger varies the delay over a given range. The speed, or frequency, at which the delay varies is controlled as well. The Flanger effect presents a window where you can set the depth, frequency, and fixed delay parameters and control how the sound is mixed. Many presets are included to demonstrate the kinds of unusual audio effects that are possible.
Volumes The Source volume specifies the volume of the original sound to mix with the final sound. A value of 0 means the original sound will not be mixed at all with the final sound. If this value is set to 100 and all other volumes are 0, no change is made to the sound. A value of -100 inverts the source, which is equivalent to subtracting the original instead of adding it to the final sound.
The Flanger volume specifies the volume of the delayed sound to mix with the final sound. Usually, this value should be in the range of 25 to 100, or -25 to -100 for an inverted mix.
Feedback specifies the level of feedback (previously generated output) to mix with the final sound. This makes the effect more full and pronounced. Set this value to 0 if you do not want any feedback. In general the feedback should be set to between -75 to 75.
Flanger Settings Variable delay specifies the maximum variable delay in milliseconds. A value of 40 will allow the delay to vary from 0 to 40 milliseconds.
Frequency specifies how fast to vary the delay. A value of 2 will vary the delay over from 0 to its maximum twice a second. For a value of 0.2, the maximum delay is reached every five seconds.
The Fixed delay is added to the depth to change the minimum delay. If the variable delay is 40 and the fixed delay is 10, the delay will vary from 10 to 50 milliseconds.
The Sine modulator and Triangular modulator settings control how the delay is varied. If sine is selected, then the delay varies on a sinusoidal pattern. If triangular is selected, then the delay varies in a simple linear pattern.
The Stereo option allows the flanger and feedback audio to be bounced between the left and right channels of a stereo sound, giving a more pronounced stereo effect.
Interpolate
Interpolate (see figure below) uses linear interpolation to smooth out the waveform within the selection. Use this command on a tiny selection to remove a pop or click. This command should not be used on a large selection.
Interpolate
Figure: Interpolate
Invert
Invert reflects the selection about the time (horizontal) axis. The selection is essentially turned upside-down. This produces no noticeable effect in mono sounds and has a slight effect in stereo sounds. Inverting a single channel of a stereo sound produces an "in" or "out" effect.
Inverting can be used before mixing so that the two sounds are subtracted instead of added.
Mechanize
Mechanize gives a robotic or mechanical characteristic to a sound through a method known as amplitude modulation. This effect was widely used in old science fiction movies. The rate of modulation is controlled with the Frequency value. The sound is modulated with one of several waveforms given in the table.
Table: Mechanize Modulator Options
Waveform Purpose
Sine The sound is modulated with a sinusoid, which tends to shift the pitch and cause distortion. Using a very small frequency value (less than 2.0) causes the sound to fade in and out.
Triangle The sound is modulated with a triangular wave. This is similar to the Sine modulator but causes more distortion at higher frequencies.
Square The sound is modulated with a raised square wave, with amplitudes ranging from 0.0 to 1.0. This causes very heavy distortion at high frequencies and intermittent (on/off) audio at low frequencies.
Clipboard The sound is modulated with audio stored in the clipboard. Audio must be copied to the clipboard before using this option. No attempt is made to convert the clipboard audio to a compatible sampling rate.
Offset
The Offset effect adjusts or removes a dc offset in the selection by shifting it up or down so that the wave is centered on the horizontal axis.
Offset
Figure: Offset
Positive values shift the graph up and a negative values shift it down. Use the Scan Offset button to automatically determine what offset to use to remove any existing offset. After scanning completes, the Left and Right values are set such that they will cancel out the offset in the given channel. If the values are zero, then no offset was detected.
Any offset should be removed to minimize pops/clicks during editing. Offsets may interfere with other effects as well.
Note
You should check the offset from time to time after processing effects. Otherwise, the offset may increase with each effect, resulting in some distortion.
Pitch
Pitch changes the pitch (frequency) of the selection. This is useful for converting instrument samples from one note to another. The new pitch is specified using a scale factor or using semitone and fine tune values.
Scale This option scales the pitch by a percentage value. If you set the scale to 50, that is equivalent to a downward shift by one octave. A value of 200 is the same as an upward shift of one octave and would make a voice sound like a chipmunk. A value of 75 would make a woman's voice sound like a man's.
Semitone This option changes the pitch by semitones (notes on a piano). If your sound is a note at middle C and the semitone value is 2, the note is changed to D. A value of -1 changes the note to B. A value of 12 make the note one octave above middle C. The Fine tune value lets you make a slight pitch adjustment in hundredths of a semitone. For example, a value of 50 changes a note from C to halfway between C and C#.
Preserve length If this option is checked, a complex algorithm is used to keep the length of the original note the same as the new note. In other words, the tempo will not be changed. In terms
of a voice recording, this changes the pitch of the voice without changing the speed at which the words are spoken. This option requires a substantial amount of processing time and will affect the quality of the sound.
The FFT size determines how much of the sound to process at one time, based on a power of 2. A value of 10, for example means that 1024 (210) samples are processed at a time. Values from 11 and up give good results. The Overlap determines what percentage of the processed samples are recalculated. It should be at least 88. Values of 90 and 95 will give better results, but require more processing time.
Plug-in
This menu lists all plug-ins detected by GoldWave. If any compatible DirectX plug-ins are detected, then they are listed under a DirectX submenu.
Reverse
This command reverses the selection so that it plays backward. Now you have an easy way to capture all those "satanic verses" or reverse speech messages. You can play a sound backwards by using the rewind button on the Control window as well.
Stereo
The Stereo submenu contains commands that apply to stereo files, such as swapping channels and left/right panning.
Channel Mix
This command swaps, mixes, inverts, or combines the left and right channels in a variety of ways. The left and right channels are replaced with one of the items listed in the table.
Table: Channel Mix Options
Option Value
Left Unmodified left channel audio.
Right Unmodified right channel audio.
Average Sum of the left and right channels divided by two.
Left + Right Sum of the left and right channels.
Left - Right The left channel minus the right channel. Commonly used to remove vocals.
Right - Left The right channel minus the left channel. Also commonly used to remove vocals.
Invert Left The inverse (negative) of the left channel.
Invert Right The inverse (negative) of the right channel.
Root(Left x Right)
The square root of the left channel multiplied by the right channel. This help reduce noise in mono sounds that were recorded as stereo.
MaxMatch
This command automatically balances the left and right channels and maximizes the volume levels. Essentially, this effect uses the Volume Match effect internally on the left and right channels, then uses the Volume Maximize effect.
After processing, the left and right channels will have the same average volume level and at least one channel will have full dynamic range (1.0 or 0dB). Note that it is rarely possible for channels to have the same average and both have full dynamic range at the same time. Typically one channel will have a dynamic range of slightly less than 1.0 or 0dB.
Pan
Pan presents the Shape Controls where left and right panning can be controlled. The graph is divided into green and red regions, representing the left and right channels respectively. The line, initially located between the regions, represents the center for panning. By bending and/or moving the line, you can dynamically alter the selection's left/right balance or pan to and from each channel. The figures below show several examples of panning shapes.
Pan
Figure: Pan from left to
right
Pan
Figure: Pan from right to left and
back to right
Pan
Figure: Pan from left center to
right center
Reduce Vocals
This effect reduces vocals from certain stereo recording by subtracting the left and right channels and by using a bandstop filter. This works best when vocals are recorded exactly the same on the left and right channels and no stereo effects have been applied to the vocals. Note that any instruments record the same in both channels are reduced as well.
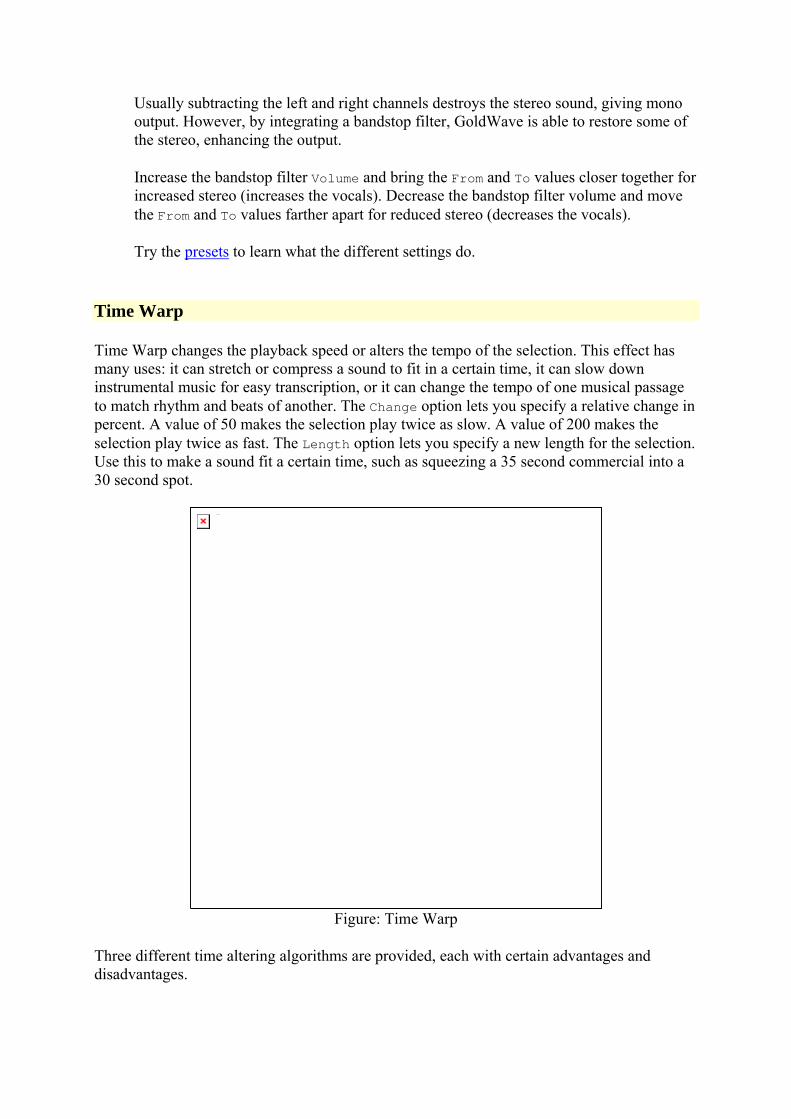
Usually subtracting the left and right channels destroys the stereo sound, giving mono output. However, by integrating a bandstop filter, GoldWave is able to restore some of the stereo, enhancing the output.
Increase the bandstop filter Volume and bring the From and To values closer together for increased stereo (increases the vocals). Decrease the bandstop filter volume and move the From and To values farther apart for reduced stereo (decreases the vocals).
Try the presets to learn what the different settings do.
Time Warp
Time Warp changes the playback speed or alters the tempo of the selection. This effect has many uses: it can stretch or compress a sound to fit in a certain time, it can slow down instrumental music for easy transcription, or it can change the tempo of one musical passage to match rhythm and beats of another. The Change option lets you specify a relative change in percent. A value of 50 makes the selection play twice as slow. A value of 200 makes the selection play twice as fast. The Length option lets you specify a new length for the selection. Use this to make a sound fit a certain time, such as squeezing a 35 second commercial into a 30 second spot.
Time Warp
Figure: Time Warp
Three different time altering algorithms are provided, each with certain advantages and disadvantages.
Speed The Speed algorithm simply changes the sampling rate of the entire sound so that it plays back at a different speed, similar to spinning a vinyl record faster or slower. It works the same way as the speed fader in the Control window, but in this case, the sound itself is changed. This technique is very fast and produces excellent quality, however, the pitch of the sound is changed as well. In other words, if you were to speed up a voice, the pitch becomes higher, making the voice sound like a chipmunk.
Similarity The Similarity algorithm uses correlation to add and overlap small, similar sections of the sound. This technique preserves the pitch. It generally produces high quality voice and fair quality music when using small speed or time changes. A fair amount of time may be require for processing, depending on the Search range value. For voice, the Window size should be set between 20 and 30 and the Search range set to between 5 and 10. For music, a larger Window size and Search range gives better results, such as 60 and 25.
FFT The FFT algorithm uses Fourier transforms and interpolates or decimates the frequency analysis to change the length. This technique preserves the pitch, but can introduce some artifacts into the sound. Best quality is obtained by using the Oscillator synthesis option, but that requires significant processing time. The FFT size should be set from 11 to 12 and the Overlap should be at least 75, but can be set to 88, 90, or 95 for better quality. The FFT size and Overlap settings are explained under the Noise Reduction filter section.
Note
If you changed the speed fader in the Control window, remember to set it back to 1.00 so that the device plays at the correct speed.
Volume
The Volume submenu contains several volume related commands. Volumes are usually specified in decibels (dB) or by a percentage (%) of the sound's original amplitude. For more information about volumes, see Volume Scales in Appendix A. Unlike the volume fader in the Control window, which changes the device playback volume, these commands scale the sound's data to change the volume.
Change
This command modifies the selection so that it sounds louder or quieter. You need to enter the new relative volume. Values less than 0dB make the selection quieter. Values greater than 0dB make it louder. A value of 0dB leaves the volume unchanged.
If you are trying to make the volumes of several different songs sound the same, use Effect | Volume | Match instead.
Fade In
Fade In gradually increases the volume throughout the selection. You need to specify the initial volume. Normally to fade in from complete silence, you'd use the lowest possible value of −160dB.
The Logarithmic and Linear options control the shape of the fade. A Logarithmic fade will fade in more rapidly than a Linear fade.
To fade in the first 5 seconds of a sound from silence:
1. Select the first 5 seconds of the sound. 2. Choose Fade In from the Effect | Volume submenu. 3. Enter −160 for the Initial volume. 4. Choose OK.
Fade Out
Fade Out gradually decreases the volume throughout the selection. You need to specify the final volume. A value of −160dB fades to complete silence.
The Logarithmic and Linear options control the shape of the fade. A Logarithmic fade will fade out more rapidly than a Linear fade.
To completely fade out the last 5 seconds of a sound:
1. Select the last 5 seconds of the sound. 2. Choose Fade Out from the Effect | Volume submenu. 3. Enter −160 for the Final volume. 4. Choose OK.
Match
The Match effect makes the volumes of separate files seem similar. When creating a CD, you often find that each songs is recorded at a different volume level. This means you have to adjust the CD Player volume from one song to the next. By using the Match effect, you can adjust the volume levels of each song so they all have the same average level, eliminating the need to adjust the volume for each song later.
Volume changes are based on based on a root-mean-square average, with silent regions excluded. Files with similar average levels will seem to have similar overall volume levels.
Use this effect on each file to set the Average to the same value. Use the File | Batch Processing command to apply this effect to a group of files before burning them to a CD.
Note
If you want to match the left and right channel levels of a single file, use the Effect | Stereo | MaxMatch effect instead.
The average value to use depends on the files. You should open each file and display the Match effect to see what average value it has, then apply an overall average value to all the files. To avoid clipping distortion, it is best to use the minimum average across all files. For example, if one file has an average of -20dB and all the other files have a higher average, then use -20dB for all files.
Unlike the Maximize volume effect, the Match effect may result in clipping distortion if the average level is set too high. This effect should not be used with Maximize. Use one or the other, but not both (one cancels the other).
Maximize (Normalize)
Maximize searches the selection for the current peak volume level. It then displays the level and the position of the level within the file. You can then specify a new absolute maximum volume level. The volume of the entire selection is changed so that the maximum will match that value. A value of 0dB gives you full dynamic range. This is often referred to as "normalizing" the volume.
Some effects in GoldWave may cause the volume level to go above 0dB. After using many effects, you should use the Maximize effect before saving a file to ensure that the full dynamic range is not exceeded. Otherwise clipping may result in the saved file.
Note
Always use Maximize before saving a file to avoid clipping and make full use of the dynamic range.
Shape
Shape presents Shape Controls where the volume envelope of the selection can be defined. The shape line is initially horizontal at 1.0, representing normal volume. By bending or moving the line, you can dynamically change the volume over the selection. Adding a point below 1.0 decreases the volume. Adding a point above 1.0, in the red section, increases the volume. Note that increasing the volume may cause clipping distortion. Several preset shapes are included.
Example To use this effect to reduce the volume of background music before mixing in a voice recording or narration over the music:
1. Open the voice file and make note of its length. 2. Choose Copy from the Edit. 3. Open the music recording. 4. Choose Shape from the Effect | Volume submenu. 5. Select the "Fade for voice-over" preset.
6. Adjust the trough of the shape so that its time length is slightly larger than the length of the voice file and its position is located where you want to mix the voice file.
7. Choose OK. 8. Adjust the start marker to the position where you want to mix the voice
file (the beginning of the trough). 9. Choose Mix from the Edit. 10. Choose OK.
Playback Rate
The Playback Rate effect changes the playback rate of the entire sound. The sound plays faster (or slower) and its pitch is higher (or lower), similar to playing a vinyl record faster or slower. Essentially, this just changes the sampling rate value shown in the status bar.
Note
While the playback rate of the audio device is controlled with the speed fader in the Control window, this has no effect on the file's data. You must use the Playback Rate effect for the change to be savable.
Resample
The Resample effect changes the sampling rate of the entire sound. Unlike Playback Rate, this command re-calculates and interpolates all the data so that the pitch and playback time are not affected. Use this command to convert any sampling rate to the standard CD rate of 44100Hz or the standard telephony rate of 8000Hz.
Up-sampling and down-sampling filters are automatically applied as required.
Note
If you have a sound recorded at 44100Hz and do not need CD quality, you can save large amounts of disk space by resampling the sound to 22050Hz or 11025Hz. This reduces the size by 2 to 1 or 4 to 1.
View Menu Commands
Before reading this section, review the terms introduced in the Interface Overview and Editing Overview sections.
View commands allow you to see a more detailed graph of part of the sound. They are similar to zoom commands in the Windows Paint accessory. When you zoom in (or magnify) the sound, you see a smaller section, but with greater detail. When zoomed out, you see the entire sound, but with less detail. The Overview box near the bottom of each Sound window gives you some information about what section of the sound is currently shown in the view (see the Main Window figure).
When zoomed in to a part of the sound, a scroll bar appears at the bottom of the Sound window so you can move to different parts of the sound while still keeping the same level of magnification. The current level of magnification is displayed in the Main window's status bar next to the modified status. The magnification is given as two numbers separated by a colon. The first number is the number of pixels and the second number is the number of samples mapped to those pixels. For example, 1:1 means one sample is mapped to one pixel and for 51:1003, 1003 samples are mapped to 51 pixels.
Most view commands use the start marker's position as the starting location for magnification, so you should move the start marker to the position of interest first.
Note
Use the Options | Window command to set the initial zoom level when a file is opened.
All
The entire sound is graphed in the view. In other words, it zooms all the way out so that the entire sound is visible. You can move the start and finish markers to select any part of the sound.
Specify
This magnifies the graph to any level you specify. The level can be given as a time length or as a ratio. If the Length option is selected, then the length you specify is shown in the graph. For example, use 1:00 to show one minute of audio. If the Ratio option is selected, then the given number of samples are mapped to a single pixel on the screen. Values greater than 1 display an approximation of the waveform. Values less than 1 (such as 0.1) reveal individual samples and allow direct editing of the waveform.
The Start time specifies what position in the file to begin drawing the zoomed waveform. If the given level is not possible, the closest valid level is used.
Selection
The selection is magnified, increasing the detail of the graph. You can zoom in many times by changing the selection and magnifying it again until only a single sample is shown in the view.
Note
Click-and-drag the right mouse button over the waveform to zoom in without changing the selection.
View Selection
Figure: View Selection
Preset
A Preset button is provided in the tool bar so that you can quickly zoom to your favourite level. The sound is magnified to the level of detail specified under Options | Window. The level can be set to any value you find convenient.
Previous
This returns the view to the previous zoom level. Use this to switch back and forward between two different zoom levels.
Zoom In
Magnifies the sound by a factor of 1.33x. This gives 33% more detail, but shows 33% less sound. The middle of the view is used as the zoom center. This command complements Zoom Out.
Note
Click-and-drag the right mouse button over the waveform to zoom in on any part of the sound.
Zoom Out
Reduces magnification by a factor of 1.33x. This gives 33% less detail, but shows 33% more sound. The middle of the view is used as the zoom center. This command complements Zoom in.
Zoom 10:1
When the number to the left of the colon is greater than the number to the right, a very small section of sound is magnified at a high level of detail. At these levels, individual samples are easily visible and direct waveform editing with the mouse is possible.
Zoom 1:1
At a level of 1:1, each audio sample is represented as a single pixel on the screen. This reveals a true representation of the shape of the sound.
Zoom 1 Second, 10 Seconds, 1 Minute, 1 Hour
These show the given amount of time of audio beginning at the start marker's position. You can use View | Finish to see the audio at the end.
Vertical Zoom All
Vertically zooms all the way out so that the entire vertical amplitude range of the sound is shown.
Vertical Zoom In
Magnifies the graph vertically to show 1.33 times as much amplitude detail. Zooming is centered on the horizontal center of the view.
Vertical Zoom Out
Reduces vertical magnification to show 1.33 times less amplitude detail. This show a larger range of the amplitude. Zooming is centered on the horizontal center of the view.
Start and Finish
These commands scroll the view to either the start or finish marker's position. The view is centered over the marker's position provided its position and the level of magnification permit it to be centered. These commands are especially useful when you need to move a marker to a precise position. For example, you can zoom in 1:1 and move the start marker to an exact position and then use View | Finish to set the finish marker's position.
Tool Menu Commands
GoldWave includes several tools for working with audio files. These are described in the following sections.
CD Reader
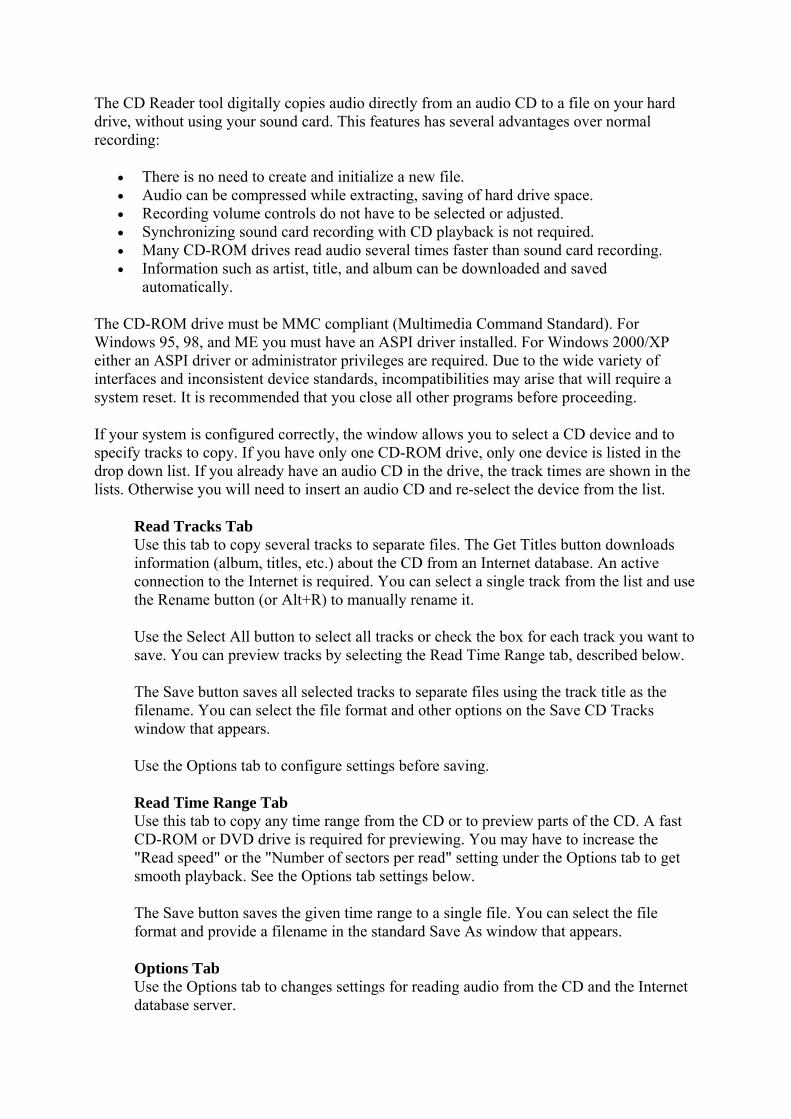
The CD Reader tool digitally copies audio directly from an audio CD to a file on your hard drive, without using your sound card. This features has several advantages over normal recording:
• There is no need to create and initialize a new file. • Audio can be compressed while extracting, saving of hard drive space. • Recording volume controls do not have to be selected or adjusted. • Synchronizing sound card recording with CD playback is not required. • Many CD-ROM drives read audio several times faster than sound card recording. • Information such as artist, title, and album can be downloaded and saved
automatically.
The CD-ROM drive must be MMC compliant (Multimedia Command Standard). For Windows 95, 98, and ME you must have an ASPI driver installed. For Windows 2000/XP either an ASPI driver or administrator privileges are required. Due to the wide variety of interfaces and inconsistent device standards, incompatibilities may arise that will require a system reset. It is recommended that you close all other programs before proceeding.
If your system is configured correctly, the window allows you to select a CD device and to specify tracks to copy. If you have only one CD-ROM drive, only one device is listed in the drop down list. If you already have an audio CD in the drive, the track times are shown in the lists. Otherwise you will need to insert an audio CD and re-select the device from the list.
Read Tracks Tab Use this tab to copy several tracks to separate files. The Get Titles button downloads information (album, titles, etc.) about the CD from an Internet database. An active connection to the Internet is required. You can select a single track from the list and use the Rename button (or Alt+R) to manually rename it.
Use the Select All button to select all tracks or check the box for each track you want to save. You can preview tracks by selecting the Read Time Range tab, described below.
The Save button saves all selected tracks to separate files using the track title as the filename. You can select the file format and other options on the Save CD Tracks window that appears.
Use the Options tab to configure settings before saving.
Read Time Range Tab Use this tab to copy any time range from the CD or to preview parts of the CD. A fast CD-ROM or DVD drive is required for previewing. You may have to increase the "Read speed" or the "Number of sectors per read" setting under the Options tab to get smooth playback. See the Options tab settings below.
The Save button saves the given time range to a single file. You can select the file format and provide a filename in the standard Save As window that appears.
Options Tab Use the Options tab to changes settings for reading audio from the CD and the Internet database server.
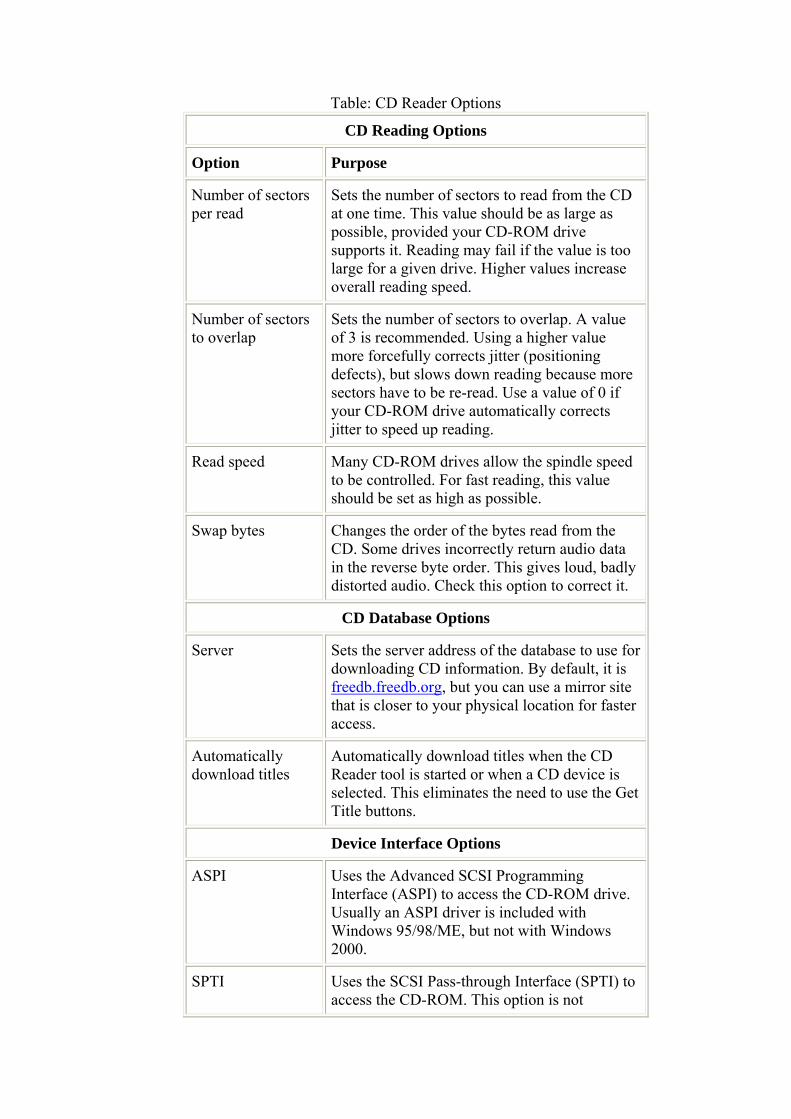
Table: CD Reader Options
CD Reading Options
Option Purpose
Number of sectors per read
Sets the number of sectors to read from the CD at one time. This value should be as large as possible, provided your CD-ROM drive supports it. Reading may fail if the value is too large for a given drive. Higher values increase overall reading speed.
Number of sectors to overlap
Sets the number of sectors to overlap. A value of 3 is recommended. Using a higher value more forcefully corrects jitter (positioning defects), but slows down reading because more sectors have to be re-read. Use a value of 0 if your CD-ROM drive automatically corrects jitter to speed up reading.
Read speed Many CD-ROM drives allow the spindle speed to be controlled. For fast reading, this value should be set as high as possible.
Swap bytes Changes the order of the bytes read from the CD. Some drives incorrectly return audio data in the reverse byte order. This gives loud, badly distorted audio. Check this option to correct it.
CD Database Options
Server Sets the server address of the database to use for downloading CD information. By default, it is freedb.freedb.org, but you can use a mirror site that is closer to your physical location for faster access.
Automatically download titles
Automatically download titles when the CD Reader tool is started or when a CD device is selected. This eliminates the need to use the Get Title buttons.
Device Interface Options
ASPI Uses the Advanced SCSI Programming Interface (ASPI) to access the CD-ROM drive. Usually an ASPI driver is included with Windows 95/98/ME, but not with Windows 2000.
SPTI Uses the SCSI Pass-through Interface (SPTI) to access the CD-ROM. This option is not

available in Windows 95/98/ME. On Windows 2000/XP, Administrator privileges on the drive are required for this to work correctly.
Troubleshooting
• If you get synchronization errors at the beginning, try continuing several times before giving up. Some drives are very inaccurate when spinning up and may require many continues before synchronization can be reliably established. If that does not help, set the "Number of sectors to overlap" value to zero on the Options tab and try again.
• If you see an error message indicating a read problem, make sure that the CD is free of dust and finger prints. If the CD contains a data track, try using the Read Time Range tab instead with a slightly increased From time and a slightly decreased To time to avoid accessing the data track.
• If preview playback is intermittent, increase the "Read speed" and the "Number of sectors per read" or reduce the "Number of sectors to overlap" under the Options tab.
Control
Use this command to show or hide the Control window. See the Control Overview section for more information.
Cue Points
Cue points mark and describe specific positions within sounds. They have numerous uses. When recording speech, for example, you can use them to hold information about the speaker or a translation of what the speaker said. For music, you can store lyrics for each verse. If you design instrument samples, cue points can hold looping points. Some multimedia applications use them to play or loop specific sections of a sound. When transferring albums to CDs, cue points can mark track division points, which can be used later to divide a large file into individual songs or tracks.
Cue points are shown as inverted triangles in the cue point slot of a Sound window (just above the time axis). They are set by using this command, by right-clicking on the cue point slot in Sound windows, or by using the Edit | Cue Point submenu.
Warning
Cue points are saved only in certain files types.
Warning
Cue point are adjusted automatically when a file is edited, but not when effects are applied. Any effects that alters the length of the selection, such as Time Warp or Silence Reduction, will cause the cue points within the selection to be misplaced.
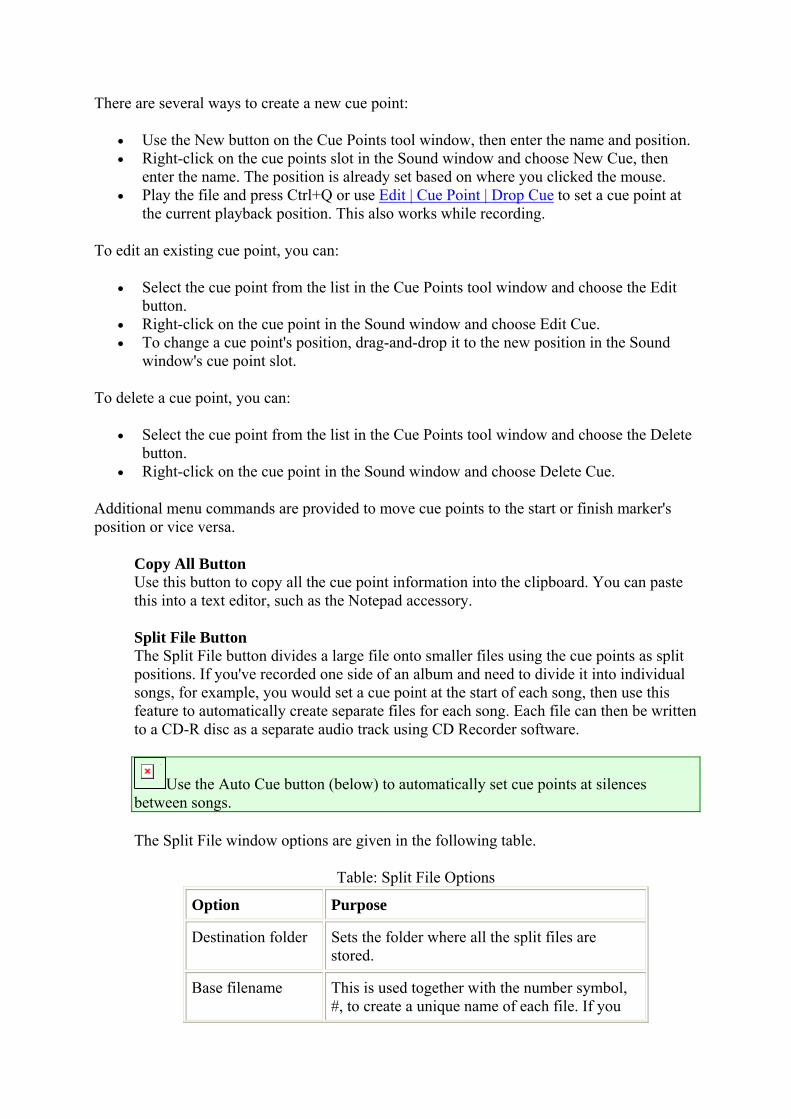
There are several ways to create a new cue point:
• Use the New button on the Cue Points tool window, then enter the name and position. • Right-click on the cue points slot in the Sound window and choose New Cue, then
enter the name. The position is already set based on where you clicked the mouse. • Play the file and press Ctrl+Q or use Edit | Cue Point | Drop Cue to set a cue point at
the current playback position. This also works while recording.
To edit an existing cue point, you can:
• Select the cue point from the list in the Cue Points tool window and choose the Edit button.
• Right-click on the cue point in the Sound window and choose Edit Cue. • To change a cue point's position, drag-and-drop it to the new position in the Sound
window's cue point slot.
To delete a cue point, you can:
• Select the cue point from the list in the Cue Points tool window and choose the Delete button.
• Right-click on the cue point in the Sound window and choose Delete Cue.
Additional menu commands are provided to move cue points to the start or finish marker's position or vice versa.
Copy All Button Use this button to copy all the cue point information into the clipboard. You can paste this into a text editor, such as the Notepad accessory.
Split File Button The Split File button divides a large file onto smaller files using the cue points as split positions. If you've recorded one side of an album and need to divide it into individual songs, for example, you would set a cue point at the start of each song, then use this feature to automatically create separate files for each song. Each file can then be written to a CD-R disc as a separate audio track using CD Recorder software.
Note
Use the Auto Cue button (below) to automatically set cue points at silences between songs.
The Split File window options are given in the following table.
Table: Split File Options
Option Purpose
Destination folder Sets the folder where all the split files are stored.
Base filename This is used together with the number symbol, #, to create a unique name of each file. If you
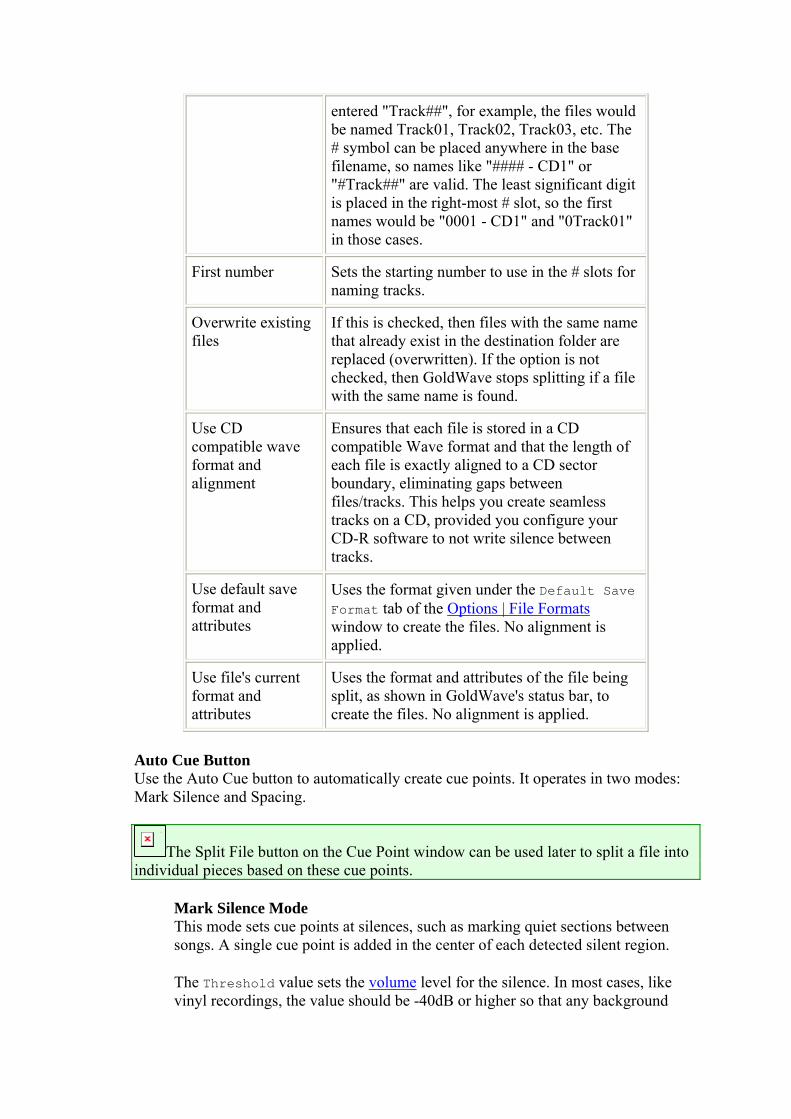
entered "Track##", for example, the files would be named Track01, Track02, Track03, etc. The # symbol can be placed anywhere in the base filename, so names like "#### - CD1" or "#Track##" are valid. The least significant digit is placed in the right-most # slot, so the first names would be "0001 - CD1" and "0Track01" in those cases.
First number Sets the starting number to use in the # slots for naming tracks.
Overwrite existing files
If this is checked, then files with the same name that already exist in the destination folder are replaced (overwritten). If the option is not checked, then GoldWave stops splitting if a file with the same name is found.
Use CD compatible wave format and alignment
Ensures that each file is stored in a CD compatible Wave format and that the length of each file is exactly aligned to a CD sector boundary, eliminating gaps between files/tracks. This helps you create seamless tracks on a CD, provided you configure your CD-R software to not write silence between tracks.
Use default save format and attributes
Uses the format given under the Default Save Format tab of the Options | File Formats window to create the files. No alignment is applied.
Use file's current format and attributes
Uses the format and attributes of the file being split, as shown in GoldWave's status bar, to create the files. No alignment is applied.
Auto Cue Button Use the Auto Cue button to automatically create cue points. It operates in two modes: Mark Silence and Spacing.
Note
The Split File button on the Cue Point window can be used later to split a file into individual pieces based on these cue points.
Mark Silence Mode This mode sets cue points at silences, such as marking quiet sections between songs. A single cue point is added in the center of each detected silent region.
The Threshold value sets the volume level for the silence. In most cases, like vinyl recordings, the value should be -40dB or higher so that any background
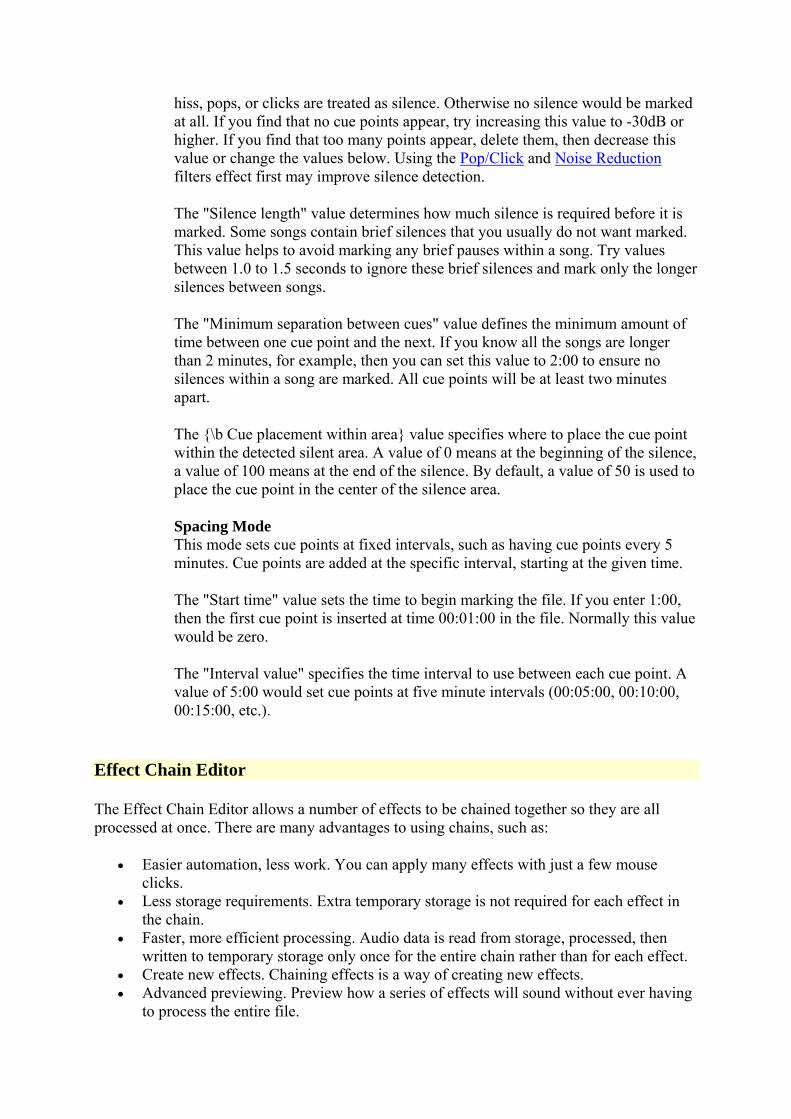
hiss, pops, or clicks are treated as silence. Otherwise no silence would be marked at all. If you find that no cue points appear, try increasing this value to -30dB or higher. If you find that too many points appear, delete them, then decrease this value or change the values below. Using the Pop/Click and Noise Reduction filters effect first may improve silence detection.
The "Silence length" value determines how much silence is required before it is marked. Some songs contain brief silences that you usually do not want marked. This value helps to avoid marking any brief pauses within a song. Try values between 1.0 to 1.5 seconds to ignore these brief silences and mark only the longer silences between songs.
The "Minimum separation between cues" value defines the minimum amount of time between one cue point and the next. If you know all the songs are longer than 2 minutes, for example, then you can set this value to 2:00 to ensure no silences within a song are marked. All cue points will be at least two minutes apart.
The {\b Cue placement within area} value specifies where to place the cue point within the detected silent area. A value of 0 means at the beginning of the silence, a value of 100 means at the end of the silence. By default, a value of 50 is used to place the cue point in the center of the silence area.
Spacing Mode This mode sets cue points at fixed intervals, such as having cue points every 5 minutes. Cue points are added at the specific interval, starting at the given time.
The "Start time" value sets the time to begin marking the file. If you enter 1:00, then the first cue point is inserted at time 00:01:00 in the file. Normally this value would be zero.
The "Interval value" specifies the time interval to use between each cue point. A value of 5:00 would set cue points at five minute intervals (00:05:00, 00:10:00, 00:15:00, etc.).
Effect Chain Editor
The Effect Chain Editor allows a number of effects to be chained together so they are all processed at once. There are many advantages to using chains, such as:
• Easier automation, less work. You can apply many effects with just a few mouse clicks.
• Less storage requirements. Extra temporary storage is not required for each effect in the chain.
• Faster, more efficient processing. Audio data is read from storage, processed, then written to temporary storage only once for the entire chain rather than for each effect.
• Create new effects. Chaining effects is a way of creating new effects. • Advanced previewing. Preview how a series of effects will sound without ever having
to process the entire file.
The left window is a tree list showing all the effect plug-in modules, with the GoldWave branch expanded initially. Only effects that can be chained are listed. Effects requiring special access to the audio data (like scans) or ones that are time based cannot be chained.
You can drag-and-drop effects to the right "chain list" window or select an effect and choose the Add button. Effects are always added to the end of the chain list. Expand the branch of other listed modules to use effects in those plug-ins.
Use the Remove Last button to remove an effect from the chain list. Note that only the last effect in the list can be removed. An effect in the middle of the list cannot be removed unless all effects below it are removed first. Use the Remove All button to remove all effects in the chain list.
When an effect is added to the chain list, it appears as a button. Use the button to change settings for that effect. Settings can be changed while previewing the audio.
When you have finished creating the chain, use the Presets controls near the bottom of the Effect Chain Editor window to save the entire chain as a single preset.
Expression Evaluator
The Expression Evaluator is a general purpose tool for manipulating and generating audio data. For a detailed explanation, see Appendix C.
Options Menu Commands
These command configure and customize GoldWave.
Colour
Use this command to change the colour scheme of Sound windows. A preview window shows the Sound's current colour scheme. Use the Item drop down list and the Colour button to change the colours or select a different scheme from the preset Schemes drop down list. You can click the mouse in the preview window to select an item you want to customize.
Control Properties
Displays the Control Properties window.
File Formats
Use File Format Options to:
• Associate a filename extension (such as .snd or .vox) with an audio type and attributes. • Change the precedence or enable and disable File Format Plug-ins used by GoldWave. • Set a default format for saving files.
These options are contained under separate tabs.
Undetectable Types Tab Use this feature to associate a filename extension with an audio type and specific attributes. This is useful for automatically opening files that do not contain any information describing their format (raw files). For example, if you work with Dialogic telephony files, you can associate the .vox extension with a specific plug-in type. In this case, you'd use the Dialogic type, usually with "ADPCM 4-bit, 8000Hz, 32 kbps, mono" attributes. Whenever you open a .vox file, GoldWave will assume that format without asking you to specify it each time. This must be done prior to using File | Batch Processing when working with raw files.
The list shows all current associations, if any. Use the Add button to create a new association. Use the Edit button to modify an existing association. Use the Remove button to remove an old association.
Example To associate .vox with Dialogic ADPCM decoding:
1. Choose File Formats from the Options menu. 2. Choose the Undetectable Types tab. 3. Choose the Add button. 4. Enter "vox" in the Extension box. Do not enter a leading period. 5. Select "Dialogic (vox)" from the File type drop down list. 6. Select "ADPCM 4-bit, 8000 Hz, 32 kbps, mono" from the Attributes
drop down list. 7. Choose the OK button.
See Appendix A for additional information about file attributes.
File Plug-in Precedence Tab Use this feature to change the order that audio files are passed to plug-ins for opening, or to enable and disable plug-ins. By default all plug-ins found in the File plug-in folder are listed and enabled, with the built-in GoldWave plug-in listed first.
Select an item in the list and use the Lower and Higher buttons to change the order. The plug-in at the top of the list is the first one to be given the opportunity to open a file, if it recognizes the format. Otherwise, the file is passed to the next plug-in and so on until the file can be opened or no plug-ins are left. See File Format Plug-ins for more information. Check or uncheck an item to enable or disable that plug-in module.
Default Save Format Tab Use this feature to set a default save format for new files when using the File | Save command. The same format can be used for all saving related commands (Save As, Save Selection As, etc.) as well if you check the "Use this format for..." box. Use the "Save as type" drop down list to select the type first, then use the Attributes drop down
list to select specific attributes. Whenever you create and save a file, this format will be selected by default.
Plug-in
Presents a menu for configuring plug-ins, if any. Plug-ins may be created by different developers. Consult the documentation included with the plug-in for more information. GoldWave Inc. does not provide technical support for plug-ins developed by other companies or individuals.
DirectX Audio Plug-in Configuration
Shows a list of compatible DirectX Audio Plug-ins currently installed on your system. Use this configuration to control what plug-ins GoldWave lists under the Effect | Plug-in | DirectX menu and to associate a different icon with a plug-in. Check the box next to an item in the Plug-in list to add it to the menu. Uncheck the box to remove it from the menu. Select an item, then choose an icon from the Icon list to associate that icon with the item. Note that GoldWave must be restarted before changes are acknowledged.
Note
GoldWave requires plug-ins that process in 32-bit IEEE floating point audio (WAVE_FORMAT_IEEE_FLOAT) format. It will not list plug-ins that process in 16-bit PCM audio format only.
Warning
If you are unable to get a particular DirectX Audio Plug-in working, please contact the plug-in developer, not GoldWave Inc.
Storage
The Storage Options window configures folders, file storage, and undo levels. See the Storage Overview section for additional information.
Sound Folder This specifies the folder to use when you start GoldWave. The File | Open command lists files in this folder whenever you start GoldWave. You can make GoldWave remember the last folder used or always start in the given folder. Use the folder button to browse for a folder.
Temporary Storage This controls how GoldWave stores audio, as explained in the Storage Overview section. When using hard drive storage, you need to specify the folder to use when creating temporary files. This folder should be located on a large, local hard drive with plenty of free space. Changing this folder does not affect opened files already in temporary storage. Use RAM storage only when working with small files for faster, efficient editing.
Undo Levels This sets the number of edits/changes you can undo. A value of 5 means you can undo the five most recent changes performed on the file. A value of 0 means that you cannot undo any changes. Larger values use much more storage to store the previous audio data. When using the RAM storage option, this should be set to a small value. Otherwise RAM may be depleted quickly and system performance will degrade.
Tool Bar
The Tool Bar Options let you customize GoldWave's tool bars. The top tool bar contains main menu commands, while the lower tool bar contains only effect commands. Select an item and use the Add and Remove buttons or drag-and-drop items between the Available and Current lists to control the layout of the tool bars. The order which items appear in the Current list is the same as the order they will appear on the tool bar. You can drag-and-drop items within the Current list to rearrange them.
Use the Visible checkbox to show or hide the entire tool bar. Use the Gray-scale checkbox to convert the coloured images to blank-and-white. Use the Captions checkbox to display text within the Main tool bar buttons. Use the "Tool bar images in menu" checkbox to display images in GoldWave's main menu. Do not check this option if screen reader accessibility is required.
You can drag-and-drop the tool bars themselves within GoldWave's Main window to change their locations. Click-and-hold on the double vertical bumps near the left edge of the tool bar to drag it.
Tool Bar Options
Figure: Tool Bar Options

Window
Use Window Options to configure the positions of the Main and Sound windows, set axis options, specify preset and initial zoom values, and set miscellaneous options.
Main Window Size This controls the Main window's position and size when GoldWave is started. Normal gives control to Windows. Maximize makes the Main window occupy the entire screen. Save position saves the Main window's position and size when GoldWave is closed so that it will appear in the same location next time.
Sound Window Size This controls the position and size of Sound windows. Normal gives control to Windows, which usually results in cascaded windows. Maximize makes a Sound window occupy the entire Main window. Auto-tile resizes all Sound windows whenever a new sound is opened or closed so that every one is visible. Arrangement is the same as the Window | Tile Horizontally command.
Y Amplitude Axis Numbering Displays or sets the units of the vertical axis in Sound windows. Selecting Off hides the axis completely. Normalized shows an axis with a range of -1.0 to 1.0. Signed 16-bit shows an axis ranging from -32768 to 32767, which is the range of a 16-bit sample. Unsigned 8-bit shows an axis with a range of 0 to 255.
X Time Axis Numbering Sets the format for displaying the horizontal time axis near the bottom of Sound windows. "Hours : minutes : seconds" gives the time as three sets of numbers separated by colons, such as 12:23:56. "Minutes : seconds" gives the time as two sets of numbers separated by colons, such as 1234:56. Seconds gives the time as a floating point number, such as 1234.56.
Zoom The Preset zoom value is used to for the View | Preset command. See View | Specify for more information about zoom values. The Initial zoom specifies the zoom level to use when a file is opened. If you choose All, then the entire waveform is shown using whatever zoom level is required.
Miscellaneous If the "Always confirm before saving" option is checked, you are asked to confirm saving whenever you use the File | Save command.
If the "Draw overview graph" option is checked, then the overview is graphed based on audio from the file. Otherwise it is drawn as simple lines, which is quicker since the entire file does not have to be scanned.
If the "Use left and right mouse button selection method" option is checked, then the start marker is set by using the left mouse button and the finish marker is set by using the right mouse button. No context menu appears. You will not be able to use the new right-click-and-drag features. This is the way older versions of GoldWave worked.
If the "Update default effect settings after each use" options is checked, then the last settings you use for an effect will be used the next time the effect window is shown. Essentially the "Default" preset is automatically updated when you choose the OK button on an effect window.
Window Menu Commands
These commands organize Sound windows and the Control window. See Interface Overview for additional information.
Cascade, Tile, Minimize, Arrange
Cascade layers Sound windows on top of each other so that their title bars are visible. Tile Horizontally arranges Sound windows above and below each other (or side by side if necessary) so that all windows are visible. Tile Vertically arranges Sound windows side by side (or above and below each other if necessary) so that all windows are visible. Minimize All minimizes all Sound windows so only a small title bar is shown. Arrange All arranges minimized Sound window in rows on the bottom of the Main window.
Classic, Horizontal, Vertical Control
Classic Control places the Control window in the bottom right corner of the screen and arranges the controls and visuals in a square layout similar to previous versions of GoldWave. The Control window can be resized in any direction. Horizontal Control places the Control window along the bottom of the Main window and arranges the controls and visuals horizontally. Makes the visuals small. The Control window cannot be resized vertically in this mode. Vertical Control places the Control window along the right side of the Main window and arranges the controls and visuals vertically. Makes the visuals large. The Control window can be resized in any direction.
Window List
A list of all currently opened Sound windows is given at the bottom of the Window menu.
Help Menu Commands
Contents
Starts Window's Help and gives a list of contents for GoldWave help.
Manual
Starts the default web browser to display the GoldWave manual (this file).
About
Displays GoldWave version and registration information.
IV. General Information
Warranty, Trademarks, and Copyright
GoldWave ("the package") includes the following software and documentation:
GoldWave.exe GoldWave application file GoldWave.hlp GoldWave help GoldWave.htm GoldWave manual text Images (*.PNG) All images associated with this manual GWPreset.reg Presets and shapes ReadMe.txt Important information WhatsNew.txt Revision history DirectX.pig DirectX Audio plug-in wrapper FLACFile.pig FLAC file plug-in OggFile.pig Ogg Vorbis file plug-in WMAFile.pig Windows Media Audio file plug-in
The package is provided as is, without warranty of any kind. GoldWave Inc. shall not be liable for damages of any kind. Use of this software indicates you agree to this.
The package and this documentation are copyright © 2003 by GoldWave Inc. All rights reserved. This document and associated images may not be shown on a public website.
GoldWave is a trademark of GoldWave Inc.
Matlab is a trademark of The Math Works Incorporated.
Windows & Microsoft are registered trademarks of Microsoft Corporation.
Sound Blaster is a trademark of Creative Labs Incorporated.
All other trademarks/registered names acknowledged.
Support and Updates
The latest information and updates can be found on the GoldWave website:
http://www.goldwave.com
If you encounter any problems, please check the following information:
• Appendix E: Troubleshooting and Q&A • The GoldWave website under Frequently Asked Questions
If a problem still cannot be resolved, please send a detailed description to the address below.
Questions, comments, and suggestions are welcome. You can find contact information here:
http://www.goldwave.com/contact.html
Postal Address GoldWave Inc. P.O. Box 51 St. John's, NF CANADA A1C 5H5
Appendix A: An Introduction to Digital Audio
Digital Audio Basics
In the digital world, everything is reduced to an on or off state so that it can be stored in computer memory as a single bit of information: 1 or 0. Complex real world things, like images and audio, cannot be directly represented in such a simple manner. An image is rarely composed of black and white dots and audio is rarely just on or off.
Reducing images and audio to a digital state requires an analog-to-digital conversion. Instead of using just one bit of information, many bits are used to more accurately store the state. By using 2 bits, for example, four states are possible: 00, 01, 10, 11. For images, that could be black (00), dark gray (01), light gray (10), and white (11). For audio, that would give four different levels of loudness. Typically, many more bits are used. Most computer video cards use 16 to 32 bits to store a single dot. Sound cards typically use 16 bits for audio levels.
The number of bits to use depends on human perception and bit alignment within computers. Computer tend to bundle bits in groups of 8, called bytes, so using 8, 16, 24, or 32 bits would fit nicely in 1, 2, 3, or 4 bytes respectively. For images, 16 bits do not provide enough states to make the transition from one state to the next imperceptible, so 24 or more bits are used. For audio, 16 bits are adequate, which is what a CD contains, but audio systems using 24 bits will be common in the future.
Samples
Digital audio is composed of thousands of numbers, called samples. Each sample holds the state, or amplitude (loudness), of a sound at a given instant in time. For images, each point of light, or pixel, has a certain brightness and location and all pixels combine to make a picture (see figure below). For digital audio, all the samples combine to make a waveform of the sound.
Samples
Figure: Samples
When playing audio, each sample specifies the position of the speaker at a certain time. A small number moves the speaker in and a large number moves the speaker out. This movement occurs thousands of times per second, causing vibration, which we hear as sound.
Digital Audio Attributes
There are several attributes that determine the quality and size of a digital audio file. They are the sampling rate, the bit depth, the number of channels, and the bitrate.
Sampling Rate
The sampling rate is the number of times, per second, that the amplitude level (or state) is captured. It is measured in Hertz (seconds-1, Hz). A high sampling rate results in high quality digital sound in the same way that high resolution video shows better picture quality. Compact disks, for example, use a sampling rate of 44100Hz, whereas telephone systems use a rate of only 8000Hz. If you've ever heard music on the telephone while on hold, you'll notice a big difference in quality when compared to the original music played on a CD player.
Higher sampling rates capture a wider range of frequencies and maintain a smoother waveform. The figure below shows a real world waveform in red and the digital waveform in black at different sampling rates. You can see that increasing the sampling rate makes each step of the digital waveform narrower. The shape more closely follows the real world. In general, the height of each step is reduced as well, but that depends on the number of bits. In simple terms, the sampling rate controls the width of each step.
Sampling Rate
Figure: Sampling Rate
The rate to use depends upon the type of sound and the amount of storage space available. Higher rates consume a lot of space. In the above example, the CD requires over 5 times the amount of storage as the telephone system for the same digital sound. Certain types of sounds can be recorded at lower rates without loss of quality. Some standard rates are listed in the table.
Table: Standard Sampling Rates
Attributes Quality and Usage
Storage (16-bit/mono, MB/minute)
8000Hz Low quality. Used for telephone systems. Good for speech. Not recommended for music.
0.960
11025Hz Fair quality. Good for speech and AM radio recordings.
1.323
22050Hz Medium quality. Good for TV and FM radio quality music.
2.646
44100Hz High quality. Used for audio CDs. 5.292
48000Hz High quality. Used for digital audio tapes (DAT).
5.760
96000Hz Very high quality. Used for DVD audio. 11.520
Bits
As explained in the Digital Audio Basics secton, the number of bits determines how accurately the amplitude of the waveform is captured. The figure below shows a real world waveform in red and the corresponding digital waveforms with 2 bit samples and 3 bit samples.
Bits
Figure: Bits
You can see that adding a single bit greatly improves the way the digital waveform conforms to the real world waveform. The 2 bit waveform looks like a rough approximation with large steps. Several amplitudes are rounded to the same state, such as samples 9 through 10. This is a source of quantization noise, explained later.
In the 3 bit waveform, no amplitudes are rounded to the same state. Each step is half the height of the 2 bit waveform, but it is still not perfect. From sample 1 to sample 2, there is a jump in the waveform, which also causes quantization noise to a much lesser extent. You'll notice that samples 0 and 1 are below the real waveform and samples 2 and 3 are above the waveform. This occurs because there are no in-between states to accurately store those amplitude levels, so the digital waveform ends up straddling the real one. Therefore more states, and bits, are needed.
8 bit and 16 bit samples are common. In an 8 bit sample, there are 256 different states or levels of amplitude. 16 bit samples have 65,536 levels. This makes a huge difference it terms of sound quality. Audio stored as 8 bit samples will often have much more quantization noise.
Signed and Unsigned
Samples can be stored as bits a couple of different ways. One way is to consider all the states as positive, with no values below zero. As shown in the figure above, the states 00, 01, 10, and 11 are the same as the positive numbers 0, 1, 2 and 3. This eliminates the need for a negative sign. Such samples are called unsigned. For 8 bit samples, the states would range from 0 to 255.
The other way is to use a form known as two's complement, which allows both positive and negative values. These samples are called signed. Since real world waveforms tend to fluctuate through a range of positive and negative values, signed samples are preferred. For 16 bit samples, the states would range from -32678 to 32767.
Big and Little Endian
When a sample is stored using more than 8 bits, more than one byte is needed. The term endian is used to describe the way bytes are ordered in computer memory. It specifies the significance of the first byte in the group. A 16 bit sample, for example, requires exactly two bytes, byte A and byte B. They can be stored as A first, then B or as B first, then A. Generally a PC will store them one way and a Mac will store them the other way due to differences in the internal processor design of those systems.
Big endian order has the most significant byte stored first, making it similar to the way we read numbers. In the number 47, the 4 is first and is most significant and the 7 is last and is least significant. This ordering is used on Mac systems.
Little endian order has the least significant byte stored first, allowing some optimizations in processing. This ordering is used on Intel and PC systems.
Channels
Digital audio can have one or more channels. Single channel audio, referred to as a monaural (or mono) audio, contains information for only one speaker and is similar to AM radio. Two channel audio, or stereo audio, contains data for two speakers or two ears, much like FM
stereo. Stereo sounds can add depth, but they require twice as much storage and processing time as mono sounds. Most movie theatres have advanced audio systems with 4 or more channels, which are capable of making sounds appear to come from certain directions. GoldWave currently supports mono and stereo audio only.
Digital Audio Limitations
Since digital audio is limited by the sampling rate, the number of bits, and the number of channels, a digital waveform can never be an exact replica of the real world waveform. These limitations can lead to a number of problems, such as aliasing, clipping, and quantization noise.
Aliasing
Aliasing occurs when the sampling rate is not high enough to correctly capture the shape of the sound wave. The recorded sound will have missing tones (Figure: Aliasing, top) or new tones that never existed in the original sound (Figure: Aliasing, bottom). These problem can be eliminated by using higher sampling rates or by using anti-aliasing filters.
Aliasing
Figure: Aliasing
Higher sampling rates increase the number of sampling points. To see how this works, try adding a three points between each sampling point in the figure and redraw the graph. The recorded sound will more closely resemble the input.
Anti-aliasing filters remove all tones that cannot be sampled correctly. They prevent high pitched tones from being aliased to low pitch. Many sound cards include anti-aliasing filters in hardware.
Clipping
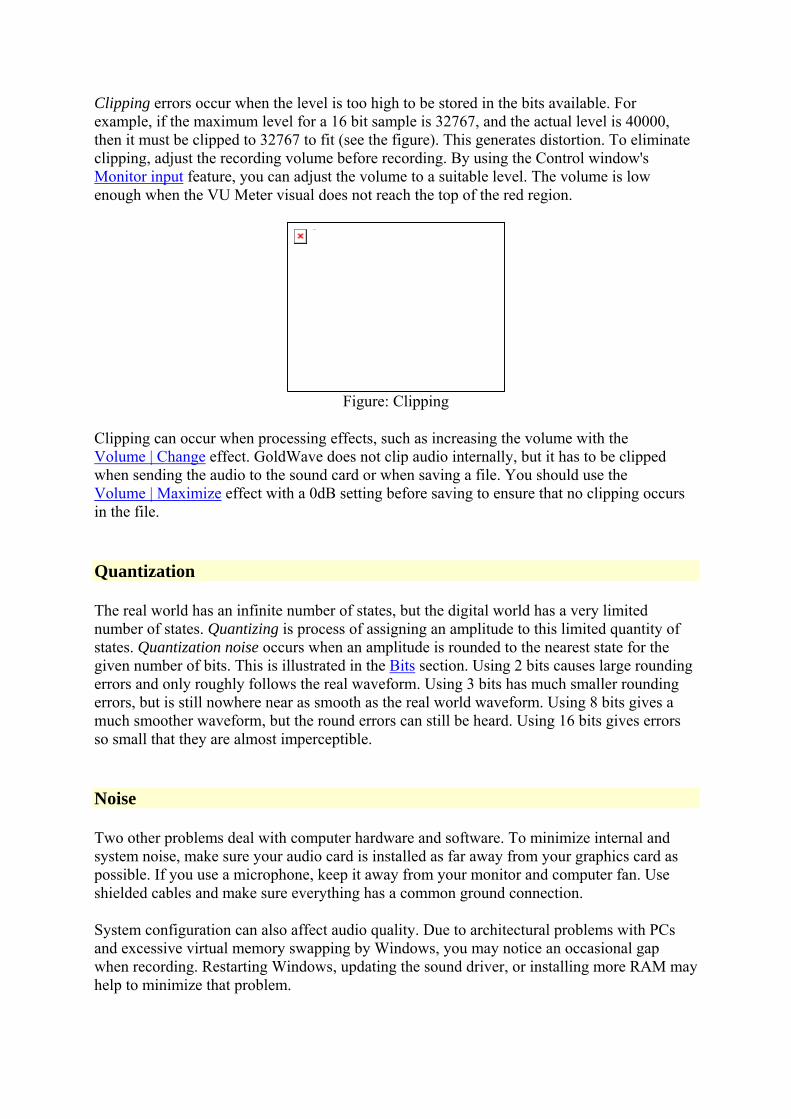
Clipping errors occur when the level is too high to be stored in the bits available. For example, if the maximum level for a 16 bit sample is 32767, and the actual level is 40000, then it must be clipped to 32767 to fit (see the figure). This generates distortion. To eliminate clipping, adjust the recording volume before recording. By using the Control window's Monitor input feature, you can adjust the volume to a suitable level. The volume is low enough when the VU Meter visual does not reach the top of the red region.
Clipping
Figure: Clipping
Clipping can occur when processing effects, such as increasing the volume with the Volume | Change effect. GoldWave does not clip audio internally, but it has to be clipped when sending the audio to the sound card or when saving a file. You should use the Volume | Maximize effect with a 0dB setting before saving to ensure that no clipping occurs in the file.
Quantization
The real world has an infinite number of states, but the digital world has a very limited number of states. Quantizing is process of assigning an amplitude to this limited quantity of states. Quantization noise occurs when an amplitude is rounded to the nearest state for the given number of bits. This is illustrated in the Bits section. Using 2 bits causes large rounding errors and only roughly follows the real waveform. Using 3 bits has much smaller rounding errors, but is still nowhere near as smooth as the real world waveform. Using 8 bits gives a much smoother waveform, but the round errors can still be heard. Using 16 bits gives errors so small that they are almost imperceptible.
Noise
Two other problems deal with computer hardware and software. To minimize internal and system noise, make sure your audio card is installed as far away from your graphics card as possible. If you use a microphone, keep it away from your monitor and computer fan. Use shielded cables and make sure everything has a common ground connection.
System configuration can also affect audio quality. Due to architectural problems with PCs and excessive virtual memory swapping by Windows, you may notice an occasional gap when recording. Restarting Windows, updating the sound driver, or installing more RAM may help to minimize that problem.
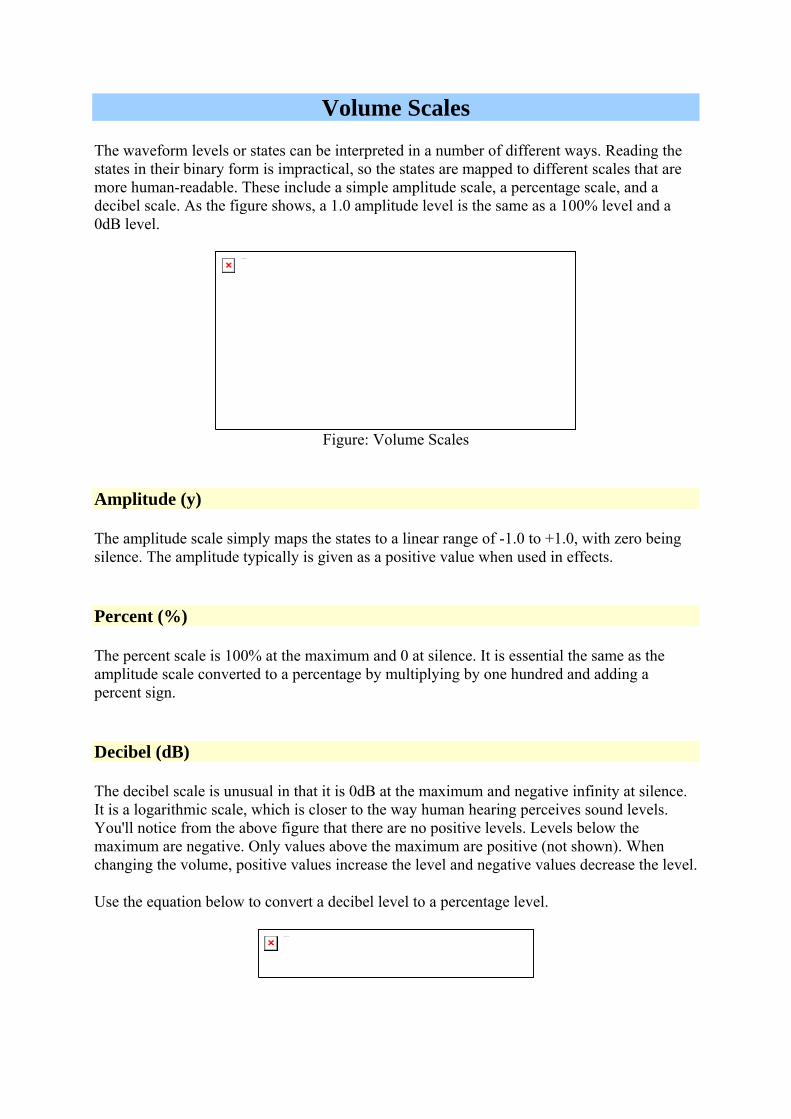
Volume Scales
The waveform levels or states can be interpreted in a number of different ways. Reading the states in their binary form is impractical, so the states are mapped to different scales that are more human-readable. These include a simple amplitude scale, a percentage scale, and a decibel scale. As the figure shows, a 1.0 amplitude level is the same as a 100% level and a 0dB level.
Volume Scales
Figure: Volume Scales
Amplitude (y)
The amplitude scale simply maps the states to a linear range of -1.0 to +1.0, with zero being silence. The amplitude typically is given as a positive value when used in effects.
Percent (%)
The percent scale is 100% at the maximum and 0 at silence. It is essential the same as the amplitude scale converted to a percentage by multiplying by one hundred and adding a percent sign.
Decibel (dB)
The decibel scale is unusual in that it is 0dB at the maximum and negative infinity at silence. It is a logarithmic scale, which is closer to the way human hearing perceives sound levels. You'll notice from the above figure that there are no positive levels. Levels below the maximum are negative. Only values above the maximum are positive (not shown). When changing the volume, positive values increase the level and negative values decrease the level.
Use the equation below to convert a decibel level to a percentage level.
Decibel Equation
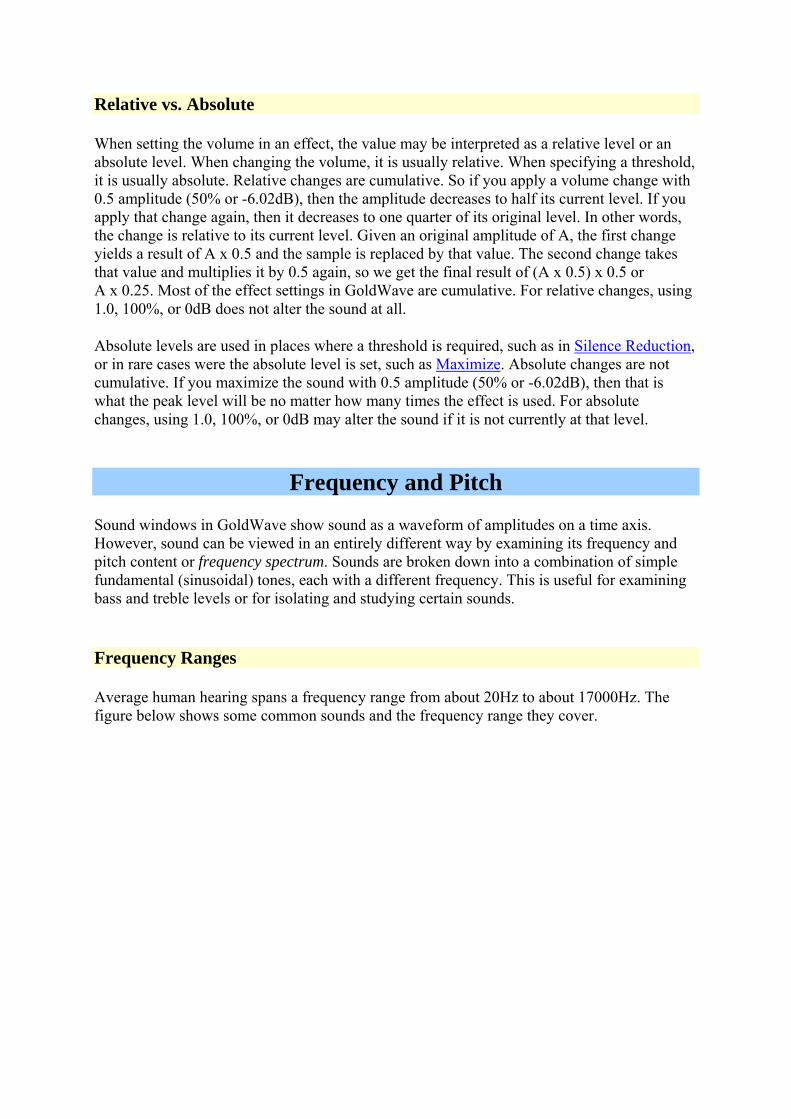
Relative vs. Absolute
When setting the volume in an effect, the value may be interpreted as a relative level or an absolute level. When changing the volume, it is usually relative. When specifying a threshold, it is usually absolute. Relative changes are cumulative. So if you apply a volume change with 0.5 amplitude (50% or -6.02dB), then the amplitude decreases to half its current level. If you apply that change again, then it decreases to one quarter of its original level. In other words, the change is relative to its current level. Given an original amplitude of A, the first change yields a result of A x 0.5 and the sample is replaced by that value. The second change takes that value and multiplies it by 0.5 again, so we get the final result of (A x 0.5) x 0.5 or A x 0.25. Most of the effect settings in GoldWave are cumulative. For relative changes, using 1.0, 100%, or 0dB does not alter the sound at all.
Absolute levels are used in places where a threshold is required, such as in Silence Reduction, or in rare cases were the absolute level is set, such as Maximize. Absolute changes are not cumulative. If you maximize the sound with 0.5 amplitude (50% or -6.02dB), then that is what the peak level will be no matter how many times the effect is used. For absolute changes, using 1.0, 100%, or 0dB may alter the sound if it is not currently at that level.
Frequency and Pitch
Sound windows in GoldWave show sound as a waveform of amplitudes on a time axis. However, sound can be viewed in an entirely different way by examining its frequency and pitch content or frequency spectrum. Sounds are broken down into a combination of simple fundamental (sinusoidal) tones, each with a different frequency. This is useful for examining bass and treble levels or for isolating and studying certain sounds.
Frequency Ranges
Average human hearing spans a frequency range from about 20Hz to about 17000Hz. The figure below shows some common sounds and the frequency range they cover.
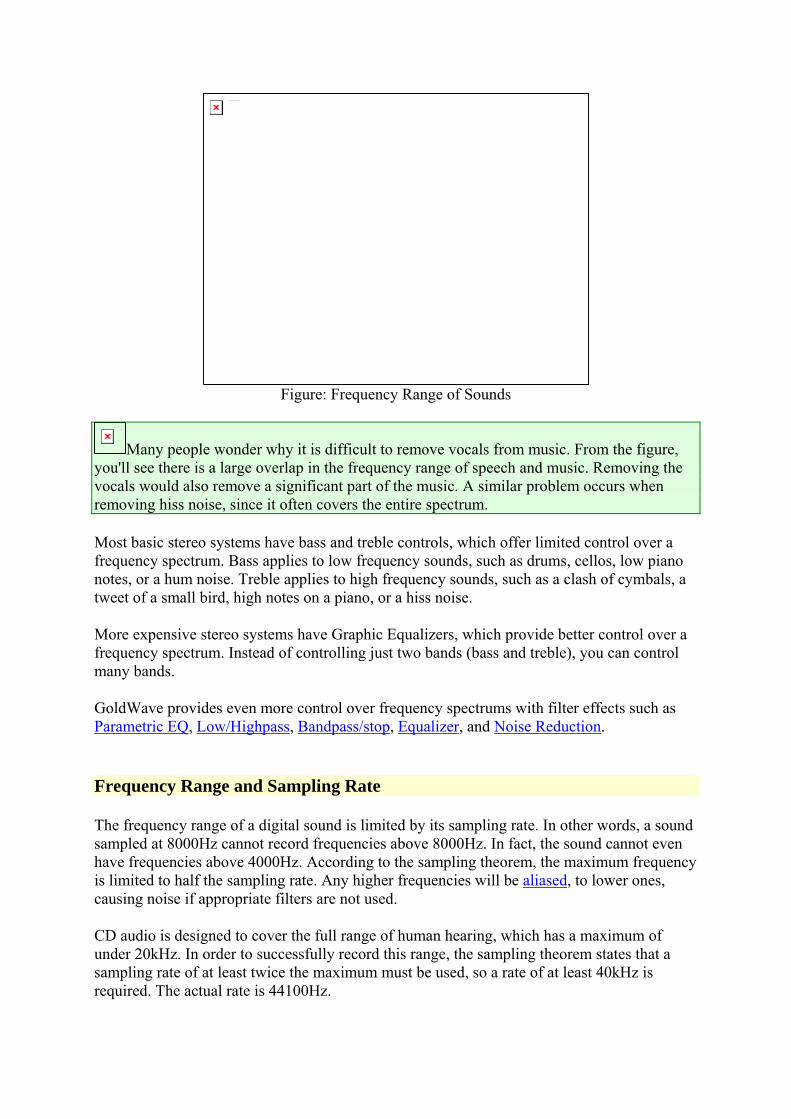
Frequency Range of Sounds
Figure: Frequency Range of Sounds
Note
Many people wonder why it is difficult to remove vocals from music. From the figure, you'll see there is a large overlap in the frequency range of speech and music. Removing the vocals would also remove a significant part of the music. A similar problem occurs when removing hiss noise, since it often covers the entire spectrum.
Most basic stereo systems have bass and treble controls, which offer limited control over a frequency spectrum. Bass applies to low frequency sounds, such as drums, cellos, low piano notes, or a hum noise. Treble applies to high frequency sounds, such as a clash of cymbals, a tweet of a small bird, high notes on a piano, or a hiss noise.
More expensive stereo systems have Graphic Equalizers, which provide better control over a frequency spectrum. Instead of controlling just two bands (bass and treble), you can control many bands.
GoldWave provides even more control over frequency spectrums with filter effects such as Parametric EQ, Low/Highpass, Bandpass/stop, Equalizer, and Noise Reduction.
Frequency Range and Sampling Rate
The frequency range of a digital sound is limited by its sampling rate. In other words, a sound sampled at 8000Hz cannot record frequencies above 8000Hz. In fact, the sound cannot even have frequencies above 4000Hz. According to the sampling theorem, the maximum frequency is limited to half the sampling rate. Any higher frequencies will be aliased, to lower ones, causing noise if appropriate filters are not used.
CD audio is designed to cover the full range of human hearing, which has a maximum of under 20kHz. In order to successfully record this range, the sampling theorem states that a sampling rate of at least twice the maximum must be used, so a rate of at least 40kHz is required. The actual rate is 44100Hz.
Frequency Spectrum Graphs
Several of GoldWave's Control visuals convert sounds into a range of frequency bands using a radix-2 fast Fourier transform (FFT) algorithm. When the results are drawn using colours, the graph is referred to as a spectrogram. When the results are drawn with lines, it is often referred to as a frequency spectrum or frequency analysis.
Frequency analysis graphs are displayed in the Noise Reduction and Parametric EQ filter effects. These help you to locate frequencies that you want to remove or enhance.
GoldWave applies a windowing function to the data before performing the FFT (see Control Visual Properties section). This reduces "discontinuity" errors that occur when dividing data into small chunks. A Kaiser window is used by default.
To make the spectrum more realistic to human hearing, magnitudes are scaled logarithmically. This means that if one frequency "sounds" twice as loud as another, it is graphed with twice the height (or the corresponding colour for the spectrogram).
File Compression
Uncompressed audio files tend to be large. CD quality audio requires ten megabytes per minute. That is not a problem with large computer hard drives available today, but it is a problem if you want to save many songs on a portable player or if you want to transfer files over the Internet. Unlike most computer data, audio data does not compress very well using typical compression methods such as those found in programs like PKZIP or WinZip. These methods preserve the data exactly so there is no loss of quality. Such compression is called lossless compression.
To make audio files smaller, complex algorithms have to used. Most of these algorithms sacrifice some quality so that when the data is decompressed, you do not get exactly the same quality you had originally. This type of compression is know as lossy compression. Ideally the quality that is lost is not perceptible, so you do not notice the difference.
The most common method of lossy audio compression is MPEG Layer-3, better known as MP3. It is capable of getting near CD quality audio in less than one tenth the size, which is about one megabyte per minute. More recent algorithms, such as Ogg Vorbis and Windows Media Audio, get even better quality in a smaller size.
Software and hardware that compress audio using complex algorithms are typically referred to as codecs (from coder/decoder). Compression is the same as encoding and decompression is the same as decoding.
To control the level of compression in GoldWave, use File | Save As and select a different file type and/or attributes. The lower the bitrate (the kbps number, see below), the smaller the file will be, usually at reduced quality.
Bitrate
Many compressed audio formats measure the compressed size as a bitrate. The bitrate is the number of bits per second (bps) required to store the audio. Usually the number is given in kilobits or one thousand bits. Divide that number by 8 to determine the number of kilobytes required per second.
Internet connection speed (bandwidth) is often measured in bitrates as well. A 56k modem is capable of receiving 56 kilobits per second. If you want people to stream your MP3 audio over a modem, you'll need to compress the file using a maximum bitrate of 56kbps. Due to the connection overhead and Internet protocol, a lower rate would have to be used to ensure the audio can be downloaded fast enough. For DSL and Cable Internet connections, the standard 128kbps MP3 rate can be used.
Audio files can contain a wide range of sounds, from noisy cymbal clashes to silence. Algorithms typically get much better compression on silence or simple audio sections than on complex, noisy audio. This means that the bitrate depending on whether constant bitrate or variable bitrate compression is used.
Constant Bitrate
When using constant bitrate, each section of audio compresses to exactly the same size, regardless of the content. If the audio contains silence, then the data may be padded to fill the required bitrate. If the audio contains complex music, then quality may be decreased until it fits within the bitrate.
Constant bitrate is useful for broadcast systems where the transmission rate is fixed. It also make is easy to seek to arbitrary positions within the audio stream or file.
Variable Bitrate
Variable bitrate compression uses the smallest size possible for each section of audio. If the audio contains silence, then the bitrate will be very low. If the audio contains complex music, the bitrate will be at its maximum.
Variable bitrate gives the best compression and quality. However, it makes it difficult to seek within the stream or file since there is no direct relation between time and size.
Appendix B: Keyboard Commands In addition to all the standard menu keystrokes, such as Alt+F O to open a file, Alt+E C to copy, Alt+E P to paste, etc., GoldWave includes a number of additional quick keystrokes. These are summarized in the following table.
Keystroke Action
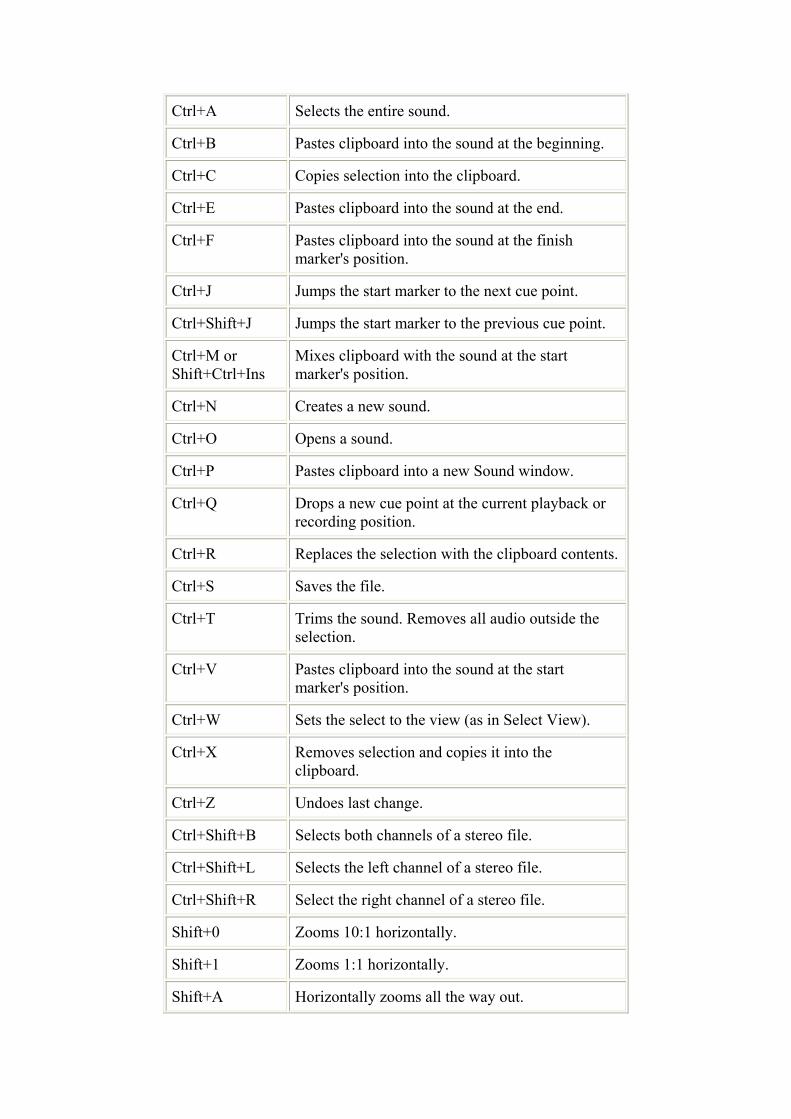
Ctrl+A Selects the entire sound.
Ctrl+B Pastes clipboard into the sound at the beginning.
Ctrl+C Copies selection into the clipboard.
Ctrl+E Pastes clipboard into the sound at the end.
Ctrl+F Pastes clipboard into the sound at the finish marker's position.
Ctrl+J Jumps the start marker to the next cue point.
Ctrl+Shift+J Jumps the start marker to the previous cue point.
Ctrl+M or Shift+Ctrl+Ins
Mixes clipboard with the sound at the start marker's position.
Ctrl+N Creates a new sound.
Ctrl+O Opens a sound.
Ctrl+P Pastes clipboard into a new Sound window.
Ctrl+Q Drops a new cue point at the current playback or recording position.
Ctrl+R Replaces the selection with the clipboard contents.
Ctrl+S Saves the file.
Ctrl+T Trims the sound. Removes all audio outside the selection.
Ctrl+V Pastes clipboard into the sound at the start marker's position.
Ctrl+W Sets the select to the view (as in Select View).
Ctrl+X Removes selection and copies it into the clipboard.
Ctrl+Z Undoes last change.
Ctrl+Shift+B Selects both channels of a stereo file.
Ctrl+Shift+L Selects the left channel of a stereo file.
Ctrl+Shift+R Select the right channel of a stereo file.
Shift+0 Zooms 10:1 horizontally.
Shift+1 Zooms 1:1 horizontally.
Shift+A Horizontally zooms all the way out.
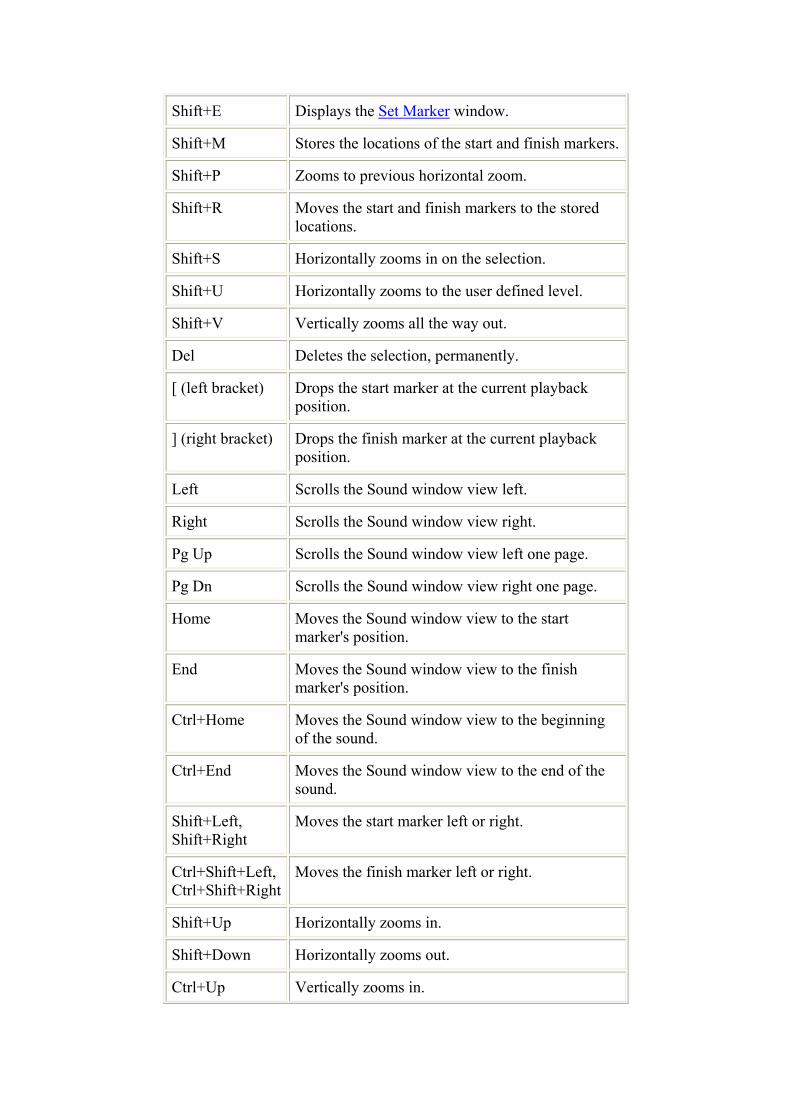
Shift+E Displays the Set Marker window.
Shift+M Stores the locations of the start and finish markers.
Shift+P Zooms to previous horizontal zoom.
Shift+R Moves the start and finish markers to the stored locations.
Shift+S Horizontally zooms in on the selection.
Shift+U Horizontally zooms to the user defined level.
Shift+V Vertically zooms all the way out.
Del Deletes the selection, permanently.
[ (left bracket) Drops the start marker at the current playback position.
] (right bracket) Drops the finish marker at the current playback position.
Left Scrolls the Sound window view left.
Right Scrolls the Sound window view right.
Pg Up Scrolls the Sound window view left one page.
Pg Dn Scrolls the Sound window view right one page.
Home Moves the Sound window view to the start marker's position.
End Moves the Sound window view to the finish marker's position.
Ctrl+Home Moves the Sound window view to the beginning of the sound.
Ctrl+End Moves the Sound window view to the end of the sound.
Shift+Left, Shift+Right
Moves the start marker left or right.
Ctrl+Shift+Left, Ctrl+Shift+Right
Moves the finish marker left or right.
Shift+Up Horizontally zooms in.
Shift+Down Horizontally zooms out.
Ctrl+Up Vertically zooms in.
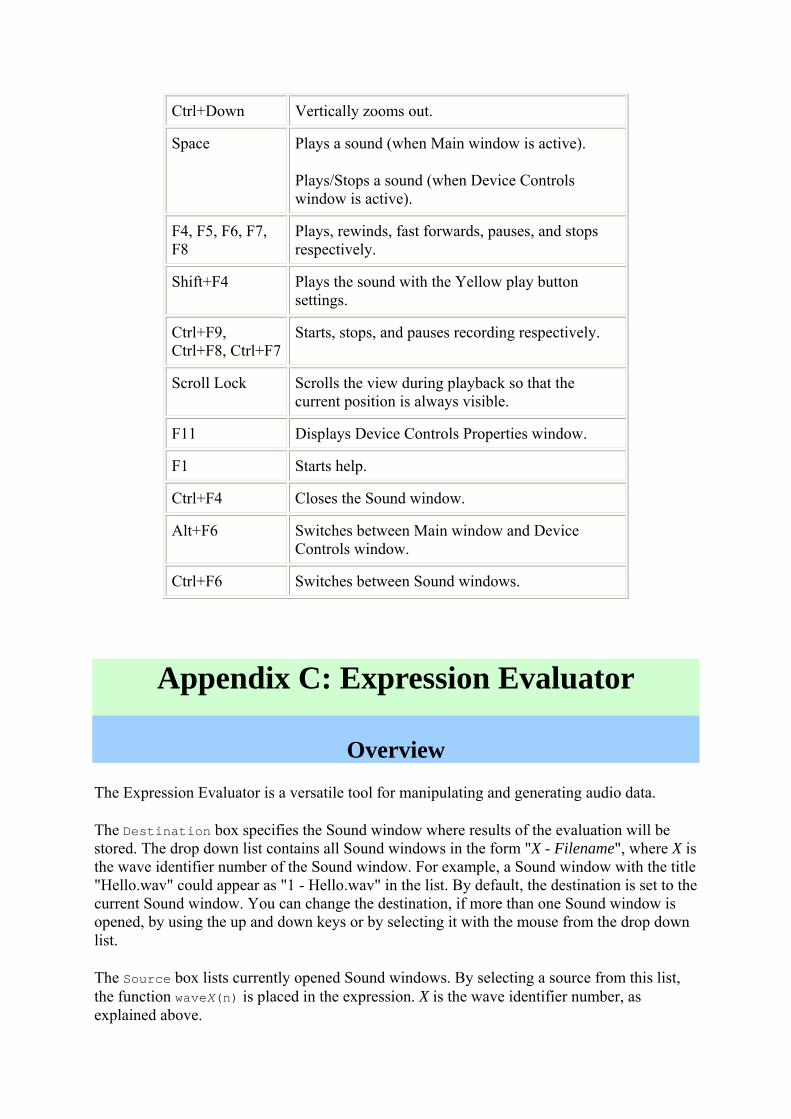
Ctrl+Down Vertically zooms out.
Space Plays a sound (when Main window is active).
Plays/Stops a sound (when Device Controls window is active).
F4, F5, F6, F7, F8
Plays, rewinds, fast forwards, pauses, and stops respectively.
Shift+F4 Plays the sound with the Yellow play button settings.
Ctrl+F9, Ctrl+F8, Ctrl+F7
Starts, stops, and pauses recording respectively.
Scroll Lock Scrolls the view during playback so that the current position is always visible.
F11 Displays Device Controls Properties window.
F1 Starts help.
Ctrl+F4 Closes the Sound window.
Alt+F6 Switches between Main window and Device Controls window.
Ctrl+F6 Switches between Sound windows.
Appendix C: Expression Evaluator
Overview
The Expression Evaluator is a versatile tool for manipulating and generating audio data.
The Destination box specifies the Sound window where results of the evaluation will be stored. The drop down list contains all Sound windows in the form "X - Filename", where X is the wave identifier number of the Sound window. For example, a Sound window with the title "Hello.wav" could appear as "1 - Hello.wav" in the list. By default, the destination is set to the current Sound window. You can change the destination, if more than one Sound window is opened, by using the up and down keys or by selecting it with the mouse from the drop down list.
The Source box lists currently opened Sound windows. By selecting a source from this list, the function waveX(n) is placed in the expression. X is the wave identifier number, as explained above.
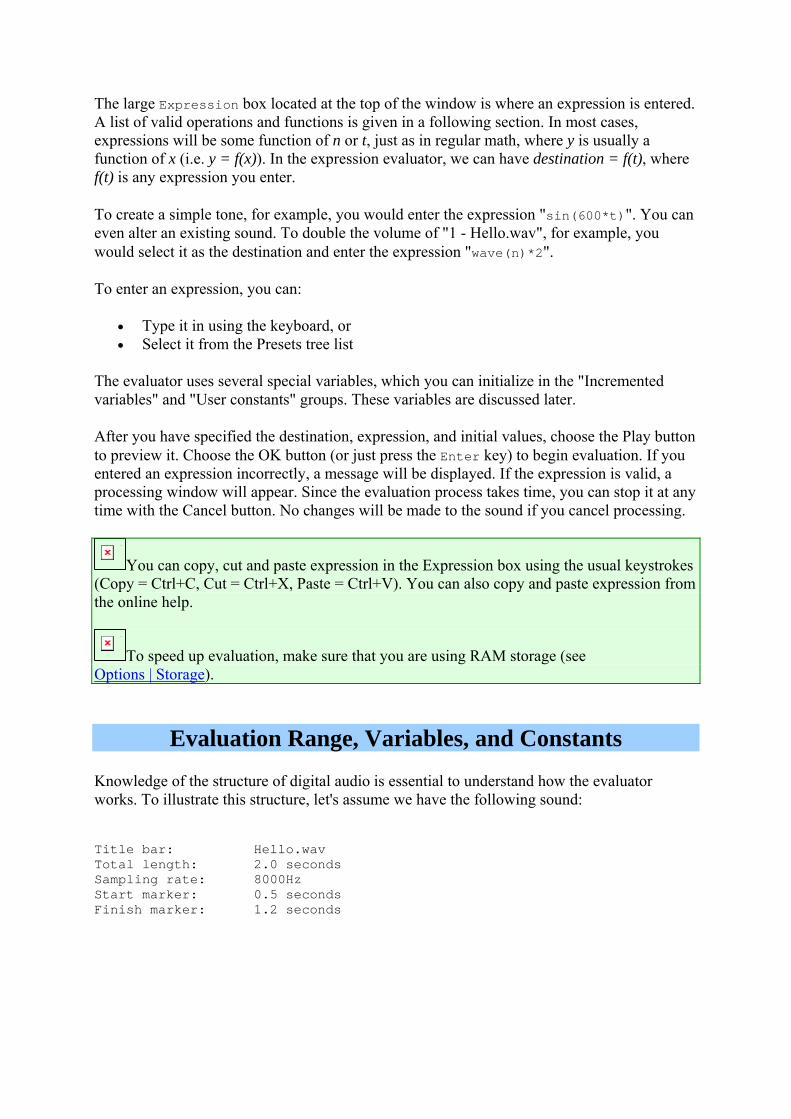
The large Expression box located at the top of the window is where an expression is entered. A list of valid operations and functions is given in a following section. In most cases, expressions will be some function of n or t, just as in regular math, where y is usually a function of x (i.e. y = f(x)). In the expression evaluator, we can have destination = f(t), where f(t) is any expression you enter.
To create a simple tone, for example, you would enter the expression "sin(600*t)". You can even alter an existing sound. To double the volume of "1 - Hello.wav", for example, you would select it as the destination and enter the expression "wave(n)*2".
To enter an expression, you can:
• Type it in using the keyboard, or • Select it from the Presets tree list
The evaluator uses several special variables, which you can initialize in the "Incremented variables" and "User constants" groups. These variables are discussed later.
After you have specified the destination, expression, and initial values, choose the Play button to preview it. Choose the OK button (or just press the Enter key) to begin evaluation. If you entered an expression incorrectly, a message will be displayed. If the expression is valid, a processing window will appear. Since the evaluation process takes time, you can stop it at any time with the Cancel button. No changes will be made to the sound if you cancel processing.
Note
You can copy, cut and paste expression in the Expression box using the usual keystrokes (Copy = Ctrl+C, Cut = Ctrl+X, Paste = Ctrl+V). You can also copy and paste expression from the online help.
Note
To speed up evaluation, make sure that you are using RAM storage (see Options | Storage).
Evaluation Range, Variables, and Constants
Knowledge of the structure of digital audio is essential to understand how the evaluator works. To illustrate this structure, let's assume we have the following sound:
Title bar: Hello.wav Total length: 2.0 seconds Sampling rate: 8000Hz Start marker: 0.5 seconds Finish marker: 1.2 seconds

File Structure
Figure: Internal Structure of Hello.wav, 8000Hz, 2 Seconds
Digital audio is stored as a series of amplitudes, which are often referred to as samples (see figure). The evaluator interprets each sample as a value between -1 and 1, inclusive. Only samples between the start and finish markers are considered valid; all other values are assumed to be zero. The number of samples selected is defined as N.
Each sample has a relative index number, n, and a time, t. Since the time of each sample depends on the sampling rate, it is usually written in terms of the unit of time between each sample, T. You many have noticed that the time, t, is related to the index number, n, by the equation t=nT. The figure shows how all these variables relate to the structure of the sound.
Using Time in an Expression
Let's assume we have entered the expression "sin(t)". Since expressions are evaluated over the selection range, the initial value for t is automatically set to start marker's position of 0.5. Choosing the OK button evaluates the expression from t = 0.5 to t = 1.2 in steps of 1/8000 of a second, as defined by T. This means that the expression is calculated for each sample in the selection, changing each sample as follows:
Sample4000 = sin(0.500000) Sample4001 = sin(0.500125) Sample4002 = sin(0.500250)
... Sample9600 = sin(1.200000)
Using the Sample Index in an Expression
The sample index is useful for modifying an existing sound. If we want to double the amplitude of Hello.wav, for example, we need to multiply each sample by two and store it back into the sound. In this case, Hello.wav will be both the destination and the source. To set it as the destination, we simply select it from the Destination list. To use it as a source, we need to determine its wave identifier number. These numbers are provided in the Source list. Assuming it is listed as "3 - Hello.wav", we now know that its wave identifier number is 3. This number is necessary for the evaluator's wave function, which has the following syntax:
waveX( n ) where: X = wave identifier number n = sample index number
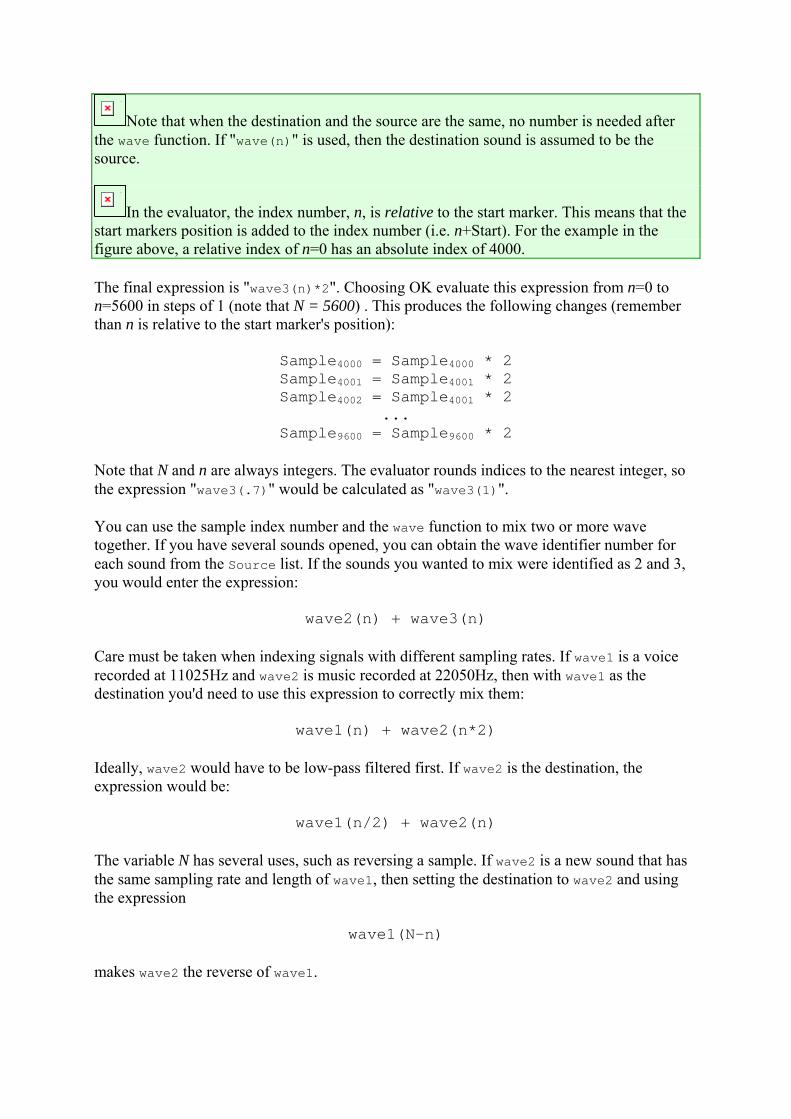
Note
Note that when the destination and the source are the same, no number is needed after the wave function. If "wave(n)" is used, then the destination sound is assumed to be the source.
Note
In the evaluator, the index number, n, is relative to the start marker. This means that the start markers position is added to the index number (i.e. n+Start). For the example in the figure above, a relative index of n=0 has an absolute index of 4000.
The final expression is "wave3(n)*2". Choosing OK evaluate this expression from n=0 to n=5600 in steps of 1 (note that N = 5600) . This produces the following changes (remember than n is relative to the start marker's position):
Sample4000 = Sample4000 * 2 Sample4001 = Sample4001 * 2 Sample4002 = Sample4001 * 2
... Sample9600 = Sample9600 * 2
Note that N and n are always integers. The evaluator rounds indices to the nearest integer, so the expression "wave3(.7)" would be calculated as "wave3(1)".
You can use the sample index number and the wave function to mix two or more wave together. If you have several sounds opened, you can obtain the wave identifier number for each sound from the Source list. If the sounds you wanted to mix were identified as 2 and 3, you would enter the expression:
wave2(n) + wave3(n)
Care must be taken when indexing signals with different sampling rates. If wave1 is a voice recorded at 11025Hz and wave2 is music recorded at 22050Hz, then with wave1 as the destination you'd need to use this expression to correctly mix them:
wave1(n) + wave2(n*2)
Ideally, wave2 would have to be low-pass filtered first. If wave2 is the destination, the expression would be:
wave1(n/2) + wave2(n)
The variable N has several uses, such as reversing a sample. If wave2 is a new sound that has the same sampling rate and length of wave1, then setting the destination to wave2 and using the expression
wave1(N-n)
makes wave2 the reverse of wave1.
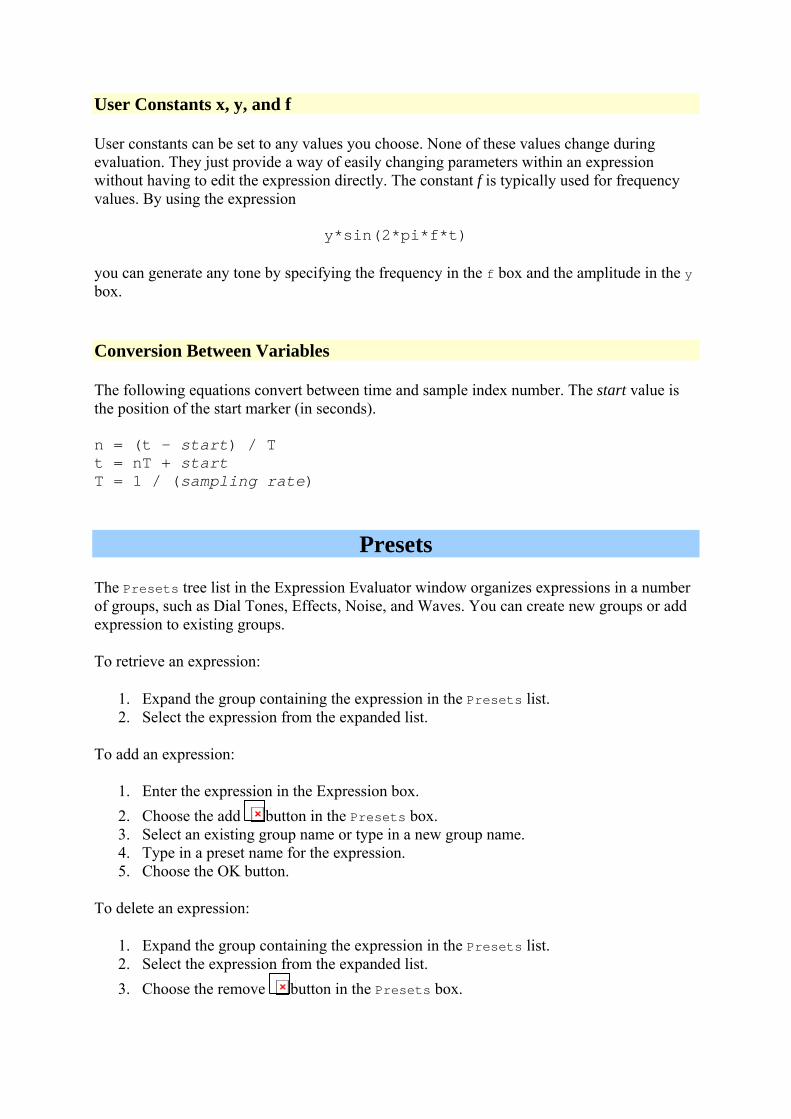
User Constants x, y, and f
User constants can be set to any values you choose. None of these values change during evaluation. They just provide a way of easily changing parameters within an expression without having to edit the expression directly. The constant f is typically used for frequency values. By using the expression
y*sin(2*pi*f*t)
you can generate any tone by specifying the frequency in the f box and the amplitude in the y box.
Conversion Between Variables
The following equations convert between time and sample index number. The start value is the position of the start marker (in seconds).
n = (t - start) / T t = nT + start T = 1 / (sampling rate)
Presets
The Presets tree list in the Expression Evaluator window organizes expressions in a number of groups, such as Dial Tones, Effects, Noise, and Waves. You can create new groups or add expression to existing groups.
To retrieve an expression:
1. Expand the group containing the expression in the Presets list. 2. Select the expression from the expanded list.
To add an expression:
1. Enter the expression in the Expression box. 2. Choose the add
Add
button in the Presets box. 3. Select an existing group name or type in a new group name. 4. Type in a preset name for the expression. 5. Choose the OK button.
To delete an expression:
1. Expand the group containing the expression in the Presets list. 2. Select the expression from the expanded list. 3. Choose the remove
Removebutton in the Presets box.
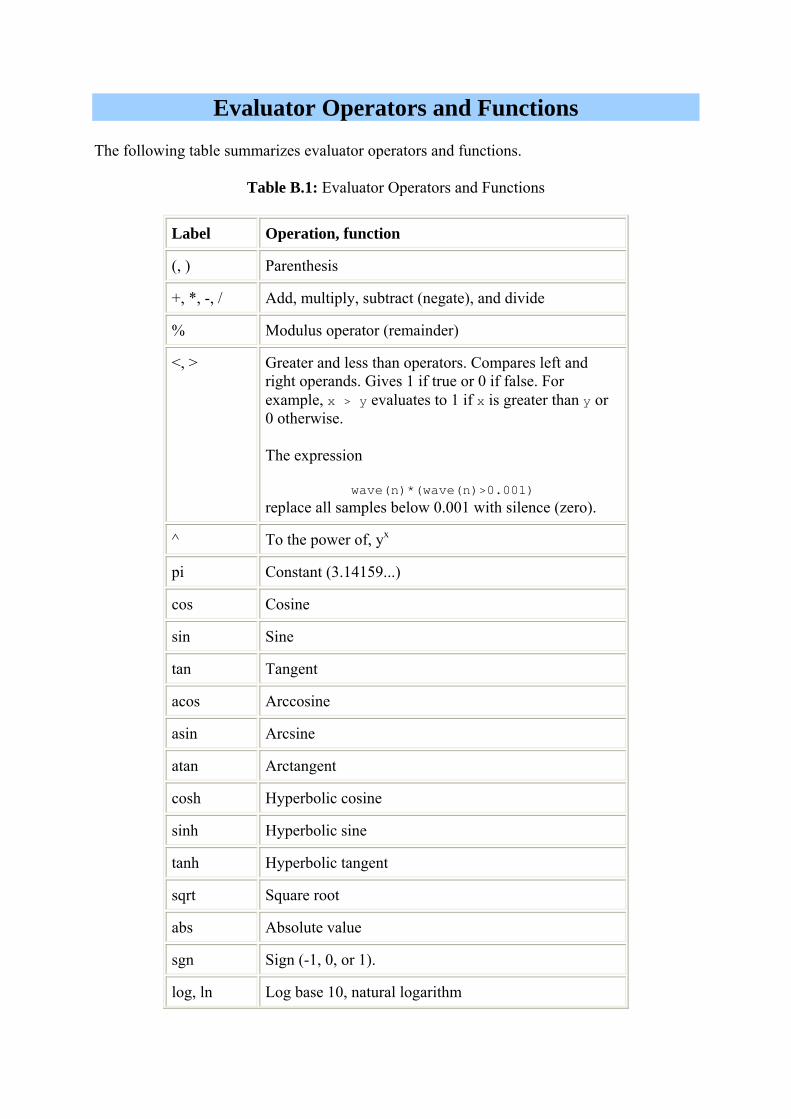
Evaluator Operators and Functions
The following table summarizes evaluator operators and functions.
Table B.1: Evaluator Operators and Functions
Label Operation, function
(, ) Parenthesis
+, *, -, / Add, multiply, subtract (negate), and divide
% Modulus operator (remainder)
<, > Greater and less than operators. Compares left and right operands. Gives 1 if true or 0 if false. For example, x > y evaluates to 1 if x is greater than y or 0 otherwise.
The expression
wave(n)*(wave(n)>0.001) replace all samples below 0.001 with silence (zero).
^ To the power of, yx
pi Constant (3.14159...)
cos Cosine
sin Sine
tan Tangent
acos Arccosine
asin Arcsine
atan Arctangent
cosh Hyperbolic cosine
sinh Hyperbolic sine
tanh Hyperbolic tangent
sqrt Square root
abs Absolute value
sgn Sign (-1, 0, or 1).
log, ln Log base 10, natural logarithm
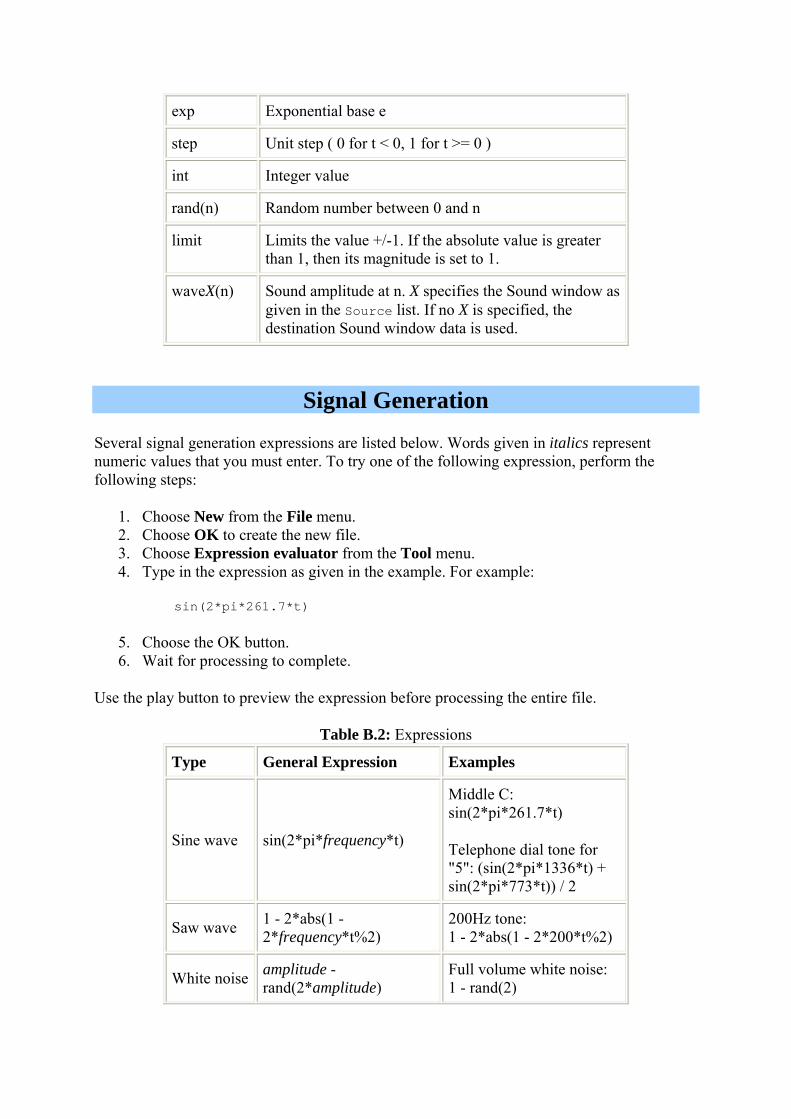
exp Exponential base e
step Unit step ( 0 for t < 0, 1 for t >= 0 )
int Integer value
rand(n) Random number between 0 and n
limit Limits the value +/-1. If the absolute value is greater than 1, then its magnitude is set to 1.
waveX(n) Sound amplitude at n. X specifies the Sound window as given in the Source list. If no X is specified, the destination Sound window data is used.
Signal Generation
Several signal generation expressions are listed below. Words given in italics represent numeric values that you must enter. To try one of the following expression, perform the following steps:
1. Choose New from the File menu. 2. Choose OK to create the new file. 3. Choose Expression evaluator from the Tool menu. 4. Type in the expression as given in the example. For example:
sin(2*pi*261.7*t)
5. Choose the OK button. 6. Wait for processing to complete.
Use the play button to preview the expression before processing the entire file.
Table B.2: Expressions
Type General Expression Examples
Sine wave sin(2*pi*frequency*t)
Middle C: sin(2*pi*261.7*t)
Telephone dial tone for "5": (sin(2*pi*1336*t) + sin(2*pi*773*t)) / 2
Saw wave 1 - 2*abs(1 - 2*frequency*t%2)
200Hz tone: 1 - 2*abs(1 - 2*200*t%2)
White noise amplitude - rand(2*amplitude)
Full volume white noise: 1 - rand(2)

Square wave int(2*t*frequency)%2*2-1 400Hz tone:
int(2*t*400)%2*2-1
Sweep sin(2*pi*t^rate) Slow sweep up to 20kHz: sin( 2*pi*160*(t%5)^3 )
Exponential decay
(1 - minimum)*exp(-t) + minimum
50% decay a 500Hz sine wave: (0.5*exp(-t) + 0.5) * sin(2*pi*500*t)
Custom Filters
One way to create your own digital filter is to use MatlabTM (The Student Edition of Matlab, by The Math Works Inc., published by Prentice-Hall, ISBN 0-13-855974-0). It has many built-in commands that generate filter coefficients. The coefficients can then used in the Expression Evaluator command.
Example of a Low-Pass Filter
In preparation for down-sampling, you can use Matlab to generate the coefficients of a 4th order Butterworth low pass filter that will remove noise above half the Nyquist frequency (one quarter the sampling rate). Enter:
[b,a] = butter(4, 0.5)
The result should be similar to:
b = 0.0940 0.3759 0.5639 0.3759 0.0940 a = 1.0000 0.0000 0.4680 0.0000 0.0177
To implement this filter in the evaluator, assume that the sound to be filtered is in the Sound window titled Sound.wav.
1. Use File | New to create a new Sound window with the same sampling rate and channels as Sound.wav.
2. Make sure the length of the new sound is as long (or longer) than Sound.wav. 3. Use Tool | Expression Evaluator to open the expression evaluator window. 4. Set the destination to the new sound. 5. Enter the following expression (assuming Sound.wav has a wave identifier of 1): 6. 7. wave1(n)*0.0940 + wave1(n-1)*0.3759 + 8. wave1(n-2)*0.5639 + wave1(n-3)*0.3759 + 9. wave1(n-4)*0.0940 - wave2(n-2)*0.4860 - 10. wave2(n-4)*0.0177 11. Choose OK to start filtering.
Appendix D: Tutorial
From Turntable to CD-R
This tutorial explains the steps required to record from a turntable, restore the audio, and split the recording into tracks so it can be burned to a blank CD.
Make Connections
Unless your turntable has a built-in amplifier or a headphone output, you'll need an external amplifier, receiver, or preamp to boost the turntable output. The figure below shows all the connections required. You may need two RCA cables with male connectors and a RCA to 1/8" miniplug stereo Y-adaptor cable.
If you have not connected your headphones or speakers to your computer, do so before proceeding.
Connections
Figure: Connections
Step 1 Connect the turntable output to Phono-in on a receiver or to the input of a preamp, as shown.
Step 2 Connect the receiver or preamp audio output to the light blue Line-In socket on your computer. It is marked with an arrow pointing into the rings, as shown.
Warning
Make sure you connect to the correct socket on your computer. If you accidentally plug the receiver/preamp output into the computer's speaker socket you may damage the hardware. Connect your speakers or headphones to your computer first.
Setup Recording
Step 1 Run GoldWave, then press F11 or use the Options | Control Properties command, then

select the Device tab. Make sure the correct playback and recording devices are selected. Usually the default settings are fine, unless you have more than one sound device.
Step 2 Select the Record tab on the Control Properties window, then check the Monitor input box. This will activate the visuals on the Control window so you can adjust volume levels whithout having to record.
Step 3 Select the Volume tab on the Control Properties window. Make sure the correct Volume device is selected. It should be the same as the recording device.
Control Properties
Figure: Volume Properties
Check the Select box for the Line (or Line In) item. Make sure the volume level is at least 50. Make sure no other items are checked as they could be a source of noise. Choose OK to close the Control Properties window so that all new settings are used.
Step 4 Play an album on your turntable to ensure that all the connections are good and that the input level is set correctly. The Level Visual in the Control window should occasionally touch the red region. If you find that the Level Visual goes too high or never goes above the green region, then adjust the volume as explained in step 3. Note that the volume fader on the Control window only changes the playback volume. You must adjust the recording volume under the Volume Property tab.
Control Window
Figure: Control Window
If you get no activity at all, check all connections, make sure your receiver/preamp is turned on, and make sure the correct recording device and volume source are selected as explained in steps 1 to 3.
Step 5 Use the File | New command and select the "CD Audio" preset quality setting. Enter the duration for the recording, such as 25:00 to record the entire side of the album. Note that you can use the Unbounded recording mode to record for any duration.
Step 6 Hold the Ctrl key and click the red record button or press Ctrl+F9 to start recording in GoldWave. Start playing the thoroughly cleaned, dust free album on the turntable. Press the red stop button to stop recording when done.
Step 7 Save the recording by using the File | Save command and providing a name for your recording.
Restore Audio
Step 1 Trim off any leading or trailing silence from the recording. To do this, use View | 10 Seconds. Right-click on the waveform to set the start selection marker to a position a few seconds before the music begins. Scroll to the end of the recording by using the

scroll bar below the waveform. Right-click to set the finish selection marker to a position a few seconds after the music ends. Use Edit | Trim, which will remove the silence on either end of the selection.
Step 2 Use the Effect | Filter | Pop/Click command to remove any pops and clicks from the recording. Use a tolerance setting of 2000 at first. If you find that some pops/clicks are still present, select a short area of the recording where the click occurs then use the Pop/Click filter again with a lower tolerance setting. Using a low tolerance on the entire recording is not recommended since it may distort some sounds, such as trumpet solos. Use Edit | Select All to select the entire recording when done.
Step 3 (optional) Use the Effect | Filter | Smoother command and select the "Reduce hiss" preset to reduce crackle and hiss.
Step 4 Play the recording to find a few seconds of silence where only background noise can be heard. Select about a second of that noise, then use Edit | Copy to copy it to the clipboard. Select the entire recording by using Edit | Select All. Use Effect | Filter | Noise Reduction to display the Noise Reduction window. Choose the "Use clipboard" envelope option. Preview the settings to ensure the quality sounds good. If you notice too much tingling or warbling, the lower the Scale setting and Apply the settings. Choose OK to remove the noise from the recording.
Step 5 (optional) Use the Effect | Compressor/Expander command and select the "Noise Gate 3" preset, then choose OK. This will eliminate any remaining noise in the silences between songs.
Step 6 Use Effect | Filter | Equalizer to display the Equalizer window. Experiment with the presets and adjust the bands to boost or reduce bass and treble. Preview the audio until you get the desired results, then choose OK to process the recording.
Step 7 Use Effect | Volume | Maximize and select the "Full dynamic range" preset, then choose OK.
Step 8 Save the restored recording by using the File | Save command.
Split into Tracks
Step 1 Use Tool | Cue Points to display the Cue Points window.
Step 2 Choose the Auto Cue button. On the Auto Cue window, choose the Mark Silence button. Set the threshold to -40dB. Set the silence length to 1 second. You may want to use a longer or shorter time depending on how long the silences are between each song. Set the minimum separation to about 1 minute (1:00). Use a longer or shorter time depending on the length of the shortest song. Choose OK to automatically set cue points at the beginning of each song.
Note that if the album is a live recording with no silences between songs, you'll have to set cue points manually. Close the Cue Points window, then Play the recording and use Edit | Marker | Drop Cue to drop cue points at places where you want to split the recording into separate tracks.
Step 3 Choose the Split File button on the Cue Points window. Provide a destination folder where each song/track will be saved. Check the "Use CD compatible wave format and alignment" box. Choose OK to create a set of track files for each song.
Step 4 Use CD-R software, such as Easy CD Creator, Nero, etc. to write the track files to a blank CD as audio tracks. Note that you cannot just copy the files to the CD using Windows Explorer. That will just create a data track. Each song must be written as a separate audio track.
End of Tutorial
Appendix E: Troubleshooting and Q&A
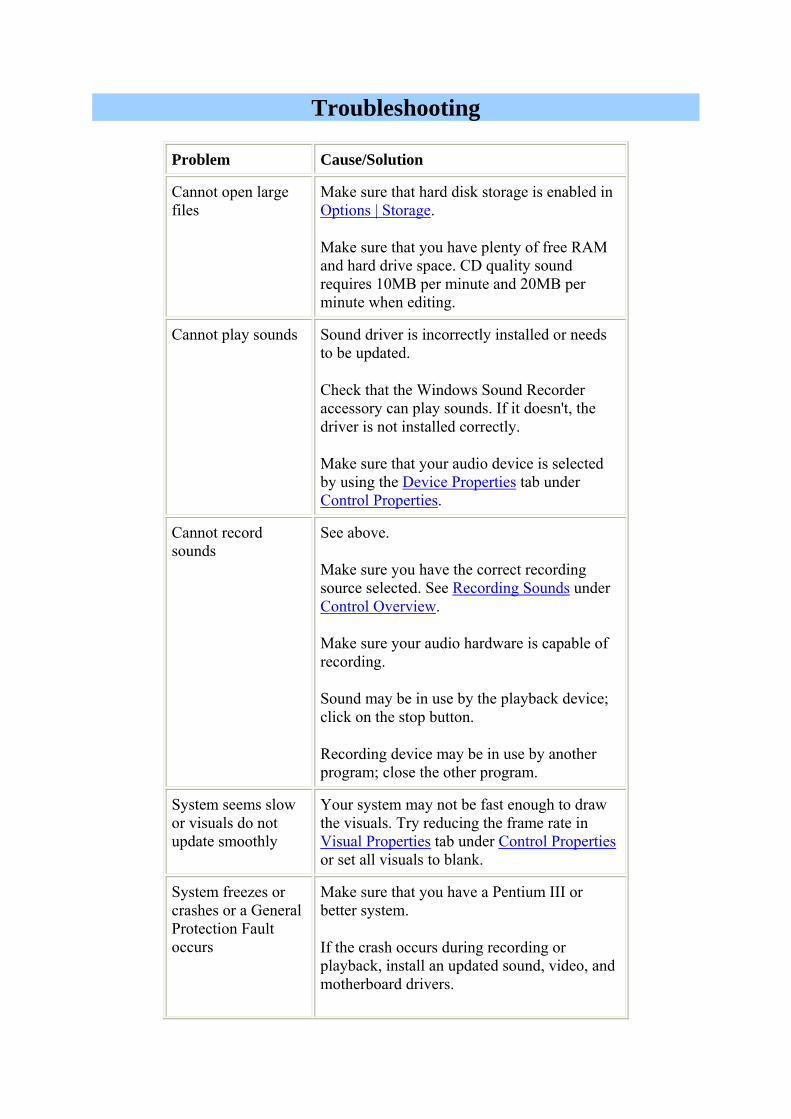
Troubleshooting
Problem Cause/Solution
Cannot open large files
Make sure that hard disk storage is enabled in Options | Storage.
Make sure that you have plenty of free RAM and hard drive space. CD quality sound requires 10MB per minute and 20MB per minute when editing.
Cannot play sounds Sound driver is incorrectly installed or needs to be updated.
Check that the Windows Sound Recorder accessory can play sounds. If it doesn't, the driver is not installed correctly.
Make sure that your audio device is selected by using the Device Properties tab under Control Properties.
Cannot record sounds
See above.
Make sure you have the correct recording source selected. See Recording Sounds under Control Overview.
Make sure your audio hardware is capable of recording.
Sound may be in use by the playback device; click on the stop button.
Recording device may be in use by another program; close the other program.
System seems slow or visuals do not update smoothly
Your system may not be fast enough to draw the visuals. Try reducing the frame rate in Visual Properties tab under Control Properties or set all visuals to blank.
System freezes or crashes or a General Protection Fault occurs
Make sure that you have a Pentium III or better system.
If the crash occurs during recording or playback, install an updated sound, video, and motherboard drivers.
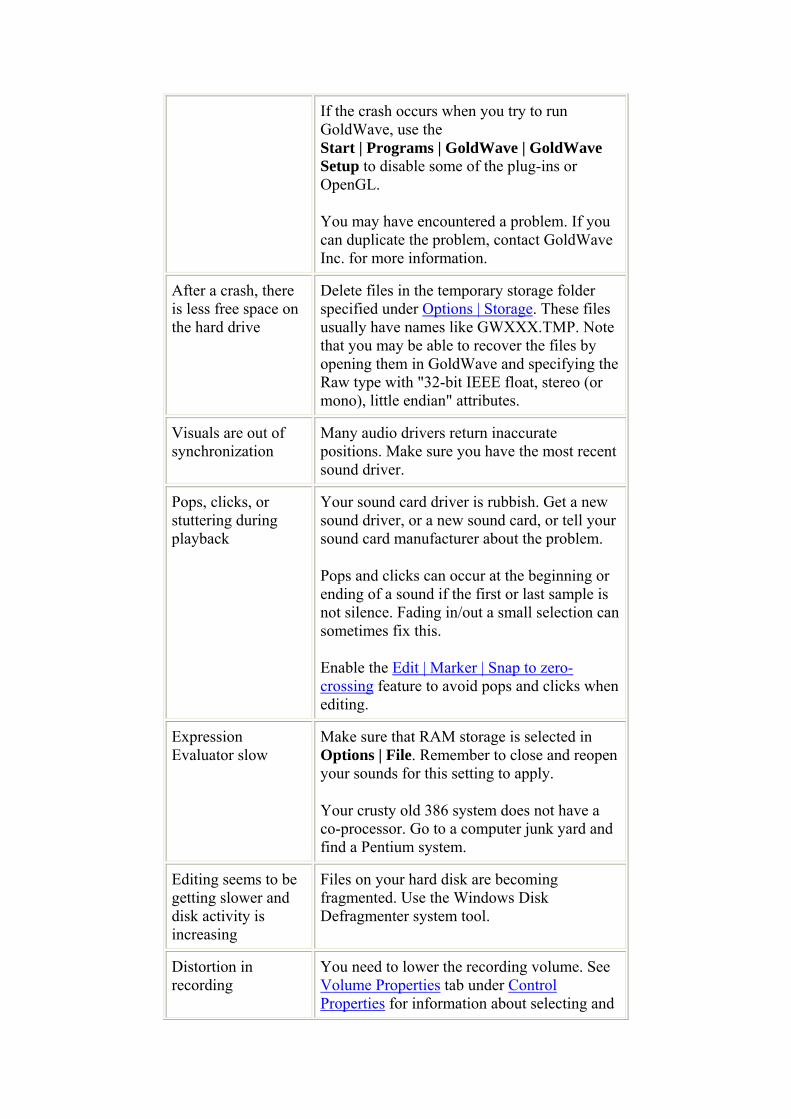
If the crash occurs when you try to run GoldWave, use the Start | Programs | GoldWave | GoldWave Setup to disable some of the plug-ins or OpenGL.
You may have encountered a problem. If you can duplicate the problem, contact GoldWave Inc. for more information.
After a crash, there is less free space on the hard drive
Delete files in the temporary storage folder specified under Options | Storage. These files usually have names like GWXXX.TMP. Note that you may be able to recover the files by opening them in GoldWave and specifying the Raw type with "32-bit IEEE float, stereo (or mono), little endian" attributes.
Visuals are out of synchronization
Many audio drivers return inaccurate positions. Make sure you have the most recent sound driver.
Pops, clicks, or stuttering during playback
Your sound card driver is rubbish. Get a new sound driver, or a new sound card, or tell your sound card manufacturer about the problem.
Pops and clicks can occur at the beginning or ending of a sound if the first or last sample is not silence. Fading in/out a small selection can sometimes fix this.
Enable the Edit | Marker | Snap to zero-crossing feature to avoid pops and clicks when editing.
Expression Evaluator slow
Make sure that RAM storage is selected in Options | File. Remember to close and reopen your sounds for this setting to apply.
Your crusty old 386 system does not have a co-processor. Go to a computer junk yard and find a Pentium system.
Editing seems to be getting slower and disk activity is increasing
Files on your hard disk are becoming fragmented. Use the Windows Disk Defragmenter system tool.
Distortion in recording
You need to lower the recording volume. See Volume Properties tab under Control Properties for information about selecting and
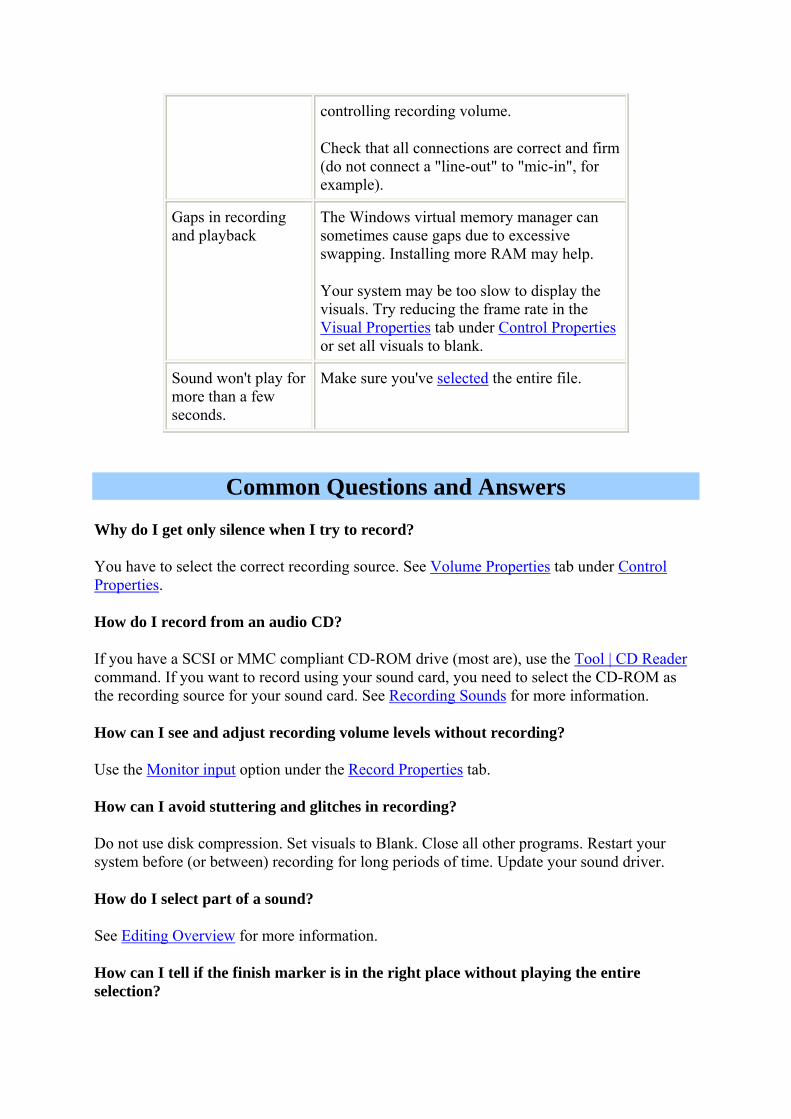
controlling recording volume.
Check that all connections are correct and firm (do not connect a "line-out" to "mic-in", for example).
Gaps in recording and playback
The Windows virtual memory manager can sometimes cause gaps due to excessive swapping. Installing more RAM may help.
Your system may be too slow to display the visuals. Try reducing the frame rate in the Visual Properties tab under Control Properties or set all visuals to blank.
Sound won't play for more than a few seconds.
Make sure you've selected the entire file.
Common Questions and Answers
Why do I get only silence when I try to record?
You have to select the correct recording source. See Volume Properties tab under Control Properties.
How do I record from an audio CD?
If you have a SCSI or MMC compliant CD-ROM drive (most are), use the Tool | CD Reader command. If you want to record using your sound card, you need to select the CD-ROM as the recording source for your sound card. See Recording Sounds for more information.
How can I see and adjust recording volume levels without recording?
Use the Monitor input option under the Record Properties tab.
How can I avoid stuttering and glitches in recording?
Do not use disk compression. Set visuals to Blank. Close all other programs. Restart your system before (or between) recording for long periods of time. Update your sound driver.
How do I select part of a sound?
See Editing Overview for more information.
How can I tell if the finish marker is in the right place without playing the entire selection?
Right click on the waveform just before the finish marker and choose the "Play from here" menu item. Or, go to the Play Properties tab and select the Finish option for one of the play buttons. That will play a few seconds before the finish marker.
How do I edit individual samples with the mouse?
See Redrawing the Waveform with the Mouse.
Why does GoldWave show the shareware messages?
GoldWave is not free software. If you are a licensed user and are still seeing shareware messages, you'll need to enter your license into the program again. Directions for entering the license are included with the license.
Can I convert sound files to MIDI?
No. MIDI files do not contain digital audio. They contain notes and timing information for instruments. In other words, they contain instructions for playing the music, but not the music itself.
How are you?
Fine, thanks.
How can I split a large recording into individual songs?
Use the Cue Points tool with the Auto Cue Button and the Split File Button.