Embed Size (px)
Citation preview

Tally.ERP 9
Training Manual

©Tally Solutions Pvt Ltd
Table of Contents
Installation ...................................................................................................... 4
Company Creation ............................................................................................ 8
TallyVault ....................................................................................................... 9
TallyVault Creation ...................................................................................... 9 Name of Company with TallyVault is Hidden ...................................................... 11
Ledger Creation ............................................................................................. 12
Auto-capitalisation.......................................................................................... 17
TallyFit ......................................................................................................... 18
Restore Company Data .................................................................................... 19
Voucher Entry................................................................................................ 22
Flexibility in entering date ............................................................................. 26 Dynamic creation of ledger ........................................................................... 26
Drill-Down ..................................................................................................... 28
Alt+F12 ........................................................................................................ 31
Extracting Information from Voucher Narration ................................................... 32 Unlimited Classification ................................................................................... 37
Dynamic re-classification ................................................................................. 39
Comparison Reports ....................................................................................... 41
Sales Register ............................................................................................... 44
Bills Receivable ............................................................................................. 48
Ageing Analysis of Bills ................................................................................... 49
Payment Performance of Debtors....................................................................... 50
Multiple Stock Valuation Methods ...................................................................... 53
Item-wise valuation .................................................................................... 53 Changeable at Will ..................................................................................... 55 All methods always available ........................................................................ 56
Integrate-disintegrate Accounts and Inventory ...................................................... 57
Auto-Backup ................................................................................................. 61
Bank Reconciliation ........................................................................................ 63
Cross-financial year reporting ........................................................................... 66
Movement Analysis ......................................................................................... 67
Identify fast and slow-moving items ................................................................. 68 Identify best supplier: .................................................................................. 69 Lifting by a customer:.................................................................................. 70
Stock Ageing analysis ..................................................................................... 73
Tracking Bills and Delivery Notes....................................................................... 75
Un-billed Delivery notes: .............................................................................. 76 Deliveries not made: ................................................................................... 76
Stock Query .................................................................................................. 78
Items of the same category .......................................................................... 78 Top Buyers and Sellers ............................................................................... 79
Multiple Godowns/Locations for Stock ................................................................ 80
©Tally Solutions Pvt Ltd
Item-wise and Invoice-wise profitability ............................................................... 84
Flexible Units of Measure ................................................................................. 88
Flexible Bills of Material ................................................................................. 102
Cheque Printing ........................................................................................... 105
Altering Dimensions of cheque .................................................................... 108 Group Company ........................................................................................... 111
Create a Group Company .......................................................................... 111 Viewing Consolidated reports of a Group Company ........................................... 113 Shut a Company ..................................................................................... 115
Statutory Compliance .................................................................................... 115
Export to Excel and Other Formats ................................................................... 120

©Tally Solutions Pvt Ltd Page 4 of 122
Installation
To begin with Tally.ERP 9 we need to install the software on the computer.
Installation of Tally.ERP 9 is a simple and quick process.
1. After placing the CD „Engagement CD’ in the CD drive, open Tally folder.
2. Double click on the install.exe file
3. The Tally.ERP 9 installation setup wizard appears as shown below:
4. Click on Next to go to the next step, i.e. version selection.
5. Select Single User and click Next

©Tally Solutions Pvt Ltd Page 5 of 122
6. In this step, either accept the default Application Directory, Data Directory,
Configuration Directory, Language Directory and License Directory or
configure new ones by browsing and selecting. Click Next.

©Tally Solutions Pvt Ltd Page 6 of 122
7. In the Country/Language Selection screen select India/SAARC as Country and
English as Startup Language. Click Install to complete the process.

©Tally Solutions Pvt Ltd Page 7 of 122
8. The Setup Status screen appears as shown below
9. The Setup process is completed within seconds and the message “Tally.ERP 9
Installed Successfully” appears. To launch Tally.ERP 9 click Finish.
The Installation process is now complete.

©Tally Solutions Pvt Ltd Page 8 of 122
Company Creation Let us see how to create a company in Tally.ERP 9.
For this, go to:
Gateway of Tally > Press C or click on Create Company in the Company Info
menu
A blank Company Creation screen appears as shown below:
We will now fill in the company details as follows:
1. Enter the name of the Company as ABC Company.
2. In the Statutory Compliance for field, select India.
3. Select the State as Karnataka.

©Tally Solutions Pvt Ltd Page 9 of 122
4. In the Financial Year from, i.e. the starting date of the financial period of
12 months for the Company, enter 01 Apr 2011.
After the details have been specified, the Company Creation screen appears as
displayed below:
5. Press Y or Enter or Ctrl +A to accept the screen.
Now, ABC Company has been successfully created in Tally.ERP 9.
TallyVault
TallyVault is a feature of Tally.ERP 9 which helps in maintaining confidentiality of
information by data encryption.
TallyVault Creation
To enable TallyVault follow the steps given below:
Go to:
Gateway of Tally > Press Alt + F3 or click on F3: Cmp Info button to display the
Company Info screen.
Here, press T or click on Change TallyVault as shown:

©Tally Solutions Pvt Ltd Page 10 of 122
Change TallyVault screen appears as shown below:
1. Select the Company for which TallyVault is to be created, from the List of
Companies. Here, select ABC Company.
2. Enter the TallyVault Password.
3. Repeat the password in the next field and press Enter.
A new dialog box appears.

©Tally Solutions Pvt Ltd Page 11 of 122
4. Press Y or Enter to accept the New TallyVault Password.
Name of Company with TallyVault is Hidden
ABC Company has now been encrypted and a new company **10002** is created.
It can be opened only by specifying the TallyVault password. User can delete the
original company if required and simply work on the newly created encrypted file.
To open the TallyVaulted ABC Company,
Go to:
Gateway of Tally > Press Alt + F3 and press S or click on Select Company in the
Company Info menu.
The Select Company screen appears as shown below:

©Tally Solutions Pvt Ltd Page 12 of 122
As you can see, there is now a company with only **** showing, which indicates a
TallyValut company.
1. Select the company with name starting ** (number 10002). This is the
Company ABC whose name is now hidden.
2. Enter the TallyVault Password in the Dialog Box that appears as shown
below:
3. Press Enter.
Once the Password is entered, ABC Company gets loaded and Gateway of Tally
screen appears.
Ledger Creation
Let us now see the process of creation of Ledgers. To start with, we will create three
Ledgers – Conveyance, Electricity and Office Rent.
To create a Ledger - Conveyance,
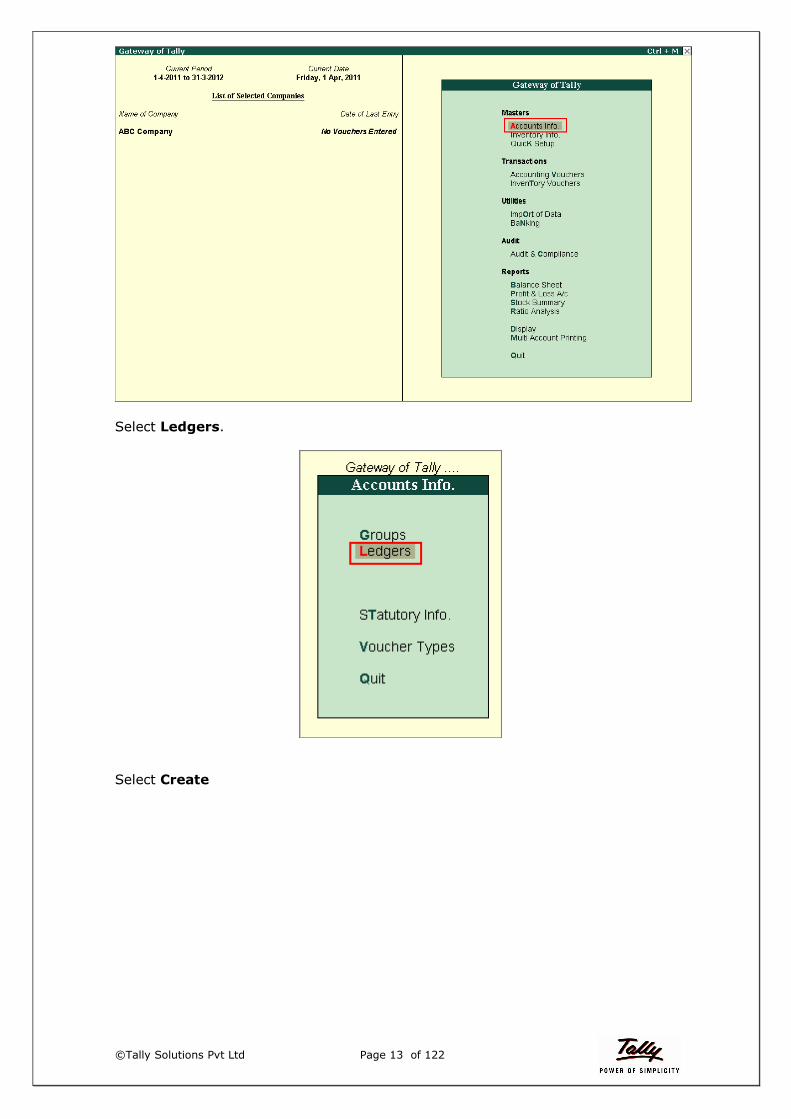
Go to Gateway of Tally > Accounts Info > Ledgers > Create
From Gateway of Tally, select Accounts Info.
©Tally Solutions Pvt Ltd Page 13 of 122
Select Ledgers.
Select Create

©Tally Solutions Pvt Ltd Page 14 of 122
A new Ledger Creation screen appears as shown below:
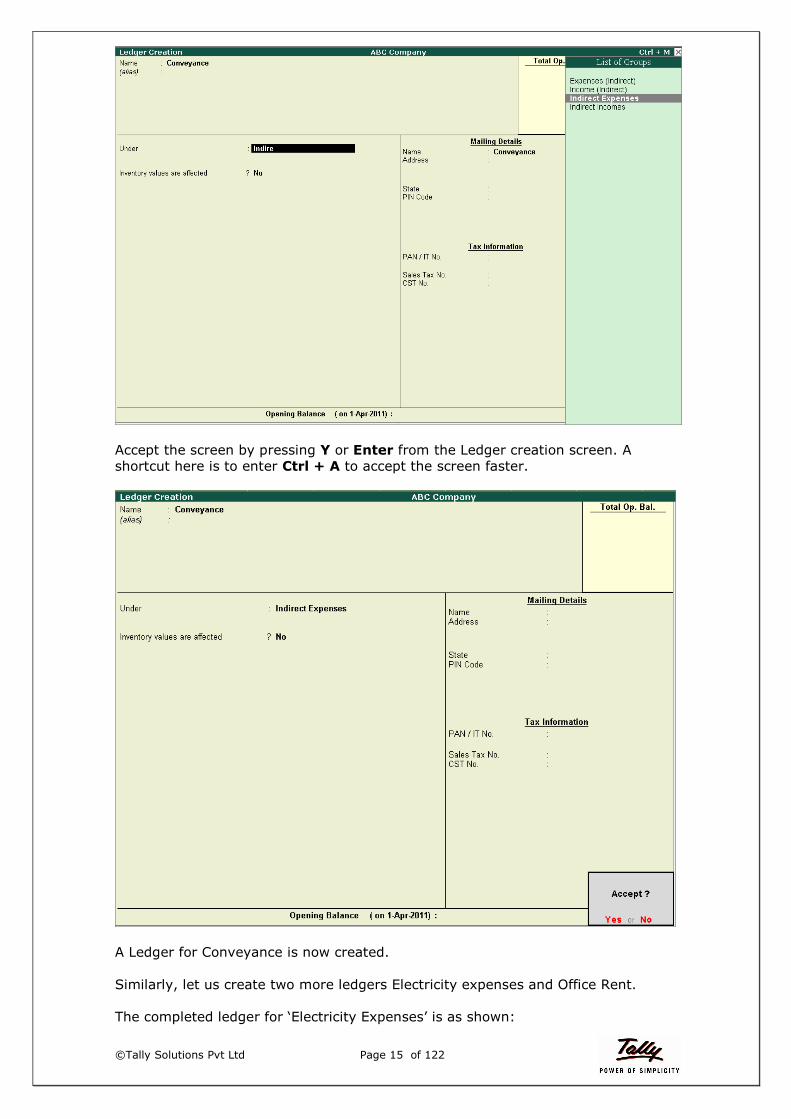
Specify the Name of the ledger as Conveyance in the Name field.
Select the group under which the ledger is created – Indirect Expenses from the
List of Groups as shown below:
©Tally Solutions Pvt Ltd Page 15 of 122
Accept the screen by pressing Y or Enter from the Ledger creation screen. A
shortcut here is to enter Ctrl + A to accept the screen faster.
A Ledger for Conveyance is now created.
Similarly, let us create two more ledgers Electricity expenses and Office Rent.
The completed ledger for „Electricity Expenses‟ is as shown:

©Tally Solutions Pvt Ltd Page 16 of 122
The completed ledger for „Office Rent‟ is as shown:

©Tally Solutions Pvt Ltd Page 17 of 122
Auto-capitalisation
Let us now see a powerful capability of Tally.ERP 9 which is Auto-capitalisation.
To view how this functionality works, let us go back to the Ledger Creation screen.
In the Name field of the Ledger creation screen, while specifying the name of the
ledger, the person typing the ledger name need not be conscious about the
capitalisation of the ledger name. Tally.ERP 9 gives you the capability for capitalising
the relevant letter of the word. For example in the name State Bank of India, ‘S’,
‘B’ and ‘I’ should to be capitalized, and ‘o’ in ‘of’ should not.
Let us take this example of the ledger State Bank of India.
The first letter of the word State is automatically capitalised.
Type the second word Bank with the first letter of the word i.e. ‘b’ in lower-case.
While typing the second letter of the word, Tally.ERP 9 automatically capitalises the
first letter B.
The word „of‟ is recognized by Tally as a preposition and the letter „o‟ automatically
comes in Lower-case.
Similarly, while typing the 4th word with the first letter in lower-case, Tally.ERP 9
instantly capitalises the first letter.

©Tally Solutions Pvt Ltd Page 18 of 122
The completed ledger name State Bank of India is shown below:
TallyFit
TallyFit is an extremely useful capability of Tally.ERP 9 which enables a person to
enter any number of details (letters or amounts) without worrying about how the
same would fit in case it is bigger than the field width.
To understand how this functionality works, let us go back to the Ledger Creation
screen.
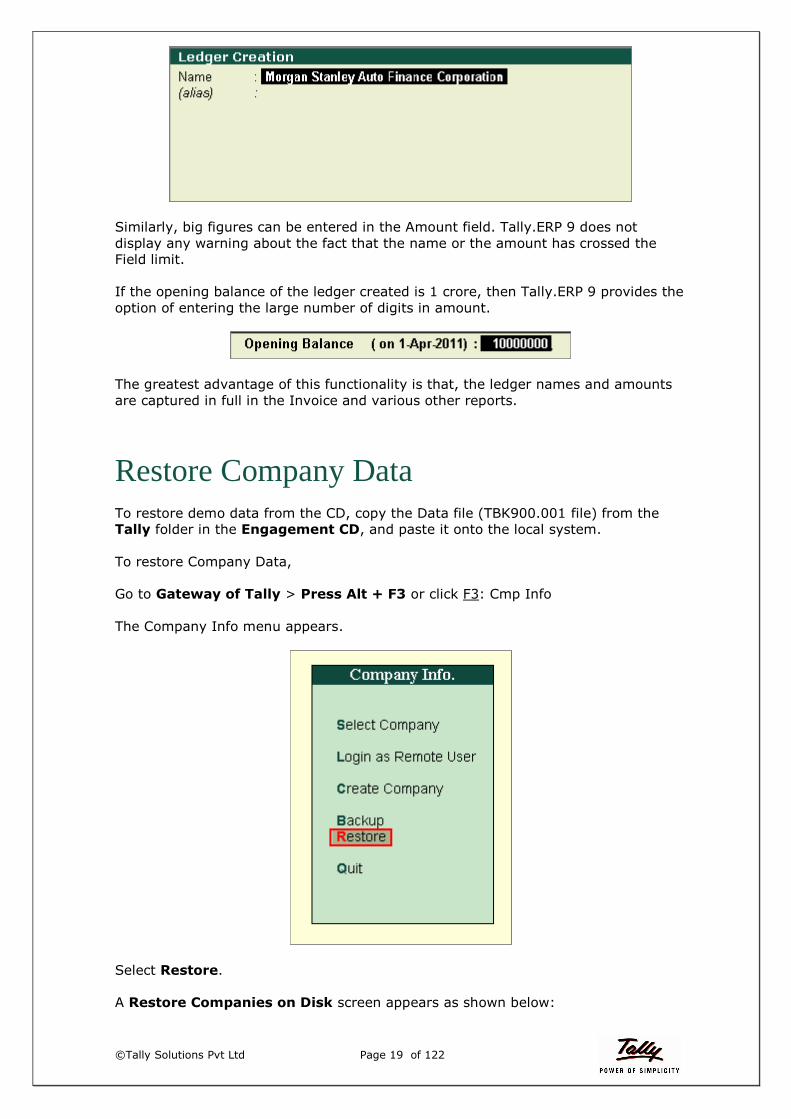
Let us create a ledger - Morgan Stanley Auto Finance Corporation.
Though the Name field in this screen is smaller in width than the Ledger Name, the
complete Ledger Name can be entered here.
Specify the Name of the ledger. You can now see that Tally.ERP 9 automatically fits
the ledger name according to the size and width of the Name field.
©Tally Solutions Pvt Ltd Page 19 of 122
Similarly, big figures can be entered in the Amount field. Tally.ERP 9 does not
display any warning about the fact that the name or the amount has crossed the
Field limit.
If the opening balance of the ledger created is 1 crore, then Tally.ERP 9 provides the
option of entering the large number of digits in amount.
The greatest advantage of this functionality is that, the ledger names and amounts
are captured in full in the Invoice and various other reports.
Restore Company Data
To restore demo data from the CD, copy the Data file (TBK900.001 file) from the
Tally folder in the Engagement CD, and paste it onto the local system.
To restore Company Data,
Go to Gateway of Tally > Press Alt + F3 or click F3: Cmp Info
The Company Info menu appears.
Select Restore.
A Restore Companies on Disk screen appears as shown below:

©Tally Solutions Pvt Ltd Page 20 of 122
Enter the Destination path where the data folder is to be restored to.
Specify the Source path where the TBK.900.001 exists.
Note: Content can be copied in Tally.ERP 9 by pressing Ctrl+Alt+C.
Similarly, content can be pasted in Tally.ERP 9 by pressing Ctrl+Alt+V.
Now, press Enter.
The List of companies for which data can be restored will be displayed as shown
below:

©Tally Solutions Pvt Ltd Page 21 of 122
Select the required company from List of Companies displayed to restore the
company data. Here we have restoring for Universal Enterprises, similarly you can
restore data for Victor Trading Company.
Press Y or Enter to continue restoring the data.
Once complete, the Data folder will appear in the destination folder.

©Tally Solutions Pvt Ltd Page 22 of 122
Voucher Entry
Tally.ERP 9 provides easy recording of transactions for a user.
Let us now take an example of creating a voucher for – Payment of conveyance
expense by cash to John.
To create a payment voucher,
Go to Gateway of Tally,
Select Accounting Vouchers and press F5.
A blank Payment voucher appears

©Tally Solutions Pvt Ltd Page 23 of 122
Specify the date as per requirement and press Enter.
Press C to select Cash. Then select Conveyance Expense.
Specify the amount and press Enter.
Press Enter twice and specify the narration in the Narration field – Paid to John.

©Tally Solutions Pvt Ltd Page 24 of 122
Press Enter twice or press Ctrl+A to accept the screen.
A Payment Voucher is now created.
Similarly create a Payment voucher for the transaction – Paid conveyance
expenses to James by cash. The completed voucher screen is as shown below:

©Tally Solutions Pvt Ltd Page 25 of 122
If a transaction for the next day is to be recorded, then just press F2 and Enter.
If a transaction is to be recorded for any date, then press F2, specify the date and
press Enter.
Let us take an example of changing the date and recording a voucher entry: Paid
Electricity charges on 3rd May 2011.
To change the date and record a voucher, press F2.
Specify the date.
Press Enter.
Now, record the transaction in a payment voucher.

©Tally Solutions Pvt Ltd Page 26 of 122
Accept the screen to save the payment voucher.
Flexibility in entering date
Different people have different styles of writing dates. Tally.ERP 9 provides a facility
to the users to follow their own format of entering a date rather than restricting
them to enter the date in a fixed format.
Now, let us enter the date in different formats:
These are some samples of date formats. Any other date format is also accepted for
better convenience of the user.
Dynamic creation of ledger
Tally.ERP 9 understands the user‟s needs and thus provides the facility of Dynamic
creation of ledger. This means that if the user is, say, on a Voucher Creation screen
and suddenly requires to create a new ledger, he need not come out of the Voucher
Creation screen. The user can create ledgers directly from the Voucher entry.

©Tally Solutions Pvt Ltd Page 27 of 122
Let us now take an example of Printing and Stationery expenses paid.
To create a payment voucher,
Go to Gateway of Tally > Accounting Vouchers > Press F5 or click on F5:
Payment.
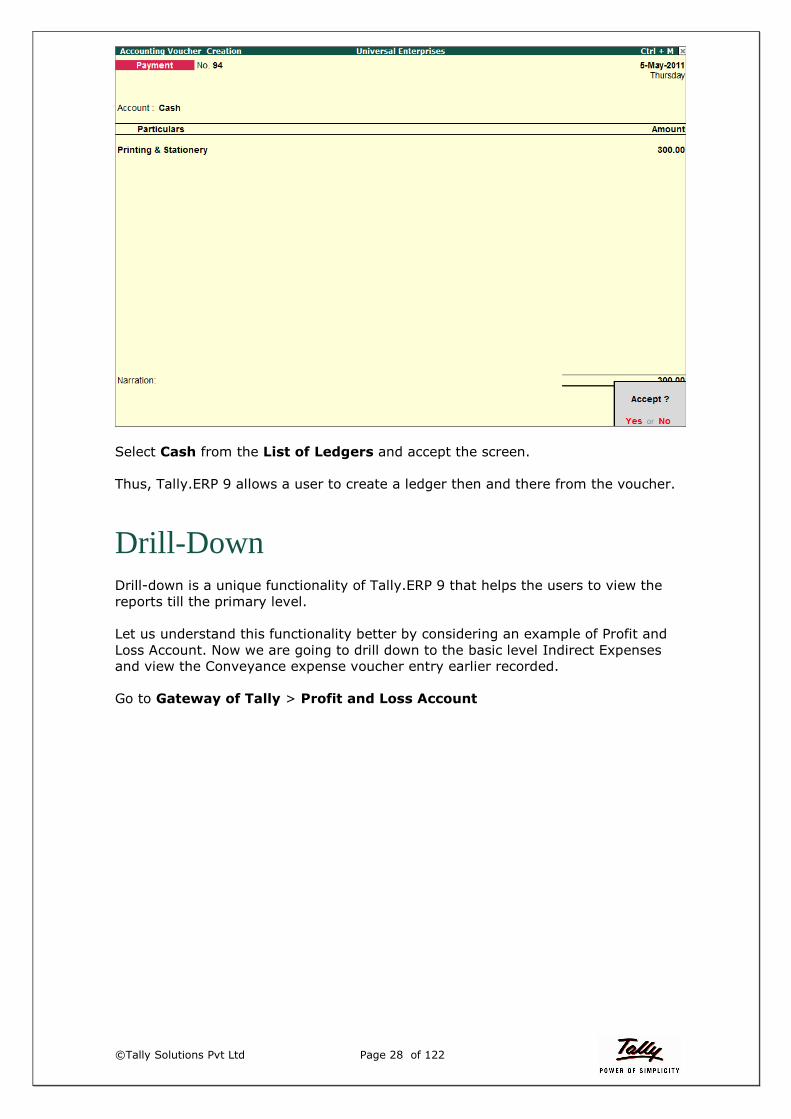
In the Debit field, type Printing & Stationery. Here the ledger is not available in
the List of Ledgers; hence a new ledger has to be created.
Press Alt+C from the Debit field. A Ledger creation screen appears as shown
below:
Specify the required details and accept the Ledger creation screen to create a
ledger.
The new ledger created will now appear in the field.
©Tally Solutions Pvt Ltd Page 28 of 122
Select Cash from the List of Ledgers and accept the screen.
Thus, Tally.ERP 9 allows a user to create a ledger then and there from the voucher.
Drill-Down
Drill-down is a unique functionality of Tally.ERP 9 that helps the users to view the
reports till the primary level.
Let us understand this functionality better by considering an example of Profit and
Loss Account. Now we are going to drill down to the basic level Indirect Expenses
and view the Conveyance expense voucher entry earlier recorded.
Go to Gateway of Tally > Profit and Loss Account

©Tally Solutions Pvt Ltd Page 29 of 122
Select Indirect Expenses group.
In the Group Summary screen, select Conveyance Expenses.

©Tally Solutions Pvt Ltd Page 30 of 122
On selecting the Conveyance expenses, the Month Summary of the ledger will
be displayed. Press Enter.
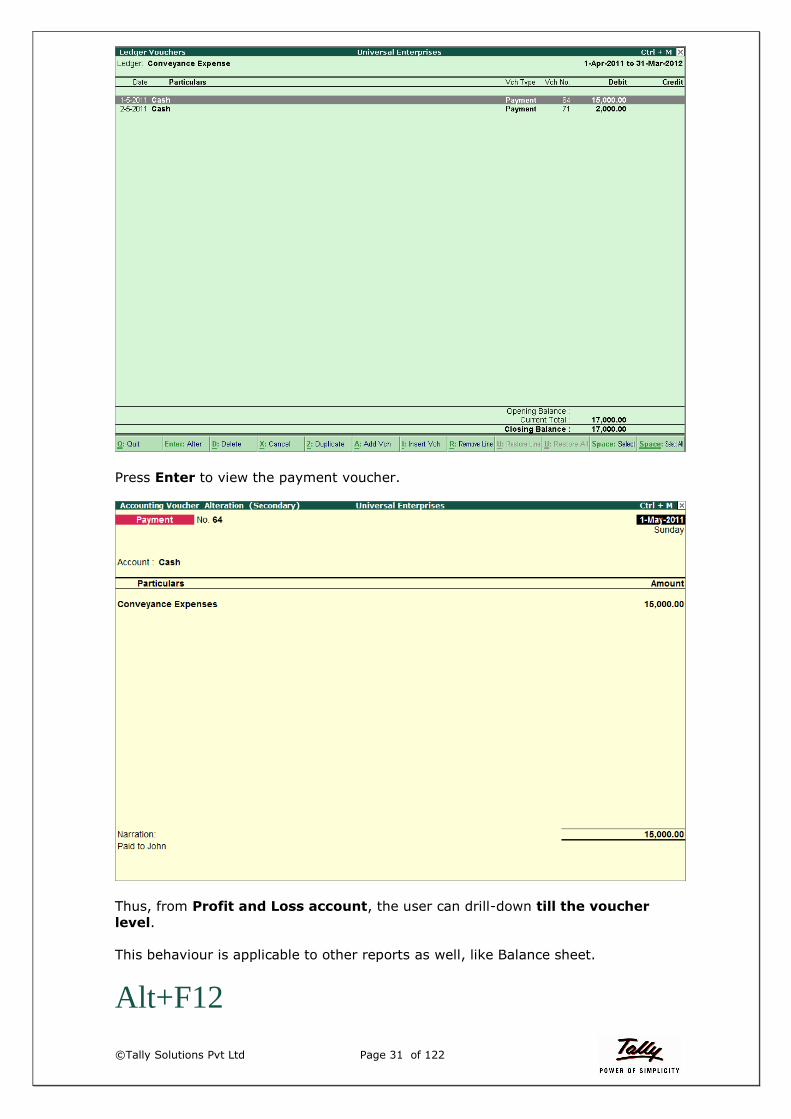
Select the transactions for the month of May, and press Enter. The list of vouchers
recorded using Conveyance Expenses will appear as shown below:
©Tally Solutions Pvt Ltd Page 31 of 122
Press Enter to view the payment voucher.
Thus, from Profit and Loss account, the user can drill-down till the voucher
level.
This behaviour is applicable to other reports as well, like Balance sheet.
Alt+F12

©Tally Solutions Pvt Ltd Page 32 of 122
Tally.ERP 9 enables its users to extract a particular type of voucher from a list of
vouchers, even if the selection is with reference to information added in the
Narration field.
Extracting Information from Voucher Narration
Tally.ERP 9 provides users the ability to extract information from the voucher
Narration.
Example: We have already created two payment vouchers (Conveyance expense).
Let us find out the details regarding payment to John for Conveyance expense.
For this,
From Gateway of Tally, go to Display.
Select Account Books.

©Tally Solutions Pvt Ltd Page 33 of 122
Select Ledger.
Select the Conveyance Expense ledger from the Names of Ledgers.

©Tally Solutions Pvt Ltd Page 34 of 122
Press Enter to view the list of vouchers recorded using Conveyance Expense
Ledger.
Press Alt+F12 or click on F12: Range to display a Range of Information in
Report screen. Select Voucher.
Select Narration from the particulars to filter by specifying the narration.

©Tally Solutions Pvt Ltd Page 35 of 122
Select containing to filter the vouchers on the basis of any word mentioned in the
narration.
In the fourth column, specify John.

©Tally Solutions Pvt Ltd Page 36 of 122
Now, press Enter.
Select the voucher and press Enter to view the voucher entry.
The voucher entry recorded for payment to John is easily available now.

©Tally Solutions Pvt Ltd Page 37 of 122
Unlimited Classification
Tally.ERP 9 allows users to create any number of levels/sub-groups you want,
depending upon their requirement. There is no restriction in structuring your
accounts. Let us see the example of this through the Balance Sheet. Go to, Gateway of Tally and select Balance Sheet.
Here select the group Current Assets as shown:
Drill down to Sundry Debtors till the point where the 1st level Groups are visible

©Tally Solutions Pvt Ltd Page 38 of 122
Here Press Alt+F1 to see the detailed view of the screen.
Next, press F:12 and Set Yes to Expand all levels in detailed format as shown:

©Tally Solutions Pvt Ltd Page 39 of 122
Save this screen. The Group Summary now shows all sub-groups and ledgers and
the fact that this is unlimited is clearly visible through this screen.
Dynamic re-classification
There are chances that changes have to be made in the group of the ledger in case
of re-structuring of accounts. Tally.ERP 9 allows a user to alter the group of the
ledger at any point of time.
To get a better understanding on this, let us take the case of a ledger grouped under
Sundry Debtor.
This type of re-classification can be done from reports like Balance Sheet, List of
Accounts etc.
From Gateway of Tally, select Balance Sheet.

©Tally Solutions Pvt Ltd Page 40 of 122
In the Balance sheet, select Current Assets appearing on the Asset side.
Press Enter to display its sub-ledgers in the Group Summary report. Drill-down till
the primary level and select the ledger for which the group is to be altered.
Press Ctrl+Enter to display Ledger Alteration screen.

©Tally Solutions Pvt Ltd Page 41 of 122
Change the group of the ledger to Loans & Advances (Asset) and accept the
screen.
Now the ledger (for which alteration was done) will not appear here.
Press Escape and go back to the first level of Current Assets. Select Loans &
Advances (Asset).
Press Enter to view the ledgers under Loans & Advances (Asset).
The ledger will now be available for display under Loans & Advances (Asset).
Comparison Reports Tally.ERP 9 facilitates comparison of reports across periods.
To view a comparative Balance Sheet:
1. Press Alt + C or click on C: New Column to create an additional column for
comparison purpose.

©Tally Solutions Pvt Ltd Page 42 of 122
2. In the Column Details screen that appears, enter April in the From field
and Feb in the To field.
3. Press Ctrl+A to accept the screen.
A comparative Balance Sheet appears as shown below:

©Tally Solutions Pvt Ltd Page 43 of 122
Similarly, Profit & Loss A/c can be configured to show monthly balances.
In Gateway of Tally, press P to display the Profit & Loss A/c of Universal
Enterprises.
Profit & Loss A/c appears as shown below:
To show a month-wise comparison of Profit & Loss A/c figures,
1. Press Alt+N or N: Auto Column and select Monthly from Column Details.
Press Enter to view a month-wise Profit & Loss A/c.

©Tally Solutions Pvt Ltd Page 44 of 122
Profit & Loss A/c appears as shown below:
Sales Register
To view the Sales Register from the month-wise configured Profit & Loss A/c,
follow the steps given below:
1. In the Monthly Profit & Loss A/c, place the cursor on the Sales Account and
drill-down to Group Summary Level as shown below:
The Ledger Monthly Summary report appears.
©Tally Solutions Pvt Ltd Page 45 of 122
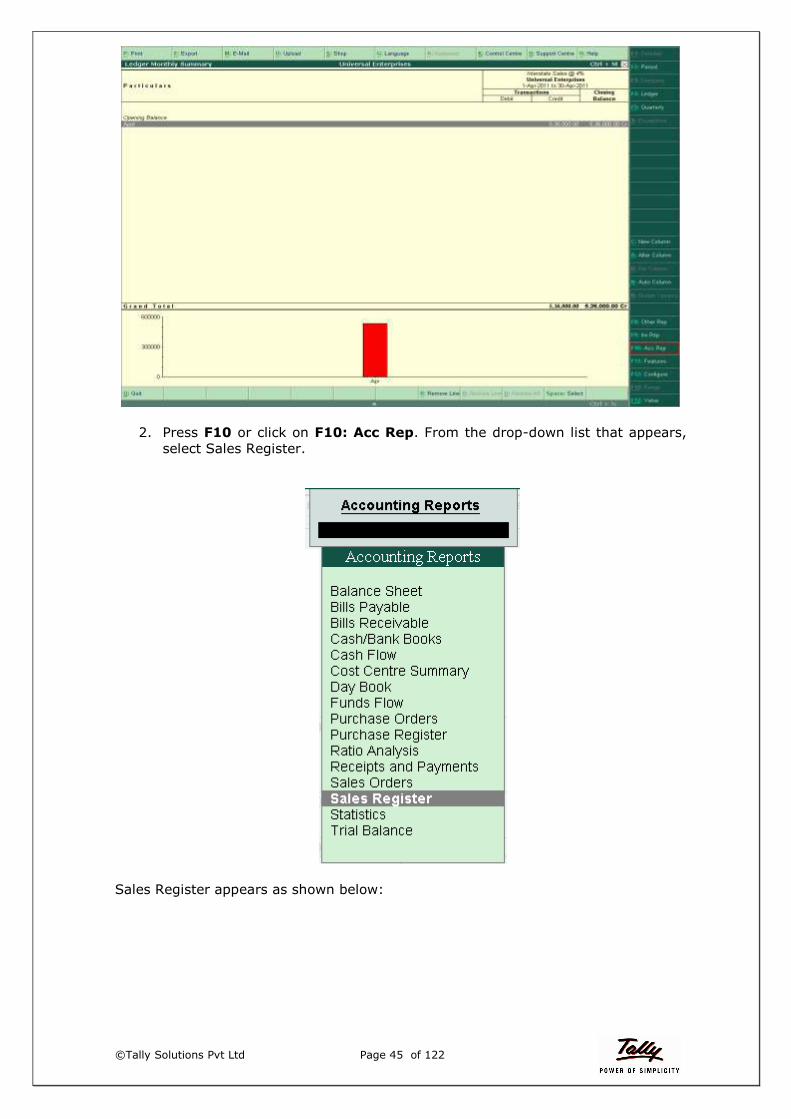
2. Press F10 or click on F10: Acc Rep. From the drop-down list that appears,
select Sales Register.
Sales Register appears as shown below:

©Tally Solutions Pvt Ltd Page 46 of 122
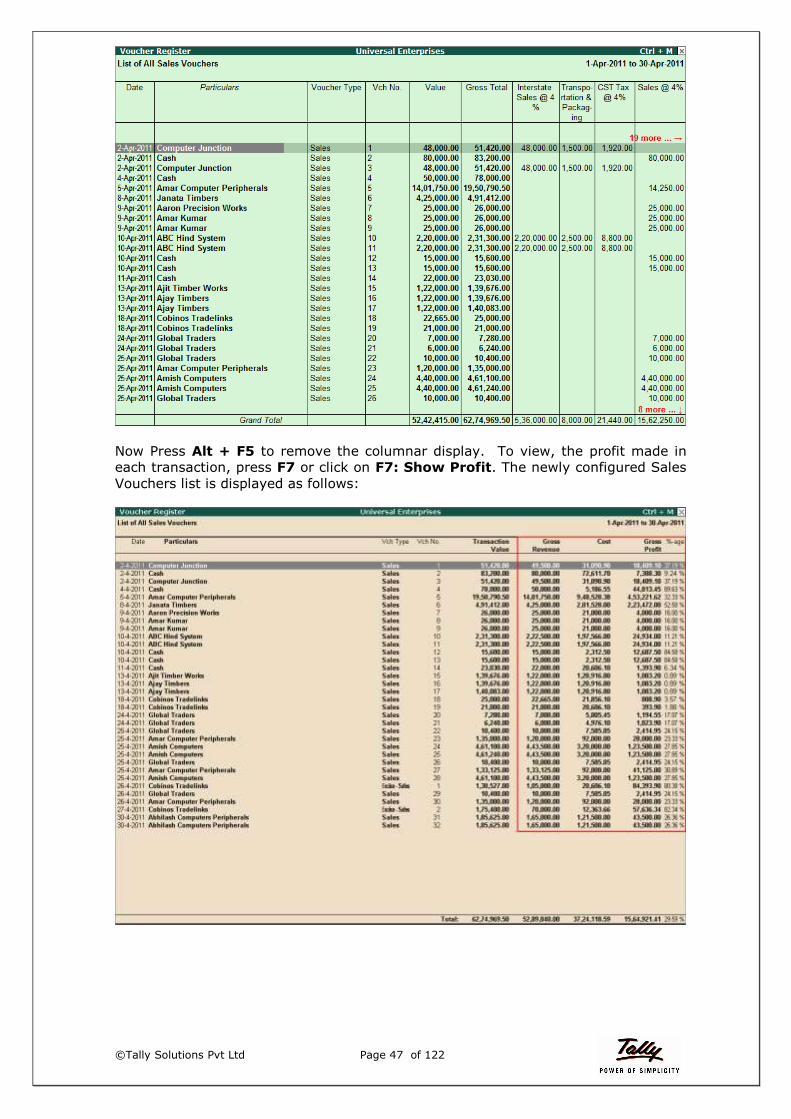
3. Press Enter to view the list of Sales Vouchers for the month of April.
To view this report in columnar format, press F5 and accept all prompts. The
Columnar Sales Register is shown as below:
©Tally Solutions Pvt Ltd Page 47 of 122
Now Press Alt + F5 to remove the columnar display. To view, the profit made in
each transaction, press F7 or click on F7: Show Profit. The newly configured Sales
Vouchers list is displayed as follows:

©Tally Solutions Pvt Ltd Page 48 of 122
Bills Receivable
From the Sales Register, press F10 to view the list of Accounting Reports and
select Bills Receivable from the list as shown below:
Bills Receivable report appears as displayed below:

©Tally Solutions Pvt Ltd Page 49 of 122
Ageing Analysis of Bills Ageing analysis of Bills Receivable is performed to find out which bill has been
due for how long a time.
Follow the steps given below to initiate Ageing Analysis:
1. In the Bills Receivable Report, press F6 or click on F6: Age wise as
displayed below:
A sub-screen Ageing Analysis appears where the ageing method needs to be
selected.
2. Select Ageing by Due Date and press Enter
Company Ageing Alteration screen appears as displayed below:

©Tally Solutions Pvt Ltd Page 50 of 122
3. Set the appropriate time period and press Y or Enter to accept the screen.
The Bill Outstanding Report appears as shown below with the ageing analysis:
Payment Performance of Debtors One of the most critical needs of any business is smooth Cash flow. And, this can be
regulated by ensuring timely collections by customers.
Tally provides a great way to see the payment performance of debtors.
For this, go to:
Gateway of Tally > Press R or enter on Ratio Analysis.

©Tally Solutions Pvt Ltd Page 51 of 122
This will display the Ratio Analysis screen as below:
Go to Recv. Turnover in days on the right side and press Enter.
This report tells you, on an average, in how much time, a business is able to collect
payment from its customers.
©Tally Solutions Pvt Ltd Page 52 of 122
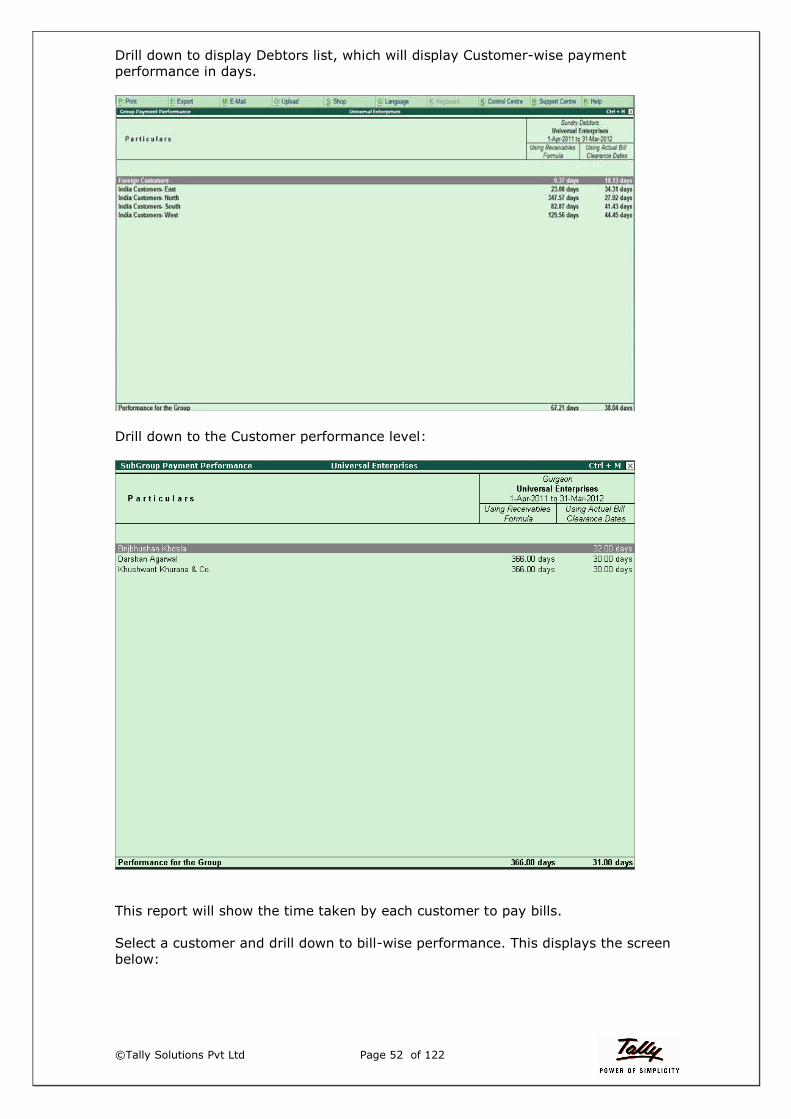
Drill down to display Debtors list, which will display Customer-wise payment
performance in days.
Drill down to the Customer performance level:
This report will show the time taken by each customer to pay bills.
Select a customer and drill down to bill-wise performance. This displays the screen
below:

©Tally Solutions Pvt Ltd Page 53 of 122
This screen displays the bill-wise performance of a particular customer and shows
the number of days that the customer has taken to pay each bill.
Multiple Stock Valuation Methods
Tally.ERP 9 supports multiple stock valuation methods.
Item-wise valuation
To understand the effect of stock valuation item-wise method, let us first create an
item:
Go to,
Gateway of Tally > Inventory Info > Stock Item > Create
1. Create a new Stock Item, Samsung Laserjet 2000.

©Tally Solutions Pvt Ltd Page 54 of 122
2. To select the costing method, first enable the option Allow Advanced
Entries in Masters in F12 Configuration sub-screen as shown below.
3. Now, select the Costing Method as FIFO

©Tally Solutions Pvt Ltd Page 55 of 122
4. Accept the screen by pressing Y or Enter.
Changeable at Will
Tally.ERP 9 provides the user the flexibility to change the costing method at will.
To change the Costing method, follow the steps given below:
Go to,
Gateway of Tally > Inventory Info > Stock Items > Alter
1. Select the required Stock Item from the drop-down list, say, Calibration Kit.
2. In the field Costing Method, select the Costing Method Last Purchase Cost
as against Avg. Cost.

©Tally Solutions Pvt Ltd Page 56 of 122
3. Press Ctrl+A to accept the change.
The costing method has been changed.
All methods always available
The user can view the effect of the Stock Valuation methods anytime on the Stock
Summary and the Balance Sheet.
Stock Summary
Gateway of Tally > Stock Summary
1. In the Stock Summary, press Alt+N or click on N: Auto Column
2. Select Stock Valuation Methods in the Column Details and press Enter
Stock Summary appears as shown below:
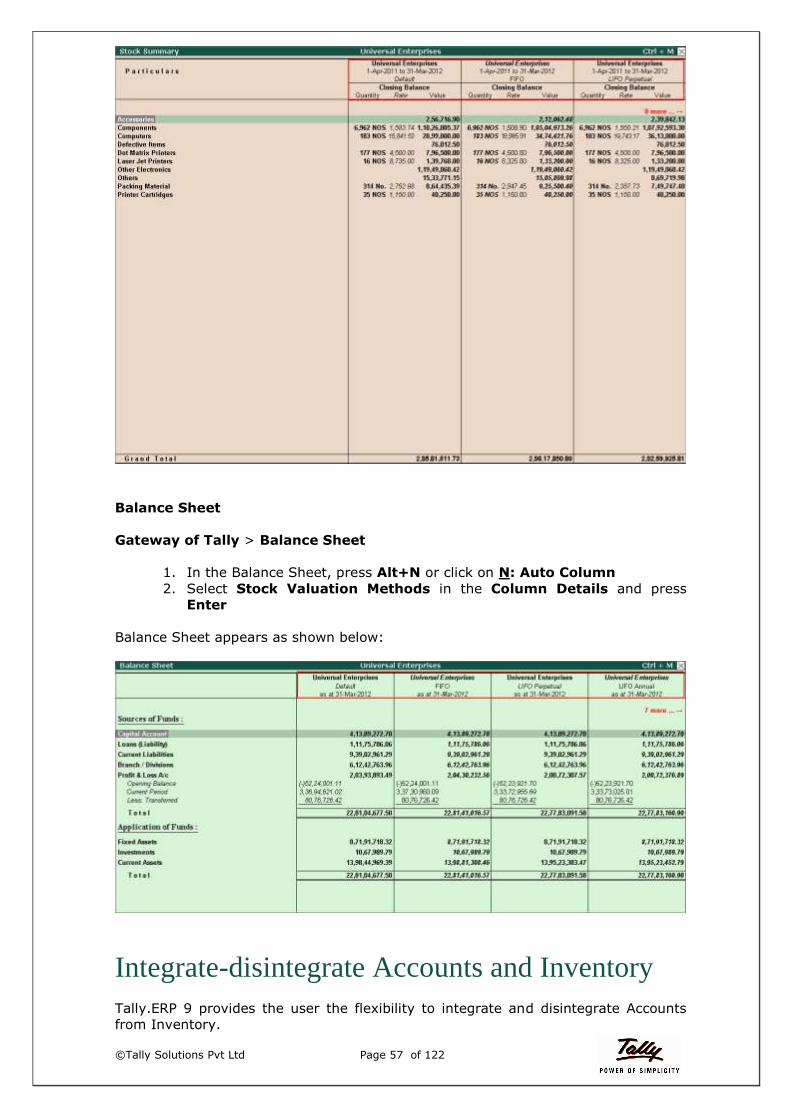
©Tally Solutions Pvt Ltd Page 57 of 122
Balance Sheet
Gateway of Tally > Balance Sheet
1. In the Balance Sheet, press Alt+N or click on N: Auto Column
2. Select Stock Valuation Methods in the Column Details and press
Enter
Balance Sheet appears as shown below:
Integrate-disintegrate Accounts and Inventory
Tally.ERP 9 provides the user the flexibility to integrate and disintegrate Accounts
from Inventory.

©Tally Solutions Pvt Ltd Page 58 of 122
Let us take an example to understand this feature better:
Go to, Gateway of Tally > Balance Sheet > Current Assets
1. Press Enter to drill down to the Group Summary Level and select Closing
Stock.
Closing Stock displays a particular value.
2. Now, press F11 and in the Accounting Features, set the option Integrate
Accounts with Inventory to No.

©Tally Solutions Pvt Ltd Page 59 of 122
3. Press Ctrl+A to accept the change.
4. Now that Accounts and Inventory are disintegrated, the Inventory value will
not be automatically taken and hence, Closing Stock will display nil value.
In this case, the user can manually enter value for his Closing Stock.
5. Press Enter on Closing Stock and drill down to Stock-in-Hand Ledger.
6. In the Stock-in-Hand Alteration screen, enter the Closing Balance date
as 31.3.2012 and amount as, say, 20,000.
The screen appears as shown below:

©Tally Solutions Pvt Ltd Page 60 of 122
7. Press Y or Enter to accept the screen.
Now, the Closing Stock will display a value of 20,000.

©Tally Solutions Pvt Ltd Page 61 of 122
Auto-Backup Automated Backup or Auto Backup is a capability that automatically takes data
backup in the background without any disturbance or affecting work of the user.
To enable Auto- backup capability in Tally.ERP 9:
Go to Company Alteration screen of the company, by pressing Alt+F3 on the
Gateway of Tally and selecting Alter as shown:

©Tally Solutions Pvt Ltd Page 62 of 122
Select the company Universal Enterprises. In the Company Alteration screen, set
Yes to Enable Auto Backup as shown:
Save the Company Alteration screen, by pressing Ctrl + A. On doing this, the
Auto-backup capability in Tally.ERP 9 will relieve the user from the burden of
remembering to take a backup, as this would be done automatically.
Now to see the location of the stored Data File backup, come back to the Gateway
of Tally and Press F:12 > Data configuration as shown:
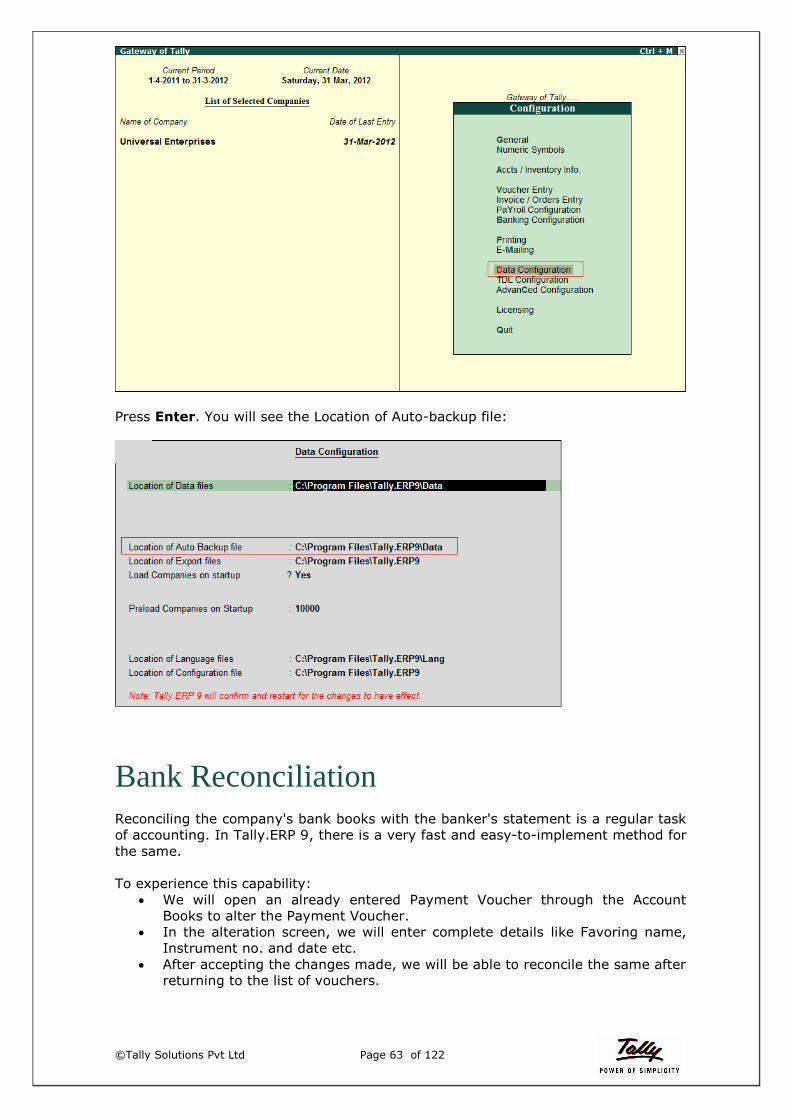
©Tally Solutions Pvt Ltd Page 63 of 122
Press Enter. You will see the Location of Auto-backup file:
Bank Reconciliation
Reconciling the company's bank books with the banker's statement is a regular task
of accounting. In Tally.ERP 9, there is a very fast and easy-to-implement method for
the same.
To experience this capability:
We will open an already entered Payment Voucher through the Account
Books to alter the Payment Voucher.
In the alteration screen, we will enter complete details like Favoring name,
Instrument no. and date etc.
After accepting the changes made, we will be able to reconcile the same after
returning to the list of vouchers.

©Tally Solutions Pvt Ltd Page 64 of 122
Go to, Gateway of Tally > Display > Account books > Cash/Bank book >
Select a bank a/c > say, HDFC Bank in this example as shown:
Drill down to a Payment voucher and open the Payment Voucher alteration screen:
In this screen, Enter the cheque number details and save as shown:

©Tally Solutions Pvt Ltd Page 65 of 122
Press escape to return to the list of vouchers and Press F:5 Reconcile button as
shown:
Here you can see the list of un-reconciled vouchers and the Reconciled Vouchers (if
the same is enabled through F12). The screen is shown as below:

©Tally Solutions Pvt Ltd Page 66 of 122
Hence, you can view all the details entered – this will help in reconciling each
transaction in a simple manner. Moreover, this will enable you to reconcile each
Instrument, rather than a voucher.
Cross-financial year reporting
In Tally.ERP 9, it is possible to easily obtain any report, across financial years,
without losing the sanctity of the defined financial year.
Let us see how this is done. First we need to change the financial period for the open
company. For this, go to,
Gateway of Tally > Press Alt+F2 > Change period to 1-1-2011 to 15-10-2011 as
shown:
Now, let us see the effect in the Profit and Loss Account, by going to:
Gateway of Tally > Press P: Profit & Loss a/c:

©Tally Solutions Pvt Ltd Page 67 of 122
Movement Analysis
Movement analysis report is used for comparative studies and gives an insight into
the flow of stock in an organization. It also helps in finding out the slow moving
items which cause blockages in the flow of the working capital of the organization.
For this, Go to Gateway of Tally > Display > Inventory Books > Movement
Analysis
Select Stock Group Analysis and enter into one stock group. You will see Inward
and Outward columns as shown:

©Tally Solutions Pvt Ltd Page 68 of 122
Identify fast and slow-moving items
Here, Press F:12,
Set Show Inwards to No
Set Show rate and value to No
Save this screen and exit. Now, you will see only one column showing Outward
quantity

©Tally Solutions Pvt Ltd Page 69 of 122
On this screen, press Alt+N > Select Monthly. The modified screen is as shown
below:
Identify best supplier:
To identify the best supplier, return to the Movement Analysis screen and select
Stock Item Analysis option as shown:

©Tally Solutions Pvt Ltd Page 70 of 122
Here select any Stock item and you will see a list of Suppliers and the Quantities,
Rates, Effective rates and Values.
This report identifies all Suppliers of this item with the Rates at which they have
supplied. The amount in the “Effective Rate” column gives the actual, landed cost for
this item and it includes charges like Freight, Carriage inward etc.
Lifting by a customer:
Through Movement Analysis in Tally.ERP 9 it is also possible to identify the monthly
lifting of Items by a specific customer. For this, return to the Movement Analysis
screen and select Ledger Analysis option as shown:

©Tally Solutions Pvt Ltd Page 71 of 122
Select any customer ledger and press Enter. A list of Stock Items with Inward and
Outward columns is displayed:
Press F:12 > and set the following fields to No:
Purchases
Rate
Value

©Tally Solutions Pvt Ltd Page 72 of 122
On doing this, only one column is shown – Sales quantity as displayed below:
To see the monthly Sales Quantity analysis, Press Alt+N > Select Monthly

©Tally Solutions Pvt Ltd Page 73 of 122
This can help a customer in identifying which specific product is not moving regularly
with a customer.
Stock Ageing analysis An Ageing Analysis Report in Tally.ERP 9 displays the age of the stock in hand.
For this, go to:
Gateway of Tally > Display > Inventory Books > Ageing Analysis as shown:
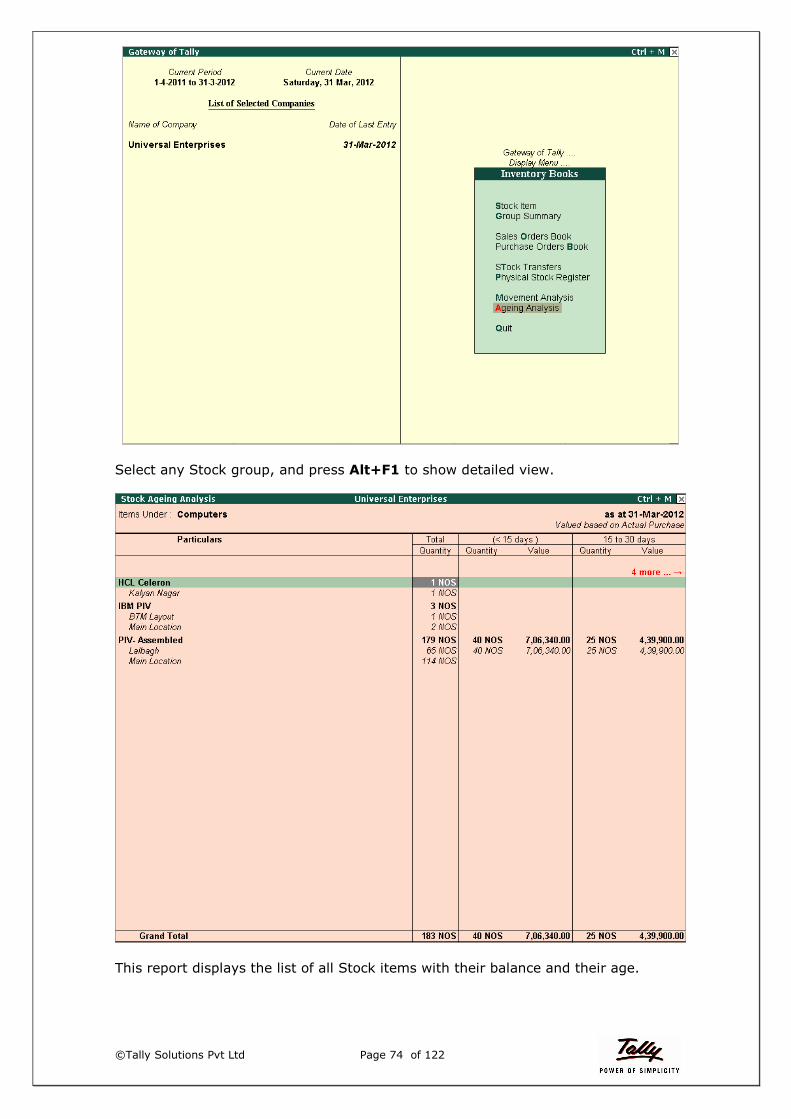
©Tally Solutions Pvt Ltd Page 74 of 122
Select any Stock group, and press Alt+F1 to show detailed view.
This report displays the list of all Stock items with their balance and their age.

©Tally Solutions Pvt Ltd Page 75 of 122
Press F6, and enter any period in place of default values. For e.g., 0 to 15, 15 to 30,
30 to 6o and so on as shown and click Yes or press Y.
This displays the screen below.
This report helps in easy identification of old non-moving stock.
Tracking Bills and Delivery Notes
In any business, there may be:
©Tally Solutions Pvt Ltd Page 76 of 122
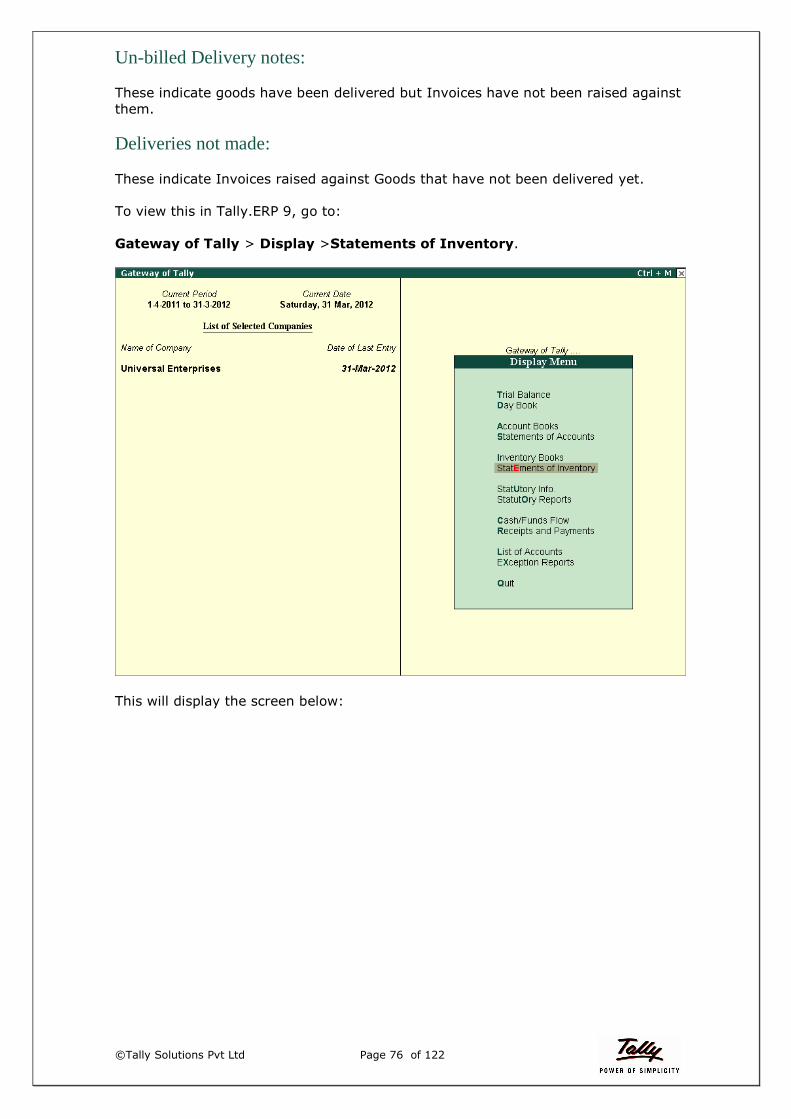
Un-billed Delivery notes:
These indicate goods have been delivered but Invoices have not been raised against
them.
Deliveries not made:
These indicate Invoices raised against Goods that have not been delivered yet.
To view this in Tally.ERP 9, go to:
Gateway of Tally > Display >Statements of Inventory.
This will display the screen below:

©Tally Solutions Pvt Ltd Page 77 of 122
Press B or enter on Sale Bills Pending.
The Sales Bills Pending report hence shows both Goods Un-billed Delivery notes and
Deliveries not made.

©Tally Solutions Pvt Ltd Page 78 of 122
Stock Query
The Stock query report provides complete information about the selected stock
item for e.g. Stock position of a selected stock item at any point of time, latest
purchase and sales, godown where such stock is available etc.
To view the Stock Query Report,
From Gateway of Tally, select Display > Statements of Inventory >Stock Query
Items of the same category
The list of stock Items which belong to the same category as the selected Item are
displayed in this section. This is useful when the selected stock item is not available
and to fulfil the demand of the customer, alternative stock items are offered.

©Tally Solutions Pvt Ltd Page 79 of 122
Top Buyers and Sellers
This functionality gives the names of the Top Buyers and Sellers for a stock item.
The list of Top Buyers and Sellers can be viewed on the basis of Value or Quantity,
depending on the requirement.
To view the list of Top Buyers and Sellers, click on F7: Top Buyers/Sellers or
press Ctrl+F7 from the Stock Query report.
A Top Buyers/Sellers reports screen appears for the selected stock item.

©Tally Solutions Pvt Ltd Page 80 of 122
By default, this report will be based on Value. To view the report on the basis of
Quantity, Press F4 or click on F4: On Quantity.
Multiple Godowns/Locations for Stock
Tally.ERP 9 helps in managing movement from and into each Godown and thereby
gives a bird‟s-eye view of the stock in different godowns.
To view the Godown / Location Summary Report,
Go to Gateway of Tally > Display > Statements of Inventory > Godowns
©Tally Solutions Pvt Ltd Page 81 of 122
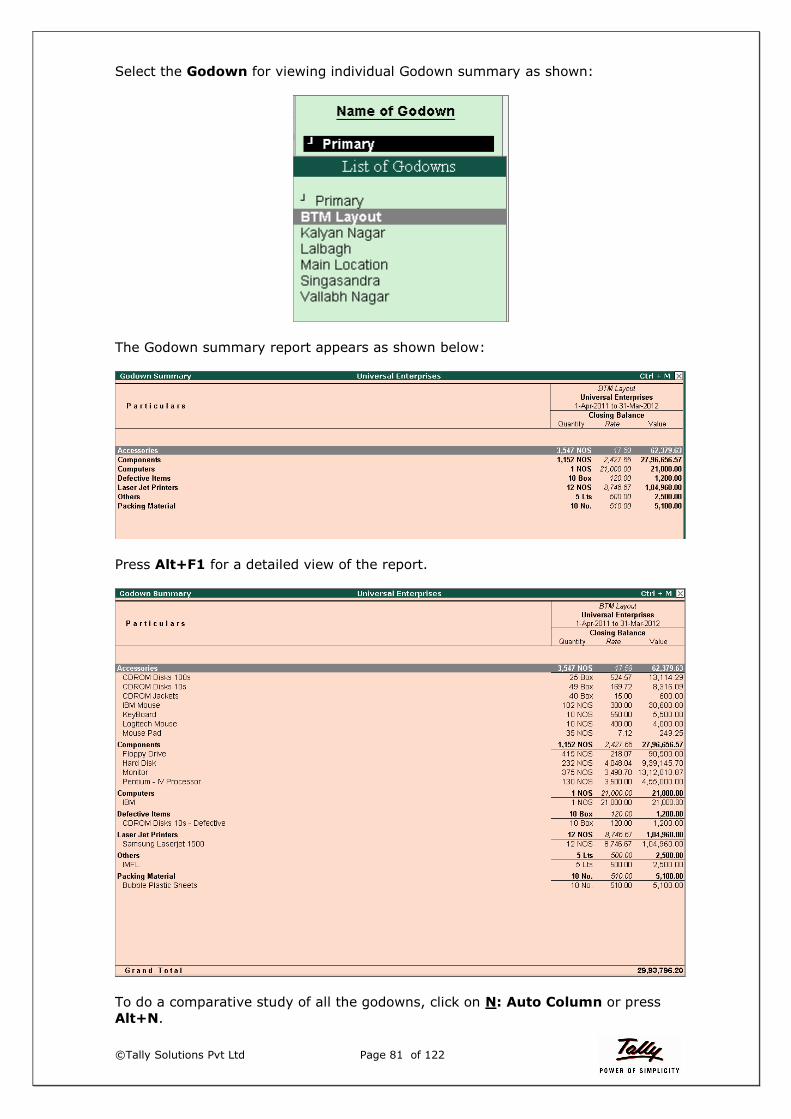
Select the Godown for viewing individual Godown summary as shown:
The Godown summary report appears as shown below:
Press Alt+F1 for a detailed view of the report.
To do a comparative study of all the godowns, click on N: Auto Column or press
Alt+N.

©Tally Solutions Pvt Ltd Page 82 of 122
Select Godowns:
Set Show Total Column to Yes to view the Total closing balance:
A Godown Summary displaying every individual godown as a separate column is
displayed as shown below:
Press the Right arrow key to view the other godowns:

©Tally Solutions Pvt Ltd Page 83 of 122
Many types of data like rates and values of the items lying in the godowns can be
removed from the report if required. For this, press F12 or click on F12: Configure.
A Configuration sub-screen appears as shown below:
Set Show Rates and Show Values to No and accept the configuration screen.
The Godown Summary report will now display only the stock items and the quantity
lying in every godown.

©Tally Solutions Pvt Ltd Page 84 of 122
Item-wise and Invoice-wise profitability
Tally.ERP 9 provides you the facility of determining Gross Margins earned on each
Stock Item. It helps in giving a better idea in terms of importance given to each
stock item.
To view Item-wise profitability,
From Gateway of Tally, select Stock Summary.

©Tally Solutions Pvt Ltd Page 85 of 122
The Stock Summary report appears as shown below:
To view Item-wise profitability from here, click F5: Item-wise or press F5 to
view all the items as shown below:

©Tally Solutions Pvt Ltd Page 86 of 122
Now, press F7 or click on F7: Show Profit to display the profit obtained on each
item.
To view Invoice-wise profitability, from the Stock Summary itself, press F10 or click
on the button F10: Acc Reports.
Select Sales Register from the list of Accounting Reports.

©Tally Solutions Pvt Ltd Page 87 of 122
Month-wise Sales Register report is displayed:
Press Enter on the required month to display all the Sales vouchers for that
particular month.

©Tally Solutions Pvt Ltd Page 88 of 122
To view Invoice-wise Profitability, press F7 or click on the button F7: Show
Profit from the list of Sales vouchers.
Flexible Units of Measure Tally.ERP 9 accepts multiple Units of Measure. To see this in action, Ledgers have to
be created first.

©Tally Solutions Pvt Ltd Page 89 of 122
Using the process shown in the Ledger creation section of this document, create the
following Ledgers:
- Ledger Sales under group Sales Accounts, set Inventory values are
affected to Yes and Accept all fields.
- Ledger Purchase under group Purchases, set Inventory values are
affected to Yes and Accept all fields
- Ledger Customer under group Sundry Debtors and Accept all fields.
- Ledger Supplier under group Sundry Creditors and Accept all fields.
Units of Measure will now need to be created.
From the Gateway of Tally, click Inventory Info and select Units of Measure.
Press C or Enter on Create as shown:
In the Unit Creation screen, create the Unit Nos as shown, and Accept the screen.

©Tally Solutions Pvt Ltd Page 90 of 122
Similarly, create the unit Kgs.
Stock Items would need to be created next. In the Inventory Info menu, press I or
enter on Stock Items and click Create. Press F12 to get the screen below:
On this screen, Set Use ALTERNATE UNITS for Stock Items to Yes and Accept
the screen.
In the Stock Item Creation screen below, create a Stock Item Pen as shown below
and Accept the screen.

©Tally Solutions Pvt Ltd Page 91 of 122
Here we have entered 2 units of measurement. This shows that each Stock
Item can be maintained in either one or two different units.
A Purchase and a Sales Invoice will now be entered to further understand the
ways in which Units of Measure is handled by Tally.ERP 9.
Go to Gateway of Tally and select Accounting Vouchers. In the Voucher entry
screen, press F9 and select Purchase. Enter the following information:
Select Supplier A as the Party’s A/c name.

©Tally Solutions Pvt Ltd Page 92 of 122
On the next screen shown below, press Ctrl+A to continue with the voucher
creation.

©Tally Solutions Pvt Ltd Page 93 of 122
For Purchase Ledger, select PURCHASE as shown:
Enter Pen as the Name of Item.

©Tally Solutions Pvt Ltd Page 94 of 122
Enter 10 in the Quantity field.

©Tally Solutions Pvt Ltd Page 95 of 122
This displays the screen below in which the Quantity field shows both 10 NOS and
100 Kgs as per the setting of 1 NOS = 10 Kgs.
Accept the screen and complete the transaction.
Say for a particular Purchase, 10 NOS Pens is not equal to 100 Kgs, but is actually
equal to 80 Kgs.
To have Tally accommodate this change, enter a different Purchase Bill and in the
Quantity field, enter 10 NOS = 80 Kgs as shown and Accept the screen. The
conversion ratio for a particular transaction can be changed this way.

©Tally Solutions Pvt Ltd Page 96 of 122
Now check the Stock statement to verify whether the stock balance is correct.
Go to Gateway of Tally, and select Stock Summary.

©Tally Solutions Pvt Ltd Page 97 of 122
The Stock Summary will display the correct stock-in-hand of the item Pen as
shown:
To know to know the number of Kgs that this stock is equal to, press F12 and set
Show using Alternate Units to Yes. Accept all fields.
This displays the Stock Item Pen in both Units in the Stock Summary screen shown
below:

©Tally Solutions Pvt Ltd Page 98 of 122
Go to Gateway of Tally and select Accounting Vouchers. In the Voucher entry
screen, press F8 and select Sales. Enter the following information:
Select Customer A as the Party’s A/c name and on the next window that is
displayed, press Ctrl+A to accept all fields.
Select Cash Sales as the Sales Ledger.
Enter Pen as the Name of Item.
Enter 10 in Quantity field, 20 in the Rate field; and Kgs in the Per field as shown:
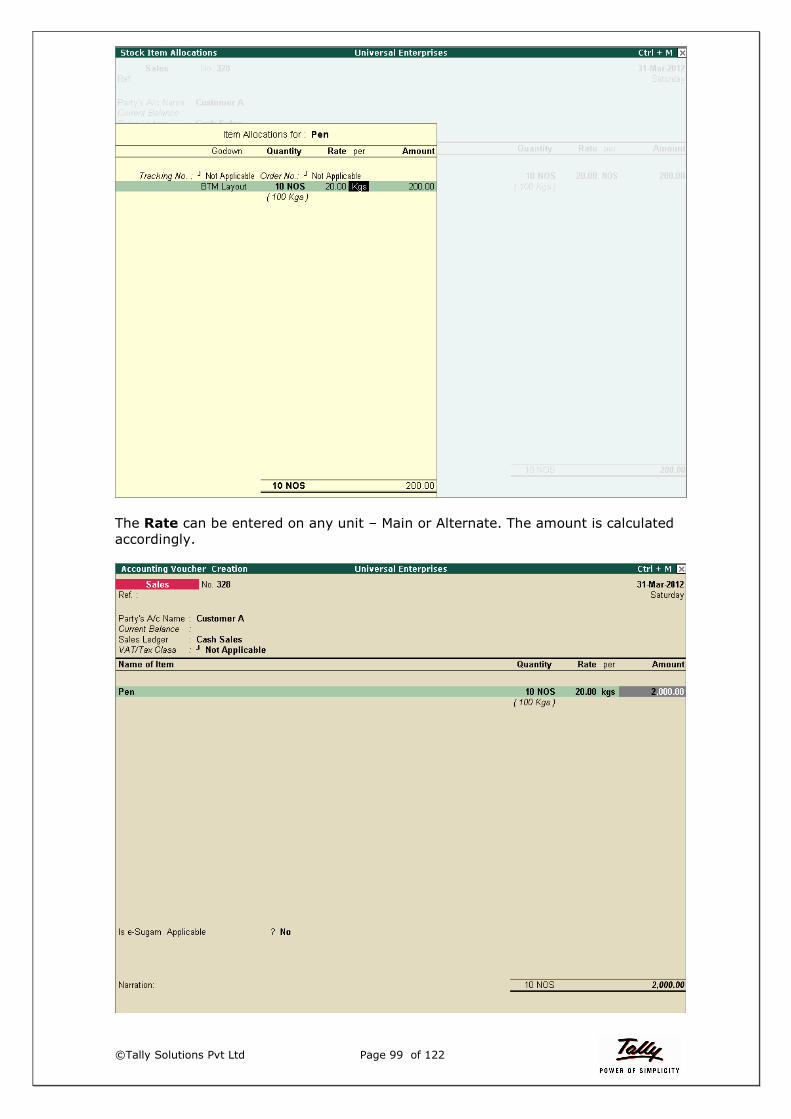
©Tally Solutions Pvt Ltd Page 99 of 122
The Rate can be entered on any unit – Main or Alternate. The amount is calculated
accordingly.

©Tally Solutions Pvt Ltd Page 100 of 122
In a different Sales Voucher, make the Rate field blank and enter 1000 in the
Amount field.
The rate will get calculated automatically as shown.

©Tally Solutions Pvt Ltd Page 101 of 122
To make Tally.ERP 9 adjust to situations where the Rate of an Item is stated as X
per 100 units, create a Sales Voucher and enter 50 in the Rate field. In the per
field, enter 5 NOS as shown below. The amount of 100 will get calculated
automatically.

©Tally Solutions Pvt Ltd Page 102 of 122
Flexible Bills of Material
To create a BoM follow the steps given below.
Go to,
Gateway of Tally > Inventory Info > Stock Items
1. Create a new Stock Item, Cotton Shirts – Full Sleeve - 42 and group it
under Primary.
2. Set Units as Nos. and Alternative units as Not Applicable.
3. Set the option Set Components (BoM) to Yes.
A sub-screen appears as shown below:
4. Enter the name of the BoM, in this case, Shirt and press Enter.

©Tally Solutions Pvt Ltd Page 103 of 122
5. In the BoM Details screen, create the components of the Stock Item, Fabric,
as shown below:
6. Accept the screen by pressing Y or Enter.
7. In the same manner create other stock items, Button, Thread and Fusing.
8. Accept the screen by pressing Enter.
The completed Stock Item screen appears as shown below:

©Tally Solutions Pvt Ltd Page 104 of 122
9. Accept the screen by pressing Y or Enter.
BoM is a list of materials required to manufacture a product. To show the
consumption of raw material and their conversion into a finished product, the user
needs to record a Manufacturing Journal.
To create a Manufacturing Journal, go to
Gateway of Tally > Accounts Info > Voucher Type > Create
Create a Manufacturing Journal Voucher Type as shown above.

©Tally Solutions Pvt Ltd Page 105 of 122
Record a Manufacturing Journal with the following details:
a. Select the name of the Product from the list of products. The BoM name is
automatically captured.
b. Select the Godown where the produced goods are to be stored.
c. Specify the quantity of the Product to be manufactured.
d. On specifying the quantity all the component details are automatically filled.
e. Press Enter to add any co-product / by-product / scrap, if any.
f. The cost of components gets automatically calculated.
g. Specify the additional cost incurred, if any.
h. Press Enter to accept the screen.
Cheque Printing
Tally.ERP 9 provides the option of printing Cheques directly from the system itself.
These cheques can be printed directly from the Payment Voucher when payment is
made by cheque.
For this,
Go to Gateway of Tally > Accounting Vouchers. The Payment Voucher is
opened.
Specify the Date on which payment is made.
Debit the Party ledger and credit the Bank ledger.

©Tally Solutions Pvt Ltd Page 106 of 122
Press Enter to display the Bank Allocations screen.
Specify the details relating to Favouring Name, Instrument number and press
Enter.
Specify the narration and press Enter.

©Tally Solutions Pvt Ltd Page 107 of 122
Press Y or Enter to accept the Payment voucher.
A Cheque Printing screen appears as shown below:
Press Y or Enter to print the cheque.

©Tally Solutions Pvt Ltd Page 108 of 122
Altering Dimensions of cheque
The Dimensions of the cheque can be altered as per the user requirement.
To alter the dimensions of a cheque, press F11 to display the Company Features
menu.
Select Accounting Features to display the Accounting Features screen.
In the Other Features section, enable the option Set/Alter Cheque Printing
Configuration to Yes.
A Company Cheque Details sub-screen appears as shown below:

©Tally Solutions Pvt Ltd Page 109 of 122
Select the Name of the bank for which the dimensions of the cheque is to be
changed.
A Cheque Printing Configuration screen for the selected bank appears as shown
below:
Make the required changes and accept the screen.
Cheque printing can be done immediately after recording of payment voucher or
later. To print cheques later,
Go to Gateway of Tally and select Banking.

©Tally Solutions Pvt Ltd Page 110 of 122
Select Cheque Printing from the Banking menu and choose the required Bank
Select all items or a particular bank to display vouchers where bank payment is
done.
Now all the cheques pending to be printed will be displayed.

©Tally Solutions Pvt Ltd Page 111 of 122
In case more cheques are pending to be printed, select multiple cheques by pressing
Spacebar and press Alt+P to print.
Group Company
The Books of Account of different companies belonging to the same management or
owners are required to be consolidated to present the financial position of the group
of companies as a whole.
Tally.ERP 9 simplifies the task of consolidation of accounts. You can consolidate the
accounts of any number of companies as well as keep them separate.
The first step for creating a Group Company is to open all the individual companies
to be grouped, also called the Member Companies.
On Gateway of Tally > Press F1 > Select the 2nd company in the demo data
Create a Group Company
Now, press Alt+F3 > select Create Group company option

©Tally Solutions Pvt Ltd Page 112 of 122
Give a name to the Group Company, say „Group‟, and select both the companies as
Members, as shown below:

©Tally Solutions Pvt Ltd Page 113 of 122
On accepting this screen, the Company „Group‟ is loaded automatically.
Viewing Consolidated reports of a Group Company
Let us see the Profit & Loss a/c.

©Tally Solutions Pvt Ltd Page 114 of 122
Go to Gateway of Tally > Profit & Loss A/c
This is the combined P&L of both companies
Now, to compare both the companies i.e. Universal Enterprises and Victor
Trading Company alongside the Group (consolidated) company, press Alt+N.
Here select Company and the P&L of all companies is shown in columns:
Similarly, we can see the consolidated information across various reports including
Balance Sheet and Stock Summary as well.

©Tally Solutions Pvt Ltd Page 115 of 122
Shut a Company
To shut a company, whether a Member Company or a Group Company, go to,
Gateway of Tally > Press Alt + F1 and select the required company to close.
Statutory Compliance
Tally.ERP 9 provides compliance for all statutes across all Indian States and Union
Territories. To display go to Display > Statutory Reports.
Let us have a look at one of the VAT Reports present in Tally.ERP 9.
Go to,
Gateway of Tally > Display Menu > Statutory Reports > VAT
VAT Reports menu appears as shown below:

©Tally Solutions Pvt Ltd Page 116 of 122
VAT Computation
To print the VAT Computation, press Alt+P.
Print sub-screen appears as shown below:

©Tally Solutions Pvt Ltd Page 117 of 122
Note: Print Preview can be enabled by pressing Alt+I
VAT Forms
Press Enter on VAT Return Forms to view the Forms for the respective state.

©Tally Solutions Pvt Ltd Page 118 of 122
The VAT Returns Forms Menu appears as shown below:
A preview of VAT Form 100 can be seen below:

©Tally Solutions Pvt Ltd Page 119 of 122
Select VAT Annexure and press Enter to view the VAT annexures applicable to
Karnataka.
VAT Annexure menu appears as shown below:

©Tally Solutions Pvt Ltd Page 120 of 122
Select Annexure – I and press Enter for a preview of the same.
Export to Excel and Other Formats
Any report can be exported to Tally.ERP 9 in various formats like Excel, PDF, JPEG,
HTML etc.
Let us export Stock Summary in Excel format from Tally.ERP 9.
Go to,
Gateway of Tally > Stock Summary

©Tally Solutions Pvt Ltd Page 121 of 122
1. Press Alt+E or click on E: Export to export the Stock Summary.
2. In the Export sub-screen that appears, set the format to Excel (Spread
sheet)
3. Accept the screen by pressing Y or Enter
The Excel Spread sheet opens automatically, displaying the Stock Summary.

©Tally Solutions Pvt Ltd Page 122 of 122
In the same manner, Stock Summary can be exported in other formats too.