Embed Size (px)
Citation preview
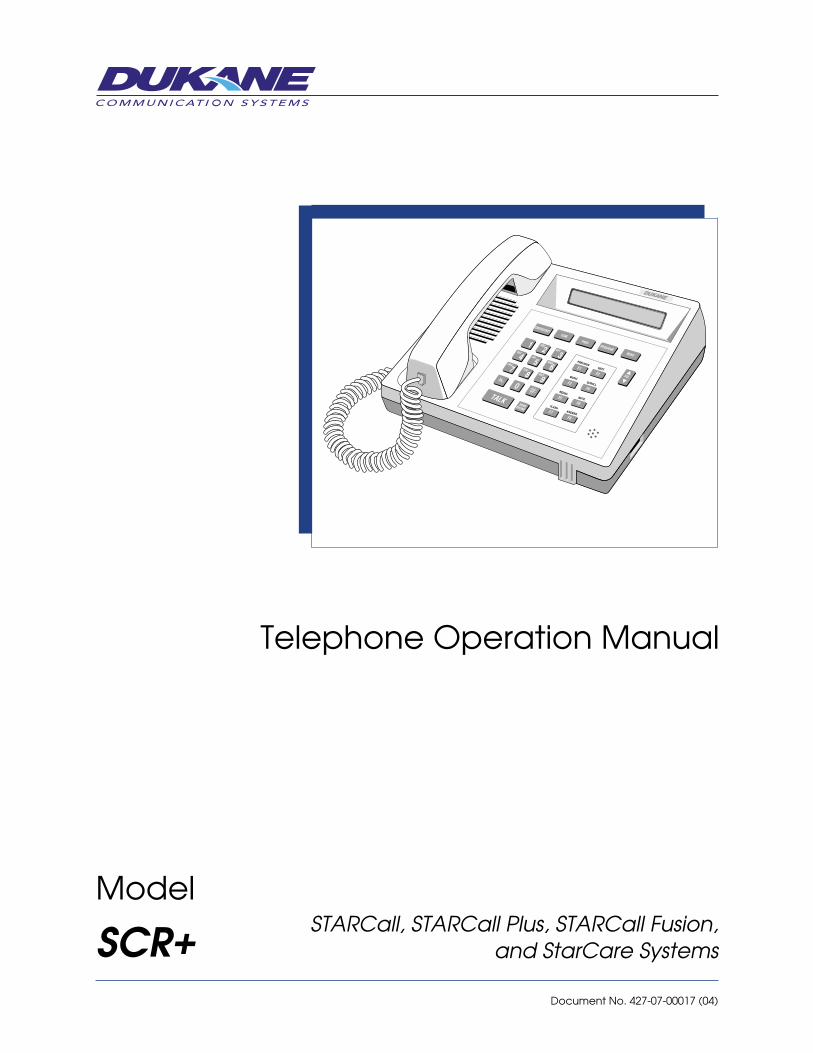
Model
SCR+Document No. 427-07-00017 (04)
Telephone Operation Manual
PREVIOUSNEXT
MUSICSCROLL
REDIALMUTE
FLASHANSWER
STARCall, STARCall Plus, STARCall Fusion,and StarCare Systems


NOTICETo ensure the performance of our products and systems, we may occasionally make tech-nological changes and updates. Therefore, the model number suffixes (A, B, C, etc.)listed in the manual or in the drawings may not always match the model you are using.Unless specifically noted, this will not affect the product or its installation, operation, orservice.
SCR+ Telephone Operation Manual 3


DOCUMENT CORRECTION FORM
Operating, installing, or servicing a product is difficult without accurate documentation. Please help us ensure thatyou get the best performance from your Dukane product by completing this form if you encounter any problems,or if you have any suggestions for the manual.
Please provide the following optional information so we can contact you if we need more feedback.
Your Name _______________________________________________________________________________
Company Name ____________________________________ Phone Number __________________________
Address __________________________________________________________________________________
City______________________________________________ State __________ Zip ____________________
—IMPORTANT—Include the manual’s document number found in the lower right corner of the front cover.
Instructions
1. Explain below how the manual should be changed, or describe the problems you encountered.2. Use the back of this form for additional corrections or comments.3. Mail or FAX this form (with a photocopy of the pages in question, if possible) to the address/FAX number
on the back of the form. To mail, tri-fold this form so the address is visible.
Corrections
Page # _____ Description
Page # _____ Description
Page # _____ Description
Page # _____ Description
427-98-00001 (04)
( )

Corrections
Page # _____ Description
Page # _____ Description
Page # _____ Description
Page # _____ Description
Page # _____ Description
Please FAX (630) 836-3800, or mail this form (tri-folded so the address below is visible).
Dukane Communication SystemsTechnical Writing Group27545 Diehl Rd, Suite 200Warrenville, IL 60555
SECTION 1—GENERAL INFORMATION
Introduction . . . . . . . . . . . . . . . . . . . . . . . . . . . . . . . . . . . . . . . . . . . . . . . . . . 1
Manual Contents . . . . . . . . . . . . . . . . . . . . . . . . . . . . . . . . . . . . . . . . . . . 1
System Acronyms . . . . . . . . . . . . . . . . . . . . . . . . . . . . . . . . . . . . . . . . . . . 2
Related Documentation . . . . . . . . . . . . . . . . . . . . . . . . . . . . . . . . . . . . . . . . 2
System Priorities . . . . . . . . . . . . . . . . . . . . . . . . . . . . . . . . . . . . . . . . . . . . . . . 3
Password Control . . . . . . . . . . . . . . . . . . . . . . . . . . . . . . . . . . . . . . . . . . . . . . . 3
STARCall Fusion Feature Set . . . . . . . . . . . . . . . . . . . . . . . . . . . . . . . . . . . . . . . . 4
Class of Service . . . . . . . . . . . . . . . . . . . . . . . . . . . . . . . . . . . . . . . . . . . . 4
Hunt Groups . . . . . . . . . . . . . . . . . . . . . . . . . . . . . . . . . . . . . . . . . . . . . . 4
Cyclical Hunt Groups . . . . . . . . . . . . . . . . . . . . . . . . . . . . . . . . . . . . . 5
Voice Mail Hunt Group . . . . . . . . . . . . . . . . . . . . . . . . . . . . . . . . . . . . 5
DIL (Direct Inward Line) Extension . . . . . . . . . . . . . . . . . . . . . . . . . . . . . . . . . 5
Dial Tone . . . . . . . . . . . . . . . . . . . . . . . . . . . . . . . . . . . . . . . . . . . . . . . 5
Account Codes . . . . . . . . . . . . . . . . . . . . . . . . . . . . . . . . . . . . . . . . . . . . 6
Interactive Voice Response (IVR) System . . . . . . . . . . . . . . . . . . . . . . . . . . . . . . 7
System Speed Dial Numbers . . . . . . . . . . . . . . . . . . . . . . . . . . . . . . . . . . . . . 7
Toll Restriction . . . . . . . . . . . . . . . . . . . . . . . . . . . . . . . . . . . . . . . . . . . . 7
SECTION 2—ATEL DESCRIPTION AND FEATURES
ATEL Description and Features . . . . . . . . . . . . . . . . . . . . . . . . . . . . . . . . . . . . . . . 9
Display Window . . . . . . . . . . . . . . . . . . . . . . . . . . . . . . . . . . . . . . . . . . . 10
Handset. . . . . . . . . . . . . . . . . . . . . . . . . . . . . . . . . . . . . . . . . . . . . . . . 11
Microphone . . . . . . . . . . . . . . . . . . . . . . . . . . . . . . . . . . . . . . . . . . . . . 11
Speaker. . . . . . . . . . . . . . . . . . . . . . . . . . . . . . . . . . . . . . . . . . . . . . . . 11
Volume. . . . . . . . . . . . . . . . . . . . . . . . . . . . . . . . . . . . . . . . . . . . . . . . 11
Key Pad . . . . . . . . . . . . . . . . . . . . . . . . . . . . . . . . . . . . . . . . . . . . . . . 11
Talk Key . . . . . . . . . . . . . . . . . . . . . . . . . . . . . . . . . . . . . . . . . . . . . . . 12
Speaker Phone Key . . . . . . . . . . . . . . . . . . . . . . . . . . . . . . . . . . . . . . . . . 12
SCR+ Telephone Operation Manual i
Tableof
Contents

Programmable Dedicated Function Keys . . . . . . . . . . . . . . . . . . . . . . . . . . . . . . 12
EMERGENCY . . . . . . . . . . . . . . . . . . . . . . . . . . . . . . . . . . . . . . . . 12
TONE. . . . . . . . . . . . . . . . . . . . . . . . . . . . . . . . . . . . . . . . . . . . . 12
PAGE. . . . . . . . . . . . . . . . . . . . . . . . . . . . . . . . . . . . . . . . . . . . . 13
PROGRAM . . . . . . . . . . . . . . . . . . . . . . . . . . . . . . . . . . . . . . . . . 13
Programmable F1 through F8 Keys . . . . . . . . . . . . . . . . . . . . . . . . . . . . . . . . . 13
Menu Key . . . . . . . . . . . . . . . . . . . . . . . . . . . . . . . . . . . . . . . . . . . . . . 14
Error Codes . . . . . . . . . . . . . . . . . . . . . . . . . . . . . . . . . . . . . . . . . . . . . . . . . 14
Selectively Answering Call-Ins (ATEL Only) . . . . . . . . . . . . . . . . . . . . . . . . . . . . . . . 14
Local Diagnostic/Programming Mode . . . . . . . . . . . . . . . . . . . . . . . . . . . . . . . . . . . 14
Entering the Local Diagnostic/Programming Mode . . . . . . . . . . . . . . . . . . . . . . . . . 14
Exiting the Local Diagnostic/Programming Mode . . . . . . . . . . . . . . . . . . . . . . . . . 15
Displaying the ATEL Hardware Revision and Software Version . . . . . . . . . . . . . . . . . . 15
Verifying a Key’s Function . . . . . . . . . . . . . . . . . . . . . . . . . . . . . . . . . . . . . 15
Programming the Dedicated Function Keys . . . . . . . . . . . . . . . . . . . . . . . . . . . . . 15
Programming the F1 through F8 Function Keys. . . . . . . . . . . . . . . . . . . . . . . . . . . 16
Adjusting the Ringer Type and Volume . . . . . . . . . . . . . . . . . . . . . . . . . . . . . . . 17
Adjusting the Voice and Music Volumes . . . . . . . . . . . . . . . . . . . . . . . . . . . . . . 17
Restoring Default Key Settings . . . . . . . . . . . . . . . . . . . . . . . . . . . . . . . . . . . 18
Setting the ATEL Background Music . . . . . . . . . . . . . . . . . . . . . . . . . . . . . . . . 18
SECTION 3—STANDARD TELEPHONE OPERATIONS
Introduction . . . . . . . . . . . . . . . . . . . . . . . . . . . . . . . . . . . . . . . . . . . . . . . . . 19
STEL Description and Features . . . . . . . . . . . . . . . . . . . . . . . . . . . . . . . . . . . . . . . 19
Placing a Call-In . . . . . . . . . . . . . . . . . . . . . . . . . . . . . . . . . . . . . . . . . . . . . . . 21
Off-Hook Duress Call-In . . . . . . . . . . . . . . . . . . . . . . . . . . . . . . . . . . . . . . . . . . 21
Off-Hook Direct Telephone Call . . . . . . . . . . . . . . . . . . . . . . . . . . . . . . . . . . . . . . 22
Off-Hook Intercom Option . . . . . . . . . . . . . . . . . . . . . . . . . . . . . . . . . . . . . . . . . 22
Off-Hook Page. . . . . . . . . . . . . . . . . . . . . . . . . . . . . . . . . . . . . . . . . . . . . . . . 23
Error Codes . . . . . . . . . . . . . . . . . . . . . . . . . . . . . . . . . . . . . . . . . . . . . . . . . 23
ii SCR+ Telephone Operation Manual
TableofContents
SECTION 4—USING THE SYSTEM
Calling a Speaker Station . . . . . . . . . . . . . . . . . . . . . . . . . . . . . . . . . . . . . . . . . . 25
Answering Speaker Station Calls . . . . . . . . . . . . . . . . . . . . . . . . . . . . . . . . . . . . . . 26
Auto Answering a Call-In . . . . . . . . . . . . . . . . . . . . . . . . . . . . . . . . . . . . . . 27
Manually Answering a Call-In (Auto Answer Disabled) . . . . . . . . . . . . . . . . . . . . . . 28
Answering the Highest Priority System Call-In . . . . . . . . . . . . . . . . . . . . . . . . . . . 29
Canceling All Normal Call-Ins in the System . . . . . . . . . . . . . . . . . . . . . . . . . . . . 30
Transferring Intercom Calls Between Room Speakers and Associated System Phones . . . . . . . . . . 30
Transferring from Speaker to Associated System Phone . . . . . . . . . . . . . . . . . . . . . . 30
Transferring from System Phone to Associated Speaker . . . . . . . . . . . . . . . . . . . . . . 31
Calling a Telephone . . . . . . . . . . . . . . . . . . . . . . . . . . . . . . . . . . . . . . . . . . . . . 31
Calling a System Telephone Extension . . . . . . . . . . . . . . . . . . . . . . . . . . . . . . . 32
Busy Station Intercom (Fusion feature set only) . . . . . . . . . . . . . . . . . . . . . . . 33
Call Back (Fusion feature set only) . . . . . . . . . . . . . . . . . . . . . . . . . . . . . 33
Calling a PBX/KSU Telephone Extension . . . . . . . . . . . . . . . . . . . . . . . . . . . . . 33
Outside Line Access (Fusion feature set) . . . . . . . . . . . . . . . . . . . . . . . . . . . . . . 34
Calling an Outside Line Connected Directly to STARCall . . . . . . . . . . . . . . . . . 34
Calling an Outside Line Connected via a PBX . . . . . . . . . . . . . . . . . . . . . . . 36
Placing an Outside Call Connected via a PBX on Hold . . . . . . . . . . . . . . . . . . . 37
Transferring an Outside Call Connected via a PBX to Another Outside Extension . . . . . 37
Answering Telephone or Outside Line Calls . . . . . . . . . . . . . . . . . . . . . . . . . . . . . . . . 38
Answering a Call From Another Telephone or Outside Line . . . . . . . . . . . . . . . . . . . . 38
Using Call Group Pickup . . . . . . . . . . . . . . . . . . . . . . . . . . . . . . . . . . . . . . 38
Using Telephone Call Pickup . . . . . . . . . . . . . . . . . . . . . . . . . . . . . . . . . . . . 38
Call Holding (Telephone and Outside Line) . . . . . . . . . . . . . . . . . . . . . . . . . . . . . . . . 39
Placing a Call on Hold . . . . . . . . . . . . . . . . . . . . . . . . . . . . . . . . . . . . . . . . 39
Removing a Call From Hold . . . . . . . . . . . . . . . . . . . . . . . . . . . . . . . . . . . . . 39
Outside Line Call Park (Fusion feature set only) . . . . . . . . . . . . . . . . . . . . . . . . . . . . . . 40
Line Pick-Up (Fusion feature set only) . . . . . . . . . . . . . . . . . . . . . . . . . . . . . . . . . . . 40
Outside Line Camp On (Fusion feature set only) . . . . . . . . . . . . . . . . . . . . . . . . . . . . . . 41
SCR+ Telephone Operation Manual iii
Tableof
Contents
Recall Timers (Fusion feature set only) . . . . . . . . . . . . . . . . . . . . . . . . . . . . . . . . . . . 41
Call Park Timeout . . . . . . . . . . . . . . . . . . . . . . . . . . . . . . . . . . . . . . . . . . 41
Camp On Timeout . . . . . . . . . . . . . . . . . . . . . . . . . . . . . . . . . . . . . . . . . . 41
Hold Timeout . . . . . . . . . . . . . . . . . . . . . . . . . . . . . . . . . . . . . . . . . . . . 41
Transfer Timeout. . . . . . . . . . . . . . . . . . . . . . . . . . . . . . . . . . . . . . . . . . . 41
Call Transferring (Telephone and Direct Outside Line). . . . . . . . . . . . . . . . . . . . . . . . . . . 42
Call Conferencing . . . . . . . . . . . . . . . . . . . . . . . . . . . . . . . . . . . . . . . . . . . . . . 43
Initiating a Three-Party Conference Call . . . . . . . . . . . . . . . . . . . . . . . . . . . . . . 43
Terminating a Conference Call . . . . . . . . . . . . . . . . . . . . . . . . . . . . . . . . . . . 43
Call Forwarding . . . . . . . . . . . . . . . . . . . . . . . . . . . . . . . . . . . . . . . . . . . . . . . 44
Forwarding Restrictions . . . . . . . . . . . . . . . . . . . . . . . . . . . . . . . . . . . . . . . 44
Forwarding a Call . . . . . . . . . . . . . . . . . . . . . . . . . . . . . . . . . . . . . . . . . . 44
Forwarding Calls to Voice Mail (Fusion feature set only) . . . . . . . . . . . . . . . . . . . . . 45
“Follow Me” Call Forwarding (v. 5.00 system software or later) . . . . . . . . . . . . . . . . . . 45
Canceling Call Forwarding . . . . . . . . . . . . . . . . . . . . . . . . . . . . . . . . . . . . . 45
Audible Forwarding Indicators . . . . . . . . . . . . . . . . . . . . . . . . . . . . . . . . . . . 46
Forwarding Conditions in a Hunt Group . . . . . . . . . . . . . . . . . . . . . . . . . . . . . . 46
Message Waiting Indicator . . . . . . . . . . . . . . . . . . . . . . . . . . . . . . . . . . . . . . . . . 47
Manually Setting the Message Waiting Indicator . . . . . . . . . . . . . . . . . . . . . . . . . . 47
Automatic Message Waiting Indicator Operation (Fusion feature set only) . . . . . . . . . . . . 47
Paging . . . . . . . . . . . . . . . . . . . . . . . . . . . . . . . . . . . . . . . . . . . . . . . . . . . . 48
Emergency Paging All Rooms and Zones . . . . . . . . . . . . . . . . . . . . . . . . . . . . . . 48
Emergency Paging Selected Zones . . . . . . . . . . . . . . . . . . . . . . . . . . . . . . . . . 49
Emergency Paging All But Excluded Zones. . . . . . . . . . . . . . . . . . . . . . . . . . . . . 50
Off-Hook Emergency Zone Page (STEL, DTMF Telephone, and CTEL Only) . . . . . . . . . . 51
Paging All Rooms and Zones . . . . . . . . . . . . . . . . . . . . . . . . . . . . . . . . . . . . 51
Paging Selected Zones . . . . . . . . . . . . . . . . . . . . . . . . . . . . . . . . . . . . . . . . 52
Paging All But Excluded Zones . . . . . . . . . . . . . . . . . . . . . . . . . . . . . . . . . . . 53
Paging Selected Rooms . . . . . . . . . . . . . . . . . . . . . . . . . . . . . . . . . . . . . . . 54
Paging All But Excluded Rooms . . . . . . . . . . . . . . . . . . . . . . . . . . . . . . . . . . 55
iv SCR+ Telephone Operation Manual
TableofContents
Distributing Tones . . . . . . . . . . . . . . . . . . . . . . . . . . . . . . . . . . . . . . . . . . . . . . 56
Distributing Tones to All Speakers . . . . . . . . . . . . . . . . . . . . . . . . . . . . . . . . . 56
Distributing Tones to Selected Zones . . . . . . . . . . . . . . . . . . . . . . . . . . . . . . . . 57
Distributing Tones to All But Excluded Zones . . . . . . . . . . . . . . . . . . . . . . . . . . . 57
Distributing Tones to Selected Rooms. . . . . . . . . . . . . . . . . . . . . . . . . . . . . . . . 58
Distributing Tones to All But Excluded Rooms . . . . . . . . . . . . . . . . . . . . . . . . . . . 59
Canceling Tone Distribution . . . . . . . . . . . . . . . . . . . . . . . . . . . . . . . . . . . . . 59
Distributing Audio Programs . . . . . . . . . . . . . . . . . . . . . . . . . . . . . . . . . . . . . . . . 60
Distributing an Audio Program to All Speakers . . . . . . . . . . . . . . . . . . . . . . . . . . . 60
Distributing an Audio Program to Selected Zones . . . . . . . . . . . . . . . . . . . . . . . . . 60
Distributing an Audio Program to All But Excluded Zones . . . . . . . . . . . . . . . . . . . . . 61
Distributing an Audio Program to Selected Rooms . . . . . . . . . . . . . . . . . . . . . . . . . 62
Distributing an Audio Program to All But Excluded Rooms . . . . . . . . . . . . . . . . . . . . 63
Adding Rooms to Audio Program Distribution in Progress . . . . . . . . . . . . . . . . . . . . . 63
Removing Rooms from Audio Program Distribution in Progress . . . . . . . . . . . . . . . . . . 64
Canceling Audio Program Distribution . . . . . . . . . . . . . . . . . . . . . . . . . . . . . . . 65
Monitoring Audio Program Sources . . . . . . . . . . . . . . . . . . . . . . . . . . . . . . . . . 65
Selecting a Source for Music-on-Hold and ATEL Background Music . . . . . . . . . . . . . . . 66
Temporarily Excluding Rooms . . . . . . . . . . . . . . . . . . . . . . . . . . . . . . . . . . . . . . . 66
Excluding Rooms . . . . . . . . . . . . . . . . . . . . . . . . . . . . . . . . . . . . . . . . . . 66
Clearing Selected Temporary Room Exclusions . . . . . . . . . . . . . . . . . . . . . . . . . . 67
Clearing All Temporary Room Exclusions . . . . . . . . . . . . . . . . . . . . . . . . . . . . . 67
Setting the Time of Day . . . . . . . . . . . . . . . . . . . . . . . . . . . . . . . . . . . . . . . . . . . 68
Setting the Date . . . . . . . . . . . . . . . . . . . . . . . . . . . . . . . . . . . . . . . . . . . . . . . 68
Activating and Deactivating the Schedules . . . . . . . . . . . . . . . . . . . . . . . . . . . . . . . . . 69
Controlling I/O System Outputs . . . . . . . . . . . . . . . . . . . . . . . . . . . . . . . . . . . . . . . 70
Controlling OCC System Outputs . . . . . . . . . . . . . . . . . . . . . . . . . . . . . . . . . . . . . . 70
Overriding Night Mode . . . . . . . . . . . . . . . . . . . . . . . . . . . . . . . . . . . . . . . . . . . 71
SCR+ Telephone Operation Manual v
Tableof
Contents

SECTION 5—CALL BUTTON OPERATIONS
Call-In Priorities . . . . . . . . . . . . . . . . . . . . . . . . . . . . . . . . . . . . . . . . . . . . . . . 73
Placing a Call-In . . . . . . . . . . . . . . . . . . . . . . . . . . . . . . . . . . . . . . . . . . . . . . . 73
Placing a Normal Call-In . . . . . . . . . . . . . . . . . . . . . . . . . . . . . . . . . . . . . . 73
Placing an Emergency Call-In . . . . . . . . . . . . . . . . . . . . . . . . . . . . . . . . . . . . 73
Upgrading a Normal Call-In to Emergency . . . . . . . . . . . . . . . . . . . . . . . . . . . . . 73
Canceling a Call-In . . . . . . . . . . . . . . . . . . . . . . . . . . . . . . . . . . . . . . . . . . . . . 74
Call Confirmation . . . . . . . . . . . . . . . . . . . . . . . . . . . . . . . . . . . . . . . . . . . . . . 74
Message Waiting . . . . . . . . . . . . . . . . . . . . . . . . . . . . . . . . . . . . . . . . . . . . . . 74
Privacy Indication . . . . . . . . . . . . . . . . . . . . . . . . . . . . . . . . . . . . . . . . . . . . . . 74
SECTION A—700 CODES QUICK REFERENCE
SECTION B—PROGRAMMABLE FUNCTION KEYS REFERENCE
SECTION C—SOFTWARE VERSIONS
System Embedded Software . . . . . . . . . . . . . . . . . . . . . . . . . . . . . . . . . . . . . 81
System Configuration Software . . . . . . . . . . . . . . . . . . . . . . . . . . . . . . . . . . . 81
vi SCR+ Telephone Operation Manual
TableofContents
SCR+ Telephone Operation Manual vii
Tableof
Contents
FIGURES
Figure 1: Model 7A1110 Administrative Telephone (ATEL) . . . . . . . . . . . . . . . . . . . . . . . . 9
Figure 2: Model 7A1111 Standard Telephone (STEL) . . . . . . . . . . . . . . . . . . . . . . . . . . . 20
TABLES
Table 1: Programmable Tone Types. . . . . . . . . . . . . . . . . . . . . . . . . . . . . . . . . . . . . 53
STARCall is a registered trademark and STARCall Plus, StarCall Fusion, and StarCare are trademarks of DukaneCommunication Systems, a division of Edwards Systems Technology, Inc.

viii SCR+ Telephone Operation Manual
Notes
General Information
IntroductionThe Dukane STARCall®, STARCall Plus™, STARCall Fusion™, and StarCare™ are advanced,multichannel, microprocessor-controlled communications systems. Each system cansimultaneously handle telephone conversations, intercom, and program and page distribu-tion using Dukane Model 7A1111 Standard Telephones (STELs), standard DTMF 2500compatible telephones with electronic ringers, Dukane Model 7A1110 AdministrativeTelephones (ATELs), caller ID telephones (CTELs), and standard 25V loudspeakers.Each System is easy to use, with many of its features accessible through the STELs orstandard telephones. Additional features are accessible through ATELs or CTELs.
The STARCall Plus can also take advantage of the Dukane Model 110-3889 NetworkInterface Card (NIC) which can network together up to 16 systems, using one NIC persystem. One system is configured as the primary, all others as secondary. This networkmakes it possible to page, telephone, or intercom seamlessly across all networked systems.Features that can be performed across systems are noted in this manual.
Manual ContentsThis manual explains the operation of the STARCall, STARCall Plus, STARCall Fusion,and StarCare feature sets using ATELs, STELs, CTELs, room speakers, and call-in stations.Information that pertains to all four feature sets will be referred to as the System.
The manual is divided into six sections:
• General Information
• Administrative Telephone (ATEL) Operations
• Standard Telephone (STEL, CTEL, and DTMF telephone) Operations
• Using the System
• Call Button Operations
• Appendixes
SCR+ Telephone Operation Manual 1
Section1

System AcronymsThe acronyms listed below appear throughout this manual.
ATC-E Administrative Telephone Card, ExpandedATEL Model 7A1110 Administrative TelephoneBTC-P Balanced Telephone Card, ProtectedBTC-E Balanced Telephone Card, ExpandedCTEL Caller ID equipped TelephoneDTMF Dual-Tone Multi-FrequencyKSU Key Service UnitMDS Maintenance and Diagnostic SoftwareNIC Network Interface CardPBX Private Branch ExchangeRAPID Remote Programming and Diagnostics SoftwareSTC-E Standard Telephone Card, ExpandedSTEL Model 7A1111 (or equivalent) Standard TelephoneTIC Trunk Interface CardCOC Central Office CardTCM Trunk Caller ID Module
Related DocumentationThe following manuals contain additional information on the STARCall, STARCallFusion, and StarCare Systems. The latest revisions are available from Dukane Communi-cation Systems, Warrenville, Illinois. Some of these documents are also available throughour web site to registered Dukane distributors at www.dukane.com/csd and go to“For Distributors.”
• STARCall, STARCall Plus, StarCare System Installation Manual, document number427-06-00034
• SW-4000 STARCall Fusion Server Installation Manual, document number 3100664
• SW-4000 STARCall Fusion Server Installation Quick Start Guide, document number3100684
• SW-4000 STARCall Fusion PC Attendant Operation Manual, document number3100652
• SW-4000 STARCall Fusion IVR Operation Manual, document number 3100663
• SW-4000 STARCall Fusion Station Message Detail Reporting (SMDR) OperationInstructions, document number 3100683
• Remote Maintenance Utility (RMU) Programming Manual, document number427-09-00005
• STARWare Software Quick Reference Guide (for STARCall Plus), document number427-07-00046
• StarCare SC-2000 Software Quick Reference Guide, document number 427-07-00045
2 SCR+ Telephone Operation Manual
Introduction

If you need additional copies of this manual or the related documentation, contact yourauthorized Dukane distributor or call Dukane Communication Systems at (630) 836-3706,during normal central time business hours. In Canada, dial (519) 748-5352 during normaleastern time business hours.
The following software includes online help in place of printed documentation:
• RAPID/MDS Programming
• SW-2000 STARWare User Application Suite (for STARCall Plus)
• SC-2000 StarCare Software
System PrioritiesThe System manages its audio functions using a priority scheme. The priorities are listedbelow with 1 as the highest priority and 9 as the lowest.
1. Emergency Intercom 6. Intercom
2. Emergency Page 7. Custodial Tone
3. Civil Emergency 8. Low Priority Event Tone
4. Manual Time Tone, High Priority Event Tone 9. Audio Program Distribution
5. All Call and Zone Page
A higher priority function is never interrupted by a lower priority function. Interruptedfunctions are automatically restored when the higher priority function ends. Telephoneconversations are not interrupted by any audio function.
Password ControlThe System can be configured to require a programmable four-digit password for accessto certain functions. If a function has been configured this way, a double tone burst isheard after you press # to start the selected function. You must then enter the password toactivate the function. Function access is denied if no password or an incorrect passwordis entered. Contact your system administrator for details.
Note:If a function is programmed for password controlled access, the password will berequired for access regardless of the type of phone used (ATEL, STEL, DTMFtelephone, or CTEL).
continued
SCR+ Telephone Operation Manual 3
System Priorities

If you need to access functions in an emergency and your system administrator is unavail-able to assist you with a password, try the factory default password 1234 (this password canbe changed). If your attempt to access a password-protected function is unsuccessful, hang upbefore trying again because the telephone must be on-hook for at least two seconds before youcan attempt to access that function again. When you lift the handset again, you must start overand press all keys.
If you have been using the SPKR. PHONE key while attempting to access functions, thehandset must be in its cradle for at least two seconds in order to clear the line before at-tempting to access that function again. When you press SPKR. PHONE again, you muststart over and press all keys.
STARCall Fusion Feature SetSTARCall Plus systems can be equipped with the optional Fusion feature set which pro-vides direct connection to outside telephone lines and various telephony functions, suchas class of service. In general, these features are configured using STARCall RAPID andcannot be changed using system telephones. Some of these features which affect outsidetelephone line access are explained below.
Class of ServiceClass of Service is a group of attributes that control the operation of each extension in theSystem. It governs such things as outside line access, intercom access, system administra-tion rights, auto off-hook answer, and much more. A class of service is assigned to everyextension during system configuration using the RAPID system configuration application.Any individual extension in the System may or may not be able to perform a particularoperation based on its assigned class of service. Contact your System Administrator fordetails on class of service for your facility.
Hunt GroupsThe System supports up to eight hunt groups, each with up to eight extension numbers.Each hunt group can have an associated dial number.
When a call from an outside telephone line is routed to a hunt group, the system willroute the call to the first idle non-forwarded extension in that group. If all extensions inthe hunt group are forwarded, the call is routed to the first idle forwarded extension. If noextensions are available, the system waits for an extension to become available. All callrouting activities are transparent to the caller, who simply hears the normal ringbacksound in the handset.
4 SCR+ Telephone Operation Manual
STARCall Fusion Feature Set

Cyclical Hunt GroupsA hunt group can be configured using RAPID such that if a call has not been answeredwithin a specified number of rings (1 to 10), the call is routed to the next free extensionwithin the hunt group. Once all extensions have been tried, the call will be routed throughthe hunt group again, starting at the first free extension. This cyclical routing continuesuntil either the caller disconnects (by hanging up) or the call is answered.
Voice Mail Hunt GroupIf the System is equipped with the optional voice mail feature, one hunt group can beconfigured as a voice mail hunt group, which contains extensions that connect directly tothe voice mail system. Outside telephone calls directed to the voice mail hunt group aregreeted by the auto-attendant when calling into the system. Internal callers that wish touse the voice mail system simply dial the number of the voice mail hunt group.
A call transferred by the voice mail system to a busy or non-answering extension can bedirected to the voice mailbox of that extension if the caller so wishes or another extensioncan be called.
DIL (Direct Inward Line) ExtensionWhen a call from an outside telephone line is routed to a DIL (Direct Inward Line) exten-sion, the trunk rings the extension. If the extension is busy, the trunk waits and the callerhears ringback until the extension becomes free, at which point the trunk rings the exten-sion. If there is no answer, the extension rings until the caller hangs up. If the calledextension is forwarded, the trunk call is directed to the forwarded extension.
Dial ToneWhen a call from an outside telephone line is routed to a dial tone, the caller will hear thedial tone after one or two ringback tones. The caller can then dial the desired extensionnumber. The caller may not access room speakers, outbound lines, or dial 700 codes froman outside line. If the caller dials "0" to reach the operator the call is transferred to the at-tendant hunt group. If the extension dialed is busy, the busy signal will be heard. If thereis no answer, the extension rings until the caller hangs up. If the called extension is for-warded, the trunk call is directed to the forwarded extension.
SCR+ Telephone Operation Manual 5
STARCall Fusion Feature Set
Account CodesThe STARCall Fusion feature set supports up to 256 account codes. Each account code isa four-digit PIN (Personal Identification Number) that has both a day and night class ofservice assigned to it. Account codes may also be governed during the course of a daythrough the Event class of service function.
When a user calls from a system extension and that extension’s current class of servicedoes not support the operation requested by the user, a double-beep password promptsounds in the handset. The user can then enter their account code. If the class of servicecurrently in force for that account code supports the requested operation, the call pro-ceeds normally. If the class of service currently in force for that account code does notsupport the requested function, the reorder tone sounds and the call is denied.
The following telephone extension attributes are controlled via account codes:
Intercom Off-Hook Answer Intercom call-in is answered when the extension goesoff-hook.
Emergency Ring Access Extension can receive emergency priority speaker stationcall-ins.
Normal Ring Access Extension can receive normal priority speaker stationcall-ins.
Telephone Ring Access Extension can receive calls from other extensions.
Dial Access Extension allows a user to dial.
Tone Access Extension allows a user to initiate tone distribution.
Page Access Extension allows a user to initiate pages.
Program Access Extension allows a user to initiate a Programdistribution.
Intercom Access Extension allows a user to initiate Intercom to a speakerstation.
Intercom Off-Hook Transfer Transfer speaker intercom to handset when extensiongoes off-hook is allowed.
Off-Hook Duress Duress call-in occurs if extension remains off-hook forduress time-out.
Room Exclusion Access Extension allows user to exclude speakers from audioreception.
Output Control Access Extension allows user to turn on/off system outputs.
Forward Access Extension allows user to forward calls (locally or viaanother extension.
Admin Access Extension allows user to set clock, schedules, musicsource or clear errors.
Digit 9 Access Extension allows user to access dial-9 trunks.
Digit 8x Access Extension allows user to access dial-8x trunks. (x = 0-9)
6 SCR+ Telephone Operation Manual
STARCall Fusion Feature Set

Interactive Voice Response (IVR) SystemOutside telephone calls routed to the IVR are greeted by the auto-attendant. The callermay then enter the extension they wish to reach, or they may access other IVR features.If a called extension is busy or does not answer, the IVR offers the appropriate options,including leaving a voice mail message or calling another extension.
For detailed information on IVR operations, please refer to the latest revision of docu-ment number 3100663, the STARCall Fusion SW-4000 IVR Operation Manual.
System Speed Dial NumbersThe Fusion feature set supports up to 20 System-wide speed dial numbers which are as-signed during system configuration. These numbers can be dialed from any telephoneconnected to the System. For example, *01 can be configured to initiate an All Call page(normally 720#).
These numbers can also be used to access an outbound line and dial an outside telephonenumber. For example, *02 could dial 91234567 in which the 9 would seize an outsideline and dial the telephone number 1234567.
Contact the System Administrator for details on implementation in your System. Notethat operations initiated by speed dial may be restricted by the class of service assigned tothe extension used to speed dial.
Toll RestrictionThe Fusion feature set supports eight toll restriction levels and eight toll permit levelswhich assigned during System configuration. This function can be used to prevent anynumber of System telephones from calling outside area and/or country codes, localexchanges, or even particular outside telephone numbers.
The 911 emergency number is not toll restricted and will not be restricted even if placedin the toll restrict table.
Contact the System Administrator for details on implementation in your System.
SCR+ Telephone Operation Manual 7
STARCall Fusion Feature Set

8 SCR+ Telephone Operation Manual
Notes

ATEL Description and Features
ATEL Description and FeaturesThe Dukane Model 7A1110 Administrative Telephone (ATEL) is shown in Figure 1.It provides user-friendly access to all System features. The 16-character alphanumericLCD display shows all telephone, intercom, and paging status information related to theATEL. Time and date are displayed when the ATEL is idle. Ring tones produce cadencesdistinctive to the incoming call type. Two tone types, each with three volume settings, areavailable. An off setting, which turns off both tone types, is also provided. The ATEL has28 pushbuttons including 12 standard telephone, one speaker phone, one talk, one volumeup/down, one menu, eight programmable general purpose, and four programmablespecial function keys.
Two-way intercom communication to a room speaker can be conducted privately throughthe handset using a voice activated switch (VOX), or through the built-in microphone andspeaker using the talk switch for manual audio direction control. Telephone conversationscan be conducted privately through the handset, or through the built-in microphone andspeaker in hands-free (auto) or talk (manual) mode. Intercom, telephone, and backgroundmusic speaker operations each have 16 possible volume settings, independent of oneanother. One-way paging to speakers can be conducted either through the handset orthrough the microphone in hands-free or talk mode.
continued
SCR+ Telephone Operation Manual 9
Section2
PREVIOUSNEXT
MUSICSCROLL
REDIALMUTE
FLASHANSWER
Figure 1: Model 7A1110 Administrative Telephone (ATEL)

The ATEL also features:
• The ability to dial three-, four-, or five-digit alphanumeric extensions and room numbers
• Intercom features:
Queuing of call-insQueue scroll and selectPrivacy indication
• Telephone features:
System extension, PBX/KSU, and outside line dialCall holdCall transferCall forwardMusic-on-holdThree-party conference
• System features:
PagingTone distributionAudio program distribution and monitoringBackground musicSystem time and date set
Note:Many System telephone features are governed by the System programming.Contact your Dukane distributor if a feature is not enabled.
Display WindowWhen the ATEL is not in use and no calls are present, the display shows the date andtime in either 12- or 24-hour mode. When a call-in is received from a room speaker, thecalling station number and the position of the call within the call-in queue appear on thedisplay. When an emergency priority call-in is received, the display flashes and a distinc-tive tone sounds. When a call from an STEL or CTEL is received, “Call from X” appears.(X is the number of the calling extension.) When the ATEL is used to call another System ex-tension, the dialed extension number appears on the display. When the ATEL is used tomake a page or distribute tones, the display shows the active mode (page or tone).
When the ATEL dials 9 or 8X to dial an outside telephone, it displays “CO” followed byeach digit dialed. Once dialing is completed, the display is updated to read “COXX Tele-phone Number” where XX is the actual outside line being used and Telephone Number isthe number which was dialed.
When line pickup (79XX) is used to select a specific line, such as line one, for dialingout, the display would read “CO01” after which each digit dialed would be displayed.Once dialing is completed, the display is updated to read “CO01 Telephone Number.”
10 SCR+ Telephone Operation Manual
ATEL Description and Features

HandsetThe ATEL’s handset can be used for normal conversations (intercom or telephone)and for voice paging. See pages Calling a Speaker Station, page 25; Calling a Telephone,page 31; and Paging, page 48, for additional information. Lifting the handset switches theATEL to handset operation, regardless of the state of the speaker/microphone.
MicrophoneThe ATEL console has a built-in electret microphone for excellent sound quality. It canbe used for talk intercom conversations with room speakers, hands-free or talk telephoneconversations, and hands-free or talk paging. See Manually Answering a Call-In (AutoAnswer Disabled), page 28, and Calling a Telephone, page 31, for additional information.
SpeakerThe ATEL’s built-in speaker allows you to listen to loudspeaker intercom, speaker phoneaudio, and background music, and to monitor an audio program. See Setting the ATELBackground Music on page 18, Manually Answering a Call-In (Auto Answer Disabled),page 28, and Monitoring Audio Program Sources, page 65, for additional information.
VolumeThe VOL up and down key adjusts the ATEL speaker’s volume to one of 16 levels.Volume levels for intercom listen, telephone speaker phone listen, and background musicto the speaker are adjusted independently of each other. The VOL key also adjusts theringer type and volume. See Adjusting the Voice and Music Volumes on page 17 for moreinformation.
Key PadThe ATEL has a standard telephone key pad. Keys 0 through 9, *, and # work the sameway as a standard DTMF telephone. The * key also allows the selection of alpha charac-ters as shown below. Note that the ATEL does not display the alpha characters whendialing.
*2 = A**2 = B***2 = C*3 = D
The # key is also used to dial speaker stations for special function dialing sequences. SeeCalling a Speaker Station, page 25, for additional information.
SCR+ Telephone Operation Manual 11
ATEL Description and Features

Talk KeyThe TALK key is used in intercom, telephone, or page mode to manually switch thevoice direction when using the speaker/microphone. In intercom mode it is used to switchfrom listen to talk. Pressing the TALK key during telephone hands-free speaker phoneoperation switches the ATEL to push-to-talk operation and manually controls the voicedirection. Pressing the TALK key during a page switches the ATEL from hands-freeoperation to push-to-talk operation to provide a means of muting voice when released.While programming speed dial strings, the TALK key can insert a one second pause inthe dialing sequence. See Programming the Dedicated Function Keys, page 15, Calling aSpeaker Station, page 25, and Emergency Paging All Rooms, page 48 for more information.
Speaker Phone KeyThe SPKR. PHONE key is used for intercom, telephone, or page operation when thespeaker/microphone combination is desired. See Calling a Speaker Station, page 25,Calling a Telephone, page 31, and Paging, page 48, for additional information. Pressingthe SPKR. PHONE key while the handset is in the cradle and the unit is idle places theATEL off-hook and into speaker/microphone operation, ready for dialing. Pressing theSPKR PHONE key while the handset is off-hook switches the ATEL to speaker/micro-phone operation, regardless of the current state of the ATEL.
Programmable Dedicated Function KeysThe dedicated function keys provide easy one-button access to common System functions.They are programmed at the factory to the default settings. The settings can be changed atany time, however this manual assumes that these default settings have not been changed.If they have, the keys will operate differently than described. It is recommended that anyreprogramming of these keys be written down in the chart provided in Appendix B onpage 79 for future reference. To customize these keys see Programming the DedicatedFunction Keys on page 15.
EMERGENCYThe EMERGENCY key initiates emergency voice pages to all speakers or to any combi-nation of speaker zones. Pressing this button automatically dials 70, which is the factorydefault setting to access emergency paging functions. The factory default setting also re-quires you to then press the # key to initiate page access (this requirement can be changedby System programming). See Paging beginning on page 48 for full instructions.
TONEThe TONE key initiates or cancels tone distribution through the System speakers. Thetone type is user selectable and can be distributed to all speakers, any combination ofspeaker zones, or any combination of individual room speakers. Pressing this button auto-matically dials 71, which is the factory default setting to access tone distribution. SeeDistributing Tones on page 55 for full instructions.
12 SCR+ Telephone Operation Manual
ATEL Description and Features
PAGEThe PAGE key initiates general voice pages to all speakers, any combination of speakerzones, or any combination of individual room speakers. Pressing this button automati-cally dials 72, which is the factory default setting to access paging functions. See Pagingbeginning on page 48 for full instructions.
PROGRAMThe PROGRAM key initiates, modifies, or cancels audio program source distribution tothe speakers. The audio source is user selectable and can be distributed to all speakers,any combination of speaker zones, or any combination of individual room speakers.Changes can be made while audio program distribution is in progress, depending on thehardware configuration and the change desired. Pressing this button automatically dials73, which is the factory default setting to access audio program source distribution. SeeDistributing Audio Programs beginning on page 60 for full instructions.
Programmable F1 through F8 KeysThe F1–F8 function keys provide easy one-button access to common ATEL functions.They are programmed at the factory to default settings. The overlay sheet on the ATELprovides text for the default settings, but it can be modified by turning over the sheet.While settings can be changed at any time, this manual assumes that these default settingshave not been changed. If they have, the keys will operate differently than described.They can alternatively be programmed as general purpose speed dials. It is recommendedthat any reprogramming of these keys be written down in the chart provided in Appendix Bon page 79 for future reference. To customize these keys see Programming the F1through F8 Function Keys on page 16.
PREVIOUS Displays the previous call in the queue (F1 default).
NEXT Displays the next call in the queue (F2 default).
MUSIC Toggles the background music on/off (F3 default).
SCROLL Displays messages longer than 16 characters (F4 default).
REDIAL Redials the last number sequence (F5 default).
MUTE Mutes the panel microphone in speaker/microphonepush-to-talk (PTT) operation, or the handset transmitter andreceiver in handset operation (F6 default).
FLASH
ANSWER
Indicates a hookswitch flash (F7 default).
Answers the next intercom call in the queue (F8 default).
CALL PARK Allows a line to be parked.
DO NOT DISTURB Forward all calls to voice mail (only available with voice mailsystem).
CALL HOLD Places a call (telephone or trunk) on hold.
CALL TRANSFER Places a call (telephone or trunk) on hold
SCR+ Telephone Operation Manual 13
ATEL Description and Features

Menu KeyThe MENU key places the ATEL into the Local Diagnostic/Programming Mode. In thismode, the ATEL’s F1–F8 keys, the four dedicated function keys, the ringer type, and theringer volume can be custom programmed. See Local Diagnostic/Programming Mode onthe next page.
Error CodesError codes appear on the ATEL display if communication problems occur within theSystem. These codes display as “SYSTEM ERROR” followed by a two-digit error code.When an error code appears, write down the exact display and contact your system ad-ministrator or authorized Dukane distributor for assistance.
Selectively Answering Call-Ins (ATEL Only)There are two ways to selectively answer calls:
• To view the call-ins in the queue, press # or the function key programmed as NEXT toscroll forward through the call-in waiting queue. Press * or the function key pro-grammed as PREVIOUS to scroll backward.
When the desired calling room number appears, lift the handset if auto answer isenabled, or dial 742#, or press the function key programmed to dial that sequence.(F8 factory default)
—OR—
• Without displaying the calling room number, lift the handset or press SPKR PHONE,press #, and dial the calling room number.
Local Diagnostic/Programming Mode
Entering the Local Diagnostic/Programming ModeTo enter the Local Diagnostic/Programming Mode, press the MENU key for 1-1/2seconds. Once the ATEL is in this mode, it alternately displays its model number and itshardware revision/software version. Thereafter, every time a key is pressed, the ATELwill sound a confirmation tone and display the key’s function.
14 SCR+ Telephone Operation Manual
Error Codes

Exiting the Local Diagnostic/Programming ModeTo exit the Local Diagnostic/Programming Mode, press the MENU key for 1-1/2 seconds.The time and date display should reappear.
Displaying the ATEL Hardware Revision and Software VersionPress the MENU key for 1-1/2 seconds to enter the Local Diagnostic/ProgrammingMode. The ATEL will alternately display its model number and its hardware revision/software version. Press MENU for 1-1/2 seconds again to exit the Local Diagnostic/Programming Mode.
Verifying a Key’s FunctionThe EMERGENCY, TONE, PAGE, and PROGRAM keys and the F1–F8 keys on anATEL can be reprogrammed to perform different functions. To determine the currentfunction of any key, follow the steps below.
1. Press MENU for 1-1/2 seconds to enter the Local Diagnostic/Programming Mode.
2. Press and release the key you want to verify. The key’s function appears on theATEL display and the feedback tone sounds.
3. Press MENU for 1-1/2 seconds to exit the Local Diagnostic/Programming Mode.
Programming the Dedicated Function KeysThe EMERGENCY, TONE, PAGE, and PROGRAM keys can be reprogrammed to dial adifferent sequence. Operation of these dedicated function keys will differ from what isdescribed in this manual if the default settings are reprogrammed. The factory defaultsettings for the dedicated function keys are:
EMERGENCY 70TONE 71PAGE 72PROGRAM 73
As you reprogram the function keys, write down their new functions in the chart providedin Appendix B on page for future reference.
1. Press MENU for 1-1/2 seconds to enter the Local Diagnostic/Programming Mode.
2. Press the desired function key. The display will show a two-character code indicatingthe function key (EM, TN, PG, or PR) accompanied by the current programmed dialsequence and a flashing cursor.
continued
SCR+ Telephone Operation Manual 15
Local Diagnostic/Programming Mode

3. Enter the desired dial sequence using the numeric key pad. Up to 32 digits can beentered. Entering the first digit clears the display of any previously assigned dialsequence. See Appendix A on page 75 for a listing of 700 codes.
4. One or more one-second pauses, indicated by a W, can be inserted at any time usingthe TALK key.
5. If you make an entry error or wish to cancel your modification of a previouslyprogrammed dial sequence, press another function key, or exit the Local Diagnostic/Programming Mode by pressing MENU for 1-1/2 seconds.
6. When you have entered the new sequence, press the function key again. The displayshows the new dial sequence without the flashing cursor.
7. Press MENU for 1-1/2 seconds to exit the Local Diagnostic/Programming Mode.
Programming the F1 through F8 Function KeysThe F1 through F8 function keys can be reprogrammed to dial a different sequence.Operation of these function keys will differ from what is described in this manual if thedefault settings are reprogrammed. The factory default settings for the F1 through F8function keys are:
F1 PREVIOUSF2 NEXTF3 MUSICF4 SCROLLF5 REDIALF6 MUTEF7 FLASHF8 742#
As you reprogram the function keys, write down their new functions in the chart providedin Appendix B on page for future reference.
1. Press MENU for 1-1/2 seconds to enter the Local Diagnostic/Programming Mode.
2. Press the desired F1–F8 function key. The display will show the key’s currentprogramming as one of seven preset functions (e.g., PREVIOUS, NEXT) or theF<#>, a dial sequence, and a flashing cursor.
3. If a preset function is desired, press and hold the function key until the desired presetfunction is displayed. Release the key.
16 SCR+ Telephone Operation Manual
Local Diagnostic/Programming Mode

4. If a dial sequence is desired:
a. Press and hold the function key until the F<#> + dial sequence and a flashingcursor are displayed. Release the key.
b. Enter the desired dial sequence using the numeric key pad. Up to 32 digits canbe entered. Entering the first digit clears the display of any previously assigneddial sequence. See Appendix A beginning on page 75 for a listing of 700 codes.
c. One or more one-second pauses, indicated by a W, can be inserted at any timeusing the TALK key.
d. If you make an entry error or wish to cancel your modification of a previouslyprogrammed dial sequence, press another function key, or exit the LocalDiagnostic/Programming Mode by pressing MENU for 1-1/2 seconds.
e. When you have entered the new sequence, press the function key again. Thedisplay shows the new dial sequence without the flashing cursor.
5. Press MENU for 1-1/2 seconds to exit the Local Diagnostic/Programming Mode.
Adjusting the Ringer Type and Volume1. Press MENU for 1-1/2 seconds to enter the Local Diagnostic/Programming Mode.
2. Press the VOL up and down key to scroll though the ringer settings—Off, Type 1 Lo,Type 1 Mid, Type 1 Hi, Type 2 Lo, Type 2 Mid, Type 2 Hi. By default, the ringertype and volume are Type 1 Mid.Note:To maintain UL 1069 integrity in a StarCare System, the ringer type/volumeCANNOT be set to Off.
3. When the desired setting appears on the display, press MENU for 1-1/2 seconds toexit the Local Diagnostic/Programming Mode.
Adjusting the Voice and Music VolumesVoice and music volumes can be adjusted by pressing the VOL up and down key whilethe function is in use. Each level is set independently, and there is no display indicationof the setting. Sixteen levels are available, with the factory default settings for telephone,intercom, and background music being:
Telephone Level 4Intercom Level 4Background Music Level 9
SCR+ Telephone Operation Manual 17
Local Diagnostic/Programming Mode

Restoring Default Key SettingsThe EMERGENCY, TONE, PAGE, and PROGRAM keys and F1 through F8 keys canbe restored to their default settings by individual programming in Local Diagnostic/Pro-gramming Mode (see page 14), or by the following method:
1. Unplug the ATEL.
2. While holding down the TALK and MENU keys reconnect the ATEL.
3. The message DEFAULT KEYS SET should appear on the display.
4. The message will stay on the display until an action is taken or until the next Systemtime update occurs (once per minute).
Setting the ATEL Background MusicYou can toggle the ATEL background music function on or off by pressing the F key as-signed to that function (default is F3) or by pressing 1 while the ATEL is on-hook. Thebackground music source is selected as described under Selecting a Source for Mu-sic-on-Hold and ATEL Background Music on page , and is the same as theSystem-wide music-on-hold source.
Background music continues to be heard from the ATEL speaker after you hang up thehandset or press SPKR PHONE. The music is muted during telephone, page, or intercom op-erations.
You can adjust the background music volume while listening to it by pressing the VOLup/down key as needed. The background music volume level is independent of intercomlisten or telephone listen volume settings.
This feature does not use a telephone link, so it can be left on all the time without reduc-ing available System resources.
Note:This feature requires that the ATEL be connected to an ATC-E4 card. The ATC-Bcard does not support the ATEL background music function. See your Dukanedistributor for assistance.
18 SCR+ Telephone Operation Manual
Local Diagnostic/Programming Mode

Standard Telephone Operations
IntroductionWith a few exceptions, many of the ATEL’s operational features can be performed by theSTEL, CTEL, or by a standard DTMF 2500 compatible telephone with electronic ringer.Multi-function display capabilities, however, are only available on the ATEL.
This section explains the operation of the Dukane Model 7A1111 Standard Telephone(STEL), a DTMF-type phone. The operations in this section also apply to standardCaller-ID telephones with electronic ringer, referred to in this manual as CTELs, andstandard, “off-the-shelf” DTMF 2500 compatible telephones. CTEL and DTMF tele-phones are not sold by Dukane, but can be purchased from various manufacturers.The majority of information in this section is relevant to STELs, CTELs, and DTMF tele-phones. Information that pertains to all three will be referred to as the phone.
Notes:
• The phone operations described in this section require the optional Model437-00122 Classroom Telephone Feature Package 1, and an STC or BTC in theequipment rack.
• Any phone connected to the System must have a REN (Ringer Equivalence Num-ber) of 1.5 or less to work with an STC or 3 or less to work with a BTC (Balancedaudio Telephone Card).
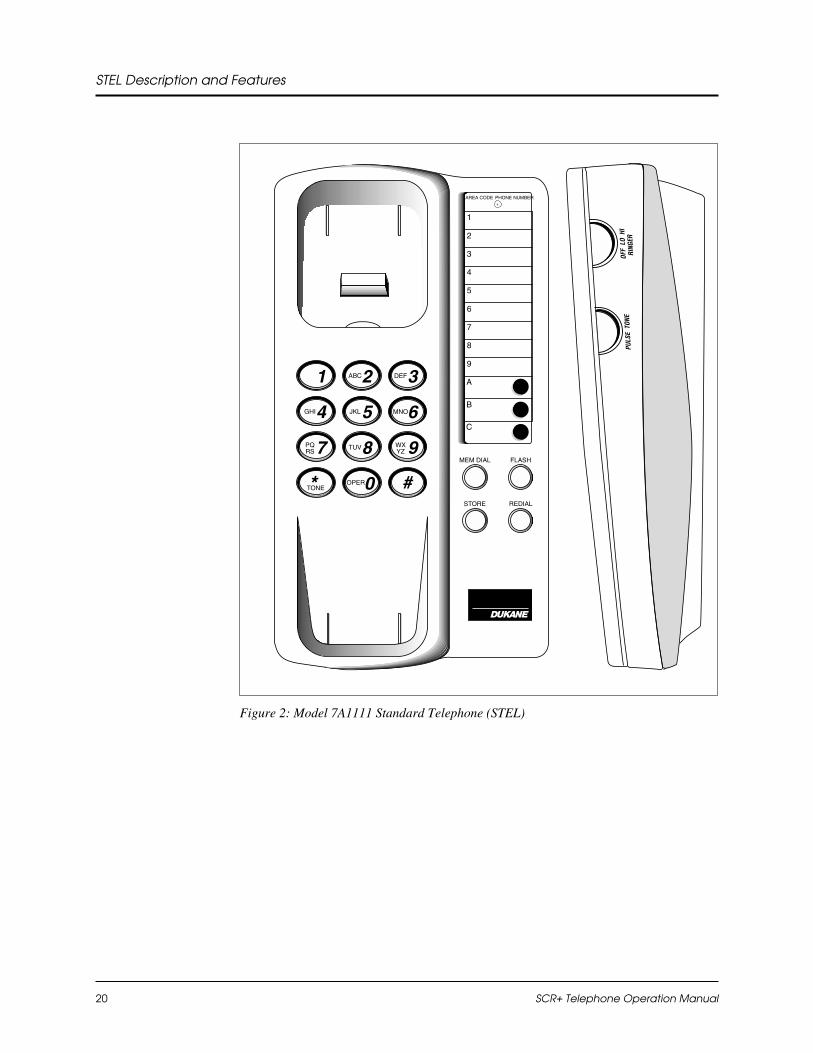
STEL Description and FeaturesThe Dukane Model 7A1111 (STEL), is shown in Figure 2 on page 20. It has a standard12-button telephone key pad, three programmable speed dial buttons, and four dedicatedfeature buttons (STORE, MEM DIAL, FLASH, and REDIAL). The handset allowsprivate, telephone-style conversations.
System functions that can only be performed by regular telephones (STEL, DTMF tele-phone, or CTEL) are described on the following pages.
SCR+ Telephone Operation Manual 19
Section3
20 SCR+ Telephone Operation Manual
STEL Description and Features
1 2 3
4 5 6
7 8 9
* 0 #TONEOPER
TUV
JKL MNO
WXYZ
PQRS
GHI
ABC DEF
MEM DIAL FLASH
REDIALSTORE
C
B
A
9
8
7
6
5
4
3
2
1
AREA CODE PHONE NUMBER
Figure 2: Model 7A1111 Standard Telephone (STEL)

Placing a Call-InInstead of a call-in switch, you can use an STEL, DTMF telephone, or CTEL to place acall-in to the call-in location (e.g., school office, nurse station) with the incoming re-sponse heard on the speaker. Follow the directions below.
1. Lift the handset.
2. Press the desired speed dial key (if the phone is so equipped and one of the buttons isso programmed) or dial 743, select the call-in switch number (1, 2, or 3), and press #.Call-in switch numbers 1, 2, and 3 correspond to the three call-in switches that canbe configured for the associated speaker station.
1—Default Normal Call-In Switch2—Default Emergency Call-In Switch3—Default Call-In Cancel
3. Hang up the handset.
4. When the call-in is answered, the response is routed to the speaker associated withthe calling telephone.Note:A speaker with the same architectural number as the telephone must exist in theSystem for the response to routed to the associated speaker.
Off-Hook Duress Call-InA System telephone port can be programmed to initiate a duress call-in to a pre-determinedlocation with a preset call priority (these settings are the same for all telephones) if thehandset is left off-hook for a configurable length of time with no activity. The audio re-sponse to such calls is automatically routed to the loudspeaker associated with the callingtelephone.
Note:This feature may not apply to your System. It requires the optional Model 437-00124Security Feature Package 1 and the optional Model 437-00122 Classroom TelephoneFeature Package 1.
SCR+ Telephone Operation Manual 21
Placing a Call-In

Off-Hook Direct Telephone CallA System telephone port can be programmed to initiate a direct telephone call to aconfigurable telephone extension when the handset is lifted. By default this option is dis-abled. If it is enabled, follow the directions below.
Note:This feature may not apply to your System. It requires the optional Model 437-00124Security Feature Package 1.
1. Lift the handset.
2. After hearing the called party answer, speak normally into the handset.
3. Listen to hear the reply from the extension. Communication is full duplex, so youmay speak while listening.
4. Hang up the handset to end the call.
Off-Hook Intercom OptionA System telephone port can be programmed to initiate a direct telephone call to aparticular remote speaker station when the handset is lifted. By default this option is dis-abled. If it is enabled, follow the directions below.
Note:This feature may not apply to your System. It requires the optional Model 437-00122Classroom Telephone Feature Package 1 and the Model 437-00124 Security FeaturePackage 1.
1. Lift the handset.
2. After hearing the connection tone, speak into the handset.
3. Stop speaking to hear the reply from the remote speaker station.
4. Hang up the handset to end the call.
22 SCR+ Telephone Operation Manual
Off-Hook Direct Telephone Call

Off-Hook PageA System telephone port can be programmed to initiate a page to programmed zoneswhen the handset is lifted. Phones programmed in this way cannot be used to make callsto other System extensions or outside lines.
1. Lift handset.
2. After hearing connection tone, speak into handset.
3. Hang up the handset to end the page.
Error CodesIf there are no ATELs in the system, error codes are displayed by flashing four LEDs onthe CPC. If an error code appears, contact your system administrator or authorizedDukane distributor for assistance.
SCR+ Telephone Operation Manual 23
Off-Hook Page

24 SCR+ Telephone Operation Manual
Notes

Using the System
Calling a Speaker StationAll speaker stations have a three-, four-, or five-digit alphanumeric extension. The starkey (*) is used to dial alpha characters. See the examples below.
Note:ATELs do not display the alpha characters when dialing.
103*2 = 103A103**2 = 103B103***2 = 103C103*3 = 103D
When dialing, press each character within 15 seconds. If no dialing activity occurs withinthis time, a reorder tone sounds to alert you to hang up and redial.
If your System has been networked to other Systems using a NIC, you can call anyspeaker station in the networked Systems. If your System has not been networked, youcan only call the speaker stations in your own System.
1. ATEL: Lift the handset for a private conversation or press SPKR PHONE for aspeaker/microphone push-to-talk conversation.
STEL, DTMF telephone, or CTEL: Lift the handset.
2. ATEL: Press and release #, then dial the extension number.
STEL, DTMF telephone, or CTEL: Same as ATEL.
3. ATEL ONLY: The display shows the extension. (P appears on the left side of thedisplay when a speaker station is in privacy mode and there is no listen audio fromthe remote speaker station.)
4. ATEL: After hearing the connection tone, speak into the handset to switch to talkmode. If you are using the speaker/microphone, press TALK and speak into themicrophone.
STEL, DTMF telephone, or CTEL: After hearing the connection tone, speak into thehandset.
5. ATEL: Stop speaking or release TALK to listen for a reply from the speaker station.(You will not hear one if the speaker station is in privacy.)
STEL, DTMF telephone, or CTEL: Stop speaking to listen for a reply from thespeaker station. (You will not hear one if the speaker station is in privacy.)
continued
SCR+ Telephone Operation Manual 25
Section4

6. ATEL ONLY: When using the handset, pressing the MUTE function (F6 factorydefault) will alternately mute and unmute both the talk and listen operation of thehandset.
7. ATEL ONLY: When using the speaker/microphone, you can adjust the speaker listenvolume by pressing the VOL up/down key as needed. The intercom listen volumelevel is independent of telephone listen or background music volume settings.
8. ATEL: Hang up the handset to end the call, or press SPKR PHONE to cancel theintercom connection.
STEL, DTMF telephone, or CTEL: Hang up the handset to end the call.
Answering Speaker Station CallsEach speaker station can be equipped with up to three call-in switches. Each call-inswitch is programmed with a priority level. Priority 1 is the highest, 6 is the lowest, andpriority 7 is used to cancel the call. The priorities are listed below.
1. Emergency 1 (E1) 5. Normal Priority (NP)2. Emergency 2 (E2) 6. Low Priority (LP)3. Emergency 3 (E3) 7. Cancel4. High Priority (HP)
By default, call-in switch 1 is programmed as a normal call (priority 5), call-in switch 2 isprogrammed as emergency 2 (priority 2), and call-in switch 3 is programmed as call can-cel (priority 7).
When a call-in switch assigned a priority from 1 to 6 is pressed, the resulting call-in isrouted to a call-in destination group. (A call-in group contains one or more phones towhich call-in activity is routed.) The call-in groups were programmed using the RAPIDor MDS software during System installation. By default, STELs, DTMF telephones, andCTELs are not assigned to any call-in designation group. By default, ATELs are assignedto call-in destination group 1. To receive a call-in from a room speaker call-in switch, aphone must be configured as part of one of the call-in destination groups. A System thatincludes NICs can configure call-in destination groups to include any ATEL, STEL, orCTEL in the networked System.
If your System has been networked to other Systems using a NIC, your phone can be as-signed to any call-in group in the networked Systems. In networked Systems, onlyspeakers assigned to zones 17 through 32 can receive emergency call-ins from other Sys-tems in a network.
26 SCR+ Telephone Operation Manual
Answering Speaker Station Calls

Using the System priority defaults as an example, if call-in switch 1 is pressed, an ATELreceiving the call-in would display the calling room number and the call-in queue position.All phones (ATELs, STELs, DTMF telephones, or CTELs) in the call-in destinationgroup for that call-in switch annunciate the call using a constant triple burst ring untilanswered.
Again using the System priority defaults, pressing call switch 2 would yield the same re-sults as described for call-in 1 switch above. All emergency call-ins (priorities 1 through3) create a quintuple burst ring with a cadence of 1.5 seconds on and 18.5 seconds off.
The call-in tone for priorities 4 through 6 is a triple burst ring with a cadence of 1.5 sec-onds on and 18.5 seconds off.
Auto Answering a Call-InIn order to auto-answer a loudspeaker call-in, the extension’s intercom off-hook answerclass of service attribute must be enabled (default is disabled). If this attribute is notenabled, see Manually Answering a Call-In on page 28. For both manually and automati-cally answering call-ins, the extension must have the intercom access class of serviceattribute enabled.
If more than one call is in the queue, the calls are automatically sorted by priority, fol-lowed by the order in which they are received.
1. TEL: Lift the handset or press SPKR PHONE.
STEL, DTMF telephone, or CTEL: Lift the handset.
2. ATEL: Speak clearly into the handset or press the TALK key and speak clearly intothe microphone. When the handset is used, your voice automatically triggers the talkmode to the calling room.
STEL, DTMF telephone, or CTEL: Speak clearly into the handset.
3. ATEL: Stop speaking into the handset or release the TALK key and listen for thereply from the calling room.
STEL, DTMF telephone, or CTEL: Stop speaking into the handset and listen for thereply from the calling room.
4. ATEL ONLY (handset): Pressing the MUTE button (F6 factory default) willalternately mute and unmute both the talk and listen operation of the handset.
5. ATEL ONLY (push to talk): Press the VOL up/down key to adjust the listen volume.Note:The MUTE function is not available in this mode of operation.
continued
SCR+ Telephone Operation Manual 27
Answering Speaker Station Calls

6. ATEL: Hang up the handset or press SPKR PHONE to end the call. Failure toreplace the handset in the cradle will cause the ATEL to switch to an on-hook modeof operation after a preset duration. If the ATEL converts to an on-hook mode, it stillrings as if the handset is in the cradle, therefore no calls are missed.
STEL, DTMF telephone, or CTEL: Hang up the handset to end the call.Note:The handset must be on-hook for a minimum of two seconds to end the call.
Manually Answering a Call-In (Auto Answer Disabled)If auto answer has been disabled in your System, you can manually answer calls.
1. ATEL: Lift the handset or press SPKR PHONE.
STEL, DTMF telephone, or CTEL: Lift the handset.
2. ATEL: Dial 742# or press the function key programmed to dial that sequence (F8factory default).
STEL, DTMF telephone, or CTEL: Dial 742#.
3. ATEL: Speak clearly into the handset or press the TALK key and speak clearly intothe microphone. When the handset is used, your voice automatically triggers the talkmode to the calling room.
STEL, DTMF telephone, or CTEL: Speak clearly into the handset.
4. ATEL: Stop speaking into the handset or release the TALK key and listen for thereply from the calling room.
STEL, DTMF telephone, or CTEL: Stop speaking into the handset and listen for thereply from the calling room.
5. ATEL ONLY (handset): Pressing the MUTE button (F6 factory default) willalternately mute and unmute both the talk and listen operation of the handset.
6. ATEL ONLY (push to talk): Press the VOL up/down key to adjust the listen volume.Note:The MUTE function is not available in this mode of operation.
7. ATEL: Hang up the handset or press SPKR PHONE to end the call. Failure toreplace the handset in the cradle will cause the ATEL to switch to an on-hook modeof operation after a preset duration. If the ATEL converts to an on-hook mode, it stillrings as if the handset is in the cradle, therefore no calls are missed.
STEL, DTMF telephone, or CTEL: Hang up the handset to end the call.Note:The handset must be on-hook for a minimum of two seconds to end the call.
28 SCR+ Telephone Operation Manual
Answering Speaker Station Calls

Answering the Highest Priority System Call-InTo answer the highest priority call-in follow the steps below.
1. ATEL: Lift the handset or press SPKR PHONE.
STEL, DTMF telephone, or CTEL: Lift the handset.
2. ATEL: Dial 745#, or press the function key programmed to dial that sequence. You areautomatically connected to the first highest priority call-in, regardless of the call’sorigin or programmed destination.
STEL, DTMF telephone, or CTEL: Dial 745#. You are automatically connected tothe first highest priority call-in, regardless of the call’s origin or programmeddestination.
3. ATEL: Speak clearly into the handset. Your voice triggers the talk mode to the callingroom. If you are using the speaker/microphone, press TALK and speak into themicrophone.
STEL, DTMF telephone, or CTEL: Speak clearly into the handset.
4. ATEL: Stop speaking into the handset or release the TALK key to listen for the replyfrom the calling room.
STEL, DTMF telephone, or CTEL: Stop speaking to listen for the reply from thecalling room.
5. ATEL ONLY (handset): Pressing the MUTE button (F6 factory default) willalternately mute and unmute both the talk and listen operation of the handset.
6. ATEL ONLY (push to talk): Press the VOL up/down key to adjust the listen volume.Note:The MUTE function is not available in this mode of operation.
7. ATEL: Hang up the handset or press SPKR PHONE to end the call. Failure toreplace the handset in the cradle will cause the ATEL to switch to an on-hook modeof operation after a preset duration. If the ATEL converts to an on-hook mode, it stillrings as if the handset is in the cradle, therefore no calls are missed.
STEL, DTMF telephone, or CTEL: Hang up the handset to end the call.Note:The handset must be on-hook for a minimum of two seconds to end the call.
SCR+ Telephone Operation Manual 29
Answering Speaker Station Calls

Canceling All Normal Call-Ins in the SystemWhen a number of call-ins occur at the same time (e.g., a hallway accident, bathroomspill), or a building-wide challenge where groups race to call in with the correct answer,all normal call-ins in the System can be canceled at once by doing the following:
1. ATEL: Lift the handset or press SPKR PHONE.
STEL, DTMF telephone, or CTEL: Lift the handset.
2. ATEL: Dial 749# or press the function key programmed to dial that sequence.
STEL, DTMF telephone, or CTEL: Dial 749#.
3. ATEL: Hang up the handset or press SPKR PHONE.
STEL, DTMF telephone, or CTEL: Hang up the handset.
Transferring Intercom Calls Between Room Speakers andAssociated System Phones
Intercom calls can be transferred from the room speaker to an associated ATEL, STEL,DTMF telephone, CTEL, or vice-versa. A System phone is associated with a speakerwhen both have the same extension number.
Notes:• Transferring from speaker to an associated ATEL is a standard option.• Transferring from speaker to STEL, DTMF telephone, or CTEL requires the op-
tional Model 437-00122 Classroom Telephone Feature Package 1 and Model437-00123 Classroom Telephone Feature Package 2.
Transferring from Speaker to Associated System PhoneTo transfer a call from the room speaker to a System telephone follow the steps below.
1. ATEL: Lift the handset. Your System may be programmed to require a dialcommand before speaker audio is transferred to the telephone. If so, dial 740#.
STEL, DTMF telephone, or CTEL: Lift the handset. Your System may beprogrammed to require a dial command before speaker audio is transferred to thetelephone. If so, dial 740#.
2. ATEL: Call audio transfers to the room telephone.
STEL, DTMF telephone, or CTEL: Call audio transfers to the room telephone.
30 SCR+ Telephone Operation Manual
Transferring Intercom Calls Between Room Speakers and Associated System Phones

Transferring from System Phone to Associated SpeakerTo transfer a call from a System phone to the associated room speaker follow the stepsbelow.
1. ATEL: Press and release the hookswitch or press and release the function keyprogrammed as FLASH.
STEL, DTMF telephone, or CTEL: Press and release the hookswitch or press andrelease FLASH.
2. ATEL: Dial 741#. Call audio transfers to the speaker.
STEL, DTMF telephone, or CTEL: Same as ATEL.
3. ATEL: Hang up the handset.
STEL, DTMF telephone, or CTEL: Same as ATEL.
Calling a TelephoneAll speakers, ATELs, STELs, CTELs, and standard DTMF telephones have a three-,four-, or five-alphanumeric dial number that can be either a room number or an extensionnumber. (The terms “room number” and “extension number” are used interchangeablythroughout this manual.) The star key (*) is used to dial alpha characters. See the examplesbelow.
103*2 = 103A103**2 = 103B103***2 = 103C103*3 = 103D
When dialing, press each character within 15 seconds. If no dialing activity occurs withinthis time, a tone sounds to alert you to hang up and redial.
Note:A System phone (STEL, DTMF telephone, or CTEL) can be programmed toautomatically call a particular extension when the handset is lifted. System phonesprogrammed in this way cannot be used to call any other extension.
SCR+ Telephone Operation Manual 31
Calling a Telephone
Calling a System Telephone ExtensionA System telephone is a Dukane-supplied ATEL or STEL; or an “off-the-shelf” DTMFtelephone or CTEL. If your System has been networked to other Systems using a NIC,you can call any telephone in the networked Systems. If your System has not been net-worked, you can only call the telephones in your own System.
Note:An extension can only be called if its telephone ring access class of service attributeis enabled. If this attribute is disabled and the telephone is associated with a speaker,the caller will be directly connected to the speaker. If the telephone is not associatedwith a speaker then the caller will hear the reorder tone in the handset.
1. ATEL: Lift the handset for a private conversation or press SPKR PHONE forspeaker/microphone conversation.
STEL, DTMF telephone, or CTEL: Lift the handset.
2. ATEL: Dial the extension number.
STEL, DTMF telephone, or CTEL: Same as ATEL.
3. ATEL: After hearing the called party answer, speak normally into the handset ortoward the microphone.
STEL, DTMF telephone, or CTEL: After hearing the called party answer, speaknormally into the handset.
4. ATEL ONLY: If you are using the speaker phone function, stop speaking to listenfor a reply from the other extension.
5. ATEL ONLY: Pressing the MUTE function (F6 factory default) will alternately muteand unmute both the transmitter and receiver in handset operation, or mute andunmute the panel microphone in speaker/microphone operation.
6. ATEL ONLY: If push-to-talk speaker/microphone operation is desired, press andrelease TALK to manually control the audio direction. The MUTE function is notavailable in this mode of operation.
7. ATEL ONLY: If you are using the speaker/microphone, you can adjust the speakerlisten volume by pressing the VOL up/down key.
8. ATEL: Hang up the handset or press SPKR PHONE to end the call. Failure toreplace the handset in the cradle will cause the ATEL to switch to an on-hook modeof operation after a preset duration. If the ATEL converts to an on-hook mode, it stillrings as if the handset is in the cradle, therefore no calls are missed.
STEL, DTMF telephone, or CTEL: Hang up the handset to end the call.Note:The handset must be on-hook for a minimum of two seconds to end the call.
32 SCR+ Telephone Operation Manual
Calling a Telephone

Busy Station Intercom (Fusion feature set only)If a called extension is busy, you can transfer the call to a room speaker associated withthat extension by pressing 2 while the busy signal sounds. You can then communicatewith the room without interrupting the telephone conversation in progress.
Note:The extension trying to initiate busy station intercom cannot have a call on hold atthe time or busy station intercom will not be enabled.
Call Back (Fusion feature set only)If a called extension is busy, you can request call back by pressing 1 while the busy sig-nal sounds. When the called extension is free, the System rings the originating extension.When the originating extension picks up, a call is automatically placed to the requestedextension.
Note:If the originating extension is busy when the call back occurs, the call back will notbe completed.
Calling a PBX/KSU Telephone ExtensionA PBX/KSU extension is a phone connected to a phone switch. Calling a PBX/KSU tele-phone extension requires the optional Model 437-00127 Call Management FeaturePackage 1. This function also requires proper setup of both the PBX/KSU and theSystem. If this function does not work, contact your Dukane distributor.
1. ATEL: Lift the handset for a private conversation or press SPKR PHONE forspeaker/microphone conversation.
STEL, DTMF telephone, or CTEL: Lift the handset.
2. ATEL: Dial the PBX/KSU extension number.—OR—Dial the access code assigned to the PBX/KSU (e.g., 81), then dial the PBX/KSUextension number when the dial tone is heard.
STEL, DTMF telephone, or CTEL: Same as ATEL.
3. ATEL: After hearing the called party answer, speak normally into the handset ortoward the microphone.
STEL, DTMF telephone, or CTEL: After hearing the called party answer, speaknormally into the handset.
4. ATEL ONLY: If you are using the speaker phone function, stop speaking to listenfor a reply from the other extension.
continued
SCR+ Telephone Operation Manual 33
Calling a Telephone

5. ATEL ONLY: Pressing the MUTE function (F6 factory default) will alternately muteand unmute both the transmitter and receiver in handset operation, or mute andunmute the panel microphone in speaker/microphone operation.
6. ATEL ONLY: If push-to-talk speaker/microphone operation is desired, press andrelease TALK to manually control the audio direction. The MUTE function is notavailable in this mode of operation.
7. ATEL ONLY: If you are using the speaker/microphone, you can adjust the speakerlisten volume by pressing the VOL up/down key.
8. ATEL: Hang up the handset or press SPKR PHONE to end the call. Failure toreplace the handset in the cradle will cause the ATEL to switch to an on-hook modeof operation after a preset duration. If the ATEL converts to an on-hook mode, it stillrings as if the handset is in the cradle, therefore no calls are missed.
STEL, DTMF telephone, or CTEL: Hang up the handset to end the call.Note:The handset must be on-hook for a minimum of two seconds to end the call.
Outside Line Access (Fusion feature set)An outside line is a telephone line that comes from the central office directly into a build-ing. These lines can be accessed either directly from the STARCall system through aCOC (Central Office Card) within the system or via a PBX system connected toSTARCall.
Inbound calls connected through the COC card with the optional TCM (Trunk Caller-IDModule) will display Caller ID information on telephones so equipped.
Outside line access for every extension is controlled by the class of service assigned.Contact your System Administrator for details concerning the availability of outside lineaccess based on class of service assignments in your System.
Calling an Outside Line Connected Directly to STARCall1. ATEL: Lift the handset for a private conversation or press SPKR PHONE for
speaker/microphone conversation.
STEL, DTMF telephone, or CTEL: Lift the handset.
2. Dial the outside line prefix number (usually 9 or 80 to 89) to access an outside line.To select a specific outside line, use the line pickup code (79XX) to select the desiredline (for example, 7902 will access line 2 for dialing if it is currently idle). See UsingTelephone Call Pickup on page 38 or more information.
ATELs display “CO” and a second dial tone is heard when the System is ready foroutbound dialing.
34 SCR+ Telephone Operation Manual
Calling a Telephone

3. Dial the desired telephone number, then wait. After 3 to 5 seconds the System willassume you have completed dialing the number.
4. If you hear a double tone burst, the number dialed is toll restricted and thisextension’s toll restriction and permit level do not allow calling this number. Enteran account code or password to proceed. If no double tone burst is heard, go tostep 5.
ATEL: If the account code is not authorized for this use or the password is wrong“INVALID SEQUENCE” is displayed and the reorder tone sounds and the call is notplaced.
STEL, DTMF telephone, or CTEL: If the account code is not authorized for this useor the password is wrong the reorder tone sounds and the call is not placed.
5. The System dials the number.
ATEL: The display is updated to show which outside line is being used.
6. ATEL: When the called party answers, speak normally into the handset or toward themicrophone.
STEL, DTMF telephone, or CTEL: When the called party answers, speak normallyinto the handset.
7. ATEL ONLY: Stop speaking to listen for a reply.
9. ATEL ONLY: Pressing the MUTE function (F6 factory default) will alternately muteand unmute both the transmitter and receiver in handset operation, or mute andunmute the panel microphone in speaker/microphone operation.
10. ATEL ONLY: If push-to-talk speaker/microphone operation is desired, press andrelease TALK to manually control the audio direction. The MUTE function is notavailable in this mode.
11. ATEL ONLY: If you are using the speaker/microphone, you can adjust the speakerlisten volume by pressing the VOL up/down key.
12. ATEL: Hang up the handset or press SPKR PHONE to end the call. Failure toreplace the handset in the cradle will cause the ATEL to switch to an on-hook modeof operation after a preset time. When in the on-hook mode, the ATEL will ring as ifthe handset is in the cradle to prevent missing any calls.
STEL, DTMF telephone, or CTEL: Hang up the handset to end the call.
Note:The handset must be on-hook for a minimum of two seconds to end the call.
SCR+ Telephone Operation Manual 35
Calling a Telephone

Calling an Outside Line Connected via a PBXFor STARCall, STARCall Plus and STARCall Fusion systems connected to outside linesthrough a PBX from another manufacturer.
1. ATEL: Lift the handset for a private conversation or press SPKR PHONE forspeaker/microphone conversation.
STEL, DTMF telephone, or CTEL: Lift the handset.
2. Dial 9 to connect to the PBX (may also be any number 80 through 89).
3. When the dial tone is heard, dial 9 again to access an outside telephone line throughthe PBX.Note:The System may automatically dial the second 9 for outside line access.
4. If this is a toll call and a double tone burst is heard, enter a four-digit accountnumber.
5. After hearing the called party answer, speak normally into the handset or toward themicrophone.
6. ATEL ONLY: Stop speaking to listen for a reply.
7. ATEL ONLY: Pressing the MUTE function (F6 factory default) will alternately muteand unmute both the transmitter and receiver in handset operation, or mute andunmute the panel microphone in speaker/microphone operation.
8. ATEL ONLY: If push-to-talk speaker/microphone operation is desired, press andrelease TALK to manually control the audio direction. The MUTE function is notavailable in this mode.
9. ATEL ONLY: If you are using the speaker/microphone, you can adjust the speakerlisten volume by pressing the VOL up/down key.
10. ATEL: Hang up the handset or press SPKR PHONE to end the call. Failure toreplace the handset in the cradle will cause the ATEL to switch to an on-hook modeof operation after a preset time. When in the on-hook mode, the ATEL will ring as ifthe handset is in the cradle to prevent missing any calls.
STEL, DTMF telephone, or CTEL: Hang up the handset to end the call.
Note:The handset must be on-hook for a minimum of two seconds to end the call.
36 SCR+ Telephone Operation Manual
Calling a Telephone
Placing an Outside Call Connected via a PBX on Hold1. ATEL: Press and release the function key programmed as FLASH (default is F7) or
press and release the hookswitch.
STEL, DTMF telephone, or CTEL: Press and release FLASH (if present) or pressand release the hookswitch.
2. ATEL: Dial 759# to put the outside call on hold.Note:To remove the call from hold, dial the pickup code of the PBX, following the outsideline equipment manufacturer’s instructions.
Transferring an Outside Call Connected via a PBX to Another OutsideExtension1. ATEL: Press and release the function key programmed as FLASH (default is F7) or
press and release the hookswitch.
STEL, DTMF telephone, or CTEL: Press and release FLASH (if present) or pressand release the hookswitch .
2. Dial 759# to put the outside call on hold.
3. Dial the other phone extension and hang up.
SCR+ Telephone Operation Manual 37
Calling a Telephone
Answering Telephone or Outside Line Calls
Answering a Call From Another Telephone or Outside LineIf your System has been networked to other Systems using a NIC, you can receive callsfrom any other telephone in the networked System. If your System has not been net-worked, you can only receive calls from telephones in your own System.
ATEL: Lift the handset for normal private phone communication or press SPKR PHONEto communicate through the speaker/microphone.
STEL, DTMF telephone, or CTEL: Lift the handset.
Using Call Group PickupTo pick up a System call from another extension, follow the steps below.
1. ATEL: Lift the handset or press SPKR PHONE.
STEL, DTMF telephone, or CTEL: Lift the handset.
2. ATEL: To pick up a telephone call by group, dial 761 followed by the group number(01–32) and the # key.Note:Call groups are defined during System programming using RAPID or MDS. Defaultis all ATELs in group 01.
STEL, DTMF telephone, or CTEL: Same as ATEL.Note:Call groups are defined during System programming using RAPID or MDS.By default phones are not assigned to any call destination group.
Using Telephone Call Pickup1. ATEL: Lift the handset or press SPKR PHONE.
STEL, DTMF telephone, or CTEL: Lift the handset.
2. To pick up a telephone call by extension, dial 762 followed by the extension numberand the # key.Note:The 762 command also allows an outside line calling a System telephone to beanswered by entering the ringing telephone’s extension in the 762 command.
38 SCR+ Telephone Operation Manual
Answering Telephone or Outside Line Calls
Call Holding (Telephone and Outside Line)
Placing a Call on HoldTo place a call on hold, follow the steps below.
1. ATEL: If using the handset or speaker/microphone, while engaged in a call, pressand release the function key programmed as FLASH (default is F7). If using thehandset, you can also press and release the hookswitch.
STEL, DTMF telephone, or CTEL: While engaged in a call, press and release thehookswitch or press and release FLASH (if present).
2. Listen for a distinct three-burst tone followed by the dial tone. The call is now onhold. The calling party placed on hold hears music or silence.Note:You can now press and release FLASH to retrieve the holding call or performanother function(e.g., call another extension).
3. If the call on hold is not retrieved by another party or the party which placed the callon hold within a programmed time, the call rings back to the extension which placedthe call on hold.
Removing a Call From HoldTo remove a call from hold, follow the steps below.
ATEL: If the handset is on-hook, lift the handset. The call is removed from hold andconversation can be resumed.—OR—If the handset was left off-hook, press and release the function key programmed asFLASH (default is F7). The call is removed from hold and conversation can be resumed.
STEL, DTMF telephone, or CTEL: Press and release the FLASH key (if present) or pressthe hookswitch long enough to send an on-hook signal, then release it. The call is re-moved from hold and conversation can be resumed.
SCR+ Telephone Operation Manual 39
Call Holding (Telephone and Outside Line)

Outside Line Call Park (Fusion feature set only)You can park a call by first placing the call on hold (see Placing a Call on Hold on thepreceding page) and dialing 763#. Your extension is now free to perform other opera-tions. A parked call can be picked up from any extension using the Line Pick-Up feature(see below).Note:If the parked call is not picked up within a programmed time, the call rings back to theextension which originally parked the call.
Line Pick-Up (Fusion feature set only)This feature lets you access a specific outside line under certain conditions.
To use this feature from a System telephone lift the handset or go into speakerphonemode and dial 79XX (where XX is the desired outside line number 01 – 32).
The table below lists the results when an outside line is selected under various conditions.
Line State Results
Idle Telephone receives dial tone and line can be usedfor outbound dialing.
Ringing Outside line is connected to the telephone andconversation can begin.
Parked Outside line is connected to the telephone andconversation can begin.
On Hold Outside line is connected to the telephone andconversation can begin.
Camped onto extension Outside line is connected to the telephone andconversation can begin.
Waiting for Attendant orDIL extension
Outside line is connected to the telephone andconversation can begin.
Talking to another telephone Telephone receives reorder tone. Outside linecannot be used if in active conversation.
If the trunk is equipped with the optional Caller ID module and enabled to receiveCaller ID, ATEL displays are updated with outside line number and caller’s caller ID in-formation.
40 SCR+ Telephone Operation Manual
Outside Line Call Park (Fusion feature set only)

Outside Line Camp On (Fusion feature set only)If a system user transfers a call to a busy extension and the caller wants to wait for thatbusy extension to become free, the call can be “camped-on” that extension by dialing765[extension number]#. A camped-on call rings the selected extension as soon as thatextension is free.Note:If the camped call is not picked up within a programmed time, the call rings back to theextension which originally camped the call.
Recall Timers (Fusion feature set only)The recall timers listed below are configured using RAPID. When a recall timer expires,the call is sent back to the System extension which originally placed the call into thetimed state. If the originating extension is busy when the recall timer expires, the callstate is maintained until the call is picked up by another extension or the originating ex-tension is idle.
Call Park TimeoutThe call park timer is started when an outside line call is parked. Timeout length can bebetween 1 and 10 minutes.
Camp On TimeoutThe camp-on timer is started when an outside line is camped onto an extension. Timeoutlength can be between 1 and 10 minutes.
Hold TimeoutThe hold timer is started when a System telephone or outside line is placed on hold.Timeout length can be between 30 seconds and 10 minutes.
Transfer TimeoutThe transfer timer is started when a System telephone or outside line is transferred (thepoint at which ringback is heard after being placed on hold). Timeout length can be be-tween 30 seconds and 10 minutes.
SCR+ Telephone Operation Manual 41
Outside Line Camp On (Fusion feature set only)

Call Transferring (Telephone and Direct Outside Line)When an extension is engaged in a telephone conversation with either another Systemtelephone or an outside line, the call can be transferred to another System extension.
1. ATEL: Press and release the function key programmed as FLASH (default is F7), orpress and release the hookswitch (if using handset), or press SPKR PHONE twice (ifusing speaker/ microphone).
STEL, DTMF telephone, or CTEL: Press and release the hookswitch or press andrelease FLASH (if present).
2. Listen for the dial tone, then dial the extension to which you want the calltransferred.
3. Hang up the handset to do a blind transfer,
—OR—
Wait for the called extension to answer and announce the transferred call beforehanging up.
Note (Fusion feature set only):If the extension to which you transfer an outside line call is busy you can camp thecall on the extension if the caller wants to wait. See Outside Line Camp On on thepreceding page.
42 SCR+ Telephone Operation Manual
Call Transferring (Telephone and Direct Outside Line)

Call ConferencingThe System can support two simultaneous three-party conference calls. Conferences caninclude three System telephones or two System telephones and one outside line. Speakerstations cannot be used in conferencing.
Note:Conference calling requires the Expanded Audio Routing Card (ARC-E, Model110-3524B) in the System card shelf and the optional Model 437-00122 ClassroomTelephone Feature Package 1.
Initiating a Three-Party Conference Call1. ATEL: While engaged in a conversation with another telephone or outside line, press
and release the hookswitch or press and release the function key programmed asFLASH (default is F7).
STEL, DTMF telephone, or CTEL: While engaged in a conversation with anothertelephone or outside line, press and release the hookswitch or press and releaseFLASH (if present).
2. Dial the third extension or trunk when you hear the dial tone.
3. ATEL: When the third party answers, press and release the function key programmedas FLASH (default is F7), CONFERENCE, or press and release the hookswitch tobegin a three-way conference call.
If the third party is busy or does not answer, press and release the function keyprogrammed as FLASH (default is F7) or press and release the hookswitch to restorethe original two-party call.
STEL, DTMF telephone, or CTEL: When the third party answers, press and releasethe hookswitch or press and release FLASH (if present) to begin the three-wayconference call.
If the third party is busy or does not answer, press and release the hookswitch orpress and release FLASH (if present) to restore the original two-party call.
Terminating a Conference CallAny party in a three-way conference call can hang up to end their participation. The re-maining parties are still connected and can continue the call.
SCR+ Telephone Operation Manual 43
Call Conferencing
Call ForwardingCall forwarding lets you send calls routed to one extension to another extension or huntgroup.
Forwarding RestrictionsA System extension cannot forward calls when:
• It does not have call forward access class of service enabled.
• It is already forwarded to another extension.
• It is already the destination for another extension which has its calls forwarded.
• It is part of a hunt group currently having calls forwarded to it.
• It is trying to forward to its own hunt group.
• It has alpha characters in its number (e.g., A101) and it is trying to forward to avoice mail port.
• The destination extension does not have telephone ring class of service enabled.
• The destination extension is in a hunt group that has extension(s) which are al-ready forwarded.
• The System maximum of 32 extensions is already forwarded.
Forwarding a Call1. ATEL: Lift the handset or press SPKR PHONE.
STEL, DTMF telephone, or CTEL: Lift the handset.
2. Dial 756.Note:If your System is equipped with a CPC-E or CPC-B (contact your SystemAdministrator), skip step 3 and go to step 4.
3. Dial a forward code from the following choices:
1—forward always2—forward when this phone is busy3—forward when there is no answer4—forward when this phone is busy and when there is no answer
4. Dial the extension or hunt group phantom extension to which calls are to beforwarded, then press #. An interrupted dial tone is heard in the handset.Note:The interrupted dial tone is heard until forwarding is canceled.
44 SCR+ Telephone Operation Manual
Call Forwarding

Forwarding Calls to Voice Mail (Fusion feature set only)1. ATEL: Lift the handset or press SPKR PHONE.
—OR—
Press the Do Not Disturb function key (skip the steps below).
STEL, DTMF telephone, or CTEL: Lift the handset.
2. Dial 7561XXX# (XXX is the extension number of the Voice Mail hunt group).
“Follow Me” Call Forwarding (v. 5.00 system software or later)1. ATEL: Lift the handset or press SPKR PHONE.
STEL, DTMF telephone, or CTEL: Lift the handset.
2. Dial 766.
3. Dial a forward code from the following choices:
1—forward always2—forward when this phone is busy3—forward when there is no answer4—forward when this phone is busy and when there is no answer
4. Dial the extension from which calls are to be forwarded to this extension, then press#. An interrupted dial tone is heard in the handset.Note:The interrupted dial tone is heard until forwarding is canceled.
Canceling Call ForwardingTo cancel call forwarding, follow the steps below.
1. ATEL: Lift the handset or press SPKR PHONE at the forwarded extension.
STEL, DTMF telephone, or CTEL: Lift the handset at the forwarded extension.
2. Dial 757# to cancel call forwarding, 767# to cancel “Follow Me” call forwarding.Forwarding is canceled and the standard dial tone is heard in the handset.
SCR+ Telephone Operation Manual 45
Call Forwarding

Audible Forwarding IndicatorsThere are several audible indications that are used to indicate the forwarding status of aSystem extension.
When an extension has been successfully forwarded to another extension, the forwarddial tone is heard. This tone consists of a 1-second confirmation tone followed by the nor-mal dial tone. An ATEL displays “Calls Forwarded.”
When a forwarded telephone goes off-hook or receives a dial tone, a 1-second confirma-tion tone is heard, followed by the normal dial tone.
When the destination extension for forwarded calls goes off-hook or receives a dial tone,a quick stutter tone (4 quick tones) is heard, followed by the normal dial tone. This indi-cate that this extension is receiving calls forwarded from another extension (systemsoftware v 5.00 or newer).
If an extension is part of a hunt group that is a destination for forwarded calls, the normaldial tone is heard since this extension may not be receiving any forwarded calls.
Forwarding Conditions in a Hunt Group• An extension in a hunt group may forward to another extension or hunt group only if
its hunt group is not already the forwarding destination of another extension.
• An extension cannot forward to a hunt group if that hunt group has extensions whichare already forwarded to other extensions.
• Forwarding is never more than one hunt group deep.Example:Extension 601 belongs to hunt group 1 as an attendant. Extension 601 is forwarded tohunt group 300, the voice mail group. An extension in the 300 hunt group cannot beforwarded to another extension or hunt group for the forward to complete successfully.
46 SCR+ Telephone Operation Manual
Call Forwarding

Message Waiting Indicator
Manually Setting the Message Waiting IndicatorThe call assurance LED in a room can flash to act as a message waiting indicator. Thisflash pattern (three rapid flashes, three seconds off) shows a message is waiting to be re-trieved by calling some predetermined extension. The Message Waiting Indicator featurerequires the optional Model 437-00127 Call Management Feature Package 1.
1. ATEL: Lift the handset or press SPKR PHONE.
STEL, DTMF telephone, or CTEL: Lift the handset.
2. ATEL: To activate the message indicator in a room, dial 7601, followed by the roomnumber and the # key.
STEL, DTMF telephone, or CTEL: Same as ATEL.
3. ATEL: To deactivate the message waiting indicator in a room, dial 7600, followedby the room number and the # key.Note:After the message is received, the indicator must be deactivated, either by the personreceiving the message or by the person delivering the message, using step 3 above.
STEL, DTMF telephone, or CTEL: Same as ATEL.
Automatic Message Waiting Indicator Operation(Fusion feature set only)
The message indicator for an extension (the call assurance LED) will flash when a newvoice mail message for that extension is received. If this extension is connected to aCTEL equipped with a voice mail indicator, that indicator will also be activated when anew voice mail message is received for that extension.
SCR+ Telephone Operation Manual 47
Message Waiting Indicator

PagingPaging from an STEL, CTEL, or DTMF telephone phone requires the installation of op-tional feature packages. The Model 437-00122 Classroom Telephone Feature Package 1must be present. When the Model 437-00123 Classroom Telephone Feature Package 2 isadded, the following paging features are provided:
All callZone page including zonesZone page excluding zonesRoom page including selected roomsRoom page excluding selected roomsProgram tone distribution
The Model 437-00124 Security Feature Package 1 adds the following paging features:
Emergency all callEmergency zone page including zonesEmergency zone page excluding zonesOff-hook emergency zone pageOff-hook zone page
Your System could be equipped with one or both feature packages. Contact your systemadministrator for details.
Emergency Paging All Rooms and ZonesTo make an emergency page to all rooms and zones, follow the steps below. If your Sys-tem has been networked to other Systems using a NIC, you can make an emergency pageto all rooms and zones in the networked Systems. If your System has not been networked,you can only page rooms and zones in your own System.
1. ATEL: Lift the handset or press SPKR PHONE and dial 70#.—OR—Press EMERGENCY, then press #.
STEL, DTMF telephone, and CTEL: Lift the handset and dial 70#.Note:A double tone burst after pressing # indicates restricted access to this feature fromthis phone. You must enter a four-digit password after the tone to complete thisoperation. See Password Control on page 3.
2. ATEL: Speak clearly into the handset or microphone to make a page announcement.
STEL, DTMF telephone, and CTEL: Speak clearly into the handset to make a pageannouncement.
48 SCR+ Telephone Operation Manual
Paging

3. ATEL ONLY: If muting is also desired while using the microphone, press TALK tochange from hands-free to push-to-talk paging. Thereafter, pushing TALK allows thepage audio, and releasing TALK mutes the microphone. The MUTE button can alsobe used to toggle between mute and unmute.
4. ATEL: Hang up the handset or press SPKR PHONE to end the page.
STEL, DTMF telephone, and CTEL: Hang up the handset to end the page.
Emergency Paging Selected ZonesTo make an emergency page to selected zones, follow the steps below. If your Systemhas been networked to other Systems using a NIC, you can make a selective emergencypage to certain zones in all networked Systems. If your System has not been networked,you can only page zones in your own System.
1. ATEL: Lift the handset or press SPKR PHONE.
STEL, DTMF telephone, and CTEL: Lift the handset.
2. ATEL: Press EMERGENCY then press 1, or dial 701.
STEL, DTMF telephone, and CTEL: Dial 701.
3. ATEL: Enter the zone numbers (01–32) to be paged. Press #.
STEL, DTMF telephone, and CTEL: Same as ATEL.Notes:• Zones 1 through 9 must be preceded by a 0 (entered as 01 through 09).• In networked Systems, only speakers assigned to zones 17 through 32 can receive
selective emergency pages from other Systems in a network. Speakers assigned tozones 1 through 16 CANNOT receive such pages from other Systems in a network.All 32 zones in a local System receive selective emergency pages originating intheir own system.
• A double tone burst after pressing # indicates restricted access to this feature fromthis phone. You must enter a four-digit password after the tone to complete thisoperation. See Password Control on page 3.
4. ATEL: Speak clearly into the handset or microphone to make a page announcement.
STEL, DTMF telephone, and CTEL: Speak clearly into the handset to make a pageannouncement.
5. ATEL ONLY: If muting is also desired while using the microphone, press TALK tochange from hands-free to push-to-talk paging. Thereafter, pushing TALK allowspage audio through, while releasing TALK mutes the microphone. The MUTEbutton can also be used to toggle between mute and unmute.
6. ATEL: Hang up the handset or press SPKR PHONE to end the page.
STEL, DTMF telephone, and CTEL: Hang up the handset to end the page.
SCR+ Telephone Operation Manual 49
Paging
Emergency Paging All But Excluded ZonesTo make an emergency page that excludes selected zones, follow the steps below. If yourSystem has been networked to other Systems using a NIC, you can make an exclusionaryemergency page to certain zones in all networked Systems. If your System has not beennetworked, you can only page zones in your own System.
1. ATEL: Lift the handset or press SPKR PHONE.
STEL, DTMF telephone, and CTEL: Lift the handset.
2. ATEL: Press EMERGENCY then press 2, or dial 702.
STEL, DTMF telephone, and CTEL: Dial 702.
3. ATEL: Enter the zone numbers (01–32) to be excluded and press #.
STEL, DTMF telephone, and CTEL: Same as ATEL.Notes:• Zones 1 through 9 must be preceded by a 0 (entered as 01 through 09).• In networked Systems, only speakers assigned to zones 17 through 32 can receive
exclusionary pages from other Systems in a network. Speakers assigned to zones 1through 16 CANNOT receive exclusionary pages from other Systems in a net-work. All 32 zones in a local System can receive exclusionary emergency pagesoriginating in their own system.
• A double tone burst after pressing # indicates restricted access to this feature fromthis phone. You must enter a four-digit password after the tone to complete thisoperation. See Password Control on page 3.
4. ATEL: Speak clearly into the handset or microphone to make a page announcement.
STEL, DTMF telephone, and CTEL: Speak clearly into the handset to make a pageannouncement.
5. ATEL ONLY: If muting is also desired while using the microphone, press TALK tochange from hands-free to push-to-talk paging. Thereafter, pushing TALK allowspage audio through, while releasing TALK mutes the microphone. The MUTEbutton can also be used to toggle between mute and unmute.
6. ATEL: Hang up the handset or press SPKR PHONE to end the page.
STEL, DTMF telephone, and CTEL: Hang up the handset to end the page.
50 SCR+ Telephone Operation Manual
Paging

Off-Hook Emergency Zone Page (STEL, DTMF Telephone, and CTEL Only)A System telephone port can be configured to initiate an automatic emergency page toany combination of zones when the telephone handset is lifted. By default this option isdisabled. If this option is enabled:
1. Lift the handset.
2. Speak clearly into the handset to make the page announcement.
3. Hang up the handset to end the page.
Paging All Rooms and ZonesTo make a page to all rooms and zones, follow the steps below. If your System has beennetworked to other Systems using a NIC, you can make a page to all rooms and certainzones in the networked Systems. If your System has not been networked, you can onlypage rooms and zones in your own System.
1. ATEL: Lift the handset or press SPKR PHONE.
STEL, DTMF telephone, and CTEL: Lift the handset.
2. ATEL: Press PAGE then press #, or dial 72#.
STEL, DTMF telephone, and CTEL: Dial 72#.Notes:A double tone burst after pressing # indicates restricted access to this feature fromthis phone. You must enter a four-digit password after the tone to complete thisoperation. See Password Control on page 3.
3. ATEL: Speak clearly into the handset or microphone to make a page announcement.
STEL, DTMF telephone, and CTEL: Speak clearly into the handset to make a pageannouncement.
4. ATEL ONLY: If muting is also desired while using the microphone, press TALK tochange from hands-free to push-to-talk paging. Thereafter, pushing TALK allowspage audio through, while releasing TALK mutes the microphone. The MUTEbutton can also be used to toggle between mute and unmute.
5. ATEL: Hang up the handset or press SPKR PHONE to end the page.
STEL, DTMF telephone, and CTEL: Hang up the handset to end the page.
SCR+ Telephone Operation Manual 51
Paging

Paging Selected ZonesTo make a page to selected zones, follow the steps below. If your System has been net-worked to other Systems using a NIC, you can page certain selected zones in allnetworked Systems. If your System has not been networked, you can only page zones inyour System.
1. ATEL: Lift the handset or press SPKR PHONE.
STEL, DTMF telephone, and CTEL: Lift the handset.
2. ATEL: Press PAGE then press 1, or dial 721.
STEL, DTMF telephone, and CTEL: Dial 721.
3. ATEL: Enter the zone numbers (01–32) to be paged and press #.
STEL, DTMF telephone, and CTEL: Same as ATEL.Notes:• Zones 1 through 9 must be preceded by a 0 (entered as 01 through 09).• In networked Systems, only speakers assigned to zones 17 through 32 can receive
pages from other Systems in a network. Speakers assigned to zones 1 through 16CANNOT receive any pages from other Systems in a network. All 32 zones in alocal System receive pages originating in their own system.
• A double tone burst after pressing # indicates restricted access to this feature fromthis phone. You must enter a four-digit password after the tone to complete thisoperation. See Password Control on page 3.
4. ATEL: Speak clearly into the handset or microphone to make a page announcement.
STEL, DTMF telephone, and CTEL: Speak clearly into the handset to make a pageannouncement.
5. ATEL ONLY: If muting is also desired while using the microphone, press TALK tochange from hands-free to push-to-talk paging. Thereafter, pushing TALK allowspage audio through, while releasing TALK mutes the microphone. The MUTEbutton can also be used to toggle between mute and unmute.
6. ATEL: Hang up the handset or press SPKR PHONE to end the page.
STEL, DTMF telephone, and CTEL: Hang up the handset to end the page.
52 SCR+ Telephone Operation Manual
Paging

Paging All But Excluded ZonesTo make a zone page that excludes selected zones, follow the steps below. If your Systemhas been networked to other Systems using a NIC, you can page zones in all networkedSystems. If your System has not been networked, you can only page zones in your ownSystem.
1. ATEL: Lift the handset or press SPKR PHONE.
STEL, DTMF telephone, and CTEL: Lift the handset.
2. ATEL: Press PAGE then press 2, or dial 722.
STEL, DTMF telephone, and CTEL: Dial 722.
3. ATEL: Enter the zone numbers (01–32) to be excluded and press #.
STEL, DTMF telephone, and CTEL: Same as ATEL.Notes:• Zones 1 through 9 must be preceded by a 0 (entered as 01 through 09).• In networked Systems, only speakers assigned to zones 17 through 32 can receive
pages from other Systems in a network. Speakers assigned to zones 1 through 16CANNOT receive any pages from other Systems in a network. All 32 zones in alocal System receive pages originating in their own system.
• A double tone burst after pressing # indicates restricted access to this feature fromthis phone. You must enter a four-digit password after the tone to complete thisoperation. See Password Control on page 3.
4. ATEL: Speak clearly into the handset or microphone to make a page announcement.
STEL, DTMF telephone, and CTEL: Speak clearly into the handset to make a pageannouncement.
5. ATEL ONLY: If muting is also desired while using the microphone, press TALK tochange from hands-free to push-to-talk paging. Thereafter, pushing TALK allowspage audio through, while releasing TALK mutes the microphone. The MUTEbutton can also be used to toggle between mute and unmute.
6. ATEL: Hang up the handset or press SPKR PHONE to end the page.
STEL, DTMF telephone, and CTEL: Hang up the handset to end the page.
SCR+ Telephone Operation Manual 53
Paging

Paging Selected RoomsTo make a page to selected rooms, follow the steps below. Regardless of whether or notyour System is networked to other Systems, you can only page selected rooms in your ownSystem.
1. ATEL: Lift the handset or press SPKR PHONE.
STEL, DTMF telephone, and CTEL: Lift the handset.
2. ATEL: Press PAGE then press 3, or dial 723.
STEL, DTMF telephone, and CTEL: Dial 723.
3. ATEL: Enter the room numbers to be paged and press #.
STEL, DTMF telephone, and CTEL: Same as ATEL.Note:A double tone burst after pressing # indicates restricted access to this feature fromthis phone. You must enter a four-digit password after the tone to complete thisoperation. See Password Control on page 3.
4. ATEL: Speak clearly into the handset or microphone to make a page announcement.
STEL, DTMF telephone, and CTEL: Speak clearly into the handset to make a pageannouncement.
5. ATEL ONLY: If muting is also desired while using the microphone, press TALK tochange from hands-free to push-to-talk paging. Thereafter, pushing TALK allowspage audio through, while releasing TALK mutes the microphone. The MUTEbutton can also be used to toggle between mute and unmute.
6. ATEL: Hang up the handset or press SPKR PHONE to end the page.
STEL, DTMF telephone, and CTEL: Hang up the handset to end the page.
Paging All But Excluded RoomsTo make a page to all rooms excluding those selected, follow the steps below. Regardlessof whether or not your System is networked to other Systems, you can only page roomsin your own System.
1. ATEL: Lift the handset or press SPKR PHONE.
STEL, DTMF telephone, and CTEL: Lift the handset.
2. ATEL: Press PAGE then press 4, or dial 724.
STEL, DTMF telephone, and CTEL: Dial 724.
54 SCR+ Telephone Operation Manual
Paging

3. ATEL: Enter the room numbers to be excluded and press #.
STEL, DTMF telephone, and CTEL: Same as ATEL.Note:A double tone burst after pressing # indicates restricted access to this feature fromthis phone. You must enter a four-digit password after the tone to complete thisoperation. See Password Control on page 3.
4. ATEL: Speak clearly into the handset or microphone to make a page announcement.
STEL, DTMF telephone, and CTEL: Speak clearly into the handset to make a pageannouncement.
5. ATEL ONLY: If muting is also desired while using the microphone, press TALK tochange from hands-free to push-to-talk paging. Thereafter, pushing TALK allowspage audio through, while releasing TALK mutes the microphone. The MUTEbutton can also be used to toggle between mute and unmute.
6. ATEL: Hang up the handset or press SPKR PHONE to end the page.
STEL, DTMF telephone, and CTEL: Hang up the handset to end the page.
Distributing TonesThe ATEL can be used to manually distribute tones to selected zones or rooms. The tableon the next page lists which numbers must be dialed to initiate particular tones. The Sys-tem has 26 available tones, all of which have a programmable duration, volume, and tonetype. Contact your System administrator for details.
The tone distribution features require the optional Model 437-00123 Classroom TelephoneFeature Package 2.
Distributing Tones to All SpeakersTo distribute tones to all speakers, follow the steps below. Even if your System is net-worked, you can only distribute tones in your own System.
1. ATEL: Lift the handset or press SPKR PHONE.
STEL, DTMF telephone, or CTEL: Lift the handset.
2. ATEL: Press TONE then press 0, or dial 710.
STEL, DTMF telephone, or CTEL: Dial 710.
continued
SCR+ Telephone Operation Manual 55
Distributing Tones

3. ATEL: Enter the tone number (01–26) (see Table 1 below) and press #.
STEL, DTMF telephone, or CTEL: Same as ATEL.Notes:• Tones 1 through 9 must be preceded by a 0 (entered as 01 through 09).• A double tone burst after pressing # indicates restricted access to this feature from
this phone. You must enter a four-digit password after the tone to complete thisoperation. See Password Control on page 3.
4. ATEL: The selected tone sounds until you cancel it (see Canceling Tone Distribution,page 59), or until the tone duration expires.
STEL, DTMF telephone, or CTEL: Same as ATEL.
5. ATEL: Hang up the handset or press SPKR PHONE.
STEL, DTMF telephone, or CTEL: Hang up the handset.
56 SCR+ Telephone Operation Manual
Distributing Tones
NUMBER TONE NUMBER TONE
01 Event tone 1 14 Event tone 14
02 Event tone 2 15 Event tone 15
03 Event tone 3 16 Event tone 16
04 Event tone 4 17 Privacy
05 Event tone 5 18 Intercom pre-announce
06 Event tone 6 19 Door
07 Event tone 7 20 Custodian
08 Event tone 8 21 Normal reminder
09 Event tone 9 22 Page pre-announce
10 Event tone 10 23 Emergency reminder
11 Event tone 11 24 Auxiliary alarm
Table 1: Programmable Tone Types

Distributing Tones to Selected ZonesTo distribute a tone to selected zones, follow the steps below. Even if your System is net-worked, you can only distribute tones in your own System.
1. ATEL: Lift the handset or press SPKR PHONE.
STEL, DTMF telephone, or CTEL: Lift the handset.
2. ATEL: Press TONE then press 1, or dial 711.
STEL, DTMF telephone, or CTEL: Dial 711.
3. ATEL: Enter the tone number (01–26) (see Table 1 on page 56), then enter the zonenumbers to be included (01–32), and press #.
STEL, DTMF telephone, or CTEL: Same as ATEL.Notes:• Tones 1 through 9 must be preceded by a 0 (entered as 01 through 09).• Zones 1 through 9 must be preceded by a 0 (entered as 01 through 09).• A double tone burst after pressing # indicates restricted access to this feature
from this phone. You must enter a four-digit password after the tone to completethis operation. See Password Control on page 3.
4. ATEL: The selected tone sounds until you cancel it (see Canceling Tone Distribution,page 59), or until the tone duration expires.
STEL, DTMF telephone, or CTEL: Same as ATEL.
5. ATEL: Hang up the handset or press SPKR PHONE.
STEL, DTMF telephone, or CTEL: Hang up the handset.
Distributing Tones to All But Excluded ZonesTo distribute a tone to all zones excluding those selected, follow the steps below. Even ifyour System is networked, you can only distribute tones in your own System.
1. ATEL: Lift the handset or press SPKR PHONE.
STEL, DTMF telephone, or CTEL: Lift the handset.
2. ATEL: Press TONE then press 2, or dial 712.
STEL, DTMF telephone, or CTEL: Dial 712.
continued
SCR+ Telephone Operation Manual 57
Distributing Tones

3. ATEL: Enter the tone number (01–26) (see Table 1 on page 56), then enter the zonenumbers (01–32) to be excluded, and press #.
STEL, DTMF telephone, or CTEL: Same as ATEL.Notes:• Tones 1 through 9 must be preceded by a 0 (entered as 01 through 09).• Zones 1 through 9 must be preceded by a 0 (entered as 01 through 09).• A double tone burst after pressing # indicates restricted access to this feature
from this phone. You must enter a four-digit password after the tone to completethis operation. See Password Control on page 3.
4. ATEL: The selected tone sounds until you cancel it (see Canceling Tone Distribution,page 59), or until the tone duration expires.
STEL, DTMF telephone, or CTEL: Same as ATEL.
5. ATEL: Hang up the handset or press SPKR PHONE.
STEL, DTMF telephone, or CTEL: Hang up the handset.
Distributing Tones to Selected RoomsTo distribute a tone to selected rooms, follow the steps below. Even if your System is net-worked, you can only distribute tones in your own System.
1. ATEL: Lift the handset or press SPKR PHONE.
STEL, DTMF telephone, or CTEL: Lift the handset.
2. ATEL: Press TONE then press 3, or dial 713.
STEL, DTMF telephone, or CTEL: Dial 713.
3. ATEL: Enter the tone number (01–26) (see Table 1 on page 56), then the roomnumbers, and press #.
STEL, DTMF telephone, or CTEL: Same as ATEL.Notes:• Tones 1 through 9 must be preceded by a 0 (entered as 01 through 09).• A double tone burst after pressing # indicates restricted access to this feature
from this phone. You must enter a four-digit password after the tone to completethis operation. See Password Control on page 3.
4. ATEL: The selected tone sounds until you cancel it (see Canceling Tone Distribution,page 59), or until the tone duration expires.
STEL, DTMF telephone, or CTEL: Same as ATEL.
5. ATEL: Hang up the handset or press SPKR PHONE.
STEL, DTMF telephone, or CTEL: Hang up the handset.
58 SCR+ Telephone Operation Manual
Distributing Tones

Distributing Tones to All But Excluded RoomsTo distribute a tone to all rooms excluding those selected, follow the steps below. Even ifyour System is networked, you can only distribute tones in your own System.
1. ATEL: Lift the handset or press SPKR PHONE.
STEL, DTMF telephone, or CTEL: Lift the handset.
2. ATEL: Press TONE then press 4, or dial 714.
STEL, DTMF telephone, or CTEL: Dial 714.
3. ATEL: Enter the tone number (01–26) (see Table 1 on page 56), then the roomnumbers to be excluded, and press #.
STEL, DTMF telephone, or CTEL: Same as ATEL.Notes:Tones 1 through 9 must be preceded by a 0 (entered as 01 through 09).A double tone burst after pressing # indicates restricted access to this feature fromthis phone. You must enter a four-digit password after the tone to complete thisoperation. See Password Control on page 3.
4. ATEL: The selected tone sounds until you cancel it (see Canceling Tone Distribution,page 59), or until the tone duration expires.
STEL, DTMF telephone, or CTEL: Same as ATEL.
5. ATEL: Hang up the handset or press SPKR PHONE.
STEL, DTMF telephone, or CTEL: Hang up the handset.
Canceling Tone DistributionThis operation cancels a tone currently being distributed, whether it has beenprogrammed with a fixed or continuous duration.
1. ATEL: Lift the handset or press SPKR PHONE.
STEL, DTMF telephone, or CTEL: Lift the handset.
2. ATEL: Press TONE then press 5, or dial 715#.
STEL, DTMF telephone, or CTEL: Dial 715#.
3. ATEL: Hang up the handset or press SPKR PHONE.
STEL, DTMF telephone, or CTEL: Hang up the handset.
SCR+ Telephone Operation Manual 59
Distributing Tones

Distributing Audio Programs
Distributing an Audio Program to All SpeakersTo distribute an audio program to all speakers, follow the steps below. Regardless ofwhether or not your System is networked to other Systems, you can only distribute audioprograms in your own System.
1. ATEL: Lift the handset or press SPKR PHONE.
STEL, DTMF telephone, or CTEL: Lift the handset.
2. ATEL: Press PROGRAM then press 0, or dial 730.
STEL, DTMF telephone, or CTEL: Dial 730.
3. ATEL: Enter the audio program source (01 or 02) and press #.
STEL, DTMF telephone, or CTEL: Same as ATEL.Notes:• If only one audio program source is available, 01 will be the only source you can
select.• A double tone burst after pressing # indicates restricted access to this feature from
this phone. You must enter a four-digit password after the tone to complete thisoperation. See Password Control on page 3.
4. ATEL: The audio program continues until you cancel it (see Canceling AudioProgram Distribution, page 65).
STEL, DTMF telephone, or CTEL: Same as ATEL.
5. ATEL: Hang up the handset or press SPKR PHONE.
STEL, DTMF telephone, or CTEL: Hang up the handset.
Distributing an Audio Program to Selected ZonesTo distribute an audio program to selected zones, follow the steps below. Even if yourSystem is networked, you can only distribute audio programs in your own System.
1. ATEL: Lift the handset or press SPKR PHONE.
STEL, DTMF telephone, or CTEL: Lift the handset.
2. ATEL: Press PROGRAM then press 1, or dial 731.
STEL, DTMF telephone, or CTEL: Dial 731.
60 SCR+ Telephone Operation Manual
Distributing Audio Programs

3. ATEL: Enter the audio program source (01 or 02), then the zone numbers (01–32),and press #.
STEL, DTMF telephone, or CTEL: Same as ATEL.Notes:• If only one audio program source is available, 01 will be the only source you can
select.• Zones 1 through 9 must be preceded by a 0 (entered as 01 through 09).• A double tone burst after pressing # indicates restricted access to this feature from
this phone. Enter a four-digit password after the tone to complete this operation.See Password Control on page 3.
4. ATEL: The audio program continues until you cancel it (see Canceling AudioProgram Distribution, page 65).
STEL, DTMF telephone, or CTEL: Same as ATEL.
5. ATEL: Hang up the handset or press SPKR PHONE.
STEL, DTMF telephone, or CTEL: Hang up the handset.
Distributing an Audio Program to All But Excluded ZonesTo distribute an audio program to all zones excluding those selected, follow thesteps below. Even if your System is networked, you can only distribute audio programs inyour own System.
1. ATEL: Lift the handset or press SPKR PHONE.
STEL, DTMF telephone, or CTEL: Lift the handset.
2. ATEL: Press PROGRAM then press 2, or dial 732.
STEL, DTMF telephone, or CTEL: Dial 732.
3. ATEL: Select the audio program source (01 or 02), then enter the zone numbers(01–32) to be excluded, and press #.
STEL, DTMF telephone, or CTEL: Same as ATEL.Notes:• If only one audio program source is available, 01 will be the only source you
can select.• Zones 1 through 9 must be preceded by a 0 (entered as 01 through 09).• A double tone burst after pressing # indicates restricted access to this feature from
this phone. You must enter a four-digit password after the tone to complete thisoperation. See Password Control on page 3.
continued
SCR+ Telephone Operation Manual 61
Distributing Audio Programs

4. ATEL: The audio program continues until you cancel it (see Canceling AudioProgram Distribution, page 65).
STEL, DTMF telephone, or CTEL: Same as ATEL.
5. ATEL: Hang up the handset or press SPKR PHONE.
STEL, DTMF telephone, or CTEL: Hang up the handset.
Distributing an Audio Program to Selected RoomsTo distribute an audio program to selected rooms, follow the steps below. Regardless ofwhether or not your System is networked to other Systems, you can only distribute audioprograms in your own System.
1. ATEL: Lift the handset or press SPKR PHONE.
STEL, DTMF telephone, or CTEL: Lift the handset.
2. ATEL: Press PROGRAM then press 3, or dial 733.
STEL, DTMF telephone, or CTEL: Dial 733.
3. ATEL: Select the audio program source (01 or 02), then enter the room numbers, andpress #.
STEL, DTMF telephone, or CTEL: Same as ATEL.Notes:• If only one audio program source is available, 01 will be the only source you
can select.• A double tone burst after pressing # indicates restricted access to this feature from
this phone. You must enter a four-digit password after the tone to complete thisoperation. See Password Control on page 3.
4. ATEL: The audio program will continue until you cancel it (see Canceling AudioProgram Distribution, page 65).
STEL, DTMF telephone, or CTEL: Same as ATEL.
5. Hang up the handset or press SPKR PHONE.
STEL, DTMF telephone, or CTEL: Hang up the handset.
62 SCR+ Telephone Operation Manual
Distributing Audio Programs

Distributing an Audio Program to All But Excluded RoomsTo distribute audio programming to all rooms excluding those selected, follow the stepsbelow. Even if your System is networked, you can only distribute audio programs in yourown System.
1. ATEL: Lift the handset or press SPKR PHONE.
STEL, DTMF telephone, or CTEL: Lift the handset.
2. ATEL: Press PROGRAM then press 4, or dial 734.
STEL, DTMF telephone, or CTEL: Dial 734.
3. ATEL: Select the audio program source (01 or 02), then the room numbers to beexcluded, and press #.
STEL, DTMF telephone, or CTEL: Same as ATEL.Notes:• If only one audio program source is available, 01 will be the only source you
can select.• A double tone burst after pressing # indicates restricted access to this feature from
this phone. You must enter a four-digit password after the tone to complete thisoperation. See Password Control on page 3.
4. ATEL: The audio program continues until you cancel it (see Canceling AudioProgram Distribution, page 65).
STEL, DTMF telephone, or CTEL: Same as ATEL.
5. ATEL: Hang up the handset or press SPKR PHONE.
STEL, DTMF telephone, or CTEL: Hang up the handset.
Adding Rooms to Audio Program Distribution in ProgressTo add rooms to an audio program currently being distributed, follow the steps below.Even if your System is networked, you can only distribute audio programs in your ownSystem.
1. ATEL: Lift the handset or press SPKR PHONE.
STEL, DTMF telephone, or CTEL: Lift the handset.
2. ATEL: Press PROGRAM then press 5, or dial 735.
STEL, DTMF telephone, or CTEL: Dial 735.
continued
SCR+ Telephone Operation Manual 63
Distributing Audio Programs

3. ATEL: Enter the audio program source (01 or 02), then the room numbers, and press #.
STEL, DTMF telephone, or CTEL: Same as ATEL.Notes:• If only one audio program source is available, 01 will be the only source you
can select.• A double tone burst after pressing # indicates restricted access to this feature from
this phone. You must enter a four-digit password after the tone to complete thisoperation. See Password Control on page 3.
• To add only the speaker associated with the ATEL you are calling from, do notenter a room number.
4. ATEL: Hang up the handset or press SPKR PHONE.
STEL, DTMF telephone, or CTEL: Hang up the handset.
Removing Rooms from Audio Program Distribution in ProgressTo remove rooms from an audio program currently being distributed, follow thesteps below. Even if your System is networked, you can only distribute audio programs inyour own System.
1. ATEL: Lift the handset or press SPKR PHONE.
STEL, DTMF telephone, or CTEL: Lift the handset.
2. ATEL: Press PROGRAM then press 6, or dial 736.
STEL, DTMF telephone, or CTEL: Dial 736.
3. ATEL: Enter the room numbers, and press #.
STEL, DTMF telephone, or CTEL: Same as ATEL.Notes:• A double tone burst after pressing # indicates restricted access to this feature from
this phone. You must enter a four-digit password after the tone to complete thisoperation. See Password Control on page 3.
• To remove only the speaker associated with the phone you are calling from, do notenter a room number.
4. ATEL: Hang up the handset or press SPKR PHONE.
STEL, DTMF telephone, or CTEL: Hang up the handset.
64 SCR+ Telephone Operation Manual
Distributing Audio Programs

Canceling Audio Program DistributionTo cancel an audio program currently being distributed, follow the steps below.
1. ATEL: Lift the handset or press SPKR PHONE.
STEL, DTMF telephone, or CTEL: Lift the handset.
2. ATEL: Press PROGRAM then press 7, or dial 737.
STEL, DTMF telephone, or CTEL: Dial 737.
3. ATEL: Enter the audio program source (01 or 02) currently in use, and press #.
STEL, DTMF telephone, or CTEL: Same as ATEL.Notes:• If only one audio program source is available, 01 will be the only source you
can select.• A double tone burst after pressing # indicates restricted access to this feature from
this phone. You must enter a four-digit password after the tone to complete thisoperation. See Password Control on page 3.
4. ATEL: Hang up the handset or press SPKR PHONE.
STEL, DTMF telephone, or CTEL: Hang up the handset.
Monitoring Audio Program SourcesTo monitor an audio program from a System phone, follow the steps below.
1. ATEL: Lift the handset or press SPKR PHONE.
STEL, DTMF telephone, or CTEL: Lift the handset.
2. ATEL: Press PROGRAM then press 8, or dial 738.
STEL, DTMF telephone, or CTEL: Dial 738.
3. ATEL: Select the audio program source (01 or 02) currently in use, and press #. Youwill hear the audio source through the handset or speaker.
STEL, DTMF telephone, or CTEL: Same as ATEL.Notes:• If only one audio program source is available, 01 will be the only source you
can select.• This function uses a telephone link. Do not use it to provide background music.
See Setting the ATEL Background Music on page 18.
4. ATEL: Hang up the handset or press SPKR PHONE.
STEL, DTMF telephone, or CTEL: Hang up the handset.
SCR+ Telephone Operation Manual 65
Distributing Audio Programs

Selecting a Source for Music-on-Hold and ATEL Background MusicThis feature lets you select one of the two available audio program sources to provideSystem-wide music-on-hold and background music for ATELs. Both features share thesame programming. At least one audio program source must be connected to the Systemfor this feature to work. You can also select no source.
When a call is placed on hold, or when an ATEL selects background music, the selectedsource is heard. If no source is selected, no audio is heard during hold or when back-ground music is selected.
1. ATEL: Lift the handset or press SPKR PHONE.
STEL, DTMF telephone, or CTEL: Lift the handset.
2. ATEL: Dial 758.
STEL, DTMF telephone, or CTEL: Same as ATEL.
3. ATEL: Enter the audio program source (see below) and press #.00—no source; 01—source 1; 02—source 2
STEL, DTMF telephone, or CTEL: Same as ATEL.
4. ATEL: Hang up the handset or press SPKR PHONE.
STEL, DTMF telephone, or CTEL: Hang up the handset.
Temporarily Excluding RoomsThis function temporarily excludes the specified speakers from receiving any audioevents except emergency page and intercom. Even if your System is networked, you can onlyexclude rooms in your own System. This exclusion can be manually canceled, or isautomatically canceled at midnight. The Temporary Room Exclusion feature requires theoptional Model 437-00126 Enhanced Intercom Feature Package 1.
Excluding RoomsTo exclude rooms from receiving any audio events except emergency page and intercom,follow the steps below.
1. ATEL: Lift the handset or press SPKR PHONE.
STEL, DTMF telephone, or CTEL: Lift the handset.
2. ATEL: Dial 746 and enter all room numbers to be excluded.
STEL, DTMF telephone, or CTEL: Same as ATEL.
66 SCR+ Telephone Operation Manual
Temporarily Excluding Rooms
3. ATEL: Press # after entering the last room number.
STEL, DTMF telephone, or CTEL: Same as ATEL.
4. ATEL: Hang up the handset or press SPKR PHONE.
STEL, DTMF telephone, or CTEL: Hang up the handset.
Clearing Selected Temporary Room ExclusionsTo allow selected rooms to again receive audio events, follow the steps below.
1. ATEL: Lift the handset or press SPKR PHONE.
STEL, DTMF telephone, or CTEL: Lift the handset.
2. ATEL: Dial 747, enter all room numbers to be restored from exclusion, then press #.
STEL, DTMF telephone, or CTEL: Same as ATEL.Note:If you are only restoring the speaker associated with the phone you are calling from,do not enter a room number.
3. ATEL: Hang up the handset or press SPKR PHONE.
STEL, DTMF telephone, or CTEL: Hang up the handset.
Clearing All Temporary Room ExclusionsTo allow all excluded rooms to receive audio events again, follow the steps below.
1. ATEL: Lift the handset or press SPKR PHONE.
STEL, DTMF telephone, or CTEL: Lift the handset.
2. ATEL: Dial 748, then press #.
STEL, DTMF telephone, or CTEL: Same as ATEL.
3. ATEL: Hang up the handset or press SPKR PHONE.
STEL, DTMF telephone, or CTEL: Hang up the handset.
SCR+ Telephone Operation Manual 67
Temporarily Excluding Rooms

Setting the Time of DayTo set the time of day at your phone or local System, follow the steps below. If yourSystem has been networked to other Systems using a NIC, the time you set will only bevalid until a new time is set in the primary System, or until 2:58 a.m., when the primarySystem updates all secondary Systems.
1. ATEL: Lift the handset or press SPKR PHONE.
STEL, DTMF telephone, or CTEL: Lift the handset.
2. ATEL: Dial 750 and enter the time:
a. For 24-hour format enter the four-digit time (e.g., 1355 for 1:55 p.m.) and press#.
b. For 12-hour format enter the four-digit time (e.g., 0955 for 9:55 a.m.), press 0for a.m. or 1 for p.m., and press #.
STEL, DTMF telephone, or CTEL: Same as ATEL.Note:A double tone burst after pressing # indicates restricted access to this feature.You must enter a four-digit password after the tone to complete this operation. SeePassword Control on page 3.
3. ATEL: Hang up the handset or press SPKR PHONE.
STEL, DTMF telephone, or CTEL: Hang up the handset.
Setting the DateTo set the correct date for your phone or local System, follow the steps below. If yourSystem has been networked to other Systems using a NIC, the date you set will only bevalid until a new date is set in the primary System, or until 2:58 a.m., when the primarySystem updates all secondary Systems.
1. ATEL: Lift the handset or press SPKR PHONE.
STEL, DTMF telephone, or CTEL: Lift the handset.
68 SCR+ Telephone Operation Manual
Setting the Time of Day
2. ATEL: Dial 751 and enter the date (seven digits, weekday/mm/dd/yy, e.g., 1 09 1601, which translates to Sunday, September 16, 2001), then press #.
STEL, DTMF telephone, or CTEL: Same as ATEL.Notes:• Days of the week are represented by a single digit, 1–7.• Months 1–9 must be preceded by a 0 (entered as 01 through 09).• Dates 1–9 must be preceded by a 0 (entered as 01 through 09).• A double tone burst after pressing # indicates restricted access to this feature.
You must enter a four-digit password after the tone to complete this operation.See Password Control on page 3.
3. ATEL: Hang up the handset or press SPKR PHONE.
STEL, DTMF telephone, or CTEL: Hang up the handset.
Activating and Deactivating the SchedulesThe System can be configured with up to 16 time event schedules that determine whattime tone events occur. These schedules are programmable and can be changed throughSystem programming. Contact your system administrator for details.
1. ATEL: Lift the handset or press SPKR PHONE.
STEL, DTMF telephone, or CTEL: Lift the handset.
2. ATEL: Dial 752, enter the desired schedules (01–16) to be activated, or enter 00 todeactivate all schedules, then press #.
STEL, DTMF telephone, or CTEL: Same as ATEL.Notes:• A double tone burst after pressing # indicates restricted access to this feature.
You must enter a four-digit password after the tone to complete this operation.See Password Control on page 3.
• The schedules selected in step 2 will be the only active schedules.
3. ATEL: Hang up the handset or press SPKR PHONE.
STEL, DTMF telephone, or CTEL: Hang up the handset.
SCR+ Telephone Operation Manual 69
Activating and Deactivating the Schedules

Controlling I/O System OutputsThis feature lets you control I/O System outputs connected to external devices such aslights, bells, or door locks. Output assignments are programmable and can vary, socontact your system administrator for details.
1. ATEL: Lift the handset or press SPKR PHONE.
STEL, DTMF telephone, or CTEL: Lift the handset.
2. ATEL: Dial 754, enter the desired output activity (see below), enter the I/O outputnumber (01 through 08), then press #.0—output off1—output on2—output momentarily on for 1 second
STEL, DTMF telephone, or CTEL: Same as ATEL.
3. ATEL: Hang up the handset or press SPKR PHONE.
STEL, DTMF telephone, or CTEL: Hang up the handset.
Controlling OCC System OutputsThis feature lets you control OCC System outputs connected to external devices such aslights, bells, or door locks. Output assignments are programmable and can vary, socontact your system administrator for details.
1. ATEL: Lift the handset or press SPKR PHONE.
STEL, DTMF telephone, or CTEL: Lift the handset.
2. ATEL: Dial 764, enter the desired output activity (see below), enter the I/O outputnumber (e.g., 001, 002), then press #.0—output off1—output on2—output on 1 second3—output cycles continuously, 1 second on, 1 second off4—toggle or switch states (e.g., high to low)
STEL, DTMF telephone, or CTEL: Same as ATEL.
3. ATEL: Hang up the handset or press SPKR PHONE.
STEL, DTMF telephone, or CTEL: Hang up the handset.
70 SCR+ Telephone Operation Manual
Controlling I/O System Outputs
Overriding Night ModeThis feature lets you override the System’s night mode configuration. The night mode al-lows speaker station call-ins to be directed to particular extensions at certain times, suchas at night when staff levels are reduced. The night mode override lets you temporarilyoverride this System-wide redirection of call-ins, turn the night mode on early, or cancelprevious choices and allow the night mode to begin at its programmed time. Any night modeoverride ends automatically on the midnight after the override is initiated.
Note:The night mode feature requires both the optional Model 437-00125A Master ClockFeature Package 1 and the optional Model 437-00126 Enhanced Intercom FeaturePackage 1.
1. ATEL: Lift the handset or press SPKR PHONE.
STEL, DTMF telephone, or CTEL: Lift the handset.
2. ATEL: Dial 755, then enter your selection:
0 for night mode off. After the next midnight, the System returns to its original nightmode start time programming. For example, if the night mode normally begins at9:00 p.m. and you cancel it using this command at 10:00 p.m., night mode will returnto its original programming at 12:00 a.m. (midnight), but remain off until 9:00 p.m.the following night since that is the programmed night mode start time.
1 for night mode on. Regardless of the programmed night mode start time, nightmode will begin as soon as you hang up, continuing until the programmed nightmode end time. After the next midnight, the System returns to its original night modestart time programming.
2 for auto mode on. The current night mode selection is canceled and night modewill begin at its programmed start time.
STEL, DTMF telephone, or CTEL: Same as ATEL.
3. ATEL: Press #.
STEL, DTMF telephone, or CTEL: Same as ATEL.
4. ATEL: Hang up the handset or press SPKR PHONE.
STEL, DTMF telephone, or CTEL: Hang up the handset.
SCR+ Telephone Operation Manual 71
Overriding Night Mode

72 SCR+ Telephone Operation Manual
Notes

Call Button Operations
Call-In PrioritiesEach speaker in a room can be equipped with up to three call-in switches. Each call-inswitch is programmed with a priority level. Priority 1 is the highest, 6 is the lowest, and 7is used to cancel the call. By default, call-in switch 1 is programmed as a normal call (pri-ority 5), call-in switch 2 is programmed as emergency 2 (priority 2), and call-in switch 3is programmed as call cancel (priority 7). The priorities are listed below.
1. Emergency 1 (E1)2. Emergency 2 (E2)3. Emergency 3 (E3)4. High Priority (HP)5. Normal Priority (NP)6. Low Priority (LP)7. Cancel
Placing a Call-In
Placing a Normal Call-InPress and release the CALL button on a non-emergency priority call-in switch.
Placing an Emergency Call-InPress and release the CALL button on a designated emergency call-in switch.—OR—Rapidly press and release the CALL button twice on a non-emergency priority call-inswitch (this must enabled by System programming).
Upgrading a Normal Call-In to EmergencyPress and release the CALL button on a designated emergency call-in switch associatedwith the call-in switch that originated the normal call-in.—OR—Rapidly press and release the CALL button twice on the same normal call-in switch thatoriginated the call (this must enabled by System programming).
SCR+ Telephone Operation Manual 73
Section5

Canceling a Call-InPress and release the designated CANCEL button. This will cancel all call-ins from thatcall-in switch EXCEPT those of Emergency 1 priority. An Emergency 1 priority call-incan only be canceled by being answered.
Call ConfirmationThe optional call assurance LED on the speaker station flashes at a slow, steady ratewhen a normal call has been registered. The LED flashes at a rapid rate for an emergencypriority call. The LED goes out when the call is answered or canceled.
Message WaitingThe optional call assurance LED on the speaker station can be used as a message waitingindicator. This requires the Model 437-00127 Call Management Feature Package 1. Themessage waiting flash pattern (three rapid flashes, three seconds off) begins in responseto a command from a telephone. The message waiting indication can only be removed inresponse to a command from a telephone. See Message Waiting Indicator on page 47.
Privacy IndicationThe optional call assurance LED on the speaker station can be used as a privacyindicator. When the System is configured in this way, the LED will flash the privacypattern (1.2 seconds on, 1 second off) if the associated speaker is currently in intercom.
74 SCR+ Telephone Operation Manual
Canceling a Call-In

700 Codes Quick Reference
The 700 codes are used to access the system functions listed in the charts. They can bedialed from ATELs, STELs, DTMF telephones, and CTELs. You must go off-hook andwait for a dial tone before using any of the codes below, except when using the ATEL’spreprogrammed EMERGENCY, TONE, PAGE, PROGRAM, or F keys. You may need topress and release FLASH to receive a dial tone. The numbers in brackets [ ], when notentered, apply the function only to the speaker associated with the extension.
Dial sequence references that are italicized require you to enter the appropriate numberfrom the corresponding list.
PAGE FUNCTION DIAL SEQUENCE DEFAULT ATEL DIAL SEQUENCE
Emergency All Call Page 70, # EMERGENCY, #
Emergency Zone Page, IncludingZones
701, zone nos., # EMERGENCY, 1, zone nos., #
Emergency Zone Page, ExcludingZones
702, zone nos., # EMERGENCY, 2, zone nos., #
All Call Page 72, # PAGE, #
Zone Page, Including Zones 721, zone nos., # PAGE, 1, zone nos., #
Zone Page, Excluding Zones 722, zone nos., # PAGE, 2, zone nos., #
Room Page, Including Rooms 723, room nos., # PAGE, 3, room nos., #
Room Page, Excluding Rooms 724, room nos., # PAGE, 4, room nos., #
AUDIO PROGRAMFUNCTION
DIAL SEQUENCE DEFAULT ATEL DIAL SEQUENCE
Audio Program to All Rooms 730, source no., # PROGRAM, 0, source no., #
Audio Prog. Including Zones 731, source no., zone nos., # PROGRAM, 1, source no., zone nos., #
Audio Prog. Excluding Zones 732, source no., zone nos., # PROGRAM, 2, source no., zone nos., #
Audio Prog. Including Rooms 733, source no., room nos., # PROGRAM, 3, source no., room nos., #
Audio Prog. Excluding Rooms 734, source no., room nos., # PROGRAM, 4, source no., room nos., #
Audio Prog., Add Rooms 735, source no., room nos., # PROGRAM, 5, source no., [room nos.], #
Audio Prog., Subtract Rooms 736, [room nos.], # PROGRAM, 6, [room nos.], #
Audio Program Cancel 737, source no., # PROGRAM, 7, source no., #
Audio Program, Monitor Source 738, source no., # PROGRAM, 8, source no., #
ATEL “Music On Hold” andBackground Music Source Selection
758, source no., # 758, source no., #
continued
Appendix: 700 Codes Quick Reference 75
AppendixA

TONE DISTRIBUTIONFUNCTION
DIAL SEQUENCE DEFAULT ATEL DIALSEQUENCE
Tone to All 710, tone no., # TONE, 0, tone no., #
Tone, Including Zones 711, tone no., zone nos., # TONE, 1, tone no., zone nos., #
Tone, Excluding Zones 712, tone no., zone nos., # TONE, 2, tone no., zone nos., #
Tone, Including Rooms 713, tone no., room nos., # TONE, 3, tone no., room nos., #
Tone, Excluding Rooms 714, tone no., room nos., # TONE, 4, tone no., room nos., #
Tone Cancel 715, # TONE, 5, #
INTERCOM FUNCTION DIAL SEQUENCE DEFAULT ATEL DIALSEQUENCE
Speaker-to-Telephone IntercomTransfer
740, # 740, #
Telephone-to-Speaker IntercomTransfer
741, # 741, #
Intercom Call-In Answer 742, # 742, #
Intercom Call-In Pickup Code 745, # 745, #
Call-In for Associated Speaker 743, switch no., #
(See ATEL at right for switchdefinitions.)
743, switch no. (see below), #
1—call-in switch 1, default normal2—call-in switch 2, default emergency3—call-in switch 3, default cancel
Cancel All Normal Call-Ins in System 749, # 749, #
TELEPHONE FUNCTION DIAL SEQUENCE DEFAULT ATEL DIALSEQUENCE
Call Forward 756, forward type, extensionno., #(see ATEL at right for forwardtypes)
756, forward type (see below),extension no., # (only with CPC2)1—forward always2—forward on busy3—forward on no answer4—forward on busy or no answer
Cancel Call Forward 757, # 757, #
Telephone Call Pickup (Group) 761, group, # 761, group, #
Telephone Call Pickup (Extension) 762, extension no., # 762, extension no., #
Trunk Call Park 763, # 763, #
Trunk Call Camp-On to Extension 765, extension no., # 765, extension no., #
76 SCR+ Telephone Operation Manual

Follow Me 766, forward type, extensionno., #(see ATEL at right for forwardtypes)
766, forward type (see below),extension no., #1—forward always2—forward on busy3—forward on no answer4—forward on busy or no answer
Remove Follow Me 767, # 767, #
Trunk-on-Hold Pickup 79, trunk no., # 79, trunk no., #
Hookswitch Flash on Trunk 759, # 759, #
Message Waiting Indicator (Off) 760, 0, extension no., # 760, 0, extension no., #
Message Waiting Indicator (On) 760, 1, extension no., # 760, 1, extension no., #
TEMPORARY ROOMEXCLUSION FUNCTION
DIAL SEQUENCE DEFAULT ATEL DIALSEQUENCE
Temporary Room Exclusion 746, [room nos.], # 746, [room nos.], #
Clear Temporary Room Exclusion 747, [room nos.], # 747, [room nos.], #
Clear All Temporary RoomExclusions
748, # 748, #
Note:Temporary room exclusion prevents a room from receiving all audio events, except emergency pages, audioprograms, and tone activities for the remainder of the day. Normal settings are restored at midnight.
SYSTEM FUNCTION DIAL SEQUENCE DEFAULT ATEL DIALSEQUENCE
Set Time of Day(12-Hour Format)
750, hhmm (e.g., 0155),0 (a.m.)/1 (p.m.), #, password
750, hhmm (e.g., 0155),0 (a.m.)/1 (p.m.), #, password
Set Time of Day(24-Hour Format)
750, hhmm (e.g., 1355), #,password
750, hhmm (e.g., 1355), #, password
Set Date 751, day (1–7, Sunday = 1),mmddyy, #, password
751, day (1–7, Sunday = 1), mmddyy,#, password
Activate Schedules 752, schedule nos., #, password 752, schedule nos., #, password
Deactivate All Schedules 752, 00, #, password 752, 00, #, password
Night Mode Override 755, command, #
(See ATEL at right for commanddefinitions.)
755, command (see below), #
0—night mode off1—night mode on2—return to night modeprogramming
SCR+ Telephone Operation Manual 77
continued

I/O Output Control 754, command, output no., #
(See ATEL at right for commanddefinitions.)
754, command (see below), outputno., #
0—off1—on2—momentary (one second)
OCC Output Control 764, command, OCC output no., #
(See ATEL at right for commanddefinitions.)
764, command (see below), OCCoutput no., #
0—off1—on2—momentary (one second)3—cycle (one second on, one secondoff, continuous)4—toggle (switch states)
Clear Error Codes 753, #, password 753, #, password
Notes:Zone numbers—1 or more zones (01–32)
Room numbers—1 or more rooms entered according to the number of System digits (3, 4, or 5)
Source number—01–10
Tone number—01–32
Schedule numbers—1 or more schedules (01–32)
I/O output number—01–08 (if no entry, assumes all)
OCC output number—001, 002, 003, etc.
Password—4-digit System password
78 SCR+ Telephone Operation Manual

Programmable Function Keys Reference
Record any changes to the default function key settings in the table below for futurereference.
Appendix: Programmable Function Keys Reference 79
Appendix
KEY NAME NEW FUNCTION/SPEED DIAL NUMBER
F1
F2
F3
F4
F5
F6
F7
F8
EMERGENCY
TONE
PAGE
B

80 Appendix: Programmable Function Keys Reference
Notes

Software Versions
This manual reflects the operations and features available with the following software:
System Embedded SoftwareSoftware versions 5.00 or later are required for:
• Model 110-3524B ARC-E main node only
• Models 110-3527 and 110-3527A ATC-E4 main and secondary nodes
• Models 110-3531 and 110-3513A STC-E
• Models 110-3533A and 110-3533B ASC-B
• Models 110-3534 and 110-3534A ASC-E
• Models 110-3551 and 110-3551A TIC-E4
• Models 110-3552A and 110-3552B TIC-E8
• Model 110-3763A CPC2
• Models 110-3775 and 110-3775A BTC-E
• Models 110-3823 and 110-3823A ICC
• Models 110-3824, 110-3824A, and 110-3824B OCC
• Models 110-3889 and 110-3889A NIC
• Models 110-3851 and 110-3851A main and secondary nodes
• Models 110-3852 and 110-3852A main and secondary nodes
• Model 110-4001 COC-4
• Model 110-4002 COC-8
• Model 7A1110 ATEL
• Model SP2057-00 APC
System Configuration Software• Model 437-00120 Rapid Programming and Diagnostics (RAPID) version 5.00 or later
• Model 437-00131Remote Maintenance Utility (RMU) version 3.00 or later
Note:Model 437-00144 Monitoring and Diagnostic Software (MDS) is no longeravailable. Its additional functionality over RAPID has been incorporated intoRAPID starting at version 5.00.
Appendix: Software Versions 81
AppendixC

82 Appendix: Software Versions
Notes


DUKANE COMMUNICATION SYSTEMS
A DIVISION OF EST, INC. — 27545 Diehl Rd, Suite 200, Warrenville, IL 60555
© 1999–2004. Printed in USA. All specifications subject to change without notice.