Embed Size (px)
Citation preview
The Basic Guide toWinching Techniques
WARN INDUSTRIES OFF-ROAD PRODUCTS
12900 S.E. Capps RoadClackamas, OR 97015-8903 USA
Customer Service: 1-800-543-WARNFax: 1-503-722-3000
www.warn.com
T A B L E O F C O N T E N T S :
Winch basics. . . . . . . . . . . . . . . . . . . . . . . . . . . . . . . . . . . . . . . . . . . . . . . . . . . . . . . . . . . . . . . . 2–3
How the winch works . . . . . . . . . . . . . . . . . . . . . . . . . . . . . . . . . . . . . . . . . . . . . . . . . . . . . . . . . 4
Winch accessories & enhancements . . . . . . . . . . . . . . . . . . . . . . . . . . . . . . . . . . . . . . . . . . 5–6
Before you pull. . . . . . . . . . . . . . . . . . . . . . . . . . . . . . . . . . . . . . . . . . . . . . . . . . . . . . . . . . . . . . 7–9
Pulling . . . . . . . . . . . . . . . . . . . . . . . . . . . . . . . . . . . . . . . . . . . . . . . . . . . . . . . . . . . . . . . . . . . . . 9–12
Rigging techniques . . . . . . . . . . . . . . . . . . . . . . . . . . . . . . . . . . . . . . . . . . . . . . . . . . . . . . . . . . . 13
Putting a winch to work . . . . . . . . . . . . . . . . . . . . . . . . . . . . . . . . . . . . . . . . . . . . . . . . . . . . 14–15
Maintenance . . . . . . . . . . . . . . . . . . . . . . . . . . . . . . . . . . . . . . . . . . . . . . . . . . . . . . . . . . . . . . . . . 15
The final analysis . . . . . . . . . . . . . . . . . . . . . . . . . . . . . . . . . . . . . . . . . . . . . . . . . . . . . . . . . . . . . 15
Every winching situation has the potential for personal injury. In order to minimizethat risk, it is important that you read this Basic Guide carefully, familiarize yourselfwith the operation of your winch before having to use it, and be constantly safetyoriented. In this Guide, we will set forth many of the basic rules of safe winchoperation. However, because every winching situation is different, your constantgood judgment and consistent focus on safety are of great importance.

G O P R E P A R E D ™3
WARN INDUSTRIES • THE BASIC GUIDE TO WINCHING TECHNIQUES
To start, you should familiarizeyourself with your Warn winch and eachof its components: Practice using yourwinch before using it on the trail.
Motor Typically the winch motor ispowered by the vehicle’s battery. Themotor provides power to the gearmechanism, which turns the winch drumand winds the wire rope.
Winch Drum The winch drum is thecylinder onto which the wire rope feeds.The drum is driven by the motor anddrive train. Its direction can be changedusing the remote control.
Wire Rope The wire rope’s diameterand length are determined by the winch’sload capacity and design. Wrappedaround the winch drum and fed throughthe fairlead, the wire rope is looped atthe end to accept the hook’s clevis pin.
Fairlead When using the winch atan angle, the fairlead (or wire lead) actsto guide the wire rope onto the spoolingdrum. It minimizes damage to the wirerope while it goes through the winchmount or bumper.
Gear Train The reduction gearconverts the winch motor power into alarge pulling force. The gear train design
makes it possible for the winch to belighter and more compact.
Braking System The brake isautomatically applied to the winch drumwhen the winch motor is stopped andthere is load on the wire rope. The brakeprevents the winch from paying out line,which in turn holds the vehicle in place.
Clutch The clutch allows theoperator to manually disengage thespooling drum from the gear train,enabling the drum to rotate freely(known as “freespooling”). Engaging theclutch “locks” the winch drum back ontothe gear train.
Control Box Using electrical powerfrom the vehicle’s battery, the controlbox solenoids switch power to themotor, enabling the operator to changethe direction of the winch drum rotation.
Remote Control The remotecontrol plugs into the winch control box,allowing the operator to control thewinch direction, as well as stand wellclear of the wire rope while operatingthe winch.
Never engage
or disengage
the clutch if
winch is under
load, wire rope
is in tension, or
wire rope drum
is moving.
1
5
2
6
3
7
8
94
G O P R E P A R E D ™2
WARN INDUSTRIES • THE BASIC GUIDE TO WINCHING TECHNIQUES
ELECTRIC WINCH BASICS
So, you have your Warn winch andyou’re ready to get out on the trails:climb a few boulders, splash a little mud,traverse the occasional stream. Basically,you’re ready to explore the backcountryand otherwise have a great time.
Well, if you’re smart enough to goprepared with the best, you’re probablysmart enough to know that to keephaving a great time, you need to fullyunderstand your winch and thewinching operation.
That’s exactly what this guide intendsto do: provide you with a basicunderstanding of your winch and teachyou the basics of proper winching
techniques. But before we get started,we must emphasize that the informa-tion in this guide is general in nature.Because no two situations are alike,it would be nearly impossible to reviewthem all. We can, however, provide you with the general principles andtechniques. Then it is up to you to takethe time to analyze the situation andapply the proper technique.
Along with a little common sense,the guidelines laid out in this book can help you keep off-roading fun.Just remember to think through each situation before you act and TREAD LIGHTLY!
Never operate
or install a
winch without
reading or
understanding
the operator’s
manual
Structural
components
of a planetary
gear winch
1
59
2
6
3
7
8
The 8274-50
winch has a
different
structure. This
winch uses spur
gears for
reduction.
Moreover, it has
an automatic disc
type brake on the
body side.
Inset above: There is a stopper onthe side of the winch body for thislarge diameter reel. In fact, this reelis also the brake.
1
5 9
2
6
3
7
4
8
6
! WARNING
! CAU T I O N

G O P R E P A R E D ™5
WARN INDUSTRIES • THE BASIC GUIDE TO WINCHING TECHNIQUES
Gloves Wire rope, through use,will develop “barbs” which can slice skin. It is extremely important to wearprotective gloves while operating the winch or handling the wire rope.Avoid loose fitting clothes or anythingthat could become entangled in the wire rope and other moving parts.
Hook Strap Use to hold the hookand keep fingers away from the fairleadas the wire rope is being spooled in.Winches develop tremendous pullingforces and can easily remove fingers and limbs that are placed in pinchpoints. Put the hook into the loop andhold the strap between the thumb and forefingers.
Snatch Block Used properly, themulti-purpose snatch block allows you to:(1) increase your winch’s pulling power;and (2) change your pulling directionwithout damaging the wire rope. Properuse of the snatch block is covered in“Before You Pull”.
Clevis/D-Shackles The D-Shackle isa safe means for connecting the loopedends of cables, straps and snatch blocks.The shackle’s pin is threaded to alloweasy removal.
Alone, the winch is not much morethan a simple tool. But when used withcertain accessories and enhancements,your Warn winch can become a versatileand productive tool. In this section, we’llreview several of these items. Some arevital to the safe operation of your winch,while others offer added versatility andconvenience.
Choker Chain Can be used to hook-up to another vehicle or sharp objectsfor an anchor point. Chains, however, willdamage or kill trees.
Tow Hooks Secured properly to your vehicle’s frame,tow hooks provide an attachment point for wire hooks,straps, and chains.
WINCH ACCESSORIES YOU’LL WANT TO HAVE WITH YOU
G O P R E P A R E D ™4
WARN INDUSTRIES • THE BASIC GUIDE TO WINCHING TECHNIQUES
HOW THE WINCH WORKS
Winch MechanicsNow that you’ve familiarized your-
self with your Warn winch and itscomponents, we can begin reviewinghow it works. The major advantage of an electric-powered winch is that itcan provide reliable service for inter-mittent utility and recreational use evenwhile the vehicle’s engine is stalled —assuming, of course, that sufficientbattery current is available. Your winchcan operate at high current loads, and,for this reason, the control box uses ahigh current control system to safelyhandle the current flow.
It is important to understand that thelonger the pull, the more heat that is
created, just like a hot plate. Prolongedwinching without cooling the winchmotor will damage the motor. Also, if the engine is idling during winching,the battery may drain faster than it ischarging. So pay close attention to yourvoltage gauge to make sure you aren’t draining your battery too low tostart your vehicle.
Control Of Your WinchThe winch is controlled by the hand
held remote control to allow theoperator to stand clear while controllingthe winching process. The remotecontrol provides control of the forwardor reverse rotation of the spooling drum.
How the Winch Reacts to LoadWarn winches are rated by pulling
capacity. The maximum pulling capacityoccurs on the first layer of wire rope onthe drum. As the layers increase, thepulling power decreases. It’s the mathe-matics of winching. Exceeding the winchcapacity could cause the winch to fail orthe wire rope to break. Thinking throughhow you intend to use your winch now,could save you a big headache later.
In addition, you’ll also want to makesure that your winch’s mounting systemand your vehicle’s frame can accom-modate the rated load of your winch.
So analyze your situation. Use yourjudgement to calculate how muchweight you intend to pull. Calculate thegross weight and multiply by 1.5 andthen do not exceed the rating of yourwinch or wire rope.
The winch is
controlled by
the hand held
remote control
to allow the
operator to
stand clear
during the
winching
process.

G O P R E P A R E D ™7
WARN INDUSTRIES • THE BASIC GUIDE TO WINCHING TECHNIQUES
BEFORE YOU PULL
Rigging for the Pull The following steps describe how to
recover your vehicle with rigging a single line pull. Double or multiple linerigging techniques follow the same basic steps, but use a snatch block toassist the process.
Step 1: PUT ON GLOVES.
Step 2: DISENGAGE CLUTCH. To allowfree spooling of the winch drum,rotate the clutch lever on the winch to Disengage. Freespooling conservesbattery power.
Step 3: FREE THE WINCH HOOK ANDATTACH HOOK STRAP. Free the winchhook from its anchor point. Attach hookstrap to the hook (if not attached).
Single line pullPractice using your winch before you
get stuck. A real situation is no time tobe learning how to use your winch.
Make sure new wire rope is stretchedbefore it is first used. Unspool the fulllength of the wire rope, leaving 5 wraps on the drum. Apply at least 500 poundsof tension. You can do this by setting upan anchor point and pulling your vehicleto it on a slightly inclined, flat surfaceand letting the vehicle roll.
Whether you’re recovering anothervehicle or pulling a stump from theground, knowing the proper winchingtechniques can help keep you andothers around you safe. And perhaps the most important part of the winchingprocess, regardless of the situation, iswhat you do before you pull.
In this section, we’ll show you thebasic fundamentals for effective winch-ing. However, it is up to you to analyzethe situation and make the decisionsnecessary for the proper use of yourwinch. Apply your knowledge of yourwinch and the basic fundamentalsyou’ve practiced and adjust your tech-niques to your unique situation. Somekeys to remember when using your Warn winch:
1. Always take your time to assess your situation and plan your pull carefully.
2. Always take your time when using a winch.
3. Use the right equipment for your situation.
4. Always wear leather gloves and do not allow the wire rope to slidethrough your hands.
5. You and only you should handle the wire rope and operate theremote control switch.
6. Think safety at all times.
7. Practice. Practice and practice the steps.
G O P R E P A R E D ™6
WARN INDUSTRIES • THE BASIC GUIDE TO WINCHING TECHNIQUES
Never attach a
recovery strap
to the winch
hook to
increase the
length of a
pull. Never
attempt to
tow a vehicle
with the
recovery strap
attached
directly to the
winch hook.
Never use
“bungie” straps
that develop
tremendous
and potentially
dangerous
amounts of
force when
stretched.
Tree Trunk ProtectorTypically made of tough, high-
quality nylon, it provides theoperator an attachment point for the
winch rope to a wide variety of anchorpoints and objects, as well as protectliving trees.
Heavy Blanket In certainsituations you maydecide to throw aheavy blanketor similar
objectover the
wire rope. A heavyblanket, such as a
quilted mover’s blanket, canabsorb energy should the wire rope
break. Place it on the wire rope midwaybetween the winch and the anchorpoint. Do this before the wire rope is put under tension. Do not approach ormove the blanket once tension isapplied. Do not allow it to get pulled into the fairlead. If necessary to move or remove the blanket, slack the tensionon the wire rope first.
Recovery Strap Never use arecovery strap in a winching operation.Because it is designed to stretch, it stores energy and could react like arubber band should your rigging fail.Use the recovery strap to “snatch” out astuck vehicle.
Shovels & Hand Tools Quite oftenduring winching activities, you’ll findyourself in need of some additional help.You may want to stow equipment such as a shovel, an axe and a Hi-Lift jack foradditional assistance when needed.
Backup Parts Important backupparts to carry for backcountry travelshould include an extra screw-pinshackle, snatch block, and remote controlunit. For severe and continued winchuse, consider including an extra wirerope and winch hook.
Toolbox Items Items to bring alonginclude hand wrenches, screwdrivers,pliers, and tools to change wire rope.
Booster Cables Many roadsideemergencies stem from a dead battery.To prevent exhausting your electricalsource, you can install a dual batterysystem and a battery isolator kit. Also,it’s wise to include battery boostercables and the Warn quick-connect cable system.
Battery RecommendationsA fully charged conventional automotivebattery with a minimum rating of 650cold cranking amps is recommended to obtain peak performance from yourwinch. Make sure all electrical connec-tions are clean and tight.
Always keep
hands and
clothing clear
of the wire
rope, hook
and fairlead
opening during
operation and
when spooling.
Always use
supplied hook
strap to hold
hook when
spooling wire
rope in or out.! CAU T I O N
! WARNING
! WARNING

G O P R E P A R E D ™9
WARN INDUSTRIES • THE BASIC GUIDE TO WINCHING TECHNIQUES
G O P R E P A R E D ™8
WARN INDUSTRIES • THE BASIC GUIDE TO WINCHING TECHNIQUES
Never attempt
to disengage
the clutch while
wire rope is
under tension.
Never engage
the clutch
while the drum
is rotating.
Always make
sure the clutch
is fully engaged
or disengaged.
Never leave
remote control
plugged into
winch while
free spooling,
rigging or
sitting idle.
Step 4: PULL WIRE TO ANCHOR POINT.Pull out enough wire rope to reach your anchor point. Be sure to keep acertain amount of tension in the wire.It can become twisted and overwrapwhen slackened, leading to wire ropedamage. To prevent loosing the end,hold the winch hook in the hook strapwhile you work.
Step 5: SECURE TO THE ANCHOR POINT.Once you’ve established your anchorpoint, secure the tree trunk protector orchoker chain around the object.
Step 6: ATTACH THE CLEVIS/D-SHACKLEAND HOOK STRAP. Attach the shackle to the two ends of the strap or chain and through the hook loop,being careful not to over tighten(tighten and back-off 1/2 turn).
Stakes or axles,driven in at anangle and tiedtogether.
Spare tire andrim buried deepand the chainsecured throughthe rim.
Buried log withchain securedaround the log.
How to choose an anchor point:
A secure anchor is critical to
winching operations. An anchor
must be strong enough to hold while
winching. Natural anchors include
trees, stumps, and rocks. Hook the
cable as low as possible. If no natural
anchors are available, when
recovering another vehicle, your
vehicle becomes the anchor point.
In this case, be sure to put the
transmission in neutral, apply the
hand brake and block its wheels to
prevent your vehicle from moving.
Ideally, you’ll want an anchor
point that will enable you to pull
straight in the direction the vehicle
will move. This allows the wire rope
to wind tightly and evenly onto
the spooling drum. An anchor
point as far away as possible will
provide the winch with its greatest
pulling power.
Step 7: LOCK THE CLUTCH. Lock thewinch drum by rotating the clutch lever on the winch to Engage.
Never winch
when there
are less than
5 wraps of
wire rope
around the
winch drum.
Step 10: CHECK YOUR ANCHOR. Makesure all connections are secured and freeof debris before continuing with thewinching procedure.
Step 8: CONNECT THE REMOTECONTROL. Be careful not to let theremote control cord dangle in front ofthe winch. If you choose to control thewinch from inside your vehicle, alwayspass the remote through a window toavoid pinching the cord in the door.Always disconnect the remotecontrol when not in use.
Step 9: PUT WIRE ROPE UNDERTENSION. Using the winch switch, slowlywind the wire rope until no slack remains.Once the wire rope is under tension,stand well clear, and never step over it.
PULLING
As you probably have already noticed,there are many things to do and considerbefore you actually begin pulling. Thinkthrough what you’re doing and you cankeep yourself and those around you outof harm’s way.
Operating your winch properly is soimportant, in fact, you should practicethese techniques before having to face the distractions and stresses of a realwinching situation.
Step 11: CHECK WIRE ROPE. The wirerope should be neatly wound aroundthe spooling drum. Improper windingcan cause damage to the wire rope.
Step 12: LAY SOMETHING OVER THEWIRE ROPE, if you decide it is necessary,midway between the winch and theanchor point to absorb energy shouldthe wire rope snap loose. Tree limbs,heavy jackets, chain, back pack and the like may be used for this purpose.
Never use
the winch as
a hoist. Never
use the winch’s
wire rope to
tow another
vehicle.
Always avoid
continuous
side pulls which
can pile up
wire rope at
one end of the
drum. This pile
up of wire can
damage wire
rope or winch.
! CAU T I O N
! CAU T I O N
! CAU T I O N
! CAU T I O N
N O T I C E
G O P R E P A R E D ™11
WARN INDUSTRIES • THE BASIC GUIDE TO WINCHING TECHNIQUES
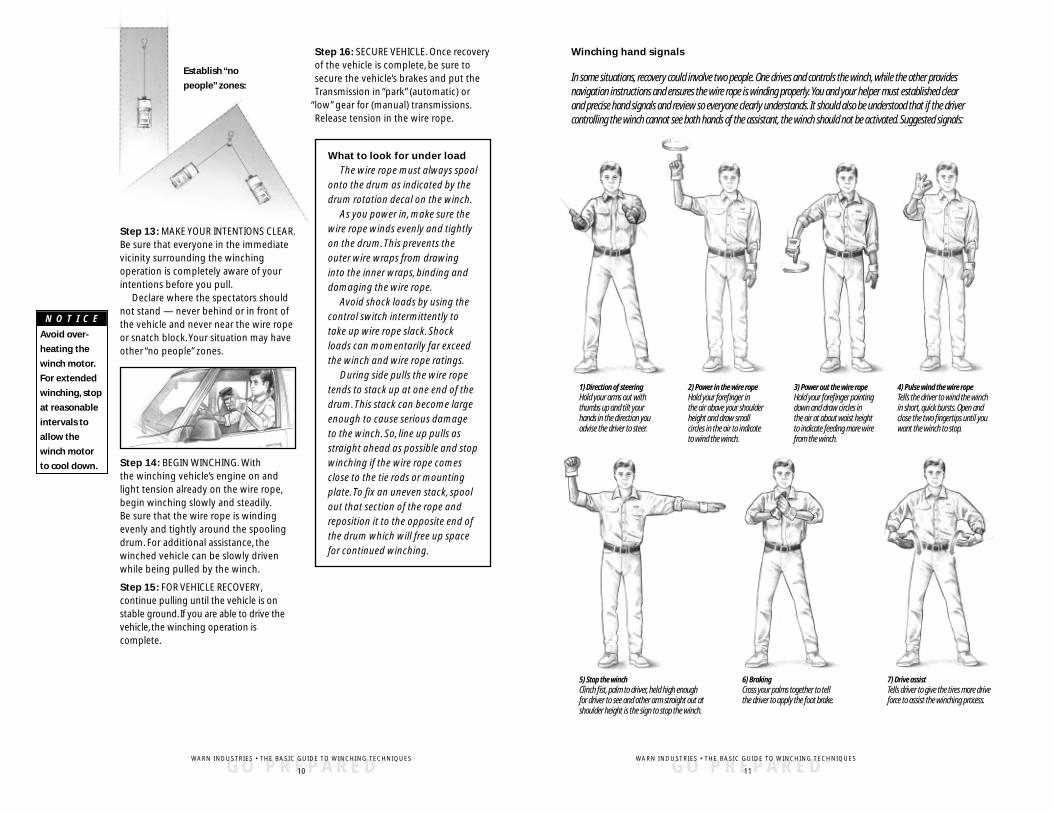
Establish “no
people” zones:
G O P R E P A R E D ™10
WARN INDUSTRIES • THE BASIC GUIDE TO WINCHING TECHNIQUES
7) Drive assistTells driver to give the tires more driveforce to assist the winching process.
Winching hand signals
5) Stop the winchClinch fist, palm to driver, held high enoughfor driver to see and other arm straight out atshoulder height is the sign to stop the winch.
6) BrakingCross your palms together to tellthe driver to apply the foot brake.
1) Direction of steeringHold your arms out with thumbs up and tilt yourhands in the direction youadvise the driver to steer.
2) Power in the wire ropeHold your forefinger in the air above your shoulderheight and draw smallcircles in the air to indicateto wind the winch.
3) Power out the wire ropeHold your forefinger pointingdown and draw circles in the air at about waist height to indicate feeding more wirefrom the winch.
4) Pulse wind the wire ropeTells the driver to wind the winchin short, quick bursts. Open andclose the two fingertips until youwant the winch to stop.
In some situations, recovery could involve two people. One drives and controls the winch, while the other providesnavigation instructions and ensures the wire rope is winding properly. You and your helper must established clear and precise hand signals and review so everyone clearly understands. It should also be understood that if the drivercontrolling the winch cannot see both hands of the assistant, the winch should not be activated. Suggested signals:
What to look for under load
The wire rope must always spool
onto the drum as indicated by the
drum rotation decal on the winch.
As you power in, make sure the
wire rope winds evenly and tightly
on the drum. This prevents the
outer wire wraps from drawing
into the inner wraps, binding and
damaging the wire rope.
Avoid shock loads by using the
control switch intermittently to
take up wire rope slack. Shock
loads can momentarily far exceed
the winch and wire rope ratings.
During side pulls the wire rope
tends to stack up at one end of the
drum. This stack can become large
enough to cause serious damage
to the winch. So, line up pulls as
straight ahead as possible and stop
winching if the wire rope comes
close to the tie rods or mounting
plate. To fix an uneven stack, spool
out that section of the rope and
reposition it to the opposite end of
the drum which will free up space
for continued winching.
Step 13: MAKE YOUR INTENTIONS CLEAR.Be sure that everyone in the immediatevicinity surrounding the winchingoperation is completely aware of yourintentions before you pull.
Declare where the spectators should not stand — never behind or in front of the vehicle and never near the wire ropeor snatch block. Your situation may haveother “no people” zones.
Step 14: BEGIN WINCHING. With the winching vehicle’s engine on and light tension already on the wire rope,begin winching slowly and steadily.Be sure that the wire rope is windingevenly and tightly around the spoolingdrum. For additional assistance, thewinched vehicle can be slowly driven while being pulled by the winch.
Step 15: FOR VEHICLE RECOVERY,continue pulling until the vehicle is onstable ground. If you are able to drive thevehicle, the winching operation iscomplete.
Step 16: SECURE VEHICLE. Once recoveryof the vehicle is complete, be sure tosecure the vehicle’s brakes and put theTransmission in “park” (automatic) or
“low” gear for (manual) transmissions.Release tension in the wire rope.
Avoid over-
heating the
winch motor.
For extended
winching, stop
at reasonable
intervals to
allow the
winch motor
to cool down.
N O T I C E

G O P R E P A R E D ™13
WARN INDUSTRIES • THE BASIC GUIDE TO WINCHING TECHNIQUES
RIGGING TECHNIQUES
Various winching situations willrequire application of other winchingtechniques. These could range from too little distance to achieve maximumpull using straight line rigging, simplyincreasing pulling power, or maintaininga straight-line pulling situation. You will have to assess what technique iscorrect for your situation. Think “safety”at all times.
How to change the pulling direction
All winching operations should have a straight line from the winch to the object being pulled.This minimizes the wire rope collecting on one side of the drum affecting pulling efficiency and damagingwire rope. A snatch block, secured to apoint directly in front of the vehicle, willenable you to change your pullingdirection while still allowing the wirerope to be at 90º to wind properly ontothe spooling drum.
Increasing pulling powerIn some cases, you may find yourself
needing more pulling power. The use of snatch blocks increases mechanicaladvantage and that increases your pulling power:
Double lineBecause pulling power decreases
with the number of layers of wire rope on the winch drum, you can use a snatch block to double line out morewire rope. This decreases the number of layers of wire rope on the drum,and increases pulling power.
Start by feeding out enough wirerope to free the winch hook. Attach the hook to your vehicle’s frame/towhook and run the wire rope through a snatch block.
Disengage the clutch and, using the snatch block, pull out enough wire to reach your anchor point. Do notattach hook to mounting kit.
Secure to the anchor point with a treetrunk protector or choker chain. Attachthe clevis/shackle. Attach the shackle tothe two ends of the strap/chain, beingcareful not to over tighten (tighten andback-off 1/2 turn).
Single line
Double line
Triple line
G O P R E P A R E D ™12
WARN INDUSTRIES • THE BASIC GUIDE TO WINCHING TECHNIQUES
Step 18: REWIND WIRE ROPE. Theperson handling the wire rope shouldwalk the rope in and not let it slidethrough the hand and control the winch at all times.
Step 19: DISCONNECT REMOTECONTROL. Disconnect the remotecontrol cord from the control box andstore in a clean and dry place. Winchingoperations are now complete. Put thecap on the solenoid plug in.
Always keep
hands and
clothing clear
of the wire
rope, hook
and fairlead
opening
during opera-
tion and when
spooling.
How to spool under no loadArrange the remote control lead
so it can not be caught in the winch.Arrange the wire rope so it will notkink or tangle when spooled. Be sureany wire rope already on the spoolingdrum is wound tightly and evenlylayered. Tighten and straighten thelayer if necessary. Keep the wire ropeunder light tension and spool thewire rope back onto the winch drumin even layers. Stop frequently totighten and straighten the layers asnecessary. Repeat this process untilthe winch hook is the same distanceas the full length of the remotecontrol from the winch. Pinch thehook between your thumb andforefinger and attach the hook strap.Hold the hook strap between thethumb and forefinger to keep tensionon the wire rope. Walk the wire ropetowards the fairlead, carefullyspooling in the remaining wire ropeby pulsing the remote control switch.Store the hook at the fairlead ortensioned to a suitable location tothe side.
If you do not have the hook strap,use a length of cord or somethingsimilar. To prevent serious injury,NEVER put your fingers inside thehook area as you are powering in.
Step 17: DISCONNECT WIRE ROPE.Disconnect from the anchor.
! WARNING

THE FINAL ANALYSIS
The basic guide to proper winchingtechniques cannot cover all the possiblesituations in which you may need to use a winch. In the final analysis, thedecisions you make will determine thefinal outcome. So think through eachsituation and each step of use. Always be mindful of your own safety and the safety of others. Pay attention andyou’ll have fun.
G O P R E P A R E D ™15
WARN INDUSTRIES • THE BASIC GUIDE TO WINCHING TECHNIQUES
MAINTENANCE
• Inspect the wire rope before and aftereach winching operation. If the wire rope has become kinked or frayed,the wire rope needs to be replaced.Be sure to also inspect the winchhook and hook pin for signs of wearor damage. Replace if necessary.
• Keep winch, wire rope, and switchcontrol free from contaminants. Use a clean rag or towel to remove anydirt and debris. If necessary, unwindwinch completely (leaving a mini-mum of 5 wraps on spooling drum),wipe clean, and rewind properlybefore storage. Using a light oil onthe wire rope and winch hook cankeep rust and corrosion from forming.
• Operating your winch for a longperiod of time places an extra burdenon your vehicle’s battery. Be sure tocheck and maintain your battery andbattery cables according to manu-facturer guidelines. Also inspect switchcontrol and all electrical connectionsto be certain they are clean and tight fitting.
• Inspect the remote control fordamage, if so equipped. Be sure to cap the remote socket to prevent dirt and debris from entering theconnections. Store remote control in a protected, clean, dry area.
• No lubrication is required for the life of the winch.
G O P R E P A R E D ™14
WARN INDUSTRIES • THE BASIC GUIDE TO WINCHING TECHNIQUES
Triple LineUse the same techniques as the
Double Line. Select a robust mountinglocation on your vehicle for the snatchblock and the screw-pin shackle. Keep a 90º angle between the winch and runthe wire rope to the first anchor-pointand through the snatch block. Securerope back to the vehicle. Put the wirerope through the snatch block andsecure with the screw-pin shackle on the vehicle as close to the winch aspractical. Now run the wire rope to thefinal anchor point
Secure to the anchor point with a treetrunk protector or choker chain. Attachthe clevis/shackle. Attach the shackle tothe two ends of the strap/chain, being
careful not to over tighten (tighten andback-off 1/2 turn).
Secure the winch hook. While keepingthe line near the ground, insert the winchhook through the screw-pin shackle.Check your anchor. Make sure all connec-tions are secured and free of debris beforecontinuing with the winching procedure.
Pull out shrubs or pull downunwanted trees
Use the choker chain low around theshrub, then start pulling with the winch.The choker chain will tighten. Smallshrubs can be pulled out by the roots.
Reposition equipment. Any heavy equipment such as broken downtractors, plows, trailers, constructionequipment, heavy pipes or even smallsheds can be moved to any position witha winch. Just attach a choker chain towhat ever needs to be moved and it canbe pulled into position by the winch.
Clear the trailMove a fallen log or tree that blocks
a road with the choker chain wrappedaround the tree, a snatch block andshackle. Study the situation first, but in most instances you will need to run a line through a snatch block off a tree at a 90 degree angle from the winch to pull the log to the side of the road.
Pull firewood up to the road Use the choker chain to wrap around
the log, and then use the winch to pullthe log to the roadside for easier cuttingand loading. Use a snatch block tochange the direction of the winch pull if needed.
PUTTING A WINCH TO WORK

62885 Rev A1