Embed Size (px)
Citation preview

C.A. de BieJ.A. van Leeuwen
P.A. Zuidema
91
The Data Entry Module
6.1 How to Start the Data Entry Module...................................................................... 92
6.2 Settings................................................................................................................... 936.2.1 Common Settings.............................................................................................. 936.2.2 Settings for Data Entry Module.......................................................................... 94
6.3 Land Use Data ........................................................................................................ 98
6.4 Dataset Identifications (Level 1).......................................................................... 1006.4.1 Add/Edit a Dataset Identification ..................................................................... 1016.4.2 Fields of Dataset Identification ........................................................................ 1036.4.3 Copy a Dataset Identification .......................................................................... 1046.4.4 Print a Dataset Identification ........................................................................... 105
6.5 Site Identifications (Level 2) ................................................................................ 1056.5.1 Add/Edit a Site Identification ........................................................................... 1066.5.2 Fields of Site Identification .............................................................................. 1086.5.3 Copy a Site Identification................................................................................. 110
6.6 Land Use System Descriptions (Level 3)............................................................ 1106.6.1 Add/Edit a Land Use System Description........................................................ 1116.6.2 Fields of Land Use System Description........................................................... 1126.6.3 Add/Edit an Infrastructure................................................................................ 1146.6.4 Add/Edit a Land Use Purpose and Quantity .................................................... 1156.6.5 Copy a Land Use System Description............................................................. 116
6.7 Operations and Observations (Level 4) .............................................................. 1176.7.1 Add/Edit an Operation..................................................................................... 1186.7.2 Fields of Operation.......................................................................................... 1196.7.3 Add/Edit a Labour Input .................................................................................. 1216.7.4 Add/Edit a Material Input ................................................................................. 1236.7.5 Add/Edit an Implement.................................................................................... 1246.7.6 Add/Edit a Product/Benefit Obtained............................................................... 1256.7.7 Add/Edit an Observation ................................................................................. 1276.7.8 Fields of Observation ...................................................................................... 1276.7.9 Copy an Operation.......................................................................................... 1296.7.10 Copy an Observation................................................................................... 130
6.8 Land Use Classes................................................................................................. 1306.8.1 A-Priori Land Use Classification Systems ....................................................... 1316.8.2 Add/Edit an A-Priori Land Use Classification System ...................................... 1316.8.3 A-Priori Land Use Classes .............................................................................. 1326.8.4 Add/Edit an A-Priori Land Use Class............................................................... 1336.8.5 Print A-Priori Land Use Classes ...................................................................... 1356.8.6 Delete an A-Priori Land Use Class or Classification System ........................... 136
C.A. de BieJ.A. van Leeuwen
P.A. Zuidema
92
6. The Data Entry Module
Instructions on the use of the Data Entry Module, i.e. how to enter collected land usedata, how to edit stored information, how to define a-priori land use classes, and howto change the program settings.
6.1 How to Start the Data Entry Module
After you selected Data Entry from the main menu of The Land Use Database (Section 4.1),the main menu of the Data Entry Module is displayed:
To select one of the 4 options from the main menu of the Data Entry Module hHighlight anoption by using the ↑↑ or ↓↓ key and press Enter to select the option. The options are brieflyexplained below with reference to the Sections in which they are discussed:
SettingsWith this option you can define common program settings of The Land Use Database,and select the current data entry configuration (Section 6.2).
Land Use DataWith this option you can enter collected and edit stored land use data (Section 6.3).
Land Use ClassesWith this option you can define new or edit stored a-priori land use classes (Section 6.8).
ExitExit the Data Entry Module; also possible by pressing Esc. You will return to the mainmenu of The Land Use Database (Section 4.1).
C.A. de BieJ.A. van Leeuwen
P.A. Zuidema
93
6.2 Settings
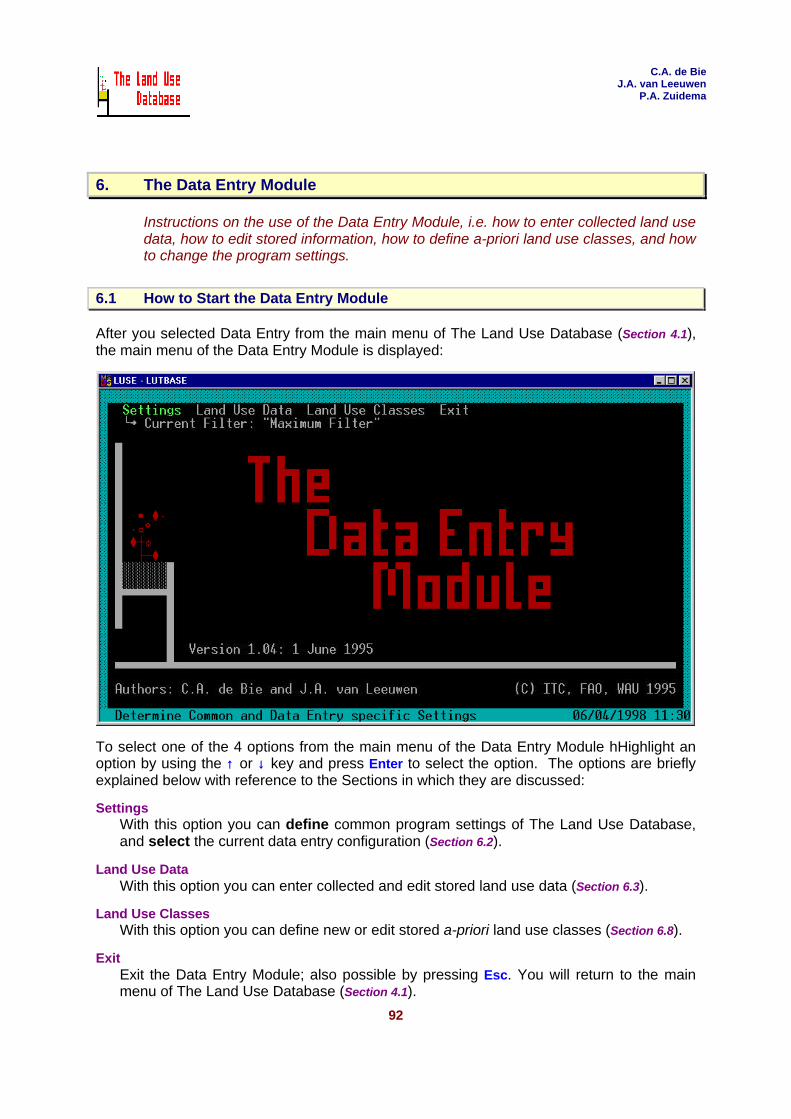
The settings option offers the possibility to select general program settings as well asspecific settings for the Data Entry Module. After selecting Settings from the main menu ofthe Data Entry Module, the next screen is displayed:
The Settings screen is divided into two parts:
Common SettingsSettings which are applicable in all modules of The Land Use Database (Section 6.2.1).
Settings for Data Entry ModuleSettings that are only applicable for the Data Entry Module (Section 6.2.2).
After defining the settings, exit and save the settings screen press F10 or Esc. You will returnto the main menu of the Data Entry Module (Section 6.1).
6.2.1 Common Settings
The common settings are applicable for all modules of The Land Use Database. They areexplained below:
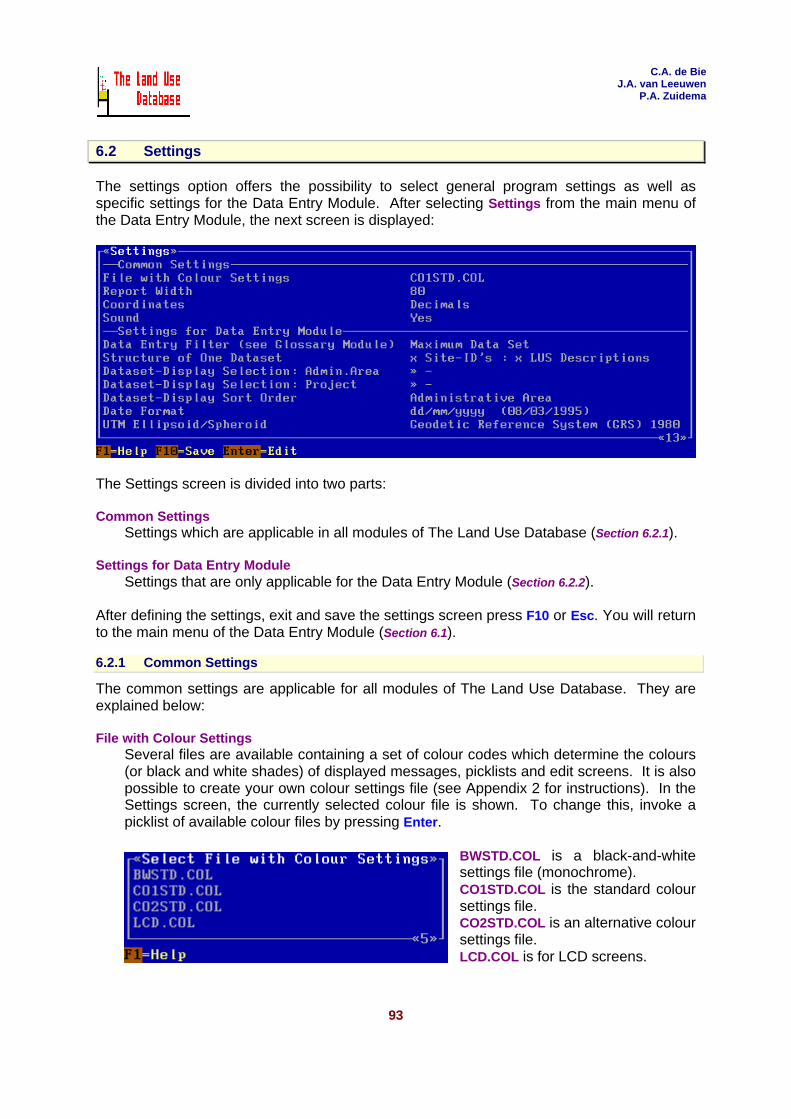
File with Colour SettingsSeveral files are available containing a set of colour codes which determine the colours(or black and white shades) of displayed messages, picklists and edit screens. It is alsopossible to create your own colour settings file (see Appendix 2 for instructions). In theSettings screen, the currently selected colour file is shown. To change this, invoke apicklist of available colour files by pressing Enter.
BWSTD.COL is a black-and-whitesettings file (monochrome).CO1STD.COL is the standard coloursettings file.CO2STD.COL is an alternative coloursettings file.LCD.COL is for LCD screens.

C.A. de BieJ.A. van Leeuwen
P.A. Zuidema
94
Report WidthThis is the maximum number of characters on one line of printed output (to the screen,printer or file). The default number is 80. If your printer can print in condensed format,you can select a higher number in order to get more information on one page. To invokea picklist from which to select the report width press Enter.
CoordinatesGeographical coordinates (longitudes and latitudes) can be specified in two ways: indegrees and in decimals. To invoke a picklist from which to select the format requiredpress Enter.
Degrees, Minutes, Seconds (o ' ")Geographical coordinates can be specified in degrees, minutes (1/60 degree) andseconds (1/60 minute).
DecimalsGeographical coordinates can be specified in degrees and decimals of degrees.
SoundSpecify here if the computer must make a sound when errors occur, when swappingbetween modules, and at termination of a query execution. To change Yes into No andvice versa press Enter.
6.2.2 Settings for Data Entry Module
These settings are only applicable for the Data Entry Module. They are explained below:
Data Entry FilterA data entry filter can be selected in the Define Data Entry Filter option of the GlossaryModule (Section 5.3). Definition and selection of a data entry filter is very important inorder to shape the data entry procedure to the requirements and objectives of yourstudy. To invoke a picklist in which to specify this setting press Enter.
C.A. de BieJ.A. van Leeuwen
P.A. Zuidema
95
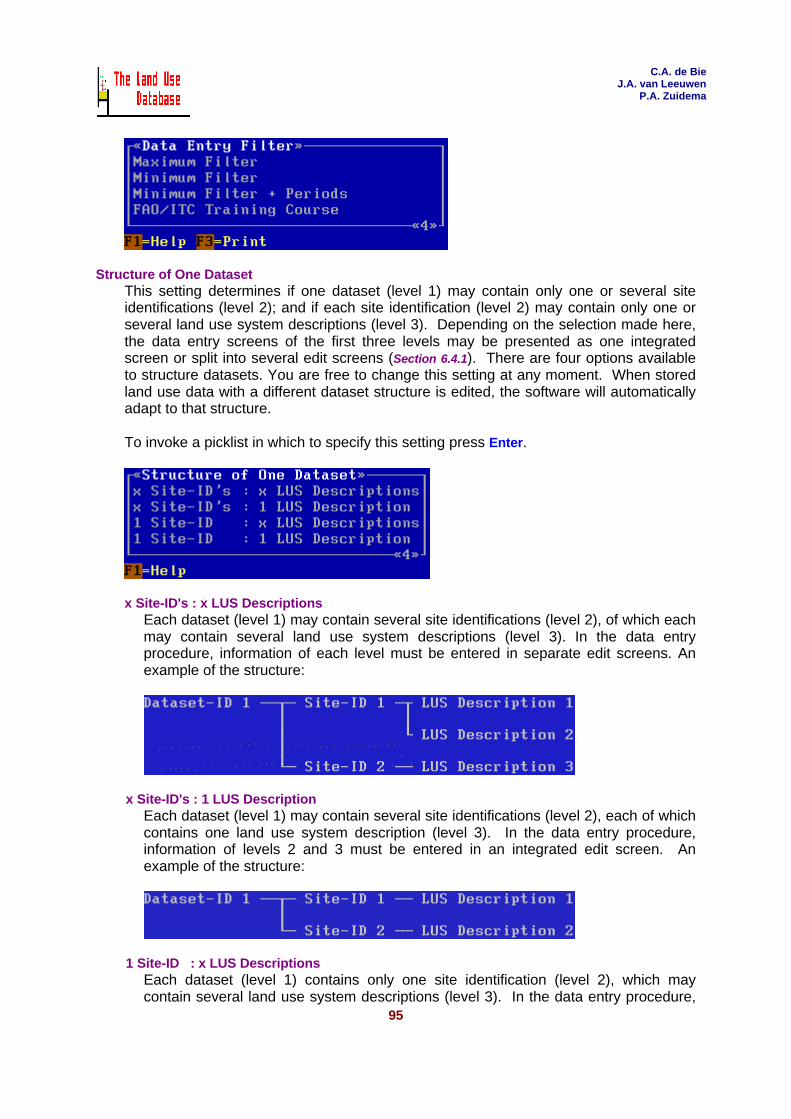
Structure of One DatasetThis setting determines if one dataset (level 1) may contain only one or several siteidentifications (level 2); and if each site identification (level 2) may contain only one orseveral land use system descriptions (level 3). Depending on the selection made here,the data entry screens of the first three levels may be presented as one integratedscreen or split into several edit screens (Section 6.4.1). There are four options availableto structure datasets. You are free to change this setting at any moment. When storedland use data with a different dataset structure is edited, the software will automaticallyadapt to that structure.
To invoke a picklist in which to specify this setting press Enter.
x Site-ID's : x LUS DescriptionsEach dataset (level 1) may contain several site identifications (level 2), of which eachmay contain several land use system descriptions (level 3). In the data entryprocedure, information of each level must be entered in separate edit screens. Anexample of the structure:
x Site-ID's : 1 LUS DescriptionEach dataset (level 1) may contain several site identifications (level 2), each of whichcontains one land use system description (level 3). In the data entry procedure,information of levels 2 and 3 must be entered in an integrated edit screen. Anexample of the structure:
1 Site-ID : x LUS DescriptionsEach dataset (level 1) contains only one site identification (level 2), which maycontain several land use system descriptions (level 3). In the data entry procedure,
C.A. de BieJ.A. van Leeuwen
P.A. Zuidema
96
information of levels 1 and 2 must be entered in an integrated edit screen. Anexample of the structure:
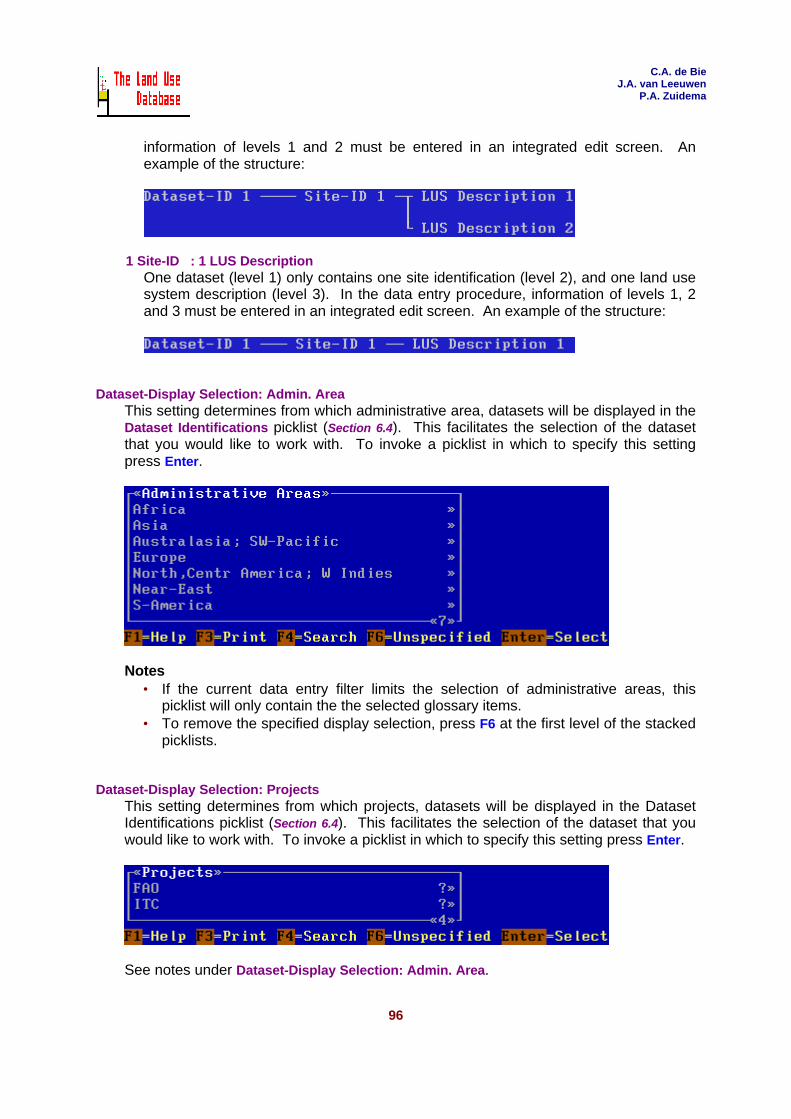
1 Site-ID : 1 LUS DescriptionOne dataset (level 1) only contains one site identification (level 2), and one land usesystem description (level 3). In the data entry procedure, information of levels 1, 2and 3 must be entered in an integrated edit screen. An example of the structure:
Dataset-Display Selection: Admin. AreaThis setting determines from which administrative area, datasets will be displayed in theDataset Identifications picklist (Section 6.4). This facilitates the selection of the datasetthat you would like to work with. To invoke a picklist in which to specify this settingpress Enter.
Notes• If the current data entry filter limits the selection of administrative areas, this
picklist will only contain the the selected glossary items.• To remove the specified display selection, press F6 at the first level of the stacked
picklists.
Dataset-Display Selection: ProjectsThis setting determines from which projects, datasets will be displayed in the DatasetIdentifications picklist (Section 6.4). This facilitates the selection of the dataset that youwould like to work with. To invoke a picklist in which to specify this setting press Enter.
See notes under Dataset-Display Selection: Admin. Area.

C.A. de BieJ.A. van Leeuwen
P.A. Zuidema
97
Dataset Display Sort OrderThis setting determines the sequence in which datasets are displayed in the DatasetIdentification picklist (see Section 6.4). If a large number of datasets is displayed,sorting the displayed datasets may enhance the overview. Datasets may be sorted byadministrative area and by project. To invoke a picklist in which to specify the sort orderpress Enter.
Administrative AreaDatasets are sorted according to the administrative area for which the dataset isapplicable, i.e. first by continent, then by country, etc. Datasets in the sameadministrative area are further sorted by dataset number.
Project CodeDatasets are sorted according to the project to which they belong. Datasets belongingto the same project are further sorted by dataset number.
Date FormatThree types of date formats may be used to enter dates in The Land Use Database. Toinvoke a picklist from which to select a date format press Enter.
dd/mm/yyyy The date 13 Febr. 1995 is entered as 13/02/1995.mm/dd/yyyy The date 13 Febr. 1995 is entered as 02/13/1995.yyyy/mm/dd The date 13 Febr. 1995 is entered as 1995/02/13.
UTM Ellipsoid/SpheroidA number of ellipsoids and spheroids can be used for UTM projections (see Appendix 4for more information on using UTM coordinates). To invoke the picklist from which toselect an ellipsoid or spheroid press Enter.
The following table provides data on included UTM projections.

C.A. de BieJ.A. van Leeuwen
P.A. Zuidema
98
UTM Ellipsoid/Spheroid Equat.Rad. Polar Rad.Airy 1849Australian 1965Bessel (Norway)Bessel 1841Clarke 1858Clarke 1866Clarke 1880Clarke IGN 1880Delambre 1810Danish EllipsoidEverest 1830Everest 1841Fischer 1960Fischer 1968Global Reference System (GRS) 1980Hayford 1909Helmert 1907Hough 1960Hughes 1980 (SSMI)IAU 1965International 1924New International 1967IUGG 1967Krassovski (1940)Mercury 1960Plessis 1817South East Asia 1960Struve 1860WalbeckWorld Geodetic System (WGS) 1966World Geodetic System (WGS) 1972World Geodetic System (WGS) 1984Swaziland (Clarke 1880)
6377563.4006378160.0006377492.0776377397.2006378293.0006378206.4006378249.1006378249.2006376428.0006377104.0006377276.3006377397.2006378155.0006378150.0006378137.0006378388.0006378200.0006378270.0006378273.0006378160.0006378388.0006378157.5006378160.0006378245.0006378166.0006376523.0006378155.0006378298.0006376896.0006378145.0006378135.0006378137.0006378249.100
6356256.9006356774.7006356079.0006356079.0006356619.0006356583.8006356514.9006356515.0006355598.0006355762.0006356075.4006356079.0006356773.0006356768.0006356752.3006356909.9006356818.0006356794.0006356889.4486356755.0006356911.9466356772.2006356774.7006356863.0006356784.3006355863.0006356773.0006356657.0006355834.9006356759.8006356750.5006356752.3146356514.900
6.3 Land Use Data
The Land Use Data option allows you to enter land use data as collected through interviewsor from other information sources into the The Land Use Database. Stored data can also beedited using this option. Collected land use information is structured in datasets, i.e. sets ofrelated information as collected during one interview (one questionnaire) or during one studyof a secondary data source.
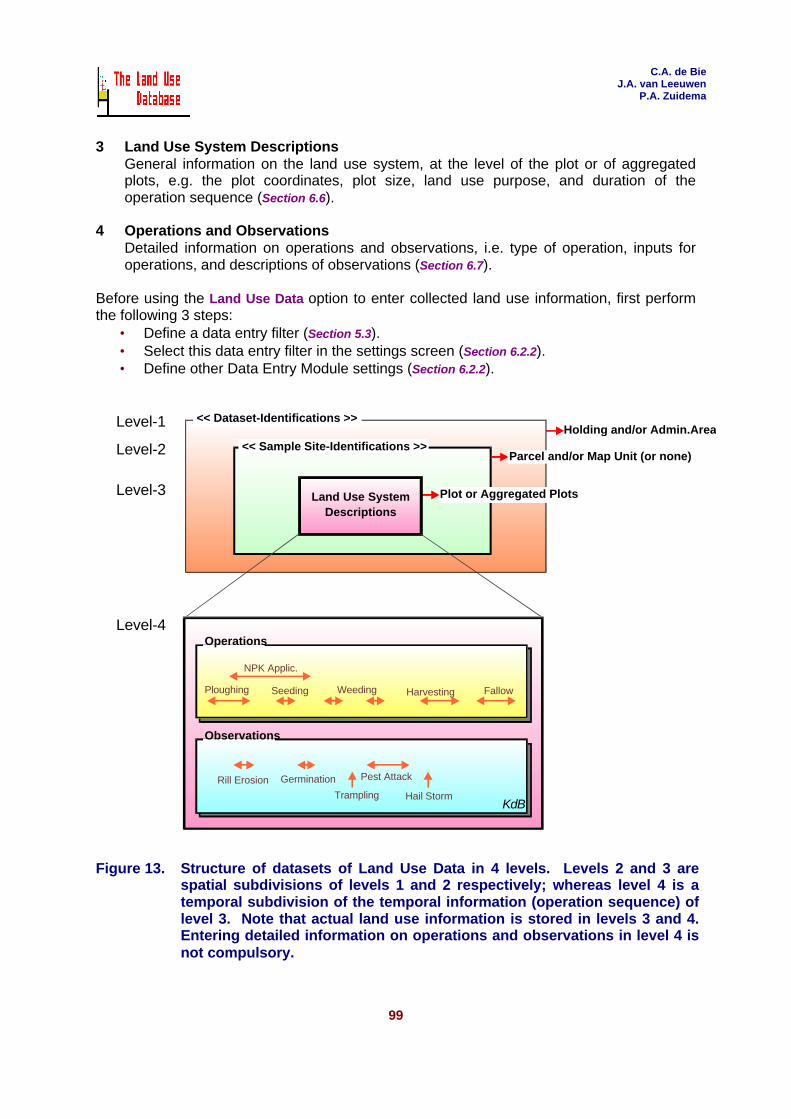
The data entry procedure for datasets is organized in four levels. The sequence of dataentry follows these levels. Information is first entered in level 1, then in level 2, etc. Thestructure of a dataset is shown in Figure 13, the content of the different levels is explainedbelow. The information is entered in fields in edit screens. A complete list of field namesgrouped by edit screens is included in Appendix 3; a print of a complete dataset is includedin Appendix 9.
1 Dataset IdentificationsGeneral information that identifies a set of collected land use information, e.g.information on the enumerator, the respondent, the administrative area where thedescribed land use systems are located, and/or the holding to which the studied landuse systems belong (Section 6.4).
2 Site IdentificationsInformation to further specify the geographic location of the site in which the studiedland use systems are located (map unit, cadastral no.) or parcel sizes (Section 6.5).
C.A. de BieJ.A. van Leeuwen
P.A. Zuidema
99
3 Land Use System DescriptionsGeneral information on the land use system, at the level of the plot or of aggregatedplots, e.g. the plot coordinates, plot size, land use purpose, and duration of theoperation sequence (Section 6.6).
4 Operations and ObservationsDetailed information on operations and observations, i.e. type of operation, inputs foroperations, and descriptions of observations (Section 6.7).
Before using the Land Use Data option to enter collected land use information, first performthe following 3 steps:
• Define a data entry filter (Section 5.3).• Select this data entry filter in the settings screen (Section 6.2.2).• Define other Data Entry Module settings (Section 6.2.2).
Level-1
Level-2
Level-3
Level-4
Holding and/or Admin.Area
Land Use System Descriptions
<< Dataset-Identifications >>
<< Sample Site-Identifications >>Parcel and/or Map Unit (or none)
Plot or Aggregated Plots
Harvesting Fallow
Pest AttackGermination
Trampling Hail Storm
Rill Erosion
Ploughing WeedingSeeding
NPK Applic.
Observations
Operations
KdB
Figure 13. Structure of datasets of Land Use Data in 4 levels. Levels 2 and 3 arespatial subdivisions of levels 1 and 2 respectively; whereas level 4 is atemporal subdivision of the temporal information (operation sequence) oflevel 3. Note that actual land use information is stored in levels 3 and 4.Entering detailed information on operations and observations in level 4 isnot compulsory.
C.A. de BieJ.A. van Leeuwen
P.A. Zuidema
100
6.4 Dataset Identifications (Level 1)
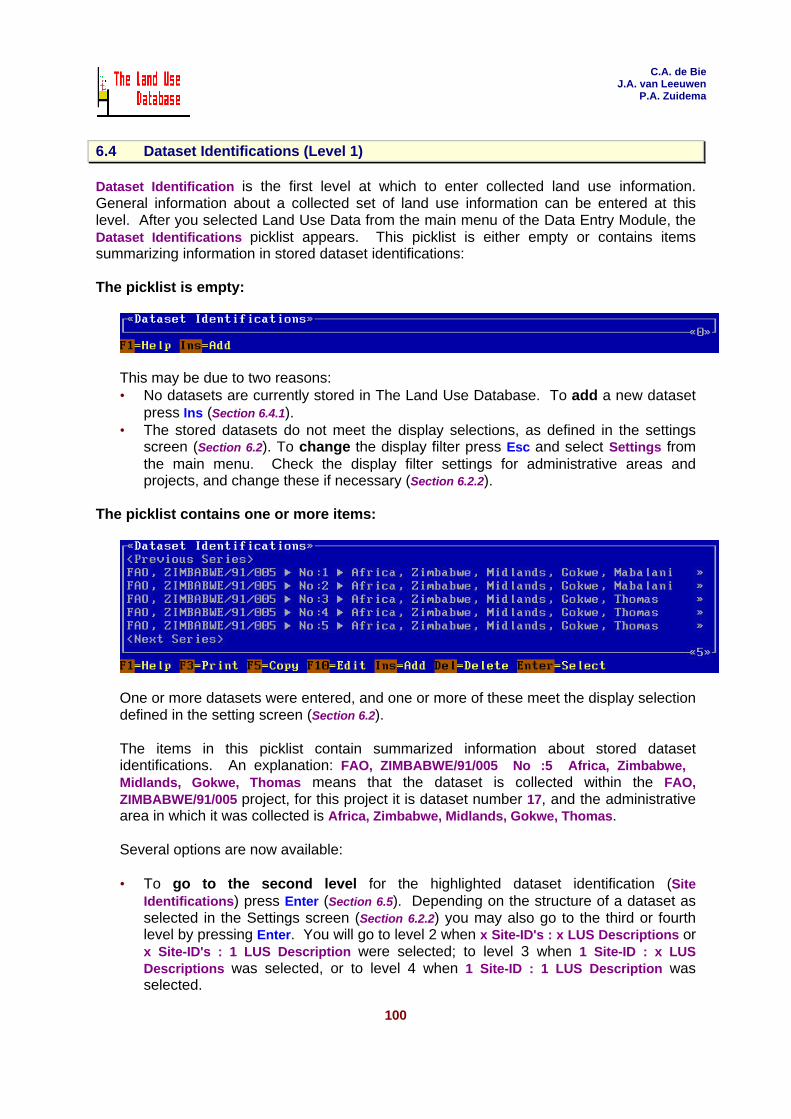
Dataset Identification is the first level at which to enter collected land use information.General information about a collected set of land use information can be entered at thislevel. After you selected Land Use Data from the main menu of the Data Entry Module, theDataset Identifications picklist appears. This picklist is either empty or contains itemssummarizing information in stored dataset identifications:
The picklist is empty:
This may be due to two reasons:• No datasets are currently stored in The Land Use Database. To add a new dataset
press Ins (Section 6.4.1).• The stored datasets do not meet the display selections, as defined in the settings
screen (Section 6.2). To change the display filter press Esc and select Settings fromthe main menu. Check the display filter settings for administrative areas andprojects, and change these if necessary (Section 6.2.2).
The picklist contains one or more items:
One or more datasets were entered, and one or more of these meet the display selectiondefined in the setting screen (Section 6.2).
The items in this picklist contain summarized information about stored datasetidentifications. An explanation: FAO, ZIMBABWE/91/005 � No :5 � Africa, Zimbabwe,Midlands, Gokwe, Thomas means that the dataset is collected within the FAO,ZIMBABWE/91/005 project, for this project it is dataset number 17, and the administrativearea in which it was collected is Africa, Zimbabwe, Midlands, Gokwe, Thomas.
Several options are now available:
• To go to the second level for the highlighted dataset identification (SiteIdentifications) press Enter (Section 6.5). Depending on the structure of a dataset asselected in the Settings screen (Section 6.2.2) you may also go to the third or fourthlevel by pressing Enter. You will go to level 2 when x Site-ID's : x LUS Descriptions orx Site-ID's : 1 LUS Description were selected; to level 3 when 1 Site-ID : x LUSDescriptions was selected, or to level 4 when 1 Site-ID : 1 LUS Description wasselected.

C.A. de BieJ.A. van Leeuwen
P.A. Zuidema
101
• To exit this picklist press Esc. You will return to the main menu of the Data EntryModule (Section 6.1).
• To add a dataset identification press Ins (Section 6.4.1).• To edit the highlighted dataset identification press F10 (Section 6.4.1).• To print the highlighted dataset identification plus all related data at lower levels
press F3 (Section 6.4.4).• To copy the highlighted dataset identification press F5 (Section 6.4.3).
To delete the highlighted dataset identification press Del. All information of thehighlighted dataset will be deleted, including all related data at lower levels (Section4.3.3).
6.4.1 Add/Edit a Dataset Identification
To add a new dataset identification or to edit an existing one, information must be entered oredited in an edit screen. After you pressed Ins or F10 in the Dataset Identifications picklist,the following edit screen appears:
The contents of this edit screen depends on two factors:
1. The number of fields in the screen depends on the selected data entry filter (Section6.2.2). In the above example, the Maximum Filter was selected.
2. Fields of more than one data entry level may be combined in one edit screen, e.g. fieldsof level 1 and level 2, or of level 1, 2, and 3. This depends on the structure of onedataset, as defined in the settings screen (Section 6.2.2). In the above example, x Site -ID's : x LUS Descriptions was selected.
Three examples of edit screens are shown corresponding to different selections of datasetstructures (in the Settings screen). All examples are based on the standard data entry filterMinimum Filter (only compulsory fields are included in the data entry screens).
The first example shows only fields of level 1, after selection of x Site -ID's : x LUSDescriptions or x Site-ID's : 1 LUS Description as dataset structure:

C.A. de BieJ.A. van Leeuwen
P.A. Zuidema
102
The second example shows fields of levels 1, 2 and 3 in an integrated edit screen, afterselection of 1 Site-ID : 1 LUS Description as dataset structure (Sections 6.5 and 6.6):
The third example shows fields of level 1 and 2 in an integrated edit screen, after selectionof 1 Site-ID : x LUS Descriptions as dataset structure (Section 6.6):
When the Add/Edit a Dataset Identification screen is displayed, enter the applicableinformation in the provided fields (Section 4.2.4). Three fields of this edit screen arecompulsory: Administrative Area, Project, Dataset Number and Dataset Type. Thecombination of Administrative Area, Project and Dataset Number must be unique for alldatasets stored. The program will automatically check if these requirements are fulfilledwhen saving the edit screen. All fields of the Add/Edit a Dataset Identification screen areexplained in Section 6.4.2.
When you have completed entering or editing information in the Add/Edit a DatasetIdentification screen, you can exit the screen:
• To save and exit press F10.• To exit without saving press Esc. A Yes/No picklist will appear from which to select
if the changes made in the edit screen can indeed be abandoned.
In both cases you will return to the Dataset Identifications picklist (Section 6.4).

C.A. de BieJ.A. van Leeuwen
P.A. Zuidema
103
6.4.2 Fields of Dataset Identification
The meaning and usage of all fields of the Add/Edit a Dataset Identification screen are brieflyexplained below, in the sequence as they appear in the edit screen.
The type of field (as put between parenthesis) determines what type of information can beentered in the field: (>>) an item from a picklist; (-) numbers or text; and (*) another editscreen is invoked. For >> fields in which items are selected from glossary trees, the numberof possible selections may be limited when glossary items are pre-selected in the data entryfilter (Section 5.3).
Administrative Area (>>)The administrative area in which the described land use systems are located. It mustalways be specified, but can optionally be defined as "Unspecified" by pressing F6.The administrative area allows you to link data stored in The Land Use Database with aGeographic Information System (GIS) in which the administrative areas are known.
Project (>>)The project responsible for the collection of this dataset. It must always be specified,but can optionally be defined as "Unspecified" by pressing F6.
Dataset Number (-; only numbers)The number that identifies this dataset, e.g. a survey record or sequence number. Itmust always be specified.
Dataset Type (>>)Definition whether the data in the dataset are actual (real) or hypothetical (imaginary).Only these two options are available, of which one must be selected.
Enumeration Date (-; only numbers)The date when the data were collected, e.g. the date the interview was conducted. Usethe format that is shown between parentheses in the information bar. The date format isdefined in the settings screen (Section 6.2). For example, if the date format shown in theinformation bar is mm/dd/yyyy, the date 13 February 1995 must be entered as02/13/1995. You can also enter it as 02/13/95.
Enumerator's Name (-)The name of the person(s) who collected this dataset, e.g. the interviewer or the personwho collected the data from secondary sources.
Respondent's Name (-)The name of the person who is interviewed, this may be the holder of the land, but alsoa labourer, tenant or guardian.
Holder's Name (-)The name of the person who has management control over the holding to which thedescribed land use system(s) belong, i.e. the name of the land user. This name may linkto a similar name in other databases.
Holding Location - Geographic CoordinatesHolding Location - UTM Projection
The location (point) of the holding, i.e. the place of residence or the office of the holder.Geographic coordinates (- Latitude and - Longitude) or UTM projections (- Ellipsoid, -UTM Zone, - Northing and - Easting). For explanation on coordinates, see Appendix 4.
C.A. de BieJ.A. van Leeuwen
P.A. Zuidema
104
Holding Size (-; only numbers)The size of the holding (area of land managed). If the holding size cannot be specifiedaccurately, enter a (estimated) range: first enter the minimum size and subsequently themaximum. If the size is exactly known, enter the same value for minimum andmaximum, i.e. accept the default value for the maximum size.
- Unit (>>)The data unit in which the holding size is expressed, usually an area. If the size isentered, the unit must always be specified.
- Info Source (>>)The source from which the informations on holding size was obtained. If this field isshown in the edit screen, and in case a size was entered, the information source mustbe entered.
Comments (-)Additional information about this dataset identification. The comments are entered in afree text window (Section 4.2.5). They must be applicable for the information entered inthis edit screen, e.g. enumerator's impression on reliability of the interview, or behaviourof the respondent. No additional information should be given on the value in a � field,since such information belongs in the glossary, i.e. either in existing glossary items or inglossary items yet to be defined.
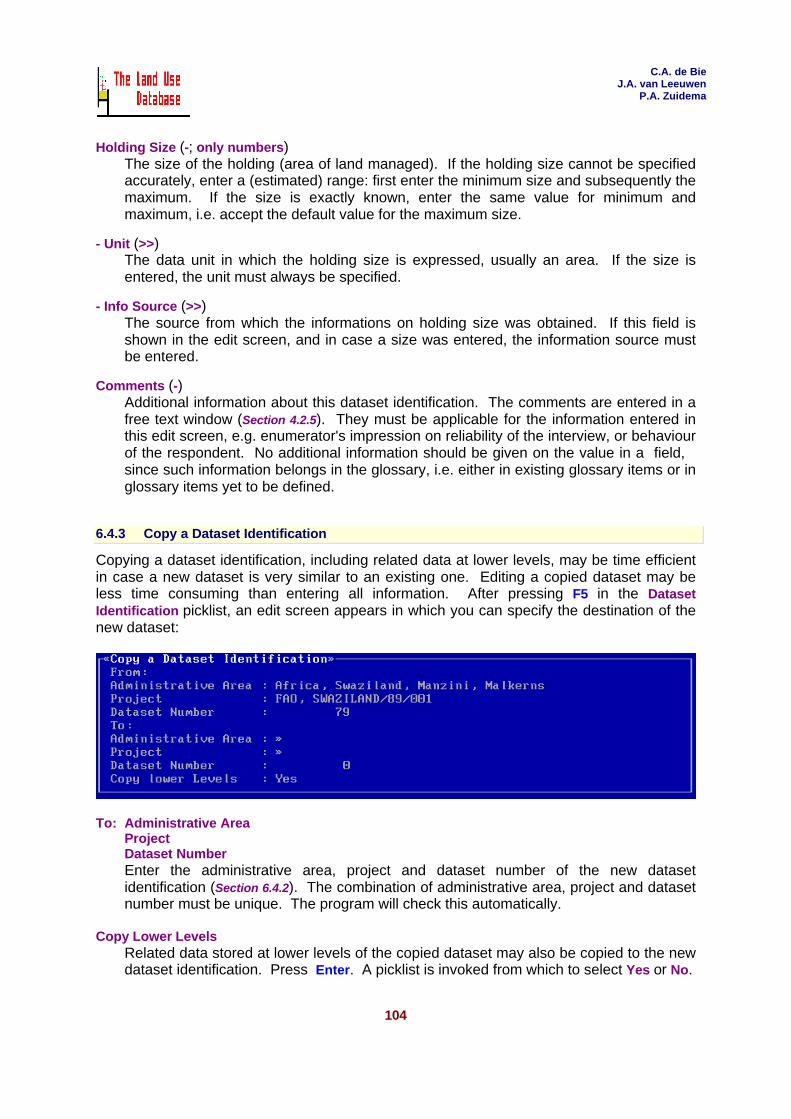
6.4.3 Copy a Dataset Identification
Copying a dataset identification, including related data at lower levels, may be time efficientin case a new dataset is very similar to an existing one. Editing a copied dataset may beless time consuming than entering all information. After pressing F5 in the DatasetIdentification picklist, an edit screen appears in which you can specify the destination of thenew dataset:
To: Administrative AreaProjectDataset NumberEnter the administrative area, project and dataset number of the new datasetidentification (Section 6.4.2). The combination of administrative area, project and datasetnumber must be unique. The program will check this automatically.
Copy Lower LevelsRelated data stored at lower levels of the copied dataset may also be copied to the newdataset identification. Press Enter. A picklist is invoked from which to select Yes or No.

C.A. de BieJ.A. van Leeuwen
P.A. Zuidema
105
After entering information in the above fields, start copying by pressing F10. The newdataset identification will be the highlighted item in the Dataset Identifications picklist that isdisplayed after copying.
6.4.4 Print a Dataset Identification
All information stored in a dataset may be printed to a printer, the screen or a text file. Afterpressing F3 in the Dataset Identifications picklist, the next picklist appears:
Highlighted Dataset IdentificationAll data of the highlighted dataset identification plus all related data at lower levels areprinted.
All Dataset Identifications in this picklistAll data of all Dataset Identifications included in the current picklist are printed plus allrelated data at lower levels. This includes the datasets of all next and/or previous serieswhich are not displayed in the shown part of the picklist. Stored datasets that are notincluded in the display selection (Section 6.2.2) will not be printed. Warning: Printing alldatasets may be time consuming. It is not possible to interrupt the printing procedure.
After selecting an item, a picklist is invoked in which to select the output device for theprinted information. An example print of a complete dataset is included in Appendix 9.
For further instructions on the printing procedure see Section 4.3.2.
6.5 Site Identifications (Level 2)
"Site Identification" is the second level at which to enter collected land use information.Information about the mapping unit or parcel in which the described land use systems arelocated, may be entered at this level.
After you selected an item from the Dataset Identifications picklist (by pressing Enter), theSite Identifications picklist is displayed. This picklist is either be empty or contains itemssummarizing information in stored site identifications:
• The picklist is empty:

C.A. de BieJ.A. van Leeuwen
P.A. Zuidema
106
No site identifications were stored for the current dataset identification (FAO,ZIMBABWE/91/005 >> No:61 >> Zimbabwe, Mashonaland East, Mutoko, Mugom).There are two options:• To add a new site identification press Ins (Section 6.5.1).• To exit this picklist press Esc. You will return to the Dataset Identifications picklist
(Section 6.4).
• The picklist contains one or more items:
One or more site identifications were stored for the current dataset identification(FAO, ZIMBABWE/91/005 >> No:61 >> Zimbabwe, Mashonaland East, Mutoko, Mugom).
Each item in this picklist refers to one site identification. For example, No:1 >> M1.2>> Site near stream >> Each LUS Description is valid for one Plot refers to siteidentification no 1 of the current dataset identification (the number is determined bythe program), located in map unit M1.2, named Site near stream, and in which eachland use system description is valid for one plot.
Several options are now available:• To go to the third level (Land Use System Descriptions) of the highlighted site
identification press Enter (Section 6.6). Depending on the structure of a dataset asselected in the Settings screen (Section 6.2.2), you may also go to the fourth levelby pressing Enter. You will go to level 3 when x Site-ID's : x LUS Descriptions wasselected; and to level 4 when x Site-ID's : 1 LUS Description was selected.
• To exit this picklist press Esc. You will return to the Dataset Identifications picklist(Section 6.4).
• To add a new site identification press Ins (Section 6.5.1).• To edit the highlighted site identification press F10 (Section 6.5.1).• To print all information of the current dataset press F3. All information of the
complete dataset to which the site identifications in the picklist belong, is printed(see example in Appendix 9 and Section 4.3.2).
• To copy the highlighted site identification press F5 (Section 6.5.3).• To delete the highlighted site identification press Del. All data of this site
identification plus all related information at lower levels is deleted (Section 4.3.3).
6.5.1 Add/Edit a Site Identification
To add a new site identification or to edit an existing one, information must be entered oredited in an edit screen. After you pressed Ins or F10 in the Site Identification picklist, thefollowing edit screen appears:

C.A. de BieJ.A. van Leeuwen
P.A. Zuidema
107
The contents of this edit screen depends on two factors:
1. The number of fields in the screen depends on the selected data entry filter (Section6.2.2). In the above example, the Maximum Filter was selected.
2. Fields of more than one data entry level may be combined in one edit screen, i.e. fieldsof level 2 and 3. This depends on the structure of one dataset, as defined in thesettings screen (Section 6.2.2). In the above example, x Site -ID's : x LUS Descriptionswas selected.
Two examples of edit screens are shown corresponding to different selections of datasetstructures (in the Settings screen). They are based on the standard data entry filterMinimum Filter (only compulsory fields are included in the data entry screens). The firstexample shows only one field of level 2, after selection of x Site -ID's : x LUS Descriptions asdataset structure:
The second example shows fields of levels 2 and 3 in an integrated edit screen, afterselection of x Site-ID's: 1 LUS Description as dataset structure (for explanation on level 3 seeSection 6.6):
When the Add/Edit a Site Identification screen is displayed, enter the applicable informationin the provided fields (for general information on using edit screens see Section 4.2.4). Onlyone field of this edit screen is compulsory: Plot Aggregation. All fields of Add/Edit a SiteIdentification screen are explained in Section 6.5.2.
When you have completed entering or editing information in the Add/Edit a Site Identificationscreen, you can exit the screen:

C.A. de BieJ.A. van Leeuwen
P.A. Zuidema
108
• To save and exit press F10.• To exit without saving press Esc. A Yes/No picklist will appear from which to select
if the changes made in the edit screen can indeed be abandoned.
In both cases you will return to the Site Identifications picklist (Section 6.5).
6.5.2 Fields of Site Identification
The meaning and usage of all fields of the Add/Edit a Site Identification screen are brieflyexplained below, in the sequence as they appear in the edit screen.
The type of field (as put between parenthesis) determines what type of information can beentered in the field: (>>) an item from a picklist; (-) numbers or text; and (*) another editscreen is invoked. For >> fields in which items are selected from glossary trees, the numberof possible selections may be limited when glossary items are pre-selected in the data entryfilter (Section 5.3).
Plot AggregationDescriptions of land use systems may be generalised for a number of plots, e.g. ageneral description about the labour inputs of all land use systems with maize in acertain mapping unit, or in a district (Section 2.2.8). In this field you determine if the landuse system descriptions, which are entered at levels 3 and 4, are generaliseddescriptions for a number of aggregated plots or that each land use system descriptionis plot-specific. These two options are shown in a picklist from which you must selectone:
Each LUS Description is valid for one plotEach land use system description that is entered at the next levels is plot-specific.
Each LUS Description is Generalised for Several Aggregated PlotsEach land use system description that is entered at the next levels is generalisedfor a number of aggregated plots. After selecting this option a warning appears,telling you that data of several fields in this edit screen are lost, as these fields arenot further applicable: Cadaster Number, Parcel Size and Distance to Holding.
Site Name (-)A name or nickname to recall the site, e.g. "near the stream".
Mapping Unit-ID (-)A code or name that identifies the mapping unit in which the site is located. Themapping unit-ID allows you to link data stored in The Land Use Database with aGeographic Information System (GIS) in which the mapping units are known. Also hardcopy maps may be referred to; these must be properly documented in the glossary tree'Projects' for the glossary item describing the current project.
- Comp./Element-ID (-)A code or name that identifies a component or element within a mapping unit, in whichthe site is located. This field can be used if the mapping unit is a complex unit, linked tomore than one legend item.
- Map Comments (-)Additional information about the used map, regarding inconsistencies or omissions withrespect to the observed situation of the site. For example, when agricultural fields are

C.A. de BieJ.A. van Leeuwen
P.A. Zuidema
109
observed in an area that was mapped as rangeland. Comments are entered in a freetext window (Section 4.2.5).
Tenancy Arrangements (>>)The arrangements or rights according to which the holder uses the parcel (cannot bespecified when Each LUS Description is Generalised for Several Aggregated Plots isselected for Plot Aggregation).
Cadastral Number (-)The registration number of the parcel in the national cadaster (cannot be specified whenEach LUS Description is Generalised for Several Aggregated Plots is selected for PlotAggregation). This number may link to a similar number in the corresponding database.
Parcel Size (-; only numbers)The size of the parcel (cannot be specified when Each LUS Description is Generalisedfor Several Aggregated Plots is selected for Plot Aggregation). If the parcel size cannotbe specified accurately, enter a (estimated) range: first enter the minimum size andsubsequently the maximum. If the size is exactly known, enter the same value forminimum and maximum, i.e. accept the default value for the maximum size.
- Unit (>>)The data unit in which the parcel size is expressed, usually an area. If the size isentered, the unit must always be specified.
- Info Source (>>)The source from which the information on parcel size was obtained. If this field isshown in the edit screen, and in case a size was entered, the information source mustbe entered.
Distance to Holding (-; only numbers)The distance from the parcel to the holding. If the distance to the holding cannot bespecified accurately, enter a (estimated) range: first enter the minimum distance andsubsequently the maximum. If the size is known exactly, enter the same value forminimum and maximum, i.e. accept the default value for the maximum size.
- Unit (>>)The data unit in which the distance to the holding is expressed, usually a linear measure(and occasionally expressed in time required to get from the holding to the site). If thesize is entered, the unit must always be specified.
- Info Source (>>)The source from which the information on distance to holding was obtained. If this fieldis shown in the edit screen, and in case a distance was entered, the information sourcemust be entered.
Comments (-)Additional information about this site identification. The comments are entered in a freetext window (Section 4.2.5). They must be applicable for the information entered in thisedit screen, e.g. additional description of the parcel, or information as seen from aerialphotographs or satellite images. No additional information should be given on the valuein a >> field, since such information belongs in the glossary, i.e. either in existingglossary items or in glossary items yet to be defined.
C.A. de BieJ.A. van Leeuwen
P.A. Zuidema
110
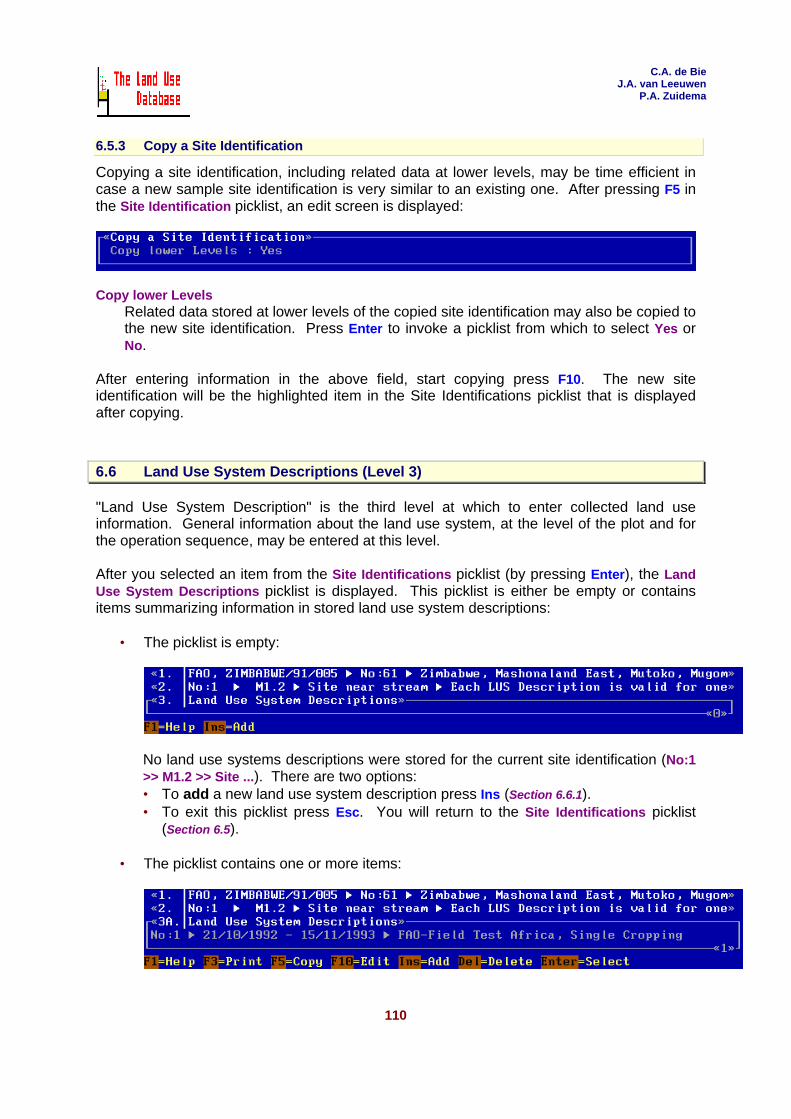
6.5.3 Copy a Site Identification
Copying a site identification, including related data at lower levels, may be time efficient incase a new sample site identification is very similar to an existing one. After pressing F5 inthe Site Identification picklist, an edit screen is displayed:
Copy lower LevelsRelated data stored at lower levels of the copied site identification may also be copied tothe new site identification. Press Enter to invoke a picklist from which to select Yes orNo.
After entering information in the above field, start copying press F10. The new siteidentification will be the highlighted item in the Site Identifications picklist that is displayedafter copying.
6.6 Land Use System Descriptions (Level 3)
"Land Use System Description" is the third level at which to enter collected land useinformation. General information about the land use system, at the level of the plot and forthe operation sequence, may be entered at this level.
After you selected an item from the Site Identifications picklist (by pressing Enter), the LandUse System Descriptions picklist is displayed. This picklist is either be empty or containsitems summarizing information in stored land use system descriptions:
• The picklist is empty:
No land use systems descriptions were stored for the current site identification (No:1>> M1.2 >> Site ...). There are two options:• To add a new land use system description press Ins (Section 6.6.1).• To exit this picklist press Esc. You will return to the Site Identifications picklist
(Section 6.5).
• The picklist contains one or more items:

C.A. de BieJ.A. van Leeuwen
P.A. Zuidema
111
One or more land use system descriptions were stored for the current siteidentification (No:1 >> M1.2 >> Site ...).
Each item in this picklist refers to a land use system description. For example, No:1� 21/10/1992 - 15/11/1993 � FAO-Field Test Africa, Single Cropping refers to land usesystem description no. 1 of the current site identification (this number is determinedby the program), which has an operation sequence from 21 October 1992 to 15November 1993, and belongs to the a-priori land use class FAO-Field Test Africa,Single Cropping.
Several options are now available:• To go to the fourth level (Operations and Observations) of the highlighted land
use system description press Enter (Section 6.7).• To exit this picklist press Esc. You will return to the Site Identifications picklist
(Section 6.5).• To add a new land use system description press Ins (Section 6.6.1).• To edit the highlighted land use system description press F10 (Section 6.6.1).• To print all information of the current dataset press F3. All information of the
complete dataset to which the land use system descriptions in the picklist belong,is printed (see example in Appendix 9 and Section 4.3.2).
• To copy the highlighted land use system description press F5 (Section 6.6.5).• To delete the highlighted land use system description press Del. All data of this
land use system description plus all related information at lower levels is deleted(Section 4.3.3).
6.6.1 Add/Edit a Land Use System Description
To add a new land use system description or to edit an existing one, information must beentered or edited in an edit screen. After you pressed Ins or F10 in the Land Use SystemDescriptions picklist, the following edit screen appears:
The number of fields in this edit screen depends on the selected data entry filter (Section6.2.2). In the above example, the Maximum Filter is used. If you select the Minimum Filter,only the following two compulsory fields will be shown:

C.A. de BieJ.A. van Leeuwen
P.A. Zuidema
112
When the Add/Edit a Land Use System Description screen is displayed, enter the applicableinformation in the provided fields (for general information on using edit screens see Section4.2.4). One field of this edit screen is compulsory: A-Priori LU Class. All fields of Add/Edit aLand Use System Description screen are explained in Section 6.6.2.
When you have completed entering or editing information in the Add/Edit a Land Use SystemDescription screen, you can exit the screen:
• To save and exit press F10.• To exit without saving press Esc. A Yes/No picklist will appear from which to select
if the changes made in the edit screen can indeed be abandoned.
In both cases you will return to the Land Use System Descriptions picklist (Section 6.6).
6.6.2 Fields of Land Use System Description
The meaning and usage of all fields of the Add/Edit a Land Use System Description screenare briefly explained below, in the sequence as they appear in the edit screen.
The type of field (as put between parenthesis) determines what type of information can beentered in the field: (>>) an item from a picklist; (-) numbers or text; and (*) another editscreen is invoked. For >> fields in which items are selected from glossary trees, the numberof possible selections may be limited when glossary items are pre-selected in the data entryfilter (Section 5.3).
Plot Location - Geographic coordinatesPlot Location - UTM Projection
The location (point) of the plot, i.e. the contiguous piece of land on which the describedland use takes place. Geographic coordinates (- Latitude and - Longitude) or UTMprojections (- Ellipsoid, - UTM Zone, - Northing and - Easting). For explanation oncoordinates, see Appendix 4.
Plot Size (-; only numbers)The size of the plot on which the described land use system is practised. If the plot sizecannot be specified accurately, enter a (estimated) range: first enter the minimum sizeand subsequently the maximum. If the size is exactly known, enter the same value forminimum and maximum, i.e. accept the default value for the maximum size.
- Unit (>>)The data unit in which the plot size is expressed, usually an area. If the size is entered,the unit must always be specified.
- Info Source (>>)The source from which the information on plot size was obtained. If this field is shownin the edit screen, and in case a size was entered, the information source must beentered.

C.A. de BieJ.A. van Leeuwen
P.A. Zuidema
113
Infrastructure (*)Information on infrastructure in or outside the plot that may be used during the operationsequence and which is present at the start date of the operation sequence, is entered inthe Add/Edit an Infrastructure edit screen (Section 6.6.3).
Soil Sample-ID (-)A number or code that uniquely identifies a soil sample taken at the plot. This ID maybe linked to a similar ID in a soil database.
Op. Seq Period (-; only numbers)The start and end dates of the described operation sequence. The start date is enteredin the left field, the end date in the right. Dates can be entered in two ways:
• As absolute date, following the Gregorian calendar. The date format (eitherdd/mm/yyyy, mm/dd/yyyy or yyyy/mm/dd) is defined in the settings screen (Section 6.2)and is shown in the information bar. For example, the date 16 June 1994 is enteredas 16/06/1994, 06/16/1994 or 1994/06/16, depending on the date format.• If dates cannot be specified accurately, the day may be left blank or entered as an
asterisk *, e.g. **/06/1994 (some day in June 1994).• If the month cannot be specified, it may also be left blank or entered with and
asterisk, e.g. **/**/1994 (some day in 1994).• The year may also be left blank, e.g. in order to indicate a period which is
repeated every year, e.g. **/07/** (in July of each year).• If qualitative periods such as 'the first week of April' are given, transform them to
dates following the list in Appendix 7.Dates from other calendar systems, e.g. the Ethiopian calendar with 13 months, mustbe translated to Gregorian dates before entering.
• As relative date, ranging from -3000 to 3000. Sometimes, a land user cannot specifya calendar date, or the calendar date cannot be reconstructed from his information,e.g. the start date is referred to as "one week after the first rain". In that case, arelative date can be used. This is a number of days before (with negative values) orafter (with positive values) a reference date, which has the value "zero". Thereference date may be "the day of the first rain". If you enter relative dates,information on the reference date must be either in the Comments field of this editscreen, or as an observation ("first rain" at date "zero") in the Add/Edit an Observationedit screen (Section 6.7.7).
A-Priori LU Class (>>)The a-priori land use class to which this land use system belongs. Land use classescan be defined and edited with the option Land Use Classes from the main menu of theData Entry Module (Section 6.8). A land use class must always be specified. If no landuse classes are available, you must define them first (Section 6.8). The land use purposeclassifier of the a-priori land use class will act as a filter when specifying data for landuse purpose (next field).
Land Use Purpose (*)Information on the purpose of the land use, i.e. the [Species/Service-Product/Benefit]combination and on the quantity of the product or benefit obtained is entered in theAdd/Edit Land Use Purpose and Quantity edit screen. This edit screen can only beinvoked after information is entered in the A-Priori LU Class field (Section 6.6.4).

C.A. de BieJ.A. van Leeuwen
P.A. Zuidema
114
Comments (-)Additional information about this land use system description. The comments areentered in a free text window (Section 4.2.5). They must be applicable for the informationentered in this edit screen, e.g. additional information on the followed rotation, cropcalendar or cropping system. When relative dates are used, the "zero" date can bedefined here as well. No additional information should be given on the value in a >>field, since such information belongs in the glossary, i.e. either in existing glossary itemsor in glossary items yet to be defined.
6.6.3 Add/Edit an Infrastructure
After pressing Enter at the Infrastructure field in the Add/Edit a Land Use System Descriptionscreen, a new edit screen is invoked in which to enter information on the type and quantity ofone infrastructure.
The number of fields in this edit screen depends on the selected data entry filter (Section6.2.2). In the above example the Maximum Filter was selected.
Enter or edit the applicable information in the provided fields of the edit screen. One field ofthis edit screen is compulsory: Infrastructure.
Infrastructure (>>)The type of infrastructure in or outside the plots, that may be used during the operationsequence and which is present at the start date of the operation sequence. Forexample, "all-weather roads", "fences".
Quantity (-; only numbers)The quantity of the specified infrastructure. If the quantity cannot be specifiedaccurately, enter a (estimated) range: first enter the minimum quantity and subsequentlythe maximum. If the quantity is exactly known, enter the same value for minimum andmaximum, i.e. accept the default value for the maximum quantity.
- Unit (>>)The data unit in which the infrastructure quantity is expressed, which may be an area, alinear measure, a number, etc. If the quantity is entered, the unit must always bespecified.
- Info Source (>>)The source from which the information on infrastructure quantity was obtained. If thisfield is shown in the edit screen, and in case a quantity was entered, the informationsource must be entered.
When you have completed entering or editing information in the Add/Edit an Infrastructurescreen, you can exit the screen:
• To save and exit press F10.• To exit without saving press Esc. A Yes/No picklist will appear from which to select if
the changes made in the edit screen can indeed be abandoned.

C.A. de BieJ.A. van Leeuwen
P.A. Zuidema
115
In both cases you will return to the Add/Edit a Land Use Description screen (Section 6.6.1). If anew infrastructure was specified, information about an additional infrastructure can beentered, using the same procedure. In this way, many infrastructure may be specified, asshown in the following part of the edit screen:
6.6.4 Add/Edit a Land Use Purpose and Quantity
After pressing Enter at the Land Use Purpose field in the Add/Edit a Land Use SystemDescription screen, a new edit screen is invoked in which to enter information on one[Species/Service-Product/Benefit] combination and its quantity:
The number of fields in this edit screen depends on the selected data entry filter (Section6.2.2). In the above example the Maximum Filter was selected.
When the edit screen is displayed, enter the applicable information in the provided fields (forgeneral informations on using edit screens see Section 4.2.4). One field of this edit screen iscompulsory: Species/Service.
Species/Service (>>)The (type of) species grown or rendered or the service provided. Only those speciesand services as specified in the selected a-priori land use class may be selected. Forexample, if Single Cropping of Cereals was selected as a-priori land use class (an a-priori land use class of FAO-Field Test classification system), only cereals may beselected as species. Thus, the land use purpose as defined for the a-priori land useclass will act as a filter for this field.
Product/Benefit (>>)The (type of) product harvested from grown species or the benefit obtained from agrown species, or from a rendered service. Only those products and benefits defined inthe a-priori land use class may be selected here (see above). This field may be definedas "Unspecified" by pressing F6.
Product Quantity (-; only numbers)Two types of quantities may be specified here:• If the Product/Benefit field is defined as "Unspecified", the quantity entered here
refers to the species grown or service rendered. Some examples: the area under
C.A. de BieJ.A. van Leeuwen
P.A. Zuidema
116
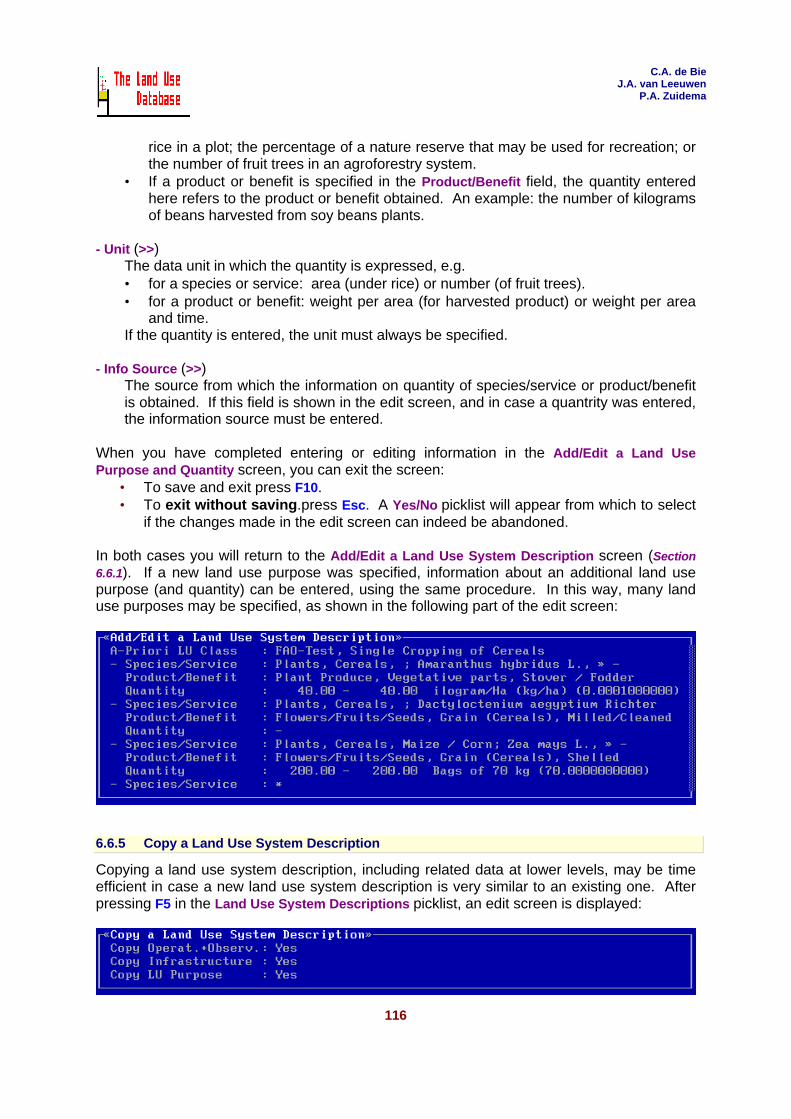
rice in a plot; the percentage of a nature reserve that may be used for recreation; orthe number of fruit trees in an agroforestry system.
• If a product or benefit is specified in the Product/Benefit field, the quantity enteredhere refers to the product or benefit obtained. An example: the number of kilogramsof beans harvested from soy beans plants.
- Unit (>>)The data unit in which the quantity is expressed, e.g.• for a species or service: area (under rice) or number (of fruit trees).• for a product or benefit: weight per area (for harvested product) or weight per area
and time.If the quantity is entered, the unit must always be specified.
- Info Source (>>)The source from which the information on quantity of species/service or product/benefitis obtained. If this field is shown in the edit screen, and in case a quantrity was entered,the information source must be entered.
When you have completed entering or editing information in the Add/Edit a Land UsePurpose and Quantity screen, you can exit the screen:
• To save and exit press F10.• To exit without saving.press Esc. A Yes/No picklist will appear from which to select
if the changes made in the edit screen can indeed be abandoned.
In both cases you will return to the Add/Edit a Land Use System Description screen (Section6.6.1). If a new land use purpose was specified, information about an additional land usepurpose (and quantity) can be entered, using the same procedure. In this way, many landuse purposes may be specified, as shown in the following part of the edit screen:
6.6.5 Copy a Land Use System Description
Copying a land use system description, including related data at lower levels, may be timeefficient in case a new land use system description is very similar to an existing one. Afterpressing F5 in the Land Use System Descriptions picklist, an edit screen is displayed:

C.A. de BieJ.A. van Leeuwen
P.A. Zuidema
117
Copy Operat.+Observ.Copy InfrastructureCopy LU Purposes
Related data on operations, observations, infrastructure and land use purposes that isstored at lower levels of the copied land use system description may also be copied tothe new land use system description. Press Enter to invoke picklists from which toselect Yes or No.
After entering information in the above fields, start copying by pressing F10. The new landuse system description will be the highlighted item in the Land Use System Descriptionspicklist that is displayed after copying.
6.7 Operations and Observations (Level 4)
"Operations and Observations" is the fourth level for at which to enter collected land useinformation. Information about individual operations and observations may be entered atthis level.
After you selected an item from the Land Use System Descriptions picklist (by pressingEnter), the Operations and Observations picklist is displayed. This picklist is either empty orcontains items summarizing information in stored operations and observations:
• The picklist is empty:
No operations or observations were stored for the this land use system description(No: 1 >> 02/04/1992 - 18/07/1993 >> FAO-Field Test ....). There are now two options:• To add a new operation press Ins (Section 6.7.1).• To add a new observation press Ctrl-Ins (Section 6.7.7).• To exit this picklist press Esc. You will return to the Land Use System
Descriptions picklist (Section 6.6).
• The picklist contains one or more items:
One or more operations or observations were stored for the current land use systemdescription (No: 1 >> 02/10/1992 - 15/11/1993 >> FAO-Field Test Africa ...).

C.A. de BieJ.A. van Leeuwen
P.A. Zuidema
118
Each item in this picklist refers to stored information about one operation or oneobservation. Several options are now available:• To exit this picklist press Esc. You will return to the Land Use System Descriptions
picklist (Section 6.6).• To add a new operation press Ins (Section 6.7.1).• To add a new observation press Ctrl-Ins (Section 6.7.7).• To edit the highlighted operation press F10 or Enter (Section 6.7.1).• To edit the highlighted observation press F10 or Enter (Section 6.7.7).• To print all information of the current dataset press F3. All information of the
complete dataset to which the operations and observations in the picklist belong,is printed (see example in Appendix 9 and Section 4.3.2).
• To copy the highlighted operation press F5 (Section 6.7.9).• To copy the highlighted observation press F5 (Section 6.7.10).• To delete the highlighted operation or observation press Del. All information of
this operation or observation is deleted (Section 4.3.3).
6.7.1 Add/Edit an Operation
To add a new operation or to edit an existing one, information must be entered or edited inan edit screen. After you pressed Ins, F10 or Enter (for a highlighted Operation) in theOperations and Observations picklist, the following edit screen appears:
The number of fields in this edit screen depends on the selected data entry filter (Section6.2.2). In the above example, the Maximum Filter is used. If you select the Minimum Filter,only the following compulsory fields will be shown:
C.A. de BieJ.A. van Leeuwen
P.A. Zuidema
119
When the Add/Edit an Operation screen is displayed, enter the applicable information in theprovided fields. Only one field of this edit screen is compulsory: Operation Name. All fieldsof the Add/Edit an Operation screen are explained in the Section 6.7.2.
When you have completed entering or editing information in the Add/Edit an Operationscreen, you can exit the screen:
• To save and exit press F10.• To exit without saving press Esc. A Yes/No picklist will appear from which to select
if the changes made in the edit screen can indeed be abandoned.
In both cases you will return to the Operations and Observations picklist (Section 6.7).
6.7.2 Fields of Operation
The meaning and usage of all fields of the Add/Edit an Operation screen are briefly explainedbelow, in the sequence as they appear in the edit screen.
The type of field (as put between parenthesis) determines what type of information can beentered in the field: (>>) an item from a picklist; (-) numbers or text; and (*) another editscreen is invoked. For >> fields in which items are selected from glossary trees, the numberof possible selections may be limited when glossary items are pre-selected in the data entryfilter (Section 5.3).
Operation Name (>>)The name of the operation carried out. It may be a general description, e.g. "tillage", ora very detailed one, e.g. "light ploughing <15 cm deep, along contours".
Species involved (>>)The species involved in the operation, e.g. the species of which a product is harvested.Only the species that were defined in the land use purpose classifiers of the selected a-priori land use class (Section 6.6) may be selected. For example, when maize andsugarcane is grown, you can specify the planting of maize or the spraying of cane. Thisfield may also be defined as "Unspecified" (by pressing F6) when the operation is cropa-specific. If only one species was specified for the land use class, this field cannot beused.
% of Plot involved (-; only numbers)The percentage of the plot that was involved in the operation, e.g. only half of a plot wasploughed. If this percentage cannot be specified accurately, enter a (estimated) range:first enter the minimum percentage and subsequently the maximum. If the percentageis exactly known, enter the same value for minimum and maximum, i.e. accept thedefault value for the maximum percentage.
Operation Period (-; only numbers)The date or period during which the operation was carried out. For example, ploughingon the 23 and 24 of May 1994 is entered as 23/5/1994 - 24/05/1994. If the operation wascarried out at one day, enter the same date twice. Dates may be entered in two ways(according to the Gregorian calendar or as a relative date). See further explanationunder the field Op. Seq. Period of the Add/Edit a Land Use System Description screen(Section 6.6.2). For the specification of qualitative periods such as 'the first week of April',see Appendix 7.

C.A. de BieJ.A. van Leeuwen
P.A. Zuidema
120
Periodicity (>>)The operation may be carried out repeatedly during the specified period. For example,if cows graze on a piece of grassland one day per week, it is not possible to describethe operation for each week. If the operation is carried out repeatedly, you may opt toenter it only once. A description of the periodicity should then be entered in the nextfield.
- Description (-)A description of the periodicity of the operation, e.g. "once per week", "three times eachmonth" or "after each rain".
Operation Duration (-; only numbers)The time required to actually carry out the operation. This must not be confused withthe operation period, which indicates only the start and end date of the period duringwhich the operation was carried out. For example, if ploughing was carried out on 23and 24 May 1994, then the operation period is 23/5/1994 - 24/5/1994 but the operationduration may have been 2 days * 7 hours = 14 hours. If the operation duration cannotbe specified accurately, enter a (estimated) range: first enter the minimum andsubsequently the maximum. If the duration is exactly known, enter the same value forminimum and maximum, i.e. accept the default value for the maximum duration.
- Unit (>>)The data unit in which the operation duration is expressed, usually a unit of time. If theduration is entered, the unit must always be specified.
- Info Source (>>)The source from which the information on the operation duration is obtained. If this fieldis shown in the edit screen, and in case a operation duration was entered, theinformation source must be entered.
Task Time (-; only numbers)The total labour time spent by labourers to carry out this operation. The task time mustnot be confused with the operation duration. For example, if the operation duration ofploughing was 14 hours and if three persons were conducting this operation, the tasktime was 3 * 14 = 42 hours. The task time can be specified per labourer in the Add/Edita Labour Input screen (Section 6.7.3). If the task time cannot be specified accurately,enter a (estimated) range: first enter the minimum and subsequently the maximum. Ifthe task time is exactly known, enter the same value for minimum and maximum, i.e.accept the default value for the maximum task time.
- Unit (>>)The data unit in which the task time is expressed, usually a unit of time, e.g. hours ormandays. If the time is entered, the unit must always be specified.
- Info Source (>>)The source from which the information on task time is obtained. If this field is shown inthe edit screen, and in case a task time was entered, the information source must beentered.
Labour Inputs (*)Information on the labour inputs used to carry out this operation is entered in theAdd/Edit a Labour Input screen (Section 6.7.3).

C.A. de BieJ.A. van Leeuwen
P.A. Zuidema
121
Material Inputs (*)Information on the material inputs used during this operation is entered in the Add/Edit aMaterial Input screen (Section 6.7.4).
Implements Used (*)Information on the implements used during this operation is entered in the Add/Edit anImplement Used screen (Section 6.7.5).
Main Power Source (>>)The major type of power source that was used to carry out the operation, e.g. humanpower, animal traction, or machine power. Note that human power is needed for almostall operations, but in case a tractor is used, the main power source is machine power.Note also that information on the type of tractor used should be entered in theImplements Used field.
Products/Benefits (*)Information on the product harvested or benefit obtained as a result of this operation isentered in the Add/Edit a Product/Benefit Obtained screen (Section 6.7.6).
Comments (-)Additional information about this operation. The comments are entered in a free textwindow (Section 4.2.5). They should be applicable for the information entered in this editscreen, e.g. additional information on the success of the operation or possible problemsencountered. No additional information should be given on the value in a >> field, sincesuch information belongs in the glossary, i.e. either in existing glossary items or inglossary items yet to be defined.
6.7.3 Add/Edit a Labour Input
After pressing Enter at the Labour Input field in the Add/Edit an Operation screen, a new editscreen is invoked in which to enter information on the type and quantity of one labour input.
The number of fields in this edit screen depends on the selected data entry filter (Section6.2.2). In the above example the Maximum Filter was selected.
When the edit screen is displayed, enter the applicable information in the provided fields.One field of this edit screen is compulsory: Gender & Age Class. Note that the combinationof gender & age class, skill and labour origin must be unique for the current operation.
Gender & Age Class (>>)The gender and age of the labourer(s), e.g. a male adult (16-59 years).
Skill (>>)The skill of the labourer(s), e.g. experienced.
C.A. de BieJ.A. van Leeuwen
P.A. Zuidema
122
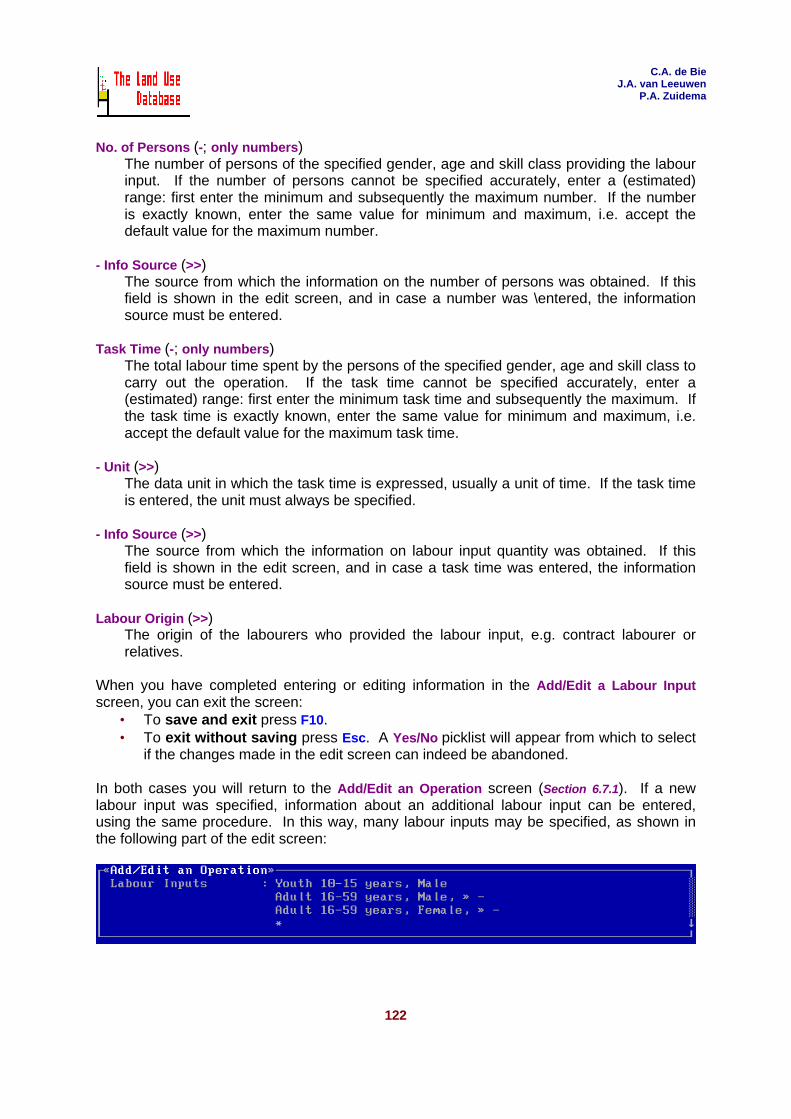
No. of Persons (-; only numbers)The number of persons of the specified gender, age and skill class providing the labourinput. If the number of persons cannot be specified accurately, enter a (estimated)range: first enter the minimum and subsequently the maximum number. If the numberis exactly known, enter the same value for minimum and maximum, i.e. accept thedefault value for the maximum number.
- Info Source (>>)The source from which the information on the number of persons was obtained. If thisfield is shown in the edit screen, and in case a number was \entered, the informationsource must be entered.
Task Time (-; only numbers)The total labour time spent by the persons of the specified gender, age and skill class tocarry out the operation. If the task time cannot be specified accurately, enter a(estimated) range: first enter the minimum task time and subsequently the maximum. Ifthe task time is exactly known, enter the same value for minimum and maximum, i.e.accept the default value for the maximum task time.
- Unit (>>)The data unit in which the task time is expressed, usually a unit of time. If the task timeis entered, the unit must always be specified.
- Info Source (>>)The source from which the information on labour input quantity was obtained. If thisfield is shown in the edit screen, and in case a task time was entered, the informationsource must be entered.
Labour Origin (>>)The origin of the labourers who provided the labour input, e.g. contract labourer orrelatives.
When you have completed entering or editing information in the Add/Edit a Labour Inputscreen, you can exit the screen:
• To save and exit press F10.• To exit without saving press Esc. A Yes/No picklist will appear from which to select
if the changes made in the edit screen can indeed be abandoned.
In both cases you will return to the Add/Edit an Operation screen (Section 6.7.1). If a newlabour input was specified, information about an additional labour input can be entered,using the same procedure. In this way, many labour inputs may be specified, as shown inthe following part of the edit screen:

C.A. de BieJ.A. van Leeuwen
P.A. Zuidema
123
6.7.4 Add/Edit a Material Input
After pressing Enter at the Material Inputs field in the Add/Edit an Operation screen, a newedit screen is invoked in which to enter information on the type and quantity of the materialinput.
The number of fields in this edit screen depend on the data entry filter, as selected in thesettings screen (Section 6.2.2). In the above example the Maximum Filter was selected.
When the edit screen is displayed, enter or edit applicable information in the provided fields.One field of this edit screen is compulsory: Material Input.
Material Input (>>)The (type of) material applied. Material Inputs must cannot be recovered from the landuse system after their usage. Some examples: seeds, fertilizers, animal feed andpesticides.
Species/Service (>>)The species of which the material input was derived, e.g. if the material input is seeds,the species of the seeds can be specified, or if organic manure of animal origin is used,you can specify which species produced the dung. The link between material input andspecies/service can be specified for glossary items from the Material Inputs glossarytree (Section 5.2.9).
Quality Class (>>)The quality of the material input used.
Quantity (-; only numbers)The quantity of the specified material input, used for this operation. If this quantitycannot be specified accurately, enter a (estimated) range: first enter the minimum andsubsequently the maximum quantity. If the quantity is exactly known, enter the samevalue for minimum and maximum, i.e. accept the default value for the maximumquantity.
- Unit (>>)The data unit in which the quantity of the material input is expressed, e.g. weight,number. If the quantity is entered, the unit must always be specified.
- Info Source (>>)The source from which the information on material inputs quantity was obtained. If thisfield is shown in the edit screen, and in case a quantity was entered, the informationsource must be entered.
Input Origin (>>)The location from where the material input, used for this operation, was derived, e.g.from outside the holding.
C.A. de BieJ.A. van Leeuwen
P.A. Zuidema
124
When you have completed entering or editing information in the Add/Edit a Material Inputscreen, you can exit the screen:
• To save and exit press F10.• To exit without saving press Esc. A Yes/No picklist will appear from which to select
if the changes made in the edit screen can indeed be abandoned.
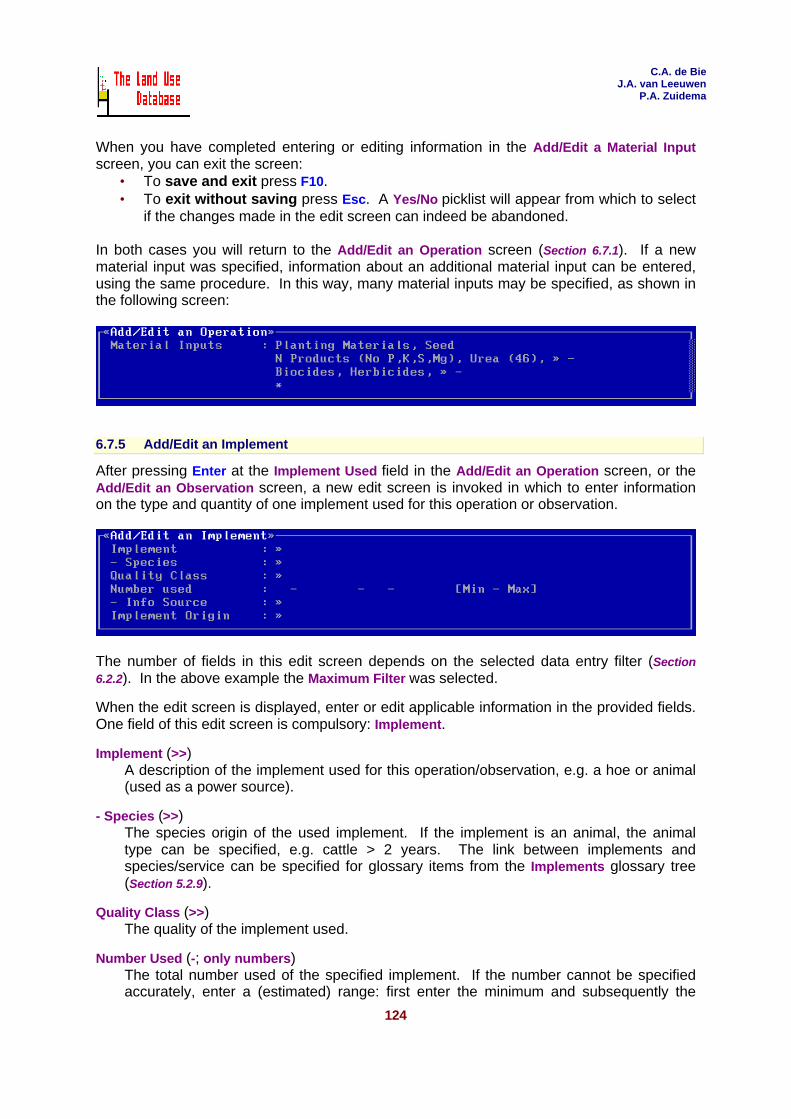
In both cases you will return to the Add/Edit an Operation screen (Section 6.7.1). If a newmaterial input was specified, information about an additional material input can be entered,using the same procedure. In this way, many material inputs may be specified, as shown inthe following screen:
6.7.5 Add/Edit an Implement
After pressing Enter at the Implement Used field in the Add/Edit an Operation screen, or theAdd/Edit an Observation screen, a new edit screen is invoked in which to enter informationon the type and quantity of one implement used for this operation or observation.
The number of fields in this edit screen depends on the selected data entry filter (Section6.2.2). In the above example the Maximum Filter was selected.
When the edit screen is displayed, enter or edit applicable information in the provided fields.One field of this edit screen is compulsory: Implement.
Implement (>>)A description of the implement used for this operation/observation, e.g. a hoe or animal(used as a power source).
- Species (>>)The species origin of the used implement. If the implement is an animal, the animaltype can be specified, e.g. cattle > 2 years. The link between implements andspecies/service can be specified for glossary items from the Implements glossary tree(Section 5.2.9).
Quality Class (>>)The quality of the implement used.
Number Used (-; only numbers)The total number used of the specified implement. If the number cannot be specifiedaccurately, enter a (estimated) range: first enter the minimum and subsequently the

C.A. de BieJ.A. van Leeuwen
P.A. Zuidema
125
maximum number. If the number is exactly known, enter the same value for minimumand maximum, i.e. accept the default value for the maximum number.
- Info Source (>>)The source from which the number used of this implement was obtained. If this field isshown in the edit screen, and in case a number was entered, the information sourcemust be entered.
Implement Origin (>>)The location from where the implement was derived, e.g. from outside the holding.
When you have completed entering or editing information in the Add/Edit an Implementscreen, you can exit the screen:
• To save and exit press F10.• To exit without saving press Esc. A Yes/No picklist will appear from which to select
if the changes made in the edit screen can indeed be abandoned.
In both cases you will return to the Add/Edit an Operation screen (Section 6.7.1). If a newimplement was specified, information about an additional implement can be entered, usingthe same procedure. In this way, many implements may be specified, as shown in thefollowing screen:
6.7.6 Add/Edit a Product/Benefit Obtained
After pressing Enter at the Products/Benefits field in the Add/Edit an Operation screen, a newedit screen is invoked in which to enter information on one product/benefit obtained throughthe current operation.
The number of fields in this edit screen depends on the selected data entry filter (Section6.2.2). In the above example the Maximum Filter was selected.
When the edit screen is displayed, enter or edit applicable information in the provided fields(for general information on using edit screens see Section 4.2.4). Two fields of this editscreen are compulsory: Species/Service and Product/Benefit.
Enter or edit collected data in the applicable fields of the edit screen. The Species/Serviceand Product/Benefit fields must always be filled.

C.A. de BieJ.A. van Leeuwen
P.A. Zuidema
126
Species/Service (>>)Product/Benefit (>>)
A [Species/Service-Product/Benefit] combination as already specified for the currentland use system description (Level 3), i.e. in the Add/Edit a Land Use Purpose screen(Section 6.6.4).
Quality Class (>>)The quality of the product/benefit obtained.
Quantity (-; only numbers)The quantity of the specified product or benefit, obtained from this operation. If thisquantity cannot be specified accurately, enter a (estimated) range: first enter theminimum and subsequently the maximum quantity. If the quantity is exactly known,enter the same value for minimum and maximum, i.e. accept the default value for themaximum quantity.
- Unit (>>)The data unit in which the quantity of the product or benefit is expressed, e.g. a numberor quantity. If the size is entered, the unit must always be specified.
- Info Source (>>)The source from which the information on product/benefit quantity was obtained. If thisfield is shown in the edit screen, and in case a quantity was entered, the informationsource must be entered.
Product Destination (>>)The destination of the obtained product, e.g. sold to a cooperative or for ownconsumption.
- A-Priori LU Class (>>)The obtained product or benefit can be used as an input in another land use system.the class name of this second system is here required. Any defined a-priori land useclass can be specified in this field. For example, the straw of wheat may be used asmulch between vegetables.
When you have completed entering or editing information in the Add/Edit a Product/BenefitObtained screen, you can exit the screen:
• To save and exit press F10.• To exit without saving press Esc. A Yes/No picklist will appear from which to select
if the changes made in the edit screen can indeed be abandoned.
In both cases you will return to the Add/Edit an Operation screen (Section 6.7.1). If a newproduct/benefit obtained was specified, information about an additional product/benefit canbe entered, using the same procedure. In this way, many products/benefits may bespecified, as shown in the following screen:

C.A. de BieJ.A. van Leeuwen
P.A. Zuidema
127
6.7.7 Add/Edit an Observation
To add a new observation or edit an exiting one, information must be entered or edited in anedit screen. After you pressed Ctrl-Ins, F10 or Enter (for a highlighted Observation) in theOperations and Observations picklist, the following edit screen appears:
The number of fields in this edit screen depends on the selected data entry filter (Section 6.2).In the above example, the Maximum Filter is used. If you select the Minimum Filter, only thefollowing two fields will be shown:
When the edit screen is displayed, enter or edit applicable information in the provided fields.One field of this edit screen is compulsory: Observation Name. All fields of Add/Edit anOperation screen are explained in Section 6.7.8.
When you have completed entering or editing information in the Add/Edit an Observationscreen, you can exit the screen:
• To save and exit press F10.• To exit without saving press Esc. A Yes/No picklist will appear from which to select
if the changes made in the edit screen can indeed be abandoned.
In both cases you will return to the Operations and Observations picklist (Section 6.7).
6.7.8 Fields of Observation
The meaning and usage of all fields of the Add/Edit an Observation screen are brieflyexplained below, in the sequence as they appear in the edit screen.
The type of field (as put between parenthesis) determines what type of information can beentered in the field: (>>) an item from a picklist; (-) numbers or text; and (*) another editscreen is invoked. For >> fields in which items are selected from glossary trees, the numberof possible selections may be limited when glossary items are pre-selected in the data entryfilter (Section 5.3).
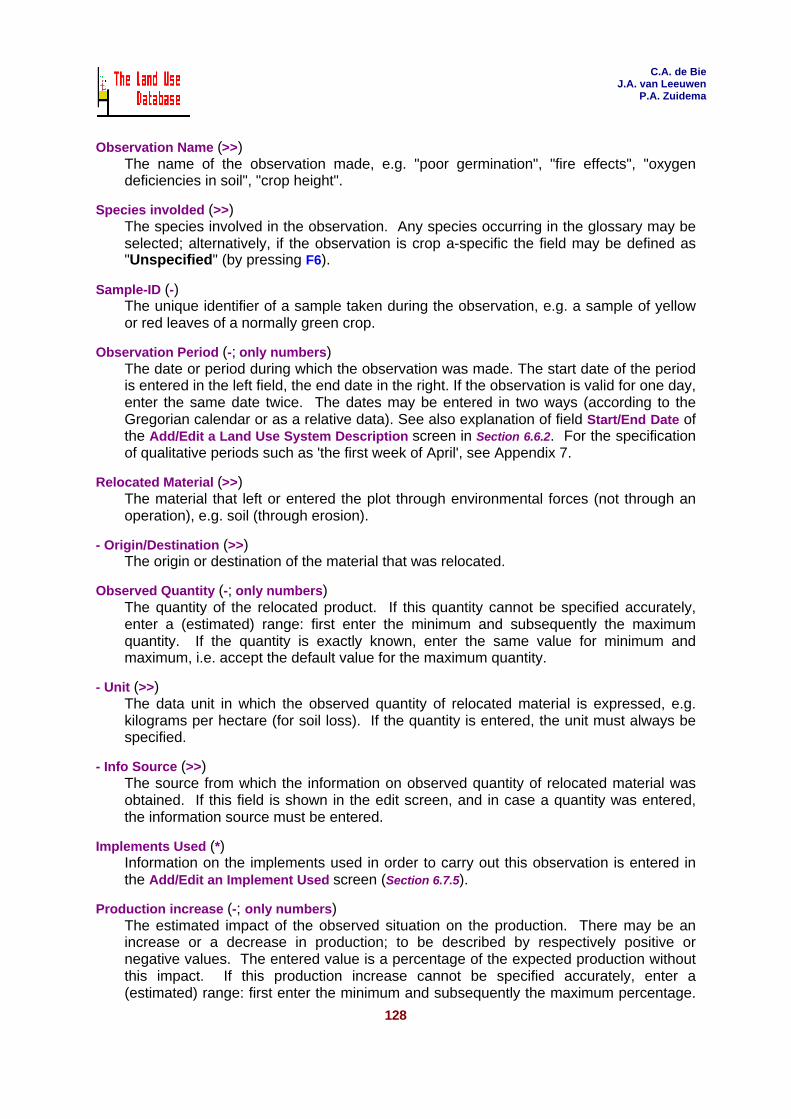
C.A. de BieJ.A. van Leeuwen
P.A. Zuidema
128
Observation Name (>>)The name of the observation made, e.g. "poor germination", "fire effects", "oxygendeficiencies in soil", "crop height".
Species involded (>>)The species involved in the observation. Any species occurring in the glossary may beselected; alternatively, if the observation is crop a-specific the field may be defined as"Unspecified" (by pressing F6).
Sample-ID (-)The unique identifier of a sample taken during the observation, e.g. a sample of yellowor red leaves of a normally green crop.
Observation Period (-; only numbers)The date or period during which the observation was made. The start date of the periodis entered in the left field, the end date in the right. If the observation is valid for one day,enter the same date twice. The dates may be entered in two ways (according to theGregorian calendar or as a relative data). See also explanation of field Start/End Date ofthe Add/Edit a Land Use System Description screen in Section 6.6.2. For the specificationof qualitative periods such as 'the first week of April', see Appendix 7.
Relocated Material (>>)The material that left or entered the plot through environmental forces (not through anoperation), e.g. soil (through erosion).
- Origin/Destination (>>)The origin or destination of the material that was relocated.
Observed Quantity (-; only numbers)The quantity of the relocated product. If this quantity cannot be specified accurately,enter a (estimated) range: first enter the minimum and subsequently the maximumquantity. If the quantity is exactly known, enter the same value for minimum andmaximum, i.e. accept the default value for the maximum quantity.
- Unit (>>)The data unit in which the observed quantity of relocated material is expressed, e.g.kilograms per hectare (for soil loss). If the quantity is entered, the unit must always bespecified.
- Info Source (>>)The source from which the information on observed quantity of relocated material wasobtained. If this field is shown in the edit screen, and in case a quantity was entered,the information source must be entered.
Implements Used (*)Information on the implements used in order to carry out this observation is entered inthe Add/Edit an Implement Used screen (Section 6.7.5).
Production increase (-; only numbers)The estimated impact of the observed situation on the production. There may be anincrease or a decrease in production; to be described by respectively positive ornegative values. The entered value is a percentage of the expected production withoutthis impact. If this production increase cannot be specified accurately, enter a(estimated) range: first enter the minimum and subsequently the maximum percentage.

C.A. de BieJ.A. van Leeuwen
P.A. Zuidema
129
If the increase is known exactly, enter the same value for minimum and maximum, i.e.accept the default value for the maximum percentage.
- Info Source (>>)The source from which the information on production increase was obtained. If this fieldis shown in the edit screen, and in case an increase was entered, the informationsource must be entered.
Comments (-)Additional information about this observation. The notes are entered in a free textwindow (Section 4.2.5). They should be applicable for the information entered in this editscreen, e.g. additional information on the value of this observation, or possible problemsencountered. No additional information should be given on the value in a >> field, sincesuch information belongs in the glossary, i.e. either in existing glossary items or inglossary items yet to be defined.
6.7.9 Copy an Operation
Copying an operation, including related data at lower levels, may be time efficient in case anew operation is very similar to an existing one. After pressing F5 in the Operations andObservations picklist, an edit screen is displayed:
To: Operation NameSpecies involvedOperation PeriodEnter the operation name, species involved and operation period of the new operation(Section 6.7.2).
Copy Implements UsedCopy Material InputsCopy Labour InputsCopy Products/Benefits
Related data on implements used material inputs, labour inputs and products/benefitsobtained that is stored at lower levels of the copied operation may also be copied to thenew operation by pressing Enter. Picklists are invoked from which to select Yes or No.
After entering information in the above fields, start copying by pressing F10. The newoperation will be the highlighted item in the Operations and Observations picklist that isdisplayed after copying.

C.A. de BieJ.A. van Leeuwen
P.A. Zuidema
130
6.7.10 Copy an Observation
Copying an observation, including related data at lower levels, may be time efficient in casea new operation is very similar to an existing one. After pressing F5 in the Operations andObservations picklist, an edit screen is displayed:
To: Observation NameSpecies involvedOperation PeriodEnter the operation name, species involved and operation period of the new operation(Section 6.7.2).
Copy Implements UsedRelated data on implements used that is stored at lower levels of the copied observationmay also be copied to the new observation by pressing Enter . Picklists are invokedfrom which to select Yes or No.
After entering information in the above fields, start copying press F10. The new observationwill be the highlighted item in the Operations and Observations picklist that is displayed aftercopying.
6.8 Land Use Classes
In The Land Use Database, an a-priori land use class name must be linked to each land usesystem description. Accordingly, the required a-priori land use classes must be definedbefore the collected land use data can be entered.
Any number of a-priori land use classes may be defined, grouped together in a hierarchicalland use classification system. Presently, in The Land Use Database 240 different land useclassification systems can be specified. For general information on how to define land useclasses and how to structure general classes into a classification system, see Sections 2.3.2and 2.3.3.
Note that posteriori classification routines of data stored in The Land Use Database are notprovided. Data analysis must be carried out using other softwares after exporting storedland use information (by a query, see Chapter 7).
With the Land Use Classes option, you can define new a-priori land use classes and land useclassification systems and edit existing ones. It is possible to develop any classificationsystem by you, or to use an existing one. It is recommended to adopt generally acceptedclassification systems, or base a newly developed classification system on your studyobjectives. An example print of part of a classification system is included in Appendix 10.

C.A. de BieJ.A. van Leeuwen
P.A. Zuidema
131
6.8.1 A-Priori Land Use Classification Systems
Land use classes are often organized in a land use classification system that is hierarchicallystructured. After you selected Land Use Classes from the main menu of the Data EntryModule, the A-Priori Land Use Classification Systems picklist appears.This may either be empty or contain items:
• The picklist is empty:
No land use classification systems, and therefore no land use classes, are stored inThe Land Use Database. There are two options:• To add an a-priori classification system press Ins (Section 6.8.2)• To exit this picklist press Esc. You will return to the main menu of the Data Entry
Module (Section 6.1).
• The picklist contains one or more items:
One ore more land use classification systems are currently stored. The items in thepicklist show the code and name of each stored land use classification system.Several options are now available:• To select the highlighted classification system and go to the first picklist with land
use classes press Enter (Section 6.8.3).• To exit this picklist: press Esc. You will return to the main menu of the Data
Entry Module (Section 6.1).• To add a new a-priori classification system press Ins (Section 6.8.2).• To edit the name of the highlighted a-priori classification system press F10 (Section
6.8.2).• To search for names of land use classes or classification systems press F4
(Section 4.3.4).• To print all a-priori land use classes of one or more classification systems press
F3 (Section 6.8.5).• To delete the highlighted a-priori classification system press Del (Section 6.8.6).
6.8.2 Add/Edit an A-Priori Land Use Classification System
To add a new land use classification system or edit the code or name of an existing oneinformation must be entered in an edit screen. After you pressed Ins or F10 in the A-PrioriLand Use Classification Systems picklist, the following edit screen appears:

C.A. de BieJ.A. van Leeuwen
P.A. Zuidema
132
CodeThe unique code for this classification system (1-240). The code cannot be changed ifone or more land use classes within the classification system are used to specify storedland use data. In that case the message (Item is Used) will be displayed right of thecode.
NameThe name of the a-priori classification system, e.g. the project name if the classificationsystem is specific for one project, or the country name if it is specific for a country.
After you have completed entering or editing information, you can save the edit screen:press F10. You will return to the Land Use Classification Systems picklist (Section 6.8.1).
6.8.3 A-Priori Land Use Classes
After you selected a classification system from the A-Priori Land Use Classification Systemspicklist (by pressing Enter), or you selected an a-priori land use class from within the currenta-priori land use classification system, the picklist at the next level may either be empty orcontain items:
• The picklist is empty:
No land use classes are stored for this classification system, or no "sub-classes" aredefined for the selected land use class. There are two options:• To add an a-priori land use class press Ins> (Section 6.8.4).• To exit this picklist press Esc. You will return to the A-Priori Land Use
Classification Systems picklist (Section 6.8.1), or a picklist with a-priori land useclasses at a higher level within the current classification system (as above orbelow).
• The picklist contains one or more items:
One ore more land use classes are stored for the selected classification system orland use class. The items in the picklist show the code and name of each stored a-priori land use class. Several options are now available:• To select the highlighted land use class and go to the next level of land use
classes press Enter. A picklist with more detailed a-priori land use classesappears, which may either be empty or contain items (see above).
• To exit this picklist press Esc. You will return to the A-Priori Land UseClassification Systems picklist (Section 6.8.1), or a picklist with a-priori land useclasses at a higher level within the current classification system (as above orbelow).
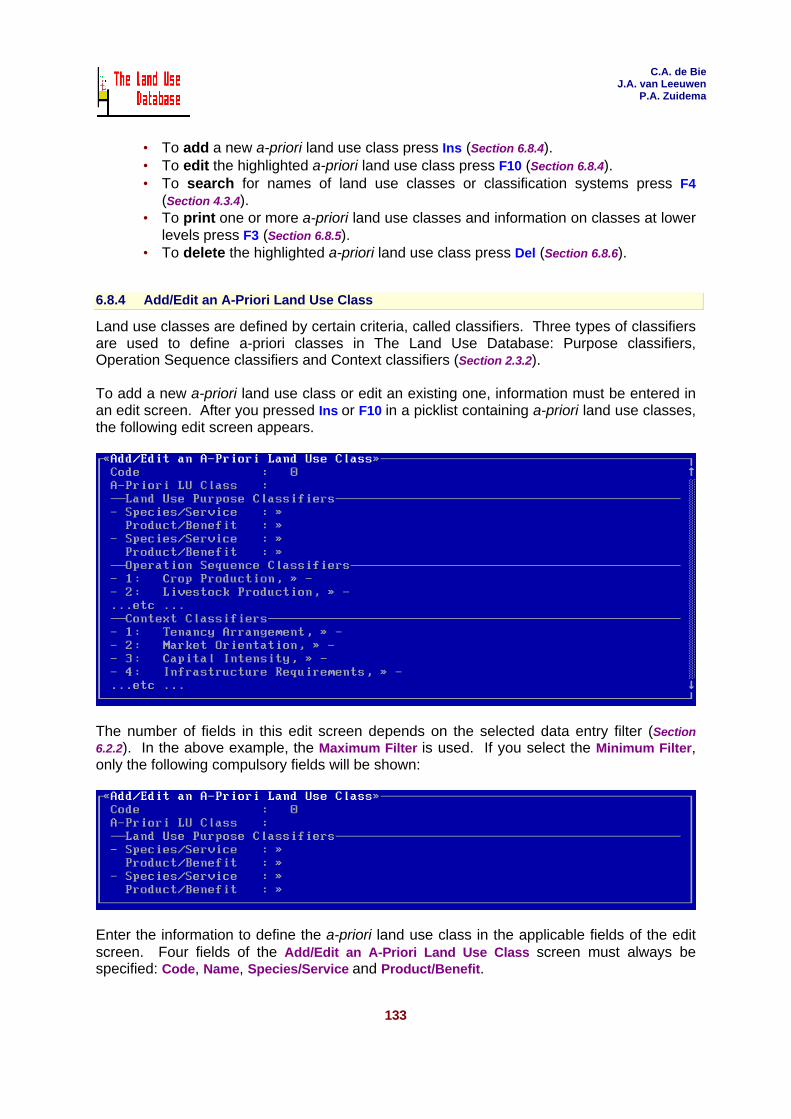
C.A. de BieJ.A. van Leeuwen
P.A. Zuidema
133
• To add a new a-priori land use class press Ins (Section 6.8.4).• To edit the highlighted a-priori land use class press F10 (Section 6.8.4).• To search for names of land use classes or classification systems press F4
(Section 4.3.4).• To print one or more a-priori land use classes and information on classes at lower
levels press F3 (Section 6.8.5).• To delete the highlighted a-priori land use class press Del (Section 6.8.6).
6.8.4 Add/Edit an A-Priori Land Use Class
Land use classes are defined by certain criteria, called classifiers. Three types of classifiersare used to define a-priori classes in The Land Use Database: Purpose classifiers,Operation Sequence classifiers and Context classifiers (Section 2.3.2).
To add a new a-priori land use class or edit an existing one, information must be entered inan edit screen. After you pressed Ins or F10 in a picklist containing a-priori land use classes,the following edit screen appears.
The number of fields in this edit screen depends on the selected data entry filter (Section6.2.2). In the above example, the Maximum Filter is used. If you select the Minimum Filter,only the following compulsory fields will be shown:
Enter the information to define the a-priori land use class in the applicable fields of the editscreen. Four fields of the Add/Edit an A-Priori Land Use Class screen must always bespecified: Code, Name, Species/Service and Product/Benefit.

C.A. de BieJ.A. van Leeuwen
P.A. Zuidema
134
CodeThe code of the land use class (1-240). The code must be unique for this level of landuse classes. For existing land use classes, it may only be changed if the class is notused to specify stored land use data.
NameThe name of the land use class. The name must be a good description of the class,e.g. Single Cropping of Cereals. Also, the name must be unique for this level of land useclasses.
Land Use Purpose ClassifiersA purpose classifier is entered into two fields, i.e. as a [Species/Service-Product/Benefit]combination. The combination of these two fields acts as a classifier. Each land useclass must at least be defined by one purpose classifier. More than one purposeclassifier can be specified for multi-purpose land use classes.
- Species/ServiceThe species or service from which the product or benefit of the classified land use isobtained. It may be general, e.g. "cereals", or detailed, e.g. "cereals - Amaranthushybridus L. ssp. incurvatus ...", but it is recommended to keep the description asgeneral as required.The species/service entered here acts as a filter for the Species/Service field in theAdd/Edit a Land Use Purpose and Quantity screen (Section 6.6.4). For example, if"Cereals" is entered in this field, only cereals can be selected as species/service inthe Add/Edit a Land Use Purpose and Quantity screen. Similarly, when more levelsof land use classes are defined, the species/service of a land use class at a higherlevel acts as a filter for species/service specification at the lower level.
- Product/BenefitThe product harvested or the benefit obtained from the classified land use. Thismay also be general, e.g. "plant produce", or very detailed, e.g. "old mature leaves".The product/benefit entered here also acts as a filter for the Product/Benefit field inthe Add/Edit a Land Use Purpose and Quantity screen (Section 6.6.4). For example,if "plant produce" is entered in this field, only plant produces can be selected asproduct/benefit in the Add/Edit a Land Use Purpose and Quantity screen. Similarly,when more levels of land use classes are defined, the product/benefit of a land useclass at a higher level acts as a filter for product/benefit specification at the lowerlevel.
Operation Sequence ClassifiersA number of parameters related to the operation sequence and to individual operationsis shown in the next fields. These correspond to the second level of the glossary tree"Classifiers: Oper.Sequence". By adding items to the second level of this glossary tree,you can add parameters to the list of context classifiers in this screen (Section 5.2.6).When more levels of land use classes are defined, the operation sequence classifiers ata higher level act as a filter for the classifiers of related classes at lower levels. To selecta value for the highlighted classifier press Enter. A picklist appears. There are topossibilities:• To select an item. Selection implies that this classifier is used to define the land use
class. For example, if you select "Yes" for the classifier "Crop Production", only landuse systems with crop production may belong to this land use class. If you select

C.A. de BieJ.A. van Leeuwen
P.A. Zuidema
135
"No" for this classifier, it implies that only land use systems without crop productionmay belong to this land use class. Highlight an item and press Enter.
• Not to select an item. This implies that this classifier is not used for the definition ofthe land use class. This is the default value for all operation sequence classifiers.So, if you want to use just one operation sequence classifier to define a land useclass, you only have to “specify” this classifier by pressing F6.
Context ClassifiersA number of parameters related to the context of land use and to individual operations isshown in the next fields. Three types of context classifiers can be distinguished:• The origin of material inputs and implements used for operations.• The tenancy arrangement.• Other parameters of which information cannot be stored in The Land Use Database.
For example: capital intensity, holder's attitude, goals of the holder.These correspond to the second level of the glossary tree "Classifiers: Context". Byadding items to the second level of this glossary tree, you can add parameters to the listof context classifiers in this screen (Section 5.2.6). When more levels of land use classesare defined, the context classifiers at a higher level act as a filter for the classifiers ofrelated classes at lower levels. Follow the above instructions for Operation SequenceClassifiers.
After you have completed entering or editing information in the edit screen, exit the screen:• To save and exit press F10.• To exit without saving press Esc. A Yes/No picklist will appear from which to select
if the changes made in the edit screen can indeed be abandoned.
In both cases you will return to a picklist with a-priori land use classes (Section 6.8.3).
6.8.5 Print A-Priori Land Use Classes
You can print information about individual or sets of a-priori land use classes as well asabout complete classification systems. After pressing F3 in a picklist with land use classesor land use classification systems, a picklist appears from which to select what informationmust be printed:
Highlighted Item without related Information at lower LevelsPrint information about the highlighted item only.
All Items without related Information at lower LevelsPrint information about all items in the current picklist.
Highlighted Item with related Information at lower LevelsPrint information about the highlighted item plus all related items at lower levels.
All Items with related Information at lower LevelsPrint information about all items in the current picklist plus all related items lower levels.

C.A. de BieJ.A. van Leeuwen
P.A. Zuidema
136
After selection of one of the above options, a picklist is displayed in which to select if onlynames must be included in the output:
YesOnly the code and the name of all selected land use classes is printed. Information onclassifiers is not printed.
NoThe code, name and classifiers of all selected land use classes are printed.
After selecting Yes or No, a new picklist appears in which to select the output device for theprinted output. An example print of part of an a-priori land use classification system isincluded in Appendix 10.
6.8.6 Delete an A-Priori Land Use Class or Classification System
A-priori land use classes and complete classification systems may be deleted, if required.After highlighting the item to be deleted and pressing Del when in a picklist with land useclasses or classification systems, there are two possibilities:
• A message appears:
The highlighted item (a class or classification system), or a related item at lower levelis used to specify one or more land use system descriptions. The item maytherefore not be deleted.
• A Yes/No picklist appears from which to select whether the class or classificationsystem and related items at lower levels can be deleted.