Embed Size (px)
Citation preview
`
1
VANGUARD
THE FANTASY SKIRMISH GAME
Beta Playtest 2018-03-08
2
VANGUARD
WHAT YOU WILL NEED Models
Mantic Games supply a range of ready-made
Warbands for Vanguard so it’s easy to start
your collection and get playing. You don’t
have to paint your models to play the game,
but painting is a fantastic part of the gaming
hobby and we would encourage you to do so.
Playing with amazing looking miniatures you
have painted yourself only adds to the fun!
Throughout this book, you will find wonderful
examples of painted models and warbands to
inspire your own collection.
The models for Vanguard are the same scale as
the models used in Mantic’s mass-battle game,
Kings of War. Indeed, players of both games
could easily use their Vanguard models as
heroes and unit champions in their Kings of
War armies.
Bases
Models should be glued to the square or
rectangular base they are supplied with which
will be the size appropriate for the model. A
model, or parts of one, may extend over the
base, but the base itself defines where the
model is for all game purposes (such as
measuring movement or range to a target).
Typically, human-sized models come on square
20mm or 25mm bases. Big brutes like ogres
and trolls can be on 40mm or 50mm bases and
cavalry models or similar will be on
rectangular 25mm x 50mm bases.
Models should be positioned on their base in a
way which clearly shows the way the model is
facing so that it is obvious where the model’s
front and rear arcs are (see page XXX).
Table and Terrain
You will need a firm, level playing surface to
play your games of Vanguard. An area 3’ x 3’ is
the standard size of playing space required
although it’s possible to play on larger surfaces
too.
Many players will build a collection of detailed
terrain like hills, buildings, walls and trees
which all adds to the realism of the game.
However, to start to play, you can simply use
what you have to hand like books and boxes if
you don’t already have a terrain collection.
Tape Measure
Distances and ranges in Vanguard are
measured in inches.
Pre-measuring is allowed – you can check
distances and ranges at any time during the
game.
`
3
VANGUARD
Dice
Vanguard uses two types of dice.
D8
For determining most actions and results in
the game, 8-sided dice are used. These are
rolled and read just like normal 6-sided dice.
Sometimes you may have to roll more than one
dice to see what happens. For example 2D8
means roll 2 8-sided dice and check each score.
Dice results may be modified. For example, a
modifier of -1 means subtract 1 from each of
your results. Unless specified otherwise, these
are cumulative (e.g. two different +1 modifiers
results in a +2 modifier for the roll).
Sometimes rolls may benefit from bonus dice
(or even lose dice). Add or remove the number
of dice specified before making the roll.
Power Dice
Power Dice are 6-sided dice with special
symbols on them. They are rolled and used to
spend on Special Abilities and activations for
your models in the game.
If the rules specify to roll a die, a D8 is
implied. The rules will be explicit if a Power
Die is to be used.
Re-rolls
Sometimes you will get the opportunity to re-
roll one or more dice. You must accept the
second result, even if it is worse than the first.
You cannot re-roll an already re-rolled die!
Counters
Vanguard uses a number of counters to
represent the status of models during play.
These are placed next to the models as a
reminder. Some have more than one status on
them to help keep the number of counters on
the table to a minimum.

4
VANGUARD
MODEL STATS Not all Warbands and their warriors are equal.
They will all have different abilities, strengths
and weaknesses. In the game, these are
represented by each model having a number of
statistics (stats for short), skills, special rules
and other game values. Warband stat cards are
also available as a great reference to use during
the game so the details of your warband are
easily at hand.
Each model in the Warband will have the
following stats:
Faction Symbol
Which faction the model is fighting for. For
example, Goblins, Northern Alliance,
Basileans, Nightstalkers etc. Your Warband has
a single faction, although it is possible to draft
in soldiers from other factions from time to
time.
Race
What race the model is. The model’s Race is
also a keyword that may interact with other
rules.
Type
Models will be one (or more) of the following
types:
GRUNT, WARRIOR, SUPPORT, COMMAND,
SPELLCASTER, LARGE
Type is important when building a Warband. A
model’s Type is also a keyword that may
interact with other rules.
Height (Ht)
The height of a model affects how it interacts
with other models and terrain for line of sight
and visibility of targets.
Speed (Sp)
This value shows the distance the model can
move in inches.
Ranged (Ra)
This value is the target number the model
needs to roll to hit a target when using a
ranged attack, typically as part of a Shoot or
Cast action.
Melee (Me)
This value is the target number the model
needs to roll to hit an opponent when making a
Melee attack.
Armour (Ar)
This value is the target number a model needs
to roll to avoid taking damage and suffering
wounds.
Nerve (Ne)
This value is the target number for any Nerve
tests the model needs to take. This will come
into play if the Warband is broken or if
something unnerving happens!
Wounds (Wn)
This value shows the number of wounds the
model can suffer before it is usually removed
from play as a casualty. The larger the number,
the more resilient (or stupid!) the model is.
Wound counters are used to track how many
wounds a model has taken. They are placed
next to the model as each wound is suffered.
When a model reaches 0 wounds (or fewer!), it
is usually removed from the game as a casualty
(too injured to continue…or possibly dead!).
Base
Each model’s card which also indicate the
model’s base size (e.g. 20mm, 40mm etc.) A
size of Cav means a 25mm x 50mm cavalry
base.
`
5
VANGUARD
Equipment Every model in the game is assumed to be
naturally equipped with the basic weapons (or
teeth, claws etc.) and armour they need to
survive. However, some models come equipped
with extra ranged weapons, specialist armour
and even rare or magical artefacts.
Cards
Some equipment may be represented using
Vanguard equipment cards. If a model has a
piece of extra equipment with a card, it should
be placed with the model’s stat card as a
reference during play.
Attack dice
Models always use the Ranged or Melee attack
dice stated on their stat cards by default.
However, some equipment comes with its own
replacement number of attack dice.
If the Type of equipment is followed by a
number of dice, use that many dice (with any
appropriate modifiers) when making an attack
with the equipment.
For example, a Bow has a Type of Ranged. The
model making a Ranged attack with a Bow uses
the number of dice stated on its model stat
card.
However, if the same model was given a Dwarf
Flame Thrower, that equipment has a Type
listed as Ranged (4D8). When the model uses
the Flame Thrower to make a Ranged Attack,
4D8 would be used instead.
A model must have a weapon or spell with a
listed range in order to make a Ranged
Attack. If not, even if a number of dice are
listed for the model, an attack cannot be made.
6
VANGUARD
THE RULES In a game of Vanguard, both you and your
opponent will have a Warband of fighters that
you will be using to play an exciting skirmish
encounter using your models. In each game,
you will play a particular scenario that
describes what each player needs to do to win.
Maybe one side has to defend their army’s
baggage train from the enemy force, or perhaps
both are fighting over control of a vital river
crossing.
Once the battlefield has been set up with
terrain and any objectives, the scenario you are
playing will also tell you how to deploy your
models ready to play. Details on how to set-up
the table ready for play are found on page
XXX.
Friendly models
If a rule refers to friendly models, this means
models in the same Warband (i.e. on the same
side and not enemy models!).
Enemy Models
Conversely, the Warband’s opponents are
considered the enemy models in the rules. If a
scenario requires other, 3rd party models to be
involved, these are considered Neutral.
The following pages are intended to introduce
you to the rules in a prescribed way as follows:
The structure of the game
o Rounds and Turns
o Rolling for Power
o The End Phase
Things you can do
o Actions
o Fatigue
o Using Power
How you do them
o Movement
o Terrain
o Arcs and Line of Sight
o Ranged Attacks
o Melee Attacks
o Nerve
Exploding 8s!
For certain rolls in the game, a mechanism
called Exploding 8s! is used.
This means that for each natural dice result of
8 in the roll (regardless of any modifiers), an
automatic success is achieved and another
bonus die can be rolled to see if a further
success is achieved. It’s possible to keep
rolling 8s and to keep getting bonus dice!
Conversely, all natural dice results of 1
(regardless of any modifiers) are automatic
failures.
Scoring a 1 or an 8 with the application of any
modifiers is not an automatic result.

`
7
VANGUARD
Rounds and TurnsA game of Vanguard is played across a number
of Rounds. Within each Round, players
alternate taking Turns, activating their
models, until both players have completed
activating their whole Warband. A game might
last a set number of Rounds, or be determined
by a particular victory (or defeat!) condition.
The scenario being played will tell you how
long to play for. Typically, games last around 5
or 6 Rounds.
A Round will always begin with both players
Rolling for Power. Players then take their
alternating Turns. During each of their Turns,
a player gets to do something (act) with a
single model, or group of models, of their
choice. Each model in a Warband only gets to
act once in each Round. During the Turn in
which it is acting, a model is known as the
acting (or active) model. Once it has finished
acting, the model is marked as Activated by
placing an Activation counter next to it.
Once a player has finished activating all their
models and declares they are finished, the
player with models yet to activate continues
playing Turns until all their models are also all
Activated. Once a player has declared they are
finished for the Round (including any/all
Forced Fatigue Actions – see pages XXX and
XXX), they cannot then change their mind! All
models must be Activated, even if they then
don’t perform any actions. Players may not
choose to pass a Turn.
Once all models on both sides have Activated,
no more Turns are played and the Round
concludes with the End Phase.
Game Sequence 1. Set-up
2. Deploy your models
3. Determine who takes the first turn
4. Play Rounds
a. Roll for Power
b. Take alternating Turns,
activating models
c. End Phase
5. Determine the winner!
Who goes first? The scenario being played will determine
which side will take the first Turn in the first
Round.
In subsequent Rounds, the player that finished
activating their models first in the previous
Round, takes the first Turn in the new Round.
8
VANGUARD
Rolling for PowerPower Dice are a representation of the
training, co-ordination and cunning of a well
led and experienced fighting team. They are a
limited resource that can be spent on accessing
certain abilities or even boosting spells and
attacks. Learning to manage your Power
resource and when to spend it is a skill you
will have to master!
1) Roll
At the start of each Round, before any Turns
are taken, each player rolls their Power Dice.
Create your pool of Power Dice by taking three
RED Power Dice and then adding any extra
dice as indicated on your Warband’s cards (for
models that are still in play and not removed
as a casualty). These extra dice will be either
RED, WHITE or BLUE. Roll all your Power
Dice simultaneously.
2) Re-Roll
After rolling, starting with the player who will
go first this Round, both players may perform
one single re-roll of as many of their dice as
they have models in play and on the table with
the COMMAND type. If a player re-rolls any of
their dice they must keep the new result(s).
Important: If no models with the COMMAND
Type are left alive in a Warband, that player
loses the ability to re-roll any Power Dice.
3) Set
Finally, each player sets their Power Dice
results beside their edge of the table. They will
be available to spend during each player’s
Turns in the coming Round to augment the
actions and abilities of the Warbands. The
total on all the dice combined is the total
amount of Power the player has to spend
during the Round.
Players can spend as much Power as they like
during a Turn and each die is discarded when
used. Any that are not spent by the end of the
Round are discarded. See the table on page
XXX for more detail about how and when these
can be used.
The End Phase Once both players have finished activating all
their models, including any Forced Fatigue (see
page XXX), the Round concludes with the End
Phase. During the End Phase, both players now
perform the following steps in order:
1. Resolve all effects and abilities that
state they take place in the End Phase.
2. Spend any remaining Power to clear
Fatigue counters from models in their
Warband. This is not mandatory
however, should a player wish to keep
a model Fatigued.
3. Clear away all activation counters
from the table and any other counters
(e.g. some spell effects) that are no
longer required, in readiness for the
next Round
4. Any Power still unused at the end of
this phase is discarded – it is not
carried over to the next Round.
`
9
VANGUARD
ActivationsWhen a model is activated during a player’s
Turn, it may perform a number of actions,
either one long action or up to two short
actions. Any model that is in the middle of its
activation is called the acting, or active, model.
Note that a model may only perform each type
of action once in a Turn unless specified
otherwise by a special ability, rule, or by Force
Fatiguing the model later (see page XXX).
A model that starts its activation knocked-
down, must Stand Up as its first action, even if
Engaged.
The basic actions available to models in the
game are listed below. Each action also
indicates whether it is (short) or (long). An
action must be completed fully before another
can be taken.
Actions Walk (short) – Only models that are not
Engaged may take this action. Move the model
up to its Speed in inches in any direction and
leave it facing a desired direction. A Walk
action must be performed even if the model is
being simply turned on the spot to face a new
direction. Models cannot move within 1” of
enemy models unless they are Engaging one of
them (see page XXX). See the full rules for
Movement on page XXX.
Shoot (short) – only models with a ranged
attack option (spell or weapon) and that are
not Engaged may take this action. Target a
single enemy model unless specified otherwise.
The target must be in range, in the front arc of
the firing model and the firing model must
have LOS to the target. In addition, the target
cannot be Engaged. See the Ranged attack
rules on page XXX.
Stand Up (short) – a model that is knocked-
down and is lying on the ground must Stand
Up before it can take any other actions.
Melee (short) – The model makes a Melee
attack against one model it is Engaged with in
its front arc. A model that is Engaged with one
or more enemy models that are not knocked-
down, must perform a Melee action against one
of those models unless it intends to make a
Break Away action. It may turn on the spot to
put the target in its front arc if there is room
for the base to fit. See the Melee attack rules
on page XXX.
Cast (variable) – only models that are not
Engaged and with the SPELLCASTER type can
use the Cast action. Cast can be repeated as an
action in a Turn.
The spell name will indicate if it takes a long
or short action to cast it. See Magic on page
XXX.
Run (long) – As a Walk action but the model
may move up to twice its Speed in inches in
any direction. If the model Engages an enemy
model at the end of its move, the Run will
qualify as a Charge action instead if:
1. The moving model had Line of Sight
(see page XXX) to the Engaged enemy
model before it moved AND
2. It took the most direct route it could
to the target, only deviating from a
straight line to avoid Impassable
Terrain or friendly models. In
addition, the moving model cannot
come within 1” of enemy models it is
not going to Engage unless they
themselves would be within 1” of the
moving model’s final position once
Engaged.
If the move qualifies as a Charge action, the
charging model gets an immediate free Melee
action against the Engaged target.
10
VANGUARD
Engaged
Models in base-to-base contact with a standing
enemy model are Engaged by it. When a model
moves to Engage another model, place the
front of the moving model’s base flush against
the target’s base on the side contact was made,
as centrally as possible.
If a Group Charge (see page XXX) is being
performed, arrange the moving models as
equally as possible if they are going to Engage
the same target. Corner-to-corner base contact
is not enough to Engage a model so is not a
valid charge move for that target. See the
Melee attack rules on page XXX.
Only a qualifying Charge action to Engage an
enemy model triggers a free Melee action.
A model that is knocked-down cannot Engage
an enemy model (but can be Engaged by one).
See page XXX for more details.
A standing model that is Engaged (or
Engaging) an enemy model can only make
Melee or Break Away actions.
Engaging models behind obstacles
Sometimes a model will position itself so that
it is touching an obstacle to put a barrier
between it and any enemy models. It is still
possible to Engage such a model and attack it.
The attacking model must be able to move and
reach the obstacle itself, directly opposite the
model it wishes to attack in order to become
Engaged. In addition, the attacking model must
make contact on the long edge of an obstacle
and within 2” of the target model – there’s no
charging one end and then fighting a model
way down the other end! If the moving model
can achieve this, place it flush against the
obstacle and facing the model it is going to
attack.
Models that are Engaged across an obstacle are
free to move away from one another without
having to use a Break Away action.
Brace (long) – The model prepares and steels
itself for an attack. The model may turn to face
any direction but otherwise doesn’t move or
act in any other way. Its Armour is improved
by one (e.g. 5+ becomes 4+) from any attack
coming from its front arc until the model is
next activated (place a Brace counter next to
the model as a reminder).
Break Away (long) – a model that is Engaged
by one or more enemy models may attempt to
break away instead of taking a Melee action.
Make 1 Armour Roll (see page XXX) for each
enemy model the activating model is breaking
away from. Models that are knocked-down are
ignored, as are any models that the model
Breaking Away is wholly in the rear-arc of. The
model will suffer a wound for each failed save.
If the model is still alive and standing, it may
make a Run action in any direction, following
the normal movement rules. It may Enage
another enemy model when doing so.
`
11
VANGUARD
Fatigue Sometimes, individuals in a Warband will push
themselves to make an extra yard of ground, or
fight that little bit harder. Such heroic efforts can
come at the expense of exhaustion however, or
finding yourself exposed.
During its activation, a model can be given an
additional short action. This extra action must
be taken after the model’s “normal” actions for
the Turn. It is known as a Fatigue Action, and
the model is then marked as both Activated
and Fatigued at the end of its activation (i.e.
once all its actions and any attacks are
resolved). A Fatigue Action cannot be a repeat
of an action the model already made this Turn
(this includes any free Melee action as a result
of a Charge).
A Fatigue Action can also be given to a model
that has already activated by spending Power
as described below. This is known as “Forced
Fatigue”. See the table on page XXX for more
details.
A Fatigue Action cannot be given to a group
(see page XXX), only to a single model. That is,
you cannot combine Fatigue Actions with
Group Actions. An activated member of a
group may still receive a Fatigue Action later
by spending Power however.
If a model is marked as Fatigued at the start of
its activation, it may only perform one short
action. In addition, it cannot have a further
Fatigue action played on it that Turn (although
it may have Force Fatigued plyed on it in a
later Turn). Once the model’s activation is
complete, the model is marked as activated and
the Fatigue counter it started the activation
with is removed.
Using Power Each Round, players will have a limited
resource of Power to spend and enhance the
actions and abilities of their models. A player
can spend as much of their Power as they wish
to during a Turn.
To help keep track of Power, it’s easiest to put
the Power Dice to one side as you spend it. If
you have a die result which shows a higher
amount of Power than you want to spend,
simply turn the die to the amount remaining
(for example a 2 down to a 1).
12
VANGUARD
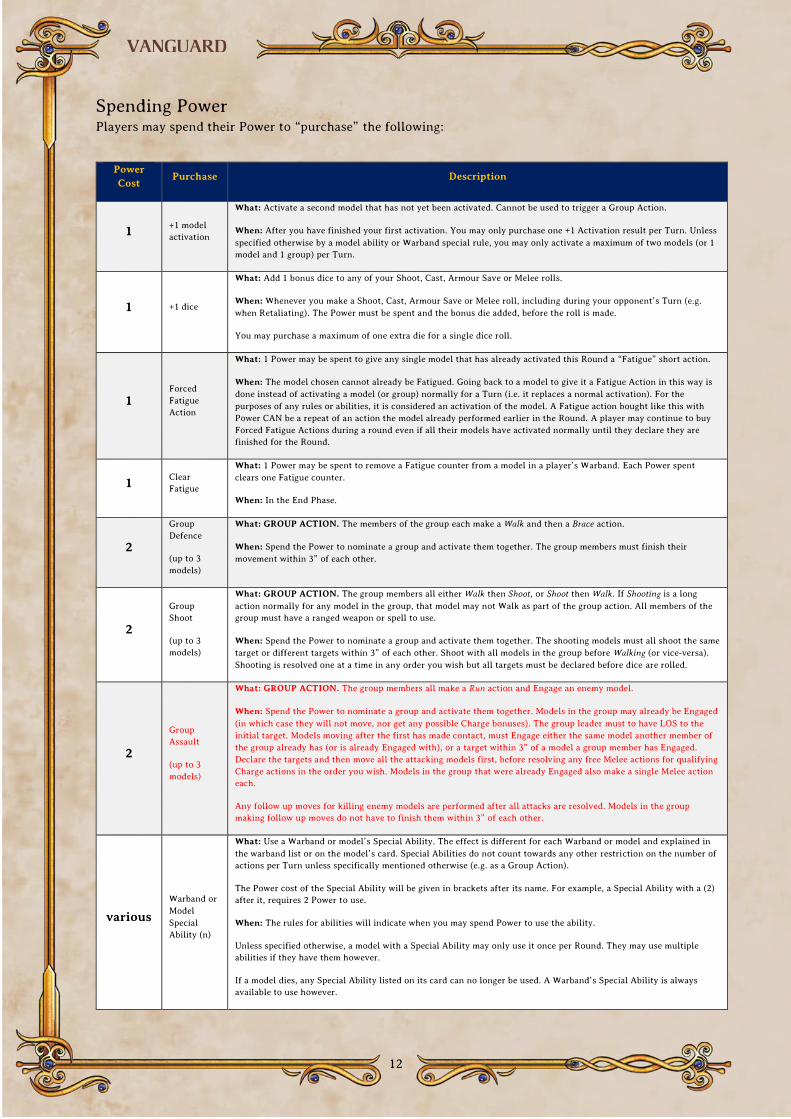
Spending Power Players may spend their Power to “purchase” the following:
Power
Cost Purchase Description
1 +1 model
activation
What: Activate a second model that has not yet been activated. Cannot be used to trigger a Group Action.
When: After you have finished your first activation. You may only purchase one +1 Activation result per Turn. Unless
specified otherwise by a model ability or Warband special rule, you may only activate a maximum of two models (or 1
model and 1 group) per Turn.
1 +1 dice
What: Add 1 bonus dice to any of your Shoot, Cast, Armour Save or Melee rolls.
When: Whenever you make a Shoot, Cast, Armour Save or Melee roll, including during your opponent’s Turn (e.g.
when Retaliating). The Power must be spent and the bonus die added, before the roll is made.
You may purchase a maximum of one extra die for a single dice roll.
1 Forced
Fatigue
Action
What: 1 Power may be spent to give any single model that has already activated this Round a “Fatigue” short action.
When: The model chosen cannot already be Fatigued. Going back to a model to give it a Fatigue Action in this way is
done instead of activating a model (or group) normally for a Turn (i.e. it replaces a normal activation). For the
purposes of any rules or abilities, it is considered an activation of the model. A Fatigue action bought like this with
Power CAN be a repeat of an action the model already performed earlier in the Round. A player may continue to buy
Forced Fatigue Actions during a round even if all their models have activated normally until they declare they are
finished for the Round.
1 Clear
Fatigue
What: 1 Power may be spent to remove a Fatigue counter from a model in a player’s Warband. Each Power spent
clears one Fatigue counter.
When: In the End Phase.
2
Group
Defence
(up to 3
models)
What: GROUP ACTION. The members of the group each make a Walk and then a Brace action.
When: Spend the Power to nominate a group and activate them together. The group members must finish their
movement within 3” of each other.
2
Group
Shoot
(up to 3
models)
What: GROUP ACTION. The group members all either Walk then Shoot, or Shoot then Walk. If Shooting is a long
action normally for any model in the group, that model may not Walk as part of the group action. All members of the
group must have a ranged weapon or spell to use.
When: Spend the Power to nominate a group and activate them together. The shooting models must all shoot the same
target or different targets within 3” of each other. Shoot with all models in the group before Walking (or vice-versa).
Shooting is resolved one at a time in any order you wish but all targets must be declared before dice are rolled.
2
Group
Assault
(up to 3
models)
What: GROUP ACTION. The group members all make a Run action and Engage an enemy model.
When: Spend the Power to nominate a group and activate them together. Models in the group may already be Engaged
(in which case they will not move, nor get any possible Charge bonuses). The group leader must to have LOS to the
initial target. Models moving after the first has made contact, must Engage either the same model another member of
the group already has (or is already Engaged with), or a target within 3” of a model a group member has Engaged.
Declare the targets and then move all the attacking models first, before resolving any free Melee actions for qualifying
Charge actions in the order you wish. Models in the group that were already Engaged also make a single Melee action
each.
Any follow up moves for killing enemy models are performed after all attacks are resolved. Models in the group
making follow up moves do not have to finish them within 3” of each other.
various
Warband or
Model
Special
Ability (n)
What: Use a Warband or model’s Special Ability. The effect is different for each Warband or model and explained in
the warband list or on the model’s card. Special Abilities do not count towards any other restriction on the number of
actions per Turn unless specifically mentioned otherwise (e.g. as a Group Action).
The Power cost of the Special Ability will be given in brackets after its name. For example, a Special Ability with a (2)
after it, requires 2 Power to use.
When: The rules for abilities will indicate when you may spend Power to use the ability.
Unless specified otherwise, a model with a Special Ability may only use it once per Round. They may use multiple
abilities if they have them however.
If a model dies, any Special Ability listed on its card can no longer be used. A Warband’s Special Ability is always
available to use however.
`
13
VANGUARD
Group Actions Using Power, you can activate a group of
models together. All models in the group must
not have already been activated this Turn. This
is called a Group Action and all models are
considered to be performing a long action for
the Turn. Once the Group Action is complete,
all models in the group are marked as
activated.
To make a Group Action, nominate a model
and then up to 2 more models within 3” of the
first model. The selected models form the
group. Some models have Special Abilities that
are also Group Actions. The model with the
Special Ability is the nominated first model of
the group in this case.
Participating in a Group Action replaces a
model’s normal activation for the Turn. You
cannot activate a single model, move it to join
a group and then attempt a Group Action
involving that model, for example.
The common Group Actions available to all
models and Warbands are listed in the table on
page XXX.
Model Special Abilities Some models have Special Abilities. These cost
Power to use as explained on page XXX.
Warband Specific Special
Abilities While the makeup of Warbands can and will be
very different, every faction has a generic
Special Ability that is always available to
Warbands of that type.
Warband Specific Special Abilities can only be
used once per Round at any time during one of
that Warband’s Turns, unless specified
otherwise.
Just like Model Special Abilities, these cost
Power to use as explained on page XXX.
14
VANGUARD
Movement Moving your models around the battlefield is a
vitally important part of the game if you want to
ensure you have the right models in the right
places and doing the job you need!
Depending on the action they are performing, a
model will be moving up to its Speed value in
inches. Typically this movement is simple and
along the ground in a line in any direction.
Models can turn any number of times as they
move. Once their activation is over, models
remain facing the way they finished.
Use your tape measure to determine how far
your models can move.
Unless a model is moving to Engage an enemy
model, it may not move within 1” of any enemy
models.
Terrain on the table can affect the way models
move. See the Terrain section on page XXX for
more details. In addition, a model cannot move
through any other models, including friendly
ones.
Unless specified otherwise, models cannot
leave the playing surface (treat the edges of the
table as Impassable terrain).
Models ending their movement with their base
touching an obstacle (e.g. a wall) must align
one side of their base flush with it.
Moving up and down stairs has no penalty.
Models can Climb up or down ladders,
counting the height in inches of the ladder as
part of their movement.
Models can Climb up or down surfaces that
require it, counting the height in inches of the
surface being scaled as Difficult Terrain and
part of their movement.
In both cases, they must reach the top (or
bottom) by the end of their activation. Models
cannot stop part-way up a wall, ladder or other
surface during a Climb. A model that would
end its movement at the top or bottom of a
surface being climbed is considered to have
successfully moved between levels and is
placed at the appropriate end, with no further
movement allowed as part of that action, but
there must be sufficient room to place the
model in position or the action cannot be
performed.
Models of Type BEAST or with the special rule
Cavalry, cannot Climb.
On vertical surfaces, models can safely drop down their Height in inches without taking any injury (instead of a controlled Climb). This movement can be voluntary (e.g. dropping to a lower level) or involuntary (e.g. pushed off a cliff!). The vertical distance is counted as part of the model’s movement. Models dropping further than their Height are Falling and take (n) hits with Crushing Strength (n), where n is the difference between the model's Height and the distance to the ground, rounding down. Thus a Height 2 model pushed down a 4” high wall will take 2 hits from Falling, each with Crushing Strength (2). A Height 1 model moving down the same wall would take 3 hits from falling, each with Crushing Strength (3). A model that takes any wounds from Falling ends its action and is knocked-down. See the special rules on page XXX for details on Crushing Strength.
`
15
VANGUARD
A model can move (jump) across gaps at the same level up to half its Sp value in inches but must make a test against its Sp value to do so and have sufficient movement to land and be placed on the opposite side. Roll a D8. If the result is equal or under the model's Sp value, the model successfully jumps the gap and may continue moveing the other side. Otherwise, the model falls into the gap and may take damage as a result (see falling above). The falling model is placed in the level it lands directly below the point the jump was attempted from. Note that for this test, a roll of 1 is always a failure and 8 is always a success.
Knocked-down
Models that have been knocked-down, are
simply placed on their side where they stood.
They lose any Brace counter they had. They
are still Engaged if they were before by any
standing enemy models. Standing models in
contact with a knocked-down model are NOT
Engaged by that model so can potentially cast
spells or make ranged attacks against it but
may also make a Melee attack against it if they
wish.
Any attacks against a model that is knocked-
down are considered to be from its rear arc
(see arcs on page XXX).
A model that is knocked-down and is lying on
the ground must Stand Up before it can take
any other actions.
16
VANGUARD
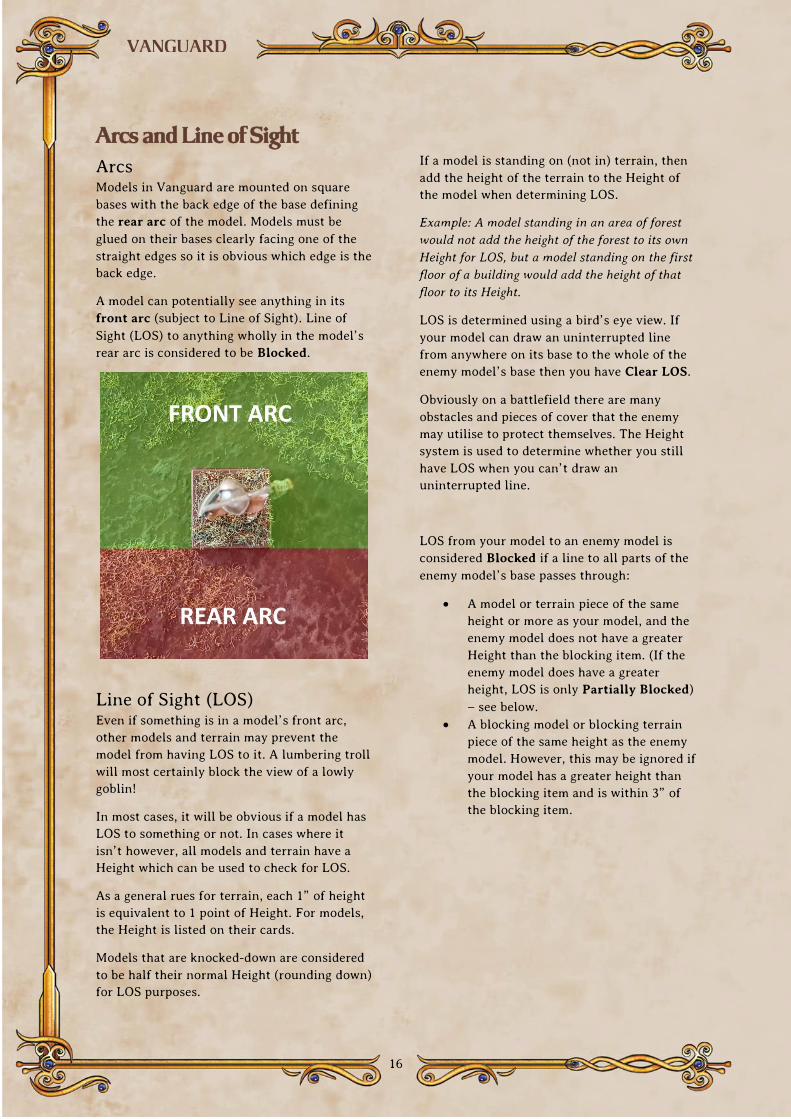
Arcs and Line of Sight Arcs Models in Vanguard are mounted on square
bases with the back edge of the base defining
the rear arc of the model. Models must be
glued on their bases clearly facing one of the
straight edges so it is obvious which edge is the
back edge.
A model can potentially see anything in its
front arc (subject to Line of Sight). Line of
Sight (LOS) to anything wholly in the model’s
rear arc is considered to be Blocked.
Line of Sight (LOS) Even if something is in a model’s front arc,
other models and terrain may prevent the
model from having LOS to it. A lumbering troll
will most certainly block the view of a lowly
goblin!
In most cases, it will be obvious if a model has
LOS to something or not. In cases where it
isn’t however, all models and terrain have a
Height which can be used to check for LOS.
As a general rues for terrain, each 1” of height
is equivalent to 1 point of Height. For models,
the Height is listed on their cards.
Models that are knocked-down are considered
to be half their normal Height (rounding down)
for LOS purposes.
If a model is standing on (not in) terrain, then
add the height of the terrain to the Height of
the model when determining LOS.
Example: A model standing in an area of forest
would not add the height of the forest to its own
Height for LOS, but a model standing on the first
floor of a building would add the height of that
floor to its Height.
LOS is determined using a bird’s eye view. If
your model can draw an uninterrupted line
from anywhere on its base to the whole of the
enemy model’s base then you have Clear LOS.
Obviously on a battlefield there are many
obstacles and pieces of cover that the enemy
may utilise to protect themselves. The Height
system is used to determine whether you still
have LOS when you can’t draw an
uninterrupted line.
LOS from your model to an enemy model is
considered Blocked if a line to all parts of the
enemy model’s base passes through:
A model or terrain piece of the same
height or more as your model, and the
enemy model does not have a greater
Height than the blocking item. (If the
enemy model does have a greater
height, LOS is only Partially Blocked)
– see below.
A blocking model or blocking terrain
piece of the same height as the enemy
model. However, this may be ignored if
your model has a greater height than
the blocking item and is within 3” of
the blocking item.
`
17
VANGUARD
LOS from your model to an enemy model is
considered Partially Blocked if:
Only part (not all) of the enemy
model’s base is in a position that
would be considered Blocked.
The enemy model is behind a blocking
item but has a greater Height.
The enemy model is within an area of
Difficult Terrain that is at least Height
1 (e.g. shooting at a model within a
wood).
The enemy model is less than 3”
within Difficult Terrain of equal or
greater height. If LOS to the enemy
model traces through more than 3” of
such Difficult Terrain, LOS is blocked.
An enemy model can be seen so long as LOS is
either Clear or Partially Blocked. When LOS is
Partially Blocked, the enemy model is often
said to be “in cover”.
Obstacles
A model in direct contact with, and tracing
LOS over an obstacle that is of a lower Height
than it, can ignore that obstacle for
determining LOS. For example, an archer
standing against a wall, firing over it, would
not have their LOS blocked by the wall itself.
18
VANGUARD
Ranged attacks Whether your models are firing with bows,
throwing knives, arcane explosives or casting
deadly spells, the following rules will explain
how to resolve such attacks.
Ranged Attacks are made due to Shoot or Cast
actions. Unless specified otherwise a model
may fire one weapon (or cast one spell) at a
single enemy model with its action.
The target of a ranged attack must be in range
and LOS of the firing model. Measure the
distance from the base of the firing model to
the target model between the shortest points.
If the distance is equal or less than the range
value of the weapon, the target is in range. If
LOS is blocked, the attack cannot be made.
Models can only make a Shoot action if they
have a number of dice specified and are
equipped with a Ranged weapon. If a model
has a “-“ listed for its Ra stat, it may not make
a Ranged attack or be given any equipment of
type Ranged.
A model may not fire at another model that is
Engaged with a friendly model in Melee. A
model that is Engaged itself may not make a
Ranged attack.
If a model has more than one type of Ranged
attack the player using the model must state
which is being used before any dice are rolled.
To make the attack, the player rolls the
number of dice shown in the model’s Ranged
section on its stat card (or equipment).
Modifiers and Bonuses
If the firing model has a Clear LOS to
the target model, the firing model
receives one bonus die to add to its
roll.
If the firing model is standing on
terrain that has elevated the model’s
Height to 3 or more Height levels
taller than the target model, the firing
model receives a +1 modifier to its
roll. For example, a Height 2 model
standing on a Height 3 piece of terrain
has a total Height of 5. It will gain a +1
modifier when shooting at models with a
Height of 2 or less.
Each dice that equals or betters the Ra stat of
the firing or casting model causes 1 hit is
scored on the target. The Exploding 8s!
mechanism is used with each 8 result
automatically scoring 1 hit.

`
19
VANGUARD
Armour Roll
The owner of the target model then rolls 1 die
for each hit scored. For each die that equals or
betters the target’s Armour value, 1 hit is
ignored (saved).
The Exploding 8s! mechanism is used with each
8 result automatically saving 1 hit.
Finally, the target model suffers one wound for
each unsaved hit. If this takes the target to
zero or less wounds, check the following
conditions:
If the model’s type is GRUNT it is
removed from the table as a casualty
and plays no further part in the game.
Otherwise, a model on zero or fewer
wounds must now make a Nerve test
(see page XXX). If the model has taken
more wounds than it had remaining,
the difference is used to modify the
Nerve test. For example, if a model with
1 wound suffers 2 wounds, the Nerve
test has a -1 modifier:
o Down But Not Out - If the
test is passed, the model
survives with 1 wound
remaining but is knocked-
down, and is marked as both
fatigued (if not already).
o Too Much Damage - If the
test is failed, the model is
removed from the table as a
casualty and plays no further
part in the game.
Modifiers and Bonuses
If the firing model’s base is wholly in
the rear arc of the target model, the
attack gains Piercing (1) or increases
the n value by 1 if the Ranged attack
already has the Piercing special rule.
Remember, if the target is knocked-
down, the attack is considered to be
from the rear arc.
Example:
Player A’s model takes a Shoot action at Player
B’s model. The model is determined to be within
the range of the weapon and LOS to the target is
Clear. The shooting model’s Ranged section says
to roll 2D8 and the model rolls an extra dice (3
in total) for the Clear LOS bonus. The model has
an Ra stat of 5+.
Player A rolls the three D8s and scores 2, 6 and
8. The Exploding 8 means another die is rolled
which scores a 4.
In total, the target is hit twice (the 6 and the 8).
Player B now rolls 2 dice for the Armour roll on
the target. The target model’s Armour is 6+. The
dice score 4 and 7 so one hit is saved but the
other one causes a wound on the target model.
20
VANGUARD
Melee attacks A model that is in base to base contact with
one or more enemy models is said to be
Engaged.
A model that takes a Melee action makes a
Melee attack against one enemy model it is
engaged with and in its front arc. The owner of
the attacking model chooses which enemy is
being attacked if it is engaged with more than
one enemy model.
Before any dice are rolled, the attacking player
may turn their model on its centre to face any
direction, so long as it remains in base contact
with all the same enemy models and there is
room to still fit the base in the new facing.
If a model has more than one type of Melee
attack the player using the model must state
which is being used before any dice are rolled.
To make the attack, the player rolls the
number of dice shown in the model’s Melee
section on its card.
Modifiers and Bonuses
If the attacking model Charged (Charge
action) into the Melee this Turn, it
gains 1 bonus die unless:
o The target model is defending
an obstacle
o The charging model moved
through Difficult Terrain or
over an obstacle
If the target model is knocked-down,
the attacking model gains a +1
modifier to its roll.
Outnumbering: If one or more other
friendly models, that are not knocked-
down or Fatigued, are also Engaged
with the target model, the attacking
model adds 1 bonus die).
Each dice that equals or betters the Me number
of the attacking model causes 1 hit on the
target. The Exploding 8s! mechanism is used
with each 8 result automatically scoring 1 hit.
`
21
VANGUARD
Armour Roll
The owner of the target model then rolls 1 die
for each hit scored. For each die that equals or
betters the target’s Armour value, 1 hit is
ignored (saved).
The Exploding 8s! mechanism is used with each
8 result automatically saving 1 hit.
Finally, the target model loses one wound for
each unsaved hit. If this takes the target to
zero or less wounds, check the following
conditions:
If the model’s type is GRUNT or it is
already knocked-down it is removed
from the table as a casualty and plays
no further part in the game.
Otherwise, a model on zero or fewer
wounds must now make a Nerve test
(see page XXX). If the model has taken
more wounds than it had remaining,
the difference is used to modify the
Nerve test. For example, if a model with
1 wound suffers 2 wounds, the Nerve
test has a -1 modifier:
o Down But Not Out - If the
test is passed, the model
survives with 1 wound
remaining but is knocked-
down, and is marked as
fatigued (if not already).
o Too Much Damage - If the
test is failed, the model is
removed from the table as a
casualty and plays no further
part in the game.
Modifiers and Bonuses
If the attacking model’s base is wholly
in the rear arc of the target when the
move to Engage is declared (or is in
the rear arc anyway while already
Engaged), the resulting attack gains
Crushing Strength (1) or increases the n
value by 1 if the Melee attack already
has Crushing Strength. Remember, if
the target is knocked-down, the attack
will be considered to be from the rear
arc.
If the defending model is the other
side of an obstacle and the attack is in
its front arc, its Armour is improved
by 1 for this Armour roll, as if it were
Braced. A model already Braced will
still receive this bonus.
Follow-up moves
If a model kills its enemy and there are no
other enemy models in base-to-base contact
with it, it may make a free follow-up move of
3” into its front arc, following the normal
movement rules. When making a follow-up
move, models are allowed to move within 1" of
enemy models but they cannot contact and
Engage them (models will often be fighting in
tight conditions and will have to remain closer
than normal to their enemies out of necessity).
Models in a Group Assault action that kill their
enemies and are no longer Engaged can each
make a free follow-up move.
If a model kills its enemy and is still Engaged
with other models, it may be turned to face any
direction as long as it can still physically fit.
22
VANGUARD
Retaliate A model that has been attacked in a Melee and
has survived now has a chance to Retaliate
and attack back. The intention to Retaliate is
declared after the attack is resolved. If the
model is being attacked by more than one
enemy (for example as part of a Group Assault
action), the intention to Retaliate is declared
after each attack in turn but before the next
one is resolved.
A model that is knocked-down or that is
already both Activated and Fatigued cannot
Retaliate in a Melee. Therefore, a model may
retaliate a maximum of two times during a
Round.
To Retaliate, the model is turned so that the
enemy model it is retaliating against is in its
front arc. If there is no room to turn the
model, it cannot Retaliate. It then makes a
Melee Attack against its opponent as described
above. Resolve the attack and then check the
following conditions and use the first which
applies:
1. If the retaliating model is not already
marked as Fatigued, mark it as such
with a Fatigued counter.
2. If the retaliating model has not already
been marked as Activated this round
mark it as such with an Activation
counter.
If a retaliating model kills its opponent and is
no longer engaged with any enemy models, it
may make a follow-up move.
Models can’t retaliate against a retaliation –
once both models have struck blows, the Melee
action is over.
Group Assaults
When resolving a Group Assault, the player
whose models are attacking chooses the order
to resolve each Melee. Each attack (and any
Retaliation) is resolved fully before moving
onto the next.
`
23
VANGUARD
Nerve A model’s Nerve value is a representation of its
morale, willpower and self-control. If things start
to go wrong, or an individual is required to do
something they aren’t comfortable with, it might
take a test of nerve to overcome it, or the
Warband will struggle to act as a coherent
fighting force.
Nerve Tests If the rules say a model must make a Nerve
test, roll a single die, applying any modifiers
given. If the result is equal or better than the
model’s Nerve stat, the test is passed. If it is
under the models’ Nerve stat, the test is failed.
Warband Morale A Warband is broken if it has less than half
the number of starting models remaining (by
model count). Determine if a Warband is
broken at the start of each Round.
Once a Warband is broken, each unengaged
model in the Warband must make a Fallback
Check when it activates. If performing a group
action, use the Nerve value of the model
nominated for the group to make the Fallback
Check.
Fallback Checks
To make a Fallback Check, simply make a
Nerve test.
If the test is passed, the Fallback Check is
succesful and the model (or group) may be
activated as normal.
If the test is failed, the Fallback Check is not
successful and the model (or group) must make
a special Fallback! action this Turn (see
below).
If a group fails a Fallback Check, all group
members must make a Fallback! action and
must finish their moves within 3” of each
other. Power must be spent on the Group
Action before any Fallback Check is made.
A Fatigued model that fails its Fallback Check
is marked as Fatigued again after the Fallback!
action (i.e. it doesn’t lose its Fatigue marker at
the end of its activation).
Fallback!
A model making a Fallback! action, must move
towards its own table edge (as defined by the
scenario being played) along as direct a path as
possible and as far as possible up to twice its
Speed in inches (Run). Retreating models
cannot engage enemy models and normal
movement rules apply. Its Activation is then
complete (mark it as activated).
Models that Fallback! may not have Fatigue
Actions or Special Abilities played on them
during their Activation. Power may be spent to
give a model a Forced Fatigue Action later
however without having to make another
Fallback Check.
If a model that is falling back reaches the edge
of the table (or started its Fallback there), it
must make another Fallback Check
immediately. If the test is passed, the model
stops and is marked as activated. If it fails, it is
removed from the board as a casualty.
If a model that is knocked-down must
Fallback! it will first Stand Up and then make a
Walk action towards its own table edge.
24
VANGUARD
TERRAIN An empty battlefield might make moving
models around simple but it’s not very
exciting! Adding scenery to your games makes
for a dynamic and tactical experience that will
help immerse you in the action. While you can
use books to represent hills or a piece of card
to mark the boundary of a small wood, having
some great looking model terrain will really
bring your games to life.
In Vanguard, the different types of scenery and
terrain that is used, is classified into the
following types.
Open Ground
Areas of flat open grass, road, or any other
clear swathe of land is considered to be Open
Ground. Open Ground doesn’t impede a
model’s movement in any way.
Obstacles
Obstacles are linear barriers that may lay in a
model’s path as it moves. Examples are walls,
hedges and fences. Obstacles up to the height
of the model cost 2” of movement to cross
over, regardless of how fast the model is
moving. Anything taller than the model will
need to be climbed up and over.
Obstacles will often provide cover for targets
behind them as they can cause LOS (see page
XXX) to be partially blocked.
Models standing at windows treat them as
obstacles for all purposes.
Difficult Terrain
Areas of broken ground, wooded areas, ruins,
steep scree slopes and marshy ground are all
examples of Difficult Terrain. Models count
every inch moved in Difficult Terrain as 2”.
Thus, a model moving 3” through Difficult
Terrain counts as having moved 6”.
Areas of Difficult Terrain should be clearly
defined with an obvious boundary. Unless the
players agree, or a scenario specifies an exact
configuration of the elements within the area,
they are simply representations and can be
moved to make model placement easier if
required (e.g. you may need to move a tree to
one side to make room for a model that has
moved).
Impassable Terrain
Some terrain simply blocks movement. Solid
buildings, lava pools, large rock pillars are all
good examples. Models cannot move into or on
top of Impassable Terrain and must move
around it.
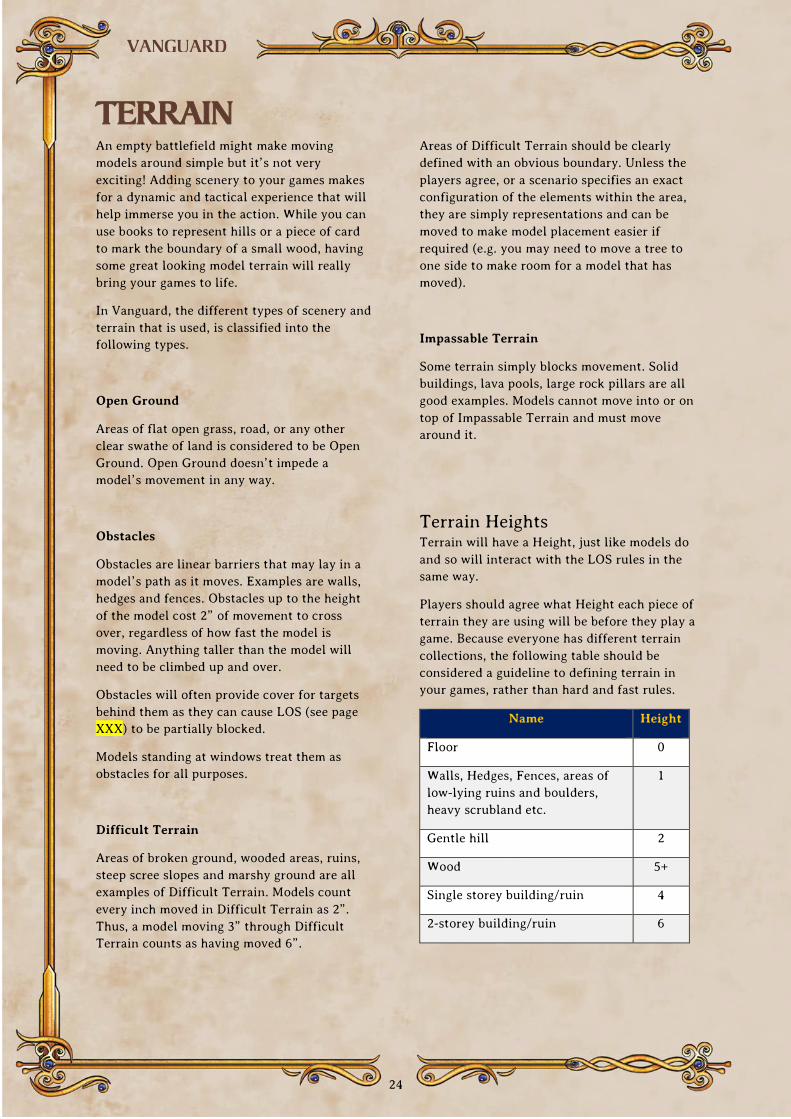
Terrain Heights Terrain will have a Height, just like models do
and so will interact with the LOS rules in the
same way.
Players should agree what Height each piece of
terrain they are using will be before they play a
game. Because everyone has different terrain
collections, the following table should be
considered a guideline to defining terrain in
your games, rather than hard and fast rules.
Name Height
Floor 0
Walls, Hedges, Fences, areas of
low-lying ruins and boulders,
heavy scrubland etc.
1
Gentle hill 2
Wood 5+
Single storey building/ruin 4
2-storey building/ruin 6

`
25
VANGUARD
SPECIAL RULES Some models, spells, effects and attacks
possess what are known as “special rules”.
Each of these Special Rules is an exception to
the normal rules. The most common are listed
below. Rules unique to a model will be printed
on its reference card.
6th Sense – models with this rule that are not
already Engaged with an enemy model and are
attacked in Melee in their rear arc, may turn to
face the attacking model before any Melee
attack is resolved. The attacking model loses
any bonus for attacking the model in its rear
arc.
Area Effect (range / dice / rules) – Attacks that
have the Area Effect rule may also hit models
near to the original target. The Area Effect rule
will detail the size of the affected area, how
many attack dice are rolled and any Special
Rules that may apply (note that the Special
Rules from the initial attack don’t
automatically apply). Once any damage and
effects on the original target are resolved, the
extended area effect attacks are then resolved
in any order the player using the attack wishes.
For example, if an attack has Area Effect (2” /
2D8 / Piecing (1)), all models (not just enemy
ones!) within 2” of the original target would be
attacked with 2D8 and any hits resolved with
Piercing (1). Roll for each model separately.
Area Effect attacks on a model other than the
original target are always assumed to be from
the direction of the original target.
If the original target is killed, leave it in place
until the any Area Effect hits have been
measured and resolved, then remove it.
Unless specified otherwise, models can only
avoid being hit by an Area Effect attack if LOS
to them from the original target would be
blocked by impassable Terrain. Assume the
original target has full LOS into both front and
rear arcs for working this out. No bonus die for
Clear LOS is granted however.
Breath – extend a rectangle out the width of
the firing model’s base out to the range of the
attack. Roll (separately) to attack all models
whose bases are partially or wholly inside this
area unless LOS is Blocked to them. LOS to all
viable models is taken as being Clear.
Bloodlust – models with this rule add 1 bonus
dice to their Melee attack if the model they are
attacking has already suffered one or more
wounds.
Cavalry – models with this rule receive a +1
modifier when making Melee attacks against
models of a lower Height (including any
terrain). They cannot Climb however and will
automatically Fall if they attempt to Climb
down a surface.
Crushing Strength (n) – Melee attacks from
models or weapons with this rule apply a -(n)
modifier to the target’s Armour Roll when
attempting to save against hits. For example,
an attack made with Crushing Strength (1)
would change a roll of 5 to 4.
Defender – Brace is a short action for models
with this special rule.
Dodge – when targeted by a Ranged attack, the
player owning the target model can force the
attacking player to re-roll one die that caused a
hit. This can be used to re-roll an Exploding 8
to try and prevent it Exploding!
Fly – models with this special rule can move
over other models and terrain that would
normally block their way. They can move up or
down any number of levels of height with no
penalty (or chance of injury). They still cannot
end their move on impassable terrain or other
models however.
Headstrong – if a model with this special rule
is Fatigued, when it is activated, roll a die. On
a 6+, the Fatigue counter is removed and the
model may act as normal.
26
VANGUARD
Inspiring – a model with this rule, and all
friendly models within 6” of it, may re-roll
failed Nerve tests.
Marksman – a model with this rule can re-roll
any 1s when making Ranged attacks.
Mob Assault - When involved in a Group
Assault action, all models with this rule
performing the Group action gain Crushing
Strength (n) where n is the number of models
in the group with this rule, attacking the same
target. Thus, 2 models attacking would each
have Crushing Strength (2). This is calculated
before each attack is made, so retaliating
enemy models may reduce the effects by killing
members of the assaulting mob.
Parry – when targeted in Melee, the player
owning the target model (including from a
Retaliation) can force the attacking player to
re-roll one die that scored a hit. This can be
used to re-roll an Exploding 8 to try and
prevent it Exploding!
Pathfinder – models with this rule treat any
Difficult Terrain they move through as Open
Ground.
Piercing (n) – Ranged attacks from models or
weapons with this rule apply a -(n) modifier to
the target’s Armour Roll when attempting to
save against hits. For example, an attack made
with Piercing (2) would change a roll of 7 to 5.
Pound – if an attack with this rule scores 3 or
more hits and the target is not killed, it is
knocked-down. Apply this rule after any
possible Down But Not Out result.
Regenerate – Once per Round, models with
this special rule may spend 1 Power at any
time to recover one wound previously suffered.
Remove one wound counter from the model.
This doesn’t count as an activation and the
model can be Fatigued or knocked-down and
still use this rule.
Reload - Shoot is a long action for any Ranged
weapons with the Reload rule. The model may
pivot on the spot before making an attack
however.
Scout – After all standard model deployments
have been made, but before the game starts,
models with the Scout skill may set up outside
their deployment area but not within 12” of
the enemy deployment area or 12” of an enemy
model. If both players have models with Scout,
the player that finished deploying their other
models first, chooses the first Scout model to
be deployed – the players then alternate
placing their Scouts. Models with Scout may
always be placed in their own deployment area
if desired.
Smash – a model with this rule gains the Pound
special rule in the subsequent Melee when it
performs a Charge action.
Sneaky – when attacking the rear arc of a
model in Melee, rolls of 7 or 8 are Exploding
and therefore score a hit and can be rerolled.
Steady – if a model with this rule is knocked-
down, roll a die. On a 5+, the model remains
standing.
Stealthy – when making Ranged attacks at a
model with this rule, attacking models suffer a
-1 modifier when rolling for hits (including
casting spells).
Stubborn – a model with this rule may re-roll
failed Nerve tests.
Swarm – models with this rule grant 2 bonus
dice instead of one if they contribute to an
outnumbering bonus in Melee.
Vicious – a model with this rule can re-roll any
1s when making Melee attacks.
`
27
VANGUARD
MAGIC In the fantasy setting of Vanguard, certain
talented (or warped!) individuals can harness
and utilise arcane and mysterious magical
powers.
Casting spells In the game, models with the ability to cast
magical spells have the SPELLCASTER Type.
All spells are Ranged Attacks using a Cast
action. Normal LOS, ranged targeting rules and
damage resolution apply unless specified
otherwise. A spell will specify after its name if
it takes a short or long Cast action to use.
Spells roll to attack using the Ra of the casting
model unless specified otherwise.
A model may use the Cast action more than
once in its activation. However, a model may
not cast the same spell more than once in a
Turn.
The most common spells are listed on the
following page. Spells unique to a model will
be printed on their stat card. Typically, models
will only be able to use a small number of
spells, as specified on their card.
Each spell description will state the Range of
the spell (if applicable), how many dice to roll
and then any special or unique rules that
apply.
Some spells can be Boosted by Special
Abilities, by Power directly, or by taking a
longer action. This will be detailed in the spell
description, or the Special Ability. Where a
model has a Special Ability that can boost a
spell (e.g. extending the range), and the spell
can be boosted itself, it is possible to do both,
so long as the appropriate action is taken, and
Power spent.
If a model has a Special Ability that boosts a
spell’s range, it will only affect spells that
explicitly list a Range (e.g. [Range 12”]).
If a model is listed as having a spell, it
automatically has access to the boosted version
too, where the spell has one.
Some spells have delayed or lasting effects.
Spell Effect counters are provided to help
track models that have these spells cast on
them. Unless specified otherwise in the spell
description, Spell Effect counters should be
removed from the board in the End Phase,
ending any effect they may have caused.
28
VANGUARD
Vanguard Basic Spellbook The following list details the Vanguard Basic
Spellbook. Additional spells are available if
you are playing a campaign, as spellcasters
gain experience and learn new incantations
and tricks. See page XXX for more details.
Fireball (short) [Range 9”]. 2D8.
Boosted version: Cast as a long action instead
to gain the Breath special rule for the spell this
casting.
Hammer (long) [Range 12”]. 2D8.
If any hits are scored, no wounds are caused.
Instead, the target is knocked-down.
Heal (short) [Range 6”].
Target a single friendly model in range (but
not the caster), even if it is Engaged and roll
3D8. For each 6+ rolled, the target recovers 1
wound previously suffered.
Boosted version: Cast as a long action instead.
As above, but for this casting, for each 5+
rolled, the target recovers 1 wound previously
suffered.
Lightning Bolt (long). [Range 12”]. 3D8.
Piercing (1), Marksman.
Boosted version: Cost 2 Power. As above, but
the attack gains the Area Effect (2” / 2D8)
special rule for this casting.
Mind Storm (long) [Range 6”]. 2D8. Piercing
(1).
LOS is not required to the target to cast this
spell.
Shield (short)
Cast on self. No dice roll is required. Caster
has the Stealthy Rule and its Armour value is
decreased by 1 until the end of the Round (for
example, Ar 5+ becomes 4+). Place a Spell
Effect marker on the target as a reminder.
Shockwave (long)
All models (including friendly ones) of up to
Height 2 within 3” of the caster are moved 3”
directly away from the caster. Movement will
only be blocked by impassable terrain or
models not moving themselves due to the
shockwave. Move the models furthest away
from the caster first. Models cannot become
Engaged when moved by Shockwave - halt
them 1” away if they would be. Models already
Engaged will still end up Engaged with each
other if both are moved.
Boosted version: Cost 1 Power. As above but
models up to Height 3 are affected for this
casting.
Stun (short) [Range 12”]. 2D8.
If any hits are scored, no wounds are caused.
Instead, the target is marked as Fatigued.
Windblast (long) [Range 9”]. 3D8.
No wounds are caused. Instead, for each hit
scored, the target model is pushed back 3”
directly away from the caster stopping only for
Impassable terrain or other models. If a model
is pushed into an enemy model, it stops and is
Engaged.
Zap (short) [Range 12”]. 3D8.
Boosted version: Cast as a long action instead.
As above, but the spell has the Piercing (1)
special rule for this attack.
`
29
VANGUARD
CREATING A WARBANDYou can play Vanguard with just a few models
per player, without worrying about the two
sides being equally matched. This is great for
learning the game, but after you’ve become
familiar with the rules and have amassed a
larger collection of models, you will want to
play games where the forces facing one
another across the battlefield are balanced, so
that both players have an equal chance of
winning the game (at least to start with!).
In order to achieve this, you and your
opponent must pick a Warband before the
game by spending a number of “points”. Both
players have 200 points to spend on their
Warband for a game unless the scenario being
played specifies otherwise. However, once
players are familiar with the game they may
wish to experiment and play larger or smaller
games with different points values.
Each player picks models from one of the
faction lists provided in this book, or from
their deck of Vanguard Warband cards. Each
model costs a certain amount of points, as
shown in its entry or card. More powerful or
specialist models will cost more points.
As you pick models and include them in your
Warband, keep adding their cost until you have
reached the total you agreed. You can of
course spend less than the agreed total, but
you cannot spend even a single point more.
However, a Warband is still considered to be
the size of the maximum total the players
agreed on (e.g. a Warband which comes to 197
points would still be considered a 200 point
Warband).
Army Selection In order to restrict the possible (nasty!)
combinations that can be fielded and to make
sure Warbands have a resemblance of ‘realism’
about them, the following limitations are
placed on the model types and numbers that
can make up your Warband:
You must take a minimum of 5 WARRIORS
and/or GRUNT models and 1 COMMAND
model.
You may take up to 1 COMMAND, 1
SUPPORT and 1 SPELLCASTER model for
every 3 WARRIOR and/or GRUNT models
you select.
You may take up to 1 LARGE model for
every full 150 points in the Warband.
However, the first COMMAND model that
is also LARGE in the Warband does not
count against this limit.
If a model has more than one TYPE (e.g.
SUPPORT and SPELLCASTER), it counts as
1 of each for the purposes of selection
within a Warband.
Models with a * after their name are unique
Named Characters. Only one model with a * in
its name may be taken in a Warband.
Smaller Games
When you are learning to play, or if you just
want a quick fun game with a handful of
models, you can modify the selection rules
above as follows, recommended for games of
100 points per side or less:
- You must take a minimum of 2 WARRIORS.
- You do not have to take any COMMAND
models but may always take one if you wish.
- You may take a maximum of 1 LARGE
model.
Because smaller games do not insist on
COMMAND models, remember that this means
a warband might not be able to re-roll its
Power Dice at the start of each Round!