Embed Size (px)
Citation preview

The International Permaculture Solutions Journal Vol. 2
Patterning - Page 17
Gangamma's Mandala: The Tropical Home or Village Garden Bill Mollison
(Extract from Permaculture: A Designer's Handbook, 1988, Tagari Publications, PO Box 1,
Tyalgum NSW 2484 AUSTRALIA) [Reprinted with permission.]
The mandala garden provides an excellent example of both advantages and problems of using curvilinear shapes in gardening. Besides the advantages that Bill lists, there are at least two other major benefits. First, this is a very beautiful garden. beauty attracts the garden's most useful symbiote, the gardener.
These gardens draw us in on emotional and aesthetic planes. We may visit to commune with Earth spirits, but we surely also notice that the parsley needs thinning or that the hot peppers have reached the fire-truck red stage and need harvest. (Earth spirits expect such observations from us.) Furthermore, this garden has an enormous amount of edge, which, if properly organized, can magnify yield immensely.
One must learn this method of gardening, however, to locate plants in the correct aspect to shade and sun, to harvest the benefits of companion planting and avoid excessive competition, to get a feel for planting distances, root growth, water needs, and other factors, all of which differ from conventional gardening in kind and complexity – DH
In Taiwan and the Philippines, small (90
square meter--970 square foot), intensively planted
home gardens feed a family of five all year. I have
added to these designs my own permaculture "least
path" layouts to give a very concise and effective
model of sustenance garden design for tropical and
subtropical regions. These can also be adapted to
temperate regions, using suitable species. The
overall pattern can be altered to fit almost every site
form, but is presented here as a flat site pattern.
Although the building of such a garden is fast and
simple, the theory and design input are
sophisticated.
The whole design owes much to the work of
the East-West Institute in Hawaii, and the Samaka
gardens of the Philippines, but the layout is purely
permaculture. I have named the total layout
"Gangamma's Mandala" after one of our Karnataka
(India) permaculture design graduates.
Figure 18. The banana-sweetpotato-papaya circle garden.
Steps in the process are:
1) At the center of a 100-square-meter (1075
square foot) or larger area, describe a circle two
meters (six feet) across and excavate the soil to a
dish shape, ridged on the perimeter, and about 0.6 to
one meter (two to three feet) deep from hollow to
rim. This is the banana-sweet potato-papaya circle
garden, as in Figure 18.
Then cover the whole circle with wet paper
or wet cardboard, banana leaves, or any sheet mulch
material and fill the hollow (or over-fill it as a
dome) with "rough mulch" of short logs, coarse
twigs, hay, rice husks, and sawdust, or indeed any
humus-creating materials. A little scatter of manure,
ash, lime, dolomite, or fertilizer can be added. If
stones are available, bank them to the outside of the
rim.
Then plant the rim with four to five papayas
(a tall variety), four or so bananas (dwarf types),
and eight to 10 sweet potato plants. If available,
place yams or taro inside the rim. Later, plant beans
to climb the banana and papaya stalks.
2. A circular sunken path 0.6 to one meter
(two to three feet) wide is sawdusted or graveled
around this central circle garden, and off it, five-six
"keyholes" or indentations are made. The garden
now looks like Figure 19.

The International Permaculture Solutions Journal Vol. 2
Patterning - Page 18
Figure 19.
A. Mulch or circle garden=banana circle. B. The annular path. C. The keyhole paths.
3. Around each 'keyhole,' a bed 1.5 to two
meters (five-six feet) wide is first edge-banked with
soil 100-200 cm. (four to eight inches) high to
prevent water run-off. Then paper and mulch the
beds as for the banana circle. The garden now
resembles Figure 3 in plan. The thick lines
represent low earth ridges.
We have thus made six major keyholed beds,
each of which is separated from the next by a thin
strip of lemon-grass (Cymbopogon c3itratus ) or
vetiver grass (Vetiveria zizanioides ). Just outside
the periphery ridge, plant strips of lemon-grass,
comfrey, and arrowroot (Canna edulis ) for a
"kikuyu grass barrier," and behind that, a taller border
of cassava/banana/papaya/pigeon pea/Leucaena
/Crotalaria forms a hedge or windbreak. All these
borders yield mulch, forage, barrier effects, or food.
The whole mandala is fenced, or has spiny woven
hedge boundary for cattle exclusion, if necessary.
The mandala has been earth-shaped and
mulched to prevent run-off and to conserve moisture.
Now plant, using buckets of good soil, the following
"zones" of plants.
A. On the track edge border of the central path
and keyholes, within scoop-reach of the path, plant
those frequently plucked or everyday greens of high
value. The placement and selection criteria here are
that all the plant, or most of it, is picked for much
of the year. These are the "path side greens." They
include all the chive and shallot species, plenty of
parsley, coriander (cilantro), thyme and sage, celery,
broccoli, edible chrysanthemum, chard, and any long-
bearing or perennial greens, e.g., various perennial
"spinaches". This is therefore a narrow border to the
inner side of the keyhole beds, planted in the ridge
soils there.
B. Behind or outside the path side plants, we
plant a 1 meter (three foot) wide strip of species that
are frequently picked over a short season to a long
season, e.g., tomatoes, eggplants, sweet and hot
peppers (chilies), bush or staked beans and peas, kale,
corn, okra and so on.4 These are the "narrow bed"
plants, all within reach of a path or keyhole. As yet,
we do not need to step on any beds to harvest.
C. Just out of reach, on the outer borders of the
keyhole beds, plant most long-term root crops
(potatoes, sweet potatoes, carrots) or any crop we "cut
off and remove" (cauliflower, head lettuce, and
cabbage). Thus, for this crop we step (once) on the
bed to harvest and replant, following root crop with
fava beans or dahl (dried beans or lentils).
In the banana circle, we can place a grid or
platform of wood over the mulch, and this then
becomes an outside shower or wash-up area. Replant
all beds as harvested, and apply a top mulch of straw,
sawdust, bark, dry manure, or chips annually (or as
convenient--DH). Feed rabbits, guinea-pigs, chickens, or small livestock weeds, waste vegetables, household
scraps, and forage greens from the border hedge
(comfrey, cassava, leucaena or lemon grass). Cut for
mulch vetiver grass, lemon grass, etc., three to five
times annually. The roots of vetiver grass prevent
rodents from burrowing from "outside" as do root
masses of Euphorbia species.
Plant all trees, shrubs, and tubers before you
lay any mulch, including sheets. Then add about 300
cm (a foot) of trodden-down, wet mulch. Transplant
tray seedlings eight to 10 cm (three to four inches)
high. Plant large seeds such as peas or beans, each in a
hole scooped into the mulch. Use a double handful of
soil in each hole.5 Thickly scatter small seeds
(lettuce, carrot) on lenses of soil 500 cm (one and one
half feet) across and five to eight cm (two to three
The International Permaculture Solutions Journal Vol. 2
Patterning - Page 19
inches) thick, placed and firmed on top of the trodden
mulch. After broadcasting the seed, dust them with a
one cm (one half inch) thick layer of fine soil. All
seed can be pre-soaked. The whole bed needs a good
soak with a sprinkler at each stage.
If the mulch contains no weed seeds, the beds are
weed free. It takes nine to 15 months to build up a
worm population and a good soil. Push any surplus
compostables under the top mulch layer.
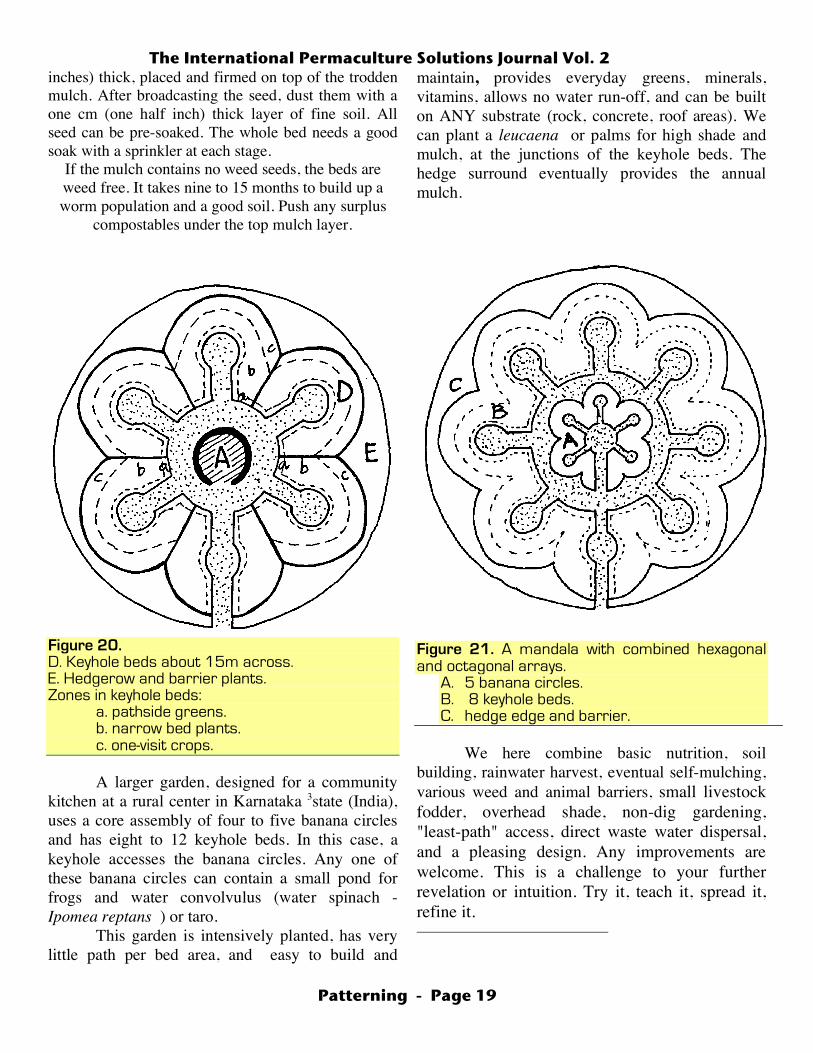
Figure 20. D. Keyhole beds about 15m across. E. Hedgerow and barrier plants. Zones in keyhole beds: a. pathside greens. b. narrow bed plants. c. one-visit crops.
A larger garden, designed for a community
kitchen at a rural center in Karnataka 3state (India),
uses a core assembly of four to five banana circles
and has eight to 12 keyhole beds. In this case, a
keyhole accesses the banana circles. Any one of
these banana circles can contain a small pond for
frogs and water convolvulus (water spinach -
Ipomea reptans ) or taro.
This garden is intensively planted, has very
little path per bed area, and easy to build and
maintain, provides everyday greens, minerals,
vitamins, allows no water run-off, and can be built
on ANY substrate (rock, concrete, roof areas). We
can plant a leucaena or palms for high shade and
mulch, at the junctions of the keyhole beds. The
hedge surround eventually provides the annual
mulch.
Figure 21. A mandala with combined hexagonal and octagonal arrays.
A. 5 banana circles. B. 8 keyhole beds. C. hedge edge and barrier.
We here combine basic nutrition, soil
building, rainwater harvest, eventual self-mulching,
various weed and animal barriers, small livestock
fodder, overhead shade, non-dig gardening,
"least-path" access, direct waste water dispersal,
and a pleasing design. Any improvements are
welcome. This is a challenge to your further
revelation or intuition. Try it, teach it, spread it,
refine it.

The International Permaculture Solutions Journal Vol. 2
Patterning - Page 20
Figure 22.
A. Banana-papaya circle with shower-wash grid fitted.
B. Sawdusted, rice husks, or gravel paths. C. Keyhole paths as B above. D. Keyhole beds: a. pathside plants, b. narrow bed plants, c. one-visit plants. E. Weed, wind, animal barrier-hedge sequence, e.g., (inner ––> outer) vetiver or lemon grass, comfrey, arrowroot, taller hedge of cassava, papaya, crotolaria, leucaena, pigeon pea and banana. F. In garden trees are leucaena or palms for shade in hot regions.
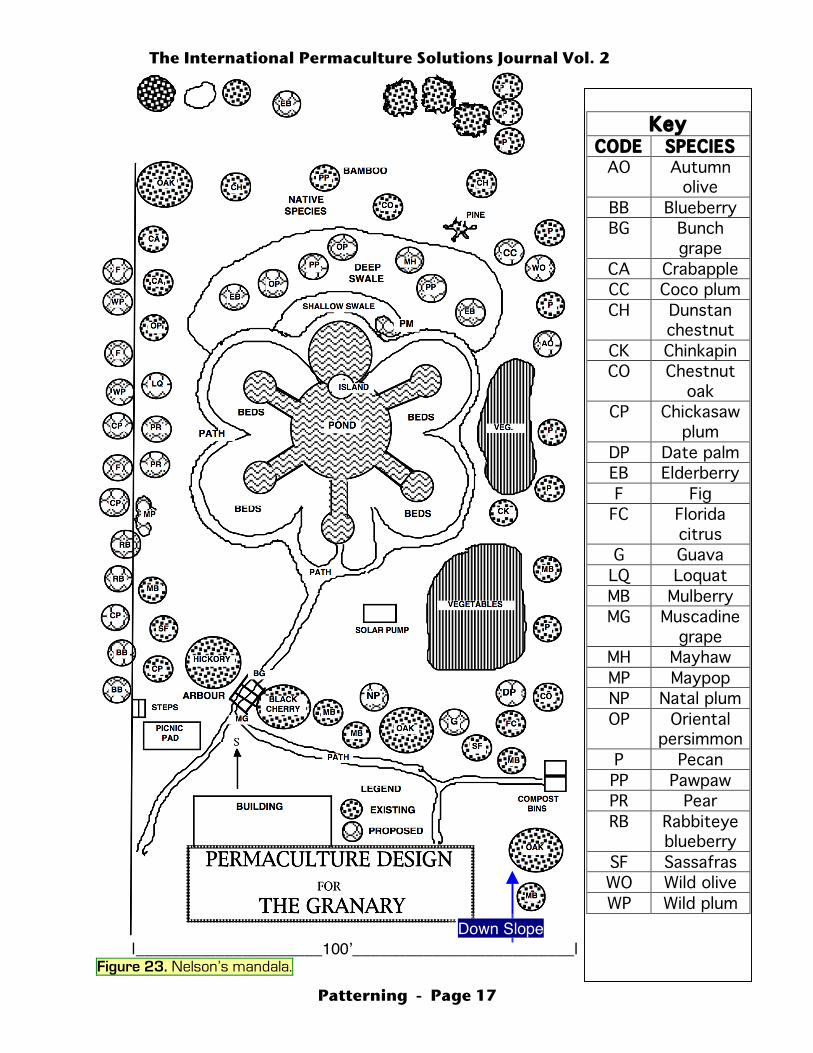
Nelsonʼs Mandala by Dan Hemenway
Several years ago, I prepared a permaculture
design for the Granary Wholefoods Inc., of Orange
Park, Florida (USA). I asked Nelson Helmuth, the
Granaryʼs owner, to explain his vision for the site. He
wanted several things, paramount of which were
plantings of mostly native Florida food plants, a pond
and a mandala like the one he saw illustrated in
Mollisonʼs Permaculture Designerʼs Manual.
With a site 100 feet wide by 300 feet deep, I
felt stymied at how to fit everything into the site. I
looked up the mandala illustrations in Mollisonʼs book,
and the solution jumped right out at me. I made
Nelsonʼs pond the mandala paths, and put the beds
around the edge, an inversion of Billʼs idea, but one
that worked. We had a situation something like
chinampas (See TIPS Journal, Vol. 1, No 3.) The
resulting design is on the next page.
The International Permaculture Solutions Journal Vol. 2
Patterning - Page 17
|_____________________100ʼ_________________________| Figure 23. Nelson’s mandala.
Key
CODE SPECIES
AO Autumn olive
BB Blueberry
BG Bunch grape
CA Crabapple
CC Coco plum
CH Dunstan chestnut
CK Chinkapin
CO Chestnut oak
CP Chickasaw plum
DP Date palm
EB Elderberry
F Fig
FC Florida citrus
G Guava
LQ Loquat
MB Mulberry
MG Muscadine grape
MH Mayhaw
MP Maypop
NP Natal plum
OP Oriental persimmon
P Pecan
PP Pawpaw
PR Pear
RB Rabbiteye blueberry
SF Sassafras
WO Wild olive
WP Wild plum
Down Slope

The International Permaculture Solutions Journal Vol. 2
Patterning - Page 18
This is the second iteration of the design.
My daughter, Cassandra was digging the pond
as part of her permaculture design internship.
She encountered a water oak sapling that she
felt should be spared. So redesigned slightly to
retain the oak on the island shown.
Because the area received considerable
runoff from parking lots, buildings, etc., I wanted
the design to be able to absorb a great deal of
water. However, because the soil is sand, we
had to seal the pond. The solution was to
incorporate a pair of swales behind the pond to
absorb water when the runoff overflows the
sealed excavations. The swales are of different
depths to accommodate plants with different
moisture preferences and different flooding
tolerances.
Draw a Mandala Dan Hemenway
I describe how to draw the mandala
on the ground. You can easily infer from
these instructions methods for drawing
the plan on paper or with a computer.
First, drive a stake or pin into the
ground where the center of your mandala
will be. Now attach a string to the pin and
make a knot about half the diameter of
your inner circle. Walk around, holding the
string tight, drawing the circle at the know.
On dark soil you can draw with ground
limestone, wood ash, or gypsum. On light
soil you can draw with charcoal, which is
very good for the soil anyway. Or you can
scratch the circle with a pointed stick.
This circle is the basis for your
mandala. Drive a pin anywhere on the
circumfrence that you have drawn on the
ground. Using the same string and the
same not, go straight out from the circle
and drive another pin, just lightly at first.
Make an arc, using the string, from this
new pin. If it is tangent to the circle, you
have succeeded. If it overlaps, move the
pin a little ways back and try again. (There
are ways to get the center of the next
circle right on the first try, but this is
probably simpler.)
Now draw a new circle, tangent to
the first one. Keep adding circles around
the center circle, taking care to keep each
circle tangent to both the original circle
and the one to the right or left. Six should
fit exactly. The center of the original circle
serves as the big circleʼs center, also.
The big circle is the boundary of your
defensive perimeter, so you need to have
designed it before deciding how far from
the mandala center to make it.
Your Earth art should look about like
this:
Figure 24. Mandala outlines.
You can see that this differs from Bill
Mollisons design. Hexagonal array of circles
overlaps the center circle a bit, and so perforce

The International Permaculture Solutions Journal Vol. 2
Patterning - Page 19
they also overlap each other. The first Earth
drawing would therefore look more like this:
Figure 25. Basic Earth drawing for a Mollison-style mandala.
If you started with something like Fig. 25, you will
want to ensure that you bring each circle in
toward the center directly, without leaning to one
side or the other. To do this, stretch a string from
the pin at the mandala center and the center of
one of the satellite circle pins. Drive the pin for
the new center along this line.
Figure 26. The pink circle is the original of one of the satellite circles. The center pin been moved inward along a line between the two original pins. The new center is show here.
This is actually the way you would work on a computer or on paper. On Earth, there is an easier way. The knot on your string marks off the exact radius of your inner circle. The radius fits inside the circle exactly six times. Drive a pin anywhere on the
circumference, keeping in mind where you want to enter the mandala. Move the knot over the circumference on either side and drive another pin. Repeat until you meet the point where you started. You will have six pins around the circumference. Extend a line from the center pin past each pin around the circumference. Decide how much overlap you want for your satellite circles and shorten the distance to the knot (make a new knot) by that amount. Drive a pin along one of the radiating lines at the distance you have determined your satellite circle shall be from the center.
Figure 27. Sink six equidistant pins temporarily around the circumference of the inner circle. The distance between pins is the same as the circle radius. Extend a line (pink here) from the center pin well past each of the six outer pins. We have arbitrarily selected a distance shorter than the radius. We drive a pin or stake (red spot) the chosen distance (green line). That pin (red) becomes the center for a new circle of the same size as the center. Because the two circles are closer than their diameter, they overlap. For more overlap, reduce the distance between the black pin and the red pin.
By this process, we draw on the ground a set of
overlapping circles such as seen in Figure 25.
The amount of overlap in Fig. 25 exceeds that in
Fig. 27. This is subject to the designer discretion.
The next step is to draw smaller circles
inside the perimeter array of six, based on the
same center pins. Again the designerʼs discretion
applies. A good starting point would be 1/3 the
diameter of the larger circles.
Now draw aisles connecting the little
circles with the center circle. Iʼve drawn
rectangles because on the computer that is
easiest. However two parallel lines suffice.
The International Permaculture Solutions Journal Vol. 2
Patterning - Page 20
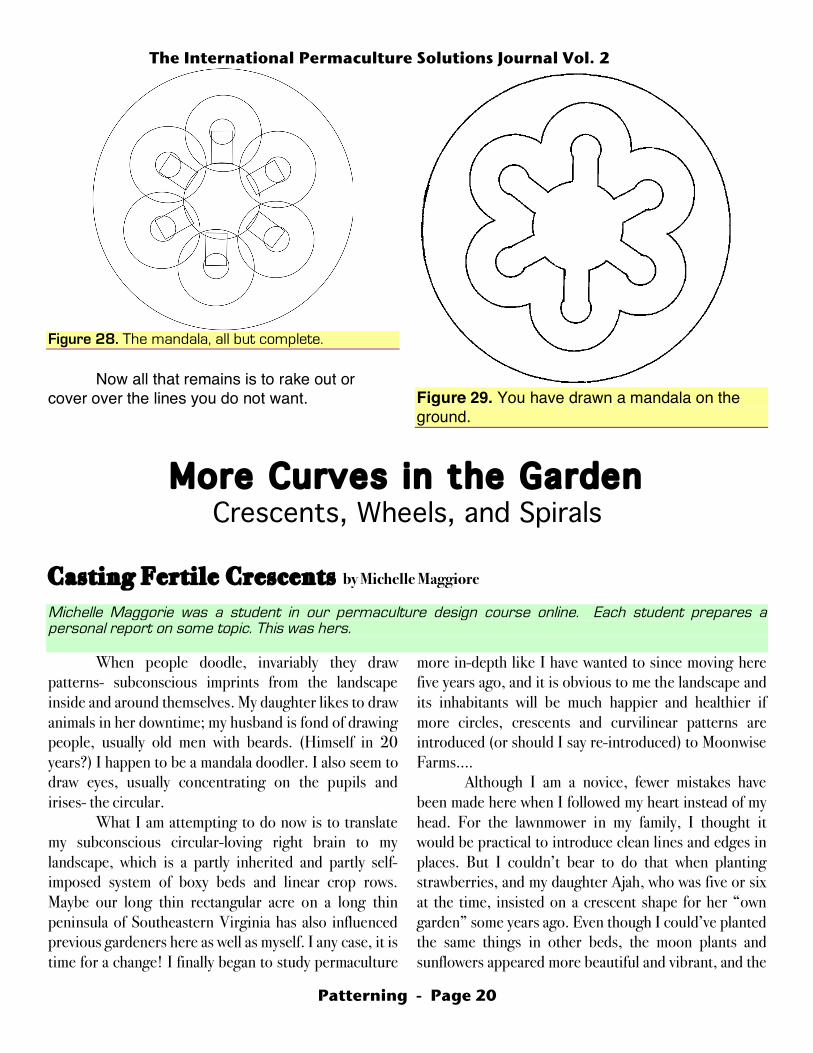
Figure 28. The mandala, all but complete.
Now all that remains is to rake out or
cover over the lines you do not want.
Figure 29. You have drawn a mandala on the
ground.
More Curves in the Garden Crescents, Wheels, and Spirals C a s t i n g F e r t i l e C r e s c e n t s by Michelle Maggiore
Michelle Maggorie was a student in our permaculture design course online. Each student prepares a personal report on some topic. This was hers.
When people doodle, invariably they draw patterns- subconscious imprints from the landscape inside and around themselves. My daughter likes to draw animals in her downtime; my husband is fond of drawing people, usually old men with beards. (Himself in 20 years?) I happen to be a mandala doodler. I also seem to draw eyes, usually concentrating on the pupils and irises- the circular.
What I am attempting to do now is to translate my subconscious circular-loving right brain to my landscape, which is a partly inherited and partly self-imposed system of boxy beds and linear crop rows. Maybe our long thin rectangular acre on a long thin peninsula of Southeastern Virginia has also influenced previous gardeners here as well as myself. I any case, it is time for a change! I finally began to study permaculture
more in-depth like I have wanted to since moving here five years ago, and it is obvious to me the landscape and its inhabitants will be much happier and healthier if more circles, crescents and curvilinear patterns are introduced (or should I say re-introduced) to Moonwise Farms….
Although I am a novice, fewer mistakes have been made here when I followed my heart instead of my head. For the lawnmower in my family, I thought it would be practical to introduce clean lines and edges in places. But I couldn’t bear to do that when planting strawberries, and my daughter Ajah, who was five or six at the time, insisted on a crescent shape for her “own garden” some years ago. Even though I could’ve planted the same things in other beds, the moon plants and sunflowers appeared more beautiful and vibrant, and the