Embed Size (px)
Citation preview

PREPARED BY ADITYA JOSYULA
UNDER THE GUIDANCE OF RASHEED AHMED
The Naming Differences between VIRSA and GRC 5.3 and GRC10.0:
VIRSA GRC5.3 GRC10.0 Compliance Calibrator Risk Analysis and Remediation (RAR) Access Risk Analysis(ARA) Access Enforcer Compliant User Provisioning (CUP) Access Request Management(ARM) Role Architect/ Role Expert Enterprise Role Management (ERM) Business Role Management(BRM) Fire Fighter Superuser Privilege Management
(SPM) Emergency Access Management(EAM)

PREPARED BY ADITYA JOSYULA
UNDER THE GUIDANCE OF RASHEED AHMED
VIRSA(COMPLIANCE CALIBRATOR)
Overview:
Virsa Compliance Calibrator provides real-time compliance monitoring and controls, integrated within your SAP deployment. Compliance Calibrator uses its built-in analysis engine to identify risks associated with Segregation of Duty (SoD), critical actions, and critical permissions. Once identified, you use Compliance Calibrator controls to mitigate or eliminate compliance risks.
Virsa Access Enforcer provides tools for assigning, enforcing, and logging (cross-system) network resource access permissions, based on job-related database objects, such as users, groups, roles, and profiles. You can also create and use workflows that model your business approval process for access requests. If you use Compliance Calibrator, you can configure Access Enforcer to provide risk analysis and mitigation controls, to identify and resolve access control risks and violations in your workflows.
Virsa Role Expert provides tools to create, manage, and define access permissions, either individual access controls, or groups of access controls – based on job functions (roles). Creating role-based access controls enables you to assign a group of access permissions to user(s) who perform a specific job function, eliminating the need to manually reassign these permissions following a change of the user(s) who perform that job function. If you use Compliance Calibrator, you can configure Role Expert to use the Compliance Calibrator risk analysis engine when creating roles and assigning mitigation controls. If you use Access Enforcer, you can configure Role Expert to require approval for new and changed roles using Access Enforcer workflows.
Virsa Firefighter provides flexible controls that allow you to assign special permissions for emergency access to network resources that would otherwise be restricted from the user or users performing the emergency tasks. In addition to network emergencies, you can use Firefighter to provide temporary and/or time and date-restricted access permissions, for tasks that require those permissions only during certain times, such as auditing services. Firefighter allows you to designate these permissions and who must approve the assignment of these permissions. Once the access has been approved, Firefighter provides an audit trail log of every action performed using these enhanced access privileges. If you use Compliance Calibrator, you can configure Firefighter to use the risk analysis engine to identify and resolve Firefighter risks and violations.

PREPARED BY ADITYA JOSYULA
UNDER THE GUIDANCE OF RASHEED AHMED
The Components of Virsa are:
1. Compliance Calibrator 2. Access Enforcer 3. Fire Fighter 4. Role Architect
How to find the Risk with the User or Role Using VIRSA:
Risk can be due to
i. whenever two different Tcodes come together that will be one risk or
ii. Two similar kind of functions come together that might be a risk.
Here, Functions are the combination of multiple Actions(nothing but Tcodes) or Authorizations.
Risk Analysis can be performed by
1. User Level
2. Role Level

PREPARED BY ADITYA JOSYULA
UNDER THE GUIDANCE OF RASHEED AHMED
Risk Analysis – User Level
To Logon to VIRSA Compliance Calibrator, the Tcode is /n/virsa/zvrat

PREPARED BY ADITYA JOSYULA
UNDER THE GUIDANCE OF RASHEED AHMED
Select the Target System & Role then Click on Execute.
PREPARED BY ADITYA JOSYULA
UNDER THE GUIDANCE OF RASHEED AHMED
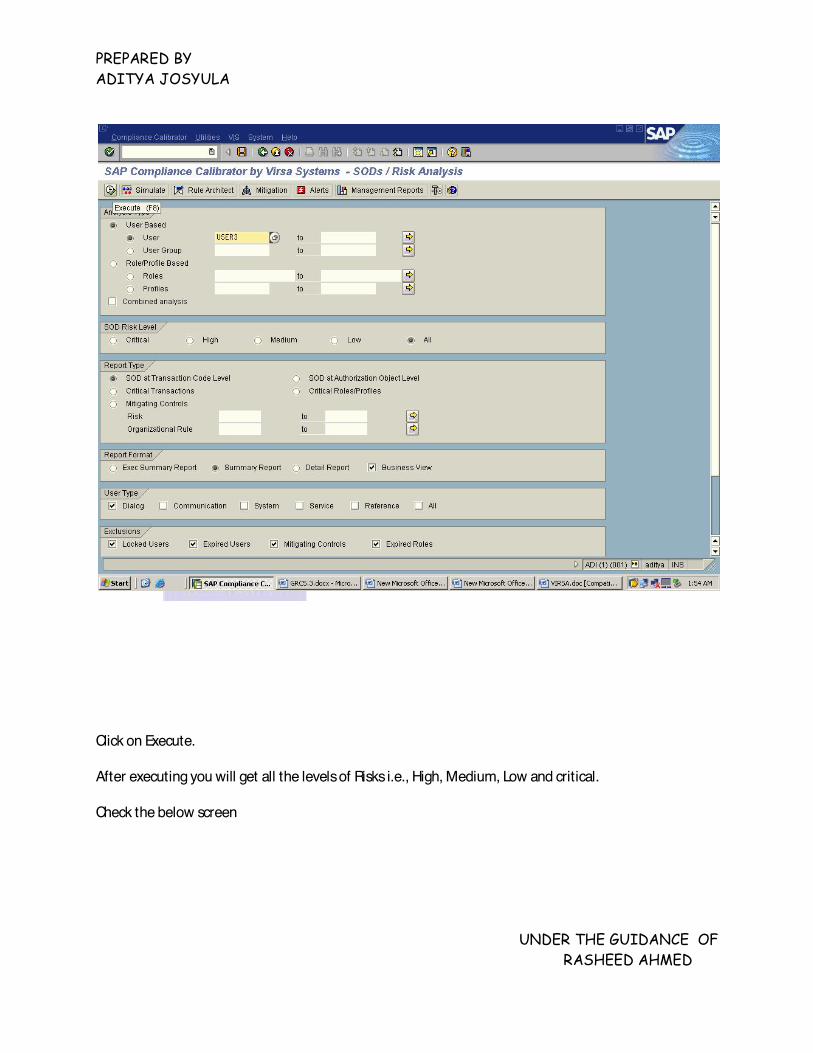
→In Analysis Type, Under User Based Select the User and Mention the user name
→In SOD Risk Level, select the option level ALL
→ Select the Report Type which you want to perform, Here we are using SOD at Transaction Code Level →Select the Report Format
→Select the User Type .
Check the below Screen Shot
PREPARED BY ADITYA JOSYULA
UNDER THE GUIDANCE OF RASHEED AHMED
Click on Execute. After executing you will get all the levels of Risks i.e., High, Medium, Low and critical. Check the below screen

PREPARED BY ADITYA JOSYULA
UNDER THE GUIDANCE OF RASHEED AHMED
By seeing the level of the risk we need to remove the risk or we need to mitigate the risk. Click on Detail Report and Copy the Role Name.

PREPARED BY ADITYA JOSYULA
UNDER THE GUIDANCE OF RASHEED AHMED
To see the conflicts you need to click Technical View tab.

PREPARED BY ADITYA JOSYULA
UNDER THE GUIDANCE OF RASHEED AHMED

PREPARED BY ADITYA JOSYULA
UNDER THE GUIDANCE OF RASHEED AHMED

PREPARED BY ADITYA JOSYULA
UNDER THE GUIDANCE OF RASHEED AHMED
To remove the risk, Copy the Role Name after that go to the backend system and remove the risk from the role. After going to the backend system remove one confliction actions (Tcodes) from the role. Here confliction actions are SCC4 and SU01 & SCC5 and SU01. Then Goto PFCG and mention the role name and remove the Tcodes from the role . Check the below screens for removing the Tcodes from the role .

PREPARED BY ADITYA JOSYULA
UNDER THE GUIDANCE OF RASHEED AHMED
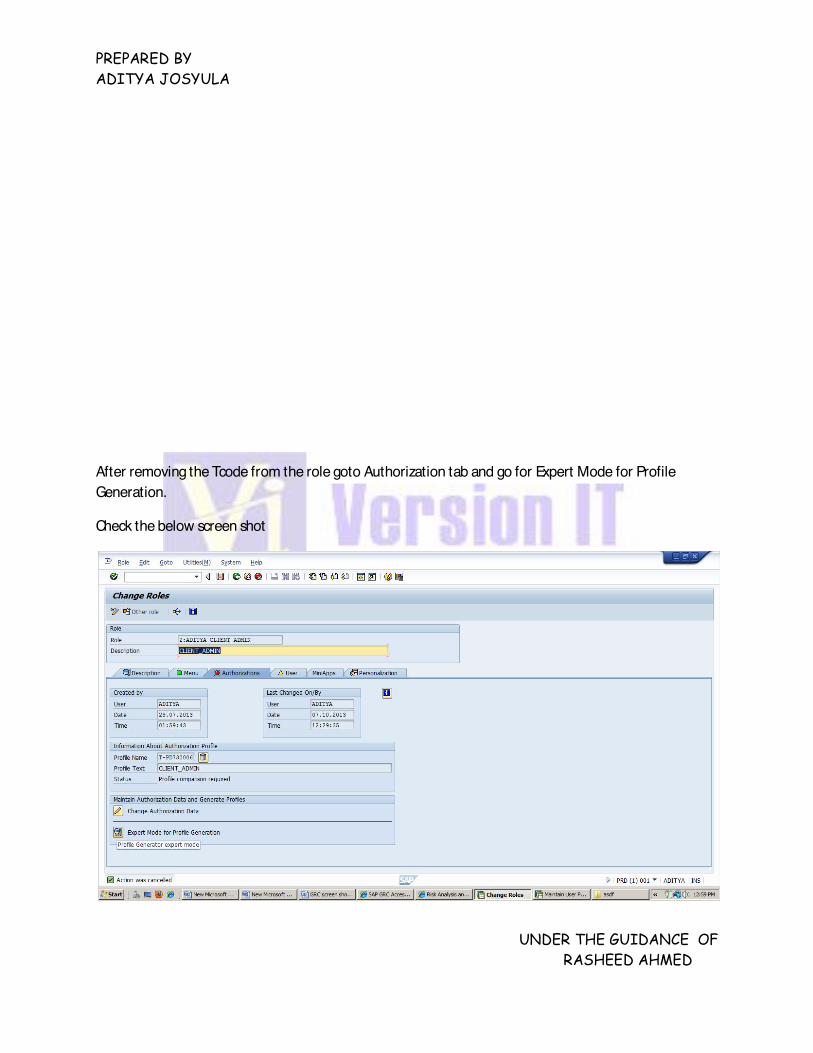
After removing the Tcode from the role goto Authorization tab and go for Expert Mode for Profile Generation. Check the below screen shot .

PREPARED BY ADITYA JOSYULA
UNDER THE GUIDANCE OF RASHEED AHMED
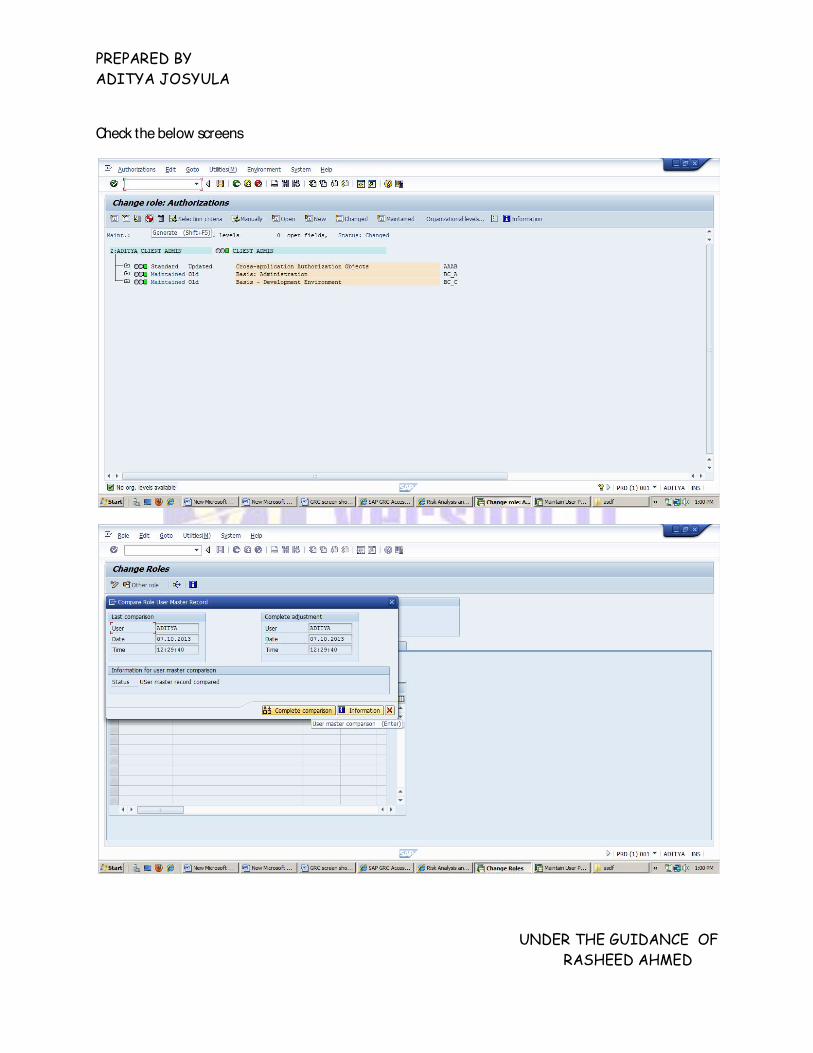
Then go with Read Old Status and Merge with New Data option and click Nike. Check the below screen
PREPARED BY ADITYA JOSYULA
UNDER THE GUIDANCE OF RASHEED AHMED
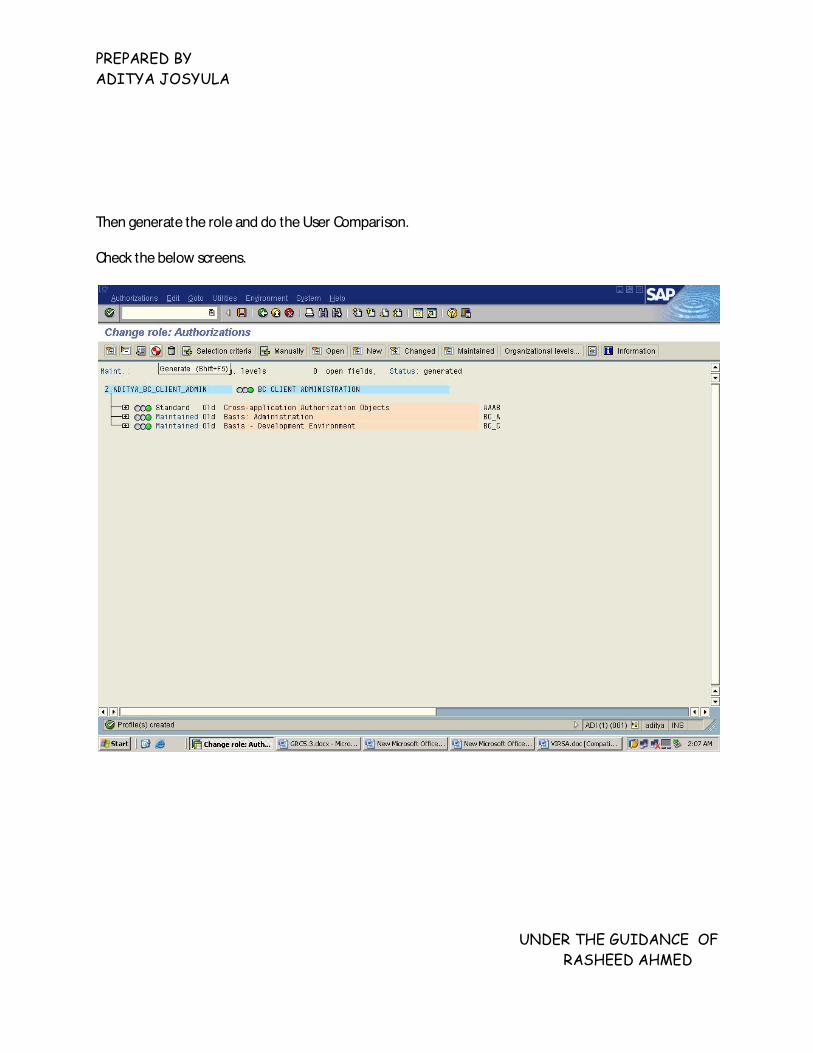
Then generate the role and do the User Comparison. Check the below screens.

PREPARED BY ADITYA JOSYULA
UNDER THE GUIDANCE OF RASHEED AHMED

PREPARED BY ADITYA JOSYULA
UNDER THE GUIDANCE OF RASHEED AHMED
Now go back to the Analysis Type, Under User Based Select the User and Mention the user name. Check the below screen

PREPARED BY ADITYA JOSYULA
UNDER THE GUIDANCE OF RASHEED AHMED
Click on execute. Now you will get a screen with No violations found . Check the below screen

PREPARED BY ADITYA JOSYULA
UNDER THE GUIDANCE OF RASHEED AHMED
Risk Analysis – ROLE Level
To Logon to VIRSA Compliance Calibrator, the Tcode is /n/virsa/zvrat

PREPARED BY ADITYA JOSYULA
UNDER THE GUIDANCE OF RASHEED AHMED
Select the Target System & Role then Click on Execute.

PREPARED BY ADITYA JOSYULA
UNDER THE GUIDANCE OF RASHEED AHMED
→In Analysis Type, Under Role/Profile Based Select the Roles and Mention the Role name
→In SOD Risk Level, select the option level ALL
→Select the Report Type which you want to perform, Here we are using SOD at Authorization Object Level
→Select the Report Format
→Select the User Type .
Check the below Screen Shot

PREPARED BY ADITYA JOSYULA
UNDER THE GUIDANCE OF RASHEED AHMED
Click on Execute.
After executing you will get all the levels of Risks i.e., High, Medium, Low and critical.
Click on Technical View.
Check the below screen

PREPARED BY ADITYA JOSYULA
UNDER THE GUIDANCE OF RASHEED AHMED
By seeing the level of the risk we need to remove the risk or we need to mitigate the risk.
Then Click on the Role Name.
Check the below Screen shot.

PREPARED BY ADITYA JOSYULA
UNDER THE GUIDANCE OF RASHEED AHMED
PREPARED BY ADITYA JOSYULA
UNDER THE GUIDANCE OF RASHEED AHMED
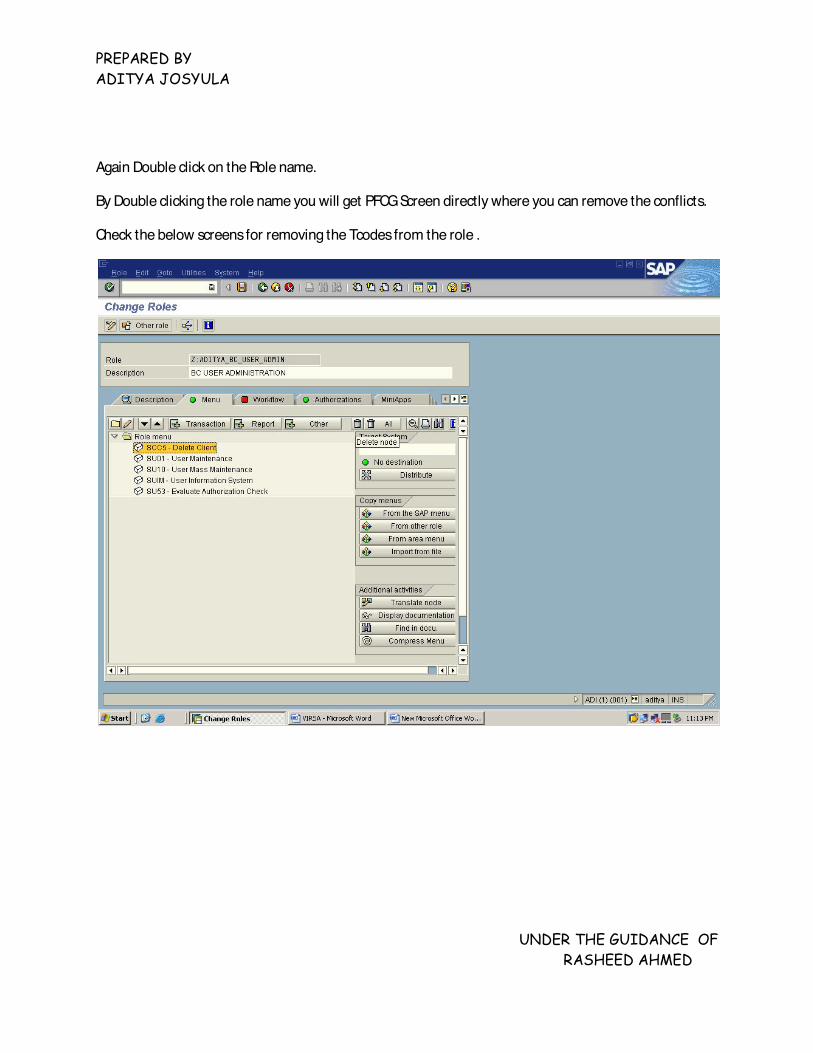
Again Double click on the Role name.
By Double clicking the role name you will get PFCG Screen directly where you can remove the conflicts.
Check the below screens for removing the Tcodes from the role .

PREPARED BY ADITYA JOSYULA
UNDER THE GUIDANCE OF RASHEED AHMED
After removing the Tcode from the role goto Authorization tab and go for Expert Mode for Profile Generation.
Check the below screen shot .

PREPARED BY ADITYA JOSYULA
UNDER THE GUIDANCE OF RASHEED AHMED
Then go with Read Old Status and Merge with New Data option and click Nike.
Check the below screen

PREPARED BY ADITYA JOSYULA
UNDER THE GUIDANCE OF RASHEED AHMED
Then generate the role and do the User Comparison .
Check the below screens

PREPARED BY ADITYA JOSYULA
UNDER THE GUIDANCE OF RASHEED AHMED

PREPARED BY ADITYA JOSYULA
UNDER THE GUIDANCE OF RASHEED AHMED
Now go back to the Analysis Type, Under Role/Profile Based Select the Role and Mention the Role name.
Check the below screen

PREPARED BY ADITYA JOSYULA
UNDER THE GUIDANCE OF RASHEED AHMED
Click on execute.
Now you will get a screen with No violations found .
Check the below screen

PREPARED BY ADITYA JOSYULA
UNDER THE GUIDANCE OF RASHEED AHMED
Simulation:
By using this option we can able to identify the risk information before adding the Tcode to Role or User.
EX: If Business is asking you to add 1 particular Tcode to the existing Role then we can get the risk information by putting the Role name & Tcode information under Simulate option and click on Simulate Button, then system will show the Risk Analysis information without adding a Tcode to Role.
Steps for Simulation at User Level
To Logon to VIRSA Compliance Calibrator, the Tcode is /n/virsa/zvrat

PREPARED BY ADITYA JOSYULA
UNDER THE GUIDANCE OF RASHEED AHMED
Select the Target System & Role then Click on Execute.

PREPARED BY ADITYA JOSYULA
UNDER THE GUIDANCE OF RASHEED AHMED

PREPARED BY ADITYA JOSYULA
UNDER THE GUIDANCE OF RASHEED AHMED
Now give the User name and Click on Simulate Tab.

PREPARED BY ADITYA JOSYULA
UNDER THE GUIDANCE OF RASHEED AHMED
Here Under the Simulation Values give the Transaction which you want to add.
Note: Leave the Remote System Details as blank.
And check Risks from Simulation Only.
Then click on Execute.

PREPARED BY ADITYA JOSYULA
UNDER THE GUIDANCE OF RASHEED AHMED
Here the value which we have used is SU01 to the user and its showing the risk in High Level.
So this clarifies the value which we have used shouldn't be assigned to the user.
But if the business wants to allow this risk to the user we can do it by using Mitigation Control Option.

PREPARED BY ADITYA JOSYULA
UNDER THE GUIDANCE OF RASHEED AHMED
Steps for Simulation at Role Level
To Logon to VIRSA Compliance Calibrator, the Tcode is /n/virsa/zvrat

PREPARED BY ADITYA JOSYULA
UNDER THE GUIDANCE OF RASHEED AHMED
Select the Target System & Role then Click on Execute.
PREPARED BY ADITYA JOSYULA
UNDER THE GUIDANCE OF RASHEED AHMED
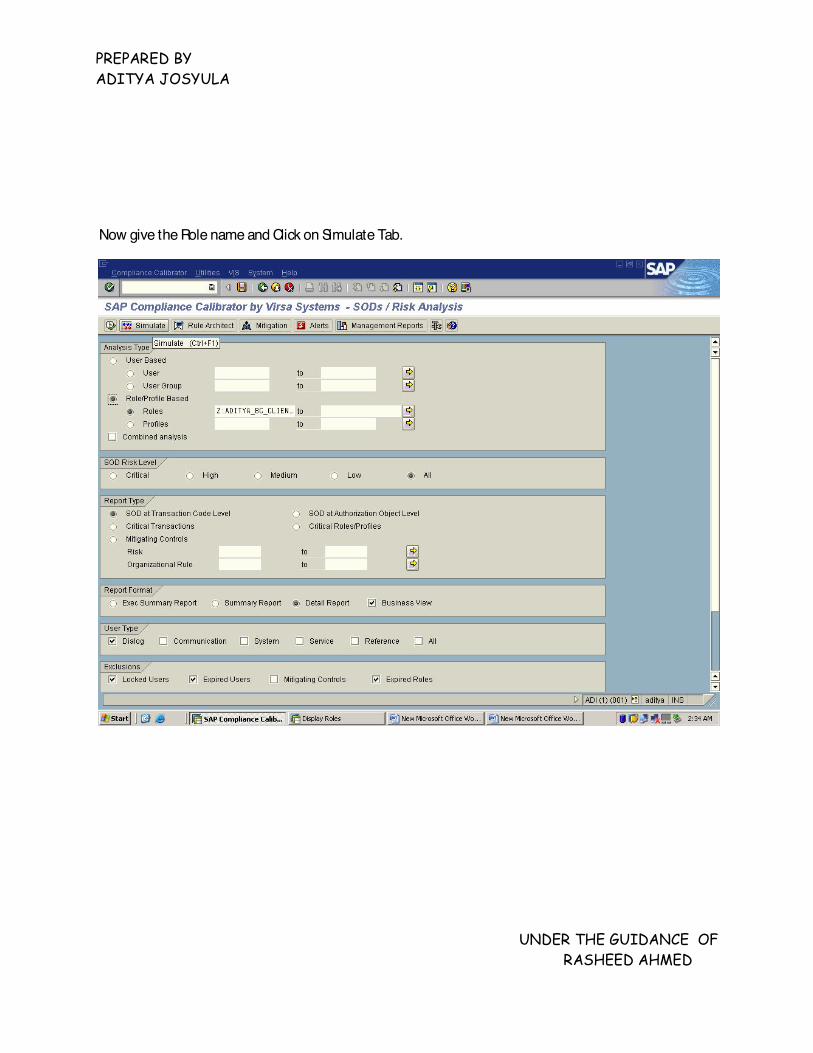
Now give the Role name and Click on Simulate Tab.

PREPARED BY ADITYA JOSYULA
UNDER THE GUIDANCE OF RASHEED AHMED
Here Under the Simulation Values give the Transaction which you want to add.
Note: Leave the Remote System Details as blank.
And check Risks from Simulation Only.
Then click on Execute.

PREPARED BY ADITYA JOSYULA
UNDER THE GUIDANCE OF RASHEED AHMED
Here the value which we have used is SU01 to the Role and its showing the risk in High Level.
So this clarifies the value which we have used shouldn't be assigned to the Role.
But if the business wants to allow this risk to the Role we can do it by using Mitigation Control Option.

PREPARED BY ADITYA JOSYULA
UNDER THE GUIDANCE OF RASHEED AHMED
Mitigation:
Allowing the risk by using or creating the Mitigation Control ID's as per the Business.
You can use Mitigation Controls to associate controls with the Risk, and assign them to Users, Roles, Profiles, or HR Objects.
Make individuals as Control Monitors or Approvers and then assign them to Controls.
Steps for Creating Mitigation
Here we are creating a Mitigation Control for the below Screen Shot.

PREPARED BY ADITYA JOSYULA
UNDER THE GUIDANCE OF RASHEED AHMED

PREPARED BY ADITYA JOSYULA
UNDER THE GUIDANCE OF RASHEED AHMED
Now come back to Virsa screen & Click on Mitigation tab.
Check the below screen shot.

PREPARED BY ADITYA JOSYULA
UNDER THE GUIDANCE OF RASHEED AHMED
After clicking the Mitigation tab you will get the below screen.
PREPARED BY ADITYA JOSYULA
UNDER THE GUIDANCE OF RASHEED AHMED
Here we have to create the Approvers, Monitors, Business Unit, Mitigating Control ID, Mitigated Users.
Check the below screen shot for the process.
STEP1:
In this Mitigation Screen we are going to create Approvers, Monitors.
Click on Define Monitors and Approvers
Check the below screen shots.

PREPARED BY ADITYA JOSYULA
UNDER THE GUIDANCE OF RASHEED AHMED

PREPARED BY ADITYA JOSYULA
UNDER THE GUIDANCE OF RASHEED AHMED

PREPARED BY ADITYA JOSYULA
UNDER THE GUIDANCE OF RASHEED AHMED
Click on New Entries and mention the Monitor ID, Company Name, Email, Role.
Here in Role option we need to select either Approver or Monitor.
Here we are creating Approver & Monitor at a time.
After that click on Save.
Check the below Screen Shot.
PREPARED BY ADITYA JOSYULA
UNDER THE GUIDANCE OF RASHEED AHMED
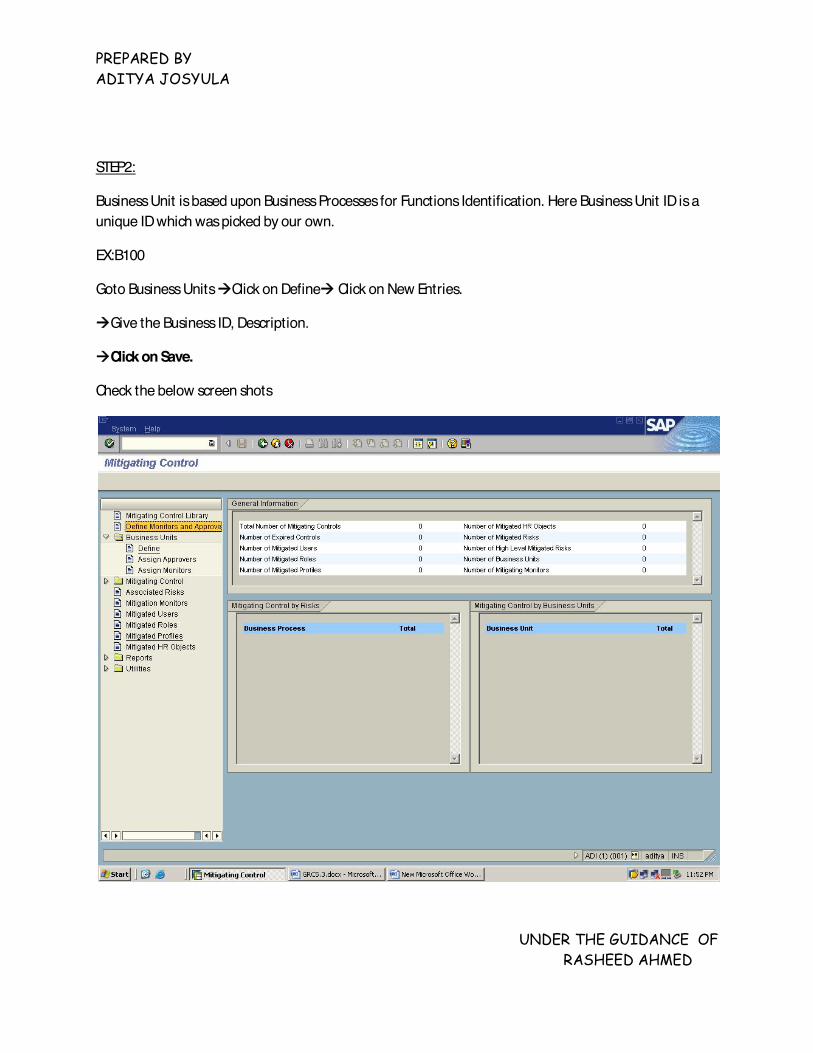
STEP2:
Business Unit is based upon Business Processes for Functions Identification. Here Business Unit ID is a unique ID which was picked by our own.
EX:B100
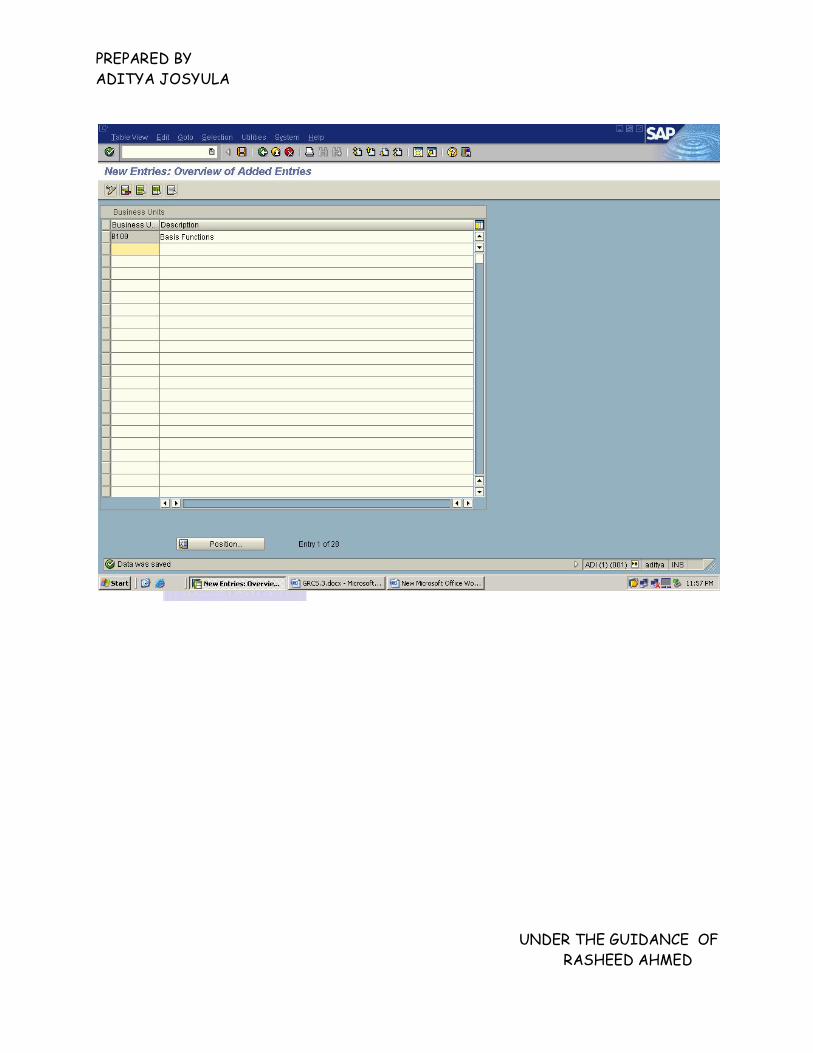
Goto Business Units Click on Define Click on New Entries.
Give the Business ID, Description.
Click on Save.
Check the below screen shots

PREPARED BY ADITYA JOSYULA
UNDER THE GUIDANCE OF RASHEED AHMED
PREPARED BY ADITYA JOSYULA
UNDER THE GUIDANCE OF RASHEED AHMED

PREPARED BY ADITYA JOSYULA
UNDER THE GUIDANCE OF RASHEED AHMED
Again Goto Business Units Click on Assign Approvers Click on New Entries.
Give the Business Unit ID and mention the Approver ID.
Click on Save.
Check the below screen shots

PREPARED BY ADITYA JOSYULA
UNDER THE GUIDANCE OF RASHEED AHMED

PREPARED BY ADITYA JOSYULA
UNDER THE GUIDANCE OF RASHEED AHMED

PREPARED BY ADITYA JOSYULA
UNDER THE GUIDANCE OF RASHEED AHMED
Again Goto Business Units Click on Assign Monitors Click on New Entries.
Give the Business Unit ID and mention the Monitor ID.
Click on Save.
Check the below screen shots

PREPARED BY ADITYA JOSYULA
UNDER THE GUIDANCE OF RASHEED AHMED

PREPARED BY ADITYA JOSYULA
UNDER THE GUIDANCE OF RASHEED AHMED
PREPARED BY ADITYA JOSYULA
UNDER THE GUIDANCE OF RASHEED AHMED
STEP3:
Mitigating Controls is based upon Risk IDs for Identification. Here Mitigating Control ID is a unique ID which was picked by our own.
EX:B200
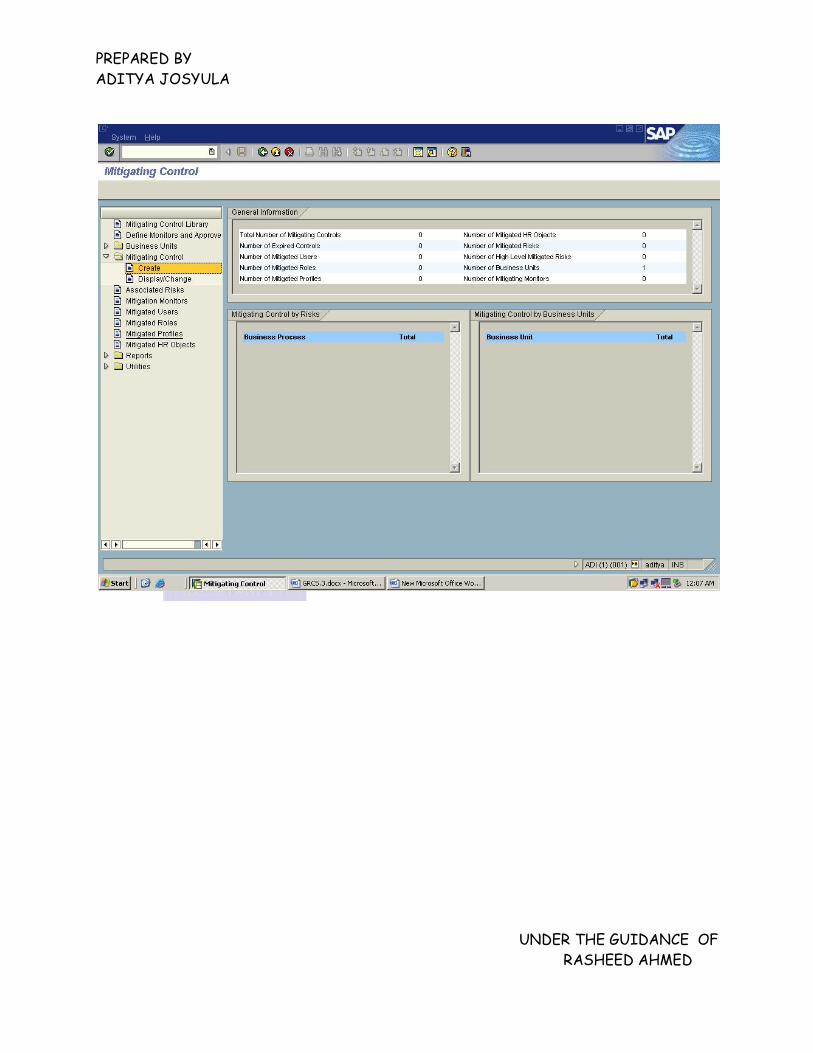
Goto Mitigating Controls Click on Create then fill the required details.
Give the Mitigating Control ID, Description, Business Unit, Management Approver.
Add the Associated Risk ID & Monitor.
Click on Save.
Check the below screen shots.
PREPARED BY ADITYA JOSYULA
UNDER THE GUIDANCE OF RASHEED AHMED

PREPARED BY ADITYA JOSYULA
UNDER THE GUIDANCE OF RASHEED AHMED

PREPARED BY ADITYA JOSYULA
UNDER THE GUIDANCE OF RASHEED AHMED

PREPARED BY ADITYA JOSYULA
UNDER THE GUIDANCE OF RASHEED AHMED
Then click on Save.

PREPARED BY ADITYA JOSYULA
UNDER THE GUIDANCE OF RASHEED AHMED
STEP4:
Mitigated Users is used for assigning the Mitigating Control ID's to the User to allow the Risk.
Goto Mitigated Users
PREPARED BY ADITYA JOSYULA
UNDER THE GUIDANCE OF RASHEED AHMED
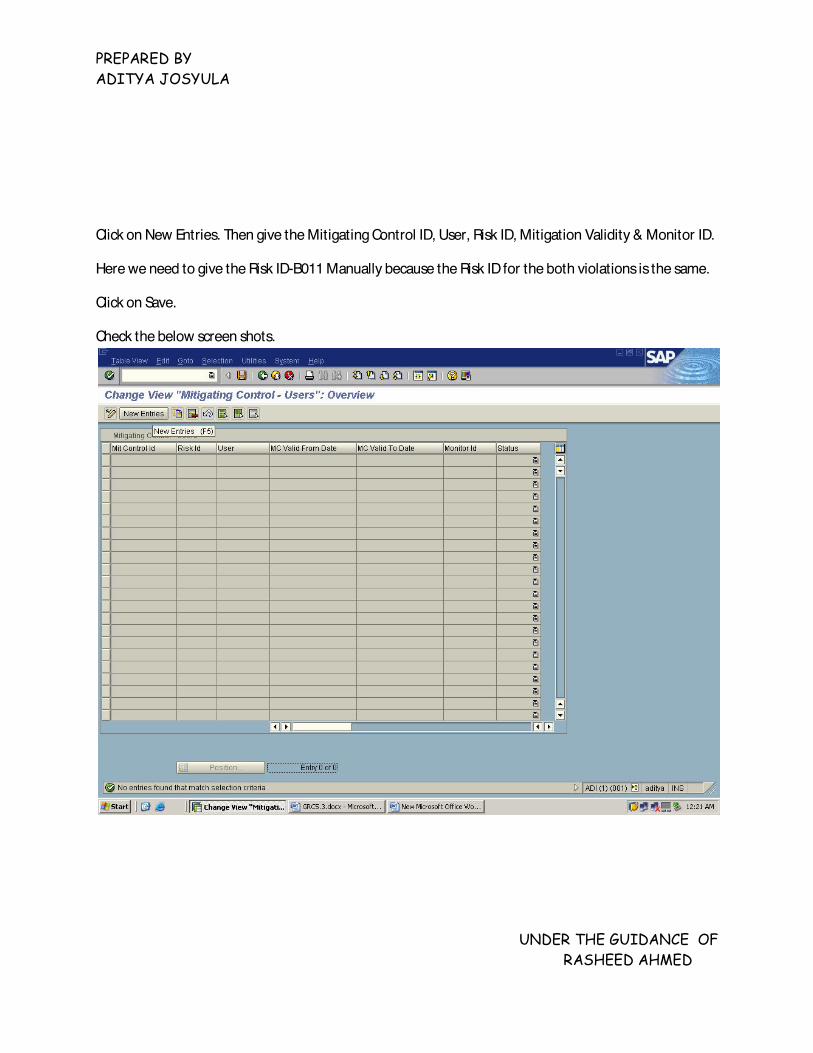
Click on New Entries. Then give the Mitigating Control ID, User, Risk ID, Mitigation Validity & Monitor ID.
Here we need to give the Risk ID-B011 Manually because the Risk ID for the both violations is the same.
Click on Save.
Check the below screen shots.

PREPARED BY ADITYA JOSYULA
UNDER THE GUIDANCE OF RASHEED AHMED

PREPARED BY ADITYA JOSYULA
UNDER THE GUIDANCE OF RASHEED AHMED
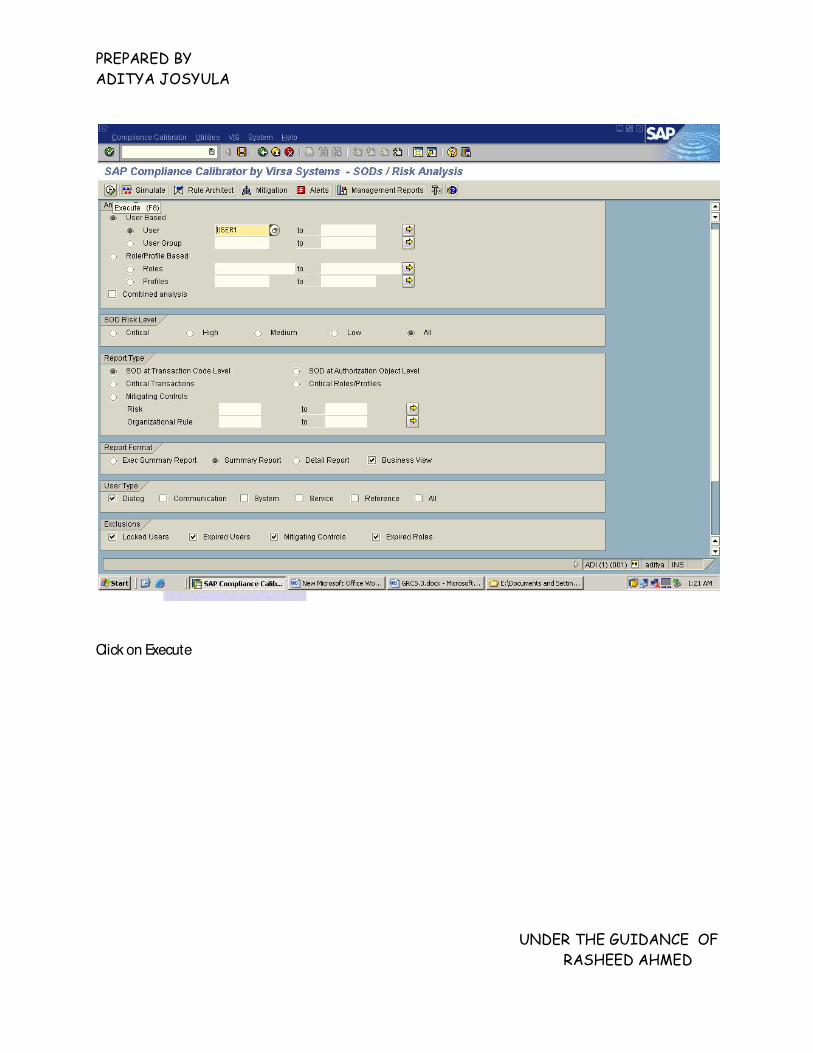
Now come back to Virsa screen and find out the Risk to that User ID:USER1
In Analysis Type, Under User Based Select the User and Mention the User name
→In SOD Risk Level, select the option level ALL
→Select the Report Type which you want to perform, Here we are using SOD at Transaction Code Level
→Select the Report Format
→Select the User Type .
→In Exclusions Tab, Check the Locked Users, Expired Users, Mitigating Controls, Expired Roles.
Check the below Screen Shot
PREPARED BY ADITYA JOSYULA
UNDER THE GUIDANCE OF RASHEED AHMED
Click on Execute

PREPARED BY ADITYA JOSYULA
UNDER THE GUIDANCE OF RASHEED AHMED
Now you won't find any Violations.
PREPARED BY ADITYA JOSYULA
UNDER THE GUIDANCE OF RASHEED AHMED
GRC 5.3 (Governance Risk Compliance)
Overview:
Being closely related concerns, governance, risk and compliance activities are increasingly being integrated and aligned to some extent in order to avoid conflicts, wasteful overlaps and gaps. While interpreted differently in various organizations, GRC typically encompasses activities such as corporate governance, enterprise risk management (ERM) and corporate compliance with applicable laws and regulations.
Governance, risk, and compliance or GRC are increasingly recognized terms that reflects a new way in which organizations are adopting an integrated approach to these aspects of their business
The following are the major advantages of GRC:
1. To increase Risk awareness and resulting in better decision making.
2. Improved visibility of risk, exposure across the organization.
3. Reduced risk of reaching segregation of duties violations.
4. Simlified Compliance, minimise Audit time & Cost.
The Components of GRC 5.3 are:
1. Access Control(AC)
2. Process Control(PC)
3. Global Trade System(GTS)
4. Environmental Health & Safety(EHS)
5. Risk Management(RM)

PREPARED BY ADITYA JOSYULA
UNDER THE GUIDANCE OF RASHEED AHMED
Access Control:
With a built-in list of critical transactions and a matrix of segregation of duties conflicts, SAP GRC Access Control lets you check if user or role maintenance introduces risks to your business. It also lets you record the steps you take to mitigate those risks.
SAP GRC Access Control consists of the following modules:
• Risk Analysis and Remediation (RAR)
• Compliant User Provisioning (CUP)
• Superuser Privilege Management (SPM)
• Enterprise Role Management (ERM)
Risk Analysis and Remediation (RAR)
Previously known as Compliance Calibrator, RAR is the repository for definitions of segregation of duties rules and critical transactions. As well as using the rules to check if user and role administration activities could introduce risks to your business, RAR reports on the risks within the system – presenting them in a graphical format within a web browser.
Compliant User Provisioning (CUP)
CUP provides the workflow engine to drive compliant user and role maintenance processes within the SAP environment. These processes are auditable and verifiable, with clear, configurable processes for approval, SoD checking and provisioning.
Enterprise Role Management (ERM)
ERM rigorously applies naming conventions and validations to role creation, reducing management effort and the risk of segregation of duties violations. To use ERM you have to define structured working methods.

PREPARED BY ADITYA JOSYULA
UNDER THE GUIDANCE OF RASHEED AHMED
Superuser Privilege Management (SPM)
Previously known as Firefighter, SPM lets you assign ‘emergency user’ status to normal support users, giving them extended access for exceptional circumstances. A notification is linked to the use of this extended access. And all activities are logged during its use to reduce the risk of unauthorised activities taking place. SPM is one of the simplest Access Control components to deploy.
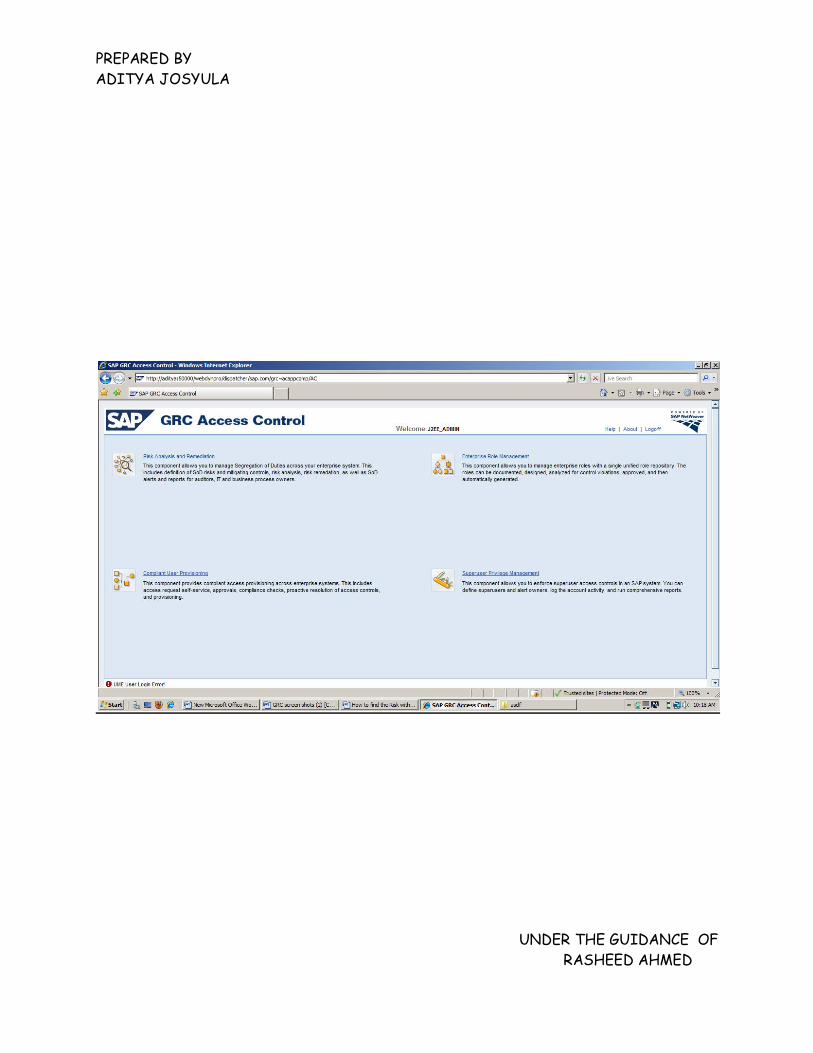
To Logon to GRC 5.3 Access Control, below is the link.
http:/ /aditya:50000/webdynpro/dispatcher/sap.com/grc~acappcomp/AC
HostName
PREPARED BY ADITYA JOSYULA
UNDER THE GUIDANCE OF RASHEED AHMED

PREPARED BY ADITYA JOSYULA
UNDER THE GUIDANCE OF RASHEED AHMED
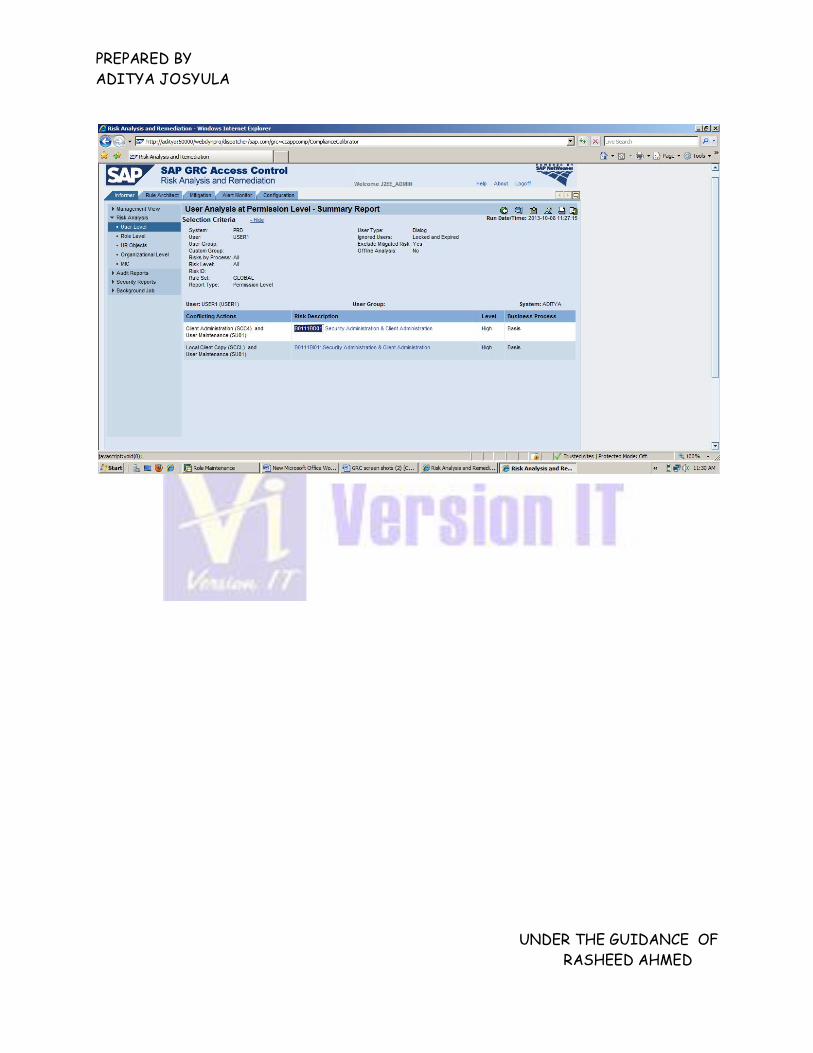
How to find the Risk with the User or Role using Risk Analysis and Remediation:
Risk can be due to
i. whenever two different Tcodes come together that will be one risk or
ii. Two similar kind of functions come together that might be a risk.
Here, Functions are the combination of multiple Actions(nothing but Tcodes) or Permissions(nothing but Authorizations).
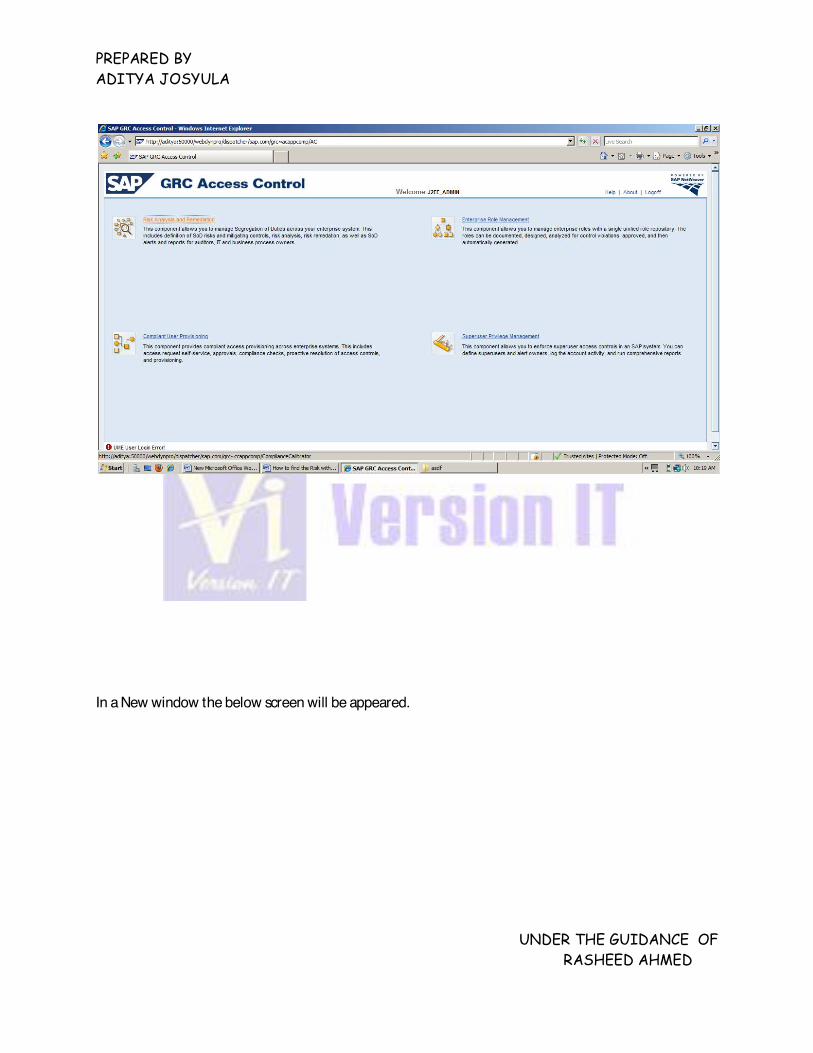
Click on Risk Analysis & Remediation
PREPARED BY ADITYA JOSYULA
UNDER THE GUIDANCE OF RASHEED AHMED
In a New window the below screen will be appeared.

PREPARED BY ADITYA JOSYULA
UNDER THE GUIDANCE OF RASHEED AHMED
Risk Analysis can be performed by
1. User Level
2. Role Level

PREPARED BY ADITYA JOSYULA
UNDER THE GUIDANCE OF RASHEED AHMED
Risk Analysis - Role Level
Click on the Informer tab, under Informer tab
=> Go to Risk Analysis Option
=> Click on User/Role Level and specify the required details as below screen.

PREPARED BY ADITYA JOSYULA
UNDER THE GUIDANCE OF RASHEED AHMED
and click on execute.
After executing you will get all the levels of Risks i.e., High, Medium, Low and critical.
Check the below screen

PREPARED BY ADITYA JOSYULA
UNDER THE GUIDANCE OF RASHEED AHMED
By seeing the level of the risk we need to remove the risk or we need to mitigate the risk.
To remove the risk click on the risk description then you will know the role name after that go to the back end system and remove the risk from the role, below is the screen of the role name

PREPARED BY ADITYA JOSYULA
UNDER THE GUIDANCE OF RASHEED AHMED
After going to the backend system remove one confliction actions (Tcodes) from the role.
Here confliction actions are SCC4 and SU01 & SCCL and SU01.
Then Goto PFCG and mention the role name and remove the Tcodes from the role .
Check the below screens for removing the Tcodes from the role.

PREPARED BY ADITYA JOSYULA
UNDER THE GUIDANCE OF RASHEED AHMED
After removing the Tcode from the role goto Authorization tab and go for Expert Mode for Profile Generation.
Check the below screen shot

PREPARED BY ADITYA JOSYULA
UNDER THE GUIDANCE OF RASHEED AHMED
Then go with Read Old Status and Merge with New Data option and click Nike.
Check the below screen

PREPARED BY ADITYA JOSYULA
UNDER THE GUIDANCE OF RASHEED AHMED
Then generate the role and do the User Comparison .
Check the below screens

PREPARED BY ADITYA JOSYULA
UNDER THE GUIDANCE OF RASHEED AHMED

PREPARED BY ADITYA JOSYULA
UNDER THE GUIDANCE OF RASHEED AHMED
Now go back to the Risk Analysis - Role Level and mention the role name which was removed in back end system .
Check the below screen

PREPARED BY ADITYA JOSYULA
UNDER THE GUIDANCE OF RASHEED AHMED
Click on execute.
Now you will get a screen with No violations found .
Check the below screen

PREPARED BY ADITYA JOSYULA
UNDER THE GUIDANCE OF RASHEED AHMED
Risk Analysis - User Level
Click on the Informer tab, under Informer tab
=> Goto Risk Analysis Option
=> Click on User Level as below screen.

PREPARED BY ADITYA JOSYULA
UNDER THE GUIDANCE OF RASHEED AHMED
Click on execute.
After executing you will get all the levels of Risks i.e., High, Medium, Low and critical.
Check the below screen
PREPARED BY ADITYA JOSYULA
UNDER THE GUIDANCE OF RASHEED AHMED
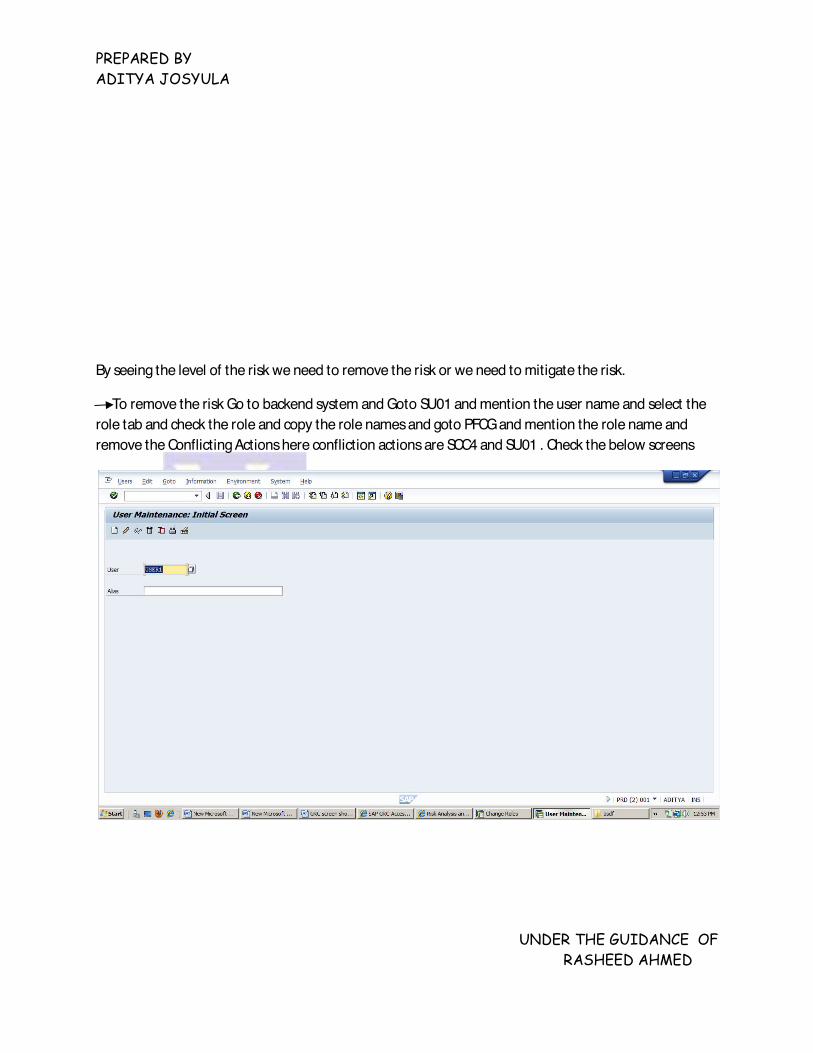
By seeing the level of the risk we need to remove the risk or we need to mitigate the risk.
To remove the risk Go to backend system and Goto SU01 and mention the user name and select the role tab and check the role and copy the role names and goto PFCG and mention the role name and remove the Conflicting Actions here confliction actions are SCC4 and SU01 . Check the below screens

PREPARED BY ADITYA JOSYULA
UNDER THE GUIDANCE OF RASHEED AHMED
Click on change and copy the role name
Check the below screen

PREPARED BY ADITYA JOSYULA
UNDER THE GUIDANCE OF RASHEED AHMED
Then Goto PFCG and mention the role name and remove the Tcodes from the role .
Check the below screens
PREPARED BY ADITYA JOSYULA
UNDER THE GUIDANCE OF RASHEED AHMED
After removing the Tcode from the role goto Authorization tab and go for Expert Mode for Profile Generation.
Check the below screen shot

PREPARED BY ADITYA JOSYULA
UNDER THE GUIDANCE OF RASHEED AHMED
Then go with Read Old Status and Merge with New Data option and click Nike.
Check the below screen

PREPARED BY ADITYA JOSYULA
UNDER THE GUIDANCE OF RASHEED AHMED
Then generate the role and do the User Comparison.
PREPARED BY ADITYA JOSYULA
UNDER THE GUIDANCE OF RASHEED AHMED
Check the below screens

PREPARED BY ADITYA JOSYULA
UNDER THE GUIDANCE OF RASHEED AHMED
Now go back to the Risk Analysis - User Level and mention the user name.
Check the below screen

PREPARED BY ADITYA JOSYULA
UNDER THE GUIDANCE OF RASHEED AHMED
Click on execute.
Now you will get a screen with No violations found .
Check the below screen

PREPARED BY ADITYA JOSYULA
UNDER THE GUIDANCE OF RASHEED AHMED
Simulation:
By using this option we can able to identify the risk information before adding the Tcode to Role or User.
EX: If Business is asking you to add 1 particular Tcode to the existing Role then we can get the risk information by putting the Role name & Tcode information under Simulate option and click on Simulate Button, then system will show the Risk Analysis information without adding a Tcode to Role.
Steps for Simulation at User Level
GO to Risk AnalysisUser Level Give the system details and user name.
Check the below screen shot

PREPARED BY ADITYA JOSYULA
UNDER THE GUIDANCE OF RASHEED AHMED
Then Click on simulate

PREPARED BY ADITYA JOSYULA
UNDER THE GUIDANCE OF RASHEED AHMED
Here fill the required details & Under the Simulation Values give the value which you want to add, Here the value is nothing but Tcode.
Then click on Simulate
Here the value which we have used is SU01 to the user and its showing the risk in High Level.
So this clarifies the value which we have used shouldn't be assigned to the user.
But if the business wants to allow this risk to the user we can do it by using Mitigation Control Option.

PREPARED BY ADITYA JOSYULA
UNDER THE GUIDANCE OF RASHEED AHMED
Steps for Simulation at Role Level
GO to Risk Analysis Role Level Give the system details and Role name.
Check the below screen shot
PREPARED BY ADITYA JOSYULA
UNDER THE GUIDANCE OF RASHEED AHMED
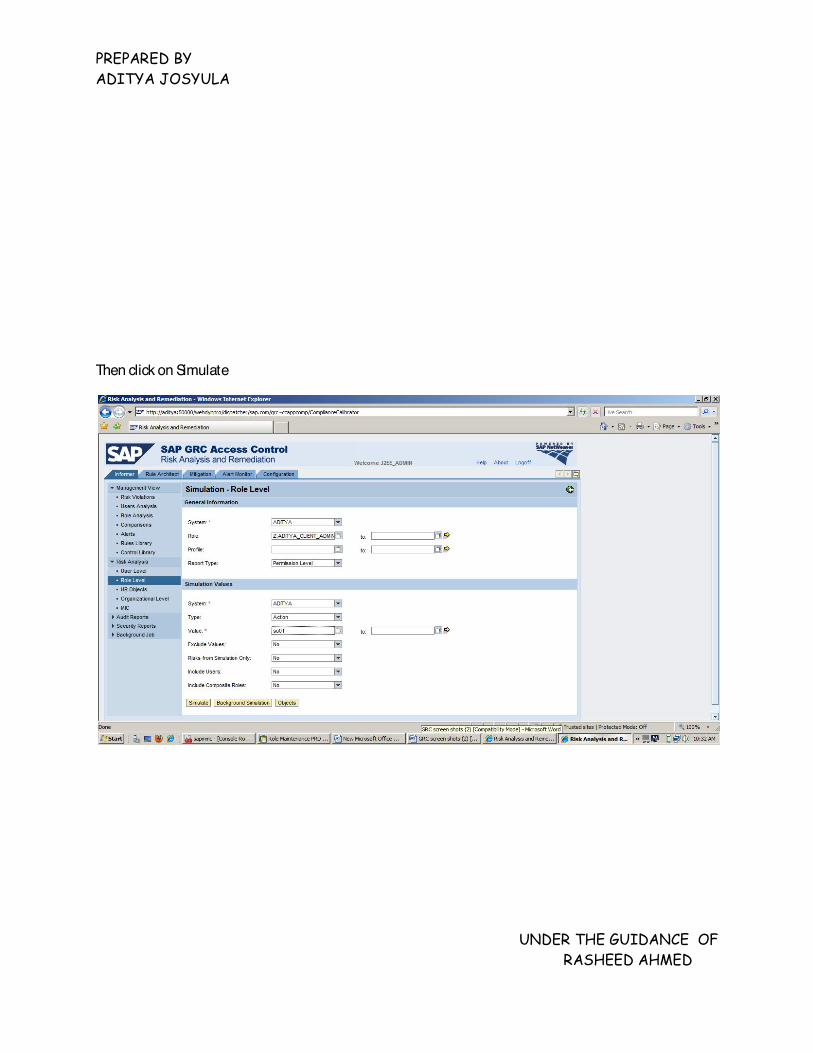
Then click on Simulate
PREPARED BY ADITYA JOSYULA
UNDER THE GUIDANCE OF RASHEED AHMED
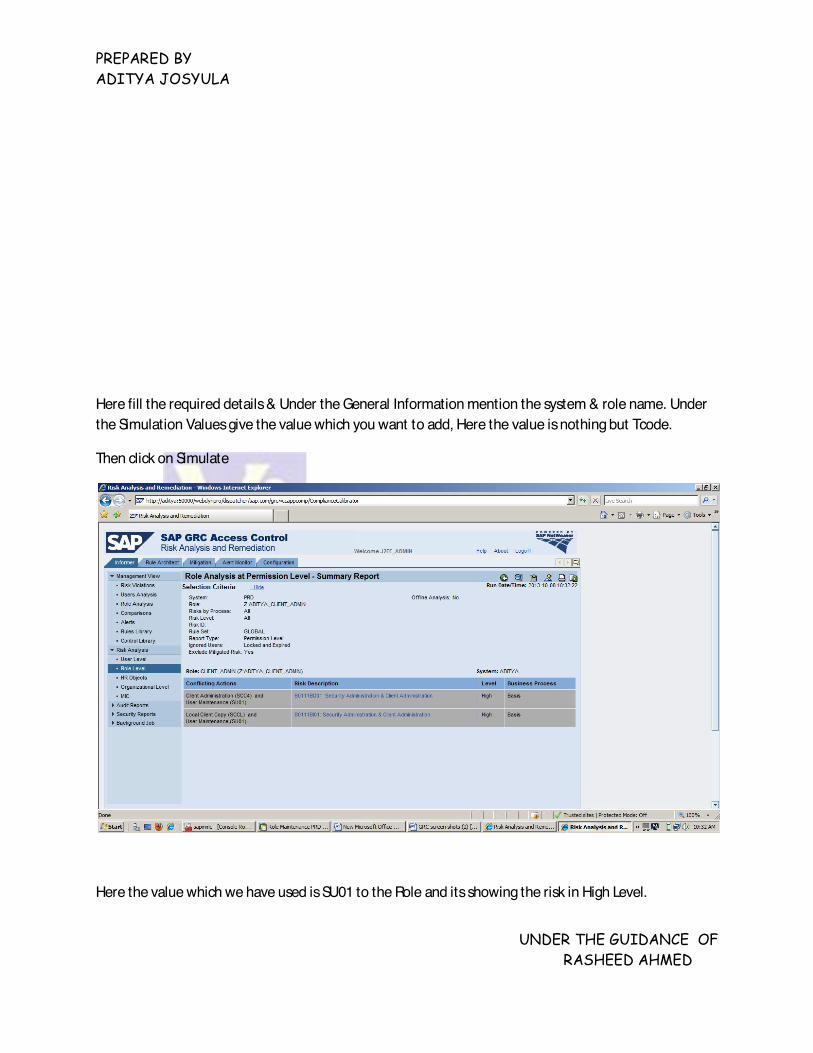
Here fill the required details & Under the General Information mention the system & role name. Under the Simulation Values give the value which you want to add, Here the value is nothing but Tcode.
Then click on Simulate
Here the value which we have used is SU01 to the Role and its showing the risk in High Level.

PREPARED BY ADITYA JOSYULA
UNDER THE GUIDANCE OF RASHEED AHMED
So this clarifies the value which we have used shouldn't be assigned to the Role.
But if the business wants to allow this risk to the Role we can do it by using Mitigation Control Option.
Mitigation:
Allowing the risk by using or creating the Mitigation Control ID's as per the Business.
You can use Mitigation Controls to associate controls with the Risk, and assign them to Users, Roles, Profiles, or HR Objects.
Make individuals as Control Monitors or Approvers and then assign them to Controls.
Steps for Creating Mitigation
Here we are creating a Mitigation Control for the below Screen Shot.

PREPARED BY ADITYA JOSYULA
UNDER THE GUIDANCE OF RASHEED AHMED

PREPARED BY ADITYA JOSYULA
UNDER THE GUIDANCE OF RASHEED AHMED
Now click on the Risk Description -B0111BD01.
Check the below screen shot
PREPARED BY ADITYA JOSYULA
UNDER THE GUIDANCE OF RASHEED AHMED

PREPARED BY ADITYA JOSYULA
UNDER THE GUIDANCE OF RASHEED AHMED
After clicking the Risk Description -B0111BD01, you will find the Risk information. You need to concentrate on the Risk ID & Business Process.
Check the below screen shot.

PREPARED BY ADITYA JOSYULA
UNDER THE GUIDANCE OF RASHEED AHMED
Now go to Mitigation Tab, Check the below screen shot.

PREPARED BY ADITYA JOSYULA
UNDER THE GUIDANCE OF RASHEED AHMED
Here we have to create the Approvers, Monitors, Risk Owners, Business Unit, Mitigating Control ID, Control Monitors and Mitigated Users.
Check the below screen shot for the process.
STEP1:
In this Administrator Tab we are going to create Approvers, Monitors, Risk Owner ID's.
Goto AdministratorsClick on Create then fill the required details.
Check the below screen shots.
Approver

PREPARED BY ADITYA JOSYULA
UNDER THE GUIDANCE OF RASHEED AHMED
Monitor
Risk Owner

PREPARED BY ADITYA JOSYULA
UNDER THE GUIDANCE OF RASHEED AHMED
STEP2:
Business Unit is based upon Business Processes for Functions Identification. Here Business Unit ID is a unique ID which was picked by our own.
EX:B100
Goto Business Unit Click on Create then fill the required details.
Give the Business ID, Description and add the Approver & Monitor.
Click on Save.
Check the below screen shots.

PREPARED BY ADITYA JOSYULA
UNDER THE GUIDANCE OF RASHEED AHMED
Click on the Plus(+) button to add the Approver.

PREPARED BY ADITYA JOSYULA
UNDER THE GUIDANCE OF RASHEED AHMED
Go to Monitor Tab & Click on the Plus(+) button to add the Monitor.

PREPARED BY ADITYA JOSYULA
UNDER THE GUIDANCE OF RASHEED AHMED
Click on Save.

PREPARED BY ADITYA JOSYULA
UNDER THE GUIDANCE OF RASHEED AHMED
STEP3:
Mitigating Controls is based upon Risk IDs for Identification. Here Mitigating Control ID is a unique ID which was picked by our own.
EX:B200
Goto Mitigating Controls Click on Create then fill the required details.
Give the Mitigating Control ID, Description, Business Unit, Management Approver.
Add the Associated Risk ID & Monitor.
Click on Save.
Check the below screen shots.

PREPARED BY ADITYA JOSYULA
UNDER THE GUIDANCE OF RASHEED AHMED

PREPARED BY ADITYA JOSYULA
UNDER THE GUIDANCE OF RASHEED AHMED
Click on Save.

PREPARED BY ADITYA JOSYULA
UNDER THE GUIDANCE OF RASHEED AHMED

PREPARED BY ADITYA JOSYULA
UNDER THE GUIDANCE OF RASHEED AHMED
STEP4:
Mitigated Users is used for assigning the Mitigating Control ID's to the User to allow the Risk.
Goto Mitigated Users

PREPARED BY ADITYA JOSYULA
UNDER THE GUIDANCE OF RASHEED AHMED
Click on Search.

PREPARED BY ADITYA JOSYULA
UNDER THE GUIDANCE OF RASHEED AHMED
Here click on the add button, then give the Mitigating Control, User ID, Risk ID & Monitor ID.
Here we need to give the Risk ID-B011* Manually because the Risk ID for the both violations is the same.

PREPARED BY ADITYA JOSYULA
UNDER THE GUIDANCE OF RASHEED AHMED
Click on Save.

PREPARED BY ADITYA JOSYULA
UNDER THE GUIDANCE OF RASHEED AHMED
Now Schedule the Background Jobs. Check the below Screen Shot

PREPARED BY ADITYA JOSYULA
UNDER THE GUIDANCE OF RASHEED AHMED
Click on Schedule.

PREPARED BY ADITYA JOSYULA
UNDER THE GUIDANCE OF RASHEED AHMED
Here give the Job Name & Click on Schedule.
After that check the Job States.
The State would be COMPLETE.

PREPARED BY ADITYA JOSYULA
UNDER THE GUIDANCE OF RASHEED AHMED
Now Go back to the Informer Tab and find out the Risk to that User ID:USER1
GO to Risk AnalysisUser Level.
Mention the System and User name.
Check the below screen shots.

PREPARED BY ADITYA JOSYULA
UNDER THE GUIDANCE OF RASHEED AHMED
Click on Execute.
Now you won't find any Violations.