Embed Size (px)
Citation preview

TheOldYangStyle
Taijiquan
Erle MontaigueMoontagu Books Australia

The Old Yang Style of TaijiquanAn Instruction Manual
By Erle Montaigue
Moontagu Books Australia
Publisher’s Note: This book contains material never before published. The enclosed information can only have come from Erle Montaigue, beingthe only Westerner to have received this information. It is illegal to copy and portion of this book other than brief extracts for review articles.You must obtain permission directly from the copyright holder ©2000. It is also illegal to plagiarize any part of this book to use in some otherpublication, paper, electronic, or video and film, by changing it in some way to make out as if it has not come from this source.
This book is provided free of charge in good faith so that all may enjoy the great benefits of this pinnacle of all Taijiquan systems. You maydownload it free of charge. But please do not plagiarize it. Even though it is free, it is still covered by international copyright laws.
Moontagu BooksPOB 792Murwillumbah, NSW 2484Australia
Ph: +61 2 6679 7145Fax: +612 6679 7028E-mail: [email protected]://www.moontagu.com
Copyright © 2000Moontagu Books Australia
First Published in Australia Electronically in 2000
All Rights Reserved
ISBN: 0-949132-07-8

Contents
1 Chapter
Introduction..........................1
History ............................................2
Dim-Mak.........................................4
2 Chapter
Form ....................................3
The Classic Sayings...........................4
Balance...........................................4
First Third Postures...................................5
Chapter one:
Introduction
Introduction
It has been my desire for many years to finally publish the
Yang Lu-ch=an form of Taijiquan (Tai Chi). However, due to
high printing costs and the lack of knowledge by the general
martial arts public of this earliest Yang style form, the cost was
prohibitive. However, in the age of electronic publishing, it is
now easier to publish such works on the web, hence this
publication in electronic format, free for anyone to download
and to learn from.
Please feel free to distribute this book to friends and students
free of charge. However, it does fall under International
copyright laws and as such cannot be re-published in any
manner, nor can any of this material be used in any other
publication unless permission has been sought from the
publisher.
This free book is a way of giving something have to an industry
that has sustained myself and family for over thirty years.
The Old Yang Style
The Old Yang Style or what I call, the AYang Lu-ch=an@ style of
Taijiquan has received much controversy since I introduced it
back in the early 80’s. Those who were unfamiliar with it and
who were perhaps a little jealous that this blue eyed westerner
was perhaps one of the only people in modern history to have
received such information, said that perhaps Erle Montaigue
Introduction 1
simply invented this form. Some even went to great lengths to
find others who had trained with me many years back to try and
gain fuel for this fire such was their evil intent!
This did not worry me and I was in a way slightly flattered to
think that such people should think that I was of such genius to
have invented such a perfect form of self-defense and self
healing. However, as much as I would like to think that I
invented this form, nowadays new information has come to
light with others producing books with very old Chinese
masters performing what amounts to the Old Yang Style.
However, it does not really matter who invented this form, my
self, Yang Lu-ch=an or my teacher, Chang Yiu-chun, the fact
remains that whoever learns this form or even sees it performed
looks on in awe at such a beautifully powerful and >still= set of
movements, rolling by in complete harmony with nature and
the internal flow of Qi (energy), with the occasional explosive
energy, (fa-jing) movement representing the AGreat River@ and
its mostly flowing softly but often violent actions. This form of
Taijiquan is why we have the lofty name of ASupreme Ultimate
Boxing@ (Taijiquan), because it was and is the highest form of
Taijiquan, the very pinnacle of the Internal Martial/Healing
Arts.
Levels
There are many levels of expertise to this form of Taijiquan
beginning with the basic beginner=s level right up to the most
advanced, >Soft Fa-jing= or >Small Frame= form and anywhere in
between like the AOpening and Closing@ form and the
AYin/Yang@ form to the AScapular Moving@ form.
In this book I will be presenting the very basic beginning form
which in itself will seem quite complicated for most people,
even those who think that they have advanced in for instance
Yang Cheng-fu=s form. You must walk before you can run and
so it is essential that every student, especially those who wish to
some day teach this form, learn from the very beginning. The
trouble with the Yang Cheng-fu form is that there are just so
many different types of yang Cheng-fu form nowadays and this
has come about by people only learning firstly the basic form
and then thinking that that was all there was, leaving their
2 Chapter one
teacher to set up their own school. In the meantime, their form
changes slightly and so they teach THAT form to their
students. Those students then go off half baked teaching others
their slight changes and so eventually no-one knows what was
original and what was not!
However, if you begin with the exact block learning of this
great form at its most basic level and do not continue until you
are sure or have been checked by a qualified instructor, then this
will go some way to insuring that this Original and Authentic
Yang Style remains pure for future generations. The placement
of the feet and hands is an exact science with each student=s
body parts being the ruler for placement of such. Exactly what
the head and eyes do is most important where most instructors
do not even know that the eyes often do something that is
different to where the head points! This aspect is very important
as the person who invented this form was a genius and built
into the form many other subtle areas such as the toning of the
reflexes by the action of the eyes and the head! This in turn
works upon the hypothalamus gland which is, among many
other things, responsible for one=s reflexes and how sharp they
are, and important aspect of course for any martial art. Even
sports departments around the world are now discovering this
aspect and are incorporating some eye to head movements in
their training schedules. But Yang Lu-ch=an knew about this
over two centuries ago. Properly placed, the hands and feet then
cause other areas of the body to come into complete balance
with reference to >paired body parts=. When these paired body
parts are in balance, so too do their associated acupuncture
meridians come into balance and hence we receive and even
flow and balance of yin and yang energy. The Chinese doctors
of old told us that most disease states are caused by an
imbalance of the amount of yin and yang energy in the body,
hence Taijiquan=s great self healing properties. But only if it is
done exactly as it was originally taught with no deviations!
History
The history of this system is also steeped in controversy.
However with much investigation into movement sciences I
have come to the only conclusion that I could have and that is
the version as follows.
Introduction 3

Chang San-feng was a famous acupuncturist and martial artist
of the >Shaolin@ style in China. AShaolin@ simply depicting the
area in China from whence this great external system came
(Little Forest). Chang was obsessed with the martial arts and
wanted desperately to invent the ultimate martial system based
upon what he then knew about the body and the energy (Qi)
system. Chang lived (give or take a few tens of years!) From
around 1270 A.D. So it is my estimation that he invented what
he did at around 30 years of age around the turn of the century
into the 1300’s.
Chang and two of his acupuncturist friends set about to find
out what effect trying to damage the acupuncture points would
have rather than trying to heal diseases using the same points.
They already knew from trial and error that when certain points
were perhaps needled too much or if the needle was pushed in
too far, that people either died or became very ill from Qi
stagnation resulting in eventual death!
But Chang wanted an even more scientific approach to know
exactly what each point in the body did when either struck,
twisted or pressed violently and more importantly what other
points when used with these points did to the body=s energy
system. So they set about using these strikes on people! It is my
knowledge that they bribed the jailers to give them the >baddies=
for >experimentation=. And our knowledge of the deadly art of
>Dim-Mak= (Death Point Striking) comes from these
experiments by Chang San-feng.
Dim-Mak
Upon discovering the devastating effects upon the Qi system of
the body, Chang did not wish to document it as others would
try to steal his discoveries claiming it as their own (as is exactly
what happens today! It=s amazing the amount of articles that
come out on the use of Taijiquan as Dim-Mak after I
introduced it to the world!), or worse still, would gain this
knowledge and use it back on he and his family. You have to
remember that China back then was feudal and it was
dangerous for anyone to even go out into the countryside for
fear of being killed! So he set about inventing a set of
movements that would act as an encyclopaedia to teach his
children and main students and those to come in future
4 Chapter one

generations, what each point in the body represented in the
fight art.
Chang discovered that he needed many sets of movements to
depict the various groups of points in the body and also worked
out (he was a genius) exactly what movements worked upon
what meridians and consequently upon what organs. So what
he eventually invented was a series of 12 sets of movements
called forms, or kata in Japanese. Each set was made such that it
worked on a set or one main acupuncture meridian such as the
Spleen meridian. Each set of course worked upon all of the 12
main acupuncture meridians and 8 extra meridians, however,
each one of the 12 had its main meridian that it worked upon.
He even went so far as to work out not only what physical
organs each set worked upon but also what emotional state each
set worked out. So that we have his 6th form which works upon
ridding oneself of built up unwanted emotions. It works upon
the >heart=. And as we have found through our own
experimentation, this one in particular when learnt correctly has
an amazing effect upon the emotions and getting rid of those
unwanted and hidden emotions from years back!
Taijiquan (T’ai Chi Ch’uan or Tai Chi)
But this was still not Taijiquan as the word >Taijiquan@ was not
invented until the later part of the 19th century! In fact
Taijiquan was not even performed on Wudang Mountain (the
birthplace of Taijiquan and all other internal systems). Only
what we now call the Wudang Qi Disruptive System, was
performed on Wudang Shan. So people who claim to be
teaching >Wudang Taijiquan= are usually simply teaching a
version of the Yang Cheng-fu form which was not even
invented until many centuries after Chang San-feng! Because
Taijiquan was not even invented back then! Only a set of 12
forms was invented on Wudang Mountain. These forms I teach
the first nine as the last three are just too powerful until the first
9 have been thoroughly mastered! I learnt these forms from the
>keeper of the system= having already known the first 4.
One of Chang=s main students, Wang Tsung-yeuh was a scholar
and wrote down what he had learnt. This treatise was then put
away and handed down through his family as a piece of funny
old writing until a man called Yang Lu-ch=an who had been
Introduction 5
studying at the Chen Style Martial Arts village came across it
and also had the good fortune to study with a direct lineage
family member of Chang San-feng called Zhiang-fa. From
Zhiang, along with the other members of the Chen clan learnt
what Zhiang knew. Because of Yang=s eclectic martial arts
learning, he was able to take exactly what Zhiang had taught
him and when he either found or was given a copy of Wang=s
treatise, worked out an eclectic form of martial art of the
internal style combining all that he had learnt from Zhiang and
incorporating the 12 main Qi Disruptive forms of Wudang
Shan. He finally invented what we now know as the Yang
Lu-ch=an form of Taijiquan. However, even yang would not
know what it was that you were talking about if you said
>Taijiquan@ as his system was simply known as AH=ao Ch=uan@
or, roughly translated= >Loose Boxing=. It was not until later
generations that the Yang=s adopted the name of Taijiquan.
Many still disagree with me about the above, preferring to
believe the Chen family=s version of the history in that it was
they who taught Yang and they alone! Because of the inherent
and great differences between the two systems, I have to believe
in my own theory. In any case it does not really matter as the
Old Yang Style is indeed the Supreme Ultimate Boxing of the
Internal Systems.
Yang Lu-ch’an’s Old Form Taijiquan
I will be presenting for the first time the basic Yang Lu-ch=an
form in as much detail as possible in a book. And although
those who already study a style of Taijiquan might be able to
learn the form from this book, it is advisable to get also my
basic tape, MTG2 and/or the new series, AYang Lu-ch=an
Corrections@ as this is the only way to really know that you are
doing the exact movements.
The beauty of Taijiquan, especially the Yang =an form is that it
was very carefully thought out by its founder. He saw a need
for a martial system that not only contained the most deadly
self-defense applications but also self-defense against disease and
depletion of Qi and a Qi system that was out of balance. So he
built into the whole form a way of manipulating each
acupuncture meridian in turn, the way that it is >activated=
throughout a 24 hour period. In this way every organ in the
6 Chapter one

body is bathed in life-giving Qi with this manipulation
emulating the exact >activation periods of the meridians during
each day. This is how Taijiquan works in the self-healing area as
a preventative as well as a healing application for many disease
states.
The Three Areas Of Taijiquan
However, Yang Lu-ch=an did not stop there, he also built into
the form a way of using Taijiquan for medical purposes in that
someone who had risen to a high degree in the art could then
become a >Taijiquan doctor= and help to heal others of various
disease states using the postures of the form on patients. In my
book, AInternal Gung-fu Volume Two@, I have covered this
aspect showing what each of the postures means and how to use
them on patients.
He even went one step further such was his genius, and built
into each posture a way of also treating mental illness and
emotional illness plus those mental illnesses caused by
childhood, adolescent and adult trauma!
It is a long road to rise to the highest level of Taijiquan.
However, along the way the view is just wonderful and you will
experience a view of life and your place in the world that you
never thought possible until eventually you will get back to
knowing what you knew at birth.
Introduction 7
CHAPTER TWO
Form
The Classics of Taijiquan
We are left with much written and oral information
relating to the practice of Taijiquan. This information was often
written down or told in the form of verse which then had to be
firstly translated into English and then further translated into
something that we Westerners could understand. The problem
rose when Chinese scholars who knew a little about Taijiquan
and who had not perhaps risen to a high level themselves, began
to directly translate the Classics. Some of them came out totally
wrong while others just sounded silly! We must remember that
these Classics were written by masters who had already come to
the very peak of their knowledge and training and wrote what
they were feeling from that perspective. So when someone who
discovers Taijiquan for the first time, picks up a book of
>Classics=, they either take every word literally or they do not
understand a word of it, even though it is written in their own
language. I have asked friends, one of whom was the Chief of
English studies at the London University in Hong Kong to
translate certain works and he even had a difficult time as he
was not up on the Internal martial Arts idiom.
So I have added some of my own experience to the Classics so
that others can benefit form my own knowledge earlier than for
instance 30 years!
8 Chapter Two

General Rules For Practice
• 1/.The head should not turn to one side; let your eyes do the
looking, keep your nose in your centre line. Even when you
have to look for instance to the front while you turn your
waist to the side, look out of the corner of your eye so that
your centres stay in line.
• 2/. The head should not bob up and down when taking steps.
By keeping your knees bent, you should be able to achieve
this. Be sure that you are well weighted on your standing leg
before you lift the other leg.
• 3/. Keep the knees bent but never allow them to come past
the level of the toes. When looking down at your toes, there is
a slight parallax error so be sure to keep the knees just over
the front of the toes.
• 4/. Start out with a higher posture and the steps not too long,
just a natural step is sufficient in the beginning. There are
three levels - high, medium and low. The low level should
only be attempted after many years of practice and only when
you are able to do it without creating tension. This still does
not mean taking the toes further than the knees, the stance
becomes longer to compensate for this. As you progress even
further and the form becomes more internal than physical, the
step will rise again, so that you perform the form at a more
natural stance again.
• 5/.The shoulders are relaxed at all times and the elbows drop
below the shoulders. By keeping the elbows relaxed, the
shoulders will be relaxed and this is one of the most difficult
aspect for westerners to achieve.
• 6/. The eyes look straight ahead and the palms are relaxed and
natural holding the `tile palm hand’. (The general photos of
the form show this hand shape).
• 7/. The backbone should be straight and vertical. The spine
should be at all times vertical to the ground. Never hunch the
back. The spine of course has an >S= shape when standing
normally and a >C= shape when you bend your knees as we do
for the most part of the Taijiquan form. So it is of course
Form 9

impossible to have a ruler straight backbone! However, if you
take the backbone and simply cause it to be >vertical= to the
ground, this is the correct way. In other words, do not lean
either way.
• 8/. Walk like a cat, carefully and softly, so that if there is
danger you are able to take that foot back. Step forwards on
the heel and backwards on the toe. However, there are some
postures in the Yang Lu-ch=an form that require that you do
the reverse by stepping back onto the whole flat foot and
there are times when you will raise the front foot by lifting it
straight off the ground, heel and toe together.
• 9/. Never have equal weight on both feet. Be aware of which
leg is yang and which is yin. Never have equal strength in
your palms as this is double weighting. Only at the very
beginning and at the end should the weight be evenly
distributed. There must of course be a time when there is
double weighted when you change your weight from one leg
to the other but it is only momentary as the weight changes.
• 10/. Maintain equilibrium (earth); never commit yourself fully
- always have in mind the retreat if you attack or the attack as
you retreat.
• 11/. In attacking forwards breathe out, in attacking backwards
breathe in. In lifting upward breathe in and in placing the foot
or stepping downward breathe out.
• 12/. The Qi, (ch’i) springs from the feet, (Kidney Point No.
1) is directed by the waist and is manifested in the fingers.
Although this is true, the Qi really comes firstly from the
tan-tien then travels down to the bubbling well point called
Kidney one@ at the base of the foot.
• 13/. Your head should be held as if suspended from above by
string. This will pull your backbone upward and sink the Qi
to the tan-tien. To make this happen simply pull your chin in
slightly but not tense, this will give the feeling of being lifted
from the crown by a piece of string.
• 14/. Practice the form three times - once for the bones,
muscles and sinews, once for the mind and once for the spirit.
The first time should be done in about 10 or 15 minutes, the
second in about 20 to 30 minutes and the last in about 40
minutes. If you cannot do it three times, then break the form
up into its three thirds depicted by when we perform the
10 Chapter Two
postures of >Apparent Close Up=. There is a brief waiting time
in between each third and this time is different for everyone.
Mine for instance is about one minute.
The Classical Times For Practice Were:
• Dawn: When you are coming out of yin and entering yang.
• Midday: When you are in extreme yang .
• Dusk: When you are coming out of yang and entering yin.
• Midnight: When you are in extreme yin.
These times give you a completely balanced practice structure,
but most of us can only manage dawn and dusk.
True Taijiquan is subconscious, the body and mind are in a state
of alpha, not asleep and not awake. Allow your computer
(brain) to do all the work for you and you can achieve anything.
It takes many years to achieve a high level of Taijiquan but on
the way you will come across wondrous things and lessons in
life; you must invest in loss.
Balance:
Balance is the most important area of one’s training. I do not
mean however, that we can simply stand on one leg. I mean
that all of our six balanced pairs of organs and corresponding
body parts are balanced out as far as yin and yang Qi or energy
is concerned. So when the hands for instance are balanced with
the feet, we will have an equal amount of yin and yang energy
in these parts.
The six balanced organ pairs with their corresponding
acupuncture meridians or acupuncture (dim-mak) points are as
follows.
Form 11

Balanced Body PartsCorresponding Acupuncture
Meridian/Point
Hands & Feet Should be Balanced Stomach & Spleen (ST & SP Meridians)
Knees and Elbows Should be Balanced Kidneys & Bladder (KD & BL Meridians)
CV1 (Point at the base of the torso
between the anus and sexual organs) & The
Crown of the Head (GV20)
Triple Heater Meridian & The Pericardium
meridian. (Representing the 3 heating
spaces in the body) (TH & PC Meridians)
Buttocks & Axilla Should be Balanced Gallbladder & Spleen (GB & SP Meridians)
Coccyx & Back of the Skull Should be
Balanced
Heart & Small Intestine (HT & SI
Meridians)
Shoulders and Hips Should be BalancedLung & Large Intestine or Colon (LU &
CO Meridians)
In the martial arts area, Taijiquan is considered to be one of the
most effective for self-defense and there is a difference between
>martial arts’ and >. When Taijiquan was invented, the founders
had to have some way of presenting what they had discovered
to their own family members and close students without
everyone learning their secrets. You must remember that back
then in China Mrs. Yang would never know if her husband
would make it home that evening for being attacked and killed!
So they invented a dance-like set of movements into which was
interwoven the most deadly attacking and defensive methods
ever invented. Every move we make in our Taijiquan form
means something in the martial arts area, even a finger
movement means a deadly strike to dim-mak (death point) or
acupuncture points on the human body.
The Yang L u-ch=an Taijiquan Form First Third Postures
Remember that this book is covering the basic level of the Yang
Lu-ch’an form. It would be almost impossible to write a book
covering the advanced ways of performing this form due to the
huge amount of photos it would take. And even then, it would
be impossible to show the intricate extremely small internal
movements necessary to succeed in this advanced method of
‘small frame’.
12 Chapter Two

The only way to learn the very advanced methods of this form is
either directly from a teacher who knows it! Or by learning it
from my videotapes. And even then, at some stage you will
need to see someone who knows it for corrections. However,
the very basic blocks of the basic form can be learnt from a
book that has enough photos to show the interim postures. And
you can get it almost perfect combining this book with my basic
tape, MTG2.
Begin:
Stand with your feet parallel and shoulder width, arms by your
side with the elbows held slightly open so that a fist can fit
under your arm. This is called ‘opening the Kua’. The palms are
held in a ‘Yang’ shape. A Yang shape is when you slightly flex
your wrist and a ‘Yin’ shape is when you allow your wrist to go
limp. A ‘Yang’ shaped palm is full of ‘Yin Qi’ or energy while a
‘Yin’ shaped hand is full of ‘Yang Qi’.
Your tongue is placed onto the top of your hard palate like you
are saying the letter ‘L’ and your chin is slightly pulled in. Make
sure that the insides of your feet are parallel. Your shoulders are
always relaxed. Photo No. 1. You are facing to the North.
Preparation:
This is the first ‘posture’ from the form and simply involves
raising your palms and lowering them. However, each of the
postures and indeed, every tiny movement has a deadly
dim-mak or ‘death point striking method’ involved in its
self-defense meaning. Often these methods are hidden and
cannot be readily seen. This was a safeguard built into the
original form so that others could not discover the deadly real
meaning of the form. I will not be showing these deadly
applications in this book as they should be learnt either from
video or from a qualified instructor.
Form 13
1

However, just to show how these methods are hidden I will
explain what this first posture is doing.
As you inhale, raise both arms causing your palms to slowly
(over the whole stroke of the movement) turn into ‘Yin’ shaped
palms. This is important to slowly change the state of the palms
as there are no ‘dead’ movements in Taijiquan. This means that
you never for instance change from a yin to a yang shaped
palm, THEN make a movement. In this case, the movement
has no meaning. So if you know that you are making a
movement that does not have this slow change from yin to yang
in the palms, then it is wrong. I have seen many so-called
masters making this error. They will change the palms from the
initial yang state, to a yin state and THEN lift their arms! This
comes about from instructors never having learnt the deadly
dim-mak applications which in turn leads to the very advanced
healing methods.
Raise your palms up to shoulder height and turn your palms
inward slightly so that your small finger is slightly above your
thumb. Photo No. 2. The index fingers are about 3 inches
apart at this time. As you exhale, take both palms back down to
where they have come from in exactly the reverse of the way
you brought them up by changing from now a ‘Yin’ shaped
hand to a ‘Yang’ shape. Photo No. 1.
The dim-mak application of this posture (remembering that
there are countless applications in the basic, advanced and
dim-mak areas) is that as an attacker comes at us with both
arms extended as in a grappling type of movement, you would
strike first his right ‘Neigwan’, or Pericardium point No. 6
point on his wrist with your left back wrist, then you would
strike his left ‘Neigwan’ with your right back wrist as your left
palm is crashing down onto his ‘Stomach 15’ point on the right
side of his chest followed quickly by an attack to his left
Stomach 16 point on his chest. The strikes to the Neigwan
points cause great energy to be depleted from his body making
him feel really ill! Struck hard enough it can case a knock out by
itself! These are the ‘Set Up’ point strikes. The ST (stomach)
15 and 16 strikes are the death point strikes which will stop his
heart from beating!
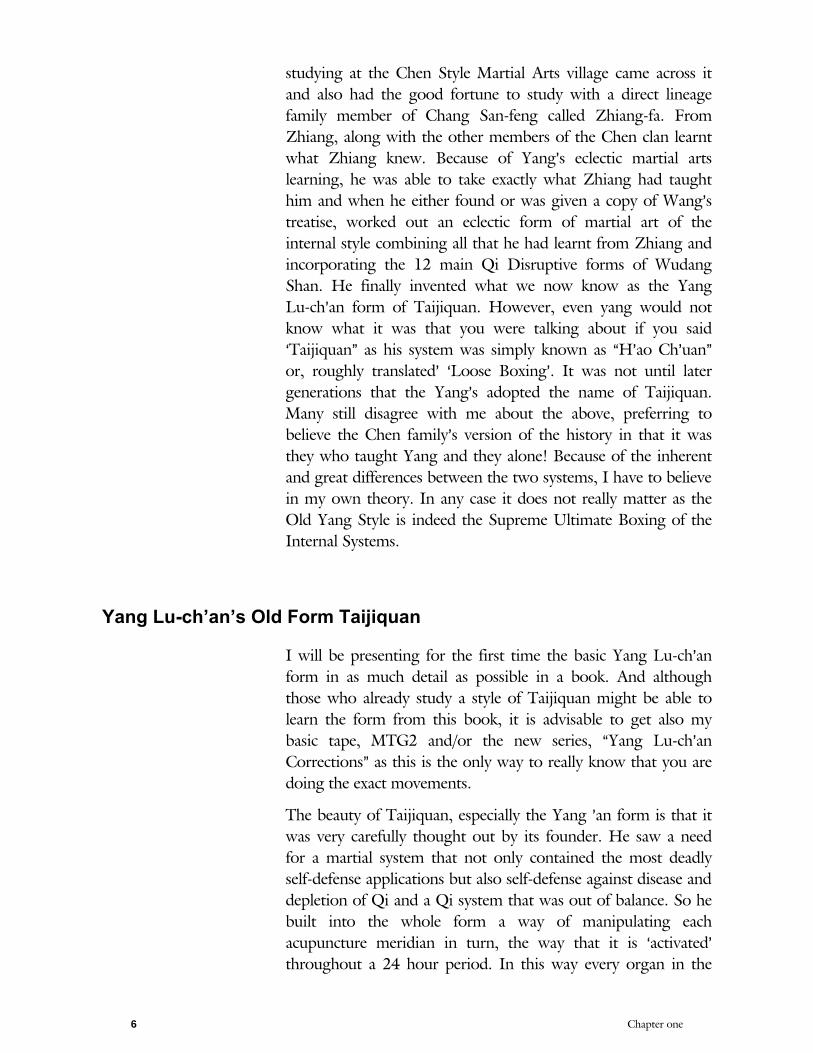
I will include only a couple of these applications just to show
how deadly this form is. Over the years, Taijiquan has been
derided by other martial artists and rightly so as Taijiquan has
14 Chapter Two
2
taken on a ‘new age’ meaning and has lost all of its martial
content. This has come about solely from so-called instructors
only ever learning the very basic forms incorrectly and thinking
that, that was all there was! They left their inept instructor to
start up a school on their own and so on. However, with the
help of myself and other people who know the real Taijiquan,
the tide is slowly turning with many karate people for instance
coming to regard Taijiquan as not just a nice add-on to their
system! They are beginning to realize the great and deadly
potential that learning Taijiquan has, even if it is only to make
their own system better.
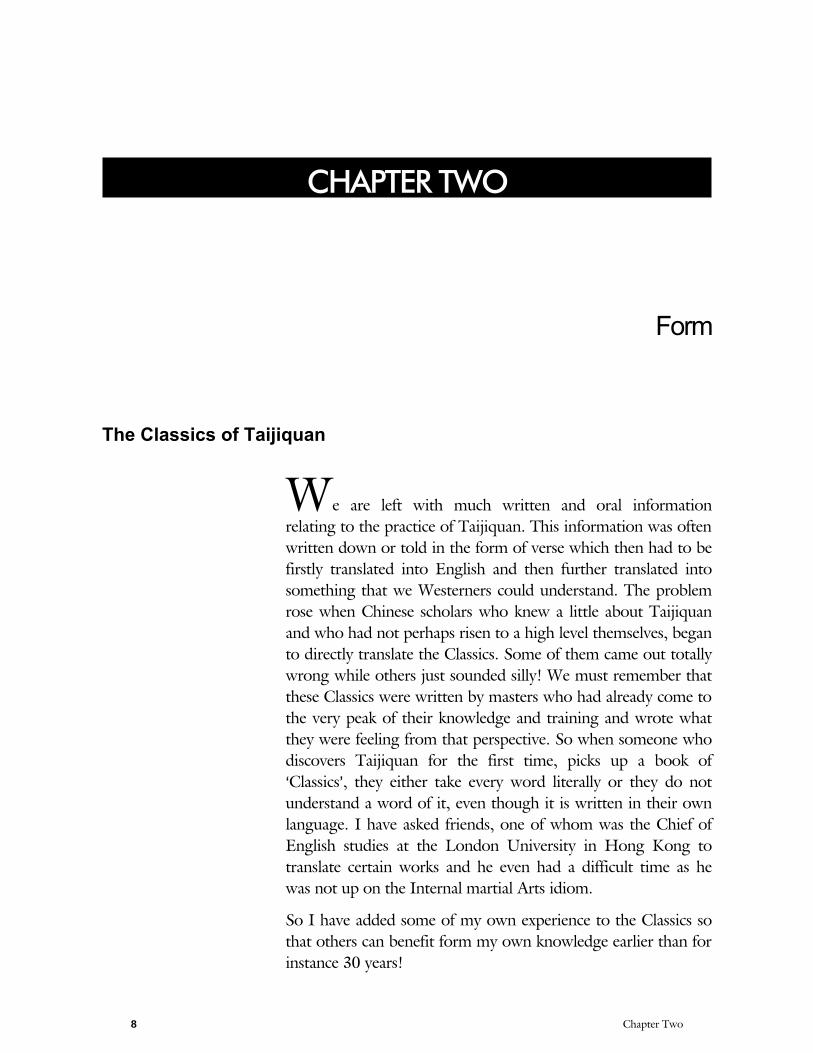
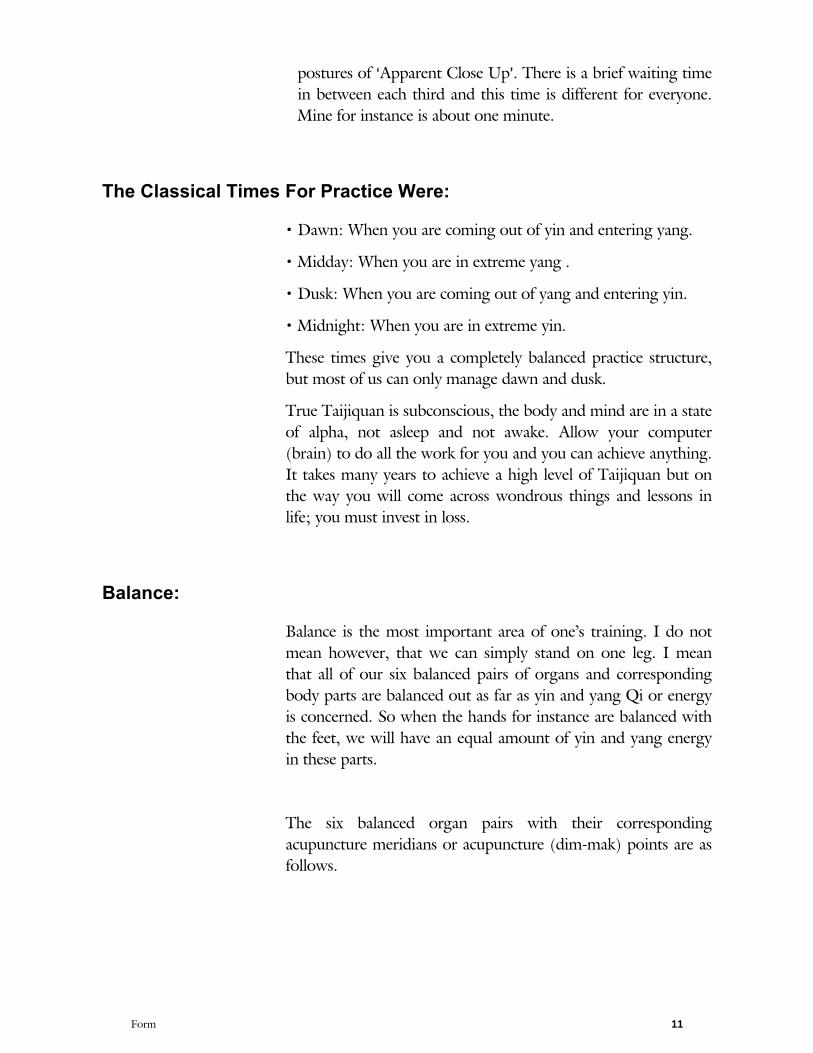
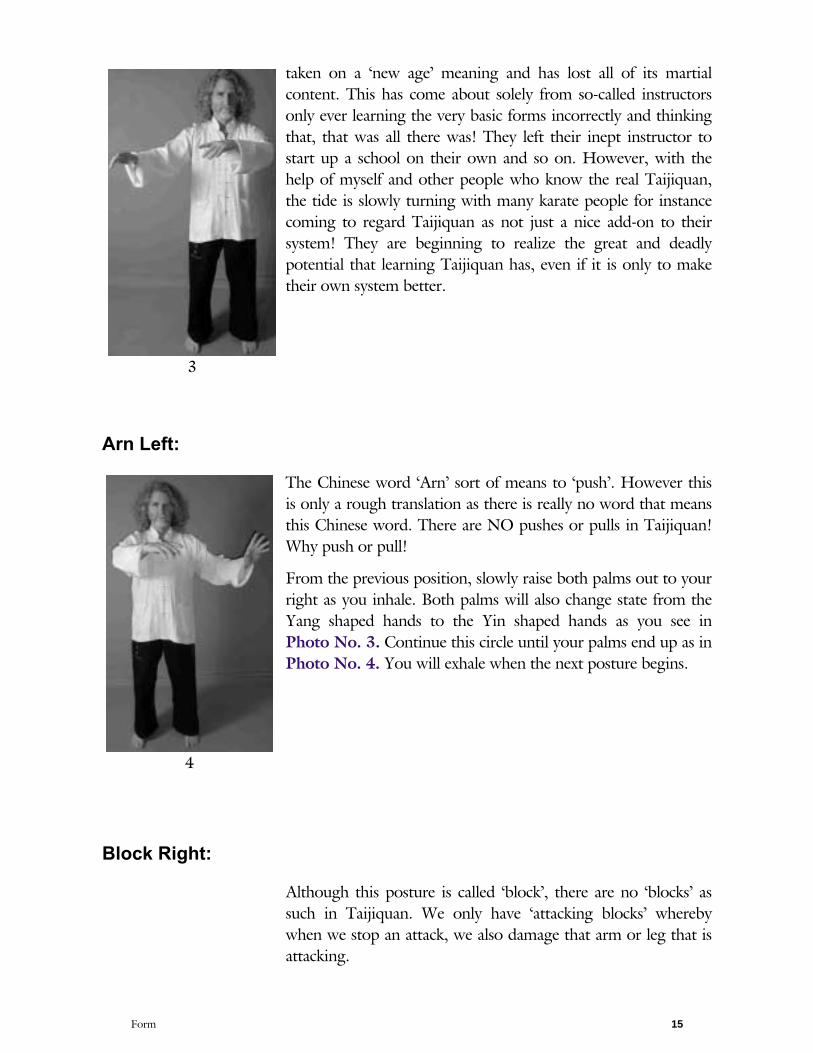
Arn Left:
The Chinese word ‘Arn’ sort of means to ‘push’. However this
is only a rough translation as there is really no word that means
this Chinese word. There are NO pushes or pulls in Taijiquan!
Why push or pull!
From the previous position, slowly raise both palms out to your
right as you inhale. Both palms will also change state from the
Yang shaped hands to the Yin shaped hands as you see in
Photo No. 3. Continue this circle until your palms end up as in
Photo No. 4. You will exhale when the next posture begins.
Block Right:
Although this posture is called ‘block’, there are no ‘blocks’ as
such in Taijiquan. We only have ‘attacking blocks’ whereby
when we stop an attack, we also damage that arm or leg that is
attacking.
Form 15
3
4

Exhale slowly as you lower your weight firstly and momentarily
onto your left leg then over onto your right leg. Your left palm
becomes firstly Yang shaped, then Yin shaped as it moves over
to your right side underneath your right palm which will
become Yang shaped. Your right toes have turned out to your
right by 45 degrees. Photo No. 5. Notice however, that the
eyes are still looking to the North. This is important in
Taijiquan as we use this eye method to hone our reflexes by its
action upon the hypothalamus gland, which among other things
is responsible for the quickness of our reflexes. Often you will
keep your eyes still and move your head to one side and other
times you will firstly move your eyes then allow your head to
catch up.
P’eng:
With your eyes still to the North (on the
attacker), take a left step to the N. onto your
heel. You must however, maintain that same
shoulder width distance between your heels
when you step. Do not allow your left heel
to come across to the right at all! Do not
over-step, simply allow your left heel to be
placed where it wants to go to without
having to place any weight onto it just now.
You should be able to pick up your left heel
without firstly moving weight back onto
your right foot. As you do this, your palms
will both change state. The right will change
to a Yang hand while the left will now be
Yin. This indicates that when a hand is Yang
shaped, it is full of Yin Qi (energy) while a
Yin shaped hand is full of Yang Qi and can
only deliver Yang Qi. Photo No. 6. Inhale.
Now as you move your weight 70% onto your left leg, your
waist will turn to the N. thus bringing your left wrist up to
chest height and in line with your centre. You will exhale as you
do this. Notice that when the Palm moves past the right palm,
16 Chapter Two
5
6 7

the fingers of the left palm will pass by very close to the
‘Dragon Mouth’ point or Colon Point N0. 4 (CO 4). Photo
No. 7. As you bring your weight onto your left leg, your waist
will turn fully to the front thus putting some pressure onto your
kua, (bridge in Chinese). You will feel some tension down the
inside of your right thigh if you do this posture correctly as for
any ‘Bow’ stance. Your buttocks should not be allowed to
protrude as this will take the pressure off the Kua and you will
lose power. Photo No. 8. Notice that the position of the right
palm is such that if you were to bring both palms together
vertically, the right fingers would just scrape past the left palm.
To check to see if the position of your right leg is good, you
should have a straight line between ‘NOSE, KNEE, TOE’ as we
are told in the Wudang Classics. However, you cannot see this
line until you turn your head to look at your rear toe! Then you
should see that straight line.
Block Left:
This is the reverse of the previous posture of the same name.
Bring your right palm underneath your left palm and change
the state of each palm as your inhale. Photo No. 9.
Double P’eng:
Raise your right heel as you do this and
turn your waist to your right by 45
degrees. Your eyes will look to the East
although your head is only to the NE.
Change the state of each palm again so
that the right is now Yang while the left is
Yin and pick up your right foot replacing
it on its heel where it was as you turn
more to your right. Photo No. 10. This
is still an inhalation. Exhale as you roll
your weight onto your right foot by 70%
and bring your right palm up to in front
of your left palm as if holding a small ball.
Form 17
8
9
10

The very last thing is that you should allow your left toes to be
dragged around by 45% to point to the NE. Keep the foot flat
on the ground when this happens swivelling on the heel. Photo
No. 11. Exhale. This is a very deadly neck strike with a
shoulder set-up dim-mak strike to SP 19 (Spleen Point No 19),
with the main thrust into the Dim-Mak point called ST 9
(stomach point No. 9). This causes instant knock out from the
action of the Carotid sinus upon the heart via the cardio-
inhibitory centre in the brain which slows the heart or stops it
when extreme high blood pressure is present! This strike
emulates extreme high blood pressure and is very dangerous!
Lu:
Roll both palms over so that your left is palm up and the right
is palm down. This is a very deadly strike
to the side of the neck. Turn your waist
so that the palms are over your right
knee. The palms also begin to drop
down. Begin to inhale. Photo No. 12.
Continue the turning of your waist to
your left this time which causes your
dropping palms to look as if they have
pulled over to your left. This is an
illusion as all you have really done with
your palms is to drop them vertically!
The body does the work! Your left palm
is over your left knee while your right
elbow is over your right knee. You have
moved your weight onto your left leg by
70%. Photo No. 13. Your eyes are still
looking to the front but your head is to
the NE.
Chee:
(This is often called ‘to press’ in other works. However, this is
incorrect as the Chinese character for this posture means to
‘squeeze’. It has been mis-translated so that we dumb westerners
can understand it! However, if you look at the physical action
of the movement, you will see that the whole upper body is
18 Chapter Two
11
12 13
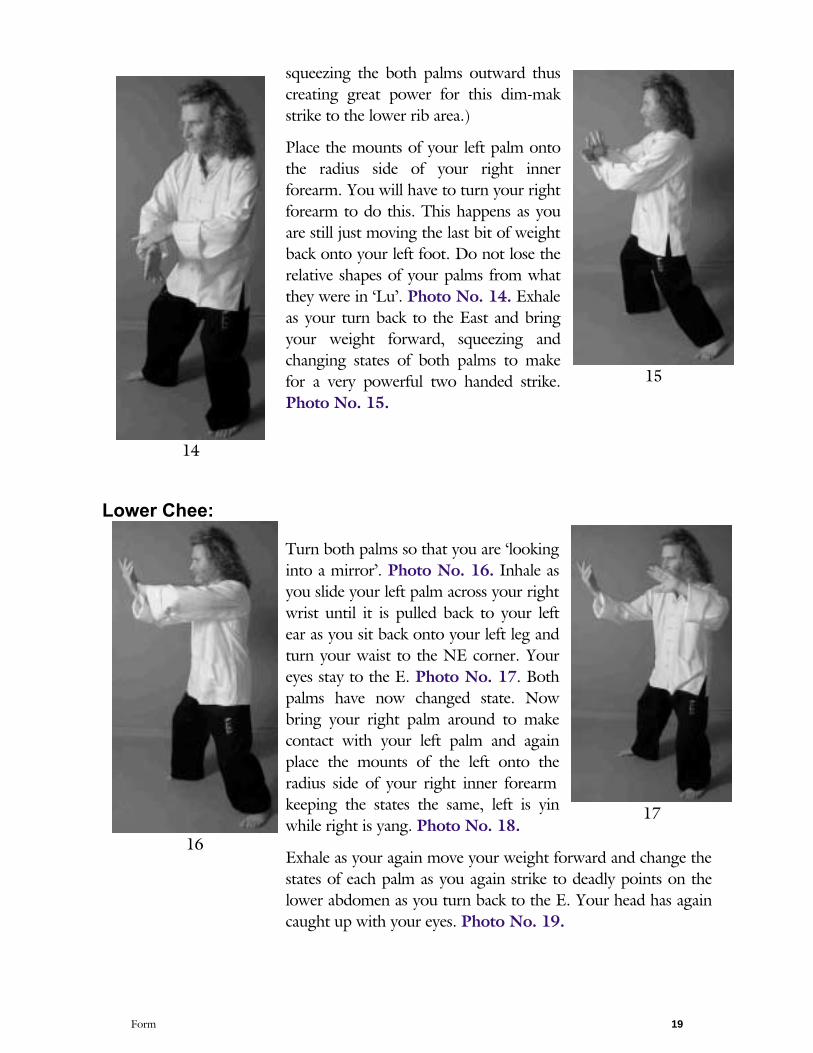
squeezing the both palms outward thus
creating great power for this dim-mak
strike to the lower rib area.)
Place the mounts of your left palm onto
the radius side of your right inner
forearm. You will have to turn your right
forearm to do this. This happens as you
are still just moving the last bit of weight
back onto your left foot. Do not lose the
relative shapes of your palms from what
they were in ‘Lu’. Photo No. 14. Exhale
as your turn back to the East and bring
your weight forward, squeezing and
changing states of both palms to make
for a very powerful two handed strike.
Photo No. 15.
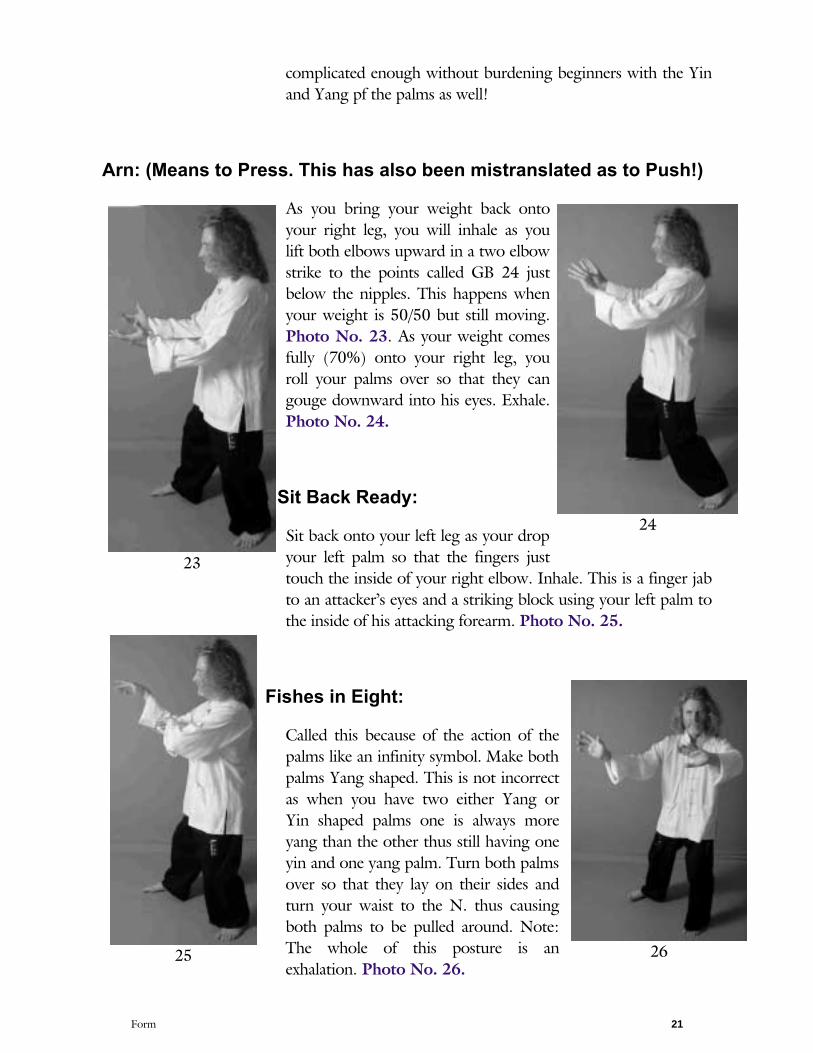
Lower Chee:
Turn both palms so that you are ‘looking
into a mirror’. Photo No. 16. Inhale as
you slide your left palm across your right
wrist until it is pulled back to your left
ear as you sit back onto your left leg and
turn your waist to the NE corner. Your
eyes stay to the E. Photo No. 17. Both
palms have now changed state. Now
bring your right palm around to make
contact with your left palm and again
place the mounts of the left onto the
radius side of your right inner forearm
keeping the states the same, left is yin
while right is yang. Photo No. 18.
Exhale as your again move your weight forward and change the
states of each palm as you again strike to deadly points on the
lower abdomen as you turn back to the E. Your head has again
caught up with your eyes. Photo No. 19.
Form 19
14
15
16
17

Double Spear Hands:
Swipe your right palm with your left as
your begin to sit back and turn your
waist to your left slightly opening both
palms out to your sides as your inhale.
Your eyes are still looking to the E.
Photo No. 20. Hook both palms
inwards towards your body rotating
them so that they are now palms
upward ready to strike. Photo No.
21. As you full sit back onto your left
leg, poke both palms outward as you
exhale. This is a dangerous dim-mak
strike to LIV 13 (liver points No. 13).
Photo No. 22.
You must note that at a more advanced
stage, no two palms will attack at the
same time. It may LOOK that way, but
always one will strike slightly before the
other. We only do it this way for beginners as this form is
20 Chapter Two
18
19 20
21
22
complicated enough without burdening beginners with the Yin
and Yang pf the palms as well!
Arn: (Means to Press. This has also been mistranslated as to Push!)
As you bring your weight back onto
your right leg, you will inhale as you
lift both elbows upward in a two elbow
strike to the points called GB 24 just
below the nipples. This happens when
your weight is 50/50 but still moving.
Photo No. 23. As your weight comes
fully (70%) onto your right leg, you
roll your palms over so that they can
gouge downward into his eyes. Exhale.
Photo No. 24.
Sit Back Ready:
Sit back onto your left leg as your drop
your left palm so that the fingers just
touch the inside of your right elbow. Inhale. This is a finger jab
to an attacker’s eyes and a striking block using your left palm to
the inside of his attacking forearm. Photo No. 25.
Fishes in Eight:
Called this because of the action of the
palms like an infinity symbol. Make both
palms Yang shaped. This is not incorrect
as when you have two either Yang or
Yin shaped palms one is always more
yang than the other thus still having one
yin and one yang palm. Turn both palms
over so that they lay on their sides and
turn your waist to the N. thus causing
both palms to be pulled around. Note:
The whole of this posture is an
exhalation. Photo No. 26.
Form 21
23
24
25 26

Keep turning until your waist has come into the NW corner
and your right toes have turned to the N. So that you are now
standing pigeon toed. Your right palm will continue to move
over but flicks over so that they fingers of that palm are now
pointing to the inside of the left elbow. Photo No. 27. Your
eyes follow the movement. Weight is on the left leg 70%.
Continuing the exhalation, you will now change your weight
back to your right foot without turning it! AS you do this and
when you are 50/50, bring both palms in over each pectoral.
Photo No. 28. You must not allow your weight to reach the
right leg until the hands also reach their final area. Turn your
waist into the NE corner as you push (strike) with both palms
into that corner. The palms are now in the same position only
opposite for the previous posture of the same name. Photo
No. 29.
Single Whip:
This posture has two parts. The first part is where it gets its
name because of in application only, the violent flicking of the
right wrist to 4 neck points. Breathe in as you rotate your right
palm to upward and turn your left fingers in so that they touch
the inside of your right elbow. Photo No. 30. This will be
done for now only moving the palms as you are beginning!
22 Chapter Two
27 28 29
30

However, later in order to create
the great power that the waist can
generate when the body is in a
state of ‘sung’, you must also turn
your waist firstly to your left, then
back to the right and slightly left
again. This is a fa-jing shake’.
Allow the tips of your fingers to
come together with your thumb
thus making a kind of ‘beak’ as
your turn your right palm down.
Photo No. 31. You have now
done a counter clockwise circle
with your right palm. Now, push
you right palm through that circle
until your right elbow is locked.
This is the only time that there is a
straight arm in Taijiquan! There is a good reason for this
however. Yin and Yang energy (electricity) if we are using
Internal Energy as opposed to pure physical
strength, must have its opposite to return to the
body. In the next movement we are doing a
very powerful one handed palm strike and so
we must have all available power. AS the strike
is releasing Yang Qi, there must be a Yin route
for it to return. Now if we make the right
elbow relax and bent, then the Qi has what is
called an ‘upper heavenly circulation’ by which
to return. This is not as powerful as we can
have, so we simply block the Qi from entering
via that route as all tension creates Qi
blockages! Now the Yang Qi finds its only
other route via the rear leg causing a far greater
strike because of the larger circle of Qi.
As you straighten your left arm, this forces your
left palm to leave your right elbow and begin
moving around to the West as your left foot is
picked up off the ground. The left elbow is over the top of your
left knee as you do this. Place your left foot down to the West
and allow your left wrist to raise slightly getting ready for the
strike. This has been an inhalation. Photo No. 32. Note that
the distance between the feet laterally is NOT a bow stance of
shoulder width! The Single Whip stance is NOT a bow stance.
Form 23
31
32

If you take a bow stance, then place the outside
of your foot to where the inside of your foot is,
this causes the step to be narrower and thus
able to take a slightly longer step. Now, roll
your weight onto your left leg 70% as your left
palm strikes releasing the Yang Qi slowly over
the whole stoke. If you see someone holding a
fully yang shaped palm before this movement,
they are wrong! The palm MUST release over
the whole stroke of this final movement and
weight change. Photo No. 33. Note also that
your waist is not fully to the West.
Spear Fingers Pierce To Rear:
Move your weight slightly back but no more than 50% as you
open your right palm. Begin to inhale. Turn your waist slightly
to your right and look back as far as you can towards your right
palm. Photo No. 34. Now put your weight back onto your left
leg as you make like you are pulling something forward. You
are in fact grabbing his arm, dragging him forward then you
will spear your fingers into his neck points. Photo No. 35.
24 Chapter Two
33
34
35
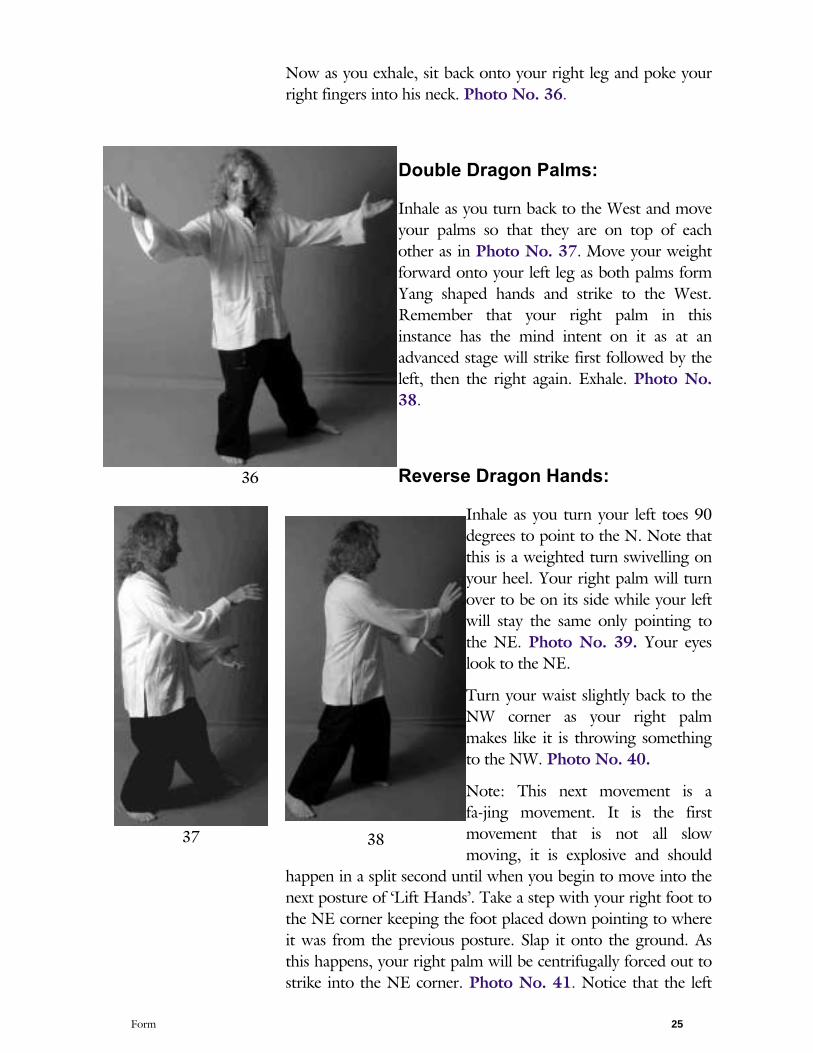
Now as you exhale, sit back onto your right leg and poke your
right fingers into his neck. Photo No. 36.
Double Dragon Palms:
Inhale as you turn back to the West and move
your palms so that they are on top of each
other as in Photo No. 37. Move your weight
forward onto your left leg as both palms form
Yang shaped hands and strike to the West.
Remember that your right palm in this
instance has the mind intent on it as at an
advanced stage will strike first followed by the
left, then the right again. Exhale. Photo No.
38.
Reverse Dragon Hands:
Inhale as you turn your left toes 90
degrees to point to the N. Note that
this is a weighted turn swivelling on
your heel. Your right palm will turn
over to be on its side while your left
will stay the same only pointing to
the NE. Photo No. 39. Your eyes
look to the NE.
Turn your waist slightly back to the
NW corner as your right palm
makes like it is throwing something
to the NW. Photo No. 40.
Note: This next movement is a
fa-jing movement. It is the first
movement that is not all slow
moving, it is explosive and should
happen in a split second until when you begin to move into the
next posture of ‘Lift Hands’. Take a step with your right foot to
the NE corner keeping the foot placed down pointing to where
it was from the previous posture. Slap it onto the ground. As
this happens, your right palm will be centrifugally forced out to
strike into the NE corner. Photo No. 41. Notice that the left
Form 25
36
37 38
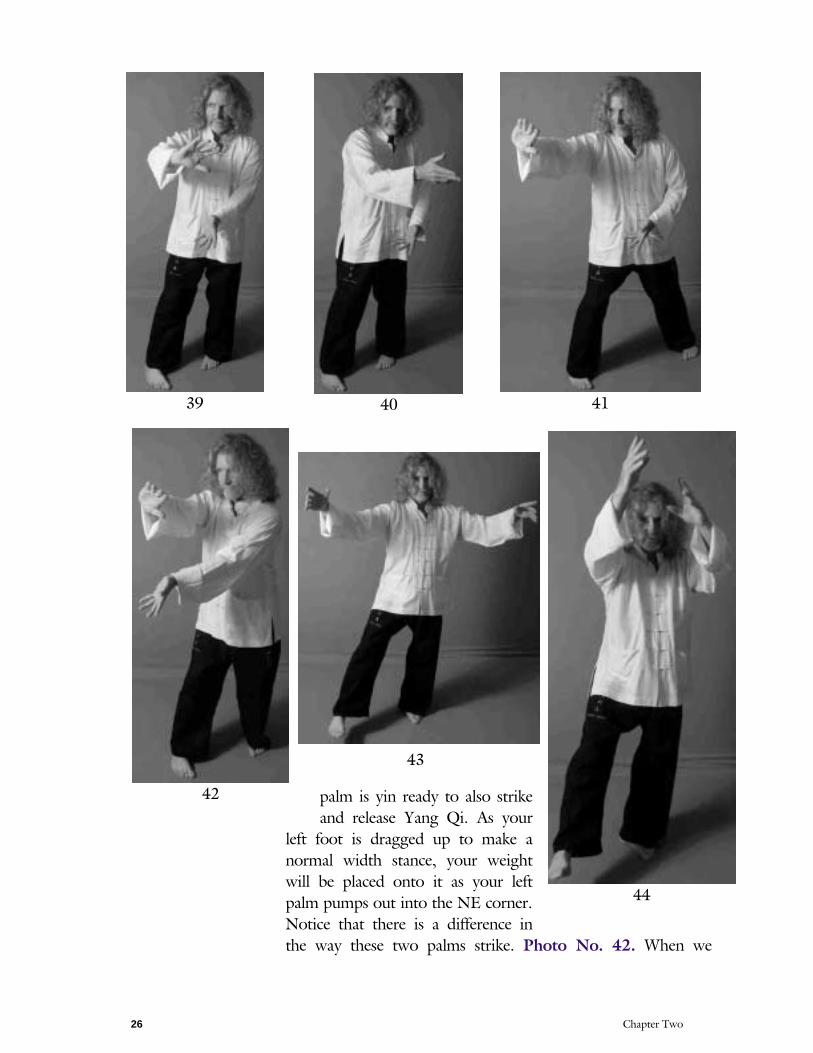
palm is yin ready to also strike
and release Yang Qi. As your
left foot is dragged up to make a
normal width stance, your weight
will be placed onto it as your left
palm pumps out into the NE corner.
Notice that there is a difference in
the way these two palms strike. Photo No. 42. When we
26 Chapter Two
39 40 41
42
43
44
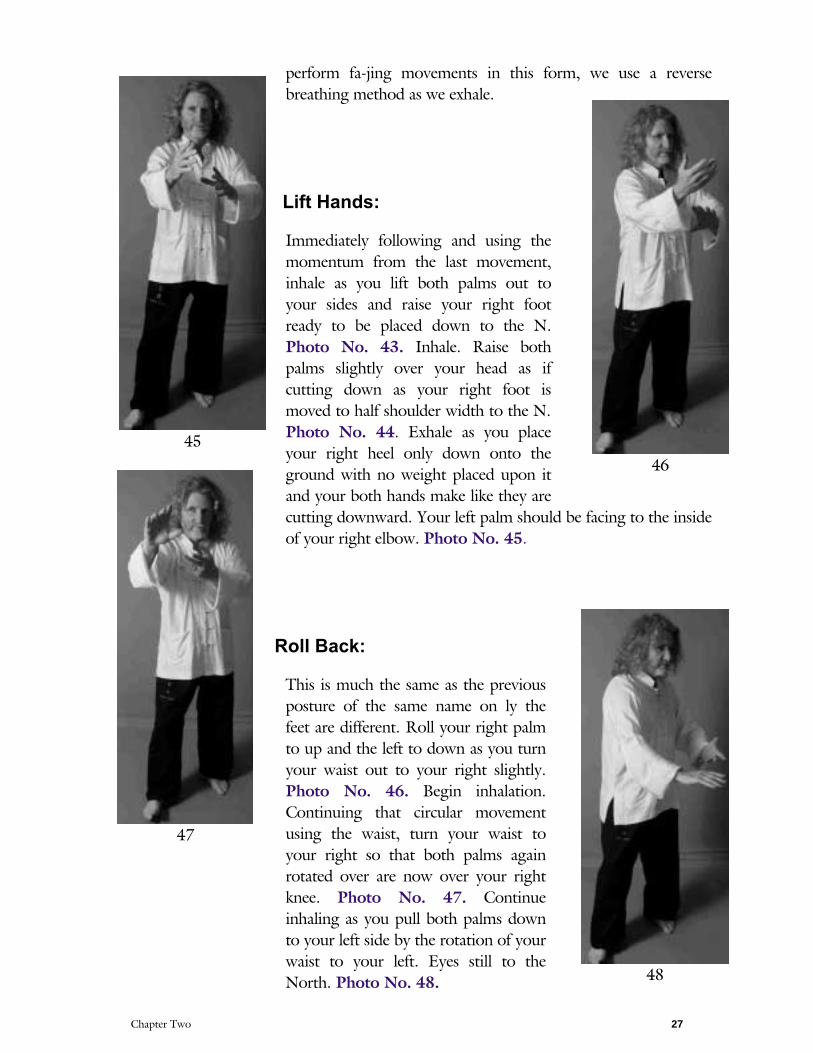
perform fa-jing movements in this form, we use a reverse
breathing method as we exhale.
Lift Hands:
Immediately following and using the
momentum from the last movement,
inhale as you lift both palms out to
your sides and raise your right foot
ready to be placed down to the N.
Photo No. 43. Inhale. Raise both
palms slightly over your head as if
cutting down as your right foot is
moved to half shoulder width to the N.
Photo No. 44. Exhale as you place
your right heel only down onto the
ground with no weight placed upon it
and your both hands make like they are
cutting downward. Your left palm should be facing to the inside
of your right elbow. Photo No. 45.
Roll Back:
This is much the same as the previous
posture of the same name on ly the
feet are different. Roll your right palm
to up and the left to down as you turn
your waist out to your right slightly.
Photo No. 46. Begin inhalation.
Continuing that circular movement
using the waist, turn your waist to
your right so that both palms again
rotated over are now over your right
knee. Photo No. 47. Continue
inhaling as you pull both palms down
to your left side by the rotation of your
waist to your left. Eyes still to the
North. Photo No. 48.
Chapter Two 27
45
47
46
48
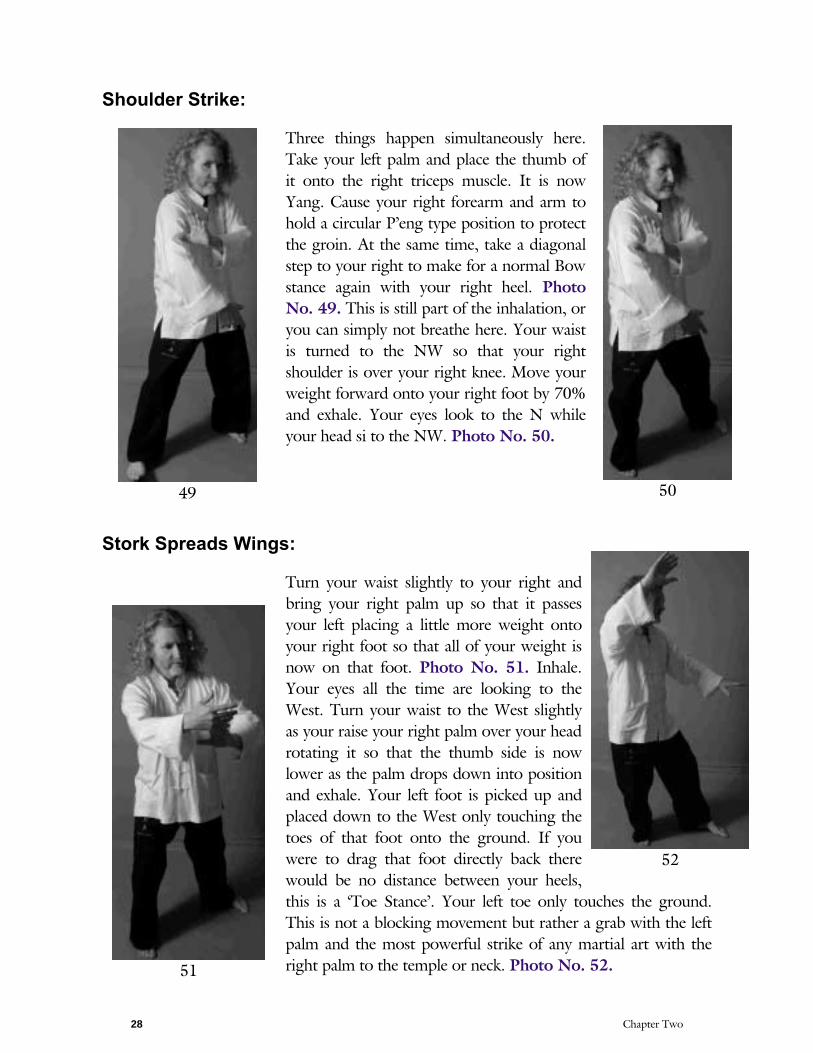
Shoulder Strike:
Three things happen simultaneously here.
Take your left palm and place the thumb of
it onto the right triceps muscle. It is now
Yang. Cause your right forearm and arm to
hold a circular P’eng type position to protect
the groin. At the same time, take a diagonal
step to your right to make for a normal Bow
stance again with your right heel. Photo
No. 49. This is still part of the inhalation, or
you can simply not breathe here. Your waist
is turned to the NW so that your right
shoulder is over your right knee. Move your
weight forward onto your right foot by 70%
and exhale. Your eyes look to the N while
your head si to the NW. Photo No. 50.
Stork Spreads Wings:
Turn your waist slightly to your right and
bring your right palm up so that it passes
your left placing a little more weight onto
your right foot so that all of your weight is
now on that foot. Photo No. 51. Inhale.
Your eyes all the time are looking to the
West. Turn your waist to the West slightly
as your raise your right palm over your head
rotating it so that the thumb side is now
lower as the palm drops down into position
and exhale. Your left foot is picked up and
placed down to the West only touching the
toes of that foot onto the ground. If you
were to drag that foot directly back there
would be no distance between your heels,
this is a ‘Toe Stance’. Your left toe only touches the ground.
This is not a blocking movement but rather a grab with the left
palm and the most powerful strike of any martial art with the
right palm to the temple or neck. Photo No. 52.
28 Chapter Two
49 50
51
52

Note, that at no time should your knee move from directly over
your big toe otherwise you will have knee problems later in life!
Many other styles do this! Notice also that in this posture, the
waist is slightly to the NW but not quite.
Spread the Weave: (Left & Right):
Your left palm will come up in an arc
while your right comes down in an arc
to sort of squeeze inward. Your left palm
will sort of poke out a little. This posture
is a bit like pretending to fire a rifle.
Breathe in as you arc your hands out and
exhale as you come into this posture.
Photo No. 53. This will be to the West.
Now you must perform this exact
posture only in reverse to the NE. Lower
your right palm and make an arc down
and up to the rear. Photo No. 54. Your
left palm will make a lateral arc to the
rear as your waist turns back to the rear.
Again inhale and exhale. Photo No. 55.
Brush Knee & Twist Step (Right):
Note: Brush Knee & Twist Step is always performed at
half pace because, medically, it works upon the heart
meridian and organ. So it is quite an important set of
movements. So from the holding of the ball and the
beginning of the posture to the end of the strikes, do it at
half pace which is pretty slow as for the most part, this
form is also done slowly except for the “Qi Release’
points or ‘fa-jing’ movements.
Inhale as you take your right palm out to near your right
ear, little finger closest to the ceiling. Your left palm will
come downward in an arc and your left thumb will brush
by your left patella. Photo No. 56. Place your left foot
down to the West in a ‘Bow’ stance, place the heel down
first and roll onto the foot as this is the same for all bow
stances forward. Your left palm will simply stay where it
Chapter Two 29
53
54
55

is after it has brushed by your
left knee and your right palm
will perform a strike to the
West. It has to make a
clockwise circle as it strikes to
end up in this position.
Exhale. Photo No. 57.
Play the Pipa (guitar):
Lift your right foot off the
ground only until your right
toe just leaves the ground.
Do not make a big deal of
this as you only need to make
your rear leg fully Yin by
lifting it. There is a martial
reason for this to make your
left leg fully yang for the next movement which involves a
thrust backward and an arm break. This is a no breath.
Photo No. 58. Sit back onto your rear leg as both palms drop
down with your right palm having
to drop more to catch up with
your left. Inhale. Photo No. 59.
Raise both palms upward and
continue inhaling while your left
foot comes off the ground and the
heel is placed down half shoulder
width (heel stance width) laterally
from your right foot and slightly
forward. The heel only just
touches the ground as this is
indicative of a low type of kick to
a knee of shin area. Photo No.
60. The hands are as if playing a
guitar .. well, sort of!
Brush Knee & Twist Step (Right):
Inhale as you turn your waist to your right and drop your right
palm and turn it to palm up while the left palm rolls over to be
30 Chapter Two
56
57
58
59
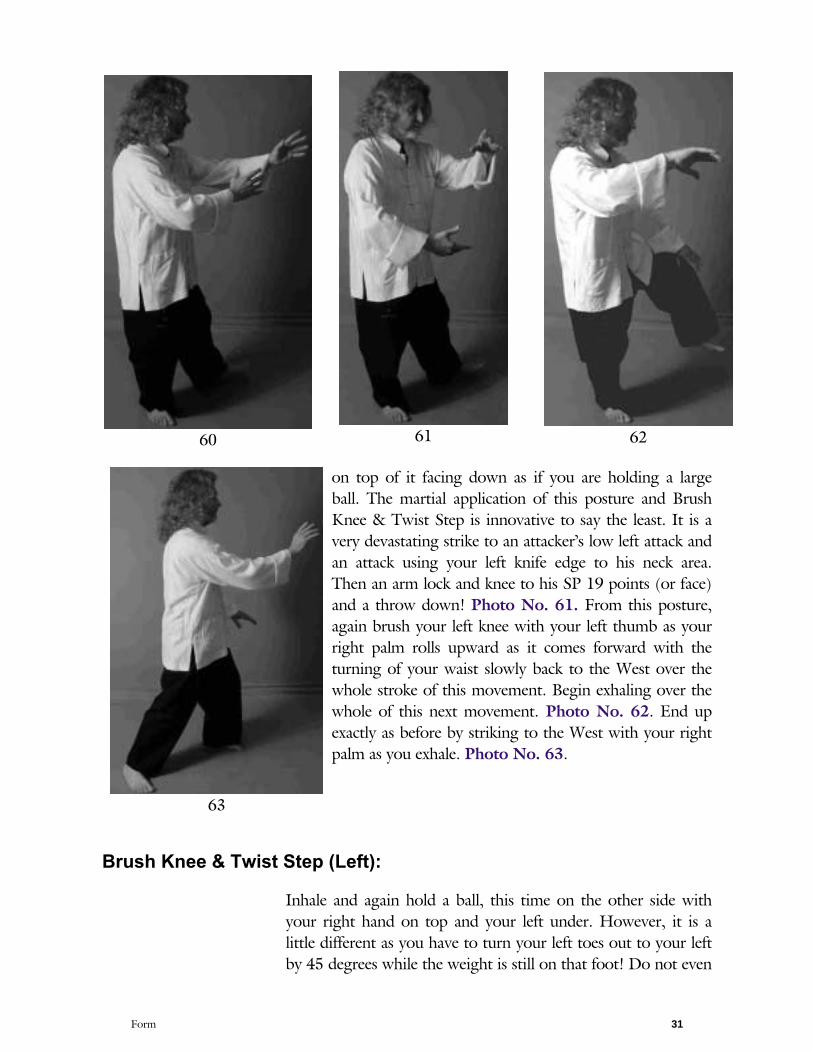
on top of it facing down as if you are holding a large
ball. The martial application of this posture and Brush
Knee & Twist Step is innovative to say the least. It is a
very devastating strike to an attacker’s low left attack and
an attack using your left knife edge to his neck area.
Then an arm lock and knee to his SP 19 points (or face)
and a throw down! Photo No. 61. From this posture,
again brush your left knee with your left thumb as your
right palm rolls upward as it comes forward with the
turning of your waist slowly back to the West over the
whole stroke of this movement. Begin exhaling over the
whole of this next movement. Photo No. 62. End up
exactly as before by striking to the West with your right
palm as you exhale. Photo No. 63.
Brush Knee & Twist Step (Left):
Inhale and again hold a ball, this time on the other side with
your right hand on top and your left under. However, it is a
little different as you have to turn your left toes out to your left
by 45 degrees while the weight is still on that foot! Do not even
Form 31
60 61 62
63

move backward one hair’s breadth! Brush Knee &
Twist Step by it’s martial applications should never
sit back in order to hold the ball as so many schools
teach in order to simply make it easier to perform.
Taiji is NOT easy! If you have your weight situated
on your left heel so that you are able to swivel on
that heel then it is not so difficult to do this and you
will not damage your knees at all if you do it
correctly! Photo No. 64. Again brush your right
knee this time with your right thumb as your left
palm comes up in an arc forward with the turning of
your waist to the West again, slowly over the whole
movement. Photo No. 65. Place the right foot to
the West as you again put the weight slowly onto it
and strike with your left palm. Exhale. Photo No.
66.
Brush Knee & Twist Step (Right):
Again a weighted turn this time to your right by 45 degrees on
your right heel as you inhale and hold the ball on your right
side. Photo No. 67. Again brush the left knee as it steps
32 Chapter Two
64 65 66
67
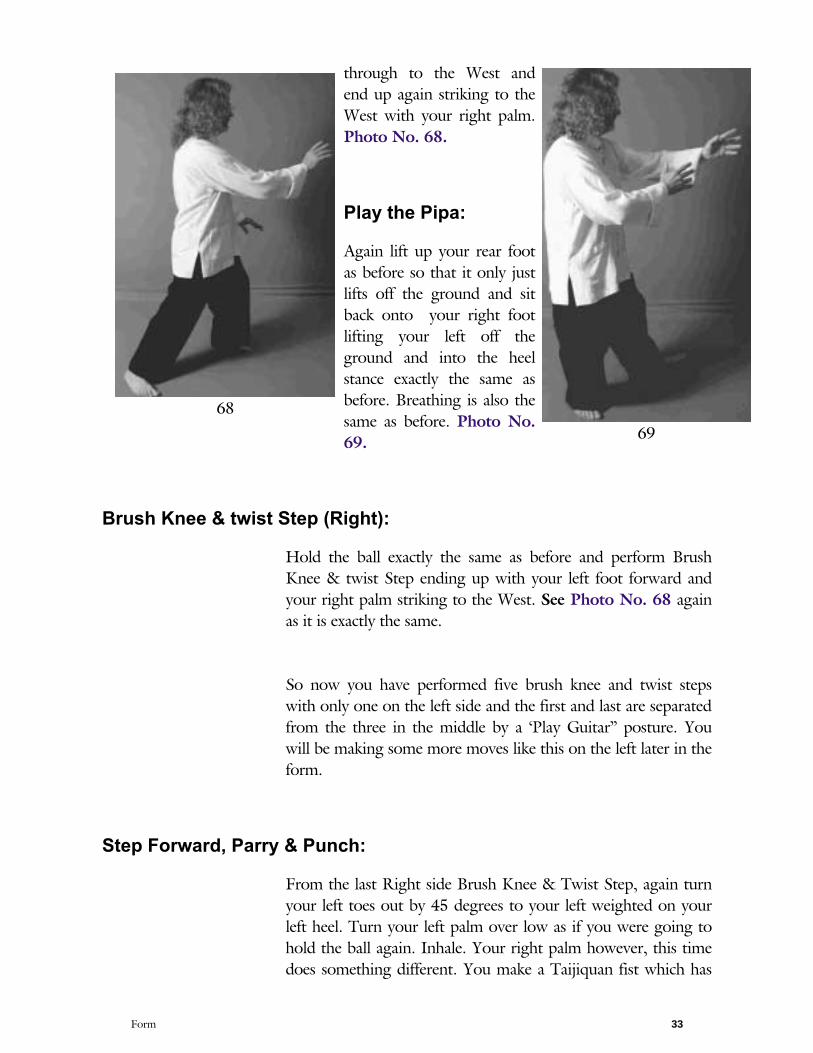
through to the West and
end up again striking to the
West with your right palm.
Photo No. 68.
Play the Pipa:
Again lift up your rear foot
as before so that it only just
lifts off the ground and sit
back onto your right foot
lifting your left off the
ground and into the heel
stance exactly the same as
before. Breathing is also the
same as before. Photo No.
69.
Brush Knee & twist Step (Right):
Hold the ball exactly the same as before and perform Brush
Knee & twist Step ending up with your left foot forward and
your right palm striking to the West. See Photo No. 68 again
as it is exactly the same.
So now you have performed five brush knee and twist steps
with only one on the left side and the first and last are separated
from the three in the middle by a ‘Play Guitar” posture. You
will be making some more moves like this on the left later in the
form.
Step Forward, Parry & Punch:
From the last Right side Brush Knee & Twist Step, again turn
your left toes out by 45 degrees to your left weighted on your
left heel. Turn your left palm over low as if you were going to
hold the ball again. Inhale. Your right palm however, this time
does something different. You make a Taijiquan fist which has
Form 33
68
69
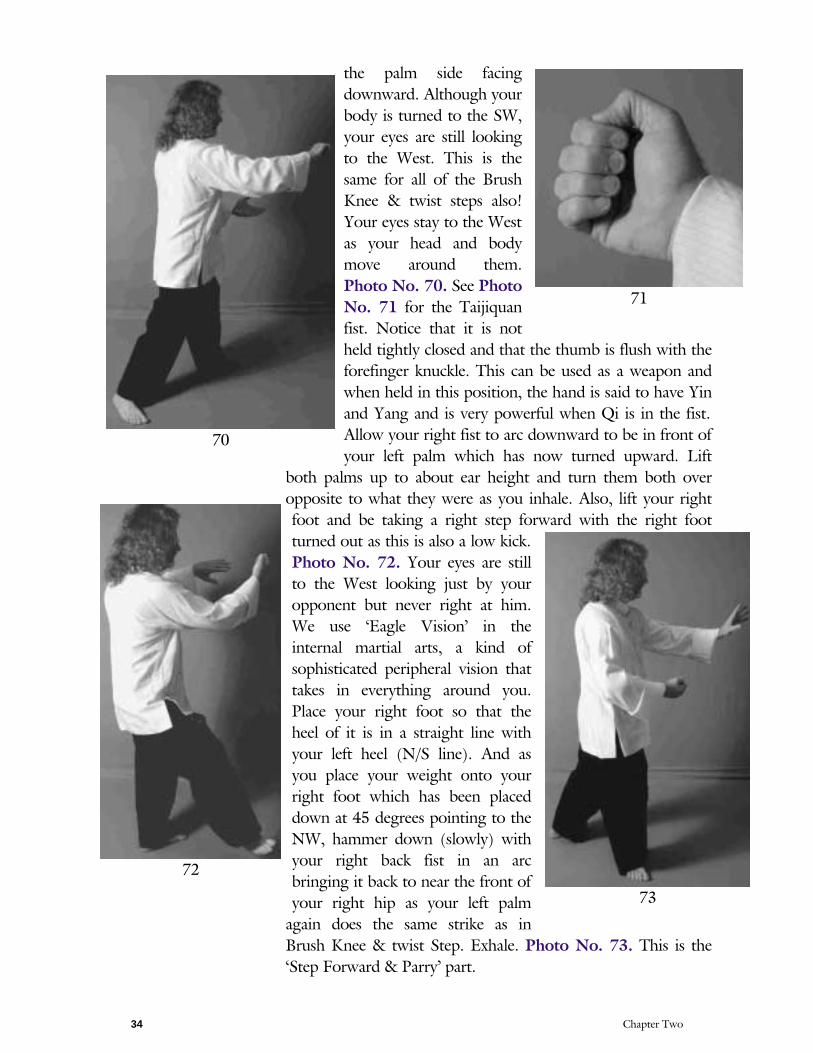
the palm side facing
downward. Although your
body is turned to the SW,
your eyes are still looking
to the West. This is the
same for all of the Brush
Knee & twist steps also!
Your eyes stay to the West
as your head and body
move around them.
Photo No. 70. See Photo
No. 71 for the Taijiquan
fist. Notice that it is not
held tightly closed and that the thumb is flush with the
forefinger knuckle. This can be used as a weapon and
when held in this position, the hand is said to have Yin
and Yang and is very powerful when Qi is in the fist.
Allow your right fist to arc downward to be in front of
your left palm which has now turned upward. Lift
both palms up to about ear height and turn them both over
opposite to what they were as you inhale. Also, lift your right
foot and be taking a right step forward with the right foot
turned out as this is also a low kick.
Photo No. 72. Your eyes are still
to the West looking just by your
opponent but never right at him.
We use ‘Eagle Vision’ in the
internal martial arts, a kind of
sophisticated peripheral vision that
takes in everything around you.
Place your right foot so that the
heel of it is in a straight line with
your left heel (N/S line). And as
you place your weight onto your
right foot which has been placed
down at 45 degrees pointing to the
NW, hammer down (slowly) with
your right back fist in an arc
bringing it back to near the front of
your right hip as your left palm
again does the same strike as in
Brush Knee & twist Step. Exhale. Photo No. 73. This is the
‘Step Forward & Parry’ part.
34 Chapter Two
70
71
72
73
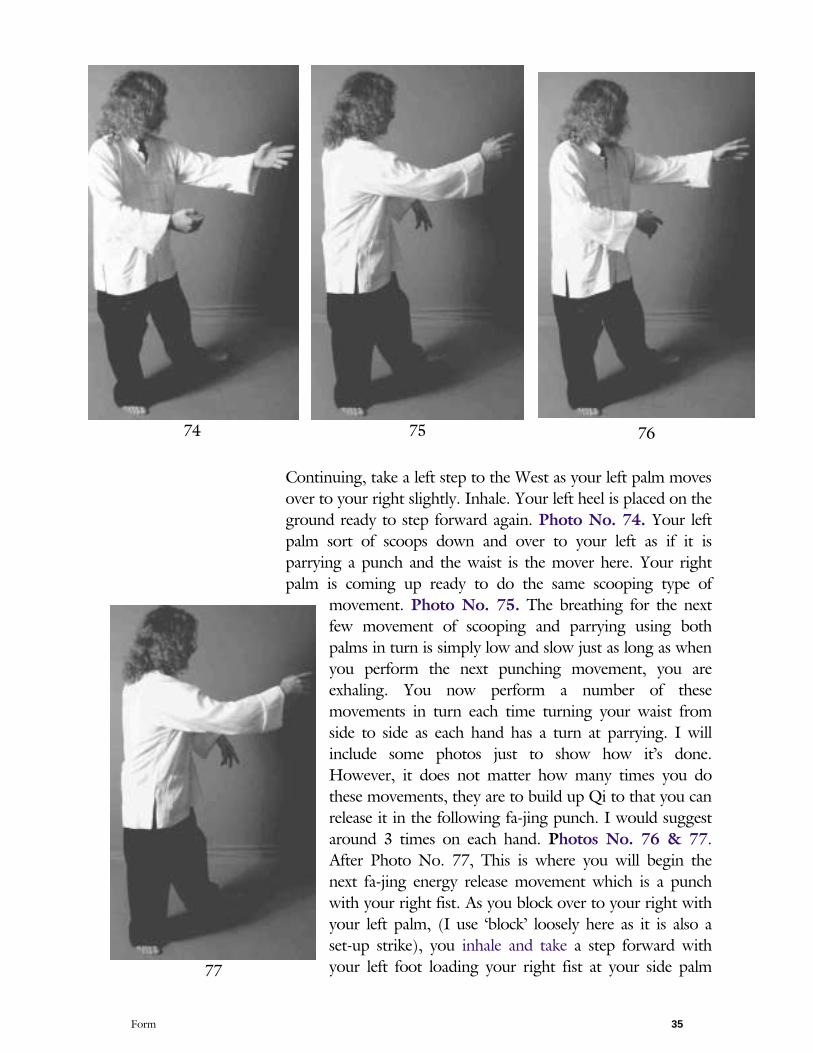
Continuing, take a left step to the West as your left palm moves
over to your right slightly. Inhale. Your left heel is placed on the
ground ready to step forward again. Photo No. 74. Your left
palm sort of scoops down and over to your left as if it is
parrying a punch and the waist is the mover here. Your right
palm is coming up ready to do the same scooping type of
movement. Photo No. 75. The breathing for the next
few movement of scooping and parrying using both
palms in turn is simply low and slow just as long as when
you perform the next punching movement, you are
exhaling. You now perform a number of these
movements in turn each time turning your waist from
side to side as each hand has a turn at parrying. I will
include some photos just to show how it’s done.
However, it does not matter how many times you do
these movements, they are to build up Qi to that you can
release it in the following fa-jing punch. I would suggest
around 3 times on each hand. Photos No. 76 & 77.
After Photo No. 77, This is where you will begin the
next fa-jing energy release movement which is a punch
with your right fist. As you block over to your right with
your left palm, (I use ‘block’ loosely here as it is also a
set-up strike), you inhale and take a step forward with
your left foot loading your right fist at your side palm
Form 35
74 75 76
77

slightly upward and bent downward so that when
you strike, the fist can kick upward using the last
three knuckles into a deadly point called CV 14, or
‘Conceptor Vessel Point No. 14’. This is actually a
Heart point as it works directly on the heart. When
struck in this manner the heart will stop especially if
performed between the hours of 11 a.m and 1 p.m.
Which is why many sports people are killed when
struck in the chest with a ball! Photo No. 78.
As your right foot is dragged up to make a normal
Bow stance, your right fist will punch forward
explosively as your left palm comes back to end up at
the inside of your left forearm. Photo No. 79. Do
not forget to kick the fist up upon impact. Exhale.
Sit Back:
Although this is a new posture, this is where the fa-jing
previous movement will stop and you will go back to all slow
movements again. So when you finish that punch, you
immediately slide your left palm under your right wrist and turn
it palm upward. Photo No. 80. Leaving your right palm where
36 Chapter Two
78 79
80
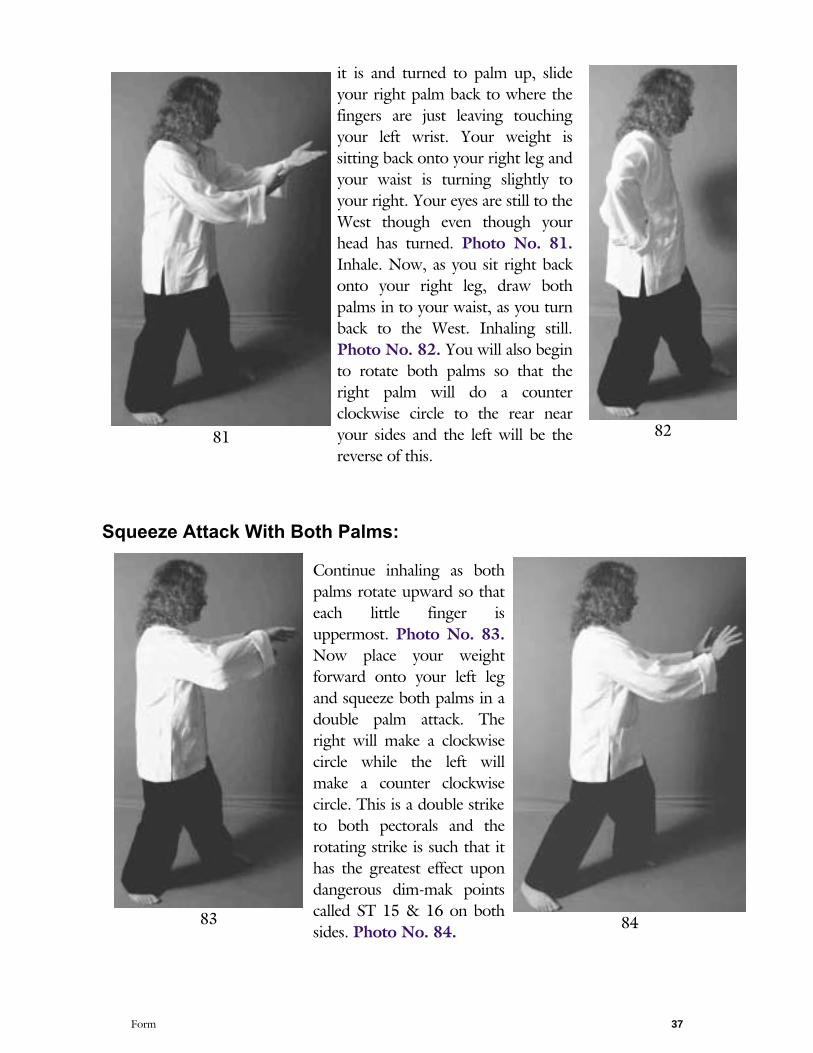
it is and turned to palm up, slide
your right palm back to where the
fingers are just leaving touching
your left wrist. Your weight is
sitting back onto your right leg and
your waist is turning slightly to
your right. Your eyes are still to the
West though even though your
head has turned. Photo No. 81.
Inhale. Now, as you sit right back
onto your right leg, draw both
palms in to your waist, as you turn
back to the West. Inhaling still.
Photo No. 82. You will also begin
to rotate both palms so that the
right palm will do a counter
clockwise circle to the rear near
your sides and the left will be the
reverse of this.
Squeeze Attack With Both Palms:
Continue inhaling as both
palms rotate upward so that
each little finger is
uppermost. Photo No. 83.
Now place your weight
forward onto your left leg
and squeeze both palms in a
double palm attack. The
right will make a clockwise
circle while the left will
make a counter clockwise
circle. This is a double strike
to both pectorals and the
rotating strike is such that it
has the greatest effect upon
dangerous dim-mak points
called ST 15 & 16 on both
sides. Photo No. 84.
Form 37
81 82
83 84

Sit Back:
Sit back and inhale to
exactly the same
position you were in
before the last strikes.
Photo No. 85.
Cross Hands,
Apparent Close
Up:
Turn your left foot to
your right swivelling
on your left heel by 90
degrees so that you
are now pigeon toed
and also turn your
body the North with the weight still on the right foot. The
hands have not changed. Photo No. 86. Place your weight
onto your left leg and as both palms move
out to both sides and downward, drag your
right foot back so that it is now parallel and
double shoulder width from your left foot.
Begin to exhale. Photo No. 87. AS your
palms continue down and scooping, lower
your weight as low as you can go still
keeping your back vertical, the weight goes
down onto your left leg. Photo No. 88. AS
you finish that exhalation, your palms will
now cross, right over left at the wrists as
your weight changes to your right leg. As
you raise your body from that low position,
lift your left foot off the ground, heel and toe
together, this is difficult, and place it down
one shoulder width from your right foot.
Photo No. 89.
38 Chapter Two
8586
87

This is the finish of the first third of the Old Yang Style
Taijiquan. You are now ready to move into the 2nd third which
is not a third in amount of movement but rather in terms of Qi
movement.
I will be putting the 2nd third up onto this site when it is ready.
However, because of space limitations, I will be taking this first
third off for a time. When the 3rd Third is ready to go, I will
again take the 2nd third off and replace it with the last third.
From then I will regularly rotate the three thirds so that you can
download them free of charge and eventually compile the whole
book.
If you wish to finish at this point, this is Ok as the Qi has now
done one complete revolution through the 12 main
acupuncture meridians. To finish, you can simply make your
weight even as you turn both palms to downward and as you
push downward with both palms, you will exhale and stand up
so that both palms will end up at your sides exactly as the
beginning posture.
Form 39
88
89

The Old Yang Style
Taijiquan
Erle MontaigueMoontagu Books Australia

The Old Yang Style of TaijiquanAn Instruction Manual
By Erle Montaigue
Part Two
Moontagu Books Australia
Publisher’s Note: This book contains material never before published. The enclosed information can only have come from Erle Montaigue, being the only Westerner to have received this information. It is illegal to copy and portion of this book other than brief extracts for review articles.You must obtain permission directly from the copyright holder ©2000. It is also illegal to plagiarize any part of this book to use in some otherpublication, paper, electronic, or video and film, by changing it in some way to make out as if it has not come from this source.
This book is provided free of charge in good faith so that all may enjoy the great benefits of this pinnacle of all Taijiquan systems. You maydownload it free of charge. But please do not plagiarize it. Even though it is free, it is still covered by international copyright laws.
Moontagu BooksPOB 792Murwillumbah, NSW 2484Australia
Ph: +61 2 6679 7145Fax: +612 6679 7028E-mail: [email protected]://www.moontagu.com
Copyright © 2000 Moontagu Books Australia
First Published in Australia Electronically in 2000
All Rights Reserved
ISBN: 0-949132-07-8

Contents
3 Chapter
Form 2nd Third ...................40Ends with 2nd Kick..............................


Chapter Three:
Introduction
Form
Yang Lu-ch’an’s Old Taijiquan Form
• Form: Second Third up to the First Kicks.
This chapter begins at the beginning of the 2nd third of theform and takes you through to the end of the first two kicks. As there are many repeated movements (same as in the first twochapters) I will be using less photos as you can simply go backand view the same photos in the 2nd chapter. However, even so, I have still included around 110 photos which is only justenough to depict this complicated form.
Again it is essential that you take note of the great and veryminute detail in this form. Never assume that like movementsare exactly the same. Take care to read every word in theposture explanations.
Thank you all for your kind words, we were swamped withthank you notes on the web for putting out this informationand our site was clogged with so many people trying todownload the book! I am getting great pleasure frompublishing this book, more so than I had initially thought.
Form 40

We begin from the end of the first third of the form from thecross hands position as in Photo No. 90. The weight is placedonto the right leg.
Brush Knee & Twist Step:
Turn your waist to your right to the NEcorner and hold a ball right hand under asyou inhale. Photo No. 91. Your eyes arestill looking to the N. We now performBrush Knee Twist Step exactly the sameway that you have done in the first third.The only difference is that you willperform it in to the NW corner. So brushyour left knee with your left palm andattack with your right palm into the NEcorner. Photo No. 92. Exhale.
Spread The Weave:
With your weight still on your left leg,turn your left toes (swivelling on yourleft heel), 90 degrees to point to the NE so that you are now pigeon toed. Yourleft palm raises up to point into the NW corner as does your right palm but nearyour left elbow. Inhale. Note that yourbody has turned to the NE corner, however, your arms are tothe NW corner and your eyes are looking out of the corner tothe NW corner. Photo No. 93.
41 Chapter Three
90
91
92
93
94

Embrace Tiger, Return to Mountain:
From here, perform as if you were going to do another BrushKnee & twist Step back into the SE corner by brushing yourright knee with your right palm and raising your left palmready. You are still either inhaling or your breath is in a holding position ready to exhale. Photo No. 94. As soon as your rightpalm brushes past your right knee, turn it over to palm upposition, placing your right foot down into the SE corner alsoturn your left palm to palm down position and perform twopoking movements with both palms. Photo No. 95. Exhale.Note that at an advanced level, you would actually make threepoking movements and also three waist turns, first with the leftpalm, then the right palm then again with the left palm. This issoft fa-jing.
In all corner postures (and you may not be able to see thisbecause of the angles that we had to take the photos in order toget both palms in), there should always be a cardinal line (N/Sor E/W) between the front heel and the rear toes. This isnothing different as it is still a normal bow stance. People justseem to have difficulty when they do a bow stance into corners!In the normal bow stances (when you do them to the cardinalpoints), there is still this straight line between front heel andrear toe, however, it is now a line on the corner points such asNE to SW etc.
Grasping Swallow’s Tail:
Now, we perform exactly the same as in the first third, theabove group of postures called “Grasping Swallow’s Tail” onlywe have a different way of getting into them.
Lu: (Roll back)
From the last posture, raise your right palm and slightly loweryour left palm, with the right out in front of the left. PhotoNo. 96. Inhale. Rotate both palms so that the right will bepalm down and left palm up and turn your body to the right so
Form 42
95
96

that your palms are now over your right knee. The inhalationwill continue. Photo No. 97. Drop both palms down as youturn your waist to your left and pull both palms to your leftside. Left palm over left knee. Right elbow over right knee.Your eyes still look to the SE. Photo No. 98.
Chee: (Squeeze)
As before in the first third, place your left palm (yin) onto the radius of your rightwrist (yang). And Squeeze forward asyou exhale. Notice that still both palmsare opposite in state and will for the most part keep changing that state for thewhole form. Photo No. 99.
Lower Chee: (Squeeze)
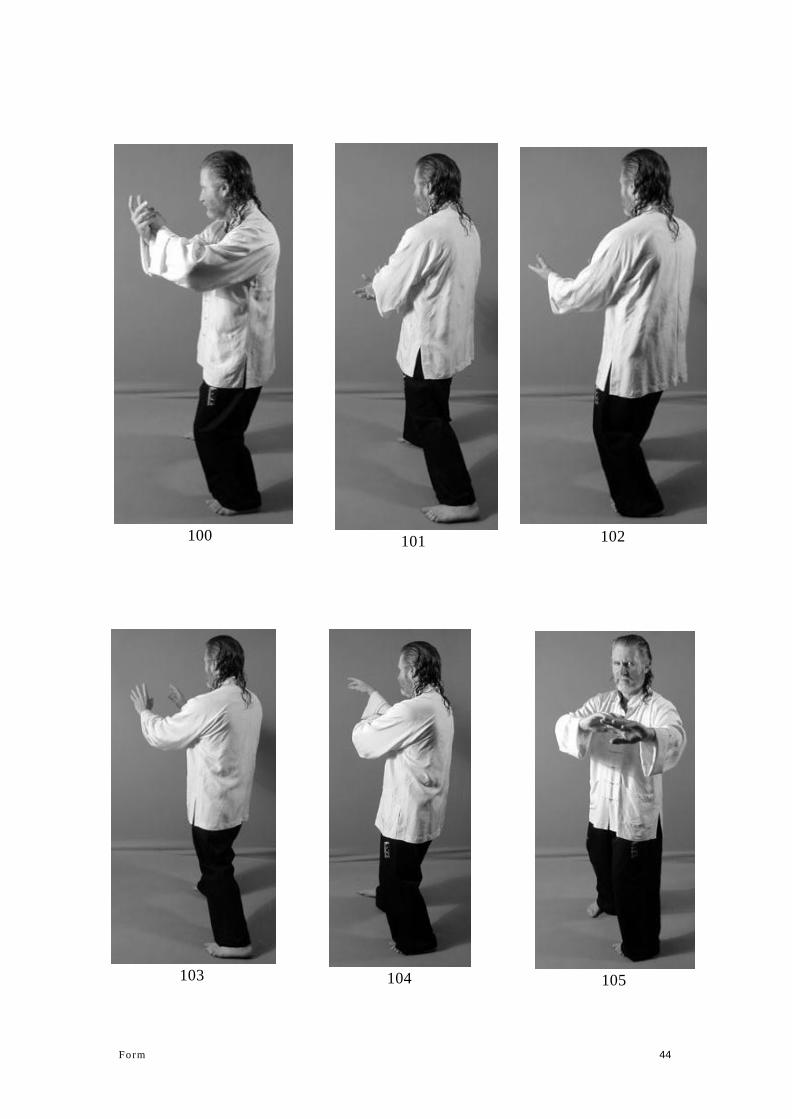
As before, turn both palms so that yourright fingers are pointing up and yourleft fingers are pointing to your right.Slide your left palm across your right wrist and as you sit back,pull your left palm to your left ear. Now, bring your right palmaround so that both palms can again join at the wrist. Inhale.Photo No. 100. Release the Yang energy stored in your leftpalm and the Yin Qi stored in your right palm as you exhaleand turn your waist back to the SE attack using Lower Chee.Photo No. 101.
Press: (Arn)
As before, brush your left palm across the back of your right asyou sit back and open both palms to your sides. Inhale. Scoopthem both in and poke with both palms as you exhale. PhotoNo. 102.
Begin moving forward as you inhale and lift both elbows asbefore in attack. Rotate both palms in a clawing down type ofmovement to perform, ‘Arn’ as you exhale. Photo No. 103.
43 Chapter Three
97
98
99
Form 44
100 101 102
103 104 105

Sit Back Ready:
As before, sitback onto your left leg and drop your left palm tothe inside of your right elbow as you inhale. Both palms are Yin shaped, however, the right one has the mind intent so it is yangrelative to the left. The left is set-up blocking as the right isfinger jabbing to the eyes. Photo No. 104. You are still facingthe SE.
Fishes in Eight:
Exactly as before only to adifferent direction. With weighton the left leg, swing your armsout to the N. as you turn yourwaist to cause this to happen.Begin exhaling. Your right foot isswivelled around by 90 degrees so that you are again pigeon-toed.Photo No. 105.
Keeping your feet as they are,change your weight onto yourright foot as you again bring both palms into your chest maintaining that same distance of wrist to elbow and push both palms outto the E. in an attack. Exhale fully. Photo No. 106. Doing thismovement at an advanced stage, you should of course changethe weight on the one foot (left) from heel to toe and backagain, in keeping with the classics of Taijiquan where we mustalways have a weight change with every movement regardless of whether it is a movement on one leg or from one leg toanother!
Guard Your House:
Pull your left palm back a little so that it is near your rightshoulder and pick up your left foot placing it down into theNW corner. Inhale. Your eyes are on your right palm. PhotoNo. 107. Place your weight onto your left leg. Photo No.
45 Chapter Three
106
107
108

108. Still on the inhalation. Pick up your right foot and place itdown parallel to your left foot. Both feet are now pointing intothe NW corner weight is on the left leg. Your breathing is nowheld for a second while in this posture which is part of ‘Guardthe House”. Photo No. 109 . Note: While in this posture, andjust before the next at an advanced level, there is s sort of‘settling’ of the right palm, really making sure that it is in a stateof sung. It sort of shakes slightly while sinking into ‘sung’ andgetting ready for the next violent fa-jing attack or ‘energy release point’.
Fist Under Elbow:
This depicts the way in which the ‘tiger paw’ fist comesfrom under the elbow andnot the final position as in the Yang Cheng-fu form.
With your weight still onyour left leg, violently turnyour waist to the W. as yourright tiger paw fist is pumped out over your left wrist un to itselbow using the power of your waist. Your right arm shouldnot be extended physically, but rather is pumped out purelyfrom the turning of the waist and the relaxation of the rightarm. This is an extremely fast and explosive movement which of course I cannot show in photos! Both this and the next punchtake all but a split second to execute and on one explosiveexhalation. Photo No. 110 . See Photo No. 111. For the‘Tiger Paw Fist’. This movement is a slap down into theattacker’s right or left forearm using your left palm and anattack to the pit of his neck at point, CV22. This is a deathpoint strike. NOTE: in all fa-jing movements you should beusing a ‘reverse’ breathing method whereby the abdomen ispushed out as you exhale.
Second Part of Fist Under Elbow:
Slightly shift some weight to your right leg but not all as yourleft palm swings up and out to your left with the turning of
Form 46
109
110
111

your waist to the left slightly.Remember that these twomovements are on one exhalation asthey both happen in a split second.Photo No. 112. Scoop your leftpalm under to form a tiger paw fist as more weight is transferred to yourright foot. Your left foot is stillpointing to the NE., at this point.Note the position also of the rightpalm ready to be placed under the left elbow in the following move. PhotoNo. 113. Now, as before punch tothe W. with your left tiger paw,(palm upward) as you push yourweight using your left leg, back fully
onto your right leg and now yourleft foot is in a heel stance pointing to the West. Note: themovement in Photo No. 112, will become smaller and smalleruntil it can no longer be seen as you advance. This is how you make it fa-jing. The application of this is when he againattacks with a right fist, so your left palm meets it on theinside and then hooks over the top of his forearm to swing itover to your right and keep controlling it as your left fistattacks to his temple. Photo No. 114.
Step Back & RepulseMonkey (Right) (Tripping)
From the previous posture, turn your waist to your left as you slide your
left palm down to your right wristopening both palms, left up and rightdown. Begin to inhale. Photo No.115. Turn your left palm so that it isnow facing down as you lift it. The left palm is the Yang palm in this case as itis blocking/hammering an attack fromthe rear. Lift your left leg and raiseyour left palm so that there is equaldistance between your left palm, rightpalm and left knee. Turn more to your
47 Chapter Three
112 113
114
115

left as you continue to inhale. Your eyesshould be looking to the SW. PhotoNo. 116. Place your left foot down(heel and toe together) to the rear about two inches laterally from the other heelso that when you finish you will have anormal bow stance to the West. Turnyour left palm so that the fingers arepointing to the West and as if you arelooking into a mirror in your hand.Photo No. 117. This is where yourinhalation has finished. Now, turn yourwaist to the West as your left heelswivels out (swivelling on the ball of thefoot) so that it is now pointing to theWest. You turn your left heel 45 degrees to your right in other words with theweight placed onto the ball of the foot.As you turn your waist, this will bringyour left palm to the front as you change it from a Yin palm to a Yang palm as if you are striking. Yourright palm goes down to your right side near your right hip.You are actually grabbing his wrist with your right palm and his elbow with your left and sticking your left leg into his knee orwaist, thus throwing him forward breaking his elbow! Hencethe ‘Tripping” part. Photo No. 118. Exhale.
Step Back & Repulse Monkey
(Left) (Tripping).
Swivel your rear foot on the ball so thatyour heel is pushed out to make the footstraight, pointing to the West. Dropyour right palm down in an arc whichwill arc up to the rear as your left palmbegins its lateral arc also to the rear andlift your right toes. Photo No. 119.Begin the inhalation.
Take both palms to the rear as you turnyour waist to the right and place yourright ball of the foot onto the ground
Form 48
116117
118
119
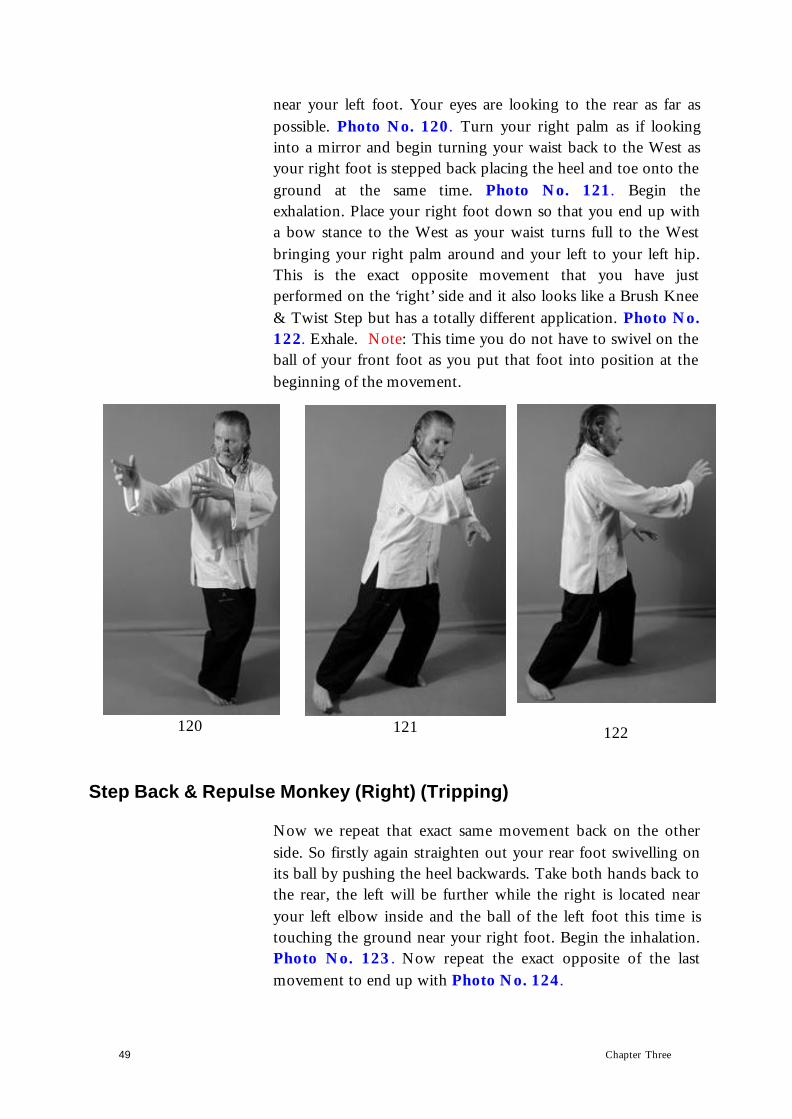
near your left foot. Your eyes are looking to the rear as far aspossible. Photo No. 120. Turn your right palm as if lookinginto a mirror and begin turning your waist back to the West asyour right foot is stepped back placing the heel and toe onto the ground at the same time. Photo No. 121. Begin theexhalation. Place your right foot down so that you end up witha bow stance to the West as your waist turns full to the Westbringing your right palm around and your left to your left hip.This is the exact opposite movement that you have justperformed on the ‘right’ side and it also looks like a Brush Knee & Twist Step but has a totally different application. Photo No.122. Exhale. Note: This time you do not have to swivel on the ball of your front foot as you put that foot into position at thebeginning of the movement.
Step Back & Repulse Monkey (Right) (Tripping)
Now we repeat that exact same movement back on the otherside. So firstly again straighten out your rear foot swivelling onits ball by pushing the heel backwards. Take both hands back to the rear, the left will be further while the right is located nearyour left elbow inside and the ball of the left foot this time istouching the ground near your right foot. Begin the inhalation.Photo No. 123. Now repeat the exact opposite of the lastmovement to end up with Photo No. 124.
49 Chapter Three
120 121 122

Spear Through the
Armour:
From the previous posture, sit back onto your left legand turn your waist to your left while taking your leftpalm up as if grabbingsomething (a wrist). Yourright palm spears forwardas if poking into something with the finger-tips. This isa grab and a spear fingersinto SP 19 point. PhotoNo. 125. Inhale. Your eyes still look to the West even
though your waist has turned slightly to your left.
Wrapping The Willow Tree:
Begin to exhale as your left palm scoops around and begins toslice down to your right side and turn out your right foot by 45 degrees. You right palm begins to move up to near your leftear. Photo No. 126. Lift your left foot and place it down nextto your right foot, ball touching as your left palm is placed over
Form 50
123 124
125 126 127
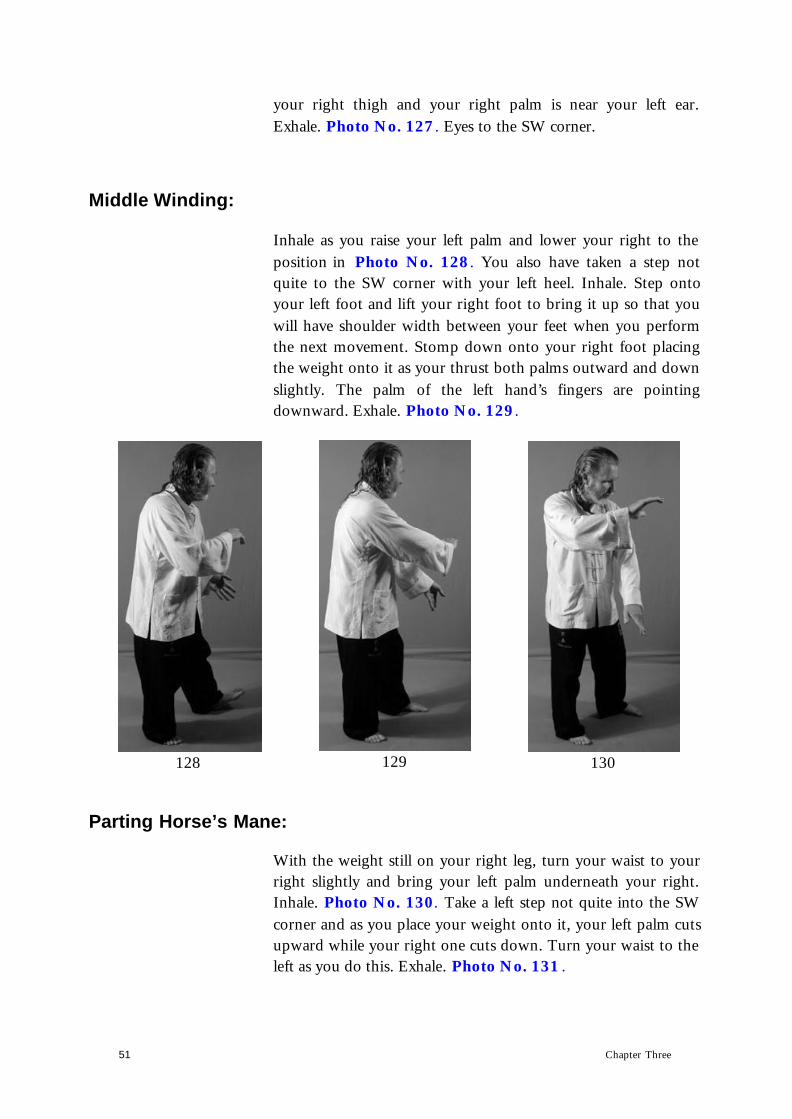
your right thigh and your right palm is near your left ear.Exhale. Photo No. 127. Eyes to the SW corner.
Middle Winding:
Inhale as you raise your left palm and lower your right to theposition in Photo No. 128. You also have taken a step notquite to the SW corner with your left heel. Inhale. Step ontoyour left foot and lift your right foot to bring it up so that youwill have shoulder width between your feet when you performthe next movement. Stomp down onto your right foot placingthe weight onto it as your thrust both palms outward and down slightly. The palm of the left hand’s fingers are pointingdownward. Exhale. Photo No. 129.
Parting Horse’s Mane:
With the weight still on your right leg, turn your waist to yourright slightly and bring your left palm underneath your right.Inhale. Photo No. 130. Take a left step not quite into the SWcorner and as you place your weight onto it, your left palm cutsupward while your right one cuts down. Turn your waist to the left as you do this. Exhale. Photo No. 131 .
51 Chapter Three
128 129 130

Pierce to Rear:
This is the same posture as in the first third.However, it is slightly different getting into it asyou are now facing a different direction than inthe first 3rd. Turn your right toes to the rightslightly as you turn your waist to the right andraise your right palm and move a small amount of weight back onto the right foot. Inhale. PhotoNo. 132. As before, sit forward onto your left leg again as you pull forward with your right palmand continue to inhale. Photo No. 133. Exhale as you sit back onto your right leg and poke to therear with your right fingers. Photo No. 134.
Double Dragon Hands:
Exactly the same as in the first third, turn to the West and bring both palms to the front on top of each other as you inhale.Then as you change the weight to the left foot, exhale andattack with both palms. Photo No. 135.
Form 52
131 132133
134
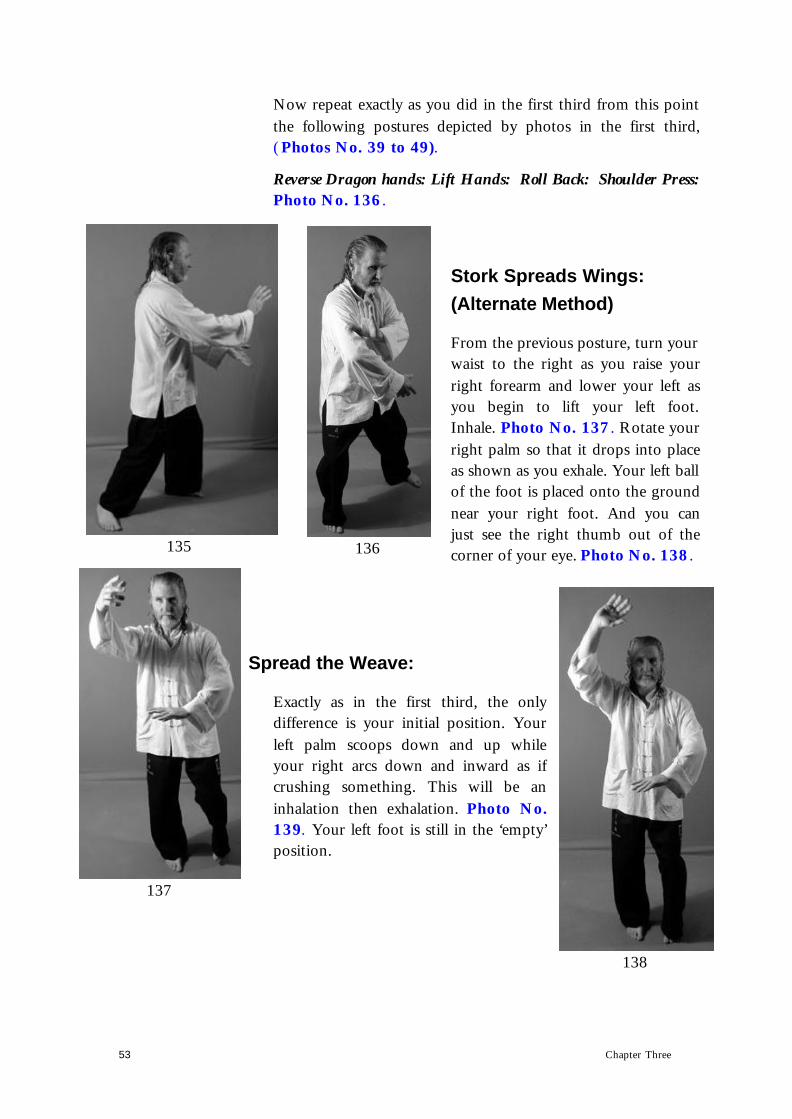
Now repeat exactly as you did in the first third from this pointthe following postures depicted by photos in the first third,(Photos No. 39 to 49).
Reverse Dragon hands: Lift Hands: Roll Back: Shoulder Press:Photo No. 136.
Stork Spreads Wings:(Alternate Method)
From the previous posture, turn your waist to the right as you raise yourright forearm and lower your left asyou begin to lift your left foot.Inhale. Photo No. 137. Rotate your right palm so that it drops into placeas shown as you exhale. Your left ball of the foot is placed onto the groundnear your right foot. And you canjust see the right thumb out of thecorner of your eye. Photo No. 138.
Spread the Weave:
Exactly as in the first third, the onlydifference is your initial position. Yourleft palm scoops down and up whileyour right arcs down and inward as ifcrushing something. This will be aninhalation then exhalation. Photo No.139. Your left foot is still in the ‘empty’position.
53 Chapter Three
135 136
137
138

Spread the Weave:
Perform this posture exactly the same as you did in the firstthird. Photo No. 140.
Brush Knee & Twist Step:
Perform this posture exactly the sameway that you did in the first third. This
time however, we only do it once.Photo No. 141.
Picking the Golden Needleat Sea Bottom:
Named this because of its applicationto LIV 3 point on the instep whichwas only ever needled using a goldenneedle.
As before, lift your right foot off the ground and replace it.Sit back onto your right leg and inhale as your right palmgoes Yin and raises slightly. Your left palm has also raised toabove your right wrist. Photo No. 142. Placing the fingers
Form 54
139 140 141
142
143
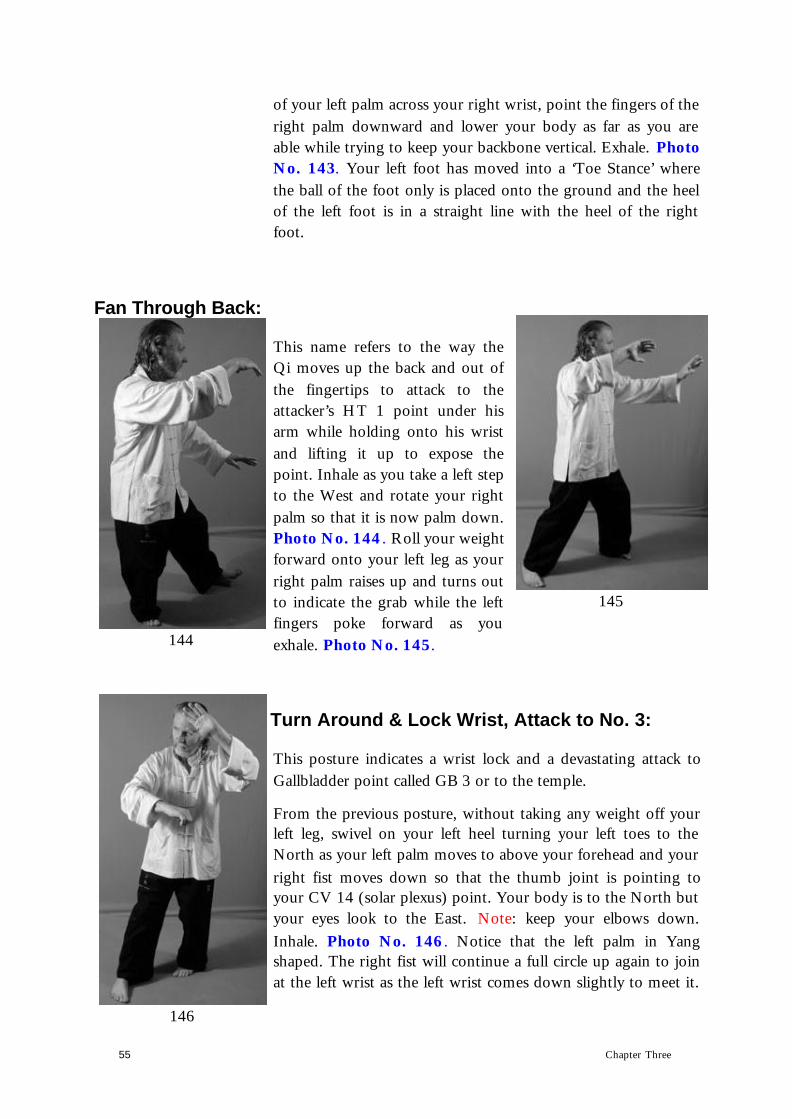
of your left palm across your right wrist, point the fingers of the right palm downward and lower your body as far as you areable while trying to keep your backbone vertical. Exhale. Photo No. 143. Your left foot has moved into a ‘Toe Stance’ wherethe ball of the foot only is placed onto the ground and the heelof the left foot is in a straight line with the heel of the rightfoot.
Fan Through Back:
This name refers to the way theQi moves up the back and out ofthe fingertips to attack to theattacker’s HT 1 point under hisarm while holding onto his wristand lifting it up to expose thepoint. Inhale as you take a left step to the West and rotate your rightpalm so that it is now palm down. Photo No. 144. Roll your weight forward onto your left leg as yourright palm raises up and turns outto indicate the grab while the leftfingers poke forward as youexhale. Photo No. 145.
Turn Around & Lock Wrist, Attack to No. 3:
This posture indicates a wrist lock and a devastating attack toGallbladder point called GB 3 or to the temple.
From the previous posture, without taking any weight off yourleft leg, swivel on your left heel turning your left toes to theNorth as your left palm moves to above your forehead and your right fist moves down so that the thumb joint is pointing toyour CV 14 (solar plexus) point. Your body is to the North but your eyes look to the East. Note: keep your elbows down.Inhale. Photo No. 146. Notice that the left palm in Yangshaped. The right fist will continue a full circle up again to joinat the left wrist as the left wrist comes down slightly to meet it.
55 Chapter Three
144
145
146
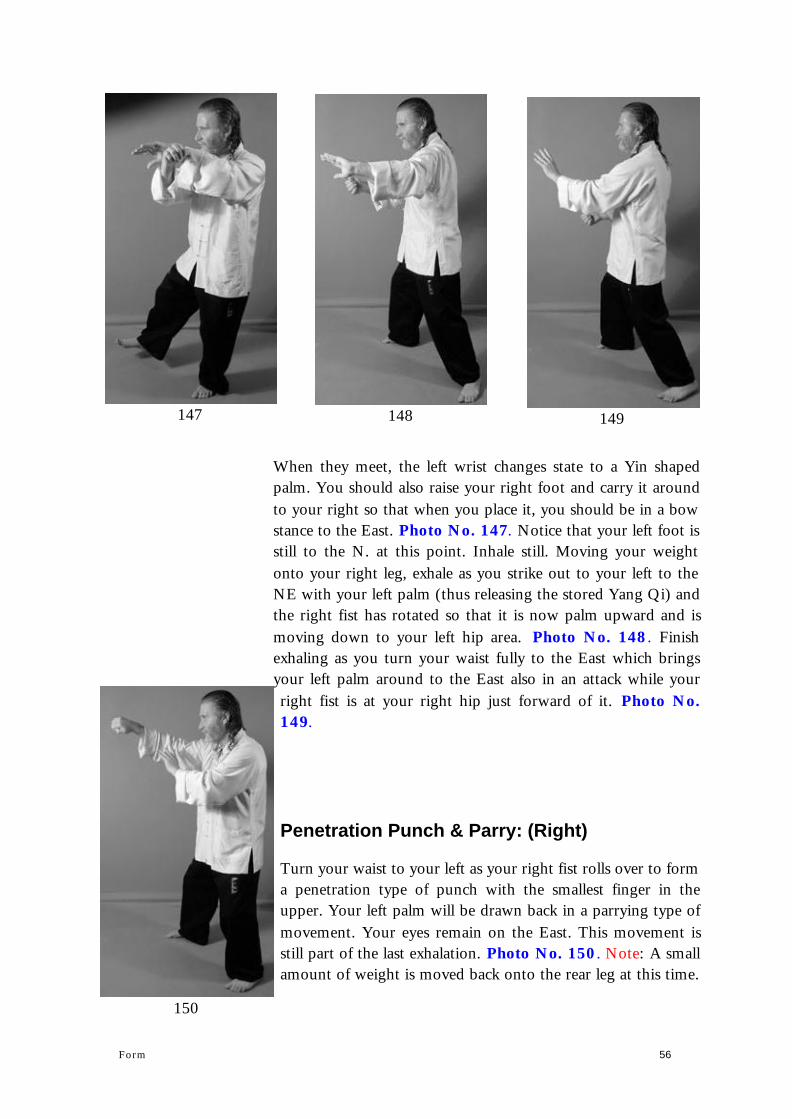
When they meet, the left wrist changes state to a Yin shapedpalm. You should also raise your right foot and carry it aroundto your right so that when you place it, you should be in a bowstance to the East. Photo No. 147. Notice that your left foot is still to the N. at this point. Inhale still. Moving your weightonto your right leg, exhale as you strike out to your left to theNE with your left palm (thus releasing the stored Yang Qi) andthe right fist has rotated so that it is now palm upward and ismoving down to your left hip area. Photo No. 148. Finishexhaling as you turn your waist fully to the East which bringsyour left palm around to the East also in an attack while yourright fist is at your right hip just forward of it. Photo No.149.
Penetration Punch & Parry: (Right)
Turn your waist to your left as your right fist rolls over to form a penetration type of punch with the smallest finger in theupper. Your left palm will be drawn back in a parrying type ofmovement. Your eyes remain on the East. This movement isstill part of the last exhalation. Photo No. 150. Note: A smallamount of weight is moved back onto the rear leg at this time.
Form 56
147 148 149
150
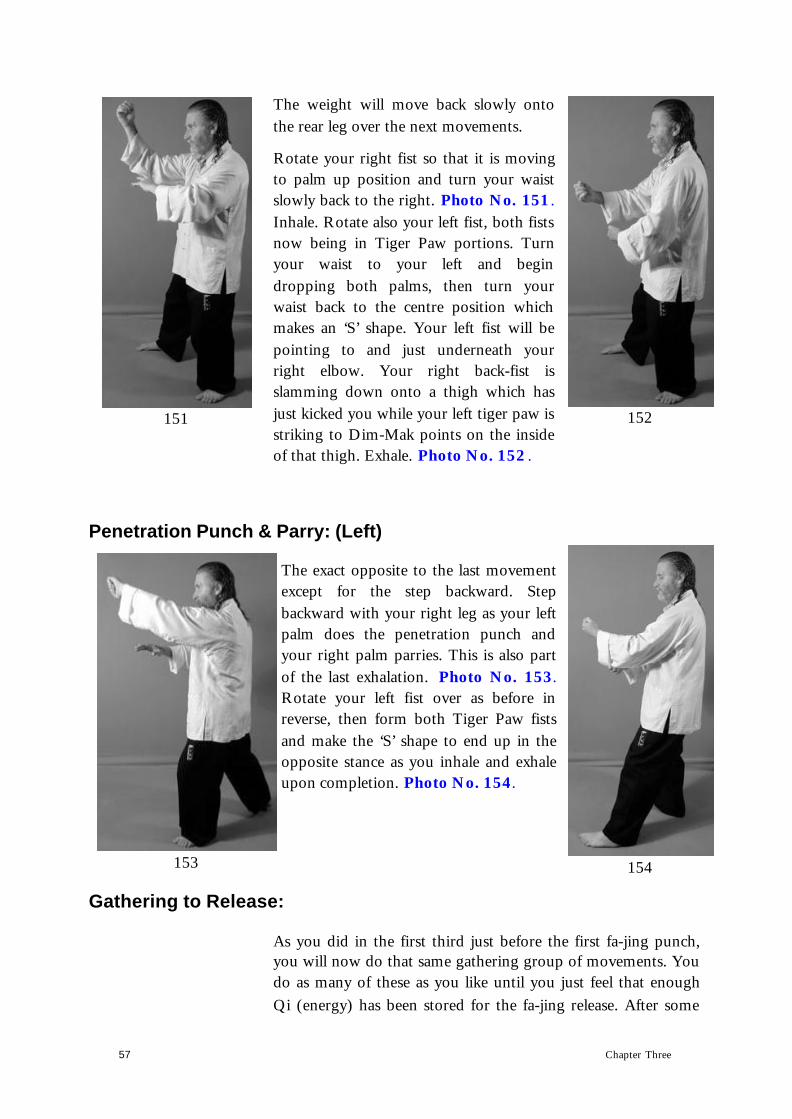
The weight will move back slowly ontothe rear leg over the next movements.
Rotate your right fist so that it is movingto palm up position and turn your waistslowly back to the right. Photo No. 151.Inhale. Rotate also your left fist, both fists now being in Tiger Paw portions. Turnyour waist to your left and begindropping both palms, then turn yourwaist back to the centre position whichmakes an ‘S’ shape. Your left fist will bepointing to and just underneath yourright elbow. Your right back-fist isslamming down onto a thigh which hasjust kicked you while your left tiger paw is striking to Dim-Mak points on the insideof that thigh. Exhale. Photo No. 152 .
Penetration Punch & Parry: (Left)
The exact opposite to the last movementexcept for the step backward. Stepbackward with your right leg as your leftpalm does the penetration punch andyour right palm parries. This is also partof the last exhalation. Photo No. 153.Rotate your left fist over as before inreverse, then form both Tiger Paw fistsand make the ‘S’ shape to end up in theopposite stance as you inhale and exhaleupon completion. Photo No. 154.
Gathering to Release:
As you did in the first third just before the first fa-jing punch,you will now do that same gathering group of movements. You do as many of these as you like until you just feel that enoughQi (energy) has been stored for the fa-jing release. After some
57 Chapter Three
151 152
153 154

practice, you will just know when this happens and thefollowing attack will just happen naturally at the correct time.Bring your right palm across as you inhale and turn your waistto your left. Your left palm also is in that same gatheringposition. Photo No. 155. Exhale as you turn your waist toyour right and do the reverse. Photo No. 156. Inhale as youagain turn your waist to your left and make the gathering typeof movement with your right palm. Photo No. 157. You cando this many times, however, on the last time for instance in the last position, you will hold that inhalation until you release theenergy with the following punch.
Release the Qi:
From the last photo, violently turn yourwaist to your right and take a stepforward with your left foot as you parrywith your left palm. Your right fist is inposition just forward from your right hip and in a Yin position by bending thewrist downward ready to snap upwardupon impact. Photo No. 158. As yourrear foot is dragged up to form a normalbow stance your waist snaps around tothe left thrusting your right fist forward
Form 58
155 156 157
158
159
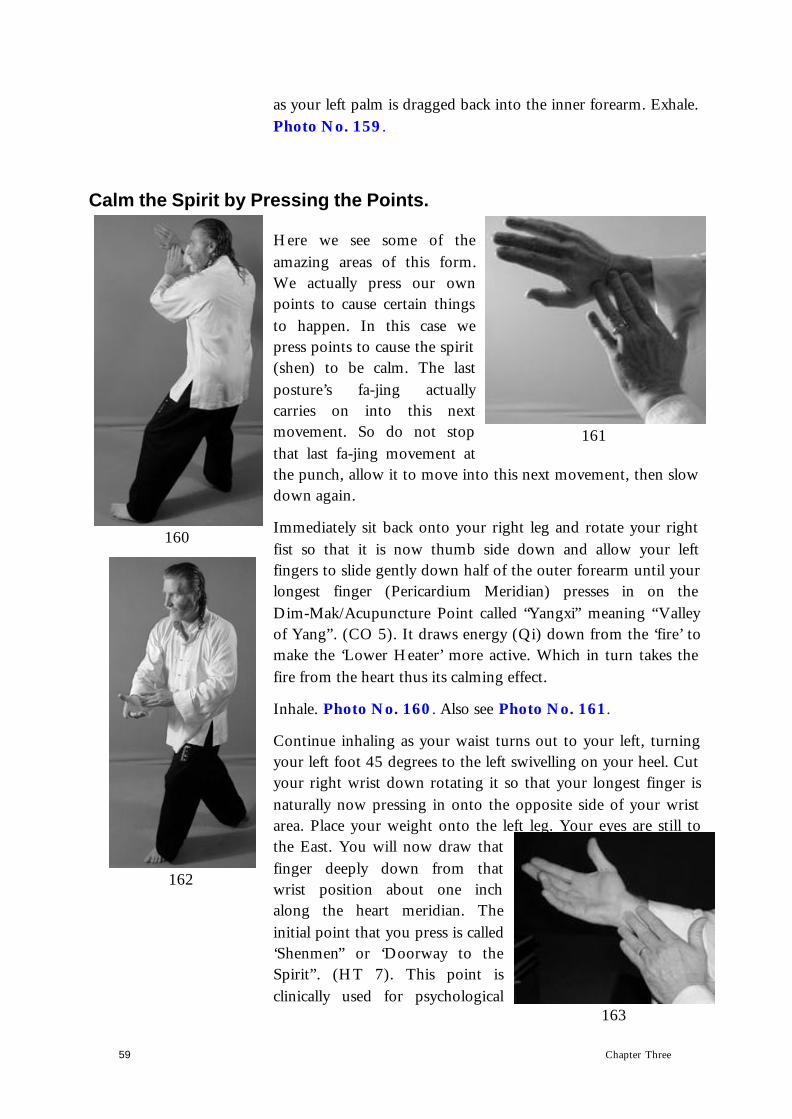
as your left palm is dragged back into the inner forearm. Exhale. Photo No. 159.
Calm the Spirit by Pressing the Points.
Here we see some of theamazing areas of this form.We actually press our ownpoints to cause certain thingsto happen. In this case wepress points to cause the spirit (shen) to be calm. The lastposture’s fa-jing actuallycarries on into this nextmovement. So do not stopthat last fa-jing movement atthe punch, allow it to move into this next movement, then slow down again.
Immediately sit back onto your right leg and rotate your rightfist so that it is now thumb side down and allow your leftfingers to slide gently down half of the outer forearm until yourlongest finger (Pericardium Meridian) presses in on theDim-Mak/Acupuncture Point called “Yangxi” meaning “Valleyof Yang”. (CO 5). It draws energy (Qi) down from the ‘fire’ tomake the ‘Lower Heater’ more active. Which in turn takes thefire from the heart thus its calming effect.
Inhale. Photo No. 160. Also see Photo No. 161.
Continue inhaling as your waist turns out to your left, turningyour left foot 45 degrees to the left swivelling on your heel. Cut your right wrist down rotating it so that your longest finger isnaturally now pressing in onto the opposite side of your wristarea. Place your weight onto the left leg. Your eyes are still tothe East. You will now draw thatfinger deeply down from thatwrist position about one inchalong the heart meridian. Theinitial point that you press is called ‘Shenmen” or ‘Doorway to theSpirit”. (HT 7). This point isclinically used for psychological
59 Chapter Three
160
161
162
163
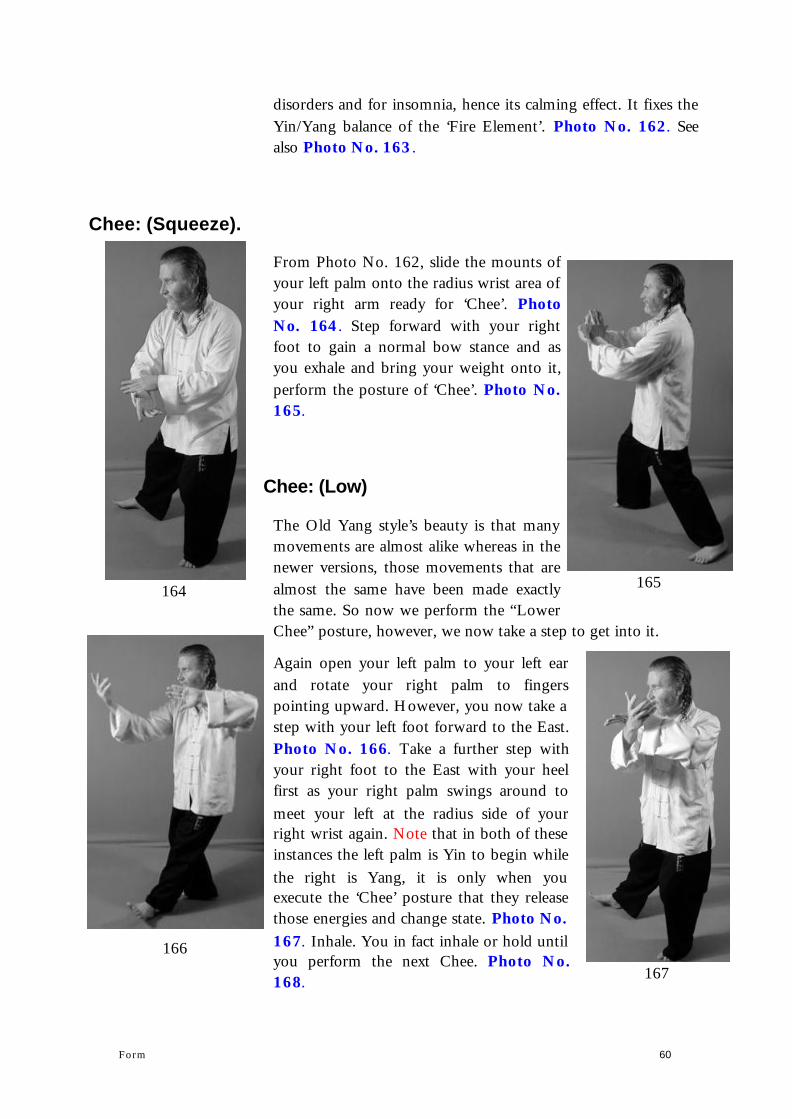
disorders and for insomnia, hence its calming effect. It fixes theYin/Yang balance of the ‘Fire Element’. Photo No. 162. Seealso Photo No. 163.
Chee: (Squeeze).
From Photo No. 162, slide the mounts ofyour left palm onto the radius wrist area of your right arm ready for ‘Chee’. PhotoNo. 164. Step forward with your rightfoot to gain a normal bow stance and asyou exhale and bring your weight onto it,perform the posture of ‘Chee’. Photo No.165.
Chee: (Low)
The Old Yang style’s beauty is that manymovements are almost alike whereas in thenewer versions, those movements that arealmost the same have been made exactlythe same. So now we perform the “LowerChee” posture, however, we now take a step to get into it.
Again open your left palm to your left earand rotate your right palm to fingerspointing upward. However, you now take a step with your left foot forward to the East.Photo No. 166. Take a further step withyour right foot to the East with your heelfirst as your right palm swings around tomeet your left at the radius side of yourright wrist again. Note that in both of theseinstances the left palm is Yin to begin whilethe right is Yang, it is only when youexecute the ‘Chee’ posture that they releasethose energies and change state. Photo No. 167. Inhale. You in fact inhale or hold until you perform the next Chee. Photo No.168.
Form 60
164 165
166167

Sit Back & Double Spear Fingers.
Exactly as in the first third and themany times that you haveperformed ‘Grasping Swallow’sTail’, sit back opening up bothpalms and hook them in thrustingthem out as you sit back andexhale. Photo No. 169. Comeforward with both elbows exactlythe same as before. Photo No.170. And end up at ‘Arn’ or‘Press’. Photo No. 171.
Now you have to repeat all of thepostures that you did in the firstthird to get you up to ‘Single Whip’. ‘Sit Back Ready’, ‘Fishesin Eight’, Photos No. 25 up to 32. Single Whip, Photo No.172.
Wave Hands Like Clouds:
This set of movements is one of the best Qigong methods forthe Stomach and can be used by itself when there is somethingwrong with this area of the body. However, the postures mustbe done correctly in order to gain this benefit. This set is not
61 Chapter Three
168 169 170
171
172

easy nor is it meant to be. Manyinstructors cause it to be easy byteaching the stepping methodincorrectly. However, when you do thestepping correctly, it becomes difficult.And all of Taijiquan was meant to bedifficult in order react upon eachmeridian.
Form Single Whip, turn your left toesweighted on the heel still, to the Northby 90 degrees. Also bring your hipsaround to the North. This is one of thedifficult bits that most get wrong. Youmust distinguish between your hips and waist. Your hips are the sacrum boneand under while the waist is above thesacrum. So you can turn your waist independently to your hipsand visa-versa. Your waist will turn into the NW corner as yourleft palm parries up in line with your chin, palm out. Your right palm attacks low (into GB 25 Point, which is actually a Kidneyattacking point and most devastating). Inhale. Notice that thewaist and head are pointing into the NW while the hips are tothe N. Photo No. 173. This is not actually part of WaveHands Like Clouds but is the initial move only.
Scoop your right palm upward and begin your left palmcoming downward as you exhale. Photo No. 174. To explainthe application of this movement in a book would be toodifficult so I will leave it as it would add many more photos.However, like many of these dangerous applications, it has todo with the neck. As your right palm pokes upward fingersleading, your left palm pushes downward and your eyes followyour right fingers upward. Drag your right foot in so that itends up parallel to your left. Photo No. 175.
Note: This whole routine is much more flowing than can beshown in a book. I have to show you in block format obviously. However, once you learn this in block form, you should beginto see that all you are doing is making opposing circles withyour palms and stepping to the left by 4 times co-ordinating the stepping with the hand movements in perfectly flowingmovements.
Form 62
173 174
175

Form the last posture, simply turnyour waist to your right taking your palms as they are with you into theNE corner and change your weightto your right leg. Notice that thehips stay to the N. This is either still part of that last exhalation or aholding breath. Photo No. 176.There is of course that short timewhen you are not breathing. We donot breathe in and out all the timeunless we are running etc. So whenyou inhale, there will be that brieftime when you are not breathing,you are holding your breath andthis is also important to the Qi flow. You will learn by trial and errorwhere to hold and for how long as the whole form was madewith this in mind. So if your breathing does not fit with themovements, then you will have to try harder. Keep in mind ofcourse that when you are learning this stuff, your movements
will not be absolutely correct nor will your stepping, soit will be difficult anyway to make the breathco-ordinate with the movement until you are a littlemore advanced and can perform without having tothink about the movements.
Next, as you perform those same hand movements butin reverse by scooping your left palm this time andpushing down with your right so that the one going up moves up on the inside of the one going down eachtime, you will also take a double shoulder width stepout to your left lifting the left heel and toe at exactly the same time and placing them at the same time. Inhale.Photo No. 177. Now, as you change your weightonto your left leg, also turn your waist only to the NWcorner taking your palms with you again. Photo No.178.
This next bit is the difficult part. As you again do a palm change by scooping your right palm upward and pushing your left onedown, you must exhale and at the same time and inco-ordination with that hand movement, lift your right leg,HEEL & TOE TOGETHER! Be hard on yourself here where
63 Chapter Three
176 177
178

even one 8 th of an inch of the heel or toelifting first is in correct. The only way todo this is to use your whole stomacharea’s muscles to pull up through thestomach. Step the right foot in so that itis again single shoulder width andparallel. The feet are parallel all the whileduring these postures. Photo No. 179.
You have now performed one wholeprogression and have taken one step tothe left. You must now perform this setanother three times. In other words, youwill be taking four steps to your left andbringing the right foot up each time. Soyou have shuffled to the left by fourdouble steps. So we will assume that that last photo is the fourth time through.
Single Whip:
Wave Hands Like Clouds isalways following by SingleWhip. So from Photo No. 179.Again turn your waist to the NE corner taking your hands withyou as if you are about to doanother set. Photo No. 180.Raise your left palm so that thefingers touch the inside of yourright elbow in a Yin position asyour join your fingers as beforeto make the ‘hook’ for SingleWhip. Photo No. 181. Thistime your palm is already almost in position so you simply needto Bend your right wrist downholding that hook. And as you straighten out your right arm asbefore, perform the Single Whip posture. Photo No. 182.
Form 64
179 180
181 182

Lift Up the Heavens:
Form Single Whip, sit back ontoyour right leg and rotate bothpalms upward as you inhale.Photo No. 183. Note: Your right arm now releases its tension sothat it is again slightly bent.
High Pat on Horse:
Exhale as your right palm movespast your right ear the fingerspointing to the ear as you do this,palm facing to the West. Your left
palm will firstly turn Yang and thenYin as it makes a clockwise arc in front of you to end up near your left hip. Your right palm will attackto the West palm lateral. Your left foot will make a ‘Toe Stance’with only the ball touching the ground. Photo No. 184.
Spread the Weave:
Turn your waist slightly to your right as your right palm arcs out to theright and back in as your left onebegins to make an arc out to theright. Inhaling. Photo No. 185.Turn your waist back to the left asyour right palm continues its arc asdoes the left to cross at the wrists. Inother words both palms are makingclockwise circles 180 degrees out ofphase. Photo No. 186. Continuethe right arc as you turn your waistand hips out to the rear corner andperform “Spread the Weave” as youcomplete the inhalation. Note:Because of the energy needs of this
65 Chapter Three
183
184
185 186

next posture, you will inhale on the whole of this movementand exhale on the Sitting Like a Duck Posture next. PhotoNo. 187.
Sitting Like a Duck:
Swivel your left heel in by 45degrees as you place your weightonto it and cut your right palmdownward palm up and also turnyour left palm upward. Tuck yourright knee in behind your left knee and sit down so that your bum issitting on your right heel. You will see the palm positions better when I do this again on the other side.
Your eyes are looking out of thecorners to the West and your leftfingers are pointing to the Westwhile your right fingers point to the East. This is a devastatingpull down using your whole body weight and then controllinghis wrist with your right while your left fingers poke him intothe eyes or ST 9 points. Photo No. 188. Exhale.
Separation of Right Leg: (Right Kick)
From the sitting position, begin to rise onto your left legand open both palms to outward. Hold your breathing asyou do this. Photo No. 189. Inhale sharply as you snapkick your right leg upward and slap the instep with yourright palm. Although the right palm is the only one doingthis, you should slap down with both at the same time. Allkicks in Taijiquan are performed on the inhalation exceptfor the ‘cross-kick’ at the end of the 2nd third. All upwardmovements (most kicks) for the most part are inhalations,all down are exhalations (stepping down after kicks) alloutward movements from the most part are exhalationswhile inward type of movements such as ‘Lu’ areinhalations. This all has to do with where we generate theinternal power from. For instance in the kicks, we generatethe power not from the kicking leg as most other martial
Form 66
187
188
189

systems, but from the standingleg with the kicking leg simplybeing so loose that it is thrownout by the action of the waistand hips. Photo No. 190.
High Pat on Horse:
This posture is almost the sameas the one you have just done.However, the weight is nowplaced onto the front leg, theright leg. After you finish thefirst kick, exhale as you stepdown to the West as your rightpalm is beginning to slam
downwards and across and your leftpalm is getting ready to strike to theWest and is Yin shaped. Photo No.191. Allow your right palm to move across your body in a counterclockwise arc to end up near yourright hip as your left palm strikes.Exhale. Photo No. 192.
Spread the Weave:
Sit back onto the left leg and windboth palms up again as before onlyin reverse, both hands makingcounter clockwise circles firstly
turning to your left. Photo No. 193.Inhaling, turn to your right as your left palm shoots out overyour right elbow continuing that circling. Photo No. 194. Asyou swing out to the rear to the SE to perform Spread theWeave, drag your right foot back into a Toe Stance as youcontinue to inhale. Photo No. 195.
67 Chapter Three
190 191
192 193

Sitting Like a Duck:
Again the reverse of the last postureof the same name, rotate your rightheel inwards cutting your left palmdownward and turning both palmsto upward. Photo No. 196.Continue sitting as your left kneecuts in behind your right knee andsit down onto your left heel. Exhale.Photo No. 197.
Separation of Left Leg: (Left Instep Kick)
Raise up as before and as you inhale, perform the left instepkick. Note: it cannot be shown in a book without greatdifficulty and frustration but the standing foot actually comesoff the ground momentarily as you perform this fa-jing kickthus moving you ahead by about ½ a step. Photo No. 198.
Form 68
194 195
196197 198

The next Chapter of this book will continue with the secondhalf of the 2nd third of the Old Yang Style form.
I have many video titles covering this form from very basic,MTG2 to the most advanced levels in the series, “Taiji to theMax” beginning with MTG56. I also have the 8th volume of this set as a demonstration tape of myself performing this form in its 5 different ways.
69 Chapter Three
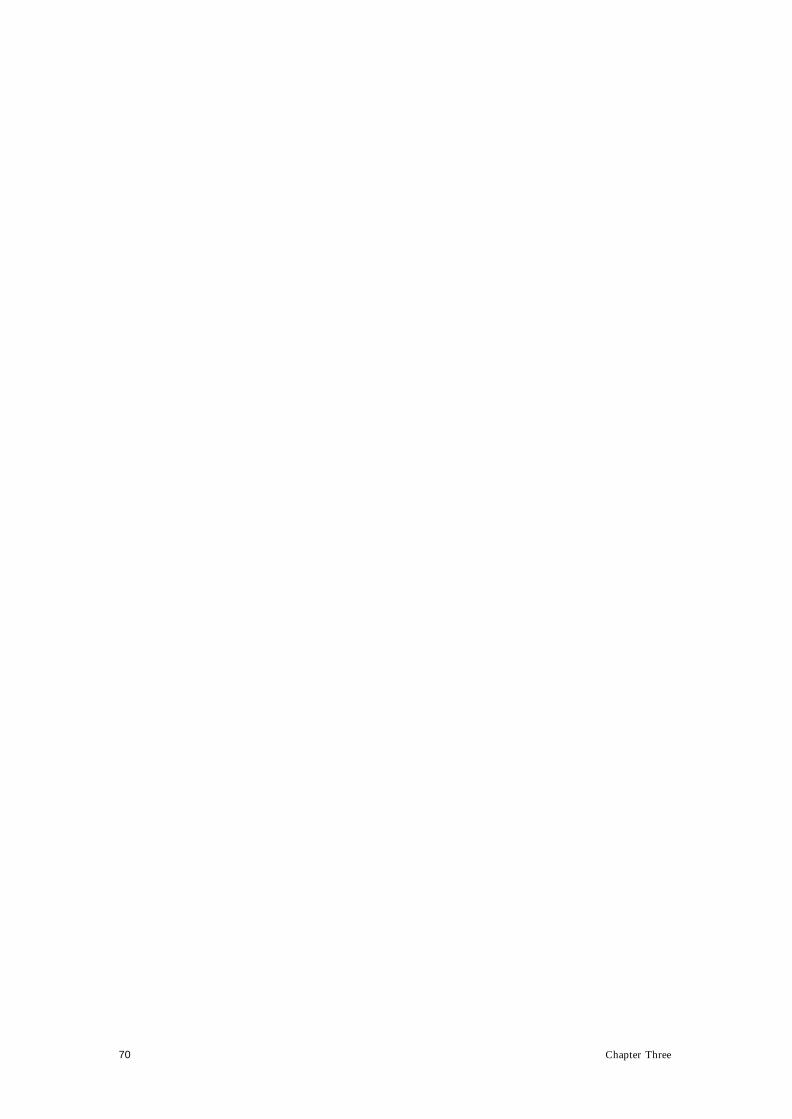
70 Chapter Three
The Old Yang Style
Taijiquan
Erle MontaigueMoontagu Books Australia

The Old Yang Style of TaijiquanAn Instruction Manual
By Erle Montaigue
Moontagu Books Australia

Publisher’s Note: This book contains material never before published. The enclosed information can only have come from Erle Montaigue, being the only Westerner to have received this information. It is illegal to copy and portion of this book other than brief extracts for review articles.You must obtain permission directly from the copyright holder ©2000. It is also illegal to plagiarize any part of this book to use in some otherpublication, paper, electronic, or video and film, by changing it in some way to make out as if it has not come from this source.
This book is provided free of charge in good faith so that all may enjoy the great benefits of this pinnacle of all Taijiquan systems. You maydownload it free of charge. But please do not plagiarize it. Even though it is free, it is still covered by international copyright laws.
Moontagu BooksPOB 792Murwillumbah, NSW 2484Australia
Ph.: +61 2 6679 7145Fax: +612 6679 7028E-mail: [email protected]://www.moontagu.com
Copyright © 2000 Moontagu Books Australia
First Published in Australia Electronically in 2000
All Rights Reserved
ISBN: 0-949132-07-8
Contents
4 Chapter
Chapter Four .......................70Form.............................................71
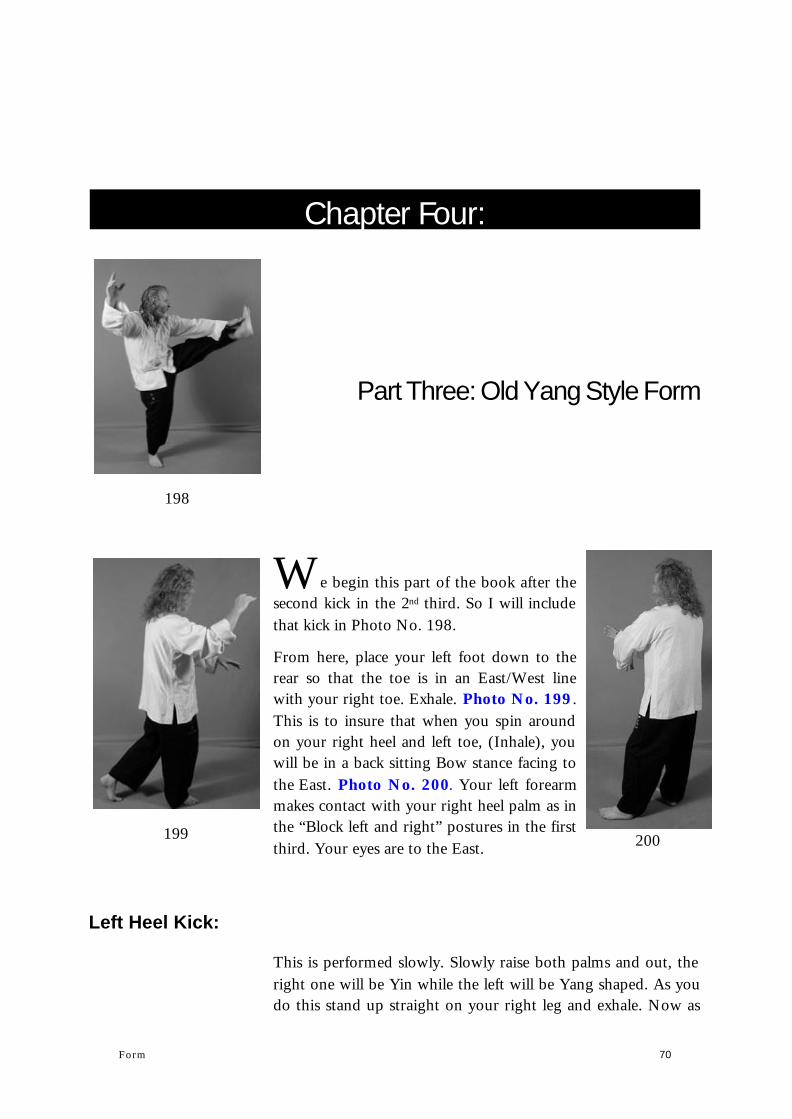
Chapter Four:
Introduction
Part Three: Old Yang Style Form
We begin this part of the book after thesecond kick in the 2nd third. So I will includethat kick in Photo No. 198.
From here, place your left foot down to therear so that the toe is in an East/West linewith your right toe. Exhale. Photo No. 199. This is to insure that when you spin aroundon your right heel and left toe, (Inhale), youwill be in a back sitting Bow stance facing tothe East. Photo No. 200. Your left forearmmakes contact with your right heel palm as in the “Block left and right” postures in the firstthird. Your eyes are to the East.
Left Heel Kick:
This is performed slowly. Slowly raise both palms and out, theright one will be Yin while the left will be Yang shaped. As youdo this stand up straight on your right leg and exhale. Now as
Form 70
198
199 200

you inhale, kick your left heel to the East 45 degrees to yourright foot. Photo No. 201.
Note: In the Yang Cheng-fu form all of the kicks are performed at 90 degrees to the other foot. In Yang Lu-ch’an’s form theyare performed at 45 degrees. So if your right foot is pointing tothe SE, then the kick would be to the East.
You must keep your standing leg straight! This is difficult andeveryone usually makes the mistake of bending the standing legto make it easier. In order to get the stretch necessary for thiskick, you can try and lift your leg onto a high ledge, such as achair back and straighten out your other leg. Slowly raise theheight of the ledge until you can get it a little higher thanhorizontal. Do not worry if you cannot get your kick highenough to begin with. Just do it as high as you can keepingyour standing leg straight.
Brush Knee & Twist Step: (Right)
NOTE: All Brush Knee & TwistSteps (including those in the firstthird) in Yang Lu-ch’an’s form areperformed at half the pace of the restof the form! This is because medically, this posture works upon the heart.
As you exhale, place your left elbowonto your left knee so that the forearm is horizontal and bend your right legdown again to the normal position.Photo No. 202. Continue exhaling as your perform Brush Knee & twistStep as in the first third only to theEast. Photo No. 203.
Brush Knee & Twist Step: (Left)
Now perform exactly as in the first third. Hold the ball on theleft and turn your left foot out by 45 degrees as you inhale.Photo No. 204. Then step through with your right foot and
71 Chapter Four
201
202203

perform Brush Knee & Twist Step to the East as you exhale. Photo No. 205.
Punch to Groin:
Turn your right toes out by 45 degreesto the right weighted as your inhale andhook your left palm clockwise using the‘Single Whip Hook’. Your right palmmakes a fist. Photo No. 206.
Continue hooking your left palm downto your left hip as your left leg makes asweeping movement clockwise out to the front as if hooking an attacker’s leg. Thisis what is happening in fact. Your left hook is slamming andhooking his oncoming right front kick attack as your righthammer fist attacks to his neck and your left foot is also assisting in tripping him. Photo No. 207.
Continue that foot circling back to yourother foot. Photo No. 208. Next,continue the left foot to take a left stepto the east. So your left foot has made acircle. As you place your weight ontothe left leg, exhale as you punchdownward with your right fist (smallfinger upper) and hook your left palmup as high as it can go. So you havelifted his leg up as high as it can go thuscausing him to fall, allowing you toattack to his groin. Photo No. 209. For all applications of this form, see my tape MTG21.
Cutting Hands:
From here, Perform a weighted turn, turning your left toes 90degrees to the right causing the toes to point to the South.Inhale as both palms make two clock-wise circles 180 degreesout of sync. So your left palm will move first, followed by your
Form 72
204205
206 207

right which will cut in underyour left wrist. You are nowfacing the South but your eyesare on the West. Photo No. 210.
Continue the hand movementsand lift your right foot placingit down to the West, the rightpalm will move slightly aheadof the left ending up as inPhoto No. 211.
Double Leaping Kick:
NOTE: This set of movements is difficult to show in photos, Iwill do my best however.
I will show the two kicks statically with an interim photoshowing that you are actually off the ground before the secondkick!
Turn your right toes out by 45 degrees. These kicks are doneexplosively! Kick your left foot upward turning the foot so thatthe big toe side of the foot is upper. This is the only way toperform a groin kick! Photo No. 212. The momentum of thiskick lifts you off the ground for the next kick. As your right foot
73 Chapter Four
208 209 210
211212
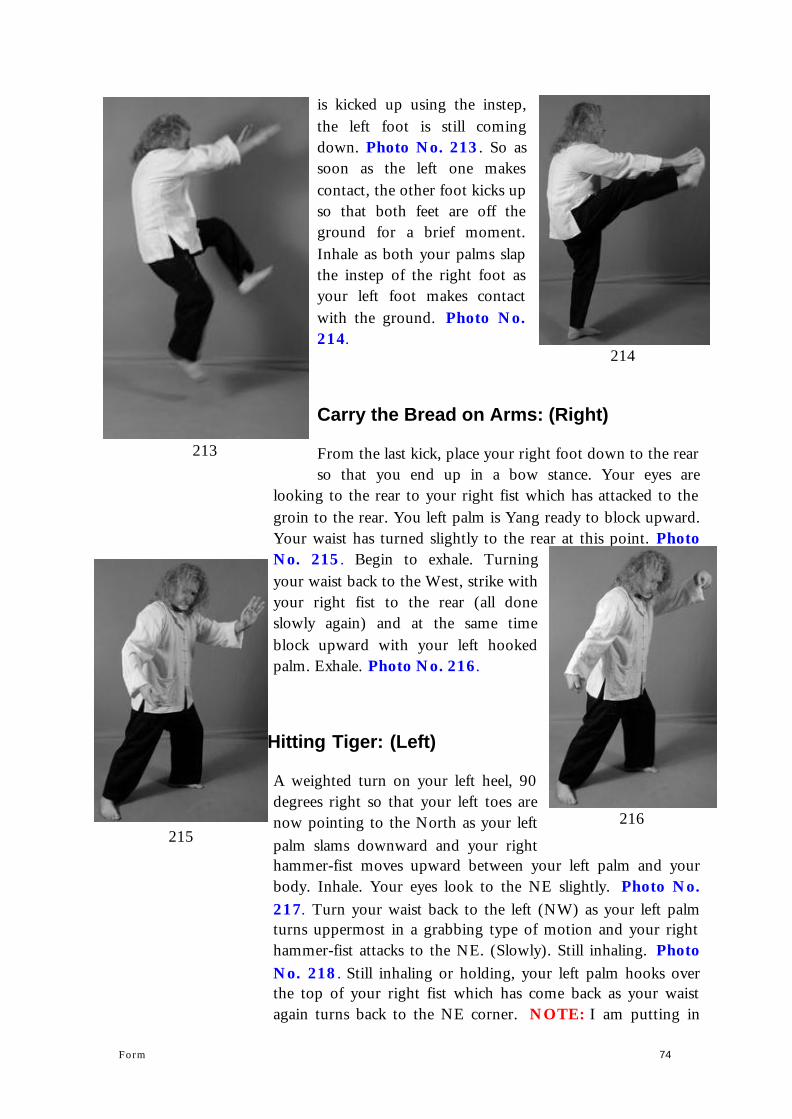
is kicked up using the instep,the left foot is still comingdown. Photo No. 213. So assoon as the left one makescontact, the other foot kicks up so that both feet are off theground for a brief moment.Inhale as both your palms slapthe instep of the right foot asyour left foot makes contactwith the ground. Photo No.214.
Carry the Bread on Arms: (Right)
From the last kick, place your right foot down to the rear so that you end up in a bow stance. Your eyes are
looking to the rear to your right fist which has attacked to thegroin to the rear. You left palm is Yang ready to block upward.Your waist has turned slightly to the rear at this point. PhotoNo. 215. Begin to exhale. Turningyour waist back to the West, strike with your right fist to the rear (all doneslowly again) and at the same timeblock upward with your left hookedpalm. Exhale. Photo No. 216.
Hitting Tiger: (Left)
A weighted turn on your left heel, 90degrees right so that your left toes arenow pointing to the North as your leftpalm slams downward and your righthammer-fist moves upward between your left palm and yourbody. Inhale. Your eyes look to the NE slightly. Photo No.217. Turn your waist back to the left (NW) as your left palmturns uppermost in a grabbing type of motion and your righthammer-fist attacks to the NE. (Slowly). Still inhaling. PhotoNo. 218. Still inhaling or holding, your left palm hooks overthe top of your right fist which has come back as your waistagain turns back to the NE corner. NOTE: I am putting in
Form 74
213
214
215216

some of the more advanced moves here as I believe people areable to grasp this. Photo No. 219. Again turn your waist back to the NW corner as your right fistalso loads ready to strike. Photo No. 220.
These next movements are all doneexplosively (fa-jing). The whole thinghappens in a matter of about onesecond! Step to the NE corner withyour right foot and strike with yourright hammer-fist. All of the nextstrikes happen on the one exhalation.Only that you must expel a little airfor each attacking movement on theone exhalation. This is difficult toexplain. Come see me! Photo No.221. As your left foot steps up onestep toward your right foot, you sit back onto it and attack with your left fist (palm downward). Photo No. 222. Notice thatthe feet are parallel pointing to the NW., although the action isto the NE!
Change your weight to your right foot and turning your waistto the NW, attack with your left back-fist to the West using thepower of your waist turning. Photo No. 223. Notice that thefeet have not changed. Cut your left fist under your right axillaas your right hammer fist attacks to the West across in a
75 Chapter Four
217 218 219
220
221

centrifugal movement from right to left. Photo No. 224. Youhave just attacked with a back-fist to his GV26 point, grabbedhis left wrist as he tries to attack you and hammered into his GB 3 point on the side of his head (temple). Now, you will finishby attacking to the temple again with your right penetrationpunch. Now is the time to move yourleft foot by pushing the heel back into a more normal back-sitting bow stance.Photo No. 225. To the West. Wellthat was difficult! Now I have to do it allagain on the other side!
Carry the Bread on Arms: (Left)
So from here, take a left step backwardso that you end up with a bow stanceto the rear and as before only on theopposite side, strike backward withyour left palm and upward blocking with your right. Inhale and exhale. Photo No. 226.
Form 76
222 223 224
225 226
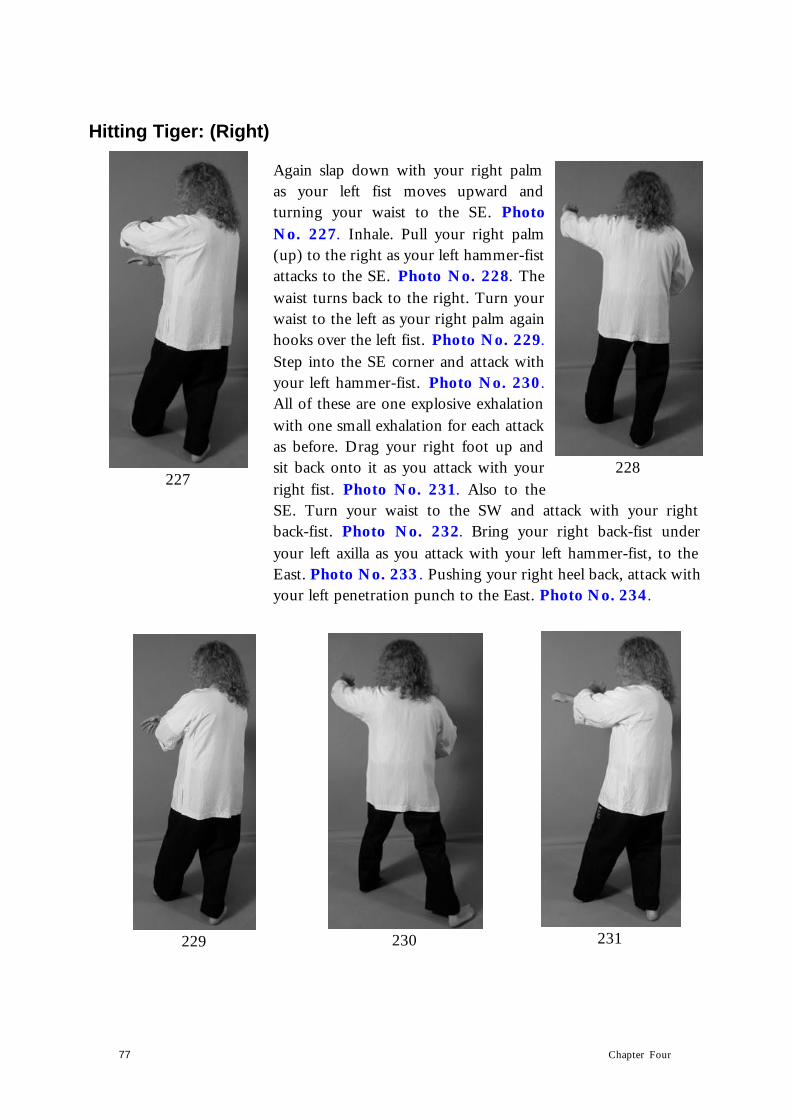
Hitting Tiger: (Right)
Again slap down with your right palmas your left fist moves upward andturning your waist to the SE. PhotoNo. 227. Inhale. Pull your right palm(up) to the right as your left hammer-fist attacks to the SE. Photo No. 228. Thewaist turns back to the right. Turn yourwaist to the left as your right palm again hooks over the left fist. Photo No. 229. Step into the SE corner and attack withyour left hammer-fist. Photo No. 230.All of these are one explosive exhalationwith one small exhalation for each attack as before. Drag your right foot up andsit back onto it as you attack with yourright fist. Photo No. 231. Also to theSE. Turn your waist to the SW and attack with your rightback-fist. Photo No. 232. Bring your right back-fist underyour left axilla as you attack with your left hammer-fist, to theEast. Photo No. 233. Pushing your right heel back, attack with your left penetration punch to the East. Photo No. 234.
77 Chapter Four
227228
229 230 231
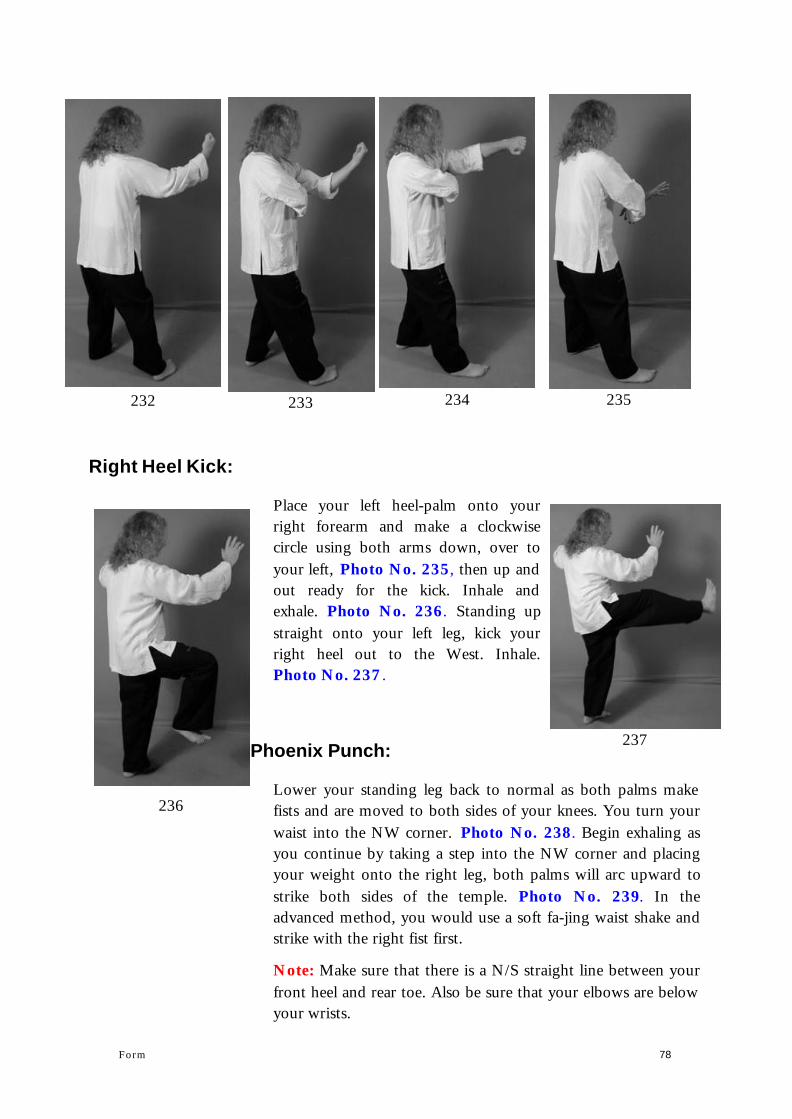
Right Heel Kick:
Place your left heel-palm onto yourright forearm and make a clockwisecircle using both arms down, over toyour left, Photo No. 235, then up andout ready for the kick. Inhale andexhale. Photo No. 236. Standing upstraight onto your left leg, kick yourright heel out to the West. Inhale.Photo No. 237.
Phoenix Punch:
Lower your standing leg back to normal as both palms makefists and are moved to both sides of your knees. You turn yourwaist into the NW corner. Photo No. 238. Begin exhaling asyou continue by taking a step into the NW corner and placingyour weight onto the right leg, both palms will arc upward tostrike both sides of the temple. Photo No. 239. In theadvanced method, you would use a soft fa-jing waist shake andstrike with the right fist first.
Note: Make sure that there is a N/S straight line between yourfront heel and rear toe. Also be sure that your elbows are belowyour wrists.
Form 78
232 233 234 235
236
237

Spear Hands With Sit:
From here, lower both palms downand out. This is a no breath. Turnyour right toes to the North or justpast the North slightly to the NNE.Photo No. 240. Continue the palmscircling up and over making full circles until the left one crosses the right onthe outside as you begin to sit downto eventually place your left knee ontothe ground. Photo No. 241. Inhale.Continue moving down until your left knee is on the ground and your gaze is to the left. Exhale. Photo No. 242 .
Back Kick:
Standing up again, begin to open both palms and load your leftpalm, (yin) ready to strike. The gaze is to the left. Photo No.243. Continue standing up picking up your left foot, loading itready to kick. Photo No. 244. The breathing has begun toinhale. Kick your left heel out to the West in a downward strike as both palms open out. Photo No. 245.
79 Chapter Four
238 239 240 241
242 243
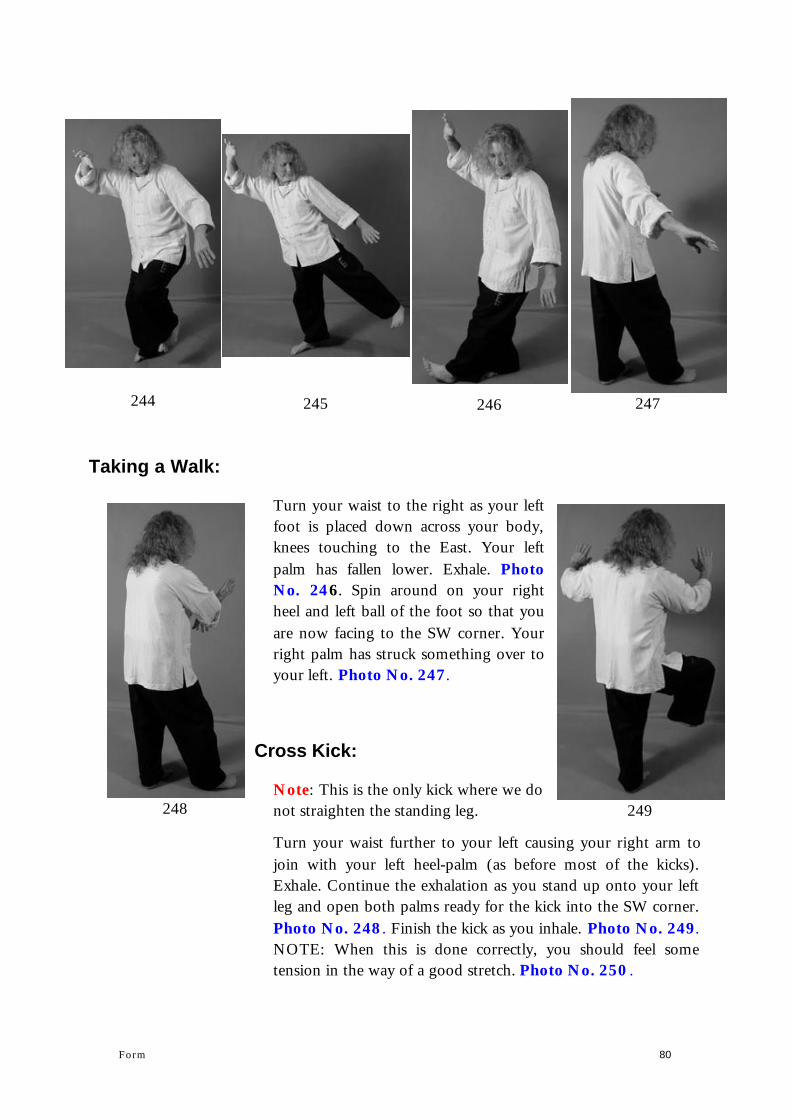
Taking a Walk:
Turn your waist to the right as your leftfoot is placed down across your body,knees touching to the East. Your leftpalm has fallen lower. Exhale. PhotoNo. 246. Spin around on your rightheel and left ball of the foot so that youare now facing to the SW corner. Yourright palm has struck something over toyour left. Photo No. 247.
Cross Kick:
Note: This is the only kick where we do not straighten the standing leg.
Turn your waist further to your left causing your right arm tojoin with your left heel-palm (as before most of the kicks).Exhale. Continue the exhalation as you stand up onto your leftleg and open both palms ready for the kick into the SW corner.Photo No. 248. Finish the kick as you inhale. Photo No. 249. NOTE: When this is done correctly, you should feel sometension in the way of a good stretch. Photo No. 250 .
Form 80
244 245 246 247
248 249

Knife & Spear Fingers:
Place your right foot downexactly where it is with the toespointing 45 degrees to the NW. Squat down slightly as bothpalms cut across to your rightto be in your centre-line. Yourleft heel will come slightly offthe ground. Photo No. 251.Exhale. Draw both palms intoyour chest loading them. Dropdown a little more but not sofar as to join your knees. Inhale. Photo No. 252. As you dropdown further so that you are locked into position by your knees touching, thrust your both finger tips out in a spearing type ofmotion. Photo No. 253. Exhale.
Lift Hands:
This next part is difficult asyou have to keep your weightright down there at that samelevel for the last move. Liftyour left foot and bring itforward placing it down sothat you are into a normalback-sitting bow stance, yourpalms are the same. PhotoNo. 254. Inhale. Your leftpalm now rises upward andyour right one is pusheddown near the left elbow asyou raise your body to the normal standing bent knee position.You are breaking an elbow here. Exhale. Photo No. 255.
81 Chapter Four
250 251
252253

Lift Hands: (2)
Step up with your right foot to near your left foot as youinhale raising both palms in Yinshapes. As you drop both palmsinto position for the normal ‘LiftHands’ posture, exhale. PhotoNo. 256.
Penetration Punch:
We now finish off this 2nd third inalmost the same way that the firstthird ended.
Begin taking a left step forward asyou load your left palm. Inhale.Photo No. 257. Take the left step
and perform the penetration punch as you exhale. Photo No.258. Roll the fist over to your left as before. Photo No. 259.Then bring it down to your right. Photo No. 260. End up asshown in Photo No. 261. You have inhaled and exhaled. Youhave made a figure of ‘8’ with your left fist.
Form 82
254 255 256 257
258 259

Wind Up & Punch:
Now perform the ‘winding upmovements’ the same as at theend of the first third. And afteryou are ready, take the left stepforward blocking to your left asyou do this. Photos No. 262,263, 264. Remember, you cando these winding up movementsany amount of times that youlike. You should just feel when itis ready to strike.
Do the fa-jing punch to the Westas you exhale. Photo No. 265.
Sit Back:
Slide your left palm under your right forearm. Inhale. PhotoNo. 266. Sit back onto your left leg as you pull both palmsback to your hips. Photo No. 267.
83 Chapter Four
261 262 263 264
265266
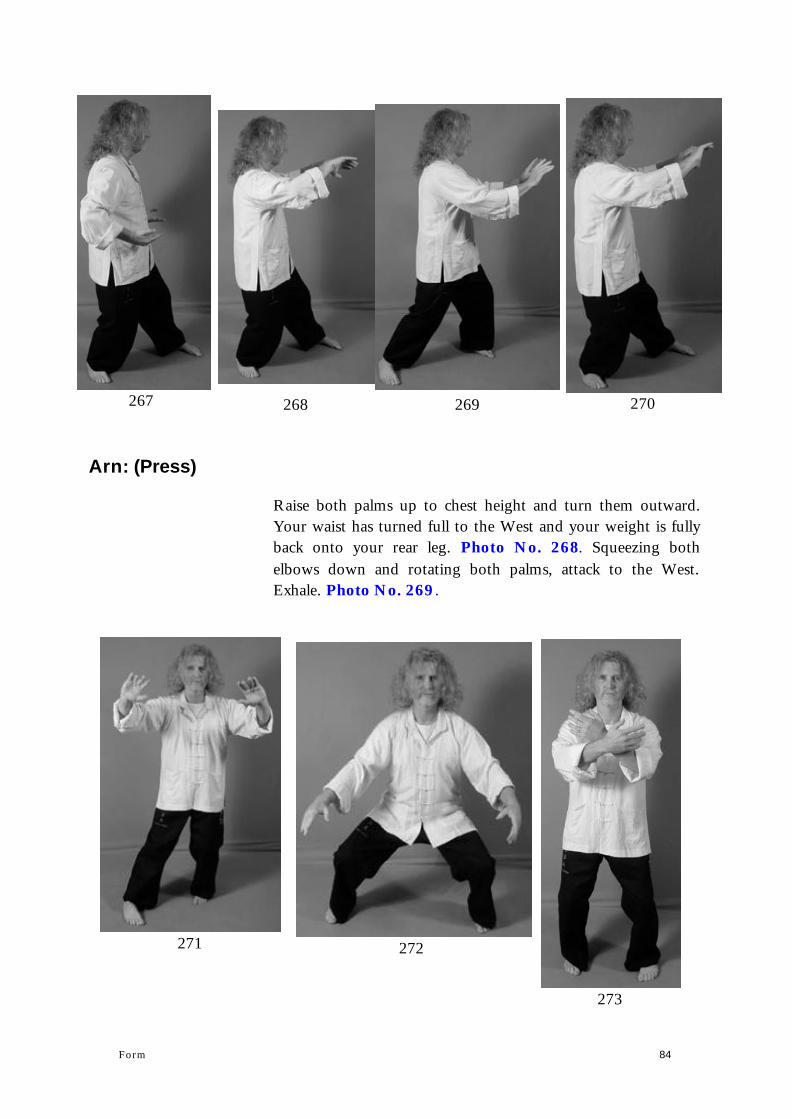
Arn: (Press)
Raise both palms up to chest height and turn them outward.Your waist has turned full to the West and your weight is fullyback onto your rear leg. Photo No. 268. Squeezing bothelbows down and rotating both palms, attack to the West.Exhale. Photo No. 269.
Form 84
267 268 269 270
271 272
273

Sit back and Apparent Close Up:
Sit back onto your rear leg as both palms again return to thatprevious position. Inhale. Photo No. 270. Turn your left footby 90 degrees to the North along with your waist then sit ontoyour left leg. Photo No. 271. Begin moving both your palmsout to either side and lowering your body onto your left legkeeping your back vertical. Photo No. 272. Stand up crossingyour palms as shown (exactly the same as in the first third)placing your weight onto your right foot and lifting your leftleg placing it down one shoulder’s width from your right footand parallel to it. Photo No. 273.
This brings you to the end of the 2nd third. I will be doing afourth part to finish off the third 3rd. It has become muchlarger than I had originally thought! I have not gone into asgreat detail as at the end of the first third because you havealready (hopefully) done that and the movement is exactly thesame in ending each third.
85 Chapter Four

The Old Yang Style
Taijiquan
Erle MontaigueMoontagu Books Australia
The Old Yang Style of TaijiquanAn Instruction Manual
By Erle Montaigue
PART FOUR
Moontagu Books Australia

Publisher’s Note: This book contains material never before published. The enclosed information can only have come from Erle Montaigue, being the only Westerner to have received this information. It is illegal to copy and portion of this book other than brief extracts for review articles.You must obtain permission directly from the copyright holder ©2000. It is also illegal to plagiarize any part of this book to use in some otherpublication, paper, electronic, or video and film, by changing it in some way to make out as if it has not come from this source.
This book is provided free of charge in good faith so that all may enjoy the great benefits of this pinnacle of all Taijiquan systems. You maydownload it free of charge. But please do not plagiarize it. Even though it is free, it is still covered by international copyright laws.
Moontagu BooksPOB 792Murwillumbah, NSW 2484Australia
Ph.: +61 2 6679 7145Fax: +612 6679 7028E-mail: [email protected]://www.moontagu.com
Copyright © 2000 Moontagu Books Australia
First Published in Australia Electronically in 2000
All Rights Reserved
ISBN: 0-949132-07-8

Contents
5 Chapter
Chapter Five........................86From 3rd Third to Finish ...................86


Chapter Five:
Introduction
Part Four: Old Yang Style Form, 3rd Third
In this chapter I will finish the third 3rd. Obviously there willbe times when I do not have to show photos of certain repeated movements if they have already been done in some of theprevious chapters. This holds true for the beginning movements of the third 3rd as they are exactly the same as at the beginningof the 2nd third.
We begin where we left off in the second 3rd at Photo No. 273.All the next movements are the same as in the beginning of thesecond 3r d. So I will include those photos from the second 3rd.The photos with reference back to other parts of the book willbe in black whereas new photos will be in blue.
Brush Knee & Twist Step:
Turn your waist to your right to the NE corner and hold a ballright hand under as you inhale. Photo No. 91. Your eyes arestill looking to the N. We now perform Brush Knee Twist Stepexactly the same way that you have done in the first third. Theonly difference is that you will perform it in to the NW corner.So brush your left knee with your left palm and attack withyour right palm into the NE corner. Photo No. 92. Exhale.
Form 86
273

Spread the Weave:
With your weight still on your left leg, turn your left toes(swivelling on your left heel), 90 degrees to point to the NE sothat you are now pigeon-toed. Your left palm rises up to pointinto the NW corner as does your right palm but near your leftelbow. Inhale. Note that your body has turned to the NEcorner, however, your arms are to the NW corner and your eyes are looking out of the corner to the NW corner. Photo No. 93.
Embrace Tiger, Return to Mountain:
From here, perform as if you were going to do another BrushKnee & twist Step back into the SE corner by brushing yourright knee with your right palm and raising your left palmready. You are still either inhaling, or your breath is in aholding position ready to exhale. Photo No. 94. As soon asyour right palm brushes past your right knee, turn it over topalm up position, placing your right foot down into the SEcorner also turn your left palm to palm down position andperform two poking movements with both palms. Photo No.95. Exhale. Note that at an advanced level, you would actuallymake three poking movements and also three waist turns, firstwith the left palm, then the right palm then again with the leftpalm. This is soft fa-jing.
In all corner postures (and you may not be able to see thisbecause of the angles that we had to take the photos in order toget both palms in), there should always be a cardinal line (N/Sor E/W) between the front heel and the rear toes. This isnothing different as it is still a normal bow stance. People justseem to have difficulty when they do a bow stance into corners!In the normal bow stances (when you do them to the cardinalpoints), there is still this straight line between front heel andrear toe, however, it is now a line on the corner points such asNE to SW etc.
Grasping Swallow’s Tail:
87 Chapter Five
Now, we perform exactly the same as in the first third, theabove group of postures called “Grasping Swallow’s Tail” onlywe have a different way of getting into them.
Lu: (Roll back)
From the last posture, raise your right palm and slightly loweryour left palm, with the right out in front of the left. Photo No. 96. Inhale. Rotate both palms so that the right will be palmdown and left palm up and turn your body to the right so thatyour palms are now over your right knee. The inhalation willcontinue. Photo No. 97. Drop both palms down as you turnyour waist to your left and pull both palms to your left side.Left palm is over the left knee. Right elbow over right knee.Your eyes still look to the SE. Photo No. 98.
Chee: (Squeeze)
As before in the first third, place your left palm (yin) onto theradius of your right wrist (yang). And Squeeze forward as youexhale. Notice that still both palms are opposite in state and will for the most part keep changing that state for the whole form.Photo No. 99.
Lower Chee: (Squeeze)
As before, turn both palms so that your right fingers arepointing up and your left fingers are pointing to your right.Slide your left palm across your right wrist and as you sit back,pull your left palm to your left ear. Now, bring your right palmaround so that both palms can again join at the wrist. Inhale.Photo No. 100. Release the Yang energy stored in your leftpalm and the Yin Qi stored in your right palm as you exhaleand turn your waist back to the SE attack using Lower Chee.Photo No. 101.
Form 88
Press: (Arn)
As before, brush your left palm across the back of your right asyou sit back and open both palms to your sides. Inhale. Scoopthem both in and poke with both palms as you exhale. PhotoNo. 102.
Begin moving forward as you inhale and lift both elbows asbefore in attack. Rotate both palms in a clawing down type ofmovement to perform, ‘Arn’ as you exhale. Photo No. 103.
Sit Back Ready:
As before, sit back onto your left leg and drop your left palm tothe inside of your right elbow as you inhale. Both palms are Yin shaped, however, the right one has the mind intent so it is yangrelative to the left. The left is set-up blocking as the right isfinger jabbing to the eyes. Photo No. 104. You are still facingthe SE.
Fishes in Eight:
Exactly as before only to a different direction. With weight onthe left leg, swing your arms out to the N. as you turn yourwaist to cause this to happen. Begin exhaling. Your right foot isswivelled around by 90 degrees so that you are againpigeon-toed. Photo No. 105.
Keeping your feet as they are, change your weight onto yourright foot as you again bring both palms into your chestmaintaining that same distance of wrist to elbow and push both palms out to the E. in an attack. Exhale fully. Photo No. 106.Doing this movement at an advanced stage, you should changethe weight on the one foot (left) from heel to toe and backagain, in keeping with the classics of Taijiquan where we mustalways have a weight change with every movement regardless of whether it is a movement on one leg or from one leg toanother!
89 Chapter Five

Single Whip:
This is the first new movement in this chapter. From the lastposture, perform Single Whip into the NW corner. This is theonly time that you will perform this posture in any otherdirection other than to the West. To get into it is exactly thesame way that you have done this posture every other timefrom “Fishes in Eight” posture. Photo No. 274.
Slant Flying: (Right)
From Single Whip, make a weighted turn on your left heel sothat your left toes are pointing to the NE and bring your leftpalm down under your right. Notice the left if yin and the rightyang. Your eyes are looking to the SE. Inhale. Photo No. 275.Take a step into the SE corner with your right foot and moveyour weight onto it as you begin to exhale. You will strike tothat corner with your right shoulder just before 70% of yourweight is moved onto that foot. Be sure that you have a N/Sline between your front heel and rear toes. Photo No. 276.
Now, as you move to the normal bow stance weighted on yourfront foot by 70%, exhale and turn your waist to that cornercutting upward with your right palm as your left moves down
Form 90
274275 276

to near your left hip. Your left toes have dragged around so that they point to the E. Photo No. 277.
Slant Flying: (Left)
A weighted turn on your right heel, turnyour toes to the South and bring your leftpalm under your right. Inhale. Try to turnyour waist as well as far to the South aspossible. Photo No. 278. Inhale. Lift yourleft foot to step it one step forward andstraight into the NE corner. Photo No. 279.NOTE: Do not (as so many do) take yourleft foot in to the right foot before stepping,take it straight into the corner. Move yourweight onto the left foot and strike usingyour shoulder to the NE corner just beforeyour weight is 70%. Photo No. 280. Exhaleas you place 70% of your weight onto yourleft foot turning your waist into the cornerand cutting upward with your left palm asyour right toes drag around to point to the E. NOTE: Your left wrist (or right if on the other side), should be in your centre.Photo No. 281.
91 Chapter Five
277 278 279 280
281 282
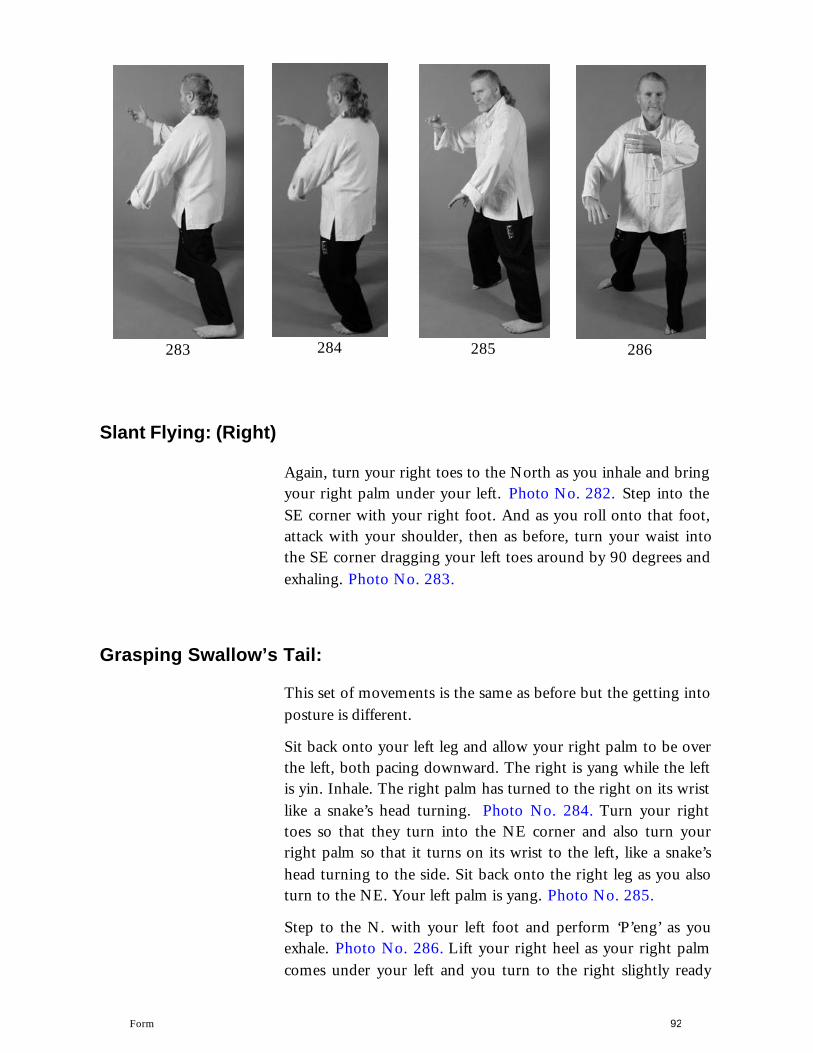
Slant Flying: (Right)
Again, turn your right toes to the North as you inhale and bring your right palm under your left. Photo No. 282. Step into theSE corner with your right foot. And as you roll onto that foot,attack with your shoulder, then as before, turn your waist intothe SE corner dragging your left toes around by 90 degrees and exhaling. Photo No. 283.
Grasping Swallow’s Tail:
This set of movements is the same as before but the getting into posture is different.
Sit back onto your left leg and allow your right palm to be overthe left, both pacing downward. The right is yang while the leftis yin. Inhale. The right palm has turned to the right on its wrist like a snake’s head turning. Photo No. 284. Turn your righttoes so that they turn into the NE corner and also turn yourright palm so that it turns on its wrist to the left, like a snake’shead turning to the side. Sit back onto the right leg as you alsoturn to the NE. Your left palm is yang. Photo No. 285.
Step to the N. with your left foot and perform ‘P’eng’ as youexhale. Photo No. 286. Lift your right heel as your right palmcomes under your left and you turn to the right slightly ready
Form 92
283 285284 286
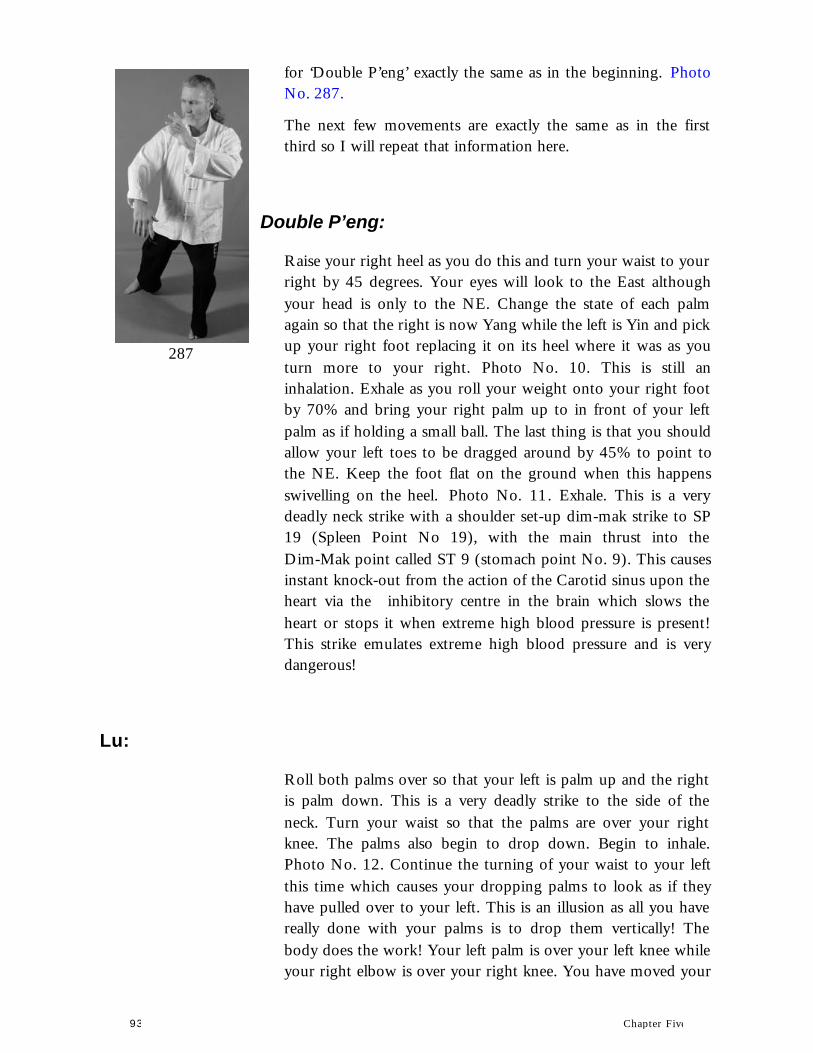
for ‘Double P’eng’ exactly the same as in the beginning. PhotoNo. 287.
The next few movements are exactly the same as in the firstthird so I will repeat that information here.
Double P’eng:
Raise your right heel as you do this and turn your waist to your right by 45 degrees. Your eyes will look to the East althoughyour head is only to the NE. Change the state of each palmagain so that the right is now Yang while the left is Yin and pick up your right foot replacing it on its heel where it was as youturn more to your right. Photo No. 10. This is still aninhalation. Exhale as you roll your weight onto your right footby 70% and bring your right palm up to in front of your leftpalm as if holding a small ball. The last thing is that you shouldallow your left toes to be dragged around by 45% to point tothe NE. Keep the foot flat on the ground when this happensswivelling on the heel. Photo No. 11. Exhale. This is a verydeadly neck strike with a shoulder set-up dim-mak strike to SP19 (Spleen Point No 19), with the main thrust into theDim-Mak point called ST 9 (stomach point No. 9). This causesinstant knock-out from the action of the Carotid sinus upon the heart via the inhibitory centre in the brain which slows theheart or stops it when extreme high blood pressure is present!This strike emulates extreme high blood pressure and is verydangerous!
Lu:
Roll both palms over so that your left is palm up and the rightis palm down. This is a very deadly strike to the side of theneck. Turn your waist so that the palms are over your rightknee. The palms also begin to drop down. Begin to inhale.Photo No. 12. Continue the turning of your waist to your leftthis time which causes your dropping palms to look as if theyhave pulled over to your left. This is an illusion as all you havereally done with your palms is to drop them vertically! Thebody does the work! Your left palm is over your left knee whileyour right elbow is over your right knee. You have moved your
93 Chapter Five
287
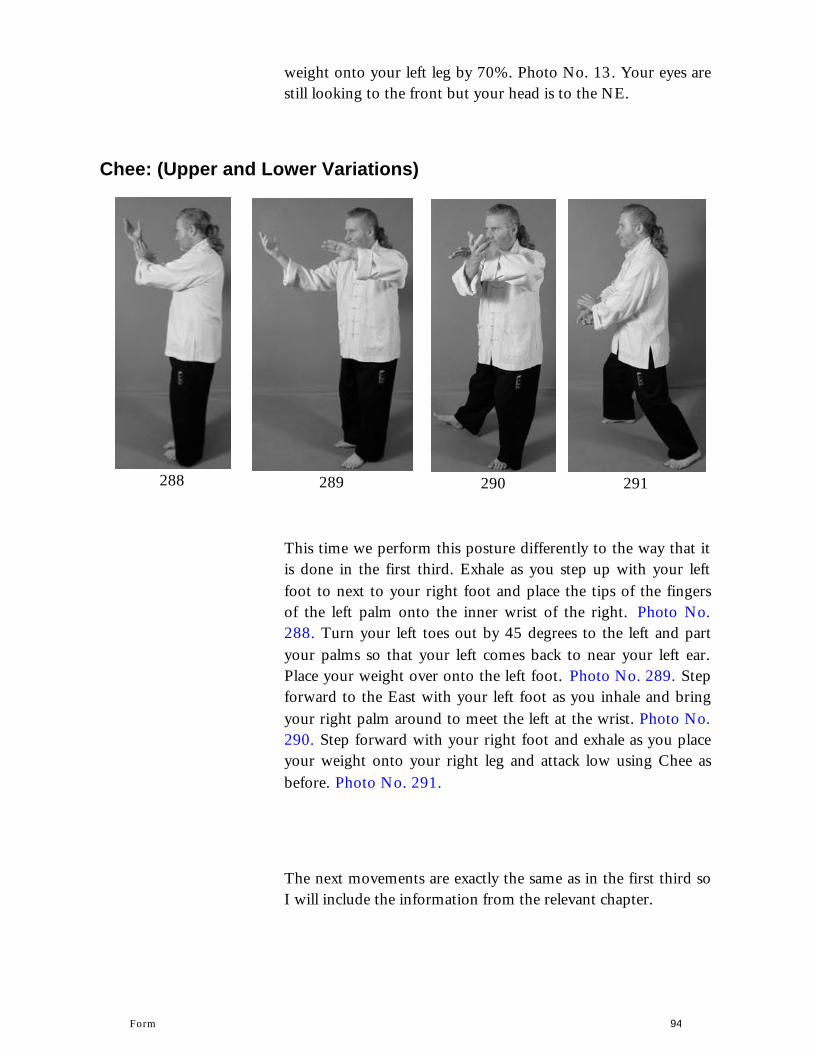
weight onto your left leg by 70%. Photo No. 13. Your eyes arestill looking to the front but your head is to the NE.
Chee: (Upper and Lower Variations)
This time we perform this posture differently to the way that itis done in the first third. Exhale as you step up with your leftfoot to next to your right foot and place the tips of the fingersof the left palm onto the inner wrist of the right. Photo No.288. Turn your left toes out by 45 degrees to the left and partyour palms so that your left comes back to near your left ear.Place your weight over onto the left foot. Photo No. 289. Stepforward to the East with your left foot as you inhale and bringyour right palm around to meet the left at the wrist. Photo No.290. Step forward with your right foot and exhale as you placeyour weight onto your right leg and attack low using Chee asbefore. Photo No. 291.
The next movements are exactly the same as in the first third soI will include the information from the relevant chapter.
Form 94
288 289 290 291
Double Spear Hands:
Swipe your right palm with your left as you begin to sit backand turn your waist to your left slightly opening both palms out to your sides as you inhale. Your eyes are still looking to the E.Photo No. 20. Hook both palms inwards towards your bodyrotating them so that they are now palms upward ready tostrike. Photo No. 21. As you full sit back onto your left leg,poke both palms outward as you exhale. This is a dangerousdim-mak strike to LIV 13 (liver points No. 13). Photo No. 22.
You must note that at a more advanced stage, no two palmswill attack at the same time. It may LOOK that way, but always one will strike slightly before the other. We only do it this wayfor beginners as this form is complicated enough withoutburdening beginners with the Yin and Yang of the palms aswell!
Arn: (Means to Press. This has also been mistranslated as to Push!)
As you bring your weight back onto your right leg, you willinhale as you lift both elbows upward in a two elbow strike tothe points called GB 24 just below the nipples. This happenswhen your weight is 50/50 but still moving. Photo No. 23. Asyour weight comes fully (70%) onto your right leg, you rollyour palms over so that they can gouge downward into hiseyes. Exhale. Photo No. 24.
Sit Back Ready:
Sit back onto your left leg as your drop your right palm so thatthe fingers just touch the inside of your right elbow. Inhale.This is a finger jab to an attacker’s eyes and a striking blockusing your left palm to the inside of his attacking forearm.Photo No. 25.
95 Chapter Five

Fishes in Eight:
Called this because of the action of the palms like an infinitysymbol. Make both palms Yang shaped. This is not incorrect aswhen you have two either Yang or Yin shaped palms one isalways more yang than the other thus still having one yin andone yang palm. Turn both palms over so that they lay on theirsides and turn your waist to the N. thus causing both palms tobe pulled around. Note: The whole of this posture is anexhalation. Photo No. 26.
Keep turning until your waist has come into the NW cornerand your right toes have turned to the N. So that you are nowstanding pigeon toed. Your right palm will continue to moveover but flicks over so that they fingers of that palm are nowpointing to the inside of the left elbow. Photo No. 27. Youreyes follow the movement. Weight is on the left leg 70%.
Continuing the exhalation, you will now change your weightback to your right foot without turning it! AS you do this andwhen you are 50/50, bring both palms in over each pectoral.Photo No. 28. You must not allow your weight to reach theright leg until the hands also reach their final area. Turn yourwaist into the NE corner as you push (strike) with both palmsinto that corner. The palms are now in the same position onlyopposite for the previous posture of the same name. Photo No.29.
Single Whip:
This posture has two parts. The first part is where it gets itsname because of in application only, the violent flicking of theright wrist to four neck points. Breathe in as you rotate yourright palm to upward and turn your left fingers in so that theytouch the inside of your right elbow. Photo No. 30. This willbe done for now only moving the palms as you are beginning!However, later in order to create the great power that the waistcan generate when the body is in a state of ‘sung’, you must also turn your waist firstly to your left, the back to the right andslightly left again. This is a fa-jing shake’. Allow the tips of yourfingers to come together with your thumb thus making a kindof ‘beak’ as your turn your right palm down. Photo No. 31.
Form 96

You have now done a counter clockwise circle with your rightpalm. Now, push your right palm through that circle until yourright elbow is locked. This is the only time that there is astraight arm in Taijiquan! There is a good reason for thishowever. Yin and Yang energy (electricity) if we are usingInternal Energy as opposed to pure physical strength, must have its opposite to return to the body. In the next movement we are doing a very powerful one handed palm strike and so we musthave all available power. AS the strike is releasing Yang Qi,there must be a Yin route for it to return. Now if we make theright elbow relax and bent, then the Qi has what is called an‘upper heavenly circulation’ by which to return. This is not aspowerful as we can have, so we simply block the Qi fromentering via that route as all tension creates Qi blockages! Nowthe Yang Qi finds its only other route via the rear leg causing afar greater strike because of the larger circle of Qi.
As you straighten your left arm, this forces your left palm toleave your right elbow and begin moving around to the West as your left foot is picked up off the ground. The left elbow is over the top of your left knee as you do this. Place your left footdown to the West and allow your left wrist to raise slightlygetting ready for the strike. This has been an inhalation. PhotoNo. 32. Note that the distance between the feet laterally isNOT a bow stance of shoulder width! The Single Whip stanceis NOT a bow stance. If you take a bow stance, then place theoutside of your foot to where the inside of your foot is, thiscauses the step to be narrower and thus able to take a slightlylonger step. Now, roll your weight onto your left leg 70% asyour left palm strikes releasing the Yang Qi slowly over thewhole stoke. If you see someone holding a fully yang shapedpalm before this movement, they are wrong! The palm MUSTrelease over the whole stroke of this final movement and weight change. Photo No. 33. Note also that your waist is not fully tothe West.
Fair Lady Works Shuttles:
This set of movements is performed into the four corners.However, unlike the Yang Cheng-fu form every other time isperformed slightly differently.
97 Chapter Five

From ‘Single Whip’, swivel your left toes, weighted on the heel90 degrees to point to the North. At the same time, ‘hold alarge ball’, left palm under and inhale. Your eyes are looking tothe NE corner. Photo No. 292.
Cross both hands as you lift your right foot placing it downexactly where it was only pointing to the East. The foot isturned as if you have a nail holding the centre of your footdown so that the heel and the toes can move swivelling on thecentre. Photo No. 293. Place your weight onto your right footand step into the NE corner with your left heel as your rightpalm is dragged back to your right hip and your left palm israised upward in a P’eng type of motion. Photo No. 294.NOTE: The right palm and left heel arrive at their respectivepositions simultaneously. Roll your weight onto your left footas you exhale and strike with your right palm turning your leftpalm also outward but Yin shaped. Photo No. 295. This handposition resembles a woman working at a loom (shuttles). Notethat there is a N/S line between the front heel and rear toes.
A weighted turn on your heel, point your toes to the South.This can be difficult. The toes of the left foot now point to thetoes of the right foot. At the same time, Inhale as you hold aball again, this time the right palm is under. Photo No. 296. Cross your wrists, right palm under as your lift your right footturning slightly to the NW corner. Photo No. 297. Step intothe NW corner with your right heel as your left palm covers
Form 98
292 293 294 295
296
297

your right fist. You will see these movements clearer when I dothem to a different direction. As you begin to place weight onto your right foot, strike with your right elbow with the aid ofyour left palm as you begin to exhale. Photo No. 298. The nexttwo movements happen so subtly that you can almost not seethem happening. As you get to where your weight is centeredbut still moving to the right foot, You turn your waist to theright and strike with the back of your right palm. Photo No.299. Your right palm now loads and again strikes using the tipsof the fingers. Photo No. 300. Roll onto your right foot as youexhale, raising your left palm to strike as your right palm rollsoutward. Exhale. Photo No. 301.
99 Chapter Five
298 299 300 301
302 303 304 305

Turn your waist into the SW corner as your push down withyour left palm to hold the ball again as you inhale. Photo No.302. Raise your left heel and cross your wrists, left under.Photo No. 303. Step into the SW corner with your left heel and drag your right palm back to your right hip as your left palmraises. Photo No. 304. Roll forward onto your left foot as yourright palm strikes into the SW corner and your left palm rollsoutward. Exhale. Photo No. 305.
Now we repeat exactly the same assecond time you performed this movement only the directionsare different. A weighted turn on your left heel so that your toes point to the North and push downward with your right palm to eventually hold the ball. Inhale. Photo No. 306. Cross hands,right underneath as you lift your right foot. Photo No. 307.Step around into the SE corner with your left heel and placeyour left palm across your right fist. Photo No. 308. Attackwith your right elbow into the SE corner using your left palmas support. Begin exhaling. Photo No. 309. Attack using theback of your right wrist when your weight is about half wayacross to your other foot. Photo No. 310. Attack with thefinger tips of your right palm. Photo No. 311. And as youexhale attack with your left palm and roll your right one out asbefore. Photo No. 312.
From here we repeat all that you did after the ‘Slant Flying’postures as follows.
Form 100
306 307 308 309

Grasping Swallow’s Tail:
This set of movements is the same as before but the getting into posture is different.
Sit back onto your left leg and allow your right palm to be overthe left, both pacing downward. The right is yang while the leftis yin. Inhale. The right palm has turned to the right on its wrist like a snake’s head turning. Photo No. 284. Turn your righttoes so that they turn into the NE corner and also turn yourright palm so that it turns on its wrist to the left, like a snake’shead turning to the side. Sit back onto the right leg as you alsoturn to the NE. Your left palm is yang. Photo No. 285.
Step to the N. with your left foot and perform ‘P’eng’ as youexhale. Photo No. 286. Lift your right heel as your right palmcomes under your left and you turn to the right slightly readyfor ‘Double P’eng’ exactly the same as in the beginning. PhotoNo. 287.
The next few movements are exactly the same as in the firstthird so I will repeat that information here.
101 Chapter Five
310 311 312

Double P’eng:
Raise your right heel as you do this and turn your waist to your right by 45 degrees. Your eyes will look to the East althoughyour head is only to the NE. Change the state of each palmagain so that the right is now Yang while the left is Yin and pick up your right foot replacing it on its heel where it was as youturn more to your right. Photo No. 10. This is still aninhalation. Exhale as you roll your weight onto your right footby 70% and bring your right palm up to in front of your leftpalm as if holding a small ball. The last thing is that you shouldallow your left toes to be dragged around by 45% to point tothe NE. Keep the foot flat on the ground when this happensswivelling on the heel. Photo No. 11. Exhale. This is a verydeadly neck strike with a shoulder set-up dim-mak strike to SP19 (Spleen Point No 19), with the main thrust into theDim-Mak point called ST 9 (stomach point No. 9). This causesinstant knock out from the action of the Carotid sinus upon theheart via the inhibitory centre in the brain which slows theheart or stops it when extreme high blood pressure is present!This strike emulates extreme high blood pressure and is verydangerous!
Lu:
Roll both palms over so that your left is palm up and the rightis palm down. This is a very deadly strike to the side of theneck. Turn your waist so that the palms are over your rightknee. The palms also begin to drop down. Begin to inhale.Photo No. 12. Continue the turning of your waist to your leftthis time which causes your dropping palms to look as if theyhave pulled over to your left. This is an illusion as all you havereally done with your palms is to drop them vertically! Thebody does the work! Your left palm is over your left knee whileyour right elbow is over your right knee. You have moved yourweight onto your left leg by 70%. Photo No. 13. Your eyes arestill looking to the front but your head is to the NE.
Form 102

Chee: (Upper and Lower Variations)
This time we perform this posture differently to the way that itis done in the first third. Exhale as you step up with your leftfoot to next to your right foot and place the tips of the fingersof the left palm onto the inner wrist of the right. Photo No.288. Turn your left toes out by 45 degrees to the left and partyour palms so that your left comes back to near your left ear.Place your weight over onto the left foot. Photo No. 289. Stepforward to the East with your left foot as you inhale and bringyour right palm around to meet the left at the wrist. PhotoNo. 290. Step forward with your right foot Photo No. 313.And exhale as you place your weight onto your right leg andattack low using Chee as before. Photo No. 314. The onlydifference is that this last movement is performed as a fa-jing orexplosive energy move. So it is done explosively.
The next movements are exactly the same as in the first third soI will include the information from the relevant chapter.
Double Spear Hands:
Swipe your right palm with your left as you begin to sit backand turn your waist to your left slightly opening both palms out to your sides as you inhale. Your eyes are still looking to the E.Photo No. 20. Hook both palms inwards towards your bodyrotating them so that they are now palms upward ready tostrike. Photo No. 21. As you full sit back onto your left leg,poke both palms outward as you exhale. This is a dangerousdim-mak strike to 13 (liver points No. 13). Photo No. 22.
You must note that at a more advanced stage, no two palmswill attack at the same time. It may LOOK that way, but always one will strike slightly before the other. We only do it this wayfor beginners as this form is complicated enough withoutburdening beginners with the Yin and Yang of the palms aswell!
103 Chapter Five
313
314
Arn: (Means to Press. This has also been mistranslated as to Push!)
As you bring your weight back onto your right leg, you willinhale as you lift both elbows upward in a two elbow strike tothe points called GB 24 just below the nipples. This happenswhen your weight is 50/50 but still moving. Photo No. 23. Asyour weight comes fully (70%) onto your right leg, you rollyour palms over so that they can gouge downward into hiseyes. Exhale. Photo No. 24.
Sit Back Ready:
Sit back onto your left leg as your drop your right palm so thatthe fingers just touch the inside of your right elbow. Inhale.This is a finger jab to an attacker’s eyes and a striking blockusing your left palm to the inside of his attacking forearm.Photo No. 25.
Fishes in Eight:
Called this because of the action of the palms like an infinitysymbol. Make both palms Yang shaped. This is not incorrect aswhen you have two either Yang or Yin shaped palms one isalways more yang than the other thus still having one yin andone yang palm. Turn both palms over so that they lay on theirsides and turn your waist to the N. thus causing both palms tobe pulled around. Note: The whole of this posture is anexhalation. Photo No. 26.
Keep turning until your waist has come into the NW cornerand your right toes have turned to the N. So that you are nowstanding pigeon toed. Your right palm will continue to moveover but flicks over so that they fingers of that palm are nowpointing to the inside of the left elbow. Photo No. 27. Youreyes follow the movement. Weight is on the left leg 70%.
Continuing the exhalation, you will now change your weightback to your right foot without turning it! AS you do this andwhen you are 50/50, bring both palms in over each pectoral.Photo No. 28. You must not allow your weight to reach theright leg until the hands also reach their final area. Turn your
Form 104

waist into the NE corner as you push (strike) with both palmsinto that corner. The palms are now in the same position onlyopposite for the previous posture of the same name. Photo No.29.
Single Whip:
This posture has two parts. The first part is where it gets itsname because of in application only, the violent flicking of theright wrist to four neck points. Breathe in as you rotate yourright palm to upward and turn your left fingers in so that theytouch the inside of your right elbow. Photo No. 30. This willbe done for now only moving the palms as you are beginning!However, later in order to create the great power that the waistcan generate when the body is in a state of ‘sung’, you must also turn your waist firstly to your left, the back to the right andslightly left again. This is a fa-jing shake’. Allow the tips of yourfingers to come together with your thumb thus making a kindof ‘beak’ as your turn your right palm down. Photo No. 31.You have now done a counter clockwise circle with your rightpalm. Now, push your right palm through that circle until yourright elbow is locked. This is the only time that there is astraight arm in Taijiquan! There is a good reason for thishowever. Yin and Yang energy (electricity) if we are usingInternal Energy as opposed to pure physical strength, must have its opposite to return to the body. In the next movement we are doing a very powerful one handed palm strike and so we musthave all available power. AS the strike is releasing Yang Qi,there must be a Yin route for it to return. Now if we make theright elbow relax and bent, then the Qi has what is called an‘upper heavenly circulation’ by which to return. This is not aspowerful as we can have, so we simply block the Qi fromentering via that route as all tension creates Qi blockages! Nowthe Yang Qi finds its only other route via the rear leg causing afar greater strike because of the larger circle of Qi.
As you straighten your left arm, this forces your left palm toleave your right elbow and begin moving around to the West as your left foot is picked up off the ground. The left elbow is over the top of your left knee as you do this. Place your left footdown to the West and allow your left wrist to raise slightlygetting ready for the strike. This has been an inhalation. Photo
105 Chapter Five
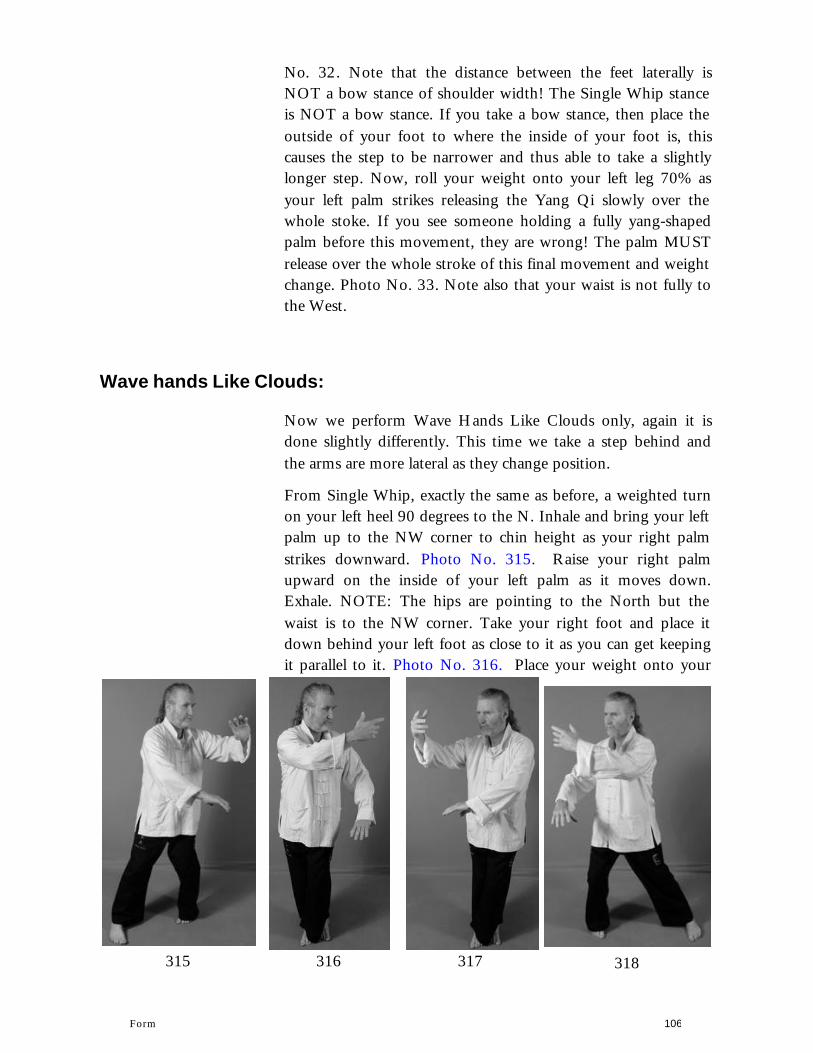
No. 32. Note that the distance between the feet laterally isNOT a bow stance of shoulder width! The Single Whip stanceis NOT a bow stance. If you take a bow stance, then place theoutside of your foot to where the inside of your foot is, thiscauses the step to be narrower and thus able to take a slightlylonger step. Now, roll your weight onto your left leg 70% asyour left palm strikes releasing the Yang Qi slowly over thewhole stoke. If you see someone holding a fully yang-shapedpalm before this movement, they are wrong! The palm MUSTrelease over the whole stroke of this final movement and weight change. Photo No. 33. Note also that your waist is not fully tothe West.
Wave hands Like Clouds:
Now we perform Wave Hands Like Clouds only, again it isdone slightly differently. This time we take a step behind andthe arms are more lateral as they change position.
From Single Whip, exactly the same as before, a weighted turnon your left heel 90 degrees to the N. Inhale and bring your left palm up to the NW corner to chin height as your right palmstrikes downward. Photo No. 315. Raise your right palmupward on the inside of your left palm as it moves down.Exhale. NOTE: The hips are pointing to the North but thewaist is to the NW corner. Take your right foot and place itdown behind your left foot as close to it as you can get keepingit parallel to it. Photo No. 316. Place your weight onto your
Form 106
315 316 317 318

right foot as you turn your waist (only) to the NE corner taking your palms with you. Photo No. 317. Your right palm pushesdown as your left one moves up on the inside nearest your body as you take a double step to the left and inhale. Photo No. 318. Change your weight to your left leg as you turn your waist tothe NW corner keeping your palms in that same configuration.Photo No. 319. Again, step behind your left leg with yourright foot and perform the change of palms as you exhale.Weight is on your left foot Photo No. 320. Change yourweight to your right foot as you turn your waist again to theNE corner. Photo No. 321.
No you will repeat all that you have done by taking anotherstep to the left etc., until you have taken four steps to the leftand finally turn back to the NE as in the above Photo No. 321.The only difference being that you have moved to the left byfour double shoulder width steps.
Single Whip:
From the previous posture, raise your left palm so that ittouches the inside of your right elbow. You are weighted onyour right foot which is behind your left foot. Photo No. 322. Inhale. Now exhale as you perform ‘Single Whip’ exactly thesame as you have done previously. Photo No. 323.
107 Chapter Five
319
320 321 322 323

Snake Creeps Down:
From the previous photo, there are two ways to perform thisnext posture. An easier (and not so correct) way and the correct way. If you were able to get into ‘Single Whip’ posture so that
you have the correct longer stance as in the photo, youshould be able to perform “Snake Creeps Down”correctly. If not and you cannot get right downwithout pushing your front foot out to make thedistance between your feet, then you will have toshuffle your rear foot backwards by turning your toesfirstly back by 90 degrees, then your heel back by 90degrees and then your toes again by 90 degrees. Youcan get this fairly smooth but it is not quite correct but will suffice for now until you have the stretch to beable to get right down.
The correct method is that your feet are already enough apart so you just turn your rear toes back by 90 degrees then drop yourbody straight down, pushing your front heel out to make upany short fall in distance. Your front leg should be straight andnot bent at all. For older people however, we allow them tohave a bent front leg until they are ever able to get right down.Inhale firstly and then exhale as you drop down. Your left palmwill make an arc out to your right then down into position near your left knee. Your right fingers will maintain the ‘SingleWhip’ hand but will turn upward as far as you are able. NOTE: the spine must be kept as vertical as possible. Photo No. 324.
Golden Rooster Stands on One Leg: (Right)
Move your weight onto your left foot as you swivel your leftheel in making your left foot 45 degrees to the West. Also dragyour right toes around by 90 degrees so that they point to theNW. Your left palm will bend at the wrist so that the fingerswill points lightly downward and your right palm will open and begin moving down in an arc. Inhale. Photo No. 325.
Stand up onto your left leg as your right foot lifts up. Your leftpalm begins to slap downward on the outside of your rightpalm which is on its way up. Photo No. 326. Stand up straight
Form 108
324
325
326

onto your left leg as your right knee makes like it is kneeingsomething and your right palm continues its upward motion tofinish up so that you could attack using a back-palm as youexhale. Photo No. 327.
Golden Rooster Stands on One Leg: (left)
Take a step forward with your right foot and as you place yourweight onto it, turn your right palm down so that both palmslook like they are pulling something down. This is also part ofthe last exhalation or a no breath. Photo No. 328.
A weighted turn on your right heel turning your toes out by 45degrees to the right, your left palm turns over and begins toslide out over your right wrist. Inhale. Photo No. 329. Standup onto your right leg as you raise your left knee as turn yourleft palm to outward as if grabbing someone’s (striking) neck.Your left elbow is touching your right wrist. Exhale. Photo No.330.
Repulse Monkey: (Tripping)
Lower your weight from the previous position as you turn your waist to the SW and lover your left palm so that it is nowtouching the back of your right wrist. Left palm is up while
109 Chapter Five
327 328 329 330
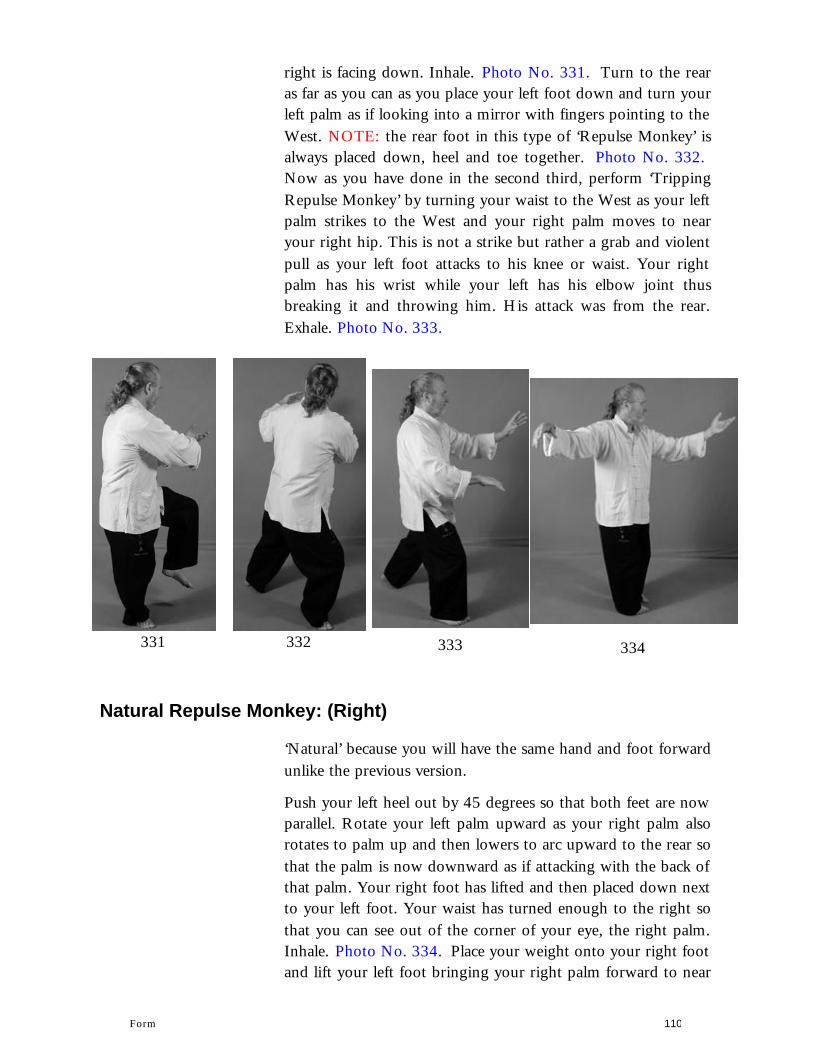
right is facing down. Inhale. Photo No. 331. Turn to the rearas far as you can as you place your left foot down and turn yourleft palm as if looking into a mirror with fingers pointing to theWest. NOTE: the rear foot in this type of ‘Repulse Monkey’ isalways placed down, heel and toe together. Photo No. 332. Now as you have done in the second third, perform ‘TrippingRepulse Monkey’ by turning your waist to the West as your leftpalm strikes to the West and your right palm moves to nearyour right hip. This is not a strike but rather a grab and violentpull as your left foot attacks to his knee or waist. Your rightpalm has his wrist while your left has his elbow joint thusbreaking it and throwing him. His attack was from the rear.Exhale. Photo No. 333.
Natural Repulse Monkey: (Right)
‘Natural’ because you will have the same hand and foot forwardunlike the previous version.
Push your left heel out by 45 degrees so that both feet are nowparallel. Rotate your left palm upward as your right palm alsorotates to palm up and then lowers to arc upward to the rear sothat the palm is now downward as if attacking with the back ofthat palm. Your right foot has lifted and then placed down nextto your left foot. Your waist has turned enough to the right sothat you can see out of the corner of your eye, the right palm.Inhale. Photo No. 334. Place your weight onto your right footand lift your left foot bringing your right palm forward to near
Form 110
331 332 333 334
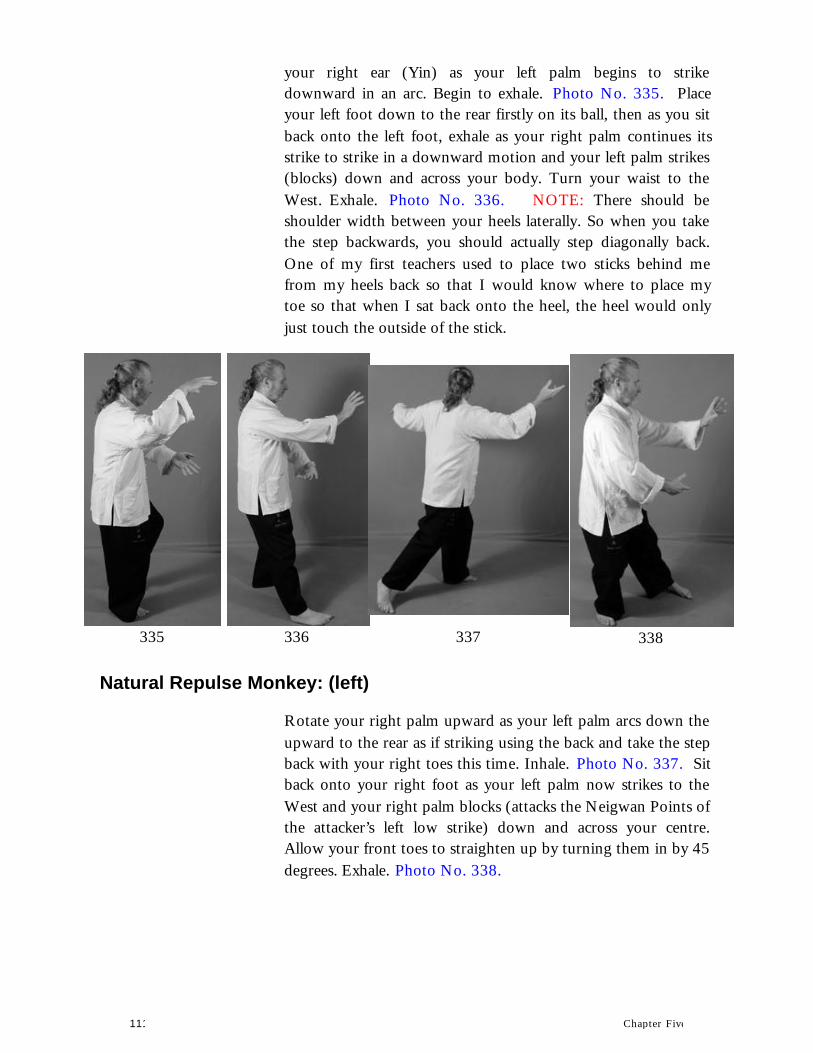
your right ear (Yin) as your left palm begins to strikedownward in an arc. Begin to exhale. Photo No. 335. Placeyour left foot down to the rear firstly on its ball, then as you sitback onto the left foot, exhale as your right palm continues itsstrike to strike in a downward motion and your left palm strikes (blocks) down and across your body. Turn your waist to theWest. Exhale. Photo No. 336. NOTE: There should beshoulder width between your heels laterally. So when you takethe step backwards, you should actually step diagonally back.One of my first teachers used to place two sticks behind mefrom my heels back so that I would know where to place mytoe so that when I sat back onto the heel, the heel would onlyjust touch the outside of the stick.
Natural Repulse Monkey: (left)
Rotate your right palm upward as your left palm arcs down theupward to the rear as if striking using the back and take the step back with your right toes this time. Inhale. Photo No. 337. Sitback onto your right foot as your left palm now strikes to theWest and your right palm blocks (attacks the Neigwan Points of the attacker’s left low strike) down and across your centre.Allow your front toes to straighten up by turning them in by 45 degrees. Exhale. Photo No. 338.
111 Chapter Five
335 336 337 338
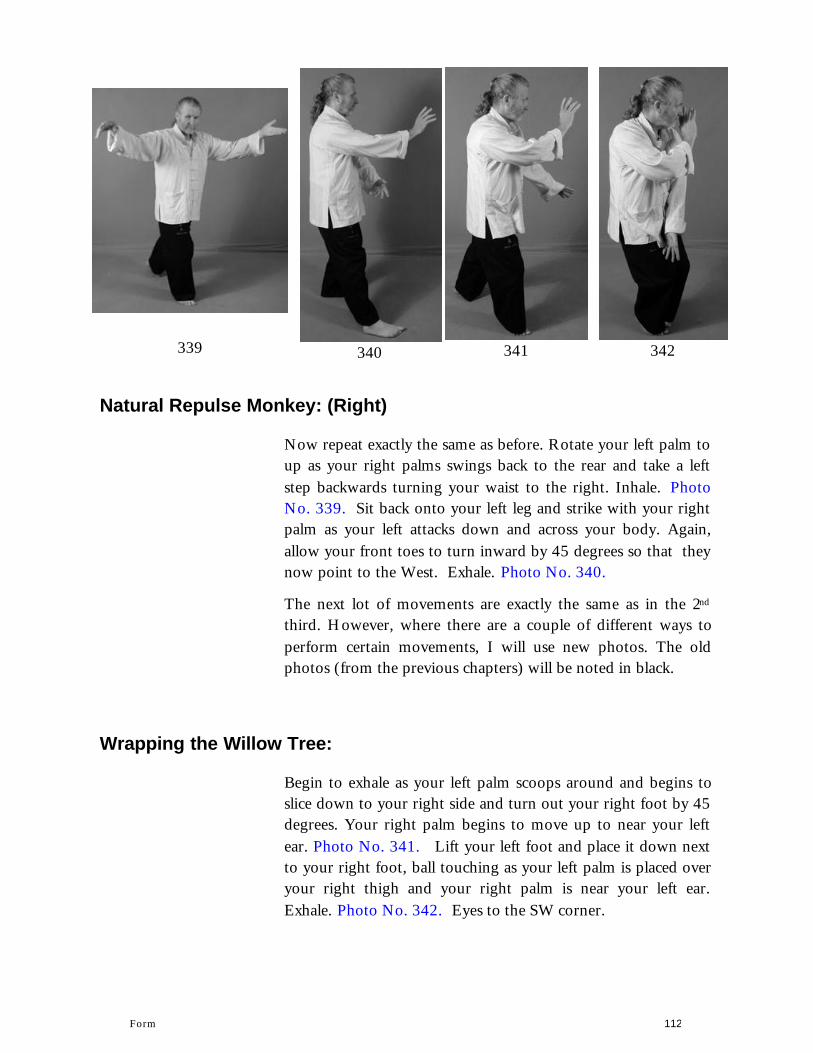
Natural Repulse Monkey: (Right)
Now repeat exactly the same as before. Rotate your left palm to up as your right palms swings back to the rear and take a leftstep backwards turning your waist to the right. Inhale. PhotoNo. 339. Sit back onto your left leg and strike with your rightpalm as your left attacks down and across your body. Again,allow your front toes to turn inward by 45 degrees so that they now point to the West. Exhale. Photo No. 340.
The next lot of movements are exactly the same as in the 2nd
third. However, where there are a couple of different ways toperform certain movements, I will use new photos. The oldphotos (from the previous chapters) will be noted in black.
Wrapping the Willow Tree:
Begin to exhale as your left palm scoops around and begins toslice down to your right side and turn out your right foot by 45 degrees. Your right palm begins to move up to near your leftear. Photo No. 341. Lift your left foot and place it down nextto your right foot, ball touching as your left palm is placed overyour right thigh and your right palm is near your left ear.Exhale. Photo No. 342. Eyes to the SW corner.
Form 112
339 340 341 342

Middle Winding:
Inhale as you raise your left palm and lower your right to theposition in Photo No. 128. You also have taken a step not quite to the SW corner with your left heel. Inhale. Step onto your left foot and lift your right foot to bring it up so that you will haveshoulder width between your feet when you perform the nextmovement. Stomp down onto your right foot placing theweight onto it as your thrust both palms outward and downslightly. The left hand’s fingers are pointing downward. Exhale.Photo No. 129.
Parting Horse’s Mane:
With the weight still on your right leg, turn your waist to yourright slightly and bring your left palm underneath your right.Inhale. Photo No. 130. Take a left step not quite into the SWcorner and as you place your weight onto it, your left palm cutsupward while your right one cuts down. Turn your waist to the left as you do this. Exhale. Photo No. 131.
Pierce to Rear:
This is the same posture as in the first third. However, it isslightly different getting into it as you are now facing a different direction than in the first 3rd. Turn your right toes to the rightslightly as you turn your waist to the right and raise your rightpalm and move a small amount of weight back onto the rightfoot. Inhale. Photo No. 132. As before, sit forward onto yourleft leg again as you pull forward with your right palm andcontinue to inhale. Photo No. 133. Exhale as you sit back ontoyour right leg and poke to the rear with your right fingers.Photo No. 134.
Double Dragon Hands:
Exactly the same as in the first third, turn to the West and bring both palms to the front on top of each other as you inhale.
113 Chapter Five

Then as you change the weight to the left foot, exhale andattack with both palms. Photo No. 135.
Now repeat exactly as you did in the first third from this pointthe following postures depicted by photos in the first third, (Photos No. 39 to 49).
Reverse Dragon hands:
Lift Hands:
Roll Back:
Shoulder Press: Photo No. 136.
Stork Spreads Wings: (Alternate Method)
From the previous posture, turn your waist to the right as youraise your right forearm and lower your left as you begin to liftyour left foot. Inhale. Photo No. 137. Rotate your right palmso that it drops into place as shown as you exhale. Your left ballof the foot is placed onto the ground near your right foot. Andyou can just see the right thumb out of the corner of your eye.Photo No. 138.
Spread the Weave:
Exactly as in the first third, the only difference is your initialposition. Your left palm scoops down and up while your rightarcs down and inward as if crushing something. This will be aninhalation then exhalation. Photo No. 139. Your left foot is still in the ‘empty’ position.
Form 114

Spread the Weave:
Perform this posture exactly the same as you did in the firstthird. Photo No. 140.
Brush Knee & Twist Step:
Perform this posture exactly the same way that you did in thefirst third. This time however, we only do it once. Photo No.141.
Picking the Golden Needle at Sea Bottom:
Named this because of its application to LIV 3 point on theinstep which was only ever needled using a golden needle.
As before, lift your right foot off the ground and replace it. Sitback onto your right leg and inhale as your right palm goes Yinand raises slightly. Your left palm has also raised to above yourright wrist. Photo No. 142. Placing the fingers of your left palm across your right wrist, point the fingers of the right palmdownward and lower your body as far as you are able whiletrying to keep your backbone vertical. Exhale. Photo No. 143.Your left foot has moved into a ‘Toe Stance’ where the ball ofthe foot only is placed onto the ground and the heel of the leftfoot is in a straight line with the heel of the right foot.
Fan Through Back:
This name refers to the way the Qi moves up the back and outof the fingertips to attack to the attacker’s HT 1 point under his arm while holding onto his wrist and lifting it up to expose thepoint. Inhale as you take a left step to the West and rotate yourright palm so that it is now palm down. Photo No. 144. Rollyour weight forward onto your left leg as your right palm raises up and turns out to indicate the grab while the left fingers pokeforward as you exhale. Photo No. 145.
115 Chapter Five
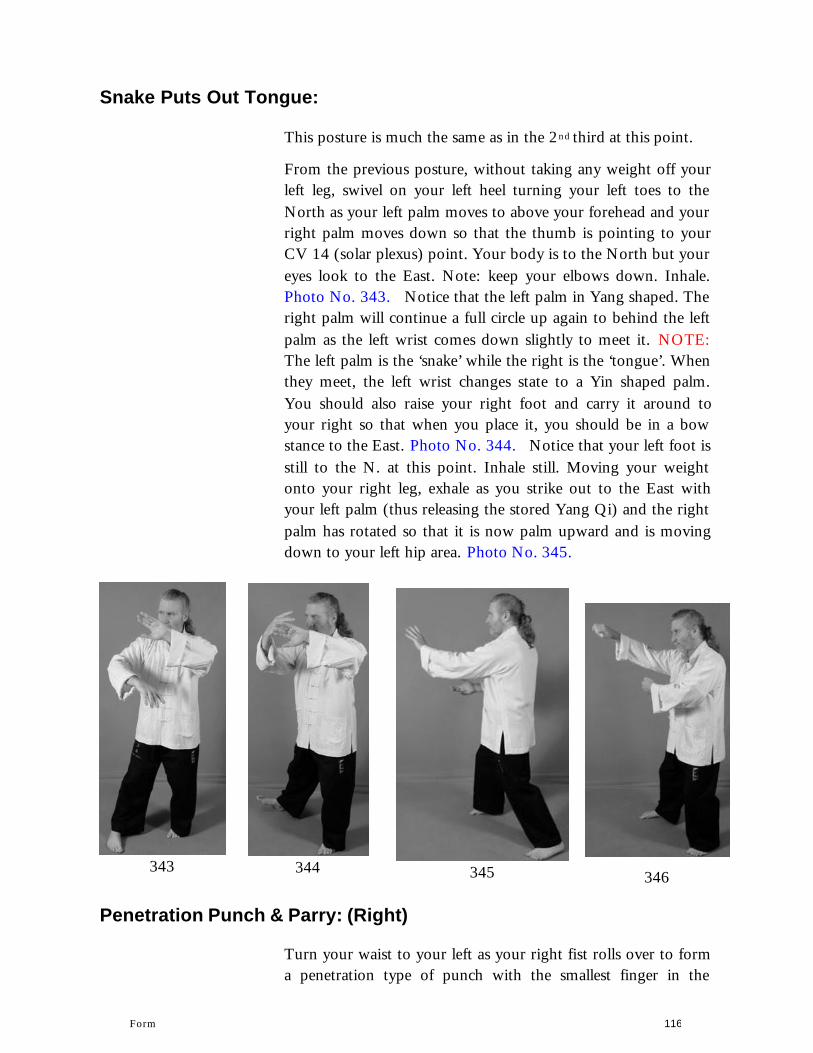
Snake Puts Out Tongue:
This posture is much the same as in the 2nd third at this point.
From the previous posture, without taking any weight off yourleft leg, swivel on your left heel turning your left toes to theNorth as your left palm moves to above your forehead and your right palm moves down so that the thumb is pointing to yourCV 14 (solar plexus) point. Your body is to the North but your eyes look to the East. Note: keep your elbows down. Inhale.Photo No. 343. Notice that the left palm in Yang shaped. Theright palm will continue a full circle up again to behind the leftpalm as the left wrist comes down slightly to meet it. NOTE:The left palm is the ‘snake’ while the right is the ‘tongue’. When they meet, the left wrist changes state to a Yin shaped palm.You should also raise your right foot and carry it around toyour right so that when you place it, you should be in a bowstance to the East. Photo No. 344. Notice that your left foot is still to the N. at this point. Inhale still. Moving your weightonto your right leg, exhale as you strike out to the East withyour left palm (thus releasing the stored Yang Qi) and the rightpalm has rotated so that it is now palm upward and is movingdown to your left hip area. Photo No. 345.
Penetration Punch & Parry: (Right)
Turn your waist to your left as your right fist rolls over to forma penetration type of punch with the smallest finger in the
Form 116
343 344 345 346

upper. Your left palm will be drawn back in a parrying type ofmovement. Your eyes remain on the East. This movement isstill part of the last exhalation. Photo No. 346. Note: A smallamount of weight is moved back onto the rear leg at this time.The weight will move back slowly onto the rear leg over thenext movements.
Rotate your right fist so that it is moving to palm up positionand turn your waist slowly back to the right. Photo No. 151.Inhale. Rotate also your left fist, both fists now being in TigerPaw portions. Turn your waist to your left and begin droppingboth palms, then turn your waist back to the centre positionwhich makes an ‘S’ shape. Your left fist will be pointing to andjust underneath your right elbow. Your right back-fist isslamming down onto a thigh which has just kicked you whileyour left tiger paw is striking to Dim-Mak points on the insideof that thigh. Exhale. Photo No. 347.
Penetration Punch & Parry: (Left)
The exact opposite to the last movement except for a stepforward this time. NOTE: In the 2nd third you steppedbackward! Step forward with your left leg as your left palmdoes the penetration punch and your right palm parries. This isalso part of the last exhalation. Photo No. 348. Rotate your left fist over as before in reverse, then form both Tiger Paw fists and make the ‘S’ shape to end up in the opposite stance as youinhale and exhale upon completion. Photo No. 349. & 350.
117 Chapter Five
347 348 349 350

Gathering to Release:
As you did in the first third just before the first fa-jing punch,you will now do that same gathering group of movements. Yodo as many of these as you like until you just feel that enoughQi (energy) has been stored for the fa-jing release. After somepractice, you will just know when this happens and thefollowing attack will just happen naturally at the correct time.Bring your right palm across as you inhale and turn your waistto your left. Your left palm also is in that same gatheringposition. Photo No. 155. Exhale as you turn your waist to your right and do the reverse. Photo No. 156. Inhale as you againturn your waist to your left and make the gathering type ofmovement with your right palm. Photo No. 157. You can dothis many times, however, on the last time for instance in thelast position, you will hold that inhalation until you release theenergy with the following punch.
Release the Qi:
From the last photo, violently turn your waist to your right and take a step forward with your left foot as you parry with yourleft palm. Your right fist is in position just forward from yourright hip and in a Yin position by bending the wrist downwardready to snap upward upon impact. Photo No. 158. As yourrear foot is dragged up to form a normal bow stance your waistsnaps around to the left thrusting your right fist forward as your left palm is dragged back into the inner forearm. Exhale. PhotoNo. 159.
Calm the Spirit by Pressing the Points.
Here we see some of the amazing areas of this form. Weactually press our own points to cause certain things to happen.In this case we press points to cause the spirit (Shen) to becalm. The last posture’s fa-jing actually carries on into this nextmovement. So do not stop that last fa-jing movement at thepunch, allow it to move into this next movement, then slowdown again.
Form 118

Immediately sit back onto your right leg and rotate your rightfist so that it is now thumb side down and allow your leftfingers to slide gently down half of the outer forearm until yourlongest finger (Pericardium Meridian) presses in on theDim-Mak/Acupuncture Point called “Yangxi” meaning “Valleyof Yang”. (CO 5). It draws energy (Qi) down from the ‘fire’ tomake the ‘Lower Heater’ more active. Which in turn takes thefire from the heart thus its calming effect. Inhale. Photo No.160. Also see Photo No. 161.
Continue inhaling as your waist turns out to your left, turningyour left foot 45 degrees to the left swivelling on your heel. Cut your right wrist down rotating it so that your longest finger isnaturally now pressing in onto the opposite side of your wristarea. Place your weight onto the left leg. Your eyes are still tothe East. You will now draw that finger deeply down from thatwrist position about one inch along the heart meridian. Theinitial point on the inside of the wrist before pulling back alongthe wrist is called ‘Shenmen” or ‘Doorway to the Spirit”. (HT7). This point is clinically used to help with psychologicaldisorders and for insomnia, hence its calming effect. It fixes theYin/Yang balance of the ‘Fire Element’. Photo No. 162. Seealso Photo No. 163.
Chee: (Squeeze).
From Photo No. 162, slide the mounts of your left palm ontothe radius wrist area of your right arm ready for ‘Chee’. PhotoNo. 164. Step forward with your right foot to gain a normalbow stance and as you exhale and bring your weight onto it,perform the posture of ‘Chee’. Photo No. 165.
Chee: (Low)
The Old Yang style’s beauty is that many movements are almost alike whereas in the newer versions, those movements that arealmost the same have been made exactly the same. So now weperform the “Lower Chee” posture, however, we now take astep to get into it.
Again open your left palm to your left ear and rotate your rightpalm to fingers pointing upward. However, you now take a
119 Chapter Five

step with your left foot forward to the East. Photo No. 166.Take a further step with your right foot to the East with yourheel first as your right palm swings around to meet your left atthe radius side of your right wrist again. Note that in both ofthese instances the left palm is Yin to begin while the right isYang, it is only when you execute the ‘Chee’ posture that theyrelease those energies and change state. Photo No. 167. Inhale.You in fact inhale or hold until you perform the next Chee.Photo No. 168.
Sit Back & Double Spear Fingers.
Exactly as in the first third and the many times that you haveperformed ‘grasping Swallows’s Tail’, sit back opening up bothpalms and hook them in thrusting them out as you sit back andexhale. Photo No. 169. Come forward with both elbows exactly the same as before. Photo No. 170. And end up at ‘Arn’ or‘Press’. Photo No. 171.
Now you have to repeat all of the postures that you did in thefirst third to get you up to ‘Single Whip’. ‘Sit Back Ready’,‘Fishes in Eight’, Photos No. 25 up to 32. Single Whip, PhotoNo. 172.
Wave Hands Like Clouds:
As with every time you perform this set of postures to get intoit, turn your left toes weighted on the heel 90 degrees to theNorth as your left hand wards off over-head and your rightpalm strikes downward. Photo No. 351. Again this thirdversion is slightly different to the other two. This time we willbe using the hands from the first version and the feet from the2nd version. So take a right step to behind your left foot as yourright palm’s fingers dig upward and your left palm pushesdownward on the outside. Photo No. 352. Do not exhale.NOTE: Notice that your right heel has not as yet touches theground! The reason is that now, the next move will be a ‘fa-jing’ movement. The left palm is Yin ready to strike downward.Make an explosive movement, exhaling, shaking your waist asyour right heel slams down onto the ground, your left palm
Form 120
351
352
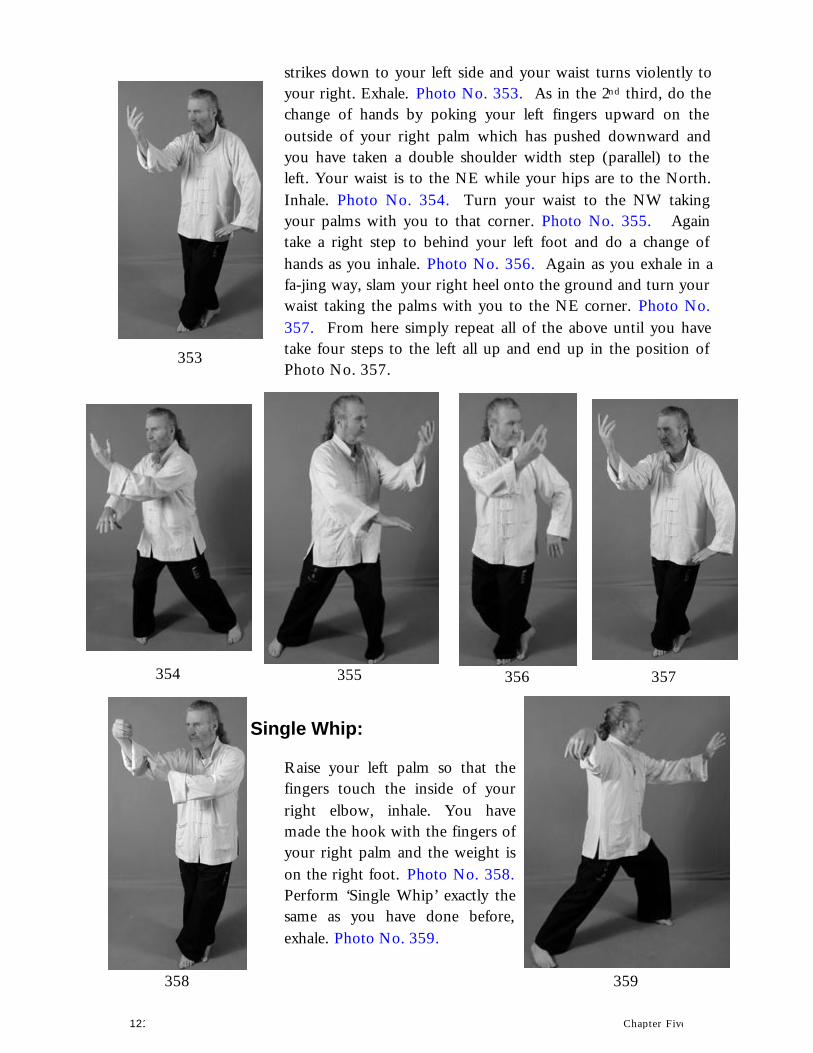
strikes down to your left side and your waist turns violently toyour right. Exhale. Photo No. 353. As in the 2nd third, do thechange of hands by poking your left fingers upward on theoutside of your right palm which has pushed downward andyou have taken a double shoulder width step (parallel) to theleft. Your waist is to the NE while your hips are to the North.Inhale. Photo No. 354. Turn your waist to the NW takingyour palms with you to that corner. Photo No. 355. Againtake a right step to behind your left foot and do a change ofhands as you inhale. Photo No. 356. Again as you exhale in afa-jing way, slam your right heel onto the ground and turn your waist taking the palms with you to the NE corner. Photo No.357. From here simply repeat all of the above until you havetake four steps to the left all up and end up in the position ofPhoto No. 357.
Single Whip:
Raise your left palm so that thefingers touch the inside of yourright elbow, inhale. You havemade the hook with the fingers ofyour right palm and the weight ison the right foot. Photo No. 358. Perform ‘Single Whip’ exactly thesame as you have done before,exhale. Photo No. 359.
121 Chapter Five
353
354 355 356 357
358 359

Lift Heavens:
A little different than in the 2nd third as you now step up withyour right foot inhaling as your both palms rotate upward.Your right foot is pointing to the NW. Photo No. 360.
High Pat on Horse:
Again, a little different than in the 2nd third. This time as yourpalms do their stuff, raise your left knee as if kneeing something and exhale. Your right palm moves past your right ear fingerspointing to the ear as it passes to strike to the West as your leftpalm ‘blocks’ downward and across your body. Photo No. 361.
Inspection of Horse’s Mouth: (West)
Place your left foot down to the West to get a bow stance.Inhale. As you place your weight onto the left leg, exhale andslide your left palm across the back of your right wrist whichends up under your left elbow touching it. You have ‘blocked’his attack down and speared him in the throat at CV 22. PhotoNo. 362.
Form 122
360 361 362 363

Inspection of Horse’s Mouth: (NE)
A weighted turn on your left heel to the N. Inhale as you dothis and draw your left palm back to the wrist of your right.Your eyes are gazing to the NE corner although your body is to the N. Photo No. 363. With your feet pigeon toed andplacing the weight onto your right foot, poke your left fingersout over your right wrist into the NE corner as you exhale.Photo No. 364.
Sweep the Enemy:
Place the weight back onto the left foot as you turn your leftpalm to facing out (thumb down) and turn your waist to theNW corner taking your palms with you in position. Inhale.Photo No. 365. Thrust your right palm out over your leftelbow and turn your waist to the East as you exhale. Photo No.366.
Crescent Kick & Spear Hands:
AS soon as your palms reach the East, and your right leg hasloaded (because of the action of the body) allow your waist tofa-jing your right instep outward and up to perform a right
123 Chapter Five
364 365 366 367
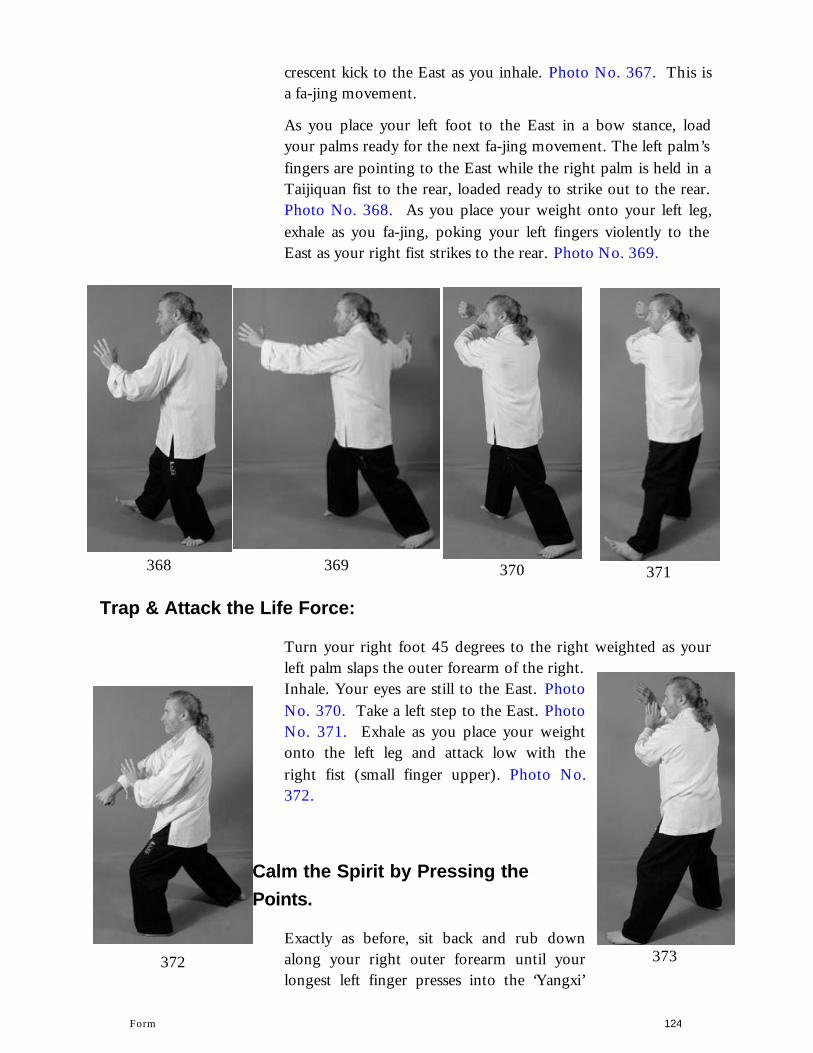
crescent kick to the East as you inhale. Photo No. 367. This isa fa-jing movement.
As you place your left foot to the East in a bow stance, loadyour palms ready for the next fa-jing movement. The left palm’s fingers are pointing to the East while the right palm is held in aTaijiquan fist to the rear, loaded ready to strike out to the rear.Photo No. 368. As you place your weight onto your left leg,exhale as you fa-jing, poking your left fingers violently to theEast as your right fist strikes to the rear. Photo No. 369.
Trap & Attack the Life Force:
Turn your right foot 45 degrees to the right weighted as yourleft palm slaps the outer forearm of the right. Inhale. Your eyes are still to the East. PhotoNo. 370. Take a left step to the East. PhotoNo. 371. Exhale as you place your weightonto the left leg and attack low with theright fist (small finger upper). Photo No.372.
Calm the Spirit by Pressing thePoints.
Exactly as before, sit back and rub downalong your right outer forearm until yourlongest left finger presses into the ‘Yangxi’
Form 124
368 369 370 371
372 373

point in the back of your right wrist. Inhaling. Photo No. 373. Same as before, turn your left toes out by 45 degrees as youplace your weight onto your left leg, rotating your right palmover so that you can now pull the ‘Shen Men’ point on theinside of your right wrist back by one inch (one cun, or Chinese inch pronounced ‘Tsune’), Photo No. 374.
Chee:
This time, Chee is performed slightly differently. Step throughto the East with your right foot taking a slightly larger step than normal and as you move onto that leg, squeeze forward withyour both palms only this time turn your right palm outward.Exhale. Photo No. 375.
Bending Backwards: ( No. 1)
You have taken a larger than normal step in the last ‘Chee’movement. As for the ‘Snake Creeps Down’ posture, you mustnow squat down very low by turning your rear (left) toes outby 90 degrees and then squatting down onto your left leg. Asyou do this, your left palm will make a fist and point upwardnear your face as your right fist will poke into your right waist.You are taking a wrist with your left palm and attacking usingthe left elbow to his neck as you pull him downward. That wasan inhalation and exhalation. Your eyes look to the East. PhotoNo. 376.
125 Chapter Five
374 375 376 377

Bending Backwards: (No. 2)
Turn your right toes slightly to the right as you stand upslightly ready to drop down again onto the right leg. Your right fist will swing out and up to the right as your left fist will swing down the centre of the body. Inhale. Photo No. 377. Continue those circles with each palm until the right is over your headand the left is down near your left knee. Exhale. NOTE: So farduring these movements, they have all been at the slow pace.WARNING: Do not do these movements until you havewarmed up with some light stretching! Once you have beendoing the form for some time, it will not be necessary to warmup first. Photo No. 378. You are now looking to the West.
Bending Backwards: (No. 3)
Again stand up slightly as your left palm moves upand out and your right moves down and inward.Inhale. Photo No. 379. Drop down almost ontoyour left getting into the squatting position as yourright forearm crosses your left forearm. Do notexhale yet as the next move is a fa-jing movementwhen you will exhale violently. Photo No. 380. Drop down to the lowest position quickly as bothpalms explode (fa-jing) outward as you exhale.Photo No. 381.
Form 126
378 379 380
381

Attack the Vital Points:
Your right palm circles back slowly to under your left arm asyour left fingers attack to the East. Inhale and exhale slowlywith the movement. Turn your waist to the right slightly. Photo No. 382. NOTE: You are attacking to the ST 9 points in theneck as well as to CV 22 (thumb) as your right palm hasgrabbed a hand and pulled him forward onto your left fingers.
Stork Spreads Wings: (No. 3 Position)
Turn your waist slightly back to the left as you open both palms like wings spreading. Inhale. Photo No. 383.
P’eng:
Move onto your right heel as the toes point to the right to theSouth (135 degrees): This is not as difficult as it sounds andfeels at first! Drag your left toes around by 90 degrees androtate your right palm so that it is now in the P’eng position,palm toward you. You are holding your breath in at this stage. Photo No. 384.
127 Chapter Five
382 383
384
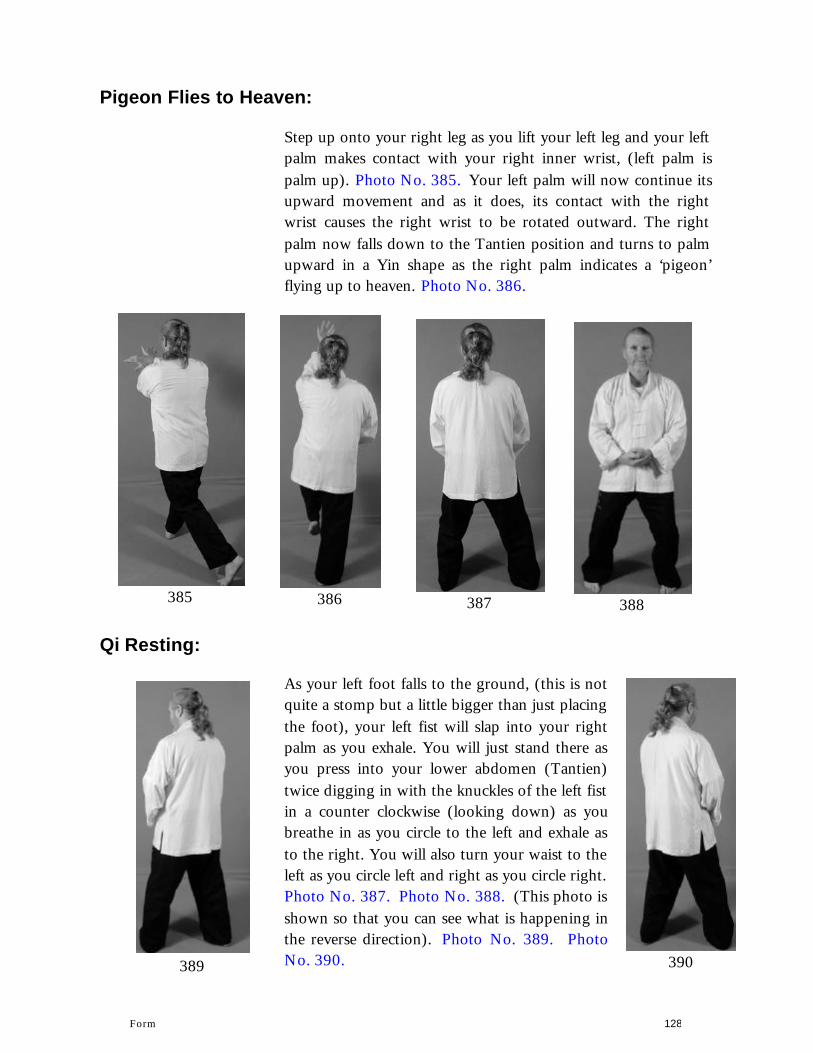
Pigeon Flies to Heaven:
Step up onto your right leg as you lift your left leg and your left palm makes contact with your right inner wrist, (left palm ispalm up). Photo No. 385. Your left palm will now continue itsupward movement and as it does, its contact with the rightwrist causes the right wrist to be rotated outward. The rightpalm now falls down to the Tantien position and turns to palmupward in a Yin shape as the right palm indicates a ‘pigeon’flying up to heaven. Photo No. 386.
Qi Resting:
As your left foot falls to the ground, (this is notquite a stomp but a little bigger than just placing the foot), your left fist will slap into your rightpalm as you exhale. You will just stand there asyou press into your lower abdomen (Tantien)twice digging in with the knuckles of the left fist in a counter clockwise (looking down) as youbreathe in as you circle to the left and exhale asto the right. You will also turn your waist to the left as you circle left and right as you circle right. Photo No. 387. Photo No. 388. (This photo is shown so that you can see what is happening inthe reverse direction). Photo No. 389. PhotoNo. 390.
Form 128
385 386 387 388
389 390
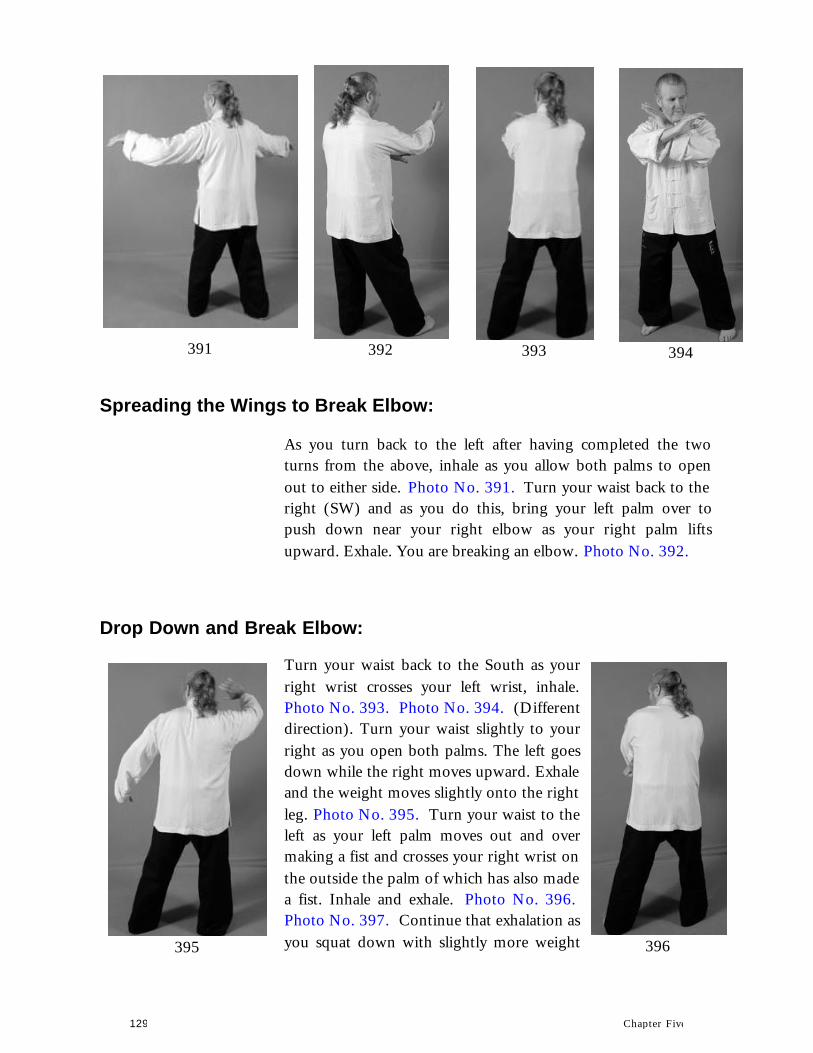
Spreading the Wings to Break Elbow:
As you turn back to the left after having completed the twoturns from the above, inhale as you allow both palms to openout to either side. Photo No. 391. Turn your waist back to theright (SW) and as you do this, bring your left palm over topush down near your right elbow as your right palm liftsupward. Exhale. You are breaking an elbow. Photo No. 392.
Drop Down and Break Elbow:
Turn your waist back to the South as yourright wrist crosses your left wrist, inhale.Photo No. 393. Photo No. 394. (Different direction). Turn your waist slightly to yourright as you open both palms. The left goesdown while the right moves upward. Exhale and the weight moves slightly onto the right leg. Photo No. 395. Turn your waist to the left as your left palm moves out and overmaking a fist and crosses your right wrist on the outside the palm of which has also made a fist. Inhale and exhale. Photo No. 396. Photo No. 397. Continue that exhalation as you squat down with slightly more weight
129 Chapter Five
391 392 393 394
395 396
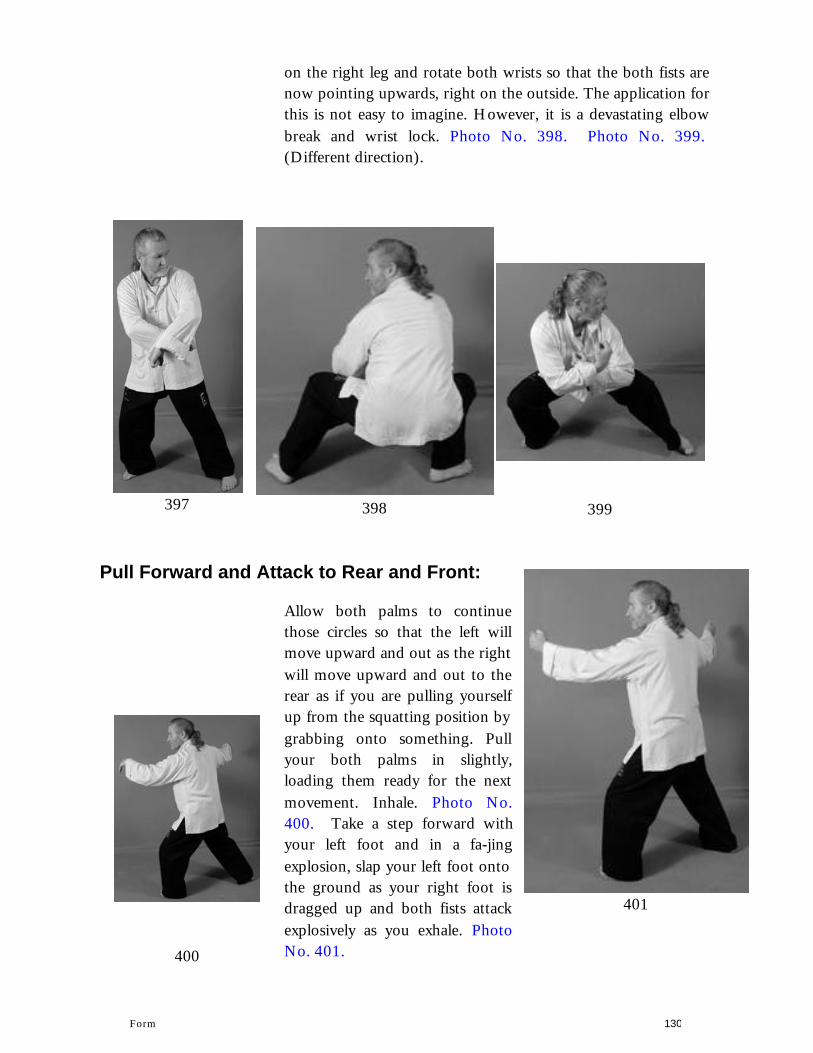
on the right leg and rotate both wrists so that the both fists arenow pointing upwards, right on the outside. The application for this is not easy to imagine. However, it is a devastating elbowbreak and wrist lock. Photo No. 398. Photo No. 399. (Different direction).
Pull Forward and Attack to Rear and Front:
Allow both palms to continuethose circles so that the left willmove upward and out as the right will move upward and out to therear as if you are pulling yourselfup from the squatting position by grabbing onto something. Pullyour both palms in slightly,loading them ready for the nextmovement. Inhale. Photo No.400. Take a step forward withyour left foot and in a fa-jingexplosion, slap your left foot onto the ground as your right foot isdragged up and both fists attackexplosively as you exhale. PhotoNo. 401.
Form 130
397 398 399
400
401
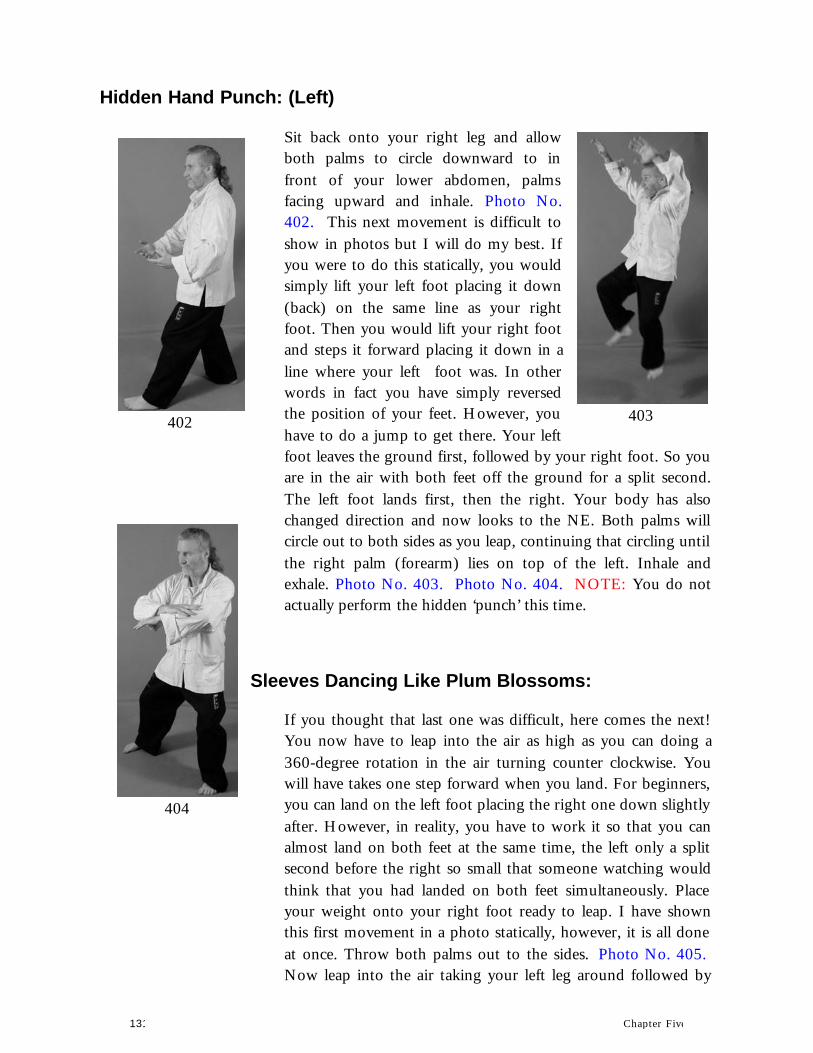
Hidden Hand Punch: (Left)
Sit back onto your right leg and allowboth palms to circle downward to infront of your lower abdomen, palmsfacing upward and inhale. Photo No.402. This next movement is difficult toshow in photos but I will do my best. Ifyou were to do this statically, you wouldsimply lift your left foot placing it down(back) on the same line as your rightfoot. Then you would lift your right footand steps it forward placing it down in aline where your left foot was. In otherwords in fact you have simply reversedthe position of your feet. However, youhave to do a jump to get there. Your leftfoot leaves the ground first, followed by your right foot. So you are in the air with both feet off the ground for a split second.The left foot lands first, then the right. Your body has alsochanged direction and now looks to the NE. Both palms willcircle out to both sides as you leap, continuing that circling until the right palm (forearm) lies on top of the left. Inhale andexhale. Photo No. 403. Photo No. 404. NOTE: You do notactually perform the hidden ‘punch’ this time.
Sleeves Dancing Like Plum Blossoms:
If you thought that last one was difficult, here comes the next!You now have to leap into the air as high as you can doing a360-degree rotation in the air turning counter clockwise. Youwill have takes one step forward when you land. For beginners,you can land on the left foot placing the right one down slightly after. However, in reality, you have to work it so that you canalmost land on both feet at the same time, the left only a splitsecond before the right so small that someone watching wouldthink that you had landed on both feet simultaneously. Placeyour weight onto your right foot ready to leap. I have shownthis first movement in a photo statically, however, it is all doneat once. Throw both palms out to the sides. Photo No. 405. Now leap into the air taking your left leg around followed by
131 Chapter Five
402 403
404

your right so that the right will take over the lead from the leftwhen you land! Photo No. 406. (I think that you will have toget the video in order to learn this one properly). In hale andexhale when you land. Your palms make like they are strikingsomething downward, the right is slightly forward of the left inkeeping with the placement of the feet. Photo No. 407.
Double Punch:
From the previous position, Violently turn your waist to theright as your left fist attacks in a fa-jing strike and your left palm is pulled back to your right side, palm upward. NOTE: both ofthese punches happen in a matter of a split second, they are that violent! So you will be forcing some breathout on each strike. Photo No. 408. Now,do the opposite. Turn your waist violently to the left as you attack with your right fist anddraw your left fist back to your left side.Photo No. 409.
Hidden Hand Punch: (Right)
No you must perform exactly the same waythat you did earlier only in reverse. Dropboth palms down to the lower abdomenupward as you inhale. Photo No. 410.
From 132
405 406 407 408
409
410
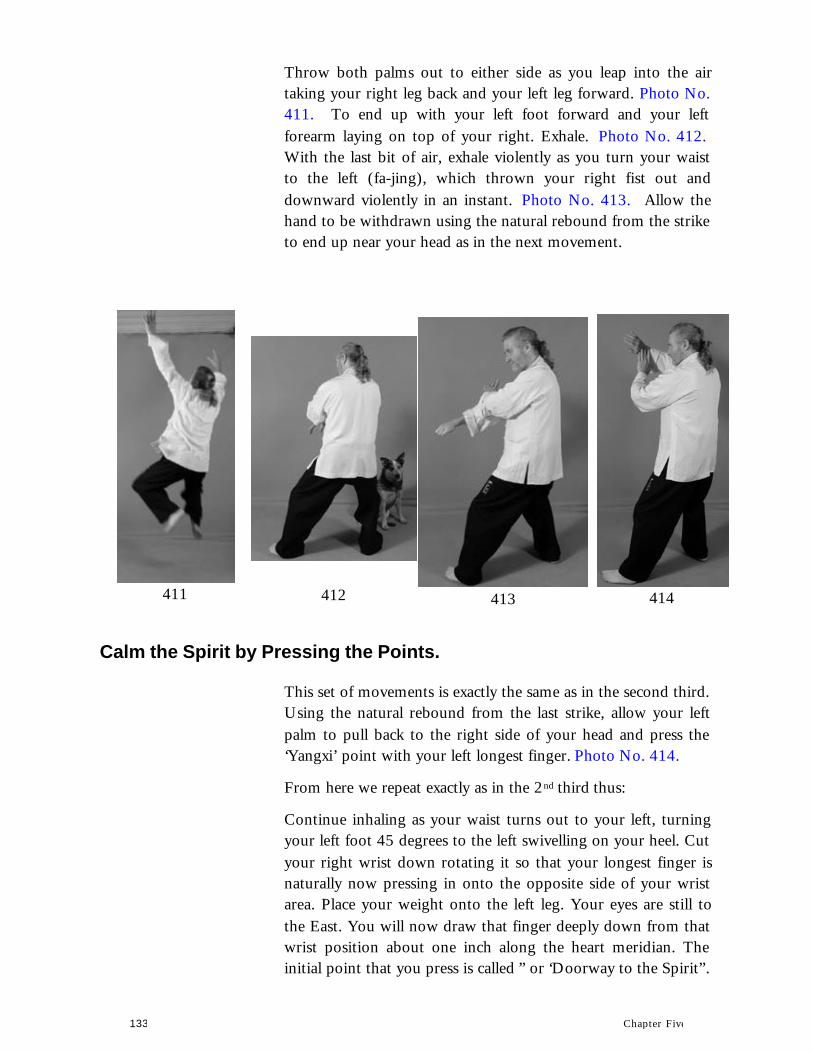
Throw both palms out to either side as you leap into the airtaking your right leg back and your left leg forward. Photo No.411. To end up with your left foot forward and your leftforearm laying on top of your right. Exhale. Photo No. 412. With the last bit of air, exhale violently as you turn your waistto the left (fa-jing), which thrown your right fist out anddownward violently in an instant. Photo No. 413. Allow thehand to be withdrawn using the natural rebound from the strike to end up near your head as in the next movement.
Calm the Spirit by Pressing the Points.
This set of movements is exactly the same as in the second third. Using the natural rebound from the last strike, allow your leftpalm to pull back to the right side of your head and press the‘Yangxi’ point with your left longest finger. Photo No. 414.
From here we repeat exactly as in the 2nd third thus:
Continue inhaling as your waist turns out to your left, turningyour left foot 45 degrees to the left swivelling on your heel. Cut your right wrist down rotating it so that your longest finger isnaturally now pressing in onto the opposite side of your wristarea. Place your weight onto the left leg. Your eyes are still tothe East. You will now draw that finger deeply down from thatwrist position about one inch along the heart meridian. Theinitial point that you press is called ” or ‘Doorway to the Spirit”.
133 Chapter Five
411 412 413 414

(HT 7). This point is clinically used to psychological disordersand for insomnia, hence its calming effect. It fixes the Yin/Yangbalance of the ‘Fire Element’. Photo No. 162. See also PhotoNo. 163.
Chee: (Squeeze).
From Photo No. 162, slide the mounts of your left palm ontothe radius wrist area of your right arm ready for ‘Chee’. PhotoNo. 164. Step forward with your right foot to gain a normalbow stance and as you exhale and bring your weight onto it,perform the posture of ‘Chee’. Photo No. 165.
Chee: (Low)
The Old Yang style’s beauty is that many movements are almost alike whereas in the newer versions, those movements that arealmost the same have been made exactly the same. So now weperform the “Lower Chee” posture, however, we now take astep to get into it.
Again open your left palm to your left ear and rotate your rightpalm to fingers pointing upward. However, you now take astep with your left foot forward to the East. Photo No. 166.Take a further step with your right foot to the East with yourheel first as your right palm swings around to meet your left atthe radius side of your right wrist again. Note that in both ofthese instances the left palm is Yin to begin while the right isYang, it is only when you execute the ‘Chee’ posture that theyrelease those energies and change state. Photo No. 167. Inhale.You in fact inhale or hold until you perform the next Chee.Photo No. 168.
Sit Back & Double Spear Fingers.
Exactly as in the first third and the many times that you haveperformed ‘grasping Swallows’s Tail’, sit back opening up bothpalms and hook them in thrusting them out as you sit back andexhale. Photo No. 169. Come forward with both elbows exactly
Form 134
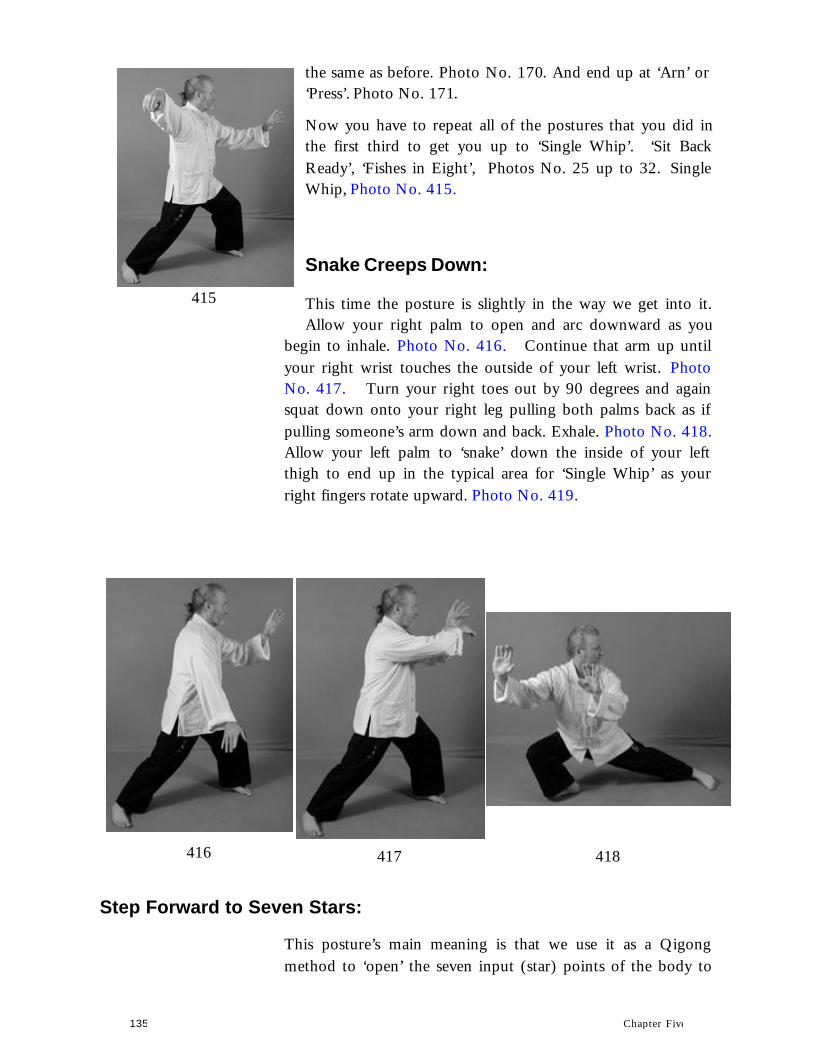
the same as before. Photo No. 170. And end up at ‘Arn’ or‘Press’. Photo No. 171.
Now you have to repeat all of the postures that you did inthe first third to get you up to ‘Single Whip’. ‘Sit BackReady’, ‘Fishes in Eight’, Photos No. 25 up to 32. SingleWhip, Photo No. 415.
Snake Creeps Down:
This time the posture is slightly in the way we get into it.Allow your right palm to open and arc downward as you
begin to inhale. Photo No. 416. Continue that arm up untilyour right wrist touches the outside of your left wrist. PhotoNo. 417. Turn your right toes out by 90 degrees and againsquat down onto your right leg pulling both palms back as ifpulling someone’s arm down and back. Exhale. Photo No. 418.Allow your left palm to ‘snake’ down the inside of your leftthigh to end up in the typical area for ‘Single Whip’ as yourright fingers rotate upward. Photo No. 419.
Step Forward to Seven Stars:
This posture’s main meaning is that we use it as a Qigongmethod to ‘open’ the seven input (star) points of the body to
135 Chapter Five
415
416 417 418
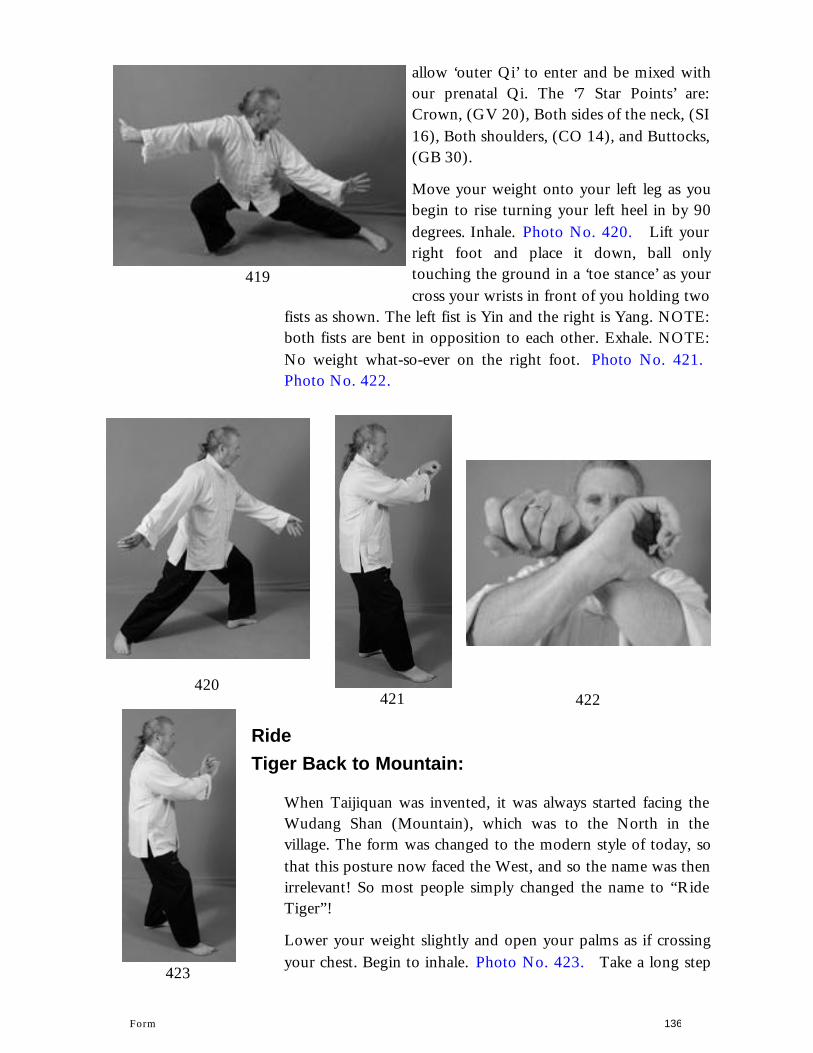
allow ‘outer Qi’ to enter and be mixed withour prenatal Qi. The ‘7 Star Points’ are:Crown, (GV 20), Both sides of the neck, (SI 16), Both shoulders, (CO 14), and Buttocks, (GB 30).
Move your weight onto your left leg as youbegin to rise turning your left heel in by 90degrees. Inhale. Photo No. 420. Lift yourright foot and place it down, ball onlytouching the ground in a ‘toe stance’ as yourcross your wrists in front of you holding two
fists as shown. The left fist is Yin and the right is Yang. NOTE:both fists are bent in opposition to each other. Exhale. NOTE:No weight what-so-ever on the right foot. Photo No. 421. Photo No. 422.
RideTiger Back to Mountain:
When Taijiquan was invented, it was always started facing theWudang Shan (Mountain), which was to the North in thevillage. The form was changed to the modern style of today, sothat this posture now faced the West, and so the name was then irrelevant! So most people simply changed the name to “RideTiger”!
Lower your weight slightly and open your palms as if crossingyour chest. Begin to inhale. Photo No. 423. Take a long step
Form 136
419
420421 422
423

around to the NE corner with your right heel and open bothpalms, eyes still looking to the West. Photo No. 424. Placeyour weight onto your right foot and slide your left toes to theNorth in a ‘Toe Stance’ as your left palm makes as if grabbing aleg from the side and your right palm is warding off over head.(It is actually striking). Exhale. Photo No. 425.
Sweep the Enemy and Lotus Kick:
This is not actually a kick but rather a backbreaker. The Lotus flower is very difficult toget out of the ground as its roots go so fardown to get water. So often they would have to cut it off low into its roots. And this iswhat we now do with this ‘kick’.
From the previous posture, Turn your leftheel out by 45 degrees and place your weight onto it as your hands both swing out inclockwise circles 180 degrees out of phase.Inhale. Photo No. 426. Cut your rightpalm (facing upward) in and across your leftinner forearm as your right heel also turns inby 45 degrees. Continue inhaling. Photo No. 427. The right palm now continues to push outward to strikeas you exhale. Photo No. 428. Again make two circles withboth palms turning the right one palm upward so that both arenow palm up. The right palm has gone slightly lower than the
137 Chapter Five
424 425 426 427
428429

left as it will eventually move under the left wrist. Photo No.429. Inhale.
Lift your left foot and place it down across the top of your right foot like the letter ‘T’. The right foot has not changed itsposition pointing to the East. This is a difficult posture. NOTE:I have taken this photos cheating a bit around to the right sothat you can see what the palms are doing. However, thisposture should be directly to the South. Continue inhaling.Photo No. 430. Allow your right toes to turn out by 90degrees to the right as your both palms continue over to yourright to the North loaded ready for the next ‘kick’. Photo No.431. This is the only kick where we use an exhalation as it isreally not a kick. Lift your right foot and using the power ofyour waist, allow it to arc over to your right as your palms areforced back to the left slapping the instep of the right foot asthey pass. This can be done slowly if you are able or a littlequicker. Photo No. 432.
Vital Low Punch:
Your right foot continues its trajectory over to the right andinto the NW corner as both palms have also continued theirway across to your left. Photo No. 433. Using the last bit of air, exhale in a fa-jing manner as you place your weight onto theright foot and punch straight downward in your centerlinewhile your right fist is drawn back to your right hip. You utilize the power of your waist here in a violent fa-jing shake. This is a violent grab with the right palm and a strike to the groin with
Form 138
430 431 432 433

the left. Notice the position of the left fist with smallest fingerouterly. Photo No. 434. This is a fa-jing attack doneexplosively.
Bending to Avoid Attack, Re-attack:
Begin bending backwards as your right arm is raised up in anarc across your face. Inhale. NOTE: This is the only time in theform when you are able to have a backbone that is not vertical.Photo No. 435. Your left palm which hold a fist has movedunder your right axilla. Continue the right fist circling aroundyour head as you bend backwards further. Photo No. 436. Continue the right fist circling over to your right as you beginto straighten up again and strike using the ‘hammer’ side of theright fist across from right to left. You are striking to histemple. Exhale. Photo No. 437. The fist ends up to the Westalong with your waist.
Shooting Tiger:
With the weight still on your right foot, turn your waist to theNW corner and raise both fists so that you could punch to both sides of his temples using the first two knuckles of each fist.Keep your elbows lower than your wrists! Inhale. Photo No.438. Turning your waist slightly to the right, hammer yourleft palm downwards as if striking to a chest area as your right
139 Chapter Five
434 435 436 437
438
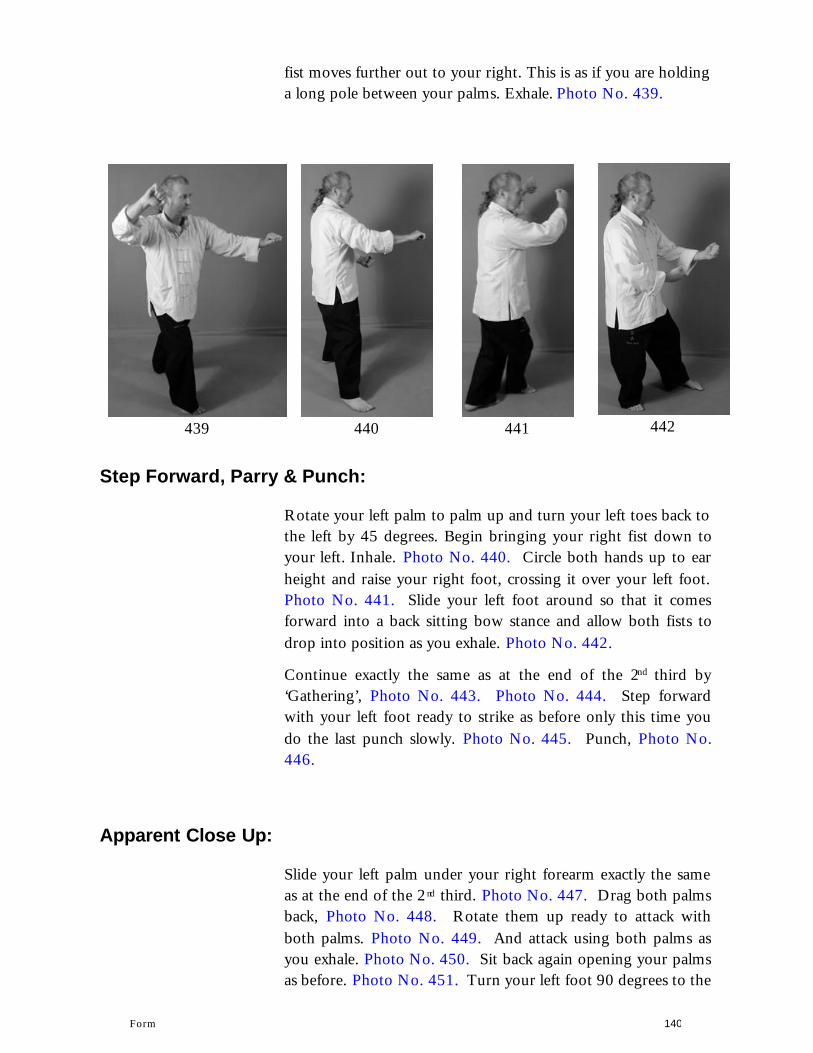
fist moves further out to your right. This is as if you are holding a long pole between your palms. Exhale. Photo No. 439.
Step Forward, Parry & Punch:
Rotate your left palm to palm up and turn your left toes back to the left by 45 degrees. Begin bringing your right fist down toyour left. Inhale. Photo No. 440. Circle both hands up to earheight and raise your right foot, crossing it over your left foot.Photo No. 441. Slide your left foot around so that it comesforward into a back sitting bow stance and allow both fists todrop into position as you exhale. Photo No. 442.
Continue exactly the same as at the end of the 2nd third by‘Gathering’, Photo No. 443. Photo No. 444. Step forwardwith your left foot ready to strike as before only this time youdo the last punch slowly. Photo No. 445. Punch, Photo No.446.
Apparent Close Up:
Slide your left palm under your right forearm exactly the sameas at the end of the 2nd third. Photo No. 447. Drag both palmsback, Photo No. 448. Rotate them up ready to attack withboth palms. Photo No. 449. And attack using both palms asyou exhale. Photo No. 450. Sit back again opening your palmsas before. Photo No. 451. Turn your left foot 90 degrees to the
Form 140
439 440 441 442
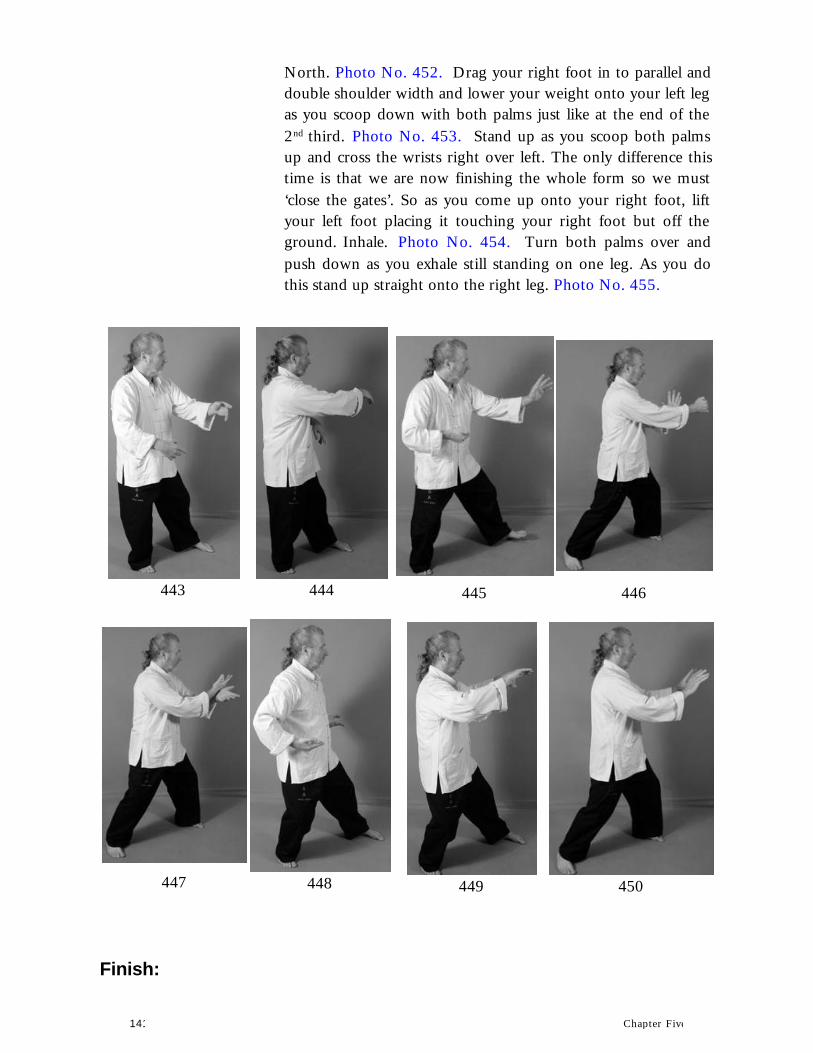
North. Photo No. 452. Drag your right foot in to parallel anddouble shoulder width and lower your weight onto your left leg as you scoop down with both palms just like at the end of the2nd third. Photo No. 453. Stand up as you scoop both palmsup and cross the wrists right over left. The only difference thistime is that we are now finishing the whole form so we must‘close the gates’. So as you come up onto your right foot, liftyour left foot placing it touching your right foot but off theground. Inhale. Photo No. 454. Turn both palms over andpush down as you exhale still standing on one leg. As you dothis stand up straight onto the right leg. Photo No. 455.
Finish:
141 Chapter Five
444443 445 446
447 448 449 450
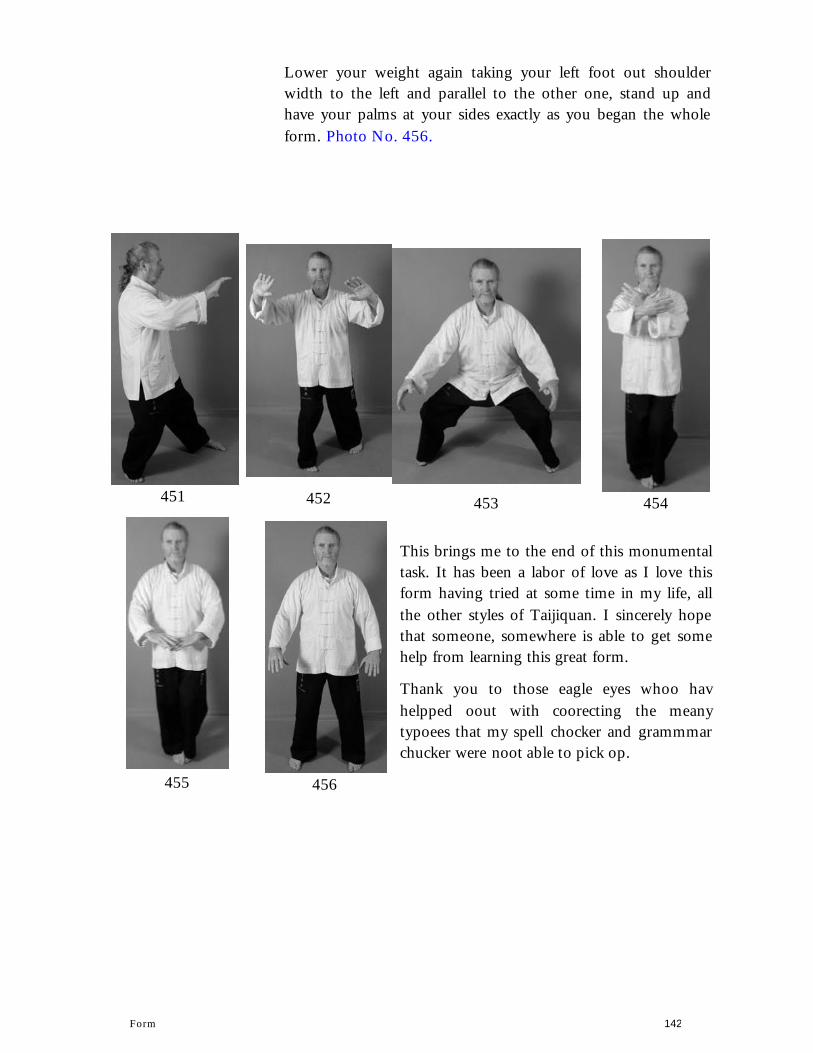
Lower your weight again taking your left foot out shoulderwidth to the left and parallel to the other one, stand up andhave your palms at your sides exactly as you began the wholeform. Photo No. 456.
This brings me to the end of this monumentaltask. It has been a labor of love as I love thisform having tried at some time in my life, allthe other styles of Taijiquan. I sincerely hopethat someone, somewhere is able to get somehelp from learning this great form.
Thank you to those eagle eyes whoo havhelpped oout with coorecting the meanytypoees that my spell chocker and grammmarchucker were noot able to pick op.
Form 142
451 452 453 454
455 456


![!Chen Taijiquan 2]. chen 38](https://img.pdfslide.net/doc/110x75/5535fa5b550346640d8b4777/chen-taijiquan-2-chen-38.jpg)