Embed Size (px)
DESCRIPTION
A type of photography method and editing it in photoshop
Citation preview
(http://feeds.feedburner.com/fstoppersfeed)(http://www.flickr.com/groups/fstoppers)(http://www.twitter.com/fstoppers)(http://vimeo.com/user3003221)(http://www.facebook.com/pages/Fstoppers/344509578243)(http://www.youtube.com/user/FStoppers)
Better Than a WhiteCard
expoimaging.com
ExpoDisc: the fast and accurate
original white balance filter.
Connect with Fstoppers
Follow @fstoppers 83.1K follow ers
Suhas Bhat, Shyam Kumar and
224,240 others like this.Like
Fstoppers Originals
(http://fstoppers.com/category/originals)
Popular Articles
A Look IntoCanon's RecentFailures
(http://fstoppers.com/a-look-into-canons-recent-failures)
The Haute GirlExplains FourReasons How toNot LookOverweight inPhotographs
(http://fstoppers.com/the-haute-girl-explains-four-reasons-how-to-not-look-overweight-in-photographs)
PhotographerCaptures theInvisible Pain ofVerbal Abuse(NSFW)
(http://fstoppers.com/photographer-captures-the-invisible-pain-of-verbal-abuse-nsfw)
Photos Re-Envisioning Historyin Color
(http://fstoppers.com/photos-re-envisioning-history-in-color)
Pricing of the Sony a7S Revealed(http://fstoppers.com/pricing-of-the-
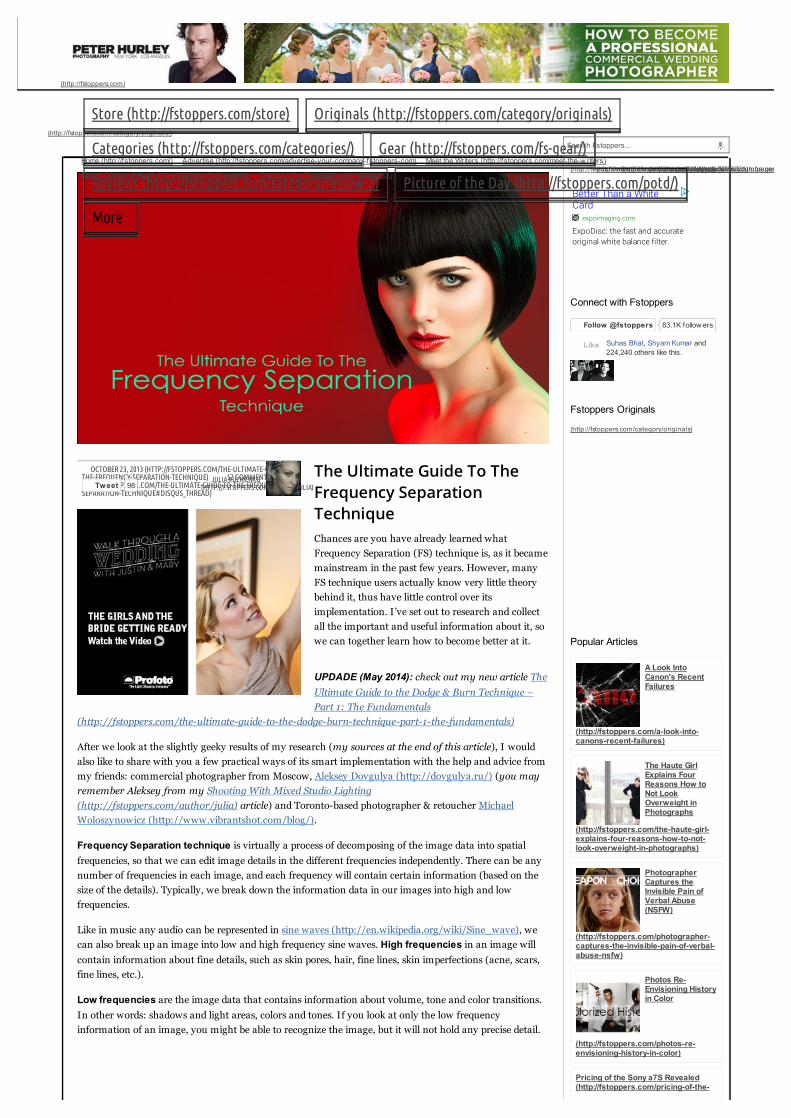
The Ultimate Guide To The
Frequency Separation
Technique
Chances are you have already learned what
Frequency Separation (FS) technique is, as it became
mainstream in the past few years. However, many
FS technique users actually know very little theory
behind it, thus have little control over its
implementation. I’ve set out to research and collect
all the important and useful information about it, so
we can together learn how to become better at it.
UPDADE (May 2014): check out my new article The
Ultimate Guide to the Dodge & Burn Technique –
Part 1: The Fundamentals
(http://fstoppers.com/the-ultimate-guide-to-the-dodge-burn-technique-part-1-the-fundamentals)
After we look at the slightly geeky results of my research (my sources at the end of this article), I would
also like to share with you a few practical ways of its smart implementation with the help and advice from
my friends: commercial photographer from Moscow, Aleksey Dovgulya (http://dovgulya.ru/) (you may
remember Aleksey from my Shooting With Mixed Studio Lighting
(http://fstoppers.com/author/julia) article) and Toronto-based photographer & retoucher Michael
Woloszynowicz (http://www.vibrantshot.com/blog/).
Frequency Separation technique is virtually a process of decomposing of the image data into spatial
frequencies, so that we can edit image details in the different frequencies independently. There can be any
number of frequencies in each image, and each frequency will contain certain information (based on the
size of the details). Typically, we break down the information data in our images into high and low
frequencies.
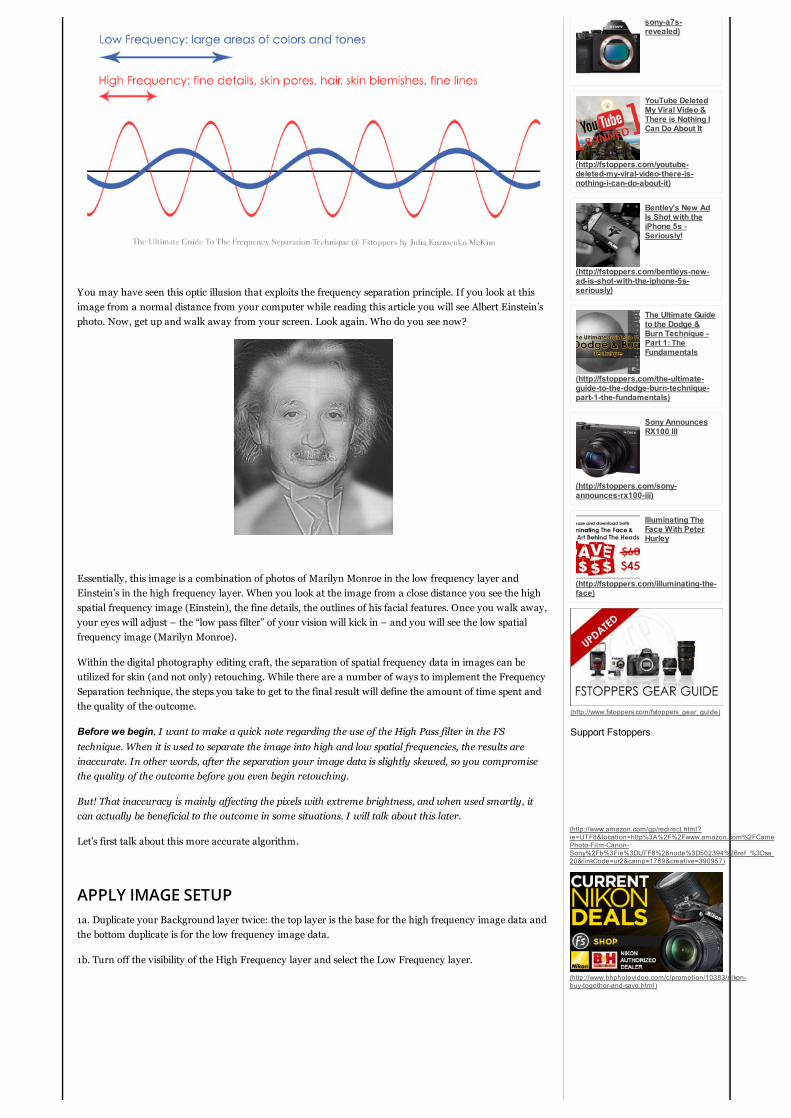
Like in music any audio can be represented in sine waves (http://en.wikipedia.org/wiki/Sine_wave), we
can also break up an image into low and high frequency sine waves. High frequencies in an image will
contain information about fine details, such as skin pores, hair, fine lines, skin imperfections (acne, scars,
fine lines, etc.).
Low frequencies are the image data that contains information about volume, tone and color transitions.
In other words: shadows and light areas, colors and tones. If you look at only the low frequency
information of an image, you might be able to recognize the image, but it will not hold any precise detail.
OCTOBER 23, 2013 (HTTP://FSTOPPERS.COM/THE-ULTIMATE-GUIDE-TO-THE-FREQUENCY-SEPARATION-TECHNIQUE) 52 COMMENTS(HTTP://FSTOPPERS.COM/THE-ULTIMATE-GUIDE-TO-THE-FREQUENCY-SEPARATION-TECHNIQUE#DISQUS_THREAD)
Tweet 98JULIA KUZMENKO
(HTTP://FSTOPPERS.COM/AUTHOR/JULIA)
(http://fstoppers.com)
(http://fstoppers.com/category/originals/)
Store (http://fstoppers.com/store) Originals (http://fstoppers.com/category/originals)
Categories (http://fstoppers.com/categories/) Gear (http://fstoppers.com/fs-gear/)
Reviews (http://fstoppers.com/category/review-2) Picture of the Day (http://fstoppers.com/potd/)
More
Search Fstoppers...
Home (http://fstoppers.com/) Advertise (http://fstoppers.com/advertise-your-company-fstoppers-com) Meet the Writers (http://fstoppers.com/meet-the-w riters)
Submit Content (http://fstoppers.com/submit-content) Contact (http://fstoppers.com/contact-us)
sony-a7s-revealed)
YouTube DeletedMy Viral Video &There is Nothing ICan Do About It
(http://fstoppers.com/youtube-deleted-my-viral-video-there-is-nothing-i-can-do-about-it)
Bentley's New AdIs Shot with theiPhone 5s -Seriously!
(http://fstoppers.com/bentleys-new-ad-is-shot-with-the-iphone-5s-seriously)
The Ultimate Guideto the Dodge &Burn Technique -Part 1: TheFundamentals
(http://fstoppers.com/the-ultimate-guide-to-the-dodge-burn-technique-part-1-the-fundamentals)
Sony AnnouncesRX100 III
(http://fstoppers.com/sony-announces-rx100-iii)
Illuminating TheFace With PeterHurley
(http://fstoppers.com/illuminating-the-face)
(http://www.fstoppers.com/fstoppers_gear_guide)
Support Fstoppers
You may have seen this optic illusion that exploits the frequency separation principle. If you look at this
image from a normal distance from your computer while reading this article you will see Albert Einstein’s
photo. Now, get up and walk away from your screen. Look again. Who do you see now?
Essentially, this image is a combination of photos of Marilyn Monroe in the low frequency layer and
Einstein’s in the high frequency layer. When you look at the image from a close distance you see the high
spatial frequency image (Einstein), the fine details, the outlines of his facial features. Once you walk away,
your eyes will adjust – the “low pass filter” of your vision will kick in – and you will see the low spatial
frequency image (Marilyn Monroe).
Within the digital photography editing craft, the separation of spatial frequency data in images can be
utilized for skin (and not only) retouching. While there are a number of ways to implement the Frequency
Separation technique, the steps you take to get to the final result will define the amount of time spent and
the quality of the outcome.
Before we begin, I want to make a quick note regarding the use of the High Pass filter in the FS
technique. When it is used to separate the image into high and low spatial frequencies, the results are
inaccurate. In other words, after the separation your image data is slightly skewed, so you compromise
the quality of the outcome before you even begin retouching.
But! That inaccuracy is mainly affecting the pixels with extreme brightness, and when used smartly, it
can actually be beneficial to the outcome in some situations. I will talk about this later.
Let’s first talk about this more accurate algorithm.
APPLY IMAGE SETUP
1a. Duplicate your Background layer twice: the top layer is the base for the high frequency image data and
the bottom duplicate is for the low frequency image data.
1b. Turn off the visibility of the High Frequency layer and select the Low Frequency layer.
(http://www.amazon.com/gp/redirect.html?ie=UTF8&location=http%3A%2F%2Fwww.amazon.com%2FCamera-Photo-Film-Canon-Sony%2Fb%3Fie%3DUTF8%26node%3D502394%26ref_%3Dsa_menu_p10&tag=fstoppers-20&linkCode=ur2&camp=1789&creative=390957)
(http://www.bhphotovideo.com/c/promotion/10383/nikon-buy-together-and-save.html)
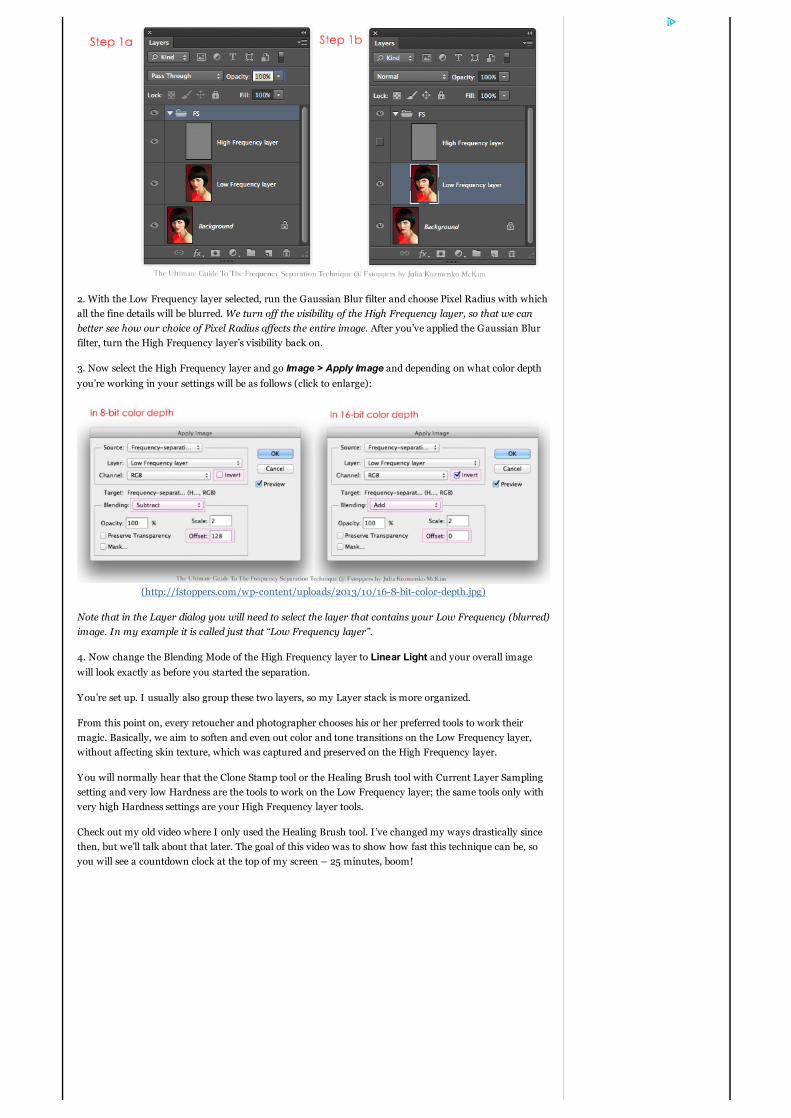
2. With the Low Frequency layer selected, run the Gaussian Blur filter and choose Pixel Radius with which
all the fine details will be blurred. We turn off the visibility of the High Frequency layer, so that we can
better see how our choice of Pixel Radius affects the entire image. After you’ve applied the Gaussian Blur
filter, turn the High Frequency layer’s visibility back on.
3. Now select the High Frequency layer and go Image > Apply Image and depending on what color depth
you’re working in your settings will be as follows (click to enlarge):
(http://fstoppers.com/wp-content/uploads/2013/10/16-8-bit-color-depth.jpg)
Note that in the Layer dialog you will need to select the layer that contains your Low Frequency (blurred)
image. In my example it is called just that “Low Frequency layer”.
4. Now change the Blending Mode of the High Frequency layer to Linear Light and your overall image
will look exactly as before you started the separation.
You’re set up. I usually also group these two layers, so my Layer stack is more organized.
From this point on, every retoucher and photographer chooses his or her preferred tools to work their
magic. Basically, we aim to soften and even out color and tone transitions on the Low Frequency layer,
without affecting skin texture, which was captured and preserved on the High Frequency layer.
You will normally hear that the Clone Stamp tool or the Healing Brush tool with Current Layer Sampling
setting and very low Hardness are the tools to work on the Low Frequency layer; the same tools only with
very high Hardness settings are your High Frequency layer tools.
Check out my old video where I only used the Healing Brush tool. I’ve changed my ways drastically since
then, but we’ll talk about that later. The goal of this video was to show how fast this technique can be, so
you will see a countdown clock at the top of my screen – 25 minutes, boom!
Note: I named the High Frequency layer “High Pass – texture” in the video, which is incorrect, because I
was actually using the Apply Image setup. Well, live and learn!
If that’s all you’ve been doing so far, let me share a few more strategies that I’ve learned from my own
experience and from my talented friends. We all love experimenting and coming up with new ways to use
ordinary tools and techniques, so here’s what we’ve come up with so far.
HIGH PASS FILTER SETUP
High Pass filter setup for the Frequency Separation technique isn’t all that bad, and shouldn’t be
completely written off as an inaccurate way to separate spatial frequencies.
As I mentioned before, when High Pass filter is applied to the High Frequency layer in place of the Apply
Image function, it gives you an imprecise final image where the brightest pixels are usually grayed out.
According to my friend Aleksey, it actually plays out well when you are retouching skin with a bit of
overexposed highlights on it. They get toned down and the skin looks more matte as a result. Other parts of
the photo where you wouldn’t want the highlights to be muted down (such as specular highlights on the
lips, catchlights in the eyes, etc.) can be easily covered up with a Layer Mask.
Aleksey also insists that it’s a very quick method, and should be used along with the Apply Image FS
algorithm when appropriate. He explains that using the High Pass filter gives you more control in deciding
what information belongs on the High Frequency layer and what should be blurred out on the Low
Frequency layer. This way, after you’ve performed the separation, your further retouching should be much
faster and precise.
Here’s how Aleksey explains how he selects the correct High Pass radius.
For example, we’ve got this photo to retouch. There are some problems that should be taken care of on the
Low Frequency layer such as shadows, larger areas of colors and tones that we need to soften or remove.
On the other hand, there are also little blemishes on the skin texture, which should be handled on the High
Frequency layer.
0:00 / 4:04
Skin Retouching | Frequency Separation Techniqu...
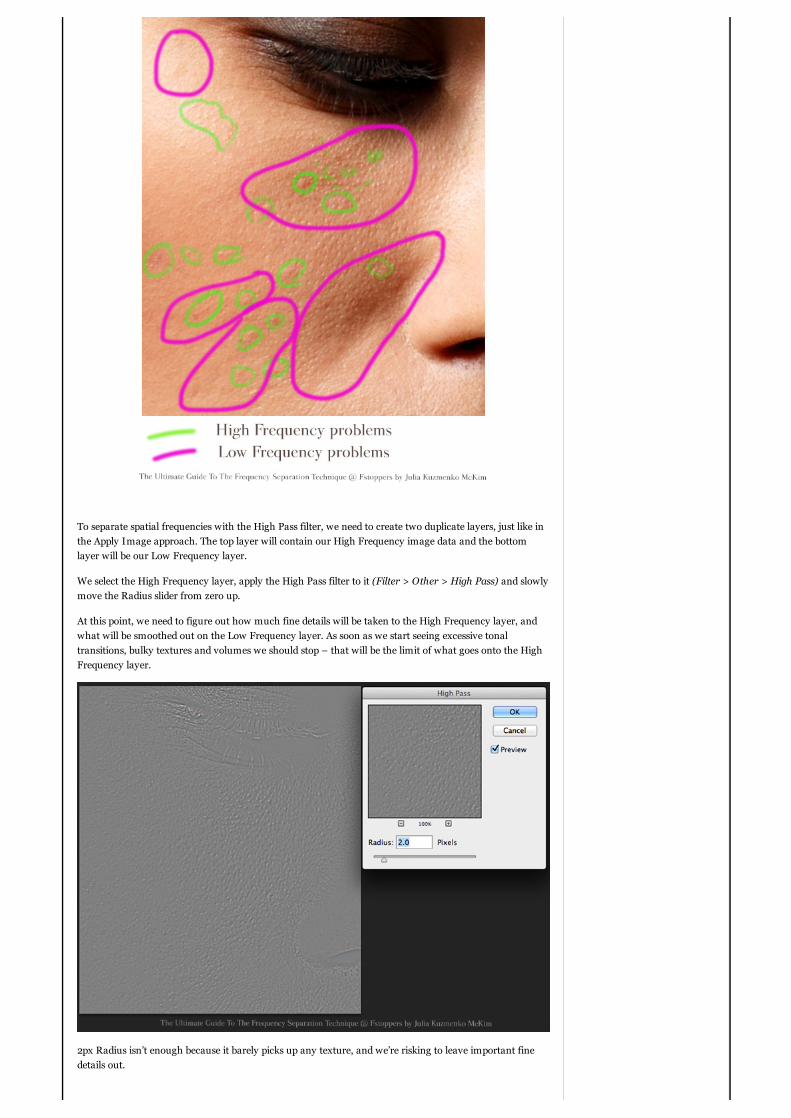
To separate spatial frequencies with the High Pass filter, we need to create two duplicate layers, just like in
the Apply Image approach. The top layer will contain our High Frequency image data and the bottom
layer will be our Low Frequency layer.
We select the High Frequency layer, apply the High Pass filter to it (Filter > Other > High Pass) and slowly
move the Radius slider from zero up.
At this point, we need to figure out how much fine details will be taken to the High Frequency layer, and
what will be smoothed out on the Low Frequency layer. As soon as we start seeing excessive tonal
transitions, bulky textures and volumes we should stop – that will be the limit of what goes onto the High
Frequency layer.
2px Radius isn’t enough because it barely picks up any texture, and we’re risking to leave important fine
details out.
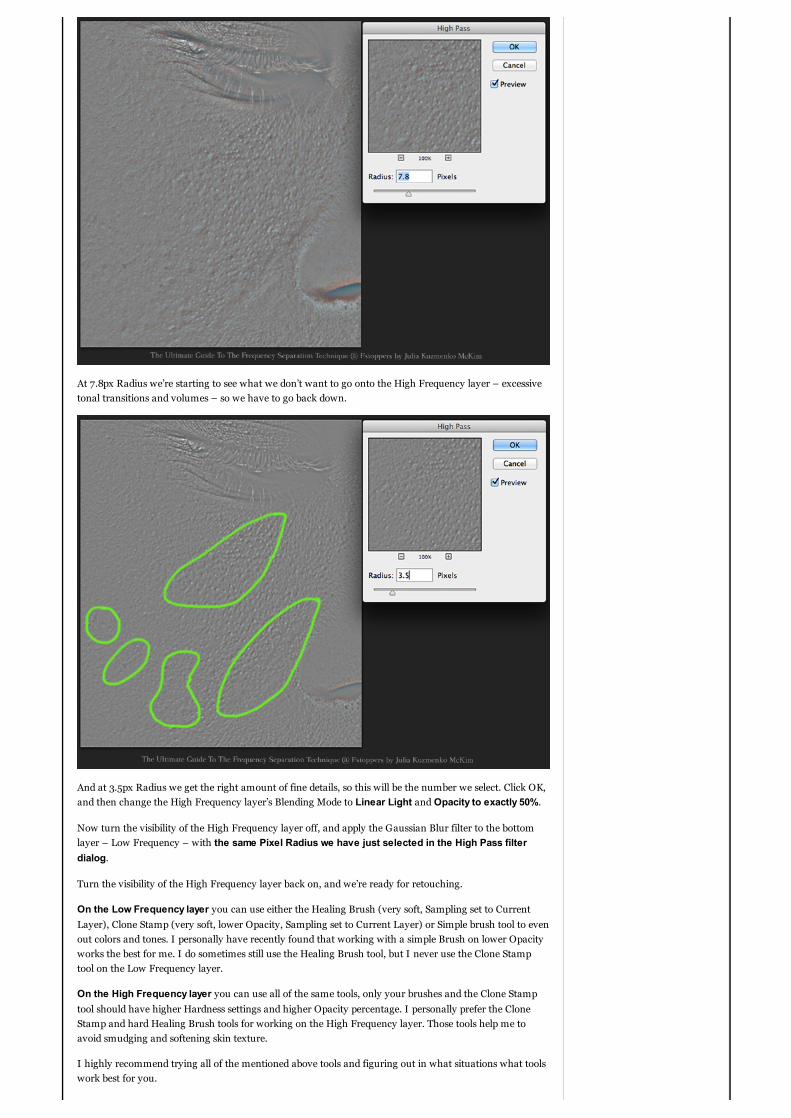
At 7.8px Radius we’re starting to see what we don’t want to go onto the High Frequency layer – excessive
tonal transitions and volumes – so we have to go back down.
And at 3.5px Radius we get the right amount of fine details, so this will be the number we select. Click OK,
and then change the High Frequency layer’s Blending Mode to Linear Light and Opacity to exactly 50%.
Now turn the visibility of the High Frequency layer off, and apply the Gaussian Blur filter to the bottom
layer – Low Frequency – with the same Pixel Radius we have just selected in the High Pass filter
dialog.
Turn the visibility of the High Frequency layer back on, and we’re ready for retouching.
On the Low Frequency layer you can use either the Healing Brush (very soft, Sampling set to Current
Layer), Clone Stamp (very soft, lower Opacity, Sampling set to Current Layer) or Simple brush tool to even
out colors and tones. I personally have recently found that working with a simple Brush on lower Opacity
works the best for me. I do sometimes still use the Healing Brush tool, but I never use the Clone Stamp
tool on the Low Frequency layer.
On the High Frequency layer you can use all of the same tools, only your brushes and the Clone Stamp
tool should have higher Hardness settings and higher Opacity percentage. I personally prefer the Clone
Stamp and hard Healing Brush tools for working on the High Frequency layer. Those tools help me to
avoid smudging and softening skin texture.
I highly recommend trying all of the mentioned above tools and figuring out in what situations what tools
work best for you.
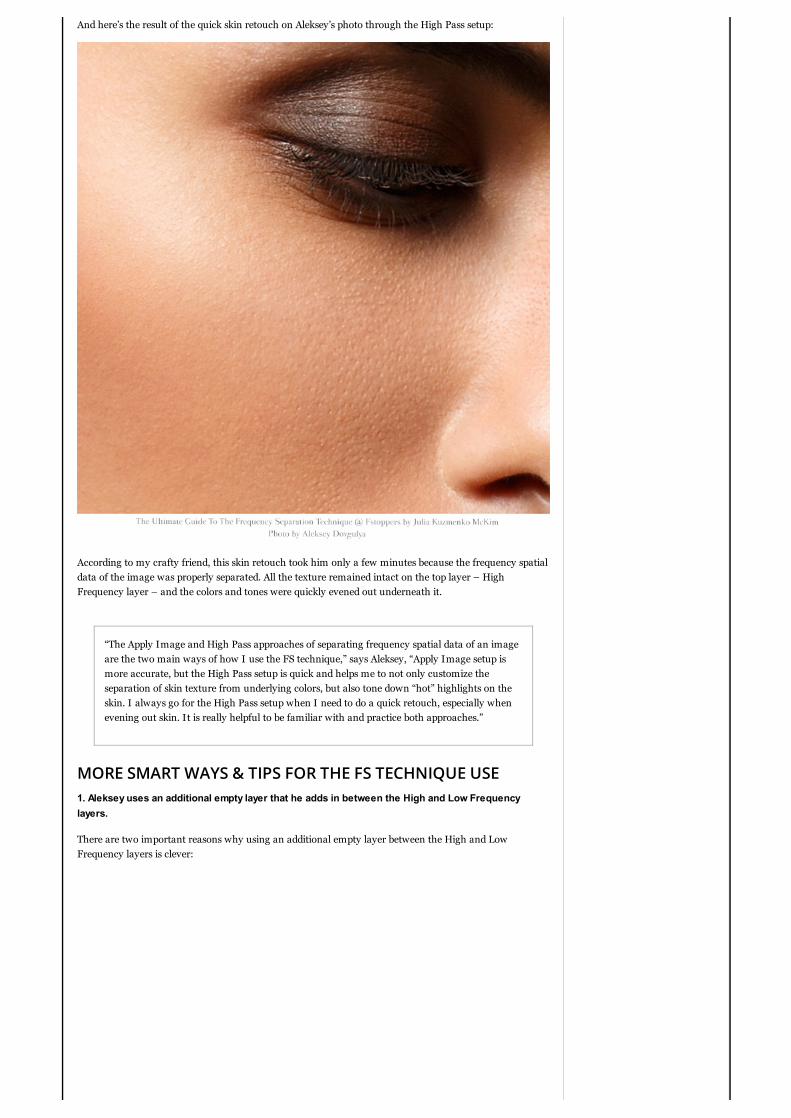
And here’s the result of the quick skin retouch on Aleksey’s photo through the High Pass setup:
According to my crafty friend, this skin retouch took him only a few minutes because the frequency spatial
data of the image was properly separated. All the texture remained intact on the top layer – High
Frequency layer – and the colors and tones were quickly evened out underneath it.
“The Apply Image and High Pass approaches of separating frequency spatial data of an image
are the two main ways of how I use the FS technique,” says Aleksey, “Apply Image setup is
more accurate, but the High Pass setup is quick and helps me to not only customize the
separation of skin texture from underlying colors, but also tone down “hot” highlights on the
skin. I always go for the High Pass setup when I need to do a quick retouch, especially when
evening out skin. It is really helpful to be familiar with and practice both approaches.”
MORE SMART WAYS & TIPS FOR THE FS TECHNIQUE USE
1. Aleksey uses an additional empty layer that he adds in between the High and Low Frequency
layers.
There are two important reasons why using an additional empty layer between the High and Low
Frequency layers is clever:
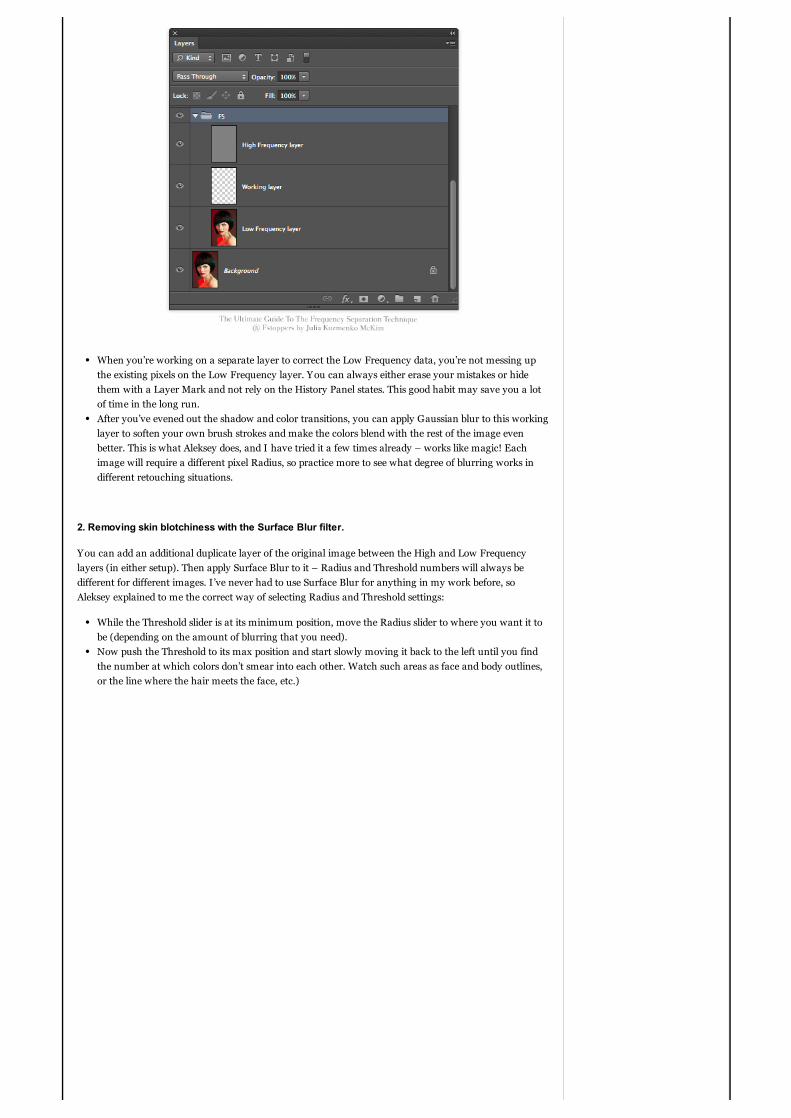
When you’re working on a separate layer to correct the Low Frequency data, you’re not messing up
the existing pixels on the Low Frequency layer. You can always either erase your mistakes or hide
them with a Layer Mark and not rely on the History Panel states. This good habit may save you a lot
of time in the long run.
After you’ve evened out the shadow and color transitions, you can apply Gaussian blur to this working
layer to soften your own brush strokes and make the colors blend with the rest of the image even
better. This is what Aleksey does, and I have tried it a few times already – works like magic! Each
image will require a different pixel Radius, so practice more to see what degree of blurring works in
different retouching situations.
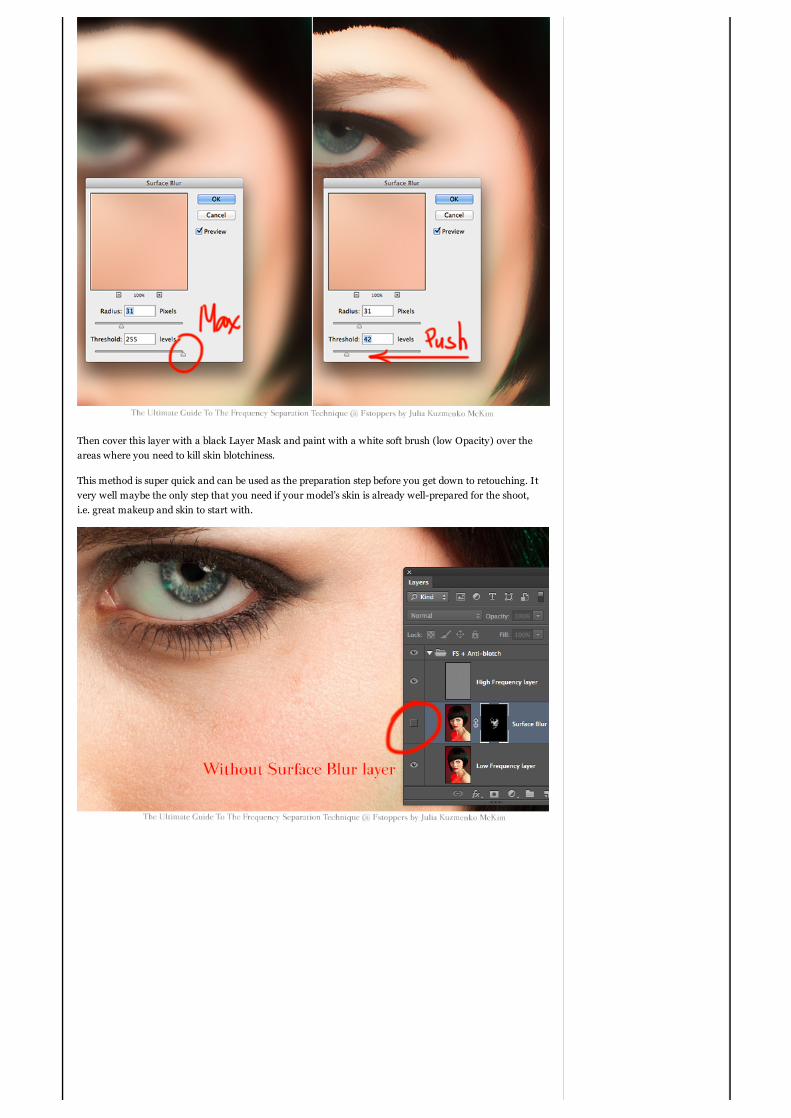
2. Removing skin blotchiness with the Surface Blur filter.
You can add an additional duplicate layer of the original image between the High and Low Frequency
layers (in either setup). Then apply Surface Blur to it – Radius and Threshold numbers will always be
different for different images. I’ve never had to use Surface Blur for anything in my work before, so
Aleksey explained to me the correct way of selecting Radius and Threshold settings:
While the Threshold slider is at its minimum position, move the Radius slider to where you want it to
be (depending on the amount of blurring that you need).
Now push the Threshold to its max position and start slowly moving it back to the left until you find
the number at which colors don’t smear into each other. Watch such areas as face and body outlines,
or the line where the hair meets the face, etc.)
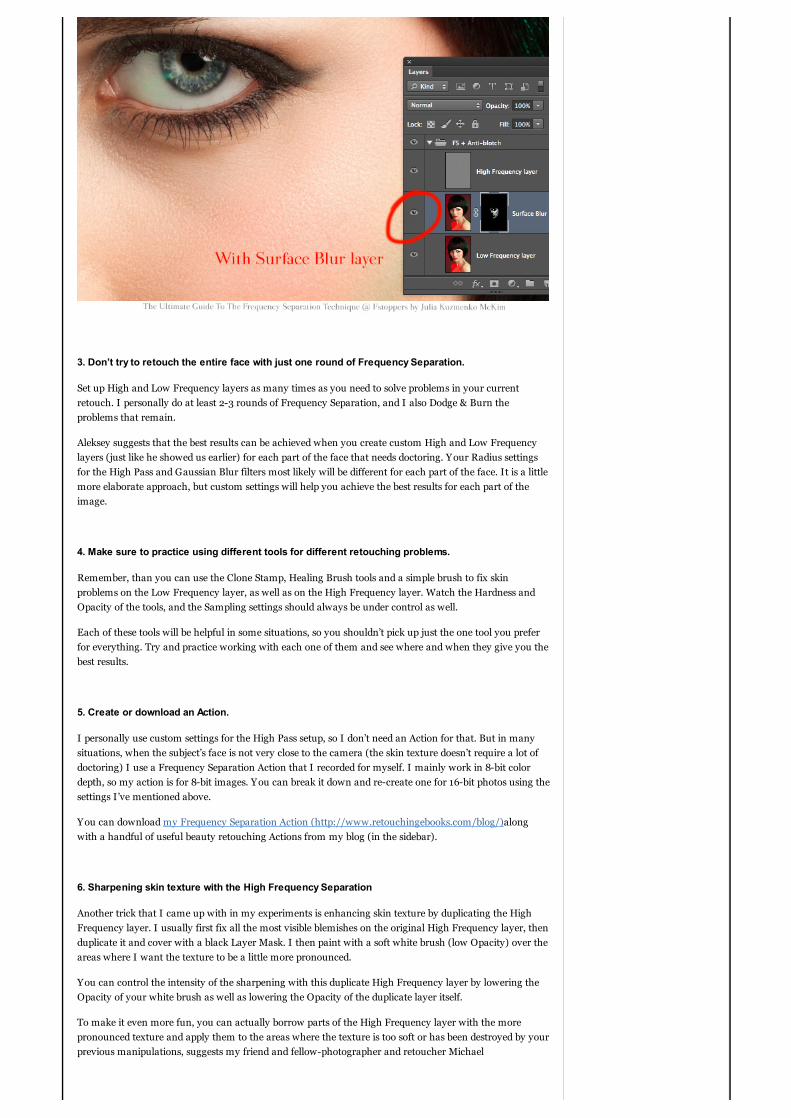
Then cover this layer with a black Layer Mask and paint with a white soft brush (low Opacity) over the
areas where you need to kill skin blotchiness.
This method is super quick and can be used as the preparation step before you get down to retouching. It
very well maybe the only step that you need if your model’s skin is already well-prepared for the shoot,
i.e. great makeup and skin to start with.
3. Don’t try to retouch the entire face with just one round of Frequency Separation.
Set up High and Low Frequency layers as many times as you need to solve problems in your current
retouch. I personally do at least 2-3 rounds of Frequency Separation, and I also Dodge & Burn the
problems that remain.
Aleksey suggests that the best results can be achieved when you create custom High and Low Frequency
layers (just like he showed us earlier) for each part of the face that needs doctoring. Your Radius settings
for the High Pass and Gaussian Blur filters most likely will be different for each part of the face. It is a little
more elaborate approach, but custom settings will help you achieve the best results for each part of the
image.
4. Make sure to practice using different tools for different retouching problems.
Remember, than you can use the Clone Stamp, Healing Brush tools and a simple brush to fix skin
problems on the Low Frequency layer, as well as on the High Frequency layer. Watch the Hardness and
Opacity of the tools, and the Sampling settings should always be under control as well.
Each of these tools will be helpful in some situations, so you shouldn’t pick up just the one tool you prefer
for everything. Try and practice working with each one of them and see where and when they give you the
best results.
5. Create or download an Action.
I personally use custom settings for the High Pass setup, so I don’t need an Action for that. But in many
situations, when the subject’s face is not very close to the camera (the skin texture doesn’t require a lot of
doctoring) I use a Frequency Separation Action that I recorded for myself. I mainly work in 8-bit color
depth, so my action is for 8-bit images. You can break it down and re-create one for 16-bit photos using the
settings I’ve mentioned above.
You can download my Frequency Separation Action (http://www.retouchingebooks.com/blog/)along
with a handful of useful beauty retouching Actions from my blog (in the sidebar).
6. Sharpening skin texture with the High Frequency Separation
Another trick that I came up with in my experiments is enhancing skin texture by duplicating the High
Frequency layer. I usually first fix all the most visible blemishes on the original High Frequency layer, then
duplicate it and cover with a black Layer Mask. I then paint with a soft white brush (low Opacity) over the
areas where I want the texture to be a little more pronounced.
You can control the intensity of the sharpening with this duplicate High Frequency layer by lowering the
Opacity of your white brush as well as lowering the Opacity of the duplicate layer itself.
To make it even more fun, you can actually borrow parts of the High Frequency layer with the more
pronounced texture and apply them to the areas where the texture is too soft or has been destroyed by your
previous manipulations, suggests my friend and fellow-photographer and retoucher Michael
EDITORIAL (HTTP://FSTOPPERS.COM/CATEGORY/EDITORIAL)
FASHION (HTTP://FSTOPPERS.COM/CATEGORY/FASHION)
FS ORIGINALS (HTTP://FSTOPPERS.COM/CATEGORY/ORIGINALS)
PICTURES (HTTP://FSTOPPERS.COM/CATEGORY/PICTURES-2)
PORTRAITS (HTTP://FSTOPPERS.COM/CATEGORY/PORTRAITS)
POST PRODUCTION (HTTP://FSTOPPERS.COM/CATEGORY/POST-PRODUCTION)
Woloszynowicz of VibrantShot.com (http://www.vibrantshot.com/). He also mentions that he uses the
Free Transform tool to re-shape those pieces when the skin texture direction or forms don’t match those of
the areas, which they are applied to.
7. I almost always mix and match the Frequency Separation technique with Dodging & Burning.
There’s no one right way as to what technique should be used first and how many rounds of each should
be applied. I sometimes start with the FS technique and finish up evening out the skin with Dodging &
Burning. Sometimes it makes sense to soften large shadows with Dodging first and then only retouch skin
texture on the High Frequency layer.
It’s always different because every image is unique. But it will definitely help to know and practice both
techniques, so that you can easier determine which one will solve the problems you stumble upon better.
“I typically use the FS technique for color changes and Dodge & Burn for luminance changes.
If you try to make drastic luminance changes with FS, I find that it can reduce texture as your
new tones will blend with the light or dark tone of the High Frequency layer. Dodging &
Burning, on the other hand, will darken or lighten both the high and low frequency data, thus
avoid this issue,” says Michael Woloszynowicz.
That’s all for today. I am sure there are many more additional tricks that can be used with the Frequency
Separation technique, so if you know any – please share with us in the comments!
Some sources I have come across in my research:
A Model Mayhem post (http://www.modelmayhem.com/po.php?thread_id=439098) by Sean Baker
(http://www.modelmayhem.com/684173).
A Model Mayhem post (http://www.modelmayhem.com/po.php?
thread_id=439098&page=4#post9688969) by grahamsz (http://www.modelmayhem.com/1157022).
And of course, thanks again to my photographer-friends Aleksey Dovgulya (http://dovgulya.ru/) and
Michael Woloszynowicz (https://www.facebook.com/vibrantshot) for sharing their methods and tips with
us! Aleksey is coming to Los Angeles in January 2014, so we can finish our Beauty & Fashion
Photography: Go Pro (http://www.retouchingebooks.com/shop/beauty-fashion-photography-go-pro/)
digital book – check it out and sign up for our newsletter to get notified when it’s ready!
Related
(/the-ultimate-guide-to-the-
frequency-separation-technique?
relatedposts_to=112059&relatedposts_order=0)
A Year In Review - Fstoppers
Best Posts of 2013 (/the-
ultimate-guide-to-the-
frequency-separation-
technique?
relatedposts_to=112059&relatedposts_order=0)
In "Favorites"
(/the-ultimate-guide-to-the-
frequency-separation-technique?
relatedposts_to=72158&relatedposts_order=1)
Frequency Separation With
Fashion Photographer &
Retoucher Elena Jasic (/the-
ultimate-guide-to-the-
frequency-separation-
technique?
relatedposts_to=72158&relatedposts_order=1)
In "BTS"
(/the-ultimate-guide-to-the-
frequency-separation-technique?
relatedposts_to=112961&relatedposts_order=2)
Commercial Photography:
Recipe For Success (/the-
ultimate-guide-to-the-
frequency-separation-
technique?
relatedposts_to=112961&relatedposts_order=2)
In "Business"
« A FAST AND EFFICIENT WORKFLOW FOR THE TRAVELINGPHOTOGRAPHER (HTTP://FSTOPPERS.COM/A-FAST-AND-EFFICIENT-WORKFLOW-FOR-THE-TRAVELING-PHOTOGRAPHER)
THIS GOPRO VIDEO OF A BIKER GOING DOWN A RIDGE LINE WILLLEAVE YOUR PALMS SWEATY (HTTP://FSTOPPERS.COM/THIS-GOPRO-VIDEO-OF-A-BIKER-GOING-DOWN-A-RIDGE-LINE-WILL-LEAVE-YOUR-PALMS-SWEATY) »
FS Originals(/category/originals/)A Look Into Canon’s RecentFailures (http://fstoppers.com/a-look-into-canons-recent-failures)
Photographer Captures theInvisible Pain of Verbal Abuse(NSFW)(http://fstoppers.com/photographer-captures-the-invisible-pain-of-verbal-abuse-nsfw)
YouTube Deleted My Viral Video &There is Nothing I Can Do About It(http://fstoppers.com/youtube-deleted-my-viral-video-there-is-nothing-i-can-do-about-it)
Vincent Laforet’s “DirectingMotion” Workshop Review(http://fstoppers.com/vincent-laforets-directing-motion-workshop-review)
The Ultimate Guide to the Dodge &Burn Technique – Part 1: TheFundamentals(http://fstoppers.com/the-ultimate-guide-to-the-dodge-burn-technique-part-1-the-fundamentals)
Categories(/categories)Commercial(http://fstoppers.com/category/commercial)
Video(http://fstoppers.com/category/video)
Gear(http://fstoppers.com/category/gear)
Location(http://fstoppers.com/category/location)
Strobe Light ()
Contests(http://fstoppers.com/category/contests)Weekly Contest: Win a Nikon 1 J1Mirrorless Camera!(http://fstoppers.com/weekly-contest-win-a-nikon-1-j1-mirrorless-camera)
Weekly Contest: Win a Tamron SP24-70 F/2.8 Di VC USD(http://fstoppers.com/weekly-contest-win-a-tamron-sp-24-70-f2-8-di-vc-usd)
Call for Entries: Canon FemalePhotojournalist Award(http://fstoppers.com/call-for-entries-canon-female-photojournalist-award)
Weekly Contest: Win a Canon 5DMark III or Nikon D800!(http://fstoppers.com/weekly-contest-win-a-canon-5d-mark-iii-or-nikon-d800)
And The Winner Is…..(http://fstoppers.com/and-the-winner-is)
Random PostsBTS With Forever 21(http://fstoppers.com/bts-forever-21)
[Funny] “The World’s SmallestCamera”(http://fstoppers.com/funny-the-worlds-smallest-camera)
Six Minutes Of Madness – MostIncredible One Shot Scene Ever?(NSFW/Spoiler)(http://fstoppers.com/six-minutes-of-madness-most-incredible-one-shot-take-ever-nsfw)
A Free Google Calendar Tool toMeet your Workflow Deadlines(http://fstoppers.com/a-free-google-calendar-tool-to-meet-your-workflow-deadlines)
Kevin Reed Exposes Fashion In 5mins (http://fstoppers.com/kevin-reed-exposes-fashion-in-5-mins)
Picture of the Day(/potd/)Le Familila(http://fstoppers.com/potd/le-familila)
The Fire Storm Sorcerer(http://fstoppers.com/potd/the-fire-storm-sorcerer)
Belmar Beach(http://fstoppers.com/potd/belmar-beach)
Alone(http://fstoppers.com/potd/alone)
New World(http://fstoppers.com/potd/new-world)
Home (http://fstoppers.com/) Advertise (http://fstoppers.com/advertise-your-company-fstoppers-com) Meet the Writers (http://fstoppers.com/meet-the-writers)Submit Content (http://fstoppers.com/submit-content) Contact (http://fstoppers.com/contact-us) Sitemap (http://fstoppers.com/sitemap.xml)
© Fstoppers (/wp-admin/) Made by Novum (http://novumstudios.com/)


![Two-Microphone Separation of Speech Mixtures · frequency domain or in the time-frequency (T-F) domain [8], [23]–[26]. Sparse sources have a limited overlap in the T-F domain. The](https://img.pdfslide.net/doc/110x75/5fbe99e51d3b88241477944d/two-microphone-separation-of-speech-mixtures-frequency-domain-or-in-the-time-frequency.jpg)


![Two-Microphone Separation of Speech Mixtures · good separation can still be obtained by applying a binary time-frequency mask to the mixture [24], [8]. Incomputational auditory scene](https://img.pdfslide.net/doc/110x75/5f62735f3d3e8643b3654e77/two-microphone-separation-of-speech-mixtures-good-separation-can-still-be-obtained.jpg)