Embed Size (px)
Citation preview
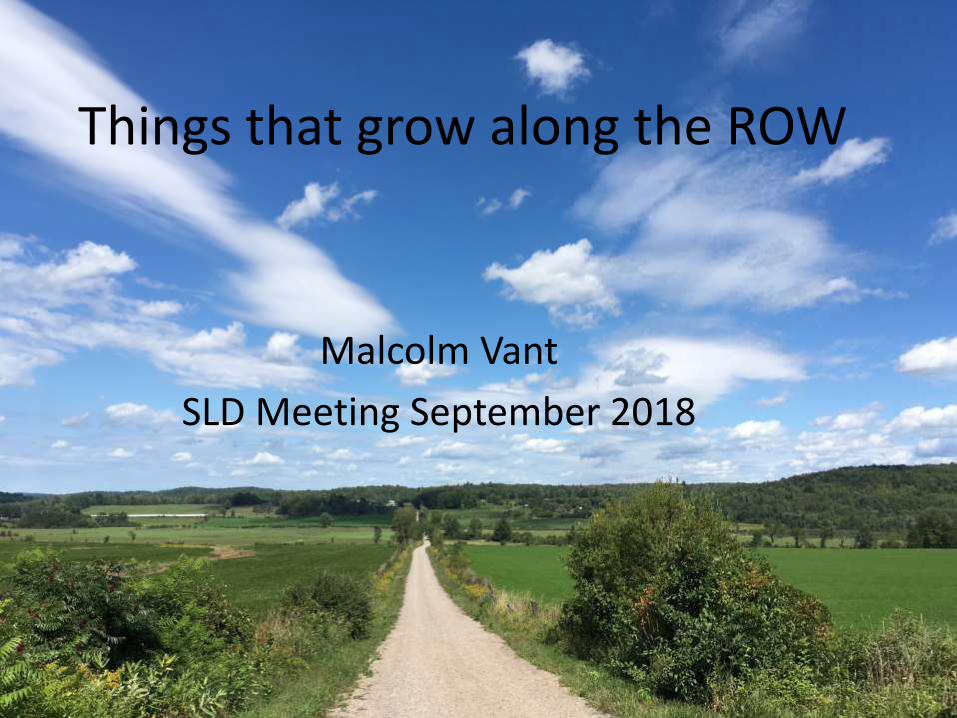
Things that grow along the ROW
Malcolm Vant
SLD Meeting September 2018
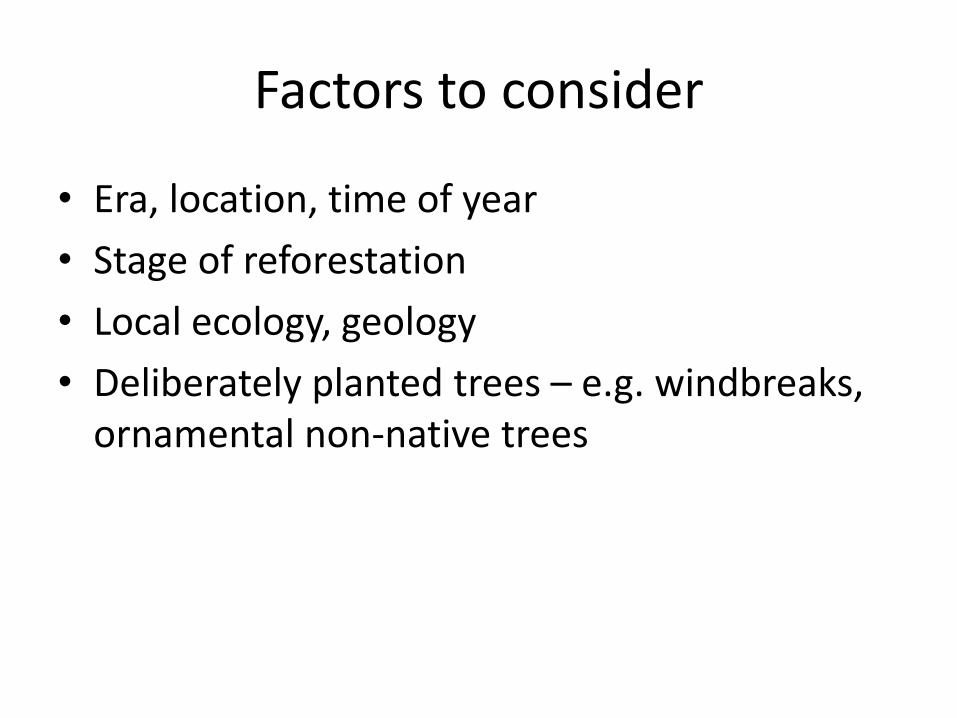
Factors to consider
• Era, location, time of year
• Stage of reforestation
• Local ecology, geology
• Deliberately planted trees – e.g. windbreaks, ornamental non-native trees
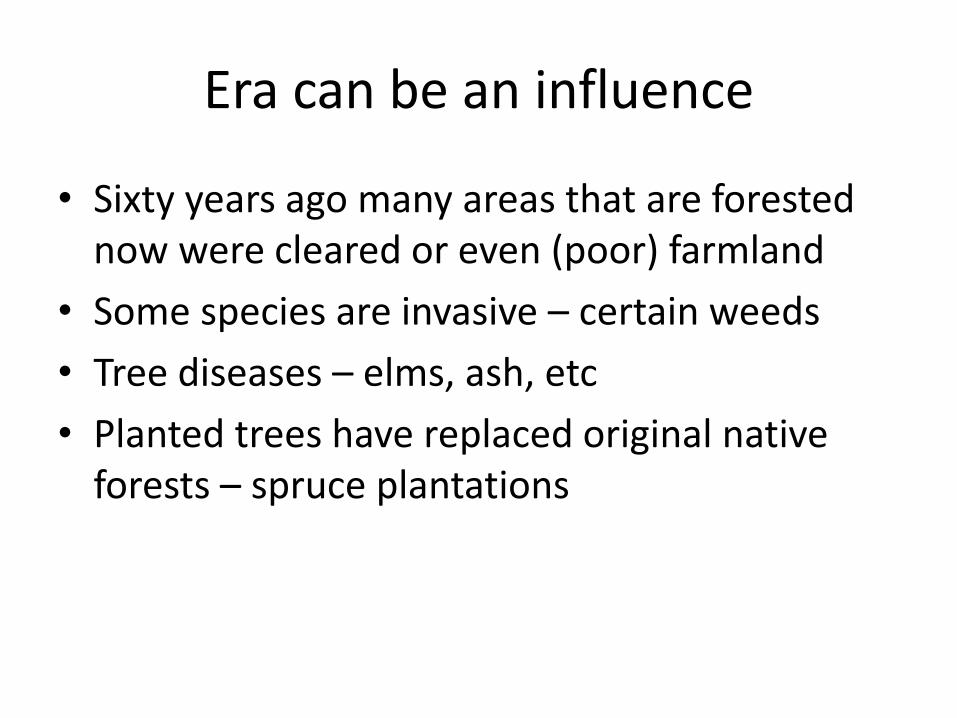
Era can be an influence
• Sixty years ago many areas that are forested now were cleared or even (poor) farmland
• Some species are invasive – certain weeds
• Tree diseases – elms, ash, etc
• Planted trees have replaced original native forests – spruce plantations
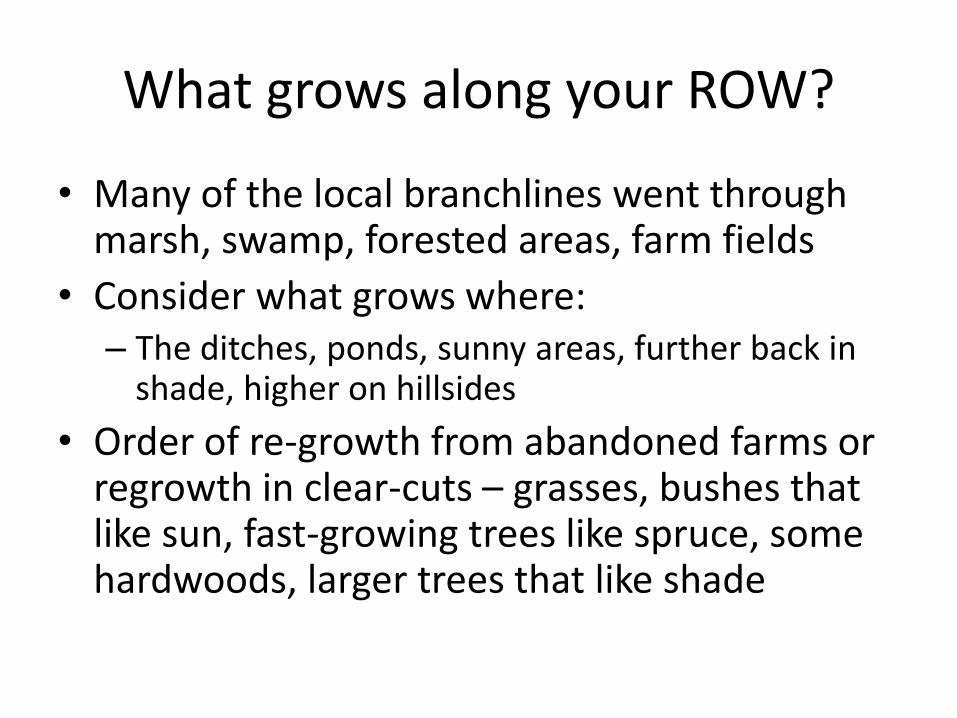
What grows along your ROW?
• Many of the local branchlines went through marsh, swamp, forested areas, farm fields
• Consider what grows where: – The ditches, ponds, sunny areas, further back in
shade, higher on hillsides
• Order of re-growth from abandoned farms or regrowth in clear-cuts – grasses, bushes that like sun, fast-growing trees like spruce, some hardwoods, larger trees that like shade
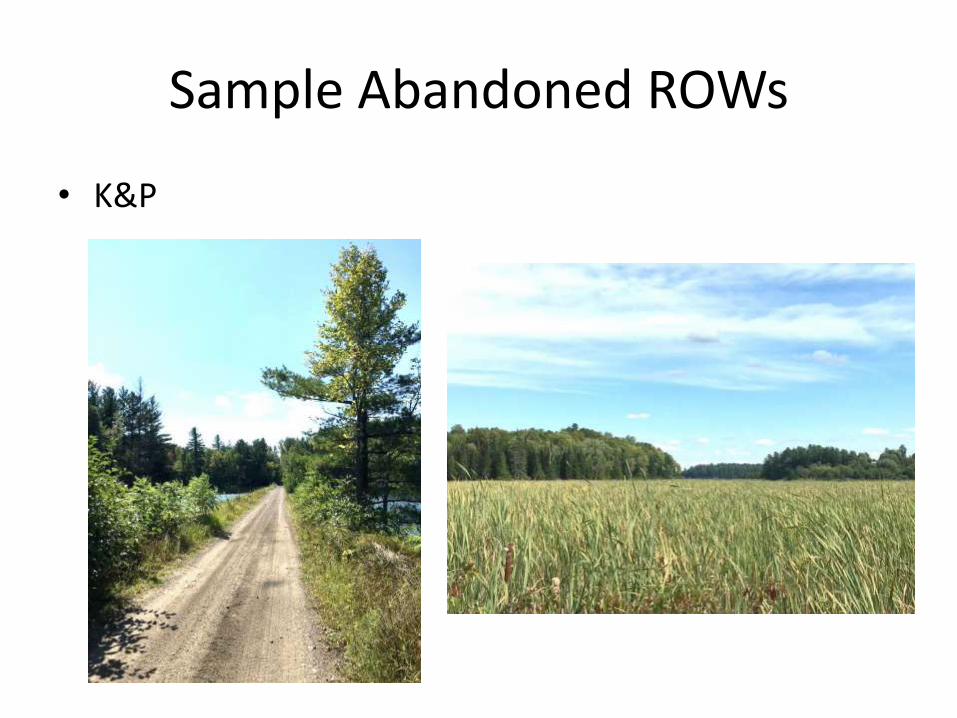
Sample Abandoned ROWs
• K&P
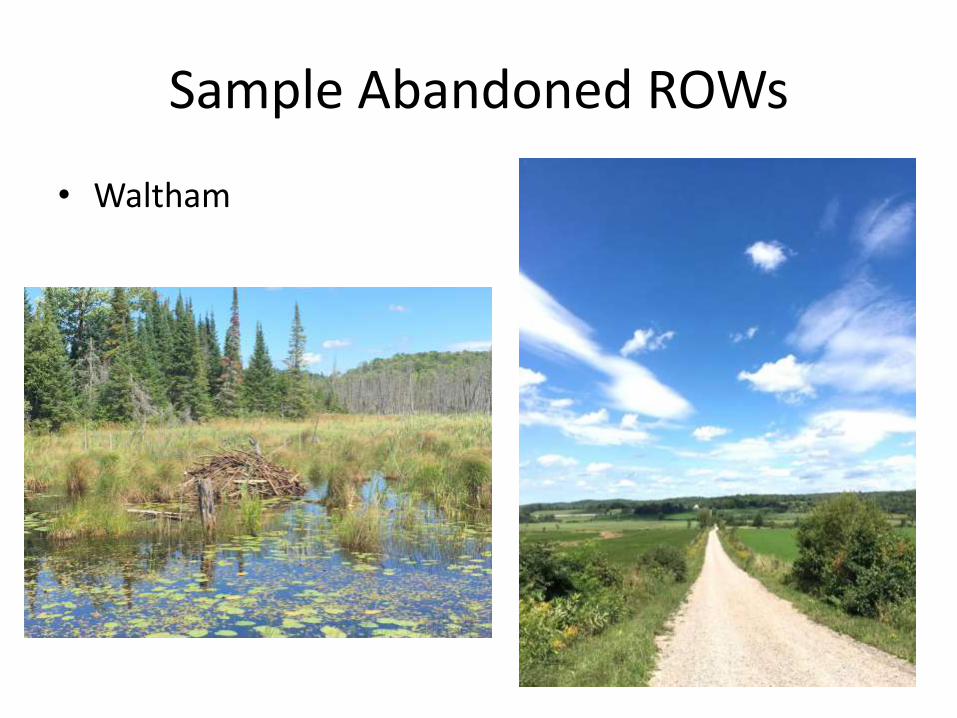
Sample Abandoned ROWs
• Waltham

Sample Abandoned ROWs
• Waltham
Today’s List
• Cattails
• Tall grasses/weeds
• Deciduous trees from sedum
• Wire Armature deciduous trees
• Conifer trees (foreground)
Starting from the swamp up!
• Cattails are ubiquitous in this area
• I adapted a technique I found in Spanish for making tall rushes
• Costs pennies per plant plus a bit of labour!
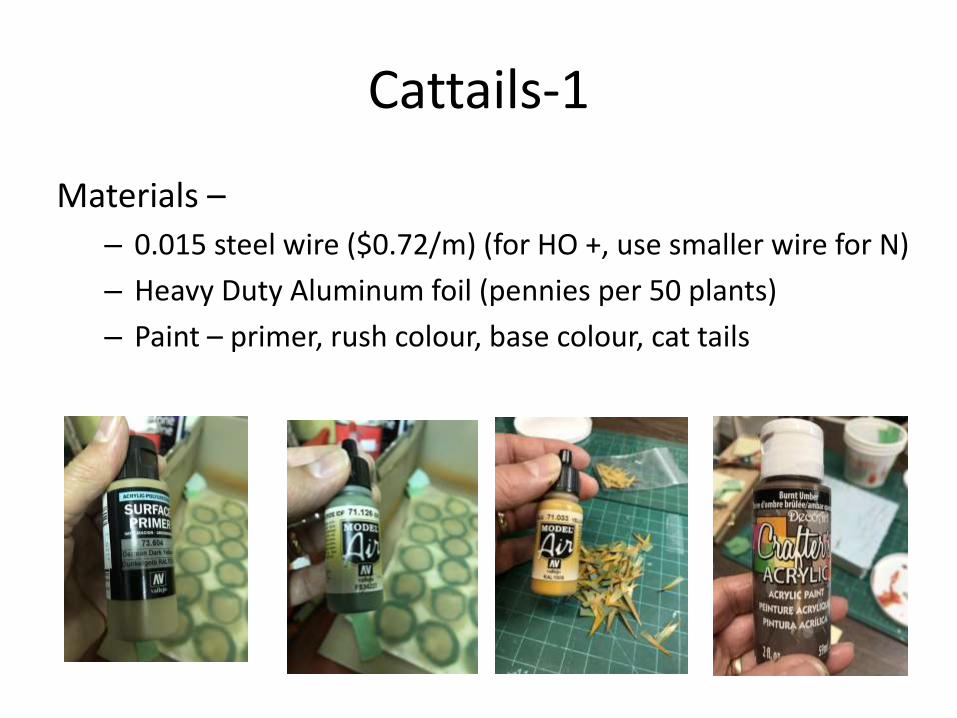
Cattails-1
Materials –
– 0.015 steel wire ($0.72/m) (for HO +, use smaller wire for N)
– Heavy Duty Aluminum foil (pennies per 50 plants)
– Paint – primer, rush colour, base colour, cat tails
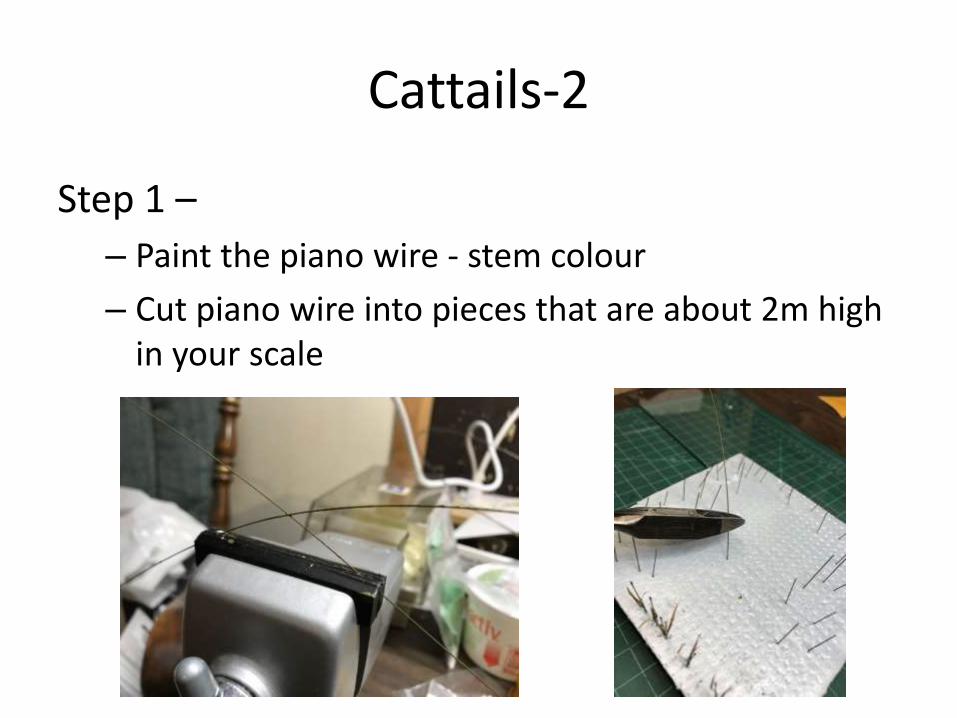
Cattails-2
Step 1 –
– Paint the piano wire - stem colour
– Cut piano wire into pieces that are about 2m high in your scale
Cattails-3
Step 2 – – Layout circles on aluminum foil that have a radius equal to
just under 2 m in your scale – Spray paint discs with primer, then paint outside edges of
discs with plant stem base colour – Paint interior of discs with rush colour – Repeat for other side – Cut out discs with sharp scissors
Note: the colours of the rushes will vary with season, so choose accordingly.
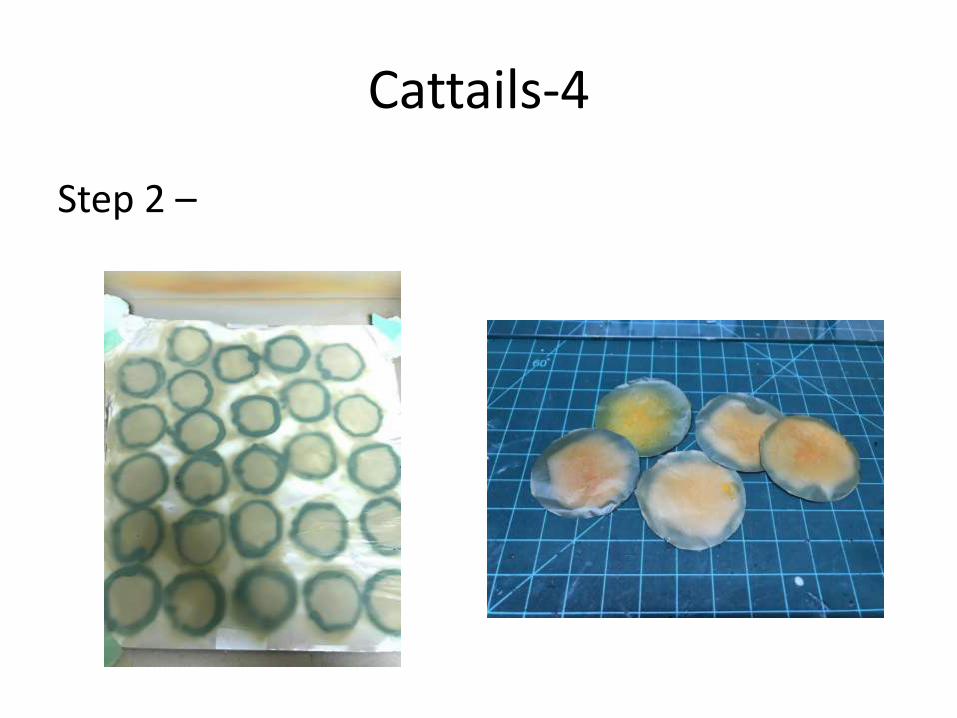
Cattails-4
Step 2 –
Cattails-5
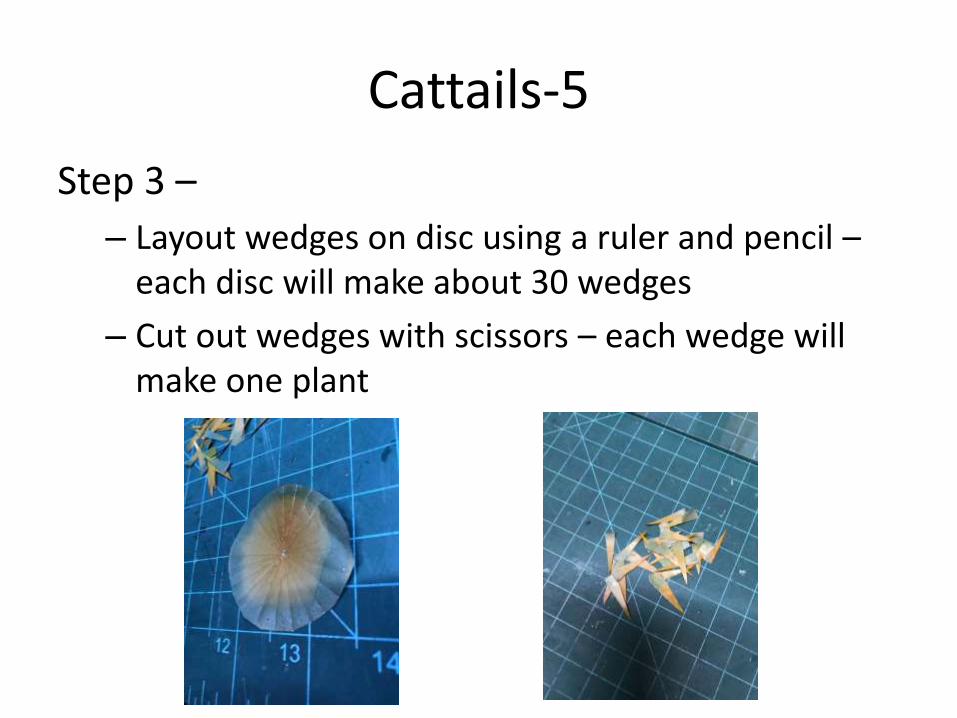
Step 3 –
– Layout wedges on disc using a ruler and pencil – each disc will make about 30 wedges
– Cut out wedges with scissors – each wedge will make one plant
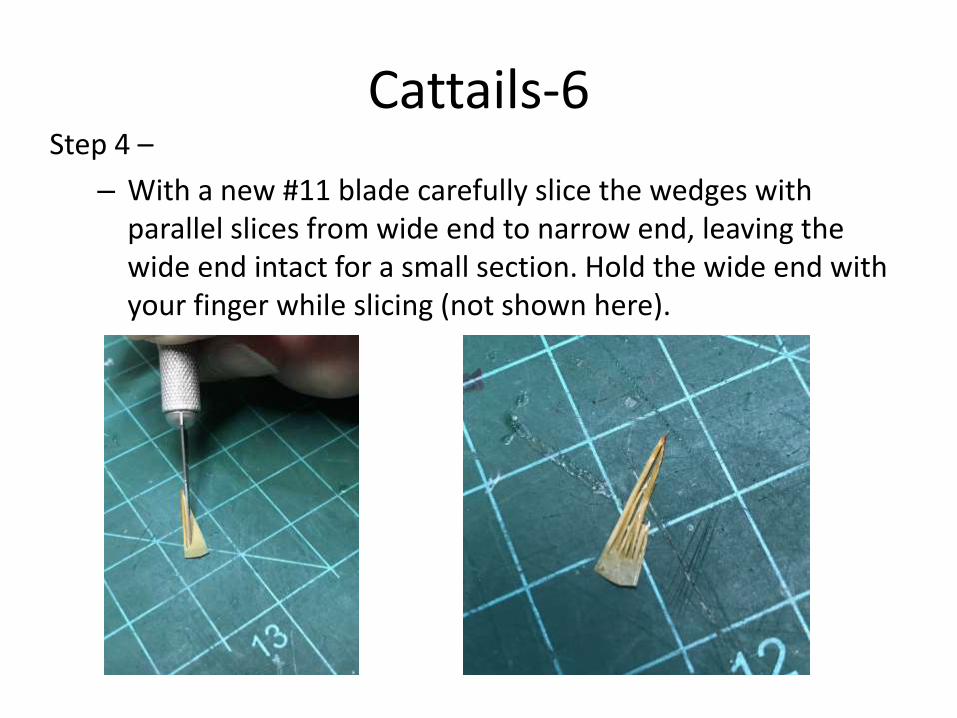
Cattails-6 Step 4 –
– With a new #11 blade carefully slice the wedges with parallel slices from wide end to narrow end, leaving the wide end intact for a small section. Hold the wide end with your finger while slicing (not shown here).
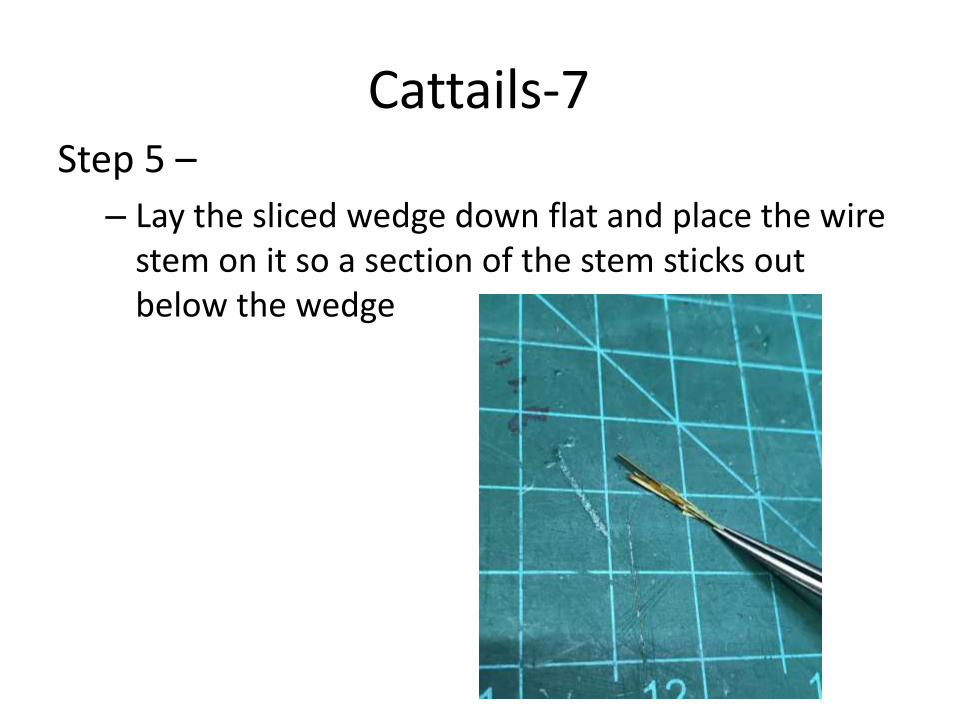
Cattails-7 Step 5 –
– Lay the sliced wedge down flat and place the wire stem on it so a section of the stem sticks out below the wedge
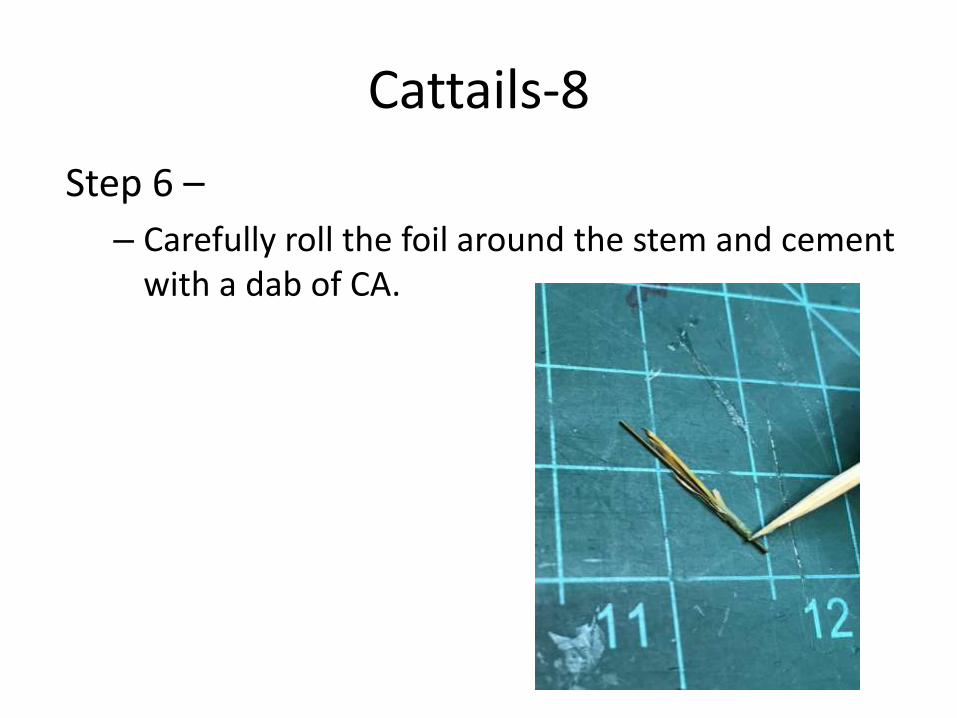
Cattails-8
Step 6 –
– Carefully roll the foil around the stem and cement with a dab of CA.
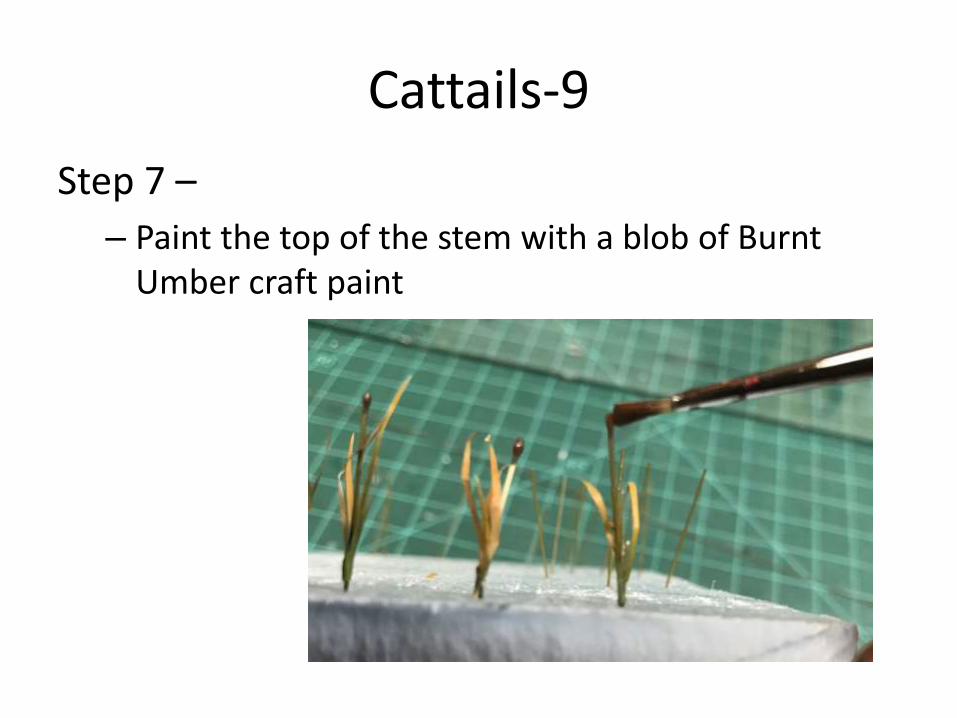
Cattails-9
Step 7 –
– Paint the top of the stem with a blob of Burnt Umber craft paint

Cattails-10
Step 8 –
– If you want to add some variation use a green wash on cut edges of the foil and the “leaves”.
– Touch up any shiny edges
– Plant your bull rush
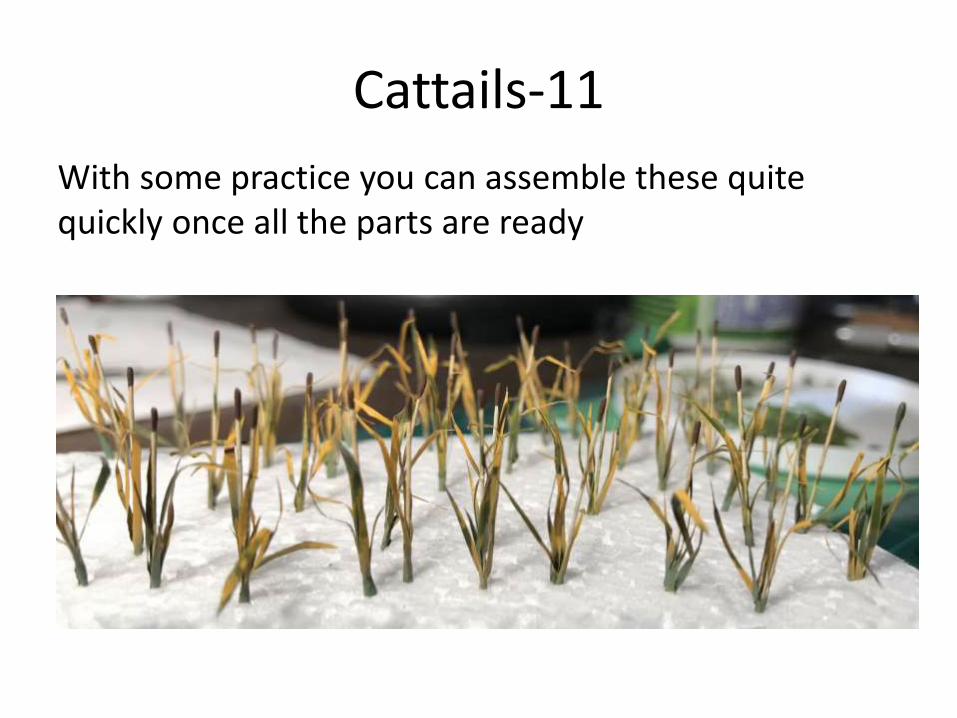
Cattails-11
With some practice you can assemble these quite quickly once all the parts are ready
Tall Grasses and Weeds -1
• The next step back from the water’s edge is usually filled with tall grasses and weeds
• Weeds such as goldenrod are very visible in later summer and found everywhere
• So far, I’ve found that for individual plants, as opposed to the excellent mats of commercial material now available, that cheap 4 “ beige-bristled paint brushes work well for grasses and weeds. They are a two to three dollars at Canadian Tire

Tall Grasses and Weeds -2
• If you want to colour the bristles slip a coffee filter under the section you want to use and paint away.
Tall Grasses and Weeds -3
• For both weeds and tall grasses, twist the desired number and length of bristles on the paint brush together and, while holding, dab the twisted end with CA
• I use the gel 25-30 sec. • For goldenrod, make the bristle lengths a little over a scale metre.
For the grasses, they should be about 2 metres.
• When that sets, cut it loose from the brush and attach a small 0.015” piece of steel wire to the twisted end to allow it to be planted in foam.
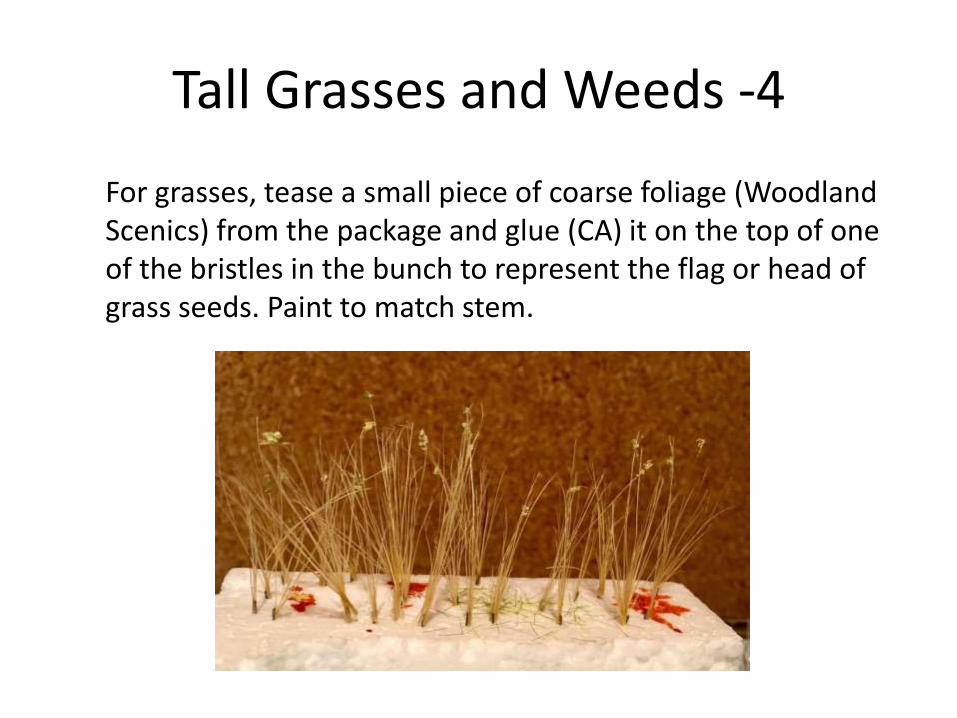
Tall Grasses and Weeds -4
For grasses, tease a small piece of coarse foliage (Woodland Scenics) from the package and glue (CA) it on the top of one of the bristles in the bunch to represent the flag or head of grass seeds. Paint to match stem.
Tall Grasses and Weeds -5
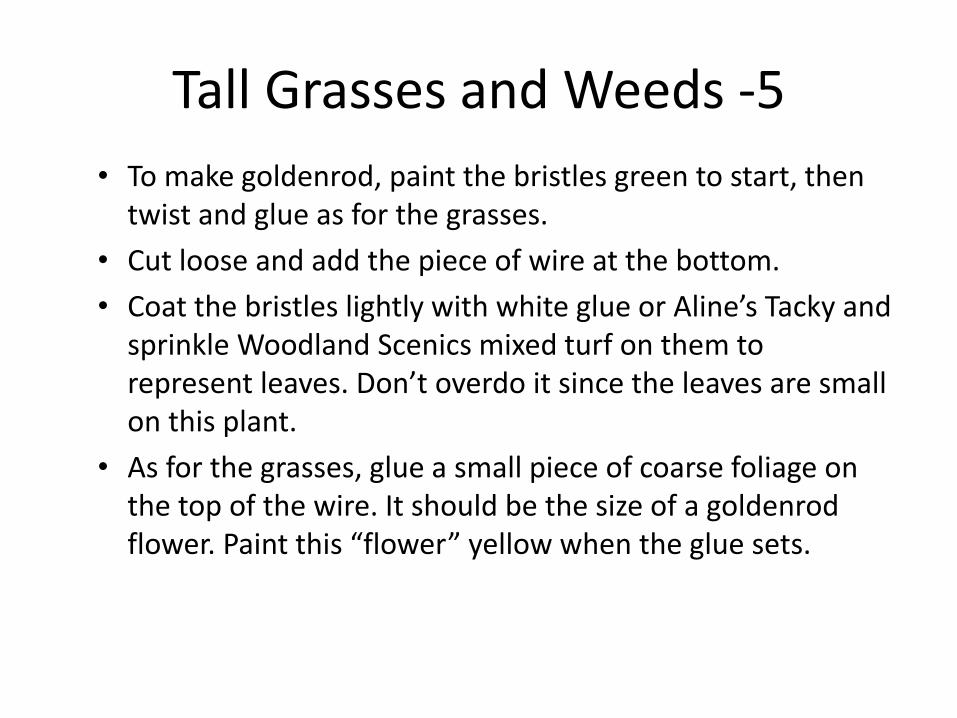
• To make goldenrod, paint the bristles green to start, then twist and glue as for the grasses.
• Cut loose and add the piece of wire at the bottom.
• Coat the bristles lightly with white glue or Aline’s Tacky and sprinkle Woodland Scenics mixed turf on them to represent leaves. Don’t overdo it since the leaves are small on this plant.
• As for the grasses, glue a small piece of coarse foliage on the top of the wire. It should be the size of a goldenrod flower. Paint this “flower” yellow when the glue sets.
Tall Grasses and Weeds -6
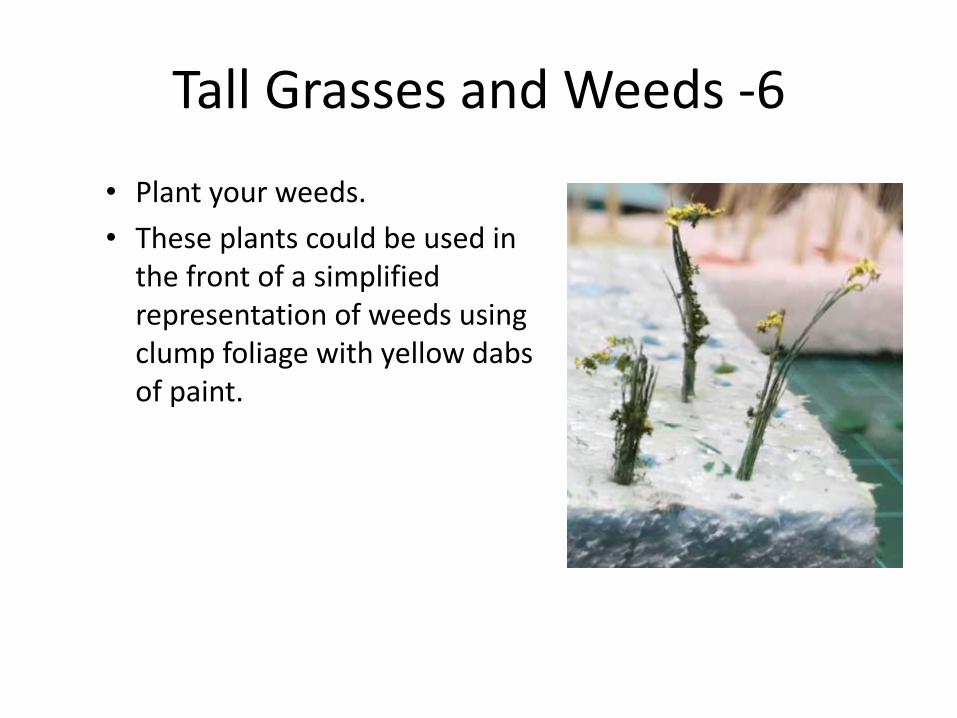
• Plant your weeds.
• These plants could be used in the front of a simplified representation of weeds using clump foliage with yellow dabs of paint.

Tall Grasses and Weeds -7 • Another way to make goldenrod is to cut 0.015 “ wire (for HO)
to desired plant height. Paint it green.
• Then tease a small string of coarse foliage (Woodland Scenics) from the package and glue, using CA, along the length of the wire.
• As before, glue a small piece of coarse foliage on the top of the wire to represent the goldenrod flower. Paint yellow when the glue sets.

Tall Grasses and Weeds -8
Commercial, scale goldenrod plants are available from Silfor for about 100/$26 US.
Trees -1
There are many types and shapes of trees in this area. Some of them are more easily modelled than others and some techniques are more appropriate for certain types of trees.
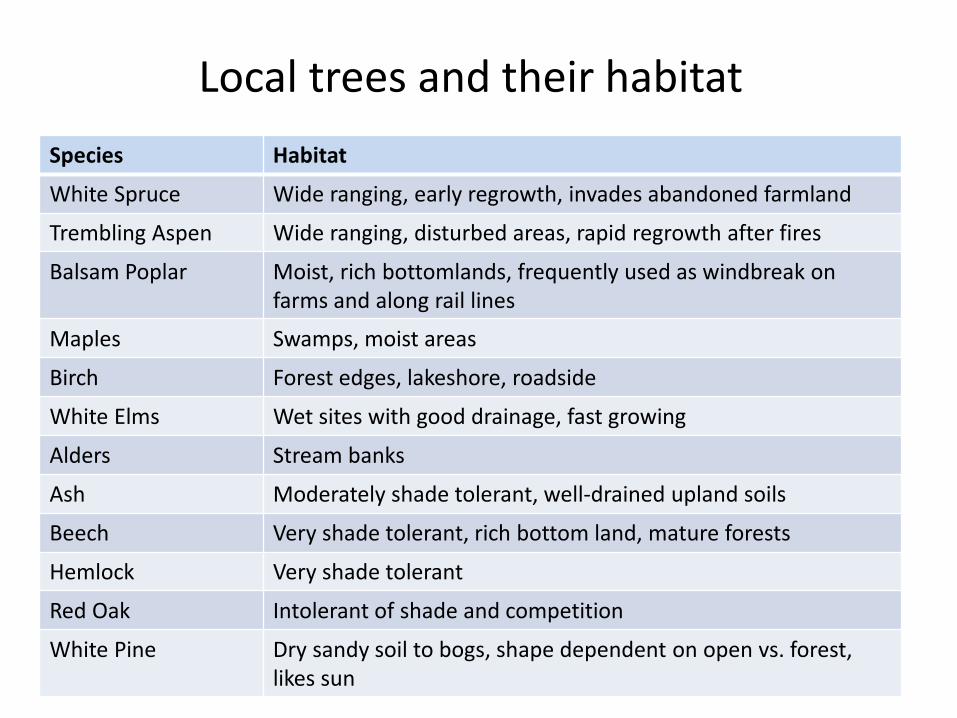
Local trees and their habitat
Species Habitat
White Spruce Wide ranging, early regrowth, invades abandoned farmland
Trembling Aspen Wide ranging, disturbed areas, rapid regrowth after fires
Balsam Poplar Moist, rich bottomlands, frequently used as windbreak on farms and along rail lines
Maples Swamps, moist areas
Birch Forest edges, lakeshore, roadside
White Elms Wet sites with good drainage, fast growing
Alders Stream banks
Ash Moderately shade tolerant, well-drained upland soils
Beech Very shade tolerant, rich bottom land, mature forests
Hemlock Very shade tolerant
Red Oak Intolerant of shade and competition
White Pine Dry sandy soil to bogs, shape dependent on open vs. forest, likes sun
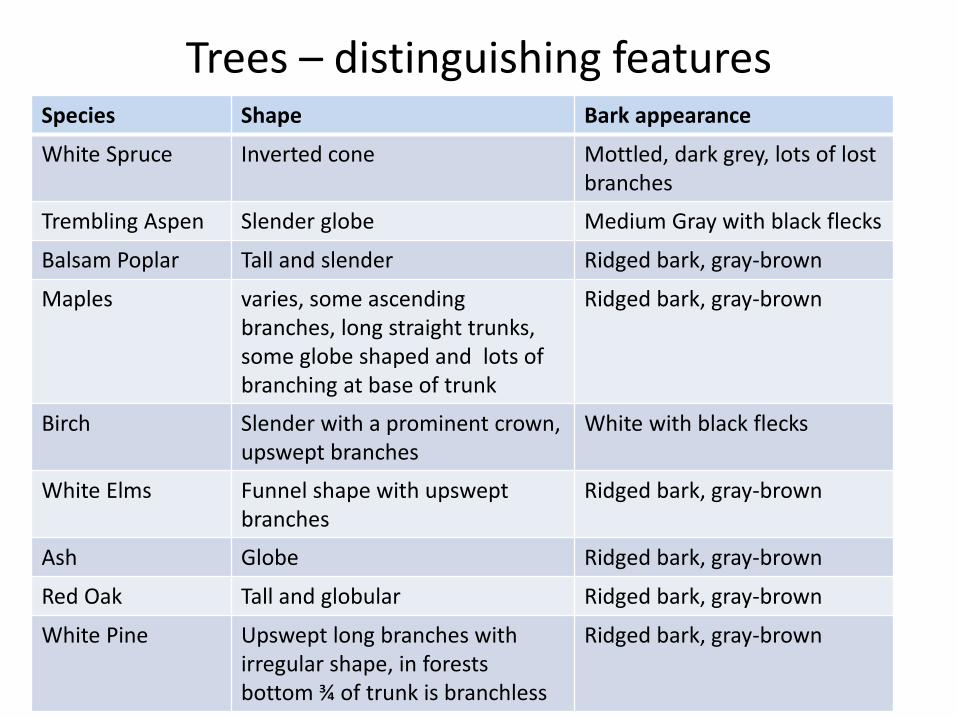
Trees – distinguishing features Species Shape Bark appearance
White Spruce Inverted cone Mottled, dark grey, lots of lost branches
Trembling Aspen Slender globe Medium Gray with black flecks
Balsam Poplar Tall and slender Ridged bark, gray-brown
Maples varies, some ascending branches, long straight trunks, some globe shaped and lots of branching at base of trunk
Ridged bark, gray-brown
Birch Slender with a prominent crown, upswept branches
White with black flecks
White Elms Funnel shape with upswept branches
Ridged bark, gray-brown
Ash Globe Ridged bark, gray-brown
Red Oak Tall and globular Ridged bark, gray-brown
White Pine Upswept long branches with irregular shape, in forests bottom ¾ of trunk is branchless
Ridged bark, gray-brown
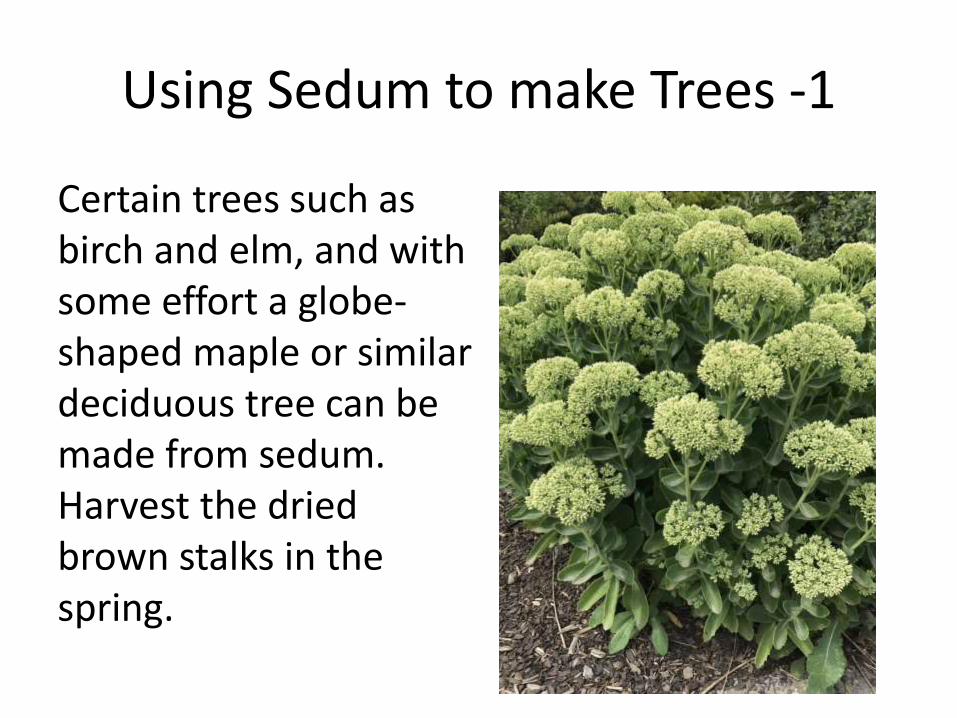
Using Sedum to make Trees -1
Certain trees such as birch and elm, and with some effort a globe-shaped maple or similar deciduous tree can be made from sedum. Harvest the dried brown stalks in the spring.
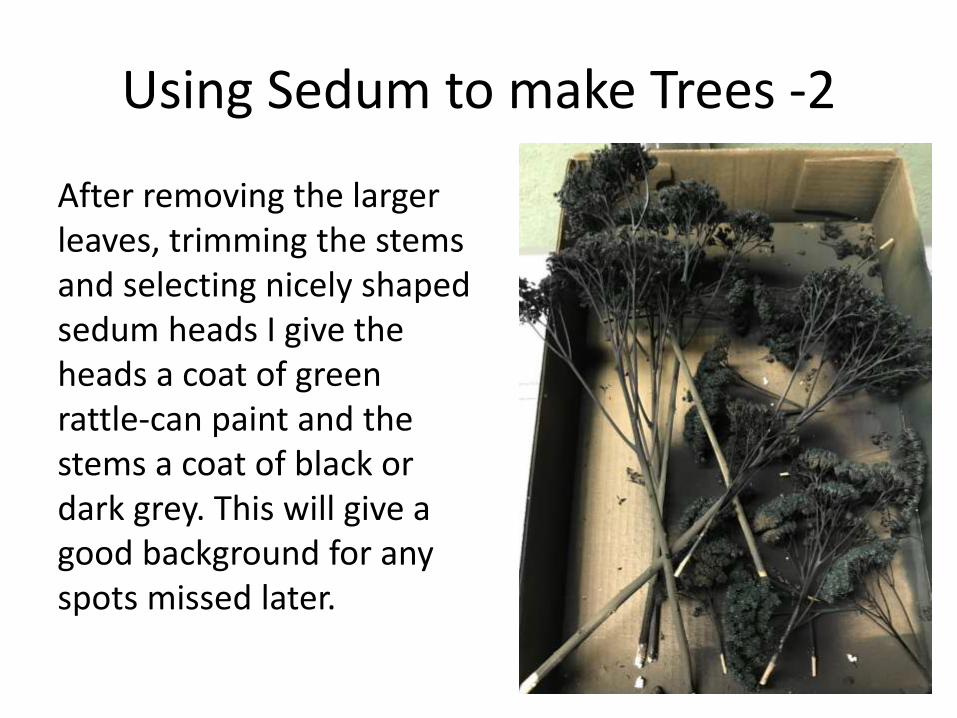
Using Sedum to make Trees -2
After removing the larger leaves, trimming the stems and selecting nicely shaped sedum heads I give the heads a coat of green rattle-can paint and the stems a coat of black or dark grey. This will give a good background for any spots missed later.
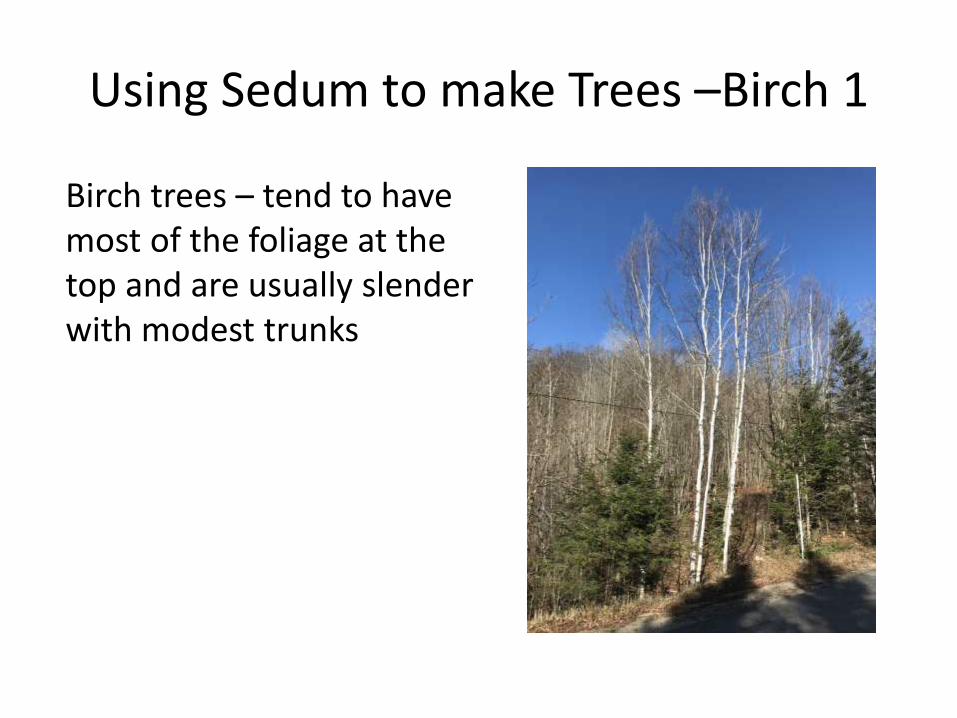
Using Sedum to make Trees –Birch 1
Birch trees – tend to have most of the foliage at the top and are usually slender with modest trunks
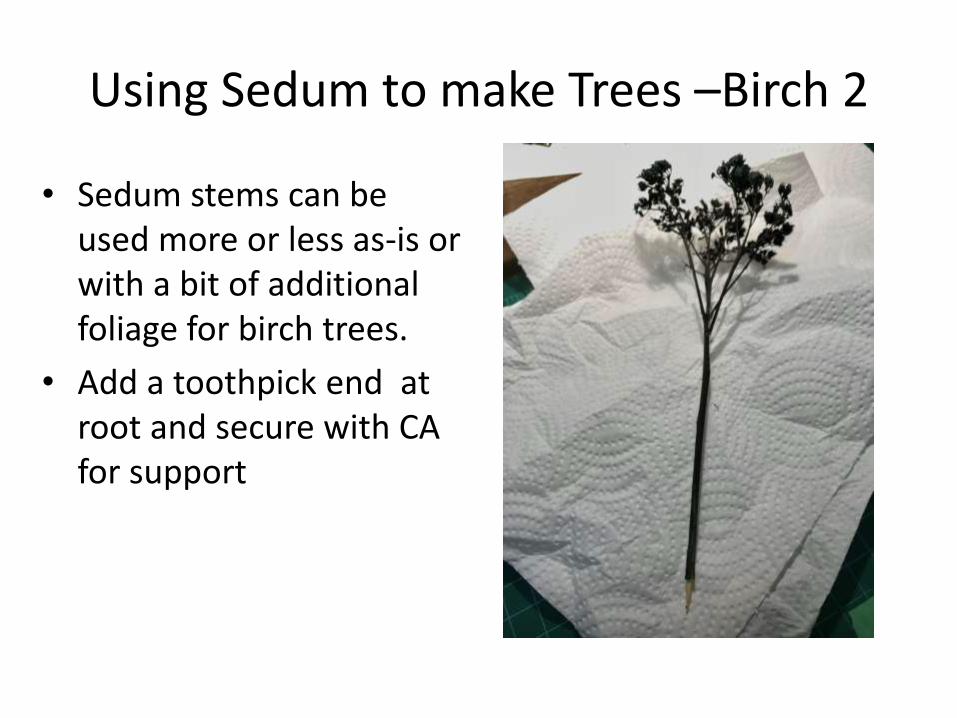
Using Sedum to make Trees –Birch 2
• Sedum stems can be used more or less as-is or with a bit of additional foliage for birch trees.
• Add a toothpick end at root and secure with CA for support
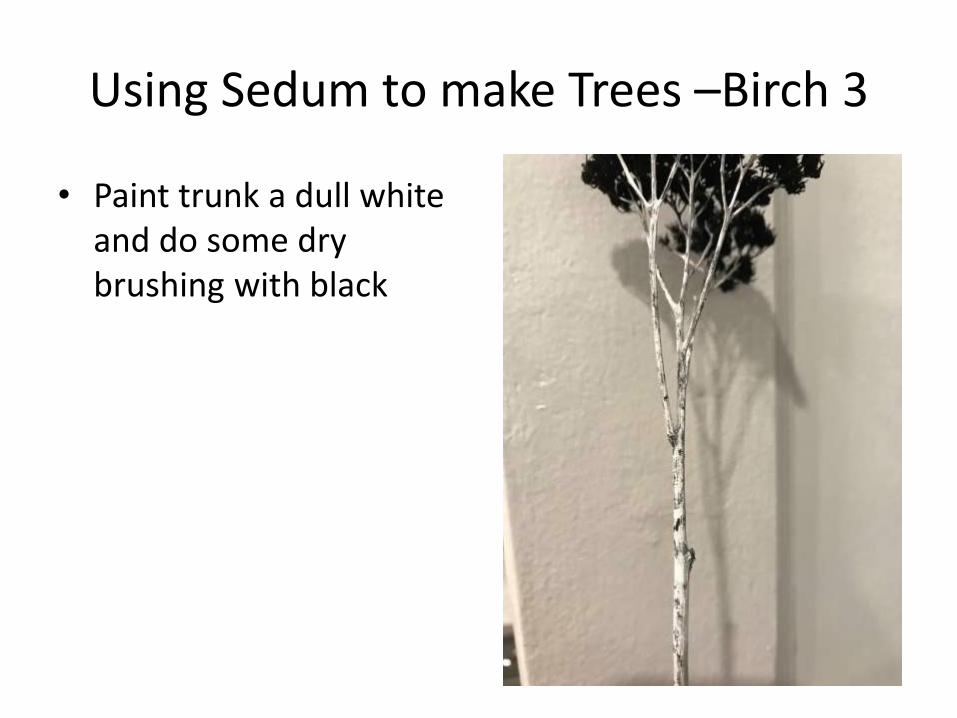
Using Sedum to make Trees –Birch 3
• Paint trunk a dull white and do some dry brushing with black
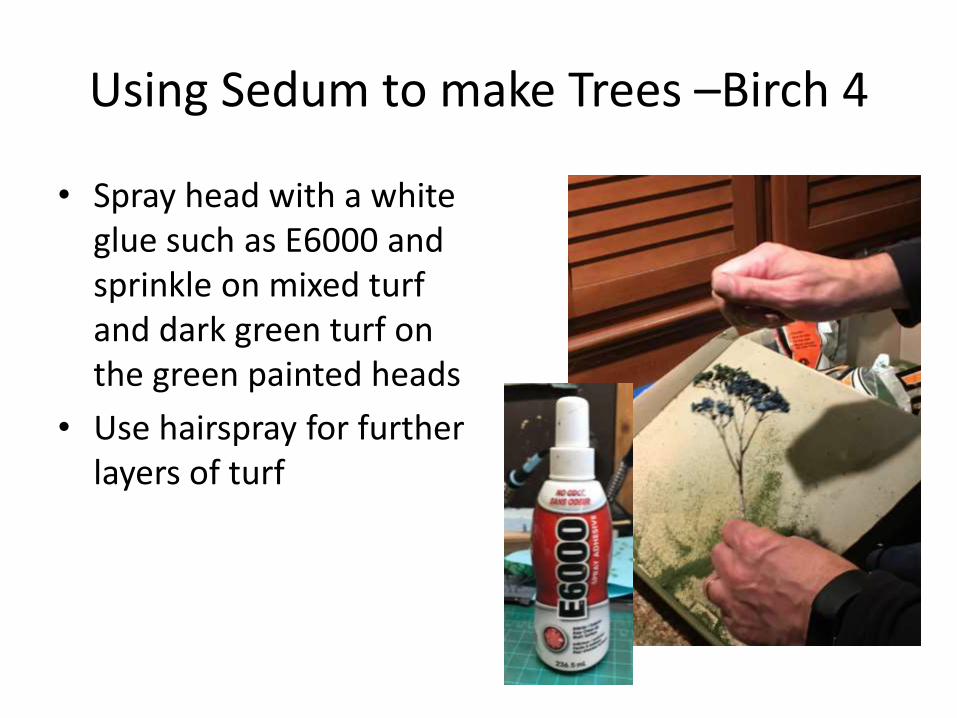
Using Sedum to make Trees –Birch 4
• Spray head with a white glue such as E6000 and sprinkle on mixed turf and dark green turf on the green painted heads
• Use hairspray for further layers of turf
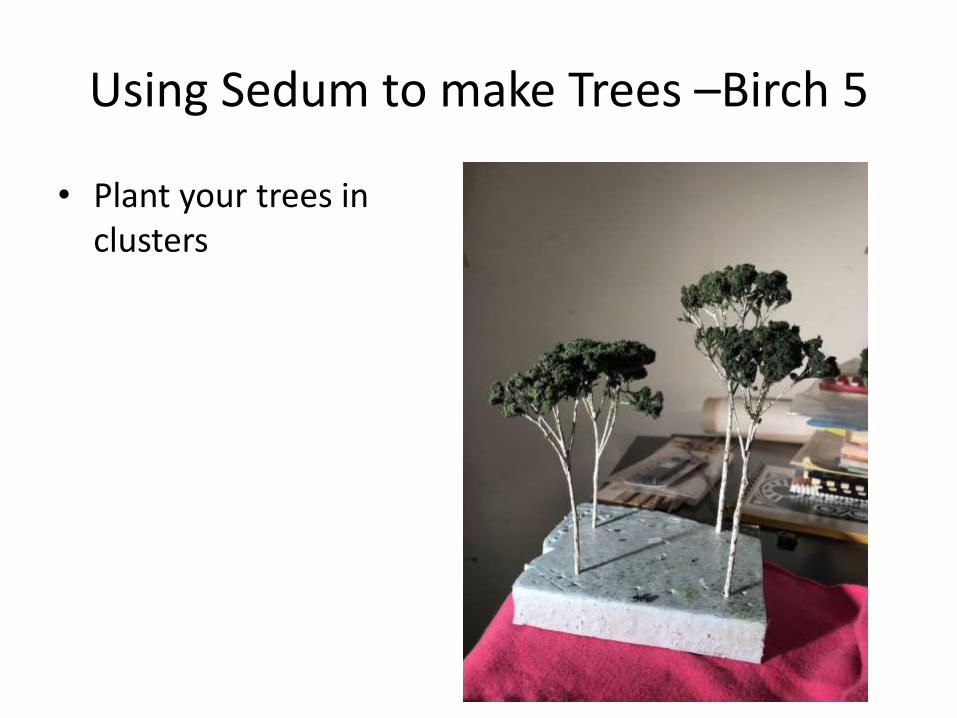
Using Sedum to make Trees –Birch 5
• Plant your trees in clusters
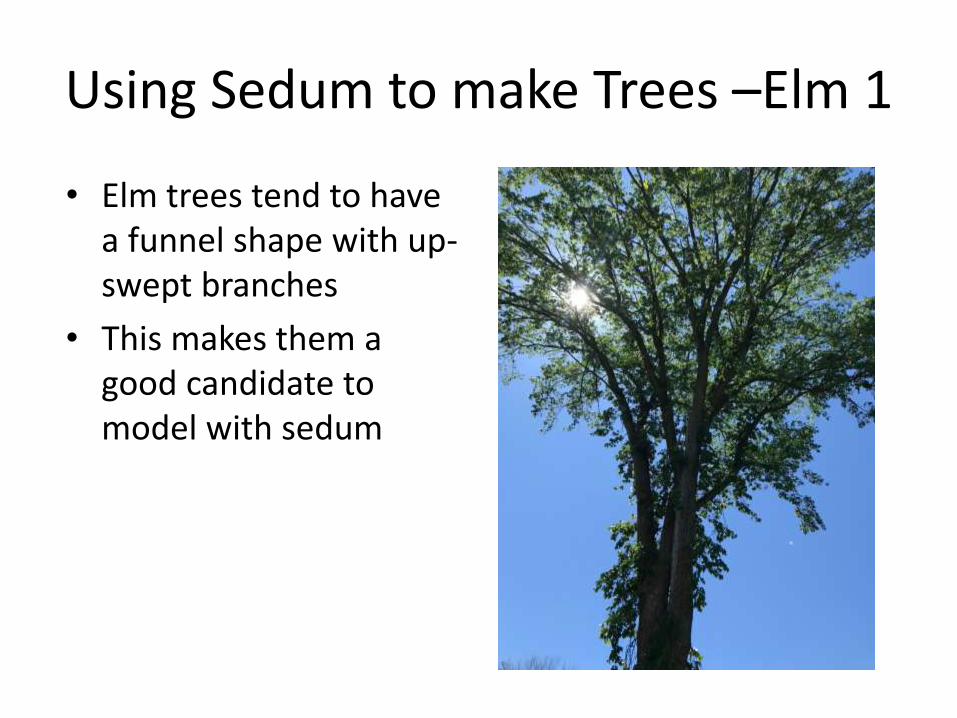
Using Sedum to make Trees –Elm 1
• Elm trees tend to have a funnel shape with up- swept branches
• This makes them a good candidate to model with sedum

Using Sedum to make Trees –Elm 2
• Groupings of Sedum stems can be used for larger trees with a funnel shape such as elms
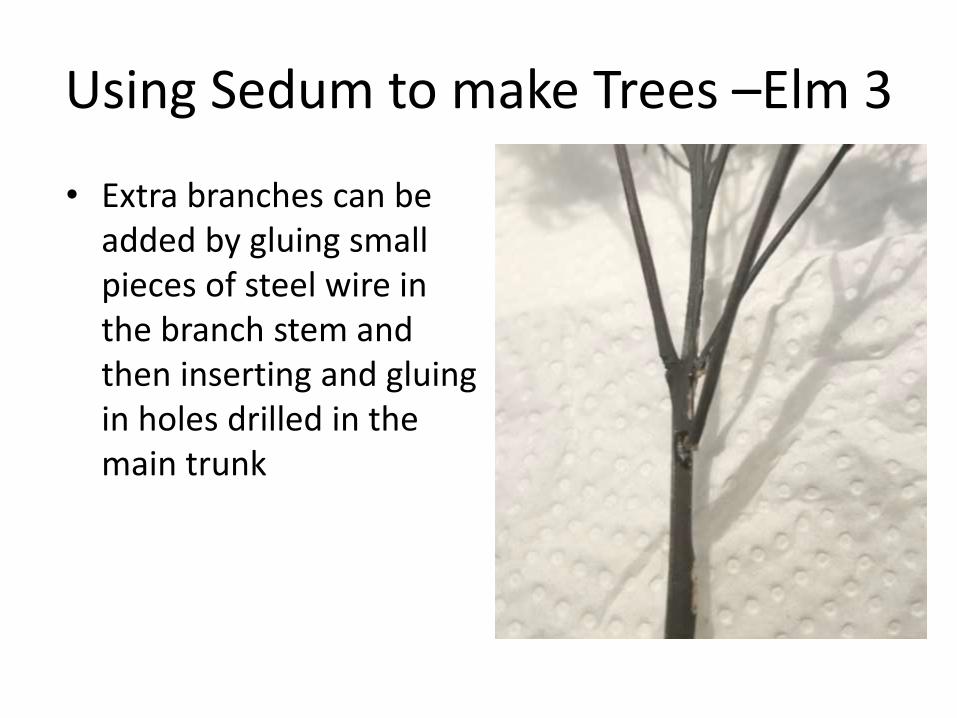
Using Sedum to make Trees –Elm 3
• Extra branches can be added by gluing small pieces of steel wire in the branch stem and then inserting and gluing in holes drilled in the main trunk
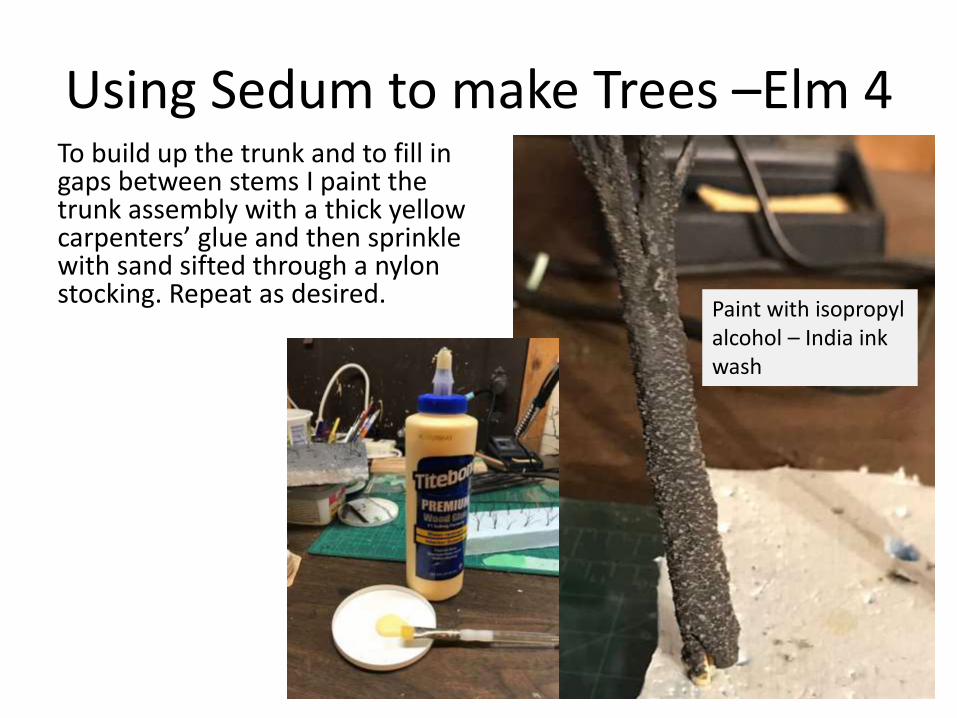
Using Sedum to make Trees –Elm 4 To build up the trunk and to fill in gaps between stems I paint the trunk assembly with a thick yellow carpenters’ glue and then sprinkle with sand sifted through a nylon stocking. Repeat as desired.
Paint with isopropyl alcohol – India ink wash
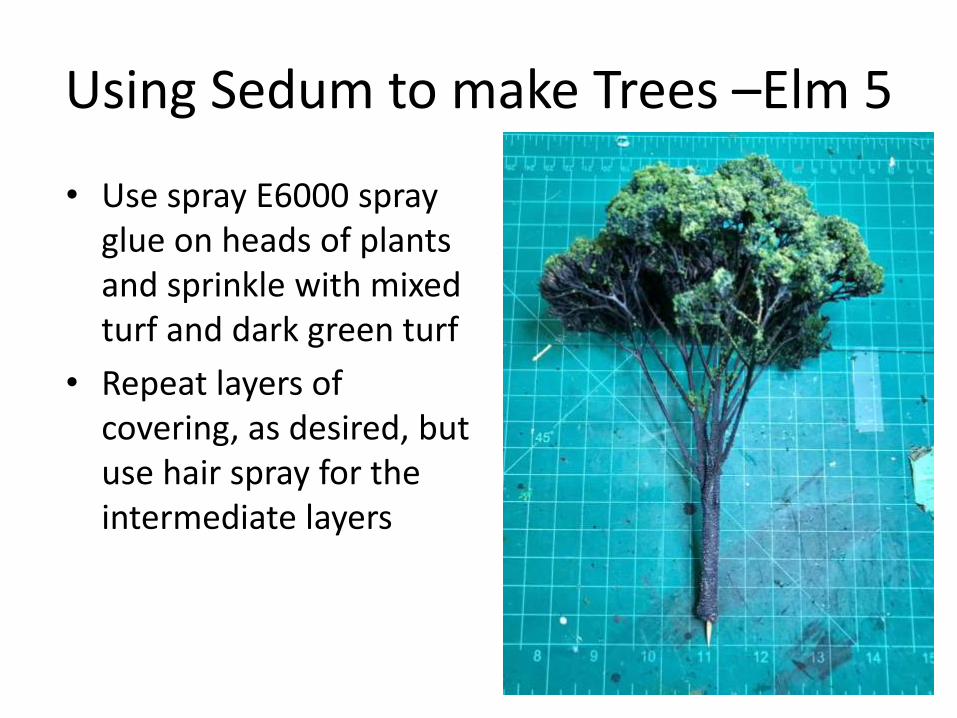
Using Sedum to make Trees –Elm 5
• Use spray E6000 spray glue on heads of plants and sprinkle with mixed turf and dark green turf
• Repeat layers of covering, as desired, but use hair spray for the intermediate layers
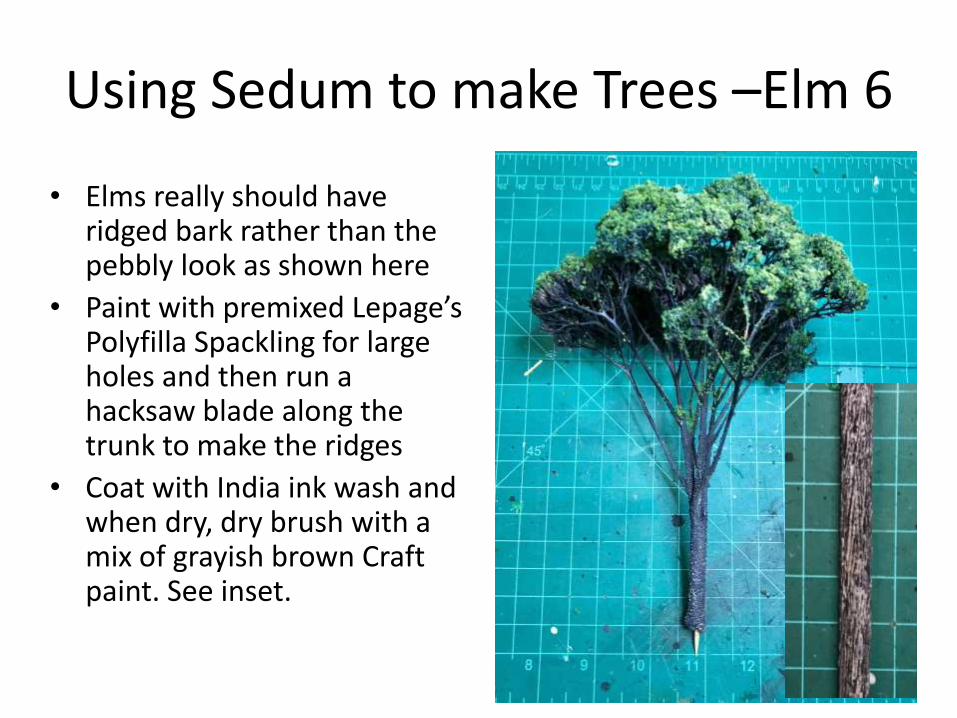
Using Sedum to make Trees –Elm 6
• Elms really should have ridged bark rather than the pebbly look as shown here
• Paint with premixed Lepage’s Polyfilla Spackling for large holes and then run a hacksaw blade along the trunk to make the ridges
• Coat with India ink wash and when dry, dry brush with a mix of grayish brown Craft paint. See inset.
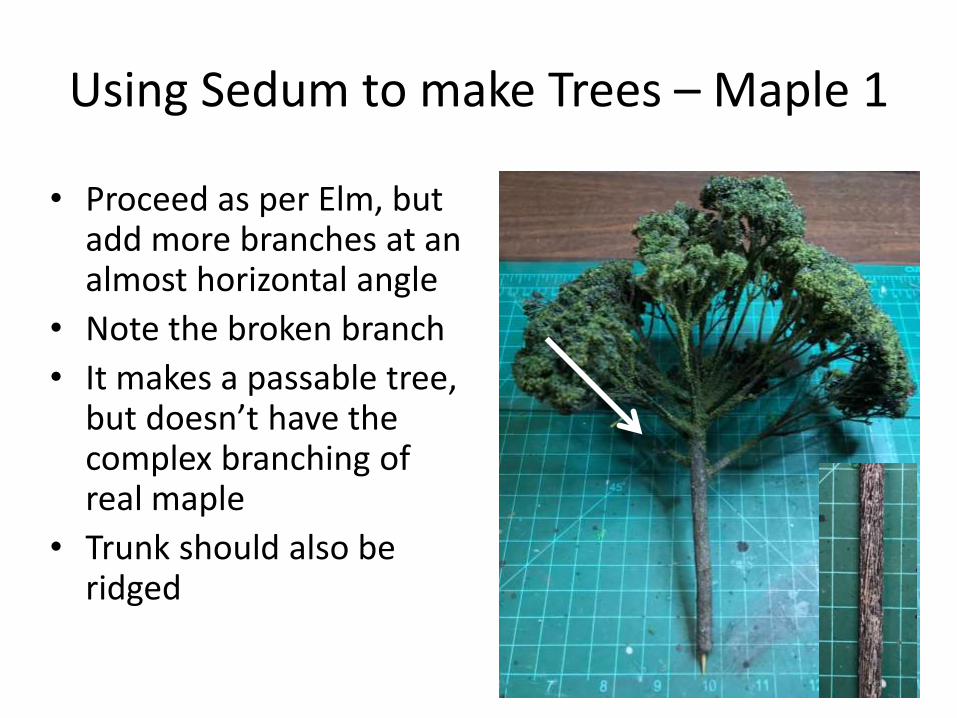
Using Sedum to make Trees – Maple 1
• Proceed as per Elm, but add more branches at an almost horizontal angle
• Note the broken branch
• It makes a passable tree, but doesn’t have the complex branching of real maple
• Trunk should also be ridged
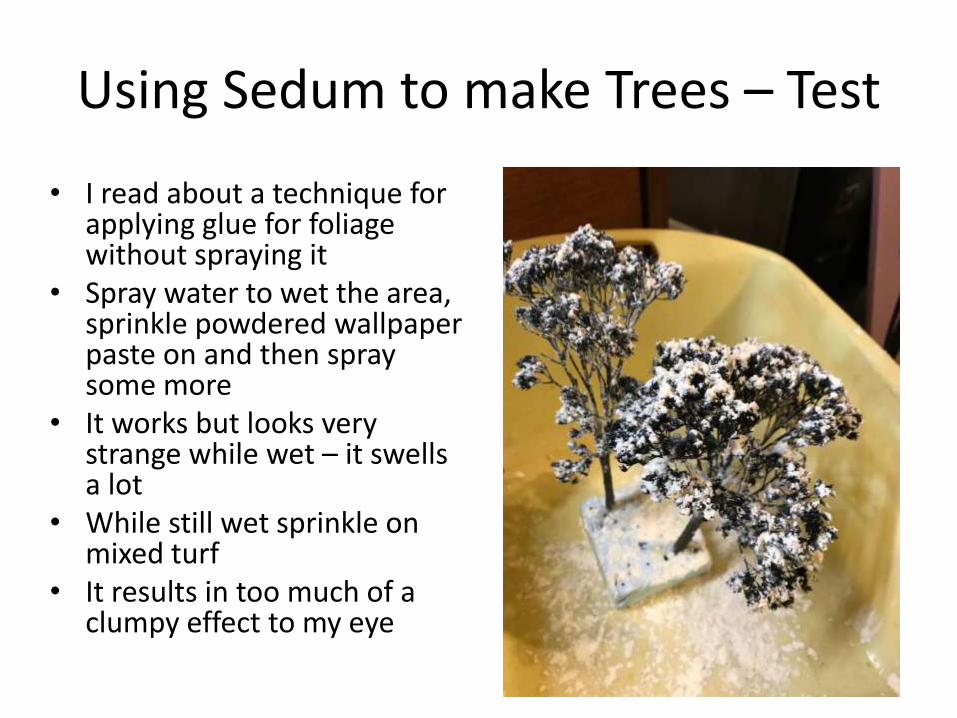
Using Sedum to make Trees – Test
• I read about a technique for applying glue for foliage without spraying it
• Spray water to wet the area, sprinkle powdered wallpaper paste on and then spray some more
• It works but looks very strange while wet – it swells a lot
• While still wet sprinkle on mixed turf
• It results in too much of a clumpy effect to my eye
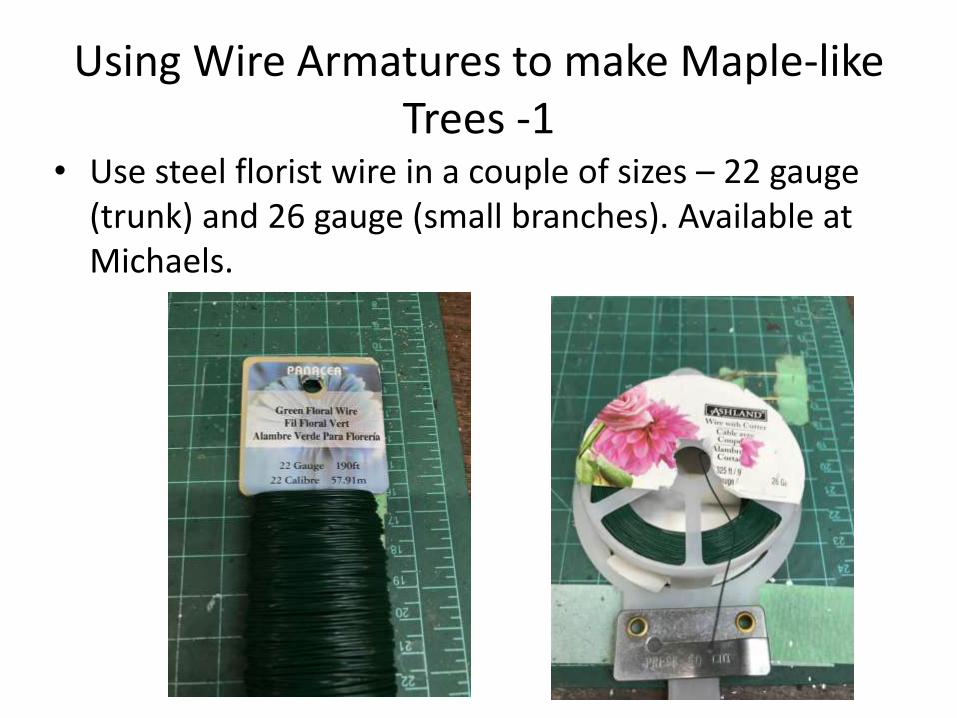
Using Wire Armatures to make Maple-like Trees -1
• Use steel florist wire in a couple of sizes – 22 gauge (trunk) and 26 gauge (small branches). Available at Michaels.
Using Wire Armatures to make Maple-like Trees -2
• Cut several to many (depending on desired trunk size (4-16)) 22 gauge wires a bit longer than the desired tree height.
• Twist the bottom 1/3 together
• Keep several wires together at the bottom for a spike (I added a toothpick drilled down the middle on the spike for better stability)
• Also bend pairs of wires together at bottom for roots – leave them sticking out horizontally
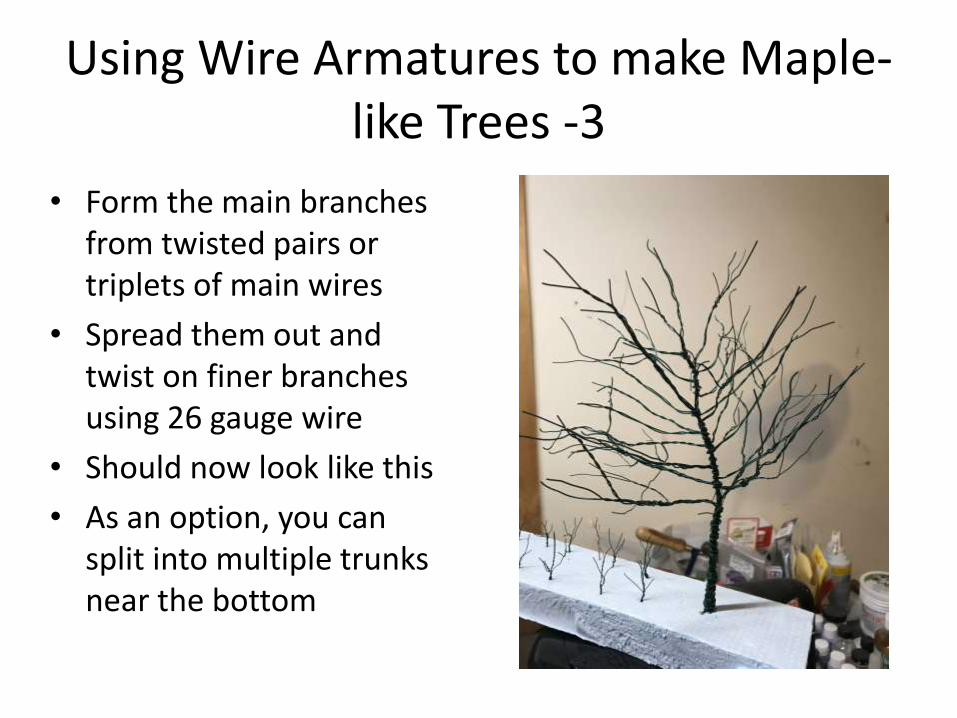
Using Wire Armatures to make Maple-like Trees -3
• Form the main branches from twisted pairs or triplets of main wires
• Spread them out and twist on finer branches using 26 gauge wire
• Should now look like this
• As an option, you can split into multiple trunks near the bottom
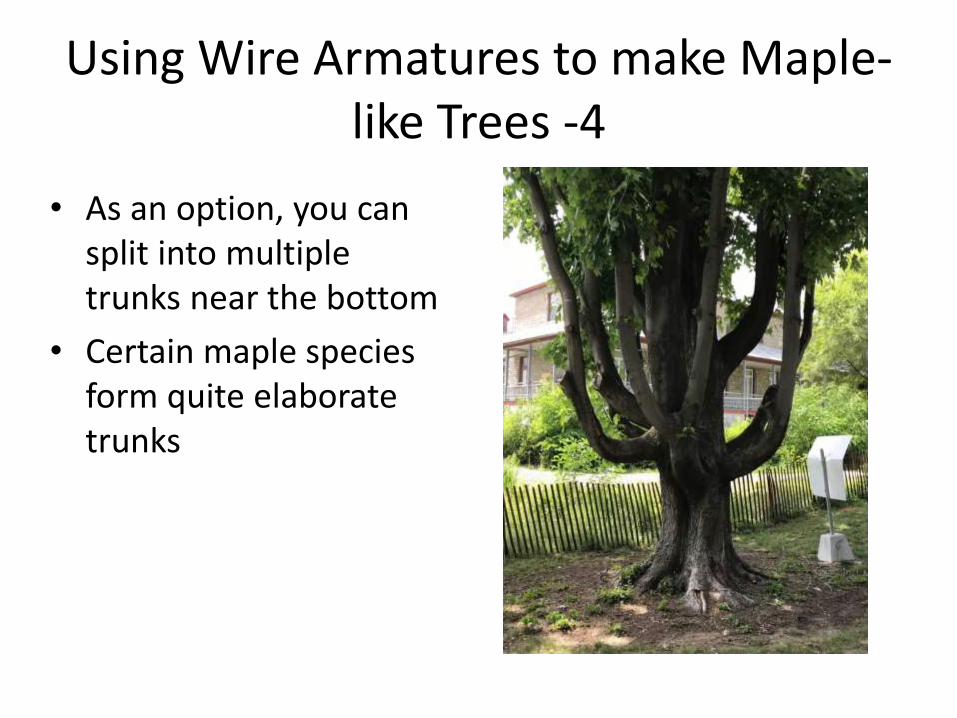
Using Wire Armatures to make Maple-like Trees -4
• As an option, you can split into multiple trunks near the bottom
• Certain maple species form quite elaborate trunks

Using Wire Armatures to make Maple-like Trees -5
• Using the thick carpenters (PVA) glue, paint the trunk and main branches with glue and sprinkle with the fine, filtered sand
• Repeat until it is desired size and the wire windings are hidden (maybe 4-5 times)
• If you wind the wires closer together than I did, you have less work to do at this stage
Using Wire Armatures to make Maple-like Trees -6
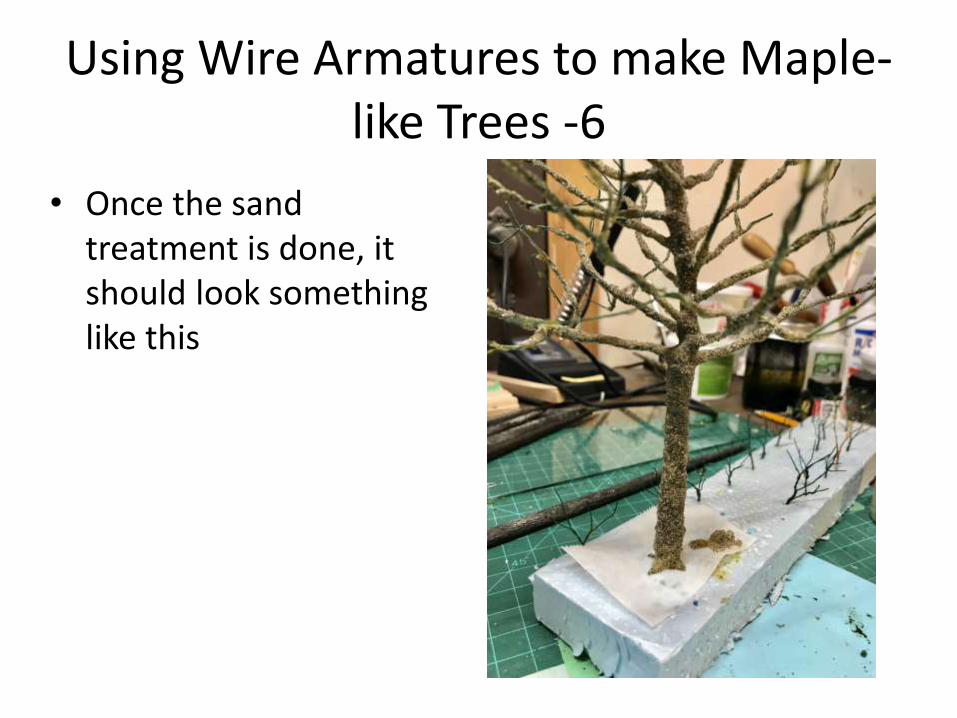
• Once the sand treatment is done, it should look something like this
Using Wire Armatures to make Maple-like Trees -6
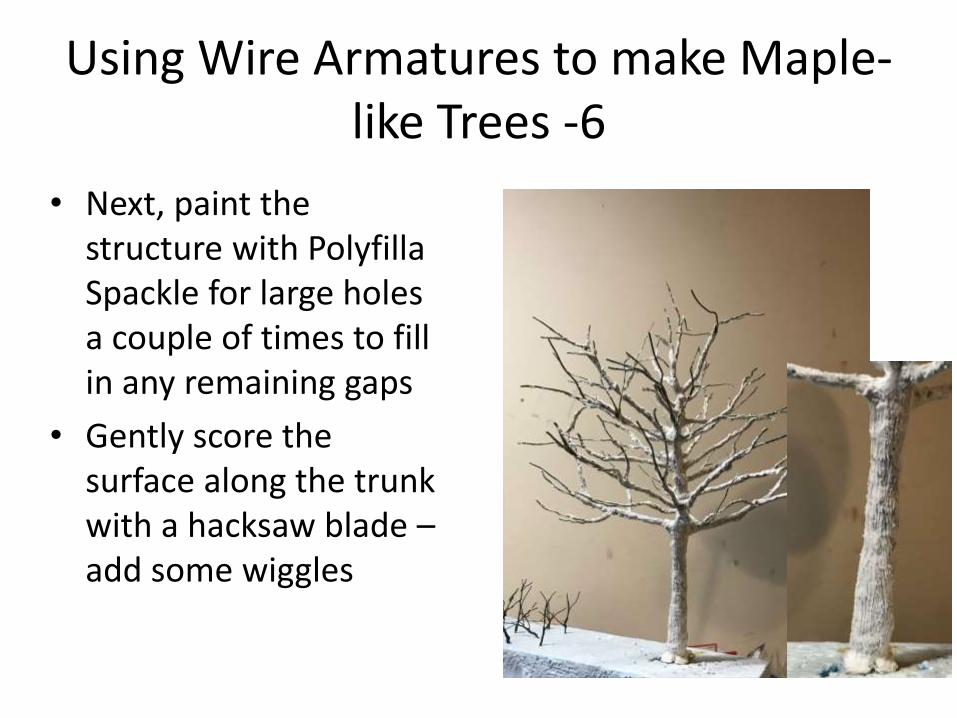
• Next, paint the structure with Polyfilla Spackle for large holes a couple of times to fill in any remaining gaps
• Gently score the surface along the trunk with a hacksaw blade – add some wiggles

Using Wire Armatures to make Maple-like Trees -7
• Paint the tree with India ink wash and let dry
• Touch up any bare wires with grey Craft paint
• Dry brush the tree with a brownish grey Craft paint mix
Using Wire Armatures to make Maple-like Trees -8
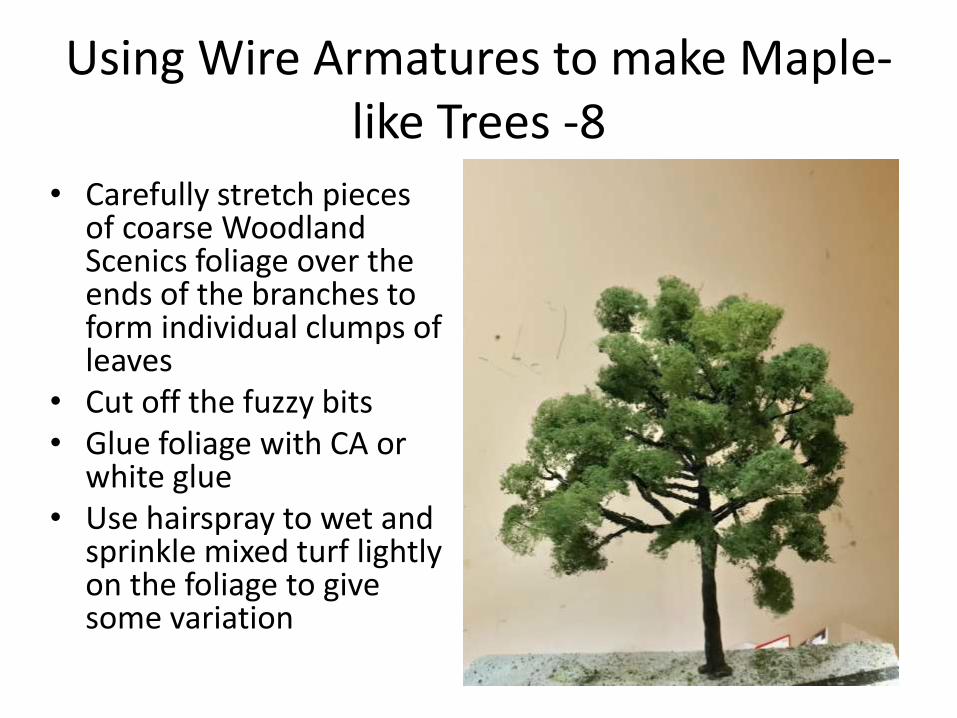
• Carefully stretch pieces of coarse Woodland Scenics foliage over the ends of the branches to form individual clumps of leaves
• Cut off the fuzzy bits • Glue foliage with CA or
white glue • Use hairspray to wet and
sprinkle mixed turf lightly on the foliage to give some variation
Using Wire Armatures to make Maple-like Trees -9
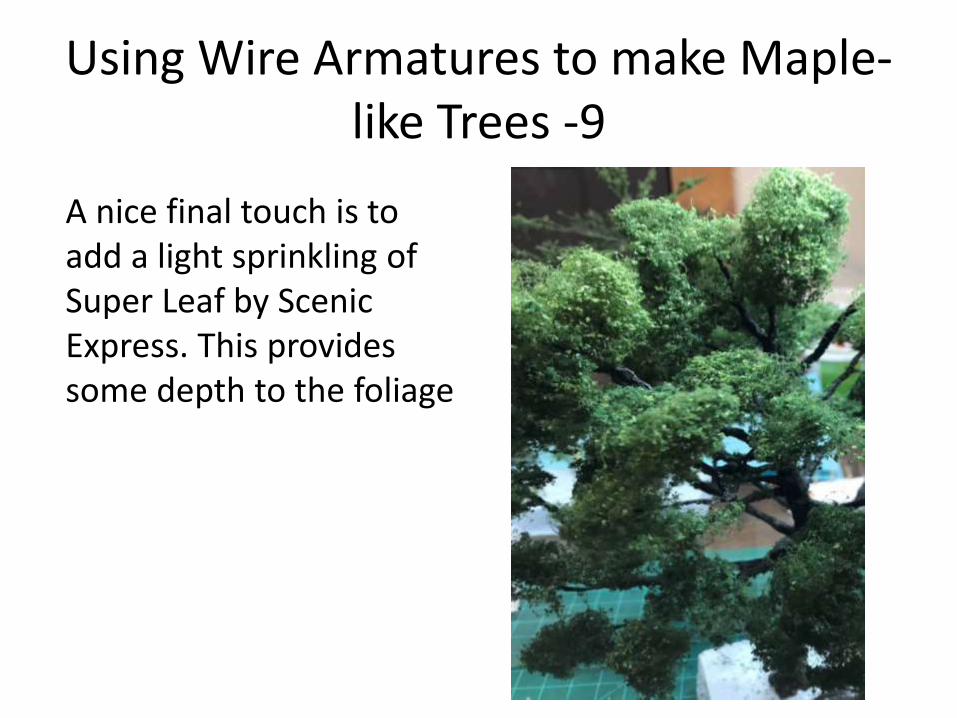
A nice final touch is to add a light sprinkling of Super Leaf by Scenic Express. This provides some depth to the foliage
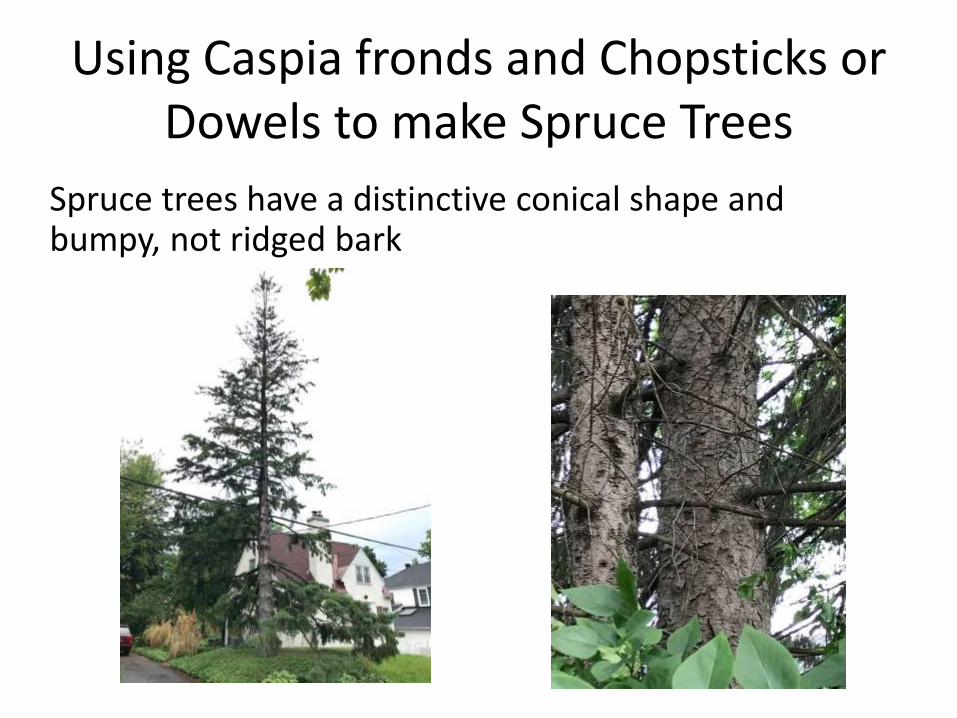
Using Caspia fronds and Chopsticks or Dowels to make Spruce Trees
Spruce trees have a distinctive conical shape and bumpy, not ridged bark

Using Caspia fronds and Chopsticks or Dowels to make Spruce Trees -1
Starting with Dollar Store chopsticks, clean off handles and then add point on end and fill in the grooves with Spackle.
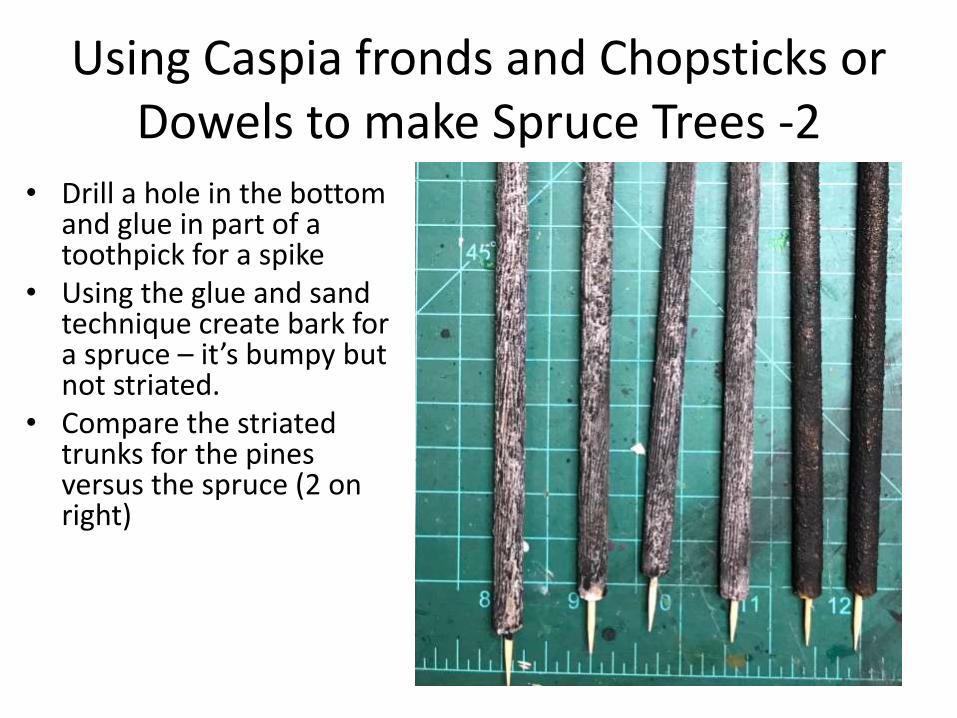
Using Caspia fronds and Chopsticks or Dowels to make Spruce Trees -2
• Drill a hole in the bottom and glue in part of a toothpick for a spike
• Using the glue and sand technique create bark for a spruce – it’s bumpy but not striated.
• Compare the striated trunks for the pines versus the spruce (2 on right)
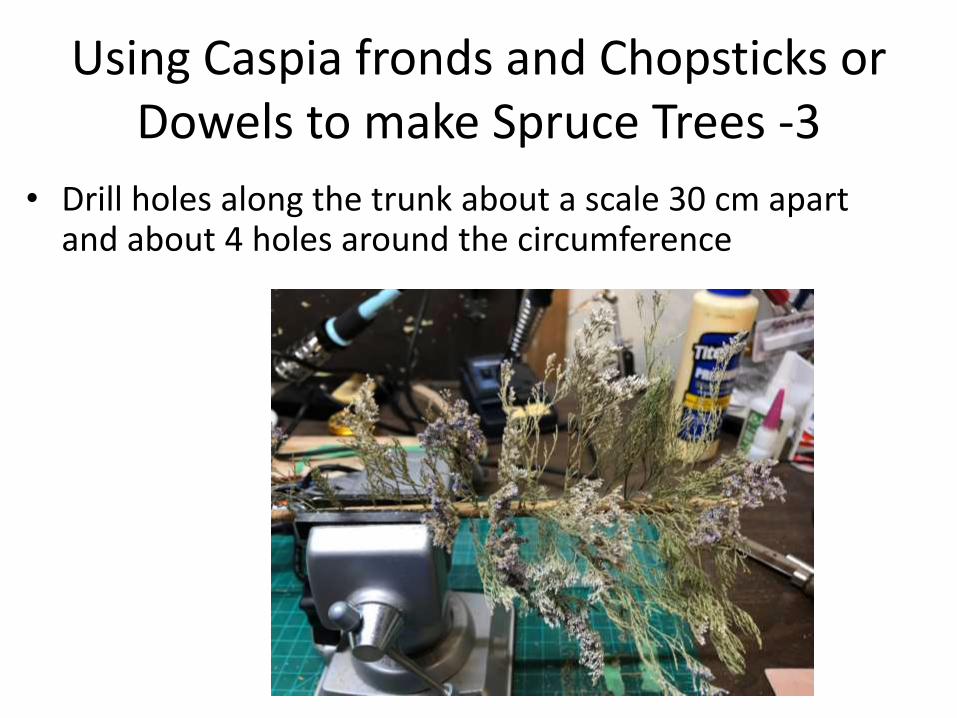
Using Caspia fronds and Chopsticks or Dowels to make Spruce Trees -3
• Drill holes along the trunk about a scale 30 cm apart and about 4 holes around the circumference
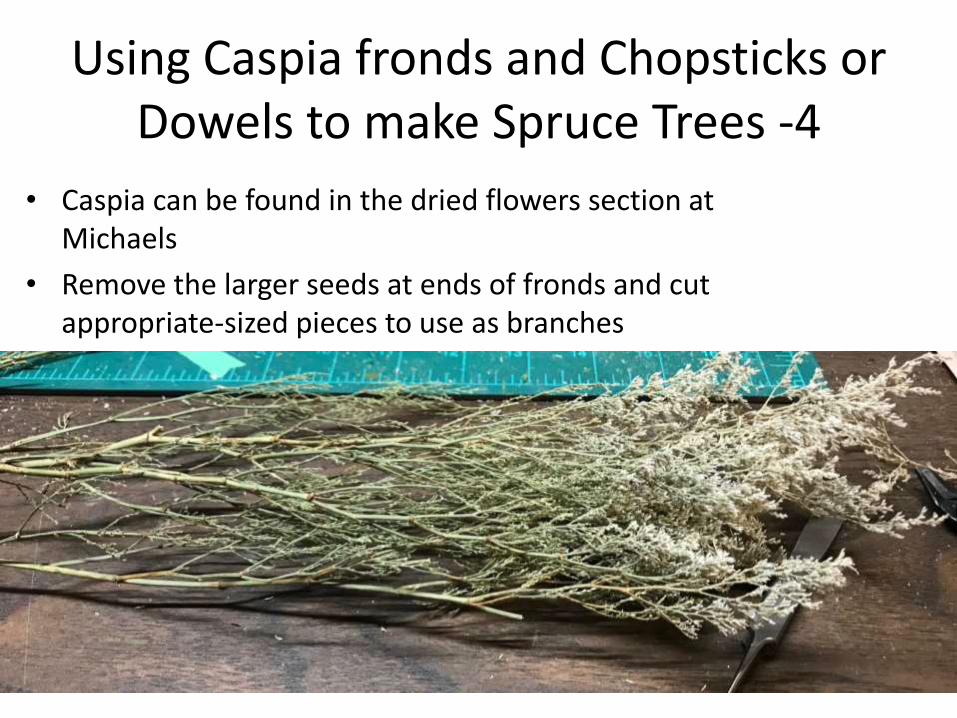
Using Caspia fronds and Chopsticks or Dowels to make Spruce Trees -4
• Caspia can be found in the dried flowers section at Michaels
• Remove the larger seeds at ends of fronds and cut appropriate-sized pieces to use as branches
Using Caspia fronds and Chopsticks or Dowels to make Spruce Trees -5
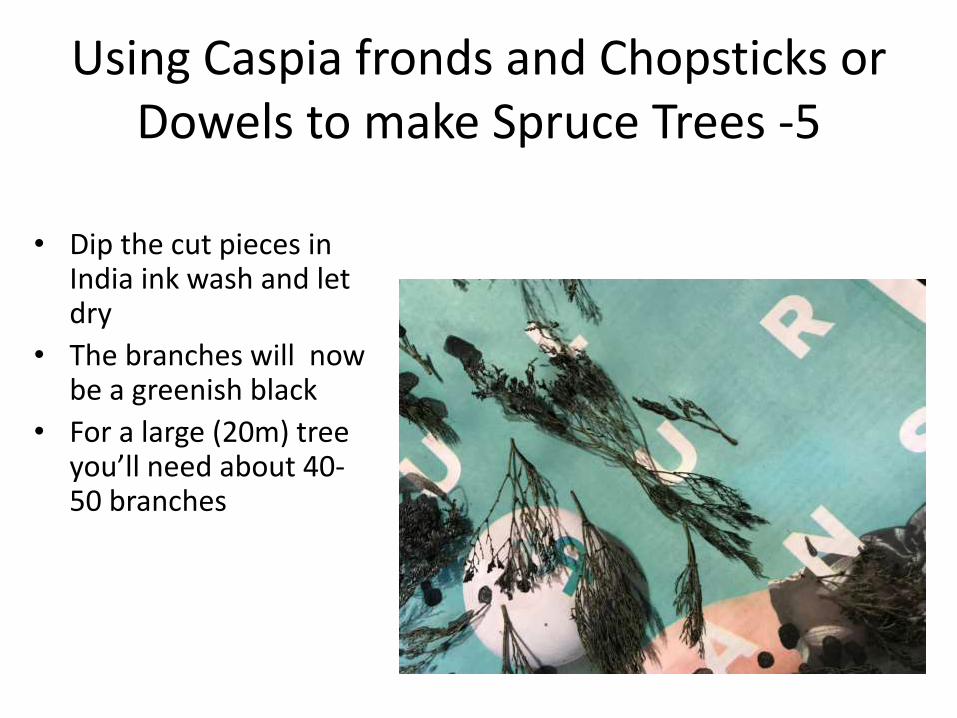
• Dip the cut pieces in India ink wash and let dry
• The branches will now be a greenish black
• For a large (20m) tree you’ll need about 40-50 branches
Using Caspia fronds and Chopsticks or Dowels to make Spruce Trees -6
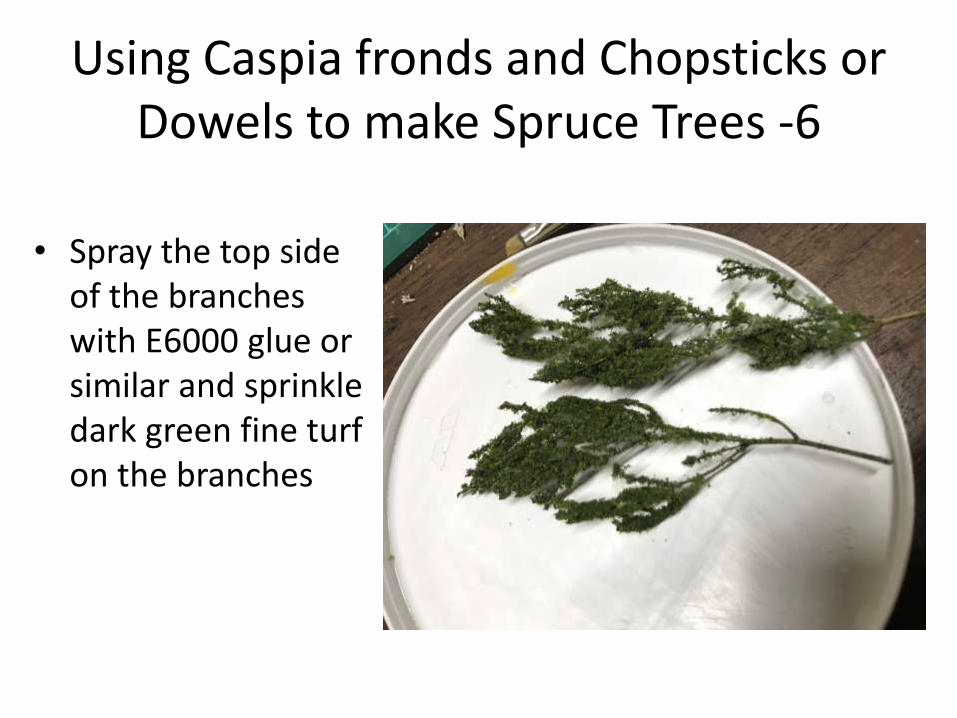
• Spray the top side of the branches with E6000 glue or similar and sprinkle dark green fine turf on the branches
Using Caspia fronds and Chopsticks or Dowels to make Spruce Trees -7
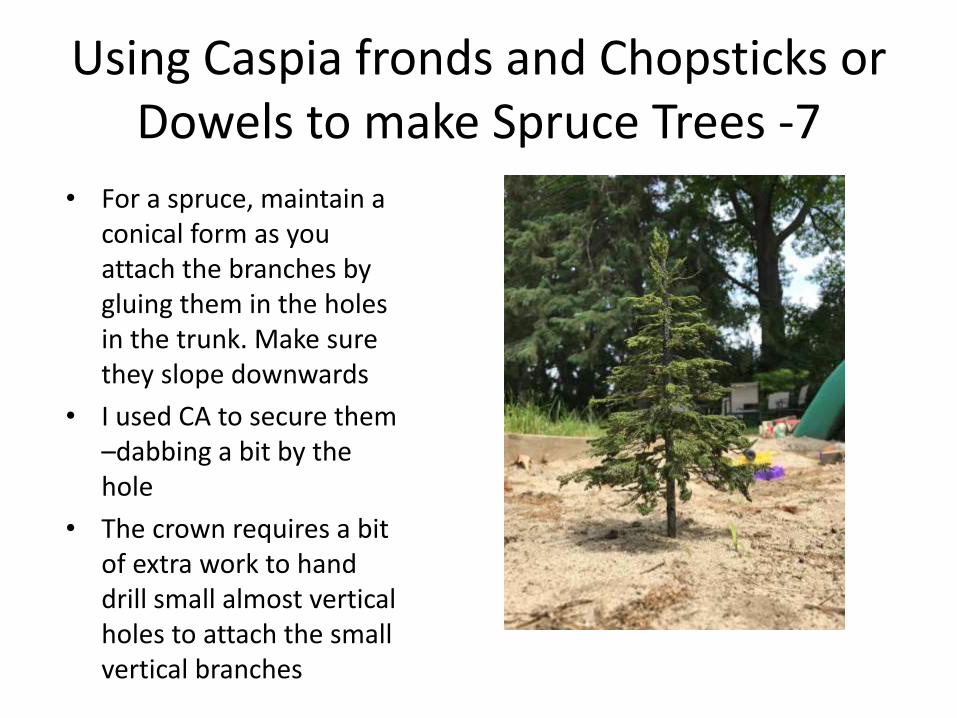
• For a spruce, maintain a conical form as you attach the branches by gluing them in the holes in the trunk. Make sure they slope downwards
• I used CA to secure them –dabbing a bit by the hole
• The crown requires a bit of extra work to hand drill small almost vertical holes to attach the small vertical branches
Using Caspia fronds and Chopsticks or Dowels to make Spruce Trees -9
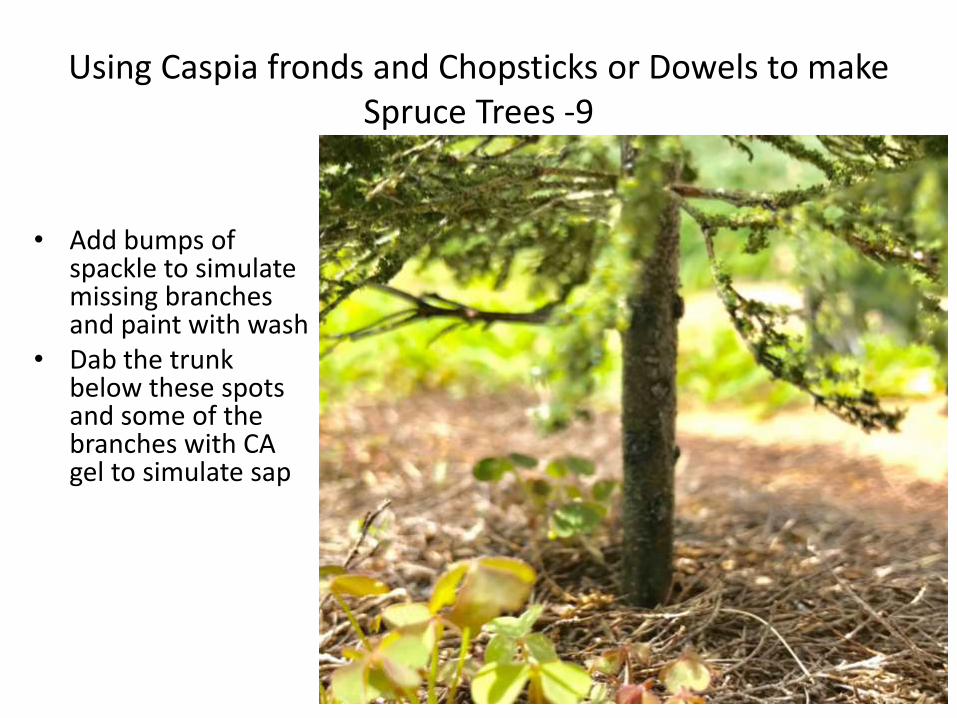
• Add bumps of spackle to simulate missing branches and paint with wash
• Dab the trunk below these spots and some of the branches with CA gel to simulate sap
Using Caspia fronds and Chopsticks or Dowels to make Spruce Trees -10
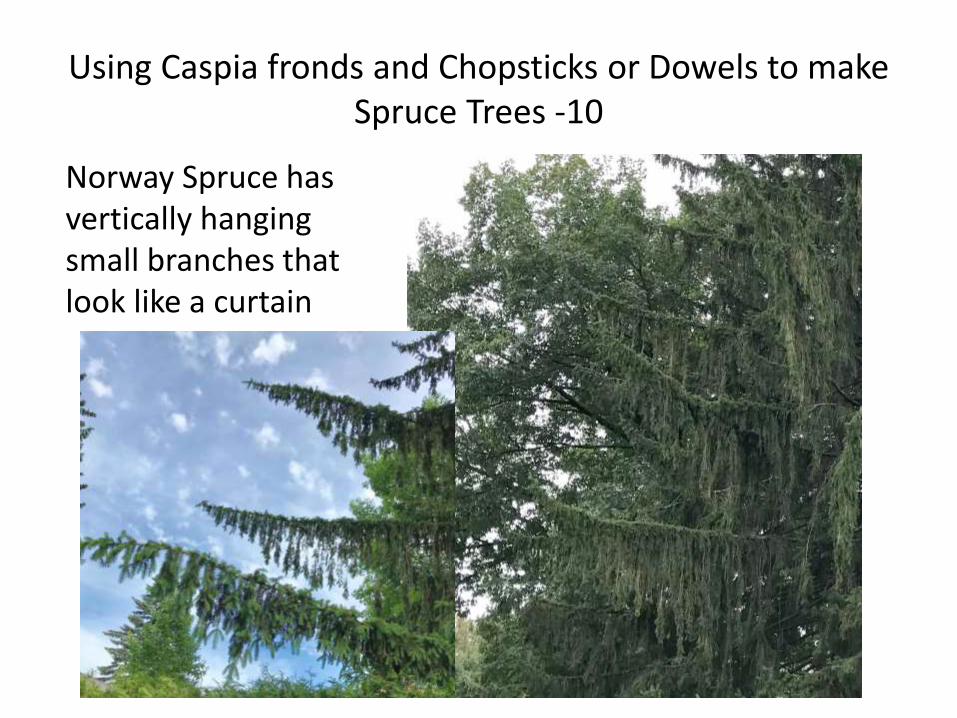
Norway Spruce has vertically hanging small branches that look like a curtain
Using Caspia fronds and Chopsticks or Dowels to make Spruce Trees -11
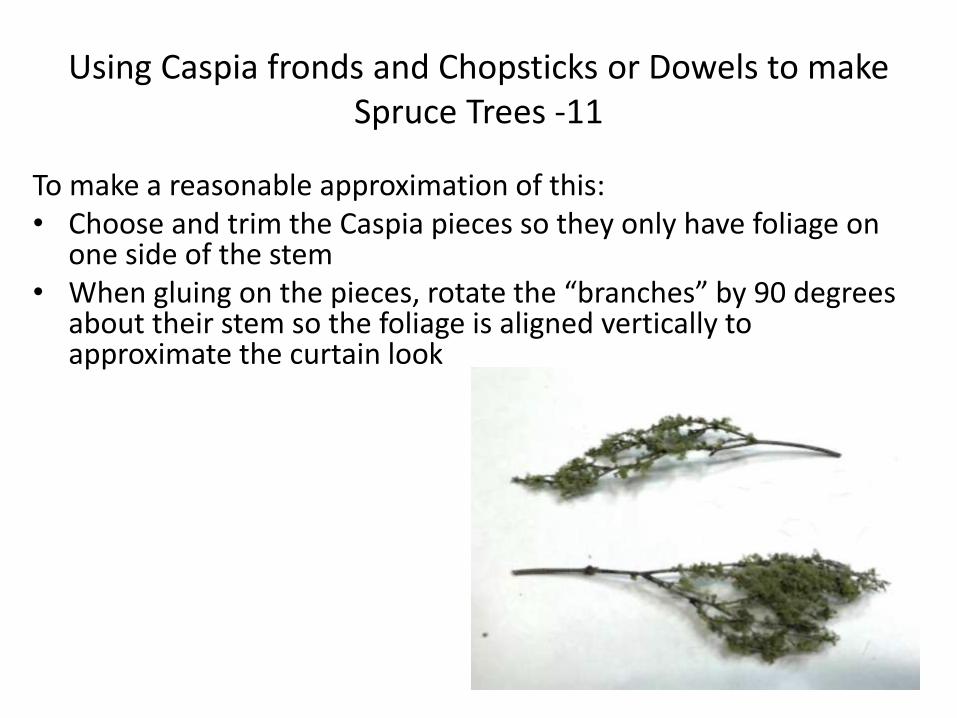
To make a reasonable approximation of this: • Choose and trim the Caspia pieces so they only have foliage on
one side of the stem • When gluing on the pieces, rotate the “branches” by 90 degrees
about their stem so the foliage is aligned vertically to approximate the curtain look
Using Caspia fronds and Chopsticks or Dowels to make Spruce Trees -12
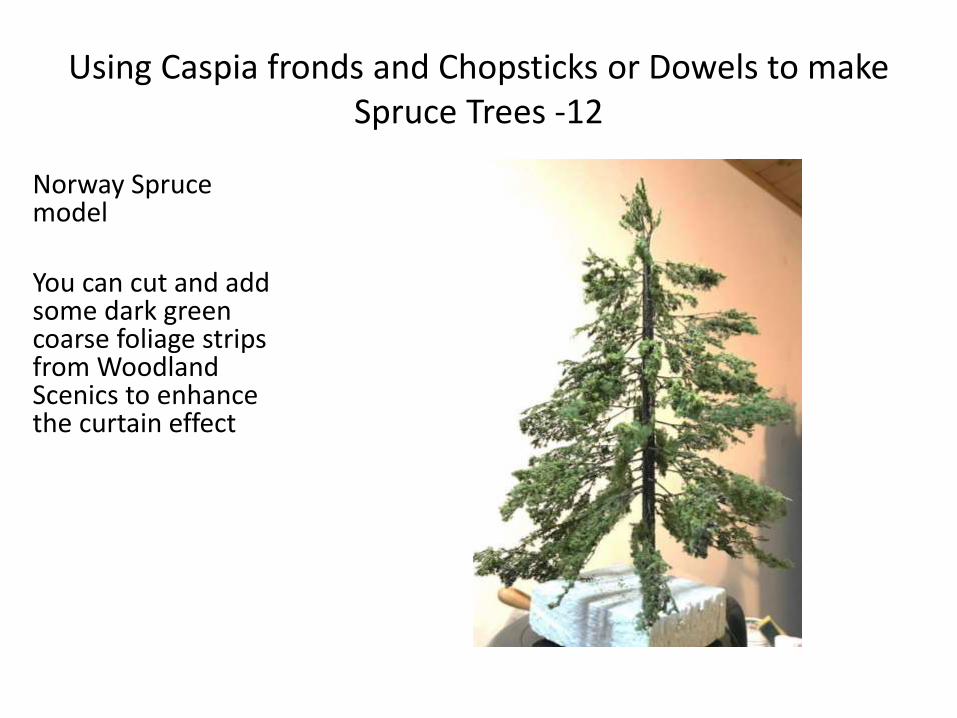
Norway Spruce model You can cut and add some dark green coarse foliage strips from Woodland Scenics to enhance the curtain effect
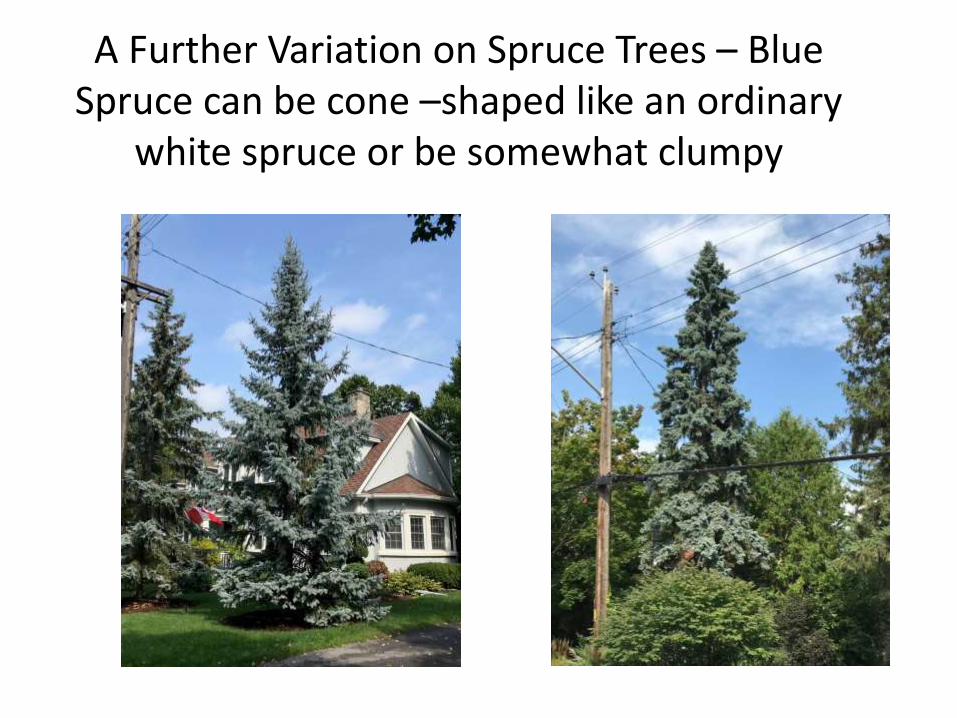
A Further Variation on Spruce Trees – Blue Spruce can be cone –shaped like an ordinary
white spruce or be somewhat clumpy
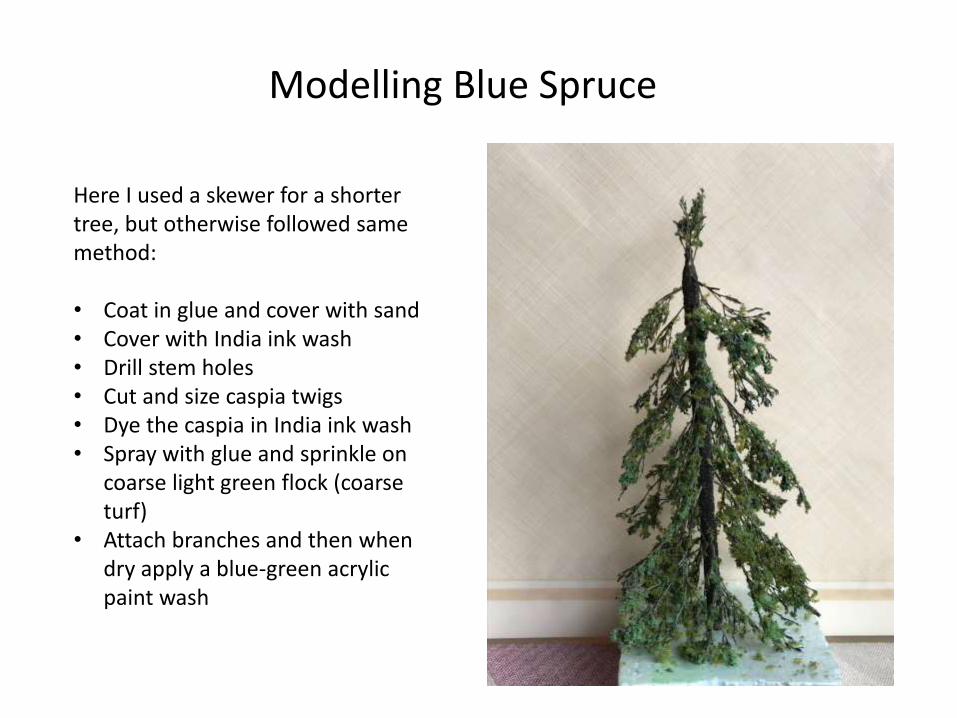
Modelling Blue Spruce
Here I used a skewer for a shorter tree, but otherwise followed same method: • Coat in glue and cover with sand • Cover with India ink wash • Drill stem holes • Cut and size caspia twigs • Dye the caspia in India ink wash • Spray with glue and sprinkle on
coarse light green flock (coarse turf)
• Attach branches and then when dry apply a blue-green acrylic paint wash
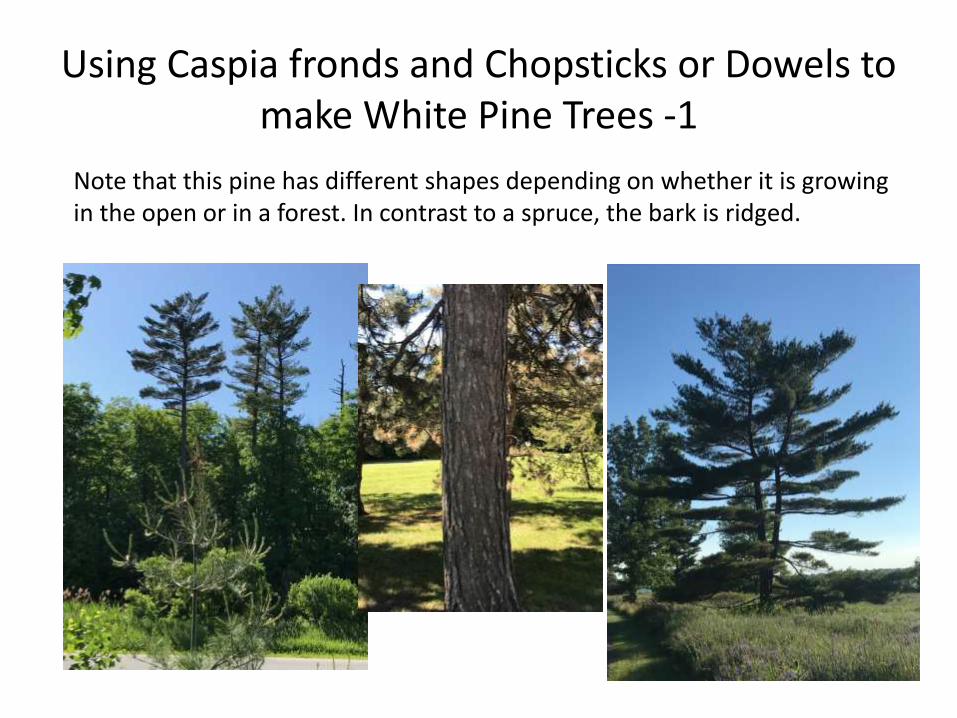
Using Caspia fronds and Chopsticks or Dowels to make White Pine Trees -1
Note that this pine has different shapes depending on whether it is growing in the open or in a forest. In contrast to a spruce, the bark is ridged.
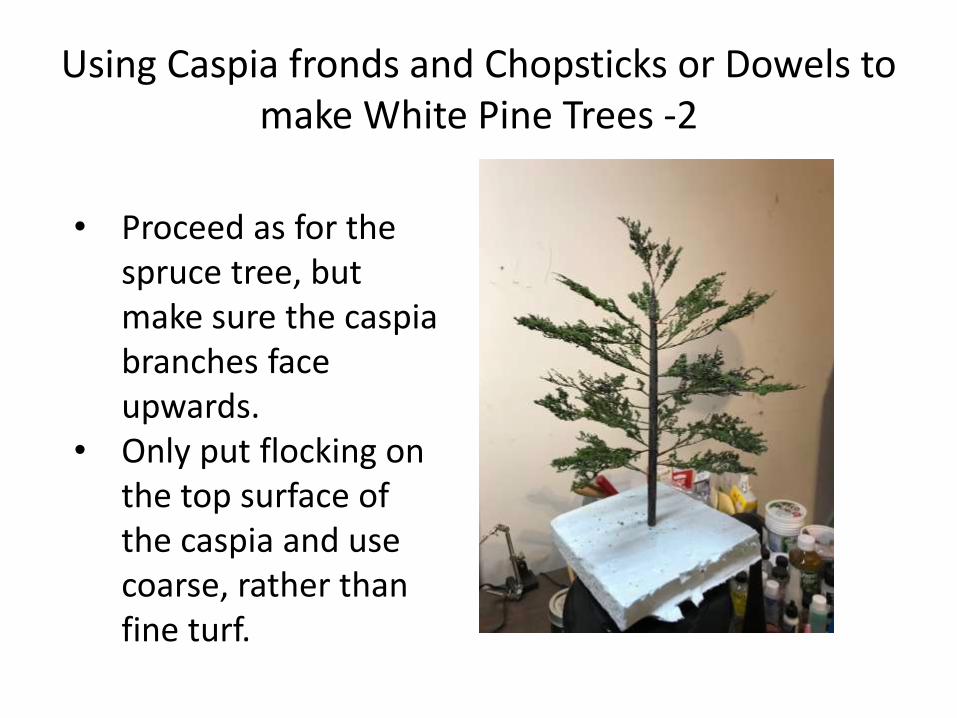
Using Caspia fronds and Chopsticks or Dowels to make White Pine Trees -2
• Proceed as for the spruce tree, but make sure the caspia branches face upwards.
• Only put flocking on the top surface of the caspia and use coarse, rather than fine turf.
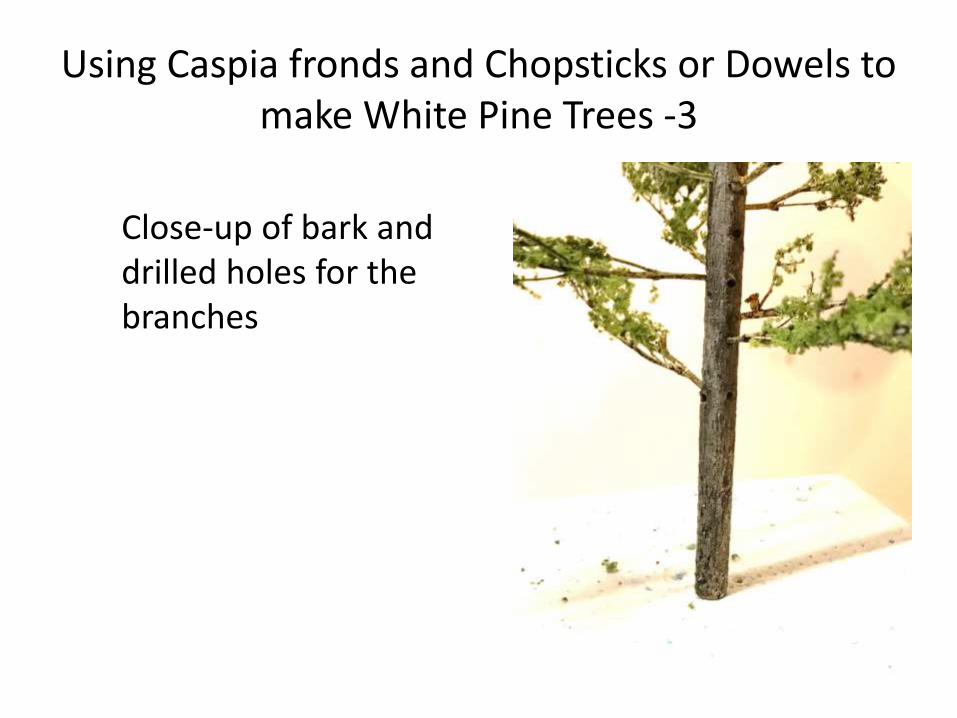
Using Caspia fronds and Chopsticks or Dowels to make White Pine Trees -3
Close-up of bark and drilled holes for the branches
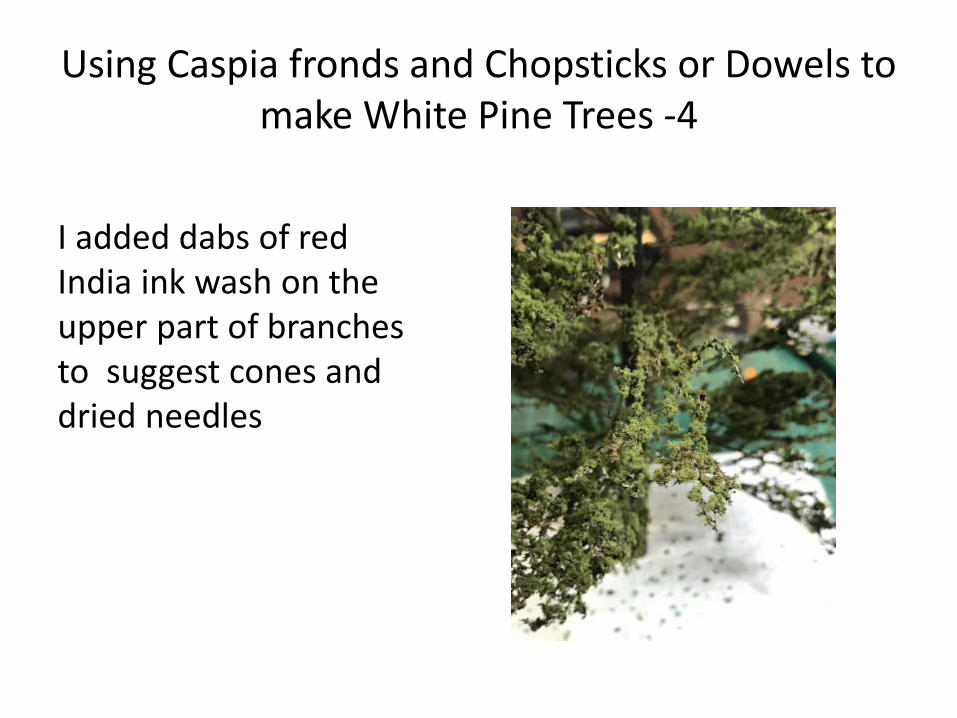
Using Caspia fronds and Chopsticks or Dowels to make White Pine Trees -4
I added dabs of red India ink wash on the upper part of branches to suggest cones and dried needles
Using Caspia fronds and Chopsticks or Dowels to make White Pine Trees - 5
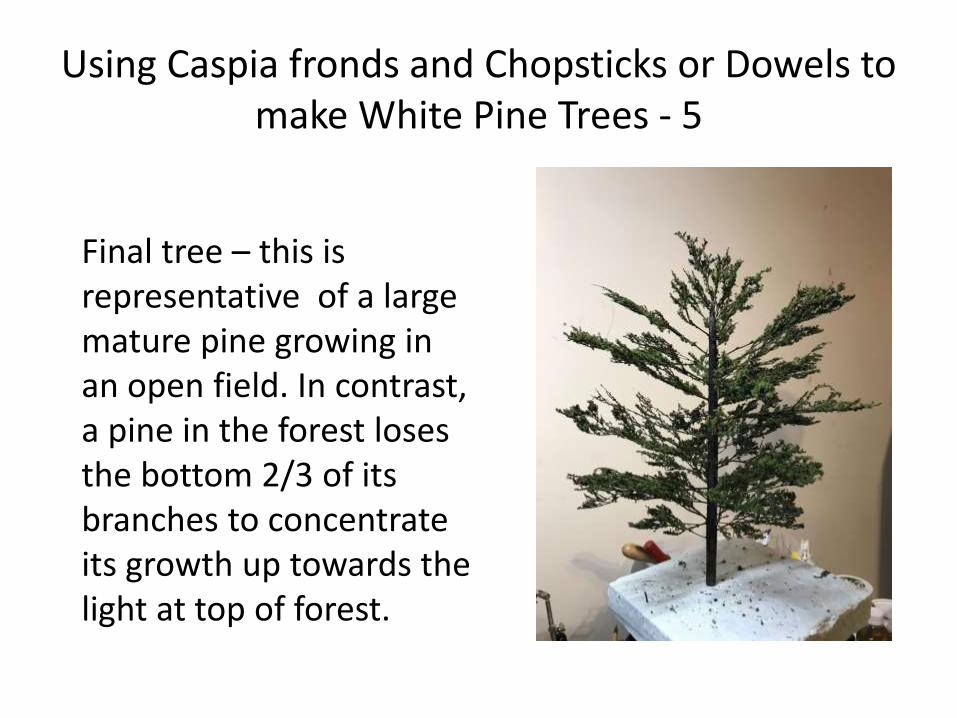
Final tree – this is representative of a large mature pine growing in an open field. In contrast, a pine in the forest loses the bottom 2/3 of its branches to concentrate its growth up towards the light at top of forest.
Using Caspia fronds and Chopsticks or Dowels to make White Pine Trees - 6
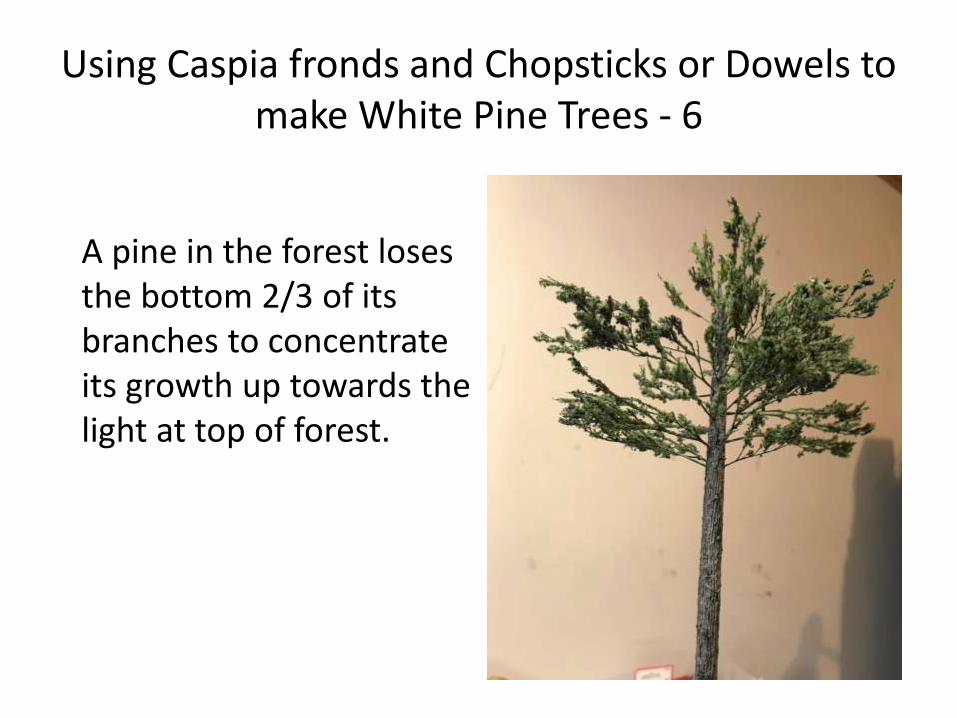
A pine in the forest loses the bottom 2/3 of its branches to concentrate its growth up towards the light at top of forest.
Using Caspia fronds and Chopsticks or Dowels to make
White Pine Trees - 7
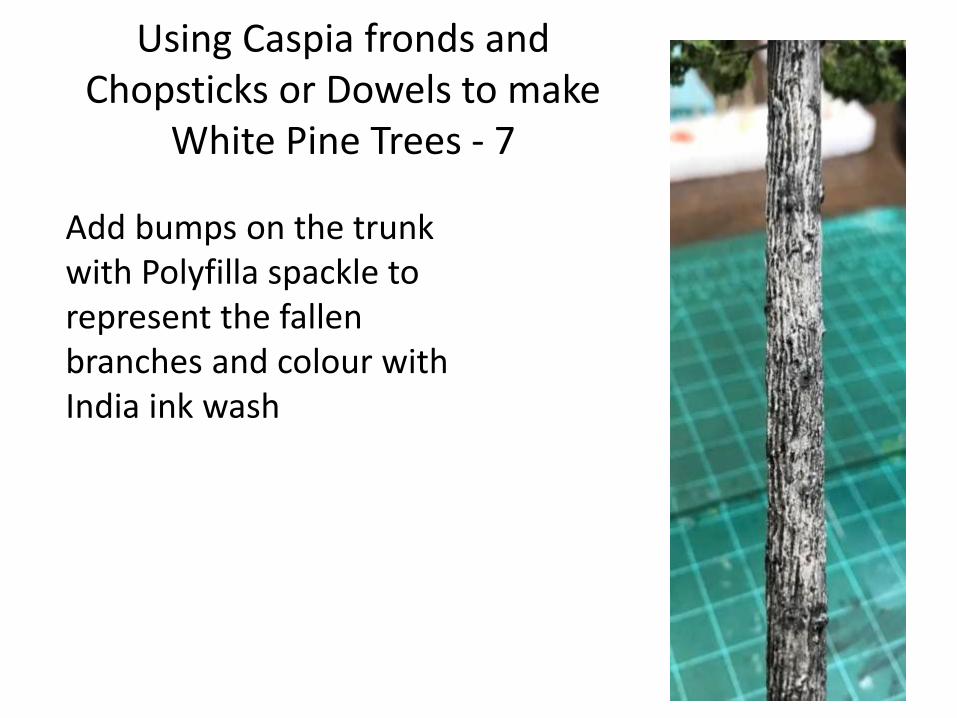
Add bumps on the trunk with Polyfilla spackle to represent the fallen branches and colour with India ink wash
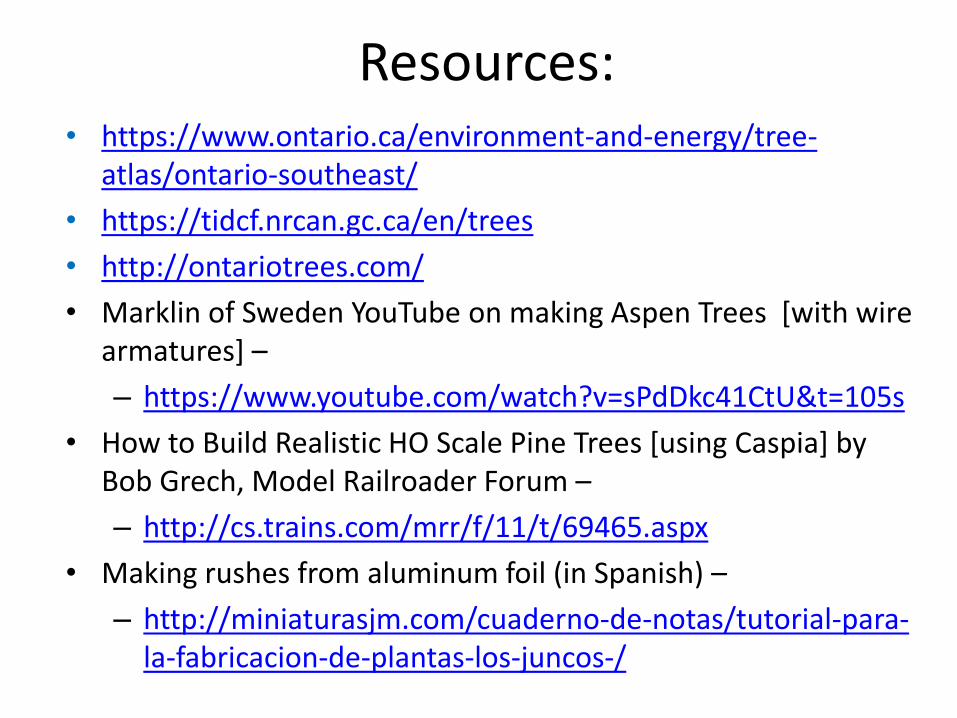
Resources: • https://www.ontario.ca/environment-and-energy/tree-
atlas/ontario-southeast/
• https://tidcf.nrcan.gc.ca/en/trees
• http://ontariotrees.com/
• Marklin of Sweden YouTube on making Aspen Trees [with wire armatures] –
– https://www.youtube.com/watch?v=sPdDkc41CtU&t=105s
• How to Build Realistic HO Scale Pine Trees [using Caspia] by Bob Grech, Model Railroader Forum –
– http://cs.trains.com/mrr/f/11/t/69465.aspx
• Making rushes from aluminum foil (in Spanish) –
– http://miniaturasjm.com/cuaderno-de-notas/tutorial-para-la-fabricacion-de-plantas-los-juncos-/