Embed Size (px)
Citation preview

A. Title Page
B. Project Proposal And Project Management
i. Project Proposal
- Identification Of Needs
- Areas Of Investigation
- Criteria To Evaluate Success
ii. Action Plans
iii. Time Plans
iv. Finance Plans
v. Resources
- Selection Of Ideas And Resources
C. Project Development And Realisation
vi. Idea Generation
- Sketches
- Computer Modifications
vii. Research
- Design Ideas
- Materials
- Tools
- Techniques
- Application Of Conclusions
- Evidence
viii. Experimentation
ix. Testing
x. Final Design
- Materials List
- Orthographic Drawings
- Presentation Drawings
- Construction Drawings

xi. Features Of Final Design
xii. Construction Of Chair/Table
- Legs
- Wood Laminating
- Backrest
- Veneering
- Finishing
xiii. Industrial Processes Related To Design Project
D. Evaluation
xiv. Final Evaluation

Identification Of Needs
To design and construct a chair of modern and unique design which incorporates a flat surface(s) that may be used for writing, coffee mugs,
books, lamps, a telephone or remote controls. The chair/table not only has to be an aesthetically pleasing design, but also suitable for use and
able to be sat on for long periods of time. When finished the chair/table has to be suited to the other surrounding furniture in its designated
environment.
Areas Of Investigation
Existing Designs
Telephone tables/benches, modern and artistic chairs and chairs with a flat area, which may be used to rest objects on, were researched
from the Internet, woodworking books from both the library and home, magazines and television shows.
Ergonomics
Research, testing and experimentation were made into the height of the chair and the height of the table. Also experimentation was made
into the backrest angle and height for the correct sitting posture and comfort.

E.
F. Aesthetics
The modern design and appearance will have a big effect and influence the project greatly. In researching an aesthetically pleasing design it
will have to be unique in design, have smooth, curved edges with a nice type of wood and modern. A creative design is also needed enabling it
to look good in any area.
Woodworking Techniques
Investigation and research on the Internet and from industries into different techniques of wood bending and laminating were made to
ensure that the area that needed laminating was going to be sturdy, safe and stable. Different ways of applying the veneer and different types
of glues were also looked at to prevent bubbles forming but still maintain its hold.
G.
H. Joining Process
The process of joining the table to chair, the legs to the seat, and backrest to the project were all looked at not only for sturdiness but also
for functionality and safety.

Materials
Research into different types of woods including solid and veneer. Metal bending and glass considered. Upholstery for the back and seat of
the chair were also looked into. Types of glue researched so that the appropriate glue was used for tasks as in timber framing, MDF laminating
and veneering.
I.
J. Finishes
Investigation into different types of stains for different types of woods, lacquers and finishing processes such as distressing wood, varnishing
and waxing. Experimentation was done with different stains on the veneer to ensure the correct finish colour was achieved.
Cost
To have an approximate finance plan and budget to stick to, research was needed to price different types of woods, glues, screws, nails and
stains.
Other things that also needed to be investigated were functionality, appropriateness of design solution, production and process methods,
amount of space, life cycle analysis, and durability and obsolescence.

Criteria To Evaluate Success
The following questions should be asked to ensure the design is to its highest quality.
Durability & Obsolescence
How long has the project been made to last for?
Will it withstand all conditions? e.g. weight and usage.
Will the design remain modern for years to come?
Sturdiness
Does all two/four legs sit on the ground evenly?
How much weight will the chair be able to hold?
Is the table stable when in use?
Safe
Are there any protruding or dangerous areas?
Does it have any sharp edges?
Are correct materials used for maximum strength?
Comfortable
Are you able to sit on it for a long period of time?
Will it suit other people?
Does the backrest support the higher and lower back regions?
Is the table area large enough?
Are you able to read and write comfortably?
Appearance
Have the correct finishing detail been achieved to the plan?
Is the chair aesthetically pleasing?
Will the design remain aesthetically pleasing in the future?
Will it look good in the area it is designated for?
Other things to consider include:
Is it functional?
What does it cost to produce?
How does it compare to other products?
Does it suit my personal liking?
Action Plan 1
November/December 2000 (Christmas Holidays)
Research existing designs of projects from books, magazines, Internet and the Melbourne Wood Show.
When a project has been chosen, (eg. chair, table, lamp), research existing designs of the project.
Modify existing designs to personal liking using a scanner and computer generated drawings or with a photocopied picture of the
project and add modifications using a pencil.
Create, sketch and draw numerous own designs.
Narrow the number of sketches down to one. The design chosen should incorporate aspects from identifications of needs and area of
investigation as well as give positive answers to questions from criteria of evaluate success.
Draw scaled drawing of chosen design both in orthographic projection and dimension orthographic formats.
Evaluation:
Successfully chose a project with the design of chair/table. The project was a modification of a pervious design found in a woodworking book
in the library.
Action Plan 2
January/February 2001
During the holidays draw a life size front and side view of the project onto a piece of cardboard. This will make it easier later on when it
comes to getting shapes and sizes for the project.
Purchase radiata pine to construct legs at school on the first day.
At school make a template of the leg shape using 9mm plywood and tracing the shape onto the wood.
Using a router with a trimming bit and the plywood template, cut out ten sets of legs. The legs are part of the carcase to be
constructed for the two sides.
Evaluation:
Whilst the drawing of the project and purchasing of wood was successful on the holidays, unfortunately not all the legs had been cut out and
an extra couple of weeks were taken.
Action Plan 3
March/April 2001 (Easter Holidays)
Cut top and bottom plates to size. Mark out even spacing for legs. Cut rebate for 10 legs.
Make a jig out of scrap wood that will be used for the wood laminating of seat and lower shelf.
Using the Laminex Craftform technique, make a test piece of wood laminated to see if it is strong and sturdy enough.
Using MDF, cut groves with a circular hand saw width ways at the point at which the wood is bending. This will be the laminate from
the seat to the upper table.
Do a dry run of wood laminate to ensure it is correct. Glue and clamp it into the jig and leave overnight.
Use another technique of laminating the desired curve for the lower table to the bottom shelf, by using seven pieces of 3mm ply. After
a dry run, glue and clamp.
Cut both laminates to correct size using large-scale drawing.
Evaluation:
The laminates were successfully made and were cut to the correct size. There was also time over the holidays to start creating the carcase for
the sides.

Action Plan 4
May/June 2001
Finish making the carcase for sides.
Cut sections of the leg carcase where the seat and lower shelf will pass through.
Nail these sections to noggins to allow the lower shelf and seat to be supported.
Fit extra noggings for support of veneering.
Veneer both laminate sections as well as the lower shelf.
Nail and glue the legs, lower shelf and seat together.
Evaluation:
The carcase of the project was successfully nailed, screwed and glued together to achieve the basic shape of the chair. I also had time to
make the backrest using MDF and cutting it out using a jigsaw. It was shaped using the disc sander.

Action Plan 5
July/August 2001
Veneer backrest.
Using liquid nails, glue 4mm veneer to each section on the carcase to enclose the legs.
Veneer the rest of the project including armrests, front of legs and table.
Stain entire project.
Estapol project twice.
Attach backrest to seat and legs.
Evaluation:
A lot of weekends and time spent clamping and gluing veneers to curved sides. This was the slowest and most difficult part of the project.
The project was successfully finished in time.
Evaluation Action Plan
The project was successfully built in time including all the veneering and staining. With these action plans, the project was built in sections
allowing it to come together in the correct order.
At times the project became very time consuming. Towards the end of the project when it came to some of the areas that needed veneering
and the trimming of the veneer it took up a lot of time.
Without these action plans it may have possibly meant not finishing the project in time or not to its highest standard.

Estimated Time Plan
Time is an important factor in any project. The main objective is to complete the project in time and complete it to its highest quality,
therefore a time plan is necessary. In the bar graph above the five critical points that need to be considered and done are displayed. Another
crucial point that also needs to be considered is the folio which will be recorded over the entire period of the project for such topics as
research, finance plans and action plans.

Research And Development
This initial step will probably take 8-9 weeks. It will involve research into a great deal of major project ideas including chairs, coffee tables
and cabinets. Once a project is chosen it will be further researched and developed to suit the area in which it will be put in and also to my own
liking.
Project Proposal
This includes the identification of needs, areas of investigation and criteria to evaluate success. It involves giving the
need for the project, looking at areas that need to be investigated such as ergonomics and woodworking techniques
and also making a list of questions relevant to the outcome of the project. About 5 weeks have been left for the
proposal.
Project Planning
An initial action, time and finance plan will need to be made. The action plan will involve an outlook to what will be achieved over the stated
time. These are important in ensuring the right steps are made at the right times. The time plan is shown above and is also an important step
in the project to ensure it is finished in time. The finance plan involves research into the approximate cost of the project and its materials.
Realisation/Construction
The construction of the project is the main section of the time plan. 2 ½ terms have been left for the construction as well as time during the
holidays. This involves the initial step of the project, purchasing the materials, right up until the finishing and staining.
Evaluation
My personal evaluation could be dramatically underestimated with different types of materials and construction not familiarised with me.
Another persons opinion, (preferably in the building trade) could be very invaluable in judging a more realistic effort, time and cost.
I’ve allowed an extra 3 weeks or 20 man hours to cover any unforseen problems that may arise.

Actual Time Devotion
Time Plan Evaluation
The construction of the project ended up taking a little longer than expected, therefore leaving less time for evaluations. The actual time
plan is very simular to the estimated time plan meaning it was beneficial in completing the project on time. The amount of time in total that
was spent on construction including school holidays and free periods was around 100 hours.
- Time spent on research, proposal and planning = 20 hours
- Time spent on construction = 100 hours
- Time spent on evaluation = 20 hours

Approximate Pricing
Wood
Radiata Pine – $ 50.00 MDF – $ 50.00 Ash Veneer – $ 150.00 ---------- $ 250.00
Glue
PVA – $ 10.00 Adhesive AV180 – $ 30.00
Contact Glue – $ 25.00 ----------
$ 65.00 Finishes
Stain – $ 10.00 Estapol – $ 10.00
---------- $ 20.00

Other Materials
Screws/Nails – $ 20.00
---------- $ 20.00 ----------
Total Price: $355.00
This is an approximate pricing plan that was constructed before the holidays. Hopefully, based on my budget, the whole project will come
under $360.00, but allowed $400.00 in case of extra materials, or if a drastic change needs to be made throughout the making of the project.

Actual Pricing
During the purchase of materials dockets and receipts were kept in order to see the total price spent on the project.
Wood (Grant’s – Lavington; Border Laminate Co. – Lavington)
Radiata Pine – $ 46.18 9mm MDF – $ 53.40 3mm MDF – $ 15.00 Ash Veneer – $ 109.07 ---------- $ 223.65
Glue (Border Laminate Co. – Lavington; Laminex Industries – Wodonga)
PVA 5L – $ 36.00 Adhesive AV180 500mL – $ 11.25 Contact Glue ($17 x 2) – $ 34.00 Liquid Nails ($5 x 2) – $ 10.00 ----------
$ 81.25 Finishes (Paint Right - Lavington)
Stain – $ 7.91 Estapol – $ 9.90 Putty – $ 3.60
----------

$ 21.41 Other Materials
Screws/Caps/Nails – $ 25.00 Non-Slip Buttons – $ 4.50
---------- $ 29.50
The entire project cost - $355.81.

Evaluation
The total pricing of the project was over the budget set, however under the maximum limit. Once I made a definite decision on the
construction method and materials to be used, it made the pricing more compatible to my estimate.
However some materials were underestimated. e.g. I only bought a 500mL container of MDF glue at $11.25 because it was the only type
available. It was all used up in only one of the laminated curve construction. I decided to buy a 5L container from another retailer because it
was a lot cheaper than buying 4 bottles of 500mL at $11.25. The left over glue will be used eventually on other jobs. Also the amount of
contact glue was underestimated. It would have been a lot cheap buying in bulk.
Extra wide Radiata Pine had to be used in the leg construction, which I didn’t forecast for, therefore it cost a little more also. The Light Ash
veneer cost a little extra. e.g. 1.5 veneer costs $4 more than a 4mm sheet of veneer.
However with the stains I was more precise because I asked for expert help in judging the required type and quantity.
Some costs could have been saved if they had been bought in bulk. Taking more time out to measure the surface area would have been a
great advantage to see the coverage rate of some items.
A lot of items were given to me for trade price, which even the costs a little. Luckily scrap wood was used for shapes and patterns and
construction of the jig. This was not allowed in my estimate pricing. Now that I’ve experienced building such a project I would seek more
advise before buying some items.
Internet
This played a big role in not only choosing the idea for my major project design but also allowed an extensive range of simular existing
designs that suited the identification of needs. The Internet has many woodworking and wood project sites in which there was a wide range of
modern and realistic designs suitable for my major project. They mostly consisted of telephone tables, telephone benches, chairs with large
armrests suitable for resting objects on and chairs of modern design in which a flat surface may be attached.
Some of the Internet sites that were searched include:
- Furnishings On The Web -
www.furnitureontheweb.com
- Woodworking Projects -
www.woodworkingprojects.com
- Laminating And Bending Wood - http://www.members.eaa.org/home/homebuilders/building/wood/bingelis_sa0686.html
Books And Magazines
Books and magazines were sources that were very handy, not only for finding designs but also to find different woodworking techniques
used. In most of the books there weren’t too many chairs with tables incorporated with, but from one of the books a modern design was
computer generated and altered to achieve my design.
Some of the books and magazines used include:
Fine Woodworking – Design Book Seven
This book not only had many different types of chairs but also had a great range of other projects that were all suitable for a major project. In
the chair section of this book was a modern design, which is pictured later on in the folio, which was modified to achieve my major project
design.
50 Chairs – by Mel Byars
An extensive range of both modern and artistic chairs using all different types of materials suited for all different types of areas.
Reader’s Digest Book Of Skills And Tools
A very good practical book used for types of joins, types of woods and also a range of wood working techniques.
Fine Woodworking Magazine Collection
Better Homes And Gardens Magazine Collection
Retail Outlets/Industries
Many industries and retail outlets throughout the border and district were very willing to help and contribute to ideas and share their
knowledge towards the design. Some of the businesses include:
Laminex Industries – Wodonga
They were very helpful towards ideas on wood laminating and gave advice on veneering, including what type of glue to use and how to apply
it.
Border Laminates – East Albury
Helpful also towards choosing laminating glue, MDF and veneer types. All the veneers were bought from there.
Paint Right – Lavington
They were very helpful and gave advice on what satins to use, how they should be applied and how to achieve the best finish.
The sales person also stained a piece of ash veneer several colours so that I could take home and decide the most suitable one.
People
As well as people in industries, my teacher and parents also had an influence on the project. For example approving the final design and
suggesting what construction method should be used.
Having experienced people sometimes overseeing the project was beneficial because I could’ve made costly mistakes. An extra pair of hands
was sometimes needed for clamping veneers and laminating wood.
I took a lot of suggestions and advice because some techniques were new to me.
Design Ideas
K. Unique And Modern Chairs
In researching a large range of both modern and unique designs in chairs from books and on the Internet I was able to modify the drawings,
adding flat surfaces that may be used as a table and also get ideas about what types of materials to use.
L. Telephone Tables/Benches
A series of these were found throughout the Internet. They consisted of a chair with a flat area attached to the side used as a table. There
was a wide range of materials used and techniques such as upholstery were applied. Here are a few of the designs.
Chairs With Flat Area Attached
A few chairs I found while researching had large armrests suitable for resting objects on. A chair/table, which was found in a woodworking
book, was unique and was modified to achieve my final design. It is pictured below.
Materials
Veneer
At Laminex Industries in Wodonga and Border Laminates in Lavington, research was made into different types of veneer and which type of
wood was best suited for the area in our house. The booklet below shows the large range of different veneers available at Laminex Industries.
Laminex Craftform
This is a type of board used for laminating. In researching it at Laminex Industries I was able to easy simulate it and a lower cost using MDF
and an electric circular saw. The information sheet shows how to use the board to create the preferred radii laminate.
MDF/Plywood
Research was made into both of these materials in order to used them for wood laminating. Such things as which one was stronger and
which was better suited for the area that needed to be laminated were investigated and tested.

Techniques
Veneering
Research was made into the best way to apply the veneer and the best type of glue to use to ensure maximum grip.
Laminating And Wood Bending
Different types laminating techniques were researched including the traditional method, Laminex Craftform and solid wood
bending. These are designed for different purposes and strengths.

Design Ideas
Paper/Cardboard Models
By making small scaled cardboard models of designs I was able to experiment with different types of shapes that are able to be made and
get a better understanding of what the design looked like.
Full Size Drawing Of Chosen Design
In drawing a full size front and side view of the design I had chosen I was able to see and experiment with the shape of the back, legs and
laminate in a life scaled drawing.
Angles Of Backrests
By adjusting and experimenting with different backrest angles I was able to see which was the most comfortable for the type of
the design.
Height, Width And Size Of Seat And Table
By experimenting with different seat heights and different table heights I was able to see which suited myself as well as
members of my family. The size was also experimented with to see how small or large it could be.
Materials
Veneering
By experimenting with different types of glue when veneering I was able to see which dried the fastest, which stuck the best and
which gave the overall best result.
Leg Carcase Covering
There were three types of methods I experimented with to cover the carcase. Firstly method that was tried was 3mm MDF with a
1 ½mm veneer over the top. This turned out to be very time consuming and impractical. I then experimented with 3mm MDF and
then staining it. Whilst this was a lot easier to apply it didn’t give a very pleasing result. The method that was undertaken was
4mm veneer. This was at times hard to apply in some areas but gave the best result out of the three experimented with.

Tools
Size Of The Saw Blade
When making the wood simulate of Laminex Craftform, experiments were made to see how deep the cut should be to conform to the radii,
how far apart each cut should be and how thick the saw blade should be.
Router Bits
Experiments were made to see what router bit and how what height it should be set to, to achieve the ideal result when trimming the veneer
and also creating the legs.
Techniques
Carcase
Different gaps were left between the leg uprights to see the strongest point for the 4mm veneer to go on. In the case of my carcase a gap
of approximately 100mm was left ensuring that the minimum amount of uprights were used but still rigid enough to take impact.

Internet
This played a big role in not only choosing the idea for my major project design but also allowed an extensive range of simular existing
designs that suited the identification of needs. The Internet has many woodworking and wood project sites in which there was a wide range of
modern and realistic designs suitable for my major project. They mostly consisted of telephone tables, telephone benches, chairs with large
armrests suitable for resting objects on and chairs of modern design in which a flat surface may be attached.
Some of the Internet sites that were searched include:
- Furnishings On The Web -
www.furnitureontheweb.com
- Woodworking Projects -
www.woodworkingprojects.com
- Laminating And Bending Wood - http://www.members.eaa.org/home/homebuilders/building/wood/bingelis_sa0686.html

Books And Magazines
Books and magazines were sources that were very handy, not only for finding designs but also to find different woodworking techniques
used. In most of the books there weren’t too many chairs with tables incorporated with, but from one of the books a modern design was
computer generated and altered to achieve my design.
Some of the books and magazines used include:
Fine Woodworking – Design Book Seven
This book not only had many different types of chairs but also had a great range of other projects that were all suitable for a major project. In
the chair section of this book was a modern design, which is pictured later on in the folio, which was modified to achieve my major project
design.
50 Chairs – by Mel Byars
An extensive range of both modern and artistic chairs using all different types of materials suited for all different types of areas.
Reader’s Digest Book Of Skills And Tools
A very good practical book used for types of joins, types of woods and also a range of wood working techniques.
Fine Woodworking Magazine Collection
Better Homes And Gardens Magazine Collection
Retail Outlets/Industries
Many industries and retail outlets throughout the border and district were very willing to help and contribute to ideas and share their
knowledge towards the design. Some of the businesses include:
Laminex Industries – Wodonga
They were very helpful towards ideas on wood laminating and gave advice on veneering, including what type of glue to use and how to apply
it.
Border Laminates – East Albury
Helpful also towards choosing laminating glue, MDF and veneer types. All the veneers were bought from there.
Paint Right – Lavington
They were very helpful and gave advice on what satins to use, how they should be applied and how to achieve the best finish.
The sales person also stained a piece of ash veneer several colours so that I could take home and decide the most suitable one.

People
As well as people in industries, my teacher and parents also had an influence on the project. For example approving the final design and
suggesting what construction method should be used.
Having experienced people sometimes overseeing the project was beneficial because I could’ve made costly mistakes. An extra pair of hands
was sometimes needed for clamping veneers and laminating wood.
I took a lot of suggestions and advice because some techniques were new to me.
I

Design Ideas
Sturdiness
Tests were made to see that not only was the entire chair sturdy and stable but also to see that the table
could be written on with ease.
Shapes And Curves
Testing was done on the full-scaled drawing with shapes and curves of the back, legs and curvature of the wood laminate to
ensure the design looked good and had a matching and unique design.

Materials
Veneer
Tests were done with the staining of veneers to not only ensure that the best and highest quality stain was achieved but also to
match in with the furniture of its surrounding environment. The method chosen was a new Baltic Pine stain and two coats of
estapol.
Different Types Of Wood Laminating
Numerous testing was involved with the wood laminating. Small samples were made to see the strength and the difficulty
involved in making them. Some of the methods tested including the traditional method of wood laminating involving several pieces
of thin MDF and the Laminex Craftform simulate. In the end the method that was chosen was the Laminex Craftform simulate with
a 3mm piece of MDF in the centre for extra strength.
Puttying And Staining
Different methods of staining over the putty were tested to guarantee that the colour of the putty looked the same as the
veneer. Staining over the putty was firstly done using the new Baltic Pine stain and then the estapol. Unfortunately this method
turned out to be too dark. The method used was only one coat of estapol over the putty. This achieved a very simular colour to the
stained veneer.
Tools
Router
Different heights were tested on the trimming router to make sure that when the veneer was being trimmed and the legs being
cut that all the waste was removed.
Circular Saw
Tests were done with different blade widths when cutting the groves for the Laminex Craftform simulates to ensure that the
wood would bend to the correct radii.
Techniques
Gluing Veneer
Tests were done with the gluing of the veneer to see which achieved the best result. PVA was firstly tried but this was too runny, difficult to
apply and took too long to dry. The method chosen was contact glue, which was quick drying and gave maximum hold for the veneer.

Drawings/Information
i. Materials List
ii. Dimension Orthographic – Front, Sides And Top View
iii. Dimension Orthographic – Back, Backrest To Frame And Curvature
iv. Dimension Orthographic – Rendered
v. Dimension Orthographic – Veneer Direction
vi. Orthographic Projection
vii. Orthographic Projection – Surrounding Area
viii. Leg Carcase

Materials List
Legs
10: 610mm x 190mm x 19mm
2: 460mm x 140mm x 15mm
2: 460mm x 80mm x 15mm
Seat And Laminate To Table
2: 1060mm x 460mm x 9mm
1: 1060mm x 460mm x 3mm
Lower Shelf
2: 650mm x 460mm x 9mm
1: 650mm x 460mm x 3mm
Laminate From Lower Shelf To Lower Table
7: 350mm x 460mm x 3mm
Backrest
1: 1000mm x 500mm x 18mm
Veneer
1: 2400mm x 1200mm x 1 ½mm
1: 2400mm x 1200mm x 4mm
Construction Of Legs
The making of the legs was the initial step in the project. After the life-size drawing of the chair/table had been put on cardboard, the leg
was then traced on to a piece of 9mm plywood. This was cut and shaped using the bandsaw and disc sander. This was to be used as a
template guide for the router.
Leg Pattern For Router
The template was traced onto 18mm radiata pine, which was cut using the bandsaw leaving 2-3mm overhang. The template was nailed to
the piece of radiata pine making sure that it had overhang around the whole leg. It was then clamped to the bench with the MDF on the
bottom. Using a trimming router bit, it was set to the right depth and used to cut the waste from the pine to create the same shape as the
template. The picture below shows the trimming technique at use.
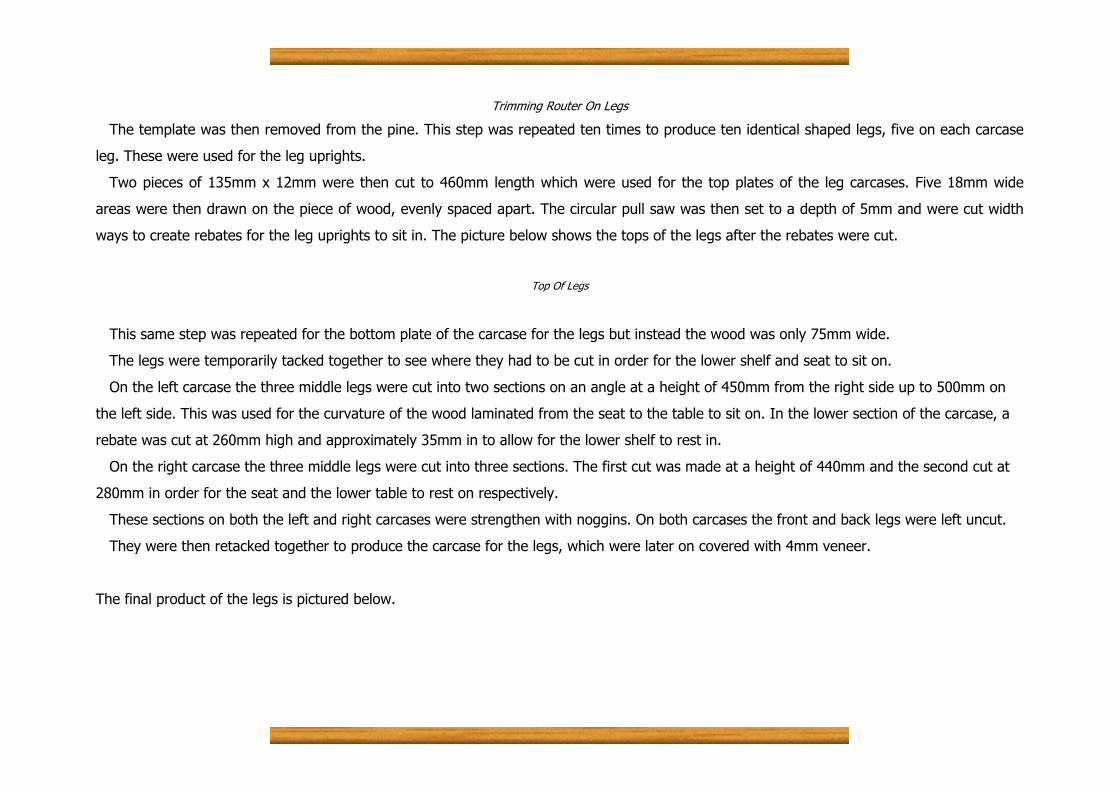
Trimming Router On Legs
The template was then removed from the pine. This step was repeated ten times to produce ten identical shaped legs, five on each carcase
leg. These were used for the leg uprights.
Two pieces of 135mm x 12mm were then cut to 460mm length which were used for the top plates of the leg carcases. Five 18mm wide
areas were then drawn on the piece of wood, evenly spaced apart. The circular pull saw was then set to a depth of 5mm and were cut width
ways to create rebates for the leg uprights to sit in. The picture below shows the tops of the legs after the rebates were cut.
Top Of Legs
This same step was repeated for the bottom plate of the carcase for the legs but instead the wood was only 75mm wide.
The legs were temporarily tacked together to see where they had to be cut in order for the lower shelf and seat to sit on.
On the left carcase the three middle legs were cut into two sections on an angle at a height of 450mm from the right side up to 500mm on
the left side. This was used for the curvature of the wood laminated from the seat to the table to sit on. In the lower section of the carcase, a
rebate was cut at 260mm high and approximately 35mm in to allow for the lower shelf to rest in.
On the right carcase the three middle legs were cut into three sections. The first cut was made at a height of 440mm and the second cut at
280mm in order for the seat and the lower table to rest on respectively.
These sections on both the left and right carcases were strengthen with noggins. On both carcases the front and back legs were left uncut.
They were then retacked together to produce the carcase for the legs, which were later on covered with 4mm veneer.
The final product of the legs is pictured below.

Final Product Of Legs
Wood Laminating
A laminated wood component is a marvel of lightness and strength and it will conform to the required shape better than a similar bend made
out of a solid wood piece. Laminating can either involve glued pieces consisting of multiple thin layers of wood with the grain of all the
adjacent layers running approximately parallel, or in the form of Laminex Craftform.
There were two areas that were laminated on the chair/table. The first was from the seat, up to the upper table and the
second from the lower shelf to the lower table.
The first piece of the wood laminate not only had to be one of the strongest components, but also look aesthetically
pleasing, therefore a simular technique to Laminex Craftform was used.
The same method as Laminex Craftform can be easily simulated using 9mm MDF. It is also a lot cheaper. I firstly purchased a 2400mm X
1200mm X 9mm sheet of MDF. Two pieces were cut at 1200mm X 645mm. Like Craftform, groves were cut width ways along the MDF. They
were spaced approximately 8mm apart and 6mm deep to ensure the maximum flexibility.
If the groves were cut any closer together, or any deeper, the board would become too weak. If they had been cut any shallower, or too far
apart, the board would have not bent the correct radii.
The groves were cut using an electric handsaw and a square guide to ensure precision cutting. A conventional blade was chosen rather than
a tungsten tip to minimise the width of the cut.
The same process could also be done at school using the table saw and setting it to the right depth and width, although the blade may have
been too wide.
The groves were only cut into the MDF where the wood was to be bent rather than the whole piece. This was 400mm along the board. An
extra 40mm length ways was left on to allow for a complete bend.
A jig was built for the pieces of MDF to be glued and shaped in. The jig was a rectangular prism made out of scrap 12mm plywood with the
sides of it cut in the same shape as the curve. Braces were added for extra strength. It was then hinged at the back to produce an
open/closing jig that the wood would be able to be put in and clamped down. By drawing a life size model of the project and seeing the right
curvature, it helped with cutting out the jig.
Opening/Closing Jig Used For Wood Laminating
A test on two pieces of MDF grooved and bent was unfortunately not strong enough. I then decided to add in an extra 3mm MDF sheet in
between the two 9mm sheets and tested that. This turned out successful, being very strong and a good thickness.
It was then glued and clamped in the jig.
When taken back out of the clamp the 9mm MDF was then covered in glue on the grooved sides. In wood laminating it is recommended to
use glue that will allow you a reasonable length of work time before the wood has to be glued and clamped. In my case I used MDF glue that
was pretty well suited to the job.
The piece of 3mm ply was placed in the middle of the two pieces of 9mm MDF. This was not only to ensure sturdiness but also so all the
glue didn’t all fall into the groves. This was then put into the jig, clamped and braced down tight and left for several hours to dry.

Clamped Wood Laminate In Jig
When the glue had dried the horizontal angle was marked off the jig. After removing the laminated wood I transferred my lines for my end
cuts to the face of the timber. I then used a handsaw to cut off the overhang at the correct angle.
For the section from the lower table to the lower shelf the traditional method of wood laminating was used. Seven pieces of 3mm MDF were
glued and clamped in the same jig created for the other laminated curve.
The picture on the next page shows this form of wood laminate.
Clamping Of Traditional Wood Laminating
The picture below shows the final product of both wood laminates. The small one on top was the traditional method of wood laminating and
used for the section from the lower table to the lower shelf and the long one was in the form of Laminex Craftform simulated. This was used
for the seat and continued through to the lower table.
Finished Product Of Both Laminates Before Veneering
Back Rest
By drawing the life size picture of the chair it was easier to see what shape of backrest suited the chair. The shape was and extension of the
leg curve and came to a connecting arc of 140mm radius. This shape was traced onto a piece of 18mm MDF and then cut with a jigsaw and
sanded using the disc sander. This was a timely process to ensure that there were no flat spots on the backrest and therefore produce a nice
smooth curve continuing from the leg shape.
The shape of the back after veneering and staining is pictured below.
The Fin-Shaped Backrest
Construction
The project started to come together once the leg carcases and wood laminating had been done. The lower shelf was firstly put into the left
legs rebate and glued and screwed to the right legs lower section of the carcase. The next section of the right leg was then placed on top and
glued and screwed. The large seat and table with the laminate was then connected and glued and screwed.
Finally the last sections of both the left and right leg carcases were glued and screwed to create the basic shape of the chair.
A temporary backrest was also made and nailed to the back. The basic shape is shown below.
Basic Shape Of Chair/Table

Veneering
Veneering was a very time consuming and difficult process. For the flat areas of the project such as the table, backrest and seat that needed
veneering contact glue was used. This involved covering the section that needed to be veneered and the piece of veneer with contact glue and
waiting until it was tacky and joining the two pieces together. Once stuck the two pieces did not come apart therefore making it very difficult
to get the veneer in the right position the first time. Each area that needed to be veneered was firstly shaped using a cardboard and then
traced on to the veneer achieving the right shape. Overhang was left on all sides and was later trimmed using a trimming router and Stanley
knife.
The sections in order of veneering were – front and back edges of seat, table and lower shelf, seat and lower table, lower curve, lower shelf,
leg carcases (see below for different type of veneering technique), edges and surface of upper table, front and backs of the legs and last of all
the backrest.
When veneering the legs to cover the carcase, 4mm veneer glued with liquid glue was used. This dries a lot slower than the contact glue
meaning there was more time to place the piece on where it need to go. This also meant clamping and bracing it into place and leaving
overnight to dry. Some of the sections that needed veneering on the legs were hard to bend to shape because of the small pieces of veneer.
Veneering of leg carcase is shown below.
Clamping And Bracing Of Veneering Carcase Box
Finishing
The finished that was applied to the project was a New Baltic Pine stain. This was done using a rag and applying it evenly over the entire
project. Once this was applied and dried, an estapol clear stain was then brushed on evenly making sure no runs were left. It was then left for
about 8 hours to dry. Once dried it was lightly sanded using wet and dry sand paper.
Another coat of estapol was then applied and left to dry to achieve a colour simular to other furniture in the house. The final product is show
below.
Final Product After Construction And Finishing
Evaluation
This project was very time consuming and involved a lot of wood working techniques such as wood laminating, carcase and framework as
well as veneering. With sticking to my action plans and time plans I was able to successfully finish the project in time and achieved a good
quality project that I was happy with. In the end the project effectively serves the purpose of a chair/table and is finished to match other
furniture in its surrounding environment.

Wood Laminating
In researching at such places as Laminex Industries in Wodonga and Border Laminates in Lavington as well as the Internet, the most
common method of wood laminating is done in the form of several pieces of MDF glued and clamped together.
(evidence of this displayed in ‘Research’)
If wood laminating in an industry was done in bulk, a model or mould is usually made to make sure they are all the same shape throughout
the production. Whilst I was only focused on wood laminating and bending, in industries may use other materials such as fibreglass, metal or
some plastics and created to the desired shape. Wood steaming has been done in some industries, which is effective because of its little time
consumption.
In some industrial practises they may have large adjustable jigs or a large set of templates to be set to any curve desired and mass-produce
it. They can possibly be made out of large sheets and cutting them to size afterwards.
The main idea behind a commercial setting is to produce the product in the most speedy and cost efficient way.