Embed Size (px)
Citation preview
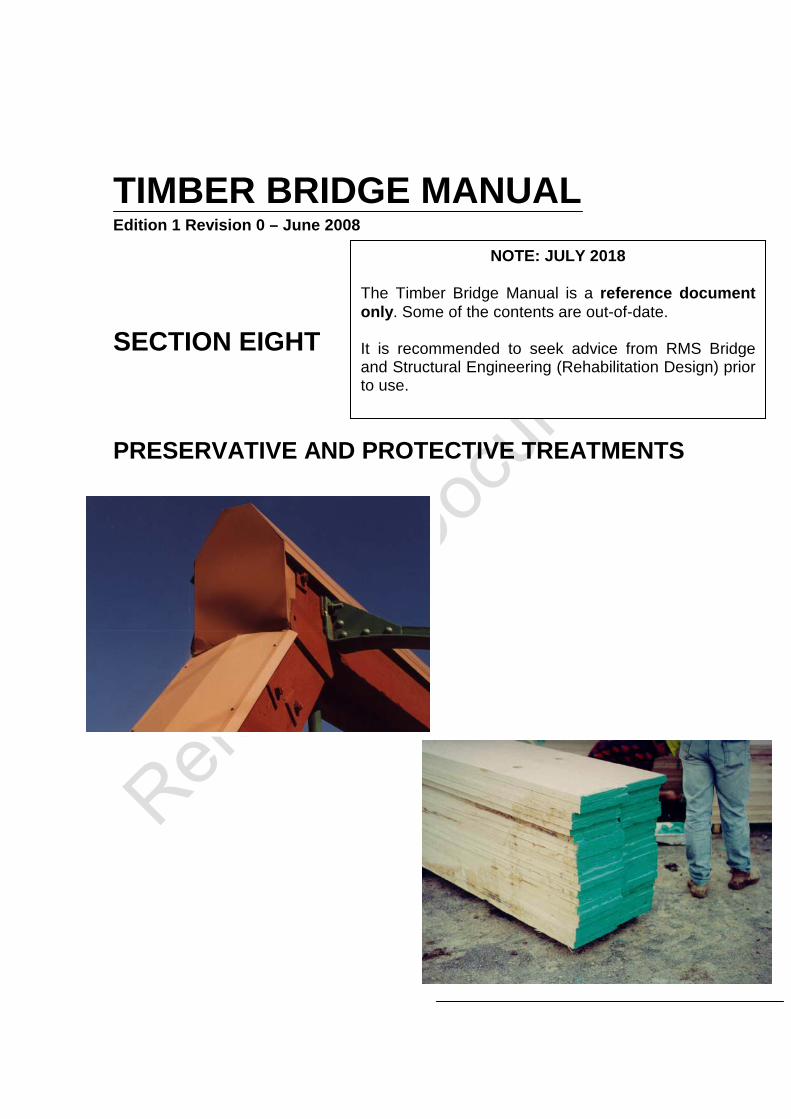
TIMBER BRIDGE MANUAL Edition 1 Revision 0 – June 2008
SECTION EIGHT PRESERVATIVE AND PROTECTIVE TREATMENTS
NOTE: JULY 2018 The Timber Bridge Manual is a reference document only. Some of the contents are out-of-date. It is recommended to seek advice from RMS Bridge and Structural Engineering (Rehabilitation Design) prior to use.

TIMBER BRIDGE MANUAL EDITION 1 R 0
(i)
TABLE OF CONTENTS
SECTION EIGHT
8. PRESERVATIVE AND PROTECTIVE TREATMENTS 1
8. 1 GENERAL 1 8. 1.1 Scope 1 8. 1.2 Objectives 1 8. 1.3 Definitions 1
8. 2 TIMBER DURABILITY AND HAZARD LEVELS 2 8. 2.1 Wood Structure 3 8. 2.2 Hazard and Hazard Levels 3
8. 2.2.1 Fire 4 8. 2.2.2 Fungal attack 4 8. 2.2.3 Insect Attack 5 8. 2.2.4 Weathering 6 8. 2.2.5 Hazard Levels 6
8. 2.3 Durability Classes of Timber 7
8. 3 TYPES OF PROTECTIVE SYSTEMS AND APPLICATION 9 8. 3.1 Preservative Treatment 10
8. 3.1.1 Pressure Preservative Treatment 10 8. 3.1.2 Field Applied Preservatives 10 8. 3.1.3 Types of preservatives 10 8. 3.1.4 Recommended Applications of Field Preservatives 12
8. 3.2 Design Detailing 13 8. 3.2.1 End Sealants 13 8. 3.2.2 Flashing and End Caps 13 8. 3.2.3 Bolts, Rebates and Countersinking in Timber 15 8. 3.2.4 Flush Seal Surfaces on Timber Sheeting 17 8. 3.2.5 Concrete Abutment Sills and Open Joints 17
8. 4 INSPECTION 18 8. 4.1 Annual Inspection 18 8. 4.2 Detailed Inspection 18
8. 5 ROUTINE MAINTENANCE 18 8. 5.1 Annual Maintenance 19 8. 5.2 Three Year Maintenance 19
8. 6 REHABILITATION AND REPAIRS 19 8. 6.1 Preservative Treatment of Non-Durable Timber 20 8. 6.2 Treatment of Fungal Attack 20 8. 6.3 Treatment of Insect Attack 20 8. 6.4 Installation of Flashing 21
(ii)
LIST OF FIGURES Figure 8.3.2.2-1 Leycester Creek - Flashing over Truss Members 14 Figure 8.3.2.2-2 Lignum Creek - End Capping of Timber Pile 14 Figure 8.3.2.2-3 Yarramundi Lagoon - Galvanised Edge Flashing 15 Figure 8.3.2.3-1 Lignum Creek - Bolted Sheeting and Partial Seal 16 Figure 8.3.2.3-2 Morongola Creek - Rebated Bolt Heads 16 Figure 8.3.2.5-1 Concrete Sill Wall with Open Joint 17
LIST OF TABLES Table 8. 2-1 Hazard Levels for Different Service Conditions 7 Table 8. 2-2 Durability Classes for Heartwood 8 Table 8. 2-3 Durability Classes (and Equivalent Hazard Levels) 8 Table 8. 2-4 Durability Classes for some Common Species 9
TIMBER BRIDGE MANUAL EDITION 1 R 0
Section Eight Page 1 of 21
8. PRESERVATIVE AND PROTECTIVE TREATMENTS
8. 1 GENERAL
8. 1.1 Scope Section 8 covers the preservative and protective treatment of all timber bridge systems and components. This section is to be read in conjunction with Section 1 - General and other sections as may be specified. Section 1 provides the basic requirements and procedures for timber bridges. Sections 2 to 7 provide additional requirements related to specific timber bridge types including some details related to preservative and protective treatments. This section provides general guidance on preservative and protective treatments, as well as general background information related to the durability of timber in exposed conditions. Unless specified otherwise, in this or other sections, the following requirements are applicable to all timber bridge systems and components.
8. 1.2 Objectives The objectives of this section are to outline the requirements of, and to provide guidance in relation to, the use of preservatives and protective treatments on timber bridges and their components. Emphasis is directed towards: • provision of background information on durability and hazard levels • selection and application of preservatives and protective treatments for new
and existing bridges • inspection and routine maintenance of protective systems • rehabilitation and repairs of deteriorated components
8. 1.3 Definitions Section 1 contains an extensive list of definitions pertaining to common terminologies, phrases and components related to timber bridges. This subsection provides additional definitions related specifically to preservative and protective treatments.
TIMBER BRIDGE MANUAL EDITION 1 R 0
Section Eight Page 2 of 21
Design Life The desired life expectancy of the bridge or component
Deterioration
A general term referring to decay or insect attack Durability (Class)
A rating for hardwood timbers indicating the susceptibility to deterioration from decay and/or insect attack as specified in Subsection 8.2.3
Fungal (Fungi)
Deterioration in timber caused by a fungal growth as specified in Subsection 8.2.2.2
Hazard (Level)
A rating relating to susceptibility to deterioration for timber which is to be preservative treated as specified in Subsection 8.2.2
Insect (Attack)
Deterioration in timber caused by insect attack as specified in Subsection 8.2.2.3
Moisture Content (%)
A measure of the amount of moisture in timber as a percentage of its oven dry weight
Preservative
A chemical used to treat timber which inhibits deterioration Protective Systems
All types of protection including preservative treatments, flashing and sealants.
8. 2 TIMBER DURABILITY AND HAZARD LEVELS Timber is a versatile material able to be used in a wide variety of situations and applications. It provides a higher strength to weight ratio than any of the alternatives and, coupled with its natural resistance and forgiving nature when exposed to hostile environments, is unmatched by other products. Notwithstanding these attributes, a number of factors must be considered when using timber in exposed applications, among them:
• desired effective design life • performance • material and installation costs (versus ongoing maintenance or
replacement)
TIMBER BRIDGE MANUAL EDITION 1 R 0
Section Eight Page 3 of 21
This section provides a brief background on a number of important subjects related to the protection and longevity of timber. With an improved understanding of the structure of wood and its susceptibility to deterioration, the designer/user can provide a more durable timber system.
8. 2.1 Wood Structure While an intimate knowledge of wood structure is not necessary to successfully design and build with timber, an understanding of some basic elements can help the designer and users to improve the long-term performance of timber bridges. It should be noted that the sapwood in nearly all species of wood is naturally susceptible to deterioration from both fungi and insects. Sapwood is the part of the wood that transmits and stores the nutrients essential for the growth of the tree. These nutrients are stored in the sapwood as sugars and starches which makes it attractive to various fungi and insect pests. The sapwood occurs immediately below the bark and is generally visible as a lighter coloured band encircling the heartwood. It varies in width from approximately 10 mm, to as much as the entire diameter of the tree in some instances (depending on the species). In NSW, the presence of sapwood in various types of timber, (eg: sawn, dressed) is limited by the provisions of the Timber Marketing Act (1977). However, it is also possible to protect sapwood by preservative treatment with chemicals as will be discussed in Subsection 8.3.1. Heartwood (or true wood) is the part of the tree that gives the timber its strength. It occurs immediately below the layer of sapwood and is usually more distinctive in colour. Because of the nature of its formation, it is usually difficult to adequately impregnate with preservatives but it does have a higher natural durability than sapwood. However, the natural durability of this material varies significantly between species. Therefore, it is important to have some knowledge of the durability of different species, as well as a formal rating system to assist in species selection for use in different applications. It is also important to have some knowledge of the “hazards” (ie: types of deterioration) as well as the accepted hazard rating system for different applications. In this way, the species of timber best suited for different applications can be identified.
8. 2.2 Hazard and Hazard Levels Except under the harshest conditions timber, with careful design, workmanship and maintenance, is a permanent structural material. Protected from the weather, moisture and insects, timber will perform satisfactorily indefinitely. However, when used in external applications the realities of:
• fire • fungal attack • insect attack and • weathering
TIMBER BRIDGE MANUAL EDITION 1 R 0
Section Eight Page 4 of 21
must all be taken into account. The following provides a brief review of the different hazards that apply to timber.
8. 2.2.1 Fire Larger section timbers such as girders do not ignite readily requiring sustained temperatures within the wood of approximately 250°C to 300°C to sustain ignition. In larger section sizes, a layer of char is formed on the surface of the timber and this acts as an insulator and inhibits burning to approximately 0.6 mm per minute. However, thinner decking and sheeting can be susceptible to the hazards of bushfires under sustained conditions. Two important considerations should be take into account when protecting bridges from fire. The first is to maintain an adequate distance between the bridge and any surrounding fuel sources. The second is to perform inspections during, and following, any bushfire activity in the surrounding area. These inspections should be carried out at reasonable intervals depending on the intensity and proximity of the fire. It is generally unlikely that a bridge will incur severe damage during a bushfire unless the bush has not been kept properly clear of the structure. However, in many instances where a timber bridge has suffered major damage through bushfire activity, it has occurred after the fire (some times up to 24 hours later) through a lack of attention and smouldering embers. The latter can become lodged in any wide interfaces where debris may have built up. 8. 2.2.2 Fungal attack Decay caused by fungal attack can only occur in a favourable environment which basically requires all of the following conditions to be present:
• A food source such as minerals and carbohydrates typical of those normally present in sapwood
• Oxygen. (Timber more than 600 mm below ground level and completely submerged under water is rarely attacked)
• Temperature within the range of 5°C to 40°C. (Above or below these temperatures fungal attack is retarded). Temperatures of 25°C to 40°C are considered to provide ideal conditions for deterioration.
• Moisture content in the wood must exceed 20% for attack to occur. The level of attack will be limited when the moisture level is between 20% to 25%, while above 25% is considered to provide an ideal environment
In general, if any one of these conditions can be eliminated or minimised, the incidence of fungal attack is reduced or prevented. In exposed situations, it is impossible to eliminate oxygen and favourable temperatures. Therefore, the aim should be to limit moisture access and control the food source. The latter can be achieved by chemically treating the sapwood (see Subsection 8.3.1) and selecting a species with a reasonably durable heartwood (see Subsection 8.2.3).
TIMBER BRIDGE MANUAL EDITION 1 R 0
Section Eight Page 5 of 21
8. 2.2.3 Insect Attack The best way to protect timber from insect attack is by careful design and good workmanship. This, coupled with correct identification of likely hazards and selection of appropriate species or preservative treatment, will help ensure a satisfactory result. More details are outlined in Subsection 8.3. The two insects presenting the greatest hazard to timber are termites and lyctids.
Termites These are divided into two main types, drywood and subterranean. Generally, NSW is considered a low risk (H1, see Subsection 8.2.2.5) area for drywood termites. However, where timber is exposed to the weather or to ground contact, a higher hazard level should be assumed. As drywood termites do not require contact with the ground, there is usually little evidence of their presence. However, this pest is usually considered more of a danger in the coastal areas of South East Queensland and beyond. The best protection available is to use a naturally termite resistant species or preservative treated timber. Where this is impractical, the hazard can be minimised by careful design, detailing and a preventative maintenance program as outlined in Subsection 8.5. NSW is considered a medium risk (H2) area for subterranean termites. However, where timber is exposed to the weather or is in ground contact, a higher risk must be assumed. Of all the insect pests, subterranean termites are by far the greatest danger to timber. In order to survive, they require moisture and access to their nest which is usually in the soil or in a warm damp location. The best protection against infestation by these pests is site preparation and detailing to ensure that they do not have direct access between their nests and a food source. This is achieved by providing a physical barrier that they must cross. Organochlorides that previously provided an excellent long life chemical barrier are no longer available. There are other chemical barriers available now but they must be reapplied every few years and may leach out of the soil in exposed situations.
Lyctids (Powder Post Beetles) While a major destroyer of timber, the lyctid should not be of undue concern to users for the following reasons:
• Softwoods (if used) are naturally immune from attack. • Only the sapwood of certain hardwoods is susceptible. • Various Australian Standards limit the percentage of susceptible
sapwood able to be included in any individual piece. • In NSW the Timber Marketing Act (1977) identifies various classes of
timber and timber products and limits the inclusion and sale of lyctid susceptible sapwood. The Act provides for penalties for those found to
TIMBER BRIDGE MANUAL EDITION 1 R 0
Section Eight Page 6 of 21
be in breach at all levels of the distribution chain. It also supersedes the requirements of any other Australian Standard or specification.
8. 2.2.4 Weathering Weathering is the combined effect of wetting, drying and exposure to UV radiation and should not be confused with decay. The effects of weathering will occur slowly (between 6 mm to 13 mm per 100 years). However, in the interim, resultant lifting of the grain and the formation of cracks and checks may provide secondary conditions conducive to decay. If timber is protected from the weather, either by well maintained paints, stains or other physical means, such as protective capping or shielding, degrade due to weathering will be minimised. Some additional information and guidance is provided in Subsection 8.3.2.
8. 2.2.5 Hazard Levels There is a traditional durability classification for timber species that is probably familiar to most timber bridge designers and builders. These are outlined in Subsection 8.2.3. However, there is also a hazard level classification that is usually implemented by the preservative treatment industry. In order to relate the two classification systems, it is better to present the hazard level system first. Chemical treatment is probably the most recognised form of preservation and can provide very high levels of protection for many timber species. In order to minimise cost, timber is treated to withstand varying degrees of expected hazard. Australian Standard - AS1604 defines hazard levels for timber under various circumstances. Preservative treated timber is chemically treated to meet each of these hazard levels by the retention of certain quantities of chemical in a given volume of timber. This is usually expressed in kg of preservative retained per m³ of timber. The required levels of preservative, however, may vary with the chemical used, species and natural durability class of the timber. None of this need be of undue concern to users as all preservative treated timber sold in NSW, with the exception of: • fence palings, battens and droppers • timber less than 1500 sq. mm in cross-section (except light decking) • timber less than 15 mm in thickness (except light decking), and • timber less than 500 mm in length, must be branded with an approved brand issued by the Forests NSW under the provisions of the Timber Marketing Act 1977 Part 4 and the regulations pertaining to the Act. This brand identifies, in part, the preservation plant, chemical used and hazard level to which the timber has been treated.
TIMBER BRIDGE MANUAL EDITION 1 R 0
Section Eight Page 7 of 21
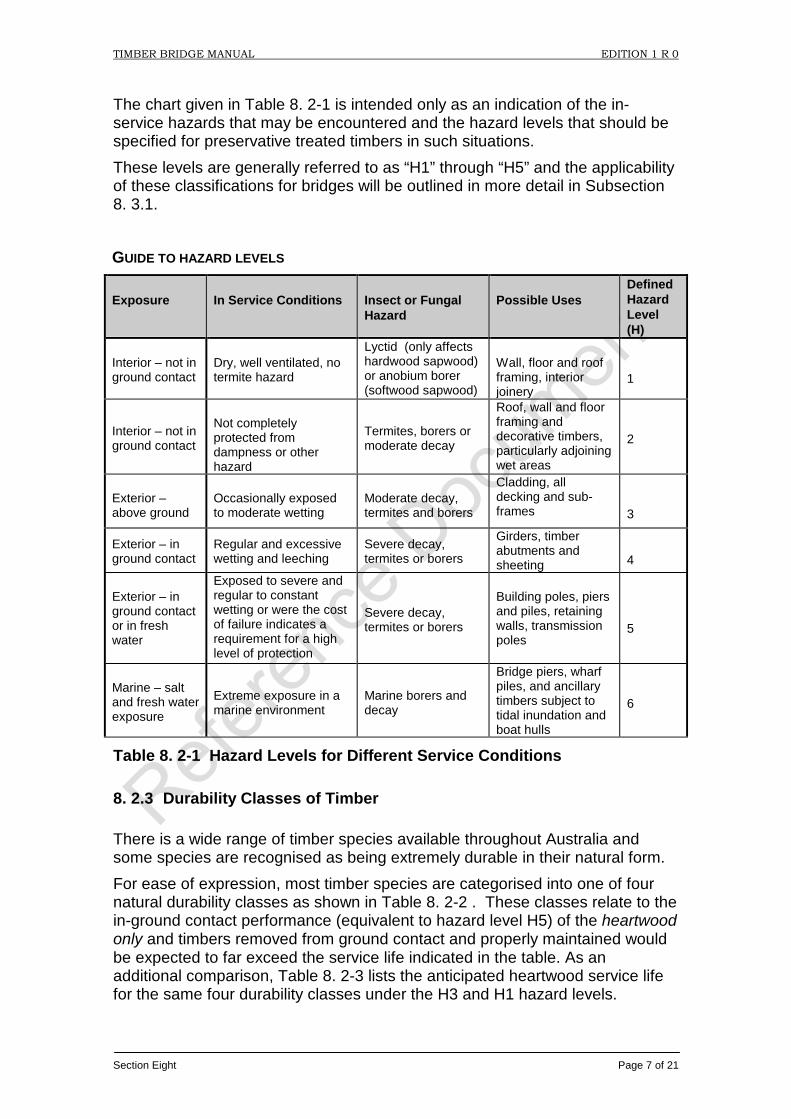
The chart given in Table 8. 2-1 is intended only as an indication of the in-service hazards that may be encountered and the hazard levels that should be specified for preservative treated timbers in such situations. These levels are generally referred to as “H1” through “H5” and the applicability of these classifications for bridges will be outlined in more detail in Subsection 8. 3.1.
GUIDE TO HAZARD LEVELS
Exposure In Service Conditions Insect or Fungal Hazard
Possible Uses Defined Hazard Level (H)
Interior – not in ground contact
Dry, well ventilated, no termite hazard
Lyctid (only affects hardwood sapwood) or anobium borer (softwood sapwood)
Wall, floor and roof framing, interior joinery
1
Interior – not in ground contact
Not completely protected from dampness or other hazard
Termites, borers or moderate decay
Roof, wall and floor framing and decorative timbers, particularly adjoining wet areas
2
Exterior –above ground
Occasionally exposed to moderate wetting
Moderate decay, termites and borers
Cladding, all decking and sub-frames 3
Exterior – in ground contact
Regular and excessive wetting and leeching
Severe decay, termites or borers
Girders, timber abutments and sheeting 4
Exterior – in ground contact or in fresh water
Exposed to severe and regular to constant wetting or were the cost of failure indicates a requirement for a high level of protection
Severe decay, termites or borers
Building poles, piers and piles, retaining walls, transmission poles
5
Marine – salt and fresh water exposure
Extreme exposure in a marine environment
Marine borers and decay
Bridge piers, wharf piles, and ancillary timbers subject to tidal inundation and boat hulls
6
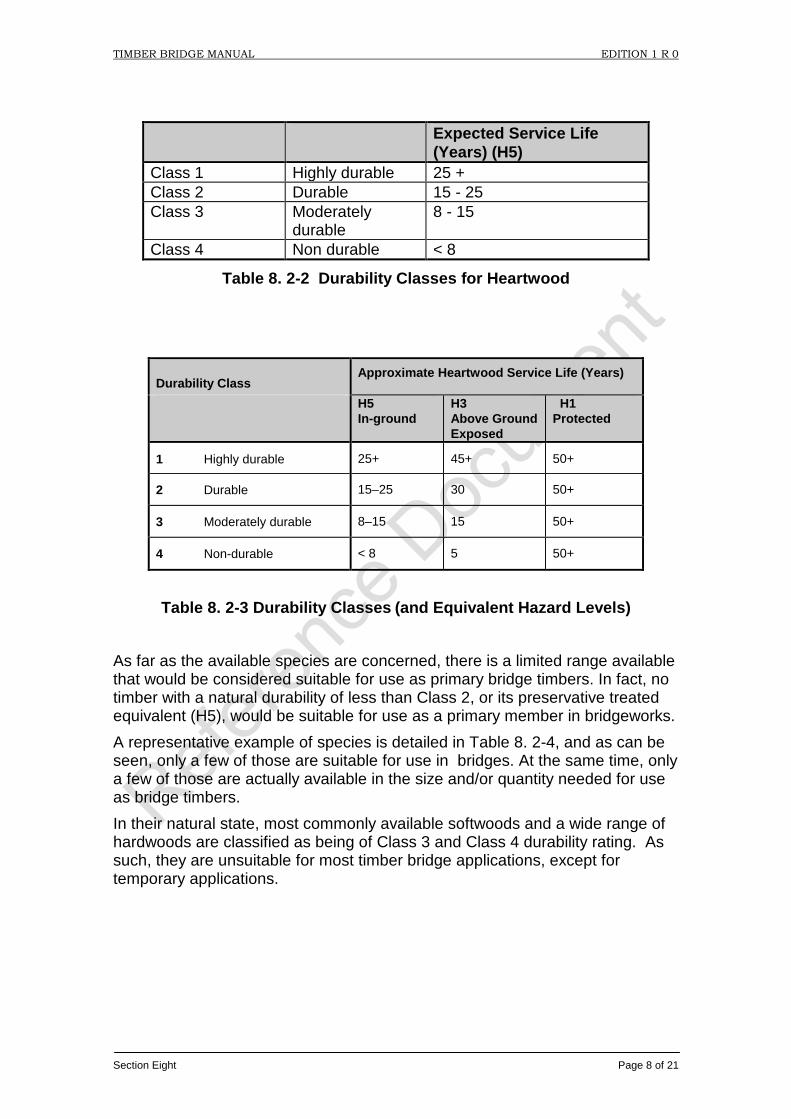
Table 8. 2-1 Hazard Levels for Different Service Conditions
8. 2.3 Durability Classes of Timber There is a wide range of timber species available throughout Australia and some species are recognised as being extremely durable in their natural form. For ease of expression, most timber species are categorised into one of four natural durability classes as shown in Table 8. 2-2 . These classes relate to the in-ground contact performance (equivalent to hazard level H5) of the heartwood only and timbers removed from ground contact and properly maintained would be expected to far exceed the service life indicated in the table. As an additional comparison, Table 8. 2-3 lists the anticipated heartwood service life for the same four durability classes under the H3 and H1 hazard levels.
TIMBER BRIDGE MANUAL EDITION 1 R 0
Section Eight Page 8 of 21
Expected Service Life (Years) (H5)
Class 1 Highly durable 25 + Class 2 Durable 15 - 25 Class 3 Moderately
durable 8 - 15
Class 4 Non durable < 8
Table 8. 2-2 Durability Classes for Heartwood
Durability Class Approximate Heartwood Service Life (Years)
H5 In-ground
H3 Above Ground Exposed
H1 Protected
1 Highly durable 25+ 45+ 50+
2 Durable 15–25 30 50+
3 Moderately durable 8–15 15 50+
4 Non-durable < 8 5 50+
Table 8. 2-3 Durability Classes (and Equivalent Hazard Levels)
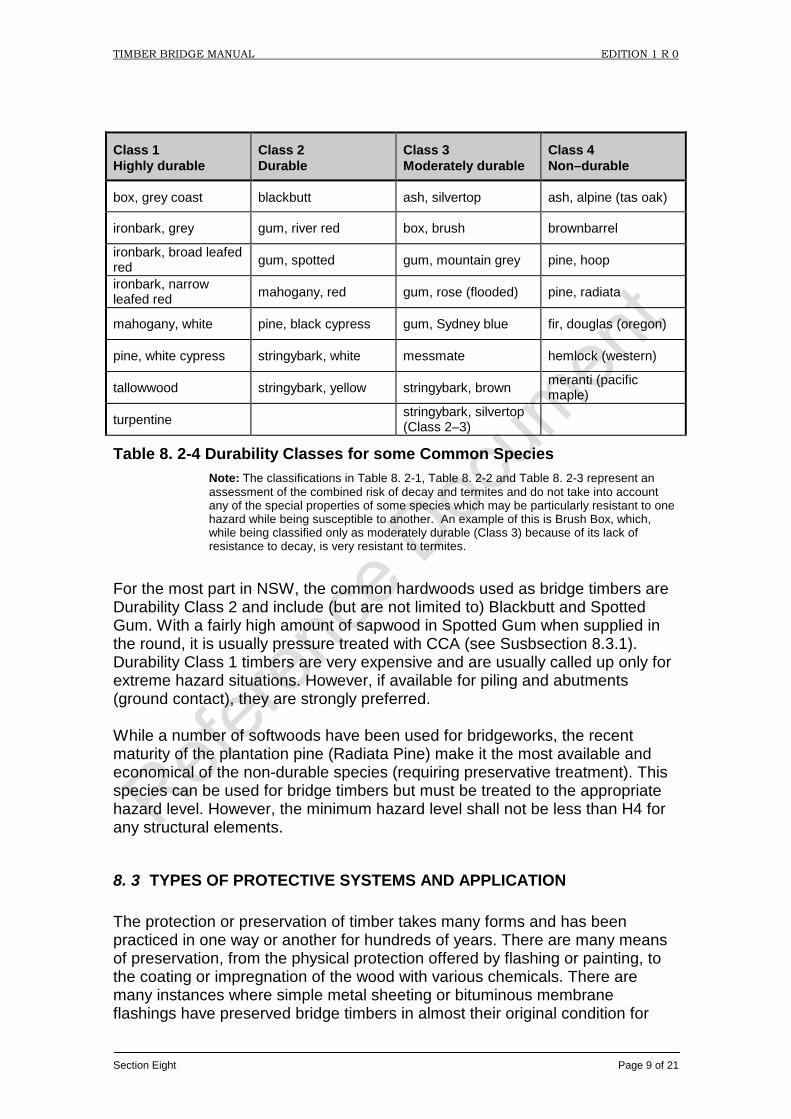
As far as the available species are concerned, there is a limited range available that would be considered suitable for use as primary bridge timbers. In fact, no timber with a natural durability of less than Class 2, or its preservative treated equivalent (H5), would be suitable for use as a primary member in bridgeworks. A representative example of species is detailed in Table 8. 2-4, and as can be seen, only a few of those are suitable for use in bridges. At the same time, only a few of those are actually available in the size and/or quantity needed for use as bridge timbers. In their natural state, most commonly available softwoods and a wide range of hardwoods are classified as being of Class 3 and Class 4 durability rating. As such, they are unsuitable for most timber bridge applications, except for temporary applications.
TIMBER BRIDGE MANUAL EDITION 1 R 0
Section Eight Page 9 of 21
Class 1 Highly durable
Class 2 Durable
Class 3 Moderately durable
Class 4 Non–durable
box, grey coast blackbutt ash, silvertop ash, alpine (tas oak)
ironbark, grey gum, river red box, brush brownbarrel
ironbark, broad leafed red gum, spotted gum, mountain grey pine, hoop
ironbark, narrow leafed red mahogany, red gum, rose (flooded) pine, radiata
mahogany, white pine, black cypress gum, Sydney blue fir, douglas (oregon)
pine, white cypress stringybark, white messmate hemlock (western)
tallowwood stringybark, yellow stringybark, brown meranti (pacific maple)
turpentine stringybark, silvertop (Class 2–3)
Table 8. 2-4 Durability Classes for some Common Species
Note: The classifications in Table 8. 2-1, Table 8. 2-2 and Table 8. 2-3 represent an assessment of the combined risk of decay and termites and do not take into account any of the special properties of some species which may be particularly resistant to one hazard while being susceptible to another. An example of this is Brush Box, which, while being classified only as moderately durable (Class 3) because of its lack of resistance to decay, is very resistant to termites.
For the most part in NSW, the common hardwoods used as bridge timbers are Durability Class 2 and include (but are not limited to) Blackbutt and Spotted Gum. With a fairly high amount of sapwood in Spotted Gum when supplied in the round, it is usually pressure treated with CCA (see Susbsection 8.3.1). Durability Class 1 timbers are very expensive and are usually called up only for extreme hazard situations. However, if available for piling and abutments (ground contact), they are strongly preferred. While a number of softwoods have been used for bridgeworks, the recent maturity of the plantation pine (Radiata Pine) make it the most available and economical of the non-durable species (requiring preservative treatment). This species can be used for bridge timbers but must be treated to the appropriate hazard level. However, the minimum hazard level shall not be less than H4 for any structural elements.
8. 3 TYPES OF PROTECTIVE SYSTEMS AND APPLICATION The protection or preservation of timber takes many forms and has been practiced in one way or another for hundreds of years. There are many means of preservation, from the physical protection offered by flashing or painting, to the coating or impregnation of the wood with various chemicals. There are many instances where simple metal sheeting or bituminous membrane flashings have preserved bridge timbers in almost their original condition for
TIMBER BRIDGE MANUAL EDITION 1 R 0
Section Eight Page 10 of 21
100 years or more. Naturally, in such instances, the added hazard of insect infestation did not necessarily apply. The following section describes the types of preservatives and protective treatments that can be adopted for the protection of timber bridges and their components.
8. 3.1 Preservative Treatment There are number of treatment methods available, ranging from brush, roller, trowel or other manual application, to dip diffusion and pressure impregnation.
8. 3.1.1 Pressure Preservative Treatment The most common commercial method is pressure impregnation where the timber is placed in large pressure vessel, a vacuum drawn and the vessel or cylinder flooded with the chosen preservative under pressure. Subsequently, a vacuum is drawn to remove any excess chemicals from the timber. The level of treatment is specified by hazard level (Table 8. 2-1) and measured by the retention of preservative in the timber in kg of preservative retained per m3 of timber (see also Subsection 8.2.2). The most common preservatives used for pressure treatment in bridge timbers are CCA and creosote, although a more recent development using an emulsified creosote offers some improved performance characteristics. The common types of preservatives are outlined in Subsection 8.3.1.3.
8. 3.1.2 Field Applied Preservatives In the field, brush, roller, trowel or spray applications are the usual methods used depending on the preservative and the member to which it is being applied. The subsequent section outlines some of preservative types and Subsection 8. 3.1.4 deals with situations where preservatives should be applied to improve durability. In addition, a table is provided at the end of this section which summarises many of the common field preservatives, their uses, application methods and many other important features.
8. 3.1.3 Types of preservatives With ongoing research, the range of chemical preservatives available can be expected to change constantly in both formulation and application. However, the four major pressure impregnated preservatives currently in use are:
• Boron salts • Copper chrome arsenic salts (CCA) • Creosote, and
TIMBER BRIDGE MANUAL EDITION 1 R 0
Section Eight Page 11 of 21
• Light organic solvent borne preservatives (LOSP) There are a number of variations of the above where different formulations are used. An example is emulsified creosote which is available under several brand names.
Boron salts Boron is considered to be an effective formulation for the protection of timber against insect attack and is usually used in conjunction with other compounds to ensure that it is not leeched from the timber.
Copper chrome arsenic (CCA) This is the most widely used preservative treatment in Australia and can usually be visually identified by its distinctive green colouring. Introduced to the timber by the vacuum pressure method, its elements of copper and arsenic are to protect the wood from fungal attack while the arsenic also deters insects. The chromium chemically fixes the other elements into the wood. Because of its resistance to leeching, CCA treated timber may be safely utilised for all manner of uses, particularly where it will be exposed to the weather. It should be noted though that, while this treatment will resist decay, it is not designed to guard against the process of weathering. Therefore, where long-term appearance is important, CCA treated timber should be maintained as should any other timber, (ie: with supplemental coatings of paints or stains). There are several derivatives of CCA offered under various trade names, some include water repellents and other features that are beyond the basic formulation. All these formulations, while having their own particular benefits, offer the same basic protection. Under certain circumstances, a white powdery substance may appear on the surface of CCA treated timbers, particularly in the first few months after treatment and usually when the timber was not redried following treatment. This substance is harmless and presents no hazard to humans or animals. Of the broad range of preservatives discussed or available commercially, timber treated with CCA, under its various trade names, will be the most readily available preservative. CCA is a water borne preservative. To successfully treat timber with preservatives, it should first be at least partially seasoned. Following treatment, if the timber is not correctly redried, distortion such as twisting, warping and shrinkage will be likely to occur. This is not usually a problem in most hardwoods that are likely to be used in bridge timber as only the sapwood is usually able to be treated and the amount of sapwood allowed in AS 2082 is limited. However, if softwoods are to be used, the designer should insist that the timber is to be DRY AFTER TREATMENT.
TIMBER BRIDGE MANUAL EDITION 1 R 0
Section Eight Page 12 of 21
Creosote The use of commercially creosote treated timber is normally restricted to heavy engineering applications. While creosote has proven an excellent preservative, particularly when pressure impregnated employing the boultonising method of boiling under vacuum, the handling of creosote treated timber presents certain problems.
Emulsified Creosote (PEC) In recent years, a preservative known as Pigment Emulsified Creosote (PEC) has been developed which is considered a far cleaner alternative because the bleeding and smell typically associated with creosote has been minimised. The basic formulation is available under more than one trade name.
Light organic solvent preservatives (LOSP) Regarded principally as a fungicide, insecticides such as synthetic pyrethroids can be introduced into LOSP when necessary. LOSPs, because they are spirit borne, are particularly useful where it is not desirable to rewet already dried timber. Because of their spirit base, they are unlikely to raise the grain of the timber as do water borne preservatives. In structural applications, they are normally only used for the treatment of softwoods.
Copper Napthanates There are a number of formulations employing Copper Napthanate which acts principally as a fungicide. Some have boron salts added to extend their use to act as an insecticide. CN is particularly useful as a groundline treatment for poles and piers and in the after treatment of end grain, between interfaces and in holes bored for fixings They are sold under several brand names and are usually designed to be applied with trowels, brushes or, where oil based, sprays.
8. 3.1.4 Recommended Applications of Field Preservatives Section 1, along with the other sections dealing with specific bridge types and components, calls for the use of field applied preservatives for specific areas during construction and repairs. While there are many areas of timber members in bridges that are susceptible to fungal and insect attack, the typical situations may be summarised as follows: • timber surfaces in contact with soil • particular piles and other substructure members to a depth of 600 mm below
the ground line
TIMBER BRIDGE MANUAL EDITION 1 R 0
Section Eight Page 13 of 21
• interfaces between timber members (that will be inaccessible after construction)
• end grain of all members including tops of piles • particular attention should be given to pressure treated members that have
been cut in the field. These should be given at least two coats, with the first allowed to dry before recoating
• areas that will be subjected to build up of debris which can cause the retention of moisture against the timber surfaces
• bolt holes
8. 3.2 Design Detailing There are a number of methods of protection that can be provided by using proper design detailing and field fabrication. The majority are directed towards the prevention of moisture access to protect against decay and general weathering. However, there are some design details that can also assist in reducing the risk of insect attack by providing barriers which make access difficult for insects. Weathering can be inhibited by the application of surface finishes (ie: paints and stains) or by flashing and good design, as will be outlined below. Detailing against weathering is important. Some of the key elements to be considered are:
• Physical protection • Clearances • Adequate ventilation • Detailing of joints • Elimination of moisture
8. 3.2.1 End Sealants One of the most important forms of protection for new timber components is the application of a suitable end sealant, particularly for green timbers. Moisture passes very easily through the open end grains of timber members and rapid drying of green timber can cause severe checking and possibly splitting. Even in timber which has been kiln dried, open end grains, in exposed situations, can subject the member to cyclic moisture changes leading to checking. To minimise these effects, the ends of all timber components should sealed before they are installed in the structure and resealed on a regular basis.
8. 3.2.2 Flashing and End Caps It can be impractical to provide flashing over the majority of timber members, particularly girders and decking, as the need to connect these members requires that holes be drilled which will perforate the membrane.
TIMBER BRIDGE MANUAL EDITION 1 R 0
Section Eight Page 14 of 21
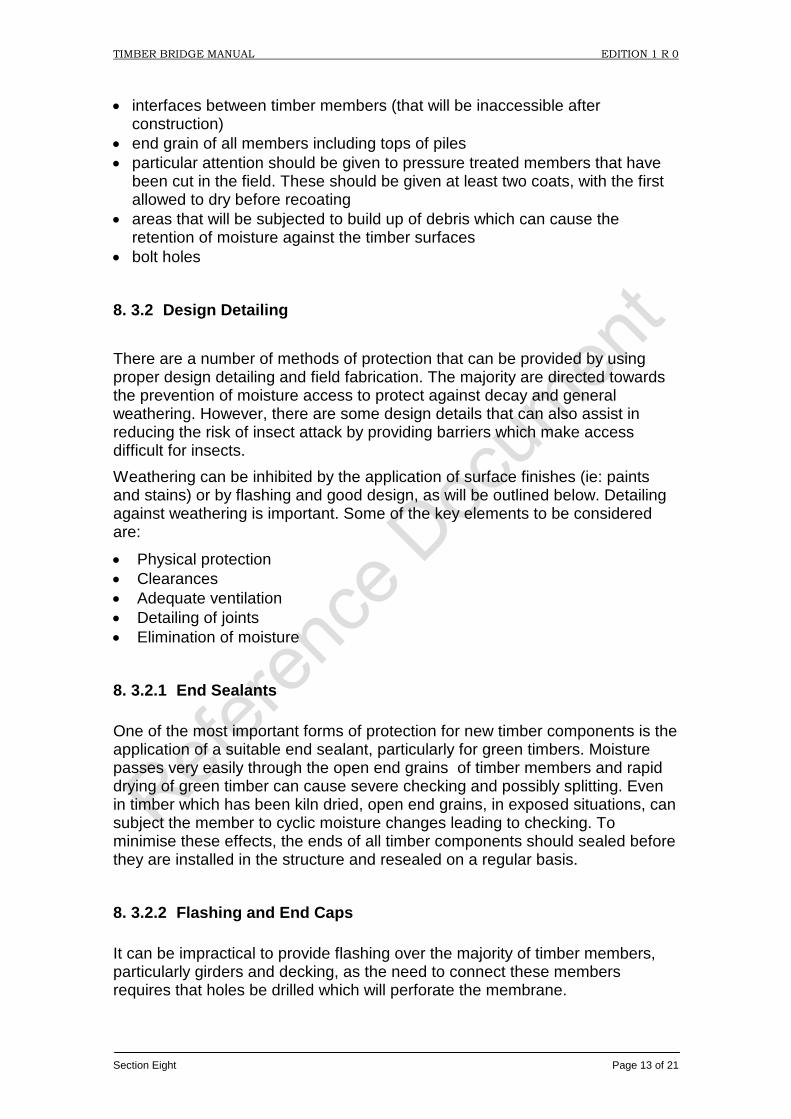
However, flashing can and should be installed over critical truss members as shown in Figure 8.3.2.2.-1 as part of a regular preventative maintenance routine during any repair works. This, coupled with a paint or stain on the timbers, will protect against weathering and prevent moisture ingress.
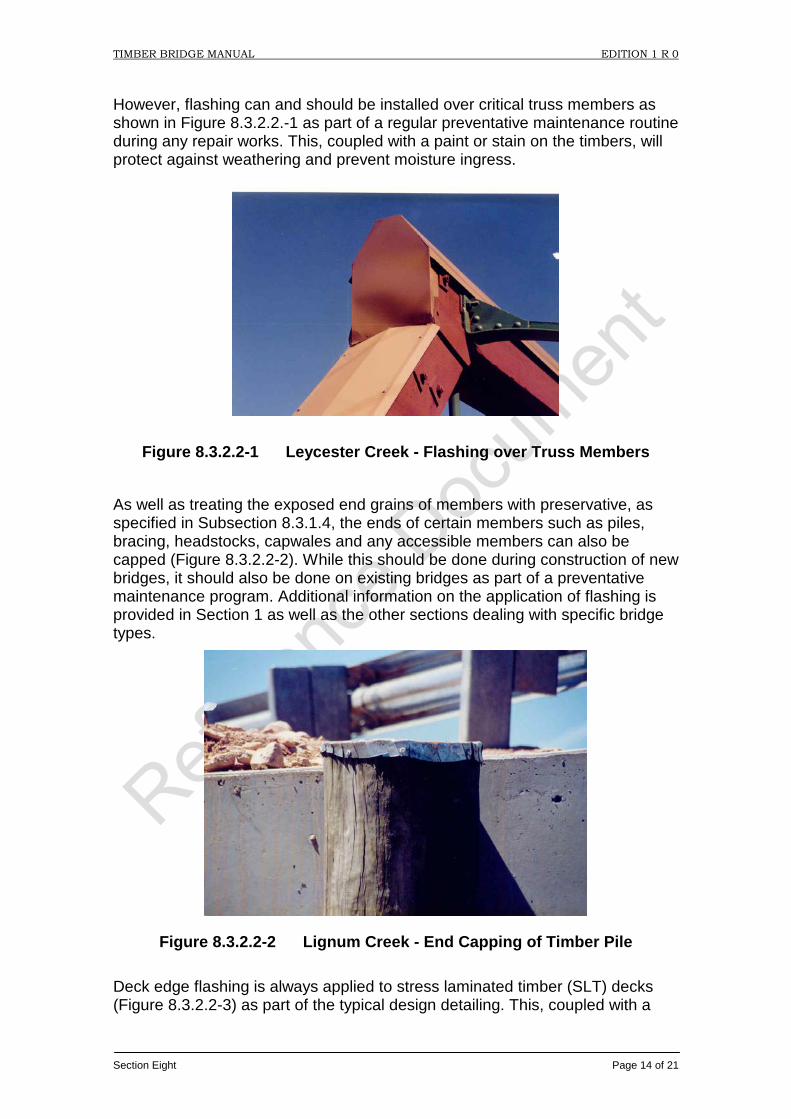
Figure 8.3.2.2-1 Leycester Creek - Flashing over Truss Members As well as treating the exposed end grains of members with preservative, as specified in Subsection 8.3.1.4, the ends of certain members such as piles, bracing, headstocks, capwales and any accessible members can also be capped (Figure 8.3.2.2-2). While this should be done during construction of new bridges, it should also be done on existing bridges as part of a preventative maintenance program. Additional information on the application of flashing is provided in Section 1 as well as the other sections dealing with specific bridge types.
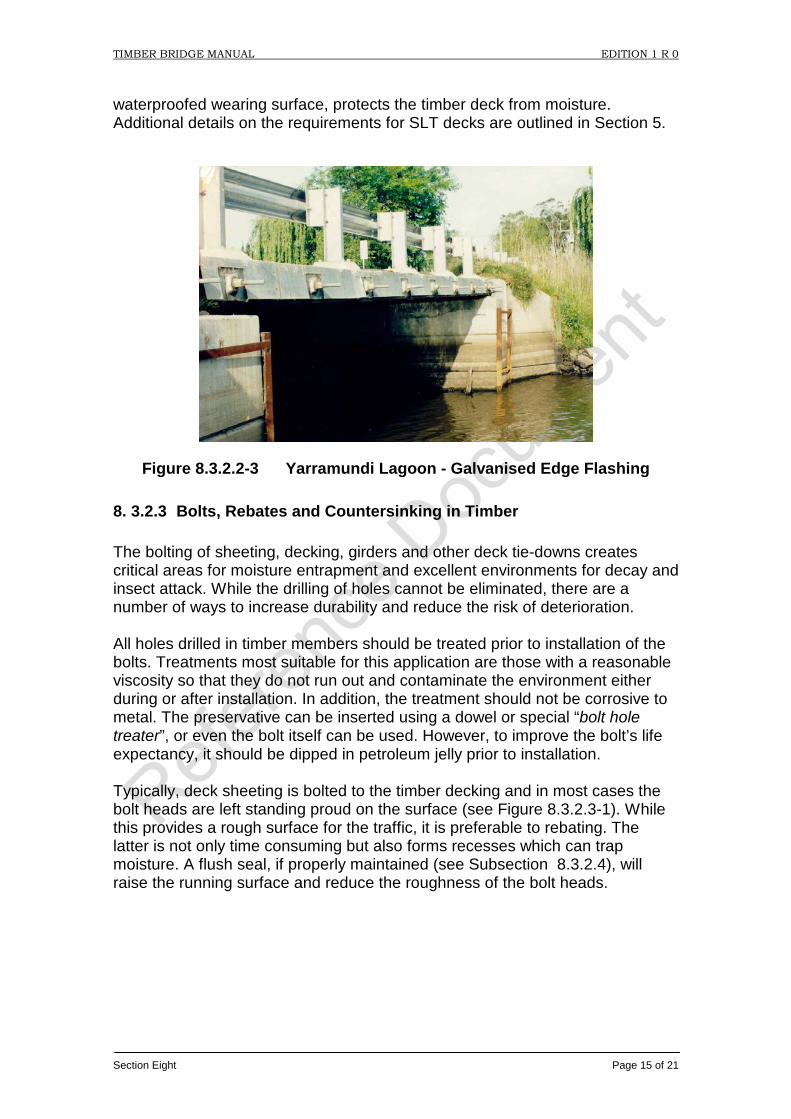
Figure 8.3.2.2-2 Lignum Creek - End Capping of Timber Pile Deck edge flashing is always applied to stress laminated timber (SLT) decks (Figure 8.3.2.2-3) as part of the typical design detailing. This, coupled with a
TIMBER BRIDGE MANUAL EDITION 1 R 0
Section Eight Page 15 of 21
waterproofed wearing surface, protects the timber deck from moisture. Additional details on the requirements for SLT decks are outlined in Section 5.
Figure 8.3.2.2-3 Yarramundi Lagoon - Galvanised Edge Flashing
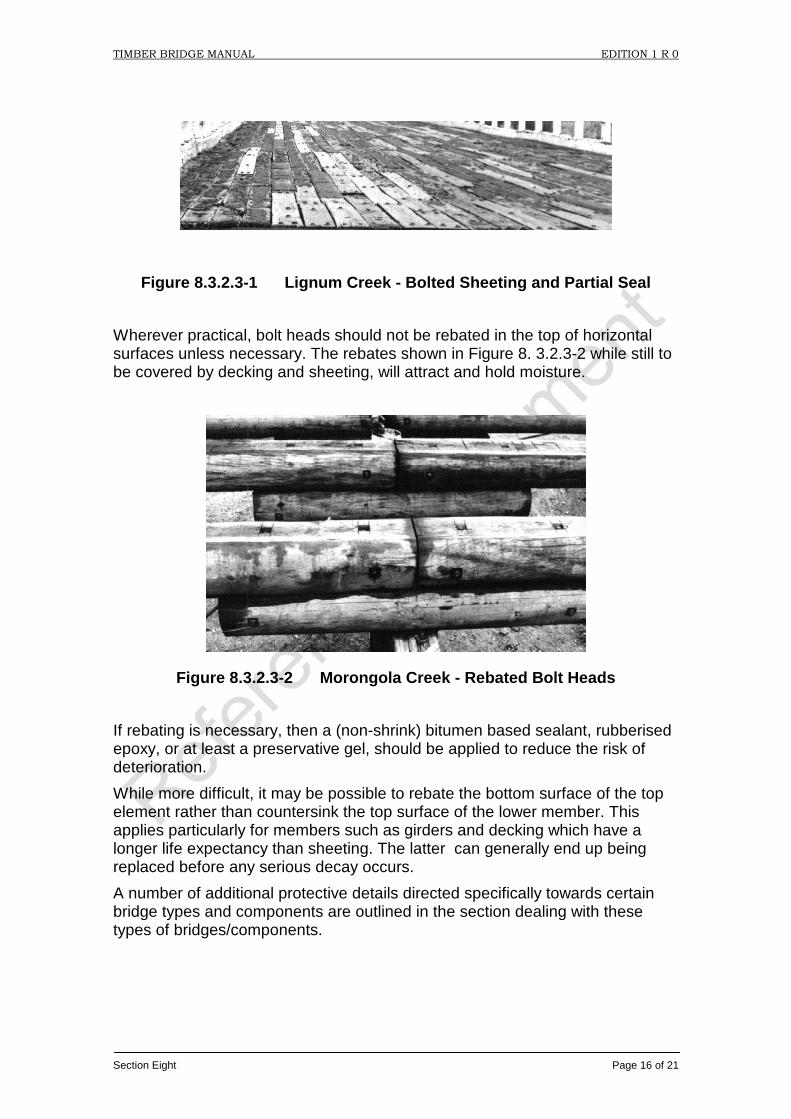
8. 3.2.3 Bolts, Rebates and Countersinking in Timber The bolting of sheeting, decking, girders and other deck tie-downs creates critical areas for moisture entrapment and excellent environments for decay and insect attack. While the drilling of holes cannot be eliminated, there are a number of ways to increase durability and reduce the risk of deterioration. All holes drilled in timber members should be treated prior to installation of the bolts. Treatments most suitable for this application are those with a reasonable viscosity so that they do not run out and contaminate the environment either during or after installation. In addition, the treatment should not be corrosive to metal. The preservative can be inserted using a dowel or special “bolt hole treater”, or even the bolt itself can be used. However, to improve the bolt’s life expectancy, it should be dipped in petroleum jelly prior to installation. Typically, deck sheeting is bolted to the timber decking and in most cases the bolt heads are left standing proud on the surface (see Figure 8.3.2.3-1). While this provides a rough surface for the traffic, it is preferable to rebating. The latter is not only time consuming but also forms recesses which can trap moisture. A flush seal, if properly maintained (see Subsection 8.3.2.4), will raise the running surface and reduce the roughness of the bolt heads.
TIMBER BRIDGE MANUAL EDITION 1 R 0
Section Eight Page 16 of 21
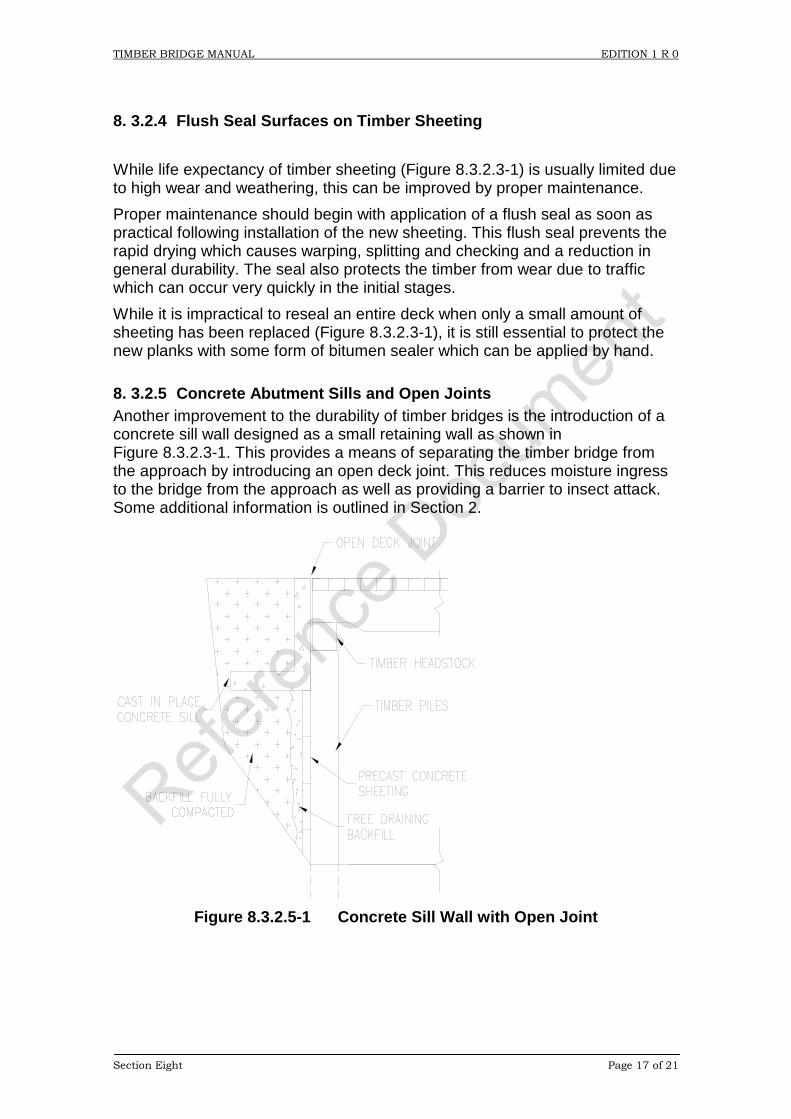
Figure 8.3.2.3-1 Lignum Creek - Bolted Sheeting and Partial Seal Wherever practical, bolt heads should not be rebated in the top of horizontal surfaces unless necessary. The rebates shown in Figure 8. 3.2.3-2 while still to be covered by decking and sheeting, will attract and hold moisture.
Figure 8.3.2.3-2 Morongola Creek - Rebated Bolt Heads If rebating is necessary, then a (non-shrink) bitumen based sealant, rubberised epoxy, or at least a preservative gel, should be applied to reduce the risk of deterioration. While more difficult, it may be possible to rebate the bottom surface of the top element rather than countersink the top surface of the lower member. This applies particularly for members such as girders and decking which have a longer life expectancy than sheeting. The latter can generally end up being replaced before any serious decay occurs. A number of additional protective details directed specifically towards certain bridge types and components are outlined in the section dealing with these types of bridges/components.
TIMBER BRIDGE MANUAL EDITION 1 R 0
Section Eight Page 17 of 21
8. 3.2.4 Flush Seal Surfaces on Timber Sheeting While life expectancy of timber sheeting (Figure 8.3.2.3-1) is usually limited due to high wear and weathering, this can be improved by proper maintenance. Proper maintenance should begin with application of a flush seal as soon as practical following installation of the new sheeting. This flush seal prevents the rapid drying which causes warping, splitting and checking and a reduction in general durability. The seal also protects the timber from wear due to traffic which can occur very quickly in the initial stages. While it is impractical to reseal an entire deck when only a small amount of sheeting has been replaced (Figure 8.3.2.3-1), it is still essential to protect the new planks with some form of bitumen sealer which can be applied by hand.
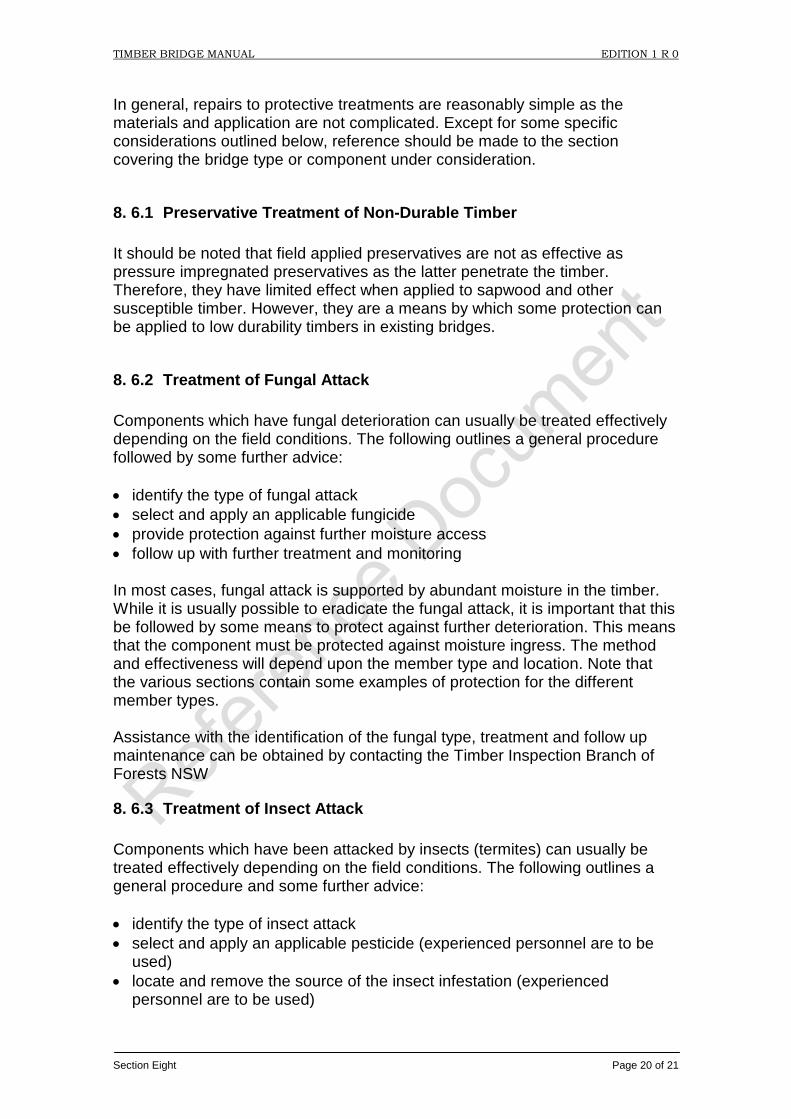
8. 3.2.5 Concrete Abutment Sills and Open Joints Another improvement to the durability of timber bridges is the introduction of a concrete sill wall designed as a small retaining wall as shown in Figure 8.3.2.3-1. This provides a means of separating the timber bridge from the approach by introducing an open deck joint. This reduces moisture ingress to the bridge from the approach as well as providing a barrier to insect attack. Some additional information is outlined in Section 2.
Figure 8.3.2.5-1 Concrete Sill Wall with Open Joint

TIMBER BRIDGE MANUAL EDITION 1 R 0
Section Eight Page 18 of 21
8. 4 INSPECTION Each section contains inspection procedures for all timber bridge types. In each case, the high risk areas requiring treatment and subsequent inspection are highlighted.
8. 4.1 Annual Inspection During the annual inspection all of the accessible protective treatments in high risk areas (susceptible to deterioration) should be inspected to ensure that they are still effective including: • preservative treatments • end sealants • flashing and other waterproofing systems • wearing surface
In addition, the condition and/or performance of certain other features which are essential to durability should also be inspected including: • drainage areas • open deck joints • fire hazards Additional information regarding the inspection of different bridge types and components is outlined in the sections dealing with these types of bridges/components.
8. 4.2 Detailed Inspection Every three years inspection of preservatives and protective treatments should be extended to less accessible areas and should include: • exposing hidden areas between members • exposing members in ground contact (see Section 2) • removing flashing • test boring as outlined in each section
8. 5 ROUTINE MAINTENANCE Section 1 outlines the basic preventative and routine maintenance works applicable to all timber bridge types and components. Each additional section covers some of the typical maintenance required for preservative and protective treatments and the following provides a summary of the basic requirements.

TIMBER BRIDGE MANUAL EDITION 1 R 0
Section Eight Page 19 of 21
8. 5.1 Annual Maintenance During the annual maintenance of bridges all of the accessible protective treatments in high risk areas (susceptible to deterioration) should be maintained as follows: • reapply preservative treatments to accessible areas • reapply end sealants in accessible areas • reseal joints in flashing and other waterproofing systems • seal cracks in wearing surfaces
In addition, other features essential to durability should also be maintained including; • clearing debris from drainage areas • clearing open deck joints • clearing debris from bearing supports and other horizontal surfaces • removing fire hazards Additional information regarding the maintenance of different bridge types and components is provided in the sections dealing with these types of bridges/components.
8. 5.2 Three Year Maintenance Every three years maintenance works should be extended as outlined in the sections dealing with specific types of bridges/components. The following summarises some of the important considerations related to protective treatments: • exposing all hidden areas for retreatment with preservative protection,
particularly high risk areas such as in ground contact and at or near the abutments
• difficult areas which cannot be exposed easily can be flooded with preservative. (this must be performed with proper attention to protecting the environment)
• All flashing should be removed to expose the members for inspection, cleaning and retreatment
8. 6 REHABILITATION AND REPAIRS Section 1 covers the general aspects of rehabilitation and repairs to timber bridges. Each additional section covers some of the typical repairs and rehabilitation for different bridge types and components and includes information related to protective treatments.
TIMBER BRIDGE MANUAL EDITION 1 R 0
Section Eight Page 20 of 21
In general, repairs to protective treatments are reasonably simple as the materials and application are not complicated. Except for some specific considerations outlined below, reference should be made to the section covering the bridge type or component under consideration.
8. 6.1 Preservative Treatment of Non-Durable Timber It should be noted that field applied preservatives are not as effective as pressure impregnated preservatives as the latter penetrate the timber. Therefore, they have limited effect when applied to sapwood and other susceptible timber. However, they are a means by which some protection can be applied to low durability timbers in existing bridges.
8. 6.2 Treatment of Fungal Attack Components which have fungal deterioration can usually be treated effectively depending on the field conditions. The following outlines a general procedure followed by some further advice: • identify the type of fungal attack • select and apply an applicable fungicide • provide protection against further moisture access • follow up with further treatment and monitoring In most cases, fungal attack is supported by abundant moisture in the timber. While it is usually possible to eradicate the fungal attack, it is important that this be followed by some means to protect against further deterioration. This means that the component must be protected against moisture ingress. The method and effectiveness will depend upon the member type and location. Note that the various sections contain some examples of protection for the different member types. Assistance with the identification of the fungal type, treatment and follow up maintenance can be obtained by contacting the Timber Inspection Branch of Forests NSW
8. 6.3 Treatment of Insect Attack Components which have been attacked by insects (termites) can usually be treated effectively depending on the field conditions. The following outlines a general procedure and some further advice: • identify the type of insect attack • select and apply an applicable pesticide (experienced personnel are to be
used) • locate and remove the source of the insect infestation (experienced
personnel are to be used)
TIMBER BRIDGE MANUAL EDITION 1 R 0
Section Eight Page 21 of 21
• provide protection against further insect attack • follow up with further treatment and monitoring Unlike fungal attack, termite attack does not generally require moisture in the timber. In fact, flashing on bridge timbers has been found to provide protection for the termites themselves. Usually the termites have a nest near the bridge or even in the bridge near the damaged area. However, experienced personnel must be used to identify and treat the infestation as well as identify and remove the source. Assistance can be obtained by contacting the Timber Inspection Branch of Forests NSW.
8. 6.4 Installation of Flashing Flashing can be applied (or improved) on existing structures to provide improved protection. However, there are a number of important points to consider in order to ensure that the flashing is effective. Each section has included some mention of the use of flashing and these should be referred to for the structure type or component under consideration. However, the following summarises some of the more important considerations: • except under extreme weather conditions, flashing should not allow the entry
of direct moisture to the surface it is protecting • flashing should not be perforated by holes or such holes should be sealed
properly • flashing should be raised above the member to allow for air circulation to
prevent condensation and promote drying in case moisture gains access • or flashing should be completely sealed with rubberised epoxy • flashing should be easily removed for inspection and retreatment of the
members • flashing should not be used where moisture may still gain access In addition to these points, it is important to consider the natural flow of water when detailing flashing for any component. It should be overlapped on sloping members similar to tiles on a roof so that the water runs off one element onto the next. Even for horizontal members, it may be possible to slope the flashing to promote rapid drainage. However, a sealant should always be used at joints in the flashing regardless of the orientation.