Embed Size (px)
Citation preview
INSTALLATION INSTRUCTIONS
1.
Timberline® ShinglesNorth America’s #1-Selling Shingle!
Quality You Can Trust…FromNorth America’s Largest Roofing Manufacturer!™
GENERAL INSTRUCTIONS
• MATERIAL SAFETY DATA SHEETS: When using GAF products, e.g., shingles, underlayments, plastic cement, etc., please refer to the applicable MSDS. The most current versions are available at www.gaf.com. GAF does not provide safety data sheets or installation instructions for products not manufactured by GAF. Please consult the material manufacturer for their MSDS and installation instructions where appropriate.• ROOF DECKS: Use minimum 3/8" (10 mm) plywood or OSB decking as recommended by APA-The Engineered Wood Assn. Wood decks must
be well-seasoned and supported having a maximum 1/8" (3 mm) spacing, using minimum nominal 1" (25 mm) thick lumber, a maximum 6" (152 mm) width, having adequate nail-holding capacity and a smooth surface. Do NOT fasten shingles directly to insulation or insulated deck unless authorized in writing by GAF. Roof decks and existing surfacing material must be dry prior to application of shingles.
• UNDERLAYMENT (LEAK BARRIER): Install GAF Leak Barrier at the eaves in localities where leaks may be caused by water backing up behind ice or debris dams.
• UNDERLAYMENT (ROOF DECK PROTECTION): Underlayment beneath shingles has many benefits, including helping to prevent wind-driven rain from reaching the interior of the building and to prevent sap in some wood decking from reacting with asphalt shingles. Underlayment is also required by many code bodies and is required to maintain the shingles’ UL Class A fire rating. When an underlayment is installed, use a breather-type underlayment, such as GAF Shingle-Mate® or Deck-Armor™ Underlayments. GAF Tiger Paw™ Underlayment, with its moisture control design, can also be used. Always have a design professional review ventilation requirements when using a moisture control design underlayment.
• FASTENERS: Use only zinc-coated steel or aluminum, 10-12 gauge, barbed, deformed, or smooth shank roofing nails with heads 3/8" (10 mm) to 7/16" (12 mm) in diameter. Fasteners should be long enough to penetrate at least 3/4" (19 mm) into wood decks or just through the plywood decks. Fasteners must be driven flush with the surface of the shingle. Overdriving will damage the shingle. Raised fasteners will interfere with the sealing of the shingles and can back out.
• ASPHALT PLASTIC CEMENT: Use asphalt plastic cement conforming to ASTM D4586 Type I or II.• WIND RESISTANCE/HAND SEALING: These shingles have a special thermal sealant that firmly bonds the shingles together after application
when exposed to sun and warm temperatures. Shingles installed in fall or winter may not seal until the following spring. If shingles are damaged by winds before sealing or are not exposed to adequate surface temperatures, or if the self-sealant gets dirty, the shingles may never seal. Failure to seal under these circumstances results from the nature of self-sealing shingles, and is not a manufacturing defect. If shingles are to be applied during PROLONGED COLD periods or in areas where airborne dust or sand can be expected before sealing occurs, the shingles MUST be hand sealed. See Nailing Instructions / Hand Sealing.
• MANSARD AND STEEP SLOPE APPLICATIONS: For roof slopes greater than 21" per foot (1750 mm/m), shingle must be hand sealed. DO NOT use on vertical side walls.
• RELEASE FILM: Plastic film strips are present either on the back or face of each shingle. The film strips are to prevent shingles from sticking together while in the bundle. Do not remove the film strip before or during the application.
• THROUGH VENTILATION: For optimal shingle life and to help prevent mold growth, all roof structures must have through ventilation to prevent entrapment of moisture-laden air behind roof sheathing. Ventilation must be designed to meet or exceed current F.H.A., H.U.D., or local code minimum requirements. Note: Minimum net free ventilation area of 1 sq. foot per 150 sq. feet (1 sq. meter per 150 sq. meters) of ceiling area is required. When vents are located at the eaves and near the roof’s peak (balanced) for maximum air flow, ventilation may be reduced to 1 sq. foot per 300 sq. feet (1 sq. meter per 300 sq. meters).
• EXPOSED METAL: Paint all exposed metal surfaces (flashing, vents, etc.) with matching GAF ShingleMatch™ Roof Accessory Paint for best appearance.
• NOTE: All drawings not drawn to scale.
2.
13-1/4"
39-3/8" (1 m)
13-1/4"
39-3/8" (1 m)
5 3/4" - 6 1/4"(146 mm – 159 mm)
5 3/4" – 6 1/4"(146 mm – 159 mm)
(337 mm)
(337 mm)
STANDARD NAILING PATTERN - four nails per shingle
14 1/2" – 17 1/2" (368 mm – 445 mm)
6-1/2" – 9-1/2" (165 mm – 241 mm)
14 1/2" – 17 1/2" (368 mm – 445 mm)
11 5/8" – 14 5/8" (295 mm – 372 mm)
1/2" - 2 1/2" (13 mm – 64 mm)
Self-seal adhesive on back
Nailguide line
Self-seal adhesive on back
Nailguide line
11 5/8" – 14 5/8" (295 mm – 372 mm)
1/2" - 2-1/2" (13 mm – 64 mm)
6 1/2" – 9 1/2" (165 mm – 241 mm)
1/2" – 2 1/2" (13 mm – 64 mm) 1/2" – 2 1/2" (13 mm – 64 mm)
ENHANCED NAILING PATTERN - six nails per shingle** required by some local codes and required for enhanced wind coverage on certain products.See limited warranty for details.
17"
(432 mm)
11"
(279 mm)
6"
(152 mm)
11"
(279 mm)
6"
(152 mm)
6"
(152 mm)
GAF Underlayment
GAF Underlayment
Siding SheathingSheathing SheathingSheathing
4" (102 mm) min.
First Course
Second Course
Second Course
Third Course
Tercer Curso
Troisième Cours
Third Course
Fourth Course
Fourth Course
GAF Underlayment
GAF Underlayment
Start at either rake and lay in either direction
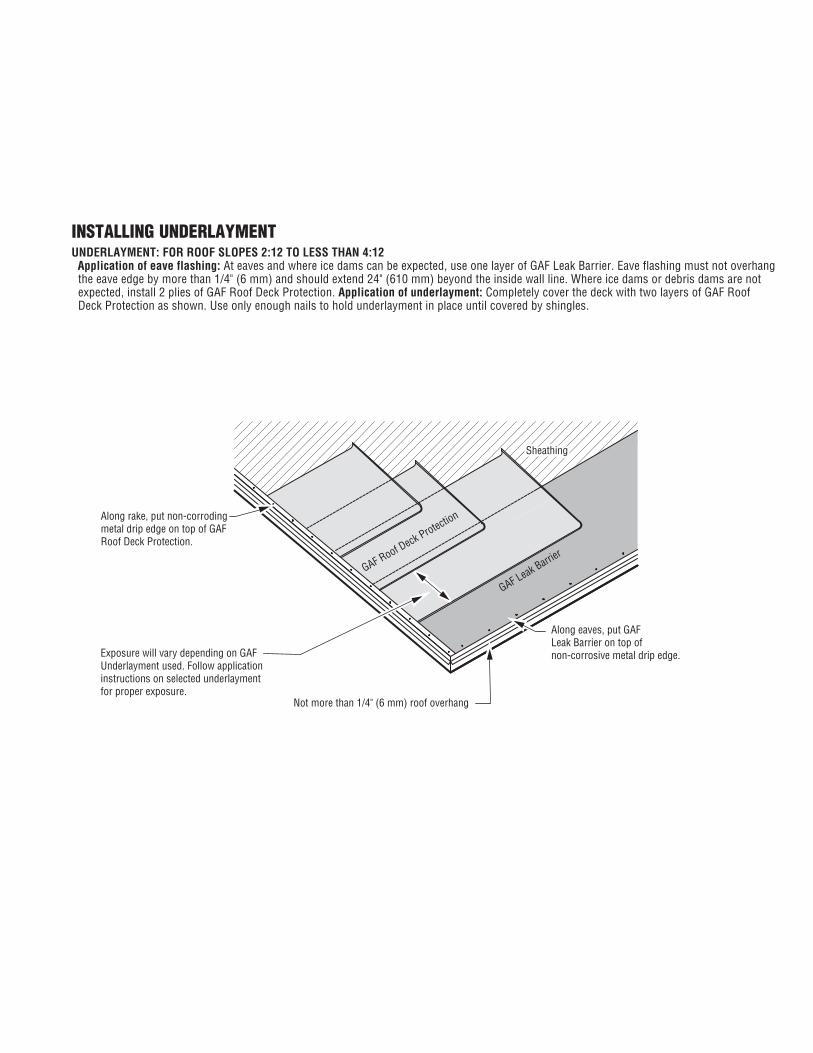
Along rake, put non-corroding metal drip edge on top of GAF Roof Deck Protection.
4" (102 mm) minimum vertical lap
Along eaves, put GAF Leak Barrier on top of non-corrosive metal drip edge.
2" (51mm) minimum horizontal lap2" (51 mm) minimum horizontal lapSolape horizontal mínimo de 2" (51mm)Chevauchement horizontal minimum de 51mm (2po)
Not more than 1/4" (6 mm) roof overhang
GAF Roof Deck Protection
GAF Leak Barrier
SheathingSheathing
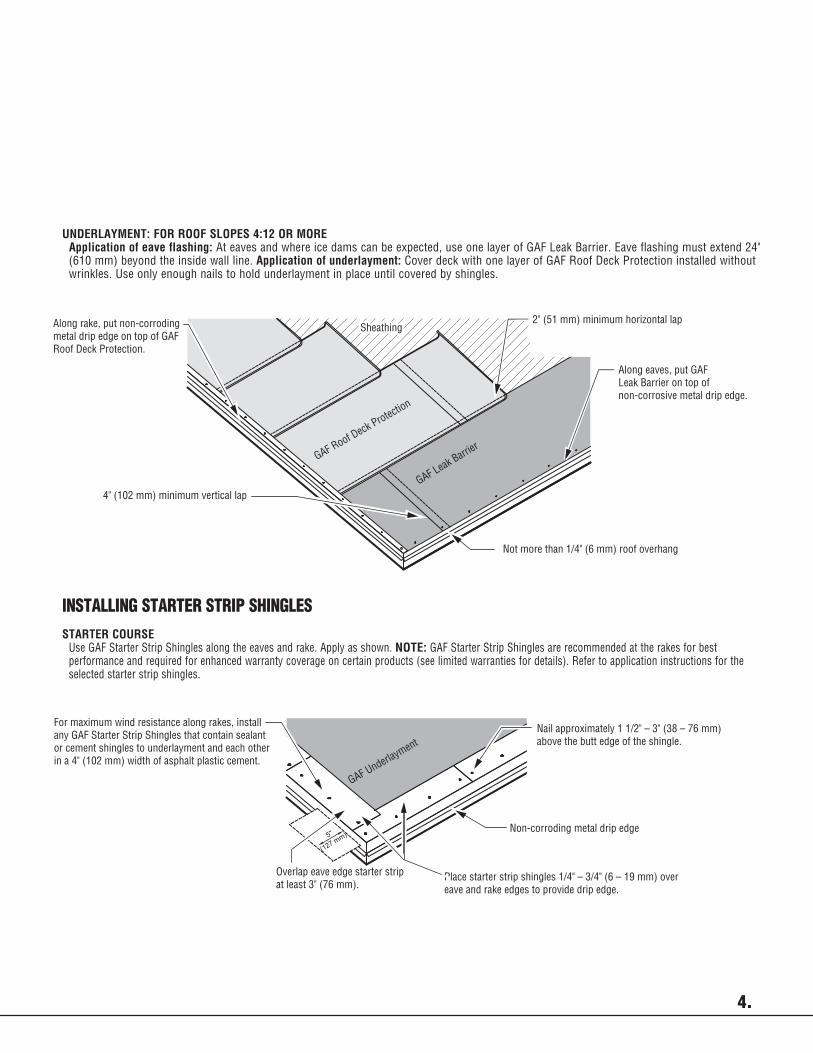
For maximum wind resistance along rakes, installany GAF Starter Strip Shingles that contain sealant or cement shingles to underlayment and each otherin a 4" (102 mm) width of asphalt plastic cement.
Place starter strip shingles 1/4" – 3/4" (6 – 19 mm) overeave and rake edges to provide drip edge.
Overlap eave edge starter strip at least 3" (76 mm).
Non-corroding metal drip edge
Nail approximately 1 1/2" – 3" (38 – 76 mm)above the butt edge of the shingle.
GAF Underlayment
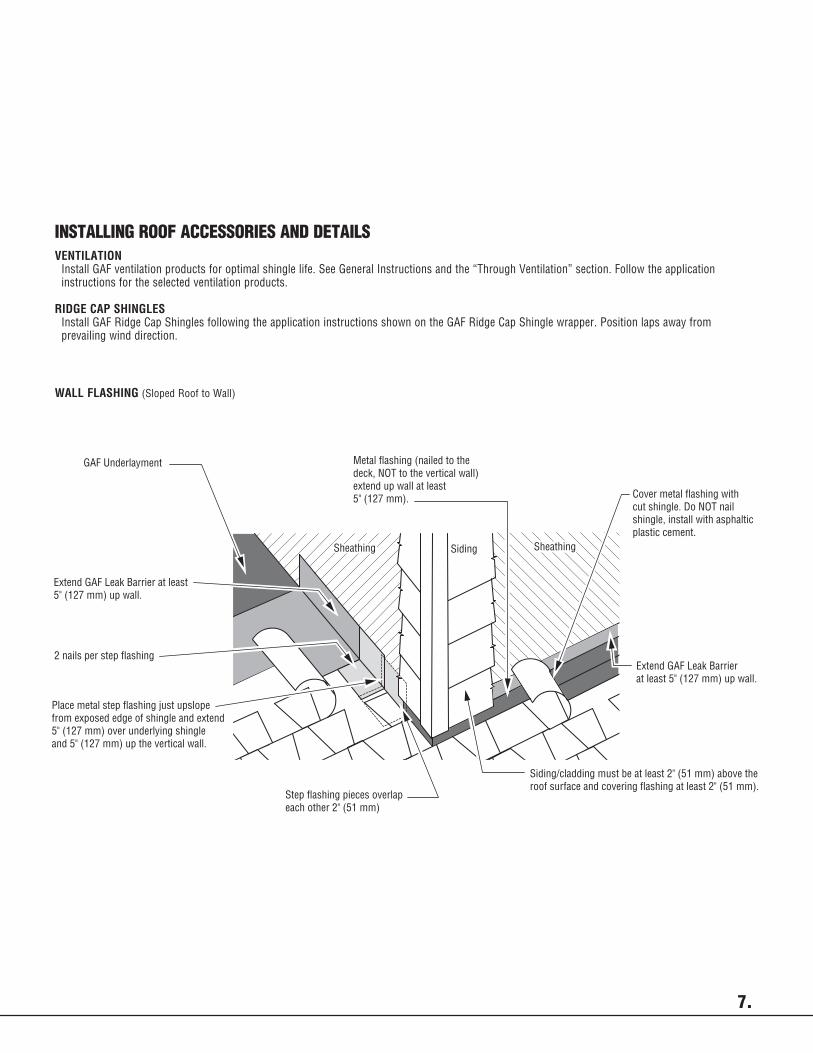
Metal flashing (nailed to the deck, NOT to the vertical wall) extend up wall at least 5" (127 mm).
Extend GAF Leak Barrierat least 5" (127 mm) up wall.
Cover metal flashing with cut shingle. Do NOT nailshingle, install with asphaltic plastic cement.
Siding/cladding must be at least 2" (51 mm) above theroof surface and covering flashing at least 2" (51 mm).
Step flashing pieces overlapeach other 2" (51 mm)
Extend GAF Leak Barrier at least 5" (127 mm) up wall.
2 nails per step flashing
GAF Underlayment
Place metal step flashing just upslopefrom exposed edge of shingle and extend5" (127 mm) over underlying shingle and 5" (127 mm) up the vertical wall.
6" (152 mm)
6" (152 mm)
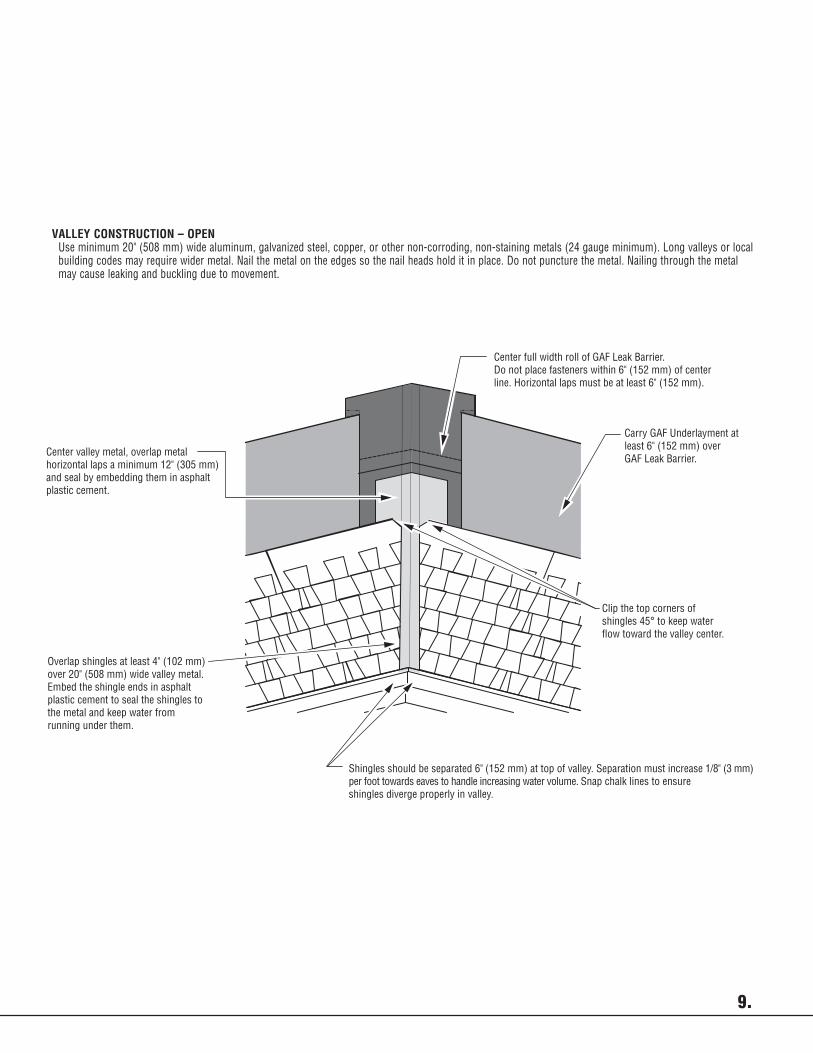
Center valley metal, overlap metalhorizontal laps a minimum 12" (305 mm)and seal by embedding them in asphaltplastic cement.
Carry GAF Underlayment atleast 6" (152 mm) overGAF Leak Barrier.
Overlap shingles at least 4" (102 mm) over 20" (508 mm) wide valley metal.Embed the shingle ends in asphaltplastic cement to seal the shingles tothe metal and keep water from running under them.
Clip the top corners ofshingles 45° to keep waterflow toward the valley center.
Shingles should be separated 6" (152 mm) at top of valley. Separation must increase 1/8" (3 mm)per foot towards eaves to handle increasing water volume. Snap chalk lines to ensureshingles diverge properly in valley.
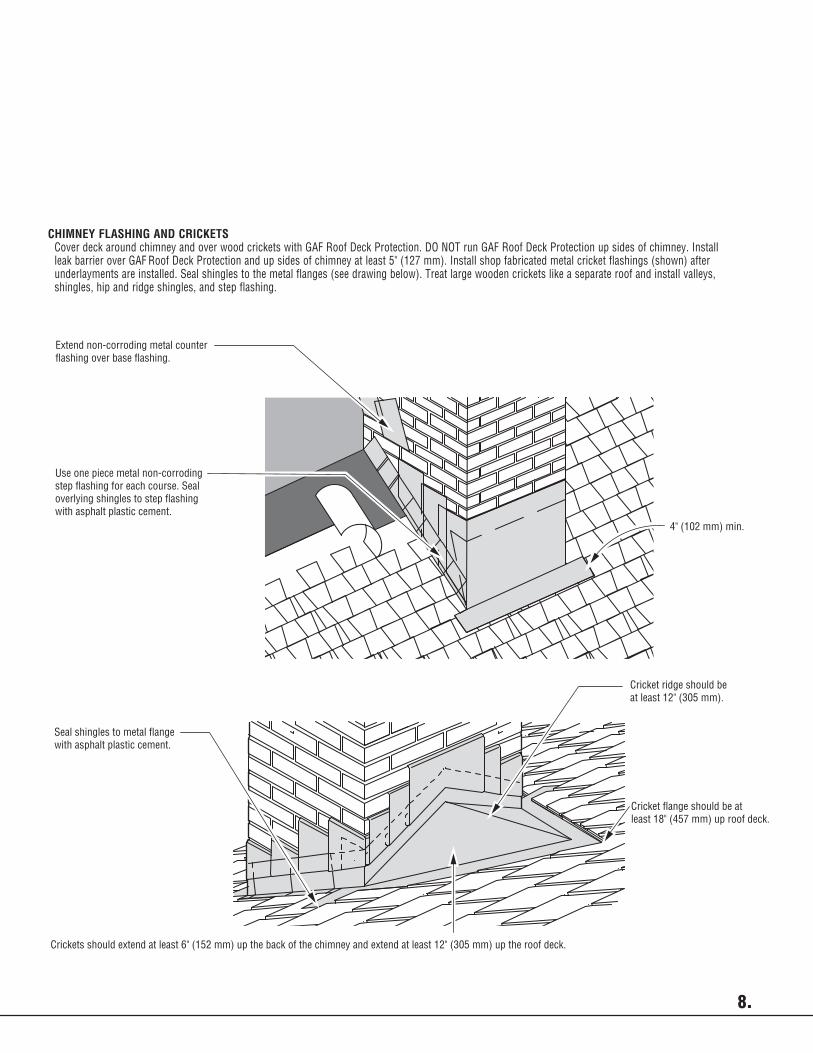
Cricket ridge should be at least 12" (305 mm).
Cricket flange should be at least 18" (457 mm) up roof deck.
Seal shingles to metal flangewith asphalt plastic cement.
Crickets should extend at least 6" (152 mm) up the back of the chimney and extend at least 12" (305 mm) up the roof deck.
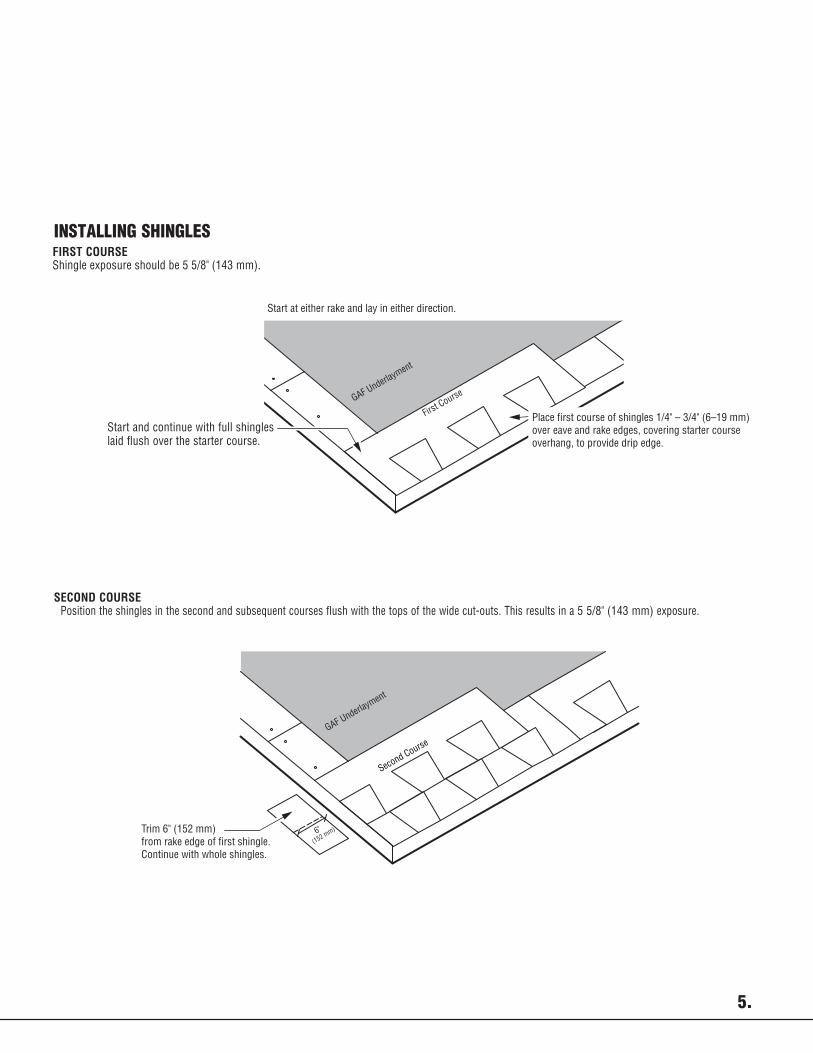
Trim 6" (152 mm)from rake edge of first shingle.Continue with whole shingles.
Carry GAF Underlayment at least6" (152 mm) over GAF Leak Barrier.
Extend end of shingle at least 12" (305 mm) beyond valley center line. Before nailing, firmly press shingles down at valley center to conform to valley shape. Nail, putting extrafastener in top corner of shingle. Due to the extreme water volume in valleys, nails near the center can leak.
Run starter strip across valley at least 12" (305 mm) and weave with opposite side starter strip and shingle.
CAUTION: Do NOT place nails closer than 6" (152 mm) to the valley center line.
Along rake, put non-corroding metal drip edge on top of GAF Roof Deck Protection.
Exposure will vary depending on GAFUnderlayment used. Follow applicationinstructions on selected underlaymentfor proper exposure.
Along eaves, put GAF Leak Barrier on top of non-corrosive metal drip edge.
GAF Leak Barrier
Not more than 1/4" (6 mm) roof overhang
Protection de Platelage
de Toit GAF
GAF Roof Deck Protection
SheathingSheathing
5"
(127 mm)
Extend non-corroding metal counterflashing over base flashing.
Use one piece metal non-corrodingstep flashing for each course. Sealoverlying shingles to step flashingwith asphalt plastic cement.
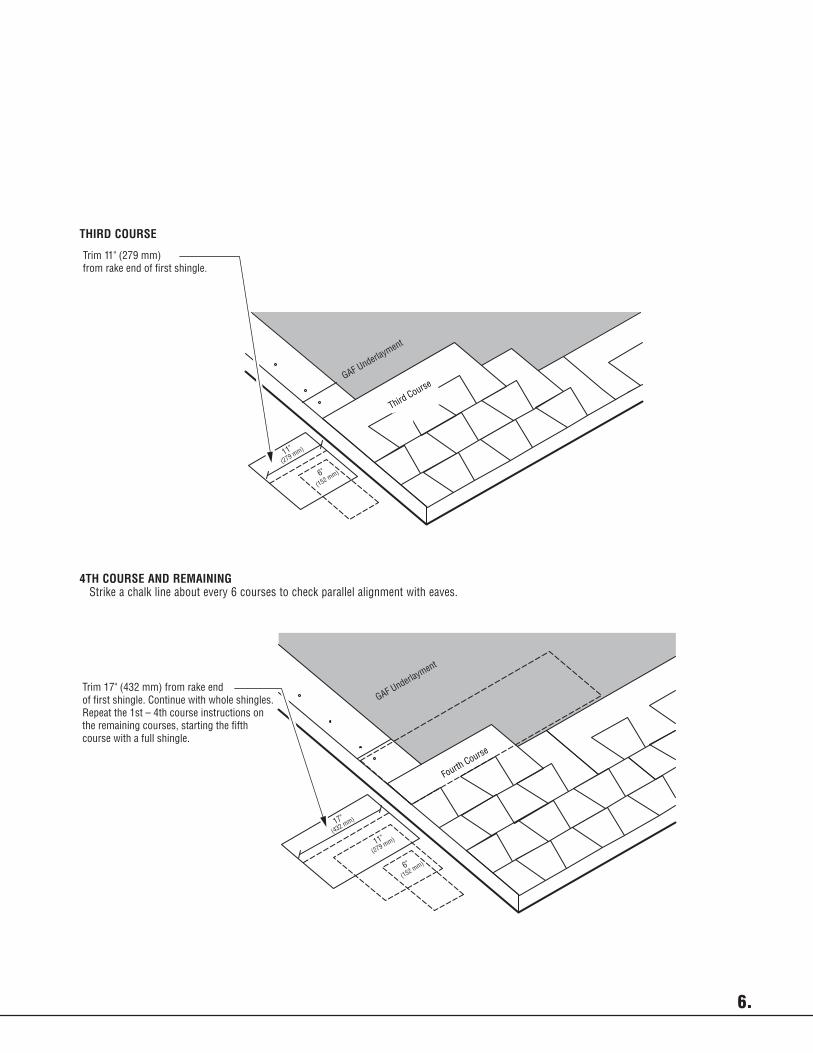
Trim 11" (279 mm)from rake end of first shingle.
Trim 17" (432 mm) from rake end of first shingle. Continue with whole shingles. Repeat the 1st – 4th course instructions on the remaining courses, starting the fifth course with a full shingle.
Start at either rake and lay in either direction.
Place first course of shingles 1/4" – 3/4" (6–19 mm)over eave and rake edges, covering starter courseoverhang, to provide drip edge.
Start and continue with full shingleslaid flush over the starter course.
Center full width roll of GAF Leak Barrier. Do not place fasteners within 6" (152 mm) of centerline. Horizontal laps must be at least 6" (152 mm).
Center full width roll of GAF Leak Barrier. Do not place fasteners within 6" (152 mm) of centerline. Horizontal laps must be at least 6" (152 mm).
Overlying shingles must be cut sothey are 2" (52 mm) away from valley center line. Clip shinglecorners 45° to keep water flowin the valley center. Seal the valleyshingles to each other usingplastic roof cement.
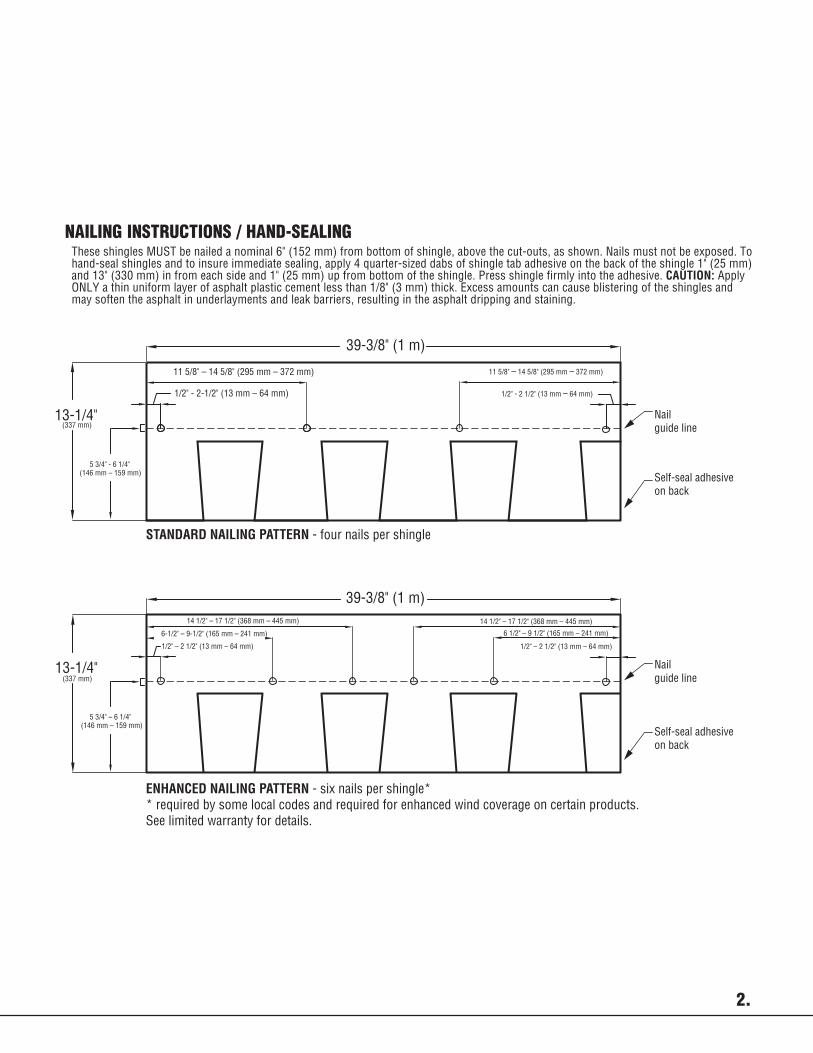
NAILING INSTRUCTIONS / HAND-SEALING These shingles MUST be nailed a nominal 6" (152 mm) from bottom of shingle, above the cut-outs, as shown. Nails must not be exposed. To
hand-seal shingles and to insure immediate sealing, apply 4 quarter-sized dabs of shingle tab adhesive on the back of the shingle 1" (25 mm) and 13" (330 mm) in from each side and 1" (25 mm) up from bottom of the shingle. Press shingle firmly into the adhesive. CAUTION: Apply ONLY a thin uniform layer of asphalt plastic cement less than 1/8" (3 mm) thick. Excess amounts can cause blistering of the shingles and may soften the asphalt in underlayments and leak barriers, resulting in the asphalt dripping and staining.
13-1/4"
39-3/8" (1 m)
13-1/4"
39-3/8" (1 m)
5 3/4" - 6 1/4"(146 mm – 159 mm)
5 3/4" – 6 1/4"(146 mm – 159 mm)
(337 mm)
(337 mm)
STANDARD NAILING PATTERN - four nails per shingle
14 1/2" – 17 1/2" (368 mm – 445 mm)
6-1/2" – 9-1/2" (165 mm – 241 mm)
14 1/2" – 17 1/2" (368 mm – 445 mm)
11 5/8" – 14 5/8" (295 mm – 372 mm)
1/2" - 2 1/2" (13 mm – 64 mm)
Self-seal adhesive on back
Nailguide line
Self-seal adhesive on back
Nailguide line
11 5/8" – 14 5/8" (295 mm – 372 mm)
1/2" - 2-1/2" (13 mm – 64 mm)
6 1/2" – 9 1/2" (165 mm – 241 mm)
1/2" – 2 1/2" (13 mm – 64 mm) 1/2" – 2 1/2" (13 mm – 64 mm)
ENHANCED NAILING PATTERN - six nails per shingle** required by some local codes and required for enhanced wind coverage on certain products.See limited warranty for details.
17"
(432 mm)
11"
(279 mm)
6"
(152 mm)
11"
(279 mm)
6"
(152 mm)
6"
(152 mm)
GAF Underlayment
GAF Underlayment
Siding SheathingSheathing SheathingSheathing
4" (102 mm) min.
First Course
Second Course
Second Course
Third Course
Tercer Curso
Troisième Cours
Third Course
Fourth Course
Fourth Course
GAF Underlayment
GAF Underlayment
Start at either rake and lay in either direction
Along rake, put non-corroding metal drip edge on top of GAF Roof Deck Protection.
4" (102 mm) minimum vertical lap
Along eaves, put GAF Leak Barrier on top of non-corrosive metal drip edge.
2" (51mm) minimum horizontal lap2" (51 mm) minimum horizontal lapSolape horizontal mínimo de 2" (51mm)Chevauchement horizontal minimum de 51mm (2po)
Not more than 1/4" (6 mm) roof overhang
GAF Roof Deck Protection
GAF Leak Barrier
SheathingSheathing
For maximum wind resistance along rakes, installany GAF Starter Strip Shingles that contain sealant or cement shingles to underlayment and each otherin a 4" (102 mm) width of asphalt plastic cement.
Place starter strip shingles 1/4" – 3/4" (6 – 19 mm) overeave and rake edges to provide drip edge.
Overlap eave edge starter strip at least 3" (76 mm).
Non-corroding metal drip edge
Nail approximately 1 1/2" – 3" (38 – 76 mm)above the butt edge of the shingle.
GAF Underlayment
Metal flashing (nailed to the deck, NOT to the vertical wall) extend up wall at least 5" (127 mm).
Extend GAF Leak Barrierat least 5" (127 mm) up wall.
Cover metal flashing with cut shingle. Do NOT nailshingle, install with asphaltic plastic cement.
Siding/cladding must be at least 2" (51 mm) above theroof surface and covering flashing at least 2" (51 mm).
Step flashing pieces overlapeach other 2" (51 mm)
Extend GAF Leak Barrier at least 5" (127 mm) up wall.
2 nails per step flashing
GAF Underlayment
Place metal step flashing just upslopefrom exposed edge of shingle and extend5" (127 mm) over underlying shingle and 5" (127 mm) up the vertical wall.
6" (152 mm)
6" (152 mm)
Center valley metal, overlap metalhorizontal laps a minimum 12" (305 mm)and seal by embedding them in asphaltplastic cement.
Carry GAF Underlayment atleast 6" (152 mm) overGAF Leak Barrier.
Overlap shingles at least 4" (102 mm) over 20" (508 mm) wide valley metal.Embed the shingle ends in asphaltplastic cement to seal the shingles tothe metal and keep water from running under them.
Clip the top corners ofshingles 45° to keep waterflow toward the valley center.
Shingles should be separated 6" (152 mm) at top of valley. Separation must increase 1/8" (3 mm)per foot towards eaves to handle increasing water volume. Snap chalk lines to ensureshingles diverge properly in valley.
Cricket ridge should be at least 12" (305 mm).
Cricket flange should be at least 18" (457 mm) up roof deck.
Seal shingles to metal flangewith asphalt plastic cement.
Crickets should extend at least 6" (152 mm) up the back of the chimney and extend at least 12" (305 mm) up the roof deck.
Trim 6" (152 mm)from rake edge of first shingle.Continue with whole shingles.
Carry GAF Underlayment at least6" (152 mm) over GAF Leak Barrier.
Extend end of shingle at least 12" (305 mm) beyond valley center line. Before nailing, firmly press shingles down at valley center to conform to valley shape. Nail, putting extrafastener in top corner of shingle. Due to the extreme water volume in valleys, nails near the center can leak.
Run starter strip across valley at least 12" (305 mm) and weave with opposite side starter strip and shingle.
CAUTION: Do NOT place nails closer than 6" (152 mm) to the valley center line.
Along rake, put non-corroding metal drip edge on top of GAF Roof Deck Protection.
Exposure will vary depending on GAFUnderlayment used. Follow applicationinstructions on selected underlaymentfor proper exposure.
Along eaves, put GAF Leak Barrier on top of non-corrosive metal drip edge.
GAF Leak Barrier
Not more than 1/4" (6 mm) roof overhang
Protection de Platelage
de Toit GAF
GAF Roof Deck Protection
SheathingSheathing
5"
(127 mm)
Extend non-corroding metal counterflashing over base flashing.
Use one piece metal non-corrodingstep flashing for each course. Sealoverlying shingles to step flashingwith asphalt plastic cement.
Trim 11" (279 mm)from rake end of first shingle.
Trim 17" (432 mm) from rake end of first shingle. Continue with whole shingles. Repeat the 1st – 4th course instructions on the remaining courses, starting the fifth course with a full shingle.
Start at either rake and lay in either direction.
Place first course of shingles 1/4" – 3/4" (6–19 mm)over eave and rake edges, covering starter courseoverhang, to provide drip edge.
Start and continue with full shingleslaid flush over the starter course.
Center full width roll of GAF Leak Barrier. Do not place fasteners within 6" (152 mm) of centerline. Horizontal laps must be at least 6" (152 mm).
Center full width roll of GAF Leak Barrier. Do not place fasteners within 6" (152 mm) of centerline. Horizontal laps must be at least 6" (152 mm).
Overlying shingles must be cut sothey are 2" (52 mm) away from valley center line. Clip shinglecorners 45° to keep water flowin the valley center. Seal the valleyshingles to each other usingplastic roof cement.
INSTALLING UNDERLAYMENTUNDERLAYMENT: FOR ROOF SLOPES 2:12 TO LESS THAN 4:12 Application of eave flashing: At eaves and where ice dams can be expected, use one layer of GAF Leak Barrier. Eave flashing must not overhang
the eave edge by more than 1/4" (6 mm) and should extend 24" (610 mm) beyond the inside wall line. Where ice dams or debris dams are not expected, install 2 plies of GAF Roof Deck Protection. Application of underlayment: Completely cover the deck with two layers of GAF Roof Deck Protection as shown. Use only enough nails to hold underlayment in place until covered by shingles.
4.
13-1/4"
39-3/8" (1 m)
13-1/4"
39-3/8" (1 m)
5 3/4" - 6 1/4"(146 mm – 159 mm)
5 3/4" – 6 1/4"(146 mm – 159 mm)
(337 mm)
(337 mm)
STANDARD NAILING PATTERN - four nails per shingle
14 1/2" – 17 1/2" (368 mm – 445 mm)
6-1/2" – 9-1/2" (165 mm – 241 mm)
14 1/2" – 17 1/2" (368 mm – 445 mm)
11 5/8" – 14 5/8" (295 mm – 372 mm)
1/2" - 2 1/2" (13 mm – 64 mm)
Self-seal adhesive on back
Nailguide line
Self-seal adhesive on back
Nailguide line
11 5/8" – 14 5/8" (295 mm – 372 mm)
1/2" - 2-1/2" (13 mm – 64 mm)
6 1/2" – 9 1/2" (165 mm – 241 mm)
1/2" – 2 1/2" (13 mm – 64 mm) 1/2" – 2 1/2" (13 mm – 64 mm)
ENHANCED NAILING PATTERN - six nails per shingle** required by some local codes and required for enhanced wind coverage on certain products.See limited warranty for details.
17"
(432 mm)
11"
(279 mm)
6"
(152 mm)
11"
(279 mm)
6"
(152 mm)
6"
(152 mm)
GAF Underlayment
GAF Underlayment
Siding SheathingSheathing SheathingSheathing
4" (102 mm) min.
First Course
Second Course
Second Course
Third Course
Tercer Curso
Troisième Cours
Third Course
Fourth Course
Fourth Course
GAF Underlayment
GAF Underlayment
Start at either rake and lay in either direction
Along rake, put non-corroding metal drip edge on top of GAF Roof Deck Protection.
4" (102 mm) minimum vertical lap
Along eaves, put GAF Leak Barrier on top of non-corrosive metal drip edge.
2" (51mm) minimum horizontal lap2" (51 mm) minimum horizontal lapSolape horizontal mínimo de 2" (51mm)Chevauchement horizontal minimum de 51mm (2po)
Not more than 1/4" (6 mm) roof overhang
GAF Roof Deck Protection
GAF Leak Barrier
SheathingSheathing
For maximum wind resistance along rakes, installany GAF Starter Strip Shingles that contain sealant or cement shingles to underlayment and each otherin a 4" (102 mm) width of asphalt plastic cement.
Place starter strip shingles 1/4" – 3/4" (6 – 19 mm) overeave and rake edges to provide drip edge.
Overlap eave edge starter strip at least 3" (76 mm).
Non-corroding metal drip edge
Nail approximately 1 1/2" – 3" (38 – 76 mm)above the butt edge of the shingle.
GAF Underlayment
Metal flashing (nailed to the deck, NOT to the vertical wall) extend up wall at least 5" (127 mm).
Extend GAF Leak Barrierat least 5" (127 mm) up wall.
Cover metal flashing with cut shingle. Do NOT nailshingle, install with asphaltic plastic cement.
Siding/cladding must be at least 2" (51 mm) above theroof surface and covering flashing at least 2" (51 mm).
Step flashing pieces overlapeach other 2" (51 mm)
Extend GAF Leak Barrier at least 5" (127 mm) up wall.
2 nails per step flashing
GAF Underlayment
Place metal step flashing just upslopefrom exposed edge of shingle and extend5" (127 mm) over underlying shingle and 5" (127 mm) up the vertical wall.
6" (152 mm)
6" (152 mm)
Center valley metal, overlap metalhorizontal laps a minimum 12" (305 mm)and seal by embedding them in asphaltplastic cement.
Carry GAF Underlayment atleast 6" (152 mm) overGAF Leak Barrier.
Overlap shingles at least 4" (102 mm) over 20" (508 mm) wide valley metal.Embed the shingle ends in asphaltplastic cement to seal the shingles tothe metal and keep water from running under them.
Clip the top corners ofshingles 45° to keep waterflow toward the valley center.
Shingles should be separated 6" (152 mm) at top of valley. Separation must increase 1/8" (3 mm)per foot towards eaves to handle increasing water volume. Snap chalk lines to ensureshingles diverge properly in valley.
Cricket ridge should be at least 12" (305 mm).
Cricket flange should be at least 18" (457 mm) up roof deck.
Seal shingles to metal flangewith asphalt plastic cement.
Crickets should extend at least 6" (152 mm) up the back of the chimney and extend at least 12" (305 mm) up the roof deck.
Trim 6" (152 mm)from rake edge of first shingle.Continue with whole shingles.
Carry GAF Underlayment at least6" (152 mm) over GAF Leak Barrier.
Extend end of shingle at least 12" (305 mm) beyond valley center line. Before nailing, firmly press shingles down at valley center to conform to valley shape. Nail, putting extrafastener in top corner of shingle. Due to the extreme water volume in valleys, nails near the center can leak.
Run starter strip across valley at least 12" (305 mm) and weave with opposite side starter strip and shingle.
CAUTION: Do NOT place nails closer than 6" (152 mm) to the valley center line.
Along rake, put non-corroding metal drip edge on top of GAF Roof Deck Protection.
Exposure will vary depending on GAFUnderlayment used. Follow applicationinstructions on selected underlaymentfor proper exposure.
Along eaves, put GAF Leak Barrier on top of non-corrosive metal drip edge.
GAF Leak Barrier
Not more than 1/4" (6 mm) roof overhang
Protection de Platelage
de Toit GAF
GAF Roof Deck Protection
SheathingSheathing
5"
(127 mm)
Extend non-corroding metal counterflashing over base flashing.
Use one piece metal non-corrodingstep flashing for each course. Sealoverlying shingles to step flashingwith asphalt plastic cement.
Trim 11" (279 mm)from rake end of first shingle.
Trim 17" (432 mm) from rake end of first shingle. Continue with whole shingles. Repeat the 1st – 4th course instructions on the remaining courses, starting the fifth course with a full shingle.
Start at either rake and lay in either direction.
Place first course of shingles 1/4" – 3/4" (6–19 mm)over eave and rake edges, covering starter courseoverhang, to provide drip edge.
Start and continue with full shingleslaid flush over the starter course.
Center full width roll of GAF Leak Barrier. Do not place fasteners within 6" (152 mm) of centerline. Horizontal laps must be at least 6" (152 mm).
Center full width roll of GAF Leak Barrier. Do not place fasteners within 6" (152 mm) of centerline. Horizontal laps must be at least 6" (152 mm).
Overlying shingles must be cut sothey are 2" (52 mm) away from valley center line. Clip shinglecorners 45° to keep water flowin the valley center. Seal the valleyshingles to each other usingplastic roof cement.
13-1/4"
39-3/8" (1 m)
13-1/4"
39-3/8" (1 m)
5 3/4" - 6 1/4"(146 mm – 159 mm)
5 3/4" – 6 1/4"(146 mm – 159 mm)
(337 mm)
(337 mm)
STANDARD NAILING PATTERN - four nails per shingle
14 1/2" – 17 1/2" (368 mm – 445 mm)
6-1/2" – 9-1/2" (165 mm – 241 mm)
14 1/2" – 17 1/2" (368 mm – 445 mm)
11 5/8" – 14 5/8" (295 mm – 372 mm)
1/2" - 2 1/2" (13 mm – 64 mm)
Self-seal adhesive on back
Nailguide line
Self-seal adhesive on back
Nailguide line
11 5/8" – 14 5/8" (295 mm – 372 mm)
1/2" - 2-1/2" (13 mm – 64 mm)
6 1/2" – 9 1/2" (165 mm – 241 mm)
1/2" – 2 1/2" (13 mm – 64 mm) 1/2" – 2 1/2" (13 mm – 64 mm)
ENHANCED NAILING PATTERN - six nails per shingle** required by some local codes and required for enhanced wind coverage on certain products.See limited warranty for details.
17"
(432 mm)
11"
(279 mm)
6"
(152 mm)
11"
(279 mm)
6"
(152 mm)
6"
(152 mm)
GAF Underlayment
GAF Underlayment
Siding SheathingSheathing SheathingSheathing
4" (102 mm) min.
First Course
Second Course
Second Course
Third Course
Tercer Curso
Troisième Cours
Third Course
Fourth Course
Fourth Course
GAF Underlayment
GAF Underlayment
Start at either rake and lay in either direction
Along rake, put non-corroding metal drip edge on top of GAF Roof Deck Protection.
4" (102 mm) minimum vertical lap
Along eaves, put GAF Leak Barrier on top of non-corrosive metal drip edge.
2" (51mm) minimum horizontal lap2" (51 mm) minimum horizontal lapSolape horizontal mínimo de 2" (51mm)Chevauchement horizontal minimum de 51mm (2po)
Not more than 1/4" (6 mm) roof overhang
GAF Roof Deck Protection
GAF Leak Barrier
SheathingSheathing
For maximum wind resistance along rakes, installany GAF Starter Strip Shingles that contain sealant or cement shingles to underlayment and each otherin a 4" (102 mm) width of asphalt plastic cement.
Place starter strip shingles 1/4" – 3/4" (6 – 19 mm) overeave and rake edges to provide drip edge.
Overlap eave edge starter strip at least 3" (76 mm).
Non-corroding metal drip edge
Nail approximately 1 1/2" – 3" (38 – 76 mm)above the butt edge of the shingle.
GAF Underlayment
Metal flashing (nailed to the deck, NOT to the vertical wall) extend up wall at least 5" (127 mm).
Extend GAF Leak Barrierat least 5" (127 mm) up wall.
Cover metal flashing with cut shingle. Do NOT nailshingle, install with asphaltic plastic cement.
Siding/cladding must be at least 2" (51 mm) above theroof surface and covering flashing at least 2" (51 mm).
Step flashing pieces overlapeach other 2" (51 mm)
Extend GAF Leak Barrier at least 5" (127 mm) up wall.
2 nails per step flashing
GAF Underlayment
Place metal step flashing just upslopefrom exposed edge of shingle and extend5" (127 mm) over underlying shingle and 5" (127 mm) up the vertical wall.
6" (152 mm)
6" (152 mm)
Center valley metal, overlap metalhorizontal laps a minimum 12" (305 mm)and seal by embedding them in asphaltplastic cement.
Carry GAF Underlayment atleast 6" (152 mm) overGAF Leak Barrier.
Overlap shingles at least 4" (102 mm) over 20" (508 mm) wide valley metal.Embed the shingle ends in asphaltplastic cement to seal the shingles tothe metal and keep water from running under them.
Clip the top corners ofshingles 45° to keep waterflow toward the valley center.
Shingles should be separated 6" (152 mm) at top of valley. Separation must increase 1/8" (3 mm)per foot towards eaves to handle increasing water volume. Snap chalk lines to ensureshingles diverge properly in valley.
Cricket ridge should be at least 12" (305 mm).
Cricket flange should be at least 18" (457 mm) up roof deck.
Seal shingles to metal flangewith asphalt plastic cement.
Crickets should extend at least 6" (152 mm) up the back of the chimney and extend at least 12" (305 mm) up the roof deck.
Trim 6" (152 mm)from rake edge of first shingle.Continue with whole shingles.
Carry GAF Underlayment at least6" (152 mm) over GAF Leak Barrier.
Extend end of shingle at least 12" (305 mm) beyond valley center line. Before nailing, firmly press shingles down at valley center to conform to valley shape. Nail, putting extrafastener in top corner of shingle. Due to the extreme water volume in valleys, nails near the center can leak.
Run starter strip across valley at least 12" (305 mm) and weave with opposite side starter strip and shingle.
CAUTION: Do NOT place nails closer than 6" (152 mm) to the valley center line.
Along rake, put non-corroding metal drip edge on top of GAF Roof Deck Protection.
Exposure will vary depending on GAFUnderlayment used. Follow applicationinstructions on selected underlaymentfor proper exposure.
Along eaves, put GAF Leak Barrier on top of non-corrosive metal drip edge.
GAF Leak Barrier
Not more than 1/4" (6 mm) roof overhang
Protection de Platelage
de Toit GAF
GAF Roof Deck Protection
SheathingSheathing
5"
(127 mm)
Extend non-corroding metal counterflashing over base flashing.
Use one piece metal non-corrodingstep flashing for each course. Sealoverlying shingles to step flashingwith asphalt plastic cement.
Trim 11" (279 mm)from rake end of first shingle.
Trim 17" (432 mm) from rake end of first shingle. Continue with whole shingles. Repeat the 1st – 4th course instructions on the remaining courses, starting the fifth course with a full shingle.
Start at either rake and lay in either direction.
Place first course of shingles 1/4" – 3/4" (6–19 mm)over eave and rake edges, covering starter courseoverhang, to provide drip edge.
Start and continue with full shingleslaid flush over the starter course.
Center full width roll of GAF Leak Barrier. Do not place fasteners within 6" (152 mm) of centerline. Horizontal laps must be at least 6" (152 mm).
Center full width roll of GAF Leak Barrier. Do not place fasteners within 6" (152 mm) of centerline. Horizontal laps must be at least 6" (152 mm).
Overlying shingles must be cut sothey are 2" (52 mm) away from valley center line. Clip shinglecorners 45° to keep water flowin the valley center. Seal the valleyshingles to each other usingplastic roof cement.
UNDERLAYMENT: FOR ROOF SLOPES 4:12 OR MORE Application of eave flashing: At eaves and where ice dams can be expected, use one layer of GAF Leak Barrier. Eave flashing must extend 24"
(610 mm) beyond the inside wall line. Application of underlayment: Cover deck with one layer of GAF Roof Deck Protection installed without wrinkles. Use only enough nails to hold underlayment in place until covered by shingles.
INSTALLING STARTER STRIP SHINGLESSTARTER COURSE
Use GAF Starter Strip Shingles along the eaves and rake. Apply as shown. NOTE: GAF Starter Strip Shingles are recommended at the rakes for best performance and required for enhanced warranty coverage on certain products (see limited warranties for details). Refer to application instructions for the selected starter strip shingles.
5.
13-1/4"
39-3/8" (1 m)
13-1/4"
39-3/8" (1 m)
5 3/4" - 6 1/4"(146 mm – 159 mm)
5 3/4" – 6 1/4"(146 mm – 159 mm)
(337 mm)
(337 mm)
STANDARD NAILING PATTERN - four nails per shingle
14 1/2" – 17 1/2" (368 mm – 445 mm)
6-1/2" – 9-1/2" (165 mm – 241 mm)
14 1/2" – 17 1/2" (368 mm – 445 mm)
11 5/8" – 14 5/8" (295 mm – 372 mm)
1/2" - 2 1/2" (13 mm – 64 mm)
Self-seal adhesive on back
Nailguide line
Self-seal adhesive on back
Nailguide line
11 5/8" – 14 5/8" (295 mm – 372 mm)
1/2" - 2-1/2" (13 mm – 64 mm)
6 1/2" – 9 1/2" (165 mm – 241 mm)
1/2" – 2 1/2" (13 mm – 64 mm) 1/2" – 2 1/2" (13 mm – 64 mm)
ENHANCED NAILING PATTERN - six nails per shingle** required by some local codes and required for enhanced wind coverage on certain products.See limited warranty for details.
17"
(432 mm)
11"
(279 mm)
6"
(152 mm)
11"
(279 mm)
6"
(152 mm)
6"
(152 mm)
GAF Underlayment
GAF Underlayment
Siding SheathingSheathing SheathingSheathing
4" (102 mm) min.
First Course
Second Course
Second Course
Third Course
Tercer Curso
Troisième Cours
Third Course
Fourth Course
Fourth Course
GAF Underlayment
GAF Underlayment
Start at either rake and lay in either direction
Along rake, put non-corroding metal drip edge on top of GAF Roof Deck Protection.
4" (102 mm) minimum vertical lap
Along eaves, put GAF Leak Barrier on top of non-corrosive metal drip edge.
2" (51mm) minimum horizontal lap2" (51 mm) minimum horizontal lapSolape horizontal mínimo de 2" (51mm)Chevauchement horizontal minimum de 51mm (2po)
Not more than 1/4" (6 mm) roof overhang
GAF Roof Deck Protection
GAF Leak Barrier
SheathingSheathing
For maximum wind resistance along rakes, installany GAF Starter Strip Shingles that contain sealant or cement shingles to underlayment and each otherin a 4" (102 mm) width of asphalt plastic cement.
Place starter strip shingles 1/4" – 3/4" (6 – 19 mm) overeave and rake edges to provide drip edge.
Overlap eave edge starter strip at least 3" (76 mm).
Non-corroding metal drip edge
Nail approximately 1 1/2" – 3" (38 – 76 mm)above the butt edge of the shingle.
GAF Underlayment
Metal flashing (nailed to the deck, NOT to the vertical wall) extend up wall at least 5" (127 mm).
Extend GAF Leak Barrierat least 5" (127 mm) up wall.
Cover metal flashing with cut shingle. Do NOT nailshingle, install with asphaltic plastic cement.
Siding/cladding must be at least 2" (51 mm) above theroof surface and covering flashing at least 2" (51 mm).
Step flashing pieces overlapeach other 2" (51 mm)
Extend GAF Leak Barrier at least 5" (127 mm) up wall.
2 nails per step flashing
GAF Underlayment
Place metal step flashing just upslopefrom exposed edge of shingle and extend5" (127 mm) over underlying shingle and 5" (127 mm) up the vertical wall.
6" (152 mm)
6" (152 mm)
Center valley metal, overlap metalhorizontal laps a minimum 12" (305 mm)and seal by embedding them in asphaltplastic cement.
Carry GAF Underlayment atleast 6" (152 mm) overGAF Leak Barrier.
Overlap shingles at least 4" (102 mm) over 20" (508 mm) wide valley metal.Embed the shingle ends in asphaltplastic cement to seal the shingles tothe metal and keep water from running under them.
Clip the top corners ofshingles 45° to keep waterflow toward the valley center.
Shingles should be separated 6" (152 mm) at top of valley. Separation must increase 1/8" (3 mm)per foot towards eaves to handle increasing water volume. Snap chalk lines to ensureshingles diverge properly in valley.
Cricket ridge should be at least 12" (305 mm).
Cricket flange should be at least 18" (457 mm) up roof deck.
Seal shingles to metal flangewith asphalt plastic cement.
Crickets should extend at least 6" (152 mm) up the back of the chimney and extend at least 12" (305 mm) up the roof deck.
Trim 6" (152 mm)from rake edge of first shingle.Continue with whole shingles.
Carry GAF Underlayment at least6" (152 mm) over GAF Leak Barrier.
Extend end of shingle at least 12" (305 mm) beyond valley center line. Before nailing, firmly press shingles down at valley center to conform to valley shape. Nail, putting extrafastener in top corner of shingle. Due to the extreme water volume in valleys, nails near the center can leak.
Run starter strip across valley at least 12" (305 mm) and weave with opposite side starter strip and shingle.
CAUTION: Do NOT place nails closer than 6" (152 mm) to the valley center line.
Along rake, put non-corroding metal drip edge on top of GAF Roof Deck Protection.
Exposure will vary depending on GAFUnderlayment used. Follow applicationinstructions on selected underlaymentfor proper exposure.
Along eaves, put GAF Leak Barrier on top of non-corrosive metal drip edge.
GAF Leak Barrier
Not more than 1/4" (6 mm) roof overhang
Protection de Platelage
de Toit GAF
GAF Roof Deck Protection
SheathingSheathing
5"
(127 mm)
Extend non-corroding metal counterflashing over base flashing.
Use one piece metal non-corrodingstep flashing for each course. Sealoverlying shingles to step flashingwith asphalt plastic cement.
Trim 11" (279 mm)from rake end of first shingle.
Trim 17" (432 mm) from rake end of first shingle. Continue with whole shingles. Repeat the 1st – 4th course instructions on the remaining courses, starting the fifth course with a full shingle.
Start at either rake and lay in either direction.
Place first course of shingles 1/4" – 3/4" (6–19 mm)over eave and rake edges, covering starter courseoverhang, to provide drip edge.
Start and continue with full shingleslaid flush over the starter course.
Center full width roll of GAF Leak Barrier. Do not place fasteners within 6" (152 mm) of centerline. Horizontal laps must be at least 6" (152 mm).
Center full width roll of GAF Leak Barrier. Do not place fasteners within 6" (152 mm) of centerline. Horizontal laps must be at least 6" (152 mm).
Overlying shingles must be cut sothey are 2" (52 mm) away from valley center line. Clip shinglecorners 45° to keep water flowin the valley center. Seal the valleyshingles to each other usingplastic roof cement.
13-1/4"
39-3/8" (1 m)
13-1/4"
39-3/8" (1 m)
5 3/4" - 6 1/4"(146 mm – 159 mm)
5 3/4" – 6 1/4"(146 mm – 159 mm)
(337 mm)
(337 mm)
STANDARD NAILING PATTERN - four nails per shingle
14 1/2" – 17 1/2" (368 mm – 445 mm)
6-1/2" – 9-1/2" (165 mm – 241 mm)
14 1/2" – 17 1/2" (368 mm – 445 mm)
11 5/8" – 14 5/8" (295 mm – 372 mm)
1/2" - 2 1/2" (13 mm – 64 mm)
Self-seal adhesive on back
Nailguide line
Self-seal adhesive on back
Nailguide line
11 5/8" – 14 5/8" (295 mm – 372 mm)
1/2" - 2-1/2" (13 mm – 64 mm)
6 1/2" – 9 1/2" (165 mm – 241 mm)
1/2" – 2 1/2" (13 mm – 64 mm) 1/2" – 2 1/2" (13 mm – 64 mm)
ENHANCED NAILING PATTERN - six nails per shingle** required by some local codes and required for enhanced wind coverage on certain products.See limited warranty for details.
17"
(432 mm)
11"
(279 mm)
6"
(152 mm)
11"
(279 mm)
6"
(152 mm)
6"
(152 mm)
GAF Underlayment
GAF Underlayment
Siding SheathingSheathing SheathingSheathing
4" (102 mm) min.
First Course
Second Course
Second Course
Third Course
Tercer Curso
Troisième Cours
Third Course
Fourth Course
Fourth Course
GAF Underlayment
GAF Underlayment
Start at either rake and lay in either direction
Along rake, put non-corroding metal drip edge on top of GAF Roof Deck Protection.
4" (102 mm) minimum vertical lap
Along eaves, put GAF Leak Barrier on top of non-corrosive metal drip edge.
2" (51mm) minimum horizontal lap2" (51 mm) minimum horizontal lapSolape horizontal mínimo de 2" (51mm)Chevauchement horizontal minimum de 51mm (2po)
Not more than 1/4" (6 mm) roof overhang
GAF Roof Deck Protection
GAF Leak Barrier
SheathingSheathing
For maximum wind resistance along rakes, installany GAF Starter Strip Shingles that contain sealant or cement shingles to underlayment and each otherin a 4" (102 mm) width of asphalt plastic cement.
Place starter strip shingles 1/4" – 3/4" (6 – 19 mm) overeave and rake edges to provide drip edge.
Overlap eave edge starter strip at least 3" (76 mm).
Non-corroding metal drip edge
Nail approximately 1 1/2" – 3" (38 – 76 mm)above the butt edge of the shingle.
GAF Underlayment
Metal flashing (nailed to the deck, NOT to the vertical wall) extend up wall at least 5" (127 mm).
Extend GAF Leak Barrierat least 5" (127 mm) up wall.
Cover metal flashing with cut shingle. Do NOT nailshingle, install with asphaltic plastic cement.
Siding/cladding must be at least 2" (51 mm) above theroof surface and covering flashing at least 2" (51 mm).
Step flashing pieces overlapeach other 2" (51 mm)
Extend GAF Leak Barrier at least 5" (127 mm) up wall.
2 nails per step flashing
GAF Underlayment
Place metal step flashing just upslopefrom exposed edge of shingle and extend5" (127 mm) over underlying shingle and 5" (127 mm) up the vertical wall.
6" (152 mm)
6" (152 mm)
Center valley metal, overlap metalhorizontal laps a minimum 12" (305 mm)and seal by embedding them in asphaltplastic cement.
Carry GAF Underlayment atleast 6" (152 mm) overGAF Leak Barrier.
Overlap shingles at least 4" (102 mm) over 20" (508 mm) wide valley metal.Embed the shingle ends in asphaltplastic cement to seal the shingles tothe metal and keep water from running under them.
Clip the top corners ofshingles 45° to keep waterflow toward the valley center.
Shingles should be separated 6" (152 mm) at top of valley. Separation must increase 1/8" (3 mm)per foot towards eaves to handle increasing water volume. Snap chalk lines to ensureshingles diverge properly in valley.
Cricket ridge should be at least 12" (305 mm).
Cricket flange should be at least 18" (457 mm) up roof deck.
Seal shingles to metal flangewith asphalt plastic cement.
Crickets should extend at least 6" (152 mm) up the back of the chimney and extend at least 12" (305 mm) up the roof deck.
Trim 6" (152 mm)from rake edge of first shingle.Continue with whole shingles.
Carry GAF Underlayment at least6" (152 mm) over GAF Leak Barrier.
Extend end of shingle at least 12" (305 mm) beyond valley center line. Before nailing, firmly press shingles down at valley center to conform to valley shape. Nail, putting extrafastener in top corner of shingle. Due to the extreme water volume in valleys, nails near the center can leak.
Run starter strip across valley at least 12" (305 mm) and weave with opposite side starter strip and shingle.
CAUTION: Do NOT place nails closer than 6" (152 mm) to the valley center line.
Along rake, put non-corroding metal drip edge on top of GAF Roof Deck Protection.
Exposure will vary depending on GAFUnderlayment used. Follow applicationinstructions on selected underlaymentfor proper exposure.
Along eaves, put GAF Leak Barrier on top of non-corrosive metal drip edge.
GAF Leak Barrier
Not more than 1/4" (6 mm) roof overhang
Protection de Platelage
de Toit GAF
GAF Roof Deck Protection
SheathingSheathing
5"
(127 mm)
Extend non-corroding metal counterflashing over base flashing.
Use one piece metal non-corrodingstep flashing for each course. Sealoverlying shingles to step flashingwith asphalt plastic cement.
Trim 11" (279 mm)from rake end of first shingle.
Trim 17" (432 mm) from rake end of first shingle. Continue with whole shingles. Repeat the 1st – 4th course instructions on the remaining courses, starting the fifth course with a full shingle.
Start at either rake and lay in either direction.
Place first course of shingles 1/4" – 3/4" (6–19 mm)over eave and rake edges, covering starter courseoverhang, to provide drip edge.
Start and continue with full shingleslaid flush over the starter course.
Center full width roll of GAF Leak Barrier. Do not place fasteners within 6" (152 mm) of centerline. Horizontal laps must be at least 6" (152 mm).
Center full width roll of GAF Leak Barrier. Do not place fasteners within 6" (152 mm) of centerline. Horizontal laps must be at least 6" (152 mm).
Overlying shingles must be cut sothey are 2" (52 mm) away from valley center line. Clip shinglecorners 45° to keep water flowin the valley center. Seal the valleyshingles to each other usingplastic roof cement.
FIRST COURSEShingle exposure should be 5 5/8" (143 mm).
SECOND COURSE Position the shingles in the second and subsequent courses flush with the tops of the wide cut-outs. This results in a 5 5/8" (143 mm) exposure.
INSTALLING SHINGLES
6.
13-1/4"
39-3/8" (1 m)
13-1/4"
39-3/8" (1 m)
5 3/4" - 6 1/4"(146 mm – 159 mm)
5 3/4" – 6 1/4"(146 mm – 159 mm)
(337 mm)
(337 mm)
STANDARD NAILING PATTERN - four nails per shingle
14 1/2" – 17 1/2" (368 mm – 445 mm)
6-1/2" – 9-1/2" (165 mm – 241 mm)
14 1/2" – 17 1/2" (368 mm – 445 mm)
11 5/8" – 14 5/8" (295 mm – 372 mm)
1/2" - 2 1/2" (13 mm – 64 mm)
Self-seal adhesive on back
Nailguide line
Self-seal adhesive on back
Nailguide line
11 5/8" – 14 5/8" (295 mm – 372 mm)
1/2" - 2-1/2" (13 mm – 64 mm)
6 1/2" – 9 1/2" (165 mm – 241 mm)
1/2" – 2 1/2" (13 mm – 64 mm) 1/2" – 2 1/2" (13 mm – 64 mm)
ENHANCED NAILING PATTERN - six nails per shingle** required by some local codes and required for enhanced wind coverage on certain products.See limited warranty for details.
17"
(432 mm)
11"
(279 mm)
6"
(152 mm)
11"
(279 mm)
6"
(152 mm)
6"
(152 mm)
GAF Underlayment
GAF Underlayment
Siding SheathingSheathing SheathingSheathing
4" (102 mm) min.
First Course
Second Course
Second Course
Third Course
Tercer Curso
Troisième Cours
Third Course
Fourth Course
Fourth Course
GAF Underlayment
GAF Underlayment
Start at either rake and lay in either direction
Along rake, put non-corroding metal drip edge on top of GAF Roof Deck Protection.
4" (102 mm) minimum vertical lap
Along eaves, put GAF Leak Barrier on top of non-corrosive metal drip edge.
2" (51mm) minimum horizontal lap2" (51 mm) minimum horizontal lapSolape horizontal mínimo de 2" (51mm)Chevauchement horizontal minimum de 51mm (2po)
Not more than 1/4" (6 mm) roof overhang
GAF Roof Deck Protection
GAF Leak Barrier
SheathingSheathing
For maximum wind resistance along rakes, installany GAF Starter Strip Shingles that contain sealant or cement shingles to underlayment and each otherin a 4" (102 mm) width of asphalt plastic cement.
Place starter strip shingles 1/4" – 3/4" (6 – 19 mm) overeave and rake edges to provide drip edge.
Overlap eave edge starter strip at least 3" (76 mm).
Non-corroding metal drip edge
Nail approximately 1 1/2" – 3" (38 – 76 mm)above the butt edge of the shingle.
GAF Underlayment
Metal flashing (nailed to the deck, NOT to the vertical wall) extend up wall at least 5" (127 mm).
Extend GAF Leak Barrierat least 5" (127 mm) up wall.
Cover metal flashing with cut shingle. Do NOT nailshingle, install with asphaltic plastic cement.
Siding/cladding must be at least 2" (51 mm) above theroof surface and covering flashing at least 2" (51 mm).
Step flashing pieces overlapeach other 2" (51 mm)
Extend GAF Leak Barrier at least 5" (127 mm) up wall.
2 nails per step flashing
GAF Underlayment
Place metal step flashing just upslopefrom exposed edge of shingle and extend5" (127 mm) over underlying shingle and 5" (127 mm) up the vertical wall.
6" (152 mm)
6" (152 mm)
Center valley metal, overlap metalhorizontal laps a minimum 12" (305 mm)and seal by embedding them in asphaltplastic cement.
Carry GAF Underlayment atleast 6" (152 mm) overGAF Leak Barrier.
Overlap shingles at least 4" (102 mm) over 20" (508 mm) wide valley metal.Embed the shingle ends in asphaltplastic cement to seal the shingles tothe metal and keep water from running under them.
Clip the top corners ofshingles 45° to keep waterflow toward the valley center.
Shingles should be separated 6" (152 mm) at top of valley. Separation must increase 1/8" (3 mm)per foot towards eaves to handle increasing water volume. Snap chalk lines to ensureshingles diverge properly in valley.
Cricket ridge should be at least 12" (305 mm).
Cricket flange should be at least 18" (457 mm) up roof deck.
Seal shingles to metal flangewith asphalt plastic cement.
Crickets should extend at least 6" (152 mm) up the back of the chimney and extend at least 12" (305 mm) up the roof deck.
Trim 6" (152 mm)from rake edge of first shingle.Continue with whole shingles.
Carry GAF Underlayment at least6" (152 mm) over GAF Leak Barrier.
Extend end of shingle at least 12" (305 mm) beyond valley center line. Before nailing, firmly press shingles down at valley center to conform to valley shape. Nail, putting extrafastener in top corner of shingle. Due to the extreme water volume in valleys, nails near the center can leak.
Run starter strip across valley at least 12" (305 mm) and weave with opposite side starter strip and shingle.
CAUTION: Do NOT place nails closer than 6" (152 mm) to the valley center line.
Along rake, put non-corroding metal drip edge on top of GAF Roof Deck Protection.
Exposure will vary depending on GAFUnderlayment used. Follow applicationinstructions on selected underlaymentfor proper exposure.
Along eaves, put GAF Leak Barrier on top of non-corrosive metal drip edge.
GAF Leak Barrier
Not more than 1/4" (6 mm) roof overhang
Protection de Platelage
de Toit GAF
GAF Roof Deck Protection
SheathingSheathing
5"
(127 mm)
Extend non-corroding metal counterflashing over base flashing.
Use one piece metal non-corrodingstep flashing for each course. Sealoverlying shingles to step flashingwith asphalt plastic cement.
Trim 11" (279 mm)from rake end of first shingle.
Trim 17" (432 mm) from rake end of first shingle. Continue with whole shingles. Repeat the 1st – 4th course instructions on the remaining courses, starting the fifth course with a full shingle.
Start at either rake and lay in either direction.
Place first course of shingles 1/4" – 3/4" (6–19 mm)over eave and rake edges, covering starter courseoverhang, to provide drip edge.
Start and continue with full shingleslaid flush over the starter course.
Center full width roll of GAF Leak Barrier. Do not place fasteners within 6" (152 mm) of centerline. Horizontal laps must be at least 6" (152 mm).
Center full width roll of GAF Leak Barrier. Do not place fasteners within 6" (152 mm) of centerline. Horizontal laps must be at least 6" (152 mm).
Overlying shingles must be cut sothey are 2" (52 mm) away from valley center line. Clip shinglecorners 45° to keep water flowin the valley center. Seal the valleyshingles to each other usingplastic roof cement.
13-1/4"
39-3/8" (1 m)
13-1/4"
39-3/8" (1 m)
5 3/4" - 6 1/4"(146 mm – 159 mm)
5 3/4" – 6 1/4"(146 mm – 159 mm)
(337 mm)
(337 mm)
STANDARD NAILING PATTERN - four nails per shingle
14 1/2" – 17 1/2" (368 mm – 445 mm)
6-1/2" – 9-1/2" (165 mm – 241 mm)
14 1/2" – 17 1/2" (368 mm – 445 mm)
11 5/8" – 14 5/8" (295 mm – 372 mm)
1/2" - 2 1/2" (13 mm – 64 mm)
Self-seal adhesive on back
Nailguide line
Self-seal adhesive on back
Nailguide line
11 5/8" – 14 5/8" (295 mm – 372 mm)
1/2" - 2-1/2" (13 mm – 64 mm)
6 1/2" – 9 1/2" (165 mm – 241 mm)
1/2" – 2 1/2" (13 mm – 64 mm) 1/2" – 2 1/2" (13 mm – 64 mm)
ENHANCED NAILING PATTERN - six nails per shingle** required by some local codes and required for enhanced wind coverage on certain products.See limited warranty for details.
17"
(432 mm)
11"
(279 mm)
6"
(152 mm)
11"
(279 mm)
6"
(152 mm)
6"
(152 mm)
GAF Underlayment
GAF Underlayment
Siding SheathingSheathing SheathingSheathing
4" (102 mm) min.
First Course
Second Course
Second Course
Third Course
Tercer Curso
Troisième Cours
Third Course
Fourth Course
Fourth Course
GAF Underlayment
GAF Underlayment
Start at either rake and lay in either direction
Along rake, put non-corroding metal drip edge on top of GAF Roof Deck Protection.
4" (102 mm) minimum vertical lap
Along eaves, put GAF Leak Barrier on top of non-corrosive metal drip edge.
2" (51mm) minimum horizontal lap2" (51 mm) minimum horizontal lapSolape horizontal mínimo de 2" (51mm)Chevauchement horizontal minimum de 51mm (2po)
Not more than 1/4" (6 mm) roof overhang
GAF Roof Deck Protection
GAF Leak Barrier
SheathingSheathing
For maximum wind resistance along rakes, installany GAF Starter Strip Shingles that contain sealant or cement shingles to underlayment and each otherin a 4" (102 mm) width of asphalt plastic cement.
Place starter strip shingles 1/4" – 3/4" (6 – 19 mm) overeave and rake edges to provide drip edge.
Overlap eave edge starter strip at least 3" (76 mm).
Non-corroding metal drip edge
Nail approximately 1 1/2" – 3" (38 – 76 mm)above the butt edge of the shingle.
GAF Underlayment
Metal flashing (nailed to the deck, NOT to the vertical wall) extend up wall at least 5" (127 mm).
Extend GAF Leak Barrierat least 5" (127 mm) up wall.
Cover metal flashing with cut shingle. Do NOT nailshingle, install with asphaltic plastic cement.
Siding/cladding must be at least 2" (51 mm) above theroof surface and covering flashing at least 2" (51 mm).
Step flashing pieces overlapeach other 2" (51 mm)
Extend GAF Leak Barrier at least 5" (127 mm) up wall.
2 nails per step flashing
GAF Underlayment
Place metal step flashing just upslopefrom exposed edge of shingle and extend5" (127 mm) over underlying shingle and 5" (127 mm) up the vertical wall.
6" (152 mm)
6" (152 mm)
Center valley metal, overlap metalhorizontal laps a minimum 12" (305 mm)and seal by embedding them in asphaltplastic cement.
Carry GAF Underlayment atleast 6" (152 mm) overGAF Leak Barrier.
Overlap shingles at least 4" (102 mm) over 20" (508 mm) wide valley metal.Embed the shingle ends in asphaltplastic cement to seal the shingles tothe metal and keep water from running under them.
Clip the top corners ofshingles 45° to keep waterflow toward the valley center.
Shingles should be separated 6" (152 mm) at top of valley. Separation must increase 1/8" (3 mm)per foot towards eaves to handle increasing water volume. Snap chalk lines to ensureshingles diverge properly in valley.
Cricket ridge should be at least 12" (305 mm).
Cricket flange should be at least 18" (457 mm) up roof deck.
Seal shingles to metal flangewith asphalt plastic cement.
Crickets should extend at least 6" (152 mm) up the back of the chimney and extend at least 12" (305 mm) up the roof deck.
Trim 6" (152 mm)from rake edge of first shingle.Continue with whole shingles.
Carry GAF Underlayment at least6" (152 mm) over GAF Leak Barrier.
Extend end of shingle at least 12" (305 mm) beyond valley center line. Before nailing, firmly press shingles down at valley center to conform to valley shape. Nail, putting extrafastener in top corner of shingle. Due to the extreme water volume in valleys, nails near the center can leak.
Run starter strip across valley at least 12" (305 mm) and weave with opposite side starter strip and shingle.
CAUTION: Do NOT place nails closer than 6" (152 mm) to the valley center line.
Along rake, put non-corroding metal drip edge on top of GAF Roof Deck Protection.
Exposure will vary depending on GAFUnderlayment used. Follow applicationinstructions on selected underlaymentfor proper exposure.
Along eaves, put GAF Leak Barrier on top of non-corrosive metal drip edge.
GAF Leak Barrier
Not more than 1/4" (6 mm) roof overhang
Protection de Platelage
de Toit GAF
GAF Roof Deck Protection
SheathingSheathing
5"
(127 mm)
Extend non-corroding metal counterflashing over base flashing.
Use one piece metal non-corrodingstep flashing for each course. Sealoverlying shingles to step flashingwith asphalt plastic cement.
Trim 11" (279 mm)from rake end of first shingle.
Trim 17" (432 mm) from rake end of first shingle. Continue with whole shingles. Repeat the 1st – 4th course instructions on the remaining courses, starting the fifth course with a full shingle.
Start at either rake and lay in either direction.
Place first course of shingles 1/4" – 3/4" (6–19 mm)over eave and rake edges, covering starter courseoverhang, to provide drip edge.
Start and continue with full shingleslaid flush over the starter course.
Center full width roll of GAF Leak Barrier. Do not place fasteners within 6" (152 mm) of centerline. Horizontal laps must be at least 6" (152 mm).
Center full width roll of GAF Leak Barrier. Do not place fasteners within 6" (152 mm) of centerline. Horizontal laps must be at least 6" (152 mm).
Overlying shingles must be cut sothey are 2" (52 mm) away from valley center line. Clip shinglecorners 45° to keep water flowin the valley center. Seal the valleyshingles to each other usingplastic roof cement.
THIRD COURSE
4TH COURSE AND REMAINING Strike a chalk line about every 6 courses to check parallel alignment with eaves.
7.
13-1/4"
39-3/8" (1 m)
13-1/4"
39-3/8" (1 m)
5 3/4" - 6 1/4"(146 mm – 159 mm)
5 3/4" – 6 1/4"(146 mm – 159 mm)
(337 mm)
(337 mm)
STANDARD NAILING PATTERN - four nails per shingle
14 1/2" – 17 1/2" (368 mm – 445 mm)
6-1/2" – 9-1/2" (165 mm – 241 mm)
14 1/2" – 17 1/2" (368 mm – 445 mm)
11 5/8" – 14 5/8" (295 mm – 372 mm)
1/2" - 2 1/2" (13 mm – 64 mm)
Self-seal adhesive on back
Nailguide line
Self-seal adhesive on back
Nailguide line
11 5/8" – 14 5/8" (295 mm – 372 mm)
1/2" - 2-1/2" (13 mm – 64 mm)
6 1/2" – 9 1/2" (165 mm – 241 mm)
1/2" – 2 1/2" (13 mm – 64 mm) 1/2" – 2 1/2" (13 mm – 64 mm)
ENHANCED NAILING PATTERN - six nails per shingle** required by some local codes and required for enhanced wind coverage on certain products.See limited warranty for details.
17"
(432 mm)
11"
(279 mm)
6"
(152 mm)
11"
(279 mm)
6"
(152 mm)
6"
(152 mm)
GAF Underlayment
GAF Underlayment
Siding SheathingSheathing SheathingSheathing
4" (102 mm) min.
First Course
Second Course
Second Course
Third Course
Tercer Curso
Troisième Cours
Third Course
Fourth Course
Fourth Course
GAF Underlayment
GAF Underlayment
Start at either rake and lay in either direction
Along rake, put non-corroding metal drip edge on top of GAF Roof Deck Protection.
4" (102 mm) minimum vertical lap
Along eaves, put GAF Leak Barrier on top of non-corrosive metal drip edge.
2" (51mm) minimum horizontal lap2" (51 mm) minimum horizontal lapSolape horizontal mínimo de 2" (51mm)Chevauchement horizontal minimum de 51mm (2po)
Not more than 1/4" (6 mm) roof overhang
GAF Roof Deck Protection
GAF Leak Barrier
SheathingSheathing
For maximum wind resistance along rakes, installany GAF Starter Strip Shingles that contain sealant or cement shingles to underlayment and each otherin a 4" (102 mm) width of asphalt plastic cement.
Place starter strip shingles 1/4" – 3/4" (6 – 19 mm) overeave and rake edges to provide drip edge.
Overlap eave edge starter strip at least 3" (76 mm).
Non-corroding metal drip edge
Nail approximately 1 1/2" – 3" (38 – 76 mm)above the butt edge of the shingle.
GAF Underlayment
Metal flashing (nailed to the deck, NOT to the vertical wall) extend up wall at least 5" (127 mm).
Extend GAF Leak Barrierat least 5" (127 mm) up wall.
Cover metal flashing with cut shingle. Do NOT nailshingle, install with asphaltic plastic cement.
Siding/cladding must be at least 2" (51 mm) above theroof surface and covering flashing at least 2" (51 mm).
Step flashing pieces overlapeach other 2" (51 mm)
Extend GAF Leak Barrier at least 5" (127 mm) up wall.
2 nails per step flashing
GAF Underlayment
Place metal step flashing just upslopefrom exposed edge of shingle and extend5" (127 mm) over underlying shingle and 5" (127 mm) up the vertical wall.
6" (152 mm)
6" (152 mm)
Center valley metal, overlap metalhorizontal laps a minimum 12" (305 mm)and seal by embedding them in asphaltplastic cement.
Carry GAF Underlayment atleast 6" (152 mm) overGAF Leak Barrier.
Overlap shingles at least 4" (102 mm) over 20" (508 mm) wide valley metal.Embed the shingle ends in asphaltplastic cement to seal the shingles tothe metal and keep water from running under them.
Clip the top corners ofshingles 45° to keep waterflow toward the valley center.
Shingles should be separated 6" (152 mm) at top of valley. Separation must increase 1/8" (3 mm)per foot towards eaves to handle increasing water volume. Snap chalk lines to ensureshingles diverge properly in valley.
Cricket ridge should be at least 12" (305 mm).
Cricket flange should be at least 18" (457 mm) up roof deck.
Seal shingles to metal flangewith asphalt plastic cement.
Crickets should extend at least 6" (152 mm) up the back of the chimney and extend at least 12" (305 mm) up the roof deck.
Trim 6" (152 mm)from rake edge of first shingle.Continue with whole shingles.
Carry GAF Underlayment at least6" (152 mm) over GAF Leak Barrier.
Extend end of shingle at least 12" (305 mm) beyond valley center line. Before nailing, firmly press shingles down at valley center to conform to valley shape. Nail, putting extrafastener in top corner of shingle. Due to the extreme water volume in valleys, nails near the center can leak.
Run starter strip across valley at least 12" (305 mm) and weave with opposite side starter strip and shingle.
CAUTION: Do NOT place nails closer than 6" (152 mm) to the valley center line.
Along rake, put non-corroding metal drip edge on top of GAF Roof Deck Protection.
Exposure will vary depending on GAFUnderlayment used. Follow applicationinstructions on selected underlaymentfor proper exposure.
Along eaves, put GAF Leak Barrier on top of non-corrosive metal drip edge.
GAF Leak Barrier
Not more than 1/4" (6 mm) roof overhang
Protection de Platelage
de Toit GAF
GAF Roof Deck Protection
SheathingSheathing
5"
(127 mm)
Extend non-corroding metal counterflashing over base flashing.
Use one piece metal non-corrodingstep flashing for each course. Sealoverlying shingles to step flashingwith asphalt plastic cement.
Trim 11" (279 mm)from rake end of first shingle.
Trim 17" (432 mm) from rake end of first shingle. Continue with whole shingles. Repeat the 1st – 4th course instructions on the remaining courses, starting the fifth course with a full shingle.
Start at either rake and lay in either direction.
Place first course of shingles 1/4" – 3/4" (6–19 mm)over eave and rake edges, covering starter courseoverhang, to provide drip edge.
Start and continue with full shingleslaid flush over the starter course.
Center full width roll of GAF Leak Barrier. Do not place fasteners within 6" (152 mm) of centerline. Horizontal laps must be at least 6" (152 mm).
Center full width roll of GAF Leak Barrier. Do not place fasteners within 6" (152 mm) of centerline. Horizontal laps must be at least 6" (152 mm).
Overlying shingles must be cut sothey are 2" (52 mm) away from valley center line. Clip shinglecorners 45° to keep water flowin the valley center. Seal the valleyshingles to each other usingplastic roof cement.
VENTILATION Install GAF ventilation products for optimal shingle life. See General Instructions and the “Through Ventilation” section. Follow the application
instructions for the selected ventilation products.
RIDGE CAP SHINGLES Install GAF Ridge Cap Shingles following the application instructions shown on the GAF Ridge Cap Shingle wrapper. Position laps away from prevailing wind direction.
INSTALLING ROOF ACCESSORIES AND DETAILS
WALL FLASHING (Sloped Roof to Wall)
8.
13-1/4"
39-3/8" (1 m)
13-1/4"
39-3/8" (1 m)
5 3/4" - 6 1/4"(146 mm – 159 mm)
5 3/4" – 6 1/4"(146 mm – 159 mm)
(337 mm)
(337 mm)
STANDARD NAILING PATTERN - four nails per shingle
14 1/2" – 17 1/2" (368 mm – 445 mm)
6-1/2" – 9-1/2" (165 mm – 241 mm)
14 1/2" – 17 1/2" (368 mm – 445 mm)
11 5/8" – 14 5/8" (295 mm – 372 mm)
1/2" - 2 1/2" (13 mm – 64 mm)
Self-seal adhesive on back
Nailguide line
Self-seal adhesive on back
Nailguide line
11 5/8" – 14 5/8" (295 mm – 372 mm)
1/2" - 2-1/2" (13 mm – 64 mm)
6 1/2" – 9 1/2" (165 mm – 241 mm)
1/2" – 2 1/2" (13 mm – 64 mm) 1/2" – 2 1/2" (13 mm – 64 mm)
ENHANCED NAILING PATTERN - six nails per shingle** required by some local codes and required for enhanced wind coverage on certain products.See limited warranty for details.
17"
(432 mm)
11"
(279 mm)
6"
(152 mm)
11"
(279 mm)
6"
(152 mm)
6"
(152 mm)
GAF Underlayment
GAF Underlayment
Siding SheathingSheathing SheathingSheathing
4" (102 mm) min.
First Course
Second Course
Second Course
Third Course
Tercer Curso
Troisième Cours
Third Course
Fourth Course
Fourth Course
GAF Underlayment
GAF Underlayment
Start at either rake and lay in either direction
Along rake, put non-corroding metal drip edge on top of GAF Roof Deck Protection.
4" (102 mm) minimum vertical lap
Along eaves, put GAF Leak Barrier on top of non-corrosive metal drip edge.
2" (51mm) minimum horizontal lap2" (51 mm) minimum horizontal lapSolape horizontal mínimo de 2" (51mm)Chevauchement horizontal minimum de 51mm (2po)
Not more than 1/4" (6 mm) roof overhang
GAF Roof Deck Protection
GAF Leak Barrier
SheathingSheathing
For maximum wind resistance along rakes, installany GAF Starter Strip Shingles that contain sealant or cement shingles to underlayment and each otherin a 4" (102 mm) width of asphalt plastic cement.
Place starter strip shingles 1/4" – 3/4" (6 – 19 mm) overeave and rake edges to provide drip edge.
Overlap eave edge starter strip at least 3" (76 mm).
Non-corroding metal drip edge
Nail approximately 1 1/2" – 3" (38 – 76 mm)above the butt edge of the shingle.
GAF Underlayment
Metal flashing (nailed to the deck, NOT to the vertical wall) extend up wall at least 5" (127 mm).
Extend GAF Leak Barrierat least 5" (127 mm) up wall.
Cover metal flashing with cut shingle. Do NOT nailshingle, install with asphaltic plastic cement.
Siding/cladding must be at least 2" (51 mm) above theroof surface and covering flashing at least 2" (51 mm).
Step flashing pieces overlapeach other 2" (51 mm)
Extend GAF Leak Barrier at least 5" (127 mm) up wall.
2 nails per step flashing
GAF Underlayment
Place metal step flashing just upslopefrom exposed edge of shingle and extend5" (127 mm) over underlying shingle and 5" (127 mm) up the vertical wall.
6" (152 mm)
6" (152 mm)
Center valley metal, overlap metalhorizontal laps a minimum 12" (305 mm)and seal by embedding them in asphaltplastic cement.
Carry GAF Underlayment atleast 6" (152 mm) overGAF Leak Barrier.
Overlap shingles at least 4" (102 mm) over 20" (508 mm) wide valley metal.Embed the shingle ends in asphaltplastic cement to seal the shingles tothe metal and keep water from running under them.
Clip the top corners ofshingles 45° to keep waterflow toward the valley center.
Shingles should be separated 6" (152 mm) at top of valley. Separation must increase 1/8" (3 mm)per foot towards eaves to handle increasing water volume. Snap chalk lines to ensureshingles diverge properly in valley.
Cricket ridge should be at least 12" (305 mm).
Cricket flange should be at least 18" (457 mm) up roof deck.
Seal shingles to metal flangewith asphalt plastic cement.
Crickets should extend at least 6" (152 mm) up the back of the chimney and extend at least 12" (305 mm) up the roof deck.
Trim 6" (152 mm)from rake edge of first shingle.Continue with whole shingles.
Carry GAF Underlayment at least6" (152 mm) over GAF Leak Barrier.
Extend end of shingle at least 12" (305 mm) beyond valley center line. Before nailing, firmly press shingles down at valley center to conform to valley shape. Nail, putting extrafastener in top corner of shingle. Due to the extreme water volume in valleys, nails near the center can leak.
Run starter strip across valley at least 12" (305 mm) and weave with opposite side starter strip and shingle.
CAUTION: Do NOT place nails closer than 6" (152 mm) to the valley center line.
Along rake, put non-corroding metal drip edge on top of GAF Roof Deck Protection.
Exposure will vary depending on GAFUnderlayment used. Follow applicationinstructions on selected underlaymentfor proper exposure.
Along eaves, put GAF Leak Barrier on top of non-corrosive metal drip edge.
GAF Leak Barrier
Not more than 1/4" (6 mm) roof overhang
Protection de Platelage
de Toit GAF
GAF Roof Deck Protection
SheathingSheathing
5"
(127 mm)
Extend non-corroding metal counterflashing over base flashing.
Use one piece metal non-corrodingstep flashing for each course. Sealoverlying shingles to step flashingwith asphalt plastic cement.
Trim 11" (279 mm)from rake end of first shingle.
Trim 17" (432 mm) from rake end of first shingle. Continue with whole shingles. Repeat the 1st – 4th course instructions on the remaining courses, starting the fifth course with a full shingle.
Start at either rake and lay in either direction.
Place first course of shingles 1/4" – 3/4" (6–19 mm)over eave and rake edges, covering starter courseoverhang, to provide drip edge.
Start and continue with full shingleslaid flush over the starter course.
Center full width roll of GAF Leak Barrier. Do not place fasteners within 6" (152 mm) of centerline. Horizontal laps must be at least 6" (152 mm).
Center full width roll of GAF Leak Barrier. Do not place fasteners within 6" (152 mm) of centerline. Horizontal laps must be at least 6" (152 mm).
Overlying shingles must be cut sothey are 2" (52 mm) away from valley center line. Clip shinglecorners 45° to keep water flowin the valley center. Seal the valleyshingles to each other usingplastic roof cement.
CHIMNEY FLASHING AND CRICKETS Cover deck around chimney and over wood crickets with GAF Roof Deck Protection. DO NOT run GAF Roof Deck Protection up sides of chimney. Install
leak barrier over GAF Roof Deck Protection and up sides of chimney at least 5" (127 mm). Install shop fabricated metal cricket flashings (shown) after underlayments are installed. Seal shingles to the metal flanges (see drawing below). Treat large wooden crickets like a separate roof and install valleys, shingles, hip and ridge shingles, and step flashing.
9.
13-1/4"
39-3/8" (1 m)
13-1/4"
39-3/8" (1 m)
5 3/4" - 6 1/4"(146 mm – 159 mm)
5 3/4" – 6 1/4"(146 mm – 159 mm)
(337 mm)
(337 mm)
STANDARD NAILING PATTERN - four nails per shingle
14 1/2" – 17 1/2" (368 mm – 445 mm)
6-1/2" – 9-1/2" (165 mm – 241 mm)
14 1/2" – 17 1/2" (368 mm – 445 mm)
11 5/8" – 14 5/8" (295 mm – 372 mm)
1/2" - 2 1/2" (13 mm – 64 mm)
Self-seal adhesive on back
Nailguide line
Self-seal adhesive on back
Nailguide line
11 5/8" – 14 5/8" (295 mm – 372 mm)
1/2" - 2-1/2" (13 mm – 64 mm)
6 1/2" – 9 1/2" (165 mm – 241 mm)
1/2" – 2 1/2" (13 mm – 64 mm) 1/2" – 2 1/2" (13 mm – 64 mm)
ENHANCED NAILING PATTERN - six nails per shingle** required by some local codes and required for enhanced wind coverage on certain products.See limited warranty for details.
17"
(432 mm)
11"
(279 mm)
6"
(152 mm)
11"
(279 mm)
6"
(152 mm)
6"
(152 mm)
GAF Underlayment
GAF Underlayment
Siding SheathingSheathing SheathingSheathing
4" (102 mm) min.
First Course
Second Course
Second Course
Third Course
Tercer Curso
Troisième Cours
Third Course
Fourth Course
Fourth Course
GAF Underlayment
GAF Underlayment
Start at either rake and lay in either direction
Along rake, put non-corroding metal drip edge on top of GAF Roof Deck Protection.
4" (102 mm) minimum vertical lap
Along eaves, put GAF Leak Barrier on top of non-corrosive metal drip edge.
2" (51mm) minimum horizontal lap2" (51 mm) minimum horizontal lapSolape horizontal mínimo de 2" (51mm)Chevauchement horizontal minimum de 51mm (2po)
Not more than 1/4" (6 mm) roof overhang
GAF Roof Deck Protection
GAF Leak Barrier
SheathingSheathing
For maximum wind resistance along rakes, installany GAF Starter Strip Shingles that contain sealant or cement shingles to underlayment and each otherin a 4" (102 mm) width of asphalt plastic cement.
Place starter strip shingles 1/4" – 3/4" (6 – 19 mm) overeave and rake edges to provide drip edge.
Overlap eave edge starter strip at least 3" (76 mm).
Non-corroding metal drip edge
Nail approximately 1 1/2" – 3" (38 – 76 mm)above the butt edge of the shingle.
GAF Underlayment
Metal flashing (nailed to the deck, NOT to the vertical wall) extend up wall at least 5" (127 mm).
Extend GAF Leak Barrierat least 5" (127 mm) up wall.
Cover metal flashing with cut shingle. Do NOT nailshingle, install with asphaltic plastic cement.
Siding/cladding must be at least 2" (51 mm) above theroof surface and covering flashing at least 2" (51 mm).
Step flashing pieces overlapeach other 2" (51 mm)
Extend GAF Leak Barrier at least 5" (127 mm) up wall.
2 nails per step flashing
GAF Underlayment
Place metal step flashing just upslopefrom exposed edge of shingle and extend5" (127 mm) over underlying shingle and 5" (127 mm) up the vertical wall.
6" (152 mm)
6" (152 mm)
Center valley metal, overlap metalhorizontal laps a minimum 12" (305 mm)and seal by embedding them in asphaltplastic cement.
Carry GAF Underlayment atleast 6" (152 mm) overGAF Leak Barrier.
Overlap shingles at least 4" (102 mm) over 20" (508 mm) wide valley metal.Embed the shingle ends in asphaltplastic cement to seal the shingles tothe metal and keep water from running under them.
Clip the top corners ofshingles 45° to keep waterflow toward the valley center.
Shingles should be separated 6" (152 mm) at top of valley. Separation must increase 1/8" (3 mm)per foot towards eaves to handle increasing water volume. Snap chalk lines to ensureshingles diverge properly in valley.
Cricket ridge should be at least 12" (305 mm).
Cricket flange should be at least 18" (457 mm) up roof deck.
Seal shingles to metal flangewith asphalt plastic cement.
Crickets should extend at least 6" (152 mm) up the back of the chimney and extend at least 12" (305 mm) up the roof deck.
Trim 6" (152 mm)from rake edge of first shingle.Continue with whole shingles.
Carry GAF Underlayment at least6" (152 mm) over GAF Leak Barrier.
Extend end of shingle at least 12" (305 mm) beyond valley center line. Before nailing, firmly press shingles down at valley center to conform to valley shape. Nail, putting extrafastener in top corner of shingle. Due to the extreme water volume in valleys, nails near the center can leak.
Run starter strip across valley at least 12" (305 mm) and weave with opposite side starter strip and shingle.
CAUTION: Do NOT place nails closer than 6" (152 mm) to the valley center line.
Along rake, put non-corroding metal drip edge on top of GAF Roof Deck Protection.
Exposure will vary depending on GAFUnderlayment used. Follow applicationinstructions on selected underlaymentfor proper exposure.
Along eaves, put GAF Leak Barrier on top of non-corrosive metal drip edge.
GAF Leak Barrier
Not more than 1/4" (6 mm) roof overhang
Protection de Platelage
de Toit GAF
GAF Roof Deck Protection
SheathingSheathing
5"
(127 mm)
Extend non-corroding metal counterflashing over base flashing.
Use one piece metal non-corrodingstep flashing for each course. Sealoverlying shingles to step flashingwith asphalt plastic cement.
Trim 11" (279 mm)from rake end of first shingle.
Trim 17" (432 mm) from rake end of first shingle. Continue with whole shingles. Repeat the 1st – 4th course instructions on the remaining courses, starting the fifth course with a full shingle.
Start at either rake and lay in either direction.
Place first course of shingles 1/4" – 3/4" (6–19 mm)over eave and rake edges, covering starter courseoverhang, to provide drip edge.
Start and continue with full shingleslaid flush over the starter course.
Center full width roll of GAF Leak Barrier. Do not place fasteners within 6" (152 mm) of centerline. Horizontal laps must be at least 6" (152 mm).
Center full width roll of GAF Leak Barrier. Do not place fasteners within 6" (152 mm) of centerline. Horizontal laps must be at least 6" (152 mm).
Overlying shingles must be cut sothey are 2" (52 mm) away from valley center line. Clip shinglecorners 45° to keep water flowin the valley center. Seal the valleyshingles to each other usingplastic roof cement.
VALLEY CONSTRUCTION – OPEN Use minimum 20" (508 mm) wide aluminum, galvanized steel, copper, or other non-corroding, non-staining metals (24 gauge minimum). Long valleys or local building codes may require wider metal. Nail the metal on the edges so the nail heads hold it in place. Do not puncture the metal. Nailing through the metal may cause leaking and buckling due to movement.

10.
13-1/4"
39-3/8" (1 m)
13-1/4"
39-3/8" (1 m)
5 3/4" - 6 1/4"(146 mm – 159 mm)
5 3/4" – 6 1/4"(146 mm – 159 mm)
(337 mm)
(337 mm)
STANDARD NAILING PATTERN - four nails per shingle
14 1/2" – 17 1/2" (368 mm – 445 mm)
6-1/2" – 9-1/2" (165 mm – 241 mm)
14 1/2" – 17 1/2" (368 mm – 445 mm)
11 5/8" – 14 5/8" (295 mm – 372 mm)
1/2" - 2 1/2" (13 mm – 64 mm)
Self-seal adhesive on back
Nailguide line
Self-seal adhesive on back
Nailguide line
11 5/8" – 14 5/8" (295 mm – 372 mm)
1/2" - 2-1/2" (13 mm – 64 mm)
6 1/2" – 9 1/2" (165 mm – 241 mm)
1/2" – 2 1/2" (13 mm – 64 mm) 1/2" – 2 1/2" (13 mm – 64 mm)
ENHANCED NAILING PATTERN - six nails per shingle** required by some local codes and required for enhanced wind coverage on certain products.See limited warranty for details.
17"
(432 mm)
11"
(279 mm)
6"
(152 mm)
11"
(279 mm)
6"
(152 mm)
6"
(152 mm)
GAF Underlayment
GAF Underlayment
Siding SheathingSheathing SheathingSheathing
4" (102 mm) min.
First Course
Second Course
Second Course
Third Course
Tercer Curso
Troisième Cours
Third Course
Fourth Course
Fourth Course
GAF Underlayment
GAF Underlayment
Start at either rake and lay in either direction
Along rake, put non-corroding metal drip edge on top of GAF Roof Deck Protection.
4" (102 mm) minimum vertical lap
Along eaves, put GAF Leak Barrier on top of non-corrosive metal drip edge.
2" (51mm) minimum horizontal lap2" (51 mm) minimum horizontal lapSolape horizontal mínimo de 2" (51mm)Chevauchement horizontal minimum de 51mm (2po)
Not more than 1/4" (6 mm) roof overhang
GAF Roof Deck Protection
GAF Leak Barrier
SheathingSheathing
For maximum wind resistance along rakes, installany GAF Starter Strip Shingles that contain sealant or cement shingles to underlayment and each otherin a 4" (102 mm) width of asphalt plastic cement.
Place starter strip shingles 1/4" – 3/4" (6 – 19 mm) overeave and rake edges to provide drip edge.
Overlap eave edge starter strip at least 3" (76 mm).
Non-corroding metal drip edge
Nail approximately 1 1/2" – 3" (38 – 76 mm)above the butt edge of the shingle.
GAF Underlayment
Metal flashing (nailed to the deck, NOT to the vertical wall) extend up wall at least 5" (127 mm).
Extend GAF Leak Barrierat least 5" (127 mm) up wall.
Cover metal flashing with cut shingle. Do NOT nailshingle, install with asphaltic plastic cement.
Siding/cladding must be at least 2" (51 mm) above theroof surface and covering flashing at least 2" (51 mm).
Step flashing pieces overlapeach other 2" (51 mm)
Extend GAF Leak Barrier at least 5" (127 mm) up wall.
2 nails per step flashing
GAF Underlayment
Place metal step flashing just upslopefrom exposed edge of shingle and extend5" (127 mm) over underlying shingle and 5" (127 mm) up the vertical wall.
6" (152 mm)
6" (152 mm)
Center valley metal, overlap metalhorizontal laps a minimum 12" (305 mm)and seal by embedding them in asphaltplastic cement.
Carry GAF Underlayment atleast 6" (152 mm) overGAF Leak Barrier.
Overlap shingles at least 4" (102 mm) over 20" (508 mm) wide valley metal.Embed the shingle ends in asphaltplastic cement to seal the shingles tothe metal and keep water from running under them.
Clip the top corners ofshingles 45° to keep waterflow toward the valley center.
Shingles should be separated 6" (152 mm) at top of valley. Separation must increase 1/8" (3 mm)per foot towards eaves to handle increasing water volume. Snap chalk lines to ensureshingles diverge properly in valley.
Cricket ridge should be at least 12" (305 mm).
Cricket flange should be at least 18" (457 mm) up roof deck.
Seal shingles to metal flangewith asphalt plastic cement.
Crickets should extend at least 6" (152 mm) up the back of the chimney and extend at least 12" (305 mm) up the roof deck.
Trim 6" (152 mm)from rake edge of first shingle.Continue with whole shingles.
Carry GAF Underlayment at least6" (152 mm) over GAF Leak Barrier.
Extend end of shingle at least 12" (305 mm) beyond valley center line. Before nailing, firmly press shingles down at valley center to conform to valley shape. Nail, putting extrafastener in top corner of shingle. Due to the extreme water volume in valleys, nails near the center can leak.
Run starter strip across valley at least 12" (305 mm) and weave with opposite side starter strip and shingle.
CAUTION: Do NOT place nails closer than 6" (152 mm) to the valley center line.
Along rake, put non-corroding metal drip edge on top of GAF Roof Deck Protection.
Exposure will vary depending on GAFUnderlayment used. Follow applicationinstructions on selected underlaymentfor proper exposure.
Along eaves, put GAF Leak Barrier on top of non-corrosive metal drip edge.
GAF Leak Barrier
Not more than 1/4" (6 mm) roof overhang
Protection de Platelage
de Toit GAF
GAF Roof Deck Protection
SheathingSheathing
5"
(127 mm)
Extend non-corroding metal counterflashing over base flashing.
Use one piece metal non-corrodingstep flashing for each course. Sealoverlying shingles to step flashingwith asphalt plastic cement.
Trim 11" (279 mm)from rake end of first shingle.
Trim 17" (432 mm) from rake end of first shingle. Continue with whole shingles. Repeat the 1st – 4th course instructions on the remaining courses, starting the fifth course with a full shingle.
Start at either rake and lay in either direction.
Place first course of shingles 1/4" – 3/4" (6–19 mm)over eave and rake edges, covering starter courseoverhang, to provide drip edge.
Start and continue with full shingleslaid flush over the starter course.
Center full width roll of GAF Leak Barrier. Do not place fasteners within 6" (152 mm) of centerline. Horizontal laps must be at least 6" (152 mm).
Center full width roll of GAF Leak Barrier. Do not place fasteners within 6" (152 mm) of centerline. Horizontal laps must be at least 6" (152 mm).
Overlying shingles must be cut sothey are 2" (52 mm) away from valley center line. Clip shinglecorners 45° to keep water flowin the valley center. Seal the valleyshingles to each other usingplastic roof cement.
VALLEY CONSTRUCTION – CLOSED CUT
11.
PRECAUTIONARY NOTES1. These shingles are fiberglass, self-sealing asphalt shingles. Because of the natural characteristics of the high-quality waterproofing material used, these shingles will
be stiff in cold weather and flexible in hot weather.2. These shingles are particularly tough and may require additional effort to trim to fit on the roof. Curved blade utility knives are more effective than straight blade
utility knives in cutting these shingles. Using a circular saw equipped with carbide-tipped blades is also effective.3. Regardless of the tool used, always wear proper protective gear such as gloves, eye protection, etc. In situations where dust or fumes are generated, e.g., cutting
shingles with a power saw, appropriate respiratory protection is recommended. Please refer to the MSDS for further information and follow all safety procedures. Use tools carefully to prevent personal injury when working with these products.
4. Handle carefully. Shingles can easily be broken in cold weather or their edges damaged in hot weather. Do not drop bundles on edge or on other bundles to separate shingles. Do not load bundles across a hip or ridge. Do not bend bundles over shoulder for carrying. Premium shingles with heavier weight may cause cracks at sharp bend points.
5. Store on flat surface in a covered, ventilated area-maximum temperature 110°F (43°C). Do not store near steam pipes, radiators, etc., or in sunlight.6. Do not store double-stacked pallets on a long-term basis. If double stacking is required for short periods, use slip sheets of 1/2" (13 mm) plywood cut to the pallet
size to minimize damage. Long-term double-stacked storage, especially in hot weather, can result in possible sticking, staining, and distortion of the shingles.
IMPORTANT: Repair leaks promptly to avoid adverse effects, including mold growth.
RE-ROOFING If old asphalt shingles are to remain in place, nail down or cut away all loose, curled, or lifted shingles and replace with new; just before applying the new roofing,
sweep the surface clean of all loose debris. Since any irregularities may show through the new shingles, be sure the underlying shingles provide a smooth surface. Fasteners must be long enough to penetrate the wood deck at least 3/4" (19 mm) or just through plywood. Follow above instructions for application. NOTE: Shingles can be applied over wood shingles if the surface can be made smooth enough. This may include cutting back old shingles at eaves and rakes,installing new wood edging strips as needed, and the use of beveled wood strips. Install #30 underlayment to maintain Class A rating.
For technical support, call 1-800-766-3411 or visit our website at gaf.com.
©2013 GAF 3/13