Embed Size (px)
Citation preview

Timberline Series
Electronic Precision Balances/ Elektronische Präzisionswaagen / Balances électroniques de précision / Balanzas electrónicas de precisión
Operating Instructions / Betriebsanleitung /Mode d’emploi / Instrucciones de funcionamiento

2
English – page 3
Deutsch – Seite 30
Français – page 56
Español – página 82
Contents
Warnings and Safety Precautions . . . . . . . . . . . . . . . . . . . . . . . . . . . . . . . . . . . . 4
Getting Started . . . . . . . . . . . . . . . . . . . . . . . . . . . . . . . . . . . . . . . . . . . . . . . . . . . 5
Operation . . . . . . . . . . . . . . . . . . . . . . . . . . . . . . . . . . . . . . . . . . . . . . . . . . . . . . 10Basic Weighing Function . . . . . . . . . . . . . . . . . . . . . . . . . . . . . . . . . . . . . . . . . . 10Calibration/Adjustment . . . . . . . . . . . . . . . . . . . . . . . . . . . . . . . . . . . . . . . . . . . 11
Application Programs . . . . . . . . . . . . . . . . . . . . . . . . . . . . . . . . . . . . . . . . . . . . . 12Net-Total Formulation/Second Tare Memory . . . . . . . . . . . . . . . . . . . . . . . . . . . 12Counting . . . . . . . . . . . . . . . . . . . . . . . . . . . . . . . . . . . . . . . . . . . . . . . . . . . . . . . . 13Weighing in Percent . . . . . . . . . . . . . . . . . . . . . . . . . . . . . . . . . . . . . . . . . . . . . . . 14Weigh Averaging . . . . . . . . . . . . . . . . . . . . . . . . . . . . . . . . . . . . . . . . . . . . . . . . . 15Toggling between Weight Units . . . . . . . . . . . . . . . . . . . . . . . . . . . . . . . . . . . . . 16
Configuring the Balance . . . . . . . . . . . . . . . . . . . . . . . . . . . . . . . . . . . . . . . . . . . 17Setting the Parameters (Menu Codes) . . . . . . . . . . . . . . . . . . . . . . . . . . . . . . . . 17Balance Operating Menu (Overview) . . . . . . . . . . . . . . . . . . . . . . . . . . . . . . . . . 18ISO/GLP-compliant Printout . . . . . . . . . . . . . . . . . . . . . . . . . . . . . . . . . . . . . . . . 20Data Interface . . . . . . . . . . . . . . . . . . . . . . . . . . . . . . . . . . . . . . . . . . . . . . . . . . . . 22
Error Codes . . . . . . . . . . . . . . . . . . . . . . . . . . . . . . . . . . . . . . . . . . . . . . . . . . . . . . 23
Care and Maintenance . . . . . . . . . . . . . . . . . . . . . . . . . . . . . . . . . . . . . . . . . . . . . 24
Instructions for Recycling . . . . . . . . . . . . . . . . . . . . . . . . . . . . . . . . . . . . . . . . . . 26
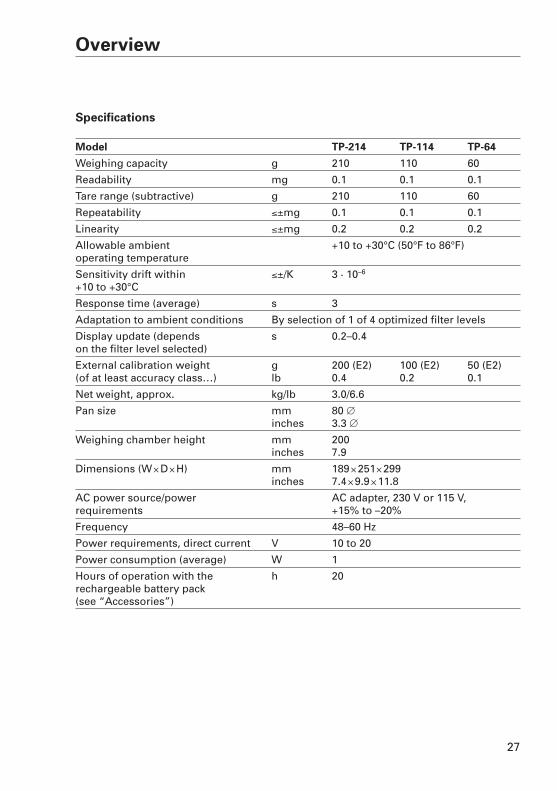
Overview . . . . . . . . . . . . . . . . . . . . . . . . . . . . . . . . . . . . . . . . . . . . . . . . . . . . . . . . 27Specifications . . . . . . . . . . . . . . . . . . . . . . . . . . . . . . . . . . . . . . . . . . . . . . . . . . . . 27
3
Contents
4
Safety§ To prevent damage to the equip-
ment, please read these operatinginstructions carefully before usingyour balance.
!Do not use this balance in a haz-ardous area/location.
!Make absolutely sure to unplugthe balance from AC power beforeyou connect or disconnect aperipheral device.
!Exposure to excessive electromag-netic disturbance can cause thereadout value to change. Once thedisturbance has ceased, the instru-ment can be used again in accor-dance with its intended use.
Setting up the Balance!Warning when using pre-wired
RS-232 connecting cables: The pinassignments in RS-232 cables pur-chased from other manufacturersmay be incompatible with DENVERbalances. Be sure to check the pinassignment against the chart onpage 21 before connecting thecable, and disconnect any linesthat do not match.
– Connect only DENVER accessoriesand options, as these are optimallydesigned for use with your DENVERbalance. Do not try to solve anyproblems on your own. The opera-tor shall be responsible for anymodifications to DENVER equip-ment and for any connections ofcables or equipment not suppliedby DENVER and must check and, ifnecessary, correct these modifica-tions and connections. On request,DENVER will provide informationon the minimum operating specifi-cations (in accordance with thestandards for defined immunity tointerference).
– Do not open the balance housing.If the seal is broken, this will resultin forfeiture of all claims under themanufacturer’s warranty.
Warnings and Safety Precautions
5
Getting Started
Storage and Shipping Conditions– Do not expose the balance to
extreme temperatures, blows,shocks, vibration or moisture.
Unpacking the Balance§ After unpacking the balance,
check it immediately for any visibledamage.
$ If you see any sign of damage,proceed as directed in the chapterentitled “Care and Maintenance,”under the section on “SafetyInspection.”
$ Save the box and all parts of thepackaging until you have success-fully installed your balance in caseyou need to return it. Before pack-ing your balance, unplug all con-nected cables to prevent damage.
Equipment Supplied– Balance– Weighing pan– Pan support (only on models with
a round weighing pan)– AC adapter, plug type
Additionally supplied with TP-214,TP-114, TP-64 and TP-323DS, TP-153DS models:– Shield ring
(not for models TP-…DS)– Shield plate– Dust cover
Additionally supplied with TP-323and TP-153 models:– Glass draft shield with cover
Installation InstructionsWhen choosing a location to setup your balance, observe the following:
– Avoid placing the balance in closeproximity to a heater or otherwiseexposing the balance to heat ordirect sunlight
– Protect the balance from draftsthat come from open windows ordoors
– Avoid exposing the balance toextreme vibrations during weighing
– Do not expose the balance to extreme moisture over longperiods
Conditioning the BalanceMoisture in the air can condense onthe surfaces of a cold balance when-ever it is brought into a substantiallywarmer place. If you transfer the bal-ance to a warmer area, make sure tocondition it for about 2 hours at roomtemperature, leaving it unpluggedfrom AC power.
6
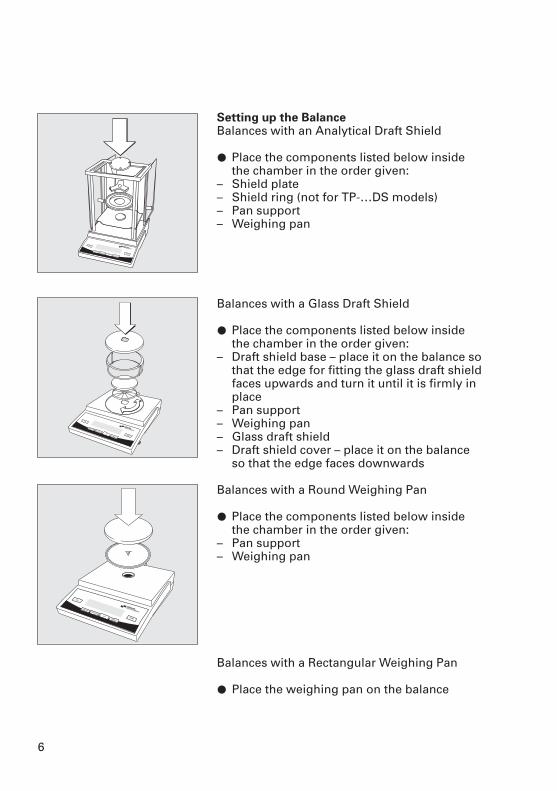
Setting up the BalanceBalances with an Analytical Draft Shield
§ Place the components listed below inside the chamber in the order given:
– Shield plate– Shield ring (not for TP-…DS models)– Pan support– Weighing pan
Balances with a Glass Draft Shield
§ Place the components listed below insidethe chamber in the order given:
– Draft shield base – place it on the balance sothat the edge for fitting the glass draft shieldfaces upwards and turn it until it is firmly inplace
– Pan support– Weighing pan– Glass draft shield– Draft shield cover – place it on the balance
so that the edge faces downwards
Balances with a Round Weighing Pan
§ Place the components listed below insidethe chamber in the order given:
– Pan support– Weighing pan
Balances with a Rectangular Weighing Pan
§ Place the weighing pan on the balance

7
Connecting the Balance to AC Power/Safety PrecautionsUse only original Denver AC adapters
§ Insert the right-angle plug into the jack
§ The AC adapter rated to Class 2 can be plugged into any wall outlet without requiring any additional safety precautions
The ground is connected to the balance housing, which can be additionally groundedfor operation.
Using a Non-Rechargeable/Rechargeable Battery:for models TP-6101, TP-3101, TP-12
$ A non-rechargeable or rechargeable batteryis not included with the equipment supplied
!Use only a commercially available non-rechargeable or rechargeable 9-volt battery
!When using a rechargeable battery, alwaysuse an external charger to recharge the
battery§ Lay the balance/scale on its side§ Open the battery compartment:
Lift the compartment cover
§ Insert the 9-volt (rechargeable) battery inthe compartment
$ Make sure to connect the positive and negative poles correctly
!All used batteries are classified as waste that requires special handling (not “house-hold” waste). Dispose of rechargeable batteries in accordance with the applicablespecial waste disposal regulations.
§ Close the battery compartment: Press down on the cover until it clicks intoplace

8
Federal Communications Commission (FCC) Statement
NOTE: This equipment has beentested and found to comply withthe limits pursuant to part 15 of FCC Rules. These limits aredesigned to provide reasonableprotection against harmful inter-ference. This equipment gener-ates, uses and can radiate radiofrequency energy and, if notinstalled and used in accordancewith these instructions, may causeharmful interference to radio communications.
For information on the specificlimits and class of this equipment,please refer to the Declaration ofConformity. Depending on the particular class, you are eitherrequired or requested to correctthe interference.
If you have a Class A digitaldevice, you need to comply withthe FCC statement as follows:“Operation of this equipment in aresidential area is likely to causeharmful interference in which casethe user will be required to correctthe interference at his ownexpense.”
If you have a Class B digital device,please read and follow the FCCinformation given below: “However, there is no guaranteethat interference will not occur in a particular installation. If thisequipment does cause harmfulinterference to radio or televisionreception, which can be deter-mined by turning the equipmentoff and on, the user is encouragedto try to correct the interference by one or more of the followingmeasures:
– Reorient or relocate the receivingantenna.
– Increase the separation betweenthe equipment and receiver.
– Connect the equipment into an outlet on a circuit different from that to which the receiver is connected.
– Consult the dealer or an experi-enced radio/TV technician forhelp.”
Before you operate this equipment,check which FCC class (Class A or Class B) it has according to theDeclaration of Conformity included.Be sure to observe the information of this Declaration.
9
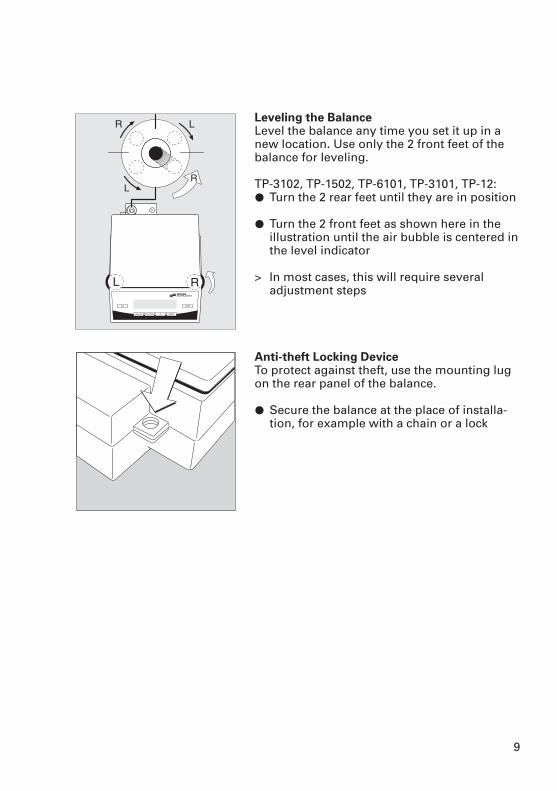
Leveling the BalanceLevel the balance any time you set it up in anew location. Use only the 2 front feet of thebalance for leveling.
TP-3102, TP-1502, TP-6101, TP-3101, TP-12:§ Turn the 2 rear feet until they are in position
§ Turn the 2 front feet as shown here in theillustration until the air bubble is centered inthe level indicator
> In most cases, this will require severaladjustment steps
Anti-theft Locking DeviceTo protect against theft, use the mounting lugon the rear panel of the balance.
§ Secure the balance at the place of installa-tion, for example with a chain or a lock
10
Operation
Basic Weighing Function
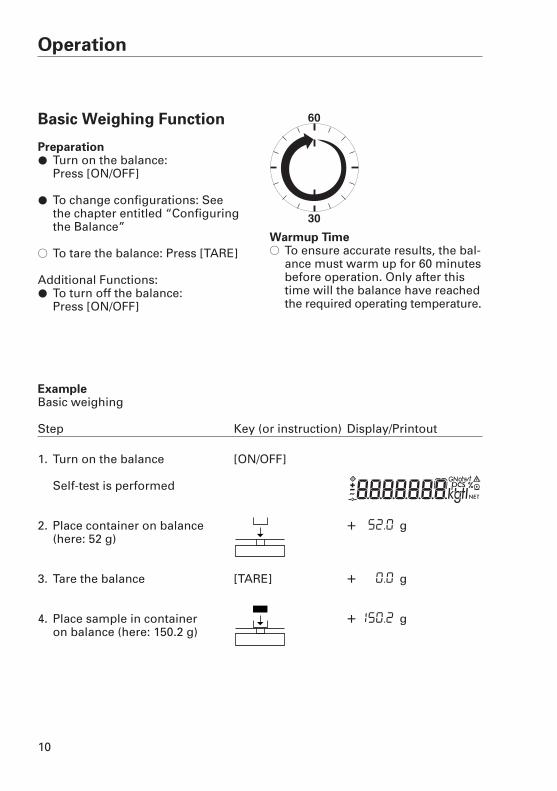
Preparation§ Turn on the balance:
Press [ON/OFF]
§ To change configurations: See the chapter entitled “Configuringthe Balance”
$ To tare the balance: Press [TARE]
Additional Functions:§ To turn off the balance:
Press [ON/OFF]
Warmup Time$ To ensure accurate results, the bal-
ance must warm up for 60 minutesbefore operation. Only after thistime will the balance have reachedthe required operating temperature.
ExampleBasic weighing
Step Key (or instruction) Display/Printout
1. Turn on the balance [ON/OFF]
Self-test is performed
2. Place container on balance + 52.0 g(here: 52 g)
3. Tare the balance [TARE] + 0.0 g
4. Place sample in container + 150.2 gon balance (here: 150.2 g)
11
Calibration and Adjustment
Calibration is the determination of any difference between the weight readoutand the true weight (mass) of a sample. Adjustment is the correction of thisdifference, or its reduction to an allowable level within maximum permissibleerror limits.
In the Timerline Series balance, both functions are performed at one touch of the CAL key. This is why we use the term “calibrate/adjust” in the examplegiven below.
Available FeaturesCalibration/adjustment can only be performed when
– there is no load on the balance,– the balance is tared,– the internal signal is stable.
If these conditions are not met, an error message is displayed. Otherwise, the weight required for calibration/adjustment is displayed.
You can use any of the following weight units to calibrate/adjust: g, kg*, lb (menu code 1. 4. x)You can block calibration/adjustment of the balance: – Select menu code 1. 5. 3
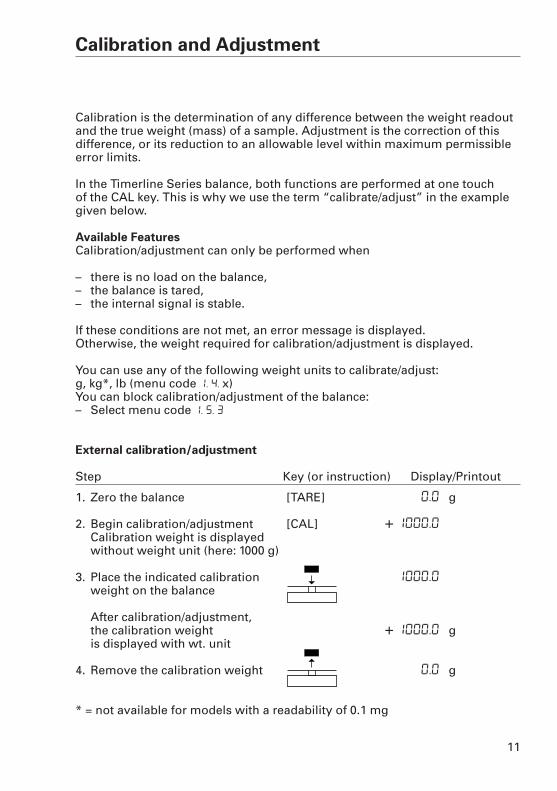
External calibration/adjustment
Step Key (or instruction) Display/Printout
1. Zero the balance [TARE] 0.0 g
2. Begin calibration/adjustment [CAL] + 1000.0
Calibration weight is displayedwithout weight unit (here: 1000 g)
3. Place the indicated calibration 1000.0
weight on the balance
After calibration/adjustment, the calibration weight + 1000.0 gis displayed with wt. unit
4. Remove the calibration weight 0.0 g
* = not available for models with a readability of 0.1 mg
12
Application Programs
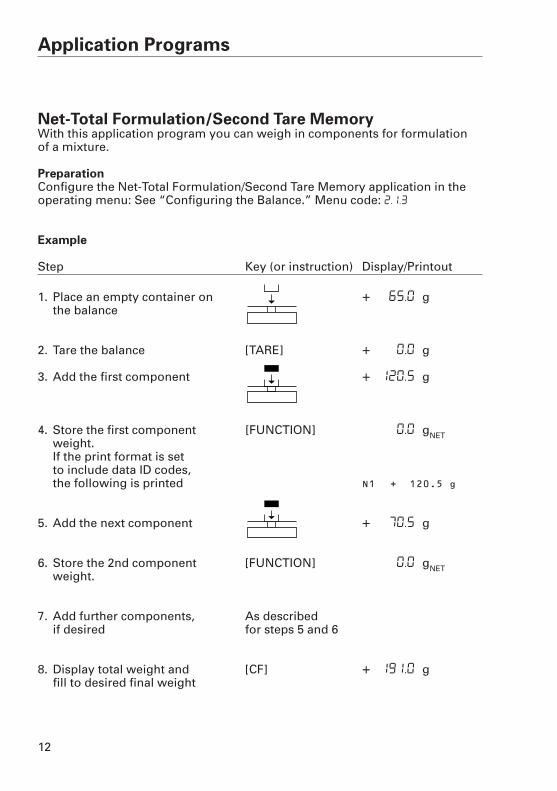
Net-Total Formulation/Second Tare MemoryWith this application program you can weigh in components for formulation of a mixture.
PreparationConfigure the Net-Total Formulation/Second Tare Memory application in theoperating menu: See “Configuring the Balance.” Menu code: 2.1.3
Example
Step Key (or instruction) Display/Printout
1. Place an empty container on + 65.0 gthe balance
2. Tare the balance [TARE] + 0.0 g
3. Add the first component + 120,5 g
4. Store the first component [FUNCTION] 0.0 gNETweight.If the print format is setto include data ID codes, the following is printed N1 + 120.5 g
5. Add the next component + 70,5 g
6. Store the 2nd component [FUNCTION] 0.0 gNETweight.
7. Add further components, As describedif desired for steps 5 and 6
8. Display total weight and [CF] + 191,0 gfill to desired final weight

13
$ Reference sample quantity:Code 3. 3. 1 5 pcsCode 3. 3. 2 10 pcs (factory setting)Code 3. 3. 3 20 pcsCode 3. 3. 4 50 pcsCode 3. 3. 5 100 pcs
$ Storage parameter (display accuracy for counting)Code 3. 4. 1 Standard resolution
(factory setting)Code 3. 4. 2 With 10 times higher
resolution than stan-dard
See also “Configuring the Balance”
Counting
PurposeWith the Counting program you candetermine the number of parts thateach have approximately equalweight.
Preparation§ Configure the Counting application
in the operating menu: See “Configuring the Balance”Menu code: 2. 1. 4
ExampleDetermine an unknown piece count; weigh the preset reference sample quantity Menu: Application program: Counting (menu code 2. 1. 4) Reference sample quantity: 20 pcs (menu code 3. 3. 3)
Step Key (or instruction) Display/Printout
1. Tare the balance [TARE] 0.0 g
2. Display the reference sample [FUNCTION] ref 20 (briefly)quantity (here: 20 pcs) >2 sec.
3. Place the reference sample + 66.0 gquantity (20 pcs) on the balance(here: 66 g)
4. Start the application; if the print [FUNCTION] + 20 pcsformat is set to include data ID codes, the following piece weight is printed wRef + 3.300 g
5. Weigh uncounted parts + 174 pcs(here: 174 pcs)
6. Display weight [FUNCTION] + 574.2 g
7. Display quantity [FUNCTION] + 174 pcs
8. Unload the balance 0 pcs
9. Delete the reference value [CF]
10. Repeat the procedure starting from step 5, if desired.
14
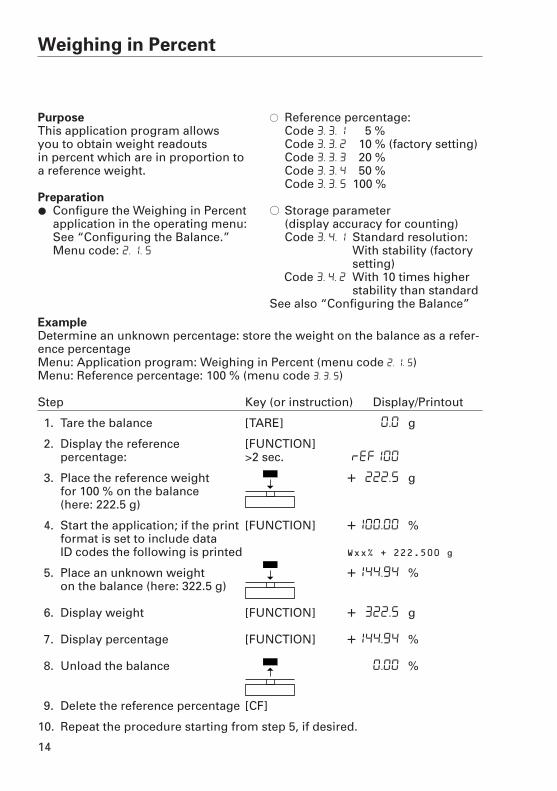
PurposeThis application program allows you to obtain weight readouts in percent which are in proportion toa reference weight.
Preparation§ Configure the Weighing in Percent
application in the operating menu: See “Configuring the Balance.”Menu code: 2. 1. 5
$ Reference percentage:Code 3. 3. 1 5 %Code 3. 3. 2 10 % (factory setting)Code 3. 3. 3 20 %Code 3. 3. 4 50 %Code 3. 3. 5 100 %
$ Storage parameter (display accuracy for counting)Code 3. 4. 1 Standard resolution:
With stability (factorysetting)
Code 3. 4. 2 With 10 times higher stability than standard
See also “Configuring the Balance”
Weighing in Percent
ExampleDetermine an unknown percentage: store the weight on the balance as a refer-ence percentageMenu: Application program: Weighing in Percent (menu code 2. 1. 5)Menu: Reference percentage: 100 % (menu code 3. 3. 5)
Step Key (or instruction) Display/Printout
1. Tare the balance [TARE] 0.0 g
2. Display the reference [FUNCTION]percentage: >2 sec. ref100
3. Place the reference weight + 222.5 gfor 100 % on the balance (here: 222.5 g)
4. Start the application; if the print [FUNCTION] +100.00 %format is set to include data ID codes the following is printed Wxx% + 222.500 g
5. Place an unknown weight +144.94 %on the balance (here: 322.5 g)
6. Display weight [FUNCTION] + 322.5 g
7. Display percentage [FUNCTION] +144.94 %
8. Unload the balance 0.00 %
9. Delete the reference percentage [CF]
10. Repeat the procedure starting from step 5, if desired.
15
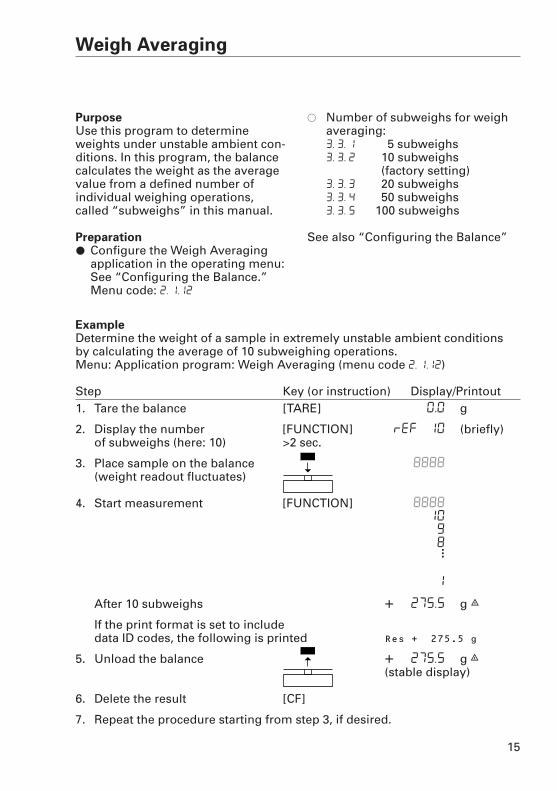
ExampleDetermine the weight of a sample in extremely unstable ambient conditionsby calculating the average of 10 subweighing operations. Menu: Application program: Weigh Averaging (menu code 2. 1.12)
Step Key (or instruction) Display/Printout1. Tare the balance [TARE] 0.0 g
2. Display the number [FUNCTION] ref 10 (briefly)of subweighs (here: 10) >2 sec.
3. Place sample on the balance 8888
(weight readout fluctuates)
4. Start measurement [FUNCTION] 8888
10
9
8
1
After 10 subweighs + 275.5 g G
If the print format is set to includedata ID codes, the following is printed Res + 275.5 g
5. Unload the balance + 275.5 g G(stable display)
6. Delete the result [CF]
7. Repeat the procedure starting from step 3, if desired.
···
Weigh Averaging
PurposeUse this program to determineweights under unstable ambient con-ditions. In this program, the balancecalculates the weight as the averagevalue from a defined number of individual weighing operations,called “subweighs” in this manual.
Preparation§ Configure the Weigh Averaging
application in the operating menu: See “Configuring the Balance.”Menu code: 2. 1.12
$ Number of subweighs for weigh averaging:3. 3. 1 5 subweighs3. 3. 2 10 subweighs
(factory setting)3. 3. 3 20 subweighs3. 3. 4 50 subweighs3. 3. 5 100 subweighs
See also “Configuring the Balance”
16
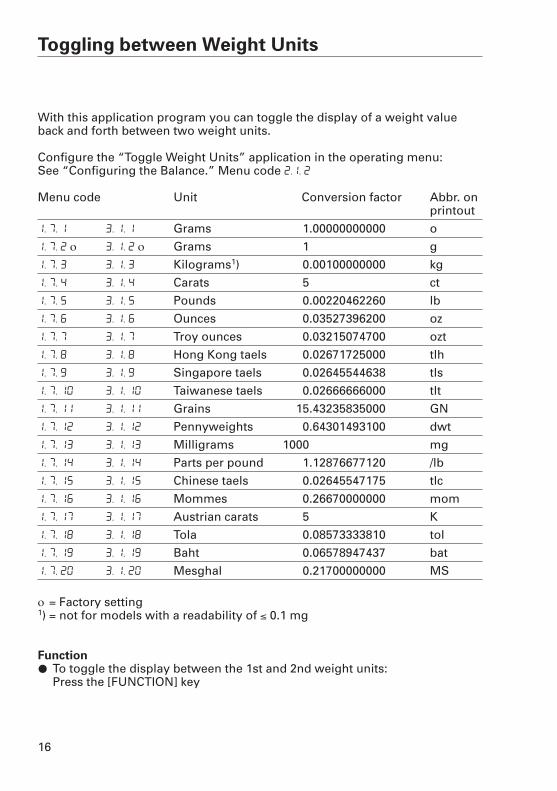
With this application program you can toggle the display of a weight valueback and forth between two weight units.
Configure the “Toggle Weight Units” application in the operating menu: See “Configuring the Balance.” Menu code 2.1. 2
Menu code Unit Conversion factor Abbr. on printout
1. 7. 1 3. 1. 1 Grams 1.00000000000 o
1. 7. 2 ο 3. 1. 2 ο Grams 1 g
1. 7. 3 3. 1. 3 Kilograms1) 0.00100000000 kg
1. 7. 4 3. 1. 4 Carats 5 ct
1. 7. 5 3. 1. 5 Pounds 0.00220462260 lb
1. 7. 6 3. 1. 6 Ounces 0.03527396200 oz
1. 7. 7 3. 1. 7 Troy ounces 0.03215074700 ozt
1. 7. 8 3. 1. 8 Hong Kong taels 0.02671725000 tlh
1. 7. 9 3. 1. 9 Singapore taels 0.02645544638 tls
1. 7. 10 3. 1. 10 Taiwanese taels 0.02666666000 tlt
1. 7. 11 3. 1. 11 Grains 15.43235835000 GN
1. 7. 12 3. 1. 12 Pennyweights 0.64301493100 dwt
1. 7. 13 3. 1. 13 Milligrams 1000 mg
1. 7. 14 3. 1. 14 Parts per pound 1.12876677120 /lb
1. 7. 15 3. 1. 15 Chinese taels 0.02645547175 tlc
1. 7. 16 3. 1. 16 Mommes 0.26670000000 mom
1. 7. 17 3. 1. 17 Austrian carats 5 K
1. 7. 18 3. 1. 18 Tola 0.08573333810 tol
1. 7. 19 3. 1. 19 Baht 0.06578947437 bat
1. 7. 20 3. 1. 20 Mesghal 0.21700000000 MS
ο = Factory setting 1) = not for models with a readability of < 0.1 mg
Function§ To toggle the display between the 1st and 2nd weight units:
Press the [FUNCTION] key
Toggling between Weight Units
17
Configuring the Balance
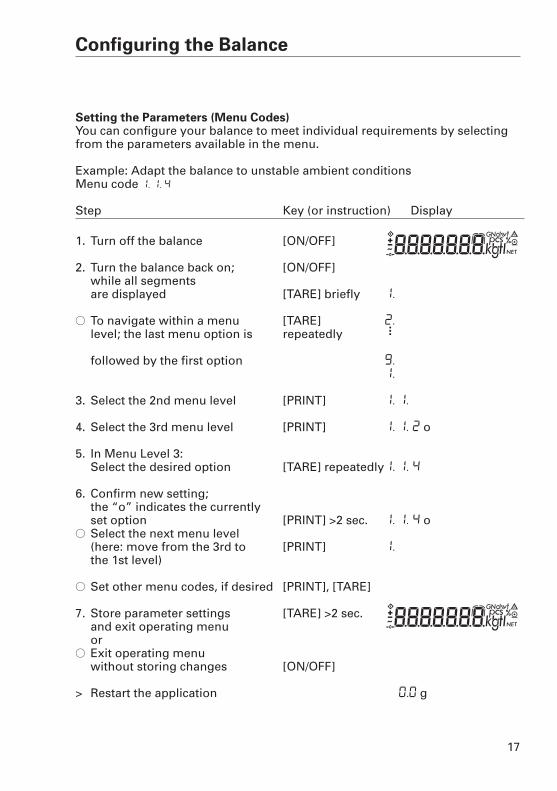
Setting the Parameters (Menu Codes)You can configure your balance to meet individual requirements by selectingfrom the parameters available in the menu.
Example: Adapt the balance to unstable ambient conditions Menu code 1. 1. 4
Step Key (or instruction) Display
1. Turn off the balance [ON/OFF]
2. Turn the balance back on; [ON/OFF]while all segments are displayed [TARE] briefly 1.
$ To navigate within a menu [TARE] 2.
level; the last menu option is repeatedly
followed by the first option 9.
1.
3. Select the 2nd menu level [PRINT] 1. 1.
4. Select the 3rd menu level [PRINT] 1. 1. 2 o
5. In Menu Level 3:Select the desired option [TARE] repeatedly1. 1. 4
6. Confirm new setting;the “o” indicates the currently set option [PRINT] >2 sec. 1. 1. 4 o
$ Select the next menu level (here: move from the 3rd to [PRINT] 1.
the 1st level)
$ Set other menu codes, if desired [PRINT], [TARE]
7. Store parameter settings [TARE] >2 sec. and exit operating menuor
$ Exit operating menu without storing changes [ON/OFF]
> Restart the application 0.0 g
···
18
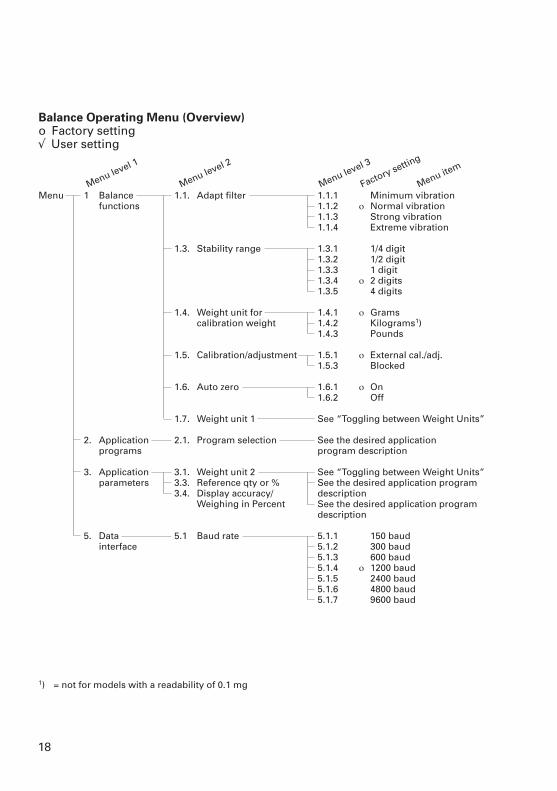
Balance Operating Menu (Overview)o Factory setting√ User setting
Menu 1 Balance 1.1. Adapt filter 1.1.1 Minimum vibrationfunctions 1.1.2 ο Normal vibration
1.1.3 Strong vibration1.1.4 Extreme vibration
1.3. Stability range 1.3.1 1/4 digit1.3.2 1/2 digit1.3.3 1 digit1.3.4 ο 2 digits1.3.5 4 digits
1.4. Weight unit for 1.4.1 ο Gramscalibration weight 1.4.2 Kilograms1)
1.4.3 Pounds
1.5. Calibration/adjustment 1.5.1 ο External cal./adj.1.5.3 Blocked
1.6. Auto zero 1.6.1 ο On1.6.2 Off
1.7. Weight unit 1 See “Toggling between Weight Units”
2. Application 2.1. Program selection See the desired application programs program description
3. Application 3.1. Weight unit 2 See “Toggling between Weight Units”parameters 3.3. Reference qty or % See the desired application program
3.4. Display accuracy/ descriptionWeighing in Percent See the desired application program
description
5. Data 5.1 Baud rate 5.1.1 150 baudinterface 5.1.2 300 baud
5.1.3 600 baud5.1.4 ο 1200 baud5.1.5 2400 baud5.1.6 4800 baud5.1.7 9600 baud
1) = not for models with a readability of 0.1 mg
Menu level 1
Menu level 2
Menu level 3
Factory setting
Menu item
19
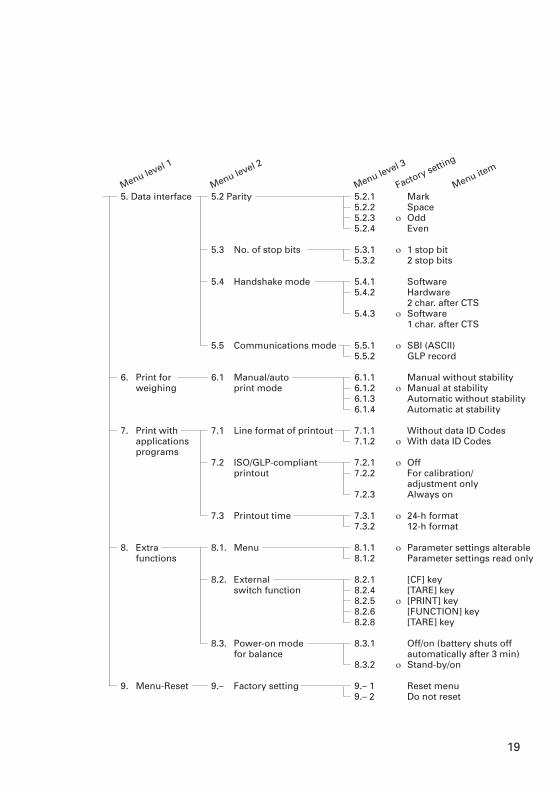
5. Data interface 5.2 Parity 5.2.1 Mark5.2.2 Space5.2.3 ο Odd 5.2.4 Even
5.3 No. of stop bits 5.3.1 ο 1 stop bit5.3.2 2 stop bits
5.4 Handshake mode 5.4.1 Software 5.4.2 Hardware
2 char. after CTS 5.4.3 ο Software
1 char. after CTS
5.5 Communications mode 5.5.1 ο SBI (ASCII)5.5.2 GLP record
6. Print for 6.1 Manual/auto 6.1.1 Manual without stabilityweighing print mode 6.1.2 ο Manual at stability
6.1.3 Automatic without stability6.1.4 Automatic at stability
7. Print with 7.1 Line format of printout 7.1.1 Without data ID Codesapplications 7.1.2 ο With data ID Codesprograms
7.2 ISO/GLP-compliant 7.2.1 ο Offprintout 7.2.2 For calibration/
adjustment only7.2.3 Always on
7.3 Printout time 7.3.1 ο 24-h format7.3.2 12-h format
8. Extra 8.1. Menu 8.1.1 ο Parameter settings alterablefunctions 8.1.2 Parameter settings read only
8.2. External 8.2.1 [CF] key switch function 8.2.4 [TARE] key
8.2.5 ο [PRINT] key 8.2.6 [FUNCTION] key 8.2.8 [TARE] key
8.3. Power-on mode 8.3.1 Off/on (battery shuts offfor balance automatically after 3 min)
8.3.2 ο Stand-by/on
9. Menu-Reset 9.– Factory setting 9.– 1 Reset menu 9.– 2 Do not reset
Menu level 1
Menu level 2
Menu level 3
Factory setting
Menu item
20
ISO/GLP-compliant Printout
FeaturesYou can have the parameters per-taining to the ambient weighing con-ditions printed before (GLP header)and after (GLP footer) the values of a weighing series. These parameters include:
GLP header:– Date– Time at beginning of measurement– Balance manufacturer– Balance model– Balance serial number– Software version number– Identification number of the
current sampling operation
GLP footer:– Date– Time at end of measurement– Field for operator signature
!The record can only be output to a Denver data printer 901042-1
Settings
§ Set the following menu codes(see “Configuring the Balance”):
– GLP-compliant record: menu code 5 5 2
– ISO/GLP-compliant record aftercalibration/adjustment only: menu code 7 2 2 or ISO/GLP-com-pliant record always on: menucode 7 2 3
– Line format for printout: With data ID codes – 22 characters:menu code 7 1 2
– Printout date/time:– 24-h format: menu code 7 3 1
– 12-h format: menu code 7 3 2
!No ISO/GLP-compliant record is output if any of the followingsettings are configured:menu codes 6 1 3, 6 1 4 (automatic printout) and 7 1 1
Function Keys Press [PRINT] to output header andfirst measured value.
> Header is output the first time[PRINT] is pressed
To output header and reference data automatically with an application program active: Press [FUNCTION]
End application program:End application program and output GLP footer: Press [CF]
2121
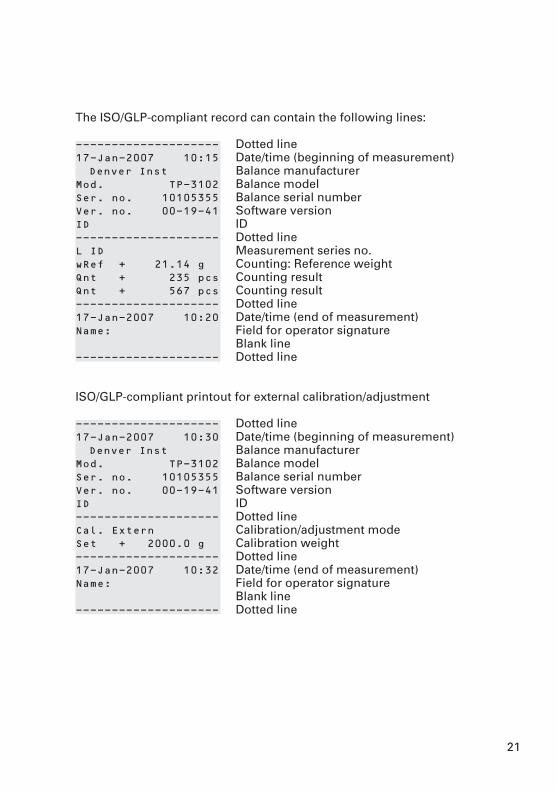
The ISO/GLP-compliant record can contain the following lines:
-------------------- Dotted line17-Jan-2007 10:15 Date/time (beginning of measurement)Denver Inst Balance manufacturer
Mod. TP-3102 Balance modelSer. no. 10105355 Balance serial numberVer. no. 00-19-41 Software versionID ID-------------------- Dotted lineL ID Measurement series no.wRef + 21.14 g Counting: Reference weightQnt + 235 pcs Counting resultQnt + 567 pcs Counting result-------------------- Dotted line17-Jan-2007 10:20 Date/time (end of measurement)Name: Field for operator signature
Blank line-------------------- Dotted line
ISO/GLP-compliant printout for external calibration/adjustment
-------------------- Dotted line17-Jan-2007 10:30 Date/time (beginning of measurement)Denver Inst Balance manufacturer
Mod. TP-3102 Balance modelSer. no. 10105355 Balance serial numberVer. no. 00-19-41 Software versionID ID-------------------- Dotted lineCal. Extern Calibration/adjustment modeSet + 2000.0 g Calibration weight-------------------- Dotted line17-Jan-2007 10:32 Date/time (end of measurement)Name: Field for operator signature
Blank line-------------------- Dotted line
22
Data Interface
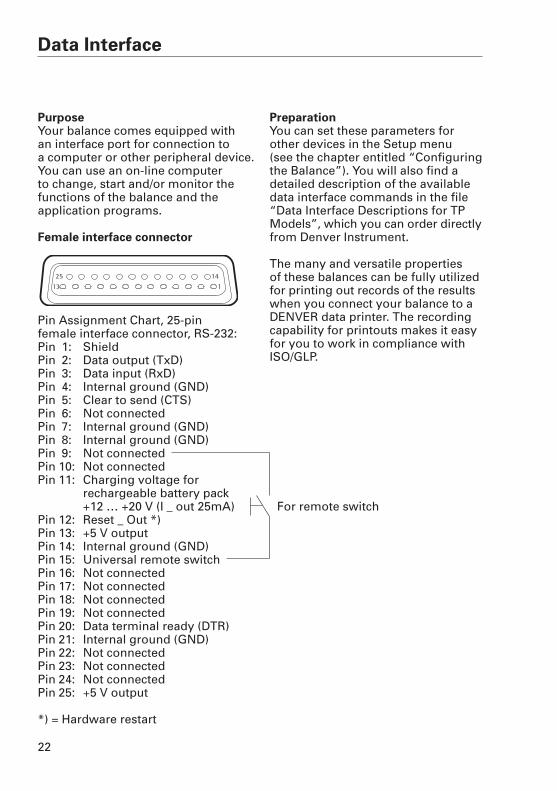
PurposeYour balance comes equipped with an interface port for connection to a computer or other peripheral device. You can use an on-line computer to change, start and/or monitor the functions of the balance and the application programs.
Female interface connector
Pin Assignment Chart, 25-pin female interface connector, RS-232:Pin 1: ShieldPin 2: Data output (TxD)Pin 3: Data input (RxD)Pin 4: Internal ground (GND)Pin 5: Clear to send (CTS)Pin 6: Not connectedPin 7: Internal ground (GND)Pin 8: Internal ground (GND)Pin 9: Not connectedPin 10: Not connectedPin 11: Charging voltage for
rechargeable battery pack+12 … +20 V (I _ out 25mA) For remote switch
Pin 12: Reset _ Out *)Pin 13: +5 V outputPin 14: Internal ground (GND)Pin 15: Universal remote switchPin 16: Not connectedPin 17: Not connectedPin 18: Not connectedPin 19: Not connectedPin 20: Data terminal ready (DTR)Pin 21: Internal ground (GND)Pin 22: Not connectedPin 23: Not connectedPin 24: Not connectedPin 25: +5 V output
*) = Hardware restart
1
14
13
25
PreparationYou can set these parameters forother devices in the Setup menu (see the chapter entitled “Configuringthe Balance”). You will also find adetailed description of the availabledata interface commands in the file“Data Interface Descriptions for TPModels”, which you can order directlyfrom Denver Instrument.
The many and versatile properties of these balances can be fully utilizedfor printing out records of the resultswhen you connect your balance to aDENVER data printer. The recordingcapability for printouts makes it easyfor you to work in compliance withISO/GLP.
23
Error Codes
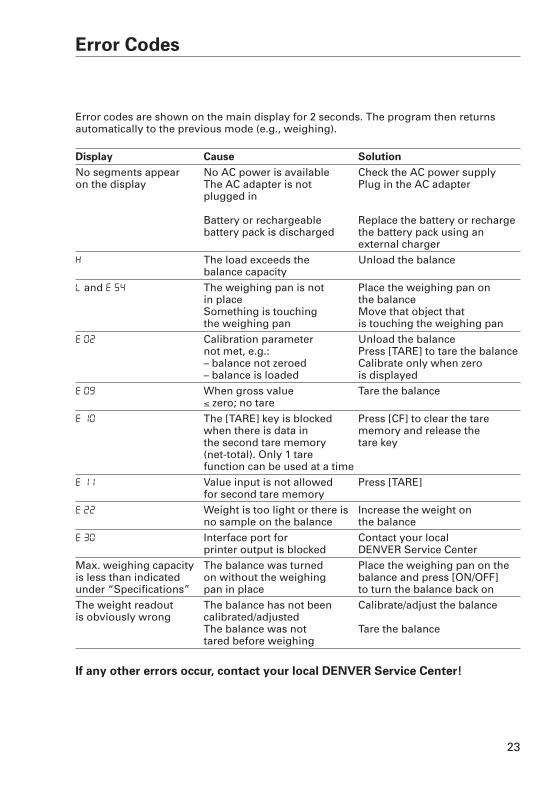
Error codes are shown on the main display for 2 seconds. The program then returns automatically to the previous mode (e.g., weighing).
Display Cause Solution
No segments appear No AC power is available Check the AC power supplyon the display The AC adapter is not Plug in the AC adapter
plugged in
Battery or rechargeable Replace the battery or recharge battery pack is discharged the battery pack using an
external chargerh The load exceeds the Unload the balance
balance capacityl and E 54 The weighing pan is not Place the weighing pan on
in place the balanceSomething is touching Move that object that the weighing pan is touching the weighing pan
e 02 Calibration parameter Unload the balancenot met, e.g.: Press [TARE] to tare the balance– balance not zeroed Calibrate only when zero – balance is loaded is displayed
e 09 When gross value Tare the balance< zero; no tare
e 10 The [TARE] key is blocked Press [CF] to clear the tare when there is data in memory and release the the second tare memory tare key(net-total). Only 1 tare function can be used at a time
e 11 Value input is not allowed Press [TARE] for second tare memory
e 22 Weight is too light or there is Increase the weight on no sample on the balance the balance
e 30 Interface port for Contact your local printer output is blocked DENVER Service Center
Max. weighing capacity The balance was turned Place the weighing pan on theis less than indicated on without the weighing balance and press [ON/OFF] under “Specifications” pan in place to turn the balance back onThe weight readout The balance has not been Calibrate/adjust the balanceis obviously wrong calibrated/adjusted
The balance was not Tare the balance tared before weighing
If any other errors occur, contact your local DENVER Service Center!

Service
Regular servicing by a trained DENVER dealerwill extend the service life of your balance andensure its continued weighing accuracy. DENVERcan offer you service contracts, with your choiceof regular maintenance intervals. The optimummaintenance interval depends on the operatingconditions at the place of installation and on theindividual tolerance requirements.
Repairs
Repair work must be performed by trained servicetechnicians. Any attempt by untrained persons toperform repairs may lead to hazards for the user.
Cleaning
§ Unplug the AC adapter from the wall outlet(mains supply). If you have an interface cableconnected to the balance port, unplug it fromthe port,
§ Clean the balance using a piece of cloth whichhas been wet with a mild detergent (soap)
§ After cleaning, wipe down the balance with a soft, dry cloth.Removing and Cleaning the Weighing Pan:
§ Lift up and remove the weighing pan togetherwith the pan support by gripping them fromunder the shield ring. Make sure that you donot damage the weighing system in doing so.
!Make sure that no liquid enters the balancehousing.
!Do not use any aggressive cleaning agents(solvents or similar agents).
Cleaning Stainless Steel Surfaces
Clean all stainless steel parts regularly. Removethe stainless steel weighing pan and thoroughlyclean it separately. Use a damp cloth or sponge toclean any stainless steel parts on the balance. Onlyuse commercially available household cleaningagent that is suitable for use on stainless steel.Clean stainless steel surfaces by wiping themdown. Then rinse thoroughly, making sure toremove all residues. Afterwards, allow the balanceto dry. If desired, you can apply oil to the cleanedsurfaces as additional protection. Solvents arepermitted for use only on stainless steel parts.
Care and Maintenance
24
25
Safety InspectionIf there is any indication that safe operation of the balance with the AC adapter is no longerwarranted:
§ Turn off the power and disconnect theequipment from AC power immediately
> Lock the equipment in a secure place toensure that it cannot be used for the timebeing
In such cases, notify your DENVER servicecenter. Maintenance and repair work mayonly be performed by service technicianswho are authorized by DENVER and who
– have access to the required maintenancemanuals
– have attended the relevant service trainingcourses
Instructions for Recycling
Information and Instructions on Disposal and Repairs Packaging that is no longer requiredmust be disposed of at the localwaste disposal facility. The packagingis made of environmentally friendlymaterials that can be used as second-ary raw materials.
The equipment, includingaccessories and batteries,does not belong in yourregular household waste. The EU legislation requiresits Member States to collect
electrical and electronic equipmentand disposed of it separately fromother unsorted municipal waste withthe aim of recycling it. In Germany and many other coun-tries, Denver Instrument takes care ofthe return and legally compliant dis-posal of its electrical and electronicequipment on its own. These prod-ucts may not be placed with thehousehold waste or brought to col-lection centers run by local publicdisposal operations – not even bysmall commercial operators.
For disposal in Germany and in theother Member States of the EuropeanEconomic Area (EEA), please contactour service technicians on location orour Service Center:
Denver Instrument GmbHRobert-Bosch-Breite 1037079 Goettingen, Germany
In countries that are not members ofthe European Economic Area (EEA)or where no Denver affiliates, sub-sidiaries, dealers or distributors arelocated, please contact your localauthorities or a commercial disposaloperator.
Prior to disposal and/or scrapping ofthe equipment, any batteries shouldbe removed and disposed of in localcollection boxes.
Denver Instrument, its affiliates, subsidiaries, dealers and distributorswill not take back equipment contam-inated with hazardous materials (ABCcontamination) – either for repair ordisposal. Please refer to the accom-panying leaflet/manual or visit ourInternet website (www.denverinstru-ment.com) for comprehensive infor-mation that includes our serviceaddresses to contact if you plan tosend your equipment in for repairs or proper disposal.
26
27
Overview
Specifications
Model TP-214 TP-114 TP-64
Weighing capacity g 210 110 60
Readability mg 0.1 0.1 0.1
Tare range (subtractive) g 210 110 60
Repeatability <±mg 0.1 0.1 0.1
Linearity <±mg 0.2 0.2 0.2
Allowable ambient +10 to +30°C (50°F to 86°F)operating temperature
Sensitivity drift within <±/K 3 · 10–6
+10 to +30°C
Response time (average) s 3
Adaptation to ambient conditions By selection of 1 of 4 optimized filter levels
Display update (depends s 0.2–0.4on the filter level selected)
External calibration weight g 200 (E2) 100 (E2) 50 (E2)(of at least accuracy class…) lb 0.4 0.2 0.1
Net weight, approx. kg/lb 3.0/6.6
Pan size mm 80 dinches 3.3 d
Weighing chamber height mm 200inches 7.9
Dimensions (W+D+H) mm 189+251+299inches 7.4+9.9+11.8
AC power source/power AC adapter, 230 V or 115 V, requirements +15% to –20%
Frequency 48–60 Hz
Power requirements, direct current V 10 to 20
Power consumption (average) W 1
Hours of operation with the h 20rechargeable battery pack(see “Accessories”)
28
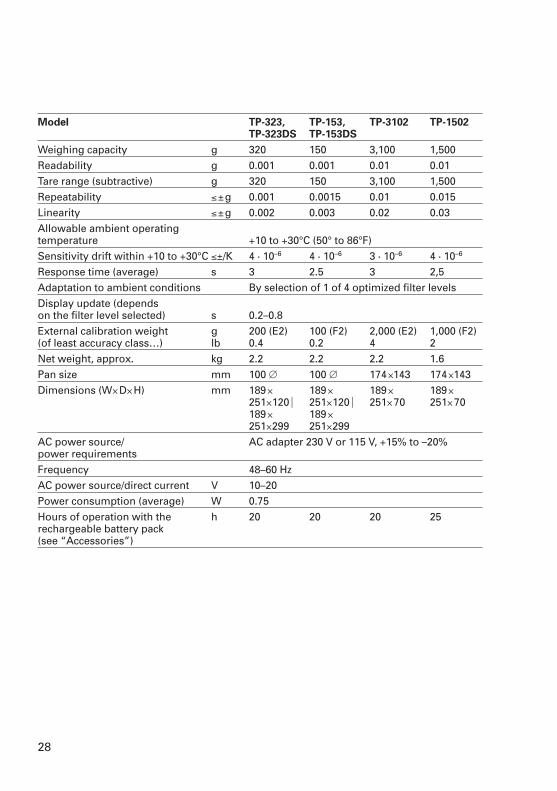
Model TP-323, TP-153, TP-3102 TP-1502TP-323DS TP-153DS
Weighing capacity g 320 150 3,100 1,500Readability g 0.001 0.001 0.01 0.01Tare range (subtractive) g 320 150 3,100 1,500Repeatability <±g 0.001 0.0015 0.01 0.015Linearity <±g 0.002 0.003 0.02 0.03Allowable ambient operating temperature +10 to +30°C (50° to 86°F)Sensitivity drift within +10 to +30°C <±/K 4 · 10–6 4 · 10–6 3 · 10–6 4 · 10–6
Response time (average) s 3 2.5 3 2,5Adaptation to ambient conditions By selection of 1 of 4 optimized filter levelsDisplay update (depends on the filter level selected) s 0.2–0.8External calibration weight g 200 (E2) 100 (F2) 2,000 (E2) 1,000 (F2)(of least accuracy class…) lb 0.4 0.2 4 2Net weight, approx. kg 2.2 2.2 2.2 1.6Pan size mm 100 d 100 d 174+143 174+143Dimensions (W+D+H) mm 189+ 189+ 189+ 189+
251+120| 251+120| 251+70 251+70189+ 189+251+299 251+299
AC power source/ AC adapter 230 V or 115 V, +15% to –20%power requirements Frequency 48–60 HzAC power source/direct current V 10–20Power consumption (average) W 0.75Hours of operation with the h 20 20 20 25rechargeable battery pack (see “Accessories”)
29
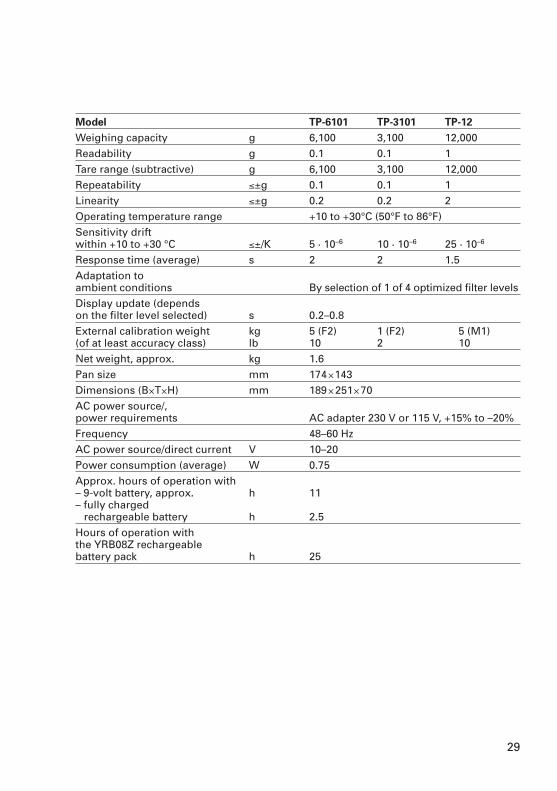
Model TP-6101 TP-3101 TP-12
Weighing capacity g 6,100 3,100 12,000Readability g 0.1 0.1 1Tare range (subtractive) g 6,100 3,100 12,000Repeatability <±g 0.1 0.1 1Linearity <±g 0.2 0.2 2Operating temperature range +10 to +30°C (50°F to 86°F)Sensitivity driftwithin +10 to +30 °C <±/K 5 · 10–6 10 · 10–6 25 · 10–6
Response time (average) s 2 2 1.5Adaptation to ambient conditions By selection of 1 of 4 optimized filter levelsDisplay update (depends on the filter level selected) s 0.2–0.8External calibration weight kg 5 (F2) 1 (F2) 5 (M1)(of at least accuracy class) lb 10 2 10Net weight, approx. kg 1.6Pan size mm 174+143Dimensions (B+T+H) mm 189+251+70AC power source/, power requirements AC adapter 230 V or 115 V, +15% to –20%Frequency 48–60 HzAC power source/direct current V 10–20Power consumption (average) W 0.75Approx. hours of operation with– 9-volt battery, approx. h 11– fully charged
rechargeable battery h 2.5Hours of operation with the YRB08Z rechargeable battery pack h 25
30
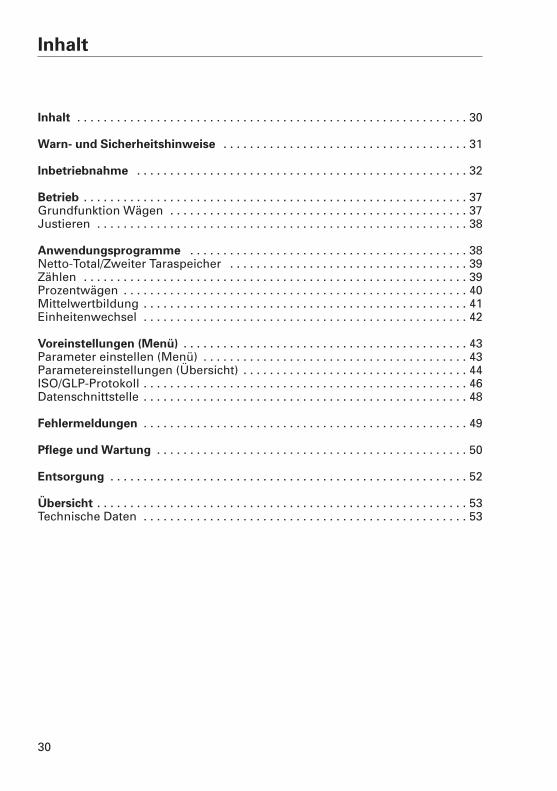
Inhalt
Inhalt . . . . . . . . . . . . . . . . . . . . . . . . . . . . . . . . . . . . . . . . . . . . . . . . . . . . . . . . . . . 30
Warn- und Sicherheitshinweise . . . . . . . . . . . . . . . . . . . . . . . . . . . . . . . . . . . . . 31
Inbetriebnahme . . . . . . . . . . . . . . . . . . . . . . . . . . . . . . . . . . . . . . . . . . . . . . . . . . 32
Betrieb . . . . . . . . . . . . . . . . . . . . . . . . . . . . . . . . . . . . . . . . . . . . . . . . . . . . . . . . . . 37Grundfunktion Wägen . . . . . . . . . . . . . . . . . . . . . . . . . . . . . . . . . . . . . . . . . . . . . 37Justieren . . . . . . . . . . . . . . . . . . . . . . . . . . . . . . . . . . . . . . . . . . . . . . . . . . . . . . . . 38
Anwendungsprogramme . . . . . . . . . . . . . . . . . . . . . . . . . . . . . . . . . . . . . . . . . . 38Netto-Total/Zweiter Taraspeicher . . . . . . . . . . . . . . . . . . . . . . . . . . . . . . . . . . . . 39Zählen . . . . . . . . . . . . . . . . . . . . . . . . . . . . . . . . . . . . . . . . . . . . . . . . . . . . . . . . . . 39Prozentwägen . . . . . . . . . . . . . . . . . . . . . . . . . . . . . . . . . . . . . . . . . . . . . . . . . . . . 40Mittelwertbildung . . . . . . . . . . . . . . . . . . . . . . . . . . . . . . . . . . . . . . . . . . . . . . . . . 41Einheitenwechsel . . . . . . . . . . . . . . . . . . . . . . . . . . . . . . . . . . . . . . . . . . . . . . . . . 42
Voreinstellungen (Menü) . . . . . . . . . . . . . . . . . . . . . . . . . . . . . . . . . . . . . . . . . . . 43Parameter einstellen (Menü) . . . . . . . . . . . . . . . . . . . . . . . . . . . . . . . . . . . . . . . . 43Parametereinstellungen (Übersicht) . . . . . . . . . . . . . . . . . . . . . . . . . . . . . . . . . . 44ISO/GLP-Protokoll . . . . . . . . . . . . . . . . . . . . . . . . . . . . . . . . . . . . . . . . . . . . . . . . . 46Datenschnittstelle . . . . . . . . . . . . . . . . . . . . . . . . . . . . . . . . . . . . . . . . . . . . . . . . . 48
Fehlermeldungen . . . . . . . . . . . . . . . . . . . . . . . . . . . . . . . . . . . . . . . . . . . . . . . . . 49
Pflege und Wartung . . . . . . . . . . . . . . . . . . . . . . . . . . . . . . . . . . . . . . . . . . . . . . . 50
Entsorgung . . . . . . . . . . . . . . . . . . . . . . . . . . . . . . . . . . . . . . . . . . . . . . . . . . . . . . 52
Übersicht . . . . . . . . . . . . . . . . . . . . . . . . . . . . . . . . . . . . . . . . . . . . . . . . . . . . . . . . 53Technische Daten . . . . . . . . . . . . . . . . . . . . . . . . . . . . . . . . . . . . . . . . . . . . . . . . . 53
31
Sicherheit§ Diese Betriebsanleitung vor
Inbetriebnahme aufmerksamdurchlesen. So können Schäden vermiedenwerden.
!Das Gerät nicht in explosions-gefährdeten Bereichen einsetzen.
!Nur handelsübliche Batterien oder Akkus verwenden: 9 Volt-Block
!Das Gerät vom Netz trennen,bevor Zusatzgeräte angeschlossenoder getrennt werden.
!Unter extremen elektromagneti-schen Einflüssen kann eine Beein-flussung des Anzeigewertes verur-sacht werden. Nach Ende desStöreinflusses ist das Produkt wie-der bestimmungsgemäß benutz-bar.
Warn- und Sicherheitshinweise
Installation!Vorsicht beim Verwenden fremder
oder handelsüblicher RS232-Verbindungskabel: Die Pinbelegun-gen sind häufig nicht für DENVER-Geräte geeignet! Die Belegung sollte anhand derVerbindungspläne überprüft,abweichende Leitungen solltengetrennt werden.
– Zubehör und Optionen von DENVER sind optimal auf dasGerät angepasst. Daher keine eige-nen Lösungen verwenden. Das Modifizieren des Geräts unddas Anschließen von Fremdkabelnoder -geräten erfolgt auf Verant-wortung des Betreibers und istvon ihm entsprechend zu prüfen.Hinweise hierzu geben auch unse-re Angaben zur Betriebsqualität(gemäß den Normen zur Störfes-tigkeit), die wir Ihnen gerne zur Ver-fügung stellen.
– Die Waage nicht öffnen. Bei ver-letzter Sicherungsmarke entfälltder Gewährleistungsanspruch.
32
Inbetriebnahme
Lager- und Transportbedingungen– Das Gerät nicht extremen Tempe-
raturen, Stößen, Vibrationen undFeuchtigkeit aussetzen.
Auspacken§ Das Gerät nach dem Auspacken
sofort auf äußere Beschädigungenüberprüfen
$ Im Beschädigungsfall siehe Hin-weise im Kapitel »Pflege und War-tung«, Abschnitt »Sicherheitsüber-prüfung«
$ Alle Teile der Originalverpackungfür einen eventuellen Rücktran-sport aufbewahren. Beim Versandbitte keine Kabel stecken lassen!
Lieferumfang– Waage– Waagschale– Unterschale nur bei Modellen
mit runder Waagschale– Steckernetzgerät
Zusätzlich bei TP-214, TP-114, TP-64,TP-323DS, TP-153DS:– Schirmring
(nicht bei Modellen TP-…DS)– Schirmblech– Staubschutzhaube
Zusätzlich bei TP-323, TP-153:– Glasring-Windschutz mit Deckel
AufstellungBei der Aufstellung Standorte mit den folgenden ungünstigenEinflüssen vermeiden:
– Hitze (Heizung, Sonneneinstrah-lung)
– Direkter Luftzug durch offene Fen-ster und Türen
– Erschütterungen während desWägens
– Extreme Feuchtigkeit
AkklimatisierenWenn ein kaltes Gerät in eine warmeUmgebung gebracht wird, kann dieszu Betauung (Kondensation) führen. Daher sollte man das vom Netzgetrennte Gerät ca. 2 Stunden beiRaumtemperatur akklimatisieren.
33
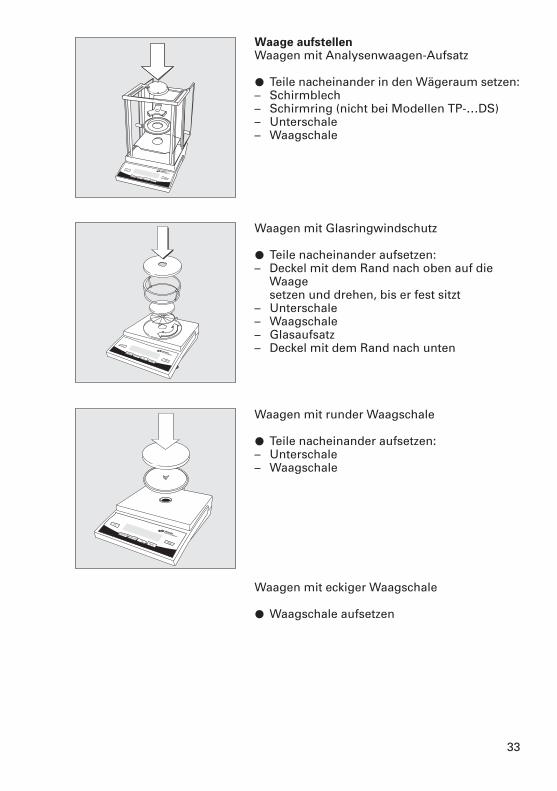
Waage aufstellenWaagen mit Analysenwaagen-Aufsatz
§ Teile nacheinander in den Wägeraum setzen:– Schirmblech– Schirmring (nicht bei Modellen TP-…DS)– Unterschale– Waagschale
Waagen mit Glasringwindschutz
§ Teile nacheinander aufsetzen:– Deckel mit dem Rand nach oben auf die
Waage setzen und drehen, bis er fest sitzt
– Unterschale– Waagschale– Glasaufsatz– Deckel mit dem Rand nach unten
Waagen mit runder Waagschale
§ Teile nacheinander aufsetzen:– Unterschale– Waagschale
Waagen mit eckiger Waagschale
§ Waagschale aufsetzen
34
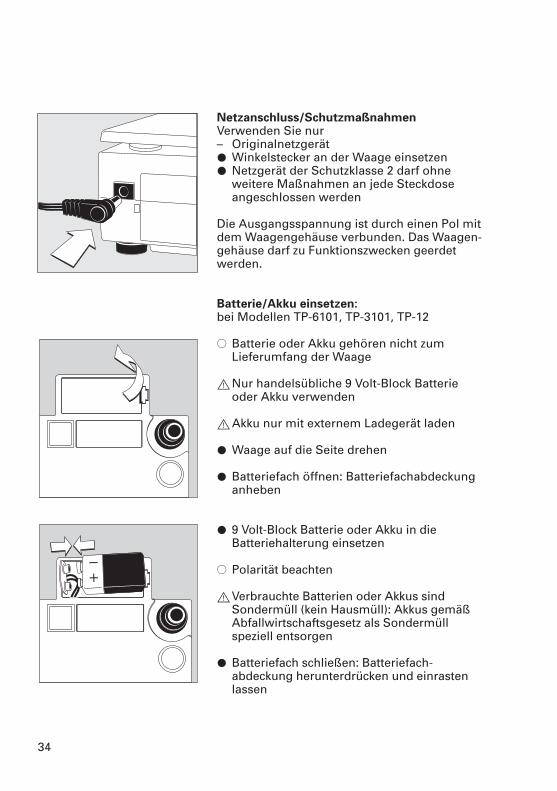
Netzanschluss/SchutzmaßnahmenVerwenden Sie nur – Originalnetzgerät § Winkelstecker an der Waage einsetzen§ Netzgerät der Schutzklasse 2 darf ohne
weitere Maßnahmen an jede Steckdose angeschlossen werden
Die Ausgangsspannung ist durch einen Pol mitdem Waagengehäuse verbunden. Das Waagen-gehäuse darf zu Funktionszwecken geerdetwerden.
Batterie/Akku einsetzen:bei Modellen TP-6101, TP-3101, TP-12
$ Batterie oder Akku gehören nicht zum Lieferumfang der Waage
!Nur handelsübliche 9 Volt-Block Batterieoder Akku verwenden
!Akku nur mit externem Ladegerät laden
§ Waage auf die Seite drehen
§ Batteriefach öffnen: Batteriefachabdeckung anheben
§ 9 Volt-Block Batterie oder Akku in die Batteriehalterung einsetzen
$ Polarität beachten
!Verbrauchte Batterien oder Akkus sindSondermüll (kein Hausmüll): Akkus gemäßAbfallwirtschaftsgesetz als Sondermüll speziell entsorgen
§ Batteriefach schließen: Batteriefach-abdeckung herunterdrücken und einrasten lassen
35
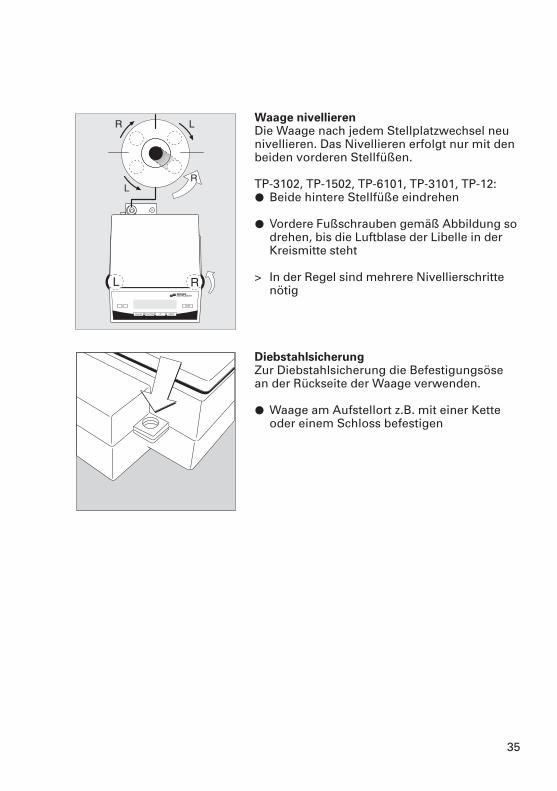
Waage nivellieren Die Waage nach jedem Stellplatzwechsel neu nivellieren. Das Nivellieren erfolgt nur mit den beiden vorderen Stellfüßen.
TP-3102, TP-1502, TP-6101, TP-3101, TP-12:§ Beide hintere Stellfüße eindrehen
§ Vordere Fußschrauben gemäß Abbildung sodrehen, bis die Luftblase der Libelle in derKreismitte steht
> In der Regel sind mehrere Nivellierschrittenötig
DiebstahlsicherungZur Diebstahlsicherung die Befestigungsösean der Rückseite der Waage verwenden.
§ Waage am Aufstellort z.B. mit einer Ketteoder einem Schloss befestigen
36
Betrieb
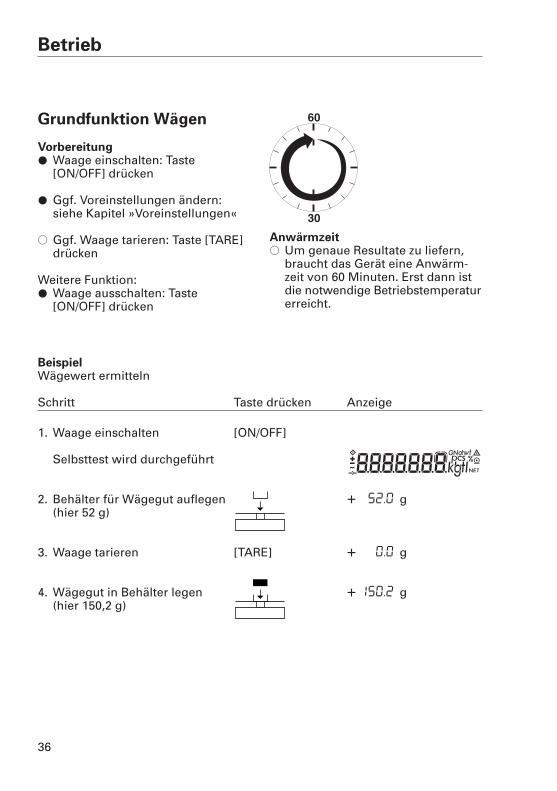
Grundfunktion Wägen
Vorbereitung§ Waage einschalten: Taste
[ON/OFF] drücken
§ Ggf. Voreinstellungen ändern:siehe Kapitel »Voreinstellungen«
$ Ggf. Waage tarieren: Taste [TARE]drücken
Weitere Funktion:§ Waage ausschalten: Taste
[ON/OFF] drücken
Anwärmzeit$ Um genaue Resultate zu liefern,
braucht das Gerät eine Anwärm-zeit von 60 Minuten. Erst dann istdie notwendige Betriebstemperaturerreicht.
BeispielWägewert ermitteln
Schritt Taste drücken Anzeige
1. Waage einschalten [ON/OFF]
Selbsttest wird durchgeführt
2. Behälter für Wägegut auflegen + 52.0 g(hier 52 g)
3. Waage tarieren [TARE] + 0.0 g
4. Wägegut in Behälter legen + 150.2 g(hier 150,2 g)
37
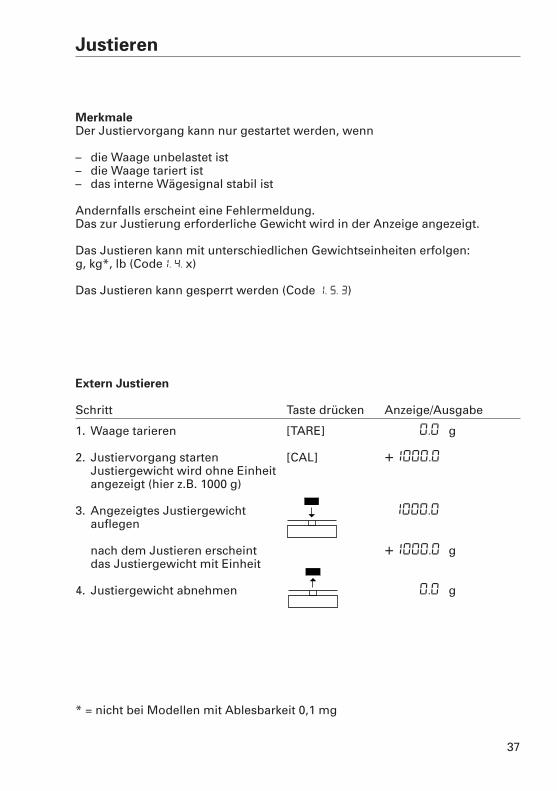
Justieren
MerkmaleDer Justiervorgang kann nur gestartet werden, wenn
– die Waage unbelastet ist– die Waage tariert ist– das interne Wägesignal stabil ist
Andernfalls erscheint eine Fehlermeldung. Das zur Justierung erforderliche Gewicht wird in der Anzeige angezeigt.
Das Justieren kann mit unterschiedlichen Gewichtseinheiten erfolgen: g, kg*, lb (Code1. 4. x)
Das Justieren kann gesperrt werden (Code 1. 5. 3)
Extern Justieren
Schritt Taste drücken Anzeige/Ausgabe
1. Waage tarieren [TARE] 0.0 g
2. Justiervorgang starten [CAL] +1000.0 gJustiergewicht wird ohne Einheitangezeigt (hier z.B. 1000 g)
3. Angezeigtes Justiergewicht 1000.0auflegen
nach dem Justieren erscheint +1000.0 gdas Justiergewicht mit Einheit
4. Justiergewicht abnehmen 0.0 g
* = nicht bei Modellen mit Ablesbarkeit 0,1 mg
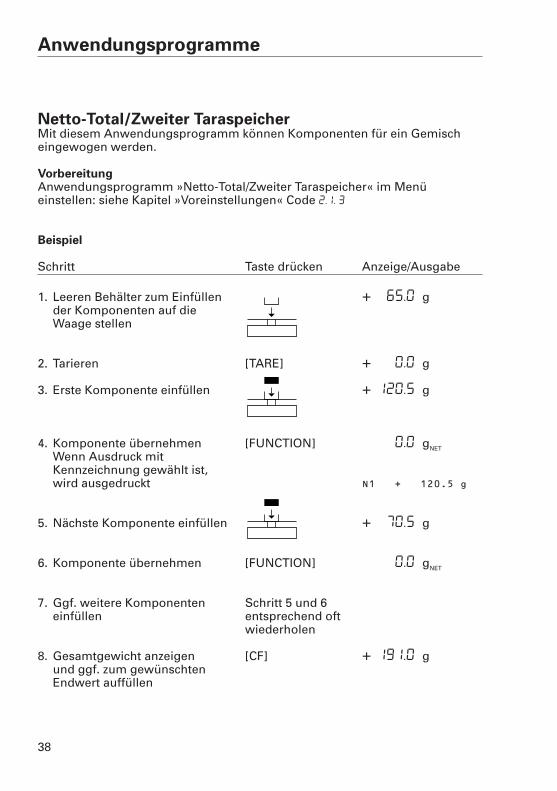
Anwendungsprogramme
Netto-Total/Zweiter TaraspeicherMit diesem Anwendungsprogramm können Komponenten für ein Gemischeingewogen werden.
VorbereitungAnwendungsprogramm »Netto-Total/Zweiter Taraspeicher« im Menü einstellen: siehe Kapitel »Voreinstellungen« Code 2.1. 3
Beispiel
Schritt Taste drücken Anzeige/Ausgabe
1. Leeren Behälter zum Einfüllen + 65.0 gder Komponenten auf die Waage stellen
2. Tarieren [TARE] + 0.0 g
3. Erste Komponente einfüllen + 120,5 g
4. Komponente übernehmen [FUNCTION] 0.0 gNET
Wenn Ausdruck mit Kennzeichnung gewählt ist, wird ausgedruckt N1 + 120.5 g
5. Nächste Komponente einfüllen + 70,5 g
6. Komponente übernehmen [FUNCTION] 0.0 gNET
7. Ggf. weitere Komponenten Schritt 5 und 6einfüllen entsprechend oft
wiederholen
8. Gesamtgewicht anzeigen [CF] + 191,0 gund ggf. zum gewünschten Endwert auffüllen
38
39
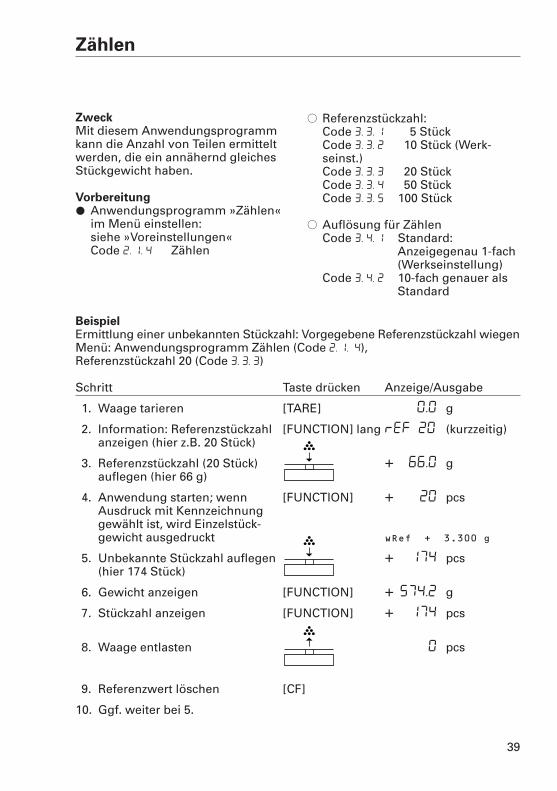
Zählen
ZweckMit diesem Anwendungsprogrammkann die Anzahl von Teilen ermitteltwerden, die ein annähernd gleichesStückgewicht haben.
Vorbereitung§ Anwendungsprogramm »Zählen«
im Menü einstellen: siehe »Voreinstellungen«Code 2. 1. 4 Zählen
$ Referenzstückzahl:Code 3. 3. 1 5 StückCode 3. 3. 2 10 Stück (Werk-seinst.)Code 3. 3. 3 20 StückCode 3. 3. 4 50 StückCode 3. 3. 5 100 Stück
$ Auflösung für ZählenCode 3. 4. 1 Standard:
Anzeigegenau 1-fach(Werkseinstellung)
Code 3. 4. 2 10-fach genauer alsStandard
BeispielErmittlung einer unbekannten Stückzahl: Vorgegebene Referenzstückzahl wiegenMenü: Anwendungsprogramm Zählen (Code 2. 1. 4), Referenzstückzahl 20 (Code 3. 3. 3)
Schritt Taste drücken Anzeige/Ausgabe
1. Waage tarieren [TARE] 0.0 g
2. Information: Referenzstückzahl [FUNCTION] lang ref 20 (kurzzeitig)anzeigen (hier z.B. 20 Stück)
3. Referenzstückzahl (20 Stück) + 66.0 gauflegen (hier 66 g)
4. Anwendung starten; wenn [FUNCTION] + 20 pcsAusdruck mit Kennzeichnunggewählt ist, wird Einzelstück-gewicht ausgedruckt wRef + 3.300 g
5. Unbekannte Stückzahl auflegen + 174 pcs(hier 174 Stück)
6. Gewicht anzeigen [FUNCTION] + 574.2 g
7. Stückzahl anzeigen [FUNCTION] + 174 pcs
8. Waage entlasten 0 pcs
9. Referenzwert löschen [CF]
10. Ggf. weiter bei 5.
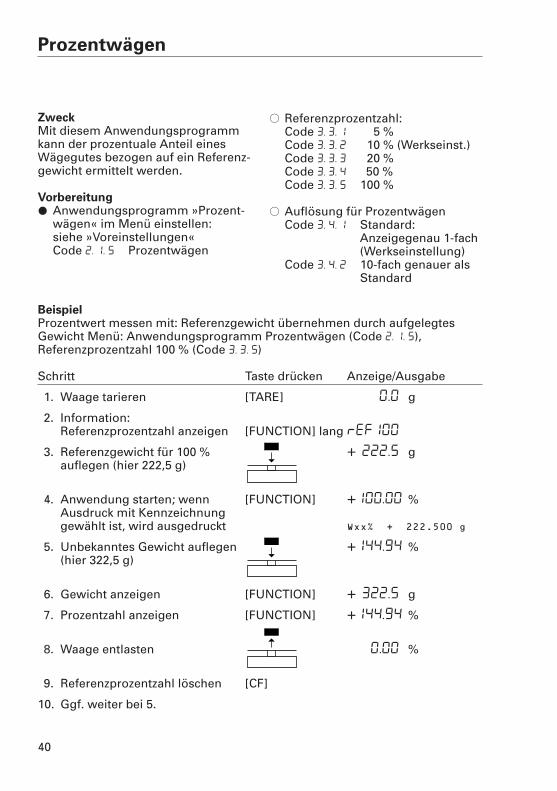
Prozentwägen
ZweckMit diesem Anwendungsprogrammkann der prozentuale Anteil einesWägegutes bezogen auf ein Referenz-gewicht ermittelt werden.
Vorbereitung§ Anwendungsprogramm »Prozent-
wägen« im Menü einstellen: siehe »Voreinstellungen« Code 2. 1. 5 Prozentwägen
$ Referenzprozentzahl:Code 3. 3. 1 115 %Code 3. 3. 2 110 % (Werkseinst.)Code 3. 3. 3 120 %Code 3. 3. 4 50 %Code 3. 3. 5 100 %
$ Auflösung für ProzentwägenCode 3. 4. 1 Standard:
Anzeigegenau 1-fach(Werkseinstellung)
Code 3. 4. 2 10-fach genauer als Standard
40
BeispielProzentwert messen mit: Referenzgewicht übernehmen durch aufgelegtesGewicht Menü: Anwendungsprogramm Prozentwägen (Code 2. 1. 5), Referenzprozentzahl 100 % (Code 3. 3. 5)
Schritt Taste drücken Anzeige/Ausgabe
1. Waage tarieren [TARE] 0.0 g
2. Information:Referenzprozentzahl anzeigen [FUNCTION] lang ref100
3. Referenzgewicht für 100 % + 222.5 gauflegen (hier 222,5 g)
4. Anwendung starten; wenn [FUNCTION] +100.00 %Ausdruck mit Kennzeichnunggewählt ist, wird ausgedruckt Wxx% + 222.500 g
5. Unbekanntes Gewicht auflegen +144.94 %(hier 322,5 g)
6. Gewicht anzeigen [FUNCTION] + 322.5 g
7. Prozentzahl anzeigen [FUNCTION] +144.94 %
8. Waage entlasten 0.00 %
9. Referenzprozentzahl löschen [CF]
10. Ggf. weiter bei 5.
41
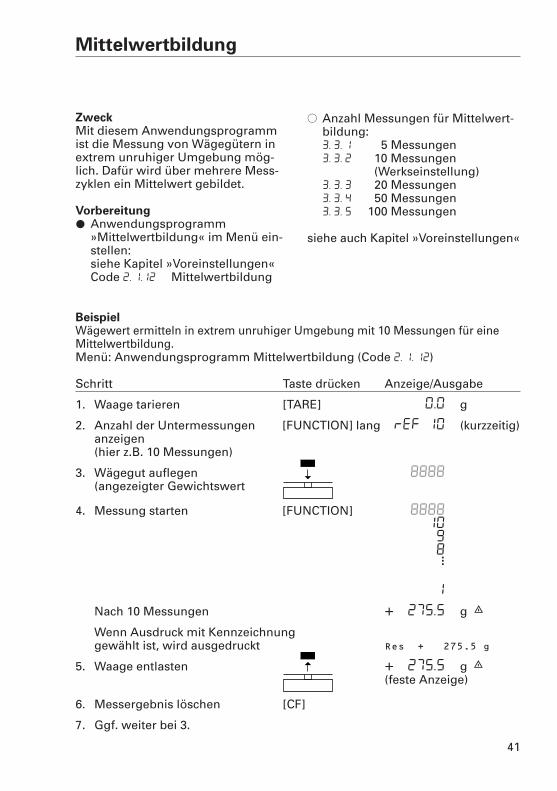
Mittelwertbildung
BeispielWägewert ermitteln in extrem unruhiger Umgebung mit 10 Messungen für eineMittelwertbildung.Menü: Anwendungsprogramm Mittelwertbildung (Code 2. 1. 12)
Schritt Taste drücken Anzeige/Ausgabe
1. Waage tarieren [TARE] 0.0 g
2. Anzahl der Untermessungen [FUNCTION] lang ref 10 (kurzzeitig)anzeigen(hier z.B. 10 Messungen)
3. Wägegut auflegen 8888(angezeigter Gewichtswert
4. Messung starten [FUNCTION] 888810
98
1
Nach 10 Messungen + 275.5 g G
Wenn Ausdruck mit Kennzeichnunggewählt ist, wird ausgedruckt Res + 275.5 g
5. Waage entlasten + 275.5 g G(feste Anzeige)
6. Messergebnis löschen [CF]
7. Ggf. weiter bei 3.
···
ZweckMit diesem Anwendungsprogrammist die Messung von Wägegütern inextrem unruhiger Umgebung mög-lich. Dafür wird über mehrere Mess-zyklen ein Mittelwert gebildet.
Vorbereitung§ Anwendungsprogramm
»Mittelwertbildung« im Menü ein-stellen: siehe Kapitel »Voreinstellungen«Code 2. 1.12 Mittelwertbildung
$ Anzahl Messungen für Mittelwert-bildung:3. 3. 1 115 Messungen3. 3. 2 110 Messungen
(Werkseinstellung)3. 3. 3 120 Messungen3. 3. 4 150 Messungen3. 3. 5 100 Messungen
siehe auch Kapitel »Voreinstellungen«
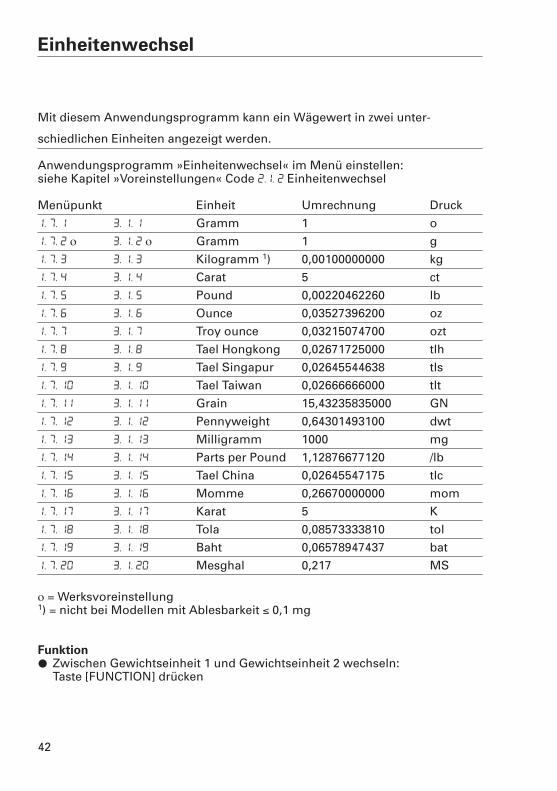
Einheitenwechsel
Mit diesem Anwendungsprogramm kann ein Wägewert in zwei unter-
schiedlichen Einheiten angezeigt werden.
Anwendungsprogramm »Einheitenwechsel« im Menü einstellen: siehe Kapitel »Voreinstellungen« Code 2.1. 2 Einheitenwechsel
Menüpunkt Einheit Umrechnung Druck
1. 7. 1 3. 1. 1 Gramm 1,00000000000 o
1. 7. 2 ο 3. 1. 2 ο Gramm 1,00000000000 g
1. 7. 3 3. 1. 3 Kilogramm 1) 0,00100000000 kg
1. 7. 4 3. 1. 4 Carat 5,00000000000 ct
1. 7. 5 3. 1. 5 Pound 0,00220462260 lb
1. 7. 6 3. 1. 6 Ounce 0,03527396200 oz
1. 7. 7 3. 1. 7 Troy ounce 0,03215074700 ozt
1. 7. 8 3. 1. 8 Tael Hongkong 0,02671725000 tlh
1. 7. 9 3. 1. 9 Tael Singapur 0,02645544638 tls
1. 7. 10 3. 1. 10 Tael Taiwan 0,02666666000 tlt
1. 7. 11 3. 1. 11 Grain 15,43235835000 GN
1. 7. 12 3. 1. 12 Pennyweight 0,64301493100 dwt
1. 7. 13 3. 1. 13 Milligramm 1000,00000000000 mg
1. 7. 14 3. 1. 14 Parts per Pound 1,12876677120 /lb
1. 7. 15 3. 1. 15 Tael China 0,02645547175 tlc
1. 7. 16 3. 1. 16 Momme 0,26670000000 mom
1. 7. 17 3. 1. 17 Karat 5,00000000000 K
1. 7. 18 3. 1. 18 Tola 0,08573333810 tol
1. 7. 19 3. 1. 19 Baht 0,06578947437 bat
1. 7. 20 3. 1. 20 Mesghal 0,21700000000 MS
ο = Werksvoreinstellung 1) = nicht bei Modellen mit Ablesbarkeit ≤ 0,1 mg
Funktion§ Zwischen Gewichtseinheit 1 und Gewichtseinheit 2 wechseln:
Taste [FUNCTION] drücken
42
43
Voreinstellungen
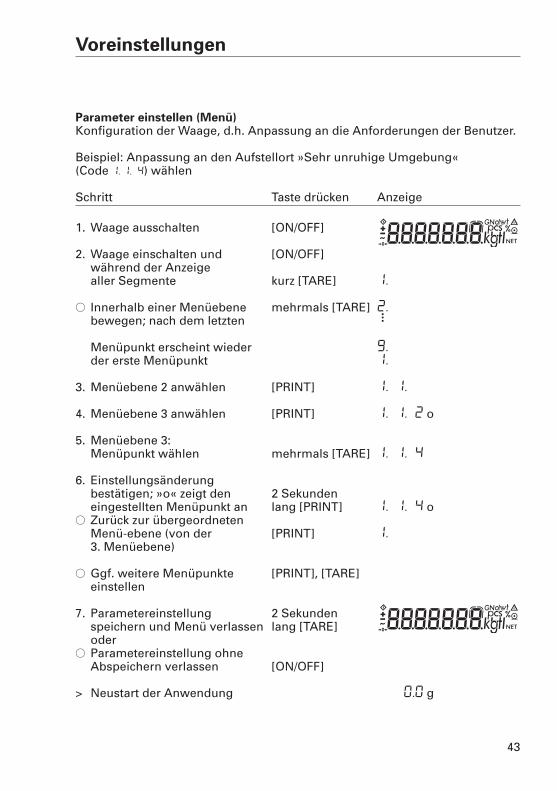
Parameter einstellen (Menü)Konfiguration der Waage, d.h. Anpassung an die Anforderungen der Benutzer.
Beispiel: Anpassung an den Aufstellort »Sehr unruhige Umgebung« (Code 1, 1. 4) wählen
Schritt Taste drücken Anzeige
1. Waage ausschalten [ON/OFF]
2. Waage einschalten und [ON/OFF]während der Anzeige aller Segmente kurz [TARE] 1.
$ Innerhalb einer Menüebene mehrmals [TARE] 2.bewegen; nach dem letzten
Menüpunkt erscheint wieder 9.der erste Menüpunkt 1.
3. Menüebene 2 anwählen [PRINT] 1. 1.
4. Menüebene 3 anwählen [PRINT] 1. 1. 2 o
5. Menüebene 3:Menüpunkt wählen mehrmals [TARE] 1. 1. 4
6. Einstellungsänderung bestätigen; »o« zeigt den 2 Sekundeneingestellten Menüpunkt an lang [PRINT] 1. 1. 4 o
$ Zurück zur übergeordneten Menü-ebene (von der [PRINT] 1.3. Menüebene)
$ Ggf. weitere Menüpunkte [PRINT], [TARE]einstellen
7. Parametereinstellung 2 Sekundenspeichern und Menü verlassen lang [TARE]oder
$ Parametereinstellung ohne Abspeichern verlassen [ON/OFF]
> Neustart der Anwendung 0.0 g
···
44
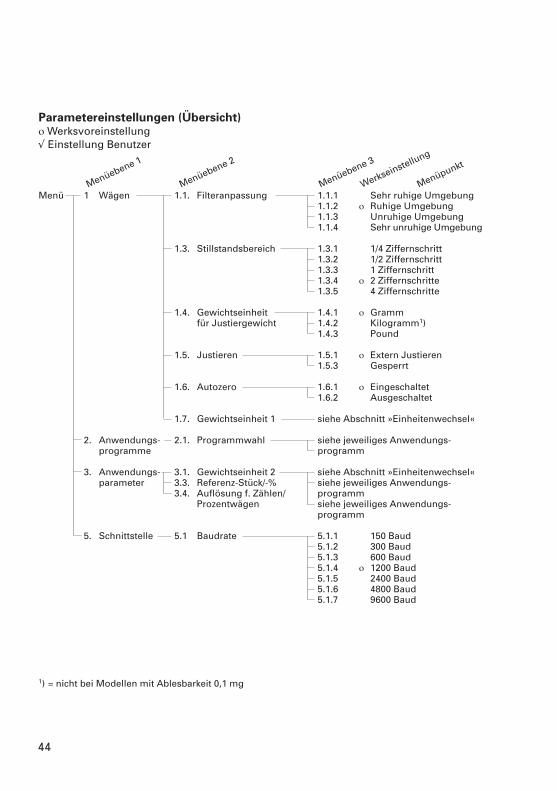
Parametereinstellungen (Übersicht)ο Werksvoreinstellung√ Einstellung Benutzer
Menü 1 Wägen 1.1. Filteranpassung 1.1.1 Sehr ruhige Umgebung1.1.2 ο Ruhige Umgebung1.1.3 Unruhige Umgebung1.1.4 Sehr unruhige Umgebung
1.3. Stillstandsbereich 1.3.1 1/4 Ziffernschritt1.3.2 1/2 Ziffernschritt1.3.3 1 Ziffernschritt1.3.4 ο 2 Ziffernschritte1.3.5 4 Ziffernschritte
1.4. Gewichtseinheit 1.4.1 ο Grammfür Justiergewicht 1.4.2 Kilogramm1)
1.4.3 Pound
1.5. Justieren 1.5.1 ο Extern Justieren1.5.3 Gesperrt
1.6. Autozero 1.6.1 ο Eingeschaltet1.6.2 Ausgeschaltet
1.7. Gewichtseinheit 1 siehe Abschnitt »Einheitenwechsel«
2. Anwendungs- 2.1. Programmwahl siehe jeweiliges Anwendungs-programme programm
3. Anwendungs- 3.1. Gewichtseinheit 2 siehe Abschnitt »Einheitenwechsel«parameter 3.3. Referenz-Stück/-% siehe jeweiliges Anwendungs-
3.4. Auflösung f. Zählen/ programmProzentwägen siehe jeweiliges Anwendungs-
programm
5. Schnittstelle 5.1 Baudrate 5.1.1 150 Baud5.1.2 300 Baud5.1.3 600 Baud5.1.4 ο 1200 Baud5.1.5 2400 Baud5.1.6 4800 Baud5.1.7 9600 Baud
1) = nicht bei Modellen mit Ablesbarkeit 0,1 mg
Menüebene 1
Menüebene 2
Menüebene 3
Werkseinstellung
Menüpunkt
45
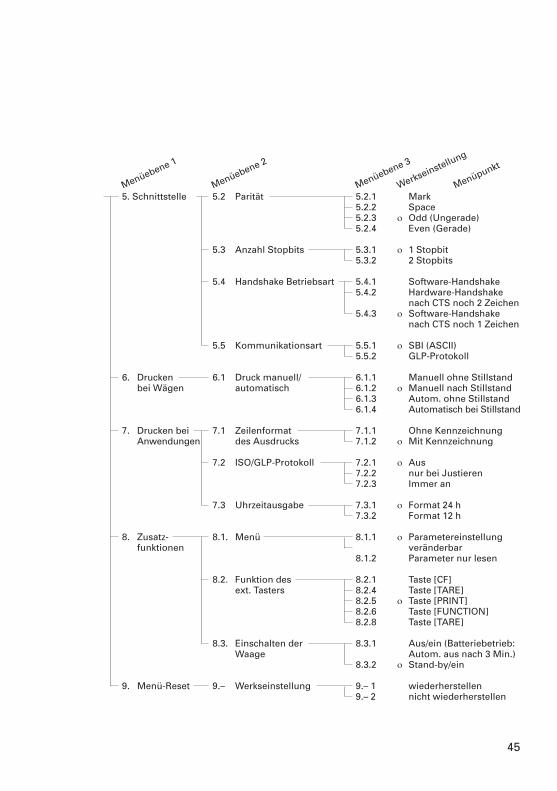
5. Schnittstelle 5.2 Parität 5.2.1 Mark5.2.2 Space5.2.3 ο Odd (Ungerade)5.2.4 Even (Gerade)
5.3 Anzahl Stopbits 5.3.1 ο 1 Stopbit5.3.2 2 Stopbits
5.4 Handshake Betriebsart 5.4.1 Software-Handshake5.4.2 Hardware-Handshake
nach CTS noch 2 Zeichen5.4.3 ο Software-Handshake
nach CTS noch 1 Zeichen
5.5 Kommunikationsart 5.5.1 ο SBI (ASCII)5.5.2 GLP-Protokoll
6. Drucken 6.1 Druck manuell/ 6.1.1 Manuell ohne Stillstandbei Wägen automatisch 6.1.2 ο Manuell nach Stillstand
6.1.3 Autom. ohne Stillstand6.1.4 Automatisch bei Stillstand
7. Drucken bei 7.1 Zeilenformat 7.1.1 Ohne KennzeichnungAnwendungen des Ausdrucks 7.1.2 ο Mit Kennzeichnung
7.2 ISO/GLP-Protokoll 7.2.1 ο Aus7.2.2 nur bei Justieren7.2.3 Immer an
7.3 Uhrzeitausgabe 7.3.1 ο Format 24 h7.3.2 Format 12 h
8. Zusatz- 8.1. Menü 8.1.1 ο Parametereinstellungfunktionen veränderbar
8.1.2 Parameter nur lesen
8.2. Funktion des 8.2.1 Taste [CF]ext. Tasters 8.2.4 Taste [TARE]
8.2.5 ο Taste [PRINT]8.2.6 Taste [FUNCTION]8.2.8 Taste [TARE]
8.3. Einschalten der 8.3.1 Aus/ein (Batteriebetrieb:Waage Autom. aus nach 3 Min.)
8.3.2 ο Stand-by/ein
9. Menü-Reset 9.– Werkseinstellung 9.– 1 wiederherstellen9.– 2 nicht wiederherstellen
Menüebene 1
Menüebene 2
Menüebene 3
Werkseinstellung
Menüpunkt
ISO/GLP-Protokoll
MerkmaleDie Gerätedaten und Identnummernsowie aktuelles Datum können vor (GLP-Kopf) und nach den Werten derMessreihe (GLP-Fuß) ausgedruckt werden. Es sind dies:
GLP-Kopf:– Datum– Uhrzeit bei Beginn der Messreihe– Waagenhersteller– Waagenmodell– Seriennummer des Modells– Software Versionsnummer– Identifikationsnummer der
Messreihe
GLP-Fuß:– Datum– Uhrzeit bei Ende der Messreihe– Unterschriftsfeld
!Der Ausdruck erfolgt nur in Verbindung mit einem DENVER-Messwertdrucker 901042-1.
Einstellung
§ Folgende Menüpunkte einstellen (Einstellmodus siehe Kapitel »Voreinstellungen«):
– GLP-Protokoll: Code 5 5 2
– ISO/GLP-konforme Protokollierungnur bei Justieren: Code 7 2 2 oder ISO/GLP-konforme Protokollierung immer an: Code 7 2 3
– Zeilenformat des Ausdrucks mitKennzeichnung – 22 Zeichen: Code 7 1 2
– Uhrzeitausgabe:– Format 24 h: Code 7 3 1
– Format 12 h: Code 7 3 2
!Bei folgenden Einstellungen werden keine ISO/GLP-Protokolleausgegeben:Code 6 1 3, 6 1 4 (automatischer Ausdruck) und 7 1 1
Funktionstasten Protokollkopf und ersten Messwertausgeben: Taste [PRINT] drücken
> Mit 1. Druck wird Protokollkopf ausgegeben
Protokollkopf und Referenzdaten mitautomatischem Druck ausgeben beiaktiviertem Anwendungsprogramm:Taste [FUNCTION] drücken
Anwendung beenden:Anwendungsprogramm beendenund Protokollfuß ausgeben: Taste [CF]
46
47
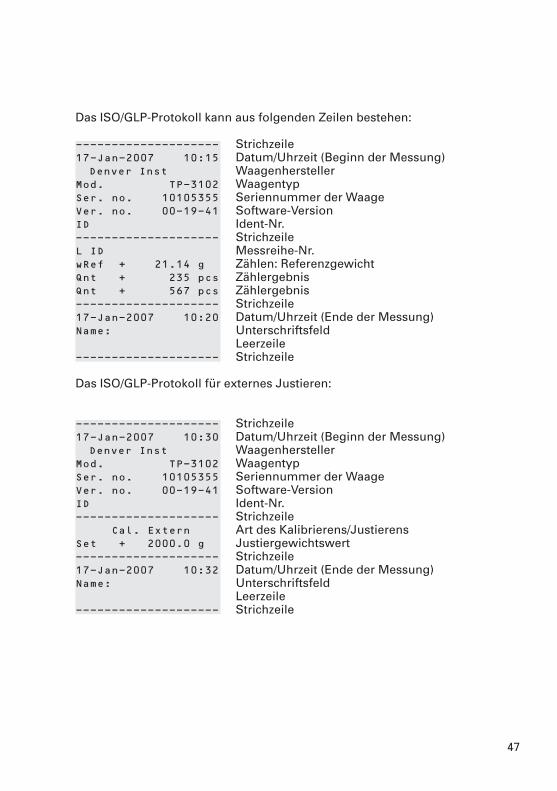
Das ISO/GLP-Protokoll kann aus folgenden Zeilen bestehen:
-------------------- Strichzeile17-Jan-2007 10:15 Datum/Uhrzeit (Beginn der Messung)Denver Inst Waagenhersteller
Mod. TP-3102 WaagentypSer. no. 10105355 Seriennummer der WaageVer. no. 00-19-41 Software-VersionID Ident-Nr.-------------------- StrichzeileL ID Messreihe-Nr.wRef + 21.14 g Zählen: ReferenzgewichtQnt + 235 pcs ZählergebnisQnt + 567 pcs Zählergebnis-------------------- Strichzeile17-Jan-2007 10:20 Datum/Uhrzeit (Ende der Messung)Name: Unterschriftsfeld
Leerzeile-------------------- Strichzeile
Das ISO/GLP-Protokoll für externes Justieren:
-------------------- Strichzeile17-Jan-2007 10:30 Datum/Uhrzeit (Beginn der Messung)Denver Inst Waagenhersteller
Mod. TP-3102 WaagentypSer. no. 10105355 Seriennummer der WaageVer. no. 00-19-41 Software-VersionID Ident-Nr.-------------------- Strichzeile
Cal. Extern Art des Kalibrierens/JustierensSet + 2000.0 g Justiergewichtswert-------------------- Strichzeile17-Jan-2007 10:32 Datum/Uhrzeit (Ende der Messung)Name: Unterschriftsfeld
Leerzeile-------------------- Strichzeile
Datenschnittstelle
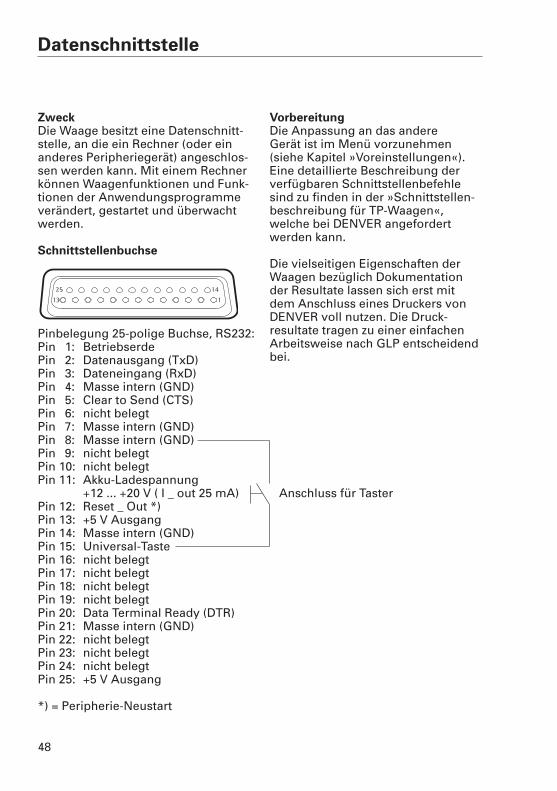
ZweckDie Waage besitzt eine Datenschnitt-stelle, an die ein Rechner (oder einanderes Peripheriegerät) angeschlos-sen werden kann. Mit einem Rechnerkönnen Waagenfunktionen und Funk-tionen der Anwendungsprogrammeverändert, gestartet und überwachtwerden.
Schnittstellenbuchse
Pinbelegung 25-polige Buchse, RS232:Pin 1: BetriebserdePin 2: Datenausgang (TxD)Pin 3: Dateneingang (RxD)Pin 4: Masse intern (GND)Pin 5: Clear to Send (CTS)Pin 6: nicht belegtPin 7: Masse intern (GND)Pin 8: Masse intern (GND)Pin 9: nicht belegtPin 10: nicht belegtPin 11: Akku-Ladespannung
+12 ... +20 V ( I _ out 25 mA) Anschluss für TasterPin 12: Reset _ Out *)Pin 13: +5 V AusgangPin 14: Masse intern (GND)Pin 15: Universal-TastePin 16: nicht belegtPin 17: nicht belegtPin 18: nicht belegtPin 19: nicht belegtPin 20: Data Terminal Ready (DTR)Pin 21: Masse intern (GND)Pin 22: nicht belegtPin 23: nicht belegtPin 24: nicht belegtPin 25: +5 V Ausgang
*) = Peripherie-Neustart
1
14
13
25
VorbereitungDie Anpassung an das andere Gerät ist im Menü vorzunehmen(siehe Kapitel »Voreinstellungen«).Eine detaillierte Beschreibung derverfügbaren Schnittstellenbefehlesind zu finden in der »Schnittstellen-beschreibung für TP-Waagen«, welche bei DENVER angefordert werden kann.
Die vielseitigen Eigenschaften derWaagen bezüglich Dokumentationder Resultate lassen sich erst mitdem Anschluss eines Druckers vonDENVER voll nutzen. Die Druck-resultate tragen zu einer einfachenArbeitsweise nach GLP entscheidendbei.
48
49
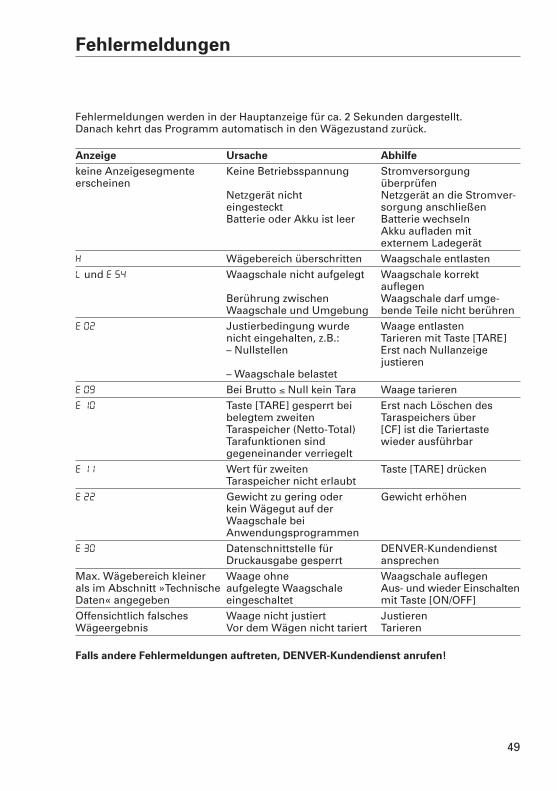
Fehlermeldungen
Fehlermeldungen werden in der Hauptanzeige für ca. 2 Sekunden dargestellt. Danach kehrt das Programm automatisch in den Wägezustand zurück.
Anzeige Ursache Abhilfe
keine Anzeigesegmente Keine Betriebsspannung Stromversorgung erscheinen überprüfen
Netzgerät nicht Netzgerät an die Stromver-eingesteckt sorgung anschließenBatterie oder Akku ist leer Batterie wechseln
Akku aufladen mitexternem Ladegerät
h Wägebereich überschritten Waagschale entlastenl und E 54 Waagschale nicht aufgelegt Waagschale korrekt
auflegenBerührung zwischen Waagschale darf umge-Waagschale und Umgebung bende Teile nicht berühren
e 02 Justierbedingung wurde Waage entlastennicht eingehalten, z.B.: Tarieren mit Taste [TARE] – Nullstellen Erst nach Nullanzeige
justieren– Waagschale belastet
e 09 Bei Brutto < Null kein Tara Waage tarierene 10 Taste [TARE] gesperrt bei Erst nach Löschen des
belegtem zweiten Taraspeichers über Taraspeicher (Netto-Total) [CF] ist die Tariertaste Tarafunktionen sind wieder ausführbargegeneinander verriegelt
e 11 Wert für zweiten Taste [TARE] drückenTaraspeicher nicht erlaubt
e 22 Gewicht zu gering oder Gewicht erhöhenkein Wägegut auf der Waagschale bei Anwendungsprogrammen
e 30 Datenschnittstelle für DENVER-Kundendienst Druckausgabe gesperrt ansprechen
Max. Wägebereich kleiner Waage ohne Waagschale auflegen als im Abschnitt »Technische aufgelegte Waagschale Aus- und wieder Einschalten Daten« angegeben eingeschaltet mit Taste [ON/OFF]Offensichtlich falsches Waage nicht justiert JustierenWägeergebnis Vor dem Wägen nicht tariert Tarieren
Falls andere Fehlermeldungen auftreten, DENVER-Kundendienst anrufen!
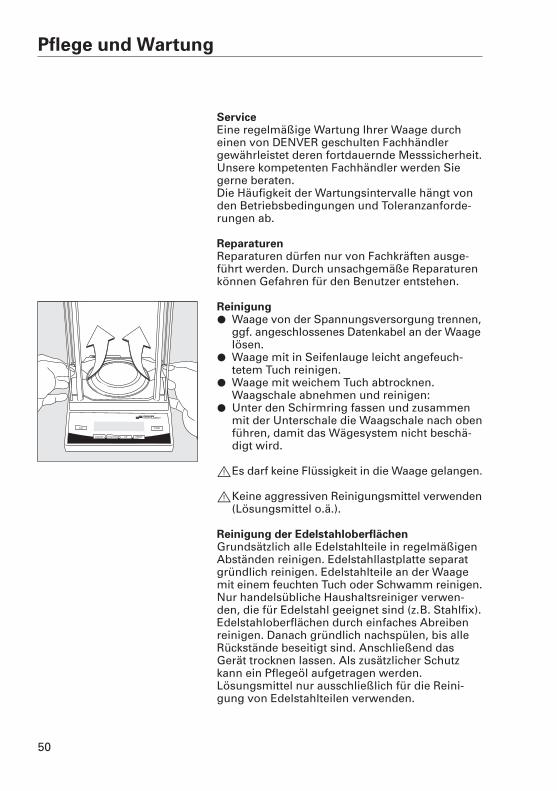
Pflege und Wartung
ServiceEine regelmäßige Wartung Ihrer Waage durcheinen von DENVER geschulten Fachhändler gewährleistet deren fortdauernde Messsicherheit.Unsere kompetenten Fachhändler werden Siegerne beraten.Die Häufigkeit der Wartungsintervalle hängt vonden Betriebsbedingungen und Toleranzanforde-rungen ab.
ReparaturenReparaturen dürfen nur von Fachkräften ausge-führt werden. Durch unsachgemäße Reparaturenkönnen Gefahren für den Benutzer entstehen.
Reinigung§ Waage von der Spannungsversorgung trennen,
ggf. angeschlossenes Datenkabel an der Waagelösen.
§ Waage mit in Seifenlauge leicht angefeuch-tetem Tuch reinigen.
§ Waage mit weichem Tuch abtrocknen.Waagschale abnehmen und reinigen:
§ Unter den Schirmring fassen und zusammenmit der Unterschale die Waagschale nach obenführen, damit das Wägesystem nicht beschä-digt wird.
!Es darf keine Flüssigkeit in die Waage gelangen.
!Keine aggressiven Reinigungsmittel verwenden(Lösungsmittel o.ä.).
Reinigung der EdelstahloberflächenGrundsätzlich alle Edelstahlteile in regelmäßigenAbständen reinigen. Edelstahllastplatte separatgründlich reinigen. Edelstahlteile an der Waagemit einem feuchten Tuch oder Schwamm reinigen.Nur handelsübliche Haushaltsreiniger verwen-den, die für Edelstahl geeignet sind (z.B. Stahlfix).Edelstahloberflächen durch einfaches Abreibenreinigen. Danach gründlich nachspülen, bis alleRückstände beseitigt sind. Anschließend dasGerät trocknen lassen. Als zusätzlicher Schutzkann ein Pflegeöl aufgetragen werden.Lösungsmittel nur ausschließlich für die Reini-gung von Edelstahlteilen verwenden.
50
51
Sicherheitsüberprüfung
Erscheint ein gefahrloser Betrieb der Waagenicht mehr gewährleistet:
§ Netzgerät aus der Steckdose ziehen
> Waage vor weiterer Benutzung sichern
Fachhändler benachrichtigen. Instandset-zungsmaßnahmen dürfen ausschließlich vonFachkräften ausgeführt werden.
52
Entsorgung
Wird die Verpackung nicht mehr be-nötigt, ist diese der örtlichen Müllent-sorgung zuzuführen. Die Verpackungbesteht aus umweltfreundlichenMaterialien, die als Sekundärrohstof-fe dienen können.
Das Gerät inklusive Zubehörund Batterien gehört nicht in den Hausmüll. Die EU-Gesetzgebung fordert inihren Mitgliedsstaaten, elektrische und elektroni-
sche Geräte vom unsortiertenSiedlungsabfall getrennt zu erfassen,um sie anschließend wiederzuverwer-ten.
In Deutschland und einigen anderen Ländern führt die Denver Instrumentdie Rücknahme und gesetzeskonformeEntsorgung ihrer elektrischen undelektronischen Produkte selbst durch.Diese Produkte dürfen nicht – auchnicht von Kleingewerbetreibenden –in den Hausmüll oder an Sammelstel-len der örtlichen öffentlichen Entsor-gungsbetriebe abgegeben werden.Hinsichtlich der Entsorgung wendenSie sich daher in Deutschland wieauch in den Mitgliedsstaaten desEuropäischen Wirtschaftsraumesbitte an unsere Service-Mitarbeitervor Ort oder an unsere Service-Zentrale:
Denver Instrument GmbHRobert-Bosch-Breite 1037079 Göttingen, Deutschland
In Ländern, die keine Mitglieder desEuropäischen Wirtschaftsraumes sindoder in denen es keine Denver-Filialengibt, sprechen Sie bitte die örtlichenBehörden oder Ihr Entsorgungsunter-nehmen an.
Vor der Entsorgung bzw. Verschrot-tung des Gerätes sollten die Batterienentfernt werden und einer Sammel-stelle übergeben werden.
Mit gefährlichen Stoffen kontaminierteGeräte (ABC-Kontamination) werdenweder zur Reparatur noch zur Entsor-gung zurückgenommen. AusführlicheInformationen mit Service-Adressenzur Reparaturannahme oder Entsor-gung Ihres Gerätes können Sie aufunserer Internetseite (www.denverin-strument.com) finden oder über denDenver Service anfordern.
53
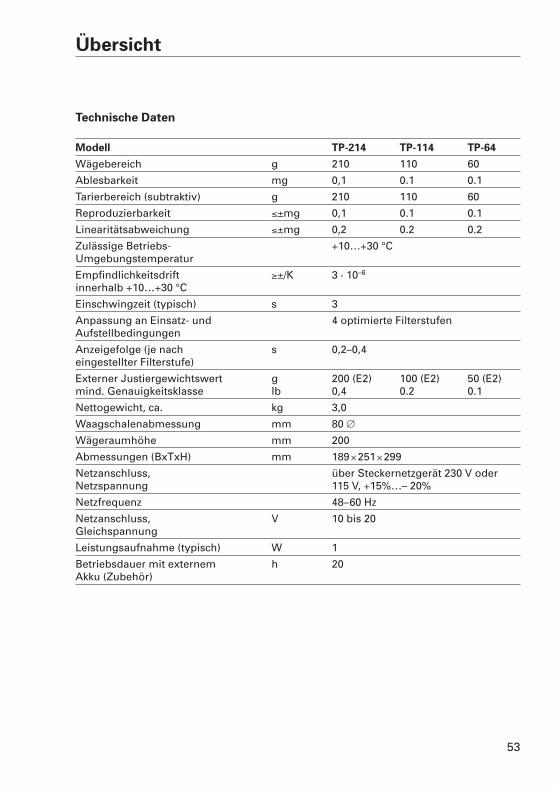
Übersicht
Technische Daten
Modell TP-214 TP-114 TP-64
Wägebereich g 210 110 60
Ablesbarkeit mg 0,1 0.1 0.1
Tarierbereich (subtraktiv) g 210 110 60
Reproduzierbarkeit <±mg 0,1 0.1 0.1
Linearitätsabweichung <±mg 0,2 0.2 0.2
Zulässige Betriebs- +10…+30 °CUmgebungstemperatur
Empfindlichkeitsdrift >±/K 3 · 10–6
innerhalb +10…+30 °C
Einschwingzeit (typisch) s 3
Anpassung an Einsatz- und 4 optimierte FilterstufenAufstellbedingungen
Anzeigefolge (je nach s 0,2–0,4eingestellter Filterstufe)
Externer Justiergewichtswert g 200 (E2) 100 (E2) 50 (E2)mind. Genauigkeitsklasse lb 0,4 0.2 0.1
Nettogewicht, ca. kg 3,0
Waagschalenabmessung mm 80 d
Wägeraumhöhe mm 200
Abmessungen (BxTxH) mm 189+251+299
Netzanschluss, über Steckernetzgerät 230 V oderNetzspannung 115 V, +15%…– 20%
Netzfrequenz 48–60 Hz
Netzanschluss, V 10 bis 20Gleichspannung
Leistungsaufnahme (typisch) W 1
Betriebsdauer mit externem h 20Akku (Zubehör)
54
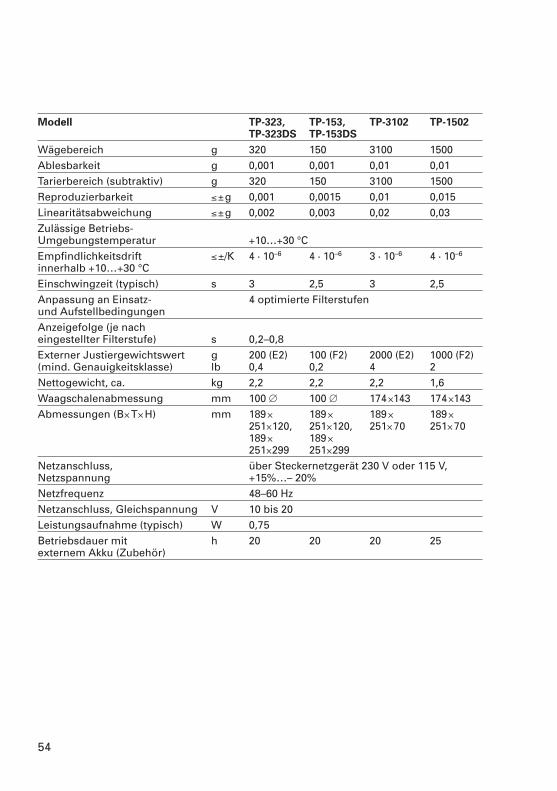
Modell TP-323, TP-153, TP-3102 TP-1502TP-323DS TP-153DS
Wägebereich g 320 150 3100 1500Ablesbarkeit g 0,001 0,001 0,01 0,01Tarierbereich (subtraktiv) g 320 150 3100 1500Reproduzierbarkeit <±g 0,001 0,0015 0,01 0,015Linearitätsabweichung <±g 0,002 0,003 0,02 0,03Zulässige Betriebs-Umgebungstemperatur +10…+30 °C Empfindlichkeitsdrift <±/K 4 · 10–6 4 · 10–6 3 · 10–6 4 · 10–6
innerhalb +10…+30 °CEinschwingzeit (typisch) s 3 2,5 3 2,5Anpassung an Einsatz- 4 optimierte Filterstufenund AufstellbedingungenAnzeigefolge (je nacheingestellter Filterstufe) s 0,2–0,8Externer Justiergewichtswert g 200 (E2) 100 (F2) 2000 (E2) 1000 (F2)(mind. Genauigkeitsklasse) lb 0,4 0,2 4 2Nettogewicht, ca. kg 2,2 2,2 2,2 1,6Waagschalenabmessung mm 100 d 100 d 174+143 174+143Abmessungen (B+T+H) mm 189+ 189+ 189+ 189+
251+120, 251+120, 251+70 251+70189+ 189+251+299 251+299
Netzanschluss, über Steckernetzgerät 230 V oder 115 V, Netzspannung +15%…– 20% Netzfrequenz 48–60 HzNetzanschluss, Gleichspannung V 10 bis 20Leistungsaufnahme (typisch) W 0,75Betriebsdauer mit h 20 20 20 25externem Akku (Zubehör)
55
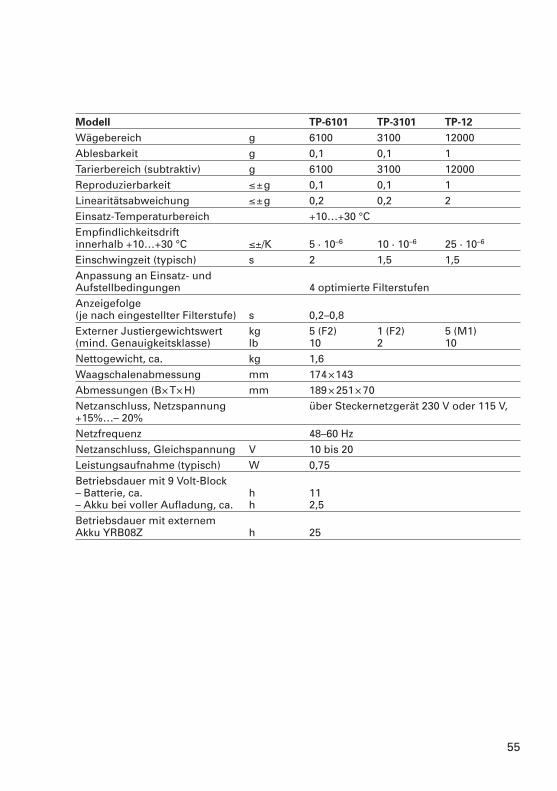
Modell TP-6101 TP-3101 TP-12
Wägebereich g 6100 3100 12000Ablesbarkeit g 0,1 0,1 1Tarierbereich (subtraktiv) g 6100 3100 12000Reproduzierbarkeit <±g 0,1 0,1 1Linearitätsabweichung <±g 0,2 0,2 2Einsatz-Temperaturbereich +10…+30 °CEmpfindlichkeitsdriftinnerhalb +10…+30 °C <±/K 5 · 10–6 10 · 10–6 25 · 10–6
Einschwingzeit (typisch) s 2 1,5 1,5Anpassung an Einsatz- und Aufstellbedingungen 4 optimierte FilterstufenAnzeigefolge (je nach eingestellter Filterstufe) s 0,2–0,8Externer Justiergewichtswert kg 5 (F2) 1 (F2) 5 (M1)(mind. Genauigkeitsklasse) lb 10 2 10Nettogewicht, ca. kg 1,6Waagschalenabmessung mm 174+143Abmessungen (B+T+H) mm 189+251+70Netzanschluss, Netzspannung über Steckernetzgerät 230 V oder 115 V,+15%…– 20%Netzfrequenz 48–60 HzNetzanschluss, Gleichspannung V 10 bis 20Leistungsaufnahme (typisch) W 0,75Betriebsdauer mit 9 Volt-Block– Batterie, ca. h 11– Akku bei voller Aufladung, ca. h 2,5Betriebsdauer mit externemAkku YRB08Z h 25
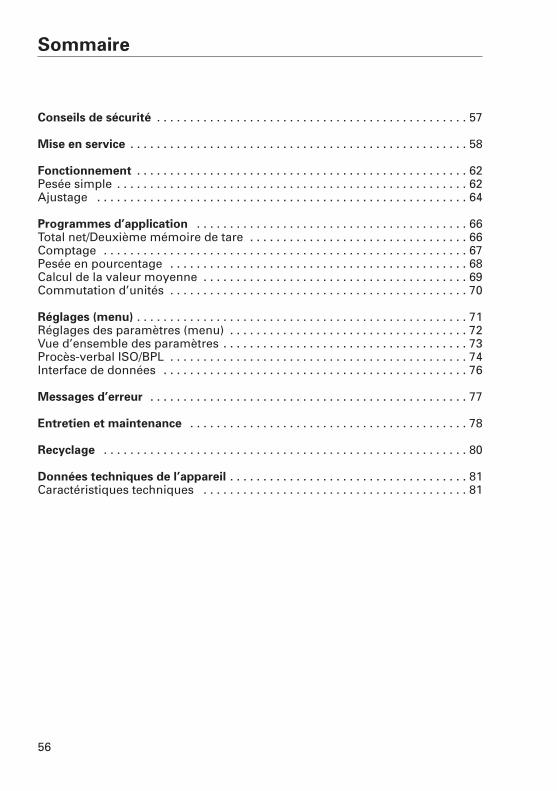
Sommaire
Conseils de sécurité . . . . . . . . . . . . . . . . . . . . . . . . . . . . . . . . . . . . . . . . . . . . . . . 57
Mise en service . . . . . . . . . . . . . . . . . . . . . . . . . . . . . . . . . . . . . . . . . . . . . . . . . . . 58
Fonctionnement . . . . . . . . . . . . . . . . . . . . . . . . . . . . . . . . . . . . . . . . . . . . . . . . . . 62Pesée simple . . . . . . . . . . . . . . . . . . . . . . . . . . . . . . . . . . . . . . . . . . . . . . . . . . . . . 62Ajustage . . . . . . . . . . . . . . . . . . . . . . . . . . . . . . . . . . . . . . . . . . . . . . . . . . . . . . . . 64
Programmes d’application . . . . . . . . . . . . . . . . . . . . . . . . . . . . . . . . . . . . . . . . . 66Total net/Deuxième mémoire de tare . . . . . . . . . . . . . . . . . . . . . . . . . . . . . . . . . 66Comptage . . . . . . . . . . . . . . . . . . . . . . . . . . . . . . . . . . . . . . . . . . . . . . . . . . . . . . . 67Pesée en pourcentage . . . . . . . . . . . . . . . . . . . . . . . . . . . . . . . . . . . . . . . . . . . . . 68Calcul de la valeur moyenne . . . . . . . . . . . . . . . . . . . . . . . . . . . . . . . . . . . . . . . . 69Commutation d’unités . . . . . . . . . . . . . . . . . . . . . . . . . . . . . . . . . . . . . . . . . . . . . 70
Réglages (menu) . . . . . . . . . . . . . . . . . . . . . . . . . . . . . . . . . . . . . . . . . . . . . . . . . . 71Réglages des paramètres (menu) . . . . . . . . . . . . . . . . . . . . . . . . . . . . . . . . . . . . 72Vue d’ensemble des paramètres . . . . . . . . . . . . . . . . . . . . . . . . . . . . . . . . . . . . . 73Procès-verbal ISO/BPL . . . . . . . . . . . . . . . . . . . . . . . . . . . . . . . . . . . . . . . . . . . . . 74Interface de données . . . . . . . . . . . . . . . . . . . . . . . . . . . . . . . . . . . . . . . . . . . . . . 76
Messages d’erreur . . . . . . . . . . . . . . . . . . . . . . . . . . . . . . . . . . . . . . . . . . . . . . . . 77
Entretien et maintenance . . . . . . . . . . . . . . . . . . . . . . . . . . . . . . . . . . . . . . . . . . 78
Recyclage . . . . . . . . . . . . . . . . . . . . . . . . . . . . . . . . . . . . . . . . . . . . . . . . . . . . . . . 80
Données techniques de l’appareil . . . . . . . . . . . . . . . . . . . . . . . . . . . . . . . . . . . . 81Caractéristiques techniques . . . . . . . . . . . . . . . . . . . . . . . . . . . . . . . . . . . . . . . . 81
56
57
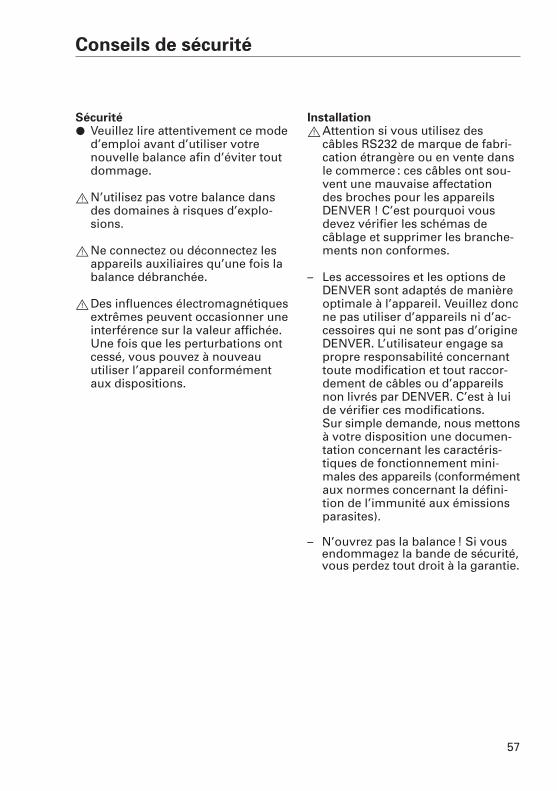
Conseils de sécurité
Sécurité§ Veuillez lire attentivement ce mode
d’emploi avant d’utiliser votrenouvelle balance afin d’éviter toutdommage.
!N’utilisez pas votre balance dansdes domaines à risques d’explo-sions.
!Ne connectez ou déconnectez lesappareils auxiliaires qu’une fois labalance débranchée.
!Des influences électromagnétiquesextrêmes peuvent occasionner une interférence sur la valeur affichée.Une fois que les perturbations ontcessé, vous pouvez à nouveau utiliser l’appareil conformémentaux dispositions.
Installation!Attention si vous utilisez des
câbles RS232 de marque de fabri-cation étrangère ou en vente dansle commerce : ces câbles ont sou-vent une mauvaise affectation des broches pour les appareilsDENVER ! C’est pourquoi vousdevez vérifier les schémas decâblage et supprimer les branche-ments non conformes.
– Les accessoires et les options deDENVER sont adaptés de manièreoptimale à l’appareil. Veuillez doncne pas utiliser d’appareils ni d’ac-cessoires qui ne sont pas d’origineDENVER. L’utilisateur engage sapropre responsabilité concernanttoute modification et tout raccor-dement de câbles ou d’appareilsnon livrés par DENVER. C’est à luide vérifier ces modifications. Sur simple demande, nous mettonsà votre disposition une documen-tation concernant les caractéris-tiques de fonctionnement mini-males des appareils (conformémentaux normes concernant la défini-tion de l’immunité aux émissionsparasites).
– N’ouvrez pas la balance ! Si vousendommagez la bande de sécurité, vous perdez tout droit à la garantie.
58
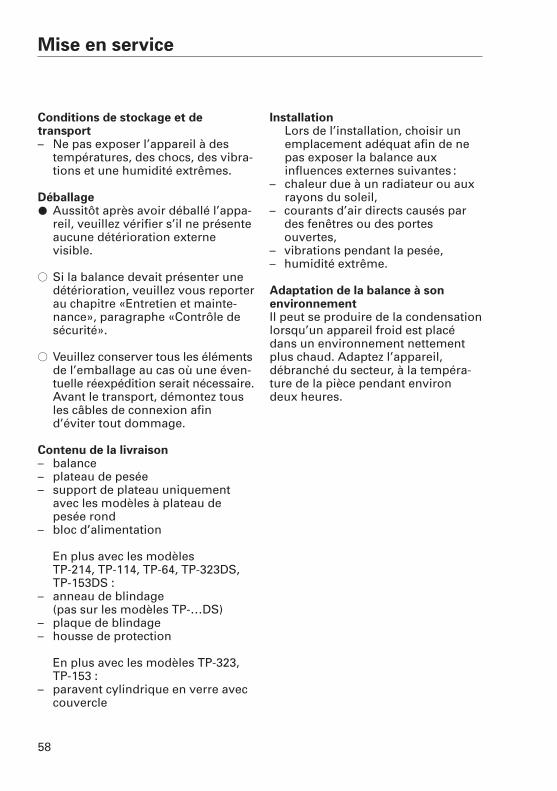
Mise en service
Conditions de stockage et de transport– Ne pas exposer l’appareil à des
températures, des chocs, des vibra-tions et une humidité extrêmes.
Déballage§ Aussitôt après avoir déballé l’appa-
reil, veuillez vérifier s’il ne présenteaucune détérioration externevisible.
$ Si la balance devait présenter unedétérioration, veuillez vous reporterau chapitre «Entretien et mainte-nance», paragraphe «Contrôle desécurité».
$ Veuillez conserver tous les élémentsde l’emballage au cas où une éven-tuelle réexpédition serait nécessaire.Avant le transport, démontez tousles câbles de connexion afin d’éviter tout dommage.
Contenu de la livraison– balance– plateau de pesée– support de plateau uniquement
avec les modèles à plateau depesée rond
– bloc d’alimentation
En plus avec les modèles TP-214, TP-114, TP-64, TP-323DS, TP-153DS :
– anneau de blindage (pas sur les modèles TP-…DS)
– plaque de blindage– housse de protection
En plus avec les modèles TP-323,TP-153 :
– paravent cylindrique en verre aveccouvercle
InstallationLors de l’installation, choisir unemplacement adéquat afin de nepas exposer la balance auxinfluences externes suivantes :
– chaleur due à un radiateur ou auxrayons du soleil,
– courants d’air directs causés pardes fenêtres ou des portesouvertes,
– vibrations pendant la pesée,– humidité extrême.
Adaptation de la balance à son environnementIl peut se produire de la condensationlorsqu’un appareil froid est placédans un environnement nettementplus chaud. Adaptez l’appareil,débranché du secteur, à la tempéra-ture de la pièce pendant environdeux heures.
59
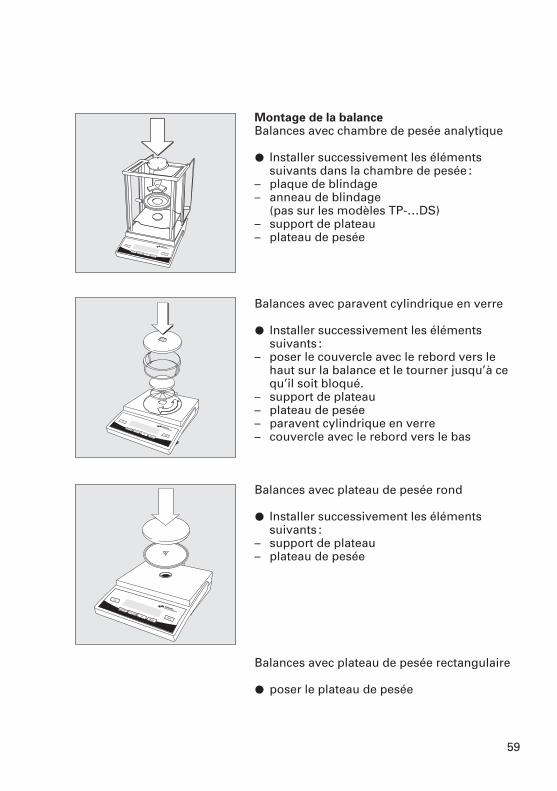
Montage de la balanceBalances avec chambre de pesée analytique
§ Installer successivement les éléments suivants dans la chambre de pesée :
– plaque de blindage– anneau de blindage
(pas sur les modèles TP-…DS)– support de plateau– plateau de pesée
Balances avec paravent cylindrique en verre
§ Installer successivement les éléments suivants :
– poser le couvercle avec le rebord vers lehaut sur la balance et le tourner jusqu’à cequ’il soit bloqué.
– support de plateau– plateau de pesée– paravent cylindrique en verre– couvercle avec le rebord vers le bas
Balances avec plateau de pesée rond
§ Installer successivement les éléments suivants :
– support de plateau– plateau de pesée
Balances avec plateau de pesée rectangulaire
§ poser le plateau de pesée
60
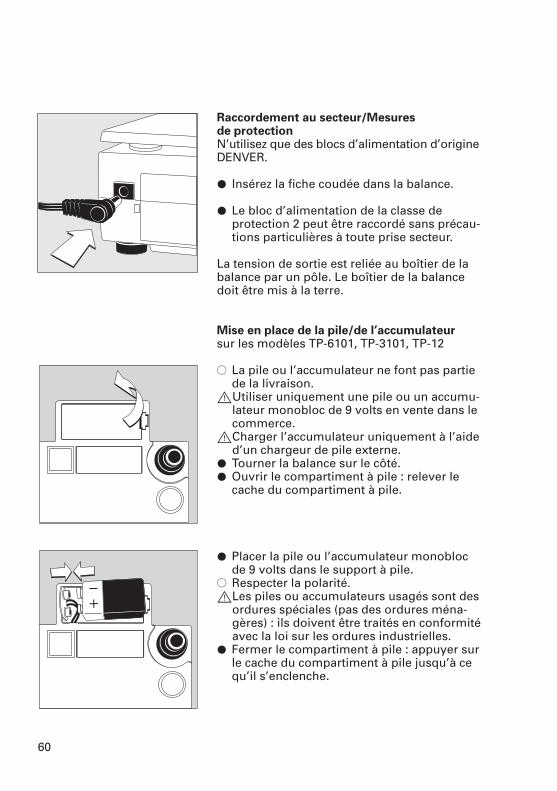
Raccordement au secteur/Mesures de protectionN’utilisez que des blocs d’alimentation d’origineDENVER.
§ Insérez la fiche coudée dans la balance.
§ Le bloc d’alimentation de la classe de protection 2 peut être raccordé sans précau-tions particulières à toute prise secteur.
La tension de sortie est reliée au boîtier de labalance par un pôle. Le boîtier de la balancedoit être mis à la terre.
Mise en place de la pile/de l’accumulateursur les modèles TP-6101, TP-3101, TP-12
$ La pile ou l’accumulateur ne font pas partiede la livraison.
!Utiliser uniquement une pile ou un accumu-lateur monobloc de 9 volts en vente dans lecommerce.
!Charger l’accumulateur uniquement à l’aided’un chargeur de pile externe.
§ Tourner la balance sur le côté.§ Ouvrir le compartiment à pile : relever le
cache du compartiment à pile.
§ Placer la pile ou l’accumulateur monoblocde 9 volts dans le support à pile.
$ Respecter la polarité.!Les piles ou accumulateurs usagés sont des
ordures spéciales (pas des ordures ména-gères) : ils doivent être traités en conformitéavec la loi sur les ordures industrielles.
§ Fermer le compartiment à pile : appuyer surle cache du compartiment à pile jusqu’à cequ’il s’enclenche.
61
REMARQUE : cet équipement a été testé et reconnu conforme auxlimites définies dans la partie 15des règles FCC. Ces limites visent à fournir une protection raisonnablecontre toute interférence nuisible.Cet équipement génère, utilise etpeut émettre une énergie de fré-quences radio et, s’il n’est pas ins-tallé et utilisé conformément à cesinstructions, provoquer des inter-férences nuisibles avec les commu-nications radio.
Pour en savoir plus sur la classe etles limites spécifiques de cet équi-pement, consultez la Déclaration deconformité. En fonction de la classedéfinie, vous devrez ou pourrez corriger l’interférence.
Pour les appareils numériques deClasse A, vous devrez vous confor-mer à la déclaration FCC suivante :« L’utilisation de cet équipementdans un secteur résidentiel est sus-ceptible de provoquer des interfé-rences nuisibles, auquel cas l’utili-sateur devra corriger l’interférenceà ses frais. »
Pour les appareils numériques deClasse B, veuillez lire et suivre les instructions suivantes de la FCC :Cependant, rien ne garantit que l’interférence ne se produira pasdans une installation donnée. Si cet équipement provoque uneinterférence nuisible avec la récep-tion radio ou TV, pouvant êtredéterminée en allumant et en éteignant l’équipement, l’utilisa-teur pourra essayer de corrigerl’interférence à l’aide des moyenssuivants :
– En réorientant ou en reposition-nant l’antenne de réception.
– En augmentant la distance entrel’équipement et le récepteur.
– En branchant l’équipement dansune sur un circuit différent de celuiauquel le récepteur est branché.
– En contactant le revendeur ou un technicien radio/TV expérimen-té pour obtenir de l’assistance.
Avant d’utiliser cet équipement, vérifiez sa classe FCC (Classe A ou B), conformément à la Déclara-tion de conformité jointe. Assurez-vous de bien respecter les infor-mations de cette Déclaration.
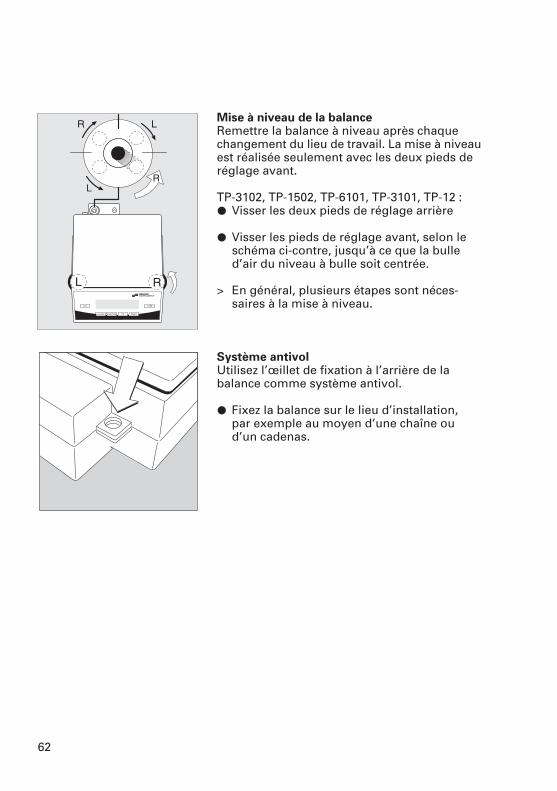
62
Mise à niveau de la balance Remettre la balance à niveau après chaquechangement du lieu de travail. La mise à niveauest réalisée seulement avec les deux pieds deréglage avant.
TP-3102, TP-1502, TP-6101, TP-3101, TP-12 :§ Visser les deux pieds de réglage arrière
§ Visser les pieds de réglage avant, selon leschéma ci-contre, jusqu’à ce que la bulled’air du niveau à bulle soit centrée.
> En général, plusieurs étapes sont néces-saires à la mise à niveau.
Système antivol Utilisez l’œillet de fixation à l’arrière de labalance comme système antivol.
§ Fixez la balance sur le lieu d’installation, par exemple au moyen d’une chaîne oud’un cadenas.

63
Fonctionnement
Pesée simple
Opérations préliminaires
§ Mettre la balance en marche :appuyer sur la touche [ON/OFF].
§ Modifier les réglages si nécessai-re : voir le chapitre «Réglages».
$ Tarer la balance si nécessaire :appuyer sur la touche [TARE].
Autre fonction :§ Eteindre la balance : appuyer sur la
touche [ON/OFF].
Temps de préchauffage$ Pour fournir des résultats précis,
l’appareil a besoin d’un temps de préchauffage de 60 minutes. La balance atteint la températurede fonctionnement nécessaire seu-lement après ce laps de temps.
ExempleCalcul de la valeur de pesée
Etape Appuyer sur Affichagela touche
1. Mettre la balance sous tension [ON/OFF]
Un test automatique est effectué
2. Poser le récipient pour + 52.0 gl’échantillon (ici 52 g)
3. Tarer la balance [TARE] + 0.0 g
4. Déposer l’échantillon dans + 150.2 gle récipient (ici 150,2 g)
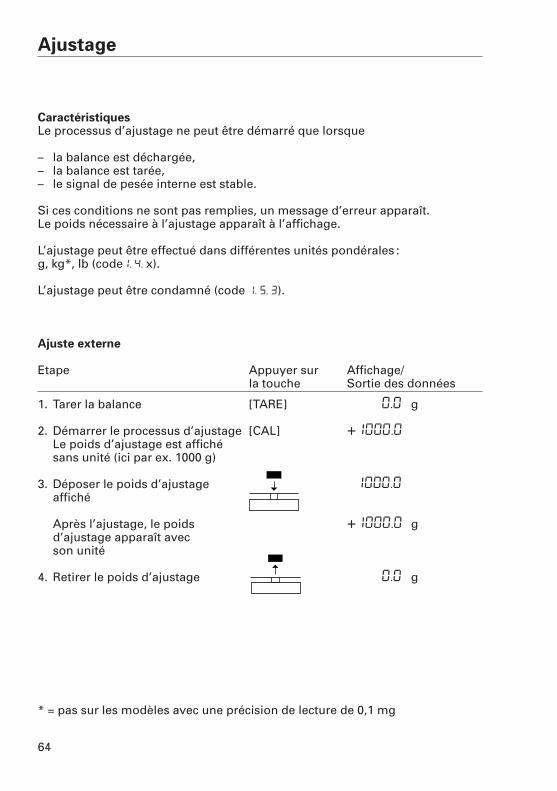
64
Ajustage
CaractéristiquesLe processus d’ajustage ne peut être démarré que lorsque
– la balance est déchargée,– la balance est tarée,– le signal de pesée interne est stable.
Si ces conditions ne sont pas remplies, un message d’erreur apparaît. Le poids nécessaire à l’ajustage apparaît à l’affichage.
L’ajustage peut être effectué dans différentes unités pondérales : g, kg*, lb (code1. 4. x).
L’ajustage peut être condamné (code 1. 5. 3).
Ajuste externe
Etape Appuyer sur Affichage/la touche Sortie des données
1. Tarer la balance [TARE] 0.0 g
2. Démarrer le processus d’ajustage [CAL] +1000.0 gLe poids d’ajustage est affichésans unité (ici par ex. 1000 g)
3. Déposer le poids d’ajustage 1000.0affiché
Après l’ajustage, le poids +1000.0 gd’ajustage apparaît avec son unité
4. Retirer le poids d’ajustage 0.0 g
* = pas sur les modèles avec une précision de lecture de 0,1 mg
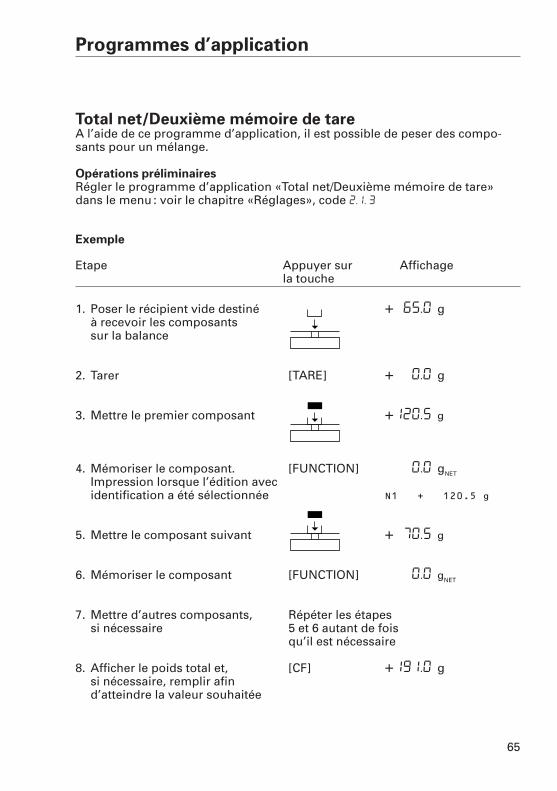
65
Programmes d’application
Total net/Deuxième mémoire de tareA l’aide de ce programme d’application, il est possible de peser des compo-sants pour un mélange.
Opérations préliminairesRégler le programme d’application «Total net/Deuxième mémoire de tare»dans le menu : voir le chapitre «Réglages», code 2.1. 3
Exemple
Etape Appuyer sur Affichagela touche
1. Poser le récipient vide destiné + 65.0 gà recevoir les composants sur la balance
2. Tarer [TARE] + 0.0 g
3. Mettre le premier composant +120,5 g
4. Mémoriser le composant. [FUNCTION] 0.0 gNET
Impression lorsque l’édition avecidentification a été sélectionnée N1 + 120.5 g
5. Mettre le composant suivant + 70,5 g
6. Mémoriser le composant [FUNCTION] 0.0 gNET
7. Mettre d’autres composants, Répéter les étapessi nécessaire 5 et 6 autant de fois
qu’il est nécessaire
8. Afficher le poids total et, [CF] +191,0 gsi nécessaire, remplir afin d’atteindre la valeur souhaitée
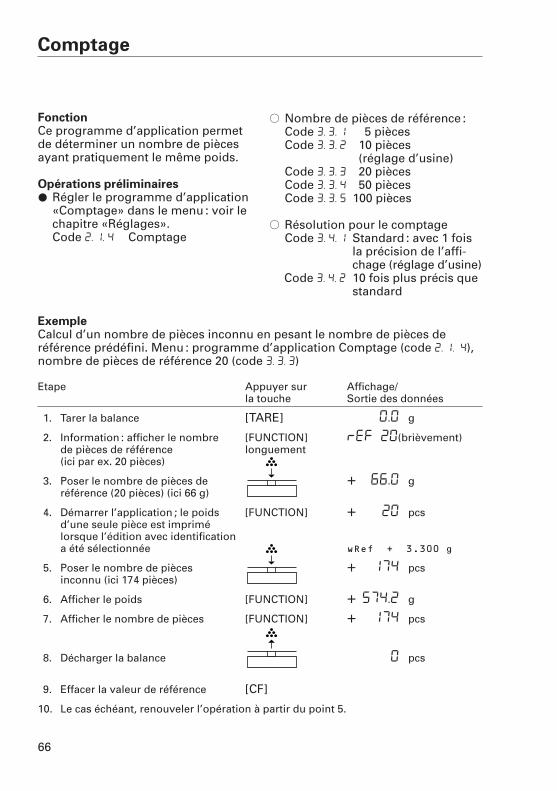
66
Comptage
FonctionCe programme d’application permetde déterminer un nombre de piècesayant pratiquement le même poids.
Opérations préliminaires§ Régler le programme d’application
«Comptage» dans le menu : voir le chapitre «Réglages».Code 2. 1. 4 Comptage
$ Nombre de pièces de référence :Code 3. 3. 1 5 piècesCode 3. 3. 2 10 pièces
(réglage d’usine)Code 3. 3. 3 20 piècesCode 3. 3. 4 50 piècesCode 3. 3. 5 100 pièces
$ Résolution pour le comptageCode 3. 4. 1 Standard : avec 1 fois
la précision de l’affi-chage (réglage d’usine)
Code 3. 4. 2 10 fois plus précis questandard
ExempleCalcul d’un nombre de pièces inconnu en pesant le nombre de pièces de référence prédéfini. Menu : programme d’application Comptage (code 2. 1. 4),nombre de pièces de référence 20 (code 3. 3. 3)
Etape Appuyer sur Affichage/la touche Sortie des données
1. Tarer la balance [TARE] 0.0 g
2. Information : afficher le nombre [FUNCTION] ref 20(brièvement)de pièces de référence longuement(ici par ex. 20 pièces)
3. Poser le nombre de pièces de + 66.0 gréférence (20 pièces) (ici 66 g)
4. Démarrer l’application ; le poids [FUNCTION] + 20 pcsd’une seule pièce est imprimé lorsque l’édition avec identification a été sélectionnée wRef + 3.300 g
5. Poser le nombre de pièces + 174 pcsinconnu (ici 174 pièces)
6. Afficher le poids [FUNCTION] + 574.2 g
7. Afficher le nombre de pièces [FUNCTION] + 174 pcs
8. Décharger la balance 0 pcs
9. Effacer la valeur de référence [CF]
10. Le cas échéant, renouveler l’opération à partir du point 5.
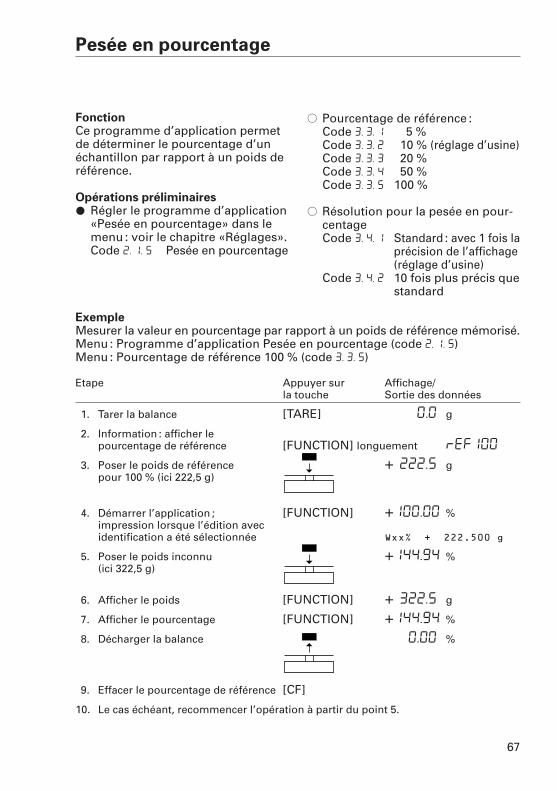
67
Pesée en pourcentage
FonctionCe programme d’application permet de déterminer le pourcentage d’unéchantillon par rapport à un poids deréférence.
Opérations préliminaires§ Régler le programme d’application
«Pesée en pourcentage» dans lemenu : voir le chapitre «Réglages».Code 2. 1. 5 Pesée en pourcentage
$ Pourcentage de référence :Code 3. 3. 1 5 %Code 3. 3. 2 10 % (réglage d’usine)Code 3. 3. 3 20 %Code 3. 3. 4 50 %Code 3. 3. 5 100 %
$ Résolution pour la pesée en pour-centageCode 3. 4. 1 Standard : avec 1 fois la
précision de l’affichage(réglage d’usine)
Code 3. 4. 2 10 fois plus précis questandard
ExempleMesurer la valeur en pourcentage par rapport à un poids de référence mémorisé.Menu : Programme d’application Pesée en pourcentage (code 2. 1. 5)Menu : Pourcentage de référence 100 % (code 3. 3. 5)
Etape Appuyer sur Affichage/la touche Sortie des données
1. Tarer la balance [TARE] 0.0 g
2. Information : afficher lepourcentage de référence [FUNCTION] longuement ref100
3. Poser le poids de référence + 222.5 gpour 100 % (ici 222,5 g)
4. Démarrer l’application ; [FUNCTION] +100.00 %impression lorsque l’édition avecidentification a été sélectionnée Wxx% + 222.500 g
5. Poser le poids inconnu +144.94 %(ici 322,5 g)
6. Afficher le poids [FUNCTION] + 322.5 g
7. Afficher le pourcentage [FUNCTION] +144.94 %
8. Décharger la balance 0.00 %
9. Effacer le pourcentage de référence [CF]
10. Le cas échéant, recommencer l’opération à partir du point 5.
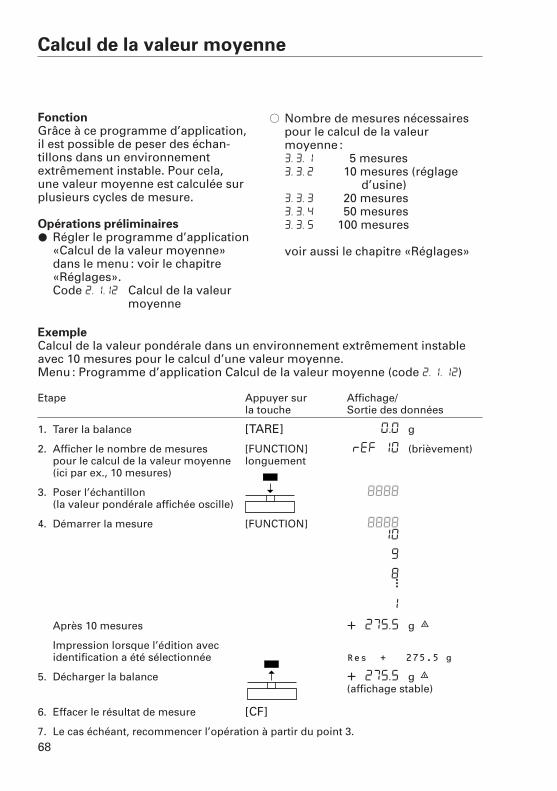
68
Calcul de la valeur moyenne
FonctionGrâce à ce programme d’application,il est possible de peser des échan-tillons dans un environnement extrêmement instable. Pour cela, une valeur moyenne est calculée surplusieurs cycles de mesure.
Opérations préliminaires§ Régler le programme d’application
«Calcul de la valeur moyenne»dans le menu : voir le chapitre«Réglages».Code 2. 1.12 Calcul de la valeur
moyenne
$ Nombre de mesures nécessairespour le calcul de la valeur moyenne :3. 3. 1 5 mesures3. 3. 2 10 mesures (réglage
d’usine)3. 3. 3 20 mesures3. 3. 4 50 mesures3. 3. 5 100 mesures
voir aussi le chapitre «Réglages»
ExempleCalcul de la valeur pondérale dans un environnement extrêmement instable avec 10 mesures pour le calcul d’une valeur moyenne.Menu : Programme d’application Calcul de la valeur moyenne (code 2. 1. 12)
Etape Appuyer sur Affichage/la touche Sortie des données
1. Tarer la balance [TARE] 0.0 g
2. Afficher le nombre de mesures [FUNCTION] ref 10 (brièvement)pour le calcul de la valeur moyenne longuement(ici par ex., 10 mesures)
3. Poser l’échantillon 8888(la valeur pondérale affichée oscille)
4. Démarrer la mesure [FUNCTION] 888810
9
8
1
Après 10 mesures + 275.5 g G
Impression lorsque l’édition avecidentification a été sélectionnée Res + 275.5 g
5. Décharger la balance + 275.5 g G(affichage stable)
6. Effacer le résultat de mesure [CF]
7. Le cas échéant, recommencer l’opération à partir du point 3.
···
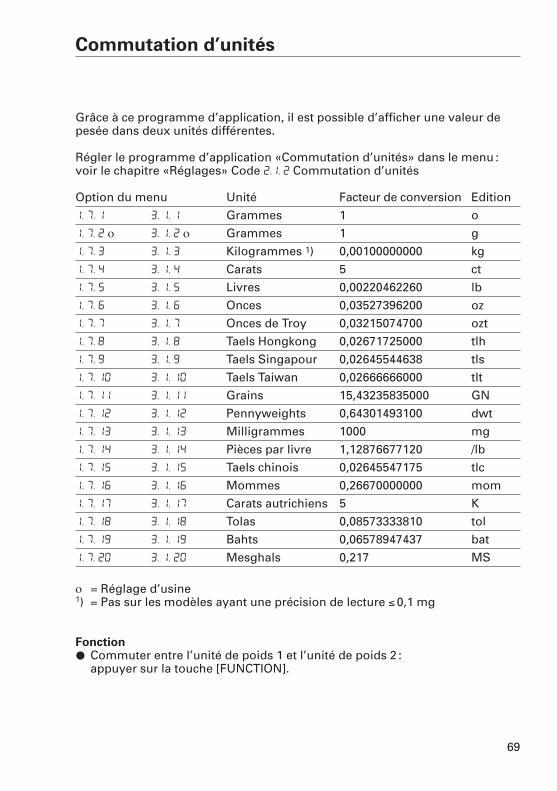
69
Commutation d’unités
Grâce à ce programme d’application, il est possible d’afficher une valeur depesée dans deux unités différentes.
Régler le programme d’application «Commutation d’unités» dans le menu : voir le chapitre «Réglages» Code 2.1. 2 Commutation d’unités
Option du menu Unité Facteur de conversion Edition
1. 7. 1 3. 1. 1 Grammes 1 o
1. 7. 2 ο 3. 1. 2 ο Grammes 1 g
1. 7. 3 3. 1. 3 Kilogrammes 1) 0,00100000000 kg
1. 7. 4 3. 1. 4 Carats 5 ct
1. 7. 5 3. 1. 5 Livres 0,00220462260 lb
1. 7. 6 3. 1. 6 Onces 0,03527396200 oz
1. 7. 7 3. 1. 7 Onces de Troy 0,03215074700 ozt
1. 7. 8 3. 1. 8 Taels Hongkong 0,02671725000 tlh
1. 7. 9 3. 1. 9 Taels Singapour 0,02645544638 tls
1. 7. 10 3. 1. 10 Taels Taiwan 0,02666666000 tlt
1. 7. 11 3. 1. 11 Grains 15,43235835000 GN
1. 7. 12 3. 1. 12 Pennyweights 0,64301493100 dwt
1. 7. 13 3. 1. 13 Milligrammes 1000 mg
1. 7. 14 3. 1. 14 Pièces par livre 1,12876677120 /lb
1. 7. 15 3. 1. 15 Taels chinois 0,02645547175 tlc
1. 7. 16 3. 1. 16 Mommes 0,26670000000 mom
1. 7. 17 3. 1. 17 Carats autrichiens 5 K
1. 7. 18 3. 1. 18 Tolas 0,08573333810 tol
1. 7. 19 3. 1. 19 Bahts 0,06578947437 bat
1. 7. 20 3. 1. 20 Mesghals 0,217 MS
ο = Réglage d’usine 1) = Pas sur les modèles ayant une précision de lecture ≤0,1 mg
Fonction§ Commuter entre l’unité de poids 1 et l’unité de poids 2 :
appuyer sur la touche [FUNCTION].
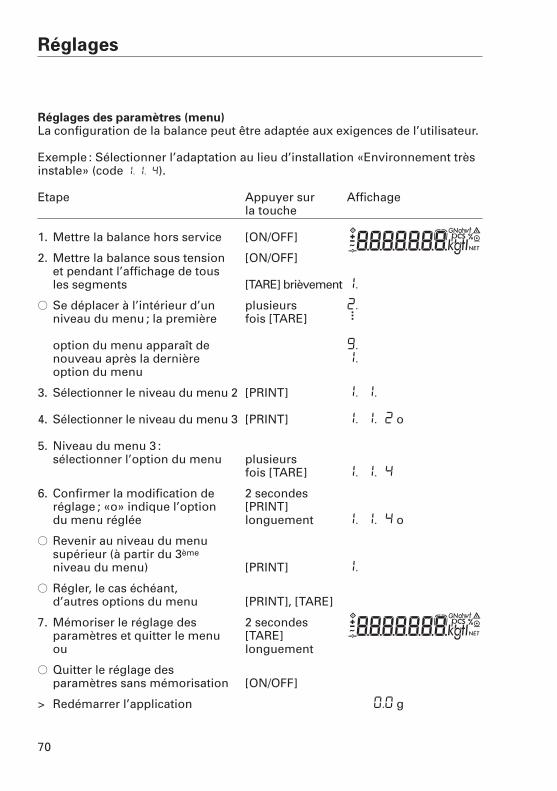
70
Réglages
Réglages des paramètres (menu)La configuration de la balance peut être adaptée aux exigences de l’utilisateur.
Exemple : Sélectionner l’adaptation au lieu d’installation «Environnement trèsinstable» (code 1, 1. 4).
Etape Appuyer sur Affichagela touche
1. Mettre la balance hors service [ON/OFF]
2. Mettre la balance sous tension [ON/OFF]et pendant l’affichage de tous les segments [TARE] brièvement 1.
$ Se déplacer à l’intérieur d’un plusieurs 2.niveau du menu ; la première fois [TARE]
option du menu apparaît de 9.nouveau après la dernière 1.option du menu
3. Sélectionner le niveau du menu 2 [PRINT] 1. 1.
4. Sélectionner le niveau du menu 3 [PRINT] 1. 1. 2 o
5. Niveau du menu 3 :sélectionner l’option du menu plusieurs
fois [TARE] 1. 1. 4
6. Confirmer la modification de 2 secondesréglage ; «o» indique l’option [PRINT] du menu réglée longuement 1. 1. 4 o
$ Revenir au niveau du menu supérieur (à partir du 3ème
niveau du menu) [PRINT] 1.
$ Régler, le cas échéant, d’autres options du menu [PRINT], [TARE]
7. Mémoriser le réglage des 2 secondesparamètres et quitter le menu [TARE]ou longuement
$ Quitter le réglage des paramètres sans mémorisation [ON/OFF]
> Redémarrer l’application 0.0 g
···

71
Réglages des paramètres (vue d’ensemble)ο Réglage d’usine√ Réglage de l’opérateur
Menu 1 Pesée simple 1.1. Adaptation filtre 1.1.1 Environnement très stable1.1.2 ο Environnement stable1.1.3 Environnement instable1.1.4 Environnement très instable
1.3. Etendue de stabilité 1.3.1 1/4 digit1.3.2 1/2 digit1.3.3 1 digit1.3.4 ο 2 digits1.3.5 4 digits
1.4. Unité de poids pour 1.4.1 ο Grammespoids d’ajustage 1.4.2 Kilogrammes1)
1.4.3 Livres
1.5. Ajustage 1.5.1 ο Ajustage externe1.5.3 Condamné
1.6. Zéro automatique 1.6.1 ο En service1.6.2 Hors service
1.7. Unité de poids 1 voir chapitre «Commutation d’unités»
2. Programmes 2.1. Sélection programme voir le programme d’application d’application correspondant
3. Paramètres 3.1. Unité de poids 2 voir chapitre «Commutation d’unités»d’application 3.3. Pièces/% de référence voir le programme d’application
correspondant3.4. Résolution pour voir le programme d’application
comptage/pesée correspondanten pourcentage
5. Interface 5.1 Vitesse de transmission 5.1.1 150 bauds5.1.2 300 bauds5.1.3 600 bauds5.1.4 ο 1200 bauds5.1.5 2400 bauds5.1.6 4800 bauds5.1.7 9600 bauds
1) = pas sur les modèles ayant une précision de lecture de 0,1 mg
Niveau du menu 1
Niveau du menu 2
Niveau du menu 3
Réglage d’usine
Option du menu
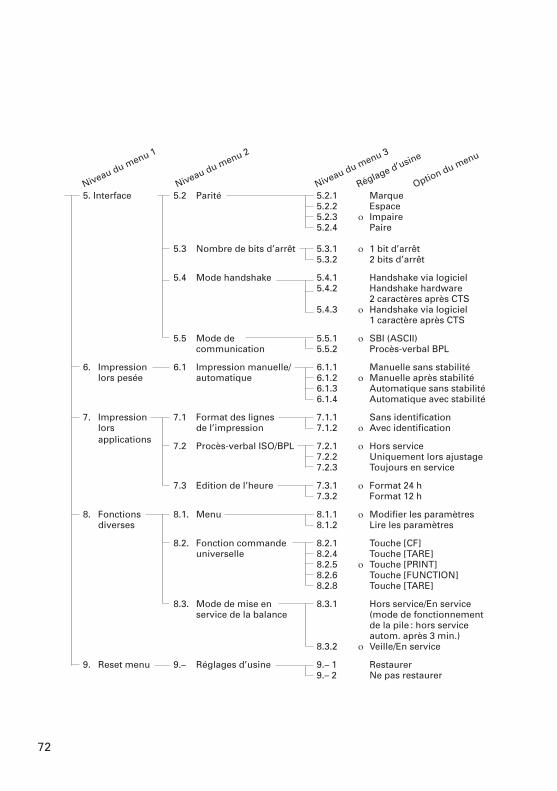
72
5. Interface 5.2 Parité 5.2.1 Marque5.2.2 Espace5.2.3 ο Impaire5.2.4 Paire
5.3 Nombre de bits d’arrêt 5.3.1 ο 1 bit d’arrêt5.3.2 2 bits d’arrêt
5.4 Mode handshake 5.4.1 Handshake via logiciel5.4.2 Handshake hardware
2 caractères après CTS5.4.3 ο Handshake via logiciel
1 caractère après CTS
5.5 Mode de 5.5.1 ο SBI (ASCII)communication 5.5.2 Procès-verbal BPL
6. Impression 6.1 Impression manuelle/ 6.1.1 Manuelle sans stabilitélors pesée automatique 6.1.2 ο Manuelle après stabilité
6.1.3 Automatique sans stabilité6.1.4 Automatique avec stabilité
7. Impression 7.1 Format des lignes 7.1.1 Sans identificationlors de l’impression 7.1.2 ο Avec identificationapplications
7.2 Procès-verbal ISO/BPL 7.2.1 ο Hors service7.2.2 Uniquement lors ajustage7.2.3 Toujours en service
7.3 Edition de l’heure 7.3.1 ο Format 24 h7.3.2 Format 12 h
8. Fonctions 8.1. Menu 8.1.1 ο Modifier les paramètresdiverses 8.1.2 Lire les paramètres
8.2. Fonction commande 8.2.1 Touche [CF]universelle 8.2.4 Touche [TARE]
8.2.5 ο Touche [PRINT]8.2.6 Touche [FUNCTION]8.2.8 Touche [TARE]
8.3. Mode de mise en 8.3.1 Hors service/En service service de la balance (mode de fonctionnement
de la pile : hors service autom. après 3 min.)
8.3.2 ο Veille/En service
9. Reset menu 9.– Réglages d’usine 9.– 1 Restaurer9.– 2 Ne pas restaurer
Niveau du menu 1
Niveau du menu 2
Niveau du menu 3
Réglage d’usine
Option du menu
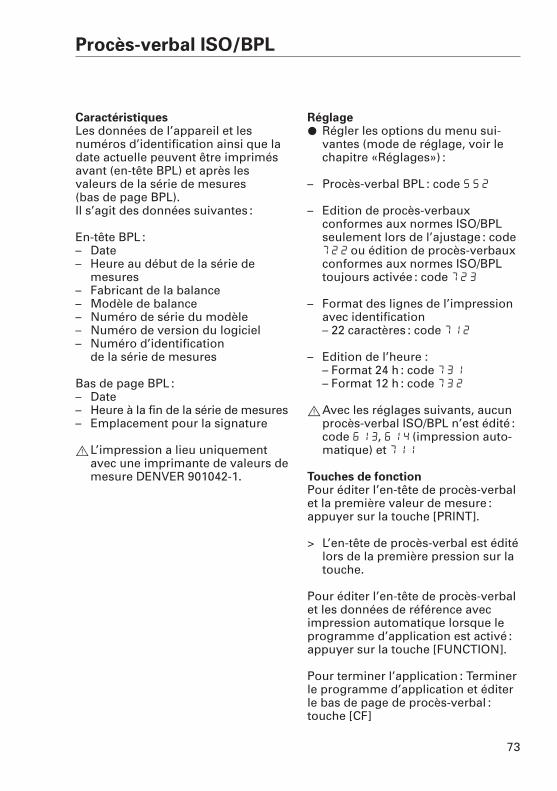
73
Procès-verbal ISO/BPL
CaractéristiquesLes données de l’appareil et lesnuméros d’identification ainsi que ladate actuelle peuvent être imprimésavant (en-tête BPL) et après lesvaleurs de la série de mesures (bas de page BPL).Il s’agit des données suivantes :
En-tête BPL :– Date– Heure au début de la série de
mesures– Fabricant de la balance– Modèle de balance– Numéro de série du modèle– Numéro de version du logiciel– Numéro d’identification
de la série de mesures
Bas de page BPL :– Date– Heure à la fin de la série de mesures– Emplacement pour la signature
!L’impression a lieu uniquementavec une imprimante de valeurs demesure DENVER 901042-1.
Réglage§ Régler les options du menu sui-
vantes (mode de réglage, voir lechapitre «Réglages») :
– Procès-verbal BPL : code 5 5 2
– Edition de procès-verbauxconformes aux normes ISO/BPLseulement lors de l’ajustage : code7 2 2 ou édition de procès-verbauxconformes aux normes ISO/BPLtoujours activée : code 7 2 3
– Format des lignes de l’impressionavec identification – 22 caractères : code 7 1 2
– Edition de l’heure :– Format 24 h : code 7 3 1
– Format 12 h : code 7 3 2
!Avec les réglages suivants, aucunprocès-verbal ISO/BPL n’est édité :code 6 1 3, 6 1 4 (impression auto-matique) et 7 1 1
Touches de fonctionPour éditer l’en-tête de procès-verbal et la première valeur de mesure :appuyer sur la touche [PRINT].
> L’en-tête de procès-verbal est éditélors de la première pression sur latouche.
Pour éditer l’en-tête de procès-verbalet les données de référence avecimpression automatique lorsque leprogramme d’application est activé :appuyer sur la touche [FUNCTION].
Pour terminer l’application : Terminerle programme d’application et éditerle bas de page de procès-verbal :touche [CF]
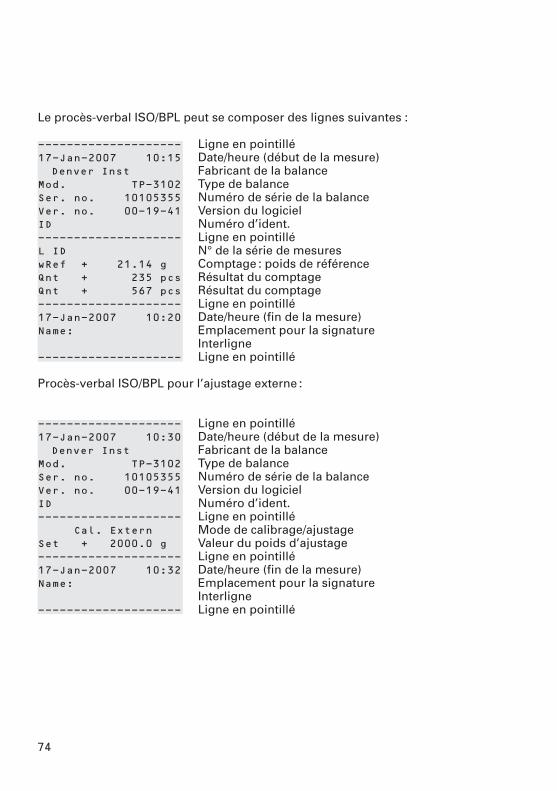
74
Le procès-verbal ISO/BPL peut se composer des lignes suivantes :
-------------------- Ligne en pointillé17-Jan-2007 10:15 Date/heure (début de la mesure)Denver Inst Fabricant de la balance
Mod. TP-3102 Type de balanceSer. no. 10105355 Numéro de série de la balanceVer. no. 00-19-41 Version du logicielID Numéro d’ident.-------------------- Ligne en pointilléL ID N° de la série de mesureswRef + 21.14 g Comptage : poids de référenceQnt + 235 pcs Résultat du comptageQnt + 567 pcs Résultat du comptage-------------------- Ligne en pointillé17-Jan-2007 10:20 Date/heure (fin de la mesure)Name: Emplacement pour la signature
Interligne-------------------- Ligne en pointillé
Procès-verbal ISO/BPL pour l’ajustage externe :
-------------------- Ligne en pointillé17-Jan-2007 10:30 Date/heure (début de la mesure)Denver Inst Fabricant de la balance
Mod. TP-3102 Type de balanceSer. no. 10105355 Numéro de série de la balanceVer. no. 00-19-41 Version du logicielID Numéro d’ident.-------------------- Ligne en pointillé
Cal. Extern Mode de calibrage/ajustageSet + 2000.0 g Valeur du poids d’ajustage-------------------- Ligne en pointillé17-Jan-2007 10:32 Date/heure (fin de la mesure)Name: Emplacement pour la signature
Interligne-------------------- Ligne en pointillé
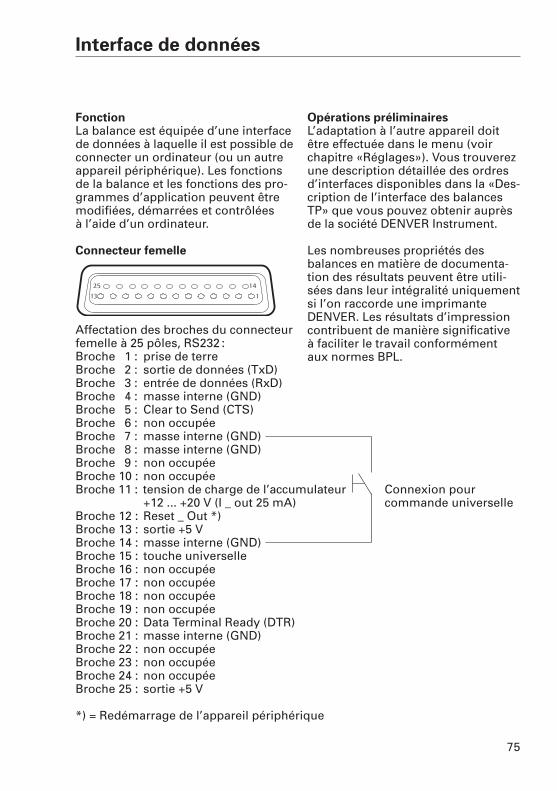
75
Interface de données
FonctionLa balance est équipée d’une interface de données à laquelle il est possible deconnecter un ordinateur (ou un autreappareil périphérique). Les fonctionsde la balance et les fonctions des pro-grammes d’application peuvent êtremodifiées, démarrées et contrôlées à l’aide d’un ordinateur.
Connecteur femelle
Affectation des broches du connecteur femelle à 25 pôles, RS232 :Broche 1 : prise de terreBroche 2 : sortie de données (TxD)Broche 3 : entrée de données (RxD)Broche 4 : masse interne (GND)Broche 5 : Clear to Send (CTS)Broche 6 : non occupéeBroche 7 : masse interne (GND)Broche 8 : masse interne (GND)Broche 9 : non occupéeBroche 10 : non occupéeBroche 11 : tension de charge de l’accumulateur Connexion pour
+12 ... +20 V (I _ out 25 mA) commande universelleBroche 12 : Reset _ Out *)Broche 13 : sortie +5 V Broche 14 : masse interne (GND)Broche 15 : touche universelleBroche 16 : non occupéeBroche 17 : non occupéeBroche 18 : non occupéeBroche 19 : non occupéeBroche 20 : Data Terminal Ready (DTR)Broche 21 : masse interne (GND)Broche 22 : non occupéeBroche 23 : non occupéeBroche 24 : non occupéeBroche 25 : sortie +5 V
*) = Redémarrage de l’appareil périphérique
1
14
13
25
Opérations préliminairesL’adaptation à l’autre appareil doitêtre effectuée dans le menu (voir chapitre «Réglages»). Vous trouverezune description détaillée des ordresd’interfaces disponibles dans la «Des-cription de l’interface des balancesTP» que vous pouvez obtenir auprèsde la société DENVER Instrument.
Les nombreuses propriétés desbalances en matière de documenta-tion des résultats peuvent être utili-sées dans leur intégralité uniquementsi l’on raccorde une imprimante DENVER. Les résultats d’impressioncontribuent de manière significative à faciliter le travail conformémentaux normes BPL.
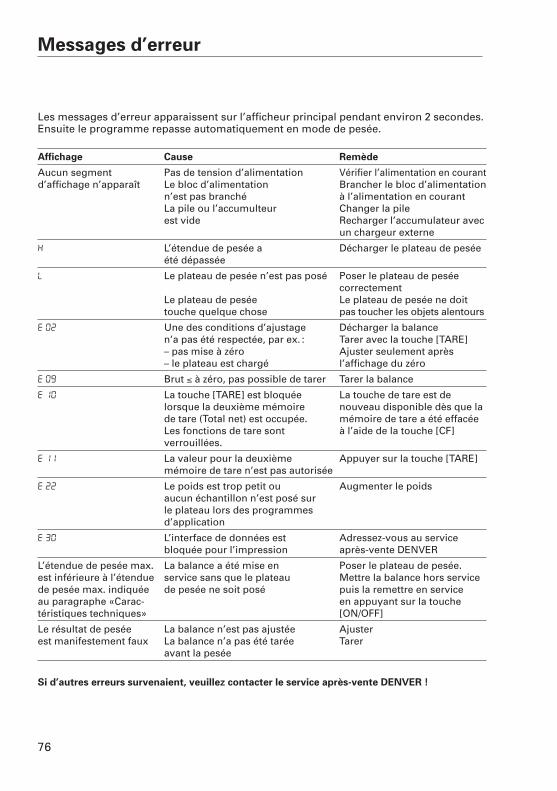
76
Messages d’erreur
Les messages d’erreur apparaissent sur l’afficheur principal pendant environ 2 secondes.Ensuite le programme repasse automatiquement en mode de pesée.
Affichage Cause Remède
Aucun segment Pas de tension d’alimentation Vérifier l’alimentation en courantd’affichage n’apparaît Le bloc d’alimentation Brancher le bloc d’alimentation
n’est pas branché à l’alimentation en courantLa pile ou l’accumulteur Changer la pile est vide Recharger l’accumulateur avec
un chargeur externe
h L’étendue de pesée a Décharger le plateau de peséeété dépassée
l Le plateau de pesée n’est pas posé Poser le plateau de pesée correctement
Le plateau de pesée Le plateau de pesée ne doit touche quelque chose pas toucher les objets alentours
e 02 Une des conditions d’ajustage Décharger la balancen’a pas été respectée, par ex. : Tarer avec la touche [TARE]– pas mise à zéro Ajuster seulement après – le plateau est chargé l’affichage du zéro
e 09 Brut < à zéro, pas possible de tarer Tarer la balance
e 10 La touche [TARE] est bloquée La touche de tare est de lorsque la deuxième mémoire nouveau disponible dès que la de tare (Total net) est occupée. mémoire de tare a été effacée Les fonctions de tare sont à l’aide de la touche [CF]verrouillées.
e 11 La valeur pour la deuxième Appuyer sur la touche [TARE]mémoire de tare n’est pas autorisée
e 22 Le poids est trop petit ou Augmenter le poidsaucun échantillon n’est posé sur le plateau lors des programmes d’application
e 30 L’interface de données est Adressez-vous au service bloquée pour l’impression après-vente DENVER
L’étendue de pesée max. La balance a été mise en Poser le plateau de pesée. est inférieure à l’étendue service sans que le plateau Mettre la balance hors service de pesée max. indiquée de pesée ne soit posé puis la remettre en service au paragraphe «Carac- en appuyant sur la touche téristiques techniques» [ON/OFF]
Le résultat de pesée La balance n’est pas ajustée Ajusterest manifestement faux La balance n’a pas été tarée Tarer
avant la pesée
Si d’autres erreurs survenaient, veuillez contacter le service après-vente DENVER !
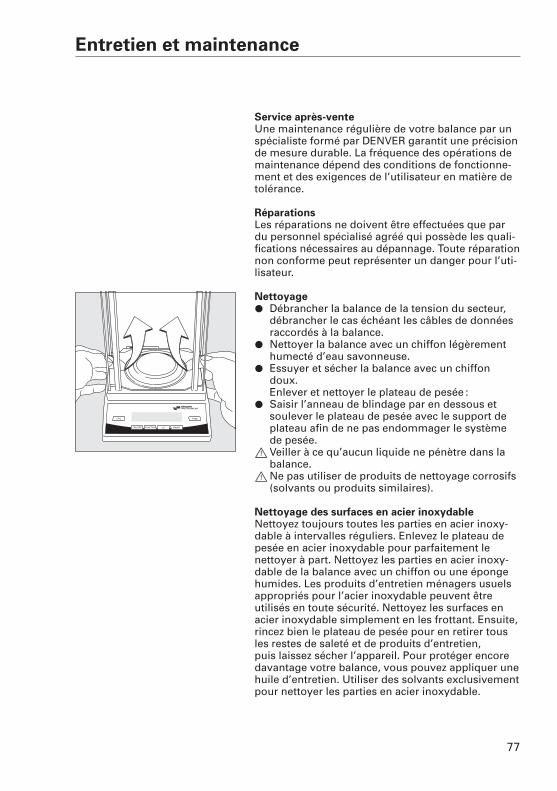
77
Entretien et maintenance
Service après-venteUne maintenance régulière de votre balance par unspécialiste formé par DENVER garantit une précision de mesure durable. La fréquence des opérations demaintenance dépend des conditions de fonctionne-ment et des exigences de l’utilisateur en matière detolérance.
RéparationsLes réparations ne doivent être effectuées que pardu personnel spécialisé agréé qui possède les quali-fications nécessaires au dépannage. Toute réparationnon conforme peut représenter un danger pour l’uti-lisateur.
Nettoyage§ Débrancher la balance de la tension du secteur,
débrancher le cas échéant les câbles de donnéesraccordés à la balance.
§ Nettoyer la balance avec un chiffon légèrementhumecté d’eau savonneuse.
§ Essuyer et sécher la balance avec un chiffondoux.Enlever et nettoyer le plateau de pesée :
§ Saisir l’anneau de blindage par en dessous etsoulever le plateau de pesée avec le support deplateau afin de ne pas endommager le systèmede pesée.
! Veiller à ce qu’aucun liquide ne pénètre dans labalance.
! Ne pas utiliser de produits de nettoyage corrosifs (solvants ou produits similaires).
Nettoyage des surfaces en acier inoxydableNettoyez toujours toutes les parties en acier inoxy-dable à intervalles réguliers. Enlevez le plateau depesée en acier inoxydable pour parfaitement le nettoyer à part. Nettoyez les parties en acier inoxy-dable de la balance avec un chiffon ou une épongehumides. Les produits d’entretien ménagers usuelsappropriés pour l’acier inoxydable peuvent être utilisés en toute sécurité. Nettoyez les surfaces enacier inoxydable simplement en les frottant. Ensuite, rincez bien le plateau de pesée pour en retirer tousles restes de saleté et de produits d’entretien, puis laissez sécher l’appareil. Pour protéger encoredavantage votre balance, vous pouvez appliquer unehuile d’entretien. Utiliser des solvants exclusivementpour nettoyer les parties en acier inoxydable.
78
Contrôle de sécuritéS’il vous semble que l’appareil ne peut plus fonctionner sans danger :
§ Débranchez le bloc d’alimentation du secteur.
> Assurez-vous que la balance ne sera plusutilisée.
Informez le service après-vente DENVER. La remise en état de l’appareil ne doit êtreeffectuée que par une main d’œuvre qualifiée.
79
Recyclage
Instructions d’élimination desdéchets et de réparationSi vous n’avez plus besoin de l’em-ballage de votre appareil, veuillezl’apporter au service local de retraite-ment des déchets. Cet emballage secompose entièrement de matériauxécologiques pouvant être recyclés.
L’appareil, y compris lesaccessoires, les piles et lesbatteries, ne doivent pasêtre jetés dans les orduresménagères normales. La législation de l’Union
européenne prescrit aux Etatsmembres de collecter les équipe-ments électriques et électroniquesséparément des déchets municipauxnon triés afin de permettre ensuite deles récupérer, de les valoriser et deles recycler.
En Allemagne et dans quelquesautres pays, la société Denver Instrument se charge elle-même dereprendre et d’éliminer ses équipe-ments électriques et électroniquesconformément à la loi. Ces appareilsne doivent pas être jetés – même parde petites entreprises – dans lesordures ménagères ni apportés dansles points de collecte des serviceslocaux d’élimination des déchets.
Pour obtenir de plus amples rensei-gnements sur l’élimination desdéchets, veuillez vous adresser enAllemagne, tout comme dans lesEtats membres de l’Espace Econo-mique Européen, à notre responsablelocal du service après-vente ou ànotre centre de service après-vente :
Denver Instrument GmbHRobert-Bosch-Breite 1037079 GoettingenAllemagne
Dans les pays qui ne font pas partiede l’Espace Economique Européenou dans lesquels Denver Instrumentn’a ni filiale, ni succursale, ni reven-deur, veuillez vous adresser aux auto-rités locales ou à l’entreprise chargéede l’élimination de vos déchets.
Les piles, batteries et accumulateursrechargeables ou non doivent êtreenlevés avant de jeter l’appareil oude le mettre au rebut et ils doiventêtre jetés dans les boîtes de collectelocales prévues à cet effet.
Les appareils contaminés par des substances dangereuses (contamina-tions NBC) ne sont pas repris parDenver Instrument, ses filiales, sessuccursales ni par ses revendeurspour être réparés ou éliminés.Veuillez consulter la notice explicativeou visiter notre site Internet (www.denverinstrument.com) pourobtenir davantage de renseignementsainsi que les adresses des centres deservice après-vente à contacter sivous envisagez le renvoi en répara-tion, l’élimination ou le recyclage devotre appareil.
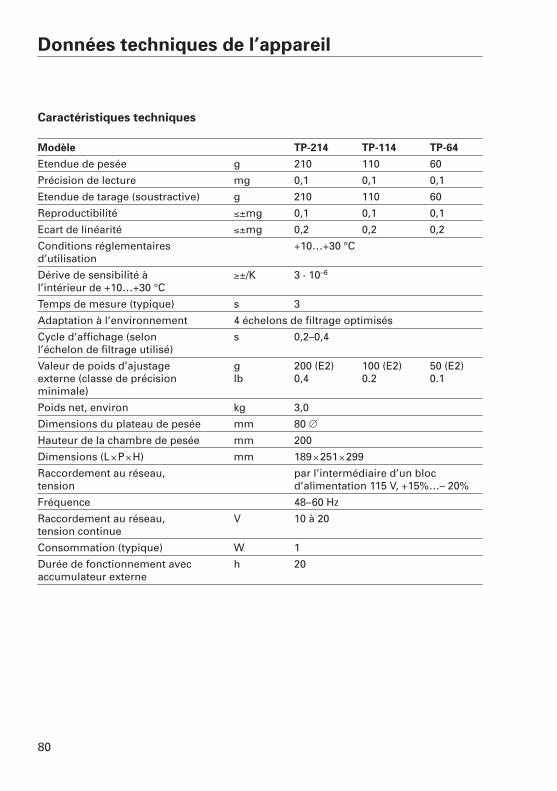
80
Données techniques de l’appareil
Caractéristiques techniques
Modèle TP-214 TP-114 TP-64
Etendue de pesée g 210 110 60
Précision de lecture mg 0,1 0,1 0,1
Etendue de tarage (soustractive) g 210 110 60
Reproductibilité <±mg 0,1 0,1 0,1
Ecart de linéarité <±mg 0,2 0,2 0,2
Conditions réglementaires +10…+30 °Cd’utilisation
Dérive de sensibilité à >±/K 3 · 10–6
l’intérieur de +10…+30 °C
Temps de mesure (typique) s 3
Adaptation à l’environnement 4 échelons de filtrage optimisés
Cycle d’affichage (selon s 0,2–0,4l’échelon de filtrage utilisé)
Valeur de poids d’ajustage g 200 (E2) 100 (E2) 50 (E2)externe (classe de précision lb 0,4 0.2 0.1minimale)
Poids net, environ kg 3,0
Dimensions du plateau de pesée mm 80 d
Hauteur de la chambre de pesée mm 200
Dimensions (L+P+H) mm 189+251+299
Raccordement au réseau, par l’intermédiaire d’un bloc tension d’alimentation 115 V, +15%…– 20%
Fréquence 48–60 Hz
Raccordement au réseau, V 10 à 20tension continue
Consommation (typique) W 1
Durée de fonctionnement avec h 20accumulateur externe
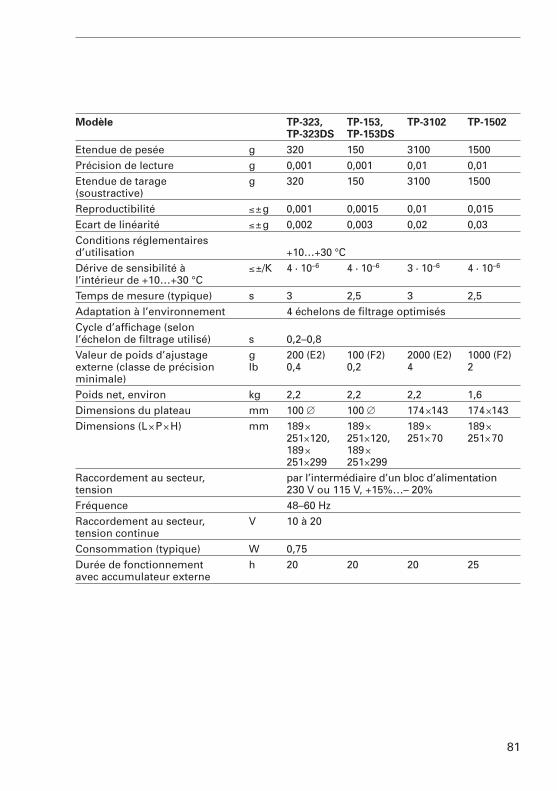
81
Modèle TP-323, TP-153, TP-3102 TP-1502TP-323DS TP-153DS
Etendue de pesée g 320 150 3100 1500Précision de lecture g 0,001 0,001 0,01 0,01Etendue de tarage g 320 150 3100 1500(soustractive)Reproductibilité <±g 0,001 0,0015 0,01 0,015Ecart de linéarité <±g 0,002 0,003 0,02 0,03Conditions réglementairesd’utilisation +10…+30 °C Dérive de sensibilité à <±/K 4 · 10–6 4 · 10–6 3 · 10–6 4 · 10–6
l’intérieur de +10…+30 °CTemps de mesure (typique) s 3 2,5 3 2,5Adaptation à l’environnement 4 échelons de filtrage optimisésCycle d’affichage (selonl’échelon de filtrage utilisé) s 0,2–0,8Valeur de poids d’ajustage g 200 (E2) 100 (F2) 2000 (E2) 1000 (F2)externe (classe de précision lb 0,4 0,2 4 2minimale)Poids net, environ kg 2,2 2,2 2,2 1,6Dimensions du plateau mm 100 d 100 d 174+143 174+143Dimensions (L+P+H) mm 189+ 189+ 189+ 189+
251+120, 251+120, 251+70 251+70189+ 189+251+299 251+299
Raccordement au secteur, par l’intermédiaire d’un bloc d’alimentation tension 230 V ou 115 V, +15%…– 20%Fréquence 48–60 HzRaccordement au secteur, V 10 à 20tension continueConsommation (typique) W 0,75Durée de fonctionnement h 20 20 20 25avec accumulateur externe
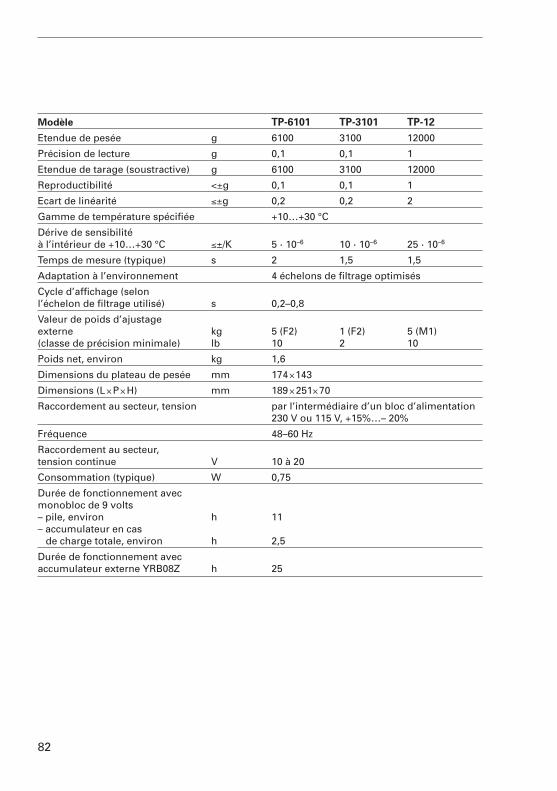
82
Modèle TP-6101 TP-3101 TP-12
Etendue de pesée g 6100 3100 12000
Précision de lecture g 0,1 0,1 1
Etendue de tarage (soustractive) g 6100 3100 12000
Reproductibilité <±g 0,1 0,1 1
Ecart de linéarité <±g 0,2 0,2 2
Gamme de température spécifiée +10…+30 °C
Dérive de sensibilité à l’intérieur de +10…+30 °C <±/K 5 · 10–6 10 · 10–6 25 · 10–6
Temps de mesure (typique) s 2 1,5 1,5
Adaptation à l’environnement 4 échelons de filtrage optimisés
Cycle d’affichage (selonl’échelon de filtrage utilisé) s 0,2–0,8
Valeur de poids d’ajustage externe kg 5 (F2) 1 (F2) 5 (M1)(classe de précision minimale) lb 10 2 10
Poids net, environ kg 1,6
Dimensions du plateau de pesée mm 174+143
Dimensions (L+P+H) mm 189+251+70
Raccordement au secteur, tension par l’intermédiaire d’un bloc d’alimentation 230 V ou 115 V, +15%…– 20%
Fréquence 48–60 Hz
Raccordement au secteur, tension continue V 10 à 20
Consommation (typique) W 0,75
Durée de fonctionnement avecmonobloc de 9 volts– pile, environ h 11– accumulateur en cas
de charge totale, environ h 2,5
Durée de fonctionnement avec accumulateur externe YRB08Z h 25
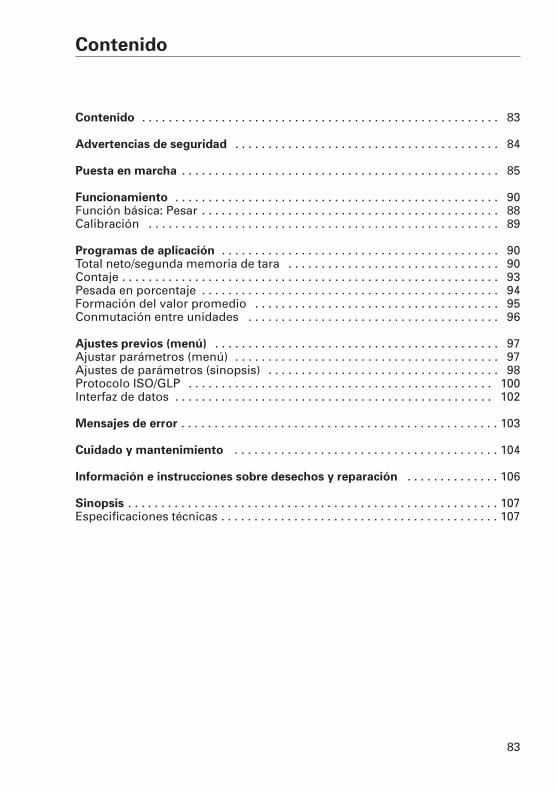
83
Contenido
Contenido . . . . . . . . . . . . . . . . . . . . . . . . . . . . . . . . . . . . . . . . . . . . . . . . . . . . . . 83
Advertencias de seguridad . . . . . . . . . . . . . . . . . . . . . . . . . . . . . . . . . . . . . . . . 84
Puesta en marcha . . . . . . . . . . . . . . . . . . . . . . . . . . . . . . . . . . . . . . . . . . . . . . . . 85
Funcionamiento . . . . . . . . . . . . . . . . . . . . . . . . . . . . . . . . . . . . . . . . . . . . . . . . . 90Función básica: Pesar . . . . . . . . . . . . . . . . . . . . . . . . . . . . . . . . . . . . . . . . . . . . . 88Calibración . . . . . . . . . . . . . . . . . . . . . . . . . . . . . . . . . . . . . . . . . . . . . . . . . . . . . 89
Programas de aplicación . . . . . . . . . . . . . . . . . . . . . . . . . . . . . . . . . . . . . . . . . . 90Total neto/segunda memoria de tara . . . . . . . . . . . . . . . . . . . . . . . . . . . . . . . . 90Contaje . . . . . . . . . . . . . . . . . . . . . . . . . . . . . . . . . . . . . . . . . . . . . . . . . . . . . . . . . 93Pesada en porcentaje . . . . . . . . . . . . . . . . . . . . . . . . . . . . . . . . . . . . . . . . . . . . . 94Formación del valor promedio . . . . . . . . . . . . . . . . . . . . . . . . . . . . . . . . . . . . . 95Conmutación entre unidades . . . . . . . . . . . . . . . . . . . . . . . . . . . . . . . . . . . . . . 96
Ajustes previos (menú) . . . . . . . . . . . . . . . . . . . . . . . . . . . . . . . . . . . . . . . . . . . 97Ajustar parámetros (menú) . . . . . . . . . . . . . . . . . . . . . . . . . . . . . . . . . . . . . . . . 97Ajustes de parámetros (sinopsis) . . . . . . . . . . . . . . . . . . . . . . . . . . . . . . . . . . . 98Protocolo ISO/GLP . . . . . . . . . . . . . . . . . . . . . . . . . . . . . . . . . . . . . . . . . . . . . . 100Interfaz de datos . . . . . . . . . . . . . . . . . . . . . . . . . . . . . . . . . . . . . . . . . . . . . . . . 102
Mensajes de error . . . . . . . . . . . . . . . . . . . . . . . . . . . . . . . . . . . . . . . . . . . . . . . . 103
Cuidado y mantenimiento . . . . . . . . . . . . . . . . . . . . . . . . . . . . . . . . . . . . . . . . 104
Información e instrucciones sobre desechos y reparación . . . . . . . . . . . . . . 106
Sinopsis . . . . . . . . . . . . . . . . . . . . . . . . . . . . . . . . . . . . . . . . . . . . . . . . . . . . . . . . 107Especificaciones técnicas . . . . . . . . . . . . . . . . . . . . . . . . . . . . . . . . . . . . . . . . . . 107
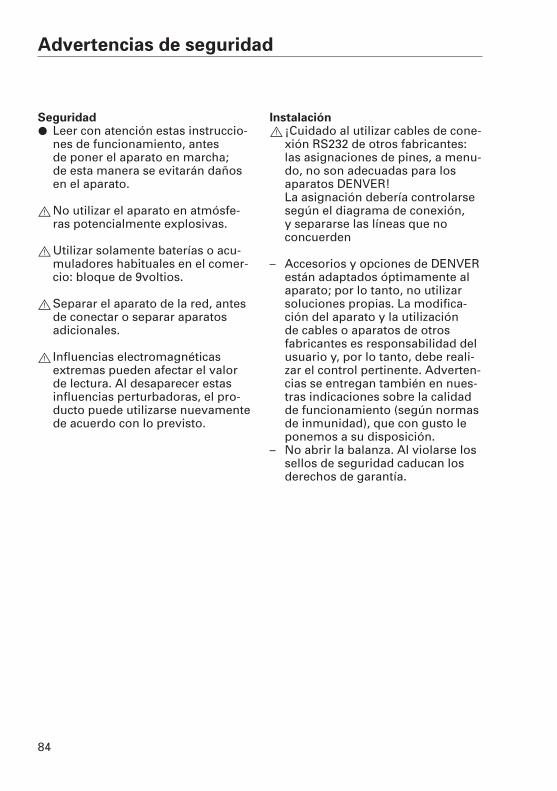
84
Advertencias de seguridad
Seguridad§ Leer con atención estas instruccio-
nes de funcionamiento, antes de poner el aparato en marcha; de esta manera se evitarán dañosen el aparato.
!No utilizar el aparato en atmósfe-ras potencialmente explosivas.
!Utilizar solamente baterías o acu-muladores habituales en el comer-cio: bloque de 9voltios.
!Separar el aparato de la red, antesde conectar o separar aparatosadicionales.
! Influencias electromagnéticasextremas pueden afectar el valorde lectura. Al desaparecer estasinfluencias perturbadoras, el pro-ducto puede utilizarse nuevamentede acuerdo con lo previsto.
Instalación! ¡Cuidado al utilizar cables de cone-
xión RS232 de otros fabricantes:las asignaciones de pines, a menu-do, no son adecuadas para losaparatos DENVER! La asignación debería controlarsesegún el diagrama de conexión, y separarse las líneas que no concuerden
– Accesorios y opciones de DENVERestán adaptados óptimamente alaparato; por lo tanto, no utilizarsoluciones propias. La modifica-ción del aparato y la utilización de cables o aparatos de otrosfabricantes es responsabilidad delusuario y, por lo tanto, debe reali-zar el control pertinente. Adverten-cias se entregan también en nues-tras indicaciones sobre la calidadde funcionamiento (según normasde inmunidad), que con gusto leponemos a su disposición.
– No abrir la balanza. Al violarse lossellos de seguridad caducan losderechos de garantía.
85
Puesta en marcha
Condiciones de transporte y almacenamiento– No exponer el aparato a tempera-
turas extremas, choques, vibracio-nes y humedad.
Desembalar§ Controlar el aparato inmediata-
mente al desembalar, para detec-tar daños exteriores visibles.
$ En caso de daños, ver las adver-tencias en el capítulo “Cuidado y mantenimiento” párrafo “Controles de seguridad”
$ Conservar todas las piezas delembalaje original, para una devolución eventual. Al enviar, ¡separar todos los cablesde conexión!
Suministro– Balanza– Platillo de pesada– Soporte de platillo, sólo en los
modelos con platillo de pesadaredondo
– Alimentador
Adicional en los modelos TP-214, TP-114, TP-64, TP-323DS, TP-153DS:– Anillo de blindaje
(excepto para modelos TP-…DS)– Placa de blindaje– Cubierta protectora
Adicional en los modelos TP-323, TP-153:– Protector contra corrientes de aire,
anillo de vidrio con tapa
InstalaciónEn la instalación, evitar lugares con las influencias negativas siguientes:– Calor (calefacción, rayos solares)– Corrientes directas de aire debido
a puertas y ventanas abiertas– Vibraciones durante la medición– Humedad extrema
AclimatarSi un aparato que está frio se instalaen un ambiente más temperadopuede producirse condensación. Por lo tanto, dejar que el aparato se aclimate, separado de la red, a latemperatura del nuevo ambiente, por aprox. 2 horas.
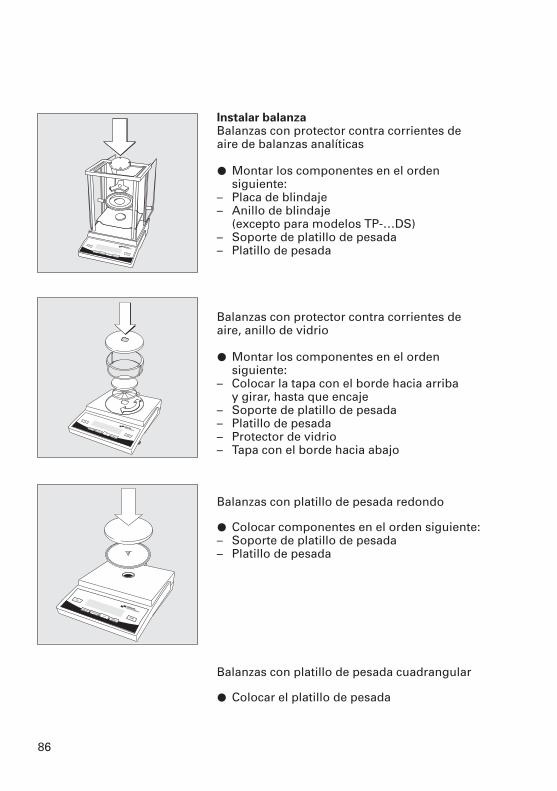
86
Instalar balanzaBalanzas con protector contra corrientes deaire de balanzas analíticas
§ Montar los componentes en el ordensiguiente:
– Placa de blindaje– Anillo de blindaje
(excepto para modelos TP-…DS)– Soporte de platillo de pesada– Platillo de pesada
Balanzas con protector contra corrientes deaire, anillo de vidrio
§ Montar los componentes en el ordensiguiente:
– Colocar la tapa con el borde hacia arriba y girar, hasta que encaje
– Soporte de platillo de pesada– Platillo de pesada– Protector de vidrio– Tapa con el borde hacia abajo
Balanzas con platillo de pesada redondo
§ Colocar componentes en el orden siguiente:– Soporte de platillo de pesada– Platillo de pesada
Balanzas con platillo de pesada cuadrangular
§ Colocar el platillo de pesada
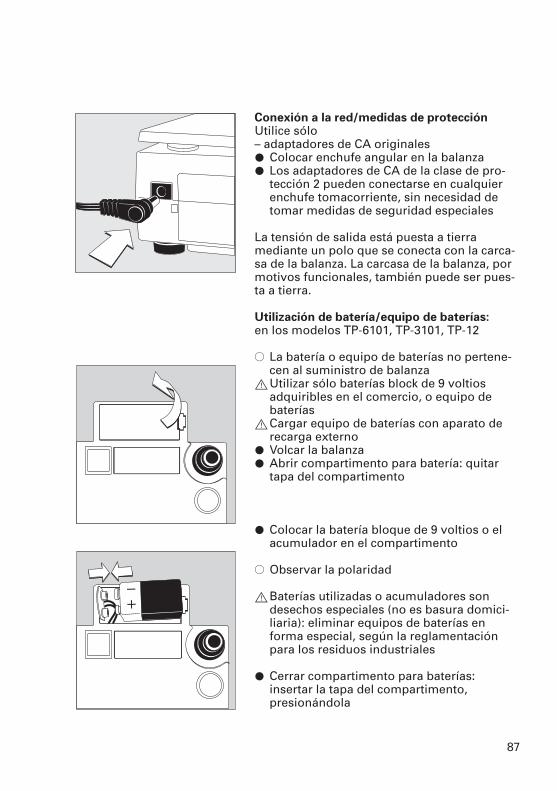
87
Conexión a la red/medidas de protecciónUtilice sólo – adaptadores de CA originales § Colocar enchufe angular en la balanza§ Los adaptadores de CA de la clase de pro-
tección 2 pueden conectarse en cualquierenchufe tomacorriente, sin necesidad detomar medidas de seguridad especiales
La tensión de salida está puesta a tierramediante un polo que se conecta con la carca-sa de la balanza. La carcasa de la balanza, pormotivos funcionales, también puede ser pues-ta a tierra.
Utilización de batería/equipo de baterías:en los modelos TP-6101, TP-3101, TP-12
$ La batería o equipo de baterías no pertene-cen al suministro de balanza
!Utilizar sólo baterías block de 9 voltiosadquiribles en el comercio, o equipo debaterías
!Cargar equipo de baterías con aparato derecarga externo
§ Volcar la balanza§ Abrir compartimento para batería: quitar
tapa del compartimento
§ Colocar la batería bloque de 9 voltios o elacumulador en el compartimento
$ Observar la polaridad
!Baterías utilizadas o acumuladores sondesechos especiales (no es basura domici-liaria): eliminar equipos de baterías enforma especial, según la reglamentaciónpara los residuos industriales
§ Cerrar compartimento para baterías: insertar la tapa del compartimento, presionándola
88
NOTA: Este equipo se ha probadoy encontrado cumplir con los límites en conformidad con elapartado 15 de las normas FCC. Estos límites se diseñan para proporcionar una protección razonable contra interferenciasperjudiciales. Este equipo genera,usa y puede irradiar energía deradiofrecuencia; si no se instala y utiliza de acuerdo con estas instrucciones puede ocasionarinterferencias perjudiciales en lascomunicaciones por radio.
Para información sobre los límitesespecíficos y la clase de este equi-po, remitirse a la Declaración deConformidad. Dependiendo de laclase específica, Ud. deberá efec-tuar la corrección de la interferen-cia o solicitar que ésta se efectúe.
Si tiene un dispositivo digital de la Clase A, necesita para cumplircon las normas FCC lo siguiente:“La operación de este equipo enun área residencial probablementecausará interferencias perjudiciales,en cuyo caso, el usuario deberáhacerse cargo de subsanarlas porsu propia cuenta”.
Si tiene un dispositivo digital de laClase B, lea y siga la informaciónFCC dada a continuación: “Sinembargo, no hay garantías de queno se producirán interferencias en una instalación específica. Si elequipo ocasiona interferenciasperjudiciales en la recepción deradio o televisión, lo que se puededeterminar apagando y volviendoa encender el equipo, se aconsejatratar de corregir la interferenciamediante una o más de lassiguientes medidas correctoras:
– Cambie la orientación o ubicaciónde la antena receptora.
– Aleje el equipo del receptor.
– Conecte el equipo a una toma decorriente de un circuito diferente al del receptor.
– Consulte al distribuidor o a un técnico de radio/televisión paraobtener sugerencias adicionales”.
Antes de operar este equipo, controle la clase FCC (Clase A o Clase B) que ha sido acordada en la Declaración de Conformidadadjunta. Asegúrese de observa lainformación de esta declaración.
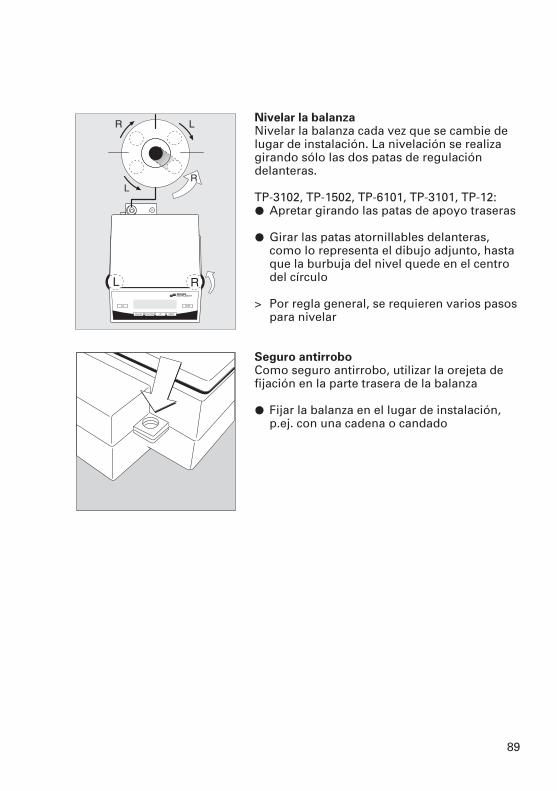
89
Nivelar la balanza Nivelar la balanza cada vez que se cambie delugar de instalación. La nivelación se realizagirando sólo las dos patas de regulacióndelanteras.
TP-3102, TP-1502, TP-6101, TP-3101, TP-12:§ Apretar girando las patas de apoyo traseras
§ Girar las patas atornillables delanteras,como lo representa el dibujo adjunto, hastaque la burbuja del nivel quede en el centrodel círculo
> Por regla general, se requieren varios pasospara nivelar
Seguro antirroboComo seguro antirrobo, utilizar la orejeta defijación en la parte trasera de la balanza
§ Fijar la balanza en el lugar de instalación, p.ej. con una cadena o candado
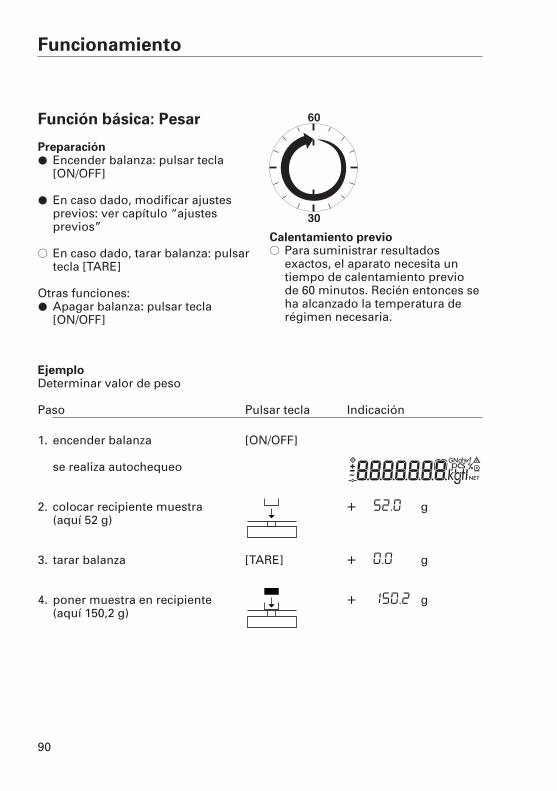
90
Funcionamiento
EjemploDeterminar valor de peso
Paso Pulsar tecla Indicación
1. encender balanza [ON/OFF]
se realiza autochequeo
2. colocar recipiente muestra + 52.0 g(aquí 52 g)
3. tarar balanza [TARE] + 0.0 g
4. poner muestra en recipiente + 150.2 g(aquí 150,2 g)
Función básica: Pesar
Preparación§ Encender balanza: pulsar tecla
[ON/OFF]
§ En caso dado, modificar ajustesprevios: ver capítulo “ajustes previos”
$ En caso dado, tarar balanza: pulsartecla [TARE]
Otras funciones:§ Apagar balanza: pulsar tecla
[ON/OFF]
Calentamiento previo$ Para suministrar resultados
exactos, el aparato necesita untiempo de calentamiento previo de 60 minutos. Recién entonces seha alcanzado la temperatura derégimen necesaria.
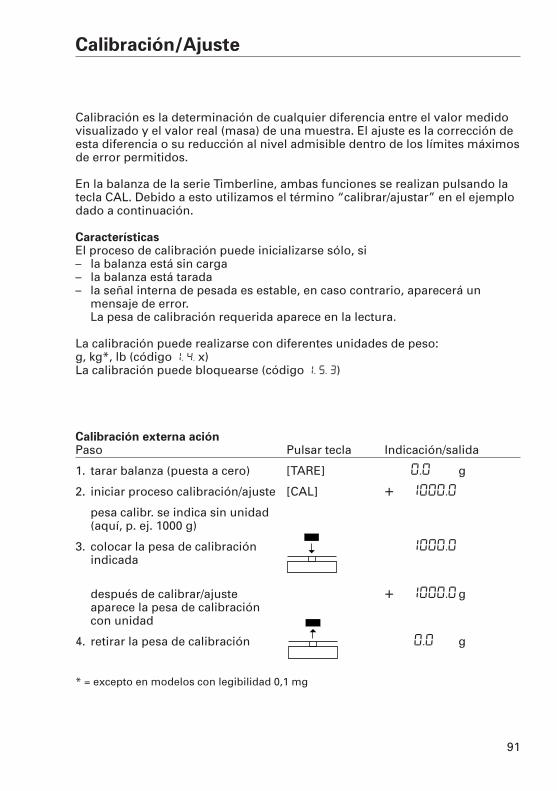
91
Calibración/Ajuste
Calibración es la determinación de cualquier diferencia entre el valor medidovisualizado y el valor real (masa) de una muestra. El ajuste es la corrección deesta diferencia o su reducción al nivel admisible dentro de los límites máximosde error permitidos.
En la balanza de la serie Timberline, ambas funciones se realizan pulsando latecla CAL. Debido a esto utilizamos el término “calibrar/ajustar” en el ejemplodado a continuación.
CaracterísticasEl proceso de calibración puede inicializarse sólo, si– la balanza está sin carga– la balanza está tarada– la señal interna de pesada es estable, en caso contrario, aparecerá un
mensaje de error. La pesa de calibración requerida aparece en la lectura.
La calibración puede realizarse con diferentes unidades de peso: g, kg*, lb (código 1. 4. x)La calibración puede bloquearse (código 1. 5. 3)
Calibración externa ación Paso Pulsar tecla Indicación/salida
1. tarar balanza (puesta a cero) [TARE] 0.0 g
2. iniciar proceso calibración/ajuste [CAL] + 1000.0 g
pesa calibr. se indica sin unidad (aquí, p. ej. 1000 g)
3. colocar la pesa de calibración 1000.0indicada
después de calibrar/ajuste + 1000.0 gaparece la pesa de calibración con unidad
4. retirar la pesa de calibración 0.0 g
* = excepto en modelos con legibilidad 0,1 mg
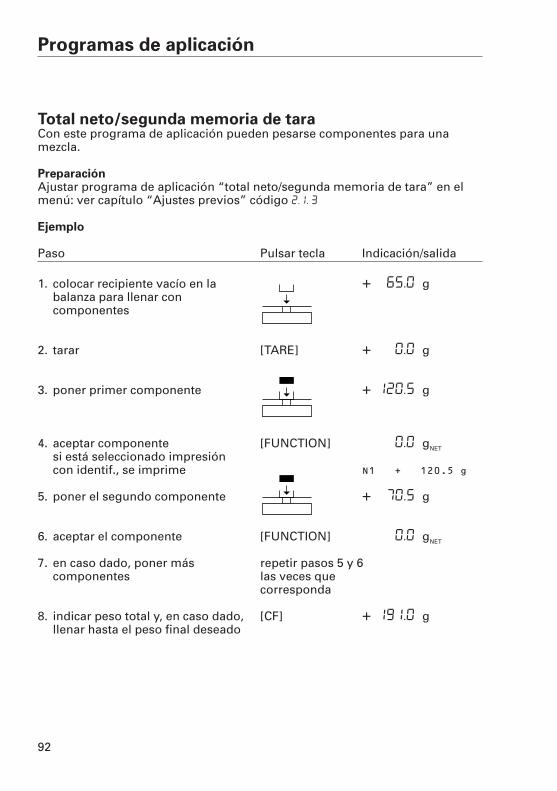
92
Programas de aplicación
Total neto/segunda memoria de taraCon este programa de aplicación pueden pesarse componentes para una mezcla.
PreparaciónAjustar programa de aplicación “total neto/segunda memoria de tara” en elmenú: ver capítulo “Ajustes previos” código 2.1. 3
Ejemplo
Paso Pulsar tecla Indicación/salida
1. colocar recipiente vacío en la + 65.0 gbalanza para llenar con componentes
2. tarar [TARE] + 0.0 g
3. poner primer componente + 120,5 g
4. aceptar componente [FUNCTION] 0.0 gNET
si está seleccionado impresióncon identif., se imprime N1 + 120.5 g
5. poner el segundo componente + 70,5 g
6. aceptar el componente [FUNCTION] 0.0 gNET
7. en caso dado, poner más repetir pasos 5 y 6componentes las veces que
corresponda
8. indicar peso total y, en caso dado, [CF] + 191,0 gllenar hasta el peso final deseado
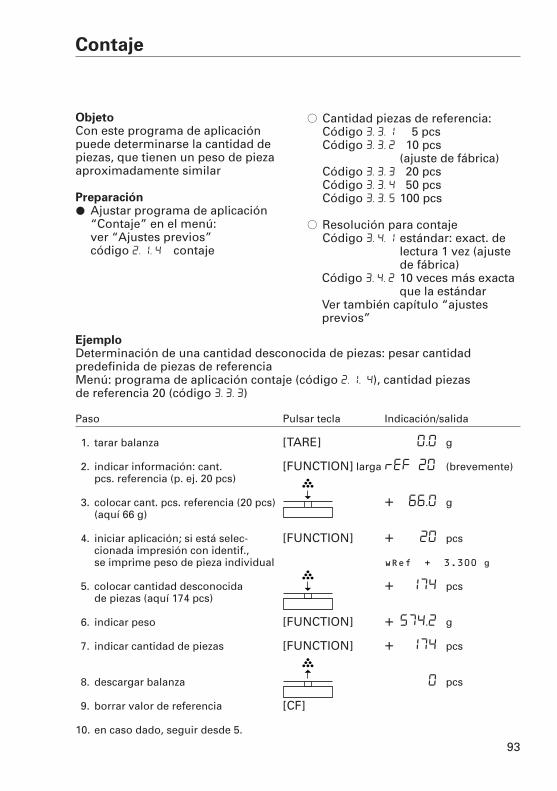
93
Contaje
ObjetoCon este programa de aplicaciónpuede determinarse la cantidad depiezas, que tienen un peso de piezaaproximadamente similar
Preparación§ Ajustar programa de aplicación
“Contaje” en el menú: ver “Ajustes previos”código 2. 1. 4 contaje
$ Cantidad piezas de referencia:Código 3. 3. 1 5 pcsCódigo 3. 3. 2 10 pcs
(ajuste de fábrica)Código 3. 3. 3 20 pcsCódigo 3. 3. 4 50 pcsCódigo 3. 3. 5 100 pcs
$ Resolución para contajeCódigo 3. 4. 1 estándar: exact. de
lectura 1 vez (ajustede fábrica)
Código 3. 4. 2 10 veces más exactaque la estándar
Ver también capítulo “ajustes previos”
EjemploDeterminación de una cantidad desconocida de piezas: pesar cantidad predefinida de piezas de referenciaMenú: programa de aplicación contaje (código 2. 1. 4), cantidad piezas de referencia 20 (código 3. 3. 3)
Paso Pulsar tecla Indicación/salida
1. tarar balanza [TARE] 0.0 g
2. indicar información: cant. [FUNCTION] larga ref 20 (brevemente)pcs. referencia (p. ej. 20 pcs)
3. colocar cant. pcs. referencia (20 pcs) + 66.0 g(aquí 66 g)
4. iniciar aplicación; si está selec- [FUNCTION] + 20 pcscionada impresión con identif., se imprime peso de pieza individual wRef + 3.300 g
5. colocar cantidad desconocida + 174 pcsde piezas (aquí 174 pcs)
6. indicar peso [FUNCTION] + 574.2 g
7. indicar cantidad de piezas [FUNCTION] + 174 pcs
8. descargar balanza 0 pcs
9. borrar valor de referencia [CF]
10. en caso dado, seguir desde 5.
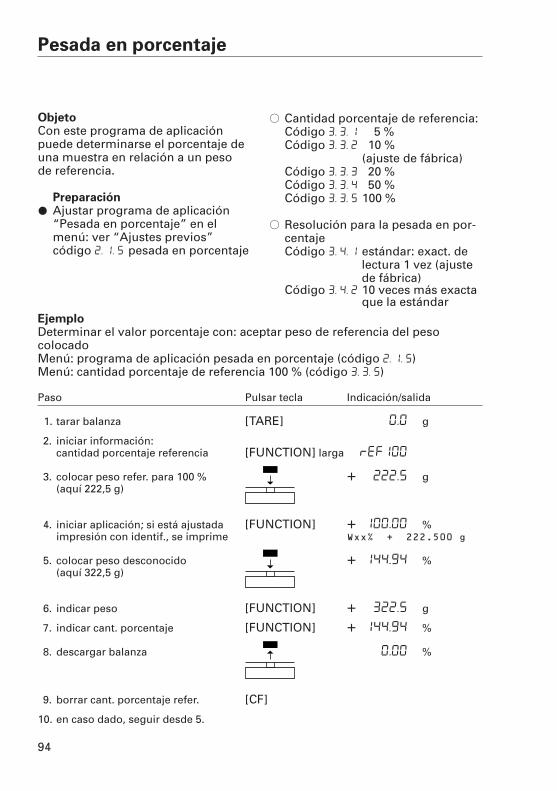
Pesada en porcentaje
ObjetoCon este programa de aplicación puede determinarse el porcentaje de una muestra en relación a un peso de referencia.
Preparación§ Ajustar programa de aplicación
“Pesada en porcentaje” en elmenú: ver “Ajustes previos” código 2. 1. 5 pesada en porcentaje
$ Cantidad porcentaje de referencia:Código 3. 3. 1 5 %Código 3. 3. 2 10 %
(ajuste de fábrica)Código 3. 3. 3 20 %Código 3. 3. 4 50 %Código 3. 3. 5 100 %
$ Resolución para la pesada en por-centajeCódigo 3. 4. 1 estándar: exact. de
lectura 1 vez (ajustede fábrica)
Código 3. 4. 2 10 veces más exactaque la estándar
EjemploDeterminar el valor porcentaje con: aceptar peso de referencia del peso colocadoMenú: programa de aplicación pesada en porcentaje (código 2. 1. 5)Menú: cantidad porcentaje de referencia 100 % (código 3. 3. 5)
Paso Pulsar tecla Indicación/salida
1. tarar balanza [TARE] 0.0 g
2. iniciar información:cantidad porcentaje referencia [FUNCTION] larga ref100
3. colocar peso refer. para 100 % + 222.5 g(aquí 222,5 g)
4. iniciar aplicación; si está ajustada [FUNCTION] + 100.00 %impresión con identif., se imprime Wxx% + 222.500 g
5. colocar peso desconocido + 144.94 %(aquí 322,5 g)
6. indicar peso [FUNCTION] + 322.5 g
7. indicar cant. porcentaje [FUNCTION] + 144.94 %
8. descargar balanza 0.00 %
9. borrar cant. porcentaje refer. [CF]
10. en caso dado, seguir desde 5.
94
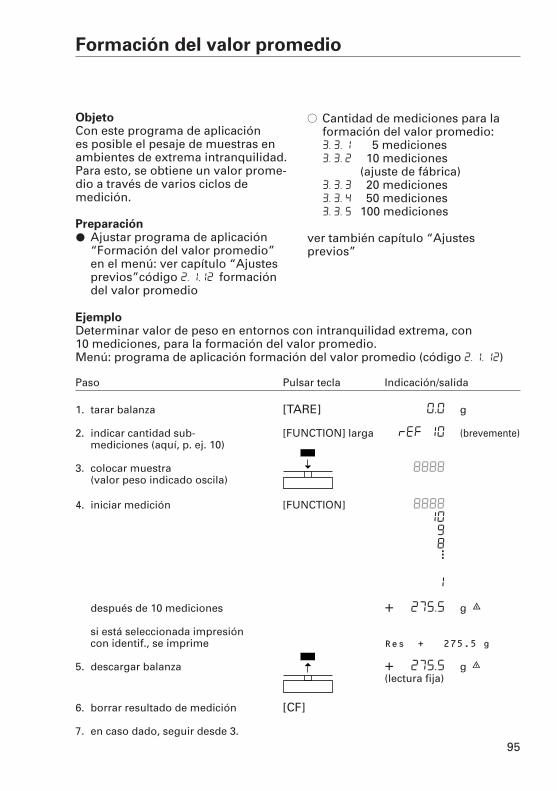
95
Formación del valor promedio
ObjetoCon este programa de aplicación es posible el pesaje de muestras enambientes de extrema intranquilidad.Para esto, se obtiene un valor prome-dio a través de varios ciclos de medición.
Preparación§ Ajustar programa de aplicación
“Formación del valor promedio”en el menú: ver capítulo “Ajustesprevios”código 2. 1.12 formacióndel valor promedio
$ Cantidad de mediciones para laformación del valor promedio:3. 3. 1 5 mediciones3. 3. 2 10 mediciones
(ajuste de fábrica)3. 3. 3 20 mediciones3. 3. 4 50 mediciones3. 3. 5 100 mediciones
ver también capítulo “Ajustes previos”
EjemploDeterminar valor de peso en entornos con intranquilidad extrema, con 10 mediciones, para la formación del valor promedio.Menú: programa de aplicación formación del valor promedio (código 2. 1. 12)
Paso Pulsar tecla Indicación/salida
1. tarar balanza [TARE] 0.0 g
2. indicar cantidad sub- [FUNCTION] larga ref 10 (brevemente)mediciones (aquí, p. ej. 10)
3. colocar muestra 8888(valor peso indicado oscila)
4. iniciar medición [FUNCTION] 8888
10
9
8
1
después de 10 mediciones + 275.5 g G
si está seleccionada impresióncon identif., se imprime Res + 275.5 g
5. descargar balanza + 275.5 g G(lectura fija)
6. borrar resultado de medición [CF]
7. en caso dado, seguir desde 3.
···
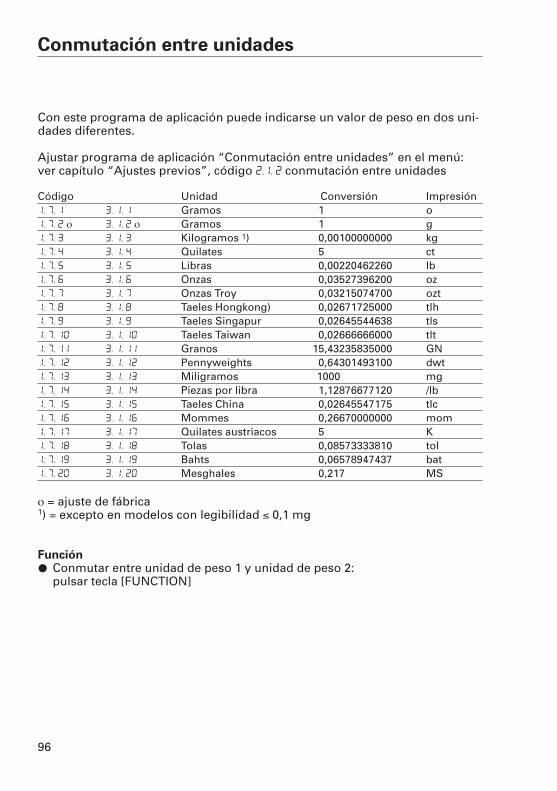
96
Conmutación entre unidades
Con este programa de aplicación puede indicarse un valor de peso en dos uni-dades diferentes.
Ajustar programa de aplicación “Conmutación entre unidades” en el menú: ver capítulo “Ajustes previos”, código 2.1. 2 conmutación entre unidades
Código Unidad Conversión Impresión1. 7. 1 3. 1. 1 Gramos 1,00000000000 o1. 7. 2 ο 3. 1. 2 ο Gramos 1,00000000000 g1. 7. 3 3. 1. 3 Kilogramos 1) 0,00100000000 kg1. 7. 4 3. 1. 4 Quilates 5,00000000000 ct1. 7. 5 3. 1. 5 Libras 0,00220462260 lb1. 7. 6 3. 1. 6 Onzas 0,03527396200 oz1. 7. 7 3. 1. 7 Onzas Troy 0,03215074700 ozt1. 7. 8 3. 1. 8 Taeles Hongkong) 0,02671725000 tlh1. 7. 9 3. 1. 9 Taeles Singapur 0,02645544638 tls1. 7. 10 3. 1. 10 Taeles Taiwan 0,02666666000 tlt1. 7. 11 3. 1. 11 Granos 15,43235835000 GN1. 7. 12 3. 1. 12 Pennyweights 0,64301493100 dwt1. 7. 13 3. 1. 13 Miligramos 1000,000000000000 mg1. 7. 14 3. 1. 14 Piezas por libra 1,12876677120 /lb1. 7. 15 3. 1. 15 Taeles China 0,02645547175 tlc1. 7. 16 3. 1. 16 Mommes 0,26670000000 mom1. 7. 17 3. 1. 17 Quilates austriacos 5,00000000000 K1. 7. 18 3. 1. 18 Tolas 0,08573333810 tol1. 7. 19 3. 1. 19 Bahts 0,06578947437 bat1. 7. 20 3. 1. 20 Mesghales 0,21700000000 MS
ο = ajuste de fábrica 1) = excepto en modelos con legibilidad ≤ 0,1 mg
Función§ Conmutar entre unidad de peso 1 y unidad de peso 2:
pulsar tecla [FUNCTION]
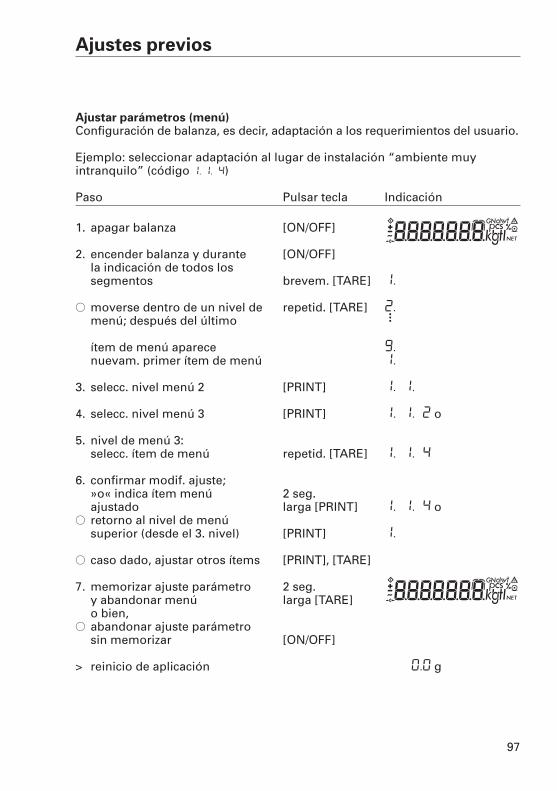
97
Ajustes previos
Ajustar parámetros (menú)Configuración de balanza, es decir, adaptación a los requerimientos del usuario.
Ejemplo: seleccionar adaptación al lugar de instalación “ambiente muy intranquilo” (código 1, 1. 4)
Paso Pulsar tecla Indicación
1. apagar balanza [ON/OFF]
2. encender balanza y durante [ON/OFF]la indicación de todos los segmentos brevem. [TARE] 1.
$ moverse dentro de un nivel de repetid. [TARE] 2.menú; después del último
ítem de menú aparece 9.nuevam. primer ítem de menú 1.
3. selecc. nivel menú 2 [PRINT] 1. 1.
4. selecc. nivel menú 3 [PRINT] 1. 1. 2 o
5. nivel de menú 3:selecc. ítem de menú repetid. [TARE] 1. 1. 4
6. confirmar modif. ajuste;»o« indica ítem menú 2 seg.ajustado larga [PRINT] 1. 1. 4 o
$ retorno al nivel de menúsuperior (desde el 3. nivel) [PRINT] 1.
$ caso dado, ajustar otros ítems [PRINT], [TARE]
7. memorizar ajuste parámetro 2 seg.y abandonar menú larga [TARE]o bien,
$ abandonar ajuste parámetro sin memorizar [ON/OFF]
> reinicio de aplicación 0.0 g
···
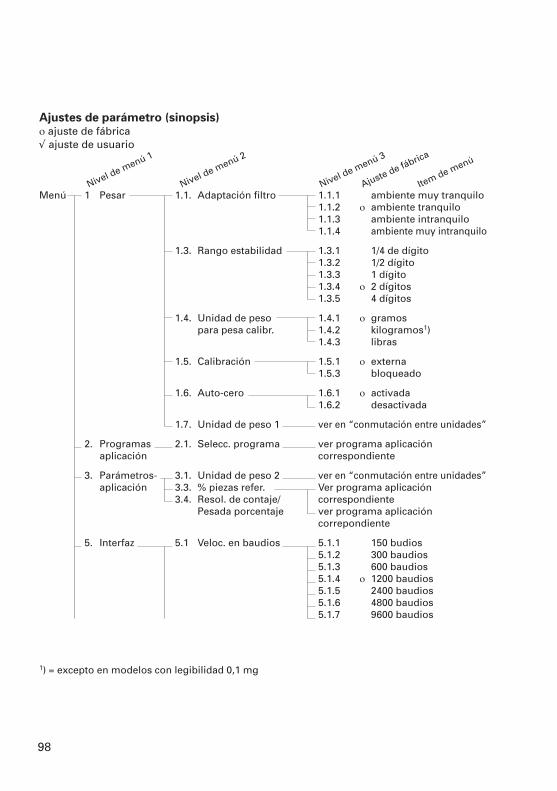
Ajustes de parámetro (sinopsis)ο ajuste de fábrica√ ajuste de usuario
Menú 1 Pesar 1.1. Adaptación filtro 1.1.1 ambiente muy tranquilo1.1.2 ο ambiente tranquilo1.1.3 ambiente intranquilo1.1.4 ambiente muy intranquilo
1.3. Rango estabilidad 1.3.1 1/4 de dígito1.3.2 1/2 dígito1.3.3 1 dígito1.3.4 ο 2 dígitos1.3.5 4 dígitos
1.4. Unidad de peso 1.4.1 ο gramospara pesa calibr. 1.4.2 kilogramos1)
1.4.3 libras
1.5. Calibración 1.5.1 ο externa1.5.3 bloqueado
1.6. Auto-cero 1.6.1 ο activada1.6.2 desactivada
1.7. Unidad de peso 1 ver en “conmutación entre unidades”
2. Programas 2.1. Selecc. programa ver programa aplicación aplicación correspondiente
3. Parámetros- 3.1. Unidad de peso 2 ver en “conmutación entre unidades”aplicación 3.3. % piezas refer. Ver programa aplicación
3.4. Resol. de contaje/ correspondientePesada porcentaje ver programa aplicación
correpondiente
5. Interfaz 5.1 Veloc. en baudios 5.1.1 150 budios5.1.2 300 baudios5.1.3 600 baudios5.1.4 ο 1200 baudios5.1.5 2400 baudios5.1.6 4800 baudios5.1.7 9600 baudios
1) = excepto en modelos con legibilidad 0,1 mg
98
Nivel de menú 1
Nivel de menú 2
Nivel de menú 3
Ajuste de fábrica
Item de menú
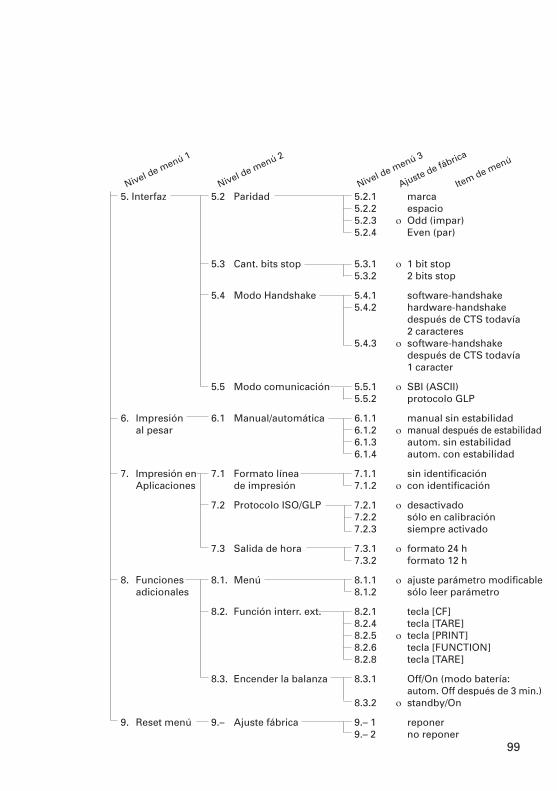
99
5. Interfaz 5.2 Paridad 5.2.1 marca5.2.2 espacio5.2.3 ο Odd (impar)5.2.4 Even (par)
5.3 Cant. bits stop 5.3.1 ο 1 bit stop5.3.2 2 bits stop
5.4 Modo Handshake 5.4.1 software-handshake5.4.2 hardware-handshake
después de CTS todavía 2 caracteres
5.4.3 ο software-handshakedespués de CTS todavía 1 caracter
5.5 Modo comunicación 5.5.1 ο SBI (ASCII)5.5.2 protocolo GLP
6. Impresión 6.1 Manual/automática 6.1.1 manual sin estabilidadal pesar 6.1.2 ο manual después de estabilidad
6.1.3 autom. sin estabilidad6.1.4 autom. con estabilidad
7. Impresión en 7.1 Formato línea 7.1.1 sin identificaciónAplicaciones de impresión 7.1.2 ο con identificación
7.2 Protocolo ISO/GLP 7.2.1 ο desactivado7.2.2 sólo en calibración7.2.3 siempre activado
7.3 Salida de hora 7.3.1 ο formato 24 h7.3.2 formato 12 h
8. Funciones 8.1. Menú 8.1.1 ο ajuste parámetro modificableadicionales 8.1.2 sólo leer parámetro
8.2. Función interr. ext. 8.2.1 tecla [CF]8.2.4 tecla [TARE]8.2.5 ο tecla [PRINT]8.2.6 tecla [FUNCTION]8.2.8 tecla [TARE]
8.3. Encender la balanza 8.3.1 Off/On (modo batería:autom. Off después de 3 min.)
8.3.2 ο standby/On
9. Reset menú 9.– Ajuste fábrica 9.– 1 reponer9.– 2 no reponer
Nivel de menú 1
Nivel de menú 2
Nivel de menú 3
Ajuste de fábrica
Item de menú
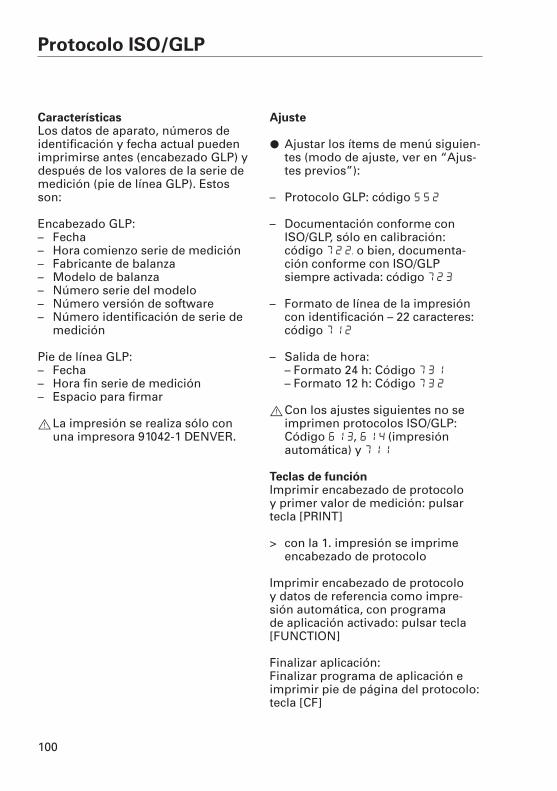
Protocolo ISO/GLP
CaracterísticasLos datos de aparato, números de identificación y fecha actual puedenimprimirse antes (encabezado GLP) ydespués de los valores de la serie demedición (pie de línea GLP). Estosson:
Encabezado GLP:– Fecha– Hora comienzo serie de medición– Fabricante de balanza– Modelo de balanza– Número serie del modelo– Número versión de software– Número identificación de serie de
medición
Pie de línea GLP:– Fecha– Hora fin serie de medición– Espacio para firmar
!La impresión se realiza sólo conuna impresora 91042-1 DENVER.
Ajuste
§ Ajustar los ítems de menú siguien-tes (modo de ajuste, ver en “Ajus-tes previos”):
– Protocolo GLP: código 5 5 2
– Documentación conforme conISO/GLP, sólo en calibración: código 7 2 2, o bien, documenta-ción conforme con ISO/GLP siempre activada: código 7 2 3
– Formato de línea de la impresión con identificación – 22 caracteres: código 7 1 2
– Salida de hora:– Formato 24 h: Código 7 3 1
– Formato 12 h: Código 7 3 2
!Con los ajustes siguientes no se imprimen protocolos ISO/GLP: Código 6 1 3, 6 1 4 (impresión automática) y 7 1 1
Teclas de función Imprimir encabezado de protocolo y primer valor de medición: pulsartecla [PRINT]
> con la 1. impresión se imprime encabezado de protocolo
Imprimir encabezado de protocolo y datos de referencia como impre-sión automática, con programa de aplicación activado: pulsar tecla[FUNCTION]
Finalizar aplicación: Finalizar programa de aplicación eimprimir pie de página del protocolo:tecla [CF]
100
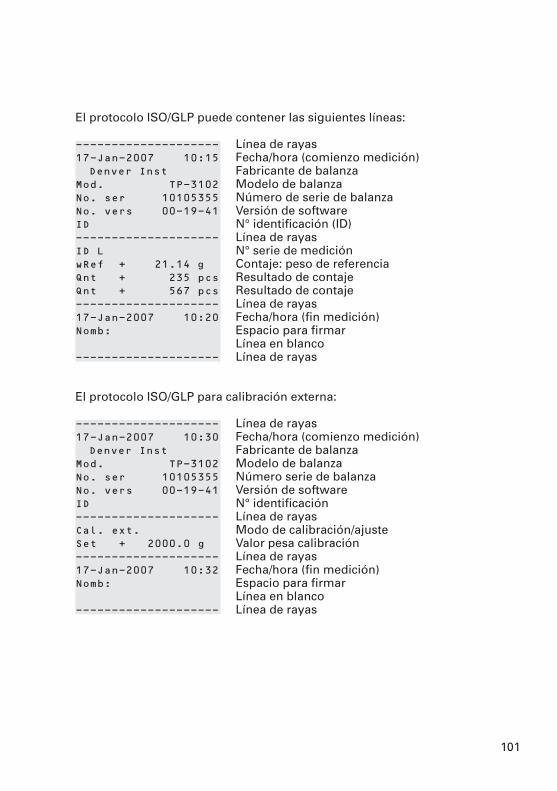
101
El protocolo ISO/GLP puede contener las siguientes líneas:
-------------------- Línea de rayas17-Jan-2007 10:15 Fecha/hora (comienzo medición)Denver Inst Fabricante de balanza
Mod. TP-3102 Modelo de balanzaNo. ser 10105355 Número de serie de balanzaNo. vers 00-19-41 Versión de softwareID N° identificación (ID)-------------------- Línea de rayasID L N° serie de mediciónwRef + 21.14 g Contaje: peso de referenciaQnt + 235 pcs Resultado de contajeQnt + 567 pcs Resultado de contaje-------------------- Línea de rayas17-Jan-2007 10:20 Fecha/hora (fin medición)Nomb: Espacio para firmar
Línea en blanco-------------------- Línea de rayas
El protocolo ISO/GLP para calibración externa:
-------------------- Línea de rayas17-Jan-2007 10:30 Fecha/hora (comienzo medición)Denver Inst Fabricante de balanza
Mod. TP-3102 Modelo de balanzaNo. ser 10105355 Número serie de balanzaNo. vers 00-19-41 Versión de softwareID N° identificación-------------------- Línea de rayasCal. ext. Modo de calibración/ajusteSet + 2000.0 g Valor pesa calibración-------------------- Línea de rayas17-Jan-2007 10:32 Fecha/hora (fin medición)Nomb: Espacio para firmar
Línea en blanco-------------------- Línea de rayas
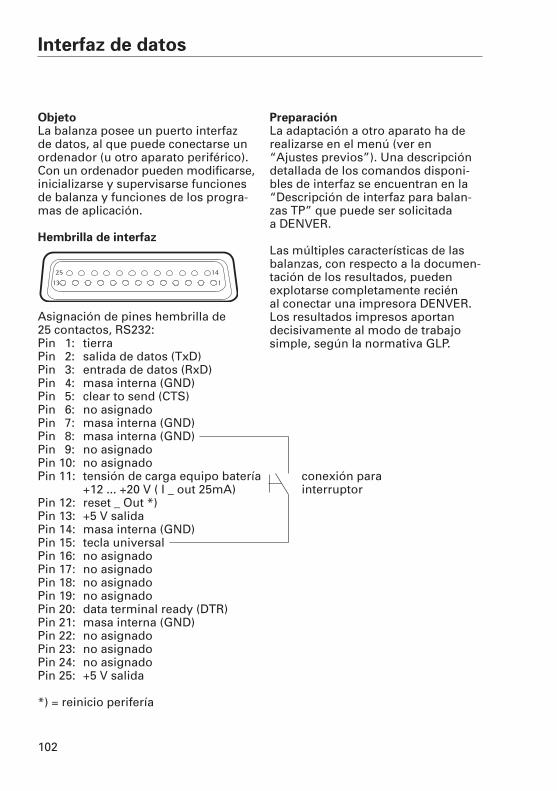
102
Interfaz de datos
ObjetoLa balanza posee un puerto interfaz de datos, al que puede conectarse unordenador (u otro aparato periférico).Con un ordenador pueden modificarse,inicializarse y supervisarse funcionesde balanza y funciones de los progra-mas de aplicación.
Hembrilla de interfaz
Asignación de pines hembrilla de 25 contactos, RS232:Pin 1: tierraPin 2: salida de datos (TxD)Pin 3: entrada de datos (RxD)Pin 4: masa interna (GND)Pin 5: clear to send (CTS)Pin 6: no asignadoPin 7: masa interna (GND)Pin 8: masa interna (GND)Pin 9: no asignadoPin 10: no asignadoPin 11: tensión de carga equipo batería conexión para
+12 ... +20 V ( I _ out 25mA) interruptorPin 12: reset _ Out *)Pin 13: +5 V salidaPin 14: masa interna (GND)Pin 15: tecla universalPin 16: no asignadoPin 17: no asignadoPin 18: no asignadoPin 19: no asignadoPin 20: data terminal ready (DTR)Pin 21: masa interna (GND)Pin 22: no asignadoPin 23: no asignadoPin 24: no asignadoPin 25: +5 V salida
*) = reinicio perifería
1
14
13
25
PreparaciónLa adaptación a otro aparato ha de realizarse en el menú (ver en “Ajustes previos”). Una descripcióndetallada de los comandos disponi-bles de interfaz se encuentran en la“Descripción de interfaz para balan-zas TP” que puede ser solicitada a DENVER.
Las múltiples características de lasbalanzas, con respecto a la documen-tación de los resultados, puedenexplotarse completamente recién al conectar una impresora DENVER. Los resultados impresos aportandecisivamente al modo de trabajosimple, según la normativa GLP.
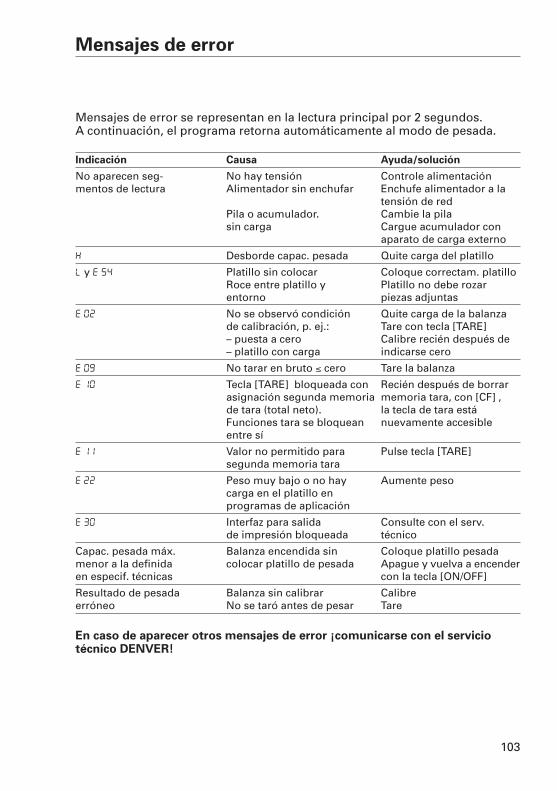
103
Mensajes de error
Mensajes de error se representan en la lectura principal por 2 segundos. A continuación, el programa retorna automáticamente al modo de pesada.
Indicación Causa Ayuda/solución
No aparecen seg- No hay tensión Controle alimentaciónmentos de lectura Alimentador sin enchufar Enchufe alimentador a la
tensión de redPila o acumulador. Cambie la pila sin carga Cargue acumulador con
aparato de carga externo
h Desborde capac. pesada Quite carga del platillo
l y E 54 Platillo sin colocar Coloque correctam. platilloRoce entre platillo y Platillo no debe rozar entorno piezas adjuntas
e 02 No se observó condición Quite carga de la balanzade calibración, p. ej.: Tare con tecla [TARE] – puesta a cero Calibre recién después de– platillo con carga indicarse cero
e 09 No tarar en bruto < cero Tare la balanza
e 10 Tecla [TARE] bloqueada con Recién después de borrar asignación segunda memoria memoria tara, con [CF] , de tara (total neto). la tecla de tara está Funciones tara se bloquean nuevamente accesibleentre sí
e 11 Valor no permitido para Pulse tecla [TARE] segunda memoria tara
e 22 Peso muy bajo o no hay Aumente pesocarga en el platillo en programas de aplicación
e 30 Interfaz para salida Consulte con el serv. de impresión bloqueada técnico
Capac. pesada máx. Balanza encendida sin Coloque platillo pesada menor a la definida colocar platillo de pesada Apague y vuelva a encender en especif. técnicas con la tecla [ON/OFF]
Resultado de pesada Balanza sin calibrar Calibreerróneo No se taró antes de pesar Tare
En caso de aparecer otros mensajes de error ¡comunicarse con el servicio técnico DENVER!
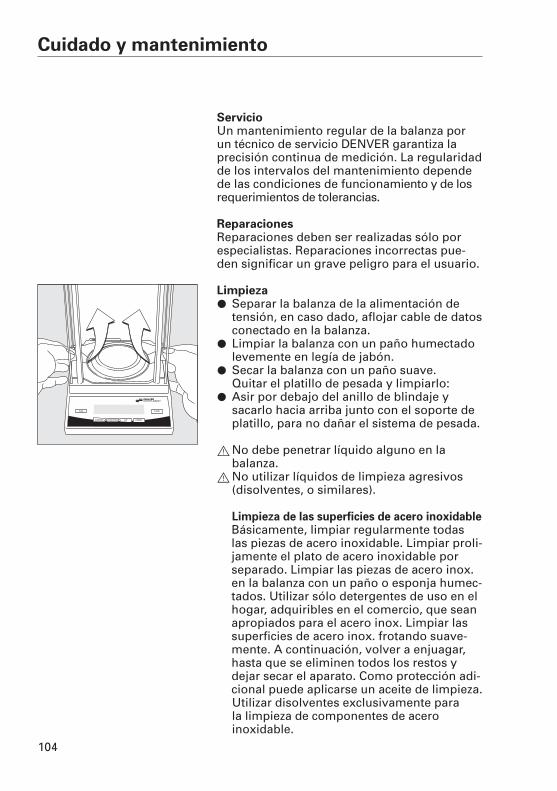
104
Cuidado y mantenimiento
ServicioUn mantenimiento regular de la balanza porun técnico de servicio DENVER garantiza la precisión continua de medición. La regularidadde los intervalos del mantenimiento dependede las condiciones de funcionamiento y de losrequerimientos de tolerancias.
ReparacionesReparaciones deben ser realizadas sólo porespecialistas. Reparaciones incorrectas pue-den significar un grave peligro para el usuario.
Limpieza§ Separar la balanza de la alimentación de
tensión, en caso dado, aflojar cable de datosconectado en la balanza.
§ Limpiar la balanza con un paño humectadolevemente en legía de jabón.
§ Secar la balanza con un paño suave.Quitar el platillo de pesada y limpiarlo:
§ Asir por debajo del anillo de blindaje ysacarlo hacia arriba junto con el soporte deplatillo, para no dañar el sistema de pesada.
! No debe penetrar líquido alguno en labalanza.
! No utilizar líquidos de limpieza agresivos (disolventes, o similares).
Limpieza de las superficies de acero inoxidableBásicamente, limpiar regularmente todaslas piezas de acero inoxidable. Limpiar proli-jamente el plato de acero inoxidable porseparado. Limpiar las piezas de acero inox.en la balanza con un paño o esponja humec-tados. Utilizar sólo detergentes de uso en elhogar, adquiribles en el comercio, que seanapropiados para el acero inox. Limpiar lassuperficies de acero inox. frotando suave-mente. A continuación, volver a enjuagar,hasta que se eliminen todos los restos ydejar secar el aparato. Como protección adi-cional puede aplicarse un aceite de limpieza.Utilizar disolventes exclusivamente para la limpieza de componentes de acero inoxidable.
105
Controles de seguridad Si un funcionamiento exento de peligro de labalanza ya no se garantiza:
§ Desenchufar el alimentador del tomaco-rriente de pared
> Asegurar la balanza contra el uso posterior
Comunicarse con el servicio técnico DENVER. Las reparaciones deben ser realizadas exclusivamente por especialistas.
106
Información e instrucciones sobre desechos y reparación
Cuando ya no necesite el embalaje,deberá depositarlo en el punto derecogida de basuras establecido porlas autoridades locales. El embalajeestá compuesto por materiales nocontaminantes que pueden utilizarsecomo materia prima recuperada.
Ni el aparato, ni los acceso-rios, ni las pilas o acumula-dores deben desecharsejunto con los residuos urba-nos no seleccionados. Lalegislación de la EU obliga a
los Estados miembros a recolectarlos aparatos eléctricos y electrónicosen forma separada de los residuosurbanos para reciclarlos.
En Alemania y en algunos otros paí-ses, Denver Instrument se encarga derecoger y eliminar correctamente susequipos eléctricos y electrónicos con-forme a la normativa. Estos equiposno deben desecharse junto con labasura doméstica, ni depositarse enlos puntos oficiales de recogida deresiduos urbanos no seleccionados.Esta prohibición afecta también a laspequeñas empresas.
Para mayores informaciones sobre la eliminación en Alemania o en cualquier Estado miembro del EspacioEconómico Europeo, consulte a nuestros colaboradores del serviciotécnico local o a nuestro centro deservicio en Goettingen, Alemania:
Denver Instrument GmbHRobert-Bosch-Breite 1037079 Goettingen, Alemania
En los países no pertenecientes alEspacio Económico Europeo o en losque Sartorius no disponga de filiales,comerciantes o distribuidores, elusuario deberá ponerse en contactocon las autoridades locales o con laempresa encargada de la eliminaciónde desechos.
Antes de desechar o destruir el aparato, se deben retirar las pilas o acumuladores y depositarlos en elpunto de recogida correspondiente.
Denver Instrument, sus filiales,comerciantes y distribuidores noadmitirán, para su reparación o elimi-nación, ningún aparato contaminadocon sustancias peligrosas (contami-nación ABC). Información más deta-llada sobre la reparación y elimina-ción de su aparato, así comodirecciones de los servicios de repa-ración autorizados, la encontrará enel folleto informativo y en nuestrapágina de Internet (www.denverins-trument.com).
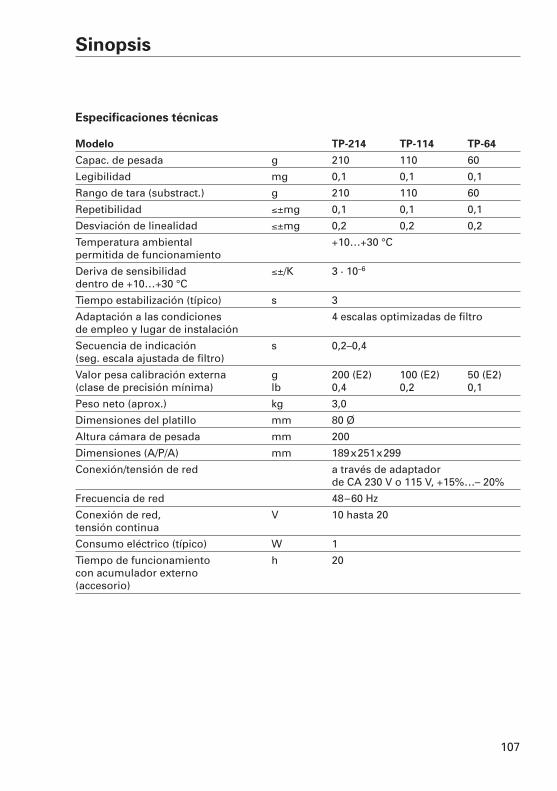
107
Sinopsis
Especificaciones técnicas
Modelo TP-214 TP-114 TP-64
Capac. de pesada g 210 110 60
Legibilidad mg 0,1 0,1 0,1
Rango de tara (substract.) g 210 110 60
Repetibilidad <±mg 0,1 0,1 0,1
Desviación de linealidad <±mg 0,2 0,2 0,2
Temperatura ambiental +10…+30 °Cpermitida de funcionamiento
Deriva de sensibilidad <±/K 3 · 10–6
dentro de +10…+30 °C
Tiempo estabilización (típico) s 3
Adaptación a las condiciones 4 escalas optimizadas de filtrode empleo y lugar de instalación
Secuencia de indicación s 0,2–0,4(seg. escala ajustada de filtro)
Valor pesa calibración externa g 200 (E2) 100 (E2) 50 (E2)(clase de precisión mínima) lb 0,4 0,2 0,1
Peso neto (aprox.) kg 3,0
Dimensiones del platillo mm 80 Ø
Altura cámara de pesada mm 200
Dimensiones (A/P/A) mm 189x251x299
Conexión/tensión de red a través de adaptador de CA 230 V o 115 V, +15%…– 20%
Frecuencia de red 48–60 Hz
Conexión de red, V 10 hasta 20tensión continua
Consumo eléctrico (típico) W 1
Tiempo de funcionamiento h 20con acumulador externo(accesorio)
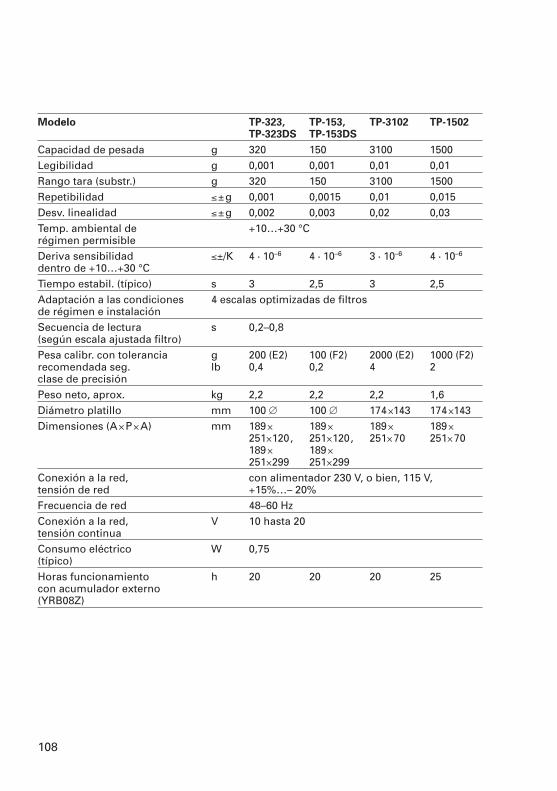
108
Modelo TP-323, TP-153, TP-3102 TP-1502TP-323DS TP-153DS
Capacidad de pesada g 320 150 3100 1500Legibilidad g 0,001 0,001 0,01 0,01Rango tara (substr.) g 320 150 3100 1500Repetibilidad <±g 0,001 0,0015 0,01 0,015Desv. linealidad <±g 0,002 0,003 0,02 0,03Temp. ambiental de +10…+30 °Crégimen permisibleDeriva sensibilidad <±/K 4 · 10–6 4 · 10–6 3 · 10–6 4 · 10–6
dentro de +10…+30 °CTiempo estabil. (típico) s 3 2,5 3 2,5Adaptación a las condiciones 4 escalas optimizadas de filtrosde régimen e instalaciónSecuencia de lectura s 0,2–0,8(según escala ajustada filtro)Pesa calibr. con tolerancia g 200 (E2) 100 (F2) 2000 (E2) 1000 (F2)recomendada seg. lb 0,4 0,2 4 2clase de precisiónPeso neto, aprox. kg 2,2 2,2 2,2 1,6Diámetro platillo mm 100 d 100 d 174+143 174+143Dimensiones (A+P+A) mm 189+ 189+ 189+ 189+
251+120, 251+120, 251+70 251+70189+ 189+251+299 251+299
Conexión a la red, con alimentador 230 V, o bien, 115 V, tensión de red +15%…– 20%Frecuencia de red 48–60 HzConexión a la red, V 10 hasta 20tensión continuaConsumo eléctrico W 0,75(típico)Horas funcionamiento h 20 20 20 25con acumulador externo (YRB08Z)
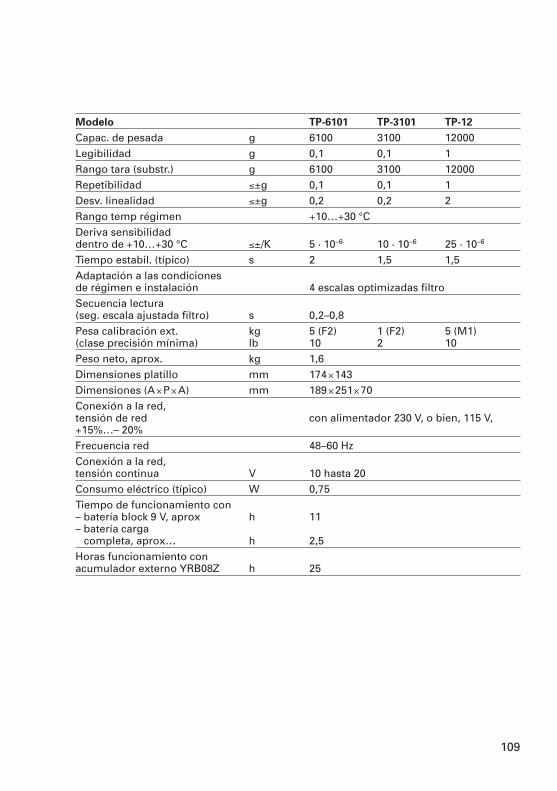
109
Modelo TP-6101 TP-3101 TP-12
Capac. de pesada g 6100 3100 12000Legibilidad g 0,1 0,1 1Rango tara (substr.) g 6100 3100 12000Repetibilidad <±g 0,1 0,1 1Desv. linealidad <±g 0,2 0,2 2Rango temp régimen +10…+30 °CDeriva sensibilidaddentro de +10…+30 °C <±/K 5 · 10–6 10 · 10–6 25 · 10–6
Tiempo estabil. (típico) s 2 1,5 1,5Adaptación a las condiciones de régimen e instalación 4 escalas optimizadas filtroSecuencia lectura (seg. escala ajustada filtro) s 0,2–0,8Pesa calibración ext. kg 5 (F2) 1 (F2) 5 (M1)(clase precisión mínima) lb 10 2 10Peso neto, aprox. kg 1,6Dimensiones platillo mm 174+143Dimensiones (A+P+A) mm 189+251+70Conexión a la red, tensión de red con alimentador 230 V, o bien, 115 V,+15%…– 20%Frecuencia red 48–60 HzConexión a la red, tensión continua V 10 hasta 20Consumo eléctrico (típico) W 0,75Tiempo de funcionamiento con– batería block 9 V, aprox h 11– batería carga
completa, aprox… h 2,5Horas funcionamiento conacumulador externo YRB08Z h 25

W4A
000
· KT
P
ub
licat
ion
No
. WT
P60
06-n
0710
1
98648-016-05
Copyright by Denver Instrument. All rights reserved. No part of this publication may be reprinted or translated in any form or by any means without the prior written permission of Denver Instrument.The status of the information, specifications and illustrations in thismanual is indicated by the date given below. Denver Instrumentreserves the right to make changes to the technology, fea-tures,specifications, and design of the equipment without notice.Status: October 2007, Denver Instrument.
Europe, Asia and Australia: Denver Instrument GmbHRobert-Bosch-Breite 1037079 Goettingen, GermanyTel: +49-551-20977-30Fax: +49-551-20977-39
Internet: www.denverinstrument.com
U.K. and Ireland: Denver Instrument CompanyDenver House, Sovereign WayTrafalgar Business ParkDownham MarketNorfolk PE38 9SW EnglandTel: +44-136-63862-42Fax: +44-136-63862-04
North and South America: Denver Instrument Company1401 17th Street, Suite 750Denver, Colorado 802021-800-321-1135Tel: +1-303-431-7255Fax: +1-303-423-4831


![Timberline [Compatibility Mode]](https://img.pdfslide.net/doc/110x75/577d245d1a28ab4e1e9c4dbb/timberline-compatibility-mode.jpg)