Embed Size (px)
Citation preview
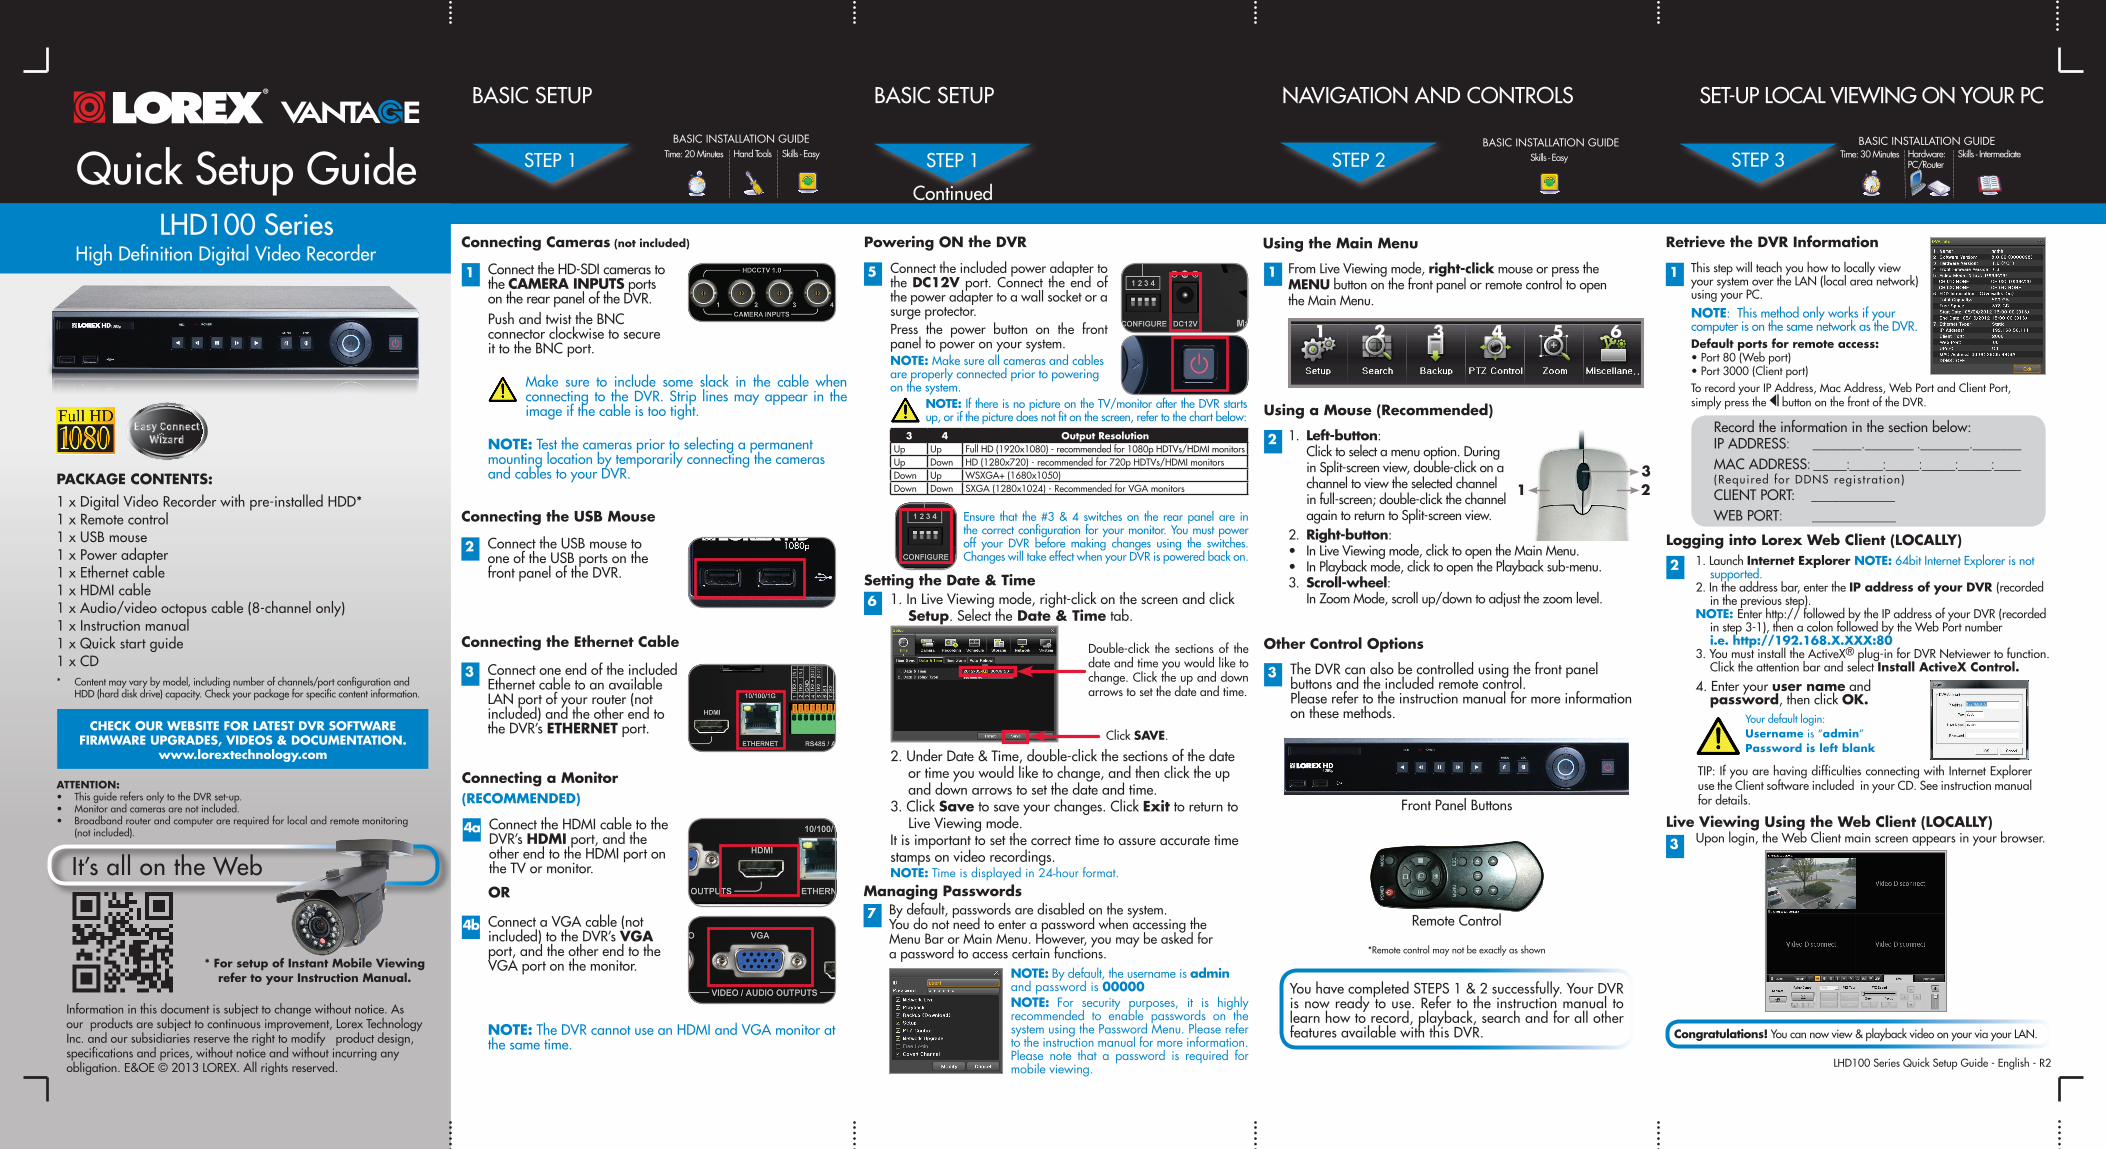
LHD100 Series Quick Setup Guide - English - R2
Skill Level
Intermediateeasy advanced
Time
under 30 minutesunder 15 minutes under 60 minutes
Hand Tools Hardware
Router
Hi Speed
over 60 minutes
Skill Level
Intermediateeasy advanced
Time
under 30 minutesunder 15 minutes under 60 minutes
Hand Tools Hardware
Router
Hi Speed
over 60 minutes
Time: 20 Minutes Hand Tools Skills - Easy Skills - Easy
BASIC INSTALLATION GUIDE BASIC INSTALLATION GUIDE BASIC INSTALLATION GUIDE
Skill Level
Intermediateeasy advanced
Time
under 30 minutesunder 15 minutes under 60 minutes
Hand Tools Hardware
Router
Hi Speed
over 60 minutes
High Definition Digital Video RecorderLHD100 Series
Quick Setup Guide
ATTENTION: • ThisguiderefersonlytotheDVRset-up.• Monitorandcamerasarenotincluded.• Broadbandrouterandcomputerarerequiredforlocalandremotemonitoring
(notincluded).
Informationinthisdocumentissubjecttochangewithoutnotice.Asourproductsaresubjecttocontinuousimprovement,LorexTechnologyInc.andoursubsidiariesreservetherighttomodifyproductdesign,specificationsandprices,withoutnoticeandwithoutincurringanyobligation.E&OE©2013LOREX.Allrightsreserved.
* For setup of Instant Mobile Viewing refer to your Instruction Manual.
It’sallontheWeb
Time: 30 Minutes Skills - IntermediateHardware: PC/Router
Skill Level
Intermediateeasy advanced
Time
under 30 minutesunder 15 minutes under 60 minutes
Hand Tools Hardware
Router
Hi Speed
over 60 minutes
Skill Level
Intermediateeasy advanced
Time
under 30 minutesunder 15 minutes under 60 minutes
Hand Tools Hardware
Router
Hi Speed
over 60 minutes
Congratulations!Youcannowview&playbackvideoonyourviayourLAN.
1xDigitalVideoRecorderwithpre-installedHDD*1xRemotecontrol1xUSBmouse1xPoweradapter1xEthernetcable1xHDMIcable1xAudio/videooctopuscable(8-channelonly)1xInstructionmanual1xQuickstartguide1xCD
PACKAGE CONTENTS:
Connecting the USB Mouse
2 ConnecttheUSBmousetooneoftheUSBportsonthefrontpaneloftheDVR.
Connecting the Ethernet Cable
3 ConnectoneendoftheincludedEthernetcabletoanavailableLANportofyourrouter(notincluded) and the other end to the DVR’s ETHERNETport.
2
Using a Mouse (Recommended)
1.Left-button: Clicktoselectamenuoption.DuringinSplit-screenview,double-clickonachanneltoviewtheselectedchannelinfull-screen;double-clickthechannelagaintoreturntoSplit-screenview.
2.Right-button: •InLiveViewingmode,clicktoopentheMainMenu.•InPlaybackmode,clicktoopenthePlaybacksub-menu.3.Scroll-wheel:
InZoomMode,scrollup/downtoadjustthezoomlevel.
1 23
YouhavecompletedSTEPS1&2successfully.YourDVRisnowreadytouse.Refer to theinstructionmanual tolearnhowtorecord,playback,searchandforallotherfeaturesavailablewiththisDVR.
Managing PasswordsBydefault,passwordsaredisabledonthesystem. YoudonotneedtoenterapasswordwhenaccessingtheMenuBarorMainMenu.However,youmaybeaskedforapasswordtoaccesscertainfunctions.
7
NOTE: For security purposes, it is highly recommended to enable passwords on the system using the Password Menu. Please refer to the instruction manual for more information. Please note that a password is required for mobile viewing.
NOTE: By default, the username is admin and password is 00000
Connecting Cameras (not included)
NOTE:TheDVRcannotuseanHDMIandVGAmonitoratthesametime.
2 1.LaunchInternet Explorer NOTE:64bitInternetExplorerisnotsupported.
2.Intheaddressbar,entertheIP address of your DVR (recorded inthepreviousstep).
NOTE: Enterhttp://followedbytheIPaddressofyourDVR(recordedinstep3-1),thenacolonfollowedbytheWebPortnumber i.e. http://192.168.X.XXX:80
3.YoumustinstalltheActiveX®plug-inforDVRNetviewertofunction.ClicktheattentionbarandselectInstall ActiveX Control.
Logging into Lorex Web Client (LOCALLY)
4.Enteryouruser name and password,thenclickOK.
Your default login:Username is “admin” Password is left blank
Other Control Options
TheDVRcanalsobecontrolledusingthefrontpanelbuttonsandtheincludedremotecontrol.Pleaserefertotheinstructionmanualformoreinformationonthesemethods.
3
FrontPanelButtons
BASICSETUPBASICSETUP NAVIGATIONANDCONTROLS SET-UPLOCALVIEWINGONYOURPC
Continued
STEP1 STEP2 STEP3STEP1
RemoteControl
*Remotecontrolmaynotbeexactlyasshown
OR
4b ConnectaVGAcable(notincluded) to the DVR’s VGA port,andtheotherendtotheVGAportonthemonitor.
4a ConnecttheHDMIcabletotheDVR’s HDMIport,andtheotherendtotheHDMIportontheTVormonitor.
Connecting a Monitor
Powering ON the DVR
5 Connecttheincludedpoweradaptertothe DC12V port.Connect theendofthepoweradaptertoawallsocketorasurgeprotector.Press the power button on the frontpaneltopoweronyoursystem.NOTE:Makesureallcamerasandcablesareproperlyconnectedpriortopoweringonthesystem.
NOTE:IfthereisnopictureontheTV/monitoraftertheDVRstartsup,orifthepicturedoesnotfitonthescreen,refertothechartbelow:
Ensure that the#3&4 switches on the rear panel are inthecorrectconfigurationforyourmonitor.Youmustpoweroff your DVR before making changes using the switches.ChangeswilltakeeffectwhenyourDVRispoweredbackon.
3 4 Output ResolutionUp Up FullHD(1920x1080)-recommendedfor1080pHDTVs/HDMImonitorsUp Down HD(1280x720)-recommendedfor720pHDTVs/HDMImonitorsDown Up WSXGA+(1680x1050)Down Down SXGA(1280x1024)-RecommendedforVGAmonitors
Recordtheinformationinthesectionbelow:IPADDRESS: _______._______ ._______._______
MACADDRESS: _____:_____:_____:_____:_____:____
CLIENTPORT:____________WEBPORT: ____________
(Required forDDNSregis t rat ion)
Retrieve the DVR Information
1 ThisstepwillteachyouhowtolocallyviewyoursystemovertheLAN(localareanetwork)usingyourPC.NOTE:ThismethodonlyworksifyourcomputerisonthesamenetworkastheDVR.
TorecordyourIPAddress,MacAddress,WebPortandClientPort,simplypressthe buttononthefrontoftheDVR.
Default ports for remote access:•Port80(Webport)•Port3000(Clientport)
3
Live Viewing Using the Web Client (LOCALLY)Uponlogin,theWebClientmainscreenappearsinyourbrowser.
CHECK OUR WEBSITE FOR LATEST DVR SOFTWARE FIRMWARE UPGRADES, VIDEOS & DOCUMENTATION.
www.lorextechnology.com
* Contentmayvarybymodel,includingnumberofchannels/portconfigurationandHDD(harddiskdrive)capacity.Checkyourpackageforspecificcontentinformation.
1 ConnecttheHD-SDIcamerastothe CAMERA INPUTS ports ontherearpaneloftheDVR.PushandtwisttheBNCconnectorclockwisetosecureittotheBNCport.
Make sure to include some slack in the cable whenconnecting to theDVR.Strip linesmayappear in theimageifthecableistootight.
NOTE:TestthecameraspriortoselectingapermanentmountinglocationbytemporarilyconnectingthecamerasandcablestoyourDVR.
Setting the Date & Time1.InLiveViewingmode,right-clickonthescreenandclick
Setup.Selectthe Date & Timetab.
2.UnderDate&Time,double-clickthesectionsofthedateortimeyouwouldliketochange,andthenclicktheupanddownarrowstosetthedateandtime.
3.ClickSavetosaveyourchanges.ClickExit to return to LiveViewingmode.
6
NOTE: Time is displayed in 24-hour format.
Itisimportanttosetthecorrecttimetoassureaccuratetimestampsonvideorecordings.
Double-click the sectionsof thedateandtimeyouwouldliketochange.Clicktheupanddownarrowstosetthedateandtime.
ClickSAVE.
Using the Main Menu
FromLiveViewingmode,right-clickmouseorpresstheMENUbuttononthefrontpanelorremotecontroltoopentheMainMenu.
1
5 61 2 3 4
(RECOMMENDED)
TIP:IfyouarehavingdifficultiesconnectingwithInternetExplorerusetheClientsoftwareincludedinyourCD.Seeinstructionmanualfordetails.
LHD100 Series Quick Setup Guide - English - R2
INTERNETREMOTEMONITORINGINTERNETREMOTEMONITORING INTERNETREMOTEMONITORING INTERNETREMOTEMONITORING INTERNETREMOTEMONITORING
ContinuedContinuedContinued Continued
5Openyourwebbrowser(InternetExplorerbydefault)andenter http://www.lorexddns.netintheaddressbar.
DDNS (Dynamic Domain Name System) Set-up
http://www.lorexddns.net
1: Populate the Router Database3TheAutoPortForwardingWizardautomaticallypopulatesalistofcurrentrouters,anddetectsthenumberofconnectedrouters.
1.ClicktheNextbuttonafterthesoftwaredetectsyourrouterconfiguration.
2.UnderRouter IP,clicktheDetect Router IP button.Therouter’sIPpopulatesintheblankfield.
3.UnderUsername and Password,entertherouter’susernameandpassword.
4.UnderIP,entertheIPaddressofyourLorexdeviceasrecordedinStep3-1.
5.UnderPort,entertheportnumber(s)thatrequireforwarding(80,3000).
6.ClickNexttocontinue.
80YourIP
3000
NOTE:ClicktheAuto DetectbuttonifyouhaveaLinksysorNetgearrouter(thisworkswithmostmodels).
2: Enter your Router Settings1.UndertheRouterdrop-downlist,selectthemodelofyour
router OR click the Searchbuttontoenterthenameofyourroutermodel.
NOTE:Ensureyouselectthepropermodelandfirmwarenumberoftherouter(asitappearsonthebackoftherouter)
IMPORTANT:Defaultportsthatmustbeportforwardedforremoteaccess:Port80(WebPort)Port3000(ClientPort)
4: Test your Connection1.ClicktheTest Your Connection button.Yoursystem’s
defaultbrowseropensandconnectstoyourLorexdevice. NOTE:EnsurethatInternetExplorerisyoursystem’s
defaultinternetbrowser. NOTE:Awindowopensthatpromptsyoutoenterinyour
DVR’susernameandpassword(bydefaultyourloginis“admin”andyourpasswordisleftblank)
NOTE:ActiveXwarningsmayappear.AcceptallActiveXinstallationwarningstoconnecttoyoursystem.
3: Update the Router Settings
1.ClicktheUpdate Router button.Theprogrambeginsupdatingtheroutersettings. Thismaytake20-30seconds.
2.Closetheupdatewindowwhentheupdatefinishes.
NOTE: Youmayhavetomanuallysaveyourroutersettingsafterthesoftwaremakestherequiredchangestoyourrouter.
Auto Port Forward Wizard1
TheLorexAutoPortForwardingWizardisasoftwarethatautomatesrouterportforwarding.
NOTE: YoumustbeonthesamenetworkastheDVRwhensettinguptheDDNS.
Youmusthavethefollowingbeforeyouconfigurethesoftware:1.Yourrouter’smodel and versionnumbers2.Yourrouter’suser name and password3.YourLorexdevice’sIP address (recorded in Step 3-1)4.YourLorexdevice’sportnumbersthatrequireportforwarding(80,3000)
Optional: Manual Port Forward4
If you were unable to port-forward your router automatically using the wizard, you will need to manually forward ports 80 and 3000 to your DVR’s IP address.Allroutersaredifferent.Toportforwardyourrouter,pleaserefertoyourrouter’susermanual.Anexampleofaportforwardingscreenisshownforillustrationpurposes.
80 80Web
EXAMPLE
3000 12
12
Client 3000
STEP4 STEP4 STEP4 STEP4 STEP4REMOTE INSTALLATION GUIDE
Time: 30 Minutes Skills - IntermediateHardware: PC
Skill Level
Intermediateeasy advanced
Time
under 30 minutesunder 15 minutes under 60 minutes
Hand Tools Hardware
Router
Hi Speed
over 60 minutes
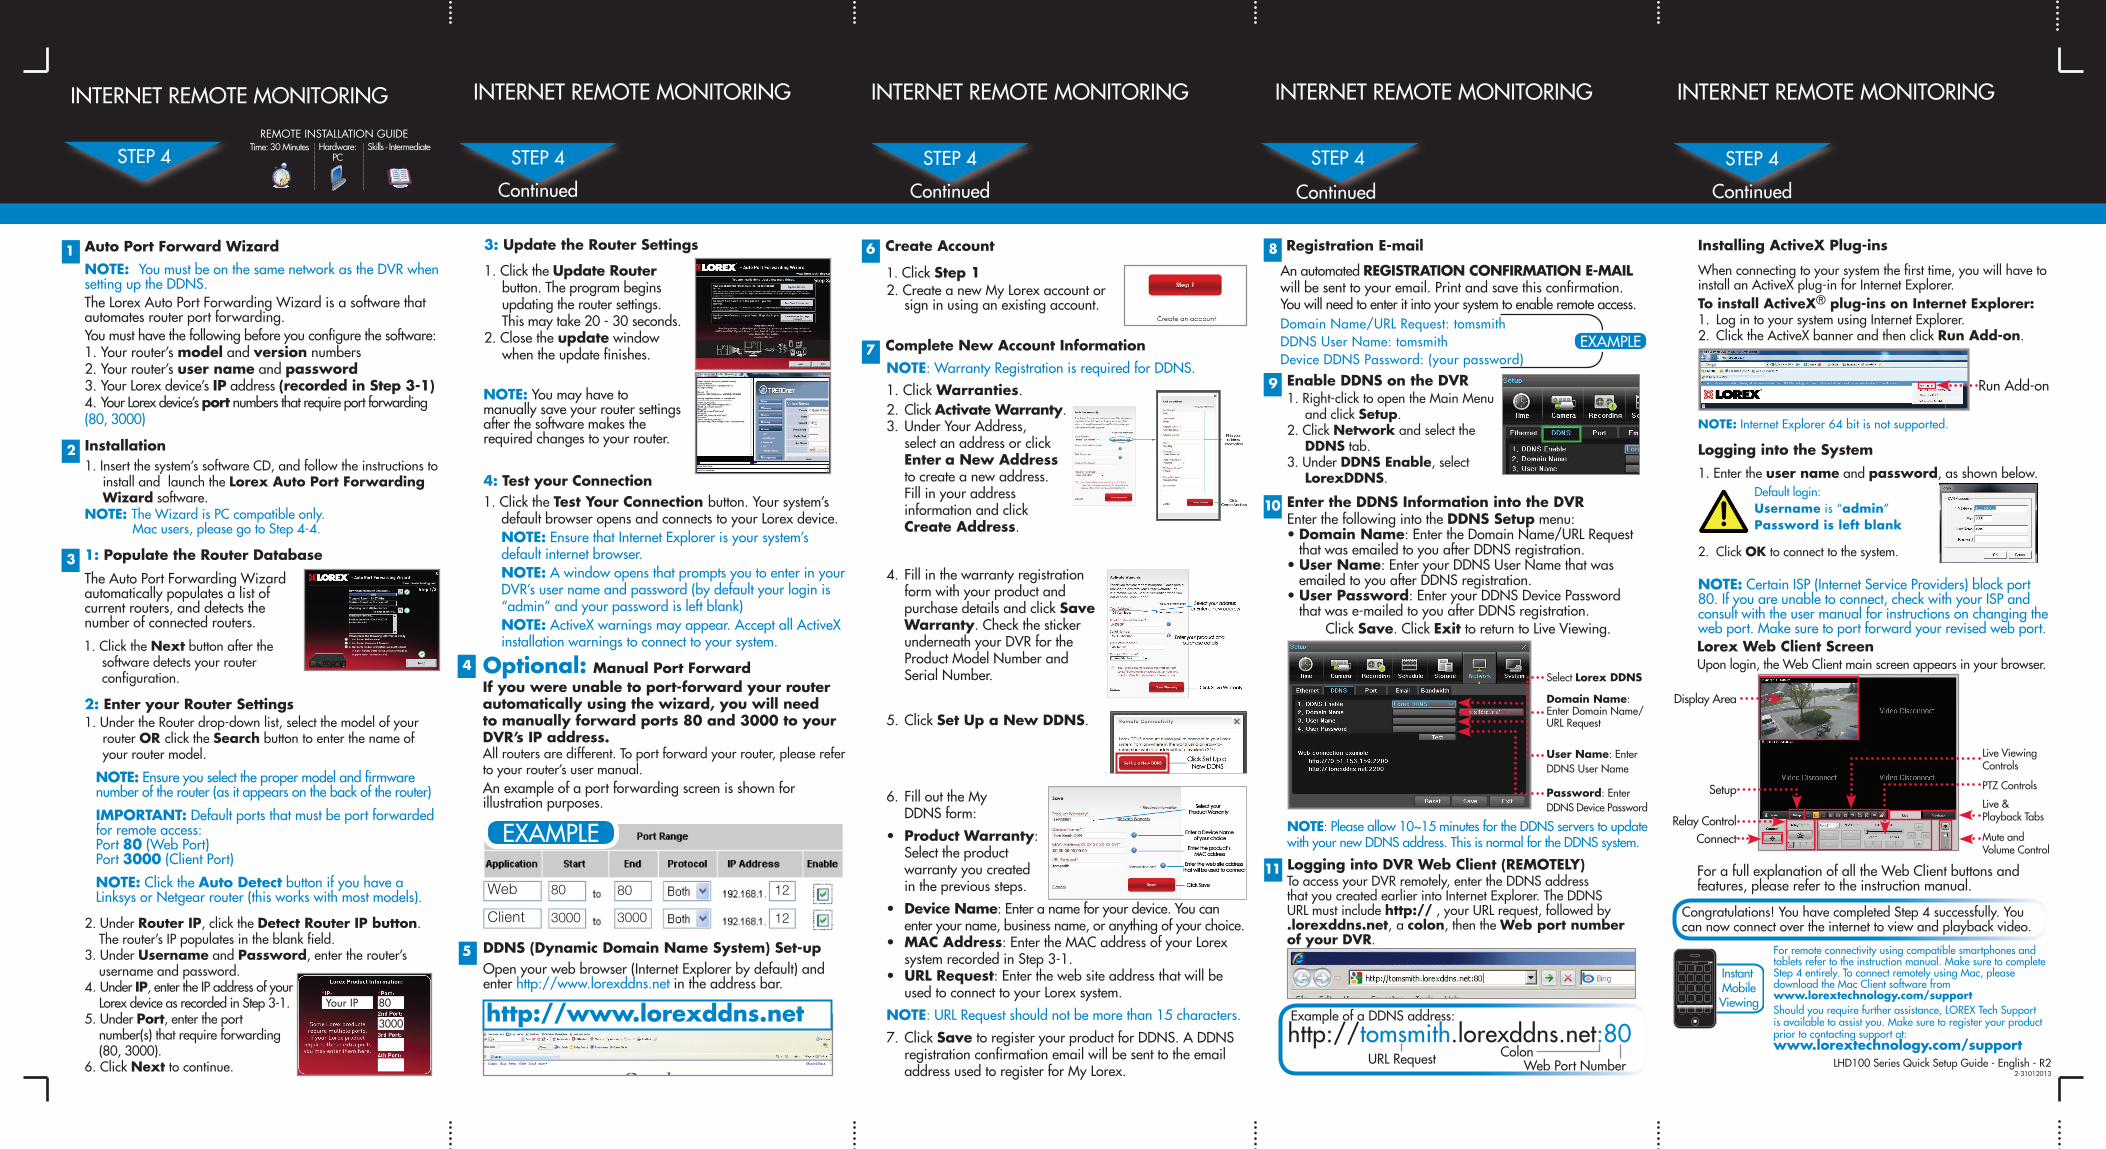
Logging into DVR Web Client (REMOTELY)ToaccessyourDVRremotely,entertheDDNSaddressthatyoucreatedearlierintoInternetExplorer.TheDDNSURLmustincludehttp://,yourURLrequest,followedby.lorexddns.net, a colon,thentheWeb port number of your DVR.
http://tomsmith.lorexddns.net:80ExampleofaDDNSaddress:
URLRequest ColonWebPortNumber
9 Enable DDNS on the DVR
NOTE:Pleaseallow10~15minutesfortheDDNSserverstoupdatewithyournewDDNSaddress.ThisisnormalfortheDDNSsystem.
EnterthefollowingintotheDDNS Setupmenu:•Domain Name:EntertheDomainName/URLRequest
thatwasemailedtoyouafterDDNSregistration.•User Name:EnteryourDDNSUserNamethatwas
emailedtoyouafterDDNSregistration.•User Password:EnteryourDDNSDevicePassword
thatwase-mailedtoyouafterDDNSregistration.ClickSave.ClickExittoreturntoLiveViewing.
Enter the DDNS Information into the DVR10
11
Select Lorex DDNS
Domain Name: EnterDomainName/URLRequest
User Name:EnterDDNSUserName
Password:EnterDDNSDevicePassword
1.Insertthesystem’ssoftwareCD,andfollowtheinstructionstoinstall and launch the Lorex Auto Port Forwarding Wizardsoftware.
Installation2
NOTE: TheWizardisPCcompatibleonly. Macusers,pleasegotoStep4-4.
Congratulations!YouhavecompletedStep4successfully.Youcannowconnectovertheinternettoviewandplaybackvideo.
Installing ActiveX Plug-ins
To install ActiveX® plug-ins on Internet Explorer:1. LogintoyoursystemusingInternetExplorer.2. ClicktheActiveXbannerandthenclickRun Add-on.
Whenconnectingtoyoursystemthefirsttime,youwillhavetoinstallanActiveXplug-inforInternetExplorer.
NOTE:InternetExplorer64bitisnotsupported.
RunAdd-on
2-31012013
ForafullexplanationofalltheWebClientbuttonsandfeatures,pleaserefertotheinstructionmanual.
DisplayArea
Setup
RelayControlConnect
PTZControls
LiveViewingControls
Live&PlaybackTabs
MuteandVolumeControl
Uponlogin,theWebClientmainscreenappearsinyourbrowser.Lorex Web Client Screen
Forremoteconnectivityusingcompatiblesmartphonesandtabletsrefertotheinstructionmanual.MakesuretocompleteStep4entirely.ToconnectremotelyusingMac,pleasedownloadtheMacClientsoftwarefromwww.lorextechnology.com/support
Instant MobileViewing
Shouldyourequirefurtherassistance,LOREXTechSupportisavailabletoassistyou.Makesuretoregisteryourproductprior to contacting support at: www.lorextechnology.com/support
1.ClickStep 12.CreateanewMyLorexaccountor
signinusinganexistingaccount.
6 Create Account
7.ClickSavetoregisteryourproductforDDNS.ADDNSregistrationconfirmationemailwillbesenttotheemailaddressusedtoregisterforMyLorex.
NOTE:URLRequestshouldnotbemorethan15characters.
6. FillouttheMyDDNSform:
• Product Warranty: Select the product warrantyyoucreatedintheprevioussteps.
• Device Name:Enteranameforyourdevice.Youcanenteryourname,businessname,oranythingofyourchoice.
• MAC Address:EntertheMACaddressofyourLorexsystemrecordedinStep3-1.
• URL Request:EnterthewebsiteaddressthatwillbeusedtoconnecttoyourLorexsystem.
Complete New Account Information7
3.UnderYourAddress,select an address or click Enter a New Address tocreateanewaddress.FillinyouraddressinformationandclickCreate Address.
1.ClickWarranties.2.ClickActivate Warranty.
NOTE:WarrantyRegistrationisrequiredforDDNS.
4. Fillinthewarrantyregistrationformwithyourproductandpurchase details and click Save Warranty.CheckthestickerunderneathyourDVRfortheProductModelNumberandSerialNumber.
5.ClickSet Up a New DDNS.
AnautomatedREGISTRATION CONFIRMATION E-MAIL willbesenttoyouremail.Printandsavethisconfirmation. Youwillneedtoenteritintoyoursystemtoenableremoteaccess.
8 Registration E-mail
DomainName/URLRequest:tomsmithDDNSUserName:tomsmithDeviceDDNSPassword:(yourpassword)
EXAMPLE
NOTE:CertainISP(InternetServiceProviders)blockport80.Ifyouareunabletoconnect,checkwithyourISPandconsultwiththeusermanualforinstructionsonchangingthewebport.Makesuretoportforwardyourrevisedwebport.
1.Right-clicktoopentheMainMenuand click Setup.
2.ClickNetwork and select the DDNStab.
3.UnderDDNS Enable,selectLorexDDNS.
Logging into the System
1.Entertheuser name and password,asshownbelow.
2. ClickOKtoconnecttothesystem.
Default login:Username is “admin” Password is left blank