Embed Size (px)
Citation preview
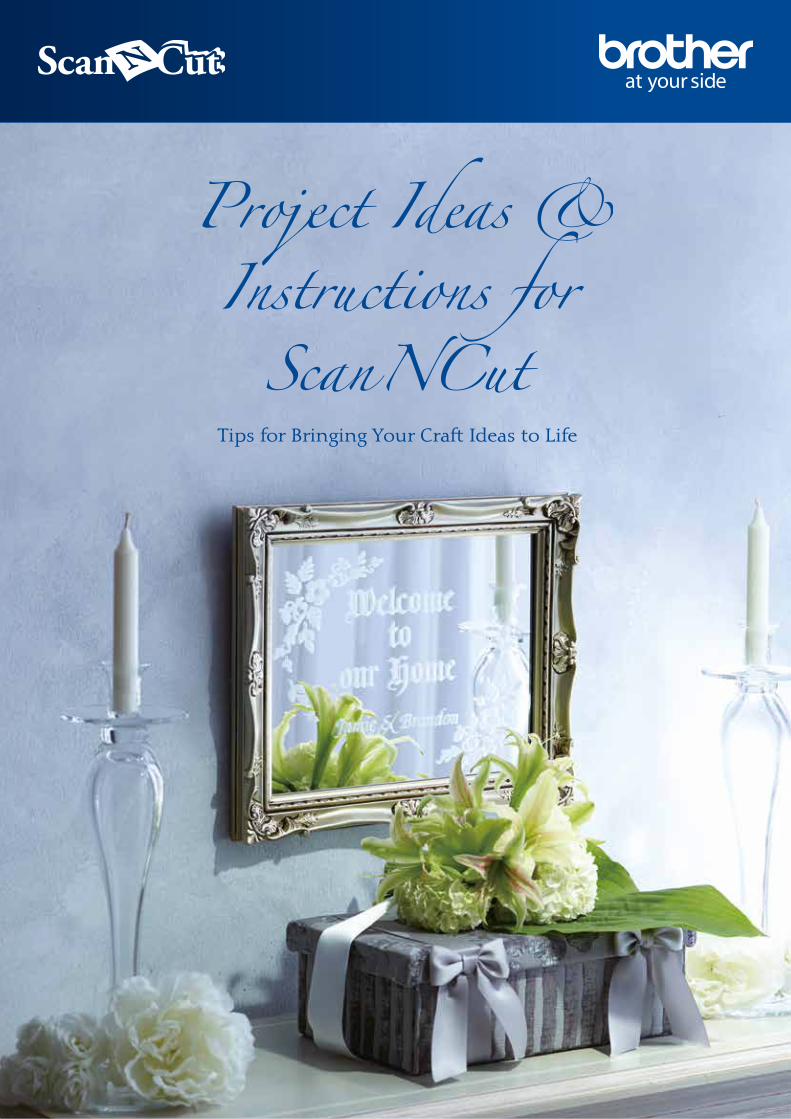
Tips for Bringing Your Craft Ideas to Life
01
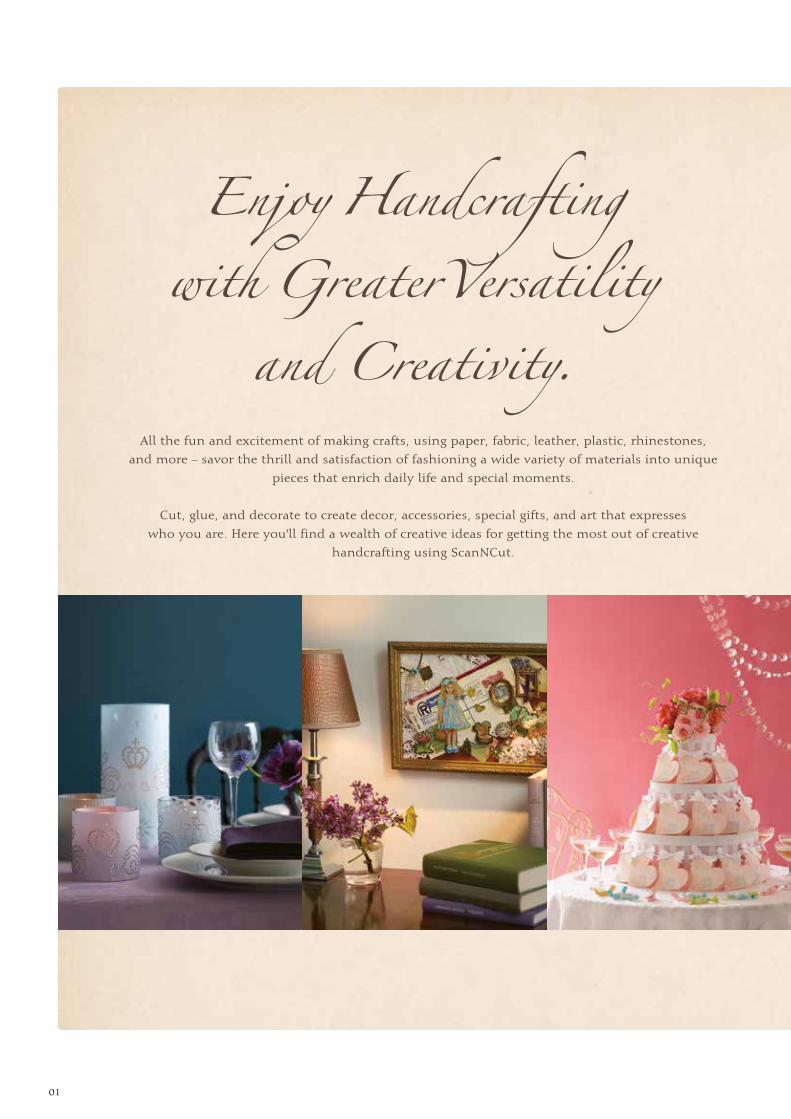
Enjoy Handcraftingwith Greater Versatility
and Creativity.All the fun and excitement of making crafts, using paper, fabric, leather, plastic, rhinestones,
and more – savor the thrill and satisfaction of fashioning a wide variety of materials into unique
pieces that enrich daily life and special moments.
Cut, glue, and decorate to create decor, accessories, special gifts, and art that expresses
who you are. Here you'll find a wealth of creative ideas for getting the most out of creative
handcrafting using ScanNCut.
02
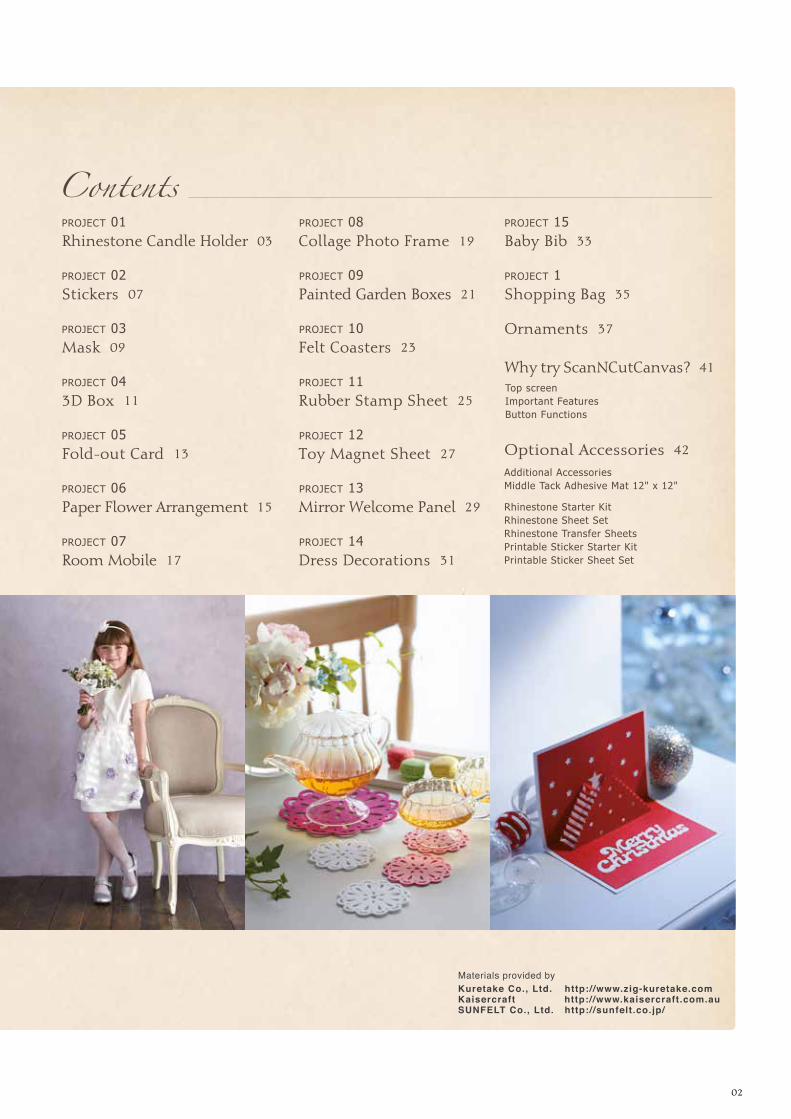
ContentsRhinestone Candle Holder 03
Stickers 07
Mask 09
3D Box 11
Fold-out Card 13
Paper Flower Arrangement 15
Room Mobile 17
PROJECT 01
PROJECT 02
PROJECT 03
PROJECT 04
PROJECT 05
PROJECT 06
PROJECT 07
PROJECT 08
PROJECT 09
PROJECT 10
PROJECT 11
PROJECT 12
PROJECT 13
PROJECT 14
PROJECT 15
PROJECT 1
Baby Bib 33
Shopping Bag 35
Ornaments 37
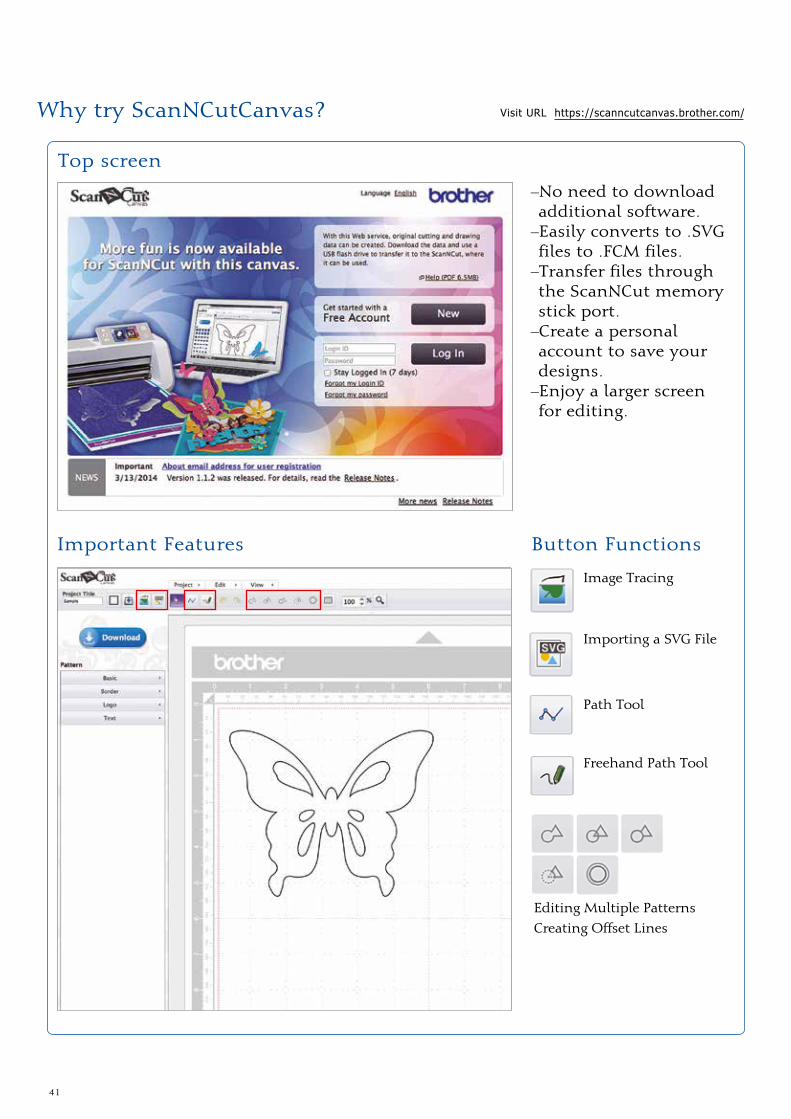
Why try ScanNCutCanvas? 41
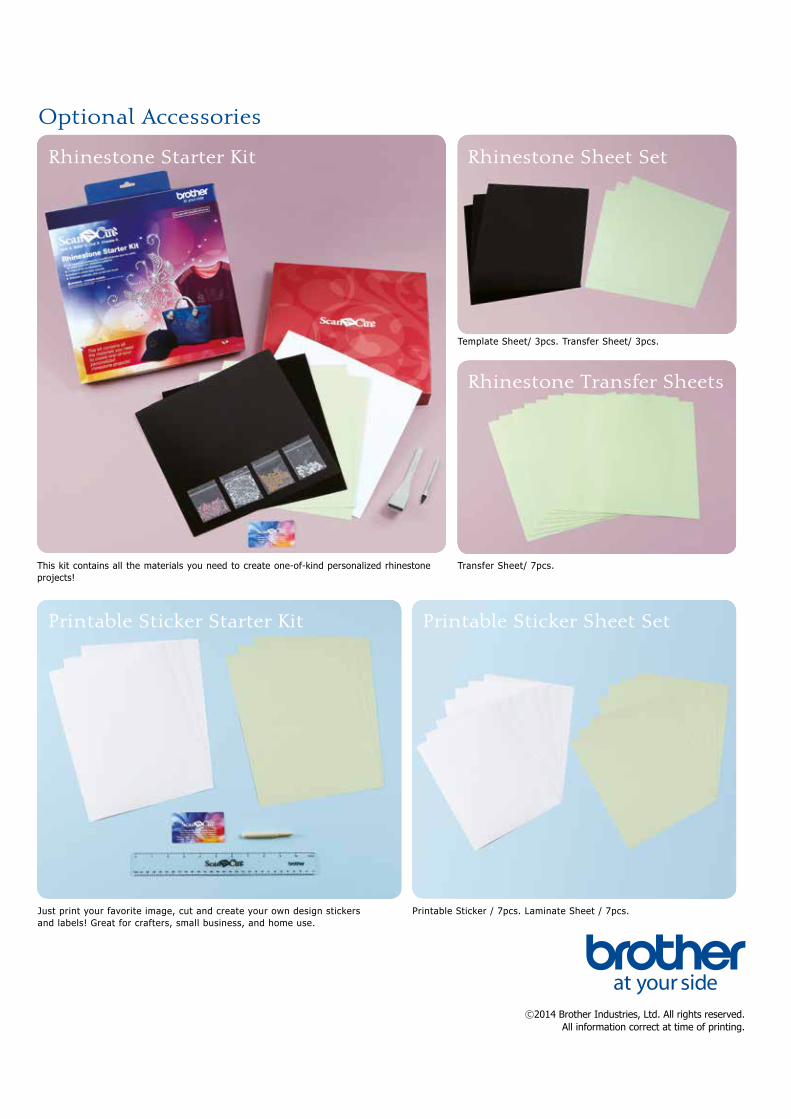
Optional Accessories 42
Materials provided byKuretake Co., Ltd. http://www.zig-kuretake.comKaisercraft http://www.kaisercraft.com.auSUNFELT Co., Ltd. http://sunfelt.co.jp/
Collage Photo Frame 19
Painted Garden Boxes 21
Felt Coasters 23
Rubber Stamp Sheet 25
Toy Magnet Sheet 27
Mirror Welcome Panel 29
Dress Decorations 31
Top screenImportant FeaturesButton Functions
Additional AccessoriesMiddle Tack Adhesive Mat 12" x 12"
Rhinestone Starter KitRhinestone Sheet SetRhinestone Transfer SheetsPrintable Sticker Starter KitPrintable Sticker Sheet Set
03
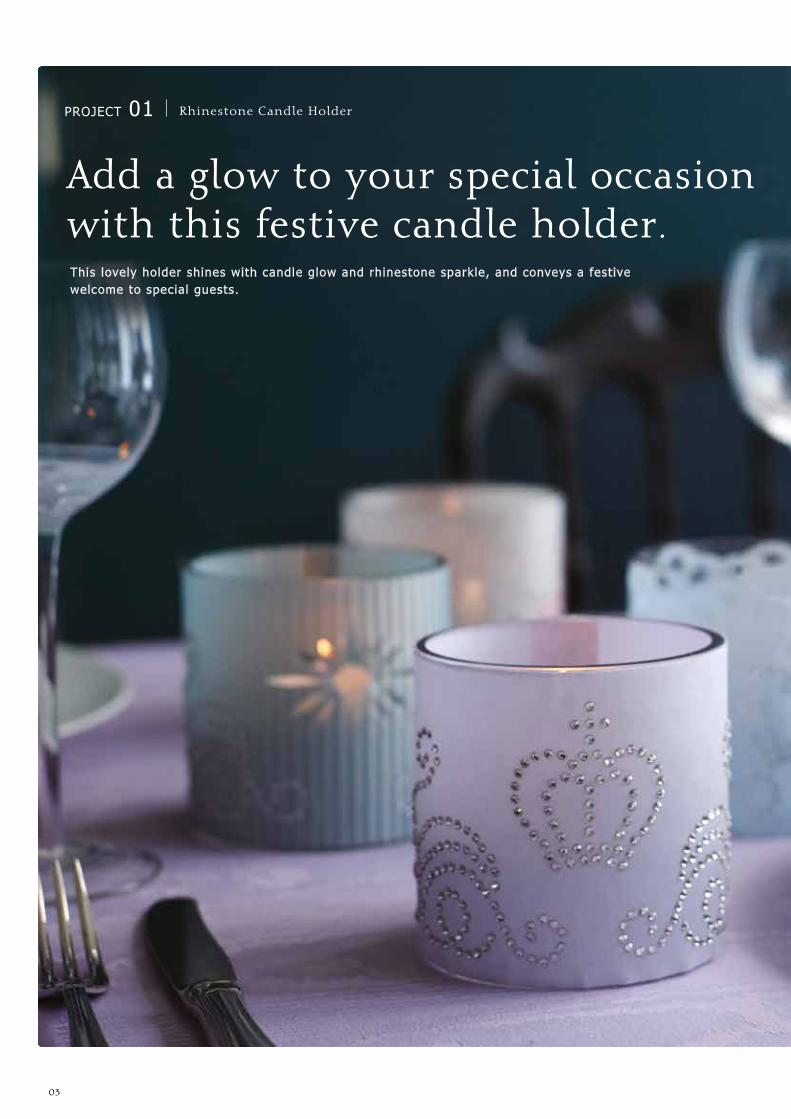
PROJECT 01 Rhinestone Candle Holder
Add a glow to your special occasion with this festive candle holder.This lovely holder shines with candle glow and rhinestone sparkle, and conveys a festive welcome to special guests.
04
05
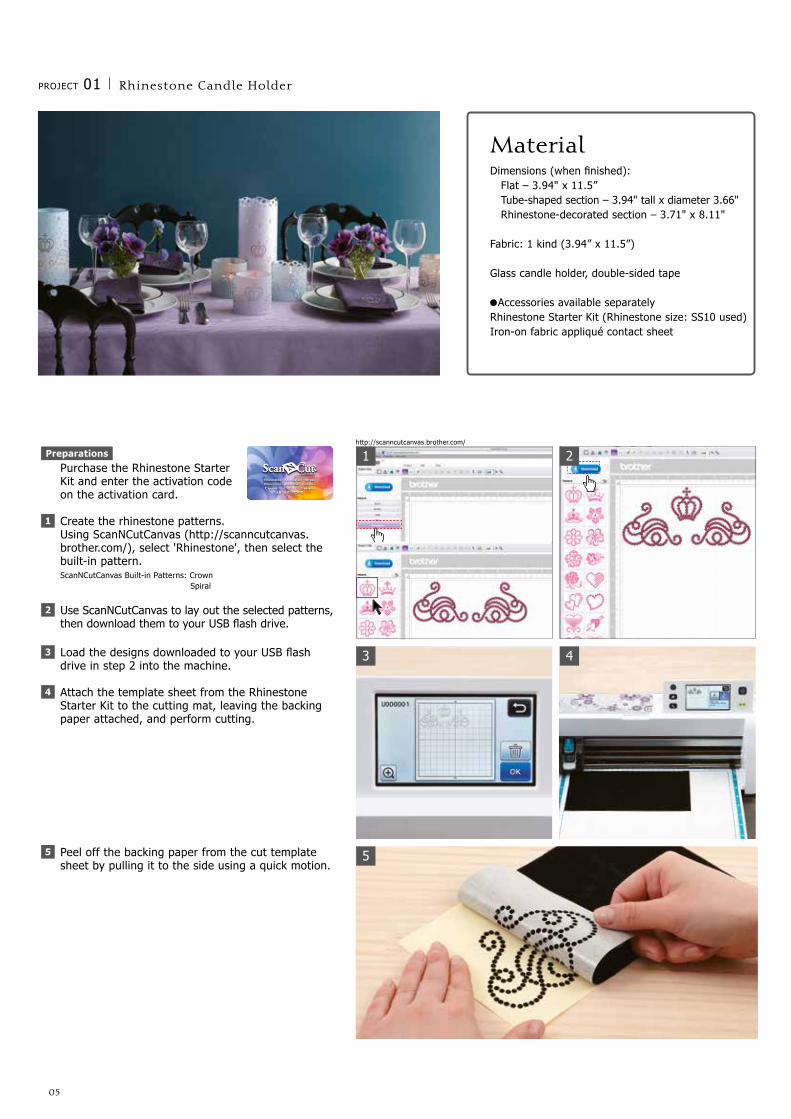
http://scanncutcanvas.brother.com/
1
3
5
2
4
PROJECT 01 Rhinestone Candle Holder
MaterialDimensions (when finished): Flat – 3.94" x 11.5” Tube-shaped section – 3.94" tall x diameter 3.66" Rhinestone-decorated section – 3.71" x 8.11"
Fabric: 1 kind (3.94” x 11.5”)
Glass candle holder, double-sided tape
Accessories available separately Rhinestone Starter Kit (Rhinestone size: SS10 used)Iron-on fabric appliqué contact sheet
Preparations
Purchase the Rhinestone Starter Kit and enter the activation codeon the activation card.
Create the rhinestone patterns.Using ScanNCutCanvas (http://scanncutcanvas.brother.com/), select 'Rhinestone', then select the built-in pattern.ScanNCutCanvas Built-in Patterns: Crown Spiral
Use ScanNCutCanvas to lay out the selected patterns, then download them to your USB flash drive.
1
2
Load the designs downloaded to your USB flash drive in step 2 into the machine.
Attach the template sheet from the Rhinestone Starter Kit to the cutting mat, leaving the backing paper attached, and perform cutting.
3
4
Peel off the backing paper from the cut template sheet by pulling it to the side using a quick motion.
5
06
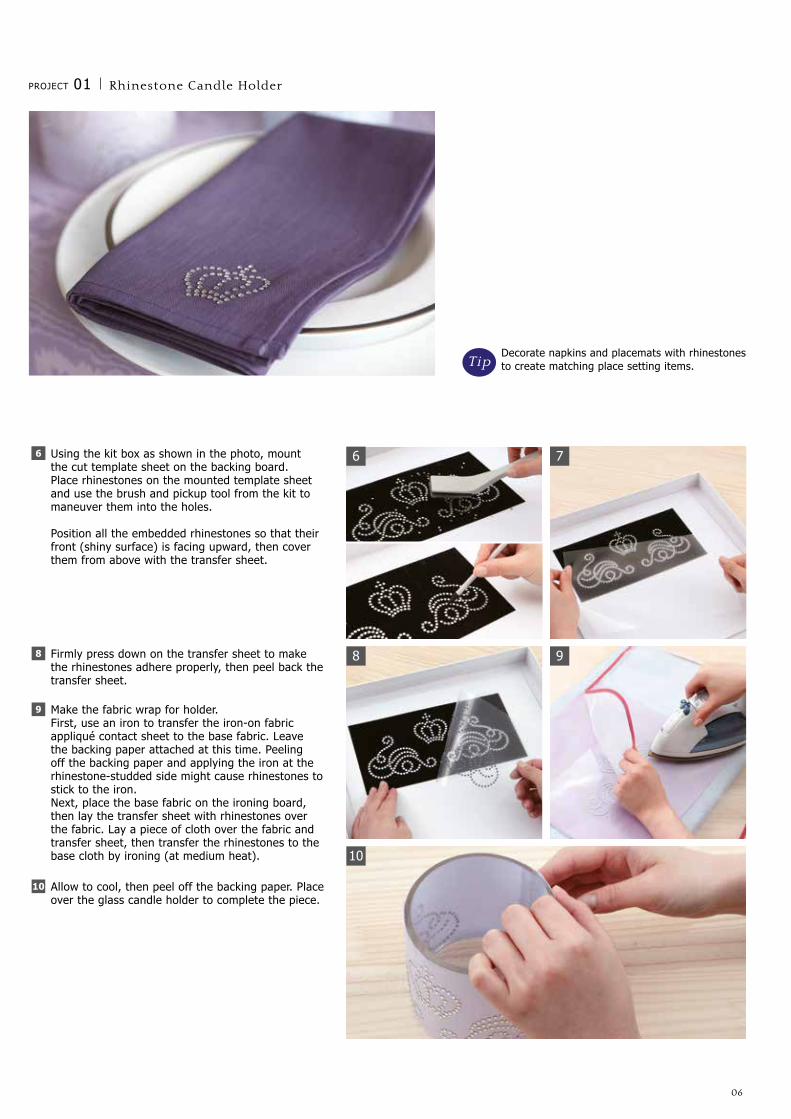
6
8
10
7
9
Using the kit box as shown in the photo, mount the cut template sheet on the backing board. Place rhinestones on the mounted template sheet and use the brush and pickup tool from the kit to maneuver them into the holes.
Position all the embedded rhinestones so that their front (shiny surface) is facing upward, then cover them from above with the transfer sheet.
66
Firmly press down on the transfer sheet to make the rhinestones adhere properly, then peel back the transfer sheet.
Make the fabric wrap for holder.First, use an iron to transfer the iron-on fabric appliqué contact sheet to the base fabric. Leave the backing paper attached at this time. Peeling off the backing paper and applying the iron at the rhinestone-studded side might cause rhinestones to stick to the iron.Next, place the base fabric on the ironing board, then lay the transfer sheet with rhinestones over the fabric. Lay a piece of cloth over the fabric and transfer sheet, then transfer the rhinestones to the base cloth by ironing (at medium heat).
8
9
Allow to cool, then peel off the backing paper. Place over the glass candle holder to complete the piece.
10
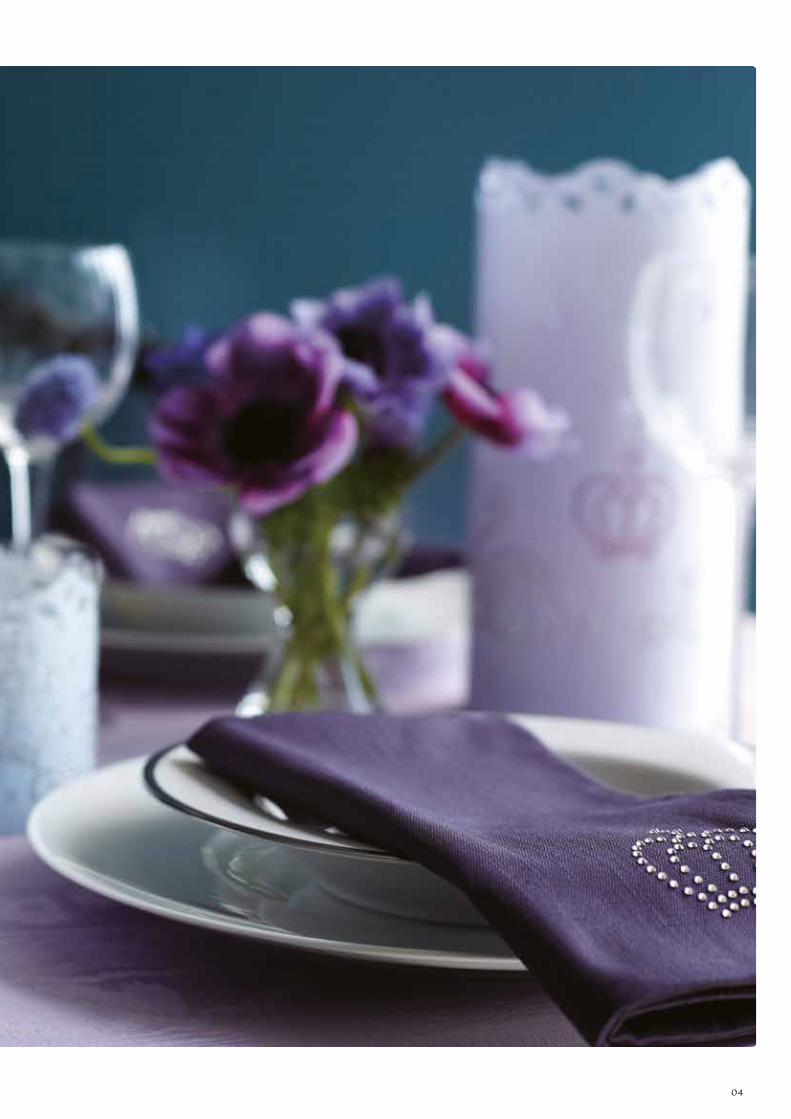
Decorate napkins and placemats with rhinestones to create matching place setting items.
PROJECT 01 Rhinestone Candle Holder
Tip
07
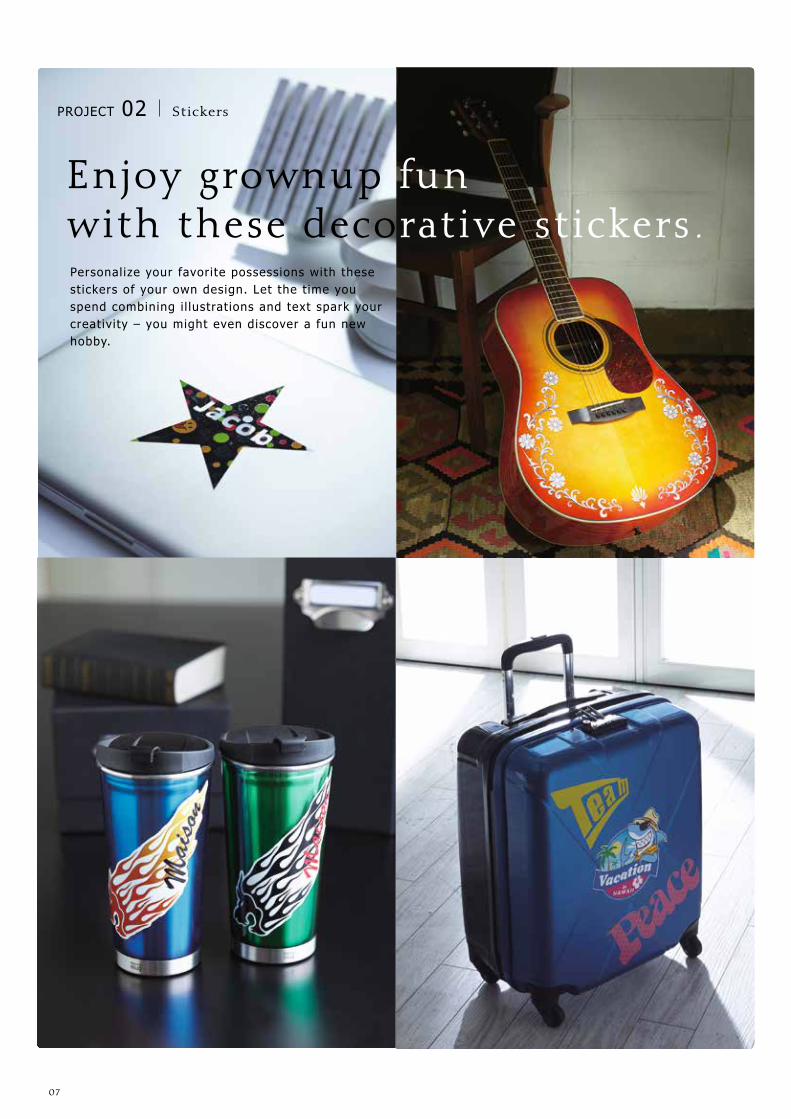
Enjoy grownup funwith these decorative stickers.Personalize your favorite possessions with these stickers of your own design. Let the t ime you spend combining i l lustrations and text spark your creativity – you might even discover a fun new hobby.
PROJECT 02 Stickers
08
1
3
5
2
4
6
PROJECT 02 Stickers
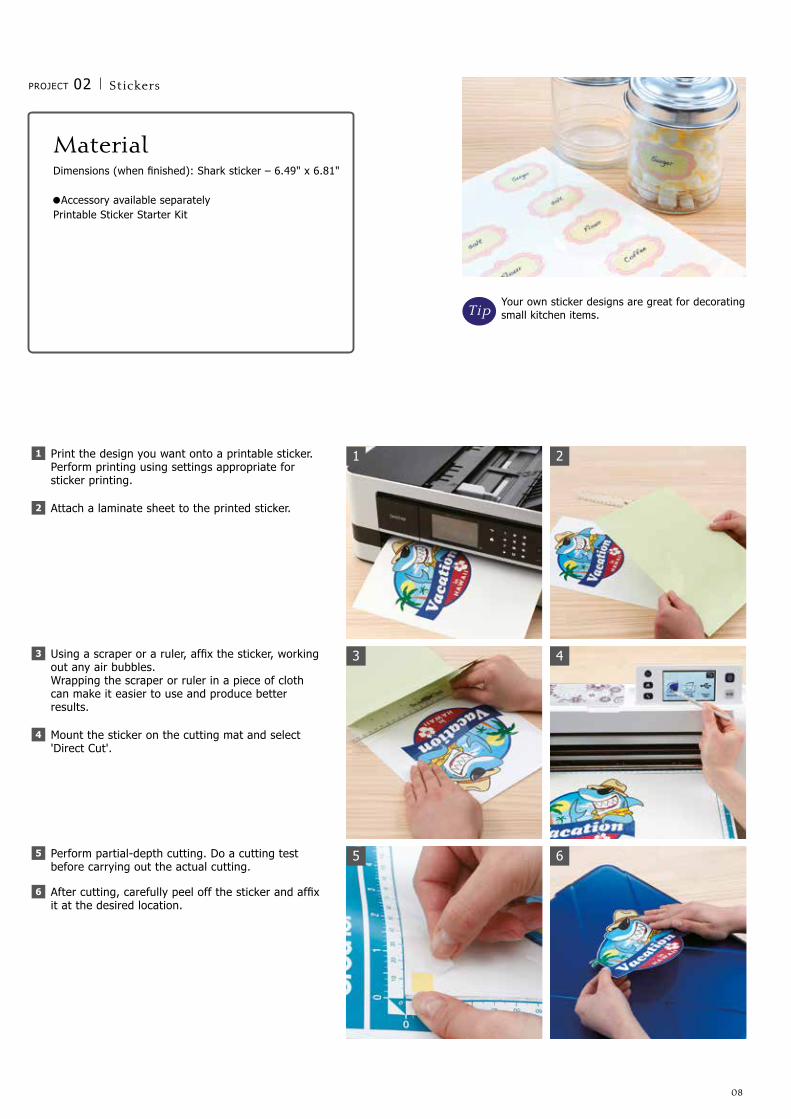
Your own sticker designs are great for decorating small kitchen items.
MaterialDimensions (when finished): Shark sticker – 6.49" x 6.81"
Accessory available separatelyPrintable Sticker Starter Kit
Print the design you want onto a printable sticker.Perform printing using settings appropriate for sticker printing.
Attach a laminate sheet to the printed sticker.
1
2
Using a scraper or a ruler, affix the sticker, working out any air bubbles.Wrapping the scraper or ruler in a piece of cloth can make it easier to use and produce better results.
Mount the sticker on the cutting mat and select 'Direct Cut'.
3
4
Perform partial-depth cutting. Do a cutting test before carrying out the actual cutting.
After cutting, carefully peel off the sticker and affix it at the desired location.
5
6
Tip

09
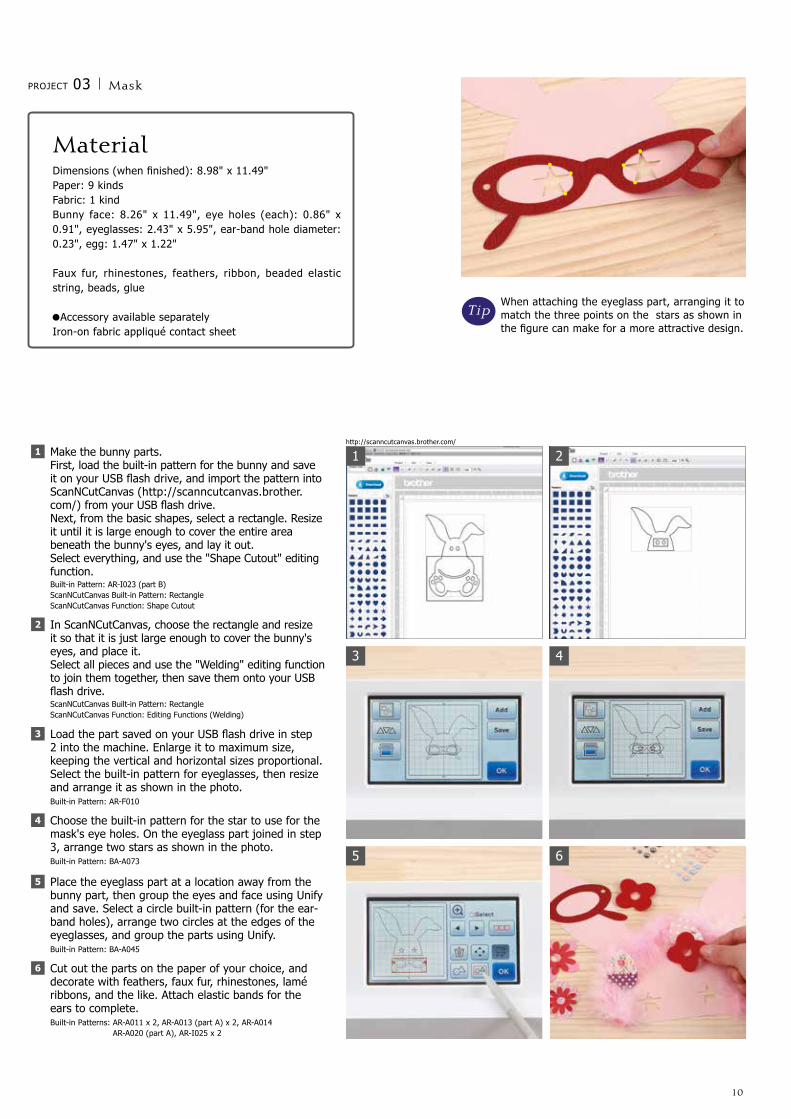
A fun and festive mask to celebrate holiday cheer.Delight your chi ld with this charming bunny mask that is sure to please and excite al l ages during your springtime events.
PROJECT 03 Mask
10
http://scanncutcanvas.brother.com/
1
3
5
2
4
6
PROJECT 03 Mask
MaterialDimensions (when finished): 8.98" x 11.49"Paper: 9 kindsFabric: 1 kindBunny face: 8.26" x 11.49", eye holes (each): 0.86" x 0.91", eyeglasses: 2.43" x 5.95", ear-band hole diameter: 0.23", egg: 1.47" x 1.22"
Faux fur, rhinestones, feathers, ribbon, beaded elastic string, beads, glue
Accessory available separatelyIron-on fabric appliqué contact sheet
Make the bunny parts.First, load the built-in pattern for the bunny and save it on your USB flash drive, and import the pattern into ScanNCutCanvas (http://scanncutcanvas.brother.com/) from your USB flash drive.Next, from the basic shapes, select a rectangle. Resize it until it is large enough to cover the entire area beneath the bunny's eyes, and lay it out.Select everything, and use the "Shape Cutout" editing function. Built-in Pattern: AR-I023 (part B)ScanNCutCanvas Built-in Pattern: RectangleScanNCutCanvas Function: Shape Cutout
In ScanNCutCanvas, choose the rectangle and resize it so that it is just large enough to cover the bunny's eyes, and place it.Select all pieces and use the "Welding" editing function to join them together, then save them onto your USB flash drive.ScanNCutCanvas Built-in Pattern: RectangleScanNCutCanvas Function: Editing Functions (Welding)
1
2
Load the part saved on your USB flash drive in step 2 into the machine. Enlarge it to maximum size, keeping the vertical and horizontal sizes proportional. Select the built-in pattern for eyeglasses, then resize and arrange it as shown in the photo. Built-in Pattern: AR-F010 Choose the built-in pattern for the star to use for the mask's eye holes. On the eyeglass part joined in step 3, arrange two stars as shown in the photo. Built-in Pattern: BA-A073
3
4
Place the eyeglass part at a location away from the bunny part, then group the eyes and face using Unify and save. Select a circle built-in pattern (for the ear-band holes), arrange two circles at the edges of the eyeglasses, and group the parts using Unify. Built-in Pattern: BA-A045 Cut out the parts on the paper of your choice, and decorate with feathers, faux fur, rhinestones, lamé ribbons, and the like. Attach elastic bands for the ears to complete. Built-in Patterns: AR-A011 x 2, AR-A013 (part A) x 2, AR-A014 AR-A020 (part A), AR-I025 x 2
5
6
When attaching the eyeglass part, arranging it to match the three points on the stars as shown in the figure can make for a more attractive design.
Tip
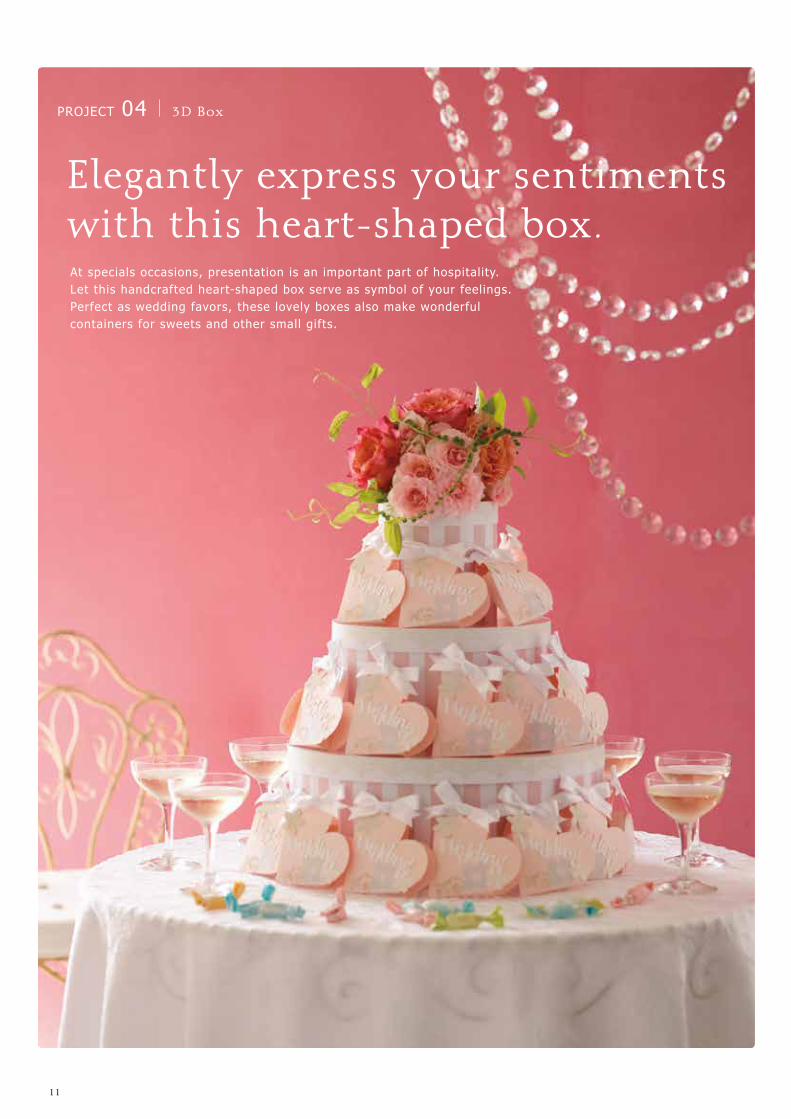
11
Elegantly express your sentiments with this heart-shaped box.At specials occasions, presentation is an important part of hospitality. Let this handcrafted heart-shaped box serve as symbol of your feelings. Perfect as wedding favors, these lovely boxes also make wonderful containers for sweets and other small gifts.
PROJECT 04 3D Box
12
1
3
5
2
4
6
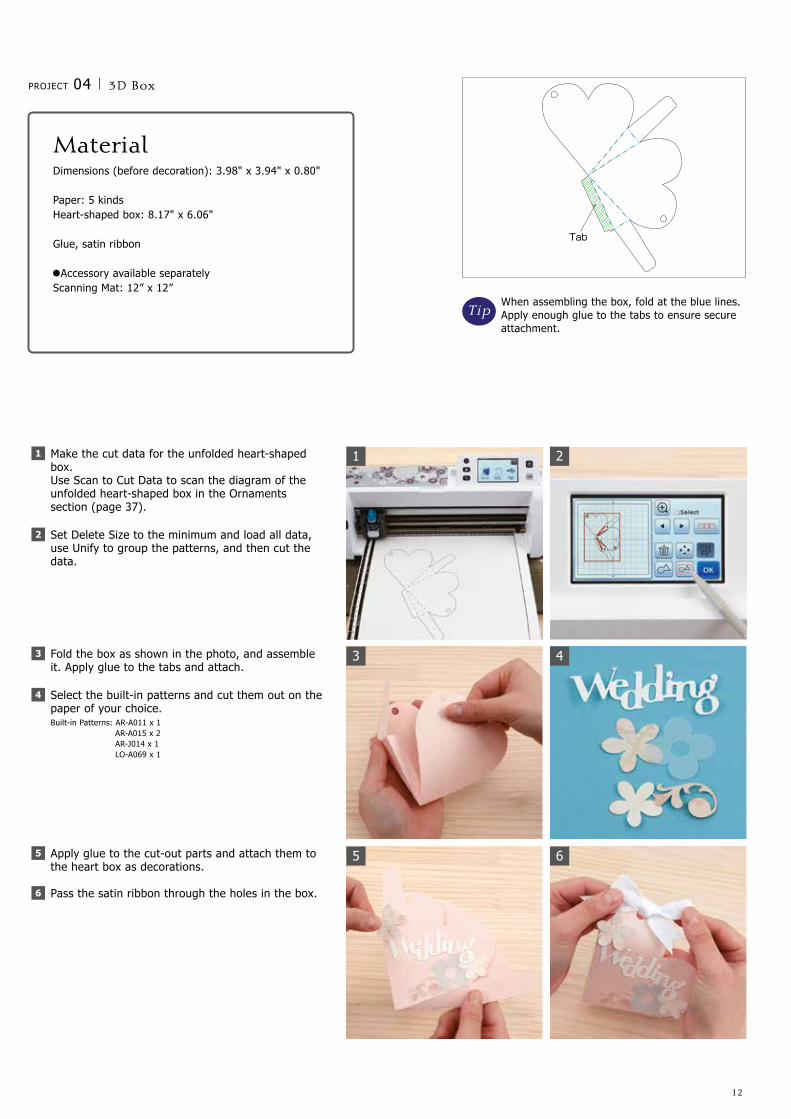
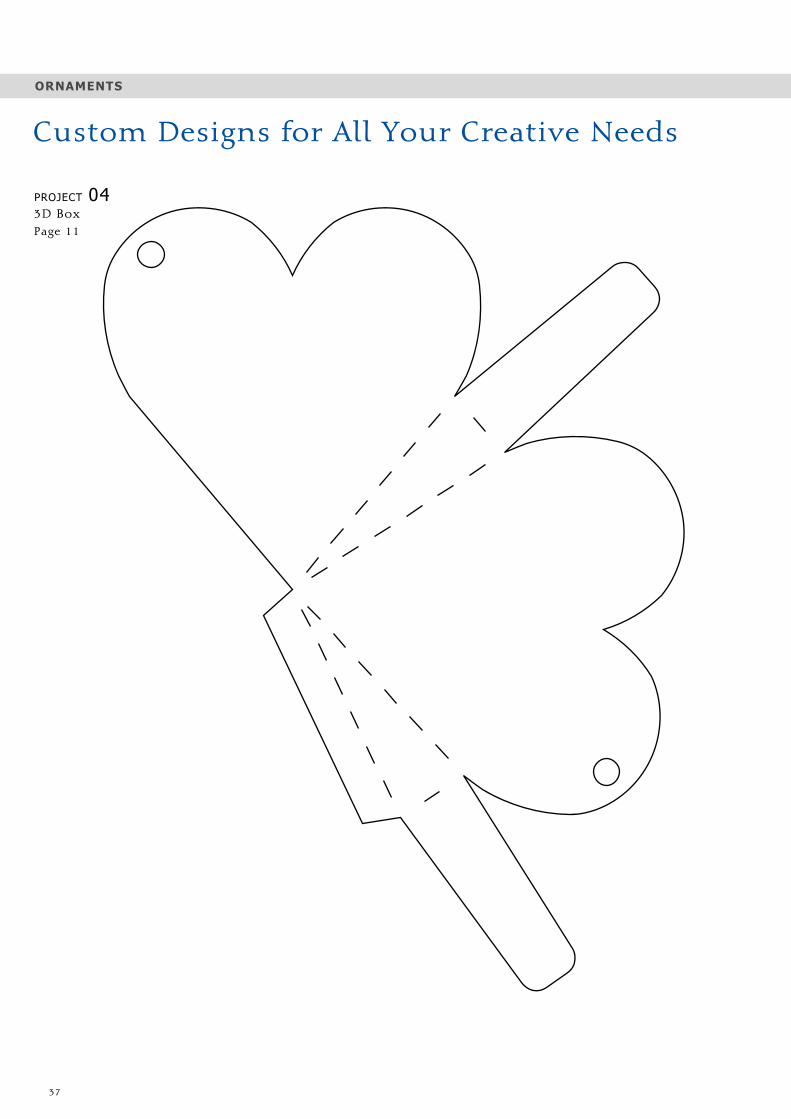
Make the cut data for the unfolded heart-shaped box.Use Scan to Cut Data to scan the diagram of the unfolded heart-shaped box in the Ornaments section (page 37).
Set Delete Size to the minimum and load all data, use Unify to group the patterns, and then cut the data.
1
2
Fold the box as shown in the photo, and assemble it. Apply glue to the tabs and attach.
Select the built-in patterns and cut them out on the paper of your choice. Built-in Patterns: AR-A011 x 1 AR-A015 x 2 AR-J014 x 1 LO-A069 x 1
3
4
Apply glue to the cut-out parts and attach them to the heart box as decorations.
Pass the satin ribbon through the holes in the box.
5
6
When assembling the box, fold at the blue lines. Apply enough glue to the tabs to ensure secure attachment.
PROJECT 04 3D Box
MaterialDimensions (before decoration): 3.98" x 3.94" x 0.80"
Paper: 5 kindsHeart-shaped box: 8.17" x 6.06"
Glue, satin ribbon
Accessory available separatelyScanning Mat: 12” x 12”
Tip
13
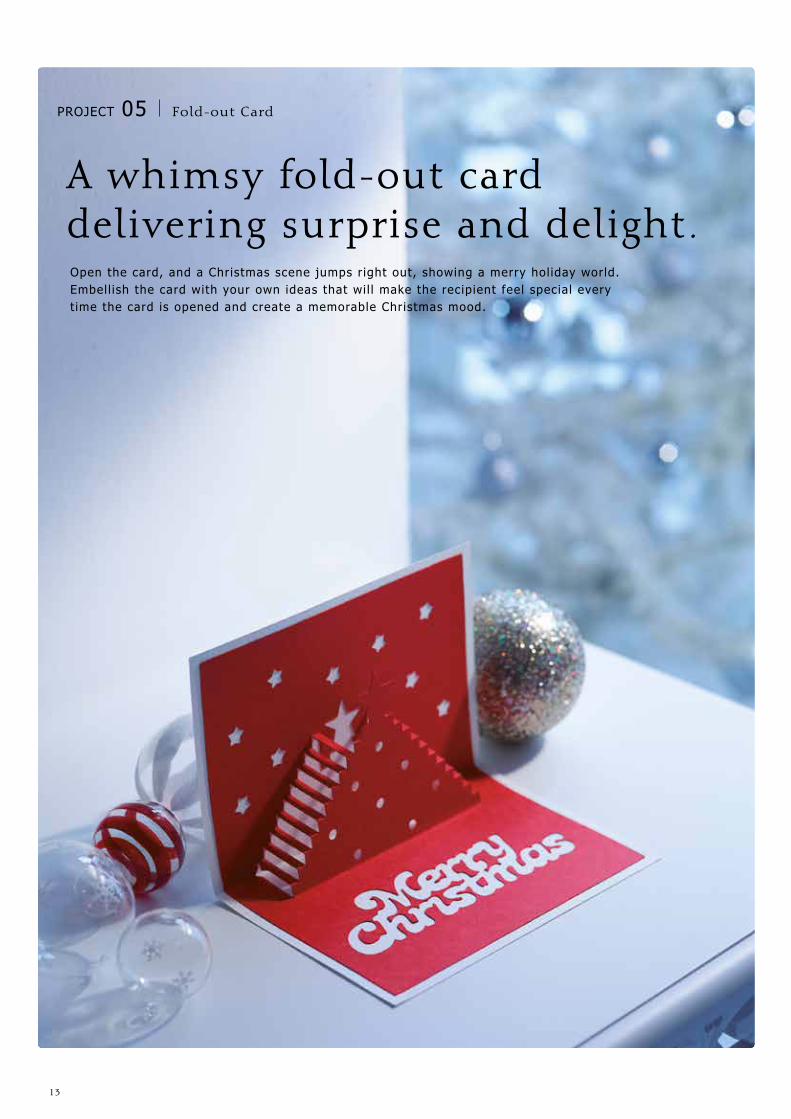
A whimsy fold-out card delivering surprise and delight.Open the card, and a Christmas scene jumps right out, showing a merry hol iday world. Embell ish the card with your own ideas that wil l make the recipient feel special every t ime the card is opened and create a memorable Christmas mood.
PROJECT 05 Fold-out Card
14
1
3
5
2
4
6
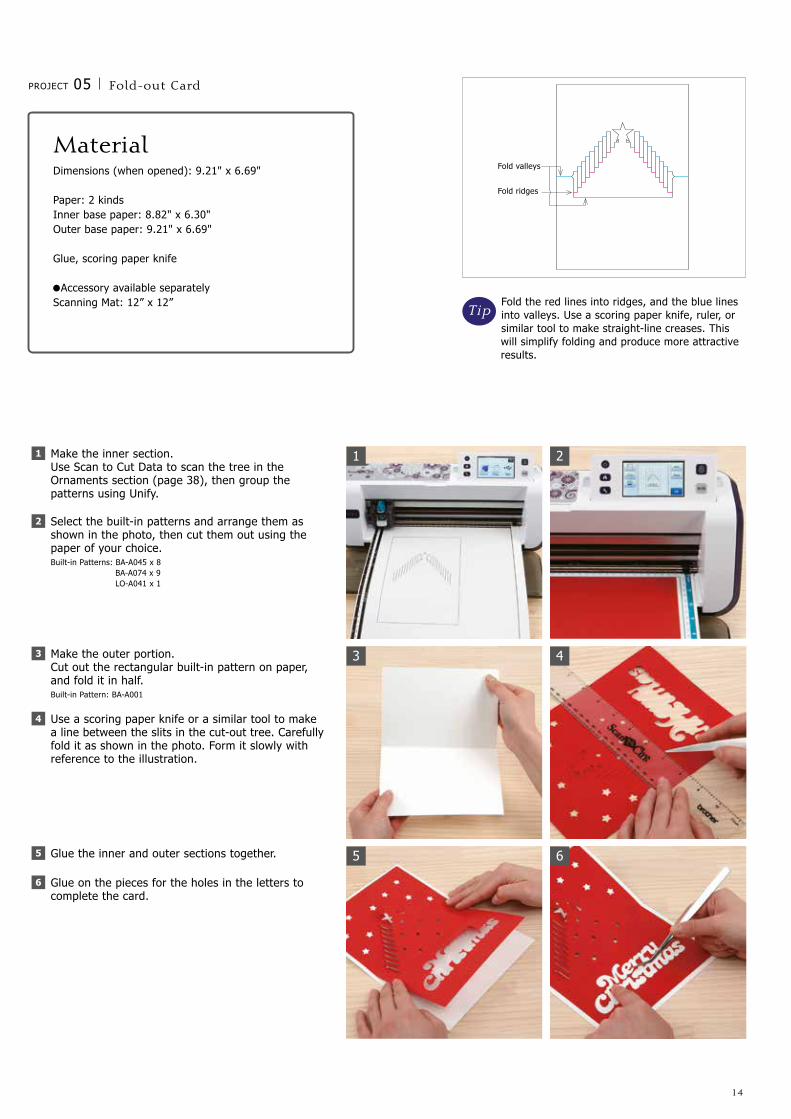
Fold valleys
Fold ridges
Fold the red lines into ridges, and the blue lines into valleys. Use a scoring paper knife, ruler, or similar tool to make straight-line creases. This will simplify folding and produce more attractive results.
PROJECT 05 Fold-out Card
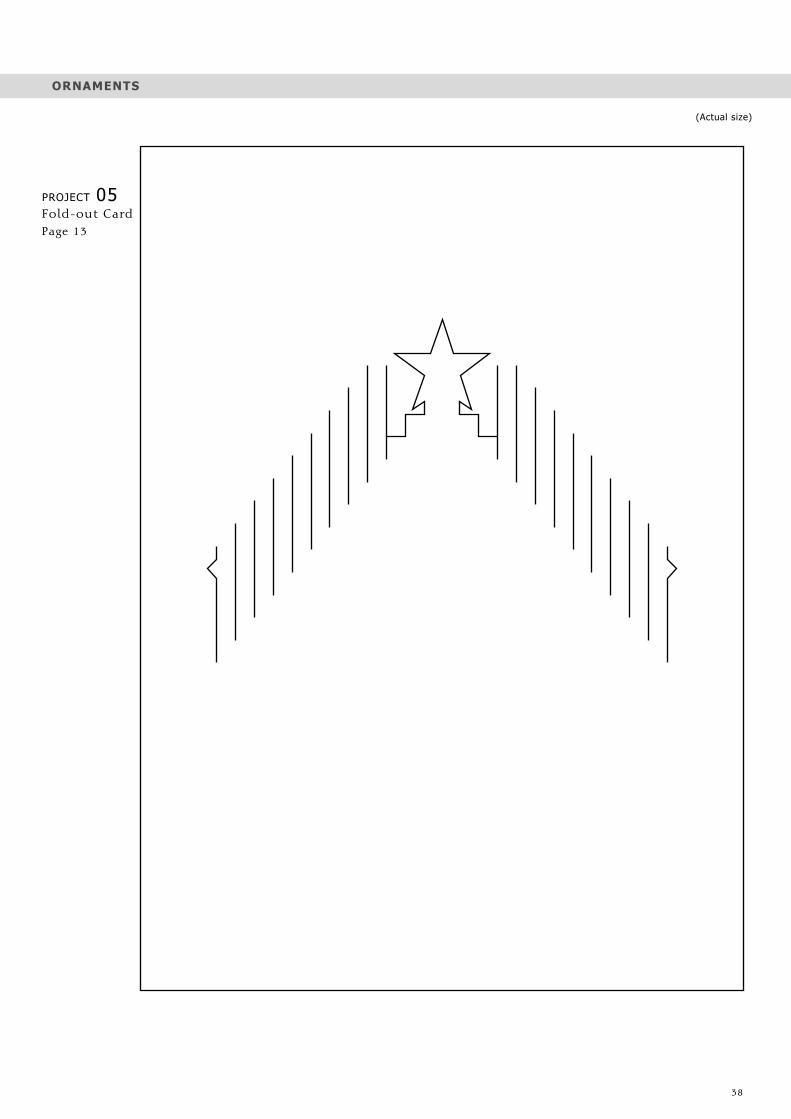
MaterialDimensions (when opened): 9.21" x 6.69"
Paper: 2 kindsInner base paper: 8.82" x 6.30"Outer base paper: 9.21" x 6.69"
Glue, scoring paper knife
Accessory available separatelyScanning Mat: 12” x 12”
Make the inner section.Use Scan to Cut Data to scan the tree in the Ornaments section (page 38), then group the patterns using Unify. Select the built-in patterns and arrange them as shown in the photo, then cut them out using the paper of your choice. Built-in Patterns: BA-A045 x 8 BA-A074 x 9 LO-A041 x 1
1
2
Make the outer portion.Cut out the rectangular built-in pattern on paper, and fold it in half. Built-in Pattern: BA-A001
Use a scoring paper knife or a similar tool to make a line between the slits in the cut-out tree. Carefully fold it as shown in the photo. Form it slowly with reference to the illustration.
3
4
Glue the inner and outer sections together. Glue on the pieces for the holes in the letters to complete the card.
5
6
Tip
15
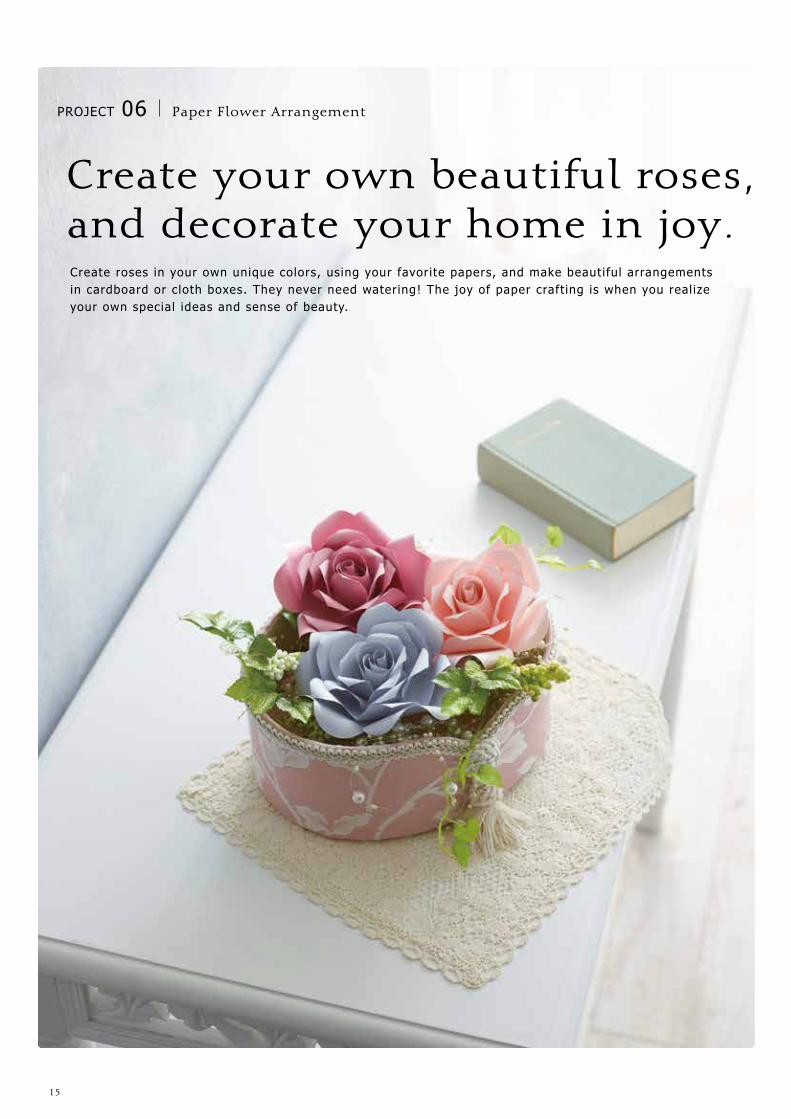
Create your own beautiful roses, and decorate your home in joy.Create roses in your own unique colors, using your favorite papers, and make beautiful arrangements in cardboard or cloth boxes. They never need watering! The joy of paper craft ing is when you real ize your own special ideas and sense of beauty.
PROJECT 06 Paper Flower Arrangement
16
1
3
5
2
4
6
Create your own beautiful roses, and decorate your home in joy.
Use the tab on the back of the stem to glue it to a box for even more impact.
PROJECT 06 Paper Flower Arrangement
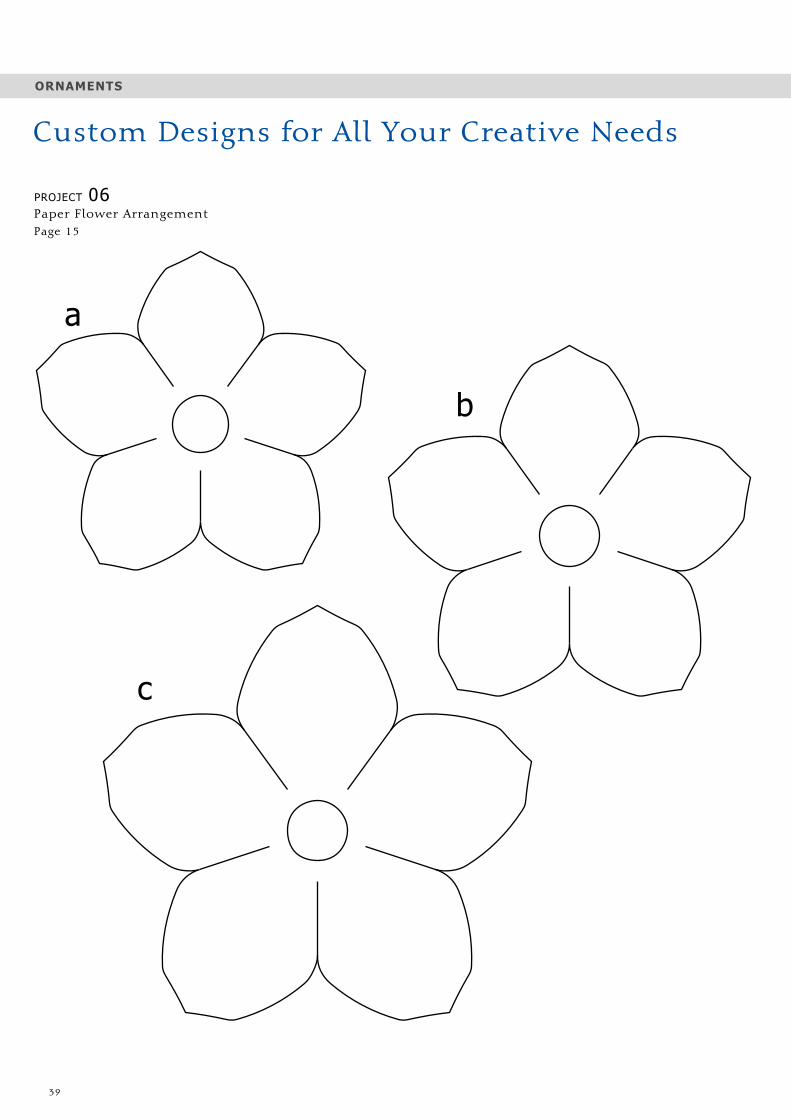
MaterialDimensions (when finished and open): 4.31” x 4.31”
Paper: 1 kindPetal (a) 3.33” x 3.44”Petal (b) 3.67” x 3.78”Petal (c) 4.32” x 4.47”Petal (d) 5.09” x 5.28”Stem (e) 8.16” x 2.19”
Glue, curling paper knife
Accessory available separatelyScanning Mat: 12” x 12”
Use Scan to Cut Data to scan the rose (page 39). Set Delete Size to the minimum and load all data, using Unify to group the patterns. Cut them out on the paper of your choice.
Use the curling paper knife to apply a curl to the stem (e), and glue it down. Twist the petals as shown in the photograph, and glue them along the dashed lines.
1
2
Curl petals (a), (b), (c), and (d) inwards, but curl their tips outwards.
Glue petals (a) and (b) so that they overlap adjoining petals, as shown in the photograph. Spread petal (b) out wider than (a) for a more beautiful flower.
3
4
Pass the stem (e) from below through petals (a), (b), (c), and (d) in that order, and attach the stem (e) to petal (d) using the tab.
Adjust the petal shape and orientation for the most beautiful design.
5
6
Tip
17
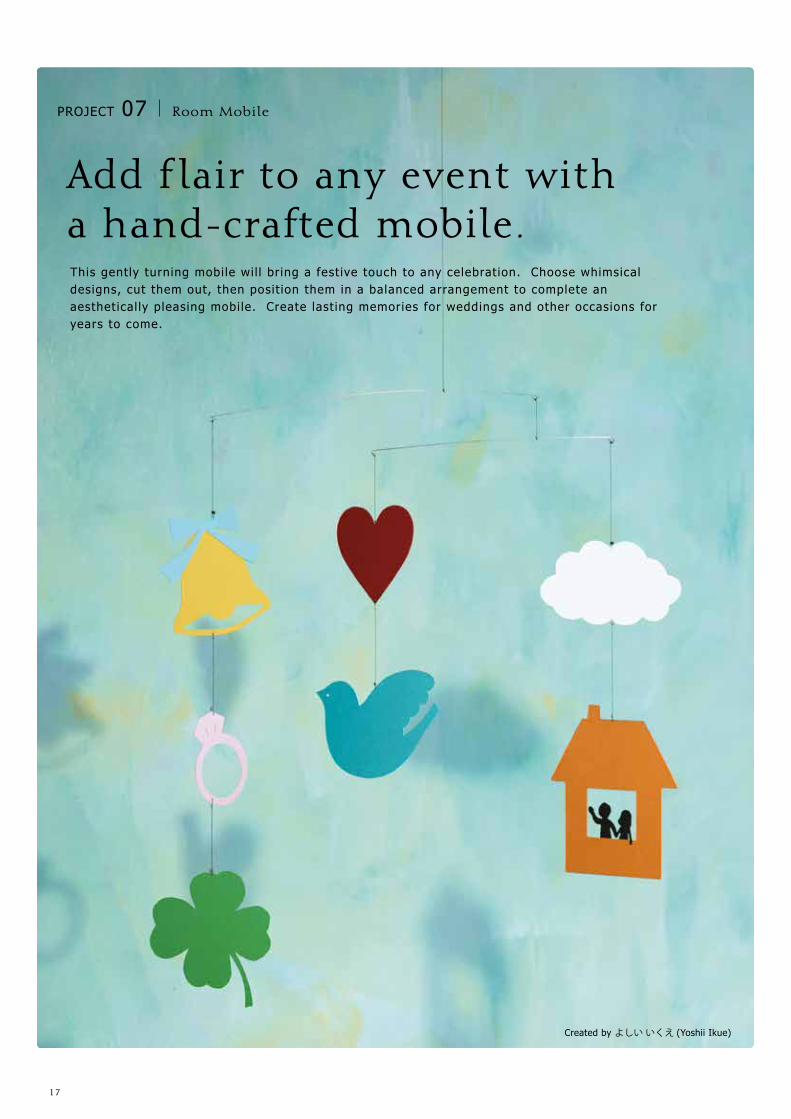
Add f lair to any event with a hand-crafted mobile.This gently turning mobile wil l bring a festive touch to any celebration. Choose whimsical designs, cut them out, then posit ion them in a balanced arrangement to complete an aesthetical ly pleasing mobile. Create lasting memories for weddings and other occasions for years to come.
PROJECT 07 Room Mobile
Created by よしい いくえ (Yoshii Ikue)
18
1
3
5
2
4
6
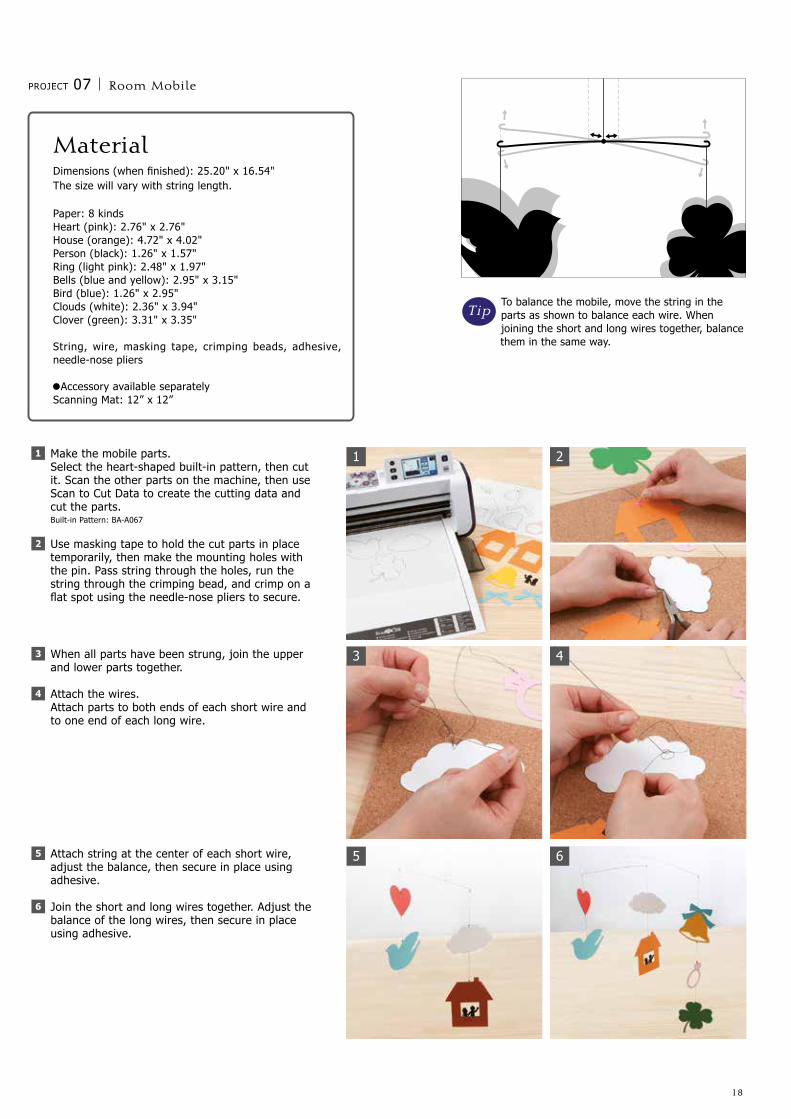
To balance the mobile, move the string in the parts as shown to balance each wire. When joining the short and long wires together, balance them in the same way.
PROJECT 07 Room Mobile
MaterialDimensions (when finished): 25.20" x 16.54"The size will vary with string length.
Paper: 8 kindsHeart (pink): 2.76" x 2.76"House (orange): 4.72" x 4.02"Person (black): 1.26" x 1.57"Ring (light pink): 2.48" x 1.97"Bells (blue and yellow): 2.95" x 3.15"Bird (blue): 1.26" x 2.95"Clouds (white): 2.36" x 3.94"Clover (green): 3.31" x 3.35"
String, wire, masking tape, crimping beads, adhesive, needle-nose pliers
Accessory available separatelyScanning Mat: 12” x 12”
When all parts have been strung, join the upper and lower parts together.
Attach the wires.Attach parts to both ends of each short wire and to one end of each long wire.
3
4
Attach string at the center of each short wire, adjust the balance, then secure in place using adhesive.
Join the short and long wires together. Adjust the balance of the long wires, then secure in place using adhesive.
5
6
Tip
Make the mobile parts.Select the heart-shaped built-in pattern, then cut it. Scan the other parts on the machine, then use Scan to Cut Data to create the cutting data and cut the parts.Built-in Pattern: BA-A067
Use masking tape to hold the cut parts in place temporarily, then make the mounting holes with the pin. Pass string through the holes, run the string through the crimping bead, and crimp on a flat spot using the needle-nose pliers to secure.
1
2
Created by よしい いくえ (Yoshii Ikue)
19
A vintage inspired collage frame with hand-crafted warmth.This charming piece is made using old-t ime i l lustrations and fabric r ibbons. Convey your special thoughts to the recipient with this hand-crafted frame that wil l add warmth to any room.
PROJECT 08 Collage Photo Frame
20
1
3
5
2
4
6
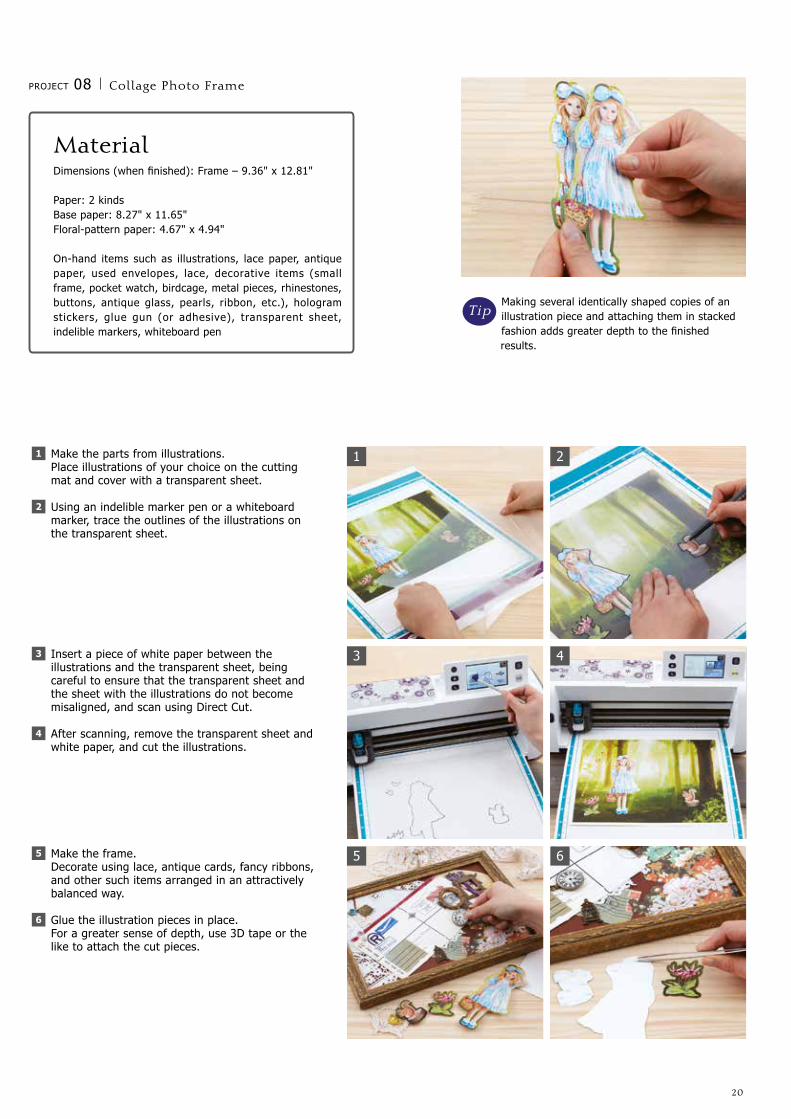
Making several identically shaped copies of an illustration piece and attaching them in stacked fashion adds greater depth to the finished results.
PROJECT 08 Collage Photo Frame
MaterialDimensions (when finished): Frame – 9.36" x 12.81"
Paper: 2 kindsBase paper: 8.27" x 11.65"Floral-pattern paper: 4.67" x 4.94"
On-hand items such as illustrations, lace paper, antique paper, used envelopes, lace, decorative items (small frame, pocket watch, birdcage, metal pieces, rhinestones, buttons, antique glass, pearls, ribbon, etc.), hologram stickers, glue gun (or adhesive), transparent sheet, indelible markers, whiteboard pen
Make the parts from illustrations.Place illustrations of your choice on the cutting mat and cover with a transparent sheet.
Using an indelible marker pen or a whiteboard marker, trace the outlines of the illustrations on the transparent sheet.
1
2
Insert a piece of white paper between the illustrations and the transparent sheet, being careful to ensure that the transparent sheet and the sheet with the illustrations do not become misaligned, and scan using Direct Cut.
After scanning, remove the transparent sheet and white paper, and cut the illustrations.
3
4
Make the frame.Decorate using lace, antique cards, fancy ribbons, and other such items arranged in an attractively balanced way.
Glue the illustration pieces in place.For a greater sense of depth, use 3D tape or the like to attach the cut pieces.
5
6
Tip
21
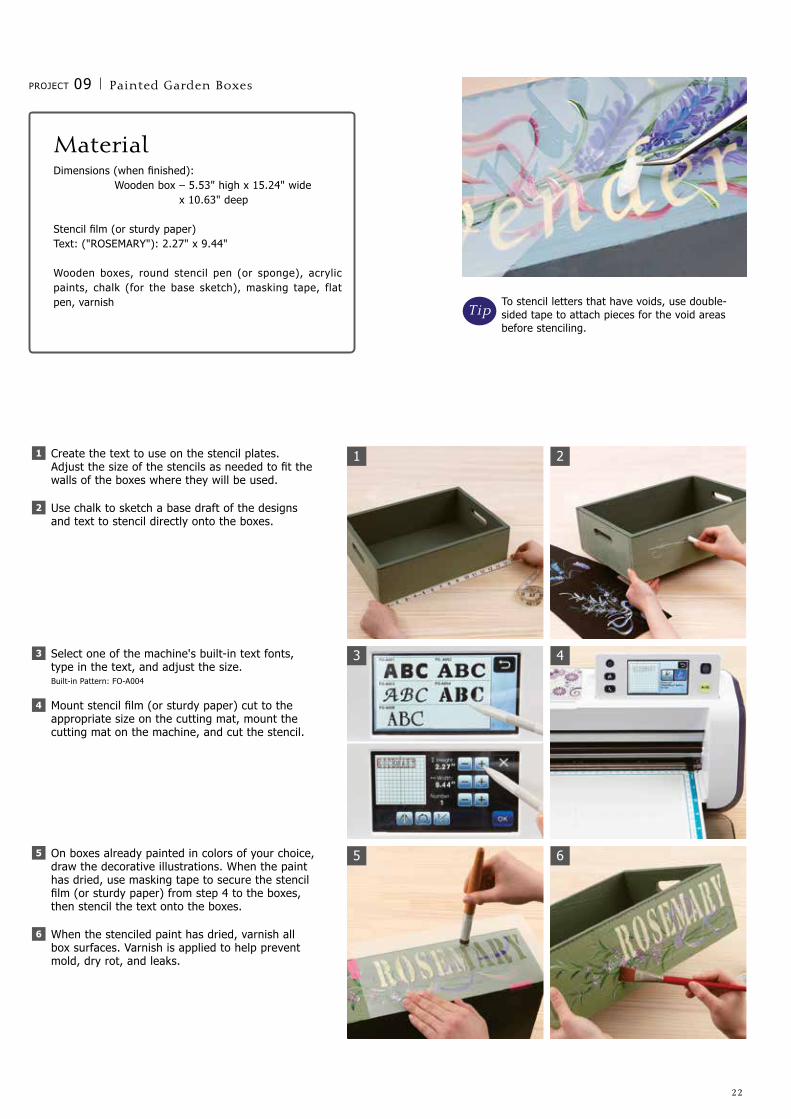
Small painted garden boxes that express your style.Transform your garden into a space that is al l your own with these enchanting painted boxes. Design and cut personalized stenci ls and use them to decorate planters and pots to l iven up your garden or give as unique gifts.
PROJECT 09 Painted Garden Boxes
22
1
3
5
2
4
6
To stencil letters that have voids, use double-sided tape to attach pieces for the void areas before stenciling.
PROJECT 09 Painted Garden Boxes
MaterialDimensions (when finished): Wooden box – 5.53" high x 15.24" wide x 10.63" deep
Stencil film (or sturdy paper)Text: ("ROSEMARY"): 2.27" x 9.44"
Wooden boxes, round stencil pen (or sponge), acrylic paints, chalk (for the base sketch), masking tape, flat pen, varnish
Create the text to use on the stencil plates.Adjust the size of the stencils as needed to fit the walls of the boxes where they will be used.
Use chalk to sketch a base draft of the designs and text to stencil directly onto the boxes.
1
2
Select one of the machine's built-in text fonts, type in the text, and adjust the size. Built-in Pattern: FO-A004
Mount stencil film (or sturdy paper) cut to the appropriate size on the cutting mat, mount the cutting mat on the machine, and cut the stencil.
3
4
On boxes already painted in colors of your choice, draw the decorative illustrations. When the paint has dried, use masking tape to secure the stencil film (or sturdy paper) from step 4 to the boxes, then stencil the text onto the boxes.
When the stenciled paint has dried, varnish all box surfaces. Varnish is applied to help prevent mold, dry rot, and leaks.
5
6
Tip
23
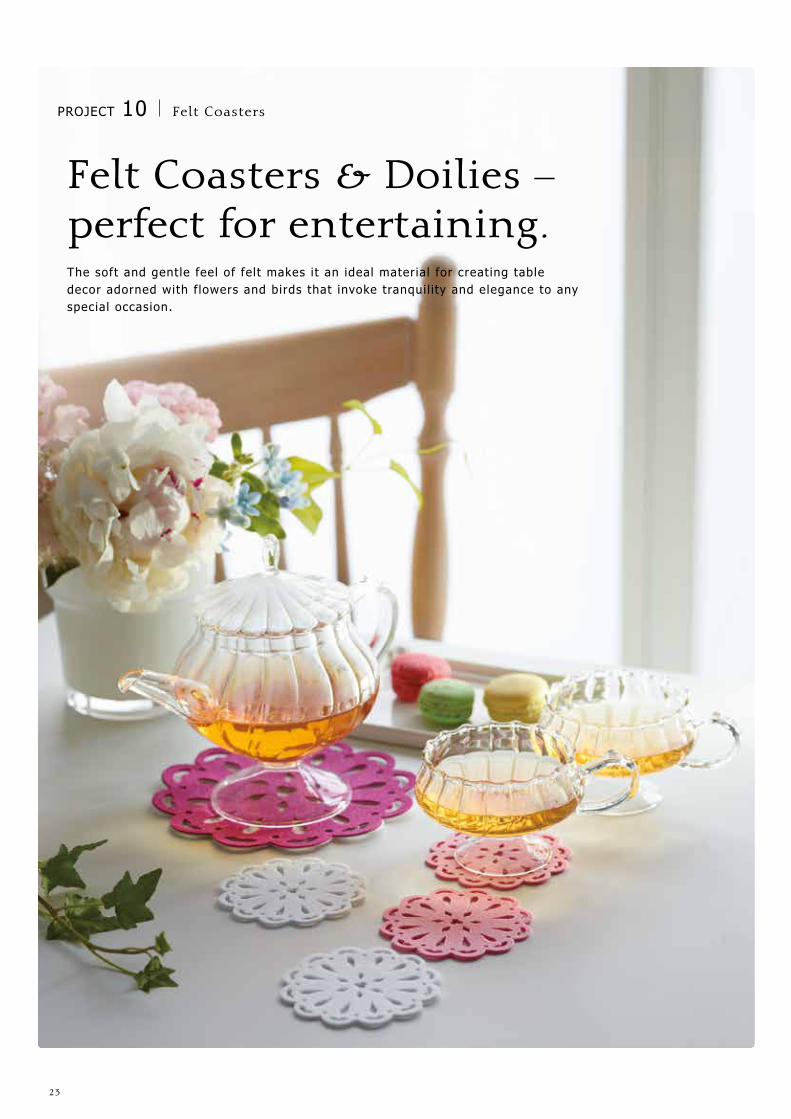
Felt Coasters & Doilies – perfect for entertaining. The soft and gentle feel of felt makes it an ideal material for creating table decor adorned with f lowers and birds that invoke tranquil i ty and elegance to any special occasion.
PROJECT 10 Felt Coasters
24
1
3
5
2
4
6
http://scanncutcanvas.brother.com/
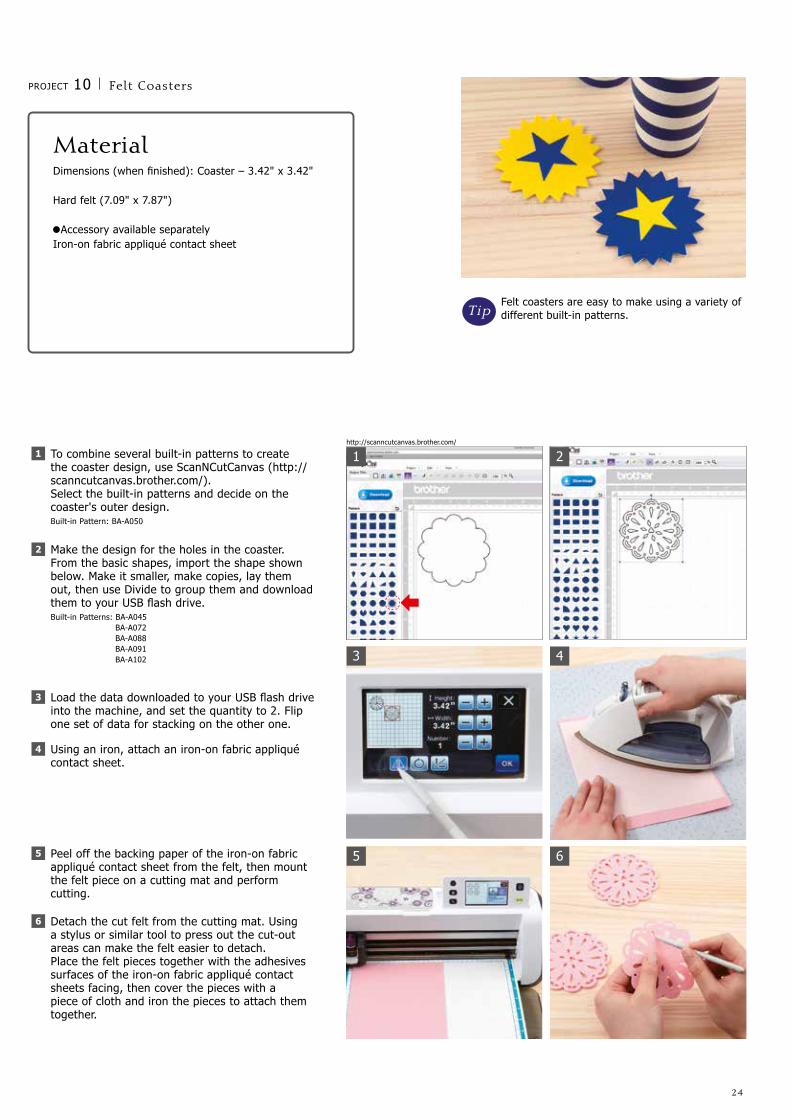
Felt coasters are easy to make using a variety of different built-in patterns.
PROJECT 10 Felt Coasters
MaterialDimensions (when finished): Coaster – 3.42" x 3.42"
Hard felt (7.09" x 7.87")
Accessory available separatelyIron-on fabric appliqué contact sheet
To combine several built-in patterns to create the coaster design, use ScanNCutCanvas (http://scanncutcanvas.brother.com/).Select the built-in patterns and decide on the coaster's outer design.Built-in Pattern: BA-A050
Make the design for the holes in the coaster.From the basic shapes, import the shape shown below. Make it smaller, make copies, lay them out, then use Divide to group them and download them to your USB flash drive.Built-in Patterns: BA-A045 BA-A072 BA-A088 BA-A091 BA-A102
1
2
Load the data downloaded to your USB flash drive into the machine, and set the quantity to 2. Flip one set of data for stacking on the other one.
Using an iron, attach an iron-on fabric appliqué contact sheet.
3
4
Peel off the backing paper of the iron-on fabric appliqué contact sheet from the felt, then mount the felt piece on a cutting mat and perform cutting.
Detach the cut felt from the cutting mat. Using a stylus or similar tool to press out the cut-out areas can make the felt easier to detach.Place the felt pieces together with the adhesives surfaces of the iron-on fabric appliqué contact sheets facing, then cover the pieces with a piece of cloth and iron the pieces to attach them together.
5
6
Tip
25
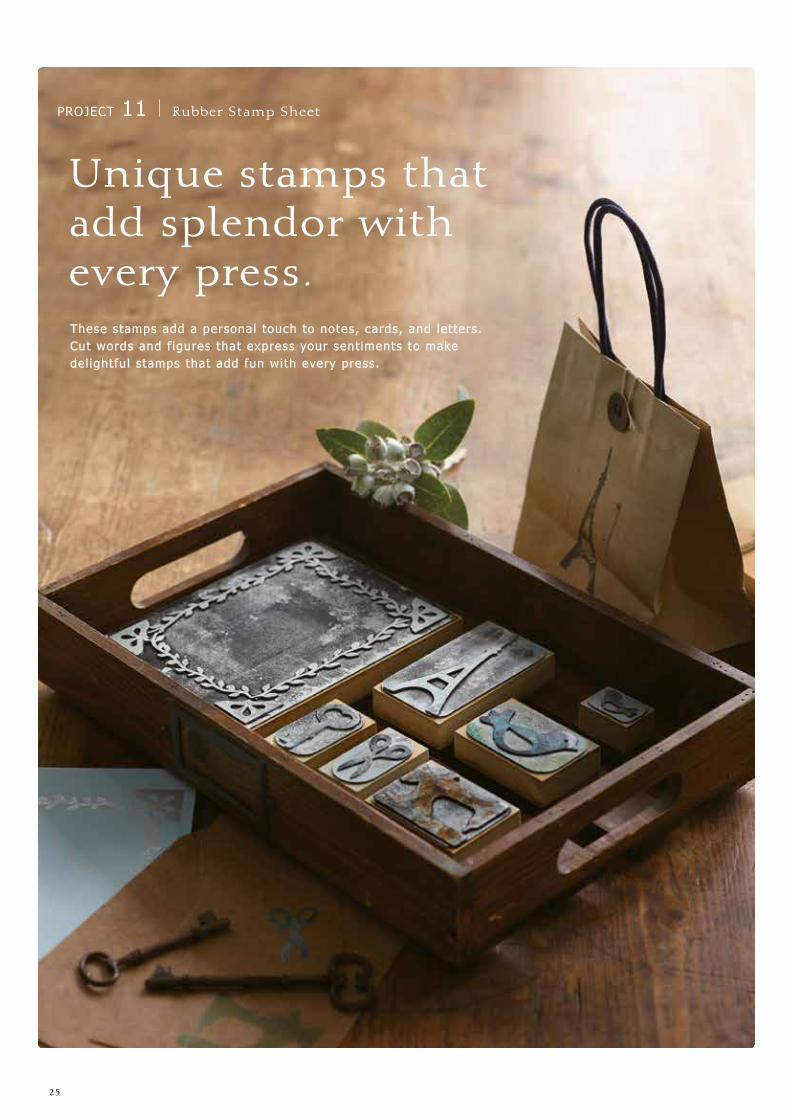
Unique stamps that add splendor with every press.These stamps add a personal touch to notes, cards, and letters. Cut words and f igures that express your sent iments to make del ightful stamps that add fun with every press.
PROJECT 11 Rubber Stamp Sheet
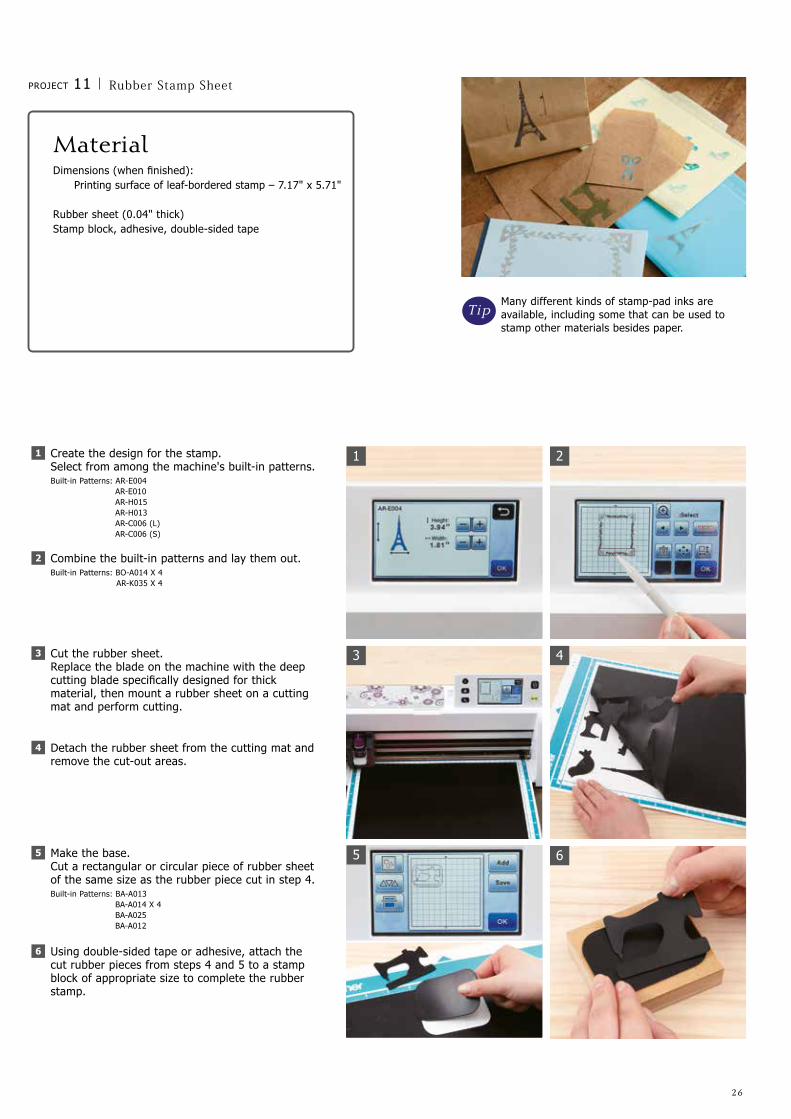
26
1
3
5
2
4
6
Many different kinds of stamp-pad inks are available, including some that can be used to stamp other materials besides paper.
PROJECT 11 Rubber Stamp Sheet
MaterialDimensions (when finished): Printing surface of leaf-bordered stamp – 7.17" x 5.71"
Rubber sheet (0.04" thick)Stamp block, adhesive, double-sided tape
Create the design for the stamp.Select from among the machine's built-in patterns.Built-in Patterns: AR-E004 AR-E010 AR-H015 AR-H013 AR-C006 (L) AR-C006 (S)
Combine the built-in patterns and lay them out.Built-in Patterns: BO-A014 X 4 AR-K035 X 4
1
2
Cut the rubber sheet.Replace the blade on the machine with the deep cutting blade specifically designed for thick material, then mount a rubber sheet on a cutting mat and perform cutting.
Detach the rubber sheet from the cutting mat and remove the cut-out areas.
3
4
Make the base.Cut a rectangular or circular piece of rubber sheet of the same size as the rubber piece cut in step 4.Built-in Patterns: BA-A013 BA-A014 X 4 BA-A025 BA-A012
Using double-sided tape or adhesive, attach the cut rubber pieces from steps 4 and 5 to a stamp block of appropriate size to complete the rubber stamp.
5
6
Tip

27
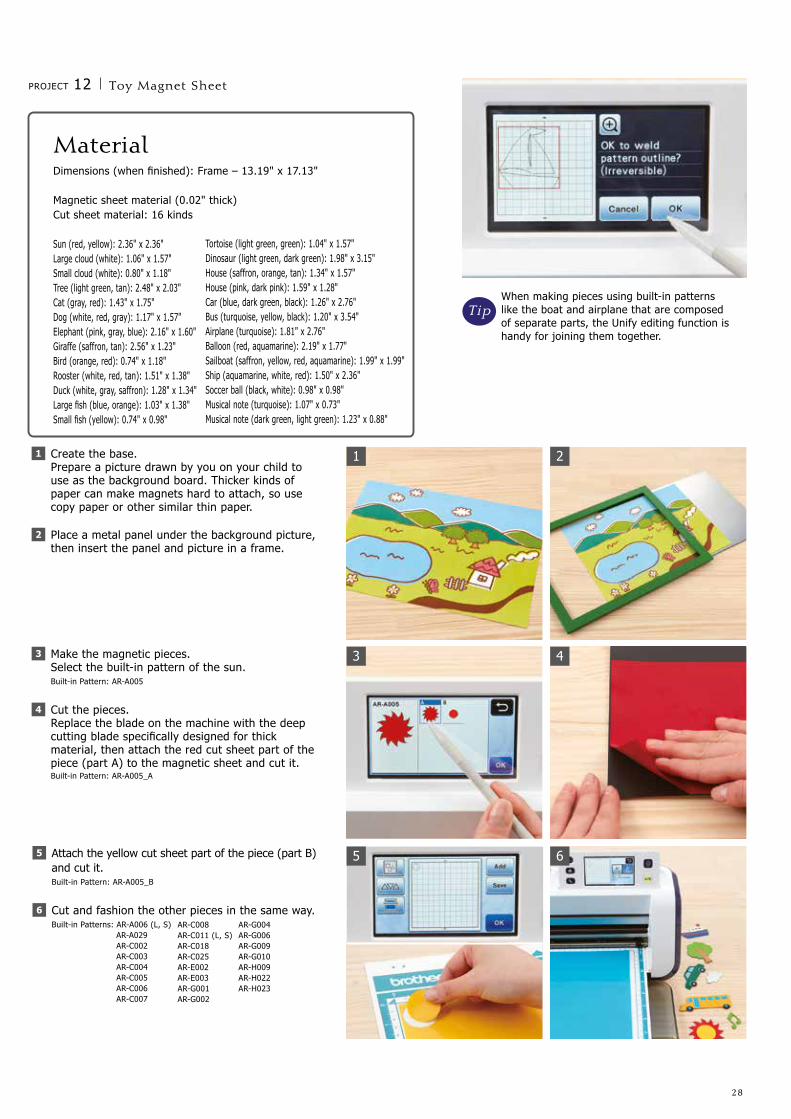
Magnets making playtime fun for both parent and child.Kids love magnets. Give them a set of fun magnetic pieces made from magnetic sheets. Use them to create pictures for a one-of-a-kind interior decoration.
PROJECT 12 Toy Magnet Sheet
28
1
3
5
2
4
6
When making pieces using built-in patterns like the boat and airplane that are composed of separate parts, the Unify editing function is handy for joining them together.
PROJECT 12 Toy Magnet Sheet
MaterialDimensions (when finished): Frame – 13.19" x 17.13"
Magnetic sheet material (0.02" thick)Cut sheet material: 16 kinds
Sun (red, yellow): 2.36" x 2.36"Large cloud (white): 1.06" x 1.57"Small cloud (white): 0.80" x 1.18"Tree (light green, tan): 2.48" x 2.03"Cat (gray, red): 1.43" x 1.75"Dog (white, red, gray): 1.17" x 1.57"Elephant (pink, gray, blue): 2.16" x 1.60"Giraffe (saffron, tan): 2.56" x 1.23"Bird (orange, red): 0.74" x 1.18"Rooster (white, red, tan): 1.51" x 1.38"Duck (white, gray, saffron): 1.28" x 1.34"Large fish (blue, orange): 1.03" x 1.38"Small fish (yellow): 0.74" x 0.98"
Create the base.Prepare a picture drawn by you on your child to use as the background board. Thicker kinds of paper can make magnets hard to attach, so use copy paper or other similar thin paper.
Place a metal panel under the background picture, then insert the panel and picture in a frame.
1
2
Make the magnetic pieces.Select the built-in pattern of the sun.Built-in Pattern: AR-A005
Cut the pieces.Replace the blade on the machine with the deep cutting blade specifically designed for thick material, then attach the red cut sheet part of the piece (part A) to the magnetic sheet and cut it.Built-in Pattern: AR-A005_A
3
4
Attach the yellow cut sheet part of the piece (part B) and cut it.Built-in Pattern: AR-A005_B
Cut and fashion the other pieces in the same way.Built-in Patterns: AR-A006 (L, S) AR-A029 AR-C002 AR-C003 AR-C004 AR-C005 AR-C006 AR-C007
5
6
Tip
Tortoise (light green, green): 1.04" x 1.57"Dinosaur (light green, dark green): 1.98" x 3.15"House (saffron, orange, tan): 1.34" x 1.57"House (pink, dark pink): 1.59" x 1.28"Car (blue, dark green, black): 1.26" x 2.76"Bus (turquoise, yellow, black): 1.20" x 3.54"Airplane (turquoise): 1.81" x 2.76"Balloon (red, aquamarine): 2.19" x 1.77"Sailboat (saffron, yellow, red, aquamarine): 1.99" x 1.99"Ship (aquamarine, white, red): 1.50" x 2.36"Soccer ball (black, white): 0.98" x 0.98"Musical note (turquoise): 1.07" x 0.73"Musical note (dark green, light green): 1.23" x 0.88"
AR-C008AR-C011 (L, S)AR-C018AR-C025AR-E002AR-E003AR-G001AR-G002
AR-G004AR-G006AR-G009AR-G010AR-H009AR-H022AR-H023
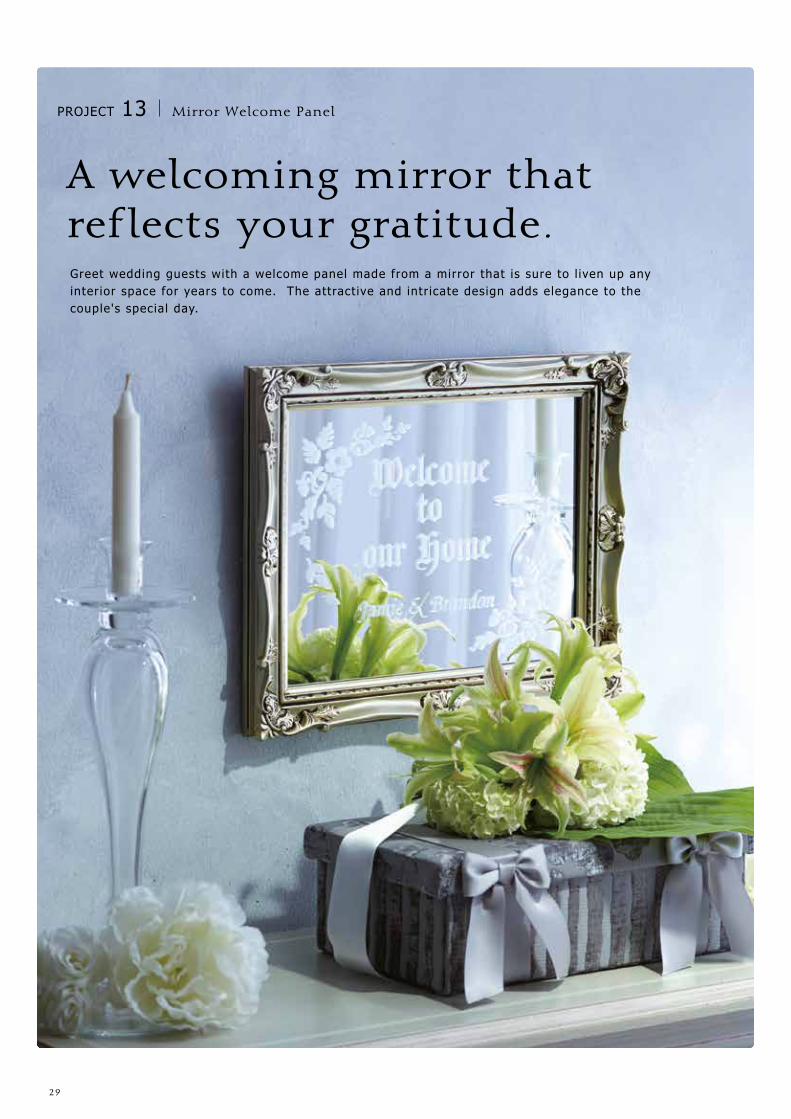
29
A welcoming mirror that ref lects your gratitude. Greet wedding guests with a welcome panel made from a mirror that is sure to l iven up any interior space for years to come. The attractive and intricate design adds elegance to the couple's special day.
PROJECT 13 Mirror Welcome Panel
30
1
3
5
2
4
6
http://scanncutcanvas.brother.com/
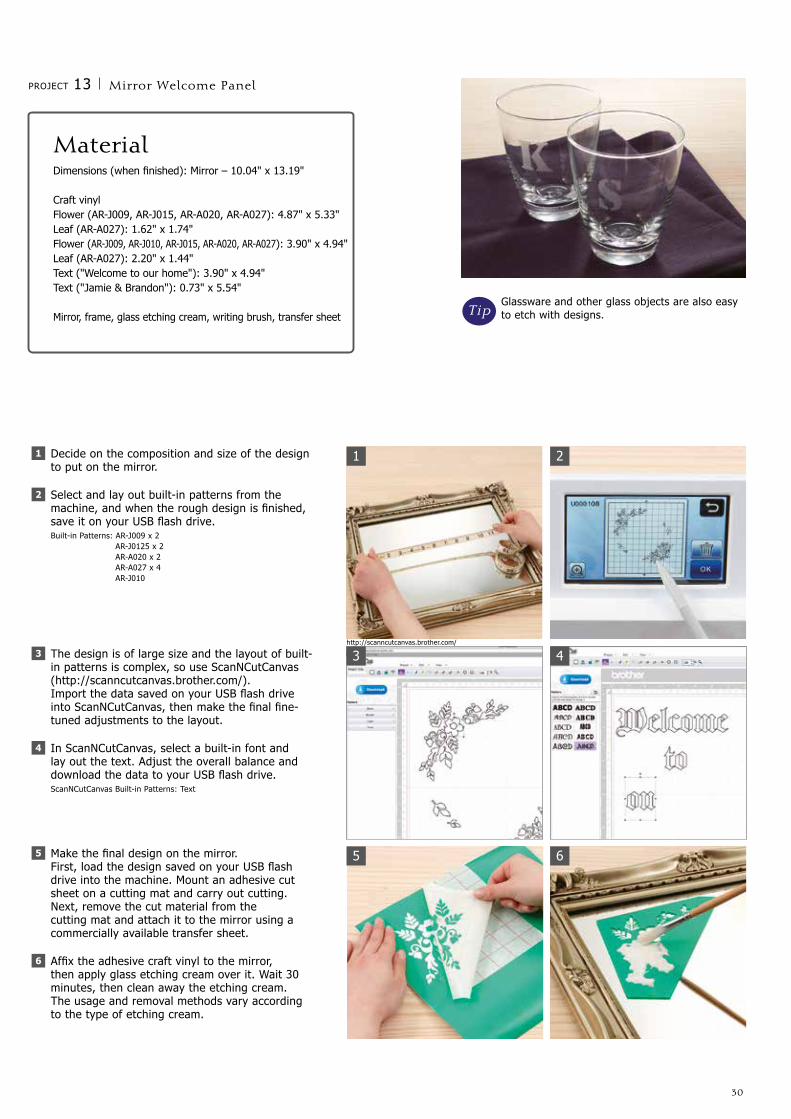
Glassware and other glass objects are also easy to etch with designs.
PROJECT 13 Mirror Welcome Panel
MaterialDimensions (when finished): Mirror – 10.04" x 13.19"
Craft vinylFlower (AR-J009, AR-J015, AR-A020, AR-A027): 4.87" x 5.33"Leaf (AR-A027): 1.62" x 1.74"Flower (AR-J009, AR-J010, AR-J015, AR-A020, AR-A027): 3.90" x 4.94"Leaf (AR-A027): 2.20" x 1.44"Text ("Welcome to our home"): 3.90" x 4.94"Text ("Jamie & Brandon"): 0.73" x 5.54"
Mirror, frame, glass etching cream, writing brush, transfer sheet
Decide on the composition and size of the design to put on the mirror.
Select and lay out built-in patterns from the machine, and when the rough design is finished, save it on your USB flash drive.Built-in Patterns: AR-J009 x 2 AR-J0125 x 2 AR-A020 x 2 AR-A027 x 4 AR-J010
1
2
The design is of large size and the layout of built-in patterns is complex, so use ScanNCutCanvas(http://scanncutcanvas.brother.com/).Import the data saved on your USB flash drive into ScanNCutCanvas, then make the final fine-tuned adjustments to the layout.
In ScanNCutCanvas, select a built-in font and lay out the text. Adjust the overall balance and download the data to your USB flash drive.ScanNCutCanvas Built-in Patterns: Text
3
4
Make the final design on the mirror.First, load the design saved on your USB flash drive into the machine. Mount an adhesive cut sheet on a cutting mat and carry out cutting.Next, remove the cut material from the cutting mat and attach it to the mirror using a commercially available transfer sheet.
Affix the adhesive craft vinyl to the mirror, then apply glass etching cream over it. Wait 30 minutes, then clean away the etching cream.The usage and removal methods vary according to the type of etching cream.
5
6
Tip
31
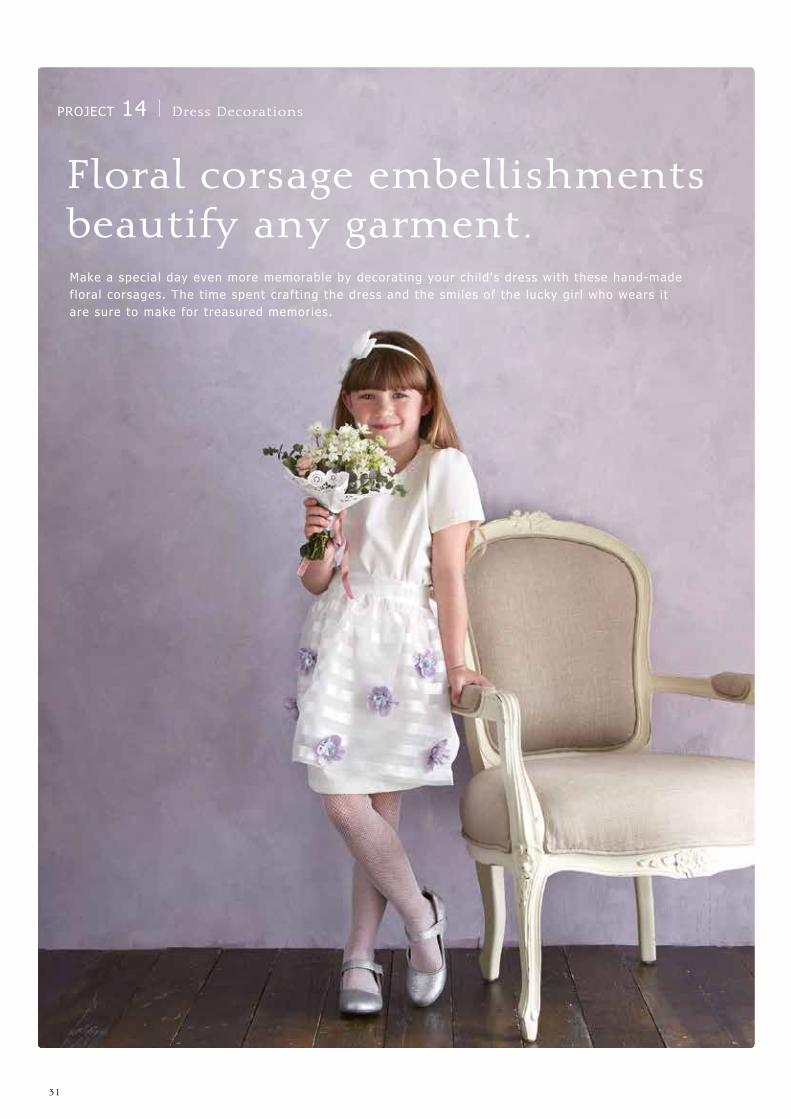
Floral corsage embellishments beautify any garment.Make a special day even more memorable by decorating your chi ld's dress with these hand-made f loral corsages. The time spent craft ing the dress and the smiles of the lucky gir l who wears it are sure to make for treasured memories.
PROJECT 14 Dress Decorations
32
1
3
5
2
4
6
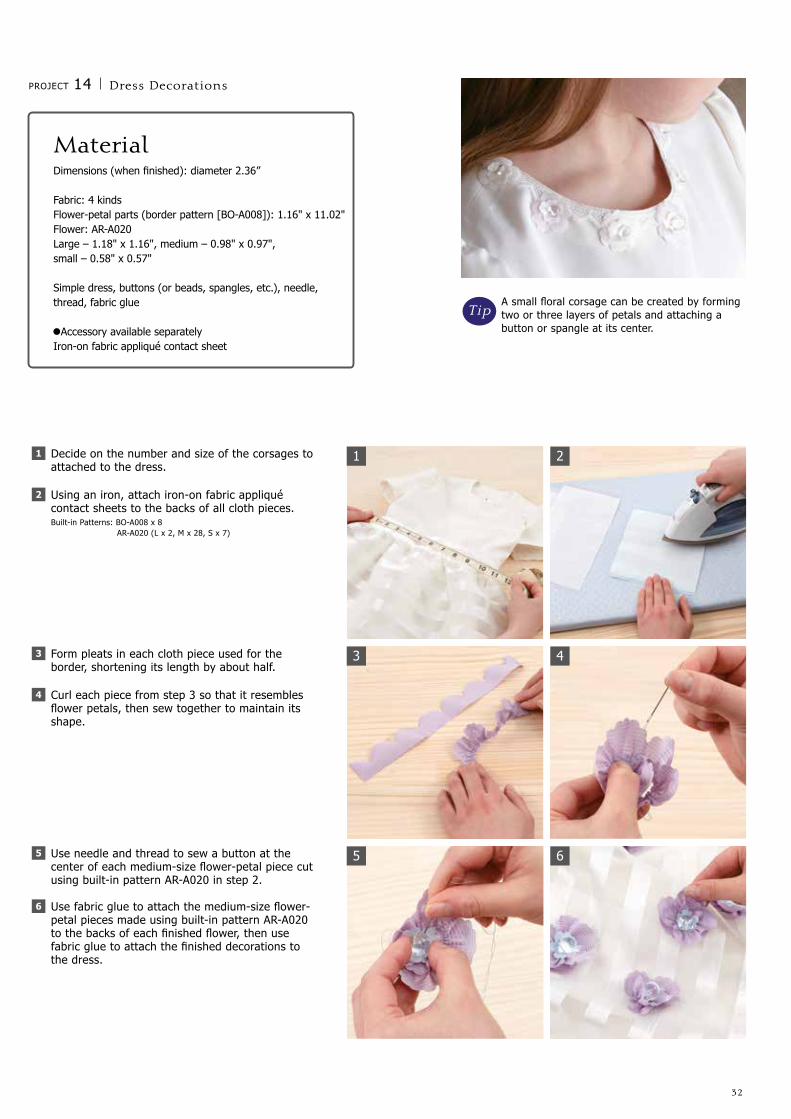
A small floral corsage can be created by forming two or three layers of petals and attaching a button or spangle at its center.
PROJECT 14 Dress Decorations
MaterialDimensions (when finished): diameter 2.36”
Fabric: 4 kindsFlower-petal parts (border pattern [BO-A008]): 1.16" x 11.02"Flower: AR-A020Large – 1.18" x 1.16", medium – 0.98" x 0.97", small – 0.58" x 0.57"
Simple dress, buttons (or beads, spangles, etc.), needle, thread, fabric glue
Accessory available separatelyIron-on fabric appliqué contact sheet
Decide on the number and size of the corsages to attached to the dress.
Using an iron, attach iron-on fabric appliqué contact sheets to the backs of all cloth pieces.Built-in Patterns: BO-A008 x 8 AR-A020 (L x 2, M x 28, S x 7)
1
2
Form pleats in each cloth piece used for the border, shortening its length by about half.
Curl each piece from step 3 so that it resembles flower petals, then sew together to maintain its shape.
3
4
Use needle and thread to sew a button at the center of each medium-size flower-petal piece cut using built-in pattern AR-A020 in step 2.
Use fabric glue to attach the medium-size flower-petal pieces made using built-in pattern AR-A020 to the backs of each finished flower, then use fabric glue to attach the finished decorations to the dress.
5
6
Tip
33
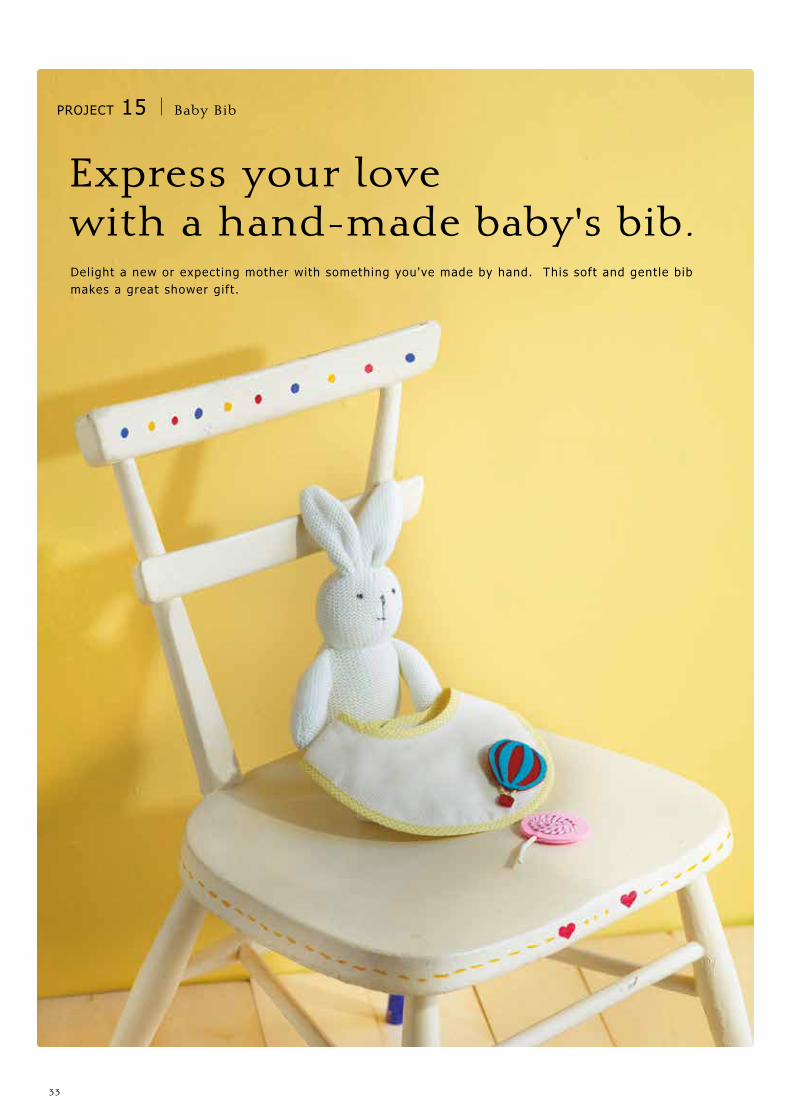
PROJECT 15 Baby Bib
Express your love with a hand-made baby's bib.Delight a new or expecting mother with something you've made by hand. This soft and gentle bib makes a great shower gift.
34
1
3
5
2
4
6
PROJECT 15 Baby Bib
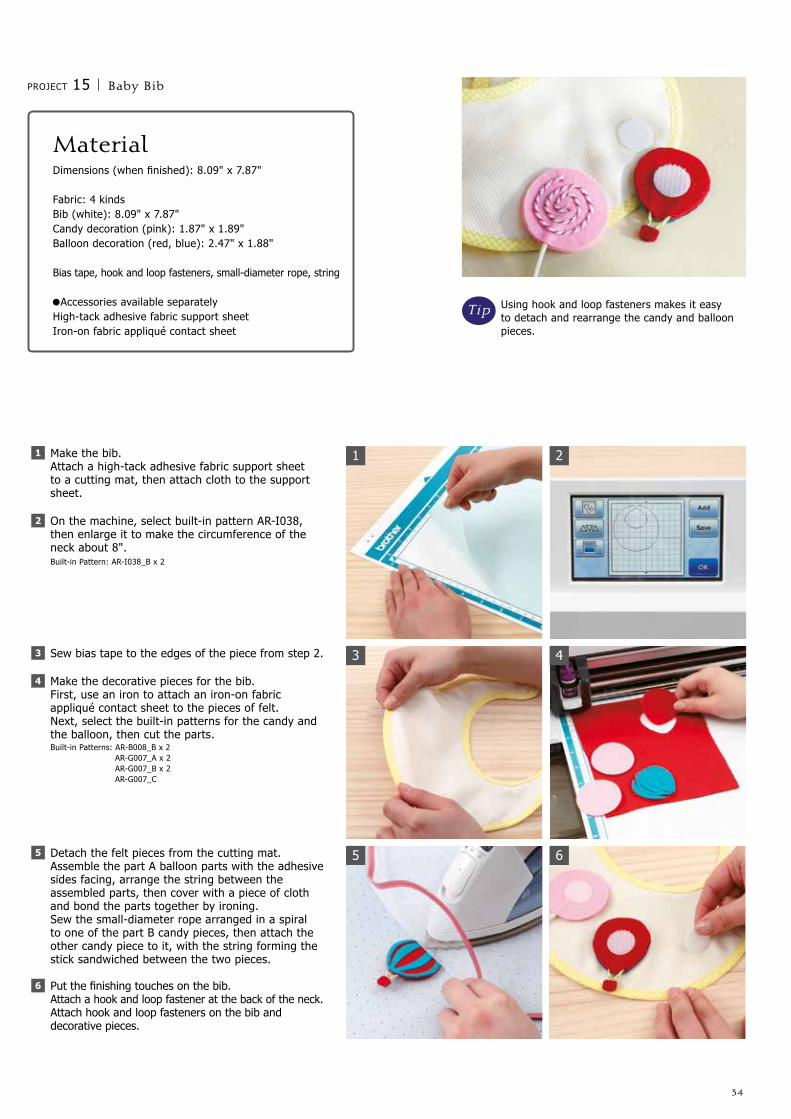
Using hook and loop fasteners makes it easy to detach and rearrange the candy and balloon pieces.
MaterialDimensions (when finished): 8.09" x 7.87"
Fabric: 4 kindsBib (white): 8.09" x 7.87"Candy decoration (pink): 1.87" x 1.89"Balloon decoration (red, blue): 2.47" x 1.88"
Bias tape, hook and loop fasteners, small-diameter rope, string
Accessories available separatelyHigh-tack adhesive fabric support sheetIron-on fabric appliqué contact sheet
Make the bib.Attach a high-tack adhesive fabric support sheet to a cutting mat, then attach cloth to the support sheet.
On the machine, select built-in pattern AR-I038, then enlarge it to make the circumference of the neck about 8".Built-in Pattern: AR-I038_B x 2
1
2
Sew bias tape to the edges of the piece from step 2.
Make the decorative pieces for the bib.First, use an iron to attach an iron-on fabric appliqué contact sheet to the pieces of felt.Next, select the built-in patterns for the candy and the balloon, then cut the parts.Built-in Patterns: AR-B008_B x 2 AR-G007_A x 2 AR-G007_B x 2 AR-G007_C
3
4
Detach the felt pieces from the cutting mat.Assemble the part A balloon parts with the adhesive sides facing, arrange the string between the assembled parts, then cover with a piece of cloth and bond the parts together by ironing.Sew the small-diameter rope arranged in a spiral to one of the part B candy pieces, then attach the other candy piece to it, with the string forming the stick sandwiched between the two pieces.
Put the finishing touches on the bib.Attach a hook and loop fastener at the back of the neck.Attach hook and loop fasteners on the bib and decorative pieces.
5
6
Tip
35
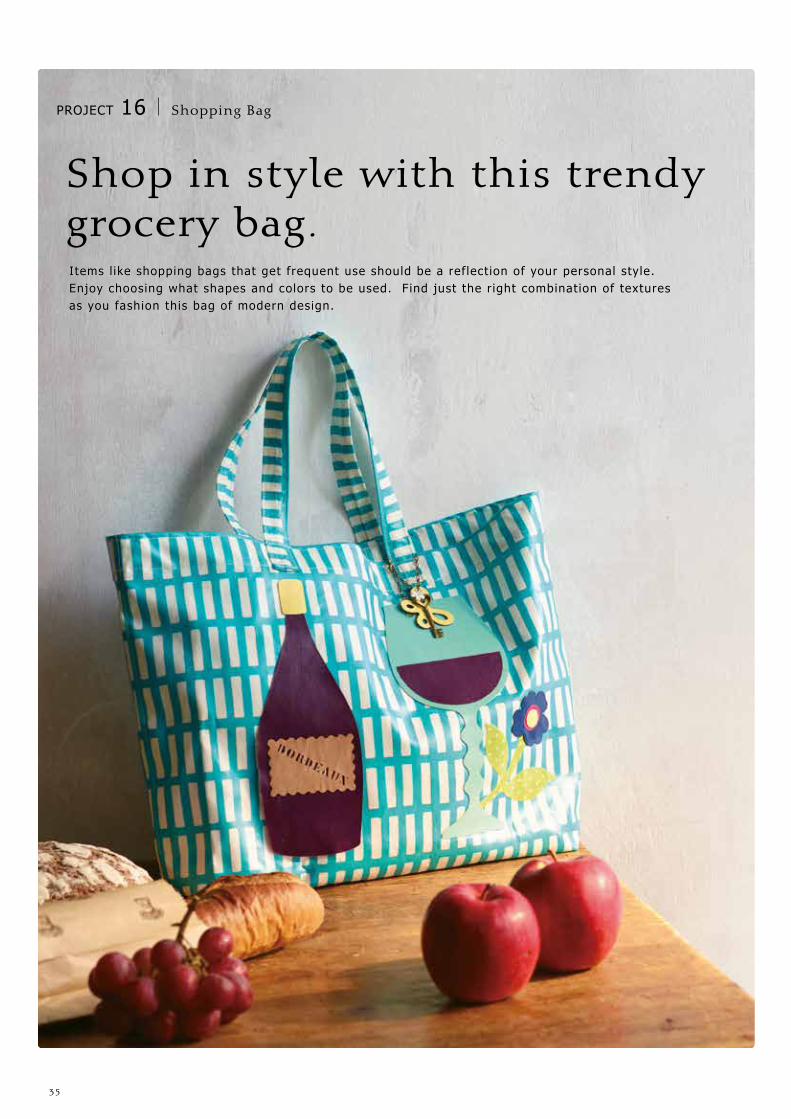
Shop in style with this trendy grocery bag.Items l ike shopping bags that get frequent use should be a reflection of your personal style. Enjoy choosing what shapes and colors to be used. Find just the right combination of textures as you fashion this bag of modern design.
PROJECT 16 Shopping Bag

36
1
3
5
2
4
6
PROJECT 16 Shopping Bag
Measure the third-party bag you want to embellish, and decide on the designs to use.
Make the decorative pieces.Select the built-in patterns for the wine bottle, glass, flower, and leaves and the semicircular basic shape, then flip them.Built-in Patterns: AR-E020 AR-A020 BA-A053 AR-E024 AR-A025
1
2
Cut the leather.Replace the blade on the machine with the deep cutting blade specifically designed for thick material, mount the leather on a cutting mat with its top (outer) surface facing the mat, then perform cutting.
Enter the text using a built-in font, then angle it as shown in the photo.Built-in Pattern: FO-A004
3
4
Add the square from the basic shapes. Position it with the pieces from step 4, use Unify to group them, then flip and cut.
When all decorative pieces have been cut, use leather and vinyl bond to attach them to the bag.
5
6
You can make an attractive charm simply by cutting two identical pieces using the same built-in pattern. Then glue them together and add a chain.
Tip
MaterialDimensions (when finished): 12.40" x 17.72" (excluding the handles)
Real leather: 3 kindsWine glass (light blue): 9.05" x 4.15"Label (brown): 1.88" x 2.87"Flower part (blue): 1.97" x 1.94"Faux leather: 1 kindCork: 1.34" x 0.88"Flower part: 0.66" x 0.65"Laminated material: 3 kindsWine in the glass (violet): 1.91" x 3.82"Wine bottle (violet): 8.83" x 3.56"Flower part (red): 0.91" x 0.94"Leaves (yellow-green): 2.96" x 3.62"
Simple bag, leather bond, vinyl bond
37
Custom Designs for All Your Creative Needs
ORNAMENTS
PROJECT 043D BoxPage 11
38
PROJECT 05Fold-out CardPage 13
ORNAMENTS
(Actual size)
39
a
b
c
Custom Designs for All Your Creative Needs
ORNAMENTS
PROJECT 06Paper Flower ArrangementPage 15
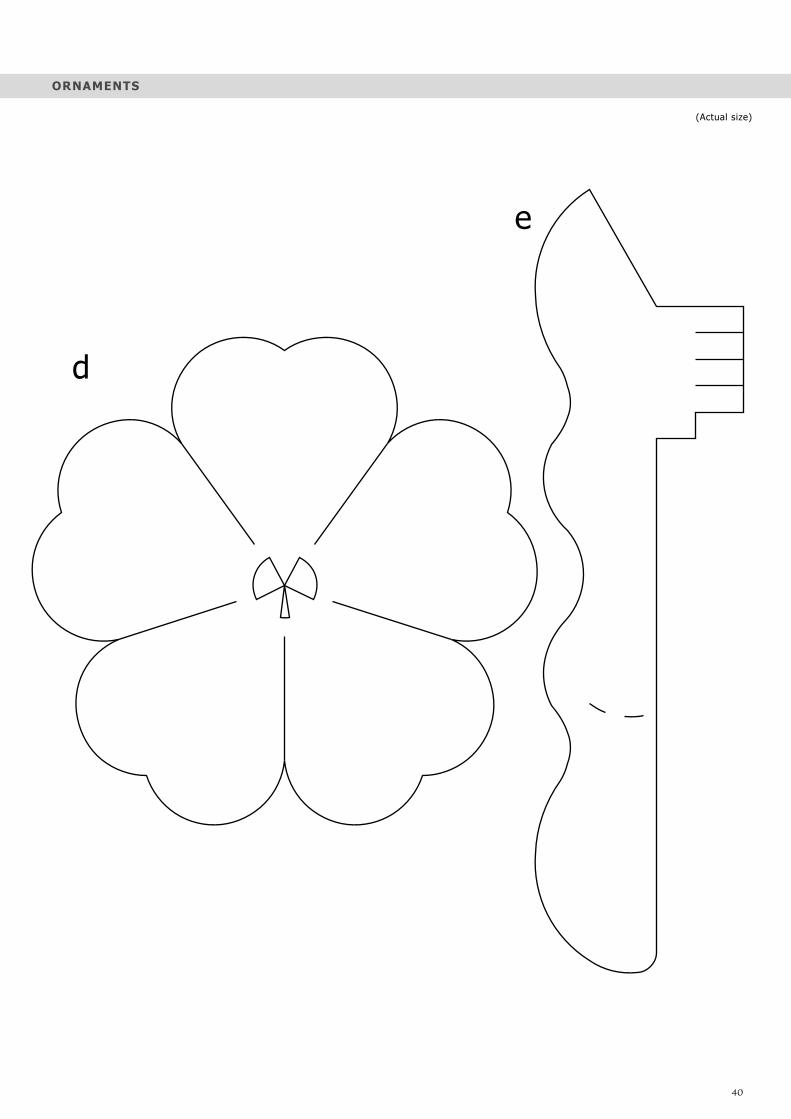
40
d
e
ORNAMENTS
(Actual size)
41
Important Features
Why try ScanNCutCanvas?
Top screen
Button Functions
–No need to download additional software.
–Easily converts to .SVG files to .FCM files.
–Transfer files through the ScanNCut memory stick port.
–Create a personal account to save your designs.
–Enjoy a larger screen for editing.
Image Tracing
Importing a SVG File
Path Tool
Freehand Path Tool
Editing Multiple PatternsCreating Offset Lines
Visit URL https://scanncutcanvas.brother.com/

42
1
2
3
4
5
6
7
8
9
10
11
12
13
14
15
16
1 Standard Mat 12"×12" 2 Low Tack Adhesive Mat 12"×12" 3 Scanning Mat 12"×12" 4 Standard Mat 12"×24" 5 Low Tack Adhesive Mat 12"×24" 6 Quilt Pattern Collection 7 Appliqué Pattern Collection 8 Erasable Pen Set 9 Pen Holder 10 Deep Cut Blade Holder 11 Standard Cut Blade Holder12 Color Pen Set 13 Deep Cut Blade 14 Standard Cut Blade 15 High Tack Adhesive Fabric Support Sheet 16 Iron-On Fabric Appliqué Contact Sheet
The adhesive strength is between Low Tack Adhesive Mat and Standard Mat.
Additional Accessories
Middle Tack Adhesive Mat 12" x 12"
Optional Accessories
2014 Brother Industries, Ltd. All rights reserved.All information correct at time of printing.
Rhinestone Starter Kit
Printable Sticker Starter Kit Printable Sticker Sheet Set
Optional Accessories
Rhinestone Sheet Set
Rhinestone Transfer Sheets
This kit contains all the materials you need to create one-of-kind personalized rhinestone projects!
Just print your favorite image, cut and create your own design stickers and labels! Great for crafters, small business, and home use.
Transfer Sheet/ 7pcs.
Printable Sticker / 7pcs. Laminate Sheet / 7pcs.
Template Sheet/ 3pcs. Transfer Sheet/ 3pcs.