Embed Size (px)
Citation preview
TIPT UC-ONE CGA PROVISIONING GUIDE
TIPT UC-One CGA Provisioning Guide | June 2016 PAGE 2 OF 12
CONVENTIONS USED IN THIS GUIDE
The following typographical conventions are used in this guide for simplicity and readability:
Web addresses, e-mail addresses and hyperlinks are shown in bold italics, for example
www.telstraenterprise.com.au.
Button names and titles/features on your computer screen are shown in italics.
User input is shown in bolded font.
TIPT UC-One, Provisioning Guide, June 2016
© Telstra Corporation Limited (ABN 33 051 775 556) 2013. All rights reserved.
This work is copyright. Apart from any use as permitted under the Copyright Act 1968, information contained within this manua l
cannot be used for any other purpose other than the purpose for which it was released. No part of this publication may be
reproduced, stored in a retrieval system, or transmitted in any form or by any means, electronic, mechanical, photocopying,
recording or otherwise, without the written permission of Telstra Corporation Limited.
Words mentioned in this document that are known to be trademarks, whether registered or unregistered, have been capitalised
or use initial capitals. Terms identified as trademarks include Cisco®, Microsoft®, Microsoft Windows®, Apple®, AirPort®,
Mac®, Linksys®.

TIPT UC-One CGA Provisioning Guide | June 2016 PAGE 3 OF 12
DOCUMENT PURPOSE
This guide outlines the manual steps required for a CGA to configure a user to use UC-One on their TIPT service. An automated tool is available for PC users that completes the steps contained within this document for one or more users at a time. It is available http://telstra.com.au/business-enterprise/help-support/tipt-resources/uc-one/index.htm
TIPT UC-One CGA Provisioning Guide | June 2016 PAGE 4 OF 12
WHAT’S INSIDE
Conventions Used in this Guide 2
Document Purpose 3
What’s Inside 4
CHAPTER 1 PROVISIONING A USER FOR TIPT UC-ONE 5
Step 1: Ensure relevant Services Packs are assigned to a Group and a user 5
Step 2: Adding Shared Call Appearance (SCA) 5
To Add SCA 5
Step 3: Setting Device Passwords for the SCA Users: 8
Step 4: Rebuilding Configuration Files 10
CHAPTER 2 RECOMMENDED SETTINGS 11
TIPT UC-One CGA Provisioning Guide | June 2016 PAGE 5 OF 12
CHAPTER 1 PROVISIONING A USER FOR TIPT UC-ONE
If you are using the UC-One mobile or desktop clients, please refer to the Customer Detailed
Integration Guide on the TIPT Online Resource Centre at http://telstra.com.au/business-
enterprise/download/document/business-tipt-customer-detailed-integration-guide.pdf for required network
settings.
STEP 1: ENSURE RELEVANT SERVICES PACKS ARE ASSIGNED TO A GROUP AND A USER
When provisioning UC-One for a user (desktop and/or mobile) ensure the TIPT Executive or Standard Pack
v10 service packs are assigned to the group and the revelant service pack is assigned to the user.
TIPT UC-One licences are not available in the Basic pack.
For users that have the Executive pack assigned to them, they also have the option of having the UC-One
iPad licence assigned to them. The BTBC v1 licence needs to be assigned to Executive pack users for them
to be able to utilise the dedicated iPad UC-One client.
STEP 2: ADDING SHARED CALL APPEARANCE (SCA)
The TIPT UC-One client uses SCA on the primary number assigned to your TIPT phone. The mobile TIPT
UC-One client and the Desktop UC-One client will require a SCA user each – three additional SCA users
must be created if the user requires both UC-One clients.
Each SCA is assigned appropriate Identity/ Device Profile Type: either the UC-One – Mobile, UC-One -
Tablet device or UC-One - PC device.
TO ADD SCA
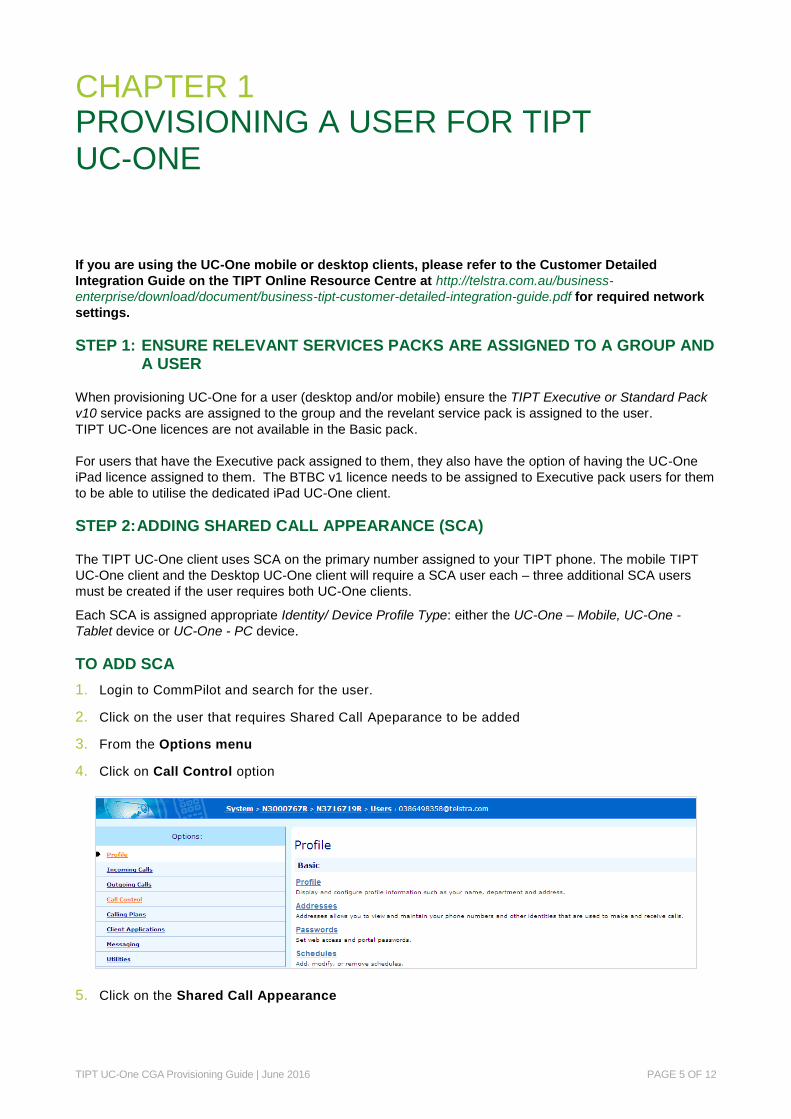
1. Login to CommPilot and search for the user.
2. Click on the user that requires Shared Call Apeparance to be added
3. From the Options menu
4. Click on Call Control option
5. Click on the Shared Call Appearance
TIPT UC-One CGA Provisioning Guide | June 2016 PAGE 6 OF 12
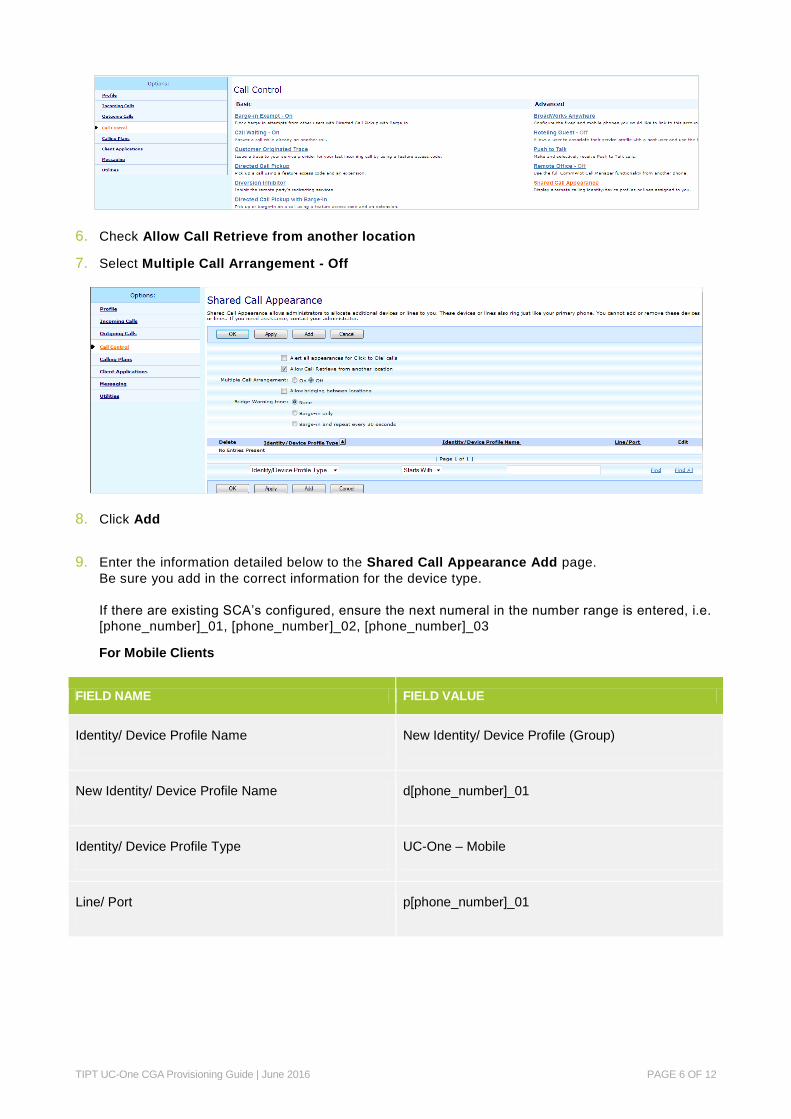
6. Check Allow Call Retrieve from another location
7. Select Multiple Call Arrangement - Off
8. Click Add
9. Enter the information detailed below to the Shared Call Appearance Add page.
Be sure you add in the correct information for the device type.
If there are existing SCA’s configured, ensure the next numeral in the number range is entered, i.e.
[phone_number]_01, [phone_number]_02, [phone_number]_03
For Mobile Clients
FIELD NAME FIELD VALUE
Identity/ Device Profile Name New Identity/ Device Profile (Group)
New Identity/ Device Profile Name d[phone_number]_01
Identity/ Device Profile Type UC-One – Mobile
Line/ Port p[phone_number]_01
TIPT UC-One CGA Provisioning Guide | June 2016 PAGE 7 OF 12
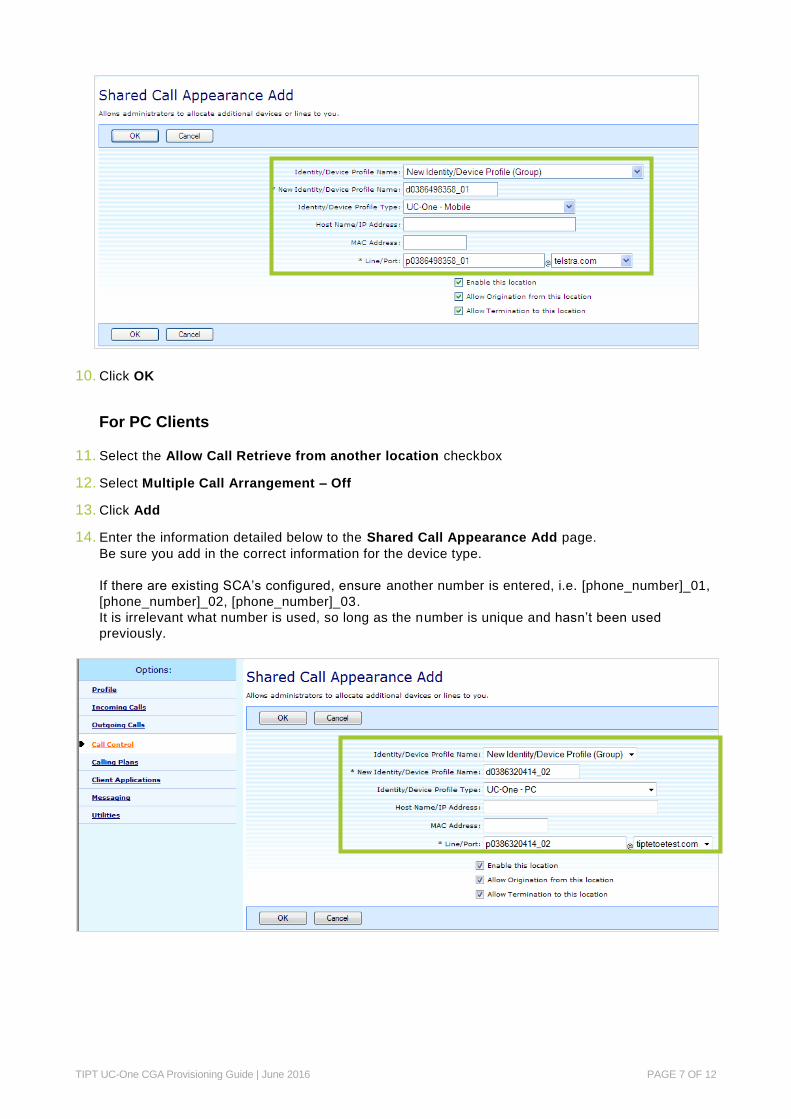
10. Click OK
For PC Clients
11. Select the Allow Call Retrieve from another location checkbox
12. Select Multiple Call Arrangement – Off
13. Click Add
14. Enter the information detailed below to the Shared Call Appearance Add page.
Be sure you add in the correct information for the device type.
If there are existing SCA’s configured, ensure another number is entered, i.e. [phone_number]_01,
[phone_number]_02, [phone_number]_03.
It is irrelevant what number is used, so long as the number is unique and hasn’t been used
previously.
TIPT UC-One CGA Provisioning Guide | June 2016 PAGE 8 OF 12
FIELD NAME FIELD VALUE
Identity/ Device Profile Name New Identity/ Device Profile (Group)
New Identity/ Device Profile Name d[phone_number]_02
Identity/ Device Profile Type UC-One – PC
Line/ Port p[phone_number]_02
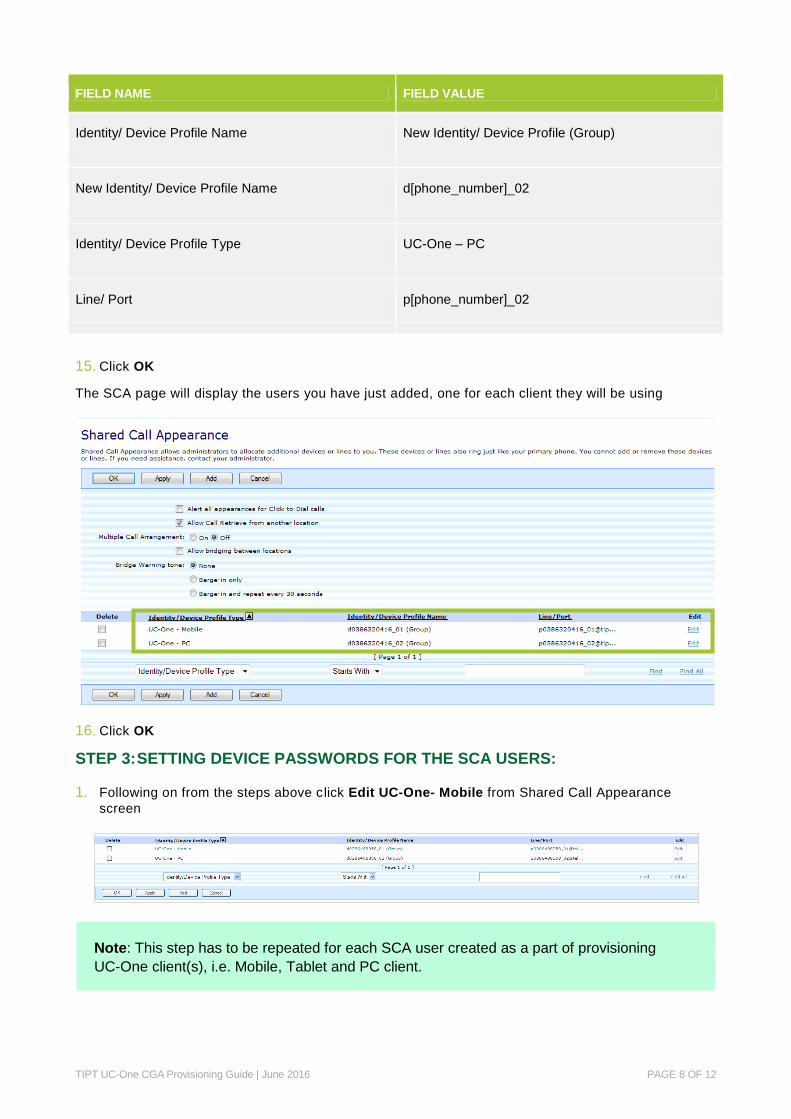
15. Click OK
The SCA page will display the users you have just added, one for each client they will be using
16. Click OK
STEP 3: SETTING DEVICE PASSWORDS FOR THE SCA USERS:
1. Following on from the steps above click Edit UC-One- Mobile from Shared Call Appearance
screen
Note: This step has to be repeated for each SCA user created as a part of provisioning
UC-One client(s), i.e. Mobile, Tablet and PC client.
TIPT UC-One CGA Provisioning Guide | June 2016 PAGE 9 OF 12
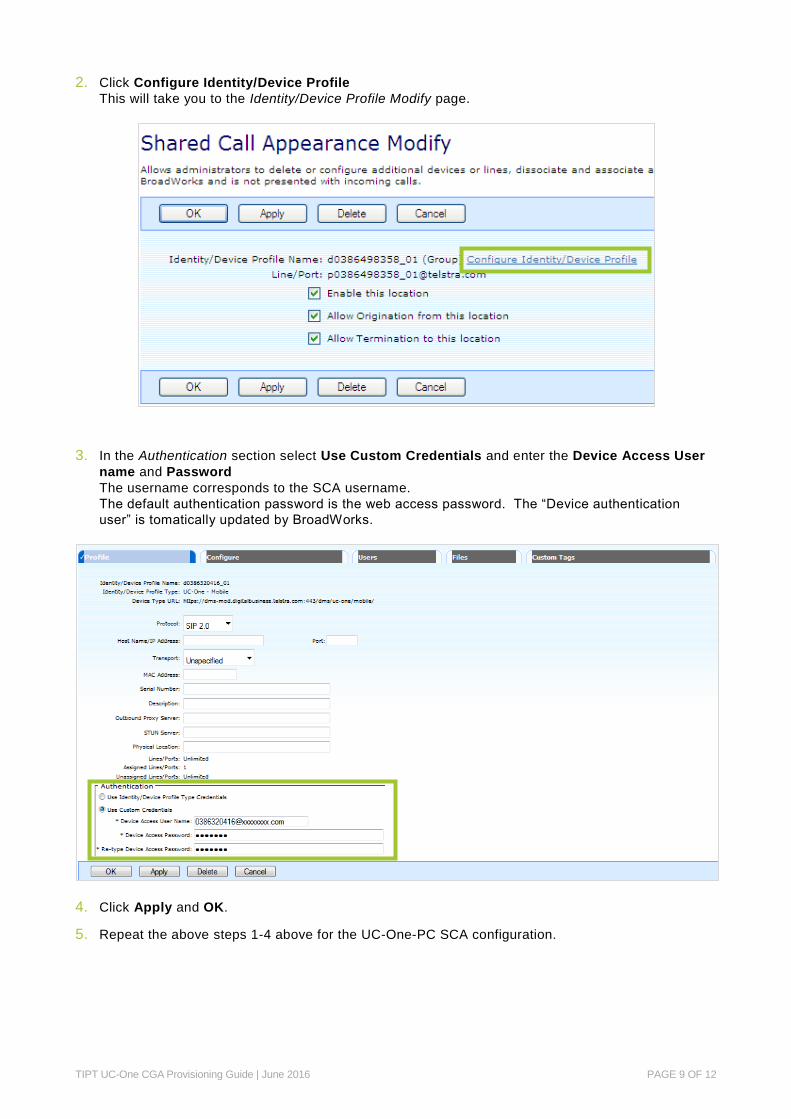
2. Click Configure Identity/Device Profile
This will take you to the Identity/Device Profile Modify page.
3. In the Authentication section select Use Custom Credentials and enter the Device Access User
name and Password
The username corresponds to the SCA username.
The default authentication password is the web access password. The “Device authentication
user” is tomatically updated by BroadWorks.
4. Click Apply and OK.
5. Repeat the above steps 1-4 above for the UC-One-PC SCA configuration.

TIPT UC-One CGA Provisioning Guide | June 2016 PAGE 10 OF 12
STEP 4: REBUILDING CONFIGURATION FILES
1. Click on the Configure tab
2. Select Rebuild the files.
3. Click OK
4. Repeat this step to rebuild the files for the UC - One desktop device type created.
TIPT UC-One CGA Provisioning Guide | June 2016 PAGE 11 OF 12
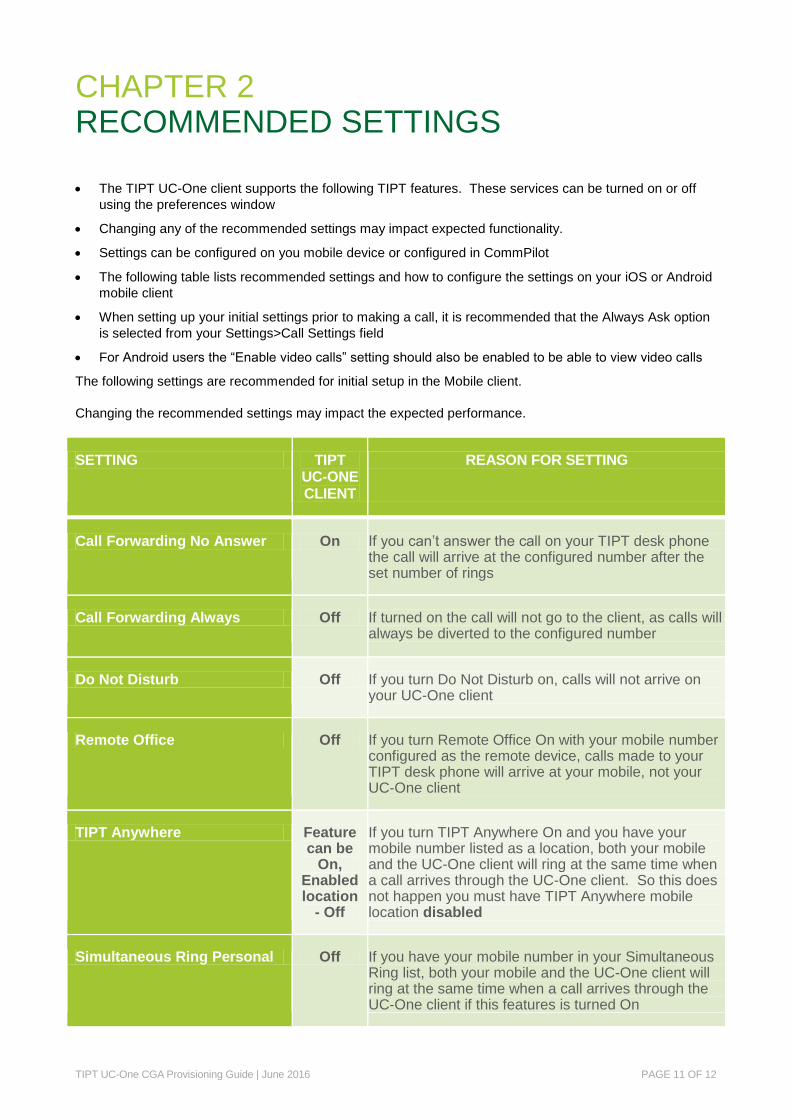
CHAPTER 2 RECOMMENDED SETTINGS
The TIPT UC-One client supports the following TIPT features. These services can be turned on or off
using the preferences window
Changing any of the recommended settings may impact expected functionality.
Settings can be configured on you mobile device or configured in CommPilot
The following table lists recommended settings and how to configure the settings on your iOS or Android
mobile client
When setting up your initial settings prior to making a call, it is recommended that the Always Ask option
is selected from your Settings>Call Settings field
For Android users the “Enable video calls” setting should also be enabled to be able to view video calls
The following settings are recommended for initial setup in the Mobile client.
Changing the recommended settings may impact the expected performance.
SETTING TIPT UC-ONE CLIENT
REASON FOR SETTING
Call Forwarding No Answer On If you can’t answer the call on your TIPT desk phone the call will arrive at the configured number after the set number of rings
Call Forwarding Always Off If turned on the call will not go to the client, as calls will always be diverted to the configured number
Do Not Disturb Off If you turn Do Not Disturb on, calls will not arrive on your UC-One client
Remote Office Off If you turn Remote Office On with your mobile number configured as the remote device, calls made to your TIPT desk phone will arrive at your mobile, not your UC-One client
TIPT Anywhere Feature can be
On, Enabled location
- Off
If you turn TIPT Anywhere On and you have your mobile number listed as a location, both your mobile and the UC-One client will ring at the same time when a call arrives through the UC-One client. So this does not happen you must have TIPT Anywhere mobile location disabled
Simultaneous Ring Personal Off If you have your mobile number in your Simultaneous Ring list, both your mobile and the UC-One client will ring at the same time when a call arrives through the UC-One client if this features is turned On
TIPT UC-One CGA Provisioning Guide | June 2016 PAGE 12 OF 12
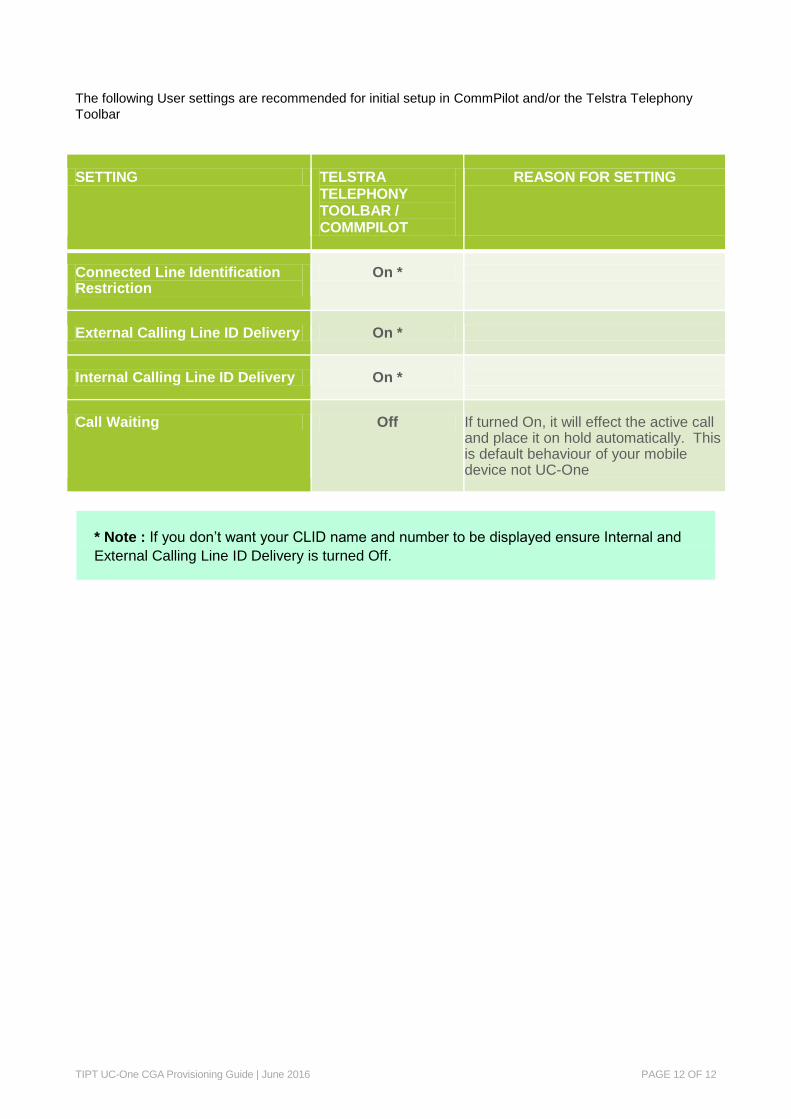
The following User settings are recommended for initial setup in CommPilot and/or the Telstra Telephony
Toolbar
SETTING TELSTRA TELEPHONY TOOLBAR / COMMPILOT
REASON FOR SETTING
Connected Line Identification Restriction
On *
External Calling Line ID Delivery On *
Internal Calling Line ID Delivery On *
Call Waiting Off If turned On, it will effect the active call and place it on hold automatically. This is default behaviour of your mobile device not UC-One
* Note : If you don’t want your CLID name and number to be displayed ensure Internal and
External Calling Line ID Delivery is turned Off.