Embed Size (px)
Citation preview
Tivoli Application Performance ManagementRelease Notes
Version 2.0
27 April 2001
Tivoli Application Performance Management Release Notes April 2001
Copyright Notice© Copyright IBM Corporation 1999, 2001. All rights reserved. May only be used pursuant to a Tivoli Systems Software License Agreement, an IBM Software License Agreement, or Addendum for Tivoli Products to IBM Customer or License Agreement. No part of this publication may be reproduced, transmitted, transcribed, stored in a retrieval system, or translated into any computer language, in any form or by any means, electronic, mechanical, magnetic, optical, chemical, manual, or otherwise, without prior written permission of IBM Corporation. IBM Corporation grants you limited permission to make hardcopy or other reproductions of any machine-readable documentation for your own use, provided that each such reproduction shall carry the IBM Corporation copyright notice. No other rights under copyright are granted without prior written permission of IBM Corporation. The document is not intended for production and is furnished “as is” without warranty of any kind. All warranties on this document are hereby disclaimed, including the warranties of merchantability and fitness for a particular purpose.
U.S. Government Users Restricted Rights—Use, duplication or disclosure restricted by GSA ADP Schedule Contract with IBM Corporation.
TrademarksIBM, the IBM logo, Tivoli, the Tivoli logo, AIX, RS/6000, Tivoli Enterprise, Tivoli Enterprise Console, and TME are trademarks or registered trademarks of International Business Machines Corporation or Tivoli Systems Inc. in the United States, other countries, or both.
Microsoft, Windows, Windows NT, and the Windows logo are trademarks of Microsoft Corporation in the United States, other countries, or both.
UNIX is a registered trademark of The Open Group in the United States and other countries.
Pentium®, is a trademark of Intel Corporation in the United States, other countries, or both.
Other company, product, and service names may be trademarks or service marks of others.
NoticesRefer to the separate section “Notices” on page iii for information.

Tivoli Application Performance Management: Release Notes iii
Notices
References in this publication to Tivoli Systems or IBM products, programs, or services do not imply that they will be available in all countries in which Tivoli Systems or IBM operates. Any reference to these products, programs, or services is not intended to imply that only Tivoli Systems or IBM products, programs, or services can be used. Subject to valid intellectual property or other legally protectable right of Tivoli Systems or IBM, any functionally equivalent product, program, or service can be used instead of the referenced product, program, or service. The evaluation and verification of operation in conjunction with other products, except those expressly designated by Tivoli Systems or IBM, are the responsibility of the user. Tivoli Systems or IBM may have patents or pending patent applications covering subject matter in this document. The furnishing of this document does not give you any license to these patents. You can send license inquiries, in writing, to the IBM Director of Licensing, IBM Corporation, North Castle Drive, Armonk, New York 10504-1785, U.S.A.
ISO 9001 CertificationThis product was developed using an ISO 9001 certified quality system.Certification has been awarded by Bureau Veritas Quality International (BVQI) (Certification No. BVQI - 92086/A).BVQI is a world leader in quality certification and is currently recognized by more than 20 accreditation bodies.

Notices
iv Version 2.0
Tivoli Application Performance Management: Release Notes v
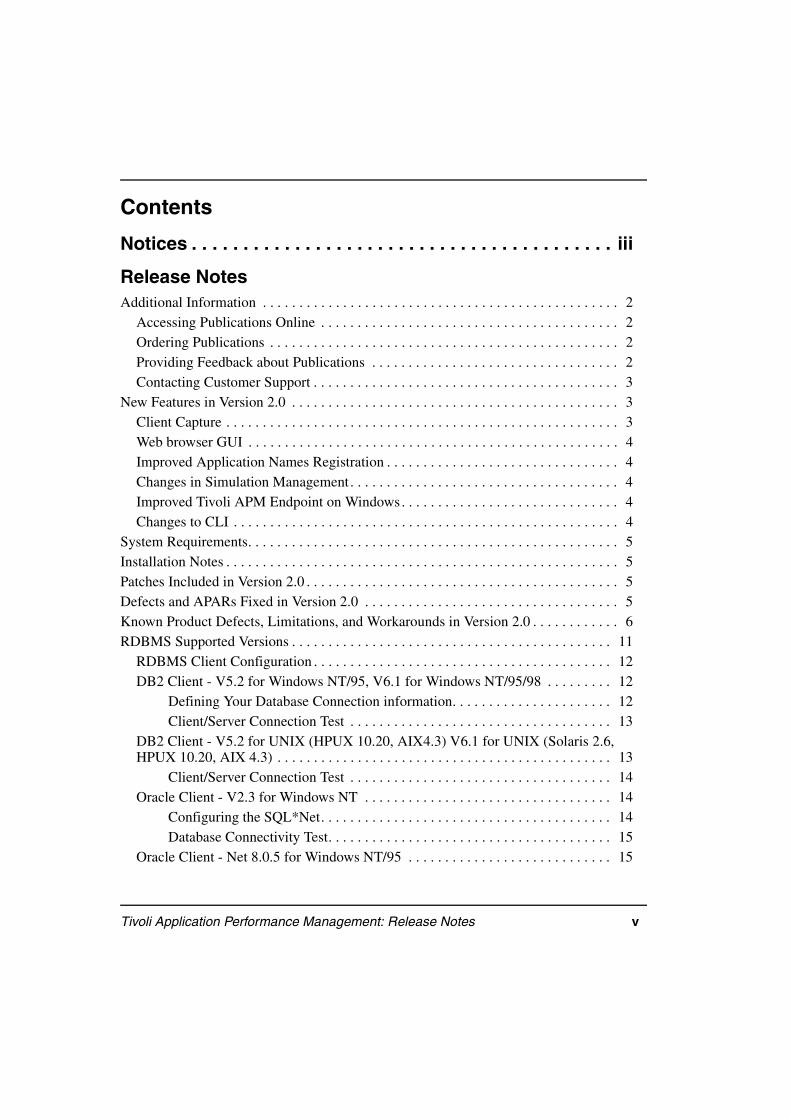
Contents
Notices . . . . . . . . . . . . . . . . . . . . . . . . . . . . . . . . . . . . . . . . . iii
Release NotesAdditional Information . . . . . . . . . . . . . . . . . . . . . . . . . . . . . . . . . . . . . . . . . . . . . . . . . 2
Accessing Publications Online . . . . . . . . . . . . . . . . . . . . . . . . . . . . . . . . . . . . . . . . . 2Ordering Publications . . . . . . . . . . . . . . . . . . . . . . . . . . . . . . . . . . . . . . . . . . . . . . . . 2Providing Feedback about Publications . . . . . . . . . . . . . . . . . . . . . . . . . . . . . . . . . . 2Contacting Customer Support . . . . . . . . . . . . . . . . . . . . . . . . . . . . . . . . . . . . . . . . . . 3
New Features in Version 2.0 . . . . . . . . . . . . . . . . . . . . . . . . . . . . . . . . . . . . . . . . . . . . . 3Client Capture . . . . . . . . . . . . . . . . . . . . . . . . . . . . . . . . . . . . . . . . . . . . . . . . . . . . . . 3Web browser GUI . . . . . . . . . . . . . . . . . . . . . . . . . . . . . . . . . . . . . . . . . . . . . . . . . . . 4Improved Application Names Registration . . . . . . . . . . . . . . . . . . . . . . . . . . . . . . . . 4Changes in Simulation Management. . . . . . . . . . . . . . . . . . . . . . . . . . . . . . . . . . . . . 4Improved Tivoli APM Endpoint on Windows. . . . . . . . . . . . . . . . . . . . . . . . . . . . . . 4Changes to CLI . . . . . . . . . . . . . . . . . . . . . . . . . . . . . . . . . . . . . . . . . . . . . . . . . . . . . 4
System Requirements. . . . . . . . . . . . . . . . . . . . . . . . . . . . . . . . . . . . . . . . . . . . . . . . . . . 5Installation Notes . . . . . . . . . . . . . . . . . . . . . . . . . . . . . . . . . . . . . . . . . . . . . . . . . . . . . . 5Patches Included in Version 2.0 . . . . . . . . . . . . . . . . . . . . . . . . . . . . . . . . . . . . . . . . . . . 5Defects and APARs Fixed in Version 2.0 . . . . . . . . . . . . . . . . . . . . . . . . . . . . . . . . . . . 5Known Product Defects, Limitations, and Workarounds in Version 2.0 . . . . . . . . . . . . 6RDBMS Supported Versions . . . . . . . . . . . . . . . . . . . . . . . . . . . . . . . . . . . . . . . . . . . . 11
RDBMS Client Configuration . . . . . . . . . . . . . . . . . . . . . . . . . . . . . . . . . . . . . . . . . 12DB2 Client - V5.2 for Windows NT/95, V6.1 for Windows NT/95/98 . . . . . . . . . 12
Defining Your Database Connection information. . . . . . . . . . . . . . . . . . . . . . 12Client/Server Connection Test . . . . . . . . . . . . . . . . . . . . . . . . . . . . . . . . . . . . 13
DB2 Client - V5.2 for UNIX (HPUX 10.20, AIX4.3) V6.1 for UNIX (Solaris 2.6, HPUX 10.20, AIX 4.3) . . . . . . . . . . . . . . . . . . . . . . . . . . . . . . . . . . . . . . . . . . . . . . 13
Client/Server Connection Test . . . . . . . . . . . . . . . . . . . . . . . . . . . . . . . . . . . . 14Oracle Client - V2.3 for Windows NT . . . . . . . . . . . . . . . . . . . . . . . . . . . . . . . . . . 14
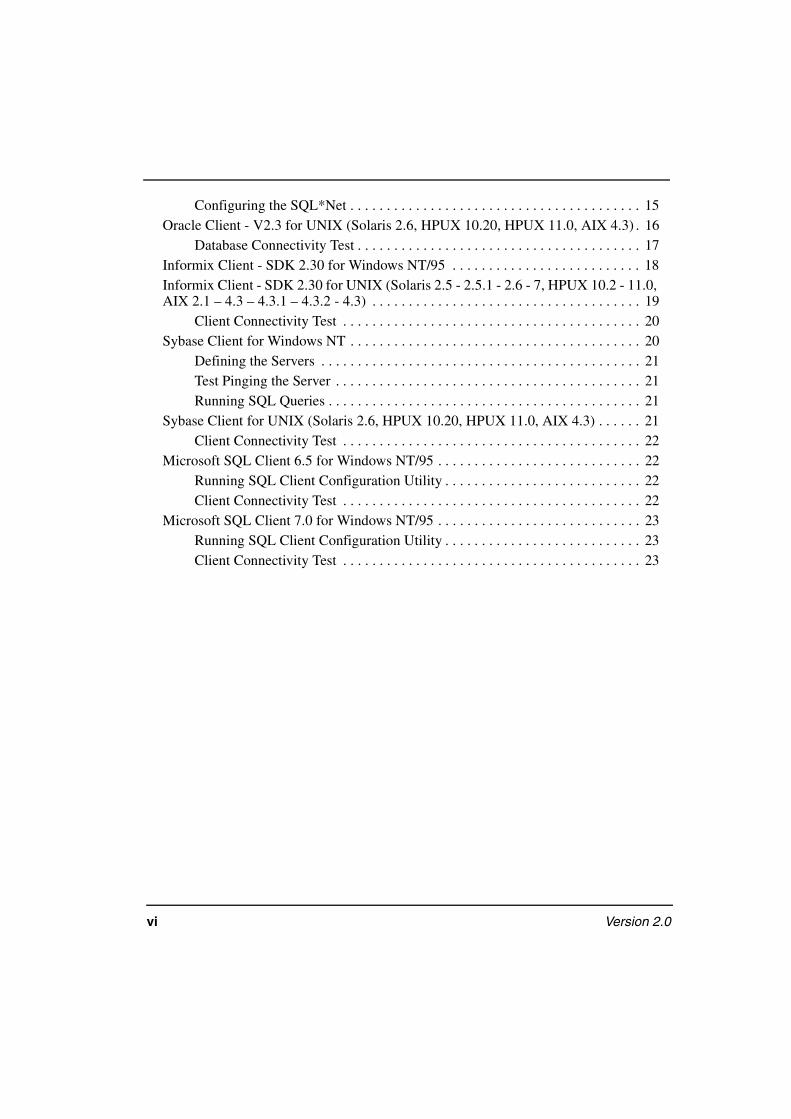
Configuring the SQL*Net. . . . . . . . . . . . . . . . . . . . . . . . . . . . . . . . . . . . . . . . 14Database Connectivity Test. . . . . . . . . . . . . . . . . . . . . . . . . . . . . . . . . . . . . . . 15
Oracle Client - Net 8.0.5 for Windows NT/95 . . . . . . . . . . . . . . . . . . . . . . . . . . . . 15
vi Version 2.0
Configuring the SQL*Net . . . . . . . . . . . . . . . . . . . . . . . . . . . . . . . . . . . . . . . . 15Oracle Client - V2.3 for UNIX (Solaris 2.6, HPUX 10.20, HPUX 11.0, AIX 4.3) . 16
Database Connectivity Test . . . . . . . . . . . . . . . . . . . . . . . . . . . . . . . . . . . . . . . 17Informix Client - SDK 2.30 for Windows NT/95 . . . . . . . . . . . . . . . . . . . . . . . . . . 18Informix Client - SDK 2.30 for UNIX (Solaris 2.5 - 2.5.1 - 2.6 - 7, HPUX 10.2 - 11.0, AIX 2.1 – 4.3 – 4.3.1 – 4.3.2 - 4.3) . . . . . . . . . . . . . . . . . . . . . . . . . . . . . . . . . . . . . 19
Client Connectivity Test . . . . . . . . . . . . . . . . . . . . . . . . . . . . . . . . . . . . . . . . . 20Sybase Client for Windows NT . . . . . . . . . . . . . . . . . . . . . . . . . . . . . . . . . . . . . . . . 20
Defining the Servers . . . . . . . . . . . . . . . . . . . . . . . . . . . . . . . . . . . . . . . . . . . . 21Test Pinging the Server . . . . . . . . . . . . . . . . . . . . . . . . . . . . . . . . . . . . . . . . . . 21Running SQL Queries . . . . . . . . . . . . . . . . . . . . . . . . . . . . . . . . . . . . . . . . . . . 21
Sybase Client for UNIX (Solaris 2.6, HPUX 10.20, HPUX 11.0, AIX 4.3) . . . . . . 21Client Connectivity Test . . . . . . . . . . . . . . . . . . . . . . . . . . . . . . . . . . . . . . . . . 22
Microsoft SQL Client 6.5 for Windows NT/95 . . . . . . . . . . . . . . . . . . . . . . . . . . . . 22Running SQL Client Configuration Utility . . . . . . . . . . . . . . . . . . . . . . . . . . . 22Client Connectivity Test . . . . . . . . . . . . . . . . . . . . . . . . . . . . . . . . . . . . . . . . . 22
Microsoft SQL Client 7.0 for Windows NT/95 . . . . . . . . . . . . . . . . . . . . . . . . . . . . 23Running SQL Client Configuration Utility . . . . . . . . . . . . . . . . . . . . . . . . . . . 23Client Connectivity Test . . . . . . . . . . . . . . . . . . . . . . . . . . . . . . . . . . . . . . . . . 23
Tivoli Application Performance Management: Release Notes 1
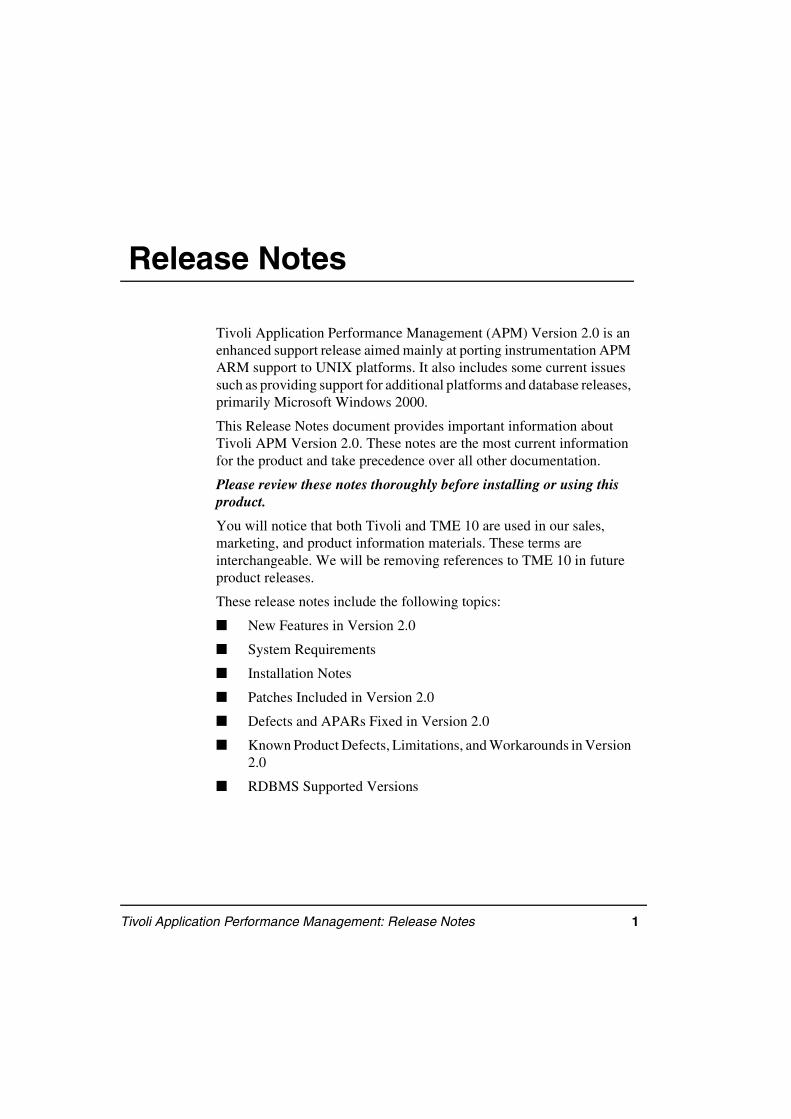
Chapter 1.Release Notes
Tivoli Application Performance Management (APM) Version 2.0 is an enhanced support release aimed mainly at porting instrumentation APM ARM support to UNIX platforms. It also includes some current issues such as providing support for additional platforms and database releases, primarily Microsoft Windows 2000.
This Release Notes document provides important information about Tivoli APM Version 2.0. These notes are the most current information for the product and take precedence over all other documentation.
Please review these notes thoroughly before installing or using this product.
You will notice that both Tivoli and TME 10 are used in our sales, marketing, and product information materials. These terms are interchangeable. We will be removing references to TME 10 in future product releases.
These release notes include the following topics:
■ New Features in Version 2.0
■ System Requirements
■ Installation Notes
■ Patches Included in Version 2.0
■ Defects and APARs Fixed in Version 2.0
■ Known Product Defects, Limitations, and Workarounds in Version 2.0
■ RDBMS Supported Versions

2 Version 2.0
Additional InformationThe following sections describe how to access publications online, order publications, provide feedback about publications and contact customer support.
Accessing Publications OnlineThe Tivoli Customer Support Web site (http://www.tivoli.com/support/) offers a guide to support services (the Customer Support Handbook); frequently asked questions (FAQs); and technical information, including release notes, user's guides, redbooks, and white papers. You can access Tivoli publications online at http://www.tivoli.com/support/documents/. The documentation for some products is available in PDF and HTML formats. Translated documents are also available for some products.
To access most of the documentation, you need an ID and a password. To obtain an ID for use on the support Web site, go to http://www.tivoli.com/support/getting/.
Resellers should refer to http://www.tivoli.com/support/smb/index.html for more information about obtaining Tivoli technical documentation and support.
Business Partners should refer to “Ordering Publications” for more information about obtaining Tivoli technical documentation.
Ordering PublicationsOrder Tivoli publications online at http://www.tivoli.com/support/Prodman/html/pub_order.html or by calling one of the following telephone numbers:
■ U.S. customers: (800) 879-2755
■ Canadian customers: (800) 426-4968
Providing Feedback about PublicationsWe are very interested in hearing about your experience with Tivoli products and documentation, and we welcome your suggestions for
Tivoli Application Performance Management: Release Notes 3
improvements. If you have comments or suggestions about our products and documentation, contact us in one of the following ways:
■ Send e-mail to [email protected].
■ Fill out our customer feedback survey at http://www.tivoli.com/support/survey/.
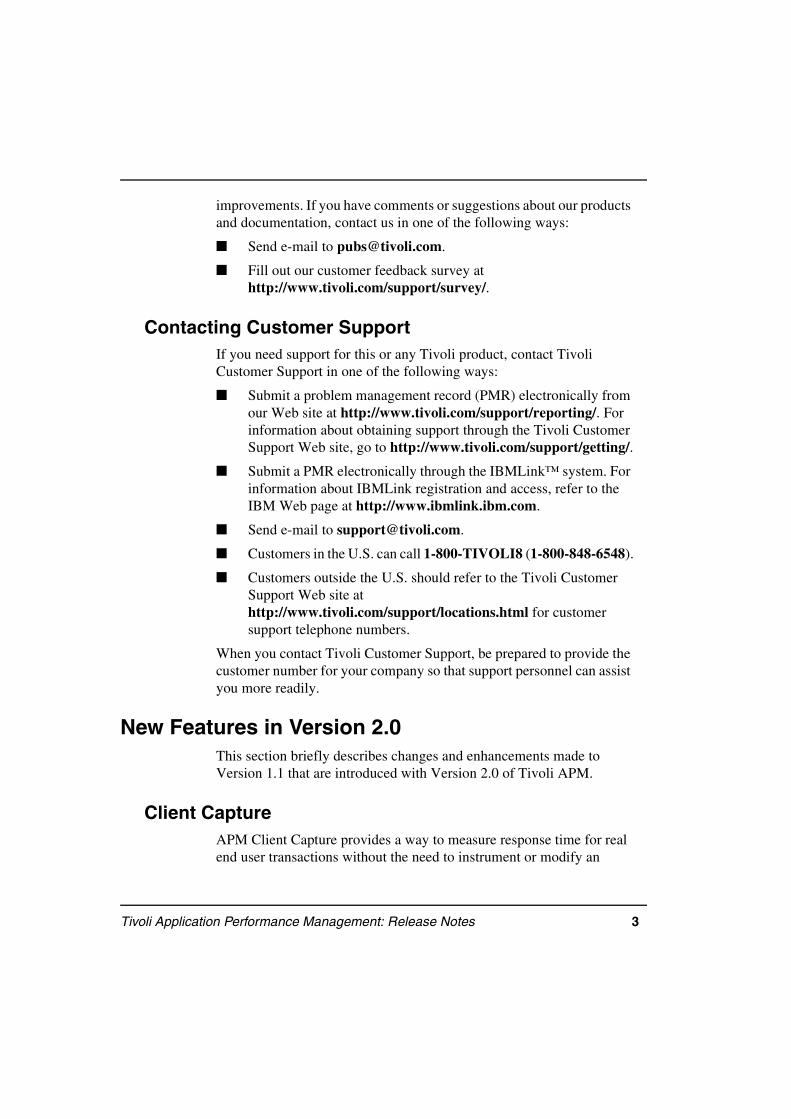
Contacting Customer SupportIf you need support for this or any Tivoli product, contact Tivoli Customer Support in one of the following ways:
■ Submit a problem management record (PMR) electronically from our Web site at http://www.tivoli.com/support/reporting/. For information about obtaining support through the Tivoli Customer Support Web site, go to http://www.tivoli.com/support/getting/.
■ Submit a PMR electronically through the IBMLink™ system. For information about IBMLink registration and access, refer to the IBM Web page at http://www.ibmlink.ibm.com.
■ Send e-mail to [email protected].
■ Customers in the U.S. can call 1-800-TIVOLI8 (1-800-848-6548).
■ Customers outside the U.S. should refer to the Tivoli Customer Support Web site at http://www.tivoli.com/support/locations.html for customer support telephone numbers.
When you contact Tivoli Customer Support, be prepared to provide the customer number for your company so that support personnel can assist you more readily.
New Features in Version 2.0This section briefly describes changes and enhancements made to Version 1.1 that are introduced with Version 2.0 of Tivoli APM.
Client CaptureAPM Client Capture provides a way to measure response time for real end user transactions without the need to instrument or modify an

4 Version 2.0
application. It does this by passively monitoring the end user interface for Web Network browsers. Current implementation is for both Internet Explorer 5.0 and Netscape Navigator 4.x.
Web browser GUIThe Web browser GUI is part of Tivoli APM. It enables you to access to the application performance data that APM collects, on the day that it is collected. Data from the data files that are held on the APM endpoint is displayed in simple graphical form through your web browser interface.
Improved Application Names RegistrationIn Tivoli APM Version 1.1, to register an application name you had to execute the script called wmarreg.sh.
APM Version 2.0 has a command, easier to use, called wmarregapp, that has the following syntax:
wmarregapp -a app_name [-l file_label][-f script_full_path_name] [-w]
The commands to retrieve and delete the registered applications have been changed to wmargetapp and wmardelapp.
Changes in Simulation ManagementTivoli APM Version 2.0 supports scripts that are created with test toolkits marked by Mercury Interactive. It can replay VuGen / LoadRunner Version 5.02 and Version 6.5 types of scripts. No version of WinRunner is supported by the Tivoli APM Version 2.0.
Improved Tivoli APM Endpoint on WindowsThe endpoint engine on Windows platforms has been improved and is more robust, with high performance, low overhead and low footprint.
Changes to CLIThere are some changes to the CLI. The parameters of some of the commands have been changed.

Tivoli Application Performance Management: Release Notes 5
When using the wmargetdata command you can now retrieve data collected not only on the current day but for any previous days for which a data log file is still present on the endpoint.
The wmarlsappl command name has been changed to wmarlsapp and its output is more readable.
The wmarsetstatus command is no longer case sensitive.
System RequirementsThere are no changes to the system requirements detailed in the Tivoli Application Performance Management User’s Guide Version 2.0.
Installation NotesThere are no changes to the installation procedure detailed in the Tivoli Application Performance Management User’s Guide Version 2.0.
Patches Included in Version 2.0The following patches have been incorporated into this release of Tivoli Application Performance Management
Defects and APARs Fixed in Version 2.0 The following defects have been corrected for this release of Tivoli Application Performance Management. The defects are listed by category. The defect number (if any) follows the description.
Defects fixed for this release of Tivoli Application Performance Management User’s Guide include:
1. Measuring an ARM instrumented application that sends a very high number of transactions, when the upload starts, both the APM engine and the application hangs. The application also
1.1-APM-0003 1.1-APM-0005
1.1-APM-0004 1.1-APM-0006
6 Version 2.0
hangs if the engine is started and stopped several times consecutively. APAR IC28618
2. The minimum response time is wrong if, within one hour, only a failed or aborted transaction occurs. APAR IC29014
3. The arm_init() call is randomly unsuccessful when issued before forking to child worker programs. APAR IC29148
4. The wmarreg.sh command does not correctly work if the VuGen script has a name containing capital letters. APAR IC29232
5. In the TDS guide Metric Label, the parameter labels for Aborted and Failed transactions are inverted in the cube: "Min tx Status". APAR IC29003
6. The Tivoli Decision Support Guide treats transaction failures missing values, as 0 (zero) response times. APAR IC29351
7. Occasionally, when multiple wmarstarteng commands are issued from concurrent users on the same w32-ix86 endpoint, some of them can return the message "ipc_create_remote failed: unable to connect to <endpoint_IP_addr> IPC shutdown", but the command works as expected starting the engine on the endpoint. (D5289)
8. Occasionally, when multiple wmarstopeng commands are issued from concurrent users on the same UNIX endpoint, some of them can return a "command failed" message, but the command works as expected stopping the engine on the endpoint. (D5288)
9. The application registration CLI command wmarreg.sh does not support extended characters, it returns error message APF0153E if the application name contains extended ASCII characters. (D4123)
Known Product Defects, Limitations, and Workarounds in Version 2.0
This section describes known defects in this release of APM. Where applicable and known, suggested workarounds are identified. The defects are listed by category. Note that this may not be a complete list of defects.
Current defects, limitations and workarounds for this release of APM include:

Tivoli Application Performance Management: Release Notes 7
1. Sometimes performance data cannot be sent to the database from the TAPM Mid-Level Manager (MLM). If a failure occurs when sending performance data to the database the file containing the performance data is cached on the MLM.
Workaround: Failures of this nature usually involve a problem with the RIM object or the database; for example if the RIM object has not been created for TAPM or the database server is not working. After correcting the problem, resend the data to the database, you must restart the MLM. This involves issuing an idlcall CLI command to shutdown the MLM followed by another idlcall CLI command to reboot the MLM. The shell script, wmarrestartmlm.sh has been created to facilitate doing these two steps.
The syntax is:
wmarrestartmlm.sh <ManagedNode>
where:
ManagedNode - is the name of the managed node where the MLM is running.
Issuing this command will restart the MLM and cause any cached data files to be sent to the database.
2. TAPM includes libarm32.dll to instrument your applications with Application Response Measurement APIs. TAPM does not support instrumentation of applications compiled with 64-bit tools.
Workaround: none.
3. During uninstallation the TAPM engine is not stopped on the endpoints. This can occasionally lead to the following error message if you reinstall and try to start an engine that is already running: “libtapmeplog.a: Open failed: Text file busy”. (D1591)
Workaround: Special attention must be paid to uninstalling TAPM from TMF Gateway nodes. It is important that the TAPM engine on the endpoints attached to the gateway is stopped before you uninstall TAPM at the Gateway.
4. During the deinstallation of TAPM, the TMF command wgateway dbcheck is run to clear any TAPM information from the gateway

8 Version 2.0
cache. However, a defect in the command means the cache is not properly cleared. This can lead to a problem if TAPM is subsequently reinstalled. In particular, performance data from the endpoint may not be uploaded to the RIM database. This is a known defect with the TMF and is being tracked.
Workaround: Manually run the wgateway restart command on each of the gateways after deinstallation of TAPM as follows:
Issue the command:
wgateway <gateway_name> restart
Note: This command will stop and restart the gateway process. Make sure the gateway is not in use before running the command.
5. Lack of support in the input fields of SBCS/MBCS extended characters: An SBCS or MBCS string cannot be specified in the input fields when using CLI or the GUI.
Workaround: Avoid using extended (non-ASCII) characters in the input fields on CLI and GUI.
6. The application sorting order in the GUI list of registered applications window pane is not locale aware. (D4124)
Workaround: Do not expect the list of registered applications to be sorted when you need to select one of the entries.
7. MAR profile distribution does not create boot_method on endpoints existing in interconnected TMRs. APAR IC29514
Workaround: none. This APAR will be fixed in the GA Patch.
8. The wmargetdata command returns 0 when daylight saving time changes. Some problems may occur to the wmargetdata aggregation process and upload of data to the database. APAR IC29985
Workaround: Problem is only present when daylight saving time change date is different to USA. As soon as both have occurred the problem no longer exists.
9. Some temporary files generated by VuGen are not cancelled on the endpoint. APAR IC29319

Tivoli Application Performance Management: Release Notes 9
Workaround: Manually delete the files.
10. The wuninst command fails if you have Tivoli management framework 3.7 and in your region there is a managed node and an endpoint with the same label. (D10804, D93503)
Workaround: Use the wep command:
wep <ep_label> set_label <ep_new_label>
to change the endpoint label.
11. The wmarlseng command does not list all the information for simulated collection, no information is provided on the "run interval" and the simulation parameters. (D14025)
Workaround: none.
12. If you open the Add entry to the profile window from the Tivoli APM GUI, when no application is registered to the repository, and then register an application and press the Refresh button, the new application is shown in the application list, but none of the window buttons are active. (D14315)
Workaround: After having registered the new application, close and reopen the window.
13. From the Tivoli APM GUI, if you add an entry setting where the schedule info has the stop date that is the same day as the start date and choose the week day rule, you will cause an error message even if the settings are correct. (D14388)
Workaround: Set the start date to be the day before the stop date.
14. When you install the Tivoli APM Web browser GUI, the IBM HTTP Administration service is created with automatic startup, thus every time the machine is rebooted, this service starts. (D14504)
Workaround: Open the NT Services window and set the startup to "Manual" for this service.
15. If endpoint label is changed, the engine fails to upload. When you rename an endpoint with the framework command line
wep <label> set_label <new_label>
10 Version 2.0
and do not stop and restart the engine, at the scheduled time the engine fails to start the data upload process. (D14513)
Workaround: After changing the endpoint label stop and restart the engine with the new label.
16. Data is stored on the database according to the managed node time zone, and if it is different from that of the Endpoint, the hour reported on the database is different from the collection time.
Workaround: none.
17. In the HOST_NAME columns of the database a fully qualified name is stored. If the host where data is aggregated has a static hosts file (such as /etc/hosts) with an entry for the local hostname, then the DNS lookup is skipped and only information on the simple name (the first part of xxx.xxx.xxx) of the hostname is stored. Note that this is the default case for Windows2000 hosts and common UNIX environment. (D12834)
18. A Tivoli Administrator who runs the wuninst command to uninstall the Tivoli APM, must have the authorization role policy.
Workaround: Ensure correct authorization role.
19. After uninstallation of Tivoli APM, the process mar_ctrl (mar controller) could be still active.
Workaround: End the process to prevent having a non referenced process running
20. Web gui installation window does not have password encryption. This is a framework problem. (D116119)
Workaround: none.
21. If you want to use Client Capture with Internet Explorer you must install Internet Explorer version 5.0. If you want to use Client Capture for Netscape on Windows 95 you have to install Service Pack 1.
Workaround: none.
22. Netscape 6 is not supported by the Tivoli APM Web browser GUI.
Workaround: none.

Tivoli Application Performance Management: Release Notes 11
23. When the Web browser GUI is uninstalled a reboot may be necessary to cleanup the file system.
24. When using Client Capture for Netscape, the response time measured by Client Capture does not correspond exactly to what a user can see displayed at the browser. For example, if a page contains a javascript source, the response time does not include images loaded by javascript.
However; completion implies that Netscape is no longer attempting to load the URL.
25. After stopping and restarting APM engine on Solaris 2.6 endpoints you may experience problems with communication between the application and Tivoli APM engine.
Workaround: Apply the Solaris 2.6 Recommended Patch Cluster, available for downloading on the Sun web site.
26. COM server registration fails if MFC42.dll is too old.
Workaround: Install MFC42.dll image version 6.0 product version 6.0.3.
RDBMS Supported VersionsTo store the performance data on a RDBMS, APM uses the Tivoli Framework RIM as interface.
For information about relational databases supported by the current TME 10 Framework version, see the TME 10 Framework Release Notes.
An RDBMS must be installed and configured. Refer to your RDBMS documentation for database installation instructions and requirements. Refer also, to "Setting Up the Database" in Chapter 11 of the Tivoli APM User's Guide, Version 2.0 for more information about configuring the RDBMS and the RDBMS Interface Module (RIM) host.
In addition to installing the RDBMS, you must designate a managed node as the RIM host in the TMR.

12 Version 2.0
RDBMS Client ConfigurationWhen the RDBMS software has been installed you must ensure that it is accessible through TCP/IP. To verify the database client/server connection, the following tips can be followed. The indicated operating system platform has the corresponding database clients it supports in parenthesis.
DB2 Client - V5.2 for Windows NT/95, V6.1 for Windows NT/95/98
Note: Do not use the 6.1 client to connect to version 5.0 or 5.2 DB2 database servers because the client is not downward compatible.
Defining Your Database Connection information
Start the client configuration assistant by clicking Start–>Programs–>DB2 for Windows NT –>Client Configuration Assistant
Next, click Add–>Add Database SmartGuide
Type in the required details as follows:
1. Source: Select Manual configure connection to a DB2 database.
2. Protocol: Select TCP/IP.
3. TCP/IP: Type in the host_name where the server is located and the port_number (example, 50000) where the service can be located or type in the service_name (example, db2cDB2) that is listed in the c:/winnt/system32/drivers/etc/services file.
4. Database: Type in the database_name you want to connect to (example, SAMPLE; which should already exist)
5. ODBC: Select Register this database for ODBC and select As a system data source.
6. Leave Node Options and Security Options blank.
7. Select Done
8. from Client Configuration Assistant choose Test option.
9. On Test the connection, type in user_id and password. Select OK and the test should return a successful message similar to:

Tivoli Application Performance Management: Release Notes 13
The connection test was successful.Database product = DB2/NT 6.1.0SQL authorization ID = db2Database alias = SAMPLE
10. Reboot.
Client/Server Connection Test
The connection between client and server is tested as follows:
1. Start a DB2 command line window
db2cmd
2. Start the DB2 interactive session:
db2
3. Within the DB2 Interactive and using <db2 user password>, type:
connect to <db name> user <db user>
DB2 Client - V5.2 for UNIX (HPUX 10.20, AIX4.3) V6.1 for UNIX (Solaris 2.6, HPUX 10.20, AIX 4.3)
After installed the DB2 CAE (Client Application Enabler) without creating an instance during the initial install process, do the following:
1. Create a DB2 instance
db2icrt -u <db2 user> -a server <instance name>
Note: If this instance is for use with RIM, the <instance name> must match the DB2 user name. Additionally, with 3.6.1 and below, the username on the client and server DB2 instances must be the same.
2. Log into the system as the DB2 user.
3. Source in the DB2 environment, if not sourced:
. $HOME/sqllib/db2profile
4. Start the DB2 interactive session:
db2
5. Register the server node with the instance
catalog tcpip node <nodename> remote <node dns name> server <port # or svc name>
14 Version 2.0
6. Register the database
catalog database <db name> at node <nodename> authentication server
7. To see the available databases on a DB2 server, start a DB2 interactive session on the server and enter the following command:
list database directory
Client/Server Connection Test
The connection between client and server is tested as follows:
1. Log into the system as the DB2 user.
2. Source in the DB2 environment:
. $HOME/sqllib/db2profile
3. Start the DB2 interactive session:
db2
4. Inside the DB2 Interactive, type in:
connect to <db name> user <db user>
using <db2 user password>
Oracle Client - V2.3 for Windows NT
Configuring the SQL*Net
Configure SQL*Net by running ‘SQL*Net Easy Configuration’ from the Oracle for Windows NT/95 program group.
1. Select OK to Add Database Alias.
2. Type in a Database Alias name.
3. Select OK to continue.
4. Type in the TCP/IP Host Name.
5. Type in the Database Instance name: for example ORCL, OR73, PRCL.
6. Select OK to continue.

Tivoli Application Performance Management: Release Notes 15
7. Select Yes to add this database alias.
8. Select Cancel to exit if done or you can Add, Modify, Delete Database Alias or View Configuration Information.
Notes:
•The configuration file TNSNAMES.ORA is stored in the Oracle install directory on your hard drive (if you installed on 'c:\orant') in c:\orant\network\admin\tnsnames.ora.
•Once you have edited the tnsnames.ora file with an editor, you cannot run the 'SQL*Net Easy Configuration' utility again to add other Oracle entries. If you do, it will wipe out all your previous changes.
Database Connectivity Test
If you have an ID, you can test the connection to the database as follows:
1. Select SQL*Plus 3.3 from the Oracle for Windows NT/95 program group.
2. Type in your username, password, and the Host String (Database Alias name from above).
3. Select OK to continue.
4. If the connection is successful, connection information is displayed, type in exit to quit SQL*Plus.
5. If the connection is not successful, the Oracle ERROR: "ORA-12154" will be displayed. If this occurs, press Return twice to exit SQL*Plus and retry the connection. Verify the information that you have typed in.
Oracle Client - Net 8.0.5 for Windows NT/95
Configuring the SQL*Net
Run ‘Oracle Net8 Easy Config’ from the Oracle for Windows NT/95 program group to configure SQL*Net

16 Version 2.0
Note: If you get a java.exe error while trying to run Easy Config, then, you can edit the tnsnames.ora file manually to type in the Oracle server configuration information.
1. Select the Add new service radio button; Type in a New Service Name (Database Alias) name for example: cafaron805; Select Next to continue.
2. Select TCP/IP as the network protocol, and click Next to continue.
3. Type in the TCP/IP Host Name.
4. Type in the appropriate Port Number and click Next to continue.
5. Type in the Database Instance name: for example ORCL, OR73, PRCL; click Next to continue.
6. Select TEST SERVICE to verify the entry is correct.
7. Type in your username and password and select TEST.
8. Select DONE when successful.
9. Select Next, then Finish.
Note: The configuration file TNSNAMES.ORA is stored in the Oracle install directory on your hard drive (if you installed on 'c:\orant') in c:\orant\network\admin\tnsnames.ora.
Oracle Client - V2.3 for UNIX (Solaris 2.6, HPUX 10.20, HPUX 11.0, AIX 4.3)
To configure SQL*Net on UNIX, you must manually add an entry in the tnsnames.ora for the alias that is used by SQL*Net to connect to the Oracle server. This instance for the alias can be inserted anywhere in the file. The alias we added was nt. As you can see, you must add the .world extension to the alias name to specify the domain.
The nt.world entry is for an HOST = london (an Oracle NT server), and SID = ORCL (the Oracle database instance name on NT). The following is an extract from the tnsnames.ora file for this alias.
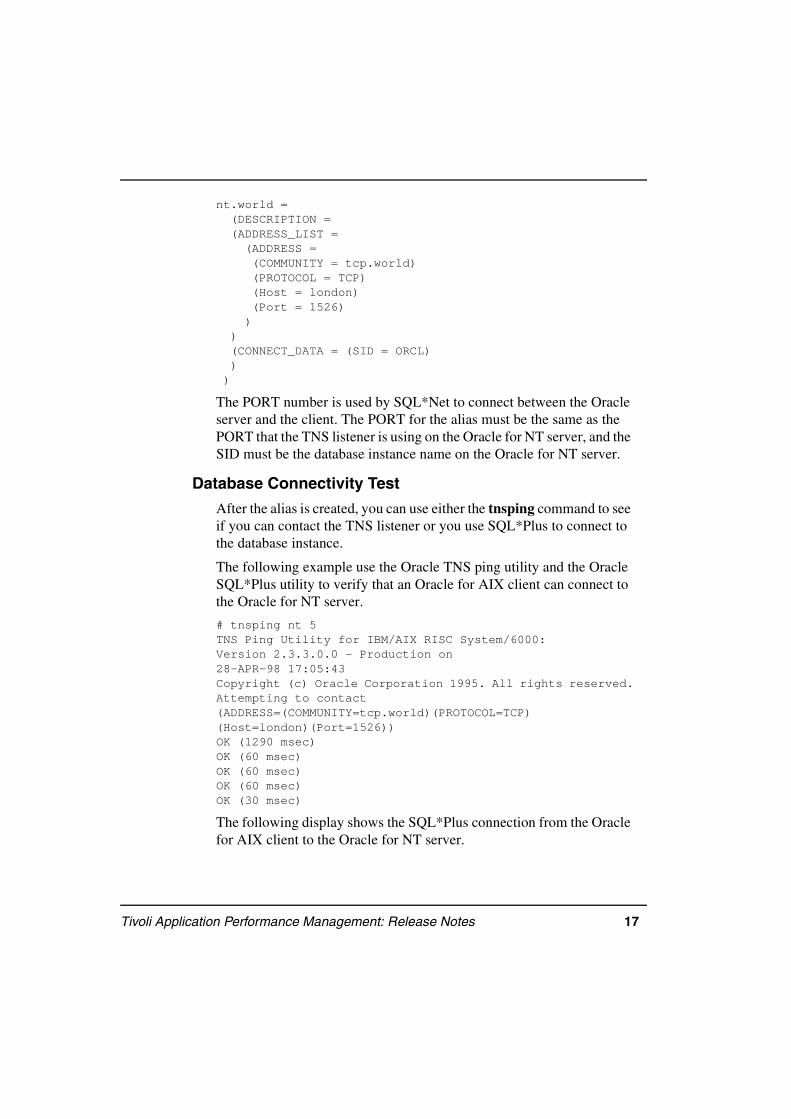
Tivoli Application Performance Management: Release Notes 17
nt.world = (DESCRIPTION = (ADDRESS_LIST = (ADDRESS = (COMMUNITY = tcp.world) (PROTOCOL = TCP) (Host = london) (Port = 1526) ) ) (CONNECT_DATA = (SID = ORCL) ) )
The PORT number is used by SQL*Net to connect between the Oracle server and the client. The PORT for the alias must be the same as the PORT that the TNS listener is using on the Oracle for NT server, and the SID must be the database instance name on the Oracle for NT server.
Database Connectivity Test
After the alias is created, you can use either the tnsping command to see if you can contact the TNS listener or you use SQL*Plus to connect to the database instance.
The following example use the Oracle TNS ping utility and the Oracle SQL*Plus utility to verify that an Oracle for AIX client can connect to the Oracle for NT server.
# tnsping nt 5TNS Ping Utility for IBM/AIX RISC System/6000:Version 2.3.3.0.0 - Production on28-APR-98 17:05:43Copyright (c) Oracle Corporation 1995. All rights reserved.Attempting to contact(ADDRESS=(COMMUNITY=tcp.world)(PROTOCOL=TCP)(Host=london)(Port=1526))OK (1290 msec)OK (60 msec)OK (60 msec)OK (60 msec)OK (30 msec)
The following display shows the SQL*Plus connection from the Oracle for AIX client to the Oracle for NT server.
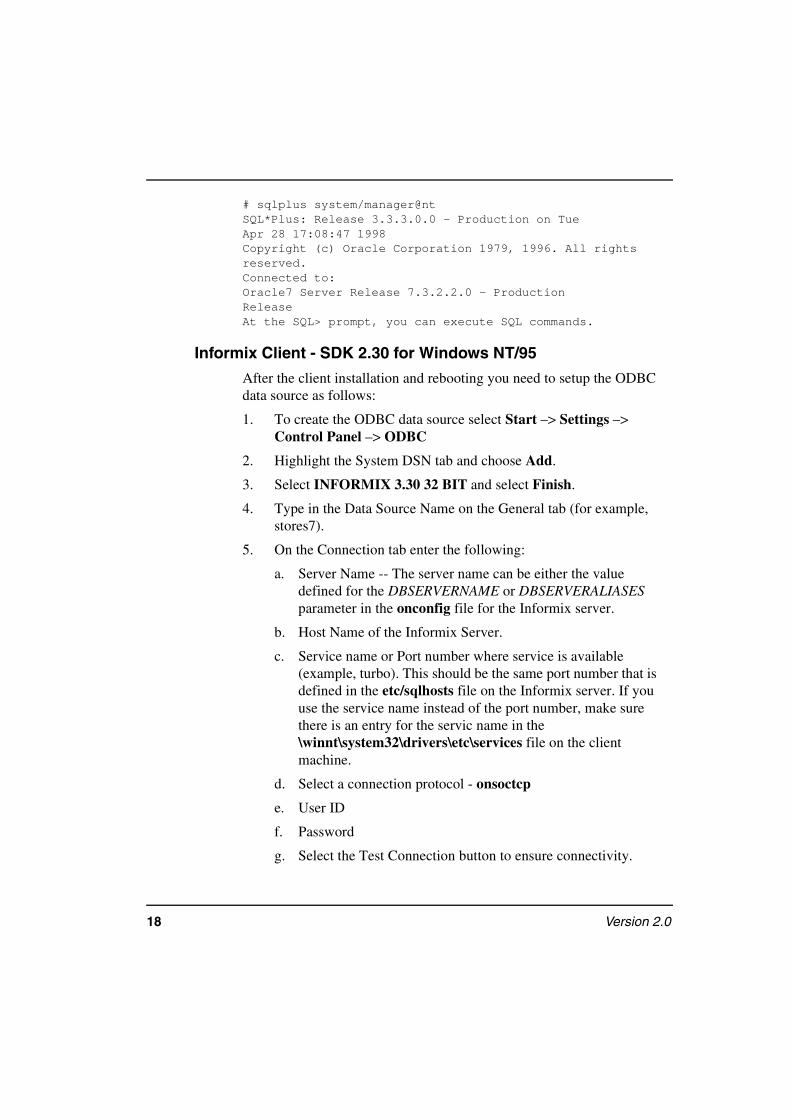
18 Version 2.0
# sqlplus system/manager@ntSQL*Plus: Release 3.3.3.0.0 - Production on TueApr 28 17:08:47 1998Copyright (c) Oracle Corporation 1979, 1996. All rights reserved.Connected to:Oracle7 Server Release 7.3.2.2.0 - ProductionReleaseAt the SQL> prompt, you can execute SQL commands.
Informix Client - SDK 2.30 for Windows NT/95
After the client installation and rebooting you need to setup the ODBC data source as follows:
1. To create the ODBC data source select Start –> Settings –> Control Panel –> ODBC
2. Highlight the System DSN tab and choose Add.
3. Select INFORMIX 3.30 32 BIT and select Finish.
4. Type in the Data Source Name on the General tab (for example, stores7).
5. On the Connection tab enter the following:
a. Server Name -- The server name can be either the value defined for the DBSERVERNAME or DBSERVERALIASES parameter in the onconfig file for the Informix server.
b. Host Name of the Informix Server.
c. Service name or Port number where service is available (example, turbo). This should be the same port number that is defined in the etc/sqlhosts file on the Informix server. If you use the service name instead of the port number, make sure there is an entry for the servic name in the \winnt\system32\drivers\etc\services file on the client machine.
d. Select a connection protocol - onsoctcp
e. User ID
f. Password
g. Select the Test Connection button to ensure connectivity.

Tivoli Application Performance Management: Release Notes 19
Informix Client - SDK 2.30 for UNIX (Solaris 2.5 - 2.5.1 - 2.6 - 7, HPUX 10.2 - 11.0, AIX 2.1 – 4.3 – 4.3.1 – 4.3.2 - 4.3)
After installing the Informix CLI product, copy the $INFORMIXDIR/.odbc.ini and $INFORMIXDIR/etc/sqlhosts file from the Informix server to the newly installed client. If the .odbc.ini file and sqlhosts file you just copied do not contain the connection information for your database, perform the next three steps:
1. Edit the ODBC Copy the ODBC Data Sources in $INFORMIXDIR/.odbc.ini file.
Add an entry for the new database:
inv1=Informix 9.x ODBC Driveror inv1=Informix 7.x ODBC Driver
2. Define the ODBC Database driver in $INFORMIXDIR/.odbc.ini file.
[inventory] Driver=<your $INFORMIXDIR>/cli/dlls/IXinf708.so;
Please refer to other entries for exact driver file
Description=Informix 9.x ODBC Driver
or
Description=Informix 7.x ODBC DriverDatabase=inv1@<informix server name>; Server name is located in $INFORMIXDIR/etc/sqlhosts HostName= <yourhostname>LogonID=Password=
3. Edit the $INFORMIXDIR/etc/sqlhosts file. Add an entry for the new informix server. example,.
<db server name> <comm method> <hostname> <port #>chip730 onsoctcp chip 1617

20 Version 2.0
Alternatively, you can make an entry in the /etc/services file for the database service. You can then specify the database service name instead of the port number in.
Client Connectivity Test
Perform a client connection as follows:
1. Source in the CLI environment
. $INFORMIXDIR/cli/.cli.sh
2. Run adhoc
$INFORMIXDIR/cli/demo2/adhoc
3. Enter the connection info and a SQL statement to execute.
If you have installed the stores7 sample database and have an entry in the .odbc.ini file for stores7, you can use the following sample adhoc session:
Enter Data Source Name: stores7
Enter userid: informix
Enter password: informix
Enter SQL string: select * from customer
Note: On AIX, the $INFORMIXDIR/.odbc.ini file must be copied to the Informix home directory for adhoc to work.
Sybase Client for Windows NT
After installing the Sybase 11.1.1 Client for Windows, apply EBF 8550. This software is located under the Win95-NT directory from which you installed the 32 bit client (directory name is EBF8550). Follow the directions in the Cover.ROLL.8550MS Word document located in the EBF8550 directory. Basically you just copy the files from each folder (bin, dll, etc.) to your sybase folders (bin, dll, etc.). Reboot afterwards.
Make sure the SYBASE and DSQUERY variables are set correctly before using isql. SYBASE should be set to the directory Sybase is installed in. DSQUERY should be set to the name of the Sybase server. The interfaces file can be consulted for a list of available servers.

Tivoli Application Performance Management: Release Notes 21
Defining the Servers
Define the servers as follows:
1. Run DSEDIT from the Sybase program group.
2. Select OK on the 'Select Directory Service'
3. Select Server Object–> Add
4. Enter a server name from the list below, select OK when done.
5. Double Click on Server Address field
6. Select Add.
7. From the Protocol drop down box, select NLWNSCK.
8. Enter the network address that applies to the server name.
9. Select OK to save.
Test Pinging the Server
Ping the server as follows:
1. From the DSEDIT screen, Select Server Object–>Ping Server–>Ping
2. The display should read "Succeeds". If not, check your parameters again and retry.
3. Repeat Server Objects–>Add to add additional servers.
Running SQL Queries
To run SQL Queries:
1. Run ‘SQL Advantage’ from the Sybase program group.
2. Select Server/Connect
3. Type in the server name or select it from the drop down box.
4. Type in your login and password information, then select Connect.
Sybase Client for UNIX (Solaris 2.6, HPUX 10.20, HPUX 11.0, AIX 4.3)

22 Version 2.0
Client Connectivity Test
Perform a client connection as follows:
1. Make sure the SYBASE and DSQUERY variables are set correctly before using isql. SYBASE should be set to the directory Sybase is installed in. DSQUERY should be set to the name of the Sybase server. The interfaces file can be consulted for a list of available server.
2. Change directory:
cd /data/sybase/bin
3. Run isql:
./isql –U <username> –P <password> –S <server name>
example
./isql –U tivoli –P tivoli –S CAFARON
Microsoft SQL Client 6.5 for Windows NT/95
Running SQL Client Configuration Utility
Run the SQL client configuration utility as follows:
1. Run the SQL Client Configuration Utility in the 'SQL Server Tools' group.
2. Select Net Library, Select TCP/IP sockets from the 'Default Network' drop down box.
3. Select Done.
If an error occurs during this step, update your path according to the information in step 1 of the conectivity test below and try again.
Client Connectivity Test
Test the connection by running ISQL/w from the SQL Server Tools group as follows:
1. Make sure that c:/mssql/binn is in your path
Tivoli Application Performance Management: Release Notes 23
2. If connecting to a MS Sql 6.0 server, make sure you have your network protocol set to TCP/IP. If set to IPX/SPX, then you may get errors during the EA build (the create table part).
Microsoft SQL Client 7.0 for Windows NT/95
Running SQL Client Configuration Utility
Run the SQL client configuration utility as follows:
1. Run the 'Client Network Utility' from the Microsoft Sql Server 7.0 program group.
2. Select TCP/IP from the 'Default Network' drop down box.
3. Select Add to add a server alias.
4. Add an entry for the Server alias and computer name. The port address is 5000. Select OK to add this new server alias.
Client Connectivity Test
Test the connection by running 'Query Analyzer' from the Microsoft Sql Server 7.0 Program group as follows:
1. To test connect and run queries, select your clientserver from the Sql Server drop down box and enter your database ID and password.

24 Version 2.0