Embed Size (px)
Citation preview

John McLellan Nov. 14, 1997 Page 1
TRADITIONAL JOINERY TECHNIQUES
OUTLINE:
COLLARS 1. USES 2. STYLES 3. FORGING A. GENERAL B. TOOLS C. PROCESS
RIVETS 1. USES 2. HEADS 3. FORGING A. TOOLS
B. PROCESS MORTISE & TENON
1. USES 2. FORGING A. TOOLS
B. PROCESS 3. VARIATIONS PIERCING
1. USES 2. FORGING A. TOOLS
B. PROCESS SHRINKING 1. USES
LAP JOINTS 1. USES
2. FORGING WELDING 1. USES
Traditional joinery techniques were developed at the dawn of the metal working age. Many methods are directly related to those used in wood construction. They were used to facilitate assembly of projects prior to the invention of the arc welder and are still a viable, though labor intensive, way of building projects. The use of these methods gives pieces a charm and appearance derived inherently from the characteristics of the joints. In fact many castings that are fashioned after forged work retain these characteristics because of their appeal.
COLLARS
1. STYLES - collars can be simple bands or have fancy molded profiles. They usually have rounded outside corners because it is extremely difficult to forge them with square corners. Some collars on older work were welded, but it is very tricky, even with wrought iron.

John McLellan Nov. 14, 1997 Page 2
2. USES - collars are used to hold two or more pieces together. They are often the easiest and most attractive way to attach curved surfaces together, as in scrolls.
3. FORGING A. General -
3/16" material works best, it is thin enough to bend easily but strong enough to hold well
Length of material = distance around pieces to be collared plus 2 to 2 1/2 times the thickness of the collar material.
B. Tools 1. Collar Blocks - size equal to the thickness of the total pieces
to be wrapped. Make 2" wide to hold in the vise without bending the collar legs.
2. Collar Die - for production runs, or if you make the same size all the time.
3. Set - for driving pieces down tight into the collar before setting.
4. Set Block - prevents collar legs spreading to keep them tight. C. Process
1. Cut to length and bevel ends. The bevel length should be 3/8" long. Allow to cool so they will be soft.
2. Find center and mark off half the desired width. Put the long end down in the vise and bend 90 degrees. the bend should be sharp on the inside.
3. Put in the vise with the appropriate block and bend into a U shape. It should be tight on the block.
4. Place the collar in position cold and drive pieces into it tight.5. If the collar spreads, heat it with a torch at the corner and
squeeze tight with tongs. 6. Heat one side, fold over with sliding blows, and repeat on the
other side. The collars will shrink as they cool making them very tight.

John McLellan Nov. 14, 1997 Page 3
Collar
Plain collars are the easiest to make. but can be difficult to fit. Fig. 80- 1 shows the formula for figuring the length of a plain collar to be fit around two pieces of straight stock. The results in this case are predictable. When collars are made to fit around unusual shapes and curves,"test" collars should be made first. It is very helpful, but not necessary, to arc weld the stock under the collar. The scarfs can be forged or cut at a 45° angle on a chop sow or band saw. Heat the collars bright cherry in the forge, or set them in place cold and use a torch to heat and bend over. As the metal cools the collar shrinks and tightens around the stock.
TlIE BLACKSMITH'S JOURNAL 209

John McLellan Nov. 14, 1997 Page 4

John McLellan Nov. 14, 1997 Page 5
RIVETS
1. USES - rivets are used for fastening two or more pieces together. They were the primary method of attaching structural components together before arc welding became common. They are still used in some applications because they allow some movement without causing cracks as would be the case with welds. Rivets are also used to allow free movement as in tongs.
2. HEADS - while round heads are the most common, they can also be flat, countersunk, oval, and decorative. Round, flat, countersunk, and oval are available "off the shelf". Decorative rivets are only limited by your imagination.
3. FORGING A. Tools
1. Heading tools - support the shank while the head is formed. They can be made to use on the anvil or in the vise. They also can be designed to allow any length of shank or to make a specific length.
2. Backup tools - used to support the head while the rivet is set. This prevents deforming the head.

John McLellan Nov. 14, 1997 Page 6
3. Sets - used to finish the end of the rivet when setting. Similar to a backup but struck with a hammer.
B. Process 1. Drill or punch holes through the pieces to be fastened. 2. Insert the rivet.
3. If 1/4" diameter or less it can be set cold, if larger heat in the forge before inserting, or heat with a torch after insertion.
4. Use a ball peen to set and spread the end and finish with a set.

John McLellan Nov. 14, 1997 Page 7
MORTISE & TENON
1. USES - this joint is used primarily to attach pieces at 90 degrees (more or less). Angled tenons can be made but are difficult to forge. This is the best structural joint for things like gate frames and attaching pickets. It also works well in furniture construction.
2. FORGING A. Tools
1. Side set (Butcher) - used to define the shoulder and start the tenon. 2. Set hammer - used to draw out tenons. 3. Swages - sizes and finishes tenons. 4. Monkey tools - use to square tenon shoulders. 5. Punch - size and shape of tenons to make mortise.

John McLellan Nov. 14, 1997 Page 8
B. Process 1. Define shoulder with side set, DO NOT GO TO FULL DEPTH. 2. Draw out tenon with set hammer. 3. Finish to size with set hammer or swage. 4. Square up shoulder with monkey tool. 5. Punch hole (mortise) to match tenon.
Tenons are made by 'pinch-ing' out the required amount of stock at the end of a bar and forming it into a specific size and shape. The stock should be worked at a yellow heat to minimize the possibility of cold shuts and weak spots. Care should be taken to keep the shoulders centered and not too deep. Notching where the shoulders will be started provides a reference point for placing the top and bottom butcher. The monkey tool is used to forge out irregularities and to square the shoulders.

John McLellan Nov. 14, 1997 Page 9
John McLellan Nov. 14, 1997 Page 10
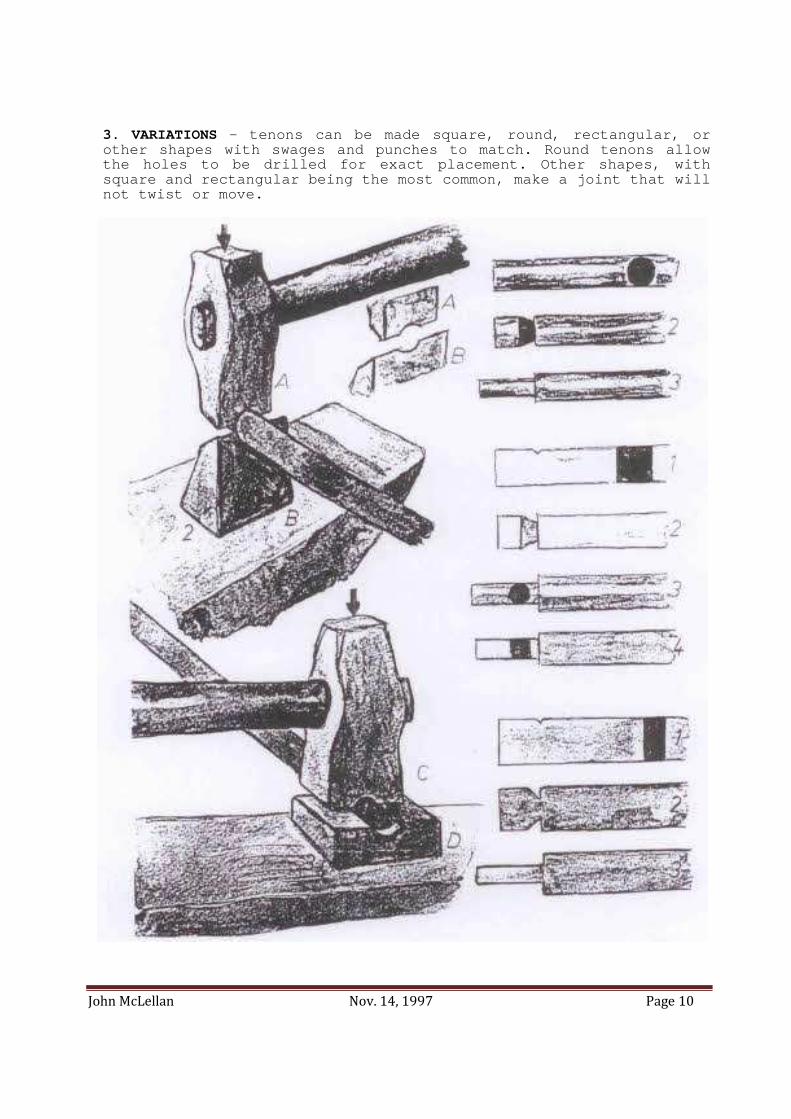
3. VARIATIONS - tenons can be made square, round, rectangular, or other shapes with swages and punches to match. Round tenons allow the holes to be drilled for exact placement. Other shapes, with square and rectangular being the most common, make a joint that will not twist or move.

John McLellan Nov. 14, 1997 Page 11
PIERCING
1. USES - piercing is used to pass one bar through another. Its main use is to stabilize long pieces by stabilizing them in the center. It can also be used for decoration.
2. FORGING A. Tools
1. Punches - used to make holes 2. Slitting chisels - creates slits that can be spread to
form holes. 3. Drifts - used to shape and size holes.
B. Process 1. Punch or slit and open a hole 2. Drive drift through to finish hole 3. Special swages are often used to dress up the outside of
the bar.

John McLellan Nov. 14, 1997 Page 12

John McLellan Nov. 14, 1997 Page 13
John McLellan Nov. 14, 1997 Page 14
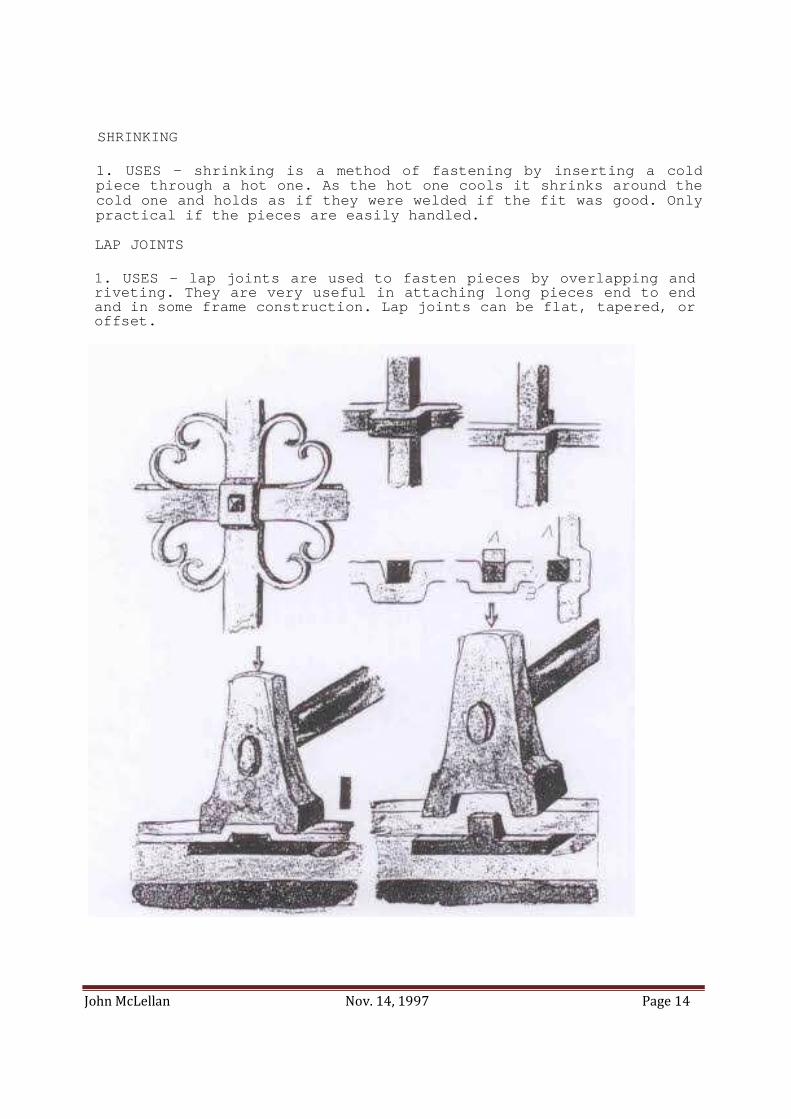
SHRINKING
1. USES - shrinking is a method of fastening by inserting a cold piece through a hot one. As the hot one cools it shrinks around the cold one and holds as if they were welded if the fit was good. Only practical if the pieces are easily handled.
LAP JOINTS
1. USES - lap joints are used to fasten pieces by overlapping and riveting. They are very useful in attaching long pieces end to end and in some frame construction. Lap joints can be flat, tapered, or offset.

John McLellan Nov. 14, 1997 Page 15
WELDING
1. USES - makes the strongest joint but is increasingly difficult as the pieces get larger and harder to handle. Welds need to be done quickly. If the parts are too hard to maneuver a good weld is nearly impossible.
REFERENCES:
THE BLACKSMITH1S JOURNAL by JERRY HOFFMANN
WROUGHT IRONWORK by COUNCIL FOR SMALL INDUSTRIES IN RURAL AREAS
WERK UND WERKZEUG DES KUNSTSCHMIEDS by OTTO SCHMIRLER
EISEN UND STAHL by FRITZ KUHN
THE BLACKSMITH1S COOKBOOK by FRANCIS WHITAKER


![[David McLellan] Marx Before Marxism(Bookos.org)](https://img.pdfslide.net/doc/110x75/55cf9c4c550346d033a95702/david-mclellan-marx-before-marxismbookosorg.jpg)