Embed Size (px)
Citation preview

1
Transcend 3 miniCPAP™
Quick Guide

2
Table of Contents
ENGLISH ………………………………………… 3 FRANÇAIS ………………………………………… 15 DEUTSCH ………………………………………… 28 ITALIANO ………………………………………… 42 ESPAÑOL ………………………………………… 56 NEDERLANDS ………………………………………… 71

3
Transcend 3 miniCPAP Quick Guide Page 2
Introduction
Thank you for choosing Transcend, the leading innovator in portable CPAP therapy. The Transcend 3 miniCPAP provides positive airway pressure to users in the range of 4 to 20 cmH2O as prescribed by the clinician. The Transcend 3 miniCPAP product family includes the Transcend 3 miniCPAP and the Transcend 3 miniCPAP Auto. Buttons and LED lights facilitate control and provide operational feedback. A DC power jack and a USB port are also incorporated into the Transcend 3 miniCPAP.
Note: For detailed device descriptions and troubleshooting, download the Transcend 3 miniCPAP user manual at www.mytranscend.com/support or by calling Somnetics customer service at 877-621-9626 to request a copy.
Precautions when using a computer with Transcend 3 miniCPAP The following precautions are cited for the safety of the patient and/or the person operating the computer as required to meet IEC 60601-1-1 safety regulations. Definitions A computer compliant with 60950-1 safety standards is one that complies
with UL 60950-1 or IEC 60950-1 safety standards. • Do not plug any devices into the Transcend 3 miniCPAP USB port other than a computer
that is compliant with 60950-1 safety standards. Attaching any other device to the Transcend 3 miniCPAP USB port may damage Transcend and may not be safe for the user.
• In order to reduce the risk of leakage currents, use an isolation transformer which is IEC 60601-1 approved to power your computer.
• Do not plug your computer compliant with 60950-1 safety standards or your Transcend into a multiple portable socket outlet (i.e. power strip).
• When using your computer compliant with 60950-1 safety standards, follow the manufacturer’s cleaning instructions.
• When using your computer compliant with 60950-1 safety standards, follow the manufacturer’s instructions for conducting preventative maintenance.
• Do not attach Transcend 3 miniCPAP USB port to your computer compliant with 60950-1 safety standards during preventative maintenance of your computer.
• Do not touch your computer compliant with 60950-1 safety standards and any exposed metal on Transcend 3 miniCPAP or on Transcend 3 miniCPAP cables at the same time.
• Do not touch exposed metal on your computer compliant with 60950-1 safety standards or exposed metal on connectors or cables
• For clinicians, do not simultaneously touch the computer compliant with 60950-1 safety standards and the patient.
• Do not use computers that have internal voltages that are accessible without the use of tools in order to gain access to such voltages.
Warnings • Do not allow water to enter this device. Transcend 3 miniCPAP should not be
exposed to environmental conditions where the system may get wet. • This device is not intended for life support.
ENGLISH
4
Transcend 3 miniCPAP Quick Guide Page 3
• The Transcend 3 miniCPAP must be set up and adjusted by a trained provider before being used for therapy ramp and pressure.
• The air temperature produced by this device can be as much as 10ºF higher than the temperature of the room. Exercise caution if the room temperature is warmer than 90ºF (32ºC).
• Do not block or otherwise obstruct the exhalation ports of the mask. Follow the manufacturer’s instructions included with your mask.
• This equipment is not suitable for use with oxygen or in the presence of a flammable anesthetic mixture with air or oxygen, or with nitrous oxide. Sources of oxygen must be located more than 1 meter from the equipment to avoid the risk of fire and burns.
• The Transcend 3 miniCPAP is only to be used with the supplied or recommended accessories. Use of accessories not recommended may result in increased electromagnetic emissions or decreased electromagnetic immunity of the PAP system and may be potentially unsafe.
• The Transcend 3 miniCPAP is not defibrillation proof. • Do not attempt to sterilize Transcend 3 miniCPAP. • If the device is to be used by multiple patients a main flow bacteria filter should be
installed in-line between the device and the breathing circuit tubing to prevent contamination.
• The device should be used only with masks and connectors recommended by Somnetics or a health care professional. A mask should not be used unless the device is turned on and is properly delivering ramp or therapy pressure. The exhalation port(s) associated with the mask should never be blocked. Explanation of the Warning: The device is intended to be used with masks or connectors specifically designed to have exhalation ports to allow continuous flow of air out of the mask. When the device is in operation, air flow from the device flushes exhaled air out through the mask exhalation port. When the device is not operating, however, fresh air will not be provided through the mask and exhaled air may be rebreathed.
• Failure to use a mask or accessory that minimizes rebreathing of carbon dioxide or permits spontaneous breathing can cause asphyxiation.
• Do not position the equipment in bed. Covering breathing tubes with a blanket or heating them can affect the quality of therapy or injure the user.
• To prevent disconnection of the tubing during use, only tubes in compliance with ISO 5367 or ISO 80601-2-74 should be used.
• Strangulation hazard from power cord and air tube. These can become wrapped around a neck and STRANGLE. Keep power cord and air tube more than 3 feet from a baby’s crib and out of baby’s reach. Keep cord and tube out of children’s reach.
• Small parts are unlikely to be expelled from the Transcend 3 miniCPAP enclosure, but in case of severe damage internal components may fragment and create a swallowing or choking hazard if they get out of the enclosure.
ENGLISH

5
Transcend 3 miniCPAP Quick Guide Page 4
Cautions • Federal law (United States) restricts this device to sale by, or on the order of, a
physician. • Power the Transcend 3 miniCPAP only with the Somnetics-supplied power supplies,
mobile power adapter, or batteries. • Discontinue use of the Transcend 3 miniCPAP and contact your physician if
respiratory or skin irritations occur. • Do not introduce objects into the Transcend 3 miniCPAP air inlet or air outlet. • Inspect the power supply for signs of wear or damage before each use. Replace the
power cord if necessary. • Somnetics recommends replacing the air delivery tubing (hose) after every three
months of use. • To protect the environment, some parts and accessories of the Transcend 3
miniCPAP, including optional batteries, must be disposed of in accordance with local regulations.
• The equipment must not be covered or positioned in such a way that adversely affects the performance of the equipment, as it may also create a safety issue. Examples of this would include:
o The equipment must not be positioned in a bed. o The equipment should not be placed anywhere other than on a firm, flat
surface. o Do not position in a location where pets or children can access equipment. o Do not position near an open window or other location where dust, or pests
(insects) can affect equipment safety and/or performance. o Do not position next to a curtain that blocks the flow of cooling air, thereby
causing the equipment to overheat. o Do not block the air intake port, thereby interfering with therapy.
DBP
Device contains DBP (a phthalate). Significant exposure to DBP may interfere with the normal development of the male reproductive tract. Testing has demonstrated that DBP exposure levels are well below established limits. Women who are pregnant or nursing may wish to discuss the benefits and risks of this device with a physician.
ENGLISH

6
Transcend 3 miniCPAP Quick Guide Page 5
Components of the Transcend 3 miniCPAP
Begin by unpacking all items from the Transcend travel bag and inspect them to ensure they were not damaged during shipment. Report any missing or damaged items to the home healthcare provider that provided the product to you.
1 Transcend 3 miniCPAP Auto or Transcend 3 miniCPAP
2 Air Supply Tube (Compatible with standard 22 mm connector)
3 Multi-plug universal power supply (PSA2)
4 Changeable plug pack
5 Transcend Travel bag
6 Transcend 3 miniCPAP Quick Guide
7 USB Cable
What’s not included (all sold separately) • Transcend Mobile Power Adapter • Transcend P4 Battery • Transcend P8 Battery • Transcend Portable Solar Battery Charger (to be used as an alternative charging
source for Transcend P4 and P8 batteries) • Patient Mask
1
2
4
3
7
5 6
ENGLISH

7
Transcend 3 miniCPAP Quick Guide Page 6
Assembling the Transcend 3 miniCPAP
1. Attach the air supply tube to the air outlet on the Transcend 3 miniCPAP device.
2. Connect the mask to the opposite end of the air supply tube.
3. Plug the power supply barrel connector into the Transcend 3 miniCPAP power jack on the rear of the device.
4. Connect power supply to a wall outlet.
Using the Multi-plug Universal Power Supply (PSA2)
The Multi-plug Universal Power Supply (PSA2) and Changeable Plug Pack containing three (3) exchangeable plugs are contained with each Transcend 3 miniCPAP. The changeable plug packs are suitable for use in most countries around the world.
1. Determine which plug is required to power the device based upon the outlet style.
2. If the correct plug is not already attached to the Power Supply remove the attached plug by depressing the button on the detachable plug and turning the plug in a counterclockwise motion until it releases from the power supply.
3. Attach the desired plug by lining up the protruding tabs on the back of the plug with the gaps on the Power Supply and gently pushing the plug into the slot. Turn the plug clockwise until it clicks into place. You should hear an audible click.
4. Insert the barrel connector of power supply into power jack on the back of the Transcend 3 miniCPAP device.
5. Insert the other end of the power supply into an AC line power outlet.
6. The Transcend 3 miniCPAP power-up LED flash sequence should initiate. Once the power-up LED flash sequence is complete the LED lights will turn off. This sequence indicates that power is being supplied to the Transcend 3 miniCPAP and that it has successfully entered Standby Mode.
Reattach: Insert plug and turn
Remove Plug
Remove: Depress button and turn
ENGLISH

8
Transcend 3 miniCPAP Quick Guide Page 7
Note Use only the Somnetics-supplied Universal Power Supplies. Do not use a power converter or voltage transformer with the PSA2 Universal Power Supply.
Note Make certain that the plug attachment is fully secured to the Power Supply before inserting the power supply into the wall outlet.
Transcend 3 miniCPAP Device
The Transcend 3 miniCPAP comes ready to generate and regulate continuous positive airway pressure therapy for delivery to the interface (mask). An external power source connects to the Transcend 3 miniCPAP to supply power to the device.
Control panel
The Transcend 3 miniCPAP control panel has two pushbuttons used to activate the blower and the pressure ramp feature. There are also two LED lights, including a green LED for indicating normal operational modes and a yellow LED that indicates fault conditions.
Power button
Ramp button
Green LED
Yellow LED
ENGLISH

9
Transcend 3 miniCPAP Quick Guide Page 8
Power connection jack and USB port
Power Jack
The power jack accepts the barrel plug of the output cable from a DC power source to operate the Transcend 3 miniCPAP.
A variety of power sources may be used to power the Transcend 3 miniCPAP. An AC to DC converting power supply is provided with your device and should be used when powering the device by line (wall outlet) power.
An optional mobile power adapter connects to a DC power outlet, such as that found in an Automobile, truck, RV, boat, or similar vehicle.
Optional Transcend battery packs are also available to power the Transcend 3 miniCPAP.
USB port
A mini-AB USB port is provided for direct data exchange between the Transcend 3 miniCPAP and a computer via a USB data cable. This interface allows the clinician to configure the Transcend 3 miniCPAP for prescription pressure, ramp settings and Auto settings and provides access to therapy compliance information that can be viewed by the user and emailed to the clinician.
Note It may be necessary to unplug the cables and reconnect to ensure a good connection.
USB port
Power jack
ENGLISH

10
Transcend 3 miniCPAP Quick Guide Page 9
Using the Transcend 3 miniCPAP
The control panel of the Transcend 3 miniCPAP has two pushbuttons that activate the blower and initiate the pressure ramp feature. There are also two LED lights, including a green LED for indicating normal operational modes and a yellow LED for indicating fault conditions. The Transcend 3 miniCPAP operational status is displayed by LED illumination states.
When a power source is connected to the device the Transcend 3 miniCPAP power-up LED flash sequence should initiate. Once the power-up LED flash sequence is complete the LED lights will turn off. This sequence indicates that power is being supplied to the Transcend 3 miniCPAP and that it has successfully entered Standby Mode. During therapy delivery, the LED lights remain off to avoid disturbing the patient and/or bed partner.
Note If the Transcend 3 miniCPAP loses power while delivering therapy it will resume delivering therapy as soon as power is restored and you press the power button. The device will repeat the power-up LED flash sequence prior to the blower restarting.
Standard user modes
Normal operation consists of four modes:
Off When the device is not connected to a power source the device is off. Control panel LEDs are both off.
Standby When power is applied to the device it completes the power-up LED sequence and enters Standby Mode. Standby Mode is also initiated by pressing the power button when the device is in On Mode or if the mask is removed while in On Mode. As long as power is supplied to the device it will remain in Standby Mode until On or Drying Mode is initiated.
On When in On Mode the blower is working and regulated device therapy pressure is being generated. The LED lights remain off. On Mode is initiated by pressing the power button when the device is in Standby Mode and the mask is worn by the patient.
Drying To initiate Drying Mode depress the Ramp button and press the Power button simultaneously. When in Drying Mode the blower runs at a low speed for 30 minutes. During Drying Mode the LED lights remain off and blower pressure is not regulated to provide therapy.
ENGLISH

11
Transcend 3 miniCPAP Quick Guide Page 10
Starting therapy
• Connect the Transcend 3 miniCPAP to a power source and allow it to enter Standby Mode.
• Be sure your user interface is fit firmly in place before initiating therapy. • To initiate therapy press the Power button. Pressing the Power button when Transcend
3 miniCPAP is in Standby Mode will initiate On Mode. Air flow will begin as the blower delivers or ramps to prescribed therapy pressure.
Using the ramp function
The Ramp feature lets users acclimate to air flow by starting at a lower pressure and gradually increasing to the prescribed pressure setting as the user falls asleep. The software section of this manual displays how to modify ramp settings on your device.
To accelerate the rate of the pressure increase during Ramp, hold the Ramp button down until the device reaches a comfortable therapy pressure. When the Ramp button is released the device will continue in Ramp Mode until it reaches the prescribed therapy pressure.
• Be sure the Transcend 3 miniCPAP is in On Mode. If not, press the power button.
• Adjust your mask to eliminate mask leaks.
• Press the Ramp button. The pressure will drop to the Ramp starting pressure and will gradually increase over a preset length of time until reaching the prescribed therapy pressure.
Note Momentarily pressing the Ramp button during ramped pressure delivery will not affect the pressure delivered. To stop the gradual pressure increase of the ramp function, turn off the device by pressing the Power button. The next time the blower is turned on it will deliver the prescribed therapy pressure.
Note In the event of power loss during ramp, the Transcend 3 miniCPAP will resume at the full prescribed pressure as soon as power is restored.
Using the EZEX function
The EZEX function is a special feature that decreases therapy pressure on exhalation. This feature is designed to provide additional comfort to the patient by reducing the amount of resistance they experience as they exhale.
There are four EZEX settings: OFF, 1, 2 or 3; progressively increasing the amount of pressure relief from none to maximum. The software section of the user manual displays how to modify EZEX settings.
Note: To download the Transcend 3 miniCPAP user manual visit www.mytranscend.com/support or call Somnetics customer service at 877-621-9626 to request a copy.
ENGLISH

12
Transcend 3 miniCPAP Quick Guide Page 11
Ending therapy
To end the delivery of therapy while the blower is on, press the Power button to deactivate the blower and return the device to Standby Mode. It is recommended the user initiate the Drying Mode function after each therapy session to dry the device interior.
Drying mode
At the end of each therapy session it is recommended the user initiates the Drying Mode. To initiate Drying Mode depress the Ramp button and press the Power button simultaneously. When in Drying Mode the blower runs at a low speed for 30 minutes. During Drying Mode the LED lights remain off and blower pressure is not regulated to provide therapy. Using the Drying Mode flushes air through the system to remove traces of moisture from the interior of the device and airway circuit. After the 30-minute drying cycle, the blower will turn off and the device will automatically enter Standby Mode.
Replacing the Filter Media
The Transcend 3 miniCPAP Filter Media should be replaced every six months at minimum.
Remove the filter assembly by pulling the tab on the back of the device to release it. Then pull the filter assembly away from the device. Discard the entire filter assembly and replace with a new one.
Caring for your Transcend 3 miniCPAP and its components Warnings: • Unplug the Transcend 3 miniCPAP before cleaning.
• Do not submerge the Transcend 3 miniCPAP or power supply in liquid.
• Prevent water from entering any openings of the device.
• Do not use harsh or abrasive cleaning agents to clean the device or any components.
• Do not attempt to sterilize the Transcend 3 miniCPAP.
• Do not place cleaning materials, such as a cloth or liquid, into the device air inlet or air outlet connector.
Pull tab to release filter assembly.
ENGLISH

13
Transcend 3 miniCPAP Quick Guide Page 12
Cleaning the Exterior
Follow these instructions to clean the exterior of the Transcend 3 miniCPAP.
1. Unplug the power supply prior to cleaning and disconnect the device from power cords.
2. Mix a solution of 5% mild liquid detergent in distilled water (1.6 fl oz liquid detergent per quart of distilled water). Mild detergent should contain biodegradable anionic surfactants and no phosphate.
3. Submerge a lint-free cotton cloth into the detergent solution.
4. Wring excess water from the cloth then wipe the exterior of the Transcend 3 miniCPAP device for approximately 20 seconds using a gentle, back and forth wiping motion from the front to back of the device. Apply firm pressure and ensure contact with all accessible contact surfaces to adequately remove soil buildup.
5. Rinse the cloth in clear water to remove residual cleaning solution.
6. Wring excess water from the cloth then wipe the Transcend 3 miniCPAP using a gentle front to back wiping motion to remove any detergent solution remaining on its surface.
Wipe the device with a dry, lint-free cotton cloth until the device is fully dry.
Cleaning of Accessories
The following accessory should be cleaned with a 5% solution of mild liquid detergent in distilled water (1.6 fl oz liquid cleaning detergent per quart of distilled water). Mild detergent should contain biodegradable anionic surfactants and no phosphate. Follow these steps to clean the accessories.
Accessory Periodic Cleaning Cycle Product Service Life
Air Supply Tube Daily 3-Month
1. Fully immerse the air supply tube in the cleaning solution. 2. While immersed, thoroughly wipe the surface with a lint-free cotton cloth. Apply firm
pressure and ensure contact with all accessible contact surfaces to adequately remove soil buildup.
3. Clean the inside of the air supply tube by lifting, then lowering the ends of the tube while the tube is filled with cleaning solution.
4. Rinse air supply tube by immersing in distilled water. Move the air supply tube in a back and forth motion for approximately10 seconds to remove cleaning agent residue.
5. Rinse the air supply tube in distilled water by fully immersing. Lift, then lower, the ends of the tube while the tube is filled with water. Repeat this motion for approximately 10 seconds to remove cleaning agent residue.
6. Dry the outside of the air supply tube with a dry, lint-free cotton cloth. Allow the tube to air dry until the inside of the tube is dry. Length of drying time will depend on ambient conditions.
ENGLISH
14
Transcend 3 miniCPAP Quick Guide Page 13
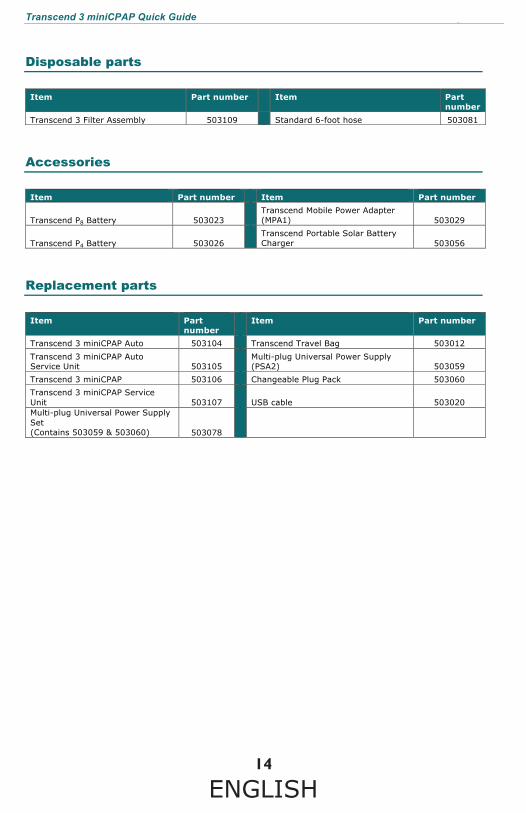
Disposable parts
Item Part number Item Part number
Transcend 3 Filter Assembly 503109 Standard 6-foot hose 503081
Accessories
Item Part number Item Part number
Transcend P8 Battery 503023 Transcend Mobile Power Adapter
(MPA1) 503029
Transcend P4 Battery 503026 Transcend Portable Solar Battery
Charger 503056
Replacement parts
Item Part number
Item Part number
Transcend 3 miniCPAP Auto 503104 Transcend Travel Bag 503012
Transcend 3 miniCPAP Auto Service Unit 503105
Multi-plug Universal Power Supply (PSA2) 503059
Transcend 3 miniCPAP 503106 Changeable Plug Pack 503060 Transcend 3 miniCPAP Service Unit 503107
USB cable 503020
Multi-plug Universal Power Supply Set (Contains 503059 & 503060) 503078
ENGLISH