Embed Size (px)
Citation preview
SCIENCE SCOPE64
TRIED AND TRUE
Reflecting on students’ misconceptions about light Using research to guide assessment and instruction by Amber Haslag and James P. Concannon
From the Sun to oven burners, light is every-where in our students’ lives. Yet despite its ubiquity and necessity, light is intangible, and students find the phenomenon abstract and
confusing. Many students have misunderstandings about light as they enter middle school, and it is the responsibility of science teachers to find activities that dispel their mistaken ideas. For example, in an analy-sis of 227 fifth-grade students’ ideas about light and color, Anderson and Smith (1986) discovered that, when asked what happens when someone turns on a light in a dark room, students believed that light filled the room and made it bright. Only 15% of students ex-plained that light continuously comes out of a lamp and hits things. This indicates that students did not think light was in motion. Anderson and Smith also asked students to draw an arrow showing the direction light reflects off of a piece of white wood. Nearly half (48%) did not draw an arrow at all, indicating these students believed the wood absorbed all the light and did not un-derstand that eyes do not see objects, rather eyes de-tect the light reflected off of objects. This lesson, which can be completed in two 50-minute class periods, be-gins by eliciting students’ preconceptions and then ad-dresses their difficulties in understanding light.
Day 1 ElicitI begin the lesson by giving each student a copy of the preassessment. The preassessment requires stu-dents to answer two questions developed and used by Anderson and Smith (1986) in their two-year study fo-cusing on fifth-graders’ misconceptions of light.
1. A girl in a dark room turns on a lamp. What happens then?A. Light comes out of the lamp until it fills the
room; then it stops moving.
B. Light keeps coming out of the lamp and bounces off things.
C. The lamp makes the room bright. D. I don’t know.
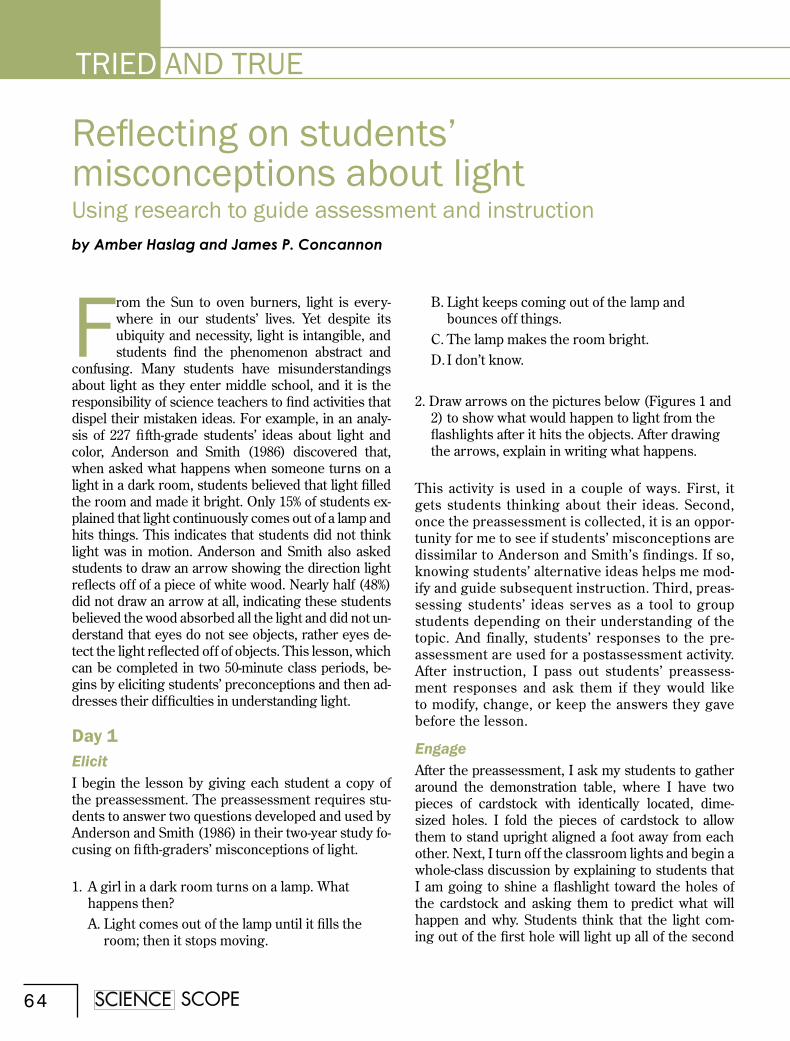
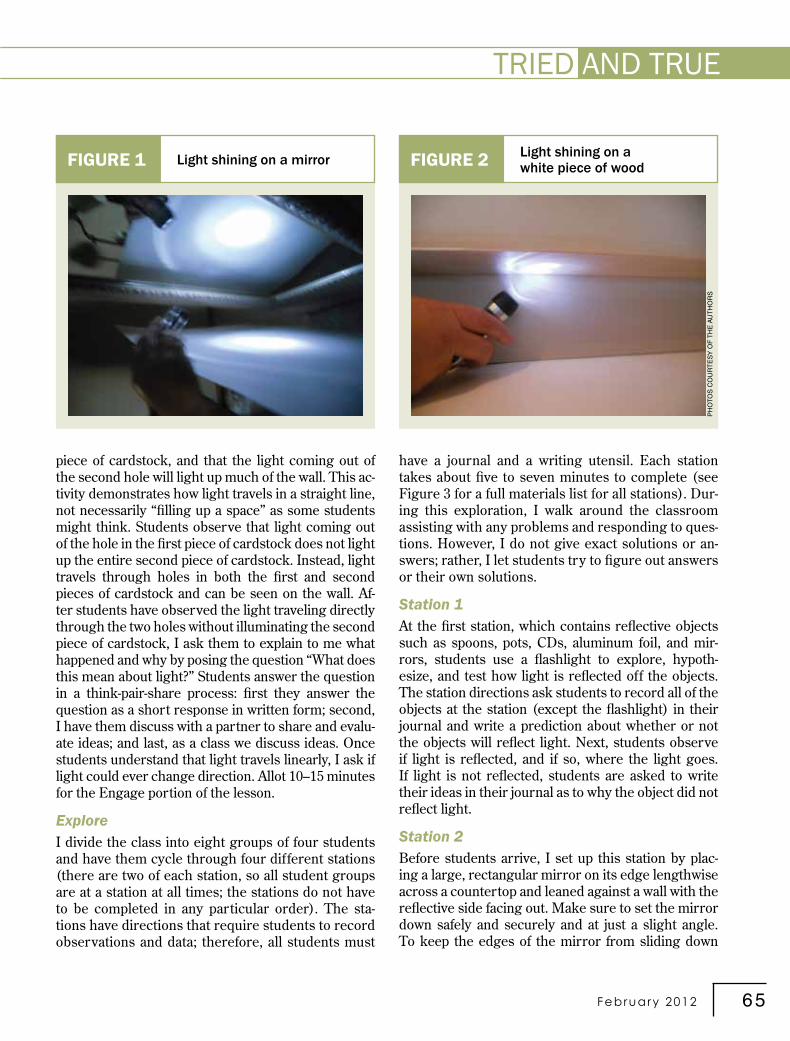
2. Draw arrows on the pictures below (Figures 1 and 2) to show what would happen to light from the flashlights after it hits the objects. After drawing the arrows, explain in writing what happens.
This activity is used in a couple of ways. First, it gets students thinking about their ideas. Second, once the preassessment is collected, it is an oppor-tunity for me to see if students’ misconceptions are dissimilar to Anderson and Smith’s findings. If so, knowing students’ alternative ideas helps me mod-ify and guide subsequent instruction. Third, preas-sessing students’ ideas serves as a tool to group students depending on their understanding of the topic. And finally, students’ responses to the pre-assessment are used for a postassessment activity. After instruction, I pass out students’ preassess-ment responses and ask them if they would like to modify, change, or keep the answers they gave before the lesson.
EngageAfter the preassessment, I ask my students to gather around the demonstration table, where I have two pieces of cardstock with identically located, dime-sized holes. I fold the pieces of cardstock to allow them to stand upright aligned a foot away from each other. Next, I turn off the classroom lights and begin a whole-class discussion by explaining to students that I am going to shine a flashlight toward the holes of the cardstock and asking them to predict what will happen and why. Students think that the light com-ing out of the first hole will light up all of the second
February 2012 65
TRIED AND TRUETRIED AND TRUE
piece of cardstock, and that the light coming out of the second hole will light up much of the wall. This ac-tivity demonstrates how light travels in a straight line, not necessarily “filling up a space” as some students might think. Students observe that light coming out of the hole in the first piece of cardstock does not light up the entire second piece of cardstock. Instead, light travels through holes in both the first and second pieces of cardstock and can be seen on the wall. Af-ter students have observed the light traveling directly through the two holes without illuminating the second piece of cardstock, I ask them to explain to me what happened and why by posing the question “What does this mean about light?” Students answer the question in a think-pair-share process: first they answer the question as a short response in written form; second, I have them discuss with a partner to share and evalu-ate ideas; and last, as a class we discuss ideas. Once students understand that light travels linearly, I ask if light could ever change direction. Allot 10–15 minutes for the Engage portion of the lesson.
ExploreI divide the class into eight groups of four students and have them cycle through four different stations (there are two of each station, so all student groups are at a station at all times; the stations do not have to be completed in any particular order). The sta-tions have directions that require students to record observations and data; therefore, all students must
Light shining on a mirrorFIGURE 1 Light shining on a white piece of woodFIGURE 2
have a journal and a writing utensil. Each station takes about five to seven minutes to complete (see Figure 3 for a full materials list for all stations). Dur-ing this exploration, I walk around the classroom assisting with any problems and responding to ques-tions. However, I do not give exact solutions or an-swers; rather, I let students try to figure out answers or their own solutions.
Station 1At the first station, which contains reflective objects such as spoons, pots, CDs, aluminum foil, and mir-rors, students use a flashlight to explore, hypoth-esize, and test how light is reflected off the objects. The station directions ask students to record all of the objects at the station (except the flashlight) in their journal and write a prediction about whether or not the objects will reflect light. Next, students observe if light is reflected, and if so, where the light goes. If light is not reflected, students are asked to write their ideas in their journal as to why the object did not reflect light.
Station 2Before students arrive, I set up this station by plac-ing a large, rectangular mirror on its edge lengthwise across a countertop and leaned against a wall with the reflective side facing out. Make sure to set the mirror down safely and securely and at just a slight angle. To keep the edges of the mirror from sliding down
Ph
oto
s c
ou
rt
es
y o
f t
he
au
th
or
s
66
TRIED AND TRUE
SCIENCE SCOPE
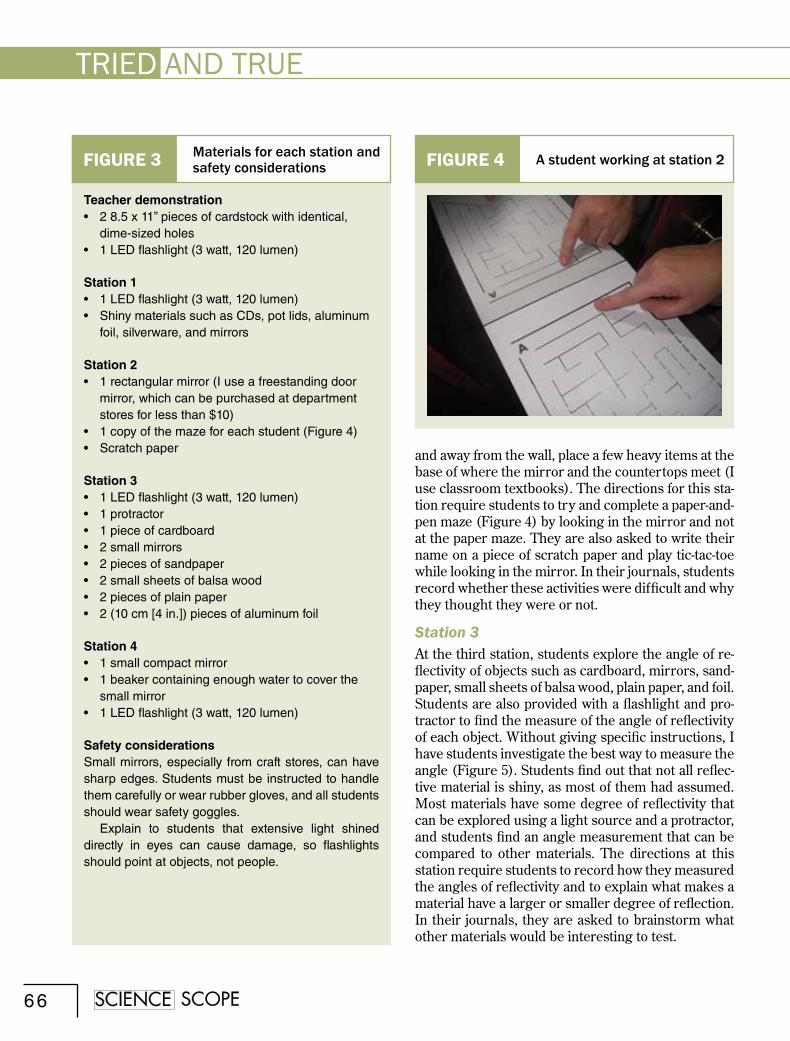
and away from the wall, place a few heavy items at the base of where the mirror and the countertops meet (I use classroom textbooks). The directions for this sta-tion require students to try and complete a paper-and-pen maze (Figure 4) by looking in the mirror and not at the paper maze. They are also asked to write their name on a piece of scratch paper and play tic-tac-toe while looking in the mirror. In their journals, students record whether these activities were difficult and why they thought they were or not.
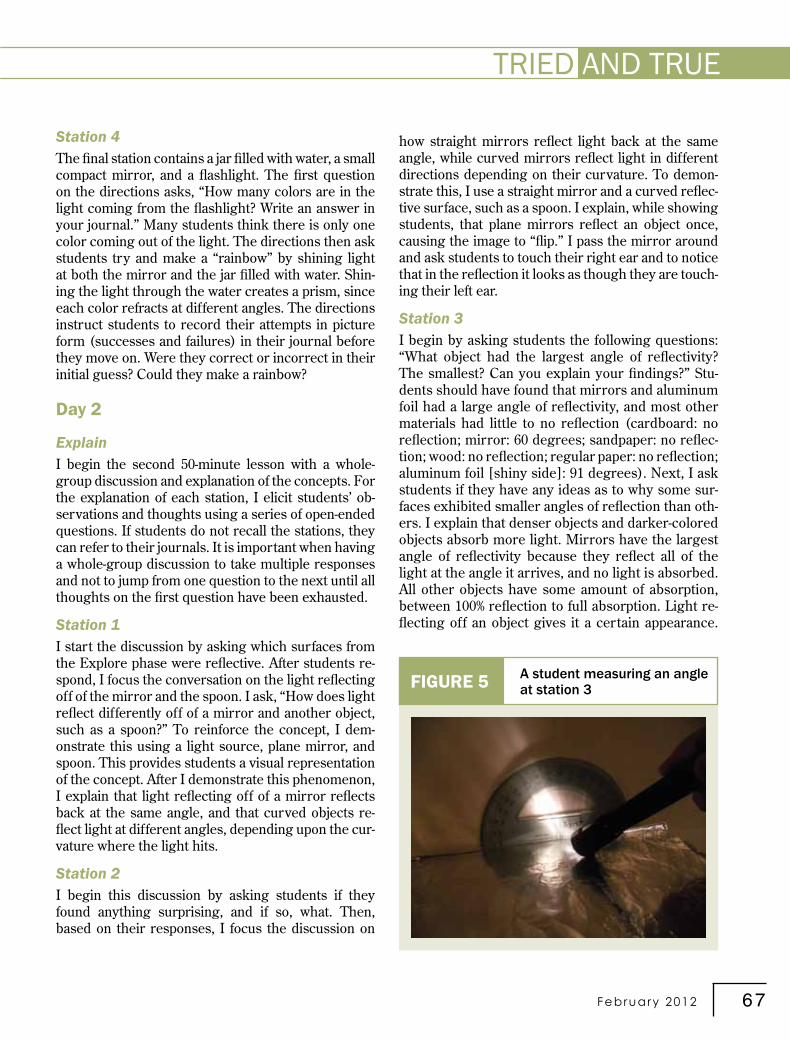
Station 3At the third station, students explore the angle of re-flectivity of objects such as cardboard, mirrors, sand-paper, small sheets of balsa wood, plain paper, and foil. Students are also provided with a flashlight and pro-tractor to find the measure of the angle of reflectivity of each object. Without giving specific instructions, I have students investigate the best way to measure the angle (Figure 5). Students find out that not all reflec-tive material is shiny, as most of them had assumed. Most materials have some degree of reflectivity that can be explored using a light source and a protractor, and students find an angle measurement that can be compared to other materials. The directions at this station require students to record how they measured the angles of reflectivity and to explain what makes a material have a larger or smaller degree of reflection. In their journals, they are asked to brainstorm what other materials would be interesting to test.
A student working at station 2FIGURE 4
Teacher demonstration• 2 8.5 x 11” pieces of cardstock with identical,
dime-sized holes • 1 LeD flashlight (3 watt, 120 lumen)
Station 1• 1 LeD flashlight (3 watt, 120 lumen)• shiny materials such as cDs, pot lids, aluminum
foil, silverware, and mirrors
Station 2• 1 rectangular mirror (I use a freestanding door
mirror, which can be purchased at department stores for less than $10)
• 1 copy of the maze for each student (figure 4)• scratch paper
Station 3• 1 LeD flashlight (3 watt, 120 lumen) • 1 protractor• 1 piece of cardboard• 2 small mirrors• 2 pieces of sandpaper• 2 small sheets of balsa wood• 2 pieces of plain paper• 2 (10 cm [4 in.]) pieces of aluminum foil
Station 4• 1 small compact mirror• 1 beaker containing enough water to cover the
small mirror• 1 LeD flashlight (3 watt, 120 lumen)
Safety considerations small mirrors, especially from craft stores, can have sharp edges. students must be instructed to handle them carefully or wear rubber gloves, and all students should wear safety goggles.
explain to students that extensive light shined directly in eyes can cause damage, so flashlights should point at objects, not people.
Materials for each station and safety considerationsFIGURE 3
February 2012 67
TRIED AND TRUETRIED AND TRUE
Station 4The final station contains a jar filled with water, a small compact mirror, and a flashlight. The first question on the directions asks, “How many colors are in the light coming from the flashlight? Write an answer in your journal.” Many students think there is only one color coming out of the light. The directions then ask students try and make a “rainbow” by shining light at both the mirror and the jar filled with water. Shin-ing the light through the water creates a prism, since each color refracts at different angles. The directions instruct students to record their attempts in picture form (successes and failures) in their journal before they move on. Were they correct or incorrect in their initial guess? Could they make a rainbow?
Day 2
ExplainI begin the second 50-minute lesson with a whole-group discussion and explanation of the concepts. For the explanation of each station, I elicit students’ ob-servations and thoughts using a series of open-ended questions. If students do not recall the stations, they can refer to their journals. It is important when having a whole-group discussion to take multiple responses and not to jump from one question to the next until all thoughts on the first question have been exhausted.
Station 1I start the discussion by asking which surfaces from the Explore phase were reflective. After students re-spond, I focus the conversation on the light reflecting off of the mirror and the spoon. I ask, “How does light reflect differently off of a mirror and another object, such as a spoon?” To reinforce the concept, I dem-onstrate this using a light source, plane mirror, and spoon. This provides students a visual representation of the concept. After I demonstrate this phenomenon, I explain that light reflecting off of a mirror reflects back at the same angle, and that curved objects re-flect light at different angles, depending upon the cur-vature where the light hits.
Station 2I begin this discussion by asking students if they found anything surprising, and if so, what. Then, based on their responses, I focus the discussion on
how straight mirrors reflect light back at the same angle, while curved mirrors reflect light in different directions depending on their curvature. To demon-strate this, I use a straight mirror and a curved reflec-tive surface, such as a spoon. I explain, while showing students, that plane mirrors reflect an object once, causing the image to “flip.” I pass the mirror around and ask students to touch their right ear and to notice that in the reflection it looks as though they are touch-ing their left ear.
Station 3I begin by asking students the following questions: “What object had the largest angle of reflectivity? The smallest? Can you explain your findings?” Stu-dents should have found that mirrors and aluminum foil had a large angle of reflectivity, and most other materials had little to no reflection (cardboard: no reflection; mirror: 60 degrees; sandpaper: no reflec-tion; wood: no reflection; regular paper: no reflection; aluminum foil [shiny side]: 91 degrees). Next, I ask students if they have any ideas as to why some sur-faces exhibited smaller angles of reflection than oth-ers. I explain that denser objects and darker-colored objects absorb more light. Mirrors have the largest angle of reflectivity because they reflect all of the light at the angle it arrives, and no light is absorbed. All other objects have some amount of absorption, between 100% reflection to full absorption. Light re-flecting off an object gives it a certain appearance.
A student measuring an angle at station 3FIGURE 5

68
TRIED AND TRUE
SCIENCE SCOPE
Objects with high degrees of absorption usually look dull and dense, whereas objects with high reflectiv-ity look shiny.
Station 4I first take a poll of the class to see how many colors students think there are in a flashlight. I then ask, “Were any groups successful at creating a rainbow? If so, how did you do it?” After their explanations, I demonstrate how to separate the colors by placing the mirror in the water at an angle and shining the flashlight on it. While showing the class the spectrum of visible light, I explain that light is made from an infinite amount of colors that altogether make up the rainbow. I then shine a flashlight on a colored article of clothing and explain that the light is absorbed by the object and we see the reflected light. The light re-flected back to our eyes is what we interpret as color. I use many examples to emphasize this concept, be-cause it is a difficult one. I make a point to explain how black and white fall into this spectrum (white is the reflection of all color while black is the absorption of all color).
After all explanations, I have students help me create a list on the board of what they learned about light: It travels linearly and can reflect and contains all colors (dispersion). Light bouncing off objects (use a bouncy ball to demonstrate) is the wavelengths that hit our eyes and what we interpret as colors.
ElaborateDelving further into this subject, I have students ex-plore two free activities at the website Science Kids (see Resources) that help them visualize and compre-hend light in a more tangible manner; the website also includes puzzles that I have my students complete. Students can do this activity in groups of two if there is not a computer for each student. If there is only one computer in the classroom, the website can be ac-cessed and shown to the whole class using a projector. Alternatively, introduce everyday objects such as tele-scopes, binoculars, and even overhead projectors to explain the connection between the properties of light and items that use light to serve specific purposes.
Evaluate To evaluate their conceptions of light after instruc-tion, I return to students their completed preassess-ments and ask them to revisit their answers to the
questions. I tell students to modify their answers if they wish; however, if students do modify their an-swers, I ask them to provide an explanation as to why. This process takes less than 10 minutes. I do not use the postassessment as a formal assessment; rather, I use it to ensure I do not move on to the next topic if students’ misconceptions persist.
ConclusionLight is a difficult concept for students, and even adults, to grasp. It seems sometimes that the miscon-ception that the color of an object is a result of color that is absorbed, not reflected, is everlasting. Another complication is that when students mix all primary and secondary colors together, the resulting color is black, leading them to think that black consists of all wavelengths of light. These conceptual misun-derstandings stem from students’ observations and intuition, therefore making this concept even more difficult to address. However, by the end of this 5-E lesson, students should understand that light is ab-sorbed and reflected off objects differently depending on the color and surface of the object, and that color is a result of reflection, not absorption. To ensure stu-dents have accommodated new ideas, it is necessary
Framework and Standards connections
Inquiry and the National science education stan-dards: In this lesson, students engage in questions, collect evidence, and give priority to that evidence when developing an explanation (Nrc 2000).
content standard B, Grades 5–8: “Light interacts with matter by transmission (including refraction), absorp-tion, or scattering (including reflection). to see an object, light from that object—emitted by or scattered from it—must enter the eye” (Nrc 1996, p. 155).
A Framework for K–12 Science Education: Practices, Crosscutting Concepts, and Core Ideas: By the end of grade 8: “When light shines on an object, it is re-flected, absorbed, or transmitted through the object, depending on the object’s material and the frequency (color) of the light” (Nrc 2011, p. 5–21).
February 2012 69
TRIED AND TRUETRIED AND TRUE
Amber Haslag is a preservice elementary teacher and James P. Concannon ([email protected]) is an assistant professor in the Department of Education, both at Westminster College in Fulton, Missouri.
to readdress these concepts when teaching other con-tent, such as photosynthesis. n
ReferencesAnderson, C.W., and E.L. Smith. 1986. Children’s con-
ceptions of light and color: Understanding the role of unseen rays. Research Series No. 166. East Lansing, MI: Institute for Research on Teaching, Michigan State University.
National Research Council (NRC). 1996. National science education standards. Washington DC: National Acad-emies Press.
National Research Council (NRC). 2000. Inquiry and the national science education standards: A guide for teach-ing and learning. Washington, DC: National Academies Press.
National Research Council (NRC). 2011. A framework for K–12 science education: Practices, crosscutting concepts, and core ideas. Washington, DC: National Academies Press.
ResourcesLaConte, J. 2007. En “light” ening geometry for middle
school students. Science Scope 31 (4): 23–27.McCann, F., J. Pedersen, C. Falsarella, and P. McCann.
2008. There’s more to light than meets the eye. Science Scope 31 (6): 33–39.
Proto, C., and E.A. Marek. 2000. Dissecting light. Science Scope 23 (7): 14–16.
Science games for kids: How we see—www.sciencekids.co.nz/gamesactivities/howwesee.html
Science games for kids: Light & dark—www.sciencekids.co.nz/gamesactivities/lightdark.html
the New Framework Looking Toward
Pre-register for this ticketed event at www.nsta.org/rdc2012.**Registration to the national conference is required.
Promising Practices in Professional Development with a Focus on Curriculum Integration
• Full Day Research Dissemination Conference, March 31, 2012• Highly focused, comprehensive forum with multiple, concurrent break-out
sessions (11) for K–12 teachers of science, administrators, and policy makers.Sample Sessions• Integrating Engineering Design Across the Curriculum and Into Student
Collaboration Skills: A Pedagogical Model for Classroom Practice• Weaving a Web of Reading and Writing Science: Strategies for Science
Literacy That StickTo view all offerings in detail visit www.nsta.org/rdc2012.aspx.