Embed Size (px)
Citation preview
Work Instructions for Repair & Finishing
Doc. No. : RAL/WI/10 Rev. No : 01
Work Instructions for Repair & Finishing: ZL5[ZL\U VG[ OLGLXL\U DF8[GL JS" >g:8=SXG o
Prepared By: RM / FN Date : Sign :
Reviewed By: VKR Date : Sign :
Pages: 1 of 4
Gel coat Finishing Procedures : H[,SM8 OLGL;L\U 5|M;LHZo
• Place the trimmed component on clean
table and check for the surface defect. • S8L\U SZ[,F SMd5MGg8G[ 8[A, 5Z D}SM
VG[ ;O"[; l0O[S8 DF8[ R[S SZMP • Deepen the crack or remove the burr of
the air blister with the help of cutting knife and emery the surface of the defect area with 80 or 100 grades.
• S|[S CF[I TM T[G[ p\0L SZM VG[ V[Z CMI TM KZL J0[ TM0L 0LO[S8LJ V[ZLIFG[ (_ S[ !__ GF 5[5Z J0[ 3;MP
• Clean it with compressed air and acetone for proper bonding.
• V[Z J0[ ;FO SZM VG[ 5|M5Z AMg0L\U DF8[ V[;L8MG J0[ ;FO SZMP
• Take small qty. of specified gel-coat, add catalyst to it, and mix it properly.
• 5|M0S8GF V[S;ZBF S,ZGM H~Z 5}ZTM H[,SM8 ,Æ AZFAZ S[8F,L:8 lDS; SZMP
• Fill the defective are with catalyzed gel-coat and allow it for curing.
• 0LO[S8LJ EFUG[ S[8F,L:8 lDS; H[,SM8 J0[ ZL5[Z SZM VG[ CF0" YJF KM0L NMP

Work Instructions for Repair & Finishing
Doc. No. : RAL/WI/10 Rev. No : 01
Work Instructions for Repair & Finishing: ZL5[ZL\U VG[ OLGLXL\U DF8[GL JS" >g:8=SXG o
Prepared By: RM / FN Date : Sign :
Reviewed By: VKR Date : Sign :
Pages: 2 of 4
• After gel-coat curing use emery paper
to remove excess material with 80, 100 & 400 and to get, finish emery with water paper 100 & 600.
• H[,SM8 CF0" YIF 5KL JWFZFGF D8LZLI,G[ (_4!__ VG[ $__ GF 5[5Z J0[ :D}W SZM VG[ !__ VG[ &__ GF JM8Z 5[5Z J0[ OLGL; SZMP
• After finishing, clean it with water. Apply rubbing compound and buff it to get required glass level.
• OLGLXL\U YIF 5KL 5F6LYL ;FO SZM VG[ H~ZL u,M; ,[J, 5|DF6[ ZAL\U Sd5Fpg0 TYF AOL\U J0[ 5M,LX SZJ]\P
• After complete finishing, shift the component to the packing area.
• OLGL;L\U 5|M;LHZ 5tIF 5KL SMd5MGg8G[ 5[SL\U VZLIFDF\ lXO8 SZJ]\P
Note: If the stress crack is through, add additional 50 mm wide glass layers before repairing the crack on gel- coated side. GM\Wo ‘[ S|[S VFZ5FZ CF[I TM4H[,SM8 ;F>0 S|[S ZL5[ZL\U SZTF\ 5C[,F\ JWFZFG]\ u,F;G]\ ,[IZ DFZMP
Surface Scratches Repairing Procedures ::-;O"[; :S[|R ZL5[ZL\U 5|M;LHZ o
• Mark the scratches area with pencil or with water based marker.
• :S[|R ZL5[ZL\U V[ZLIF 5[lg;, S[ JM8ZA[h DFS"Z 5[G J0[ DFS" SZMP

Work Instructions for Repair & Finishing
Doc. No. : RAL/WI/10 Rev. No : 01
Work Instructions for Repair & Finishing: ZL5[ZL\U VG[ OLGLXL\U DF8[GL JS" >g:8=SXG o
Prepared By: RM / FN Date : Sign :
Reviewed By: VKR Date : Sign :
Pages: 3 of 4
• Use clean water and Fine sanding paper to sand the scratch area. Users flat block of wood, rubber, or foam for uniform cutting and even surface.
• :S[|R ZL5[ZL\U V[ZLIF 3;JF RMbB]\ 5F6L VG[ :D}W ;[g0 5[5Z JF5ZMPO,[8 ,FS0]\4ZAZ S[ OMDGF a,MSDF\ OF>G ;[g0LU 5[5Z J0[ DFS" SZ[,F EFUG[ 3;MP
• Apply flat hand sanding at curved and radius areas to avoid uneven surface.
• V[S;ZBL ;O["X D/L ZC[ T[ DF8[ J/F\S VG[ Z[0LI; V[ZLIFDF\ O,[8 C[g0 ;[¬g0\U SZMP
• After finishing, clean it with water. Apply rubbing compound and buff it to get required glass level.
• OLGLXL\U YIF 5KL 5F6LYL ;FO SZM VG[ H~ZL u,M; ,[J, 5|DF6[ ZAL\U Sd5Fpg0 TYF AOL\U J0[ 5M,LX SZJ]\P
• After complete finishing, shift the component to the packing area.
• OLGL;L\U 5|M;LHZ 5tIF 5KL SMd5MGg8G[ 5[SL\U VZLIFDF\ lXO8 SZJ]\P
Work Instructions for Repair & Finishing: Laminate Repair : ,[DLG[8 ZL5[ZL\U 5|M;LHZo
• Place the trimmed component on clean
table and check for the thickness or laminate problems.
• S8L\U SZ[,F SMd5MGg8G[ ;FO 8[A, 5Z D}SM VG[ YLSG[X S[ ,[DLG[8 5|Ma,[D DF8[ R[S SZMP
• Emery / grind the surface of the defect
area with 80 or 100 grade. • 0LO[S8LJ V[ZLIFG[ (_ S[ !__ GF 5[5Z
J0[ 3;MP
Work Instructions for Repair & Finishing
Doc. No. : RAL/WI/10 Rev. No : 01
Work Instructions for Repair & Finishing: ZL5[ZL\U VG[ OLGLXL\U DF8[GL JS" >g:8=SXG o
Prepared By: RM / FN Date : Sign :
Reviewed By: VKR Date : Sign :
Pages: 4 of 4
• Clean it with compressed air, if required wipe with acetone for proper bonding.
• SMd5|[:0 V[Z J0[ ;FO SZM VG[ H~Z ,FU[ TM 5|M5Z AMg0L\U DF8[ V[;L8MG J0[ ;FO SZMP
• Apply the catalyzed resin on the sanded
area, lay the required glass matt, and wet it with resin.
• ZO SZ[,F EFUDF\ S[8F,L:8 ¬DŸ SZ[, Z[hLG SM8L\U SZLG[ H~Z 5|DF6[GF u,F;,[IZ 5FYZM VG[ Z[¬hGYL 5,F/MP
• Apply roller to remove trapped air and for consolidation.
• V[Z SF-JF VG[ JW] ;FZL :8=[guY DF8[ :8L, ZM,ZGF[ p5IMU SZMP
• Follow the same process up to the required thickness (RAL/WI/08)
• H~ZL YLSG[X D[/JJF p5ZGL 5|M;LHZ VG];ZMP (JS" >g:8=SXG G\P()
• Allow it for curing, if required cut the laminate during green stage.
• CJ[ T[G[ CF0" YJF KM0L NM VG[ ‘[ H~ZL CMI TM YM0]\ CF0" YFI tIFZ[ ,L,FDF\ KZL J0[ S8L\U SZL ,MP
• Once after completely cured emery / grind the excess material and do finishing.
• 5}Z[5]Z\] CF0" YIF 5KL JWFZFGF D8LZLI,G[ 3;M S[ U|F.\lg0U SZLG[ OLGL;L\U SZMP
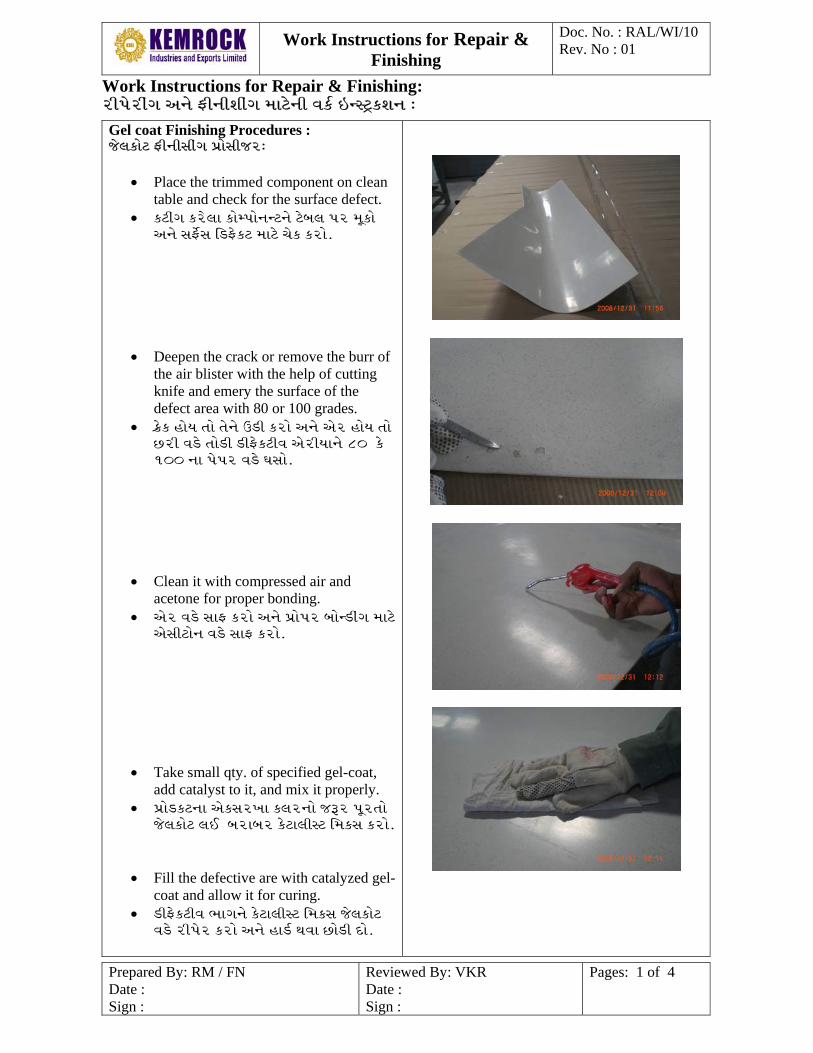
Note: Use the necessary safety gadgets and clothing required for the operation. GM\W: SFD SZTL JBT[ H~ZL ;[O8L GF ;FWGMGM p5IMU SZM VG[ H~ZL S50F\ 5C[ZMP
![INDEX Yusuf-e-Zehra · 2014. 8. 18. · 8.;bt d]xs[,l vg[ d];latyl ghft df8[gl n]vf 9.lhifzt[ chzt aslit](,fc svzjfcmgf olnff 10.tf{ols df8[gl n]vf 11 lhifzt[ vf,[ if;lg 12. lxof](https://img.pdfslide.net/doc/110x75/60b27e09eee8ef34222595c0/index-yusuf-e-2014-8-18-8bt-dxsl-vg-dlatyl-ghft-df8gl-nvf-9lhifzt.jpg)


![ABC-ul limbii germane - Ala Bujor, Vadim Rusu limbii...Piciul poliqlor ABC,u[ lirvrbii qenvrANE 500 de cuvirure, l0O dr pnopozirii L^,2, de subiecre t&,]H CZU 087.5:8ll P64 ISBN 978-997s-947-54-l](https://img.pdfslide.net/doc/110x75/5e2f71caf553293d4a10577e/abc-ul-limbii-germane-ala-bujor-vadim-rusu-limbii-piciul-poliqlor-abcu-lirvrbii.jpg)

![lJ`,[QF6 - Shodhgangashodhganga.inflibnet.ac.in/bitstream/10603/1946/13/13_chapter6.pdf · ;efg k[ m pÀfznftfvmgl ¹lq8v[ :+lv5]z]qf v;dfg 5|df6 df8[ hjfanfz sfz6m Éif k[m ue"hflt](https://img.pdfslide.net/doc/110x75/5b921a0309d3f274268d43c0/ljqf6-efg-k-m-pafznftfvmgl-lq8v-lv5zqf-vdfg-5df6-df8-hjfanfz.jpg)


![;D:IF ooo o - શબ્દપ્રીત · 2014. 4. 27. · 5mtfgf vwif5gdf\ ;]wfzm ,fjjf df8[ vg[ ;\rf,s 5mtfgf xf/f ;\rf,gdf\ vg[ jIJCFZDF\ ;]WFZ6F ,FJJF DF8[ CFY WZ[ T[J]\ ;\XMWG](https://img.pdfslide.net/doc/110x75/60c863ec8ce01136a041b797/dif-ooo-o-aaaaaaaaa-2014-4-27-5mtfgf-vwif5gdf-wfzm.jpg)

![vavaddaily.comvavaddaily.com/uploads/23-06-2021.pdf2021/06/23 · page 4 Year : 47 VAVAD Daily çkwÄðkh WEDNESDAY 23-06-2021 Issue 206 SrKLVMG]\ SrK DF8[ ÝU8 YT]\ 5MTFG]\ N{lGS](https://img.pdfslide.net/doc/110x75/614a11d612c9616cbc692cd2/20210623-page-4-year-47-vavad-daily-kwkh-wednesday-23-06-2021-issue.jpg)