Embed Size (px)
DESCRIPTION
Underwater Media Student Notes
Citation preview

1
PPAADDII
UUNNDDEERRWWAATTEERR
MMEEDDIIAA CCOOUURRSSEE

2
PADI
UNDERWATER MEDIA COURSE
STUDENT NOTES
Copyright David Jones
3
Course Overview Prerequisites To qualify for the Underwater Media course, an individual must as a minimum: 1. Be certified as a PADI Open Water Diver, Junior Open Water Diver, or have an
equivalent certification from another training organization. 2. Be 12 years of age or older. Course Overview This course is intended to introduce divers to the media diving industry. It is not intended to take the place of commercial diving training that is required for people to work as divers within the media industry, but to provide an insight to the opportunities, techniques, legal requirements and skills that are involved within that particular field. It has been designed for students who are already involved in film and media courses of study, however, it is not restricted to those students and may be attended by any qualified divers with an interest in underwater media, photography, and film making. The following key theory and practical sessions are included: 1. A look at the size and scope of the Media Diving Industry. This will lead on to an
assessment of the range of opportunities and training required. 2. A look at the legislation. This will include an understanding of HSE legislation, Risk
Management, the requirement for and production of Diving Project Plans, and a detailed look at the Media Approved code of practice.
3. Planning and organization of media dives. Students will practice the planning and organization of media diving activities appropriate to the conditions and location. It will include defining the requirements for supervision and communication and will incorporate some of the limitations involved with undertaking media diving projects.
4. A detailed look at underwater cameras, housings and accessories. This will include a look at the various options, as well as the practical care and maintenance of underwater cameras and filming equipment
5. Filming and Photography theory. Students will cover some of the theory, and the art, of film making and photography. This will include exposure adjustment and colour correction techniques.
6. Principles of filming and photography underwater including composition, shots and sequencing, and editing .
7. Confined water training. During confined water training students will familiarize themselves with a range of underwater cameras they have been using during the theory sessions and begin to put some of the theory into practice.
8. Open water training dives. In open water students will apply the theory and practical skills learned during the theory and confined water sessions in order to produce a short film or photographic portfolio.
Indicative Reading Students will be required to have access to the following: 1. HSE Diving at Work Regulations 2. Approved Code of Practice for Media Diving Operations

4
Academic Topics Presentation 2 - Overview of the Underwater Media Industry 1. How big is the underwater media industry?
a. The underwater world has opened up to us with the advent and growth of scuba diving as a recreational pastime. More and more people want to experience this unique environment and this creates opportunities within the media industry, especially film and photography.
b. Coupled with the enormous number of terrestrial channels available (which number the hundreds of thousands) and the ubiquitous growth of the internet and phenomenon such as You Tube and other social media channels, there are more and more avenues for underwater media products to reach the general public.
c. Think about the number of times you see an underwater documentary on the TV. How many people don’t know the voice of David Attenborough when they hear it on the television.
2. There are a huge number of areas within the media where a knowledge and
understanding of working underwater can be beneficial. This doesn’t necessarily mean that you need to be an underwater cameraman or woman, but knowing the limitations and what can, and cannot be done, is extremely useful.
3. Opportunities include: big screen film production, magazine articles, documentaries, news, drama productions, supervision of underwater filming, travel companies, promotional videos, government work, support to research, exploration and expeditions.
Scientific Expeditions
Magazine articles and press
Documentaries

5
Presentation 3 - Health and Safety, Legislation and Media Diving Health and Safety and Working Underwater 1. Diving at work regulations designed to protect divers “at work”. Brought in 1997.
They provide the legislative framework. This applies to media diving work as well. In the UK any diving that is 'paid' (even in kind) is considered to be diving at work and the legislation applies. The 'law' is applied through the DWR 1997. The Approved Codes of Practice provide practical guidelines for various elements of the underwater industry. [Use the ACOP for Media diving to show some of the rules and regulations that apply. In particular, team size, qualification requirements for 'talent', and medical requirements.]
2. Key elements of the regulations: a. Definitions and responsibilities:
• Contractor – Every dive project must have a contractor. This might be a self-employed instructor or commercial firm engaging a diving team for a specific project. The contractor has responsibility for the safety of the dive team and must appoint a diving supervisor in writing. Contractor must ensure that the supervisor is undertaking his duties and is also responsible for the preparation of the diving project plan.
• Dive Team members • Supervisor - Responsible for on site conduct of the project, including equipment,
risk assessment and control of divers.
Briefing the Producer, dive team and ‘talent’ on CBBC ‘Inside Life’
• Diver – Responsible for all diving in a safe and responsible manner. Own
equipment function checks and thorough understanding of task. Can point out hazards or risks to the Supervisor. Maintenance of diving log books. Relays results to the Supervisor

6
• Standby diver – Has the same responsibilities as the diver but must be available to assist diver in emergency. Needs to understand his own and divers equipment. Normally based on the shore, for the purpose of the open water dives the standby diver will actually be the dive buddy. Also acceptable practice.
• Tender – A general assistant, not mandatory but advised. Assists with dressing, relaying communications, equipment checking (machinery)
3. Equipment Considerations:
• Sufficient air supply and breathing rate calculations.
Diving for 8 hours a day on BBC LIFE meant that rebreathers were essential
• An emergency recall system must be available. Several alternatives. • Any equipment in use must be serviceable and a written audit of servicing must
be available. This includes any rented equipment • First Aid and Oxygen requirements. This must be on site and at least one
person on the surface must be trained and current in its use. • Flag alpha or lights at night are required to indicate diving operations on going.
Don’t forget the importance of other agencies such as coastguard or QHM. 4. Training Competences:
• Explain the minimum requirements to work within the Media Diving ACOP. There are a number of differences and equivalencies and these can be found in the HSE Diving at Work Regulations 1997 - List of Approved Diving Qualifications.
5. First Aid and Medicals
• Divers must have minimum competence. Supervisor must be HSE recognized First Aid.

7
• HSE Medicals are required by all divers, including 'talent' • Lets have a look at the ACOP
Risk Assessments Definition: A Hazard – anything with the potential to cause harm ….. this might constitute a hazard)
1. A risk assessment is nothing more than a common sense approach to identifying significant hazards; who or what is likely to be affected by those hazards; the risks associated with those hazards and what measures you will take to control the risks thereby reducing the harm to anyone or anything during any dive operation and then recording what you have done. You will need to review the assessment periodically or whenever there is a significant change. The important thing to decide is whether an identified hazard is significant, and whether you can ensure the risk of harm is low or negligible before embarking on your dive.
2. Risk Assessment is already inherent in the way dives are planned and organized, and
safety procedures are an integral part of diver training, so in the process of conducting a risk assessment should be covering some familiar ground.
3. The key aspect of risk assessment within diving projects is that they are recorded.
This then, provides the measures to be undertaken to reduce the possibility of harm and subsequently leads to the modus operandi of a diving project.

8
4. The key is not to be over complicated; checking for hazards is common sense. All
you need to do is ask the following questions:
• Is there a hazard? • Can I get rid of the hazard altogether? • If not how can I control the risk to reduce the possibility of harm?
For example: Hazard = Cold Water Possible Harm = Hypothermia Control Measures = exposure protection, reduce in water time, monitor for signs of hypothermia, have warm clothing and shelter available 5. As a diving contractor you are responsible for ensuring that a risk assessment has
been conducted before every diving task. Initially this will consist of a generic risk assessment. Generic risks are those that you are forewarned of and can put control measures in place in advance of the diving. For example, there is always a hazard of running out of gas or equipment malfunction.
6. In addition, the generic risk assessment should be supplemented with an on-site
assessment, conducted on the day of the project. This should detail any unforeseen hazards and any special precautions that need to be taken to reduce the risk. For example, on arrival there may be debris or pollution in the water which you had not expected.
7. Don’t forget that situations may change and hazards and risks should be continually
monitored and supervisors need to be prepared to put contingency plans into place at any point during the project. For example, shipping movements may increase, or the weather may change.
8. Be aware of including hazards that have already been covered through other means.
Diving is an inherently potentially dangerous activity, and as such requires training to a high level. This means that many of the associated risks are already minimized through training standards and procedures. For example mask squeeze is minimized by equalization, taught at the earliest stage in training and this is therefore no longer a significant hazard. You do not need to include these types of hazard in you risk assessments
9. The list below covers some significant potential hazards their consequences and
control measure recommendations. This can be used to help you to build your own generic and on-site specific risk assessment. It is offered as a guide and shows the bare minimum that would be required for a real diving project plan.
HAZARD RISK OF LIKELIHOOD SEVERITY CONTROL MEASURES
Low Visibility Diver separation or injury
Brief on low visibility procedures. Ensure back up lighting is provided. Change standby diver notice.

9
Debris Physical Injury to the diver
Change entry and exit techniques. Move debris. Ensure headgear is worn.
Cold Water Equipment Failure Use cold water equipment. Brief on procedures for cold environment
Wet Decks Slipping and falls leading to injury
Brief on dive site rules. Equipment husbandry. Standby diver to assist in dressing divers
Running out of gas
Injury through lung expansion/DCI drowning
Ensure equipment is in good order and serviced. Ensure sufficient gas is on board including enough for bale out and standby.
Fishing line Panic, entrapment, entanglement leading to drowning
Ensure that divers carry tools and cutting implements. Consider removing prior to diving
Boat Propeller Injury on surfacing Clear use of signalling devices such as flags and whistles. Brief QHM Use buoys if necessary
Currents Running out of gas, over exertion, lost diver
Ensure tide / current tables are checked. Use buoys as necessary. Standby diver notice to be changed. Option of downstream boat to be considered
Deteriorating weather
Injury to diver Monitor conditions throughout the project. Assess diver comfort levels. Initiate diver recall system if necessary
Nothing like taking your eye off the ball to create a hazard!
10
Diving Project Plan 1. A Project Plan is a written document that provides the details of a diving project. The
law requires the following to be included:
• Supervisors letter of appointment. • A written risk assessment and any on-site changes to a generic assessment.
Where hazards are identified control measures put in place must be written down • As a minimum it should also include:
• Type of dive • Date and Location • Task being undertaken • Experience and qualifications of the divers • Type of equipment • Planned depth, duration and decompression plan • Procedures for aborting dives • Emergency Action plan • Other information as appropriate
• A diving operation record must also be included and retained for 2 years. As a minimum it should include: • Names and roles of dive team • Description of the dive • Date, time and location • Maximum depth, bottom and dive times • Decompression schedules • A record that equipment has been checked • Note – instructors may include other relevant information at this stage in
discussion – first aid qualified personnel, briefing confirmation, weather, tide and currents and so on.

11
Presentation 4 - Underwater Camera Equipment and Accessories 1. The digital age has revolutionized underwater film making and photography. The
option of being able to review images and footage before committing them to 'film' has reduced costs, increased flexibility, and opened up what was a previously restrictive industry to the masses. That said there are still many things to think about when it comes to equipment selection.
2. Types of Equipment - There are three main equipment groupings
• Consumer Equipment:
• These tend to be less expensive but also have less features than other
models. Cameras complete with housings can cost as little as £200. Other cameras are now being produced that are totally waterproof however generally they are limited to shallow depths.
• These 'compact' consumer models tend to be dual purpose, ie they can take stills photographs as well as video. From a flexibility point of view this makes them very attractive. They also tend to be lightweight which may be advantageous, but the downside is they can be fragile.
• As technology improves the capabilities of these cameras is growing all the time and the gap between consumer and professional cameras is narrowing.
• The most radical growth area has been the action cameras (the GoPro type of camera). These are now able to produce resolution of up to 4K. Televisions are only just coming on stream that are able to handle this type of footage. The downside to these at the moment is that there are only a limited amount of customizable settings. That said, if it has the setting you need it is likely to be an ideal addition to your equipment list.
• It is generally accepted that Camcorders still produce better video footage than the hybrid cameras, but recently we have seen a move away from

12
dedicated video in favour of the mirrorless cameras that are dual functioning. These cameras still require separate housings. Very often the housing is more expensive than the camera.
• Consumer cameras tend to be fixed lens with or without zoom options. They do not normally have interchangeable lens'.
• There are a lot of consumer housings to fit cameras so a much wider choice is available
• Prosumer Equipment - Mirrorless and DSLRs.
• These middle of the road cameras have filled the void in equipment that the
increase in the number of enthusiasts and keen amateurs has generated. They tend to have many of the features of professional camera equipment but often with a slightly reduced capability and therefore reduced cost.
• Mirrorless cameras generally have faster autofocus speed and this is linked to the 'live-view' mode which uses the same system. Traditional Nikon and Canon DSLRs have fast autofocus, but this is not copied into the live-view mode. So while shooting video this makes mirrorless cameras an excellent all round 'media' choice. [Actual cameras to be shown if possible or images]
• Both of these products normally have the ability to change lenses and filters.
• They are generally lighter in weight than professional cameras, without a huge reduction in capability, making them ideal for the traveling media diver.
• Latest prosumer cameras are capable of producing 4k footage. • Prosumer cameras tend to be hybrid in that they are capable of taking still
and video images. • Prosumer cameras need housings and these are not generally
manufactured by the same company that produced the camera. These housings can often cost more than the cameras themselves.

13
• Professional Equipment
• The highest quality camera equipment is also inevitably the highest priced
and also the bulkiest. • These cameras and housings are generally out of the range of anyone not
undertaking underwater filming and photography for a living. There are exceptions and cameras such as the Canon D5 Mk3 is currently the camera of choice for many professional underwater video cameramen.
• Housings are always made by external companies. • The investment in designing and developing housings means that only a
select range of these cameras will have housings. It is essential to make sure that there are compatible housings and cameras.
• Dedicated Video Cameras 3. Selection Criteria
• Size - the smaller the camera the smaller the housing. Not only useful for travelling, but also with respect to drag and maneuverability underwater. Small cameras are also hard to keep level and 'shake' free underwater and keeping it steady can be a challenge. Small cameras tend to, but not always, have less features and capabilities [This is well worth discussing with the students depending on their existing knowledge] The optimum size will be a balance of many factors

14
75 luggage items, an excess baggage bill of £2000, and a 15 person crew
• Housing Availability - Not much point in buying a camera if there is no suitable housing for it. What are the capabilities of the housing? Can you use all the features of the camera while it is in the housing?
• Battery Life - [Discuss these issues with the students. What is their experience? What battery life do they think they will need?]
• Lens Selection - Do you need to change lens'? Is the lens 'wide' enough. [Note that wide angle shots and refraction will be discussed at a later point in the course]
• Low Light Operation - Is this necessary? Lighting could be an option. [Note that colour correction and light absorption will be discussed later in the academic programme.]
• Buoyancy - Does it float or sink? Consumer housings tend to float. Some prosumer and all professional housings have adjustable weighting in order to make the cameras close to neutrally buoyant and adjust the position of the weighting to help keep the camera steady.
• Controls - ideally you will need access to all of the camera controls when it is in the housing. This is particularly important for a stills camera (especially prosumer and professional).
• There are two main types of housing, mechanical and digital. Mechanical housings have some advantages, in particular they can be repaired in the field if they break and you dont have to worry about electronics getting wet. However, they do sometimes get stuck. Still camera housings are currently always mechanical. Video camera housings can have mechanical, or electronic control features (or a mixture). Electronic, or digital housings plug into the camera and operate all controls from digital controls on the housing. Disadvantages are the high cost and the fact that an occasional failed circuit board could leave you stranded, especially in remote locations.

15
• Domes and Ports. Consumer cameras generally have fixed ports although sometimes these have the option to add-on macro and wide angle attachments. Prosumer and professional cameras tend to have the ability to change ports to suit the range of interchangeable lens that can be used. As with cameras and housings, it is essential that there is a port available to match the lens you intend to use.
4. Lights and Strobes.
• Digital post editing software allows us to 'add-in' colours that might not be captured at the time.
• Filters can also be used to add in colour and this is often used in consumer video cameras
• Many of the latest digital cameras in all three groups, have the ability to digitally change the colour by adjusting the white balance of the camera
• Filters are still used in both video and underwater stills photography. At consumer level they tend to be used to reintroduce colours that have been absorbed, or to compensate for overly green or blue water. At a prosumer and professional level they are often used to achieve a desired effect.
• In spite of all the above options, due to the absorption of light in water we may still wish to use artificial light for both photographic and video work.
• Strobes are specifically used for still photography. Consumer cameras often rely on the fitted camera strobes. Prosumer and professional DSLR cameras will use external strobes.
• Strobes can be used singularly or more than one can be used. Sometimes remote strobes using electronic triggers can also be used. The size (strength) of the strobe you chose will depend on what you want to achieve (sufficient brightness and adjustability) and the budget.
• Video lights can be used for stills photography and video, and for that reason may be a good choice. Things to consider are the quality of the light (brightness

16
and 'temperature', burn time and size (including decisions regarding internal or external battery packs)
• There are currently 3 types of lights on the market. These are Halogen, HID and LED. A few years ago HID took over from traditional halogen lights as the intensity of the light was far greater than the available alternatives. The downside of these lights were that the burn time was quite short and that the bulbs tended to be relatively fragile and they were also expensive to produce. LED lights at the time were not nearly bright enough. That has all changed and the LED is changing the video light market. At the time of writing there are LED lights on the market of up to 25,000 lumens. In comparison your average small dive torch might be around 100 lumens. These lights literally convert night into day.
• The 'temperature' of lights are a subject in their own right and one that is only touched on in this course. It can change the 'tone' or 'mood' of a shot or a film. Temperature can be changed by using different light sources, electronically in the camera, or in post edit.
5. Monitors
• Monitors have always been used alongside professional video systems, but increasingly (as price drops and availability increases) they are entering the prosumer world.
• Monitors allow the cameraman to have a 'head up' view point which increases stability when using the camera, but also provides other advantages.
• Many monitors have additional features which can enhance the cameras capability, for example focus peaking, exposure 'zebras' and other features that can aid the cameraman in getting the ideal shot.
• Monitors usually need their own underwater housing although waterproof monitors are now available.

17
Presentation 5 - Underwater Camera Equipment Care and Maintenance 1. Underwater camera equipment like all electronic equipment doesn’t tend to work very
well when we take it into water. So unless you want to be taking out some pretty hefty insurance premiums it is well worth doing everything possible to protect your expensive equipment.
2. Proper O-ring care. The O-rings in a camera housing are the only thing between your
equipment and potential disaster. Proper care is essential: • Immediately accessible O-rings should be checked visually and ideally be
removed, cleaned and replaced every time the housing is opened. This may not be possible but common sense needs to be applied depending [discuss how the environment and situation may impact on O-ring degradation]
• [Demonstrate proper O-ring removal, cleaning and replacement. Allow the students to practice this]
• Less accessible O-rings should be replaced by manufacturers at recommended intervals.
3. Avoiding Condensation. Condensation occurs when warm moist air comes into
contact with the cooler walls and ports of the housing. There are a number of solutions: • Use silica gel packs to absorb the moisture • Avoid temperature extremes. Keeping a camera and housing in an air-
conditioned room overnight and coming out into the heat of the tropics will cause condensation in lenses and the housing.
• Use a gentle stream of air from a scuba tank to dry the housing.

18
• In humid conditions try to avoid allowing warm moist air to get into the housing. For example open and close the housing in an air-conditioned room.
We probably will experience condensation when we go into the pool area. 4. Pre Dive Checks. After assembly the equipment should be checked for functionality
and leaks: • Visually inspect the seals for damage or dirt • Undertake a bubble check on the housing with the lens port down • Move all the controls to ensure they are working and not leaking • For housings with a vacuum seal system ensure the vacuum is working
[demonstrate and allow students to practice this] 5. Post Dive Care. After use there are a number of procedures that need to be followed
to properly care for the camera equipment: • Immediately after exciting the water the equipment should be rinsed in fresh
water. Preferably it should be immersed. • If it cannot be rinsed immediately keep it immersed in salt water until it can be. • Warm soapy water is good for cleaning the housing and removing any remaining
dirt and salt deposits. • Dry the housing thoroughly before opening the housing. If the housing has a
vacuum seal release the vacuum prior to attempting to open it.

19
Presentation 6 - Understanding Camera Settings Underwater (1) 1. Exposure.
a. Photographers and film makers often talk about 'good exposure' or 'correct exposure'. What they mean is whether the shot is not too dark or too bright.
b. The easiest way of doing this is to use the histogram feature that many cameras have. This system allows the user to see what the camera is seeing with regards to light and dark and make adjustments accordingly. However while it is a useful tool it is not always that simple.
c. Getting exposure right is an art form rather than a science; sometimes a darker image will create a mood that the shot is trying to portray. Similarly, something like a sunburst, while it might be over exposed, can create a pleasing effect that enhances the shot.
d. It could be argued therefore, that there is no right or wrong as everything is in the eye of the beholder. What appeals to you, may not be something that I like. Good exposure is defined only by your judgement, and so the definition of correct exposure is the one that matches your vision as the cameraman.
e. The best camera in the world cannot automatically know what you are thinking and expose it in the way your imagination sees that particular shot. for this reason the ideal way of managing exposure is by totally or partially manual controlling the camera settings.
f. There are several factors affecting exposure and achieving the right exposure is dependent on how you balance these factors. These will be covered in the following sections.
20
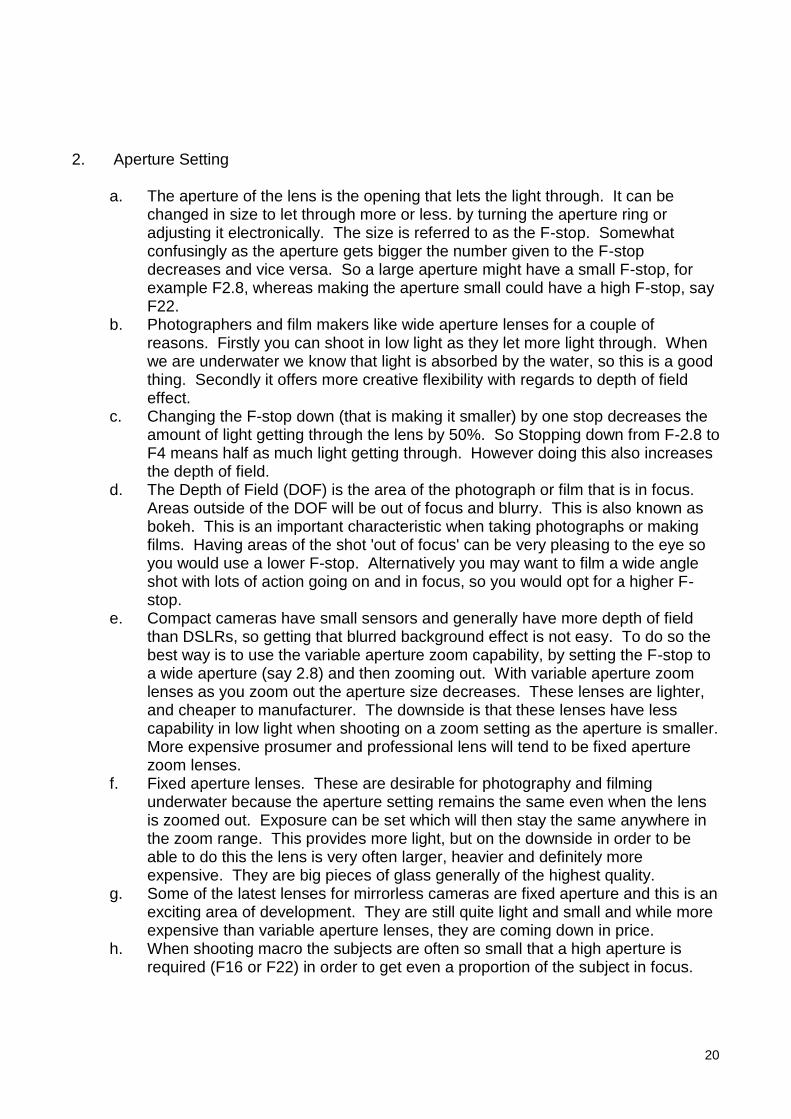
2. Aperture Setting
a. The aperture of the lens is the opening that lets the light through. It can be changed in size to let through more or less. by turning the aperture ring or adjusting it electronically. The size is referred to as the F-stop. Somewhat confusingly as the aperture gets bigger the number given to the F-stop decreases and vice versa. So a large aperture might have a small F-stop, for example F2.8, whereas making the aperture small could have a high F-stop, say F22.
b. Photographers and film makers like wide aperture lenses for a couple of reasons. Firstly you can shoot in low light as they let more light through. When we are underwater we know that light is absorbed by the water, so this is a good thing. Secondly it offers more creative flexibility with regards to depth of field effect.
c. Changing the F-stop down (that is making it smaller) by one stop decreases the amount of light getting through the lens by 50%. So Stopping down from F-2.8 to F4 means half as much light getting through. However doing this also increases the depth of field.
d. The Depth of Field (DOF) is the area of the photograph or film that is in focus. Areas outside of the DOF will be out of focus and blurry. This is also known as bokeh. This is an important characteristic when taking photographs or making films. Having areas of the shot 'out of focus' can be very pleasing to the eye so you would use a lower F-stop. Alternatively you may want to film a wide angle shot with lots of action going on and in focus, so you would opt for a higher F-stop.
e. Compact cameras have small sensors and generally have more depth of field than DSLRs, so getting that blurred background effect is not easy. To do so the best way is to use the variable aperture zoom capability, by setting the F-stop to a wide aperture (say 2.8) and then zooming out. With variable aperture zoom lenses as you zoom out the aperture size decreases. These lenses are lighter, and cheaper to manufacturer. The downside is that these lenses have less capability in low light when shooting on a zoom setting as the aperture is smaller. More expensive prosumer and professional lens will tend to be fixed aperture zoom lenses.
f. Fixed aperture lenses. These are desirable for photography and filming underwater because the aperture setting remains the same even when the lens is zoomed out. Exposure can be set which will then stay the same anywhere in the zoom range. This provides more light, but on the downside in order to be able to do this the lens is very often larger, heavier and definitely more expensive. They are big pieces of glass generally of the highest quality.
g. Some of the latest lenses for mirrorless cameras are fixed aperture and this is an exciting area of development. They are still quite light and small and while more expensive than variable aperture lenses, they are coming down in price.
h. When shooting macro the subjects are often so small that a high aperture is required (F16 or F22) in order to get even a proportion of the subject in focus.

21
i. A well known photographer once gave me a great rule of thumb: 'Stick it on F8 and be there.' it is not a bad place to start in underwater media as it will generally give you good sharpness and a middle of the road DOF.
j. Finally when DOF is your priority and freezing motion is not important, consider setting the camera to an 'aperture priority' and allow the camera to work out your shutter speed automatically. In ambient light it can often work very well.
3. Shutter Speed
a. Shutter speed also affects the amount of ambient light getting into the camera. Shooting at 1/30th of a second means that the aperture is open for that length of time. Cutting the time in half - that is to 1/60th of a second, will reduce the the amount of light by 50%. This is one 'stop' so it has the same effect as stopping

22
down the aperture. So effectively we can balance shutter speed and aperture in a number of ways and in each way we would get the same amount of light.
b. However, when we are shooting still photography (not video, I will come on to that in a moment), in the same way that aperture affects DOF, shutter speed also has a number of affects on the image which we can use to our advantage.
c. The first of these is motion blur. High shutter speeds can be used to freeze motion. 1/125th is generally the lowest we would go to if we wanted to freeze the subject, and with really fast moving subjects like dolphins and seals you should go to 1/200. Many of the subjects that we find ourselves filming underwater will move, or be moved by currents and waves so shutter speed is an essential element to master.
d. There are limitations on shutter speeds when using strobes due to what is known as the Strobe Sync Speed. This is the synchronisation between the speed of the shutter and the speed of the strobe firing. Normally the maximum sync speed is 1/250th and this is more than adequate for underwater photography.
e. With slow shutter speeds, say 1 second to 1/15th, you will tend to get motion trails. You may also unfortunately pick up the tiniest amount of camera shake resulting in an entirely blurred photo except for any portions that may be frozen by the strobe light. To reduce camera shake, increase the shutter speed.
f. Using slow shutter speeds can also be used in colour composition. A slower shutter speed will give you a blue background, which as long as the camera is steady, can produce a nice effect.
g. Shutter speed can be used to adjust background exposure. If you are shooting wide angle with strobes you can adjust the shutter speed to either illuminate, or silhouette close objects.
h. Finally, if you know you need a fast shutter speed to prevent motion blur, it is often a good option to set the camera to shutter speed priority. This can often be effective when you don't have the opportunity to do all adjustments - for example a fleeting glance at a passing pod of dolphins.
4. Shutter Speed and Video
a. Shutter speed is a totally different concept when filming video. Whereas Aperture and ISO (which I will come on to next) have the same affect in both photography and stills, shutter speed does not. When you think about it, in stills cameras we are adjusting the shutter speed to change motion blur. With video we are actually trying to capture each individual image so that it can be played back with sufficient motion blur to make the captured individual images join together seamlessly. To do this videos run at various frame rates. The standard is 24p (which is actually 23.976 frames per second). PAL TVs (as we have in the UK) operate at 25 frames per second so you would normally set the recording rate to match whatever speed you are going to be broadcasting at.
b. Frame rate and shutter speed are related but are different concepts. Frame rate is the number of frames that are recorded in each second of video. Shutter speed refers to the amount of time that each individual frame is exposed for.
c. To achieve the 'film look' and blur the individual images in a way that is pleasing to the eye videographers tend to use the 180 degree rule which essentially means that your shutter speed should be double your frame rate. So for a frame rate of 25p you need a shutter speed of 1/50th of a second. It's that simple.

23
d. Well not exactly. You can adjust the shutter speed, once again, to provide special effects when we are feeling creative. If we slow the shutter speed we will (not surprisingly) get a blurring effect. This tends to have a slower more relaxed feel to the finished product. Likewise, if we use a faster shutter speed we get a stuttering 'staccato' effect. This can provide a 'frantic' mood. This was used extensively in the Saving Private Ryan film during the beach scene.
e. Many new cameras, even the consumer ones like the GoPro, also have the option of recording at a number of different frame rates, including higher ones. The new Panasonic Lumix GH4 has an option to record at 96p. This option means that when the film is played back at 24p or 25p it provides some wonderful opportunities for slow motion movie making.
5. ISO
a. In the days of film, ISO was a figure that represented the speed of the film, or its 'sensitivity' to light. Standard film for holiday snaps was ISO 100. If you wanted to take photographs in lower light you used a more sensitive film, so something like an ISO 400 would have been commonplace in underwater photography. This was another option, another part of the balance with shutter speed and aperture that you could use to get the desired effect. The opportunity to shoot with less light was unfortunately counter balanced by the fact that when you increased the ISO of the film you would also increased the 'grain' also known as the noise, of the finished photograph. This would mean that you couldn't enlarge the image as the sharpness and definition would be lost. Noise was also something that would affect video film.
b. With digital cameras the ISO works in a similar way except it is done electronically. A higher ISO can be set when the desired aperture and shutter speed doesn't let in sufficient light.
c. Electronically produced high ISOs still results in more 'noise' and a reduction in dynamic range and colour sensitivity and as a rule of thumb use the lowest ISO possible ..... unless of course your creative streak is trying to achieve a grainy effect to your image!
d. Some of the new DSLR and mirrorless cameras have extreme ISO ranges, with reduced noise levels, increasing their low light capabilities. Generally however, a ISO 800 is the highest you would want to go unless you are happy with a very small image that will not show noise.
e. Most cameras have an auto setting. This is not recommended for underwater photography.

24
Presentation 7 - Understanding Camera Settings Underwater (2) 1. Light and the Underwater Environment.
a. When sunlight enters water various things happen which as photographers and film makers we need to be aware of. The key issues are the loss of contrast and colour, which we will come onto, however we also need to understnd some of the physics behind what is happening
b. As sunlight strikes the surface of the sea or a body of water, the first thing that happens is that some of that light is reflected back. This reduces the amount of light available to us as on a media diving project and we have covered the techniques to rectify that in the previous sections.
c. As light hits the water it goes from air to water and is bent, or refracted. This refraction of light also occurs when light passes from the underwater environment, through the glass of the dome port and lens of our camera, or through the diving mask we are wearing. The result of this refraction and bending of the light is that the objects we are looking at appear magnified and closer. [Instructors should refer students back to their open water course and may wish to pull up the section from the prescriptive lesson guide or manual as a reminder]
d. From a filming and photography perspective we can use this to our advantage. [Encourage students to think why and how this might be advantageous]
e. Light going through water is also absorbed. This is because it is more dense and there are more particles in it that reflect the light. Essentially there is less of it around so we either need to use faster film, increase the size of the aperture, use slower shutter speeds or use artificial light. The density also means that any light reflecting from the object we are trying to shoot doesn't travel as far. For this reason it is essential that we get as close as possible to the thing we are trying to film - within the bounds of cinematic and photographic creativity of

25
course. The rule of thumb is to reduce the amount of water between you and the subject as much as possible. Absorption also changes the colours that we see when we are underwater
2. Colour and the Underwater Environment
a. Colours behave differently underwater. Visible white light is composed of a spectrum of colours all of which have a different wavelength. Underwater, the intensity of each wavelength is reduced as the depth of water increases. This selective absorption as it is known is due to the deformations and vibrations of water molecules as they are excited by each wavelength.
b. The absorption is strongest at longer wavelengths - so Red becomes the first to be absorbed, essentially all of it has gone at around 5 - 6m although the exact depth will also be dependent on the waters transparency (a function of the degree of sediment and plankton in the water). [Remind students that this might be another reason to have a look first as mentioned earlier in the course]
3. Correcting Colour
a. Essentially there are four methods of correcting the colour differences that we experience underwater. The first is to use filters. This is the cheapest and easiest way of putting back a colour that has been absorbed. The most commonly used filter is red, as this is the first colour to be absorbed. Filters can also be used to compensate for the absorption of light in different areas. For example filters for blue water and green water are different.

26
b. The second method of adjustment is by adjusting by using some form of post editing software. Many cameras have capabilities built within them that allow you to do this, but they tend to be fairly limited. Using computers after the dive opens up a whole new range of possibilities. When film and images are shot in RAW format [this course will into go into detail on this] images and film can be changed completely and those colours that have been lost due to absorption can be reintroduced to the image or film. The downside of this is that it adds to the amount of time that has to be spent in producing the finished product. Get it as close as you can first time around.
c. The third method of adjusting the colour is to use artificial light. By using video lights, or strobes you are effectively no longer using the ambient light but introducing a new source. As the distance between the light source and the subject are minimal the absorption is also negligible. So does this provide the 'true' colour of the subject? This is not entirely the case, because as we mentioned earlier when discussing lights and strobes, different light sources have different temperatures.
4. White Balance
a. The fourth method of colour correction with digitlal cameras is by changing the white balance. Being able to change the white balance is a great feature of digital cameras. Essentially it allows you to tell the camera what it is seeing. When you set the camera's white balance you are telling it what you expect the colour temperature to be.
b. All cameras have an auto white balance and many cameramen will use this and adjust the white balance in post edit. This setting is also quite useful for close up and macro shots where the artificial light is in abundance. However the amount of work needed in post can be significantly reduced if the correct white balance can be achieved at the time of taking the shot.
c. Most cameras have cloudy/sunny/flash/indoor settings. These can be used on occasions underwater but not that often.
d. For ambient light shots with or without filters you will want to set your white balance manually both for photography and film. What you are doing is letting your camera work out what neutral is. In the manual settings mode of the camera you take the picture of something neutral (a white slate, sandy bottom or silver dive tank for example) and the camera will automatically colour correct.
e. Note that adjusting white balance setting will not bring back colours that have
completely been absorbed by water. As a result it works best down to around 15m.
f. You can white balance when using dive lights and this will work to lower depths. However there is a tendency when using this method that the camera puts too much red into the shot.
g. Remember that if you set manual white balance and then use strobes or a flash you will add in too much red and your images and film will come out the same.

27
Presentation 8 - Underwater Techniques 1. Composition. It isn't just what you shoot that counts. It's the way that you shoot it. A
great subject can become dull if incorrectly composed. Similarly a dull subject can be brought to life with a few simply techniques. The whole purpose of composition is to make the shot interesting and aesthetically pleasing.
a. Framing. How you frame the shot will depend on the subject. Ideally you should be close enough so that the subject fills one third of the frame. Which third can vary. The rule of thirds applies to photography and film
b. Lead room. A person in the shot should be looking at the subject or into open space for example. This is known as lead room or looking space and it applies to underwater filming but is also a good technique to use in still photography as well
c. The diagonal line in a shot can add drama and action to a shot. [Instructor to show and example of this].
d. You need to think about the angle. Shots taken from a high angle make the subject look weak and diminished. Shots taken from a low angle make the subject look strong and dominant.
e. Use lines and patterns to exaggerate and steer the viewer towards the main subject.
f. Use background and foreground to add depth. The close focus technique having a close up subject with something going on in the background works very well underwater both in film and stills.
g. Action can affect composition so use it sensibly. Divers coming into shot or going out of shop are a great aid to sequencing. However be aware that action needs to have a sense of completeness; if a fish swims into frame the audience expect it to leave.

28
h. Avoid the middle, especially in wide angle shots. Cropping can be used in post to change the position of the main subject but try to avoid the bullseye technique.
i. Remember the background. The background can detract from the image you are trying to put across. Don't just focus on the main subject.
j. Be creative with colours. Contrasting colours are pleasing on the eye and with blue or green ocean backgrounds this can create fantastic contrast.
k. Interaction within the shot increases interest. A fish, or a diver on their own look lost and uninteresting. When either interacts with its environment it adds excitement and a story.
l.
l. Have an understanding of what you are trying to achieve in your portfolio or your film. What is the subject matter, or the narrative?
m. Don't be afraid to break the rules. Although there are some accepted 'norms'
the best composition often arises when film makers and photographers attempt to break the rules.
2. Shots and Sequencing
a. A shot is an uninterrupted section of film, or an individual photograph. A sequence is a series of shots put together to show a piece of action or tell a story
b. Good videos are built from a series of shots in a sequence that is edited together to tell a story. The same idea can be used for a photographic portfolio. In order to put these together it is important to plan your shots beforehand.
c. There are several types of shot and they are familiar to still photography and film: • Long Shot - a distant wide angle shot that is used to establish the scene or
the location.

29
• Medium Shot - Closer intermediate shot useful in showing reaction and more detail or establish a point of interest such as a person in the crowd, or underwater a particular fish on the reef.
• Close Up - Also known as a tight shot. Much closer and used to portray emotion and reaction, so the look on a divers face or the close up behaviour of feeding for example.
d. Sequencing leads the viewer through the story. You would start wide, get closer and eventually move out wide. A photographic portfolio might use similar images, each one leading onto the next in some way.
e. Shots are cut in a video in a way that suits the story. Clean cuts are important so that the viewers don't get lost. Follow the sequence logically and if you follow a wide or long shot by another long shot ensure that the angle is radically different.
f. It may be desirable to not complete the action in a sequence in order to lead on to the next sequence.

30
3. Camera Moves. a. Pan - Used to follow a subject, establish a scene or possibly show the distance
between objects i.e show a sense of scale. Quite simply the camera follows from left to right, or right to left.
b. Tilt - The camera follows up and down. This also provides a sense of scale and establishes depth
c. Dolly - The camera moves towards and away from a subject. This is often used in drift diving. It can be useful in providing a sense of tension to a shot.
d. Truck - The camera moves to left or right but remains focused on the subject. This is an excellent technique for a continuous shot that provides a different angle
e. Follow - What is describes, the camera follows the subject. The viewer will focus on what is appearing in the scene rather than the subject. Also excellent for portraying speed.
f. Lead - the camera moves with the subject from ahead. The viewer will concentrate on the subject.
g. Rack Focus - this is the technique of starting the image blurry and then bringing it into focus.
h. Pedestal - this method records vertical movement but the camera moves up and down rather than remaining fixed and tilting.
i. Zooming - over used but still an option. This technique can add immediate subject interest to a wide shot by going to an intermediate shot.
4. Story Line.
a. For underwater film making the development of a story line will help produce something that the audience will enjoy. Without it your footage is a collection of shots without meaning.
b. The story line needs to be with you underwater so transfer the information onto a dive slate.
c. Be flexible. If you find something you had not planned that would add interest to your film or portfolio take the shot. You don't have to use it.
d. Don't forget you don't have to complete the sequence or the film on a single dive. Plan the sequences into the dive plan. Think about depth, air consumption and other limiting factors.
5. Editing Software. There are plenty of software packages available for editing stills and
film. 6. 12 Top Tips for Underwater Photography and Filming
a. Get closer. The absorption of light will reduce colour, sharpness and everything you want to shoot. Get as close as you can.
b. Try to shoot up. Shooting down onto a brown fish on a brown piece of rock just doesn't work. Shoot up to add light, outline and depth of field to your shots.
c. Don't forget about the background. Does it detract form the shot or enhance it? d. Don't centre your subject unless it is a part of your creative genius e. Sometimes you can’t get as close as you want. No problem; don't be afraid to
crop in post if you need to.

31
f. Keep the camera steady. A tripod is useful for macro photography and filming. g. Move you film camera around. Different angles develop interest. h. Keep rolling. You can always put in another memory card so keep the camera
rolling - that way you won’t miss the unexpected. i. Variety is the spice of life so get a good range of shots. j. Know when and when not to use lights or filters k. Understand white balance - it is key to all your underwater videos and ambient
light shots. l. Ultimately remember to protect the environment you are in. No shot is
worth the destruction of a piece of coral that has taken hundreds of years to grow.

32
Presentation 9 - Understanding the Underwater Environment 1. Learn to Dive! It may sound obvious but the most important thing about being able to
undertake an underwater photography of videography shoot is the ability to dive properly. Buoyancy control is key - you cannot hope to be able to keep a camera still and steady if you are not steady yourself.
2. Use the right diving equipment and have the right training for the job. Many
underwater photographers and film makers use rebreathers as diving without noise and bubbles allows them to get much closer to the action they are trying to film.
3. Look around at your Environment. An assessment of the conditions will help you
understand how to film or take images. What colour is the water? What is the visibility like? Where is the sun in the sky? Which way is the current going and how strong is it? Will the site provide wide angle images or macro? Very often cameramen and photographers will dive a site to get a feel of it before beginning to film. What environmental factors might you encounter during diving that will impact on what you want to do.
4. Remember your Dive Plan. Photographers and videographers generally make the
worst dive buddies in the world because they are so focused on what they see through the camera. Don't forget, you need someone to make sure you are safe. Professional cameramen will normally have a safety diver whose sole purpose is to look after the diver with the camera. You also need to make sure that you stick to your dive plan. Many photographers will go over their time limits or leave less air in their reserve in order to get 'that last shot'. This is not safe diving practice and is not acceptable. Make sure that your project plan has addressed these questions.

33
5. Breathing. Photographers tend to hold their breath when they take a shot - it is something we do without thinking. Be aware of this and make sure you continue to breath normally or exhale slowly
6. Move Slowly. If you want to film wildlife it is better not to scare it away. Move slowly,
conserve your air, be controlled. 7. Protect the environment you are in. This may sound obvious but if you cannot control
your position in the water while filming then get additional training before you pick up a camera. You will not be able to get what you want if you are constantly crashing into rocks and coral reefs - neither will you be popular with other divers and film makers.
8. Be Aware of the Silt. Following a diver who has no awareness can ruin a dive. Check
behind you to make sure you are not kicking up silt and destroying the opportunity for others
9. Think about the Entry and Exits. Equipment can be damaged or leak unless they are
handled carefully. The most dangerous time is entering and exiting the water. Make sure you have someone available to hand you the camera after you have got in and take it from you on the way out. If you are entering into deep water you should attach a lanyard to the equipment. If you are entering into surf keep the lens cover attached until you are away from the 'danger zone'.
10. Think about Drag. Camera equipment can become quite bulky and creates a lot of
drag as you are swimming in the water. This will use more energy and result in you consuming your air at a faster rate. Streamline yourself as much as possible.
11. Planning an underwater shoot requires the application of filming knowledge an diving
knowledge. They are interlinked. The limitations of the diving will more often than not be the determining factor.
12. Know when Enough is Enough. Sometimes the 'money shot' may just be in your grasp. But only if you stay down a little longer than you should, get that last gasp of air, or destroy something in the process of getting it. In these situations it is time to say enough is enough. Come back another day.

34
Confined Water Dive Objective - By the end of the confined water training session the student will be able to: • Assemble and leak test the camera equipment • Operate the camera in the housing underwater • Take a range of shots in order to practice the techniques covered in the
academic sessions 1. Confined Water Session Details:
a. Briefing: • Entry and exit techniques and location • Conditions • Sequence of training and objectives • End tank pressure
b. Pre-dive Procedures: • Assemble camera equipment and perform leak tests • Prepare and don personal diving equipment • Perform pre-dive safety checks • Proper entry techniques
c. Dive Skills: • Practice skills using subjects and other divers • To include, adjusting shutter speed, white balance, aperture, ISO and
lighting • Practice focusing using manual (if available) and automatic focusing • [Instructor to provide specific 'shots' to be achieved]
d. Post-dive procedures: • Proper exit technique • Rinse equipment in fresh water. Dry thoroughly before opening • Assist buddies with equipment removal
e. Debriefing: • Cover the dive and any issues (buoyancy, handling etc) • Examine and analyse the results from the cameras as a group session in
class.

35
Open Water Dives Open Water Dive One - Application of knowledge and skills in open water Performance Requirements - By the end of this dive the student will be able to: • Undertake a risk assessment for the dive and develop a project plan. • Plan the dive and brief the instructor as to that plan based on the limitations of
the diving and the filming requirements • Assemble and test the camera equipment and accessories for use. • Enter the water in an appropriate manner. • Maintain proper buoyancy throughout the dive. • Check air supply, depth, time and direction at appropriate intervals while diving
with the camera system. • Get an awareness of the environment and adjust the camera settings
accordingly. • Practice basic underwater camera techniques including adjusting for exposure
and colour correction. • Identify and shoot video footage and stills as required. • Exit the water properly with the camera equipment. • Undertake post-dive care on the equipment. • Disassemble the camera equipment. 1. Camera System Preparation. 2. Risk assessment and project plan leading to a dive plan.
3. Briefing. To include:
• Evaluation of the conditions • Site facilities • Entry techniques and equipment handling procedures • Exit technique • Site conditions; bottom, topography, flora, fauna, depth, directions, location of
specific subjects • Dive times, air supply information and monitoring, depth limits • Communication review to include communication between divers and
communication between divers and surface • Review of emergency procedures • Confirm team assignments and buddy teams • Overview dive objectives and run through story board
4. Pre-dive Procedures:
• Prepare equipment • Check the buoyancy of the equipment - adjust if necessary • Don equipment • Pre-dive safety check • Entry
5. Training Dive One

36
• Descent • Identify subjects and generally get the 'feel' for the environment • Check the buoyancy of the system • Practice adjustment of aperture, ISO, shutter speed. • Practice colour correction using manual white balance • Practice use of lighting systems if appropriate • Practice manual focus is available • Shoot with the camera system taking either film footage, or stills, using the story
line and portfolio theme as a guide • Check depth and time frequently throughout the dive • Maintain proper buoyancy throughout the dive • Ascend and include a 3 minute safety stop at 5 metres.
6. Post-dive Procedures:
• Secure/hand up the camera equipment • Exit the water • Remove and stow personal equipment • Rinse video system, dry thoroughly and disassemble.
7. Debriefing: Open Water Dive Two - Continuation of skills practice and production of shots and stills for the development of a short film or photographic portfolio Students should use the same story line that they were using in dive one. Note, this dive can be repeated on further occasions in order to allow the students time underwater to get sufficient shots and stills to produce their film or portfolio. Performance Requirements - By the end of this dive the student will be able to: • Undertake a risk assessment for the dive and develop a project plan. • Plan the dive and brief the instructor as to that plan based on the limitations of
the diving and the filming requirements Review and adjust the story line as necessary
• Continue to practice the skills mastered in open water dive one. • Continue to produce shots and stills for the production of a short film or
photographic portfolio. 1. Camera System Preparation 2. Review of the risk assessment and project plan leading to a dive plan 3. Story Line Development. 4. Camera System Preparation.
5. Briefing. To include:
• Evaluation of the conditions • Site facilities

37
• Entry techniques and equipment handling procedures • Exit technique • Site conditions; bottom, topography, flora, fauna, depth, directions, location of
specific subjects • Dive times, air supply information and monitoring, depth limits • Communication review to include communication between divers and
communication between divers and surface • Review of emergency procedures • Confirm team assignments and buddy teams • Overview dive objectives and run through story board again. [Emphasize that
while continuing to practice, they are now working towards the production of their films and portfolio. Also emphasize that if they do not get all the shots they need that more dives can be undertaken as necessary]
6. Pre-dive Procedures:
• Prepare equipment • Check the buoyancy of the equipment - adjust if necessary • Don equipment • Pre-dive safety check • Entry
7. Training Dive Two
• Descent • Shoot with the camera system taking either film footage, or stills, using the story
line and portfolio theme as a guide • Ascend and include a 3 minute safety stop at 5 metres.
8. Post-dive Procedures:
• Secure/hand up the camera equipment • Exit the water • Remove and stow personal equipment • Rinse video system, dry thoroughly and disassemble.
9. Debriefing:
• Discuss how the shoot went and review what the students obtained with regards to the story line
• Review the film and shots taken by the students and provide appropriate feedback.
• Students can undertake additional dives (up to a recommended maximum of 4) in order to get the shots that they need for their films and portfolios.