Embed Size (px)
Citation preview

1 1
UNIVERSITES PARIS V - PARIS VI - PARIS XI et PARIS XII
DIPLOME INTER-UNIVERSITAIRE DE PEDAGOGIE MEDICALE
Année Universitaire 2012 - 2013
TEACHING OF TECHNICAL GESTURES TO MEDICAL STUDENTS: IS SIMULATION A GREAT
HELP?
Mémoire présenté le 11 octobre 2013 par le Dr Sabine IRTAN et le Dr Laurent DUPIC

2 2
Préambule
Nous avons souhaité rédiger ce travail en anglais même si le nombre d’étudiants inclus
est trop faible et la méthodologie à améliorer pour une éventuelle publication. Nous
souhaitons poursuivre notre étude afin d’atteindre un seuil de significativité statistique
et ainsi d’infirmer ou confirmer les conclusions préliminaires que nous avons tirées. Les
annexes 1 et 2 n’ont pas été traduites en anglais car elles ne peuvent figurer dans une
publication. Les annexes 3, 4 et 5 ont été traduites car publiables.

3 3
Abstract
Aim : to evaluate simulation as part of a teaching process of urethral catheterization
(UC) and thoracentesis procedure (TP) for medical students.
Methods : A classic first lesson was given for all students, with the distribution of a
detailed technical report explaining how UC and TP have to be performed. They were
then divided into two groups: one group with a simulation teaching, one group without.
The assessment was performed on a mannequin or a dedicated simulator kit with an
assessment grid, 2 months and 1 week after the simulation teaching for UC and TP,
respectively. Students were also given an evaluation form to assess their feelings about
the simulation method at the end of the evaluation step.
Results : The assessment of UC and TP revealed better skills for students participating
in the simulation teaching process, whereas the other students’ overall proficiency was
less accurate. 5 out of 6 students judged the theoretical lesson and the technical report
formative for the UC and the TP. They all thought the simulation workshop could
improve their professional practice. Although they considered that it should be pursued,
the teaching at the bedside has equally to be done, as both teaching methods appeared
complementary.
Conclusion : Our study shows a tendency that simulation added to classical lecture
improve the teaching of technical gestures. These very preliminary results have to be
confirmed in a further study.

4 4
1. Introduction
In 1999, the Institute of Medicine Report “to err is human” [Kohn 2000] stated that
medical errors were the eighth cause of death among patients and that 44000 to 98000
deaths per year were related to health care. The incidence of serious adverse effects
occurs mainly in the surgical field or intensive care unit. However, the zero risk does not
exist, making it mandatory to reduce the risk to a minimum.
Although a recent review of literature stated that simulator-based medical education
with deliberate practice is superior to traditional clinical medical education in achieving
specific clinical skill acquisition goals [McGaghie 2011], a recent communication at the
French Pediatric Surgery Congress [Eyssartier SFCP 2013] showed that simulation is not
widely used as a teaching method. Among 128 students who were asked by mail, only 48
(37.5%) answered: 27 students had learned some technical gestures by simulation, of
whom five spent more than 10 hours and 4 over 20 hours.
Twenty-one people had learned by more elaborate simulation, three of whom spent
more than 10 hours and one more than 20 hours. Indeed, less than 15% of the
responders have not even once participated in a high fidelity simulation scenario.
During their medical studies students in the 4th to 6th years attend pratical professional
activity every morning at the hospital and are asked to learn several medico surgical
procedures. Urethral catheterization (UC) is of frequent prescription in surgical and
intensive care units, which makes it a core skill for any physician. However, the
procedure can lead to adverse effects such as false passage, stricture, stenosis,
hematuria, paraphimosis or infection, especially in the hands of interns during their first
six months of internship [Thomas 2009]. Considering that it could be too late to learn
such skills practised by nurses in the internship, we intended to teach medical students
so that they will be prepared for their internship. Thoracentesis procedure (TP)

5 5
especially for the diagnosis of pleural effusion is frequent in our ward or ICU. This
procedure can lead to side effects such as hemothorax pneumothorax, infection of the
skin. Assessment of educational program for TP is now of major interest to improve the
skills of our medical student [Jiang 2011].
The goal of our study was to test the usefulness of simulation in the medical teaching of
UC and TP.
2. Material and methods
Study population
Medical students in two of our hospital departments were enrolled in the study: five
from the paediatric intensive care unit and five from the paediatric surgery unit. They
were told that their participation in this exercise would have no impact on their course
grade and that any data collected would not be part of their formal course records.
Teaching method for the UC
A classic first lesson was given to all the students, explaining in detail how UC has to be
performed. The power-point presentation was as clear as possible with only two photos,
one showing the material needed and one showing the catheterization of a man. No
video was shown so as not to interfere with the simulation teaching. During the lesson, a
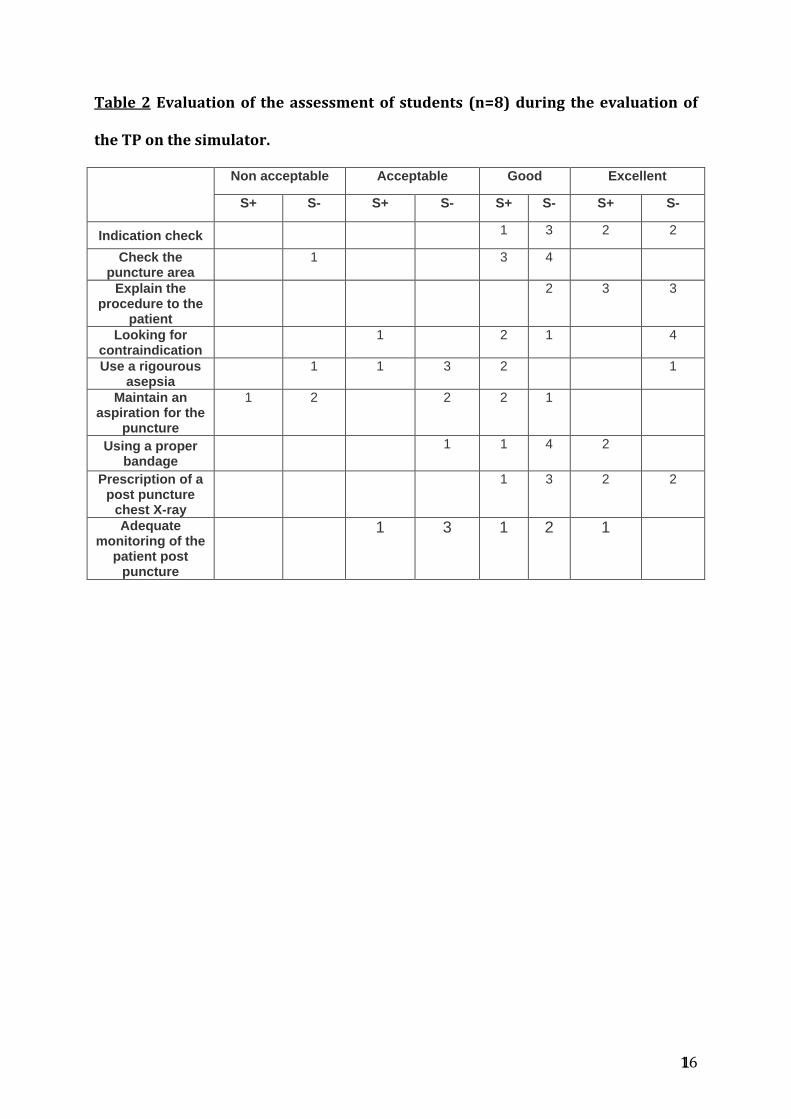
detailed technical report (annexe 1) was distributed to each student so that they were
able to carefully follow the presentation and keep it as key rules for their future practice.
Teaching method for the TP
A classic lesson was done as for UC. No photos were shown during the TP course. A
detailed technical report was given to all the students after the lecture (Annexe 2).

6 6
We then divided the students into two groups: one group with a simulation teaching,
(S+) one group without (S-). For the UC, they were given a number they would have to
remember for the evaluation day so that the examiner would not know which group the
student belonged to. The repartition between the two groups was equally done
regarding their presence or absence due to the summer holidays. For the TP, the
blindness could not proceed because the time between the course and the evaluation
was only one week.
All the students were told to remember how many catheterizations or TP they would see
and how many they would perform alone or with help (nurse, resident, senior) between
the time of the lesson and the assessment process.
Simulation sessions
The simulation was organised one week after the lesson for UC and the same day as the
lesson for TP. For the UC, each student did the entire procedure first on a female model
and only the technical gesture of catheterization on a male model. For the TP, the
student did the entire procedure on a kit that allowed the palpation of the skin, the rib
and obtaining liquid if the procedure was correctly made.
Assessment of the students
For the UC procedure
Students were asked the number they had been initially given, the number of UC they
had seen and the number of UC they had already performed alone or accompanied since
the lesson. They were also asked how many UC they had seen or performed before their
participation in the study.
The assessment was performed on a male mannequin, ideally by another person than
7 7
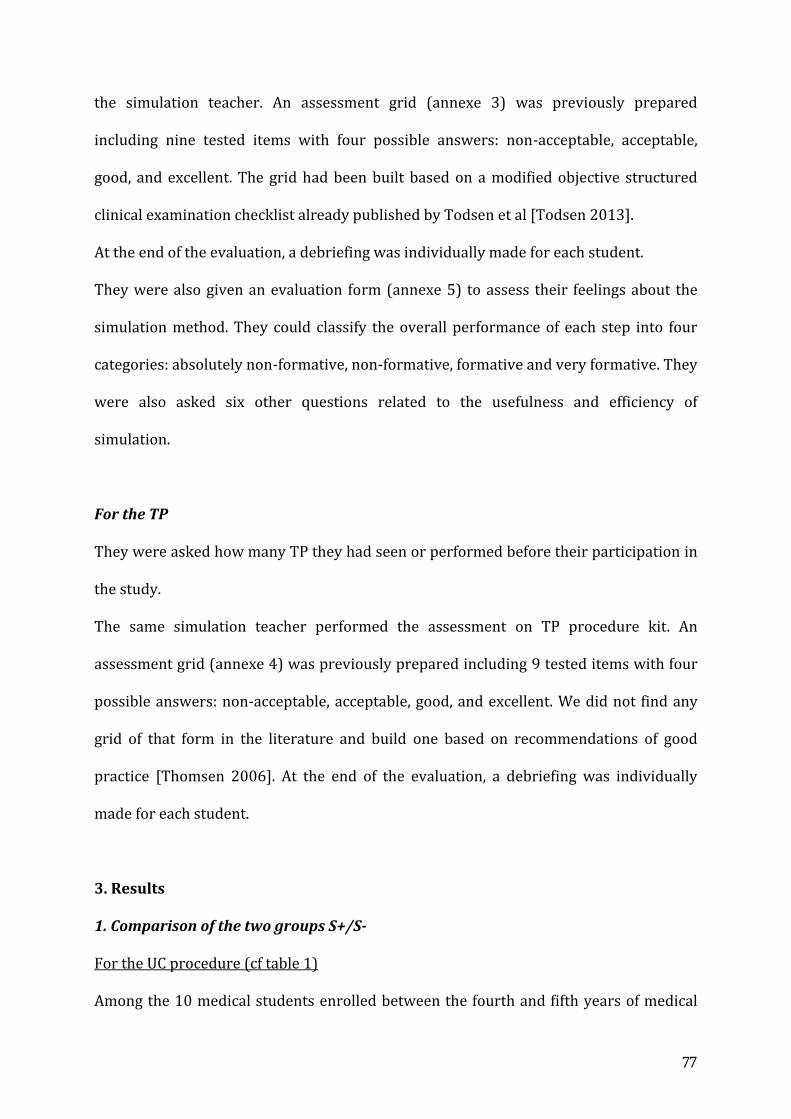
the simulation teacher. An assessment grid (annexe 3) was previously prepared
including nine tested items with four possible answers: non-acceptable, acceptable,
good, and excellent. The grid had been built based on a modified objective structured
clinical examination checklist already published by Todsen et al [Todsen 2013].
At the end of the evaluation, a debriefing was individually made for each student.
They were also given an evaluation form (annexe 5) to assess their feelings about the
simulation method. They could classify the overall performance of each step into four
categories: absolutely non-formative, non-formative, formative and very formative. They
were also asked six other questions related to the usefulness and efficiency of
simulation.
For the TP
They were asked how many TP they had seen or performed before their participation in
the study.
The same simulation teacher performed the assessment on TP procedure kit. An
assessment grid (annexe 4) was previously prepared including 9 tested items with four
possible answers: non-acceptable, acceptable, good, and excellent. We did not find any
grid of that form in the literature and build one based on recommendations of good
practice [Thomsen 2006]. At the end of the evaluation, a debriefing was individually
made for each student.
3. Results
1. Comparison of the two groups S+/S-
For the UC procedure (cf table 1)
Among the 10 medical students enrolled between the fourth and fifth years of medical

8 8
school, all followed the classic lesson but only six were finally evaluated on the simulator
for UC.
The assessment revealed better skills for students participating in the simulation
teaching process, even if some steps were completely forgotten (for example, two
students forgot to fix the catheter, one forgot to put a sterile drape on the patient). On
the other hand, the three other students forgot did not forget step but the quality of each
step was less accurate.
Students reported seeing a mean of 1.6 UC (0-5) between the lesson and the assessment,
but not having done only once. Prior to the study, students had seen a mean of 2.6 (0-10)
UC and performed a mean of 3 (0-10) UC. In the simulation group, two students had seen
more UC before the study than the whole group but the only student who had seen only
one UC and who had never performed one, succeeded better than students of the non-
simulation group. In parallel, the student belonging to the non-simulation group who
had performed UC before the study scored worse than all the students of the simulation
group.
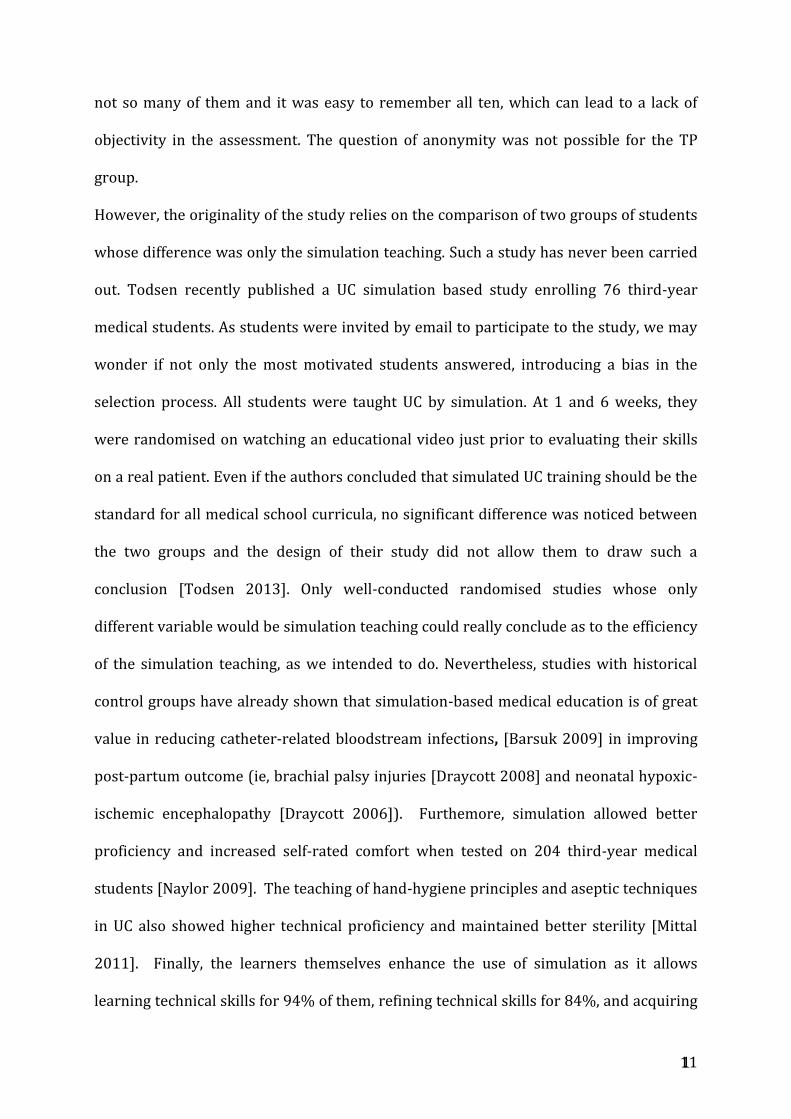
For the TP procedure (cf table 2)
Among the 10 medical students enrolled between the fourth and fifth years of medical
school, 6 followed the classic lesson and 3 had the simulation session after the course.
One week after the course, we finally evaluated 8 students on the simulator for TP. The
S+ had 3 students; the S- group had 5 students.
Interestingly, no differences between the two groups were shown for the items
evaluating the theory (indication, search for contra indication, information on the
patient chest X-ray after the TP). Practical skills such as disinfection, puncture with
maintaining the aspiration and checking the puncture zone were evaluated with a level

9 9
of competence from good to excellent whatever the group S- or S+ (table 2). The
assessment found 5 evaluations unacceptable: 4 were from the S- group, one from the S+
group.
No students were reported seeing or participating in a TP between the lesson and the
assessment.
2. Evaluation of the teaching method by the students
For the UC procedure
Students have to evaluate the theoretical lesson, the technical report and the simulation
workshop. For the UC, 5 out of 6 students judged the theoretical lesson and the
technical report formative. One student found the theoretical lesson non-formative
whereas one student found the technical report very formative. Four students evaluated
the simulation session as very formative, 2 as formative.
They all thought the simulation workshop could improve their professional practice and
they agreed that it should be pursued. They did not want longer sessions and 2/3 of
them thought simulation sessions should be mandatory. Nevertheless, five students
thought that teaching at the bedside should not be abandoned and should be done in
parallel, as both teaching methods are complementary. One student felt destabilized by
the relation with the mannequin. They suggest that this type of teaching should be
performed early on in their curriculum (second or third year of medical school).
For the TP procedure
8 Students had to evaluate the theoretical lesson, the technical report and the simulation
workshop. The theoretical lesson was found formative for 5, non-formative for 1. The
technical report was judged formative in 5/8. They all thought the simulation workshop
10 10
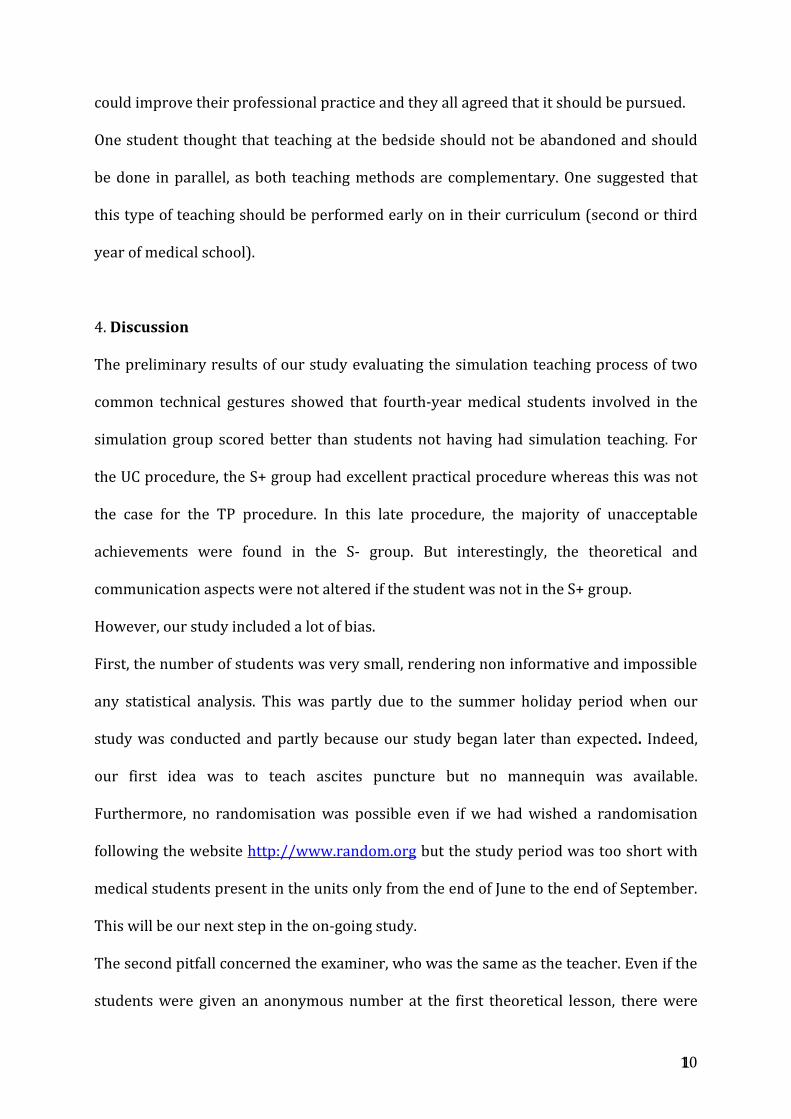
could improve their professional practice and they all agreed that it should be pursued.
One student thought that teaching at the bedside should not be abandoned and should
be done in parallel, as both teaching methods are complementary. One suggested that
this type of teaching should be performed early on in their curriculum (second or third
year of medical school).
4. Discussion
The preliminary results of our study evaluating the simulation teaching process of two
common technical gestures showed that fourth-year medical students involved in the
simulation group scored better than students not having had simulation teaching. For
the UC procedure, the S+ group had excellent practical procedure whereas this was not
the case for the TP procedure. In this late procedure, the majority of unacceptable
achievements were found in the S- group. But interestingly, the theoretical and
communication aspects were not altered if the student was not in the S+ group.
However, our study included a lot of bias.
First, the number of students was very small, rendering non informative and impossible
any statistical analysis. This was partly due to the summer holiday period when our
study was conducted and partly because our study began later than expected. Indeed,
our first idea was to teach ascites puncture but no mannequin was available.
Furthermore, no randomisation was possible even if we had wished a randomisation
following the website http://www.random.org but the study period was too short with
medical students present in the units only from the end of June to the end of September.
This will be our next step in the on-going study.
The second pitfall concerned the examiner, who was the same as the teacher. Even if the
students were given an anonymous number at the first theoretical lesson, there were
11 11
not so many of them and it was easy to remember all ten, which can lead to a lack of
objectivity in the assessment. The question of anonymity was not possible for the TP
group.
However, the originality of the study relies on the comparison of two groups of students
whose difference was only the simulation teaching. Such a study has never been carried
out. Todsen recently published a UC simulation based study enrolling 76 third-year
medical students. As students were invited by email to participate to the study, we may
wonder if not only the most motivated students answered, introducing a bias in the
selection process. All students were taught UC by simulation. At 1 and 6 weeks, they
were randomised on watching an educational video just prior to evaluating their skills
on a real patient. Even if the authors concluded that simulated UC training should be the
standard for all medical school curricula, no significant difference was noticed between
the two groups and the design of their study did not allow them to draw such a
conclusion [Todsen 2013]. Only well-conducted randomised studies whose only
different variable would be simulation teaching could really conclude as to the efficiency
of the simulation teaching, as we intended to do. Nevertheless, studies with historical
control groups have already shown that simulation-based medical education is of great
value in reducing catheter-related bloodstream infections, [Barsuk 2009] in improving
post-partum outcome (ie, brachial palsy injuries [Draycott 2008] and neonatal hypoxic-
ischemic encephalopathy [Draycott 2006]). Furthemore, simulation allowed better
proficiency and increased self-rated comfort when tested on 204 third-year medical
students [Naylor 2009]. The teaching of hand-hygiene principles and aseptic techniques
in UC also showed higher technical proficiency and maintained better sterility [Mittal
2011]. Finally, the learners themselves enhance the use of simulation as it allows
learning technical skills for 94% of them, refining technical skills for 84%, and acquiring

12 12
procedural teaching skills for 84% [Shanks 2010]. As in our study, it should be done
early in residency and instructors have an important role in the demonstration of the
technique (92%), the observance of learner techniques (92%), the teaching of evidence
behind procedural steps (84%) and the feedback provision (89%) [Shanks 2010].
Conclusion
Although not perfectly designed and performed, our study shows a tendency to better
technical gestures, concerning UC and TP teaching when based on simulation. These
very preliminary results are to be confirmed in a further study. Other medico-surgical
procedures must be included in that simulation programme such as ascitis puncture and
arterial gas puncture.

13 13
Bibliography
Kohn LT, Corrigan JM, Donaldson MS (eds.). Committee on Quality of Health Care
in America, Institute of Medicine. (2000). To err is human: building a safer health
system. Washington, DC: National Academy Press. This report can be viewed
online at http://books.nap.edu/books/0309068371/html/index.htlm
McGaghie WC, Issenberg SB, Cohen ER, Barsuk JH, Wayne DB. Does simulation-
based medical education with deliberate practice yield better results than
traditional clinical education? A meta-analytic comparative review of the
evidence. Acad Med. 2011 Jun;86(6):706-11.
Eyssartier E, Breaud J, Lardy H, Berton J, Grangy JC, Podevin G. Teaching pediatric
surgery with simulation: inventory in 2013. French Pediatric Surgery Congress
2013.
Thomas AZ, Giri SK, Meagher D, Creagh T. Avoidable iatrogenic complications of
urethral catheterization and inadequate intern training in a tertiary-care teaching
hospital. BJU Int. 2009 Oct;104(8):1109-12.
Jiang G, Chen H, Wang S, Zhou Q, Li X, Chen K, Sui X. Learning curves and long-
term outcome of simulation-base thoracentesis training for medical students. BMC
Med Educ.
Todsen T, Henriksen MV, Kromann CB, Konge L, Eldrup J, Ringsted C. Short- and
long-term transfer of urethral catheterization skills from simulation training to
performance on patients. BMC Med Educ. 2013 25;13:29.
Thomsen TW, DeLaPena J, Setnik GS. Videos in clinical medicine. Thoracentesis. N
Engl J Med. 2006 Oct 12;355(15):e16.
Barsuk JH, Cohen ER, Feinglass J, et al. Use of simulation-based education to

14 14
reduce catheterrelated bloodstream infections. Arch Intern Med. 2009;
169:1420–1423.
Draycott TJ, Crofts JF, Ash JP, et al. Improving neonatal outcome through practical
shoulder dystocia training. Obstet Gynecol. 2008; 112:14–20.
Draycott T, Sibanda T, Owen L, et al. Does training in obstetric emergencies
improve neonatal outcome? BJOG. 2006; 113:177–182.
9 Naylor RA, Hollett LA, Valentine RJ, Mitchell IC, Bowling MW, Ma AM, Dineen SP,
Bruns BR, Scott DJ. Can medical students achieve skills proficiency through
simulation training ? Am J Surg. 2009 Aug;198(2):277-82.
10 Mittal MK, Morris JB, Kelz RR. Germ simulation: a novel approach for raising
medical students awareness toward asepsis. Simul Healthc. 2011 Apr;6(2):65-70.
11 Shanks D, Wong RY, Roberts JM, Nair P, Ma IW. Use of simulator-based medical
procedural curriculum: the learner's perspectives. BMC Med Educ. 2010 Nov
8;10:77.

15 15
Table 1 Results of the level of performance of the students (n=6) during the
evaluation on a simulation mannequin for the UC.
Non acceptable Acceptable Good Excellent
S- S+ S- S+ S- S+ S- S+
Indication check 2 1 3
Check the equipment and its use planning
3 3
Choose the appropriate
probe according to the patient's
age
2 1 3
Aseptic technique at each
stage
2 3 1
Proper technique according to sex
mannequin
1 1 1 3
Inflate the balloon to the
correct value and with sterile water
2 1 3
Check the correct position of the
catheter
1 1 1 3
Has done a closed
catheterization
1 1 1 3
Adequate fixation of the catheter
2 1 1 2
16 16
Table 2 Evaluation of the assessment of students (n=8) during the evaluation of
the TP on the simulator.
Non acceptable Acceptable Good Excellent
S+ S- S+ S- S+ S- S+ S-
Indication check 1 3 2 2
Check the puncture area
1 3 4
Explain the procedure to the
patient
2 3 3
Looking for contraindication
1 2 1 4
Use a rigourous asepsia
1 1 3 2 1
Maintain an aspiration for the
puncture
1 2 2 2 1
Using a proper bandage
1 1 4 2
Prescription of a post puncture
chest X-ray
1 3 2 2
Adequate monitoring of the
patient post puncture
1 3 1 2 1
17 17
Annexe 1
FICHE TECHNIQUE LE SONDAGE VESICAL
Indications
Diagnostiques Recueil d’échantillon d’urines stériles pour analyse bactériologique Surveillance des entrées et des sorties dans les services de soins intensifs Cystographie rétrograde
Thérapeutiques Intervention sur le petit bassin Rétention urinaire et prévention des rétentions urinaires Administration médicamenteuse
Contre-indications
Absolue : Suspicion de rupture traumatique de l'urètre (fracture du bassin, traumatisme pelvien)
Relatives : malformation du bas appareil urinaire, plastie urétrale ou vésicale, allergie au latex
Matériel
Sonde : o Calibre en principe : de charrière 6 à 18 selon l’âge o Sondage à demeure : sonde de Foley munie d'un ballonnet
Sonde de Foley en latex : inférieur à 1 semaine Sonde de Foley en latex enduit : silicone, hydrogel, polyuréthane :
inférieur à 3 semaines Sonde de Foley en silicone : inférieur à 5 semaines
o Sondage intermittent : sonde droite ou béquillée type Nélaton sans ballonnet
N Engl J Med 2010;363:e19.
Nécessaire pour la toilette génitale hygiénique : o Savon doux, gant de toilette, serviette o Gants non stériles à usage unique o Plat-bassin (chez la femme) o Alaise en tissu
Nécessaire pour la toilette génitale antiseptique : o Antiseptique : Halogénés chlorés (Dakin®), Polyvidone iodé (Bétadine®
gynécologique), Chlorhexidine acqueuse o Compresses stériles. o Gants stériles

18 18
Autre matériel : o Gants stériles o Seringue de 10 ml o Ampoule d'eau stérile : jamais de sérum physiologique o Champ de table stérile o Champ fendu stérile o Lubrifiant hydrosoluble o Poche collectrice d'urine vidangeable équipée d'une valve antireflux o Support de sac pour la poche o Nécessaire à l'hygiène des mains
PROCEDURE
Préparation
Vérifier l’indication
Prévenir le (la) patient(e) : expliquer l’anatomie, la nature du geste, les bénéfices, les risques et les complications
Installer le matériel après vérification des dates de péremptions et de l'intégrité des emballages
S'installer à gauche de le (la) patient(e) si l'on est droitier et à droite si l'on est gaucher
Toilette génitale hygiénique
Installer le (la) patient(e) confortablement, sur le plat-bassin chez la femme Effectuer un lavage simple des mains Mettre les gants non stériles Savonner les cuisses puis les organes génitaux de l'extérieur vers l'intérieur et
de haut en bas Rincer en procédant de la même façon Essuyer en tamponnant, sans frotter
antiseptique
Effectuer un lavage antiseptique des mains Mettre les gants stériles Effectuer la toilette génitale antiseptique avec les compresses stériles
imbibées d'antiseptique en allant d'avant en arrière et utiliser une compresse par passage
Installation et préparation du matériel de sondage
Installer le champ stérile de table et déposer le matériel stérile sur le champ stérile de table
Effectuer un lavage antiseptique des mains Mettre les gants stériles Remplir la seringue avec de l'eau stérile Faire le montage du système clos : sonde et poche collectrice. Mettre un
Tégaderm® à la jonction des 2 pour éviter toute ouverture lors d’une traction involontaire.
Verser le lubrifiant sur une compresse stérile Lubrifier la sonde urinaire
19 19
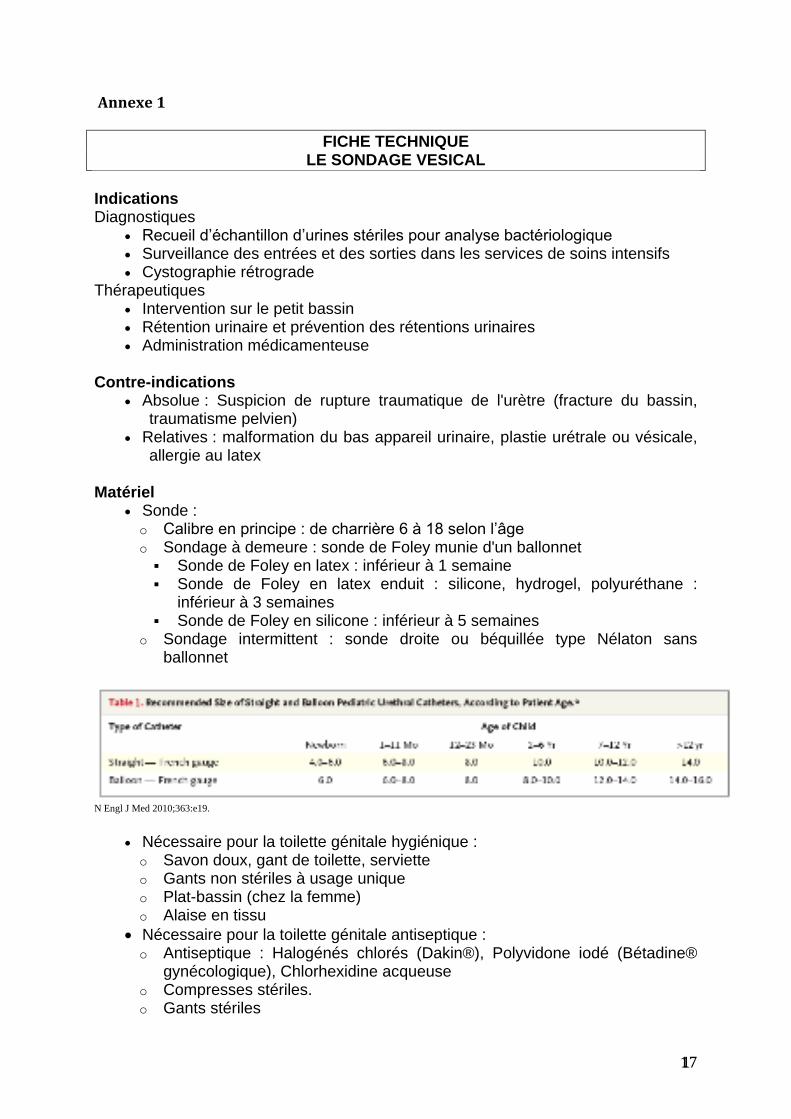
Introduction de la sonde urinaire
1. Chez la femme
Installer le champ fendu stérile : centrer la fente du champ sur la vulve.
Ecarter les lèvres de la main non dominante. Saisir la sonde avec la main dominante en "cor de chasse" : faire une boucle en l'air afin d’éviter tout contact avec une surface non stérile.
Introduire la sonde par le méat urinaire dans l'urètre et la pousser en l'orientant tout droit.
Poursuivre l'introduction, un écoulement d'urine dans la tubulure de la poche collectrice atteste de la bonne position de la sonde en intra-vésical.
Si sonde de Foley, gonfler le ballonnet de la sonde avec la seringue d'eau stérile 3 à 10 ml.
Tirer légèrement sur la sonde pour vérifier que la sonde ne sort pas.
2. Chez l’homme
Installer le champ fendu stérile sur les cuisses et recouvrir le scrotum. Saisir la sonde avec la main dominante en "cor de chasse". Saisir la verge avec la main non dominante en maintenant une traction légère
et la tenir en position verticale pour faire "disparaître" la courbure antérieure. Introduire la sonde par le méat urinaire dans l'urètre jusqu'à la butée. Au
besoin, instiller dans l’urètre du gel lubrifiant pour faciliter l’introduction de la sonde.
Lorsque l'on butte, abaisser la verge à l'horizontale pour terminer l'introduction de la sonde, c'est le passage de la deuxième courbure de l'urètre.
Poursuivre l'introduction, un écoulement d'urine atteste de la bonne position de la sonde.
Si sonde de Foley, gonfler le ballonnet de la sonde avec la seringue d'eau stérile 5 à 10 ml.
Tirer légèrement sur la sonde pour vérifier que la sonde ne descend pas. Recalotter le gland pour éviter un œdème et le risque de paraphimosis.
Fixation de la sonde et fin du sondage
Fixer la sonde sur la cuisse chez la jeune fille ou sur le ventre chez le garçon : mettre un Duoderm® sur la peau puis fixer la jonction entre la sonde et la poche collectrice à l’aide d’un Tégaderm®
Accrocher le sac collecteur en déclive. Complications : Elles sont rares : hématurie, fistule par perforation urétrale, paraphimosis, infections iatrogènes (conditions d’asepsie non adéquate), sténose de l’urètre.

20 20
Annexe 2
FICHE TECHNIQUE
LA PONCTION PLEURALE
I/ Définition
Acte médico-chirurgical qui consiste à introduire une aiguille dans l'espace pleural. du
patient dans une position en rapport avec sa pathologie ou son handicap
II/ Contre indication
Troubles de l’hémostase
III/ Les buts
La ponction pleurale peut être :
1. Exploratrice
Elle permet de dépister ou confirmer un épanchement pleural en précisant :
– la nature du liquide pleural
– – liquide clair jaune citrin
– – liquide hématique (sanglant ou rosé)
– – liquide chyleux (lymphatique)
Elle permet de réaliser :
Une étude bactériologique (recherche de germes pyogènes)
Une Etude chimique :
dosage du glucose et des protéines
Distinguer :
– un transsudat = taux de protéines < 30 g/l
– un exsudat = taux de protéines > 60 g/l (c'est un liquide inflammatoire)
Une étude cytologique : une numération des éléments du liquide pleural (hématies,
leucocytes, recherche, de cellules tumorales, ...)
2. Evacuatrice Elle est réalisée lorsqu'un épanchement est trop important et entraîne une gêne
respiratoire.
3. Thérapeutique injection d'un produit médicamenteux : ATB spécifique, cytostatique en cas de cancer,
... lavage de la cavité pleurale
21 21
IV/ Procédures
Avant la ponction informer la personne, la rassurer :
Repérage de la zone de ponction Percussion Echographique
– la ponction pleurale se réalise au lit du malade
– – peut se faire sous anesthésie locale
– – éviter de bouger, tousser pendant la ponction
– - demander si allergie à la Xylocaïne (choc anaphylactique)
préparer le dossier :
– résultats NF, crase sanguine
– arrêt des anticoagulants sur PM
– vérifier la radio radio thoracique
Mise en place d’un scope qui permet une surveillance continue pendant le geste de la
Fc, la SpO2, FR
Vêtir la personne soignée d'une chemise fendue demander d'aller uriner prendre les
différents paramètres (T°C, pulsations, FR, ...)
b) Au cours de la ponction La ponction se réalise au ras du bord supérieur de la côte ; le paquet vasculo nerveux
passe contre le bord inférieur de la côte
Installation du patient :
la ponction se réalise
assis au bord du lit (épaules légèrement en avant etdos rond)
assis à califourchon sur une chaise
dans son lit en décubitus latéral et le bras sur élevé au dessus de la tête
Déroulement :
➢ l'habillage du médecin :
surblouse / masque / gants stériles/ calot ➢ préparation cutanée : rasage éventuel de
l'aisselle ou du thorax /
désinfection cutanée selon le protocole
➢ +/ anesthésie locale : souvent c'est de la Xylocaïne 1% non adrénaliné dans
une seringue de 10 mL ; on adapte une aiguille à intra musculaire ; l'aiguille
est enfoncée en aspirant pour éviter un pneumothorax
la ponction :

22 22
– si elle est exploratrice seule,; seringue de 50 mL /20 ml avec du serum
physiologique
– avec une aiguille de Küss ou
– une aiguille à PL (avec mandrin)–
– si elle est exploratrice et évacuatrice, Vous enfoncez l'aiguille dans la plèvre,
désadaptez la seringue, utilisez une tubulure de perfusion (sans le compte
gouttes) qui sera relié à un bocal (type Redon sans vide) ; le simple fait d'être
en déclive (= bocal par terre) va permettre au liquide de s'écouler ; au
moment où vous désadaptez seringue et aiguille, le patient doit rester en
apnée pour éviter un pneumothorax.
–
– si ponction évacuatrice avec lavage de la cavité pleurale au cours des pleurésies
purulentes ;
– elle se réalise soit
– un trocart de Küss et
– une seringue de Tournant /
– soit avec une seringue de 50 mL et une tubulure à 3 voies = 1 voie avec la
tubulure reliée à un bocal de type Redon, 1 voie avec une tubulure plongeant
dans un bocal de chlorure de sodium isotonique à 9%0 tiédit à 37°C (afin
d'éviter un décalage thermique et un risque d'infection respiratoire),
c) Surveillance clinique de la personne soignée au cours de la ponction pleurale Demander au patient si il presente des douleurs si il est confortablement installé
expliquez ce que vous êtes en train de faire
Les complications possibles = ➔ Risque de malaise vagal : signes : sueurs, tachycardie, vertige, pâleur, +/ hypoTA, malaise général observer le
faciès du patient, prendre les pulsations et la température arrêt de la ponction
➔ Risque de pneumothorax : douleurs thoraciques importantes à type de point de côté, toux quinteuse / sèche,
dyspnée / polypnée, cyanose des muqueuses labiales et des ongles (= signes
respiratoire spécifique)
radio pulmonaire prévue systématiquement après la ponction pour voir si
pneumothorax
Risque de choc anaphylactique à la Xylocaïne : signes généraux : pâleur, anxiété, hypoTA, tachycardie, sueurs
➔ Risque hémorragique
signe : écoulement pleural hématique surveillance de la TA si beaucoup de sang : arrêt
de la ponction
signes : malaise général, hypoTA, tachycardie rush cutané, prurit, fourmillements si
surdosage à la Xylocaïne : fourmillements péri buccal
: ➔ Risque d'OAP, risque d'oedème a vaguo : – oedème a vaquo quand le débit de la
ponction est trop important / trop rapide, entraînant une expansion pulmonaire trop

23 23
rapide d'où un appel d'eau des capillaires vers les alvéoles pulmonaires
– signes : toux quinteuse avec expectorations rosées, mousseuses
–
➔ Risque d'atteinte locale : – lorsque l'aiguille pique dans le paquet vasculo
nerveux – signes : douleurs importantes, baisse de la sensibilité au niveau local
➔ Risque infectieux : – pleural = fièvre dans les jours suivants la ponction, douleurs thoracique –
la paroi thoracique = écoulement purulent, douleur, rougeur local
Surveillance post procedure
prévoir une radio pulmonaire dans la journée surveillance du patient : toutes les demie
heure pendant les 3 premières heures (pulsations, T°C, respiration, faciès, état général)
24 24
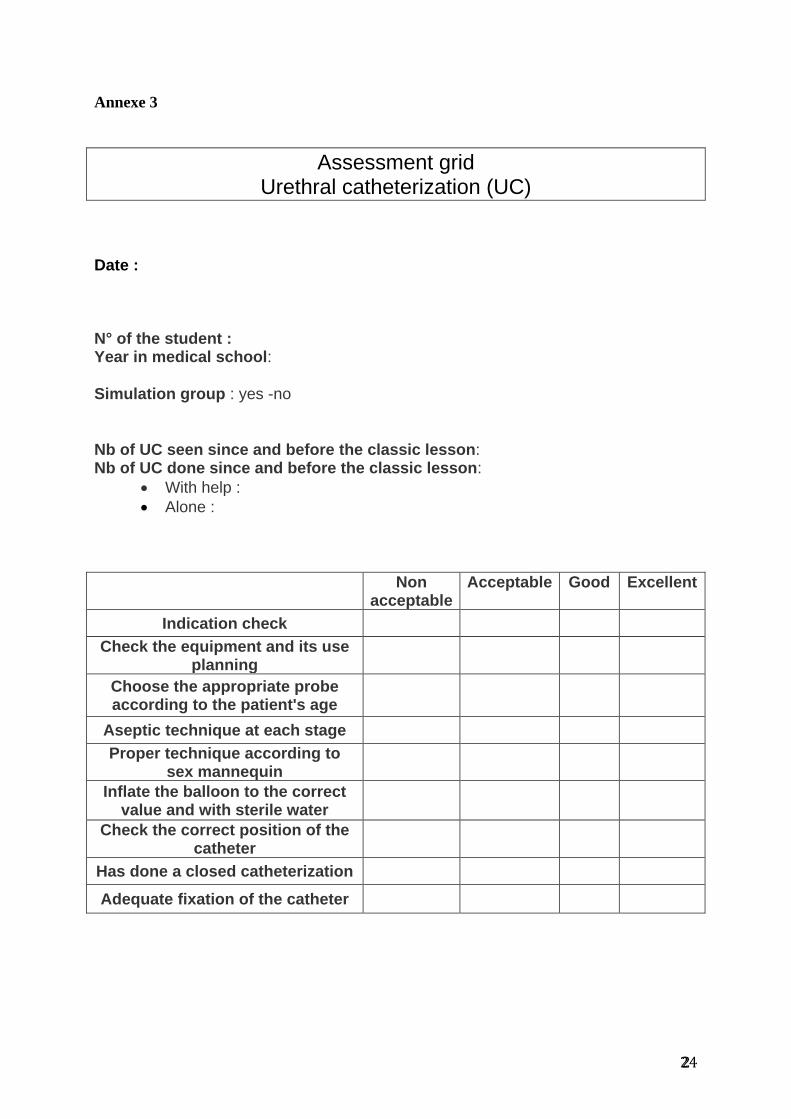
Annexe 3
Assessment grid Urethral catheterization (UC)
Date : N° of the student : Year in medical school: Simulation group : yes -no
Nb of UC seen since and before the classic lesson: Nb of UC done since and before the classic lesson:
With help :
Alone :
Non acceptable
Acceptable Good Excellent
Indication check
Check the equipment and its use planning
Choose the appropriate probe according to the patient's age
Aseptic technique at each stage
Proper technique according to sex mannequin
Inflate the balloon to the correct value and with sterile water
Check the correct position of the catheter
Has done a closed catheterization
Adequate fixation of the catheter

25 25
Annexe 4
Assessment grid Thoracentesis procedure (TP)
Date : N° of the student : Year in medical school: Simulation group : yes -no
Nb of TP seen since and before the classic lesson: Nb of TP done since and before the classic lesson:
With help :
Alone :
Non acceptable
Acceptable Good Excellent
Indication check
Check the puncture area
Explain the procedure to the patient
Looking for contraindication
Use a rigourous asepsia
Maintain an aspiration for the puncture
Using a proper bandage
Prescription of a post puncture chest X-ray
Adequate monitoring of the patient post puncture

26 26
Annexe 5
Simulation teaching assessment by the students UC and TP Date : How do you consider: Absolutely
non-formative Non formative
Formative Very formative
The classic lesson The technical report The simulation process If you have participated to the simulation group: Do you think simulation can improve your professional practice ? Not at all ----------------------------------------------------------------------- Enormously Do you think we should go on with simulation teaching ? o yes o no Would you like to have longer simulation teaching time ? o yes o no Do you think simulation must become mandatory ? o yes o no Do you think we should privilege bedside teaching ? o yes o no Do you think we should privilege simulation teaching ? o yes o no Other(s) suggestion(s) :