Embed Size (px)
Citation preview

i
UNIX and Linux Fundamentals
Workbook
December 2004 © Alan Johnson
Revision 1.38

UNIX Fundamentals
ii
Disclaimer The information provided in this manual is provided with the best intent. No
responsibility is assumed for any errors or omissions resulting from the use of this
document.
The document is a work in progress and will be updated regularly.
All trademarks acknowledged.
Copyright © Alan Johnson http://www.alan.johnson.org

UNIX Fundamentals
iii
Typographical Conventions
This document uses the following typeface conventions:
• The default font is Times New Roman.
• Keywords and important concepts are introduced with italicized text.
• File names, commands and computer output is shown in Courier font.
• Bold type is used for emphasis
• Shell prompt changes to reflect user - # for root and $ for ordinary user.
• Angled brackets <> denote an option such as
# mount /dev/sda1 /mnt/<mountpoint>

UNIX Fundamentals
iv
Edit History • Version 1.0 June 2001
o Section 1, 2 and 3 added
• Version 1.1 Feb 2002
o Added in section 4 to cover Solaris 2.8 disk admin and other miscellaneous functions
o setuid information added to section 2. • Version 1.2 Sept. 2002
o Minor edits
• Version 1.3 Nov. 2002
o Added in a new section involving advanced topics such as driver modules and kernel compiling
• Version 1.31 Dec. 2002
o Added exportfs command after nfs section o Added in section to load device driver modules and creating new
ramdisks
• Version 1.32 February 2003
o Added in more kernel/ramdisk topics
• Version 1.33 March 2003 o Minor kernel/ramdisk edits
• Version 1.34 May 2003
o Minor edits
• Version 1.35 July 2003
o Added section on Red Hat Advanced Server 2.1 Clustering
• Version 1.36 July 2003
o Added section on client server operation with X
• Version 1.37 May 2004

UNIX Fundamentals
v
o Added in Appendix A to show SuSE installation screenshots
• Version 1.38 Dec 2004
o Added example showing how to pass multiple LUN support with the
insmod command.

UNIX Fundamentals
vi
Contents
MODULE 1 – GETTING STARTED 1-1
Background to UNIX 1-3
Linux 1-4
GNU 1-4
Linux Distributions 1-5
Installing Linux 1-5
Partitioning 1-5
Device Naming under Linux 1-6
Red Hat Installation 1-7
The X windows system 1-24
Remote Client Operation 1-26
Shutting down the system 1-27
Module 1 Review 1-28
MODULE 2 – UNIX ARCHITECTURE AND ADMINISTRATION 2-1
Objectives: 2-2
Architecture 2-3
Run levels 2-3
UNIX Processes 2-11
The UNIX File System 2-12
NFS 2-12
Setting up NFS 2-13
Inodes 2-13
File links 2-14

UNIX Fundamentals
vii
Limiting file sizes 2-17
Monitoring disk space 2-17
Creating file systems 2-17
File system checking 2-18
UNIX Signals 2-18
Users and Permissions 2-19
SUID bit 2-21
Job scheduling 2-21
System Administration 2-22
Remote commands 2-23
Module 2 Review 2-25
MODULE 3 – UNIX COMMANDS AND UTILITIES 3-1
Objectives: 3-2
Using the System 3-3
Shutting down 3-3
The UNIX Shell 3-4
Shell programming examples 3-5
Environment Variables 3-10
EDITING UNDER UNIX 3-12
ENTER INPUT MODE 3-12
CURSOR MOVEMENT 3-12
DELETION KEYS 3-12
SCREEN MOVEMENT 3-12
LAST LINE MODE 3-13
SEARCH COMMAND 3-13
File Manipulation Commands 3-13
Some Useful Utilities 3-13
UNIX Fundamentals
viii
Getting Help 3-15
UNIX Utilities Quick Reference 3-17
Module 3 Review 3-22
MODULE 4 - INTRODUCTION TO SOLARIS 4-1
Objectives: 4-2
Solaris and UNIX 4-3
Installing Solaris 4-4
Boot Prompt Options 4-5
Run level Control 4-7
Adding Device Drivers 4-8
Configuring disks 4-9
Accessing LUNs greater than zero 4-9
Steps to add a new disk under Solaris 4-10
Serial ports on SUN Machines 4-14
Using the tip utility 4-14
Solaris Troubleshooting 4-15
Examining Crash Dumps under Solaris 2.8 4-15
Unable to auto-configure drive parameters 4-15
Bypassing lengthy format procedures 4-16
Using Hardware RAID with Solaris 4-17
Module 4 Review 4-18
MODULE 5 – ADVANCED LINUX CONCEPTS 5-1

UNIX Fundamentals
ix
Objectives: 5-2
Understanding the Linux Kernel 5-3
Monolithic Vs modular 5-3
Loading and removing driver modules 5-4
Basics of Linux Compilation and Linking 5-8
Library files 5-8
Linking 5-9
Building the code 5-9
A compilation example 5-9
Re-building the Kernel 5-11
Kernel re-build walkthrough 5-11
Adding in new device drivers to load automatically during startup 5-17
The mkinitrd utility 5-17
Adding the driver 5-17
Configuring WINE 5-19
Installing WINE 5-19
SAMBA configuration 5-22
Module 5 Review 5-26
MODULE 6 – RED HAT ADVANCED SERVER CLUSTER SERVICES 6-1
Overview of Clustering 6-3
System Configuration 6-4
Preparation 6-5

UNIX Fundamentals
x
Using the Red Hat Cluster Manager GUI 6-7
Web Server Configuration –local access 6-7
Adding a Service 6-8
Output of Cluster configuration script on first node (Dell2) 6-12
Output of Cluster configuration script on second node (Dell1) 6-15
Module 6 Review 6-18
MODULE 7 INSTALLATION USING SUSE LINUX 7-1

UNIX Fundamentals
xi
Figures Figure 1 Linux Hierarchy................................................................................................ 1-4
Figure 2 Possible disk partitioning arrangement............................................................. 1-6
Figure 3 Installation menu screen ................................................................................... 1-8
Figure 4 Using a driver disk during installation.............................................................. 1-9
Figure 5 Selecting the installation language ................................................................... 1-9
Figure 6 Selecting the keyboard type............................................................................ 1-10
Figure 7 Selecting the installation media ...................................................................... 1-10
Figure 8 Loading special device drivers ....................................................................... 1-11
Figure 9 Red Hat Welcome Screen............................................................................... 1-11
Figure 10 Selecting the installation configuration method ........................................... 1-12
Figure 11 Disk partitioning........................................................................................... 1-12
Figure 12 Selecting a disk for partitioning.................................................................... 1-13
Figure 13 Using fdisk - step 1....................................................................................... 1-13
Figure 14 Using fdisk - step 2....................................................................................... 1-13
Figure 15 Selecting the first primary partition. ............................................................. 1-14
Figure 16 Specifying the partition size ......................................................................... 1-14
Figure 17 Printing the partition table ............................................................................ 1-14
Figure 18 Changing the file type to type swap ............................................................. 1-15
Figure 19 Writing the partition table to disk................................................................. 1-15
Figure 20 Setting up the disk ........................................................................................ 1-16
Figure 21 Assigning mount points ................................................................................ 1-16
Figure 22 Setting up the root mountpoint .................................................................. 1-17
Figure 23 Showing the mountpoints ............................................................................. 1-17
Figure 24 Formatting the new partition ........................................................................ 1-18
Figure 25 Configuring lilo Step 1 ................................................................................. 1-18
Figure 26 Installing LILO ............................................................................................ 1-19
Figure 27 Booting multiple O/S's with LILO ............................................................... 1-19
Figure 28 Setting up the hostname................................................................................ 1-20
Figure 29 Setting up the machine’s IP address ............................................................. 1-20
UNIX Fundamentals
xii
Figure 30 Selecting the mouse type .............................................................................. 1-21
Figure 31 Setting the time zone .................................................................................... 1-21
Figure 32 Setting the root password ......................................................................... 1-22
Figure 33 Adding a user................................................................................................ 1-22
Figure 34 Add user dialog............................................................................................. 1-23
Figure 35 Authentication options.................................................................................. 1-23
Figure 36 Selecting packages........................................................................................ 1-24
Figure 37 UNIX Directory Structure ............................................................................ 2-12
Figure 38 inode table .................................................................................................... 2-14
Figure 39 Example of a file hard link ........................................................................... 2-15
Figure 40 Symbolic link example ................................................................................. 2-16
Figure 41 Using SMIT on AIX V3.2 ............................................................................ 2-23
Figure 42 Configuring the kernel for module support. ................................................... 5-4
Figure 43 Using the text based kernel configuration tool. ............................................ 5-12
Figure 44 Configuring the kernel options with make xconfig .................................. 5-13
Figure 45 Configuring multiple LUN support with make xconfig......................... 5-14
Figure 46 Kernel configuration help messages ............................................................. 5-15
Figure 47 Using kpackage to install WINE .................................................................. 5-19
Figure 48 Starting the smb service ............................................................................... 5-22
Figure 49 Using Samba as a file server in a Microsoft network ................................... 5-24
Figure 50 Using the swat tool ....................................................................................... 5-25
Figure 51 Viewing the Cluster from Netscape................................................................ 6-8
Figure 52 Viewing Cluster Services ............................................................................. 6-10
Figure 53 Detailed Cluster Service view ...................................................................... 6-11
Figure 54 Installation menu screen ................................................................................. 7-1
Figure 55 Installation boot progress................................................................................ 7-2
Figure 56 Accepting the license agreement .................................................................... 7-2
Figure 57 Selecting the installation language ................................................................. 7-3
Figure 58 Selecting the installation options .................................................................... 7-4
Figure 59 Changing the default installation options. ...................................................... 7-5
Figure 60 Changing the partitioning scheme .................................................................. 7-6

UNIX Fundamentals
xiii
Figure 61 Customized Disk Partitioning......................................................................... 7-6
Figure 62 Selecting the disk............................................................................................ 7-8
Figure 63 Selecting the partition type ............................................................................. 7-8

UNIX Fundamentals
xiv
Tables Table 1 Red Hat Linux run levels ................................................................................... 2-3
Table 2 Run level Actions............................................................................................... 2-5
Table 3 Process State fields .......................................................................................... 2-10
Table 4 Solaris run levels................................................................................................ 4-7

UNIX Fundamentals
xv
Overview This course is designed to provide an understanding of basic UNIX concepts. It is an
introductory text, which should help Hardware Engineers to gain a familiarity of UNIX
concepts. The course is based around the LINUX/GNU Operating system (Red Hat V7.X
with Version 2.4 of the kernel) and is intended to be generic in that much of the
information is largely portable across UNIX platforms. Where platform specific UNIX
commands other than Linux are used they will be indicated in the text. Version 1.1 added
in a brief section on Solaris, which covers how to install disks as well as an overview of
other System Administration functions.
The course is intended to serve as a solid foundation for more detailed vendor specific
UNIX Operating System training, such as AIX, HP-UX, Solaris etc. The emphasis is
around file systems and disk drives, very little is covered in other administration areas
such as printing, security, networking etc.
Course Objectives After completion of the course the student should be able to:
• Discuss the background and philosophy of the UNIX Operating System
• Discuss common Linux distributions
• Understand how to install the Linux Operating System on an Intel based PC.
• Describe the boot and run level processes
• Understand the UNIX file structure
• Describe redirection and pipes
• Write simple shell scripts
• Understand the X windows system and window managers
• Have an understanding of disk configuration on SUN platforms
• Understand how to build a Linux Kernel
• Understand the concepts behind Red Hat Advanced Server Clusters

1-1
MODULE 1 – Getting Started

UNIX Fundamentals
1-2
Objectives: After completion of this module, you should be able to:
• Describe the evolution of UNIX
• Discuss how The Linux kernel and GNU fit together
• Describe partitioning under Linux
• Install Red Hat Linux on an Intel based PC
• Understand the concepts behind the X windows system

UNIX Fundamentals
1-3
Background to UNIX UNIX grew out of MULTICS which was a project started by Bell Labs to provide
computing power on demand to the masses. The MULTICS project was too ambitious
and was abandoned by Bell Labs. A stripped down version known as UNIX began
development in 1969 on a cast off PDP-7 by Ken Thompson. It was originally written in
about 20K of Machine Code. Later it was rewritten in the C programming language to
allow greater portability.
In 1973 it was distributed free to Educational Institutions, and by 1979 Version 7 was
released and it began to be used on a commercial basis. UNIX System V became
available in 1983 with a more aggressive marketing approach by AT&T. This situation
continued well into the early nineteen-nineties until the widespread use of open source
UNIX Operating Systems such as Linux took hold.
The philosophy behind UNIX was to provide a small number of tools that could do jobs
well. Commands and utilities could easily be combined to provide more powerful ones.
Features of UNIX include:
• Multi-Tasking
• Multi-User
• Hierarchical File System
• Relatively machine independent
• Device independent Input/Output
• Portable Software
• Powerful Utilities

UNIX Fundamentals
1-4
Linux Linux came about from a posting on the MINIX newsgroups by Linus Torvalds. It started
as a college project and with help from programmers worldwide and the addition of GNU
programs developed into a full-blown UNIX like Operating System. Linux runs on many
platforms but Intel based PCs dominate.
One of the major features of Linux that differentiates it from most other Operating
Systems is the fact that it is based around Open Source Software. Open Source Software
makes its source code available to users. This is in marked contrast to commercial
implementations that normally only supply the executable binary code. This approach has
encouraged many programmers around the world to freely contribute their efforts in the
development of Linux. The core of the Operating System - the Kernel is really the Linux
portion with GNU providing tools such as compilers and editors.
GNU
GNU (GNU’s not UNIX) was started in 1984 by Richard Stallman with the intention of
developing a free UNIX like Operating System. Many UNIX utilities have a free GNU
equivalent that runs on numerous versions of UNIX. Today much of Linux uses these
GNU utilities to deliver a fully featured Operating System and some evangelists refer to
the Operating System as GNU/Linux.
Figure 1 Linux Hierarchy
Operating System
GNU Tools
Kernel

UNIX Fundamentals
1-5
Linux Distributions
Although Linux is freely available for download many vendors offer value add services.
Typically these services include an installation front end, technical support and
independent documentation. In Europe SUSE is probably the best known and in the U.S.
Red Hat is dominant. At the time of writing SUSE is at version 9.2 with the 2.6 revision
kernel. Novell has recently acquired SUSE so it is likely that the SUSE distribution will
continue to gain market share. Red Hat are now concentrating on professional editions
such as their Advanced Server versions. Their desktop version has now become Fedora
which is an open distribution contributed to by Red Hat. Each company sells different
compilations such as Server and Professional editions. Although the contents of this
course are designed to be as portable as possible, there may be minor incompatibilities
between distribution and later revision of the Operating System. Red Hat recently
announced their Advanced Server Product V3 that has high-end features such as
clustering and is used by Oracle to run their 9i product on Intel platforms.
Installing Linux Linux has good device support for many peripherals and most new versions will allow for
easy installations. Hardware vendors are beginning to supply Linux drivers as well as
Microsoft ones. Provided that the system uses fairly standard hardware, installation
should provide few challenges for computer professionals.
Partitioning
Intel based, Linux systems support four primary partitions; it is also possible to set up an
extended2 partition which may contain further logical devices. A possible configuration
under Linux is shown in Figure 2. In this case the system contains three bootable file
systems – Windows 98 (Fat32), Windows 2000 (NTFS) and Linux (/). The fourth
1 MINIX was a minimal open source version of UNIX available for the PC and Atari ST written by Andy
Tanenbaum. 2 An extended partition is really a special case of a primary partition except with the ability to act as a
container for a number of logical drives

UNIX Fundamentals
1-6
partition is an extended partition, which can be used for containing other logical
partitions.
One of the primary partitions is set to an Active state, which means that it will be the
bootable partition. In Linux a boot loader program called LILO is available which can be
used to allow the user to select which partition is to be booted. This may be located in a
special area of the disk known as the Master Boot Record (MBR). Basically the boot
loader provides a menu and the user can select which partition to make bootable. This
happens immediately after the system’s BIOS has been loaded and is the first program to
be loaded from the bootable disk.
Figure 2 Possible disk partitioning arrangement
Device Naming under Linux
ATA drives are denoted as hdxy under Linux where x is the disk number and y is the
partition number, so the device hda2 refers to the second partition on the first ATA disk.
SCSI disks are denoted as sdxy, again where x is the disk number and y is the partition
Windows 98
Windows 2K
Linux Root }Primary Partitions 1 3
}Logical Partitions 5 7
Linu
x Sw
ap P
artit
ion

UNIX Fundamentals
1-7
number, so the device sdb3 refers to the third partition on the second SCSI disk.
Referring to a device without a partition number denotes the drive in its entirety, so a
reference to hdb means the second ATA drive (configured as a slave on the first
controller).
Typically a reference to a raw device like this would be used when partitioning. As an
example the partitioning command fdisk would be used to set up partitions on the first
SCSI disk with a command such as fdisk /dev/sda. In Figure 2 above the Fat32
partition would be seen under Linux as hda1, the Windows 2000 partition as hda2, the
Linux root partition as hda3, and the second logical drive in the extended partition will
appear as hda6.
Red Hat Installation
There are various editions of the software available ranging from low end to high end
which includes a number of third party programs. There will be an installation CD3 which
is used to either boot from or with which to generate a boot diskette. If the system that
you are using has the capability of booting directly from the CD then this is the easiest
way, an alternative method is to boot from a diskette. The next section describes how to
use either of these methods. Installation can be done graphically or by a text based menu.
Booting from CD
Most PCs have the ability to boot from CDROM by setting a parameter in the BIOS.
Since the Red Hat CD is bootable then this is the recommended method. If the PC does
not have the ability to boot from CD then a boot floppy must be made as described in the
next section.
Booting from diskette
3 Note Appendix A shows screenshots of the equivalent SuSE installation

UNIX Fundamentals
1-8
This is done by the use of the rawrite command found on the installation CD. This
command normally found in the directory dosutils creates a bootable floppy from an
image file also found on the CD usually in the directory images found on the CD. To
create the boot floppy under a DOS/Windows system with the CDROM as drive d:
perform the following sequence of steps.
1. Enter d:
2. Enter cd \dosutils
3. Enter rawrite
The system responds with Enter disk image source file name:
4. Respond with \images\boot.img
The system then responds with Enter target diskette drive
5. Insert a blank formatted floppy and respond with the target drive designation – A:
When the process has completed boot from the newly prepared diskette
Post Boot Installation Process
During the boot process the installation program is called up. The following screens show
how the installation program progresses. In this example a text based installation is
shown, but GUI based installations are also possible. Other versions of Red Hat may
differ slightly from the screenshots shown. The initial screen is shown in Figure 3
Figure 3 Installation menu screen

UNIX Fundamentals
1-9
After the default option has been selected there is an opportunity to install a device
driver. This is normally only required when unsupported hardware is used or if the device
has only recently been released. Most users will navigate to the <No> button by use of
the mouse or the <TAB> key as shown in Figure 4. Options may be selected by the
mouse or by hitting the space bar.
The next screen is for language selection. Wide ranges of languages are supported. Select
the desired language as shown in Figure 5.
Figure 4 Using a driver disk during installation
If device support is required that is not included in the distribution then if the driver is
available it can be installed at this point by selecting Yes at the prompt.
Figure 5 Selecting the installation language

UNIX Fundamentals
1-10
The next stage is to select the keyboard type.
Figure 6 Selecting the keyboard type
The next stage is to select the installation media. Usually Linux is installed from a
CDROM, however it is also possible to download it and install from a disk drive
partition.
Figure 7 Selecting the installation media
Use whichever media is appropriate and navigate to the <OK> button. After this there is
a choice to install special device drivers, if there are none to install then select <Done>.

UNIX Fundamentals
1-11
Figure 8 Loading special device drivers
After this the Red Hat welcome screen is posted.
Figure 9 Red Hat Welcome Screen
The next screen provides a list of default installations. A server setup typically installs all
the software required for a networked server. These files may include a web server,
firewall utilities and other file sharing services. Local users may wish to choose the
workstation configuration. An existing configuration can be upgraded or a customized
installation may be selected.
In the examples following the Custom method is used.
UNIX Fundamentals
1-12
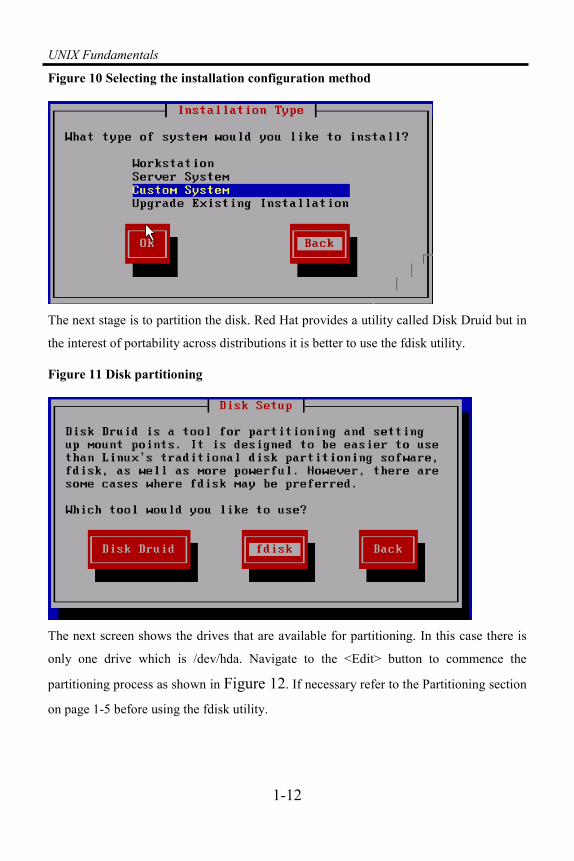
Figure 10 Selecting the installation configuration method
The next stage is to partition the disk. Red Hat provides a utility called Disk Druid but in
the interest of portability across distributions it is better to use the fdisk utility.
Figure 11 Disk partitioning
The next screen shows the drives that are available for partitioning. In this case there is
only one drive which is /dev/hda. Navigate to the <Edit> button to commence the
partitioning process as shown in Figure 12. If necessary refer to the Partitioning section
on page 1-5 before using the fdisk utility.

UNIX Fundamentals
1-13
Figure 12 Selecting a disk for partitioning.
The first screen of fdisk is shown in Figure 13.
Figure 13 Using fdisk - step 1
Select the m option for help. The first command to use is n which adds a (n)ew partition.
Figure 14 Using fdisk - step 2

UNIX Fundamentals
1-14
In this case a primary partition will be used to install the Operating System. Select p for
(P)rimary and then 1 as the partition number.
Figure 15 Selecting the first primary partition.
The program then prompts for the partition size. In the example below the first cylinder is
set to 1 and the last cylinder is set to 900. It also possible to specify the size in Mbytes by
entering a value such as +2000M.
Figure 16 Specifying the partition size
The next step is to create a second partition which will be used for virtual memory
purposes. The example following shows that the rest of the disk has been used to create
the second partition. Use the p command to (p)rint out the partition table. The default
partition type is ext2, however the swap file does not use ext2 and its file type needs to be
changed.
Figure 17 Printing the partition table
Entering an upper case L will list the codes for various file systems. The default Linux
file system of ext2 uses type 83 and the swap file uses a code of 82. This is shown in

UNIX Fundamentals
1-15
Figure 18 below. Printing out the partition table then shows the newly created
partitions.
Figure 18 Changing the file type to type swap
The final stage using fdisk is to (w)rite the partition table to disk using the w command as
shown in Figure 19.
Figure 19 Writing the partition table to disk
. There are often a number of restrictions when booting and this is largely dependent on
the bios configuration of the machines that are being used. As a general rule a boot
system should be located within the first 8 Gbytes of a disk and preferably on the first
disk. It is also possible to create a small partition of around 15 MB and create a boot
partition on this. The data portion of the disk can be located in the higher regions.

UNIX Fundamentals
1-16
Many administrators will create a number of partitions. This allows them to locate the
Operating System files in a location separate from the user’s data thus facilitating restore
operations. After the program has exited the next stage is to select the location for
installing Linux. A choice of locations will be presented, in our example however, the
only valid choice is /dev/hda so this option is taken.
Figure 20 Setting up the disk
Selecting <Done> will bring up the screen in Figure 21.
Figure 21 Assigning mount points

UNIX Fundamentals
1-17
Highlighting device hda1 and selecting <Edit> will bring up the mount point dialog
screen. This example has only a single valid partition in which to install Linux. It is
mounted on the root mountpoint “/”. All other areas will become sub-directories of this
mountpoint. For example the boot files will be located in the boot directory /boot.
Figure 22 Setting up the root mountpoint
Returning, now shows that the disk is to be mounted on / as shown in Figure 23.
Figure 23 Showing the mountpoints
The next stage is to format the partitions. A thorough format can be invoked by selecting
the bad block check option.

UNIX Fundamentals
1-18
Figure 24 Formatting the new partition
After this the boot loader (Linux Loader – lilo) has to be set up, lilo allows the user to
boot multiple Operating Systems. Most devices will not need to use the linear option
shown in Figure 25. An alternative boot loader offered in later versions is grub.
Figure 25 Configuring lilo Step 1
Selecting <OK> brings up the next Lilo dialog. The choice here is to install the boot
loader in the master boot record (MBR) of the disk or in the first sector of the boot
partition. If Lilo is to be used as the boot program then install it in the Master Boot

UNIX Fundamentals
1-19
Record, if another boot Manager is going to be used then install it in the first sector of the
boot partition4.
Figure 26 Installing LILO
In the discussion so far we are only using one Operating System so there is only one
choice available, if multiple Operating Systems were available then they would normally
be identified and lilo will allow them to be booted.
Figure 27 Booting multiple O/S's with LILO
The next step is to set up the hostname. The screen below assigns the hostname “alpha”.
4 The system will try and boot from the code in the MBR, if there is no valid code then it will boot form
whichever partition is marked bootable (active) . This is done by using the fdisk utility.

UNIX Fundamentals
1-20
Figure 28 Setting up the hostname.
After the hostname has been set up, the IP address must be configured. The IP address is
set to 192.168.1.10 and the netmask is set up for 255.255.255.000. Leave the default
gateway and the primary nameserver blank unless there is a requirement to use them.
Figure 29 Setting up the machine’s IP address
After the network has been configured the mouse parameters need to be set up. Select
whichever mouse type is appropriate for the machine. Certain functions can be accessed
with a three-button mouse; if these are used and a three button mouse is not available
then it is possible to emulate one by pressing both buttons together. If this option is
required then select the Emulate 3 buttons dialog.

UNIX Fundamentals
1-21
Figure 30 Selecting the mouse type
The next screen sets up the time zone.
Figure 31 Setting the time zone
The screen shown in Figure 32 sets up the password for user root. In UNIX systems
the root account is known as the Superuser and because of the unrestricted permissions
that are associated with this account it should only be used with care.

UNIX Fundamentals
1-22
Figure 32 Setting the root password
For normal purposes a user account should be set up such as that shown in Figure 33.
This account should be used unless administration duties have to be carried out, users can
become Superuser by issuing the su command and then entering the password.
Figure 33 Adding a user
Continue to <Add> accounts as required or select <OK> to go to the next screen.

UNIX Fundamentals
1-23
Figure 34 Add user dialog
The next stage is for authentication.
Figure 35 Authentication options
After this the installation program begins to install the applications.
Select the desired programs and then select the <OK> button to continue. Depending on
the applications selected there may be a final dialog, which sets up the X windows
system. Finally the system will reboot and the installation will be complete.

UNIX Fundamentals
1-24
Figure 36 Selecting packages
The X windows system Most users are hidden from the complexities of UNIX by using a graphical environment
to manipulate commands. Many layered products offered by third parties will run under
these environments also. The Graphical User Interface (GUI) will also allow non-GUI
applications to run by using a terminal emulation feature.
The X windows system is an industry standard part of Linux and several different GUI’s
are based on X. A few of these are listed below:
OPEN LOOK AT&T, Sun Microsystems
Motif Open Software Foundation
Open Desktop SCO
The most popular environments for Linux are Gnome and KDE.
The X Window System uses a logical display with each application getting its own
window(s). Management of the display is done by a software module known as the
display server. It must recognize how to deal with the hardware display. Client

UNIX Fundamentals
1-25
programs handle the work of the application. This distinction is important, clients do not
have to worry about the hardware connected to it, they can be abstracted away and it this
that makes them portable to other systems. The development of the server is the
responsibility of each individual vendor.
X is a very powerful system, which can be run across a network. The implication of this
is that the local machine can run the server portion, which is not very processor intensive
whilst the clients can be run on remote, more powerful processors.
Within the X environment it is possible to customize settings such as colors and terminal
window sizes. It is also possible to do this before entering the X environment by adding
the commands to a file called xinitrc. This file is located in the path
$HOME/.xinitrc. The equivalent file for openlook is $HOME/olinitrc. A
sample script for X is shown following:
$
$ cat .xinitrc
xterm -geometry 80x24+20+20 -fg blue -bg white &
xclock -rv -geometry 20x20 -10-10 &
xbiff -rv -geometry 30x30+100+100 &
$
The geometry parameter with xterm tells us that we are setting up a default screen layout
of 80 columns and 24 rows and we will offset the window by 20 pixels horizontally and
vertically from the top left hand corner. The foreground color is set to blue with the
background color set to white.
The xclock application is set with a geometry of 40x40 pixels offset from by 10 pixels
from the right hand side. The mail notification program xbiff is set up in reverse
video. It is normal to run multiple virtual terminals within the GUI and thus monitor
multiple events. There are usually a wide range of tools such as performance meters,
clocks and calculators along with some games. Administration of the GUI is reasonably
complex and not normally done by the average user.

UNIX Fundamentals
1-26
Remote Client Operation
The X Window System allows remote clients to access the server across a network.
Computation may occur on a remote machine and the display can then be rendered on a
local machine. The output display is changed from the local machine on the server node
by setting the DISPLAY variable. Access is granted to the server to display its output on
the remote machine by the use of the xhost command. The format of this command is
xhost + <nodename> or xhost + which grants all nodes access. In the example following
there are two nodes – the server is running on node xserver and the client is running on
node xclient.
On the client node xclient:
# xhost + xserver
On the server node xserver:
# export DISPLAY=xclient:0.0
# xclock
The output of the xclock command will now run on the client machine and the processing
will take place on the server.

UNIX Fundamentals
1-27
Shutting down the system The system can be shut down from the GUI by selecting logout from the system menu
and then selecting the shutdown option. Alternatively it can be brought down from a
command line interface by typing:
# shutdown –h now
or
#shutdown –i0 now
The general form is <initialization state5>, <time period>, see the manual pages6 for more
information. Syntax may vary between different UNIX systems.
5 Initialization states are covered in the next section. 6 See page 3-15 for information about using the manual pages

UNIX Fundamentals
1-28
Module 1 Review 1. Explain the purpose of the DISPLAY variable.
________________________________________________________________________
________________________________________________________________________
________________________________________________________________________
________________________________________________________________________
2. Explain the reference to the device /dev/sda3 and how it differs from /dev/sda
________________________________________________________________________
________________________________________________________________________
________________________________________________________________________
________________________________________________________________________
3. What is the purpose of the DOS based utility rawrite ?
________________________________________________________________________
________________________________________________________________________
________________________________________________________________________
________________________________________________________________________
4. How would you change a partition with a file type of ext2 to a file type of SWAP?
________________________________________________________________________
________________________________________________________________________
________________________________________________________________________
________________________________________________________________________
________________________________________________________________________
5. Under what circumstances would the device hda4 be addressable?
________________________________________________________________________
________________________________________________________________________
________________________________________________________________________
________________________________________________________________________

UNIX Fundamentals
2-1
MODULE 2 – UNIX Architecture and Administration

UNIX Fundamentals
2-2
Objectives: After completion of this module, you should be able to:
• Understand boot and run level processes
• Describe inodes and the UNIX file structure
• Understand the term process

UNIX Fundamentals
2-3
Architecture UNIX systems run a number of processes, which are responsible for carrying out various
tasks. The kernel7 is responsible for triggering the first process: init. Each process has a
Process Identification number (PID). Since init is the first process to start its PID is 1.
Red Hat uses the UNIX System V init program which uses run levels. Configuration
information is read in from the file /etc/inittab. The inittab file specifies the
default run level as well as startup and shutdown behaviour.
Run levels There are seven commonly described run levels and each run level denotes a particular
state as shown in Table 1. When the run level changes init will consult inittab to
determine the appropriate action.
Table 1 Red Hat Linux run levels
Run Level Meaning
0 Halt
1 Single user
2 Multi-user, non networked8
3 Multi-user
4 Not used with Linux
5 X
6 reboot
Listing 1 - The inittab file
The following extract shows the contents of a typical inittab file: #
# inittab This file describes how the INIT process should set up
7 More details about the kernel are on page 5-3. 8 This state may vary depending on the UNIX version used.

UNIX Fundamentals
2-4
# the system in a certain run-level.
#
# Author: Miquel van Smoorenburg, <[email protected]>
# Modified for RHS Linux by Marc Ewing and Donnie Barnes
#
# Default runlevel. The runlevels used by RHS are:
# 0 - halt (Do NOT set initdefault to this)
# 1 - Single user mode
# 2 - Multiuser, without NFS (The same as 3, if you do not have
networking)
# 3 - Full multiuser mode
# 4 - unused
# 5 - X11
# 6 - reboot (Do NOT set initdefault to this)
#
id:5:initdefault:
# System initialization.
si::sysinit:/etc/rc.d/rc.sysinit
l0:0:wait:/etc/rc.d/rc 0
l1:1:wait:/etc/rc.d/rc 1
l2:2:wait:/etc/rc.d/rc 2
l3:3:wait:/etc/rc.d/rc 3
l4:4:wait:/etc/rc.d/rc 4
l5:5:wait:/etc/rc.d/rc 5
l6:6:wait:/etc/rc.d/rc 6
# Things to run in every runlevel.
ud::once:/sbin/update
# Trap CTRL-ALT-DELETE
ca::ctrlaltdel:/sbin/shutdown -t3 -r now

UNIX Fundamentals
2-5
# When our UPS tells us power has failed, assume we have a few
minutes
# of power left. Schedule a shutdown for 2 minutes from now.
# This does, of course, assume you have powerd installed and your
# UPS connected and working correctly.
pf::powerfail:/sbin/shutdown -f -h +2 "Power Failure; System
Shutting Down"
# If power was restored before the shutdown kicked in, cancel it.
pr:12345:powerokwait:/sbin/shutdown -c "Power Restored; Shutdown
Cancelled"
# Run gettys in standard runlevels
1:2345:respawn:/sbin/mingetty tty1
2:2345:respawn:/sbin/mingetty tty2
3:2345:respawn:/sbin/mingetty tty3
4:2345:respawn:/sbin/mingetty tty4
5:2345:respawn:/sbin/mingetty tty5
6:2345:respawn:/sbin/mingetty tty6
# Run xdm in runlevel 5
# xdm is now a separate service
x:5:respawn:/etc/X11/prefdm –nodaemon
Syntax of inittab
Anything preceded with the # symbol is a comment. Lines with colons as delimiters have
the following syntax - id:runlevel:action:process: parameters. The first field “id” is a
unique identifier, the second field denotes the run level, the third field denotes the action
and the last field states the process that will run along with any arguments that it takes.
Table 2 shows valid actions for run levels.
Table 2 Run level Actions
Action Description

UNIX Fundamentals
2-6
Respawn Process is restarted when terminated
Wait The process is run and init waits until it terminates
once The process is run once
Boot Process is run during the boot phase
Bootwait The process is run during the boot phase and init waits until it
terminates
Off No action
Ondemand Can be used with ondemand9 run levels but typically not used
Initdefault Sets the default run level for the system
Sysinit Run once during system boot
Powerwait Runs the process when the SIGPWR10 signal is received and waits
until the process terminates
Powerfail Runs the process when the SIGPWR signal is received
Powerokwait Runs the process when the SIGPWR11 signal is received and the text
file /etc/powerstatus contains a string with the characters “OK”.
Ctrlaltdel This process is run when a Ctrl Alt Del sequence (SIGINT signal) is
received.
kbrequest Run whenever a KeyboardSignal is received.
In Listing 1 above the line id:5:initdefault: specifies that the identifier is “id” the run
level is “5” and the default run level is 5 which means that the system will come up in
graphical mode rather than as a command line. Following this line is
si::sysinit:/etc/rc.d/rc.sysinit which uses “si” as the identifier, no run level is specified, the
action is sysinit and the file to be run is /etc/rc.d/rc.sysinit.
The lines following specify which script to run when the run level changes.
9 On demand runlevels are specified as run levels a,b,c but are not really used. 10 Normally sent by UPS software. 11 Normally sent by UPS software.

UNIX Fundamentals
2-7
l0:0:wait:/etc/rc.d/rc 0
l1:1:wait:/etc/rc.d/rc 1
l2:2:wait:/etc/rc.d/rc 2
l3:3:wait:/etc/rc.d/rc 3
l4:4:wait:/etc/rc.d/rc 4
l5:5:wait:/etc/rc.d/rc 5
l6:6:wait:/etc/rc.d/rc 6
To take a specific example if the run level changes to three then the script /etc/rc.d/rc is
run with an argument of 3 passed to it. This then invokes a number of script files which
are normally held in sub directories corresponding to the run level. For example the
directory /etc/rc.d/rc3.d contains scripts which begin with a “K” or an “S”. The K scripts
are KILL scripts and the S scripts are Start scripts. Kill scripts are run with the STOP
argument whereas S scripts are run with the START argument. These scripts are actually
links to other files located in /etc/rc.d/init.d and they start up various services. The
program chkconfig with the list option lists the services and their state within each run
level –
$ /sbin/chkconfig --list
Listing 2 Partial output of the chkconfig command
syslog 0:off 1:off 2:on 3:on 4:on 5:on 6:off
crond 0:off 1:off 2:on 3:on 4:on 5:on 6:off
netfs 0:off 1:off 2:off 3:on 4:on 5:on 6:off
network 0:off 1:off 2:on 3:on 4:on 5:on 6:off
random 0:off 1:off 2:on 3:on 4:on 5:on 6:off
rawdevices 0:off 1:off 2:off 3:on 4:on 5:on 6:off
xfs 0:off 1:off 2:on 3:on 4:on 5:on 6:off
amd 0:off 1:off 2:off 3:off 4:off 5:off 6:off
xinetd 0:off 1:off 2:off 3:on 4:on 5:on 6:off
The next section details the action to take when various shutdown options are
encountered.

UNIX Fundamentals
2-8
After this comes the section for setting up virtual consoles. A virtual console in Linux is
similar to multiple terminals except that the input and output takes place on the same
physical device12. For example a user could be logged in as root on one virtual console
and could then login as a different user on another virtual console. This is useful if a
program is behaving in an unpredictable manner where it “hangs”, it may then be
possible to log in from a different console to investigate or to kill the process. Finally the
X windows Display Manager (xdm) runs at level 5 and is re-spawned if terminated.
It is possible to enter the different run states by typing in init followed by the desired run
state. For example the following command halts the system –
# init 0.
When the system has booted it is then possible to log in and monitor the various
processes that are running by use of the ps command. Listing 3 shows some of the
process states of a typical machine. The switches -e and -f print every process in full
format.
Listing 3 Output of the ps command
$ ps –ef
UID PID PPID C STIME TTY TIME CMD
root 1 0 0 Sep20 ? 00:00:06 init [5]
root 2 1 0 Sep20 ? 00:00:00 [kflushd]
root 3 1 0 Sep20 ? 00:07:13 [kupdate]
root 4 1 0 Sep20 ? 00:00:00 [kpiod]
root 5 1 0 Sep20 ? 00:00:01 [kswapd]
root 6 1 0 Sep20 ? 00:00:00 [mdrecoveryd]
root 61 1 0 Sep20 ? 00:00:00 [khubd]
root 356 1 0 Sep20 ? 00:00:00 syslogd -m 0
root 366 1 0 Sep20 ? 00:00:00 klogd
12 Virtual terminals may be accessed by the key combination <Alt FX> where X corresponds to the virtual
terminal number, for example <Alt F4> to access virtual terminal 4. To access virtual terminals under the X
environment use the key combination <Ctrl+Alt+FX>

UNIX Fundamentals
2-9
rpc 381 1 0 Sep20 ? 00:00:00 portmap
root 397 1 0 Sep20 ? 00:00:00 [lockd]
root 398 397 0 Sep20 ? 00:00:00 [rpciod]
rpcuser 408 1 0 Sep20 ? 00:00:00 rpc.statd
root 423 1 0 Sep20 ? 00:00:00 /usr/sbin/apmd -p 10 -w 5
-W -P
root 474 1 0 Sep20 ? 00:00:00 /usr/sbin/automount --
timeout 60
root 527 1 0 Sep20 ? 00:00:00 identd -e -o
root 531 527 0 Sep20 ? 00:00:00 identd -e -o
root 532 531 0 Sep20 ? 00:00:00 identd -e -o
root 533 531 0 Sep20 ? 00:00:00 identd -e -o
root 534 531 0 Sep20 ? 00:00:00 identd -e -o
daemon 546 1 0 Sep20 ? 00:00:00 /usr/sbin/atd
root 577 1 0 Sep20 ? 00:00:00 xinetd -reuse -pidfile
/var/run/
root 592 1 0 Sep20 ? 00:00:00 /usr/sbin/sshd
lp 613 1 0 Sep20 ? 00:00:00 lpd Waiting
root 661 1 0 Sep20 ? 00:00:00 sendmail: accepting
connections
root 677 1 0 Sep20 ? 00:00:00 gpm -t ps/2
root 825 1 0 Sep20 ? 00:00:01 /usr/sbin/httpd -D
HAVE_DAV -D H
root 848 1 0 Sep20 ? 00:00:00 crond
xfs 933 1 0 Sep20 ? 00:00:00 xfs -droppriv -daemon
root 965 1 0 Sep20 ? 00:00:00 rhnsd --interval 120
root 982 1 0 Sep20 tty1 00:00:00 /sbin/mingetty tty1
root 983 1 0 Sep20 tty2 00:00:00 /sbin/mingetty tty2
root 984 1 0 Sep20 tty3 00:00:00 /sbin/mingetty tty3
root 985 1 0 Sep20 tty4 00:00:00 /sbin/mingetty tty4
root 986 1 0 Sep20 tty5 00:00:00 /sbin/mingetty tty5
root 987 1 0 Sep20 tty6 00:00:00 /sbin/mingetty tty6
root 988 1 0 Sep20 ? 00:00:00 /usr/bin/gdm -nodaemon
root 993 988 0 Sep20 ? 00:00:01 /etc/X11/X -auth
/var/gdm/:0.Xau
root 994 988 0 Sep20 ? 00:00:00 /usr/bin/gdm -nodaemon
gdm 1002 994 0 Sep20 ? 00:00:00 /usr/bin/gdmlogin --
disable-soun

UNIX Fundamentals
2-10
admin 21636 825 0 Sep23 ? 00:00:00 /usr/sbin/httpd -D
HAVE_DAV -D H
admin 21637 825 0 Sep23 ? 00:00:00 /usr/sbin/httpd -D
HAVE_DAV -D H
admin 21638 825 0 Sep23 ? 00:00:00 /usr/sbin/httpd -D
HAVE_DAV -D H
admin 21639 825 0 Sep23 ? 00:00:00 /usr/sbin/httpd -D
HAVE_DAV -D H
admin 21640 825 0 Sep23 ? 00:00:00 /usr/sbin/httpd -D
HAVE_DAV -D H
admin 21641 825 0 Sep23 ? 00:00:00 /usr/sbin/httpd -D
HAVE_DAV -D H
admin 21642 825 0 Sep23 ? 00:00:00 /usr/sbin/httpd -D
HAVE_DAV -D H
admin 21644 825 0 Sep23 ? 00:00:00 /usr/sbin/httpd -D
HAVE_DAV -D H
root 8194 577 0 11:55 ? 00:00:00 in.telnetd:
ajohnson.xelsys
root 8195 8194 0 11:55 pts/0 00:00:00 login -- ajohnson
ajohnson 8196 8195 0 11:55 pts/0 00:00:00 -bash
ajohnson 9531 8196 0 15:31 pts/0 00:00:00 -sh
ajohnson 9573 9531 0 15:36 pts/0 00:00:00 ps –ef
The meaning of the fields is shown in Table 3.
Table 3 Process State fields
Field Description
UID The User Identification of the owner of the process
PID The ID of the process
PPID The ID of the Parent Process
C Used by the scheduler to compute execution priority
STIME Time or date that the process started
TTY Terminal port that is associated with the process
TIME Amount of CPU time used
CMD Command line that is being executed

UNIX Fundamentals
2-11
Looking at the last two lines of the output. The owner in both cases is ajohnson, the ID of
the processes is 9531 and 9573. The last process has a parent ID of 9531 which shows
that the preceding process (PID of 9531) started it. The process 9531 started at 15:31 and
the process 9573 started at 15:36. Neither process consumed any significant amount of
CPU time and the last process invoked the ps command.
UNIX Processes In UNIX a process is an instance of an executing program. When a command is executed
that command becomes a process.
$
$ cat files.txt
$
The command cat generates a process that lives until the cat command completes while
the example below creates two separate processes.
$
$ cat /etc/passwd | wc
$
UNIX will switch between processes in turn giving the impression that each user has
their own separate CPU. Processes usually have equal priority but user’s can lower their
process’s priority by using the nice command.
#
# nice -12 cat * > files.txt
#
This command reduces the priority of the processes by 12, the numbers that nice can use
range from 0 to 19. The Superuser can pass a negative number thus raising the priority:
# nice --11 cat *
Normally nice would be used for background processes. A background process is a
command that executes for you in the background whilst allowing you to still enter
commands at your terminal. These processes are invoked by adding an ampersand
character (&) at the end of each command.
# nice ps -e &

UNIX Fundamentals
2-12
The UNIX File System Within UNIX devices are mounted to a central file system. Unlike Microsoft based
Operating Systems where each filesystem appears on separate devices such as C:, D: etc,
devices are mounted on directories within a single file system. For example you could
make a top level directory called SCSI_Disk_1 for example and mount a disk on this
mount point, we would then access this disk via the directory /SCSI_Disk_1.
Figure 37 UNIX Directory Structure
NFS NFS was first released in the mid eighties by SUN Computer Systems. Its licensing
policy has led to implementations being available for the VMS, MVS and Microsoft
based Operating Systems, thus promoting heterogeneous file sharing. It provides
transparent file sharing and is independent of any particular protocol. Performance has
been enhanced by the use of caching and read-ahead algorithms. Data integrity is handled
by the use of locks between client and server processes, which eliminates concurrent file
access issues. Highly Available implementations of NFS are available running on fault
tolerant hardware to further enhance system reliability.
Root Directory
/
dev bin etc SCSI_Disk_1
init

UNIX Fundamentals
2-13
Setting up NFS
An NFS server exists to allow its own files to be accessed by other client machines. It
achieves this with the aid of a file called exports that resides in the /etc directory. This file
lists the directories and files that can be shared (exported) to clients. It also lists the type
of access allowed. An example of this file is shown below:
$ cat /etc/exports
/usr/aj Minerva (rw) (ro)
/usr/salesdept Aphrodite (rw) (ro)
/usr/ceo alpha (rw)
In this example the client Minerva has read and write access to the directory /usr/aj
located on the host machine and all others have read only access. Client Aphrodite has
read and write access to the directory /usr/salesdept and all others have read only access.
Finally alpha is the only client that is allowed to access the directory /usr/ceo with read
and write access.
The clients access the remote directories by issuing the mount command. Assuming that
the NFS server is a host named omega and the client alpha wishes to access the directory
/usr/ceo on Zeus by mounting it on its own local directory /mnt/remote, the syntax is:
# mount omega:/usr/ceo /mnt/remote
It is the presence of the hostname in the command line that identifies it as an NFS server.
Inodes
In UNIX the files are stored on disk along with a table of information relating to the files.
This table is known as the inode table. A directory in UNIX contains the name of the
files present in that directory along with their inode numbers. When the ls command is
issued, the attributes relating to the particular files are retrieved from the inode table and
not from the directory.

UNIX Fundamentals
2-14
To view the inode number of a file use the command ls –i. Block sizes under UNIX are
usually 512 bytes or 1024 bytes in length though larger sizes may sometimes be used.
Figure 38 inode table
Inode table
54 test.c attribute
55 null
56 a.txt attributes
57 test.out attributes
Directory
Filename inode
a.txt 56
test.c 54
test.out 57
File links
Links are pointers to other files and are similar to shortcuts found on Microsoft systems.
Links can be hard or symbolic.
Hard Links
An example of a hard link is shown in Figure 39. In this case the files myfile1 and
myfile2 both have directory entries but both point to the same inode entry. The inode
entry will only point to null (no reference) when all files referencing it have been deleted.

UNIX Fundamentals
2-15
Figure 39 Example of a file hard link
Inode table
54 test.c attributes
55 null
56 a.txt attributes
57 test.out attributes
Directory
Filename inode
a.txt 56
test.c 54
test.out 57
myfile2
myfile1 202 myfile1 attributes
202
202
Change the working directory to /etc/rcd.d.rc5.d and perform a long listing.
# cd /etc/rcd.d/rc5.d
# ls –l
Note that the file S80sendmail is listed as S80sendmail
../init.d/sendmail. This signifies the presence of a link, the file S80sendmail
actually points to the file ../init.d/sendmail. Figure 40 shows how this works.

UNIX Fundamentals
2-16
Figure 40 Symbolic link example
Inode table
54 test.c attributes
55 null
56 a.txt attributes
57 test.out attributes
Directory
Filename inode
a.txt 56
test.c 54
test.out 57
S80sendmail(A small filepointing to
another file)
sendmail 202 sendmail attributes202
Symbolic links are more powerful than hard links, hard links cannot point to directories
or traverse13 file systems. The advantages of links are that they consume less disk space
since unique copies of files are not necessary and that they provide ease of reference. For
example it may be easier to specify a command such as mount /dev/cdrom .. than to work
out which controller the cdrom is connected to. By setting up a link from /dev/hdx to
/dev/cdrom during the initial installation the administrator is relieved of this burden
everytime they want to mount the cdrom from different machines which may have the
cdrom on different controllers.
The syntax of the link command is ln [options] <file> <link to file>
The following command creates a hard link from myfile2 to myfile1.
$ ln myfile1 myfile2
A symbolic link is created by the-s option –
$ ln –s myfile1 myfile2
Note: Administrators must also give consideration to backing up files, if the files are
restored to a different machines, links may be pointing to inaccessible files.
13 Identical inodes cannot be guaranteed across file systems since the inode may already be in use on the remote
device or not even exist.

UNIX Fundamentals
2-17
Note: Hard links share inode numbers, symbolic links do not.
Limiting file sizes
It is possible to limit the size of files via the ulimit command.
$
$ ulimit 1000 ; restricts file sizes to 1000 blocks
$
The amount of disk free space may be shown by use of the df (disk free) command.
Monitoring disk space
$
$ df/ (/dev/dsk/0s1 ): 76000 blocks 11011 inodes
$
In this example there are 76000 blocks free and there is enough room for 11011 more
files. The du command reports on space used within individual directories rather than the
file system as a whole.
$ du /mnt/disk1
1004 /mnt/disk1/bin
890 /mnt/disk1/usr
1200 /mnt/disk1
Creating file systems
Communication with devices is achieved via device files that name the device type. Disk
devices are normally accessed as block type devices for mountable disk types and
through /dev/rdsk for raw devices. Devices such as terminals are character devices
When formatting devices use the raw device as no file system exists.
File systems are made by the mkfs command. One version of UNIX creates a file
structure on floppy disk 0 with a capacity of 2400 blocks by the use of the following
command.

UNIX Fundamentals
2-18
#
# mkfs /dev/rdsk/f0q15dt 2400
#
Here the inode number has not been specified and it normally defaults to one quarter of
the total number of blocks on the disk. The next example specifies that we would like an
inode count of 500:
#
# mkfs /dev/rdsk/f0q15dt 2400:500
#
If the inode count is decreased more disk space becomes available, however make sure
that the inode count is adequate as this value cannot be changed later. Linux uses variants
of mkfs such as mk2fs which uses the ext2 file system.
File system checking The File System Consistency Check program fsck is used to check the status of disks. It
should not be used on mounted file systems. It may be invoked automatically by the
system following an improper shutdown or run by the user. There are a number of phases
which check various parts of the file system. Errors can be repaired by answering <y> to
the prompts. The format of fsck is:
# fsck –F <filesystem> option.
UNIX Signals Signals may be sent to other processes. These signals specify certain actions. Sometimes
the administrator may wish to kill a process that has gone astray:
#
# kill 3800
#
This command sends signal 15 to the specified PID, which requests the process to
gracefully commit suicide. If the process does not comply the administrator may
“murder” the process by sending signal 9.:
#
UNIX Fundamentals
2-19
# kill -9 3800
#
Refer to the UNIX documentation for further information about the various signals.
Users and Permissions In user there is an account – root that is known as the Superuser . This account should be
used with care as there are few restrictions imposed so it is possible to render the system
useless with this account. In general root is only used for administration purposes. It is
possible to invoke the su command prior to running another command. This will allow
the user to temporarily change their login status to root. If su is issued with a username
such as su – ajohnson then it will default to the ajohnson environment so su by itself is
equivalent to the command su – root.
Excluding root , there are 3 categories of user:
• USER The owner of the file
• GROUP Anyone in the same group as the user
• OTHER Anyone not in either of the above 2 categories.
Each category may have permission to:
• Read files
• Write files (or delete)
• Execute files
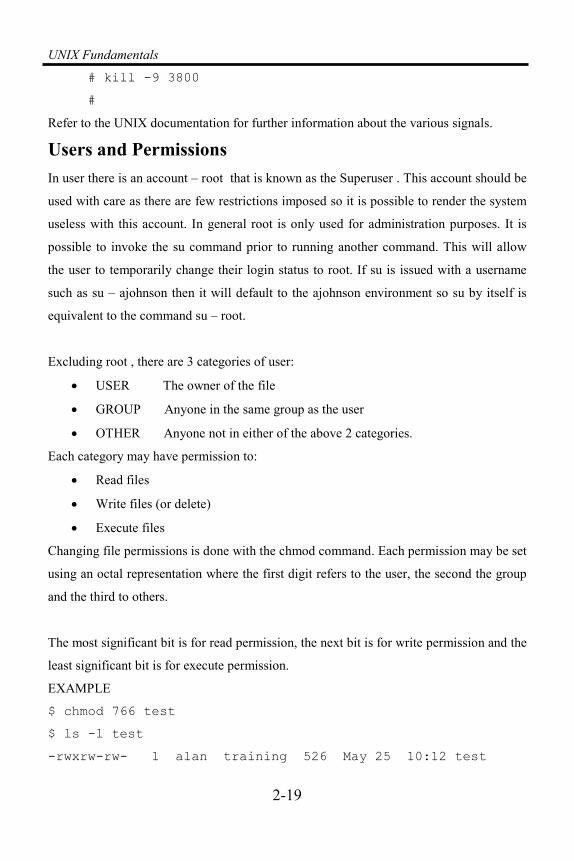
Changing file permissions is done with the chmod command. Each permission may be set
using an octal representation where the first digit refers to the user, the second the group
and the third to others.
The most significant bit is for read permission, the next bit is for write permission and the
least significant bit is for execute permission.
EXAMPLE
$ chmod 766 test
$ ls -l test
-rwxrw-rw- 1 alan training 526 May 25 10:12 test

UNIX Fundamentals
2-20
$ chmod 777 test
-rwxrwxrwx 1 alan training 526 May 25 10:12 test
It is possible to change your default file permissions e.g. to allow you to set up
permissions the way you want them with each new file that you create. Note that you can
only turn off permissions that are normally on, you cannot turn on permissions normally
off. This is done with the umask command.
$
$ umask 027
$
027 inverted = 75014 =
USER:READ WRITE EXECUTE GROUP: READ EXECUTE OTHERS: The command chown is used to change the ownership of a file:
$
$ chown brian test
$
Note: You must be the owner of the file in question for this command to work.
The command chgrp is used to change the group to which a file belongs:
$
$ chgrp training notes
$
Note It is also possible to change file permissions by the following syntax rather than as
octal digits:
$ chmod go+wx file.txt
This example gives the group and owner write and execute permission to a file.
14 Convert the octal numbers to binary to see this more clearly - (027 Octal = 000010111Binary) (750 Octal =
111101000 Binary)

UNIX Fundamentals
2-21
SUID bit
Many commands can be run as the Superuser as they automatically invoke the correct
privileges for the duration of the process. This is done using a permission bit called Set
User ID (suid) and Set Group ID (sgid). If these bits are clear then the process runs with
the same privileges as the user that invoked the command whereas if the bit is set then the
process runs with the owner’s permission. So if the file is owned by user root then the
process will execute with root’s permissions. The suid and sgid bits replace the
executable flag in the user and group sections of the permission field.
Job scheduling It is possible to queue jobs for running at a later time by use of the at command. The next
few examples show different formats of this command: $
$ at 11:15 < script.file ;commands held in script.file are
executed at 11:15
job 756864000.a at Wed Dec 14 1994 ; job id is no. of secs since
1970.
# at 17 < script ; command is executed at 17:00
# at 5pm < script ; command is executed at 17:00
# at noon < script ; command is executed at noon
# at 3:00pm Jun 20 < script ; command is executed 15:00 Jun
20th
# at 4:00pm + 4 months < script; command is executed 4 mths after
4:00
# at -l ; lists jobs in the queue
# at -r 756864000.a ; removes the specified job.
A similar command to at is batch. This command will schedule the job to run when the
system load is low enough. The format is as follows:
# batch < script

UNIX Fundamentals
2-22
The command at -r may also be used to remove batch jobs provided that they have not
yet started.
Security considerations for queued processes are normally set up in the directory
/usr/lib/cron, at.allow maintains a list of user ids who are allowed to use at and batch.
at.deny is checked if at.allow is not present to see if the user is denied access. To allow
access to all we would delete at.allow and ensure that at.deny is empty. If we wish to
deny access to all but the Superuser we would delete both at.allow and at.deny. The
scheduling used by at and batch is done by using the services of a scheduler called cron
(chronograph). It is possible to see cron by invoking ps at the system prompt. Even
though cron is an executable file it should only be invoked at boot time. Some versions
of UNIX use different names than cron.
Log files are kept which allow the user to examine when the jobs commenced along with
the command strings that started them
System Administration To perform system administration tasks there is normally a special login id - root . This
gives the user Superuser privileges, which will allow system management functions to be
performed. It is best not to use the root account for normal user access as it allows
potentially destructive commands to be executed.
Although most management functions can be performed manually there are usually a
number of shells provided to allow these tasks to be performed via menus.
Examples of system management tools available under some UNIX systems are:
• sam (HP)
• smit (RS 6000)
• admintool (SUN- Solaris)
• linuxconf Linux

UNIX Fundamentals
2-23
Usually these tools allow the administrator to add and modify users, install printers and
configure new disk devices.
The following text shows the initial screen of the SMIT Utility running on an RS/6000
using AIX Version 3.2
Figure 41 Using SMIT on AIX V3.2
Remote commands
Most UNIX systems are networked the following commands are often used by
administrators:
• rcp
• rsh
• telnet
Remote copying is achieved with the rcp command, for example to copy all files
from the current directory on the local machine to a directory /home/user on the
remote system alpha use:
$ rcp * alpha:/home/user
Move cursor to desired item and press enter
SSSoooffftttwwwaaarrreee IIInnnssstttaaallllllaaatttiiiooonnn aaannnddd MMMaaaiiinnnttteeennnaaannnccceee Devices
Physical and Logical Storage
Security and Users
Diskless Workstation Management and Installation
Communications applications and services
Spooler (Print Jobs)
Problem Determination
Performance and Resource Scheduling
System Environment
Processes and Subsystems
Applications
Using SMIT (Information Only)

UNIX Fundamentals
2-24
To copy files from a remote system to the current directory on the local machine use:
$ rcp alpha:/home/user/* .
The remote shell command allows commands to be executed on a
remote machine, for example to look at the processes running on a
remote machine alpha use: $ rsh alpha: ps –eaf
To enable these and other remote commands –
1. Verify that these system services are set up using the ntsysv command –
nfs, rexec, rlogin, smb, swat and rsh.
2. Check that the following files rexec, rsh, rlogin in /etc/pam.d/
have the word optional rather than required.
3. Check that the files rsh, telnet and rexec in /etc/xinetd.d have
the disable option set to no.

UNIX Fundamentals
2-25
Module 2 Review 1. Examine the file /etc/rc.d/rc.sysinit and describe how swap space is
enabled.
________________________________________________________________________
________________________________________________________________________
________________________________________________________________________
________________________________________________________________________
________________________________________________________________________
2. What command would you use to set up a file for the following permissions
User : Full access, Group : Read and Write access, Others :
No access
________________________________________________________________________
________________________________________________________________________
________________________________________________________________________
________________________________________________________________________
________________________________________________________________________
3. When running a command in Linux you find that it has “hung”. Describe how you
would proceed.
________________________________________________________________________
________________________________________________________________________
________________________________________________________________________
________________________________________________________________________
________________________________________________________________________
4. What is the purpose of cron ?
________________________________________________________________________
________________________________________________________________________
________________________________________________________________________
________________________________________________________________________
________________________________________________________________________

UNIX Fundamentals
3-1
MODULE 3 – UNIX Commands and Utilities

UNIX Fundamentals
3-2
Objectives: After completion of this module, you should be able to:
• The UNIX CLI
• Understand the concept of environment variables
• Write basic shell scripts
• Run a wide range of utilities

UNIX Fundamentals
3-3
Using the System When the system has initially booted local users are presented with the log on screen,
remote users gain access by using telnet or ssh15 to the machines hostname or IP address.
On Linux systems, this screen will be a fully featured login dialog box if the default run
level is set to 5 on Linux systems or a simple command prompt if the run level is at 3.
Enter16 the user name when prompted followed by the password. If the default
environment is run level 3 then the windows system can be entered by typing in the
command: startx provided that it has been properly set up as described on page 1-23.
The file /etc/profile contains the default operating environment for the user. This will
include the default shell. Linux systems tend to use the bash shell whereas many users
use the cshell under Solaris. The default prompt for ordinary users is $ for bash and % for
Solaris csh users. The Superuser (root ) uses the prompt # to differentiate themselves.
Shutting down Shutdown can be invoked by the shutdown command, it is customary to give users a
grace period prior to shutdown with the –t switch. Another variant is
# shutdown –h now17
which performs an immediate shutdown.
# shutdown –i0 now
Shuts the system down into init state 0.
15 Later versions of Linux prefer secure shell (ssh) over telnet for security reasons. 16 NOTE: Be aware that UNIX systems are case sensitive so username/password combinations are no different
in this respect from commands, which are also case sensitive. 17 This is similar to $init 0 which brings the system down to initialization state 0.

UNIX Fundamentals
3-4
The UNIX Shell UNIX systems feature a Command Line Interpreter(CLI) that allows commands to be
executed, variables to be defined, loop constructs to be invoked and a number of other
features. In UNIX commands are case sensitive. Programs are run using shell scripts. The
most popular shells are sh(Bourne Shell), ksh (Korn Shell), csh (C shell) and for Linux
bash ( Bourne again shell). Under UNIX the kernel remains resident in memory whilst
the utilities remain on the disk and are brought into memory when required.
UNIX System
Memory Disk
(Kernel) (Utilities)
The sequence of events when running utilities is:
1. User types in command.
2. Command is brought in from the filesystem into memory.
3. Command is executed.
The shell itself is a utility. The responsibilities of the shell include:
1. I/O redirection
2. Environment control
3. Interpreted command language
4. Variable substitution/Wildcarding
When the user logs in to a system the shell is normally executed at this time.
Program Execution 1. User types in command line (program name, arguments)
2. Shell analyses the command line
3. Shell executes the command

UNIX Fundamentals
3-5
Shell programming examples The following set of brief examples use the Linux bash shell. Syntax may vary if other
shells are used. The intent is to show the syntax and it is left to the user to generate more
useful scripts.
This first example involves redirection. Redirection sends the output to somewhere other
than the default device18. The script below redirects the output to a file other than the
screen.
echo "This is an example of a shell script"
ls -ial > dirlist
If >> is used then the output will be appended to a file if it exists.
The following example shows piping in operation. The output of one command can
become the input of another command. This script shows the output of the cat command
being fed into the sort utility.
$
$ cat file.txt | sort
$
The shell has its own built in command language which allows for simple decision and
loop constructs using if, while and for.
Another useful feature of the shell is command line completion, if there is a long file or
directory name such mylongdirectoryname then it is possible to enter cd my and
then hit the TAB key. Provide that there is no ambiguity the system will complete the
command to read cd mylongdirectoryname automatically.
The next example shows the use of variables within a for loop.
Shell script 1
18 This is normally referred to as stdout and will usually be the screen.

UNIX Fundamentals
3-6
echo 'This is Shell script 1'
for i in 1 2 3 4 5
do
echo $i
done
Output
This is Shell script 1
1
2
3
4
5
The following example shows the effect of single quotes around a text string.
Shell script 2 echo 'This is Shell Script 2'
echo One Two
echo 'One Two'
Output
This is Shell Script 2
One Two
One Two This example differentiates between single and double
quotes
Shell script 3
echo 'This is Shell Script 3'
x=*
echo $x
echo '$x'
echo '\$x'
echo "\$x"

UNIX Fundamentals
3-7
Output
This is Shell Script 3
INSTALL dirlist dos filelist linux shell1 shell1.out shell2
shell2.out shell3 shell3.out shell4 shell5
$x
\$x
$x
The next example shows a command being passed within the shell. The file filelist
contains the lines ls & du; and illustrates the use of backquotes. Note a real life example
is shown on page 5-16 where the command will automatically resolve the kernel name
and work with all kernel versions.
Shell script 4
echo 'This is Shell script 4'
files=`cat filelist`
for file in $files
do
$file
done
Output This is Shell script 4
INSTALL
dirlist
dos
filelist
shell4
shell4.out
shell5
4 ./.term
14 ./.seyon
42 .

UNIX Fundamentals
3-8
Another method of producing the same output as the previous example is shown below:
Shell script 5
echo 'This is Shell Script 5'
for file in `cat filelist`
do
$file
done
This next example shows a simple script which will copy files from one directory to
another and prints out the pass count:
Shell script 6
#! /bin/bash
echo Simple test script to repeatedly copy files
mkdir $HOME/test
# Change the variable 'count' below to reflect the number
of passes
count=100
i=0
while [ $i -lt $count ]
do
i=`expr $i + 1`
cp -v /bin/* $HOME/test
chmod 777 $HOME/test/*
rm $HOME/test/*
echo Pass # is
echo $i
sleep 5
done
rmdir $HOME/test

UNIX Fundamentals
3-9
The first line of the script (#!) tells the system to use the bash shell. Two variables are
used – count which sets the upper bound for the number of times that the loop will be
executed and i which is the index number that is incremented through each pass.
The next listing shows the use of the trap construct. Although this example is trivial it can
be used to generate more powerful actions.
Shell script 7
#! /bin/bash
echo Simple test script to repeatedly copy files
mkdir $HOME/test
# Change the variable 'count' below to reflect the number
of passes
trap "echo Program Aborted; exit" 2
count=100
i=0
while [ $i -lt $count ]
do
i=`expr $i + 1`
cp -v /etc/* $HOME/test
chmod 777 $HOME/test/*
rm $HOME/test/*
echo Pass # is
echo $i
sleep 5
done
rmdir $HOME/test
Normally the shell is set up at login time but it is possible to execute another shell
process during a session. When a user logins to the system two scripts are executed
–/etc/profile ; sets up the global environment
–.profile ; sets up a customized environment

UNIX Fundamentals
3-10
The .profile file is normally hidden from the user because of the leading dot character but
can be displayed by using the ls-a command. Typically a user would define their path
here. The path is a list of directories that are to be searched whenever a command is
typed in. There are usually commands relating to the terminal type as well as any
customized scripts that the user would like to execute such as the notification of Mail
messages. The standard shell (Bourne) lacks more sophisticated features such as
command history and aliasing. More advanced shells such as the Korn shell and the C
shell have all the functionality of the Bourne shell along with these advanced features.
As a consequence of this many users call these shells from within their .profile scripts.
The most common shell used in Linux systems is bash. In the case of the C shell there is
a further hidden file .cshrc which controls the C shell environment. Linux sets up a
.bash_profile file for use with the bash shell and also uses the file /etc/bashrc.
Environment Variables
When a command is executed in UNIX it has access to a number of Environment
Variables, which convey information to that command. Examples of this are PATH and
TERM. PATH is the environment variable that tells us where to look for commands.
The environment variable TERM is used to tell the screen editor how to issue screen
formatting commands. The command env is used to display the environmental variables
known to the system. An example is shown below:
$
$ env
LOGDIR=/home/aj
HOME=/home/aj
SHELL=/usr/bin/sh
LOGNAME=aj
TERM=ansi
PATH=/home/aj:/usr/bin:/usr/X/bin
$
Another example:

UNIX Fundamentals
3-11
$
$ username = $LOGNAME
$ echo $username
$
Note: Without the $ in front of username we would not have interpreted username as a
variable and instead we would have simply printed out the string “username”.
If we wish to pass these environment variables via a shell script to child processes they
must be exported using the export command:
$
$ TERM=ansi
$ export TERM
$
Note: We can only export to sub processes, we cannot export back upwards.
We normally put our environment variable definitions in the .profile script. This script
file will be executed first in the chain but if subsequently we wish to make changes to
.profile and test them we will have problems. Running the .profile script will now be
executed within its own subshell and changes will not be propagated back. There is a
special command the dot command (.), which will cause a script to be executed by the
current shell. In this way no sub shell is created and changes will be reflected to the
current shell.
$
$ sh .profile ; changes only valid in this subshell
$
$
$ . .profile ; changes valid to current environment.
Consider the following example:
$ pwd
/home/ajohnson
./changedir
$ pwd

UNIX Fundamentals
3-12
How does the system respond if the file changedir contains the following line?
$ cd /bin
EDITING UNDER UNIX Editors normally found in UNIX systems are:
ed (Line oriented)
sed stream editor)
vi (Full screen editor) emacs (Full screen editor)
vi is the most extensively used editor and there are three modes of operation which are
input, command and last line. Some of the more common editing keys are shown below:
ENTER INPUT MODE
i insert (before cursor) a append (after cursor)
I insert at start of line A input at end of line
o open line below O open line above
CURSOR MOVEMENT
l move one space right h move one space left
j move one line down k move one line up
$ move to end of line ^ move to start of line
DELETION KEYS
dw delete word dd delete line
x delete character D delete to end of line
SCREEN MOVEMENT
Ctrl-d scroll forward Ctrl-u scroll back
Ctrl-f next screen Ctrl-b previous screen

UNIX Fundamentals
3-13
LAST LINE MODE
:w write file :! escape to shell
:q quit :wq write file and quit
SEARCH COMMAND
/
File Manipulation Commands To show the current directory that a user is working in use the command pwd
Example:
$
$ pwd
/usr/aj/training
$
To change our working directory from /usr/aj/training to /dev/tty we would
use the following command:
$ cd /dev/tty
Specifying a directory in this way is using absolute path names. We can also specify
relative pathnames.
$ pwd
/usr
$ cd aj
$ pwd
$ /usr/aj
We could also have reached /usr/aj by the command cd /usr/aj but because aj was a child
of /usr and our working directory was /usr we were able to specify a relative pathname.
Some Useful Utilities grep may be used to perform string searches:
$
$ grep aj namelist ; displays lines containing
the string aj

UNIX Fundamentals
3-14
aj Alan Johnson ; in the file namelist.
$
$ grep -c washer invfile ; displays a count of the number
lines with the string washer.
$
find is used to locate files within a file system
$
$ find . -name aj –print ;searches for the filename aj
/usr/training/aj$
$ find ./ -size +50 -print ;prints out all files > 50
blocks
pg is used to present information one screenful at a time.
tail is used to display the last 10 (default) lines of a file.
$
$ tail -5 course.notes ; displays the last 5 lines of
the file course.notes
$
$ tail-50c /usr/aj/memo.txt ; displays the last 50
characters of the file
stty is used to set up your terminal. stty -a will display your terminal’s
characteristics.
$
$ stty 1200 ; sets baud rate to 1200
$ stty sane ; restores “normal settings” to terminal
Try the following commands to see what happens:
Note: <CR> = Carriage Return ^d = End of file
$ sort <CR> 4<CR> 5<CR> 7<CR> 1<CR> 2<CR> ^d
$ cal
$ date
$ banner Hi There

UNIX Fundamentals
3-15
$ bc
$ dc <CR> 2<CR> 3<CR> +<CR> p<CR>
Exercise : Use the sort command to sort the contents of a file.
Use the calendar command to print out a calendar for the current year.
Getting Help Help under UNIX is obtained via the man command that is basically online
documentation from the manual pages. There are a number of sections, which are as
follows:
1. Command and application programs
2. System Calls
3. Subroutines
4. File Formats
5. Miscellaneous
6. Games
7. Special files
8. System Maintenance Procedures.
The same command may appear in more than one section such as the user command
being found in section 1 and the developer’s system call shown in section 2.
The format is as shown:
man [section] command name
An example is:-
$
$ man stty
. . . ; Manual text.
$
Another way of getting help with the various utilities is to type in an illegal switch:
$ cp -Z
usage cp [-ip] f1 f2;
$

UNIX Fundamentals
3-16
Use the -k option with the man command if you are unsure of which commands relate to
a particular area. This option is similar to apropos found in BSD systems, a partial output
is shown below:
$ man -k terminal
clear (1) - Clear terminal screen
cmdtool(1) - Run a shell (or other program) in an
OpenWindows enhanced terminal window
console (4) - Console terminal
ctermid (3) - Get controlling terminal name
curses (3) - System V terminal screen handling and
optimization package
getty (1) - Sets terminal mode, speed, and line discipline
hunt (6) - A multi-player multi-terminal game
isatty (3) - Does this descriptor refer to a terminal
kermit (1) - File transfer, management, and terminal
connection
last (1) - Indicate last logins by user or terminal
mesg (1) - Control write access to your terminal
ncurses (3) - Terminal-independent screen management
package
reset (1) - Reset the terminal
resize (1) - Utility to set TERMCAP and terminal settings
to current window size
xterm (1) - Terminal emulator for X
Linux users can also use the info command.

UNIX Fundamentals
3-17
UNIX Utilities Quick Reference The following table lists some of the more common commands used.
Command Description Example Comments/Hints cat Sends the
contents of a
file to the
output device
cat
$HOME/aj.txt
Prints the contents of
the file aj.txt on the
screen
chdir Changes the
default
directory
chdir /usr Changes the current
directory to /usr
chmod Changes the
file
permissions
chmod 777 Changes the permissions
so that all users can
read, write and execute
cp Copy command cp file1.txt
file2.txt
Makes a copy of
file1.txt and calls the
new file file2.txt
cpio Copys raw
data to and
from archives
ls | cpio –o
>/dev/fd0u1440
Archives data to a
floppy diskette on a
Linux system
df Reports on
disk free
space
df Shows used and available
blocks for each mounted
file system
du Shows how
much disk
space is used
du Reports usage on current
directory and all sub
directories, unless the
directory name is given
as an argument
echo Outputs to
screen
echo Linux is
cool
Often used to print out
the value of Environment
variables such as echo
$PATH
env Prints out
environment
env To get an alphabetical
listing pipe the command

UNIX Fundamentals
3-18
variables into sort –
env | sort
exit Leaves a
session
exit Used to logout from a
command environment or
to close a text
application such as
xterm
export Makes
variables
available to
child
processes
TERM=ansi
export TERM
Using the export command
by itself causes a list
of exported variables to
be printed.
find Locates files
within
particular
directories
find $HOME –
find / -name
aj.txt -print
Searches sub directories
so can be combined with
other commands such as
cp to copy entire sub
directories
grep Finds text
strings
grep Hello * Searches for the string
Hello in all files
history Displays
previously
entered
commands
history History and recalling
commands can vary with
shell usage
kill Stops a
process
kill – 9 2020 Kills off the process
with a pid of 2020
less Outputs a
page at a
time
Less file.txt Similar to the more
program but more
powerful, allows
backward as well as
forward movement Less is
More!
ls Lists
directory
contents
ls –l
ls -a
Prints out a (l)ong
listing of files in the
current directory,

UNIX Fundamentals
3-19
prints out (a)ll files,
including hidden ones.
mkdir Makes a
directory
mkdir aj Makes a directory called
aj as a subdirectory of
the current directory.
more Outputs a
page at a
time
more
history.txt
ls –l | more
Often used to control
the output of other
programs
mount Makes a
filesystem
accessible by
mounting it
within the
root
filestructure
mount
/dev/hda1/aj
/users/aj
Devices can be
automatically mounted at
boot time by entries in
the file /etc/fstab
mv Renames a
file
mv aj.txt
aj.old
(M)oves a file to
another destination
passwd Changes a
user’s
password
passwd If no user is given then
the default is the
current user
ps Shows the
state of
running
processes
ps -ef
ps –eaf | grep
kde
Prints a (f)ull listing
of (e)very (P)rocess
(S)tate.
Looks in the process
table for the string kde
pwd Shows the
default
directory
pwd (P)rints (W)orking
(D)irectory
rm Deletes files rm aj.txt ( R)emoves files
rmdir Deletes
directories
rmdir /usr/aj ( R)emoves
(D)irectories
set Prints out
the current
environment
set Use to look at the PATH
etc.

UNIX Fundamentals
3-20
variables
su Gives the
user Super
user
privileges
su Requires knowledge of
the Superuser password
tar Tape Archive
program
tar –cf
/dev/fd0u1440
/users/aj
tar –xf
/dev/fd0u1440
The first command
archives the files from
the directory specified
and all sub-directories
below it to the
diskette. The second
command restores the
files from the diskette.
umask Set default
file
privileges
umask 777 Set the default
privileges to be read,
write and execute for
all users
umount Dismounts a
mounted file
system
umount
/dev/hda1
Removes the device hda1
from the file structure
wall Sends a
broadcast
message
contained in
the file
specified
wall < shout (W)rite to (All) users -
the file shout contains
the text that is to be
sent
who Shows who is
logged in to
the system
who Used for administration
purposes
whoami Returns the
user name
associated
with the
session
whoami Useful when an
administrator is logged
in multiple times under
their own account and as
root

UNIX Fundamentals
3-21

UNIX Fundamentals
3-22
Module 3 Review 1. Write a shell script to provide a full sub directory search facility, which looks
for a string of characters in the current directory and all child directories below it.19 ________________________________________________________________________
________________________________________________________________________
________________________________________________________________________
________________________________________________________________________
________________________________________________________________________
2. How would you see the order in which directories are searched when a command is
issued?
________________________________________________________________________
________________________________________________________________________
________________________________________________________________________
________________________________________________________________________
________________________________________________________________________
3.How would you preserve the contents of a file when redirecting output to that file and
investgate the command tail -f
________________________________________________________________________
________________________________________________________________________
________________________________________________________________________
________________________________________________________________________
4. What is the effect of the command cd /../.. ?
________________________________________________________________________
________________________________________________________________________
________________________________________________________________________
________________________________________________________________________
________________________________________________________________________
19 Hint – Use the output of one command to pipe into another command

UNIX Fundamentals
4-1
MODULE 4 - Introduction to Solaris

UNIX Fundamentals
4-2
Objectives: After completion of this module, you should be able to:
• Understand how Solaris “plays” with Intel and SPARC machines
• Describe the console boot options, Solaris run levels and how to stop the system.
• Configure storage devices
• Use the tip utility and look at crash dumps

UNIX Fundamentals
4-3
Solaris and UNIX The current version of Solaris is version 10. Solaris runs on top of SunOS which provides
kernel services. Solaris is based on both BSD and AT&T SystemV and runs on both
SPARC and Intel platforms. It is POSIX compliant. Versions20 of SPARC Solaris are
available from Sun’s website. The SPARC version is at www.sun.com/solaris/binaries/
and the Intel version is at www.sun.com/software/intel/get.html.
20 At this time of writing the SPARC version is freely downloadable whereas the Intel version carries a small
nominal charge.
UNIX Fundamentals
4-4
Installing Solaris There are four commonly used methods to install Solaris:
• Web Based
Uses Java to install using a Graphical User Interface, this method is used for
initial installations rather than upgrades.
• Interactive
This method gives a greater degree of control than the Web based one. It
can also be used to upgrade and preserve existing files.
• Network
A network installation can be used on stations that do not have CDROMS
connected or as a remote install.
• Jumpstart
This is a script-based method, which can be used to install Solaris on multiple
machines.
During the installation the user will typically be prompted to supply the following
information:
• Install or Upgrade?
• Format the disk?
• Swap size?
• Supply Network Parameters
• Power Management on or off ?
• Default or Custom install ?
• Disk Partitioning ?
The methods will differ slightly between Intel and SPARC systems. The system may
require various reboots during the installation. The best way to learn about the installation
process is to perform an actual installation21.
21 This is one of the workbook exercises.

UNIX Fundamentals
4-5
Boot Prompt Options There are two basic ways of communicating with a SPARC system prior to the loading of
the Operating System:
• Console Port – via a serial null modem cable.
• OK Prompt from the keyboard
To use the serial port22 connect up a terminal such as a VT100 or use a terminal
emulation program such as HyperTerminal which is available on Windows 2000
Systems. A list of the current boot option states can be printed out using the command
printenv. Useful options here are the ability to set up automatic booting and the boot
device. The type of boot process can also be specified:
• boot –s Boots in single user mode
• boot cdrom –s Boots a bootable CDROM
• boot –a Boots in Interactive mode, allows
different kernels to be booted etc.
• boot –r Re-configuration boot, checks new
devices and rebuilds the /dev and /devices
directories.
• boot –d Diagnostic boot
• boot Boots from default boot device
• When the system has been shutdown by the Operating System the keystroke
combination <STOP A>23 brings the system back into console mode.
Other options such as the default boot device are available which provides further
information about the system; the state of these console variables can be displayed
with the printenv command. Some of the more common commands are:
• devalias <alias> <physical device>
• probe-SCSI
22 For most systems set up a default baud rate of 9600 23 Use <Ctrl Break> on remote access
UNIX Fundamentals
4-6
• probe-pci
• show-devs
• show-disks
• setenv auto-boot true|false
• probe-scsi-all ; scans SCSI buses
• show-devs ; shows installed devices
• " /pci@1f,0/pci@1/QLGC,xxx@1" select-dev ; selects
a device
; the first space is needed
Should see "Loading Firmware ..."
• show-children ; similar to probe-scsi but only to
this adapter
• show-data-rate ; show the data-rate for this adapter
• set-data-rate 2 ; 1/2/autonegotiate for Fibre Channel
Intel systems can be configured within the bios to set various default boot options such as
the CDROM, floppy etc.

UNIX Fundamentals
4-7
Run level Control The run level scripts24 in Solaris 8 are held in /etc/rcX.d where X corresponds to the
various run levels. Solaris run levels are:
Table 4 Solaris run levels
Run level Description
0 Power down
S/s Single user
1 Similar to single user with only root (/) and
/usr mounted
2 Multi-user state, nfs not available
3 Multi-user state resources exported (default
run level)
5 Power down state, similar to 0 but only
supported by some systems.
6 Reboot state
24 Refer to Page 2-3 for a description of run levels.

UNIX Fundamentals
4-8
Adding Device Drivers A common task when installing new controllers such as Host Bus Adapters (HBAs) is to
install a device driver. The manufacturer of the device will normally supply the
appropriate driver along with documentation explaining the procedure. In general
however, manufacturers use the pkgadd utility to perform this task. The device driver
(or regular application software) is supplied in a package which is normally a
compressed25 archive. The pkgadd command will extract the files from the package and
install them into the correct location. The syntax for the command is pkgadd –d
/<pathname>/<directoryname>. In this case –d specifies a device name to
install from which can be a directory or an actual device name. If the manufacturer’s
package is copied to the user’s current directory then pkgadd –d would install the
package from the current directory. The installation procedure will list the available
packages and prompt for installation. When the installation has completed a status
message will be issued. Software packages such as device drivers will usually necessitate
a reconfiguration reboot.
All packages are logged and can be viewed by the pkginfo command. Finally packages
can be removed by pkgrm <Package Name>.
25 In some cases it may be necessary to uncompress the file first. Again the procedure should be documented by
the vendor.
UNIX Fundamentals
4-9
Configuring disks The format26 command is used to integrate new disks into the system. Device names are
of the form /dev/rdsk/cwtxdysz where cw is the controller number, tx is the target
id, dy is the logical unit number (LUN) and sz is the slice27 (partition) number. The
devices can also be accessed through /dev/dsk rather than through the raw path. When
format starts it will present a list of disks and ask the user to enter a number
corresponding to the required disk. If the disk is not recognized then it may be necessary
to enter parameters manually. Devices can be labeled and partitioned. When partitioning
is complete, the utility can be exited and a new file system created. To create the new
UFS28 system, enter the command newfs /dev/rdsk/<device name>. When
the newfs command has completed the device can be mounted as a block device
through the /dev/dsk path. To have this device automatically mounted at boot time
edit the file /etc/vfstab to provide an entry for that device.
Accessing LUNs greater than zero Solaris maintains a list of supported target IDs and LUNs in the file /kernel/drv/sd.conf. It
may be necessary to edit this file to support LUNs greater than zero. The extract below
shows SCSI target 0 with support for 6 luns and target 1 with support for 4 luns.
name="sd" class="scsi" target=0 lun=0; name="sd" class="scsi" target=0 lun=1; name="sd" class="scsi" target=0 lun=2; name="sd" class="scsi" target=0 lun=3; name="sd" class="scsi" target=0 lun=4; name="sd" class="scsi" target=0 lun=5; name="sd" class="scsi" target=1 lun=0; name="sd" class="scsi" target=1 lun=1;
26 A full example is given on page 4-10. 27 Under Solaris a partition number of 2 refers to the entire disk. Do not use this for data storage. 28 The default file system is UFS – Universal File System

UNIX Fundamentals
4-10
name="sd" class="scsi" target=1 lun=2; name="sd" class="scsi" target=1 lun=3;
When the file has been edited with the appropriate entries enter the command
devfsadm29 followed by disks and then devlinks. Finally perform a re-configuration
reboot by typing in reboot -- -r. During the reboot the system may print out
messages about bad magic number. To resolve this enter the format command when the
system has rebooted to label each of the new disks.
Steps to add a new disk under Solaris When a device is freshly added to the system it requires an integration process, this is
done by the format command. Solaris 2.8 is usually able to automatically configure30
drives, the following walkthrough shows the output of a typical session:
# format
Searching for disks31 … done
AVAILABLE DISK SELECTIONS
0. c0t0d0 <Seagate–ST30102LC-3302 cyl 6922 alt 2 hd
12 sec 214>
/pci@1f,4000/SCSIID3/sd@0,0
1. c15t0d0 <IFT-SR2500R2-0323 cyl 1998 alt 2 hd 64
sec 32>
/pci@if,2000/IntraServer-Ultra160,SCSI1,1/sd@0,0
2. 2. c15t1d0 <IFT-SR2500R2-0323 cyl 3998 alt 2 hd 64
sec 32>
/pci@if,2000/IntraServer-Ultra160,SCSI1,1/sd@1,0
29 This is actually invoked during a configuration re-boot but it is good practice to re-boot after adding new
hardware. 30 Refer to page 4-15 for instructions on configuring devices manually 31 Disks that have not been previously formatted will be unlabeled. Solaris will recognize this and prompt the
user to label the disk.

UNIX Fundamentals
4-11
Specify disk (enter its number); 2
selecting c15t1d0
[disk formatted]
FORMAT MENU
disk - select a disk
type - select (define) a disk type
partition - select (define) a partition type
current - describe the current disk
format - format and analyze the disk
repair - repair a defective sector
label - write label to the disk
analyze - surface analysis
defect - defect list management
backup - search for backup label
verify - save new disk/partition definitions
inquiry - show vendor, product and revision
volname - set 8 character volume name
! <cmd> - execute <cmd>, then return
format > p
PARTITION MENU
0 - Change ‘0’ partition
1 - Change ‘1’ partition
2 - Change ‘2’ partition
3 - Change ‘3’ partition
4 - Change ‘4’ partition
5 - Change ‘5’ partition
6 - Change ‘6’ partition
7 - Change ‘7’ partition

UNIX Fundamentals
4-12
select - select a predefined partition
table
modify - modify a predefined partition
table
name - name the current table
print - display the current table
label - write partition map and label to
the disk
!<cmd> - execute <cmd>, then return
quit
partition > p
Current partition table (original):
Total disk cylinders available: 3998 + 2 (reserved
cylinders)
Part Tag Flag Cylinder Size blocks
0 root wm 0-127 128.00
MB(128/0/0)
262144
1 swap wu 128-255 128.00
MB(128/0/0)
262144
2 backup wu 0-3997 3.90 GB
(3998/0/0)
8187904
3 unassigned wm 0 (0/0/0) 0
4 unassigned wm 0 (0/0/0) 0
5 unassigned wm 0 (0/0/0) 0
6 usr wm 256-3997 3.65 GB
(3742/0/0)
7663616
7 unassigned wm 0 (0/0/0) 0
partition > q
FORMAT MENU

UNIX Fundamentals
4-13
disk - select a disk
type - select (define) a disk type
partition - select (define) a partition type
current - describe the current disk
format - format and analyze the disk
repair - repair a defective sector
label - write label to the disk
analyze - surface analysis
defect - defect list management
backup - search for backup label
verify - save new disk/partition definitions
inquiry - show vendor, product and revision
volname - set 8 character volume name
! <cmd> - execute <cmd>, then return
format > q
#
In the example above Solaris correctly recognized the drive capacity and partitioned it
correctly. It is possible to override the default partitioning scheme using the modify
option under the partition sub-menu.

UNIX Fundamentals
4-14
Serial ports on SUN Machines Serial ports will vary depending on the particular machine in use but many systems have
two 25 pin female ports labelled A and B. These are denoted as /dev/term/a and
/dev/term/b respectively.
Using the tip utility The SUN application corresponding to the Windows 2K program HyperTerminal is tip.
This application uses the file /etc/remote to obtain configuration information. Edit
this file and look for an entry similar to the one below
hardwire:dv=/dev/term/b:br#19200:el=^C^S^Q^U^D:ie=%$:oe=^D:pa=none
If necessary change the baud rate and the terminal port. In the line above the terminal
port is /dev/term/b and the baud rate is described by the entry br#19200.
When editing is complete invoke tip by entering the command tip hardwire. To exit tip
enter ~ followed by <Ctrl-D>

UNIX Fundamentals
4-15
Solaris Troubleshooting
Examining Crash Dumps under Solaris 2.8 Low-level program such as device drivers interact with the kernel and therefore have the
potential to damage the running Operating System. When the kernel detects an
inconsistency it shuts itself down so as to avoid damaging the file system. This is termed
a “kernel panic”. A crash file is held which allows a post-mortem to be carried out.
Although many aspects of this analysis is a highly-skilled operation it is possible
nevertheless to gain some useful information with only basic effort.
The following example shows how to view the running process at the time of the crash:
# cd /var/crash/sparc60 ; sparc60 is the hostname
# crash vmcore.12 ; core dumps are numbered
sequentially
> p ; prints out process table
See the man entry for further information.
Unable to auto-configure drive parameters Solaris should be able to auto-configure SCSI disks however in the event of this not
happening the following workaround can be performed. Logical volumes such as RAID
do not have physical characteristics such as Cylinder, Heads and Sectors so it may be
necessary to emulate a valid physical configuration. To do this perform the following
sequence of operations.
1. Use the Logical Volume Utility to obtain the number of MB in the Logical
Drive.
2. Multiply this number by 1024 to obtain the number of KB.
3. Multiply this number by 2 to obtain the number of 512-byte blocks.
a. Assume a logical value for the number of Heads (Solaris 8 allows up to
64).

UNIX Fundamentals
4-16
b. Assume a logical value for the number of Sectors/Track (Solaris 8
allows up to 256).
4. Divide the number of blocks by Heads*Sectors/Track (16384) to yield the
number of accessible cylinders.
5. Enter the format command followed by the type command to enter the
parameters.
6. When asked for the number of data cylinders, use two32 less than the number of
accessible cylinders calculated above.
Example:
Assume Logical Drive that is 173,000MB
Number of KB = (730,000 * 1024) = 177,152,000
Number of 512-byte blocks (177,152,000 *2) = 354,304,000
Assume 64 Heads * 256 Sectors/Track = 16384
Therefore, number of accessible cylinders = 21625
Number of data cylinders for input to format utility = 21623
Bypassing lengthy format procedures
1. Use the format utility to define the partitions
2. Begin a format
3. Ctrl-C the format after about 30 seconds33
4. Now label the disk
5. Exit the format utility and use the following command:
# prtvtoc -h /dev/rdsk/c2t0d0s0 > /tmp/vtoc.out ; dump
partns
# fmthard -n "IFT 20GB SCSI" -s /tmp/vtoc.out ; write
partns
6. Proceed with
32 These are termed alt cylinders 33 This gives enough time to write out the partition table, without going through the
extended low level formatting time that it takes for large RAID volumes

UNIX Fundamentals
4-17
# newfs -v /dev/rdsk/c2t0d0s0 ...
Using Hardware RAID with Solaris Normally devices such as disks have a fixed capacity, Solaris will use the SCSI inquiry
string to ‘remember’ a device’s geometry. This can lead to a problem with RAID
volumes. The RAID controller will present the inquiry string as a constant but the logical
volumes beneath it will have variable capacities. This may cause a problem when
subsequent volumes are added as the capacity may be incorrect.
When a new RAID logical drive has been added, ensure that the capacity under the
partition sub-menu is correct. If it is not then from the format menu select the disk then
type and autoconfigure which will then re-read the volume to give the desired capacity.
Then re-label the volume.

UNIX Fundamentals
4-18
Module 4 Review 1. Practical session - Install a clean version of Solaris on the machine provided
during this course.
________________________________________________________________________
________________________________________________________________________
________________________________________________________________________
________________________________________________________________________
________________________________________________________________________
2. A second disk has been added to your system, the /opt system is rapidly
running out of space on the first disk, explain how you would configure the system to use
/opt on the second disk rather than the first.
________________________________________________________________________
________________________________________________________________________
________________________________________________________________________
________________________________________________________________________
________________________________________________________________________
3. How would you use the crash utility to show which devices were mounted at the
time of the crash?
________________________________________________________________________
________________________________________________________________________
________________________________________________________________________
________________________________________________________________________
_______________________________________________________________________
4. Discuss why you would not use slice2 on a Solaris disk for data storage.
________________________________________________________________________
________________________________________________________________________
________________________________________________________________________
________________________________________________________________________
________________________________________________________________________

UNIX Fundamentals
5-1
MODULE 5 – Advanced Linux Concepts

UNIX Fundamentals
5-2
Objectives: After completion of this module, you should understand
• The components of the Linux kernel
o Monolithic Vs Modular
o Version numbering scheme
• How to load and remove driver modules
o lsmod, insmod, rmmod commands
• Basics of the compilation process
• How to re-build the Linux kernel
o Supporting multiple LUNS
• Configuring WINE
o Running software under WINE
• SAMBA configuration

UNIX Fundamentals
5-3
Understanding the Linux Kernel At the heart of UNIX systems is the kernel. The kernel is the core and implements the
functions such as task scheduling and memory management that are often transparent to
users. Under Linux the core of the Operating System - the Kernel is really the Linux
portion with GNU providing tools such as compilers and editors. The applications are the
part that the users interact with. Kernel versions are of the form major.minor.patchlevel
so a version number of 2.4.18 has a major version of 2, a minor version of 4 and a
patchlevel of 18. Minor version numbers that are even such as 2.2, 2.4 are stable kernel
versions whereas odd numbers such as 2.1 and 2.3 are considered as developmental.
Monolithic Vs modular A kernel can be monolithic which means that it is a self-sufficient piece of code with
support for devices built in or it can be modular which means that the necessary code is
called upon only when needed. Monolithic kernels are often larger than necessary by
supporting hardware that may not be present in the system, so the preference is to use the
modular method. Kernel modules are files that can be linked34 with the kernel when
required and are object files with a .o suffix.
The kernel configuration process allows options for generating modular or monolithic
support. This is done by selecting no (N) support, (Y) support or (M) module support as
shown in the kernel re-build process is covered on page 5-11. Boot devices should be
supported within the kernel rather than as modules.
34 See the section Basics of Linux Compilation and Linking on page 5-8 for more information about the linking process
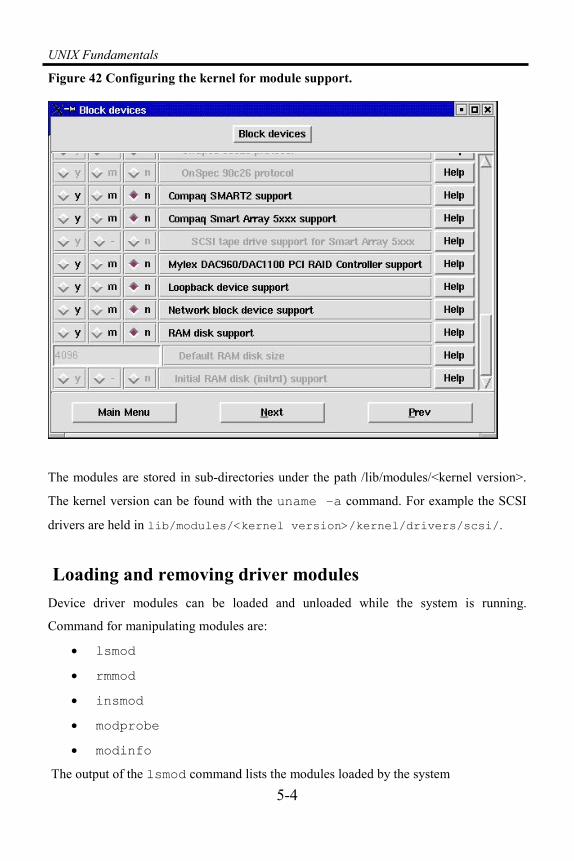
UNIX Fundamentals
5-4
Figure 42 Configuring the kernel for module support.
The modules are stored in sub-directories under the path /lib/modules/<kernel version>.
The kernel version can be found with the uname –a command. For example the SCSI
drivers are held in lib/modules/<kernel version>/kernel/drivers/scsi/.
Loading and removing driver modules Device driver modules can be loaded and unloaded while the system is running.
Command for manipulating modules are:
• lsmod
• rmmod
• insmod
• modprobe
• modinfo
The output of the lsmod command lists the modules loaded by the system

UNIX Fundamentals
5-5
# lsmod
Module Size Used by Not tainted qla1280 83773 0 (unused) nls_iso8859-1 3516 0 (autoclean) nls_cp437 5116 0 (autoclean) vfat 13084 0 (autoclean) fat 38744 0 (autoclean) [vfat] ide-cd 33608 0 (autoclean) cdrom 33696 0 (autoclean) [ide-cd] via82cxxx_audio 23480 0 (autoclean) uart401 8420 0 (autoclean) [via82cxxx_audio] ac97_codec 13384 0 (autoclean) [via82cxxx_audio] sound 74228 0 (autoclean) [via82cxxx_audio uart401] soundcore 6500 5 (autoclean) [via82cxxx_audio sound] binfmt_misc 7524 1 autofs 13348 0 (autoclean) (unused) 8139too 17704 1 mii 2156 0 [8139too] iptable_filter 2412 0 (autoclean) (unused) ip_tables 14840 1 [iptable_filter] mousedev 5524 1 keybdev 2976 0 (unused) hid 22244 0 (unused) input 5888 0 [mousedev keybdev hid] usb-uhci 26188 0 (unused) usbcore 77056 1 [hid usb-uhci] ext3 70400 1 jbd 52212 1 [ext3] sd_mod 13552 0 scsi_mod 107144 2 [qla1280 sd_mod]
After the drivers have been loaded it should be possible to initialize them:
fdisk /dev/sdx
mkfs /dev/sdxy (where x is the device position, a for first device, b for second
device and y is the partition number)
To look at the disks recognized by the system use the following command –
# cat /proc/partitions
major minor #blocks name rio rmerge rsect ruse wio wmerge wsect wuse running use aveq

UNIX Fundamentals
5-6
8 0 35843685 sda 36 156 384 232 0 0 0 0 0 214 232 8 1 8193118 sda1 9 43 104 68 0 0 0 0 0 58 68 8 2 48195 sda2 7 29 72 39 0 0 0 0 0 37 39 8 3 10241437 sda3 7 29 72 35 0 0 0 0 0 31 35 8 4 1020127 sda4 9 43 104 52 0 0 0 0 0 50 52 22 0 659626 hdc 1 3 16 417 0 0 0 0 -7364 4918919 3430237 3 0 19551168 hda 51806 26550 626426 479835 13542 26890 326512 1780007 -1 4765246 5612152 3 1 6249253 hda1 51788 26490 626234 479404 13542 26890 326512 1780007 0 391378 2259412 3 3 12779707 hda3 7 29 72 171 0 0 0 0 0 171 171 3 4 1 hda4 0 0 0 0 0 0 0 0 0 0 0 3 5 522081 hda5 9 25 104 191 0 0 0 0 0 191 191
In this example there are two IDE disks – hda and hdc and one SCSI disk – sda. The
system that the command was running on actually booted from the IDE system and is not
using the SCSI disk so it is safe to unload the module. Looking at the output of the lsmod
command we can see that the module name is qla1280,
# rmmod qla1280.
Now if we look at the partitions we get the following output –
major minor #blocks name rio rmerge rsect ruse wio wmerge wsect wuse running use aveq 22 0 659626 hdc 1 3 16 417 0 0 0 0 -7388 4934328 7233628 3 0 19551168 hda 51806 26550 626426 479835 13566 26914 326896 1780031 -1 4780650 5596768 3 1 6249253 hda1 51788 26490 626234 479404 13566 26914 326896 1780031 0 391386 2259435 3 3 12779707 hda3 7 29 72 171 0 0 0 0 0 171 171 3 4 1 hda4 0 0 0 0 0 0 0 0 0 0 0 3 5 522081 hda5 9 25 104 191 0 0 0 0 0 191 191 showing that the SCSI drives are no longer visible to the system. The module is
reinstalled with the insmod command –
# insmod qla1280
Using /lib/modules/2.4.18-14/kernel/drivers/scsi/qla1280.o

UNIX Fundamentals
5-7
Parameters can be passed when installing modules such as:
insmod scsi_mod.o max_scsi_luns=8
The modprobe command is similar to insmod but contains more functionality. To find
out information about a module use the modinfo command.

UNIX Fundamentals
5-8
Basics of Linux Compilation and Linking Programming broadly consists of the following stages:
• Creation of the program
o Normally created with a text editor using a higher level language such
as C or C++.
o Known as the source code, conventionally c code has a suffix of “c”
such as mycode.c
• Converting the human readable code into machine readable code
o The first step in the compilation process, the generation of machine
language code normally corresponding to the processor35 that the
compilation takes place on.
o Known as the object code and normally has the suffix “o” such as
mycode.o
• Linking the object code with other modules
o This step resolves references to other object code modules and
generates the final executable application.
Library files
To facilitate efficient coding a set of libraries are available. This means that code that is
commonly used across a range of applications can be shared. An example might be the
code base for a range of scientific applications. The C language has no facility to
calculate Fourier Transforms, so each application that requires this facility could simply
link up to a library that does, in this way coding is more efficient since each application
does not have to deploy the fourier code in its own source program. Also if more
functionality or modification is required then the library code needs to be updated only
35 It is also possible to compile code for other machines such as generation Motorola 68000 code on an Intel
Pentium machine. This is termed cross-compiling.

UNIX Fundamentals
5-9
once rather than within all the other programs. This is the linking part of the compilation
process.
Linking
Linking can take two forms – static or dynamic. Static linking includes the library code in
to the final executable application which makes the program larger or it can be
dynamically linked at run time which means that it uses the library only when the
program is actually running. Dynamic linking has the advantage that no re-compilation
process takes place during a library update. These are often termed of dynamic link
libraries and may have a .dll extension with some Operating Systems. Libraries are used
extensively under Linux to take advantage of common features such as input/output etc.
Building the code
Large projects can take a long time to compile so there is a method of ensuring that
multiple file compilations only re-compile the modules that have actually changed. This
is done using a makefile which sets up dependencies, so if a particular module is
dependent on another one that has changed it will have to be re-run. These dependencies
are a set of rules within the makefile.
A compilation example
Linux uses the GNU compiler gcc to compile programs.
Using the vi editor enter the following code:
$ vi test.c
void main (void) { printf("\nThis is a simple example of a program written in C\n"); } Compile the code with the cc command
$ cc test.c
The output file is called a.out by default. To change this, use the –o switch. For example
the following command generates an executable file called test.exe.

UNIX Fundamentals
5-10
$ cc –o test.exe test.c
The compiler cleans up the intermediate files after it has completed. To view the
intermediate files a number of switches can be used to generate the intermediate files
rather than just the executable.
This next command generates a file test.s which contains the intermediate assembler
source code.
$ cc –S test.c
$ cat test.s
.file "test.c" .section .rodata .align 32 .LC0: .string "\nThis is a simple example of a program written in C\n" .text .align 2 .globl main .type main,@function main: pushl %ebp movl %esp, %ebp subl $8, %esp andl $-16, %esp movl $0, %eax subl %eax, %esp subl $12, %esp pushl $.LC0 call printf addl $16, %esp leave ret .Lfe1: .size main,.Lfe1-main .ident "GCC: (GNU) 3.2 20020903 (Red Hat Linux 8.0 3.2-7)"

UNIX Fundamentals
5-11
Re-building the Kernel The default kernel supplied with the system is satisfactory for many users, however it can
be customized to provide support for more esoteric devices or optimized to run more
efficiently. The example which follows shows how the kernel can be re-compiled to
provide default support for multiple SCSI LUNs36.
Kernel re-build walkthrough 1. Ensure that the kernel source files are present on the system.
cd /usr/src/linux37
2.Check and set the EXTRAVERSION38 parameter in the main Makefile. This will be
needed when creating the ramdisk. It can be changed to prevent the confusion.
Example:
EXTRAVERSION = -custom
3.If necessary make a clean kernel source tree by executing the following command:
make mrproper
4.Run the kernel configuration routine. This can be done three ways –
make config
This option is not recommended as it is nearly equivalent to editing a large textfile
(.config), however in headless operations with a dumb terminal it may be the only choice
available.
36 LUN stands for Logical Unit Number and multiple LUNs are supported by devices such as RAID controllers
and CD jukeboxes. Disk drives which are the commonest SCSI device are presented with a LUN of 0 only so
many systems do not support LUN numbers greater than this. 37 There is normally a link to the actual kernel version set up as linux, if this does not exist then look for a
directory called linux2.4 or similar. The kernel parameters can be found with the uname –a command. 38 EXTRAVERSION can take any form such as a revision number or a string such as “my_customized_kernel”

UNIX Fundamentals
5-12
# make menuconfig
This is the preferred option when running in a text only environment. It is menu driven
and allows cursor selection of the options and is shown in Figure 43 below:
Figure 43 Using the text based kernel configuration tool.
# make xconfig
This is the option that most users will use running under an X environment. The choices
are Y = supported (monolithic)N= Not supported, M=Load as a module.

UNIX Fundamentals
5-13
Figure 44 Configuring the kernel options with make xconfig
# make xconfig
Under SCSI support
enable Probe all LUNs on each SCSI device
Under SCSI support
SCSI low-level drivers make sure your boot SCSI controller is enabled
as a module (M).

UNIX Fundamentals
5-14
Figure 45 Configuring multiple LUN support with make xconfig
Help is available throughout this process, the following screenshot shows the help
message for multiple LUN support:

UNIX Fundamentals
5-15
Figure 46 Kernel configuration help messages
Save the kernel configuration changes.
The file .config holds the parameters edited under xconfig.
5. This next step ensures that all the dependencies are set up correctly
# make dep
6.The next stage generates a compressed kernel.
#make bzImage39
7.Compile the kernel modules:
# make modules
8.(Re)Install the newly compiled kernel modules into /lib/modules/<kernelversion>
# make modules_install
9. If necessary create the ramdisk. Assume you changed the EXTRAVERSION to –
custom. The format of this command is mkinitrd <new image name> <current kernel
39 the ‘z’ in bzimage indicates that it is compressed.

UNIX Fundamentals
5-16
name>. To find out the kernel name use the command uname –r or pass it as an
argument as shown in the following line:
# mkinitrd initrd-2.4.9-e.3custom.img `uname –r`
10.Copy the kernel and the ramdisk to /boot
# cp –p /usr/src/linux/arch/i386/boot/bzImage /boot/<new kernel name>
# mv initrd-2.4.9-e.3custom.img /boot
11. Finally edit /etc/grub.conf or /etc/lilo.conf as appropriate to boot the
new image.
Note: It may be instructive to look at the Makefile to gain a better understanding of the
process.
Note: that if LILO is used as the boot loader then run the command lilo after the edits
have been completed. This step is not necessary if using grub.

UNIX Fundamentals
5-17
Adding in new device drivers to load automatically during startup The mkinitrd utility The utility mkinitrd creates a RAMdisk image which is used for preloading block
device modules which may be needed to access the root filesystem. This is a bootstrap
process where the module has to be loaded to access the device before the O/S can load it
the driver for it. The file /etc/modules.conf (conf.modules with some
systems) is used to supply mkinitrd with SCSI HBA entries.
Adding the driver The first step is to obtain the device driver from the vendor’s web site. The device drive
package is normally in rpm format or a compressed tarball (tgz). There is normally a
readme file to explain the installation process, but essentially the steps to install a SCSI or
fibre channel driver are as follows:
1. Obtain driver package from the vendor
2. Unpack the distribution
3. Run the supplied makefile to compile the driver with the current kernel
4. Copy the driver file (.o) to /lib/modules/<kernelversion>/kernel/drivers/scsi
5. Load the module with the insmod command.
6. Edit /etc/modules.conf with the following options entry and as many entries as
there are HBAs to be added:
options scsi_mod max_scsi_luns=255
alias scsi-hostadapter <module name>
alias scsi-hostadapter1 <module name>
alias scsi-hostadapter2 <module name>
. . .
7. Build the ramdisk with the command: mkinitrd
/boot/<newfilename.img> `uname –r`

UNIX Fundamentals
5-18
8. Edit the grub.conf file or lilo.conf40 to call up the new RAMdisk
9. Reboot the system
40 If using lilo as the boot loader run the lilo command after editing.

UNIX Fundamentals
5-19
Configuring WINE WINE is a program that allows many windows based programs to run under Linux. The
WINE project is ongoing and will always play “catch-up” but nevertheless many
windows programs run successfully within the Linux environment using this tool. Since
WINE does not require a copy of windows to be pre-installed licensing restrictions are
circumvented.
Installing WINE
1. Download the file http://www.codeweavers.com/technology/wine/download.php
and save it to a temporary directory.
2. Install the package by either of the following methods:
a) Using kpackage from a GUI environment by double
clicking on the rpm file from the file manager.
Figure 47 Using kpackage to install WINE
or

UNIX Fundamentals
5-20
b) From a text environment (logged in as root), type:
rpm –i codeweavers-wine-20020904-7.i386.rpm
3. Configuring Wine
Using either KDE or Gnome, select the <Wine Configuration> option.
Note that this program must not be run as root otherwise an error message occurs.
Respond to the dialog boxes and the configuration program will setup files in the hidden
directory .wine under the user’s home directory. A directory called fake_windows is
set up which will be mapped as the c: drive to window’s applications. Default directories
are created under this directory as shown in the listing below:
$ cd $HOME $ cd .wine $ ls config fake_windows system.reg userdef.reg user.reg cd fake_windows/ $ ls

UNIX Fundamentals
5-21
My Documents Program Files Recycled Temp Windows $
4. Running Windows applications
a) KDE and GNOME File Managers:
Double click on the Windows program icon from the file manager.
or
b) From a command line enter
$ wine <Program Name>
such as wine notepad.exe

UNIX Fundamentals
5-22
SAMBA configuration Samba is a powerful program that lets a UNIX system act as a server to Microsoft based
systems. It uses the CIFS protocol to achieve this and as far as Microsoft based clients are
concerned, they are connecting to a Microsoft server. Samba may be installed by default
depending on the whether it was selected or not during the installation. To verify whether
Samba is installed use the following command:
# rpm –qa | grep samba
If it is installed a response such as the text below should be printed out.
samba-client-2.2.1a-4
samba-common-2.2.1a-4
alternatively type
# smbd –h
to see if a list of valid options appear.
If the system is not installed then it can be obtained from the website www.samba.org or
from the installation CDs. The next stage is to check that it is started as a system service
– run the ntsysv command and select smb as shown in Figure 48.
Figure 48 Starting the smb service

UNIX Fundamentals
5-23
Verify that the Samba daemon is running by :
# ps-eaf | grep smbd
The file /etc/samba/smb.conf contains configuration options. These
options are extensive and only a subset will be covered here. A
segment of the configuration file is shown below:
$ less /etc/samba/smb.conf
# This is the main Samba configuration file. You should read the # smb.conf(5) manual page in order to understand the options listed # here. Samba has a huge number of configurable options (perhaps too # many!) most of which are not shown in this example # # Any line which starts with a ; (semi-colon) or a # (hash) # is a comment and is ignored. In this example we will use a # # for commentry and a ; for parts of the config file that you # may wish to enable # # NOTE: Whenever you modify this file you should run the command "testparm" # to check that you have not made any basic syntactic errors. # #======================= Global Settings ===================================== [global] # workgroup = NT-Domain-Name or Workgroup-Name workgroup = MYGROUP # server string is the equivalent of the NT Description field server string = Samba Server # This option is important for security. It allows you to restrict # connections to machines which are on your local network. The # following example restricts access to two C class networks and # the "loopback" interface. For more examples of the syntax see # the smb.conf man page ; hosts allow = 192.168.1. 192.168.2. 127. # if you want to automatically load your printer list rather # than setting them up individually then you'll need this printcap name = /etc/printcap load printers = yes # It should not be necessary to spell out the print system type unless

UNIX Fundamentals
5-24
# yours is non-standard. Currently supported print systems include: # bsd, sysv, plp, lprng, aix, hpux, qnx printing = lprng # Uncomment this if you want a guest account, you must add this to /etc/passwd # otherwise the user "nobody" is used ; guest account = pcguest The file is well commented throughout and can be readily adapted to suit the desired
environment. It can be tested by double clicking on the Network Places icon on a
windows system and verifying that the system appears as a workgroup. In Figure 49
below the Linux server appears in the list of workgroups as “MYGROUP” and double
clicking on this workgroup will show a system called “Samba Server”.
Figure 49 Using Samba as a file server in a Microsoft network
Other parameters to be set up are the directories which are to be shared on the Samba
Server and level of user access. Later versions of Linux have the swat tool available
which provides a graphical way of manipulating the configuration file. Figure 50 shows
the swat tool.
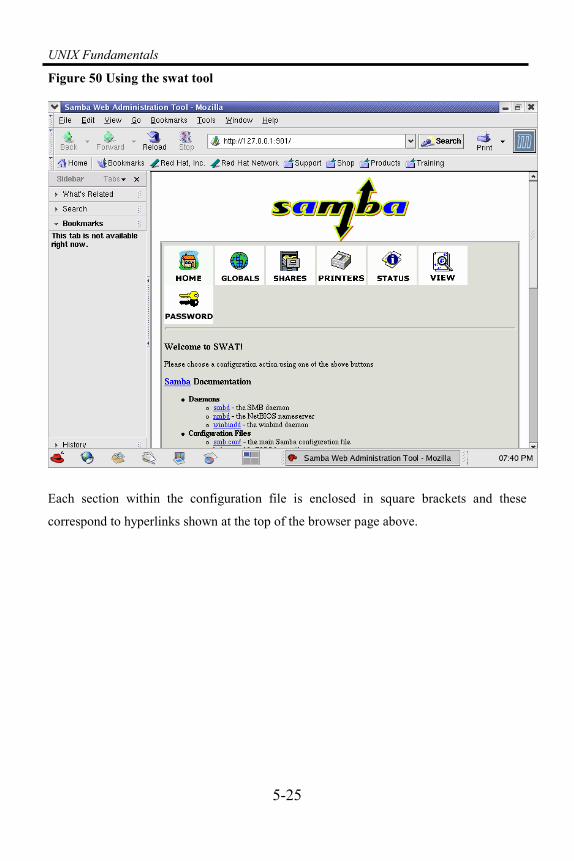
UNIX Fundamentals
5-25
Figure 50 Using the swat tool
Each section within the configuration file is enclosed in square brackets and these
correspond to hyperlinks shown at the top of the browser page above.

UNIX Fundamentals
5-26
Module 5 Review 1. Discuss the command make modules. ________________________________________________________________________
________________________________________________________________________
________________________________________________________________________
________________________________________________________________________
________________________________________________________________________
2. Set up a wine configuration – test by installing and running a Windows
application such as notepad.
________________________________________________________________________
________________________________________________________________________
________________________________________________________________________
________________________________________________________________________
________________________________________________________________________
3. Set up a Samba share and copy files from the Linux system to a Microsoft
system.
________________________________________________________________________
________________________________________________________________________
________________________________________________________________________
________________________________________________________________________
______________________________________________________________________

UNIX Fundamentals
6-1
MODULE 6 – Red Hat Advanced Server Cluster Services

UNIX Fundamentals
6-2
Objectives: After completion of this module, you should be able to:
• Understand the benefits of a Cluster
• Build a two node cluster
• Use a web based browser to view the Cluster status
• Add a Cluster Service

UNIX Fundamentals
6-3
Overview of Clustering Although Clusters have been available for some time now, it is only recently that low
cost Cluster solutions have become available to the masses. There are many forms of
Clusters, all of which promote some form of High Data Availability. This is either by a
Fail-over mechanism or by reallocating the software task to another node. Other
enhancements such as Dynamic Load Balancing may be offered but this is less usual.
It is relatively easy to share data among systems with the same architecture but to
perform this task efficiently with heterogeneous systems is more complex. The advent of
high-speed data channels such as Fibre Channel, which accommodates many devices, has
led to a storage area network of nodes, which facilitates Clustering.
Red Hat offers a robust version of Linux for the Enterprise in the form of Advanced
Server 2.141. Enterprise feature should as Clustering are supported and this section covers
some of the basics of setting up a cluster (mainly) from a software configuration
perspective.
41 With Red Hat Advanced Server V3 this Clustering is a layered product

UNIX Fundamentals
6-4
System Configuration In the example following the hardware configuration was used:
• 1 X Shared Storage RAID Controller
• 1 X Fibre Channel Host Bus Adapter per server
• 2 X Intel based Servers
• 1 X Fibre Channel Hub
• 1 x Ethernet hub to link servers and client (not shown) machines together.
Dell1
Dell2
Ethernet Hub
Servers
Shard RAID Storage
1 2 3 4 5 6
7 8 9 101112
AB
12x
6x
8x
2x
9x
3x
10x
4x
11x
5x
7x
1x
Eth
erne
t
A
12x
6x
8x
2x
9x
3x
10x
4x
11x
5x
7x
1x
C
Fibre Channel Hub
Each Server has a single Fibre Channel Host Bus Adapter (HBA) connected to the
storage via a Fibre Channel Hub and are both connected to the main LAN via an Ethernet
hub as shown in the diagram. Each server boots from their own internal SCSI device
which appears as /dev/sda and is heterogeneous in that shared device names are
identical on each node. Clients access the server via the Ethernet Hub.
Two volumes are available on the RAID and are presented to the servers as /dev/hdb and
/dev/hdc.

UNIX Fundamentals
6-5
Preparation 1. Create a minimum of two devices on the RAID storage
2. Partition the first shared device into two (sdb1 and sdb2)
3. Create two quorum partitions on the first device and edit the configuration file on both servers -
# vi /etc/sysconfig/rawdevices /dev/raw/raw1 /dev/sdb1 /dev/raw/raw2 /dev/sdb2 # service rawdevices restart 4. Create filesystems on the shared disks
5. Configure the Cluster # /sbin/cluconfig
Enter Cluster Name MyCluster
Enter IP for Cluster alias 192.168.4.90 Information for Cluster Member 0
---------------------------------------------------------
Enter name of cluster member [Dell2]: Dell2
Enter number of heartbeat channels 1
Channel type net or serial [net] net
Enter hostname of the cluster member on heartbeat channel 0 [Dell2]: Dell2
Enter Primary Quorum Partition [/dev/raw/raw1] /dev/raw/raw1
Enter Shadow Quorum Partition [/dev/raw/raw2] /dev/raw/raw2
Choose one of the following power switches [none] none
---------------------------------------------------------
Information for Cluster Member 1
---------------------------------------------------------
Enter name of cluster member: Dell1
Enter hostname of the cluster member on heartbeat channel 0: Dell1
Enter Primary Quorum Partition [/dev/raw/raw1] /dev/raw/raw1
Note:
The full text of the following script is captured at the end of this section on page 6-14
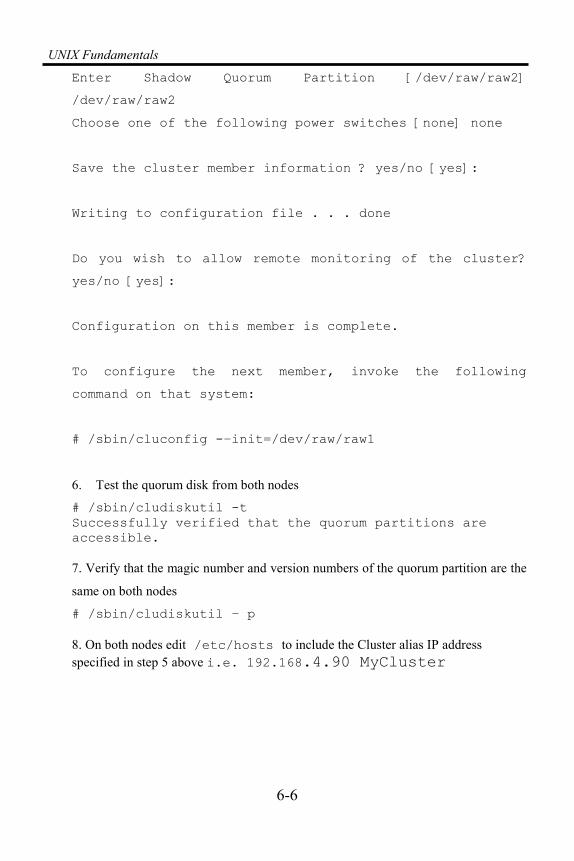
UNIX Fundamentals
6-6
Enter Shadow Quorum Partition [/dev/raw/raw2]
/dev/raw/raw2
Choose one of the following power switches [none] none
Save the cluster member information ? yes/no [yes]:
Writing to configuration file . . . done
Do you wish to allow remote monitoring of the cluster?
yes/no [yes]:
Configuration on this member is complete.
To configure the next member, invoke the following
command on that system:
# /sbin/cluconfig -–init=/dev/raw/raw1
6. Test the quorum disk from both nodes
# /sbin/cludiskutil -t Successfully verified that the quorum partitions are accessible. 7. Verify that the magic number and version numbers of the quorum partition are the
same on both nodes
# /sbin/cludiskutil – p 8. On both nodes edit /etc/hosts to include the Cluster alias IP address specified in step 5 above i.e. 192.168.4.90 MyCluster

UNIX Fundamentals
6-7
Using the Red Hat Cluster Manager GUI Web Server Configuration –local access42
Ensure that a web server is installed and up and running. The web server is normally
Apache. Verify that httpd is active by running ntsysv and enabling it under Services.
Start the Service with:
# service httpd start
If Netscape is used as the browser then execute the following commands:
# cd /usr/lib/netscape/plugins
# ln –s /opt/IBMJava2-131/jre/bin/plugin.so
# netscape &
Use the following URL http://MyCluster/Cluster/
The next screen shows the two Cluster nodes, Dell1 and Dell2 and their status. Figure 51
shows that there are no Services configured as yet.
42 Note if remote access was selected as an option during the cluster configuration, remote hosts can control and
monitor the cluster, however this may involve downloading a copy of Javefrom the Sun site and configuring it
according to Sun’s instructions.

UNIX Fundamentals
6-8
Figure 51 Viewing the Cluster from Netscape
Adding a Service To make the Cluster useful Services must be added. These Services are available to client
nodes and can be now be made Highly Available due to the use of Clustering. Essentially
clients will connect to the Virtual Server MyCluster, which can be serviced by either
of the two Physical Servers Dell1 or Dell2.
To add a Service to the Cluster use the clusteradmin tool and follow the prompts. The
example below shows how to add shared storage and set up a SAMBA Service. Services
are added by the Cluster Administration Tool - cluadmin.
# cluadmin
cluadmin> service add

UNIX Fundamentals
6-9
The user interface will prompt you for information about the service. Not all information is required for all services. Enter a question mark (?) at a prompt to obtain help. Enter a colon (:) and a single-character command at a prompt to do one of the following: c - Cancel and return to the top-level cluadmin command r - Restart to the initial prompt while keeping previous responses p - Proceed with the next prompt Currently defined services: Service name: sharedstorage Preferred member [None]: User script (e.g., /usr/foo/script or None) [None]: Status check interval [0]: Do you want to add an IP address to the service (yes/no/?) [no]: Do you want to add a disk device to the service (yes/no/?) [no]: yes Disk Device Information Device special file (e.g., /dev/sdb4): /dev/sdc1 Filesystem type (e.g., ext2, or ext3): ext2 Mount point (e.g., /usr/mnt/service1) [None]: /shared Mount options (e.g., rw,nosuid,sync): Forced unmount support (yes/no/?) [yes]: Would you like to allow NFS access to this filesystem (yes/no/?) [no]: Would you like to share to Windows clients (yes/no/?) [no]: yes You will now be prompted for the Samba configuration: Samba share name: sambashare Do you want to (a)dd, (m)odify, (d)elete or (s)how DEVICES, or are you (f)inished adding DEVICES [f]: s 0) /dev/sdc1 Do you want to (a)dd, (m)odify, (d)elete or (s)how DEVICES, or are you (f)inished adding DEVICES [f]: f

UNIX Fundamentals
6-10
name: sharedstorage preferred node: None user script: None monitor interval: 0 device 0: /dev/sdc1 mount point, device 0: /shared mount fstype, device 0: ext2 force unmount, device 0: yes samba share, device 0: sambashare Add sharedstorage service as shown? (yes/no/?) yes 0) Dell2 1) Dell1 c) cancel Choose member to start service on: 0 Added sharedstorage. cluadmin> Figure 52 now shows that the Service has been configured.
Figure 52 Viewing Cluster Services
Further information about the Cluster Services can be obtained by double clicking the
Service in question as shown in Figure 53.

UNIX Fundamentals
6-11
Figure 53 Detailed Cluster Service view

UNIX Fundamentals
6-12
Output and File Listings
Output of Cluster configuration script on first node (Dell2) [root@Dell2 qlogic]# /sbin/cluconfig Red Hat Cluster Manager Configuration Utility (running on Dell2) Enter cluster name [Red Hat Cluster Manager]: MyCluster Enter IP address for cluster alias [NONE]: 192.168.4.90 -------------------------------- Information for Cluster Member 0 -------------------------------- Enter name of cluster member [Dell2]: Dell2 /sbin/cluconfig: [: Dell2: unary operator expected Looking for host Dell2 (may take a few seconds)... Enter number of heartbeat channels (minimum = 1) [1]: 1 Information about Channel 0 Channel type: net or serial [net]: net Enter hostname of the cluster member on heartbeat channel 0 [Dell2]: Dell2 /sbin/cluconfig: [: Dell2: unary operator expected Looking for host Dell2 (may take a few seconds)... Information about Quorum Partitions Enter Primary Quorum Partition [/dev/raw/raw1]: /dev/raw/raw1 Enter Shadow Quorum Partition [/dev/raw/raw2]: /dev/raw/raw2 Information About the Power Switch That Power Cycles Member 'Dell2' Choose one of the following power switches: o NONE o RPS10 o BAYTECH o APCSERIAL o APCMASTER o WTI_NPS o SW_WATCHDOG Power switch [NONE]: Note: Operating a cluster without a remote power switch does not provide maximum data integrity guarantees.

UNIX Fundamentals
6-13
-------------------------------- Information for Cluster Member 1 -------------------------------- Enter name of cluster member: Dell1 /sbin/cluconfig: [: Dell1: unary operator expected Looking for host Dell1 (may take a few seconds)... Information about Channel 0 Enter hostname of the cluster member on heartbeat channel 0: Dell1 /sbin/cluconfig: [: Dell1: unary operator expected Looking for host Dell1 (may take a few seconds)... Warning: Host Dell1 not responding Keep your selection? [yes]: yes Information about Quorum Partitions Enter Primary Quorum Partition [/dev/raw/raw1]: Enter Shadow Quorum Partition [/dev/raw/raw2]: Information About the Power Switch That Power Cycles Member 'Dell1' Choose one of the following power switches: o NONE o RPS10 o BAYTECH o APCSERIAL o APCMASTER o WTI_NPS o SW_WATCHDOG Power switch [NONE]: Note: Operating a cluster without a remote power switch does not provide maximum data integrity guarantees. Cluster name: MyCluster Cluster alias IP address: 192.168.4.90 -------------------- Member 0 Information -------------------- Name: Dell2 Primary quorum partition: /dev/raw/raw1 Shadow quorum partition: /dev/raw/raw2 Heartbeat channels: 1 Channel type: net, Name: Dell2 Power switch IP address or hostname: Dell2 Identifier on power controller for member Dell2: unused

UNIX Fundamentals
6-14
-------------------- Member 1 Information -------------------- Name: Dell1 Primary quorum partition: /dev/raw/raw1 Shadow quorum partition: /dev/raw/raw2 Heartbeat channels: 1 Channel type: net, Name: Dell1 Power switch IP address or hostname: Dell1 Identifier on power controller for member Dell1: unused -------------------------- Power Switch 0 Information -------------------------- Power switch IP address or hostname: Dell2 Type: NONE Login or port: unused Password: unused -------------------------- Power Switch 1 Information -------------------------- Power switch IP address or hostname: Dell1 Type: NONE Login or port: unused Password: unused Save the cluster member information? yes/no [yes]: Writing to configuration file...done Configuration information has been saved to /etc/cluster.conf. ---------------------------- Setting up Quorum Partitions ---------------------------- Running cludiskutil -I to initialize the quorum partitions: done Saving configuration information to quorum partitions: done Do you wish to allow remote monitoring of the cluster? yes/no [yes]: ---------------------------------------------------------------- Configuration on this member is complete. To configure the next member, invoke the following command on that system:

UNIX Fundamentals
6-15
# /sbin/cluconfig --init=/dev/raw/raw1 Refer to the Red Hat Cluster Manager Installation and Administration Guide for details. Output of Cluster configuration script on second node (Dell1) [root@Dell1 sysconfig]# /sbin/cluconfig --init=/dev/raw/raw1 Red Hat Cluster Manager Configuration Utility (running on Dell1) - Retrieving the database from the quorum partition... - Verifying database information... -------------------------------- Information for Cluster Member 0 -------------------------------- /sbin/cluconfig: [: Dell2: unary operator expected Looking for host Dell2 (may take a few seconds)... Information about Channel 0 /sbin/cluconfig: [: Dell2: unary operator expected Looking for host Dell2 (may take a few seconds)... Information about Quorum Partitions Information About the Power Switch That Power Cycles Member 'Dell2' Note: Operating a cluster without a remote power switch does not provide maximum data integrity guarantees. -------------------------------- Information for Cluster Member 1 -------------------------------- /sbin/cluconfig: [: Dell1: unary operator expected Looking for host Dell1 (may take a few seconds)... Information about Channel 0 /sbin/cluconfig: [: Dell1: unary operator expected Looking for host Dell1 (may take a few seconds)... Information about Quorum Partitions Information About the Power Switch That Power Cycles Member 'Dell1'

UNIX Fundamentals
6-16
Note: Operating a cluster without a remote power switch does not provide maximum data integrity guarantees. Press <Return> to continue. Cluster name: MyCluster Cluster alias IP address: 192.168.4.90 -------------------- Member 0 Information -------------------- Name: Dell2 Primary quorum partition: /dev/raw/raw1 Shadow quorum partition: /dev/raw/raw2 Heartbeat channels: 1 Channel type: net, Name: Dell2 Power switch IP address or hostname: Dell2 Identifier on power controller for member Dell2: unused -------------------- Member 1 Information -------------------- Name: Dell1 Primary quorum partition: /dev/raw/raw1 Shadow quorum partition: /dev/raw/raw2 Heartbeat channels: 1 Channel type: net, Name: Dell1 Power switch IP address or hostname: Dell1 Identifier on power controller for member Dell1: unused -------------------------- Power Switch 0 Information -------------------------- Power switch IP address or hostname: Dell2 Type: NONE Login or port: unused Password: unused -------------------------- Power Switch 1 Information -------------------------- Power switch IP address or hostname: Dell1 Type: NONE Login or port: unused Password: unused Save the cluster member information? yes/no [yes]: yes Writing to configuration file...done

UNIX Fundamentals
6-17
Configuration information has been saved to /etc/cluster.conf. Saving configuration information to quorum partitions: done Do you wish to allow remote monitoring of the cluster? yes/no [yes]: yes ---------------------------------------------------------------- Configuration on this member is complete. Execute "/sbin/service cluster start" to start the cluster software. [root@Dell1 sysconfig]# /sbin/service cluster start Starting cluster management agent: done. Starting cluster manager services: done. [root@Dell1 sysconfig]#

UNIX Fundamentals
6-18
Module 6 Review 1. Explain briefly the benefits of a Cluster.
________________________________________________________________________
________________________________________________________________________
________________________________________________________________________
________________________________________________________________________
2. Discuss the file structure on the quorum disk
________________________________________________________________________
________________________________________________________________________
________________________________________________________________________
________________________________________________________________________
3. Which cluster utility is used to add Cluster Services
________________________________________________________________________
________________________________________________________________________
________________________________________________________________________
________________________________________________________________________

UNIX Fundamentals
7-1
MODULE 7 Installation using SuSE Linux
Installation Process using SuSE
During the boot process the installation program is called up. The following screens show
how the installation program progresses. Other versions of SuSE Linux may differ
slightly from the screenshots shown.
Figure 54 Installation menu screen
The default installation method is to install Linux in graphical mode. This is the
recommended option unless the machine has an unsupported video card. After the
installation mode has been selected the system will boot up into the installation menu.

UNIX Fundamentals
7-2
Figure 55 Installation boot progress
The first screen prompts the installer to read and accept the licence agreement.
Figure 56 Accepting the license agreement

UNIX Fundamentals
7-3
The next stage is to select the installation language used
Figure 57 Selecting the installation language
The next stage is to select the various options such as partitioning, software selection,
installation type (New or Upgrade) etc. If there is a need to deviate from the default
options changes can be made from this screen by selecting the category listed or by
clicking on it from the change dialog box as shown in
Figure 59. Generally most users will need to customize the installation to suit the needs
of their organization.
For the purposes of the training course a custom partitioning scheme will be used. File
file types are available under Linux. Up to recently the file type used was ext2, but
recently more popular file types are Reiser and ext3. This is largely due to the fact that

UNIX Fundamentals
7-4
they support journaling which provides faster file system recovery as well as offering
more resilience against data corruption. The use of custom partitioning also allows better
ease of management. For example there can be a /home partition which provides a
grouping of user’s data files. Sine this is kept on a separate partition it is immune from
possible system file crashes caused to the Operating System’s files.
Figure 58 Selecting the installation options
There are often a number of restrictions when booting and this is largely dependent on
the BIOS configuration of the machines that are being used. As a general rule (on Intel
based systems) boot files should be located within the first 8 GBytes of disk space and
preferably on the first disk. Typically a small partition of around 100 MB is created and
this becomes the boot partition. The data portion and Operating System files can be
located in the higher regions of the disk.
Many administrators will create a number of additional partitions. This allows them to
locate the Operating System files in a location separate from the user’s data thus
facilitating restore operations.

UNIX Fundamentals
7-5
Figure 59 Changing the default installation options.

UNIX Fundamentals
7-6
Figure 60 Changing the partitioning scheme
To create a customized partition Select <Create custom partition setup> as shown in
Figure 60 above. At the next screen select <custom partitioning for experts>.
Figure 61 Customized Disk Partitioning

UNIX Fundamentals
7-7
At the next screen select the disk that is to be partitioned. In this example there is only
one drive. Select <Create> from the button shown in

UNIX Fundamentals
7-8
Figure 62 to bring up the screen shown in Figure 63.

UNIX Fundamentals
7-9
Figure 62 Selecting the disk
Figure 63 Selecting the partition type

UNIX Fundamentals
Useful Resources
Web Sites The following list of web sites have useful information relating to this course
http://www.linux.org/
http://www.kernel.org
http://www.linuxdoc.org/
http://www.ugu.com/
http://www.redhat.com
http://www.mandrakesoft.com/
http://www.gnu.org/
http://www.slashdot.org/
http://www.freshmeat.net/
http://www.samba.org/
http://docs.sun.com/
http://www.solariscentral.com/
http://www.sunhelp.org/
http://www.solarisguide.com/

UNIX Fundamentals
Index .profile, 3-9, 3-10, 3-11
/etc/modules.conf, 5-18
/etc/passwd, 3-3
/etc/remote, 4-14
/etc/vfstab, 4-9
/kernel/drv/sd.conf, 4-9
absolute, 3-13
admintool, 2-22
AIX, 2-23
aliasing, 3-10
apropos, 3-16
at, 2-21
AT&T., 1-3
background processes, 2-11
banner, 3-14
bash, 2-10, 3-3, 3-4, 3-5, 3-10
batch, 2-21, 2-22
Bell Labs, 1-3
boot –r, 4-5
boot –s, 4-5
cat, 2-11
chdir, 3-17
chmod, 2-19, 2-20, 3-17
chown, 2-20
cluadmin, 6-8
cluconfig, 6-5
Clusters, 6-3
command line completion, 3-5
Console Port, 4-5
cp, 3-15, 3-17, 3-18
cpio, 3-17
crash file, 4-15
csh, 3-3, 3-4
cshell, 3-3
date, 3-14
devfsadm, 4-10
device driver, 1-9, 4-8
Device Naming, 1-6
devlinks, 4-10
df, 2-17, 3-17
display server, 1-24
du, 2-17, 3-7, 3-17
Dynamic linking, 5-9
Dynamic Load Balancing, 6-3
echo, 3-5, 3-6, 3-7, 3-8, 3-11, 3-17
ed, 3-12
env, 3-10, 3-17, 3-18
Environment Variables, 3-10
exit, 3-18
EXTRAVERSION, 5-11
Fat32, 1-5, 1-7
fdisk, 1-7, 1-12, 1-13, 1-15, 1-19
Fibre Channel, 6-4
find, 2-25, 3-14, 3-18

UNIX Fundamentals
format, 1-17, 2-8, 2-18, 2-21, 3-15, 4-
9, 4-10, 4-11, 4-13, 4-16, 4-17
fsck, 2-18
gateway, 1-20
GNU, 1-2, 1-4, 5-3
grep, 3-13, 3-14, 3-18
HBA, 6-4
Host Bus Adapters, 4-8
hostname, 1-19, 1-20, 2-13, 3-3
httpd, 6-7
HyperTerminal, 4-5, 4-14
info, 3-16
init, 2-3, 2-5, 2-6, 2-7, 2-8
inittab, 2-3, 2-5
inode, 2-13, 2-14, 2-18
inode table, 2-13, 2-14
Intel, 1-2, 1-4, 1-5, 4-2, 4-3, 4-4, 4-6
IP address, 1-20, 3-3
Ken Thompson, 1-3
kernel panic, 4-15
kill, 2-8, 2-18, 2-19, 3-18
KILL scripts, 2-7
kpackage, 5-19
ksh, 3-4
libraries, 5-8
LILO, 1-6
linking, 5-9
Linus Torvalds, 1-4
linuxconf, 2-22
lsmod, 5-4
LUN, 4-9
magic number, 4-10, 6-6
make bzImage, 5-15
make dep, 5-15
make menuconfig, 5-12
make modules, 5-15
make modules_install, 5-15
make mrproper, 5-11
make xconfig, 5-12
makefile, 5-9
man, 3-15, 3-16
MINIX, 1-4
mk2fs, 2-18
mkdir, 3-19
mkfs, 2-17, 2-18
mkinitrd, 5-15, 5-16, 5-17
modify, 2-23, 4-12, 4-13
modinfo, 5-7
modprobe, 5-7
modular, 5-3
Monolithic, 5-3
more, 1-3, 1-25, 2-17, 2-18, 2-20, 3-
10, 3-12, 3-15, 3-17, 3-19
Motif, 1-24
mount, 1-16, 1-17, 2-12, 2-13, 3-
19
mountpoint, 1-17
MULTICS, 1-3
multiple SCSI LUNs, 5-11
mv, 3-19
newfs, 4-9

UNIX Fundamentals
NFS, 2-12
nice, 2-11
NTFS, 1-5
ntsysv, 2-24, 5-22, 6-7
object code, 5-8
octal, 2-19, 2-20
Open Desktop, 1-24
OPEN LOOK, 1-24
owner, 2-10, 2-11, 2-19, 2-20, 2-21
partition table, 1-14, 1-15
partitioning, 1-2, 1-7, 1-12, 1-13
PATH, 3-10, 3-17, 3-19
PDP-7, 1-3
permission, 2-19, 2-20, 2-21
pg, 3-14
PID. See Process Identification Number
piping, 3-5
pkgadd, 4-8
pkginfo, 4-8
pkgrm, 4-8
POSIX, 4-3
printenv, 4-5
probe-pci, 4-6
probe-SCSI, 4-5
probe-scsi-all, 4-6
process, 1-8, 1-12, 2-2, 2-3, 2-5, 2-6, 2-
8, 2-10, 2-11, 2-18, 2-21, 3-9, 3-
18, 4-4, 4-5, 7-1
Process Identification number, 2-3
ps, 2-8, 2-9, 2-10, 2-11, 2-22, 3-19
pwd, 3-13, 3-19
quorum, 6-5
RAID, 4-15, 4-16, 4-17, 6-4
rawrite, 1-8, 1-28
Red Hat, 1-2, 1-5, 1-7, 1-8, 1-11, 1-12,
2-3, 7-1
redirection, 3-4, 3-5
relative, 3-13
rm, 3-19
rmdir, 3-19
rmmod, 5-6
root, 1-17, 1-21, 1-22, 2-8, 2-9, 2-10, 2-
19, 2-21, 2-22, 3-3, 3-19, 3-20
run levels, 2-3, 2-5, 2-6, 4-2, 4-7
sam, 2-22
Samba, 5-22
SCSI inquiry, 4-17
Security, 2-22
sed, 3-12
set, 1-5, 1-6, 1-7, 1-14, 1-18, 1-19, 1-20,
1-22, 1-25, 2-3, 2-4, 2-19, 2-20, 2-
21, 2-22, 2-25, 3-3, 3-5, 3-9, 3-14,
3-16, 3-19, 4-5, 4-6
sgid, 2-21
shell, 3-2, 3-3, 3-4, 3-5, 3-7, 3-9, 3-10,
3-11, 3-13, 3-16, 3-18, 3-22
show-devs, 4-6
show-disks, 4-6
shutdown, 3-3
Signals, 2-18

UNIX Fundamentals
smit, 2-22
Solaris, iv, 2-22, 3-3, 4-1, 4-2, 4-3,
4-4, 4-7, 4-18, 7-1
sort, 3-5, 3-14, 3-15, 3-18
source code, 5-8
SPARC, 4-2, 4-3, 4-4, 4-5
ssh, 3-3
Start scripts, 2-7
Static linking, 5-9
STOP A, 4-5
stty, 3-14, 3-15
su, 1-22, 2-19, 3-20
suid, 2-21
SunOS, 4-3
superuser, 1-21, 1-22, 2-19, 2-21, 2-
22, 3-20
SUSE, 1-5
swat, 5-24, 5-25
tail, 3-14
tar, 3-20
telnet, 3-3
TERM, 3-10, 3-11, 3-18
tip, 4-2, 4-14
UFS, 4-9
ulimit, 2-17
umask, 2-20, 3-20
UNIX System V, 1-3
vi, 3-12
virtual consoles, 2-7
Virtual Server, 6-8
VT100, 4-5
wall, 3-20
who, 2-22, 3-20
whoami, 3-20
WINE, 5-2, 5-19
X windows, 1-2, 1-23, 1-24, 2-8
xinitrc, 1-25