Embed Size (px)
Citation preview
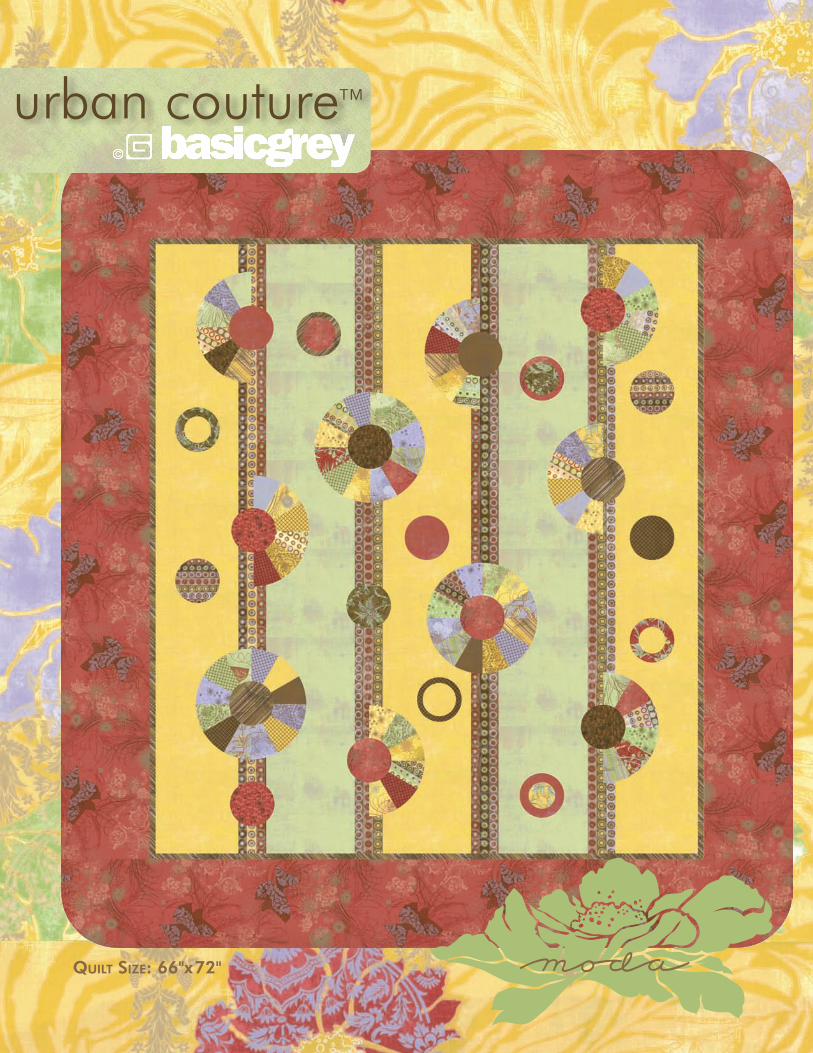
urban couture™
Quilt Size: 66"x72"

urban couture™
Quilt Size: 66"x72"
quilTer basics
Read instructions before beginning a project.
All instructions include a ¼" seam allowance.
Press as you go. Press seams in one direction.
cuTTing
Layer CakeCut each layer cake into
4- 5"x5" squares. Total 160.
FlangeCut 6-1½" x WOF strips
SashingCut 8 (2 of each colorset) 3" x Length of fabric strips
See illustration below
Yellow Background Cut 6 – 8½"xWOF strips
Green BackgroundCut 4 – 8½"xWOF strips
Outer Border and Binding(fabric is directional)
First cut 8 – 2½"xWOF strips for binding.
Then cut 4 – 8½"xWOF strips for top and bottom borders
Finally cut 2 – 8½"x 56½" side borders from length of fabric
consTrucTion
Quilt Center:1. Piece like sashing strips together and cut each pieced strip to measure
3"x 56½". Make 4.2. Piece yellow and green background strips. Cut strips to measure
8½"x 56½". Make 3 yellow and 2 green. 3. Join prepared background and sashing strips to make quilt center.
Begin and end with a yellow background strip. Press seams toward sashings.
4. Quilt center should measure 50½"x 56½" with seams.
Fans and Circles1. Select 5"x 5" squares for fan blades – 7 sets of 6 and 3 sets of 12. 2. Select squares for fan circle center and fan “handles”.
Choose 10.3. Select squares for floating circles. Choose 18.
Preparing Floating Circles
Use enclosed template to cut circles from selected 5"x5" squares. Note: Templates do not include seam allowance. Add seam allowance if necessary.
paper FoundaTion pieced Fans
Hint: Measure printed foundation block. Make sure it measures 10" from trim line to trim line across base of fan. You may need to adjust your printer to assure this measurement as individual printers may vary slightly.
1. Print 13 paper foundation sheets. Cut paper shape approximately ½" beyond trim lines. The foundation shape includes seam allow-ance for joining blocks.
2. Begin by piecing one fan. You will repeat this method for the re-maining 12 fans.
Piecing a Foundation Block
Step 1 To foundation piece each fan, select the 5"x5" square for Blade #1. Place and pin piece #1 with right side up over the shape labeled Blade #1 on the unmarked side of the foundation. Be sure the fabric piece overlaps the shape on all sides by at least ¼". Place fabric piece #2 with
Cutting SaShing
Cut 23"x length of fabric
strips from the same colorset.
Colorsets are repeated across width of fabric.

right side up
wrong side up
FRont – PRinted Side oF temPlate PaPeR
Blade 1
Blade 2
Blade 3 Blade 4
Blade 6
Blade 5stitch on line between 1 & 2
Blade 1
Blade 2
Blade 3Blade 4
Blade 6
Blade 5
BaCk – unPRinted Side oF temPlate PaPeR
right si
de up
wrong side u
p
right side up
wrong side up
Blade 1
Blade 2
Blade 3
Blade 4 Blade 6
Blade 5
ruler
using a rotary cutter, trim seam to ¼"
Blade 3Blade 4
Blade 6
Blade 5
right side up
right side up
BaCk – unPRinted Side oF temPlate PaPeR
right sides together over the fabric for Blade #1, with one edge approximately ¼" over the line between Blades #1 and #2 as shown.
Step 2 Check to be sure that the line between Blade #1 and Blade #2 is covered by the fabric piece. You can do this by carefully lifting up the fabric edges or holding the pieces up to a light source. Now check to be sure that the fabric piece for Blade #2 will cover the shape when it is stitched in place and pressed open. Make any adjustments necessary. Place pins perpendicular to the seam line between Blades #1 and #2 when you are satisfied with the fabric placement.
Step 3 With the marked side of the foundation up, stitch along the seam line between Blades #1 and #2.
Step 4 Fold the foundation away from the fabric pieces and trim the seam to ¼", using a rotary cutter and ruler.
Step 5 From the fabric side, finger-press the fabric piece for Blade #2 away from Blade #1 so that it covers Blade #2.
Step 6 Place the square for Blade #3. Align, pin, sew, and trim the piece in the same manner as for Blade #2.
Step 7 Continue adding blades to the foundation in this man-ner, working in numerical order, until the fan is complete. When you complete all of the fan blocks, trim each foun-dation along the outer marked line.
Step 8 Sew 6 fans together to make 3 circles. Fan “handles” and center circles will be added later.
assemble quilTNote: The fans and circles may be hand or machine appliquéd, raw-edge appliquéd or fused. Choose your favorite method.
Referring to the quilt image on front of this project sheet, arrange circles and fans on quilt top. Pin and/or baste elements to quilt top before appliqueing. Begin with fans and fan circles and then add circles and fan “handles”. We recommend that you work from the center outward as you applique or fuse the various pieces.
Step 1 Step 3
Step 4
Step 5
Step 8Make 3 circles
Finishing Layer, hand or machine quilt. Round corners of quilt if desired and bind.
Adding the Flange
1. Join 6 – 1½"x WOF strips end to end. Press.2. Fold prepared strip in half wrong sides together. Press. 3. Cut 2 – 56½" flanges for sides of quilt and 2 – 50½”
flanges for top and bottom.4. Align edges and pin or baste flange pieces first to the
sides of the quilt top and then to top and bottom. Fold of flange should face center of quilt. Note: Strips will overlap in corners. Flange will be “sandwiched” between quilt top and outer border. It will be stitched at the same time as the outer border.
ouTer border1. Add 8½"x 56½" borders to sides of quilt top. Press
border away from flange and center of quilt.2. Piece 4 – 8½"xWOF border strips end to end. Press.3. Measure quilt top through horizontal center including
borders. Cut top and bottom borders to that measure-ment. Add prepared borders to top and bottom of quilt. Press. Quilt top should measure 66½" x 72½"
FYI: A flange is a folded strip of fabric which is sewn between sections of a quilt for added interest. The folded edge is not sewn into the quilt.

urban couture™
Quilt Size: 66"x72"
PS30150 — SuggeSted Retail $3.00
modafabrics.com
4"
3"
2½"
Cir
Cle
Tem
plaT
es
Tem
plaT
es d
o n
oT
in
clu
de
seam
all
ow
anc
e
Blade 1
Blade 2
Blade 3
Blade 4
Blade 5
Blade 6
Seam
Lin
e
Trim
Lin
e
Seam
Lin
eTr
im L
ine
Seam
Lin
e
Trim
Lin
e
Seam
Lin
e
Trim
Lin
eFo
unda
tion
Pape
r sh
ould
mea
sure
10"
Urb
an C
oU
tUre
Fan T
empl
aTe
Tem
plaT
e is F
ull
siz
e
Fabric requiremenTs
1 Layer Cake – 30150LC
Green Background – 30150-20 – 1 yard
Yellow Backgound – 30150-15 – 1½ yard
Sashing – 30153-12 – 1 yard
Flange – 30155-11 – ⅓ yard
Outer Border and Binding – 30152-13 – 3½ yards