Embed Size (px)
Citation preview
0476
EN
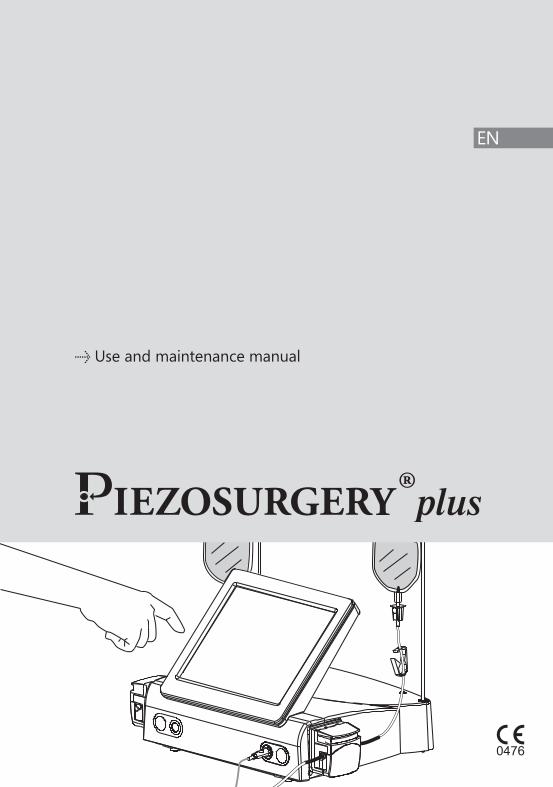
Use and maintenance manual
2
EN
2
01 INTRODUCTION . . . . . . . . . . . . . . . . . . . . . . . . . . . . . . . . . . . . . . . . . . . . 4 01 .1 Intended use of the PIEZOSURGERY® plus . . . . . . . . . . . . . . . . . . . . 4 01 .2 Description of the device . . . . . . . . . . . . . . . . . . . . . . . . . . . . . . . . . . . 5 01 .3 Responsibility waiver . . . . . . . . . . . . . . . . . . . . . . . . . . . . . . . . . . . . . . . 5 01 .4 Safety requirements . . . . . . . . . . . . . . . . . . . . . . . . . . . . . . . . . . . . . . . . 6 01 .5 Symbols . . . . . . . . . . . . . . . . . . . . . . . . . . . . . . . . . . . . . . . . . . . . . . . . . . 8
02 IDENTIFICATION DATA . . . . . . . . . . . . . . . . . . . . . . . . . . . . . . . . . . . . . 9 02 .1 Device data plate . . . . . . . . . . . . . . . . . . . . . . . . . . . . . . . . . . . . . . . . . . 9 02 .2 Handpiece data . . . . . . . . . . . . . . . . . . . . . . . . . . . . . . . . . . . . . . . . . . . 9 02 .3 Inserts data . . . . . . . . . . . . . . . . . . . . . . . . . . . . . . . . . . . . . . . . . . . . . . . 9
03 DELIVERY . . . . . . . . . . . . . . . . . . . . . . . . . . . . . . . . . . . . . . . . . . . . . . . . . . . 10 03 .1 List of the standard equipment . . . . . . . . . . . . . . . . . . . . . . . . . . . . 10 03 .2 List of accessories . . . . . . . . . . . . . . . . . . . . . . . . . . . . . . . . . . . . . . . . 10
04 INSTALLATION AND CONFIGURATION . . . . . . . . . . . . . . . . . 11 04 .1 Safety requirements during installation . . . . . . . . . . . . . . . . . . . . 11 04 .2 Device installation . . . . . . . . . . . . . . . . . . . . . . . . . . . . . . . . . . . . . . . 12 04 .3 Switching the device on . . . . . . . . . . . . . . . . . . . . . . . . . . . . . . . . . 12 04 .4 Language selection . . . . . . . . . . . . . . . . . . . . . . . . . . . . . . . . . . . . . . 14 04 .5 Irrigation kit assembly . . . . . . . . . . . . . . . . . . . . . . . . . . . . . . . . . . . . 15 04 .6 Connection of the handpieces to the device . . . . . . . . . . . . . . . . 16 04 .7 Assembly of PIEZOSURGERY® medical insert cover and extension . . . . . . . . . . . . . . . . . . . . . . . . . . . . . . . . . . . . . . 16 04 .8 Assembly of the inserts . . . . . . . . . . . . . . . . . . . . . . . . . . . . . . . . . . . 18 04 .9 Description of commands . . . . . . . . . . . . . . . . . . . . . . . . . . . . . . . . . 19 04 .10 Device configuration . . . . . . . . . . . . . . . . . . . . . . . . . . . . . . . . . . . . . 22 04 .11 Changing the device configuration . . . . . . . . . . . . . . . . . . . . . . . . 24 04 .12 Foot pedal button . . . . . . . . . . . . . . . . . . . . . . . . . . . . . . . . . . . . . . . 25 04 .13 Safety requirements before and during use . . . . . . . . . . . . . . . . . 25 04 .14 Important information on inserts . . . . . . . . . . . . . . . . . . . . . . . . . . 28 04 .15 Switching the device off . . . . . . . . . . . . . . . . . . . . . . . . . . . . . . . . . . 29
CONTENTS
3
EN
05 MAINTENANCE . . . . . . . . . . . . . . . . . . . . . . . . . . . . . . . . . . . . . . . . . . . 30
06 DISPOSAL MODES AND PRECAUTIONS . . . . . . . . . . . . . . . . . 30
07 TECHNICAL DATA . . . . . . . . . . . . . . . . . . . . . . . . . . . . . . . . . . . . . . . . . . 31 07 .1 Electromagnetic compatibility EN 60601-1-2 . . . . . . . . . . . . . . . . 32
08 TROUBLESHOOTING . . . . . . . . . . . . . . . . . . . . . . . . . . . . . . . . . . . . . . 36 08 .1 Diagnostic reports and solutions . . . . . . . . . . . . . . . . . . . . . . . . . . 36 08 .2 Quick troubleshooting guide . . . . . . . . . . . . . . . . . . . . . . . . . . . . . 40 08 .3 Replacing the fuses . . . . . . . . . . . . . . . . . . . . . . . . . . . . . . . . . . . . . . 42 08 .4 Sending to an Authorised Mectron Service Centre . . . . . . . . . . 43
09 PACKAGING AND UNPACKING . . . . . . . . . . . . . . . . . . . . . . . . . . 44
10 WARRANTY . . . . . . . . . . . . . . . . . . . . . . . . . . . . . . . . . . . . . . . . . . . . . . . . 45
4
EN
01 INTRODUCTION
01.1 INTENDED USE OF THE PIEZOSURGERY® plus
Please read this manual carefully before proceeding to install, use, maintain or carry out any other interventions on the device. It must be available to operators at all times. IMPORTANT: to avoid any injury to people or damage to property, please pay careful attention to all the “Safety requirements” included in this manual . Depending on the level of danger involved, the safety requirements are classified as follows:
DANGER (related to personal injury)
WARNING (relating to possible damage to objects)
The purpose of this manual is to ensure that operators are aware of the safety requirements, installation procedures, and instructions for correct use and maintenance of the device and its accessories . Using this manual for purposes other than those relating to the installation, use and maintenance of the device, is strictly prohibited . The information and illustrations contained in this manual are updated as of the date of publication specified on the last page. Mectron is committed to the continuous updating of our products, which may entail changes to components of the device . If any discrepancies are seen between the descriptions given in this manual and your equipment, please contact your retailer or the Mectron After-Sales Service for clarification.
The PIEZOSURGERY® plus is a surgical ultrasound device used to cut bone, fitted with handpieces and specific inserts that enable osteotomy and osteoplasty techniques and to drill holes in a variety of surgical procedures: - Otorhinolaryngology - Oral-maxillofacial surgery - Hand and foot surgery
- Neurosurgery - Spinal surgery - Plastic-reconstructive surgery - Orthopaedics - Chest surgeryThe device can also be used with the help of visual endoscopic techniques employed to carry out the procedures listed above .
DANGER: Only use the device for its intended use . Failure to comply with this requirement may lead to serious injury to the patient or operator, and damage/failure of the device .
DANGER: Carefully read and apply the recommendations given in this manual to avoid all risk to patient and/or user safety . Failure to do so may lead to serious injury to the patient and/or operator .
DANGER: The device must be used in the operating theatre of a hospital .
DANGER: Qualified and specialised personnel. This device may only be used by specialised personnel such as a surgeon with proper medical culture; no training activities are foreseen for the use of the device . If correctly used, this device causes no side effects . Improper use, on the other hand, will transmit heat to the tissues .
DANGER: Risk of explosion. The device cannot function in places where there is an atmosphere saturated with flammable gases (anaesthetic mixtures, oxygen, etc .) .
DANGER: The PIEZOSURGERY® plus is not suitable for direct cardiac application .
5
EN
01 INTRODUCTION
01.2 DESCRIPTION OF THE DEVICE
01.3 RESPONSIBILITY WAIVER
The PIEZOSURGERY® plus device uses piezoelectric ultrasound technology to generate mechanical micro vibrations that can cut through mineralised structures causing minimal damage to soft tissues . The PIEZOSURGERY® plus has two piezoelectric channels of different power types and with independent electronics . Channel 1 enables the PIEZOSURGERY® medical handpiece to be used, to which the sterile, single-use PIEZOSURGERY® medical inserts can be connected . Channel 2 enables the PIEZOSURGERY® medical+ handpiece to be used, to which the sterile, single-use PIEZOSURGERY® medical+ inserts can be connected . Other components (PIEZOSURGERY® medical-R handpiece) can be used on channel 1 . For information, please contact the area manager .
DANGER: All handpieces can be used in the applications specified in the intended use . The PIEZOSURGERY® medical+ handpiece is especially recommended in the case of highly mineralised bone .
The touch screen makes all functions immediately available; they are activated by simply pressing the finger against the screen at the chosen buttons . The user can use the graphic interface to select the chosen insert and set the power type and irrigation values within a range pre-established by Mectron .
DANGER: To prevent the treated parts from overheating, we recommend increasing irrigation levels as power type increases .
The manufacturer, Mectron, refuses all specific or implicit liability and shall not be held liable for any direct or indirect injury to people and/or damage to objects occurring following incorrect procedures connected with the use of the device and its accessories . The manufacturer, Mectron, cannot be held specifically or implicitly liable for any type of injury to people and/or damages to objects caused by the user of the product and its accessories and which took place in the following cases: 1 Use in procedures other than those
specified in the product’s intended use;2 The environmental conditions in which the
device is kept and stored do not comply with the requirements indicated in chapter 07 - TECHNICAL DATA;
3 The device is not used in accordance with the instructions and requirements described in this manual;
4 The wiring systems in the room where the device is used do not comply with the applicable standards and relevant requirements;
5 Device assembly, extension, regulation, update or repair has been carried out by personnel not authorised by Mectron; all assistance services must be provided by qualified personnel only.
WARNING: The back-up battery must be replaced with a CR2032 type identical battery, by authorised Mectron technical service centres .
6 Improper use, damage and/or incorrect interventions;
7 All attempted tampering or changes to the device in any circumstances;
8 Use of non-original Mectron inserts, which definitively damages the handpiece thread, affecting correct function and risking injury to the patient;
9 Use of non-original Mectron inserts, used according to the settings designed and tested on original Mectron inserts . Correct use of settings is only guaranteed with original Mectron inserts;
10 Lack of spare materials (handpiece, inserts, wrenches) to be used in the event of failure or problem .
6
EN
DANGER: Risk of explosion. The device cannot function in places where there is an atmosphere saturated with flammable gases (anaesthetic mixtures, oxygen, etc .) .
DANGER: Contraindications. Interference with other equipment. Although PIEZOSURGERY® plus complies with standard IEC 60601-1-2, it may interfere with other equipment located nearby . PIEZOSURGERY® plus must not be used near, or stacked on other equipment . Install PIEZOSURGERY® plus at a safe distance from life-support equipment . If necessary, however, prior their use, please check and monitor that the device and all other equipment function correctly in that layout .
DANGER: Contraindications. Interference by other equipment. An electrosurgical knife of other electrosurgical devices near the PIEZOSURGERY® plus device, may interfere with its correct functioning .
WARNING: If the end user should need to submit the equipment in its facility to regular checks, in order to comply with relevant requirements, the test procedures to be applied to electromedical systems and devices to evaluate safety must be carried out by means of standard EN 62353 “Medical Electrical Equipment - recurrent test and test after repair of medical electrical equipment” .
DANGER: Check the condition of the device before treatment.Always make sure that there is no water under the device . Before each treatment, always check that the device is in proper working order and that the accessories are efficient. Do not carry out the treatment if any problems are encountered in operating the device . If experiencing problems with the device, contact an Authorised Mectron Service Centre .
WARNING: The wiring systems in the room in which the device is installed and used must comply with applicable standards and relevant electrical safety requirements .
WARNING: To avoid risk of electric shock, this device must only be connected to power grids with protective earth .
DANGER: When the peristaltic pump cover is open, the foot pedal of the PIEZOSURGERY® plus must not be pressed . Moving parts may injure the operator .
DANGER: Personal injury. Take care to ensure that cables do not hinder the free movement of personnel .
WARNING: US Federal Law (of the United States of America) restricts this device to sale by or on the order of a physician
DANGER: Before each use, examine each part looking for any damages . If damages are found, do not use .
DANGER: Do not activate the device if the handpiece is faulty, damaged or broken . Replace the handpiece immediately .
DANGER: Only use original Mectron accessories and spare parts .
WARNING: No changes can be made to this device .
DANGER: The removable panel on the back of the device can only be accessed by authorised Mectron personnel . Users must not attempt to remove it or tamper with it as this would invalidate the warranty and may damage the device .
DANGER: Contraindications. Do not use the PIEZOSURGERY® plus on patients fitted with pace-makers or other implantable electronic devices . This also applies to the operator .
01.4 SAFETY REQUIREMENTS
7
EN
01 INTRODUCTION
WARNING: Contraindications. Do not carry out this treatment on metal or ceramic prosthetic artefacts . The ultrasonic vibrations could cause them to decement .
DANGER: Infection control. To ensure maximum patient and operator safety, before using all reusable parts and accessories, please ensure that they have been previously cleaned and sterilised in accordance with the instructions given in the Cleaning and Sterilisation Manual .
DANGER: Cleaning and sterilisation of new or repaired tools. All new and repaired reusable device accessories are supplied non-sterile. Before first use, and after each treatment, they must be cleaned and sterilised in strict compliance with the instructions given in the Cleaning and Sterilisation Manual .
WARNING: Contraindications . After having sterilised the handpiece, the torque wrench or all other sterilisable accessories in the autoclave, wait for them to have cooled completely before reusing .
DANGER - Breakage and wear of the inserts. The high-frequency vibrations and general wear and tear can, very occasionally, lead to insert breakage . Do not bend, change the shape or sharpen an insert in any way . Bending an insert or applying leverage to it can cause it to break . Deformed or otherwise damaged inserts are liable to break during use . These inserts must never be used . Excessive pressure on inserts during use can cause them to break . If the tip of the insert comes into contact with metal objects, it may break leaving fragments in the operating site . In the event of breakage, check that no fragments remain in the treated part, and at the same time suction effectively to remove any . If a fragment cannot be found, use diagnostic tools such as x-rays to confirm that the broken piece is not in the surgical area . Check that the insert is whole on regular occasions during the intervention, and particularly the apical part . During the intervention, avoid prolonged contact with retractors or other metal tools being used .
8
EN
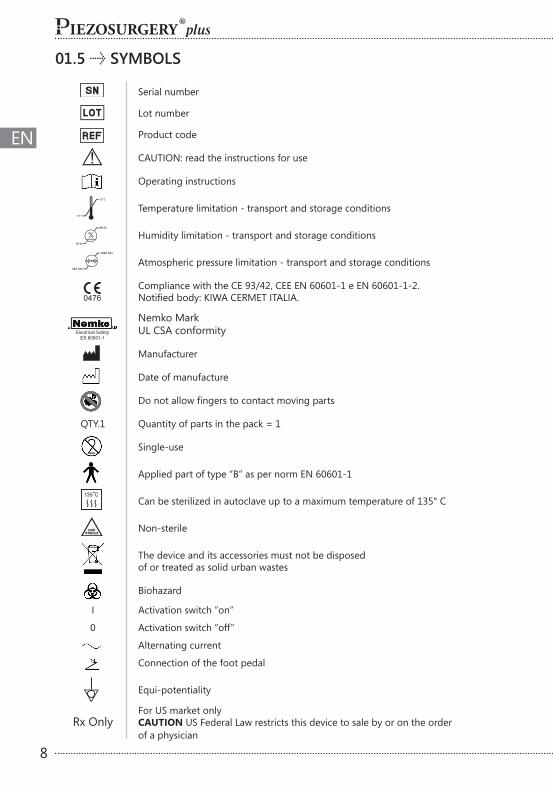
Serial number
Lot number
Product code
CAUTION: read the instructions for use
Operating instructions
Temperature limitation - transport and storage conditions
Humidity limitation - transport and storage conditions
Atmospheric pressure limitation - transport and storage conditions
Compliance with the CE 93/42, CEE EN 60601-1 e EN 60601-1-2 . Notified body: KIWA CERMET ITALIA.
Nemko Mark UL CSA conformity
Manufacturer
Date of manufacture
Do not allow fingers to contact moving parts
QTY .1 Quantity of parts in the pack = 1
Single-use
Applied part of type “B” as per norm EN 60601-1
Can be sterilized in autoclave up to a maximum temperature of 135° C
Non-sterile
The device and its accessories must not be disposed of or treated as solid urban wastes
Biohazard
I Activation switch “on”
0 Activation switch “off”
Alternating current
Connection of the foot pedal
Equi-potentiality
Rx Only
For US market only CAUTION US Federal Law restricts this device to sale by or on the order of a physician
01.5 SYMBOLS
0476
-10 °C
70 °C
10 %
90 %
1060 hPa
500 hPa
9
EN
02 IDENTIFICATION DATA
02 IDENTIFICATION DATA
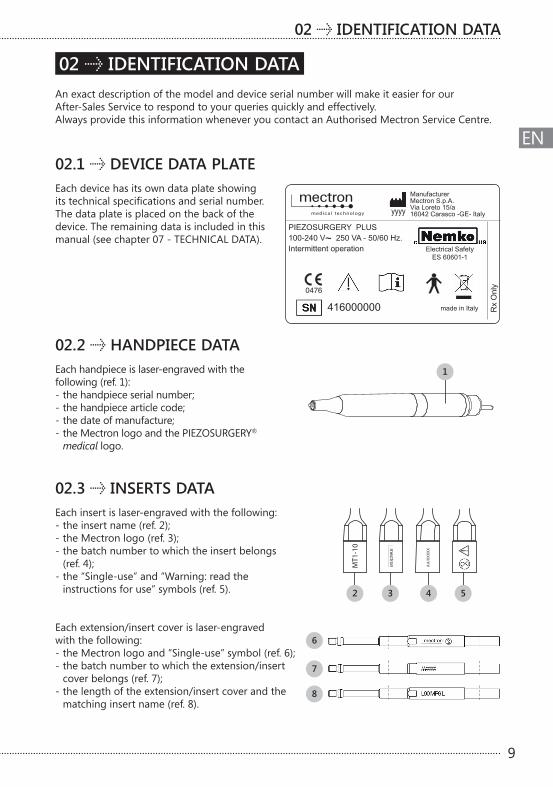
Each device has its own data plate showing its technical specifications and serial number. The data plate is placed on the back of the device . The remaining data is included in this manual (see chapter 07 - TECHNICAL DATA).
Each handpiece is laser-engraved with the following (ref. 1): - the handpiece serial number; - the handpiece article code; - the date of manufacture;- the Mectron logo and the PIEZOSURGERY®
medical logo .
Each insert is laser-engraved with the following: - the insert name (ref. 2); - the Mectron logo (ref. 3); - the batch number to which the insert belongs
(ref. 4); - the “Single-use” and “Warning: read the
instructions for use” symbols (ref. 5).
Each extension/insert cover is laser-engraved with the following: - the Mectron logo and “Single-use” symbol (ref. 6);- the batch number to which the extension/insert
cover belongs (ref. 7); - the length of the extension/insert cover and the
matching insert name (ref. 8).
02.1 DEVICE DATA PLATE
02.2 HANDPIECE DATA
02.3 INSERTS DATA
An exact description of the model and device serial number will make it easier for our After-Sales Service to respond to your queries quickly and effectively . Always provide this information whenever you contact an Authorised Mectron Service Centre .
2
1
MT1
-10
AA/XXX
XX
3 4 5
6
7
8
10
EN
03 DELIVERY
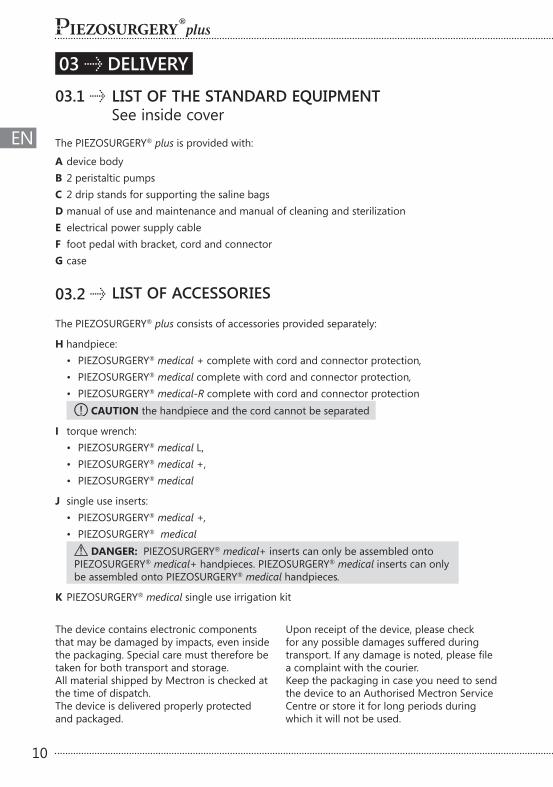
03.1 LIST OF THE STANDARD EQUIPMENT See inside coverThe PIEZOSURGERY® plus is provided with:
A device bodyB 2 peristaltic pumpsC 2 drip stands for supporting the saline bagsD manual of use and maintenance and manual of cleaning and sterilizationE electrical power supply cableF foot pedal with bracket, cord and connectorG case
03.2 LIST OF ACCESSORIES
The PIEZOSURGERY® plus consists of accessories provided separately:
H handpiece: • PIEZOSURGERY® medical + complete with cord and connector protection, • PIEZOSURGERY® medical complete with cord and connector protection, • PIEZOSURGERY® medical-R complete with cord and connector protection
CAUTION the handpiece and the cord cannot be separated
I torque wrench: • PIEZOSURGERY® medical L,• PIEZOSURGERY® medical +, • PIEZOSURGERY® medical
J single use inserts: • PIEZOSURGERY® medical +,• PIEZOSURGERY® medical
DANGER: PIEZOSURGERY® medical+ inserts can only be assembled onto PIEZOSURGERY® medical+ handpieces . PIEZOSURGERY® medical inserts can only be assembled onto PIEZOSURGERY® medical handpieces.
K PIEZOSURGERY® medical single use irrigation kit
The device contains electronic components that may be damaged by impacts, even inside the packaging . Special care must therefore be taken for both transport and storage . All material shipped by Mectron is checked at the time of dispatch . The device is delivered properly protected and packaged .
Upon receipt of the device, please check for any possible damages suffered during transport. If any damage is noted, please file a complaint with the courier . Keep the packaging in case you need to send the device to an Authorised Mectron Service Centre or store it for long periods during which it will not be used .
11
EN
04 INSTALLATION AND CONFIGURATION
04 INSTALLATION AND CONFIGURATION
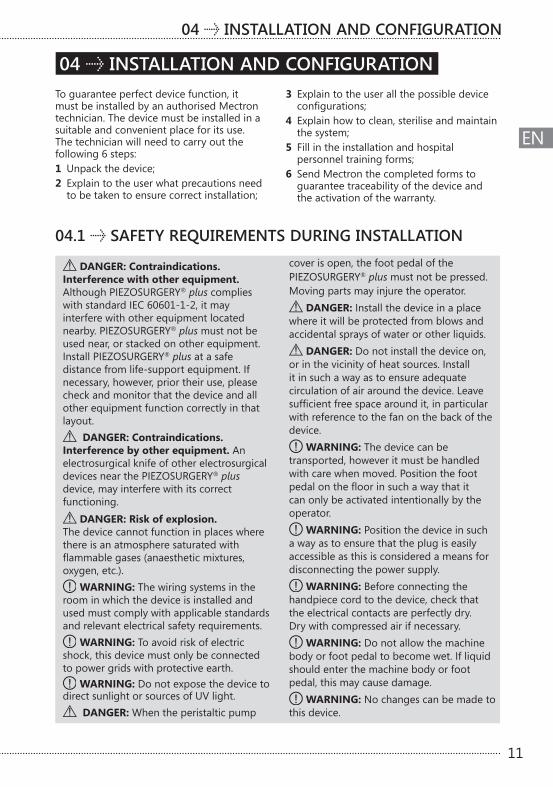
04.1 SAFETY REQUIREMENTS DURING INSTALLATION
DANGER: Contraindications. Interference with other equipment. Although PIEZOSURGERY® plus complies with standard IEC 60601-1-2, it may interfere with other equipment located nearby . PIEZOSURGERY® plus must not be used near, or stacked on other equipment . Install PIEZOSURGERY® plus at a safe distance from life-support equipment . If necessary, however, prior their use, please check and monitor that the device and all other equipment function correctly in that layout .
DANGER: Contraindications. Interference by other equipment. An electrosurgical knife of other electrosurgical devices near the PIEZOSURGERY® plus device, may interfere with its correct functioning .
DANGER: Risk of explosion. The device cannot function in places where there is an atmosphere saturated with flammable gases (anaesthetic mixtures, oxygen, etc .) .
WARNING: The wiring systems in the room in which the device is installed and used must comply with applicable standards and relevant electrical safety requirements .
WARNING: To avoid risk of electric shock, this device must only be connected to power grids with protective earth .
WARNING: Do not expose the device to direct sunlight or sources of UV light .
DANGER: When the peristaltic pump
cover is open, the foot pedal of the PIEZOSURGERY® plus must not be pressed . Moving parts may injure the operator .
DANGER: Install the device in a place where it will be protected from blows and accidental sprays of water or other liquids .
DANGER: Do not install the device on, or in the vicinity of heat sources . Install it in such a way as to ensure adequate circulation of air around the device . Leave sufficient free space around it, in particular with reference to the fan on the back of the device .
WARNING: The device can be transported, however it must be handled with care when moved . Position the foot pedal on the floor in such a way that it can only be activated intentionally by the operator .
WARNING: Position the device in such a way as to ensure that the plug is easily accessible as this is considered a means for disconnecting the power supply .
WARNING: Before connecting the handpiece cord to the device, check that the electrical contacts are perfectly dry . Dry with compressed air if necessary .
WARNING: Do not allow the machine body or foot pedal to become wet . If liquid should enter the machine body or foot pedal, this may cause damage .
WARNING: No changes can be made to this device .
To guarantee perfect device function, it must be installed by an authorised Mectron technician . The device must be installed in a suitable and convenient place for its use . The technician will need to carry out the following 6 steps: 1 Unpack the device;2 Explain to the user what precautions need
to be taken to ensure correct installation;
3 Explain to the user all the possible device configurations;
4 Explain how to clean, sterilise and maintain the system;
5 Fill in the installation and hospital personnel training forms;
6 Send Mectron the completed forms to guarantee traceability of the device and the activation of the warranty .
12
EN
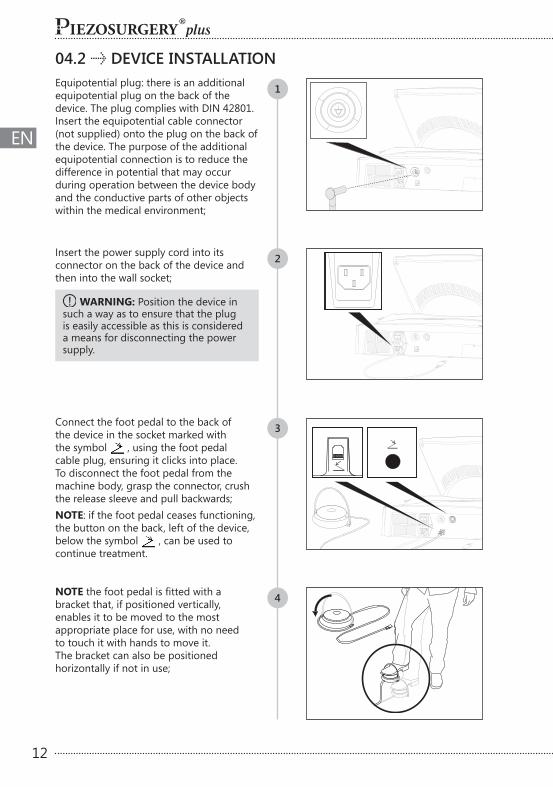
Connect the foot pedal to the back of the device in the socket marked with the symbol , using the foot pedal cable plug, ensuring it clicks into place . To disconnect the foot pedal from the machine body, grasp the connector, crush the release sleeve and pull backwards;NOTE: if the foot pedal ceases functioning, the button on the back, left of the device, below the symbol , can be used to continue treatment .
04.2 DEVICE INSTALLATION
1
2
3
4
Insert the power supply cord into its connector on the back of the device and then into the wall socket;
WARNING: Position the device in such a way as to ensure that the plug is easily accessible as this is considered a means for disconnecting the power supply .
NOTE the foot pedal is fitted with a bracket that, if positioned vertically, enables it to be moved to the most appropriate place for use, with no need to touch it with hands to move it . The bracket can also be positioned horizontally if not in use;
Equipotential plug: there is an additional equipotential plug on the back of the device . The plug complies with DIN 42801 . Insert the equipotential cable connector (not supplied) onto the plug on the back of the device . The purpose of the additional equipotential connection is to reduce the difference in potential that may occur during operation between the device body and the conductive parts of other objects within the medical environment;
13
EN
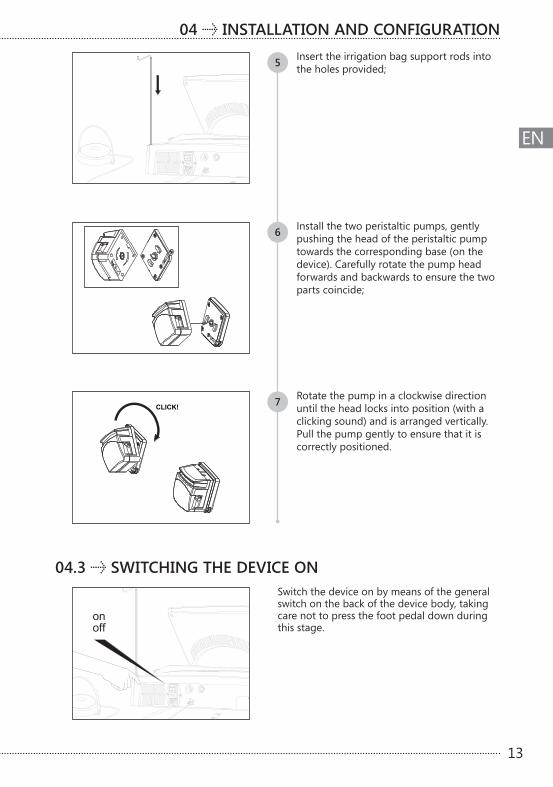
Insert the irrigation bag support rods into the holes provided;5
Install the two peristaltic pumps, gently pushing the head of the peristaltic pump towards the corresponding base (on the device) . Carefully rotate the pump head forwards and backwards to ensure the two parts coincide;
6
7 Rotate the pump in a clockwise direction until the head locks into position (with a clicking sound) and is arranged vertically . Pull the pump gently to ensure that it is correctly positioned .
CLICK!
04.3 SWITCHING THE DEVICE ON Switch the device on by means of the general switch on the back of the device body, taking care not to press the foot pedal down during this stage .
onoff
04 INSTALLATION AND CONFIGURATION
14
EN
04.4 LANGUAGE SELECTION
WARNING: The language can only be chosen if no handpieces are connected to the device .
2
1
3
4
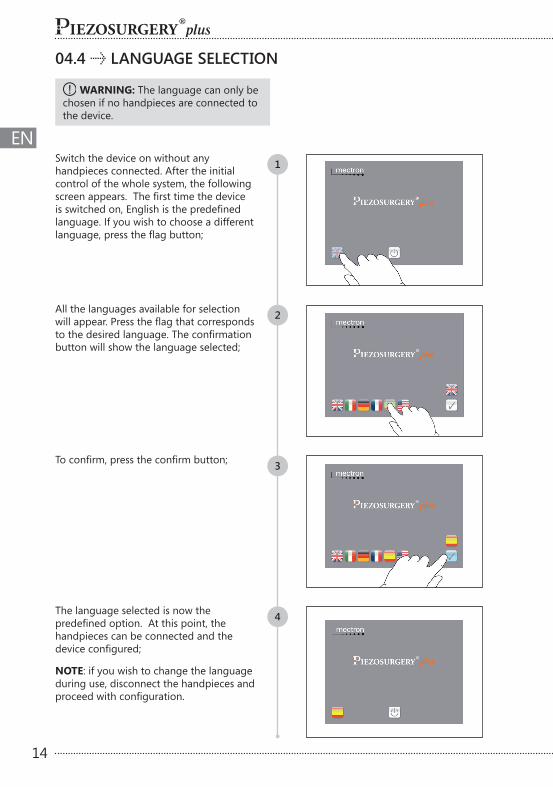
Switch the device on without any handpieces connected . After the initial control of the whole system, the following screen appears. The first time the device is switched on, English is the predefined language . If you wish to choose a different language, press the flag button;
All the languages available for selection will appear. Press the flag that corresponds to the desired language. The confirmation button will show the language selected;
To confirm, press the confirm button;
The language selected is now the predefined option. At this point, the handpieces can be connected and the device configured;
NOTE: if you wish to change the language during use, disconnect the handpieces and proceed with configuration.
15
EN
2
1
3
4
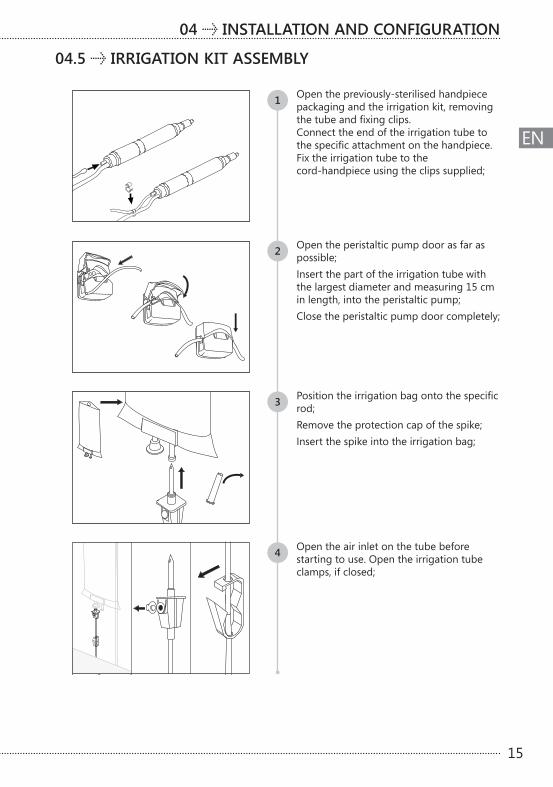
Open the peristaltic pump door as far as possible;Insert the part of the irrigation tube with the largest diameter and measuring 15 cm in length, into the peristaltic pump;Close the peristaltic pump door completely;
Open the previously-sterilised handpiece packaging and the irrigation kit, removing the tube and fixing clips. Connect the end of the irrigation tube to the specific attachment on the handpiece. Fix the irrigation tube to the cord-handpiece using the clips supplied;
Position the irrigation bag onto the specific rod;Remove the protection cap of the spike;Insert the spike into the irrigation bag;
Open the air inlet on the tube before starting to use . Open the irrigation tube clamps, if closed;
04.5 IRRIGATION KIT ASSEMBLY
04 INSTALLATION AND CONFIGURATION
16
EN
1
2
04.6 CONNECTION OF THE HANDPIECES TO THE DEVICE
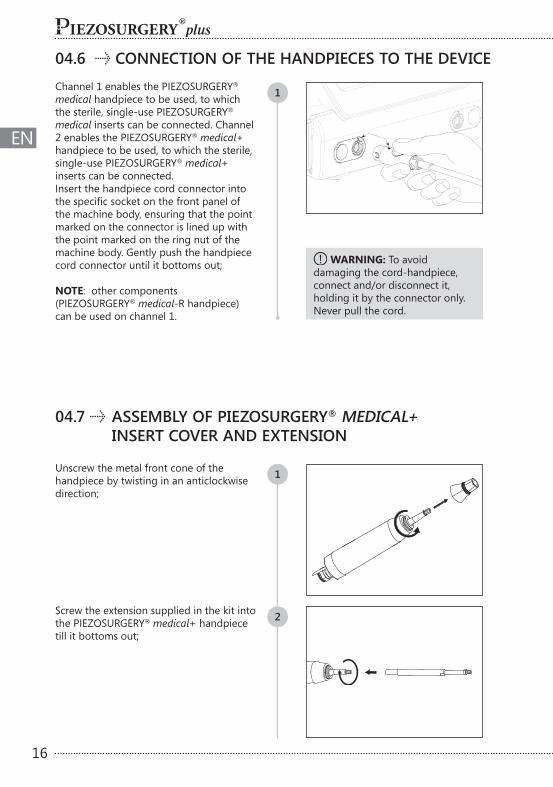
Channel 1 enables the PIEZOSURGERY® medical handpiece to be used, to which the sterile, single-use PIEZOSURGERY® medical inserts can be connected . Channel 2 enables the PIEZOSURGERY® medical+ handpiece to be used, to which the sterile, single-use PIEZOSURGERY® medical+ inserts can be connected . Insert the handpiece cord connector into the specific socket on the front panel of the machine body, ensuring that the point marked on the connector is lined up with the point marked on the ring nut of the machine body . Gently push the handpiece cord connector until it bottoms out;
NOTE: other components (PIEZOSURGERY® medical-R handpiece) can be used on channel 1 .
WARNING: To avoid damaging the cord-handpiece, connect and/or disconnect it, holding it by the connector only . Never pull the cord .
Screw the extension supplied in the kit into the PIEZOSURGERY® medical+ handpiece till it bottoms out;
Unscrew the metal front cone of the handpiece by twisting in an anticlockwise direction;
04.7 ASSEMBLY OF PIEZOSURGERY® MEDICAL+ INSERT COVER AND EXTENSION
1
17
EN
6
4
5
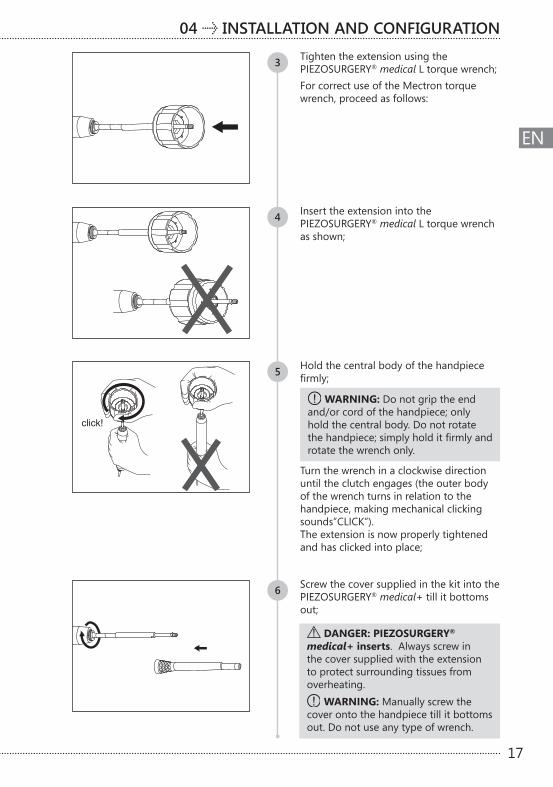
3 Tighten the extension using the PIEZOSURGERY® medical L torque wrench;For correct use of the Mectron torque wrench, proceed as follows:
Insert the extension into the PIEZOSURGERY® medical L torque wrench as shown;
Hold the central body of the handpiece firmly;
WARNING: Do not grip the end and/or cord of the handpiece; only hold the central body . Do not rotate the handpiece; simply hold it firmly and rotate the wrench only .
Turn the wrench in a clockwise direction until the clutch engages (the outer body of the wrench turns in relation to the handpiece, making mechanical clicking sounds”CLICK”) . The extension is now properly tightened and has clicked into place;
Screw the cover supplied in the kit into the PIEZOSURGERY® medical+ till it bottoms out;
click!
DANGER: PIEZOSURGERY® medical+ inserts . Always screw in the cover supplied with the extension to protect surrounding tissues from overheating .
WARNING: Manually screw the cover onto the handpiece till it bottoms out . Do not use any type of wrench .
04 INSTALLATION AND CONFIGURATION
18
EN
2
3
1
click!
CORRECT
NOT CORRECT
4
04.8 ASSEMBLY OF THE INSERTS
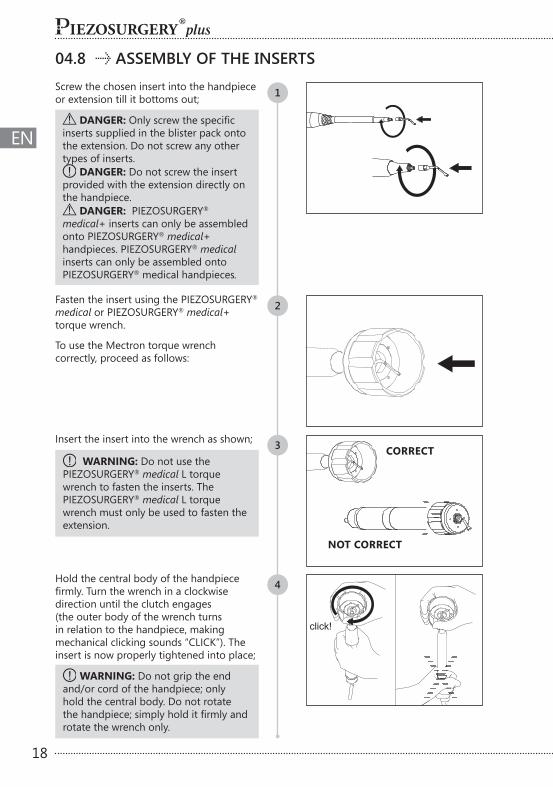
Insert the insert into the wrench as shown;
Hold the central body of the handpiece firmly. Turn the wrench in a clockwise direction until the clutch engages (the outer body of the wrench turns in relation to the handpiece, making mechanical clicking sounds “CLICK”) . The insert is now properly tightened into place;
WARNING: Do not grip the end and/or cord of the handpiece; only hold the central body . Do not rotate the handpiece; simply hold it firmly and rotate the wrench only .
Screw the chosen insert into the handpiece or extension till it bottoms out;
Fasten the insert using the PIEZOSURGERY® medical or PIEZOSURGERY® medical+ torque wrench .
To use the Mectron torque wrench correctly, proceed as follows:
DANGER: Only screw the specific inserts supplied in the blister pack onto the extension . Do not screw any other types of inserts .
DANGER: Do not screw the insert provided with the extension directly on the handpiece .
DANGER: PIEZOSURGERY® medical+ inserts can only be assembled onto PIEZOSURGERY® medical+ handpieces . PIEZOSURGERY® medical inserts can only be assembled onto PIEZOSURGERY® medical handpieces.
WARNING: Do not use the PIEZOSURGERY® medical L torque wrench to fasten the inserts . The PIEZOSURGERY® medical L torque wrench must only be used to fasten the extension .
19
EN
04.9 DESCRIPTION OF COMMANDS
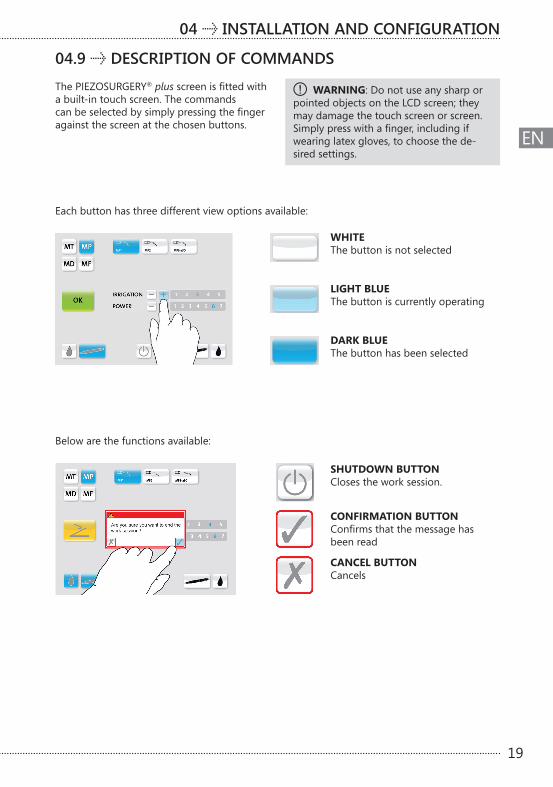
The PIEZOSURGERY® plus screen is fitted with a built-in touch screen . The commands can be selected by simply pressing the finger against the screen at the chosen buttons .
WARNING: Do not use any sharp or pointed objects on the LCD screen; they may damage the touch screen or screen . Simply press with a finger, including if wearing latex gloves, to choose the de-sired settings .
SHUTDOWN BUTTON Closes the work session .
WHITEThe button is not selected
LIGHT BLUE The button is currently operating
DARK BLUE The button has been selected
Below are the functions available:
Each button has three different view options available:
CONFIRMATION BUTTON Confirms that the message has been read
CANCEL BUTTON Cancels
04 INSTALLATION AND CONFIGURATION
20
EN
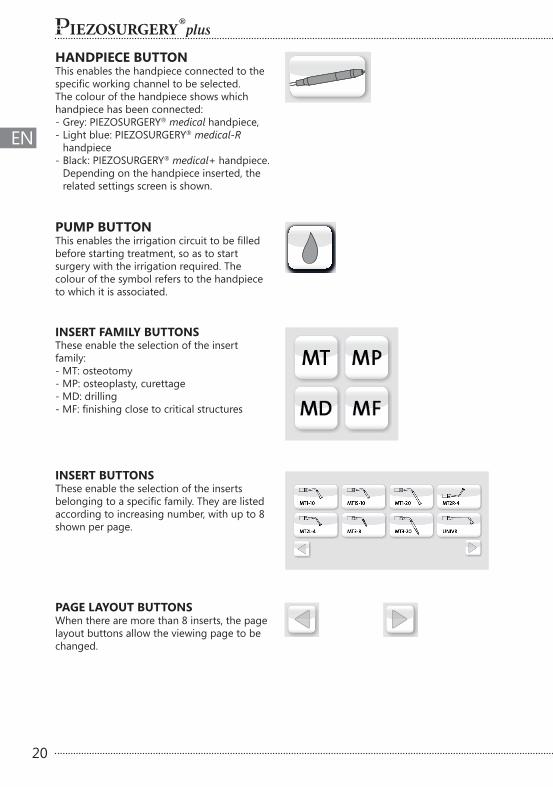
PAGE LAYOUT BUTTONS When there are more than 8 inserts, the page layout buttons allow the viewing page to be changed .
INSERT BUTTONS These enable the selection of the inserts belonging to a specific family. They are listed according to increasing number, with up to 8 shown per page .
INSERT FAMILY BUTTONS These enable the selection of the insert family: - MT: osteotomy- MP: osteoplasty, curettage- MD: drilling- MF: finishing close to critical structures
HANDPIECE BUTTON This enables the handpiece connected to the specific working channel to be selected. The colour of the handpiece shows which handpiece has been connected: - Grey: PIEZOSURGERY® medical handpiece, - Light blue: PIEZOSURGERY® medical-R
handpiece - Black: PIEZOSURGERY® medical+ handpiece .
Depending on the handpiece inserted, the related settings screen is shown .
PUMP BUTTON This enables the irrigation circuit to be filled before starting treatment, so as to start surgery with the irrigation required . The colour of the symbol refers to the handpiece to which it is associated .
21
EN
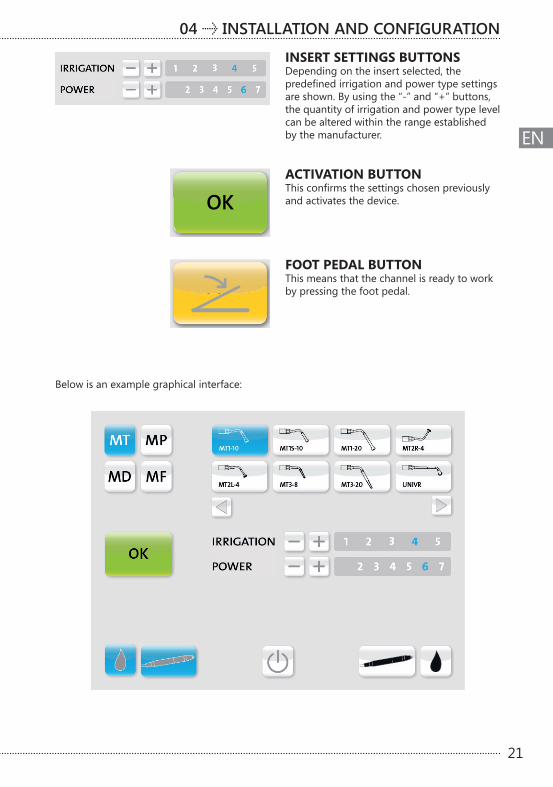
INSERT SETTINGS BUTTONS Depending on the insert selected, the predefined irrigation and power type settings are shown . By using the “-” and “+” buttons, the quantity of irrigation and power type level can be altered within the range established by the manufacturer .
ACTIVATION BUTTON This confirms the settings chosen previously and activates the device .
FOOT PEDAL BUTTON This means that the channel is ready to work by pressing the foot pedal .
OKOK
OK
Below is an example graphical interface:
04 INSTALLATION AND CONFIGURATION

22
EN
1
2
Upon switching the device on, when at least one handpiece is connected, the settings selection screen will appear . The MT family is predefined, together with the relevant list of inserts . If you wish to change family, press the relevant button .
For each insert, the device shows the optimal working settings . By using the “-” and “+” buttons, the quantity of irrigation and power type level can be altered within the range established by the manufacturer .
Select the insert desired .
3
Fill the irrigation circuit before activating the device, using the pump button . The cycle can be interrupted as soon as liquid is seen to come out of the insert, pressing the pump button again .
04.10 DEVICE CONFIGURATION
DANGER: To prevent the treated parts from overheating, we recommend increasing irrigation levels as power type increases .
4

23
EN
Confirm the desired settings by pressing OK .
5
6 The foot pedal button is shown, thereby indicating that the channel is ready for use . Press the foot pedal to start treatment . The foot pedal button starts to flash, showing that the device is functioning correctly .
04 INSTALLATION AND CONFIGURATION
24
EN
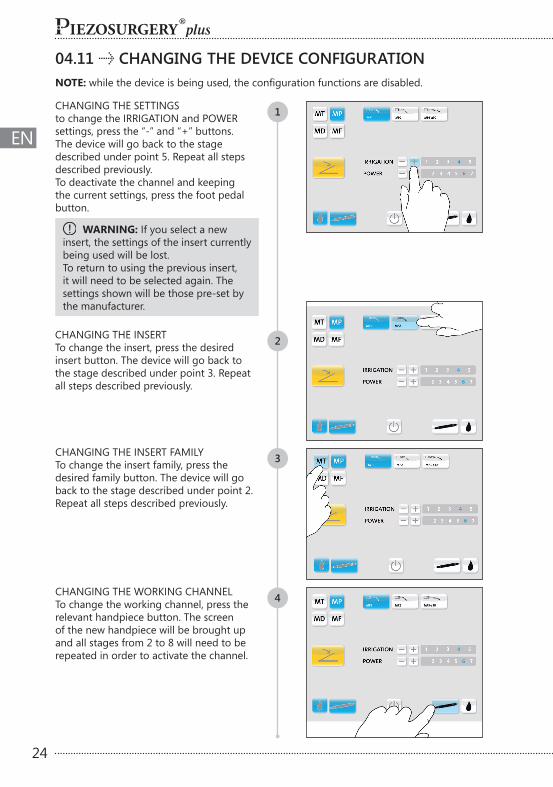
CHANGING THE WORKING CHANNEL To change the working channel, press the relevant handpiece button . The screen of the new handpiece will be brought up and all stages from 2 to 8 will need to be repeated in order to activate the channel .
CHANGING THE INSERT To change the insert, press the desired insert button . The device will go back to the stage described under point 3 . Repeat all steps described previously .
2
3CHANGING THE INSERT FAMILY To change the insert family, press the desired family button . The device will go back to the stage described under point 2 . Repeat all steps described previously .
4
04.11 CHANGING THE DEVICE CONFIGURATION
CHANGING THE SETTINGS to change the IRRIGATION and POWER settings, press the “-” and “+” buttons . The device will go back to the stage described under point 5 . Repeat all steps described previously . To deactivate the channel and keeping the current settings, press the foot pedal button .
WARNING: If you select a new insert, the settings of the insert currently being used will be lost . To return to using the previous insert, it will need to be selected again . The settings shown will be those pre-set by the manufacturer .
NOTE: while the device is being used, the configuration functions are disabled.
1

25
EN
04.12 FOOT PEDAL BUTTON
DANGER: Do not press the foot pedal button if not specifically required by the user . The user must train personnel on use of the foot pedal .
DANGER: The foot pedal button must only be used in lieu of the foot pedal supplied . This button allows treatment to be completed even when the foot pedal is not functioning correctly .
If the foot pedal ceases functioning, the button on the back, left of the device, below the symbol , can be used to continue treatment .
04 INSTALLATION AND CONFIGURATION
04.13 SAFETY REQUIREMENTS BEFORE AND DURING USE
DANGER: Before starting work, always ensure that you have plenty of spare materials (handpiece, inserts, wrenches) to be used in the event of failure or problem .
DANGER: Use of non-original Mectron inserts: this can definitively damage the threading of the handpiece, affecting correct functioning and risking injury to the patient .
WARNING: Contraindications. Do not carry out this treatment on metal or ceramic prosthetic artefacts . The ultrasonic vibrations could cause them to decement .
DANGER: Contraindications. Do not use the PIEZOSURGERY® plus on patients fitted with pace-makers or other implantable electronic devices . This also applies to the operator .
DANGER: Check the condition of the device before treatment. Always make sure that there is no water under the device . Before each treatment, always check that the device is in proper working order and that the accessories are efficient. Do not carry out the treatment if any problems are encountered in operating the device . If experiencing problems with the device, contact an Authorised Mectron Service Centre .
DANGER: Infection control. First use: all reusable parts and accessories (whether new or returned from an Authorised Mectron Service Centre) are delivered NON-STERILE and must be treated before use, in accordance with the instructions given in the Cleaning and Sterilisation Manual . Subsequent uses: after each treatment, clean and sterilise all reusable parts and accessories, in accordance with the instructions given in the Cleaning and Sterilisation Manual .
WARNING: If you need to use the foot pedal button, disconnect the foot pedal from the device .
1
26
EN
WARNING: Contraindications. After having sterilised the handpiece, the torque wrench or all other sterilisable accessories in the autoclave, wait for them to have cooled completely before reusing .
DANGER: Only use original Mectron accessories and spare parts .
WARNING: The electrical contacts inside the cord connector must be dry. Before connecting the handpiece to the device, make sure that the electrical contacts of the connector are perfectly dry, above all after the autoclave sterilisation cycle . Dry the contacts if necessary, by blowing compressed air onto them .
DANGER: To ensure that the handpiece is cooled, always activate it with the irrigation circuit correctly installed and filled. To fill the irrigation circuit, always use the pump button .
DANGER: Always check irrigation function before and during use . Ensure that liquid is released from the insert . Do not use the device if irrigation is not functioning or the pump is faulty .
DANGER: Check the level of physiological solution contained in the physiological irrigation bag . Replace the physiological irrigation bag with a new one before it empties completely .
DANGER: Sterile single-use material - Before surgery. Before using any insert inspect the sterile package and the product for any damage . Insert loses sterility in case of broken or damaged packaging .
DANGER: Before each surgical intervention, ensure that the insert chosen has been correctly fastened onto the handpiece . This is assured when the PIEZOSURGERY® medical torque wrench used to tighten it makes a mechanical clicking sound “CLICK“ .
DANGER: The PIEZOSURGERY® medical irrigation kit is guaranteed for one use only . Separate and dispose of this kit in accordance with current regulations governing hospital waste .
DANGER: Before using the device, check that the irrigation tube clamps are open . After surgery, close the clamps before disconnecting the irrigation kit from the physiological irrigation bag .
WARNING: Never force the connector onto the connector cord-handpiece of the machine body as this may damage the cord-handpiece connector and/or the device . If the two connectors do not connect reasonably easily, they probably do not match . Ensure that the connector spot of the cord-handpiece is facing upwards .
WARNING: Check that the PIEZOSURGERY® medical handpiece is correctly connected before using the system .
DANGER: Before each treatment, ensure that the right insert for the treatment has been positioned on the handpiece . Only use the PIEZOSURGERY® medical torque wrench to fasten the insert to the handpiece . Do not use any other tools, such as pliers, pincers, etc .
DANGER: Check that the insert fitted to the handpiece is the same one as shown on the display, otherwise performance will be less than optimal .
WARNING: To avoid damaging the foot pedal cable, connect and/or disconnect it, holding it by the connector only . Never pull the cable .
WARNING: Do not twist or rotate the foot pedal cable connector when inserting or removing it . Twisting can damage the connector .
WARNING: The foot pedal has been specifically designed for use with the PIEZOSURGERY® plus device only . Only use the original foot pedal; otherwise damages or malfunctions may be caused .
WARNING: Do not activate the handpiece while the insert is in contact with the part to be treated . Doing so will not allow the electronic control circuit of the console to recognise the best point of resonance of the insert required for efficient, optimum performance .
27
EN
DANGER: The patient must not come into contact with the machine body or foot pedal .
DANGER: Do not change the insert when the handpiece is operating; the operator may be injured .
DANGER: Pay careful attention to the sharp blades of cutting inserts . When tightening and removing these inserts, the blades may cause injury .
DANGER - Breakage and wear of the inserts. The high-frequency vibrations and general wear and tear can, very occasionally, lead to insert breakage . Do not bend, change the shape or sharpen an insert in any way . Bending an insert or applying leverage to it can cause it to break . Deformed or otherwise damaged inserts are liable to break during use . These inserts must never be used . Excessive pressure on inserts during use can cause them to break . If the tip of the insert comes into contact with metal objects, it may break leaving fragments in the operating site . In the event of breakage, check that no fragments remain in the treated part, and at the same time suction effectively to remove any . If a fragment cannot be found, use diagnostic tools such as x-rays to confirm that the broken piece is not in the surgical area . Check that the insert is whole on regular occasions during the intervention, and particularly the apical part . During the intervention, avoid prolonged contact with retractors or other metal tools being used .
DANGER: The PIEZOSURGERY® plus device is intended for bone cutting . However, prolonged contact and/or excessive force of the instrument tip on soft tissues should be avoided as this may cause thermal and/or blunt injury . Particular care should be exercized when sharp tip inserts are used . Prolonged mechanical action of a sharp insert may also result in the soft tissue being cut . In close proximity to soft tissues/nerves (e.g. the perinevrium of the peripheral nerve system, or dura mater of central nerve system), it is recommended to complete the cut with a blunt tip diamond coated insert, to minimize the potential for soft tissue damage .
DANGER: Before using the PIEZOSURGERY® medical handpiece on the patient, check that all parts of the device are functioning correctly .
WARNING: Intermittent function. Prolonged use can cause the handpiece to overheat . Refer to the paragraph entitled “Technical data” for average use times (intermittent function).
DANGER: Sterile single-use. Sterile single-use objects must only be used in one surgical procedure and on one patient . Single-use objects must not be reused . Separate and dispose of each single-use object in accordance with current regulations governing hospital waste .
04 INSTALLATION AND CONFIGURATION
28
EN
DANGER:- The insert must be kept moving at all
times . If the insert is blocked, the bone may overheat . We recommend using a continuous movement to minimise contact between the tip and the tissue . We recommend using high levels of irrigation as the power type level is increased .
- Apply gentle, constant force to the insert for best efficiency. Do not apply excessive pressure; let the ultrasonic vibrations work .
- The extension and insert must be left free to vibrate . Do not block them against tissues as this may cause them to overheat .
- Do not activate the handpiece while the insert is in contact with the part to be treated . Doing so will not allow the electronic control circuit of the console to recognise the best point of resonance of the insert required for efficient, optimum performance .
- Use original PIEZOSURGERY® medical inserts only . Use of non-original inserts invalidates the warranty and damages the thread of the PIEZOSURGERY® medical handpiece, with the risk of no longer being able to correctly screw in the original inserts at subsequent uses . The machine settings are only tested and guaranteed for correct function with original PIEZOSURGERY® medical inserts .
- Do not alter the shape of the inserts by bending or prying them in any way . This may lead to their breakage .
- Do not use an insert that has been deformed in any way .
- Always check that the threaded parts of the insert and handpiece are perfectly clean - see the Cleaning and Sterilisation Manual .
- If excessive pressure is applied to the insert, it can cause it to break and potentially injure the patient .
- Before using the PIEZOSURGERY® plus ensure that the surgical site has been properly prepared, with all soft tissues first removed to avoid potential damage. When cutting bone, accidental contact of some parts of the insert with the soft tissues can cause minor traumas . To minimise this risk, use specific protective tools .
- PIEZOSURGERY® medical+ inserts can only be assembled onto PIEZOSURGERY® medical+ handpieces . PIEZOSURGERY® medical inserts can only be assembled onto PIEZOSURGERY® medical handpieces .
WARNING: PIEZOSURGERY® medical+ inserts. Only screw the specific inserts supplied in the blister pack onto the extension . Do not screw the insert provided with the extension directly on the handpiece .
04.14 IMPORTANT INFORMATION ON INSERTS
29
EN
04 INSTALLATION AND CONFIGURATION
04.15 SWITCHING THE DEVICE OFF
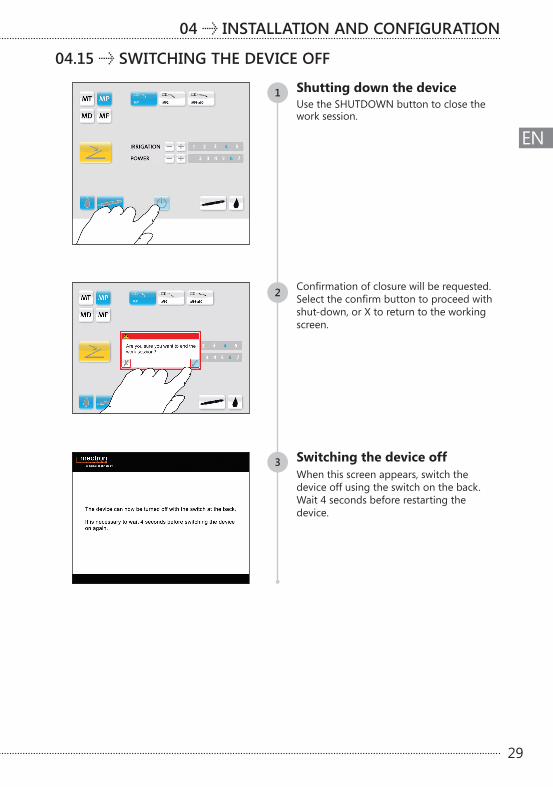
Shutting down the device Use the SHUTDOWN button to close the work session .
1
2
Switching the device off When this screen appears, switch the device off using the switch on the back . Wait 4 seconds before restarting the device .
Confirmation of closure will be requested. Select the confirm button to proceed with shut-down, or X to return to the working screen .
3

30
EN
05 MAINTENANCE
06 DISPOSAL MODES AND PRECAUTIONS
If the device is not used for a long time, proceed as follows: 1 Disconnect the device from the electricity;2 If it is not likely to be used for a long time,
replace the device in its original packaging and store in a safe place;
3 Before using the device again, clean and sterilise the handpiece and wrench according to the instructions given in the Cleaning and Sterilisation Manual .
DANGER: Regularly check that the power supply cord is in good condition . Replace it when damaged with an original Mectron spare part .
DANGER: Hospital waste. Treat the following items as hospital waste:- Sterile inserts after each intervention;- Sterile irrigation kit after each
intervention;- Torque wrench, dispose of when worn or
broken .
Disposable materials and materials with an intrinsic biological risk must be disposed of in accordance with current local regulations governing hospital waste . The PIEZOSURGERY® plus must be disposed
of and treated as waste requiring separate collection . The buyer is entitled to deliver the old device for disposal to the retailer supplying the new equipment . Instructions on correct disposal are available from Mectron . Failure to comply with the above points may incur penalties in accordance with the Waste Electrical and Electronic Equipment (WEEE) Directive .
31
EN
07 TECHNICAL DATA
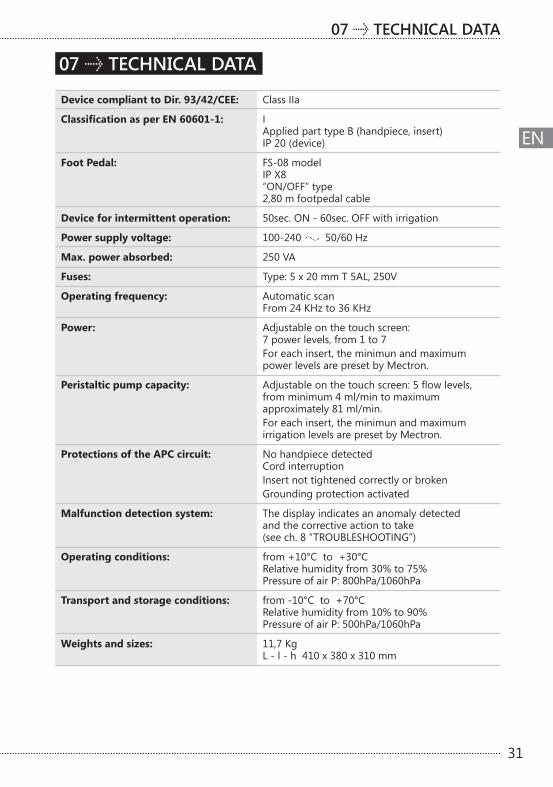
Device compliant to Dir. 93/42/CEE: Class IIa
Classification as per EN 60601-1: I Applied part type B (handpiece, insert) IP 20 (device)
Foot Pedal: FS-08 model IP X8 “ON/OFF” type 2,80 m footpedal cable
Device for intermittent operation: 50sec . ON - 60sec . OFF with irrigation
Power supply voltage: 100-240 50/60 Hz
Max. power absorbed: 250 VA
Fuses: Type: 5 x 20 mm T 5AL, 250V
Operating frequency: Automatic scan From 24 KHz to 36 KHz
Power: Adjustable on the touch screen: 7 power levels, from 1 to 7For each insert, the minimun and maximum power levels are preset by Mectron .
Peristaltic pump capacity: Adjustable on the touch screen: 5 flow levels, from minimum 4 ml/min to maximum approximately 81 ml/min .
For each insert, the minimun and maximum irrigation levels are preset by Mectron .
Protections of the APC circuit: No handpiece detected Cord interruption Insert not tightened correctly or broken Grounding protection activated
Malfunction detection system: The display indicates an anomaly detected and the corrective action to take (see ch. 8 “TROUBLESHOOTING”)
Operating conditions: from +10°C to +30°C Relative humidity from 30% to 75%
Pressure of air P: 800hPa/1060hPa
Transport and storage conditions: from -10°C to +70°C Relative humidity from 10% to 90% Pressure of air P: 500hPa/1060hPa
Weights and sizes: 11,7 Kg L - l - h 410 x 380 x 310 mm
07 TECHNICAL DATA
32
EN
DANGER: Contraindications. Interference with other equipment. Although PIEZOSURGERY® plus complies with standard IEC 60601-1-2, it may interfere with other equipment located nearby . PIEZOSURGERY® plus must not be used near, or stacked on other equipment . Install PIEZOSURGERY® plus at a safe distance from life-support equipment . If necessary, however, prior their use, please check and monitor that the device and all other equipment function correctly in that layout .
DANGER: Portable and mobile radio communication appliances may affect correct device function .
DANGER: Contraindications. Interference by other equipment. An electrosurgical knife of other electrosurgical devices near the PIEZOSURGERY® plus device, may interfere with its correct functioning .
DANGER: The device requires specific EMC precautions and must be installed and started up in accordance with the EMC information given in this paragraph .
07.1 ELECTROMAGNETIC COMPATIBILITY EN 60601-1-2
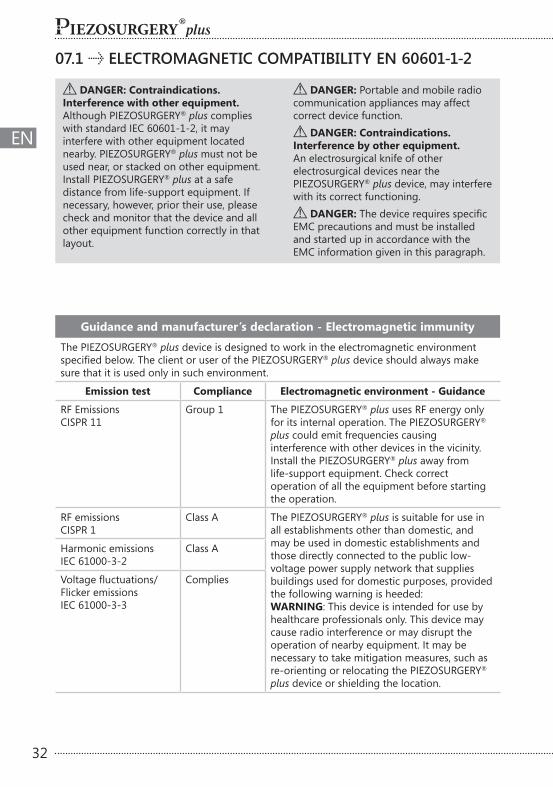
Guidance and manufacturer’s declaration - Electromagnetic immunityThe PIEZOSURGERY® plus device is designed to work in the electromagnetic environment specified below. The client or user of the PIEZOSURGERY® plus device should always make sure that it is used only in such environment .
Emission test Compliance Electromagnetic environment - Guidance
RF EmissionsCISPR 11
Group 1 The PIEZOSURGERY® plus uses RF energy only for its internal operation . The PIEZOSURGERY® plus could emit frequencies causing interference with other devices in the vicinity . Install the PIEZOSURGERY® plus away from life-support equipment . Check correct operation of all the equipment before starting the operation .
RF emissionsCISPR 1
Class A The PIEZOSURGERY® plus is suitable for use in all establishments other than domestic, and may be used in domestic establishments and those directly connected to the public low-voltage power supply network that supplies buildings used for domestic purposes, provided the following warning is heeded:WARNING: This device is intended for use by healthcare professionals only . This device may cause radio interference or may disrupt the operation of nearby equipment . It may benecessary to take mitigation measures, such as re-orienting or relocating the PIEZOSURGERY® plus device or shielding the location .
Harmonic emissionsIEC 61000-3-2
Class A
Voltage fluctuations/ Flicker emissionsIEC 61000-3-3
Complies
33
EN
07 TECHNICAL DATA
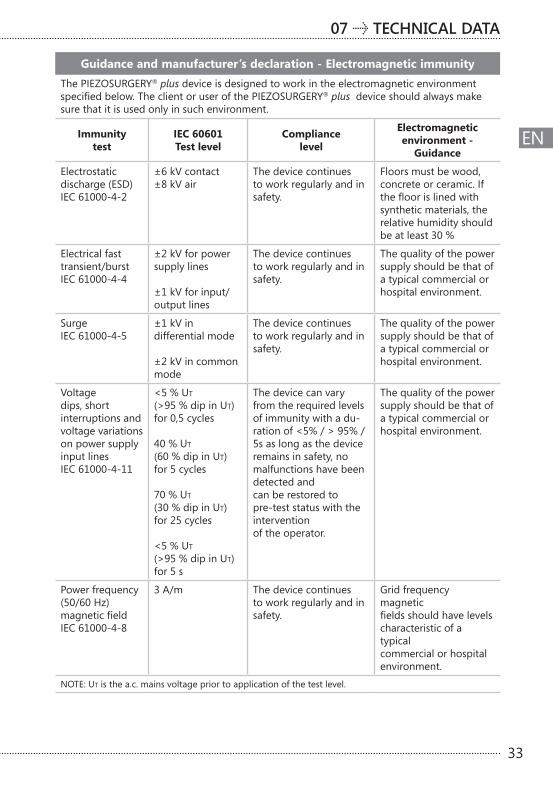
Guidance and manufacturer’s declaration - Electromagnetic immunityThe PIEZOSURGERY® plus device is designed to work in the electromagnetic environment specified below. The client or user of the PIEZOSURGERY® plus device should always make sure that it is used only in such environment .
Immunity test
IEC 60601Test level
Compliance level
Electromagneticenvironment -
Guidance
Electrostaticdischarge (ESD)IEC 61000-4-2
±6 kV contact±8 kV air
The device continuesto work regularly and in safety .
Floors must be wood,concrete or ceramic . If the floor is lined with synthetic materials, the relative humidity should be at least 30 %
Electrical fasttransient/burstIEC 61000-4-4
±2 kV for power supply lines
±1 kV for input/output lines
The device continuesto work regularly and in safety .
The quality of the power supply should be that of a typical commercial or hospital environment .
SurgeIEC 61000-4-5
±1 kV in differential mode
±2 kV in common mode
The device continuesto work regularly and in safety .
The quality of the power supply should be that of a typical commercial or hospital environment .
Voltage dips, short interruptions andvoltage variationson power supplyinput linesIEC 61000-4-11
<5 % Ut (>95 % dip in Ut) for 0,5 cycles
40 % Ut (60 % dip in Ut) for 5 cycles
70 % Ut (30 % dip in Ut) for 25 cycles
<5 % Ut (>95 % dip in Ut) for 5 s
The device can vary from the required levels of immunity with a du-ration of <5% / > 95% / 5s as long as the device remains in safety, no malfunctions have been detected andcan be restored to pre-test status with the interventionof the operator .
The quality of the power supply should be that of a typical commercial or hospital environment .
Power frequency(50/60 Hz)magnetic fieldIEC 61000-4-8
3 A/m The device continuesto work regularly and in safety .
Grid frequency magneticfields should have levelscharacteristic of a typicalcommercial or hospitalenvironment .
NOTE: Ut is the a .c . mains voltage prior to application of the test level .
34
EN
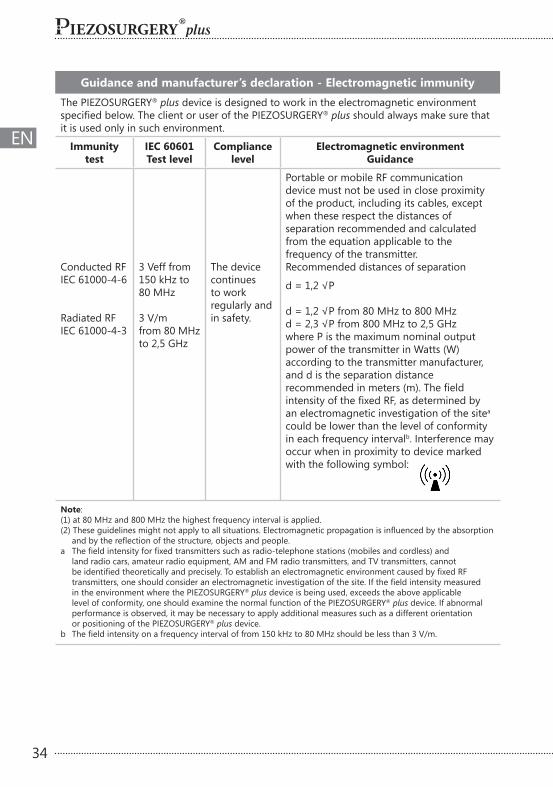
Guidance and manufacturer’s declaration - Electromagnetic immunityThe PIEZOSURGERY® plus device is designed to work in the electromagnetic environment specified below. The client or user of the PIEZOSURGERY® plus should always make sure that it is used only in such environment .
Immunity test
IEC 60601Test level
Compliancelevel
Electromagnetic environment Guidance
Conducted RFIEC 61000-4-6
Radiated RFIEC 61000-4-3
3 Veff from 150 kHz to 80 MHz
3 V/mfrom 80 MHz to 2,5 GHz
The device continuesto work regularly and in safety .
Portable or mobile RF communication device must not be used in close proximity of the product, including its cables, except when these respect the distances of separation recommended and calculated from the equation applicable to the frequency of the transmitter . Recommended distances of separation
d = 1,2 √P
d = 1,2 √P from 80 MHz to 800 MHzd = 2,3 √P from 800 MHz to 2,5 GHzwhere P is the maximum nominal output power of the transmitter in Watts (W) according to the transmitter manufacturer, and d is the separation distance recommended in meters (m). The field intensity of the fixed RF, as determined by an electromagnetic investigation of the sitea could be lower than the level of conformity in each frequency intervalb . Interference may occur when in proximity to device marked with the following symbol:
Note:(1) at 80 MHz and 800 MHz the highest frequency interval is applied.(2) These guidelines might not apply to all situations. Electromagnetic propagation is influenced by the absorption
and by the reflection of the structure, objects and people.a The field intensity for fixed transmitters such as radio-telephone stations (mobiles and cordless) and land radio cars, amateur radio equipment, AM and FM radio transmitters, and TV transmitters, cannot be identified theoretically and precisely. To establish an electromagnetic environment caused by fixed RF transmitters, one should consider an electromagnetic investigation of the site. If the field intensity measured in the environment where the PIEZOSURGERY® plus device is being used, exceeds the above applicable level of conformity, one should examine the normal function of the PIEZOSURGERY® plus device . If abnormal performance is observed, it may be necessary to apply additional measures such as a different orientation or positioning of the PIEZOSURGERY® plus device .b The field intensity on a frequency interval of from 150 kHz to 80 MHz should be less than 3 V/m.
35
EN
Recommended separation distances between portable and mobile RF communications equipment and the PIEZOSURGERY® plus device
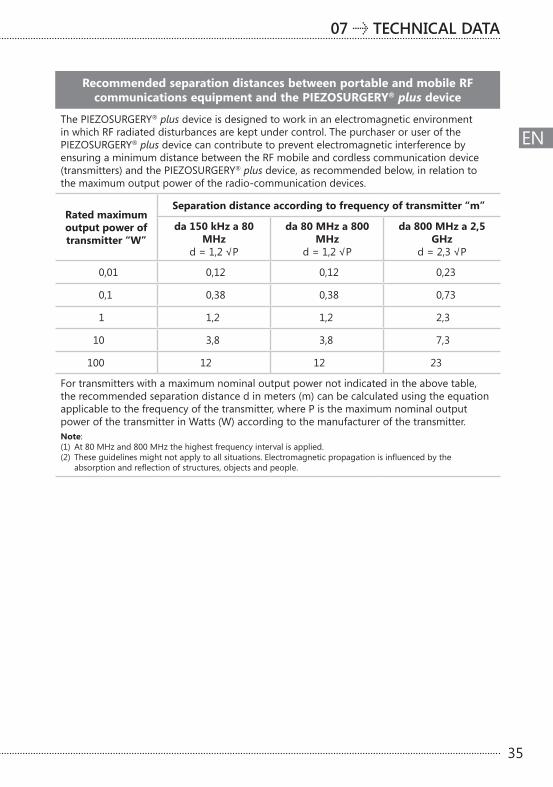
The PIEZOSURGERY® plus device is designed to work in an electromagnetic environment in which RF radiated disturbances are kept under control . The purchaser or user of the PIEZOSURGERY® plus device can contribute to prevent electromagnetic interference by ensuring a minimum distance between the RF mobile and cordless communication device (transmitters) and the PIEZOSURGERY® plus device, as recommended below, in relation to the maximum output power of the radio-communication devices .
Rated maximum output power of transmitter “W”
Separation distance according to frequency of transmitter “m”
da 150 kHz a 80 MHz
d = 1,2 √P
da 80 MHz a 800 MHz
d = 1,2 √P
da 800 MHz a 2,5 GHz
d = 2,3 √P
0,01 0,12 0,12 0,23
0,1 0,38 0,38 0,73
1 1,2 1,2 2,3
10 3,8 3,8 7,3
100 12 12 23
For transmitters with a maximum nominal output power not indicated in the above table, the recommended separation distance d in meters (m) can be calculated using the equation applicable to the frequency of the transmitter, where P is the maximum nominal output power of the transmitter in Watts (W) according to the manufacturer of the transmitter.Note:(1) At 80 MHz and 800 MHz the highest frequency interval is applied.(2) These guidelines might not apply to all situations. Electromagnetic propagation is influenced by the absorption and reflection of structures, objects and people.
07 TECHNICAL DATA
36
EN
08 TROUBLESHOOTING
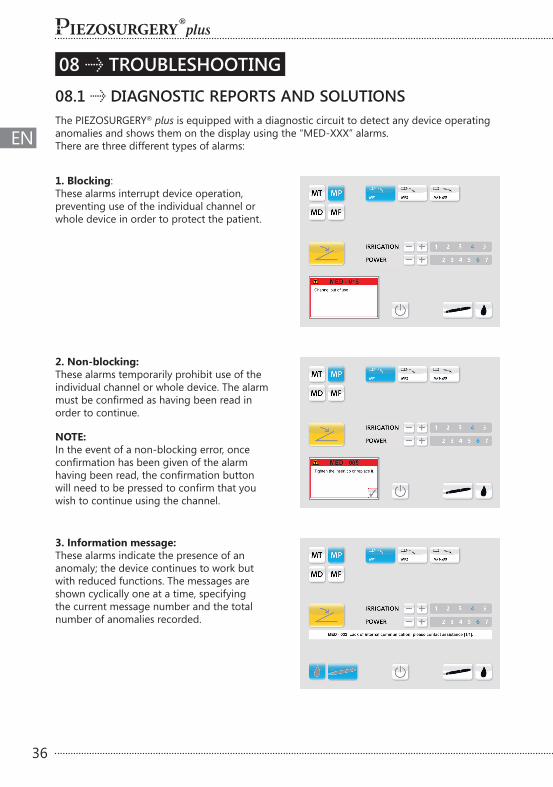
08.1 DIAGNOSTIC REPORTS AND SOLUTIONS The PIEZOSURGERY® plus is equipped with a diagnostic circuit to detect any device operating anomalies and shows them on the display using the “MED-XXX” alarms . There are three different types of alarms:
1. Blocking: These alarms interrupt device operation, preventing use of the individual channel or whole device in order to protect the patient .
2. Non-blocking: These alarms temporarily prohibit use of the individual channel or whole device . The alarm must be confirmed as having been read in order to continue .
NOTE:In the event of a non-blocking error, once confirmation has been given of the alarm having been read, the confirmation button will need to be pressed to confirm that you wish to continue using the channel .
3. Information message: These alarms indicate the presence of an anomaly; the device continues to work but with reduced functions . The messages are shown cyclically one at a time, specifying the current message number and the total number of anomalies recorded .
37
EN
08 TROUBLESHOOTING
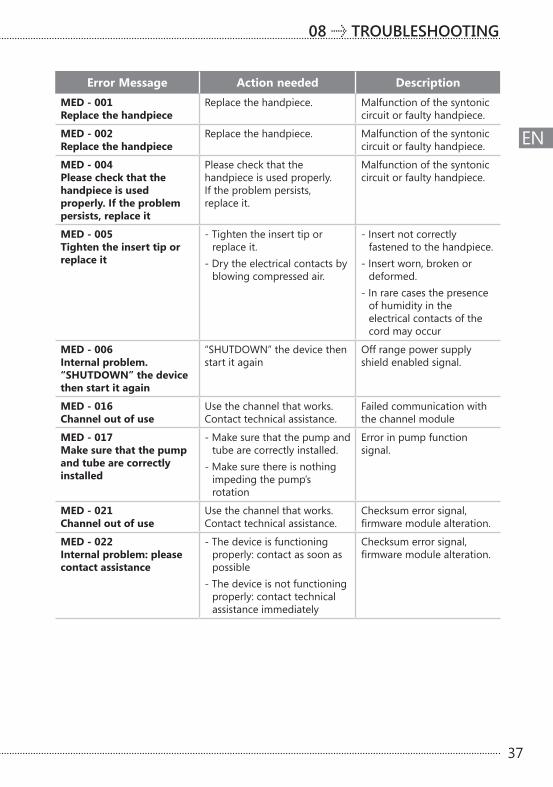
Error Message Action needed DescriptionMED - 001Replace the handpiece
Replace the handpiece . Malfunction of the syntonic circuit or faulty handpiece .
MED - 002Replace the handpiece
Replace the handpiece . Malfunction of the syntonic circuit or faulty handpiece .
MED - 004Please check that the handpiece is used properly. If the problempersists, replace it
Please check that the handpiece is used properly . If the problem persists, replace it .
Malfunction of the syntonic circuit or faulty handpiece .
MED - 005Tighten the insert tip or replace it
- Tighten the insert tip or replace it .
- Dry the electrical contacts by blowing compressed air .
- Insert not correctly fastened to the handpiece .
- Insert worn, broken or deformed .
- In rare cases the presence of humidity in the electrical contacts of the cord may occur
MED - 006Internal problem. “SHUTDOWN” the device then start it again
“SHUTDOWN” the device then start it again
Off range power supply shield enabled signal .
MED - 016Channel out of use
Use the channel that works .Contact technical assistance .
Failed communication with the channel module
MED - 017 Make sure that the pump and tube are correctly installed
- Make sure that the pump and tube are correctly installed .
- Make sure there is nothing impeding the pump’s rotation
Error in pump function signal .
MED - 021Channel out of use
Use the channel that works .Contact technical assistance .
Checksum error signal, firmware module alteration.
MED - 022Internal problem: please contact assistance
- The device is functioning properly: contact as soon as possible
- The device is not functioning properly: contact technical assistance immediately
Checksum error signal, firmware module alteration.
38
EN
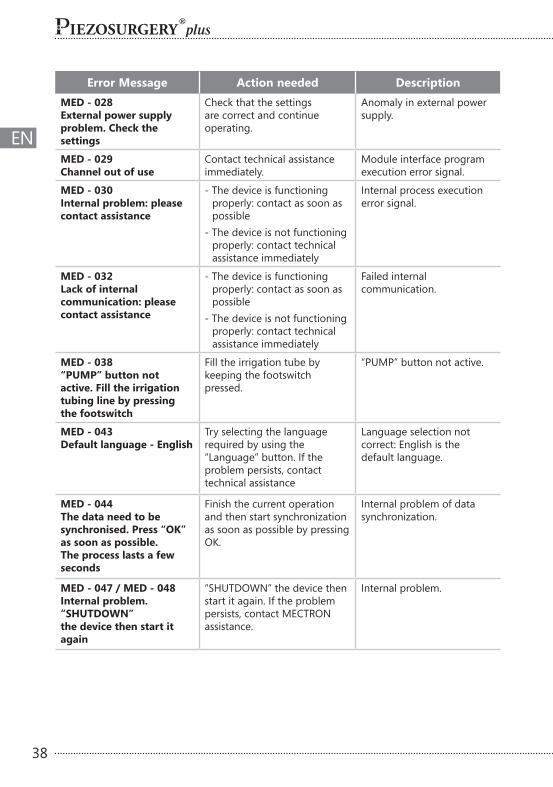
Error Message Action needed DescriptionMED - 028External power supply problem. Check the settings
Check that the settings are correct and continue operating .
Anomaly in external power supply .
MED - 029Channel out of use
Contact technical assistance immediately .
Module interface programexecution error signal .
MED - 030Internal problem: pleasecontact assistance
- The device is functioning properly: contact as soon as possible
- The device is not functioning properly: contact technical assistance immediately
Internal process execution error signal .
MED - 032Lack of internal communication: please contact assistance
- The device is functioning properly: contact as soon as possible
- The device is not functioning properly: contact technical assistance immediately
Failed internal communication .
MED - 038“PUMP” button not active. Fill the irrigation tubing line by pressing the footswitch
Fill the irrigation tube by keeping the footswitch pressed .
“PUMP” button not active .
MED - 043Default language - English
Try selecting the language required by using the “Language” button . If the problem persists, contact technical assistance
Language selection not correct: English is the default language .
MED - 044The data need to besynchronised. Press “OK” as soon as possible. The process lasts a few seconds
Finish the current operation and then start synchronization as soon as possible by pressing OK .
Internal problem of datasynchronization .
MED - 047 / MED - 048Internal problem. “SHUTDOWN”the device then start it again
“SHUTDOWN” the device then start it again . If the problem persists, contact MECTRON assistance .
Internal problem .
39
EN
08 TROUBLESHOOTING
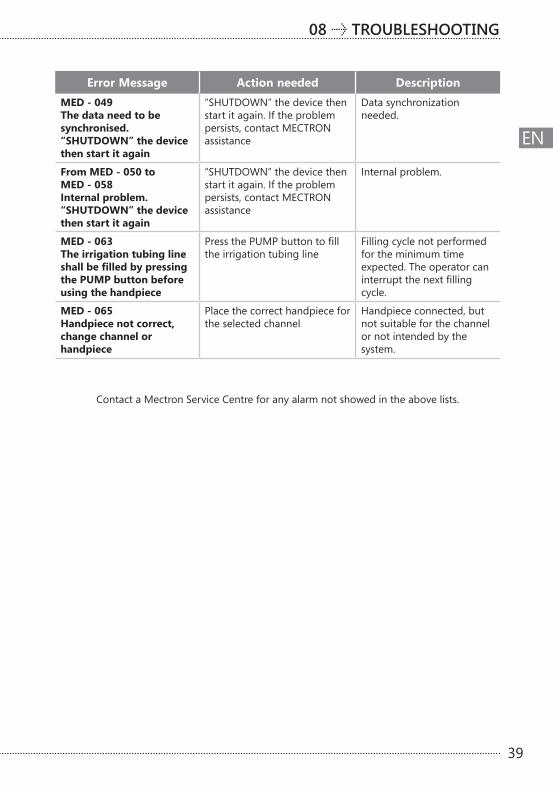
Error Message Action needed DescriptionMED - 049The data need to besynchronised. “SHUTDOWN” the device then start it again
“SHUTDOWN” the device then start it again . If the problem persists, contact MECTRON assistance
Data synchronization needed .
From MED - 050 to MED - 058Internal problem. “SHUTDOWN” the device then start it again
“SHUTDOWN” the device then start it again . If the problem persists, contact MECTRON assistance
Internal problem .
MED - 063The irrigation tubing line shall be filled by pressing the PUMP button before using the handpiece
Press the PUMP button to fill the irrigation tubing line
Filling cycle not performed for the minimum time expected . The operator can interrupt the next filling cycle .
MED - 065Handpiece not correct, change channel or handpiece
Place the correct handpiece for the selected channel
Handpiece connected, but not suitable for the channel or not intended by the system .
Contact a Mectron Service Centre for any alarm not showed in the above lists .
40
EN
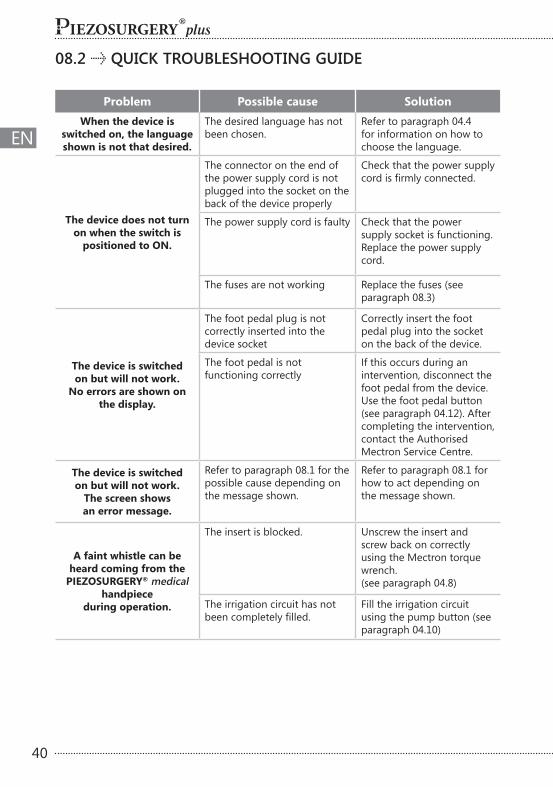
08.2 QUICK TROUBLESHOOTING GUIDE
Problem Possible cause SolutionWhen the device is
switched on, the language shown is not that desired.
The desired language has not been chosen .
Refer to paragraph 04 .4 for information on how to choose the language .
The device does not turn on when the switch is
positioned to ON.
The connector on the end of the power supply cord is not plugged into the socket on the back of the device properly
Check that the power supply cord is firmly connected.
The power supply cord is faulty Check that the power supply socket is functioning . Replace the power supply cord .
The fuses are not working Replace the fuses (see paragraph 08 .3)
The device is switched on but will not work.
No errors are shown on the display.
The foot pedal plug is not correctly inserted into the device socket
Correctly insert the foot pedal plug into the socket on the back of the device .
The foot pedal is not functioning correctly
If this occurs during an intervention, disconnect the foot pedal from the device . Use the foot pedal button (see paragraph 04.12). After completing the intervention, contact the Authorised Mectron Service Centre .
The device is switched on but will not work.
The screen shows an error message.
Refer to paragraph 08 .1 for the possible cause depending on the message shown .
Refer to paragraph 08 .1 for how to act depending on the message shown .
A faint whistle can be heard coming from the
PIEZOSURGERY® medical handpiece
during operation.
The insert is blocked . Unscrew the insert and screw back on correctly using the Mectron torque wrench . (see paragraph 04.8)
The irrigation circuit has not been completely filled.
Fill the irrigation circuit using the pump button (see paragraph 04 .10)
41
EN
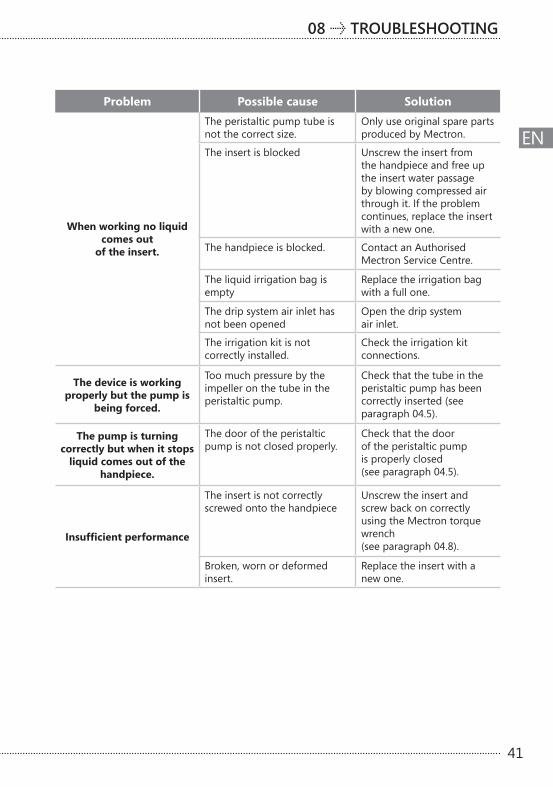
08 TROUBLESHOOTING
Problem Possible cause Solution
When working no liquid comes out
of the insert.
The peristaltic pump tube is not the correct size .
Only use original spare parts produced by Mectron .
The insert is blocked Unscrew the insert from the handpiece and free up the insert water passage by blowing compressed air through it . If the problem continues, replace the insert with a new one .
The handpiece is blocked . Contact an Authorised Mectron Service Centre .
The liquid irrigation bag is empty
Replace the irrigation bag with a full one .
The drip system air inlet has not been opened
Open the drip system air inlet .
The irrigation kit is not correctly installed .
Check the irrigation kit connections .
The device is working properly but the pump is
being forced.
Too much pressure by the impeller on the tube in the peristaltic pump .
Check that the tube in the peristaltic pump has been correctly inserted (see paragraph 04 .5) .
The pump is turning correctly but when it stops
liquid comes out of the handpiece.
The door of the peristaltic pump is not closed properly .
Check that the door of the peristaltic pump is properly closed (see paragraph 04.5).
Insufficient performance
The insert is not correctly screwed onto the handpiece
Unscrew the insert and screw back on correctly using the Mectron torque wrench (see paragraph 04.8).
Broken, worn or deformed insert .
Replace the insert with a new one .
42
EN
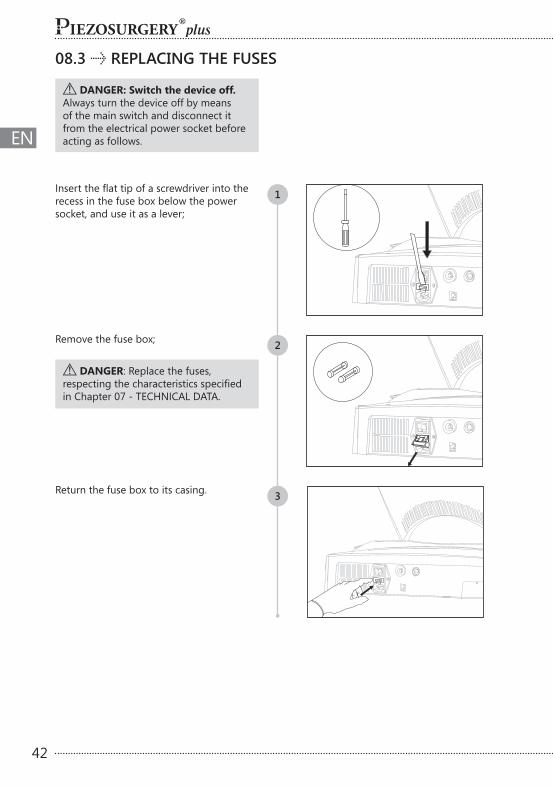
08.3 REPLACING THE FUSES
Insert the flat tip of a screwdriver into the recess in the fuse box below the power socket, and use it as a lever;
DANGER: Switch the device off. Always turn the device off by means of the main switch and disconnect it from the electrical power socket before acting as follows .
DANGER: Replace the fuses, respecting the characteristics specified in Chapter 07 - TECHNICAL DATA .
Remove the fuse box;
Return the fuse box to its casing .
1
2
3
43
EN
08 TROUBLESHOOTING
08.4 SENDING TO AN AUTHORISED MECTRON SERVICE CENTRE
If you need technical assistance with the machine, contact one of the Authorised Mectron Service Centres or your retailer . Do not attempt to repair or alter the device or its accessories . Clean and sterilise all parts to be sent to an Authorised Mectron Service Centre according to the instructions given in the Cleaning and Sterilisation Manual supplied with the machine . Leave the sterilised parts in the packaging, procedure that confirms the sterilizationprocess has been performed .These cleaning and sterilisation requests are in compliance with current requirements concerning the protection of health and safety in the workplace, as per Italian Legislative Decrees 626/94 and 81/08 as subsequently amended . If the customer should fail to comply with these requests, Mectron reserves the right to charge him for the costs of cleaning and sterilisation or to refuse any goods received in unsuitable condition, returning them to him, at his expense, for correct cleaning and sterilisation .
The device should be returned suitably packaged, together with all the accessories and a sheet bearing the following information: • Data of the hospital facility and contact
person • Product name • Serial number and/or batch number • Reason for return/description of the
malfunction • A photocopy of the consignment note
or invoice from when the device was purchased .
WARNING: Packaging Package the device in its original packaging to avoid any damage during transport .
Once the material has been received by the Authorised Mectron Service Centre, the qualified technical personnel will assess the situation . The repair will only be carried out upon acceptance by the end customer . For more details, contact your nearest Authorised Mectron Service Centre or retailer . The Authorised Service Centre shall not be held liable for any devices returned without prior authorisation . Unauthorised repairs can damage the system and invalidate the warranty and in this case, Mectron shall refuse all liability for any direct or indirect damages or injuries caused to people or objects .
44
EN
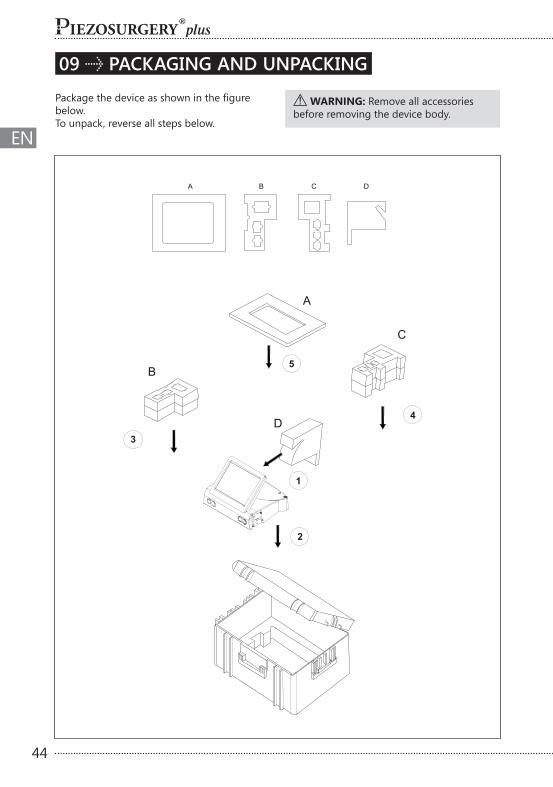
09 PACKAGING AND UNPACKING
Package the device as shown in the figure below . To unpack, reverse all steps below .
WARNING: Remove all accessories before removing the device body .
A B C D
1
2
3
4
5
A
B
C
D
45
EN
10 WARRANTY
10 WARRANTYBefore they are placed on themarket ., all Mectron devices undergo a thorough final check to ensure that they are in proper working order . Mectron guarantees the PIEZOSURGERY® plus, purchased new from a Mectron retailer or importer, as free from manufacturing or material flaws for: - 2 YEARS (TWO) on the device, as from the
date of installation and testing;- 1 YEAR (ONE) on the handpiece complete
with cord, as from the date of installation and testing .
The other accessories are not included in the warranty . Throughout the warranty period, Mectron undertakes to repair (or, at its sole discretion, to replace) free of charge, any parts that, in their opinion, are faulty . Mectron refuses all liability for direct or indirect injuries or damages caused to people or objects, and the manufacturer’s warranty and device approval is not valid in the following cases: - If the device is used for purposes other than
that for which it is intended . - If the device is not used in accordance with
the instructions and precautions described in this manual .
- If the wiring systems in the room where the device is used do not comply with the applicable standards and appropriate requirements .
- If any assembly operations, extensions, settings, updates or repairs have been carried out by personnel not authorised by Mectron .
- The environmental conditions in which the device is kept and stored do not comply with the requirements indicated in chapter 07 - TECHNICAL DATA .
- If non-original Mectron inserts, accessories or spare parts have been used that may affect the correct working of the device, and cause injury to the patient .
- If accidental breakage is caused during transport .
- If damage is caused by incorrect use or negligence,or to connection to a power voltage other than the one foreseen .
- If the cleaning and sterilisation procedures have not been completed correctly .
- If the warranty has expired
NOTE: the warranty is valid from the date of installation, as specified on the installation and test module . The warranty will be invalidated if the device has been tampered with or repaired by unauthorised personnel . See paragraph 08 .4 for details on sending it to an Authorised Mectron Service Centre .
The indications that appear in this publication are not binding and can be modified without fore-notice.The Italian version of this manual is the original document from which its translations have been obtained . In case of anydiscrepancy, the Italian version will have pertinence .
Texts, images, and graphics of this manual are property of Mectron S .p .A ., Carasco, Italy . All rights reserved .The contents cannot be copied, distributed, changed, or made available to third parties without the written approval ofMectron S .p .A .