Embed Size (px)
Citation preview
P/N 340486-B09/2017
CheckPoint 3User Guide EN

This blank page has been inserted to enable double sided printing of the document!
DANSENSOR
CheckPoint 3 EN User Guide
P/N 340486-B
09/2017
CheckPoint 3User Guide
Published by: MOCON Europe A/SRønnedevej 184100 Ringsted, DenmarkTel +45 57 66 00 [email protected]
EN

DANSENSOR
2 User Guide EN CheckPoint 3
P/N 340486-B
09/2017
DANSENSOR
CheckPoint 3 EN User Guide 3
P/N 340486-B
09/2017
Table of Contents
1. Introduction. . . . . . . . . . . . . . . . . . . . . . . . . . . . . . . . . . . . . . . . . . . . 7Register your product . . . . . . . . . . . . . . . . . . . . . . . . . . . . . . . . . . . . . . . . . 7Important! . . . . . . . . . . . . . . . . . . . . . . . . . . . . . . . . . . . . . . . . . . . . . . . . . . . 7
Safety and Use. . . . . . . . . . . . . . . . . . . . . . . . . . . . . . . . . . . . . . . . . . . . . . . . . . . . . . . . . . . . . . . 7About this Manual . . . . . . . . . . . . . . . . . . . . . . . . . . . . . . . . . . . . . . . . . . . . 7
Intended Use of this Manual . . . . . . . . . . . . . . . . . . . . . . . . . . . . . . . . . . . . . . . . . . . . . . . . . 7Reservations. . . . . . . . . . . . . . . . . . . . . . . . . . . . . . . . . . . . . . . . . . . . . . . . . . . . . . . . . . . . . . . . . 7Notes, cautions and warnings! . . . . . . . . . . . . . . . . . . . . . . . . . . . . . . . . . . . . . . . . . . . . . . . 8Tips and recommendations . . . . . . . . . . . . . . . . . . . . . . . . . . . . . . . . . . . . . . . . . . . . . . . . . . 8
CheckPoint 3 . . . . . . . . . . . . . . . . . . . . . . . . . . . . . . . . . . . . . . . . . . . . . . . . . 9Models . . . . . . . . . . . . . . . . . . . . . . . . . . . . . . . . . . . . . . . . . . . . . . . . . . . . . . . . . . . . . . . . . . . . . . 9Overview . . . . . . . . . . . . . . . . . . . . . . . . . . . . . . . . . . . . . . . . . . . . . . . . . . . . . . . . . . . . . . . . . . . 10Accessories . . . . . . . . . . . . . . . . . . . . . . . . . . . . . . . . . . . . . . . . . . . . . . . . . . . . . . . . . . . . . . . . . 11
Setting up . . . . . . . . . . . . . . . . . . . . . . . . . . . . . . . . . . . . . . . . . . . . . . . . . . . 12Assembling the sample gas hose . . . . . . . . . . . . . . . . . . . . . . . . . . . . . . . . . . . . . . . . . . . . 12Fitting the bumpers (option) . . . . . . . . . . . . . . . . . . . . . . . . . . . . . . . . . . . . . . . . . . . . . . . . 12
2. Operation and Maintenance . . . . . . . . . . . . . . . . . . . . . . . . . . . . 13Basics . . . . . . . . . . . . . . . . . . . . . . . . . . . . . . . . . . . . . . . . . . . . . . . . . . . . . . . 13
Switching on/off. . . . . . . . . . . . . . . . . . . . . . . . . . . . . . . . . . . . . . . . . . . . . . . . . . . . . . . . . . . . 13Restarting/resetting . . . . . . . . . . . . . . . . . . . . . . . . . . . . . . . . . . . . . . . . . . . . . . . . . . . . . . . . 13Touch screen . . . . . . . . . . . . . . . . . . . . . . . . . . . . . . . . . . . . . . . . . . . . . . . . . . . . . . . . . . . . . . . 13Navigation . . . . . . . . . . . . . . . . . . . . . . . . . . . . . . . . . . . . . . . . . . . . . . . . . . . . . . . . . . . . . . . . . 14Typing . . . . . . . . . . . . . . . . . . . . . . . . . . . . . . . . . . . . . . . . . . . . . . . . . . . . . . . . . . . . . . . . . . . . . 15Splash screen. . . . . . . . . . . . . . . . . . . . . . . . . . . . . . . . . . . . . . . . . . . . . . . . . . . . . . . . . . . . . . . 16Login and access levels . . . . . . . . . . . . . . . . . . . . . . . . . . . . . . . . . . . . . . . . . . . . . . . . . . . . . 17The Measuring screen . . . . . . . . . . . . . . . . . . . . . . . . . . . . . . . . . . . . . . . . . . . . . . . . . . . . . . 18Charging and monitoring the battery . . . . . . . . . . . . . . . . . . . . . . . . . . . . . . . . . . . . . . . 20Pop-up messages. . . . . . . . . . . . . . . . . . . . . . . . . . . . . . . . . . . . . . . . . . . . . . . . . . . . . . . . . . . 22
Get started . . . . . . . . . . . . . . . . . . . . . . . . . . . . . . . . . . . . . . . . . . . . . . . . . . 23Measuring. . . . . . . . . . . . . . . . . . . . . . . . . . . . . . . . . . . . . . . . . . . . . . . . . . . 24
Selecting a product for measuring. . . . . . . . . . . . . . . . . . . . . . . . . . . . . . . . . . . . . . . . . . . 24Performing a measurement . . . . . . . . . . . . . . . . . . . . . . . . . . . . . . . . . . . . . . . . . . . . . . . . . 25
WebGUI . . . . . . . . . . . . . . . . . . . . . . . . . . . . . . . . . . . . . . . . . . . . . . . . . . . . . 27Network connection . . . . . . . . . . . . . . . . . . . . . . . . . . . . . . . . . . . . . . . . . . . . . . . . . . . . . . . . 28Using the WebGUI . . . . . . . . . . . . . . . . . . . . . . . . . . . . . . . . . . . . . . . . . . . . . . . . . . . . . . . . . . 32
DANSENSOR
4 User Guide EN CheckPoint 3
P/N 340486-B
09/2017
Cleaning and Maintenance . . . . . . . . . . . . . . . . . . . . . . . . . . . . . . . . . . . 42General . . . . . . . . . . . . . . . . . . . . . . . . . . . . . . . . . . . . . . . . . . . . . . . . . . . . . . . . . . . . . . . . . . . . 42Cleaning . . . . . . . . . . . . . . . . . . . . . . . . . . . . . . . . . . . . . . . . . . . . . . . . . . . . . . . . . . . . . . . . . . . 42Replacing filter, needle and measuring gas hose . . . . . . . . . . . . . . . . . . . . . . . . . . . . . 42
3. Menus and Settings . . . . . . . . . . . . . . . . . . . . . . . . . . . . . . . . . . . . 45Main menu . . . . . . . . . . . . . . . . . . . . . . . . . . . . . . . . . . . . . . . . . . . . . . . . . . 45Alarm . . . . . . . . . . . . . . . . . . . . . . . . . . . . . . . . . . . . . . . . . . . . . . . . . . . . . . . 46Products . . . . . . . . . . . . . . . . . . . . . . . . . . . . . . . . . . . . . . . . . . . . . . . . . . . . 47
Active Product. . . . . . . . . . . . . . . . . . . . . . . . . . . . . . . . . . . . . . . . . . . . . . . . . . . . . . . . . . . . . . 48New product . . . . . . . . . . . . . . . . . . . . . . . . . . . . . . . . . . . . . . . . . . . . . . . . . . . . . . . . . . . . . . . 49Find . . . . . . . . . . . . . . . . . . . . . . . . . . . . . . . . . . . . . . . . . . . . . . . . . . . . . . . . . . . . . . . . . . . . . . . . 50
Data log. . . . . . . . . . . . . . . . . . . . . . . . . . . . . . . . . . . . . . . . . . . . . . . . . . . . . 51Collected data . . . . . . . . . . . . . . . . . . . . . . . . . . . . . . . . . . . . . . . . . . . . . . . . . . . . . . . . . . . . . . 52
Diagnostics. . . . . . . . . . . . . . . . . . . . . . . . . . . . . . . . . . . . . . . . . . . . . . . . . . 54Setup . . . . . . . . . . . . . . . . . . . . . . . . . . . . . . . . . . . . . . . . . . . . . . . . . . . . . . . 56
Data log . . . . . . . . . . . . . . . . . . . . . . . . . . . . . . . . . . . . . . . . . . . . . . . . . . . . . . . . . . . . . . . . . . . . 57Network. . . . . . . . . . . . . . . . . . . . . . . . . . . . . . . . . . . . . . . . . . . . . . . . . . . . . . . . . . . . . . . . . . . . 58Users . . . . . . . . . . . . . . . . . . . . . . . . . . . . . . . . . . . . . . . . . . . . . . . . . . . . . . . . . . . . . . . . . . . . . . . 59Date/Time/Units . . . . . . . . . . . . . . . . . . . . . . . . . . . . . . . . . . . . . . . . . . . . . . . . . . . . . . . . . . . . 61Power save . . . . . . . . . . . . . . . . . . . . . . . . . . . . . . . . . . . . . . . . . . . . . . . . . . . . . . . . . . . . . . . . . 62Supervisor PIN code . . . . . . . . . . . . . . . . . . . . . . . . . . . . . . . . . . . . . . . . . . . . . . . . . . . . . . . . 63Display . . . . . . . . . . . . . . . . . . . . . . . . . . . . . . . . . . . . . . . . . . . . . . . . . . . . . . . . . . . . . . . . . . . . . 64
Access level . . . . . . . . . . . . . . . . . . . . . . . . . . . . . . . . . . . . . . . . . . . . . . . . . 65Calibration . . . . . . . . . . . . . . . . . . . . . . . . . . . . . . . . . . . . . . . . . . . . . . . . . . 66
Calibrate: 0% CO2 . . . . . . . . . . . . . . . . . . . . . . . . . . . . . . . . . . . . . . . . . . . . . . . . . . . . . . . . . . 67Calibrate: 100% CO2 . . . . . . . . . . . . . . . . . . . . . . . . . . . . . . . . . . . . . . . . . . . . . . . . . . . . . . . . 68Restore defaults . . . . . . . . . . . . . . . . . . . . . . . . . . . . . . . . . . . . . . . . . . . . . . . . . . . . . . . . . . . . 68
Language . . . . . . . . . . . . . . . . . . . . . . . . . . . . . . . . . . . . . . . . . . . . . . . . . . . 69
4. Technical Information. . . . . . . . . . . . . . . . . . . . . . . . . . . . . . . . . . 71Technical specifications . . . . . . . . . . . . . . . . . . . . . . . . . . . . . . . . . . . . . . 71
Electrical specifications . . . . . . . . . . . . . . . . . . . . . . . . . . . . . . . . . . . . . . . . . . . . . . . . . . . . . 71Connectivity. . . . . . . . . . . . . . . . . . . . . . . . . . . . . . . . . . . . . . . . . . . . . . . . . . . . . . . . . . . . . . . . 71Mechanical specifications . . . . . . . . . . . . . . . . . . . . . . . . . . . . . . . . . . . . . . . . . . . . . . . . . . . 71Sensors. . . . . . . . . . . . . . . . . . . . . . . . . . . . . . . . . . . . . . . . . . . . . . . . . . . . . . . . . . . . . . . . . . . . . 72Sampling . . . . . . . . . . . . . . . . . . . . . . . . . . . . . . . . . . . . . . . . . . . . . . . . . . . . . . . . . . . . . . . . . . . 72Standard factory calibration specification. . . . . . . . . . . . . . . . . . . . . . . . . . . . . . . . . . . . 73Specification conditions . . . . . . . . . . . . . . . . . . . . . . . . . . . . . . . . . . . . . . . . . . . . . . . . . . . . 73User Interface . . . . . . . . . . . . . . . . . . . . . . . . . . . . . . . . . . . . . . . . . . . . . . . . . . . . . . . . . . . . . . 73Conformity . . . . . . . . . . . . . . . . . . . . . . . . . . . . . . . . . . . . . . . . . . . . . . . . . . . . . . . . . . . . . . . . . 73
DANSENSOR
CheckPoint 3 EN User Guide 5
P/N 340486-B
09/2017
Consumable parts and options . . . . . . . . . . . . . . . . . . . . . . . . . . . . . . . 74Ordering items . . . . . . . . . . . . . . . . . . . . . . . . . . . . . . . . . . . . . . . . . . . . . . . . . . . . . . . . . . . . . 74Available User Guides. . . . . . . . . . . . . . . . . . . . . . . . . . . . . . . . . . . . . . . . . . . . . . . . . . . . . . . 74Consumable parts . . . . . . . . . . . . . . . . . . . . . . . . . . . . . . . . . . . . . . . . . . . . . . . . . . . . . . . . . . 74Options . . . . . . . . . . . . . . . . . . . . . . . . . . . . . . . . . . . . . . . . . . . . . . . . . . . . . . . . . . . . . . . . . . . . 74
Appendix . . . . . . . . . . . . . . . . . . . . . . . . . . . . . . . . . . . . . . . . . . . . . . . . 75Safety and handling instructions. . . . . . . . . . . . . . . . . . . . . . . . . . . . . . 75
Handling and maintenance . . . . . . . . . . . . . . . . . . . . . . . . . . . . . . . . . . . . . . . . . . . . . . . . . 75Repairing. . . . . . . . . . . . . . . . . . . . . . . . . . . . . . . . . . . . . . . . . . . . . . . . . . . . . . . . . . . . . . . . . . . 75Needles . . . . . . . . . . . . . . . . . . . . . . . . . . . . . . . . . . . . . . . . . . . . . . . . . . . . . . . . . . . . . . . . . . . . 75Battery and charging . . . . . . . . . . . . . . . . . . . . . . . . . . . . . . . . . . . . . . . . . . . . . . . . . . . . . . . 76Prolonged heat exposure . . . . . . . . . . . . . . . . . . . . . . . . . . . . . . . . . . . . . . . . . . . . . . . . . . . 76Explosive atmospheres . . . . . . . . . . . . . . . . . . . . . . . . . . . . . . . . . . . . . . . . . . . . . . . . . . . . . 76Cleaning . . . . . . . . . . . . . . . . . . . . . . . . . . . . . . . . . . . . . . . . . . . . . . . . . . . . . . . . . . . . . . . . . . . 76Using connectors, ports, and buttons. . . . . . . . . . . . . . . . . . . . . . . . . . . . . . . . . . . . . . . . 76Operating/storing temperatures . . . . . . . . . . . . . . . . . . . . . . . . . . . . . . . . . . . . . . . . . . . . 77
WebGUI compatible browsers . . . . . . . . . . . . . . . . . . . . . . . . . . . . . . . . 77Toxic and Hazardous Substances or Elements. . . . . . . . . . . . . . . . . . 77
DANSENSOR
6 User Guide EN CheckPoint 3
P/N 340486-B
09/2017
DANSENSOR
CheckPoint 3 EN User Guide 7
P/N 340486-B
09/2017
1. Introduction
Register your productThank you for purchasing the CheckPoint 3, we hope that it will fullfil your needs.
In order to learn more about our customers and the markets we serve, we kindly ask you to fill out the product registration form available on-line at
www.dansensor.com/registerIn return we can offer to send important product information to you.
Important!
Safety and UseWARNING! Personnel operating and maintaining the device must be familiar with all aspects of its operation and be proficient in maintenance.Such personnel should review the information in "Safety and handling instructions" on page 75 to promote safety awareness.Failure to follow the safety instructions could result in fire, electric shock, injury, or damage to CheckPoint 3 or other property.
Prior to using the equipment it is assumed that it has been properly installed and configured as described in this manual.
Always refer to this manual before operating or maintaining the device. Observe all NOTES, CAUTIONS and WARNINGS - see page 8 for details.
About this Manual
Intended Use of this Manual This manual describes the common use and maintenance procedures of the CheckPoint 3
device.It is intended for the daily users and should be kept with the equipment for reference at all times.
Reservations This manual was written and illustrated using the best possible information available at the
time of publication. Any differences between this manual and the equipment reflect improvements introduced
after the publication of the manual. Changes, technical inaccuracies and typographic errors will be corrected in subsequent
editions. As a part of our policy of continuous improvement, we reserve the right to alter design and
specifications without further notice.
DANSENSOR
8 User Guide EN CheckPoint 3
P/N 340486-B
09/2017
Notes, cautions and warnings!Throughout the manual notes, cautions, and warnings are indicated with various icons and written in bold like the example below:
CAUTION! Never use hard tools or abrasive materials when cleaning any part of the device.
Explanation
NOTE! The operator should observe and/or act according to the information in order to obtain the best possible function of the equipment.
CAUTION! The operator must observe and/or act according to the information in order to avoid any mechanical or electrical damage to the equipment.
WARNING! The operator must observe and/or act according to the information in order to avoid any personnel injury.
Tips and recommendationsTips, recommendations and “best practise” advises are indicated as shown in the example below:
TIP! The touch screen works best when you use the tip of a fingernail.

DANSENSOR
CheckPoint 3 EN User Guide 9
P/N 340486-B
09/2017
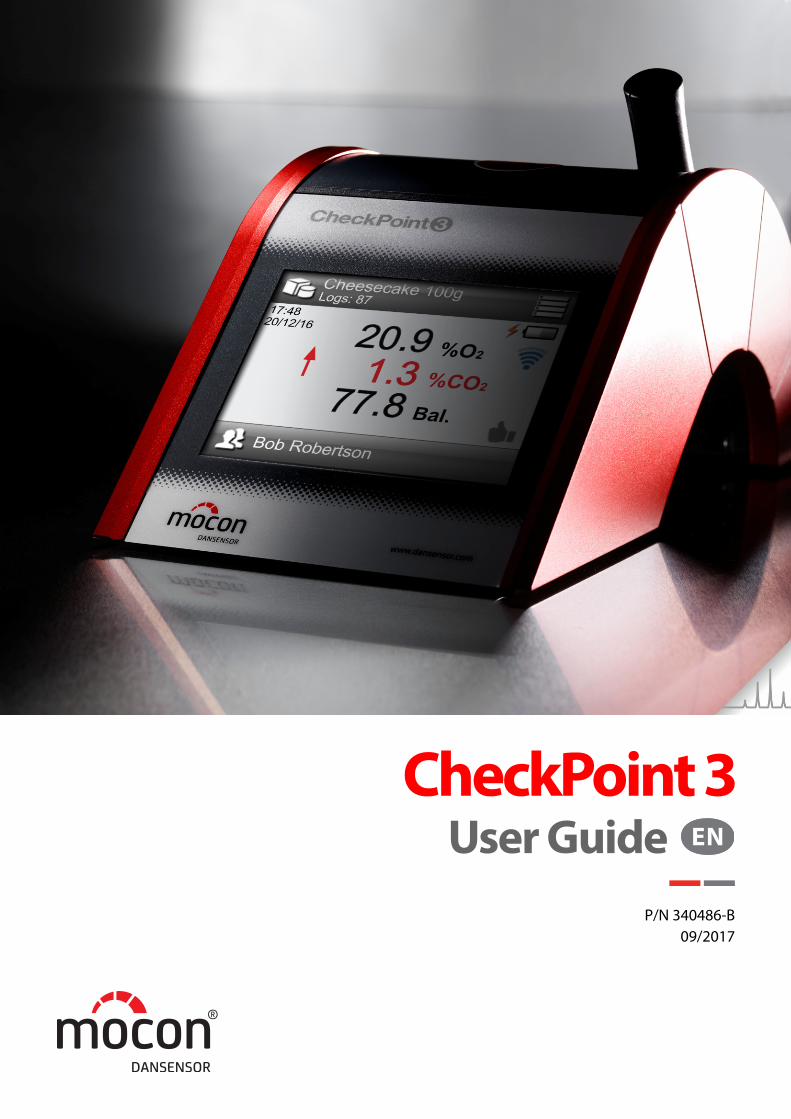
CheckPoint 3CheckPoint 3 is a portable headspace gas analyzer for MAP packages. The device is based on an all-in-one concept, and together with MOCON Dansensor’s new and innovative sensor technology it ensures accurate and reliable measurements every time.
The embedded easy-to-use WebGUI makes it easy to create and manage users and products and to set up product measurement details and general device settings and it enables the control of several CheckPoint 3 units in a production environment.
All measurement data can be saved in the device’s database and exported for further analysis.
Models3 different models are available:CheckPoint 3 (basic), CheckPoint 3 Premium, and CheckPoint 3 Premium w/Extended Data Pack.
The table below shows the various configuration levels.
PremiumPremium(Basic)
CheckPoint 3
O /CO2 2 O /CO2 2 O /CO2 2O2 O2 O2
CheckPoint 3 CheckPoint 3
Extended Data Pack
O sensor2
CO sensor2
Simple gas alarms
Individual product settings & gas alarms
Users
Products
WiFi/Web Interface
Data logging/data export
Export of device settings
Data collection
No. of data collections
0 10
100
10.000
100
1.000
1.000.000
1

DANSENSOR
10 User Guide EN CheckPoint 3
P/N 340486-B
09/2017
Overview
Sample gas hose w/needle
Needle retainerA small magnet in the needle retainer makes the needle snap into it and keeps it in place.
WARNING! Due to safety considerations the needle should always be placed in the retainer after measuring.
3.5" colour touch displayFor intuitive operation of the device by use of explanatory icons and easy understandable text messages and buttons.
The ButtonThe button has the following functions:- Switching device on (press and release)- Switching device off (press and hold for 3 s.)- Start measuring (press and release)- Resetting of the device (press and hold for 8 s.)
USB (Micro-B) connectorThe USB connector is only for charging use.
DANSENSOR
CheckPoint 3 EN User Guide 11
P/N 340486-B
09/2017
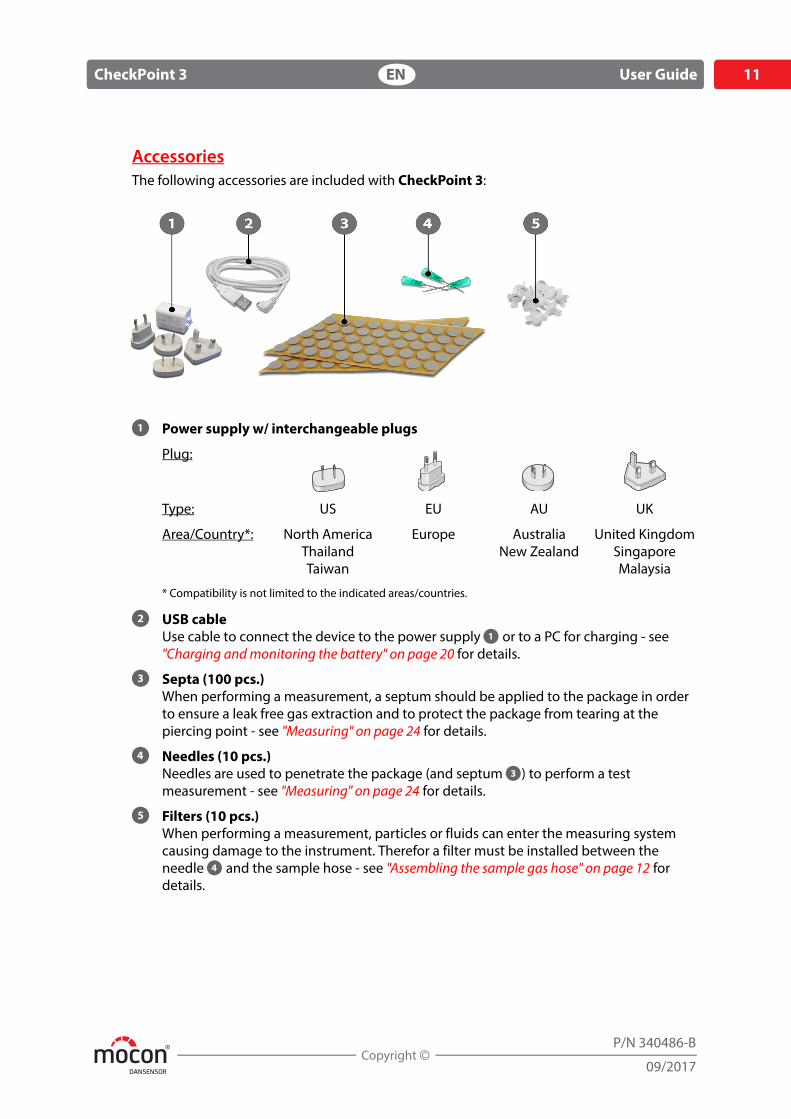
AccessoriesThe following accessories are included with CheckPoint 3:
Power supply w/ interchangeable plugs
Plug:
Type: US EU AU UK
Area/Country*: North AmericaThailandTaiwan
Europe AustraliaNew Zealand
United KingdomSingaporeMalaysia
* Compatibility is not limited to the indicated areas/countries.
USB cableUse cable to connect the device to the power supply or to a PC for charging - see "Charging and monitoring the battery" on page 20 for details.
Septa (100 pcs.)When performing a measurement, a septum should be applied to the package in order to ensure a leak free gas extraction and to protect the package from tearing at the piercing point - see "Measuring" on page 24 for details.
Needles (10 pcs.)Needles are used to penetrate the package (and septum ) to perform a test measurement - see "Measuring" on page 24 for details.
Filters (10 pcs.)When performing a measurement, particles or fluids can enter the measuring system causing damage to the instrument. Therefor a filter must be installed between the needle and the sample hose - see "Assembling the sample gas hose" on page 12 for details.

DANSENSOR
12 User Guide EN CheckPoint 3
P/N 340486-B
09/2017
Setting up
Assembling the sample gas hose1. Equip the needle holder with a filter and a needle then place the needle in the
retainer .
WARNING! Due to safety considerations the needle should always be placed in the retainer after measuring.
Fitting the bumpers (option)1. Fit the bumpers onto the side plates starting from the pointed front corner. 2. When fitting the bumpers in the bottom, make sure that the notches snap properly
around the side plates keeping the bumpers in place (see details).
DANSENSOR
CheckPoint 3 EN User Guide 13
P/N 340486-B
09/2017
2. Operation and Maintenance
Basics
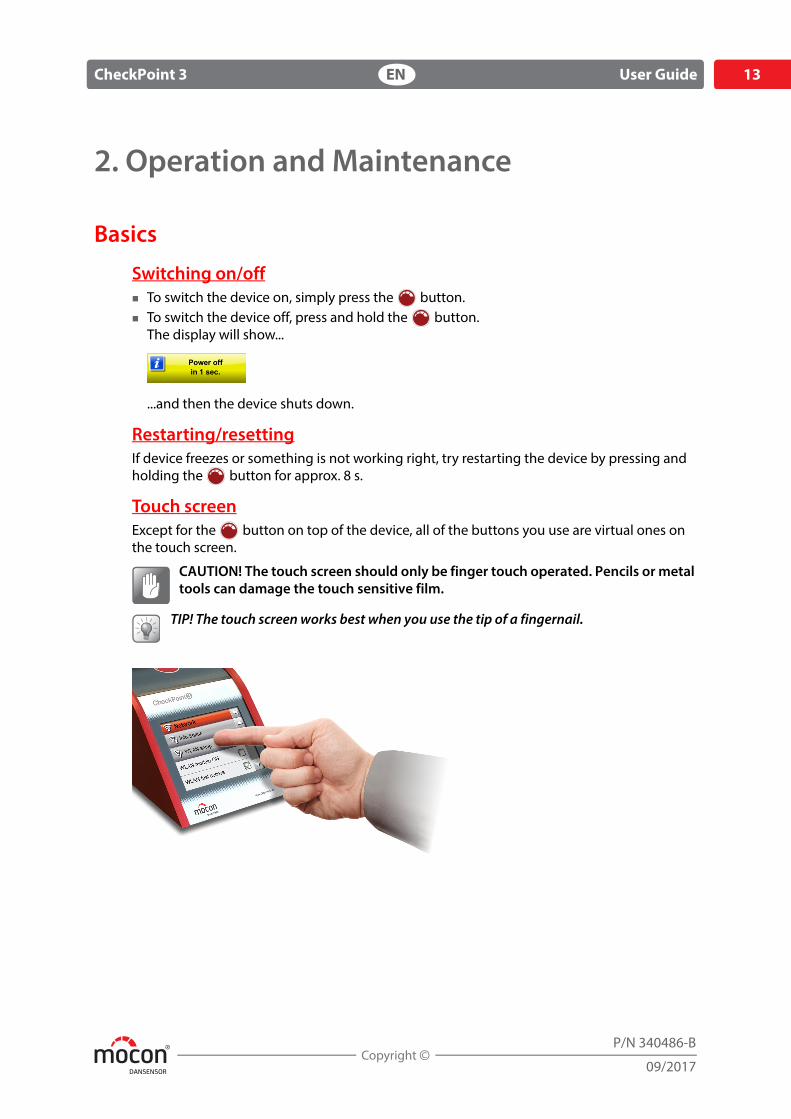
Switching on/off To switch the device on, simply press the button. To switch the device off, press and hold the button.
The display will show...
...and then the device shuts down.
Restarting/resettingIf device freezes or something is not working right, try restarting the device by pressing and holding the button for approx. 8 s.
Touch screenExcept for the button on top of the device, all of the buttons you use are virtual ones on the touch screen.
CAUTION! The touch screen should only be finger touch operated. Pencils or metal tools can damage the touch sensitive film.
TIP! The touch screen works best when you use the tip of a fingernail.
DANSENSOR
14 User Guide EN CheckPoint 3
P/N 340486-B
09/2017
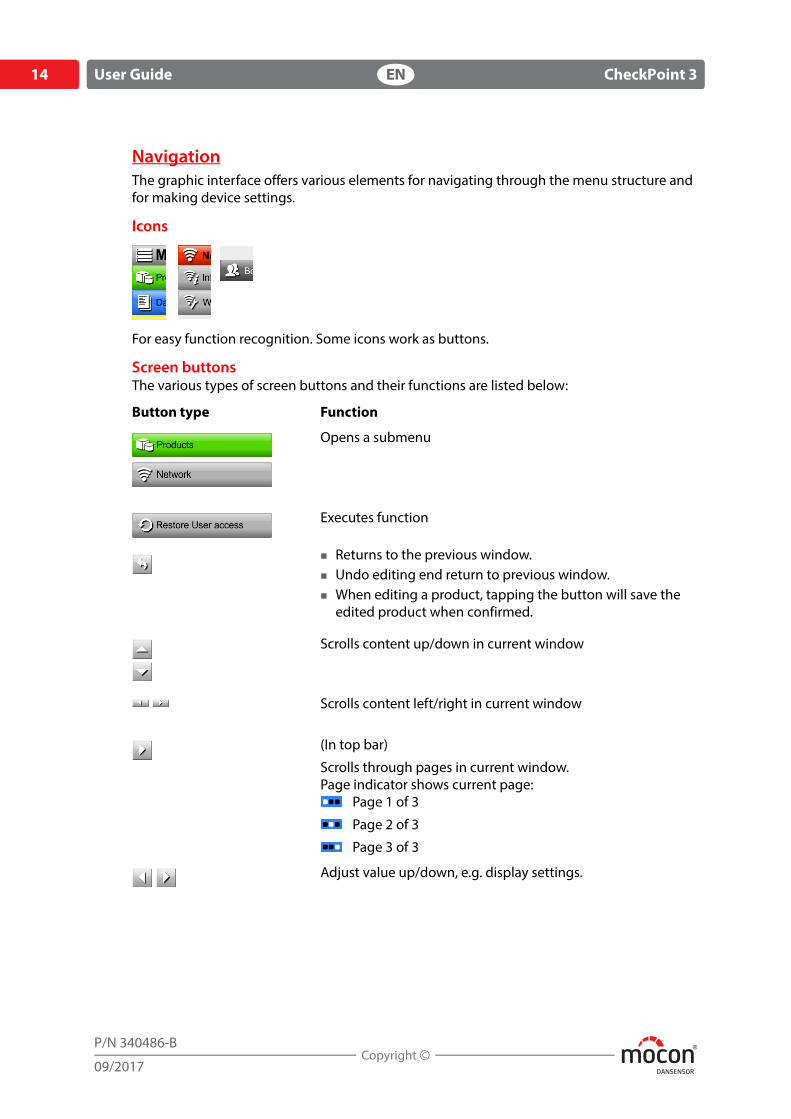
NavigationThe graphic interface offers various elements for navigating through the menu structure and for making device settings.
Icons
For easy function recognition. Some icons work as buttons.
Screen buttonsThe various types of screen buttons and their functions are listed below:
Button type Function
Opens a submenu
Executes function
Returns to the previous window. Undo editing end return to previous window. When editing a product, tapping the button will save the
edited product when confirmed.
Scrolls content up/down in current window
Scrolls content left/right in current window
(In top bar)
Scrolls through pages in current window.Page indicator shows current page:
Page 1 of 3
Page 2 of 3
Page 3 of 3
Adjust value up/down, e.g. display settings.
DANSENSOR
CheckPoint 3 EN User Guide 15
P/N 340486-B
09/2017
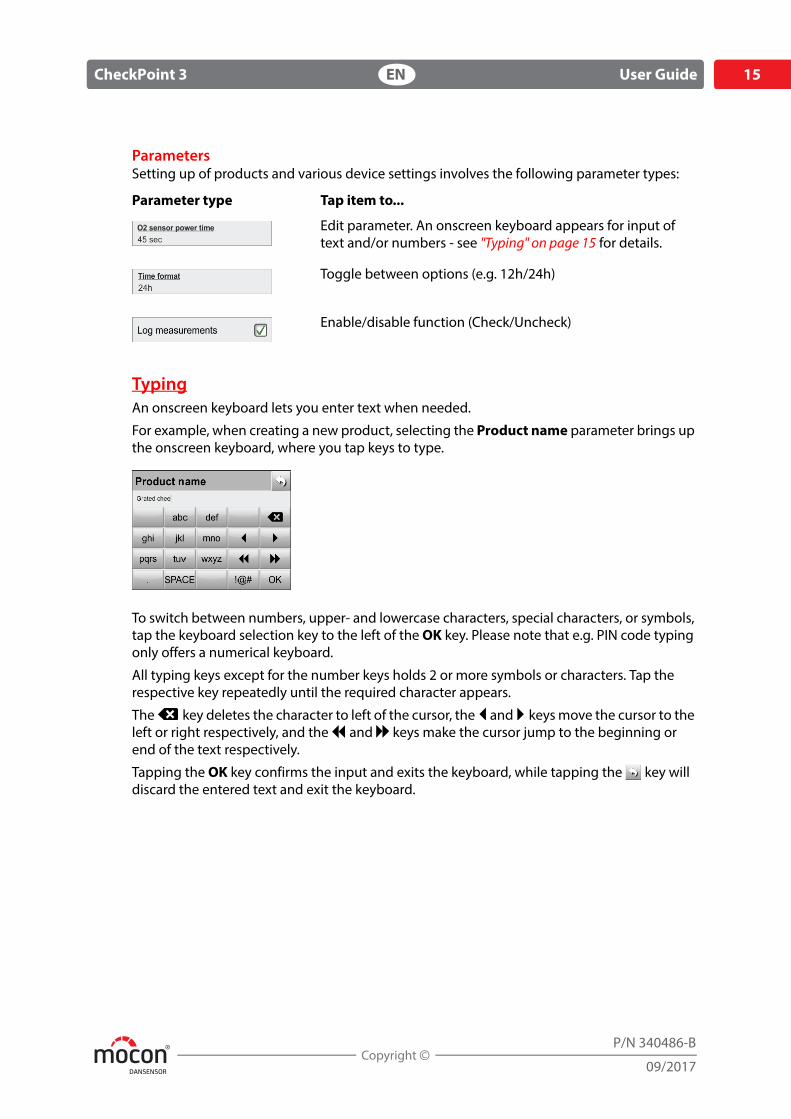
ParametersSetting up of products and various device settings involves the following parameter types:
TypingAn onscreen keyboard lets you enter text when needed.
For example, when creating a new product, selecting the Product name parameter brings up the onscreen keyboard, where you tap keys to type.
To switch between numbers, upper- and lowercase characters, special characters, or symbols, tap the keyboard selection key to the left of the OK key. Please note that e.g. PIN code typing only offers a numerical keyboard.
All typing keys except for the number keys holds 2 or more symbols or characters. Tap the respective key repeatedly until the required character appears.
The key deletes the character to left of the cursor, the and keys move the cursor to the left or right respectively, and the and keys make the cursor jump to the beginning or end of the text respectively.
Tapping the OK key confirms the input and exits the keyboard, while tapping the key will discard the entered text and exit the keyboard.
Parameter type Tap item to...
Edit parameter. An onscreen keyboard appears for input of text and/or numbers - see "Typing" on page 15 for details.
Toggle between options (e.g. 12h/24h)
Enable/disable function (Check/Uncheck)
DANSENSOR
16 User Guide EN CheckPoint 3
P/N 340486-B
09/2017
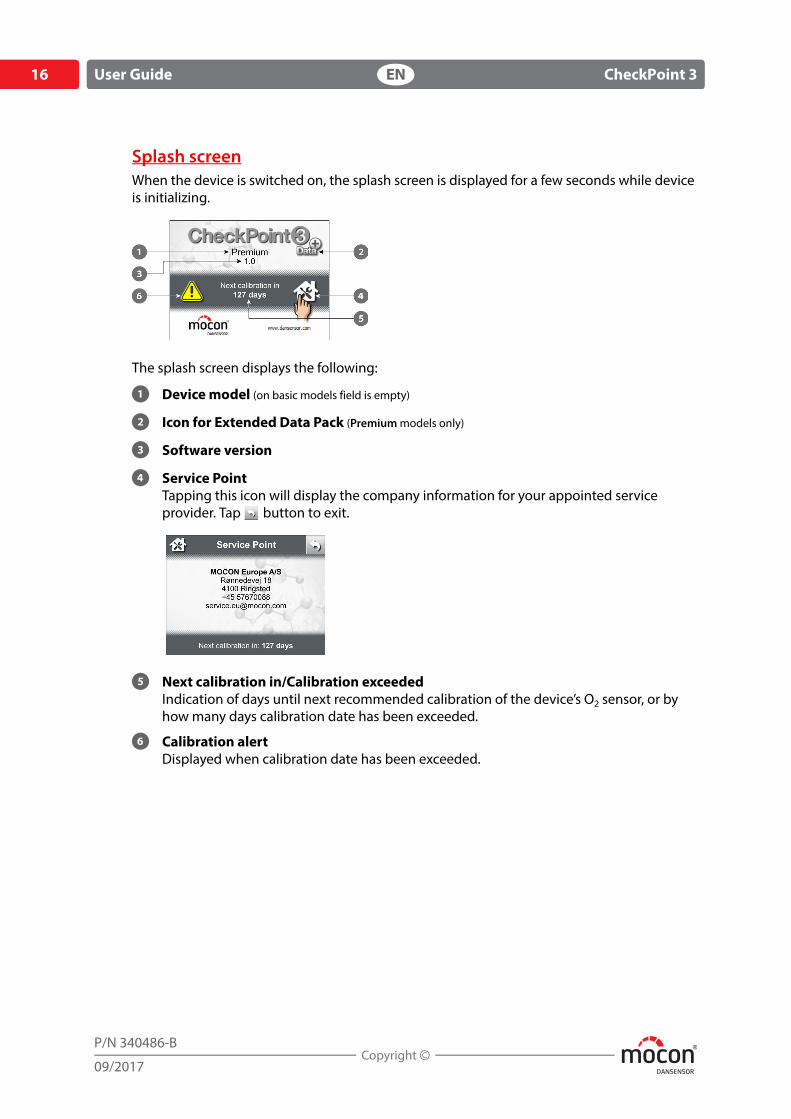
Splash screenWhen the device is switched on, the splash screen is displayed for a few seconds while device is initializing.
The splash screen displays the following:
Device model (on basic models field is empty)
Icon for Extended Data Pack (Premium models only)
Software version
Service PointTapping this icon will display the company information for your appointed service provider. Tap button to exit.
Next calibration in/Calibration exceededIndication of days until next recommended calibration of the device’s O2 sensor, or by how many days calibration date has been exceeded.
Calibration alertDisplayed when calibration date has been exceeded.
DANSENSOR
CheckPoint 3 EN User Guide 17
P/N 340486-B
09/2017
Login and access levels(Premium models only)
Login levelsDifferent levels of login can be set up:
NOTE! If you forget your User ID, you should create a new (ask a Supervisor).
See "Users" on page 59 for details about user and login settings.
Access levelsWhen device is switched on (after power off ) it is locked in User access level. User access only gives access to a limited number of functions and does not allow for parameter set-up.
To obtain full access you have to change the device to Supervisor access level.To do so select Access level from the main Menu - see "Access level" on page 65 for details.
No login(default setting)
At start-up the device initializes and when finished it changes to show the measuring screen, ready for measuring. Current user is the default User.
User login required At start-up the device initializes and when finished, you are taken to the User screen, from where you must select a user to go to the measuring screen, ready for measuring.
User login with ID At start-up the device initializes and when finished, you are prompted to enter a valid User ID.When done you are taken to the measuring screen, ready for measuring.
DANSENSOR
18 User Guide EN CheckPoint 3
P/N 340486-B
09/2017
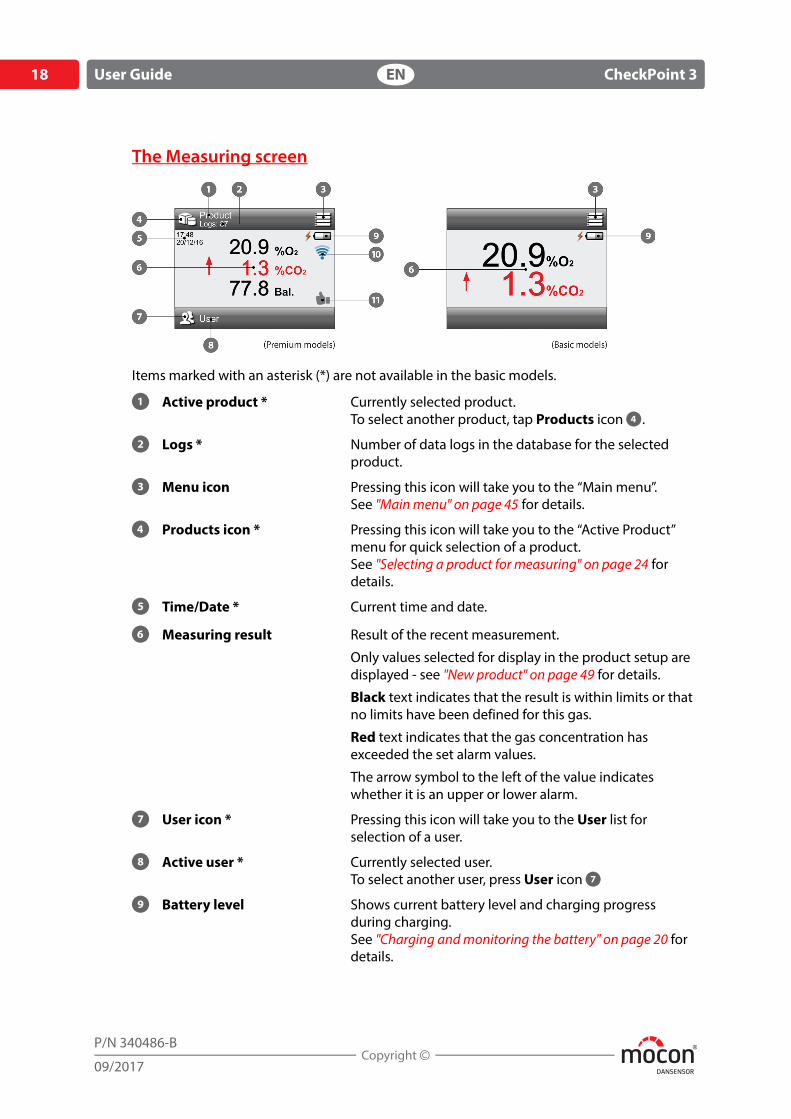
The Measuring screen
Items marked with an asterisk (*) are not available in the basic models.
Active product * Currently selected product.To select another product, tap Products icon .
Logs * Number of data logs in the database for the selected product.
Menu icon Pressing this icon will take you to the “Main menu”.See "Main menu" on page 45 for details.
Products icon * Pressing this icon will take you to the “Active Product” menu for quick selection of a product.See "Selecting a product for measuring" on page 24 for details.
Time/Date * Current time and date.
Measuring result Result of the recent measurement.
Only values selected for display in the product setup are displayed - see "New product" on page 49 for details.
Black text indicates that the result is within limits or that no limits have been defined for this gas.
Red text indicates that the gas concentration has exceeded the set alarm values.
The arrow symbol to the left of the value indicates whether it is an upper or lower alarm.
User icon * Pressing this icon will take you to the User list for selection of a user.
Active user * Currently selected user.To select another user, press User icon
Battery level Shows current battery level and charging progress during charging.See "Charging and monitoring the battery" on page 20 for details.
DANSENSOR
CheckPoint 3 EN User Guide 19
P/N 340486-B
09/2017
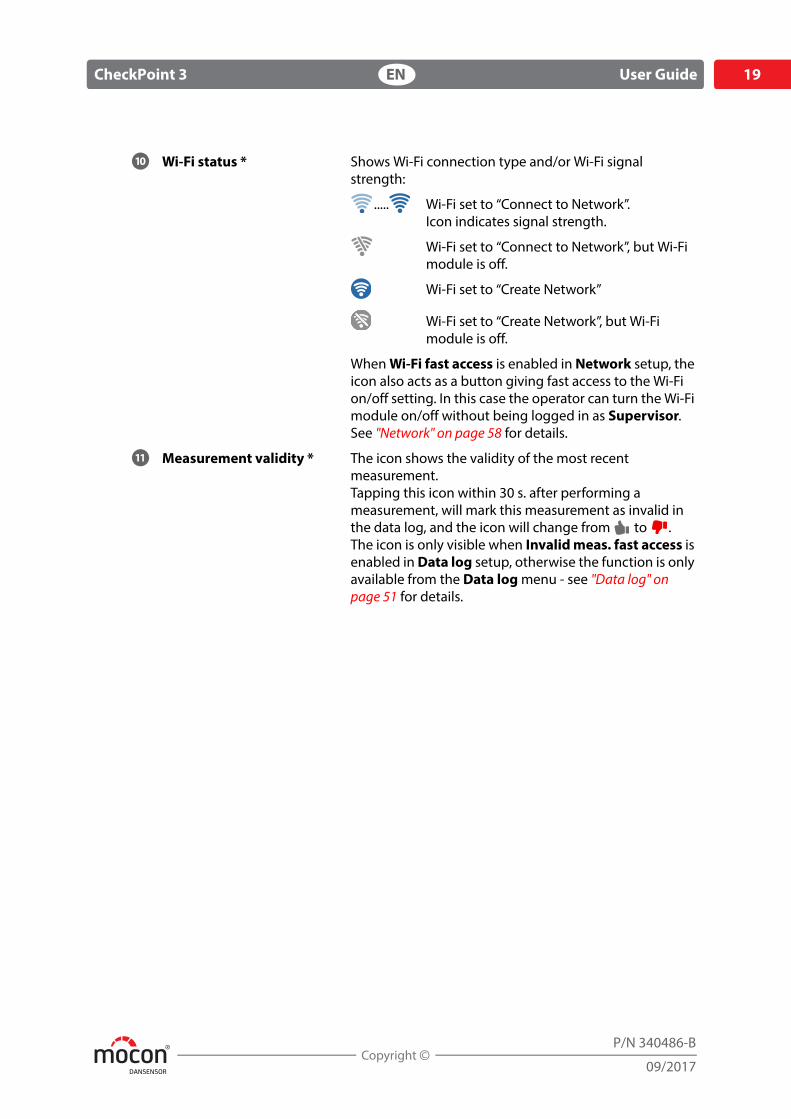
Wi-Fi status * Shows Wi-Fi connection type and/or Wi-Fi signal strength:
..... Wi-Fi set to “Connect to Network”.Icon indicates signal strength.
Wi-Fi set to “Connect to Network”, but Wi-Fi module is off.
Wi-Fi set to “Create Network”
Wi-Fi set to “Create Network”, but Wi-Fi module is off.
When Wi-Fi fast access is enabled in Network setup, the icon also acts as a button giving fast access to the Wi-Fi on/off setting. In this case the operator can turn the Wi-Fi module on/off without being logged in as Supervisor.See "Network" on page 58 for details.
Measurement validity * The icon shows the validity of the most recent measurement.Tapping this icon within 30 s. after performing a measurement, will mark this measurement as invalid in the data log, and the icon will change from to .The icon is only visible when Invalid meas. fast access is enabled in Data log setup, otherwise the function is only available from the Data log menu - see "Data log" on page 51 for details.
DANSENSOR
20 User Guide EN CheckPoint 3
P/N 340486-B
09/2017
Power saving(Premium models only)
To save battery, the device has a 2-step power saving function:
1. After a certain time of inactivity, the device switches into power save mode by reducing the display’s back light intensity.
2. After a certain time of inactivity in power save mode as described above, the device automatically switches off.
NOTE! If device’s Wi-Fi module is switched on, the network activity will prevent the device from switching off, even though the set time runs out.
To “wake up” the device when in power save mode, simply touch the screen or press the button.
Power save settings are described in "Power save" on page 62.
Charging and monitoring the batteryWARNING! For important safety information about the internal, rechargeable lithium-ion battery and charging of the device, see "Safety and handling instructions" on page 75.
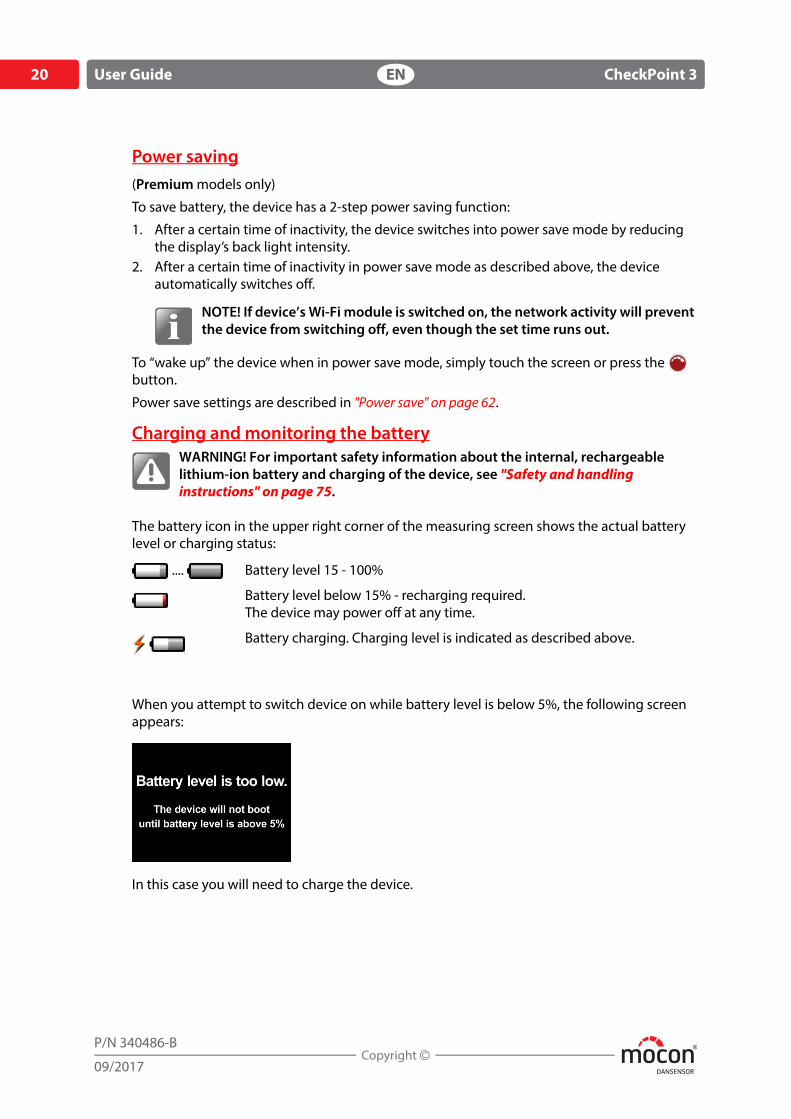
The battery icon in the upper right corner of the measuring screen shows the actual battery level or charging status:
When you attempt to switch device on while battery level is below 5%, the following screen appears:
In this case you will need to charge the device.
.... Battery level 15 - 100%
Battery level below 15% - recharging required.The device may power off at any time.
Battery charging. Charging level is indicated as described above.

DANSENSOR
CheckPoint 3 EN User Guide 21
P/N 340486-B
09/2017
Battery charging
1. Assemble the power supply with the appropriate plug - see page 11 for plug compatibility details.Fit the plug onto the connector and then turn it 1/4 of a turn clockwise to lock it (see detail).
2. Connect the cable between the power supply and the connector underneath the device.
CAUTION! Make sure that the cable plug matches the orientation of the connector .
3. Connect the power supply to the main power outlet .4. When charging, if the device is switched on and showing the measuring screen, the
battery indicator in the upper right corner of the display will show the charging progress.
NOTE! You can also charge the battery by connecting the device to a USB 2.0 or 3.0 port on your computer using the cable , but you should be aware that because the PC delivers so little power, the charging time can be up to 3 times longer than when using the supplied power supply , and the battery may drain instead of charge, if device is used for measuring while charging or if the computer is turned off or in sleep or standby mode.
DANSENSOR
22 User Guide EN CheckPoint 3
P/N 340486-B
09/2017
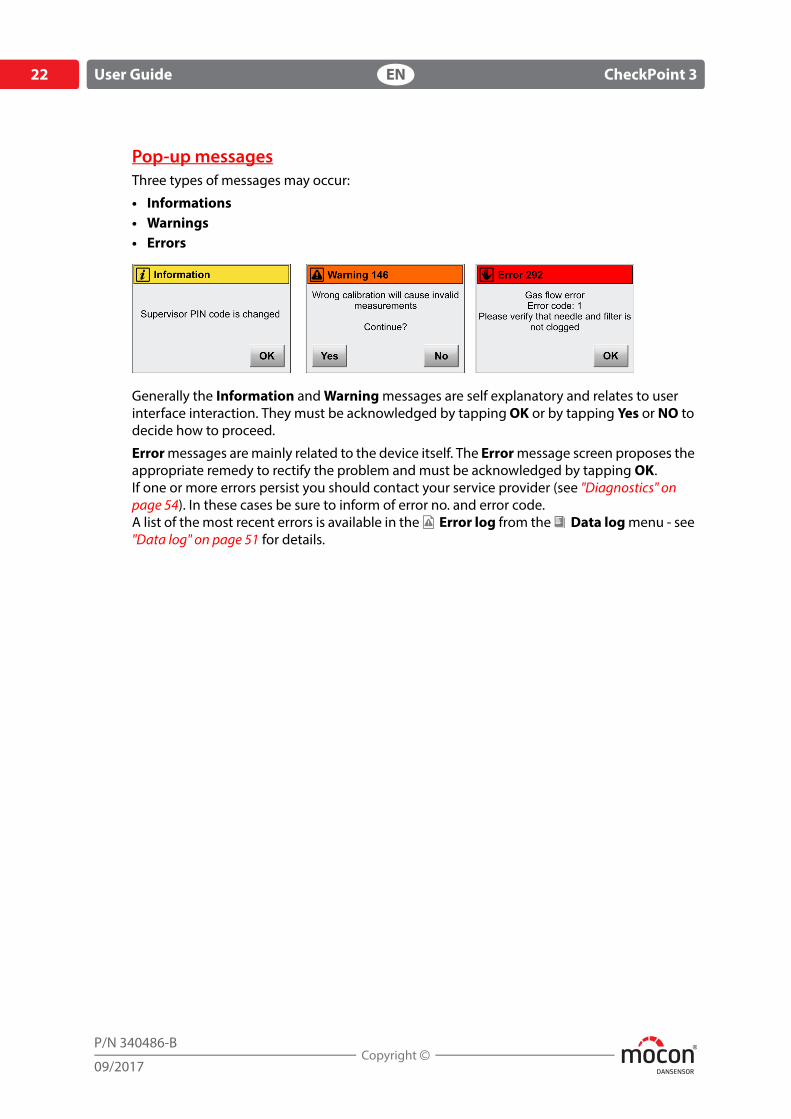
Pop-up messagesThree types of messages may occur:
• Informations• Warnings• Errors
Generally the Information and Warning messages are self explanatory and relates to user interface interaction. They must be acknowledged by tapping OK or by tapping Yes or NO to decide how to proceed.
Error messages are mainly related to the device itself. The Error message screen proposes the appropriate remedy to rectify the problem and must be acknowledged by tapping OK.If one or more errors persist you should contact your service provider (see "Diagnostics" on page 54). In these cases be sure to inform of error no. and error code.A list of the most recent errors is available in the Error log from the Data log menu - see "Data log" on page 51 for details.
DANSENSOR
CheckPoint 3 EN User Guide 23
P/N 340486-B
09/2017
Get startedWhen you start the device for the first time and before you start making measurements, it is recommended that you perform some basic device settings.
Select languageGo to Menu -> Language to select the language in which you want to view the different menus and messages - see "Language" on page 69 for details.
Set up gas concentration alarms- Basic models:
Go to Menu -> Alarm to set values for when the measured gas concentrations should appear on the measurement screen as not acceptable - see "Alarm" on page 46 for details.
- Premium models:Gas concentration alarms are set individually for each product - see "Products" on page 47 for details.
NOTE! You may experience shorter measurement times if appropriate gas alarms have been set up.
Set up Products and Users(Premium models only)From the factory a default user and a default product have been created, but we highly recommend that you create specific products and users, so that you can separate the different measurements later on for use in product statistics etc. - see "Products" on page 47 and "Users" on page 59 for details.
Perform SetupGo through the parameters available in the Setup menu and make appropriate settings - see "Setup" on page 56 for details.
DANSENSOR
24 User Guide EN CheckPoint 3
P/N 340486-B
09/2017
Measuring
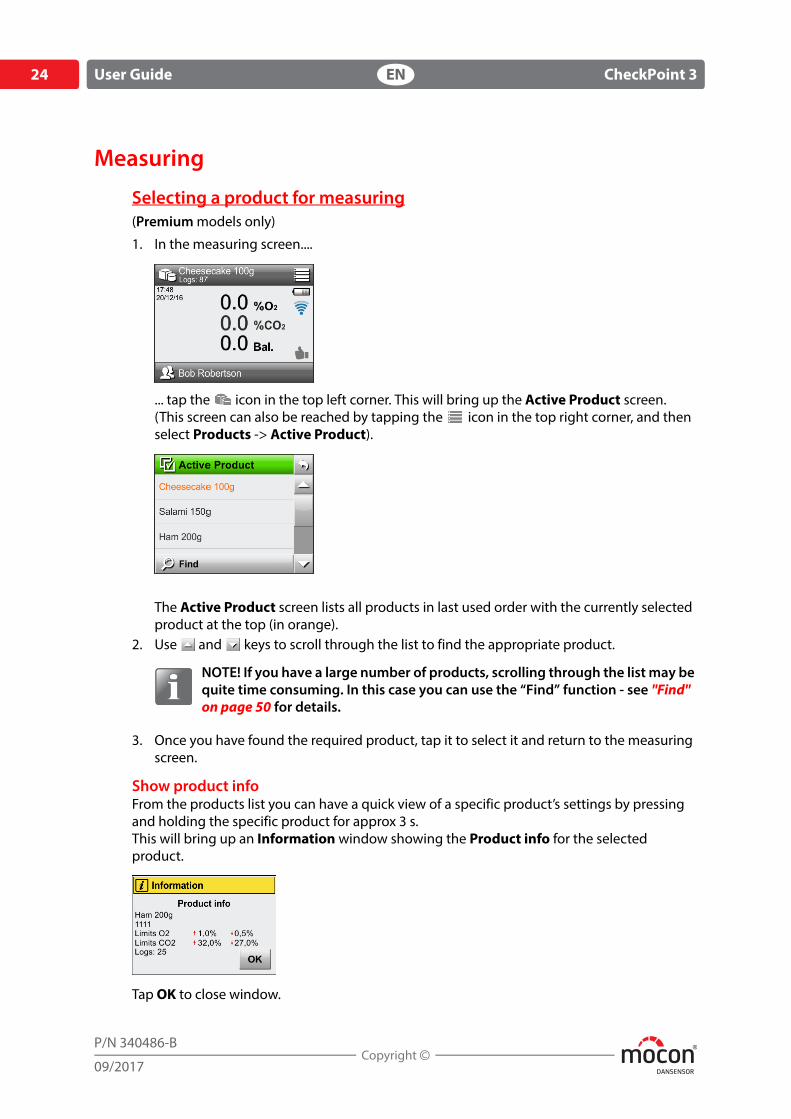
Selecting a product for measuring(Premium models only)
1. In the measuring screen....
... tap the icon in the top left corner. This will bring up the Active Product screen.(This screen can also be reached by tapping the icon in the top right corner, and then select Products -> Active Product).
The Active Product screen lists all products in last used order with the currently selected product at the top (in orange).
2. Use and keys to scroll through the list to find the appropriate product.
NOTE! If you have a large number of products, scrolling through the list may be quite time consuming. In this case you can use the “Find” function - see "Find" on page 50 for details.
3. Once you have found the required product, tap it to select it and return to the measuring screen.
Show product infoFrom the products list you can have a quick view of a specific product’s settings by pressing and holding the specific product for approx 3 s.This will bring up an Information window showing the Product info for the selected product.
Tap OK to close window.
DANSENSOR
CheckPoint 3 EN User Guide 25
P/N 340486-B
09/2017
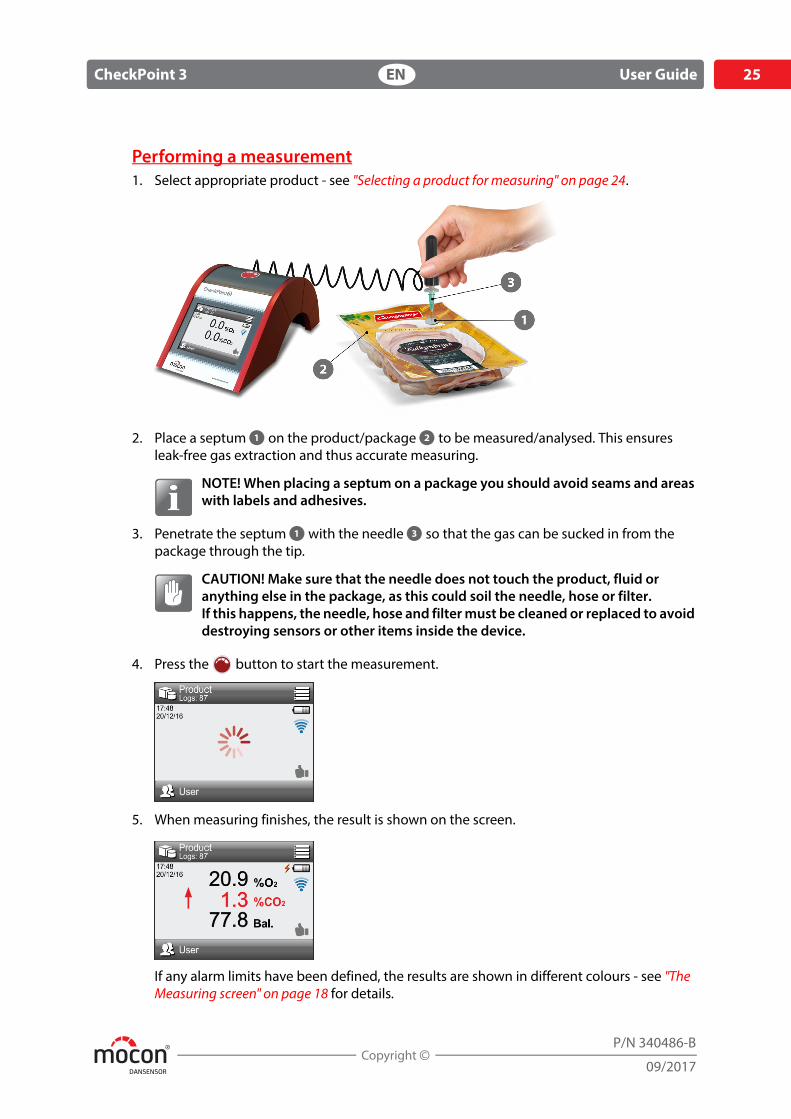
Performing a measurement1. Select appropriate product - see "Selecting a product for measuring" on page 24.
2. Place a septum on the product/package to be measured/analysed. This ensures leak-free gas extraction and thus accurate measuring.
NOTE! When placing a septum on a package you should avoid seams and areas with labels and adhesives.
3. Penetrate the septum with the needle so that the gas can be sucked in from the package through the tip.
CAUTION! Make sure that the needle does not touch the product, fluid or anything else in the package, as this could soil the needle, hose or filter.If this happens, the needle, hose and filter must be cleaned or replaced to avoid destroying sensors or other items inside the device.
4. Press the button to start the measurement.
5. When measuring finishes, the result is shown on the screen.
If any alarm limits have been defined, the results are shown in different colours - see "The Measuring screen" on page 18 for details.
DANSENSOR
26 User Guide EN CheckPoint 3
P/N 340486-B
09/2017
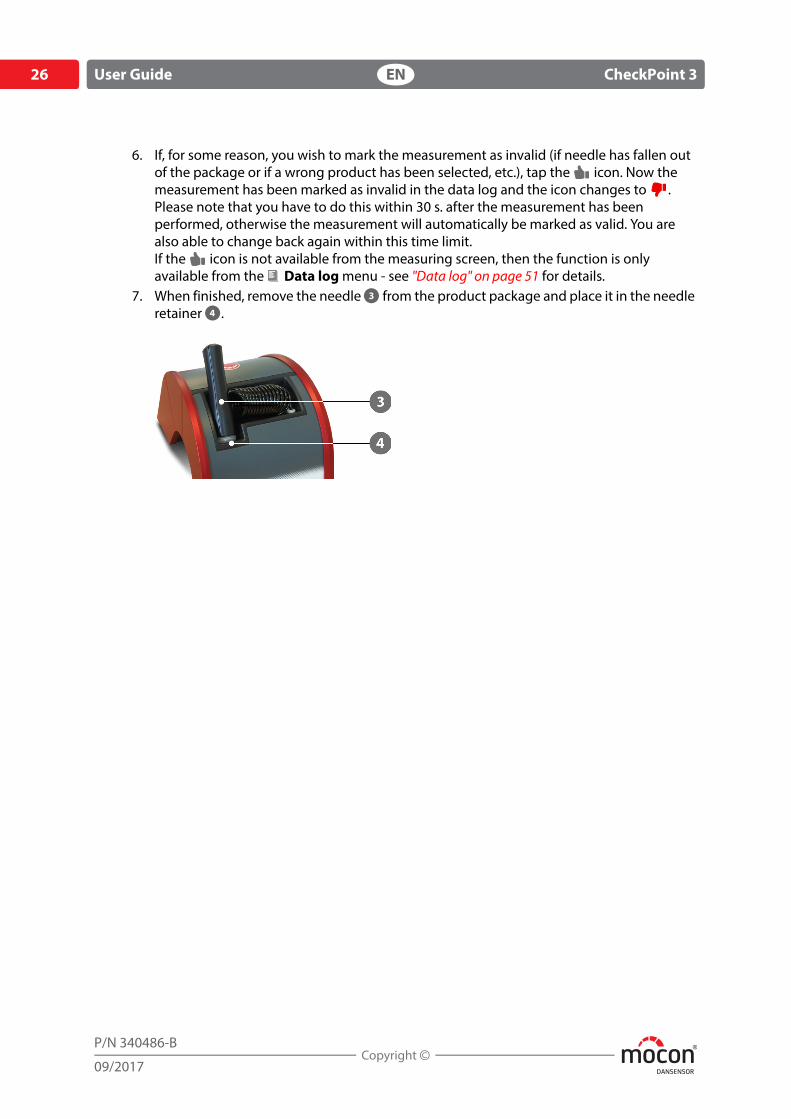
6. If, for some reason, you wish to mark the measurement as invalid (if needle has fallen out of the package or if a wrong product has been selected, etc.), tap the icon. Now the measurement has been marked as invalid in the data log and the icon changes to .Please note that you have to do this within 30 s. after the measurement has been performed, otherwise the measurement will automatically be marked as valid. You are also able to change back again within this time limit.If the icon is not available from the measuring screen, then the function is only available from the Data log menu - see "Data log" on page 51 for details.
7. When finished, remove the needle from the product package and place it in the needle retainer .
DANSENSOR
CheckPoint 3 EN User Guide 27
P/N 340486-B
09/2017
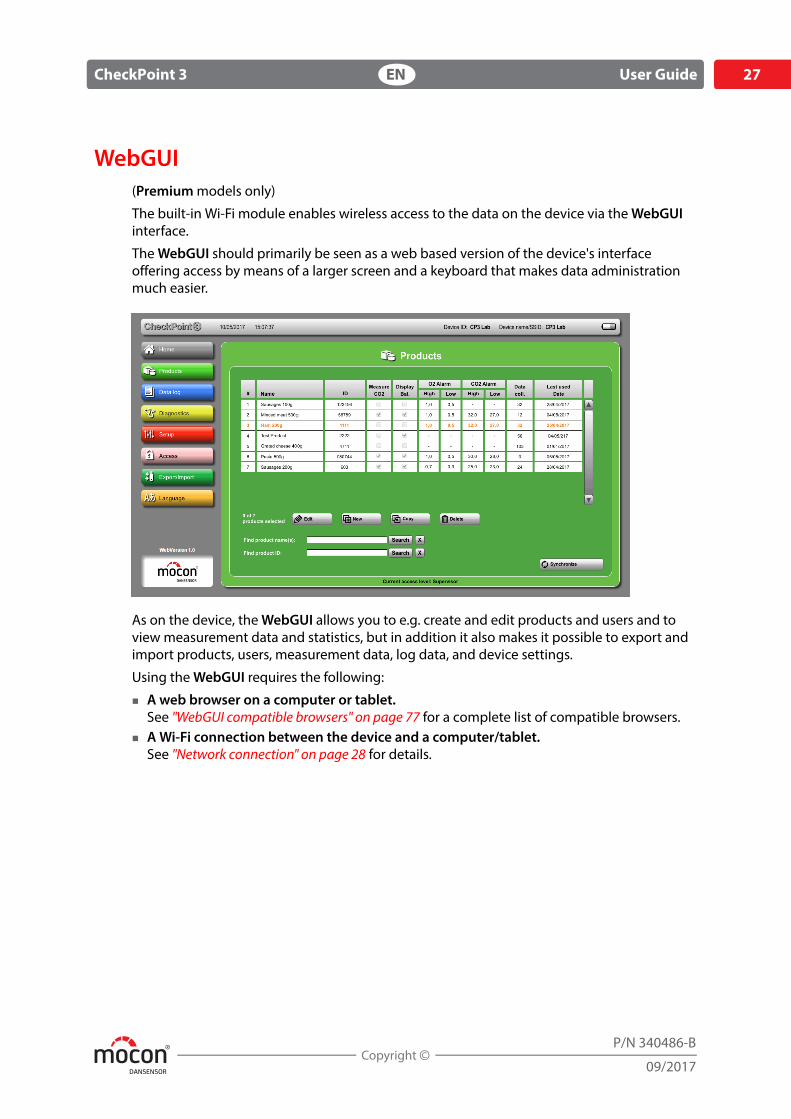
WebGUI(Premium models only)
The built-in Wi-Fi module enables wireless access to the data on the device via the WebGUI interface.
The WebGUI should primarily be seen as a web based version of the device's interface offering access by means of a larger screen and a keyboard that makes data administration much easier.
As on the device, the WebGUI allows you to e.g. create and edit products and users and to view measurement data and statistics, but in addition it also makes it possible to export and import products, users, measurement data, log data, and device settings.
Using the WebGUI requires the following:
A web browser on a computer or tablet.See "WebGUI compatible browsers" on page 77 for a complete list of compatible browsers.
A Wi-Fi connection between the device and a computer/tablet.See "Network connection" on page 28 for details.
DANSENSOR
28 User Guide EN CheckPoint 3
P/N 340486-B
09/2017
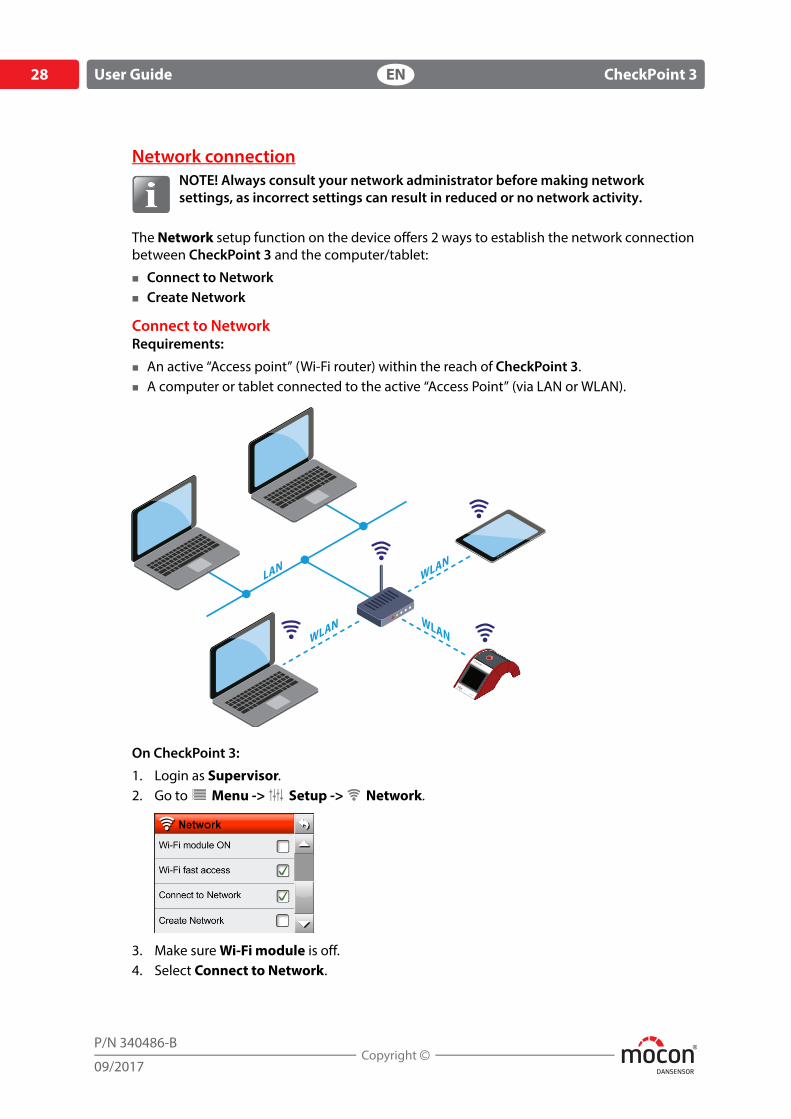
Network connectionNOTE! Always consult your network administrator before making network settings, as incorrect settings can result in reduced or no network activity.
The Network setup function on the device offers 2 ways to establish the network connection between CheckPoint 3 and the computer/tablet:
Connect to Network Create Network
Connect to NetworkRequirements:
An active “Access point” (Wi-Fi router) within the reach of CheckPoint 3. A computer or tablet connected to the active “Access Point” (via LAN or WLAN).
On CheckPoint 3:
1. Login as Supervisor.2. Go to Menu -> Setup -> Network.
3. Make sure Wi-Fi module is off.4. Select Connect to Network.

DANSENSOR
CheckPoint 3 EN User Guide 29
P/N 340486-B
09/2017
5. Select Wi-Fi setup.
6. Change Device name in order to create a unique name, e.g. CP3 Lab.The device name is displayed when you connect with a browser. The name can be used to identify a specific device, if more than one device is connected on the same network.
7. Select appropriate DHCP setting, either Enabled (default) or Disabled.
NOTE! Before selecting the “Disabled” setting you should consult your network administrator, as incorrect settings can result in reduced or no network activity.
8. Return to the previous menu and switch Wi-Fi module on (wait a few seconds).9. Once again select Wi-Fi setup and now press Select network (wait a few seconds
while list of available networks is updated).
10. Select the network name of the “Access Point” you wish to connect to, e.g. MyNetwork1.
11. Enter Password (if needed).12. Press Apply.13. Return to Network screen and select Info/Status.
DANSENSOR
30 User Guide EN CheckPoint 3
P/N 340486-B
09/2017
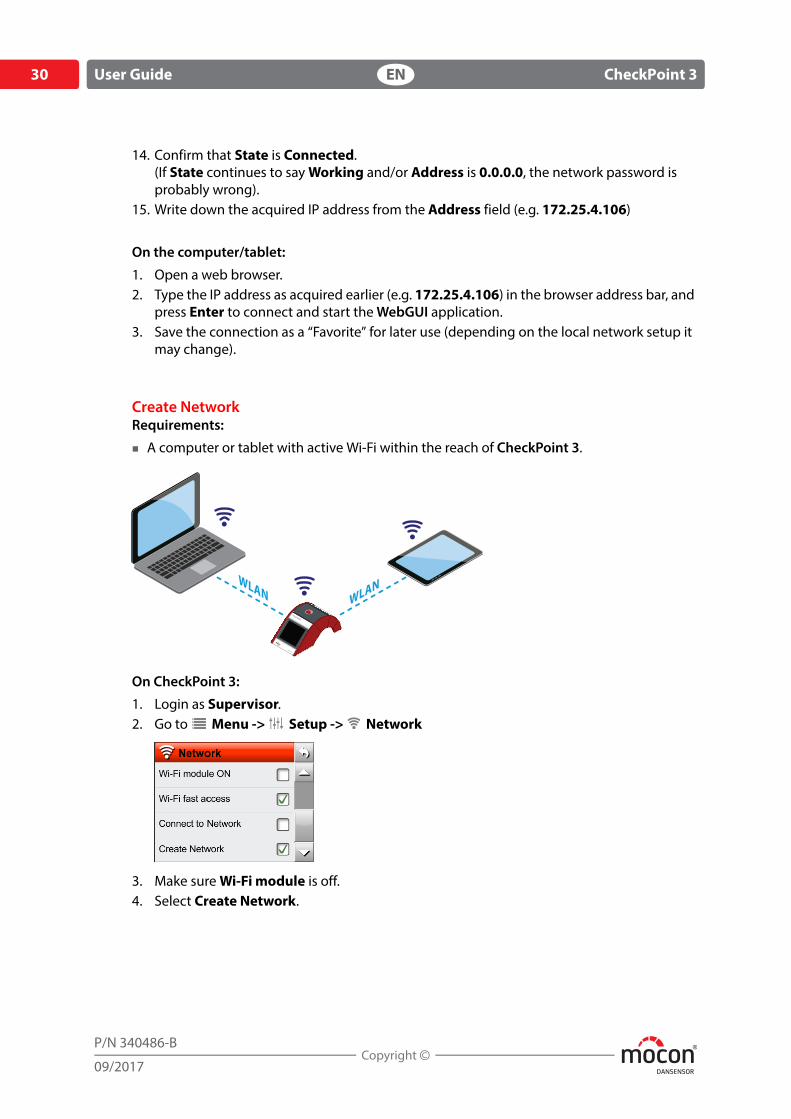
14. Confirm that State is Connected.(If State continues to say Working and/or Address is 0.0.0.0, the network password is probably wrong).
15. Write down the acquired IP address from the Address field (e.g. 172.25.4.106)
On the computer/tablet:
1. Open a web browser.2. Type the IP address as acquired earlier (e.g. 172.25.4.106) in the browser address bar, and
press Enter to connect and start the WebGUI application.3. Save the connection as a “Favorite” for later use (depending on the local network setup it
may change).
Create NetworkRequirements:
A computer or tablet with active Wi-Fi within the reach of CheckPoint 3.
On CheckPoint 3:
1. Login as Supervisor.2. Go to Menu -> Setup -> Network
3. Make sure Wi-Fi module is off.4. Select Create Network.
DANSENSOR
CheckPoint 3 EN User Guide 31
P/N 340486-B
09/2017
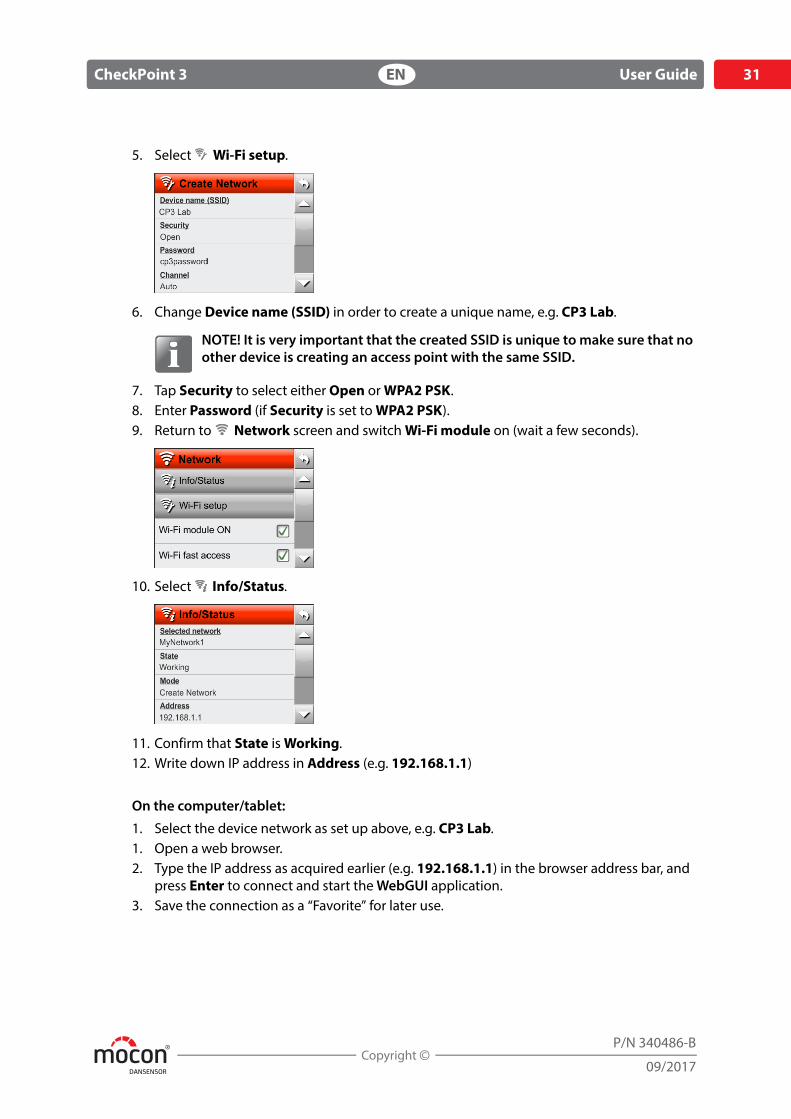
5. Select Wi-Fi setup.
6. Change Device name (SSID) in order to create a unique name, e.g. CP3 Lab.
NOTE! It is very important that the created SSID is unique to make sure that no other device is creating an access point with the same SSID.
7. Tap Security to select either Open or WPA2 PSK.8. Enter Password (if Security is set to WPA2 PSK).9. Return to Network screen and switch Wi-Fi module on (wait a few seconds).
10. Select Info/Status.
11. Confirm that State is Working.12. Write down IP address in Address (e.g. 192.168.1.1)
On the computer/tablet:
1. Select the device network as set up above, e.g. CP3 Lab.1. Open a web browser.2. Type the IP address as acquired earlier (e.g. 192.168.1.1) in the browser address bar, and
press Enter to connect and start the WebGUI application.3. Save the connection as a “Favorite” for later use.
DANSENSOR
32 User Guide EN CheckPoint 3
P/N 340486-B
09/2017
Using the WebGUIOnce you have established a proper connection as described in "Network connection" on page 28, you can start the application.
NOTE! The device’s current “Power save” settings have a great influence on the network connection, as this will be interrupted if the device turns off.This does not happen if the device is connected to the PC with the USB cable. In this case the device may enter the “sleep” mode where display turns off, but the network connection is maintained.
In general, the WebGUI functions work like the corresponding functions on the device, and reference is therefore made to the descriptions of these functions. The WebGUI has, however, some additional functions, which will be described in the following.
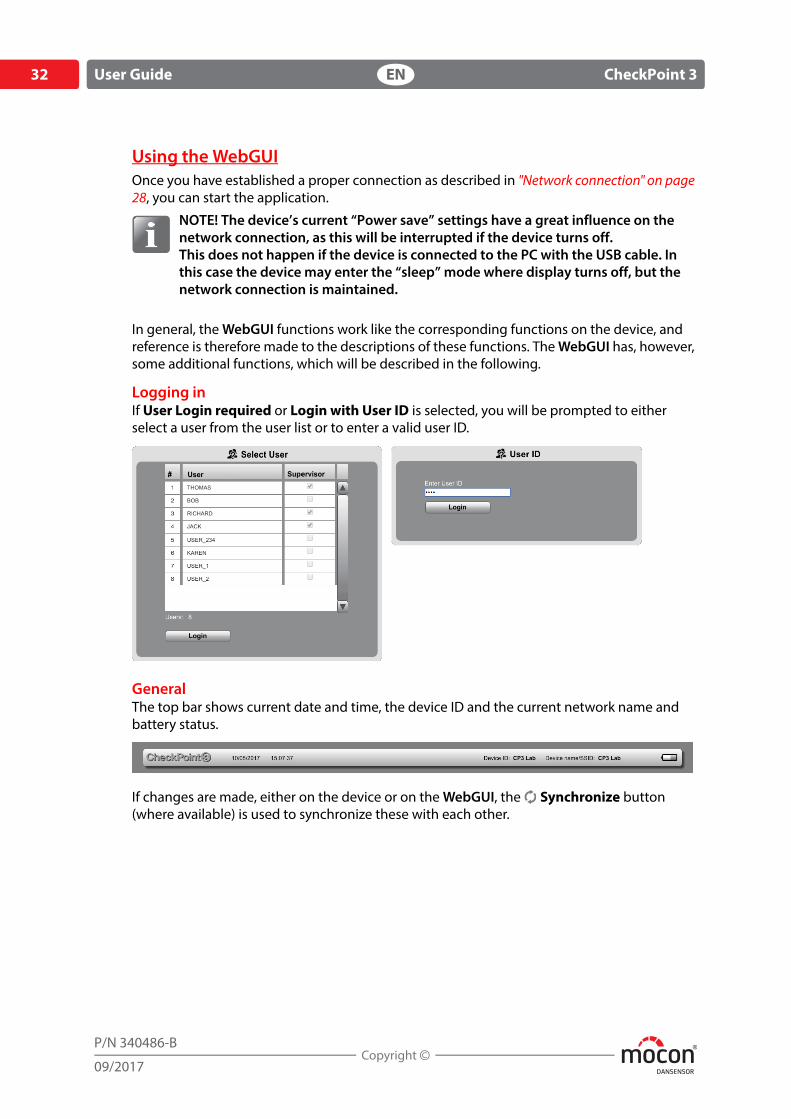
Logging inIf User Login required or Login with User ID is selected, you will be prompted to either select a user from the user list or to enter a valid user ID.
GeneralThe top bar shows current date and time, the device ID and the current network name and battery status.
If changes are made, either on the device or on the WebGUI, the Synchronize button (where available) is used to synchronize these with each other.
DANSENSOR
CheckPoint 3 EN User Guide 33
P/N 340486-B
09/2017
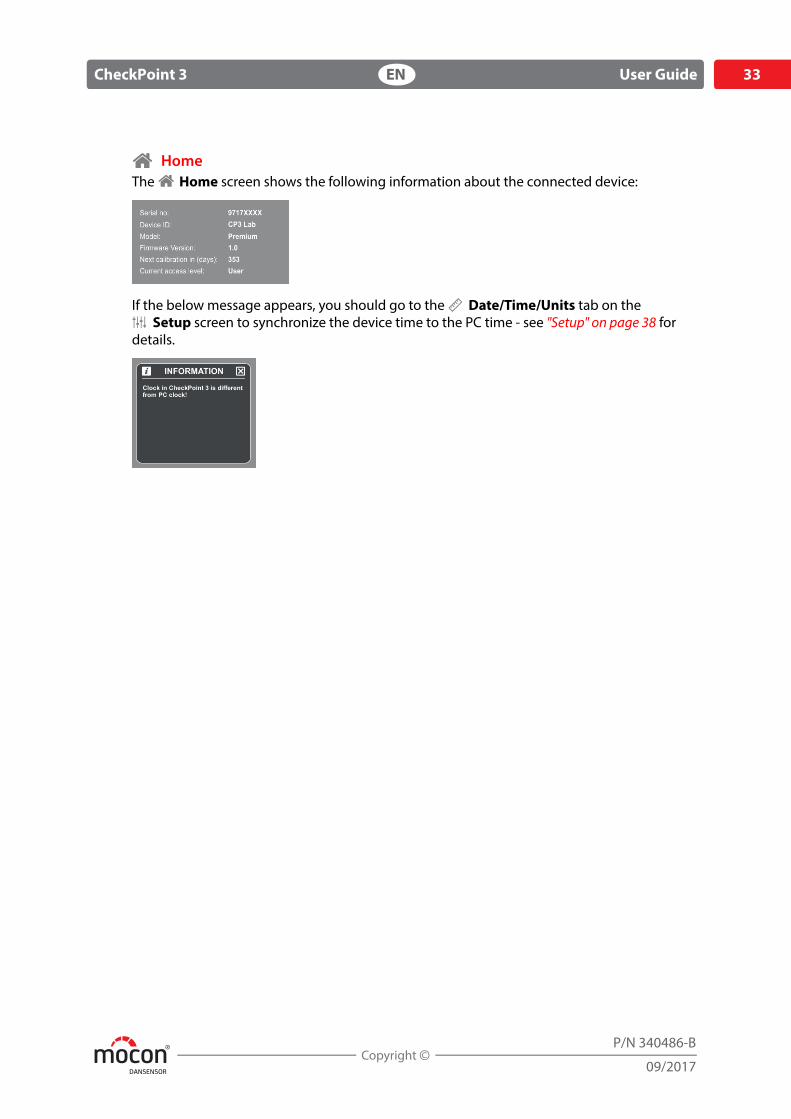
HomeThe Home screen shows the following information about the connected device:
If the below message appears, you should go to the Date/Time/Units tab on the Setup screen to synchronize the device time to the PC time - see "Setup" on page 38 for
details.

DANSENSOR
34 User Guide EN CheckPoint 3
P/N 340486-B
09/2017
Products
The Products screen displays a list of all products and their settings. You can sort the products by Name, ID, Data Coll. or Last used Date by clicking in the respective header field.
The product with orange text is the product currently selected on the device.
Click on a product to select it and again to deselect it.
Select a product to Edit, Copy or Delete it.The only function that works with multiple selected products is Delete.
Find product name(s)/product ID:Enter "t" in the respective search field to list all products containing "t" in their name or product ID, e.g. “Product1” and “DefaultProduct”.Enter "10" in the respective search field to list all products containing "10" in their name or product ID, e.g. “Product_10” and "10008".
Searching for product names and ID’s can be combined.
Pressing X button deletes all text in the search box and displays the entire product list again.
DANSENSOR
CheckPoint 3 EN User Guide 35
P/N 340486-B
09/2017
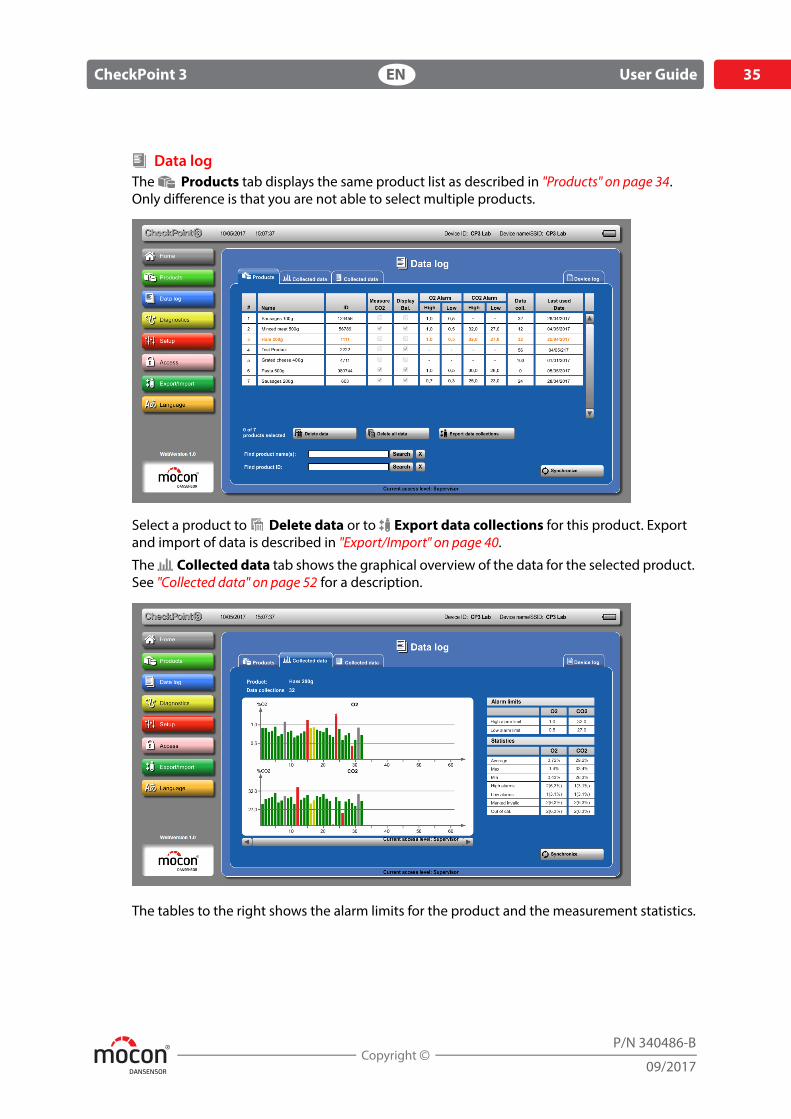
Data logThe Products tab displays the same product list as described in "Products" on page 34.Only difference is that you are not able to select multiple products.
Select a product to Delete data or to Export data collections for this product. Export and import of data is described in "Export/Import" on page 40.
The Collected data tab shows the graphical overview of the data for the selected product. See "Collected data" on page 52 for a description.
The tables to the right shows the alarm limits for the product and the measurement statistics.
DANSENSOR
36 User Guide EN CheckPoint 3
P/N 340486-B
09/2017
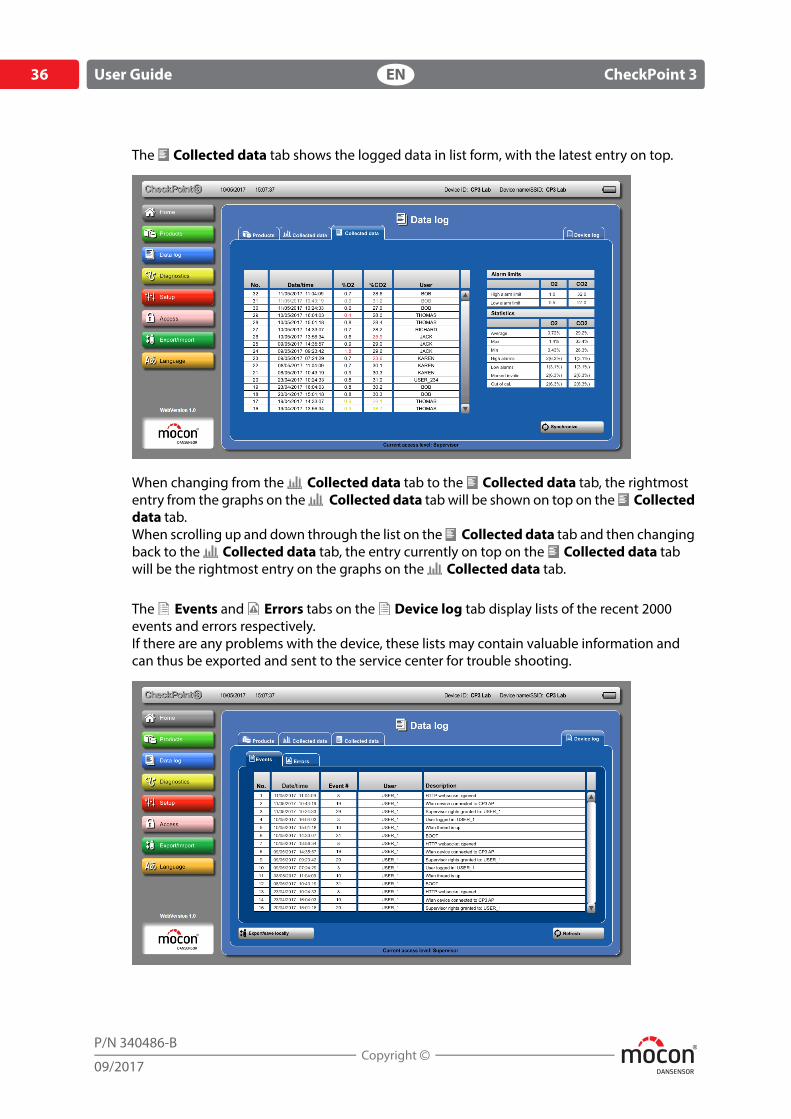
The Collected data tab shows the logged data in list form, with the latest entry on top.
When changing from the Collected data tab to the Collected data tab, the rightmost entry from the graphs on the Collected data tab will be shown on top on the Collected data tab.When scrolling up and down through the list on the Collected data tab and then changing back to the Collected data tab, the entry currently on top on the Collected data tab will be the rightmost entry on the graphs on the Collected data tab.
The Events and Errors tabs on the Device log tab display lists of the recent 2000 events and errors respectively.If there are any problems with the device, these lists may contain valuable information and can thus be exported and sent to the service center for trouble shooting.
DANSENSOR
CheckPoint 3 EN User Guide 37
P/N 340486-B
09/2017
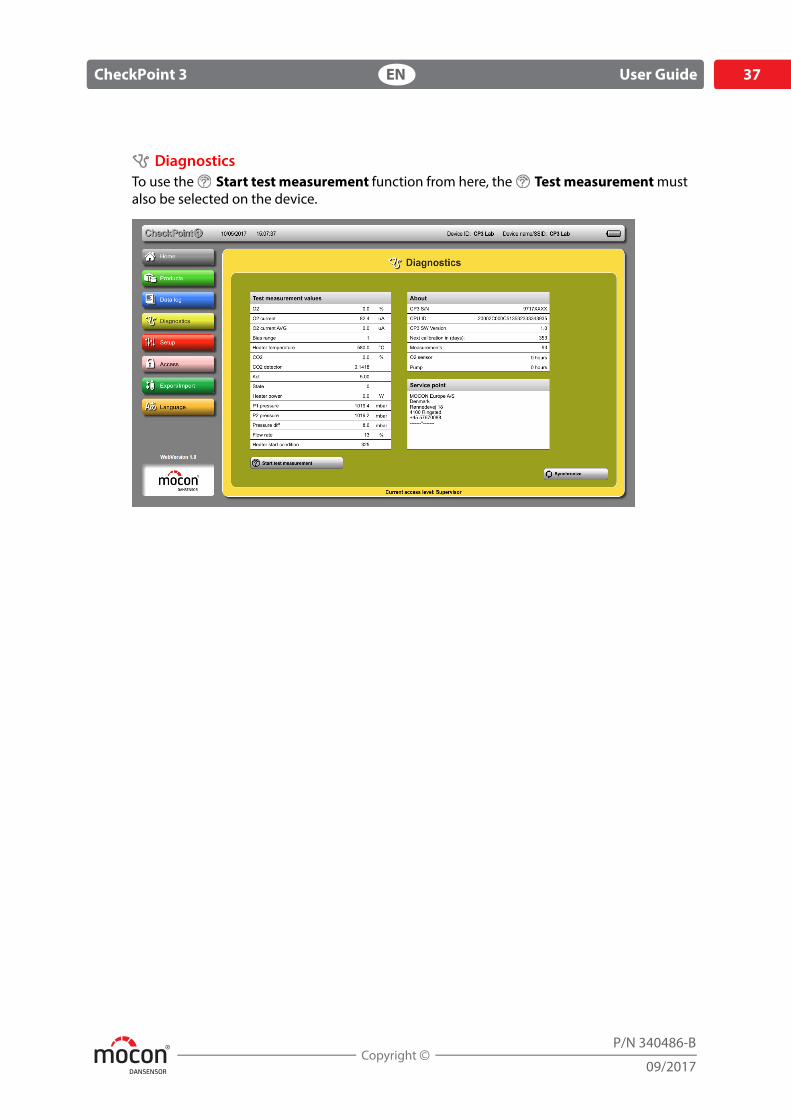
DiagnosticsTo use the Start test measurement function from here, the Test measurement must also be selected on the device.
DANSENSOR
38 User Guide EN CheckPoint 3
P/N 340486-B
09/2017
Setup
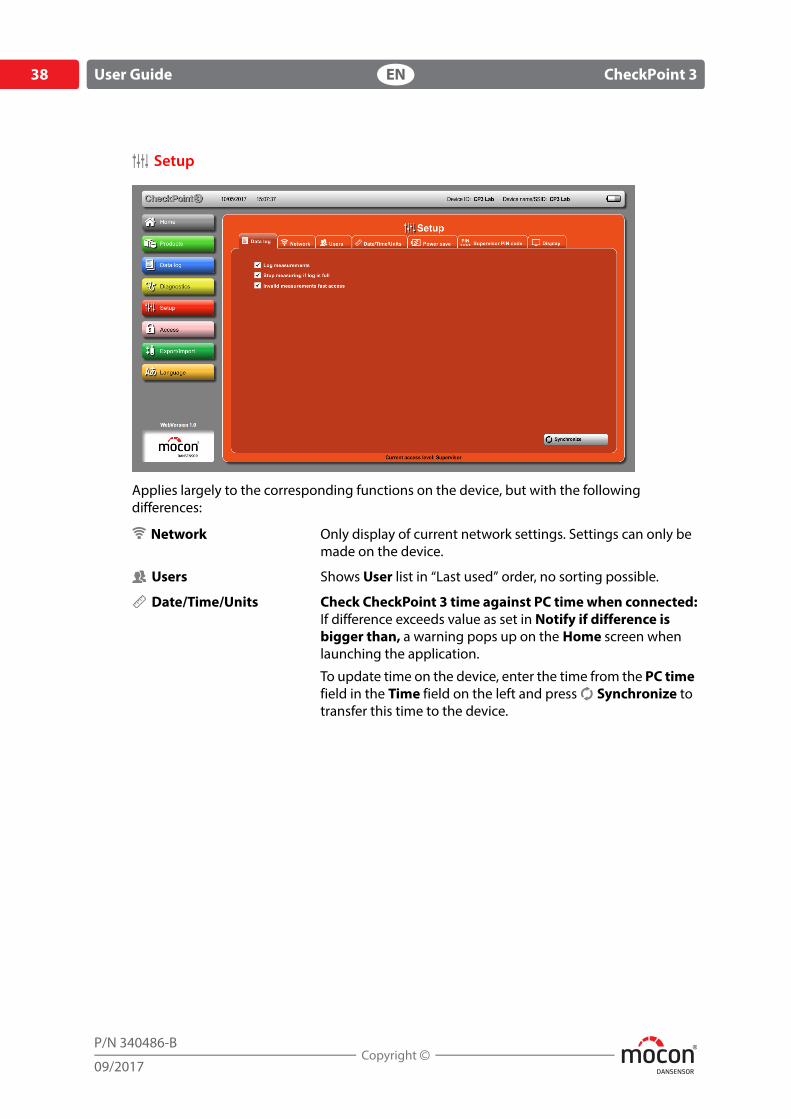
Applies largely to the corresponding functions on the device, but with the following differences:
Network Only display of current network settings. Settings can only be made on the device.
Users Shows User list in “Last used” order, no sorting possible.
Date/Time/Units Check CheckPoint 3 time against PC time when connected:If difference exceeds value as set in Notify if difference is bigger than, a warning pops up on the Home screen when launching the application.
To update time on the device, enter the time from the PC time field in the Time field on the left and press Synchronize to transfer this time to the device.

DANSENSOR
CheckPoint 3 EN User Guide 39
P/N 340486-B
09/2017
AccessIt is possible to have Supervisor access in the WebGUI while having only User access on the device (and vice versa).
DANSENSOR
40 User Guide EN CheckPoint 3
P/N 340486-B
09/2017
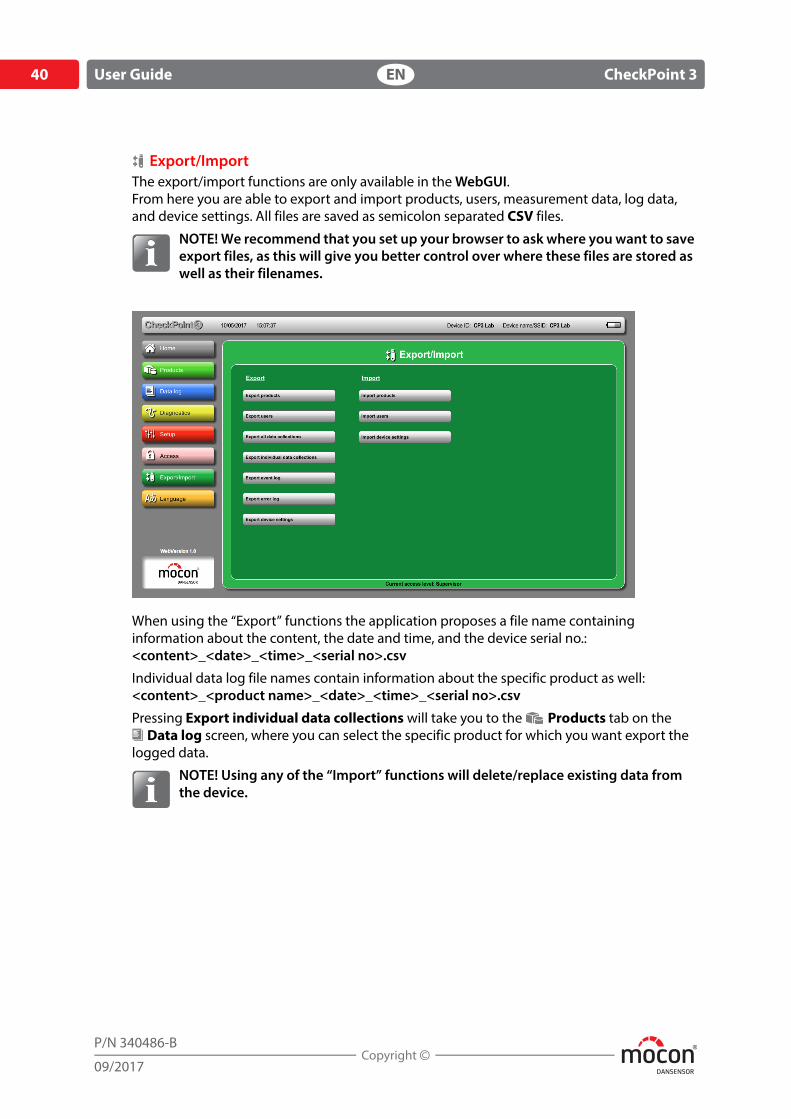
Export/ImportThe export/import functions are only available in the WebGUI.From here you are able to export and import products, users, measurement data, log data, and device settings. All files are saved as semicolon separated CSV files.
NOTE! We recommend that you set up your browser to ask where you want to save export files, as this will give you better control over where these files are stored as well as their filenames.
When using the “Export” functions the application proposes a file name containing information about the content, the date and time, and the device serial no.:<content>_<date>_<time>_<serial no>.csv
Individual data log file names contain information about the specific product as well:<content>_<product name>_<date>_<time>_<serial no>.csv
Pressing Export individual data collections will take you to the Products tab on the Data log screen, where you can select the specific product for which you want export the
logged data.
NOTE! Using any of the “Import” functions will delete/replace existing data from the device.
DANSENSOR
CheckPoint 3 EN User Guide 41
P/N 340486-B
09/2017
Language
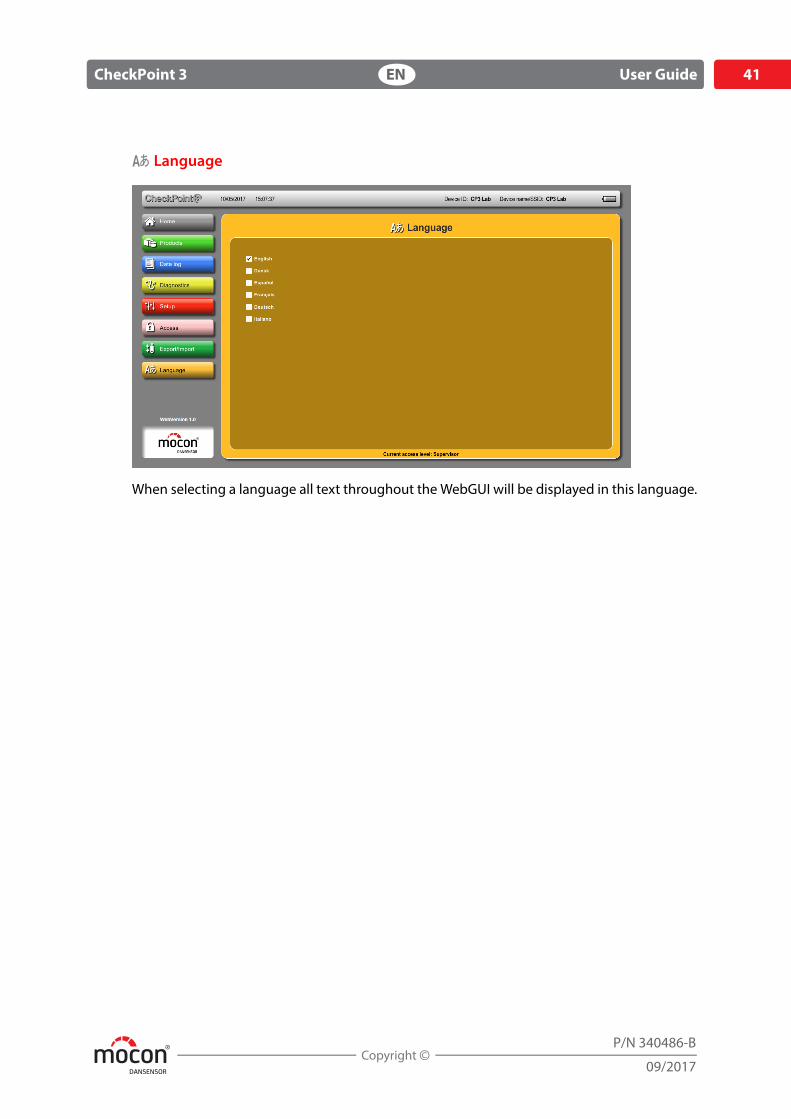
When selecting a language all text throughout the WebGUI will be displayed in this language.
DANSENSOR
42 User Guide EN CheckPoint 3
P/N 340486-B
09/2017
Cleaning and Maintenance
GeneralPerforming cleaning and maintenance regularly reduces the chances of equipment failure.
CAUTION! Personnel performing any maintenance or cleaning must familiarize themselves with the information in "Safety and handling instructions" on page 75 before attempting any of these procedures.
Cleaning Disconnect cable (if connected) and turn device off by pressing and holding the button
for approx. 3 s. Clean all surfaces using a soft, lint-free cloth with a mild soap solution. Avoid getting
moisture in openings.
Replacing filter, needle and measuring gas hose
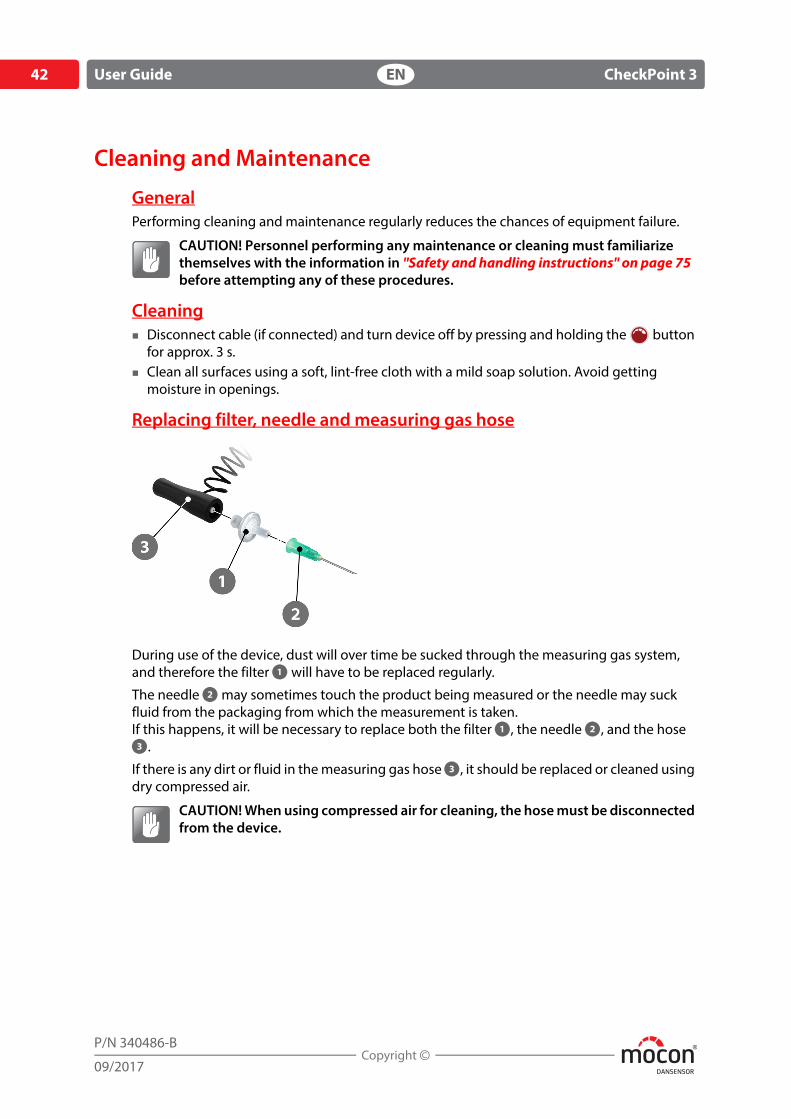
During use of the device, dust will over time be sucked through the measuring gas system, and therefore the filter will have to be replaced regularly.
The needle may sometimes touch the product being measured or the needle may suck fluid from the packaging from which the measurement is taken.If this happens, it will be necessary to replace both the filter , the needle , and the hose .
If there is any dirt or fluid in the measuring gas hose , it should be replaced or cleaned using dry compressed air.
CAUTION! When using compressed air for cleaning, the hose must be disconnected from the device.
DANSENSOR
CheckPoint 3 EN User Guide 43
P/N 340486-B
09/2017
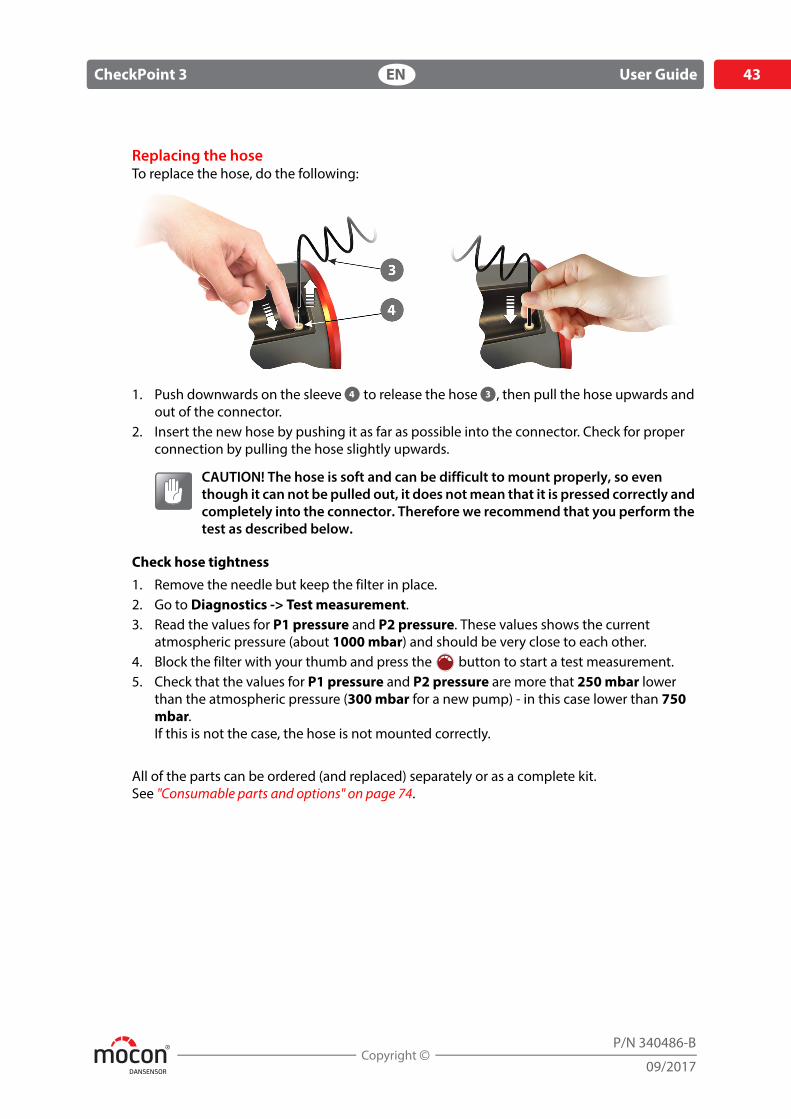
Replacing the hoseTo replace the hose, do the following:
1. Push downwards on the sleeve to release the hose , then pull the hose upwards and out of the connector.
2. Insert the new hose by pushing it as far as possible into the connector. Check for proper connection by pulling the hose slightly upwards.
CAUTION! The hose is soft and can be difficult to mount properly, so even though it can not be pulled out, it does not mean that it is pressed correctly and completely into the connector. Therefore we recommend that you perform the test as described below.
Check hose tightness
1. Remove the needle but keep the filter in place.2. Go to Diagnostics -> Test measurement.3. Read the values for P1 pressure and P2 pressure. These values shows the current
atmospheric pressure (about 1000 mbar) and should be very close to each other.4. Block the filter with your thumb and press the button to start a test measurement.5. Check that the values for P1 pressure and P2 pressure are more that 250 mbar lower
than the atmospheric pressure (300 mbar for a new pump) - in this case lower than 750 mbar. If this is not the case, the hose is not mounted correctly.
All of the parts can be ordered (and replaced) separately or as a complete kit.See "Consumable parts and options" on page 74.

DANSENSOR
44 User Guide EN CheckPoint 3
P/N 340486-B
09/2017
DANSENSOR
CheckPoint 3 EN User Guide 45
P/N 340486-B
09/2017
3. Menus and Settings
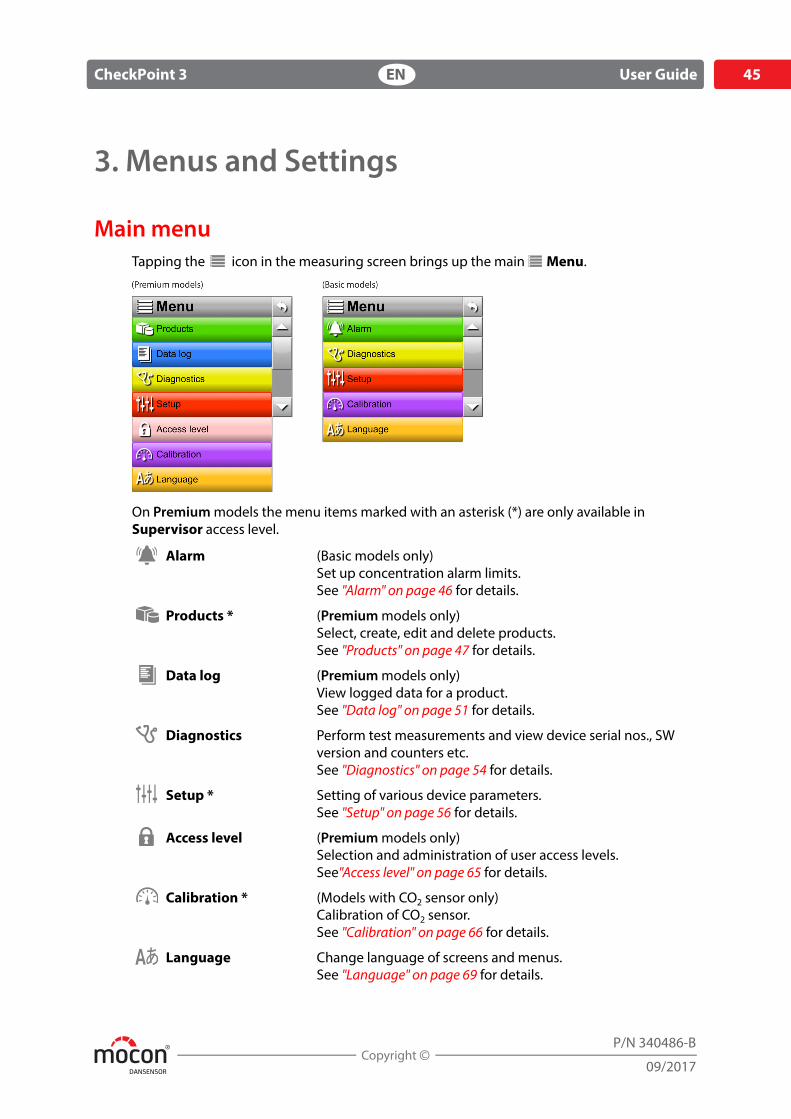
Main menuTapping the icon in the measuring screen brings up the main Menu.
On Premium models the menu items marked with an asterisk (*) are only available in Supervisor access level.
Alarm (Basic models only)Set up concentration alarm limits.See "Alarm" on page 46 for details.
Products * (Premium models only)Select, create, edit and delete products.See "Products" on page 47 for details.
Data log (Premium models only)View logged data for a product.See "Data log" on page 51 for details.
Diagnostics Perform test measurements and view device serial nos., SW version and counters etc.See "Diagnostics" on page 54 for details.
Setup * Setting of various device parameters.See "Setup" on page 56 for details.
Access level (Premium models only)Selection and administration of user access levels.See"Access level" on page 65 for details.
Calibration * (Models with CO2 sensor only)Calibration of CO2 sensor.See "Calibration" on page 66 for details.
Language Change language of screens and menus.See "Language" on page 69 for details.
DANSENSOR
46 User Guide EN CheckPoint 3
P/N 340486-B
09/2017
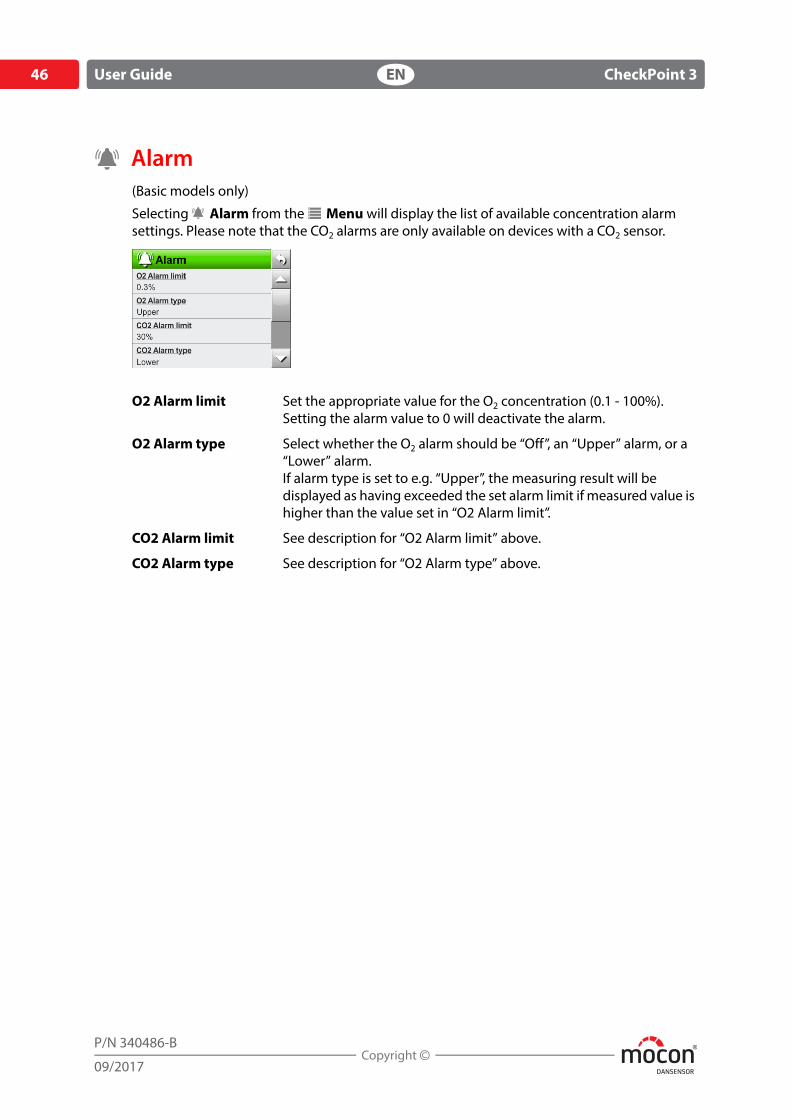
Alarm(Basic models only)
Selecting Alarm from the Menu will display the list of available concentration alarm settings. Please note that the CO2 alarms are only available on devices with a CO2 sensor.
O2 Alarm limit Set the appropriate value for the O2 concentration (0.1 - 100%).Setting the alarm value to 0 will deactivate the alarm.
O2 Alarm type Select whether the O2 alarm should be “Off”, an “Upper” alarm, or a “Lower” alarm.If alarm type is set to e.g. “Upper”, the measuring result will be displayed as having exceeded the set alarm limit if measured value is higher than the value set in “O2 Alarm limit”.
CO2 Alarm limit See description for “O2 Alarm limit” above.
CO2 Alarm type See description for “O2 Alarm type” above.
DANSENSOR
CheckPoint 3 EN User Guide 47
P/N 340486-B
09/2017
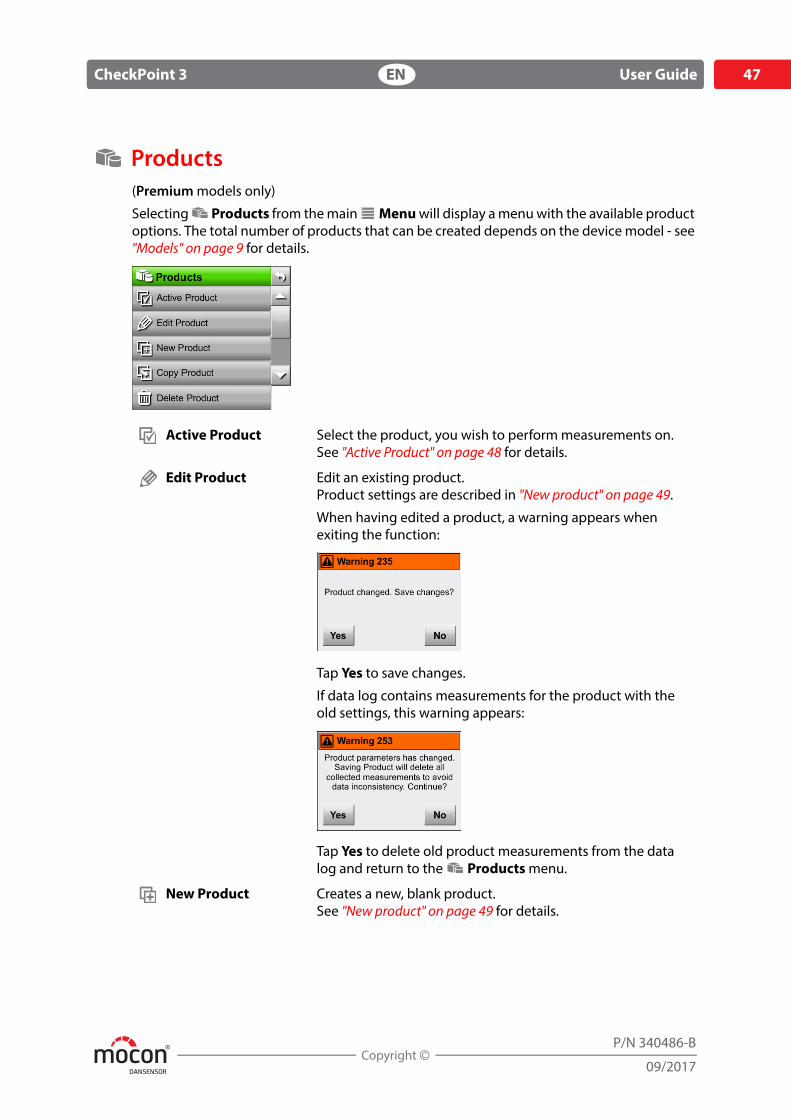
Products(Premium models only)
Selecting Products from the main Menu will display a menu with the available product options. The total number of products that can be created depends on the device model - see "Models" on page 9 for details.
Active Product Select the product, you wish to perform measurements on.See "Active Product" on page 48 for details.
Edit Product Edit an existing product.Product settings are described in "New product" on page 49.
When having edited a product, a warning appears when exiting the function:
Tap Yes to save changes.
If data log contains measurements for the product with the old settings, this warning appears:
Tap Yes to delete old product measurements from the data log and return to the Products menu.
New Product Creates a new, blank product.See "New product" on page 49 for details.
DANSENSOR
48 User Guide EN CheckPoint 3
P/N 340486-B
09/2017
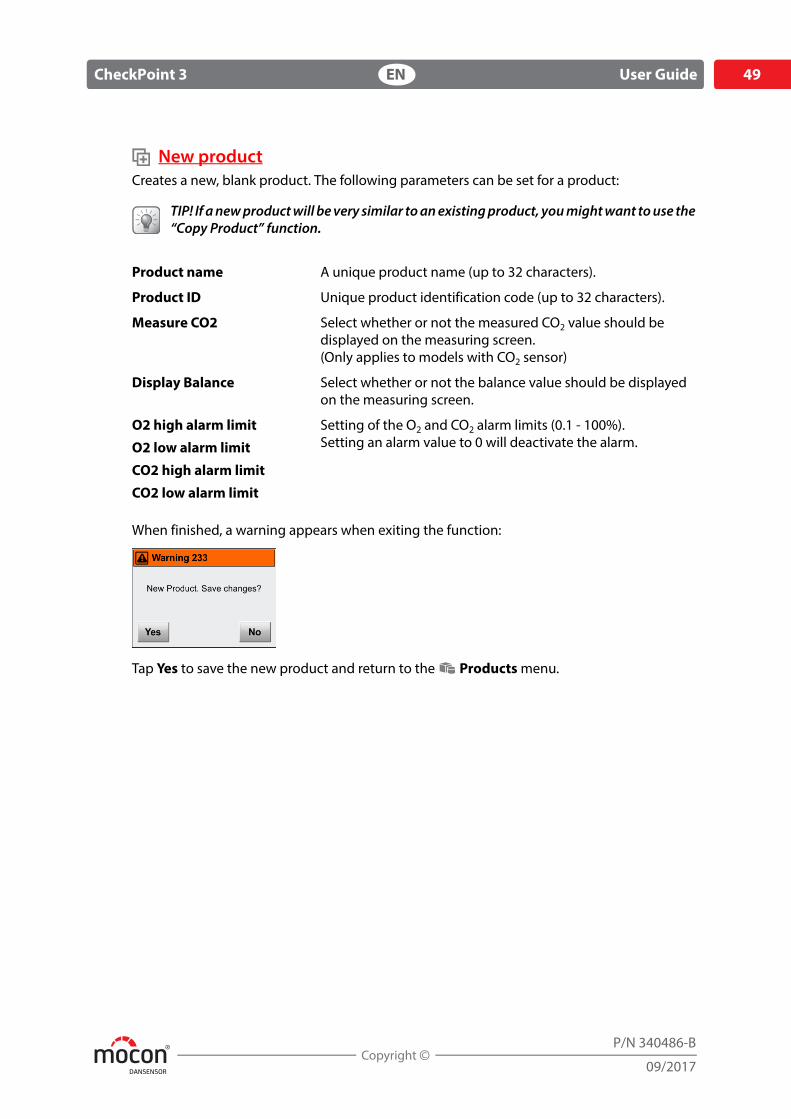
Active ProductThis function allows you to select the product, you wish to perform measurements on.
1. Select Active Product (or tap the icon in the top left corner of the measuring screen).
The appearing Active Product screen lists all products in “last used” order with the currently selected product at the top (in orange).
2. Use and keys to scroll through the list to find the appropriate product, then tap it to select it and return to the measuring screen.
3. If you have a large number of products, scrolling through the list may be quite time consuming.In this case use the Find function in the bottom of the screen - see "Find" on page 50 for details.
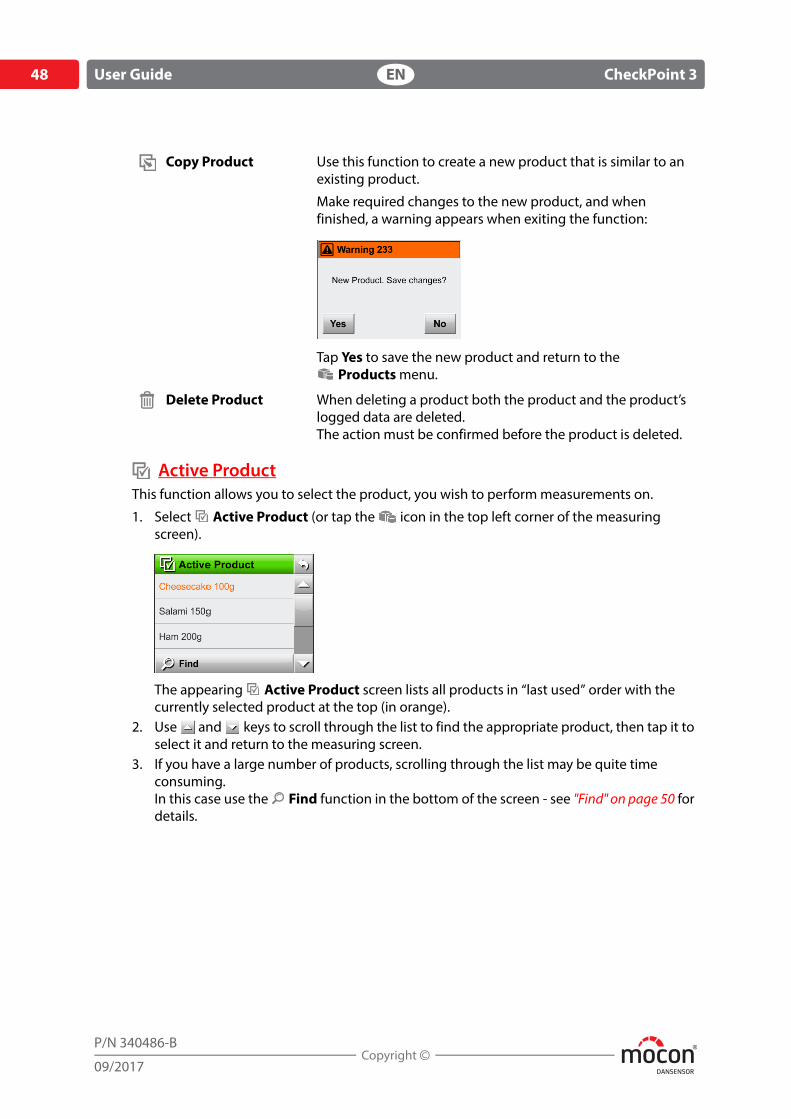
Copy Product Use this function to create a new product that is similar to an existing product.
Make required changes to the new product, and when finished, a warning appears when exiting the function:
Tap Yes to save the new product and return to the Products menu.
Delete Product When deleting a product both the product and the product’s logged data are deleted.The action must be confirmed before the product is deleted.
DANSENSOR
CheckPoint 3 EN User Guide 49
P/N 340486-B
09/2017
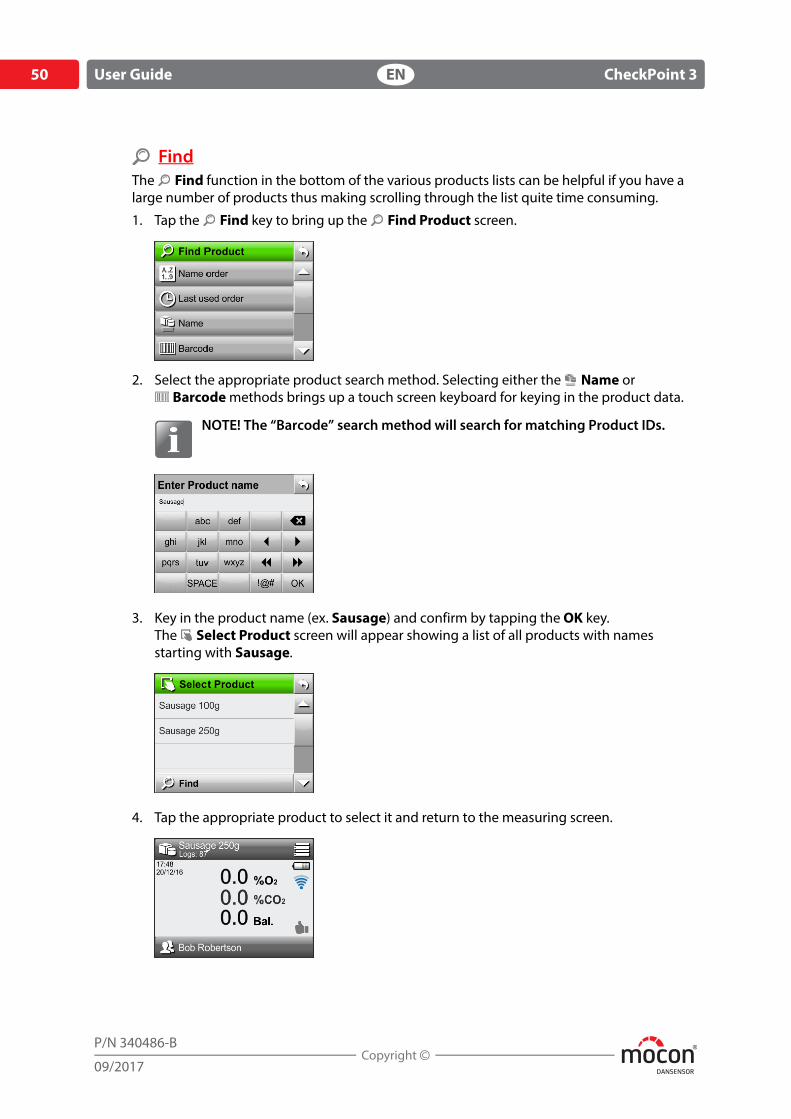
New productCreates a new, blank product. The following parameters can be set for a product:
TIP! If a new product will be very similar to an existing product, you might want to use the “Copy Product” function.
When finished, a warning appears when exiting the function:
Tap Yes to save the new product and return to the Products menu.
Product name A unique product name (up to 32 characters).
Product ID Unique product identification code (up to 32 characters).
Measure CO2 Select whether or not the measured CO2 value should be displayed on the measuring screen.(Only applies to models with CO2 sensor)
Display Balance Select whether or not the balance value should be displayed on the measuring screen.
O2 high alarm limitO2 low alarm limit
CO2 high alarm limitCO2 low alarm limit
Setting of the O2 and CO2 alarm limits (0.1 - 100%).Setting an alarm value to 0 will deactivate the alarm.
DANSENSOR
50 User Guide EN CheckPoint 3
P/N 340486-B
09/2017
FindThe Find function in the bottom of the various products lists can be helpful if you have a large number of products thus making scrolling through the list quite time consuming.
1. Tap the Find key to bring up the Find Product screen.
2. Select the appropriate product search method. Selecting either the Name or Barcode methods brings up a touch screen keyboard for keying in the product data.
NOTE! The “Barcode” search method will search for matching Product IDs.
3. Key in the product name (ex. Sausage) and confirm by tapping the OK key.The Select Product screen will appear showing a list of all products with names starting with Sausage.
4. Tap the appropriate product to select it and return to the measuring screen.
DANSENSOR
CheckPoint 3 EN User Guide 51
P/N 340486-B
09/2017
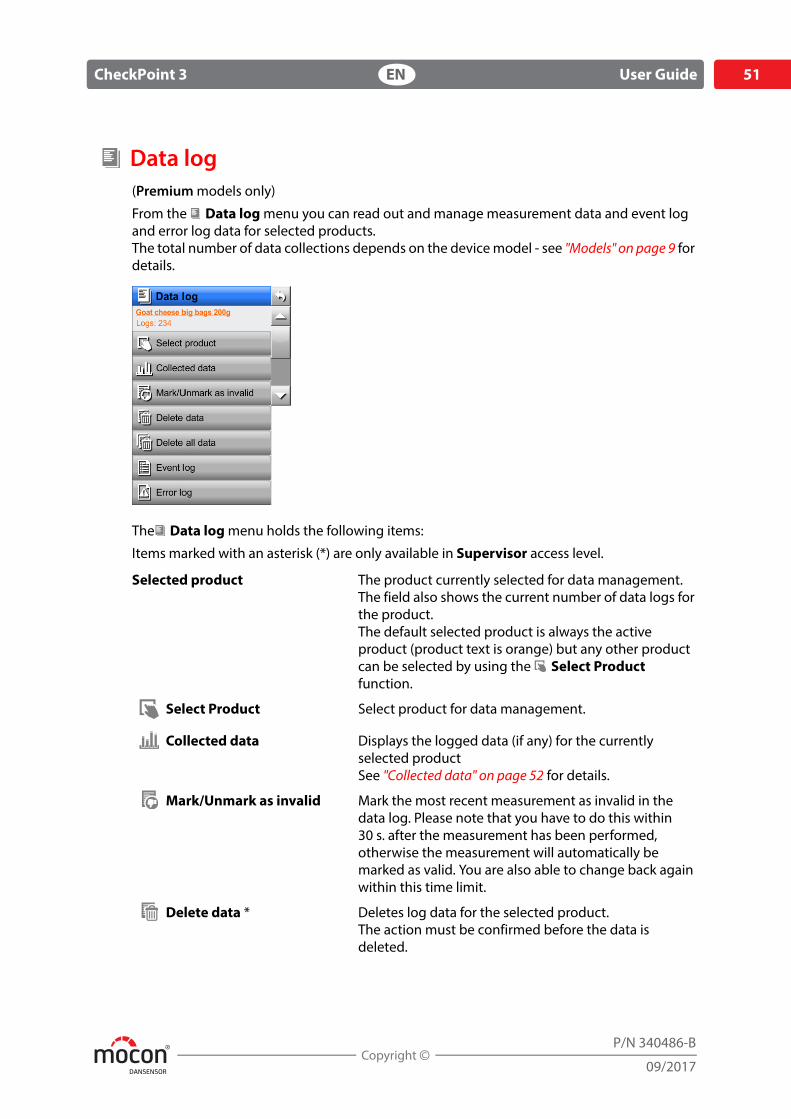
Data log(Premium models only)
From the Data log menu you can read out and manage measurement data and event log and error log data for selected products.The total number of data collections depends on the device model - see "Models" on page 9 for details.
The Data log menu holds the following items:
Items marked with an asterisk (*) are only available in Supervisor access level.
Selected product The product currently selected for data management.The field also shows the current number of data logs for the product.The default selected product is always the active product (product text is orange) but any other product can be selected by using the Select Product function.
Select Product Select product for data management.
Collected data Displays the logged data (if any) for the currently selected productSee "Collected data" on page 52 for details.
Mark/Unmark as invalid Mark the most recent measurement as invalid in the data log. Please note that you have to do this within 30 s. after the measurement has been performed, otherwise the measurement will automatically be marked as valid. You are also able to change back again within this time limit.
Delete data * Deletes log data for the selected product.The action must be confirmed before the data is deleted.
DANSENSOR
52 User Guide EN CheckPoint 3
P/N 340486-B
09/2017
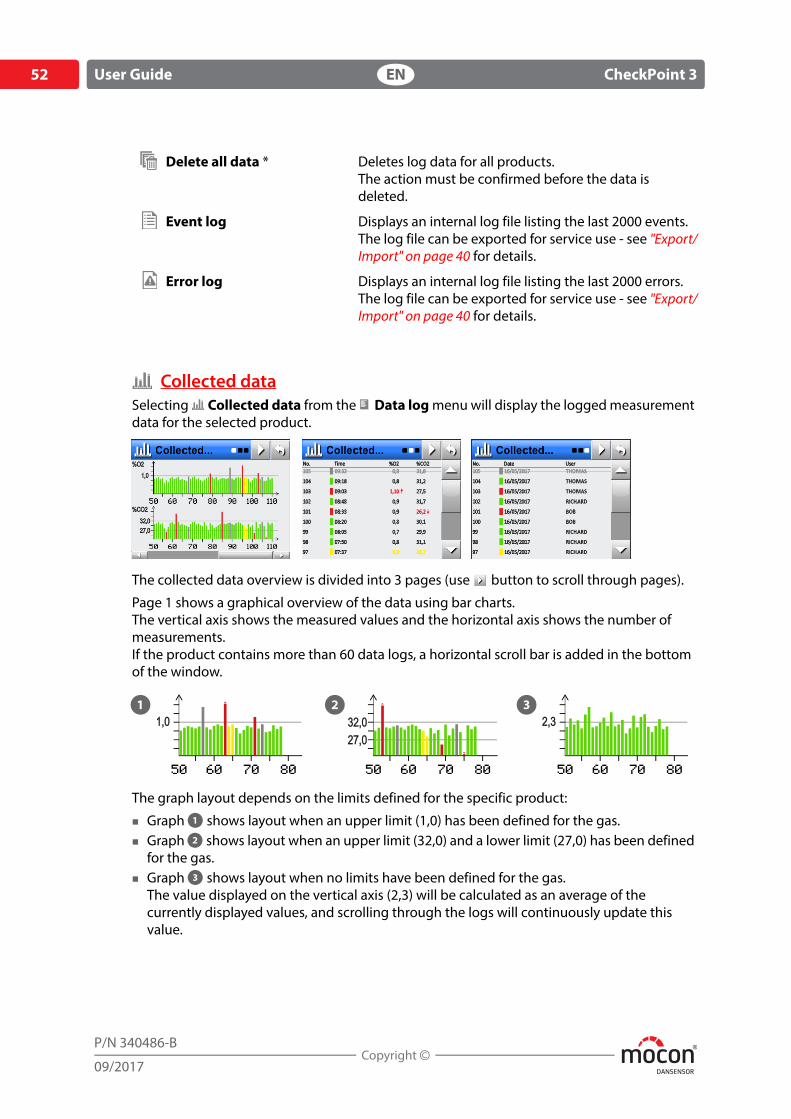
Collected dataSelecting Collected data from the Data log menu will display the logged measurement data for the selected product.
The collected data overview is divided into 3 pages (use button to scroll through pages).
Page 1 shows a graphical overview of the data using bar charts.The vertical axis shows the measured values and the horizontal axis shows the number of measurements.If the product contains more than 60 data logs, a horizontal scroll bar is added in the bottom of the window.
The graph layout depends on the limits defined for the specific product:
Graph shows layout when an upper limit (1,0) has been defined for the gas. Graph shows layout when an upper limit (32,0) and a lower limit (27,0) has been defined
for the gas. Graph shows layout when no limits have been defined for the gas.
The value displayed on the vertical axis (2,3) will be calculated as an average of the currently displayed values, and scrolling through the logs will continuously update this value.
Delete all data * Deletes log data for all products.The action must be confirmed before the data is deleted.
Event log Displays an internal log file listing the last 2000 events.The log file can be exported for service use - see "Export/Import" on page 40 for details.
Error log Displays an internal log file listing the last 2000 errors.The log file can be exported for service use - see "Export/Import" on page 40 for details.
DANSENSOR
CheckPoint 3 EN User Guide 53
P/N 340486-B
09/2017
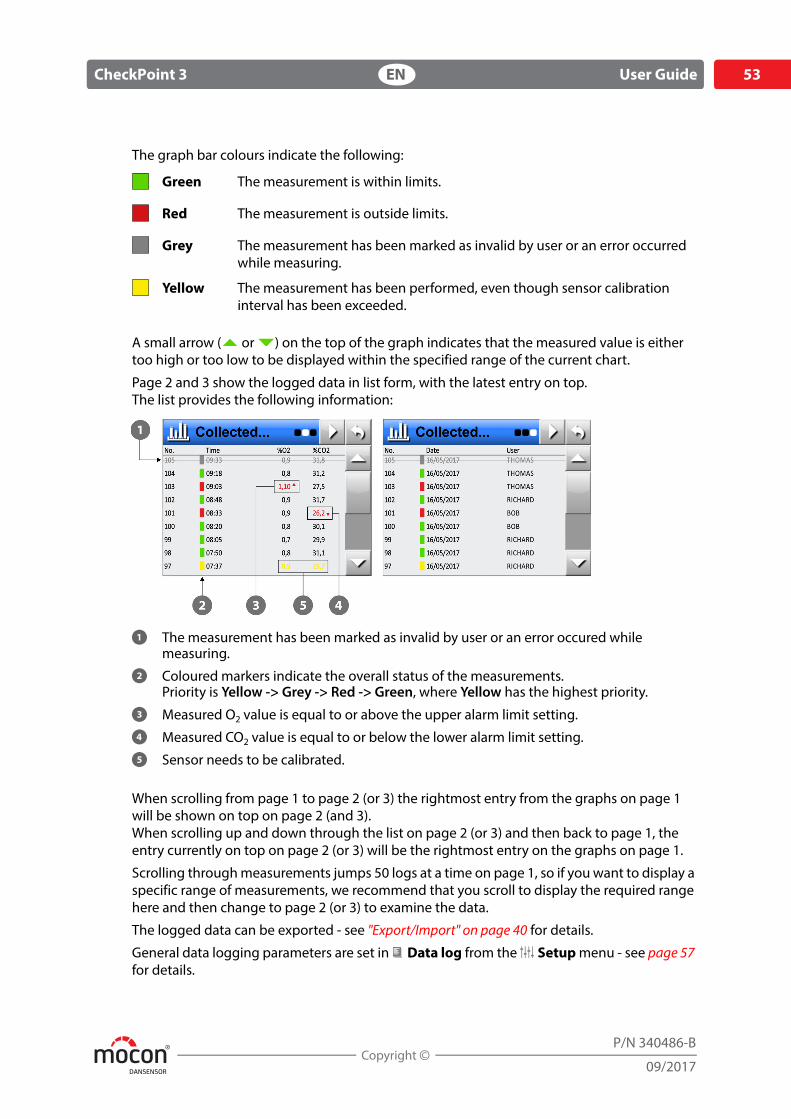
The graph bar colours indicate the following:
A small arrow ( or ) on the top of the graph indicates that the measured value is either too high or too low to be displayed within the specified range of the current chart.
Page 2 and 3 show the logged data in list form, with the latest entry on top.The list provides the following information:
The measurement has been marked as invalid by user or an error occured while measuring.
Coloured markers indicate the overall status of the measurements.Priority is Yellow -> Grey -> Red -> Green, where Yellow has the highest priority.
Measured O2 value is equal to or above the upper alarm limit setting.
Measured CO2 value is equal to or below the lower alarm limit setting.
Sensor needs to be calibrated.
When scrolling from page 1 to page 2 (or 3) the rightmost entry from the graphs on page 1 will be shown on top on page 2 (and 3).When scrolling up and down through the list on page 2 (or 3) and then back to page 1, the entry currently on top on page 2 (or 3) will be the rightmost entry on the graphs on page 1.
Scrolling through measurements jumps 50 logs at a time on page 1, so if you want to display a specific range of measurements, we recommend that you scroll to display the required range here and then change to page 2 (or 3) to examine the data.
The logged data can be exported - see "Export/Import" on page 40 for details.
General data logging parameters are set in Data log from the Setup menu - see page 57 for details.
Green The measurement is within limits.
Red The measurement is outside limits.
Grey The measurement has been marked as invalid by user or an error occurred while measuring.
Yellow The measurement has been performed, even though sensor calibration interval has been exceeded.
DANSENSOR
54 User Guide EN CheckPoint 3
P/N 340486-B
09/2017
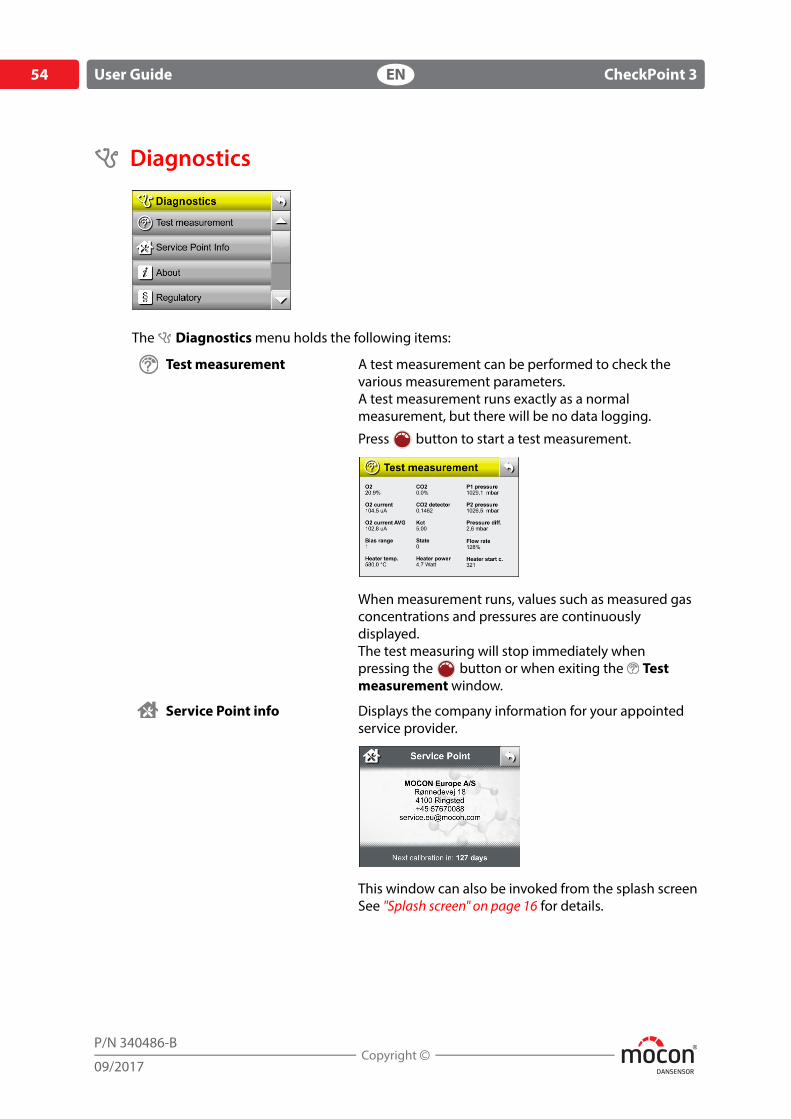
Diagnostics
The Diagnostics menu holds the following items:
Test measurement A test measurement can be performed to check the various measurement parameters.A test measurement runs exactly as a normal measurement, but there will be no data logging.
Press button to start a test measurement.
When measurement runs, values such as measured gas concentrations and pressures are continuously displayed.The test measuring will stop immediately when pressing the button or when exiting the Test measurement window.
Service Point info Displays the company information for your appointed service provider.
This window can also be invoked from the splash screenSee "Splash screen" on page 16 for details.
DANSENSOR
CheckPoint 3 EN User Guide 55
P/N 340486-B
09/2017
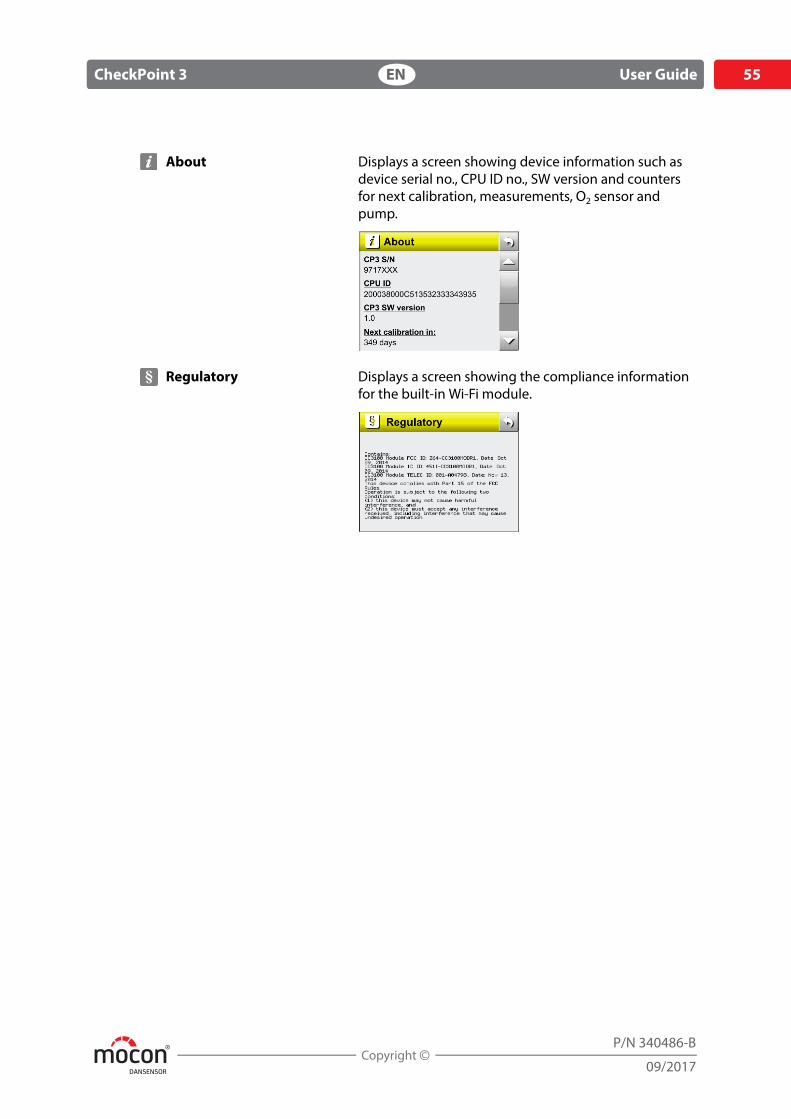
About Displays a screen showing device information such as device serial no., CPU ID no., SW version and counters for next calibration, measurements, O2 sensor and pump.
Regulatory Displays a screen showing the compliance information for the built-in Wi-Fi module.
DANSENSOR
56 User Guide EN CheckPoint 3
P/N 340486-B
09/2017
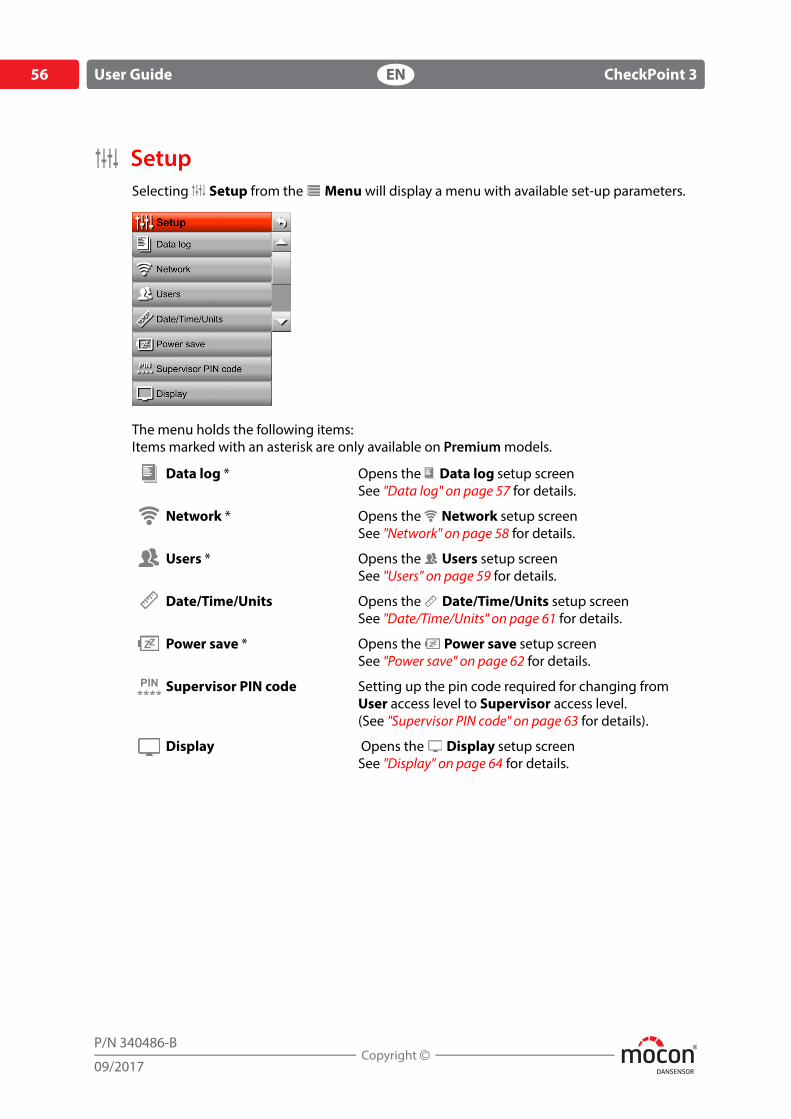
SetupSelecting Setup from the Menu will display a menu with available set-up parameters.
The menu holds the following items:Items marked with an asterisk are only available on Premium models.
Data log * Opens the Data log setup screenSee "Data log" on page 57 for details.
Network * Opens the Network setup screenSee "Network" on page 58 for details.
Users * Opens the Users setup screenSee "Users" on page 59 for details.
Date/Time/Units Opens the Date/Time/Units setup screenSee "Date/Time/Units" on page 61 for details.
Power save * Opens the Power save setup screenSee "Power save" on page 62 for details.
Supervisor PIN code Setting up the pin code required for changing from User access level to Supervisor access level.(See "Supervisor PIN code" on page 63 for details).
Display Opens the Display setup screenSee "Display" on page 64 for details.
DANSENSOR
CheckPoint 3 EN User Guide 57
P/N 340486-B
09/2017
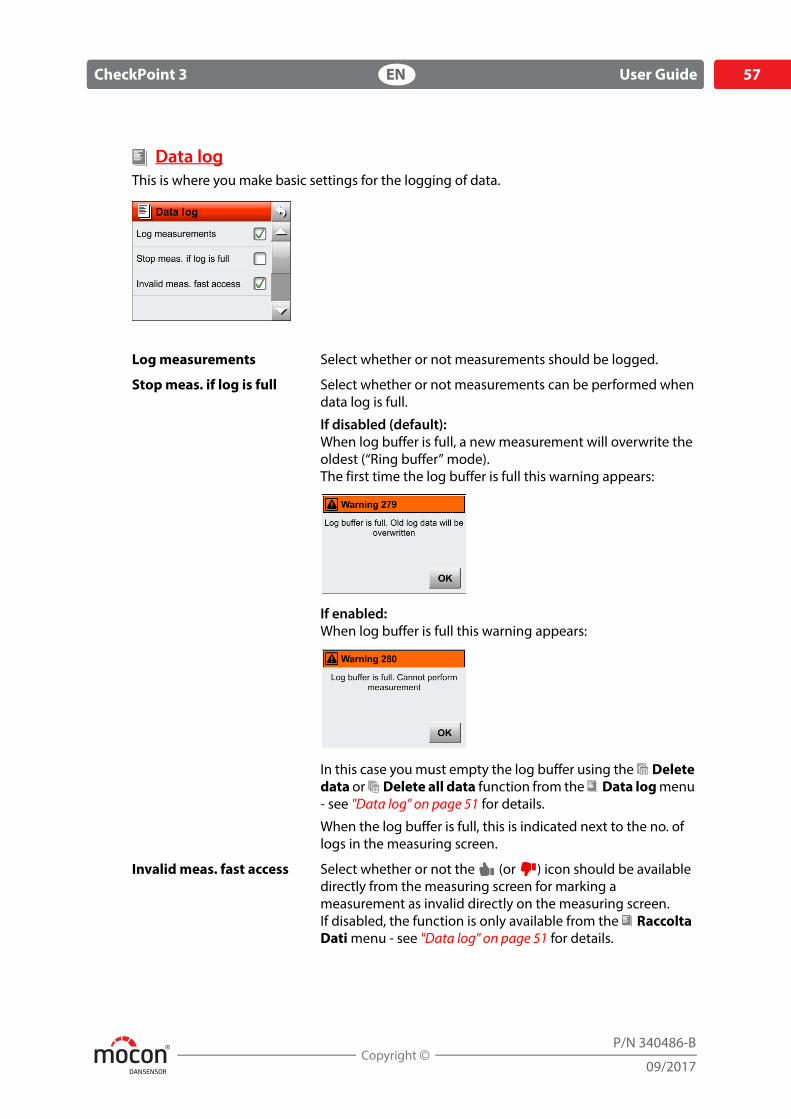
Data logThis is where you make basic settings for the logging of data.
Log measurements Select whether or not measurements should be logged.
Stop meas. if log is full Select whether or not measurements can be performed when data log is full.
If disabled (default):When log buffer is full, a new measurement will overwrite the oldest (“Ring buffer” mode).The first time the log buffer is full this warning appears:
If enabled:When log buffer is full this warning appears:
In this case you must empty the log buffer using the Delete data or Delete all data function from the Data log menu - see "Data log" on page 51 for details.
When the log buffer is full, this is indicated next to the no. of logs in the measuring screen.
Invalid meas. fast access Select whether or not the (or ) icon should be available directly from the measuring screen for marking a measurement as invalid directly on the measuring screen.If disabled, the function is only available from the Raccolta Dati menu - see "Data log" on page 51 for details.
DANSENSOR
58 User Guide EN CheckPoint 3
P/N 340486-B
09/2017
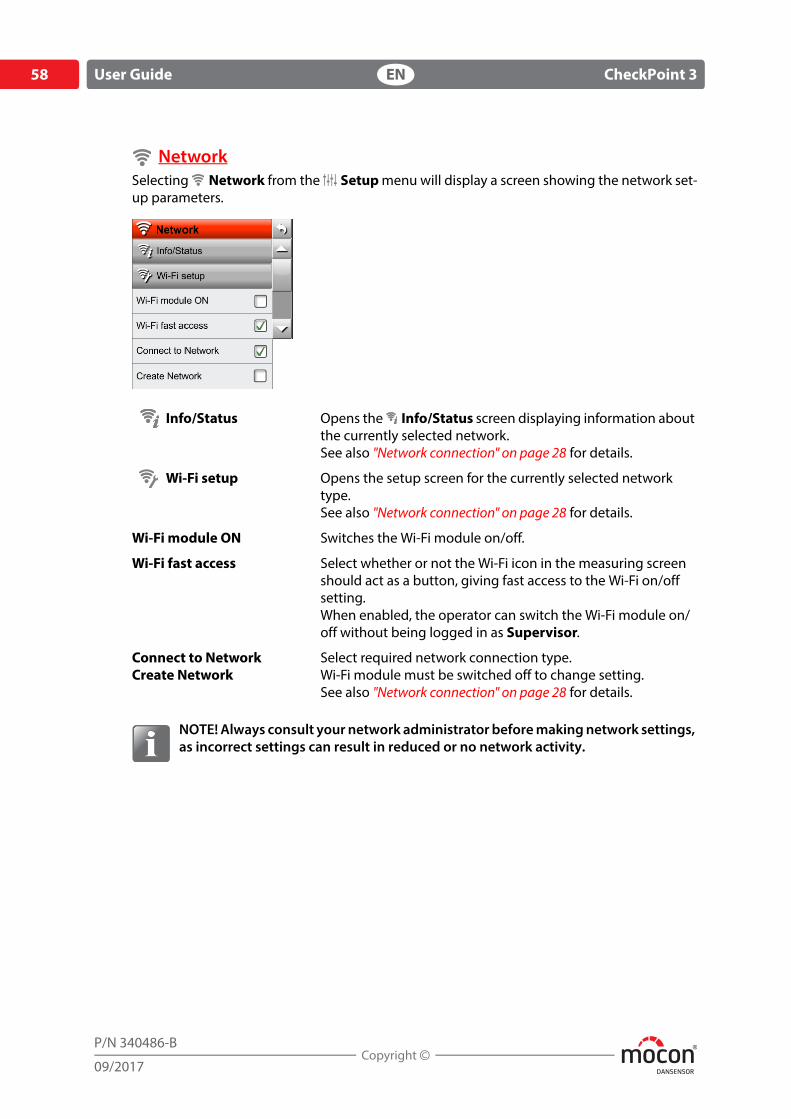
NetworkSelecting Network from the Setup menu will display a screen showing the network set-up parameters.
NOTE! Always consult your network administrator before making network settings, as incorrect settings can result in reduced or no network activity.
Info/Status Opens the Info/Status screen displaying information about the currently selected network.See also "Network connection" on page 28 for details.
Wi-Fi setup Opens the setup screen for the currently selected network type. See also "Network connection" on page 28 for details.
Wi-Fi module ON Switches the Wi-Fi module on/off.
Wi-Fi fast access Select whether or not the Wi-Fi icon in the measuring screen should act as a button, giving fast access to the Wi-Fi on/off setting.When enabled, the operator can switch the Wi-Fi module on/off without being logged in as Supervisor.
Connect to NetworkCreate Network
Select required network connection type.Wi-Fi module must be switched off to change setting.See also "Network connection" on page 28 for details.
DANSENSOR
CheckPoint 3 EN User Guide 59
P/N 340486-B
09/2017
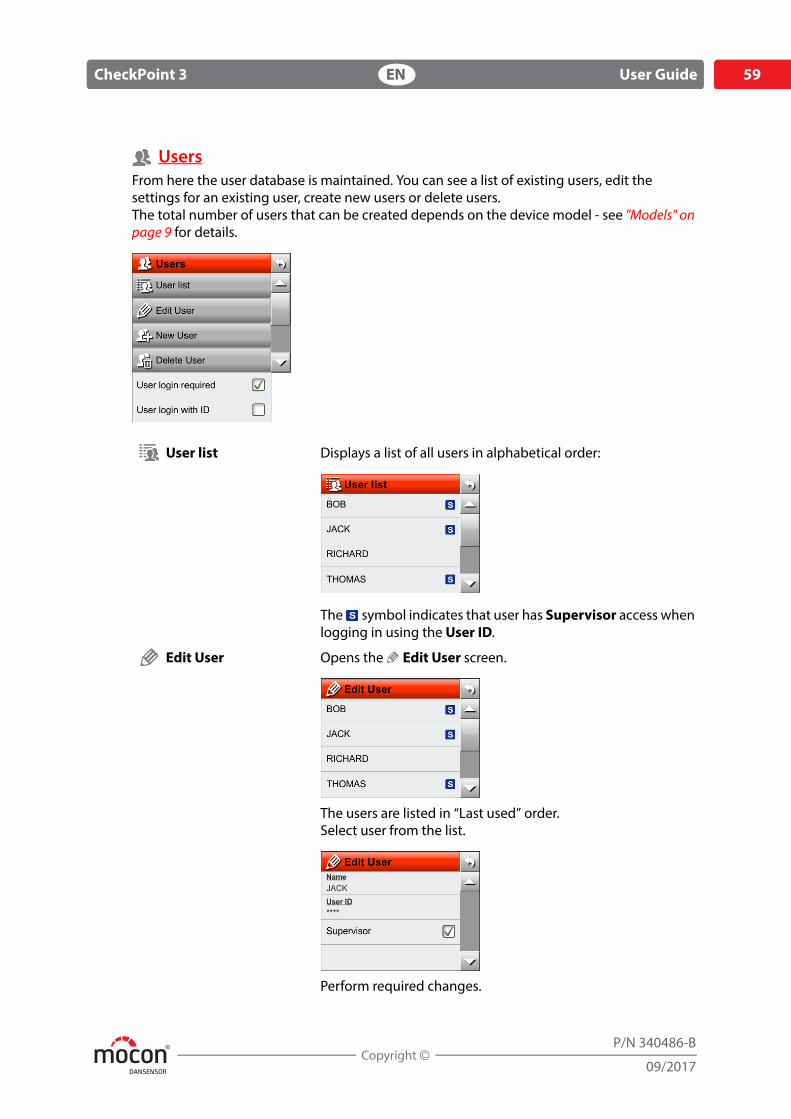
UsersFrom here the user database is maintained. You can see a list of existing users, edit the settings for an existing user, create new users or delete users.The total number of users that can be created depends on the device model - see "Models" on page 9 for details.
User list Displays a list of all users in alphabetical order:
The symbol indicates that user has Supervisor access when logging in using the User ID.
Edit User Opens the Edit User screen.
The users are listed in “Last used” order.Select user from the list.
Perform required changes.
DANSENSOR
60 User Guide EN CheckPoint 3
P/N 340486-B
09/2017
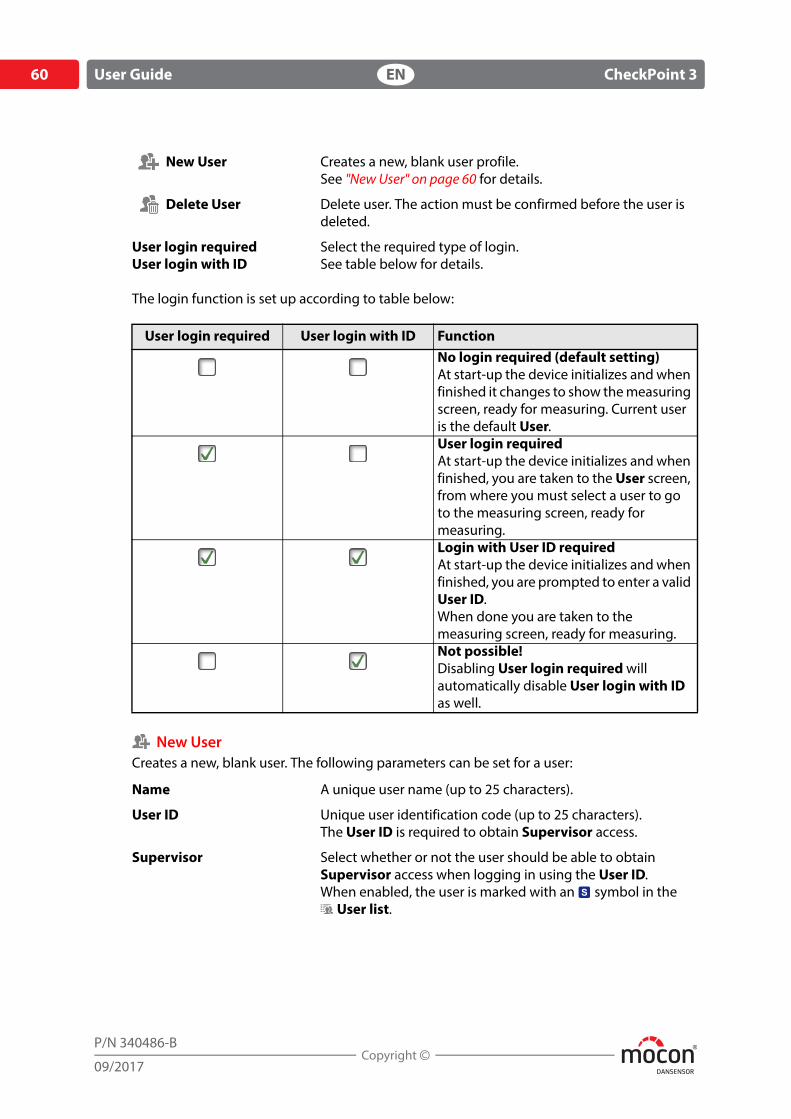
The login function is set up according to table below:
New UserCreates a new, blank user. The following parameters can be set for a user:
New User Creates a new, blank user profile.See "New User" on page 60 for details.
Delete User Delete user. The action must be confirmed before the user is deleted.
User login requiredUser login with ID
Select the required type of login.See table below for details.
User login required User login with ID FunctionNo login required (default setting)At start-up the device initializes and when finished it changes to show the measuring screen, ready for measuring. Current user is the default User.User login requiredAt start-up the device initializes and when finished, you are taken to the User screen, from where you must select a user to go to the measuring screen, ready for measuring.Login with User ID requiredAt start-up the device initializes and when finished, you are prompted to enter a valid User ID.When done you are taken to the measuring screen, ready for measuring.Not possible!Disabling User login required will automatically disable User login with ID as well.
Name A unique user name (up to 25 characters).
User ID Unique user identification code (up to 25 characters).The User ID is required to obtain Supervisor access.
Supervisor Select whether or not the user should be able to obtain Supervisor access when logging in using the User ID.When enabled, the user is marked with an symbol in the
User list.
DANSENSOR
CheckPoint 3 EN User Guide 61
P/N 340486-B
09/2017
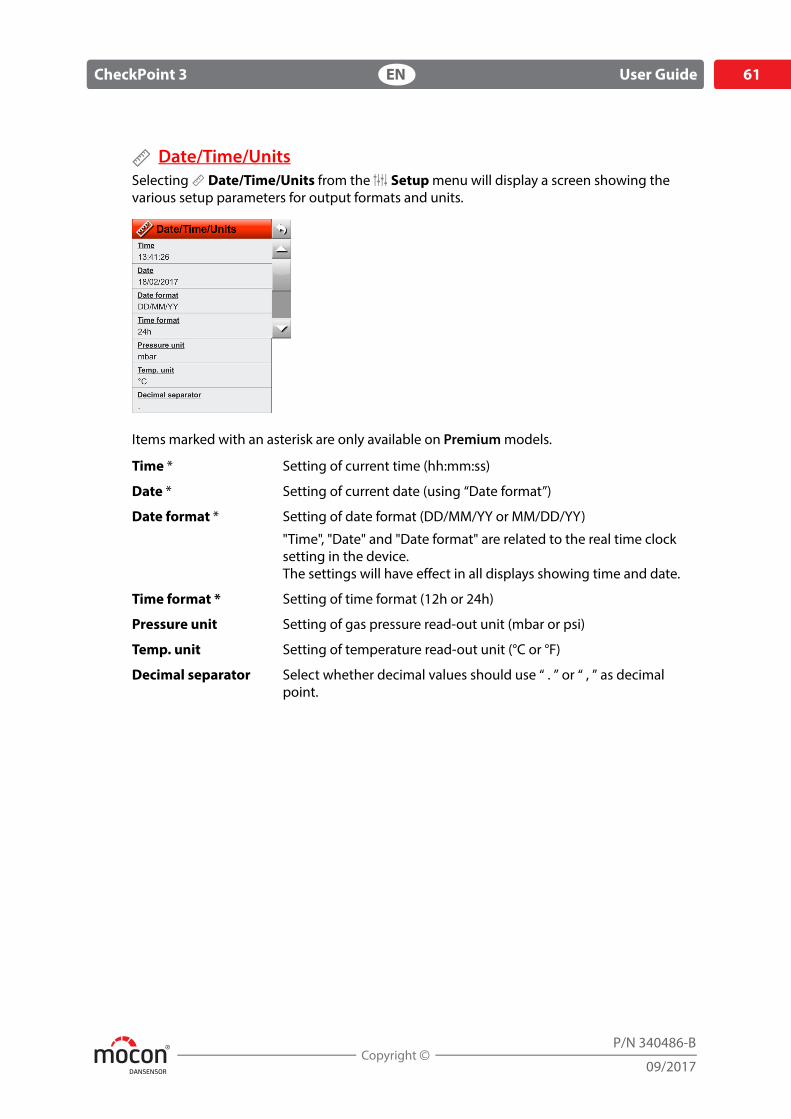
Date/Time/UnitsSelecting Date/Time/Units from the Setup menu will display a screen showing the various setup parameters for output formats and units.
Items marked with an asterisk are only available on Premium models.
Time * Setting of current time (hh:mm:ss)
Date * Setting of current date (using “Date format”)
Date format * Setting of date format (DD/MM/YY or MM/DD/YY)
"Time", "Date" and "Date format" are related to the real time clock setting in the device.The settings will have effect in all displays showing time and date.
Time format * Setting of time format (12h or 24h)
Pressure unit Setting of gas pressure read-out unit (mbar or psi)
Temp. unit Setting of temperature read-out unit (°C or °F)
Decimal separator Select whether decimal values should use “ . ” or “ , ” as decimal point.
DANSENSOR
62 User Guide EN CheckPoint 3
P/N 340486-B
09/2017
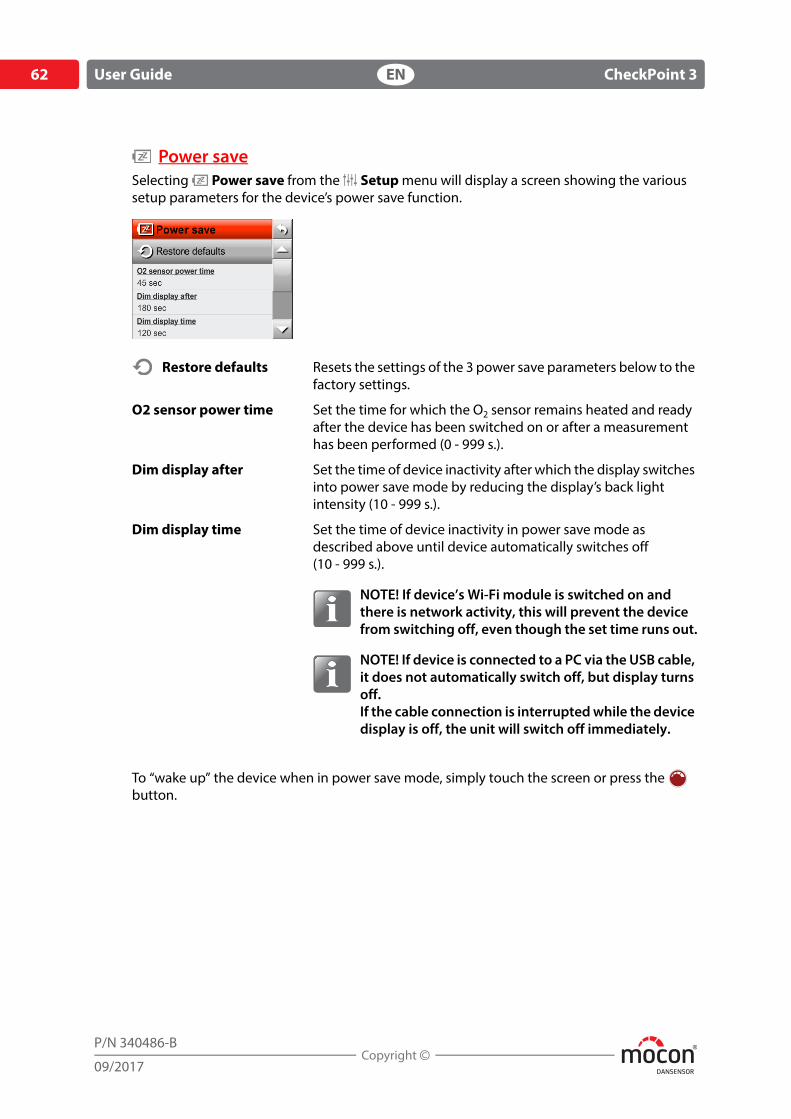
Power saveSelecting Power save from the Setup menu will display a screen showing the various setup parameters for the device’s power save function.
To “wake up” the device when in power save mode, simply touch the screen or press the button.
Restore defaults Resets the settings of the 3 power save parameters below to the factory settings.
O2 sensor power time Set the time for which the O2 sensor remains heated and ready after the device has been switched on or after a measurement has been performed (0 - 999 s.).
Dim display after Set the time of device inactivity after which the display switches into power save mode by reducing the display’s back light intensity (10 - 999 s.).
Dim display time Set the time of device inactivity in power save mode as described above until device automatically switches off(10 - 999 s.).
NOTE! If device’s Wi-Fi module is switched on and there is network activity, this will prevent the device from switching off, even though the set time runs out.
NOTE! If device is connected to a PC via the USB cable, it does not automatically switch off, but display turns off. If the cable connection is interrupted while the device display is off, the unit will switch off immediately.
DANSENSOR
CheckPoint 3 EN User Guide 63
P/N 340486-B
09/2017
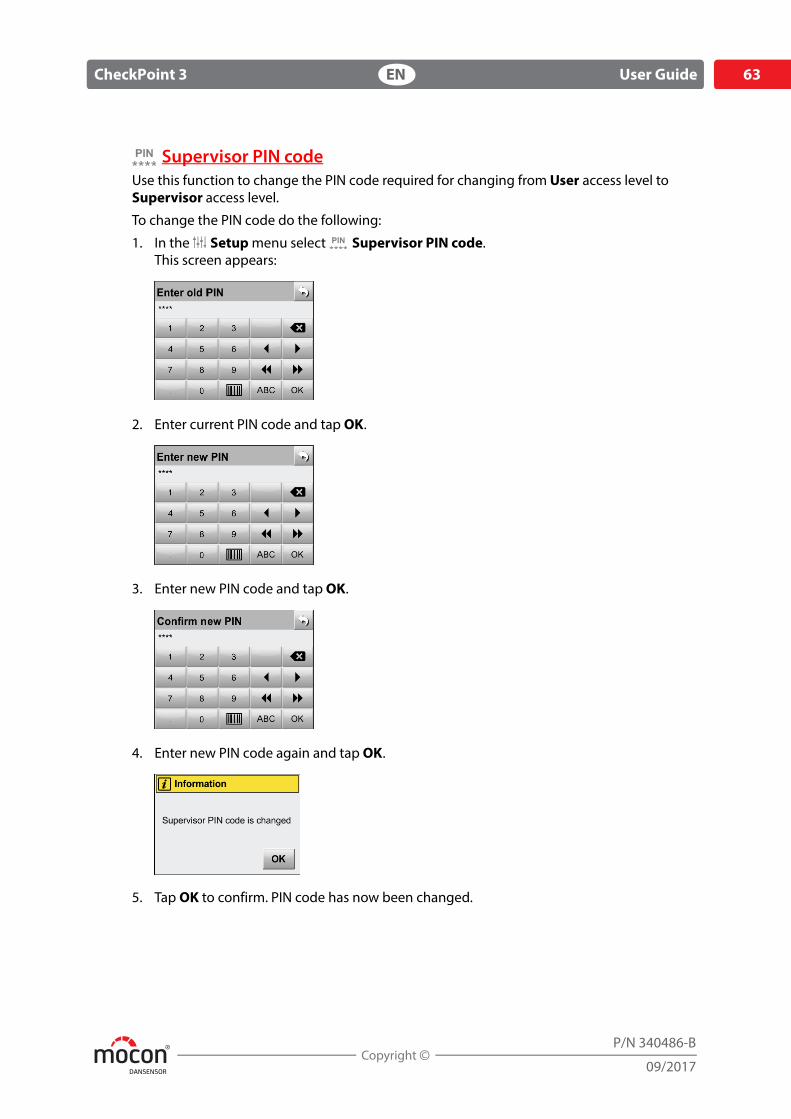
Supervisor PIN codeUse this function to change the PIN code required for changing from User access level to Supervisor access level.
To change the PIN code do the following:
1. In the Setup menu select Supervisor PIN code.This screen appears:
2. Enter current PIN code and tap OK.
3. Enter new PIN code and tap OK.
4. Enter new PIN code again and tap OK.
5. Tap OK to confirm. PIN code has now been changed.
DANSENSOR
64 User Guide EN CheckPoint 3
P/N 340486-B
09/2017
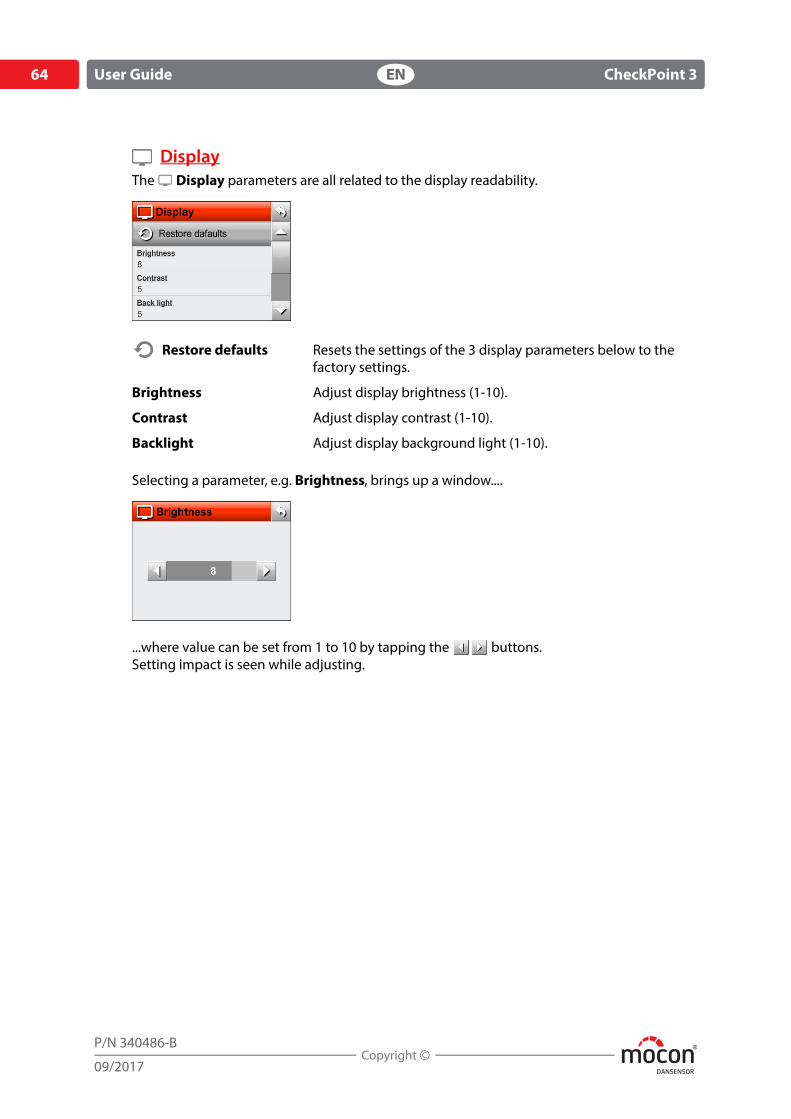
DisplayThe Display parameters are all related to the display readability.
Selecting a parameter, e.g. Brightness, brings up a window....
...where value can be set from 1 to 10 by tapping the buttons.Setting impact is seen while adjusting.
Restore defaults Resets the settings of the 3 display parameters below to the factory settings.
Brightness Adjust display brightness (1-10).
Contrast Adjust display contrast (1-10).
Backlight Adjust display background light (1-10).
DANSENSOR
CheckPoint 3 EN User Guide 65
P/N 340486-B
09/2017
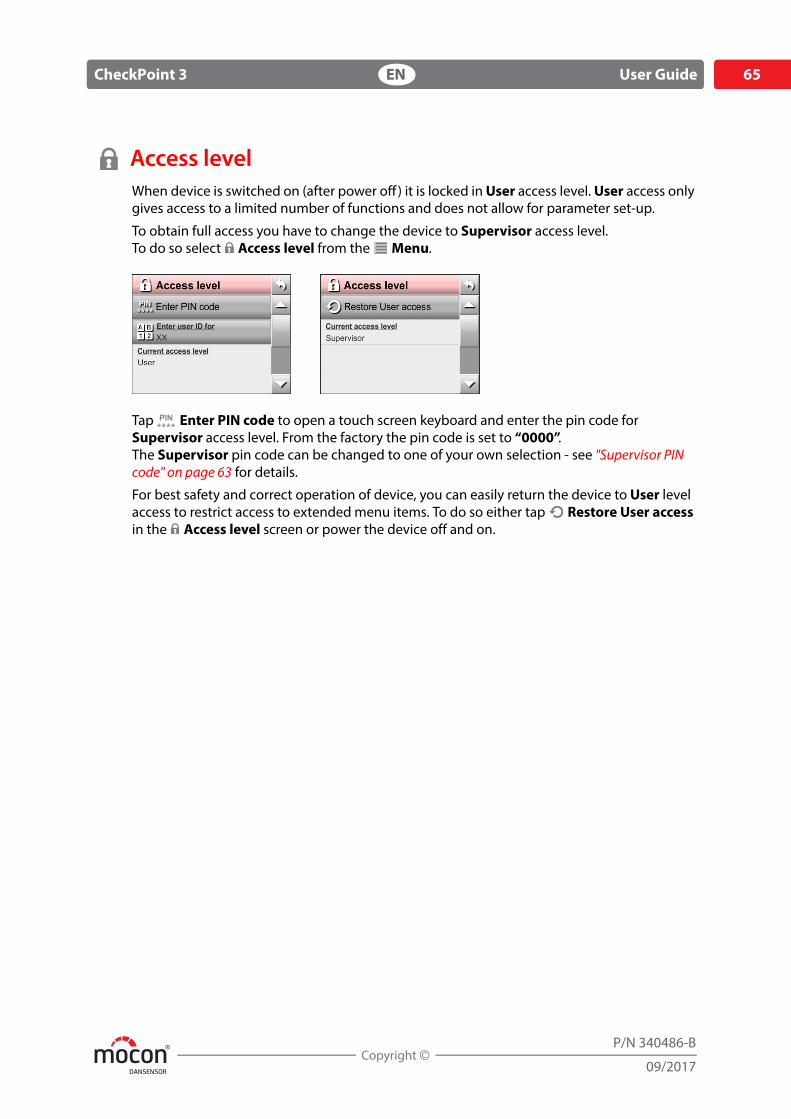
Access levelWhen device is switched on (after power off ) it is locked in User access level. User access only gives access to a limited number of functions and does not allow for parameter set-up.
To obtain full access you have to change the device to Supervisor access level.To do so select Access level from the Menu.
Tap Enter PIN code to open a touch screen keyboard and enter the pin code for Supervisor access level. From the factory the pin code is set to “0000”.The Supervisor pin code can be changed to one of your own selection - see "Supervisor PIN code" on page 63 for details.
For best safety and correct operation of device, you can easily return the device to User level access to restrict access to extended menu items. To do so either tap Restore User access in the Access level screen or power the device off and on.
DANSENSOR
66 User Guide EN CheckPoint 3
P/N 340486-B
09/2017
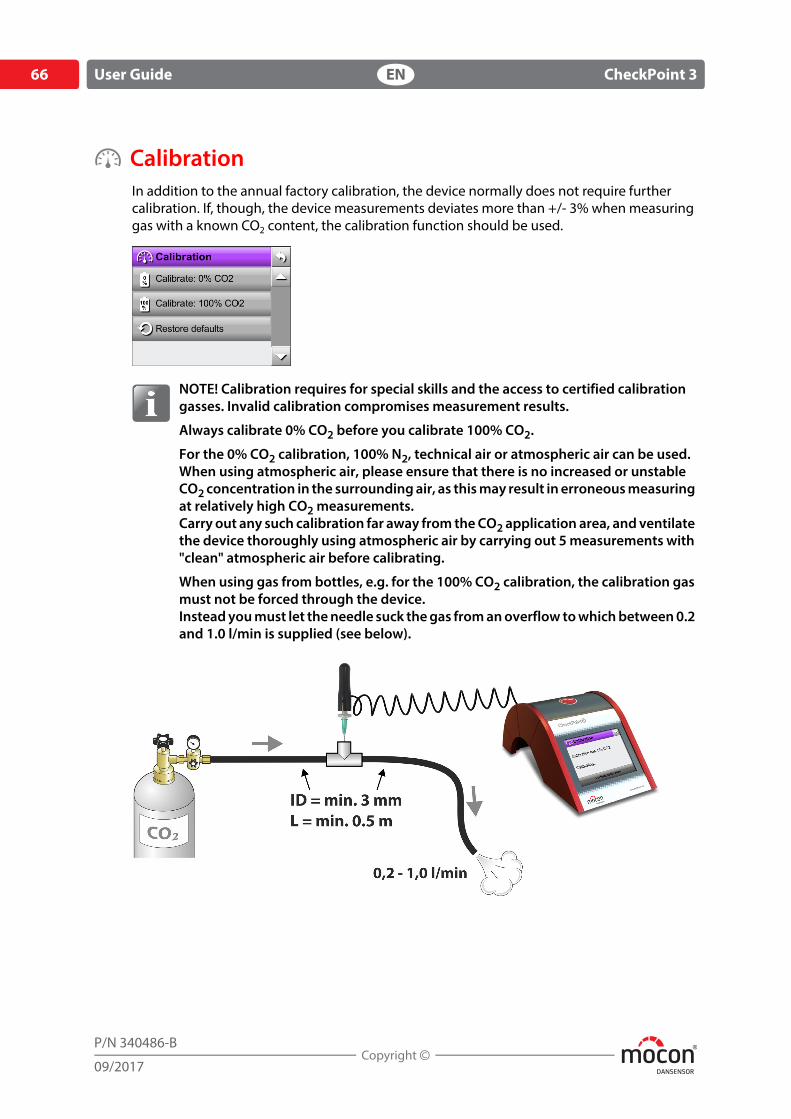
CalibrationIn addition to the annual factory calibration, the device normally does not require further calibration. If, though, the device measurements deviates more than +/- 3% when measuring gas with a known CO2 content, the calibration function should be used.
NOTE! Calibration requires for special skills and the access to certified calibration gasses. Invalid calibration compromises measurement results.
Always calibrate 0% CO2 before you calibrate 100% CO2.
For the 0% CO2 calibration, 100% N2, technical air or atmospheric air can be used.When using atmospheric air, please ensure that there is no increased or unstable CO2 concentration in the surrounding air, as this may result in erroneous measuring at relatively high CO2 measurements. Carry out any such calibration far away from the CO2 application area, and ventilate the device thoroughly using atmospheric air by carrying out 5 measurements with "clean" atmospheric air before calibrating.
When using gas from bottles, e.g. for the 100% CO2 calibration, the calibration gas must not be forced through the device.Instead you must let the needle suck the gas from an overflow to which between 0.2 and 1.0 l/min is supplied (see below).
DANSENSOR
CheckPoint 3 EN User Guide 67
P/N 340486-B
09/2017
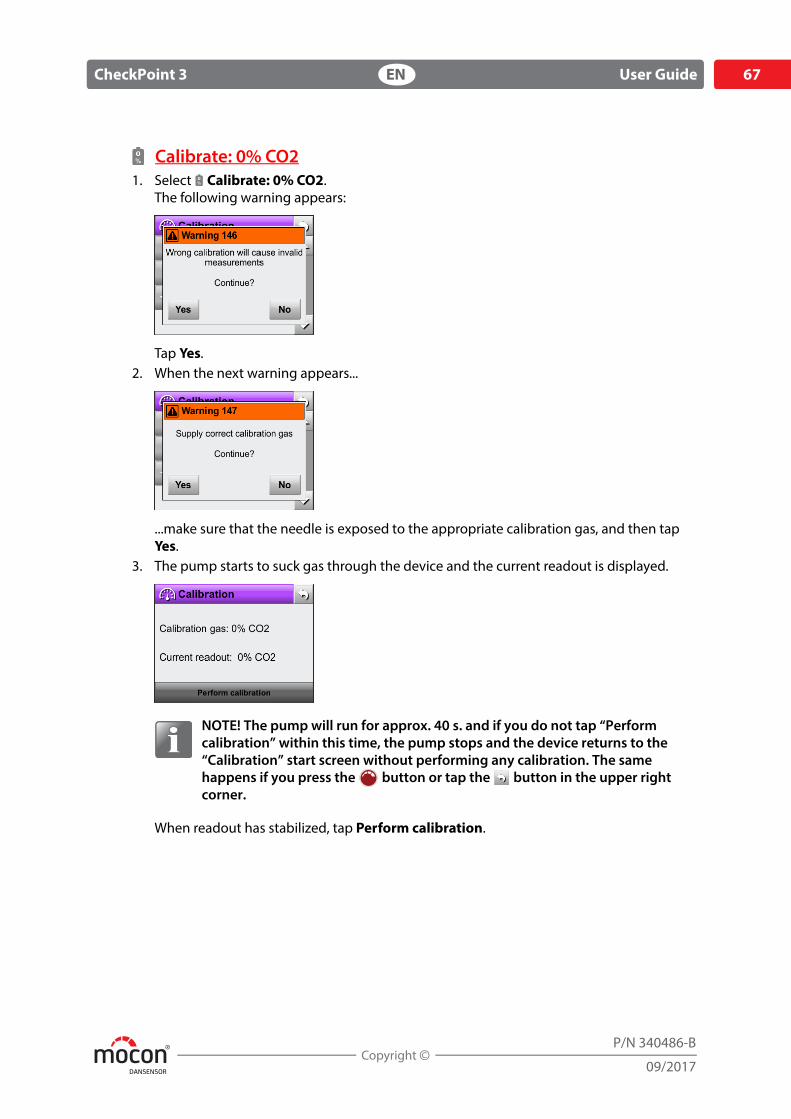
Calibrate: 0% CO21. Select Calibrate: 0% CO2.
The following warning appears:
Tap Yes.2. When the next warning appears...
...make sure that the needle is exposed to the appropriate calibration gas, and then tap Yes.
3. The pump starts to suck gas through the device and the current readout is displayed.
NOTE! The pump will run for approx. 40 s. and if you do not tap “Perform calibration” within this time, the pump stops and the device returns to the “Calibration” start screen without performing any calibration. The same happens if you press the button or tap the button in the upper right corner.
When readout has stabilized, tap Perform calibration.
DANSENSOR
68 User Guide EN CheckPoint 3
P/N 340486-B
09/2017
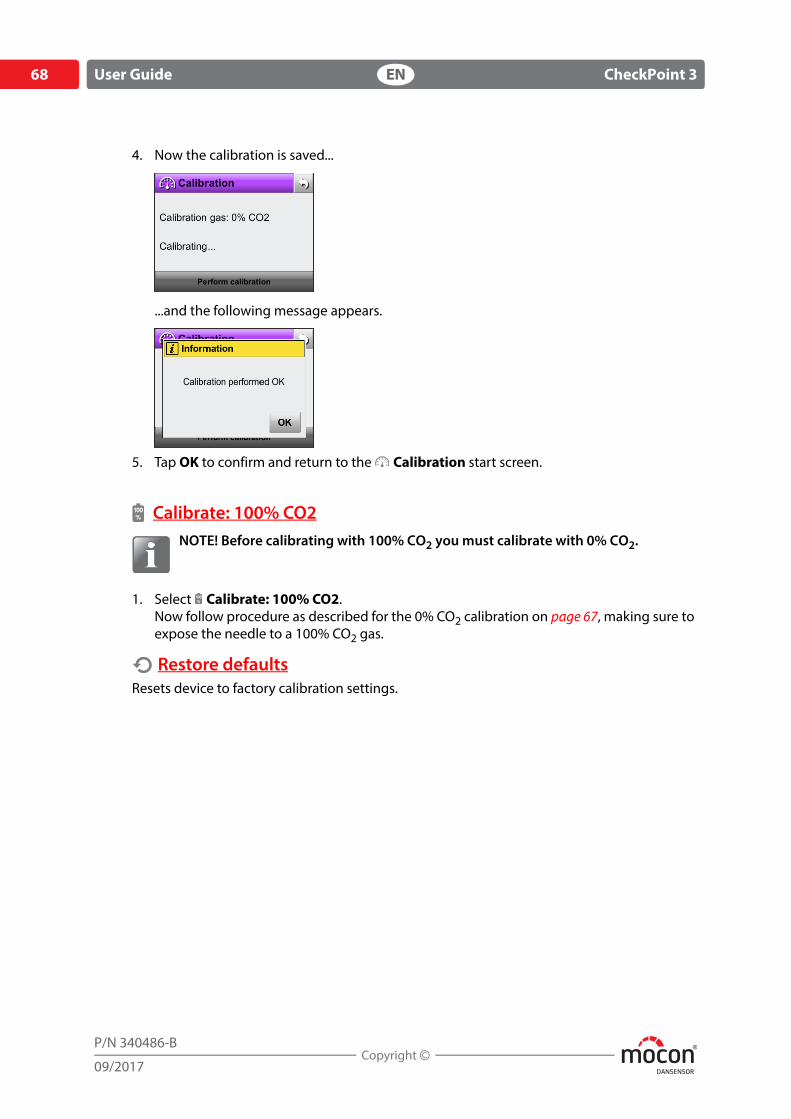
4. Now the calibration is saved...
...and the following message appears.
5. Tap OK to confirm and return to the Calibration start screen.
Calibrate: 100% CO2NOTE! Before calibrating with 100% CO2 you must calibrate with 0% CO2.
1. Select Calibrate: 100% CO2.Now follow procedure as described for the 0% CO2 calibration on page 67, making sure to expose the needle to a 100% CO2 gas.
Restore defaultsResets device to factory calibration settings.
DANSENSOR
CheckPoint 3 EN User Guide 69
P/N 340486-B
09/2017
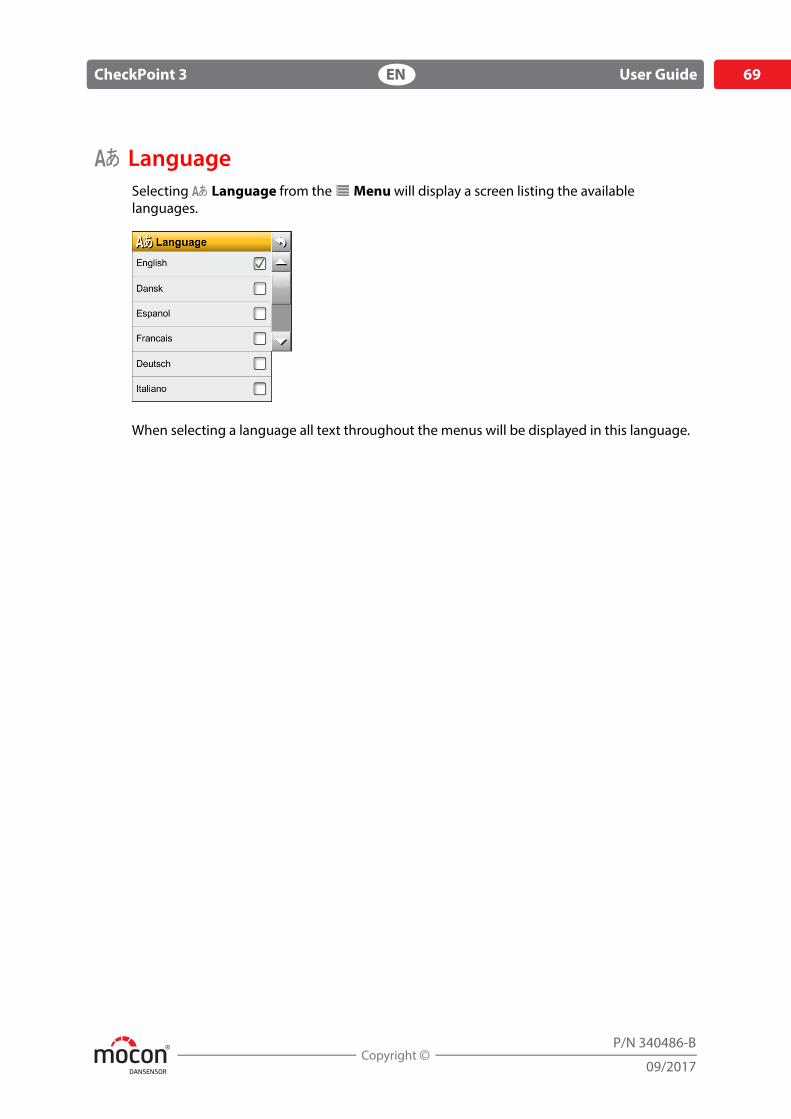
LanguageSelecting Language from the Menu will display a screen listing the available languages.
When selecting a language all text throughout the menus will be displayed in this language.

DANSENSOR
70 User Guide EN CheckPoint 3
P/N 340486-B
09/2017
DANSENSOR
CheckPoint 3 EN User Guide 71
P/N 340486-B
09/2017
4. Technical Information
Technical specifications
Electrical specifications
Power supply Input: 100 - 240 VAC, 50 - 60 Hz, 0.4 AOutput: 5 V - 2 A, max. 10 W
Battery Type: Lithium-Ion (LiOn)5200 mAh
Expected life1: Approx. 1½ yearMeasurements per charge: Approx. 2000Charging time: Max. 5 hours
1 At 10 hours daily use (no Wi-Fi activity)
Connectivity
USB Micro-B USB (2.0) (For charging only)
Wi-Fi b/g/n, “Create Network” or “Connect to Network” ModeWPA2, WPA2 Enterprise
Mechanical specifications
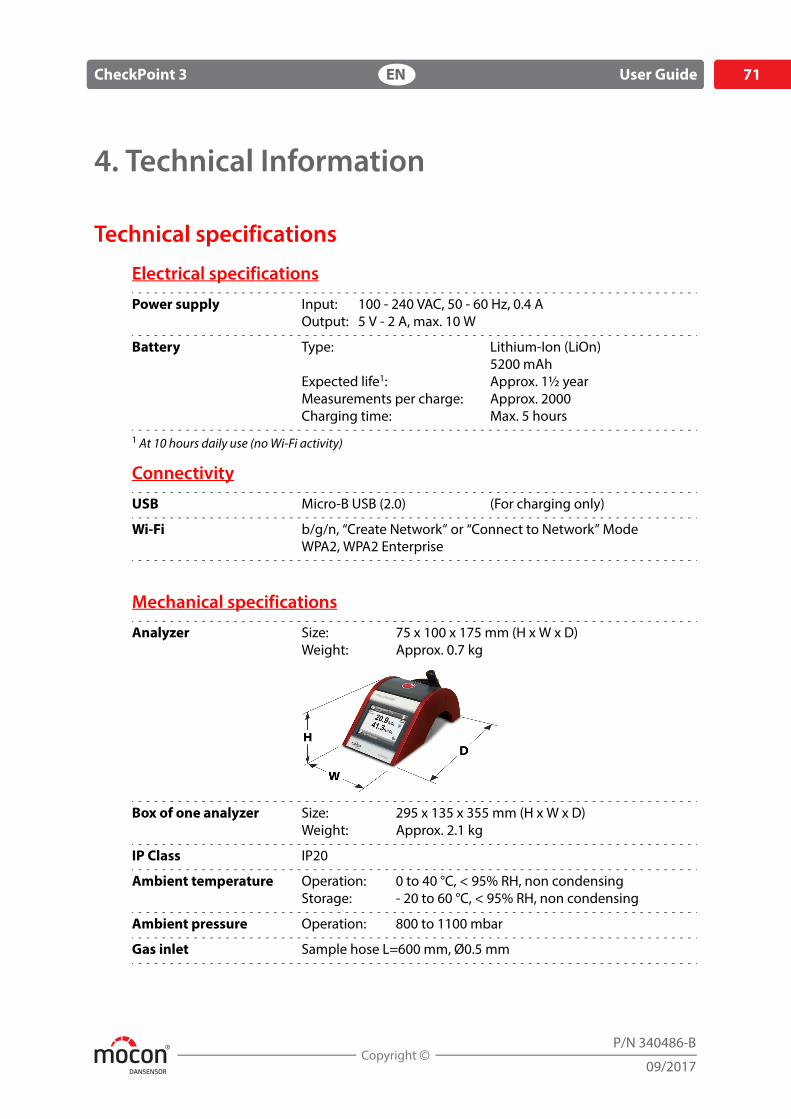
Analyzer Size: 75 x 100 x 175 mm (H x W x D)Weight: Approx. 0.7 kg
Box of one analyzer Size: 295 x 135 x 355 mm (H x W x D)Weight: Approx. 2.1 kg
IP Class IP20
Ambient temperature Operation: 0 to 40 °C, < 95% RH, non condensingStorage: - 20 to 60 °C, < 95% RH, non condensing
Ambient pressure Operation: 800 to 1100 mbar
Gas inlet Sample hose L=600 mm, Ø0.5 mm
DANSENSOR
72 User Guide EN CheckPoint 3
P/N 340486-B
09/2017
Sensors
O2 Sensor
Sensor type Ceramic solid-state
Range 0 - 85%, measurements >85% will be cut off
Resolution 0.1% absolute
Accuracy ±0.1% absolute ±2% of readout
Measuring time Min. 9 s.
Startup time 5 s.
Service calibration interval 12 months
CO2 Sensor
Sensor type Non Dispersive Infra Red (NDIR), single beam,temperature compensated
Range 0-100%
Resolution 0.1% absolute
Accuracy ±2.0% absolute in range 0 to 20%±3.0% absolute in range 20 to 100%
Measuring time Min. 9 s.
Startup time 5 s.
Service calibration interval 12 months
Sampling
Sample gas O2, CO2, Ar or N2, < 95% RH, non condensing
Sample flow 38 - 52 standard ml/min.Nominal flow 45 standard ml/min.
Sample pressure range Ambient pressure ± 50 mbar(verified at 1013 mbar ambient pressure)
Typical sample volume 5 ml
DANSENSOR
CheckPoint 3 EN User Guide 73
P/N 340486-B
09/2017
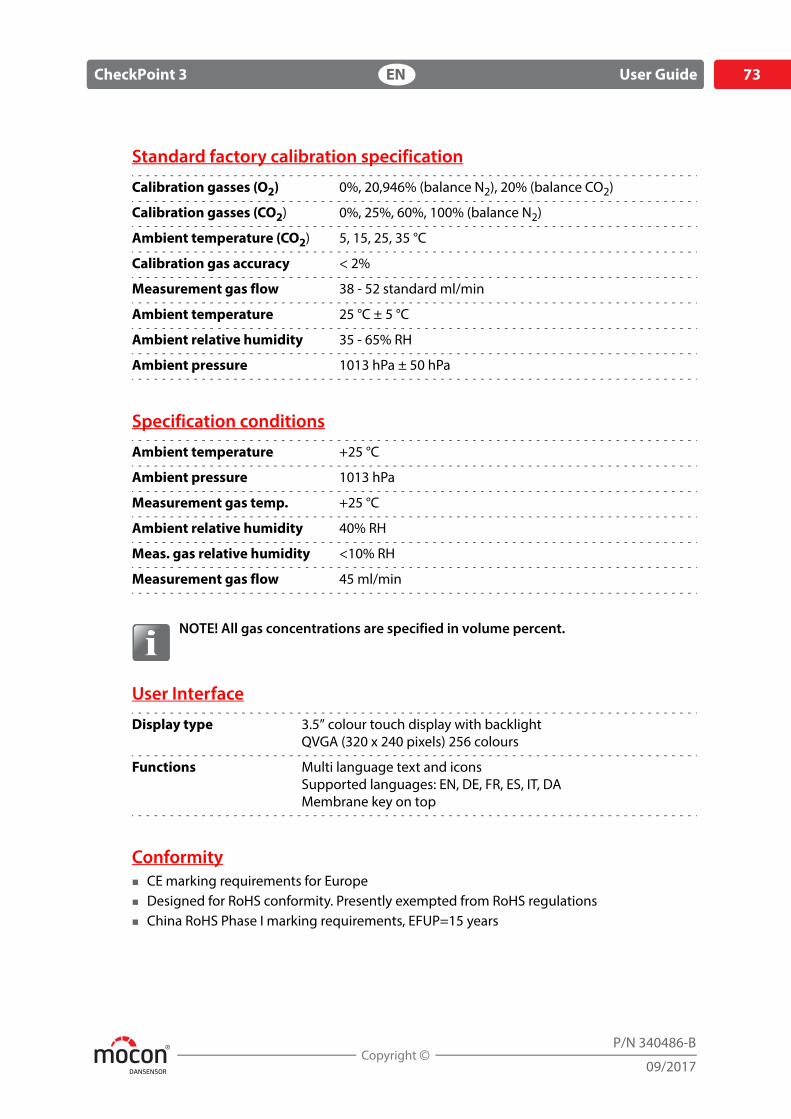
Standard factory calibration specification
Calibration gasses (O2) 0%, 20,946% (balance N2), 20% (balance CO2)
Calibration gasses (CO2) 0%, 25%, 60%, 100% (balance N2)
Ambient temperature (CO2) 5, 15, 25, 35 °C
Calibration gas accuracy < 2%
Measurement gas flow 38 - 52 standard ml/min
Ambient temperature 25 °C ± 5 °C
Ambient relative humidity 35 - 65% RH
Ambient pressure 1013 hPa ± 50 hPa
Specification conditions
Ambient temperature +25 °C
Ambient pressure 1013 hPa
Measurement gas temp. +25 °C
Ambient relative humidity 40% RH
Meas. gas relative humidity <10% RH
Measurement gas flow 45 ml/min
NOTE! All gas concentrations are specified in volume percent.
User Interface
Display type 3.5” colour touch display with backlightQVGA (320 x 240 pixels) 256 colours
Functions Multi language text and iconsSupported languages: EN, DE, FR, ES, IT, DAMembrane key on top
Conformity CE marking requirements for Europe Designed for RoHS conformity. Presently exempted from RoHS regulations China RoHS Phase I marking requirements, EFUP=15 years
DANSENSOR
74 User Guide EN CheckPoint 3
P/N 340486-B
09/2017
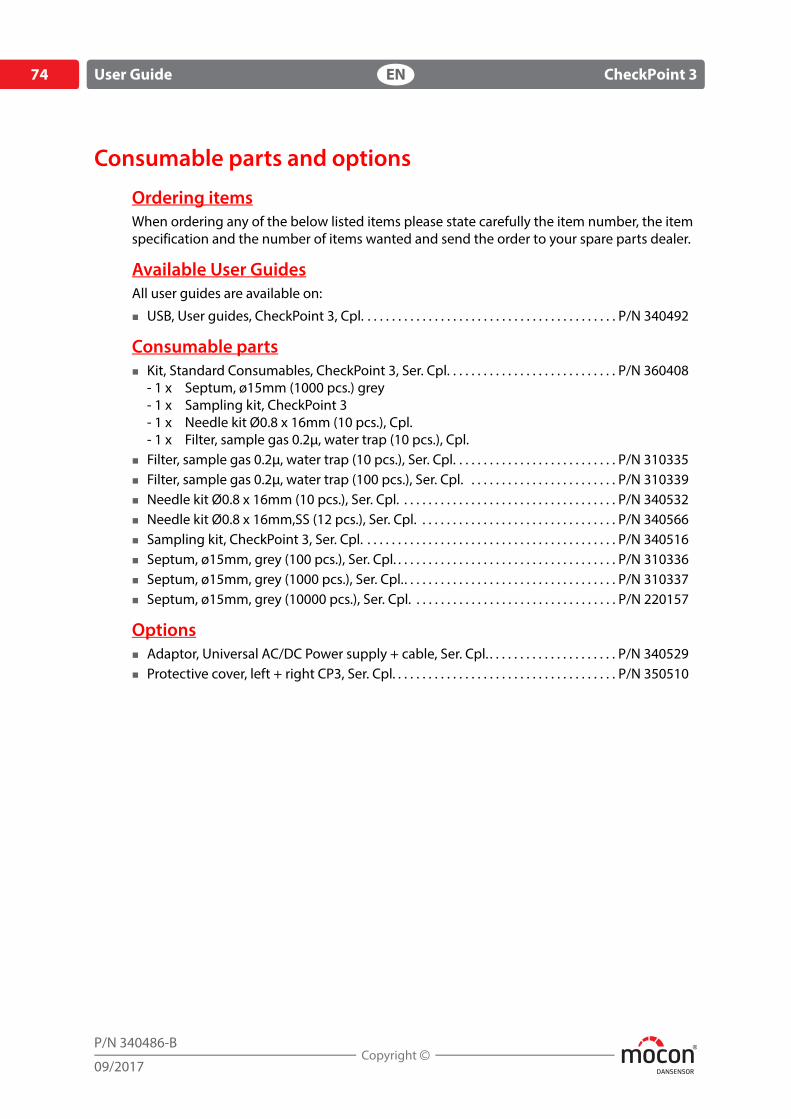
Consumable parts and options
Ordering itemsWhen ordering any of the below listed items please state carefully the item number, the item specification and the number of items wanted and send the order to your spare parts dealer.
Available User GuidesAll user guides are available on:
USB, User guides, CheckPoint 3, Cpl. . . . . . . . . . . . . . . . . . . . . . . . . . . . . . . . . . . . . . . . . . P/N 340492
Consumable parts Kit, Standard Consumables, CheckPoint 3, Ser. Cpl. . . . . . . . . . . . . . . . . . . . . . . . . . . . P/N 360408
- 1 x Septum, ø15mm (1000 pcs.) grey- 1 x Sampling kit, CheckPoint 3- 1 x Needle kit Ø0.8 x 16mm (10 pcs.), Cpl.- 1 x Filter, sample gas 0.2μ, water trap (10 pcs.), Cpl.
Filter, sample gas 0.2μ, water trap (10 pcs.), Ser. Cpl. . . . . . . . . . . . . . . . . . . . . . . . . . . P/N 310335 Filter, sample gas 0.2μ, water trap (100 pcs.), Ser. Cpl. . . . . . . . . . . . . . . . . . . . . . . . . P/N 310339 Needle kit Ø0.8 x 16mm (10 pcs.), Ser. Cpl. . . . . . . . . . . . . . . . . . . . . . . . . . . . . . . . . . . . P/N 340532 Needle kit Ø0.8 x 16mm,SS (12 pcs.), Ser. Cpl. . . . . . . . . . . . . . . . . . . . . . . . . . . . . . . . . P/N 340566 Sampling kit, CheckPoint 3, Ser. Cpl. . . . . . . . . . . . . . . . . . . . . . . . . . . . . . . . . . . . . . . . . . P/N 340516 Septum, ø15mm, grey (100 pcs.), Ser. Cpl. . . . . . . . . . . . . . . . . . . . . . . . . . . . . . . . . . . . . P/N 310336 Septum, ø15mm, grey (1000 pcs.), Ser. Cpl.. . . . . . . . . . . . . . . . . . . . . . . . . . . . . . . . . . . P/N 310337 Septum, ø15mm, grey (10000 pcs.), Ser. Cpl. . . . . . . . . . . . . . . . . . . . . . . . . . . . . . . . . . P/N 220157
Options Adaptor, Universal AC/DC Power supply + cable, Ser. Cpl. . . . . . . . . . . . . . . . . . . . . . P/N 340529 Protective cover, left + right CP3, Ser. Cpl. . . . . . . . . . . . . . . . . . . . . . . . . . . . . . . . . . . . . P/N 350510
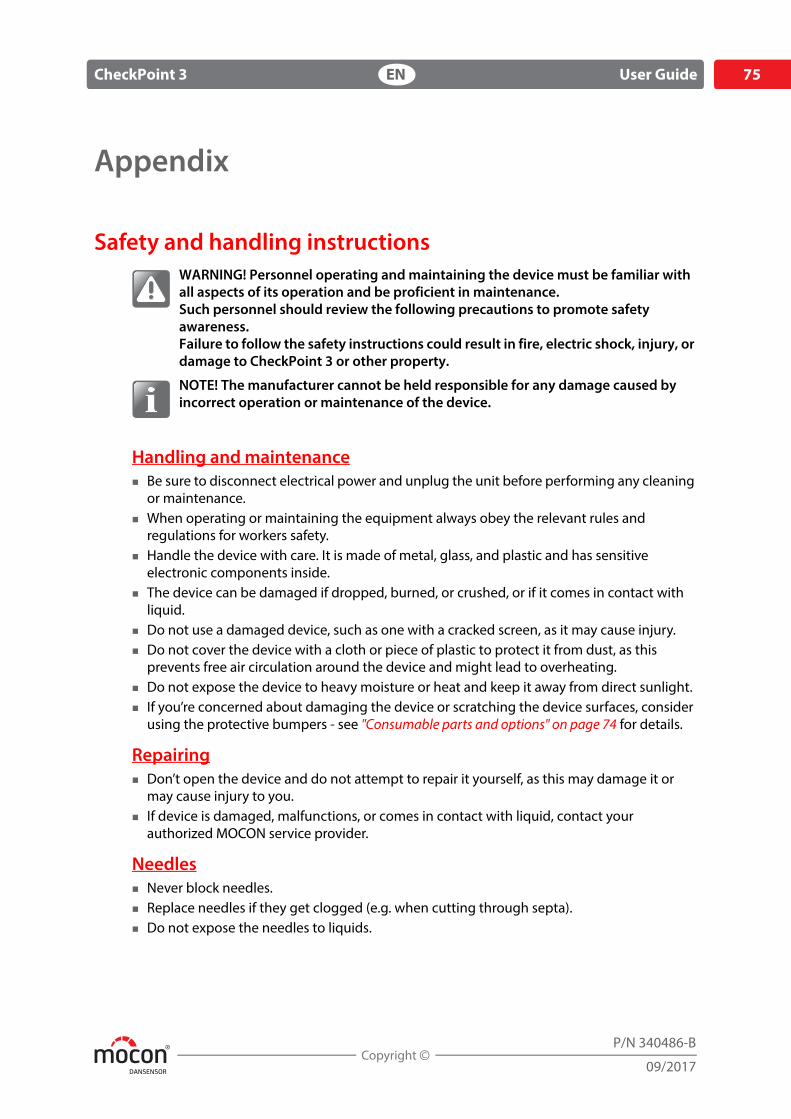
DANSENSOR
CheckPoint 3 EN User Guide 75
P/N 340486-B
09/2017
Appendix
Safety and handling instructionsWARNING! Personnel operating and maintaining the device must be familiar with all aspects of its operation and be proficient in maintenance.Such personnel should review the following precautions to promote safety awareness.Failure to follow the safety instructions could result in fire, electric shock, injury, or damage to CheckPoint 3 or other property.
NOTE! The manufacturer cannot be held responsible for any damage caused by incorrect operation or maintenance of the device.
Handling and maintenance Be sure to disconnect electrical power and unplug the unit before performing any cleaning
or maintenance. When operating or maintaining the equipment always obey the relevant rules and
regulations for workers safety. Handle the device with care. It is made of metal, glass, and plastic and has sensitive
electronic components inside. The device can be damaged if dropped, burned, or crushed, or if it comes in contact with
liquid. Do not use a damaged device, such as one with a cracked screen, as it may cause injury. Do not cover the device with a cloth or piece of plastic to protect it from dust, as this
prevents free air circulation around the device and might lead to overheating. Do not expose the device to heavy moisture or heat and keep it away from direct sunlight. If you’re concerned about damaging the device or scratching the device surfaces, consider
using the protective bumpers - see "Consumable parts and options" on page 74 for details.
Repairing Don’t open the device and do not attempt to repair it yourself, as this may damage it or
may cause injury to you. If device is damaged, malfunctions, or comes in contact with liquid, contact your
authorized MOCON service provider.
Needles Never block needles. Replace needles if they get clogged (e.g. when cutting through septa). Do not expose the needles to liquids.
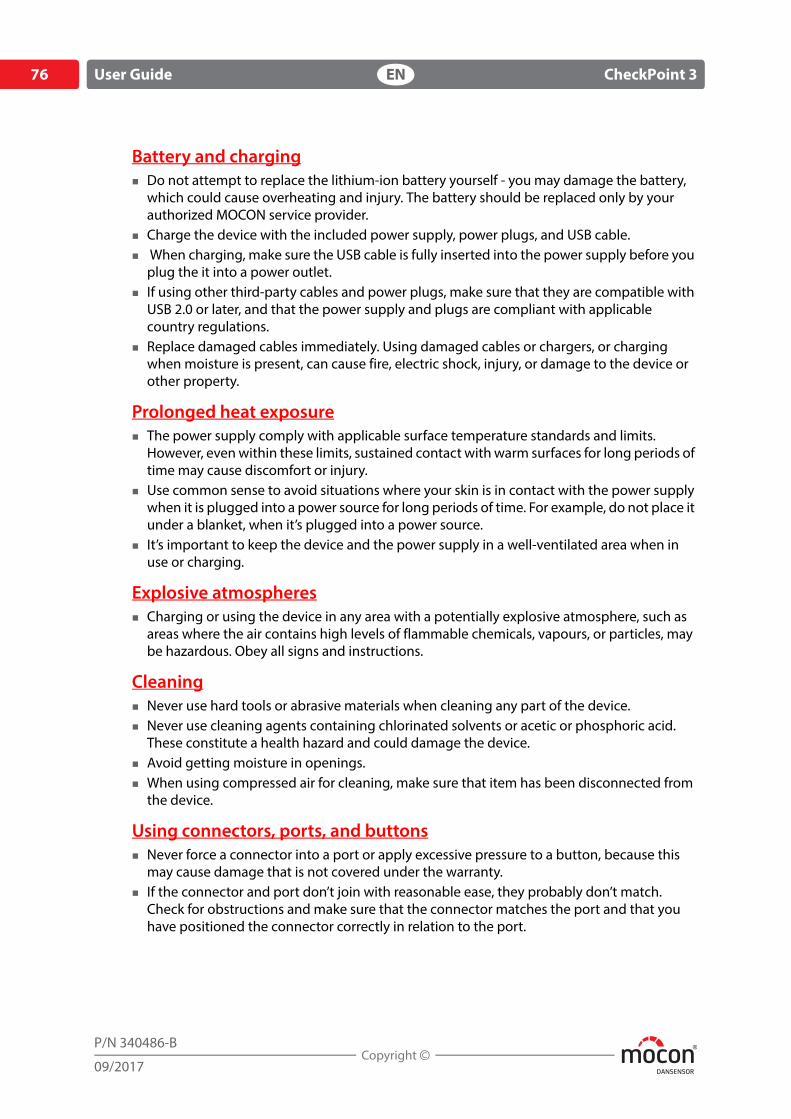
DANSENSOR
76 User Guide EN CheckPoint 3
P/N 340486-B
09/2017
Battery and charging Do not attempt to replace the lithium-ion battery yourself - you may damage the battery,
which could cause overheating and injury. The battery should be replaced only by your authorized MOCON service provider.
Charge the device with the included power supply, power plugs, and USB cable. When charging, make sure the USB cable is fully inserted into the power supply before you
plug the it into a power outlet. If using other third-party cables and power plugs, make sure that they are compatible with
USB 2.0 or later, and that the power supply and plugs are compliant with applicable country regulations.
Replace damaged cables immediately. Using damaged cables or chargers, or charging when moisture is present, can cause fire, electric shock, injury, or damage to the device or other property.
Prolonged heat exposure The power supply comply with applicable surface temperature standards and limits.
However, even within these limits, sustained contact with warm surfaces for long periods of time may cause discomfort or injury.
Use common sense to avoid situations where your skin is in contact with the power supply when it is plugged into a power source for long periods of time. For example, do not place it under a blanket, when it’s plugged into a power source.
It’s important to keep the device and the power supply in a well-ventilated area when in use or charging.
Explosive atmospheres Charging or using the device in any area with a potentially explosive atmosphere, such as
areas where the air contains high levels of flammable chemicals, vapours, or particles, may be hazardous. Obey all signs and instructions.
Cleaning Never use hard tools or abrasive materials when cleaning any part of the device. Never use cleaning agents containing chlorinated solvents or acetic or phosphoric acid.
These constitute a health hazard and could damage the device. Avoid getting moisture in openings. When using compressed air for cleaning, make sure that item has been disconnected from
the device.
Using connectors, ports, and buttons Never force a connector into a port or apply excessive pressure to a button, because this
may cause damage that is not covered under the warranty. If the connector and port don’t join with reasonable ease, they probably don’t match.
Check for obstructions and make sure that the connector matches the port and that you have positioned the connector correctly in relation to the port.
DANSENSOR
CheckPoint 3 EN User Guide 77
P/N 340486-B
09/2017
Operating/storing temperatures The device is designed to be operated and stored in the temperatures ranges as specified in
"Mechanical specifications" on page 71. The device can be damaged and battery life shortened if stored or operated outside of these temperature ranges.
Avoid exposing the device to dramatic changes in temperature or humidity.
WebGUI compatible browsersThe WebGUI has been tested for compatibility with the following PC/tablet browsers:
Firefox 52 (Windows 7, 8, 10) Google Chrome 56 (Windows 7, 8, 10) Internet Explorer 11 (Windows 8) Edge (Windows 10) Safari (iPad, iOS 9.3.1) Safari (Mac mini, OS X 10.11.6) Google Chrome 52 (Android 4.4)
Toxic and Hazardous Substances or Elements(For China RoHS compliance)
See table on the next page.
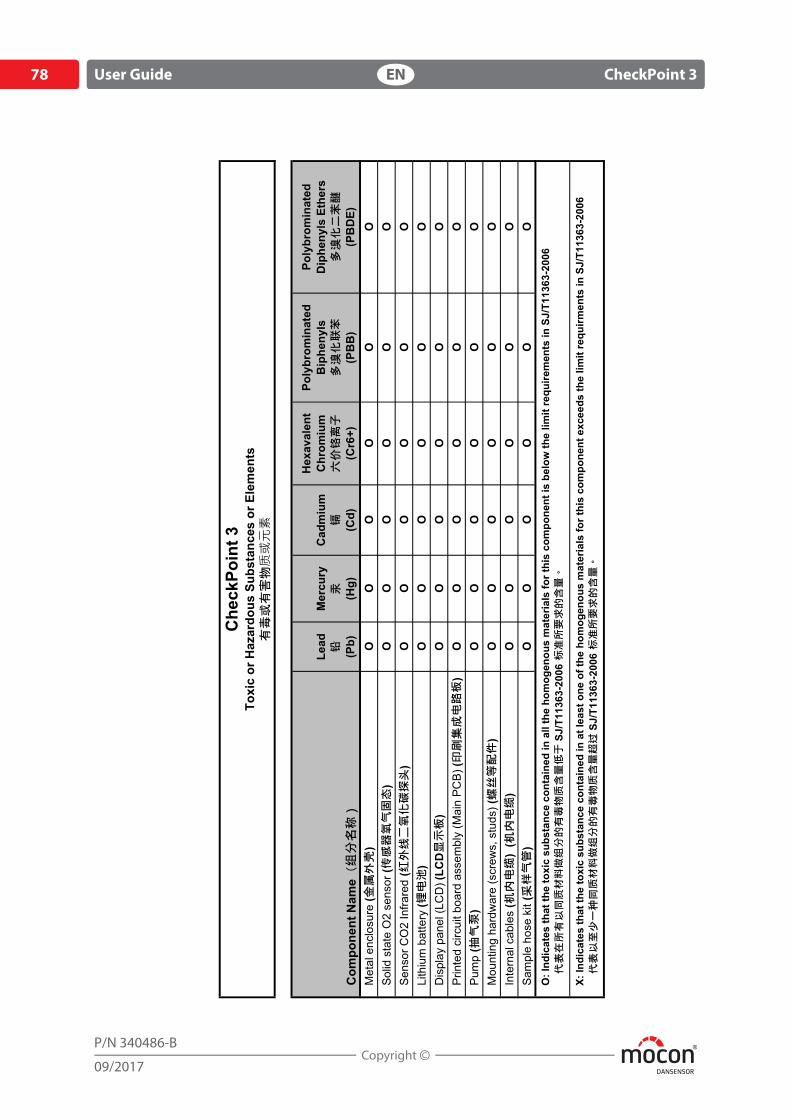
DANSENSOR
78 User Guide EN CheckPoint 3
P/N 340486-B
09/2017
Com
pone
nt N
ame
Lead
(Pb)
Mer
cury
(Hg)
Cad
miu
m
(Cd)
Hex
aval
ent
Chr
omiu
m
(Cr6
+)
Poly
brom
inat
edB
iphe
nyls
(PB
B)
Poly
brom
inat
edD
iphe
nyls
Eth
ers
(PB
DE)
Met
al e
nclo
sure
()
OO
OO
OO
Sol
id s
tate
O2
sens
or (
)O
OO
OO
OS
enso
r CO
2 In
frare
d (
)O
OO
OO
OLi
thiu
m b
atte
ry (
)O
OO
OO
OD
ispl
ay p
anel
(LC
D) (
LCD
)O
OO
OO
OP
rinte
d ci
rcui
t boa
rd a
ssem
bly
(Mai
n P
CB
) ()
OO
OO
OO
Pum
p(
)O
OO
OO
OM
ount
ing
hard
war
e (s
crew
s, s
tuds
) ()
OO
OO
OO
Inte
rnal
cab
les
()
()
OO
OO
OO
Sam
ple
hose
kit
()
OO
OO
OO
Che
ckPo
int 3
Toxi
c or
Haz
ardo
us S
ubst
ance
s or
Ele
men
ts
O: I
ndic
ates
that
the
toxi
c su
bsta
nce
cont
aine
d in
all
the
hom
ogen
ous
mat
eria
ls fo
r thi
s co
mpo
nent
is b
elow
the
limit
requ
irem
ents
in S
J/T1
1363
-200
6 S
J/T1
1363
-200
6
X: In
dica
tes
that
the
toxi
c su
bsta
nce
cont
aine
d in
at l
east
one
of t
he h
omog
enou
s m
ater
ials
for t
his
com
pone
nt e
xcee
ds th
e lim
it re
quirm
ents
in S
J/T1
1363
-200
6 S
J/T1
1363
-200
6

This blank page has been inserted to enable double sided printing of the document!

DANSENSOR
MOCON Europe A/S
Rønnedevej 18
4100 Ringsted, Denmark
Tel +45 57 66 00 88
www.dansensor.com