Embed Size (px)
Citation preview

User Guide for the Cisco Unified Intelligence Center
Reporting ApplicationRelease 8.0(4)
June 2011
Americas Headquarters
Cisco Systems, Inc.
170 West Tasman Drive
San Jose, CA 95134-1706
USA
http://www.cisco.com
Tel: 408 526-4000
800 553-NETS (6387)
Fax: 408 527-0833

THE SPECIFICATIONS AND INFORMATION REGARDING THE PRODUCTS IN THIS MANUAL ARE SUBJECT TO CHANGE WITHOUT NOTICE.ALL STATEMENTS, INFORMATION, AND RECOMMENDATIONS IN THIS MANUAL ARE BELIEVED TO BE ACCURATE BUT ARE PRESENTEDWITHOUT WARRANTY OF ANY KIND, EXPRESS OR IMPLIED. USERS MUST TAKE FULL RESPONSIBILITY FOR THEIR APPLICATION OFANY PRODUCTS.THE SOFTWARE LICENSE AND LIMITED WARRANTY FOR THE ACCOMPANYING PRODUCT ARE SET FORTH IN THE INFORMATION PACKETTHAT SHIPPED WITH THE PRODUCT AND ARE INCORPORATED HEREIN BY THIS REFERENCE. IF YOU ARE UNABLE TO LOCATE THESOFTWARE LICENSE OR LIMITED WARRANTY, CONTACT YOUR CISCO REPRESENTATIVE FOR A COPY.The Cisco implementation of TCP header compression is an adaptation of a program developed by the University of California, Berkeley (UCB) aspart of UCBs public domain version of the UNIX operating system. All rights reserved. Copyright 1981, Regents of the University of California.NOTWITHSTANDING ANY OTHER WARRANTY HEREIN, ALL DOCUMENT FILES AND SOFTWARE OF THESE SUPPLIERS ARE PROVIDED"AS IS" WITH ALL FAULTS. CISCO AND THE ABOVE-NAMED SUPPLIERS DISCLAIM ALL WARRANTIES, EXPRESSED OR IMPLIED, INCLUDING,WITHOUT LIMITATION, THOSE OF MERCHANTABILITY, FITNESS FOR A PARTICULAR PURPOSE AND NONINFRINGEMENT OR ARISINGFROM A COURSE OF DEALING, USAGE, OR TRADE PRACTICE.IN NO EVENT SHALL CISCO OR ITS SUPPLIERS BE LIABLE FOR ANY INDIRECT, SPECIAL, CONSEQUENTIAL, OR INCIDENTAL DAMAGES,INCLUDING, WITHOUT LIMITATION, LOST PROFITS OR LOSS OR DAMAGE TO DATA ARISING OUT OF THE USE OR INABILITY TO USETHIS MANUAL, EVEN IF CISCO OR ITS SUPPLIERS HAVE BEEN ADVISED OF THE POSSIBILITY OF SUCH DAMAGES.Cisco and the Cisco Logo are trademarks of Cisco Systems, Inc. and/or its affiliates in the U.S. and other countries. A listing of Cisco's trademarkscan be found at http://www.cisco.com/go/trademarks. Third party trademarks mentioned are the property of their respective owners. The use ofthe word partner does not imply a partnership relationship between Cisco and any other company. (1005R)Any Internet Protocol (IP) addresses used in this document are not intended to be actual addresses. Any examples, command display output, andfigures included in the document are shown for illustrative purposes only. Any use of actual IP addresses in illustrative content is unintentional andcoincidental.Copyright 2011 Cisco Systems, Inc. All rights reserved.

Table of Contents
Preface ...........................................................................................................................................................1Purpose .....................................................................................................................................................1Audience ....................................................................................................................................................1Organization ..............................................................................................................................................1Related Documentation .............................................................................................................................2Conventions................................................................................................................................................3Obtaining Documentation and Submitting a Service Request...................................................................3Documentation Feedback...........................................................................................................................4
1. Product Overview........................................................................................................................................5About Cisco Unified Intelligence Center.....................................................................................................5Deployment Models....................................................................................................................................6Databases in the Unified IC Cluster...........................................................................................................7Installation and Configuration.....................................................................................................................7Accessibility................................................................................................................................................7The Overview Drawer.................................................................................................................................8User Authentication....................................................................................................................................8Links on Unified IC Reporting Pages..........................................................................................................9
2. Getting Started with Unified IC Reporting.................................................................................................13Acquire the License File from the License Website..................................................................................13Sign in to the Administration Interface......................................................................................................14
Upload the License..............................................................................................................................14Configure the Active Directory Server.................................................................................................15Optionally, Configure Report Scheduler Email Settings......................................................................15Optionally, Create Another Super User ...............................................................................................15Optionally, Enable Unified CCE User Integration ................................................................................16About Unified CCE User Integration....................................................................................................16
Set Up Security for a Remote Data Base.................................................................................................17Sign in to the Unified IC Reporting Interface............................................................................................18
Complete the Configuration of the UCCE Data Sources.....................................................................18Review the User List and Set up User Roles, Permissions, and Groups.............................................19Create at Least One Dashboard..........................................................................................................20
Unified IC Reporting: Basic Concepts......................................................................................................20How Do I Create a User?.........................................................................................................................22How Do I Run a Report?..........................................................................................................................23Unified IC Reporting: Unified IC User Roles.............................................................................................23
Other Users.........................................................................................................................................25Caching in Unified IC................................................................................................................................26
3. Dashboards...............................................................................................................................................29Available Dashboards Page......................................................................................................................30
Dashboard permalink...........................................................................................................................31Create a Dashboard.................................................................................................................................31View a Dashboard....................................................................................................................................31Add Dashboard Items...............................................................................................................................32
Add a Report.......................................................................................................................................33Add a Scheduled Report.....................................................................................................................33Add a Note...........................................................................................................................................34Add a URL...........................................................................................................................................35
User Guide for the Cisco Unified Intelligence Center Reporting Application 8.0(4)
i
Add a Widget.......................................................................................................................................35Dashboard Slideshow...............................................................................................................................36Rename a Dashboard..............................................................................................................................36Delete a Dashboard..................................................................................................................................37
4. Data Sources............................................................................................................................................39Data Sources Page..................................................................................................................................40
Data Source Rules...............................................................................................................................41Create/Edit a Data Source........................................................................................................................42Delete a Data Source...............................................................................................................................44Mapping to Multiple Databases................................................................................................................44
5. Reports.....................................................................................................................................................47Available Reports Page............................................................................................................................48Stock Report Templates...........................................................................................................................49
List of Stock Templates........................................................................................................................50Creating a Save As Version of a Stock Template.................................................................................52Historical and Real Time Templates.....................................................................................................53Custom Templates...............................................................................................................................54
Reports and Report Definitions................................................................................................................54Manage Reports.......................................................................................................................................54Importing Reports.....................................................................................................................................55Running a Report.....................................................................................................................................57Filtering Reports.......................................................................................................................................58
Basic Filters Tab...................................................................................................................................58Advanced Filters Tab...........................................................................................................................60Basic Filters Tab for Anonymous Block/Stored Procedure...................................................................61Setting the Default Filter......................................................................................................................62
The Report Viewer....................................................................................................................................62Report Editor............................................................................................................................................63
Save.....................................................................................................................................................65Save As................................................................................................................................................65
Creating Reports......................................................................................................................................65Renaming a Report..................................................................................................................................66Exporting a Report...................................................................................................................................67Deleting a Report.....................................................................................................................................67Report Views............................................................................................................................................68
Grids....................................................................................................................................................68Charts..................................................................................................................................................69Gauges................................................................................................................................................70Report Permalinks...............................................................................................................................71
Views Editor..............................................................................................................................................71Exporting a Report to Excel using Permalinks....................................................................................73Opening an Exported Report in Excel.................................................................................................74HTML permalink..................................................................................................................................74XML permalink.....................................................................................................................................74Grid Editor............................................................................................................................................75Current Fields and Available Fields.....................................................................................................80Thresholds...........................................................................................................................................80Add/Edit Thresholds Page...................................................................................................................81Threshold Images................................................................................................................................82Report Summaries...............................................................................................................................83
User Guide for the Cisco Unified Intelligence Center Reporting Application 8.0(4)
ii

Chart Editor.........................................................................................................................................84Gauge Editor........................................................................................................................................93
Export to Excel.........................................................................................................................................95Print..........................................................................................................................................................96Reports and TimeZones...........................................................................................................................96
Reports and Daylight Savings Time.....................................................................................................97
6. Report Definitions.....................................................................................................................................99Available Report Definitions Page..........................................................................................................100Create a Report Definition......................................................................................................................101Save As..................................................................................................................................................102Edit Report Definition.............................................................................................................................102
Data Source Tab................................................................................................................................103Database Query................................................................................................................................104Anonymous Block..............................................................................................................................105Stored Procedure...............................................................................................................................106Fields Tab...........................................................................................................................................107Parameters Tab..................................................................................................................................113Properties Tab....................................................................................................................................116
Unified IC SQL Syntax ...........................................................................................................................117Working with Drilldowns.........................................................................................................................119
Create a Drilldown.............................................................................................................................119Edit a Drilldown..................................................................................................................................121Delete a Drilldown..............................................................................................................................121Best Practices for Drilldowns.............................................................................................................122
Rename a Report Definition...................................................................................................................122Delete a Report Definition......................................................................................................................122Import a Report Definition......................................................................................................................123Export a Report Definition......................................................................................................................123
7. Value Lists and Collections.....................................................................................................................125Data Collections.....................................................................................................................................125Value Lists..............................................................................................................................................126
Create/Edit Value List........................................................................................................................128Display and Refresh Value List..........................................................................................................129Associating a Value List with a Report...............................................................................................129Collections.........................................................................................................................................129All Collections....................................................................................................................................130Create/Edit Collection Page...............................................................................................................130Collections from UCCE User Integration...........................................................................................131Collection Types.................................................................................................................................132
8. Scheduler................................................................................................................................................135Schedule List..........................................................................................................................................136Scheduler Create/Edit ...........................................................................................................................137
9. Security...................................................................................................................................................141About Unified IC Security.......................................................................................................................141
Administrative Overview....................................................................................................................142User List Page........................................................................................................................................142
User Information Page.......................................................................................................................143Creating a User on the User List Page..............................................................................................146
User Groups Page..................................................................................................................................147
User Guide for the Cisco Unified Intelligence Center Reporting Application 8.0(4)
iii
Group Information..............................................................................................................................148User Permissions Page..........................................................................................................................150
Assigned Group Permissions............................................................................................................150Assigned User Permissions...............................................................................................................151
About Permissions..................................................................................................................................152User Roles and Permissions.............................................................................................................153
About User Groups.................................................................................................................................153Groups and Child Groups..................................................................................................................154
Run As....................................................................................................................................................155Best Practices for Security.....................................................................................................................155
10. System Concepts and Navigation Controls...........................................................................................157Accessing Cisco Unified Communications Solutions Tools from Unified IC...........................................157
Cisco Unified Serviceability...............................................................................................................158Cisco Unified OS Administration........................................................................................................159Disaster Recovery System................................................................................................................159
Categories..............................................................................................................................................160Create a Sub-Category......................................................................................................................161Delete a Sub-Category......................................................................................................................161Drag and Drop within Categories.......................................................................................................161Rename Categories...........................................................................................................................161Permissions for Categories................................................................................................................162
Drawers..................................................................................................................................................162Filtering...................................................................................................................................................163Unified IC Licenses.................................................................................................................................163
How To Obtain Your License..............................................................................................................164How to Upload the License................................................................................................................165License Types....................................................................................................................................165Feature Set for Standard and Premium Licenses..............................................................................166
Multiple Delete........................................................................................................................................167Online Help.............................................................................................................................................167Refresh...................................................................................................................................................167Sorting....................................................................................................................................................168Stock and Custom Objects.....................................................................................................................168Tabs........................................................................................................................................................169
Index ...........................................................................................................................................................171
User Guide for the Cisco Unified Intelligence Center Reporting Application 8.0(4)
iv

List of Figures
Figure 1: Title Bar..............................................................................................................................................................9
Figure 2: Stock Templates...............................................................................................................................................23
Figure 3: Available Dashboards page..............................................................................................................................30
Figure 4: Adding a Report to a Dashboard......................................................................................................................33
Figure 5: Dashbord with Sticky Note..............................................................................................................................35
Figure 6: Data Sources.....................................................................................................................................................40
Figure 7: Mapping the Data Source.................................................................................................................................45
Figure 8: Stock Templates...............................................................................................................................................48
Figure 9: Importing Reports............................................................................................................................................56
Figure 10: Grid................................................................................................................................................................68
Figure 11: Pie Chart.........................................................................................................................................................69
Figure 12: Column Chart.................................................................................................................................................70
Figure 13: Line Chart.......................................................................................................................................................70
Figure 14: Sample Gauge................................................................................................................................................71
Figure 15: Threshold Image - Status Critical Error.........................................................................................................82
Figure 16: Threshold Image - Status Error......................................................................................................................83
Figure 17: Threshold Image - Status Warning.................................................................................................................83
Figure 18: Threshold Image - Status Success..................................................................................................................83
Figure 19: Threshold Image - Wizard Check...................................................................................................................83
Figure 20: Threshold Image - Wizard Error....................................................................................................................83
Figure 21: Threshold Image - Help..................................................................................................................................83
Figure 22: Threshold Image - Stop..................................................................................................................................83
Figure 23: Threshold Image - Green check.....................................................................................................................83
Figure 24: Threshold Image - Info...................................................................................................................................83
Figure 25: Chart Dynamic Dataset example....................................................................................................................85
Figure 26: Chart Data with Use Report Filters disabled..................................................................................................86
Figure 27: Chart Data with Use Report Filters enabled..................................................................................................86
Figure 28: Chart Dynamic Dataset..................................................................................................................................90
Figure 29: Gauge Sample................................................................................................................................................94
Figure 30: Absolute Date Range......................................................................................................................................97
Figure 31: Available Report Definitions........................................................................................................................100
Figure 32: Report Definition Data Source Tab..............................................................................................................104
Figure 33: Anonymous Block example 1 of 5...............................................................................................................105
User Guide for the Cisco Unified Intelligence Center Reporting Application 8.0(4)
v

Figure 34: Anonymous Block example 2 of 5...............................................................................................................106
Figure 35: Anonymous Block example 3 of 5...............................................................................................................106
Figure 36: Anonymous Block example 4 of 5...............................................................................................................106
Figure 37: Anonymous Block example 5 of 5...............................................................................................................106
Figure 38: Report Definition Fields Tab........................................................................................................................107
Figure 39: Report Definitions Edit Field Properties......................................................................................................111
Figure 40: Report Definition Edit Field Format............................................................................................................113
Figure 41: Report Definition Parameters Tab................................................................................................................114
Figure 42: Report Definition Data Settings Tab............................................................................................................117
Figure 43: Navigation dropdown...................................................................................................................................158
Figure 44: Categories.....................................................................................................................................................160
Figure 45: Drawers in Unified IC Reporting.................................................................................................................163
Figure 46: Online Help Navigation Icon ......................................................................................................................167
Figure 47: Online Help Features....................................................................................................................................167
User Guide for the Cisco Unified Intelligence Center Reporting Application 8.0(4)
vi
Preface
Purpose
This guide explains the user interface and functionality in the Cisco Unified Intelligence Centerreporting application.
Audience
This guide is intended for reporting users, administrators, and developers who use the CiscoUnified Intelligence Center (Unified IC) web server to run and manage reports for the CiscoUnified Contact Center products.
This guide documents the stock objects that are installed with Unified IC and does not explaincustomization. Stock objects are Reports, Report Definitions, Data Sources, Categories, ValueLists, and Collections.
Organization
CoversThis Section
A high-level description of Unified IC, the Overview drawer,the cluster deployment model, logging in, and authentication.
Chapter 1: Product Overview(page 5)
First steps to perform when you begin to use Unified IC, basicconcepts, User Roles.
Chapter 2: Getting Started withUnified IC Reporting (page 13)
The Dashboards interface, creating and viewing dashboards,adding items to a dashboard, the dashboard slideshow.
Chapter 3: Dashboards (page?)
The Data Sources interface, the data sources that are installedwith Unified IC, how to create and edit a data source.
Chapter 4: Data Sources (page39)
User Guide for the Cisco Unified Intelligence Center Reporting Application 8.0(4)
1

CoversThis Section
The Reports interface, the stock reports that are installed withUnified IC, how to run a report, how to edit a report, how toimport reports, working with report views, charts, and gauges.
Chapter 5: Reports (page 47)
The Report Definitions interface that is offered with thePremium license, what is a report definition, the types of
Chapter 6: Report Definitions(page 99)
queries supported by Unified IC, working with a reportdefinition, the SQL syntax used with Unified IC.
The Values List and Collections interface, how value lists areassociated with report definitions, the types of collections you
Chapter 7: Value Lists andCollections (page 125)
can create for a value list, the collections that are created byUCCE User Integration.
The Scheduler interface, how to create and maintain a schedulefor a report.
Chapter 8: Scheduler (page 135)
The Security interface, the User List, User Group, Permissions,and using Run As.
Chapter 9: Security (page 141)
The Unified IC user interface, how to access the Cisco UnifiedCommunications tools, working with categories, the differencebetween stock and custom objects.
Chapter 8: System Conceptsand Navigation Controls (page157)
Troubleshooting is located online, on a customer-facing Wikipage that can be accessed by anyone who has a Cisco.comaccount:
Troubleshooting
Troubleshooting tips for the Cisco Unified Intelligence
Center1
Related Documentation
Guides for the Cisco Unified Intelligence Center (http://www.cisco.com/en/US/products/ps9755/products_user_guide_list.html)
The Bill of Materials for the Cisco Unified Intelligence Center (http://www.cisco.com/en/US/products/ps9755/products_user_guide_list.html)
Troubleshooting tips for the Cisco Unified Intelligence Center (http://docwiki.cisco.com/wiki/Troubleshooting_Unified_Intelligence_Suite)
The Developers' Forum for the Cisco Unified Intelligence Center (http://developer.cisco.com/web/ccr)
Cisco ACE 4700 Series Appliance Server Load-Balancing Configuration Guide (http://www.ciscosystems.com/en/US/docs/app_ntwk_services/data_center_app_services/ace_appliances/vA3_1_0/configuration/slb/guide/preface.html)
1) http://docwiki.cisco.com/wiki/Troubleshooting_Unified_Intelligence_Suite
User Guide for the Cisco Unified Intelligence Center Reporting Application 8.0(4)
2
Preface
Related Documentation

Conventions
This manual uses the following conventions:
DescriptionConvention
Boldface font is used to indicate commands, such as user entries,keys, buttons, and folder and submenu names. For example:
boldface font
• Choose Edit > Find.
• Click Finish.
Italic font is used to indicate the following:italic font
• To introduce a new term. Example: A skill group is acollection of agents who share similar skills.
• For emphasis. Example: Do not use the numerical namingconvention.
• A syntax value that the user must replace. Example: IF(condition, true-value, false-value)
• A book title. Example: See the Cisco CRS Installation Guide.
Window font, such as Courier, is used for the following:window font
• Text as it appears in code or that the window displays.Example: <html><title>Cisco Systems,Inc. </title></html>
Angle brackets are used to indicate the following:< >
• For arguments where the context does not allow italic, suchas ASCII output.
• A character string that the user enters but that does not appearon the window such as a password.
Obtaining Documentation and Submitting a Service Request
For information on obtaining documentation, submitting a service request, and gatheringadditional information, see the monthly What's New in Cisco Product Documentation, whichalso lists all new and revised Cisco technical documentation, at:
User Guide for the Cisco Unified Intelligence Center Reporting Application 8.0(4)
3
Preface
Conventions

http://www.cisco.com/en/US/docs/general/whatsnew/whatsnew.html
Subscribe to the What's New in Cisco Product Documentation as a Really Simple Syndication(RSS) feed and set content to be delivered directly to your desktop using a reader application.The RSS feeds are a free service and Cisco currently supports RSS version 2.0.
Documentation Feedback
You can provide comments about this document by sending email to the following address:
mailto:[email protected]
We appreciate your comments.
User Guide for the Cisco Unified Intelligence Center Reporting Application 8.0(4)
4
Preface
Documentation Feedback
Product OverviewThis chapter contains the following topics:
• About Cisco Unified Intelligence Center, page 5• Deployment Models, page 6• Databases in the Unified IC Cluster, page 7• Installation and Configuration, page 7• Accessibility, page 7• The Overview Drawer, page 8• User Authentication, page 8• Links on Unified IC Reporting Pages, page 9
About Cisco Unified Intelligence Center
Cisco Unified Intelligence Center (Unified IC) is a web-based graphical user interface thatprovides real-time and historical reporting and customizable dashboards. You can "save as" thestock reports and then edit the cloned copies by changing the order and the names of columnsand by presenting the information graphically as gauges and charts. You can also importadditional templates. The premium version of Unified IC comes with a native Report Designertool for designing new templates.
Depending on the features enabled by your license (Standard or Premium) and on your UserRole and your Unified IC object permissions, you can work in Unified IC to:
• Create, maintain, share, and view dashboards that display reports, report lists, sticky notes,scheduled reports, URLs and widgets.
• Run real-time and historical reports from Cisco stock report templates.
• Copy ("Save As") and modify the stock templates to create custom templates.
• Create views for the custom templates to display them as grids, charts, gauges.
User Guide for the Cisco Unified Intelligence Center Reporting Application 8.0(4)
5
Chapter 1
• View the status of the default data source that populates the stock templates.
Create and maintain additional data sources for reports that are populated by databases otherthan the Unified ICM/CC database.
• Control access to the reports, reporting features, and data that each user can see.
• Manage users and groups.
Note: Cisco Unified Intelligence Center reporting is one of two web-based interfaces for UnifiedIC. The other is the Administration console. The Administration console has its own userdocumentation and online help.
See Also
Stock Report Templates (page 49)
Custom templates (page 54)
Feature Set for Standard and Premium Licenses (page 166)
Unified IC User Roles (page 23)
Deployment Models
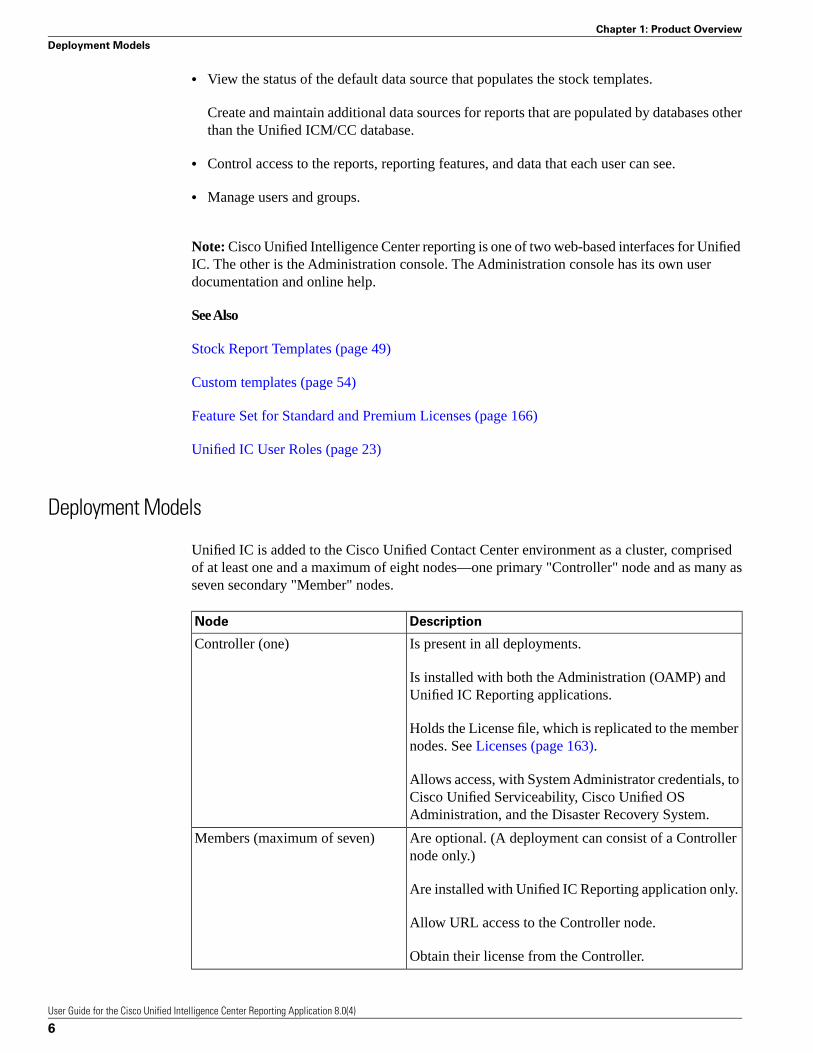
Unified IC is added to the Cisco Unified Contact Center environment as a cluster, comprisedof at least one and a maximum of eight nodes—one primary "Controller" node and as many asseven secondary "Member" nodes.
DescriptionNode
Is present in all deployments.Controller (one)
Is installed with both the Administration (OAMP) andUnified IC Reporting applications.
Holds the License file, which is replicated to the membernodes. See Licenses (page 163).
Allows access, with System Administrator credentials, toCisco Unified Serviceability, Cisco Unified OSAdministration, and the Disaster Recovery System.
Are optional. (A deployment can consist of a Controllernode only.)
Members (maximum of seven)
Are installed with Unified IC Reporting application only.
Allow URL access to the Controller node.
Obtain their license from the Controller.
User Guide for the Cisco Unified Intelligence Center Reporting Application 8.0(4)
6
Chapter 1: Product Overview
Deployment Models
Unified IC is an appliance application similar to Cisco Unified Communications Manager. Itmust be installed on dedicated servers, which must be Multimedia Communications Servers(MCS) or equivalent hardware.
Refer to the Cisco Unified Intelligence Center Bill of Materials (http://www.cisco.com/en/US/products/ps9755/products_user_guide_list.html) for server requirements and versioncompatibility.
Databases in the Unified IC Cluster
The Informix Dynamic Server (IDS) is installed on all nodes in the cluster.
The installation creates these databases on each node:
• The System database is installed on all nodes. This database is the standard Cisco CallManager database, modified for the Unified IC.
• The Unified IC database (CUIC). This database holds information on reports, dashboard,users, and other objects maintained on each server. CUIC databases are replicated across thecluster.
The CUIC and System databases are not documented and are not directly accessible forreview and management.
You can use the Command Line Interface to perform certain actions and to view databasetables and properties. These commands include run sql, various show tech commands, theutils dbreplication and utils purge commands.
• Two UCCE databases - UCCE Historical and UCCE Realtime. These databases are used torun the stock reports.
The UCCE database is documented in the Database Schema Handbook for Cisco UnifiedICM/Contact Center Enterprise & Hosted (http://www.cisco.com/en/US/products/sw/custcosw/ps1001/prod_technical_reference_list.html)
Installation and Configuration
Installation is documented in the Installation Guide for Cisco Unified Intelligence Center(http://www.cisco.com/en/US/products/ps9755/products_user_guide_list.html)
Accessibility
Software
Cisco Unified Intelligence Center software is in compliance with Part 1193 of the United StatesFederal Telecommunications Act Accessibility Guidelines.
User Guide for the Cisco Unified Intelligence Center Reporting Application 8.0(4)
7
Chapter 1: Product Overview
Databases in the Unified IC Cluster

For more information, go to this website for details on the Cisco Accessibility (http://www.cisco.com/web/about/responsibility/accessibility/index.html)
User Documentation
Due to technical limitations at this time, documentation groups are unable to fulfill alldocumentation accessibility design requirements.
Requests for improved accessibility for documentation are handled on a case-by-case basis uponrequest only.
To request a fully accessible document, please email [email protected].
Refer to the Accessibility Troubleshooting topics for tips about working in the Unified ICinterface (http://docwiki.cisco.com/wiki/Troubleshooting_Tips_for_Unified_IC_8.0).
The Overview Drawer
A successful sign in to Unified IC opens the Getting Started page. Each line of blue text on theGetting Started page is a link that opens an online help topic about one of the Unified ICfunctions.
The Getting Started page is controlled by the Overview drawer. You can always return to GettingStarted by clicking the Overview drawer. All users have access to the Overview drawer and tothe Getting Started page.
Do This:To:
Click the X on the Overview tabClose (hide) the Getting Started page
Click the Overview drawerReopen the Getting Started page
User Authentication
The url for the Unified IC reporting application is http://<HOST where HOST is theDNS name or IP Address of a Unified IC node.
Note: If you implement server load balancing, use the UP address of the Application ControlEngine (ACE) server.
Who can log in?
• The individual designated as Server Application User during the installation is automaticallyeligible to log in and is the initial System Administrator for Unified IC. This user appears bydefault on the User List Page (page 142).
– This person can sign in to Unified IC with the user name and password he or she definedduring the installation.
• Any user who has been imported with the Unified CCE User Integration feature.
User Guide for the Cisco Unified Intelligence Center Reporting Application 8.0(4)
8
Chapter 1: Product Overview
The Overview Drawer

– Once integrated (imported), UCCE supervisors can sign in to Unified IC with their ActiveDirectory User ID and Password.
– They automatically have the User Roles of Dashboard Designer and Report Designer andhave Read and Execute permissions to view collections of their (and only their) Agentand Agent teams. They can select these collections when they filter reports.
• All IMS (IP Multimedia Subsystem) users can log in using their IMS username and password.Once they log in, they are added to the CUIC database (cuic_data) and appear in the UserList Page.
– The login for these users is either CUIC\<username> or <username>. The user name iscase insensitive, but the password is case sensitive. For example, if the user name iscuicadmin, you can enter cuicadmin, CuicAdmin, and CUIC\cuicadmin.
– IMS does not perform cross-forest authentication. However, there is a workaround thatinvolves the use of Active Directory proxies. For more information, refer to How toConfigure Unified Communication Manager Directory Integration in a Multi-ForestEnvironment (http://www.cisco.com/en/US/products/sw/voicesw/ps556/products_configuration_example09186a0080b2b103.shtml).
• For all domain (LDAP) users, once the LDAP server is configured in the Administrationapplication, users in that domain can sign in to Unified IC. When they log in, they are addedto the cuic database and appear on the User List Page (page 142). The Security Administratormust assign user roles to them. To configure Active Directory in the Administrationapplication, select Cluster Configuration > Reporting Configuration > Active Directorytab.
– The login username format is <FQDN>\<username> or <subDomainName>\<username>where <subDomainName> is the name of the last level of the sub domain. For example,for <FQDN>: cuic.ccbu.cisco.com, the <SubDomainName> is cuic.
– Domain\user name is case insensitive, but password is case sensitive.
See Also
Unified IC User Roles (page 23)
Links on Unified IC Reporting Pages
Figure 1: Title Bar
DescriptionLink / Feature
Click the Cisco Systems logo icon to open the Cisco Systems website.
Cisco Logo
User Guide for the Cisco Unified Intelligence Center Reporting Application 8.0(4)
9
Chapter 1: Product Overview
Links on Unified IC Reporting Pages

DescriptionLink / Feature
By default, the Unified IC interface displays in the language thathas been established for your operating system and browser. You
Locale
can change this by clicking the locale dropdown and selecting thelanguage you want.
Setting the locale changes the language used on web pages -including the reports and their generated output, as well as the dateand time format.
Note: If your default browser language is one that Unified IC doesnot yet support, Unified IC will display the first supported languagelisted in your browser Language Preference. For example, if yourbrowser Language Preference lists Croatian, Vietnamese, and FrenchCanadian (in that order), Unified IC will default to French Canadian,which is the first language in your preferences that Unified ICsupports.
Language is session-based. You can open one instance of UnifiedIC Reporting in French Canadian and another instance in EuropeanFrench.
You can select your locale:
• At the initial log in page. To do this, click the locale dropdownunder the Password field.
• At the top of each page.
Unified IC Reporting interface and online help are available in theselanguages:
• Simpified Chinese = zh_CN
• Traditional Chinese = zh_TW
• Danish = da_DK (Denmark)
• Dutch = nl_NL (Netherlands)
• US English = en_US
• European French = fr_FR (France)
• French Canadian = fr_CA (Canada)
• German = de_DE (Germany)
• Italian = it_IT (Italy)
• Japanese = ja_JP (Japan)
User Guide for the Cisco Unified Intelligence Center Reporting Application 8.0(4)
10
Chapter 1: Product Overview
Links on Unified IC Reporting Pages

DescriptionLink / Feature
• Korean = kp_KR
• Polish = pl_PL
• Portuguese = pt_BR (Brazil)
• Russian = ru_RU (Russia)
• Spanish = es_ES (Spain)
• Swedish = sv_SE (Sweden)
• Turkish = tr_TR
Shows the user id for the user who is currently signed in.Signed On As
Opens a custom Google search for documentation relevant to CiscoUnified Intelligence Center.
Documentation Search
System Configuration Administrators can click this to clear the localcache. See Caching in Unified IC (page 26).
Synchronize Cluster
Shows the user id for the user that the Security Administrator isimpersonating or "running as". See Run As (page 155).
Run As
Click to exit Run As mode.Stop Run As
Asks for confirmation and then logs you out.Logout
Shows the version of Unified IC that you are running. Also showthe hostname and IP Address of the node.
About
The timeout for session inactivity is set by default to 14,400 seconds (four hours). It isconfigurable through the Command Line Interface: set cuic-properties session-timeout.
See Also
System Navigation Controls (page 157)
User Guide for the Cisco Unified Intelligence Center Reporting Application 8.0(4)
11
Chapter 1: Product Overview
Links on Unified IC Reporting Pages
User Guide for the Cisco Unified Intelligence Center Reporting Application 8.0(4)
12
Chapter 1: Product Overview
Links on Unified IC Reporting Pages

Getting Started with Unified IC ReportingThe System Application User (page 25) must perform these tasks so that other users can beginworking with Unified IC Reporting.
This chapter contains the following topics:
• Acquire the License File from the License Website, page 13• Sign in to the Administration Interface, page 14• Set Up Security for a Remote Data Base, page 17• Sign in to the Unified IC Reporting Interface, page 18• Unified IC Reporting: Basic Concepts, page 20• How Do I Create a User?, page 22• How Do I Run a Report?, page 23• Unified IC Reporting: Unified IC User Roles, page 23• Caching in Unified IC, page 26
Acquire the License File from the License Website
Any user in your organization can contact Cisco Systems, Inc. to request a license.
Step 1 To acquire the license file, go to the Cisco Product License Registration website at this URL:https://tools.cisco.com/SWIFT/Licensing/PrivateRegistrationServlet
Step 2 If you do not have a PAK, click the available licenses link (https://tools.cisco.com/SWIFT/Licensing/PrivateRegistrationServlet?DemoKeys=Y).
Step 3 Scroll to Voice Products and click Cisco Unified Intelligence Center - v8.0.
Step 4 Enter your MAC Address, accept the agreement, and enter your Registrant Information.
Step 5 Follow prompts to complete the registration pages.
User Guide for the Cisco Unified Intelligence Center Reporting Application 8.0(4)
13
Chapter 2
You will receive an email from Cisco Systems that contains your license file as an attachment.The file format is *.lic.
Step 6 Save the license file in a location where the System Application User (page 25) can access it.
Note: As a best practice, save a backup copy of this file. You can open a *.lic. file to look at it,but do not make any changes to it. Changing the file invalidates the license.
Sign in to the Administration Interface
The first person who signs in to the Administration application must do so using the User IDand password that were defined for the System Application User (page 25) during the installation.This user is the initial Super User for Unified IC Administration.
To sign in:
1. Enter this URL: http://<HOST ADDRESS>/oamp where HOST ADDRESS is the IPAddress or Hostname of your Controller node.
2. Enter the application user ID and password that you defined during installation.
Next step: Upload the License (page 14).
Upload the License
As soon as the Super User signs in, he or she must upload the license file. The file is uploadedto the Controller node and, within a minute, is automatically replicated to all nodes in the cluster.
Step 1 Navigate to Cluster Configuration > License Management in the Administration application.
Step 2 Click Upload license file (Browse).
Step 3 Navigate to the location where the *.lic file was saved.
Step 4 Click Apply License to load the license.
A message displays indicating that the license file was uploaded successfully and will bedistributed in the cluster in approximately one minute.
Note: The databases are polled once a minute for changes. The license replication is notimmediate but will occur within a minute.
Next step: Configure the Active Directory Server (page 15).
User Guide for the Cisco Unified Intelligence Center Reporting Application 8.0(4)
14
Chapter 2: Getting Started with Unified IC Reporting
Sign in to the Administration Interface
Configure the Active Directory Server
The initial Super User does not need to be authenticated through Active Directory.
Other users, such as Unified CVP reporting users, must be authenticated through ActiveDirectory.
You must configure the Active Directory tab in the Administration console with the credentialof Active Directory servers so that supervisors and others can log in to the Unified IC webapplication with the User Name and password that is defined in their domain.
Step 1 In the Administration application, navigate to Cluster Configuration > ReportingConfiguration and select the Active Directory tab.
Step 2 Complete all fields on this page, referring to the online help for guidance.
Step 3 Click Test Connection.
Step 4 When the connection is confirmed, click Save.
Next step: Optionally, Configure Report Scheduler Email Settings (page 15).
Optionally, Configure Report Scheduler Email Settings
Perform this step if you intend to schedule reports and to have the scheduled reports deliveredby email. You can skip this step and do this at a later time if you are not sure that you will bescheduling reports.
Step 1 From the Administration application, click Cluster Configuration > Reporting Configurationand select the Report Scheduler Email Settings tab
Step 2 Complete the fields on this tab, referring to online help for guidance.
Step 3 Test the connection.
Step 4 Save.
Next step: Optionally, Create Another Super User (page 15).
Optionally, Create Another Super User
At the initial sign in, the System Application user defined during installation is the only SuperUser recognized by the Administration application.
As a safeguard, set up at least one other Super User.
User Guide for the Cisco Unified Intelligence Center Reporting Application 8.0(4)
15
Chapter 2: Getting Started with Unified IC Reporting
Sign in to the Administration Interface
Step 1 In the Administration application, select Admin User Management drawer > Admin UserManagement to open the Admin Users page.
Step 2 Click Add New to open the Configure User page.
Step 3 Compete the General tab to define a user name and a password for the new Super User.
Step 4 Complete the Credentials tab and the Policy tab, referring to the online help for guidance.
Step 5 Save the Super User.
Until granted other roles, additional Super Users have the Login User role.
Next step: Optionally, Enable Unified CCE User Integration (page 16).
Optionally, Enable Unified CCE User Integration
Users who are configured as agent supervisors in Unified CCE Configuration Manager andsaved in the Unified ICM database can be integrated into Unified IC. If you enable UCCE UserIntegration in the Administration interface, you can schedule and run a synchronize processthat:
• Imports these supervisors and creates them as Report Designer and Dashboard users forUnified IC.
• Updates two stock value lists (Agents and Agent Teams) with collections for all supervisors'agents and agent teams.
Grants team supervisors READ and EXECUTE permissions for those collections.
Step 1 From the Administration application, click Cluster Configuration > UCCE User Integration.
Step 2 Click Enable UCCE User Integration.
Step 3 Optionally, set the schedule for time of day and days of the week when you want to userintegration. (You can return to this page and set the schedule later, after you configure the UCCEHistorical Data Source.)
Step 4 Click Save.
Step 5 Do not click Synchronize Now. (You must first configure the UCCE Historical data source.)
Next step: Set Up Reporting Data Source Security (page 17).
About Unified CCE User Integration
The Unified CCE User Integration feature imports supervisors and their teams from UnifiedICM/CCE from the Unified ICM Configuration Manager and database into Unified IC.
User Guide for the Cisco Unified Intelligence Center Reporting Application 8.0(4)
16
Chapter 2: Getting Started with Unified IC Reporting
Sign in to the Administration Interface

Supervisors are automatically given Unified IC user roles and can log in to Unified IC to accesscollections for - and run reports for - their agent team(s).
Note:
• You cannot run User Integration until you upload the license.
• There are five tasks in the initial setup for Unified CCE User Integration. Some are performedin the Administration interface. Some are performed in the Reporting interface. As the SystemApplication User (page 25) has access to both interfaces, it is efficient for a that user to setup UCCE User Integration.
The tasks are to:
• Enable Unified CCE User Integration in the Administration interface.
• Complete the configuration of the UCCE Historical Data Source in the Reporting Interface.
• Synchronize Users in the Administration Interface.
• Validate Collections of Agents and Agent Teams in the Reporting Interface.
• Set up a synchronization schedule in the Administration Interface.
Results of Unified CCE User Integration:
• Integrated Supervisors can sign in to Unified IC Reporting (provided their Active Directoryauthentication has been configured).
• Integrated Supervisors are added to the Unified IC Reporting User List with the roles ofLogin User, Report Designer and Dashboard Designer.
• The Unified IC Value Lists page is updated with Agents and Agent Teams collections.
• Integrated Supervisors can view their Agents and Agent Teams collections (Unified ICReporting > Value Lists drawer).
• Integrated Supervisors are granted permissions only to the Agents and Agent Teams collectionsthat they "own".
Once Unified CCE User Integration schedule is set up, Unified IC is updated with changes tosupervisors and their teams every time the synchronization updates.
Set Up Security for a Remote Data Base
All remote databases referred by Unified IC data sources are repositories for data that populatesUnified IC report. They must meet these specifications:
• They must be accessible to Unified IC through the network.
User Guide for the Cisco Unified Intelligence Center Reporting Application 8.0(4)
17
Chapter 2: Getting Started with Unified IC Reporting
Set Up Security for a Remote Data Base
• Their TCP/IP protocol support must be enabled.
• Their remote access must be enabled.
• They must be protected with read-only access.
• Select SQL Server & Windows Authentication. Windows Authentication is not an option.
• There must be a SQL Authentication User.
Next step: Sign in to the Unified IC Reporting Interface (page 18).
Sign in to the Unified IC Reporting Interface
The System Application User (page 25) is the initial Super User for Administration and is alsothe initial Security Administrator for the Unified IC Reporting interface. He or she uses thesame User ID and password to sign in to the Administration interface and to the Unified ICReporting interface.
To sign in to the Unified IC Reporting interface:
1. From the home page of the Administration interface, click the Control Center drawer.
2. Locate and double-click the name of the member node you want to access. This opens theCisco Unified Intelligence Center login page for that member.
3. Enter your User ID and password.
The Overview page displays.
Note: If you implement server load balancing, you need to access the Unified IC reportinginterface using http://<ACE Host> where <ACE Host> is either the DND name or the IP VLANaddress of the Application Control Engine (ACE) server.
Next step: Complete the Configuration of the UCCE Data Source (page 18).
Complete the Configuration of the UCCE Data Sources
Placeholders for two UCCE Data Sources appear by default on the Data Sources page. Theseare the data sources for the data that populates the stock templates. Before you can run reportsor can run UCCE User Integration, you must edit the parameters of these data sources to completethe configuration, including Database Host, Database port, Database Name, User ID andPassword.
The two data sources - UCCE Historical and UCCE Realtime - contain the same information,but the UCCE Historical data source typically has a lower load volume and is used to gatherdata for most of the stock value lists and for UCCE User Integration.
User Guide for the Cisco Unified Intelligence Center Reporting Application 8.0(4)
18
Chapter 2: Getting Started with Unified IC Reporting
Sign in to the Unified IC Reporting Interface
Before you can run reports or can run UCCE User Integration, you must edit the UCCE Historicaldata source to complete the configuration for the Database Host Address, Database Name, IPAddress, User ID, and Password.
To do this:
Step 1 From the Unified IC Reporting application, click the Data Sources drawer in the left panel toopen the Data Sources page.
Step 2 Select the UCCE Historical Data Source.
Step 3 Click Edit to open the Data Source Create/Edit page.
Step 4 Complete the fields for this data source, referring to online help for guidance.
Step 5 Test the data source connection. Troubleshoot if necessary.
Step 6 Save the data source.
Step 7 Repeat steps 2 through 6 for the UCCE Realtime data source.
Next step: Review the User List (page 19).
Review the User List and Set up User Roles, Permissions, and Groups
The System Application User (page 25), as the default Security Administrator, needs to reviewall the users who are on the User List, check their User Roles, assign Permissions, create UserGroups and assign users as members of groups.
Step 1 From the Unified IC Reporting application, click the Security drawer. Then click User List.
The User List is populated with the initial Security Administrator as well as all supervisors whohave been imported by UCCE User Integration.
Step 2 Select and edit each user to verify his or her User Roles and to set Permissions. Refer to theonline help for details on User Roles and Permissions.
The System Application User (page 25) (initial Security Administrator) ) has all user roles andis the owner of all stock objects, including stock data sources, stock categories. report definitions,reports, value lists and connections. The Permission preference for this user is set to EXECUTEfor both My Group and the All Users group.
Unified users who correspond to UCCE supervisors are created by UCCE User Integration andhave the Report Designer role and Dashboard Designer roles.
Step 3 From the Unified IC Reporting application, click the Security drawer. Then click User Groups.
User Guide for the Cisco Unified Intelligence Center Reporting Application 8.0(4)
19
Chapter 2: Getting Started with Unified IC Reporting
Sign in to the Unified IC Reporting Interface

There are two stock groups: AllUsers, to which all Unified IC users are automatic members of,and Administrators which System Application Users are members of. You can create additionaluser groups as indicated by your organization's needs.
Step 4 Assign users to groups. By default, every user's default parent group is AllUsers. You can assigneach user to a different group as its default parent group, and to as many as other groups asindicated by your organization's needs. Refer to the online help for details on User Groups.
Next step: Create at Least One Dashboard (page 20).
Create at Least One Dashboard
Unified IC Reporting uses dashboards to organize and orient users. The installation does notcreate a default dashboard. You must create at least one dashboard and set it with EXECUTEpermissions for the AllUsers Group. To do this:
Step 1 From the Unified IC Reporting application, click the Dashboards drawer to open the AvailableDashboards page.
Step 2 Right-click the Dashboards folder and select Create Dashboard.
This opens a dialog box that asks for a name and user permissions for the new dashboard.
Step 3 Enter the dashboard name and select EXECUTE permissions for All Users. Then click OK.
You return to the Available Dashboards page. Your new dashboard appears on the list.
Step 4 Right-click your dashboard and select View.
This opens a page where you can add items to the dashboard.
Step 5 Design the dashboard, referring to the online help if necessary.
Step 6 Save the dashboard.
Unified IC Reporting: Basic Concepts
ExplanationTerm
Dashboards are web pages that can display reports,report lists, scheduled reports, notes, and web-based
Dashboards
elements - such as URLs and widgets - that are relevantto specific workflows and responsibilities.
A data source is a connection to a database from whichreports are populated. Each data source has a
Data Sources
configuration page with the IP Address, username,
User Guide for the Cisco Unified Intelligence Center Reporting Application 8.0(4)
20
Chapter 2: Getting Started with Unified IC Reporting
Unified IC Reporting: Basic Concepts
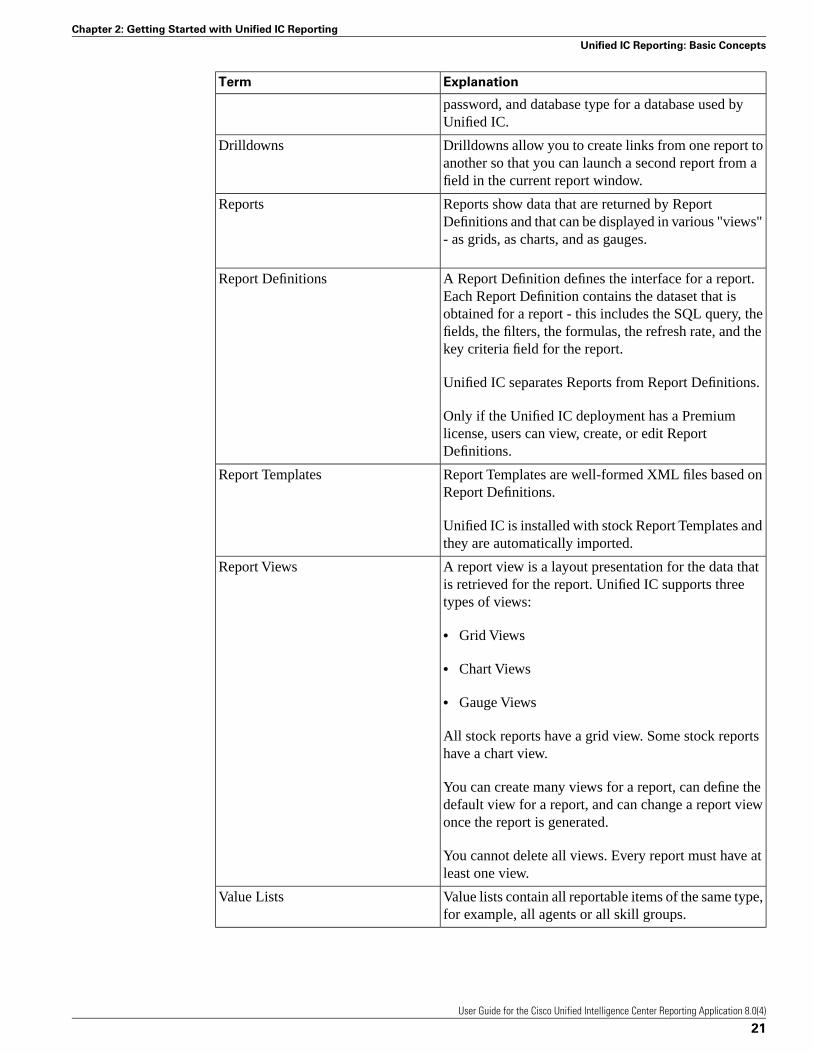
ExplanationTerm
password, and database type for a database used byUnified IC.
Drilldowns allow you to create links from one report toanother so that you can launch a second report from afield in the current report window.
Drilldowns
Reports show data that are returned by ReportDefinitions and that can be displayed in various "views"- as grids, as charts, and as gauges.
Reports
A Report Definition defines the interface for a report.Each Report Definition contains the dataset that is
Report Definitions
obtained for a report - this includes the SQL query, thefields, the filters, the formulas, the refresh rate, and thekey criteria field for the report.
Unified IC separates Reports from Report Definitions.
Only if the Unified IC deployment has a Premiumlicense, users can view, create, or edit ReportDefinitions.
Report Templates are well-formed XML files based onReport Definitions.
Report Templates
Unified IC is installed with stock Report Templates andthey are automatically imported.
A report view is a layout presentation for the data thatis retrieved for the report. Unified IC supports threetypes of views:
Report Views
• Grid Views
• Chart Views
• Gauge Views
All stock reports have a grid view. Some stock reportshave a chart view.
You can create many views for a report, can define thedefault view for a report, and can change a report viewonce the report is generated.
You cannot delete all views. Every report must have atleast one view.
Value lists contain all reportable items of the same type,for example, all agents or all skill groups.
Value Lists
User Guide for the Cisco Unified Intelligence Center Reporting Application 8.0(4)
21
Chapter 2: Getting Started with Unified IC Reporting
Unified IC Reporting: Basic Concepts
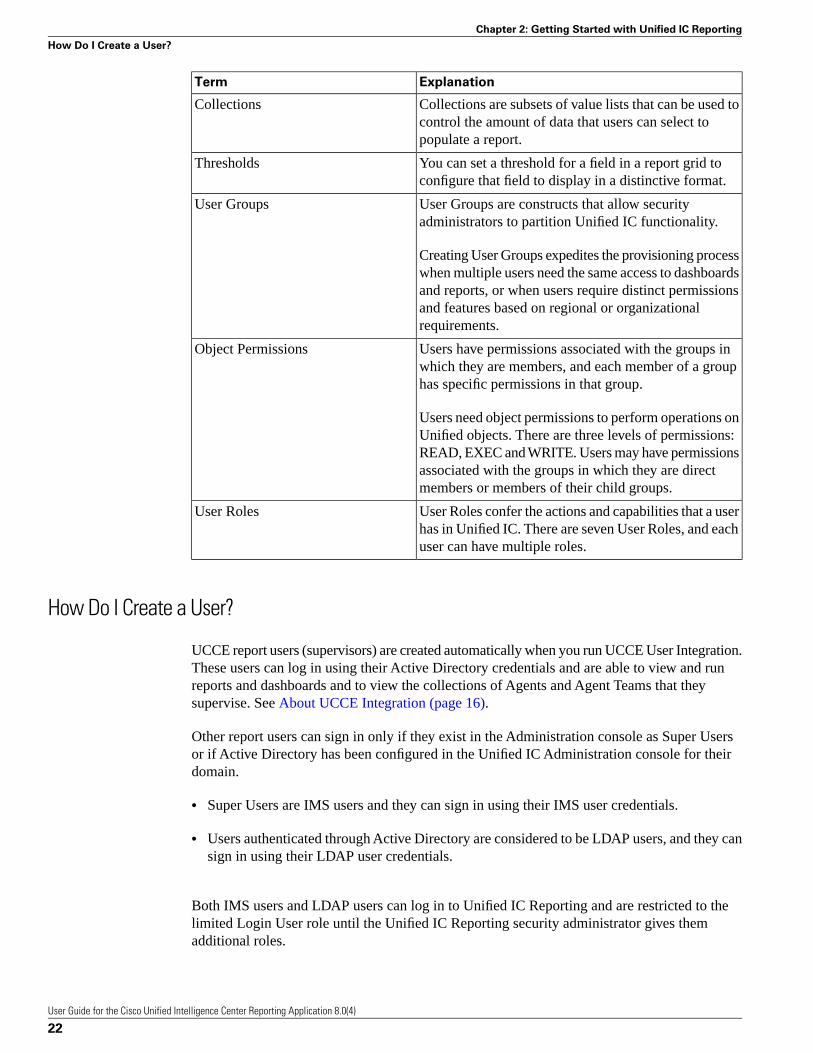
ExplanationTerm
Collections are subsets of value lists that can be used tocontrol the amount of data that users can select topopulate a report.
Collections
You can set a threshold for a field in a report grid toconfigure that field to display in a distinctive format.
Thresholds
User Groups are constructs that allow securityadministrators to partition Unified IC functionality.
User Groups
Creating User Groups expedites the provisioning processwhen multiple users need the same access to dashboardsand reports, or when users require distinct permissionsand features based on regional or organizationalrequirements.
Users have permissions associated with the groups inwhich they are members, and each member of a grouphas specific permissions in that group.
Object Permissions
Users need object permissions to perform operations onUnified objects. There are three levels of permissions:READ, EXEC and WRITE. Users may have permissionsassociated with the groups in which they are directmembers or members of their child groups.
User Roles confer the actions and capabilities that a userhas in Unified IC. There are seven User Roles, and eachuser can have multiple roles.
User Roles
How Do I Create a User?
UCCE report users (supervisors) are created automatically when you run UCCE User Integration.These users can log in using their Active Directory credentials and are able to view and runreports and dashboards and to view the collections of Agents and Agent Teams that theysupervise. See About UCCE Integration (page 16).
Other report users can sign in only if they exist in the Administration console as Super Usersor if Active Directory has been configured in the Unified IC Administration console for theirdomain.
• Super Users are IMS users and they can sign in using their IMS user credentials.
• Users authenticated through Active Directory are considered to be LDAP users, and they cansign in using their LDAP user credentials.
Both IMS users and LDAP users can log in to Unified IC Reporting and are restricted to thelimited Login User role until the Unified IC Reporting security administrator gives themadditional roles.
User Guide for the Cisco Unified Intelligence Center Reporting Application 8.0(4)
22
Chapter 2: Getting Started with Unified IC Reporting
How Do I Create a User?

Although you can create a user on the Unified IC User List page, an entry on the User List isnot sufficient for that user to be able to sign in to Unified IC. One reason to create users on theUser List page is to expedite the assigning of roles to users before they sign in.
How Do I Run a Report?
To run a report:
1. Sign in to the Unified IC application.
2. Click the Reports drawer.
3. Open Report Category folders until you locate the report you want.
The Stock reports are listed under Reports > Stock > UCCE.
Figure 2: Stock Templates
4. Double-click the report name, or right-click the name and select Run.
Unified IC Reporting: Unified IC User Roles
There are seven User Roles, and a user can be assigned to one, any, or all of them.
Depending on the size, staff, geographical distribution, and security practices of your call center,you might prefer to assign multiple user roles to a few people or to distribute user roles to manypeople.
These are the User Roles for Unified IC:
• Login User
By default, everyone who signs in to Unified IC for the first time is a Login User. LoginUsers have that role and only that role until the Security Administrator assigns additionalroles or deactivates (removes) the Login User role.
User Guide for the Cisco Unified Intelligence Center Reporting Application 8.0(4)
23
Chapter 2: Getting Started with Unified IC Reporting
How Do I Run a Report?

Only a Security Administrator can assign additional user roles to a user or remove any roleincluding Login role from any user. If a user does not have the Login Role, he can no longeraccess the reporting interface..
An active login user can:
– Log in to Unified IC
– Open the Security drawer, access the User List, and edit his own User Information page;for example, to change his alias or phone number.
• System Configuration Administrator
This user has all the rights of an active Login User and also:
– Has full access to the Data Sources drawer and its functions.
– Has full access to the Scheduler drawer and its functions.
– Can delete, import, and export stock reports.
– Can click the Synchronize Cluster button to clear the local cache.
• Security Administrator
This user has all the rights of an active Login User and also has full access to the Securitydrawer and its functions.
• Dashboard Designer
This user has all the rights of an active Login User and also has full access to the Dashboarddrawer.:
• Report Designer
This user has all the rights of an active Login User and also:
– Has full access to the Reports drawer.
– Has View (Read) access to the Data Sources and Value Lists drawers
– Can access the Scheduler drawer to work with own reports.
• Report Definition Designer
This user has all the rights of an active Login User and also:
– Has full access to the Report Definition drawer.
– Has View (Read) access to the Data Sources and Value Lists drawers
• Value List Collection Designer
User Guide for the Cisco Unified Intelligence Center Reporting Application 8.0(4)
24
Chapter 2: Getting Started with Unified IC Reporting
Unified IC Reporting: Unified IC User Roles

This user has all the rights of an active Login User and also:
– Has full access to the Value List drawer.
– Has View (Read) access to the Data Sources drawer.
Other Users
In addition to the seven designated Unified IC User Roles, the following individuals have accessto Unified IC as follows:
UCCE Supervisors
Supervisors who are imported when UCCE User Integration is enabled. They become UnifiedIC users and are automatically give these roles. They:
• Are Active Login Users.
• Are Dashboard Designers.
• Are Report Designers and can run and schedule reports for the agents and agent teams theysupervise.
• Can view their own Agent and Agent Team collections that are imported during UCCE UserIntegration.
System Application User
This is not a Unified IC role. This role is defined during installation. You set credentials for thisuser during the installation of all nodes. As a best practice, use the same Application Usercredentials for all nodes.
The Application user who is configured during the installation of the Controller node is is bydefault the initial Super User for the Adminstration console and has full rights to all functionsin the Administration and Unified IC reporting applications.
This user:
• Is the user who is configured as the Application User during installation.
• Is the initial Super User in the Administration console.
• Can create additional Super Users in the Administration application.
• Can sign in to Unified IC and has full rights to all functions in Unified IC.
• Is the initial Security Administrator user in the Unified IC reporting application
User Guide for the Cisco Unified Intelligence Center Reporting Application 8.0(4)
25
Chapter 2: Getting Started with Unified IC Reporting
Unified IC Reporting: Unified IC User Roles

• Can create additional Security Administrator users in the Unified IC reporting application.
• Cannot have any role taken away from him.
• Cannot take any role away from himself.
System Administration User
The System Administrator account User ID and password are configured at installation for eachnode. It is a best practice to enter the same user name and password for all nodes.
The System Administrator for the Controller can access:
• The Cisco Systems tools on the Navigation dropdown in the Administration console: DisasterRecovery System, Cisco Unified Serviceability, and Cisco Unified OS Administrationinterfaces.
• The CLI for the Controller.
The System Administrator has no access to functions in the Unified IC reporting application.
Note: If you configure unique System Administrator credentials for Member nodes, use thosecredentials to access the CLI for those Member servers.
Caching in Unified IC
Unified IC uses a cache to optimize access to the local configuration database (CUIC). Thiscache is built on top of the local configuration database. Using database replication, the contentsof every node's CUIC database are kept in sycnchronization with the other nodes in the cluster.
The Unified IC architecture is designed to provide a highly scalable cluster in which every nodemanages its own local cache independently of other nodes. Whenever an item stored in the localcache (such as a report template or a dashboard) is modified, a message is sent to other nodesin the cluster indicating that that item has been modified and that their version of that item isstale.
Upon receipt of the message, each node invalidates its own references to the stale item in thelocal cache. In this manner, all nodes remain synchronized. There are a few exceptional caseswhere stale data can be re-cached or become out of synch in the cluster. For this reason, theUnified IC System Configuration Administrator has access to a link on the menubar calledSynchronize Cluster.
Clicking this link and confirming notifies all nodes in the cluster to clear their local cache andsynchronizes and empties all caches in the cluster. Clearing the locale cache forces each nodeto go directly to the database for the requested information.
User Guide for the Cisco Unified Intelligence Center Reporting Application 8.0(4)
26
Chapter 2: Getting Started with Unified IC Reporting
Caching in Unified IC
As each node gets fresh data from the database, the new data is automatically put into the localcache and accessed during future requests. Data will be consistent in the database, and therewill be no loss of information.
Note: It is best to perform this action during off-hours.
User Guide for the Cisco Unified Intelligence Center Reporting Application 8.0(4)
27
Chapter 2: Getting Started with Unified IC Reporting
Caching in Unified IC

User Guide for the Cisco Unified Intelligence Center Reporting Application 8.0(4)
28
Chapter 2: Getting Started with Unified IC Reporting
Caching in Unified IC
DashboardsThe Unified IC interface is organized by dashboards.
Dashboards are web pages that can display reports, scheduled reports, sticky notes, and web-basedelements such as URLs and web widgets that are relevant to specific workflows andresponsibilities.
For example, if your call center team supports a clothing retailer, it might be useful to create adashboard with several versions of a real-time call activity report (a grid and a chart) as well asthe URL for the retailer's web page.
Click the Dashboards drawer in the left panel to open the Available Dashboards Page (page30). (Only users with the Dashboard Designer user role can open the Dashboards drawer.) Thedashboards you see when you open the Dashboards drawer are those you have created and thosethat other users have created and have given you permission to view.
Note:
• All dashboards must be created by a Dashboard Designer.
• Unified IC is not installed with a default dashboard.
• All actions on the Dashboards interface are based on User Role and on the user's objectPermissions for dashboards and for Categories. See About Permissions (page 152).
See also:
Troubleshooting Dashboards (http://docwiki-dev.cisco.com/wiki/Troubleshooting_Tips_for_Unified_IC_8.0)
This chapter contains the following topics:
• Available Dashboards Page, page 30• Create a Dashboard, page 31• View a Dashboard, page 31
User Guide for the Cisco Unified Intelligence Center Reporting Application 8.0(4)
29
Chapter 3

• Add Dashboard Items, page 32• Dashboard Slideshow, page 36• Rename a Dashboard, page 36• Delete a Dashboard, page 37
Available Dashboards Page
You can manage dashboards from the Available Dashboards page - the page that opens whenyou click the Dashboards drawer.
Dashboards are contained in categories and sub-categories. Unified IC is installed with one
default dashboard category named Dashboards1. All dashboards and sub-categories that yourorganization creates are nested under Dashboards. You can rename Dashboards. You cannotdelete the Dashboards category.
Figure 3: Available Dashboards page
Actions from this page
• Refresh - updates both the Available Dashboards page and the tree under the Dashboardsdrawer to reflect changes anyone has made to add, modify, or delete dashboards or dashboardcategories.
• Help - opens online help for the page.
• X on the tab heading - closes the page.
• Work with Categories
– Create Sub-category (page 161) from a category or a sub-category.
– Delete Sub-category (page 161)
– Rename Sub-category (page 161)
– Set permissions for the sub-category. See About Permissions (page 152).
• Drag and drop - You can drag and drop (page 161) dashboards and sub-categories.
1) Initially, this category contains no dashboards.
User Guide for the Cisco Unified Intelligence Center Reporting Application 8.0(4)
30
Chapter 3: Dashboards
Available Dashboards Page

• Copy and use the dashboard permalink (page 31)- To retrieve the permalink, right click onthe dashboard for which you want to copy the permalink in dashboards tree and click onHtml Link.
Dashboard permalink
Note: This is a premum feature available only to users having the PREMIUM license.If youhave a STANDARD license, you cannot use the dashboard permalink feature.
Unified IC now supports Permalink to a dashboard. To retrieve the permalink, right click onthe dashboard in dashboards tree, click on Html Link and copy the permalink.
Similar to the other type of permalinks, dashboard permalink can be disabled by uncheckingEnable Links check box.
Click Pop Out to Open the dashboard permalink in a new, separate browser display window.The popout has no Unified IC edit or toolbar functions. Click x to close the popout.
Note: If the dashboard has got report widgets, then ensure that the default filter is set for thesereports. Filters cannot be saved for stock reports since they are not editable. The recommendedoption is to make a copy of the stock report, set the default filter, check the Bypass Filter Dialogcheckbox, save it, and add the report copy to the dashboard.
Create a Dashboard
To create a dashboard, right-click on Dashboards or on a sub-category on the AvailableDashboards Page (page 30). Then click Create Dashboard.
This opens a dialog box that requests a name and Default Permissions for the dashboard.
1. Enter a name (using a maximum of 50 characters).
2. Define the permissions for My Group and the All Users group. See About Permissions(page 152).
3. Click OK. This adds the new dashboard to the Dashboards page.
4. To add content to the new dashboard, right-click its icon and select View. See View aDashboard (page 31).
View a Dashboard
If you have the EXECUTE permission, you can view a dashboard, based on your permissionfor the dashboard's category. (If you cannot READ the category, you cannot locate the dashboard,even if you have EXECUTE or WRITE permission for the dashboard.)
User Guide for the Cisco Unified Intelligence Center Reporting Application 8.0(4)
31
Chapter 3: Dashboards
Create a Dashboard

To access this function, click a dashboard or right-click a dashboard and select View.
Actions from this page
• Add - opens a dialog where users with the permission to do so can Add Dashboard Items(page 32). By default, the new dashboard is empty (has no items). A user who is a DashboardDesigner but who does not have the WRITE permission can add items to a dashboard butwill not be able to save the added items.
• Save - saves changes you make to the dashboard.
• Refresh - updates the dashboard to reflect changes anyone has made to it.
• Pop Out - Opens the dashboard permalink in a new, separate browser display window. Thepopout has no Unified IC edit or toolbar functions. Click x to close the popout.
• Slideshow - select this to view the dashboard items as a Dashboard Slideshow (page 36).This is disabled until you have added items to the dashboard.
• Help - opens online help.
• X on the tab heading - closes the dashboard.
Add Dashboard Items
If you have the EXECUTE permission, you can add content to a new dashboard and can modifythe content of an existing dashboard.
You can add the following items to a dashboard: Reports, Scheduled Reports, URLs, Widgets,and Sticky Notes.
After you add an item, move or resize it if necessary. Then click Save.
Actions for Dashboard items:
• Move - Newly-added items overlap existing items. Click the item titlebar and drag the itemso that it does not obscure the item beneath it.
• Resize - To resize dashboard items, click the bottom right corner.
• Display item properties - Click the pencil (/ ) image in the item menu to open item settingsfor editing.
• Minimize Click the _ image in the top right corner to minimize an item.
• Delete - Click the x image in the top right corner to delete an item.
User Guide for the Cisco Unified Intelligence Center Reporting Application 8.0(4)
32
Chapter 3: Dashboards
Add Dashboard Items

Add a Report
Step 1 Open the Dashboard and click Add.
Step 2 Enter a title for the report you are adding.
Step 3 Select type Report.
Step 4 Retain the default parameters for size and position or change them to your preferred parameters.
Step 5 Select a report by clicking the arrow next to the Reports folder and then clicking a radio buttonfor the report name.
Step 6 Click OK to return to the dashboard.
You might need to collapse the category to see the OK button.
Step 7 If necessary, move the report to a better location on the dashboard.
Step 8 Click Save.
Figure 4: Adding a Report to a Dashboard
Reports that you add to a dashboard are refreshed, and you can scroll up and down and canresize them on the dashboard.
Note: If you want a dashboard to display both a grid view and a chart view of the same report,you need to create a SaveAs version of the report with a chart view and select both the grid andthe chart for the dashboard display.
Add a Scheduled Report
Step 1 Open the Dashboard and click Add.
User Guide for the Cisco Unified Intelligence Center Reporting Application 8.0(4)
33
Chapter 3: Dashboards
Add Dashboard Items
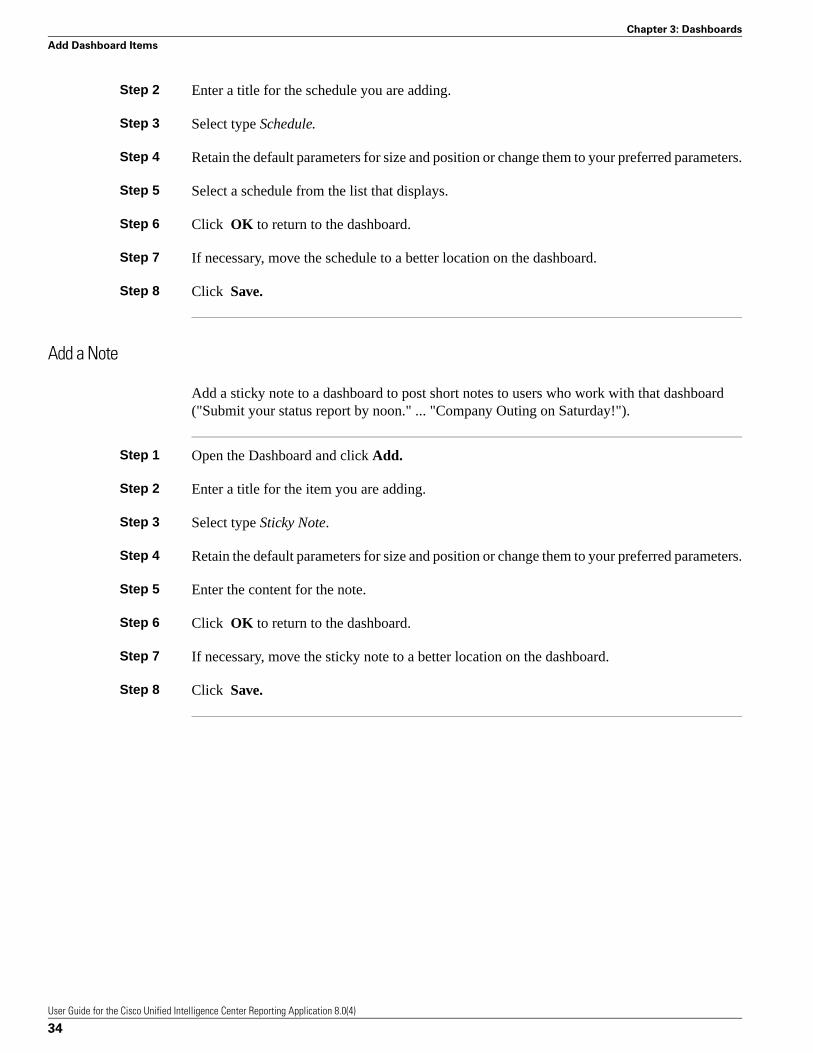
Step 2 Enter a title for the schedule you are adding.
Step 3 Select type Schedule.
Step 4 Retain the default parameters for size and position or change them to your preferred parameters.
Step 5 Select a schedule from the list that displays.
Step 6 Click OK to return to the dashboard.
Step 7 If necessary, move the schedule to a better location on the dashboard.
Step 8 Click Save.
Add a Note
Add a sticky note to a dashboard to post short notes to users who work with that dashboard("Submit your status report by noon." ... "Company Outing on Saturday!").
Step 1 Open the Dashboard and click Add.
Step 2 Enter a title for the item you are adding.
Step 3 Select type Sticky Note.
Step 4 Retain the default parameters for size and position or change them to your preferred parameters.
Step 5 Enter the content for the note.
Step 6 Click OK to return to the dashboard.
Step 7 If necessary, move the sticky note to a better location on the dashboard.
Step 8 Click Save.
User Guide for the Cisco Unified Intelligence Center Reporting Application 8.0(4)
34
Chapter 3: Dashboards
Add Dashboard Items

Figure 5: Dashbord with Sticky Note
Add a URL
Add a Uniform Resource Locator (URL) to embed a web page that opens from that URL to thedashboard.
Step 1 Open the Dashboard and click Add.
Step 2 Enter a title for the item you are adding.
Step 3 Select type URL.
Note:
• If you do not begin the URl with http://, the http protocol is assumed.
• The resulting behavior for an invalid URL depends on the browser.
Step 4 Retain the default parameters for size and position or change them to your preferred parameters.
Step 5 Type or paste the URL in the Content field.
Step 6 Click OK to return to the dashboard.
Step 7 If necessary, move the URL item to a better location on the dashboard.
Step 8 Click Save.
Add a Widget
Add a web widget (a Javascript-based widget) to embed an application (such as a video or acalculator) that runs from that widget into the dashboard.
User Guide for the Cisco Unified Intelligence Center Reporting Application 8.0(4)
35
Chapter 3: Dashboards
Add Dashboard Items

This is an advanced feature that should be used by those familiar with web development. UnifiedIC is not installed with any canned widgets, but you can copy them from online sources suchas www.widgetbox.com.
Step 1 Open the Dashboard and click Add.
Step 2 Enter a title for the item you are adding.
Step 3 Select type Widget.
Step 4 Retain the default parameters for size and position or change them to your preferred parameters.
Step 5 Copy the code from a widget you have found on the Internet; then paste it in the Content fieldof the dialog.
Step 6 Click OK to return to the dashboard.
Step 7 If necessary, move the widget item to a better location on the dashboard.
Step 8 Click Save.
Dashboard Slideshow
Use the slideshow mode to cycle through all items on the dashboard.
Note: If a dashboard has only one item, you can run a slideshow, but you will not notice achange.
Actions from this page
• Pause - halts the slideshow on current item.
• Play - starts the slideshow.
• Stop - stops the slideshow and returns you to the dashboard.
• Set Interval - opens a field where you can set the interval in seconds for the slideshow cycles.The minimum interval is 1 second. The maximum is 900 seconds.
Rename a Dashboard
With the WRITE permission, you can rename a dashboard.
To rename a dashboard:
1. Right-click its icon and select Rename. This opens a dialog box with a Rename To field.
User Guide for the Cisco Unified Intelligence Center Reporting Application 8.0(4)
36
Chapter 3: Dashboards
Dashboard Slideshow

2. Enter a new name (using a maximum of 50 characters) and click Rename to proceed.Click Cancel to keep the original name.
Delete a Dashboard
With the WRITE permission, you can delete a dashboard.
To delete a dashboard:
• Right-click its icon and select Delete.
• Click Yes to confirm the deletion. Click No to cancel.
User Guide for the Cisco Unified Intelligence Center Reporting Application 8.0(4)
37
Chapter 3: Dashboards
Delete a Dashboard
User Guide for the Cisco Unified Intelligence Center Reporting Application 8.0(4)
38
Chapter 3: Dashboards
Delete a Dashboard

Data SourcesA data source represents a database. Each reporting server requires one data source for eachdatabase from which reports are to be populated.
Note:
• This release of Unified IC supports MS SQL Server and Informix databases.
• This release supports Data Source connections across a wide area network.
• This release does not support Windows Authentication to an MS SQL Server database. UseSQL authentication only.
Data Sources Drawer: Click the Data Sources drawer in the left panel to open the Data SourcesPage (page 40). (Only users with the System Configuration Administrator user role can accessthe full functions of this drawer.)
Note: All actions on the Data Source interface are based on User Role and on the user's objectPermissions for data sources. See About Permissions (page 152).
See also:
Troubleshooting Data Sources (http://docwiki-dev.cisco.com/wiki/Troubleshooting_Tips_for_Unified_IC_8.0)
This chapter contains the following topics:
• Data Sources Page, page 40• Create/Edit a Data Source, page 42• Delete a Data Source, page 44• Mapping to Multiple Databases, page 44
User Guide for the Cisco Unified Intelligence Center Reporting Application 8.0(4)
39
Chapter 4

Data Sources Page
This page opens when you click the Data Sources drawer. After a new installation, this pageshows the following Data Sources:
• The Unified IC data source (CUIC).
– A Data Source for the Unified IC database is added by the installer. This database holdstables for objects such as reports, dashboards, value lists, and users that are added andmaintained on that member node. The CUIC data source for each member is replicatedacross the cluster.
– You can edit the description for the CUIC data source, but do not change other fields. TheCUIC data source for each node is configured by default to point to that member.
• The UCCE Historical data source
– This data source is added by default to support the Unified ICM/CC stock historical reportsand UCCE User Integration.
– You need to complete the Database Host, Database Name, and the Database User ID andPassword fields for this data source and to make sure it is online before Unified CCE UserSynchronization can occur.
• The UCCE Realtime data source
– This data source is added by default to support the Unified ICM/CC stock real time reports.
– You need to complete the Database Host, Database Name, and the Database User ID andPassword fields for this data source.
Depending on your enviroment, the UCCE Historical and UCCE Realtime data sources canpoint to the same machine.
You have the option to execute a CLI command such that each node points to a unique IPAddress for the UCCE Historical or Realtime data source. The command is set cuic-propertieshost-to-ip. The Command Line Interface is documented in the Administration Console UserGuide for Cisco Unified Intelligence Center. See Mapping to Multiple Data Sources (page 44).
Figure 6: Data Sources
User Guide for the Cisco Unified Intelligence Center Reporting Application 8.0(4)
40
Chapter 4: Data Sources
Data Sources Page
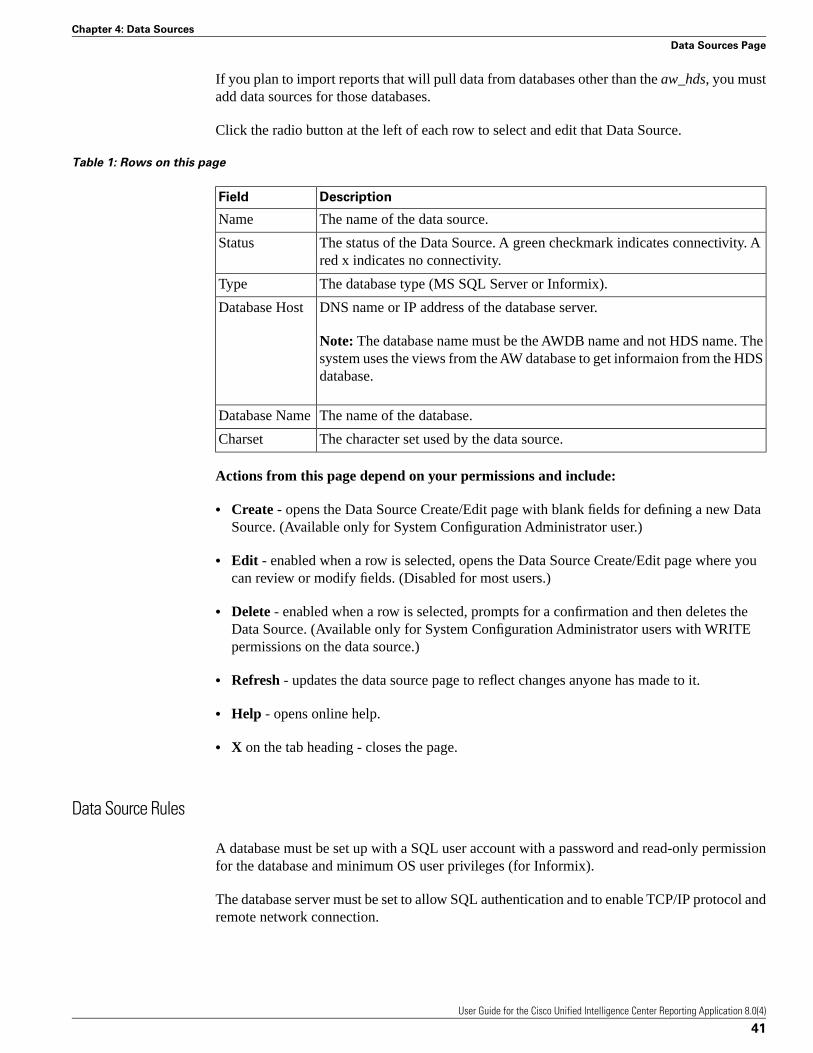
If you plan to import reports that will pull data from databases other than the aw_hds, you mustadd data sources for those databases.
Click the radio button at the left of each row to select and edit that Data Source.
Table 1: Rows on this page
DescriptionField
The name of the data source.Name
The status of the Data Source. A green checkmark indicates connectivity. Ared x indicates no connectivity.
Status
The database type (MS SQL Server or Informix).Type
DNS name or IP address of the database server.Database Host
Note: The database name must be the AWDB name and not HDS name. Thesystem uses the views from the AW database to get informaion from the HDSdatabase.
The name of the database.Database Name
The character set used by the data source.Charset
Actions from this page depend on your permissions and include:
• Create - opens the Data Source Create/Edit page with blank fields for defining a new DataSource. (Available only for System Configuration Administrator user.)
• Edit - enabled when a row is selected, opens the Data Source Create/Edit page where youcan review or modify fields. (Disabled for most users.)
• Delete - enabled when a row is selected, prompts for a confirmation and then deletes theData Source. (Available only for System Configuration Administrator users with WRITEpermissions on the data source.)
• Refresh - updates the data source page to reflect changes anyone has made to it.
• Help - opens online help.
• X on the tab heading - closes the page.
Data Source Rules
A database must be set up with a SQL user account with a password and read-only permissionfor the database and minimum OS user privileges (for Informix).
The database server must be set to allow SQL authentication and to enable TCP/IP protocol andremote network connection.
User Guide for the Cisco Unified Intelligence Center Reporting Application 8.0(4)
41
Chapter 4: Data Sources
Data Sources Page

The database port must not be blocked by firewalls, routers, or any other security software (suchas Cisco Security Agent).
The following are not supported:
• Windows integrated authentication connection to MS SQL Server.
• Automatic failover to a different database.
• A data source that points to more than one database.
Create/Edit a Data Source
Use this page to add a new data source.
Step 1 Select Data Sources drawer > Data Sources page > Create to open the Data Sources createpage.
Step 2 Complete fields on this page as follows:
ValueField
Enter the name of the data source.Name
When users create Report Definitions and Value Lists,they see only the name of the data sources. As a BestPractice, to benefit those users, give a meaningfulname to a new Data Source.
Enter a description for this data source.Description
Select a value from the list. Options are Informix andMS SQL Server.
Type
Type is disabled in Edit mode.
In a single-node deployment, enter the DNS name orIP address of the database server.
Database Host
In a multinode cluster, use the DNS name. Do not usethe IP address. See Mapping to Multiple Data Sources(page 44).
Enter the port for the databasePort
For SQL Server, leave this field blank to use thedefault port (1433).
Enter the database name.Database Name
Required for Informix. Specify the server instancename of the Informix database you are connecting to.
Instance
The environment INFORMIXSERVER on the
User Guide for the Cisco Unified Intelligence Center Reporting Application 8.0(4)
42
Chapter 4: Data Sources
Data Sources Page

ValueField
Informix database server should contain the instanceinformation.
Optional for SQL Server. For the UCCE data source,leave this field blank. The Unified ICM/CC databasedoes not use instance names.
Select the correct timezone for the data stored in thedatabase.
Timezone
Enter the ID for the user who is authorized to accessthe database.
Database User ID
Enter and confirm the password for the database user.Password and Confirm Password
The character set used by the database.Charset
The default character set is ISO-8859-1 (Latin 1).
If your database uses Non-Latin-1 encoding, selectthe appropriate character set for your locale from thedropdown.
If the character set is not correct, the data source mayfail to connect to the database or reports may not bereadable.
This must be UTF-8 for the Unified CVP Informixdatabase.
View or edit the permissions for this datasource forMY Group and for the All Users group. See AboutPermissions (page 152).
Default Permissions
Step 3 Test the database connection before you save the data source.
Actions from this page:
• Save - saves your new entry or changes to the fields.
• Cancel - cancels your changes and closes the page.
• Test Connection - tests that the Data Source is online. If the status is Offline, review theerror message to determine the cause and edit the data source accordingly. Repeat the stepsuntil the data source is Online.
– If the data source is offline or there is a connection issue, an error message button labeledShow Error Details becomes available on the Data Sources page. Click this button to seethe error message provided from the database.
User Guide for the Cisco Unified Intelligence Center Reporting Application 8.0(4)
43
Chapter 4: Data Sources
Data Sources Page

– Note: When the database type is Informix, the error message may be a generic one andmay not provide detail about why the connection failed.
• Help - opens online help.
• X on the tab heading - closes the page.
Delete a Data Source
To delete a data source, click the radio button to the left of the data source name and then clickDelete.
Click Yes to confirm the deletion. Click No to cancel.
Both Yes and No generate another dialog box confirming your action to delete or to cancel thedeletion. Click OK to confirm the deletion.
Note: Data sources are referenced by Report Definitions and Value Lists. When you delete adata source that is used by Report Definitions and/or Value Lists, you see a message that youcannot delete the data source until the dependent value lists or report definitions are deleted orare updated to reference another data source.
Mapping to Multiple Databases
Unified 8.0 is a clustered solution, and every node is installed with stock reports that run againstthe Unified CCE realtime and historical databases.
It might be the case that a single Unified CCE database is unable to support an entire clustersimultaneously. You can distribute the reporting load to several Unified CCE databases usingthe Command Line Interface and conventional name resolution.
If there is a need to direct a specific Member node to database host other than the one in DataSources, you can use the set cuic-properties host-to-ip command to resolve the data sourcename differently on each node.
Using this command at each Member node, it is possible to define a unique mapping so thatdifferent nodes map the same database name to a different IP Address as follows:
For example, if the Datasource host for the UCCE Historical datasource is sprhds2.krypton.icm:
User Guide for the Cisco Unified Intelligence Center Reporting Application 8.0(4)
44
Chapter 4: Data Sources
Delete a Data Source

Figure 7: Mapping the Data Source
Then to map the UCCE Historical data source for Member_Node_2 to a unique IP Address,access the CLI from Member_Node_2 and enter the command: set cuic-properties host-to-ipsprhds2.krypton.icm <hds ip-address> .
The Command Line Interface is documented in the Administration Console User Guide forCisco Unified Intelligence Center. With this command, you map the host name with an IPAddress.
You can use this method for any data source.
Note: Avoid using DNS. The mapping is from a name to an IP Address, but the name is notnecessarily a DNS name.
User Guide for the Cisco Unified Intelligence Center Reporting Application 8.0(4)
45
Chapter 4: Data Sources
Mapping to Multiple Databases

User Guide for the Cisco Unified Intelligence Center Reporting Application 8.0(4)
46
Chapter 4: Data Sources
Mapping to Multiple Databases
ReportsReports show data returned by Report Definitions. This data is extracted by database queriesand can be displayed in various Report Views (page 68) - as grids, as charts, and as gauges.
Unified IC is installed with Cisco stock reports. All stock reports have one default grid view.Some stock reports also have a chart view.
Users with the Report Designer User Role can click the Reports drawer to open the AvailableReports Page (page 48).
Note: All actions on the Reports interface are based on User Role and on the user's objectPermissions for reports and for Categories. See About Permissions (page 152).
See also:
Troubleshooting Reports (http://docwiki-dev.cisco.com/wiki/Troubleshooting_Tips_for_Unified_IC_8.0)
This chapter contains the following topics:
• Available Reports Page, page 48• Stock Report Templates, page 49• Reports and Report Definitions, page 54• Manage Reports, page 54• Importing Reports, page 55• Running a Report, page 57• Filtering Reports, page 58• The Report Viewer, page 62• Report Editor, page 63• Creating Reports, page 65• Renaming a Report, page 66• Exporting a Report, page 67• Deleting a Report, page 67• Report Views, page 68
User Guide for the Cisco Unified Intelligence Center Reporting Application 8.0(4)
47
Chapter 5
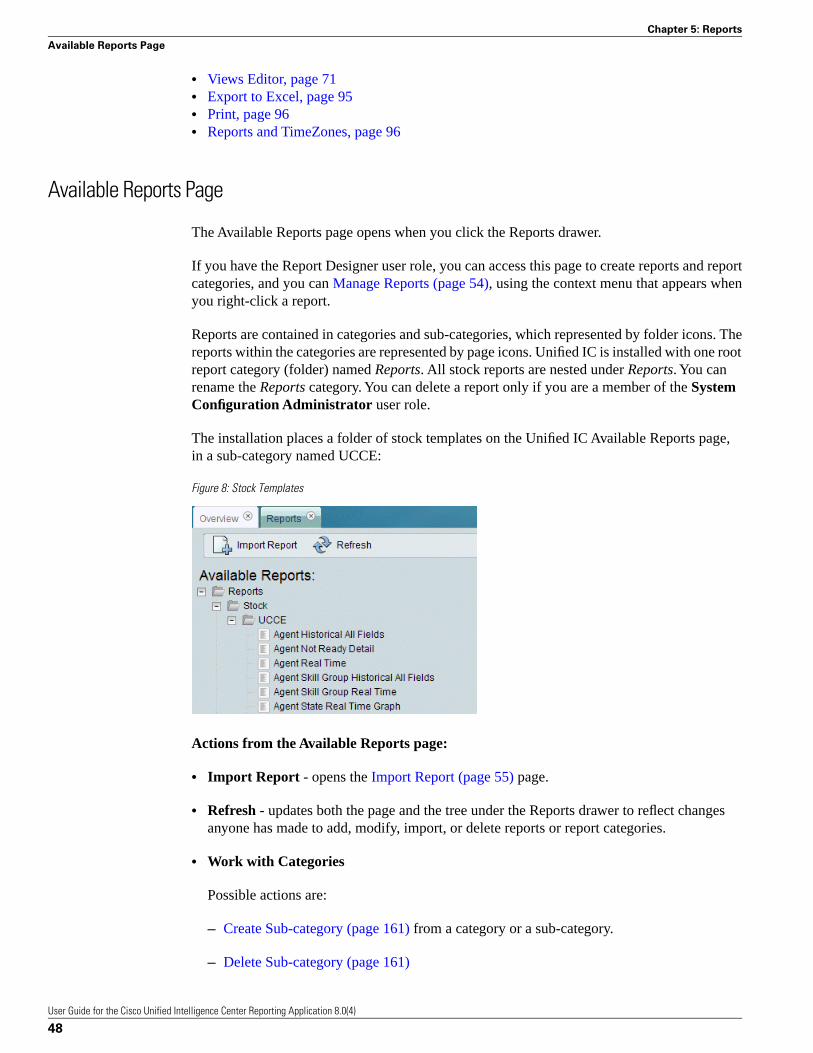
• Views Editor, page 71• Export to Excel, page 95• Print, page 96• Reports and TimeZones, page 96
Available Reports Page
The Available Reports page opens when you click the Reports drawer.
If you have the Report Designer user role, you can access this page to create reports and reportcategories, and you can Manage Reports (page 54), using the context menu that appears whenyou right-click a report.
Reports are contained in categories and sub-categories, which represented by folder icons. Thereports within the categories are represented by page icons. Unified IC is installed with one rootreport category (folder) named Reports. All stock reports are nested under Reports. You canrename the Reports category. You can delete a report only if you are a member of the SystemConfiguration Administrator user role.
The installation places a folder of stock templates on the Unified IC Available Reports page,in a sub-category named UCCE:
Figure 8: Stock Templates
Actions from the Available Reports page:
• Import Report - opens the Import Report (page 55) page.
• Refresh - updates both the page and the tree under the Reports drawer to reflect changesanyone has made to add, modify, import, or delete reports or report categories.
• Work with Categories
Possible actions are:
– Create Sub-category (page 161) from a category or a sub-category.
– Delete Sub-category (page 161)
User Guide for the Cisco Unified Intelligence Center Reporting Application 8.0(4)
48
Chapter 5: Reports
Available Reports Page
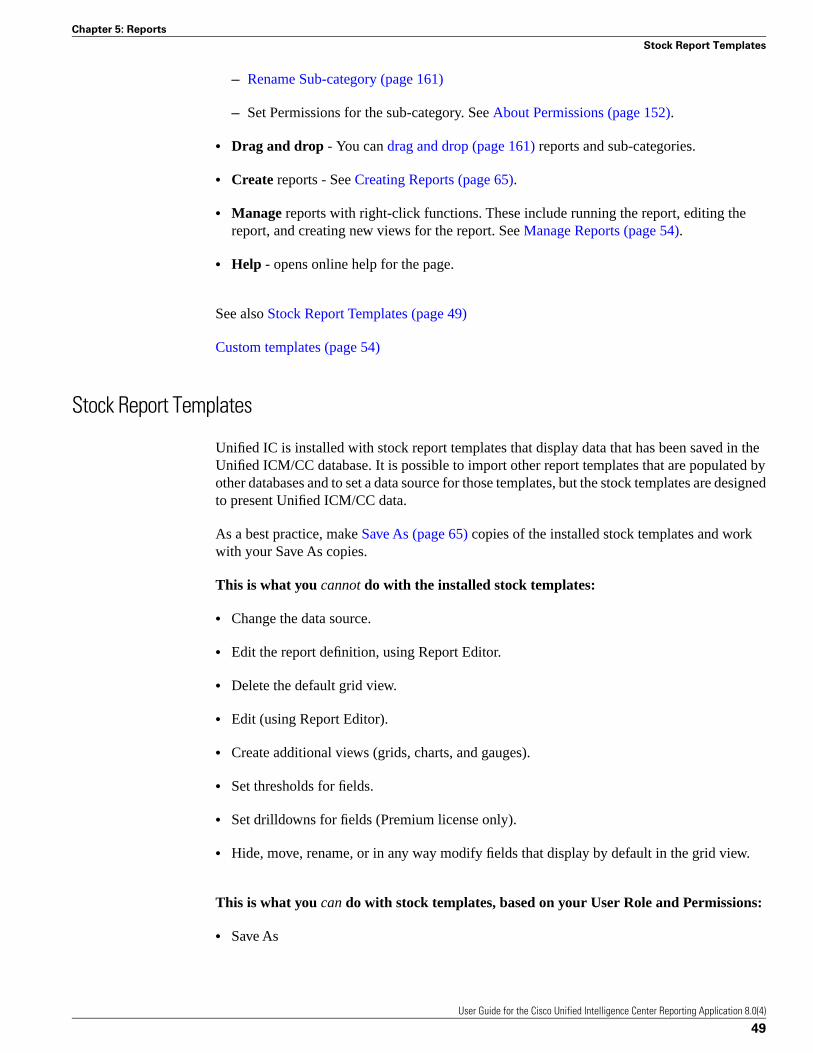
– Rename Sub-category (page 161)
– Set Permissions for the sub-category. See About Permissions (page 152).
• Drag and drop - You can drag and drop (page 161) reports and sub-categories.
• Create reports - See Creating Reports (page 65).
• Manage reports with right-click functions. These include running the report, editing thereport, and creating new views for the report. See Manage Reports (page 54).
• Help - opens online help for the page.
See also Stock Report Templates (page 49)
Custom templates (page 54)
Stock Report Templates
Unified IC is installed with stock report templates that display data that has been saved in theUnified ICM/CC database. It is possible to import other report templates that are populated byother databases and to set a data source for those templates, but the stock templates are designedto present Unified ICM/CC data.
As a best practice, make Save As (page 65) copies of the installed stock templates and workwith your Save As copies.
This is what you cannot do with the installed stock templates:
• Change the data source.
• Edit the report definition, using Report Editor.
• Delete the default grid view.
• Edit (using Report Editor).
• Create additional views (grids, charts, and gauges).
• Set thresholds for fields.
• Set drilldowns for fields (Premium license only).
• Hide, move, rename, or in any way modify fields that display by default in the grid view.
This is what you can do with stock templates, based on your User Role and Permissions:
• Save As
User Guide for the Cisco Unified Intelligence Center Reporting Application 8.0(4)
49
Chapter 5: Reports
Stock Report Templates

• Run
• Schedule
• Edit
• Import (requires System Configuration Administrator privilege)
• Export (requires System Configuration Administrator privilege)
• Delete (requires System Configuration Administrator privilege)
See also:
List of Stock Templates (page 50)
Custom templates (page 54)
List of Stock Templates
These are the stock report templates installed in the current release. This includes templatesfrom Unified CCE Release 7.x and 8.x.
ShowsReport Template
All data for the agents in the selected skillgroups for the selected interval.
Agent Historical All Fields
Default grid view.
Agent availability in a logon session. Defaultgrid view.
Agent Not Ready Detail
Each agent's currently active skill group, state,and call direction within each media routingdomain into which the agent is logged.
Agent Real Time
Default grid view.
Activity for selected agents for a selectedinterval, sorted by skill group.
Agent Skill Group Historical All Fields
Default grid view.
Current agent status within the specified skillgroup(s).
Agent Skill Group Real Time All Fields
Default grid view.
A pie chart showing the current total count ofagents in different agent states.
Agent State Real Time Graph
Default pie chart view only.
User Guide for the Cisco Unified Intelligence Center Reporting Application 8.0(4)
50
Chapter 5: Reports
Stock Report Templates

ShowsReport Template
All the available report team data from theAgent_Skill_Group_Interval database table for
Agent Team Historical All Fields
each selected team during the time periodselected.
Default grid view.
The current status of the selected agent team(s)and the current agent states of each agent withinthe selected agent team(s).
Agent Team Real Time
Default grid view.
Real-time agent team information on numberof agents assigned to a team, number of agents
Agent Team State Counts Real Time
logged on, number of agents in different states,and number of agents available to receiveincoming tasks.
Default grid view.
The number of answered and abandoned callsfor separate intervals for the report's timeperiod, broken out into summaries.
Call Type Abandon/Answer DistributionHistorical
Default grid view.
The status of call types for the selected timeperiod.
Call Type Historical All Fields
Default grid and pie chart views.
Shows the interval status of skill groups by calltype for the selected time period.
Call Type Skill Group Historical All Fields
The current status of call types.Call Type Real Time All Fields
Default Grid and Gauge views.
All the available Enterprise Service HistoricalAll Fields report data in the Service_Interval
Enterprise Service Historical All Fields
database table so that you can select which datayou want for a customized enterprise-servicehistorical report.
Default grid view.
Peripheral service historical report data.Peripheral Service Historical All Fields
Default grid view.
Available peripheral-service real-time data.Peripheral Service Real Time All Fields
Default grid view.
User Guide for the Cisco Unified Intelligence Center Reporting Application 8.0(4)
51
Chapter 5: Reports
Stock Report Templates

ShowsReport Template
All selected enterprise skill groups, listing allthe available skill-group historical report datafor the selected interval.
Enterprise Skill Group Historical All Fields
Default grid view.
The current status of the selected enterpriseskill groups.
Enterprise Skill Group Real Time All Fields
Default grid view.
A Consolidated call and skill group statistics,gathered in interval increments.
Peripheral Skill Group Historical All Fields
Default Grid and chart views.
The current status of the selected skill groups.Peripheral Skill Group Real Time All Fields
Default grid view.
The performance of IVR ports for the selectedtime period. It presents a table of half-hour
IVR Ports Performance Historical
counts of IVR ports in-service, ports idle, andthe time HH:MM:SS (hours, minutes, seconds)that all ports were busy.
Default grid view.
Creating a Save As Version of a Stock Template
First , create a Report Category for your Save As versions:
1. From the Available Reports page, right-click the Reports folder and select CreateSub-Category.
2. Name the new category and set permissions. At a minimum, set READ permissions.
Next, create a Save As copy of the report:
1. Locate the report, right-click, and select Edit.
This opens the Report Editor page.
2. Enter a description for the report and click Save As.
3. On the Save As page:
– Enter a report name and description.
– Click the arrow next to the Reports folder and navigate to, and select, the sub-categoryfolder you created.
User Guide for the Cisco Unified Intelligence Center Reporting Application 8.0(4)
52
Chapter 5: Reports
Stock Report Templates
4. Set permissions.
5. Click OK.
6. Return to the Available Reports page and click Refresh.
The right-click options are now extended and include Edit Views, which opens the Views Editor(page 71).
Select the Grid and click Edit to open the Grid Editor (page 75), where you can move, rename,and set thresholds for report fields.
Historical and Real Time Templates
The stock Unified ICM/CC templates that are installed with Unified IC are either Historical orReal Time "All Fields" templates.
All Fields refers to the fact that, for the databases that are queried to populate the template, everyfield in the database is available to be included in the grid view or to be charted or gauged.
These Available fields are listed in the Grid Editor (page 75).
An historical report template:
• Receives data from the UCCE Historical data source. See Data Sources Page (page 40).
• Is populated with interval data. The interval at which the database tables are refreshed canbe a 15-minute or a 30-minute interval. This interval is set in the Unified ICM ConfigurationManager.
• Has a default refresh rate of 15 minutes. Refresh Rate is configurable in the Report DefinitionProperties page in a Save As version of the report.
• Has an upper limit of 8,000 rows. Row limit is not configurable. The Report Viewer indicateswhen the row limit has been reached and when more data is available. You can adjust thefilter and rerun the report to see additional data.
A real time report template:
• Receives data from the UCCE Realtime Data Source. See Data Sources Page (page 40).
• Is populated with current data that is passed by the Peripheral Gateways to the Unified ICMRouter and then saved to real-time database tables. By default, real time data is forwardedto the router every 15 seconds. Old real-time data is constantly overwritten by new real-timedata.
• Has a default refresh rate of 15 seconds. Refresh Rate is configurable in the Report DefinitionProperties page in a Save As version of the report.
User Guide for the Cisco Unified Intelligence Center Reporting Application 8.0(4)
53
Chapter 5: Reports
Stock Report Templates

• Has an upper limit of 3,000 rows. Row limit is not configurable. The Report Viewer indicateswhen the row limit has been reached and when more data is available. You can adjust thefilter and rerun the report to see additional data.
Custom Templates
A custom template is:
• A new template that Report Designer users have created.
• A Save As version of a stock template.
• An imported template.
Note: Your Cisco Support provider cannot assist you with custom report issues.
See Also
Stock Report Templates (page 49)
Stock and Custom Objects (page 168)
Reports and Report Definitions
All reports are based on Report Definitions (page 99).
Report Definitions contain the dataset that is obtained for a report. This includes the query type(stored procedure, anonymous block, SQL query), the fields, the filters, the formulas, the refreshrate, and the key criteria field for the report
Only users who have a Premium license can view, create, or edit Report Definitions.
Manage Reports
To manage reports from the Available Reports Page (page 48), use the context menu that appearswhen you right-click a report.
The options available to you depend on your User Role and permissions.
To:Use this option:
Click this to filter the report (see Filtering Reports (page58) ) and then run it so that it opens in the Report Viewer(page 62).
Run
User Guide for the Cisco Unified Intelligence Center Reporting Application 8.0(4)
54
Chapter 5: Reports
Reports and Report Definitions
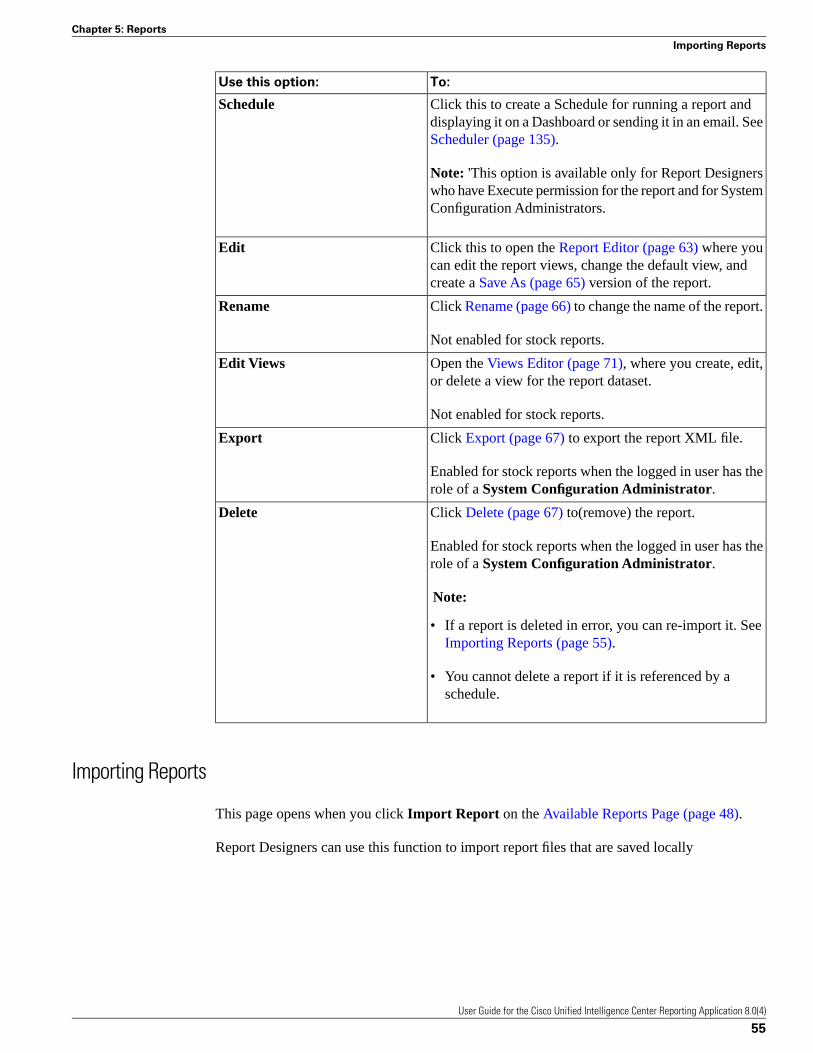
To:Use this option:
Click this to create a Schedule for running a report anddisplaying it on a Dashboard or sending it in an email. SeeScheduler (page 135).
Schedule
Note: 'This option is available only for Report Designerswho have Execute permission for the report and for SystemConfiguration Administrators.
Click this to open the Report Editor (page 63) where youcan edit the report views, change the default view, andcreate a Save As (page 65) version of the report.
Edit
Click Rename (page 66) to change the name of the report.Rename
Not enabled for stock reports.
Open the Views Editor (page 71), where you create, edit,or delete a view for the report dataset.
Edit Views
Not enabled for stock reports.
Click Export (page 67) to export the report XML file.Export
Enabled for stock reports when the logged in user has therole of a System Configuration Administrator.
Click Delete (page 67) to(remove) the report.Delete
Enabled for stock reports when the logged in user has therole of a System Configuration Administrator.
Note:
• If a report is deleted in error, you can re-import it. SeeImporting Reports (page 55).
• You cannot delete a report if it is referenced by aschedule.
Importing Reports
This page opens when you click Import Report on the Available Reports Page (page 48).
Report Designers can use this function to import report files that are saved locally
User Guide for the Cisco Unified Intelligence Center Reporting Application 8.0(4)
55
Chapter 5: Reports
Importing Reports

Figure 9: Importing Reports
To import a report:
1. To import a report from your computer (an xml or zip file that is saved locally), clickBrowse and navigate to select the template xml file.
Note: You can import multiple reports in a *.zip file.
2. Select the Data Source from the dropdown.
Note: It is important to select the correct and appropriate data source for the importedreport. If a report is associated with the wrong data source, you will see an error when youtry to run the report.
3. Click Save To and navigate to the report category folder into which you want to categorizethe imported template(s).
4. Click Import.
5. Click Refresh on the Reports page to see the imported report.
Note:
• Data from imported reports are extracted from the xml file and saved as configuration datain the CUIC database.
• If your Available Reports page already contains a report template with the same name as areport you are importing, you see a prompt asking if you want to overwrite it.
What is imported:
• The report
• Its Report Definition
• Its Value Lists
• Its Views
• The values defined for it in Report Editor (its default view, online help, etc)
User Guide for the Cisco Unified Intelligence Center Reporting Application 8.0(4)
56
Chapter 5: Reports
Importing Reports
• Its Thresholds
• Its Drilldowns
• Its Permissions
What is not imported:
• Report Filters
• Collections
Note:
• During the import, the software checks to see if any prerequisite objects needed by the report(such as Value Lists) already exist. If they do not, the import will create them. If they alreadyexist, you are prompted to use the existing file or to overwrite it.
• This allows users from one system to write a report that uses a certain Value List (for example,the Skill Groups Value List), and then export the report and import it into another systemthat has another (different) Skill Groups Value List. There is no need to create a new ValueList or to edit the report.
• Reports are language-independent. The report templates and their generated output dependson the locale you select for Unified IC.
Actions on the Import Report page:
• Import - proceeds with the import.
• Cancel - closes the page.
• Refresh updates the page to show changes another user has made.
• Help - opens online help for the page.
Running a Report
There are several ways to run a report. You can:
• Right-click a report from the Available Reports Page (page 48) page and select Run.
• Click the report name from the dashboard or the Reports page.
If the report designer has selected to bypass the filter dialog on the Report Editor (page 63)page, the report opens immediately.
User Guide for the Cisco Unified Intelligence Center Reporting Application 8.0(4)
57
Chapter 5: Reports
Running a Report

If the report designer did not select to bypass the filter dialog, selecting a report to view opensthe Filters page for that report. See Filtering Reports (page 58).
Once you select to run and filter a report, the report displays in the Report Viewer (page 62).
Filtering Reports
Use the filter page to both define and restrict the data that will populate the report.
The filter page opens:
• Before the report is generated - when you right-click the report and click Run. Note that youdo not see the filter page if the report designer has selected Bypass Filter on the Report Editor(page 63) page.
• After the report is generated - when you click the Filter button in the Report Viewer (page62) for the generated report. Do this to refine the filter values for a generated report.
Filter parameters are based on whether:
• The report based on a simple query or on an anonymous block or stored procedure.
– Reports based on simple queries have two tabs in the filter interface: Basic Filters Tab(page 58) and Advanced Filters Tab (page 60).
– Reports based on anonymous blocks or stored procedures have a Basic filters tab only.See Basic Filters Tab for Anonymous Block/Stored Procedure (page 61).
• You are running a real time or an historical report.
You can:
• Create a default filter to persist the filtering criteria so that the filter can be reused every timethe report is run.
• Bypass the filter so that the filter page does not display and the report runs with the defaultfilter.
• Create a default filter, so when you run the report, it always opens to the default filters youhave defined. See Setting the Default Filter (page 62).
Basic Filters Tab
Follow these steps to complete the basic filters tab for a report based on a simple query. Thefilter tabs for reports based on queries are populated by all fields in the query. If you run thereport without selecting filters, the report will return all data.
User Guide for the Cisco Unified Intelligence Center Reporting Application 8.0(4)
58
Chapter 5: Reports
Filtering Reports

Reports based on Anonymous Blocks and Stored Procedures have a different filter interface.See Basic Filters Tab for Anonymous Block/Stored Procedure (page 61).
You use this tab to filter a report before you run the report. You also use this tab to edit thedefault filter for a report.
Step 1 To filter a real time report, skip to step 3.
Step 2 To filter an historical report, select date/time ranges for Historical Reports as follows:
Relative Date Range:
• From the Relative Date Range dropdown, select from Today, Yesterday, This Week, LastWeek, This Month, Last Month, Year to Date, or Last Year.
• Check Only show results that are within a specific time period to check or uncheck days.By default, all days of the week are checked. This checkbox only appears if one of thefollowing is selected in the Relative Date Range dropdown: This Week, Last Week, ThisMonth, Last Month, Year to Date, or Last Year. If you do not check this box, the report showsall values from 12:00 AM of the first date in your range through 11:59 PM of the last datein the range.
Absolute Date Range:
• In the From and To fields, click the calendar icons to select a starting and ending date range.
• Check Only show results that are within a specific time period to enter a starting andending time range. If you do not check this box, the report shows all values from 12:00 AMof the first date in your range through 11:59 PM of the last date in the range.
• Check Only show results that are on certain days of the week to check/uncheck days. Bydefault, all days of the week are checked.
Step 3 Select a filter for the report.
Filters criteria are based on the Key Criteria field in the Report Definition and can be ValueLists or Collections, based on your permissions.
To filter by a Value List:
• Select one or more objects in the Available column and move them to the Selected column,or
• Use the Search in available and Search in selected fields to enter a character to move to thefirst item in the list that begins with that character.
To filter by a Collection:
• Select the collection from the Choose Collection dropdown.
User Guide for the Cisco Unified Intelligence Center Reporting Application 8.0(4)
59
Chapter 5: Reports
Filtering Reports

Populate the Selected panel with the object you want in the report.
Note:
• A Value List or Collection displays in the Basic Filters tab only if you have Execute permissionfor it.
• Most stock reports are filtered by Value Lists or Collections that are associated with the KeyCriteria Field that has been specified on the Report Definition Properties (page 116) tab.
• If no Key Criteria field has been specified in the Report Definition, you cannot filter thereport. You can, however, run the report. Having no filters means the report will pull in alarge amount of data.
Step 4 Click the Advanced Filters (page 60) to review and select additional filtering criteria.
Step 5 If you are running the report, click Run to generate the report.
If you are editing the default filter, click Save.
See Also
Associating a Value List with a Report (page 129)
Advanced Filters Tab
For reports defined as Database Queries, this second tab on the Filter page allows you to furtherrefine the results in a report.
This tab is a list of all the fields that have Available in Filter checked in the Edit Field Properties(page 110) tab. It shows the field name, display name, and description.
Select one or more of these fields and then click Edit to indicate any value or a filtered value.
Filter criteria depend on the field type (Date, Decimal, Value List, String, or Boolean).
Step 1 Select one or more of the fields in the Advanced Filter tab. and then click Edit to indicate anyvalue or a filtered value.
Filter criteria depend on the field type (Date, Decimal, Value List, String, or Boolean).
• For type Date, click Edit to specify any value or to filter by selecting either Relative DateRange or Absolute Date Range. For both Relative and Absolute date ranges, you can furtherindicate a specific time period and certain days of the week.
• For type Decimal, click Edit to specify any value or to select an Operator from Equal To,Not Equal To, Less Than, Less Than or Equal To, or Greater Than and then entering a value;for example, Operator = Greater Than and Value = 16.5.
User Guide for the Cisco Unified Intelligence Center Reporting Application 8.0(4)
60
Chapter 5: Reports
Filtering Reports

• For type String, click Edit to specify any value or to filter by selecting an Operator fromEqual To, Not Equal To, or Matches Pattern and then entering a value for the string; forexample, Operator = Matches Pattern and Value = Team Green.
• For type Boolean, click Edit to specify any value or to filter by selecting an Operator andthen selecting True or False.
• If the advanced filter field is a Value List, click Edit to specify any value or to filter bymoving one, all, or some items in the list to the Selected column.
Step 2 Run the report.
The report will pull data for the Collection / Value List objects selected on the Basic tab, filteredby the values you set for the additional (Advanced) fields.
For example, if your Basic Filter is an Agent Team collection, and you added an AdvancedFilter for Agent Name Equal to <a certain string>, then report shows only agents in the teamwhose name contain that string.
Note: The field for the Advanced Filter must be moved from the Available panel to the Currentpanel in the Grid Viewer in the Grid Editor (page 75).
Basic Filters Tab for Anonymous Block/Stored Procedure
Filters for reports whose Report Definitions are anonymous blocks or stored procedures havea different filter interface than filters for reports whose Report Definitions are simple queries.Thefilter tabs for reports based on Anonymous Blocks and Stored Procedures are populated byparameters. If you run the report without selecting filters and if no Default Filter exists, thereport returns all data.
There is no Advanced Filters tab for these reports.
Follow these steps to filter a report before you run the report or to edit the default filter for areport.
Step 1 Enter a Start Date value.
Step 2 Enter an End Date value.
Note: Because the dates are parameters, the system cannot validate that Start is earlier thanEnd.
Step 3 Select a filter.
The filter options are the parameters created in the Report Definition. A parameter is associatedwith a Value List.
User Guide for the Cisco Unified Intelligence Center Reporting Application 8.0(4)
61
Chapter 5: Reports
Filtering Reports
See Also
Associating a Value List with a Report (page 129)
Setting the Default Filter
You can create a default filter for a report and save that filter so that the report always generatesaccording to that filter (until you change the filter again).
Combining this feature with Bypass Default Filter allows for consistent report generation amongreport users.
Step 1 Open the Available Reports page (Reports drawer) and navigate to the report for which youwant to set a default filter.
Step 2 Right-click the report and select Edit.
This opens the Report Editor (page 63) page.
Step 3 Click Edit Default Filter.
This opens the filter page for the report.
Depending on the report you selected, it might open the Basic Filters Tab (page 58) or the BasicFilters Tab for Anonymous Block/Stored Procedure (page 61).
The tab appears almost exactly as it appears when you run a report with one exception; it hasno Run button. It has a Save button.
Step 4 Select the filter you want for the report. For example, if the filter offers a collection or a ValueList of Call Types, you might select only one or two Call Types.
Step 5 Click Save.
Every time the report is run, the filter opens to your default settings. You can change them forthat instance of the report.
The Report Viewer
When a report is run, it displays in the Report Viewer. This page is a container that managesthe report execution. Its content varies, based on which view (data presentation) of a report isdisplayed - a grid, a chart, or a gauge. You can change the report view on this page.
If the report view is a grid. you can review the field definitions for its template in the help topicfor that template.
The menubar across the top of the Report Viewer has these selections:
User Guide for the Cisco Unified Intelligence Center Reporting Application 8.0(4)
62
Chapter 5: Reports
The Report Viewer
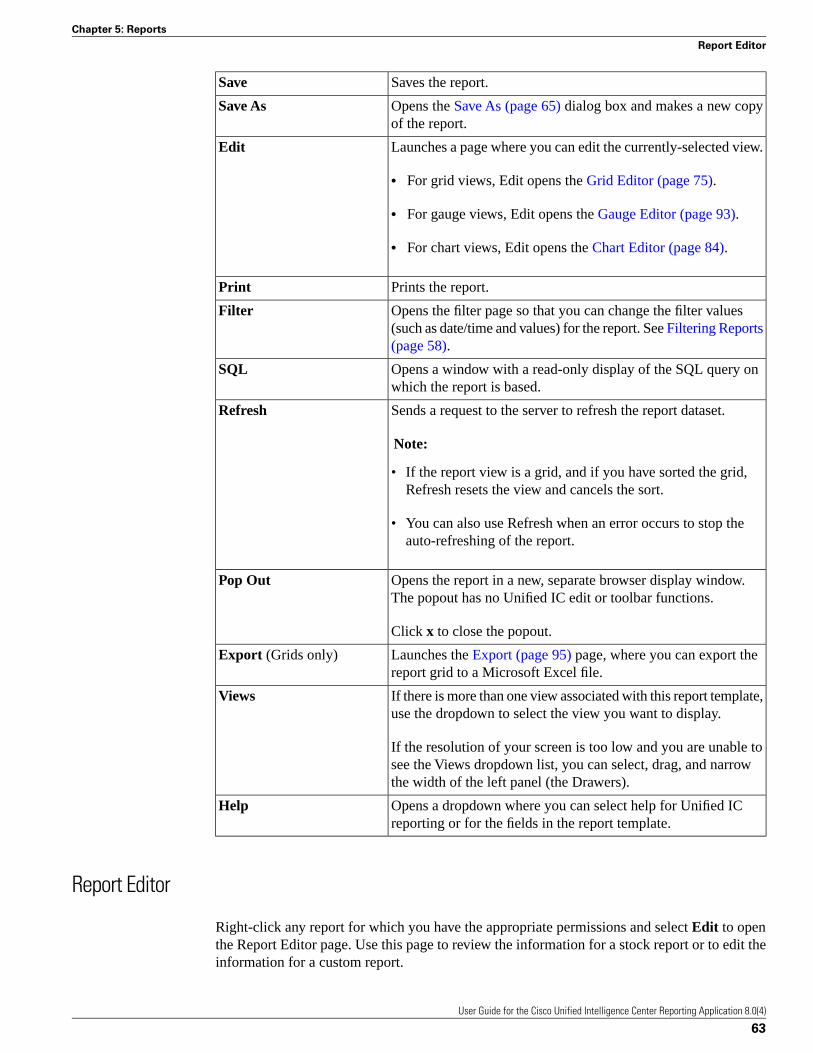
Saves the report.Save
Opens the Save As (page 65) dialog box and makes a new copyof the report.
Save As
Launches a page where you can edit the currently-selected view.Edit
• For grid views, Edit opens the Grid Editor (page 75).
• For gauge views, Edit opens the Gauge Editor (page 93).
• For chart views, Edit opens the Chart Editor (page 84).
Prints the report.Print
Opens the filter page so that you can change the filter values(such as date/time and values) for the report. See Filtering Reports(page 58).
Filter
Opens a window with a read-only display of the SQL query onwhich the report is based.
SQL
Sends a request to the server to refresh the report dataset.Refresh
Note:
• If the report view is a grid, and if you have sorted the grid,Refresh resets the view and cancels the sort.
• You can also use Refresh when an error occurs to stop theauto-refreshing of the report.
Opens the report in a new, separate browser display window.The popout has no Unified IC edit or toolbar functions.
Pop Out
Click x to close the popout.
Launches the Export (page 95) page, where you can export thereport grid to a Microsoft Excel file.
Export (Grids only)
If there is more than one view associated with this report template,use the dropdown to select the view you want to display.
Views
If the resolution of your screen is too low and you are unable tosee the Views dropdown list, you can select, drag, and narrowthe width of the left panel (the Drawers).
Opens a dropdown where you can select help for Unified ICreporting or for the fields in the report template.
Help
Report Editor
Right-click any report for which you have the appropriate permissions and select Edit to openthe Report Editor page. Use this page to review the information for a stock report or to edit theinformation for a custom report.
User Guide for the Cisco Unified Intelligence Center Reporting Application 8.0(4)
63
Chapter 5: Reports
Report Editor

Table 2: Fields on the Report Editor page
ExplanationField
This field displays a description for the report.Report Description
This field displays Report Definition for the report.Report Definition
From the dropdown, select the default view that is todisplay when users run the report.
Default View
Note: Once the report has generated, users can changethe view. For example, if the default view is a grid, anda gauge has been developed for the report, users canchange the generated report to show the gauge view.
Displays the location of the online help topic for thisstock report template. If you create a custom help, enterthe URL for the full path the custom help.html file.
Online Help
Check this box so that the report runs directly and usersare not prompted to filter the report.
Bypass Filter Dialog
Note:
• Even if the report has run directly, you can click theFilter icon in the Report Viewer (page 62) to refilterand rerun the report.
• As a best practice, do not check Bypass Filter untilyou have defined a Default Filter. See Setting theDefault Filter (page 62). Bypassing with no defaultfilter set will run the report for all dates and times andfor all data.
Use these boxes to view or change user permissions forMy Group (the default group) and for the All Usersgroup.
Permissions
Actions on the Report Editor page:
• Edit Default Filter opens the filter page for the report, where you can review the basic andadvanced filters that are defined in the Report Definition. See Setting the Default Filter (page62).
• Edit Views opens the Views Editor (page 71).
• Save (page 65)
• Save As (page 65)
• Cancel closes the page without saving your changes.
• Refresh updates the page to show changes another user has made.
User Guide for the Cisco Unified Intelligence Center Reporting Application 8.0(4)
64
Chapter 5: Reports
Report Editor
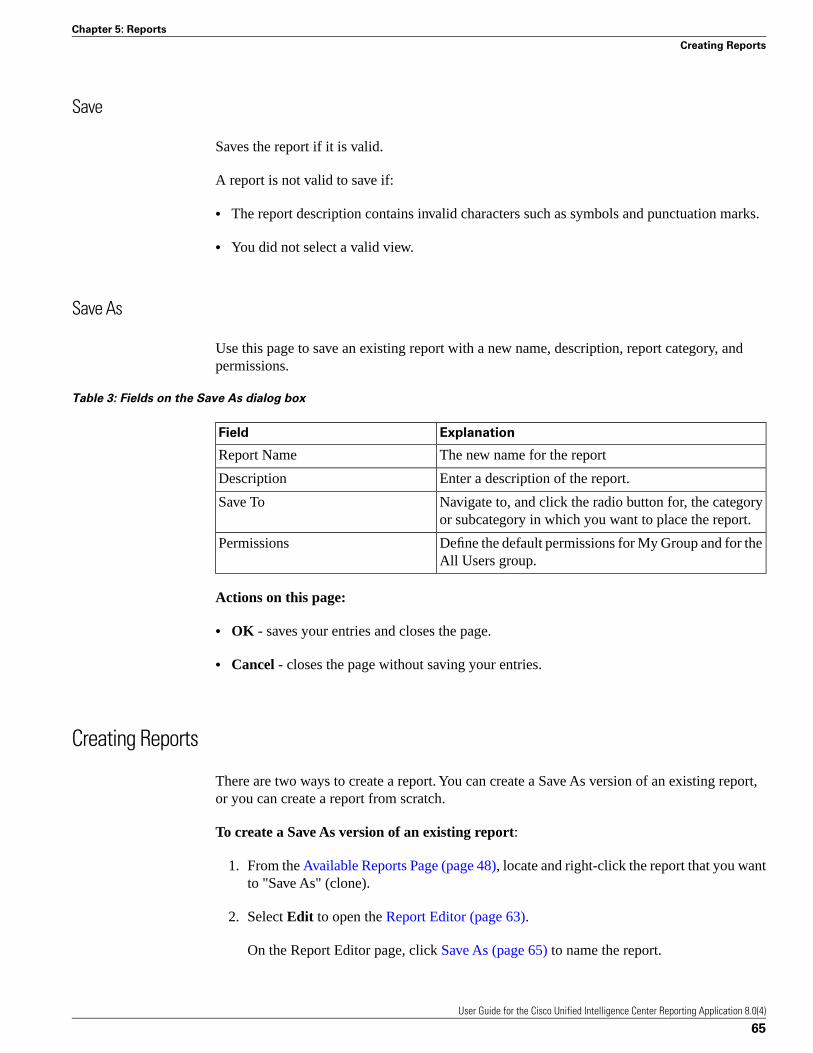
Save
Saves the report if it is valid.
A report is not valid to save if:
• The report description contains invalid characters such as symbols and punctuation marks.
• You did not select a valid view.
Save As
Use this page to save an existing report with a new name, description, report category, andpermissions.
Table 3: Fields on the Save As dialog box
ExplanationField
The new name for the reportReport Name
Enter a description of the report.Description
Navigate to, and click the radio button for, the categoryor subcategory in which you want to place the report.
Save To
Define the default permissions for My Group and for theAll Users group.
Permissions
Actions on this page:
• OK - saves your entries and closes the page.
• Cancel - closes the page without saving your entries.
Creating Reports
There are two ways to create a report. You can create a Save As version of an existing report,or you can create a report from scratch.
To create a Save As version of an existing report:
1. From the Available Reports Page (page 48), locate and right-click the report that you wantto "Save As" (clone).
2. Select Edit to open the Report Editor (page 63).
On the Report Editor page, click Save As (page 65) to name the report.
User Guide for the Cisco Unified Intelligence Center Reporting Application 8.0(4)
65
Chapter 5: Reports
Creating Reports
The report is saved to the Available Reports page, where you can right-click to mange it.
To create a report from scratch:
1. Right-click a category or sub-category on the Reports page and select Create Report.This opens a naming dialog box.
2. Enter a name for the report.
3. Enter a description for the report.
4. From the Report Definition dropdown, select the Report Definition on which this reportwill be based.
What this dropdown shows:
– If you have a standard license, the list shows all stock Report Definitions and thecustom Report Definitions for any custom templates you have imported.
– If you have a premium license, the list contains all stock Report Definitions and anycustom Report Definitions that have been created.
5. Specify the default permissions for this report for members of your User Group and forall users.
6. Click OK to open the Report Editor (page 63).
7. Complete fields on the Report Editor.
8. Click Save from the Report Editor page to save the new report. The report is saved to theAvailable Reports page, where you can right-click to mange it.
Renaming a Report
Right-click a report and select Rename to open a dialog box prompting you for the new name.
Type a new name. Then click OK.
You see a message if you:
• Enter a duplicate name (the same name as an existing report).
• Leave the Rename To field blank.
• Type a name that contains invalid characters (symbols or punctuation marks other than anapostrophe).
User Guide for the Cisco Unified Intelligence Center Reporting Application 8.0(4)
66
Chapter 5: Reports
Renaming a Report

Exporting a Report
A Report Designer with WRITE permission can export a custom report for troubleshooting orso that it can be archived or imported to another server in XML format. You cannot export stockreports.
What is exported:
• The report
• Its Report Definition
• Its Value Lists
• Its Views - including all custom grids, charts, and gauges
• The values defined for it in Report Editor (default view, online help, etc)
• Its Thresholds
• Its Permissions
• Its Drilldowns
What is not exported:
• Report Filters
• Collections
To export a report:
1. Right-click a report and select Export to open the Export Report dialog box, which givesyou the option to rename the report.
You can change the name but do not change the file extension.
2. Click OK to open the Windows file download dialog box.
3. Click Save and navigate to the location where you want to save the report.
Deleting a Report
Right-click a custom report and select Delete to open a message prompting for confirmation.
• Click Yes to Delete.
User Guide for the Cisco Unified Intelligence Center Reporting Application 8.0(4)
67
Chapter 5: Reports
Exporting a Report

• Click No to cancel the deletion.
Note:
• Reports are referenced by views and schedulers.
• When you delete a report that has views and/or schedules, you see a message that remindsyou to delete those views/schedules before you delete the report.
• You can delete a report only if you have the user role of a System ConfigurationAdministrator.
Report Views
Report views are the presentation containers in which a report dataset can appear. Three arethree types of views: Grids, Charts, and Gauges.
You cannot run a report that has no views. All stock reports and any custom reports that youcreate have at least one view. When a report has only one view, you cannot delete that view.
The default view for each report is defined in the Report Editor (page 63).
You can create and edit Views in the Views Editor (page 71).
Grids
All stock report templates are installed with one default grid view. The Report Editor (page 63)displays the name of the default grid, and you can access this grid view through the Grid Editor(page 75) .
Grids are tabular presentations of the data in rows and columns. You can modify the stock gridsby moving, adding, and deleting columns and by adding and renaming column headings andregrouping columns under those heading.
By default, all Cisco stock reports have a grid view. You can create additional grid views forthe stock reports.
Figure 10: Grid
For custom reports, a default grid is created from the SQL query in the Report Definition.
User Guide for the Cisco Unified Intelligence Center Reporting Application 8.0(4)
68
Chapter 5: Reports
Report Views
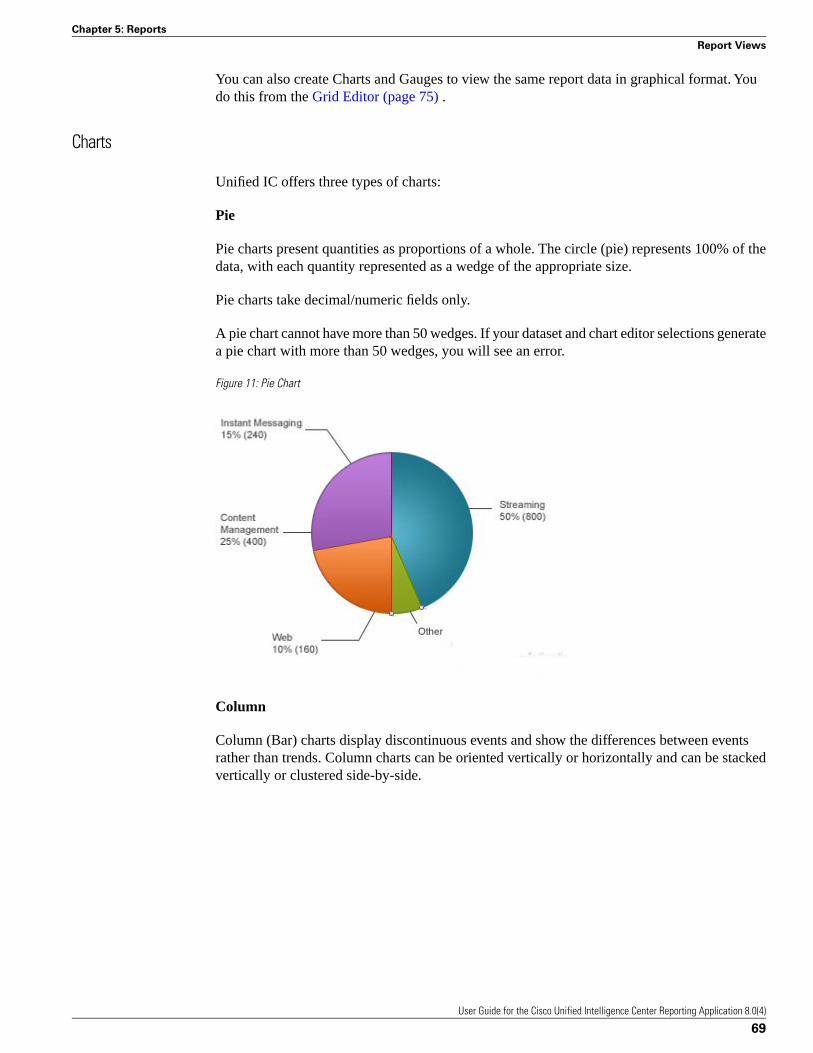
You can also create Charts and Gauges to view the same report data in graphical format. Youdo this from the Grid Editor (page 75) .
Charts
Unified IC offers three types of charts:
Pie
Pie charts present quantities as proportions of a whole. The circle (pie) represents 100% of thedata, with each quantity represented as a wedge of the appropriate size.
Pie charts take decimal/numeric fields only.
A pie chart cannot have more than 50 wedges. If your dataset and chart editor selections generatea pie chart with more than 50 wedges, you will see an error.
Figure 11: Pie Chart
Column
Column (Bar) charts display discontinuous events and show the differences between eventsrather than trends. Column charts can be oriented vertically or horizontally and can be stackedvertically or clustered side-by-side.
User Guide for the Cisco Unified Intelligence Center Reporting Application 8.0(4)
69
Chapter 5: Reports
Report Views
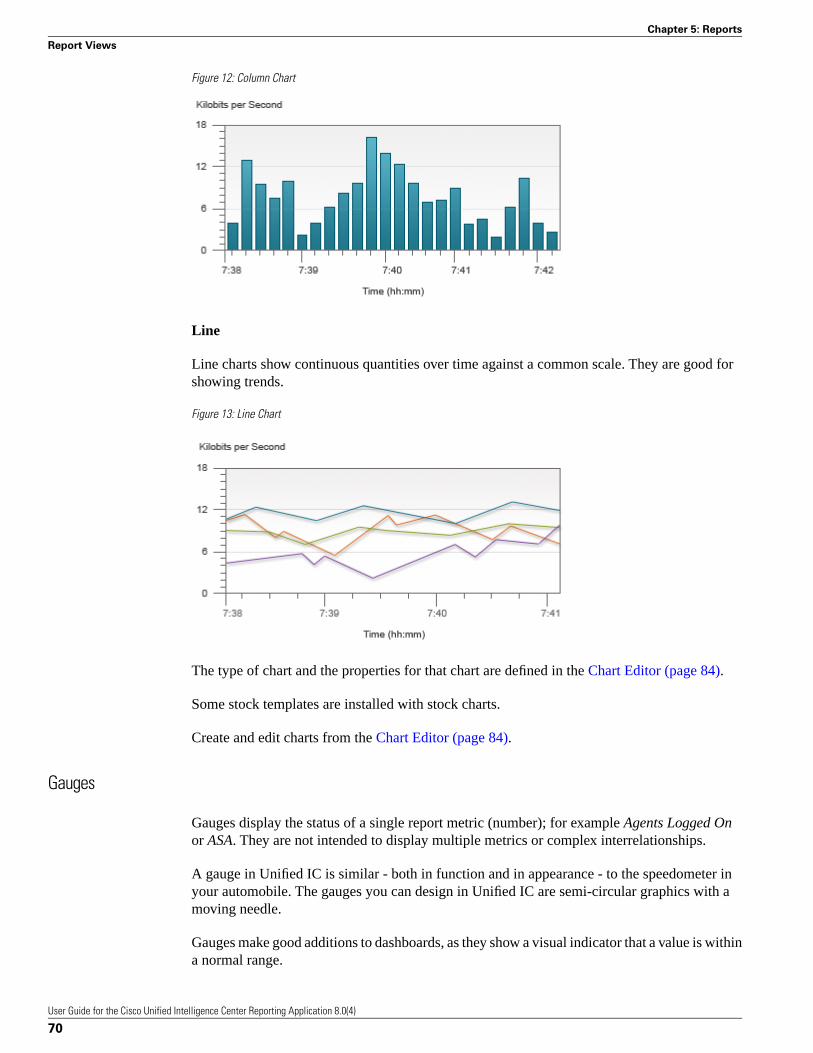
Figure 12: Column Chart
Line
Line charts show continuous quantities over time against a common scale. They are good forshowing trends.
Figure 13: Line Chart
The type of chart and the properties for that chart are defined in the Chart Editor (page 84).
Some stock templates are installed with stock charts.
Create and edit charts from the Chart Editor (page 84).
Gauges
Gauges display the status of a single report metric (number); for example Agents Logged Onor ASA. They are not intended to display multiple metrics or complex interrelationships.
A gauge in Unified IC is similar - both in function and in appearance - to the speedometer inyour automobile. The gauges you can design in Unified IC are semi-circular graphics with amoving needle.
Gauges make good additions to dashboards, as they show a visual indicator that a value is withina normal range.
User Guide for the Cisco Unified Intelligence Center Reporting Application 8.0(4)
70
Chapter 5: Reports
Report Views
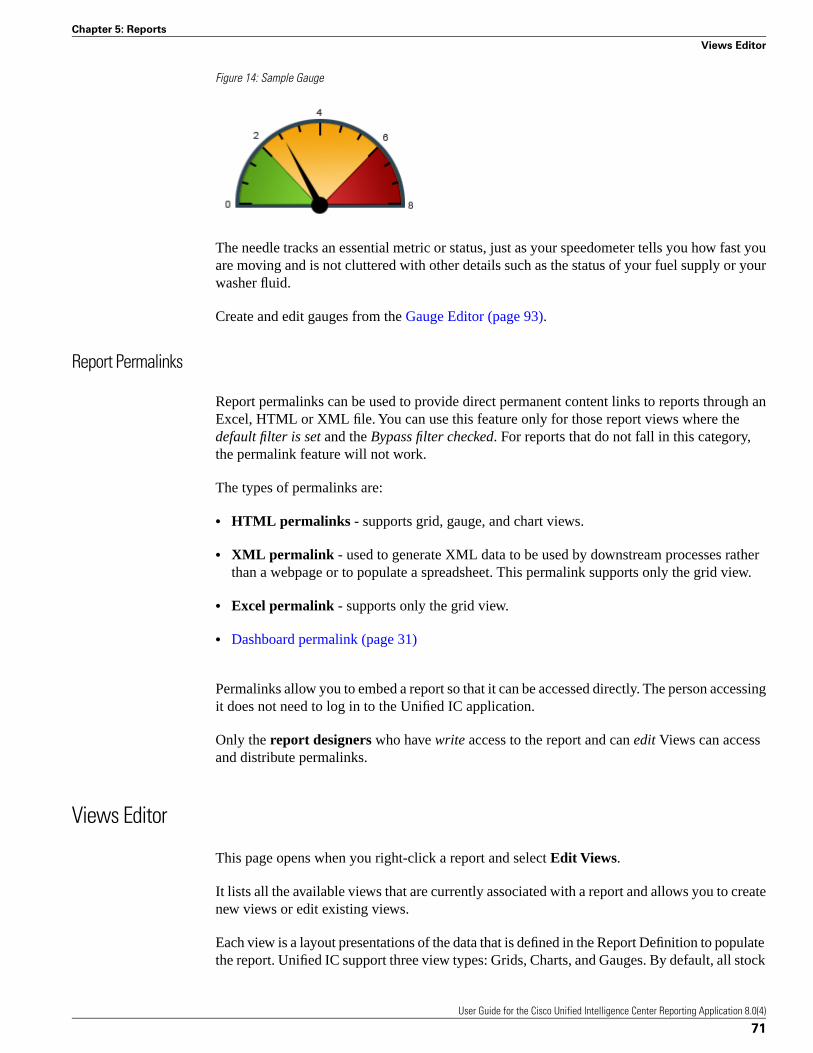
Figure 14: Sample Gauge
The needle tracks an essential metric or status, just as your speedometer tells you how fast youare moving and is not cluttered with other details such as the status of your fuel supply or yourwasher fluid.
Create and edit gauges from the Gauge Editor (page 93).
Report Permalinks
Report permalinks can be used to provide direct permanent content links to reports through anExcel, HTML or XML file. You can use this feature only for those report views where thedefault filter is set and the Bypass filter checked. For reports that do not fall in this category,the permalink feature will not work.
The types of permalinks are:
• HTML permalinks - supports grid, gauge, and chart views.
• XML permalink - used to generate XML data to be used by downstream processes ratherthan a webpage or to populate a spreadsheet. This permalink supports only the grid view.
• Excel permalink - supports only the grid view.
• Dashboard permalink (page 31)
Permalinks allow you to embed a report so that it can be accessed directly. The person accessingit does not need to log in to the Unified IC application.
Only the report designers who have write access to the report and can edit Views can accessand distribute permalinks.
Views Editor
This page opens when you right-click a report and select Edit Views.
It lists all the available views that are currently associated with a report and allows you to createnew views or edit existing views.
Each view is a layout presentations of the data that is defined in the Report Definition to populatethe report. Unified IC support three view types: Grids, Charts, and Gauges. By default, all stock
User Guide for the Cisco Unified Intelligence Center Reporting Application 8.0(4)
71
Chapter 5: Reports
Views Editor
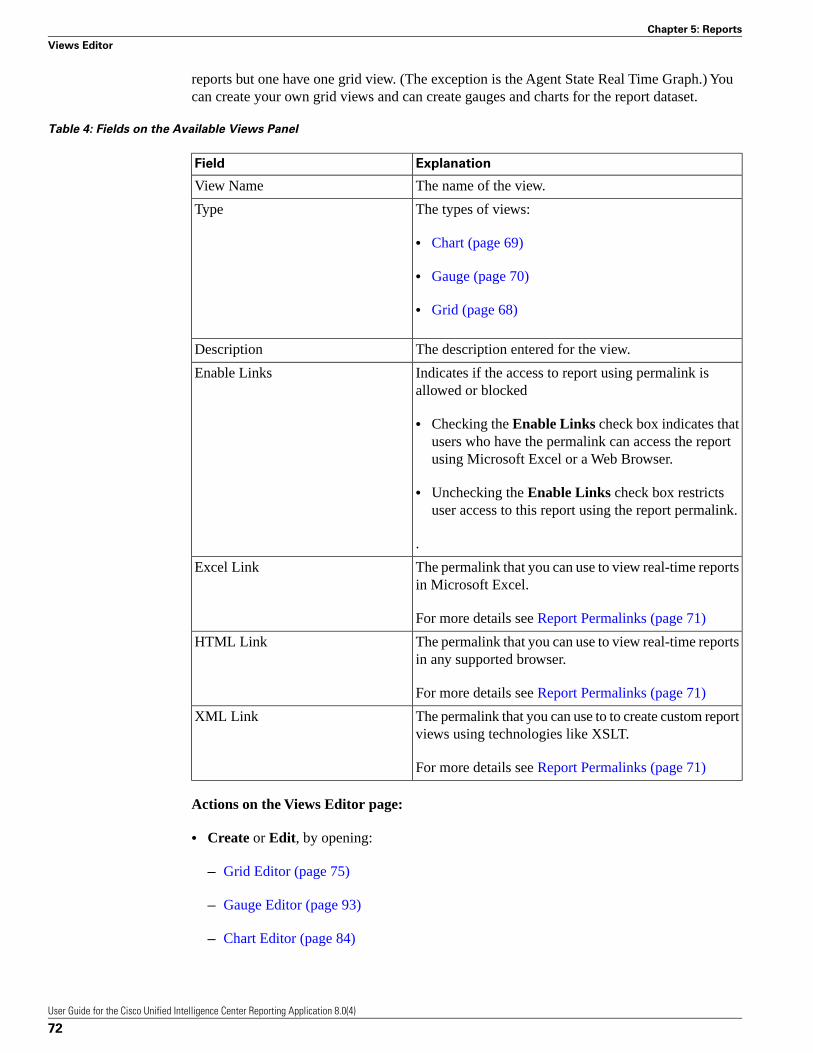
reports but one have one grid view. (The exception is the Agent State Real Time Graph.) Youcan create your own grid views and can create gauges and charts for the report dataset.
Table 4: Fields on the Available Views Panel
ExplanationField
The name of the view.View Name
The types of views:Type
• Chart (page 69)
• Gauge (page 70)
• Grid (page 68)
The description entered for the view.Description
Indicates if the access to report using permalink isallowed or blocked
Enable Links
• Checking the Enable Links check box indicates thatusers who have the permalink can access the reportusing Microsoft Excel or a Web Browser.
• Unchecking the Enable Links check box restrictsuser access to this report using the report permalink.
.
The permalink that you can use to view real-time reportsin Microsoft Excel.
Excel Link
For more details see Report Permalinks (page 71)
The permalink that you can use to view real-time reportsin any supported browser.
HTML Link
For more details see Report Permalinks (page 71)
The permalink that you can use to to create custom reportviews using technologies like XSLT.
XML Link
For more details see Report Permalinks (page 71)
Actions on the Views Editor page:
• Create or Edit, by opening:
– Grid Editor (page 75)
– Gauge Editor (page 93)
– Chart Editor (page 84)
User Guide for the Cisco Unified Intelligence Center Reporting Application 8.0(4)
72
Chapter 5: Reports
Views Editor

• Delete - asks for confirmation and then deletes the view. Do not delete all report views. Youcannot run a report that has no views.
• Refresh - updates the page to show changes other users have made to the views for this reportdataset.
• Help - opens online help for the page.
Exporting a Report to Excel using Permalinks
You can also export real-time reports and reports that have filtered embedded, to Excel usingthe report permalinks. For more information on permalinks, see Report Permalinks (page 71).
Before you perform this task:
1. Create a report and run it for a filtered and relative date range, usually for a specific setof Skill Groups or Call Types for say This Week.
2. Save a copy of this report with the filters intact and then follow the steps below.
Step 1 Open the Reports Manager.
Step 2 Right-click the report that you want to export to Excel and select Report Info.
Step 3 In the Report Info dialog box, copy the URL from the Excel Link field to your clipboard.
Step 4 Open Microsoft Excel and from the Data menu, choose Import.
Step 5 In the New Web Query dialog box, paste the URL that you copied from the Report Info dialogbox in the Address field.
Step 6 Press Go.
Excel displays the report preview.
Step 7 Click Import.
Excel prompts you to choose the insertion point for the imported data.
Step 8 Select the cell in the Excel spreadsheet that you want to make the top left corner of your newreport.
Step 9 Click OK.
The CUIC Report data is imported into Excel.
Note: Microsoft Excel 2007 has a 'refresh rate' parameter in the Connections menu, whichbasically governs how frequently the report data needs to be fetched. Refer Excel documentationfor details.
User Guide for the Cisco Unified Intelligence Center Reporting Application 8.0(4)
73
Chapter 5: Reports
Views Editor
You can now filter or format the report to your requirements.
Opening an Exported Report in Excel
You can import the permalink URL to Excel as a web query, using report permalinks.
To import a report:
Step 1 Open Microsoft Excel and from the Data menu, choose From Web.
Step 2 In the Report Info dialog box, enter the permalink URL .
Step 3 Select the table.
Step 4 Click OK.
The CUIS Report data is imported into Excel.
HTML permalink
HTML permalink provides a direct link to the Report Viewer, thereby bypassing the maininterface and logging into CUIC. The report has the same look and feel as the reports that aredisplayed using pop out functionality in Report Viewer in CUIC.
Note: The permalink status (Enable or Disable) will be preserved during the export of a reportand the will be retained during report import. In case of importing older version reports(stockor customer), the permalinks will be enabled by default for all the views of the imported report.
XML permalink
XML permalink provides a direct link to generate an XML structure corresponding to a reportview,thereby bypassing the main interface and logging into CUIC. The generated XML structurecan be used by other applications to create custom report views using technologies like XSLT.
The generated XML will have the following types of tags:
• report - This is the root tag with attribute 'name', the value of which will be the report viewname.
• row - For every record in the report, there will be a row tag in the XML. It will have anattribute 'index' which can take integer values starting from 0. This tag represents the sortingorder of the records, if you sort the corresponding report view.
• header - This tag will be present only if there are super headers in the report view. There willbe two attributes to this tag - name and index. The name attribute will correspond to SuperHeader name and the index attribute will correspond to the position of the Super Header inthe report view, with index starting from 0.
User Guide for the Cisco Unified Intelligence Center Reporting Application 8.0(4)
74
Chapter 5: Reports
Views Editor

• column - For every field in the report view, there will be a column tag. It will have twoattributes - name and index. The name attribute will correspond to the field name and theindex attribute will correspond to the position of the field in the report view. The text contentof the column tag will be the value of the field. If field value is null, this tag will be empty.
An example of a sample report having a super header:
Call Type IDCall TypeBranch Details
Orig Branch CodeOrig Branch
99940032_MainQueue5240032Bethlehem
56280035_MainQueue3479035Bethlehem
The corresponding XML structure for the report will be as follows:
<report name="sample grid view">
<row index="0">
<header index="0" name="Branch Details">
<column index="0" name="Orig Branch">032Bethlehem</column>
<column index="1" name="Orig Branch Code">5240</column>
</header>
<column index="1" name="Call Type">0032_MainQueue</column>
<column index="2" name="Call Type ID">9994</column>
</row>
<row index="1">
<header index="0" name="Branch Details">
<column index="0" name="Orig Branch">035Bethlehem</column>
<column index="1" name="Orig Branch Code">3479</column>
</header>
<column index="1" name="Call Type">0035_MainQueue</column>
<column index="2" name="Call Type ID">5628</column>
</row>
</report>
Grid Editor
This page opens when you select a grid view from the Views Editor (page 71) and then clickEdit.
Use this page to edit an existing grid or to create a new grid view for a report dataset.
Fields on this page:
User Guide for the Cisco Unified Intelligence Center Reporting Application 8.0(4)
75
Chapter 5: Reports
Views Editor

• Name - Enter the name for this view. The default view names for stock templates areread-only.
• Description: Enter a description for the view.
• Font Size - Retain the default font size (10) or enter another value between 8 and 45.
Panels on this page:
Available Fields This panel shows all fields that are collected from the database, that areavailable to be used in the report, and that are checked as Allow to show if Invisible in the ReportDefinition Fields tab.
The fields in the Available Fields panel include the Current fields (fields that appear in thecurrent grid view) as well as all other fields that are eligible to be used in the report view.
In a stock template, if you add Available fields to the Current panel so that they appears in thegrid, and if those fields do not have footers defined for them the summary row of the report willnot show column summaries\totals for those fields. To add a footer to a field, open the ReportDefinition, locate the field in the Fields tab, and click Edit Field Properties (page 110).
Current field order in the grid
This panel shows all fields that are currently used in the grid view of the report, the order inwhich they appear, and the headers (if any) under which they are grouped.
Fields in this list appear as columns in the report. You can reorder and rename these fields, andyou can set thresholds for them. You can also remove them so they are no longer visible in thereport.
Note: For custom reports, the Available panel and the Current field panel show identical fields.The Report Designer must move fields from Current to Available to remove them from the gridview.
Do This:To:
Right-click a field and select Properties toopen a page where you can set Field Properties(page 77).
View the properties of a Current (visible) Field
Right-click a field and select Thresholds (page80)
Manage thresholds for a Current (visible) field
Right-click a field and select Remove Selected.If the field has is a superheader (has other fields
Move a Current (visible) field so it is no longervisible in a report.
under it), you see a confirmation message.Click Yes at the confirmation message.
To add the field back, select it in the AvailableFields panel and move it back to the Currentfield order in the grid panel.
User Guide for the Cisco Unified Intelligence Center Reporting Application 8.0(4)
76
Chapter 5: Reports
Views Editor

Do This:To:
If you remove all fields from the Current panel,the generated report will show no data.
Note: To regain the default Current panel, youcan re-import the report, or you can move fieldsfrom the Available panel back into the Currentpanel.
Click (highlight) GridHeaders at the top of theCurrent panel.
Move a field from the Available panel to theCurrent panel.
Select the field you want to move in theAvailable panel.
Click > to move the field over. It is placed atthe bottom of the Current panel. Locate it; thenuse the up arrow to move it to the position inwhich you want it to display in the grid.
Note: The Available panel shows the default(database) name. The Current panel shows thedisplay name. If you move an Available fieldthat is already present in the Current panel (forexample, if you move active_other fromAvailable, and Active Other is already part ofCurrent), the Active Other field in Currentbecomes highlighted. You cannot have thesame field more than once in the Current panel.
Use the up and down arrows to the right of theCurrent field order in the grid panel.
Reorder Current Fields (Up and Down)
Actions on this page:
• Grouping - opens the Grouping (page 78) dialog box.
• Save - saves your changes to the grid view and closes the page.
• Save As - opens a dialog box where you can enter a name for the changes you have made tothe grid view.
• Cancel - cancels entries you have made and closes the page.
• Add Header - opens the Add Header (page 79) dialog box.
• Remove Selected - removes a field from the Current panel so that it no longer appears inthe report. The field remains in the Available panel.
• Help - opens the online help topic for this page.
User Guide for the Cisco Unified Intelligence Center Reporting Application 8.0(4)
77
Chapter 5: Reports
Views Editor
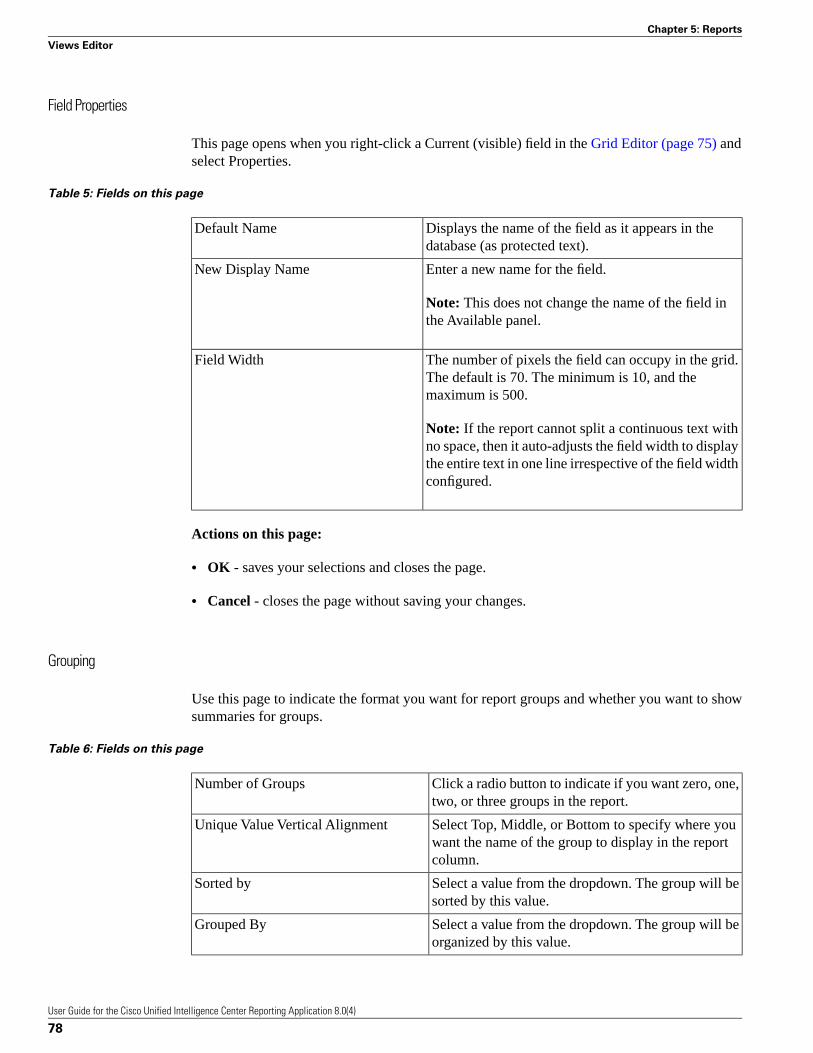
Field Properties
This page opens when you right-click a Current (visible) field in the Grid Editor (page 75) andselect Properties.
Table 5: Fields on this page
Displays the name of the field as it appears in thedatabase (as protected text).
Default Name
Enter a new name for the field.New Display Name
Note: This does not change the name of the field inthe Available panel.
The number of pixels the field can occupy in the grid.The default is 70. The minimum is 10, and themaximum is 500.
Field Width
Note: If the report cannot split a continuous text withno space, then it auto-adjusts the field width to displaythe entire text in one line irrespective of the field widthconfigured.
Actions on this page:
• OK - saves your selections and closes the page.
• Cancel - closes the page without saving your changes.
Grouping
Use this page to indicate the format you want for report groups and whether you want to showsummaries for groups.
Table 6: Fields on this page
Click a radio button to indicate if you want zero, one,two, or three groups in the report.
Number of Groups
Select Top, Middle, or Bottom to specify where youwant the name of the group to display in the reportcolumn.
Unique Value Vertical Alignment
Select a value from the dropdown. The group will besorted by this value.
Sorted by
Select a value from the dropdown. The group will beorganized by this value.
Grouped By
User Guide for the Cisco Unified Intelligence Center Reporting Application 8.0(4)
78
Chapter 5: Reports
Views Editor
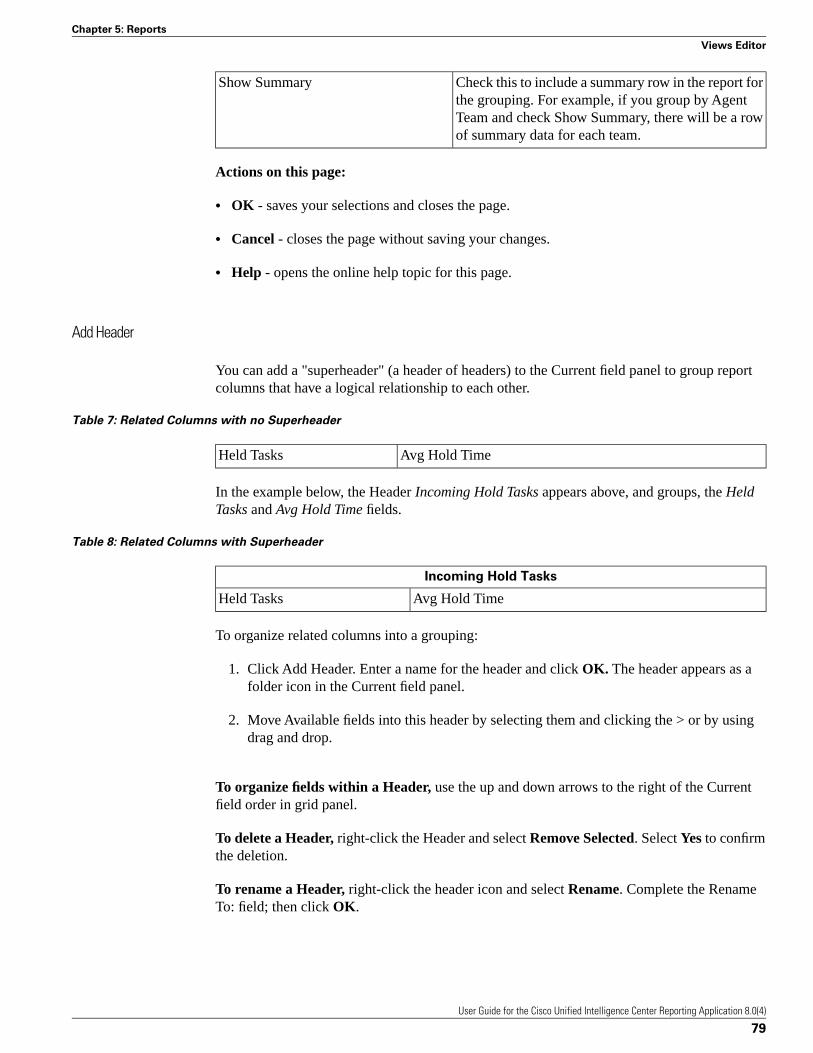
Check this to include a summary row in the report forthe grouping. For example, if you group by Agent
Show Summary
Team and check Show Summary, there will be a rowof summary data for each team.
Actions on this page:
• OK - saves your selections and closes the page.
• Cancel - closes the page without saving your changes.
• Help - opens the online help topic for this page.
Add Header
You can add a "superheader" (a header of headers) to the Current field panel to group reportcolumns that have a logical relationship to each other.
Table 7: Related Columns with no Superheader
Avg Hold TimeHeld Tasks
In the example below, the Header Incoming Hold Tasks appears above, and groups, the HeldTasks and Avg Hold Time fields.
Table 8: Related Columns with Superheader
Incoming Hold Tasks
Avg Hold TimeHeld Tasks
To organize related columns into a grouping:
1. Click Add Header. Enter a name for the header and click OK. The header appears as afolder icon in the Current field panel.
2. Move Available fields into this header by selecting them and clicking the > or by usingdrag and drop.
To organize fields within a Header, use the up and down arrows to the right of the Currentfield order in grid panel.
To delete a Header, right-click the Header and select Remove Selected. Select Yes to confirmthe deletion.
To rename a Header, right-click the header icon and select Rename. Complete the RenameTo: field; then click OK.
User Guide for the Cisco Unified Intelligence Center Reporting Application 8.0(4)
79
Chapter 5: Reports
Views Editor

Current Fields and Available Fields
For every report, the Grid Editor (page 75) shows a panel named Available Fields and a panelnamed Current Field order in the grid.
When you create custom reports, both panels contain the identical list of database fields.
For Cisco stock reports:
• The Available panel includes all the fields that the SQL query is pulling from the database,including those fields that display by default when you run the report. The Available panelis inclusive of the Current panel.
• The Current panel includes all fields that appear in the default grid view of the generatedstock report. The vertical list of Current fields represents their left-to-right orientation in thegrid. The second field from the top of this list is the second field from the left in the reportgrid.
You can change the fields in the Current panel as follows:
– You can remove a field. (Select it and use the < to move to the Available panel.)
– You can move a field. (Select it and use the up/down arrow keys to move it up or downthe list
– You can rename a field. (Right-click it and select Properties.) If you rename the field inthe Current list, the field retains it original name when you move it back to the Availablelist.
– You can set a threshold for a field so that it appears in a certain format in the generatedreport. (Right-click it and select Properties.)
– You can create a Header and group it with related fields.
Thresholds
When you set a threshold for a field in a report grid, you are configuring that field to displayin a distinctive format when its value matches, exceeds, or does not meet a criterion that youset.
For example, you can configure a field so that it always appears as bold or as red in the generatedreport grid when it is greater than or equal to a certain value.
To access the Thresholds available for the field:
1. Open the Reports page and right-click the report for which you want to set a threshold.
2. Select Edit Views.
User Guide for the Cisco Unified Intelligence Center Reporting Application 8.0(4)
80
Chapter 5: Reports
Views Editor

3. Select a view of type Grid; then click Edit. This opens the Grid Viewer in the Grid Editor(page 75).
4. Right click a field in the Current Fields panel.
5. Select Thresholds.
This opens a page that shows a list of thresholds that are available for this field. The pageis blank if no thresholds exist.
Each available threshold has a bullet in the far left. The name of the threshold indicatesthe criteria on which it is based - for example, Greater Than: 50.
Note: There is no limit to the number of thresholds you can define for a field.
Actions on this page:
– To add a threshold, click Add. This opens the Add/Edit Thresholds page (page 81).
– To edit a threshold, select the bullet to the left of its name and click Edit. This opensthe Add/Edit Thresholds page (page 81).
– To delete a threshold, select the bullet to the left of its name and click Delete. Thisdisplays a confirmation message. Click Yes to complete the deletion.
– OK - closes the Available Thresholds page.
Add/Edit Thresholds Page
Complete the Add/Edit Threshold page as follow:
DescriptionValue
Click the dropdown to select a type.Type
The available types are Always, Equal To, Not Equal To, GreaterThan, Greater Than or Equal To, Less Than, Less Than or EqualTo, and Between.
The Types you can select depend on the field. For example, youcannot select the type Greater Than for the Agent Name field.
Selecting any type other than Always displays a field where youmust enter a value to which the field must be compared.
When you select a field that is text (string), a Regular Expressioncheckbox displays. Check Regular Expression if you want thethreshold to include all strings that contain a text value.
User Guide for the Cisco Unified Intelligence Center Reporting Application 8.0(4)
81
Chapter 5: Reports
Views Editor
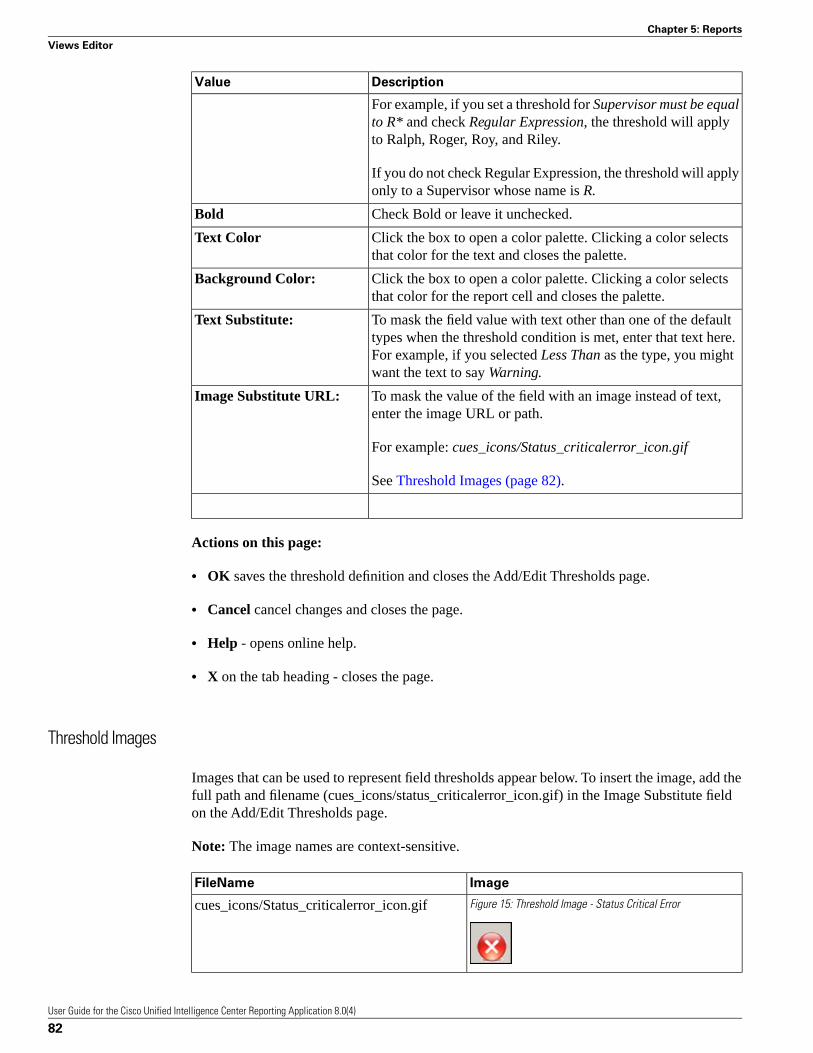
DescriptionValue
For example, if you set a threshold for Supervisor must be equalto R* and check Regular Expression, the threshold will applyto Ralph, Roger, Roy, and Riley.
If you do not check Regular Expression, the threshold will applyonly to a Supervisor whose name is R.
Check Bold or leave it unchecked.Bold
Click the box to open a color palette. Clicking a color selectsthat color for the text and closes the palette.
Text Color
Click the box to open a color palette. Clicking a color selectsthat color for the report cell and closes the palette.
Background Color:
To mask the field value with text other than one of the defaulttypes when the threshold condition is met, enter that text here.
Text Substitute:
For example, if you selected Less Than as the type, you mightwant the text to say Warning.
To mask the value of the field with an image instead of text,enter the image URL or path.
Image Substitute URL:
For example: cues_icons/Status_criticalerror_icon.gif
See Threshold Images (page 82).
Actions on this page:
• OK saves the threshold definition and closes the Add/Edit Thresholds page.
• Cancel cancel changes and closes the page.
• Help - opens online help.
• X on the tab heading - closes the page.
Threshold Images
Images that can be used to represent field thresholds appear below. To insert the image, add thefull path and filename (cues_icons/status_criticalerror_icon.gif) in the Image Substitute fieldon the Add/Edit Thresholds page.
Note: The image names are context-sensitive.
ImageFileName
Figure 15: Threshold Image - Status Critical Errorcues_icons/Status_criticalerror_icon.gif
User Guide for the Cisco Unified Intelligence Center Reporting Application 8.0(4)
82
Chapter 5: Reports
Views Editor
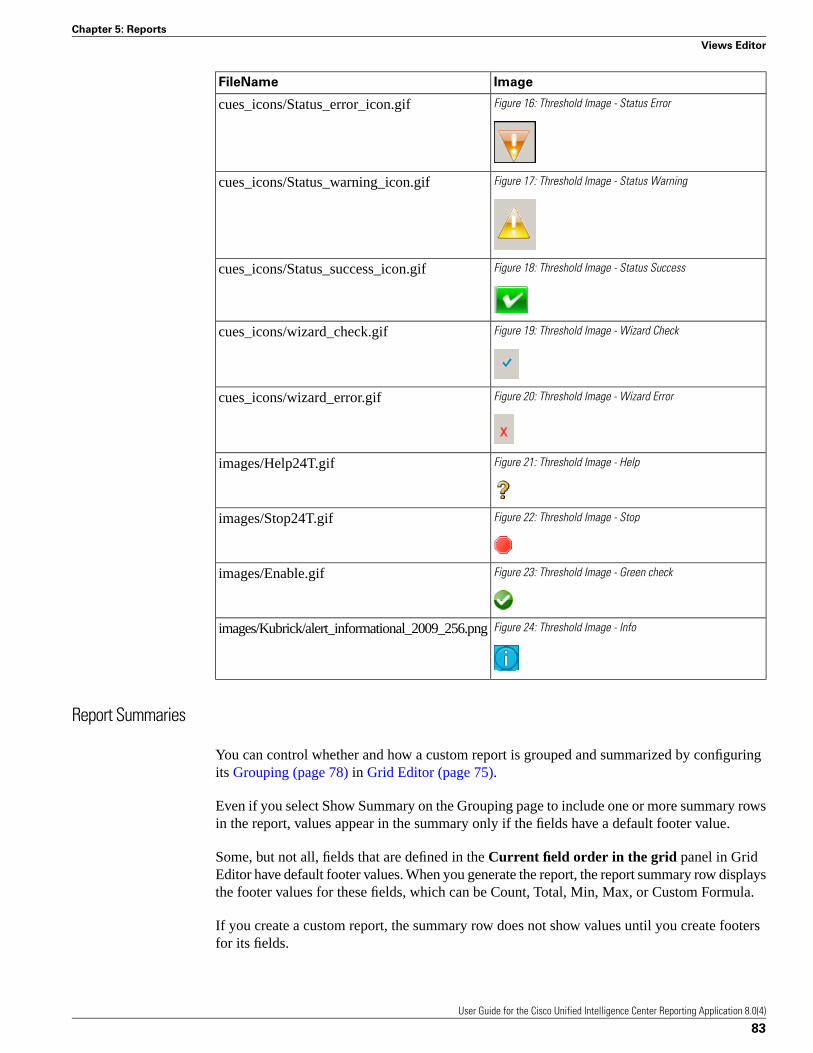
ImageFileName
Figure 16: Threshold Image - Status Errorcues_icons/Status_error_icon.gif
Figure 17: Threshold Image - Status Warningcues_icons/Status_warning_icon.gif
Figure 18: Threshold Image - Status Successcues_icons/Status_success_icon.gif
Figure 19: Threshold Image - Wizard Checkcues_icons/wizard_check.gif
Figure 20: Threshold Image - Wizard Errorcues_icons/wizard_error.gif
Figure 21: Threshold Image - Helpimages/Help24T.gif
Figure 22: Threshold Image - Stopimages/Stop24T.gif
Figure 23: Threshold Image - Green checkimages/Enable.gif
Figure 24: Threshold Image - Infoimages/Kubrick/alert_informational_2009_256.png
Report Summaries
You can control whether and how a custom report is grouped and summarized by configuringits Grouping (page 78) in Grid Editor (page 75).
Even if you select Show Summary on the Grouping page to include one or more summary rowsin the report, values appear in the summary only if the fields have a default footer value.
Some, but not all, fields that are defined in the Current field order in the grid panel in GridEditor have default footer values. When you generate the report, the report summary row displaysthe footer values for these fields, which can be Count, Total, Min, Max, or Custom Formula.
If you create a custom report, the summary row does not show values until you create footersfor its fields.
User Guide for the Cisco Unified Intelligence Center Reporting Application 8.0(4)
83
Chapter 5: Reports
Views Editor
If you move an Available field into the Current field order in grid panel, the summary for thatcolumn will be empty unless you define its footer value.
To define a footer value for a report field:
1. Open the Report Definition.
2. Click the Fields tab.
3. Locate the field and click the radio button at the left to select that field for editing.
4. Click Field Formatting.
5. Scroll down to the Footer field and select a value from the dropdown.
Chart Editor
This page opens from the Views Editor (page 71) page when you select to Create or Edit achart. It also opens directly from the Report Viewer when you are viewing a chart.
The Chart Editor is a wizard that moves you through with three or four steps, depending on thetype of chart you are creating or editing.
General Settings (page 84)
Series Settings (page 88)
Axis Settings (page 90)
Summary (page 92)
General SettingsTable 9: Fields on this page
DescriptionField
Options are Pie Chart (the default), Column Chart, and Line Chart. See Charts(page 69) for a description of each.
Chart Type
Once you save a chart, you cannot change its chart type.
Enter the name of a new chart or edit the name of an existing chart.Chart Name
Chart names are required and must be unique for all views of a report.
Enter text that identifies the purpose of the report.ChartDescription
Check this box to add fill patterns (stripes and dots) to chart colors, makingthem easier to distinguish for users who have color blindness.
AccessibleMode
User Guide for the Cisco Unified Intelligence Center Reporting Application 8.0(4)
84
Chapter 5: Reports
Views Editor
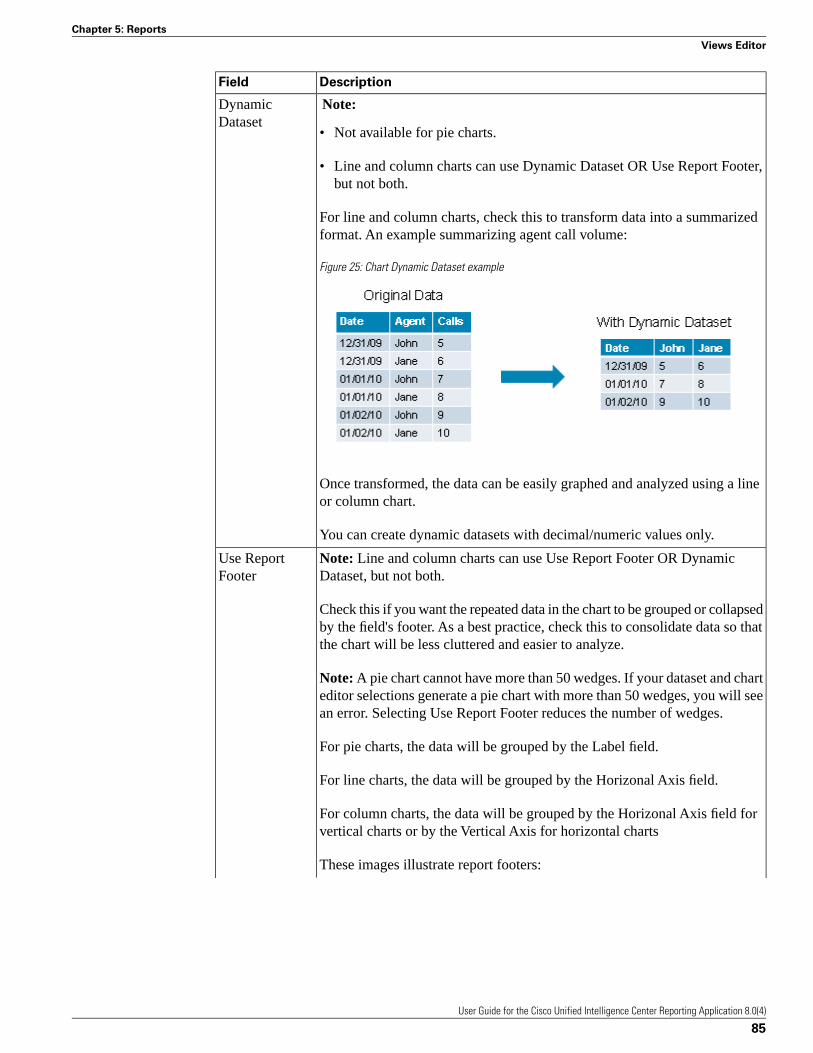
DescriptionField
Note:DynamicDataset
• Not available for pie charts.
• Line and column charts can use Dynamic Dataset OR Use Report Footer,but not both.
For line and column charts, check this to transform data into a summarizedformat. An example summarizing agent call volume:
Figure 25: Chart Dynamic Dataset example
Once transformed, the data can be easily graphed and analyzed using a lineor column chart.
You can create dynamic datasets with decimal/numeric values only.
Note: Line and column charts can use Use Report Footer OR DynamicDataset, but not both.
Use ReportFooter
Check this if you want the repeated data in the chart to be grouped or collapsedby the field's footer. As a best practice, check this to consolidate data so thatthe chart will be less cluttered and easier to analyze.
Note: A pie chart cannot have more than 50 wedges. If your dataset and charteditor selections generate a pie chart with more than 50 wedges, you will seean error. Selecting Use Report Footer reduces the number of wedges.
For pie charts, the data will be grouped by the Label field.
For line charts, the data will be grouped by the Horizonal Axis field.
For column charts, the data will be grouped by the Horizonal Axis field forvertical charts or by the Vertical Axis for horizontal charts
These images illustrate report footers:
User Guide for the Cisco Unified Intelligence Center Reporting Application 8.0(4)
85
Chapter 5: Reports
Views Editor

DescriptionField
Figure 26: Chart Data with Use Report Filters disabled
Note that there are repeated values for Fruit Name. The purpose of Use ReportFooter is to collapse these repeated values into single rows, using the footersdefined in the other columns.
Figure 27: Chart Data with Use Report Filters enabled
With Use Report Footers enabled, the original rows are collapsed by distinctFruit Names. The Fruit Price column shows a count (3 prices for Apple, 2for Peach) since that is its footer function, and the Fruit Weight column showsthe average weight for each fruit.
Note:
• If Use Report Footer is enabled and no footer is defined in one of theselected "grouping" fields, an error displays and the box does not remainchecked.
• Fields that do not have footers are disabled and cannot be selected.
To set the footer for a Save As or custome Report Definition:
• Open the Report Definition and click the Fields tab.
• Locate the field for the gauge and select Edit Formatting.
• Select a footer value from the dropdown.
User Guide for the Cisco Unified Intelligence Center Reporting Application 8.0(4)
86
Chapter 5: Reports
Views Editor

DescriptionField
A legend provides text labels explaining the meaning of each data series andits associated color, pattern or data point marker.
Legend: ShowLegend
Checking this box configures the chart to show a label and enables these twofields:
• Legend Placement
Select where the legend should appear in the chart view. Options are Rightand Bottom.
Right is preferable, as it does not add to the total height of the chart.
• Maximum Legend Label Length
Enter a value (in number of characters) for the length of the chart label.
Use a short legend length to eliminate wrapping.
Data Change Effect enables animation in the chart . Animation occurs thefirst time the chart draws and at every refresh. It has these options:
Data ChangeEffect
• Type
Select a type of animation for the chart. Options are Interpolate, Zoom,Slide, and None.
• Duration
Enter a value in milliseconds for the duration of the interval between theanimation transitions.
Note:
• Modifications to the default value for Duration (milliseconds) can causethe chart to appear to constantly refresh.
• The default Refresh Rate for a Real Time report is 15 seconds. The defaultData Change Effect is 1000 ms. These two values work well together.
• If you change the Data Change Effect to 10000 ms (10 sec), then by thetime the Chart Effect is completing, the Chart refresh rate is ready to beginagain. This makes the chart appear to constantly be refreshing.
• If you want to modify the default Data Change Effect value considermodifying the Report Refresh Rate.
Note: Unavailable for Pie Charts and Line Charts.Column ChartSettings
Column Chart Settings are:
User Guide for the Cisco Unified Intelligence Center Reporting Application 8.0(4)
87
Chapter 5: Reports
Views Editor
DescriptionField
• Column Type
Select the type of display. Options are Clustered or Stacked columns.
• Column Orientation
Enter the orientation of the columns. Options are Horizontal or Vertical.
Note: The selection of Column Orientation (Vertical or Horizontal) determinesthe layout of the Series Settings and Axis Settings pages.
Check this to interpolate the display of a line chart such that a continuousline appears if there is a gap in the data. Protected for pie charts and columncharts.
Line ChartSettings
Actions from this page:
• Back - moves to the previous wizard page
• Next - moves to the next wizard page
• Save & Exit - saves the settings you have configured up to this point and closes the ChartEditor wizard. This button is disabled until you reach the Summary page.
• Cancel - closes the Chart Editor wizard. Does not save changes.
Series Settings
This wizard page opens when you click Next at the General Settings page of the Chart Editor.
Series settings differ by chart type, column chart orientation, and Dynamic Dataset selectionsmade on the General Settings page.
Table 10: Pie Chart Series
DescriptionField
From the dropdown, select a data field for the series.Data Field
Options are the numeric fields only. You cannot create a pie chart from dateor text values.
From the dropdown, select a label field for the data field.Label Field
Each label corresponds to its field name, but you can edit the label.
From the dropdown, select a label position. Options are Callouts, InsideWedges, Inside Wedges + Callouts, Outside Wedges, and None.
Label Position
User Guide for the Cisco Unified Intelligence Center Reporting Application 8.0(4)
88
Chapter 5: Reports
Views Editor
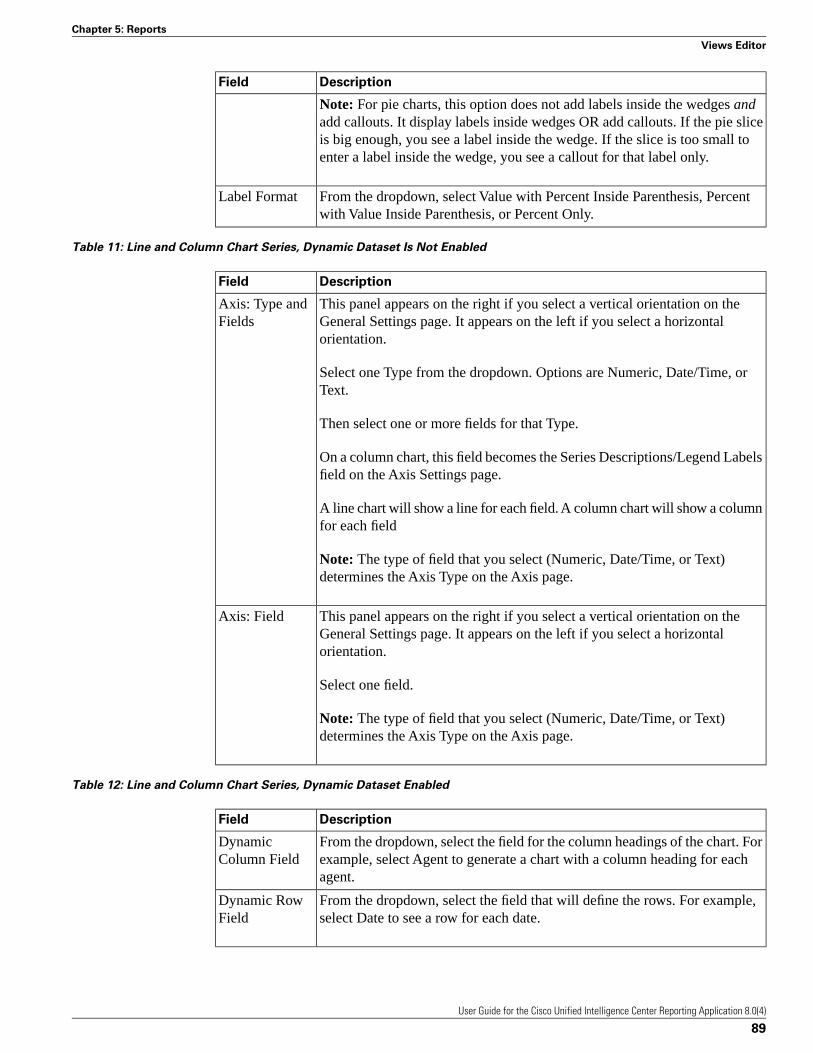
DescriptionField
Note: For pie charts, this option does not add labels inside the wedges andadd callouts. It display labels inside wedges OR add callouts. If the pie sliceis big enough, you see a label inside the wedge. If the slice is too small toenter a label inside the wedge, you see a callout for that label only.
From the dropdown, select Value with Percent Inside Parenthesis, Percentwith Value Inside Parenthesis, or Percent Only.
Label Format
Table 11: Line and Column Chart Series, Dynamic Dataset Is Not Enabled
DescriptionField
This panel appears on the right if you select a vertical orientation on theGeneral Settings page. It appears on the left if you select a horizontalorientation.
Axis: Type andFields
Select one Type from the dropdown. Options are Numeric, Date/Time, orText.
Then select one or more fields for that Type.
On a column chart, this field becomes the Series Descriptions/Legend Labelsfield on the Axis Settings page.
A line chart will show a line for each field. A column chart will show a columnfor each field
Note: The type of field that you select (Numeric, Date/Time, or Text)determines the Axis Type on the Axis page.
This panel appears on the right if you select a vertical orientation on theGeneral Settings page. It appears on the left if you select a horizontalorientation.
Axis: Field
Select one field.
Note: The type of field that you select (Numeric, Date/Time, or Text)determines the Axis Type on the Axis page.
Table 12: Line and Column Chart Series, Dynamic Dataset Enabled
DescriptionField
From the dropdown, select the field for the column headings of the chart. Forexample, select Agent to generate a chart with a column heading for eachagent.
DynamicColumn Field
From the dropdown, select the field that will define the rows. For example,select Date to see a row for each date.
Dynamic RowField
User Guide for the Cisco Unified Intelligence Center Reporting Application 8.0(4)
89
Chapter 5: Reports
Views Editor
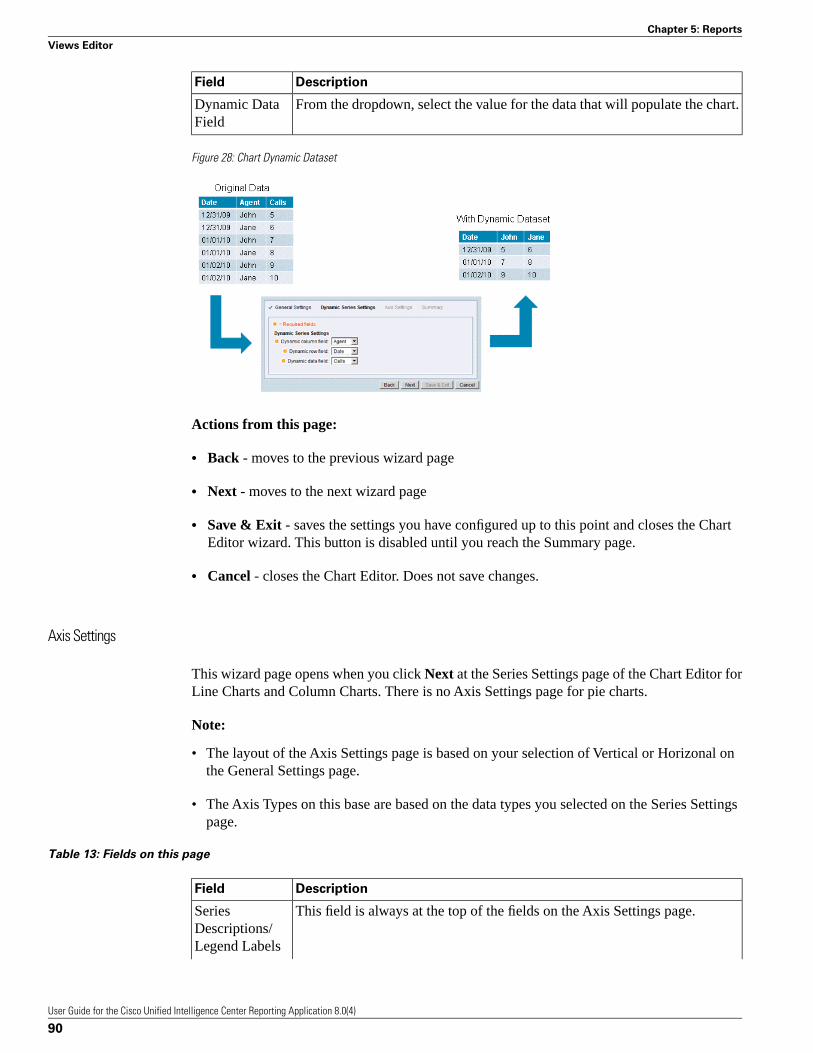
DescriptionField
From the dropdown, select the value for the data that will populate the chart.Dynamic DataField
Figure 28: Chart Dynamic Dataset
Actions from this page:
• Back - moves to the previous wizard page
• Next - moves to the next wizard page
• Save & Exit - saves the settings you have configured up to this point and closes the ChartEditor wizard. This button is disabled until you reach the Summary page.
• Cancel - closes the Chart Editor. Does not save changes.
Axis Settings
This wizard page opens when you click Next at the Series Settings page of the Chart Editor forLine Charts and Column Charts. There is no Axis Settings page for pie charts.
Note:
• The layout of the Axis Settings page is based on your selection of Vertical or Horizonal onthe General Settings page.
• The Axis Types on this base are based on the data types you selected on the Series Settingspage.
Table 13: Fields on this page
DescriptionField
This field is always at the top of the fields on the Axis Settings page.SeriesDescriptions/Legend Labels
User Guide for the Cisco Unified Intelligence Center Reporting Application 8.0(4)
90
Chapter 5: Reports
Views Editor
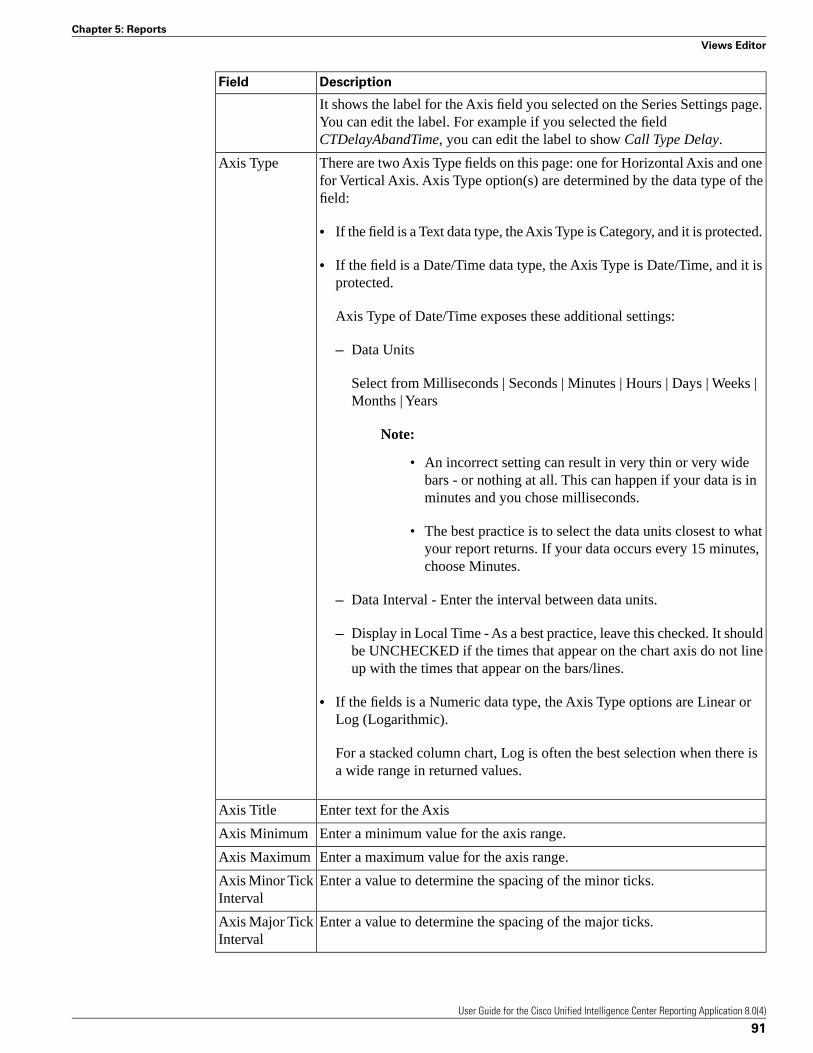
DescriptionField
It shows the label for the Axis field you selected on the Series Settings page.You can edit the label. For example if you selected the fieldCTDelayAbandTime, you can edit the label to show Call Type Delay.
There are two Axis Type fields on this page: one for Horizontal Axis and onefor Vertical Axis. Axis Type option(s) are determined by the data type of thefield:
Axis Type
• If the field is a Text data type, the Axis Type is Category, and it is protected.
• If the field is a Date/Time data type, the Axis Type is Date/Time, and it isprotected.
Axis Type of Date/Time exposes these additional settings:
– Data Units
Select from Milliseconds | Seconds | Minutes | Hours | Days | Weeks |Months | Years
Note:
• An incorrect setting can result in very thin or very widebars - or nothing at all. This can happen if your data is inminutes and you chose milliseconds.
• The best practice is to select the data units closest to whatyour report returns. If your data occurs every 15 minutes,choose Minutes.
– Data Interval - Enter the interval between data units.
– Display in Local Time - As a best practice, leave this checked. It shouldbe UNCHECKED if the times that appear on the chart axis do not lineup with the times that appear on the bars/lines.
• If the fields is a Numeric data type, the Axis Type options are Linear orLog (Logarithmic).
For a stacked column chart, Log is often the best selection when there isa wide range in returned values.
Enter text for the AxisAxis Title
Enter a minimum value for the axis range.Axis Minimum
Enter a maximum value for the axis range.Axis Maximum
Enter a value to determine the spacing of the minor ticks.Axis Minor TickInterval
Enter a value to determine the spacing of the major ticks.Axis Major TickInterval
User Guide for the Cisco Unified Intelligence Center Reporting Application 8.0(4)
91
Chapter 5: Reports
Views Editor

DescriptionField
Use this field with Decimal (%) values such as Service Level to configurethe digits that appear after the decimal point.
Maximum LabelPrecision
For example, with a value of 3, you see 0.000. 0.400, 1.000. With a value of1, you see 0.0, 0.4, 1.0.
Note: Making the Maximum Label Position large does not add decimals tothe value. Setting it to 5 does not make the value of 10.25 display as 10.25000.
If this is selected, the system takes a best guess at the range and will adjustthe beginning and end of the axis to meet the data range.
Auto adjust
With this selected, if all values are positive, or all values are negative, thechart will base the axis at zero.
Base at zero
Note: Base at zero will not have any effect if Auto Adjust is disabled.
.
Actions from this page:
• Back - moves to the previous wizard page
• Next - moves to the next wizard page
• Save & Exit - saves the settings you have configured up to this point and closes the ChartEditor wizard. This button is disabled until you reach the Summary page.
• Cancel - closes the Chart Editor. Does not save changes.
Summary
The left panel on this page shows a summary of the settings you have made for the chart.
Actions from this page are:
• Save and Preview. Clicking this saves the chart, runs the report without a filter, and displaysthe chart in the Preview area.
• Back - moves to the previous wizard page
• Next - disabled
• Save & Exit - saves the chart and closes the Chart Editor wizard.
• Cancel - closes the Chart Editor.
User Guide for the Cisco Unified Intelligence Center Reporting Application 8.0(4)
92
Chapter 5: Reports
Views Editor

Gauge Editor
This page opens from the Views Editor (page 71) when you select to create or edit a gauge.Use the fields on the Gauge Editor to create a new gauge or to edit an existing gauge. Thechanges that you make are reflected immediately in the gauge graphic.
A gauge displays a single number, and that number is the footer value of one of the fields inthe Report Definition.
Note: If the field does not have a footer, you see an error saying that the footer value is null oris not a number when you run the report. You will need to set the footer for the field.
To set the footer for a Save As or a Custom Report Definition:
• Open the Report Definition and click the Fields tab.
• Locate the field for the gauge and select Edit Formatting.
• Select a footer value from the dropdown.
Note: Footer values are Sum | Avg | Count | Min | Max | Custom Formula. Some footer valuesdo not make sense for some fields, and will not result in useful gauges. For example, setting agauge field to Agent Name and setting the Agent Name footer value to Avg does not result in auseful gauge.
Table 14: Fields on the Gauge Editor
ExplanationField
From the dropdown, select the field from the reportdefinition that the gauge will track. You can select onlyone field.
Field
Note: Not all of the fields in the dropdown list makeuseful gauges, and not all of them have pre-defined footervalues.
Enter the name for the gauge. This is the name that willdisplay as the report view. The name must be uniqueamong all gauge views for the report.
Name
Enter minimum and maximum values to set the rangefor the gauge.
Range
Check the types of markers (ticks) you want to displayon the gauge.
Number of scale markers
Note: If the gauge has a small range and a large numberof scale markers, the markers might overlap.
User Guide for the Cisco Unified Intelligence Center Reporting Application 8.0(4)
93
Chapter 5: Reports
Views Editor
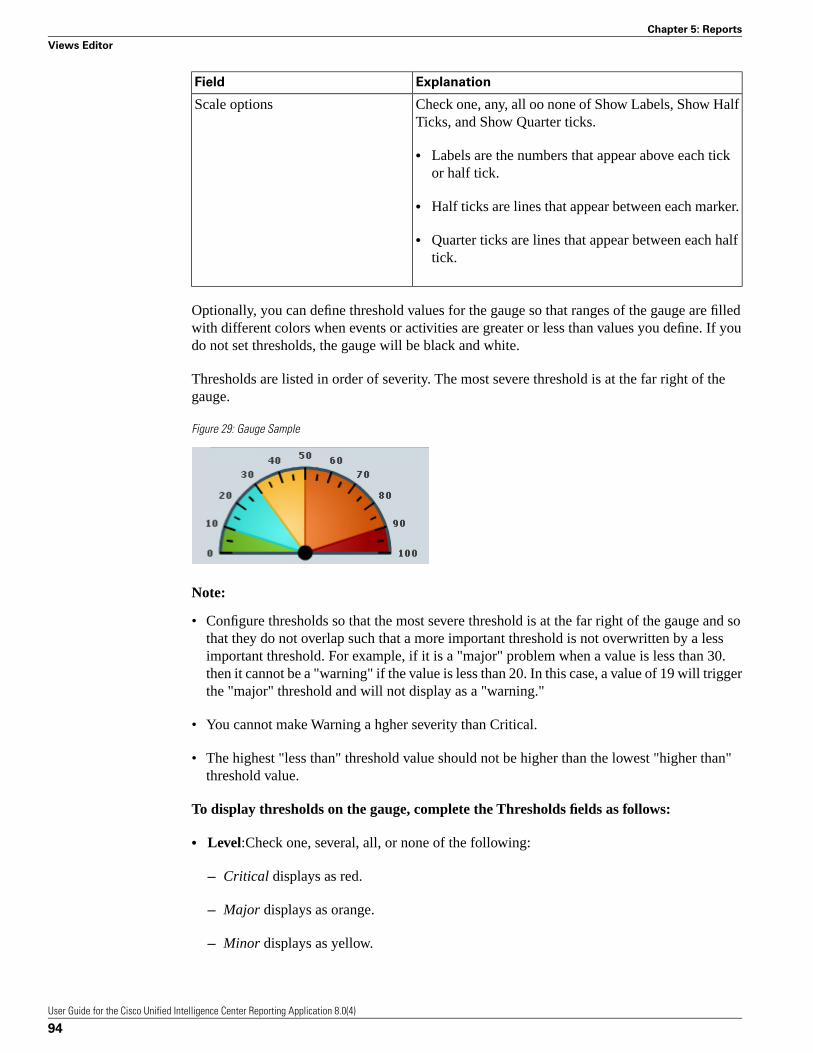
ExplanationField
Check one, any, all oo none of Show Labels, Show HalfTicks, and Show Quarter ticks.
Scale options
• Labels are the numbers that appear above each tickor half tick.
• Half ticks are lines that appear between each marker.
• Quarter ticks are lines that appear between each halftick.
Optionally, you can define threshold values for the gauge so that ranges of the gauge are filledwith different colors when events or activities are greater or less than values you define. If youdo not set thresholds, the gauge will be black and white.
Thresholds are listed in order of severity. The most severe threshold is at the far right of thegauge.
Figure 29: Gauge Sample
Note:
• Configure thresholds so that the most severe threshold is at the far right of the gauge and sothat they do not overlap such that a more important threshold is not overwritten by a lessimportant threshold. For example, if it is a "major" problem when a value is less than 30.then it cannot be a "warning" if the value is less than 20. In this case, a value of 19 will triggerthe "major" threshold and will not display as a "warning."
• You cannot make Warning a hgher severity than Critical.
• The highest "less than" threshold value should not be higher than the lowest "higher than"threshold value.
To display thresholds on the gauge, complete the Thresholds fields as follows:
• Level:Check one, several, all, or none of the following:
– Critical displays as red.
– Major displays as orange.
– Minor displays as yellow.
User Guide for the Cisco Unified Intelligence Center Reporting Application 8.0(4)
94
Chapter 5: Reports
Views Editor

– Warning displays as blue.
• For each Level, select a Direction: Options are Greater than and Less than.
• For each Level, select a Value. Values must be numbers.
Note:
• You cannot specify a range for a Normal threshold. Any values in the bottom range that arenot specified display as Normal (Green). For example, if you set Warning to be greater than20 and your minimum range is 0, then 0 - 19 display as green.
• The sample gauge updates along with your changes unless there is an error in your settings.Once you resolve the error, the sample gauge will update. The Save buttons are also disableduntil any errors are resolved.
• If you do not see the change immediately, click elsewhere on the page.
Each gauge that you design and save becomes available in the Views Editor (page 71).
To see the gauge, run the report and select the Gauge from Report Viewer, or create a Save Asfor the report's Gauge View and add it to a dashboard. (See Add a Report (page 33) underDashboards help.)
Actions on this page:
• Save As creates a new gauge based on the gauge you have opened. You must enter a newname for the Save As version of the gauge.
• Save and Close saves the gauge, closes the Gauge Editor, and returns you to the ViewsEditor.
• Save saves the gauge and keeps the page open so that you can refine the values.
• Refresh refreshes the page to show changes another user might have made to this gauge.
• Cancel cancel changes and closes the Gauge Editor.
• Help - opens online help.
• X on the tab heading - closes the page.
Export to Excel
Click the Export button in a generated report grid to save the report as an Microsoft Excel xlsfile that you can download and save locally.
User Guide for the Cisco Unified Intelligence Center Reporting Application 8.0(4)
95
Chapter 5: Reports
Export to Excel
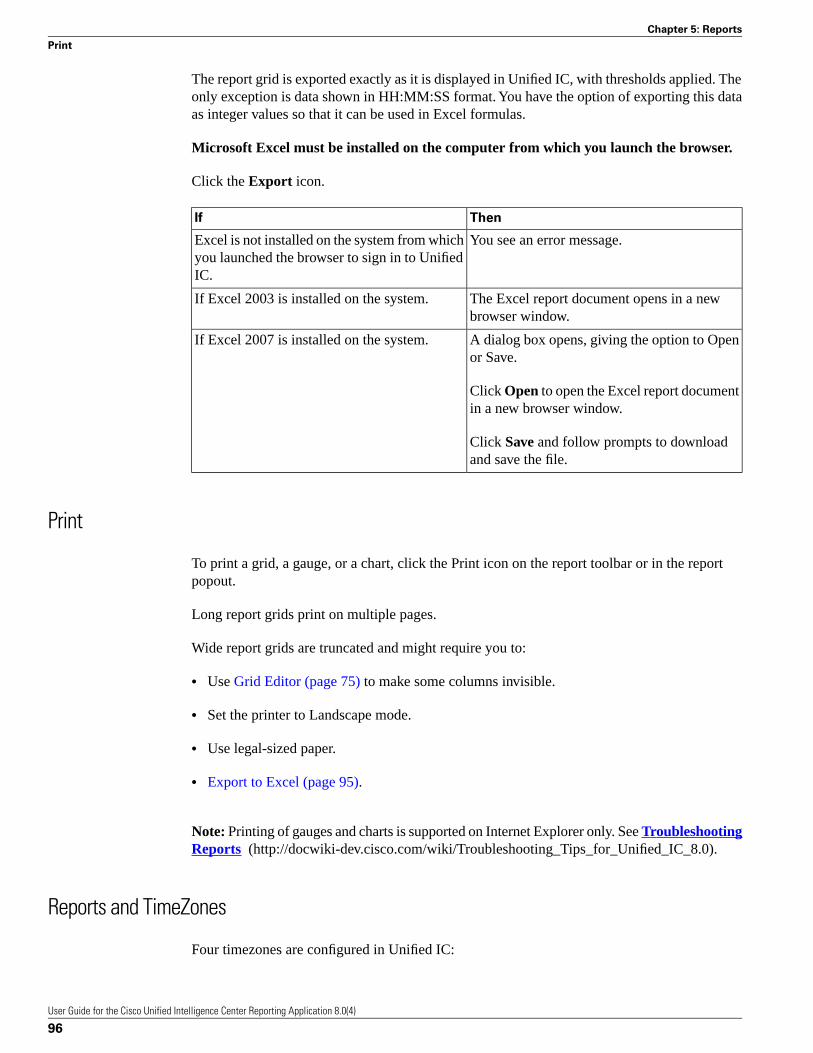
The report grid is exported exactly as it is displayed in Unified IC, with thresholds applied. Theonly exception is data shown in HH:MM:SS format. You have the option of exporting this dataas integer values so that it can be used in Excel formulas.
Microsoft Excel must be installed on the computer from which you launch the browser.
Click the Export icon.
ThenIf
You see an error message.Excel is not installed on the system from whichyou launched the browser to sign in to UnifiedIC.
The Excel report document opens in a newbrowser window.
If Excel 2003 is installed on the system.
A dialog box opens, giving the option to Openor Save.
If Excel 2007 is installed on the system.
Click Open to open the Excel report documentin a new browser window.
Click Save and follow prompts to downloadand save the file.
To print a grid, a gauge, or a chart, click the Print icon on the report toolbar or in the reportpopout.
Long report grids print on multiple pages.
Wide report grids are truncated and might require you to:
• Use Grid Editor (page 75) to make some columns invisible.
• Set the printer to Landscape mode.
• Use legal-sized paper.
• Export to Excel (page 95).
Note: Printing of gauges and charts is supported on Internet Explorer only. See TroubleshootingReports (http://docwiki-dev.cisco.com/wiki/Troubleshooting_Tips_for_Unified_IC_8.0).
Reports and TimeZones
Four timezones are configured in Unified IC:
User Guide for the Cisco Unified Intelligence Center Reporting Application 8.0(4)
96
Chapter 5: Reports
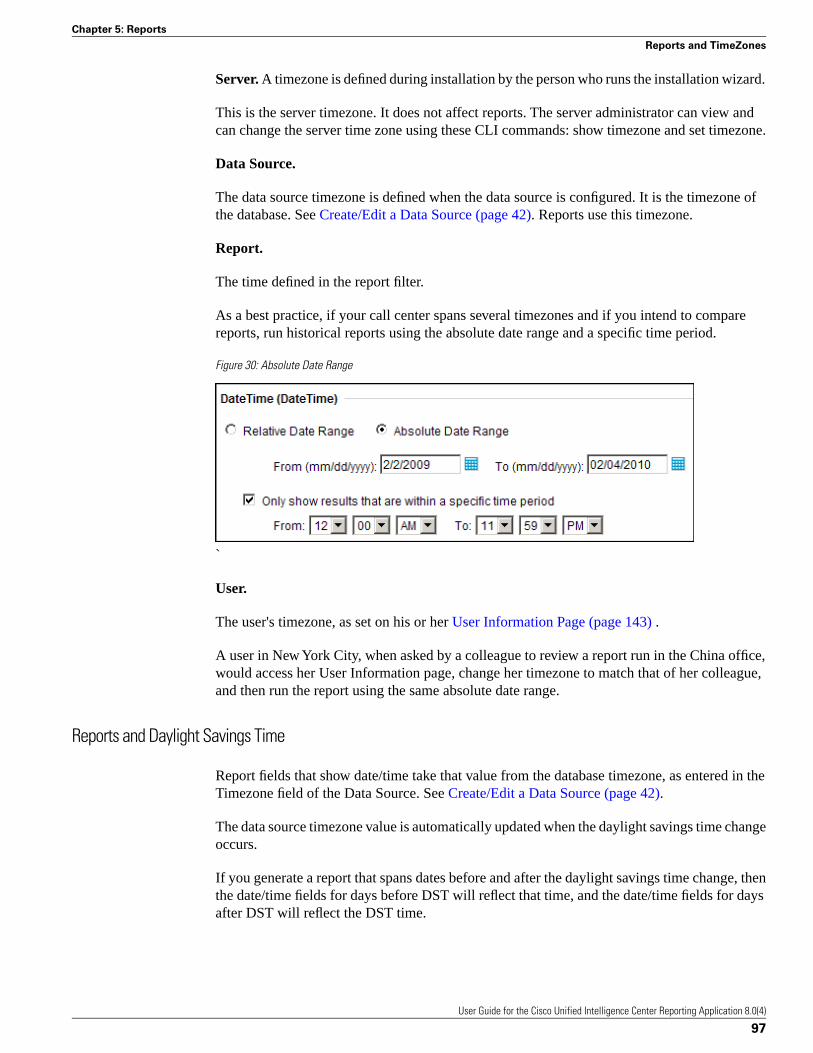
Server. A timezone is defined during installation by the person who runs the installation wizard.
This is the server timezone. It does not affect reports. The server administrator can view andcan change the server time zone using these CLI commands: show timezone and set timezone.
Data Source.
The data source timezone is defined when the data source is configured. It is the timezone ofthe database. See Create/Edit a Data Source (page 42). Reports use this timezone.
Report.
The time defined in the report filter.
As a best practice, if your call center spans several timezones and if you intend to comparereports, run historical reports using the absolute date range and a specific time period.
Figure 30: Absolute Date Range
`
User.
The user's timezone, as set on his or her User Information Page (page 143) .
A user in New York City, when asked by a colleague to review a report run in the China office,would access her User Information page, change her timezone to match that of her colleague,and then run the report using the same absolute date range.
Reports and Daylight Savings Time
Report fields that show date/time take that value from the database timezone, as entered in theTimezone field of the Data Source. See Create/Edit a Data Source (page 42).
The data source timezone value is automatically updated when the daylight savings time changeoccurs.
If you generate a report that spans dates before and after the daylight savings time change, thenthe date/time fields for days before DST will reflect that time, and the date/time fields for daysafter DST will reflect the DST time.
User Guide for the Cisco Unified Intelligence Center Reporting Application 8.0(4)
97
Chapter 5: Reports
Reports and TimeZones

User Guide for the Cisco Unified Intelligence Center Reporting Application 8.0(4)
98
Chapter 5: Reports
Reports and TimeZones

Report DefinitionsEach report has a Report Definition, which represents the manner in which data is retrievedfrom the data source for that report template.
In addition to specifying the manner in which data is retrieved (by a simple MS SQL query, bya stored procedure query, or by an anonymous block query), a Report Definition contains thedataset that is obtained. This includes the fields, the filters, the formulas, the refresh rate, andthe key criteria field for the report.
Note: There is a stock Report Definition for each report template installed by Unified IC.
When you create a custom report template from scratch, you must first select its ReportDefinition. If the custom template requires a custom Report Definition, you must create theReport Definition before you create the template.
Access to the Report Definitions interface is controlled by license type and user role. You musthave a premium license and a Report Definition Designer user role to open this drawer.
Users with a standard license cannot access the Report Definition drawer to create or editReport Definitions. They can, however, see and select from a list Report Definitions when theycreate a report. The Report Definitions they can see are the stock Report Definitions and anyReport Definitions for custom reports that were created or were imported into their database.
Users with a premium license
• With Report Definition Designer user role, can access the Report Definition drawer.
• Can view and Save As the stock Report Definitions; for example, to change the refresh rate,and to create new filters and formula fields in the Save As copies.
• Can create new Report Definitions.
Note: All actions on the Report Definitions interface are based on User Role and on the user'sobject Permissions for report definitions and for Categories. See About Permissions (page 152).
User Guide for the Cisco Unified Intelligence Center Reporting Application 8.0(4)
99
Chapter 6
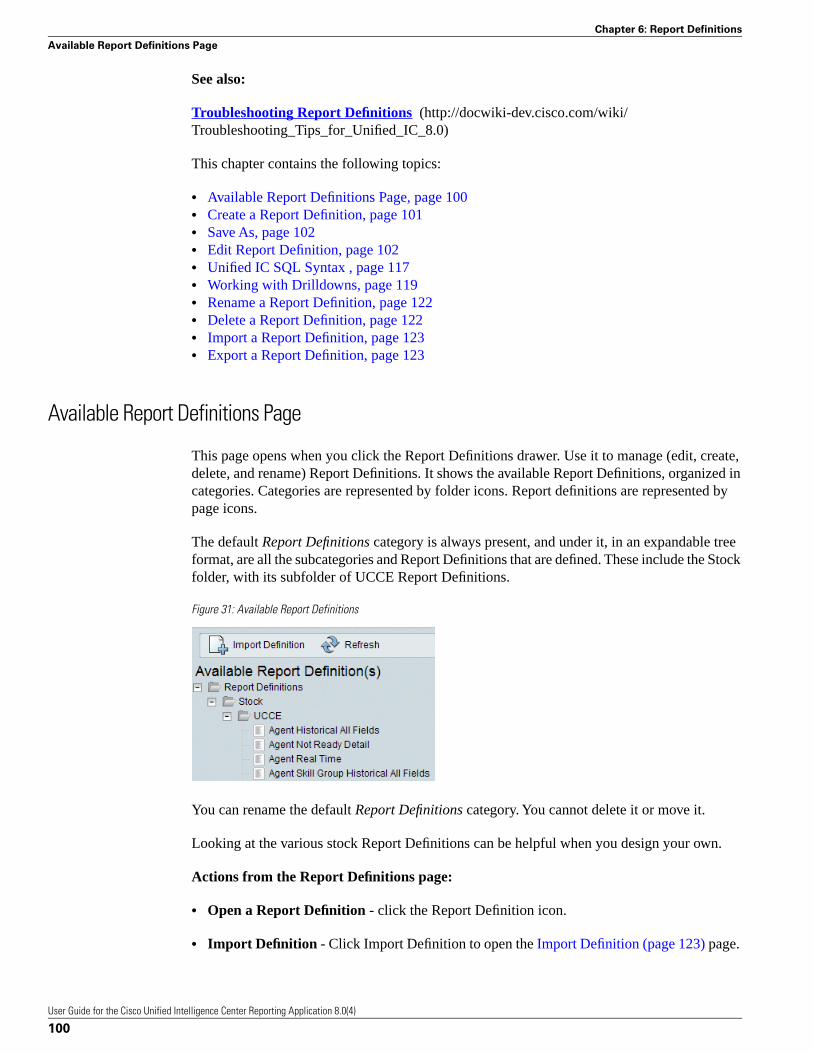
See also:
Troubleshooting Report Definitions (http://docwiki-dev.cisco.com/wiki/Troubleshooting_Tips_for_Unified_IC_8.0)
This chapter contains the following topics:
• Available Report Definitions Page, page 100• Create a Report Definition, page 101• Save As, page 102• Edit Report Definition, page 102• Unified IC SQL Syntax , page 117• Working with Drilldowns, page 119• Rename a Report Definition, page 122• Delete a Report Definition, page 122• Import a Report Definition, page 123• Export a Report Definition, page 123
Available Report Definitions Page
This page opens when you click the Report Definitions drawer. Use it to manage (edit, create,delete, and rename) Report Definitions. It shows the available Report Definitions, organized incategories. Categories are represented by folder icons. Report definitions are represented bypage icons.
The default Report Definitions category is always present, and under it, in an expandable treeformat, are all the subcategories and Report Definitions that are defined. These include the Stockfolder, with its subfolder of UCCE Report Definitions.
Figure 31: Available Report Definitions
You can rename the default Report Definitions category. You cannot delete it or move it.
Looking at the various stock Report Definitions can be helpful when you design your own.
Actions from the Report Definitions page:
• Open a Report Definition - click the Report Definition icon.
• Import Definition - Click Import Definition to open the Import Definition (page 123) page.
User Guide for the Cisco Unified Intelligence Center Reporting Application 8.0(4)
100
Chapter 6: Report Definitions
Available Report Definitions Page
• Refresh - Click this to update and see reflect changes anyone has made to add, modify, ordelete Report Definitions or categories.
• Work with Categories
Actions are:
– Create Sub-category (page 161) from a category or a sub-category.
– Delete Sub-category (page 161)
– Rename Sub-category (page 161)
– Set Permissions for the sub-category
• Create a Report Definition. To do this, right-click a category or sub-category and selectCreate Report Definition. See Create Report Definition (page 101).
• Edit a Report Definition. To do this, right-click a Report Definition and select Edit. See EditReport Definition (page 102).
• Delete a Report Definition. To do this, right-click a Report Definition and select Delete. SeeDelete a Report Definition (page 122).
• Rename a Report Definition. To do this, right-click a Report Definition and select Rename.See Rename a Report Definition (page 122).
• Export a Report Definition. To do this, right-click a Report Definition and select Export.See Export a Report Definition (page 123)
• Help - opens online help for the page.
• Drag and Drop - you can drag and drop (page 161) Report Definitions and sub-categories.
Create a Report Definition
This page opens when you right-click a category or sub-category and select Create ReportDefinition.
To create a Report Definition:
1. Enter a Name.
2. Enter a Description.
3. Set the default permissions for My Group and for the All Users group.
4. Click OK. This opens the Edit Report Definition (page 102) page.
User Guide for the Cisco Unified Intelligence Center Reporting Application 8.0(4)
101
Chapter 6: Report Definitions
Create a Report Definition
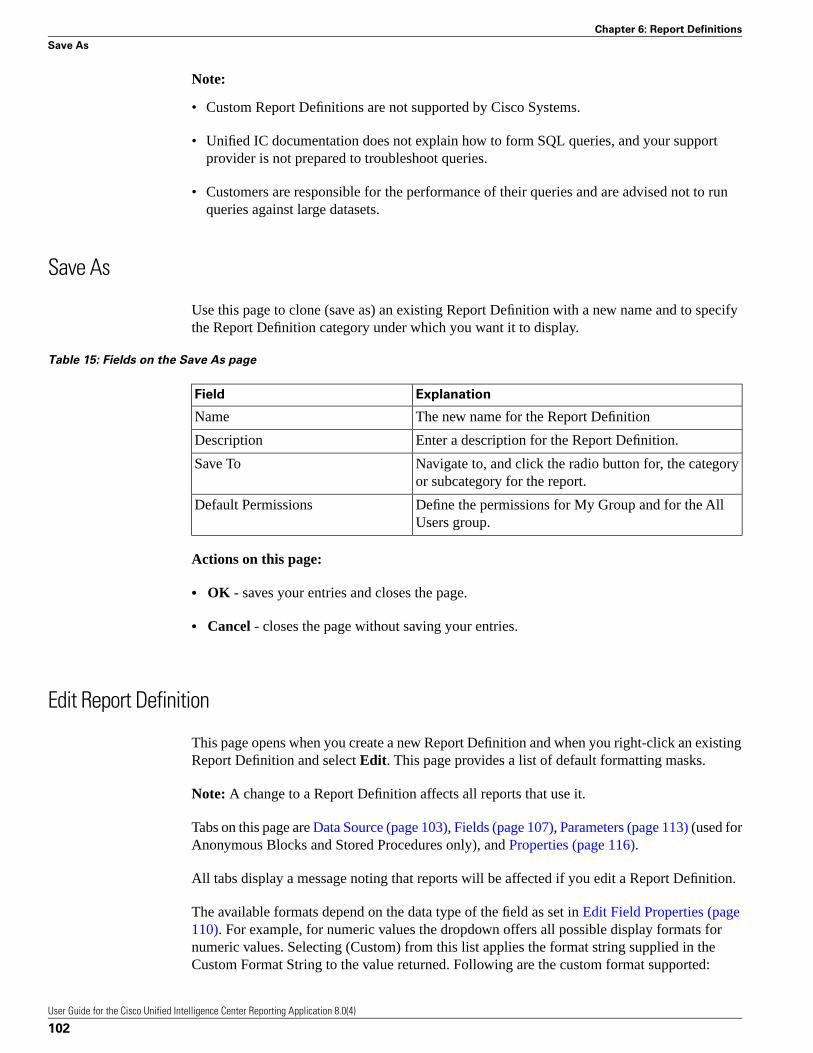
Note:
• Custom Report Definitions are not supported by Cisco Systems.
• Unified IC documentation does not explain how to form SQL queries, and your supportprovider is not prepared to troubleshoot queries.
• Customers are responsible for the performance of their queries and are advised not to runqueries against large datasets.
Save As
Use this page to clone (save as) an existing Report Definition with a new name and to specifythe Report Definition category under which you want it to display.
Table 15: Fields on the Save As page
ExplanationField
The new name for the Report DefinitionName
Enter a description for the Report Definition.Description
Navigate to, and click the radio button for, the categoryor subcategory for the report.
Save To
Define the permissions for My Group and for the AllUsers group.
Default Permissions
Actions on this page:
• OK - saves your entries and closes the page.
• Cancel - closes the page without saving your entries.
Edit Report Definition
This page opens when you create a new Report Definition and when you right-click an existingReport Definition and select Edit. This page provides a list of default formatting masks.
Note: A change to a Report Definition affects all reports that use it.
Tabs on this page are Data Source (page 103), Fields (page 107), Parameters (page 113) (used forAnonymous Blocks and Stored Procedures only), and Properties (page 116).
All tabs display a message noting that reports will be affected if you edit a Report Definition.
The available formats depend on the data type of the field as set in Edit Field Properties (page110). For example, for numeric values the dropdown offers all possible display formats fornumeric values. Selecting (Custom) from this list applies the format string supplied in theCustom Format String to the value returned. Following are the custom format supported:
User Guide for the Cisco Unified Intelligence Center Reporting Application 8.0(4)
102
Chapter 6: Report Definitions
Save As
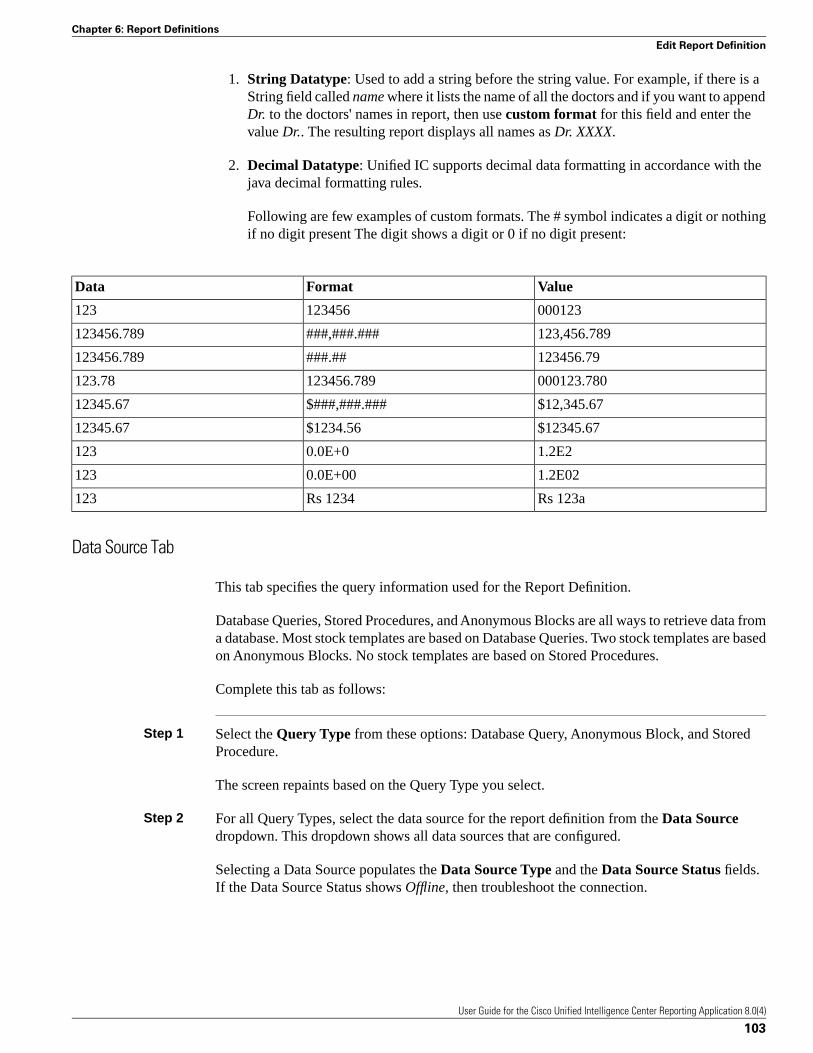
1. String Datatype: Used to add a string before the string value. For example, if there is aString field called name where it lists the name of all the doctors and if you want to appendDr. to the doctors' names in report, then use custom format for this field and enter thevalue Dr.. The resulting report displays all names as Dr. XXXX.
2. Decimal Datatype: Unified IC supports decimal data formatting in accordance with thejava decimal formatting rules.
Following are few examples of custom formats. The # symbol indicates a digit or nothingif no digit present The digit shows a digit or 0 if no digit present:
ValueFormatData
000123123456123
123,456.789###,###.###123456.789
123456.79###.##123456.789
000123.780123456.789123.78
$12,345.67$###,###.###12345.67
$12345.67$1234.5612345.67
1.2E20.0E+0123
1.2E020.0E+00123
Rs 123aRs 1234123
Data Source Tab
This tab specifies the query information used for the Report Definition.
Database Queries, Stored Procedures, and Anonymous Blocks are all ways to retrieve data froma database. Most stock templates are based on Database Queries. Two stock templates are basedon Anonymous Blocks. No stock templates are based on Stored Procedures.
Complete this tab as follows:
Step 1 Select the Query Type from these options: Database Query, Anonymous Block, and StoredProcedure.
The screen repaints based on the Query Type you select.
Step 2 For all Query Types, select the data source for the report definition from the Data Sourcedropdown. This dropdown shows all data sources that are configured.
Selecting a Data Source populates the Data Source Type and the Data Source Status fields.If the Data Source Status shows Offline, then troubleshoot the connection.
User Guide for the Cisco Unified Intelligence Center Reporting Application 8.0(4)
103
Chapter 6: Report Definitions
Edit Report Definition
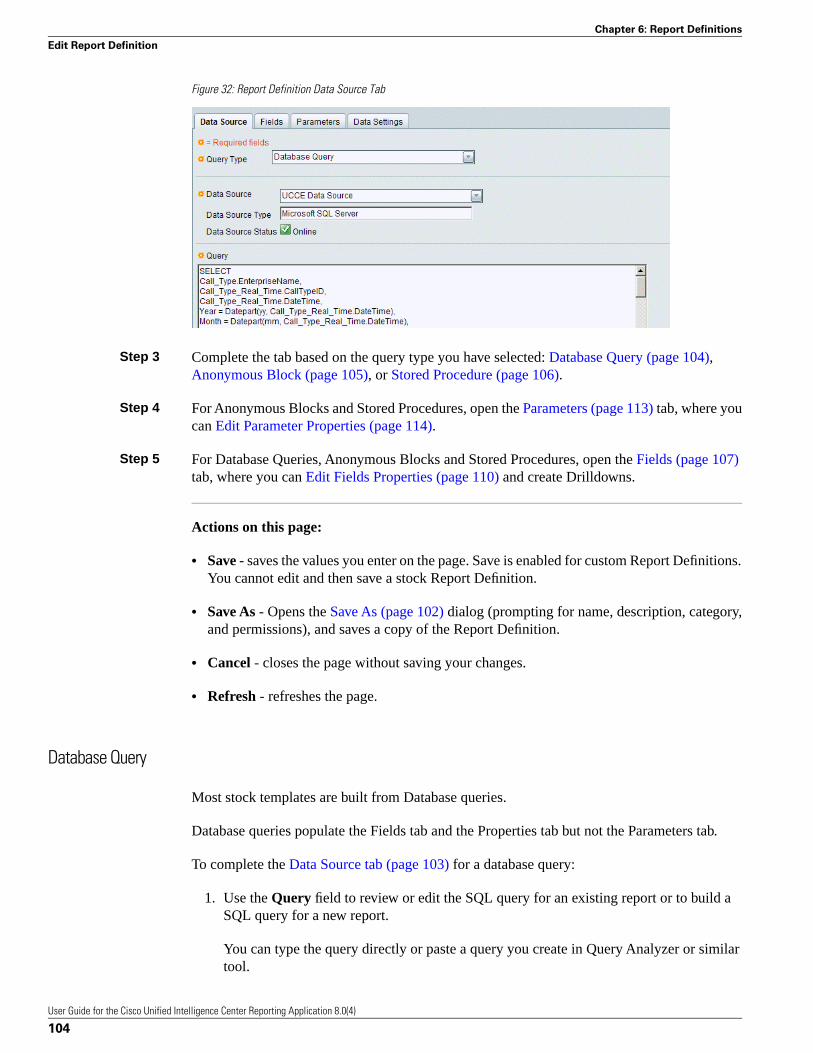
Figure 32: Report Definition Data Source Tab
Step 3 Complete the tab based on the query type you have selected: Database Query (page 104),Anonymous Block (page 105), or Stored Procedure (page 106).
Step 4 For Anonymous Blocks and Stored Procedures, open the Parameters (page 113) tab, where youcan Edit Parameter Properties (page 114).
Step 5 For Database Queries, Anonymous Blocks and Stored Procedures, open the Fields (page 107)tab, where you can Edit Fields Properties (page 110) and create Drilldowns.
Actions on this page:
• Save - saves the values you enter on the page. Save is enabled for custom Report Definitions.You cannot edit and then save a stock Report Definition.
• Save As - Opens the Save As (page 102) dialog (prompting for name, description, category,and permissions), and saves a copy of the Report Definition.
• Cancel - closes the page without saving your changes.
• Refresh - refreshes the page.
Database Query
Most stock templates are built from Database queries.
Database queries populate the Fields tab and the Properties tab but not the Parameters tab.
To complete the Data Source tab (page 103) for a database query:
1. Use the Query field to review or edit the SQL query for an existing report or to build aSQL query for a new report.
You can type the query directly or paste a query you create in Query Analyzer or similartool.
User Guide for the Cisco Unified Intelligence Center Reporting Application 8.0(4)
104
Chapter 6: Report Definitions
Edit Report Definition

2. Click Create Fields to validate the query syntax and to populate the Fields (page 107) tab.Each field represents a column in the database.
Anonymous Block
Anonymous Blocks are queries with both parameters and fields. Two stock templates are builtfrom Anonymous Blocks. They are the Agent Historical All Fields and Agent Not Ready Detailreports.
To complete the Data Source tab (page 103) for an anonymous block:
1. In the Anonymous Block Field, enter or paste the anonymous block.
Here is a sample anonymous block: select SkillTargetID, EnterpriseNamefrom Agent where SkillTargetID = :paramName
Parameter names in the anonymous block must have a colon followed by the rest of theparameter name; for example :paramName or :anotherParamName. The colon at thebeginning of the parameter name will be substituted with the at sign (@).
2. Click Create Parameters to create parameters.
You see a message that the parameters were successfully created.
A panel displays under the Create Parameters button. This panel displays the parametername, and for each name shows Data Type 'String" and Value 'test'.
3. For each parameter in the panel, select the correct Data Type.
A sample value for this data type will appear in the Value textbox. This value will bepasted into the anonymous block instead of the parameter name to validate it and createfields.
4. Click Create Fields to validate the query and create fields.
You see a message that the fields were created.
5. Open the Fields tab to review them.
For example:
• Enter this anonymous block
Figure 33: Anonymous Block example 1 of 5
• Click Create Parameters:
User Guide for the Cisco Unified Intelligence Center Reporting Application 8.0(4)
105
Chapter 6: Report Definitions
Edit Report Definition
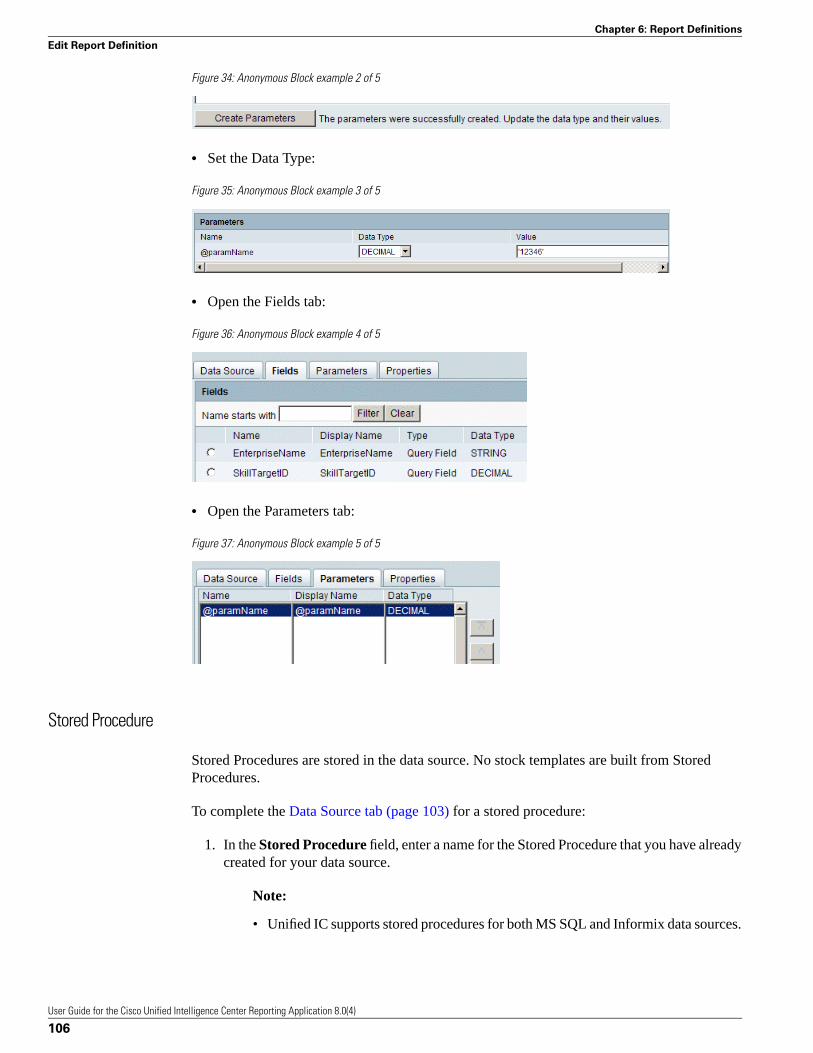
Figure 34: Anonymous Block example 2 of 5
• Set the Data Type:
Figure 35: Anonymous Block example 3 of 5
• Open the Fields tab:
Figure 36: Anonymous Block example 4 of 5
• Open the Parameters tab:
Figure 37: Anonymous Block example 5 of 5
Stored Procedure
Stored Procedures are stored in the data source. No stock templates are built from StoredProcedures.
To complete the Data Source tab (page 103) for a stored procedure:
1. In the Stored Procedure field, enter a name for the Stored Procedure that you have alreadycreated for your data source.
Note:
• Unified IC supports stored procedures for both MS SQL and Informix data sources.
User Guide for the Cisco Unified Intelligence Center Reporting Application 8.0(4)
106
Chapter 6: Report Definitions
Edit Report Definition
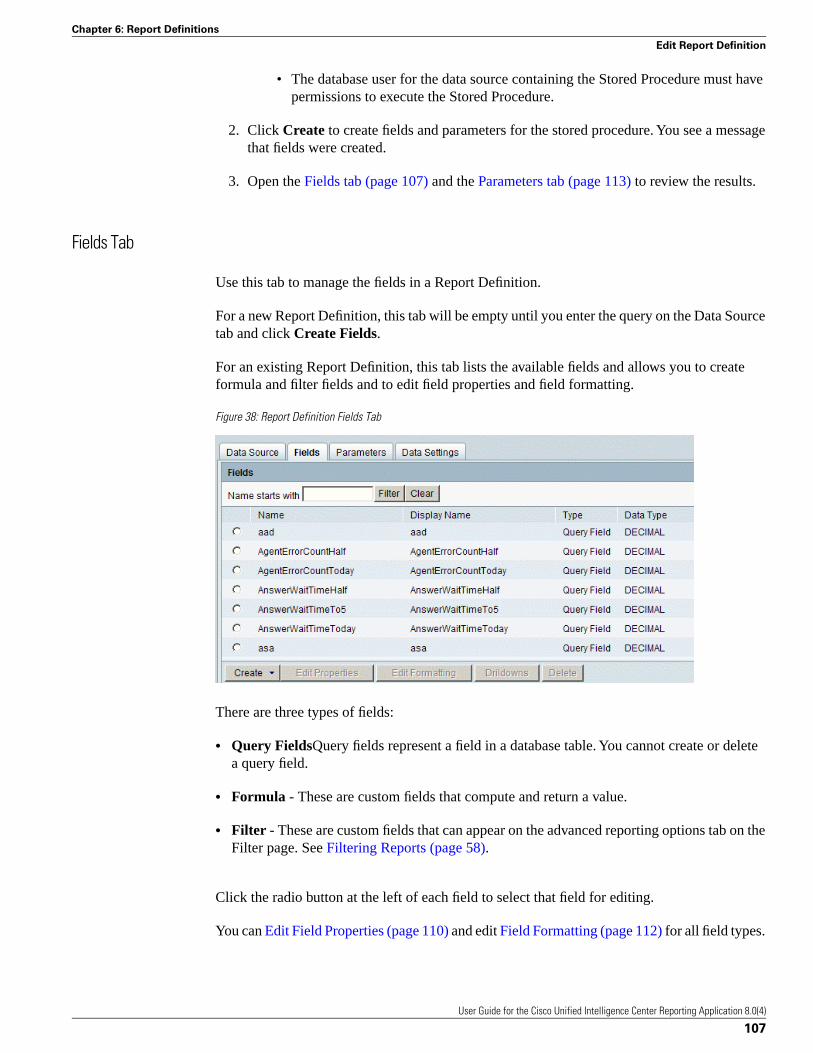
• The database user for the data source containing the Stored Procedure must havepermissions to execute the Stored Procedure.
2. Click Create to create fields and parameters for the stored procedure. You see a messagethat fields were created.
3. Open the Fields tab (page 107) and the Parameters tab (page 113) to review the results.
Fields Tab
Use this tab to manage the fields in a Report Definition.
For a new Report Definition, this tab will be empty until you enter the query on the Data Sourcetab and click Create Fields.
For an existing Report Definition, this tab lists the available fields and allows you to createformula and filter fields and to edit field properties and field formatting.
Figure 38: Report Definition Fields Tab
There are three types of fields:
• Query FieldsQuery fields represent a field in a database table. You cannot create or deletea query field.
• Formula - These are custom fields that compute and return a value.
• Filter - These are custom fields that can appear on the advanced reporting options tab on theFilter page. See Filtering Reports (page 58).
Click the radio button at the left of each field to select that field for editing.
You can Edit Field Properties (page 110) and edit Field Formatting (page 112) for all field types.
User Guide for the Cisco Unified Intelligence Center Reporting Application 8.0(4)
107
Chapter 6: Report Definitions
Edit Report Definition

Table 16: Rows on this page
DescriptionField
The database name of the field.Name
The name of the field as it appears in the report grid.Display Name
The type of field (Query Field, Filter Field, or Formula Field).Type
The data type of the field.Data Type
Note: You cannot change the data type for a parameter.
Actions from this page:
• Create - opens a dropdown for selecting the type of field you want to create. Options areFormula Field (page 109) and Filter Field (page 108).
• Edit Properties - enabled when a row is selected. Expands the page to reveal Edit FieldProperties (page 110).
• Edit Formatting - enabled when a row is selected. Expands the page to reveal FieldFormatting (page 112).
• Drilldowns - enabled when a row is selected. Click to display the All Drilldowns panel whereyou can view, create, edit, or delete a drilldown for the field.
See Working with Drilldowns (page 119).
• Delete - enabled when a row is selected, prompts for a confirmation and then deletes thefield.
Note: You can delete format and filter fields only.
• Save - saves your changes on all tabs.
• Cancel - cancels your changes on this tab.
• Refresh - updates the page to show changes another user might have made on the fields tabs.
• Help - opens online help.
• X on the tab heading - closes the page.
Filter Field
Create a filter field if you want to add a filtering value to the advanced filters tab on the Filterpage. See Filtering Reports (page 58).
Filter fields reduce the amount of data that is used to generate a report, They do not display ascolumns in the generated report.
User Guide for the Cisco Unified Intelligence Center Reporting Application 8.0(4)
108
Chapter 6: Report Definitions
Edit Report Definition

Step 1 Click Create from the Fields Tab (page 107) and select Filter.
The new filter field is added to the end of list of Fields. Scroll down the page to locate it.
Step 2 Select Edit Field Properties (page 110) and complete the fields to define a required DisplayName and Data Type for the field. Complete optional Edit Field Properties fields such as enteringthe formula syntax, referring to the User Guide for the Cisco Unified Intelligence CenterReporting Application ()and the online help for explanations.
Step 3 Click Update to save the field properties.
Formula Field
Create a formula field if you want the report to include a computed field that does not exist inthe list of fields.
To create a formula field.
Step 1 Click Create from the Fields Tab (page 107) and select Formula.
The new formula field is added to the end of list of Fields. Scroll down the page to locate it.
Step 2 Select Edit Field Properties (page 110) and complete the fields to define a required DisplayName and Data Type for the field. Complete optional Edit Field Properties fields, referring tothe online help for explanations.
Step 3 Click Update to save the field properties.
Step 4 Scroll up and select Edit Field Properties (page 110) for the formula field.
Step 5 Click Update to save the field formatting.
Best Practices for Formulas
A formula field is an expression that uses operators to perform a calculation on database fields.You can define a formula field to appear as a column in a report. You can also create a formulafor a column footer.
The operators you can use in a formula are the basic arithmetic operators: + for addition, - forsubtraction, * for multiplication, / for division, and ( ) parentheses for grouping operands..
The database field values you can use in a formula can be any data type (Boolean, Date, Decimal,or String).
Note that:
• Each value in a formula represents a single field in the database. For example. to create aformula that adds AbanHold and AbanRing, the syntax must be ${AbanHold} + ${AbanRing}.
User Guide for the Cisco Unified Intelligence Center Reporting Application 8.0(4)
109
Chapter 6: Report Definitions
Edit Report Definition
If you enter ${AbanHold + AbanRing}, the formula will fail because there is no databasefield named AbanHold + AbanRing.
• Dates must be enclosed in double quotes. The system interprets "10/10/2010" as a date. Itinterprets 10/10/2010 as a mathematical operation.
• The Key Criteria field cannot be a formula field.
• A formula cannot use other formulas in its formula.
• If you enter a formula in a footer, note that a footer cannot interpret a specific database field.The footer interprets the field name as an array for the database column to which the fieldbelongs. For example, this expression in footer formula ${FIELD1} + 1 is interpreted as${FIELD1 : FIELDn} + 1.
See also Examples of Correct and Incorrect Formula Syntax (page 110).
Examples of Correct and Incorrect Formula Syntax
Correct Syntax:
• ${num1} + ${num2)
• ${num1} - ${num2)
• (${num1}) / (${num2}) * (${num3})
• (${num1}) / (${num2}) / (${num3} * ${num4}) - ${num1}
• ${str1} + ${str2)
You can use + with strings to concatenate them.
Incorrect Syntax:
• ${str1} - ${str2) -
You cannot subtract strings. You also cannot multiply or divide them.
• ${str1} + ${num1)
You can add a num and a string only if the database has a null constraint on the number.
• ${str1 + str2}
str1 + str2 is not a field name.
User Guide for the Cisco Unified Intelligence Center Reporting Application 8.0(4)
110
Chapter 6: Report Definitions
Edit Report Definition
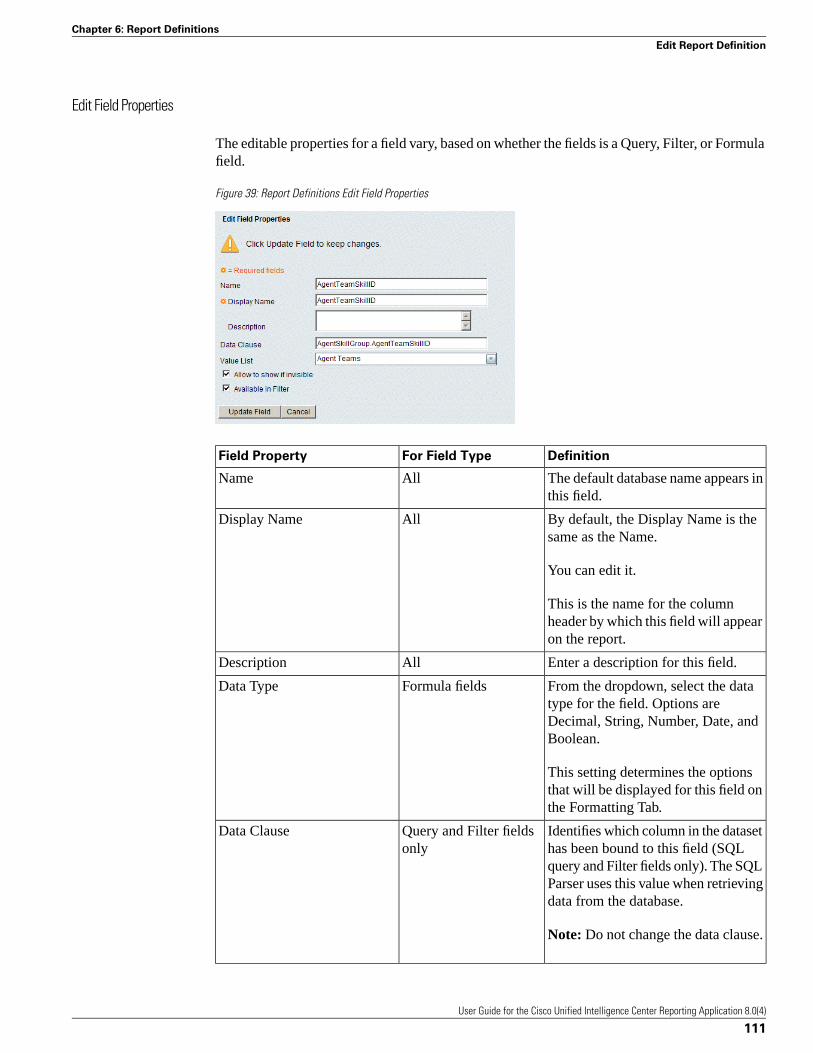
Edit Field Properties
The editable properties for a field vary, based on whether the fields is a Query, Filter, or Formulafield.
Figure 39: Report Definitions Edit Field Properties
DefinitionFor Field TypeField Property
The default database name appears inthis field.
AllName
By default, the Display Name is thesame as the Name.
AllDisplay Name
You can edit it.
This is the name for the columnheader by which this field will appearon the report.
Enter a description for this field.AllDescription
From the dropdown, select the datatype for the field. Options are
Formula fieldsData Type
Decimal, String, Number, Date, andBoolean.
This setting determines the optionsthat will be displayed for this field onthe Formatting Tab.
Identifies which column in the datasethas been bound to this field (SQL
Query and Filter fieldsonly
Data Clause
query and Filter fields only). The SQLParser uses this value when retrievingdata from the database.
Note: Do not change the data clause.
User Guide for the Cisco Unified Intelligence Center Reporting Application 8.0(4)
111
Chapter 6: Report Definitions
Edit Report Definition
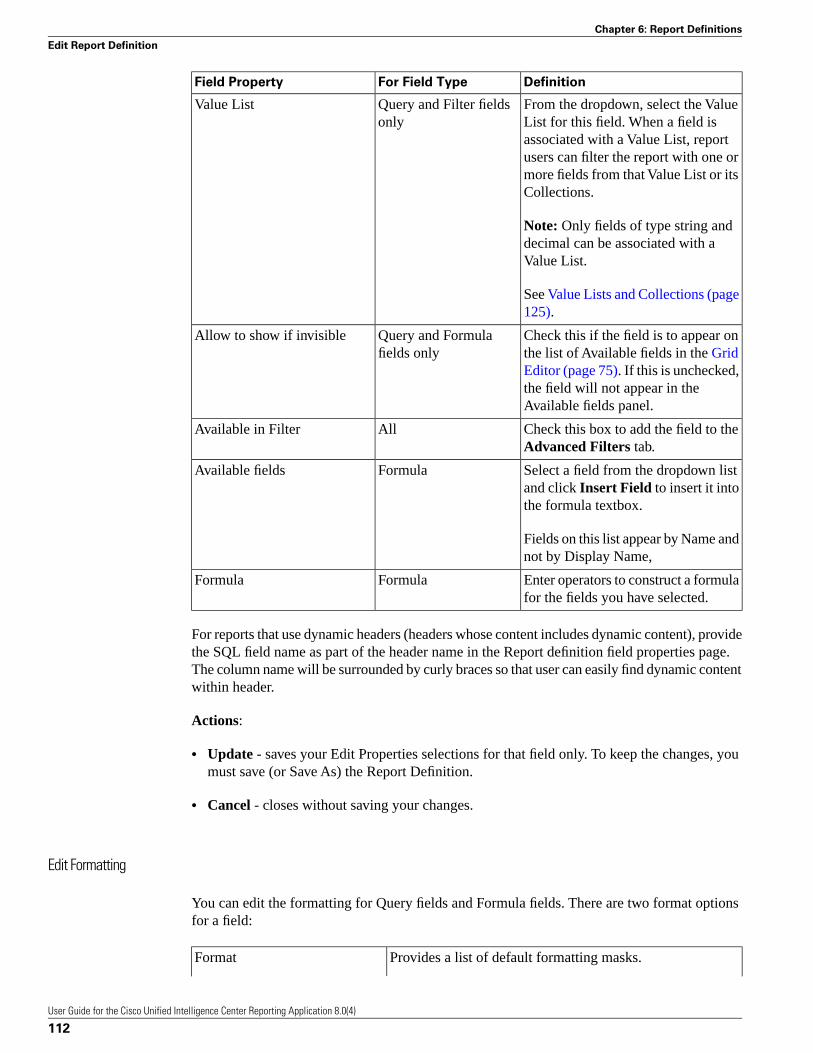
DefinitionFor Field TypeField Property
From the dropdown, select the ValueList for this field. When a field is
Query and Filter fieldsonly
Value List
associated with a Value List, reportusers can filter the report with one ormore fields from that Value List or itsCollections.
Note: Only fields of type string anddecimal can be associated with aValue List.
See Value Lists and Collections (page125).
Check this if the field is to appear onthe list of Available fields in the Grid
Query and Formulafields only
Allow to show if invisible
Editor (page 75). If this is unchecked,the field will not appear in theAvailable fields panel.
Check this box to add the field to theAdvanced Filters tab.
AllAvailable in Filter
Select a field from the dropdown listand click Insert Field to insert it intothe formula textbox.
FormulaAvailable fields
Fields on this list appear by Name andnot by Display Name,
Enter operators to construct a formulafor the fields you have selected.
FormulaFormula
For reports that use dynamic headers (headers whose content includes dynamic content), providethe SQL field name as part of the header name in the Report definition field properties page.The column name will be surrounded by curly braces so that user can easily find dynamic contentwithin header.
Actions:
• Update - saves your Edit Properties selections for that field only. To keep the changes, youmust save (or Save As) the Report Definition.
• Cancel - closes without saving your changes.
Edit Formatting
You can edit the formatting for Query fields and Formula fields. There are two format optionsfor a field:
Provides a list of default formatting masks.Format
User Guide for the Cisco Unified Intelligence Center Reporting Application 8.0(4)
112
Chapter 6: Report Definitions
Edit Report Definition
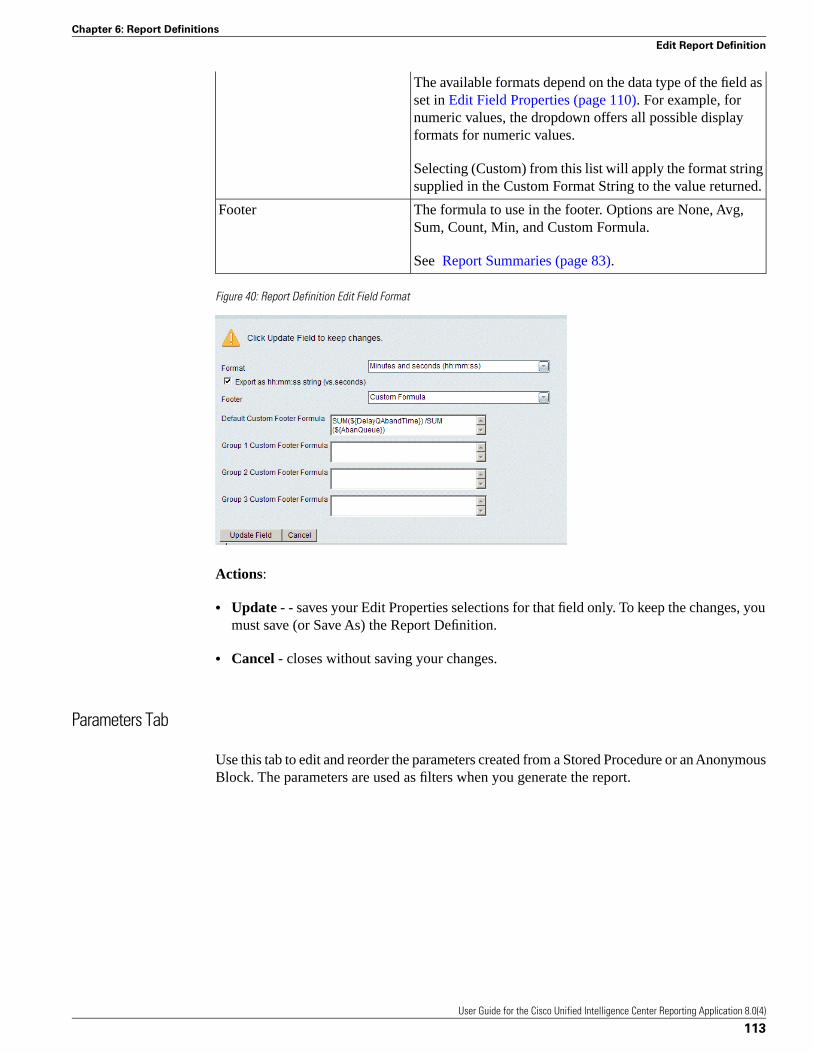
The available formats depend on the data type of the field asset in Edit Field Properties (page 110). For example, fornumeric values, the dropdown offers all possible displayformats for numeric values.
Selecting (Custom) from this list will apply the format stringsupplied in the Custom Format String to the value returned.
The formula to use in the footer. Options are None, Avg,Sum, Count, Min, and Custom Formula.
Footer
See Report Summaries (page 83).
Figure 40: Report Definition Edit Field Format
Actions:
• Update - - saves your Edit Properties selections for that field only. To keep the changes, youmust save (or Save As) the Report Definition.
• Cancel - closes without saving your changes.
Parameters Tab
Use this tab to edit and reorder the parameters created from a Stored Procedure or an AnonymousBlock. The parameters are used as filters when you generate the report.
User Guide for the Cisco Unified Intelligence Center Reporting Application 8.0(4)
113
Chapter 6: Report Definitions
Edit Report Definition

Figure 41: Report Definition Parameters Tab
Table 17: Rows on this page
DescriptionField
The name of the parameter.Name
The display name of the parameter that a user can modify and that appearsin the filter page
Display Name
The data type of the parameter (Date, Decimal, Boolean, or String).Data Type
Actions from this page:
• Edit - select a parameter and click Edit to expand the page to display edit fields. Changethese fields to modify the way the parameter is presented to the user for input and passed tothe database for processing.
• Reorder arrows - select a parameter and click an arrow to move the parameter up one, tothe top of the list, down one, or to the bottom of the list. Doing this changes their order onthe report filter. See Filtering Reports (page 58).
• Save - saves your changes on this all tabs.
• Cancel - cancels your changes on this tab.
• Refresh - updates the page to show changes another user might have made to this tab
• Help - opens online help.
• X on the tab heading - closes the page.
If you reorder the parameters, be sure to click the Save Order button before leaving the pageor your changes will not be saved.
Edit Parameter Properties
The first seven fields on this page are the same for all parameters, regardless of data type.
User Guide for the Cisco Unified Intelligence Center Reporting Application 8.0(4)
114
Chapter 6: Report Definitions
Edit Report Definition

Step 1 Name: The name of the parameter.
Step 2 Display Name: Change the display (user-friendly) name of the parameter.
Step 3 Description: Enter a description for the parameter.
Step 4 Data Type: You cannot change the data type for a parameter.
Step 5 Hard-coded value: Enter a hard-coded value to be passed as a parameter value when runninga report based on an anonymous block or stored procedure report definition. To pass null as ahard-coded value, leave this textbox blank and check Pass NULL for empty string. Entering ahard-coded value will hide this parameter in the filter page.
Step 6 Required: Check or uncheck to indicate if the parameter is required on the report filter.
Step 7 Pass Null for empty string: This field is enabled only if the parameter is not required or hasno value. If the parameter is populated, then this field is disabled, and the value is passed.
Step 8 The remaining fields on this page vary, based on the data type.
For DateTime: select a date format from the dropdown.
Table 18: For Decimal:
Select the character to be placed between eachvalue when a value list is passed to the storedprocedure/anonymous block
Value Delimiter
From the dropdown, select a Value List toassociate this parameter with that list.
Value List
Check this checkbox to surround the parametervalue with two additional single quotes when
Quote Values
the value is passed to the storedprocedure/anonymous block. The first singlequote is used to escape the second single quote.
Table 19: For String:
Select the character to be placed between eachvalue when a value list is passed to the storedprocedure/anonymous block
Value Delimiter
From the dropdown, select a Value List toassociate this parameter with that list.
Value List
The value prefix defines how the parameterwill appear in the filter.
Value Prefix
Check this to surround the parameter value withtwo additional single quotes when the value is
Quote Values
passed to the stored procedure/anonymousblock. The first single quote is used to escapethe second single quote.
User Guide for the Cisco Unified Intelligence Center Reporting Application 8.0(4)
115
Chapter 6: Report Definitions
Edit Report Definition

Step 9 Select Update Field - saves your Edit Properties selections for that field only. To keep thechanges, you must save (or Save As) the Report Definition.
Properties Tab
Use this tab to establish or change data settings for the report template.
Complete this tab as follows:
Step 1 Description: Enter text to describe the data settings.
Step 2 Key Criteria Field: For reports based on simple queries, select a key criteria field from thedropdown.
This field is required if you intend to filter the report with it. See Associating a Value List witha Report (page 129).
The Key Criteria field is not enabled for reports based on Anonymous Blocks or StoredProcedures.
Note: Although users can run a report based on a simple query itfthe Report Definition doesnot have a Key Criteria field defined, the report will run with the default filter and might bevery large.
Step 3 Historical checkbox: Check this if the report is an historical report. Leave blank for a real-timereport.
Step 4 Refresh Rate (seconds): Enter the refresh rate for this report in seconds. This is the rate atwhich the report is automatically refreshed. The minimum refresh rate is every 15 seconds forreal-time reports and every 900 seconds for historical reports. You cannot enter values less thanthe defaults.
Step 5 Historical Key Field: Enter or modify the historical key field used for the date and time intervalsfor the report.
Although historical reports can run if this field is left blank, the report will return all data forall dates and might be very large. Only fields of date format are available in the Historical KeyField drop down list.
Step 6 Default Permissions: Set permissions for My Group and for the All Users group.
User Guide for the Cisco Unified Intelligence Center Reporting Application 8.0(4)
116
Chapter 6: Report Definitions
Edit Report Definition
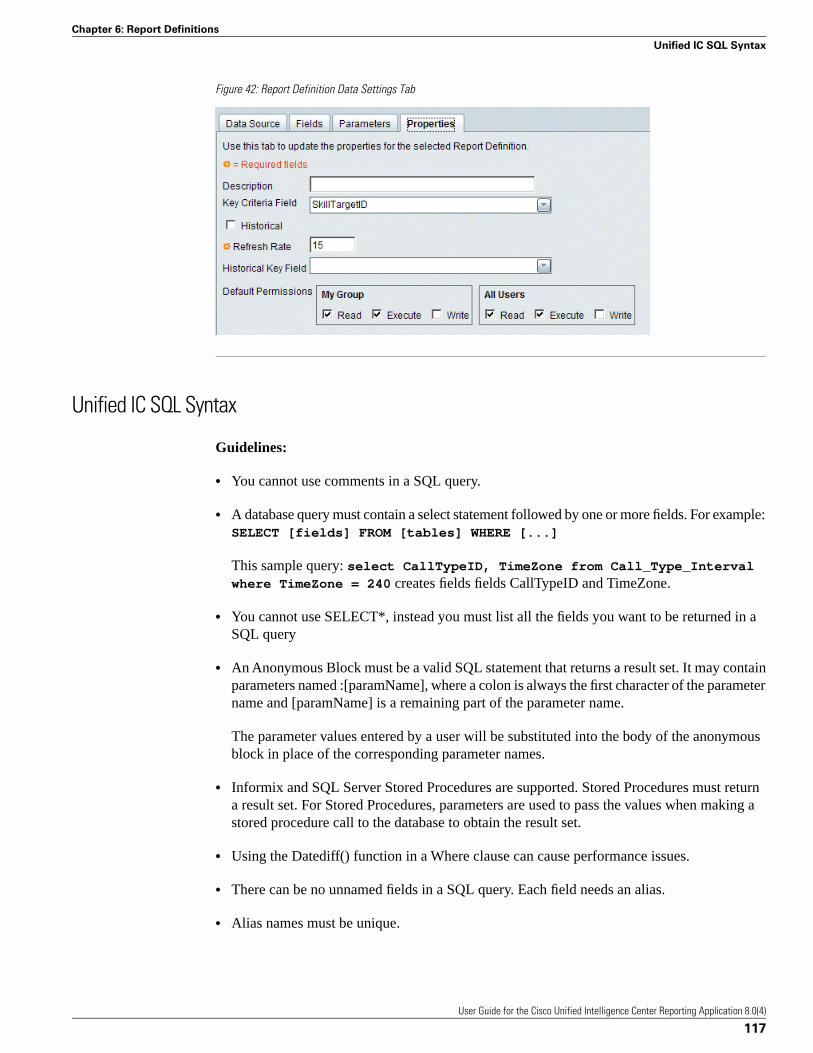
Figure 42: Report Definition Data Settings Tab
Unified IC SQL Syntax
Guidelines:
• You cannot use comments in a SQL query.
• A database query must contain a select statement followed by one or more fields. For example:SELECT [fields] FROM [tables] WHERE [...]
This sample query: select CallTypeID, TimeZone from Call_Type_Intervalwhere TimeZone = 240 creates fields fields CallTypeID and TimeZone.
• You cannot use SELECT*, instead you must list all the fields you want to be returned in aSQL query
• An Anonymous Block must be a valid SQL statement that returns a result set. It may containparameters named :[paramName], where a colon is always the first character of the parametername and [paramName] is a remaining part of the parameter name.
The parameter values entered by a user will be substituted into the body of the anonymousblock in place of the corresponding parameter names.
• Informix and SQL Server Stored Procedures are supported. Stored Procedures must returna result set. For Stored Procedures, parameters are used to pass the values when making astored procedure call to the database to obtain the result set.
• Using the Datediff() function in a Where clause can cause performance issues.
• There can be no unnamed fields in a SQL query. Each field needs an alias.
• Alias names must be unique.
User Guide for the Cisco Unified Intelligence Center Reporting Application 8.0(4)
117
Chapter 6: Report Definitions
Unified IC SQL Syntax

• Informix stored procedures must contain a returning statement, and for each datatype in thereturning statement. there must be corresponding alias specified with AS.
For example: RETURNING CHAR(32) AS returnID, CHAR(32) AS returnName, INTEGERAS returnRefreshrate, BOOLEAN as returnHistorical; And not: RETURNING CHAR(32,CHAR(32, INTEGER, BOOLEAN; If a user fails to provide an alias, the field name willjust be fieldN, where N is the index of unnamed field, such as field1, field2, etc.
• Every SQL query must have a WHERE clause, even if it serves no purpose.
• Informix stored procedure parameter names will be prepended with the 'at' character:@param1, @param2 ...
Supported data types for fields and parameters are:
• BIGINT, DECIMAL, DOUBLE, FLOAT, INTEGER, NUMERIC, SMALLINT, REAL, TINYINT
• CHAR , LONGNVARCHAR, LONGVARCHAR, NCHAR, NVARCHAR, VARCHAR
• DATETIME
• BOOLEAN, BIT
Special Keywords for the SQL Parser (with sample queries):
• ALL (SQL Server or Informix) - SELECT ALL CallTypeID from Call_Type_Interval
• DISTINCT (SQL Server or Informix) - SELECT DISTINCT CallTypeID fromCall_Type_Interval
• TOP (SQL Server) - SELECT TOP 5 CallTypeID from Call_Type_Interval
• FIRST (Informix) - SELECT FIRST 5 ID FROM CUICDATASETINFO
• UNIQUE(Informix) - SELECT UNIQUE NAME FROM CUICGRID
Unified IC supports these aggregate functions for both Informix and SQL Server: SUM,COUNT, MIN, MAX, and AVG.
In cases where a report definition field is an aggregate function (such as sum(CallsHandled),and that field is a key criteria field or an advanced filter, the supported syntax for filter the reportis:
SELECT (fields)FROM [tables]WHERE [...]GROUP BY [...]HAVING [...] optionalORDER BY [...] optional
User Guide for the Cisco Unified Intelligence Center Reporting Application 8.0(4)
118
Chapter 6: Report Definitions
Unified IC SQL Syntax
Sample query:
select CallTypeID, TimeZone, sum(CallsHandled) as total, avg(CallsHandled) as averagefrom Call_Type_Intervalwhere TimeZone = 240group by CallTypeID, TimeZonehaving sum(CallsHandled) in(3, 5, 13) and avg(CallsHandled) > 0order by CallTypeID
Working with Drilldowns
Users with the Premium license and access to Report Definitions can create drilldowns.
Drilldowns allow you to create links from one report grid to another so that you can launch asub-report from within the current report window. You cannot drilldown from or to a chart ora gauge.
You can create a drilldown for any field in a report that is not a grouped field. To determine ifa field is a grouped field, open Grid Editor (page 75), then click Grouping (page 78).
There is no limit to the number of drilldowns you can define for a field.
Note:
• If several users have added different drilldowns to a field, the field appears as a hyperlink inthe grid view. If a field has more than one drilldown associated with it, clicking it opens apopup where you can select the link you need. If you do not want to drilldown to anotherreport, ignore the drilldown link.
• Once you launch a drill-down report, you can save it as a separate report.
Create a Drilldown
To create a drilldown:
Step 1 Open the Report Definition for the report in which you want to create a drilldown.
Step 2 Click the Fields tab.
Step 3 Locate the field from which you want to drill down.
Step 4 Click Drilldowns.
This displays the All Drilldowns panel. It shows any drilldowns that already exist for that field.
Step 5 Click Create.
Step 6 Enter a Name for the drilldown.
Step 7 Click the > arrow next to the Report to Drilldown into to display the list of reports.
User Guide for the Cisco Unified Intelligence Center Reporting Application 8.0(4)
119
Chapter 6: Report Definitions
Working with Drilldowns
Note: You cannot drill down to or from a report based on an Anonymous Block or a StoredProcedure
Step 8 Select a report by clicking the radio button next to the report name.
This opens a panel showing all the fields in that report.
Step 9 Highlight a field and click Edit.
Doing this presents two options:
• Any value - Select this to drilldown into the report that shows any value of the field youselected.
• Filter according to the following criteria - Select this to drilldown into the report that showsfiltered values of this field.
Filter criteria for fields of type string are:
– Match field in originating report
– Equal to (value)
– Not equal to (value)
– Matches the pattern
Filter criteria for fields of type date are:
– Match field in originating report
– Match date range in originating report (available only if the originating report is a historicalreport)
– Set date
Filter criteria for fields that are associated with a Value List are:
– Match field in originating report
– Set values
Filter criteria for fields that are of type boolean are:
– True
– False
Step 10 Scroll up and click OK.
User Guide for the Cisco Unified Intelligence Center Reporting Application 8.0(4)
120
Chapter 6: Report Definitions
Working with Drilldowns
Edit a Drilldown
To edit a drilldown:
Step 1 Open the Report Definition for the report in which you want to edit a drilldown.
Step 2 Click the Fields tab.
Step 3 Locate the field from which you want to drill down.
Step 4 Click Drilldowns.
This displays the All Drilldowns panel. It show any drilldowns that already exist for that field.
Step 5 Select a drilldown and click Edit.
Step 6 Edit the Name for the drilldown.
Step 7 Click the > arrow next to the Report to Drilldown into to display the list of reports.
Step 8 Change the report by clicking the radio button next to the report name.
This opens a panel showing all the fields in that report.
Step 9 Highlight a field and click Edit.
Edit the filter values.
Step 10 Click OK.
Step 11 Scroll up and click Save.
Delete a Drilldown
To delete a drilldown:
1. Open the Report Definition for the report in which you want to delete a drilldown.
2. Click the Fields tab.
3. Locate the field from which you want to delete a drilldown.
4. Click Drilldowns. This displays the All Drilldowns panel. It show any drilldowns thatalready exist for that field.
5. Select the name of the drilldown you want to delete.
6. Click Delete.
User Guide for the Cisco Unified Intelligence Center Reporting Application 8.0(4)
121
Chapter 6: Report Definitions
Working with Drilldowns
Best Practices for Drilldowns
As a best practice, create drilldowns first in cloned (Save As) reports - not in the Cisco stocktemplate reports.
You can drill down from grids only. You cannot drill down from - or to - a Chart view or aGauge view.
Be aware that you cannot drill down from grouped fields. To determine if a field is grouped:
• Open the Grid Editor (page 75) for the report.
• Click Grouping.
• From the Grouping (page 78) dialog box, determine if the field appears in any of the GroupedBy fields.
The Drilldown interface does not monitor your selections for Drilldown from and Drilldowninto. It is your responsibility to be familiar with the reports and their fields and to understandthe business reasons for drilling from one report into another.
Rename a Report Definition
Note: Not enabled for stock Report Definitions.
To rename a Report Definitions, right-click its icon and select Rename.
This opens a dialog box with a Rename To field.
Enter a new name (using a maximum of 50 characters) and click Rename to proceed.
Click Cancel to keep the original name.
Delete a Report Definition
Note: Not enabled for stock Report Definitions.
To delete a Report Definition, right-click its icon and select Delete.
Click Yes to confirm the deletion. Click No to cancel.
Both Yes and No generate another dialog box confirming your action to delete or to cancel thedeletion. Click OK to close this dialog box and to complete the action.
You can delete a report definition only if you have the user role of a System ConfigurationAdministrator
User Guide for the Cisco Unified Intelligence Center Reporting Application 8.0(4)
122
Chapter 6: Report Definitions
Rename a Report Definition

Note: You cannot delete a Report Definition if it is referenced by one or more Reports or ValueLists.
Import a Report Definition
Note: Not enabled for stock Report Definitions.
This page opens when you click Import Definition on the Available Report Definitions Page(page 100).
Use it to import custom Report Definition files saved to your computer. Stock Report Definitionsare imported automatically with the stock report templates.
You can import a report definition only if you have the user role of a System ConfigurationAdministrator
To import a Report Definition:
1. Click the Browse button to the right of the File Name (With Full Path) field, and navigateto the Report Definition file.
2. Select the Data Source for this Report Definition from the dropdown.
3. Click the dropdown in the Save To field to select the category in which you want thisReport Definition saved.
4. Click Import.
5. Return to the Report Definitions page and click Refresh. The imported Report Definitiondisplays only after you refresh the page.
Export a Report Definition
You can export a report definition only if you have the user role of a System ConfigurationAdministrator
To export a Report Definition:
1. Right-click a Report Definition and select Export to open the Export Report Definitiondialog box, which gives you the option to rename the Report Definition file name.
You can change the name but do not change the file extension.
2. Click OK to open the Windows file download dialog box.
3. Click Save and navigate to the location where you want to save the report definition.
User Guide for the Cisco Unified Intelligence Center Reporting Application 8.0(4)
123
Chapter 6: Report Definitions
Import a Report Definition
User Guide for the Cisco Unified Intelligence Center Reporting Application 8.0(4)
124
Chapter 6: Report Definitions
Export a Report Definition

Value Lists and CollectionsUsers with the Value List Collection Designer user role can open the Value List drawer to accessValue Lists and Collections.
See also:
Troubleshooting Value Lists and Collections (http://docwiki-dev.cisco.com/wiki/Troubleshooting_Tips_for_Unified_IC_8.0)
This chapter contains the following topics:
• Data Collections, page 125• Value Lists, page 126
Data Collections
Unified IC uses Value Lists and Collections as filtering tools to collect and control the data thatare available for display in reports.
Value lists are based on database queries and contain all reportable items of the same type, forexample, all agents or all skill groups.
Collections are subsets of Value Lists that can be created to control the amount of data shownto specific users and user groups. For example. you could create a Collection of Skill Groupsthat would display only the Skill groups in a region or line of business. No stock collections areinstalled with Unified IC. Users with permissions to do so can create custom collections.
Note: Value Lists and Collections that use collection queries are refreshed every night at midnight(using the server's time zone). The refresh operation is performed on the primary node in acluster and propogated to other nodes..
User Guide for the Cisco Unified Intelligence Center Reporting Application 8.0(4)
125
Chapter 7
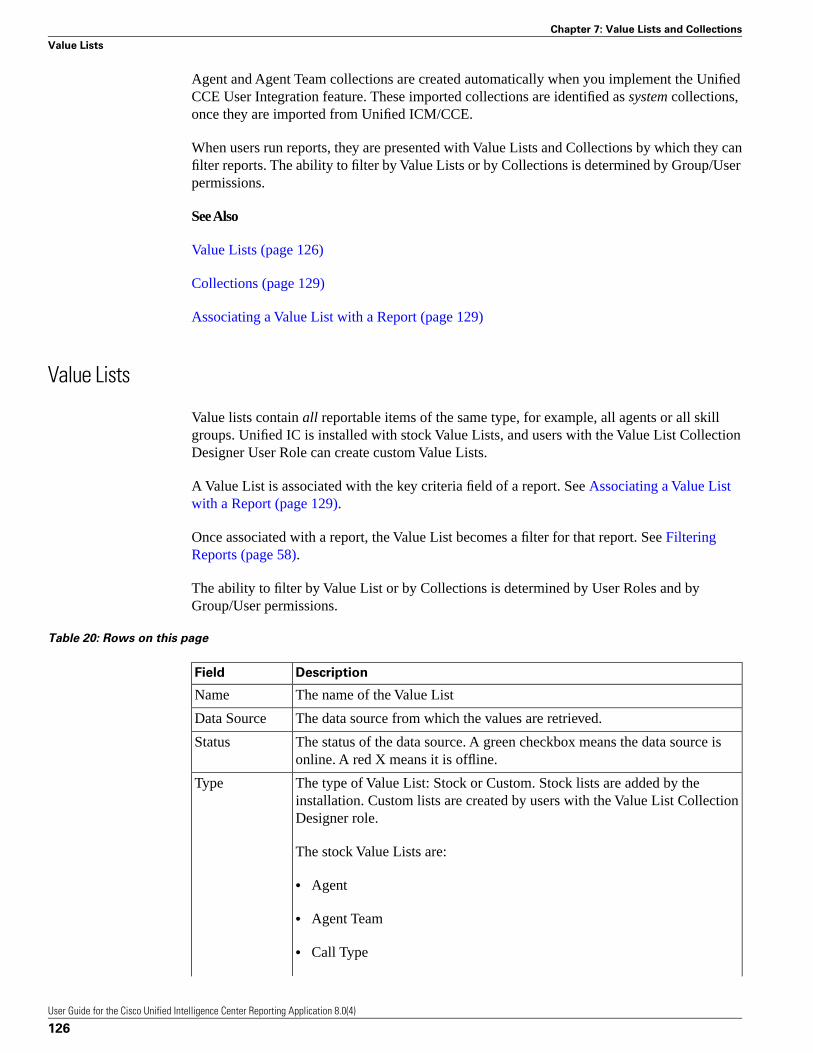
Agent and Agent Team collections are created automatically when you implement the UnifiedCCE User Integration feature. These imported collections are identified as system collections,once they are imported from Unified ICM/CCE.
When users run reports, they are presented with Value Lists and Collections by which they canfilter reports. The ability to filter by Value Lists or by Collections is determined by Group/Userpermissions.
See Also
Value Lists (page 126)
Collections (page 129)
Associating a Value List with a Report (page 129)
Value Lists
Value lists contain all reportable items of the same type, for example, all agents or all skillgroups. Unified IC is installed with stock Value Lists, and users with the Value List CollectionDesigner User Role can create custom Value Lists.
A Value List is associated with the key criteria field of a report. See Associating a Value Listwith a Report (page 129).
Once associated with a report, the Value List becomes a filter for that report. See FilteringReports (page 58).
The ability to filter by Value List or by Collections is determined by User Roles and byGroup/User permissions.
Table 20: Rows on this page
DescriptionField
The name of the Value ListName
The data source from which the values are retrieved.Data Source
The status of the data source. A green checkbox means the data source isonline. A red X means it is offline.
Status
The type of Value List: Stock or Custom. Stock lists are added by theinstallation. Custom lists are created by users with the Value List CollectionDesigner role.
Type
The stock Value Lists are:
• Agent
• Agent Team
• Call Type
User Guide for the Cisco Unified Intelligence Center Reporting Application 8.0(4)
126
Chapter 7: Value Lists and Collections
Value Lists

DescriptionField
• Enterprise Services
• Enterprise Skill Groups
• Services
• Skill Group
• Trunk Groups
The description entered for the Value List.Description
Actions for Value Lists:
• Filter/Clear - type one or more characters and click Filter to narrow the list. Click Clear toremove the filter.
• Create - opens the Create/Edit Value List (page 128) page where you can define a new customValue List.
• Edit - enabled when the radio button for a row is selected. Opens the Create/Edit Value List(page 128) page where you can review and edit the properties of a custom Value List. Youcan edit only the Permissions for a stock Value List.
• Values - enabled when the radio button for a row is selected. Opens a box that shows all thevalues in a list and has a Refresh Value List button. See Display and Refresh Value List(page 129).
• Collections - enabled when the radio button for a row is selected. Refreshes the Value Listspage to display All Collections (page 130) for that Value list.
• Delete - enabled when the radio button for a row is selected. Requests confirmation; thendeletes the custom Value List.
Note:
• You cannot delete a stock Value List.
• You cannot delete a custom Value List if it is referenced by a field in the ReportDefinition.
• You cannot delete a custom Value List that contains Collections.
• Refresh - updates the page to show changes another user might have made, such as creatingor deleting a Value List.
• Help - opens online help.
• X on the tab heading - closes the page.
User Guide for the Cisco Unified Intelligence Center Reporting Application 8.0(4)
127
Chapter 7: Value Lists and Collections
Value Lists
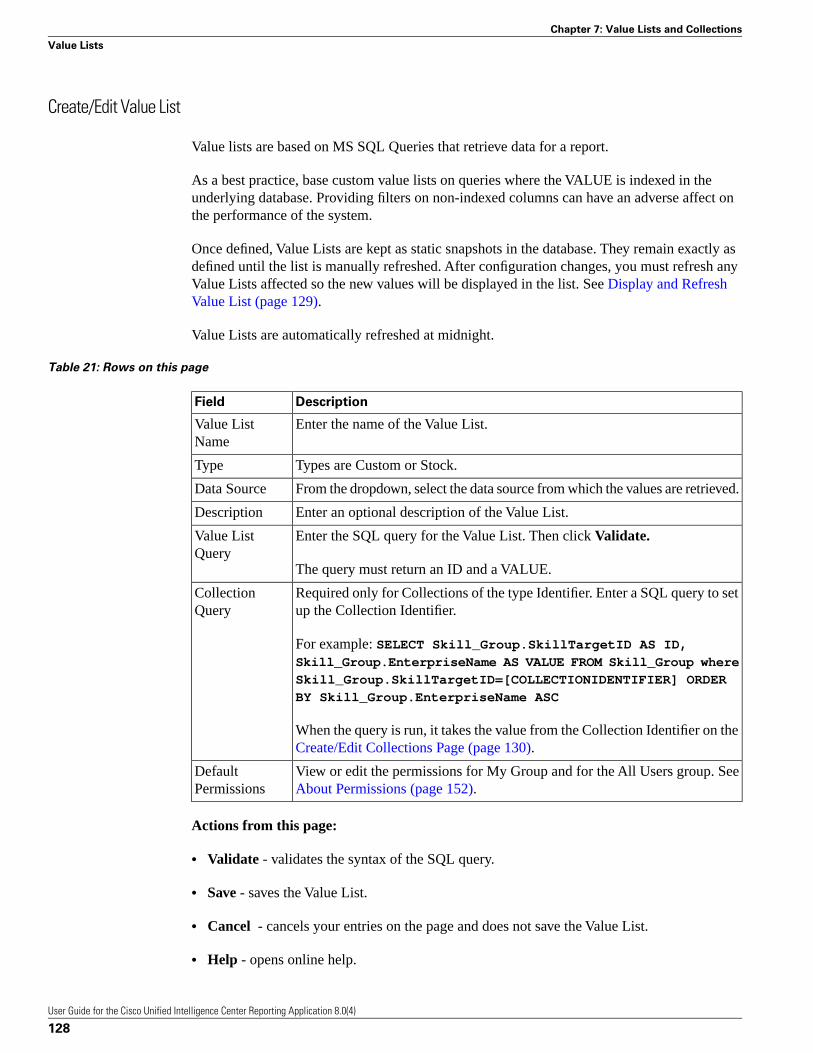
Create/Edit Value List
Value lists are based on MS SQL Queries that retrieve data for a report.
As a best practice, base custom value lists on queries where the VALUE is indexed in theunderlying database. Providing filters on non-indexed columns can have an adverse affect onthe performance of the system.
Once defined, Value Lists are kept as static snapshots in the database. They remain exactly asdefined until the list is manually refreshed. After configuration changes, you must refresh anyValue Lists affected so the new values will be displayed in the list. See Display and RefreshValue List (page 129).
Value Lists are automatically refreshed at midnight.
Table 21: Rows on this page
DescriptionField
Enter the name of the Value List.Value ListName
Types are Custom or Stock.Type
From the dropdown, select the data source from which the values are retrieved.Data Source
Enter an optional description of the Value List.Description
Enter the SQL query for the Value List. Then click Validate.Value ListQuery
The query must return an ID and a VALUE.
Required only for Collections of the type Identifier. Enter a SQL query to setup the Collection Identifier.
CollectionQuery
For example: SELECT Skill_Group.SkillTargetID AS ID,Skill_Group.EnterpriseName AS VALUE FROM Skill_Group where
Skill_Group.SkillTargetID=[COLLECTIONIDENTIFIER] ORDER
BY Skill_Group.EnterpriseName ASC
When the query is run, it takes the value from the Collection Identifier on theCreate/Edit Collections Page (page 130).
View or edit the permissions for My Group and for the All Users group. SeeAbout Permissions (page 152).
DefaultPermissions
Actions from this page:
• Validate - validates the syntax of the SQL query.
• Save - saves the Value List.
• Cancel - cancels your entries on the page and does not save the Value List.
• Help - opens online help.
User Guide for the Cisco Unified Intelligence Center Reporting Application 8.0(4)
128
Chapter 7: Value Lists and Collections
Value Lists

• X on the tab heading - closes the page.
Display and Refresh Value List
Select any Value List from the Value Lists (page 126) page and click the Values button.
This opens a new window that displays the values of all the items that are called by the ValueList.
Click Refresh Value List to update the list to display new values that have been configured.A message appears, indicating that the list is being refreshed.
For example, if a new Agent Team has been created in Unified ICM/CC Configuration Manager,the Agent Team Value List will include a collection for that team after you refresh.
Associating a Value List with a Report
Value Lists (and their collections) are properties of the key criteria field of the Report Definition.Follow these steps to identify the key criteria field and its Value List.
Step 1 If the Report Definition is based on a simple query, identify the key criteria field for a reporton the Report Definition Properties tab (page 116). The key criteria field is required and isselected from a dropdown on the Properties tab.
Locate the field on the Report Definition Fields tab and click Edit Field Properties (page 110).
Step 2 If the Report Definition is based on an Anonymous Block or a Stored Procedure, identify theparameter with which you want to associate a Value List.
Select the parameter on the Parameters tab and click Edit to display the Edit Parameters field.
Step 3 In the Edit Field / Edit Parameters panel, locate the Value List dropdown. In stock reporttemplates, this field is populated with the stock Value List for the Report Definition. In customReport Definitions, you can select a Value List from the dropdown.
Once you have associated the key criteria field or the parameter with a Value List, the reportuser sees that Value List or Collection on the Basic Filters tab provided he or she has Executepermission for the Value List or Collection.
Note: Only fields of type string and decimal can be associated with a Value List.
Collections
Collections are subsets of Value Lists that can be used to control the amount of data that userscan select to populate a report.
User Guide for the Cisco Unified Intelligence Center Reporting Application 8.0(4)
129
Chapter 7: Value Lists and Collections
Value Lists
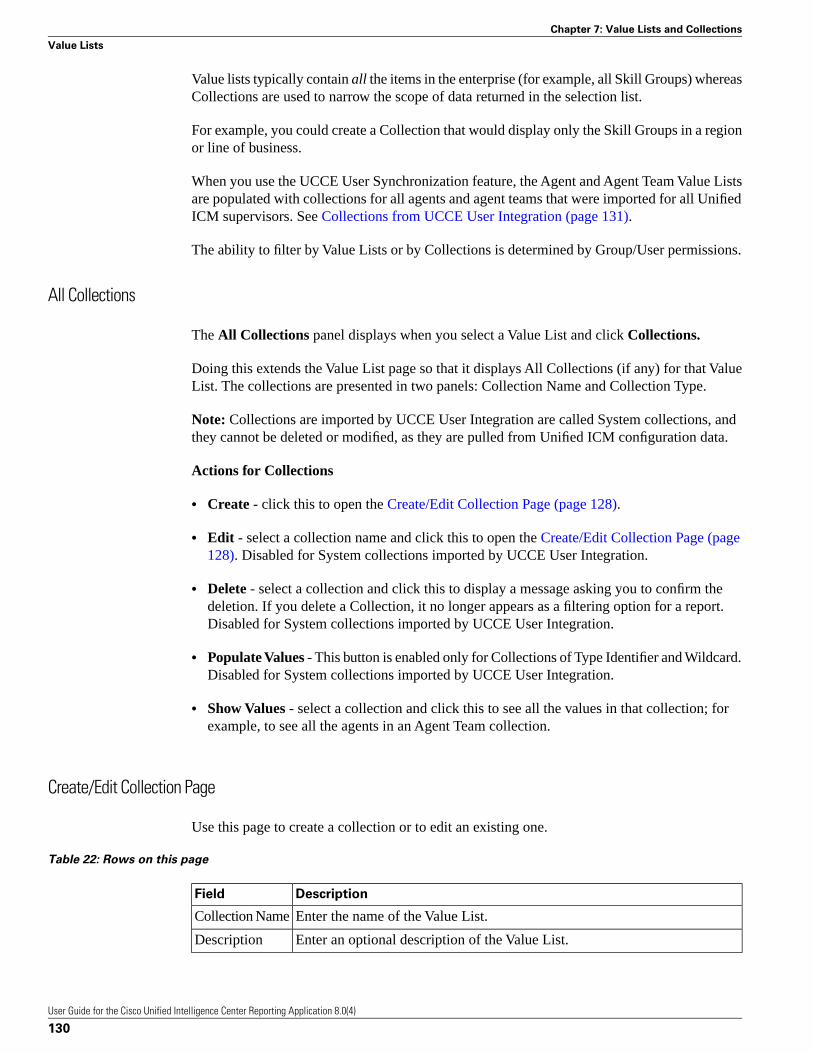
Value lists typically contain all the items in the enterprise (for example, all Skill Groups) whereasCollections are used to narrow the scope of data returned in the selection list.
For example, you could create a Collection that would display only the Skill Groups in a regionor line of business.
When you use the UCCE User Synchronization feature, the Agent and Agent Team Value Listsare populated with collections for all agents and agent teams that were imported for all UnifiedICM supervisors. See Collections from UCCE User Integration (page 131).
The ability to filter by Value Lists or by Collections is determined by Group/User permissions.
All Collections
The All Collections panel displays when you select a Value List and click Collections.
Doing this extends the Value List page so that it displays All Collections (if any) for that ValueList. The collections are presented in two panels: Collection Name and Collection Type.
Note: Collections are imported by UCCE User Integration are called System collections, andthey cannot be deleted or modified, as they are pulled from Unified ICM configuration data.
Actions for Collections
• Create - click this to open the Create/Edit Collection Page (page 128).
• Edit - select a collection name and click this to open the Create/Edit Collection Page (page128). Disabled for System collections imported by UCCE User Integration.
• Delete - select a collection and click this to display a message asking you to confirm thedeletion. If you delete a Collection, it no longer appears as a filtering option for a report.Disabled for System collections imported by UCCE User Integration.
• Populate Values - This button is enabled only for Collections of Type Identifier and Wildcard.Disabled for System collections imported by UCCE User Integration.
• Show Values - select a collection and click this to see all the values in that collection; forexample, to see all the agents in an Agent Team collection.
Create/Edit Collection Page
Use this page to create a collection or to edit an existing one.
Table 22: Rows on this page
DescriptionField
Enter the name of the Value List.Collection Name
Enter an optional description of the Value List.Description
User Guide for the Cisco Unified Intelligence Center Reporting Application 8.0(4)
130
Chapter 7: Value Lists and Collections
Value Lists

DescriptionField
From the dropdown, selectCollectionTypes
• Identifier
• Wildcard
• Values
See Collection Types (page 132).
This field displays if you select the Collection Type of Identifier. Enter avalue for identifier you want the collection to retrieve in the Collection Query.
Identifier
For this type of Collection to succeed, the Value List must have a CollectionQuery on the Create/Edit Value List Page (page 128). For instance, if youneeded to create Collections on the Agent Value list for each supervisor, youcould enter their SupervisorSkillTargetID in this field to populate theCollection from the awdb tables.
These fields display if you select the Collection Type of Values.Values
• Search fields - enter text in these fields to move directly to a value in theAvailable or Selected panel that begins with that string.
• Available panel - show all values that are available to be included in thecollection.
• Selected panel - show values that are currently included in the collection.
• Arrow buttons (<, >, <<, and >>) - Use to move values between theAvailable and Selected panels.
This field displays if you select Wildcard as the Collection Type. Enter astring to create a collection that includes that string.
Wildcard
View or edit the permissions for My Group and for the All Users group. SeeAbout Permissions (page 152).
DefaultPermissions
Actions on this page are:
• Save - saves the collection and returns you to the Value List page.
• Cancel - does not save the collection, and returns you to the Value List page.
• Help - opens online help for Create/Edit Collections.
Collections from UCCE User Integration
If you choose to implement UCCE User Integration, the stock Agent and Agent Teams ValueLists are updated with collections of agents and agent teams that are automatically created fromthe synchronization.
User Guide for the Cisco Unified Intelligence Center Reporting Application 8.0(4)
131
Chapter 7: Value Lists and Collections
Value Lists
The collections that are imported from the synchronization are identified as system collectionsand do not affect any custom collections you might have created for the Agent or Agent TeamsValue Lists.
Supervisors who are imported with UCCE User Integration become Unified IC DashboardDesigner and Report Designer Users. As Report Designer Users, they have read access for theValue List drawer and automatically are granted Execute permission for the Agent and AgentTeam collections for which they are supervisors.
All imported Supervisors have Read permission for all Value Lists. However, for the importedteam collections under the Agents and Agent Teams Value Lists, only the Supervisors for thoseteams have Read permission to those Collections.
The system collections for Agent and Agent Team that are created by UCCE User Integrationare distinguished from the custom Agent and Agent Team collections in that you cannot edit,delete, or modify the system collections.
Collection Types
Collections are built according to the Collection Type you choose, as follows:
Identifier
When you create an Identifier Collection, you define one identifier value on the Add/EditCollection Page. That value is a database identifier for a specific object; for example, a skillgroup or a supervisor.
When the Populate Values action occurs, the collection query uses that identifier value to retrieveitems from the database and to populate the collection. The Collection filter will contain onlythe returned values for that identifier.
Identifier is the most restrictive collection type. Use it, for example, to build a collection of oneskill group.
Values
When you create a Values Collection, you manually choose from a list of possible values toinclude in the collection. All items that you select are part of the Collection filter. Valuescollections are not updated automatically by the system. The only way to update them is byusing the collection interface.
A Values collection is less restrictive than an Identifier collection. Use it, for example, to builda collection of several skill groups.
Wildcard
When you create a Wildcard Collection, you define a wildcard string that is used to identifywhich items belong to the collection. When the Populate Values action occurs, all items arecompared against the wildcard pattern. If they match the pattern, then they will be part of thecollection, otherwise, they will not be part of the collection.
User Guide for the Cisco Unified Intelligence Center Reporting Application 8.0(4)
132
Chapter 7: Value Lists and Collections
Value Lists

Wildcard is the least restrictive collection. Use it, for example, to build a collection of all skillgroups that begin with a certain string.
Wildcard collections use java regular expressions. Some simple examples of regular expressionsare included below. Note that the expressions are case-sensitive, and that 'character' isalphanumeric.
• Exact match: To match one item, enter the item you want in the Wildcard field. For example:Agent_10.
• Any character: Specifying ''.'' as part of the pattern will match any character. For example:the pattern "p.g" will match "p" followed by any other single character and then a "g"character: pig, pag, peg, ptg.
• List of valid characters: Use brackets [ ] to specify a list of valid characters. For example:the pattern "p[ie]g" will match "p" followed by an "i"OR an "e" character and then a "g"character. For example, pig, peg.
• Negation: Using a caret ^ specifies that the pattern can contain any character except thespecified characters. For example: the pattern "p[^ie]g" " will match "p" followed by anythingexcept an "i" or "e" character and then a "g" character. For example, pag, pbg.
• Range: Use brackets and a range tp specify a range of valid characters. For example, thepattern "p[0-9]g" will match "p" followed by 0,1,2,3,4,5,6,7,8,or 9 followed by a "g" character:p0g, p1g, p2g, p3g, p4g, p5g, p6g, p7g, p8g, p9g.
• Zero or more match: Specifies that the preceeding expression will be repeated 0 or moretimes. For example, the pattern "p.*g" will match the character "p", followed by 0 or morecharacters, followed by a "g" character: pg, pig, peg, piig, peeg.
• One or more match: specifies that the preceeding expression will be repeated 1 or moretimes. For example, the pattern "p.+g" will match the character "p", followed by 1 or morecharacters, followed by a "g" character: pig, peg, piig, peeg.
• Escape character: Specifies that the character following the backslash character should notbe interpreted. This allows brackets, periods, and other characters to be part of the pattern.For example: the pattern "p\[ie\]g" match "p" followed by a "[", followed by a "i", followedby an "e", followed by a "]", and then followed by a "g" character: p[ie]g.
For more information, please refer to Java Regular Expressions documentation for more examplesand how to build more complex patterns.
User Guide for the Cisco Unified Intelligence Center Reporting Application 8.0(4)
133
Chapter 7: Value Lists and Collections
Value Lists

User Guide for the Cisco Unified Intelligence Center Reporting Application 8.0(4)
134
Chapter 7: Value Lists and Collections
Value Lists

SchedulerYou can automate the generation of reports on a regular and recurring basis by setting up aschedule. You can configure scheduled reports to run at predetermined times and to beautomatically sent to e-mail recipients and added to (or updated on) a dashboard.
Scheduling lets you run large dataset reports once to be sent to, and viewed by, many users.
Click the Scheduler drawer in the left panel to open the Schedule List (page 136). Only userswith Report Designer and System Configuration Administrator roles are allowed to access theScheduler drawer.
• System Configuration Administrators can perform all scheduler function on any reports.They can read, edit and run any scheduled report and can create a schedule for any report.
• Report designers can see the list of scheduled reports for which they have READ permission.Report designers can create a schedule only for those reports that they created or for whichthey have EXECUTE permission.
Note:
• READ means being able to see the scheduled report on the Schedule List. EDIT means beingable to select the scheduled report on the Schedule List and Edit, Delete, Enable, or Disableit. EXECUTE means being able to select the scheduled report on the Schedule List andperform the Run Now operation.
• Configure Email Settings!Scheduled reports can be sent by email only if the email serverhas configured in the Administration Console. The administrator does this in ClusterConfiguration > Reporting Configuration > Report Scheduler Email Settings.
• All actions on the Scheduler interface are based on User Role and on the user's objectPermissions for schedules. See About Permissions (page 152).
See also:
User Guide for the Cisco Unified Intelligence Center Reporting Application 8.0(4)
135
Chapter 8

Troubleshooting Report Schedules (http://docwiki-dev.cisco.com/wiki/Troubleshooting_Tips_for_Unified_IC_8.0)
This chapter contains the following topics:
• Schedule List, page 136• Scheduler Create/Edit , page 137
Schedule List
This page opens when you click the Scheduler drawer.
System Configuration Administrators can create, review, and manage all report schedules.
Report Designers can create, review, and manage all report schedules that they own. ReportDesigners can also create schedules from the Available Reports page (page 48) by right-clickinga report and selecting Schedule.
Table 23: Rows on this page
DescriptionField
The name of the scheduled report.ScheduledReport Name
The date and time of the last time this schedule ran.Last Run
The status of the last schedule that ran.Last Result
The date and time for the next time this schedule will run.Next ScheduledRun
The user who created this schedule.Scheduled By
The frequency for this schedule (Daily, Monthly...)Frequency
Note:
Actions from this page:
• Filter/Clear - type one or more characters and click Filter to narrow the list. Click Clear toremove the filter.
• Create - opens the Report Schedule Create/Edit page with blank fields for defining a newschedule.
• Edit - enabled when a row is selected, opens the Report Schedule Create/Edit page whereyou can modify a schedule.
• Delete - enabled when a row is selected, prompts for a confirmation and then deletes theschedule. If schedule is deleted, you see an error if you try to open it. You can, however,retrieve the data by running the report with the same date and time range represented in thedeleted scheduled report.
User Guide for the Cisco Unified Intelligence Center Reporting Application 8.0(4)
136
Chapter 8: Scheduler
Schedule List
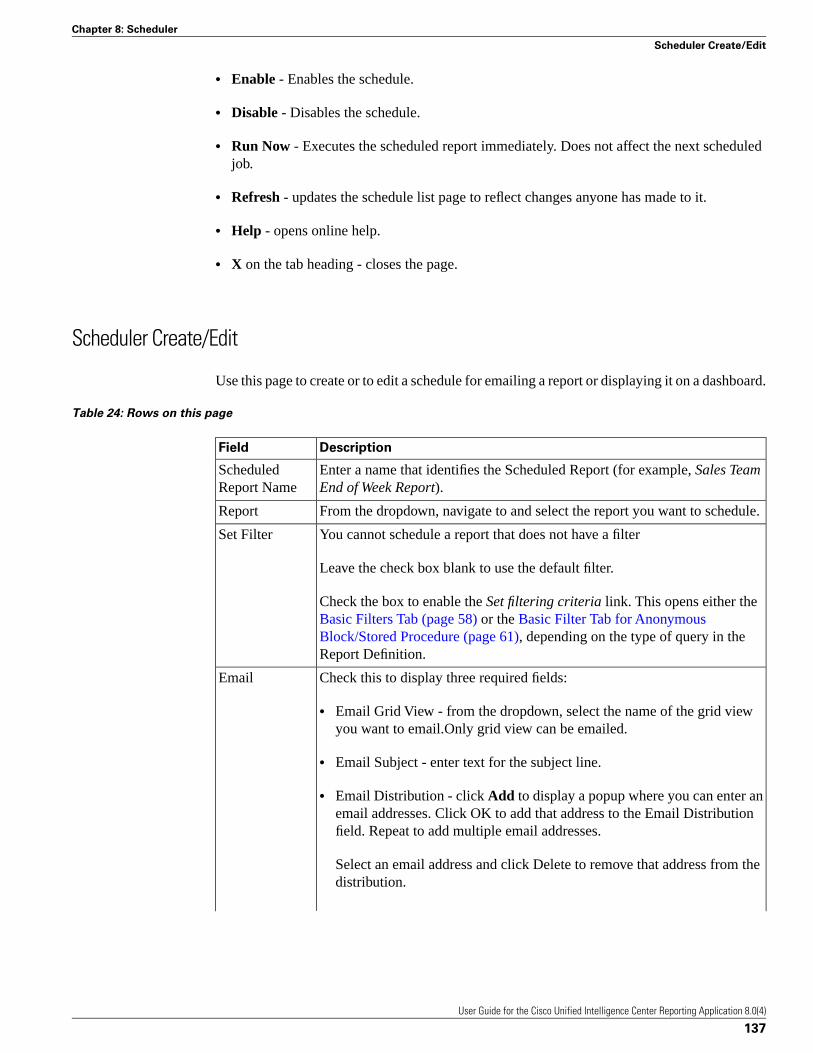
• Enable - Enables the schedule.
• Disable - Disables the schedule.
• Run Now - Executes the scheduled report immediately. Does not affect the next scheduledjob.
• Refresh - updates the schedule list page to reflect changes anyone has made to it.
• Help - opens online help.
• X on the tab heading - closes the page.
Scheduler Create/Edit
Use this page to create or to edit a schedule for emailing a report or displaying it on a dashboard.
Table 24: Rows on this page
DescriptionField
Enter a name that identifies the Scheduled Report (for example, Sales TeamEnd of Week Report).
ScheduledReport Name
From the dropdown, navigate to and select the report you want to schedule.Report
You cannot schedule a report that does not have a filterSet Filter
Leave the check box blank to use the default filter.
Check the box to enable the Set filtering criteria link. This opens either theBasic Filters Tab (page 58) or the Basic Filter Tab for AnonymousBlock/Stored Procedure (page 61), depending on the type of query in theReport Definition.
Check this to display three required fields:Email
• Email Grid View - from the dropdown, select the name of the grid viewyou want to email.Only grid view can be emailed.
• Email Subject - enter text for the subject line.
• Email Distribution - click Add to display a popup where you can enter anemail addresses. Click OK to add that address to the Email Distributionfield. Repeat to add multiple email addresses.
Select an email address and click Delete to remove that address from thedistribution.
User Guide for the Cisco Unified Intelligence Center Reporting Application 8.0(4)
137
Chapter 8: Scheduler
Scheduler Create/Edit
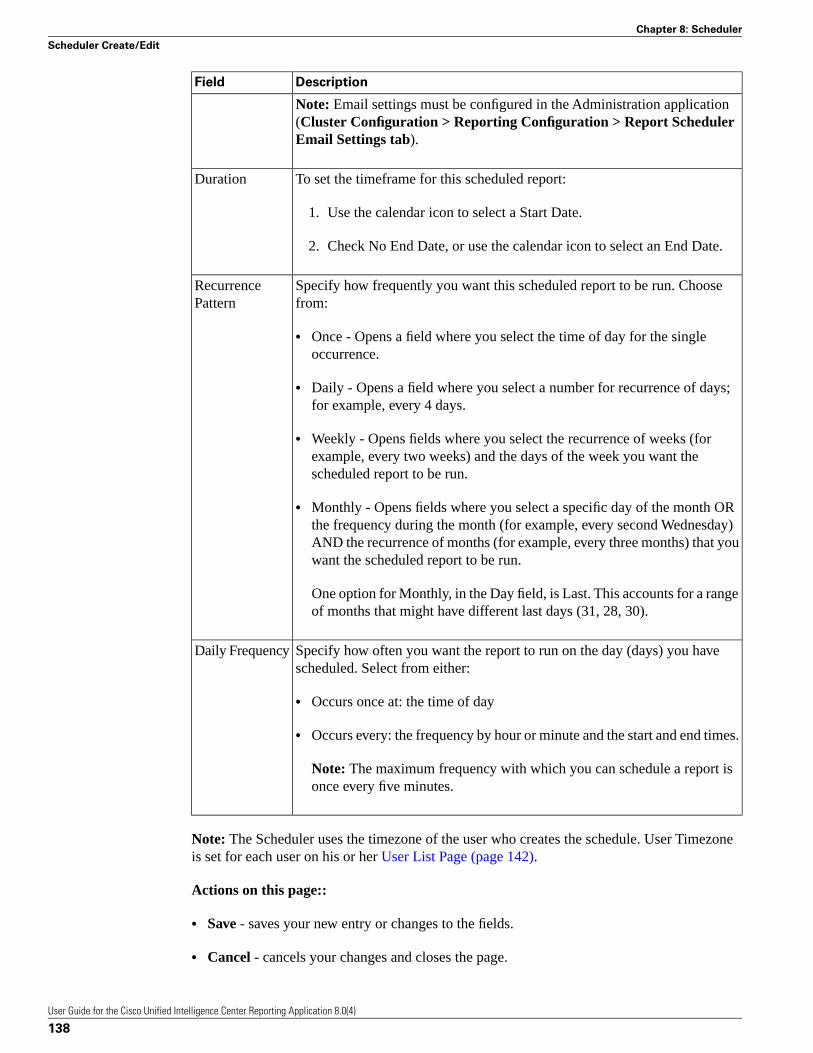
DescriptionField
Note: Email settings must be configured in the Administration application(Cluster Configuration > Reporting Configuration > Report SchedulerEmail Settings tab).
To set the timeframe for this scheduled report:Duration
1. Use the calendar icon to select a Start Date.
2. Check No End Date, or use the calendar icon to select an End Date.
Specify how frequently you want this scheduled report to be run. Choosefrom:
RecurrencePattern
• Once - Opens a field where you select the time of day for the singleoccurrence.
• Daily - Opens a field where you select a number for recurrence of days;for example, every 4 days.
• Weekly - Opens fields where you select the recurrence of weeks (forexample, every two weeks) and the days of the week you want thescheduled report to be run.
• Monthly - Opens fields where you select a specific day of the month ORthe frequency during the month (for example, every second Wednesday)AND the recurrence of months (for example, every three months) that youwant the scheduled report to be run.
One option for Monthly, in the Day field, is Last. This accounts for a rangeof months that might have different last days (31, 28, 30).
Specify how often you want the report to run on the day (days) you havescheduled. Select from either:
Daily Frequency
• Occurs once at: the time of day
• Occurs every: the frequency by hour or minute and the start and end times.
Note: The maximum frequency with which you can schedule a report isonce every five minutes.
Note: The Scheduler uses the timezone of the user who creates the schedule. User Timezoneis set for each user on his or her User List Page (page 142).
Actions on this page::
• Save - saves your new entry or changes to the fields.
• Cancel - cancels your changes and closes the page.
User Guide for the Cisco Unified Intelligence Center Reporting Application 8.0(4)
138
Chapter 8: Scheduler
Scheduler Create/Edit
• Help - opens online help.
• X on the tab heading - closes the page.
User Guide for the Cisco Unified Intelligence Center Reporting Application 8.0(4)
139
Chapter 8: Scheduler
Scheduler Create/Edit

User Guide for the Cisco Unified Intelligence Center Reporting Application 8.0(4)
140
Chapter 8: Scheduler
Scheduler Create/Edit
SecurityClicking the Security drawer expands to show nested links that open pages where you canmanage and view User Lists, User Groups, and User Permissions.
Every user can open the Security drawer to access the User List and see his or her own UserInformation page. Users who have the Security Administrator role can access all Security pagesand functions.
Note: All actions on the Security interface are based on User Role and on the user's objectPermissions. See About Permissions (page 152).
See also:
Troubleshooting Security Center (http://docwiki-dev.cisco.com/wiki/Troubleshooting_Tips_for_Unified_IC_8.0)
This chapter contains the following topics:
• About Unified IC Security, page 141• User List Page, page 142• User Groups Page, page 147• User Permissions Page, page 150• About Permissions, page 152• About User Groups, page 153• Run As, page 155• Best Practices for Security, page 155
About Unified IC Security
Unified IC security offers multi-layered and flexible functionality that allows a securityadministrator to create a flat or a tiered structure of access to Unified IC functions, based onthe needs of the organization.
User Guide for the Cisco Unified Intelligence Center Reporting Application 8.0(4)
141
Chapter 9
A user's access to Unified IC functions is tied to:
• His login authentication (page 8).
• The license type (page 165) under which his organization runs Unified IC. For example,organizations that use a Standard license cannot access the Report Definition functions.
• His User Role (a user can have one, some, or all of seven User Roles).
• The User Groups in which he is a member. See About User Groups (page 153).
• For an object the user can access, the object-level permissions assigned by the person whocreated that object. See About Permissions (page 152).
Administrative Overview
Access to the functions in the Unified IC reporting application is controlled by the one or moreusers who have the User Role of Security Administrator.
The initial, default Security Administrator is the user defined as the System Application Userduring the installation.
Security Administrators can:
• Create and maintain users.
• Assign User Roles - User roles are assigned to users to control what drawers the user canaccess and what objects the user can create.
• Assign users to User Groups.
• Create and maintain user groups.
• Assign Permissions - Whereas User Roles are associated with people, permissions areassociated with objects (Dashboards, Reports, Report Definitions, Data Sources, Value Lists,and Collections).
• Use the Run As (page 155) feature to verify other users' permissions.
User List Page
This page opens from the Security drawer. If a user who does not have the Security Administratoruser role accesses this page, he can see only his name and can open his page to modify someparameters such email and phone number. He cannot change his role or group membership.
When Security Administrators access this page, they can see all existing users; can create users,modify or delete users, review or edit user information, and "Run As" a user.
User Guide for the Cisco Unified Intelligence Center Reporting Application 8.0(4)
142
Chapter 9: Security
User List Page

The first time the Super User administrator who installed the system opens this page, the list ispopulated with his or her name and with the names of all Supervisors who integrated fromUnified CCE (if the initial User Integration has been run).
Note: Unified CCE User Integration is configured and scheduled in the Unified IC OperationsConsole (Cluster Configuration > ICM User Integration). It is documented in the onlinehelp for the Operations Console.
Table 25: Fields on the User List
ExplanationField
Click this to narrow the list so that it displays only thoseusers who are active.
Only show currently active users
Use this filter field to narrow the list of names or to moveto a specific name.
Name Contains
The domain and user name (domain\name).User Name
The user's first name.First Name
The user's last name.Last Name
Checks in these boxes show the User Roles that applyto this user.
User Role check boxes
Actions on this page:
• Create - opens the User Information Page (page 143).
• Edit - select the button to the left of the user name and click to open the User InformationPage (page 143).
• Delete - select the button to the left of the user name and click to delete the user.
• Run As - select a user, then click this button to click to refresh the Unified IC reportinginterface as that user would see it at login. See Run As (page 155) for details.
• Refresh- refreshes the page to show changes another person might have made to the UserList.
• Page - click the arrow to move to the next page of the User List, when it consists of morethan one page.
• Help - opens online help.
• X on the tab heading - closes the page.
User Information Page
This page opens when you click Create or Edit from the User List Page (page 142).
This page has two tabs: General Information (page 144) and Groups (page 146).
User Guide for the Cisco Unified Intelligence Center Reporting Application 8.0(4)
143
Chapter 9: Security
User List Page
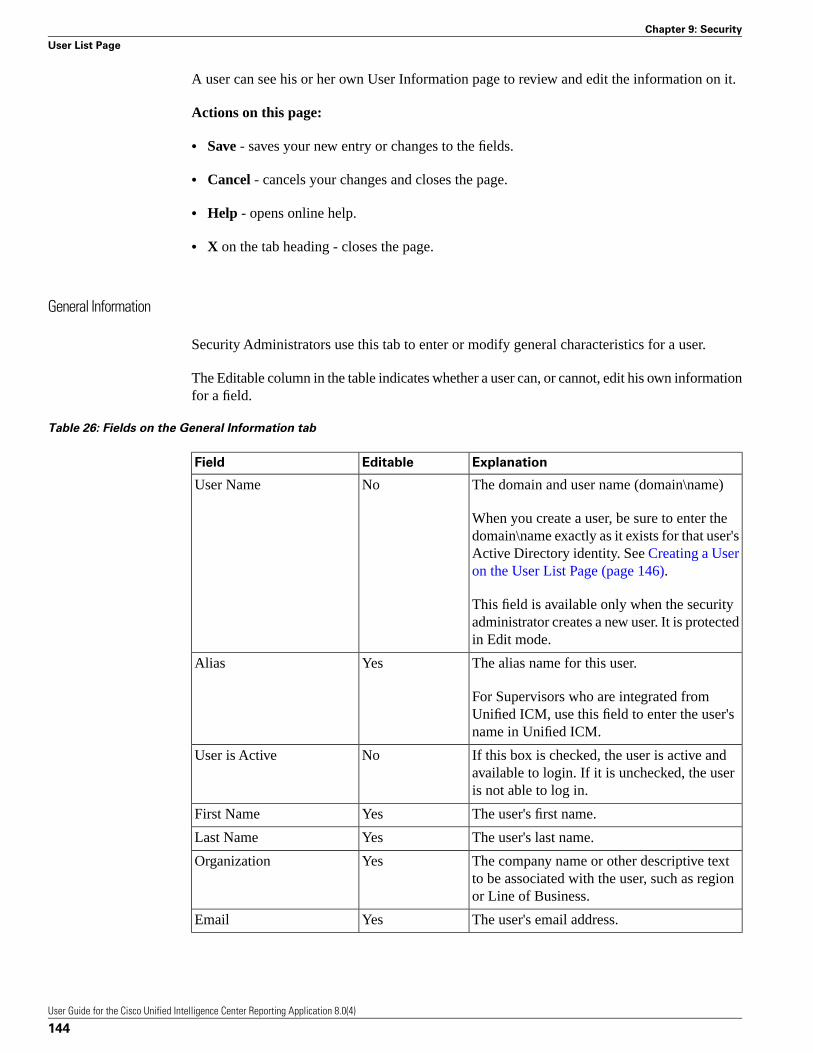
A user can see his or her own User Information page to review and edit the information on it.
Actions on this page:
• Save - saves your new entry or changes to the fields.
• Cancel - cancels your changes and closes the page.
• Help - opens online help.
• X on the tab heading - closes the page.
General Information
Security Administrators use this tab to enter or modify general characteristics for a user.
The Editable column in the table indicates whether a user can, or cannot, edit his own informationfor a field.
Table 26: Fields on the General Information tab
ExplanationEditableField
The domain and user name (domain\name)NoUser Name
When you create a user, be sure to enter thedomain\name exactly as it exists for that user'sActive Directory identity. See Creating a Useron the User List Page (page 146).
This field is available only when the securityadministrator creates a new user. It is protectedin Edit mode.
The alias name for this user.YesAlias
For Supervisors who are integrated fromUnified ICM, use this field to enter the user'sname in Unified ICM.
If this box is checked, the user is active andavailable to login. If it is unchecked, the useris not able to log in.
NoUser is Active
The user's first name.YesFirst Name
The user's last name.YesLast Name
The company name or other descriptive textto be associated with the user, such as regionor Line of Business.
YesOrganization
The user's email address.YesEmail
User Guide for the Cisco Unified Intelligence Center Reporting Application 8.0(4)
144
Chapter 9: Security
User List Page

ExplanationEditableField
A phone number for the user. This can be theuser's personal phone number or an emergencycontact.
YesPhone
Text that describes this user.YesDescription
From the dropdown, select the time zone theuser would like to use in the report. This time
YesTime Zone
zone is also used for the user's scheduledreports and takes precedence over the timezone used by CUIC server.
If this field is left blank, the system uses thetimezone that is set for the CUIC Data Source.
Assign one or more roles for this user.NoRoles
Note: If the Security Administrator adds orchanges User Roles, the change does not takeeffect until the user logs out and then logs inagain.
These boxes show this user's permission settingpreference for "My Group" and "All Users"
YesPermissions
when he creates new objects. A user canalways change the permissions for all theobjects created by the user.
"My Group" is this user's default Group.
Checks for My Group configure whether allother users who belong to this user's defaultgroup can read, write, or execute the objectsthat this user creates.
Checks for AllUsers configure whether ALLother users can read, write, or execute theobjects that this user creates.
Higher level permissions prevail.
See also:
User Permissions Page (page 150)
About Permissions (page 152)
Adding or Changing User Roles
If a user is given new roles of Report Designer, Report Definition Designer, or DashboardDesigner, or if those roles are removed, the change is not reflected in the interface.
User Guide for the Cisco Unified Intelligence Center Reporting Application 8.0(4)
145
Chapter 9: Security
User List Page
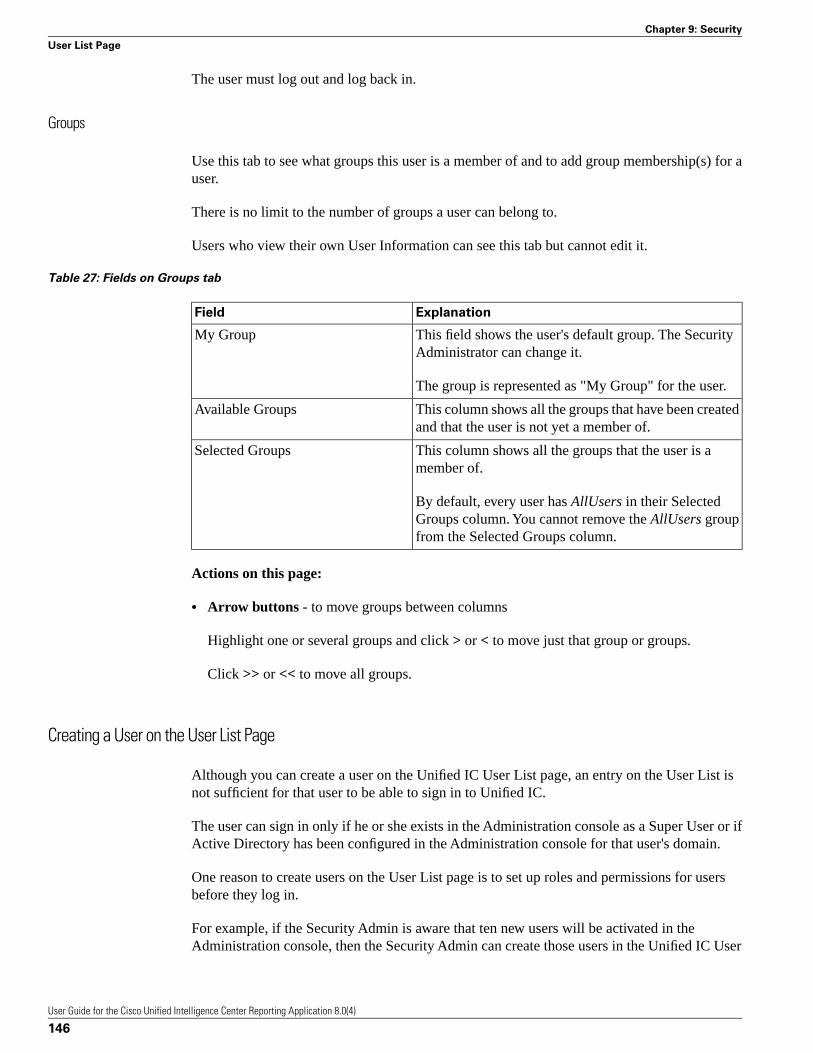
The user must log out and log back in.
Groups
Use this tab to see what groups this user is a member of and to add group membership(s) for auser.
There is no limit to the number of groups a user can belong to.
Users who view their own User Information can see this tab but cannot edit it.
Table 27: Fields on Groups tab
ExplanationField
This field shows the user's default group. The SecurityAdministrator can change it.
My Group
The group is represented as "My Group" for the user.
This column shows all the groups that have been createdand that the user is not yet a member of.
Available Groups
This column shows all the groups that the user is amember of.
Selected Groups
By default, every user has AllUsers in their SelectedGroups column. You cannot remove the AllUsers groupfrom the Selected Groups column.
Actions on this page:
• Arrow buttons - to move groups between columns
Highlight one or several groups and click > or < to move just that group or groups.
Click >> or << to move all groups.
Creating a User on the User List Page
Although you can create a user on the Unified IC User List page, an entry on the User List isnot sufficient for that user to be able to sign in to Unified IC.
The user can sign in only if he or she exists in the Administration console as a Super User or ifActive Directory has been configured in the Administration console for that user's domain.
One reason to create users on the User List page is to set up roles and permissions for usersbefore they log in.
For example, if the Security Admin is aware that ten new users will be activated in theAdministration console, then the Security Admin can create those users in the Unified IC User
User Guide for the Cisco Unified Intelligence Center Reporting Application 8.0(4)
146
Chapter 9: Security
User List Page
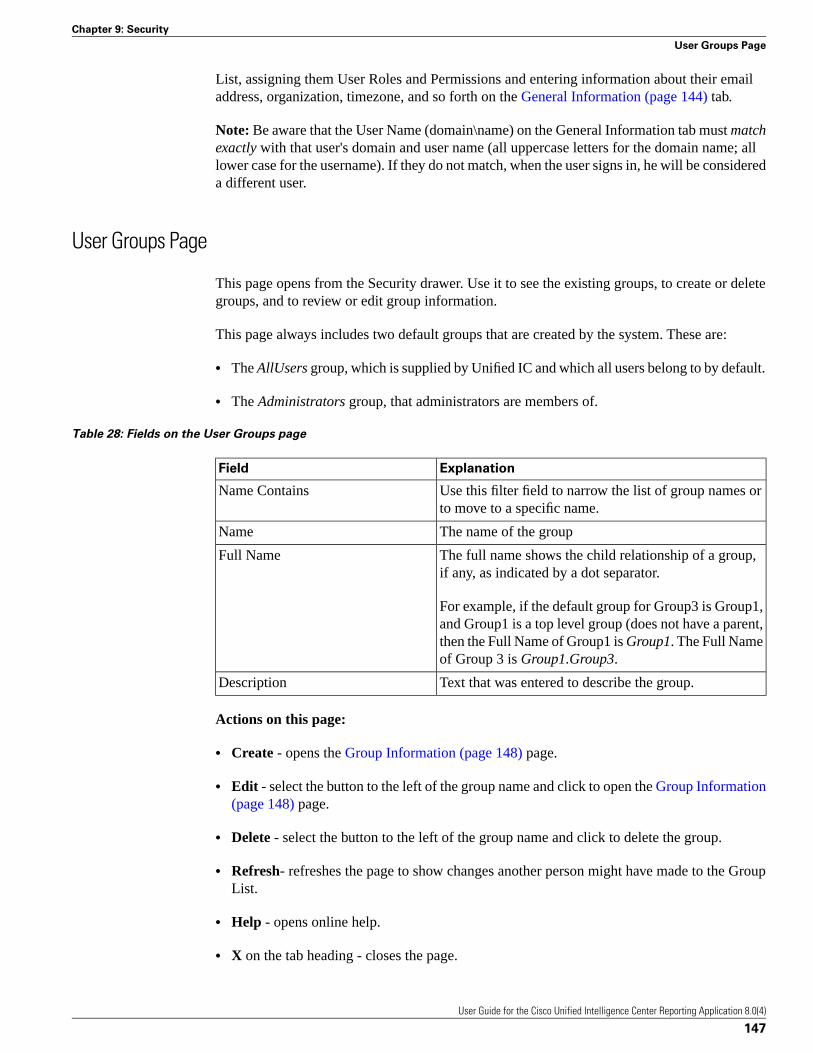
List, assigning them User Roles and Permissions and entering information about their emailaddress, organization, timezone, and so forth on the General Information (page 144) tab.
Note: Be aware that the User Name (domain\name) on the General Information tab must matchexactly with that user's domain and user name (all uppercase letters for the domain name; alllower case for the username). If they do not match, when the user signs in, he will be considereda different user.
User Groups Page
This page opens from the Security drawer. Use it to see the existing groups, to create or deletegroups, and to review or edit group information.
This page always includes two default groups that are created by the system. These are:
• The AllUsers group, which is supplied by Unified IC and which all users belong to by default.
• The Administrators group, that administrators are members of.
Table 28: Fields on the User Groups page
ExplanationField
Use this filter field to narrow the list of group names orto move to a specific name.
Name Contains
The name of the groupName
The full name shows the child relationship of a group,if any, as indicated by a dot separator.
Full Name
For example, if the default group for Group3 is Group1,and Group1 is a top level group (does not have a parent,then the Full Name of Group1 is Group1. The Full Nameof Group 3 is Group1.Group3.
Text that was entered to describe the group.Description
Actions on this page:
• Create - opens the Group Information (page 148) page.
• Edit - select the button to the left of the group name and click to open the Group Information(page 148) page.
• Delete - select the button to the left of the group name and click to delete the group.
• Refresh- refreshes the page to show changes another person might have made to the GroupList.
• Help - opens online help.
• X on the tab heading - closes the page.
User Guide for the Cisco Unified Intelligence Center Reporting Application 8.0(4)
147
Chapter 9: Security
User Groups Page

See also About User Groups (page 153).
Group Information
This page opens when you click Create or Edit from the User Groups Page (page 147).
This page has three tabs for most groups: General Information (which describes the group),Groups (where you can establish the group as a child group), and Group Members (where youcan add or identify children for the group).
The AllUsers and Administrators groups do not have a Groups tab.
Actions on this page:
• Save - saves your new entry or changes to the fields.
• Cancel - cancels your changes and closes the page.
General Information
Use this tab to enter general information about a user group.
Table 29: Fields on the User Group General Information tab
ExplanationField
The name of the group.Group Name
This field is available only when you create a new group.It is protected in Edit mode.
Enter or modify text to describe this groupDescription
Groups
Use this tab to establish the groups for this user group.
Once you do this, this group becomes a child of those parent groups, and one of the parentgroups is identified as its Default Group.
Note:
• The default Administrators and AllUsers groups do not have this Groups tab.
• It is not necessary to complete this tab if you do not want this group to be a child.
User Guide for the Cisco Unified Intelligence Center Reporting Application 8.0(4)
148
Chapter 9: Security
User Groups Page
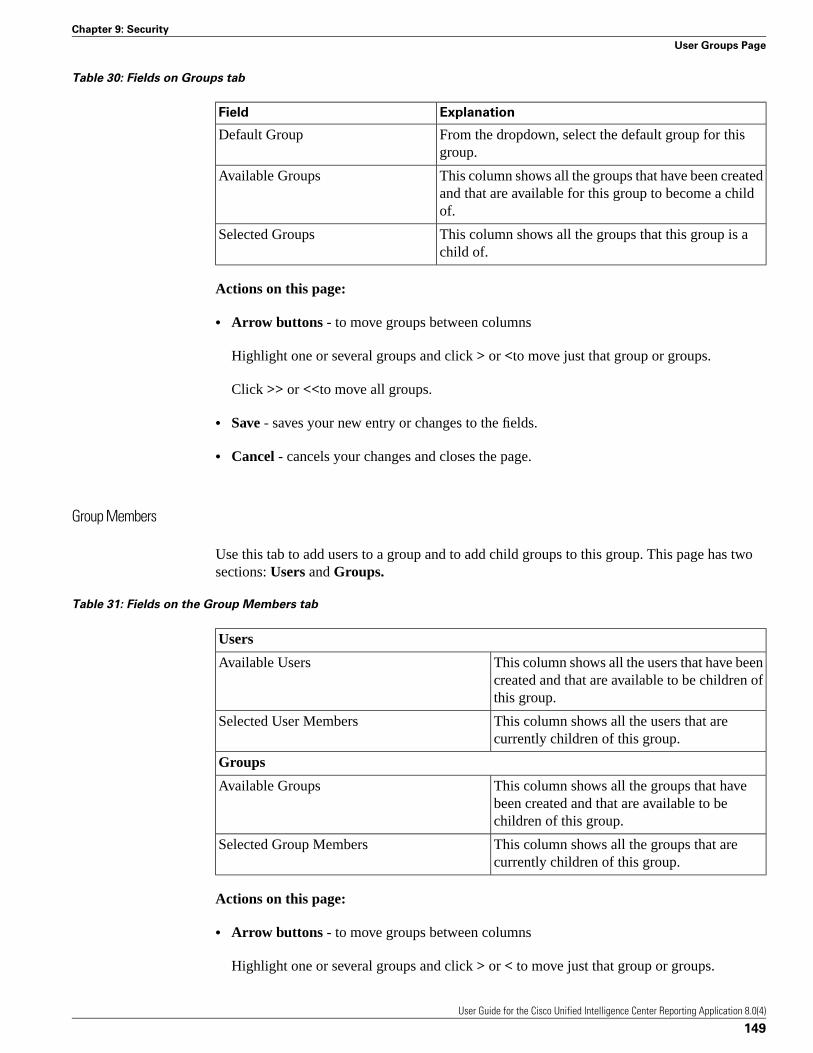
Table 30: Fields on Groups tab
ExplanationField
From the dropdown, select the default group for thisgroup.
Default Group
This column shows all the groups that have been createdand that are available for this group to become a childof.
Available Groups
This column shows all the groups that this group is achild of.
Selected Groups
Actions on this page:
• Arrow buttons - to move groups between columns
Highlight one or several groups and click > or <to move just that group or groups.
Click >> or <<to move all groups.
• Save - saves your new entry or changes to the fields.
• Cancel - cancels your changes and closes the page.
Group Members
Use this tab to add users to a group and to add child groups to this group. This page has twosections: Users and Groups.
Table 31: Fields on the Group Members tab
Users
This column shows all the users that have beencreated and that are available to be children ofthis group.
Available Users
This column shows all the users that arecurrently children of this group.
Selected User Members
Groups
This column shows all the groups that havebeen created and that are available to bechildren of this group.
Available Groups
This column shows all the groups that arecurrently children of this group.
Selected Group Members
Actions on this page:
• Arrow buttons - to move groups between columns
Highlight one or several groups and click > or < to move just that group or groups.
User Guide for the Cisco Unified Intelligence Center Reporting Application 8.0(4)
149
Chapter 9: Security
User Groups Page

Click >> or << to move all groups.
User Permissions Page
Use this page to set extra permissions to Groups or to individual users
This page has two tabs: Assigned Group Permissions (page 150) and Assigned User Permissions(page 151).
See also: About Permissions (page 152).
Assigned Group Permissions
This page has four panels and one button.
To assign permissions to a group:
1. Select the object type in the Permissions For panel. For Dashboard, Report or ReportDefinition type, you can select a category or an object within a category. For other objecttypes, select an object from the list. All the groups that have already been assignedpermission for the object will be displayed in the Group permissions for the selected itempanel.
2. Select a group in the All Groups panel. All user members of this group are displayed inthe AllUsers for the selected group panel.
3. Click Set Permissions. Check the level you want for the group (READ, EXECUTE,WRITE), and click OK.
4. The Group Permissions for the selected item panel updates to include the group and itsassigned permission you defined in Step 3.
Note: If the Security Administrator adds or changes User Permissions, the change may not takeplace immediately.
Table 32: Fields on the Group Members tab
ExplanationField
Click the dropdown arrow to select the kinds of objectfor which you want to set permissions. Options are Data
Permissions For panel (top left)
Sources, Report Definitions, Reports, Dashboards, ValueLists, Collections and System Collections (UCCE).
System Collections (UCCE) are the collections of agentsand agent teams that are created and updated by UCCEUser Synchronization.
User Guide for the Cisco Unified Intelligence Center Reporting Application 8.0(4)
150
Chapter 9: Security
User Permissions Page

ExplanationField
Selecting an object type refreshes the panel to show thelist of items or categories for that object.
This panel shows all available User Groups. Highlightinga user group refreshes the page to display an AllUsers
All Groups panel (top right)
for Selected Group panel that lists the member of thegroup.
This panel shows all members in the group that ishighlighted in the All Groups panel directly above.
All Users for the Selected Grouppanel (bottom right)
Click this to open a dialog box where you select thepermission level for the selected object in the
Set Permissions button
Permissions For panel and the selected group in the AllGroups panel.
This panel shows all the groups that have already beenassigned permission for the selected object, and theirpermission level.
Group Permissions for the selecteditem
Assigned User Permissions
To assign permissions to a user:
1. Select the object type in the Permissions For panel. For Dashboard, Report, or ReportDefinition type, you can select a category or an object within a category. For other objecttypes, select an object from the list. All the users that have already been assigned permissionfor the object will be displayed in the User permissions for the selected item panel.
2. Select a user name in the User List panel.
3. Click Show Groups to see all groups for which this user is a member.
4. Click Set Permissions, check the level you want for this user (READ, EXECUTE, WRITE),and click OK.
The All Permissions for the selected item panel refreshes to show the user and permissionyou have added or changed for this user in steps 3 and 4.
ExplanationField
Click the dropdown arrow to select the kinds of objectfor which you want to set permissions. Options are Data
Permissions For panel (top left)
Sources, Report Definitions, Reports, Dashboards, ValueLists, Collections, and System Collections (UCCE).
System Collections (UCCE) are the collections of agentsand agent teams that are created and updated by UCCEUser Synchronization.
User Guide for the Cisco Unified Intelligence Center Reporting Application 8.0(4)
151
Chapter 9: Security
User Permissions Page

ExplanationField
Selecting an object type refreshes the panel to show thelist of items or categories for that object.
This panel shows all current users. Filter the list andselect one or many user names.
User List panel (top right)
Click this to show the All Groups for the selected userpanel.
Show Groups button
This panel shows all groups of which the username thatis highlighted in the User List panel directly above is amember.
All Groups for the selected User(bottom right)
Click this to open a dialog box where you select thepermission level for the object (READ, EXECUTE,WRITE).
Set Permissions button
This panel shows all users who currently have permissionfor the object, and what level of permissions they have.
All Permissions for the selected item
Note: : You cannot change the permission for the owner of an object and owner always hasWrite Permission for the object. For example if User Lee is the owner of Report 1, he has WRITEpermission for Report 1, and no one can change his permission to EXECUTE or READ.
Actions on this page:
• Save - saves your new entry or changes to the fields.
• Cancel - cancels your changes and closes the page.
About Permissions
Whereas User Roles are associated with people, permissions are associated with objects. UnifiedIC objects are Dashboards, Reports, Report Definitions, Data Sources, Categories, Value Lists,and Collections.
There are three levels of permissions, represented by three check boxes:
• READ: When a user has READ permission for an object, the user can see that object in theobject list or under a category. READ is the lowest level of permission.
• EXECUTE: When user has EXECUTE permission for an object, he can perform some actionswith the object. The type of action depends on the type of object.
For example, with EXECUTE permission, a user can run, print, and refresh a report, canopen and refresh a dashboard and run a dashboard slideshow, can see a Value List query.EXECUTE permission includes the READ permission.
• WRITE: When the user has WRITE permission for an object, he can alter, rename or deletethe object. For example, With WRITE permission, you Save As, import, and export reports;
User Guide for the Cisco Unified Intelligence Center Reporting Application 8.0(4)
152
Chapter 9: Security
About Permissions
you can can edit a data source and can delete a custom Value List. WRITE permission alsoincludes EXECUTE and READ permission.
Note: If no check boxes are selected when setting permission for an object, the user has noaccess privileges to the object.
Permissions are combined and the highest level prevails.
A user receives permission for an object from different sources. Permission can be inheritedfrom the AllUsers group, from the Default Group (My Group), or from the permission assignedby the Security Administrator. Among all these permissions, the highest level permission isused when user access the object.
See also: Permissions for Categories (page 162).
User Roles and Permissions
Your User Role allows you to "open" the drawer that corresponds to that role. If you haveEXECUTE permission, you can create objects for that drawer. For example, if you are aDashboard Designer, you can create dashboards on the Available Dashboards page.
When you create an object, you are the owner of that object. You have WRITE permission forthe object, and you can set the permissions for that object for AllUsers and for users in yourGroup.
If the object is still a work-in-progress and you do not want anyone to access it yet, you canmake it "private" by leaving all permissions unchecked for both the AllUsers and the Groups.
When the object is ready, you might set the AllUsers permissions to READ and your defaultGroup (My Group) permissions to EXECUTE or even WRITE. For example, if you create aDashboard for your Group and the dashboard has notes, you might want others in your Groupto update the notes.
Even though you are a Dashboard Designer, if the Available Dashboards page containsdashboards created by (owned by) other Dashboard Designers, you may or may not be able tosee those dashboards, based on your Group permissions and on the object-level permissionsthose owners have set for their dashboards.
About User Groups
User Groups are constructs that allow security administrators to partition Unified IC functionality.
Creating User Groups expedites the process of provisioning users when multiple users need thesame access to dashboards and reports, or when users require distinct permissions and featuresbased on regional or organizational requirements.
User Guide for the Cisco Unified Intelligence Center Reporting Application 8.0(4)
153
Chapter 9: Security
About User Groups
User groups have no impact on how data is stored in the database. They are used only forassigning permissions to all the user members of the group through one operation instead ofrepeating the same operation for each user.
System-Defined AllUsers Group
All users are automatically a member of the system-defined AllUsers group.
AllUsers always appears on the Manage User Groups window. The security administrator cannotdelete it.
System-Defined Administrator User Group
The security administrator is automatically a member of the system-defined Administratorsgroup and can add other security administrators to it.
Additional Security Administrators must be added to the Administrators group. Having the roledoes not automatically make them members of that group.
Customer-Defined User Groups
Security administrators can create any number of user groups and can add users to them. Fromthose other user groups, one is designated as the user's Group (also called My Group).
The Default Group
After creating the customer-defined groups, the security administrator can add a user to anynumber to these groups and can configure one of them as the user's default Group (MyGroup).The All Users group can also be seleected as the default group.
The owner of an object can set permission for its Group, and the All Users group. Only theSecurity Administrator can set extra permission to other groups or individual users on the UserPermissions Page (page 150). A user's access permission to an object is the highest level of thepermission that user gets from all the permission "sources.
Groups and Child Groups
Rules for Groups and Child Groups
• A group can be both a Parent and a Child. For example, Group 2 can be child of Group 1.Group 2 can also be a parent of Group 3.
• A Group is not required to have Child Groups.
• A Group may have any number of Child Groups.
• A Child Group cannot be a Parent to its own Parent Group and similarly, a Parent Groupcannot be a Child of its own Child Group. For example, Group 3 is a child of Groups 1 and2. Group 3 cannot also be a parent of Group 1 or Group 2.
• A Group can have both Groups and Users as children. For example, Group 2 can be a childof Group 1. User Lee can be a child of Group 1.
User Guide for the Cisco Unified Intelligence Center Reporting Application 8.0(4)
154
Chapter 9: Security
About User Groups
• A Group is not required to have a Parent Group.
• Child Groups Do Not Inherit the Members of their Parent Groups. - Adding a user as amember of a group does not mean that user is also a member of its children. For example,Group 2 and Group 3 are children of Group 1. The security administrator adds User A as amember of Group 1. User A does not automatically become a member of Group 2 or Group3. To make User A as a member of Group 2, the security administrator must add User A asa member of Groups 2.
Run As
Security Administrators can select a name on the User List page and click Run As. This refreshesthe Unified IC web page so that it reflects the interface that user has when he logs in.
Use this tool to verify that the User Roles and permissions that are configured for that user areas you expect them.
Note:
• When you Run As another user, the top of the page shows both your Logged In identity andyour Run As identity.
• You cannot Run As yourself.
• You can Run As one level of user. A Security Admin cannot Run As User A and, as User A,then Run As User B.
To leave Run As mode, click Stop Run As at the top of the page.
Best Practices for Security
If you make the user a member of one or more other groups, make one of those groups, theuser's default group, and set the permissions for the default group higher than those of theAllUsers group.
Higher permissions for the default group prevail over permissions in the AllUsers group.Individual user permissions prevail over group permissions.
User Guide for the Cisco Unified Intelligence Center Reporting Application 8.0(4)
155
Chapter 9: Security
Run As

User Guide for the Cisco Unified Intelligence Center Reporting Application 8.0(4)
156
Chapter 9: Security
Best Practices for Security

System Concepts and Navigation ControlsThis chapter contains the following topics:
• Accessing Cisco Unified Communications Solutions Tools from Unified IC, page 157• Categories, page 160• Drawers, page 162• Filtering, page 163• Unified IC Licenses, page 163• Multiple Delete, page 167• Online Help, page 167• Refresh, page 167• Sorting, page 168• Stock and Custom Objects, page 168• Tabs, page 169
Accessing Cisco Unified Communications Solutions Tools from Unified IC
The Navigation dropdown menu at the top right of the Unified IC Administration page has threeCisco Unified Communications Solutions tools:
User Guide for the Cisco Unified Intelligence Center Reporting Application 8.0(4)
157
Chapter 10

Figure 43: Navigation dropdown
To access these tools from a Member node, where x.x.x.x is the IP address of the member:
• To access Unified Serviceability: http://x.x.x.x/ccmservice/
• To access Unified OS Administration: http://x.x.x.x/cmplatform
• To access Disaster Recovery System: http://x.x.x.x/drf
To sign in to these tools, use the user name and password for the Installation Administratoraccount.
Cisco Unified Serviceability
Cisco Unified Serviceabilty is one of three system-level tools that Unified IC shares with CiscoUnified Communications Solutions. The other two are Disaster Recovery System (page 159)and Cisco Unified OS Administration (page 159)
To access Cisco Unified Serviceabilty, select it from the Navigation dropdown in the upper-rightcorner and click Go.
Cisco Unified Serviceability is a web-based troubleshooting tool, with four menus (Alarms,Trace, Tools, and Snmp). Unified Serviceability features are supported by and applicable toUnified IC with exceptions noted in Unified IC Notations.
Cisco Unified Serviceability features include the following:
• Provides information on configuring alarms, traces, and SNMP
• Saves alarms and events for troubleshooting and provides alarm message definitions.
• Saves trace information to various log files for troubleshooting.
• Monitors real-time behavior of components through the Cisco Unified Real-Time MonitoringTool (RTMT).
User Guide for the Cisco Unified Intelligence Center Reporting Application 8.0(4)
158
Chapter 10: System Concepts and Navigation Controls
Accessing Cisco Unified Communications Solutions Tools from Unified IC
• Provides feature services that you can activate, deactivate, and view through the ServiceActivation window.
• Provides an interface for starting and stopping feature and network services.
• Generates and archives daily reports; for example, alert summary or server statistic reports.
• Allows Cisco Unified Communications Manager and Cisco Unity Connection to work as amanaged device for SNMP remote management and troubleshooting.
• Monitors the disk usage of the log partition on a server.
• Monitors the number of threads and processes in the system; uses cache to enhance theperformance.
All information in the Cisco Unified Serviceablity documentation is applicable to UnifiedIntelligence system.
Cisco Unified OS Administration
Cisco Unified OS Administration Cisco Unified OS Administration is one of three system-leveltools that Unified IC shares with Cisco Unified Communications Solutions. The other two areDisaster Recovery System (page 159) and Cisco Unified Serviceability (page 158).
To access Cisco Unified OS Administration select it from the Navigation dropdown in theupper-right corner and click Go.
Use Cisco Unified OS Administration to perform many common system administration functions.Unified OS Administration menus are the following:
• Show: How to view information on Cluster Nodes, Hardware Status, Network Configuration,Installed Software, System Status, and IP Preferences.
• Settings: How to display and change IP settings, host settings, and Network Time Protocol(NTP) settings.
• Security: How to manage certificates and how to set up and manage IPSec policies
• Software Upgrades: How to perform an upgrade and how to revert to a previous version.
• Services: How to use the Ping and Remote Support features
Disaster Recovery System
The Disaster Recovery System (DRS) is one of three system-level tools that Unified IC shareswith Cisco Unified Communications Solutions. The other two are Cisco Unified OSAdministration (page 159) and Cisco Unified Serviceability (page 158).
User Guide for the Cisco Unified Intelligence Center Reporting Application 8.0(4)
159
Chapter 10: System Concepts and Navigation Controls
Accessing Cisco Unified Communications Solutions Tools from Unified IC

To access Disaster Recovery System, select it from the Navigation dropdown in the upper-rightcorner and click Go.
The Disaster Recovery System provides backup and restore capability for all servers in a UnifiedIC cluster and allows you to perform regularly-scheduled automatic backups as well asuser-invoked data backups.
Refer to the DRS online help for topics including:
• Backup and Restore procedures
• Creating and editing backup schedules
• Starting a manual backup
• Restoring a backup version and viewing restore status
• Restoring a cluster
• Error messages that can occur during a backup or a restore
All information in the DRS online help is applicable to Unified Intelligence system. See thetopics below for DRS-related information that pertains to Unified IC.
Categories
Certain Unified IC Reporting objects are grouped in categories. Categories display in a "tree"format, where categories and sub-categories are represented as folders and items within categorieare represented as pages.
Figure 44: Categories
There cannot be two objects with the same name within a category or a subcategory. There canbe objects with the same name in two different sub-categories.
See also:
Create a Sub-Category (page 161)
User Guide for the Cisco Unified Intelligence Center Reporting Application 8.0(4)
160
Chapter 10: System Concepts and Navigation Controls
Categories

Delete a Sub-Category (page 161)
Drag and Drop within Categories (page 161)
Rename Categories (page 161)
Permissions for Categories (page 162)
Create a Sub-Category
To create a category or a sub-category, right-click the parent (category or sub-category) andselect Create.
This opens a dialog box asking for:
• The category or sub-category name. Enter a name (using a maximum of 50 characters).
• The permissions for the Parent User group and the All Users group.
Click OK to save the category.
Delete a Sub-Category
To delete a sub-category, right-click its icon and select Delete.
This opens a dialog box stating that deleting will delete all of its children sub-categories anddashboards.
Click Yes to confirm the deletion. Click No to cancel.
Both Yes and No generate another dialog box confirming your action to delete or to cancel thedeletion. Click OK to close this dialog box and to complete the action.
Drag and Drop within Categories
Use standard drag-and-drop actions to move items such as dashboards and reports from onecategory to another. You can also move an entire sub-category with all its component items.
To use drag and drop, a user must have Execute permissions for the object.
Rename Categories
To rename a category or a sub-category, right-click the sub-category icon and select Rename.
This opens a dialog box with a Rename To field.
Enter a new name (using a maximum of 50 characters) and click Rename to proceed.
User Guide for the Cisco Unified Intelligence Center Reporting Application 8.0(4)
161
Chapter 10: System Concepts and Navigation Controls
Categories

Click Cancel to keep the original name.
To rename, a user must have Write permissions for the object.
Permissions for Categories
Categories are Unified IC "objects", as are Reports, Report Definitions, Dashboards, DataSources, Value Lists, and Collections.
Permissions are set for all objects when you create them and for categories are enforced asfollows:
• READ = you can see the category and all objects in it.
• WRITE = you can view a category, add a sub-category to it, move objects into it, rename it,delete it, and set permissions for it.
• EXECUTE = you can add a sub-category and move (drag and drop) an item such as adashboard into this category. To add an item, you must have WRITE permission to that item.After you move the item into a category, the original owner of that item can access it onlyif that user has WRITE permission to the category that you modified.
There are impacts for the permissions a user has for a category with respect to the permissionthat user has for the object/drawer. For example:
• If the user has the Dashboard Designer role but does not have READ permission to a dashboardcategory, he cannot see that category or any dashboards it contains.
• If a user has the Report Definition Designer role and has WRITE permissions for a category,he can delete the category. The delete operation will fail if any of the objects are not eligiblefor deletion. They might be stock Report Definitions. They might be custom Report Definitionsthat are referenced by reports.
• If a user does not have access to a drawer, for example, to Dashboards, the user's permissionto a category in that drawer is irrelevant. For example, if a user has WRITE permission inthe AllUsers group for a dashboard category, but that user does not have the DashboardDesigner role, no harm can come—unless that user is subsequently given the DashboardDesigner role. He could then delete that dashboard category.
See also: About Permissions (page 152).
Drawers
The left panel of the Unified IC Reporting interface contains drawers.
Drawers are similar to menus: they group logically-related functions. Clicking (opening) adrawer in the left panel might immediately open a page in the right panel or it might expand toshow a list or tree of nested links.
User Guide for the Cisco Unified Intelligence Center Reporting Application 8.0(4)
162
Chapter 10: System Concepts and Navigation Controls
Drawers
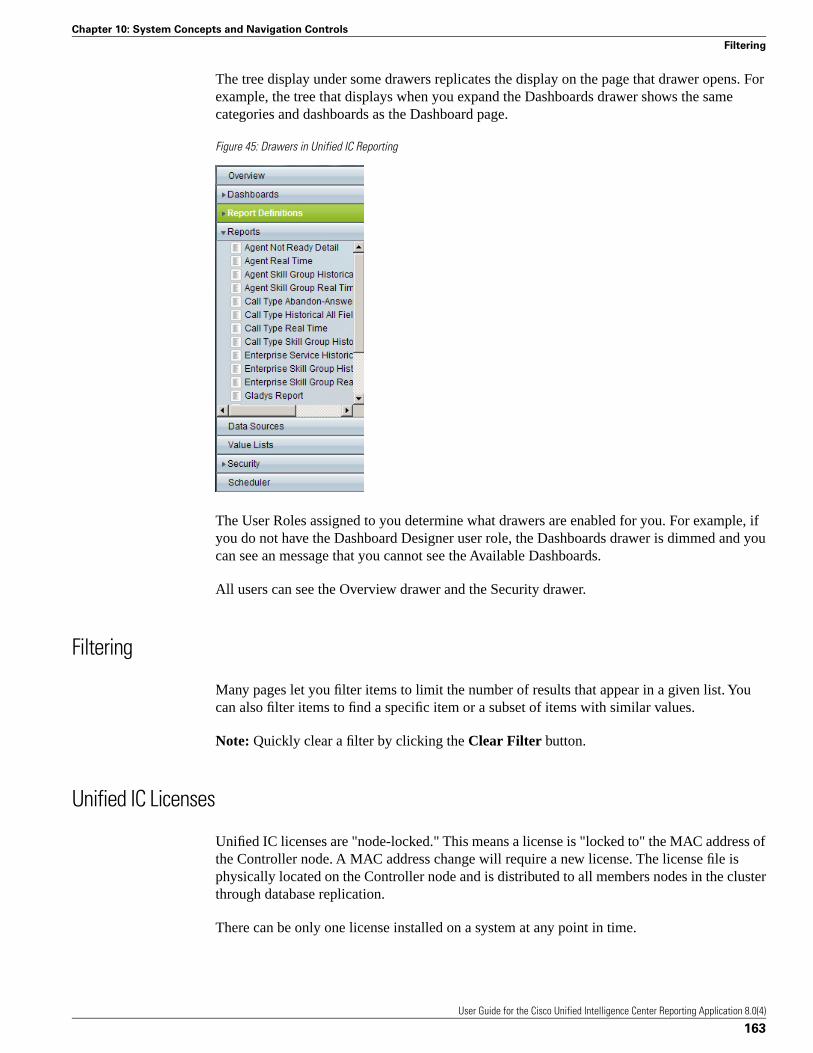
The tree display under some drawers replicates the display on the page that drawer opens. Forexample, the tree that displays when you expand the Dashboards drawer shows the samecategories and dashboards as the Dashboard page.
Figure 45: Drawers in Unified IC Reporting
The User Roles assigned to you determine what drawers are enabled for you. For example, ifyou do not have the Dashboard Designer user role, the Dashboards drawer is dimmed and youcan see an message that you cannot see the Available Dashboards.
All users can see the Overview drawer and the Security drawer.
Filtering
Many pages let you filter items to limit the number of results that appear in a given list. Youcan also filter items to find a specific item or a subset of items with similar values.
Note: Quickly clear a filter by clicking the Clear Filter button.
Unified IC Licenses
Unified IC licenses are "node-locked." This means a license is "locked to" the MAC address ofthe Controller node. A MAC address change will require a new license. The license file isphysically located on the Controller node and is distributed to all members nodes in the clusterthrough database replication.
There can be only one license installed on a system at any point in time.
User Guide for the Cisco Unified Intelligence Center Reporting Application 8.0(4)
163
Chapter 10: System Concepts and Navigation Controls
Filtering

Uploading the license file is the first action the System Application User must take after installingthe Controller node.
After installation, and until the System Application User obtains and uploads a Standard orPremium license, he or she:
• Can sign in to the Administration Console to view the Controller and to add the alias name.
• Cannot perform other Administration Console functions.
• Cannot sign in to the Unified IC Reporting application.
• Cannot install member nodes.
How To Obtain Your License
To acquire a license:
1. Go to the Cisco Product License Registration website at this URL: https://tools.cisco.com/SWIFT/Licensing/PrivateRegistrationServlet
2. If you do not have a PAK, click the available licenses link (https://tools.cisco.com/SWIFT/Licensing/PrivateRegistrationServlet?DemoKeys=Y).
3. Scroll to Voice Products and click Cisco Unified Intelligence Center - v8.0.
4. Enter your MACAddress as a single string (with no spaces between the characters), acceptthe agreement, and enter your Registrant Information.
5. Follow prompts to complete the registration pages.
You will receive the license file in an email from Cisco Systems. When you receive it, save itlocally in a location where it cannot be deleted by mistake or opened by an unauthorized person.In the event that your system becomes corrupted, you can browse to this location to upload thelicense file again.
The same license file will be valid if you need to reapply it - unless you apply it to a new serverwith a new MAC address.
Caution: License files are human-readable and can be opened. However, changing anytext in the license file invalidates the license.
Locating the MAC Address
You must supply the MAC address of the Controller node when you apply for a license tooperate Unified IC.
User Guide for the Cisco Unified Intelligence Center Reporting Application 8.0(4)
164
Chapter 10: System Concepts and Navigation Controls
Unified IC Licenses
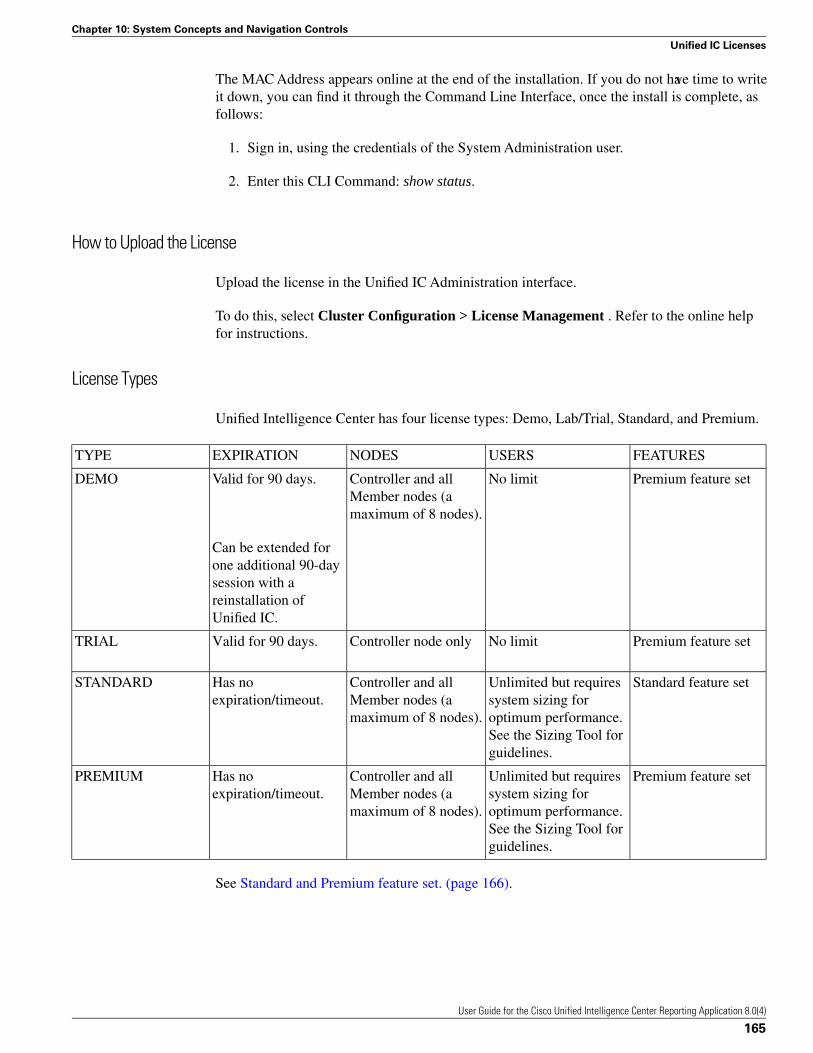
The MAC Address appears online at the end of the installation. If you do not have time to writeit down, you can find it through the Command Line Interface, once the install is complete, asfollows:
1. Sign in, using the credentials of the System Administration user.
2. Enter this CLI Command: show status.
How to Upload the License
Upload the license in the Unified IC Administration interface.
To do this, select Cluster Configuration > License Management . Refer to the online helpfor instructions.
License Types
Unified Intelligence Center has four license types: Demo, Lab/Trial, Standard, and Premium.
FEATURESUSERSNODESEXPIRATIONTYPE
Premium feature setNo limitController and allMember nodes (amaximum of 8 nodes).
Valid for 90 days.DEMO
Can be extended forone additional 90-daysession with areinstallation ofUnified IC.
Premium feature setNo limitController node onlyValid for 90 days.TRIAL
Standard feature setUnlimited but requiressystem sizing for
Controller and allMember nodes (amaximum of 8 nodes).
Has noexpiration/timeout.
STANDARD
optimum performance.See the Sizing Tool forguidelines.
Premium feature setUnlimited but requiressystem sizing for
Controller and allMember nodes (amaximum of 8 nodes).
Has noexpiration/timeout.
PREMIUM
optimum performance.See the Sizing Tool forguidelines.
See Standard and Premium feature set. (page 166).
User Guide for the Cisco Unified Intelligence Center Reporting Application 8.0(4)
165
Chapter 10: System Concepts and Navigation Controls
Unified IC Licenses
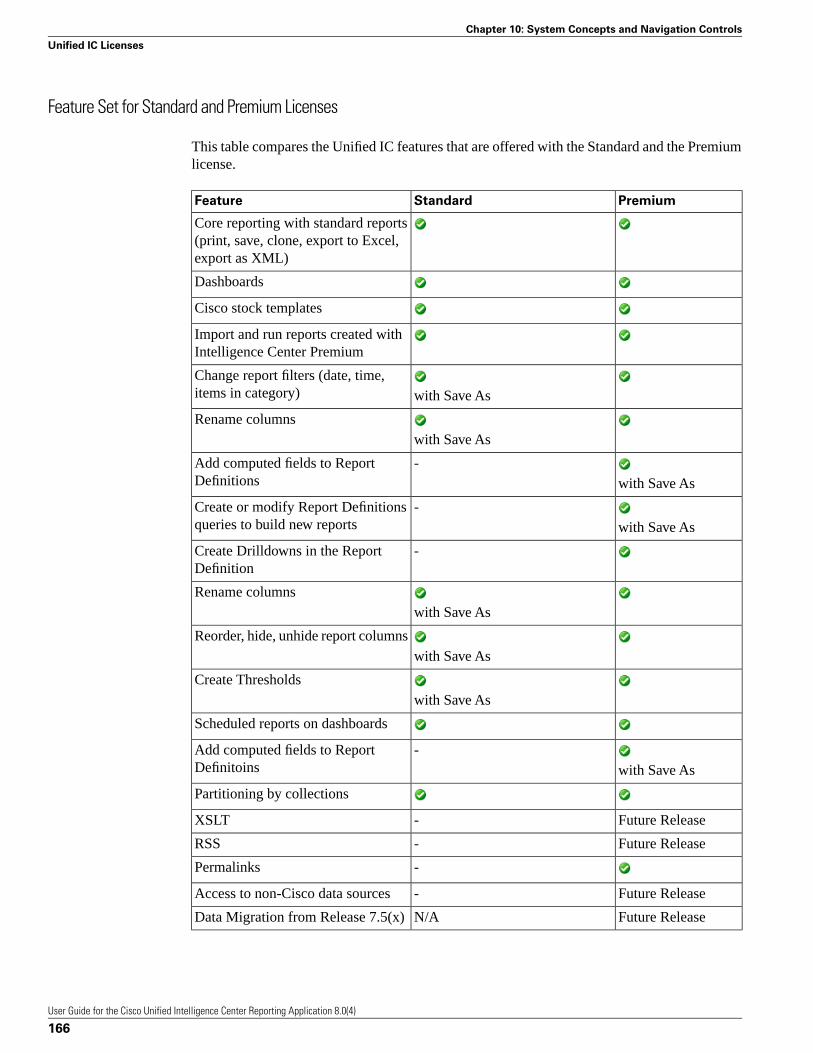
Feature Set for Standard and Premium Licenses
This table compares the Unified IC features that are offered with the Standard and the Premiumlicense.
PremiumStandardFeature
Core reporting with standard reports(print, save, clone, export to Excel,export as XML)
Dashboards
Cisco stock templates
Import and run reports created withIntelligence Center Premium
Change report filters (date, time,items in category) with Save As
Rename columnswith Save As
-Add computed fields to ReportDefinitions with Save As
-Create or modify Report Definitionsqueries to build new reports with Save As
-Create Drilldowns in the ReportDefinition
Rename columnswith Save As
Reorder, hide, unhide report columnswith Save As
Create Thresholdswith Save As
Scheduled reports on dashboards
-Add computed fields to ReportDefinitoins with Save As
Partitioning by collections
Future Release-XSLT
Future Release-RSS
-Permalinks
Future Release-Access to non-Cisco data sources
Future ReleaseN/AData Migration from Release 7.5(x)
User Guide for the Cisco Unified Intelligence Center Reporting Application 8.0(4)
166
Chapter 10: System Concepts and Navigation Controls
Unified IC Licenses
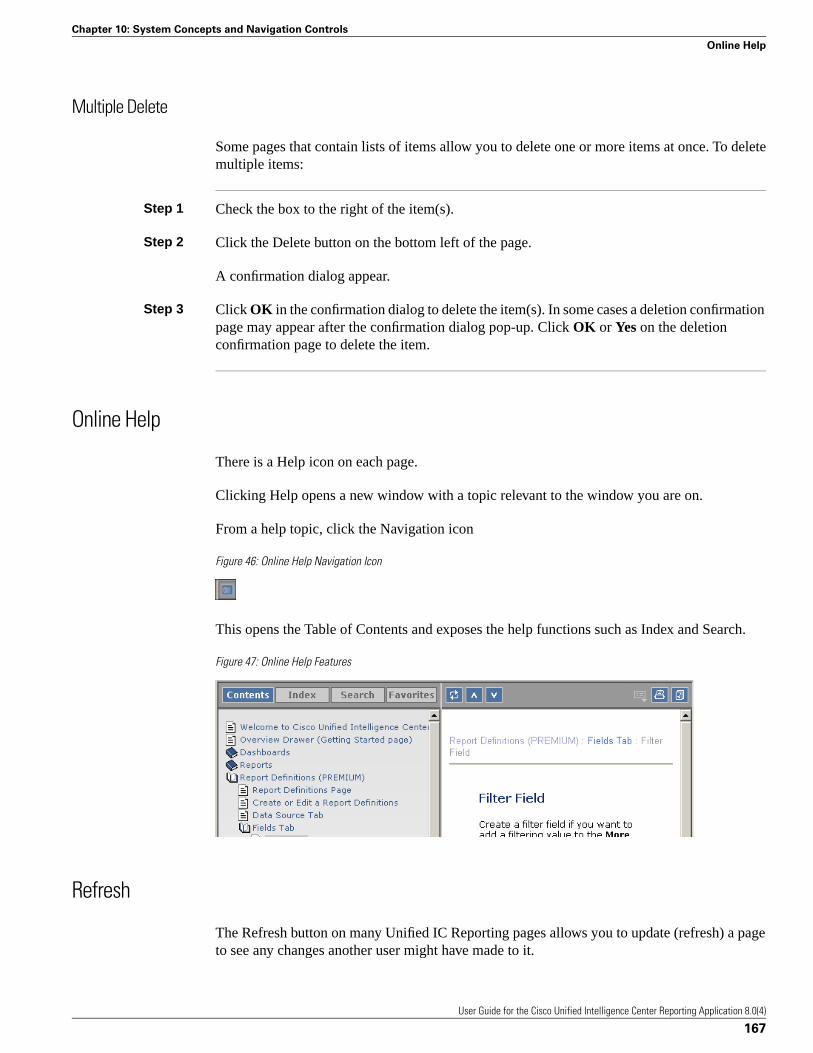
Multiple Delete
Some pages that contain lists of items allow you to delete one or more items at once. To deletemultiple items:
Step 1 Check the box to the right of the item(s).
Step 2 Click the Delete button on the bottom left of the page.
A confirmation dialog appear.
Step 3 Click OK in the confirmation dialog to delete the item(s). In some cases a deletion confirmationpage may appear after the confirmation dialog pop-up. Click OK or Yes on the deletionconfirmation page to delete the item.
Online Help
There is a Help icon on each page.
Clicking Help opens a new window with a topic relevant to the window you are on.
From a help topic, click the Navigation icon
Figure 46: Online Help Navigation Icon
This opens the Table of Contents and exposes the help functions such as Index and Search.
Figure 47: Online Help Features
Refresh
The Refresh button on many Unified IC Reporting pages allows you to update (refresh) a pageto see any changes another user might have made to it.
User Guide for the Cisco Unified Intelligence Center Reporting Application 8.0(4)
167
Chapter 10: System Concepts and Navigation Controls
Online Help

Sorting
Any page that contains lists of items can be sorted by any field name. To sort a list of items:
Step 1 Click the name of the field on the top of the column that you want to sort.
The listed is sorted in ascending order for that column.
Step 2 Click the name of the field again to sort the list in descending order.
Step 3 Click any other field name at the top of the column to sort on that column.
Stock and Custom Objects
Unified IC uses the terms Stock and Custom as follows:
Stock objectsare supplied by and installed with Unfied IC. Stock objects include:
• Reports
• Report Definitions for each of the Stock Reports
• The CUIC data source
• The UCCE Historical data source
• The UCCE Real Time data source
• Value Lists for each of the Stock Reports
• Agent Team Collections created through the UCCE User Integration feature.
Note: There are no stock dashboards.
You cannot make changes to the Cisco stock objects and then save those changes.
You can make changes to stock Reports and Report Definitions and then Save As to create new,cloned and renamed versions of them.
There is no Save As function for the stock Value Lists. To create a custom version of a stockValue lists, create a custom Value List, copy the query from a stock Value List, and then makeedits to it.
Custom Custom objects are any objects that were not installed with the product and includenew reports and report definitions that were designed by a third party and imported into UnifiedIntelligence Center
User Guide for the Cisco Unified Intelligence Center Reporting Application 8.0(4)
168
Chapter 10: System Concepts and Navigation Controls
Stock and Custom Objects

Your support provider cannot assist you in troubleshooting custom objects.
Tabs
Tabs organize content and facilitate navigation.
When you open a drawer, or click an item within a drawer, the panel that opens pops up a tabat the top of the page, if that tab is not already opened.
To close a tab in the Reporting application, click the x at the right of the tab label.
User Guide for the Cisco Unified Intelligence Center Reporting Application 8.0(4)
169
Chapter 10: System Concepts and Navigation Controls
Tabs

User Guide for the Cisco Unified Intelligence Center Reporting Application 8.0(4)
170
Chapter 10: System Concepts and Navigation Controls
Tabs
Index
accessibility....7, 84
Active Directory
and supervisors....15
configuring....15
adding
charts....84
collections....130
dashboard items....32
dashboards....20, 31
data sources....42
drilldowns....119, 121
filter fields....108
formula fields....109
gauges....93
grids....68
report definitions....101
reports....65
report views....71
schedule....136
sub-categories....161
super users....15
thresholds....80, 81
User Groups....147, 148
users....142
value lists....128
Administration UI....1
active directory configuration....15
configuring Report Scheduler....15
logging in....14
upload license....14
Administrators Group....147
Administrator User Group....153
advanced filters tab....60
agent teams....129
aggregate functions....117
All Users Group....19, 147, 153
anonymous blocks....113
and drilldowns....120
Available Dashboards page....30
Available Fields....76, 80
and footers....76
and report summaries....76
Available Report Definitions page....100
Available Reports page....48
best practices
drilldowns....122
formula fields....109
license....13
security....155
bypass report filter....63
caching
clearing local cache....11, 24, 26
categories
dashboards....30
drag and drop....161
renaming....161
sub-categories....160
certificates....159
Chart Editor....63, 84
charts....69
adding....84
axis settings....90
deleting....71
editing....84
from Views Editor....84
general settings....84
previewing....92
User Guide for the Cisco Unified Intelligence Center Reporting Application 8.0(4)
Index 171
Index

series settings....88
types....69
Child Groups....148, 154
Cisco.com....9
Cisco Unified Administration....6, 26
Cisco Unified OS Administration....159
Cisco Unified Serviceability....6, 26, 158
CLI
access to....26
cluster status....159
collections....22, 125, 129
adding....130
and agent teams....129
and user roles....129
collection identifier....128
collection types....130, 132
deleting....130
editing....130
MS SQL queries....128
of agent teams from Unified CCE UserIntegration....129
report filters....129
collection types
identifier....130, 132
values....130, 132
wildcard....130, 132
column (bar) charts....69, 84
Controller node....6
cuicdatabase....6
CUIC database....40
Current field order in the grid....80
Current fields....76
custom collections....131
custom templates....54
custom value lists....126
Dashboard Designer....29
dashboards
adding....20, 31
adding items to....32
adding notes....34
adding reports....33
adding scheduled reports....33
adding URLs....35
adding widgets....35
and schedule reports....137
available dashboards page....30
deleting....37
drawer....29
overview....29
renaming....36
slideshow....36
User Permissions....31
viewing....31
database
backup and restore....159
databases
Informix....39
mapping to multiple....44
MS SQL Server....39
timezones....40
User ID and password....42
data dependencies
data sources, report definitions, and value lists....44
report defintions and reports....122
reports, views, and schedules....67
Data Settings tab....116
data sources
adding....42
and value lists....126
character set....42
CUIC database....40
User Guide for the Cisco Unified Intelligence Center Reporting Application 8.0(4)
Index 172
Index
data sources page....40
deleting....40, 44
drawer....39
editing....42
overview....39
report definitions....101
reports....65
security....17
testing connection....42
timezone....42
Unified CCE....18
Unified CCE User Integration....40
User Permissions....42
value lists....128
viewing....40
Data Source tab....103
data types....117
daylight savings time....42, 97
deleting
charts....71
collections....130
dashboards....37
data sources....40, 44
drilldowns....121
gauges....71
grids....71
multiple delete....167
report definitions....122
reports....67
report views....71
schedule....136
sub-categories....161
thresholds....80
User Groups....147
users....142
Value Lists....127
Disaster Recovery System....6, 26, 159
drag and drop....30, 49, 161
drawers....162
drilldowns....21
adding....119, 121
and anonymous blocks....120
and grouped fields....119
and Premium license....119
and stored procedures....120
best practices....122
deleting....121
editing....119, 121
grid views....119
multiple for the same field....119
Edit Field Properties tab....111
Edit Formatting tab....112
editing
charts....84
collections....130
data sources....42
drilldowns....119, 121
filter fields....108, 111
formula fields....109, 111
gauges....93
grids....68
parameters....113
report definitions....102
reports....54, 63
report views....71
schedule....136
thresholds....80, 81
User Groups....147, 148
users....142
value lists....128
User Guide for the Cisco Unified Intelligence Center Reporting Application 8.0(4)
Index 173
Index

Edit Parameters Properties....114
emailing
scheduled reports....15, 137
execute permission....152, 161
exporting
report definitions....123
reports to Excel....63, 95
report xml....54, 67
Fields tab....107
filter fields....107, 108
adding....108
editing....108, 111
filtering reports....108
filtering reports....58
advanced filters tab....60
basic filters tab....58, 61
filter fields....108
parameters....113
footers
and Availalbe Fields....76
and charts....85
and gauges....93
and Report Summaries....83
formula fields....107, 109
adding....109
best practices....109
dates....109
editing....109, 111
syntax....110
Gauge Editor....63, 93
gauges....70
adding....93
and footers....93
colors for levels....93
deleting....71
editing....93
Getting Started page....8
Google custom search....9
Grid Editor....63, 75
all available fields....75
current fields in grid....75
field properties....75
removing fields....75
renaming fields....75
setting thresholds for a field....75
grids
adding....68, 75
and custom reports....68
and stock reports....68
deleting....71
editing....68
save as....75
saving....75
Group....153
grouping report fields....77, 78
Groups....148, 154
historical key field....116
historical reports....53
images in thresholds....81
importing
report definitions....100, 123
reports....55
IMS users....8
Informix....39
key criteria field....116
and value list....126, 129
language preferences....9
language selection....10
LDAP users....8
license
User Guide for the Cisco Unified Intelligence Center Reporting Application 8.0(4)
Index 174
Index

best practices....13, 163
feature set by license type....166
obtaining....13, 164
replication....14
types....165
uploading from Administration UI....14
line charts....70, 84
locale....9, 10
and reports....9, 55
localization....9, 10
login
and change of permissions....150
and change of User Roles....145
authentication....8
for supervisors....8, 15
to the Administration UI....14
to Unified IC Reporting UI....18
username and password....8
login information
system administrator user....26
MAC Address....164
Member nodes....6
MS SQL queries
for collections....128
for report definitions....103
for value lists....128
in Report Viewer....63
syntax....117
MS SQL Server....17, 39
aggregate functions....117
syntax guidelines....117
My Group....19
navigation
drawers....162
filtering lists....163
refresh....167
sorting items....168
tabs....169
network status....159
notes on dashboards....34
online help....64, 167
overview drawer....8
parameters
editing....113
edit properties....114
filtering reports....113
reordering....113
supported data types....117
Parameters tab....113
Parent Groups....146
passwords
system administrator user....26
Permalink
Report....71
Permissions
and User Groups....152
changing....150
User Groups....150
users....150
pie charts....69, 84
popouts....63
Premium license
and drilldowns....119
and report definitions....99
Premium license feature set....166
printing
from report popouts....96
reports....63, 96
query fields....107
read permission....152
User Guide for the Cisco Unified Intelligence Center Reporting Application 8.0(4)
Index 175
Index
real time reports....53
refresh....167
refresh rate....116
remote support....159
renaming
categories....161
dashboard....36
report definitions....122
reports....66
sub-categories....161
reordering
parameters....113
report fields....77
replication
of license....14
Report
Permalinks....71
report definitions....21
adding....101
and Premium license....99
and reports....99
Available Report Definitions page....100
changing....102
Data Settings tab....116
data sources....101
Data Source tab....103
deleting....122
drawer....99
Drilldowns....119
Edit Field Properties tab....111
Edit Formatting tab....112
editing....102
Edit Parameters Properties....114
exporting....123
Fields tab....107
importing....100, 123
MS SQL query....103
overview....99
Parameters tab....113
renaming....122
stock....99
User Permissions....101
Report Designer....47
Report Editor....55, 63
report fields
Available....76, 80
Current....76, 80
editing....111
filter fields....107, 108
formula fields....107, 109
formulas in footers....112
grouping....77
headers....79
properties....78
query fields....107
removing....76, 77
renaming....78
reordering....77
superheaders....79
supported data types....117
thresholds....76
reports
adding....65
and daylight saving time....97
and locale....9, 55
and report definitions....54
and timezones....96
bypass filter....63
chart views....69
data source....65
User Guide for the Cisco Unified Intelligence Center Reporting Application 8.0(4)
Index 176
Index

deleting....55, 67
drawer....47
editing....54, 63
emailing scheduled reports....137
exporting to Excel....63, 95
exporting xml file....55, 67
filtering....58
footers....112
gauges views....70
grid views....68
historical....53
importing....55
on dashboard ....33
online help link....63
overview....47
printing....63, 96
real time....53
refresh rate....116
renaming....55, 66
report categories....48
Report Viewer....62
report xml....54
running....54
save as....65, 102
saving....63, 65
scheduled reports on dashboard....137
scheduling....15, 54, 55, 135
setting the default view....63
stock templates....49, 50
User Permissions....63
viewing (running)....57
viewing SQL....63
views....71
Report Summaries....83
report templates....21
custom....54
Report Viewer....55, 62
popouts....63
views....63
Report Views (see also Views Editor)....21, 71
Run As....9, 11, 155
running reports....54
Save As
grid views....75
reports....65, 102
saving
grids....75
reports....63
schedule
adding....136
deleting....136
disabling....136
editing....136
enabling....136
setting....137
scheduled reports
on dashboard....137
on dashboard ....33
scheduler....54, 55
adding scheduled reports....135
configuring....135
schedule list....136
scheduler email
configuring....15
security
best practices....155
Security Administrator....142
session inactivity....11
set cuic-properties host-to-ip....44
slideshow on dashboard....36
User Guide for the Cisco Unified Intelligence Center Reporting Application 8.0(4)
Index 177
Index

Standard license feature set....166
stock report definitions....99
stock report templates....47, 49, 50, 55
stock value lists....126
stored procedures....113
and drilldowns....120
sub-categories
adding sub-categories....161
dashboards....30
deleting ....161
drag and drop....161
renaming....161
write permission....161
super users
adding....15
Super Users....142
supervisors
logging in....8, 15
synchronize cluster....11, 24, 26
system administrator user....26
configuring at installation....26
system application user....25
system collections....125, 130, 131
System Configuration Administrator....39
system status....159
tabs....169
thresholds....22, 75, 76, 80
adding....80, 81
color....81
deleting....80
editing....80, 81
images....81
image substitutes....82
multiple for the same field....80
text substitutes....82
text substitution....81
types....81
time change....42
timeout....11
timezones
and data sources....43
and reports....96
and users....145
and usersuser....145
Unified CCE data source....18
Unified CCE User Integration....16
Active Directory configuration....16
agent team collections....129
data source....40
supervisors....142
value list....126
Unified IC Reporting UI
logging in....8, 18
URLs on dashboards....35
User Groups....22, 153
adding....147, 148
adding members....149
Administrator User Group....153
and Permissions....152
assigning Permissions....150
Child Groups....153
deleting....147
editing....147, 148
Groups....153
members....149
User List....19, 142
User Permissions....19, 22
for dashboards....31
for data sources....42
for report definitions....101
User Guide for the Cisco Unified Intelligence Center Reporting Application 8.0(4)
Index 178
Index
for reports....63
for users....144
write, read, and execute....152
User Roles....19, 22
changing....145
User Roles Defined at Installation
Administrator User....23
Application User....23
Database Access Security....23
User Roles for Administration UI
Super Users....23
User Roles for Unified IC Reporting UI....23
users
adding....142
adding to User Groups....149
assigning Permissions....150
deleting....142
editing....142
Run As....155
User Permissions....144
Value List Collection Designer....125
value lists....21, 125
adding....128
and key criteria field....126, 129
and user roles....126
custom....126
data sources....126, 128
deleting....126
display values for....129
editing....128
MS SQL queries....128
refreshing....126
refresh values for....129
report filters....126
stock....126
Unified CCE User Integration....126
Value Lists
deleting....127
viewing
dashboards....31
reports....57
report SQL....63
views....21, 55
charts....69
gauges....70
grids....68
Views Editor....71
add report views....71
Chart Editor....84
delete report views....71
edit report views....71
Gauge Editor....93
Grid Editor....75
views on Report Viewer....63
widgets on dashboards....35
write permission....152, 161
User Guide for the Cisco Unified Intelligence Center Reporting Application 8.0(4)
Index 179
Index