Embed Size (px)
Citation preview

For safe and correct use, be sure to read the Safety Information in Read This First before using the machine.
Information for This Printer
Troubleshooting
Loading Paper
Getting StartedUser Guide

TABLE OF CONTENTSManuals for This Machine................................................................................................................................. 4
1. Getting Started
Before You Start..................................................................................................................................................7
How to Read the Manuals.............................................................................................................................7
Model-Specific Information...........................................................................................................................8
List of Options................................................................................................................................................. 9
Guide to Names and Functions of Components............................................................................................11
Guide to Functions of the Attention Light....................................................................................................13
Guide to Functions of the Machine's Options................................................................................................16
Guide to Functions of the Machine's External Options.............................................................................16
Guide to Functions of the Machine's Internal Options..............................................................................17
Guide to the Names and Functions of the Machine's Control Panel........................................................... 19
Changing the Display Language.................................................................................................................... 20
How to Use the [Home] Screen...................................................................................................................... 21
Main Icons on the [Home] Screen..............................................................................................................23
[Printer (Classic)] Screen............................................................................................................................. 24
[Information] Screen.................................................................................................................................... 25
Possible Operations on the Screen............................................................................................................ 26
Adding Icons to the [Home] Screen........................................................................................................... 28
Turning On/Off the Power..............................................................................................................................30
Turning On/Off the Power..........................................................................................................................30
Saving Energy.............................................................................................................................................. 31
Accessing User Tools....................................................................................................................................... 33
Changing Default Settings...........................................................................................................................33
Quitting User Tools...................................................................................................................................... 34
Using Web Image Monitor............................................................................................................................. 35
Displaying Top Page................................................................................................................................... 36
Replenishing and Replacing Consumables....................................................................................................38
Adding Toner............................................................................................................................................... 38
Replacing the Waste Toner Bottle.............................................................................................................. 40
Adding Staples.............................................................................................................................................41
Replacing Other Consumables...................................................................................................................42
1

2. Loading Paper
Loading Paper.................................................................................................................................................. 45
Precautions for Loading Paper....................................................................................................................45
Loading Paper into Paper Trays..................................................................................................................45
Loading Paper into the Bypass Tray...........................................................................................................47
Loading Paper into Tray 3 (LCT).................................................................................................................52
Loading Paper into the Large Capacity Tray (LCT)...................................................................................53
Loading Orientation-fixed Paper or Two-sided Paper..............................................................................54
Recommended Paper.......................................................................................................................................56
Recommended Paper Sizes and Types......................................................................................................56
Printing from the Bypass Tray.......................................................................................................................... 68
Specifying Regular Sizes Using the Control Panel....................................................................................68
Specifying a Custom Size Paper Using the Control Panel........................................................................68
Specifying Thick Paper, Thin Paper, or OHP Transparencies for Paper Type Using the Control Panel...........................................................................................................................................................................69
3. Troubleshooting
When the Machine Makes a Beeping Sound............................................................................................... 71
When a Status Icon Is Displayed....................................................................................................................72
When the Indicator Lamp for [Check Status] Is Lit or Flashing..................................................................... 73
When You Have Problems Operating the Machine..................................................................................... 75
If USB Connection Fails................................................................................................................................... 79
Messages Displayed When You Use the Printer Function............................................................................ 80
Messages Displayed on the Control Panel When You Use the Printer Function.................................... 80
Messages Printed on the Error Logs or Reports When You Use the Printer Function............................. 83
When Other Messages Appear..................................................................................................................... 85
When Problems Occur While Logging In..................................................................................................86
When the User Lacks Privileges to Perform an Operation........................................................................86
When You Cannot Print................................................................................................................................... 87
Other Printing Problems................................................................................................................................... 90
When PictBridge Printing Does Not Work..................................................................................................... 99
Removing Jammed Paper..............................................................................................................................100
Locating Jammed Paper............................................................................................................................101
Removing Jammed Banner Sheets........................................................................................................... 101
2

4. Information for This Printer
Information on Environmental Regulations.................................................................................................. 105
ENERGY STAR Program........................................................................................................................... 105
Energy Saving Functions...........................................................................................................................105
User Information on Electrical and Electronic Equipment (mainly Europe)...................... 107
Note for the Battery and/or Accumulator Symbol (For EU countries only) (mainly Europe).................................................................................................................................................................... 108
Environmental Advice for Users (mainly Europe)............................................................... 108
Notes to users in the state of California (Notes to Users in USA) (mainly North America)........................................................................................................................................................................ 109
Trademarks.....................................................................................................................................................110
INDEX...........................................................................................................................................................113
3

Manuals for This MachineThe operating instructions of this machine are provided in the following formats:
Format Manuals
Printed manuals • Read This First
• Start Guide
• Quick Installation Guide
CD-ROM • Driver Installation Guide
• (mainly Asia)
• HTML manuals (Only for Englishversion)
Web page • Read This First
• User Guide
• Operating Instructions (HTML manuals)
• Start Guide
• Quick Installation Guide
• Driver Installation Guide
Read This First
Before using the machine, be sure to read the section of this manual entitled Safety Information. Italso describes each regulation and environmental conformance.
Start Guide
Describes how to read manuals on the control panel. It also describes how to log in to the machine.
User Guide
Regarding the basic usage of this machine, frequently used functions, troubleshooting when anerror message appears, etc., summaries are provided for each user manual.
Operating Instructions (HTML manuals)
Describes the setup for using the machine, how to use functions to print or for maintenance andspecifications, troubleshooting, system settings, and security functions.
Manuals are available in English, German, French, Italian, Spanish, Dutch, and Russian.
User Guide and Security Guide are available in the seven languages above and other languages.
For details about how to use the HTML manuals, see "How to Use the Operating Instructions",Operating Instructions.
4

Quick Installation Guide
Describes procedures for unpacking and setting up the machine, which include loading paper andinstalling print cartridge and waste toner bottle, etc.
Driver Installation Guide
Describes how to install and configure each driver. This manual is included in the drivers CD.
• Before you configure the extended security and authentication settings, refer to "Before Using ThisMachine" in the Security Guide.
• You can see the following manuals on the Web page.
• Appendix
• DHCP Option 204
5

6

1. Getting StartedThis section describes the symbols used in the manuals supplied with the printer, available options, andnames and functions of components.
Before You Start
How to Read the Manuals
Symbols used in the manuals
This manual uses the following symbols:
Indicates points to pay attention to when using the machine, and explanations of likely causes of papermisfeeds, damage to originals, or loss of data. Be sure to read these explanations.
Indicates supplementary explanations of the machine's functions, and instructions on resolving usererrors.
[ ]Indicates the names of keys on the machine's display or control panels.
(mainly Europe and Asia), (mainly Europe), or (mainly Asia)
(mainly North America)
Differences in the functions of Region A and Region B models are indicated by the two symbols. Readthe information indicated by the symbol that corresponds to the region of the model you are using. Fordetails about which symbol corresponds to the model you are using, see page 8 "Model-SpecificInformation".
Disclaimer
Contents of this manual are subject to change without prior notice.
In no event will the company be liable for direct, indirect, special, incidental, or consequential damagesas a result of handling or operating the machine.
7

Notes
The manufacturer shall not be responsible for any damage or expense that might result from the use ofparts other than genuine parts from the manufacturer with your office products.
For good output quality, the manufacturer recommends that you use genuine toner from themanufacturer.
Some illustrations in this manual might be slightly different from the machine.
About IP addresses
In this manual, "IP address" covers both IPv4 and IPv6 environments. Read the instructions that arerelevant to the environment you are using.
Model-Specific Information
This section explains how to identify the region to which your printer belongs.
There is a label on the rear of the printer, located in the position shown below. The label contains detailsthat identify the region to which your printer belongs. Read the label.
DRA253
The following information is region-specific. Read the information under the symbol that corresponds tothe region of your printer.
(mainly Europe and Asia)
If the label contains the following, your printer is a Region A model:
• CODE XXXX -27
• 220–240 V
(mainly North America)
If the label contains the following, your printer is a Region B model:
• CODE XXXX -17
• 120–127 V
1. Getting Started
8

• Dimensions in this manual are given in two measurement units: metric and imperial. If your printer isa Region A model, refer to the metric units. If your printer is a Region B model, refer to the imperialunits.
List of Options
This section provides a list of options for this printer and the names commonly used in this manual.
Option name Description
Paper Feed Unit PB3250 Lower Paper Tray
Paper Feed Unit PB3240 Lower Paper Trays
LCIT PB3260 Tray 3 (LCT)
LCIT RT3030 Large Capacity Tray (LCT)
Mail Box CS3010 Mailbox
Internal Multi-fold Unit FD3000 Internal Multi-fold unit
Bridge Unit BU3070 Bridge unit
Punch Unit PU3050 EU
Punch Unit PU3050 NA
Punch Unit PU3050 SC
Punch Unit PU3060 EU
Punch Unit PU3060 NA
Punch Unit PU3060 SC
Punch unit
Output Jogger Unit Type M25 Output jogger unit
HDD Option Type P11 HDD
IPDS Unit Type P11 IPDS
XPS Direct Print Option Type P11 XPS
IEEE 802.11a/g/n Interface Unit Type M19 Wireless LAN board
IEEE 1284 Interface Board Type M19 IEEE 1284 Interface Board
USB Device Server Option Type M19A USB Device Server
Before You Start
9

Option name Description
Extended USB Board Type M19 Extended USB Board
Camera Direct Print Card Type M19 PictBridge card
VM CARD Type P8 VM card
PostScript3 Unit Type P11 Adobe PostScript 3 unit
1. Getting Started
10

Guide to Names and Functions of Components
• Do not obstruct the machine's vents. Doing so risks fire caused by overheated internalcomponents.
Front and left view
31 4
5
6
7
DRA261
8
9
2
1. Auxiliary Tray on the Paper Reversal Location
Pull this tray to print on paper larger than A4 or 81/2 × 11 .
2. Paper Reversal Location
This area is used to reverse pages that are printed on both sides.
3. Control panel
See page 19 "Guide to the Names and Functions of the Machine's Control Panel".
4. Main power switch
To operate the machine, the main power switch must be on. If it is off, open the main power switch's cover andturn the switch on.
5. Front cover
Open to access the inside of the machine.
6. Paper trays (Trays 1–2)
Load paper here. For details, see page 45 "Loading Paper".
Guide to Names and Functions of Components
11

7. Lower paper trays
Load paper here. For details, see page 45 "Loading Paper".
8. Vents
Prevent overheating.
9. Internal tray 1
Printed paper are delivered here.
Front and right view
DRA262
2 31
4
5
6
2
1. Right cover
Open this cover when a paper jam occurs.
2. Vents
Prevent overheating.
3. Bypass tray
Use to print on OHP transparencies, adhesive labels, and paper that cannot be loaded in the paper trays. Fordetails, see page 47 "Loading Paper into the Bypass Tray".
4. Paper guides
When loading paper in the bypass tray, align the paper guides flush against the paper.
5. Extender
Pull this extender out when loading sheets larger than A4 , 81/2 × 11 in the bypass tray.
1. Getting Started
12
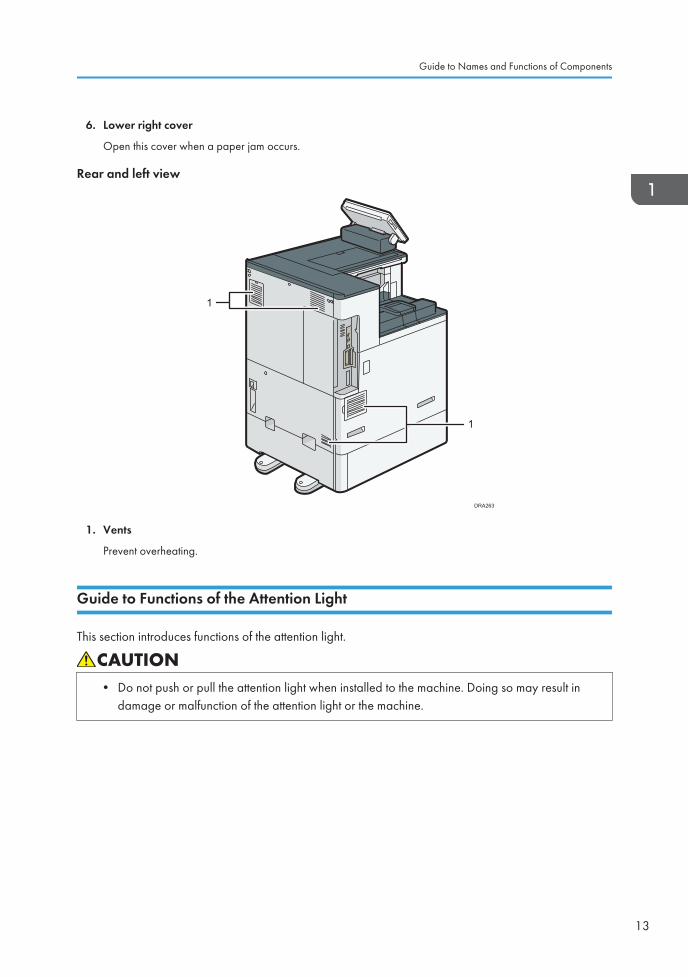
6. Lower right cover
Open this cover when a paper jam occurs.
Rear and left view
DRA263
1
1
1. Vents
Prevent overheating.
Guide to Functions of the Attention Light
This section introduces functions of the attention light.
• Do not push or pull the attention light when installed to the machine. Doing so may result indamage or malfunction of the attention light or the machine.
Guide to Names and Functions of Components
13

CUV121
The attention light notifies the user by light when there is a paper jam or no paper is left.
The colors of the lamp and their meanings are as follows:
Lamp Status
The bottom lamp lights blue. Printing
The bottom lamp flashes blue. Data in
The top lamp lights red. Error occurred
(Example)
• When the service call message appears
• Paper jam
• Out of paper
• Out of toner
• Memory overflow
Read the message on the display panel, and thentake appropriate action. For details, see "WhenMessages Appear and the Machine Cannot BeOperated", Operating Instructions, page 80"Messages Displayed When You Use the PrinterFunction", or page 85 "When Other MessagesAppear".
1. Getting Started
14

Lamp Status
The top lamp flashes yellow. Warning
(Example)
• Toner has nearly run out.
• Waste toner bottle is nearly full.
• Paper has nearly run out.
Read the message on the display panel, and thentake appropriate action. For details, see "WhenMessages Appear and the Machine Cannot BeOperated", page 80 "Messages DisplayedWhen You Use the Printer Function", orpage 85 "When Other Messages Appear".
Guide to Names and Functions of Components
15

Guide to Functions of the Machine's Options
Guide to Functions of the Machine's External Options
DRA264
7
345
1
9
2
8
10
11
6
12
1. Banner Paper Guide Tray
Allows you to load large-sized paper in the bypass tray.
2. Lower paper tray
Paper is loaded here.
3. Tray 3 (LCT)
Consists of two paper trays.
You can load paper even if Tray 3 (LCT) is in use. It is okay to pull out the left half of the tray while Tray 3(LCT) is in use.
4. Large capacity tray (LCT)
Paper is loaded here.
1. Getting Started
16

5. Lower paper trays
Consists of two paper trays.
6. Bridge unit
Relays paper to the finisher.
7. Mailbox
Sorts printed paper. Consists of mailbox output trays 1–4.
8. Internal Multi-fold unit
Internal Multi-fold unit can apply the following folds: Half Fold, Letter Fold-out, Letter Fold-in, and Z-fold.
9. Finisher SR3210
Sorts, stacks, and staples multiple sheets of paper. Consists of the following paper trays:
• Finisher upper tray
• Finisher shift tray
Copies can be punched if the optional punch unit is installed on the finisher.
10. Booklet Finisher SR3220
Sorts, stacks, and staples multiple sheets of paper. The saddle stitch function can staple multiple sheets ofpaper in the center and fold them into booklets. Consists of the following paper trays:
• Finisher upper tray
• Finisher shift tray
• Finisher booklet tray
Copies can be punched if the optional punch unit is installed on the finisher.
11. Finisher SR3230
Sorts, stacks, and staples multiple sheets of paper. Consists of the following paper trays:
• Finisher upper tray
• Finisher shift tray
Copies can be punched if the optional punch unit is installed on the finisher.
12. Output jogger
Jogs the sheets delivered to the finisher shift tray.
Guide to Functions of the Machine's Internal Options
• HDD
Allows you to store documents to be printed.
• Adobe PostScript 3 unit
Allows you to print by Adobe PostScript 3 printer driver.
• PictBridge card
Allows you to directly print images taken with a PictBridge-compatible digital camera.
Guide to Functions of the Machine's Options
17

• VM card
With this card, you can install embedded software applications.
• IPDS unit
Allows you to print using Intelligent Printer Data Stream (IPDS).
• XPS card
Allows you to print XPS files.
• USB device server
Allows you to add an Ethernet port to the printer and use two IP addresses at the same time.
To attach this option, see "Installing the Interface Units", Operating Instructions.
• Extended USB Board
Allows you to add a USB port.
To attach this option, see "Installing the Interface Units", Operating Instructions.
• IEEE 1284 interface board
Allows you to connect to an IEEE 1284 cable.
To attach this option, see "Installing the Interface Units", Operating Instructions.
• Wireless LAN board
Allows you to communicate over wireless LAN.
To attach this option, see "Installing the Interface Units", Operating Instructions.
1. Getting Started
18

Guide to the Names and Functions of theMachine's Control Panel
DNE093
21
4
5
56
3
1. Display panel
This is a touch panel display that features icons, keys, shortcuts, and widgets that allow you to navigate thescreens of the various functions and applications and provide you with information about operation status andother messages. See page 21 "How to Use the [Home] Screen".
2. Main power indicator
The main power indicator goes on when you turn on the main power switch. When the machine is in Sleepmode, the main power indicator flashes slowly. In Fusing Unit Off mode, the main power indicator is lit.
3. Status indicator
Indicates the status of the system. Stays lit when an error occurs or the toner runs out.
4. Data In indicator (printer mode)
Flashes when the machine is receiving print jobs from a computer.
5. Media slots
Use to insert an SD card or a USB flash memory device. For details, see "Inserting/Removing a MemoryStorage Device", Operating Instructions.
6. Media access lamp
Lights up when an SD card is inserted in the media slot.
Guide to the Names and Functions of the Machine's Control Panel
19

Changing the Display LanguageYou can change the language used on the display. English is set as default.
1. Press [Home] ( ) at the bottom of the screen in the center.
2. Flick the screen to the left, and then press the [Change Langs. Widget] icon.
3. Select the language you want to display.
4. Press [OK].
1. Getting Started
20

How to Use the [Home] ScreenThe [Home] screen is set as the default screen when the machine is turned on.
One icon is assigned to each function, and these icons are displayed on the [Home] screen. You canadd shortcuts to frequently used Web pages to the [Home] screen. Also, you can register widgets suchas the Change Langs. Widget to it. The [Home] screen and the screen of each function may differdepending on the optional units that are installed.
To display the [Home] screen, press [Home] ( ) at the bottom of the screen in the center.
• Do not apply strong impact or force to the screen, or it may be damaged. Maximum forceallowable is approx. 30N (approx. 3 kgf). (N = Newton, kgf = Kilogram force. 1 kgf = 9.8N.)
To switch between screens, flick your finger to the right or left on the screen.
DRA311
5
6
12
1 3 4
7891011
2
1. Logged-in user icon
When user authentication is enabled, an icon is displayed that indicates that users are logged in.
Press the icon to show the names of the users that are currently logged in.
2. System message
Displays messages from the machine system and applications.
3. [Login]/[Logout]
These keys are displayed when user authentication is enabled. When you press [Login], the authenticationscreen appears. If you have been already logged in to the machine, [Logout] appears. To log out of themachine, press [Logout].
For details about how to log in and out, see "Logging in to the Printer", Operating Instructions.
4. [Energy Saver]
Press to switch to Sleep mode.
For details about the modes, see page 31 "Saving Energy".
How to Use the [Home] Screen
21

5. Application list icon
Press to display the application list. You can create shortcuts to the applications on the [Home] screen.
To use an application displayed in the [Widgets] tab and [Program] tab, create a shortcut for the applicationon the [Home] screen. For details, see "Customizing the [Home] Screen", Operating Instructions.
6. Icons to switch between screens
Press to switch between the five home screens. The icons appear at the bottom right and left of the screen, thenumber of icons indicates the number of screens on each side of the current screen.
7. [Stop]
Press to stop a job in progress.
8. [Menu]
Displays the menu screen of the application you are using. Depending on the application you are using, thiskey may be disabled. You can also press this key in the [Home] screen to restore the [Home] screen's settingsto their defaults.
9. [Home]
Press to display the [Home] screen.
10. [Return]
Press this key to return to the previous screen while Screen Features are enabled or applications are used.Depending on the application you are using, this key may be disabled. You can specify whether this key isenabled or not in some applications. For details about the settings, see "Screen Features", OperatingInstructions.
11. [Check Status]
Press to check the machine's system status, operational status of each function, and current jobs. You can alsodisplay the job history and the machine's maintenance information.
12. Icon display area
Displays the function or application icons and widgets. Displayed icons differ between the five home screens.For details about icons on each screen, see page 23 "Main Icons on the [Home] Screen".
You can also add shortcuts and arrange icons using folders. For details, see "Customizing the [Home]Screen", Operating Instructions.
• You can change the [Home] screen's wallpaper. For details, see "Changing the [Home] Screen'sWallpaper", Operating Instructions.
• You can switch modes by pressing icons on the [Home] screen. You can also switch modes bypressing the function keys. For details about the function keys, see "Changing Modes by Pressingthe Function Keys", Operating Instructions.
• You cannot switch modes in any of the following situations:
• When accessing the following screens:
• Machine Features
• Counter
1. Getting Started
22

• Inquiry
• Address Book Management
• Tray Paper Settings
• Current Job / Job History
• The [Home] screen is set as the default screen when the machine is turned on. You can change thisdefault setting under Function Priority. See "Screen Features", Operating Instructions.
Main Icons on the [Home] Screen
The following icons are displayed on the [Home] screen as a factory default:
Icon Description
Printer Allows you to make settings for using the machine as a printer easily.
For details, see "Checking the Printer Status from the Printer Icon",Operating Instructions.
Print (Memory StorageDevice)
Allows you to print scan files from and save them to a memory storagedevice. For details, see "Using the Print (Memory Storage Device)Function", Operating Instructions.
Quick Print Release Allows you to print files easily. For details, see "Using the Quick PrintRelease Function", Operating Instructions.
Printer (Classic) Press to make settings for using the machine as a printer.
Web Browser Press to display Web pages. For details, see "Using the BrowserFunction", Operating Instructions.
User Guide Press to display the manuals for the machine.
Address Book Management Press to display the Address Book.
For details about how to use the Address Book, see "Address Book",Operating Instructions.
Application Site Press to display Application site.
Allows you to download applications for your machine. For details,see "How to Use the Application Site", Operating Instructions.
User Tools Press to display the screen for the machine's initial settings.
System Mes. Widget Displays messages from the machine system and applications.
How to Use the [Home] Screen
23

Icon Description
Change Langs. Widget Allows you to change the on-screen language.
Supply Info Widget Displays the remaining amount of toner.
Paper Tray Info Widget Displays the tray's settings and the amount of paper remaining. InEnergy Saver mode, this widget is dimmed and no longer reflects thetray's settings or the amount of paper remaining.
Embedded softwareapplications
When an embedded software application is installed, a function iconfor the application is displayed on the [Home] screen.
You can add icons to the [Home] screen to customize the machine. For details about adding icons to the[Home] screen, see page 28 "Adding Icons to the [Home] Screen".
[Printer (Classic)] Screen
2 31
98
5
67
10DRA313
4
1. Paper tray status indicators
Displays paper tray settings.
2. Operational status or messages
Displays current machine status, such as "Ready", "Offline", and "Printing...". Information about the print job(user ID and document name) appears in this section.
3. [Print from Memory Storage Device]
Press to display the screen for printing files stored on memory storage devices directly.
4. Supply Information
Displays the remaining amount of toner.
1. Getting Started
24

5. [Job Reset]
Press to cancel the current print job.
If you press it when the Hex Dump is selected, Hex Dump is canceled.
6. [Job Operation]
Press to suspend a job being processed.
7. [Form Feed]
Press to print all the data left in the machine's input buffer.
8. [Spooling Job List]
Press to display spooled jobs.
9. [Error Log]
Press to display the error logs of print jobs sent from a computer.
10. [Print Jobs]
Press to display print jobs sent from a computer.
[Information] Screen
To raise awareness of resource conservation, you can configure the machine to display the reduction inpaper usage.
The color utilization ratio is also displayed on the [Information] screen.
When user authentication is enabled, the screen is displayed when you log in to the machine. Whenuser authentication is not enabled, the screen is displayed after returning from Sleep mode or after asystem reset. The [Information] screen appears when the power is turned on, regardless of theauthentication settings.
1 2 3 4
DLV058
5
6
1. [Prev.] / [Crnt.]
Press to switch between the [Information] screen of the previous count period and that of the current countperiod.
How to Use the [Home] Screen
25

2. Paper Reduction
Shows the amount of paper saved by using the duplex and combine printing functions. The figure indicates thepercentage of paper saved from the total of all the paper used. As the figures become greater, the number ofthe trees increases. If the paper reduction ratio exceeds a certain level, the trees will bear fruit.
Press [...] on the bottom right of the balloon to display the following items:
• Total Print Pages:
Total number of pages printed in the current count period is displayed.
• 2 sided Utilization:
The ratio of 2-sided prints to the total number of prints is displayed.
The higher the ratio is, the more leaves are displayed.
• Combine Utilization:
The ratio of combined prints to the total number of prints is displayed.
The higher the ratio is, the more leaves are displayed.
3. Color Utilization
The ratio of color prints to the total number of prints is displayed.
4. [Close]
Press this to close the [Information] screen and return to operation.
5. Count periods
The current and previous count periods are displayed.
6. Message
A message from the administrator is displayed.
Possible Operations on the Screen
• Pinch-in
Place your thumb and forefinger on the screen, and then pinch the fingers together to zoom out thescreen. Double-tapping can also be effective for this operation.
DNE103
• Pinch-out
Place your thumb and forefinger on the screen, and then spread the fingers apart to zoom in thescreen. Double-tapping can also be effective for this operation.
1. Getting Started
26
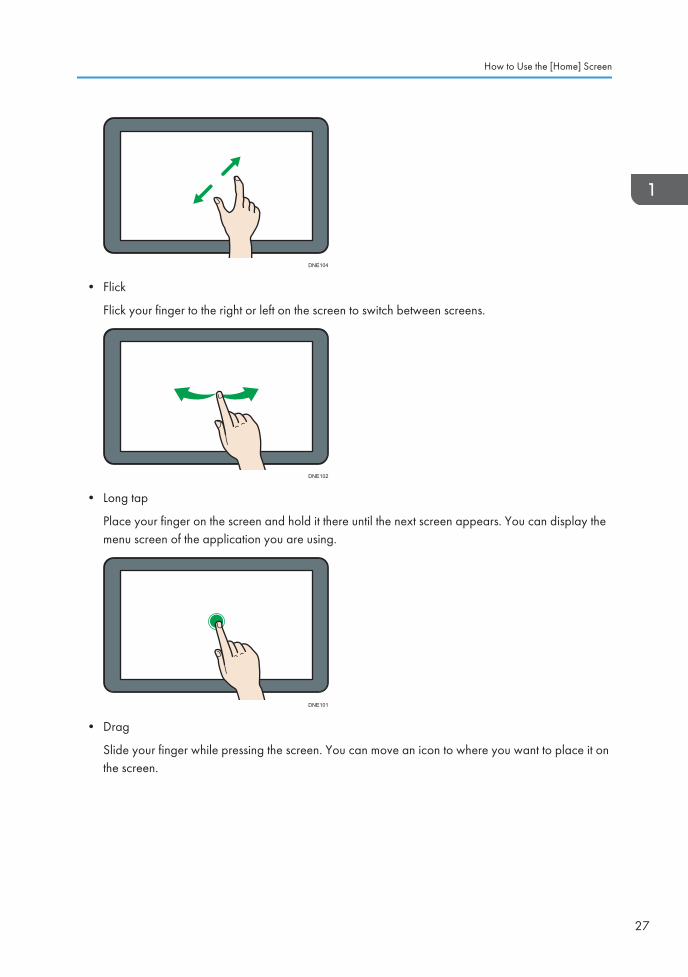
DNE104
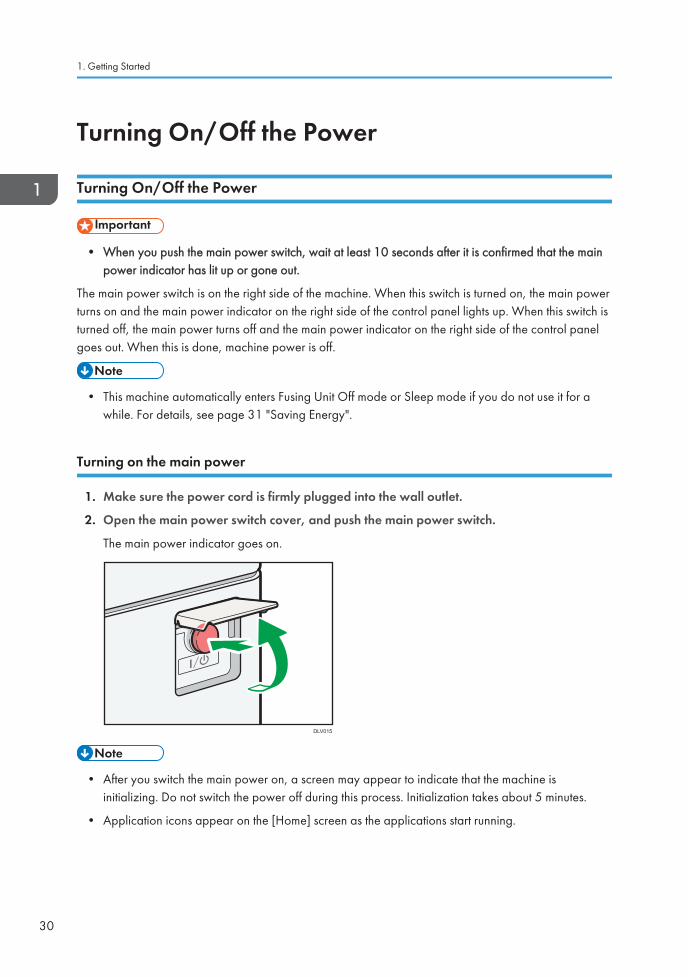
• Flick
Flick your finger to the right or left on the screen to switch between screens.
DNE102
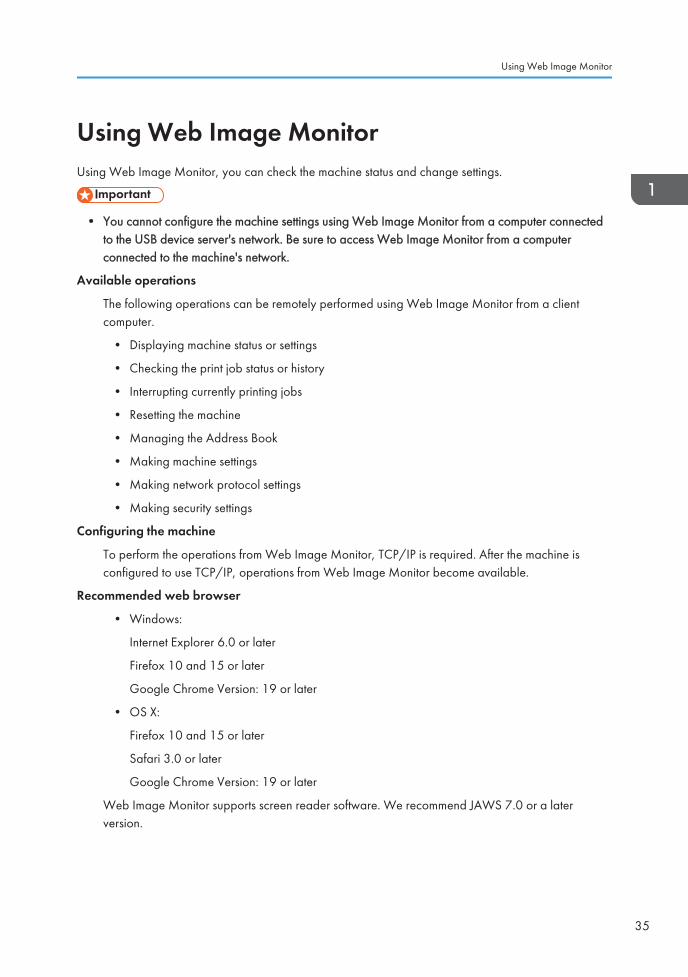
• Long tap
Place your finger on the screen and hold it there until the next screen appears. You can display themenu screen of the application you are using.
DNE101
• Drag
Slide your finger while pressing the screen. You can move an icon to where you want to place it onthe screen.
How to Use the [Home] Screen
27

DNE111
Adding Icons to the [Home] Screen
Adding shortcuts to the [Home] screen
You can add shortcuts to the machine's functions.
You can display the icons for the machine's functions and the embedded software applications after youdelete them from the [Home] screen.
1. Press [Home] ( ) at the bottom of the screen in the center.
2. Press .
3. Press the [Apps] tab to add a shortcut to an application other than [Printer (Classic)]. Pressthe [Program] tab to add a shortcut to [Printer (Classic)].
4. Press and hold down the application icon to add a shortcut to an application other than[Printer (Classic)]. Press and hold down the [Classic Applications] icon to add a shortcut to[Printer (Classic)].
The image of where the shortcut is to be placed on the [Home] screen is displayed.
5. Drag the icon to where you want to place it on the screen.
If you want to add a shortcut to [Printer (Classic)], proceed to Step 6.
6. Select [Printer (Classic)].
Adding shortcuts to bookmarks on the [Home] screen
You can add shortcuts to bookmarks that have been registered in favorites in the Web Browser to the[Home] screen.
1. Press [Home] ( ) at the bottom of the screen in the center.
2. Press .
3. Press the [Program] tab.
1. Getting Started
28

4. Press and hold down the [Bookmark] icon.
The image of where the shortcut is to be placed on the [Home] screen is displayed.
5. Drag the icon to where you want to place it on the screen.
6. Select the bookmark you want to add from the bookmark list.
Adding widgets to the [Home] screen
You can add widgets to the [Home] screen to show the remaining amount of toner or change the displaylanguage.
1. Press [Home] ( ) at the bottom of the screen in the center.
2. Press .
3. Press the [Widget] tab.
4. Press and hold down the widget icon you want to add.
The image of where the widget is to be placed on the [Home] screen is displayed.
5. Drag the icon to where you want to place it on the screen.
How to Use the [Home] Screen
29
Turning On/Off the Power
Turning On/Off the Power
• When you push the main power switch, wait at least 10 seconds after it is confirmed that the mainpower indicator has lit up or gone out.
The main power switch is on the right side of the machine. When this switch is turned on, the main powerturns on and the main power indicator on the right side of the control panel lights up. When this switch isturned off, the main power turns off and the main power indicator on the right side of the control panelgoes out. When this is done, machine power is off.
• This machine automatically enters Fusing Unit Off mode or Sleep mode if you do not use it for awhile. For details, see page 31 "Saving Energy".
Turning on the main power
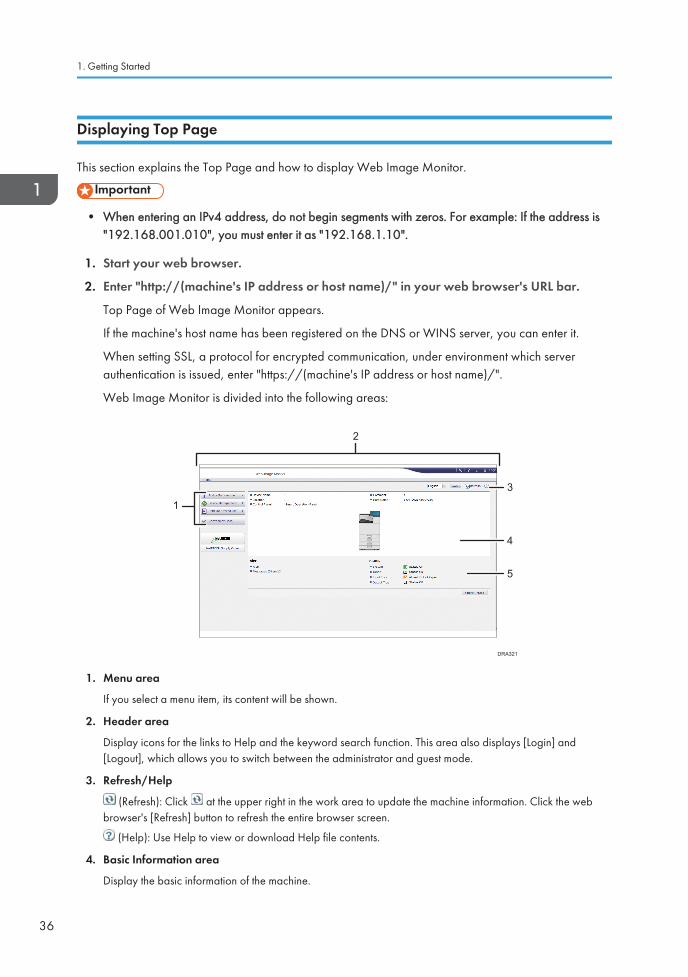
1. Make sure the power cord is firmly plugged into the wall outlet.
2. Open the main power switch cover, and push the main power switch.
The main power indicator goes on.
DLV015
• After you switch the main power on, a screen may appear to indicate that the machine isinitializing. Do not switch the power off during this process. Initialization takes about 5 minutes.
• Application icons appear on the [Home] screen as the applications start running.
1. Getting Started
30

Turning off the main power
• When disconnecting the power cord from the wall outlet, always pull the plug, not the cord.Pulling the cord can damage the power cord. Use of damaged power cords could result in fireor electric shock.
• Do not turn off the power while the machine is in operation.
• Do not hold down the main power switch while turning off the main power. Doing so forcibly turnsoff the machine's power and may damage the hard disk or memory and cause malfunctions.
1. Open the main power switch cover, and push the main power switch.
The main power indicator goes out. The main power turns off automatically when the machine shutsdown. If the screen on the control panel does not disappear, contact your service representative.
Saving Energy
This machine has the following energy saving functions.
Fusing Unit Off mode
If you do not use the machine for a certain period after an operation, the machine makes a clickingsound and enters Fusing Unit Off mode.
When the machine is in Fusing Unit Off mode, the display is on but the fusing unit heater is off tosave energy. In this mode, you can change the machine's settings on the control panel. However,the machine must exit this mode to print.
You can change the amount of time that the machine waits before switching to Fusing Unit Offmode under [Fusing Unit Off Mode (Energy Saving) On/Off]. For details, see "Timer Settings",Operating Instructions.
To exit Fusing Unit Off mode, do one of the following:
• Start print jobs
Sleep mode
If the machine remains inactive for a specified period or [Energy Saver] ( ) is pressed, it entersSleep mode to further reduce the electricity it consumes. For details, see "System Settings",Operating Instructions.
You can change the amount of time that the machine waits before switching to Sleep mode under[Sleep Mode Timer]. For details, see "Timer Settings", Operating Instructions.
To exit Sleep mode, do one of the following:
• Touch the display panel
Turning On/Off the Power
31

• When a machine is in Fusing Unit Off mode, the main power indicator is lit. In Sleep mode, themain power indicator flashes slowly.
• The energy saving functions will not operate in the following cases:
• When fixed warm-up is in progress
• When operations are suspended during printing
• When a warning message appears (The machine enters Fusing Unit Off mode unless thecover is open.)
• When paper is jammed (The machine enters Fusing Unit Off mode except when the cover isopen.)
• When the Data In indicator is lit or flashing
• The machine does not enter Sleep mode in the following cases:
• During communication with external equipment
• When the hard disk is active
• When the service call message appears
• When the "Add Toner" message appears
• When toner is being replenished
• When one of the following screens is displayed:
• Machine Features
• Counter
• Inquiry
• Address Book Management
• Tray Paper Settings
• When data is being processed
• When a recipient is being registered in the address list or group dial list
• When the sample print, locked print, hold print, or stored print screen is displayed
• When the screen of a document that was stored under the printer function appears
• When the internal cooling fan is active
• When accessing the machine using Web Image Monitor
1. Getting Started
32

Accessing User ToolsThis section describes how to access the User Tools menu.
User Tools allow you to change or set defaults, and have eight types of menus:
• Screen Features
Specify the settings of the control panel.
• Machine Features
Specify the settings of the machine.
• Maintenance: Print
Displays settings made under Maintenance: Print menu.
• Maintenance: Image
Displays settings made under Maintenance: Image menu. You can set this menu when you log in asan administrator.
• Counter
You can confirm the number of sheets you have printed.
• Inquiry
You can confirm the contact info for inquiries.
• Address Book Management
You can manage user information of the machine.
• Tray Paper Settings
Specify the settings of the paper.
• Operations for system settings differ from normal operations. Always quit User Tools when youhave finished.
• Any changes you make with User Tools remain in effect even if the main power switch or operationswitch is turned off, or [Energy Saver] or [Reset] is pressed.
Changing Default Settings
This section describes how to change the settings of User Tools.
• If Administrator Authentication Management is specified, contact your administrator.
1. Press [Home] ( ) at the bottom of the screen in the center.
2. Flick the screen to the left, and then press the [User Tools] ( ) icon.
Accessing User Tools
33

3. Select the settings you want to change.
To change the user tool in [System Settings], press [Machine Features], and then press [SystemSettings].
4. Change settings by following instructions on the display, and then press [OK].
Quitting User Tools
This section describes how to quit the settings of User Tools.
1. Close the initial settings screen.
• When configuring Screen Features
Press [Home] ( ) at the bottom of the screen in the center.
• When configuring Machine Features, Maintenance: Print, Maintenance: Image, Counter,Inquiry, Address Book Management, or Tray Paper Settings
Press [User Tools] ( ) on the top right of the screen, and then press [Home] ( ) at thebottom of the screen in the center.
• When configuring Machine Features, Maintenance: Print, Maintenance: Image, Counter, Inquiry,Address Book Management, or Tray Paper Settings, you can also quit User Tools by pressing [Exit]or [Close] on the top right of the screen and [Home] ( ) at the bottom of the screen in the center.
1. Getting Started
34
Using Web Image MonitorUsing Web Image Monitor, you can check the machine status and change settings.
• You cannot configure the machine settings using Web Image Monitor from a computer connectedto the USB device server's network. Be sure to access Web Image Monitor from a computerconnected to the machine's network.
Available operations
The following operations can be remotely performed using Web Image Monitor from a clientcomputer.
• Displaying machine status or settings
• Checking the print job status or history
• Interrupting currently printing jobs
• Resetting the machine
• Managing the Address Book
• Making machine settings
• Making network protocol settings
• Making security settings
Configuring the machine
To perform the operations from Web Image Monitor, TCP/IP is required. After the machine isconfigured to use TCP/IP, operations from Web Image Monitor become available.
Recommended web browser
• Windows:
Internet Explorer 6.0 or later
Firefox 10 and 15 or later
Google Chrome Version: 19 or later
• OS X:
Firefox 10 and 15 or later
Safari 3.0 or later
Google Chrome Version: 19 or later
Web Image Monitor supports screen reader software. We recommend JAWS 7.0 or a laterversion.
Using Web Image Monitor
35
Displaying Top Page
This section explains the Top Page and how to display Web Image Monitor.
• When entering an IPv4 address, do not begin segments with zeros. For example: If the address is"192.168.001.010", you must enter it as "192.168.1.10".
1. Start your web browser.
2. Enter "http://(machine's IP address or host name)/" in your web browser's URL bar.
Top Page of Web Image Monitor appears.
If the machine's host name has been registered on the DNS or WINS server, you can enter it.
When setting SSL, a protocol for encrypted communication, under environment which serverauthentication is issued, enter "https://(machine's IP address or host name)/".
Web Image Monitor is divided into the following areas:
5
4
3
2
1
DRA321
1. Menu area
If you select a menu item, its content will be shown.
2. Header area
Display icons for the links to Help and the keyword search function. This area also displays [Login] and[Logout], which allows you to switch between the administrator and guest mode.
3. Refresh/Help
(Refresh): Click at the upper right in the work area to update the machine information. Click the webbrowser's [Refresh] button to refresh the entire browser screen.
(Help): Use Help to view or download Help file contents.
4. Basic Information area
Display the basic information of the machine.
1. Getting Started
36

5. Work area
Display the contents of the item selected in the menu area.
Using Web Image Monitor
37

Replenishing and Replacing ConsumablesThis section explains precautions for adding toner and staples, and how to replace the stamp cartridgeand the waste toner bottle.
Adding Toner
• Do not incinerate toner (new or used) or toner containers. Doing so risks burns. Toner will igniteon contact with naked flame.
• Do not store toner (new or used) or toner containers anywhere near naked flames. Doing sorisks fire and burns. Toner will ignite on contact with naked flame.
• Do not use a vacuum cleaner to remove spilled toner (including used toner). Absorbed tonermay cause a fire or explosion due to electrical contact flickering inside the vacuum cleaner.However, it is possible to use a vacuum cleaner that is explosion-proof and dust ignition-proof. Iftoner is spilled on the floor, remove the spilled toner slowly using a wet cloth, so that the toner isnot scattered.
• The following explains the warning messages on the plastic bag used in this product'spackaging.
• Keep the polythene materials (bags, etc.) supplied with this machine away from babiesand small children at all times. Suffocation can result if polythene materials are brought intocontact with the mouth or nose.
• Do not crush or squeeze toner containers. Doing so can cause toner spillage, possibly resultingin dirtying of skin, clothing, and floor, and accidental ingestion.
• Store toner (new or used), toner containers, and components that have been in contact withtoner out of reach of children.
• If toner or used toner is inhaled, gargle with plenty of water and move into a fresh airenvironment. Consult a doctor if necessary.
• If toner or used toner gets into your eyes, flush immediately with large amounts of water. Consulta doctor if necessary.
1. Getting Started
38

• If toner or used toner is swallowed, dilute by drinking a large amount of water. Consult a doctorif necessary.
• When removing jammed paper or replacing toner, avoid getting toner (new or used) on yourclothing. If toner comes into contact with your clothing, wash the stained area with cold water.Hot water will set the toner into the fabric and make removing the stain impossible.
• When removing jammed paper or replacing toner, avoid getting toner (new or used) on yourskin. If toner comes into contact with your skin, wash the affected area thoroughly with soap andwater.
• When replacing a toner or waste toner container or consumables with toner, make sure that thetoner does not splatter. Put the waste consumables in a bag after they are removed. Forconsumables with a lid, make sure that the lid is shut.
• Always replace the toner cartridge when a notification appears on the machine.
• Fault may occur if you use toner other than the recommended type.
• When adding toner, do not turn off the main power. If you do, settings will be lost.
• Store toner where it will not be exposed to direct sunlight, temperatures above 35°C (95°F), orhigh humidity.
• Store toner horizontally.
• Do not shake the toner cartridge with its mouth down after removing it. Residual toner may scatter.
• Do not repeatedly install and remove toner cartridges. This will result in toner leakage.
Follow the instruction on the screen regarding how to replace a toner cartridge.
• If "Toner Cartridge is almost empty." appears on the system message widget, the toner has almostrun out. Have a replacement toner cartridge at hand.
• If appears when there is a lot of toner, hold the cartridge with the opening upward, shake itwell, and then reinstall it.
• When "No Toner" appears on the system message widget, you can check the name of the requiredtoner and the replacement procedure using the [ Add Toner] screen. To display the [ AddToner] screen, press [Check Status], and then press [Check] in the [Mach. Status] area in the[Mach./Applic. Stat] tab.
• For details about how to check contact number where you can order supplies, see "Inquiry",Operating Instructions.
Replenishing and Replacing Consumables
39

Replacing the Waste Toner Bottle
• The following explains the warning messages on the plastic bag used in this product'spackaging.
• Keep the polythene materials (bags, etc.) supplied with this machine away from babiesand small children at all times. Suffocation can result if polythene materials are brought intocontact with the mouth or nose.
• Do not incinerate toner (new or used) or toner containers. Doing so risks burns. Toner will igniteon contact with naked flame.
• Do not store toner (new or used) or toner containers anywhere near naked flames. Doing sorisks fire and burns. Toner will ignite on contact with naked flame.
• Do not use a vacuum cleaner to remove spilled toner (including used toner). Absorbed tonermay cause a fire or explosion due to electrical contact flickering inside the vacuum cleaner.However, it is possible to use a vacuum cleaner that is explosion-proof and dust ignition-proof. Iftoner is spilled on the floor, remove the spilled toner slowly using a wet cloth, so that the toner isnot scattered.
• Do not crush or squeeze toner containers. Doing so can cause toner spillage, possibly resultingin dirtying of skin, clothing, and floor, and accidental ingestion.
• Store toner (new or used), toner containers, and components that have been in contact withtoner out of reach of children.
• If toner or used toner is inhaled, gargle with plenty of water and move into a fresh airenvironment. Consult a doctor if necessary.
• If toner or used toner gets into your eyes, flush immediately with large amounts of water. Consulta doctor if necessary.
• If toner or used toner is swallowed, dilute by drinking a large amount of water. Consult a doctorif necessary.
• When removing jammed paper or replacing toner, avoid getting toner (new or used) on yourclothing. If toner comes into contact with your clothing, wash the stained area with cold water.Hot water will set the toner into the fabric and make removing the stain impossible.
1. Getting Started
40

• When removing jammed paper or replacing toner, avoid getting toner (new or used) on yourskin. If toner comes into contact with your skin, wash the affected area thoroughly with soap andwater.
• When replacing a toner or waste toner container or consumables with toner, make sure that thetoner does not splatter. Put the waste consumables in a bag after they are removed. Forconsumables with a lid, make sure that the lid is shut.
• Waste toner bottles cannot be reused.
• Before removing the waste toner bottle from the machine, spread paper or some other materialaround the area to keep toner from dirtying your workspace.
• When removing the waste toner bottle, do not touch the inside of the machine.
• Be careful to not allow the toner to leak from the waste toner bottle when you remove it.
• Carefully pull the waste toner bottle out horizontally when you are replacing it.
• Do not use a waste toner bottle that has not been used for a long time.
• Take care not to drop the waste toner bottle.
• Make sure the waste toner bottle is fully inserted. If it is not, toner will leak inside the machine.
• We recommend purchasing and keeping a spare waste toner bottle on hand since waste tonerbottles are consumable items.
Follow the instruction on the screen regarding how to replace a waste toner bottle.
• Replace the waste toner bottle if " Waste Toner Bottle is full. Replace Waste Toner Bottle."appears on the display.
• When the " Waste Toner Bottle is almost full." appears on the display, the waste toner bottleshould be replaced soon. Prepare a new waste toner bottle.
• Your service representative can replace the waste toner bottle if it is included in your contract. Fordetails, contact your local dealer or service representative.
Adding Staples
• When closing the finisher, keep hands clear of the finisher's upper surface.
Replenishing and Replacing Consumables
41

• Keep your hands clear of the booklet finisher tray when removing misfed paper, pulling out orpushing in the finisher's staple unit. You can trap and injure your fingers if you do not.
• Stapling failures or jams may occur if you use a staple cartridge other than that recommended.
Follow the instruction on the screen regarding how to add staples.
• If you cannot pull out the upper unit, there are staples remaining inside the cartridge. Use all thestaples, and do not add more.
Replacing Other Consumables
Refer to the maintenance guide provided with the new items for the replacement.
• Do not incinerate toner (new or used) or toner containers. Doing so risks burns. Toner will igniteon contact with naked flame.
• Store toner (new or used), toner containers, and components that have been in contact withtoner out of reach of children.
• The fusing unit becomes very hot. When installing a new fusing unit, turn off the printer and waitat least an hour after power off before replacing parts. Not allowing the printer to cool mayresult in burns.
• Exposure to light reduces black drum unit/color drum units performance. Replace the unit asquickly as possible.
• Do not pull out the black drum unit/color drum units quickly or with force as it may fall.
• Take care that nothing comes into contact with the top surface of the black drum unit/color drumunits.
• When holding the black drum unit/color drum units, grab the green grip on the left and the handleon the front together. Do not move the black drum unit/color drum units by only grabbing the grip.Doing so may damage the grip.
• Waste toner bottles cannot be reused.
1. Getting Started
42
• Purchasing and storing extra waste toner bottles is recommended.
• Before removing the waste toner bottle from the printer, spread paper or some other materialaround the area to keep toner from dirtying your workspace.
Black Drum Unit/Color Drum Unit
Replace the drum unit when the following messages appear on the display:
"Replacement of Black Photoconductor Unit is now necessary. Replace Black Photoconductor Unit."
"Replacement of Color Photoconductor Unit is now necessary. Replace Color PhotoconductorUnit."
When the following message appears on the display, the drum unit should be replaced soon.
"Replacement of Black Photoconductor Unit will soon be necessary. A new Black PhotoconductorUnit is required. Please contact your local vendor."
"Replace Black Photoconductor Unit."
"Replacement of Color Photoconductor Unit will soon be necessary. A new Color PhotoconductorUnit is required. Please contact your local vendor."
"Replace Color Photoconductor Unit."
Fuser Unit/Paper Transfer Unit/Dust Filter
Replace the fuser unit, the paper transfer unit, and the dust filter when the following messageappears on the display:
"Replacement of Fuser Unit is now necessary. Replace Fuser Unit."
When the following message appears on the display, the fusing unit should be replaced soon.
"Replacement of Fuser Unit will soon be necessary."
Intermediate Transfer Unit
Replace Intermediate Transfer Unit when the following message appears on the display:
"Replacement of Transfer Unit is now necessary. Replace Transfer Unit."
When the following message appears on the display, Intermediate Transfer Unit should bereplaced soon.
"Replacement of Transfer Unit will soon be necessary."
Replenishing and Replacing Consumables
43

1. Getting Started
44

2. Loading PaperThis chapter describes available trays for each paper size and type, and explains how to load paper inpaper trays.
Loading Paper
Precautions for Loading Paper
• When loading paper, take care not to trap or injure your fingers.
• Do not stack paper over the limit mark.
• While Mailbox or Internal Multi-fold unit is attached, pull out only one paper tray at a time.
• To prevent multiple sheets from being fed at once, fan the paper before loading it.
• If you load paper when only a few sheets of paper remain in the tray, multiple sheet feeding mayoccur. Remove any remaining paper, stack them with the new sheets of paper, and then fan theentire stack before loading it into the tray.
• Straighten curled or warped paper before loading.
• For details about the paper sizes and types that can be used, see page 56 "RecommendedPaper Sizes and Types".
• You might at times hear a rustling noise from paper moving through the machine. This noise doesnot indicate a malfunction.
Loading Paper into Paper Trays
Every paper tray is loaded in the same way.
In the following example procedure, paper is loaded into Tray 2.
• (mainly Europe and Asia)Tray 1 can hold A4 paper only. If you want to print on A5 , B5 JIS , or 81/2 × 11 from Tray1, contact your service representative.
• (mainly North America)
45

Tray 1 can hold 81/2 × 11 paper only. If you want to print on A4 , A5 , or B5 JIS from Tray1, contact your service representative.
• Check the paper edges are aligned at the right side.
• If a paper tray is pushed vigorously when putting it back into place, the position of the tray's sidefences may slip out of place.
1. Check that paper in the paper tray is not being used, and then pull the tray carefully outuntil it stops.
DLV106
2. Square the paper and load it print side up.
Do not stack paper over the limit mark.
DLV107
3. Carefully push the paper tray fully in.
• Various sizes of paper can be loaded in Trays 2–5 by adjusting the positions of side fences andend fence. For details, see "Changing the Paper Size in Trays 2 - 5", Operating Instructions.
• You can load envelopes in Trays 2–5. When loading envelopes, place them in the correctorientation. For details, see page 65 "Envelopes".
2. Loading Paper
46

Loading Paper into the Bypass Tray
Use the bypass tray to use OHP transparencies, adhesive labels, translucent paper, and paper thatcannot be loaded in the paper trays.
• The maximum number of sheets you can load at the same time depends on paper type. Do notstack paper over the limit mark. For the maximum number of sheets you can load, see page 56"Recommended Paper Sizes and Types".
1. Open the bypass tray.
DRA272
2. Load the paper face down until you hear the beep.
3. Align the paper guides to the paper size.
If the guides are not flush against the paper, images might be skewed or paper misfeeds mightoccur.
DLV109
• Certain types of paper might not be detected properly when placed on the bypass tray. If thishappens, remove the paper and place it on the bypass tray again.
• Pull the extender out when loading A4 , 81/2 × 11 or larger size paper in the bypass tray.
Loading Paper
47

• When loading thick paper, thin paper, or OHP transparencies, specify the paper size and thepaper type.
• Letterhead paper must be loaded in a specific orientation. For details, see page 54 "LoadingOrientation-fixed Paper or Two-sided Paper".
• You can load envelopes into the bypass tray. Envelopes must be loaded in a specific orientation.For details, see page 65 "Envelopes".
• Specify the sizes of paper that are not automatically detected. For details about the sizes that canbe detected automatically, see page 56 "Recommended Paper Sizes and Types". For detailsabout how to specify sizes, see page 68 "Printing from the Bypass Tray".
• When loading paper that has a horizontal width of 457.2–1,260 mm (18.00–49.60 inches),install the optional banner paper guide tray. For details, see page 48 "Loading paper into thebanner paper guide tray".
• When printing from a computer, see page 68 "Printing from the Bypass Tray".
• When [Notification Sound] is set to [No Sound], it does not sound if you load paper into thebypass tray. For details about [Notification Sound], see "Screen Features", Operating Instructions.
Loading paper into the banner paper guide tray
1. Turn the knob clockwise until its triangle mark stops at the unlock mark.
Be careful that your hand does not hit the banner paper guide tray when turning the knob.
If you cannot turn the knob, turn it while pushing the banner paper guide tray toward the machine.
DRA273
2. Hold the handle in one hand while supporting the back of the bypass tray with the otherhand, and then open the bypass tray slowly.
Open the bypass tray until it is parallel to the floor.
2. Loading Paper
48
DRA274
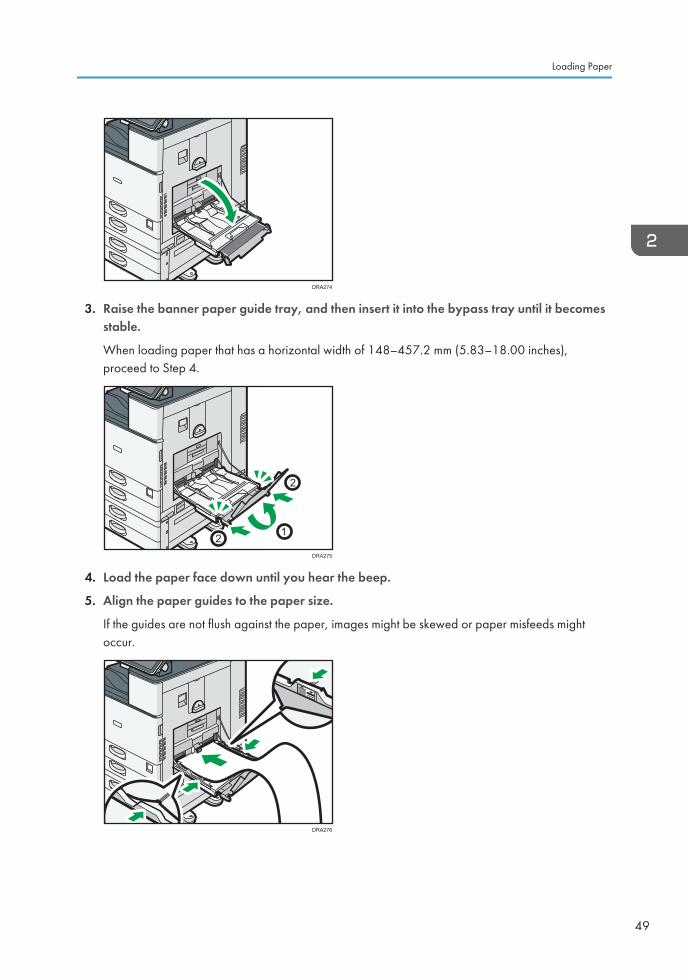
3. Raise the banner paper guide tray, and then insert it into the bypass tray until it becomesstable.
When loading paper that has a horizontal width of 148–457.2 mm (5.83–18.00 inches),proceed to Step 4.
DRA275
2
2
1
4. Load the paper face down until you hear the beep.
5. Align the paper guides to the paper size.
If the guides are not flush against the paper, images might be skewed or paper misfeeds mightoccur.
DRA276
Loading Paper
49

6. Open the subtray, and then raise the minor banner paper guide tray.
When loading paper that has a horizontal width of 148–900.0 mm (5.83–35.5 inches), proceedto Step 7.
DLV128
21
7. Set the leading edge of the paper according to the paper size.
• When using paper that has a horizontal width of 1,200 mm (47.3 inches), curl the paper sothat its leading edge touches the minor banner paper guide tray.
DRA277
• When using paper that has a horizontal width of 900 mm (35.5 inches), curl the paper sothat its leading edge touches the side of the machine.
DRA278
• When using paper that has a horizontal width of 457.2–900 mm (18.00–35.5 inches), setthe paper so that its leading edge protrudes from the banner paper guide tray.
2. Loading Paper
50

DRA279
• When using paper that has a horizontal width of 148–457.2 mm (5.83–18.00 inches), setthe paper as loading paper into the bypass tray.
DRA280
• You can load up to 10 sheets of paper that has a horizontal width of 457.2–1,260 mm (18.00–49.60 inches) into the banner paper guide tray. When loading multiple sheets of paper into thebanner paper guide tray, be sure to separate them one by one before loading them.
• When [Notification Sound] is set to [No Sound], it does not sound if you load paper into thebanner paper guide tray. For details about [Notification Sound], see "Screen Features", OperatingInstructions.
Closing the banner paper guide tray
1. Remove any paper that is loaded.
2. Fold the subtray up.
3. Slide the paper guides outward to the maximum width.
4. Fold up the banner paper guide tray.
5. Hold the handle in one hand while supporting the back of the bypass tray with the otherhand, and then close the bypass tray slowly.
6. Turn the knob counter-clockwise until its triangle mark stops at the lock mark.
Loading Paper
51

Loading Paper into Tray 3 (LCT)
(mainly Europe and Asia)
Tray 3 (LCT) can hold A4 paper only. If you want to print on 81/2 × 11 from Tray 3 (LCT), contactyour service representative.
(mainly North America)
Tray 3 (LCT) can hold 81/2 × 11 paper only. If you want to print on A4 from Tray 3 (LCT), contactyour service representative.
• When paper loaded in the right side of Tray 3 (LCT) runs out, paper on the left is automaticallyshifted to the right. Do not pull out Tray 3 (LCT) while the tray is moving paper; wait until soundsstop coming from the tray.
• For the right stack, align the right edge of the paper with the right edge of the tray. For the leftstack, align the left edge of the paper to the left edge of the tray.
1. Carefully pull out the paper tray until it stops.
CVA017
2. Square the paper and load it print side up.
Do not stack paper over the limit mark.
• Whole tray pulled out
CVA018
2. Loading Paper
52

• Left half of the tray pulled out
CVA019
3. Carefully push the paper tray fully in.
• You can load paper even if Tray 3 (LCT) is in use. It is okay to pull out the left half of the tray whileTray 3 (LCT) is in use.
• Load 30 or more sheets of paper in the left half of the tray.
Loading Paper into the Large Capacity Tray (LCT)
(mainly Europe and Asia)
The large capacity tray (LCT) can hold A4 paper only. If you want to print on 81/2 × 11 or B5 JISfrom the large capacity tray (LCT), contact your service representative.
(mainly North America)
The large capacity tray (LCT) can hold 81/2 × 11 paper only. If you want to print on A4 or B5 JISfrom the large capacity tray (LCT), contact your service representative.
• Check the paper edges are aligned at the left side.
Loading Paper
53

1. Check that paper in the paper tray is not being used, and then open the right cover of thelarge capacity tray (LCT).
DLV120
2. Load paper into the paper tray with the print side down.
Do not stack paper over the limit mark.
DLV121
3. Close the right cover of the large capacity tray (LCT).
Loading Orientation-fixed Paper or Two-sided Paper
Orientation-fixed (top to bottom) or two-sided paper (for example, letterhead paper, punched paper, orcopied paper) might not be printed correctly, depending on how the originals and paper are placed.
Settings for the User Tools
Specify [Auto Detect] or [On (Always)] for [Letterhead Setting] in [System] under the PrinterFeatures menu, and then place the paper as shown below.
For details about the letterhead settings, see "System", Operating Instructions.
Paper orientation
The meanings of the icons are as follows:
2. Loading Paper
54

Icon Meaning
Place or load paper printed side face up.
Place or load paper printed side face down.
Print sideTray 1 or Tray 3
(LCT)Trays 2–5
Large capacity tray(LCT)
Bypass tray
One-sided
Two-sided
• To print on letterhead paper when [Auto Detect] is specified for [Letterhead Setting], you mustspecify [Letterhead] as the paper type in the printer driver's settings.
• If a print job is changed partway through printing from one-sided to two-sided printing, one-sidedoutput after the first print may be printed facing a different direction. To ensure all paper is outputfacing the same direction, specify different input trays for one-sided and two-sided printing. Notealso that two-sided printing must be disabled for the tray specified for one-sided printing.
• For details about how to make two-sided prints, see "Printing on Both Sides of Sheets", OperatingInstructions.
Loading Paper
55

Recommended Paper
Recommended Paper Sizes and Types
This section describes recommended paper sizes and types.
• If you use paper that curls, either because it is too dry or too damp, a staple clogging or paper jammay occur.
• Do not use paper designed for inkjet printers, as these may stick to the fusing unit and cause amisfeed.
• When you load OHP transparencies, check the front and back of the sheets, and place themcorrectly, or a misfeed might occur.
Tray 1
Paper type and weight Paper size Paper capacity
60–300 g/m2 (16 lb. Bond–110 lb. Cover)
Plain Paper 1–Thick Paper 4A4
81/2 × 11
550 sheets
60–300 g/m2 (16 lb. Bond–110 lb. Cover)
Plain Paper 1–Thick Paper 4
*1
A5 , B5 JIS , 81/2 × 11
A4 , A5 , B5 JIS
550 sheets
*1 To load paper any of the sizes specified above, contact your service representative.
2. Loading Paper
56

Tray 2
Paper type and weight Paper size Paper capacity
60–300 g/m2 (16 lb. Bond–110 lb. Cover)
Plain Paper 1–Thick Paper 4
Paper sizes that can bedetected automatically*1:
A3 , A4 , A5 , B4 JIS, B5 JIS , 81/2 × 11 ,
SRA3
A4 , A5 , B5 JIS , 11 ×17 , 81/2 × 14 , 81/2 ×11 , 71/4 × 101/2 , 12× 18 , 81/2 × 132/5
550 sheets
60–300 g/m2 (16 lb. Bond–110 lb. Cover)
Plain Paper 1–Thick Paper 4
Select the paper size usingthe Tray Paper Settingsmenu*1:
A5 , A6 , B6 JIS , 11 ×17 , 81/2 × 14 , 81/2 ×13 , 81/2 × 11 , 81/4 ×14 , 81/4 × 13 , 8 × 13
,
8 × 10 , 71/4 × 101/2 ,51/2 × 81/2 , 8K , 16K
, 12 × 18 , 11 × 15 ,10 × 14 , 81/2 × 132/5
A3 , A4 , A5 , A6 , B4JIS , B5 JIS , B6 JIS ,81/2 × 13 , 81/4 × 14 ,81/4 × 13 , 8 × 13 , 8 ×10 ,
71/4 × 101/2 , 51/2 ×81/2 , 8K , 16K , 11× 15 , 10 × 14 , SRA3
550 sheets
Recommended Paper
57

Paper type and weight Paper size Paper capacity
60–300 g/m2 (16 lb. Bond–110 lb. Cover)
Plain Paper 1–Thick Paper 4
Custom size*2, 3:
Vertical: 90.0–320.0 mm
Horizontal: 148.0–457.2mm
Vertical: 3.55–12.59 inches
Horizontal: 5.83–18.00inches
550 sheets
Envelopes Select the paper size usingthe Tray Paper Settings menu:
41/8 × 91/2 , 37/8 ×71/2 , C5 Env , C6 Env
, DL Env
• : 50 sheets
• :
Double flap: 15 sheets
Single flap: 25 sheets
*1 Adjust the supporting side fence before loading B4 JIS , A3 , SRA3 , 11 × 17 , or 12 × 18paper.
*2 Set the supporting side fence position to SRA3 before loading paper with a vertical length of 297 mmor longer and a horizontal length of over 335 mm.
*3 When loading paper with a vertical length of more than 304.8 mm (12.0 inches) in Trays 2–5, usepaper that has a horizontal width of 450 mm (17.8 inches) or less.
Trays 3, 4, and 5
Paper type and weight Paper size Paper capacity
60–300 g/m2 (16 lb. Bond–110 lb. Cover)
Plain Paper 1–Thick Paper 4
Paper sizes that can bedetected automatically*1:
A3 , A4 , A5 , B4 JIS, B5 JIS , 81/2 × 11 ,
SRA3 *2
A4 , A5 , B5 JIS , 11 ×17 , 81/2 × 14 , 81/2 ×11 , 71/4 × 101/2 , 12× 18 *2, 81/2 × 132/5
550 sheets
2. Loading Paper
58

Paper type and weight Paper size Paper capacity
60–300 g/m2 (16 lb. Bond–110 lb. Cover)
Plain Paper 1–Thick Paper 4
Select the paper size using theTray Paper Settings menu*1:
A5 , A6 , B6 JIS ,
11 × 17 , 81/2 × 14 ,81/2 × 13 , 81/2 × 11 ,81/4 × 14 , 81/4 × 13 , 8× 13 , 8 × 10 ,
71/4 × 101/2 , 51/2 ×81/2 , 8K , 16K , 12 ×18 *2, 11 × 15 , 10 × 14
, 81/2 × 132/5
A3 , A4 , A5 , A6 , B4JIS , B5 JIS , B6 JIS ,
81/2 × 13 , 81/4 × 14 ,81/4 × 13 , 8 × 13 , 8 ×10 ,
71/4 × 101/2 , 51/2 ×81/2 , 8K , 16K , 11 ×15 , 10 × 14 , SRA3 *2
550 sheets
60–300 g/m2 (16 lb. Bond–110 lb. Cover)
Plain Paper 1–Thick Paper 4
Custom size*3, 4:
Vertical: 90.0–320.0 mm
Horizontal: 148.0–457.2 mm
Vertical: 3.55–12.59 inches
Horizontal: 5.83–18.00inches
550 sheets
Envelopes Select the paper size using theTray Paper Settings menu:
41/8 × 91/2 , 37/8 ×71/2 , C5 Env , C6 Env
, DL Env
• : 50 sheets
• :
Double flap: 15 sheets
Single flap: 25 sheets
Recommended Paper
59

*1 Adjust the supporting side fence before loading B4 JIS , A3 , SRA3 , 11 × 17 , or 12 × 18paper.
*2 There are lines to indicate these paper sizes on the labels attached to the paper trays, however there isno size description for these paper sizes.
*3 When loading paper with a vertical length of more than 304.8 mm (12.0 inches) in Trays 2–5, usepaper that has a horizontal width of 450 mm (17.8 inches) or less.
*4 Set the supporting side fence position to SRA3 before loading paper with a vertical length of 297 mmor longer and a horizontal length of over 335 mm.
Bypass tray
Paper type and weight Paper size Paper capacity
52–300 g/m2 (14 lb. Bond–110 lb. Cover)
Thin Paper–Thick Paper 4
Paper sizes that can bedetected automatically:
A3 , A4 , A5 , A6 ,B4 JIS , B5 JIS , B6 JIS
, SRA3
A5 , B5 JIS , 11 × 17 ,81/2 × 11 , 51/2 × 81/2
, 12 × 18 , SRA3
• 100 sheets (up to 10 mmin height)
• Thick Paper 1: 40 sheets
• Thick Paper 2–ThickPaper 3: 20 sheets
• Thick Paper 4: 16 sheets
2. Loading Paper
60

Paper type and weight Paper size Paper capacity
52–300 g/m2 (14 lb. Bond–110 lb. Cover)
Thin Paper–Thick Paper 4
*1
11 × 17 , 81/2 × 14 ,81/2 × 13 , 81/2 × 11 ,81/4 × 14 , 81/4 × 13 , 8× 13 , 8 × 10 ,
71/4 × 101/2 , 51/2 ×81/2 , 8K , 16K , 12 ×18 , 11 × 15 , 10 × 14 ,SRA4 , 81/2 × 132/5
A3 , A4 , A5 , A6 ,B4 JIS , B5 JIS , B6 JIS ,81/2 × 14 , 81/2 × 13 ,81/4 × 14 , 81/4 × 13 , 8× 13 , 8 × 10 ,
71/4 × 101/2 , 8K ,16K , 11 × 15 , 10 × 14
, SRA4 , 81/2 × 132/5
• 100 sheets (up to 10 mmin height)
• Thick Paper 1: 40 sheets
• Thick Paper 2–ThickPaper 3: 20 sheets
• Thick Paper 4: 16 sheets
52–300 g/m2 (14 lb. Bond–110 lb. Cover)
Thin Paper–Thick Paper 4
Custom size*2:
Vertical: 90.0–320.0 mm*3
Horizontal: 148.0–1,260 mm
Vertical: 3.55–12.59inches*3
Horizontal: 5.83–49.60inches
• 100 sheets (up to 10 mmin height)
• Thick Paper 1: 40 sheets
• Thick Paper 2–ThickPaper 3: 20 sheets
• Thick Paper 4: 16 sheets
OHP transparencies A4 , 81/2 × 11 50 sheets
Translucent paper A3 , A4 , B4 JIS , B5JIS
1 sheet
Label paper (adhesive labels) B4 JIS , A4 30 sheets
Recommended Paper
61

Paper type and weight Paper size Paper capacity
Envelopes *1
41/8 × 91/2 , 37/8 ×71/2 , C5 Env , C6Env , DL Env
10 sheets
*1 Select the paper size. See page 68 "Specifying Regular Sizes Using the Control Panel".
*2 Enter the paper size. See page 68 "Specifying a Custom Size Paper Using the Control Panel".
*3 When only the folding unit is installed, the vertical size range is limited to 90.0–297.0 mm (3.55–11.69 inches).
Tray 3 (LCT)
Paper type and weight Paper size Paper capacity
52–300 g/m2 (14 lb. Bond–110 lb. Cover)
Thin Paper–Thick Paper 4A4
81/2 × 11
1000 sheets × 2
52–300 g/m2 (14 lb. Bond–110 lb. Cover)
Thin Paper–Thick Paper 4
*1
81/2 × 11
A4
1000 sheets × 2
*1 To load paper any of the sizes specified above, contact your service representative.
Large capacity tray (LCT)
Paper type and weight Paper size Paper capacity
52–300 g/m2 (14 lb. Bond–110 lb. Cover)
Thin Paper–Thick Paper 4A4
81/2 × 11
1500 sheets
2. Loading Paper
62

Paper type and weight Paper size Paper capacity
52–300 g/m2 (14 lb. Bond–110 lb. Cover)
Thin Paper–Thick Paper 4
*1
B5 JIS , 81/2 × 11
A4 , B5 JIS
1500 sheets
*1 To load paper any of the sizes specified above, contact your service representative.
Paper Thickness
Paper Thickness*1 Paper weight
Thin Paper*2 52–59 g/m2 (14–15 lb. Bond)
Plain Paper 1 60–74 g/m2 (16–20 lb. Bond)
Plain Paper 2 75–81 g/m2 (20 lb. Bond)
Middle Thick 82–105 g/m2 (20–28 lb. Bond)
Thick Paper 1 106–169 g/m2 (28 lb. Bond–90 lb. Index)
Thick Paper 2 170–220 g/m2 (65–80 lb. Cover)
Thick Paper 3 221–256 g/m2 (80 lb. Cover–140 lb. Index)
Thick Paper 4 257–300 g/m2 (140 lb. Index–110 lb. Cover)
*1 Print quality will decrease if the paper you are using is close to the minimum or maximum weight.Change the paper weight setting to thinner or thicker.
*2 Depending on the type of thin paper, the edges may crease or the paper may be misfed.
• Certain types of paper, such as translucent paper or OHP transparencies, may produce noisewhen delivered. This noise does not indicate a problem and print quality is unaffected.
• The paper capacity described in the tables above is an example. Actual paper capacity might belower, depending on the paper type.
• When loading paper, make sure the stack height does not exceed the limit mark of the paper tray.
• If multiple sheet feeding occurs, fan sheets thoroughly or load sheets one by one from the bypasstray.
• Flatten out curled sheets before loading them.
Recommended Paper
63

• Depending on the paper sizes and types, the print speed may be slower than usual.
• When loading thick paper of 106–300 g/m2 (28 lb. Bond–110 lb. Cover), see page 65 "Thickpaper".
• When loading envelopes, see page 65 "Envelopes".
• When printing onto letterhead paper, the paper placing orientation is different depending onwhich function you are using. For details, see page 54 "Loading Orientation-fixed Paper or Two-sided Paper".
• When loading label paper:
• We recommend that you use specified label paper.
• It is recommended to place one sheet at a time.
• Press [Bypass], and then select the appropriate paper thickness for [Paper Type].
• When loading OHP transparencies:
• It is recommended to place one sheet at a time.
• When printing on OHP transparencies from the computer, see "Specifying thick paper, thinpaper, or OHP transparencies for paper type using the control panel", Operating Instructions.
• Fan OHP transparencies thoroughly whenever you use them. This prevents OHPtransparencies from sticking together, and from feeding incorrectly.
• Remove copied or printed sheets one by one.
• When loading translucent paper:
• When loading translucent paper, always use long grain paper, and set the paper directionaccording to the grain.
• Translucent paper easily absorbs humidity and becomes curled. Remove curl in the translucentpaper before loading.
• Remove copied or printed sheets one by one.
• When loading coated paper:
• To print on coated paper: press the [User Tools] icon ( ), press [Tray Paper Settings], andthen, for each tray's [Paper Type] be sure to specify [Paper Type] to [Coated: Matte], and[Paper Thickness] to the appropriate paper thickness.
• To print on high-gloss coated paper: press the [User Tools] icon ( ), press [Tray PaperSettings], and then, for each tray's [Paper Type], be sure to set [Paper Type] to [Coated:Glossy].
• When loading coated paper or glossy paper, always fan the paper before using it.
• If a paper jam occurs or if the machine makes a strange noise when feeding stacks of coatedpaper, feed the coated paper from the bypass tray one sheet at a time.
• After continuous printing of A5 , A6 , envelopes or other smaller custom paper sizes, printingon different sized paper may require a wait of up to 1 minute for adjustments.
2. Loading Paper
64

Thick paper
This section gives you various details about and recommendations concerning thick paper.
When loading thick paper of 106–300 g/m2 (28 lb. Bond–110 lb. Cover), follow therecommendations below to prevent misfeeds and loss of image quality.
• Store all your paper in the same environment - a room where the temperature is 20–25°C (68–77°F) and the humidity is 30–65%.
• When loading paper in the paper trays, be sure to load at least 20 sheets. Also, be sure to positionthe side fences flush against the paper stack.
• Jams and misfeeds can occur when printing on thick smooth paper. To prevent such problems, besure to fan smooth paper thoroughly before loading them. If paper continues to become jammed orfeed in together even after they are fanned, load them one by one from the bypass tray.
• When loading thick paper, set the paper direction according to its grain, as shown in the followingdiagram:
Direction ofpaper grain
Tray 1 or Tray 3(LCT)
Trays 2–5Large capacity
tray (LCT)Bypass tray
Notrecommended
Notrecommended
• Select [Thick Paper 1], [Thick Paper 2], [Thick Paper 3], or [Thick Paper 4] as the paper thickness in[Tray Paper Settings].
• Even if thick paper is loaded as described above, normal operations and print quality might still notbe possible, depending on the paper type.
• Prints might have prominent vertical creases.
• Prints might be noticeably curled. Flatten out prints if they are creased or curled.
Envelopes
This section gives you various details about and recommendations concerning envelopes.
• Do not use window envelopes.
Recommended Paper
65

• Misfeeds might occur depending on the length and shape of the flaps.
• Only envelopes that are at least 148 mm (5.9 inches) wide and whose flaps are open can beloaded in the orientation.
• When loading envelopes in the orientation, load them with flaps fully open. Otherwise, theymight not feed into the machine.
• Before loading envelopes, press down on them to remove any air from inside, flatten out all fouredges. If they are bent or curled, flatten their leading edges (the edge going into the machine) byrunning a pencil or ruler across them.
The way to load envelopes varies depending on the orientation of the envelopes. When printing ontoenvelopes, load them according to the applicable orientation shown below:
How to load envelopes
Types of envelopes Trays 2–5 Bypass tray
Side-openingenvelopes
• Flaps: open
• Bottom side of envelopes:toward the right of the machine
• Side to be printed: face up
• Flaps: open
• Bottom side of envelopes:toward the left of the machine
• Side to be printed: face down
Side-openingenvelopes
• Flaps: closed
• Bottom side of envelopes:toward the back of the machine
• Side to be printed: face up
• Flaps: closed
• Bottom side of envelopes:toward the back of the machine
• Side to be printed: face down
When loading envelopes, select "Envelope" as the paper types using both [Tray Paper Settings] andprinter driver and specify the thickness of envelopes. For details, see "Printing on Envelopes", OperatingInstructions.
To print on envelopes that are loaded with their short edges against the machine body, rotate the printimage by 180 degrees using the printer driver.
2. Loading Paper
66

Recommended envelopes
For information about recommended envelopes, contact your local dealer.
For details about the sizes of envelopes you can load, see page 56 "Recommended Paper Sizesand Types".
• Load only one size and type of envelope at a time.
• The Duplex function cannot be used with envelopes.
• To get better output quality, it is recommended that you set the right, left, top, and bottom printmargin, to at least 15 mm (0.6 inches) each.
• Output quality on envelopes may be uneven if parts of an envelope have differing thicknesses. Printone or two envelopes to check print quality.
• Printed sheets are delivered to the internal tray even if you specified a different tray.
• Flatten out prints if they are creased or curled.
• Check the envelopes are not damp.
• High temperature and high humidity conditions can reduce print quality and cause envelopes tobecome creased.
• Depending on the environment, printing on envelopes may wrinkle them even if they arerecommended.
• Certain types of envelopes might come out creased, dirtied, or misprinted. If you are printing asolid color on an envelope, lines may appear where the overlapped edges of the envelope make itthicker.
Recommended Paper
67
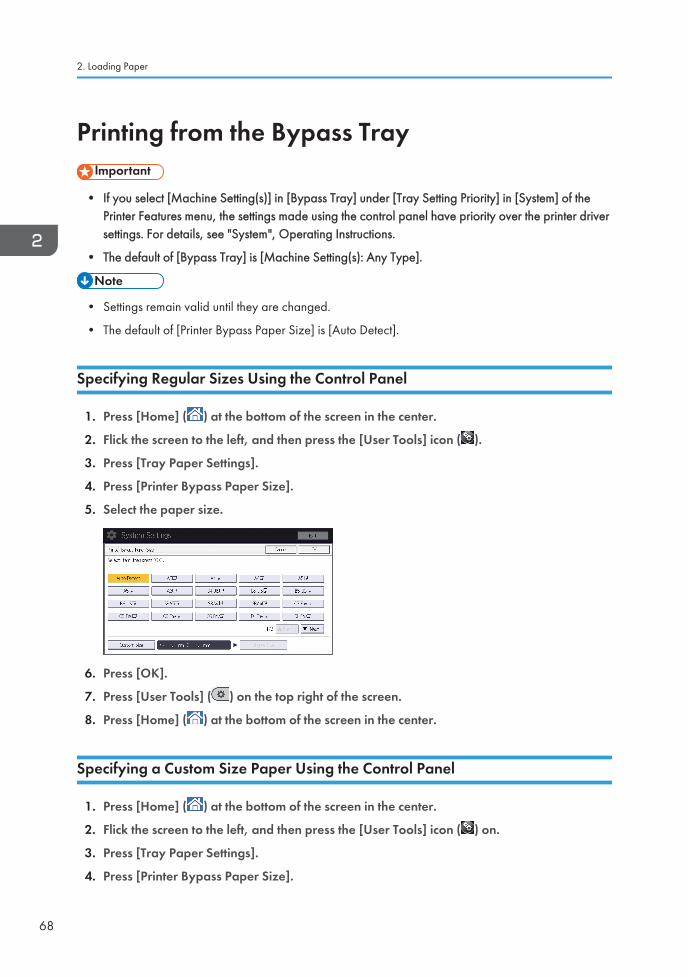
Printing from the Bypass Tray
• If you select [Machine Setting(s)] in [Bypass Tray] under [Tray Setting Priority] in [System] of thePrinter Features menu, the settings made using the control panel have priority over the printer driversettings. For details, see "System", Operating Instructions.
• The default of [Bypass Tray] is [Machine Setting(s): Any Type].
• Settings remain valid until they are changed.
• The default of [Printer Bypass Paper Size] is [Auto Detect].
Specifying Regular Sizes Using the Control Panel
1. Press [Home] ( ) at the bottom of the screen in the center.
2. Flick the screen to the left, and then press the [User Tools] icon ( ).
3. Press [Tray Paper Settings].
4. Press [Printer Bypass Paper Size].
5. Select the paper size.
6. Press [OK].
7. Press [User Tools] ( ) on the top right of the screen.
8. Press [Home] ( ) at the bottom of the screen in the center.
Specifying a Custom Size Paper Using the Control Panel
1. Press [Home] ( ) at the bottom of the screen in the center.
2. Flick the screen to the left, and then press the [User Tools] icon ( ) on.
3. Press [Tray Paper Settings].
4. Press [Printer Bypass Paper Size].
2. Loading Paper
68

5. Press [Custom Size].
If a custom size is already specified, press [Change Size].
6. Press [Horizontal].
7. Enter the horizontal size using the number keys, and then press [ ].
8. Press [Vertical].
9. Enter the vertical size using the number keys, and then press [ ].
10. Press [OK] twice.
11. Press [User Tools] ( ) on the top right of the screen.
12. Press [Home] ( ) at the bottom of the screen in the center.
Specifying Thick Paper, Thin Paper, or OHP Transparencies for Paper TypeUsing the Control Panel
• Use A4 or 81/2 × 11 size OHP transparencies, and specify their size.
• Usually only one side of OHP transparencies can be used for printing. Be sure to load them with theprint side down.
• When printing onto OHP transparencies, remove printed sheets one by one.
1. Press [Home] ( ) at the bottom of the screen in the center.
2. Flick the screen to the left, and then press the [User Tools] icon ( ).
3. Press [Tray Paper Settings].
4. Press [Printer Bypass Paper Size], and then specify the paper size.
5. Press [OK].
6. Press [ Next].
7. Press [Paper Type: Bypass Tray].
Printing from the Bypass Tray
69

8. Select the proper items, according to the paper type you want to specify.
• Press [OHP (Transparency)] on the [Paper Type] area when loading OHP transparencies.
• To load thin or thick paper, press [Do not Display] on the [Paper Type] area, and then selectthe appropriate paper thickness in the [Paper Thickness] area.
9. Press [OK].
10. Press [User Tools] ( ) on the top right of the screen.
11. Press [Home] ( ) at the bottom of the screen in the center.
• We recommend that you use specified OHP transparencies.
• For details about paper thickness, see "Tray Paper Settings", Operating Instructions.
2. Loading Paper
70

3. TroubleshootingThis chapter provides solutions to common problems and it also explains how to correct unwanted printresults.
When the Machine Makes a Beeping SoundThe following table describes the meaning of the various beep patterns that the machine issues to alertusers about left originals and other machine conditions.
Beep pattern Meaning Cause
Single short beep Panel/screen inputaccepted.
A screen key was pressed.
Short, then long beep Panel/screen input rejected. An invalid key was pressed on thescreen, or the entered password wasincorrect.
2 long beeps Machine has warmed up. When the power is turned on or themachine exits Sleep mode, themachine has fully warmed up and isready for use.
5 long beeps repeated fourtimes
Soft alert Paper tray is empty.
5 short beeps repeated fivetimes.
Strong alert The machine requires user attentionbecause paper has jammed, the tonerneeds replenishing, or other problemshave occurred.
• Users cannot mute the machine's beep alerts. When the machine beeps to alert users of a paperjam or toner request, if the machine's covers are opened and closed repeatedly within a shortspace of time, the beep alert might continue, even after normal status has resumed.
• You can enable or disable beep alerts. For details about Sound, see "DEVICE", OperatingInstructions.
71

When a Status Icon Is DisplayedThis section describes the status icons displayed when the machine requires the user to remove misfedpaper, to add paper, or to perform other procedures.
Status Icon Status
: Paper Misfeed icon Appears when a paper misfeed occurs.
For details about removing jammed paper, see page 100"Removing Jammed Paper".
: Load Paper icon Appears when paper runs out.
For details about loading paper, see page 45 "LoadingPaper".
: Add Toner icon Appears when toner runs out.
For details about adding toner, see page 38 "AddingToner".
: Add Staple icon Appears when staples run out.
For details about adding staples, see page 41 "AddingStaples".
: Waste Toner Full icon Appears when the waste toner bottle is full.
For details about replacing the waste toner bottle, seepage 40 "Replacing the Waste Toner Bottle".
: Hole Punch Receptacle Full icon Appears when the hole punch receptacle is full.
For details about removing punch waste, see "RemovingPunch Waste", Operating Instructions.
: Service Call icon Appears when the machine is malfunctioning or requiresmaintenance.
: Open Cover icon Appears when one or more covers of the machine areopen.
3. Troubleshooting
72

When the Indicator Lamp for [Check Status] IsLit or FlashingIf the indicator lamp for [Check Status] lights up or flashes, press [Check Status] to display the [CheckStatus] screen. Check the status of each function in the [Check Status] screen.
[Check Status] screen
DRA3203
1
4
2
1. [Mach./Applic. Stat] tab
Indicates the status of the machine and each function.
2. [Check]
If an error occurs in the machine or a function, press [Check] to view details.
Pressing [Check] displays an error message or the corresponding function screen. Check the error messagedisplayed on the function screen and take the appropriate action. For details about how to resolve theproblems described in error messages, see "When Messages Appear and the Machine Cannot BeOperated", Operating Instructions, page 80 "Messages Displayed When You Use the Printer Function", orpage 85 "When Other Messages Appear".
3. Messages
Displays a message that indicates the status of the machine and each function.
4. Status icons
The status icons that can be displayed are described below:
: The function is performing a job.
: The machine cannot be used because an error has occurred in the machine.
: The function cannot be used because an error has occurred in the function or machine. This icon may alsoappear if the toner is running low.
When the Indicator Lamp for [Check Status] Is Lit or Flashing
73

The following table explains problems that cause the indicator lamp for [Check Status] to light or flash.
Problem Cause Solution
Documents and reports donot print out.
The paper output tray is full. Remove the prints from the tray.
Documents and reports donot print out.
There is no paper left. Load paper. For details about loadingpaper, see page 45 "Loading Paper".
An error has occurred. A function which has thestatus "Error Occurred" inthe [Check Status] screen isdefective.
Press [Check] in the function which theerror has occurred. Then read thedisplayed message, and take theappropriate action. For details abouterror messages and their solutions, see"When Messages Appear and theMachine Cannot Be Operated",Operating Instructions, page 80"Messages Displayed When You Usethe Printer Function", or page 85"When Other Messages Appear".
You can use other functions normally.
The machine is unable toconnect to the network.
A network error hasoccurred.
• Check that the machine iscorrectly connected to thenetwork and that the machine iscorrectly set. For details abouthow to connect the network, see"Connecting to the Interface",Operating Instructions.
• For details about connecting tothe network, contact youradministrator.
• If the indicator lamp is still lit evenafter you try to solve the problemas described here, contact yourservice representative.
3. Troubleshooting
74

When You Have Problems Operating theMachine
Problem Cause Solution
The indicator lamp remainslit and the machine does notenter Sleep mode eventhough [Energy Saver] waspressed.
In some cases, the machinedoes not enter Sleep modewhen [Energy Saver] ispressed.
Before you press [Energy Saver],check that Sleep mode can beenabled. For details about enablingSleep mode, see page 31 "SavingEnergy".
The display is turned off. The machine is in Sleepmode.
Touch the display panel.
Nothing happens when thedisplay panel is touched.
The power is turned off. Make sure the main power indicator isoff, and then turn on the power.
The power turns offautomatically.
The Weekly Timer setting isset to [Main Power Off].
Change the Weekly Timer setting. Fordetails about the Weekly Timer setting,see "Timer Settings", OperatingInstructions.
The user code entry screen isdisplayed.
Users are restricted by UserCode Authentication.
For details about how to log in whenUser Code Authentication is enabled,see "When the Authentication Screen isDisplayed", Operating Instructions.
The Authentication screenappears.
User Authentication is set. See "When the Authentication Screenis Displayed", Operating Instructions.
An error message is stilldisplayed, even if misfedpaper is removed.
Paper is still jammed in thetray.
Remove the jammed paper byfollowing the procedures displayed onthe control panel. For details aboutremoving jammed paper, seepage 100 "Removing Jammed Paper".
An error message is stilldisplayed, even if theindicated cover is closed.
One or more of the coversthat are not indicated arestill open.
Close all the covers of the machine.
Images are printed on thereverse side of the paper.
You may have loaded thepaper incorrectly.
Load the paper correctly. For detailsabout loading paper, see page 45"Loading Paper".
When You Have Problems Operating the Machine
75

Problem Cause Solution
Misfeeds occur frequently. Using curled paper oftencauses misfeeds, soiledpaper edges, or slippedpositions while stack printingis performed.
• Flatten the paper with your handsto straighten out the curl.
• Load the paper up side down sothat the curled edges facedownward. For details aboutrecommended paper, seepage 56 "Recommended Paper".
• Place the cut paper on a flatsurface to prevent it from curling,and do not lean it against thewall. For details about the properway to store paper, see "PaperStorage", Operating Instructions.
Misfeeds occur frequently. The tray's side or end fencesmay not be set properly.
• Remove the misfed paper. Fordetails about removing jammedpaper, see page 100 "RemovingJammed Paper".
• Check that the side or end fencesare set properly. Also, check thatthe side fences are locked. Fordetails about setting the side andend fences, see "Changing thePaper Size", OperatingInstructions.
Misfeeds occur frequently. Paper of undetectable sizehas been loaded.
• Remove misfed paper. For detailsabout removing jammed paper,see page 100 "RemovingJammed Paper".
• If you load a paper size that is notselected automatically, you needto specify the paper size with thecontrol panel. For details aboutspecifying paper size with thecontrol panel, see "Changing to aSize That Is Not AutomaticallyDetected", Operating Instructions.
3. Troubleshooting
76

Problem Cause Solution
Misfeeds occur frequently. There is a foreign object onthe finisher tray.
• Remove the misfed paper. Fordetails about removing jammedpaper, see page 100 "RemovingJammed Paper".
• Do not place anything on thefinisher tray.
Cannot print in duplexmode.
You have selected a papertray that is not set for duplexprinting.
Change the setting for "Apply Duplex"in "Tray Paper Settings" to enableduplex printing for the paper tray. Fordetails about setting "Apply Duplex",see "Tray Paper Settings", OperatingInstructions.
Cannot print in duplexmode.
You have selected a papertype that cannot be used forduplex printing.
In "Tray Paper Settings", select a papertype that can be used for duplexprinting. For details about setting"Paper Type", see "Tray PaperSettings", Operating Instructions.
The machine does not turnoff in 5 minutes after themain power is turned off.
The machine cannot performthe shutdown procedure.
Repeat the shutdown procedure. If themachine does not turn off, contact yourservice representative.
An error has occurred whenthe Address Book ischanged from the displaypanel or Web ImageMonitor.
The Address Book cannot bechanged while you deletethe multiple storeddocuments.
Wait a while, and then retry theoperation.
The Address Book cannot bechanged from the displaypanel.
The Address Book cannot bechanged while it is beingbacked up from Web ImageMonitor or other toolsrunning on the computer.
• Wait until the Address Bookbackup is complete, and then tryto change the Address Bookagain.
• If an SC997 error occurs, press[Exit].
When You Have Problems Operating the Machine
77

Problem Cause Solution
The function does not run orcannot be used.
The function cannot beperformed while the AddressBook is being backed upfrom Web Image Monitor orother tools running on thecomputer.
Wait a while. When the Address Bookbackup is complete, the function willbe performed.
Paper is bent. Paper may be bent when it isejected from the finisherupper tray.
Change the output tray to the finishershift tray.
• There are times when images might not turn out as you want because of paper type, paper size, orpaper capacity problems, use the recommended paper. For details about recommended paper,see page 56 "Recommended Paper Sizes and Types".
3. Troubleshooting
78

If USB Connection FailsProblem Cause Solution
The machine is notautomatically recognized.
The USB cable is notconnected properly.
Disconnect the USB cable, and turn offthe machine, and then turn the machineback on. When the [Home] screenappears, connect the USB cableagain.
The machine is notautomatically recognized.
Windows has alreadyconfigured the USB settings.
Check whether the computer hasidentified the machine as anunsupported device. Open Windows'Device Manager, and then, under[Universal Serial Bus controllers],remove any conflicting devices.Conflicting devices are indicated by a[!] or [?] icon. Be careful not to removerequired devices accidentally. Fordetails, see Windows Help.
The machine does notrecognize the USBconnection even when aUSB cable is inserted.
If the USB cable isconnected while themachine is off, the machinemight not recognize the USBconnection.
Press [Check Status], and thendisconnect the USB cable. After youdisconnect cable, press [Check Status]again. When the machine is ready,connect the USB cable again.
If USB Connection Fails
79

Messages Displayed When You Use the PrinterFunctionThis section describes the principal messages that appear on the display panel, error logs or reports. Ifother messages appear, follow their instructions.
Messages Displayed on the Control Panel When You Use the Printer Function
• Before turning off the power, see page 30 "Turning On/Off the Power".
Message Cause Solution
"Hardware Problem:Ethernet"
An error has occurred in theEthernet interface.
Turn off the power, and then back onagain. If the message appearsagain, contact your servicerepresentative.
"Hardware Problem: HDD" An error has occurred in thehard disk.
Turn off the power, and then back onagain. If the message appearsagain, contact your servicerepresentative.
"Hardware Problem: USB" An error has occurred in theUSB interface.
Turn off the power, and then back onagain. If the message appearsagain, contact your servicerepresentative.
"Hardware Problem:Wireless Card"
(A "wireless LAN board" isreferred to as a "wirelesscard".)
• The wireless LAN boardhas malfunctioned.
• The wireless LAN boardyou are using is notcompatible with thismachine.
Turn off the power, and then confirmthe wireless LAN board is insertedcorrectly. And then, turn on thepower again. If the messageappears again, contact your servicerepresentative.
3. Troubleshooting
80

Message Cause Solution
"Load following paper in n.To force print, selectanother tray and press[Continue]."
("n" is replaced by avariable.)
The printer driver settings areincorrect or the tray does notcontain paper of the sizeselected in the printer driver.
Check that the printer driver settingsare correct, and then load paper ofthe size selected in the printer driverinto the input tray. For details abouthow to change the paper size, see"Changing the Paper Size",Operating Instructions.
"Paper in staple tray. Opencover and remove paper."
If printing is stopped before it isfinished, paper may remain inthe finisher.
Remove the paper remaining in thefinisher.
"Paper size and type aremismatched. Select anothertray from the following andpress [Continue]. To canceljob, press [Job Reset].Paper size and type canalso be changed in UserTools."
The printer driver settings areincorrect or the tray does notcontain paper of the size ortype selected in the printerdriver.
• Check that the printer driversettings are correct, and thenload paper of the size selectedin the printer driver into theinput tray. For details abouthow to change the paper size,see "Changing the Paper Size",Operating Instructions.
• Select the tray manually tocontinue printing, or cancel aprint job. For details about howto select the tray manually, orcancel a print job, see "If anError Occurs with the SpecifiedPaper Size and Type",Operating Instructions.
"Paper type of n ismismatched. Select anothertray from the following andpress [Continue]. Papertype can also be changedin User Tools."
(A tray name is placed atn.)
The type of the paper in the traydoes not match the paper typespecified in the printer driver.
Select a tray containing paper that isthe same type as the specified papertype.
Messages Displayed When You Use the Printer Function
81

Message Cause Solution
"Parallel I/F board has aproblem."
An error has occurred in theIEEE 1284 interface board.
Turn off the power, and then back onagain. If the message appearsagain, contact your servicerepresentative.
"Printer font error." An error has occurred in thefont settings.
Contact your service representative.
"Cannot print because boththe main and designation(chapter) sheets are set tothe same paper tray. Press[Job Reset] to cancel thejob. To print the job againspecify different trays."
The tray selected for otherpages is the same as the onefor slip sheets.
Reset the job. Be sure the tray youselect for slip sheets is not providingpaper for other pages.
When using direct print from a memory storage device
Message Cause Solution
"Exceeded the limit value fortotal data size of theselected files. Cannot selectmore files."
• The size of the selectedfile exceeds 1 GB.
• The total size of theselected files exceeds 1GB.
Files or groups of files larger than 1 GBcannot be printed.
• When the total size of the multiplefiles that are selected exceeds 1GB, select files separately.
• When the size of the selected fileexceeds 1 GB, print from amemory storage device using afunction other than the Directprinting function.
You cannot select files of differentformats at the same time.
3. Troubleshooting
82

Message Cause Solution
"Unable to access thespecified memory storagedevice."
• An error occurredwhen the machineaccessed the memorystorage device or a filestored on the memorystorage device.
• An error occurredwhen the user used theDirect printing functionto print from a memorystorage device.
Save the file to a different memorystorage device, and then print again.
Messages Printed on the Error Logs or Reports When You Use the PrinterFunction
This section describes likely causes of and possible solutions for the error messages that are printed onthe error logs or reports.
When print jobs are canceled
Message Cause Solution
"91: Error" Printing was canceled by theauto job cancel function dueto a command error.
Check that the data is valid.
"A job via the network thatwas not printed existsbecause an error occurred.It was stored as a job notprinted."
Jobs with errors were storedbecause an error occurredwith a print job via thenetwork while the error jobstoring function wasenabled.
Contact your administrator to checkwhether the machine is connectedcorrectly to the network. For detailsabout how to check and print jobsstored when print configuration errorsoccur, see "Printing of DocumentsStored When Print Configuration ErrorsOccur", Operating Instructions.
Messages Displayed When You Use the Printer Function
83

Message Cause Solution
"Error occurred whileprocessing an UnauthorizedCopy Prevention job. Jobcancelled."
The [Enter User Text:] fieldon the [Unauthorized CopyPrevention for PatternDetails] screen is blank.
On the printer driver's [DetailedSettings] tab, click [Effects] in "Menu:".Select [Unauthorized CopyPrevention], and then click [Details...]to display [Unauthorized CopyPrevention for Pattern Details]. Entertext in [Enter User Text:].
"Error occurred whileprocessing an UnauthorizedCopy Prevention job. Jobcancelled."
The resolution is set to avalue less than 600 dpiwhen [Unauthorized CopyPrevention] is specified.
On the printer driver, set the resolutionto 600 dpi or higher, or cancel[Unauthorized Copy Prevention].
"Error occurred whileprocessing an UnauthorizedCopy Prevention job. Jobcancelled."
In [Administrator Tools]under [System Settings],priority was specified to begiven to Unauthorized CopyPrevention Printing set on thismachine.
Cancel Unauthorized Copy PreventionPrinting for the printer driver. For detailsabout how to cancel the settings, seethe printer driver Help.
"Collate Cancelled" Collate was canceled. Turn off the power, and then back onagain. If the message appears again,contact your service representative.
"You reach the usage limit.This job has beencancelled."
The number of pages theuser is permitted to print hasbeen exceeded.
For details about print volume uselimitation, see "Managing Print Volumeper User", Security Guide.
"Receiving data failed." Data reception was aborted. Resend the data.
"Sending data failed." The machine received acommand to stoptransmission from the printerdriver.
Check if the computer is workingcorrectly.
"The selected paper size isnot supported. This job hasbeen cancelled."
Job reset is automaticallyperformed if the specifiedpaper size is incorrect.
Specify the correct paper size, andthen print the file again.
"The selected paper type isnot supported. This job hasbeen cancelled."
Job reset is automaticallyperformed if the specifiedpaper type is incorrect.
Specify the correct paper type, andthen print the file again.
3. Troubleshooting
84

When Other Messages AppearMessage Cause Solution
"Firmware update will start.Press [OK]. It will startautomatically after 30seconds have elapsed."
Automatic firmware updateis enabled and it is the timefor an automatic update.
• If you want to start the firmwareupdate, press [OK], or configurethe setting so that the automaticfirmware update startsautomatically in 30 seconds.
• If you do not want to start thefirmware update, press [Cancel]before 30 seconds elapse.
• Do not turn off the power switchduring the firmware update.
"Cannot connect with thewireless card. Turn the mainpower switch off, then checkthe card."
(A "wireless LAN board" isreferred to as a "wirelesscard".)
• The wireless LANboard was not insertedwhen the machine wasturned on.
• The wireless LANboard was pulled outafter the machine wasturned on.
The settings are not updatedalthough the unit is detected.
Turn off the power, and then check thewireless LAN board is insertedcorrectly. After this, turn on the poweragain. If the message appears again,contact your service representative.
"Failed to read the PDF file." There is a possibility that thePDF version is not supportedby the browser’s PDF vieweror an unsupportedencryption level is specified.
With this machine’s browser PDF filesother than those whose versions andencryption levels are specified belowcannot be viewed.
• PDF version: 1.3-1.7
• PDF encryption level: 128Bit AESor 256Bit AES
"Following output tray is full.Remove paper."
The output tray is full. Remove paper from the output tray toresume printing. Press [Continue] onthe display panel to resume printing.
When Other Messages Appear
85
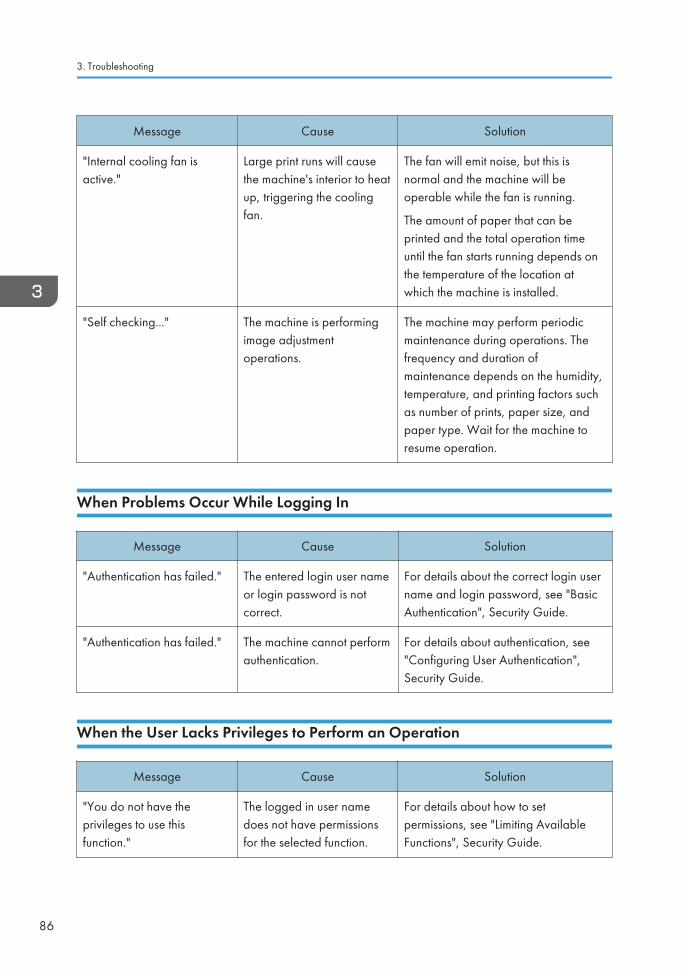
Message Cause Solution
"Internal cooling fan isactive."
Large print runs will causethe machine's interior to heatup, triggering the coolingfan.
The fan will emit noise, but this isnormal and the machine will beoperable while the fan is running.
The amount of paper that can beprinted and the total operation timeuntil the fan starts running depends onthe temperature of the location atwhich the machine is installed.
"Self checking..." The machine is performingimage adjustmentoperations.
The machine may perform periodicmaintenance during operations. Thefrequency and duration ofmaintenance depends on the humidity,temperature, and printing factors suchas number of prints, paper size, andpaper type. Wait for the machine toresume operation.
When Problems Occur While Logging In
Message Cause Solution
"Authentication has failed." The entered login user nameor login password is notcorrect.
For details about the correct login username and login password, see "BasicAuthentication", Security Guide.
"Authentication has failed." The machine cannot performauthentication.
For details about authentication, see"Configuring User Authentication",Security Guide.
When the User Lacks Privileges to Perform an Operation
Message Cause Solution
"You do not have theprivileges to use thisfunction."
The logged in user namedoes not have permissionsfor the selected function.
For details about how to setpermissions, see "Limiting AvailableFunctions", Security Guide.
3. Troubleshooting
86

When You Cannot PrintCause Solution
The power is off. For details about how to turn on the power, see page 30"Turning On/Off the Power".
The cause is displayed on the screen ofthe control panel.
Check the error message or warning status on thedisplay panel, and then take the required action. Fordetails about solutions, see page 80 "MessagesDisplayed When You Use the Printer Function".
The interface cable is not connectedcorrectly.
For details about how to connect interface cablescorrectly, see "Connecting to the Interface", OperatingInstructions.
The correct interface cable is not beingused.
The type of interface cable you use depends on thecomputer. Be sure to use the correct one. If the cable isdamaged or worn, replace it. For details about theinterface cable, see "Connecting to the Interface",Operating Instructions.
The interface cable was connected afterthe power was turned on.
Connect the interface cable before turning on the power.
If the machine is using wireless LAN, aweak wireless signal might result in printfailures.
Check the radio signal status of the wireless LAN in[System Settings]. If signal strength is not satisfactory,move the machine to a location where radio wavestravel, or remove objects that might cause interference.
You can check signal status only when wireless LAN isused in infrastructure mode. For details about the radiosignal status of the wireless LAN, see "Interface Settings",Operating Instructions.
When there is a microwave oven or awireless LAN access point near thedevice, radio waves may be interferingwith the Bluetooth's communication.
Turn off the microwave oven and the wireless LANaccess point, and then print again. If printing is successfulafter you turn off the power, then it is possible thesedevices are the cause of the interference. Move thedevices to a location where they do not interfere.
When You Cannot Print
87

Cause Solution
If the machine is using a wireless LAN(IEEE 802.11b/g/n), radio waves maybe interfering with wirelesscommunication. This may occur if there isa microwave oven, cordless telephone,industrial machine, scientific instrument, ormedical instrument using the samefrequency range near the device.
Turn off other machines or instruments which use thesame frequency range, and then print again. If printing issuccessful after you turn off the power, then it is possiblethese devices are the cause of the interference. Move thedevices to a location where they do not interfere.
If the machine is using wireless LAN, SSIDsettings are incorrect.
Check that the SSID is correctly set by using themachine's display panel. For details about SSID setting,see "Wireless LAN ", Operating Instructions.
If the machine is using wireless LAN, thereceiver's MAC address may bepreventing communication with the accesspoint.
Check access point settings when wireless LAN is used inthe infrastructure mode. Depending on the access point,client access may be limited by MAC address. Also,check there are no transmission problems betweenaccess point and wired clients, and between accesspoint and wireless clients.
The login user name, login password, ordriver encryption key is invalid.
Check the login user name, login password, or driverencryption key.
Advanced encryption has been set usingthe extended security function.
Check the extended security function settings. For detailsabout extended security function settings, see "Specifyingthe Extended Security Functions", Security Guide.
A mechanical error might have occurred. Contact your service representative.
Transmission mode is not configuredcorrectly when wireless LAN is used in adhoc mode.
• Turn off the power, and then turn it on again. Fordetails about how to turn on and off the power, seepage 30 "Turning On/Off the Power".
• Change [Communication Mode] in [SystemSettings] to [802.11 Ad-hoc Mode], and thenselect [Off] for [Security Method]. For details aboutCommunication Mode, see "Interface Settings",Operating Instructions.
3. Troubleshooting
88

Cause Solution
When the Data In indicator does not lightup or flash after a print job starts, data isnot being sent to the machine.
• When a cable is used to connect the computerdirectly to the machine, check whether the printports are configured correctly.
• When the computer is connected to the network,ask your administrator about the computer'snetwork connection.
If printing does not start, contact your service representative.
When You Cannot Print
89

Other Printing ProblemsThis section describes likely causes of and possible solutions for problems that can occur when printingfrom a computer.
When you cannot print clearly
Problem Cause Solution
The printed image issmudged.
Settings for thick paper havenot been made for printingon thick paper in the bypasstray.
PCL 5c
On the printer driver's [Paper]tab, select [Bypass Tray] in the"Input Tray:" list. Then in the"Type:" list, select a proper papertype.
PCL 6 or PostScript 3
On the printer driver's [DetailedSettings] tab, click [Paper] in"Menu:", and then select [BypassTray] in the "Input Tray:" list. Thenin the "Paper Type:" list, select aproper paper type.
The printed image is fadedover the entire page.
The paper is damp. Use paper that has been stored in therecommended temperature andhumidity conditions. For details aboutthe paper storage conditions werecommend, see "Paper Storage",Operating Instructions.
The printed image is fadedover the entire page.
The paper is unsuitable. Use recommended paper. Printing oncoarse or treated paper might result infaint print image. For details aboutrecommended paper, see page 56"Recommended Paper Sizes andTypes".
The printed image is fadedover the entire page.
If the [Toner Saving] isselected in the printer driversettings, the entire page willbe faded when printed.
Only when using PostScript 3
On the printer driver's [DetailedSettings] tab, click [PrintQuality:Standard] in "Menu:",and then select [Off] in the "TonerSaving:" list.
3. Troubleshooting
90

Problem Cause Solution
Images smudge whenrubbed. (Toner is not fixed.)
The specified paper typeand the paper that isactually loaded might bedifferent. For example, thickpaper might be loaded butnot specified as the papertype.
PCL 5c
On the printer driver's [Paper]tab, select a proper paper type inthe [Type:] box.
PCL 6 or PostScript 3
On the printer driver's [DetailedSettings] tab, click [Paper] in"Menu:", and then select a properpaper type in the "Paper Type:"list.
The printed image is differentfrom the image on thecomputer's display.
Printing will be performed bythe machine's graphicprocessing function.
Only when using PCL 6
On the printer driver's [DetailedSettings] tab, click [PrintQuality:Advanced] in "Menu:",and then select [Raster] in the"Vector/Raster:" list.
When graphics are printed,the output and the screenare different.
If the printer driver isconfigured to use thegraphics command, thegraphics command from themachine is used to print.
If you want to print accurately, set theprinter driver to print without using thegraphics command. For details aboutsettings for printer driver, see theprinter driver Help.
White lines appear. The dustproof glass is dirty. Clean the dustproof glass. For detailsabout how to clean the dustproofglass, see "Cleaning the DustproofGlass", Operating Instructions.
Lines of garbled orunwanted alphanumericcharacters appear.
An incorrect printerlanguage might have beenselected.
Select the correct printer driver, andthen print the file again.
Images are cut off, ormargins are printed.
You may be using papersmaller than the sizeselected in the application.
Use the same size paper as thatselected in the application. If youcannot load paper of the correct size,use the reduction function to reduce theimage, and then print. For detailsabout reduction function, see theprinter driver Help.
Other Printing Problems
91
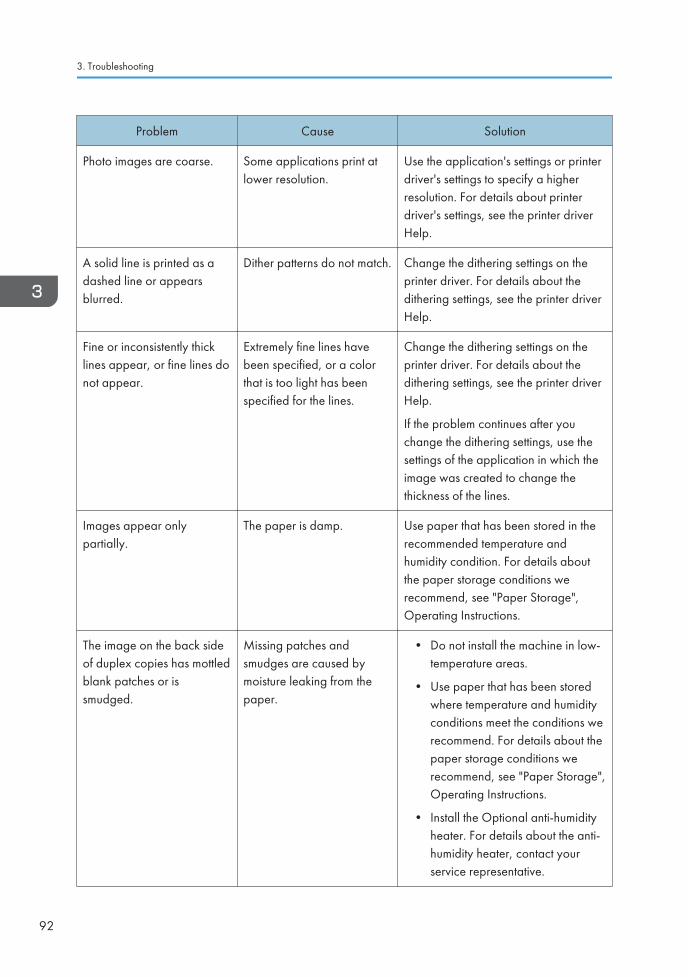
Problem Cause Solution
Photo images are coarse. Some applications print atlower resolution.
Use the application's settings or printerdriver's settings to specify a higherresolution. For details about printerdriver's settings, see the printer driverHelp.
A solid line is printed as adashed line or appearsblurred.
Dither patterns do not match. Change the dithering settings on theprinter driver. For details about thedithering settings, see the printer driverHelp.
Fine or inconsistently thicklines appear, or fine lines donot appear.
Extremely fine lines havebeen specified, or a colorthat is too light has beenspecified for the lines.
Change the dithering settings on theprinter driver. For details about thedithering settings, see the printer driverHelp.
If the problem continues after youchange the dithering settings, use thesettings of the application in which theimage was created to change thethickness of the lines.
Images appear onlypartially.
The paper is damp. Use paper that has been stored in therecommended temperature andhumidity condition. For details aboutthe paper storage conditions werecommend, see "Paper Storage",Operating Instructions.
The image on the back sideof duplex copies has mottledblank patches or issmudged.
Missing patches andsmudges are caused bymoisture leaking from thepaper.
• Do not install the machine in low-temperature areas.
• Use paper that has been storedwhere temperature and humidityconditions meet the conditions werecommend. For details about thepaper storage conditions werecommend, see "Paper Storage",Operating Instructions.
• Install the Optional anti-humidityheater. For details about the anti-humidity heater, contact yourservice representative.
3. Troubleshooting
92

When paper is not fed properly
Problem Cause Solution
Paper is not fed from theselected tray.
When you are using aWindows operating system,printer driver settingsoverride those settingsapplied to the display panel.
PCL 5c
On the printer driver's [Paper]tab, select the desired input tray inthe "Input Tray:" list.
PCL 6 or PostScript 3
On the Printer driver's [DetailedSettings] tab, click [Paper] in"Menu:", select the input tray youwant to use in the "Input Tray:" list.
Images are printed at aslant.
The tray's side fences mightnot be locked.
Check that the side fences are locked.For details about how to set the sidefences, see "Changing the Paper Size",Operating Instructions.
Images are printed at aslant.
The paper is fed in at a slant. Load the paper correctly. For detailsabout loading paper, see page 45"Loading Paper".
Misfeeds occur frequently. The number of sheets loadedexceeds the capacity of themachine.
Load paper only as high as the upperlimit markings on the side fences of thepaper tray, or the markings on thepaper guides of the bypass tray.
Misfeeds occur frequently. The paper tray's side fencesare set too tightly.
Push the side fences lightly, and thenreset them.
Misfeeds occur frequently. The paper is damp. Use paper that has been stored in therecommended temperature andhumidity conditions. For details aboutthe paper storage conditions werecommend, see "Paper Storage",Operating Instructions.
Misfeeds occur frequently. The paper is too thick or thin. Use recommended paper. For detailsabout recommended paper, seepage 56 "Recommended Paper Sizesand Types".
Other Printing Problems
93

Problem Cause Solution
Misfeeds occur frequently. The paper is wrinkled or hasbeen folded or creased.
• Use recommended paper. Fordetails about recommendedpaper, see page 56"Recommended Paper Sizes andTypes".
• Use paper that has been stored inthe recommended temperatureand humidity conditions. Fordetails about the proper way tostore paper, see "Paper Storage",Operating Instructions.
Misfeeds occur frequently. Printed paper is being used. Do not load sheets that have alreadybeen copied or printed.
Misfeeds occur frequently. Sheets are sticking together. Fan the sheets thoroughly beforeloading them. Alternatively, feed thesheets into the machine one at a time.
Sheets are fed in together,resulting in jams.
Sheets are sticking together. Fan the sheets thoroughly beforeloading them. Alternatively, feed thesheets into the machine one at a time.
Printed paper becomescreased.
The paper is damp. Use paper that has been stored in therecommended temperature andhumidity conditions. For details aboutthe paper storage conditions werecommend, see "Paper Storage",Operating Instructions.
Printed paper becomescreased.
The paper is too thin. Use recommended paper. For detailsabout recommended paper, seepage 56 "Recommended Paper Sizesand Types".
Edges of sheets are creased. The paper is damp. Use paper that has been stored in therecommended temperature andhumidity conditions. For details aboutthe paper storage conditions werecommend, see "Paper Storage",Operating Instructions.
3. Troubleshooting
94

Problem Cause Solution
Edges of sheets are creased. You are using non-recommended paper.
Use recommended paper. For detailsabout recommended paper, seepage 56 "Recommended Paper Sizesand Types".
Duplex printing cannot beapplied.
You have loaded paper thatis too thick or thin.
Change the paper. For details aboutpaper weight that can be used forduplex printing, see "Specifications forthe Main Unit", Operating Instructions.
Duplex printing cannot beapplied.
You have selected a papertray that is not set for duplexprinting.
Change the setting for "Apply Duplex"in "Tray Paper Settings" to enableduplex printing for the paper tray. Fordetails about setting "Apply Duplex",see "Tray Paper Settings", OperatingInstructions.
Duplex printing cannot beapplied.
You have selected a papertype that cannot be used forduplex printing.
In "Tray Paper Settings", select a papertype that can be used for duplexprinting. For details about setting"Paper Type", see "Tray PaperSettings", Operating Instructions.
White stripes appear on theOHP transparency.
Fragments of paper arestuck to the OHPtransparency.
Use a dry cloth to wipe any paperfragments off the back of the OHPtransparency.
Other printing problems
Problem Cause Solution
It takes a long time tocomplete a print job.
Sleep mode or Fusing UnitOff mode might be set.
The machine requires time to warm upif it has been in Sleep mode or FusingUnit Off mode. For details about Sleepmode and Fusing Unit Off mode, seepage 31 "Saving Energy".
Other Printing Problems
95
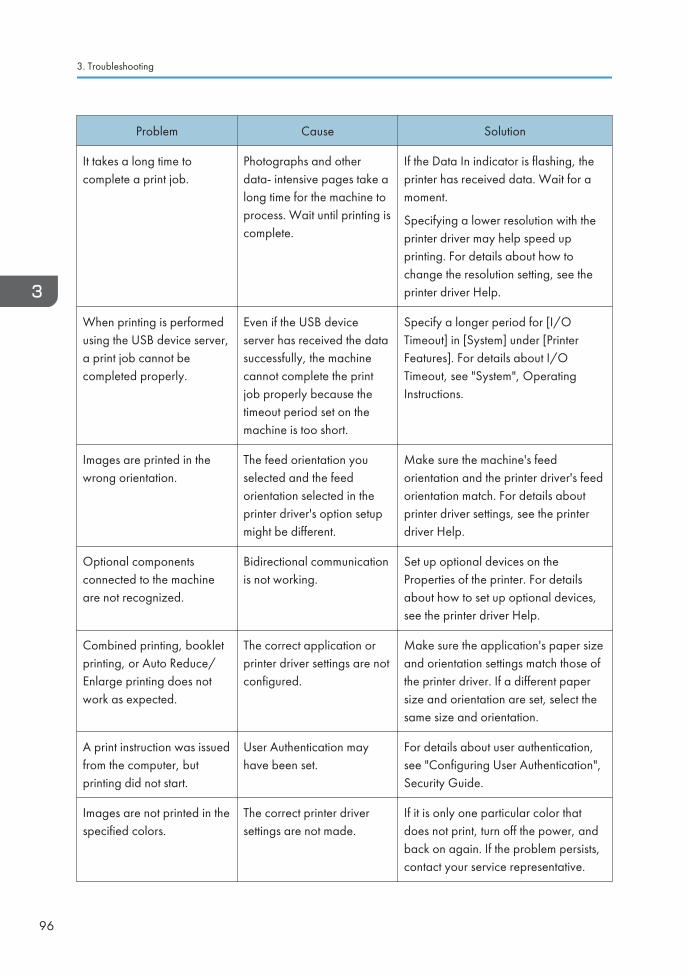
Problem Cause Solution
It takes a long time tocomplete a print job.
Photographs and otherdata- intensive pages take along time for the machine toprocess. Wait until printing iscomplete.
If the Data In indicator is flashing, theprinter has received data. Wait for amoment.
Specifying a lower resolution with theprinter driver may help speed upprinting. For details about how tochange the resolution setting, see theprinter driver Help.
When printing is performedusing the USB device server,a print job cannot becompleted properly.
Even if the USB deviceserver has received the datasuccessfully, the machinecannot complete the printjob properly because thetimeout period set on themachine is too short.
Specify a longer period for [I/OTimeout] in [System] under [PrinterFeatures]. For details about I/OTimeout, see "System", OperatingInstructions.
Images are printed in thewrong orientation.
The feed orientation youselected and the feedorientation selected in theprinter driver's option setupmight be different.
Make sure the machine's feedorientation and the printer driver's feedorientation match. For details aboutprinter driver settings, see the printerdriver Help.
Optional componentsconnected to the machineare not recognized.
Bidirectional communicationis not working.
Set up optional devices on theProperties of the printer. For detailsabout how to set up optional devices,see the printer driver Help.
Combined printing, bookletprinting, or Auto Reduce/Enlarge printing does notwork as expected.
The correct application orprinter driver settings are notconfigured.
Make sure the application's paper sizeand orientation settings match those ofthe printer driver. If a different papersize and orientation are set, select thesame size and orientation.
A print instruction was issuedfrom the computer, butprinting did not start.
User Authentication mayhave been set.
For details about user authentication,see "Configuring User Authentication",Security Guide.
Images are not printed in thespecified colors.
The correct printer driversettings are not made.
If it is only one particular color thatdoes not print, turn off the power, andback on again. If the problem persists,contact your service representative.
3. Troubleshooting
96

Problem Cause Solution
Color images are printed inblack and white.
No color print settings aremade on the printer driver.
Change the "Color/ Black and White:"setting on the printer driver. For detailsabout how to change the "Color/Black and White:" setting, see theprinter driver Help.
The paper bound by staple-free stapling comes apart.
An image is printed in thestapling position.
Adjust the position of the image on theoriginal so that it is not printed in thestapling position.
PDF files cannot print or PDFdirect printing cannot beperformed.
PDF files are password-protected.
To print password-protected PDF files,enter the password in the [PDF Menu]or on Web Image Monitor. For detailsabout printing PDF files, see "PDFMenu", Operating Instructions or WebImage Monitor Help.
PDF files cannot print or PDFdirect printing cannot beperformed.
PDF files cannot print if theyare print-disabled in PDF filesecurity setting.
Change the PDF file security setting.
PDF direct print producesgarbled characters.
Fonts were not embedded. Embed fonts in the PDF file you want toprint, and then print.
Printing did not start eventhough the specified printtime passed.
[Jobs Not Printed As Machn.Was Off] was set to [Do notPrint] in [Printer Features],but when the specifiedprinting time came, thepower was turned off.
Set [Jobs Not Printed As Machn. WasOff] to [Print When Machine On] in[Printer Features].
Printing did not start eventhough the specified printtime passed.
The time set on the machineor computer is incorrect.
Set the correct time on the machine orcomputer.
It takes a long time to startprinting.
The machine accesses theUSB interface when itreceives a print job from theUSB device server's network.In this case, it takes longerthan usual to start a print jobreceived from the machine'snetwork.
Specify a shorter period for [I/OTimeout] in [System] under [PrinterFeatures]. For details about I/OTimeout, see "System", OperatingInstructions.
Other Printing Problems
97
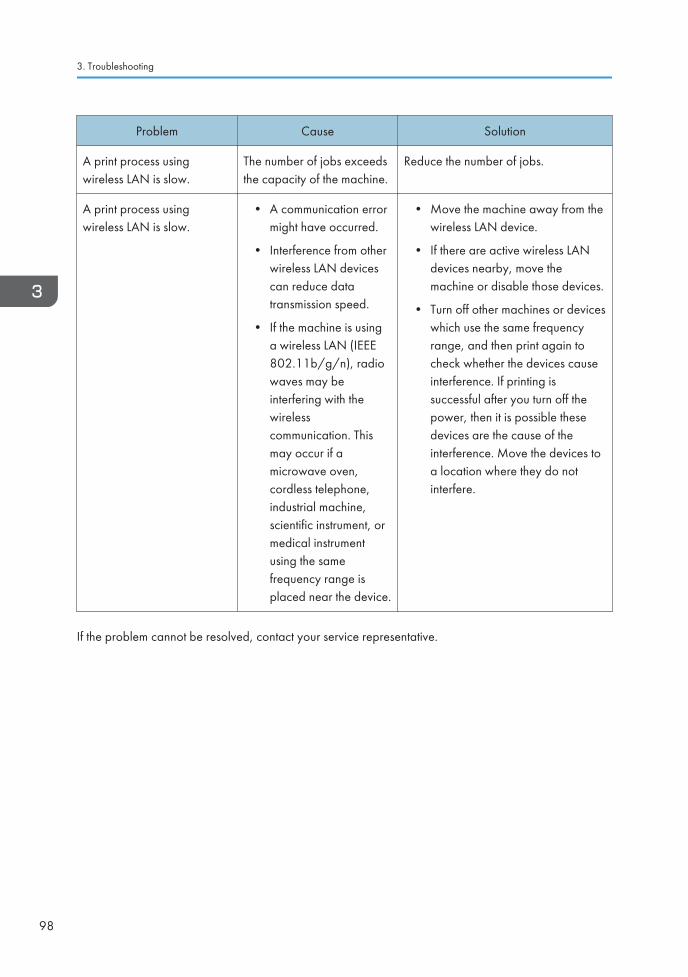
Problem Cause Solution
A print process usingwireless LAN is slow.
The number of jobs exceedsthe capacity of the machine.
Reduce the number of jobs.
A print process usingwireless LAN is slow.
• A communication errormight have occurred.
• Interference from otherwireless LAN devicescan reduce datatransmission speed.
• If the machine is usinga wireless LAN (IEEE802.11b/g/n), radiowaves may beinterfering with thewirelesscommunication. Thismay occur if amicrowave oven,cordless telephone,industrial machine,scientific instrument, ormedical instrumentusing the samefrequency range isplaced near the device.
• Move the machine away from thewireless LAN device.
• If there are active wireless LANdevices nearby, move themachine or disable those devices.
• Turn off other machines or deviceswhich use the same frequencyrange, and then print again tocheck whether the devices causeinterference. If printing issuccessful after you turn off thepower, then it is possible thesedevices are the cause of theinterference. Move the devices toa location where they do notinterfere.
If the problem cannot be resolved, contact your service representative.
3. Troubleshooting
98

When PictBridge Printing Does Not WorkProblem Causes Solutions
PictBridge is not available. There is a problem with theUSB connection or thePictBridge settings.
Use the following procedure to checkthe connection and settings:
1. Disconnect the USB cable, andthen connect it again.
2. Check the PictBridge settings areenabled.
3. Disconnect the USB cable, andturn off the machine, and then turnthe machine back on. When the[Home] screen appears, connectthe USB cable again.
PictBridge is not available. The USB cable is connectedincorrectly.
Connect the USB cable to the USBHost Interface.
When two or more digitalcameras are connected, thesecond and subsequentcameras are not recognized.
You have connected multipledigital cameras.
Connect one digital camera only.
Printing is disabled. The number of originalsexceeds the maximumnumber of pages that can beprinted at a time.
The maximum print number at a time is999. Specify 999 or less as the printnumber, and then print again.
Printing is disabled. There is no paper of thespecified size remaining.
There is no paper of the specified sizeremaining.
If you want to use paper whose size isdifferent from the specified size,perform Form Feed. To cancel printing,perform Job Cancel.
Printing is disabled. The paper size setting for thistray cannot be specified onthe machine.
Select the paper size setting that canbe used on the machine.
When PictBridge Printing Does Not Work
99

Removing Jammed Paper
• The inside of the machine could be very hot. Do not touch the parts with a label indicating the"hot surface." Otherwise, an injury might occur.
• Some of this machine's internal components get very hot. For this reason, take care whenremoving misfed paper. Not doing so could result in burns.
• Keep your hands clear of the booklet finisher tray when removing misfed paper, pulling out orpushing in the finisher's staple unit. You can trap and injure your fingers if you do not.
• When removing jammed paper, make sure not to trap or injure your fingers.
• To prevent misfeeds, do not leave any torn scraps of paper inside the machine.
• If paper jams continue to occur, see page 75 "When You Have Problems Operating the Machine"and page 90 "Other Printing Problems" for details about how to solve the problem. If the actionsrecommended in this manual fail to eliminate the problem, contact your service representative.
• If the error message remains displayed even after you remove misfed paper, fully open the frontcover, and then close it.
• When removing jammed paper, you can touch only those areas explicitly indicated in the manual.
• Do not remove the fusing unit. Doing so will result in loss of print quality.
• To remove paper that has not been fed into the fixing section correctly, remove the jammed paperthrough the underside of the fusing unit. If the jammed paper cannot be removed through theunderside of the fusing unit, remove it from the top.
• If you are using the banner paper guide tray attached to the bypass tray, the paper loaded in thebypass tray may fall out when you remove jammed paper. First remove the paper loaded in thebypass tray, and then open the right cover.
• When clearing paper jams from the mailbox, open the right cover all the way and hold it with yourhand. Releasing the right cover while it is open may damage the band that holds the right cover.
• Inside the finisher, or inside the front cover, there are stickers or sheets explaining how to removemisfed paper.
• If a detailed removal instruction appears on the right of the screen, follow it.
• You can also use the procedure indicated in the [Check Status] screen to remove jammed paper.
3. Troubleshooting
100

Locating Jammed Paper
If a misfeed occurs, remove the jammed paper by following the procedures indicated in the animationthat appears on the screen and the sticker or sheet inside the front cover.
A misfeed has occurred in the place corresponding to the letter displayed on the control panel.
DRA285
1. Remove the jammed paper by following the procedures that are displayed on the screen.
• When [Next] or [Previous] is displayed on the screen.
After each step is complete, press [Next]. To go back to the previous step, press [Previous].
2. When the jammed paper is removed, restore the machine to the original state.
• Multiple paper misfeed locations may be indicated at the same time. When this happens, check allthe areas indicated.
• If there is no misfed paper in the area you check first, see the other areas that are indicated.
Removing Jammed Banner Sheets
Remove the jammed banner sheet by following the procedures described below.
Banner sheets are loaded into the banner paper guide tray that is attached to the bypass tray.
Removing Jammed Paper
101
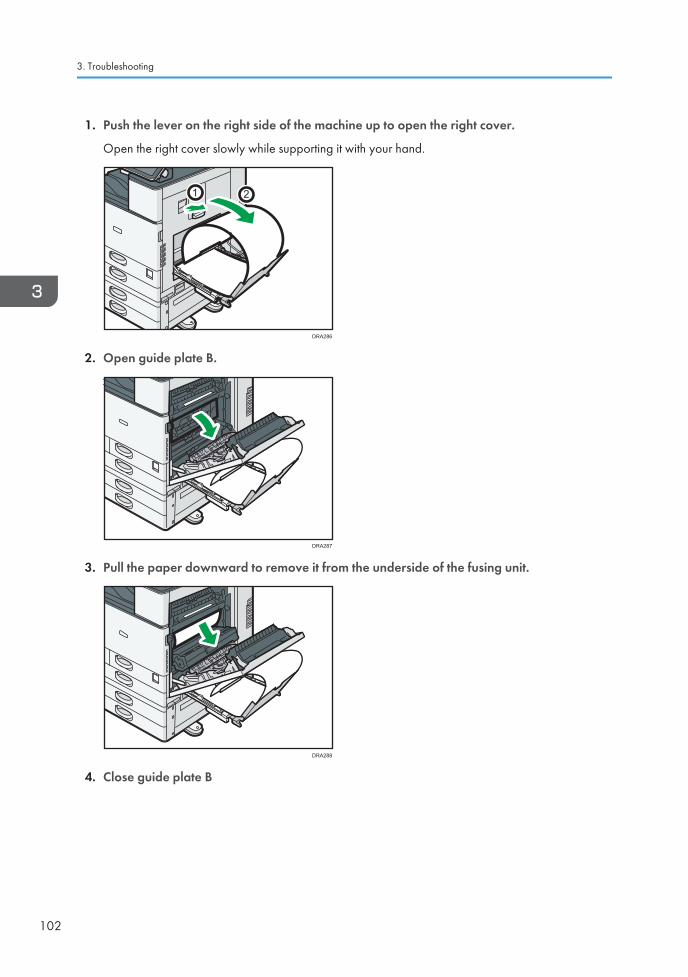
1. Push the lever on the right side of the machine up to open the right cover.
Open the right cover slowly while supporting it with your hand.
21
DRA286
2. Open guide plate B.
DRA287
3. Pull the paper downward to remove it from the underside of the fusing unit.
DRA288
4. Close guide plate B
3. Troubleshooting
102
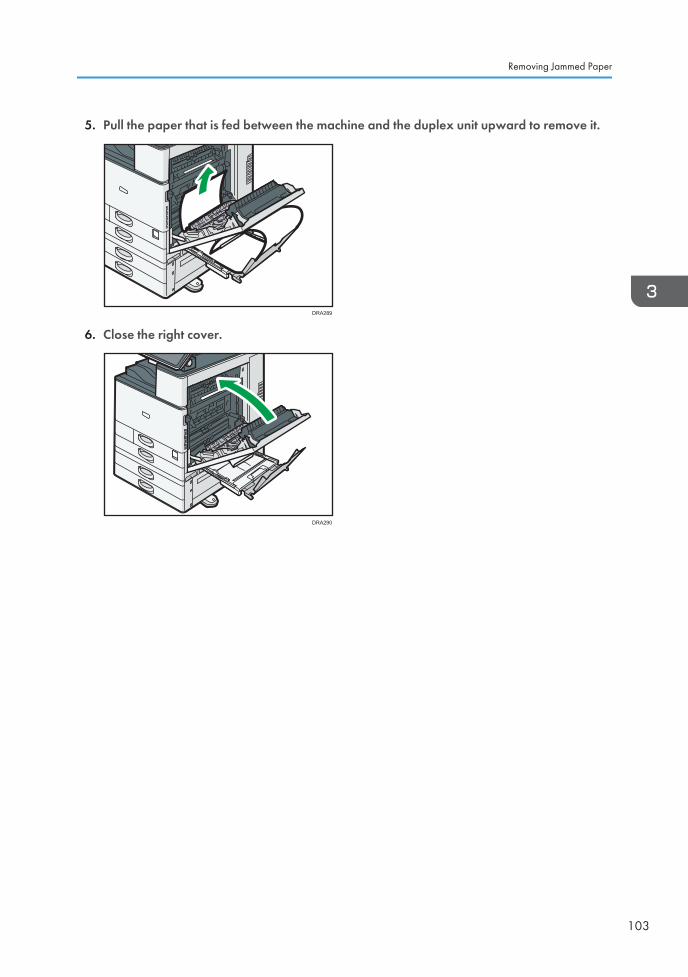
5. Pull the paper that is fed between the machine and the duplex unit upward to remove it.
DRA289
6. Close the right cover.
DRA290
Removing Jammed Paper
103

3. Troubleshooting
104

4. Information for This PrinterThis chapter describes environmental precautions and regulations.
Information on Environmental Regulations
ENERGY STAR Program
ENERGY STAR® Program Requirements for Imaging Equipment
This company is a participant in the ENERGY STAR® Program.
This machine is compliant with the regulations specified by theENERGY STAR® Program.
The ENERGY STAR® Program Requirements for Imaging Equipment encourage energy conservationby promoting energy efficient computers and other office equipment.
The program backs the development and dissemination of products that feature energy savingfunctions.
It is an open program in which manufacturers participate voluntarily.
Targeted products are computers, monitors, printers, facsimiles, copiers, scanners, and multi-functiondevices. Energy Star standards and logos are internationally uniform.
• For details about the "default delay time", see page 105 "Energy Saving Functions".
Energy Saving Functions
To reduce its power consumption, this machine has the following functions:
Sleep mode
• If this machine remains idle for a specified period or when [Energy Saver] ( ) is pressed, itenters Sleep mode to further reduce its electrical consumption.
105
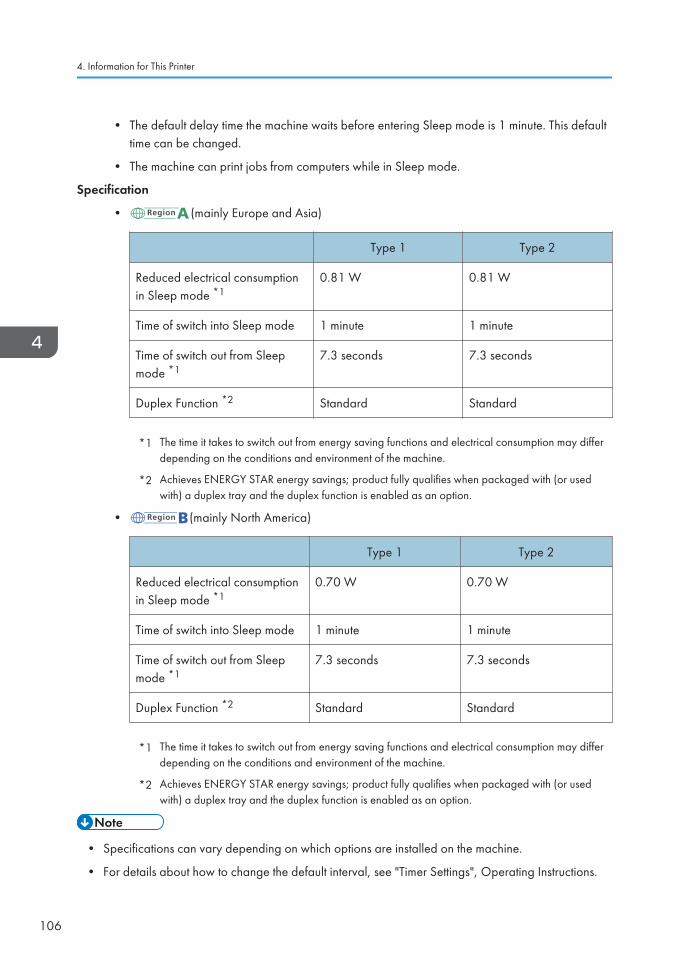
• The default delay time the machine waits before entering Sleep mode is 1 minute. This defaulttime can be changed.
• The machine can print jobs from computers while in Sleep mode.
Specification
• (mainly Europe and Asia)
Type 1 Type 2
Reduced electrical consumptionin Sleep mode *1
0.81 W 0.81 W
Time of switch into Sleep mode 1 minute 1 minute
Time of switch out from Sleepmode *1
7.3 seconds 7.3 seconds
Duplex Function *2 Standard Standard
*1 The time it takes to switch out from energy saving functions and electrical consumption may differdepending on the conditions and environment of the machine.
*2 Achieves ENERGY STAR energy savings; product fully qualifies when packaged with (or usedwith) a duplex tray and the duplex function is enabled as an option.
• (mainly North America)
Type 1 Type 2
Reduced electrical consumptionin Sleep mode *1
0.70 W 0.70 W
Time of switch into Sleep mode 1 minute 1 minute
Time of switch out from Sleepmode *1
7.3 seconds 7.3 seconds
Duplex Function *2 Standard Standard
*1 The time it takes to switch out from energy saving functions and electrical consumption may differdepending on the conditions and environment of the machine.
*2 Achieves ENERGY STAR energy savings; product fully qualifies when packaged with (or usedwith) a duplex tray and the duplex function is enabled as an option.
• Specifications can vary depending on which options are installed on the machine.
• For details about how to change the default interval, see "Timer Settings", Operating Instructions.
4. Information for This Printer
106

• Depending on which embedded software application is installed on it, the machine might takelonger than indicated to enter Sleep mode.
User Information on Electrical and Electronic Equipment (mainlyEurope)
Users in the countries where this symbol shown in this section has been specified innational law on collection and treatment of E-waste
Our Products contain high quality components and are designed to facilitate recycling.
Our products or product packaging are marked with the symbol below.
The symbol indicates that the product must not be treated as municipal waste. It must be disposed ofseparately via the appropriate return and collection systems available. By following these instructionsyou ensure that this product is treated correctly and help to reduce potential impacts on the environmentand human health, which could otherwise result from inappropriate handling. Recycling of productshelps to conserve natural resources and protect the environment.
For more detailed information on collection and recycling systems for this product, please contact theshop where you purchased it, your local dealer or sales/service representatives.
All Other Users
If you wish to discard this product, please contact your local authorities, the shop where you bought thisproduct, your local dealer or sales/service representatives.
For Turkey only
Information on Environmental Regulations
107

Note for the Battery and/or Accumulator Symbol (For EU countries only)(mainly Europe)
In accordance with the Battery Directive 2006/66/EC Article 20 Information for end-users Annex II,the above symbol is printed on batteries and accumulators.
This symbol means that in the European Union, used batteries and accumulators should be disposed ofseparately from your household waste.
In the EU, there are separate collection systems for not only used electrical and electronic products butalso batteries and accumulators.
Please dispose of them correctly at your local community waste collection/recycling centre.
Contact your sales or service representative to change the battery.
Environmental Advice for Users (mainly Europe)
Users in the EU, Switzerland and Norway
Consumables yield
Please refer to either the User's Manual for this information or the packaging of the consumable.
Recycled paper
The machine can use recycled paper which is produced in accordance with European standardEN 12281:2002 or DIN 19309. For products using EP printing technology, the machine can printon 64 g/m2 paper, which contains less raw materials and represents a significant resourcereduction.
Duplex printing (if applicable)
Duplex printing enables both sides of a sheet of paper to be used. This saves paper and reducesthe size of printed documents so that fewer sheets are used. We recommend that this feature isenabled whenever you print.
4. Information for This Printer
108
Toner and ink cartridge return program
Toner and ink cartridge for recycling will be accepted free of charge from users in accordance withlocal regulations.
For details about the return program, please refer to the Web page below or consult your serviceperson.
https://www.ricoh-return.com/
Energy efficiency
The amount of electricity a machine consumes depends as much on its specifications as it does onthe way you use it. The machine is designed to allow you to reduce electricity costs by switching toReady mode after it prints the last page. If required, it can immediately print again from this mode.If no additional prints are required and a specified period of time passes, the device switches to anenergy saving mode.
In these modes, the machine consumes less power (watts). If the machine is to print again, it needsa little longer to return from an energy saving mode than from Ready mode.
For maximum energy savings, we recommend that the default setting for power management isused.
Products that comply with the Energy Star requirement are always energy efficient.
Notes to users in the state of California (Notes to Users in USA) (mainly North America)
Perchlorate Material - special handling may apply. See: www.dtsc.ca.gov/hazardouswaste/perchlorate
Information on Environmental Regulations
109

TrademarksAdobe, PostScript, and PostScript 3 are either registered trademarks or trademarks of Adobe SystemsIncorporated in the United States and/or other countries.
The Bluetooth® word mark and logos are registered trademarks owned by Bluetooth SIG, Inc. and anyuse of such marks by Ricoh Company, Ltd. is under license.
Firefox and Thunderbird are registered trademarks of the Mozilla Foundation.
Google and Chrome are trademarks of Google Inc.
JAWS® is a registered trademark of Freedom Scientific, Inc., St. Petersburg, Florida and/or othercountries.
OS X and Safari are trademarks of Apple Inc., registered in the U.S. and other countries.
Microsoft, Windows, Windows Server, Windows Vista, and Internet Explorer are either registeredtrademarks or trademarks of Microsoft Corp. in the United States and/or other countries.
PictBridge is a trademark.
This product includes RSA BSAFE® Cryptographic software of EMC Corporation. RSA and BSAFE areregistered trademarks or trademarks of EMC Corporation in the United States and other countries.
The proper names of Internet Explorer 6, 7, and 8 are as follows:
• Microsoft® Internet Explorer® 6
• Windows® Internet Explorer® 7
• Windows® Internet Explorer® 8
The proper names of the Windows operating systems are as follows:
• The product names of Windows Vista are as follows:
Microsoft® Windows Vista® Ultimate
Microsoft® Windows Vista® Business
Microsoft® Windows Vista® Home Premium
Microsoft® Windows Vista® Home Basic
Microsoft® Windows Vista® Enterprise
• The product names of Windows 7 are as follows:
Microsoft® Windows® 7 Home Premium
4. Information for This Printer
110

Microsoft® Windows® 7 Professional
Microsoft® Windows® 7 Ultimate
Microsoft® Windows® 7 Enterprise
• The product names of Windows 8.1 are as follows:
Microsoft® Windows® 8.1
Microsoft® Windows® 8.1 Pro
Microsoft® Windows® 8.1 Enterprise
• The product names of Windows 10 are as follows:
Microsoft® Windows® 10 Home Premium
Microsoft® Windows® 10 Pro
Microsoft® Windows® 10 Enterprise
Microsoft® Windows® 10 Education
• The product names of Windows Server 2008 are as follows:
Microsoft® Windows Server® 2008 Standard
Microsoft® Windows Server® 2008 Enterprise
• The product names of Windows Server 2008 R2 are as follows:
Microsoft® Windows Server® 2008 R2 Standard
Microsoft® Windows Server® 2008 R2 Enterprise
• The product names of Windows Server 2012 are as follows:
Microsoft® Windows Server® 2012 Foundation
Microsoft® Windows Server® 2012 Essentials
Microsoft® Windows Server® 2012 Standard
• The product names of Windows Server 2012 R2 are as follows:
Microsoft® Windows Server® 2012 R2 Foundation
Microsoft® Windows Server® 2012 R2 Essentials
Microsoft® Windows Server® 2012 R2 Standard
• The product names of Windows Server 2016 are as follows:
Microsoft® Windows Server® 2016 Datacenter
Microsoft® Windows Server® 2016 Standard
Microsoft® Windows Server® 2016 Essentials
Microsoft® Windows Server® 2016 MultiPoint® Premium Server
Other product names used herein are for identification purposes only and might be trademarks of theirrespective companies. We disclaim any and all rights to those marks.
Trademarks
111

Microsoft product screen shots reprinted with permission from Microsoft Corporation.
4. Information for This Printer
112

INDEXA
Adding toner..........................................................38
Auxiliary tray on the paper reversal location..... 11
B
Banner Paper Guide Tray.....................................16
Beeping pattern..................................................... 71
Booklet Finisher SR3220...................................... 17
Bridge unit..............................................................17
Bypass tray......................................... 12, 47, 60, 68
C
Cannot print........................................................... 87
Changing the display language.......................... 20
Check Status.......................................................... 73
Control panel.................................................. 11, 19
D
Data In indicator....................................................19
Display panel.........................................................19
Drag....................................................................... 27
E
ENERGY STAR Program.....................................105
Envelopes...............................................................65
Environmental advice for users.......................... 108
Error log................................................................. 83
Error report.............................................................83
Extender................................................................. 12
External options..................................................... 16
F
Finisher SR3210....................................................17
Finisher SR3230....................................................17
Flick.........................................................................27
Front cover............................................................. 11
H
Home screen................................................... 21, 28
How to Read the Manuals......................................7
I
Icon.................................................................. 21, 28
Indicator lamp........................................................73
Information on environmental regulations.........105
Internal Multi-fold unit...........................................17
Internal options...................................................... 17
Internal tray 1........................................................ 12
L
Label paper............................................................56
Large capacity tray............................................... 16
LCT...................................................... 16, 52, 53, 62
Loading paper....................................45, 47, 52, 53
Logging in the machine.........................................86
Long tap................................................................. 27
Lower paper tray...................................... 12, 16, 17
Lower right cover...................................................13
M
Mailbox..................................................................17
Main power indicator........................................... 19
Main power switch...................................11, 30, 31
Manuals................................................................... 4
Message................................ 75, 80, 82, 83, 85, 86
Model-specific information.....................................8
N
Note for the battery and/or accumulator symbol................................................................................108
Notes to users in the state of California.............109
O
OHP transparencies.............................................. 56
Options.............................................................. 9, 16
Orientation-fixed paper........................................54
Other printing problems........................................90
Output jogger........................................................ 17
P
Paper capacity.......................................................56
Paper guides..........................................................12
Paper reversal location......................................... 11
Paper size...............................................................56
Paper thickness...................................................... 63
Paper tray..................................................11, 45, 56
Paper type..............................................................56
Paper weight..........................................................56
PictBridge............................................................... 99
Pinch-in...................................................................26
113

Pinch-out.................................................................26
Printer.........................................................80, 82, 83
Privilege..................................................................86
Problem.................................................................. 75
R
Recommended paper........................................... 56
Region A...................................................................8Region B................................................................... 8
Removing jammed paper................................... 100
Replacing consumables........................................ 38
Replenishing consumables....................................38
Right cover............................................................. 12
S
Shortcut icon....................................................21, 28
Sleep mode......................................................... 105
Status icon..............................................................72
Status indicator...................................................... 19
Symbols.................................................................... 7
T
Thick paper............................................................ 65
Trademarks.......................................................... 110
Translucent paper..................................................56
Tray.........................................................................11
Tray 1..................................................................... 56
Tray 2..................................................................... 57
Tray 3..................................................16, 52, 58, 62
Tray 4..................................................................... 58
Tray 5..................................................................... 58
Turning off the power............................................ 31
Turning on the power............................................ 30
Two-sided paper................................................... 54
U
User information on electrical and electronicequipment............................................................ 107
V
Vents.................................................................12, 13
W
Web Image Monitor.......................................35, 36
Widget................................................................... 29
114

MEMO
115

MEMO
116 EN GB EN US EN AU M0AJ-7110B

© 2016, 2018

M0AJ-7110BAUENUSENGBEN
![Skaffold - storage.googleapis.com · [getting-started getting-started] Hello world! [getting-started getting-started] Hello world! [getting-started getting-started] Hello world! 5](https://img.pdfslide.net/doc/110x75/5ec939f2a76a033f091c5ac7/skaffold-getting-started-getting-started-hello-world-getting-started-getting-started.jpg)