Embed Size (px)
Citation preview
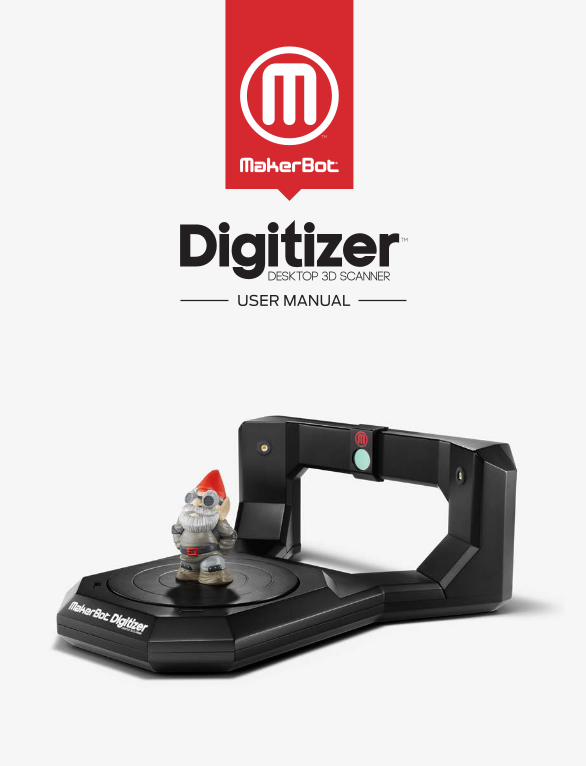
USER MANUAL

WELCOME, LET’S GET STARTED 3
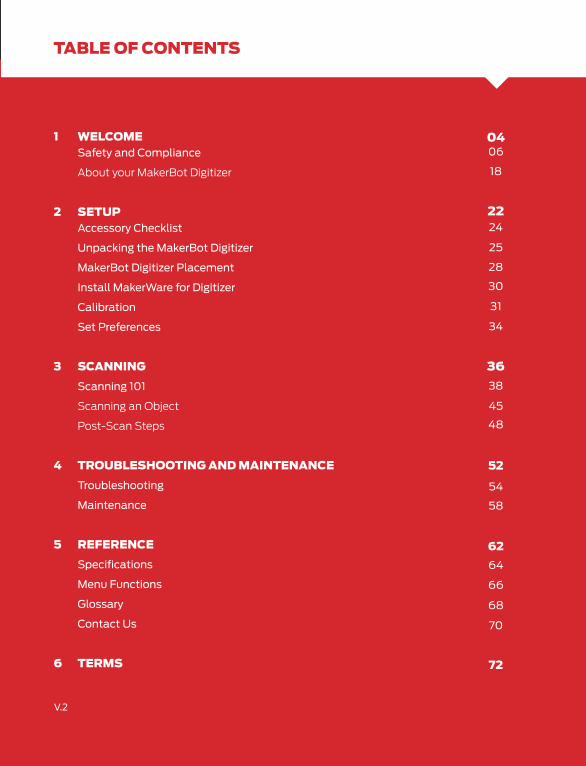
1 WELCOME Safety and Compliance
About your MakerBot Digitizer
2 SETUP Accessory Checklist
Unpacking the MakerBot Digitizer
MakerBot Digitizer Placement
Install MakerWare for Digitizer
Calibration
Set Preferences
3 SCANNING
Scanning 101
Scanning an Object
Post-Scan Steps
4 TROUBLESHOOTING AND MAINTENANCE
Troubleshooting
Maintenance
5 REFERENCE
Specifications
Menu Functions
Glossary
Contact Us
6 TERMS
TABLE OF CONTENTS
V.2
0406
18
2224
25
28
30
31
34
36
38
45
52
54
58
62
64
66
68
70
72
48

1
Welcome to the Leading Edge of the Next Industrial Revolution!
Let’s Get Started.
Hi there,
When we started MakerBot in 2009, one of the biggest hurdles to
3D printing was finding great 3D models. Now you hold one of the
keys to crossing this hurdle, the MakerBot Digitizer Desktop 3D Scanner.
The engineers here at MakerBot had a big task: build a machine that
scans physical objects quickly and always delivers clean 3D models
with no holes or extra pieces floating around. We also knew the entire
process had to be seamless and simple, so that creative people could
just keep creating.
After some calibration, the scan process requires just two clicks, and
you’ll have a complete, watertight 3D model in as little as 12 minutes.
Not everything will scan perfectly; we still have to abide by the laws of
physics. Read through this manual and check makerbot.com/digitizer
so that you understand how the technology works and how to get
good results.
People who own MakerBot Desktop 3D Printers tend to see the world
with MakerBot goggles. We’re always thinking of what we can create
next. With the MakerBot Digitizer Desktop 3D Scanner, you will start to
see all the things around you as the inspiration for something new.
We at MakerBot can’t wait to see what you create next.
Let’s remake our world together.
Bre PettisCEO, MAKERBOT
6
SAFETY AND COMPLIANCE
FCC DECLARATION
This equipment has been tested and found to comply with the limits for a Class B digital device, pursuant
to Part 15 of the FCC rules. These limits are designed to provide reasonable protection against harmful
interference in a residential installation. This equipment generates, uses and can radiate radio frequency
energy and, if not installed and used in accordance with the instructions, may cause harmful interference
to radio communications. However, there is no guarantee that interference will not occur in a particular
installation. If this equipment does cause harmful interference to radio or television reception, which
can be determined by turning the equipment off and on, the user is encouraged to try to correct the
interference by one or more of the following measures:
• Reorient or relocate the receiving antenna.
• Increase the separation between the equipment and the receiver.
• Connect the equipment into an outlet on a circuit different from that to which the receiver is connected.
• Consult the dealer or an experienced radio/TV technician for help.
You may also find helpful the following booklet, prepared by the FCC: “How to Identify and Resolve Radio-
TV Interference Problems.” This booklet is available from the U.S. Government Printing Office, Washington
D.C. 20402.
Changes and Modifications not expressly approved by the manufacturer or registrant of this equipment
can void your authority to operate this equipment under Federal Communications Commissions rules.
MANUFACTURER
MakerBot Industries, LLC
One MetroTech Center
21st Floor
Brooklyn, NY 11201
347.334.6800
Now, before we get going, let’s review some important safety information.

WELCOME, LET’S GET STARTED 7
SAFETY AND COMPLIANCE
WELCOME, LET’S GET STARTED
This safety alert symbol precedes each safety message in this manual. This symbol
indicates a potential safety hazard that could harm you or others or cause product or
property damage.
Warning: If the MakerBot Digitizer gets wet, immediately disconnect it from power and
allow it to dry completely before attempting to use it again.
Caution: Handle the MakerBot Digitizer with care; it includes sensitive electronic and
optical components that may be damaged if it is bumped or dropped.
Caution: Avoid excessive humidity or temperatures. When the MakerBot Digitizer is in
use, avoid temperatures above 32° C or below 0° C. Do not store the MakerBot Digitizer
in areas where temperatures exceed 32° C or fall below 0° C.
Important safety information is contained in this manual. Please read the following messages thoroughly before using the MakerBot Digitizer™ Desktop 3D Scanner.
To use the MakerBot Digitizer safely, adhere to the following guidelines:
• Do not touch the camera filter or camera lens; oil or smudges may decrease the
MakerBot Digitizer’s performance.
• Do not touch the laser housing while the MakerBot Digitizer is powered on.
• Do not operate the MakerBot Digitizer if any part of the machine is cracked or
otherwise damaged.
• Only use the provided power supply with the MakerBot Digitizer.
• Do not use power or USB cables if damaged.
• Do not force USB or Power connector into place.
• The socket-outlet must be installed near the equipment and must be easily accessible.
8
SAFETY AND COMPLIANCE
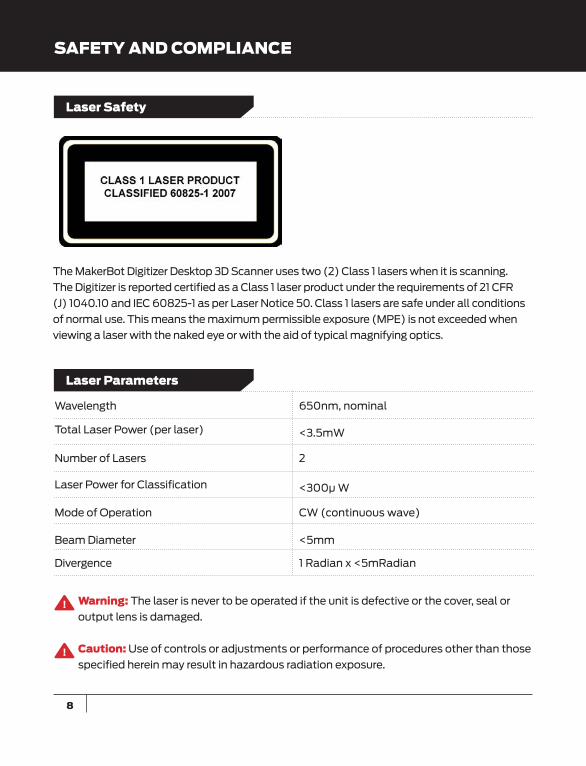
The MakerBot Digitizer Desktop 3D Scanner uses two (2) Class 1 lasers when it is scanning.
The Digitizer is reported certified as a Class 1 laser product under the requirements of 21 CFR
(J) 1040.10 and IEC 60825-1 as per Laser Notice 50. Class 1 lasers are safe under all conditions
of normal use. This means the maximum permissible exposure (MPE) is not exceeded when
viewing a laser with the naked eye or with the aid of typical magnifying optics.
Wavelength
Total Laser Power (per laser)
Number of Lasers
Laser Power for Classification
Mode of Operation
Beam Diameter
Divergence
650nm, nominal
<3.5mW
2
<300μ W
CW (continuous wave)
<5mm
1 Radian x <5mRadian
Warning: The laser is never to be operated if the unit is defective or the cover, seal or
output lens is damaged.
Caution: Use of controls or adjustments or performance of procedures other than those
specified herein may result in hazardous radiation exposure.
Laser Safety
Laser Parameters

WELCOME, LET’S GET STARTED 9
SAFETY AND COMPLIANCE
Caution: Do not open the MakerBot Digitizer’s laser modules or attempt to repair them.
Service on your MakerBot Digitizer’s lasers may only be performed by authorized, factory
trained technicians. To report a problem with your MakerBot Digitizer or to arrange for
service, email [email protected]
All maintenance tasks for the MakerBot Digitizer must be performed with the power
turned off.
UNDERSIDE OF THE MAKERBOT DIGITIZER
Service
10
SÉCURITÉ ET RESPECT DES NORMES
DÉCLARATION DE CONFORMITÉ FCC
Cet appareil a été contrôlé et déclaré conforme aux limites relatives aux appareils numériques de
catégorie B, conformément à la section 15 des directives FCC. Ces limites sont conçues pour assurer une
protection raisonnable contre les interférences nuisibles dans une installation résidentielle. Cet appareil
produit, utilise et peut émettre de l’énergie radio-électrique et, s’il n’est pas installé et utiisé conformément
aux instructions, peut causer des interférences nuisibles aux communications radio. Cependant, il n’est
pas garanti qu’il n’y aura aucune interférence pour une installation donnée. Si cet appareil cause des
interférences nuisibles à la reception des signaux de radio ou de télévision, ce qui peut se déterminer en
éteignant et en rallumant l’appareil, il est conseillé à l’utilisateur d’essayer de corriger les interférences à
l’aide d’une ou plusieurs des mesures suivantes:
• Réorienter ou repositionner l’antenne de réception.
• Augmenter la distance existant entre l’appareil et le récepteur.
• Connecter l’appareil à une prise d’un circuit électrique différent de celui auquel le récepteur
est connecté.
• Contacter le revendeur ou un technicien radio/TV qualifié pour toute assistance.
Vous pouvez également trouver utile le fascicule suivant, préparé par la FCC : « Comment identifier et
résoudre les problèmes d’interférence Radio-TV ». Ce fascicule est disponible auprès de l’imprimerie
nationale des Etats-Unis, Washington D.C. 20402.
Les changements et modifications apportés à cet appareil sans l’autorisation expresse du fabricant ou
du déclarant peuvent annuler votre autorisation à utiliser cet appareil aux termes du règlement des la
Commission Fédérale des Communications.
MANUFACTURER
MakerBot Industries, LLC
One MetroTech Center
21st Floor
Brooklyn, NY 11201
347.334.6800
WELCOME, LET’S GET STARTED 11
SÉCURITÉ ET RESPECT DES NORMES
Ce symbole d’avertissement de sécurité précède tout message de sécurité de ce manuel.
Ce symbole indique un risque potentiel pour la sécurité, qui pourrait vous blesser, blesser un
tiers, ou causer des avaries ou des dommages matériels.
Avertissement: Si le MakerBot Digitizer vient à se mouiller, déconnectez-le
immédiatement du courant électrique et laissez-le sécher complètement avant
d’essayer de l’utiliser de nouveau.
Attention: Manipulez le MakerBot Digitizer avec soin; il contient en effet des
composants électroniques et optiques sensibles qui pourraient être endommagés par
une manipulation brutale.
Attention: Evitez une humidité ou des températures excessives. Lorsque le MakerBot
Digitizer est en cours de fonctionnement, évitez les températures supérieures à 32º C ou
inférieures à 0º C. N’entreposez pas le scanner dans des endroits où les températures
dépassent 32º C ou tombent en-dessous de 0º C.
Ce manuel contient des renseignements importants sur la sécurité. Veuillez lire attentivement les messages suivants avant de faire fonctionner le MakerBot Digitizer.
Pour utiliser le MakerBot Digitizer en toute sécurité, respectez les lignes directrices suivantes:
• Ne touchez pas le filtre passe-bande; de la graisse ou des taches peuvent
diminuer les performances du scanner.
• Ne touchez pas le boîtier du laser pendant que le scanner est sous tension.
• Ne faites pas fonctionner le scanner si une pièce quelconque de l’appareil est
fendue ou endommagée de quelque façon que ce soit.
• Utilisez exclusivement l’unité d’alimentation fournie avec le MakerBot Digitizer.
• N’utilisez pas les câbles d’alimentation ou les cables USB s’ils sont endommagés.
• Ne forcez pas sur les connecteurs d’alimentation ou USB pour les mettre en place.
• La prise de courant doit être installée près de l’équipement, et il doit être
facilement accessible.
12
SÉCURITÉ ET RESPECT DES NORMES
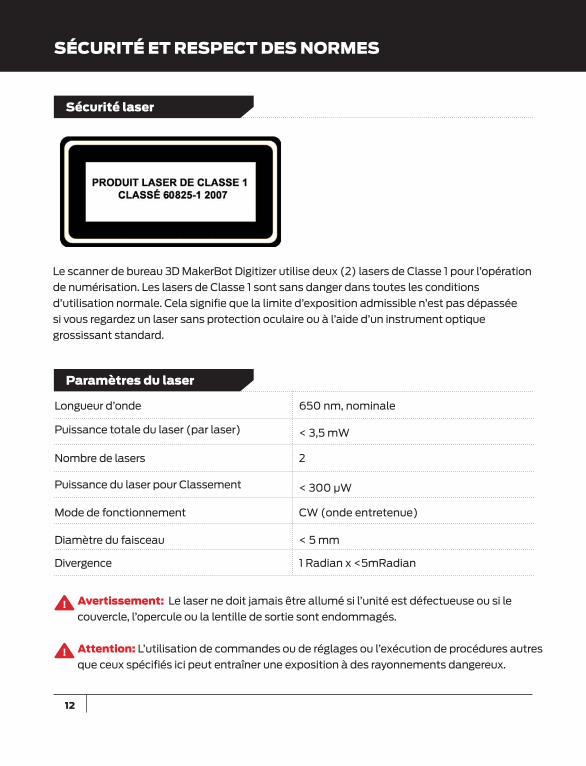
Le scanner de bureau 3D MakerBot Digitizer utilise deux (2) lasers de Classe 1 pour l’opération
de numérisation. Les lasers de Classe 1 sont sans danger dans toutes les conditions
d’utilisation normale. Cela signifie que la limite d’exposition admissible n’est pas dépassée
si vous regardez un laser sans protection oculaire ou à l’aide d’un instrument optique
grossissant standard.
Longueur d’onde
Puissance totale du laser (par laser)
Nombre de lasers
Puissance du laser pour Classement
Mode de fonctionnement
Diamètre du faisceau
Divergence
650 nm, nominale
< 3,5 mW
2
< 300 μW
CW (onde entretenue)
< 5 mm
1 Radian x <5mRadian
Avertissement: Le laser ne doit jamais être allumé si l’unité est défectueuse ou si le
couvercle, l’opercule ou la lentille de sortie sont endommagés.
Attention: L’utilisation de commandes ou de réglages ou l’exécution de procédures autres
que ceux spécifiés ici peut entraîner une exposition à des rayonnements dangereux.
Sécurité laser
Paramètres du laser

WELCOME, LET’S GET STARTED 13
SÉCURITÉ ET RESPECT DES NORMES
Attention: Ne pas ouvrir les modules laser de la MakerBot Digitizer ou d’essayer de les
réparer. Les services aprèsvente sur les lasers de votre MakerBot Digitizer doivent
être réalisés exclusivement par des techniciens agréés formés dans nos usines.
En outre, la garantie de votre scanner pourraît être annulée si vous le modifiez ou
si vous en enlevez les couvercles protecteurs ou le boîtier. Pour signaler un problème
avec votre scanner ou pour demander une réparation, envoyez un courrier électronique
Toutes les tâches de maintenance pour le MakerBot Digitizer doivent être effectuées avec la
puissance coupée.
BAS DE MAKERBOT DIGITIZER
Réparations

14
SICHERHEIT UND EINHALTUNG DER RICHTLINIEN
ERKLÄRUNG GEMÄSS DER US-ZULASSUNGSBEHÖRDE FÜR KOMMUNIKATIONSGERÄTE FCC Die Prüfung dieses Geräts hat ergeben, dass die Grenzwerte für ein digitales Gerät der Klasse B gemäß
Teil 15 der FCC-Bestimmungen eingehalten werden. Diese Grenzwerte dienen dem angemessenen Schutz
gegen Störungen und Schäden beim Gebrauch in Wohnräumen. Dieses Gerät erzeugt und verwendet
Hochfrequenzenergie und strahlt diese auch aus; wenn es nicht ordnungsgemäß und in Übereinstimmung
mit den Sicherheitshinweisen installiert und benützt wird, kann es Störungen bei Radio-, Funk- und
Fernsehgeräten erzeugen. Es gibt jedoch keine Garantie, dass eine Störung bei bestimmten Installationen
ausgeschlossen werden kann. Wenn dieses Gerät Störungen beim Empfang von Radio oder Fernsehen
erzeugt, was durch Aus- und Einschalten des Geräts festgestellt werden kann, kann der Benützer diese
Störung durch eine oder mehrere der folgenden Maßnahmen zu beheben versuchen:
• Richten Sie die Empfangsantenne neu aus oder versetzen Sie sie
• Vergrößern Sie den Abstand zwischen Gerät und Empfänger.
• Schließen Sie das Gerät an den Ausgang eines vom Empfangsgerät separatem Schaltkreises an.
• Kontaktieren Sie den Händler oder einen erfahrenen Radio/TV - Techniker.
Unter Umständen ist Ihnen auch das folgende, vom FCC erstellte Handbuch nützlich: “How to Identify
and Resolve Radio-TV Interference Problems” (Probleme bei Radio/TV-Störungen identifizieren und
beheben). Dieses Handbuch ist beim U.S. Government Printing Office, Washington D.C. 20402, erhältlich.
Veränderungen und Modifizierungen, die nicht ausdrücklich vom Hersteller oder vom Registranten dieses
Gerätes genehmigt sind, können nach den Richtlinien der Federal Communications Commission Ihr Recht
erlöschen lassen, dieses Gerät zu benützen.
MANUFACTURER
MakerBot Industries, LLC
One MetroTech Center
21st Floor
Brooklyn, NY 11201
347.334.6800

WELCOME, LET’S GET STARTED 15
SICHERHEIT UND EINHALTUNG DER RICHTLINIEN
WELCOME, LET’S GET STARTED
Dieses Warnhinweis-Symbol steht vor jedem Sicherheitshinweis in dieser
Bedienungsanleitung. Dieses Symbol weist auf ein potentielles Sicherheitsrisiko hin, dass
Ihnen und anderen Schaden zufügen oder Produkt- und Sachschaden verursachen könnte.
Warnung: Sollte der MakerBot Digitizer mit Flüssigkeit in Berührung gelangen, trennen
Sie ihn sofort von der Stromzufuhr und lassen Sie ihn vollständig trocknen, bevor Sie
erneut versuchen, ihn in Betrieb zu nehmen.
Vorsicht: Handhaben Sie den MakerBot Digitizer sorgfältig; er beinhaltet empfindliche
elektronische und optische Komponenten, die bei nachlässiger Handhabung
beschädigt werden könnten.
Vorsicht: Vermeiden Sie extreme Temperaturen oder Feuchtigkeit. Wenn der MakerBot
Digitizer benützt wird, vermeiden Sie Temperaturen über 32° C oder unter 0° C.
Bewahren Sie den MakerBot Digitizer nicht an Orten mit Temperaturen über 32° C
oder unter 0° C auf.
Diese Bedienungsanleitung enthält wichtige Sicherheitshinweise. Bitte lesen Sie die folgenden Hinweise aufmerksam durch, bevor Sie den MakerBotDigitizer in Betrieb nehmen.
Um den MakerBot Digitizer sicher zu benützen, beachten Sie die folgenden Richtlinien:
• Berühren Sie den Bandpassfilter nicht; Öl oder Flecken können die Leistung des
MakerBot Digitizers beinträchtigen.
• Berühren Sie das Lasergehäuse nicht, während der MakerBot Digitizer
angeschlossen ist.
• Verwenden Sie den MakerBot Digitizer nicht, wenn ein Bestandteil des Geräts
gebrochen oder auf andere Weise beschädigt ist.
• Benützen Sie ausschließlich das mitgelieferte Netzgerät für den MakerBot Digitizer.
• Verwenden Sie keine beschädigten Strom- oder USB-Kabel.
• Wenden Sie beim Anstecken der USB- oder Stromverbindung keine Gewalt an.
• Die Steckdose muss in der Nähe der Geräte installiert werden, und es muss leicht
zugänglich sein.

16
SICHERHEIT UND EINHALTUNG DER RICHTLINIEN
Der MakerBot Digitizer Desktop 3D Scanner verwendet zwei (2) Laser der Klasse 1 im Scan-
Prozess. Laser der Klasse 1 sind unter Bedingungen des normalen Gebrauchs sicher. Das
bedeutet, solange die maximal zulässige Bestrahlung (MZB) nicht überschritten wird, wenn
man das bloße oder mit üblichen optischen Vergrößerungsbehelfen versehene Auge dem
Strahl aussetzt.
Wellenlänge
Laser-Gesamtleistung (pro Laser)
Anzahl der Laser
Laser-Leistung zur Klassifizierung
Betriebsmodus
Strahl-Durchmesser
Divergenz
650nm, nominal
<3.5mW
2
<300μ W
CW (Dauerstrich)
<5mm
1 Radian x <5mRadian
Warnung: Der Laser darf unter keinen Umständen verwendet werden, wenn das Gerät
defekt oder die Abdeckung, der Verschluss oder die Abschlusslinse beschädigt sind.
Vorsicht: Die Verwendung von Steuerelementen, Einstellungen oder die Durchführung
anderer Schritte als die hier angegebenen können zu gefährlicher Strahlung führen.
Laser-Sicherheit
Laser-Parameter

WELCOME, LET’S GET STARTED 17
SICHERHEIT UND EINHALTUNG DER RICHTLINIEN
Vorsicht: Öffnen Sie den MakerBot Digitalisierer-Laser-Module nicht und versuchen Sie
nicht, ihnen zu reparieren. Service an Ihrem MakerBot Digitalisierer-Laser-Module darf
nur von autorisierten, im Werk ausgebildeten Technikern ausgeführt werden. Darüber
hinaus kann jegliche Manipulation an Ihrem MakerBot Digitizer oder das Entfernen von
Schutzabdeckungen oder des Gehäuses die Garantie erlöschen lassen Um ein Problem
mit Ihrem MakerBot Digitizer zu melden oder um einen Servicetermin zu vereinbaren,
schreiben Sie an [email protected]
Alle Wartungsarbeiten für den MakerBot Digitizer muss durchgeführt mit das Gerät
ausgeschaltet werden.
BODEN MAKERBOT DIGITIZER
Service
18
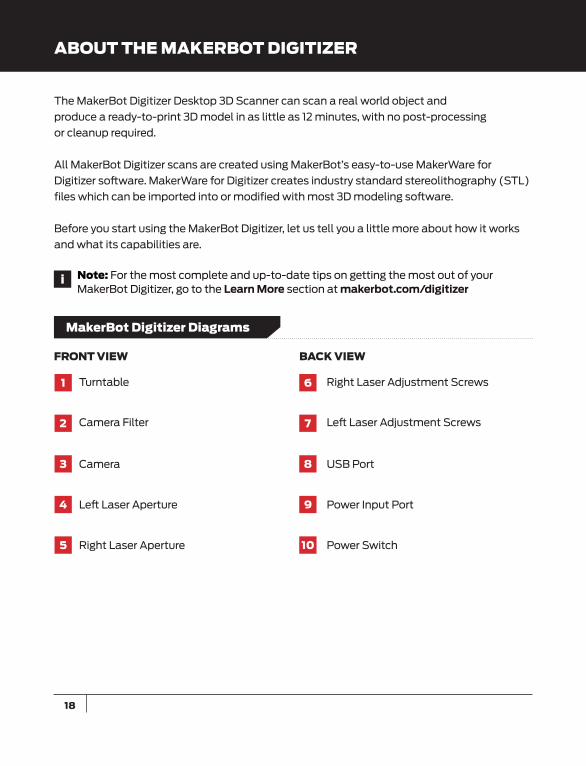
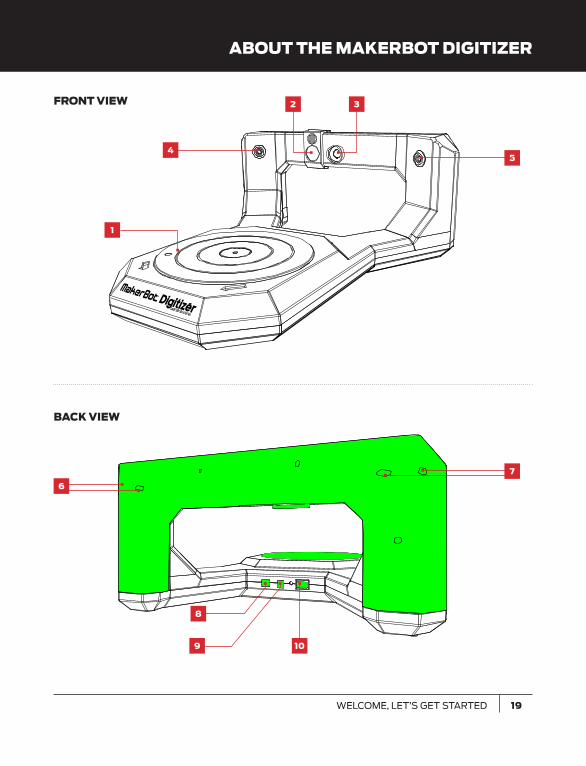
ABOUT THE MAKERBOT DIGITIZER
The MakerBot Digitizer Desktop 3D Scanner can scan a real world object and
produce a ready-to-print 3D model in as little as 12 minutes, with no post-processing
or cleanup required.
All MakerBot Digitizer scans are created using MakerBot’s easy-to-use MakerWare for
Digitizer software. MakerWare for Digitizer creates industry standard stereolithography (STL)
files which can be imported into or modified with most 3D modeling software.
Before you start using the MakerBot Digitizer, let us tell you a little more about how it works
and what its capabilities are.
FRONT VIEW BACK VIEW
Turntable Right Laser Adjustment Screws
Camera Filter Left Laser Adjustment Screws
Camera USB Port
Left Laser Aperture Power Input Port
Right Laser Aperture Power Switch
1 6
2 7
3 8
4 9
5 10
Note: For the most complete and up-to-date tips on getting the most out of your MakerBot Digitizer, go to the Learn More section at makerbot.com/digitizer
MakerBot Digitizer Diagrams
i
WELCOME, LET’S GET STARTED 19
ABOUT THE MAKERBOT DIGITIZER
FRONT VIEW
BACK VIEW
1
5
2
4
6
7
8
9 10
3

20
ABOUT THE MAKERBOT DIGITIZER
The MakerBot Digitizer Desktop 3D Scanner creates a digital 3D model of a physical object
by taking a rapid sequence of pictures as the object rotates on the MakerBot Digitizer
turntable. Here is how it happens:
1. Two lasers, mounted on the left and right corners of the MakerBot Digitizer, create laser
lines that outline the profile of the object, while a camera takes a series of photographs.
2. MakerWare for Digitizer software takes the photographs of the laser lines and combines
them to create a point cloud.
3. If a completed scan still needs improvement, MakerWare for Digitizer can rescan
the object from a different angle and combine the two sets of scan data using
MakerBot MultiScan™ Technology.
Your final scan will be a manifold 3D mesh that can be printed on your MakerBot,
shared on Thingiverse.com, or modified in almost any 3D modeling software.
i Note: The MakerBot Digitizer has a dimensional accuracy of up to 2 mm.
How it Works

WELCOME, LET’S GET STARTED 21
Some objects will produce better scans than others. Here are a few guidelines to help you
determine what will produce a good scan.
GREAT TO SCAN
• Objects that are larger than a 50 x 50 mm (2 x 2 in) cylinder
• Objects that are smaller than a 203 x 203 mm (8 x 8 in) cylinder
• Objects weighing less than 3 kg (6.6 lbs)
• Stationary objects
• Opaque objects
DIFFICULT TO SCAN
• Transparent objects
• Shiny or reflective objects
• Very dark objects
• Fuzzy objects
DO NOT SCAN
• Moving objects
• Objects that weigh more than 3 kg (6.6 lbs)
• Objects that are larger than a 203 x 203 mm (8 x 8 in) cylinder
• Objects that are smaller than a 50 x 50 mm (2 x 2 in) cylinder
Tip: You can reduce glare on reflective surfaces or lighten dark surfaces by
applying corn starch with a paint brush. For more tips, go to the Learn More section at makerbot.com/digitizer
What can be Scanned?
i
ABOUT THE MAKERBOT DIGITIZER

Setting Up Your MakerBot Digitizer
2

In this chapter you will be guided through everything you need to do to set up your new MakerBot Digitizer Desktop 3D Scanner, from unpacking it to producing your first 3D scan.
24
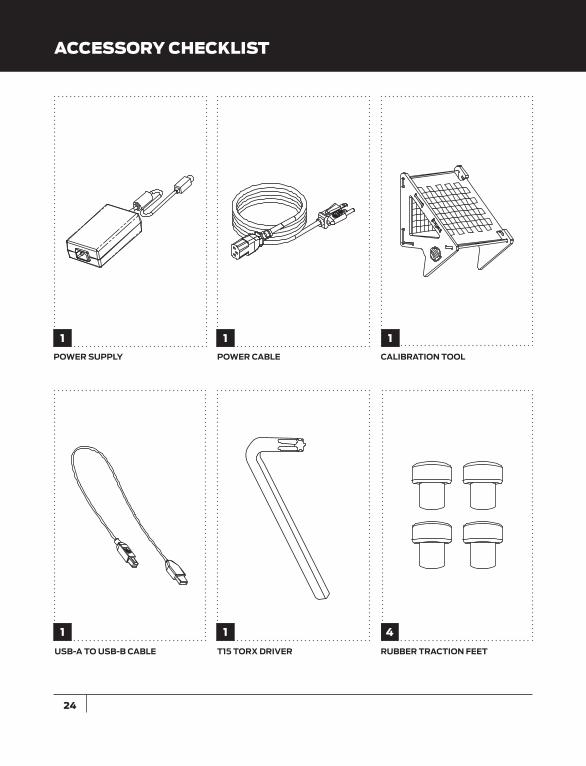
ACCESSORY CHECKLIST
USB-A TO USB-B CABLE T15 TORX DRIVER RUBBER TRACTION FEET
1 41
1 1
POWER SUPPLY POWER CABLE CALIBRATION TOOL
1
25
2 Open Accessory Box
SETTING UP YOUR MAKERBOT DIGITIZER
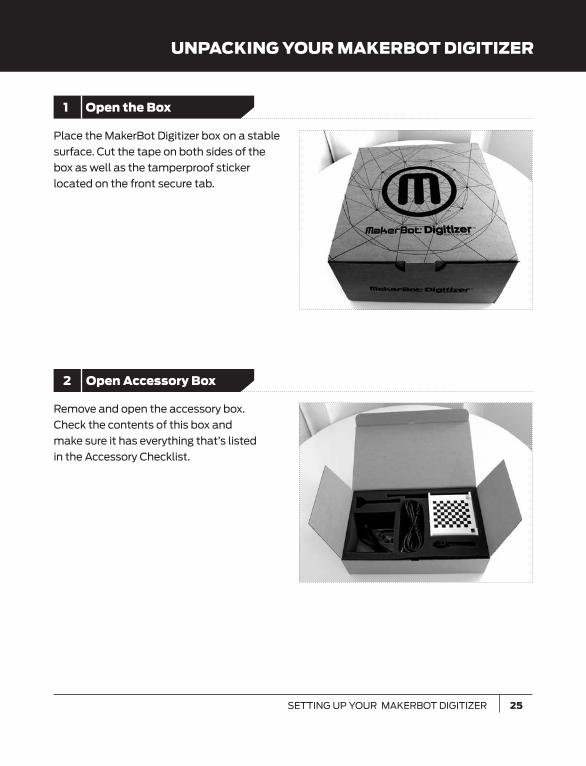
UNPACKING YOUR MAKERBOT DIGITIZER
1 Open the Box
Place the MakerBot Digitizer box on a stable
surface. Cut the tape on both sides of the
box as well as the tamperproof sticker
located on the front secure tab.
Remove and open the accessory box.
Check the contents of this box and
make sure it has everything that’s listed
in the Accessory Checklist.

26
3 Lift MakerBot Digitizer out of Box
UNPACKING YOUR MAKERBOT DIGITIZER
Grasp the protective foam packaging at both
sides and lift the MakerBot Digitizer out of
the box.
Separate both foam packaging pieces from
the MakerBot Digitizer and remove the clear
plastic bag.
4 Remove Packaging
27SETTING UP YOUR MAKERBOT DIGITIZER
UNPACKING YOUR MAKERBOT DIGITIZER
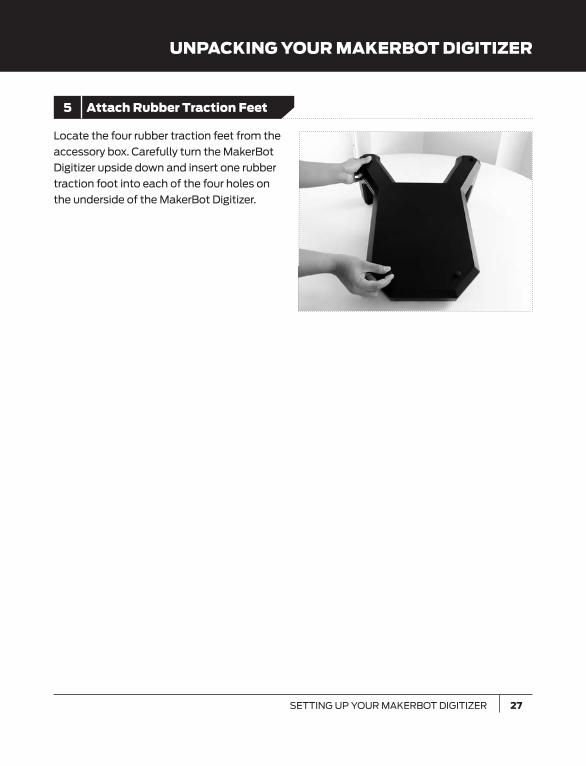
Locate the four rubber traction feet from the
accessory box. Carefully turn the MakerBot
Digitizer upside down and insert one rubber
traction foot into each of the four holes on
the underside of the MakerBot Digitizer.
5 Attach Rubber Traction Feet

28
PLACEMENT OF THE MAKERBOT DIGITIZER
Finding the right location for your MakerBot Digitizer is important.
Follow these guidelines to ensure the best quality scans:
• Set up your MakerBot Digitizer in an indoor area with ample incandescent
or fluorescent light. Avoid natural light sources.
• Avoid pointing the MakerBot Digitizer’s camera and lasers toward light sources.
Avoid placing the MakerBot Digitizer directly below a light source.
• Place your MakerBot Digitizer on a flat, stable work surface and make sure no part of
the MakerBot Digitizer extends over the surface edge. If it is not in a stable position,
the MakerBot Digitizer could fall, damaging itself and causing injury to the user.
• Make sure to set up your Makerbot Digitizer at least one foot away from the nearest wall.
Light sources should be placedoutside of the MakerBot Digitizer’sline of sight.
Avoid natural light aiming directly at camera.
MAKERBOT DIGITIZER
AERIAL VIEW OF ROOM
Set up at least 1 ftaway from a wall.
29
UNPACKING YOUR MAKERBOT DIGITIZER (CONTINUED)
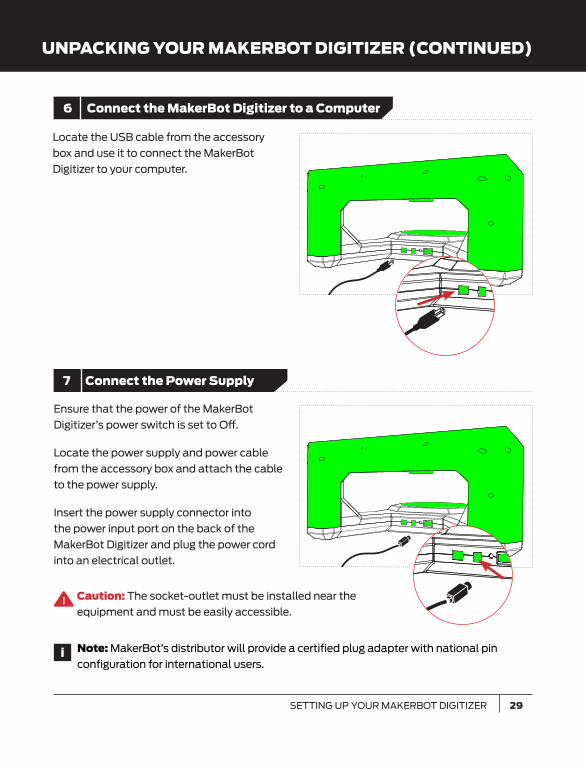
Locate the USB cable from the accessory
box and use it to connect the MakerBot
Digitizer to your computer.
SETTING UP YOUR MAKERBOT DIGITIZER
Ensure that the power of the MakerBot
Digitizer’s power switch is set to Off.
Locate the power supply and power cable
from the accessory box and attach the cable
to the power supply.
Insert the power supply connector into
the power input port on the back of the
MakerBot Digitizer and plug the power cord
into an electrical outlet.
Note: MakerBot’s distributor will provide a certified plug adapter with national pin
configuration for international users.i
Caution: The socket-outlet must be installed near the
equipment and must be easily accessible.
6 Connect the MakerBot Digitizer to a Computer
7 Connect the Power Supply
30
INSTALLING MAKERWARE FOR DIGITIZER
MakerWare for Digitizer is the software that drives your MakerBot Digitizer.
The MakerWare for Digitizer package also includes the most current version of MakerWare,
MakerBot’s 3D printing software. If MakerWare is already installed on your computer,
the software will automatically update to the most current version. When you first run
MakerWare or MakerWare for Digitizer, a folder called “My Things” (on PCs), or “Things” (on
Macs), is created in your home directory. This is where your MakerBot Digitizer scans will be
saved by default.
• Open a browser session and go to makerbot.com/digitizer
• Click the MakerWare for Digitizer link. You will be taken to the MakerWare for Digitizer
download page.
• Select your operating system from the dropdown menu and click the download button.
The system-specific installer file will download to your computer.
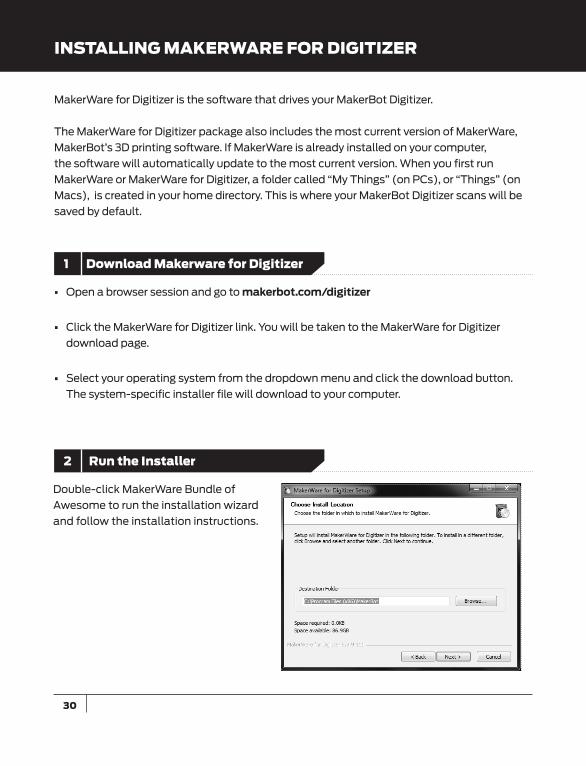
Double-click MakerWare Bundle of
Awesome to run the installation wizard
and follow the installation instructions.
1 Download Makerware for Digitizer
2 Run the Installer
31
You are almost ready to begin your first scan, but first you have to to calibrate your new
MakerBot Digitizer. The calibration routine ensures that the position of the turntable and
lasers are recorded accurately so your MakerBot Digitizer can produce the best scan possible.
Recalibrate the turntable and lasers about once a week—or every 20 scans—to make sure
that scan quality remains constant. If you move, bump or drop your MakerBot Digitizer, the
positions of the lasers and turntable might change slightly. In any of those cases, you might
need to recalibrate the lasers and turntable. To run the calibration routine at any time, go to
the Scanner menu and choose Calibrate Turntable & Lasers.
SETTING UP YOUR MAKERBOT DIGITIZER
CALIBRATE YOUR MAKERBOT DIGITIZER
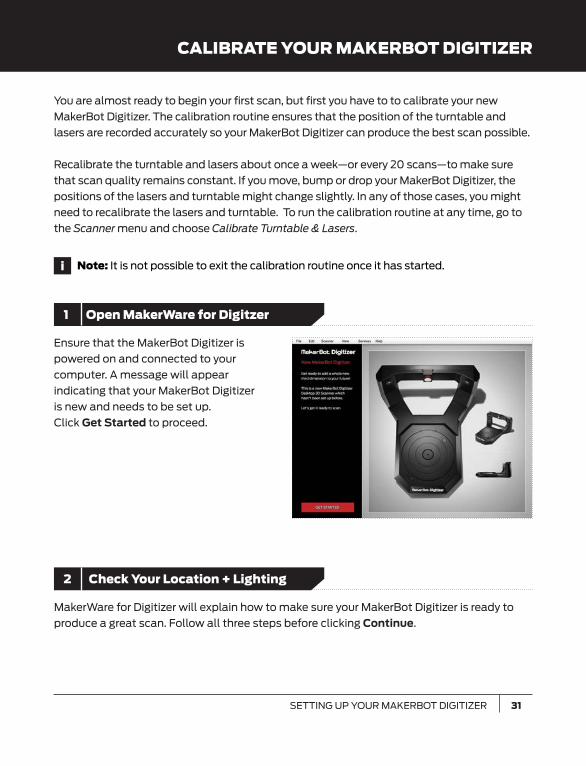
Ensure that the MakerBot Digitizer is
powered on and connected to your
computer. A message will appear
indicating that your MakerBot Digitizer
is new and needs to be set up.
Click Get Started to proceed.
MakerWare for Digitizer will explain how to make sure your MakerBot Digitizer is ready to
produce a great scan. Follow all three steps before clicking Continue.
Note: It is not possible to exit the calibration routine once it has started.i
1 Open MakerWare for Digitzer
2 Check Your Location + Lighting

32
CALIBRATE YOUR MAKERBOT DIGITIZER
Locate the calibration tool from
the accessory box and place it on
the turntable with the letter A pointing
up, as shown on the screen. Insert the
tab on the lower edge of the calibration
tool into the hole at the center of the
turntable. Ensure that the calibration
tool is positioned as shown before
clicking Continue.
Flip the calibration tool so that the
letter B points up as shown on the
screen, and insert the tab on the lower
edge of the calibration tool into the hole
at the center of the turntable. Ensure
that the calibration tool is positioned as
shown before clicking Continue.
3 Calibrate the MakerBot Digitizer Camera
4 Calibrate the MakerBot Digitizer Turntable
33
CALIBRATE YOUR MAKERBOT DIGITIZER
SETTING UP YOUR MAKERBOT DIGITIZER
6 Calibration Complete
Before you start scanning, let’s name your MakerBot Digitizer and set your sharing options.
Click Continue again to begin. You can change your preferences at any point by choosing
Settings from the File menu. On a Mac, the same options are available as Preferences in the
MakerWare for Digitizer menu.
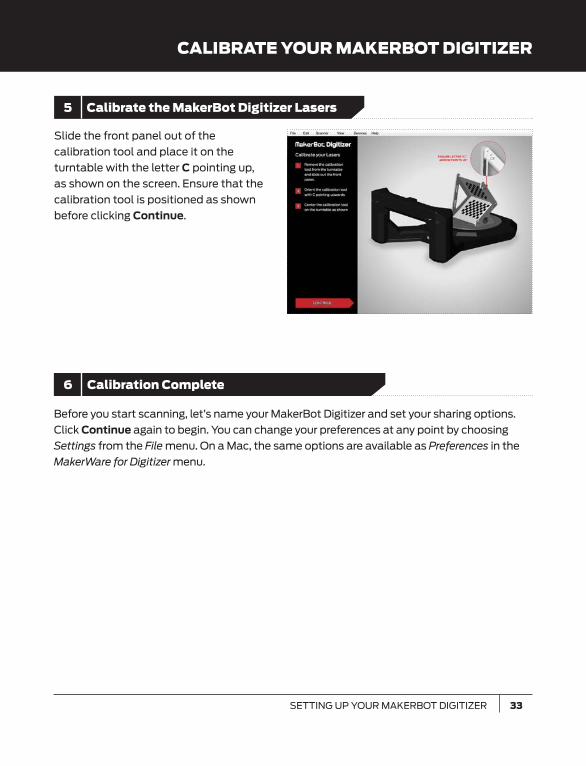
Slide the front panel out of the
calibration tool and place it on the
turntable with the letter C pointing up,
as shown on the screen. Ensure that the
calibration tool is positioned as shown
before clicking Continue.
5 Calibrate the MakerBot Digitizer Lasers
34
SET BASIC PREFERENCES
NAME YOUR MAKERBOT DIGITIZERBy default the name of your MakerBot Digitizer is “My MakerBot Digitizer”. To create a
unique name for your MakerBot Digitizer, click within the Name your MakerBot Digitizer
text field and type the new name.
HELP IMPROVE MAKERBOT DIGITIZER Help us help you. By checking the “Share my usage statistics to help improve MakerBot
Digitizer” checkbox, you’re allowing us to view information that will help us continue to make
the MakerBot Digitizer better.
Thingiverse.com is MakerBot’s online community for sharing and downloading 3D models
and other designs. Use MakerBot Thingiverse to share and store the 3D models you create
with your MakerBot Digitizer.
TO AUTOMATICALLY SYNC YOUR SCANS WITH YOUR MAKERBOT THINGIVERSE ACCOUNT Check Private Sync before signing in. If you check this box, MakerWare for Digitizer will au-
tomatically add your scans to your Thingiverse account as unpublished Things. If you leave
this box unchecked, nothing will be sent to Thingiverse automatically.
TO CREATE A MAKERBOT THINGIVERSE ACCOUNT Click the Sign up on Thingiverse link.
TO CONTINUE WITHOUT LOGGING INClick Skip this Step. You can log into Thingiverse at any time by choosing File > Settings
on a PC or MakerWare for Digitizer > Preferences on a Mac, or by choosing Share on Thingiverse at the end of a scan.
1 Set Up Your MakerBot Digitizer
2 Connect to Makerbot Thingiverse
SET-UP
SET-UP
1
1
CONNECT
CONNECT
2
2
SCAN
SCAN
SCAN
3
3
35
Start Scanning3
SET BASIC PREFERENCES
SETTING UP YOUR MAKERBOT DIGITIZER
3 Start Scanning
SET-UP
1
CONNECT
2
SCAN
3
The setup process is complete. Proceed to the next chapter to start scanning with your
MakerBot Digitizer.

Scanning with Your MakerBot Digitizer
3

Once you’re finished calibrating your MakerBot Digitizer and setting your sharing preferences, you will be taken to the New Scan screen. This is your MakerWare for Digitizer home screen.
Before you start scanning with your MakerBot Digitizer, let’s go over some basics and best practices.
Note: You can return to New Scan screen at any time by choosing New from the File Menu.i
38
SCANNING 101
Object Placement
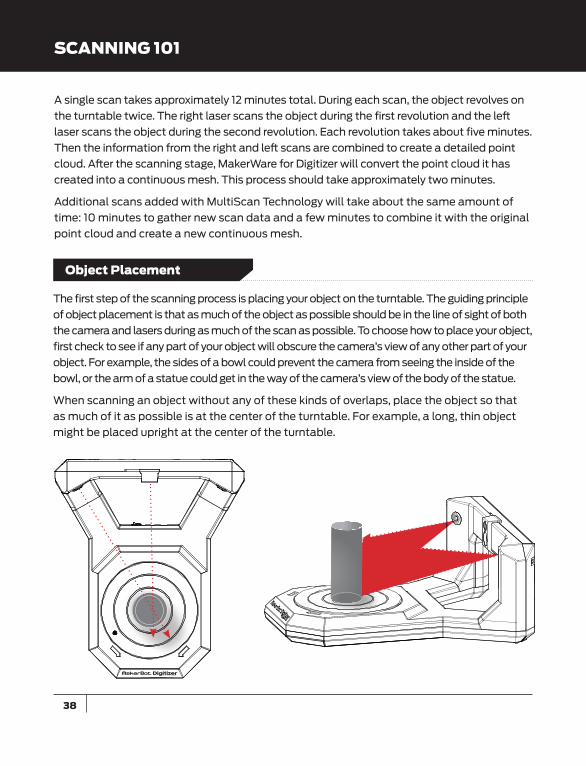
The first step of the scanning process is placing your object on the turntable. The guiding principle
of object placement is that as much of the object as possible should be in the line of sight of both
the camera and lasers during as much of the scan as possible. To choose how to place your object,
first check to see if any part of your object will obscure the camera’s view of any other part of your
object. For example, the sides of a bowl could prevent the camera from seeing the inside of the
bowl, or the arm of a statue could get in the way of the camera’s view of the body of the statue.
When scanning an object without any of these kinds of overlaps, place the object so that
as much of it as possible is at the center of the turntable. For example, a long, thin object
might be placed upright at the center of the turntable.
A single scan takes approximately 12 minutes total. During each scan, the object revolves on
the turntable twice. The right laser scans the object during the first revolution and the left
laser scans the object during the second revolution. Each revolution takes about five minutes.
Then the information from the right and left scans are combined to create a detailed point
cloud. After the scanning stage, MakerWare for Digitizer will convert the point cloud it has
created into a continuous mesh. This process should take approximately two minutes.
Additional scans added with MultiScan Technology will take about the same amount of
time: 10 minutes to gather new scan data and a few minutes to combine it with the original
point cloud and create a new continuous mesh.

39
SCANNING 101
SCANNING WITH YOUR MAKERBOT DIGITIZER
If your object does have features that overlap other parts of it, place the object so that the
hardest part to see is as visible as possible to both the lasers and the camera. For example,
a bowl might be placed on its side with the inside facing the center of the turntable.
Tip: If your object doesn’t stay in place by itself, try resting the object on a piece of
modeling clay. For more tips, go to the Learn More section at makerbot.com/digitizer
Note that there may be exceptions to these rules. It’s not always possible to predict what
position will produce the best scan, so if you’re having trouble getting a good scan of an
object, try placing it at a different angle.
If you are planning on combining multiple scans with MultiScan Technology, scan your object
in its tallest position first. That way you will be able to crop unwanted data without risking
cutting off pieces of additional scans.
i
40
SCANNING 101
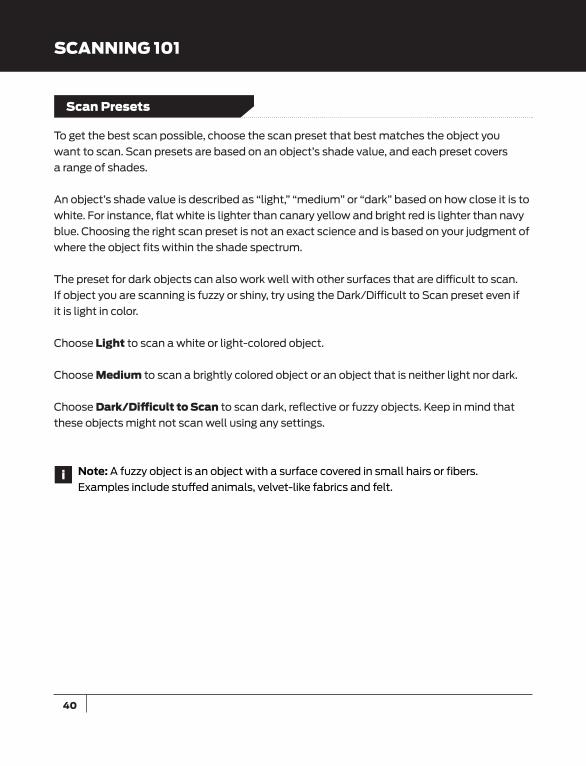
To get the best scan possible, choose the scan preset that best matches the object you
want to scan. Scan presets are based on an object’s shade value, and each preset covers
a range of shades.
An object’s shade value is described as “light,” “medium” or “dark” based on how close it is to
white. For instance, flat white is lighter than canary yellow and bright red is lighter than navy
blue. Choosing the right scan preset is not an exact science and is based on your judgment of
where the object fits within the shade spectrum.
The preset for dark objects can also work well with other surfaces that are difficult to scan.
If object you are scanning is fuzzy or shiny, try using the Dark/Difficult to Scan preset even if
it is light in color.
Choose Light to scan a white or light-colored object.
Choose Medium to scan a brightly colored object or an object that is neither light nor dark.
Choose Dark/Difficult to Scan to scan dark, reflective or fuzzy objects. Keep in mind that
these objects might not scan well using any settings.
Scan Presets
Note: A fuzzy object is an object with a surface covered in small hairs or fibers.
Examples include stuffed animals, velvet-like fabrics and felt.i

41
SCANNING 101
LIGHT Choose this for lighter colored objects.
MEDIUM Choose this for objects which are neither light nor dark.
DARK/ DIFFICULT TO SCAN Choose this for moderately dark objects. Note that extremely dark objects may still cause problems.
Note: We love gnomes! If you have any, please digitize them and upload them to
Thingiverse with the tag #GnomeScan.i
SCANNING WITH YOUR MAKERBOT DIGITIZER
42
SCANNING 101
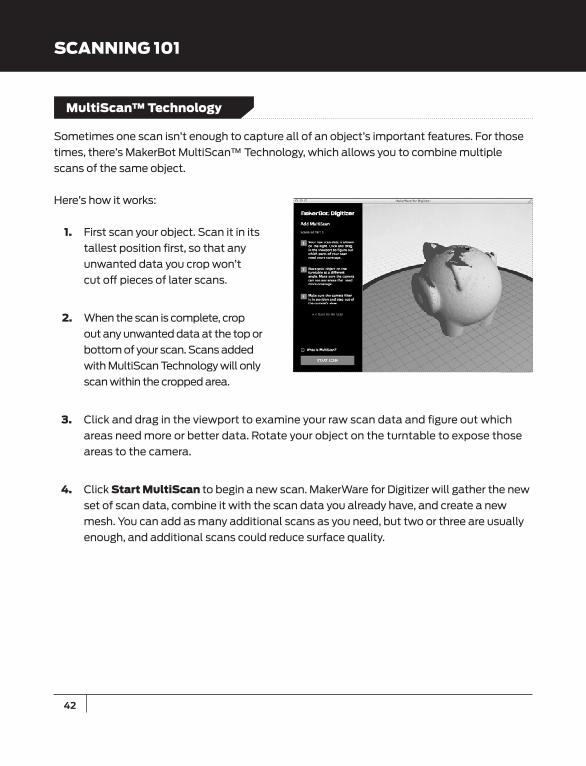
Sometimes one scan isn’t enough to capture all of an object’s important features. For those
times, there’s MakerBot MultiScan™ Technology, which allows you to combine multiple
scans of the same object.
Here’s how it works:
1. First scan your object. Scan it in its
tallest position first, so that any
unwanted data you crop won’t
cut off pieces of later scans.
2. When the scan is complete, crop
out any unwanted data at the top or
bottom of your scan. Scans added
with MultiScan Technology will only
scan within the cropped area.
3. Click and drag in the viewport to examine your raw scan data and figure out which
areas need more or better data. Rotate your object on the turntable to expose those
areas to the camera.
4. Click Start MultiScan to begin a new scan. MakerWare for Digitizer will gather the new
set of scan data, combine it with the scan data you already have, and create a new
mesh. You can add as many additional scans as you need, but two or three are usually
enough, and additional scans could reduce surface quality.
MultiScan™ Technology

SCANNING WITH YOUR MAKERBOT DIGITIZER 43
SCANNING 101
Crop
MakerWare for Digitizer will make sure your scan is completely watertight, but a difficult
to scan object or a bad lighting situation can create unwanted artifacts in your 3D mesh.
For those situations, or for occasions when you need to give your scan a flat top or bottom,
MakerWare for Digitizer includes a crop function.
To crop your scan:
1. When you arrive at the Scan
Complete screen, click Crop Scan Area.
2. Drag the arrows at the right to
move the top and bottom cutting
planes. Position the planes so
that anything you want to cut off
the bottom of your scan is below
the bottom cutting plane and
everything you want to cut off at the top of your scan is above the top cutting plane.
3. Click Preview Crop to see what your cropped scan will look like. If you are not happy
with the crop, click Undo Crop to restore both cutting planes to their original positions.
You can also click the X on a cutting plane’s arrow to restore only that plane to its
original position.
4. When you are happy with your results, click Done Cropping to crop your scan. You can
return to the Crop screen from the Scan Complete screen by clicking Edit Crop. You will
not be able to return to the Crop screen after saving your scan or starting MultiScan.

44
SCANNING 101
During a scan, the MakerBot Digitizer Desktop 3D Scanner shines laser beams on your object.
The camera captures images of the laser lines and MakerWare for Digitizer translates those
images into a point cloud. Objects that are either too reflective or not reflective enough will
result in images that are difficult for the software to interpret. That is why it can be difficult to
produce a high-quality scan of an object that is shiny, transparent, fuzzy, or very dark.
To scan objects that fit this description, try one or more of the following:
• Dust reflective or transparent objects with a fine white powder such as corn starch
or baby powder to reduce reflections.
• Paint an object to reduce shininess, smooth a fuzzy texture, remove transparency,
or turn a very dark object white.
• Cover fuzzy, mirrored, or transparent sections of an object with masking tape.
Note: For additional tips and tricks, go to the Learn More section at makerbot.com/digitizer
i
Scanning Tips
45SCANNING WITH YOUR MAKERBOT DIGITIZER
SCANNING AN OBJECT
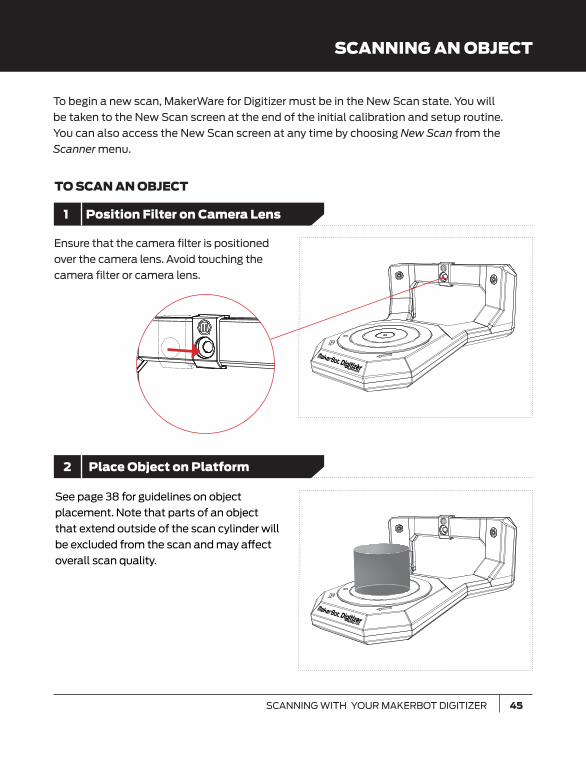
Ensure that the camera filter is positioned
over the camera lens. Avoid touching the
camera filter or camera lens.
To begin a new scan, MakerWare for Digitizer must be in the New Scan state. You will
be taken to the New Scan screen at the end of the initial calibration and setup routine.
You can also access the New Scan screen at any time by choosing New Scan from the
Scanner menu.
TO SCAN AN OBJECT
See page 38 for guidelines on object
placement. Note that parts of an object
that extend outside of the scan cylinder will
be excluded from the scan and may affect
overall scan quality.
1 Position Filter on Camera Lens
2 Place Object on Platform
46
SCANNING AN OBJECT
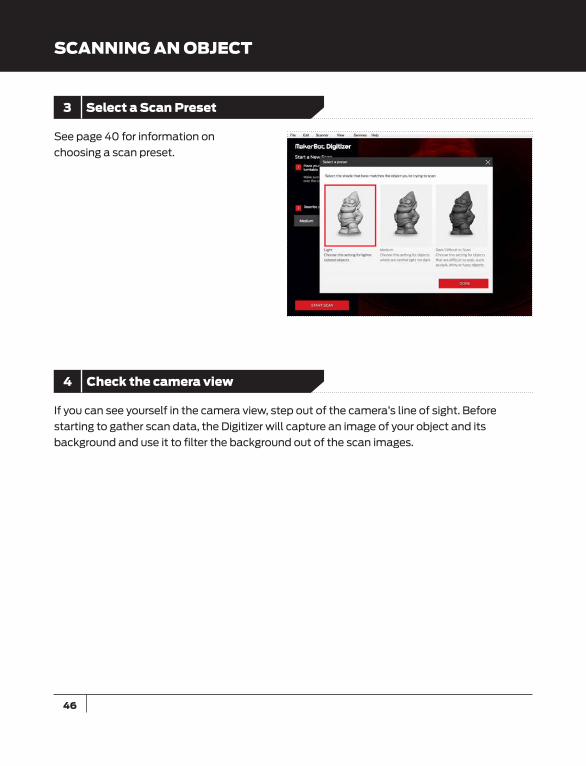
See page 40 for information on
choosing a scan preset.
3 Select a Scan Preset
If you can see yourself in the camera view, step out of the camera’s line of sight. Before
starting to gather scan data, the Digitizer will capture an image of your object and its
background and use it to filter the background out of the scan images.
4 Check the camera view

47SCANNING WITH YOUR MAKERBOT DIGITIZER
SCANNING AN OBJECT
Note: Do not touch or move the
object being scanned while the
scan is in progress.
i
Note: Did you get a mesh that doesn’t look like your object? If some parts of your object
look much better than others, try adding an additional scan using MultiScan Technology.
If the whole scan looks wrong, and you’ve double-checked your lighting, object
placement and calibration, it’s possible that you just have an object that doesn’t scan
well. We’re working on making sure there are fewer of those, and you can help by sending
us some information about your failed scan. See page 58 in the Troubleshooting section
for more details.
i
During the scan, data points will
appear in the viewport as the MakerBot
Digitizer identifies points on the
surface of your object. A progress
bar will also appear, showing the
estimated time remaining in the scan.
During the scan, you can use your
mouse to view the partial point cloud
from different angles.
After the MakerBot Digitizer finishes scanning your object, MakerWare for Digitizer will
automatically turn the generated point cloud into a manifold 3D mesh. A manifold 3D mesh
is completely enclosed and has no holes, reversed faces or extra geometry.
The meshing process should take approximately two minutes. When the mesh is complete,
it will appear in the viewport.
5 Click Start Scan
• To rotate: left-click and drag within the viewport
• To pan: middle-click and drag within the viewport OR shift key + left-click and drag
within the viewport
• To zoom: scrollwheel
48
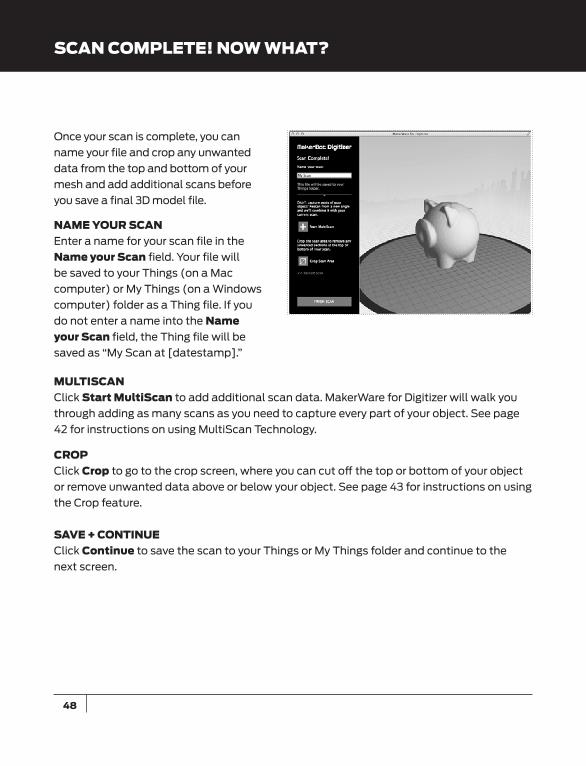
Once your scan is complete, you can
name your file and crop any unwanted
data from the top and bottom of your
mesh and add additional scans before
you save a final 3D model file.
NAME YOUR SCANEnter a name for your scan file in the
Name your Scan field. Your file will
be saved to your Things (on a Mac
computer) or My Things (on a Windows
computer) folder as a Thing file. If you
do not enter a name into the Name your Scan field, the Thing file will be
saved as “My Scan at [datestamp].”
MULTISCANClick Start MultiScan to add additional scan data. MakerWare for Digitizer will walk you
through adding as many scans as you need to capture every part of your object. See page
42 for instructions on using MultiScan Technology.
CROPClick Crop to go to the crop screen, where you can cut off the top or bottom of your object
or remove unwanted data above or below your object. See page 43 for instructions on using
the Crop feature.
SAVE + CONTINUEClick Continue to save the scan to your Things or My Things folder and continue to the
next screen.
SCAN COMPLETE! NOW WHAT?
49SCANNING WITH YOUR MAKERBOT DIGITIZER
SCAN COMPLETE! NOW WHAT?
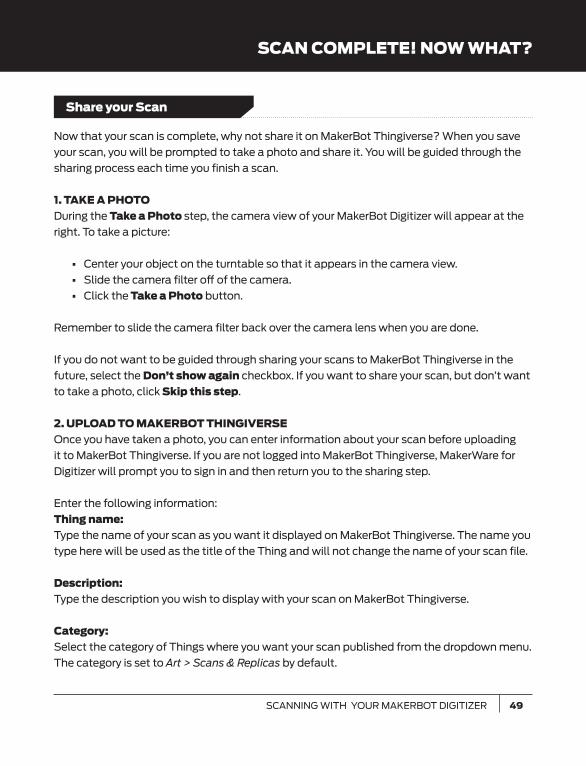
Share your Scan
Now that your scan is complete, why not share it on MakerBot Thingiverse? When you save
your scan, you will be prompted to take a photo and share it. You will be guided through the
sharing process each time you finish a scan.
1. TAKE A PHOTO
During the Take a Photo step, the camera view of your MakerBot Digitizer will appear at the
right. To take a picture:
• Center your object on the turntable so that it appears in the camera view.
• Slide the camera filter off of the camera.
• Click the Take a Photo button.
Remember to slide the camera filter back over the camera lens when you are done.
If you do not want to be guided through sharing your scans to MakerBot Thingiverse in the
future, select the Don’t show again checkbox. If you want to share your scan, but don’t want
to take a photo, click Skip this step.
2. UPLOAD TO MAKERBOT THINGIVERSE Once you have taken a photo, you can enter information about your scan before uploading
it to MakerBot Thingiverse. If you are not logged into MakerBot Thingiverse, MakerWare for
Digitizer will prompt you to sign in and then return you to the sharing step.
Enter the following information:
Thing name: Type the name of your scan as you want it displayed on MakerBot Thingiverse. The name you
type here will be used as the title of the Thing and will not change the name of your scan file.
Description: Type the description you wish to display with your scan on MakerBot Thingiverse.
Category: Select the category of Things where you want your scan published from the dropdown menu.
The category is set to Art > Scans & Replicas by default.
50
SCAN COMPLETE! NOW WHAT?
License: Select the type of license that you want your scan published under from the dropdown menu.
The license is set to CC - Attribution - Non - Commercial by default. For descriptions of the
available Creative Commons licenses, see creativecommons.org/licenses
If you do not want to be guided through sharing your scans to MakerBot Thingiverse in
the future, select the Don’t show again checkbox. If you want to skip the sharing process
completely, click Skip this step.
Click the Share on Thingiverse button to upload your scan.
3. DONE! When your scan is uploaded to MakerBot Thingiverse, MakerWare for Digitizer will display
a link to the published scan. You will also have the option to share your published scan to
social media.
Share your Scan (Continued)

51
PRINT WITH MAKERWARE MakerBot MakerWare is the
software that drives MakerBot 3D printers. When you click Print with MakerWare, the
most recent scan is opened in MakerWare. You can also open the most recently saved scan
in MakerWare at any time by choosing Open in MakerWare from the File menu.
EXPORT THIS SCAN This allows you to save another copy of the scan with a different name or file format,
or to a specific location. This new version will not replace the original file that was saved
to your Things or My Things folder. You can also save the most recent scan at any time by
choosing Save from the File menu.
Scans can be saved as STL files, Thing files or other available file formats.
DISCARD THIS SCAN If you’re not happy with your scan, click Discard this Scan to delete the completed
scan. Once you’ve accepted the delete confirmation prompt, MakerWare for Digitizer deletes
the saved file from your Things or My Things folder and returns you to the New Scan screen.
SCAN AGAINClick Scan Again to return to the New Scan screen.
SCANNING WITH YOUR MAKERBOT DIGITIZER
SCAN COMPLETE! NOW WHAT?
SHARE ON THINGIVERSE If you skipped the Share on
Thingiverse prompt after you saved
your scan, you can still publish to
MakerBot Thingiverse. Click this button
or choose Share from the File menu to
open the Share on Thingiverse dialog at
any time.
Note: You must be logged in to
MakerBot Thingiverse to share. i
Next Steps

Troubleshooting + Maintenance
4
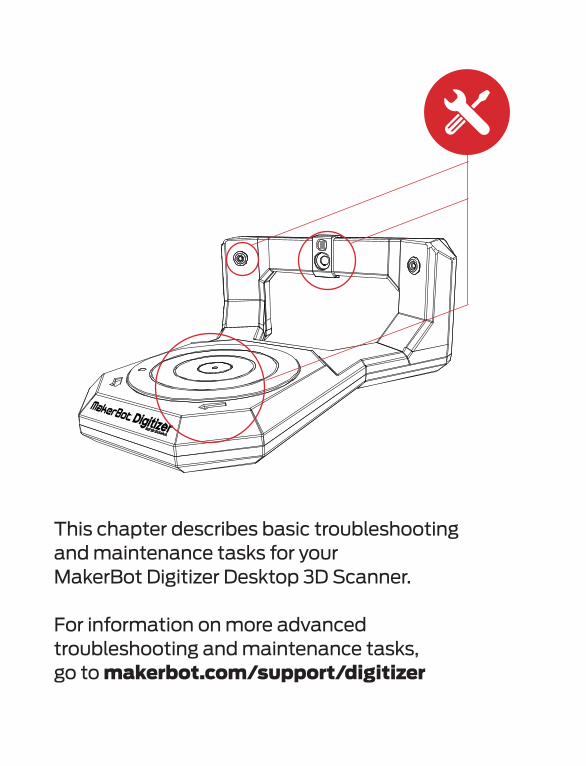
This chapter describes basic troubleshooting and maintenance tasks for your MakerBot Digitizer Desktop 3D Scanner.
For information on more advanced troubleshooting and maintenance tasks, go to makerbot.com/support/digitizer
54
PROBLEM SOLUTION
The MakerBot Digitizer is
connected via USB but
MakerWare for Digitizer
shows a “MakerBot Digitizer
Not Connected” message
1. Ensure that the USB cable is connected
to both your MakerBot Digitizer and
your computer.
2. Choose Restart Background Service from
the Services menu to restart Conveyor, the
service that handles the connection of the
MakerBot Digitizer to your computer.
3. Try restarting the MakerBot Digitizer,
rebooting your computer, or using a different
USB port or USB cable.
If MakerWare for Digitizer still does not recognize
your Digitizer, please contact MakerBot Support
by emailing [email protected]
The calibration routine fails If the calibration routine fails during the
turntable or laser calibration section, run the
routine again by choosing Calibrate Turntable &
Lasers from the Scanner menu.
If the calibration routine fails during the camera
calibration section, run the routine again by
choosing Calibrate Camera from the Scanner
menu. Then choose Calibrate Turntable & Lasers
from the Scanner menu to finish the complete
calibration routine.
If a calibration section fails for a second time,
please contact MakerBot Support by emailing
TROUBLESHOOTING
55TROUBLESHOOTING + MAINTENANCE
TROUBLESHOOTING
PROBLEM SOLUTION
The camera feed does not
appear in the viewport on the
New Scan screen
1. Restart the MakerBot Digitizer, reboot your
computer and make sure the USB cable is
connected to both the computer and the
MakerBot Digitizer.
2. Choose Restart Background Service from
the Services menu to restart Conveyor, the
service that handles the MakerBot Digitizer’s
connection to your computer.
3. If the camera feed still does not appear,
contact MakerBot Support by emailing
The point cloud does not build
during a scan
No points appearing in the viewport during a
scan is a sign that the camera is not gathering
any data. Check to ensure that the lasers are
projecting red light onto your object, and make
sure that the camera filter is positioned over the
camera lens.
If the lasers are functioning and the camera
filter is in the correct position, please
contact MakerBot Support by emailing
56
TROUBLESHOOTING
PROBLEM SOLUTION
A scannable object results in a
poor scan
1. Check the Object Placement guidelines on
page 38 and ensure that your object is well
positioned on the turntable. Some objects
may scan better in other positions. Try
placing it somewhere else on the turntable.
2. Check the Placement section on page 28
and ensure that the lighting conditions
around your MakerBot Digitizer are
appropriate for scanning.
3. Check that you are using the most
appropriate scan preset. If you are unsure
which shade category best fits your object,
try a different one. Keep in mind that some
objects may not scan well using any preset.
4. If your object is placed well and the lighting is
appropriate, but your scans are consistently
poor, you might need to recalibrate your
lasers and turntable. Clean the camera filter
using the directions on page 58 and run
both the camera calibration routine and the
turntable and lasers calibration routine from
the Scanner menu.
You receive a “Scan Failed”
message
This means that MakerWare for Digitizer is
not collecting any data. If your object adheres
to the guidelines listed on page 21, there may
be a problem with the MakerBot Digitizer’s
connection to your computer. Follow the
directions for dealing with a connection
problem on page 54.

57
TROUBLESHOOTING
TROUBLESHOOTING + MAINTENANCE
PROBLEM SOLUTION
You receive a “MultiScan
Failed” message.
MultiScan Technology could fail to merge your
scans if:
• You attempted to combine scans of two
different objects
• Lighting conditions changed between your
first and second scans
• Your object is fuzzy, reflective, transparent,
or very dark, and produced widely different
sets of scan data for each scan.
MultiScan Technology should only be used to
combine scans of the same object, scanned
under similar conditions. If MultiScan
Technology fails to merge your scans,
MakerWare for Digitizer will revert your scan to
its previous state.
58
MAINTENANCE
Recalibrate the MakerBot Digitizer’s turntable and lasers approximately once a week or
every 20 scans to maintain optimal scan quality. To run the calibration routine, go to the
Scanner menu and choose Calibrate Turntable & Lasers.
Calibration
When an object is too shiny, fuzzy or translucent – or just too complicated a shape – no
amount of correct lighting, object placement or calibration can get a great scan out of it.
We’re working on making some of those unscannable objects scannable, and you can help
by sending us information on objects that didn’t scan well. Email [email protected]
and attach your STL or Thing file, along with a photo of the object you were trying to scan.
We’ll use that data to improve MakerWare for Digitizer.
Show Us What’s not Working
Keep your camera clean and free of debris to ensure the best quality scan. If at any time the
camera filter appears dusty or dirty, follow these steps to clean it:
1. Turn off the MakerBot Digitizer.
2. Use canned air to remove any particles from the filter surface.
3. Moisten a lint-free cloth, lens tissue or cotton swab with isopropyl alcohol.
4. Gently wipe the surface in a circular motion to remove residue.
Caution: Do not immerse the camera filter in any type of liquid. Do not use glass cleaner
or water to clear camera filter.
Camera Care

59
MAINTENANCE
MakerWare for Digitizer will correct small changes in laser alignment by itself, so you will
probably never need to manually adjust laser alignment. However, if the MakerBot Digitizer
is jarred or shaken the lasers could be misaligned badly enough that they will need to be
manually adjusted.
Contact MakerBot Support by emailing [email protected] and confirm that the
lasers are misaligned before manually adjusting the lasers. The lasers are misaligned if a
laser line is clearly not vertical or if the two laser lines intersect at a point other than the
center of the turntable.
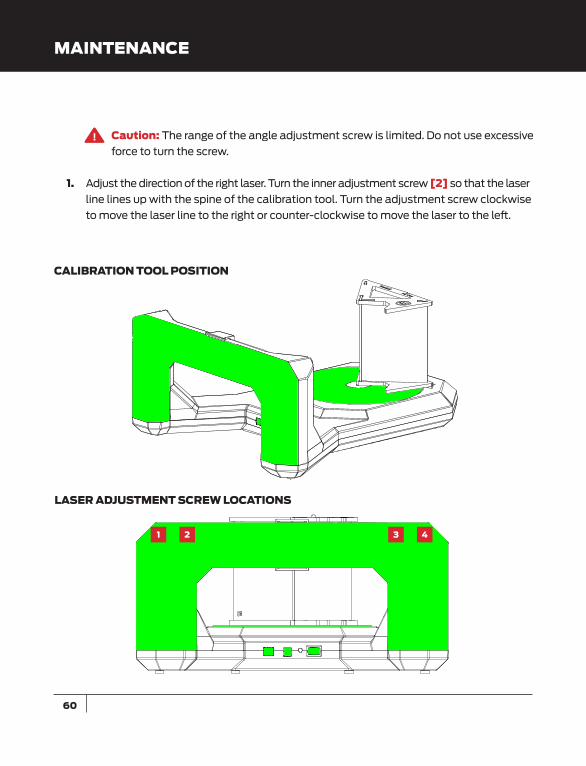
Each laser has two adjustment screws. The inner screw on each side adjusts the direction
of the laser. The outer screw adjusts the angle of the laser. During the laser alignment
process, you will use the T15 Torx driver to adjust the angle and direction of each laser.
TO MANUALLY ADJUST LASER ALIGNMENT1. Choose Align Lasers from the Scanner menu. Both lasers will turn on.
2. Place the calibration tool on the turntable with the letter A pointing up and fit the tab
on the lower edge of the calibration tool into the hole at the center of the turntable.
Orient the tool so that the front panel faces away from the camera.
3. Adjust the angle of the left laser using the T15 Torx Driver. You will feel the screw click as
the laser turns in increments. Turn the outer adjustment screw [4] so that the laser line
is as vertical as possible. Turn the screw clockwise to turn the laser line clockwise and
turn the screw counter-clockwise to turn the laser line counter-clockwise.
Caution: The range of the angle adjustment screw is limited. Do not use
excessive force to turn the screw.
4. Adjust the direction of the left laser. Turn the inner adjustment screw [3] so that the
laser line lines up with the spine of the calibration tool. Turn the adjustment screw
clockwise to move the laser line to the left or counter-clockwise to move the laser to
the right.
5. Adjust the angle of the right laser. You will feel the screw click as the laser turns in
increments. Turn the outer adjustment screw [1] so that the laser line is as vertical as
possible. Turn the screw clockwise to turn the laser line clockwise and turn the screw
counter-clockwise to turn the laser line counter-clockwise.
Laser Alignment
TROUBLESHOOTING + MAINTENANCE
60
MAINTENANCE
CALIBRATION TOOL POSITION
LASER ADJUSTMENT SCREW LOCATIONS
Caution: The range of the angle adjustment screw is limited. Do not use excessive
force to turn the screw.
1. Adjust the direction of the right laser. Turn the inner adjustment screw [2] so that the laser
line lines up with the spine of the calibration tool. Turn the adjustment screw clockwise
to move the laser line to the right or counter-clockwise to move the laser to the left.
1 32 4

61
NOTES
TROUBLESHOOTING + MAINTENANCE

Reference
5

This chapter includes hardware and software specifications for your MakerBot Digitizer Desktop 3D Scanner, a list of the menu options available in MakerBot MakerWare for Digitizer and a glossary to help you understand terms you may be unfamiliar with.
64
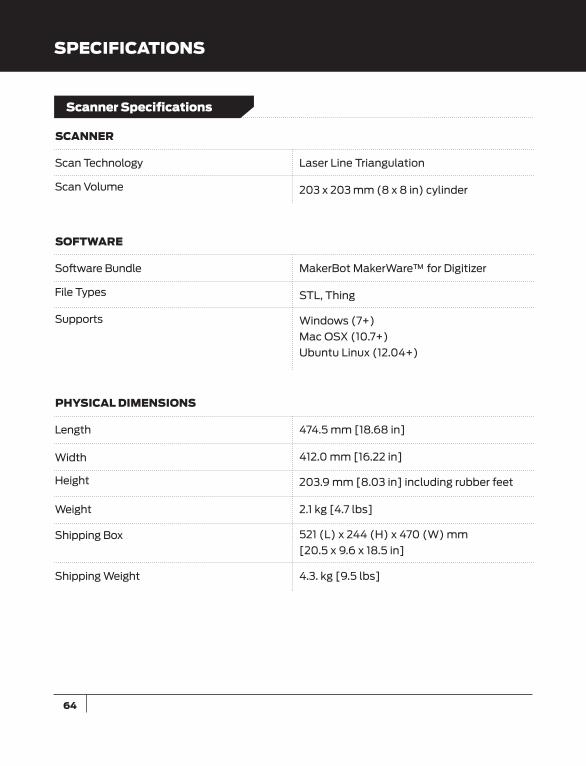
SPECIFICATIONS
Scan Technology
Software Bundle
Length
Scan Volume
File Types
Width
Supports
Height
Weight
Shipping Box
Shipping Weight
Laser Line Triangulation
MakerBot MakerWare™ for Digitizer
474.5 mm [18.68 in]
203 x 203 mm (8 x 8 in) cylinder
STL, Thing
412.0 mm [16.22 in]
Windows (7+)
Mac OSX (10.7+)
Ubuntu Linux (12.04+)
203.9 mm [8.03 in] including rubber feet
2.1 kg [4.7 lbs]
521 (L) x 244 (H) x 470 (W) mm
[20.5 x 9.6 x 18.5 in]
4.3. kg [9.5 lbs]
SCANNER
SOFTWARE
PHYSICAL DIMENSIONS
Scanner Specifications

65REFERENCE
SPECIFICATIONS
Ambient Operating Temperature
Enclosure Material
AC Input
Storage Temperature
Central Bearing
Power Requirements
Stepper Motor
Connectivity
Lasers
Sensor
0°–32° C [32°–90° F]
PC ABS
100 – 240 V, ~2 amps, 50 – 60 Hz
0°–32° C [32°–90° F]
Shielded Chrome Ball Bearing
12 V DC @ 2.08 amps
0.9° step angle with 1/16 micro-stepping
USB
2x Class 1 Laser Line Generators
1.3MP CMOS Image Sensor
TEMPERATURE
MECHANICAL
ELECTRICAL
66
MENU FUNCTIONS
This section describes the menu options available in MakerWare for Digitizer.
FILE Export: Allows you to save the currently open scan under the name, location and file type
of your choice.
Share: Opens the Share to Thingiverse dialog. This option will not be available if no scan is
open or if the open scan has not yet been saved.
Open in MakerWare: Opens a new MakerWare window with the most recent scan open.
This option will be available only after the scan has been saved.
Settings: Displays the settings available for MakerWare for Digitizer. On a Mac, this option
will appear as Preferences in the MakerWare for Digitizer menu.
Close: Quits MakerWare for Digitizer. If a completed scan is open but has not been saved, a
dialog will alert you and ask you to confirm that you wish to quit MakerWare for Digitizer. On
a Mac, this option will appear as Quit in the MakerWare for Digitizer menu.
VIEW Home View: Resets the viewport to the home position.
Front View: Sets the viewport to a front view.
Top View: Sets the viewport to a top view.
Side View: Sets the viewport to a side view.

67
MENU FUNCTIONS
SCANNER Calibrate Camera: Runs the camera calibration portion of the MakerBot Digitizer
calibration routine.
Calibrate Turntable & Lasers: Runs the turntable and laser portions of the MakerBot
Digitizer calibration routine.
Align Lasers: Turns on both lasers for manual alignment.
Update Firmware: Walks you through the process of uploading new firmware to your
MakerBot Digitizer. If MakerWare for Digitizer is connected to the internet, it will notify you
when a firmware update becomes available.
New Scan: Brings you to MakerWare for Digitizer’s New Scan screen.
SERVICESRestart Background Service: Allows you to restart Conveyor, the service that handles
MakerWare for Digitizer’s connection to the MakerBot Digitizer.
View Background Service Log: Opens the log file for Conveyor, the service that handles
MakerWare for Digitizer’s connection to the MakerBot Digitizer.
HELPOnline Help: Directs the user to online support documentation.
About MakerWare for Digitizer: Displays a dialog with version and copyright information.
On a Mac, this option will appear in the MakerWare for Digitizer menu.
REFERENCE
68
GLOSSARY
CALIBRATION ROUTINE: The step-by-step
process MakerWare for Digitizer uses to accurately
locate its cameras, turntable and lasers.
CALIBRATION TOOL: A geometrically specific
object with a checkered surface that is used for
the calibration of the camera of the MakerBot
Digitizer, turntable and lasers.
CAMERA FILTER: A filter that reflects all
wavelengths other than the lasers’ wavelength,
ensuring that the MakerBot Digitizer’s camera only
sees the laser lines on your object.
CLASS 1 LASER: The class of laser used in the
MakerBot Digitizer. Class 1 lasers are safe under
all conditions of normal use.
DARK/DIFFICULT TO SCAN (SCAN PRESET):
One of three available scan presets used to
describe the shade value of an object. This
preset should be used on dark objects, very
shiny objects, or objects with a fuzzy texture.
Keep in mind that these objects might not
scan well using any preset.
DATA POINT: A single piece of information
describing a location on the surface of the
object being scanned. A point cloud is
composed of individual data points.
FUZZY: Having a surface covered in small hairs
or fibers. Fuzzy objects are difficult to scan with
the MakerBot Digitizer.
LASER DIVERGENCE: An angular measurement
of the increase in a laser beam’s diameter
with distance from the laser aperture. The
MakerBot Digitizer Class 1 laser divergence
is 1 Radian x < 5 mRadians.
LIGHT (SCAN PRESET): One of three available
scan presets used to describe the shade value
of an object. The Light preset should be used on
white and light-colored objects.
MAKERWARE: Free software created by
MakerBot that allows you to send 3D models
to a MakerBot 3D printer for building. Models
can be sent to MakerWare directly from
MakerWare for Digitizer.
MAKERWARE FOR DIGITIZER: Free software
created by MakerBot and used to control the
MakerBot Digitizer Desktop 3D Scanner.
MANIFOLD: A term used to describe 3D models
that consist of one completely enclosed three-
dimensional shape with no holes, reversed faces or
extra geometry. Non-manifold models will cause
problems for 3D printing and other applications.
MAKERBOT DIGITIZER: The MakerBot Digitizer
Desktop 3D Scanner.
MAKERBOT THINGIVERSE: A website for
sharing and downloading 3D model files and
other designs.
MAXIMUM PERMISSIBLE EXPOSURE (MPE):
A rating used for laser safety calculations. The
MPE is the highest amount of exposure to a light
source that is considered safe.
MEDIUM (SCAN PRESET): One of three avail-
able scan presets used to describe the shade
value of an object. The Medium preset should be
used on brightly colored objects and objects that
are neither light nor dark.
69
GLOSSARY
MESH, 3D: A collection of vertices, edges
and faces used to describe the shape of a
an object in three dimensional computer
graphics and modeling.
MULTISCAN TECHNOLOGY: A feature of
MakerWare for Digitizer that allows you to scan
an object from multiple angles and merge the
scans to create a better 3D model.
MY THINGS FOLDER: The directory where
MakerBot Digitizer scans are saved by default.
On Mac computers, this directory is called the
Things folder.
OPAQUE: An opaque object is one that does not
allow light to pass through it. Opaque objects are
easier to scan with the MakerBot Digitizer than
transparent or translucent objects.
POINT CLOUD: A set of data points that
represent an object in a three-dimensional
coordinate system.
SCAN CYLINDER: The cylindrical area inside
of which the MakerBot Digitizer collects data.
To be scanned, an object must fit completely
inside the scan cylinder.
SCAN PRESET: A setting used to describe an
object’s shade value to the MakerBot Digitizer.
The three scan presets are Light, Medium and
Dark/Difficult to Scan.
STL FILE: A widely used file format for 3D
models. STL files describe only the surface
geometry of a three-dimensional object
without any representation of color, texture
or other common CAD model attributes.
THING FILE: A file format used by MakerBot
software that allows you to save multiple 3D
models to the same file and to save other
information about the models it contains,
including size and location.
THINGS FOLDER: See “My Things folder”.
TRANSLUCENT: A translucent object allows
light to pass through it, but diffuses the light so
that objects on the other side of it are not clearly
visible. Translucent objects are more difficult to
scan than opaque objects.
TRANSPARENT: A transparent object allows
light to pass through without diffusing it, so that
objects on the other side of it are clearly visible.
Transparent objects are more difficult to scan
than translucent or opaque objects.
TURNTABLE: The revolving platform on which
you will place the object being scanned.
VIEWPORT: The window in MakerWare for
Digitizer where the camera view, point cloud,
and 3D mesh are displayed.
WAVELENGTH: A measurement used to describe
any form that travels as a wave, e.g. light, sound,
and lasers. Laser wavelengths are measured in
nanometers. The wavelength of the Class 1 lasers
used in the MakerBot Digitizer is 650nm.
REFERENCE

70
CONTACT US
Support makerbot.com/supportOur website has extensive documentation
and troubleshooting information about your
MakerBot Digitizer Desktop 3D Scanner. It’s a
great resource when you want to try to solve
issues quickly on your own.
[email protected] you ever need help resolving an issue with
your MakerBot Digitizer, send an email to
the address above to open a ticket with the
MakerBot Support Team. To help us understand
your problem from the start, it is very helpful to
include pictures or a video as attachments on
your email.
Sales [email protected] learn about other MakerBot products, please
email the address above or call our Sales Team
at 1-347-334-6800.
Feedback [email protected] general questions, or to tell us what’s on
your mind, send an email to the address above.
We love to hear from you, and using this email
address helps keep our Sales and Support lines
free for customers in need.

71
NOTES
REFERENCE

Terms
6

MakerBot products do not carry a long-term warranty. Returns are possible only on
unaffected items, within 14 days of receipt. After such time, all sales are considered final.
“Unaffected” means a device has never been assembled, powered up, programmed, or
otherwise changed. MakerBot cannot accept returns on purchased items that have had
electrical power applied to them, or been otherwise programmed, changed, or affected.
However, we will provide parts or service on items that prove to be defective from the time of
manufacture, and we’ll always work with you to get your bot running again.
Please be advised of the following terms (the “Terms”) regarding this User Manual (the “Manual”):
All information in this Manual is subject to change at any time without notice and is provided for convenience purposes only. MakerBot reserves the right to modify or revise the Manual in its sole discretion and at any time. You agree to be bound by any modifications and/or revisions. Contact the MakerBot Support Team for up-to-date information.
The design of this Manual and all text, graphics, information, content, and other material are protected by copyright and other laws. The contents are Copyright (c) 2009, 2010, 2011, 2012, 2013 MakerBot Industries, or our respective affiliates and suppliers. All rights reserved. Certain trademarks, trade names, service marks and logos (the “Marks”) used are registered and unregistered trademarks, trade names and service marks of MakerBot and its affiliates. Nothing contained in this Manual grants or should be construed as granting, by implication, estoppel, or otherwise, any license or right to use any Marks without the written permission of MakerBot. Any unauthorized use of any information, materials or Marks may violate copyright laws, trademark laws, laws of privacy and publicity, and/or other laws and regulations.
Warranty, Returns + Replacement Policy
Terms of Service

MakerBot One MetroTech Center, 21st Floor, Brooklyn, NY [email protected] makerbot.com