Embed Size (px)
Citation preview

User Manual
®
Congratulations on your purchase of the Merlin elite HD Magnifier with OCR from Enhanced Vision. The Merlin elite is a full-color High-Definition (HD), auto-focus video magnifier system designed
to enhance the lifestyle of the visually impaired. With the LCD Monitor’s adjustable arm, Merlin elite can provide the user with the ultimate flexibility in the position of the screen making reading easier than ever.
The Merlin elite is a fully integrated solution, offering the advantage
of a built-in HD LCD screen and OCR. Merlin elite enables
individuals with low vision to read, write, view photos, enjoy crafts
and hobbies, and more – in color, black-and-white, or enhanced
high-contrast positive or negative viewing modes. Merlin elite
also includes 3 different preset viewing combinations for both text
and background to provide improved viewing when reading. An
additional 28 text and background combinations are available and
can be programmed. With easy-to-use buttons, you can enlarge
or reduce the image in seconds, change viewing modes for easier
visibility.
Prior to using this system, please carefully read and follow the
instructions provided within this booklet. Your Merlin elite is
ready to use right out of the box. By reviewing all Merlin elite
features and controls before use and following the directions
carefully, you’ll be able to enjoy all the great benefits from your
purchase.
Enhanced Vision products are designed to give you the highest
quality image, convenient and easy-to-use features and years of
reliable service. Thank you for choosing the Enhanced Vision
Merlin elite.
FCC COMPLIANCE NOTICE
This device complies with Part 15 of the FCC Rules. Operation is
subject to the following two conditions: (1) This device may not cause
harmful interference, and (2) this device must accept any interference
received, including interference that may cause undesired operation.
This equipment has been tested and found to comply with the limits
for a Class B digital device, pursuant to Part 15 of the FCC Rules.
These limits are designed to provide reasonable protection against
harmful interference in a residential installation. This equipment
generates, uses, and can radiate radio frequency energy and, if not
installed and used in accordance with the instructions, may cause
harmful interference to radio communications. However, there is no
guarantee that interference will not occur in a particular installation. If
this equipment does cause harmful interference to radio or television
reception, which can be determined by turning the equipment off and
on, the user is encouraged to try to correct the interference by one or
more of the following measures:
Reorient or relocate the receiving antenna.
Increase the separation between the equipment and receiver.
Connect the equipment into an outlet on a circuit different from that to which the receiver is connected.
Consult the dealer or an experienced radio/TV technician for help.
Unauthorized changes or modification to this system can void the users’ authority to operate this equipment.
If your Low Vision device has an option to connect to a TV, it must be
used with shielded interface cables in order to meet FCC emissions
limits for Class B digital devices. It is the responsibility of the user to
use the shielded interface cables supplied with the equipment.
FCC Compliance Notice

Safety and Care . . . . . . . . . . . . . . . . . . . . . . . . . . . . . . . . . . . . . . . . . . . . 5-9
Merlin elite at a Glance . . . . . . . . . . . . . . . . . . . . . . . . . . . . . . . . . . . 10-11
Setting Up Merlin elite . . . . . . . . . . . . . . . . . . . . . . . . . . . . . . . . . . . 12-13
Control Console .. . . . . . . . . . . . . . . . . . . . . . . . . . . . . . . . . . . . . . . 14
Button Definitions / Turning Lights On/Off. . . . . . . . . . . . . . . . 15-16
Using the X-Y Table . . . . . . . . . . . . . . . . . . . . . . . . . . . . . . . . . . . . . . . . . 17
Tips for Reading and Writing . . . . . . . . . . . . . . . . . . . . . . . . . . . . . . . 18
Changing Magnification . . . . . . . . . . . . . . . . . . . . . . . . . . . . . . . . . . . . . 19
Changing Viewing Modes . . . . . . . . . . . . . . . . . . . . . . . . . . . . . . . . 20-22
Adjusting Brightness & White Balance . . . . . . . . . . . . . . . . . . . . 23
Using and Adjusting Markers . . . . . . . . . . . . . . . . . . . . . . . . . . . . 24-25
Volume Adjustment & VGA/HDMI Toggle. . . . . . . . . . . . . . . . . . . . . 26
OCR/Text-To-Speech Mode . . . . . . . . . . . . . . . . . . . . . . . . . . . . . . . 27-30
Saving, Recalling, Downloading & Deleting Images. . . . . 31-32
Screen Saver . . . . . . . . . . . . . . . . . . . . . . . . . . . . . . . . . . . . . . . . . . . . . . . 33
Language Settings/Product Info . . . . . . . . . . . . . . . . . . . . . . . . . 34-35
Troubleshooting . . . . . . . . . . . . . . . . . . . . . . . . . . . . . . . . . . . . . . . . . 36-37
Merlin elite Specifications . . . . . . . . . . . . . . . . . . . . . . . . . . . . . . . . . . . 38
Warranty Statement . . . . . . . . . . . . . . . . . . . . . . . . . . . . . . . . . . . . . . . . . 39
Other Enhanced Vision Products . . . . . . . . . . . . . . . . . . . . . . . . . . . . . . . . . . . . . . . . 40-42
Table of Contents

SAFETY AND CARE
For your safety and to obtain the most benefit from the Merlin elite, please
read these safety precautions very carefully.
The Merlin elite is designed to enlarge and enhance images and read
print aloud in order to improve the quality of life for people who are
visually impaired. The extent to which this product can improve the ability
to see images depends on a person’s individual condition and level of
visual impairment.
The Merlin elite is not designed to restore vision, correct eye conditions
or halt degenerative vision loss. An eye care professional can
determine the usefulness and suitability of the Merlin elite for a patient’s
individual condition.
Precautions for Use
Follow all warnings, cautions, and instructions marked on the product.
Use the Merlin elite on a stable, level surface such as a solid desk or
table, according to its intended design specifications.
Avoid placing the Merlin elite on an unstable table, cart or stand. It may
fall causing serious damage to the unit or bodily injury to the user.
Use the Merlin elite indoors only – it should NOT be exposed to
extreme or rapid changes in temperature or humidity. Do not place
the Merlin elite near a radiator, heater or areas exposed to long hours
of direct sunlight. These conditions may cause damage to the unit’s
electronics or optics.
At least once per week, clean the Merlin elite with a soft dry cloth
or an electrostatic dusting wipe. DO NOT use liquid cleaners on its
plastic surfaces. No additional methods of sterilization or cleaning are
recommended nor required.
Do not use the Merlin elite near flammable materials or liquids.
Safety and Care 5
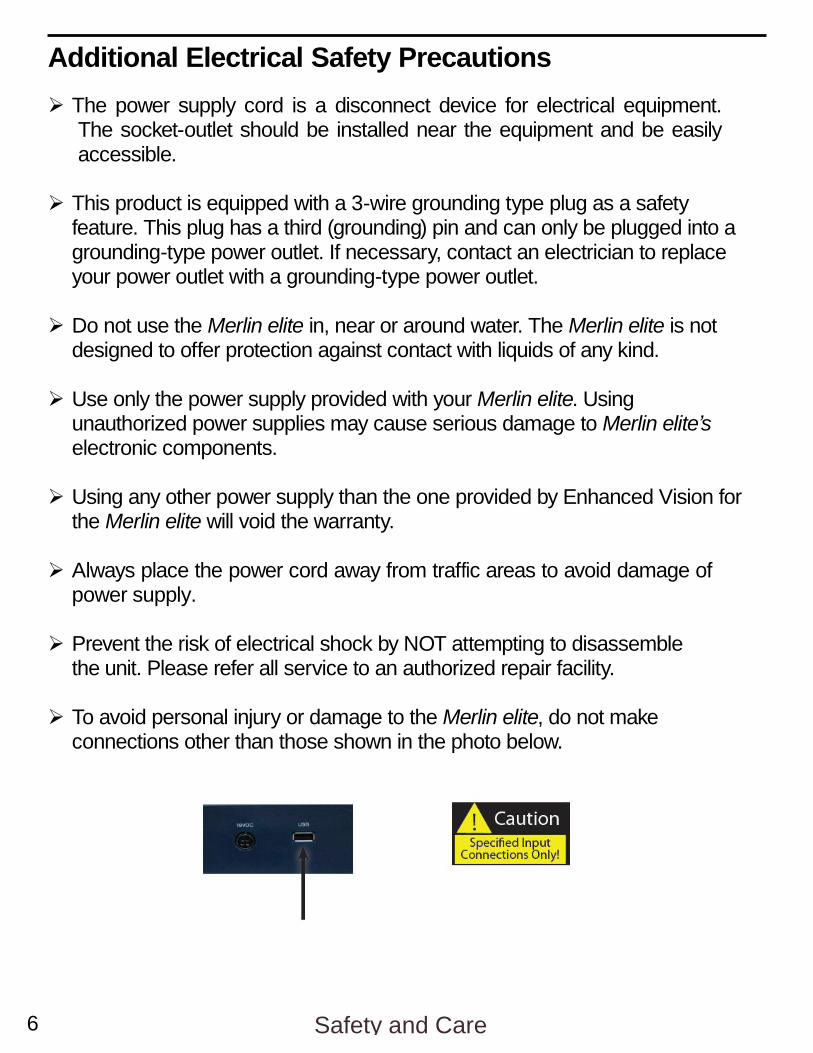
Additional Electrical Safety Precautions
The power supply cord is a disconnect device for electrical equipment. The socket-outlet should be installed near the equipment and be easily accessible.
This product is equipped with a 3-wire grounding type plug as a safety
feature. This plug has a third (grounding) pin and can only be plugged into a grounding-type power outlet. If necessary, contact an electrician to replace your power outlet with a grounding-type power outlet.
Do not use the Merlin elite in, near or around water. The Merlin elite is not
designed to offer protection against contact with liquids of any kind. Use only the power supply provided with your Merlin elite. Using
unauthorized power supplies may cause serious damage to Merlin elite’s electronic components.
Using any other power supply than the one provided by Enhanced Vision for
the Merlin elite will void the warranty.
Always place the power cord away from traffic areas to avoid damage of power supply.
Prevent the risk of electrical shock by NOT attempting to disassemble
the unit. Please refer all service to an authorized repair facility. To avoid personal injury or damage to the Merlin elite, do not make
connections other than those shown in the photo below.
6 Safety and Care
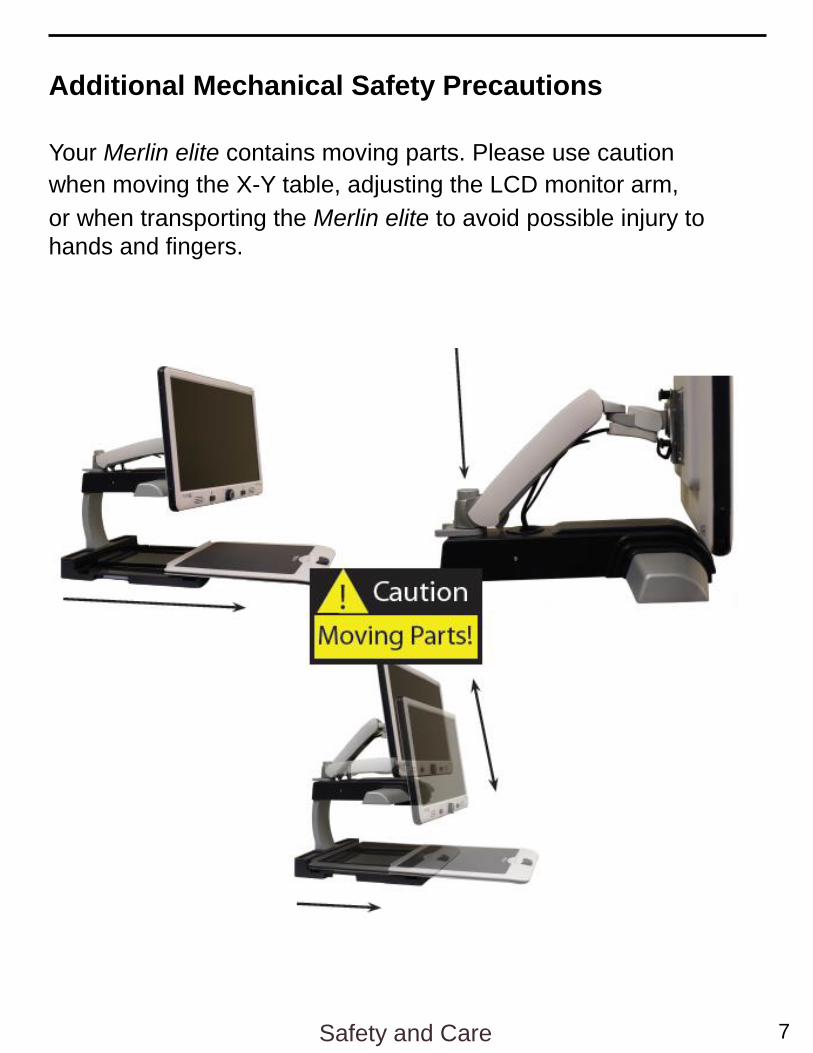
Additional Mechanical Safety Precautions
Your Merlin elite contains moving parts. Please use caution
when moving the X-Y table, adjusting the LCD monitor arm,
or when transporting the Merlin elite to avoid possible injury to
hands and fingers.
Safety and Care 7

To Move Merlin elite to Another Location
Use caution if you are repositioning the Merlin elite a short
distance across a desk or table. Make sure you do not pull on
any power cords or connector cables.
Disconnect and secure all power and video cables and lock the
X-Y table before moving the unit.
Carry the unit only by the two recessed handles located on either
side of its base.
***Do not carry it by the LCD monitor arm.***
Caring for Merlin elite
Always turn the power OFF (by holding the Power button for 5
seconds) on the Merlin elite when the system is not in use.
• Pressing the Power button on the Front Panel, right side, of
the Merlin elite for less than 5 seconds will put the device
in Standby. Pressing the Power button again will wake the
Merlin elite up from Standby.
Always turn the power OFF (by holding the Power button for 5
seconds) before cleaning the Merlin-elite.
Clean the Merlin elite with a soft dry cloth or an electrostatic
dusting wipe. DO NOT use liquid cleaners on its plastic surfaces.
The protective glass covering the camera can be cleaned as
needed with the lens cloth provided within the packaging of the
Merlin elite.
8 Safety and Care

Susceptibility to Interference:
There may be temporary degradation of the image when the Merlin
elite is subjected to a strong radio frequency field, electro-static
discharge or transient electrical noise. An electro-static discharge
(caused by static electricity) may cause the screen to go blank. If
this happens, disconnect the AC power from the electrical outlet,
wait 30 seconds, and connect the AC power again.
Compliance Warnings:
Electromagnetic compatibility: The use of accessories and cables
other than those specified by Enhanced Vision may result in
increased emissions or decreased immunity of the Merlin elite.
Placement of equipment: The Merlin elite should not be used
adjacent to or stacked with other equipment.
Product enhancements and revisions are an integral part
of what we do here at Enhanced Vision. Please visit –
http://www. enhancedvision.com/low-vision-product-line.html
and select your Enhanced Vision Product. You will find the
most up-to-date version of the User Manual at the bottom of
the page.
Safety and Care 9

MERLIN elite AT A GLANCE
Take a few moments to familiarize yourself with the
components of your Merlin elite:
1. 24” LCD Screen: displays high quality image
2. Power button
3. Zoom Wheel (Size/Magnification dial) – ‘FIND’ key in center
4. Viewing Mode button
5. LCD Monitor Arm
6. X-Y table
7. X-Y table locking lever
8. Recessed handles for carrying Merlin elite
9. Merlin elite 19V power supply
10. Merlin elite Power Cord (Attaches to 19v Power Supply)
(power cord style may vary based upon country)
11. 3.5mm jack for Headphones
Accessories included:
12. Control Console: allows the user to control the Merlin elite
functions
*Must be plugged in to use and have access to the menu
items for OCR/Text-To-Speech
13. Lens Cloth: permits cleaning of the LCD display and lenses
10 Merlin elite at a Glance

Merlin elite at a Glance 11

SETTING UP THE MERLIN elite
1. Find a steady and level location,
such as a table or desk, where you
will be comfortable using Merlin elite.
Carry the Merlin elite only by the two
recessed handles on the side of the
base for a secure grip. Do not lift the
unit by the LCD monitor arm. Place
it on the table or desk (see Figure 1).
2. Connect the Control Console cord
(See Page 10 Item 12) to the USB
port at the back, left side (facing the
back), of the Merlin elite base (See
Figure 2).
3. Connect the power cord to the power
supply (See Figure 3). Connect the
power cord to an available electrical
outlet (See Figure 4). Connect the
other end of the power supply to
the Merlin elite where it is labeled
“19VDC” (See Figure 2).
To offer additional protection during an electrical storm, a surge protector may also be used and is recommended.
12 Setting Up Merlin elite
If the lights on the Power, Zoom Wheel and Mode buttons do not illuminate, or if an image does not appear on the HD LCD monitor, please check the power supply connections (review steps 2-3 on page 12 for details).
Pressing the Power button on the Front Panel, right side, of the
Merlin elite for less than 5 seconds will put the device in Standby.
Pressing the Power button again will wake the Merlin elite up from
Standby.
To turn the Merlin elite off, press and hold the Power Button for
more than 5 seconds or until “Merlin elite HD/OCR” appears on the
screen.
Button Combinations
Throughout the User Manual there will be ‘button combinations’
(e.g. Press the “[Find] and [Mode]” buttons). This indicates that
the buttons should be pressed simultaneously. Control buttons,
levers, etc. are enclosed in [ ].
Setting Up Merlin elite 13

Brightness
Zoom
Mode
Volume
OCR /
Capture OCR Speed
Markers
Previous
Sentence
Next
Sentence
Save Library
(Recall) Play /Pause
Find
Merlin elite Control Console
NOTE: When the lower cover is placed on the Control Console, OCR related menu
options are de-activated in the Merlin elite Menus
See the following Page for Console Controls Detail
14 Control Console
2
1 3
4 5
6 7
8 9
10 11 12

Button Definitions 15
1. Brightness – When in desktop/live mode, press Up/Down to increase/decrease brightness
When in OCR mode, press [Brightness] Up/Down to move to the Next/Previous word. ‘Press and hold’ [Brightness] Up/Down to advance 2 words per second. Note: Word navigation is only available when OCR is paused.
2. Zoom Wheel – Turn clockwise/counter-clockwise to increase/decrease the magnification level.
In the menu or [Recall] mode, turn clockwise/counter-clockwise to advance through the menu items or saved files
3. Mode – Press to advance through viewing modes. ‘Press and hold’ for 2 seconds to return to
‘Normal’ color from any ‘Enhanced’ color mode. Press [Mode Up] for 2 seconds for the color mode menu
4. Find – When used above Minimum Zoom, a box outline will indicate what will be displayed at that
zoom level to assist with document positioning. When used in combination with the [Mode] button, this allows one to enter the Main Menu (press
“[Find] and [Mode Up]”). When in the menu, press [Find] to select a menu item. To exit menu, press [Mode Up]. 5. OCR/Capture – Press to capture an image for OCR (starts Zoning Preview if enabled in menu).
Press again to exit out of OCR and back to desktop/live mode. 6. Volume – Rotate to increase/decrease volume in desktop/live mode or OCR mode 7. OCR Speed / Markers – When in OCR mode, rotate clockwise/counter-clockwise to
increase/decrease OCR Playback speed (Speed 1-10 only during OCR Playback). Pressing this wheel will reset the OCR Playback speed to 5.
When in desktop/live mode, rotate clockwise/counter-clockwise to cycle through enabled markers
(Column, Line & Window). Pressing this wheel will remove visible markers. 8. Previous Sentence (In OCR Mode) – Press to move to the previous sentence. ‘Press and hold’
for more than 2 seconds to move to a previous sentence, two sentences per second. When in [Recall] - jumps to top of current list or jumps to previous bottom of list 9. Next Sentence (In OCR Mode) – Press to move to the next sentence. ‘Press and hold’ for more
than 2 seconds to move to the next sentence, two sentences per second. When in Recall - Jumps to bottom of current list or jumps to top of next list 10. Save (desktop/live mode) – ‘Press and hold’ for 2 seconds or more to save the current image.
In OCR mode, ‘Pressing and hold’ for 2 seconds during OCR Playback to save the current OCR 11. Pause/Play – Toggle operation: Used to pause, or resume play, during OCR Playback 12. Library (Recall) – Enters the Image/OCR File recall menu (Press for 2 seconds)
BUTTON DEFINITIONS

Turning Lights On/Off (toggle)
To turn the Merlin elite lights On/Off:
Press and hold the [Marker Wheel] for more than 5 seconds
***Note: The Merlin elite lights will automatically turn on when it is
first powered on ***
NOTE: If your Merlin elite is plugged into a power strip/surge
protector, make sure the power switch is turned on before
attempting to turn on Merlin elite. If the power strip/surge
protector comes with a circuit breaker, make sure the circuit
breaker has been reset before attempting to turn on Merlin elite.
16 Using the Control Console
USING X-Y TABLE
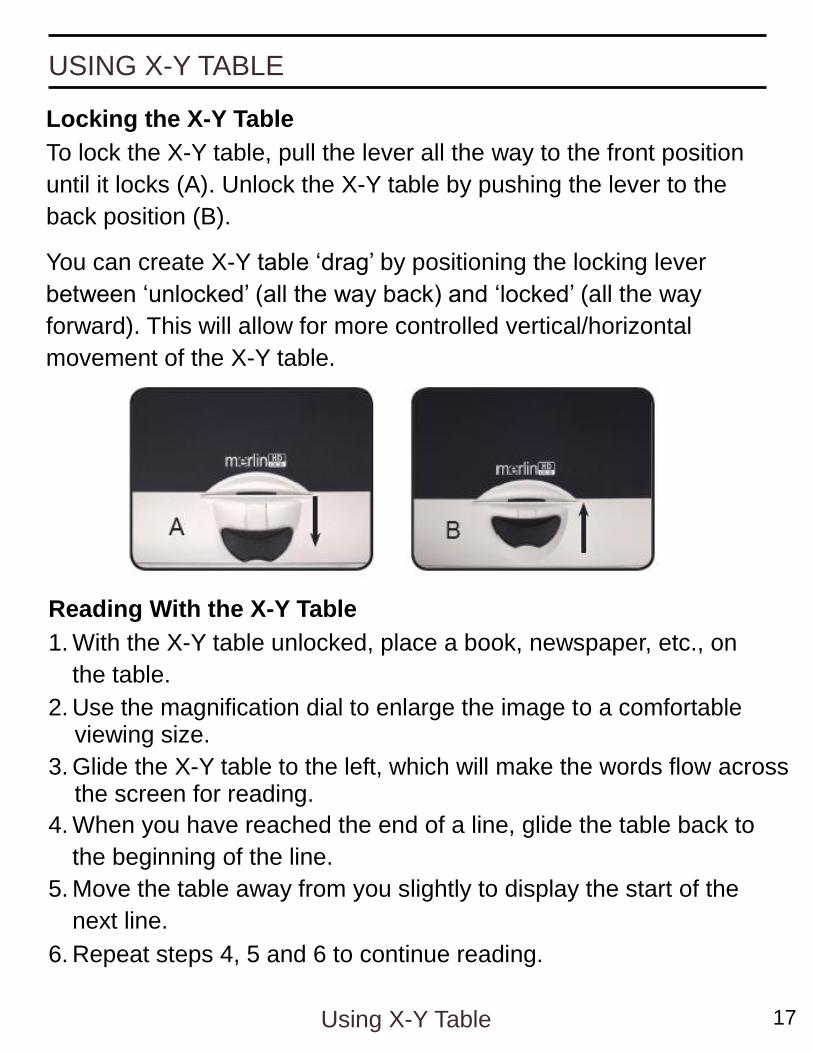
Locking the X-Y Table
To lock the X-Y table, pull the lever all the way to the front position
until it locks (A). Unlock the X-Y table by pushing the lever to the
back position (B).
You can create X-Y table ‘drag’ by positioning the locking lever
between ‘unlocked’ (all the way back) and ‘locked’ (all the way
forward). This will allow for more controlled vertical/horizontal
movement of the X-Y table.
Reading With the X-Y Table
1. With the X-Y table unlocked, place a book, newspaper, etc., on
the table.
2. Use the magnification dial to enlarge the image to a comfortable viewing size.
3. Glide the X-Y table to the left, which will make the words flow across the screen for reading.
4. When you have reached the end of a line, glide the table back to
the beginning of the line.
5. Move the table away from you slightly to display the start of the
next line.
6. Repeat steps 4, 5 and 6 to continue reading.
Using X-Y Table 17
TIPS FOR READING AND WRITING
Reading with Merlin elite New users of video magnifier systems have a tendency to over-
magnify their reading material. Make the type large enough to see it comfortably, but not so large that it becomes tedious to scan across a page.
Use the X-Y table to move reading materials under the camera,
rather than moving the material manually, except small items
such as a checkbook or a business card.
New users should use two hands when moving the X-Y table for
reading, until they become comfortable using one hand.
Writing with Merlin elite Beginners should start at smaller magnification sizes, and then
increase magnification as they become more comfortable using
Merlin elite for writing.
The smaller the magnification size the bigger you tend to write;
the higher the magnification size the smaller you’ll write.
Use a pen that makes a bold line, such as a heavy point pen, a
felt-tip marker or a fine point marker, for easier visibility.
It might be helpful to use lined paper to more easily find and
keep your place.
It might be easier to keep your place if you write a few words
at a time, then move the X-Y table and write again, rather
than moving continually as you write.
Write in either color, black-and-white or positive viewing modes.
18 Tips for Reading and Writing

CHANGING MAGNIFICATION
The Merlin elite offers a large range of magnification capabilities.
The following directions can be used with the Merlin elite Front Panel
Controls (See Figure 1) or Control Console (See Figure 2).
1. To adjust the magnification turn the [Zoom Wheel] located on
the Front panel, or Control Console, until you reach your desired
magnification. Turning the wheel clockwise will increase
magnification and turning the wheel counter-clockwise will decrease
magnification.
2. The Zoom Level will appear in the upper right corner of your
monitor when you are increasing or decreasing magnification.
“Max Zoom,” will appear at the maximum magnification and “Min
Zoom,” will appear at the minimum magnification.
NOTE: The extent of the magnification is dependent upon the distance of the Camera to the object.
Figure 1
Working Distance
You can increase the ‘working distance’ (distance from source material to
camera lens) of the Merlin elite by enabling this setting. This feature is best utilized when you have thicker ‘source material’ (e.g. a thick book) on the
X-Y Table
***Note: You MAY notice a slight reduction in image quality (above Magnification level 8) when this setting is enabled***
Changing Magnification 19
Figure 2

CHANGING VIEWING MODES
The Merlin elite is designed to provide optimum viewing for people with certain visual conditions by offering a range of choices in both text and background colors.
Press the [Mode] button located on the Front Panel, or Control Console, to toggle between: Full Color viewing, Black and White, Enhanced Positive, Enhanced Negative, and up to 5 of your favorite color select modes. Each push will allow you to cycle through all seven viewing modes. The 5 favorite color select modes can be modified to any of the 28 color select options by following the instructions provided on page 22.
VIEWING MODES
Full Color Image (default)
This mode gives a true color representation of the image being magnified.
Black-and-White Image
This mode gives a black and white representation of the image being magnified.
Enhanced-Positive Image
This mode provides a white background with black text. It increases the contrast to offer crisp text images for reading.
Enhanced-Negative Image
This mode provides a black background with white text. It increases the contrast to offer crisp text images for reading.
Crisp, Clear Text Images!
Enhanced Positive
Crisp, Clear Text Images!
Enhanced Negative
20 Changing Viewing Modes
Color Select 1
In factory default this mode provides a black background with green text. This is one of the most commonly used color combinations. To change this mode to any of the 28 available follow the instructions on page 22.
Color Select 2
In factory default this mode provides a black background with yellow text. To change this mode to any of the 28 available follow the instructions on page 22.
Color Select 3
In factory default this mode provides a yellow background with blue text. To change this mode to any of the 28 available follow the instructions on page 22.
Color Select 4
In factory default this mode is turned off. Follow the instructions on page 22 to turn this color mode on.
Color Select 5
In factory default this mode is turned off. Follow the instructions on page 22 to turn this color mode on.
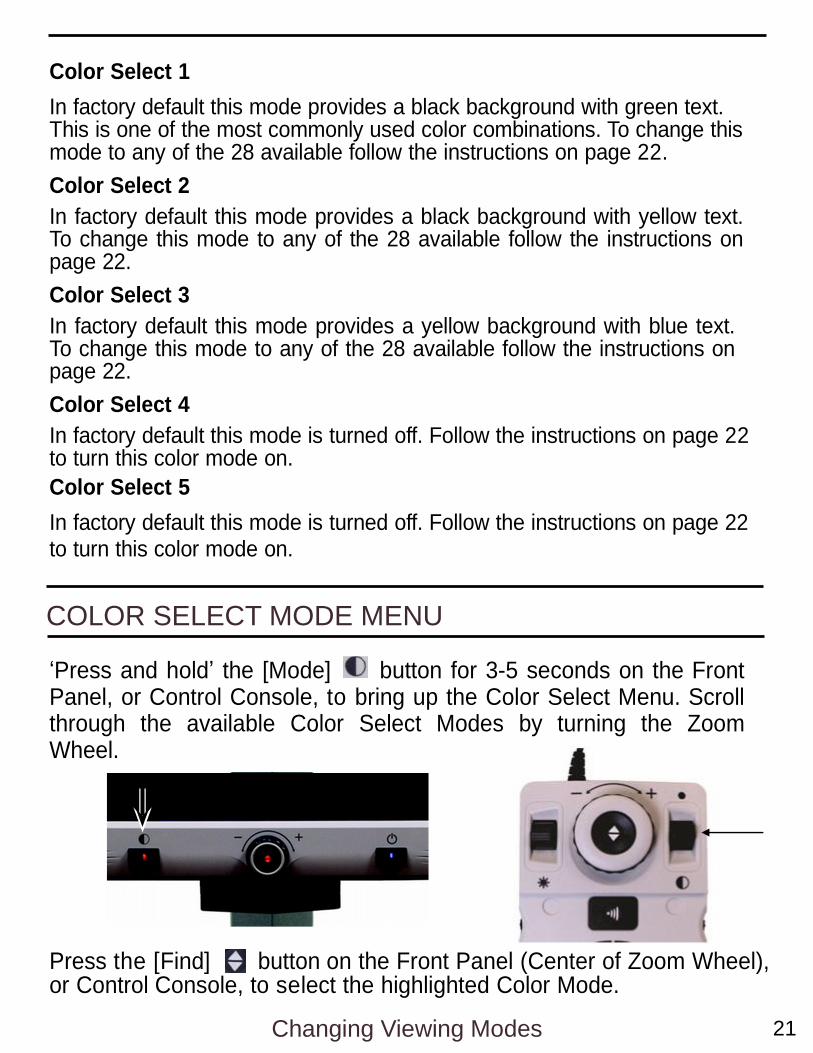
COLOR SELECT MODE MENU
‘Press and hold’ the [Mode] button for 3-5 seconds on the Front Panel, or Control Console, to bring up the Color Select Menu. Scroll through the available Color Select Modes by turning the Zoom Wheel.
Press the [Find] button on the Front Panel (Center of Zoom Wheel), or Control Console, to select the highlighted Color Mode.
Changing Viewing Modes 21
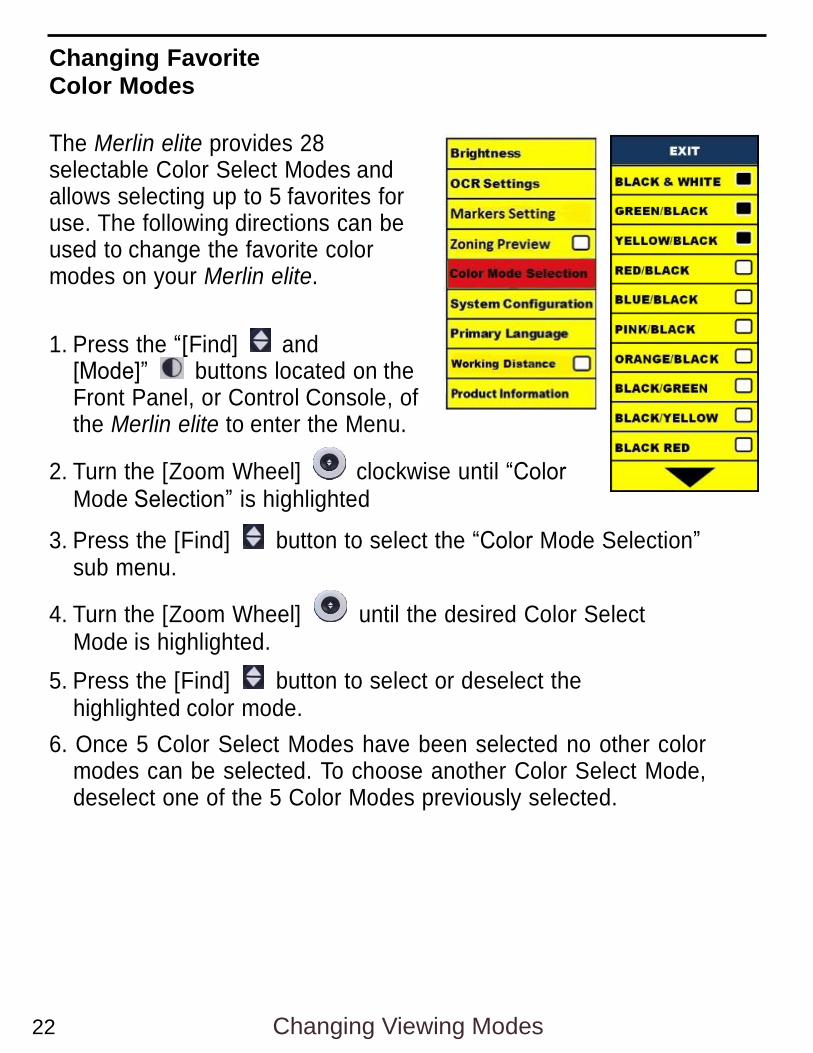
Changing Favorite Color Modes
The Merlin elite provides 28 selectable Color Select Modes and allows selecting up to 5 favorites for use. The following directions can be used to change the favorite color modes on your Merlin elite.
1. Press the “[Find] and [Mode]” buttons located on the Front Panel, or Control Console, of the Merlin elite to enter the Menu.
2. Turn the [Zoom Wheel] clockwise until “Color Mode Selection” is highlighted
3. Press the [Find] button to select the “Color Mode Selection” sub menu.
4. Turn the [Zoom Wheel] until the desired Color Select Mode is highlighted.
5. Press the [Find] button to select or deselect the highlighted color mode.
6. Once 5 Color Select Modes have been selected no other color modes can be selected. To choose another Color Select Mode, deselect one of the 5 Color Modes previously selected.
22 Changing Viewing Modes

Adjusting the Brightness
1. Press the “[Find] and [Mode]” buttons located on the Front
Panel, or Control Console, of the Merlin elite to enter the Menu.
2. “Brightness” should already be highlighted. Press the [Find] button
to select the brightness adjustment option.
3. Turn the [Zoom Wheel] clockwise to brighten the display or
counterclockwise to dim the display.
4. Once the desired brightness is set, press the [Mode] button to exit
or wait 10 seconds for the Menu to exit.
Adjusting the White Balance
The color white is often affected by the lighting used in a room. The Merlin elite White Balance selection allows you to achieve optimum clarity.
1. Press the “[Find] and [Mode]” buttons located on the Front
Panel, or Control Console, of the Merlin elite to enter the Menu.
2. Turn the [Zoom Wheel] clockwise until “System Configuration” is
highlighted.
3. Press the [Find] button to select the “System Configuration” sub
menu.
4. Choose between Auto, Normal, Warm, or Cold by highlighting the
desired White Balance.
“Color: Auto” – Automatically adjusts to the lighting in the room
“Color: Normal” – Casts a balanced tone
“Color: Warm” – Casts a red tone
“Color: Cold” – Casts a blue tone
5. Press the [Find] button to select the desired setting.
6. Press the [Mode] button to exit the menu.
Adjusting Brightness & White Balance 23

USING LINE MARKERS, WINDOWING & COLUMN MARKERS
Line Markers and Windowing
Line Markers can be used as a reading guide by providing horizontal lines across the screen.
Windowing can be used as a reading guide by only displaying a portion of the screen.
Turning Markers On/Off:
Rotating the [Marker Wheel] on the Control Console will allow you to toggle through the Marker Options *Column Marker is only available when Control Console is plugged in.
Off • Column Marker • Line Marker • Windowing
Adjusting Line Markers and Windowing (Column Marker Cannot be adjusted):
To adjust the position of the Marker:
1. Press the “[Find] and [Mode]” buttons located on the Front Panel, or Control Console, of the Merlin elite to enter the Menu.
2. Turn the [Zoom Wheel] until “Marker Position” is selected.
Then press the [Find] button to select.
3. When this option is selected it will be highlighted RED. When this
occurs, you can turn the [Zoom Wheel] clockwise /
counterclockwise to move the Line Markers or Visible area up/down.
Control Console Shortcut:
Press and hold the “[Marker Wheel]
and press [Brightness Up/Down]”
24 Using & Adjusting Markers
(Right EDGE of Console)
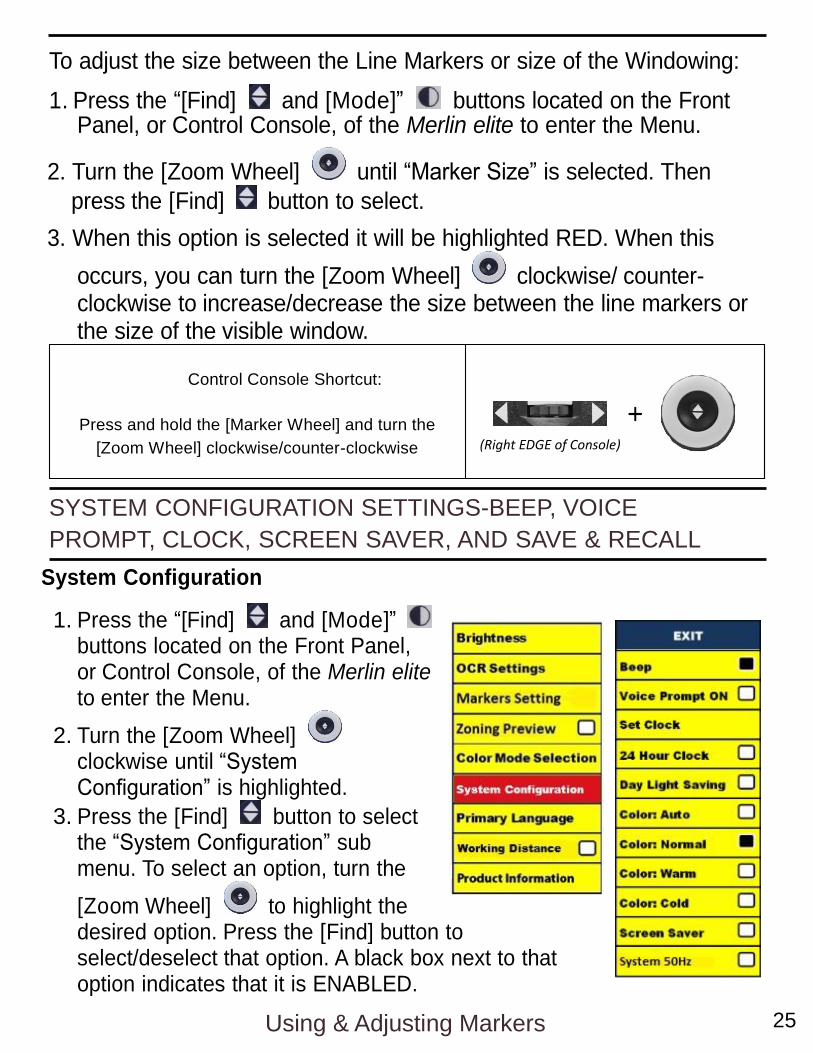
To adjust the size between the Line Markers or size of the Windowing:
1. Press the “[Find] and [Mode]” buttons located on the Front Panel, or Control Console, of the Merlin elite to enter the Menu.
2. Turn the [Zoom Wheel] until “Marker Size” is selected. Then
press the [Find] button to select.
3. When this option is selected it will be highlighted RED. When this
occurs, you can turn the [Zoom Wheel] clockwise/ counter-clockwise to increase/decrease the size between the line markers or the size of the visible window.
Control Console Shortcut:
Press and hold the [Marker Wheel] and turn the
[Zoom Wheel] clockwise/counter-clockwise
SYSTEM CONFIGURATION SETTINGS-BEEP, VOICE
PROMPT, CLOCK, SCREEN SAVER, AND SAVE & RECALL
System Configuration
1. Press the “[Find] and [Mode]” buttons located on the Front Panel, or Control Console, of the Merlin elite to enter the Menu.
2. Turn the [Zoom Wheel] clockwise until “System Configuration” is highlighted.
3. Press the [Find] button to select the “System Configuration” sub menu. To select an option, turn the
[Zoom Wheel] to highlight the desired option. Press the [Find] button to select/deselect that option. A black box next to that option indicates that it is ENABLED.
Using & Adjusting Markers 25
(Right EDGE of Console)
VOLUME ADJUSTMENT & VGA/HDMI TOGGLE
Adjusting the Volume of your Merlin elite in CCTV mode
On the Merlin elite’s Control Console you can turn the [Volume Wheel] (Left EDGE of Console) to increase or decrease the volume.
A message on the top right corner of the screen will display the volume level when adjusting the volume. The Merlin-elite provides up to 10 volume levels.
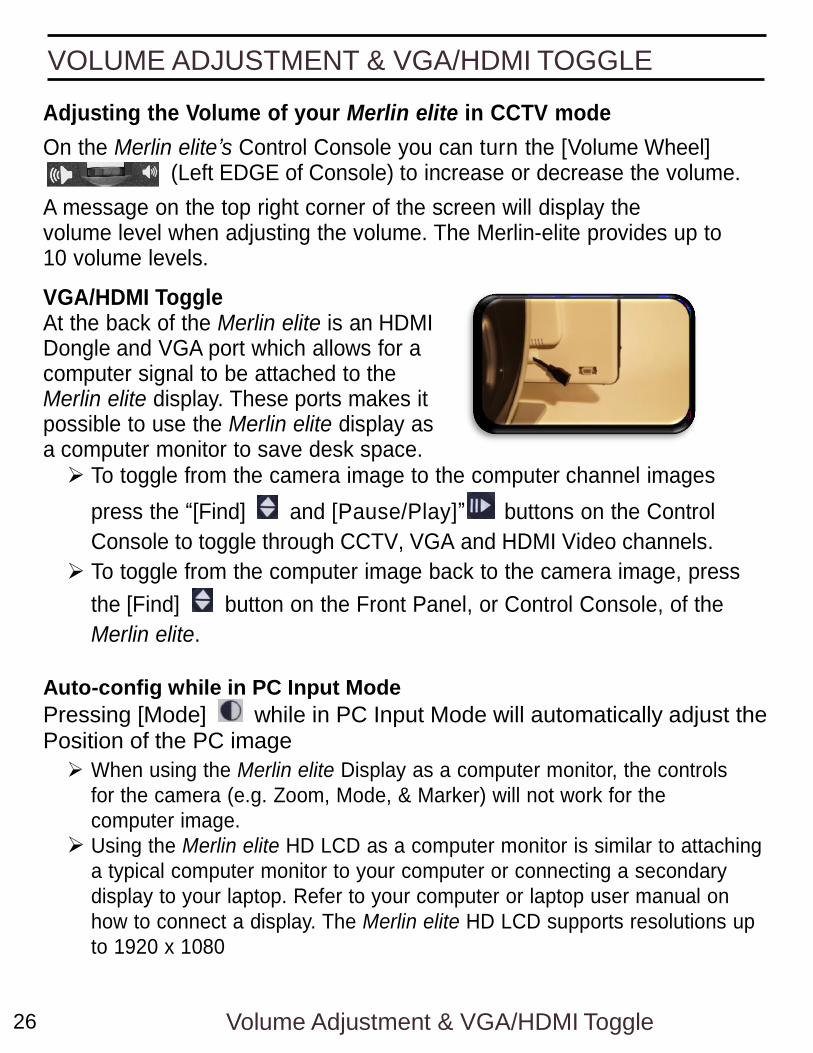
VGA/HDMI Toggle At the back of the Merlin elite is an HDMI Dongle and VGA port which allows for a computer signal to be attached to the Merlin elite display. These ports makes it possible to use the Merlin elite display as a computer monitor to save desk space. To toggle from the camera image to the computer channel images
press the “[Find] and [Pause/Play]” buttons on the Control
Console to toggle through CCTV, VGA and HDMI Video channels.
To toggle from the computer image back to the camera image, press
the [Find] button on the Front Panel, or Control Console, of the
Merlin elite.
Auto-config while in PC Input Mode
Pressing [Mode] while in PC Input Mode will automatically adjust the Position of the PC image
When using the Merlin elite Display as a computer monitor, the controls
for the camera (e.g. Zoom, Mode, & Marker) will not work for the
computer image.
Using the Merlin elite HD LCD as a computer monitor is similar to attaching
a typical computer monitor to your computer or connecting a secondary
display to your laptop. Refer to your computer or laptop user manual on
how to connect a display. The Merlin elite HD LCD supports resolutions up
to 1920 x 1080
26 Volume Adjustment & VGA/HDMI Toggle
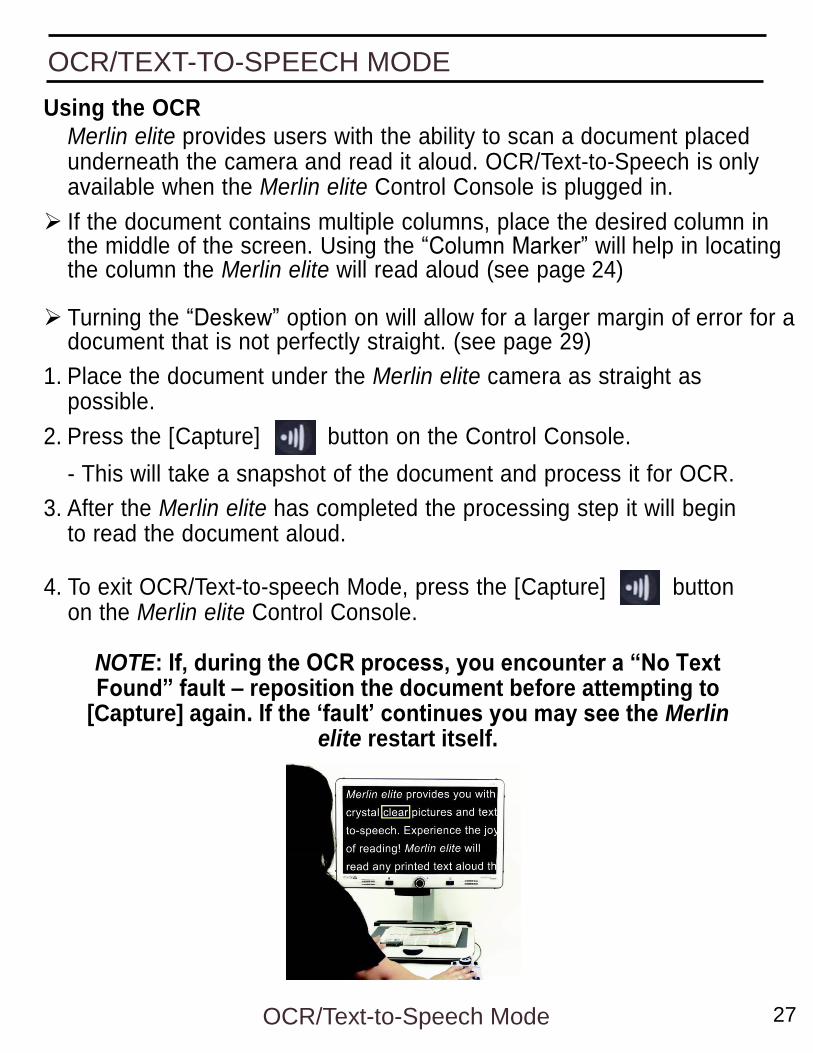
OCR/TEXT-TO-SPEECH MODE
Using the OCR
Merlin elite provides users with the ability to scan a document placed underneath the camera and read it aloud. OCR/Text-to-Speech is only available when the Merlin elite Control Console is plugged in.
If the document contains multiple columns, place the desired column in the middle of the screen. Using the “Column Marker” will help in locating the column the Merlin elite will read aloud (see page 24)
Turning the “Deskew” option on will allow for a larger margin of error for a document that is not perfectly straight. (see page 29)
1. Place the document under the Merlin elite camera as straight as possible.
2. Press the [Capture] button on the Control Console.
- This will take a snapshot of the document and process it for OCR.
3. After the Merlin elite has completed the processing step it will begin to read the document aloud.
4. To exit OCR/Text-to-speech Mode, press the [Capture] button on the Merlin elite Control Console.
NOTE: If, during the OCR process, you encounter a “No Text Found” fault – reposition the document before attempting to
[Capture] again. If the ‘fault’ continues you may see the Merlin elite restart itself.
OCR/Text-to-Speech Mode 27
Column Marker
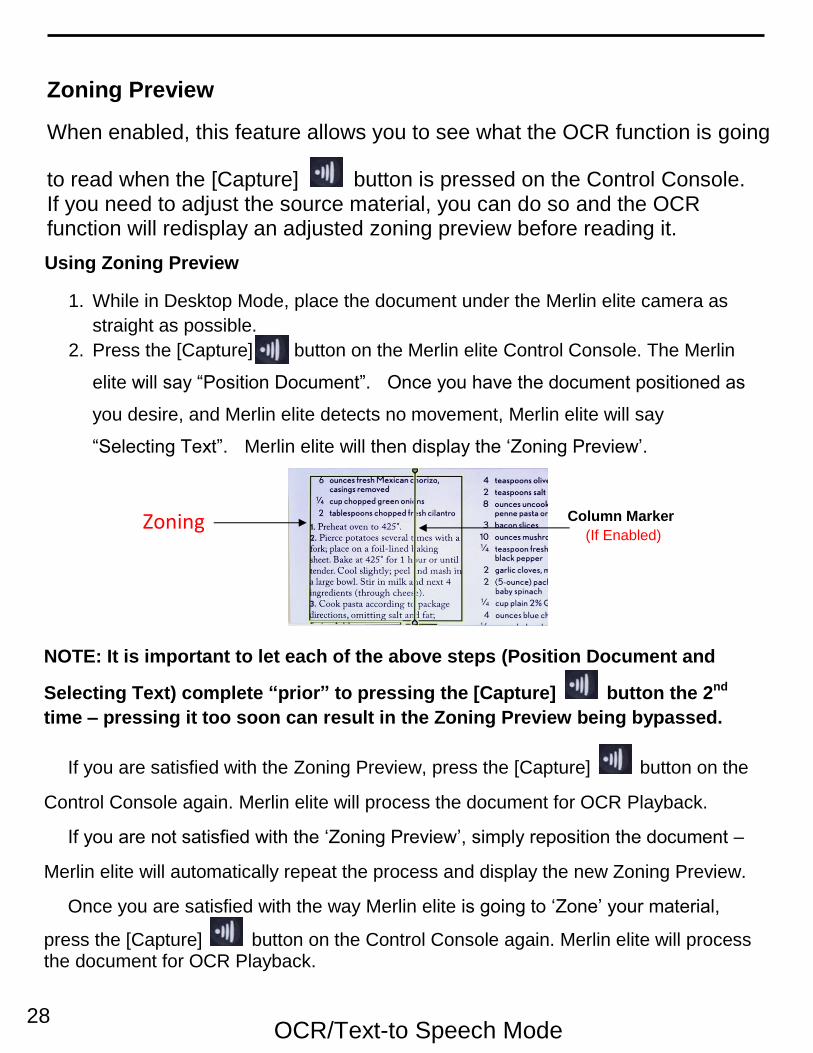
Zoning Preview
When enabled, this feature allows you to see what the OCR function is going
to read when the [Capture] button is pressed on the Control Console. If you need to adjust the source material, you can do so and the OCR function will redisplay an adjusted zoning preview before reading it.
Zoning
(If Enabled)
Using Zoning Preview
1. While in Desktop Mode, place the document under the Merlin elite camera as
straight as possible.
2. Press the [Capture] button on the Merlin elite Control Console. The Merlin
elite will say “Position Document”. Once you have the document positioned as
you desire, and Merlin elite detects no movement, Merlin elite will say
“Selecting Text”. Merlin elite will then display the ‘Zoning Preview’.
NOTE: It is important to let each of the above steps (Position Document and
Selecting Text) complete “prior” to pressing the [Capture] button the 2nd
time – pressing it too soon can result in the Zoning Preview being bypassed.
If you are satisfied with the Zoning Preview, press the [Capture] button on the
Control Console again. Merlin elite will process the document for OCR Playback.
If you are not satisfied with the ‘Zoning Preview’, simply reposition the document –
Merlin elite will automatically repeat the process and display the new Zoning Preview.
Once you are satisfied with the way Merlin elite is going to ‘Zone’ your material,
press the [Capture] button on the Control Console again. Merlin elite will process the document for OCR Playback.
NOTE: It is important to let each 28
OCR/Text-to Speech Mode

Adjusting Volume (OCR Playback Mode)
To increase/decrease the volume, rotate the [Volume Wheel] on the Control Console. ***Note: CCTV and OCR mode volume levels are independent from each other***
Adjusting Reading Speed To increase/decrease the speed that the OCR will read the document
aloud, turn the [OCR Speed/Marker Wheel] (Right EDGE of Console).
Skip to Next or Previous Sentence To skip to or go back to the previous sentence, press the [Previous
Sentence] or [Next Sentence] button on the Control Console. ‘Press and hold’ for more than 2 seconds to move to a previous sentence, two sentences per second.
Skip to Next or Previous Word To skip to, or go back to, the next/previous word, press [Brightness Up/Down]
to move to the Next/Previous word. ‘Press and hold’ [Brightness Up/Down] to advance 2 words per second. Note: Word navigation is only available when OCR Playback is paused.
Pause/Play
Press the [Pause/Play] button on the Control Console to pause OCR Playback.
Press the [Pause/Play] button again to resume OCR Playback.
Using Headphones with the Merlin elite
On the left hand side of the Merlin elite monitor, there is an available 3.5mm input jack for use of standard headphones.
*Note: Sound from the Merlin elite speakers will not be available while the
headphone jack is in use.
*Headphones are not included with Merlin elite.
OCR/Text-to-Speech Mode 29

OCR Menu Settings
Male Voice/Female Voice Set the Merlin elite to read aloud or prompt in a Male or Female Voice.
Deskew When on, the Merlin elite will automatically adjust a document when not set straight under the camera.
Progress Bar
Enables/Disables the visibility of a progress bar when the Merlin elite is processing a document to Text-To-Speech.
OCR/Text-to-Speech Mode 30

Saving and Recalling Images
The Merlin elite has the ability to save images from CCTV or OCR modes. This will allow the user to take a snapshot of a document, save it, and view it at a later time. Saving an Image
1. Place a document underneath the camera head and set the desired
Color Mode and Zoom.
2. Press and hold the [Save] button on the Merlin elite Control Console for
2 seconds. When the image is saved the Merlin elite will display “IMAGE
SAVED”. If the storage space is full, the Merlin elite will display “DEVICE FULL”
with a voice prompt (if enabled)
The Merlin elite will name that image by the month, day, year, time, and mode it was
saved at. mm.dd.yyyy – hh:mm [OCR/IMG]
*In CCTV mode, if you save the image consecutively within a minute,
the previous image saved will be overwritten.
**In OCR mode, if you save the image consecutively within a minute,
the Merlin elite will display “Already Saved”
Recalling a Saved Image
1. Press and hold the [Recall] button on the Merlin elite Control Console for 2 Seconds.
2. The Merlin elite will enter the Recall Image
menu displaying a list of available images.
If the storage space is empty, the message “NO FILES” will be displayed with a voice prompt (if enabled).
3. Use the [Zoom Wheel] on the Merlin elite Front panel, or Control Console, to navigate through the list of images. When an image file on the list is highlighted, it will display a preview of that image on the right side of the screen.
4. Pressing the Find button on the highlighted file will display the image in full screen and begin to read aloud if saved in OCR mode.
To exit the Recall Menu back to CCTV mode, press the [Capture] button on the Merlin elite Control Console.
To exit the full screen display back to CCTV mode, press the [Capture] button on the Merlin elite Control Console.
Saving and Recalling Images 31

Downloading a Saved File Recommended using USB hub with a minimum of 2 ports available along with an empty 1GB (minimum) External USB/ Mass Storage Drive
1. While in the Recall menu use the [Zoom Wheel] on the Merlin Elite Front Panel or Control Console to navigate to a file.
2. Press and Release the [Pause/Play] button on the Merlin Elite Control Console on the desired file.
***At this point insert a USB (or Mass Storage Device) to the USB port on the back on the Merlin Elite***
3. A sub menu will appear next to the selected file allowing you to “CANCEL” “DELETE”. or “DOWNLOAD”
4. Use the [Zoom Wheel] on the Merlin Elite Front Panel or Control Console to select “DOWNLOAD”. (At this stage the storage device is already connected to the Merlin Elite.)
5. Press the [Find] button on the Merlin Elite Front Panel or Control Console
while “DOWNLOAD” is highlighted to select, and then wait for the “Download
Complete” prompt before removing the storage device.
Downloading ALL Saved Files Recommended using USB hub with a minimum of 2 ports available along with an empty 1GB (minimum) External USB/ Mass Storage Drive
1. While in the Recall menu Press and Hold the [Pause/Play] button for about 10 seconds on the Merlin Elite Control Console. A sub menu will appear with the options to “CANCEL”, “DELETE ALL”, or “DOWNLOAD ALL”.
2. Insert a USB (or Mass Storage Device) to the USB port on the back on the Merlin Elite
3. Use the [Zoom Wheel] on the Merlin Elite Front Panel or Control Console to select “DOWNLOAD ALL”. Wait for the “Download Complete” prompt before removing the storage device.
Saving and Recalling Images 32
Deleting a Saved Image
1. While in Image Recall Menu use the [Zoom Wheel] on the Merlin elite Front Panel, or Control Console, to navigate to an image.
2. Press the [Pause/Play] button on the Merlin elite Control Console on the
desired image file.
3. A sub menu will appear next to the selected image allowing you to “CANCEL”
or “DELETE”.
4. Use the [Zoom Wheel] on the Front Panel, or Control Console, to
select “CANCEL” or “DELETE”.
5. Pressing the “Find” button on Merlin elite Front panel, or Control Console,
while “CANCEL” is highlighted will bring you back to the Image Recall menu.
Pressing the [Find] button on Merlin elite Front Panel, or Control Console,
while “DELETE” is high- lighted will delete the selected image. The Merlin
elite will display “IMAGE DELETED” when the file has been successfully
deleted. Press the [Mode] button on the Front Panel, or [Mode Up] on the
Control Console, to exit the Image Recall menu.
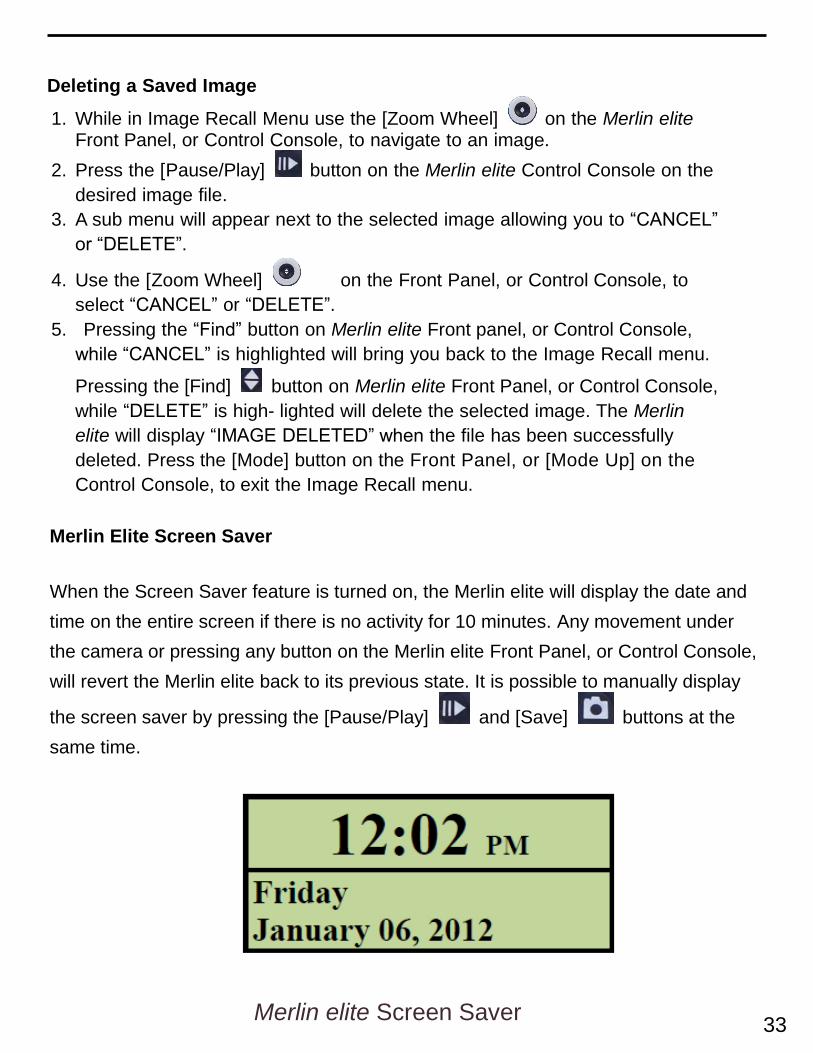
Merlin Elite Screen Saver
When the Screen Saver feature is turned on, the Merlin elite will display the date and
time on the entire screen if there is no activity for 10 minutes. Any movement under
the camera or pressing any button on the Merlin elite Front Panel, or Control Console,
will revert the Merlin elite back to its previous state. It is possible to manually display
the screen saver by pressing the [Pause/Play] and [Save] buttons at the
same time.
Merlin elite Screen Saver
33
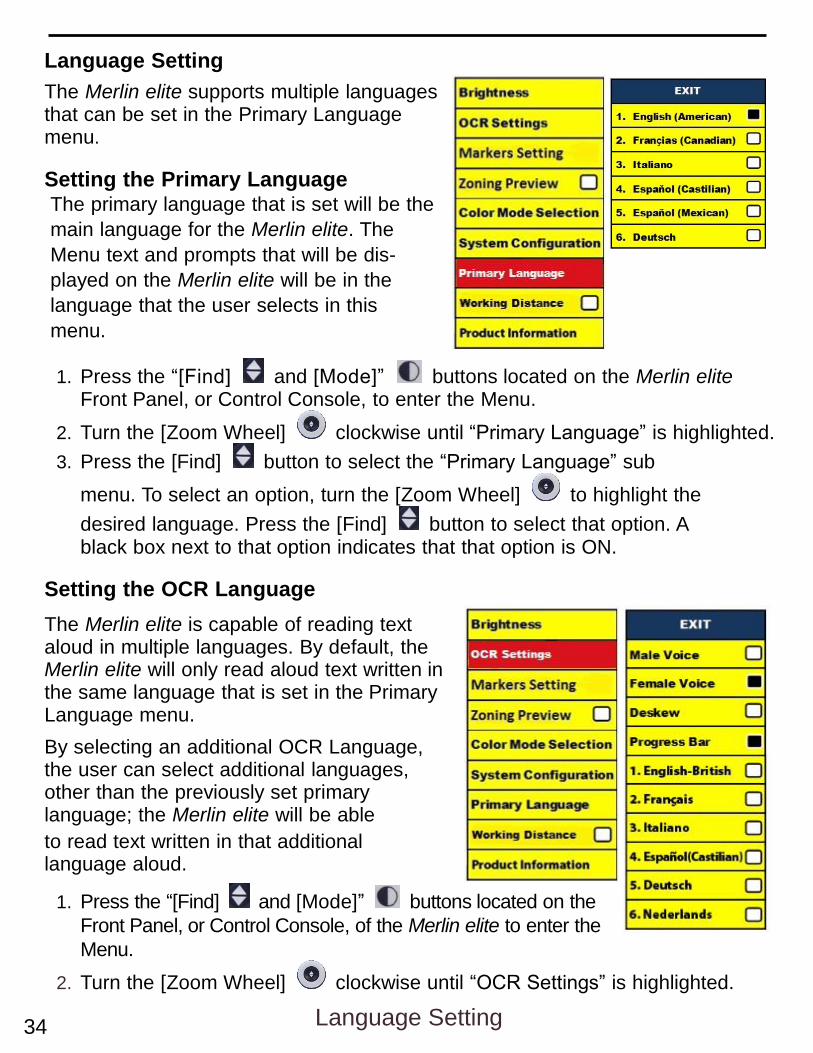
Language Setting
The Merlin elite supports multiple languages that can be set in the Primary Language menu.
Setting the Primary Language
The primary language that is set will be the
main language for the Merlin elite. The
Menu text and prompts that will be dis-
played on the Merlin elite will be in the
language that the user selects in this
menu.
1. Press the “[Find] and [Mode]” buttons located on the Merlin elite Front Panel, or Control Console, to enter the Menu.
2. Turn the [Zoom Wheel] clockwise until “Primary Language” is highlighted.
3. Press the [Find] button to select the “Primary Language” sub
menu. To select an option, turn the [Zoom Wheel] to highlight the
desired language. Press the [Find] button to select that option. A black box next to that option indicates that that option is ON.
Setting the OCR Language
The Merlin elite is capable of reading text aloud in multiple languages. By default, the Merlin elite will only read aloud text written in the same language that is set in the Primary Language menu.
By selecting an additional OCR Language, the user can select additional languages, other than the previously set primary language; the Merlin elite will be able
to read text written in that additional language aloud.
1. Press the “[Find] and [Mode]” buttons located on the
Front Panel, or Control Console, of the Merlin elite to enter the
Menu.
2. Turn the [Zoom Wheel] clockwise until “OCR Settings” is highlighted.
Language Setting 34

3. Press the [Find] button to enter the “OCR Settings” menu options.
To select an additional OCR Language, turn the [Zoom Wheel] to
highlight the desired language. Press the [Find] button to select that option. A black box next to that option indicates that it is ENABLED. The Primary Language will already be selected and the user will not be able to deselect that option. Multiple languages can be set at one time.
** Languages may vary upon region and can change with future updates.
Product Information
The Product Information will display the technical information of the Merlin- elite and also allows the user to restore the Merlin elite back to its factory settings.
1. Press the “[Find] and [Mode]” buttons located on the Merlin elite Front Panel, or Control Console, to enter the Menu.
2. Turn the [Zoom Wheel] clockwise until “Product Information” is highlighted.
3. Press the [Find] button to display the “Product Information” sub menu.
4. While in this menu you can: a. Check the firmware versions
and other software related version numbers.
b. Or restore the settings of the Merlin elite by rotating the
[Zoom Wheel] clockwise to “Factory Restore” then pressing the [Find] button.
** When resetting the Merlin elite to its
factory settings, the Male/Female voice and Primary Language preference
will remain the same.
Language Setting 35
TROUBLESHOOTING
The Merlin elite will not power on
Push the Power button on the Merlin elite’s Front Panel. Lights on the Power button, Zoom Wheel and Mode button should illuminate indicating the power is turned on.
Make sure the power supply from the Merlin elite is securely connected to a working outlet.
Make sure the two parts of the power supply cord are securely connected.
Make sure the power supply cord is completely plugged into the DC 19V IN jack on the back of the viewing stand base.
Check the power strip/surge protectors on/off switch and circuit breaker if the Merlin elite is plugged into one.
The images seem to be out of focus
Clean the protective glass covering the camera with the nonabrasive lens cleaning cloth provided with your Merlin elite.
Clean the monitor screen with a non-abrasive cloth sprayed with a glass cleaning solution.
Make sure the target material is steady on the tray. It might take a few moments for the camera to achieve perfect focus after motion has stopped. This is normal.
Make sure the LED Lamps near the Merlin elite Camera are ON. Making sure there is sufficient ambient lighting will assist in creating a better image.
X-Y Table Does Not Move Smoothly
Make sure the locking lever is positioned completely to the back.
X-Y Table Does Not Stay in Locked Position
Make sure the locking lever is all the way to the front.
Troubleshooting 36

The Merlin elite is taking a long time to process the document for Text-to-speech.
Disabling the “Deskew” in the menu will increase the processing speed. By disabling “Deskew” in the document must be placed under the Merlin elite camera as straight as possible.
Resetting the Merlin elite
If the Merlin elite is not responding you can ‘reset’ it by pressing the “[Find]
and [Power]” buttons. Any setting changes you have made will be retained. Replacement LED lamps
Your Merlin elite comes equipped with two 100,000-hour LED lamps
designed to provide years of trouble-free service. However, in the
unlikely event that the LEDs need replacement, contact your place of
purchase
or Enhanced Vision at (800)440-9476 for instructions or assistance
on replacing the LEDs.
Firmware Update
To keep your Merlin elite up to date visit our software support page at: http://www.enhancedvision.com/support/software.html
Troubleshooting 37
If you have any questions or require technical assistance
with your product, please call (800) 440-9476,
Monday – Friday, from 8 a.m. to 5 p.m. PST.

MERLIN ELITE SPECIFICATIONS
Product
Dimensions:
24” LCD: 27.75” H x 22.75” W x 20” D (70.5cm H X 57.8cm W x 50.8cm D) Product Weight: 24” LCD: 40.1 lbs (18.2 Kg)
Display
Type: 24” Standard Diagonal LCD Average lifetime: 40,000 hours Resolution: 1920 x 1080 (24” model) Response Rate: 1.5 milliseconds (24” monitor) All monitor specifications subject to change without prior notice
Magnification range
24” LCD: 2.4x (minimum) - to 73.2x (maximum) Field of View (Reading Mode): 7.1mm (min); 220mm (max)
Viewing Modes
Color, black & white, high contrast Positive/Negative, Digital Color Select (3 modes).
Power Supply Input voltage/current: 120-240 VAC / 0.3-0.5A (nominal)
Output voltage: 19 VDC
Frequency: 50/60 Hz
Power usage: 30W
Equipment Classification (IEC 601-1): Type of Protection: Class 1
Degree of Protection: Type B
Mode of Operation: Continuous
Operating temperature range: 0-40°C / 32-104°F
Storage/transport temperature range: 0-60°C / 32-140°F
Warranty: 3 Years
*Product specifications subject to change without notice.
Specifications 38

WARRANTY STATEMENT
Enhanced Vision Merlin elite Warranty Policy
Enhanced Vision products are designed to give you the highest quality image, convenient features, ease of use and reliable service. The Merlin elite has been
inspected and tested prior to shipping. Enhanced Vision warrants the Merlin elite against defects in material and workmanship under normal use for three years from the date of original purchase. Enhanced Vision, at its option, will at no charge either repair the product or replace it during the warranty period. There are no other expressed or implied warranties accompanying this product.
This warranty does not cover: a) Defects or damage from misuse, use in other than
normal and customary manner, accident or neglect; b) Defects or damage from improper operation, maintenance, installation, adjustment, alterations or modification; c) Defects or damage from spills of food or liquid; d) All plastic surfaces and all other externally exposed parts that are scratched or damaged due to normal use; e) Damage due to operation of the Merlin elite with equipment not supplied by Enhanced Vision.
You must provide proof of purchase, bearing the date of purchase, in order to
receive warranty service.
Anyone using this product does so knowingly assuming certain risks, due to the need to utilize vision enhancement devices.
A 2-year extended warranty option is available within 12 months from the date of
purchase. Please contact Enhanced Vision for detailed information.
Service Process
In the event that technical support or repair service is needed, please contact your local Enhanced Vision representative or the Enhanced Vision warranty service center.
If warranty service is required, please contact Enhanced Vision at (800)440-9476 Monday through Friday, between 8 a.m. and 5 p.m. Pacific Standard Time (PST) to request a return authorization number. Warranty repairs will not be accepted without a valid return authorization number.
You may wish to keep the original product packaging in case warranty
service is required. The manufacturer cannot provide packaging for warranty repairs.
***NOTE: Please completely fill out and send in the enclosed warranty***
Warranty Statement 39

OTHER PRODUCTS FROM ENHANCED VISION
Other Products from Enhanced Vision 40
Pebble-mini
Pebble HD

Other Products from Enhanced Vision 41
Amigo HD

Other Products from Enhanced Vision 42
20” LCD: 1.9x (min) to 51.2x (max) 22” LCD: 2.1x (min) to 55.9x (max) 24” LCD: 2.3x (min) to 61.2x (max)
DaVinci Pro DaVinci Pro is a high performance desktop video magnifier (CCTV), featuring a Full HD Sony 1080p 3-in-1 camera and Full Page Text-to-Speech (OCR). With Full HD you will experience high definition color and contrast giving you a beautiful, crystal clear picture and vibrant colors. DaVinci Pro allows you to experience the joy of reading again by converting any full page of printed text to speech. Magnification: 24”LCD up to 77x

CONTACT INFORMATION
Enhanced Vision manufacturers many different types of products
tailored to meet the needs of our low vision customers. If you have
questions about any of our products, please don’t hesitate to give
us a call.
Contact Information:
(US Office) Phone: (714)465-3400 Fax: (714)374-1821
(UK Office) Phone: +44 (0)115 9442317 Fax: +44 (0)115 9440720
(DE Office) Phone: +49 (0)6078 969827-0 Fax: +49 (0)6078 969827-33
www.enhancedvision.com
Technical Support:
Main Toll Free (800) 440-9476 ext. 3
Local Phone: (714) 465-3400 ext. 3
E-mail: [email protected]
Contact Information
_
The Merlin elite is a high performance desktop video magnifier
(CCTV) - featuring text-to-speech (OCR). With HD you will
experience high definition color and contrast giving you a beautiful,
crystal clear picture with vibrant colors. Experience the joy of
reading with our new text-to-speech feature. Merlin elite will read
any printed text aloud with just the push of a button. For more
information, please visit www.enhancedvision.com.
Part # MAN-0505-00 Rev 8
April, 2018
Copyright © 2009 by Enhanced Vision. All rights reserved.
Product specifications subject to change without prior notice.
www.enhancedvision.com
(800) 440-9476 (US Office, toll free)
(714) 465-3400 (US Office)
+44 (0) 115 9442317 (UK Office)
Tel. + 49 (0) 6078 969827- 0 (DE Office)
Fax + 49 (0) 6078 969827- 33 (DE Office)