Embed Size (px)
Citation preview

E-FILING PROCEDUREU S E R M A N U A L
FOR HIGH COURTS & DISTRICT COURTS IN INDIA
Jaisalmer House, 26, Mansingh Road, New Delhi-110001Phone: +91-11-23072136 | Telefax: +91-11-23072552 Website: doj.gov.in
Tilak Marg, New Delhi - 110201Email: [email protected]
Printed: August 2018

E-FILING PROCEDUREU S E R M A N U A L
FOR HIGH COURTS&
DISTRICT COURTS IN INDIA
eCommitteeSupreme Court of India
2018
Authored by: Dr. Karnika Seth
Cyberlaw Expert & Advocate, Supreme Court of IndiaB.A (Eng. Hons.), LL.B (Del), LL.M (Lon), Ph.D (Cyberlaw)


TABLE OF CONTENTS
Chapter Page No.
1. Introduction 1
1.1. Key Purpose 1
1.2. Hardware & Software Requirements for e-Filing 1
1.3. Format requirements 2
1.4. Security & Making Payments 2
1.5. User responsibility 3
1.6. Suspension or Termination of User Account 3
1.7. Disclaimer 3
1.8. Help desk 3
2. Begin Use of e-�ling 4
2.1. The log in screen of e-�ling 4
3. User registration 5
3.1. Registration as an advocate 5
3.2. Registration as a Petitioner in Person 6
3.3. Registration as authorized representative of a police station 7
3.4. Validation of OTP 7
3.5. Fill user data 8
3.6. Landing on the Dashboard 9
3.7. The Dashboard 10
3.8. Forgot password 10
3.9. Forgot User Name 12
3.10. Filing a New Case 12
3.11. Click new case 13
I
Chapter Page No.
4. New case- �ling form 14
4.1. Submit Extra Information 16
4.2. Details of Subordinate Court 16
4.3. Filing Form-Act & Section Tab 17
4.4. Add Extra Party 18
4.5. Upload documents 19
4.6. Pay the court fees 20
4.7. Proceed to Affirmation 20
4.8. OTP validation 21
4.9. Preview 22
4.10. Press ‘Final submit’ button 23
5. How to File a miscellaneous document 24
5.1. Where to �le miscellaneous documents 24
5.2. Uploading the miscellaneous document 25
5.3. Submit court fees to �le miscellaneous document 26
5.4. Screen to e-�le miscellaneous document 26
5.5. E-sign the document 27
5.6. OTP validation for e-�ling miscellaneous documents 27
5.7. Preview 27
5.8. Pay de�cit court fees 28
5.9. De�cit court fees tab 28
5.10. Pay the court fees 28
5.11. Preview page 29
6. Reports 30
Chapter Page No.
7. Dashboard 31
7.1. Accessing dashboard 31
7.2. My e-�ling status 32
7.3. Drafts 32
7.4. Pending acceptance 32
7.5. Not accepted 33
7.6. De�cit court fees 34
7.7. Pending Scrutiny 34
7.8. Defective cases 35
9. Editing a user’s pro�le page 41
9.1. View & edit user pro�le 41
9.2. Upload photo 41
9.3. Change e-mail address 42
9.4. Update mobile number in a user pro�le 42
9.5. Update address in a user’s pro�le 43
9.6. Update password 43
II III
8. My Cases 36
8.1. E-�led cases Tab 36
8.2. 10.3.2 E-�led document 36
8.3. E-�led De�cit court fees 37
8.4. Rejected matters 37
8.5. Idle/unprocessed e-�led Nos. 38
8.6. Viewing e-�led cases, documents & court fees 38
8.7. E-�led cases 38
8.8. View e-�led miscellaneous document 39
8.9. View e-�led de�cit court fees 39
8.10. View case status 40

1
1.1. Key Purpose
The e- Committee of the Supreme Court of India has designed & set up the e-�ling System which enables electronic �ling of legal papers (“e-�ling”). Using the e-�ling, cases (both civil and criminal) can be �led before all high courts and district courts that adopt this e-�ling system. Introduction of this e-�ling system is aimed at promoting paperless �ling & create time and cost saving efficiencies by adopting technological solution to �le cases before various courts in India.
This User Manual is for enabling the users to understand the step by step process involved in e-�ling, to facilitate use of e-�ling system and offer support to users. The e-�ling system can be used by any Advocate enrolled to practice in the Bar Council of any State in India or by any Petitioner in Person to �le cases before the High court and District Courts of States that adopt this e-�ling system. The system will also enable the police stations across India to e-�le the charge sheets and other documents pertaining to criminal cases. The list of courts that have adopted this e-�ling system will be shown to you in the form of drop down list the moment you select any State and District. Before use of e-�ling, a user is required to read the User Manual carefully and abide by its terms and follow its step by step guidance.
1.2. Hardware & Software Requirements for e-Filing
A User must have a personal computer running a Linux or Windows or Macintosh, internet access, a web browser such as Mozilla Firefox or Google Chrome, Adobe Acrobat Reader 11 software and a scanner to scan documents for e-�ling. Documents in only PDF format will be accepted for e-�ling. Adobe Acrobat reader is available at no charge from Adobe by download at the following address: www.adobe.com/products/reader. PDF documents can also be created by scanning hard copies of documents. When paper documents are scanned, the resolution must be set to 200 dpi. Currently the maximum size a document can be uploaded is 25MB per document pages for a .doc or .docx format.
1. Introduction

1.3. Format requirements
The formatting requirements for any cases �led through the e-�ling shall be as far as possible in compliance with the respective provisions/rules of the concerned court where a user e-�les the case.
It is recommended to �le cases/documents using this facility in double space, Times new Roman 14 font only.
Please note that this facility is for e-�ling cases/documents. However, concerned court where a case/document is e-�led may require physical submission/�ling of documents as well. Please note that at present e-�ling does not support �ling of audio/video clips as documents and only PDF format is supported by this software. Also, please do not submit encryption or password protected documents. Before �ling the documents, please ensure that you have removed any hidden text, such as markings, track changes or annotations from source documents before converting them to PDF.
1.4. Security & Making Payments
The user account of every registered user is password-protected using encryption or other security features. We use industry standard measures to protect all information that is stored on our servers and within our database.
Accepting Court Fees by online or electronic transaction depends on whether the State Government has any system in place to accept payment of Court Fees in electronic form. If such system is in place, in that case it may be possible to make online payment of Court Fees while using this website and e-�ling cases.
In order to pay any court fees through e-�ling, using netbanking/credit cards, a SSL secure payment gateway has been integrated into the e-�ling website where mechanism is available with State Government to accept the payment of Court Fees in electronic form. Any �nancial details submitted by a user shall be in an encrypted form and not saved on the website’s server but will be processed only by the SSL secure server of the payment gateway service. Alternatively, you can also upload scanned copy of receipt obtained after payment of Court Fees. No Money orders/ Demand Drafts are accepted for payment of Court Fee in the e-�ling facility.
1.5. User responsibility
It is the responsibility of a user to ensure that an e-�led document does not contain a virus or malware that disrupts an e-�ling function or causes any other damage or loss to any party or the e-�ling system. A user shall not post anything that is spam, abusive, harassing, defamatory or objectionable or illegal. It is the responsibility of a user to keep their Username and Password con�dential at all times and contact Helpdesk in case of any suspicious activity using their account.
1.6. Suspension or Termination of User Account
If it is discovered or reported that any member is using e-�ling to engage or indulge in any unlawful or illegal activity or has committed breach of any term of this User Manual, his/her membership will be suspended for inquiry/ terminated forthwith without any liability on providers of e-�ling facility. Any illegal activity shall attract criminal and civil penalties.
1.7. Disclaimer
This service is provided on an ‘as is basis’ and provides no assurances of uninterrupted access, technical error free data or availability at all times. User agrees that e-committee has no liability in case a user is unable to avail the e-�ling service at any given point of time or case e-�led is rejected for non-compliance with e-�ling rules or rules of concerned court where a case is e-�led.
1.8. Helpdesk
Technical assistance on e-�ling is provided by the E-�ling Resource center, where the staff is available to answer queries from 9 am to 7 pm IST on each business day. There shall be e-�ling admin to each Court Complex who can be contacted by email or phone or like mechanism.
32

2.1. The log in screen of e-�ling
In order to begin using the e-�ling system for �ling cases in high courts & district courts, type the address https://e�ling.ecourts.gov.in (For example, in Google Chrome, Internet Explorer, Mozilla Firefox, etc.), the Home Page of the said Website shall display a log in screen.
In case a user is new, it will require the user to register to create a user id and password to use the e-�ling facility by clicking on the ‘New to Website?’ Create Account’ option. On clicking ‘Create Account’ registration form will be displayed.
In case a user has already registered with the e-�ling facility, such user will simply type his user id and password and log in to the e-�ling system.
A new user can register using the ‘create account’ option in the log in screen shown in Fig 1. For registration purpose, a user must choose whether it registers as an Advocate or Petitioner in Person or as authorized representative of a police station.
3.1. Registration as an advocate
The �elds in the registration form must be �lled by a User. For registration, in case a User is an Advocate, he must enter the following details in the form as shown in Fig. 2 for Registration as an Advocate
• Mobile Number • Email ID • Bar Registration Number (Only in case of Advocate)• User ID • Enrolled State • Enrolled District • Enrolled Establishment
In case a User is an Advocate, he must submit the same mobile number and e-mail id that is registered by the person with the concerned court where he practices. In case he does not submit the same, the registration process will not be complete. Incase an advocate chooses to change his e-mail id or mobile number from the registered mobile and email address with the concerned court database, he can do so subsequent to registration formalities on e-�ling system is complete. The Advocate must provide details of state, district and establishment details where Advocate’s Bar Registration number, mobile and e-mail id are registered.
All the �elds are mandatory. After �lling the form, user must �ll the captcha code show in the captcha box and then click 'Get OTP'. Two different OTPs gets generated and are sent to the registered mobile number and email address submitted at time of registration by the User. A user then needs to follow steps explained in 3.3 -3.4 to complete the registration process.
54
Fig 1 Home page of e-�ling -Log in screen
Fig. 1 below displays how the main page of the will appear to a user. e-�ling facility
Fig 2 Registration form for Petitioner in person
2. Begin Use of e-f iling 3. User Registration

3.2. Registration as a Petitioner in Person
In case a user is a Petitioner in Person, he is required to register by submitting below information as shown in Fig 3 below namely-
• Mobile Number • E-mail id • User id
Nearest court establishment details, such as State, District & Establishment
All the �elds are mandatory. After �lling the form, user must �ll the captcha code show in the captcha box and then click 'Get OTP'. Two different OTPs gets generated and are sent to the registered mobile number and email address submitted at time of registration by the user. A User then needs to follow process given in 3.3. And 3.4 below to complete the registration process.
NOTE: Incase an Advocate is �ling case using e-�ling system as a Petitioner in Person, he needs to make a separate registration as a Petitioner in Person with separate email address and mobile number despite he is already registered as an Advocate in the e-�ling system.
Fig 4 Validate OTP screen Fig 3 Registration form for Petitioner in person
3.3. Registration as authorized representative of a police station
To register as a police station, the following information will be required to be submitted-Details of State, district, address and location of the police station• Mobile Number• E-mail id• User id
All the �elds are mandatory. After �lling the form, user must �ll the captcha code show in the captcha box and then click 'Get OTP'. Two different OTPs get generated and are sent to the registered mobile number and email address submitted at time of registration by the user.
3.4. Validation of OTP
Once the registration details requested from a User are submitted by a User, a new screen for validation of OTP is displayed. A User is required to type the OTP received on his registered mobile number and e-mail address and then click on ‘Validate OTP’ Button shown in Fig 4 below.
Once the OTP gets validated, or in other words, if the OTP entered by a User matches with OTP generated by the e-�ling system, the Registration process proceeds further.
76

3.5. Fill user data
After the OTP is validated, a new screen is displayed with a registration form where a User is required to �ll following details to complete the Registration process as shown in Fig. 5 below.
Password (must contain 1 uppercase character, 1 lowercase character, 1 character, 1 number, 1 special character with minimum length of password at least 8 digit length)
• Con�rm password • First name • Last name • Other contact number• Gender • Date of Birth (DD/MM/YYYY) • Address • City• State • Pin code
Photo (in Jpg format of size less than 50 KB). Files from User’s system may be chosen and uploaded for photo by pressing Browse button.
Identity proof (ID Type). Image of the ID card can be uploaded (less than 50KB) using the Browse button to select the �le from a User’s system. All �elds are mandatory except other contact number. User �nally enters the captcha code given in box and press the Register’ button to complete the Registration process.
Fig 6 Registered User e-�ling status page (Dashboard)
3.6. Landing on the Dashboard
Once a Registered User logs in from home page for e-�ling (�g 1), a Dashboard page appears displaying the following information on the left side panel:
Home: - This is to return to the home page of e-Filing.
New Case: - This allows e-�ling of a new case.
Documents: - This allows any miscellaneous document such as an affidavit or an application to e-�led.
De�cit Court Fee: - This enables e-�ling of any de�cit court fee.
Reports: - This gives access to see /print any report speci�c to the user.
Help: - This is for user guidance.
98
Fig 5 Registration form with user data

3.7. The Dashboard
The Dashboard provides information to a user about the e-�ling status of any case �led by him including saved drafts (Drafts), cases �led but pending acceptance from technical standpoint (Pending acceptance), cases failed technical checking (Not accepted), de�cient court fees (de�cit court fees), cases pending scrutiny check by court Registry (Pending Scrutiny) and defective cases after checking by court registry (Defective cases). If Court registry �nds the case �led to be in order, it will be shown in ‘e-�led cases’ Tab in ‘My Cases’ section below. In case the Registry �nds the case �ling to be defective, it will show in the ‘defective’ tab in ‘My e-�ling cases status’ Section.
The ‘My Cases’ section of the Dashboard comprises of information on ‘e-�led cases’, ‘e-�led documents’ , ‘de�cit court fees’, ‘rejected cases’ and ‘unprocessed e-�led cases’. These Tabs will be explained in detail after the process to �le a ‘New Case’ has been explained as these Tabs on Dashboard will be useful only after a new case has been �led by a User.
Logout: - A user can sign out by clicking the 'Logout Button' which is given to the right corner of the screen at all times.
A User is required to �ll the registered email id or registered mobile number and enter captcha code shown and press the ‘Get OTP’ option.
On pressing Get OTP, a new screen is displayed wherein a User is asked to Enter OTP number received by him on e-mail/mobile �lled by user on the forgot password screen. User can then change his password and con�rm the same by entering new password in �elds as shown in �g 8 below.
User then types the captcha code and presses ‘Change Password’ Option to complete the process of changing his password.
Fig 7 Forgot password screen
3.8. Forgot Password
In case a registered user forgets his password, the same can be retrieved by clicking on ‘Forgot password’ link in Log in screen shown in Fig 1 which is �rst screen that shows when a User accesses the website of e-�ling system at https://e�ling.ecourts.gov.in clicking on Forgot password option opens a Forgot password screen shown in Fig 7.
10 11
Fig 8 Forgot password screen

3.9. Forgot User Name
In case a User has forgotten his User Name he used to register on this website, he can press the ‘Forgot username’ option on Log in screen to retrieve the same at Fig 1 as provided. This opens a new screen which requires User to �ll in his registered mobile number and registered e-mail address. A User needs to enter the captcha code shown and press the Send Mail button to receive the User name on his registered e-mail address.
On pressing Send Mail button in �g 9 a screen noti�cation appears showing user name has been successfully mailed at user’s registered mail id as shown in �g 10.
Fig 9 Forgot user name screen
Fig 10 Message con�rmation for retrieval of user id.
3.10. Filing a New Case
In order to e-�le a new case, click on ‘New case’ option in the left panel of the Dashboard screen (Fig 6 above).(Note: The Dashboard screen appears as soon as a Registered User logs in his registered user id and Password for this e-�ling system in the Home page of the website (Fig 1).
Fig 11 New Case> Where to �le screen for High Court
3.11. Click New Case
On clicking ‘New case’ option in the left panel of the Dashboard screen, a screen ‘Where to �le’ will be shown.
Fig 11(a) New Case> Where to �le screen for Lower Court
A User is required to �ll in the following �elds:
State: - Select State from the listed options.District: -Select District from the listed options.Court Establishment: -Select Court establishment where the case is to be �led.
Case Type: - First select one option from the given two options viz. Civil or Criminal. Then select the relevant case type from the 'Case Type' dropdown.
A User is then required to select whether the documents being e-�led will be signed by 'Aadhar' or 'Digital Token' and click 'Submit' button.
The User must select the signing option carefully, as he/she would be automatically directed to concerned speci�c page for signing new case when it is �nally submitted. If the User wants to reset the chosen options at any point before clicking 'Submit', then press the Reset button. If the data �lled in is correct, the user would be taken to 'Filing Form' (Fig.12).
12 13

Ÿ Filing Form – Petitioner Form - In Petitioner form (Fig.12) under Filing Form, the requisite details about the Petitioner are required to be �lled by a user. The �eld marked with red asterisk (*) are mandatory. If the user is an organization, then on clicking the checkbox of 'Organization details', the user is taken to a form (Fig. 13) for �lling in the organization details. The user should �ll the requisite details in 'Petitioner' tab and then click 'Save' button.
Ÿ An e-�ling number gets generated and displayed on screen on clicking 'Save' button and the user is taken to the next screen (Fig. 14) for �ling the details required for 'Respondent ' (�g 15). Pressing previous button takes a user back to petitioner tab and pressing next takes user to next page.
Ÿ A user can also �ll in the details between various tabs in the Filing Form, without click 'Save' button, but all the data thus entered may get lost if the current session ends/expire, or any other option is selected by the user, hence, the best practice is to keep on saving data at regular intervals, to prevent data loss. The user can access other tabs, by clicking on their respective tabs, or by clicking 'Next' to access the next option.
Fig 12 New Case> Filing form -Petitioner
Fig 13 New Case>Filing form –Petitioner (Organization)
Fig 14 New case>e-�ling number generated
Fig 15 New Case> Filing Form>Respondent details
14 15
4. New Case-Filing Form

4.1. Submit Extra information
Any Extra information about a Petitioner and/or Respondent in a new case to be e-�led can be submitted in the ‘Extra Information’ tab such as Passport number, nationality, occupation, PAN number, contact details. After details are added, User clicks on ‘Save’ to submit the information. Pressing ‘Previous’ button will take a user to Respondent tab and pressing ‘Next’ to the Subordinate Court Tab as shown in Fig 16 below.
4.2. Details of Subordinate Court
After completing ‘Extra information’, ‘the Subordinate court’ screen will open. A User must �ll all mandatory �elds and then submit the form such as name of subordinate Court, Case Registration number (CNR), type of case, case no/�ling no, year of �ling, name of Judge who passed the judgement that is being challenged in new case being e-�led, date of impugned decision, CC applied date and CC ready date as shown in �g 17.
Generally when you are �ling appeal or revision or other appellate type of cases, you may be required to �ll in details regarding ‘Subordinate Court’ details. You may have to choose appropriate Court from the drop down list appearing before you. Pressing the ‘Previous’ button takes a user to extra information tab and pressing ‘Next’ button sends user to next tab i.e. ‘Act-Section’ tab.
Fig 16 New Case >Fill form>Extra Information Tab
Fig 17 New Case> Subordinate court details
4.3. Filing Form-Act & Section Tab
After adding ' Subordinate Court' tab, 'Act-Section' screen will open.
Fill in all mandatory �elds and then submit the form by clicking the 'Save' button. If user wants to add more than one Act then he needs to click on ‘Add More’ Button. If user wants to delete a particular Act & Section he must press ‘Delete’ option next to relevant Act and Section to be deleted.
Fig 18 New case>Act-Section screen
Previous Button- Send back to previous tab i.e. 'Subordinate Court'' tab.
Next Button- Send forward to next tab i.e. 'Extra Party'' tab.
16 17

4.5. Upload documents
After �lling all the forms provided for �ling new case, users can upload the relevant �le in 'Upload Documents' screen (Fig. 20).
The �le should be in pdf. If you have token to digitally sign pdf document, then you can use it to sign the document. Otherwise, the document can be signed by a user using Aadhar based e-signing process as shown in new case screen in �g 22 below. The type of document to be uploaded can be chosen from the drop down menu and by pressing ‘browse’ button, �le can be selected by user for upload. User needs to type the ‘document title’ and then press the ‘upload’ button to upload the chosen �le.
Upon successful upload, document name, along with its hash value will be shown and number of pages as shown in screen below in a list format.
A user can delete the uploaded document by pressing ‘delete’ option at the ‘Remove’ tab.
User can then click on ‘pay & view court fees’ and pay applicable fees by clicking the ‘court fee’ button and upload the physically signed oath document, by clicking ‘proceed to Affirmation’ button
Fig 19 New case>Extra party Fig 20 New case>upload documents screen
4.4. Add Extra Party
After entering data in 'Act-Section', 'Extra Party' form (Fig. 19) will open. There are two options provided here iz. Complainant/Petitioner and Accused/Respondent depending on type of case to be e-�led.
Select applicable option. Fill all mandatory �elds and then submit the form.
If the User selects ‘Complainant’, then complainant form will open and incase he selects ‘Respondent’, corresponding form will open. If user selects organization detail, the relevant form will open.
User �lls the required details and shall press ‘Save’ to submit the relevant data. Incase user has any other information to add select ‘other information’ option in �g 19 to open required form.
Pressing ‘previous’ button will send back to previous tab-Act-Section tab.
If extra party has been added successfully a message appears at top of screen ‘extra party details added successfully’.
18 19

Fig 21 Submit court fees screen
4.6. Pay the court fees
A user is required to pay the applicable court fees by clicking on pay court fees tab as shown in �g 21 below. The court fees can be paid either using the payment gateway or uploading the scanned payment receipt. User can make the payment of court fees using the payment gateway integrated into the website through net banking/credit cards/debit cards.
Through Aadhar number
In case applicant provides Aadhar number for signatures, �g 23 shows screen as will then appear. If applicant does not wish to provide Aadhar number, he can physically sign and upload his document of affirmation and Advocate can submit his Aadhar to sign as shown in �g 24 below. Please note that a user is required to accept the consent form to use Aadhar for e-signing.
4.7. Proceed to Affirmation
After ‘proceed to affirmation’ button is pressed in upload document screen, affirmation is complete when applicant submits e-signed affirmation in pdf and advocate uploads e-signed affirmation in pdf. E-signatures can be made using Aadhar number or digital token. A sample affirmation page is shown in �g 22.
Fig 22 Sample affirmation page
Fig 23 Applicant affirmation signed using his Aadhar
Fig 24 Applicant affirmation (physically signed) signed using
Advocate’s Aadhar
4.8. OTP validation
Where Aadhar is submitted for e-signing the affirmation, an OTP will be received on user’s registered mobile number with UIDAI for authentication. Once correct OTP is entered for validation as shown in Fig 25 below, a message showing Affirmation is submitted successfully is displayed on screen. Once it is successfully validated, affirmation is e-signed using Aadhar.
Fig 25 OTP validation to con�rm submission of Affirmation
20 21

Through digital token
The screen showing option to digitally sign affirmation if a user has chosen digital signature token to sign the affirmation is shown at �g 26(below).
Fig 26 Affirmation through digitally signed document.
4.9. Preview
When a user presses the ‘Preview’ button at top right corner as shown in �g 26 above, the ‘Preview’ screen appears with saved data in all forms �lled by a user in a new case to be �led. (Fig 27 below)
Fig 27 Preview of forms �lled by user to �le new case
4.10. Press ‘Final submit’ button
If the Preview is in order, press the Final Submit button (�g 27) at top right corner of form above to �nally e-�le the case.
In case any information is not complete, a warning button at the top right corner of preview screen (�g 28 below) will show the information that must be �lled by a user before pressing Final Submit.
Fig 28 Warning alert at �nal submit
22 23
Fig 27 (a) Preview of forms �lled by user to �le new case

5.1. Where to �le miscellaneous documents
In case a user intends to e-�le documents in an already �led case in a court (both in cases where the case was e-�led or physically �led), it can be �led using this e-�ling facility. To do so, a User must click on ‘Documents’ link after logging in to this facility from the dashboard screen‘s left panel (as in �g 6 above & �g 29 below). On clicking the ‘Documents’ link, a new screen opens, the ‘Where to �le’ page (�g 29) .The system will automatically cross-check registration information of an advocate to enable e-�ling through the website.
Fig 29 File misc documents page
Fig 29 (a) Registration information of advocate
User is required to �ll in the requisite details on the ‘Where to �le’ section such as CNR number, court establishment details, and submit the form after signing the document either using Aadhar or Digital token. By clicking 'Submit' button the user would be taken to next 'E-File Miscellaneous Documents' page to upload the misc document.
5.2. Uploading the miscellaneous document
The next screen displayed is to enable user to select and upload the miscellaneous document from his computer system. User selects document type, document title, and select the �le to be uploaded as shown in �g 30.
The user can select the type of document to be �led from the drop down menu, and select the �le to be �led from his system by pressing the browse button. After selecting the �le and typing the document title, user must press the ‘upload’ button to upload the pdf document which is uploaded with an automatic hash value generated. Uploaded document is shown in screen (Fig 31) in the list displayed below. If user wants to delete any �le than it can be deleted by clicking the delete icon.
Fig 30 Upload miscellaneous document screen
Fig 31Uploaded miscellaneous document screen
24 25
5. How to File aMiscellaneous Document
5.3. Submit court fees to �le miscellaneous document
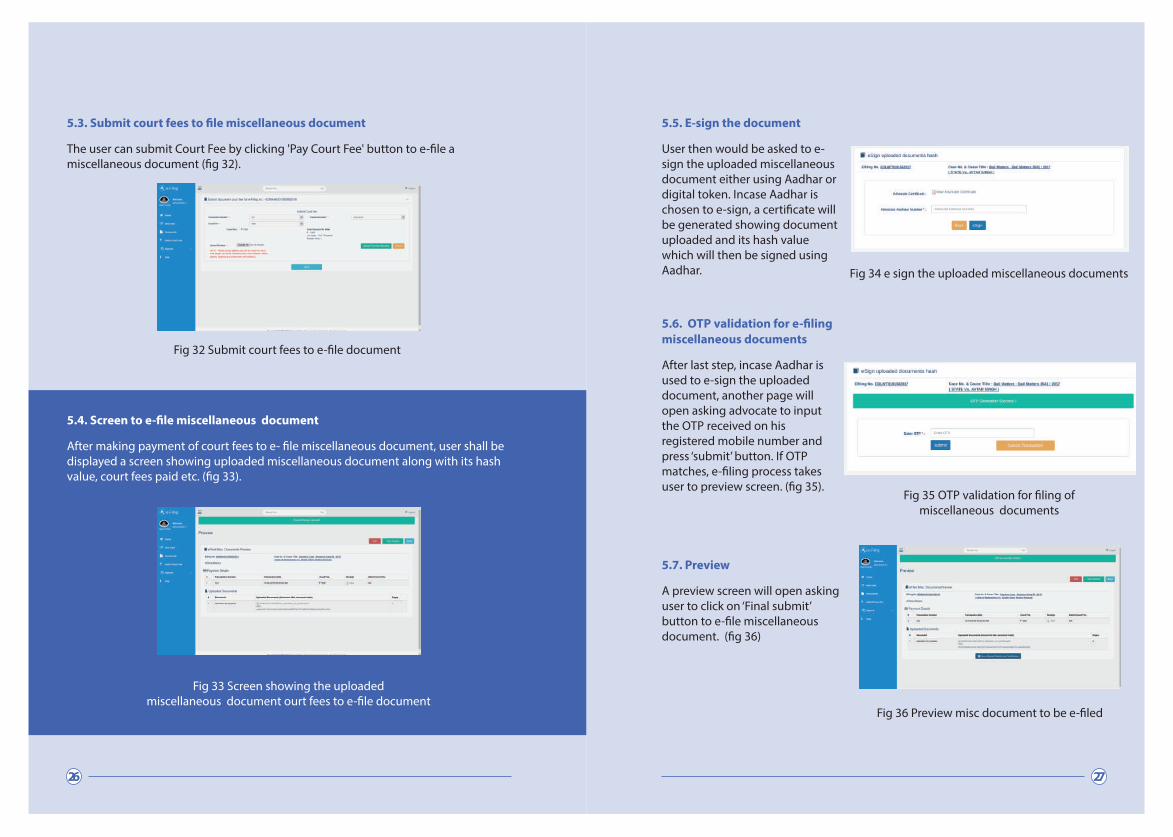
The user can submit Court Fee by clicking 'Pay Court Fee' button to e-�le a miscellaneous document (�g 32).
Fig 32 Submit court fees to e-�le document
5.4. Screen to e-�le miscellaneous document
After making payment of court fees to e- �le miscellaneous document, user shall be displayed a screen showing uploaded miscellaneous document along with its hash value, court fees paid etc. (�g 33).
Fig 33 Screen showing the uploaded miscellaneous document ourt fees to e-�le document
5.5. E-sign the document
User then would be asked to e-sign the uploaded miscellaneous document either using Aadhar or digital token. Incase Aadhar is chosen to e-sign, a certi�cate will be generated showing document uploaded and its hash value which will then be signed using Aadhar. Fig 34 e sign the uploaded miscellaneous documents
5.6. OTP validation for e-�ling miscellaneous documents
After last step, incase Aadhar is used to e-sign the uploaded document, another page will open asking advocate to input the OTP received on his registered mobile number and press ‘submit’ button. If OTP matches, e-�ling process takes user to preview screen. (�g 35).
Fig 35 OTP validation for �ling of miscellaneous documents
5.7. Preview
A preview screen will open asking user to click on ‘Final submit’ button to e-�le miscellaneous document. (�g 36)
Fig 36 Preview misc document to be e-�led
26 27

5.8. Pay De�cit Court Fees
Incase the court fees �led by a User for an e-�led document/case ( even if �led physically with a court registry) is de�cient, user can �le the de�cient court fees by clicking the ‘de�cient court fees’ option in the left panel of the dashboard . The fees can be paid either using the payment gateway integrated into this website or by uploading the payment receipt in pdf if paid offline.
5.9. De�cit court fees tab
In the de�cit court fees tab on left side panel of dashboard, User is required to �ll the CNR Number of the case, and details of court establishment where the case has been �led. (�g 37)
Fig 37 De�cit court fees screen
5.10. Pay the court fees
User will be directed to a page that asks user to mention the amount of de�cit court fees to be paid. On inserting the value, user can make the payment by clicking the ‘Make Payment’ button. (�g 38). A User may cancel the transaction, using the ‘cancel’ button.
Fig 38 Pay de�cit court fees screen
5.11. Preview page
After paying de�cit court fees, user is directed to view the ‘Preview’ page (�g.39) where he can check the details for correctness before pressing the ‘Final submit’ button and ‘edit’ it if required. Where Aadhar is chosen to e-sign, the Aadhar e-sign process including OTP validation process will follow. User then presses the ‘�nal submit’ button to �nally e-�le the de�cit court fees (�g. 40).
Fig 39 Preview of miscellaneous document to be �led
Fig 40 Pending document to e-sign
de�cient court fees
28 29

6. Reports Incase a user wants to check reports of his activity on e-�ling facility, he can press the Reports option on left panel of the dashboard and select type of report he wants to view, such as court fees �ling (�g 41). The relevant report about user’s activity will be displayed on screen. For example, in case of court fees �ling, the following screen will be displayed.
The court fees report can be �ltered using the relevant period of time by selecting the ‘From Date’ and ‘To Date’ �elds provided therein. The report will display case details, de�cit court fees paid along with receipt, and transaction ID.
Fig 41 Report of court fees �led by a user
7.1. Accessing dashboard
When a user accesses e�ling.ecourts.gov.in, he reaches the Home page of e-�ling facility (�g 1.). User is required to submit his user id and password. On correctly submitting his user id and password, he is directed to the dashboard screen. (�g 6.)
Fig 42 Home page of e-�ling
Fig 43 Dashboard screen
30 31
7. Dashboard

7.2. My e-�ling status
A user can check the status of the cases in the process of being e-�led by him/e-�led by him by checking the Tabs on the Dashboard under ‘My e-�ling status’
7.3. Drafts
By clicking on the ‘draft’ Tab under ‘My e-�ling status’, user can view all the saved drafts of cases to be e-�led which are not yet �nally submitted. User can access the drafts, edit or complete them for submission. The screen shows e-�ling number, type of case, cause title, date of creation. If the draft is ready, user can press the ‘Final Submit’ button to �nally submit it.
Fig 44 My e-�ling status> Drafts screen
7.4. Pending acceptance
When a user has �nally e-�led a case, the e-�ling Administrator checks the forms �lled by the user known as “Acceptance” checking. The e-�led cases which are pending such administrator checking can be viewed in the ‘Pending Acceptance’ Tab of the Dashboard.
Fig 45 My e-�ling status>Pending acceptance
7.5. Not accepted
The e-�led cases which are not accepted by E-�ling Administrator are shown by selecting this Tab. Details shown are e-�ling case no., cause title, and rejection date, etc. A user can choose to resubmit it for curing the defects/ checking by pressing the ‘Re-Submit’ Button. Reasons for rejection are shown in screen displayed after pressing ‘re-submit’ button. (�g 44)
32 33
Fig 46 My e-�ling status>Waiting Re-Submit
Fig 46 (a) E-�led case preview

7.8. Defective cases
A user can view the e-�led case has defects or not by clicking on the ‘Defective’ tab in the My e-�ling status on Dashboard. These cases have been scrutinized by the �ling Section of concerned court and found to contain defects that are required to be cured. The page shows e-�ling number of the case, cause title and when the defects were raised by. It displays a button ‘Cure defects’ to cure the defects raised by the concerned court registry. Clicking on a particular case shown in this list will open a preview page of the case listing the defects and a cure defect button on top right corner, if clicked by a user will resubmit it after he cures the defects. (�g 47)
Fig 49 Case status>defects cure screen
Fig 47 E-�ling status>De�cit court fees
7.6. De�cit court fees
A user can check if the fees paid by him for e-�ling a case is de�cit or not by pressing the ‘De�cit court fees’ tab under ‘My e-�ling status’ on Dashboard. The cases listed there have been accepted by the E-�ling Administrator after these have been �nally e-�led by a user. User can pay the de�cit court fees shown therein by pressing relevant ‘Make Payment’ button. (�g 45)
7.7. Pending Scrutiny
A user can check the cases e-�led by him which are pending scrutiny of the concerned court registry where it is been �led. The page displays e-�ling number, CNR number and cause title of case and date when updated by the E-�ling Admin (�g 46)
Fig 48 Case status> e-�led cases pending scrutiny screen
34 35

Once a user cures the defects raised by the concerned court registry, if any, the details of e-�led case can be found under ‘My cases’ category of the dashboard under ‘e-�led cases ‘tab.
8.1. E-�led cases Tab
Clicking on the e-�led cases Tab, opens a page where user can view list of cases e-�led by him successfully along with e-�ling number, CNR number, cause title, and date when it was updated last. (�g 48)
Fig 51 My cases>E-�led document
Fig 50 E-�led cases Tab on dashboard
8.2. 10.3.2 E-�led document
A user can access any document successfully e-�led by him (for which CNR number has been allotted) using this facility by clicking the e-�led document tab under ‘My cases’ category on the dashboard. The screen will display case details and document �led and last update date. (�g 49)
8.3. E-�led De�cit court fees
A user can access the cases where he has �led any de�cit court fees by clicking on the ‘E-�led de�cit court fees’ tab under ‘My cases’ category on the dashboard. User can then view the e-�ling number, CNR no. and cause title and last updated date. By clicking on a case user wants to view, de�cit court fees paid in the case is shown. (�g 50)
Fig 52 My cases> de�cit court fees �led
8.4. Rejected matters
All such cases which are rejected by the �ling section of the concerned court and in which defects are not of curable nature are shown under rejected matters page. The page shows its e-�ling number, type of case, cause title and date of last update. (�g 51)
Fig 53 My cases>Rejected cases
36 37
8. My Cases

8.5. Idle/unprocessed e-�led Nos.
The cases for which an e-�ling number has been generated but user has not taken any action are re�ected in this section. If a case e-�led has incurable defects, it may be shown in this section. (�g 52)
8.6. Viewing e-�led cases, documents & court fees
A unique feature of this e-�ling facility enables users to access details about e-�led cases �led by a user undergoing process of �ling and checking by the Registry of concerned court , e-�ling of miscellaneous documents and de�cit court fees. This is accessible also by clicking on the e-�ling number at any place in the e-�ling facility website.
Fig 54 Idle/unprocessed cases screen
8.7. e-�led cases
E-�led cases can be accessed by clicking on the e-�ling number at any place in the e-�ling facility website. (�g 53)
Fig 55 Screen showing details of an e-�led case
8.8. View e-�led miscellaneous document
Similarly a user can view an e �led miscellaneous document by clicking on its e-�ling number at any place in the e-�ling system. (�g 54)
Fig 56 Screen showing details of an e-�led miscellaneous document
8.9. View e-�led de�cit court fees
A user can view details of an e-�led de�cit court fees by clicking on e-�ling number of concerned case. (�g 55)
Fig 57 Screen showing details of de�cit court fees
38 39

8.10. View case status
A user can access the case status of a successfully e-�led case by clicking ‘My e-�led cases’/clicking option of case status on left panel of dashboard once a CNR number is issued for an e-�led case. A screen is displayed as shown below showing all details of a case, names of parties and their advocates and interim orders passed in a case.(�g 56)
Fig 58 (a) Case status screen
Fig 59 Edit pro�le page
9.1. View & edit user pro�le
In order to view or edit user’s pro�le, a user must click on ‘view pro�le’ page at the top of the left panel on the Dashboard. Clicking on view pro�le tab, will open a page displaying name and contact details of the Advocate submitted by him at the time of registration for using the e-�ling facility. User pro�le displays his contact details or other information submitted by him at the time of registration which he can edit by selecting required �eld.
9.2. Upload photo
A user may upload his (passport size) photo by selecting the upload button with a click on ‘upload’ check box. The contact details can be edited by clicking on ‘edit’ icon given next to each detail. (�g 57)
40 41
9. Editing a User’s Profi le Page
Fig 58 Case status screen

9.3. Change e-mail address
Clicking on edit icon next to an email address (as shown in �g 57) will display screen below (�g.58). User may enter the new email address and press ‘update’ button.
An OTP message will be sent to the user on his email which he must input in the OTP validation page (�g 59) to update the new e-mail address input by user (�g 58.)
9.4. Update mobile number in a user pro�le
Similarly, to edit mobile number, a user must select the edit icon next to his Mobile number (�g 57). A new page appears on screen, where the new mobile number must be �lled. (�g.60). On clicking the ‘Update’ button, OTP will be sent to a user on his new mobile number, which he needs to �ll in the OTP validation page. (�g 61).
Fig 62 Update user mobile number
Fig 60 Update email id of a user Fig 61 OTP validation to change email id of user
Fig 63 OTP validation to updatemobile number of a user
9.5. Update address in a user’s pro�le
Through a similar process (as shown in �g 57), address of a user can be edited in his pro�le by clicking on edit button next to address. A new screen is displayed as below in �g 62.
9.6. Update password
A user can update his password, by clicking the ‘change password’ option on the pro�le screen (�g 57). User can enter his old password and input new password and press update.
Password must atleast be of 8-digit length with one special character, 1 digit, 1 lower case, 1 upper case character.)
Fig 64 Updating address of user in his pro�le
On clicking the ‘Update’ button, the changed address will be updated in a user’s pro�le
42 43

Notes Notes

Notes Notes
![IN THE SUPREME COURT OF INDIA CIVIL … BY MADRAS BENCH] AND CIVIL APPEAL NOS.10717-10718 OF 2016 (ARISING OUT OF SLP (C) ... Madras and Madurai Bench of the High Court of Madras …](https://img.pdfslide.net/doc/110x75/5ab0a2717f8b9aea528b5d3a/in-the-supreme-court-of-india-civil-by-madras-bench-and-civil-appeal-nos10717-10718.jpg)