Embed Size (px)
Citation preview

USER’S GUIDE

User’s Guide

POLARIS®, RZR®, RideCommand™, and DYNAMIX™ are trademarks ofPOLARIS Industries Inc.Copyright 2017 Polaris Industries Inc. All information contained within thispublication is based on the latest product information at the time ofpublication. Due to constant improvements in the design and quality ofproduction components, some minor discrepancies may result between theactual vehicle and the information presented in this publication. Depictionsand/or procedures in this publication are intended for reference use only. Noliability can be accepted for omissions or inaccuracies. Any reprinting orreuse of the depictions and/or procedures contained within, whether whole orin part, is expressly prohibited.The original instructions for this vehicle are in English. Other languages areprovided as translations of the original instructions.Printed in U.S.A.RideCommand™ User Guide9928591

Thank you for purchasing a POLARIS vehicle, and welcome to our world-widefamily of POLARIS enthusiasts. Be sure to visit us online at www.polaris.com forthe latest news, new product introductions, upcoming events, careeropportunities and more.Here at POLARIS we proudly produce an exciting line of utility and recreationalproducts. We believe POLARIS sets a standard of excellence for all utility andrecreational vehicles manufactured in the world today. Many years of experiencehave gone into the engineering, design, and development of your POLARISvehicle, making it the finest machine we’ve ever produced.
• Snowmobiles• All-terrain vehicles (ATVs)• Low emission vehicles (LEVs)• RANGER® utility vehicles• BRUTUS® work vehicles• SLINGSHOT® three wheelmotorcycles
• RZR® sport vehicles• GEM® vehicles• INDIAN® motorcycles• POLARIS POWER® generators• POLARIS DEFENSE® combatvehicles
• Timbersled® Snow Bikes
For safe and enjoyable operation of your vehicle, be sure to follow theinstructions and recommendations in this owner’s manual. Your manual containsinstructions for minor maintenance, but information about major repairs isoutlined in the POLARIS Service Manual and can be performed by a factorycertified Master Service Dealer® (MSD) technician.Your POLARIS dealer knows your vehicle best and is interested in your totalsatisfaction. Your POLARIS dealership can perform all of your service needsduring, and after, the warranty period.
3
WELCOME
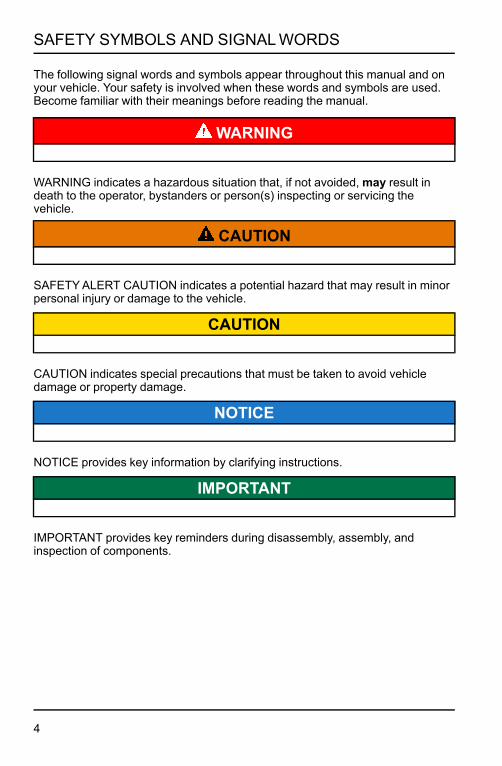
The following signal words and symbols appear throughout this manual and onyour vehicle. Your safety is involved when these words and symbols are used.Become familiar with their meanings before reading the manual.
WARNING
WARNING indicates a hazardous situation that, if not avoided,may result indeath to the operator, bystanders or person(s) inspecting or servicing thevehicle.
CAUTION
SAFETYALERT CAUTION indicates a potential hazard that may result in minorpersonal injury or damage to the vehicle.
CAUTION
CAUTION indicates special precautions that must be taken to avoid vehicledamage or property damage.
NOTICE
NOTICE provides key information by clarifying instructions.
IMPORTANT
IMPORTANT provides key reminders during disassembly, assembly, andinspection of components.
4
SAFETY SYMBOLS AND SIGNALWORDS

Introduction . . . . . . . . . . . . . . . . . . . . 7General Information . . . . . . . . . . . . . . . . 9Features and Controls . . . . . . . . . . . . . . 11Operation . . . . . . . . . . . . . . . . . . . . 29Dynamix™ Active Suspension . . . . . . . . . . 35Maintenance . . . . . . . . . . . . . . . . . . 43
5
TABLE OF CONTENTS

6

INTRODUCTIONOVERVIEWThank you for purchasing a RIDE COMMAND™ Display, and welcome to thePolaris RIDE COMMAND™ App. Your Display is easy to use and will allow youto customize the information displayed through the use of alternate screenselections.For a safe and enjoyable riding experience with your new Display, please readyour vehicle’s owner’s manual and this Display owner’s manual. If you shouldneed additional assistance with Display operation or software updates, pleasesee your Polaris dealer or visit polaris.com/ridecommand.
WARNINGDo not enter information while operating your vehicle. Failure to pay attentionto operating your vehicle could result in loss of control, injury, or death. Youassume all risks associated with using this device. Read your User Guide.
Always ride with the latest maps and trails data from polaris.com/ridecommand. Check polaris.com/ridecommand for updates.
BEFORE YOU RIDEBefore riding with your new display, do the following:
• Read this entire manual.• Familiarize yourself with the features and operations of the Display while thevehicle is stationary.
• Register your vehicle if not already registered at polaris.com/ridecommand.• Download the Polaris RIDE COMMAND™ App from the Apple/Google Playstore and create your personalized account.
• Check your display to ensure you have the appropriate maps and trails visiblefor your area. To change or update maps/trails see page 44.
NOTETrails data expires 90 days from the file’s release date.
DEVICE OPERATING REQUIREMENTSPhone functionality is dependent on the capabilities of your cell phone. Textmessaging functionality may vary depending on your phone’s operating system.
NOTESome cell phones or operating systems will not work as shown in this manual.
7
INTRODUCTION

8

GENERAL INFORMATIONOPERATING CONDITIONSView fuel level, coolant temperature, battery voltage, gear position, drivelinestatus, diagnostics and maintenance warnings.
PERFORMANCEView the speedometer, tachometer, dual trip meters, odometer, trip time, andengine hours.
BLUETOOTH FUNCTIONALITYUse Bluetooth-enabled communication with a compatible iOS and Android cellphone (with Bluetooth audio capability as well as notifications of incoming ormissed calls and texts, and the ability to view battery strength and signalstrength).
GPS MAPPINGNOTE
The compass is controlled by the GPS systems. Calibration is not required.
Use the compass and full-featured GPS when the GPS receiver is installed(includes the display of latitude, longitude and elevation). Mark and savewaypoints and rides.
SCREEN OPTIONSSelect from available ride screens.
SOFTWARE UPDATESSoftware updates are recommended as they become available throughout thelife of the vehicle. Log in to polaris.com/ridecommand to download the latestsoftware updates. If you need assistance, please see your POLARIS dealer.
MAP UPDATESMap updates are recommended every 90 days, and especially before long trips.Log in to polaris.com/ridecommand for the latest updates.
9
GENERAL INFORMATION

10

FEATURES AND CONTROLSBUTTONS
q Gauge Screen Button r Device Manager Button
w Audio Button t Apps Screen Button
eMap Button
11
FEATURES AND CONTROLS

GAUGE SCREEN
1. Press the Gauge Button to display the main gauge screen.
2. Use the gauge button again to move between gauge and camera screens.These can also be selected with the touch screen buttons in the lower leftcorner.
3. The grey buttons on the gauge screen are touch selectable. Press on the“ODO” icon to toggle between trip 1, trip 2, time traveled, total hours, andtotal miles. To reset trip 1, trip 2, or time traveled, press and hold this icon onwhichever output you wish to reset.
4. Pressing the MPH/RPM button will change whether miles per hour or RPM isshown on top.
5. Press on the coolant icon to cycle to battery voltage, and turbo boostpressure (if applicable), then back to engine temperature.
12
FEATURES AND CONTROLS

6. Swipe down from the top of the screen or press the upper navigation bar toadjust brightness and Bluetooth connection.
FRONT AND REAR CAMERAWithin the Gauge Menu is a front and rear view camera as shown below. Totoggle between camera views, press the FRONT/REAR icon in the top leftcorner of the screen.
13
FEATURES AND CONTROLS

AUDIO SCREEN
1. Press the audio screen button shown above to display the audio screen.2. Use the source button in the top left corner to change between FM, AM,
Weather, Bluetooth, and USB Audio.3. Press the tune up or down icons to change the radio station by small
increments or press the scan up or down icon to search for the next qualitysignal station.
4. To set favorites, scroll to a radio station and hold an “Empty” favorite icon.Press the arrows on either side of the favorites to view all 18 favorite slots.
14
FEATURES AND CONTROLS
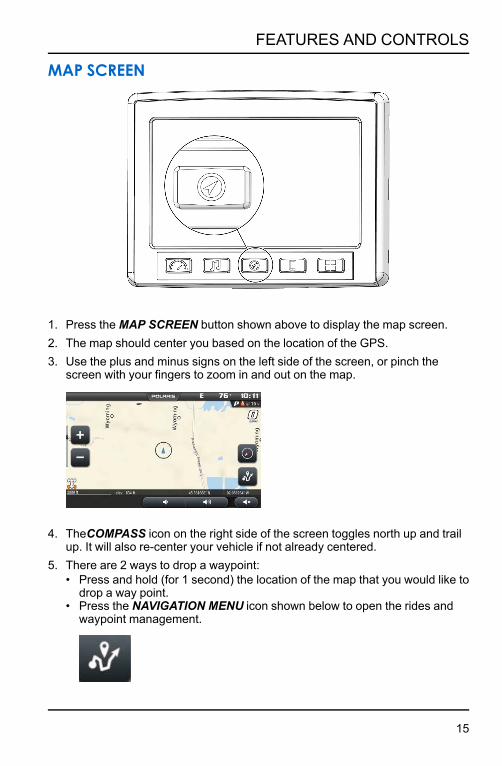
MAP SCREEN
1. Press theMAP SCREEN button shown above to display the map screen.2. The map should center you based on the location of the GPS.3. Use the plus and minus signs on the left side of the screen, or pinch the
screen with your fingers to zoom in and out on the map.
4. TheCOMPASS icon on the right side of the screen toggles north up and trailup. It will also re-center your vehicle if not already centered.
5. There are 2 ways to drop a waypoint:• Press and hold (for 1 second) the location of the map that you would like todrop a way point.
• Press the NAVIGATION MENU icon shown below to open the rides andwaypoint management.
15
FEATURES AND CONTROLS

6. Select the ADDWAYPOINTS icon shown below to drop and name awaypoint where the cross-hairs are pointing.
7. You can manage waypoints by selecting the waypoint. You can managewaypoints by selecting theWAYPOINT icon shown below.
8. When selected, the screen below will pop up with your previously savedwaypoints.
9. You can also save a ride on your display by clicking on the RECORD iconshown below to start recording your ride.
When you are finished recording your ride, press the STOP icon to stoprecording.
16
FEATURES AND CONTROLS

10.You can manage rides on your display by clicking on the RIDE icon as shownbelow.
MANAGE RIDES OR WAYPOINTS1. To navigate to a waypoint, go to the waypoint menu on your display, select
the waypoint you would like to navigate to and press the NAVIGATE toWAYPOINT icon.
Or simply press the VIEWWAYPOINT icon to view it on your navigationscreen.
2. To view a ride on your display, go to the rides menu and press the VIEWRIDE icon to toggle whether the ride is shown on your display or not.
3. To edit a ride/waypoint select the ride/waypoint you wish to edit then pressthe edit icon. From here you can rename the ride or waypoint and the changeits color by pressing the COLOR icon to the left of the name.
17
FEATURES AND CONTROLS

4. To export a single ride/waypoint to a USB flashdrive, select the ride/waypointyou wish ti export and press the EXPORT icon.
5. To delete a ride or waypoint select the ride/waypoint you would like to deleteand press the DELETE icon.
IMPORT RIDES AND WAYPOINTSTo import previously saved rides/waypoints from your USB flash drive, do thefollowing:1. Plug the USB drive into the USB pigtail/port and press the USB IMPORT
icon.
2. Press the DOWN ARROW icon to the left of the ride or waypoint that youwould like to download. The ride/waypoint should then appear in your ride orwaypoint list on the navigation screen.
NOTEIn order for .gpx files to be imported they must be saved in the root of a flash
drive rather than in a folder.
18
FEATURES AND CONTROLS

EXPORT RIDES AND WAYPOINTSTo export rides/waypoints from your USB drive, do the following:1. Plug the USB flash drive into the USB port and press the USB EXPORT icon.
2. Press the DOWN ARROW icon to the left of the ride or waypoint that youwould like to download. The Ride/waypoint should then be saved on the USBflash drive.
NOTEYou must be on the waypoints manager screen to import or export waypoints.
You must be on the ride manager screen to import or export rides.
POLARIS RIDE COMMAND™ APPRides and waypoints can also be created and edited with the Polaris RIDECOMMAND™ app. These rides and waypoints can then be transferred to andfrom the display via Bluetooth connection with your smartphone.
GROUP RIDEThe Polaris RIDE COMMAND™ app also has the ability to track the location offriends you are riding with. Simply create or join a group with your friends fromthe Polaris RIDE COMMAND™ app on your smartphone, and ensure yoursmartphone is connected to the display via Bluetooth. After this, other riders inyour group should automatically appear on the map screen of the display withtheir location and profile name. Rider icons that are circular are moving and ridericons that are square are stationary. When rider icons are displayed in color itmeans they are active, when they are greyed out it means they or you have lostsignal.
19
FEATURES AND CONTROLS

DEVICE MANAGER SCREEN
1. Press the Device Manager button shown above to display the devicemanager screen.
2. This will open up the display below.
CONNECT YOUR PHONE TO THE DISPLAYThe RIDE COMMAND™ Display is compatible with Android and iOS. Checkpolaris.com/ridecommand for latest operating system compatibility.Click on the BLUETOOTH icon below the cellphone image to open up theBluetooth connection window.
The display will ask for you to turn on your Bluetooth if this is your first timeconnecting. If available, make your phone discoverable to other devices in yoursmartphone’s Bluetooth settings. Click Ok to poll Bluetooth devices.
20
FEATURES AND CONTROLS

IPHONETo connect your iPhone to the display, do the following:1. In your iPhone settings turn on Bluetooth. If available, make your phone
discoverable to other devices in your iPhone’s Bluetooth settings. When yourphone appears on the display press the “+” button next to it.
2. A prompt will appear on your iPhone requesting “Polaris RZR” to pair withyour phone.
3. Ensure the conformation code on the screen and your phone are the samethen press “Pair” on your phone.
4. For optimal experience turn on show notifications from “Polaris RZR” withinyour smartphone’s Bluetooth settings.
ANDROIDTo connect you Android device to the display, do the following:1. From your smartphone settings, open the Bluetooth options on your device
and ensure that Bluetooth is turned on.
NOTEOn some phones you have to make the phone visible to other devices. If yourphone has this feature, it should show up on the Bluetooth connection screenof your phone. If no option exists to make your phone visible to the display, it is
already visible to the display.
2. Press the add device button on the bottom right corner of the Display andpress “OK” on the display.
3. When your phone appears on the display press the “+” button next to it topair with your phone.
4. Ensure the conformation code on the screen and your phone are the samethen press “OK” on your phone.
21
FEATURES AND CONTROLS

5. For optimal experience press “Accept” on your phone when requested toaccess contacts and messages.
6. The display will now show a list of previously connected phones on thedisplay. If it is unpaired, click on your phone from the list.
7. Once the display says connected/paired, your phone is now connected to thedisplay via Bluetooth. After a phone is connected, the Device ManagerScreen will appear as shown below.
22
FEATURES AND CONTROLS

8. When a Smartphone is connected to the display via Bluetooth, users areable to make phone calls from the display through the keypad, recent calls,or their contacts by pressing the phone icon in the device manager screen orthrough the pull down menu.
NOTEThere is no built in microphone in the display. Phone call audio will play
through the phone speakers or Polaris approved headset if connected. Somedial options may be unavailable at speeds greater than 3 MPH.
HARDWIRE MOBILE PHONEUsers can also hardwire their smart phones to connect to the display and playmusic. To do this just plug a USB charge cable for your smartphone into the USBpigtail/ port (see page 31).
NOTEUSB music playback is not available on all devices.
CONNECTING YOUR BLUETOOTH HEADSET WITH THE DISPLAYThe Display can connect with Polaris approved Bluetooth headsets to listen tomusic, take phone calls, and talk with other riders. Use the following steps toconnect your Bluetooth headset to the Display.
To connect your Bluetooth Heaset to your display, do the following:
23
FEATURES AND CONTROLS

1. From the Device Manager menu press the Bluetooth icon below the headsetto open the Bluetooth connection window.
2. Turn your Bluetooth headset on and put it in phone pairing mode.3. When your Bluetooth headset appears on the display press the “+” icon on
the display.4. The display will say “Pairing Headset” and give you a code. Press OK to pair.5. Users can then return to the Device Management menu and toggle whether
music plays through the headset or speakers with the icon below the headsetname.
24
FEATURES AND CONTROLS

APPS SCREEN
1. Press the Apps Menu button shown above to display the Apps Menu.
2. From this menu Settings, Diagnostics, Lock Screen, GPS Satellite Status,Ride Stats, and GoPro features can all be accessed.
25
FEATURES AND CONTROLS

ICON BARThe icon bar at the top of the screen displays cell phone related information, aclock and the GPS heading. Some of these built-in features are only functionalwith the addition of Polaris Accessories. Your Polaris dealer can assist.In most situations, the GPS and mapping features will function best while thevehicle is outdoors in an open space.
q Vehicle Warnings r Ambient Temperature
w Phone Signal t Clock
e Compass
26
FEATURES AND CONTROLS

CHECK ENGINE INDICATORThis indicator appears if an EFI-related fault occurs. Do notoperate the snowmobile if this warning appears. Seriousengine damage could result. Your dealer can assist.
LOW FUEL INDICATORThe low fuel indicator illuminates when fuel is low.
OVER-TEMPERATURE INDICATORThe over-temperature indicator will illuminate when theengine is overheating. Take action to cool the engine. Theindicator will flash when engine temperature reachescritical levels. Stop the engine immediately.
LOW OIL INDICATORThe low oil indicator light may flicker at times due to oilmovement in the bottle, but when the light comes on andremains on, add the recommended oil before furtheroperation.
LOW BATTERY VOLTAGE INDICATORThe low battery voltage indicator illuminates when thebattery voltage is low.
EPS WARNING (IF EQUIPPED)This indicator illuminates briefly when the key is turned tothe ON position. If the light remains on, the EPS system isinoperative. Your POLARIS dealer can assist.
27
FEATURES AND CONTROLS

28

OPERATIONSETTINGSTo access the Setting menu, press the Apps Screen Button and select Settings.
GENERALPressing the Settings icon will take you to a general settings screen as shownbelow.
From the General Settings menu you can change the following:• Language• Speed Units• Temperature Units• Enable/Disable Auto Brightness
It also provides access to general system information and the ability to updatethe Display Software and Maps. To update software or maps refer to page 32and 33.
TIME
By pressing the time tab on the left side of the settings screen users are able toadjust:• Time Zone• Daylight Savings• Time Format
29
OPERATION

AUDIOThe audio tab on the left side of the display allows access to automatic volumecontrol as well as stereo adjustments. This menu is also available from thesettings button on the audio screen.
Use the equalizer to adjust Bass, Mid, and Treble. To do this drag the dot abovethe desired adjustment up to increase band frequency and down to decreaseband frequency.
Use the Fade/Balance screen to adjust sound output location. Drag the dot forBalance to the left to move sound output left or to the right to move sound outright. Similarly, drag the dot for Fade left to move sound output to the rear of thevehicle, or the right to move sound output to the front of the vehicle.
VEHICLEBy pressing the vehicle tab on the left side users can see oil life.
30
OPERATION

DIAGNOSTICSThe Diagnostics menu is meant to show any faults that may have been detectedby the vehicle. The Diagnostics menu will provide users with a brief descriptionof the fault and an action for correcting the fault, if one exists. For a systemdiagnostics inspection and/or service, please see your authorized Polaris dealer.
NOTEThe Diagnostics menu is meant to show any faults that may have been
detected by the vehicle. The Diagnostics menu will provide users with a briefdescription of the fault and an action for correcting the fault, if one exists. For asystem diagnostics inspection and/or service, please see your authorized
Polaris dealer.
LOCK TOUCHSCREENBy pressing the Lock Touchscreen icon, you will see the display below. Thisscreen is useful for clearing your screen of debris. To get out of this screen,press any of the hard buttons below the screen.
31
OPERATION

SATELLITE STATUSIn the Apps Menu, select GPs Satellite Status. The screen displays all availablesatellites in the area.
RIDE STATUSThe Ride Stats icon shows a summary of previous rides. The Ride Stats menucan be reset using the reset icon in the bottom right corner.
GOPROThe GoPro menu lets users sync their GoPro to the Display. From this, it allowscontrol of camera record functions, switching camera options, and still previewsof recorded videos and playback of previous images.
NOTERide Command™ supports GoPro Hero 4 Black and Silver models. Other
models may work with limitations. Polaris recommends the use of a MicroSDcard comparable to a SanDisk Extreme Plus for optimal experience.
NOTEFor GoPro Hero 5 users, when Ride Command™ prompts you to select your
GoPro Model, select GoPro Hero 4.
32
OPERATION

1. Turn on the GoPro camera by pressing the power button.2. Turn on the GoPro’s Wi-Fi by holding the side button until a blue light flashes
(you should see a Wi-Fi signal on the GoPro display).3. In order to connect a GoPro to the display navigate to Apps Screen.4. Select the GoPro icon.5. Select the "Camera" icon.6. Select the "+(camera)" icon in the lower right corner of the display.7. Select "Continue" if the on screen criteria has been met.
8. Select the "+" icon next to the name of your camera.9. Select the type of GoPro device that you are trying to connect to the display.10.Enter the password of the GoPro to connect it to the display.11. After entering the password correctly you should see a message displaying
"GoPro Successfully Connected". Select “OK”.12.Press "Preview" on the display to pull an image preview and confirm that the
camera is operating properly.• To record an image or video press the Capture button in the top rightquarter of the screen.
• To view previously taken images and still images of videos press theMedia icon.
• To add and delete GoPros press the Camera icon.• The icons in the bottom right corner allow the camera mode to be changedbetween video, picture, burst, and time lapse.
33
OPERATION

NOTEPreview image will be disabled when traveling at speeds over 15 MPH.
ENGINE OVERHEAT INDICATORSTEMPERATURE SCALEThe engine temperature scale at the right side of the Display screen changes toRED and the check engine temperature indicator at the top left of the screenilluminates when the engine is overheating. Take action to cool the engine.
The indicator will flash when engine temperature reaches critical levels. Stop theengine immediately.
NOTEPlease see your vehicle owner’s manual for more information.
A flashing indicator indicates continued operation could result in serious enginedamage. The engine management system will automatically reduce enginepower and create a misfire condition. Stop the engine immediately. Allow theengine to cool down.
NOTEIf engine overheating seems to be caused by something other than poor
cooling conditions, see your dealer for service.
CAUTIONThe speedometer may display incorrect values at the existence of
electromagnetic radiation >= 10 V/m. Front and/or rear video may becomedistorted at the existence of electromagnetic radiation >=10 V/M.
34
OPERATION
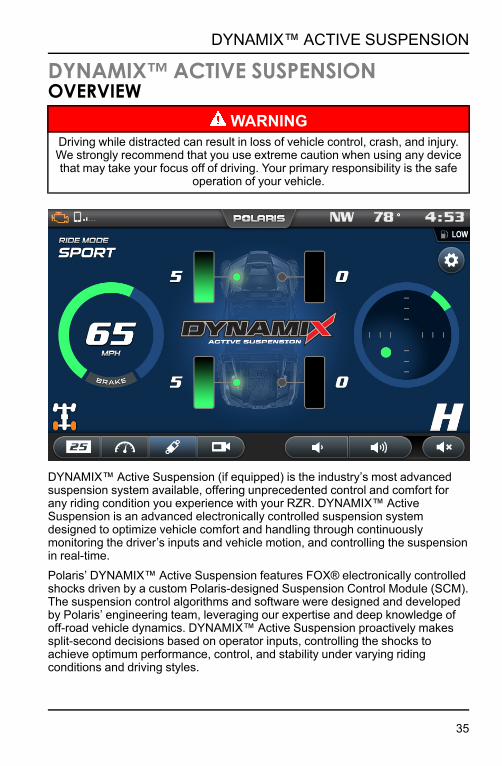
DYNAMIX™ ACTIVE SUSPENSIONOVERVIEW
WARNINGDriving while distracted can result in loss of vehicle control, crash, and injury.We strongly recommend that you use extreme caution when using any devicethat may take your focus off of driving. Your primary responsibility is the safe
operation of your vehicle.
DYNAMIX™ Active Suspension (if equipped) is the industry’s most advancedsuspension system available, offering unprecedented control and comfort forany riding condition you experience with your RZR. DYNAMIX™ ActiveSuspension is an advanced electronically controlled suspension systemdesigned to optimize vehicle comfort and handling through continuouslymonitoring the driver’s inputs and vehicle motion, and controlling the suspensionin real-time.Polaris’ DYNAMIX™ Active Suspension features FOX® electronically controlledshocks driven by a custom Polaris-designed Suspension Control Module (SCM).The suspension control algorithms and software were designed and developedby Polaris’ engineering team, leveraging our expertise and deep knowledge ofoff-road vehicle dynamics. DYNAMIX™ Active Suspension proactively makessplit-second decisions based on operator inputs, controlling the shocks toachieve optimum performance, control, and stability under varying ridingconditions and driving styles.
35
DYNAMIX™ ACTIVE SUSPENSION

DYNAMIX™ SYSTEM COMPONENTSSHOCKS2.5" FOX® Podium with Electronically Controlled Damping.
SUSPENSION CONTROL MODULE (SCM)The Suspension Control Module (SCM) contains the logic for suspension con-trol, including communications, operator inputs, and shock drivers, to executethe suspension control algorithms. The SCM also has an internal 6-axis inertialmeasurement unit which is used to monitor the performance of the vehicle bythe suspension control algorithms.
CAUTIONMoving or altering the SCM may have an adverse effect on vehicle handling.
Never move the SCM from it’s factory mounting location.
ELECTRONIC POWER ASSISTED STEERING (EPAS)The Electronic Power Assisted Steering (EPAS) system has been enhanced witha steering angle sensor to provide steering angle information to the SCM.
DYNAMIX™ SYSTEM FEATURESVEHICLE SPEED SENSITIVITYThe system continuously monitors the speed of the vehicle and adjusts a baselevel of damping for a given vehicle speed depending on the mode selected bythe user.
CORNERING CONTROLThe system continuously monitorssteering angle, lateral acceleration,and vehicle yaw rate to provideenhanced cornering control, reducingbody motion for maximumperformance.
36
DYNAMIX™ ACTIVE SUSPENSION

BRAKINGThe system continuously monitors thebrake switch status and vehicledeceleration rate, reducing bodymotion in braking conditions.
ACCELERATIONThe system continuously monitorsvehicle speed, accelerator pedalposition, and engine speed to increasedamping of the rear shocks undercertain acceleration conditions toreduce squat.
AIRBORNE DETECTIONThe system continuously monitors thestate of the vehicle using its 6-axisinertial measurement unit. When low-gsituations are encountered, the systemprovides maximum damping until thelow-g situation is no longer present,after which it reverts back to the user-selected drive mode.
37
DYNAMIX™ ACTIVE SUSPENSION

ADVANCED DIAGNOSTICSThe system continuously monitors thehealth and state of all input and outputsignals. If a fault is detected, thesystem reverts to a safe operatingstate and alerts the operator of acomponent or system problem via theSCM diagnostic indicator on theRideCommand™ display.
Suspension activity notifications canbe turned enabled/disabled from thevehicle the setting menu.
PROCESSING CAPABILITYDYNAMIX™ Active Suspension controls current to the shock valve 1000 timesper second, performs vehicle dynamics calculations 200 times per second, andcan actuate a shock from soft to firm approximately 20 times per second.
DYNAMIX™MODE SWITCHYour RZR is equipped with a suspension control mode switch that allows you tochange the suspension control mode of your DYNAMIX™ Active Suspensionsystem on-the-fly. There are 3 available drive modes to select from: Comfort,Sport, and Firm.
WARNINGThe rider should use caution to select the appropriate ride mode to match thecurrent terrain conditions and driving style. Failure to select an appropriate ridemode could lead to vehicle dynamic behaviors not matched to the terrain or
driver’s skill level.
NOTICEThe system will prevent mode transitions from a more firm operating mode to a
more soft operating mode when a current active vehicle state is present(cornering, braking, accelerating, or airborne).
38
DYNAMIX™ ACTIVE SUSPENSION

COMFORTUse Comfort mode for the mostcomfortable ride.In Comfort mode, the suspensioncontrol system is primarily optimizedfor rider comfort, intervening inperformance situations whererequired. The system will graduallyincrease the base value of damping asvehicle speed increases. Cornering,braking, acceleration, and airbornedetection algorithms are fully active.
SPORTIn Sport mode, some level of ridercomfort is traded for higherperformance levels and reduced bodymotion. Damping ramps up moreaggressively as a function of vehiclespeed. This mode is recommended forspirited driving where additionalsuspension system performance isrequired. All semi-active features areenabled in this mode.
FIRMIn Firm mode, the suspension revertsto its most firm compression dampingsetting. This mode is recommendedfor challenging terrain where largesuspension events and complexterrain is encountered. In this mode, all4 shocks are at the most firm setting.
39
DYNAMIX™ ACTIVE SUSPENSION

DISPLAY FEATURESYour vehicle is equipped with an advanced Ride Command™ display. Thesuspension control screen provides additional information about the operation ofyour DYNAMIX™ Active Suspension system.
q Current Suspension Ride Mode
w Accelerator Pedal Position
e Vehicle Speed
r Brake Status
t Current Damping Setting (shown as both a bar gauge and an integer for each shock)
y Active Vehicle Event State Pop-ups (Cornering, Braking, Accelerating, Airborne)
u Steering Angle
i G-Meter (vehicle lateral and longitudinal acceleration)
WARNINGDo not enter information while operating your vehicle. Failure to pay attentionto operating your vehicle could result in loss of control, injury, or death. Youassume all risks associated with using this device. Read your User Guide.
Always ride with the latest maps and trails data from polaris.com/ridecommand. Check polaris.com/ridecommand for updates.
40
DYNAMIX™ ACTIVE SUSPENSION

DEMONSTRATION MODEWhen the vehicle is first keyed on, and the shift lever is in the Park (P) position,the SCM will enter a demonstration mode. The suspension will react to theoperator inputs as if the vehicle was being driven. After a period of time (5minutes), the SCM will exit demonstration mode and stop driving the shocks toconserve vehicle power. The vehicle will enter normal operation if the engine isstarted.
NOTEThe vehicle will enter demonstration mode any time the shift lever is in the parkposition (P), the engine speed is at 0 rpm, and the vehicle speed is at 0 mph.
Demonstration mode will time out after 5 minutes.
41
DYNAMIX™ ACTIVE SUSPENSION

42

MAINTENANCECARE AND MAINTENANCEUse a soft cloth to clean the housing. Mild soap and water may be used. Do notuse harsh or abrasive cleaners.The touch screen can be disabled in order to clean the display. For best results,use a micro-fiber towel to clean the screen. Window cleaner or alcohol may beused.
NOTEImmediately clean off any gasoline that splashes on the display.
STORAGEWhen preparing the vehicle for storage make sure the ignition switch is in theOFF position to prevent battery drain and a shortened battery life.
SPEED LIMITATIONVarious aspects of the display such as the front facing camera, GoPro preview,phone contacts and call logs may be unavailable while driving at variousspeeds.
UPDATE SOFTWARENOTE
Before updating the Display, always export your existing rides and waypointsto a USB drive to avoid losing them.
To update the software, do the following:
ON YOUR PERSONAL COMPUTER1. Upload the most recent software from ridecommand.polaris.com to a USB
flash drive.
ON YOUR VEHICLE1. Press the Apps Screen button.2. Tap on settings app and select General settings.3. Select the Update Software arrow.4. Select the down arrow icon to the left of the update you would like install.5. Press Yes to install.6. The display will initiate the update and restart with the new software. Do not
remove the USB flash drive until the display has fully restarted.
43
MAINTENANCE

ERROR MESSAGESIf an error occurs while updating your software, perform one or all of thefollowing actions to resolve the issue:1. Remove and reconnect the USB flash drive securely.2. Make sure the display files are not inside a folder on the flash drive.3. Make sure only display files are on the flash drive. Remove any other files if
necessary.4. Try using a different USB flash drive.
UPDATE MAPSTo update the maps on your display, do the following:
1. Go to ridecommand.polaris.com and download the map update to a USBflash drive.
2. Insert USB flash drive into the USB port on your vehicle.3. Press the Update maps in the General Settings.4. Select the file you want to install by pressing the corresponding down arrow
icon.5. This will update the display’s map which will automatically restart the display
once the update is complete. Do not remove the USB flash drive until thedisplay has fully restarted.
USB HARDWAREFor software update, POLARIS recommends using a SanDisk® or similar USBflash drive with a minimum of 4G in available memory, formatted using theFAT32 file system. For best results remove all files from the flash drive beforestarting the update process.
FREQUENTLY ASKED QUESTIONS1. How do I update my map on my display?
Log in at my.polaris.com to download the latest MAPS/Software data. Thentransfer the files to the Display using a USB flash drive. Refer to UpdateSoftware or MAPS/Software Data on page 9.
2. How do I find the USB connection on my specific vehicle?
Refer to USB Connection Locations on page 44.3. Why does my display not acquire satellite signal or GPS?
The GPS can take a few minutes to lock from a cold start. After warm-up, ifless than 4 satellites are shown in the GPS satellite screen move the vehicleto an area free of overhead obstructions. Refer to Satellite Status on page29.
44
MAINTENANCE

4. I get a “Memory Full” warning while in the MAPS/RIDES screen, whatshould I do?
You are reaching the limit allowed for an individual ride. Save the current rideand start a new ride. Up to 20 rides can be saved.
5. How do I connect my phone via Bluetooth to the Display?
Refer to Bluetooth on pages 17-20. Refer to the phone’s user manual forspecific Bluetooth functionality.
6. How do I change the screens brightness?
Option 1: While on any screen, pull down from the top of the display andadjust the brightness bar.
Option 2: Apps Menu > Settings > General Settings > Turn Auto BrightnessON/OFF.
7. How do I find what version of software my display currently has?
Apps Menu > Settings > General Settings > Update Software.8. How do I set the clock on my display?
Option 1: Make sure the time zone (GMToffset) and daylight savings mode iscorrect for your location if in GPS mode. GPS automatically sets the clockwhen there is a locked GPS signal.
Option 2: Apps Menu > Time Settings
45
MAINTENANCE

46

AAcceleration ............................. 37Advanced Diagnostics ................ 38Airborne Detection ..................... 37Apps Screen............................. 25Audio Screen............................ 14
BBluetooth Functionality .................9Braking Anti-Dive....................... 37Buttons ................................... 11
CCare and Maintenance ............... 43Check Engine Indicator ............... 27Cornering Control ...................... 36
DDemonstration Mode .................. 41Device Manager ........................ 20Display Features ....................... 40Dynamix Active Suspension......... 35Dynamix System Components ..... 36DYNAMIX™ Mode Switch ........... 38
EEngine Overheat Indicators ......... 34Engine Overheating ................... 27EPS Warning............................ 27
FFAQ........................................ 44
GGauge Screen .......................... 12GPS .........................................9
IIcon Bar................................... 26
LLow Battery Voltage Indicator ....... 27Low Fuel.................................. 27Low Oil Indicator ....................... 27
MMap Screen.............................. 15Map Updates ..............................9
OOperating Conditions....................9Overheating, Engine .................. 27
PPerformance ..............................9Processing Capability ................. 38
SScreen Options ...........................9Software Updates ........................9Speed Limitation ....................... 43Storage ................................... 43
UUpdate Maps ............................ 44Update Software ....................... 43
VVehicle Speed Sensitivity ............ 36
47

For your nearest Polaris dealer, call 1-800-POLARIS (765-2747)
or visit www.polaris.com
Polaris Industries Inc.2100 Highway 55
Medina, MN 55340
Part No. 9928591 Rev 01Printed in USA