Embed Size (px)
Citation preview

USER’S MANUAL
P.O. Box 448
1027 Commercial Ave. East Petersburg, PA 17520-0448
(717) 569-2681 PRELIMINARY ISSUE
08/15/05


iii
Table of Contents I. Introduction .................................................................................. 1
General Manual Conventions.......................................................................................... 1 Glossary........................................................................................................................... 1 General Overview ........................................................................................................... 2
Control of Groups........................................................................................................ 2 Operational Modes ...................................................................................................... 2
Direct Mode............................................................................................................. 2 Remote Mode........................................................................................................... 2 Gateway Mode......................................................................................................... 2
II. Installation................................................................................... 3 Module Installation ......................................................................................................... 3 Module Signal Identification........................................................................................... 4 Rear Panel Connections .................................................................................................. 4 Interconnection Requirements ........................................................................................ 4
Peer-to Peer Connection.............................................................................................. 5 Connections via Hub ................................................................................................... 6
Power Connections.......................................................................................................... 6 III. Features Overview ..................................................................... 7
Front Panel Layout .......................................................................................................... 7 Power-On Screen ............................................................................................................ 8 Access Restrictions ......................................................................................................... 8 Dimmed Display Mode ................................................................................................... 8
IV. Operations .................................................................................. 9 Power-On Menu Options ................................................................................................ 9
Mix Mode.................................................................................................................... 9 Delay Mode ............................................................................................................... 10
Secondary Menus .......................................................................................................... 10 Secondary Power-On Menu ...................................................................................... 10
Select Group.......................................................................................................... 10 Display Contrast ................................................................................................... 11
Mix Output Mode.......................................................................................................... 12 Secondary Mix Menus .............................................................................................. 13
Mix Down .............................................................................................................. 13 Phase and Gain Menu ........................................................................................... 14
Input Phase ........................................................................................................ 14 Output Gains ..................................................................................................... 14 Matrix Gains...................................................................................................... 15 Input Gains ........................................................................................................ 15
Swap-Mix Mode........................................................................................................ 15 Swap-Mix Channel Assignment............................................................................. 16
Set Delay Mode............................................................................................................. 17 Channel Sets .............................................................................................................. 17
Single..................................................................................................................... 17 Paired .................................................................................................................... 17

OctaStream OCP1000 User’s Manual
iv
Global.................................................................................................................... 18 Channel Assignment ................................................................................................. 18
Individual Assignment ........................................................................................... 18 Simultaneous Assignment...................................................................................... 18
Setting Output Delay................................................................................................. 18 Delay Units Display .................................................................................................. 18 Swap-Delay ............................................................................................................... 19
System State – Recall and Store.................................................................................... 20 System State Recall ................................................................................................... 20 System State Store..................................................................................................... 20
Factory Defaults Store .......................................................................................... 21

1
I. INTRODUCTION
General Manual Conventions To assist in the usage of this manual, the conventions for referring to the controls and settings on the control panel are specified as follows-
Switches with fixed functions will be referenced in CAPITALS – MIX, SWAP, PREV, etc.
Buttons with soft-defined functions will be referenced in italics- ex. -Mix Down, Output Gains.
Settings/Values that can be set will be referenced using Bold type – ex.- Attenuated, 9.0, Mute, etc.
Glossary
Channel Set- a set of output channels to which similar delay values will be applied.
Frame – the S5000 Signal Management Frame that houses the DA5315 Delay and DA5320 Mixer/Router modules.
or
Frame – a complete video picture composed of two fields (as used for delay measurement).
Remote Group – a combination of one card each of a DA5320 Mixer/Router and a DA5315 Delay Module that are located in an S5000 frame to which the control panel is not directly connected.
Local Group – a combination of one card each of a DA5320 Mixer/Router and a DA5315 Delay Module that are located in adjacent slots in the S5000 frame to which an OCP1000 is directly connected via the 9-pin D-sub serial port. Slot 1 and 2 is identified as Group 1, slot 3 & 4 is Group2, slot 6 & 7 is Group 3 and slot 8 & 9 is Group 4. The DA5320 must be located in slots 1, 3, 6 or 8 and the DA5315 must be located in slot 2, 4, 7 or 9.
Virtual Group - a reference to a remote or local group, to be controlled by the panel being configured, that is chosen from the pool of all potential groups on the LAN.
Master Operator – an OCP1000 operator that has access to all features of the panel including the engineering functions used to program the panel and restrict access to individual menus.

OctaStream OCP1000 User’s Manual
2
Operator – an OCP1000 user that does not have access to the programming and configuration settings accessible in the Engineering menus.
General Overview The OCP1000 is used to set the operating parameters of Mixer/Router (DA5320) and Delay modules in the Sigma Octastream line of digital audio management equipment. The typical application for which the OCP1000 was designed consists of the pairing of a Mixer/Router and a Delay module. This pair of modules is referred to as a group in this manual.
Control of Groups A single OCP1000 panel can control four different groups. These groups may be located in the S5000 Signal Management Frame to which it is connected via the serial port (local group) or they can be located in another frame to which a different control panel is directly connected (remote group) or a combination of the two. Each of the four groups that are defined as being controlled by the control panel are referred to as a virtual group because they may physically be located anywhere on the network to which the control panel is connected.
Operational Modes The OCP1000 has three modes of operation – direct, remote and gateway. These functions are directly related to which interface connections are being used. Operational modes are assigned by group. Therefore, a panel can be assigned to control some local groups and some remote groups.
Direct Mode When the OCP1000 is connected to the “NTWK EIA 485” connector on the S5000 Signal Management Frame via the 9-pin D-sub connector on the rear of the OCP1000, it is operating in the direct mode. In this mode, the OCP1000 can directly access any one of up to four groups located in the S5000 frame.
Remote Mode When the OCP1000 is part of an Ethernet network connected to other OCP1000 via the RJ45 connector, it is operating in the remote mode. In this mode, the OCP1000 is not connected to an S5000 frame and is controlling groups located in a frame directly connected to another panel in the network. If there are more than two control panels in the network, they must be connected to a switcher/hub.
Gateway Mode If a control panel is directly connected to an S5000 frame via the 9-pin D-sub serial port and it is connected to other panels via a network for the purpose of giving them access to the groups in that frame, it is operating in the gateway mode.
3
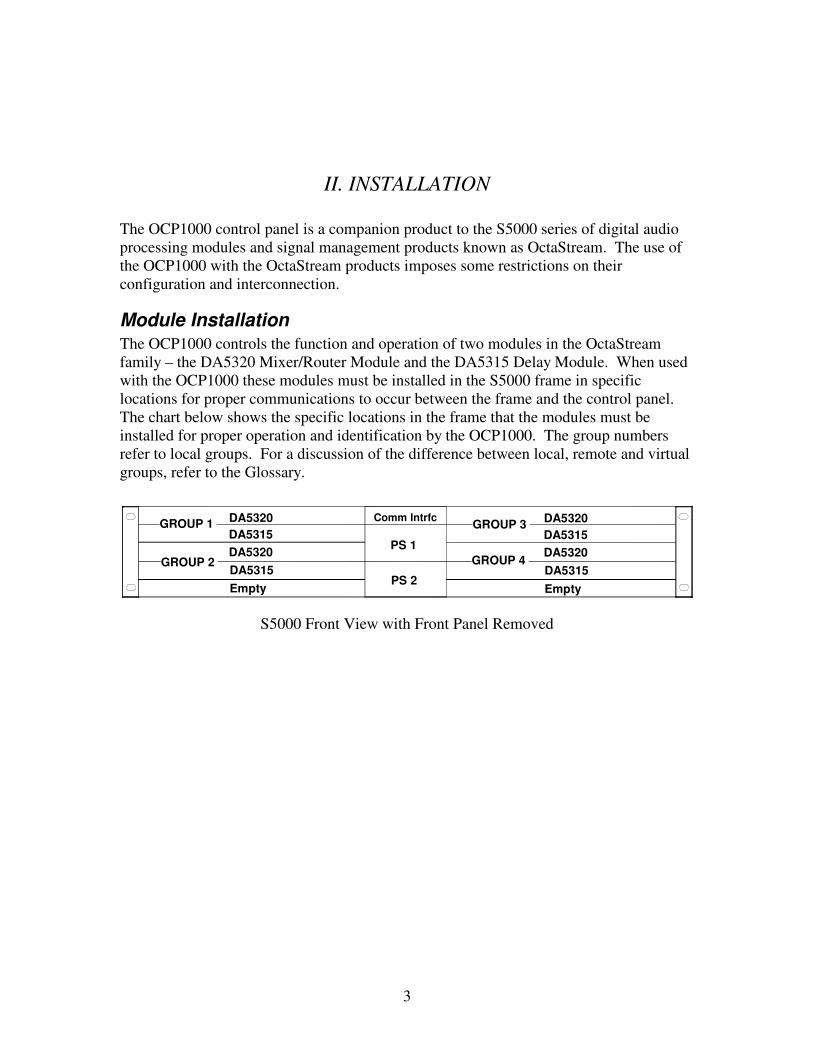
II. INSTALLATION
The OCP1000 control panel is a companion product to the S5000 series of digital audio processing modules and signal management products known as OctaStream. The use of the OCP1000 with the OctaStream products imposes some restrictions on their configuration and interconnection.
Module Installation The OCP1000 controls the function and operation of two modules in the OctaStream family – the DA5320 Mixer/Router Module and the DA5315 Delay Module. When used with the OCP1000 these modules must be installed in the S5000 frame in specific locations for proper communications to occur between the frame and the control panel. The chart below shows the specific locations in the frame that the modules must be installed for proper operation and identification by the OCP1000. The group numbers refer to local groups. For a discussion of the difference between local, remote and virtual groups, refer to the Glossary.
Comm Intrfc
Empty DA5315 DA5320 DA5315 DA5320
Empty DA5315 DA5320 DA5315 DA5320
PS 1
PS 2 GROUP 2
GROUP 3
GROUP 4
GROUP 1
S5000 Front View with Front Panel Removed

OctaStream OCP1000 User’s Manual
4
Module Signal Identification The S5000, being a flexible signal management frame that does not have slots dedicated to individual processing modules, does not have the input and output signals labeled on the rear panel. The following illustration shows the signal assignment for both the DA5320 Mixer/Router and DA5315 Delay modules when installed in the S5000 as well as the location of the BNC where a reference signal is to be connected for distribution to all modules in the frame.
SD
/HD
-SD
IE
M03
05-0
0
A B C D
A B C D
A B C D
GE F H I J
GE F H I
GE F H I
J
J
DCBA
DCBA
JIHFE G
IHFE G J
R
SIGMA ELECTRONICS, INC.5000 SERIES
90-130/180-250V~1.2A/0.6A50/60Hz
105 WATTS MAX
T 1.25A 250V FUSES LOCATED
ON POWER SUPPLIES
CAUTION
CONTROL NO. 9K50PROFESSIONALVIDEO/AUDIO
P/S 2
P/S 1
ALARMS
NTWK EIA-485
VIDEO REF
A B C D
A B C D
A B C D
GE F H I J
GE F H I
GE F H I
J
J
DCBA
DCBA
JIHFE G
IHFE G JE
M03
05-0
0S
D/H
D-S
DI
Rear Panel Connections
The Rear Panel of the OCP1000 has a DC power jack and three interface connectors. The interface connectors are a BNC jack, an RJ45 Ethernet jack and a 9-pin D-subminiature jack. The BNC jack is for Sigma use only.
Interconnection Requirements
Communications between the OCP1000 and the S5000 are via the 9-pin D-subminiature jack on both units. A user–supplied, 9 conductor, straight-thru, male-male cable is required.
Communications between control panels is via Ethernet cable as explained in the following paragraphs.

II. Installation
5
Peer-to Peer Connection The diagram below shows a typical peer-to-peer connection arrangement for (2) OCP1000 control panels and a single S5000 frame. Communications between the Gateway control panel and the S5000 frame are via a user-supplied standard straight-thru, 9 position, male-to-male D subminiature cable. Communications between control panels is via a user-supplied null modem Ethernet cable. Standard Ethernet cables will not allow the panels to operate correctly when operating peer-to-peer. The requirement for null-modem cable is based upon a direct control panel to control panel connection and would be necessary even if there were (2) control panels acting as gateways to (2) S5000 frames.

OctaStream OCP1000 User’s Manual
6
Connections via Hub The diagram below shows a typical connection arrangement for more than two OCP1000 control panels and a single S5000 frame. Communications between the Gateway control panel and the S5000 frame are via a user-supplied standard straight-thru, 9 position, male-to-male D subminiature cable. Communications between control panels is controlled by an Ethernet hub. When a hub is used, a user-supplied standard Ethernet cable is required. The requirement for a standard Ethernet cable is based upon all network traffic being directed through a hub and has nothing to do with the number of gateway to S5000 connections.
Power Connections The DC power connector is located on the far right end of the OCP1000 rear panel (viewed from the rear). To apply power to the OCP1000, plug the included external power supply into a wall outlet and then plug the DC power connector into the DC power jack on the rear of the OCP1000.

7
III. FEATURES OVERVIEW
Front Panel Layout The front panel is organized into three distinct areas – the Display in the center with its soft buttons, the mode switches on the left and the channel select/memory switches on the right.
Mode Switches Display/Soft Buttons Channel Select/Memory
Display/Soft Buttons - The display is where all selection choices are displayed. The OCP1000 is a soft panel that redefines the function of the individual buttons under the display for each screen of information. The function of the switch is identified by the information on the display.
Mode Switches – The mode switches select which parameters are to be displayed and changed. The four switches are labeled MENU, MIX, DELAY and SWAP.
Channel Select/Memory switches – These switches provide two distinctly different functions. The PREV and NEXT switches are used to scroll through the available options when setting parameters. The RECALL and STORE switches are used to access the memory where complete parameter sets are stored for use after power interruptions or when multiple configurations are needed.

OctaStream OCP1000 User’s Manual
8
Power-On Screen When power is initially applied to the OCP1000, a power-on self-test is initiated. When complete, the OCP1000 displays five pieces of information about its current settings/condition – Version, Group #, Loaded Preset, Mix mode and Delay mode. The Mix and Delay modes can be changed from this menu and will be discussed in the Operations Section of the manual.
Version – this is the level of firmware that has been installed into the unit. This information is important in the unlikely event that a call to a service technician would be required.
Group # - this is the number of the group currently configured to have its settings changed. To change the group being configured, see the Select Group instructions under Secondary Power-On Menu below.
Loaded Preset – The name of the currently loaded group, as defined by its source, displays after the Group # in the parentheses.
Access Restrictions Access can be restricted to any menu (and therefore any submenu) of the OCP1000 by the master operator. If restrictions have been applied to the panel, when attempting to access a restricted menu the operator will receive an “ACCESS DENIED” message.
Dimmed Display Mode After a period of inactivity, the panel will automatically switch into a display-dimming mode that shuts off all switch LED’s and dims the display to prevent excessive brightness in low light environments. To restore the panel to the active mode, press any button once. The display will return to the active mode immediately without executing any button operation.

9
IV. OPERATIONS
The OCP1000 is a menu-driven control panel. The following instructions systematically detail the operation of the control panel using the menu structure as the framework from which to describe the operations. Starting with the Power-on menu option settings, then detailing the Mix options and settings, the Delay options and settings and then how to Recall and Save entire configuration sets.
Most of the time, only the switches and buttons that are active, will have their LED illuminated.
Power-On Menu Options The Power-on menu mostly provides information about the current status of the OCP1000. As discussed in the previous section, it indicates the current Version #, Group #, Loaded Preset, Mix mode and Delay mode. The Mix Mode and the Delay mode can be changed from the Power-On menu.
Mix Mode The current operational mode for dealing with inputs to the mixer card is displayed. The possible modes are Bypass, Normal and Demo. To change the Mix mode, press the button under Mix and toggle between Bypass and Normal. Demo will only appear when the panel is not receiving any response from a frame.
Bypass – in this mode the mix board is set to default values. Changes that are made to any mix values will show on the display, but will not be implemented until the panel is switched out of the Bypass mode.
Normal – in this mode all of the routing and mixing capabilities are accessible.
Demo - in this mode, all the mix functions of the OCP1000 will appear to work but no attempt will be made to configure the Mixer/Router modules in a frame. This mode will be automatically invoked when the OCP1000 is not able to communicate with an S5000 containing Mixer/Router modules. Until a valid connection is made, no other mode will be able to be selected.
OctaStream OCP1000 User’s Manual
10
Delay Mode The current operational mode for dealing with inputs to the delay card is displayed. The possible modes are Bypass, Normal and Demo. To change the Delay mode, press the button under Delay and toggle between Bypass and Normal. Demo will only appear when the panel is not receiving any response from the delay board in the frame.
Bypass – in this mode all inputs are set to their default values. Changes that are made to any delay values will show on the display, but will not be implemented until the panel is switched out of the Bypass mode.
Normal – in this mode all of the routing and gain capabilities are accessible.
Demo - in this mode, all the delay functions of the OCP1000 will appear to work but no attempt will be made to configure the Delay modules in a frame. This mode will be automatically invoked when the OCP1000 is not able to communicate with an S5000 containing delay modules. Until a valid connection is made, no other mode will be able to be selected.
Secondary Menus
The MENU switch selects secondary menus for each operational mode if available. There are secondary menus accessible from the Power-On menu and the Mix menu.
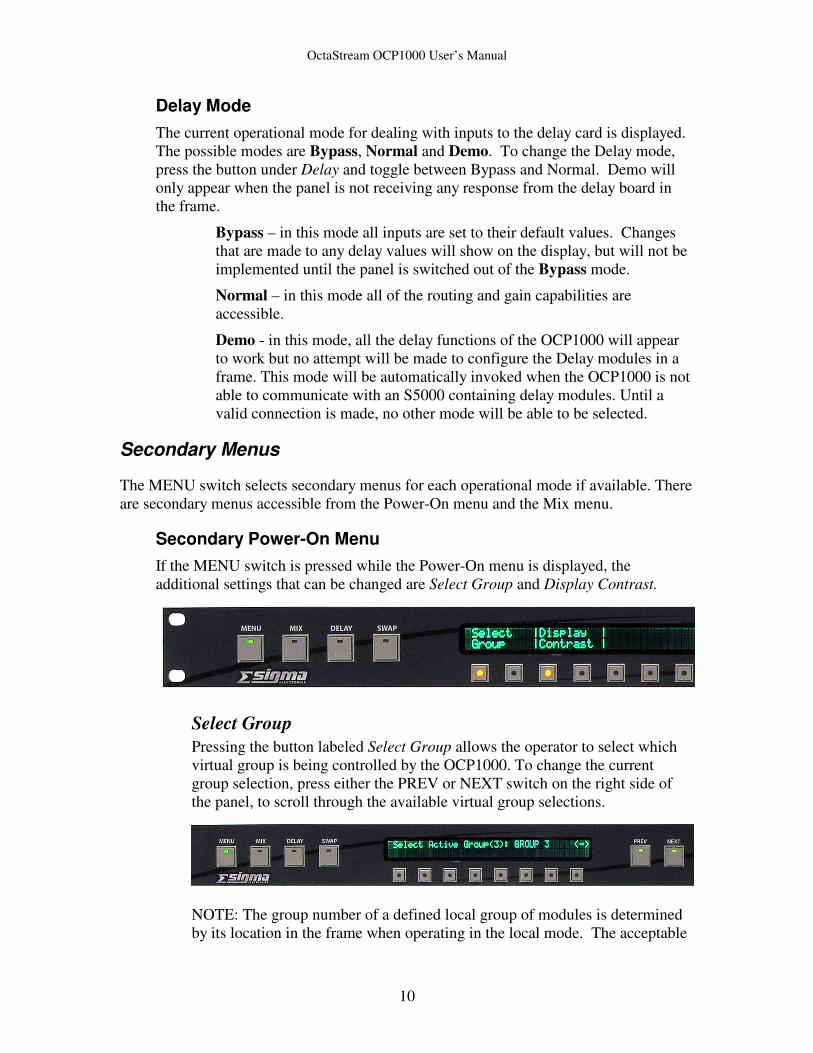
Secondary Power-On Menu If the MENU switch is pressed while the Power-On menu is displayed, the additional settings that can be changed are Select Group and Display Contrast.
Select Group Pressing the button labeled Select Group allows the operator to select which virtual group is being controlled by the OCP1000. To change the current group selection, press either the PREV or NEXT switch on the right side of the panel, to scroll through the available virtual group selections.
NOTE: The group number of a defined local group of modules is determined by its location in the frame when operating in the local mode. The acceptable

IV. Operations
11
locations for installation of modules, and their assigned group numbers, are shown in the illustration below. When operating in the Gateway or Remote modes, the group’s location is specified in the configuration of the virtual group. For a discussion of the difference between local, remote and virtual groups, refer to the Glossary.
Comm Intrfc
Empty DA5315 DA5320 DA5315 DA5320
Empty DA5315 DA5320 DA5315 DA5320
PS 1
PS 2 GROUP 2
GROUP 3
GROUP 4
GROUP 1
S5000 Front View with Front Panel Removed
Display Contrast Pressing the button labeled Display Contrast allows the operator to adjust the contrast level between the illuminated characters in the display and the background of the display. To change the background level, press the buttons labeled "+" and "-" until an acceptable level is achieved.

OctaStream OCP1000 User’s Manual
12
Mix Output Mode
The Mix operation of the DA5320 is very comprehensive in its capabilities. The operator has three distinct processes that can be performed on the signals in the group being controlled – change the gain, change the phase and mix signals from any input to any output. As the following diagram shows, the gain can be adjusted at the input, at the output and each channels contribution to the mix can be altered.
Σ
Σ
Σ
The Mix Output mode (MIX LED illuminated) indicates that the DA5320 Mixer/Router Module, in the configured group, is being controlled. Pressing the MIX switch at any time can activate the Mix Output mode. To return to the main menu, press the MIX switch.
When the main Mix Output mode menu is active, the current status of the eight outputs are shown on the display – On if it is active and "--" if it is not active. To toggle an output to change its status, push the button under that channel.

IV. Operations
13
If it is desired that a single AES output channel be temporarily activated, to the exclusion of other channels (solo selection), press and hold the button for the output channel desired until the status for all other channels is cleared and the status of the channel selected changes to "**" as shown below. To clear the solo selection, press any output button, without holding.
Secondary Mix Menus If the MENU switch is pressed while in the Mix operation mode, a secondary screen is activated that acts as a gateway to settings for Mix Down or the Phase & Gain menu.
To access Mix Down, press the button under Mix Down. To access the Phase & Gain menu, press either the PREV or NEXT switch.
To return to the Mix output mode screen, press the MENU switch.
Mix Down This menu allows changes to the mixing method and setting the total output level for the mixed signal in some methods. The available mixing methods, which are scrolled through by pushing the button labeled Slct, are – Attenuated(Non-Additive), No Attenuation(Additive), and Attenuated & Compensated.
Attenuated(Non-Additive) - In this method, as signals are configured to be part of the output mix, they do not increase the level of the output. The total output level remains fixed at the level set in Output Gains with each input signal contributing to the output in proportion to their input.
No Attenuation(Additive) – In this method, as signals are configured to be part of the output mix, they increase the level of the output in proportion to their input.

OctaStream OCP1000 User’s Manual
14
Attenuated & Compensated – In this method, each input signal contributes to the output in proportion to their input level with the additional capacity to change the final output level. This is achieved by by pressing the "+" and "-" buttons. If the compensation level has been changed, and it is desired that the channel being adjusted be set to 0dB, press the Rst button.
To return to the Mix Down menu, press the MIX switch
Phase and Gain Menu This menu has control functions to set the phase of the inputs and the gain of the inputs and outputs to the DA5320 Mixer/Router.
Input Phase This menu allows the phase of the input signal to be changed by 180 degrees. The settings of Nrm for normal and Flp for 180 degree phase-shift are selected by pressing the button under the channel to be changed.
To return to the Mix Down menu , press the MENU switch.
Output Gains This menu allows changes to the combined level of the mix of input channels defined as a particular output. To select the output whose level is being set, press PREV or NEXT to scroll to the desired channel and then the "+" and "-" buttons to change the absolute level of the output. To quickly set the output level to 0dB, press the Rst button. To quickly set the output level to silence, press the Mute button.
To return to the Mix Down menu , press the MENU switch.

IV. Operations
15
Matrix Gains The Matrix Gain menu is where the proportion of each channel contributing the output mix is defined.
To change the input being selected to add to the mix, use the <Inp (Input down) or Inp> (Input up) buttons. To apply some gain to the channel selected (assuming it has not been muted in the Input Gain screen, described below), use the "+" and "-" buttons.
Select all input channels to verify their contribution to the mix and then change to a different output using the PREV and NEXT switches and repeat the process of defining the inputs.
Input Gains This menu allows changes to the level of the input channels. To select the input whose level is being set, press <Inp (Input down) or Inp> (Input up) to scroll to the desired channel and then the "+" and "-" buttons to change the absolute level of the input. To quickly set the input level to 0dB, press the Rst button. To quickly set the input level to silence, press the Mute button.
To return to the Mix Down menu , press the MENU switch.
Swap-Mix Mode In the Swap-Mix mode, any combination of inputs can be directed to a single output. To activate this mode, press the SWAP switch anytime the MIX switch LED is lit.
OctaStream OCP1000 User’s Manual
16
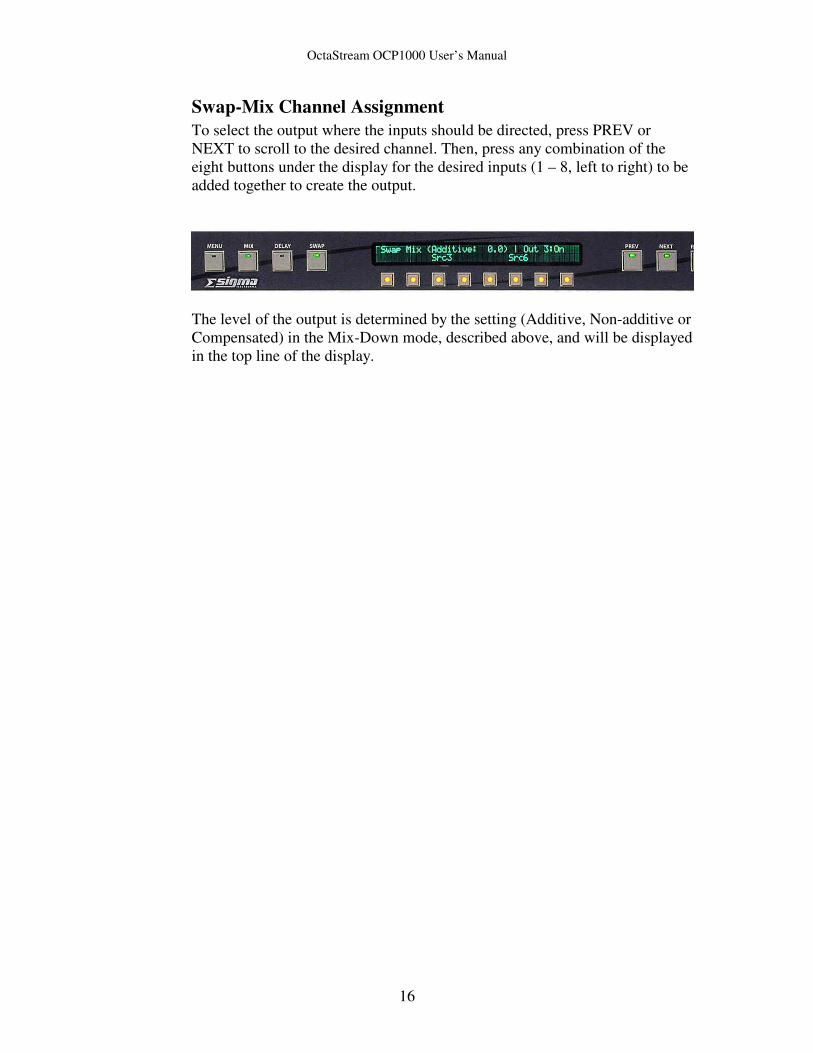
Swap-Mix Channel Assignment To select the output where the inputs should be directed, press PREV or NEXT to scroll to the desired channel. Then, press any combination of the eight buttons under the display for the desired inputs (1 – 8, left to right) to be added together to create the output.
The level of the output is determined by the setting (Additive, Non-additive or Compensated) in the Mix-Down mode, described above, and will be displayed in the top line of the display.

IV. Operations
17
Set Delay Mode The Set Delay mode (DELAY switch LED illuminated) indicates that the DA5315 Delay Module is being controlled. Pressing the DELAY switch at any time can activate the Set Delay mode.
In the Set Delay mode, the amount of delay being applied to each output of the DA5315 can be controlled.
The display of the units of delay can also be set from this menu. The amount of the delay being applied to the outputs can be displayed on the OCP1000 in units of seconds or frames. Since “frames” is a context-sensitive value, there are five different frame rates at which the OCP1000 can display the configured delay in addition to standard seconds. They are 30, 29.97, 25, 24 and 23.98 frames per second.
Channel Sets Each of the eight output channels can belong to one of three mutually exclusive channel sets that will define how delays are applied to that channel relative to the other eight channels. The three sets are Single, Paired and Global. To scroll through the available channel sets, push the button under Mode.
Single When a channel is set to be in the single mode, delay settings will be applied to this channel individually and settings applied to any other channel have no effect upon it.
Paired When the Paired channel set is selected, delay settings applied to either of the channels in a pair are automatically applied to the other. The defined channel pairs are 1 & 2, 3 & 4, 5 & 6 and 7 & 8 and are not re-configurable. When initially changed to the Paired mode, the delay applied to both channels of the pair is the delay of the lower numbered channel. If a channel in a pair is changed to the single mode, the other channel is automatically changed back to its previous mode.
OctaStream OCP1000 User’s Manual
18
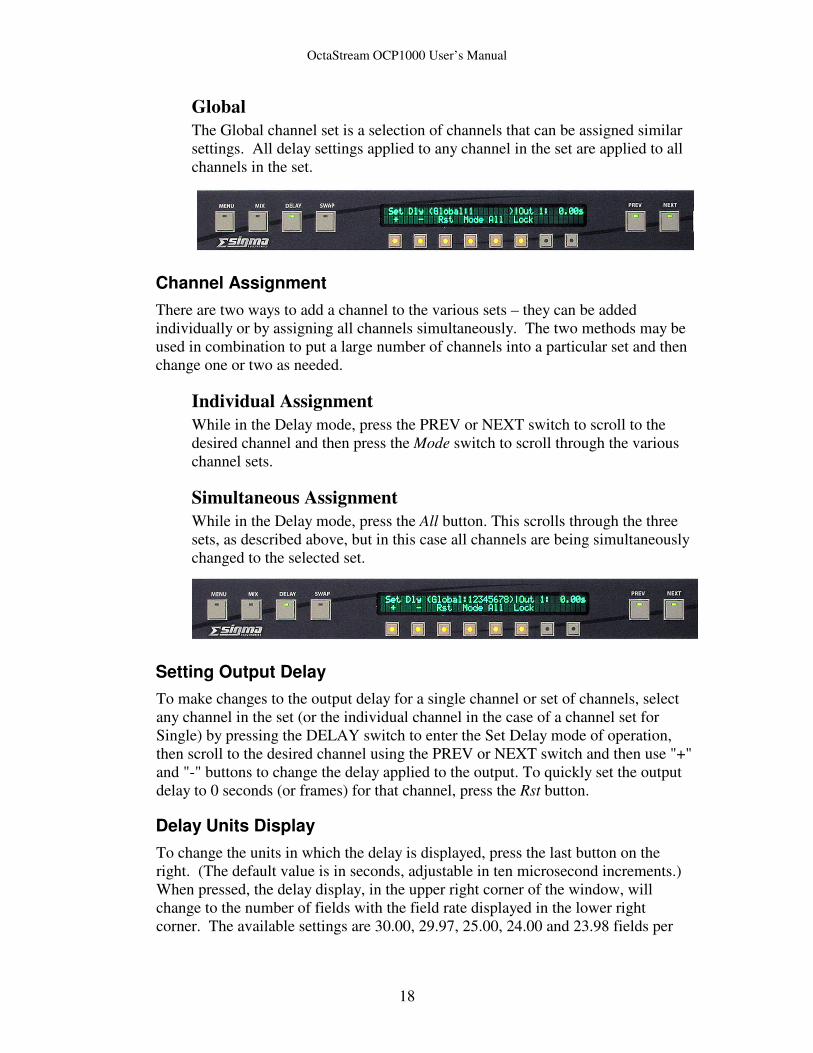
Global The Global channel set is a selection of channels that can be assigned similar settings. All delay settings applied to any channel in the set are applied to all channels in the set.
Channel Assignment There are two ways to add a channel to the various sets – they can be added individually or by assigning all channels simultaneously. The two methods may be used in combination to put a large number of channels into a particular set and then change one or two as needed.
Individual Assignment While in the Delay mode, press the PREV or NEXT switch to scroll to the desired channel and then press the Mode switch to scroll through the various channel sets.
Simultaneous Assignment While in the Delay mode, press the All button. This scrolls through the three sets, as described above, but in this case all channels are being simultaneously changed to the selected set.
Setting Output Delay To make changes to the output delay for a single channel or set of channels, select any channel in the set (or the individual channel in the case of a channel set for Single) by pressing the DELAY switch to enter the Set Delay mode of operation, then scroll to the desired channel using the PREV or NEXT switch and then use "+" and "-" buttons to change the delay applied to the output. To quickly set the output delay to 0 seconds (or frames) for that channel, press the Rst button.
Delay Units Display To change the units in which the delay is displayed, press the last button on the right. (The default value is in seconds, adjustable in ten microsecond increments.) When pressed, the delay display, in the upper right corner of the window, will change to the number of fields with the field rate displayed in the lower right corner. The available settings are 30.00, 29.97, 25.00, 24.00 and 23.98 fields per

IV. Operations
19
second. When in the field-rate display mode, the delay will be adjusted in ½ field increments.
Swap-Delay In the Swap-Delay mode, any single input can be routed to any output. The Swap-Delay mode can be entered when the DELAY mode (switch LED illuminated) is active.
To select the output where the input should be directed, press the PREV or NEXT switch to scroll to the desired channel. Then, press one of the eight buttons under the display for the desired input (1 – 8, left to right).

OctaStream OCP1000 User’s Manual
20
System State – Recall and Store Due to the large number of parameters that can be addressed during configuration of the OCP1000 Control Panel, a convenient system has been developed to save all settings currently programmed into the OCP1000 for recall at another time. Since it is highly probable that a number of different configurations may be desired, the OCP1000 can save eight different sets of preset parameters for each group of modules in a frame.
System State Recall To access the menu for recalling stored system states, press the RECALL switch when the Power-on menu (showing the current software revision and Group being accessed) is being displayed. The display will change to System State Recall: Next, press any of the eight buttons under the display to recall the desired system state previously saved for the active frame and group (1 – 8, left to right). If no system state had previously been saved for that location, the display will indicate that the memory is empty.
System State Store To access the menu for storing system states, press the STORE switch when the Power-on menu (showing the current software revision and Group being accessed) is being displayed. The display will change to System State Store and the currently stored names for each preset will be displayed above the buttons. (If the panel being used is configured to deny access to any preset store, “Deny” will show in place of the preset name). Next, press any of the eight buttons (1 – 8, left to right) under the display to store all the current parameters into memory under that preset name.
NOTE: If the preset button is held too long, the factory defaults will be saved instead of the current mix and delay settings. See Factory Defaults Store below. To correct the situation if this occurs accidentally, just repeat the store procedure.

IV. Operations
21
Factory Defaults Store To restore all values in a Preset location to factory defaults, press the STORE switch and then press and hold the button for the preset to be cleared. When the defaults have been saved, a message indicating that preset values have been reset will appear on the screen
NOTE: Storing the preset names is an engineering function that is detailed in the Engineering Controls section of the Master manual.
NOTES