Embed Size (px)
Citation preview

© Copyright 2007, STIHL Incorporated. All rights reserved. EA
1
Technical TrainingUSG Saw Chain Grinder

© Copyright 2007, STIHL Incorporated. All rights reserved. EA
2
USG HOS
The STIHL USG Universal Sharpener will sharpen all types of saw chain. This is by far the most versatile and accurate machine of its type on the market. The STIHL part number for a USG is 5203 201 0303.There are attachments for the USG to allow accurate dressing of hedge trimmer blades and sharpening of the chisel tooth blades for brushcutters.
The HOS Grinder is less expensive than the USG Grinder. It has an adjustable swivel base for setting the sharpening angle, but it is not equipped with any other adjustments, and will not accept any other attachments for circular blades or hedge trimmer blades.One excellent use of a HOS would be to set it up for grinding depth gauges. If you sharpen a lot of saw chain, this would speed up the process, by not having to change wheels on your USG. The STIHL part number for a HOS is 5202 201 0601.

© Copyright 2007, STIHL Incorporated. All rights reserved. EA
3
Preparing to Sharpen on the USG
Look Up Chain Specifications
Set Scales A, B, and C
Select and Install Correct Grinding Wheel
Locate the Shortest Cutter and Mark It as the Starting Place
The chart included with the manual will give you the specifications for setting the grinder for the chain you are sharpening. Set the three scales given on the chart, and install the correct wheel. By having three adjustments, the USG sharpener will give you the most accurate and professional saw chain sharpening possible. Most competitive sharpeners do not have the “B”adjustment range, that allows you to center the cutter on both sides of the chain under the grinding wheel for precise grinding of the cutting angle.

© Copyright 2007, STIHL Incorporated. All rights reserved. EA
4
This is a portion of the specification chart. The first column identifies the chain pitch, by reading the right side of the column, for the U.S. The second column tells you what part of the cutter the setting refers to: left, right, or depth gauge.The next three columns give you specific scale numbers to set the grinder to. The next column gives you the part number for the sharpening wheel and the depth gauge wheel for a specific chain.The next column gives you the wheel thickness for the sharpening wheel, and the angle to set the depth gauge wheel at. This is where you would use the 5203 893 6306 gauge and a dressing stone to make the wheel match the profile on the gauge.The last column gives you the part number for the depth gauge tool to use to see if the depth gauges will need lowered, once the chain has been sharpened.

© Copyright 2007, STIHL Incorporated. All rights reserved. EA
5
Wheel Ring Test; Mounting the Wheel
Always check a grinding wheel before mounting by doing a “Ring Test” to be sure the wheel does not have a crack in it. Support the wheel on the shank of a screwdriver and gently tap it on the side with the handle end of another screwdriver. It should have a slight “ring” when tapped. If the wheel is cracked, it will make a dull “thunk” type of sound. A crack may not be visible to your eye. If the wheel has been dropped or damaged, when it is spun up to operating speed, it may fly apart. Once the wheel passes the ring test, stand to the side and let it run on the grinder for several minutes before using it to be sure it is safe.Use the stop pin to hold the shaft while you tighten down the left hand thread retaining nut, hand tight. Grinding wheels should not be used if the paper washer is torn or missing on either side. Remove the stop pin, and always replace the guard after installing the wheel.

© Copyright 2007, STIHL Incorporated. All rights reserved. EA
6
Preparing the Wheel
New wheels will need to be dressed to the specifications on the setting gauge, part number 5203 893 6306. You should also check a wheel periodically to be sure it keeps the correct profile, and dress the wheel back to the correct shape as needed. The specification chart has information regarding this.The grinding wheels can be dressed to the correct profile by using the dressing stone, part number 5202 893 6000.

© Copyright 2007, STIHL Incorporated. All rights reserved. EA
7
Diamond Tool for Dressing the Wheel
You can install a diamond wheel dressing kit, part number 5203 890 4400, which will do a very precise job of dressing the radius on a grinding wheel, very quickly.
© Copyright 2007, STIHL Incorporated. All rights reserved. EA
8
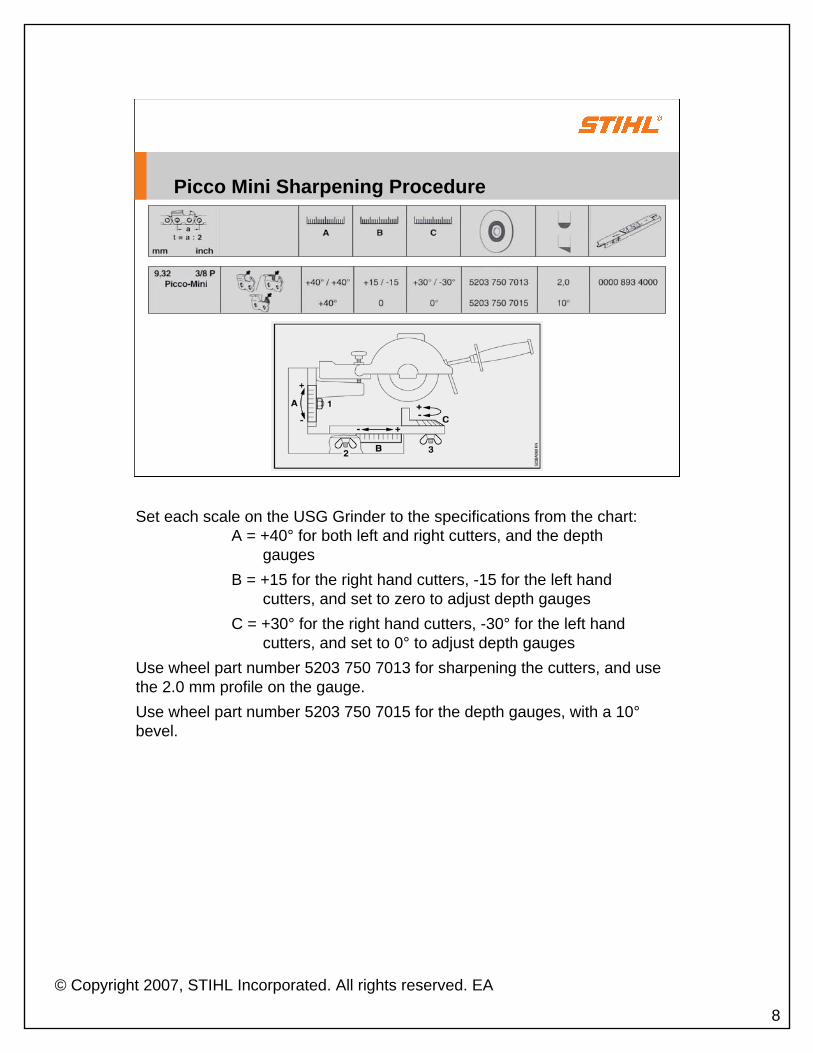
Picco Mini Sharpening Procedure
Set each scale on the USG Grinder to the specifications from the chart: A = +40° for both left and right cutters, and the depth
gaugesB = +15 for the right hand cutters, -15 for the left hand
cutters, and set to zero to adjust depth gaugesC = +30° for the right hand cutters, -30° for the left hand
cutters, and set to 0° to adjust depth gaugesUse wheel part number 5203 750 7013 for sharpening the cutters, and use the 2.0 mm profile on the gauge.Use wheel part number 5203 750 7015 for the depth gauges, with a 10°bevel.

© Copyright 2007, STIHL Incorporated. All rights reserved. EA
9
Adjust for Drive Link Gauge
The swiveling tool rest comes set up for .058” and .063” gauge drivers. To sharpen chain with a gauge of .043” or .050”, a shim and washers must be added to center the chain and clamp it tightly. You will need to remove the clamping lever, and both plates. There are two .036” thick washers, part number 0000 958 0600, between the plates. Save them to reinstall if you change back.

© Copyright 2007, STIHL Incorporated. All rights reserved. EA
10
Shim Installation
The .006” shim goes between the tool rest and the rear clamping plate, and is held in place with the two screws (3). Install one .057” washer (7), part number 9291 021 0140, in place of the two washers (6) that came with the tool rest. These are held on with the two screws (4).If you plan on having one USG sharpener to do all your chain sharpening needs, an additional swiveling tool rest can be purchased, so you can have one set up with the shim, and one without.

© Copyright 2007, STIHL Incorporated. All rights reserved. EA
11
Locate Shortest Cutter
Always wear protective safety glasses when sharpening a chain.Locate the shortest cutter, and color it with a felt tip marker, to use as your starting point. If the chain has been hand filed, the cutters may be uneven and at different angles.

© Copyright 2007, STIHL Incorporated. All rights reserved. EA
12
Set Limit Stops
Do not start the machine.Pull the starting cutter back against the stop, which is adjustable in and out for each side of the chain. You will sharpen all of the right or left cutters at one time, and then switch to the remaining side to finish. Lower the grinding wheel to the chain, and adjust the travel limit screw until you are just touching the gullet of the cutter with the wheel, and adjust the chain stop back and forth until you are just removing a portion of the dull part of the cutter. Lock the travel limit adjustment and chain stop with the knurled knobs. Clamp the chain and start the motor. Be sure to wear safety glasses, and for the first cutter, slowly bring the wheel into contact with the cutter, and apply the wheel several times, checking your progress. You want to get the cutter sharp, but remove the least amount of material in the process. Don’t take all the material in one pass, touch the wheel several times, going deeper each time, until you bottom out against the stop. Be sure you are not taking too much material in one pass, or you will overheat the cutter, taking away the temper, or hardness, of the steel. A severely dulled chain may require two or more passes to clean up the cutter.Once you have done the first side, adjust the “B” and “C” specifications, and do the other side of the chain. Verify that the cutter lengths are the same on each side of the chain.

© Copyright 2007, STIHL Incorporated. All rights reserved. EA
13
Check the Depth Gauge
Using the specified tool, in this case, the 0000 893 4000 for Picco Micro, check the depth gauges on the sharpened chain. It may be necessary to lower them. If they need to be lowered, and it is not done, the chain will only make sawdust, not chips, and will appear to be dull to the operator.For this chain, install the 5203 750 7015 wheel, and adjust the “B” sliding scale to 0, and the “C” swiveling tool rest to 0°, as the chart indicates. Adjust the travel limit stop and chain stop as before, and carefully grind one cutter , checking with the gauge, until it is to specification, then proceed to do the rest of the cutters, on both sides of the chain. You may have to remove some material from the tail of the tie strap, if the chain is a “green family” low kickback design.This is the same procedure that would be used for any of the STIHL round ground saw chain designs.

© Copyright 2007, STIHL Incorporated. All rights reserved. EA
14
Diamond Wheel for Carbide Saw Chain
The Rapid-Duro carbide chain requires a special diamond wheel to be sharpened. The RD chain is on the spec chart, and is sharpened just like any other round ground chain.The carbide chain for the MS 460 Rescue Saw is not on the chart. Refer to the appropriate Technical Bulletin for specifications of new saw chain designs that are not on the spec chart. The carbide chains can only be sharpened with the diamond wheel. This wheel is expensive, and the diamonds are bonded to a ceramic core, so it is also very fragile.The wheel comes with a dressing stone to open up the diamonds if they get glazed over.A loop of carbide chain may cost around $200, so if there is a market for the chain in your area, investing in a diamond wheel for servicing carbide chain may be worthwhile.

© Copyright 2007, STIHL Incorporated. All rights reserved. EA
15
Hedge Trimmer Blades
It is certainly quick to touch up dull hedge trimmer blades with a small right angle grinder, but it is also impossible to do it accurately, getting the same angle and material removal from all the teeth evenly.The USG can be adapted to do a professional job of sharpening hedge trimmer blades by installing kit part number 5203 750 1400.

© Copyright 2007, STIHL Incorporated. All rights reserved. EA
16
Hedge Trimmer Blade Settings
Use the specification chart to find the settings for the blade to be sharpened.For example, a HS 80:Set scale “A” to -10°.Set scale “B” to 0.Set scale “C” to +45° and - 45° for each side of the cutter blade.Use grinding wheel part number 5202 750 7010, with a normal radius on it.The hedge trimmer blades must be removed from the unit for sharpening.

© Copyright 2007, STIHL Incorporated. All rights reserved. EA
17
Single Sided Hedge Trimmer Blades
Single sided hedge trimmer blades will need the spacer installed below the blade to hold it up to the correct height. Double sided blades do not need the spacer.

© Copyright 2007, STIHL Incorporated. All rights reserved. EA
18
Adjust Limit Stops
Turn the star wheel to the left and put a blade between the clamping area, with the cutting edges to the rear. With the grinder off, bring the motor down so the wheel is even to the depth you want on the blade and lock the travel stop with the knurled wheel. Next slide the blade over to the left until the first tooth is touching the edge of the wheel. The angle of the blade should match that of the wheel, or you need to rotate the blade 180°.Always wear protective safety glasses when sharpening.Raise the wheel and adjust the stop and clamp the blade. Check the wheel again and readjust if necessary. The first pass you make should barely remove any material, and then you can adjust the stop slightly to clean up the tooth. Hedge trimmer blades should be sharpened in much the same way as chain saw cutters, by taking several passes, each a little deeper until you reach the travel stop. These blades are heat treated and hardened, and if you overheat them while sharpening, they will not stay sharp. You also need to be careful if the blade you are sharpening has been hand sharpened with a grinder, as the teeth may vary considerably in width, depending upon how much material has been removed. If you happen to reference on a narrow tooth, the next tooth you try to sharpen may need a considerable amount of material removed to even them up.

© Copyright 2007, STIHL Incorporated. All rights reserved. EA
19
Move to Next Tooth
The spring on the star wheel moves the stop for you when you loosen and tighten the wheel. Just work your way down the blade, then reverse it and change the swivel plate to the opposite 45° position to do the other side. Double sided blades use the same procedure. Just be sure to check the depth to the gullet and the stop each time you relocate to a different side or a different blade, before you begin sharpening.

© Copyright 2007, STIHL Incorporated. All rights reserved. EA
20
Circular Blades
To sharpen chisel tooth circular saw blades for brushcutters on the USG, install kit part number 5203 750 2800.Mount the attachment in place of the swiveling tool rest, and set it to 0 on the sliding scale. Follow the directions in the owner’s manual to set up the blade and adjust the settings for the proper specification.

© Copyright 2007, STIHL Incorporated. All rights reserved. EA
21
Once you have made all necessary adjustments, sharpen the teeth on one side of the blade, then reset the swivel adjustment and sharpen the other side of the blade.

© Copyright 2007, STIHL Incorporated. All rights reserved. EA
22
Summary
The USG and HOS Grinders Are Capable of Providing Accurate and Professional Sharpening of Saw Chain
The USG Grinder Can Be Adapted to Service Hedge Trimmer Blades and Brushcutter Blades