Embed Size (px)
Citation preview

Hands-On LabUsing Portable Class LibrariesLab version: 1.0.0.0
Last updated: 12/6/2011
CONTENTS
OVERVIEW................................................................................................................................................. 3
EXERCISE 1: CREATING AND USING PORTABLE CLASS LIBRARIES................................................4Task 1 – Configuring and Exploring the PhotoGallery Application.......................................................4
Task 2 – Creating a New Portable Class Library.................................................................................12
Task 3 – Refactoring the Photo Gallery to Use the Portable Class Library.........................................17
APPENDIX: USING CODE SNIPPETS.....................................................................................................22
To give feedback please write to [email protected] © 2011 by Microsoft Corporation. All rights reserved.

Overview
In this Hands-on Lab, you will learn how to write code that works on more than one Framework platform without recompilation using portable class libraries.
Portable class libraries enable you to write and build managed assemblies that work on more than one .NET Framework platform. Within these assemblies, you can write code you want to share across project running on different platforms, such as common business logic.
You can build portable assemblies that work without modification on the .NET Framework, Silverlight, Windows Phone 7, or Xbox 360 platforms. Without the Portable Class Library project, you must target a single platform and then manually rework the class library for other platforms.
The Portable Class Library project supports a subset of assemblies from these platforms and provides a Visual Studio template that makes it possible to build assemblies that run without modification on all these platforms.
You can build portable .NET class libraries by simply creating a Portable Class Library project (the template is provided for you) and choosing the platform targets. The IDE will then create the appropriate reference assemblies, and you can then program as you normally would.
The Portable Class Libraries project ships as part of Visual Studio 11 Developer Preview. You can build portable .NET class libraries by simply creating a Portable Class Library project (the template is provided for you) and choosing the platform targets. The IDE will then create the appropriate reference assemblies for you and you can then program as you normally would.
To learn more about portable class libraries, check out this article at MSDN: http://msdn.microsoft.com/en-us/library/gg597391(v=VS.110).aspx
Objectives
In this hands-on lab, you will learn how to:
Refactor existing projects to extract the common code into a portable class library
Prerequisites
Windows 8 Developer Preview
Microsoft Visual Studio 11 Developer Preview
ASP.NET MVC 4 Developer Preview
Setup
Throughout the lab document, you will be instructed to insert code blocks. For your convenience, most of that code is provided as Visual Studio Code Snippets, which you can use from within Visual Studio to avoid having to add it manually.
To install the code snippets:
1. Open a Windows Explorer window and browse to the lab’s Source\Setup folder.
2. Double-click the Setup.cmd file in this folder to install the Visual Studio code snippets.
If you are not familiar with the Visual Studio Code Snippets, and want to learn how to use them, you can refer to the appendix from this document ‘Using Code Snippets’.
Exercises
This hands-on lab includes the following exercises:
1. Creating and using Portable Class Libraries
Note: Each exercise is accompanied by a starting solution—located in the Begin folder of the exercise—that allows you to follow each exercise independently of the others. Please be aware that the code snippets that are added during an exercise are missing from these starting solutions and that they will not necessarily work until you complete the exercise.
Inside the source code for an exercise, you will also find an End folder containing a Visual Studio solution with the code that results from completing the steps in the corresponding exercise. You can use these solutions as guidance if you need additional help as you work through this hands-on lab.
Exercise 1: Creating and using Portable Class Libraries
Using portable class libraries enables code reusing, as well as an improved maintainability. You are now able to write and compile your code just once.
In this exercise, you will learn how to create and use portable class libraries, refactoring a Photo Gallery sample application that runs in two different platforms –ASP.NET MVC and Windows 8 Metro Style.
Task 1 – Configuring and Exploring the PhotoGallery Application

In this task, you will configure the settings to run the Photo Gallery. Then, you will explore the solution and discover the shared code that could potentially be moved to a common library.
1. Launch Visual Studio 11 and open PortableLibraries-Ex1-Begin.sln solution located under the Source\Ex1-PortableLibraries\Begin folder of this lab.
2. Open the NuGet Package Manager Console. To do this, open Tools | Library Package Manager | Package Manager Console.
3. In the Package Manager Console, change the Default Project to PhotoGallery.Service and run the following commands to install the WebApi and EntityFramework packages.
NuGet
Install-Package WebApiInstall-Package EntityFramework
The WebAPI package is required because the solution used throughout the lab includes a WCF Web API service for client applications to retrieve photos and their metadata (name, description, etc.). To learn more about WCF Web API, check out the following CodePlex site: http://wcf.codeplex.com/wikipage?title=WCF%20HTTP.
Additionally, the lab uses EntityFramework 4.1 (or above) to interact with a SQL CE database where the photo data is stored. Version 4.1 or above is required because the lab uses System.Data.Entity.DbContext and System.Data.Entity.DbSet, which are wrappers around the ObjectContext and ObjectSet types and provide a simplified API for carrying out the most common database tasks. To learn more about EntityFramework 4.1 (or above) check out the following article at MSDN: http://msdn.microsoft.com/en-us/library/gg696172(v=VS.103).aspx.
4. In Solution Explorer, under the PhotoGallery.Client.Metro project, double-click Package.appxmlmanifest. Open the Capabilities tab and notice the Internet (client) and Home/Work (Networking) options are checked. This PhotoGallery sample app retrieves the photos data from a WCF Web API Service and thus requires permissions to perform web requests.

Figure 1Photo Gallery solution
Note: Metro style apps run in sandboxes where permissions are granted based on their capabilities. A Metro style app runs in a security container with limited access to the file system, network resources, and hardware. Whenever a user installs an app from the Windows Store, Windows looks at the metadata in the Package.appxmanifest file to figure out what capabilities the app needs to function. For example, an app might need to access data from the Internet, documents from the user's Document Library, or the user's webcam and microphone. When the app is installed, it displays to the user the capabilities it needs, and the user must grant permission for it to access those resources. If the app doesn't request and receive access to a resource it needs, it will not be allowed access to that resource when the user runs it.
5. The Windows 8 Firewall blocks Metro applications from connecting to the local computer. Since the Metro application will consume the service hosted in the localhost, you will need to temporally disable the Firewall to run the solution. Go to Control Panel, More Settings, Windows Firewall, select Turn Windows Firewall on or off from the left menu. In the Customize Settings page, select the Turn off Windows Firewall option in both sections (private and public) and click OK.

Figure 2Disabling Windows Firewall
Warning - Remember to turn your firewall on once you have completed this lab in order to keep your computer safe.
6. In the Solution Explorer, you will see that this solution contains a service and two clients – One Metro Style application and one MVC Web application –both consuming the service to show the images.
a. PhotoGallery.Service: This is a WCF Web API service which exposes the PhotoGallery data and images retrieved from a database.
b. PhotoGallery.Client.Web: This is an ASP.NET MVC 4 application, which consumes the service and shows the images.
c. PhotoGallery.Client.Metro: This is a Windows Metro Style Grid application, which consumes the service and shows the images.

Figure 3Photo Gallery solution
7. In PhotoGallery.Client.Web project, expand the Controllers folder and open HomeController.cs class. Locate the RetrievePhotos() method inside of it. Notice how the web request is performed using the HttpClient class and the response is deserialized.

Figure 4Web request in the MVC project
8. Now, in the PhotoGallery.Client.Metro project, expand DataSource folder and open PhotoGalleryDataSource.cs class. Locate the constructor method. Notice this code is performing the same request and deserialization instructions as the previous RetrievePhotos method from the PhotoGallery.Client.Web project.
Figure 5Web request in the Metro style app
9. In the Solution Explorer, expand the following folders for each project node:
◦ PhotoGallery.Client.Metro\DataSource
◦ PhotoGallery.Client.Web\Model

◦ PhotoGallery.Service\Model
You will notice the same Photo.cs model class is present in both client applications and the service. The Photo.cs file can also be refactored by moving the model class to a common library.
Figure 6Model classes
Note: To simplify the flow of this lab, model classes have the same namespace, so you do not have to change it when you move the file to another project.
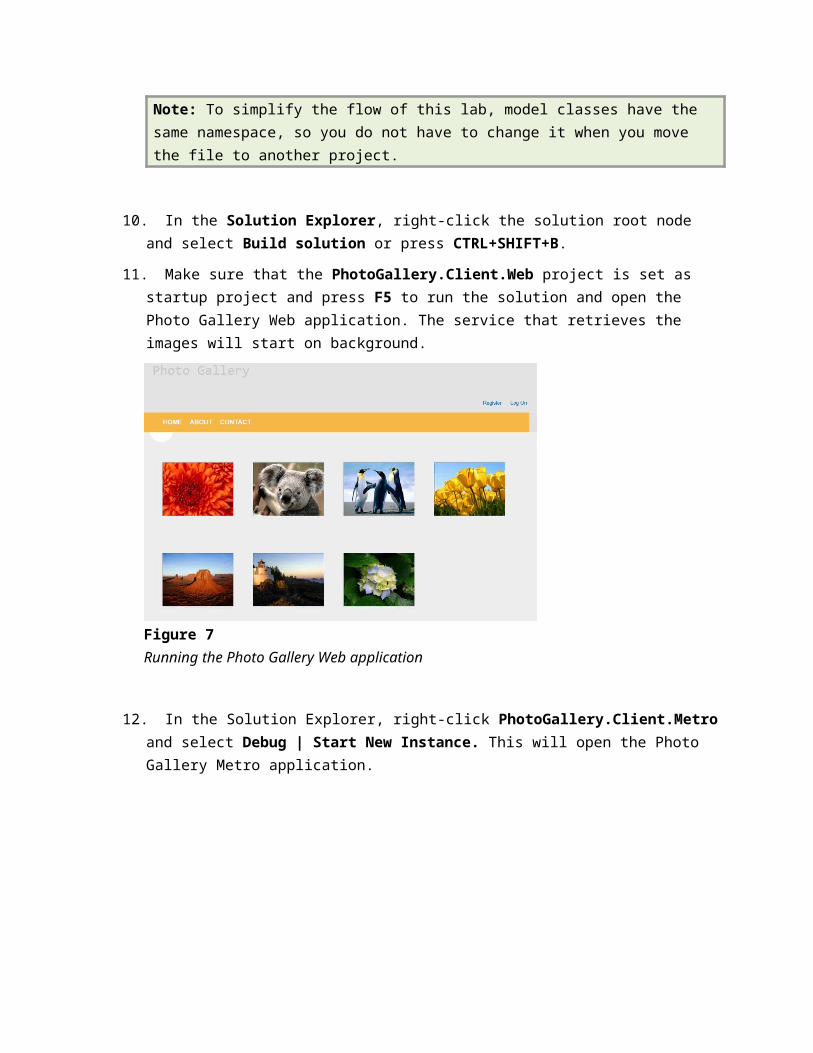
10. In the Solution Explorer, right-click the solution root node and select Build solution or press CTRL+SHIFT+B.

11. Make sure that the PhotoGallery.Client.Web project is set as startup project and press F5 to run the solution and open the Photo Gallery Web application. The service that retrieves the images will start on background.
Figure 7Running the Photo Gallery Web application
12. In the Solution Explorer, right-click PhotoGallery.Client.Metro and select Debug | Start New Instance. This will open the Photo Gallery Metro application.
Figure 8Running the Photo Gallery Metro application
13. Switch to Visual Studio and stop debugging to continue with the lab.
Task 2 – Creating a New Portable Class Library
In this task, you will create a new Portable Class Library to include on it all the code that both clients have in common: the data model and the methods that retrieve the images from the service.
Note: With simplicity purposes, the lab scenario consists of just a small refactoring of simple code. In a more realistic application, the refactoring will likely involve bigger changes.
1. In Solution Explorer, right-click on the solution node and select Add | New Project. In the Add New Project dialog box, expand the Visual C# item at the left side. Choose Portable Class Library project type and name it PhotoGallery.Client. Press OK to create a new project.
Figure 9Creating a Portable Class Library
2. Right-click the PhotoGallery.Client project in the Solution Explorer, and select Properties. Select the Library tab and in the Target frameworks section click the Change button.
3. Update the Target Frameworks checklist to have only the following frameworks checked:
◦ .NET Framework 4 (to be consumed by the ASP.NET MVC client)
◦ Windows Tailored (to consumed by the Metro client)

Figure 10Changing the target frameworks
Note: Notice that the Silverlight 4 framework is automatically selected since it supports all of the available functionality in the target framework you selected.
4. Click OK.
5. Right-click the PhotoGallery.Client project and select Add Reference. Notice the restricted list of assemblies available for creating your library and the ‘Targeting’ details on the top. Add a reference to the System.ComponentModel.Composition assembly (used by the Managed Extensibility Framework). Click Add then Close to add the reference.

Figure 11Reference Manager
6. Once again, right-click the PhotoGallery.Client project in the Solution Explorer, and select Properties. Select the Library tab, in the Target frameworks section click Change button to change the target frameworks. Now select Windows Phone 7 and click OK.
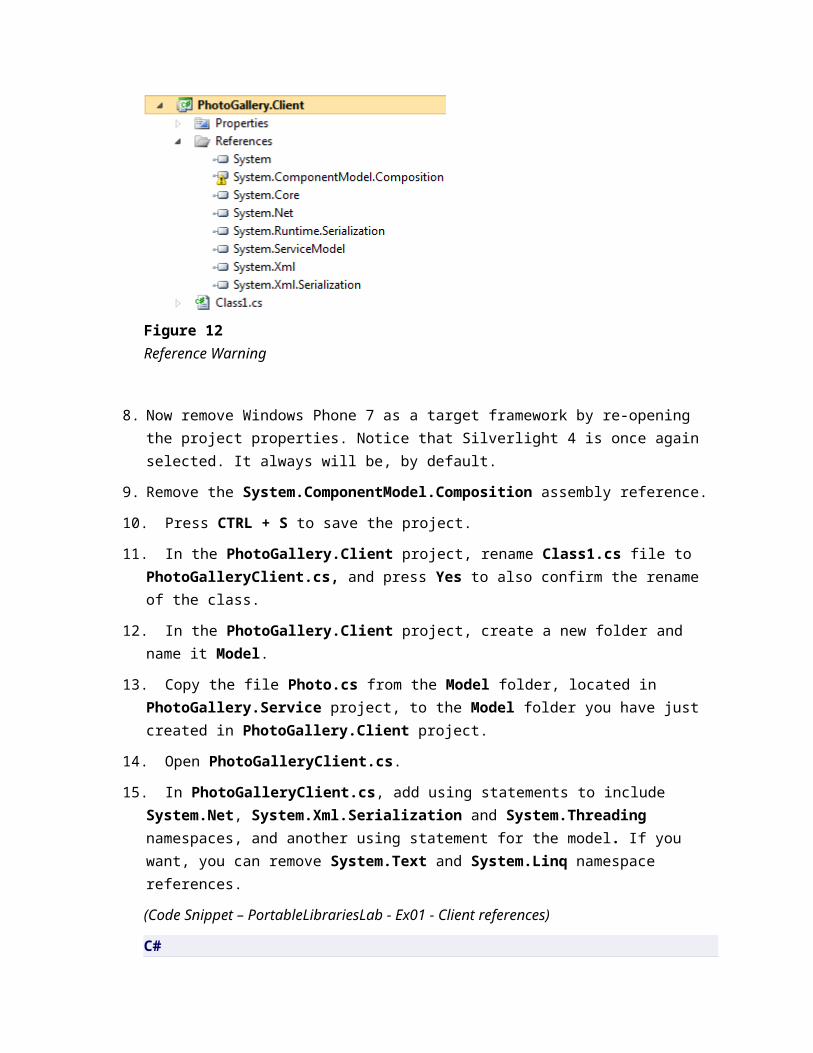
7. Expand the References node in Solution Explorer. Notice that the System.ComponentModel.Composition assembly is displayed with a warning.
Not all of the assemblies displayed are supported on all target frameworks (Windows Phone 7, Metro, etc.). In a Portable Class Library project, only the supported assemblies for the target frameworks selected for your project are available. The core assemblies (mscorlib.dll, System.dll, System.Core.dll, and System.Xml.dll) are supported on all platforms.
If you try to reference an assembly that is not supported for the platforms you have targeted, Visual Studio warns you of the incompatibility.

Figure 12Reference Warning
8. Now remove Windows Phone 7 as a target framework by re-opening the project properties. Notice that Silverlight 4 is once again selected. It always will be, by default.
9. Remove the System.ComponentModel.Composition assembly reference.
10. Press CTRL + S to save the project.
11. In the PhotoGallery.Client project, rename Class1.cs file to PhotoGalleryClient.cs, and press Yes to also confirm the rename of the class.
12. In the PhotoGallery.Client project, create a new folder and name it Model.
13. Copy the file Photo.cs from the Model folder, located in PhotoGallery.Service project, to the Model folder you have just created in PhotoGallery.Client project.
14. Open PhotoGalleryClient.cs.
15. In PhotoGalleryClient.cs, add using statements to include System.Net, System.Xml.Serialization and System.Threading namespaces, and another using statement for the model. If you want, you can remove System.Text and System.Linq namespace references.
(Code Snippet – PortableLibrariesLab - Ex01 - Client references)
C#
using System;using System.Collections.Generic;using System.Net;using System.Threading;using System.Xml.Serialization;using PhotoGallery.Model;
16. In PhotoGalleryClient.cs, define a private string member to store the service base URI.

C#
public class PhotoGalleryClient{ private string baseUri;
17. Create a constructor to receive the service base URI and store it in the private member.
(Code Snippet – PortableLibrariesLab - Ex01 - PhotoGalleryClient constructor)
C#
public class PhotoGalleryClient{ private string baseUri;
public PhotoGalleryClient(string baseUri) { this.baseUri = baseUri; }
18. After declaring the PhotoGalleryClient constructor, create a method named GetPhotosAsync to perform an asynchronous request to the service and deserialize the result into an array of photos.
(Code Snippet – PortableLibrariesLab - Ex01 - GetPhotosAsync)
C#
public void GetPhotosAsync(int albumId, Action<List<Photo>> onComplete){ var uri = string.Format("{0}/{1}/photos", this.baseUri, albumId); var request = WebRequest.CreateHttp(uri); request.BeginGetResponse( result => { var response = request.EndGetResponse(result); var ser = new XmlSerializer(typeof(List<Photo>)); var obj = ser.Deserialize(response.GetResponseStream());
onComplete(obj as List<Photo>); }, null);}
The HttpClient class, which was used in the MVC and Metro clients to perform web requests, is not available in portable class libraries. Therefore, you will have to use the WebRequest class to
perform requests to a service. Notice also that WebRequest objects do not have methods to perform synchronous requests. In the next step, you will create a wrapper method to make a synchronous version of GetPhotosAsync.
19. Create another method named GetPhotos to wrap GetPhotosAsync and return the result synchronously.
(Code Snippet – PortableLibrariesLab - Ex01 - GetPhotos)
C#
public List<Photo> GetPhotos(int albumId){ List<Photo> result = null; var signal = new AutoResetEvent(false);
this.GetPhotosAsync( 1, (r) => { result = r; signal.Set(); }); signal.WaitOne();
return result;}
20. Press CTRL+SHIFT+B to build the PhotoGallery.Client project.
Task 3 – Refactoring the Photo Gallery to Use the Portable Class Library
In this task, you will refactor the Photo Gallery application to use the portable class library you have just created. You will update the projects to use this library and remove the repeated code.
1. In the PhotoGallery.Service project, perform the following tasks:
a. Add a reference to the PhotoGallery.Client project.
b. Delete the Model project folder and its content (Photo.cs).
2. In the PhotoGallery.Client.Web project, perform the following tasks:
a. Add a reference to the PhotoGallery.Client project.
b. Delete the Model project folder and its content (Photo.cs).

c. In HomeController.cs, locate the Index method and replace its implementation to call PhotoGalleryClient.GetPhotos method from the portable class library, instead of RetrievePhotos method.
(Code Snippet – PortableLibrariesLab - Ex01 - Refactored HomeControllerIndex)
C#
public class HomeController : Controller{ public ActionResult Index() { var photoList = RetrievePhotos(); var client = new PhotoGallery.Client.PhotoGalleryClient("http://localhost:16501/photogallery"); var photoList = client.GetPhotos(1);
return View(photoList); }
d. Delete the RetrievePhotos function because it is not used anymore.
3. In the PhotoGallery.Client.Metro project, perform the following tasks:
a. Add a reference to the PhotoGallery.Client project.
b. In the DataSource folder, delete Photo.cs.
c. Open PhotoGalleryDataSource.cs, located in the DataSource folder.
d. Replace the PhotoGalleryDataSource class constructor to call the GetPhotosAsync method from the PhotoGalleryClient class, instead of performing the request with HttpClient. The code that performs the deserialization will be removed, since GetPhotosAsync retrieves Photo objects that are already deserialized.
(Code Snippet – PortableLibrariesLab - Ex01 - Refactored PhotoGalleryDataSource)
C#
internal class PhotoGalleryDataSource{ public PhotoGalleryDataSource(Uri baseUri, CoreDispatcher currentDispatcher) { var client = new PhotoGallery.Client.PhotoGalleryClient("http://localhost:16501/photogallery");
this.GroupedCollections = new ObservableVector<object>(new ObservableCollection<object>());

var album = new PhotoGalleryCollection() { Title = "Photo Gallery" };
client.GetPhotosAsync(1, result => { foreach (var photo in result) { var item = new PhotoGalleryItem() { Title = photo.FileTitle, Description = photo.FileTitle, Collection = album };
currentDispatcher.Invoke( CoreDispatcherPriority.Normal, (s, e) => { item.Image = new BitmapImage(new Uri(photo.PhotoUrl)); this.GroupedCollections.Add(item); album.Add(item); }, this, null); } }); } public ObservableVector<object> GroupedCollections { get; private set; }}
4. Select Build | Build Solution in the menu to rebuild the Photo Gallery solution.
5. Make sure that the PhotoGallery.Client.Web project is set as startup project and press F5 to run the solution and show the Photo Gallery web application.

Figure 13The PhotoGallery web application after the refactoring
6. In the Solution Explorer, right-click the PhotoGallery.Client.Metro project and select Debug | Start New Instance. This will deploy the Photo Gallery Metro application and show the images.

Figure 14The PhotoGallery metro style application after the refactoring

Figure 15The PhotoGallery metro style application after the refactoring
Notice the behavior of the client applications has not changed; what you have accomplished is a simplification of your code by moving the repeated code into a library, this was not possible without portable class libraries due to the different frameworks being targeted by the client applications.
Appendix: Using Code Snippets

With code snippets, you have all the code you need at your fingertips. The lab document will tell you exactly when you can use them, as shown in the following figure.
Figure 16Using Visual Studio code snippets to insert code into your project
To add a code snippet using the keyboard (C# only)
1. Place the cursor where you would like to insert the code.
2. Start typing the snippet name (without spaces or hyphens).
3. Watch as IntelliSense displays matching snippets' names.
4. Select the correct snippet (or keep typing until the entire snippet's name is selected).
5. Press the Tab key twice to insert the snippet at the cursor location.
Figure 17Start typing the snippet name
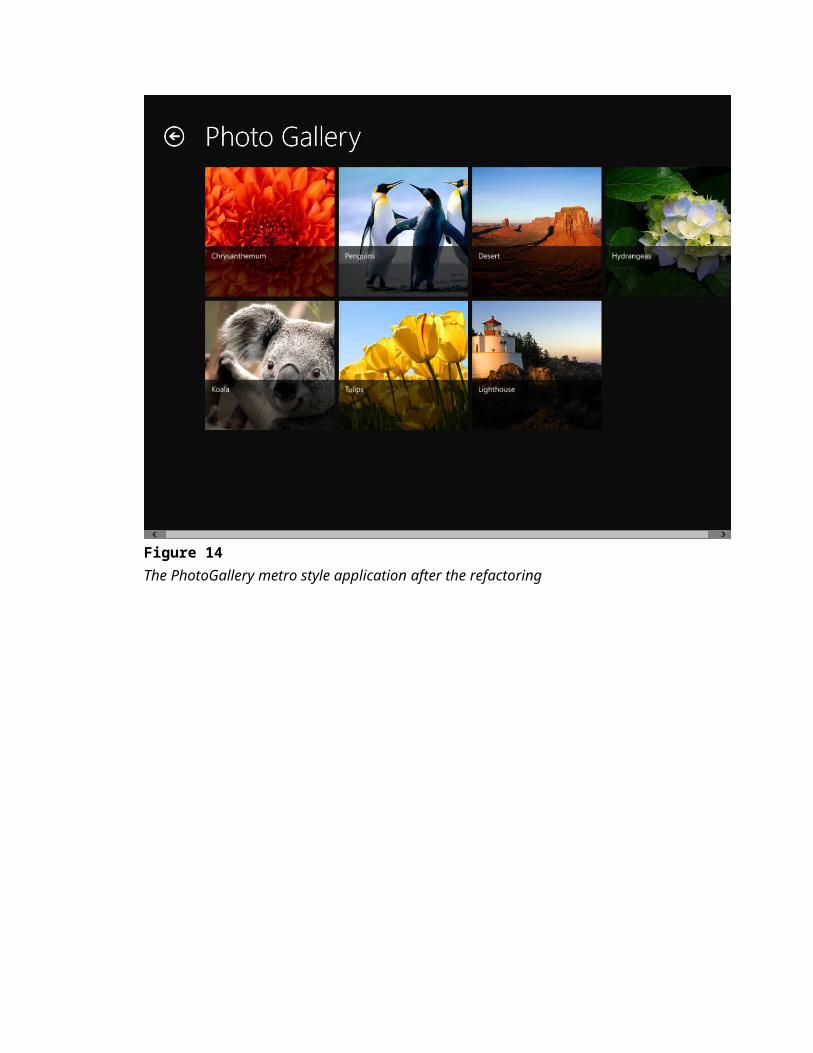
Figure 18Press Tab to select the highlighted snippet
Figure 19Press Tab again and the snippet will expand
To add a code snippet using the mouse (C#, Visual Basic and XML)
1. Right-click where you want to insert the code snippet.
2. Select Insert Snippet followed by My Code Snippets.
3. Pick the relevant snippet from the list, by clicking on it.
Figure 20Right-click where you want to insert the code snippet and select Insert Snippet
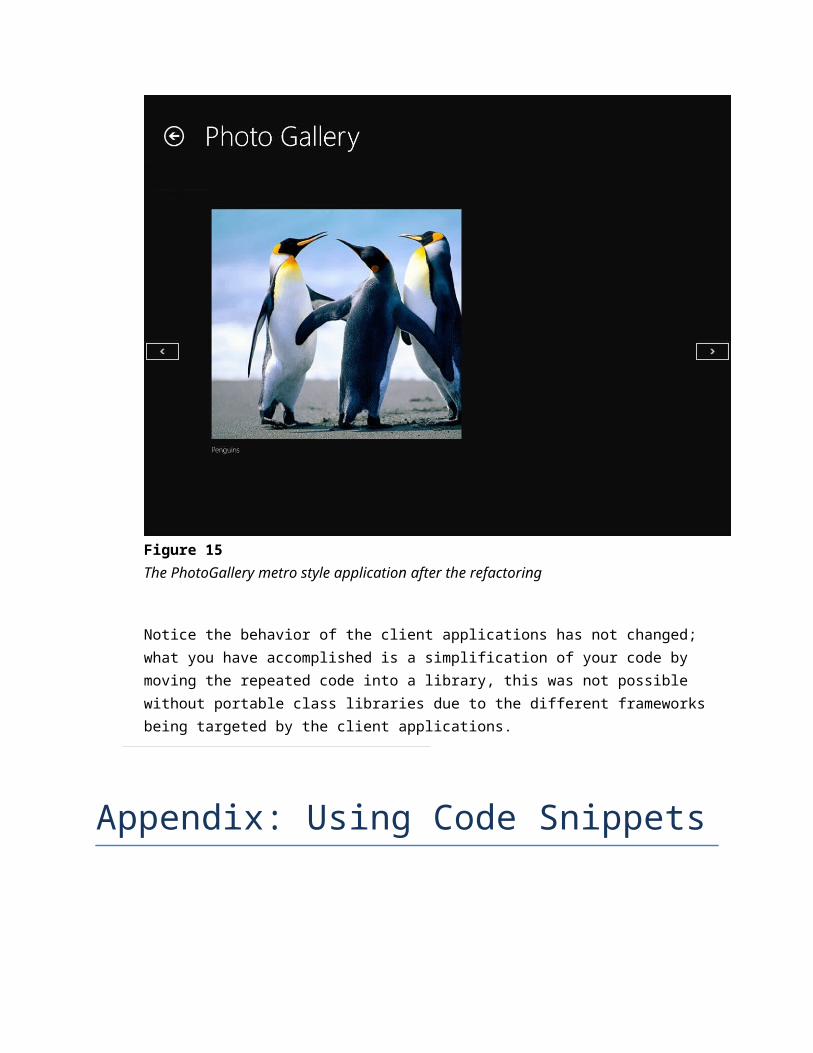
Figure 21Pick the relevant snippet from the list, by clicking on it


![Portable ProductsRAC °] 7500 › mmh › lis_pdf › OWNM › L0403232.pdf · GENPortable ProductsRAC °] 7500 Portable Generator Owner's Manual Model No. 1315-0 (7,500 Watt AC Generator)](https://img.pdfslide.net/doc/110x75/5f204288361a060b480a464d/portable-productsrac-7500-a-mmh-a-lispdf-a-ownm-a-l0403232pdf-genportable.jpg)