Embed Size (px)
Citation preview
Payroll Accounting: A Practical, Real-World Approach Page 1 of 13
Using QuickBooks for Payroll For use with Chapter 7: Comprehensive Projects, Payroll Accounting
Classrooms may complete the comprehensive projects either manually through the
use of provided Excel templates, or through the use of provided QuickBooks 2014
sample company files. Whichever method you use, these projects allow you to
practice the skills learned in the course. This guide is designed to give you guidance
when completing payroll using QuickBooks.
I N T H I S G U I D E
• Getting Started with QuickBooks
• Using the Sample QuickBooks Files
• Accessing the QuickBooks Employee Center
• Processing Payroll
• Viewing Payroll Reports
• Viewing Checks in the Payroll Checking Account Register
• Terminating Employees
• Exporting to Excel
Payroll Accounting: A Practical, Real-World Approach Page 2 of 13
Getting Started with QuickBooks Chapter 7 is composed of two projects:
• The one-month project uses the Ellipses Corp Project QuickBooks file.
• The three-month project uses the Ampersand Inc Project QuickBooks file.
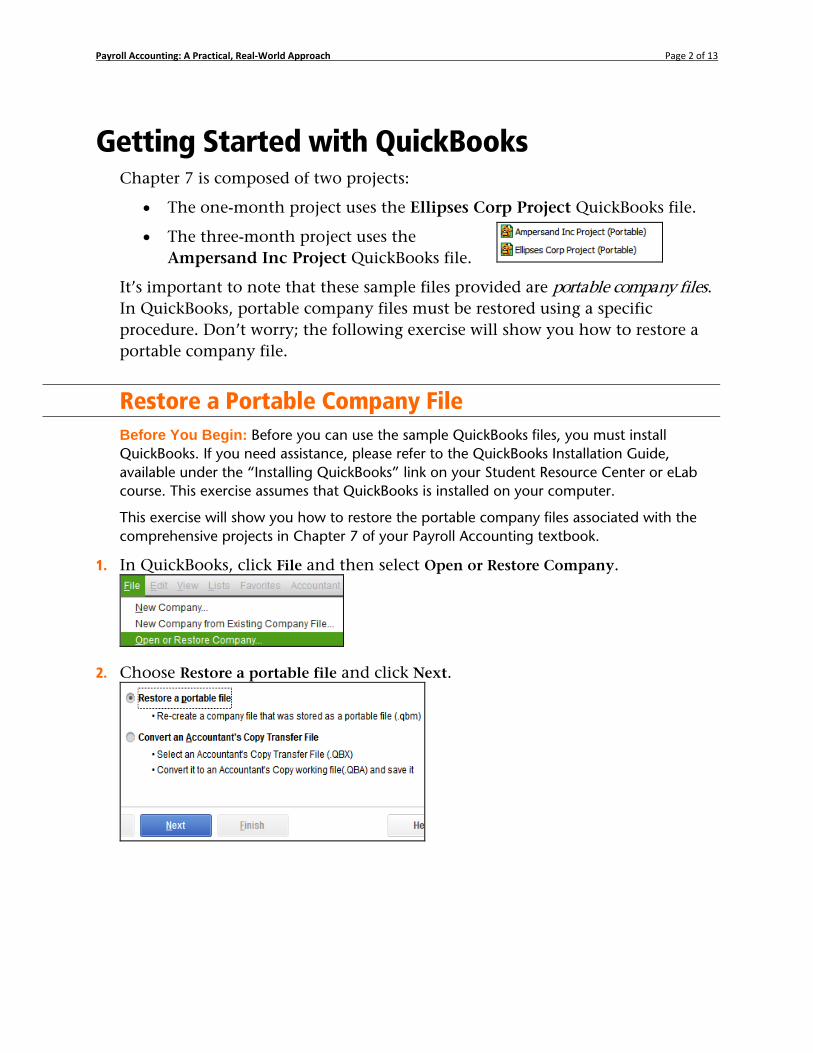
It’s important to note that these sample files provided are portable company files. In QuickBooks, portable company files must be restored using a specific procedure. Don’t worry; the following exercise will show you how to restore a portable company file.
DYS 1-1-1 Restore a Portable Company File Before You Begin: Before you can use the sample QuickBooks files, you must install QuickBooks. If you need assistance, please refer to the QuickBooks Installation Guide, available under the “Installing QuickBooks” link on your Student Resource Center or eLab course. This exercise assumes that QuickBooks is installed on your computer.
This exercise will show you how to restore the portable company files associated with the comprehensive projects in Chapter 7 of your Payroll Accounting textbook.
1. In QuickBooks, click File and then select Open or Restore Company.
2. Choose Restore a portable file and click Next.

Payroll Accounting: A Practical, Real-World Approach Page 3 of 13
3. Navigate to and choose the portable company file to restore; click Open.
The files on your computer may be in a different location from that shown below.
4. Click Next, choose where to save the file, and click Save.
Create a folder on your Desktop in which to save these files. At the end of the project, you can simply delete the entire folder.
Portable files take time to restore, so be patient!
5. Click OK to the acknowledgement that the restore was successful.
Using the Sample QuickBooks Files Each of the two sample QuickBooks 2014 company files uses a default date of December 15, 2013. Because they are sample data files, the tax tables are not up to date. This means you must calculate the taxes for each payday and override the data in QuickBooks to get the accurate net pay and employer tax liability.
This section will assist you in completing the comprehensive payroll projects in your textbook using QuickBooks, but it is not designed to walk you step by step through the process.
Payroll Accounting: A Practical, Real-World Approach Page 4 of 13
Keep the following points in mind:
• All employees and year-to-date earnings, and tax payments, have been entered.
• QuickBooks records the general journal entry by each payroll check. You will not need to prepare additional entries.
• Screenshots are meant to display work patterns, not to display actual accurate data for the projects.
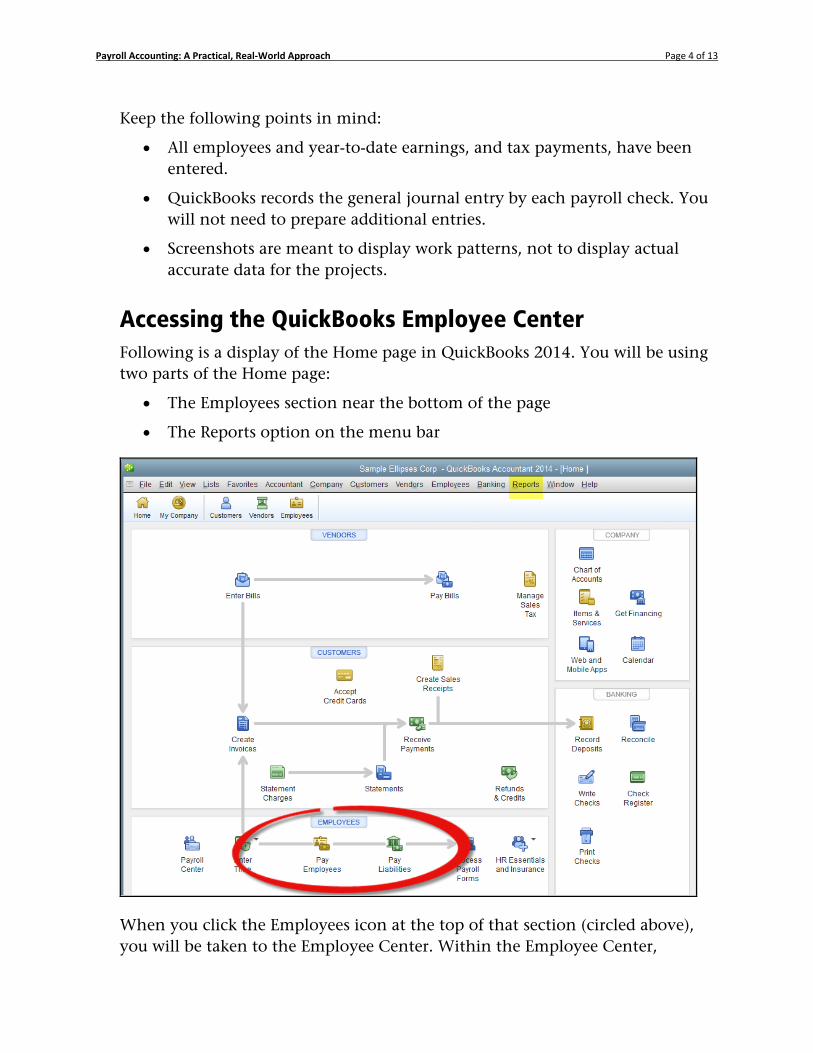
Accessing the QuickBooks Employee Center Following is a display of the Home page in QuickBooks 2014. You will be using two parts of the Home page:
• The Employees section near the bottom of the page
• The Reports option on the menu bar
When you click the Employees icon at the top of that section (circled above), you will be taken to the Employee Center. Within the Employee Center,
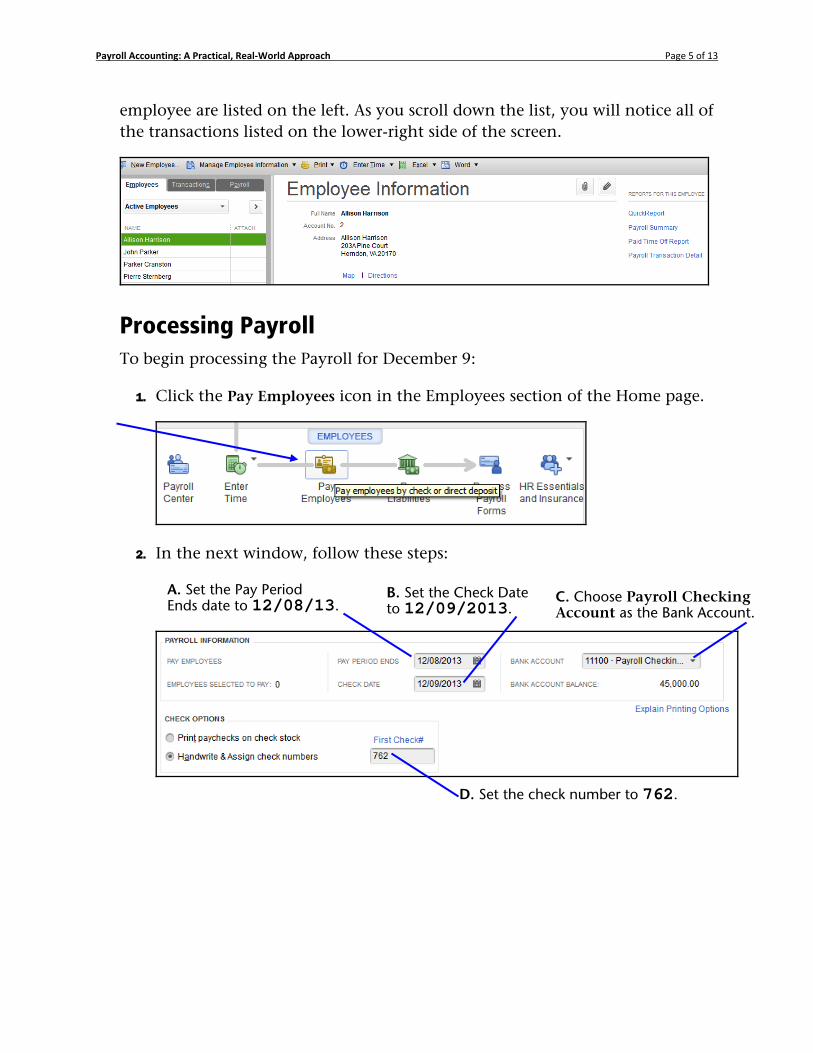
Payroll Accounting: A Practical, Real-World Approach Page 5 of 13
employee are listed on the left. As you scroll down the list, you will notice all of the transactions listed on the lower-right side of the screen.
Processing Payroll To begin processing the Payroll for December 9:
1. Click the Pay Employees icon in the Employees section of the Home page.
2. In the next window, follow these steps:
D. Set the check number to 762.
A. Set the Pay Period Ends date to 12/08/13.
B. Set the Check Date to 12/09/2013.
C. Choose Payroll Checking Account as the Bank Account.

Payroll Accounting: A Practical, Real-World Approach Page 6 of 13
3. Continue entering the payroll information by following these steps:
In the QuickBooks sample file, the federal and state taxes for the employee and employer will be automatically calculated based on installed tax tables.
NOTE! You may need to adjust these tax amounts to match your project instructions.
4. Enter the hours worked in the appropriate cell and press [Tab]. The Employee Summary and the Company Summary tables will populate. Calculate the appropriate taxes and enter the values. Enter the values only. The minus symbol is not necessary.
The Company Summary at the lower left of the screen shows the employer taxes and liabilities associated with the Employee Summary table on the right. Adjust both as necessary.
A. Sort by employee number here.
C. Click the Open Paycheck Detail button.
B. Select all employees by checking the boxes to the left of each employee name.
Payroll Accounting: A Practical, Real-World Approach Page 7 of 13
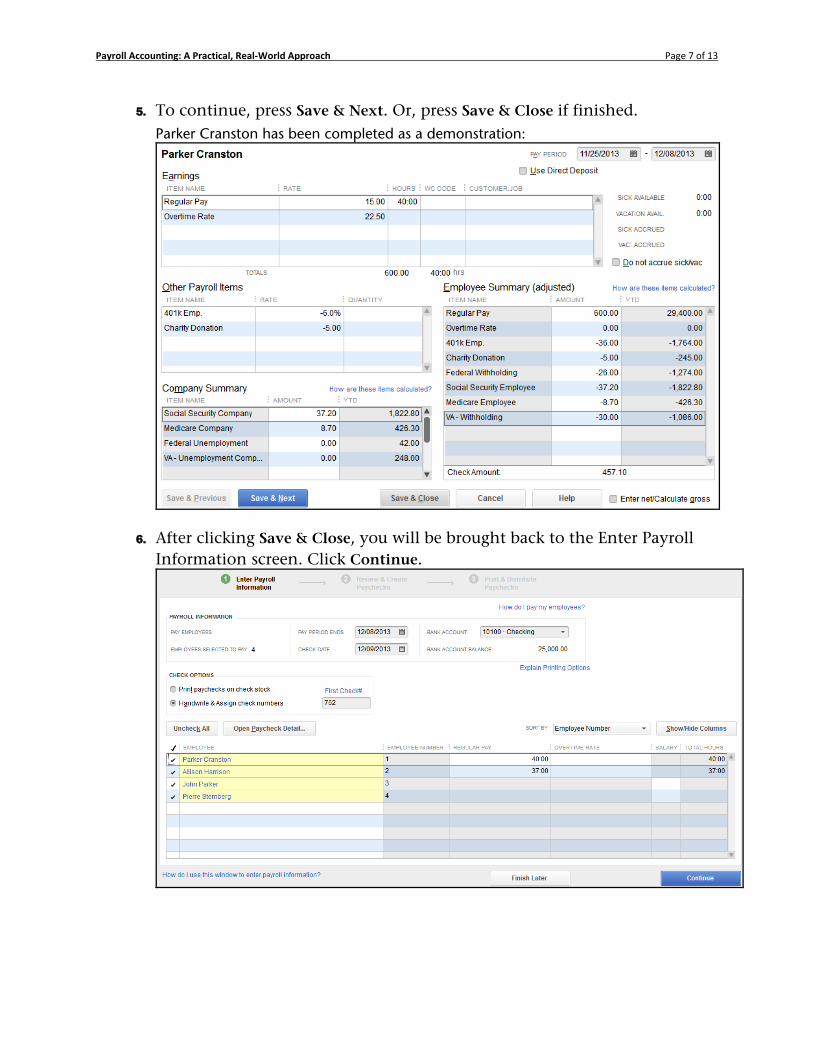
5. To continue, press Save & Next. Or, press Save & Close if finished. Parker Cranston has been completed as a demonstration:
6. After clicking Save & Close, you will be brought back to the Enter Payroll Information screen. Click Continue.
Payroll Accounting: A Practical, Real-World Approach Page 8 of 13
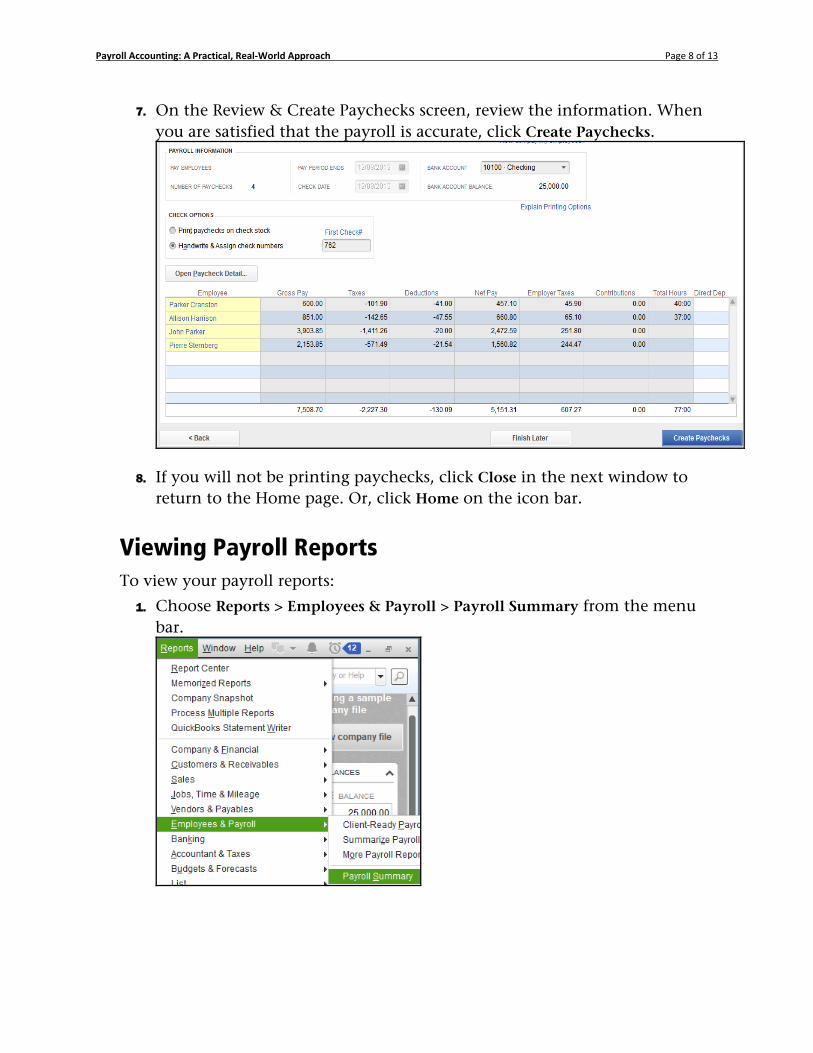
7. On the Review & Create Paychecks screen, review the information. When you are satisfied that the payroll is accurate, click Create Paychecks.
8. If you will not be printing paychecks, click Close in the next window to return to the Home page. Or, click Home on the icon bar.
Viewing Payroll Reports To view your payroll reports:
1. Choose Reports > Employees & Payroll > Payroll Summary from the menu bar.

Payroll Accounting: A Practical, Real-World Approach Page 9 of 13
2. Select the date range and tap [Tab] to generate a report that shows the payroll summary information for the range you defined. You can double-click on any cell to see the detail.
NOTE! Your instructor may direct you to submit such a report to him/her for evaluation.
Viewing Checks in the Payroll Checking Account Register To view each payroll check in your Payroll Checking Account register:
1. From the Home page, click the Check Register icon.
2. Select the appropriate account and click OK.
Your Payroll Checking Account Register will open and list all transactions. You can double-click each transaction to see the detail.
3. Once finished, tap [Esc] to return to the Home page. Then, begin the payroll process again for the rest of the year.
Payroll Accounting: A Practical, Real-World Approach Page 10 of 13
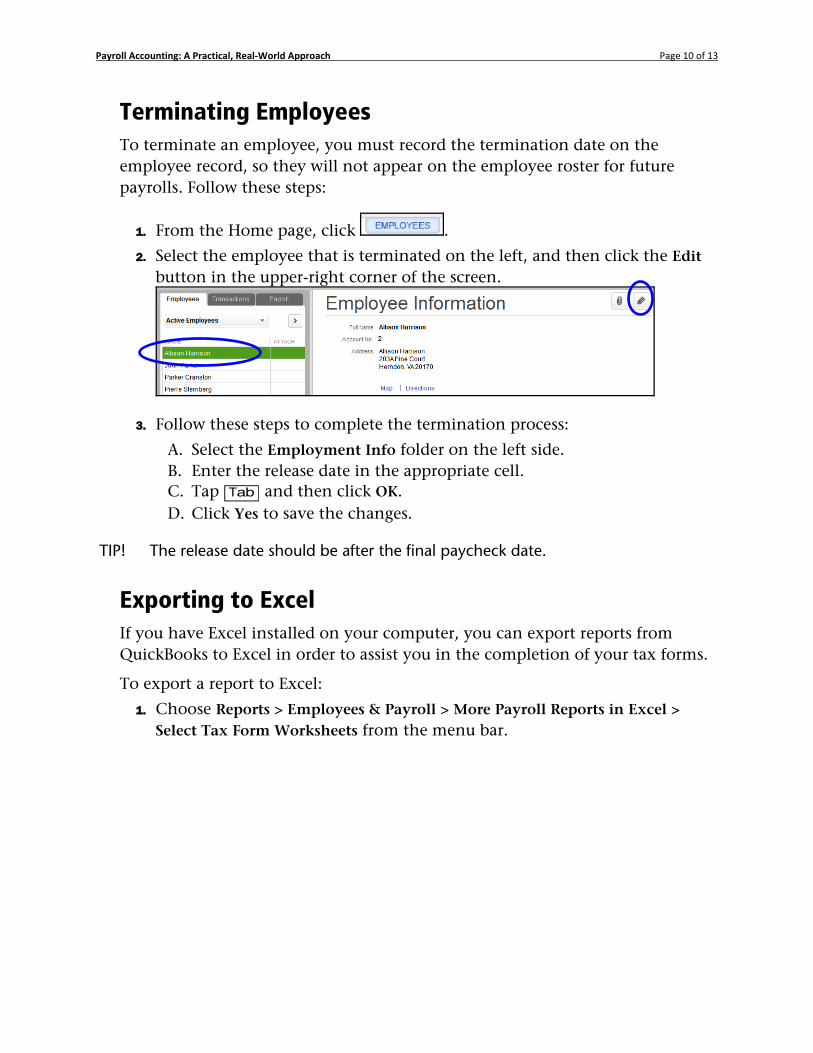
Terminating Employees To terminate an employee, you must record the termination date on the employee record, so they will not appear on the employee roster for future payrolls. Follow these steps:
1. From the Home page, click .
2. Select the employee that is terminated on the left, and then click the Edit button in the upper-right corner of the screen.
3. Follow these steps to complete the termination process:
A. Select the Employment Info folder on the left side. B. Enter the release date in the appropriate cell. C. Tap [Tab] and then click OK. D. Click Yes to save the changes.
TIP! The release date should be after the final paycheck date.
Exporting to Excel If you have Excel installed on your computer, you can export reports from QuickBooks to Excel in order to assist you in the completion of your tax forms.
To export a report to Excel:
1. Choose Reports > Employees & Payroll > More Payroll Reports in Excel > Select Tax Form Worksheets from the menu bar.

Payroll Accounting: A Practical, Real-World Approach Page 11 of 13
2. Select the desired form and from/to dates, and then click Create Report.
3. If the QuickBooks Tax Worksheets – Updated screen appears, read the note and then click OK.
Payroll Accounting: A Practical, Real-World Approach Page 12 of 13
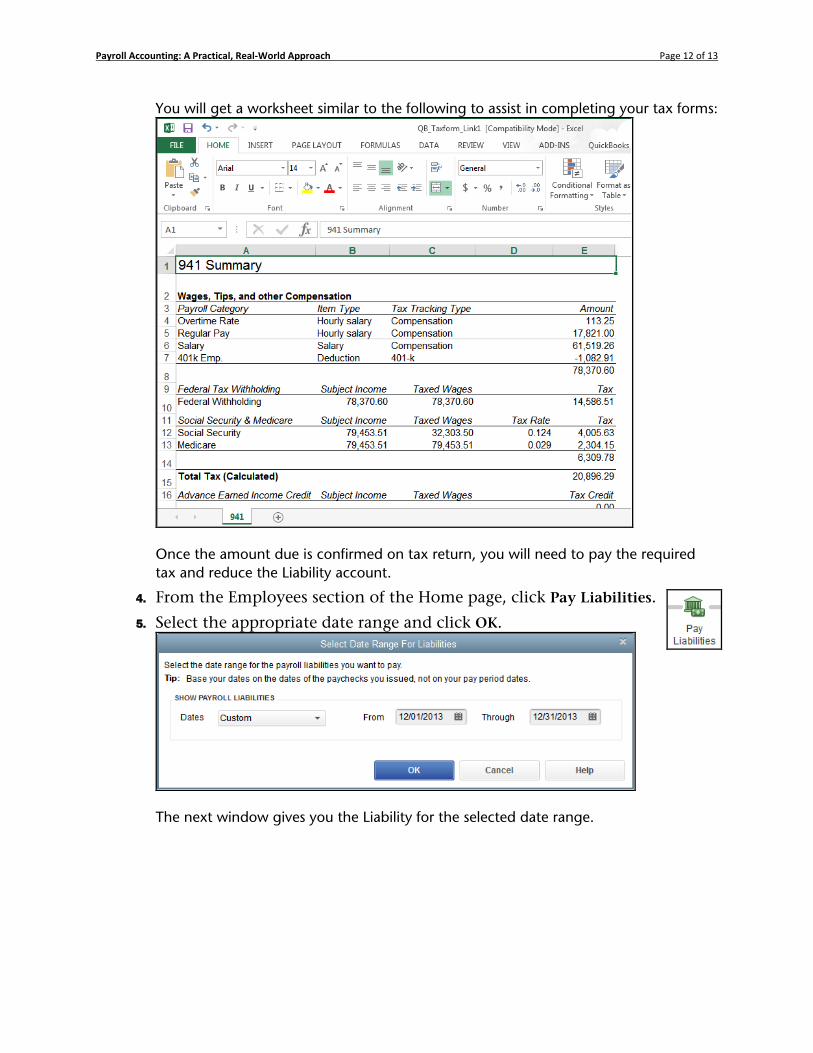
You will get a worksheet similar to the following to assist in completing your tax forms:
Once the amount due is confirmed on tax return, you will need to pay the required tax and reduce the Liability account.
4. From the Employees section of the Home page, click Pay Liabilities.
5. Select the appropriate date range and click OK.
The next window gives you the Liability for the selected date range.
Payroll Accounting: A Practical, Real-World Approach Page 13 of 13
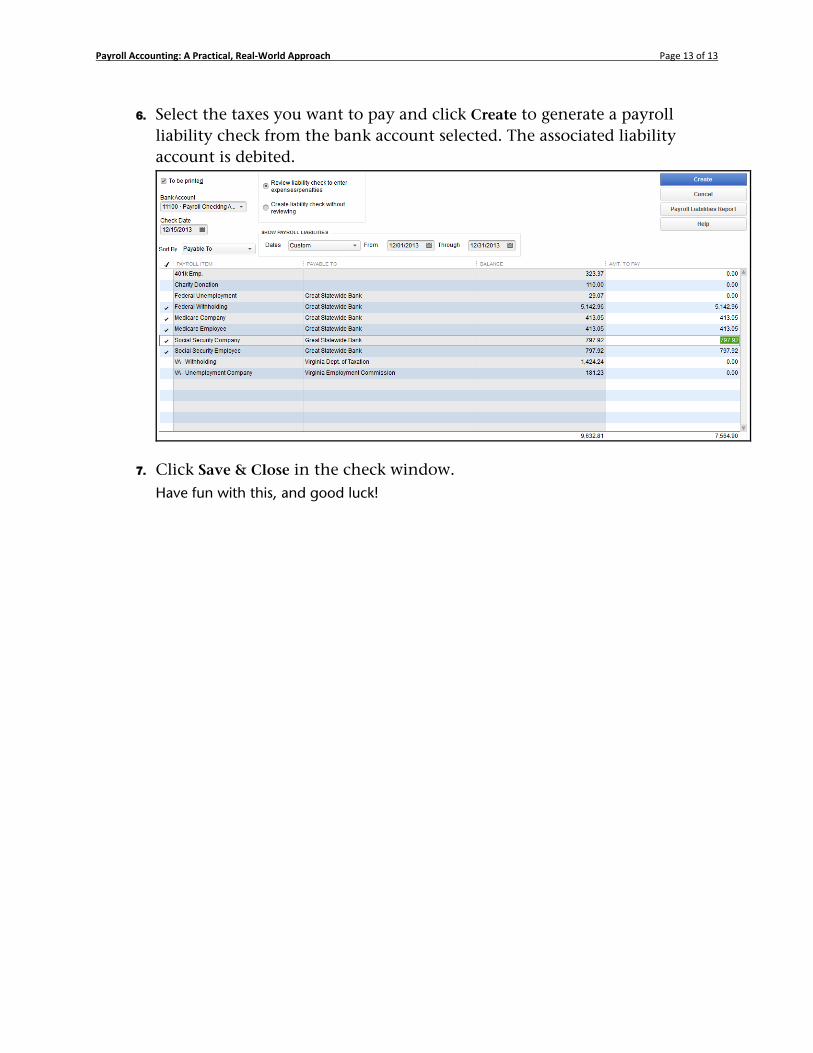
6. Select the taxes you want to pay and click Create to generate a payroll liability check from the bank account selected. The associated liability account is debited.
7. Click Save & Close in the check window. Have fun with this, and good luck!