Embed Size (px)
Citation preview

Casablanca Fan Co. - Factory Service Department - Technical Library
VII - 7.30
1906730 Capacitor 5uf 250 W Vac X X
1906740 Capacitor 1/2 W 330R 5.5uf X X X X X
1906750 Capacitor 4.5uf 350V 50/60 h2 X X X
7801250 Reverse Slide Switch Assy X X
1937210 3 Speed Pull Chain Switch X X
1937220 3 Speed Pull Chain Switch S.S. X X X
1937180 REVERSE Pull Chain Switch S.S X X X
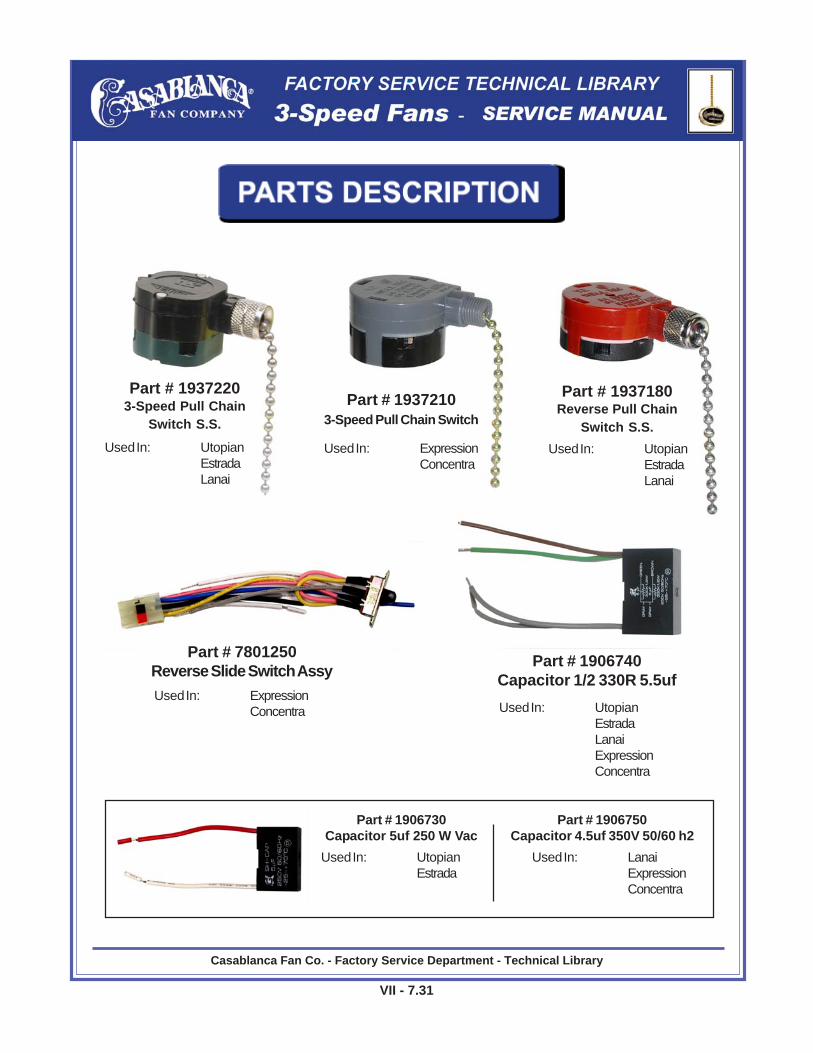
Utopian Estrada Lanai Expression ConcentraPart # Part Description
How do you change the PULL CHAIN SWITCH ONLY? - This is a question that we are asked over and over again,the information in this section of the service manual will help you. Once you have the right pull chain switch,changing it only takes a few minutes. First remove the switch housing cup or switch housing cap from the fanshown in Figure #1. Now you will need to look at the pull chain switch you are replacing. Match it up with one youare going to replace it with.
If the wrong switch is used, the fan will not operate properly. The problem will be that you will have TWO mediumspeeds. If you have this problem after changing the switch, most likely you have installed the wrong switch. Mostfans with a spinner motor using this type of switch housing cup, use two capacitors together to get the secondspeed. For more information on how pull chain switches work and how the speeds are controlled in three speedfans, refer to technical bulletin TB-98-30 (#1a) INTERCHANGEABLE - 3 Speed PC Boards and Pull Chain Switch,dated March 30, 1998. The following steps will show you how to change the pull chain switch.
How To Change The Electronic on:
Utopian ExpressionEstrada ConcentraLanaiExpression
Casablanca Fan Co. - Factory Service Department - Technical Library
VII - 7.31
Part # 7801250Reverse Slide Switch AssyUsed In: Expression
Concentra
Part # 1906730Capacitor 5uf 250 W Vac
Used In: UtopianEstrada
Part # 19372203-Speed Pull Chain
Switch S.S.
Used In: UtopianEstradaLanai
Part # 19372103-Speed Pull Chain Switch
Used In: ExpressionConcentra
Part # 1906740Capacitor 1/2 330R 5.5uf
Used In: UtopianEstradaLanaiExpressionConcentra
Part # 1937180Reverse Pull Chain
Switch S.S.
Used In: UtopianEstradaLanai
Part # 1906750Capacitor 4.5uf 350V 50/60 h2
Used In: LanaiExpressionConcentra

Casablanca Fan Co. - Factory Service Department - Technical Library
VII - 7.32
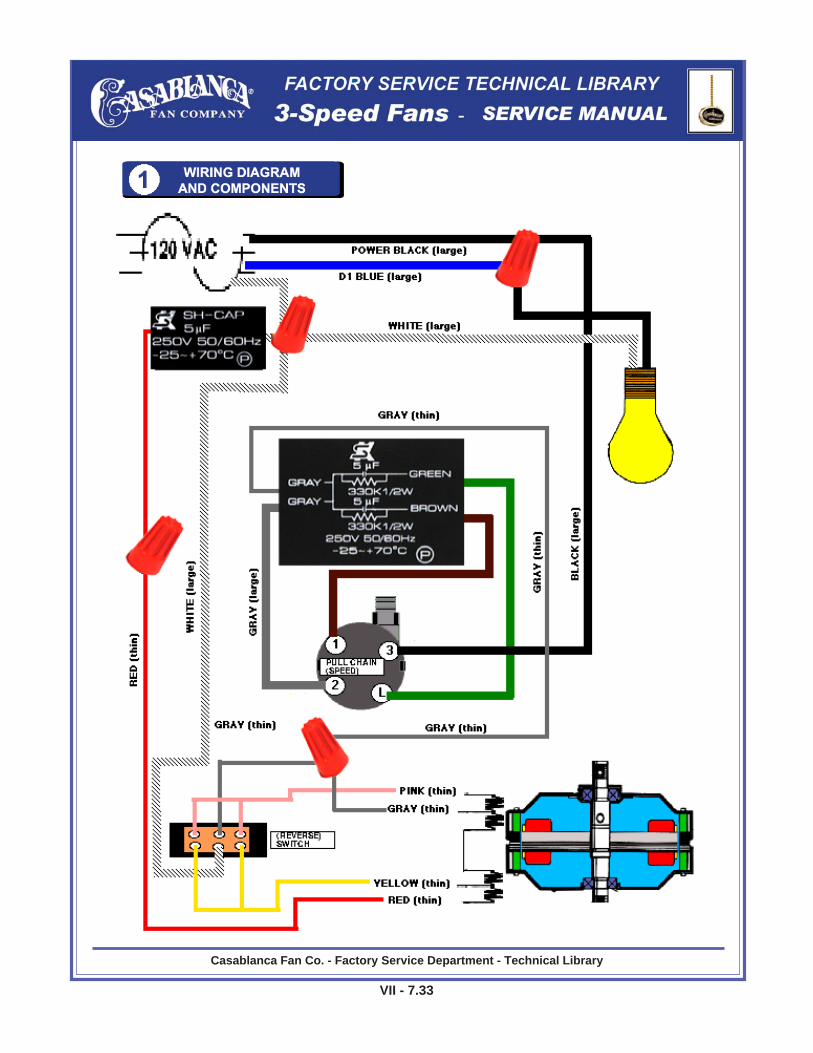
Wiring Diagram and Components
PULL CHAIN SWITCH REPLACEMENT
SPEED CONTROL RUN CAPACITOR REPLACEMENT
START CAPACITOR REPLACEMENT
REVERSE SWITCH REPLACEMENT
MOTOR REPLACEMENT
LIGHT SWITCH REPLACEMENT
Casablanca Fan Co. - Factory Service Department - Technical Library
VII - 7.33

Casablanca Fan Co. - Factory Service Department - Technical Library
VII - 7.34
How do you change the PULL CHAINSWITCH ONLY? - This is a question that weare asked over and over again, the informa-tion in this section of the service manual willhelp you. Once you have the right pull chainswitch, changing it only takes a few minutes.First remove or open up the switch housingon the fan shown in Figure #1. Now you willneed to look at the pull chain switch you arereplacing. Match it up with one you are goingto replace it with.
Step #1
Remove the knurl nut from the pull chain switchshown in Figure #2. Pull the switch out of the switchhousing cup with wire attached, as shown in Figure#2A and remove it from the switch housing cup.
(Figure #1)
(Figure #2)
(Figure #2A)Pull Chain Switch Replacement - CONTINUED

Casablanca Fan Co. - Factory Service Department - Technical Library
VII - 7.35
Step #2
Compare the old switch you are replacing and the newone. Make sure that they are the same. Compare theletter and numbers on the switches as shown in Fig-ure #3.
When changing the switch you do NOT need to cutthe wires. By using a large paper clip as a tool withboth the new and old switch side by side (shown inFigure #3A), you will be removing ONE wire from theold switch and inserting that same wire into the newswitch. Continue to remove the wires from the old switchuntil all wires have been inserted in to the new. Themost important thing in doing this, is matching the let-ter and numbers on the back of the switches as shownin Figure #3.
Step #3
Using the letter and number on the switch as a refer-ence, insert the paper clip into the same hole that thewire is in. This is easily done by placing the paper clipalong the side of the wire as shown in Figure #4 andpushing the clip into the hole and pulling out the wire.
NOTE: It is very important when removing the wire fromthe OLD switch has shown in Figure # 4 and and in-serting the same wire into the New switch, it is doneone at a time. Make sure that the hole position mark-ings match on the replacement switch as shown inFigure # 3 at the top of this page.
(Figure #3)
(Figure #3A)
(Figure #4)
Pull Chain Switch Replacement - CONTINUED

Casablanca Fan Co. - Factory Service Department - Technical Library
VII - 7.36
Once the paper clip has been inserted into the hole withthe wire (shown in Figure #5), lift up or press down on theclip and at the same time pull out the wire removing itfrom the switch as shown. Now insert the wire you justremoved from the old switch into the hole marked thesame on the New switch (shown in Figure #6). Wheninserting the wire into the switch you should hear a click,at this time pull on the wire making sure that the wire isheld tightly in the switch (shown in Figure #6). Repeatthese steps until all wires have been removed from theold switch and inserted into the new one.
Once all the wires have been attached on to the newswitch, push the switch back into the switch housingcup shown in Figure #7. Screw the knurl nut back on tothe pull chain switch. Reinstall the switch housing capon to the fan. Now you are ready to test the fan.
Test all three (3) speeds of the fan by making sure thatyou have LOW, MEDIUM AND HIGH speeds. If youhave two speeds that are the same, most likely thewrong switch has been installed. Again look at the oldswitch you removed from the fan and compare it withthe new switch.
Step #4
Step #5
(Figure #5)
(Figure #6)
(Figure #7)Pull Chain Switch Replacement - END

Casablanca Fan Co. - Factory Service Department - Technical Library
VII - 7.37
(Figure #1)
The Run Capacitor Black Box has two capacitorsbuilt into one block as shown in (figure #1). Match theold block with the new, the capacitor values must be aperfect match. If not, the first and second speeds willnot be the same as before.
Once you have found your replacement block, you willneed to look at the leads. Some of the wires leads aretinted and some are not as shown in (figure #2A and2B). The wires that insert into the pull chain switch asshown in (figure #3) must be tinted for easy insertion. Ifthey are not they will need to be tinted, only tint thewires that are being connected to the switch.
(Figure #2A)
(Figure #2B)
(Figure #3)
Run Capacitor Replacement - CONTINUED

Casablanca Fan Co. - Factory Service Department - Technical Library
VII - 7.38
First locate both the pole chain switch canspeed control capacitor block as shown in(figure #4).
Step #1
(Figure #4)
(Figure #5)
Run Capacitor Replacement - CONTINUED
Remove the knurl nut from the pull chainswitch shown in (figure #5).
Step #2
Remove the pull chain switch and run capacitorblock from the switch housing as shown (figure#6). The run capacitor block is held into theswitch housing by two sided tape.
Step #3
(Figure #6)

Casablanca Fan Co. - Factory Service Department - Technical Library
VII - 7.39
Run Capacitor Replacement - END
Locate the second gray wire on the old block thatis connected to the pull chain switch as shown in(figure #8A). Using a large paper clip as a tool asshown in (figure #8B), remove the gray wire fromthe switch and replace the wire with the graytinted wire on the new block. Replace the greenand brown wires that are connected to the pullchain switch and the old block with the wires onthe new block as shown in (figure #8C). Once allwires have been connected, reinstall both the pullchain switch and capacitor block back into theswitch housing and test.
Step #5
Step #4
(Figure #7)
(Figure #8A)
(Figure #8B)(Figure #8C)
Place your run capacitor block next to theswitch housing as shown in (figure #7). Locatethe gray wire that is on the old block that is wirenutted to the gray wire that is in the switchhousing as shown. Remove the wire nut andreplace the gray wire it with the NOT TINTEDgray wire on the new block. Then wire nut thetwo wires together as shown.
Casablanca Fan Co. - Factory Service Department - Technical Library
VII - 7.40
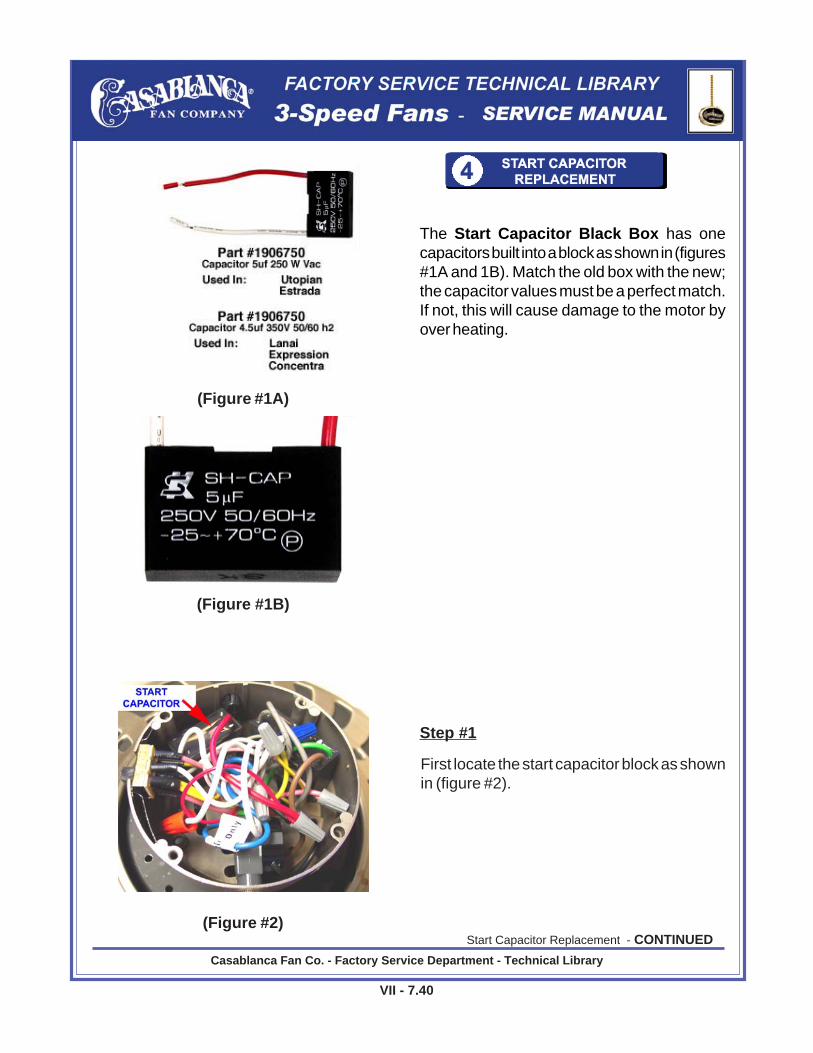
The Start Capacitor Black Box has onecapacitors built into a block as shown in (figures#1A and 1B). Match the old box with the new;the capacitor values must be a perfect match.If not, this will cause damage to the motor byover heating.
(Figure #1A)
(Figure #1B)
(Figure #2)Start Capacitor Replacement - CONTINUED
First locate the start capacitor block as shownin (figure #2).
Step #1

Casablanca Fan Co. - Factory Service Department - Technical Library
VII - 7.41
Once you have located the run capacitor block,remove it from the switch housing and locatethe two wire nuts as shown in (figure #3).
Step #2
Start Capacitor Replacement - END(Figure #4)
(Figure #3)
(Figure #5)
Place the new capacitor block next to the oldone as shown in (figure #4). Remove the twowire nuts one at a time replacing the wire withthe wires from the new start capacitor block asshown.
Step #3
Once all wires have been connected, reinstallstart capacitor block back into the switchhousing (figure #5) and test.
Step #4

Casablanca Fan Co. - Factory Service Department - Technical Library
VII - 7.42
(Figure #1)
Cut the pink and yellow wires as close to plugas you can as shown in (figure #3A). Strip boththe pink and yellow wires as shown in (figure#3B) and disregard the plug and other wires,they will not be needed during this installation.
Step #1
(Figure #2)
(Figure #3A)
(Figure #3B)
Locate the reverse slide switch assembly asshown in (figure #1). You will see that it isattached with wire nuts to several wires andmay not have a plug attached as shown in(figure #2). The reverse slide switch assemblyshown in (figure #2) is the universal part that isused as the replacement for many differentmodel fans. In some cases the plug will need tobe removed.
Reverse Switch Replacement - CONTINUED
Casablanca Fan Co. - Factory Service Department - Technical Library
VII - 7.43
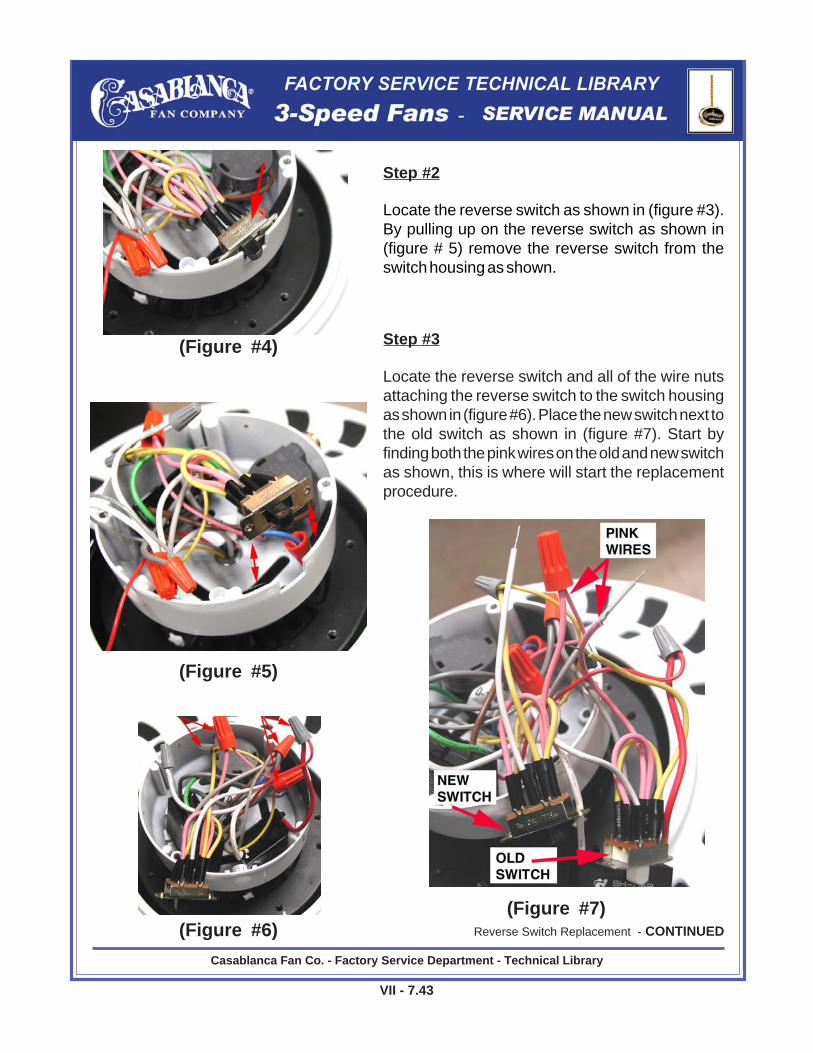
Locate the reverse switch as shown in (figure #3).By pulling up on the reverse switch as shown in(figure # 5) remove the reverse switch from theswitch housing as shown.
Step #2
Reverse Switch Replacement - CONTINUED
(Figure #4)
(Figure #5)
(Figure #6)(Figure #7)
Locate the reverse switch and all of the wire nutsattaching the reverse switch to the switch housingas shown in (figure #6). Place the new switch next tothe old switch as shown in (figure #7). Start byfinding both the pink wires on the old and new switchas shown, this is where will start the replacementprocedure.
Step #3

Casablanca Fan Co. - Factory Service Department - Technical Library
VII - 7.44
Reverse Switch Replacement - END
(Figure #10)(Figure #9)
(Figure #8)
Once you have connected the pink wires of thenew reverse switch to the pink wires in theswitch housing as shown in (figure #8). Locateboth the yellow wires on the old and new switchand then replace them and wire nut them to-gether as you did with the pink wires as shownin (figure #9).
Step #4
Do the same for both the white and gray wires,until all the wires on the new reverse switchhave been reconnected to the wires in theswitch housing. Check your work; reinstall thereverse switch back into the switch housing.Rout the wires so that the switch housing capor light kit can be easily installed on to theswitch housing without pinching the wires asshown in (figure #10). Again, check your workand then test the fan.
Step #5