Embed Size (px)
Citation preview

���
o
VarioPrint 2090
Jobmanual
VarioPrint 2090
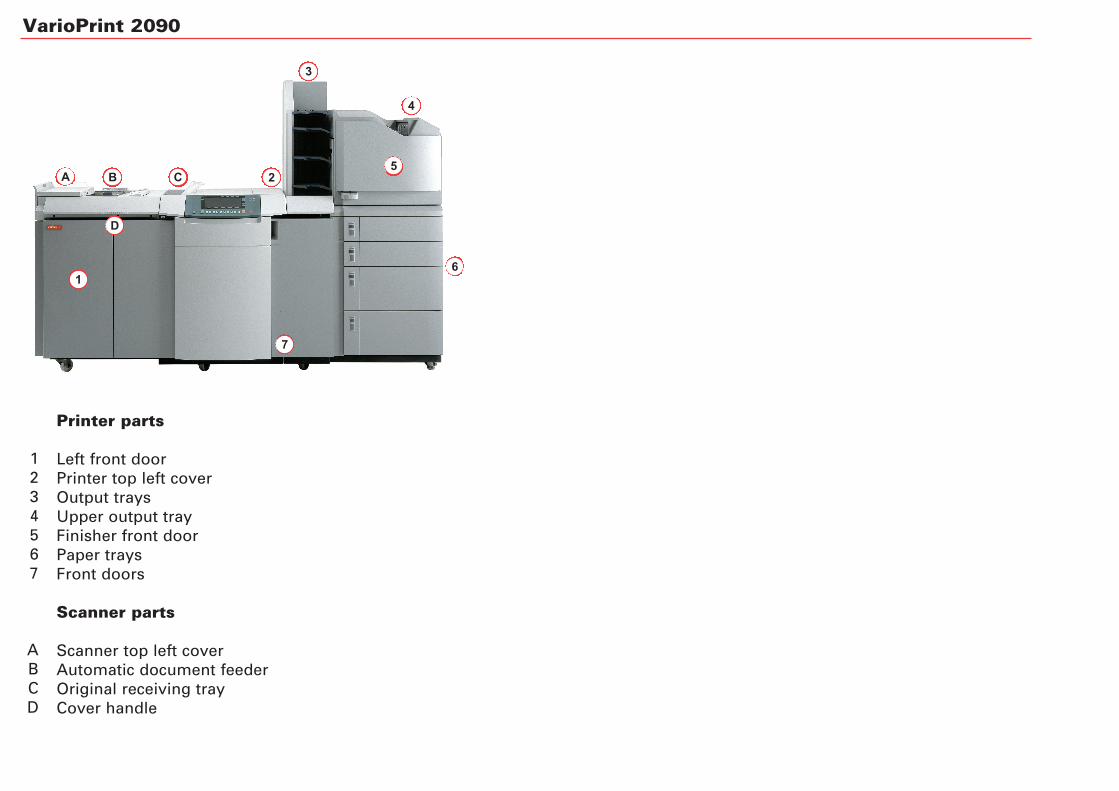
1234567
ABCD
Printer parts
Left front doorPrinter top left coverOutput traysUpper output trayFinisher front door Paper traysFront doors
Scanner parts
Scanner top left coverAutomatic document feederOriginal receiving trayCover handle
1
2
3
4
5
6
7
A B C
D

Operator Panel
ABCDEFGHI
JK
Set-build keyStart keyJob queue manager keyFunction keysHelp keySystem information keyArrow keysStop keyCorrection keyThe numeric keysFunction keys
linp
rach
douma
Copy
Printer ready to copy or print.
Print from mailbox...
1 2 3 4 5 6 7 8 9 0
?
CA
B
C
J
K
D
G
E
F
IH

�������� � ������� ��
���� ���������� ����
o
VP2090 JOB MAN GB
*1060002595*1 Piece
Made in : The Netherlands
Océ VarioPrint 2090
Job manual

Copyright
© 2003, Océ-Technologies B.V. Venlo, The Netherlands All rights reserved. No part of this work may be reproduced, copied, adapted, or transmitted in any form or by any means without written permission from Océ.
Océ-Technologies B.V. makes no representation or warranties with respect to the contents hereof and specifically disclaims any implied warranties of merchantability or fitness for any particular purpose. Further, Océ-Technologies B.V. reserves the right to revise this publication and to make changes from time to time in the content hereof without obligation to notify any person of such revision or changes.
Code number 1060002595Edition 2003-04
Océ Technologies B.V.
GB
TrademarksProducts in this manual are referred to by their trade names. In most, if not all cases, these designations are claimed as trademarks or registered trademarks of their respective companies.
3
Notes for the reader
Definition
This manual helps you to use the Océ VarioPrint 2090 . The manual contains a description of the Océ VarioPrint 2090 and guidelines to use and operate the Océ VarioPrint 2090 . There are also tips to increase your knowledge of the Océ VarioPrint 2090 and to help you manage the workflow even better.
Note, Attention and Caution
Some parts of this manual require your special attention. These parts provide important, additional information or are about the prevention of damage to your properties. The words 'Note', 'Attention' and 'Caution' indicate these important parts.
■ The word 'Note' comes before additional information about the correct operation or the Océ VarioPrint 2090 or a tip.
■ A part marked with 'Attention' contains information to prevent damage to items, for example the Océ VarioPrint 2090 , an original or a file.
■ A part marked with 'Caution' contains information to prevent personal injury. Caution is found only in manuals that describe physical products.
Safety information
The safety information for this product is included in the separate booklet with the title 'Safety manual'. This booklet is part of the information set that you received for the product.

4 Océ VarioPrint 2090 Job manual
Contents 5
Contents
Notes for the reader 3
Chapter 1 IntroductionGeneral information 8
Available documentation 8Océ VarioPrint 2090 concepts and philosophy 10
About the system 14Océ VarioPrint 2090 configuration 14
Chapter 2 Get startedPower modes on the Océ VarioPrint 2090 22Turn on the Océ VarioPrint 2090 25Shut down the Océ VarioPrint 2090 28Restart the Océ Smart Imager 31
Chapter 3 Print jobs (mailbox)About the mailbox 34Print a job from the mailbox 37Edit a mailbox job 39Stop printing 43Remove jobs from the mailbox 45My Paper in a print job 46Print jobs with special paper 49Secure print jobs 51
Chapter 4 Print to the Océ VarioPrint 2090About the printer driver 54Create a print job with the printer driver 58Create a secure print job with the printer driver 60About the page programmer 62About Océ Intra Logic 65Océ Intra Logic functions 67
6 Océ VarioPrint 2090 Job manual
Chapter 5 Copy jobsBasic copies 70
Make a copy 70Types of copy job settings 72Correct the settings for a copy job 77Copy special originals and originals of a non-standard size 78Stapled copies 81
Extended copies 84Combine subsets into one document 84Concatenation and chapterization 87Delete subsets 90
Stop scanning 92
Chapter 6 The job queueAbout the job queue 94
Chapter 7 Error handlingHandle contradictions 98Handle errors on the Océ VarioPrint 2090 101Clear the paper jams 103Clear the staple jams 106
Appendix A Overview and tables 107Product specifications 108Originals that can be used 109Materials that can be used 110
Appendix B Miscellaneous 113Reader's comment sheet 114Addresses of local Océ organisations 116

7
Océ VarioPrint 2090
User manual
Chapter 1 Introduction
8 Océ VarioPrint 2090 Job manual
General information
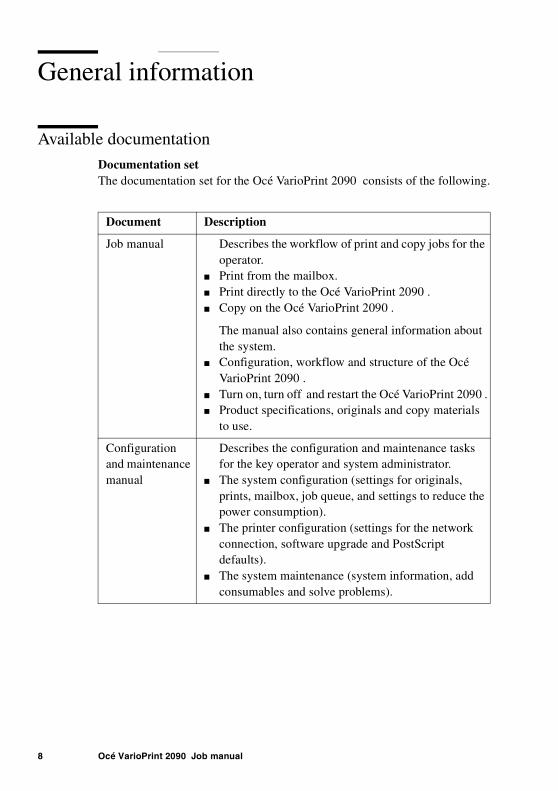
Available documentation
Documentation setThe documentation set for the Océ VarioPrint 2090 consists of the following.
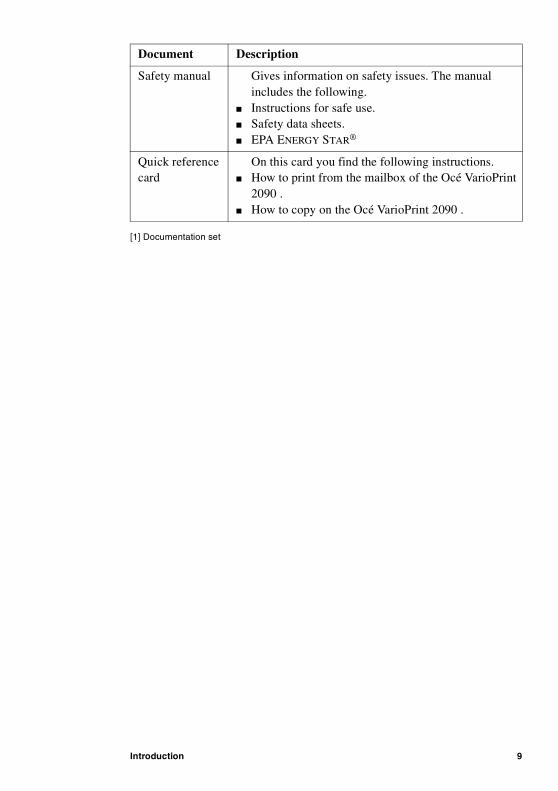
[1] Documentation set
Document Description
Job manual Describes the workflow of print and copy jobs for the operator.
■ Print from the mailbox.■ Print directly to the Océ VarioPrint 2090 .■ Copy on the Océ VarioPrint 2090 .
The manual also contains general information about the system.
■ Configuration, workflow and structure of the Océ VarioPrint 2090 .
■ Turn on, turn off and restart the Océ VarioPrint 2090 .■ Product specifications, originals and copy materials
to use.
Configuration and maintenance manual
Describes the configuration and maintenance tasks for the key operator and system administrator.
■ The system configuration (settings for originals, prints, mailbox, job queue, and settings to reduce the power consumption).
■ The printer configuration (settings for the network connection, software upgrade and PostScript defaults).
■ The system maintenance (system information, add consumables and solve problems).
Introduction 9
[1] Documentation set
Safety manual Gives information on safety issues. The manual includes the following.
■ Instructions for safe use.■ Safety data sheets.■ EPA ENERGY STAR®
Quick reference card
On this card you find the following instructions.■ How to print from the mailbox of the Océ VarioPrint
2090 .■ How to copy on the Océ VarioPrint 2090 .
Document Description

10 Océ VarioPrint 2090 Job manual
Océ VarioPrint 2090 concepts and philosophy
Introduction
The Océ VarioPrint 2090 is a high-volume black and white system. The system is based on the successful Océ 31x5. It has improvements in productivity, in paper input, document finishing and document output.In this paragraph you find an explanation and description of the main concepts, and the philosophy behind the concepts that are applied in the Océ VarioPrint 2090 .
The mailbox
The mailbox is what makes the Océ VarioPrint 2090 everybody's personal printer. The mailbox is a user-specific storage area for print jobs. You (each user) can print these mailbox print jobs from any networked location at any time.
[1] The Océ VarioPrint 2090 mailbox
[1] The Océ VarioPrint 2090 mailbox
Cost reduction
The philosophy of the mailbox brings a number of benefits for the user. For example, all jobs are grouped by user. This means that you do not need any banner pages, when you print a job at the system. The mailbox also reduces the paper mess near the system, because you print on demand.
Flexibility
The mailbox offers you flexibility. You can change the settings locally on the operator panel before you print your job, and you can also use an optional function to print secure print jobs on the system (PIN code needed to start the job).
Introduction 11
Efficiency
The mailbox offers you efficiency. You can send your print job at any time, and print later. Send a job once and print many. You can make proof prints, which enable you to check the print before you print many. The system offers you the function of priority setting of mailbox jobs
The job manual gives you detailed information about the workflow of a job to the mailbox (see ‘Print a job from the mailbox’ on page 37).
Next job
Whether it is an analogue or digital job, the comprehensive job queue system (called the Factory) increases daily production on the system. The job queue enables you to prepare jobs in advance. The jobs are created and sent to the job queue while other jobs are prepared to be printed.Next job preparation is independent from print production. Scanning, printing and processing is done at the same time, which keeps the system active and enables the processing of a wide variety of jobs.
Set Logic (set-build)
'Océ Set Logic' enables you to handle hardcopy originals on the Océ VarioPrint 2090 in an effective way. 'Océ Set Logic' allows you to define subsets within the document (page programming).
The Océ VarioPrint 2090 allows you to join different originals, the subsets, into one digital document, for example a report or book.■ Different original size.■ 1-sided and 2-sided originals.■ Different paper types.
You can change 1-sided originals into 2-sided documents. If the originals result in an odd number of pages, the Océ VarioPrint 2090 will detect this. An odd number of pages can result in an empty page between the subsets.■ Concatenation
You decide to print the next subset on this empty page (do not keep the empty page).
■ ChapterizationYou decide to keep the empty page and start the next subset on a new sheet (a new chapter starts on a new sheet).

12 Océ VarioPrint 2090 Job manual
Image Logic
The system detects and adjusts photos and fine lines on the original with the unique Océ Image Logic technology. The Océ VarioPrint 2090 processes even complex originals with only one push of a button into prints of excellent quality.
The paper trays
For the Océ VarioPrint 2090 a complete new paper unit is introduced. The following table shows the changes and advantages of this new concept.
Feature Description
Refill during run No loss of productivity when you reload the paper trays.
Paper tray linking
Print long runs without reload of the paper trays (trays that contain the same paper type are linked).
Front loading The paper trays are easy to access at the front of the system (less floor space required).
Uniform paper input
All the trays have the same orientation of the paper. This system simplifies the task of loading the paper trays. You also avoid misprints because the paper is always loaded the same way.
■ Face down■ Header up
Flexible paper trays
All the trays can contain the same variety of media types.
■ 90 degrees rotation allows the paper to put in both short edge feed (SEF) as well as long edge feed (LEF), the information the prints and copies can always be read.
■ air separation in the trays makes the paper trays suitable for special paper.
Introduction 13
The finisher
The finisher has two general output destinations, there are four output trays and there is one upper output tray.■ Jobs that only use long edge feed (LEF) paper (A4 or Letter Standard) go
into the output trays.■ Jobs that only use short edge feed (SEF) paper and jobs that need multiple
sheet sizes go into the upper output tray.
Offset stackingIf the sets in a job have more than one page, the sets are offset stacked. For stapled sets, offset stacking increases the capacity and stacking quality of the output sets.
14 Océ VarioPrint 2090 Job manual
About the system
Océ VarioPrint 2090 configuration
Introduction
The Océ VarioPrint 2090 can be divided in functional units.■ Operator panel■ Printer (includes paper unit and finisher unit)■ Scanner■ Océ Smart Imager
Introduction 15
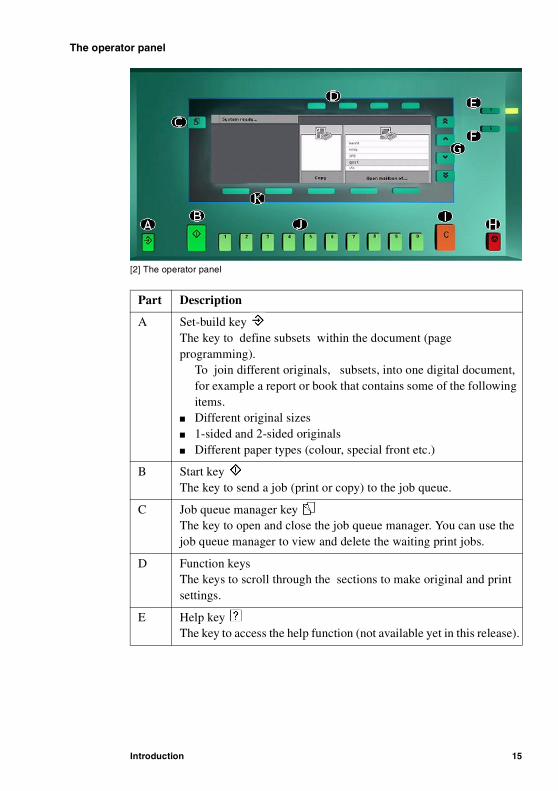
The operator panel[2] The operator panel
[2] The operator panel
Part Description
A Set-build key The key to define subsets within the document (page programming).
To join different originals, subsets, into one digital document, for example a report or book that contains some of the following items.
■ Different original sizes■ 1-sided and 2-sided originals■ Different paper types (colour, special front etc.)
B Start key The key to send a job (print or copy) to the job queue.
C Job queue manager key The key to open and close the job queue manager. You can use the job queue manager to view and delete the waiting print jobs.
D Function keysThe keys to scroll through the sections to make original and print settings.
E Help key The key to access the help function (not available yet in this release).
16 Océ VarioPrint 2090 Job manual
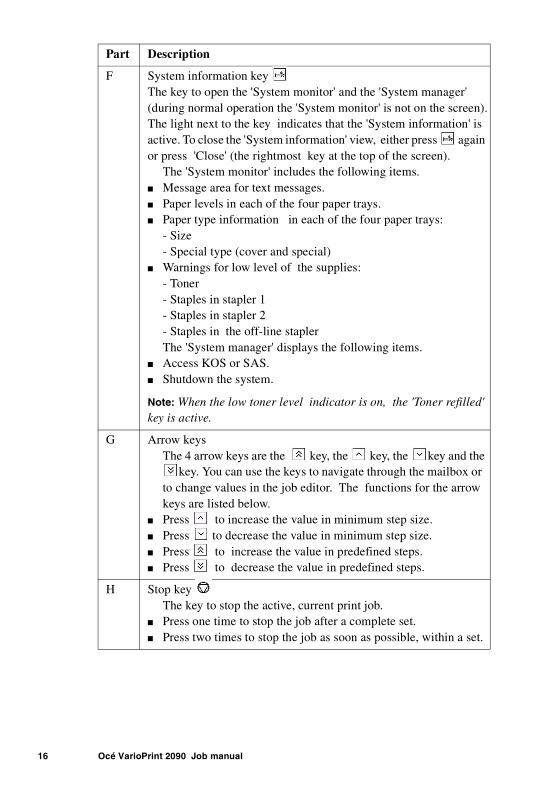
F System information key The key to open the 'System monitor' and the 'System manager' (during normal operation the 'System monitor' is not on the screen).The light next to the key indicates that the 'System information' is active. To close the 'System information' view, either press again or press 'Close' (the rightmost key at the top of the screen).
The 'System monitor' includes the following items.■ Message area for text messages.■ Paper levels in each of the four paper trays.■ Paper type information in each of the four paper trays:
- Size- Special type (cover and special)
■ Warnings for low level of the supplies:- Toner- Staples in stapler 1- Staples in stapler 2- Staples in the off-line staplerThe 'System manager' displays the following items.
■ Access KOS or SAS.■ Shutdown the system.
Note: When the low toner level indicator is on, the 'Toner refilled' key is active.
G Arrow keysThe 4 arrow keys are the key, the key, the key and the
key. You can use the keys to navigate through the mailbox or to change values in the job editor. The functions for the arrow keys are listed below.
■ Press to increase the value in minimum step size. ■ Press to decrease the value in minimum step size. ■ Press to increase the value in predefined steps. ■ Press to decrease the value in predefined steps.
H Stop key The key to stop the active, current print job.
■ Press one time to stop the job after a complete set.■ Press two times to stop the job as soon as possible, within a set.
Part Description
Introduction 17
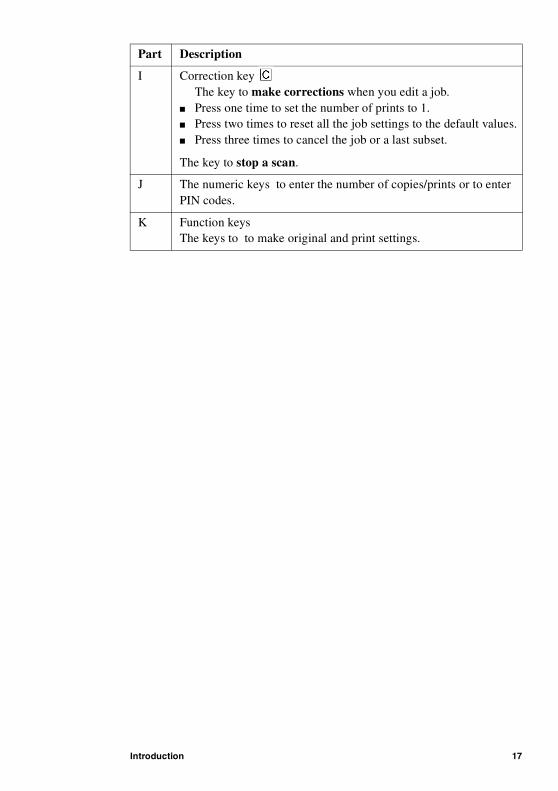
I Correction key The key to make corrections when you edit a job.
■ Press one time to set the number of prints to 1.■ Press two times to reset all the job settings to the default values.■ Press three times to cancel the job or a last subset.
The key to stop a scan.
J The numeric keys to enter the number of copies/prints or to enter PIN codes.
K Function keysThe keys to to make original and print settings.
Part Description
18 Océ VarioPrint 2090 Job manual
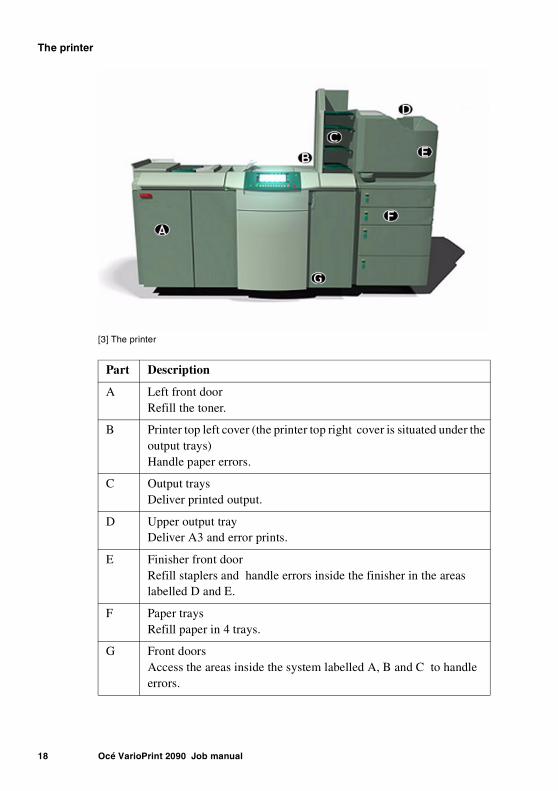
The printer[3] The printer
[3] The printer
Part Description
A Left front doorRefill the toner.
B Printer top left cover (the printer top right cover is situated under the output trays)Handle paper errors.
C Output traysDeliver printed output.
D Upper output trayDeliver A3 and error prints.
E Finisher front doorRefill staplers and handle errors inside the finisher in the areas labelled D and E.
F Paper traysRefill paper in 4 trays.
G Front doorsAccess the areas inside the system labelled A, B and C to handle errors.
Introduction 19
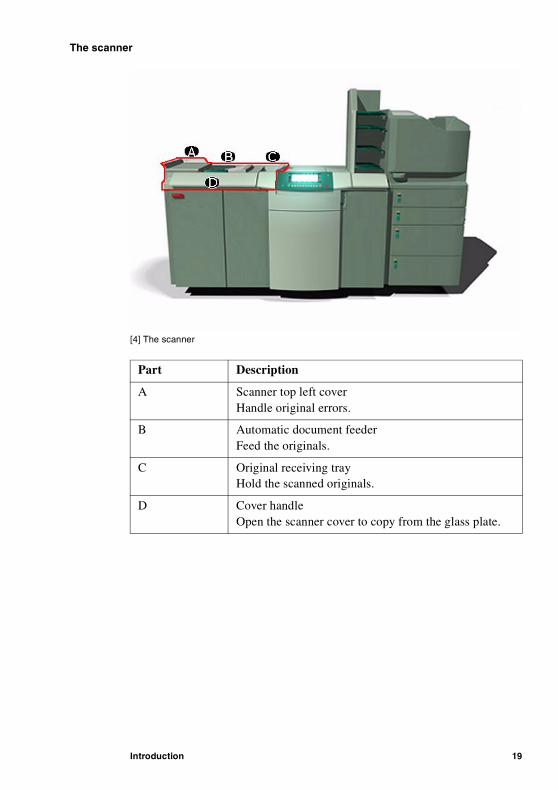
The scanner[4] The scanner
[4] The scanner
Part Description
A Scanner top left coverHandle original errors.
B Automatic document feederFeed the originals.
C Original receiving trayHold the scanned originals.
D Cover handleOpen the scanner cover to copy from the glass plate.

20 Océ VarioPrint 2090 Job manual
21
Océ VarioPrint 2090
User manual
Chapter 2 Get started

22 Océ VarioPrint 2090 Job manual
Power modes on the Océ VarioPrint 2090
Introduction
This section describes the power modes of theOcé VarioPrint 2090 .
OFF
The Océ VarioPrint 2090 is turned off completely, because the Océ Smart Imager, that controls the power of the system is turned off. You can not reach the system via the network. The operator panel if off as well as the LEDs next to the operator panel.
Controller initialising
This state describes that the controller is booting, testing and starting up applications. The system remains off.
1 The LEDs on the right-hand side of the operator panel are blinking green.2 The screen becomes active after some time and shows that the system is
starting up.3 The LED in the On/Off button blinks (amber).4 When the controller initialisation is ready, the message 'Press to switch on
the Océ VarioPrint 2090 ' appears. The LEDs on the right-hand side of the operator panel turn off.
5 The LED in the On/Off button becomes amber. When a PIN code protects the safety sleep mode and you press the On/Off button , you must enter the PIN code.
Stand-by mode
The initialisation of the controller is complete. The system is ready to print and copy. the On/Off button is green.
Safety sleep mode
When the system is in the safety sleep mode, the operator panel is off. The system goes to the safety sleep mode in the following situations.■ When you press the power switch .■ When the power returns after a mains failure.
Press the On/Off button to get the system out of the safety sleep mode.
Get started 23
Sleep mode
When the system is in sleep mode, the power consumption is decreased to a very low level. The system needs a couple of minutes to return to the stand-by mode.
The system goes to sleep mode in the following situations.■ If you do not use the Océ VarioPrint 2090 for a defined time (EPA setting).
To change the EPA ( Environmental Protection Agency) setting for the sleep mode delay, change the sleep mode timer (see the Configuration and maintenance manual See Set the EPA timers). If the Océ VarioPrint 2090 is in the sleep mode, you must press the On/Off button to activate the system.
■ Press the On/Off button . The system stops when all jobs are processed. Then the system goes into sleep mode.
The system returns from the sleep mode in the following situations.■ Press the On/Off button .■ An automatic print job (AP) arrives in the job queue.
Note: If you send an automatic print job, the system remains in sleep mode in the following situations.- A PIN code protects the sleep mode (See Activate and change the wake-up PIN code- The automatic print job is forced to the mailbox (KOS, See Allow automatic printing).- The job queue is set to stop (KOS).
Printer warming up
The system is ready to receive and scan jobs.
24 Océ VarioPrint 2090 Job manual
Low power mode
When the printer is in low power mode, the power consumption is decreased to a lower level. The screen displays a screen saver. The system needs a couple of minutes to return to the stand-by mode.The system turns into the low power mode when the system is not used for a defined time. The low power mode timer settings indicate this time. The low power mode timer can be set in KOS. See Set the EPA timers
The system returns from the low power mode in the following situations.■ The Océ VarioPrint 2090 must be active to print a document. The system
automatically returns to the 'Printer warming up' status (the system will not return to warming up when the job is forced to the mailbox or when the job queue is set to stop in KOS).
■ Press any key on the operator panel.
Get started 25
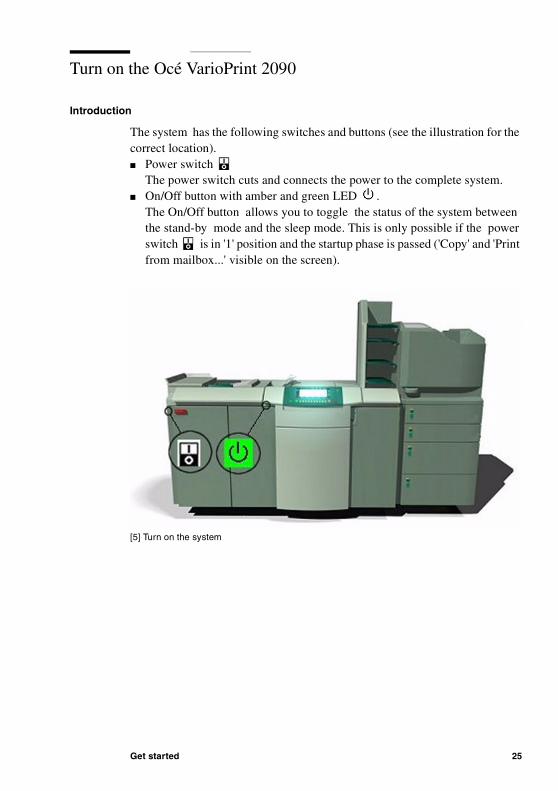
Turn on the Océ VarioPrint 2090
Introduction
The system has the following switches and buttons (see the illustration for the correct location). ■ Power switch
The power switch cuts and connects the power to the complete system.■ On/Off button with amber and green LED .
The On/Off button allows you to toggle the status of the system between the stand-by mode and the sleep mode. This is only possible if the power switch is in '1' position and the startup phase is passed ('Copy' and 'Print from mailbox...' visible on the screen).
[5] Turn on the system
[5] Turn on the system
26 Océ VarioPrint 2090 Job manual
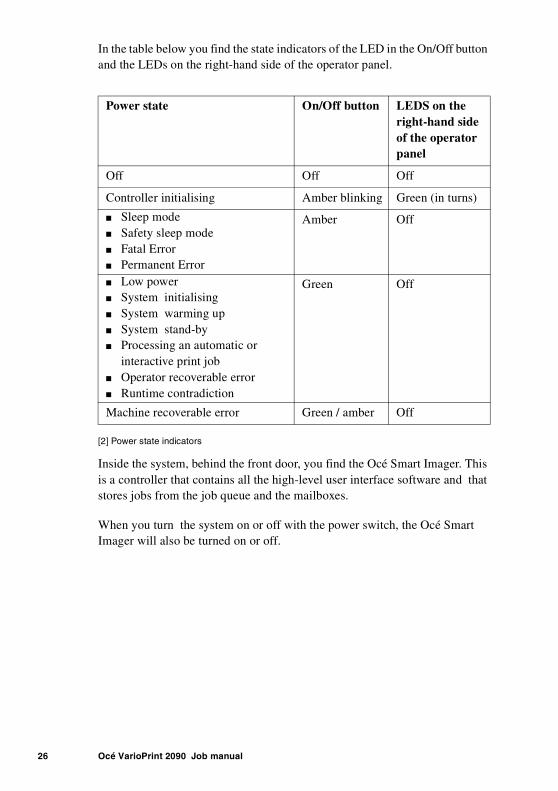
In the table below you find the state indicators of the LED in the On/Off button and the LEDs on the right-hand side of the operator panel.
[2] Power state indicators
[2] Power state indicators
Inside the system, behind the front door, you find the Océ Smart Imager. This is a controller that contains all the high-level user interface software and that stores jobs from the job queue and the mailboxes.
When you turn the system on or off with the power switch, the Océ Smart Imager will also be turned on or off.
Power state On/Off button LEDS on the right-hand side of the operator panel
Off Off Off
Controller initialising Amber blinking Green (in turns)
■ Sleep mode■ Safety sleep mode■ Fatal Error■ Permanent Error
Amber Off
■ Low power■ System initialising■ System warming up■ System stand-by■ Processing an automatic or
interactive print job■ Operator recoverable error■ Runtime contradiction
Green Off
Machine recoverable error Green / amber Off

Get started 27
How to turn on the Océ VarioPrint 2090
1 Press the power switch . The Océ Smart Imager starts up. The following occurs.■ The LED on the operator panel blinks.■ The screen of the operator panel is off/black.
2 Wait a few minutes, then the screen displays the Océ VarioPrint 2090 logo.3 After the screen displays the message to press the On/Off button , you can
follow this instruction. The LED in the On/Off button changes from amber to green.
How to wake-up the Océ VarioPrint 2090 from sleep mode
1 Press the On/Off button . 2 The LED in the On/Off button changes from amber to green.
28 Océ VarioPrint 2090 Job manual
Shut down the Océ VarioPrint 2090
Introduction
This chapter describes how to shut down the Océ VarioPrint 2090 system. The Océ Smart Imager inside is a PC that controls the Océ VarioPrint 2090 . Therefore, you must follow the shut down procedure to shut down the Océ Smart Imager and eventually the complete system.
When to do
When you shut down the Océ VarioPrint 2090 at the end of the day, the information in the mailbox will remain available after you start up the Océ VarioPrint 2090 again.
Information in the job queue will be lost when you shut down the machine.Jobs that have not entered the mailbox at the moment that you shut down the machine will also be lost.
Attention: Follow the shut down procedure on the operator panel before you shut down the Océ VarioPrint 2090 with the power switch .
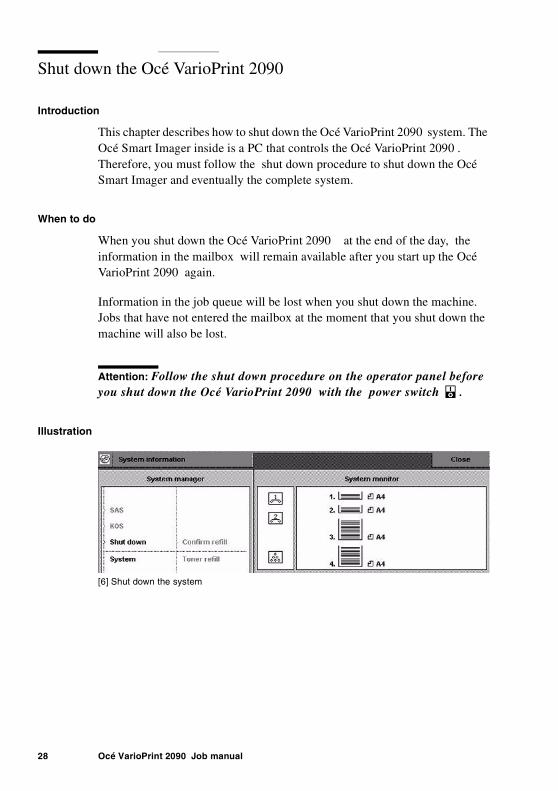
Illustration[6] Shut down the system
[6] Shut down the system
Get started 29
How to shut down the Océ VarioPrint 2090
1 Press to open the 'System manager' on the operator panel.2 Press 'Shut down' to start the shut down procedure. 3 Select 'Yes' to confirm the procedure or 'No' to stop the procedure.4 The Smart Imager will start shutting down (the LED onon the right-hand side
of the operator panel changes from green to red).5 A message is displayed that instructs you to wait until the LED on the
right-hand side of the operator panel is off before you press the power switch .
6 Read the message and press the key for 'OK' to continue the shut down procedure.- The LED in the On/Off button changes from green to amber.- The screen of the operator panel goes off.- The LED next to the goes off.
7 Press the power switch .
How to put the Océ VarioPrint 2090 into sleep mode
1 Press the On/Off button . The system switches to sleep mode. The LED in the button changes from green to amber,orNote: If the system processes a job, the system stops printing after all the jobs in the job queue are completed and then goes into sleep mode.
30 Océ VarioPrint 2090 Job manual
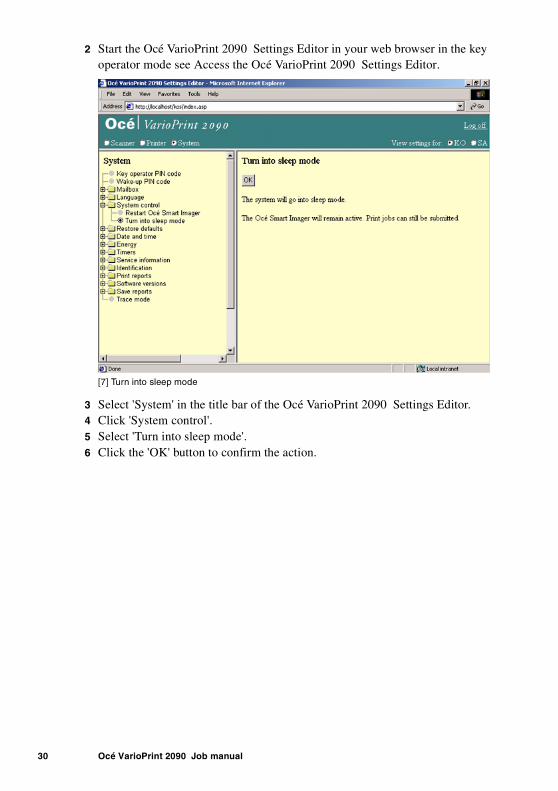
2 Start the Océ VarioPrint 2090 Settings Editor in your web browser in the key operator mode see Access the Océ VarioPrint 2090 Settings Editor.[7] Turn into sleep mode
[7] Turn into sleep mode
3 Select 'System' in the title bar of the Océ VarioPrint 2090 Settings Editor. 4 Click 'System control'. 5 Select 'Turn into sleep mode'. 6 Click the 'OK' button to confirm the action.

Get started 31
Restart the Océ Smart Imager
Introduction
When you change some settings in the Océ VarioPrint 2090 Settings Editor, the software may ask you to restart the Océ Smart Imager. A restart activates the new changed settings.
If you restart the Océ Smart Imager the following is achieved.■ the Océ VarioPrint 2090 Settings Editor changes become active.■ the jobs in the mailbox are saved.■ the job queue is not saved.■ the job number of new copy and scan jobs is set to 1.
You can restart the Océ Smart Imager if you use the Océ VarioPrint 2090 Settings Editor. Follow the procedure below to restart the Océ Smart Imager.
Before you begin
Start the Océ VarioPrint 2090 Settings Editor in your web browser in key operator mode or system administrator mode. To start Océ VarioPrint 2090 Settings Editor, see Access the Océ VarioPrint 2090 Settings Editor in the Configuration and maintenance manual.
32 Océ VarioPrint 2090 Job manual
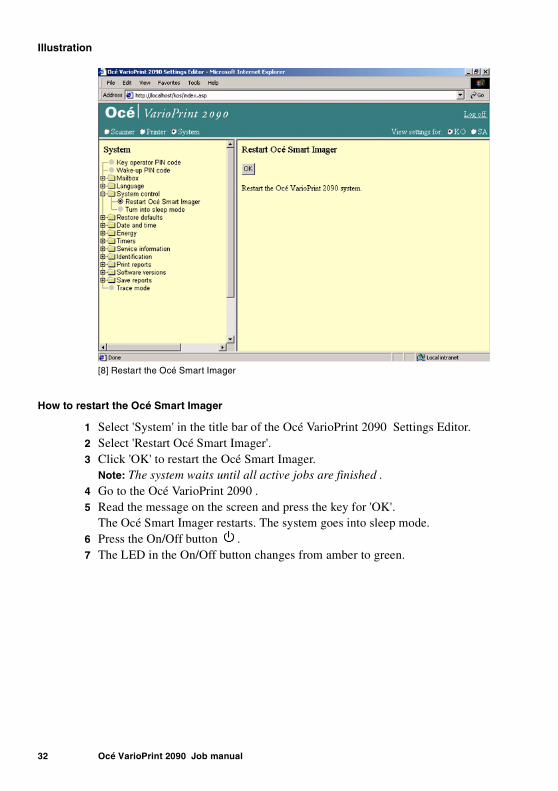
Illustration[8] Restart the Océ Smart Imager
[8] Restart the Océ Smart Imager
How to restart the Océ Smart Imager
1 Select 'System' in the title bar of the Océ VarioPrint 2090 Settings Editor. 2 Select 'Restart Océ Smart Imager'. 3 Click 'OK' to restart the Océ Smart Imager.
Note: The system waits until all active jobs are finished .4 Go to the Océ VarioPrint 2090 .5 Read the message on the screen and press the key for 'OK'.
The Océ Smart Imager restarts. The system goes into sleep mode.6 Press the On/Off button .7 The LED in the On/Off button changes from amber to green.

33
Océ VarioPrint 2090
User manual
Chapter 3 Print jobs (mailbox)
34 Océ VarioPrint 2090 Job manual
About the mailbox
Introduction
A mailbox is a digital storage area (not intended for archiving purposes) for print jobs from the network. This digital storage area is on the hard disk of the Océ Smart Imager.
When you print a document from your desktop, there are 2 options.1 The print job is sent to the mailbox of the Océ VarioPrint 2090 .2 The print job is sent to the job queue of the Océ VarioPrint 2090 (not available
yet in this version).
If the job is sent to the mailbox, you can access the job on the operator panel of the Océ VarioPrint 2090 . You have a personal user-area in the mailbox where you can find your print jobs.
The mailbox allows you to do the following.■ Edit the job settings for multiple print jobs.■ Start to print one or more jobs.■ Delete one or more jobs.
When you start a job from the mailbox, you send a copy of the mailbox job to the job queue. The original job remains in the mailbox. You can reuse the mailbox job as many times as required. Each time you start a job from the mailbox, you create a copy of the print job that is sent to the job queue.
To remove a job from the mailbox, you must delete the job.If you delete the mailbox job, the jobs that are started to the job queue are not automatically deleted as well. You must delete these jobs separately.
Note: The key operator can clear the mailboxes periodically. The key operator defines the storage time of jobs in the mailbox ('1 day', '1 week', '1 month' or 'Infinitely') see automatic mailbox cleanup.
Job order in the mailbox
When you open your mailbox on the operator panel, you see all your jobs. All new (or unprinted) jobs that you send from your desktop are highlighted. (The user that last sent a print job to the Océ VarioPrint 2090 is highlighted in the user list on the operator panel.) You can scroll through the list of jobs with the 4 arrow keys ( , , and ) on the right-hand side of the display.
Print jobs (mailbox) 35
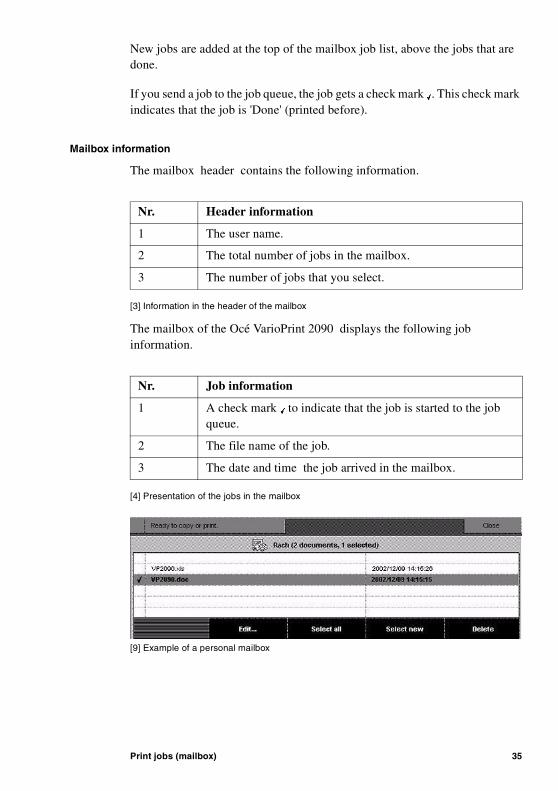
New jobs are added at the top of the mailbox job list, above the jobs that are done.
If you send a job to the job queue, the job gets a check mark . This check mark indicates that the job is 'Done' (printed before).
Mailbox information
The mailbox header contains the following information.
[3] Information in the header of the mailbox
[3] Information in the header of the mailbox
The mailbox of the Océ VarioPrint 2090 displays the following job information.
[4] Presentation of the jobs in the mailbox
[4] Presentation of the jobs in the mailbox
[9] Example of a personal mailbox
[9] Example of a personal mailbox
Nr. Header information
1 The user name.
2 The total number of jobs in the mailbox.
3 The number of jobs that you select.
Nr. Job information
1 A check mark to indicate that the job is started to the job queue.
2 The file name of the job.
3 The date and time the job arrived in the mailbox.
36 Océ VarioPrint 2090 Job manual
Graphical information
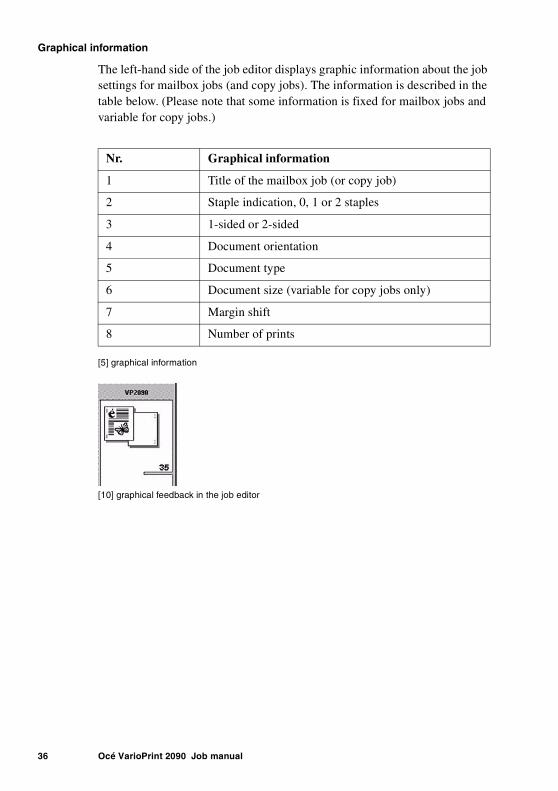
The left-hand side of the job editor displays graphic information about the job settings for mailbox jobs (and copy jobs). The information is described in the table below. (Please note that some information is fixed for mailbox jobs and variable for copy jobs.)
[5] graphical information
[5] graphical information
[10] graphical feedback in the job editor
[10] graphical feedback in the job editor
Nr. Graphical information
1 Title of the mailbox job (or copy job)
2 Staple indication, 0, 1 or 2 staples
3 1-sided or 2-sided
4 Document orientation
5 Document type
6 Document size (variable for copy jobs only)
7 Margin shift
8 Number of prints
Print jobs (mailbox) 37
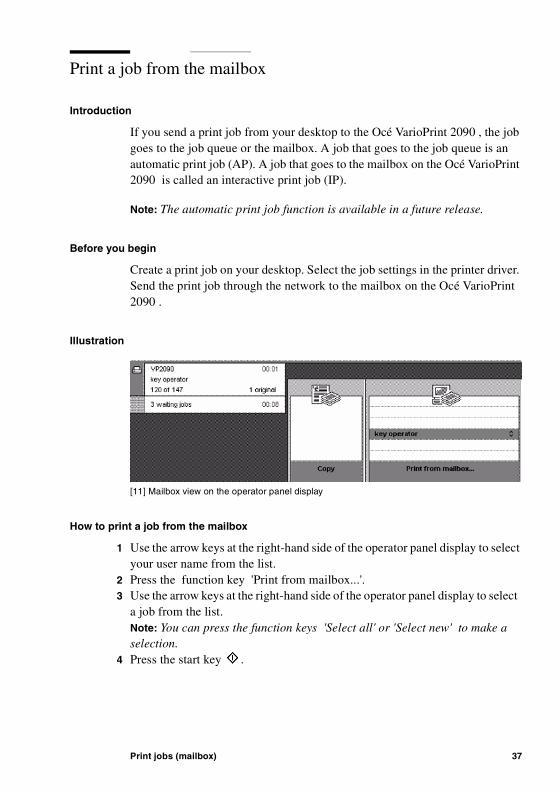
Print a job from the mailbox
Introduction
If you send a print job from your desktop to the Océ VarioPrint 2090 , the job goes to the job queue or the mailbox. A job that goes to the job queue is an automatic print job (AP). A job that goes to the mailbox on the Océ VarioPrint 2090 is called an interactive print job (IP).
Note: The automatic print job function is available in a future release.
Before you begin
Create a print job on your desktop. Select the job settings in the printer driver. Send the print job through the network to the mailbox on the Océ VarioPrint 2090 .
Illustration[11] Mailbox view on the operator panel display
[11] Mailbox view on the operator panel display
How to print a job from the mailbox
1 Use the arrow keys at the right-hand side of the operator panel display to select your user name from the list.
2 Press the function key 'Print from mailbox...'.3 Use the arrow keys at the right-hand side of the operator panel display to select
a job from the list.Note: You can press the function keys 'Select all' or 'Select new' to make a selection.
4 Press the start key .

38 Océ VarioPrint 2090 Job manual
Result
A copy of the mailbox job is sent to the job queue of the Océ VarioPrint 2090. The mailbox job gets a check mark . This check mark indicates that the job has been sent to the job queue. The job remains in the mailbox and you can use the job again until you delete the job.

Print jobs (mailbox) 39
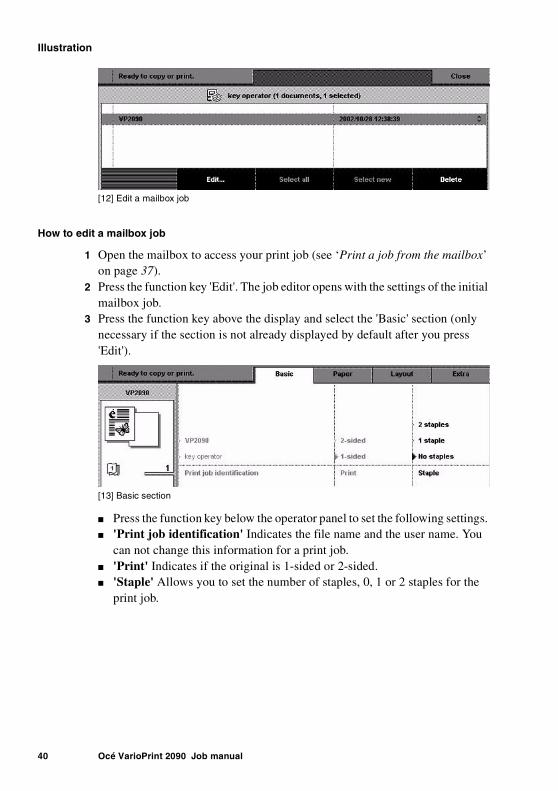
Edit a mailbox job
Introduction
When you start a job from the mailbox, a copy of this mailbox job is sent to the job queue. You can change the settings of that job in the job editor before you send the job to the job queue. Your changes are not applied to the original job that you sent to the mailbox. The changes you make in the job editor are applied to the job that is sent to the job queue.
Options
You access the job settings through the 'Edit' function. The job settings are accessible on the following 4 sections. ■ 'Basic'■ 'Paper'■ 'Layout'■ 'Extra'
Use the numeric keys to define the number of prints. The number of prints is displayed on the left-hand side of the 4 settings sections.
Note: You can select more than one job in the mailbox, use the function key 'Edit' to change the settings for multiple jobs.
When to do
If you want to check or change the job settings of a print job or define the number of prints before you start a print job, you can access the job settings in the mailbox.
Before you begin
Create a print job on your desktop. Select the job settings in the printer driver. Send the print job through the network to the mailbox on the Océ VarioPrint 2090 .
40 Océ VarioPrint 2090 Job manual
Illustration[12] Edit a mailbox job
[12] Edit a mailbox job
How to edit a mailbox job
1 Open the mailbox to access your print job (see ‘Print a job from the mailbox’ on page 37).
2 Press the function key 'Edit'. The job editor opens with the settings of the initial mailbox job.
3 Press the function key above the display and select the 'Basic' section (only necessary if the section is not already displayed by default after you press 'Edit'). [13] Basic section
[13] Basic section
■ Press the function key below the operator panel to set the following settings. ■ 'Print job identification' Indicates the file name and the user name. You
can not change this information for a print job.■ 'Print' Indicates if the original is 1-sided or 2-sided.■ 'Staple' Allows you to set the number of staples, 0, 1 or 2 staples for the
print job.
Print jobs (mailbox) 41
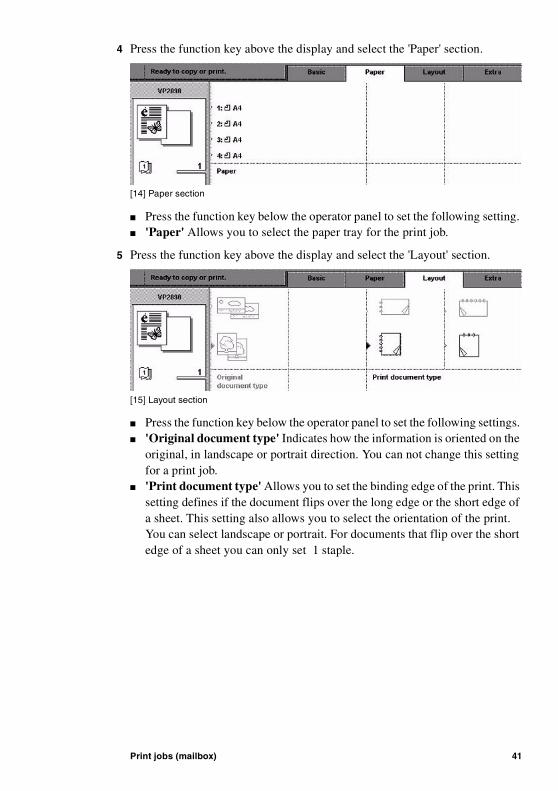
4 Press the function key above the display and select the 'Paper' section.[14] Paper section
[14] Paper section
■ Press the function key below the operator panel to set the following setting. ■ 'Paper' Allows you to select the paper tray for the print job.
5 Press the function key above the display and select the 'Layout' section.[15] Layout section
[15] Layout section
■ Press the function key below the operator panel to set the following settings. ■ 'Original document type' Indicates how the information is oriented on the
original, in landscape or portrait direction. You can not change this setting for a print job.
■ 'Print document type' Allows you to set the binding edge of the print. This setting defines if the document flips over the long edge or the short edge of a sheet. This setting also allows you to select the orientation of the print. You can select landscape or portrait. For documents that flip over the short edge of a sheet you can only set 1 staple.
42 Océ VarioPrint 2090 Job manual
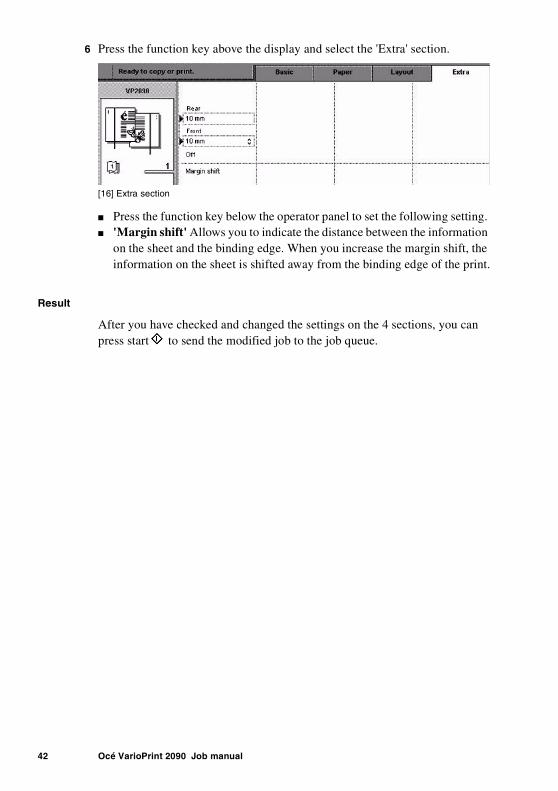
6 Press the function key above the display and select the 'Extra' section.[16] Extra section
[16] Extra section
■ Press the function key below the operator panel to set the following setting. ■ 'Margin shift' Allows you to indicate the distance between the information
on the sheet and the binding edge. When you increase the margin shift, the information on the sheet is shifted away from the binding edge of the print.
Result
After you have checked and changed the settings on the 4 sections, you can press start to send the modified job to the job queue.
Print jobs (mailbox) 43
Stop printing
Introduction
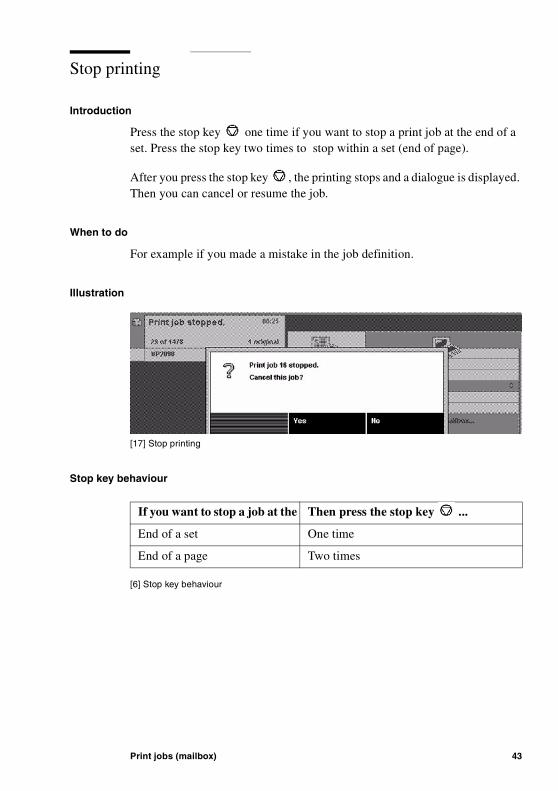
Press the stop key one time if you want to stop a print job at the end of a set. Press the stop key two times to stop within a set (end of page).
After you press the stop key , the printing stops and a dialogue is displayed. Then you can cancel or resume the job.
When to do
For example if you made a mistake in the job definition.
Illustration[17] Stop printing
[17] Stop printing
Stop key behaviour[6] Stop key behaviour
[6] Stop key behaviour
If you want to stop a job at the Then press the stop key ...
End of a set One time
End of a page Two times
44 Océ VarioPrint 2090 Job manual
Result
After the printer stops printing, the following dialogue with two options appears.
[7] Stop key dialogue
[7] Stop key dialogue
'Cancel this job?' Result
'Yes' The job is cancelled. If the job is stored in the mailbox, you can print the job again. If you stopped printing at the end of a page, the partial set must be removed from the output destination. The Océ VarioPrint 2090 prints the next job in the job queue (if any).
'No' The Océ VarioPrint 2090 continues to print the job.
Print jobs (mailbox) 45
Remove jobs from the mailbox
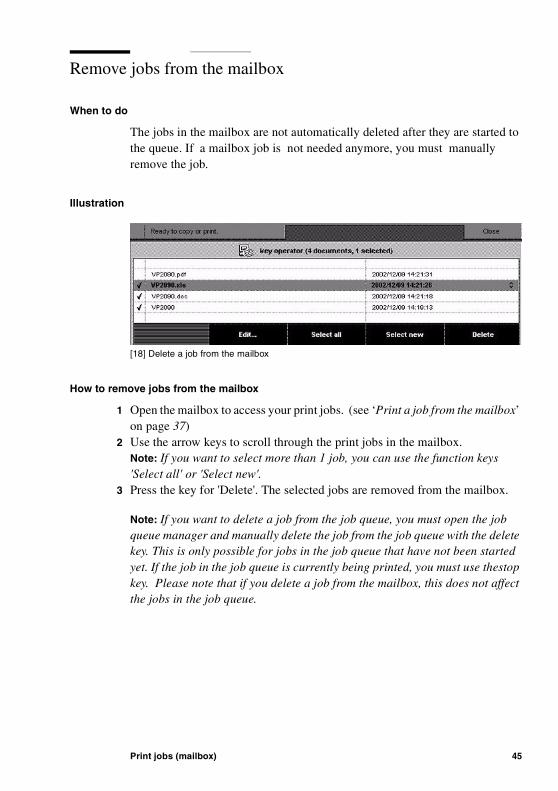
When to do
The jobs in the mailbox are not automatically deleted after they are started to the queue. If a mailbox job is not needed anymore, you must manually remove the job.
Illustration[18] Delete a job from the mailbox
[18] Delete a job from the mailbox
How to remove jobs from the mailbox
1 Open the mailbox to access your print jobs. (see ‘Print a job from the mailbox’ on page 37)
2 Use the arrow keys to scroll through the print jobs in the mailbox.Note: If you want to select more than 1 job, you can use the function keys 'Select all' or 'Select new'.
3 Press the key for 'Delete'. The selected jobs are removed from the mailbox.
Note: If you want to delete a job from the job queue, you must open the job queue manager and manually delete the job from the job queue with the delete key. This is only possible for jobs in the job queue that have not been started yet. If the job in the job queue is currently being printed, you must use thestop key. Please note that if you delete a job from the mailbox, this does not affect the jobs in the job queue.
46 Océ VarioPrint 2090 Job manual
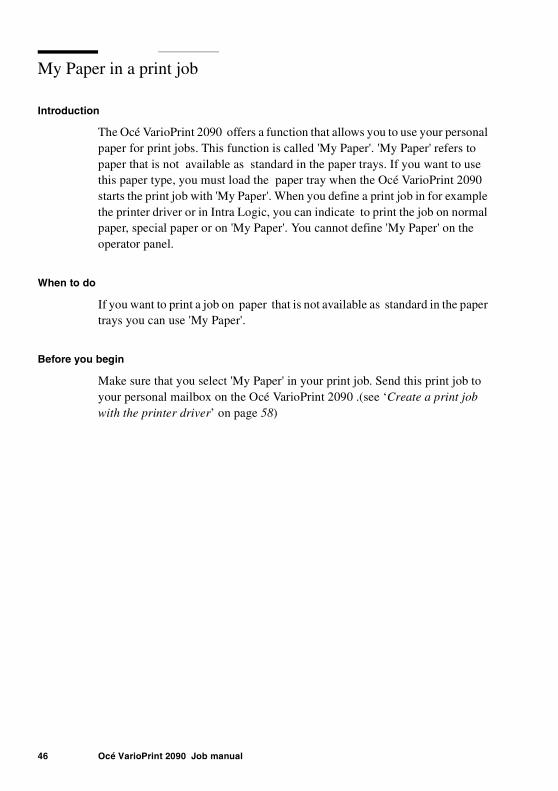
My Paper in a print job
Introduction
The Océ VarioPrint 2090 offers a function that allows you to use your personal paper for print jobs. This function is called 'My Paper'. 'My Paper' refers to paper that is not available as standard in the paper trays. If you want to use this paper type, you must load the paper tray when the Océ VarioPrint 2090 starts the print job with 'My Paper'. When you define a print job in for example the printer driver or in Intra Logic, you can indicate to print the job on normal paper, special paper or on 'My Paper'. You cannot define 'My Paper' on the operator panel.
When to do
If you want to print a job on paper that is not available as standard in the paper trays you can use 'My Paper'.
Before you begin
Make sure that you select 'My Paper' in your print job. Send this print job to your personal mailbox on the Océ VarioPrint 2090 .(see ‘Create a print job with the printer driver’ on page 58)
Print jobs (mailbox) 47
Illustration[19] My Paper setting in the printer driver
[19] My Paper setting in the printer driver
How to create a print job with My Paper
1 Select the print option in your application. The print application window appears.
2 Select the required settings in the print application window.3 Select the name of the printer, for example Océ VarioPrint 2090 .4 Select 'Properties' to access the settings in the printer driver.5 Click the 'Job' tab.6 Select 'My Paper' in the 'Media type' combo box.7 Click 'OK' to confirm your settings and click 'OK' again to send the job to your
mailbox on the Océ VarioPrint 2090 .

48 Océ VarioPrint 2090 Job manual
Illustration[20] My Paper message dialogue
[20] My Paper message dialogue
How to print a job on My Paper
1 Open your personal mailbox on the operator panel of the Océ VarioPrint 2090 . 2 Select the print job and check the settings if necessary.3 Set the number of prints with the numeric keys.4 Press the start key .5 A message appears. 'Job needs My Paper.'6 Open a paper tray and load the paper. See Load the paper trays7 Close the paper tray.8 Indicate the correct paper tray on the operator panel. 9 Press the function key to continue. The job starts to print.
Note: You can also put 'My Paper' in the paper tray before you start the print job. When you start the job and the message dialogue appears, you must indicate which paper tray contains your personal paper.
Print jobs (mailbox) 49
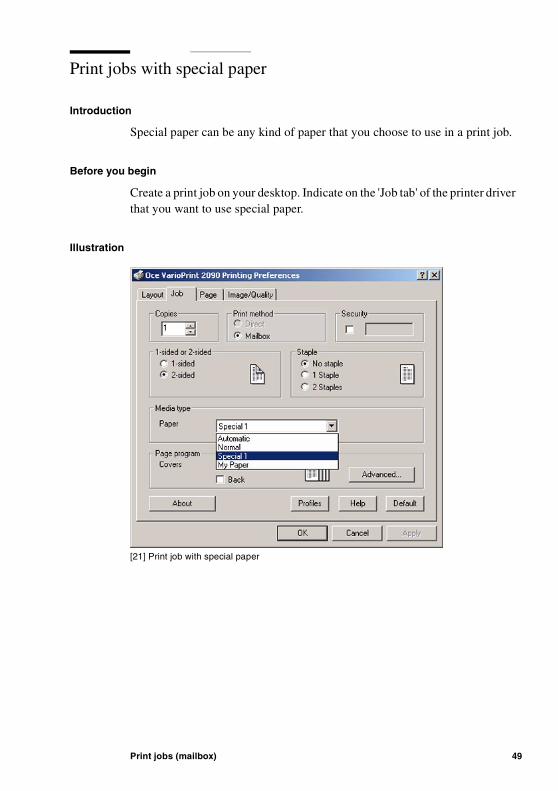
Print jobs with special paper
Introduction
Special paper can be any kind of paper that you choose to use in a print job.
Before you begin
Create a print job on your desktop. Indicate on the 'Job tab' of the printer driver that you want to use special paper.
Illustration[21] Print job with special paper
[21] Print job with special paper
50 Océ VarioPrint 2090 Job manual
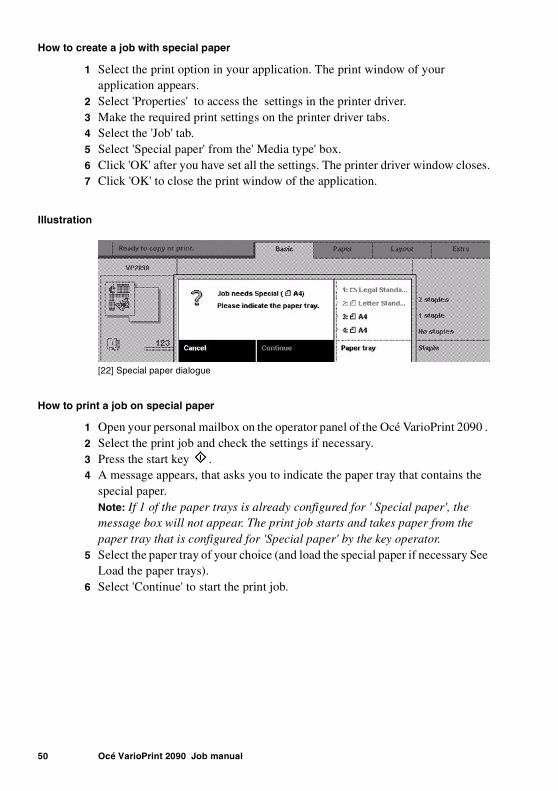
How to create a job with special paper
1 Select the print option in your application. The print window of your application appears.
2 Select 'Properties' to access the settings in the printer driver.3 Make the required print settings on the printer driver tabs.4 Select the 'Job' tab.5 Select 'Special paper' from the' Media type' box.6 Click 'OK' after you have set all the settings. The printer driver window closes.7 Click 'OK' to close the print window of the application.
Illustration[22] Special paper dialogue
[22] Special paper dialogue
How to print a job on special paper
1 Open your personal mailbox on the operator panel of the Océ VarioPrint 2090 . 2 Select the print job and check the settings if necessary.3 Press the start key .4 A message appears, that asks you to indicate the paper tray that contains the
special paper.Note: If 1 of the paper trays is already configured for ' Special paper', the message box will not appear. The print job starts and takes paper from the paper tray that is configured for 'Special paper' by the key operator.
5 Select the paper tray of your choice (and load the special paper if necessary See Load the paper trays).
6 Select 'Continue' to start the print job.
Print jobs (mailbox) 51
Secure print jobs
Introduction
The Océ VarioPrint 2090 allows you to protect sensitive information in a print job. If you want to print a job that contains sensitive information, you can set a protective PIN code. This PIN code is set in the printer driver or in Océ Intra Logic. The PIN code has a length of 1-5 digits. After you send the print job to the Océ VarioPrint 2090 , you can not change the PIN code of the print job. The secure print job goes to the mailbox on the Océ VarioPrint 2090 . You can open the job editor to modify the job settings. You do not need to enter the PIN code to change the job settings. When you press the start key , a message appears. Enter the PIN code to continue.
Note: You do not need a PIN code to remove a secure print job from the mailbox. (see ‘Remove jobs from the mailbox’ on page 45)
When to do
When you start a secure print job on the Océ VarioPrint 2090 , a message appears that asks you to enter the PIN code.
Before you begin
Create a print job on your PC. Set the PIN code in the printer driver or in Océ Intra Logic before you send the job to the mailbox of the Océ VarioPrint 2090 (see ‘Create a secure print job with the printer driver’ on page 60).
Note: You can not set or change a PIN code of a print job through the operator panel of the Océ VarioPrint 2090 .
How to print a secure print job
1 Open and print the job in the mailbox (see ‘Print a job from the mailbox’ on page 37).
2 Press the start key .A message appears that asks you to enter the PIN code.
3 Use the numeric keys to enter the PIN code (enter 1-5 digits).
52 Océ VarioPrint 2090 Job manual
Result
The following situations can occur after you enter the PIN code.■ Correct PIN code
The message disappears and the print job is sent to the job queue.■ Wrong PIN code
The message disappears and the print job is not started.
Note: If you edit a secure print job and then enter the wrong PIN code, the job is not started. The job editor view with the changed settings stays open. The display does not return to the mailbox view.
53
Océ VarioPrint 2090
User manual
Chapter 4 Print to the Océ VarioPrint 2090
54 Océ VarioPrint 2090 Job manual
About the printer driver
Introduction
You need a printer driver to print jobs from the network to the Océ VarioPrint 2090 . The printer driver allows you to define the print job settings on your PC. The printer driver also makes the files suitable for printing, because the printer driver translates print jobs into PostScript files.The Microsoft Windows operating systems use Adobe PostScript 3 drivers to make printing easier. Océ provides a printer driver on the basis of the Océ VarioPrint 2090 PPD (PostScript Printer Description) for PC users. This PPD adds the Océ VarioPrint 2090 characteristics to a general Adobe PostScript 3 driver. This printer driver translates the print jobs into PostScript files. The PostScript files are sent to the Océ Smart Imager and printed on theOcé VarioPrint 2090 .
There is also an Océ VarioPrint 2090 UPD (Universal PostScript printer Driver) available. This driver runs on Windows 2000 and XP platforms only.
Note: The printer driver version described in this manual can be different from the printer driver version on your PC. Refer to the help file of the printer driver for the most up-to-date description.
Functions of the Océ VarioPrint 2090 printer driver
If you want to print a document to the Océ VarioPrint 2090 you first access the print window of the application. If you click on 'Properties' the print window of the Océ VarioPrint 2090 appears.
The printer driver has the following tabs where you can make the print job settings. Some of these tabs are standard Microsoft tabs (not mentioned here) and some tabs are Océ specific tabs.■ 'Job'■ 'Page'■ 'Image/Quality'
Print to the Océ VarioPrint 2090 55
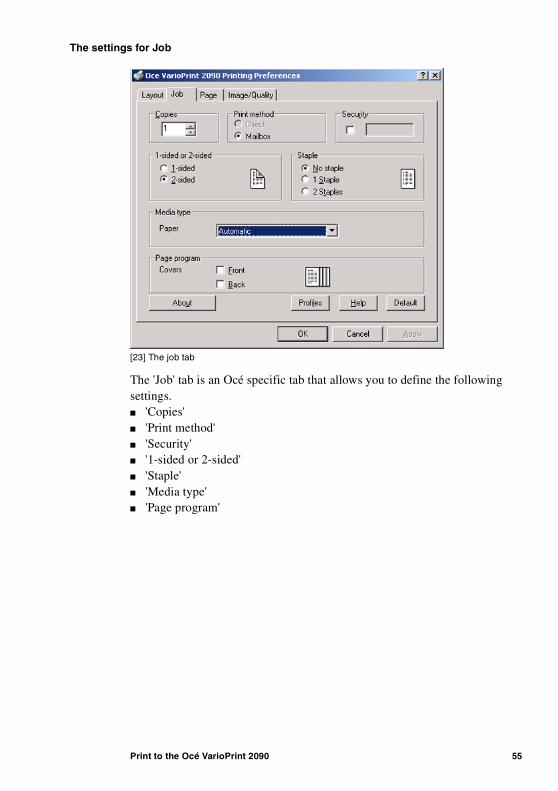
The settings for Job[23] The job tab
[23] The job tab
The 'Job' tab is an Océ specific tab that allows you to define the following settings.■ 'Copies'■ 'Print method'■ 'Security'■ '1-sided or 2-sided'■ 'Staple'■ 'Media type'■ 'Page program'
56 Océ VarioPrint 2090 Job manual
The settings for Page[24] the page tab
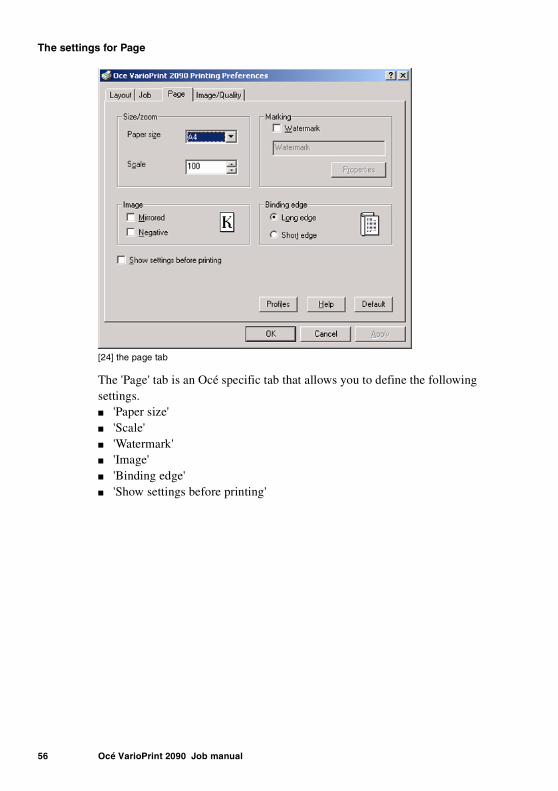
[24] the page tab
The 'Page' tab is an Océ specific tab that allows you to define the following settings.■ 'Paper size'■ 'Scale'■ 'Watermark'■ 'Image'■ 'Binding edge'■ 'Show settings before printing'
Print to the Océ VarioPrint 2090 57
The settings for Image/quality[25] The image/quality tab
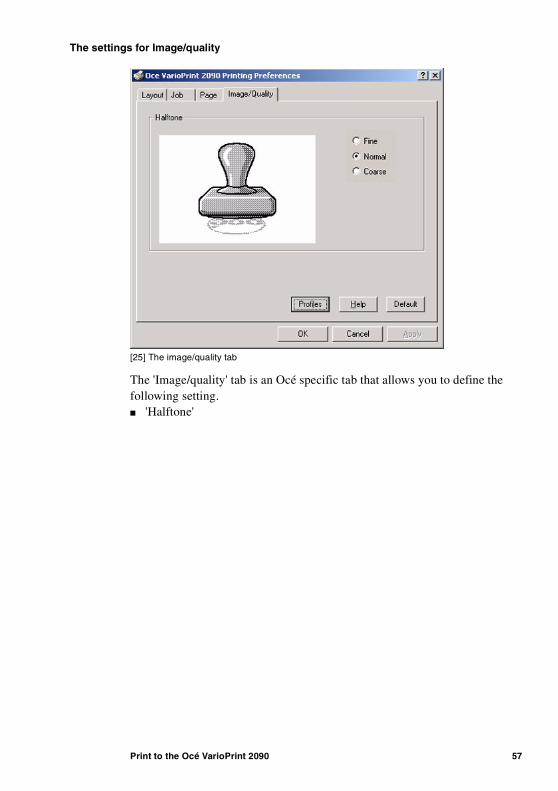
[25] The image/quality tab
The 'Image/quality' tab is an Océ specific tab that allows you to define the following setting.■ 'Halftone'

58 Océ VarioPrint 2090 Job manual
Create a print job with the printer driver
Introduction
If you want to print a document from your desktop application, you can define the print settings before you send the job to the Océ VarioPrint 2090 . The settings that you define are set in the printer driver dialog box.
Illustration[26] Application print window
[26] Application print window
How to start a print job
1 Select the print option in your application. The application print window appears.
2 Select the page range if necessary.3 Select the number of prints.4 Select the name of the printer, for example Océ VarioPrint 2090 .5 Select 'Properties' to access the settings in the printer driver.

Print to the Océ VarioPrint 2090 59
Illustration[27] Print sett ings in the printer driver
[27] Print settings in the printer driver
How to define the print settings in the printer driver
1 Select the settings in the different tabs.2 Click 'OK'. The window of the printer driver closes.3 Click 'OK' in the application window. The document is printed or sent to
theOcé VarioPrint 2090 .
Result
The print job arrives in your personal mailbox on the Océ VarioPrint 2090 . Access the print job on the operator panel to check the settings you made in the printer driver or start the print job. (see ‘Print a job from the mailbox’ on page 37)
60 Océ VarioPrint 2090 Job manual
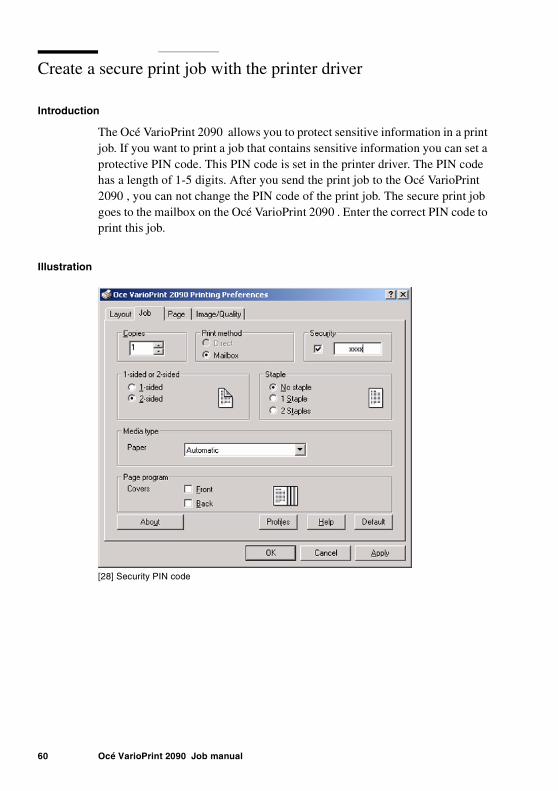
Create a secure print job with the printer driver
Introduction
The Océ VarioPrint 2090 allows you to protect sensitive information in a print job. If you want to print a job that contains sensitive information you can set a protective PIN code. This PIN code is set in the printer driver. The PIN code has a length of 1-5 digits. After you send the print job to the Océ VarioPrint 2090 , you can not change the PIN code of the print job. The secure print job goes to the mailbox on the Océ VarioPrint 2090 . Enter the correct PIN code to print this job.
Illustration[28] Security PIN code
[28] Security PIN code

Print to the Océ VarioPrint 2090 61
How to create a secure print job
1 Select the print option in your application. The print window of your application appears.
2 Select 'Properties' to access the settings in the printer driver.3 Make the required print settings on the printer driver tabs.4 Select the 'Job' tab.5 Click the 'Security' check box.6 Enter a PIN code that has a length of 1-5 digits.
Note: You can not change the PIN code after you send the print job to the printer.
7 Click 'OK' after you have set all the settings. The printer driver window closes.8 Click 'OK' to close the print window of the application.
Result
The print job is sent to the mailbox on the Océ VarioPrint 2090 (see ‘Secure print jobs’ on page 51).
62 Océ VarioPrint 2090 Job manual
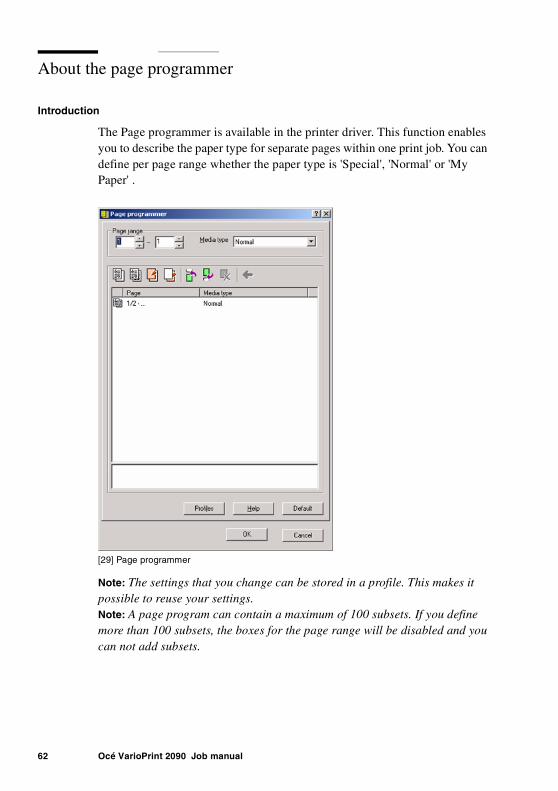
About the page programmer
Introduction
The Page programmer is available in the printer driver. This function enables you to describe the paper type for separate pages within one print job. You can define per page range whether the paper type is 'Special', 'Normal' or 'My Paper' .
[29] Page programmer
[29] Page programmer
Note: The settings that you change can be stored in a profile. This makes it possible to reuse your settings.Note: A page program can contain a maximum of 100 subsets. If you define more than 100 subsets, the boxes for the page range will be disabled and you can not add subsets.
Print to the Océ VarioPrint 2090 63
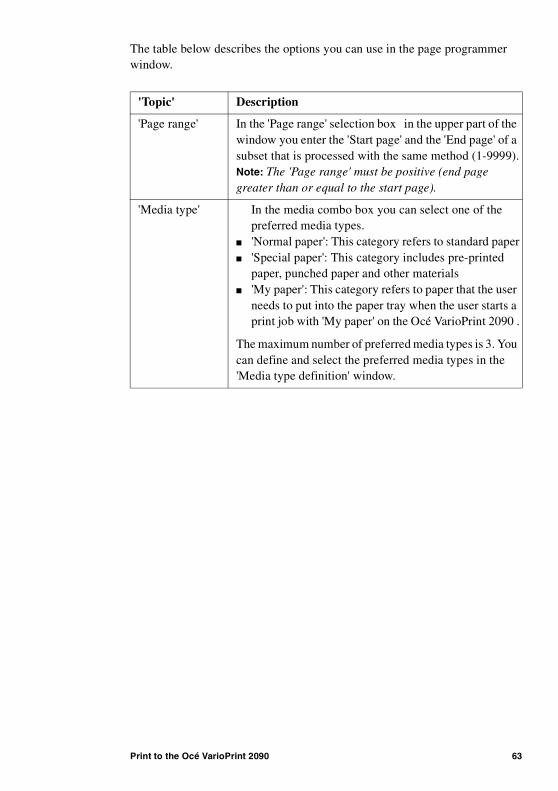
The table below describes the options you can use in the page programmer window.
'Topic' Description
'Page range' In the 'Page range' selection box in the upper part of the window you enter the 'Start page' and the 'End page' of a subset that is processed with the same method (1-9999).Note: The 'Page range' must be positive (end page greater than or equal to the start page).
'Media type' In the media combo box you can select one of the preferred media types.
■ 'Normal paper': This category refers to standard paper■ 'Special paper': This category includes pre-printed
paper, punched paper and other materials ■ 'My paper': This category refers to paper that the user
needs to put into the paper tray when the user starts a print job with 'My paper' on the Océ VarioPrint 2090 .
The maximum number of preferred media types is 3. You can define and select the preferred media types in the 'Media type definition' window.
64 Océ VarioPrint 2090 Job manual
Note: Covers are not programmed in the 'Page programmer 'window. You can define the use of covers on the 'Job' tab in the 'Page program' box in the lower part of the window.
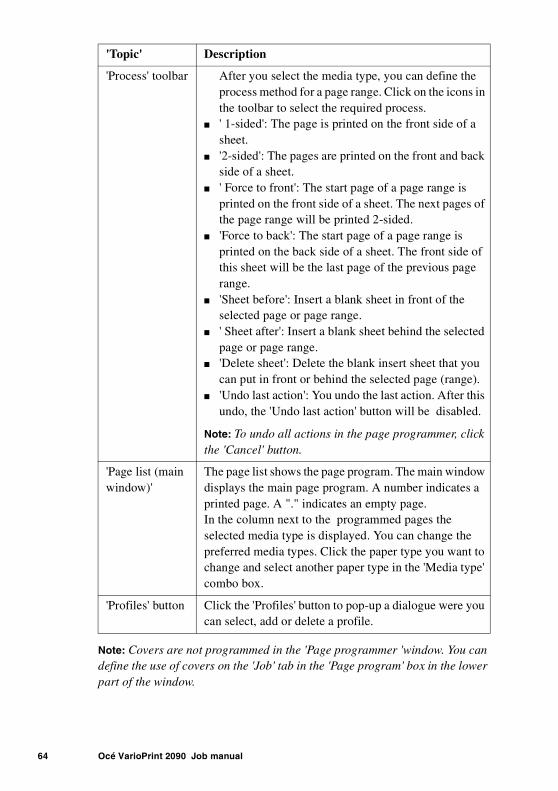
'Process' toolbar After you select the media type, you can define the process method for a page range. Click on the icons in the toolbar to select the required process.
■ ' 1-sided': The page is printed on the front side of a sheet.
■ '2-sided': The pages are printed on the front and back side of a sheet.
■ ' Force to front': The start page of a page range is printed on the front side of a sheet. The next pages of the page range will be printed 2-sided.
■ 'Force to back': The start page of a page range is printed on the back side of a sheet. The front side of this sheet will be the last page of the previous page range.
■ 'Sheet before': Insert a blank sheet in front of the selected page or page range.
■ ' Sheet after': Insert a blank sheet behind the selected page or page range.
■ 'Delete sheet': Delete the blank insert sheet that you can put in front or behind the selected page (range).
■ 'Undo last action': You undo the last action. After this undo, the 'Undo last action' button will be disabled.
Note: To undo all actions in the page programmer, click the 'Cancel' button.
'Page list (main window)'
The page list shows the page program. The main window displays the main page program. A number indicates a printed page. A "." indicates an empty page.In the column next to the programmed pages the selected media type is displayed. You can change the preferred media types. Click the paper type you want to change and select another paper type in the 'Media type' combo box.
'Profiles' button Click the 'Profiles' button to pop-up a dialogue were you can select, add or delete a profile.
'Topic' Description
Print to the Océ VarioPrint 2090 65
About Océ Intra Logic
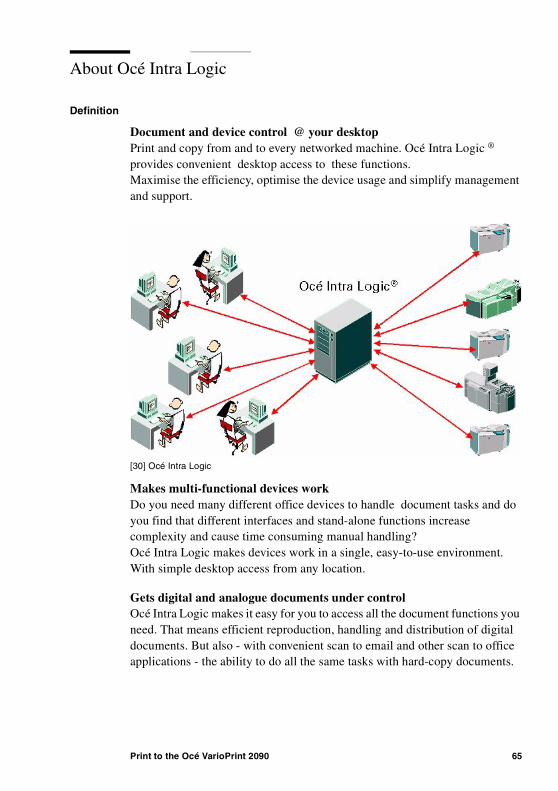
Definition
Document and device control @ your desktopPrint and copy from and to every networked machine. Océ Intra Logic ® provides convenient desktop access to these functions. Maximise the efficiency, optimise the device usage and simplify management and support.
[30] Océ Intra Logic
[30] Océ Intra Logic
Makes multi-functional devices workDo you need many different office devices to handle document tasks and do you find that different interfaces and stand-alone functions increase complexity and cause time consuming manual handling? Océ Intra Logic makes devices work in a single, easy-to-use environment. With simple desktop access from any location.
Gets digital and analogue documents under controlOcé Intra Logic makes it easy for you to access all the document functions you need. That means efficient reproduction, handling and distribution of digital documents. But also - with convenient scan to email and other scan to office applications - the ability to do all the same tasks with hard-copy documents.
66 Océ VarioPrint 2090 Job manual
Supports effective information sharingWhen business processes depend on fast information availability, get documents to those who need them is more important than ever. Thanks to the open interface to different tasks like fax, archive and other office applications. All these tasks are accessible from the users' desktops.
Get maximum productivity from all office devices.With Océ Intra Logic you can make the most efficient, productive use of printers and copiers. Address all SNMP/MIB-compatible printing systems through a web-based browser interface. You can use the right resources for every job, wherever the jobs are located.
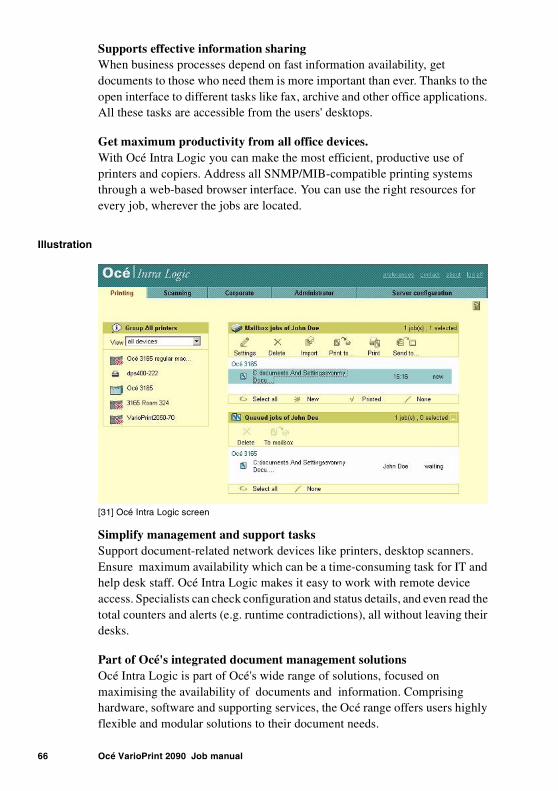
Illustration[31] Océ Intra Logic screen
[31] Océ Intra Logic screen
Simplify management and support tasksSupport document-related network devices like printers, desktop scanners. Ensure maximum availability which can be a time-consuming task for IT and help desk staff. Océ Intra Logic makes it easy to work with remote device access. Specialists can check configuration and status details, and even read the total counters and alerts (e.g. runtime contradictions), all without leaving their desks.
Part of Océ's integrated document management solutionsOcé Intra Logic is part of Océ's wide range of solutions, focused on maximising the availability of documents and information. Comprising hardware, software and supporting services, the Océ range offers users highly flexible and modular solutions to their document needs.
Print to the Océ VarioPrint 2090 67
Océ Intra Logic functions
Introduction
Océ Intra Logic is an easy-to-use intranet application, is used to make more efficient use of the printer.■ Know which paper is loaded.■ See whether the machine is available or not.■ Gather jobs, the whole day and print them in one session.■ Get information about problems (e.g. out of paper).■ Ability to program difficult jobs.
Only relevant information is offered to the user, e.g. the user is informed when there is a jam or paper empty situation for a job.
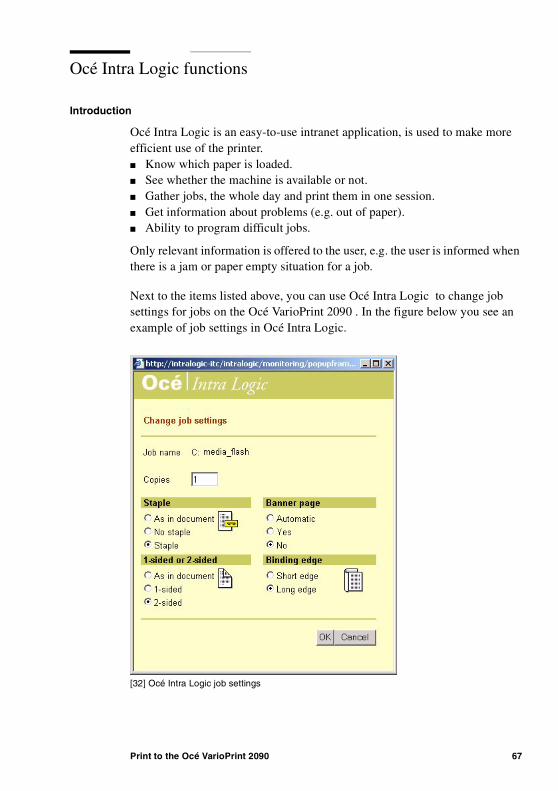
Next to the items listed above, you can use Océ Intra Logic to change job settings for jobs on the Océ VarioPrint 2090 . In the figure below you see an example of job settings in Océ Intra Logic.
[32] Océ Intra Logic job settings
[32] Océ Intra Logic job settings

68 Océ VarioPrint 2090 Job manual
Job settings overview
The following table gives an overview of the job settings you can change in Océ Intra Logic. In the table you see a Yes when a setting is applicable. You see a No when the setting does not influence the Océ VarioPrint 2090 .
[8] Océ Intra Logic job settings
[8] Océ Intra Logic job settings
Setting label Change in mailbox via Océ Intra Logic
General
Number of copies Yes
AP/IP No
Security Code No
Basic
Original sides No
Print sides Yes
Staple Yes
Zoom No
Paper
Paper size No (read-only)
Paper tray No
Paper type Yes
Cover Yes
Orientation (jobs from glass plate only)
No
Document type No
Image type (analogue originals only)
No
Lay out print
Lay out Booklet No (read-only)
Document type Yes
Margin shift front No
Margin shift back No
69
Océ VarioPrint 2090
User manual
Chapter 5 Copy jobs
70 Océ VarioPrint 2090 Job manual
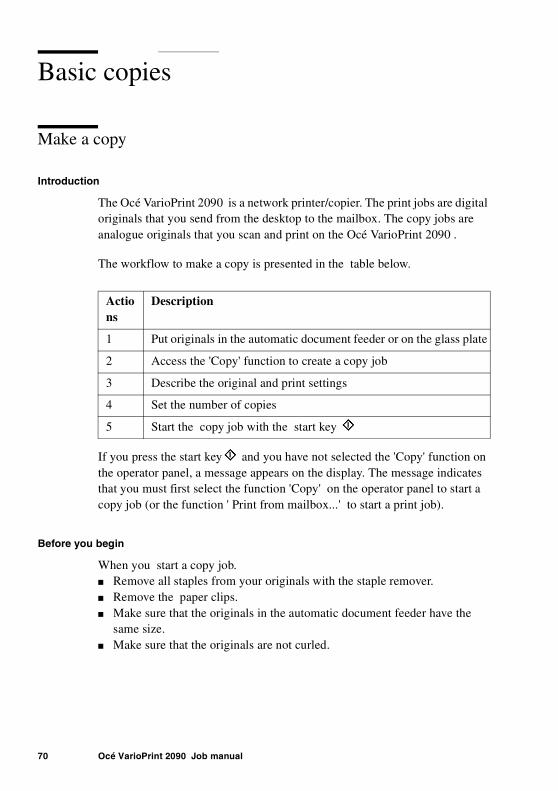
Basic copies
Make a copy
Introduction
The Océ VarioPrint 2090 is a network printer/copier. The print jobs are digital originals that you send from the desktop to the mailbox. The copy jobs are analogue originals that you scan and print on the Océ VarioPrint 2090 .
The workflow to make a copy is presented in the table below.
If you press the start key and you have not selected the 'Copy' function on the operator panel, a message appears on the display. The message indicates that you must first select the function 'Copy' on the operator panel to start a copy job (or the function ' Print from mailbox...' to start a print job).
Before you begin
When you start a copy job.■ Remove all staples from your originals with the staple remover.■ Remove the paper clips.■ Make sure that the originals in the automatic document feeder have the
same size.■ Make sure that the originals are not curled.
Actions
Description
1 Put originals in the automatic document feeder or on the glass plate
2 Access the 'Copy' function to create a copy job
3 Describe the original and print settings
4 Set the number of copies
5 Start the copy job with the start key
Copy jobs 71
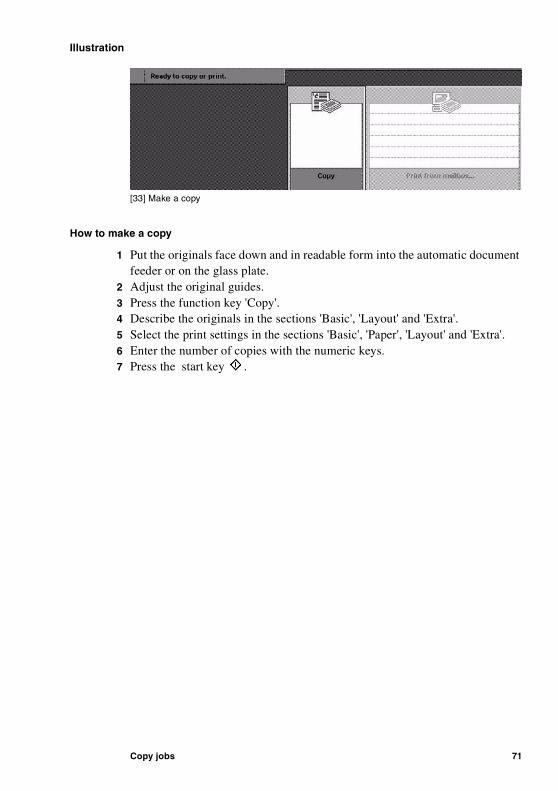
Illustration[33] Make a copy
[33] Make a copy
How to make a copy
1 Put the originals face down and in readable form into the automatic document feeder or on the glass plate.
2 Adjust the original guides.3 Press the function key 'Copy'.4 Describe the originals in the sections 'Basic', 'Layout' and 'Extra'.5 Select the print settings in the sections 'Basic', 'Paper', 'Layout' and 'Extra'.6 Enter the number of copies with the numeric keys.7 Press the start key .
72 Océ VarioPrint 2090 Job manual
Types of copy job settings
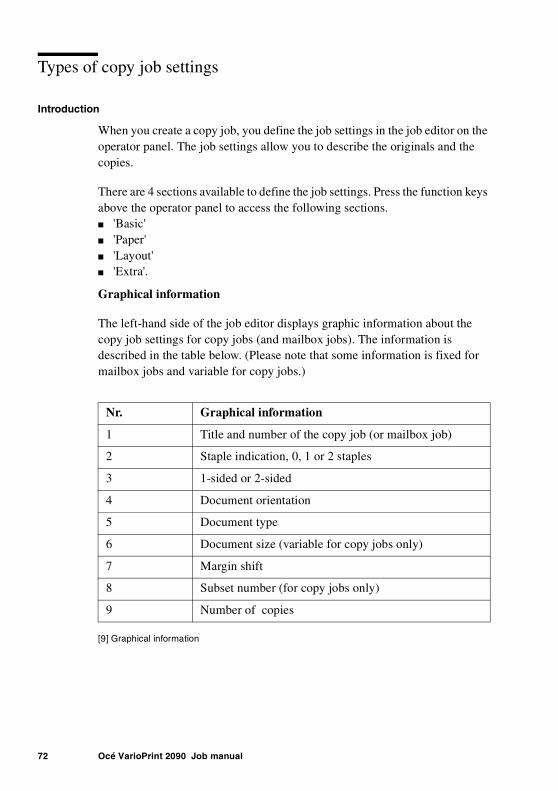
Introduction
When you create a copy job, you define the job settings in the job editor on the operator panel. The job settings allow you to describe the originals and the copies.
There are 4 sections available to define the job settings. Press the function keys above the operator panel to access the following sections.■ 'Basic'■ 'Paper'■ 'Layout'■ 'Extra'.
Graphical information
The left-hand side of the job editor displays graphic information about the copy job settings for copy jobs (and mailbox jobs). The information is described in the table below. (Please note that some information is fixed for mailbox jobs and variable for copy jobs.)
[9] Graphical information
[9] Graphical information
Nr. Graphical information
1 Title and number of the copy job (or mailbox job)
2 Staple indication, 0, 1 or 2 staples
3 1-sided or 2-sided
4 Document orientation
5 Document type
6 Document size (variable for copy jobs only)
7 Margin shift
8 Subset number (for copy jobs only)
9 Number of copies

Copy jobs 73
[34] Graphical feedback
[34] Graphical feedback
Settings on the Basic section[10] The settings on the Basic section
[10] The settings on the Basic section
[35] Basic section
[35] Basic section
Note: The settings of the 'Basic' section for a copy job are not the same as the settings of the 'Basic' section for a print job. The 'Basic' section for a print job has less options. (see ‘Edit a mailbox job’ on page 39)
Settings Description
'Original' This setting describes if the originals must be scanned 1-sided or 2-sided
'Copy' This setting describes if the copies must be 1-sided or 2-sided
'Staple' This setting allows you to set the number of staples. you can set 0, 1 or 2 staples.Note: The position of 1 staple depends on the selected original document type (landscape stapling possible).
'Zoom' This setting has 2 options■ 'Automatic'. This function resizes the information on the
original to fit on a copy with a different paper size. The automatic function uses fixed conversion values.
■ Manual setting. The zoom range is between 25% and 400%.
74 Océ VarioPrint 2090 Job manual
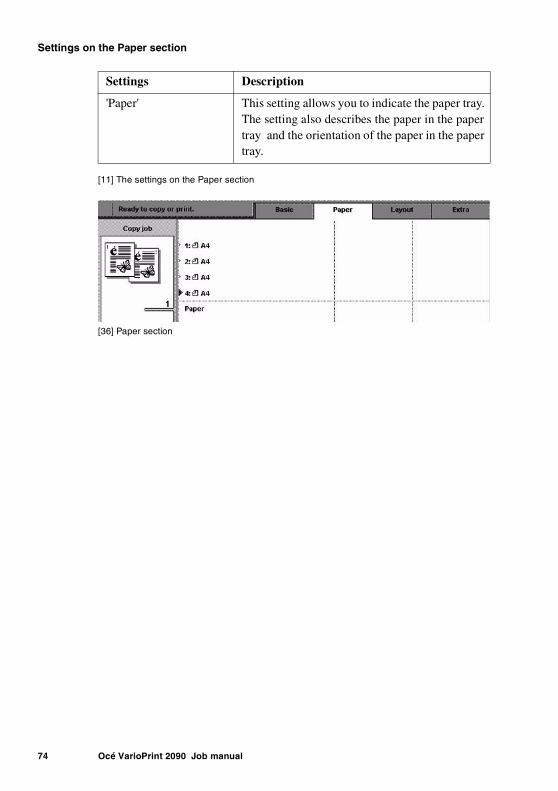
Settings on the Paper section[11] The settings on the Paper section
[11] The settings on the Paper section
[36] Paper section
[36] Paper section
Settings Description
'Paper' This setting allows you to indicate the paper tray. The setting also describes the paper in the paper tray and the orientation of the paper in the paper tray.
Copy jobs 75
Settings on the Layout section[12] The settings on the Layout section
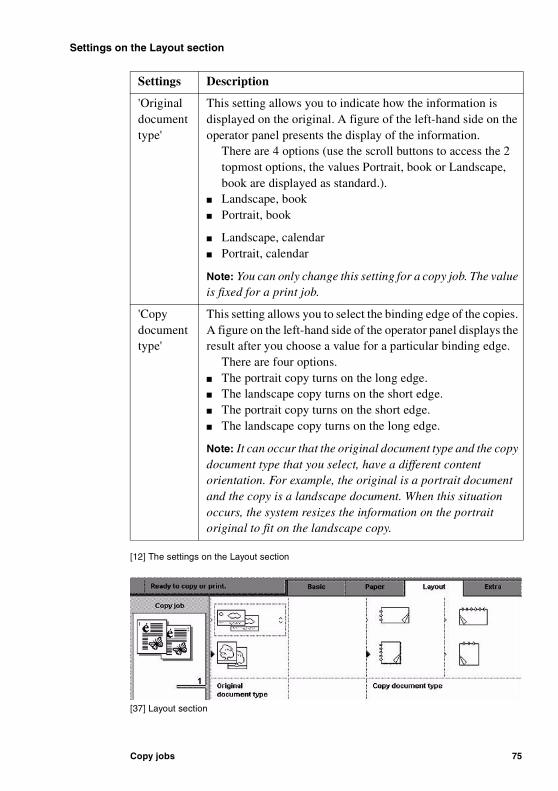
[12] The settings on the Layout section
[37] Layout section
[37] Layout section
Settings Description
'Original document type'
This setting allows you to indicate how the information is displayed on the original. A figure of the left-hand side on the operator panel presents the display of the information.
There are 4 options (use the scroll buttons to access the 2 topmost options, the values Portrait, book or Landscape, book are displayed as standard.).
■ Landscape, book■ Portrait, book
■ Landscape, calendar■ Portrait, calendar
Note: You can only change this setting for a copy job. The value is fixed for a print job.
'Copy document type'
This setting allows you to select the binding edge of the copies. A figure on the left-hand side of the operator panel displays the result after you choose a value for a particular binding edge.
There are four options.■ The portrait copy turns on the long edge.■ The landscape copy turns on the short edge.■ The portrait copy turns on the short edge.■ The landscape copy turns on the long edge.
Note: It can occur that the original document type and the copy document type that you select, have a different content orientation. For example, the original is a portrait document and the copy is a landscape document. When this situation occurs, the system resizes the information on the portrait original to fit on the landscape copy.

76 Océ VarioPrint 2090 Job manual
Settings on the Extra section[13] The settings on the Extra section
[13] The settings on the Extra section
[38] Extra section
[38] Extra section
Settings Description
'Orientation' This setting is read-only for the originals that you put in the automatic document feeder. You can use this setting when you scan the original from the glass plate and the original is small enough to make a scan in 2 directions (A3 can only be scanned in 1 direction on the glass plate).
'Image type' This setting allows you to get the required image quality for the following 3 types of information.■ 'Photo'■ 'Text'■ 'Mixed'
'Margin shift' This setting allows you to indicate the distance between the information on the sheet and the binding edge. When you increase the margin shift, the information on the sheet is shifted away from the binding edge of the copy.

Copy jobs 77
Correct the settings for a copy job
Introduction
You can define or change the settings of a copy job until you press the start key or the set-build key . When you create a copy job, you open the job
editor. There you select the required job settings. Use the correction key to correct the settings.
How to correct the quantity setting for a copy job
1 Press the correction key once to reset the quantity setting (number of prints).
2 Use the numeric keys to enter a new value.3 Press the start key to send the job to the job queue.
Note: If the number of prints is 1, you can not reset the quantity setting to default. In this case, the job settings are set to default when you press the correction key once.
How to correct the settings in the 4 copy job sections
1 Press the correction key two times to reset the values in the 4 sections of the job editor. This action changes all the copy job settings back to the default value.
2 Use the function keys above the operator panel to access the 4 copy job sections.
3 Use the function keys below the operator panel to select the required settings.4 Press the start key to send the job to the job queue.
78 Océ VarioPrint 2090 Job manual
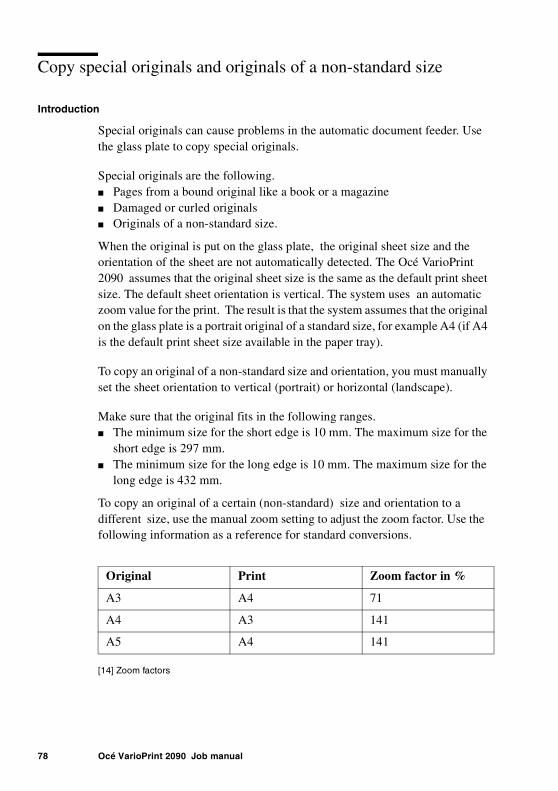
Copy special originals and originals of a non-standard size
Introduction
Special originals can cause problems in the automatic document feeder. Use the glass plate to copy special originals.
Special originals are the following.■ Pages from a bound original like a book or a magazine■ Damaged or curled originals■ Originals of a non-standard size.
When the original is put on the glass plate, the original sheet size and the orientation of the sheet are not automatically detected. The Océ VarioPrint 2090 assumes that the original sheet size is the same as the default print sheet size. The default sheet orientation is vertical. The system uses an automatic zoom value for the print. The result is that the system assumes that the original on the glass plate is a portrait original of a standard size, for example A4 (if A4 is the default print sheet size available in the paper tray).
To copy an original of a non-standard size and orientation, you must manually set the sheet orientation to vertical (portrait) or horizontal (landscape).
Make sure that the original fits in the following ranges.■ The minimum size for the short edge is 10 mm. The maximum size for the
short edge is 297 mm.■ The minimum size for the long edge is 10 mm. The maximum size for the
long edge is 432 mm.
To copy an original of a certain (non-standard) size and orientation to a different size, use the manual zoom setting to adjust the zoom factor. Use the following information as a reference for standard conversions.
[14] Zoom factors
[14] Zoom factors
Original Print Zoom factor in %
A3 A4 71
A4 A3 141
A5 A4 141

Copy jobs 79
Before you begin
1 Open the cover of the scan station.2 Put the original face down, in horizontal or vertical orientation on the glass
plate (in readable form). Note: Put the original in the upper left corner on the glass plate.Note: When you use the glass plate, you must use the set-build key to make 2-sided copies.
How to scan special originals from the glass plate
1 Press the function key 'Copy'.[39] Copy job
[39] Copy job
2 Select the 'Basic' section with the function key above the operator panel display (in case this section is not already opened by default).
3 Select the 'Zoom' percentage box.[40] Zoom setting
[40] Zoom setting
4 Use the arrow keys on the right-hand side of the operator panel display to select the required zoom factor.Note: (see table 14)

80 Océ VarioPrint 2090 Job manual
5 Select the 'Layout' section.6 Set the 'Original document type' to vertical or horizontal. This setting describes
how the information is mapped on the original.[41] Layout settings
[41] Layout settings
7 Select the 'Orientation' setting in the 'Extra' section. This setting describes how the original is put on the glass plate.[42] Extra settings
[42] Extra settings
Note: This setting is greyed out if you use the automatic document feeder.8 Press the start key to send the copy job to the job queue.

Copy jobs 81
Stapled copies
Introduction
The finisher of the Océ VarioPrint 2090 has two staplers to staple sets. The finisher can also have an optional off-line stapler.
You can staple as follows.■ 1 staple in portrait direction■ 2 staples■ 1 staple in landscape direction.
Select the correct document type to create a document with a landscape staple.
[43] Staple function
[43] Staple function
If your set is too thick to staple (this is measured), the screen displays a dialogue. You can do the following.■ Continue without staples.■ Cancel the job.
If one of the staplers is or runs empty, the screen displays a dialogue. You can do the following.■ Continue without staples.■ Refill the staplers.■ Cancel the job.
82 Océ VarioPrint 2090 Job manual
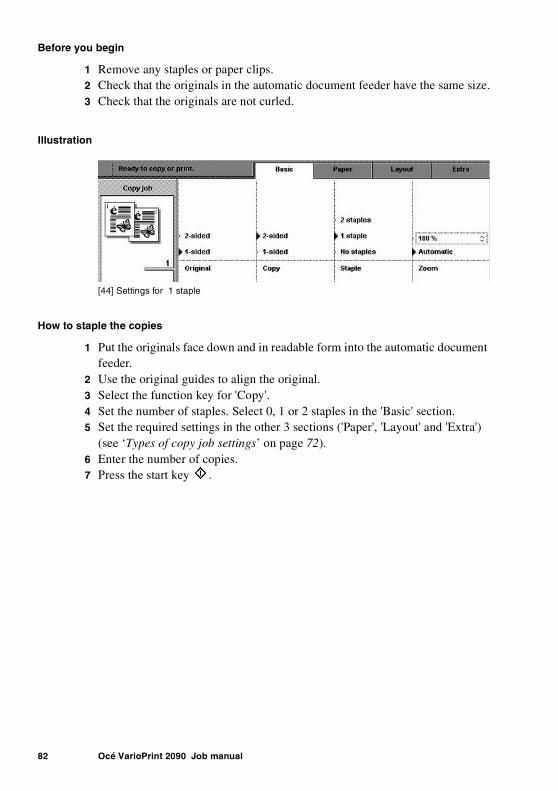
Before you begin
1 Remove any staples or paper clips.2 Check that the originals in the automatic document feeder have the same size.3 Check that the originals are not curled.
Illustration[44] Sett ings for 1 staple
[44] Settings for 1 staple
How to staple the copies
1 Put the originals face down and in readable form into the automatic document feeder.
2 Use the original guides to align the original.3 Select the function key for 'Copy'.4 Set the number of staples. Select 0, 1 or 2 staples in the 'Basic' section.5 Set the required settings in the other 3 sections ('Paper', 'Layout' and 'Extra')
(see ‘Types of copy job settings’ on page 72).6 Enter the number of copies.7 Press the start key .
Copy jobs 83
How to staple a landscape oriented document
1 Follow the steps 1-3 from the previous paragraph.Note: You can use only 1 staple for a landscape oriented document.
2 Select the 'Layout' section.3 Set the 'Original document type' setting to landscape.4 Set the 'Copy document type' setting to landscape. This setting allows you to
describe the orientation and binding edge of the copy.Note: If you change the settings, the left part of the operator panel shows the result of these changes.
5 Define the required settings in the other 3 sections ('Basic', 'Paper' and 'Extra') (see ‘Types of copy job settings’ on page 72).
6 Enter the number of copies.7 Press the start key .
84 Océ VarioPrint 2090 Job manual
Extended copies
Combine subsets into one document
Introduction
The Océ VarioPrint 2090 allows you to create your documents and make a report, a manual or a brochure. Combined (built) documents can include different parts like a title page, the table of contents, the various chapters and the appendices. You can scan some parts of the document 1-sided and other parts 2-sided. You can print the different parts of a document on cover material and separation sheets. You can insert for example pre-printed paper and blank pages.
SubsetsA subset of a document is a number of pages to process in a defined method, for example print on red paper. When the required processing method changes, a new subset begins. When you process parts of a document in a different method, you must divide the document into subsets.
The set-build keyUse the set-build key to scan different subsets. The set-build key is located on the lower left-hand side of the operator panel left of the start key .
When you use the set-build key, the following settings apply to the whole document.■ The staple settings.■ The number of copies.
Remember that you can only combine hardcopy originals into a set-build job. You can not use the set-build key for (digital) documents in the mailbox. You can only use originals from the glass plate or the automatic document feeder. Use the 'Copy' function on the operator panel to start a set-build job.
Copy jobs 85
The automatic document feeder
Use the automatic document feeder to copy a set of originals. You can put a maximum of 50 originals into the automatic document feeder. This number refers to originals of 80 g/m2, size A4.■ The originals must have the same size.■ The originals must not be smaller than 127 x 203 mm.■ The originals must not be larger than 297 x 432 mm.■ The weight of the originals can be between 60 and 170 g/m2.
For the four items above it is necessary that the size is one of the supported standard formats if you use the automatic document feeder.
When to do
Use the procedure below for example to do the following.■ Print a document with many pages.■ Print the appendices of a document on coloured paper.■ Insert blank pages into a document.
Before you begin
Divide your documents into subsets. Arrange the different subsets in the required order. For example, you can put a subset on red paper to act as a front or back cover. When the processing method changes, a new subset begins. You must scan each subset separately with the set-build key .
How to prepare your originals
1 Jog the subset of originals carefully to make a straight stack.2 Put the stack face down and in the readable form into the automatic document
feeder.3 If necessary, adjust the original guides.4 Press the function key 'Copy'.5 Define the settings for the original and the copy in the four sections on the
operator panel ('Basic', 'Paper', 'Layout', 'Extra').
86 Océ VarioPrint 2090 Job manual
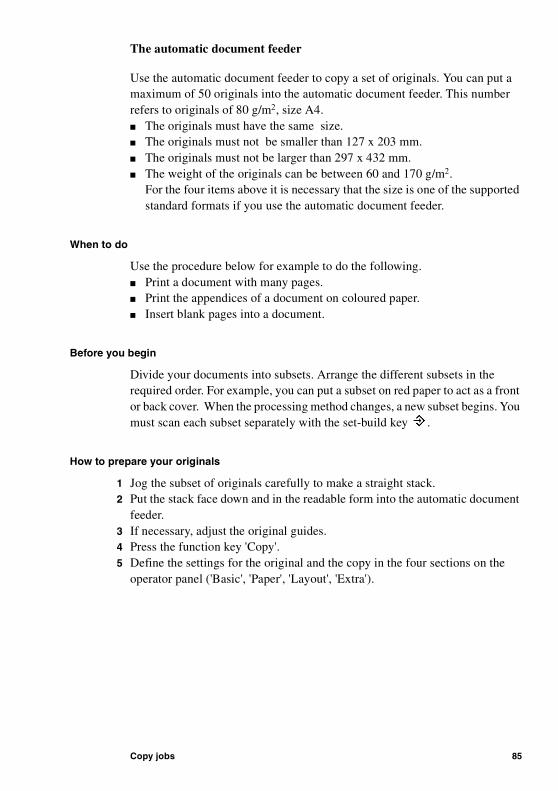
How to scan the subsets
1 Press the set-build key . The originals in the automatic document feeder are scanned.
Illustration[45] Example subsets
[45] Example subsets
How to finish your set-build job
1 Wait for the scan process to finish.2 Put the next stack of originals in the automatic document feeder.3 Follow the steps described in the previous paragraphs for each subset you want
to add.4 After the last subset you must define the staple settings for the whole
document.5 Set the number of copies with the numeric keys.6 Press the start key to send the job to the job queue.
Copy jobs 87
Concatenation and chapterization
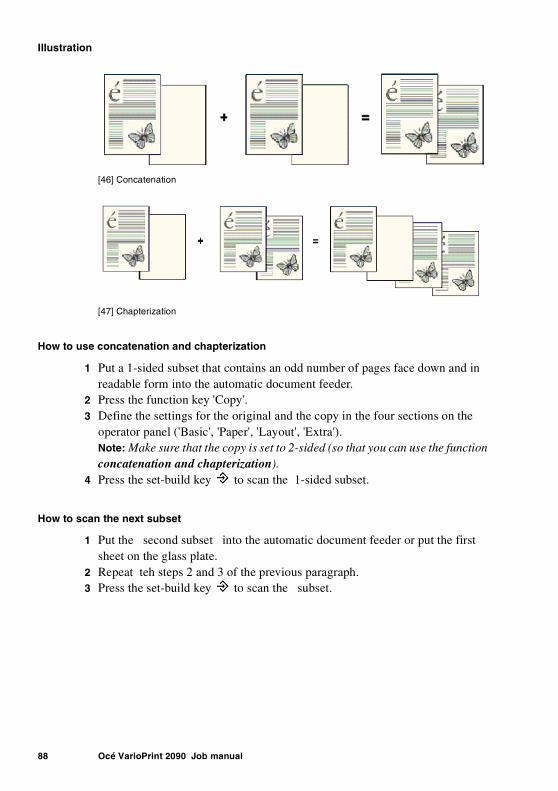
Introduction
The set-build key of the Océ VarioPrint 2090 combines different originals, the subsets, into one digital document. For example a report or book. You can change 1-sided originals into 2-sided documents. If the originals result in an odd number of pages the Océ VarioPrint 2090 detects this. An odd number of pages can result in an empty page between the subsets.
ConcatenationYou decide to print the next subset on this empty page (do not keep the empty page).
ChapterizationYou decide to keep the empty page and start the next subset on a new sheet (a new chapter starts on a new sheet).
When to do
When you use the set-build key to combine subsets, you can do the following.■ Start a subset on a new sheet or not.■ Use this setting for the whole document or not.
Before you begin
Divide your document into subsets. For example, put your first set of originals into the automatic document feeder or put the original on the glass plate. Use the set-build key to start a new subset.
88 Océ VarioPrint 2090 Job manual
Illustration[46] Concatenation
[46] Concatenation
[47] Chapterization
[47] Chapterization
How to use concatenation and chapterization
1 Put a 1-sided subset that contains an odd number of pages face down and in readable form into the automatic document feeder.
2 Press the function key 'Copy'.3 Define the settings for the original and the copy in the four sections on the
operator panel ('Basic', 'Paper', 'Layout', 'Extra').Note: Make sure that the copy is set to 2-sided (so that you can use the function concatenation and chapterization).
4 Press the set-build key to scan the 1-sided subset.
How to scan the next subset
1 Put the second subset into the automatic document feeder or put the first sheet on the glass plate.
2 Repeat teh steps 2 and 3 of the previous paragraph.3 Press the set-build key to scan the subset.
Copy jobs 89
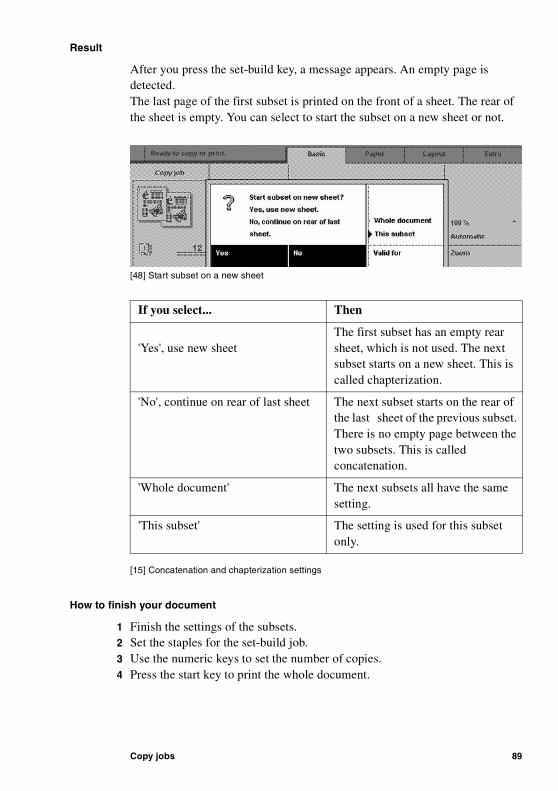
Result
After you press the set-build key, a message appears. An empty page is detected.The last page of the first subset is printed on the front of a sheet. The rear of the sheet is empty. You can select to start the subset on a new sheet or not.
[48] Start subset on a new sheet
[48] Start subset on a new sheet
[15] Concatenation and chapterization settings
[15] Concatenation and chapterization settings
How to finish your document
1 Finish the settings of the subsets.2 Set the staples for the set-build job.3 Use the numeric keys to set the number of copies.4 Press the start key to print the whole document.
If you select... Then
'Yes', use new sheetThe first subset has an empty rear sheet, which is not used. The next subset starts on a new sheet. This is called chapterization.
'No', continue on rear of last sheet The next subset starts on the rear of the last sheet of the previous subset. There is no empty page between the two subsets. This is called concatenation.
'Whole document' The next subsets all have the same setting.
'This subset' The setting is used for this subset only.
90 Océ VarioPrint 2090 Job manual
Delete subsets
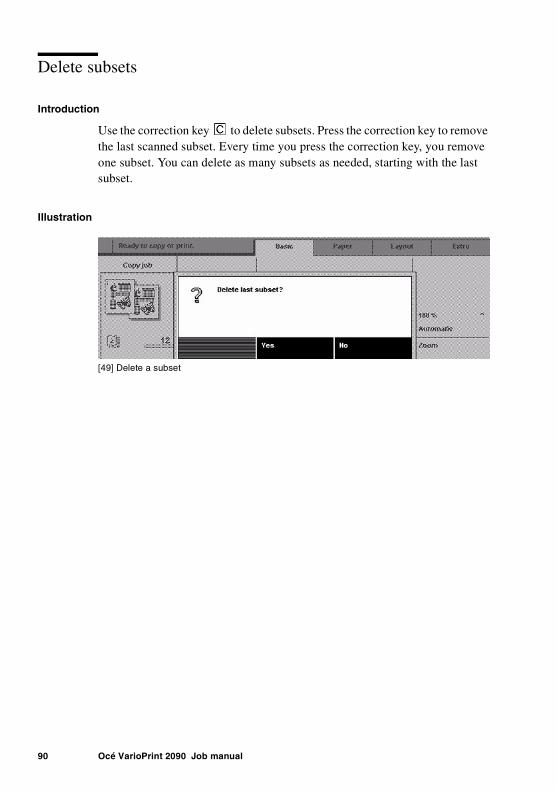
Introduction
Use the correction key to delete subsets. Press the correction key to remove the last scanned subset. Every time you press the correction key, you remove one subset. You can delete as many subsets as needed, starting with the last subset.
Illustration[49] Delete a subset
[49] Delete a subset
Copy jobs 91
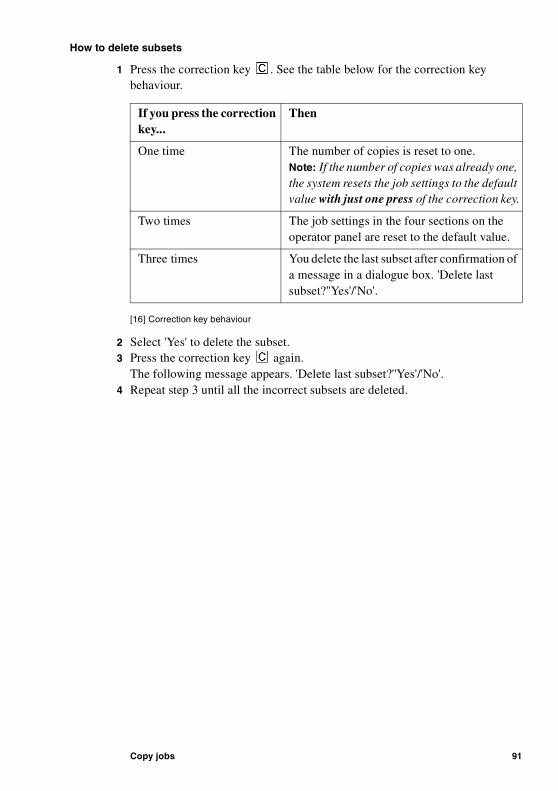
How to delete subsets
1 Press the correction key . See the table below for the correction key behaviour.[16] Correction key behaviour
[16] Correction key behaviour
2 Select 'Yes' to delete the subset.3 Press the correction key again.
The following message appears. 'Delete last subset?''Yes'/'No'.4 Repeat step 3 until all the incorrect subsets are deleted.
If you press the correction key...
Then
One time The number of copies is reset to one.Note: If the number of copies was already one, the system resets the job settings to the default value with just one press of the correction key.
Two times The job settings in the four sections on the operator panel are reset to the default value.
Three times You delete the last subset after confirmation of a message in a dialogue box. 'Delete last subset?''Yes'/'No'.

92 Océ VarioPrint 2090 Job manual
Stop scanning
Introduction
When you make a copy, the Océ VarioPrint 2090 starts by scanning the documents that are in the automatic document feeder or on the glass plate. You can stop the scanning with the correction key on the operator panel. If you press the correction key, the scanning will stop after the scanner has processed the originals that are already separated from each other in the automatic document feeder.
The screen displays the message 'Cancel this job?' with two options.■ 'Yes'■ 'No'
Illustration[50] Stop scanning
[50] Stop scanning
How to stop scanning
1 Press the correction key on the operator panel while the scanner scans the originals.
Result
■ The scanning of the originals stops.■ The message 'Cancel this job?' appears. Select 'Yes' to cancel or 'No' to
resume the job.■ If you select 'Yes', the job is removed from the job queue.
Note: If you use the set-build key , the cancel option only cancels the last subset, not the job in the job queue.Note: If you cancel the scanning, this also indicates that you cancel the corresponding copy job.
93
Océ VarioPrint 2090
User manual
Chapter 6 The job queue
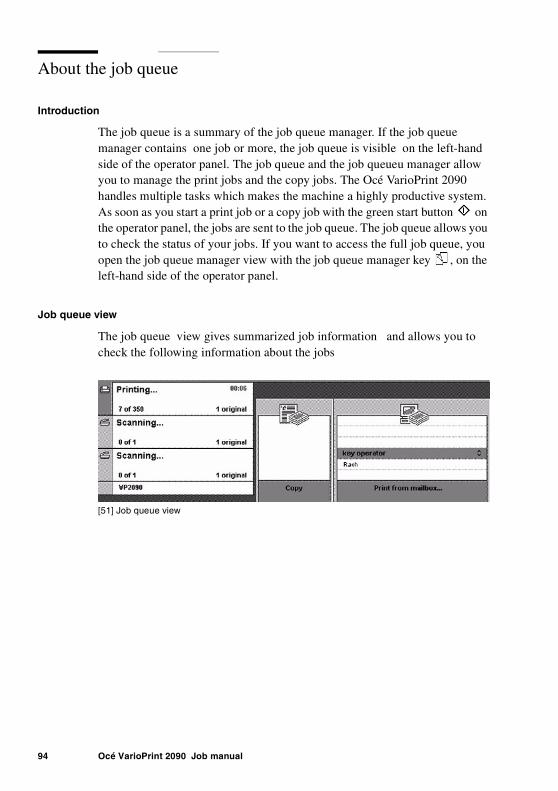
94 Océ VarioPrint 2090 Job manual
About the job queue
Introduction
The job queue is a summary of the job queue manager. If the job queue manager contains one job or more, the job queue is visible on the left-hand side of the operator panel. The job queue and the job queueu manager allow you to manage the print jobs and the copy jobs. The Océ VarioPrint 2090 handles multiple tasks which makes the machine a highly productive system. As soon as you start a print job or a copy job with the green start button on the operator panel, the jobs are sent to the job queue. The job queue allows you to check the status of your jobs. If you want to access the full job queue, you open the job queue manager view with the job queue manager key , on the left-hand side of the operator panel.
Job queue view
The job queue view gives summarized job information and allows you to check the following information about the jobs
[51] Job queue view
[51] Job queue view
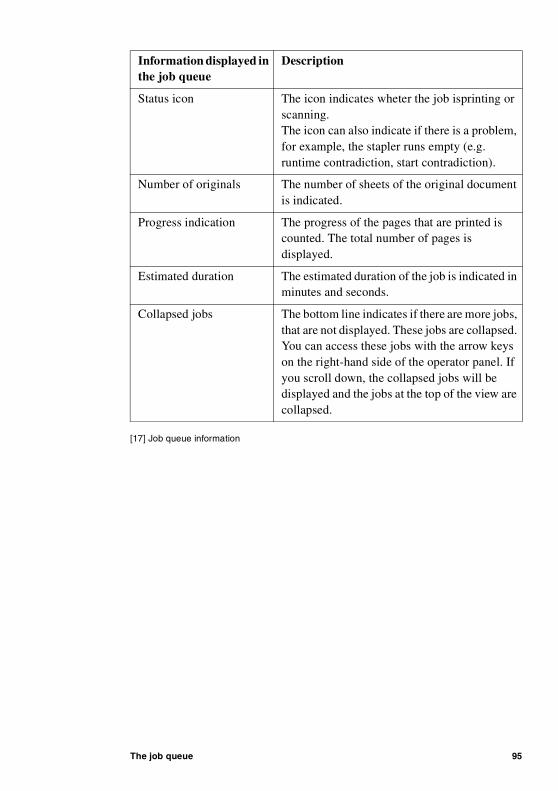
The job queue 95
[17] Job queue information
[17] Job queue information
Information displayed in the job queue
Description
Status icon The icon indicates wheter the job isprinting or scanning.The icon can also indicate if there is a problem, for example, the stapler runs empty (e.g. runtime contradiction, start contradiction).
Number of originals The number of sheets of the original document is indicated.
Progress indication The progress of the pages that are printed is counted. The total number of pages is displayed.
Estimated duration The estimated duration of the job is indicated in minutes and seconds.
Collapsed jobs The bottom line indicates if there are more jobs, that are not displayed. These jobs are collapsed. You can access these jobs with the arrow keys on the right-hand side of the operator panel. If you scroll down, the collapsed jobs will be displayed and the jobs at the top of the view are collapsed.
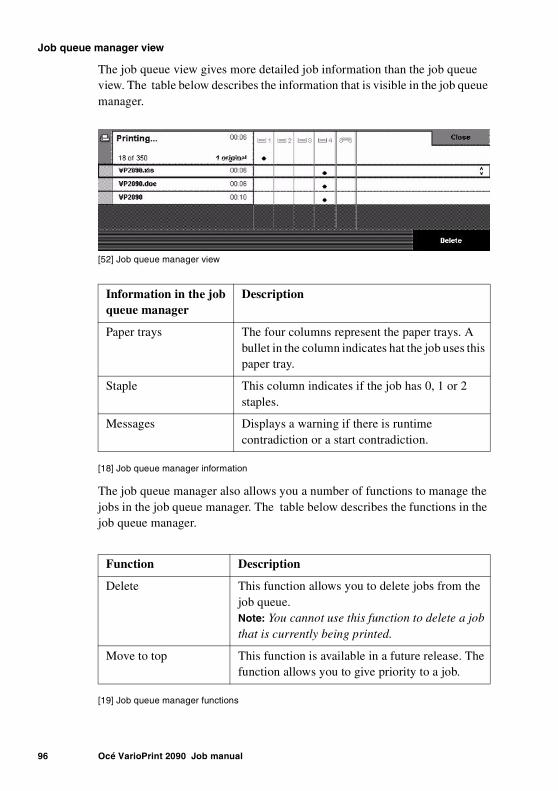
96 Océ VarioPrint 2090 Job manual
Job queue manager view
The job queue view gives more detailed job information than the job queue view. The table below describes the information that is visible in the job queue manager.
[52] Job queue manager view
[52] Job queue manager view
[18] Job queue manager information
[18] Job queue manager information
The job queue manager also allows you a number of functions to manage the jobs in the job queue manager. The table below describes the functions in the job queue manager.
[19] Job queue manager functions
[19] Job queue manager functions
Information in the job queue manager
Description
Paper trays The four columns represent the paper trays. A bullet in the column indicates hat the job uses this paper tray.
Staple This column indicates if the job has 0, 1 or 2 staples.
Messages Displays a warning if there is runtime contradiction or a start contradiction.
Function Description
Delete This function allows you to delete jobs from the job queue.Note: You cannot use this function to delete a job that is currently being printed.
Move to top This function is available in a future release. The function allows you to give priority to a job.

97
Océ VarioPrint 2090
User manual
Chapter 7 Error handling

98 Océ VarioPrint 2090 Job manual
Handle contradictions
Introduction
Three types of contradictions can occur on the Océ VarioPrint 2090 .■ Specification contradictions
Specification contradictions refer to combinations of settings that are not possible.For example, you want to make a 2-sided scan from the glass plate (not possible, change the original setting from 2-sided to 1-sided).
■ Start contradictionsStart contradictions refer to conflicts that occur when the required resources for a job are not available. Start contradictions occur after a job is sent to the queue. For example, a job needs staples, but the staplers are empty. An alarm bell is displayed. This alarm bell indicates that a certain resource is not available (no staples, no toner etc).
■ Run-time contradictionsRun-time contradictions occur when the system runs out of required resources (no staples, toner etc) while the job is active. The active or current job stops. The screen will show a message.
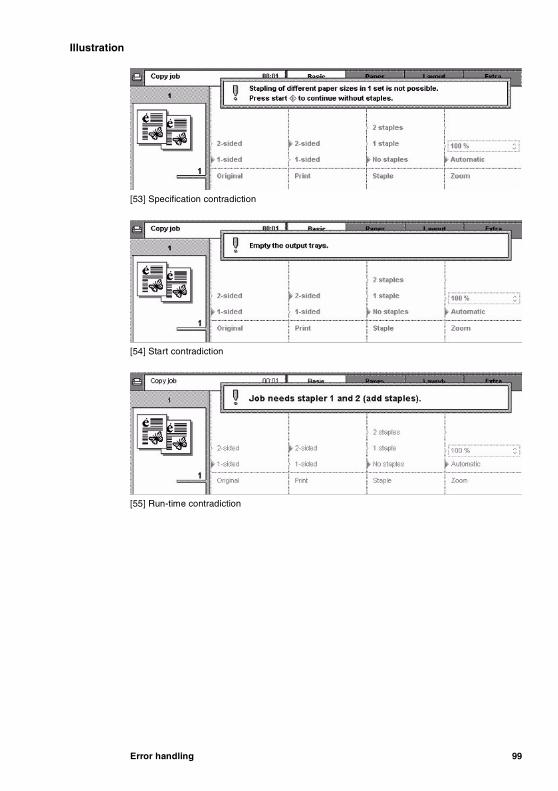
Error handling 99
Illustration[53] Specif ication contradiction
[53] Specification contradiction
[54] Start contradiction
[54] Start contradiction
[55] Run-time contradiction
[55] Run-time contradiction
100 Océ VarioPrint 2090 Job manual
How to correct a specification contradiction[20] Correct a specif ication contradiction
[20] Correct a specification contradiction
How to correct a start contradiction
1 Press the start key .The screen displays a contradiction message.
2 Add the needed resources. The job starts if there are no more contradictions.
How to correct a run-time contradiction
1 Add the required supplies.2 The job starts if there are no more contradictions.
Step Action Remarks
1 Press the start key or the set-build key .
The system checks the settings that you selected. If the settings conflict, the system can not print your job. A pop-up message appears.
2 Change the settings according to the specifications of the Océ VarioPrint 2090 .
For example, change the 'Print' settings from 2-sided to 1-sided if you want to make a copy from the glass plate. You can also press the start key two times. This action corrects the invalid setting.
3 Press the start key or the set-build key .
If the job has the correct settings, the job is processed. If you did not correct the settings, the system will make a default selection on how to automatically resolve the specification contradiction.
Error handling 101
Handle errors on the Océ VarioPrint 2090
Introduction
If an error occurs, the Océ VarioPrint 2090 stops to process.
There are three types of errors that can occur on the Océ VarioPrint 2090 . ■ ORE (operator recoverable error)
You must resolve the error locations before scanning or printing can continue. After the error locations are resolved, the Océ VarioPrint 2090 will automatically continue with the active job unless the operator has to perform an additional activity (e.g. reload originals). After this error the system will still be stand-by.
■ MRE (machine recoverable error)After this message the system goes to sleep mode. You only need to turn on the system again. Follow the instructions on the screen.
■ PE(permanent error)If the system has a permanent error, the Océ VarioPrint 2090 stops. An error screen indicates that service is required. Only a service technician can resolve the error and remove the message.
Note: The scan process and the print process are separate processes. If one process of the two processes has an error, the other process will continue.
The error screen
Screen messages or error screens A message shows you which areas you must inspect to find the error. A picture shows you how to correct the error. After you correct the error, the error screen disappears and the Océ VarioPrint 2090 starts to process.The (ORE) error screen is divided into two sections, a left-hand section and a right-hand section.The right-hand section shows the part of the Océ VarioPrint 2090 where the error occurred. The screen gives you instructions for the area that you must inspect. If necessary, open doors or covers to access these areas.The left-hand section shows all the actions to take. The Océ VarioPrint 2090 traces your actions and marks the steps on the screen. After you have checked all the indicated areas and after you have corrected the problems, the error screen disappears.
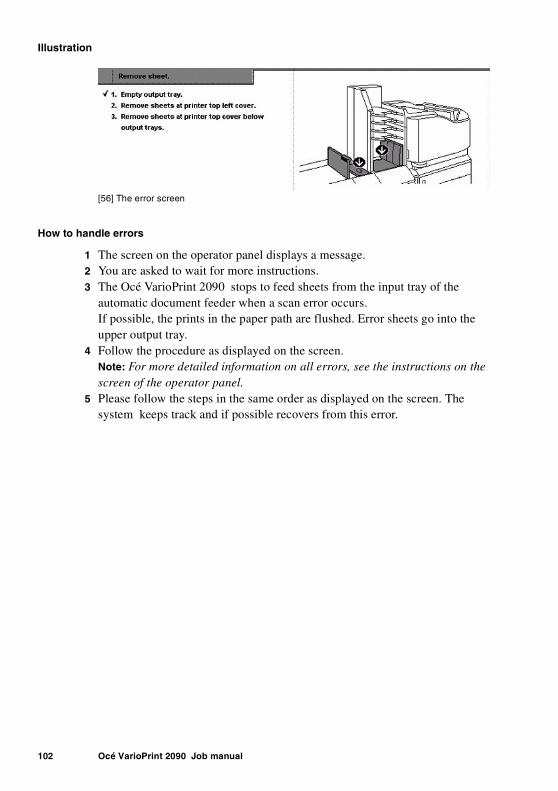
102 Océ VarioPrint 2090 Job manual
Illustration[56] The error screen
[56] The error screen
How to handle errors
1 The screen on the operator panel displays a message. 2 You are asked to wait for more instructions.3 The Océ VarioPrint 2090 stops to feed sheets from the input tray of the
automatic document feeder when a scan error occurs. If possible, the prints in the paper path are flushed. Error sheets go into the upper output tray.
4 Follow the procedure as displayed on the screen.Note: For more detailed information on all errors, see the instructions on the screen of the operator panel.
5 Please follow the steps in the same order as displayed on the screen. The system keeps track and if possible recovers from this error.
Error handling 103
Clear the paper jams
Introduction
Task for: operatorThe print material and originals normally move through the Océ VarioPrint 2090 without any problems. A sheet that gets stuck can cause paper jams.
If there is a paper jam, the operator panel displays an error message. The operator panel gives you an instruction to clear the error. The graphics on the screen indicate in which part of the Océ VarioPrint 2090 the paper stopped.
The operator panel guides you through a sequence of steps to correct the problem. If a paper jam occurs in more than one location, the operator panel continues to give the instructions until all paper jams are removed.
When the error is cleared, the display will give you instructions to continue the job so that all copies are correctly moved into the output trays or print tray.
If you do not get the print that you need, check the following: ■ the originals must be aligned to the right in the automatic document feeder ■ the original guides must not be too tight or loose ■ the originals must not be too heavy, too curled or too damaged. Make the
originals flat or make new originals on the glass plate. ■ the originals must not be stapled. Make sure you separate the originals after
you remove the staples.
The cause of the problem can be in the paper compartment. ■ the paper is curled. Reload the paper upside down. ■ the paper does not leave the paper tray. The guides are set too tight. (loosen
the guides) A sheet can be folded or damaged. Remove this sheet.
The green labels on several of the handles, covers or other parts of the Océ VarioPrint 2090 indicate the parts described in the instructions on the operator panel. Lift, press or open these parts to remove the paper jam.
For example the operator panel instructs you to open cover C1. A photograph on the screen shows the exact location of cover C1 behind the open right-hand door. If you then open the door, you find a cover with a green label 'C1' at the indicated position.
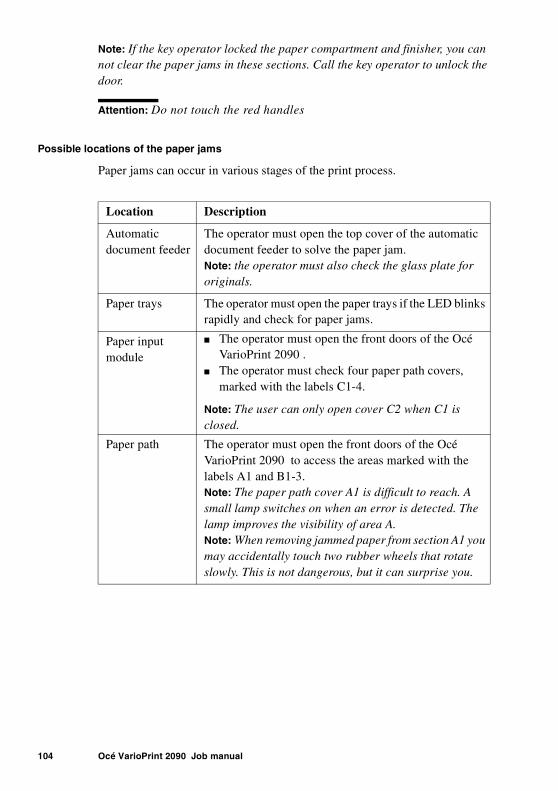
104 Océ VarioPrint 2090 Job manual
Note: If the key operator locked the paper compartment and finisher, you can not clear the paper jams in these sections. Call the key operator to unlock the door.
Attention: Do not touch the red handles
Possible locations of the paper jams
Paper jams can occur in various stages of the print process.
[21] Locations of the paper jams
Location Description
Automatic document feeder
The operator must open the top cover of the automatic document feeder to solve the paper jam.Note: the operator must also check the glass plate for originals.
Paper trays The operator must open the paper trays if the LED blinks rapidly and check for paper jams.
Paper input module
■ The operator must open the front doors of the Océ VarioPrint 2090 .
■ The operator must check four paper path covers, marked with the labels C1-4.
Note: The user can only open cover C2 when C1 is closed.
Paper path The operator must open the front doors of the Océ VarioPrint 2090 to access the areas marked with the labels A1 and B1-3.Note: The paper path cover A1 is difficult to reach. A small lamp switches on when an error is detected. The lamp improves the visibility of area A.Note: When removing jammed paper from section A1 you may accidentally touch two rubber wheels that rotate slowly. This is not dangerous, but it can surprise you.

Error handling 105
[21] Locations of the paper jams
Note: The operator must follow the instructions on the operator panel in the correct order.
Finisher There are 3 global areas in the finisher that the operator must check for paper jams.
■ The operator must open the top covers left of the finisher and below the output trays of the finisher for paper jams.
■ The operator must open the front door of the finisher to access the covers marked with the labels D1-2. The operator must also check the internal error tray.
■ The operator must open the front door and the top cover to access the paper path covers marked with the labels E1-3.
Note: Remove any paper from the upper output tray when you open the top cover of the finisher.
Upper output tray
The operator must check the upper output tray for paper jams.
Location Description
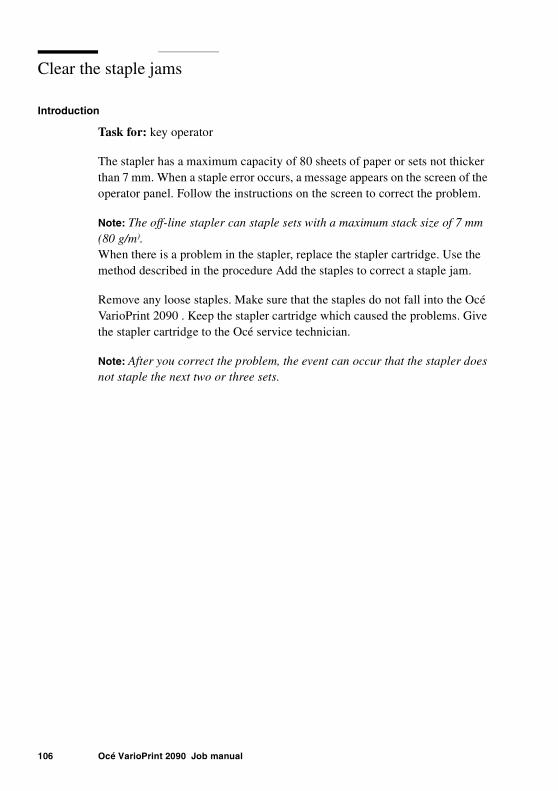
106 Océ VarioPrint 2090 Job manual
Clear the staple jams
Introduction
Task for: key operator
The stapler has a maximum capacity of 80 sheets of paper or sets not thicker than 7 mm. When a staple error occurs, a message appears on the screen of the operator panel. Follow the instructions on the screen to correct the problem.
Note: The off-line stapler can staple sets with a maximum stack size of 7 mm (80 g/m).When there is a problem in the stapler, replace the stapler cartridge. Use the method described in the procedure Add the staples to correct a staple jam.
Remove any loose staples. Make sure that the staples do not fall into the Océ VarioPrint 2090 . Keep the stapler cartridge which caused the problems. Give the stapler cartridge to the Océ service technician.
Note: After you correct the problem, the event can occur that the stapler does not staple the next two or three sets.

107
Océ VarioPrint 2090
User manual
Appendix A Overview and tables

108 Océ VarioPrint 2090 Job manual
Product specifications
Introduction
This table describes the main features of the Océ VarioPrint 2090 .
Part Specification
Process Paper Logic, for reliable productivity through contstant feed of materials from the paper traysImage Logic, for high copy qualityBin Logic, for intelligent use of flexible output trays
Print speedScan speed
85 A4 pages a minute (1-sided and 2-sided)56 A4 pages a minute
Resolution Scan: 600 x 400 dpiPrint: 600 x 600 dpi
Warm-up time < 12 minutes
Zoom Min: 25%Max: 400%
Auto-detectable sizes in the paper trays
■ A4 LEF■ A4 SEF■ A3 SEF■ 8.5 x 11 inches (Letter-standard)LEF■ 8.5 x 11 inches (Letter-standard)SEF■ 8.5 x 14 inches (Legal-Standard) SEF■ 11 x 17 inches (Ledger) SEF
Network connection switchable 10/100 Mbit/s Ethernet TCP/IP interface
Platforms platforms that support lpr/lpd over an Ethernet TCP/IPconnection, for example
■ Windows 2000/NT/ME / XP ■ Unix■ OS/2■ VMS■ Mac
Toner F11

Overview and tables 109
Originals that can be used
Introduction
The table below describes the main requirements for the originals that are suitable for the Océ VarioPrint 2090 .
Note: Do not put transparent originals into the automatic document feeder.
Originals Specifications
Original sizes Glass plate max. 297 x 432 mm
Automatic document feeder
min. 127 x 203 mmmax. 297 x 432 mm
Original weight Glass plate any weight (max. 10 kg)
Automatic document feeder
50 sheets of 80 g/m2
Original type Glass plate any type of original
Automatic document feeder
not damaged, 1-sided and 2-sided originals with a light curl
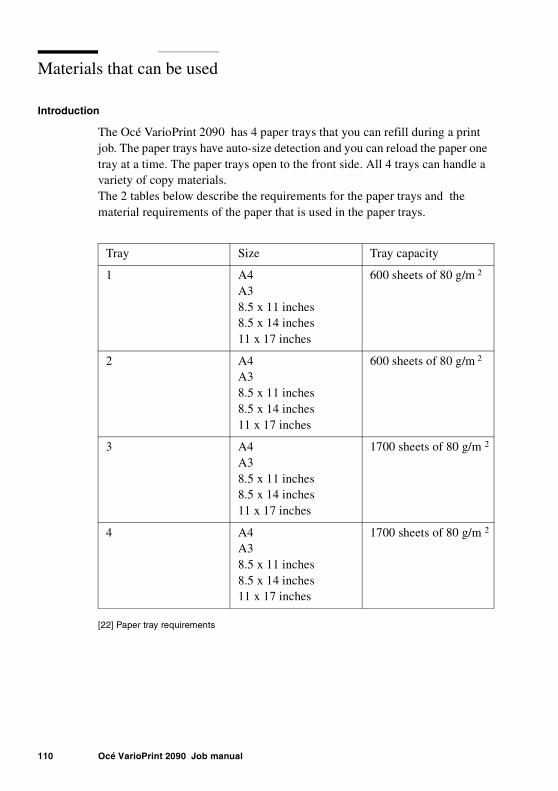
110 Océ VarioPrint 2090 Job manual
Materials that can be used
Introduction
The Océ VarioPrint 2090 has 4 paper trays that you can refill during a print job. The paper trays have auto-size detection and you can reload the paper one tray at a time. The paper trays open to the front side. All 4 trays can handle a variety of copy materials. The 2 tables below describe the requirements for the paper trays and the material requirements of the paper that is used in the paper trays.
[22] Paper tray requirements
[22] Paper tray requirements
Tray Size Tray capacity
1 A4A38.5 x 11 inches8.5 x 14 inches11 x 17 inches
600 sheets of 80 g/m 2
2 A4A38.5 x 11 inches8.5 x 14 inches11 x 17 inches
600 sheets of 80 g/m 2
3 A4A38.5 x 11 inches8.5 x 14 inches11 x 17 inches
1700 sheets of 80 g/m 2
4 A4A38.5 x 11 inches8.5 x 14 inches11 x 17 inches
1700 sheets of 80 g/m 2
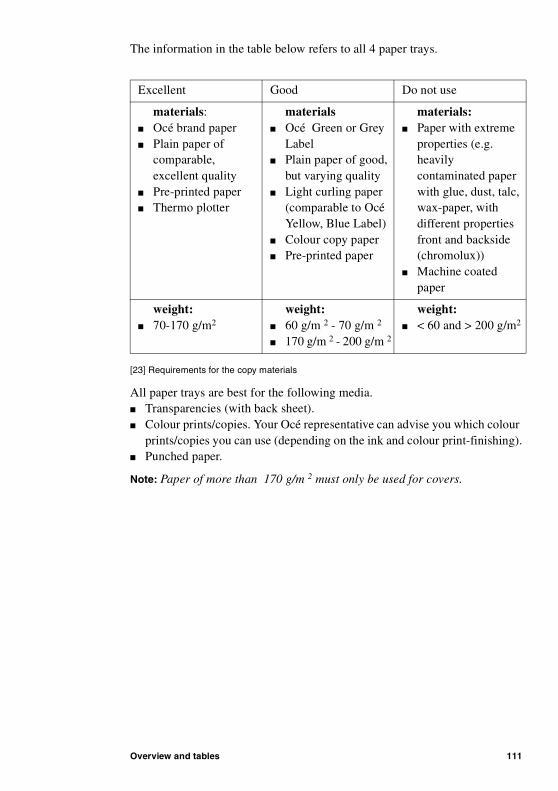
Overview and tables 111
The information in the table below refers to all 4 paper trays.
[23] Requirements for the copy materials
[23] Requirements for the copy materials
All paper trays are best for the following media.■ Transparencies (with back sheet).■ Colour prints/copies. Your Océ representative can advise you which colour
prints/copies you can use (depending on the ink and colour print-finishing).■ Punched paper.
Note: Paper of more than 170 g/m 2 must only be used for covers.
Excellent Good Do not use
materials:■ Océ brand paper ■ Plain paper of
comparable, excellent quality
■ Pre-printed paper ■ Thermo plotter
materials■ Océ Green or Grey
Label ■ Plain paper of good,
but varying quality■ Light curling paper
(comparable to Océ Yellow, Blue Label)
■ Colour copy paper■ Pre-printed paper
materials:■ Paper with extreme
properties (e.g. heavily contaminated paper with glue, dust, talc, wax-paper, with different properties front and backside (chromolux))
■ Machine coated paper
weight:■ 70-170 g/m2
weight:■ 60 g/m 2 - 70 g/m 2
■ 170 g/m 2 - 200 g/m 2
weight:■ < 60 and > 200 g/m2

112 Océ VarioPrint 2090 Job manual

113
Océ VarioPrint 2090
User manual
Appendix B Miscellaneous
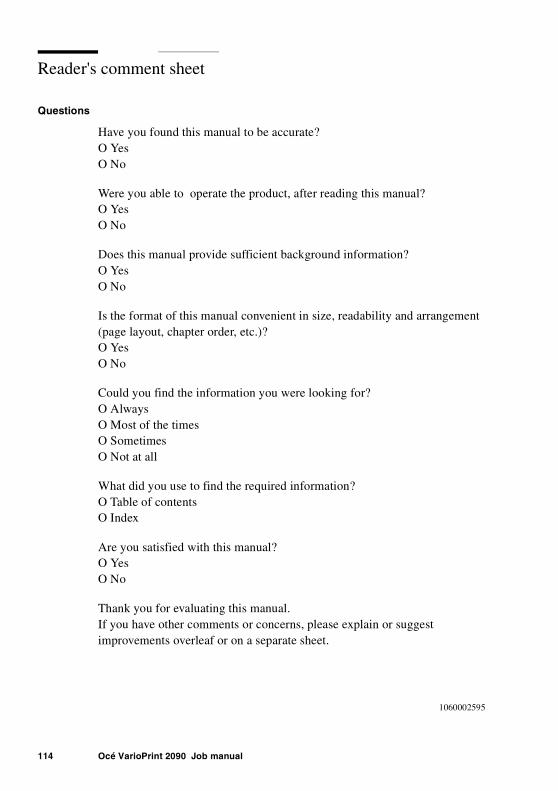
114 Océ VarioPrint 2090 Job manual
Reader's comment sheet
Questions
Have you found this manual to be accurate? O Yes O No
Were you able to operate the product, after reading this manual? O Yes O No
Does this manual provide sufficient background information? O Yes O No
Is the format of this manual convenient in size, readability and arrangement (page layout, chapter order, etc.)?O Yes O No
Could you find the information you were looking for? O Always O Most of the times O Sometimes O Not at all
What did you use to find the required information? O Table of contents O Index
Are you satisfied with this manual?O Yes O No
Thank you for evaluating this manual.If you have other comments or concerns, please explain or suggest improvements overleaf or on a separate sheet.
1060002595
Miscellaneous 115
Comments:------------------------------------------------------------------------------------------------------------------------------------------------------------------------------------------------------------------------------------------------------------------------------------------------------------------------------------------------------------------------------------------------------------------------------------------------------------------------------------------------------------------------------------------------------------------------Date:
This reader's comment sheet is completed by: (If you prefer to remain unknown, please do fill in your occupation)
Name:
Occupation:
Company:
Phone:
Address:
City:
Country:
Please return this sheet to:
Océ-Technologies B.V.For the attention of ITC User Documentation. P.O. Box 101, 5900 MA VenloThe Netherlands
Send your comments by E-mail to: [email protected]
For the addresses of local Océ organisations see: http://www.oce.com
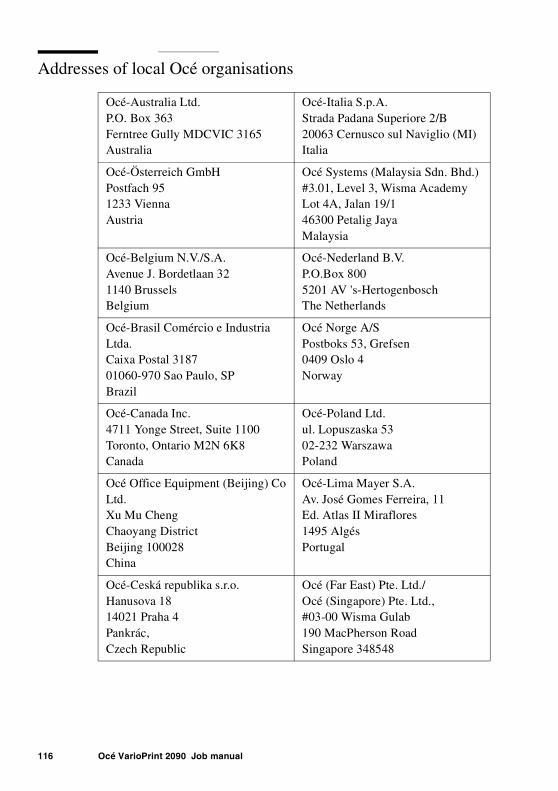
116 Océ VarioPrint 2090 Job manual
Addresses of local Océ organisations
Océ-Australia Ltd. P.O. Box 363 Ferntree Gully MDCVIC 3165 Australia
Océ-Italia S.p.A. Strada Padana Superiore 2/B 20063 Cernusco sul Naviglio (MI) Italia
Océ-Österreich GmbH Postfach 95 1233 Vienna Austria
Océ Systems (Malaysia Sdn. Bhd.)#3.01, Level 3, Wisma Academy Lot 4A, Jalan 19/1 46300 Petalig Jaya Malaysia
Océ-Belgium N.V./S.A. Avenue J. Bordetlaan 32 1140 Brussels Belgium
Océ-Nederland B.V. P.O.Box 800 5201 AV 's-Hertogenbosch The Netherlands
Océ-Brasil Comércio e Industria Ltda. Caixa Postal 3187 01060-970 Sao Paulo, SP Brazil
Océ Norge A/S Postboks 53, Grefsen 0409 Oslo 4Norway
Océ-Canada Inc. 4711 Yonge Street, Suite 1100 Toronto, Ontario M2N 6K8 Canada
Océ-Poland Ltd. ul. Lopuszaska 53 02-232 Warszawa Poland
Océ Office Equipment (Beijing) Co Ltd. Xu Mu Cheng Chaoyang District Beijing 100028 China
Océ-Lima Mayer S.A. Av. José Gomes Ferreira, 11 Ed. Atlas II Miraflores 1495 Algés Portugal
Océ-Ceská republika s.r.o. Hanusova 18 14021 Praha 4 Pankrác,Czech Republic
Océ (Far East) Pte. Ltd./Océ (Singapore) Pte. Ltd., #03-00 Wisma Gulab 190 MacPherson Road Singapore 348548

Miscellaneous 117
Océ-Danmark A.S. Kornmarksvej 6 DK 2605 Brøndby Denmark
Océ España SA Business Park MAS BLAU C/Osona2, 2-3a Planta 08820 El Prat del Llobregat (Barcelona) Spain
Océ-France S.A. 32, Avenue du Pavé Neuf, 93161 Noisy-le-grand, Cedex France
Océ-Svenska AB P.O.box 1231 S-164 28 KistaSweden
Océ-Deutschland GmbH Postfach 101454 4330 Mülheim an der Ruhr (13) Deutschland
Océ-Schweiz AG Sägereistrasse 29 CH8152 Glattbrugg Switzerland
Océ (Hong Kong China) Ltd.12/F 1202 The Lee Gardens 33 Hysan Avenue, Causeway Bay Hong Kong
Océ (Thailand) Ltd. 16th Floor, B.B. Building 54 Asoke Road, Sukhumvit 21 Bangkok 10110 Thailand
Océ-Hungária Kft. P.O.B. 237 1241 Budapest Hungary
Océ-USA Inc. 5450 North Cumberland Av. Chicago, Ill. 60656 U.S.A.
Océ-U.K. Ltd. Langston Road Loughton, Essex IG10 3SL United Kingdom
Océ Ireland Ltd.3006 Lake Drive Citywest Business CampusSaggarl Co. DublinIreland
Océ Finland OYP.O. Box 163FIN-OO181Finland
OPS (South Africa) (PTY) Ltd.P.O. Box 629Rivonia2128South Africa
Océ Japan Corporation3-25-1, NishishinnbashiMinato-Ku105-0003 TokyoJapan

118 Océ VarioPrint 2090 Job manual
Index 119
Index
2-sided from the glass plate 87
Aabout the job queue 94areas a, b and c 18areas d and e 18arrow keys 15, 34auto-detectable sizes in the paper trays 108automatic document feeder 19automatic print job (ap) 37automatic zoom 78auto-size detection 110available documentation 8
Bbasic section
copy 73original 73print 40print job identification 40staple 40, 73zoom 73
before you shut down 28bin logic 108book or magazine 78
Ccancel a print job 43cancel a scan job 92chapterization 11, 87clear a staple jam 106clear the paper jams 103combine analogue documents 84combine subsets into one document 84
concatenation 11, 87concatenation and chapterization 87concepts 10configuration 14continue a print job 43contradictions 98controller initialising 22copy 73copy document type 75copy job 70
basic section 73extra section 76job settings 72layout section 75paper section 74, 75
copy materials 110colour prints/copies 110punched paper 110size 110transparencies 110weight 110
copy special originals 78correct a run-time contradiction 100correct a specification contradiction 100correct a start contradiction 100correct the settings for a copy job 77correction key 15, 77, 91
behaviour 91cover handle 19create a job with special paper 50create a print job 58
Ddelete
print jobs 45delete a print job 43delete a scan job 92delete mailbox jobs 45delete subsets 90describe the originals 71document management solutions 66documentation set 8driver information 54
120 Océ VarioPrint 2090 Job manual
Eedit a mailbox job 39empty page between subsets 87error screens 101extra section 76
image type 76margin shift 40, 76orientation 76
Ffinisher 13finisher front door 18front loading 12
Gglass plate
copy from a3 to a4 78copy from a4 to a3 78copy from a5 to a4 78
Hhandle errors 101help key 15how to
clear run-time contradictions 100correct a specification contradiction 100correct start contradictions 100correct the quantity setting for a copy job 77correct the settings in the 4 copy job sections 77
create a job with special paper 50create a print job with my paper 47create a secure print job 61define the print settings in the printer driver
59delete subsets 91edit a mailbox job 40finish your document 89finish your set-build job 86handle errors 102
prepare your originals 85print a job from the mailbox 37print a job on my paper 48print a job on special paper 50print a secure print job 51put the océ varioprint 2090 into sleep mode
29restart the océ smart imager 32scan special originals from the glass plate 79scan the next subset 88scan the subsets 86shut down the océ varioprint 2090 29staple a landscape oriented document 83staple the copies 82start a print job 58stop scanning 92turn on the océ varioprint 2090 27use concatenation and chapterization 88wake-up the océ varioprint 2090 from sleep mode 27
how to make a copy 71how to remove jobs from the mailbox 45
Iimage logic 12, 108image type 76image/quality settings 57image/quality tab 57information in the mailbox 34interactive print job (ip) 37
Jjob
edit a mailbox job 39job queue 94job queue manager 94
functions 96job information 96
job queue manager view 96job queue view 94job settings 55, 71, 72job tab 55job ticket
Index 121
job settings 39
Kkeep empty page 87key switch. 25
Llayout section 75
copy document type 75original document type 75
led in the on/off button 25leds operator panel 25left front door 18locations of the paper jams 104long edge-size 78low power mode 24
Mmachine recoverable error 101maibox
graphical information 36mailbox 34
basic settings 39create a new job in the job queue 40delete jobs 45digital storage area 34edit a mailbox job 39extra settings 39header information 35information 35information in the mailbox 34job information 35job order in the mailbox 34layout settings 39paper settings 39print a job 37remove jobs 45secure print job 51secure print jobs 51start a job 34
mailbox concept 10
make a copy 70manual zoom 78manuals
configuration and maintenance 8job 8quick reference card 8safety 8
margin shift 76materials that can be used 110mre 101my paper 46
Nnetwork connection 108next job 11
Oocé intra logic
function overview 67get information 67job settings 68
océ intra logic ® 65océ smart imager 14
restart 31océ varioprint 2090 54off 22offset stacking 13on/off button 25open the scanner cover 19operator panel 14operator recoverable error 101ore 101orientation 76original 73original document type 75
landscape 75portrait 75
original orientationhorizontal 78vertical 78
original receiving tray 19original sheet size 78original sizes 109
122 Océ VarioPrint 2090 Job manual
original type 109original weight 109originals of a non-standard size 78originals that can be used 109output destinations 13output trays 18
Ppage programmer 62
media type 63page list (extended window) 63page list (main window) 63page range 63process 63profiles 63
page settings 56page tab 56paper jams 103
in the automatic document feeder 104in the finisher 104in the paper input module 104in the paper path 104in the paper trays 104in the upper output tray 104
paper logic 108paper section
original document type 40paper 74print document type 40
paper tray capacity 110paper tray content 74paper tray linking 12paper tray requirements 110paper trays 12
face down 12header up 12
pe 101permanent error 101pin code 51, 60platforms 108postscript print jobs 54power modes 22power state indicators 25power switch 25ppd 54ppd (postscript printer description) 54
printmailbox job 37
print a job 37print a job from the mailbox 37print a job on special paper 50print from the desktop 58print job
cancel 43delete a print job 45remove a print job 45resume 43stop 43
print job settings 54print jobs 58print jobs from the mailbox 34print jobs with special paper 49print settings 71print sheet size 78print speed 108printer 14, 18printer driver 54, 58printer warming up 23product specifications 108
Qqueue manager key 15
Rrefill during run 12remove
print jobs 45remove jobs from the mailbox 45requirements for the copy materials 110resolution 108restart the smart imager 31restart the system 31resume a print job 43resume a scan job 92run-time contradictions 98

Index 123
Ssafety sleep mode 22scan speed 108scanner 14, 19scanner top left cover 19scanning
stop 92secure print job 60secure print jobs 51
pin code 51send a print job 58set logic 11set-build 11, 84, 87
how to finish your set-build job 86how to prepare your originals 85how to scan the subsets 86
set-build job 84set-build key 15, 84settings on the basic section 73settings on the extra section 76settings on the layout section 75settings on the paper section 74short edge-size 78shut down procedure 28sleep mode 23specification contradictions 98specification of originals to be used 109stand-by mode 22staple 73, 81staple error 106staple jam
clear the staple jams 106stapled copies 81stapler
landscape 81off-line 81portrait 81
staples 81start contradictions 98start key 15start to print a job 34stop a print job 43stop a scan job 92stop key 15stop key behaviour 43stop printing 43
stop scanning 92subsets 84system information key 15
Ttoner 108turn into sleep mode 29turn on the system 25types of copy job settings 72
Uupd (universal postscript printer driver) 54upper output tray 18
Wwarm-up time 108workflow to make a copy 70
Zzoom 73, 108
automatic 73manual setting 73
zoom factor 78
Documentation Status Form
Manual Name Océ VarioPrint 2090 Job manual
INAP-name VP2090 JOB MAN GB
Océ Codenumber 1060002595
Language Gb
Documentation Version 2003-04
Identified codenumber 28/09/99
Planned Release DatesReviewed xxx
Approved/Final xxx
Status
Reviewed xxx
Approved February 26, 2003
Final February 26, 2003
Release date documentation February 26, 2003
Name of document 1060002595p.pdf
Print/Copy book Printbook
Paper size A4
Finished format A5 (14.85 x 21cm)
Number of sheets Last Page Number: 123
Name of Cover 1060002595k.pdf
Paper 90 grams, wit A4/190 grams wit A4 fl.
Text on Cover Océ VarioPrint 2090 Job manual fl.
Packing Geseald, gekrompen fl.
Stickers n.v.t.
Wire-O zwart fl.
Wire-O 4 / 8 pages fl.
Binder n.v.t. fl.
Quick Reference Card n.v.t. fl.
Copies ITC 1 stuks, afleveren poort 33 fl.
Printproof Ja
Inkoop bonnummer exemplaren BU
fl.
Notes: Omslag in kleur
Van: ● Rob JanssenITC Documentation & DistributionPhone. 077-3595749Fax. 077-3595427
Kopie: Balie, Dept. D&D, Loc.8T427Mr. J.Teeuwen, Dept. R-IM, Loc.3G21Mrs. C. Goossens,Dept. Inkoop, Loc. 2R254
DK 03.18 ver.3


![Océ User manual - files.oceusa.comfiles.oceusa.com/.../TDS700/Documentation/OceTDS700_SafetyManual.pdf · 9 Doporučené hmotnostní limity [2] V následujícím přehledu jsou uvedeny](https://img.pdfslide.net/doc/110x75/5bf2484409d3f23f5f8cc12a/oce-user-manual-files-9-doporucene-hmotnostni-limity-2-v-nasledujicim.jpg)