Embed Size (px)
Citation preview
Page 1
HOME SHOPPING NETWORK
Vendor User’s Guide VERSION 6.0 - 1/12/09
Page 2
Table of Contents Table of Contents .................................................................................................................................................. 2 SAR Processing ..................................................................................................................................................... 3
View SAR’s ........................................................................................................................................................ 3 Update Vendor's SAR......................................................................................................................................... 5 Creating a SAR ................................................................................................................................................... 6 Showroom Samples SAR.................................................................................................................................. 12
Trading Partner Invoice Process....................................................................................................................... 18 Add Invoice....................................................................................................................................................... 18 Delete Invoice ................................................................................................................................................... 24 Print Invoice...................................................................................................................................................... 26
DropShip Data Exchange ................................................................................................................................... 18 DropShip Certification...................................................................................................................................... 28
File Formats .................................................................................................................................................. 28 Transaction Types......................................................................................................................................... 28 Starting DropShip Certification Process....................................................................................................... 29
Order Lookup.................................................................................................................................................... 37 Pickup Orders.................................................................................................................................................... 36
Pickup Orders................................................................................................................................................ 39 Acknowledge Orders .................................................................................................................................... 41 Print Summaries............................................................................................................................................ 43
Shipment Confirmations ................................................................................................................................... 46 Remittance Advice............................................................................................................................................ 50 Returns .............................................................................................................................................................. 53
Upload Credit Memo .................................................................................................................................... 54 Manually Submit Credit Memo .................................................................................................................... 55
Acknowledgements........................................................................................................................................... 56 My Warehouses................................................................................................................................................... 57
Adding and Updating Warehouses ................................................................................................................... 57 User Accounts...................................................................................................................................................... 59
Edit your profile................................................................................................................................................ 59 Administer sub users......................................................................................................................................... 61 Add a Vendor User ........................................................................................................................................... 63
Note: Words contained in this document that have an Outline around them denote a web link or button. When action is required to click a link or button, the exact wording of that link or button will be indicated with the Outline.
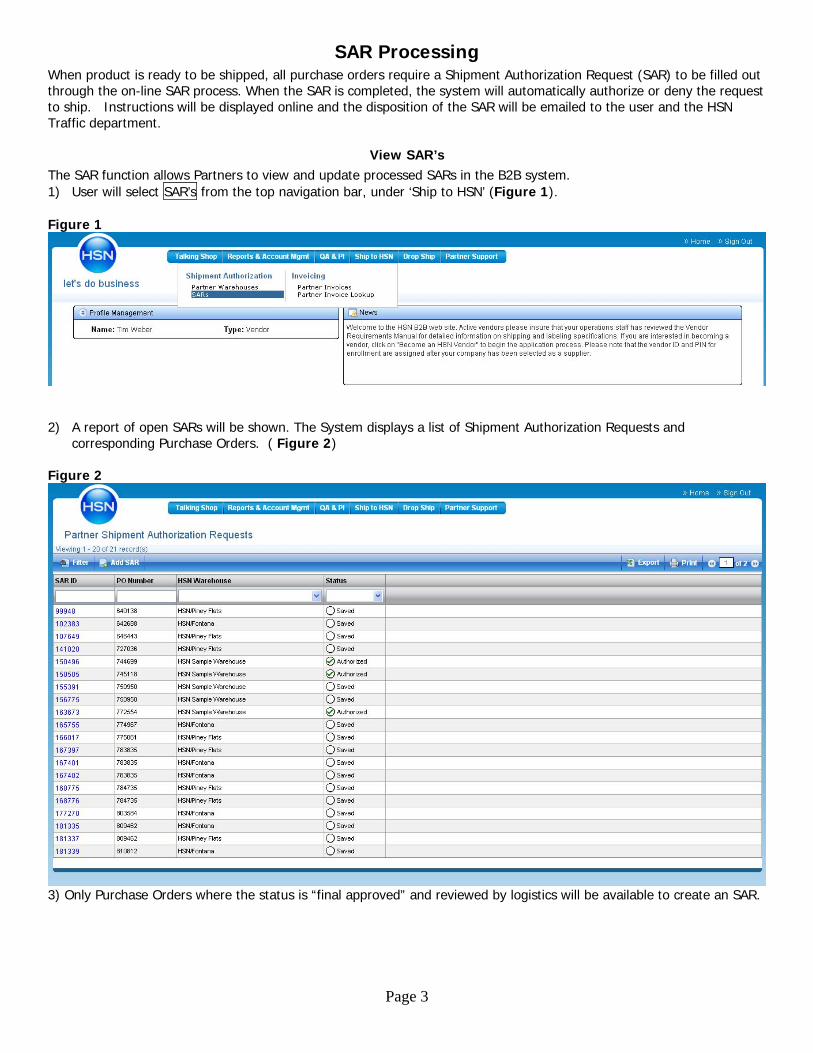
SAR Processing When product is ready to be shipped, all purchase orders require a Shipment Authorization Request (SAR) to be filled out through the on-line SAR process. When the SAR is completed, the system will automatically authorize or deny the request to ship. Instructions will be displayed online and the disposition of the SAR will be emailed to the user and the HSN Traffic department.
View SAR’s The SAR function allows Partners to view and update processed SARs in the B2B system. 1) User will select SAR’s from the top navigation bar, under ‘Ship to HSN’ (Figure 1). Figure 1
2) A report of open SARs will be shown. The System displays a list of Shipment Authorization Requests and
corresponding Purchase Orders. ( Figure 2) Figure 2
3) Only Purchase Orders where the status is “final approved” and reviewed by logistics will be available to create an SAR.
Page 3
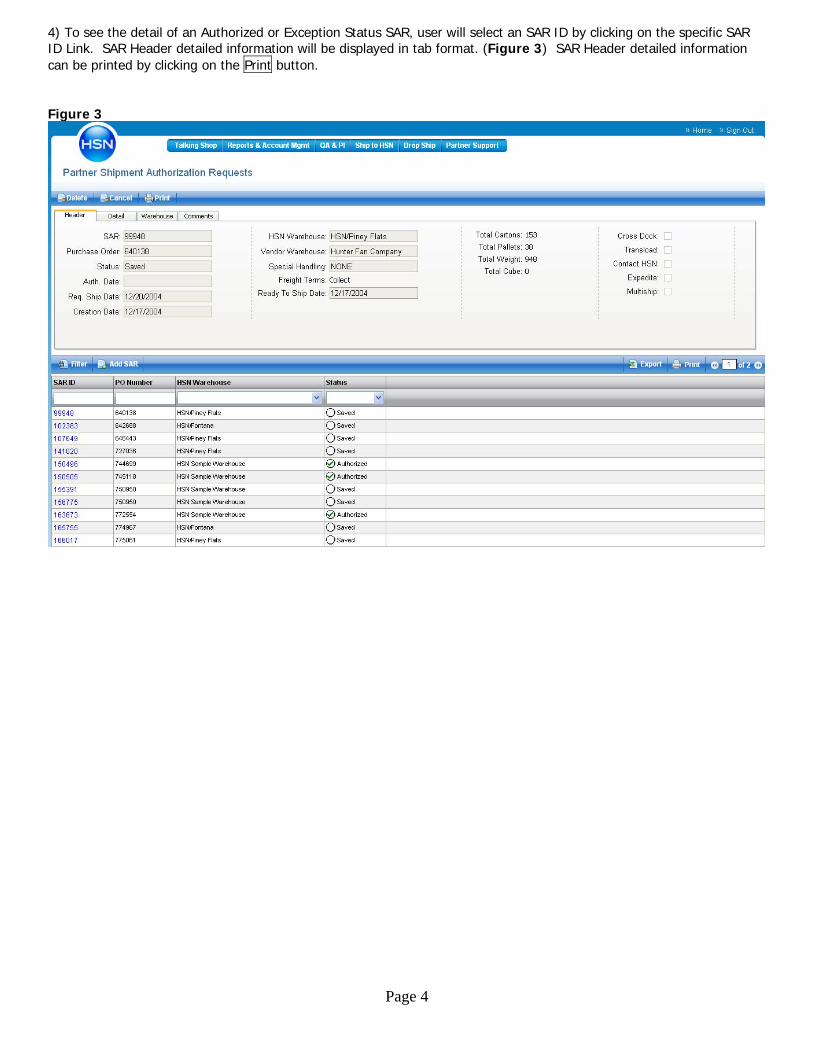
4) To see the detail of an Authorized or Exception Status SAR, user will select an SAR ID by clicking on the specific SAR ID Link. SAR Header detailed information will be displayed in tab format. (Figure 3) SAR Header detailed information can be printed by clicking on the Print button. Figure 3
Page 4
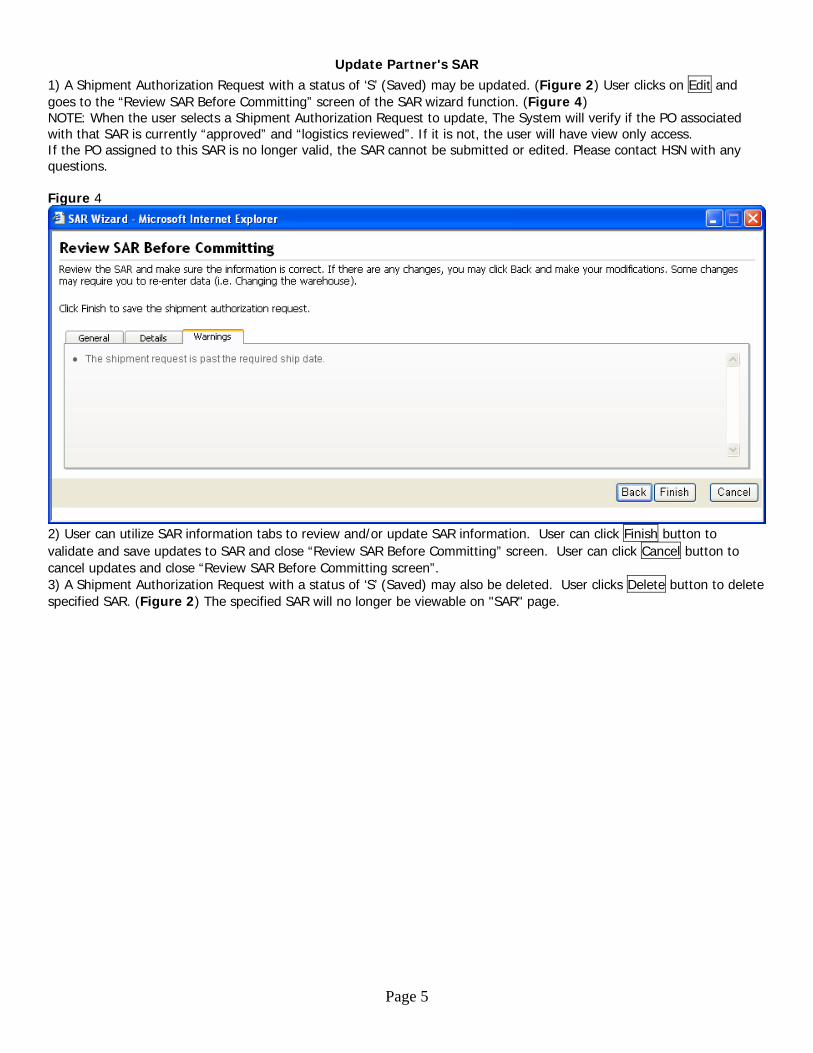
Update Partner's SAR 1) A Shipment Authorization Request with a status of ‘S’ (Saved) may be updated. (Figure 2) User clicks on Edit and goes to the “Review SAR Before Committing” screen of the SAR wizard function. (Figure 4) NOTE: When the user selects a Shipment Authorization Request to update, The System will verify if the PO associated with that SAR is currently “approved” and “logistics reviewed”. If it is not, the user will have view only access. If the PO assigned to this SAR is no longer valid, the SAR cannot be submitted or edited. Please contact HSN with any questions. Figure 4
2) User can utilize SAR information tabs to review and/or update SAR information. User can click Finish button to validate and save updates to SAR and close “Review SAR Before Committing” screen. User can click Cancel button to cancel updates and close “Review SAR Before Committing screen”. 3) A Shipment Authorization Request with a status of ‘S’ (Saved) may also be deleted. User clicks Delete button to delete specified SAR. (Figure 2) The specified SAR will no longer be viewable on "SAR" page.
Page 5
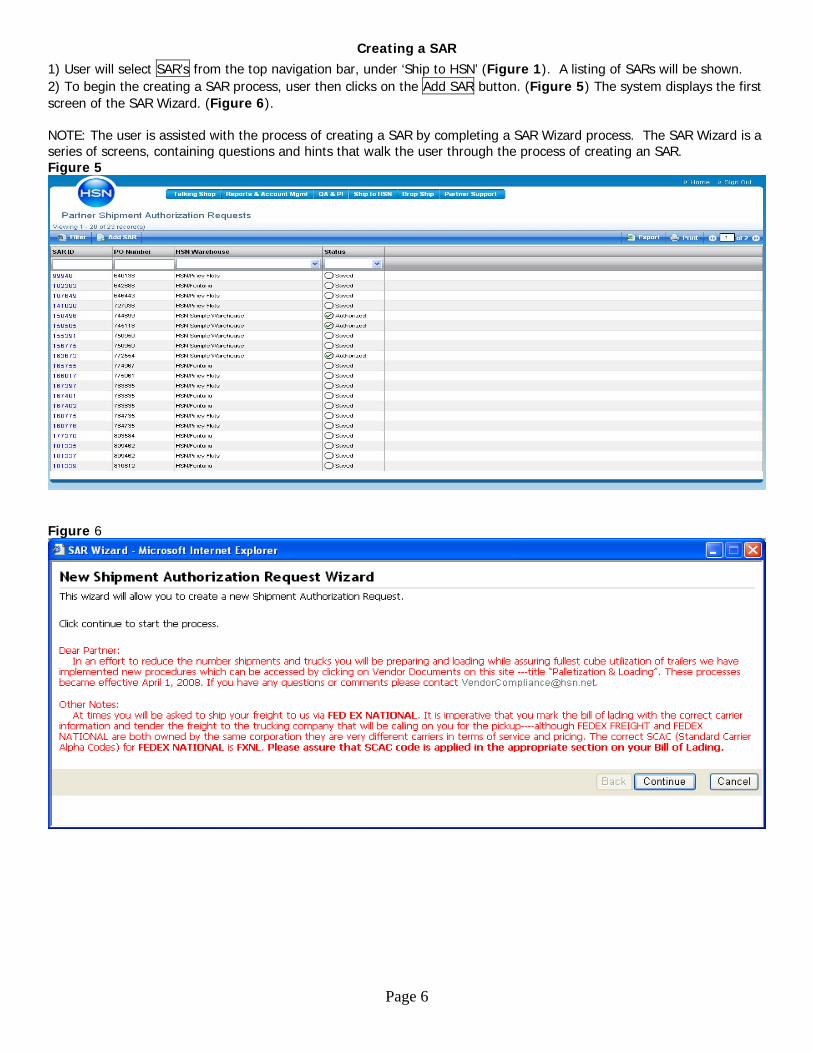
Creating a SAR 1) User will select SAR’s from the top navigation bar, under ‘Ship to HSN’ (Figure 1). A listing of SARs will be shown. 2) To begin the creating a SAR process, user then clicks on the Add SAR button. (Figure 5) The system displays the first screen of the SAR Wizard. (Figure 6). NOTE: The user is assisted with the process of creating a SAR by completing a SAR Wizard process. The SAR Wizard is a series of screens, containing questions and hints that walk the user through the process of creating an SAR. Figure 5
Figure 6
Page 6
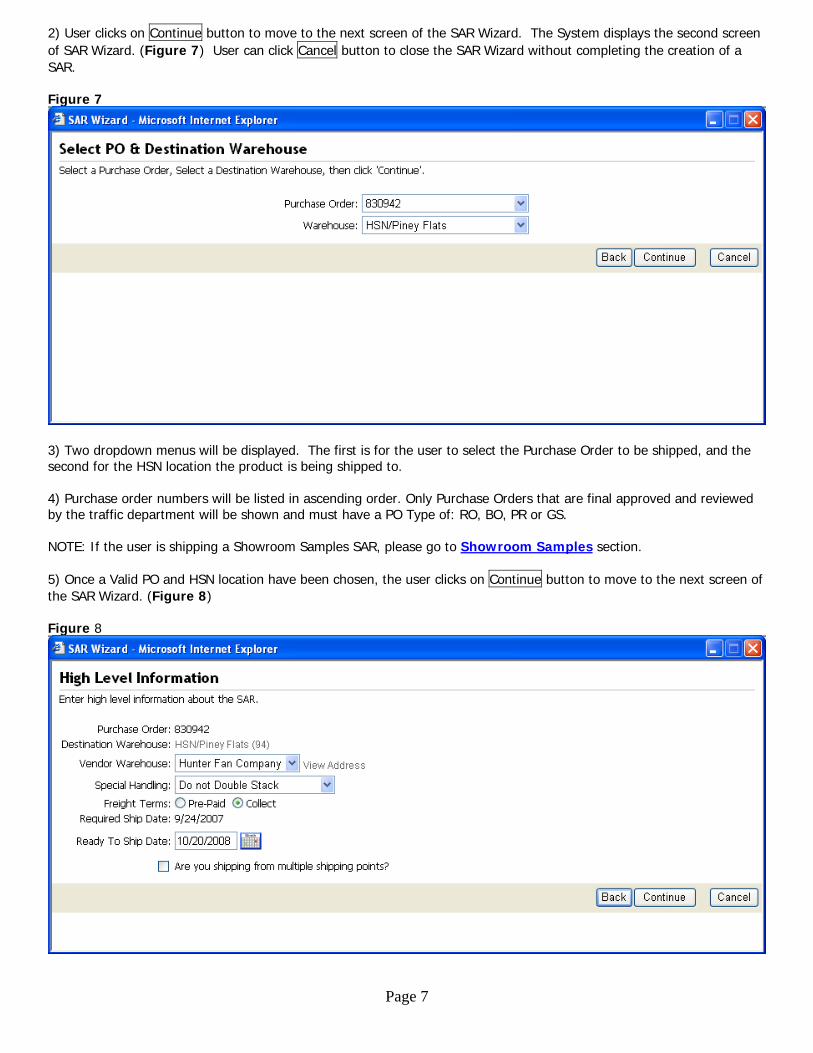
2) User clicks on Continue button to move to the next screen of the SAR Wizard. The System displays the second screen of SAR Wizard. (Figure 7) User can click Cancel button to close the SAR Wizard without completing the creation of a SAR. Figure 7
3) Two dropdown menus will be displayed. The first is for the user to select the Purchase Order to be shipped, and the second for the HSN location the product is being shipped to. 4) Purchase order numbers will be listed in ascending order. Only Purchase Orders that are final approved and reviewed by the traffic department will be shown and must have a PO Type of: RO, BO, PR or GS. NOTE: If the user is shipping a Showroom Samples SAR, please go to Showroom Samples section. 5) Once a Valid PO and HSN location have been chosen, the user clicks on Continue button to move to the next screen of the SAR Wizard. (Figure 8) Figure 8
Page 7
Page 8
) All editable fields will have either a drop down box or open text box. Multi-ship box is an optional field. ectly to
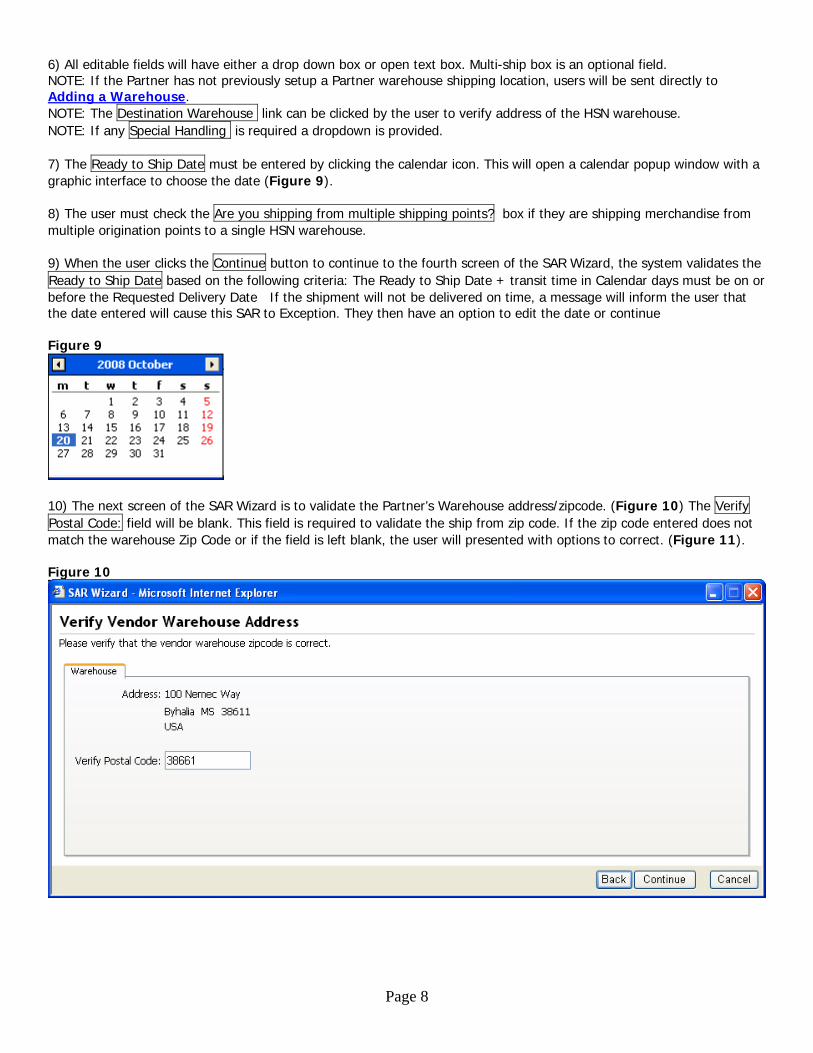
6NOTE: If the Partner has not previously setup a Partner warehouse shipping location, users will be sent dirAdding a Warehouse. NOTE: The Destination Warehouse link can be clicked by the user to verify address of the HSN warehouse. NOTE: If any Special Handling is required a dropdown is provided. 7) The Ready to Ship Date must be entered by clicking the calendar icon. This will open a calendar popup window with a graphic interface to choose the date (Figure 9). 8) The user must check the Are you shipping from multiple shipping points? box if they are shipping merchandise from multiple origination points to a single HSN warehouse. 9) When the user clicks the Continue button to continue to the fourth screen of the SAR Wizard, the system validates the Ready to Ship Date based on the following criteria: The Ready to Ship Date + transit time in Calendar days must be on or before the Requested Delivery Date If the shipment will not be delivered on time, a message will inform the user that the date entered will cause this SAR to Exception. They then have an option to edit the date or continue Figure 9
0) The next screen of the SAR Wizard is to validate the Partner’s Warehouse address/zipcode. (Figure 10) The Verify 1
Postal Code: field will be blank. This field is required to validate the ship from zip code. If the zip code entered does not match the warehouse Zip Code or if the field is left blank, the user will presented with options to correct. (Figure 11). Figure 10
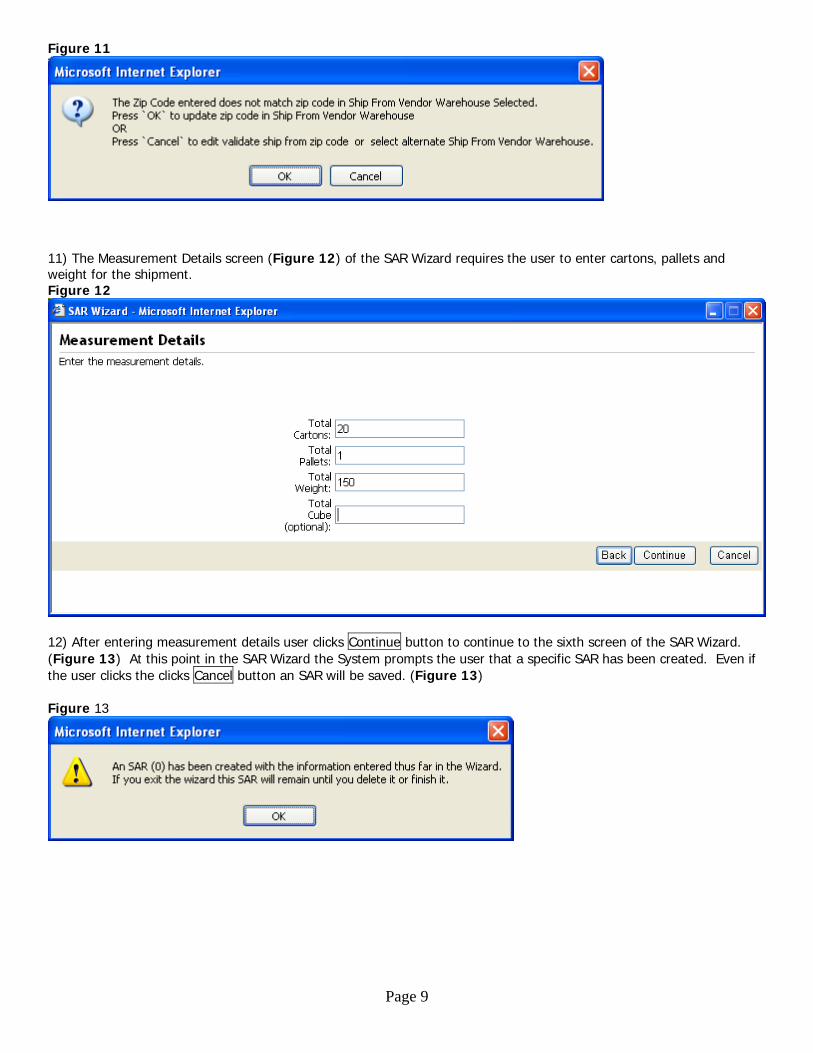
Figure 11
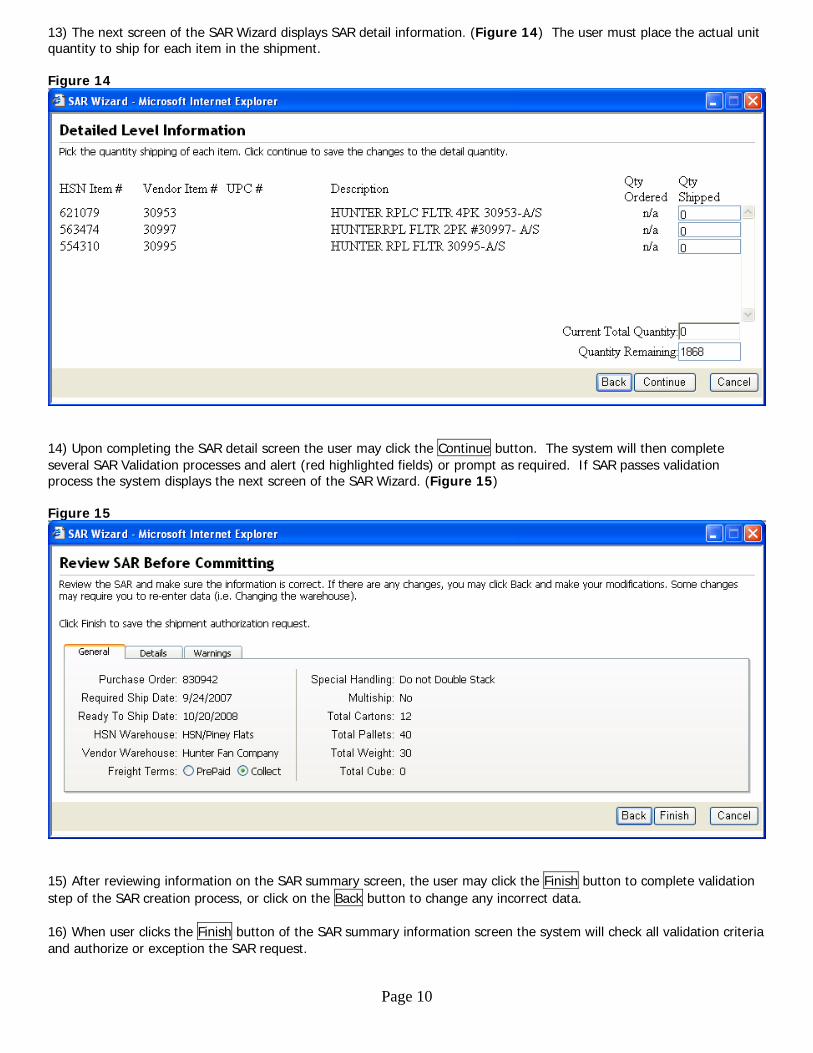
11) The Measurement Details screen (Figure 12) of the SAR Wizard requires the user to enter cartons, pallets and weight for the shipment. Figure 12
12) After entering measurement details user clicks Continue button to continue to the sixth screen of the SAR Wizard. (Figure 13) At this point in the SAR Wizard the System prompts the user that a specific SAR has been created. Even if the user clicks the clicks Cancel button an SAR will be saved. (Figure 13) Figure 13
Page 9
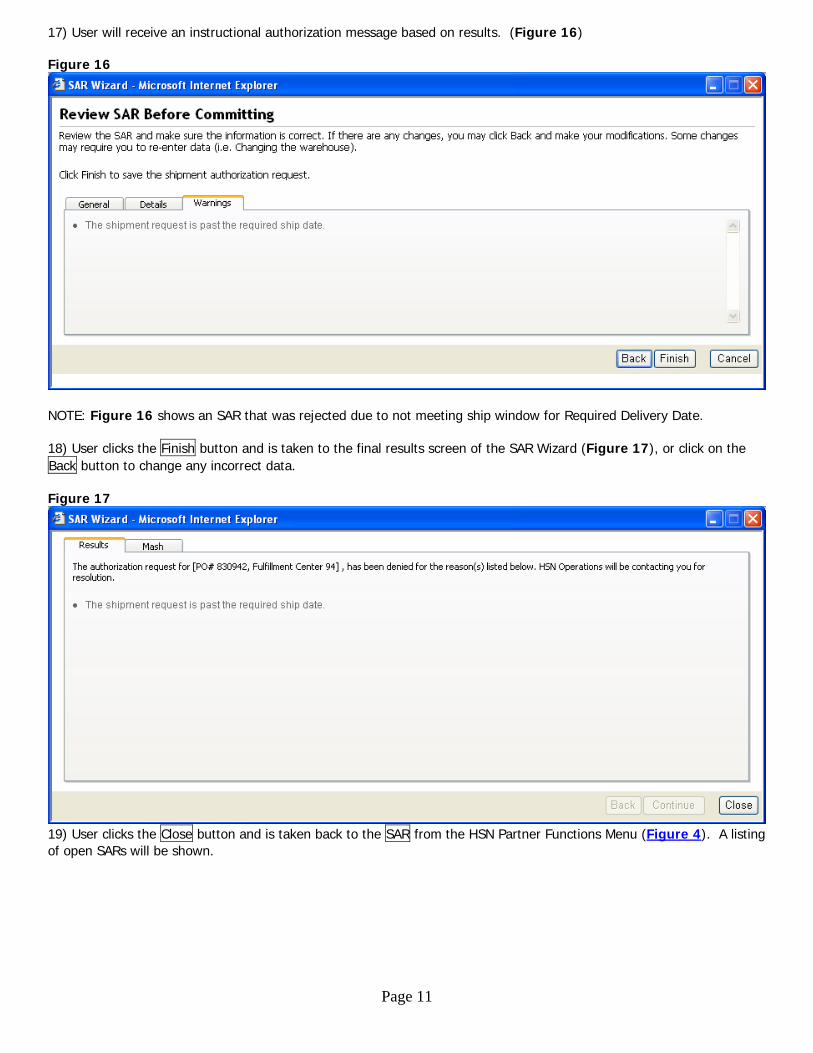
13) The next screen of the SAR Wizard displays SAR detail information. (Figure 14) The user must place the actual unit quantity to ship for each item in the shipment. Figure 14
14) Upon completing the SAR detail screen the user may click the Continue button. The system will then complete several SAR Validation processes and alert (red highlighted fields) or prompt as required. If SAR passes validation process the system displays the next screen of the SAR Wizard. (Figure 15) Figure 15
15) After reviewing information on the SAR summary screen, the user may click the Finish button to complete validation step of the SAR creation process, or click on the Back button to change any incorrect data. 16) When user clicks the Finish button of the SAR summary information screen the system will check all validation criteria and authorize or exception the SAR request.
Page 10
17) User will receive an instructional authorization message based on results. (Figure 16) Figure 16
NOTE: Figure 16 shows an SAR that was rejected due to not meeting ship window for Required Delivery Date. 18) User clicks the Finish button and is taken to the final results screen of the SAR Wizard (Figure 17), or click on the Back button to change any incorrect data. Figure 17
19) User clicks the Close button and is taken back to the SAR from the HSN Partner Functions Menu (Figure 4). A listing of open SARs will be shown.
Page 11
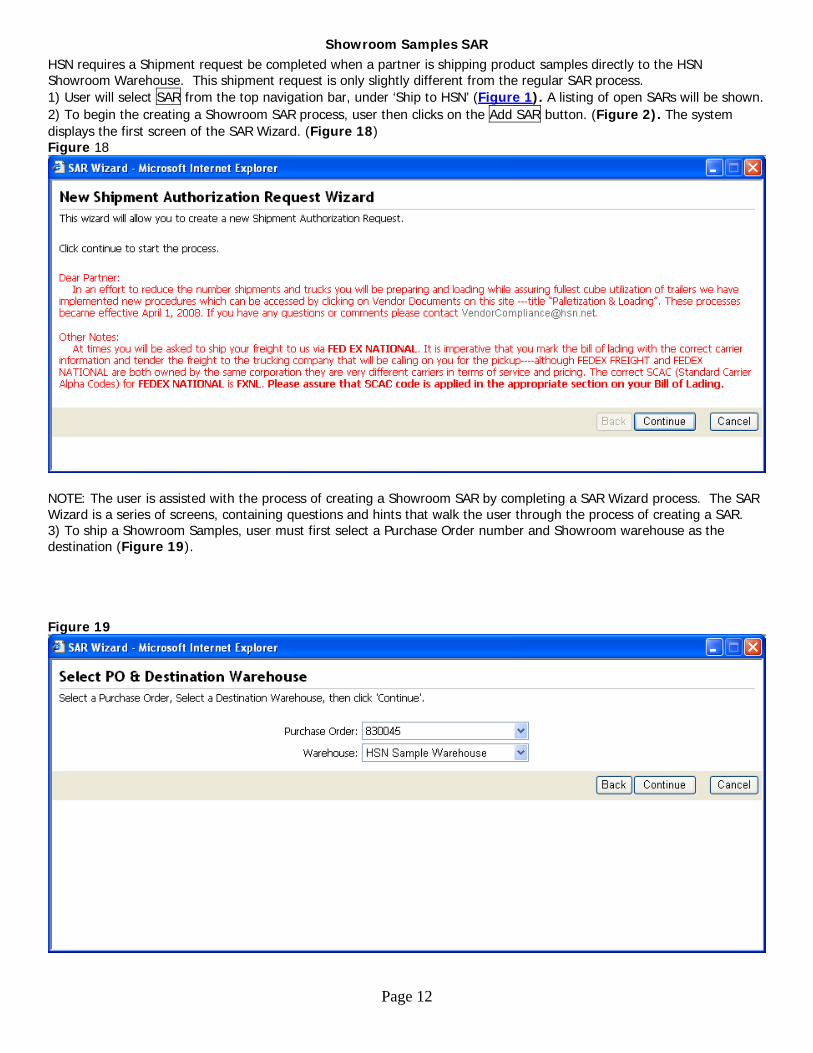
Showroom Samples SAR HSN requires a Shipment request be completed when a partner is shipping product samples directly to the HSN Showroom Warehouse. This shipment request is only slightly different from the regular SAR process. 1) User will select SAR from the top navigation bar, under ‘Ship to HSN’ (Figure 1). A listing of open SARs will be shown. 2) To begin the creating a Showroom SAR process, user then clicks on the Add SAR button. (Figure 2). The system displays the first screen of the SAR Wizard. (Figure 18) Figure 18
NOTE: The user is assisted with the process of creating a Showroom SAR by completing a SAR Wizard process. The SAR Wizard is a series of screens, containing questions and hints that walk the user through the process of creating a SAR. 3) To ship a Showroom Samples, user must first select a Purchase Order number and Showroom warehouse as the destination (Figure 19). Figure 19
Page 12
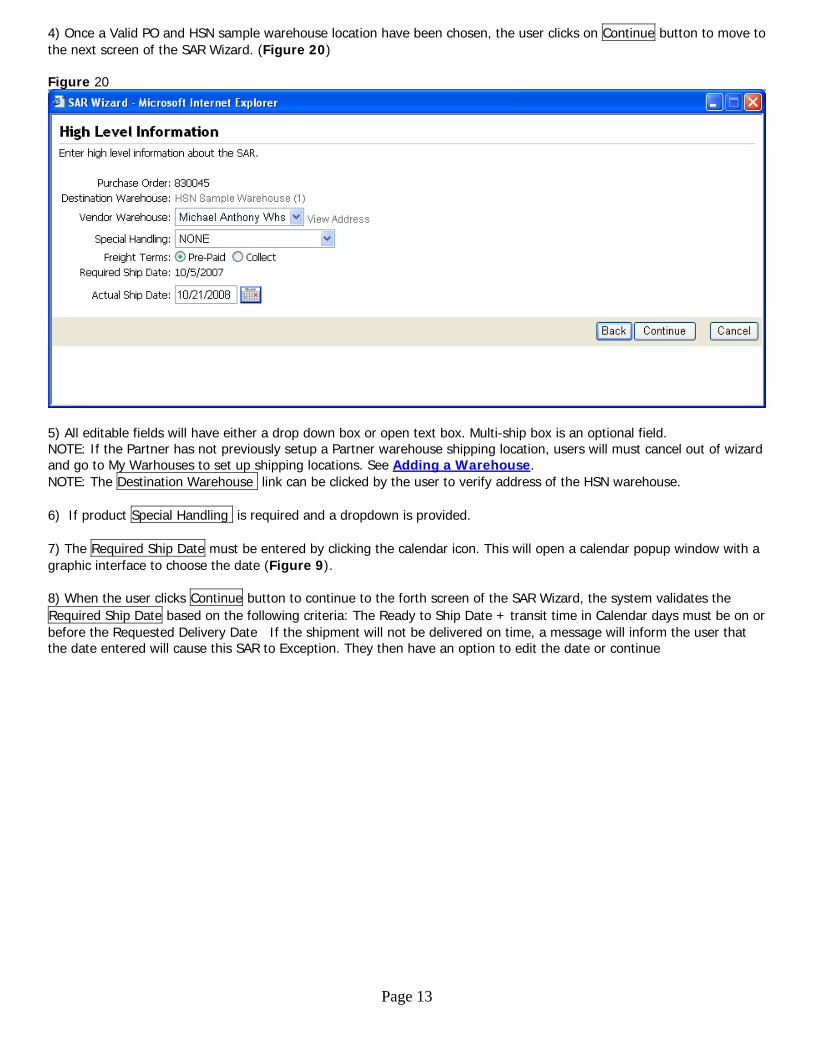
4) Once a Valid PO and HSN sample warehouse location have been chosen, the user clicks on Continue button to move to the next screen of the SAR Wizard. (Figure 20) Figure 20
5) All editable fields will have either a drop down box or open text box. Multi-ship box is an optional field. NOTE: If the Partner has not previously setup a Partner warehouse shipping location, users will must cancel out of wizard and go to My Warhouses to set up shipping locations. See Adding a Warehouse. NOTE: The Destination Warehouse link can be clicked by the user to verify address of the HSN warehouse. 6) If product Special Handling is required and a dropdown is provided. 7) The Required Ship Date must be entered by clicking the calendar icon. This will open a calendar popup window with a graphic interface to choose the date (Figure 9). 8) When the user clicks Continue button to continue to the forth screen of the SAR Wizard, the system validates the Required Ship Date based on the following criteria: The Ready to Ship Date + transit time in Calendar days must be on or before the Requested Delivery Date If the shipment will not be delivered on time, a message will inform the user that the date entered will cause this SAR to Exception. They then have an option to edit the date or continue
Page 13
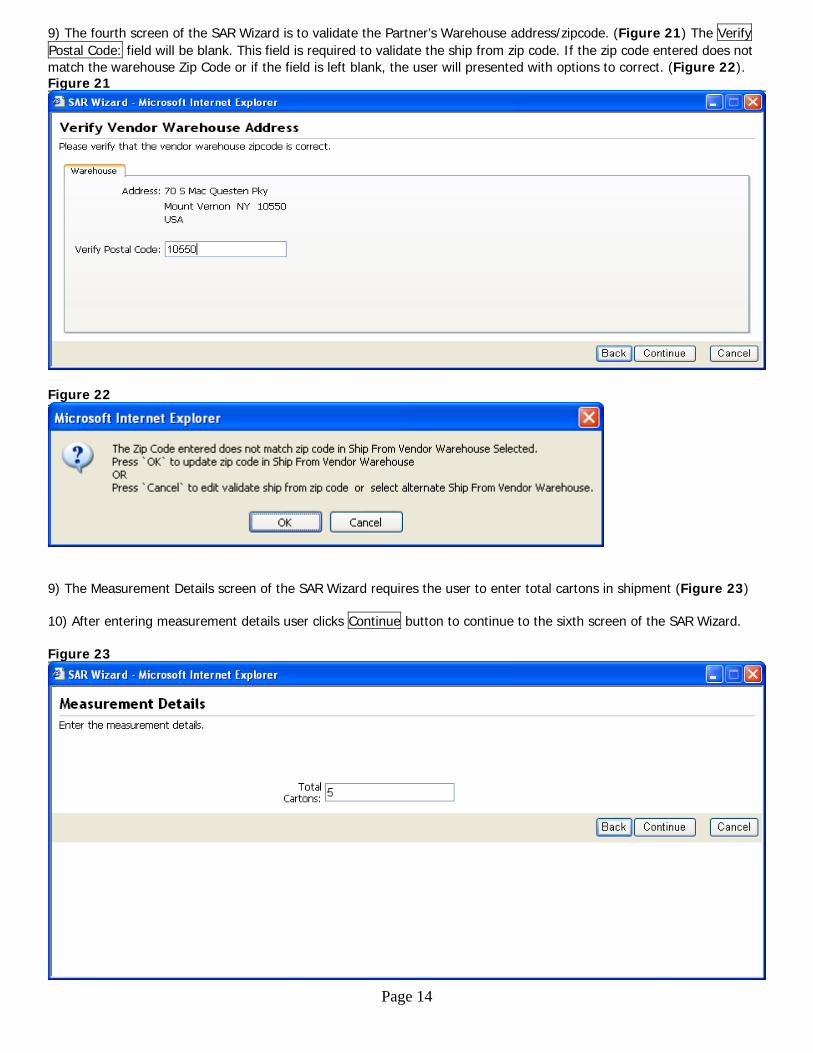
9) The fourth screen of the SAR Wizard is to validate the Partner’s Warehouse address/zipcode. (Figure 21) The Verify Postal Code: field will be blank. This field is required to validate the ship from zip code. If the zip code entered does not match the warehouse Zip Code or if the field is left blank, the user will presented with options to correct. (Figure 22). Figure 21
Figure 22
9) The Measurement Details screen of the SAR Wizard requires the user to enter total cartons in shipment (Figure 23) 10) After entering measurement details user clicks Continue button to continue to the sixth screen of the SAR Wizard. Figure 23
Page 14
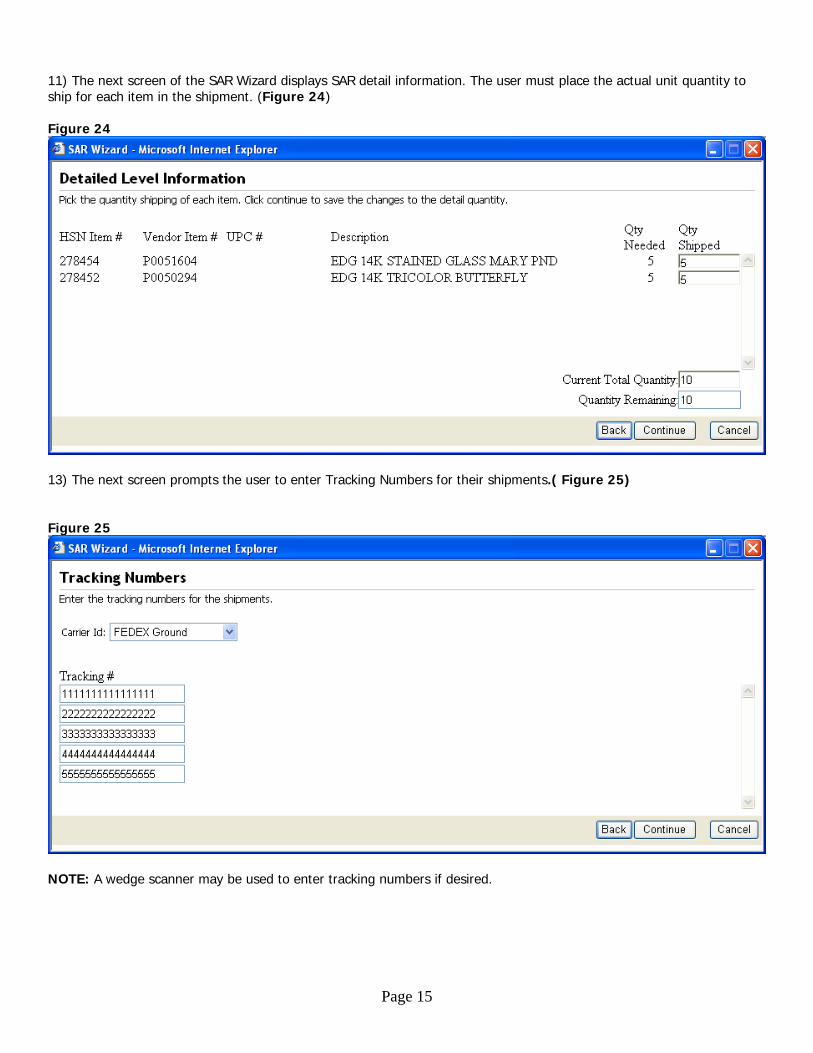
11) The next screen of the SAR Wizard displays SAR detail information. The user must place the actual unit quantity to ship for each item in the shipment. (Figure 24) Figure 24
13) The next screen prompts the user to enter Tracking Numbers for their shipments.( Figure 25) Figure 25
NOTE: A wedge scanner may be used to enter tracking numbers if desired.
Page 15
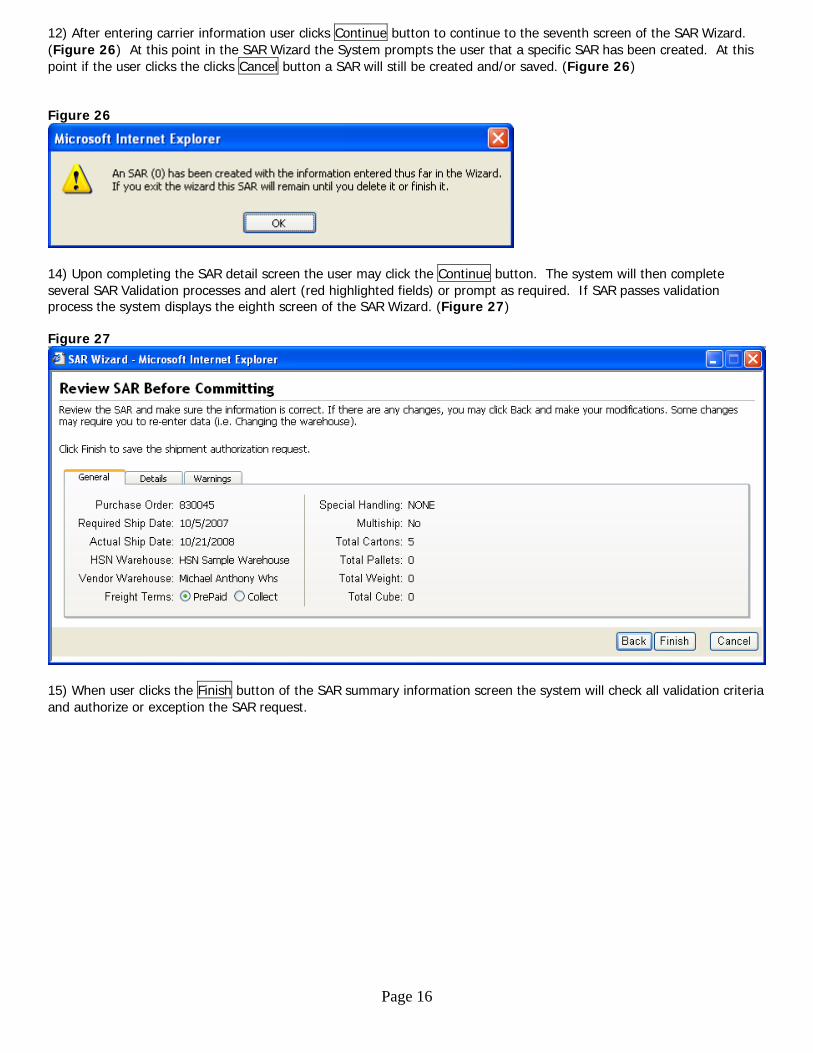
12) After entering carrier information user clicks Continue button to continue to the seventh screen of the SAR Wizard. (Figure 26) At this point in the SAR Wizard the System prompts the user that a specific SAR has been created. At this point if the user clicks the clicks Cancel button a SAR will still be created and/or saved. (Figure 26) Figure 26
14) Upon completing the SAR detail screen the user may click the Continue button. The system will then complete several SAR Validation processes and alert (red highlighted fields) or prompt as required. If SAR passes validation process the system displays the eighth screen of the SAR Wizard. (Figure 27) Figure 27
15) When user clicks the Finish button of the SAR summary information screen the system will check all validation criteria and authorize or exception the SAR request.
Page 16
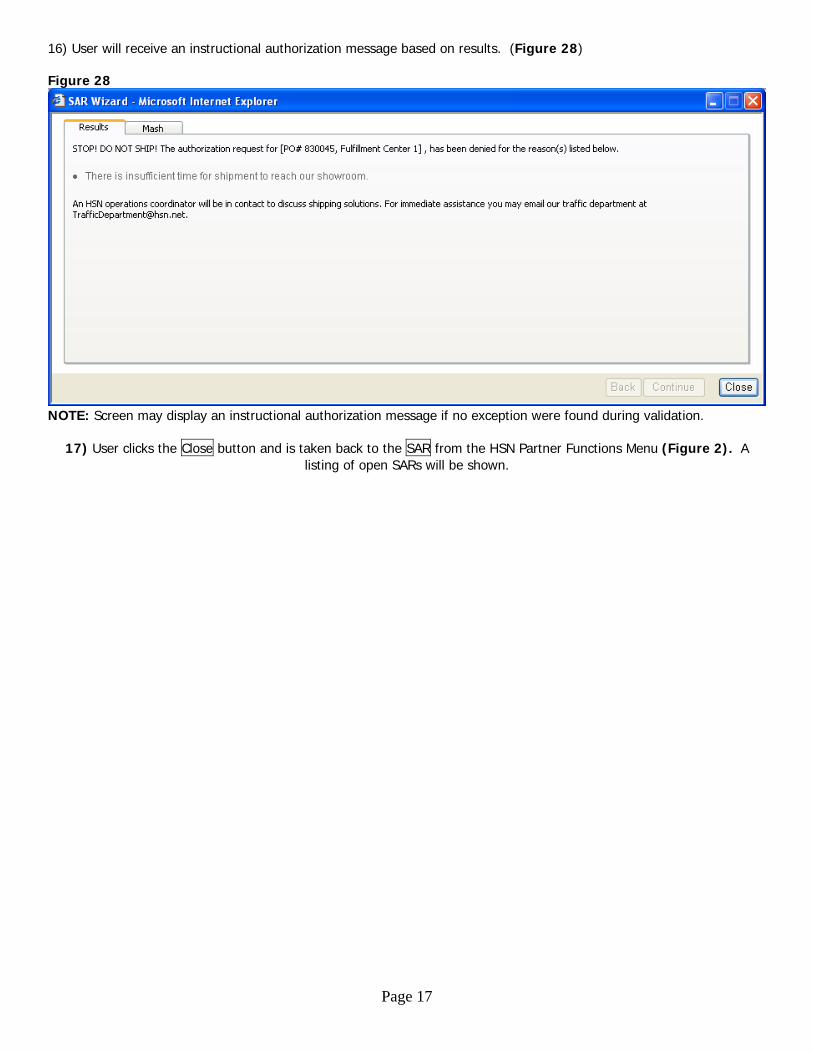
16) User will receive an instructional authorization message based on results. (Figure 28) Figure 28
NOTE: Screen may display an instructional authorization message if no exception were found during validation.
17) User clicks the Close button and is taken back to the SAR from the HSN Partner Functions Menu (Figure 2). A listing of open SARs will be shown.
Page 17

Partner Invoice Process
Partners will have the ability to submit invoices for products shipped domestically to HSN distribution centers.
Add Invoice The Add function will allow Partners to submit Invoices using HSN B2B application. 1) Select Partner Invoices from the top navigation bar, under ‘Ship to HSN’. (Figure 29) Figure 23
Page 18
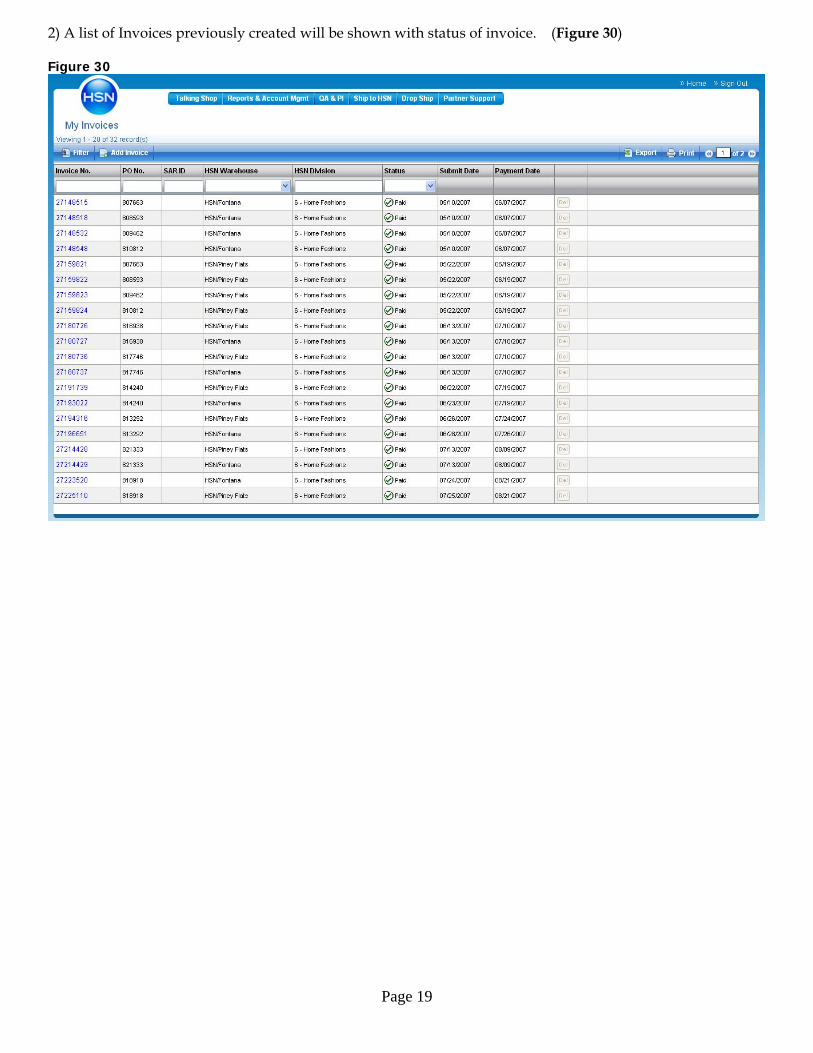
2) A list of Invoices previously created will be shown with status of invoice. (Figure 30) Figure 30
Page 19
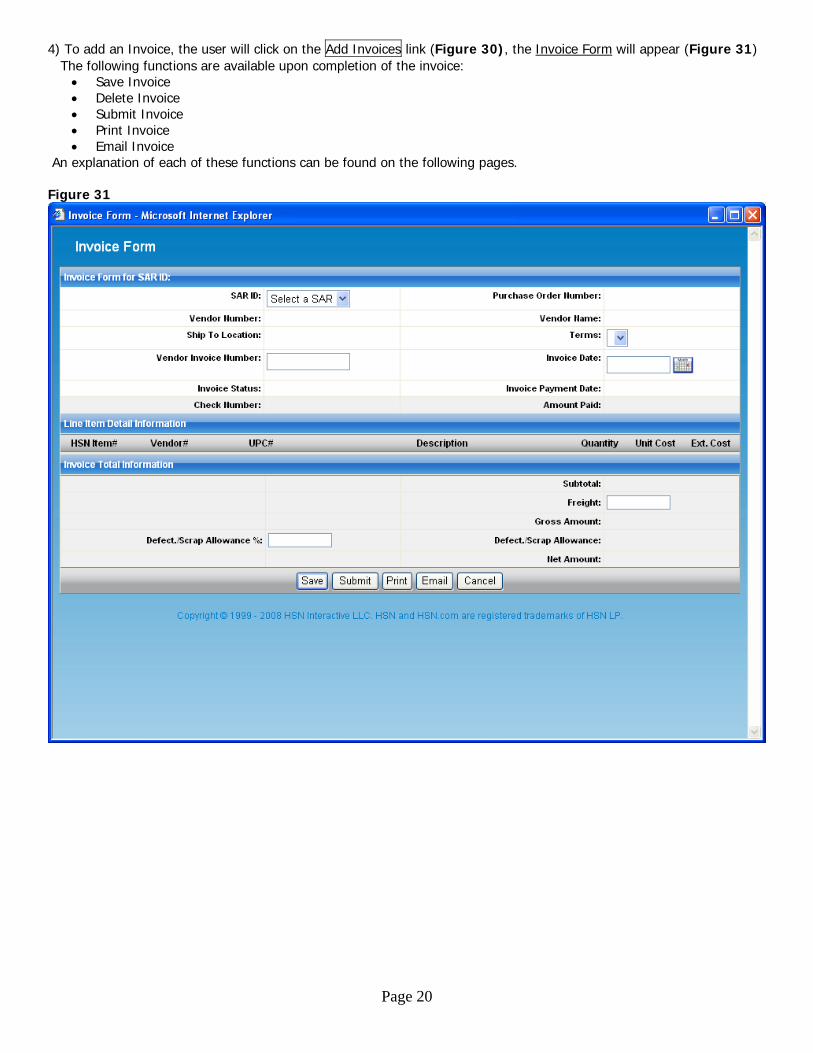
4) To add an Invoice, the user will click on the Add Invoices link (Figure 30), the Invoice Form will appear (Figure 31) The following functions are available upon completion of the invoice:
• Save Invoice • Delete Invoice • Submit Invoice • Print Invoice • Email Invoice
An explanation of each of these functions can be found on the following pages. Figure 31
Page 20
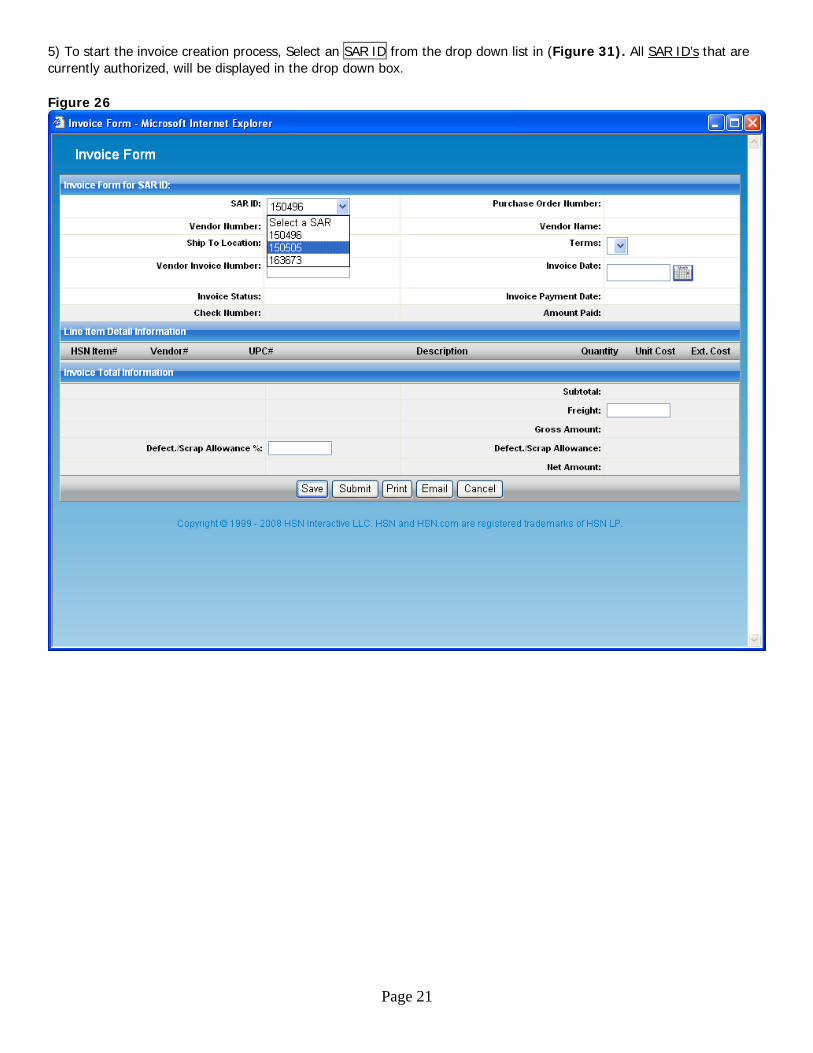
5) To start the invoice creation process, Select an SAR ID from the drop down list in (Figure 31). All SAR ID’s that are currently authorized, will be displayed in the drop down box. Figure 26
Page 21
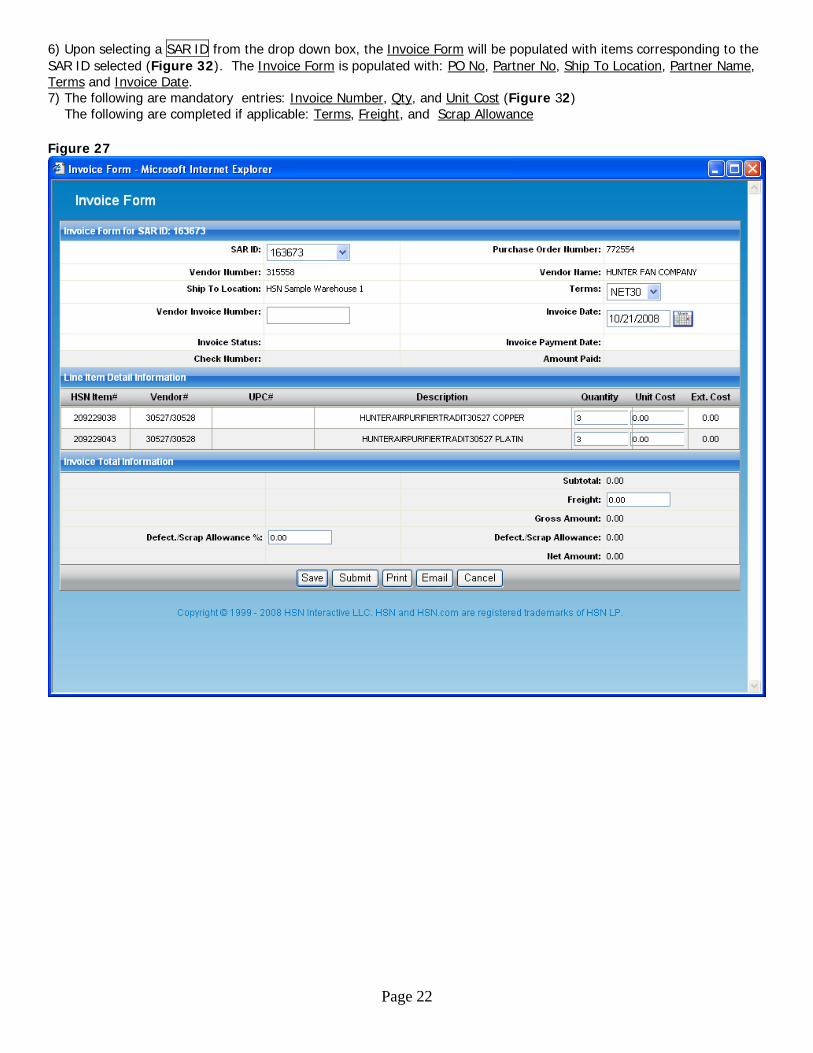
6) Upon selecting a SAR ID from the drop down box, the Invoice Form will be populated with items corresponding to the SAR ID selected (Figure 32). The Invoice Form is populated with: PO No, Partner No, Ship To Location, Partner Name, Terms and Invoice Date. 7) The following are mandatory entries: Invoice Number, Qty, and Unit Cost (Figure 32) The following are completed if applicable: Terms, Freight, and Scrap Allowance Figure 27
Page 22
Save invoice Submit invoice
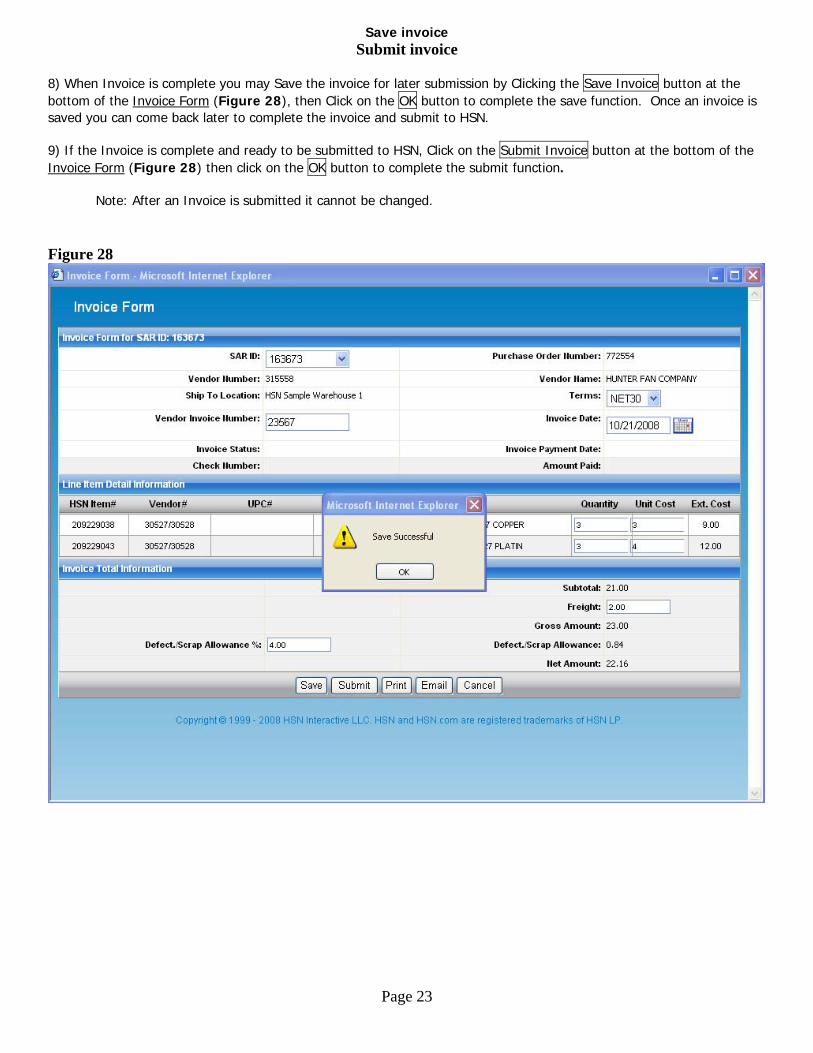
8) When Invoice is complete you may Save the invoice for later submission by Clicking the Save Invoice button at the
Page 23
bottom of the Invoice Form (Figure 28), then Click on the OK button to complete the save function. Once an invoice is saved you can come back later to complete the invoice and submit to HSN. 9) If the Invoice is complete and ready to be submitted to HSN, Click on the Submit Invoice button at the bottom of the Invoice Form (Figure 28) then click on the OK button to complete the submit function.
Note: After an Invoice is submitted it cannot be changed. Figure 28
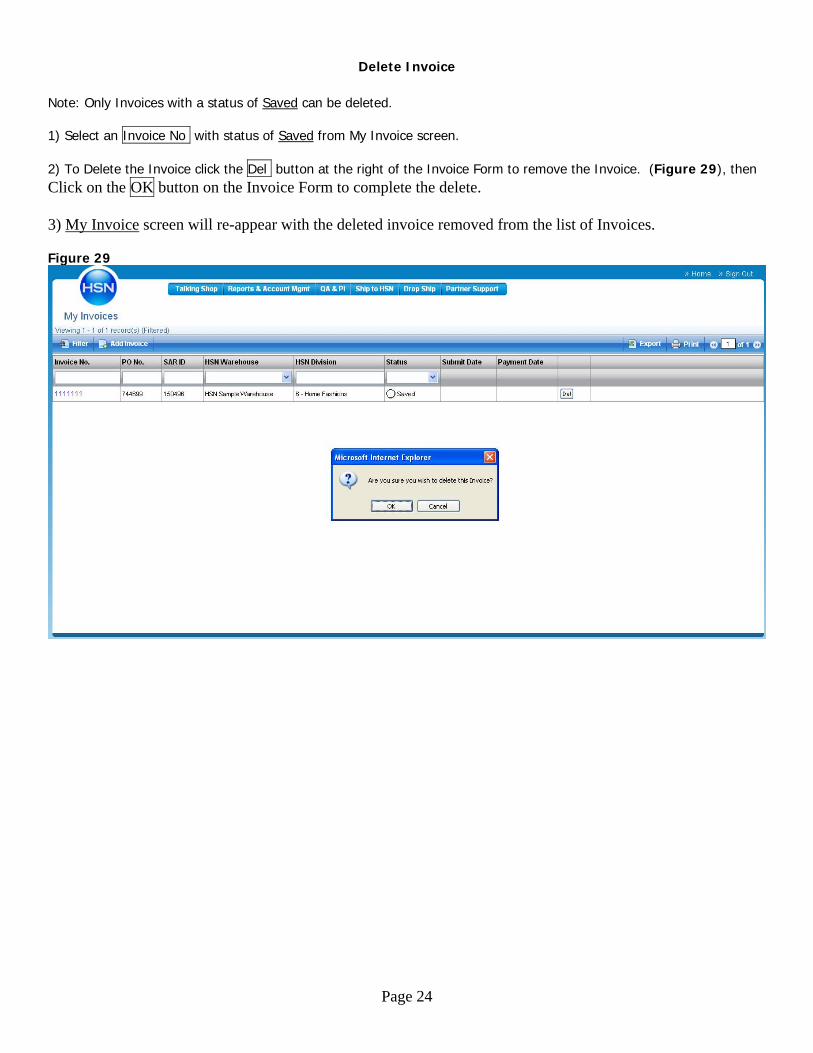
Delete Invoice Note: Only Invoices with a status of Saved can be deleted. 1) Select an Invoice No with status of Saved from My Invoice screen. 2) To Delete the Invoice click the Del button at the right of the Invoice Form to remove the Invoice. (Figure 29), then Click on the OK button on the Invoice Form to complete the delete. 3) My Invoice screen will re-appear with the deleted invoice removed from the list of Invoices. Figure 29
Page 24
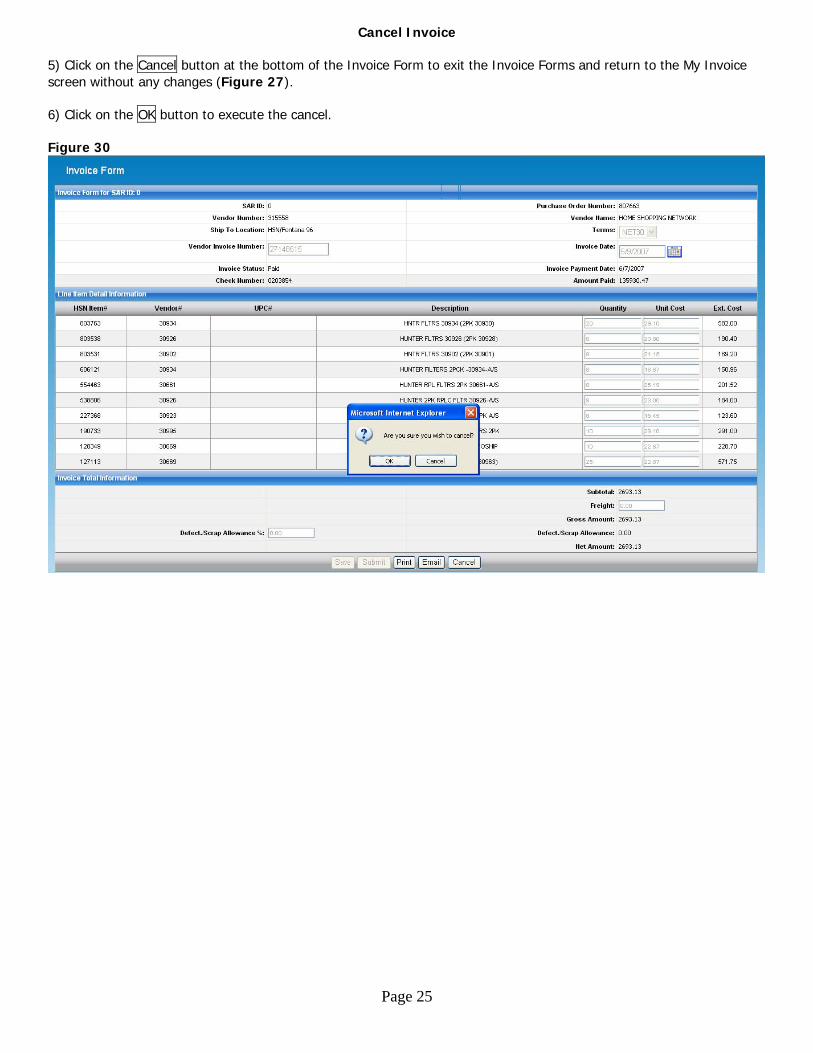
Cancel Invoice 5) Click on the Cancel button at the bottom of the Invoice Form to exit the Invoice Forms and return to the My Invoice screen without any changes (Figure 27). 6) Click on the OK button to execute the cancel. Figure 30
Page 25
Print Invoice
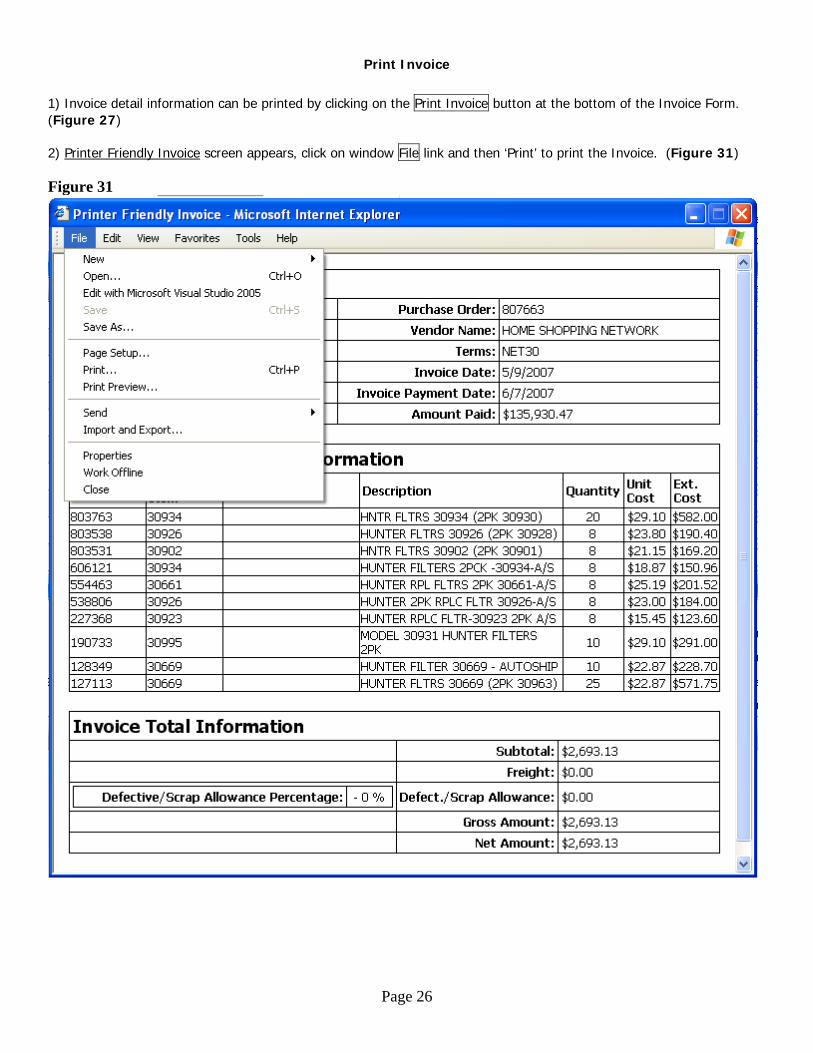
1) Invoice detail information can be printed by clicking on the Print Invoice button at the bottom of the Invoice Form. (Figure 27) 2) Printer Friendly Invoice screen appears, click on window File link and then ‘Print’ to print the Invoice. (Figure 31) Figure 31
Page 26
Email Invoice
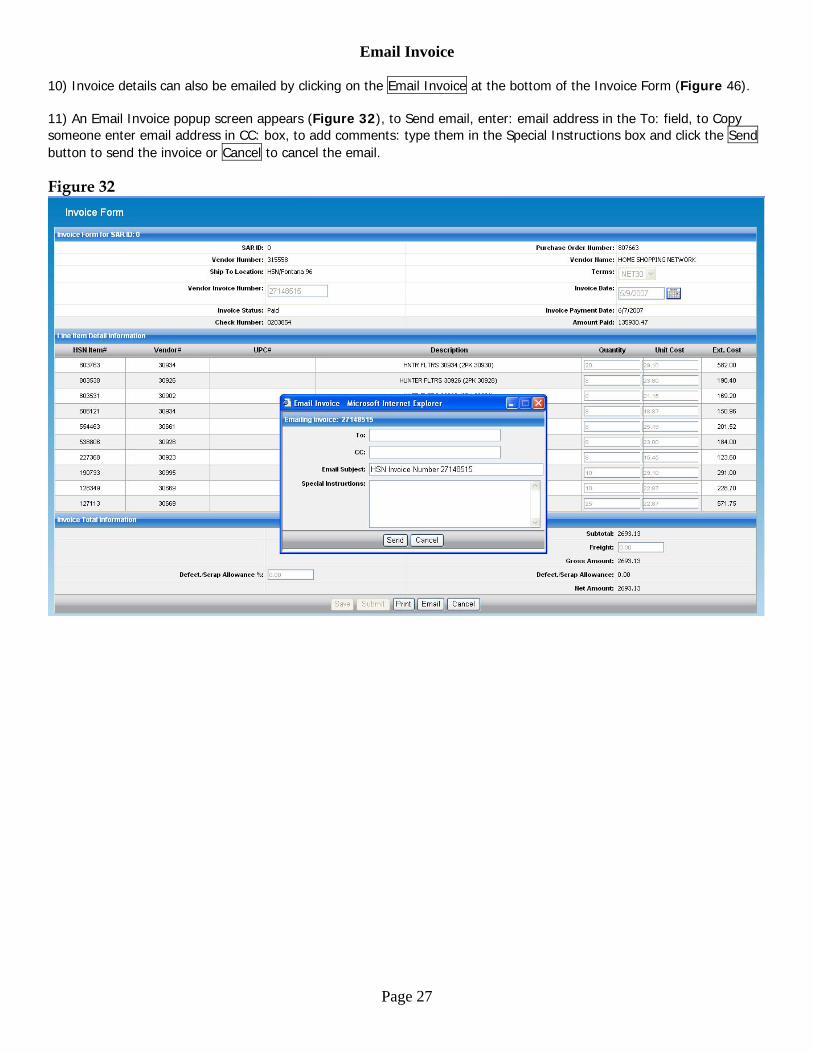
10) Invoice details can also be emailed by clicking on the Email Invoice at the bottom of the Invoice Form (Figure 46). 11) An Email Invoice popup screen appears (Figure 32), to Send email, enter: email address in the To: field, to Copy someone enter email address in CC: box, to add comments: type them in the Special Instructions box and click the Send button to send the invoice or Cancel to cancel the email. Figure 32
Page 27
Page 28
DropShip Data Exchange
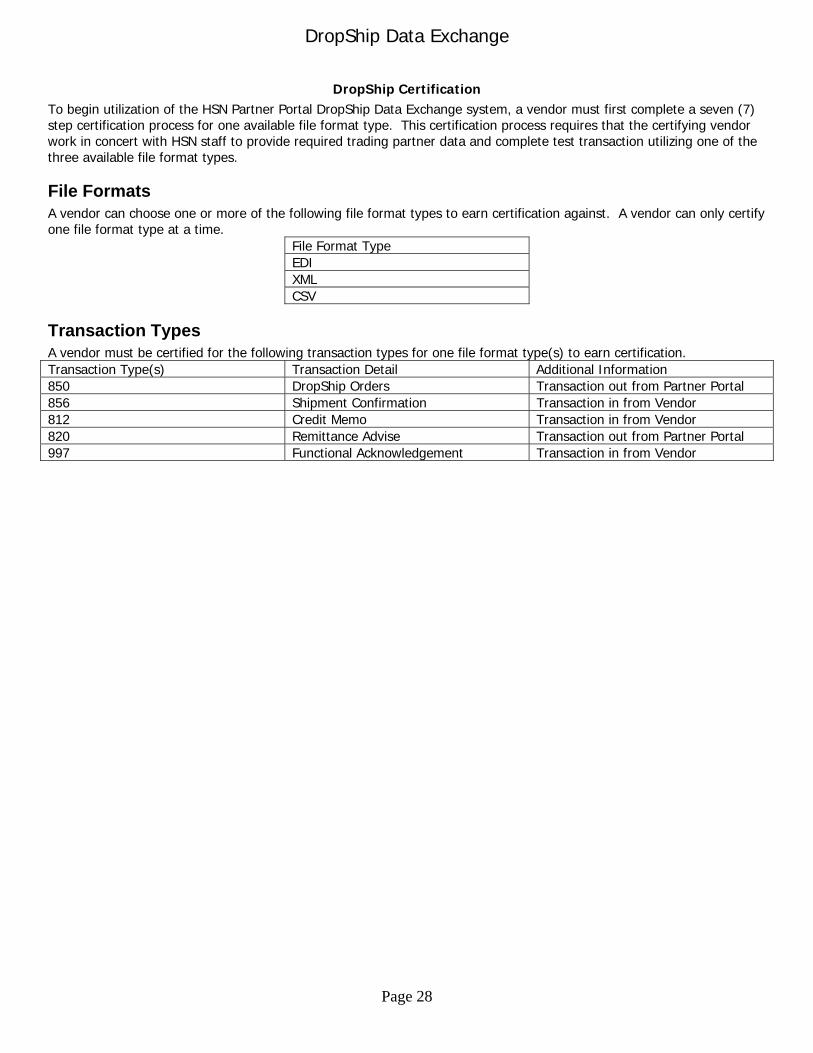
DropShip Certification To begin utilization of the HSN Partner Portal DropShip Data Exchange system, a vendor must first complete a seven (7) step certification process for one available file format type. This certification process requires that the certifying vendor work in concert with HSN staff to provide required trading partner data and complete test transaction utilizing one of the three available file format types.
File Formats A vendor can choose one or more of the following file format types to earn certification against. A vendor can only certify one file format type at a time.
File Format Type EDI XML CSV
Transaction Types A vendor must be certified for the following transaction types for one file format type(s) to earn certification. Transaction Type(s) Transaction Detail Additional Information 850 DropShip Orders Transaction out from Partner Portal 856 Shipment Confirmation Transaction in from Vendor 812 Credit Memo Transaction in from Vendor 820 Remittance Advise Transaction out from Partner Portal 997 Functional Acknowledgement Transaction in from Vendor
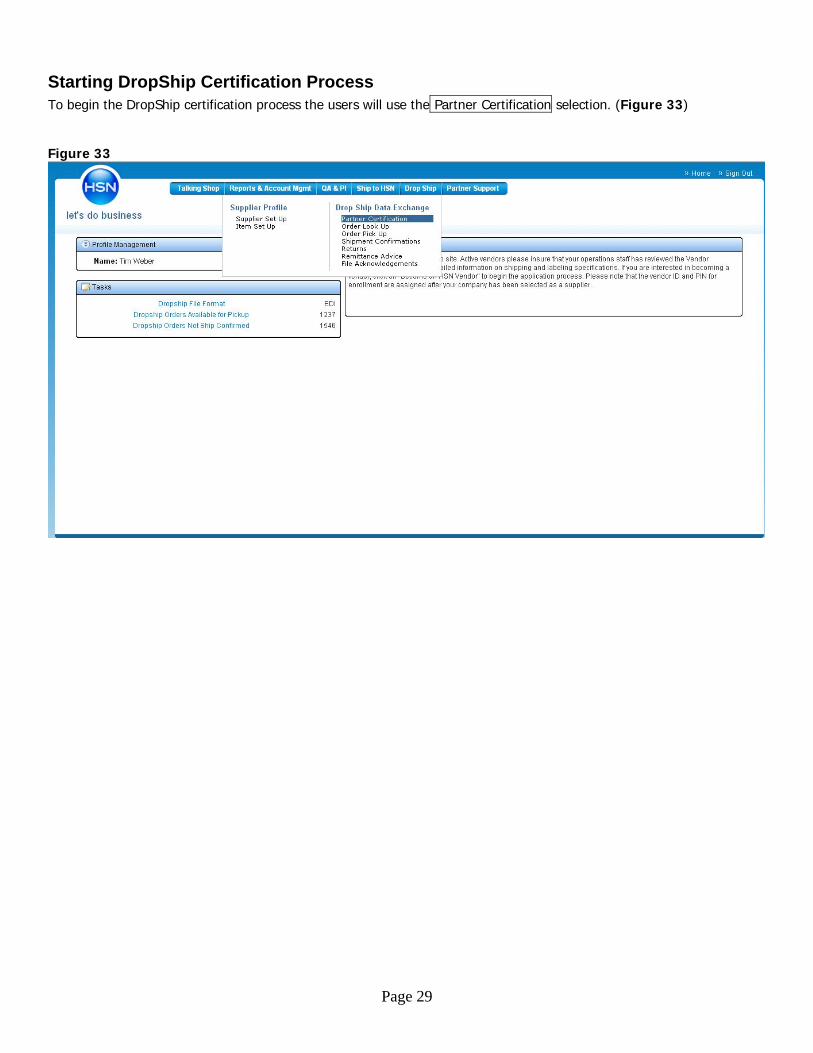
Starting DropShip Certification Process To begin the DropShip certification process the users will use the Partner Certification selection. (Figure 33) Figure 33
Page 29
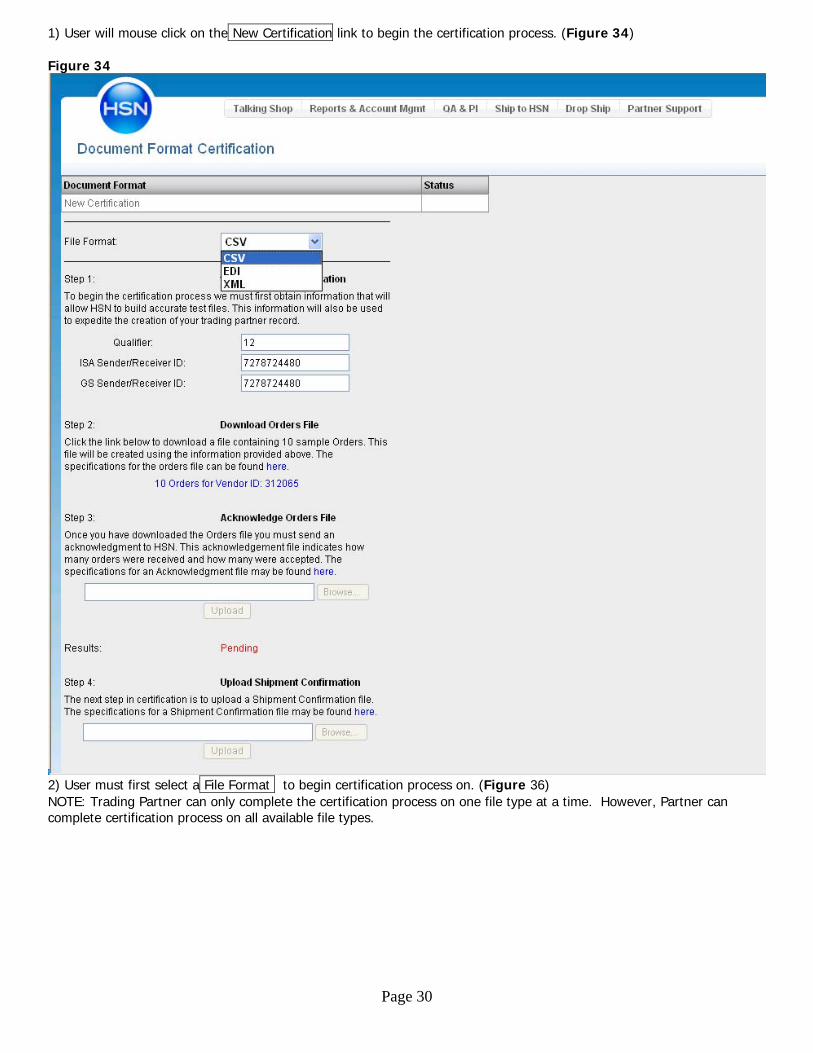
1) User will mouse click on the New Certification link to begin the certification process. (Figure 34) Figure 34
2) User must first select a File Format to begin certification process on. (Figure 36) NOTE: Trading Partner can only complete the certification process on one file type at a time. However, Partner can complete certification process on all available file types.
Page 30
3) Step One Trading Partner Information requires the user to enter vendor trading partner information. (Figure 34) This information includes the following: Data Requirement Additional Information ISA Qualifier Represents what type of sender/receiver code you will be
using. 01 = Duns Number, 12 = Phone Number, or ZZ = mutually defined. Minimum length =2, Maximum length= 2
ISA/GS Sender ID Identifier for your company and lets HSN’s systems identify who the file is from. Minimum length =2, Maximum length= 15
ISA/GS Receiver ID Also identifies your company and is usually the same as the ISA sender/receiver id. Minimum length =2, Maximum length= 15
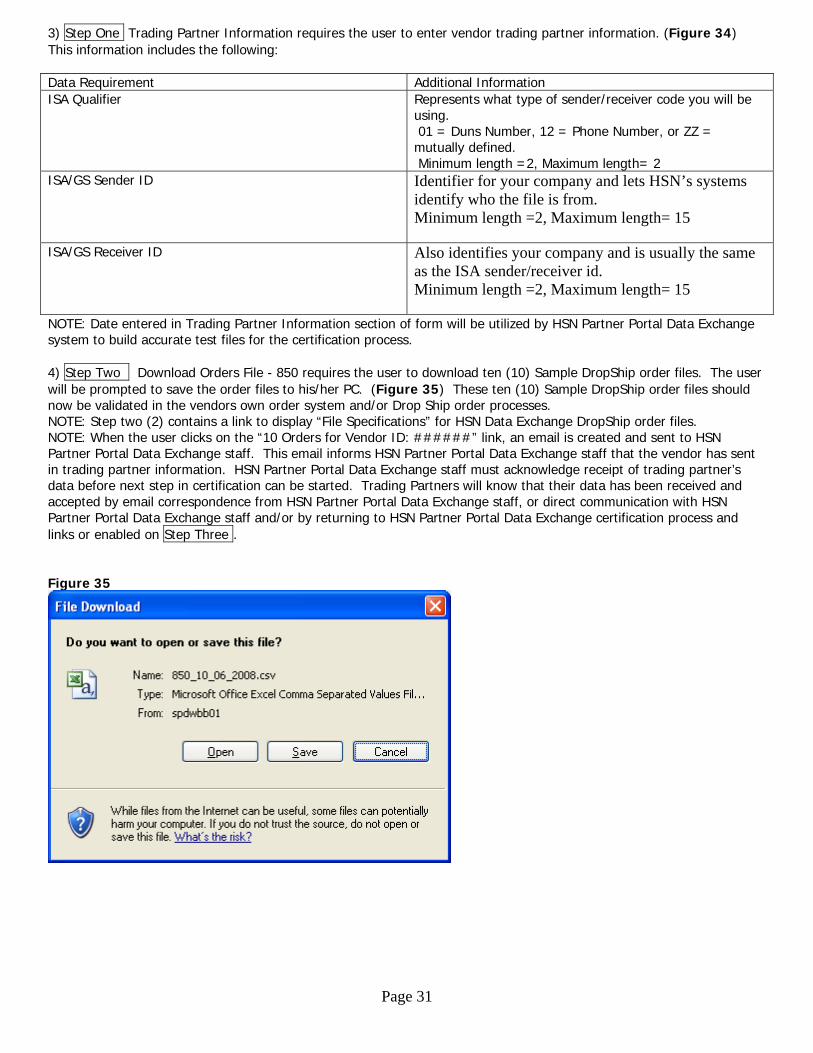
NOTE: Date entered in Trading Partner Information section of form will be utilized by HSN Partner Portal Data Exchange system to build accurate test files for the certification process. 4) Step Two Download Orders File - 850 requires the user to download ten (10) Sample DropShip order files. The user will be prompted to save the order files to his/her PC. (Figure 35) These ten (10) Sample DropShip order files should now be validated in the vendors own order system and/or Drop Ship order processes. NOTE: Step two (2) contains a link to display “File Specifications” for HSN Data Exchange DropShip order files. NOTE: When the user clicks on the “10 Orders for Vendor ID: ######” link, an email is created and sent to HSN Partner Portal Data Exchange staff. This email informs HSN Partner Portal Data Exchange staff that the vendor has sent in trading partner information. HSN Partner Portal Data Exchange staff must acknowledge receipt of trading partner’s data before next step in certification can be started. Trading Partners will know that their data has been received and accepted by email correspondence from HSN Partner Portal Data Exchange staff, or direct communication with HSN Partner Portal Data Exchange staff and/or by returning to HSN Partner Portal Data Exchange certification process and links or enabled on Step Three . Figure 35
Page 31
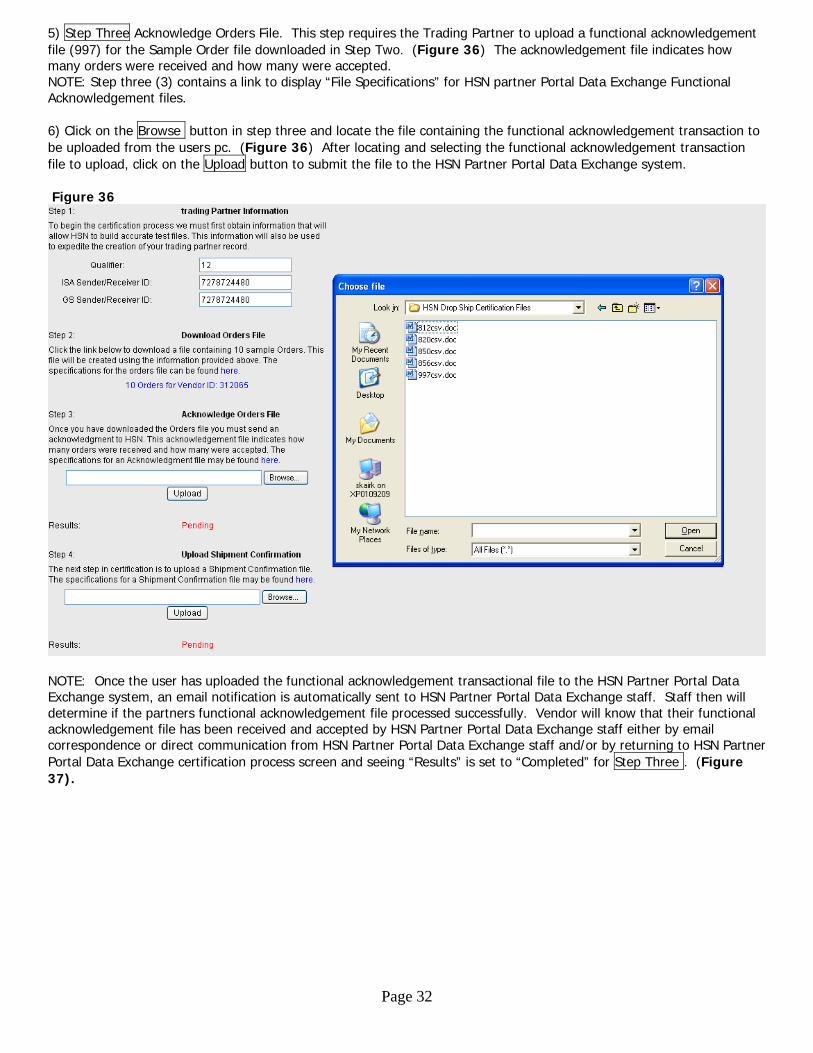
5) Step Three Acknowledge Orders File. This step requires the Trading Partner to upload a functional acknowledgement file (997) for the Sample Order file downloaded in Step Two. (Figure 36) The acknowledgement file indicates how many orders were received and how many were accepted. NOTE: Step three (3) contains a link to display “File Specifications” for HSN partner Portal Data Exchange Functional Acknowledgement files. 6) Click on the Browse button in step three and locate the file containing the functional acknowledgement transaction to be uploaded from the users pc. (Figure 36) After locating and selecting the functional acknowledgement transaction file to upload, click on the Upload button to submit the file to the HSN Partner Portal Data Exchange system. Figure 36
NOTE: Once the user has uploaded the functional acknowledgement transactional file to the HSN Partner Portal Data Exchange system, an email notification is automatically sent to HSN Partner Portal Data Exchange staff. Staff then will determine if the partners functional acknowledgement file processed successfully. Vendor will know that their functional acknowledgement file has been received and accepted by HSN Partner Portal Data Exchange staff either by email correspondence or direct communication from HSN Partner Portal Data Exchange staff and/or by returning to HSN Partner Portal Data Exchange certification process screen and seeing “Results” is set to “Completed” for Step Three . (Figure 37).
Page 32
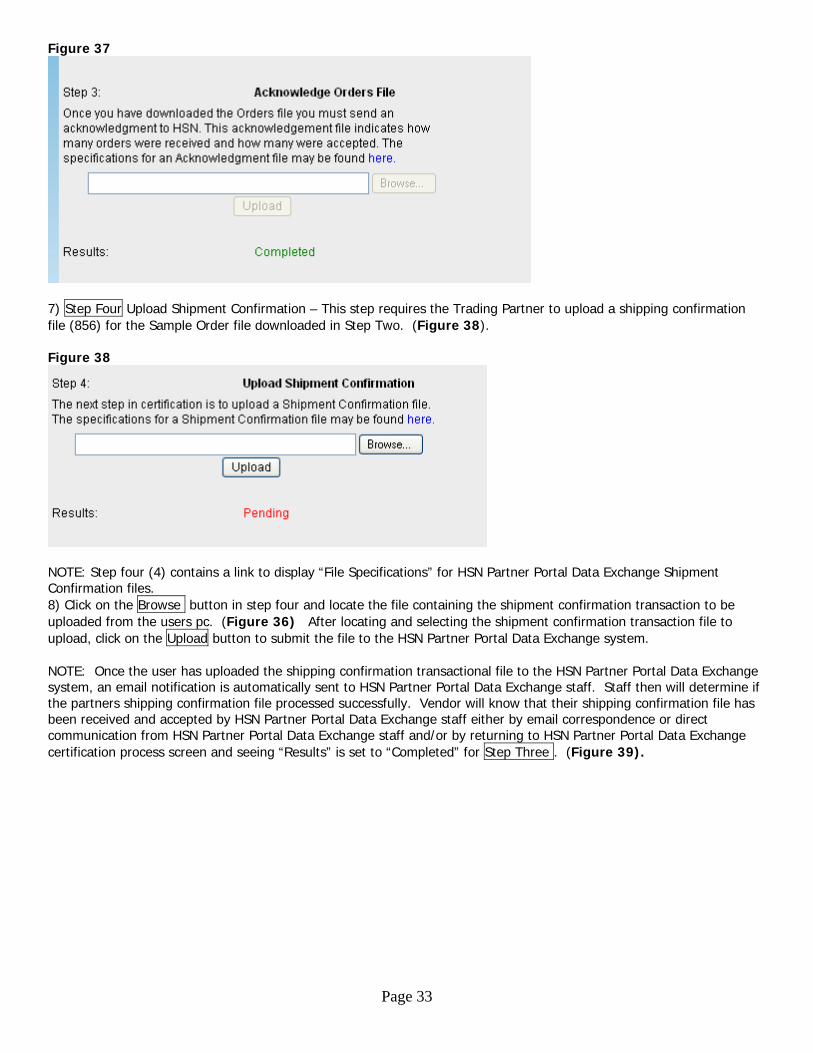
Figure 37
7) Step Four Upload Shipment Confirmation – This step requires the Trading Partner to upload a shipping confirmation file (856) for the Sample Order file downloaded in Step Two. (Figure 38). Figure 38
NOTE: Step four (4) contains a link to display “File Specifications” for HSN Partner Portal Data Exchange Shipment Confirmation files. 8) Click on the Browse button in step four and locate the file containing the shipment confirmation transaction to be uploaded from the users pc. (Figure 36) After locating and selecting the shipment confirmation transaction file to upload, click on the Upload button to submit the file to the HSN Partner Portal Data Exchange system. NOTE: Once the user has uploaded the shipping confirmation transactional file to the HSN Partner Portal Data Exchange system, an email notification is automatically sent to HSN Partner Portal Data Exchange staff. Staff then will determine if the partners shipping confirmation file processed successfully. Vendor will know that their shipping confirmation file has been received and accepted by HSN Partner Portal Data Exchange staff either by email correspondence or direct communication from HSN Partner Portal Data Exchange staff and/or by returning to HSN Partner Portal Data Exchange certification process screen and seeing “Results” is set to “Completed” for Step Three . (Figure 39).
Page 33
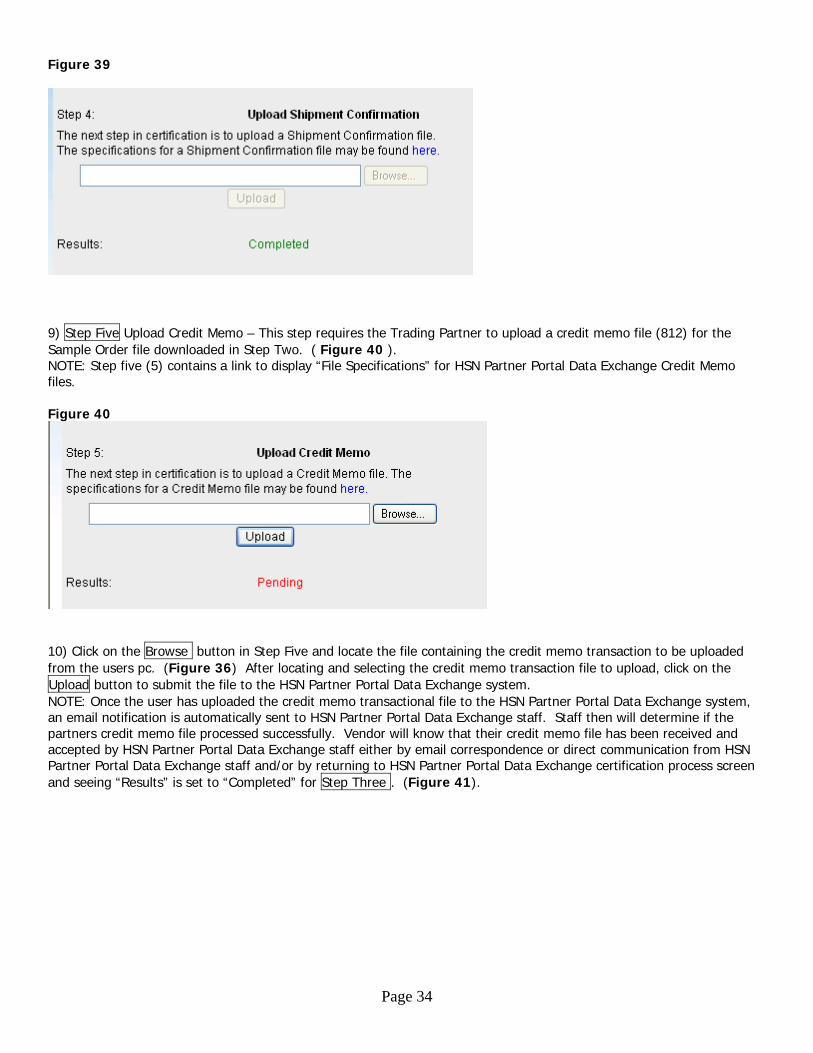
Figure 39
9) Step Five Upload Credit Memo – This step requires the Trading Partner to upload a credit memo file (812) for the Sample Order file downloaded in Step Two. ( Figure 40 ). NOTE: Step five (5) contains a link to display “File Specifications” for HSN Partner Portal Data Exchange Credit Memo files. Figure 40
10) Click on the Browse button in Step Five and locate the file containing the credit memo transaction to be uploaded from the users pc. (Figure 36) After locating and selecting the credit memo transaction file to upload, click on the Upload button to submit the file to the HSN Partner Portal Data Exchange system. NOTE: Once the user has uploaded the credit memo transactional file to the HSN Partner Portal Data Exchange system, an email notification is automatically sent to HSN Partner Portal Data Exchange staff. Staff then will determine if the partners credit memo file processed successfully. Vendor will know that their credit memo file has been received and accepted by HSN Partner Portal Data Exchange staff either by email correspondence or direct communication from HSN Partner Portal Data Exchange staff and/or by returning to HSN Partner Portal Data Exchange certification process screen and seeing “Results” is set to “Completed” for Step Three . (Figure 41).
Page 34
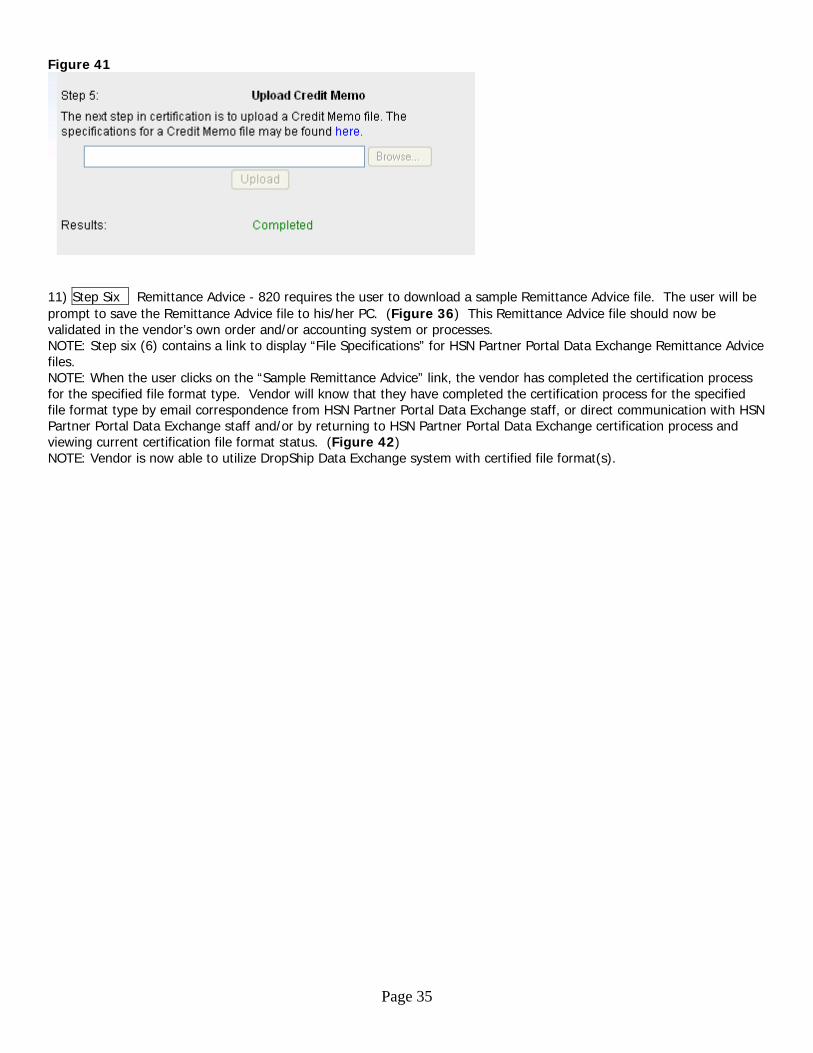
Figure 41
11) Step Six Remittance Advice - 820 requires the user to download a sample Remittance Advice file. The user will be prompt to save the Remittance Advice file to his/her PC. (Figure 36) This Remittance Advice file should now be validated in the vendor’s own order and/or accounting system or processes. NOTE: Step six (6) contains a link to display “File Specifications” for HSN Partner Portal Data Exchange Remittance Advice files. NOTE: When the user clicks on the “Sample Remittance Advice” link, the vendor has completed the certification process for the specified file format type. Vendor will know that they have completed the certification process for the specified file format type by email correspondence from HSN Partner Portal Data Exchange staff, or direct communication with HSN Partner Portal Data Exchange staff and/or by returning to HSN Partner Portal Data Exchange certification process and viewing current certification file format status. (Figure 42) NOTE: Vendor is now able to utilize DropShip Data Exchange system with certified file format(s).
Page 35
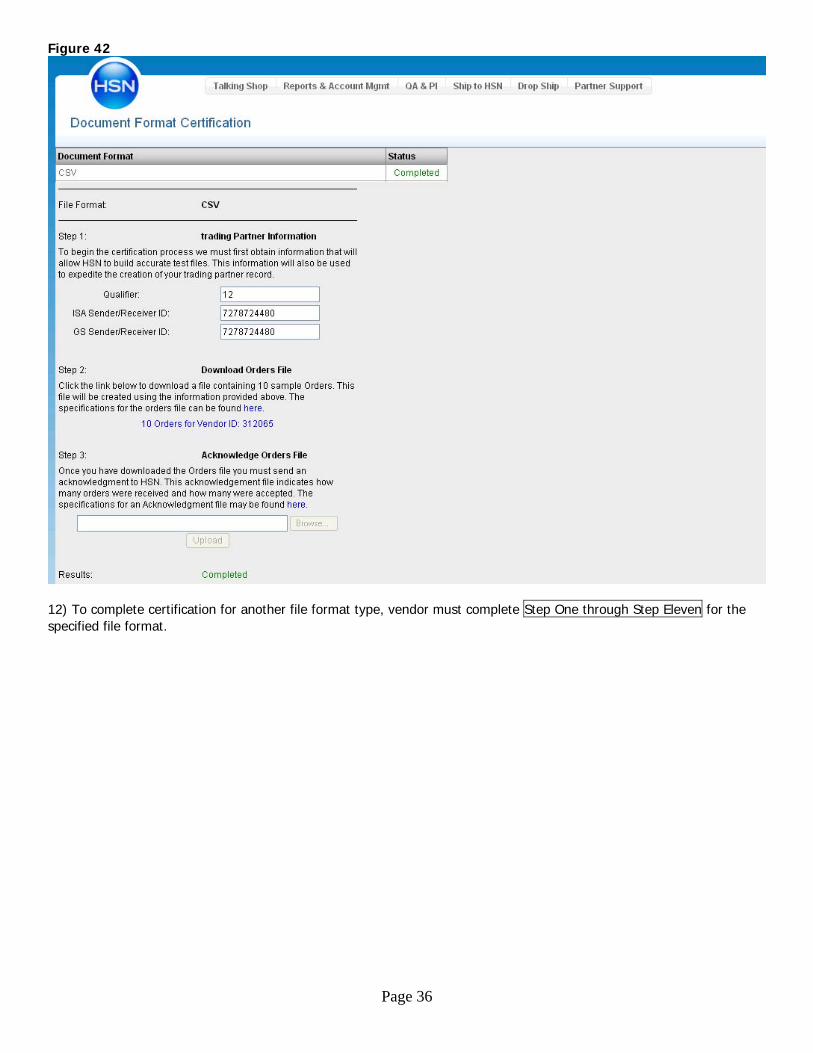
Figure 42
12) To complete certification for another file format type, vendor must complete Step One through Step Eleven for the specified file format.
Page 36
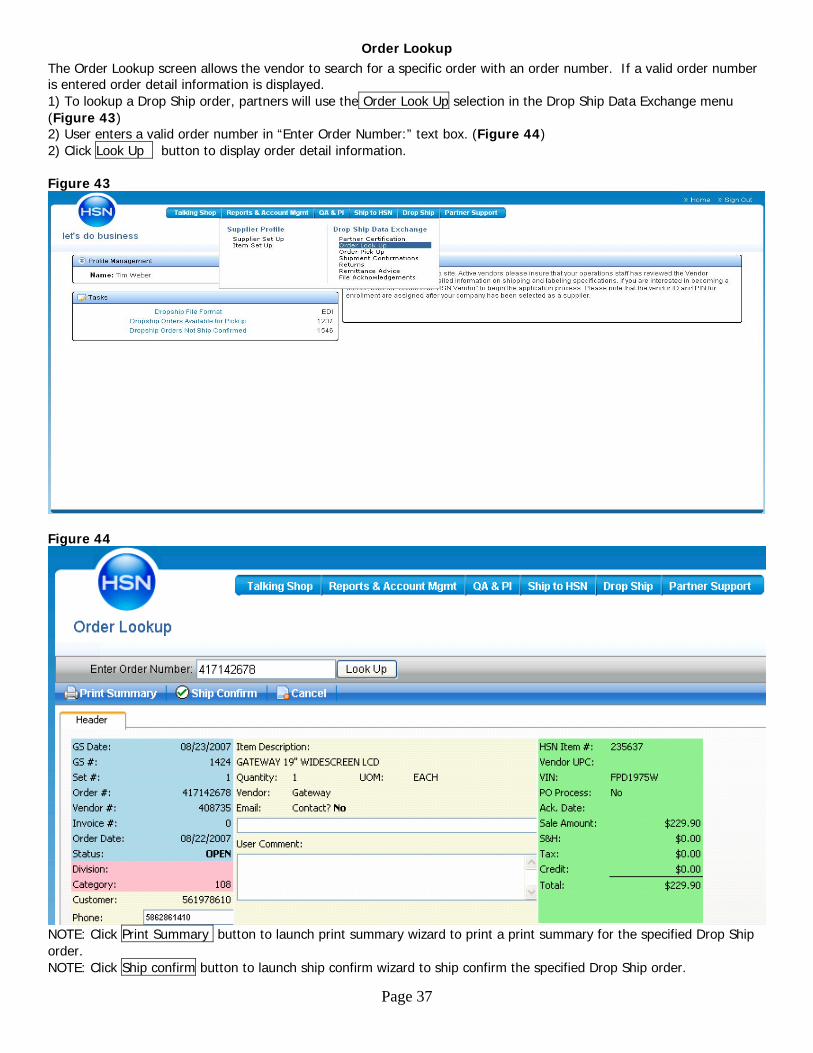
Order Lookup The Order Lookup screen allows the vendor to search for a specific order with an order number. If a valid order number is entered order detail information is displayed. 1) To lookup a Drop Ship order, partners will use the Order Look Up selection in the Drop Ship Data Exchange menu (Figure 43) 2) User enters a valid order number in “Enter Order Number:” text box. (Figure 44) 2) Click Look Up button to display order detail information. Figure 43
Figure 44
NOTE: Click Print Summary button to launch print summary wizard to print a print summary for the specified Drop Ship order. NOTE: Click Ship confirm button to launch ship confirm wizard to ship confirm the specified Drop Ship order.
Page 37
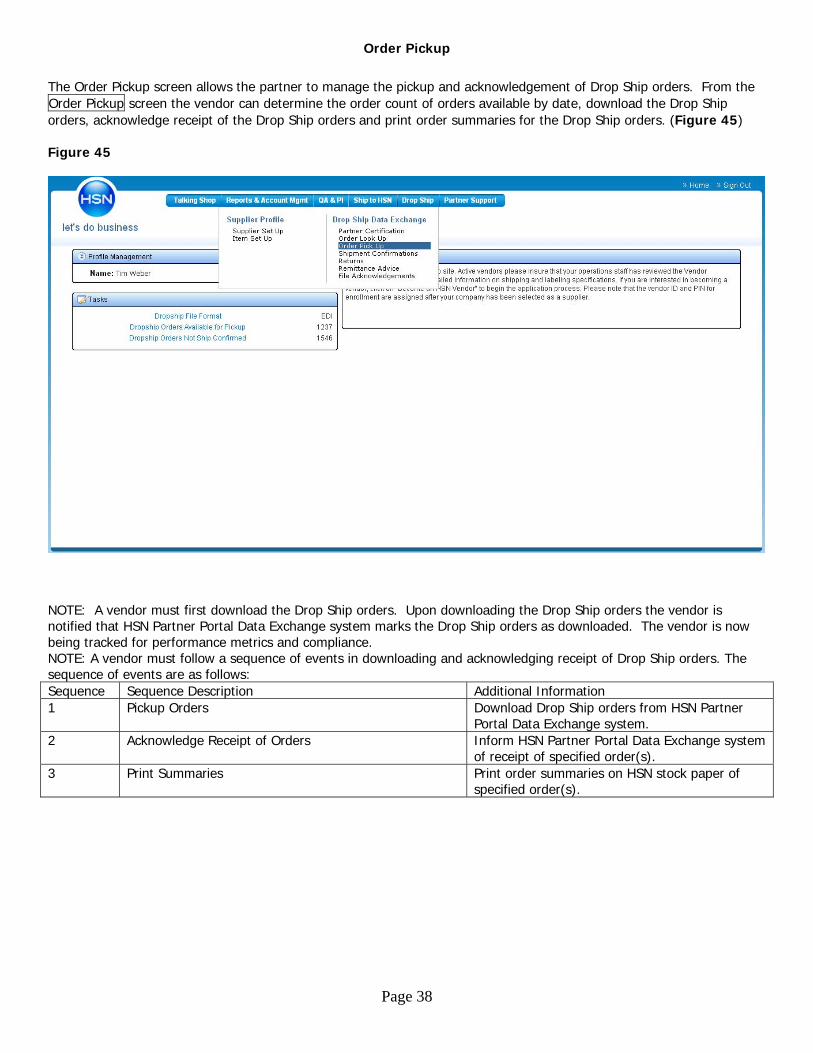
Order Pickup
The Order Pickup screen allows the partner to manage the pickup and acknowledgement of Drop Ship orders. From the Order Pickup screen the vendor can determine the order count of orders available by date, download the Drop Ship orders, acknowledge receipt of the Drop Ship orders and print order summaries for the Drop Ship orders. (Figure 45) Figure 45
NOTE: A vendor must first download the Drop Ship orders. Upon downloading the Drop Ship orders the vendor is notified that HSN Partner Portal Data Exchange system marks the Drop Ship orders as downloaded. The vendor is now being tracked for performance metrics and compliance. NOTE: A vendor must follow a sequence of events in downloading and acknowledging receipt of Drop Ship orders. The sequence of events are as follows: Sequence Sequence Description Additional Information 1 Pickup Orders Download Drop Ship orders from HSN Partner
Portal Data Exchange system. 2 Acknowledge Receipt of Orders Inform HSN Partner Portal Data Exchange system
of receipt of specified order(s). 3 Print Summaries Print order summaries on HSN stock paper of
specified order(s).
Page 38
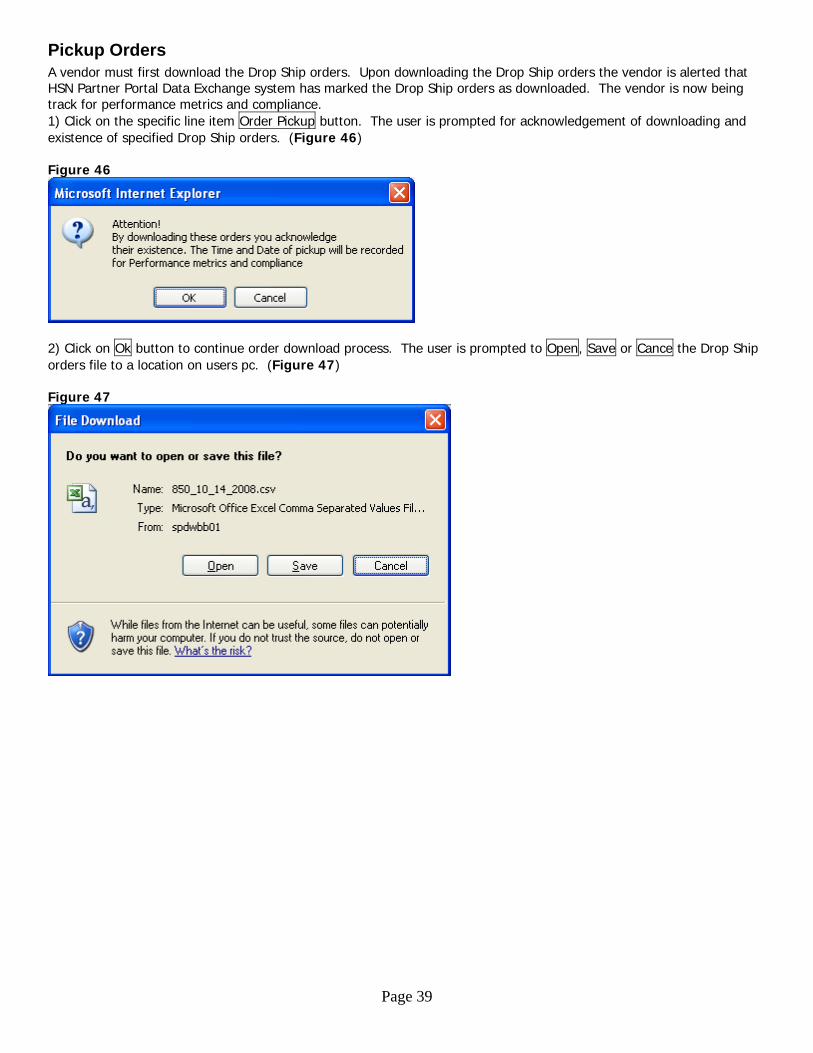
Pickup Orders A vendor must first download the Drop Ship orders. Upon downloading the Drop Ship orders the vendor is alerted that HSN Partner Portal Data Exchange system has marked the Drop Ship orders as downloaded. The vendor is now being track for performance metrics and compliance. 1) Click on the specific line item Order Pickup button. The user is prompted for acknowledgement of downloading and existence of specified Drop Ship orders. (Figure 46) Figure 46
2) Click on Ok button to continue order download process. The user is prompted to Open, Save or Cance the Drop Ship orders file to a location on users pc. (Figure 47) Figure 47
Page 39

3) Click Save button to save to a specified location on user’s pc for utilization in the Trading Partner’s internal Drop Ship order system and/or internal business processes. (Figure 48) NOTE: Pickup Orders screen contains a tool bar button to display “File Specifications” for HSN Partner Portal Data Exchange DropShip Orders files. Figure 48
Page 40
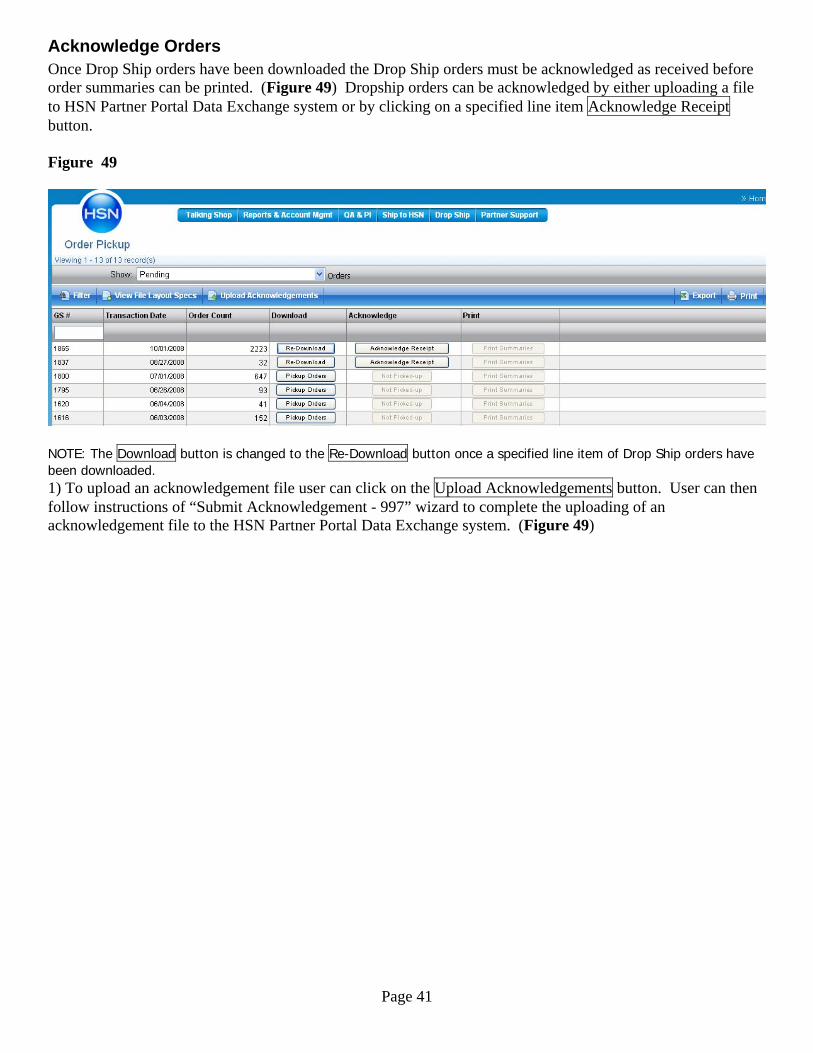
Acknowledge Orders Once Drop Ship orders have been downloaded the Drop Ship orders must be acknowledged as received before order summaries can be printed. (Figure 49) Dropship orders can be acknowledged by either uploading a file to HSN Partner Portal Data Exchange system or by clicking on a specified line item Acknowledge Receipt button. Figure 49
NOTE: The Download button is changed to the Re-Download button once a specified line item of Drop Ship orders have been downloaded. 1) To upload an acknowledgement file user can click on the Upload Acknowledgements button. User can then follow instructions of “Submit Acknowledgement - 997” wizard to complete the uploading of an acknowledgement file to the HSN Partner Portal Data Exchange system. (Figure 49)
Page 41
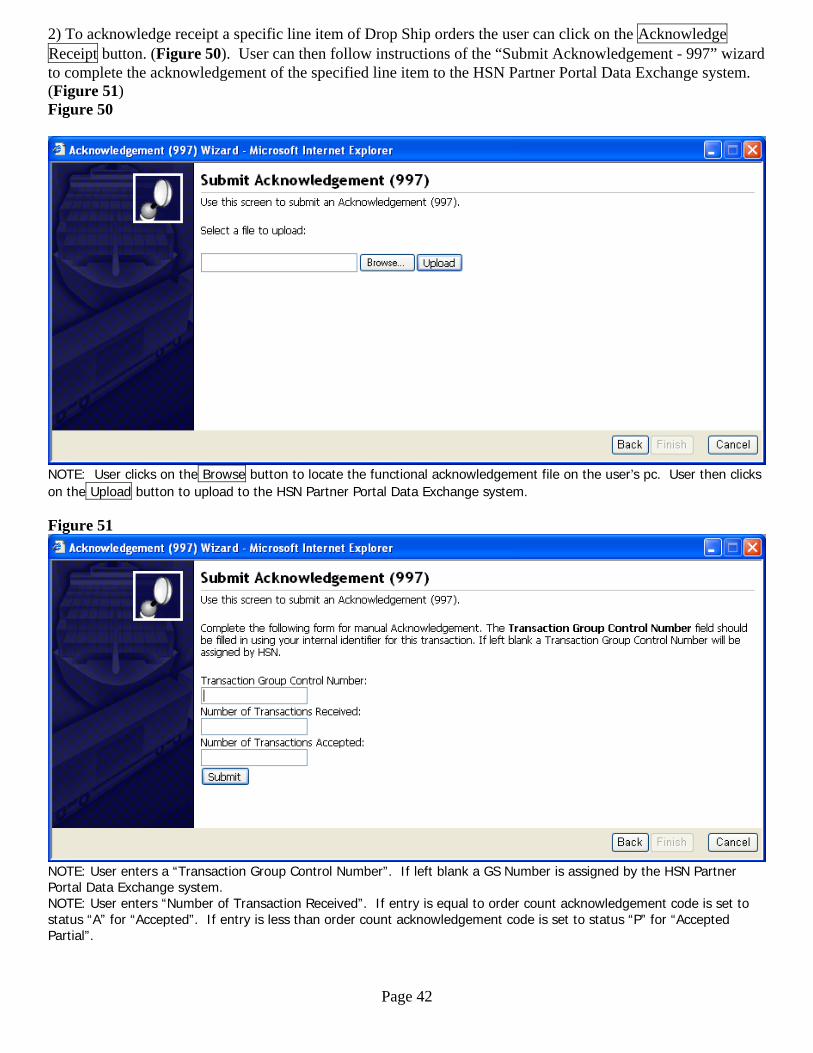
2) To acknowledge receipt a specific line item of Drop Ship orders the user can click on the Acknowledge Receipt button. (Figure 50). User can then follow instructions of the “Submit Acknowledgement - 997” wizard to complete the acknowledgement of the specified line item to the HSN Partner Portal Data Exchange system. (Figure 51) Figure 50
NOTE: User clicks on the Browse button to locate the functional acknowledgement file on the user’s pc. User then clicks on the Upload button to upload to the HSN Partner Portal Data Exchange system. Figure 51
NOTE: User enters a “Transaction Group Control Number”. If left blank a GS Number is assigned by the HSN Partner Portal Data Exchange system. NOTE: User enters “Number of Transaction Received”. If entry is equal to order count acknowledgement code is set to status “A” for “Accepted”. If entry is less than order count acknowledgement code is set to status “P” for “Accepted Partial”.
Page 42
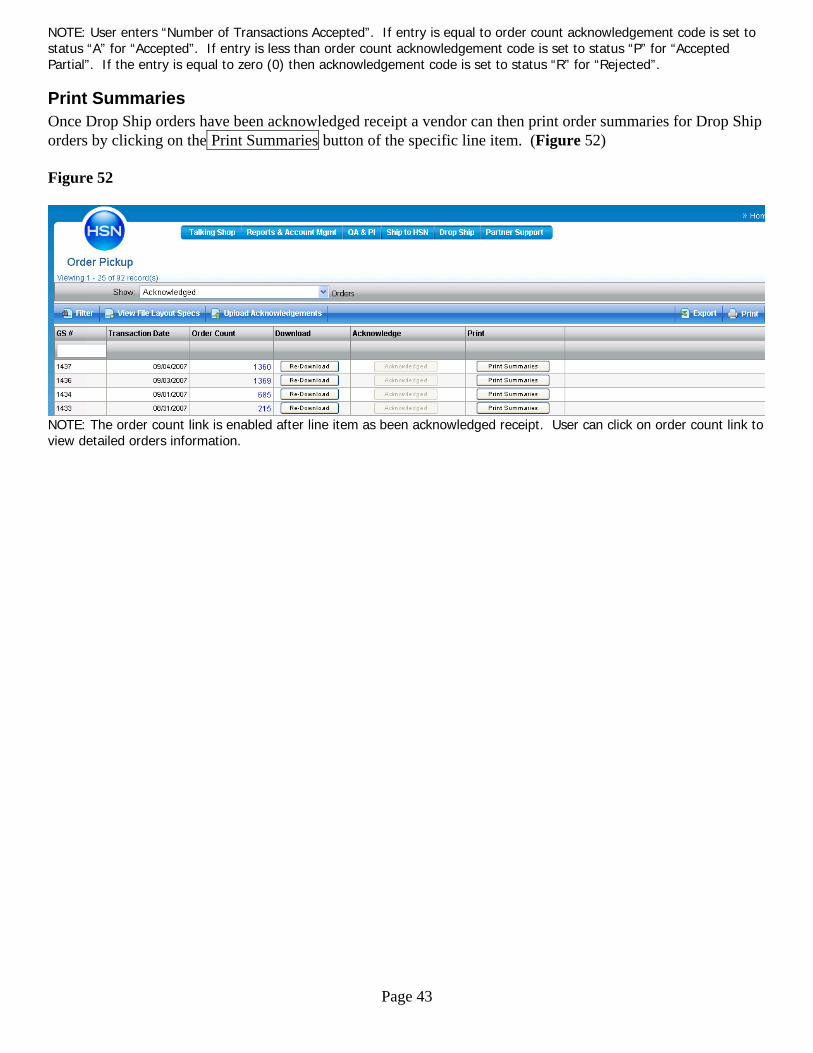
NOTE: User enters “Number of Transactions Accepted”. If entry is equal to order count acknowledgement code is set to status “A” for “Accepted”. If entry is less than order count acknowledgement code is set to status “P” for “Accepted Partial”. If the entry is equal to zero (0) then acknowledgement code is set to status “R” for “Rejected”.
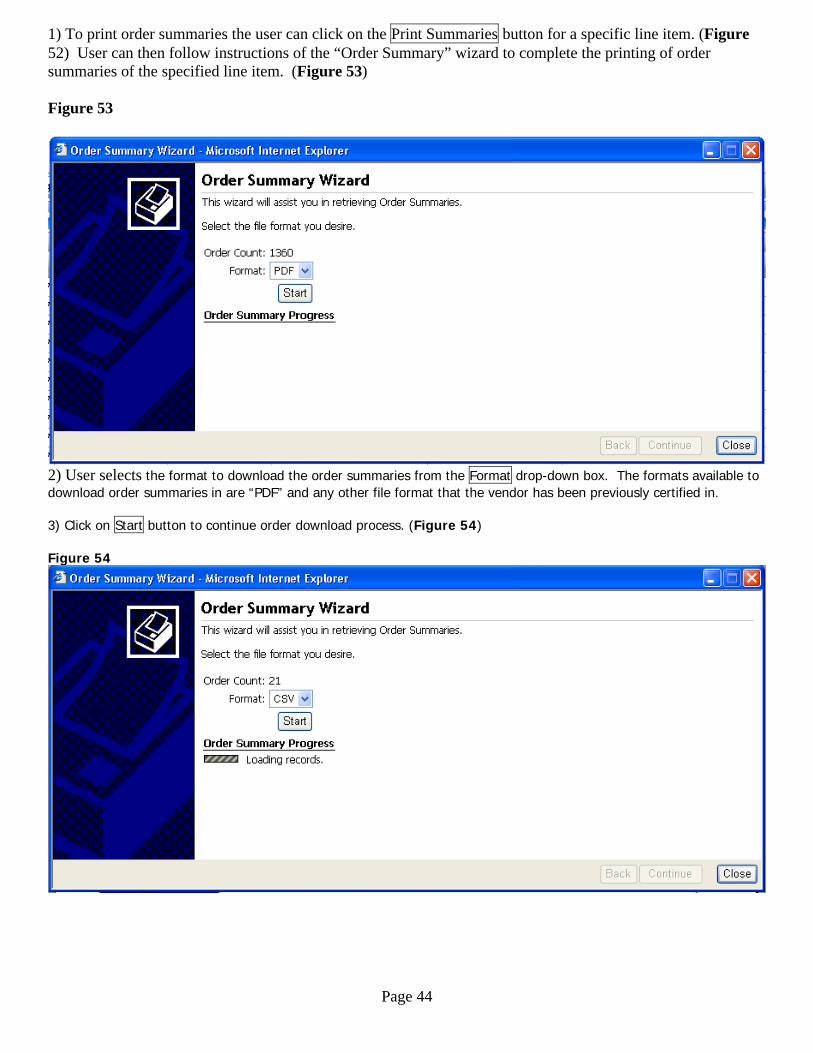
Print Summaries Once Drop Ship orders have been acknowledged receipt a vendor can then print order summaries for Drop Ship orders by clicking on the Print Summaries button of the specific line item. (Figure 52) Figure 52
NOTE: The order count link is enabled after line item as been acknowledged receipt. User can click on order count link to view detailed orders information.
Page 43
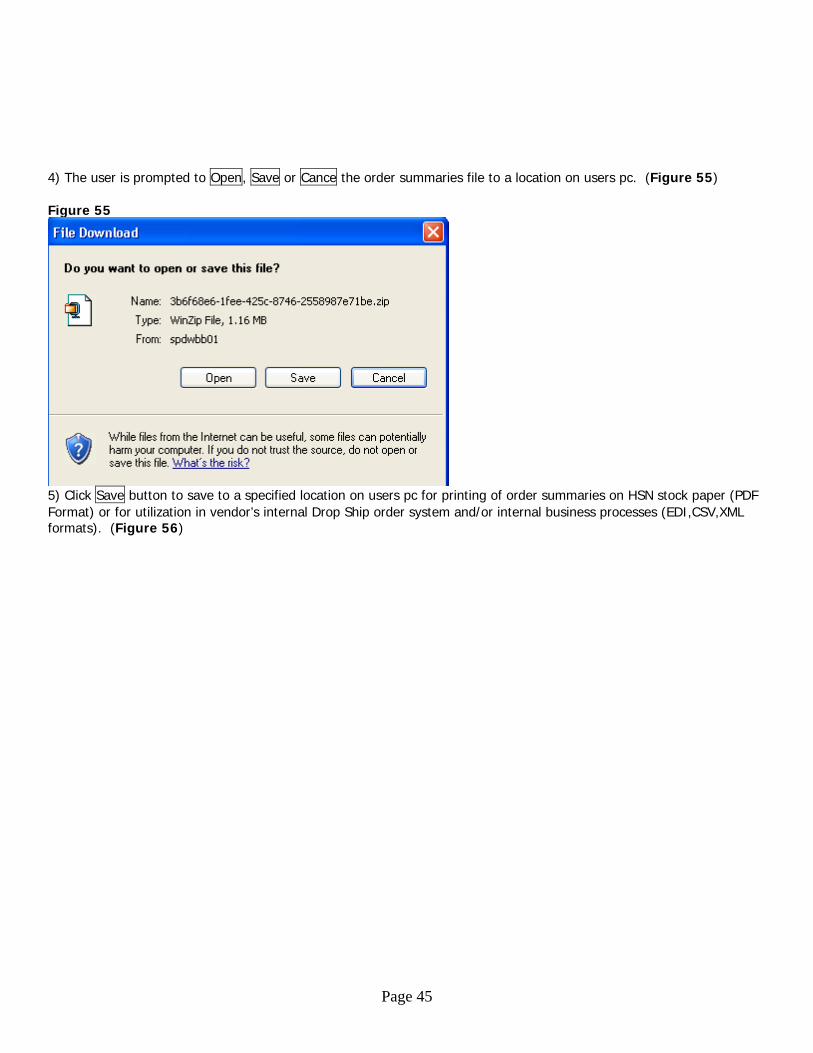
1) To print order summaries the user can click on the Print Summaries button for a specific line item. (Figure 52) User can then follow instructions of the “Order Summary” wizard to complete the printing of order summaries of the specified line item. (Figure 53) Figure 53
2) User selects the format to download the order summaries from the Format drop-down box. The formats available to download order summaries in are “PDF” and any other file format that the vendor has been previously certified in. 3) Click on Start button to continue order download process. (Figure 54) Figure 54
Page 44
4) The user is prompted to Open, Save or Cance the order summaries file to a location on users pc. (Figure 55) Figure 55
5) Click Save button to save to a specified location on users pc for printing of order summaries on HSN stock paper (PDF Format) or for utilization in vendor’s internal Drop Ship order system and/or internal business processes (EDI,CSV,XML formats). (Figure 56)
Page 45
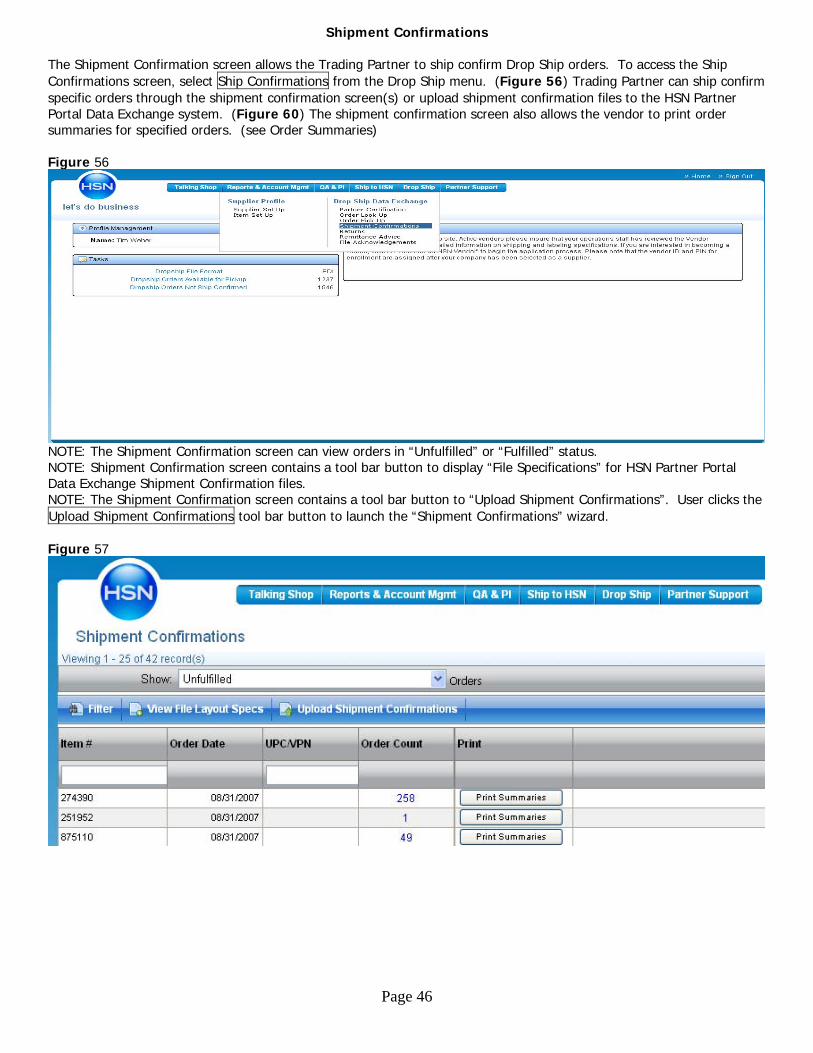
Shipment Confirmations The Shipment Confirmation screen allows the Trading Partner to ship confirm Drop Ship orders. To access the Ship Confirmations screen, select Ship Confirmations from the Drop Ship menu. (Figure 56) Trading Partner can ship confirm specific orders through the shipment confirmation screen(s) or upload shipment confirmation files to the HSN Partner Portal Data Exchange system. (Figure 60) The shipment confirmation screen also allows the vendor to print order summaries for specified orders. (see Order Summaries) Figure 56
NOTE: The Shipment Confirmation screen can view orders in “Unfulfilled” or “Fulfilled” status. NOTE: Shipment Confirmation screen contains a tool bar button to display “File Specifications” for HSN Partner Portal Data Exchange Shipment Confirmation files. NOTE: The Shipment Confirmation screen contains a tool bar button to “Upload Shipment Confirmations”. User clicks the Upload Shipment Confirmations tool bar button to launch the “Shipment Confirmations” wizard. Figure 57
Page 46
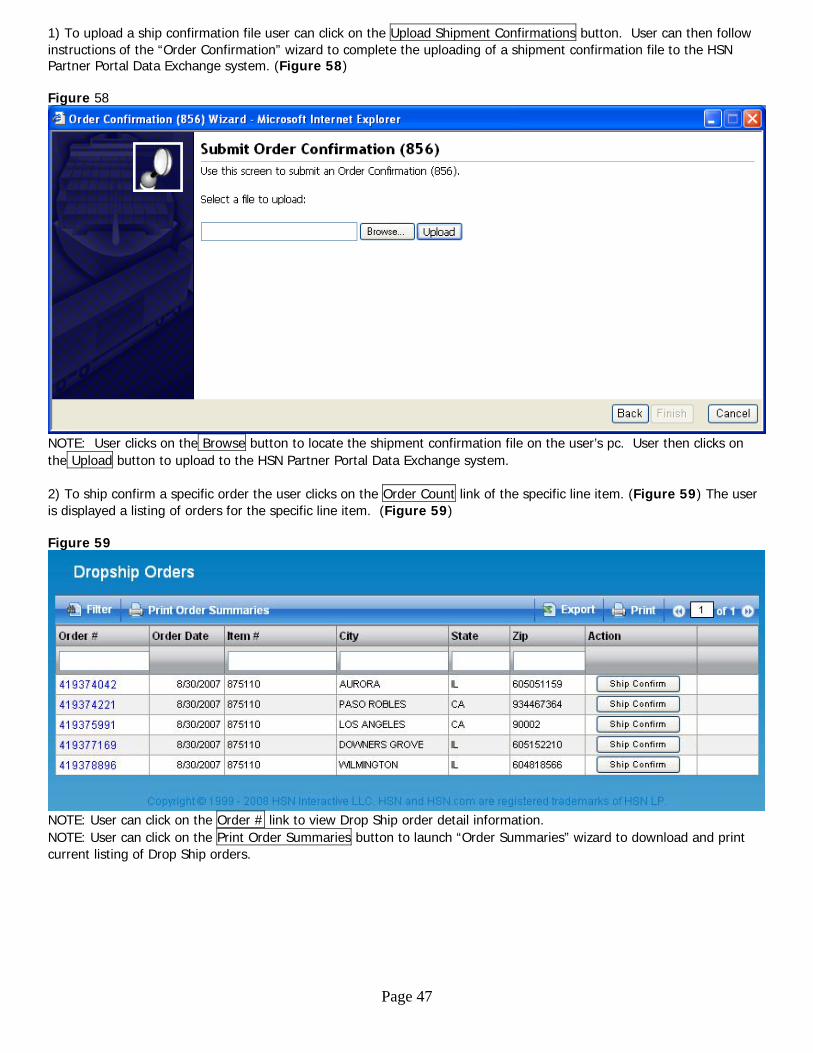
1) To upload a ship confirmation file user can click on the Upload Shipment Confirmations button. User can then follow instructions of the “Order Confirmation” wizard to complete the uploading of a shipment confirmation file to the HSN Partner Portal Data Exchange system. (Figure 58) Figure 58
NOTE: User clicks on the Browse button to locate the shipment confirmation file on the user’s pc. User then clicks on the Upload button to upload to the HSN Partner Portal Data Exchange system. 2) To ship confirm a specific order the user clicks on the Order Count link of the specific line item. (Figure 59) The user is displayed a listing of orders for the specific line item. (Figure 59) Figure 59
NOTE: User can click on the Order # link to view Drop Ship order detail information. NOTE: User can click on the Print Order Summaries button to launch “Order Summaries” wizard to download and print current listing of Drop Ship orders.
Page 47
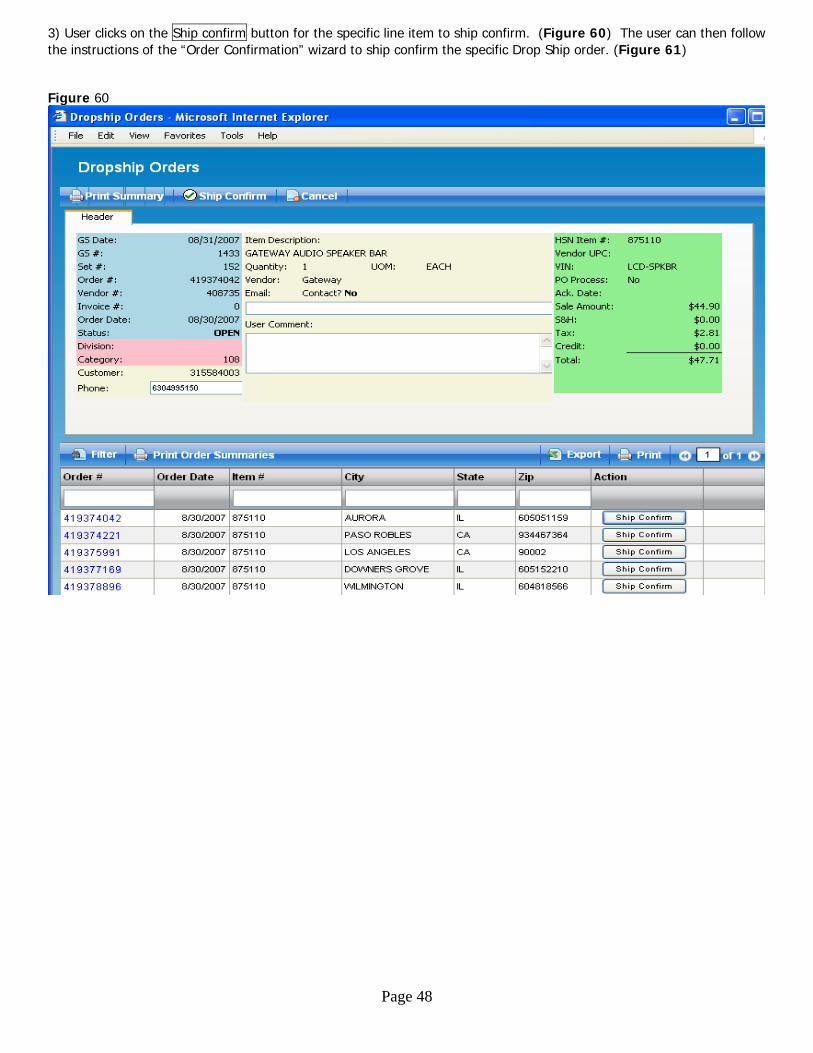
3) User clicks on the Ship confirm button for the specific line item to ship confirm. (Figure 60) The user can then follow the instructions of the “Order Confirmation” wizard to ship confirm the specific Drop Ship order. (Figure 61) Figure 60
Page 48
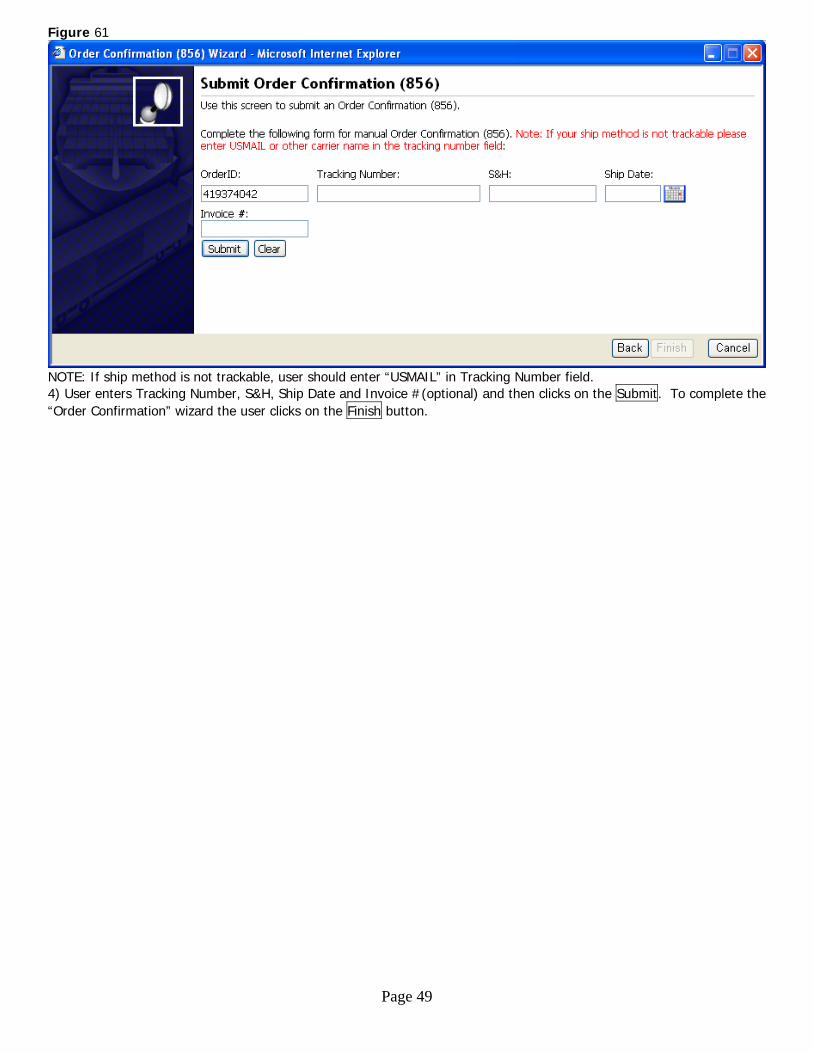
Figure 61
NOTE: If ship method is not trackable, user should enter “USMAIL” in Tracking Number field. 4) User enters Tracking Number, S&H, Ship Date and Invoice #(optional) and then clicks on the Submit. To complete the “Order Confirmation” wizard the user clicks on the Finish button.
Page 49
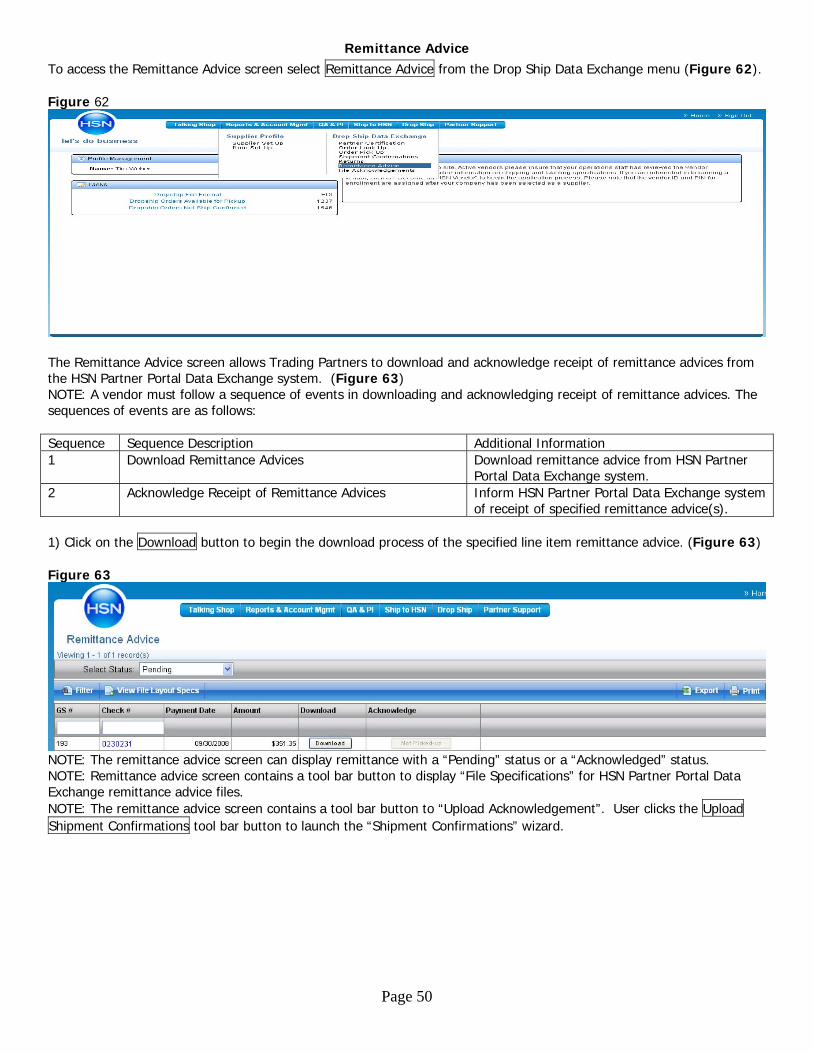
Remittance Advice To access the Remittance Advice screen select Remittance Advice from the Drop Ship Data Exchange menu (Figure 62). Figure 62
The Remittance Advice screen allows Trading Partners to download and acknowledge receipt of remittance advices from the HSN Partner Portal Data Exchange system. (Figure 63) NOTE: A vendor must follow a sequence of events in downloading and acknowledging receipt of remittance advices. The sequences of events are as follows: Sequence Sequence Description Additional Information 1 Download Remittance Advices Download remittance advice from HSN Partner
Portal Data Exchange system. 2 Acknowledge Receipt of Remittance Advices Inform HSN Partner Portal Data Exchange system
of receipt of specified remittance advice(s). 1) Click on the Download button to begin the download process of the specified line item remittance advice. (Figure 63) Figure 63
NOTE: The remittance advice screen can display remittance with a “Pending” status or a “Acknowledged” status. NOTE: Remittance advice screen contains a tool bar button to display “File Specifications” for HSN Partner Portal Data Exchange remittance advice files. NOTE: The remittance advice screen contains a tool bar button to “Upload Acknowledgement”. User clicks the Upload Shipment Confirmations tool bar button to launch the “Shipment Confirmations” wizard.
Page 50
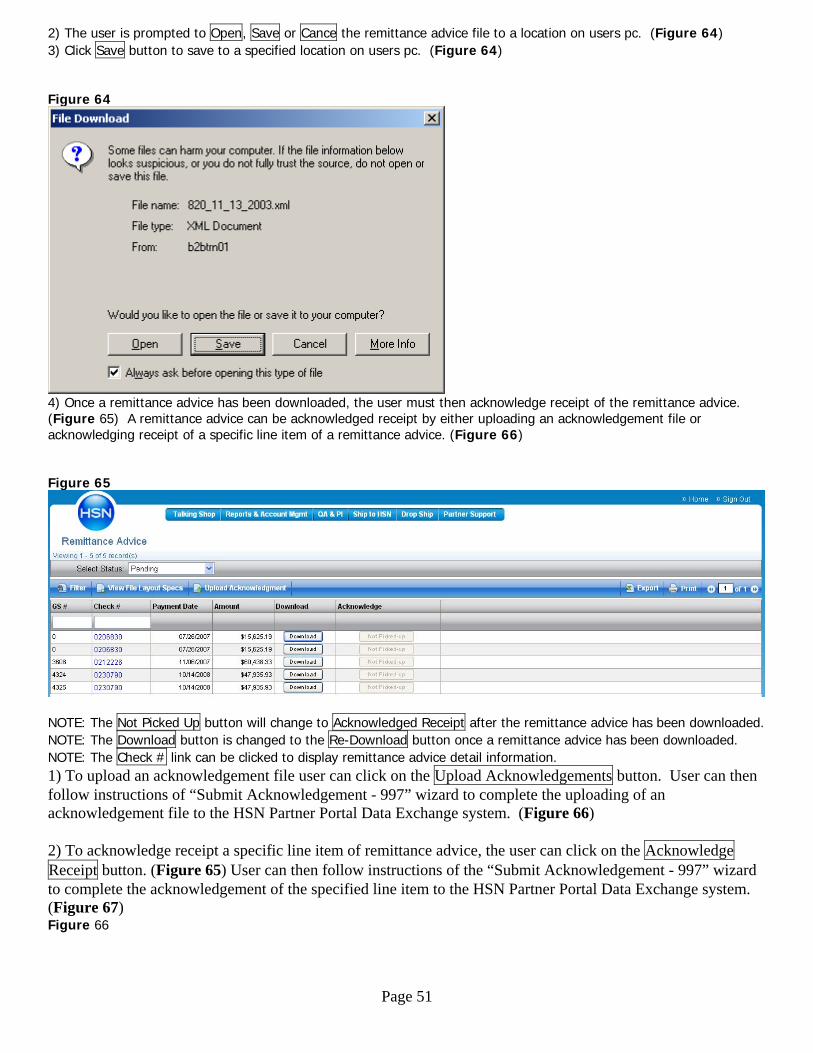
2) The user is prompted to Open, Save or Cance the remittance advice file to a location on users pc. (Figure 64) 3) Click Save button to save to a specified location on users pc. (Figure 64) Figure 64
4) Once a remittance advice has been downloaded, the user must then acknowledge receipt of the remittance advice. (Figure 65) A remittance advice can be acknowledged receipt by either uploading an acknowledgement file or acknowledging receipt of a specific line item of a remittance advice. (Figure 66) Figure 65
NOTE: The Not Picked Up button will change to Acknowledged Receipt after the remittance advice has been downloaded. NOTE: The Download button is changed to the Re-Download button once a remittance advice has been downloaded. NOTE: The Check # link can be clicked to display remittance advice detail information. 1) To upload an acknowledgement file user can click on the Upload Acknowledgements button. User can then follow instructions of “Submit Acknowledgement - 997” wizard to complete the uploading of an acknowledgement file to the HSN Partner Portal Data Exchange system. (Figure 66) 2) To acknowledge receipt a specific line item of remittance advice, the user can click on the Acknowledge Receipt button. (Figure 65) User can then follow instructions of the “Submit Acknowledgement - 997” wizard to complete the acknowledgement of the specified line item to the HSN Partner Portal Data Exchange system. (Figure 67) Figure 66
Page 51
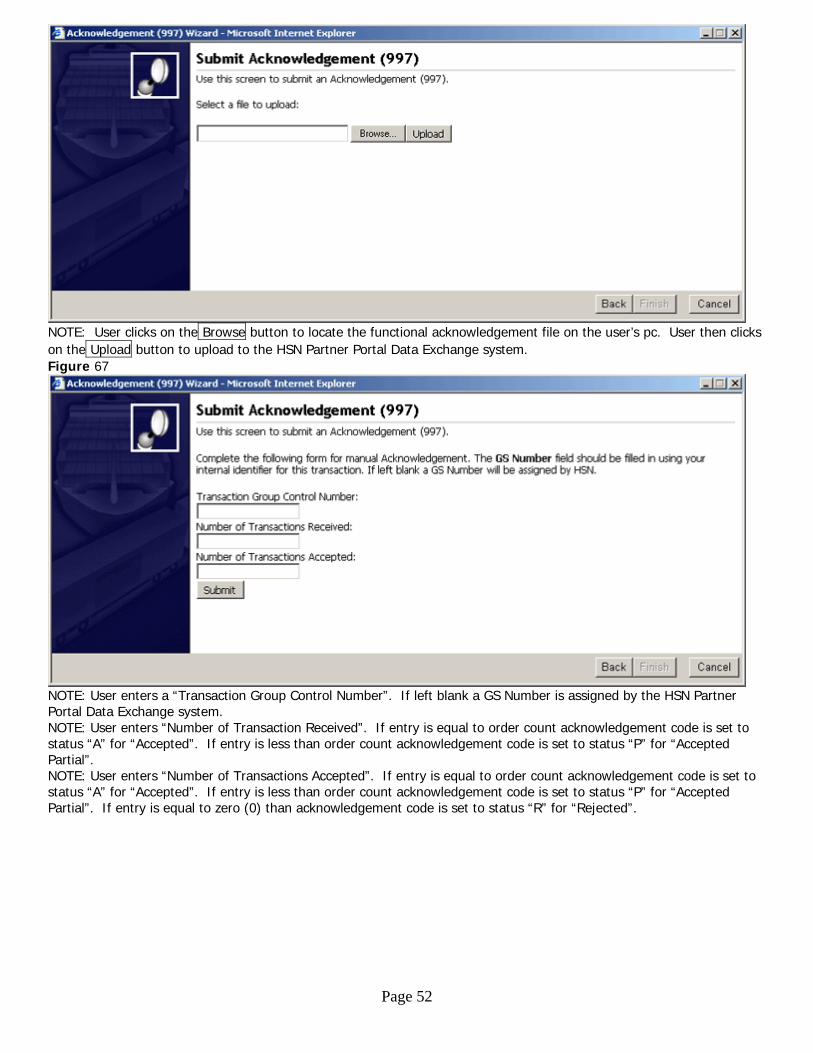
NOTE: User clicks on the Browse button to locate the functional acknowledgement file on the user’s pc. User then clicks on the Upload button to upload to the HSN Partner Portal Data Exchange system. Figure 67
NOTE: User enters a “Transaction Group Control Number”. If left blank a GS Number is assigned by the HSN Partner Portal Data Exchange system. NOTE: User enters “Number of Transaction Received”. If entry is equal to order count acknowledgement code is set to status “A” for “Accepted”. If entry is less than order count acknowledgement code is set to status “P” for “Accepted Partial”. NOTE: User enters “Number of Transactions Accepted”. If entry is equal to order count acknowledgement code is set to status “A” for “Accepted”. If entry is less than order count acknowledgement code is set to status “P” for “Accepted Partial”. If entry is equal to zero (0) than acknowledgement code is set to status “R” for “Rejected”.
Page 52
Returns
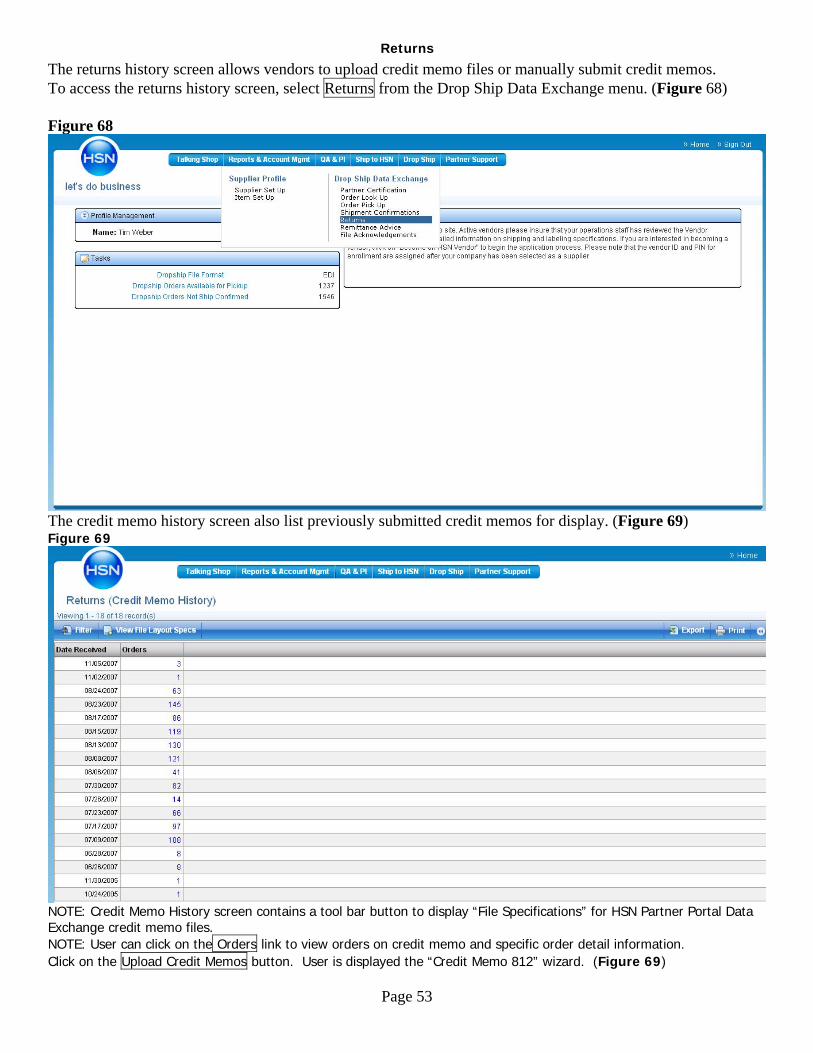
The returns history screen allows vendors to upload credit memo files or manually submit credit memos. To access the returns history screen, select Returns from the Drop Ship Data Exchange menu. (Figure 68) Figure 68
The credit memo history screen also list previously submitted credit memos for display. (Figure 69) Figure 69
NOTE: Credit Memo History screen contains a tool bar button to display “File Specifications” for HSN Partner Portal Data Exchange credit memo files. NOTE: User can click on the Orders link to view orders on credit memo and specific order detail information. Click on the Upload Credit Memos button. User is displayed the “Credit Memo 812” wizard. (Figure 69)
Page 53
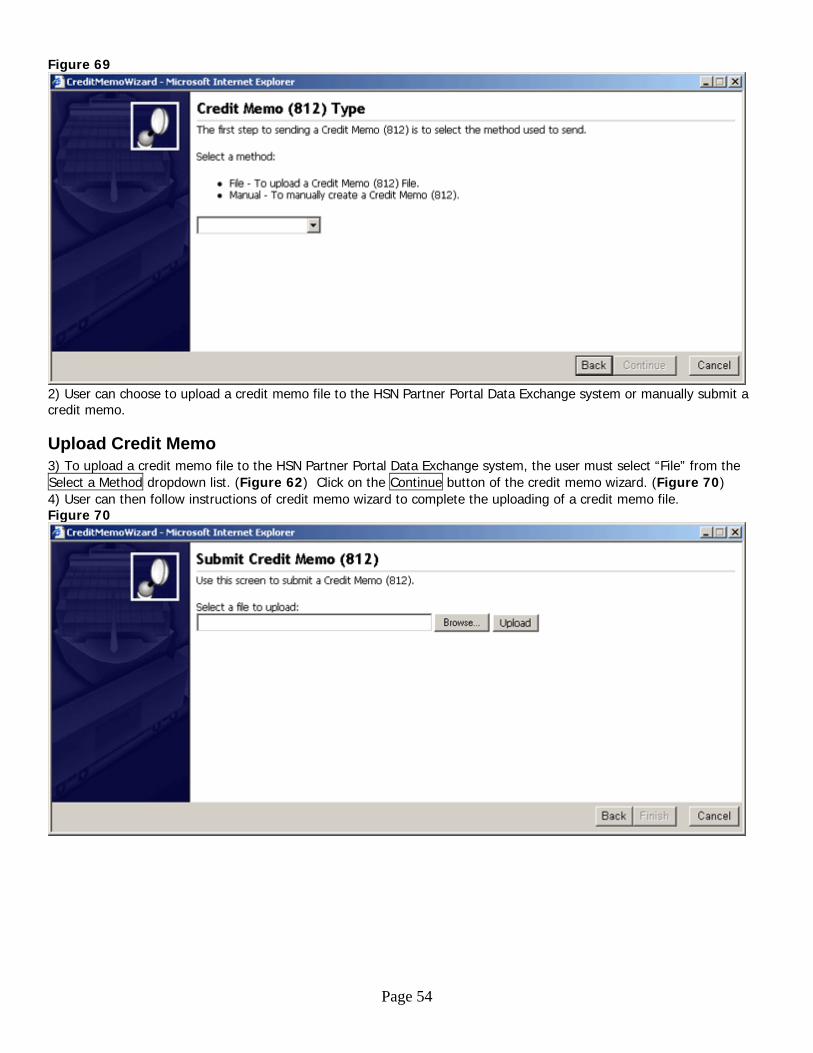
Figure 69
2) User can choose to upload a credit memo file to the HSN Partner Portal Data Exchange system or manually submit a credit memo.
Upload Credit Memo 3) To upload a credit memo file to the HSN Partner Portal Data Exchange system, the user must select “File” from the Select a Method dropdown list. (Figure 62) Click on the Continue button of the credit memo wizard. (Figure 70) 4) User can then follow instructions of credit memo wizard to complete the uploading of a credit memo file. Figure 70
Page 54
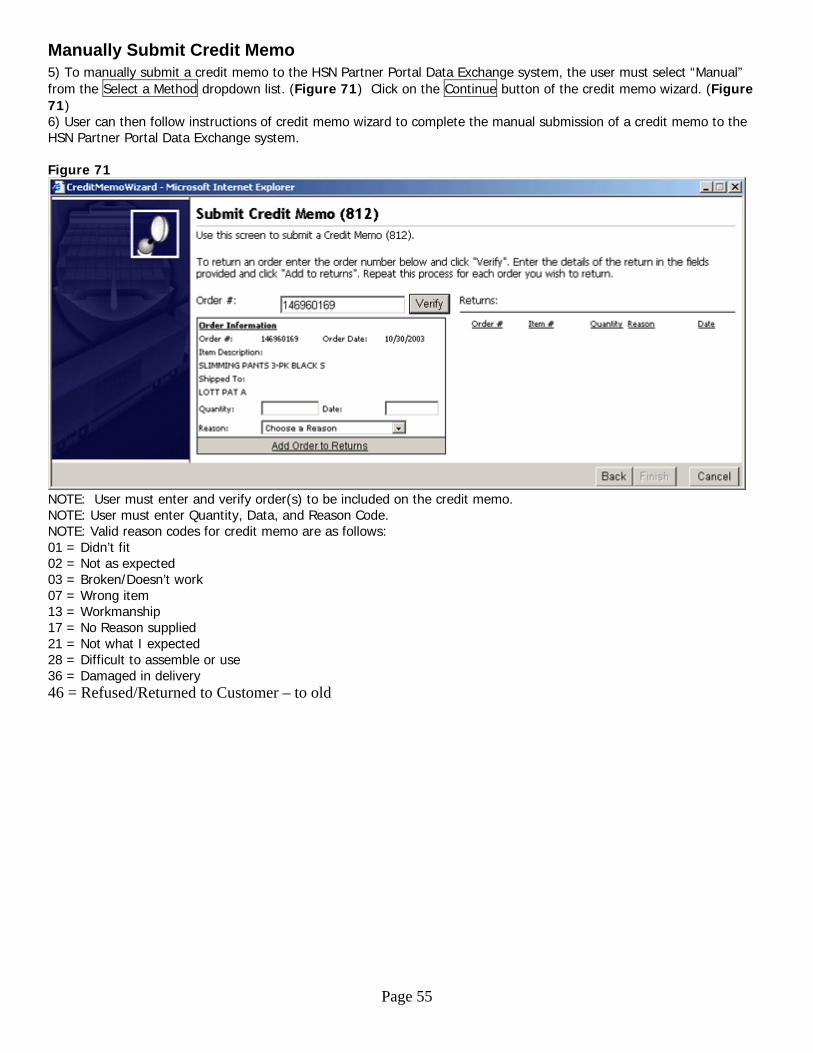
Manually Submit Credit Memo 5) To manually submit a credit memo to the HSN Partner Portal Data Exchange system, the user must select “Manual” from the Select a Method dropdown list. (Figure 71) Click on the Continue button of the credit memo wizard. (Figure 71) 6) User can then follow instructions of credit memo wizard to complete the manual submission of a credit memo to the HSN Partner Portal Data Exchange system. Figure 71
NOTE: User must enter and verify order(s) to be included on the credit memo. NOTE: User must enter Quantity, Data, and Reason Code. NOTE: Valid reason codes for credit memo are as follows: 01 = Didn’t fit 02 = Not as expected 03 = Broken/Doesn’t work 07 = Wrong item 13 = Workmanship 17 = No Reason supplied 21 = Not what I expected 28 = Difficult to assemble or use 36 = Damaged in delivery 46 = Refused/Returned to Customer – to old
Page 55
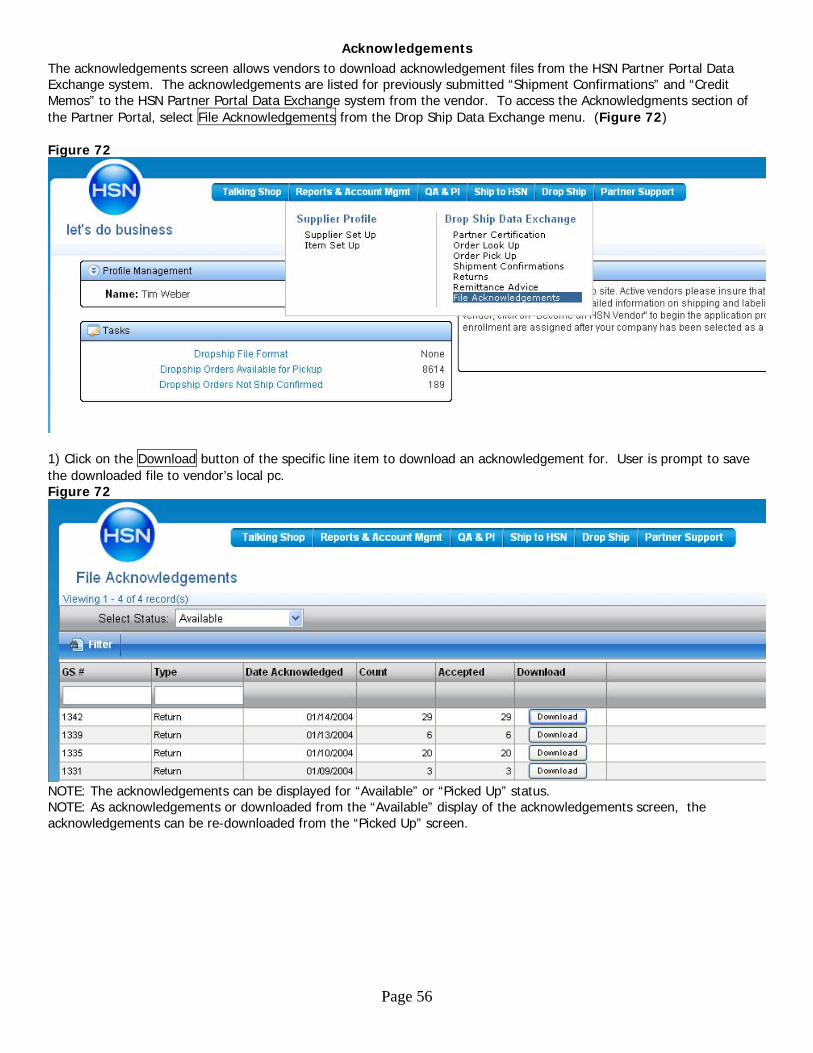
Acknowledgements The acknowledgements screen allows vendors to download acknowledgement files from the HSN Partner Portal Data Exchange system. The acknowledgements are listed for previously submitted “Shipment Confirmations” and “Credit Memos” to the HSN Partner Portal Data Exchange system from the vendor. To access the Acknowledgments section of the Partner Portal, select File Acknowledgements from the Drop Ship Data Exchange menu. (Figure 72) Figure 72
1) Click on the Download button of the specific line item to download an acknowledgement for. User is prompt to save the downloaded file to vendor’s local pc. Figure 72
NOTE: The acknowledgements can be displayed for “Available” or “Picked Up” status. NOTE: As acknowledgements or downloaded from the “Available” display of the acknowledgements screen, the acknowledgements can be re-downloaded from the “Picked Up” screen.
Page 56
My Warehouses
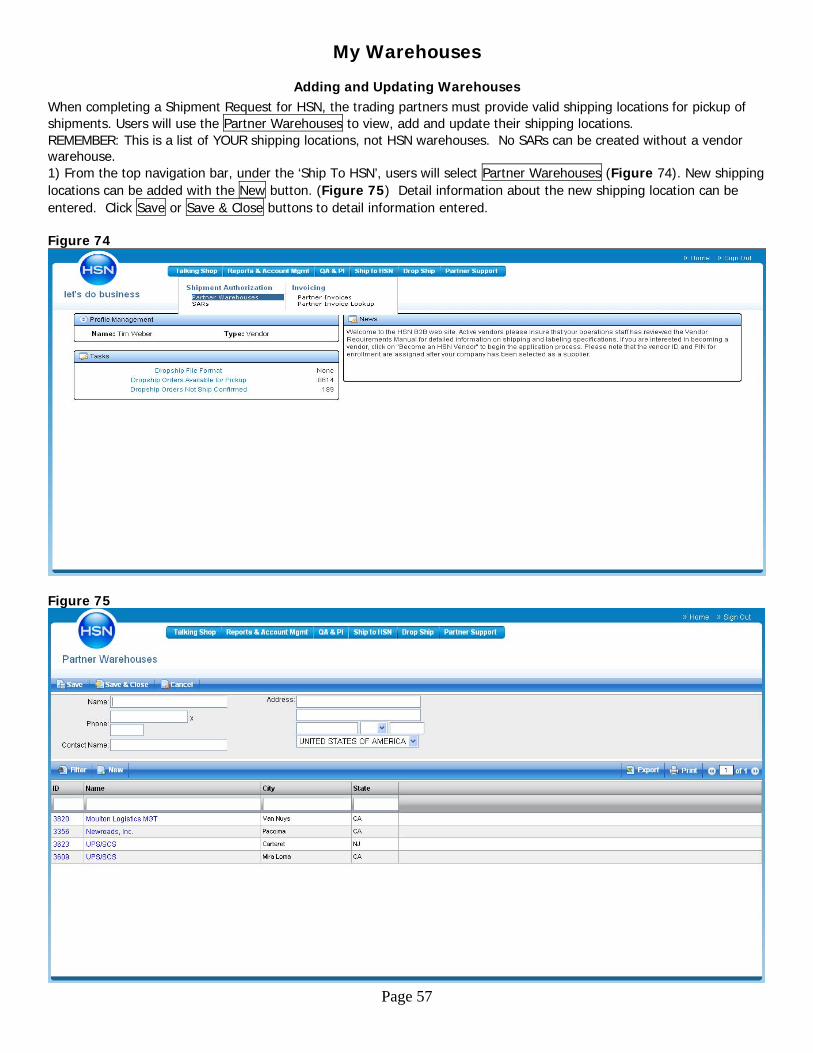
Adding and Updating Warehouses When completing a Shipment Request for HSN, the trading partners must provide valid shipping locations for pickup of shipments. Users will use the Partner Warehouses to view, add and update their shipping locations. REMEMBER: This is a list of YOUR shipping locations, not HSN warehouses. No SARs can be created without a vendor warehouse. 1) From the top navigation bar, under the ‘Ship To HSN’, users will select Partner Warehouses (Figure 74). New shipping locations can be added with the New button. (Figure 75) Detail information about the new shipping location can be entered. Click Save or Save & Close buttons to detail information entered. Figure 74
Figure 75
Page 57
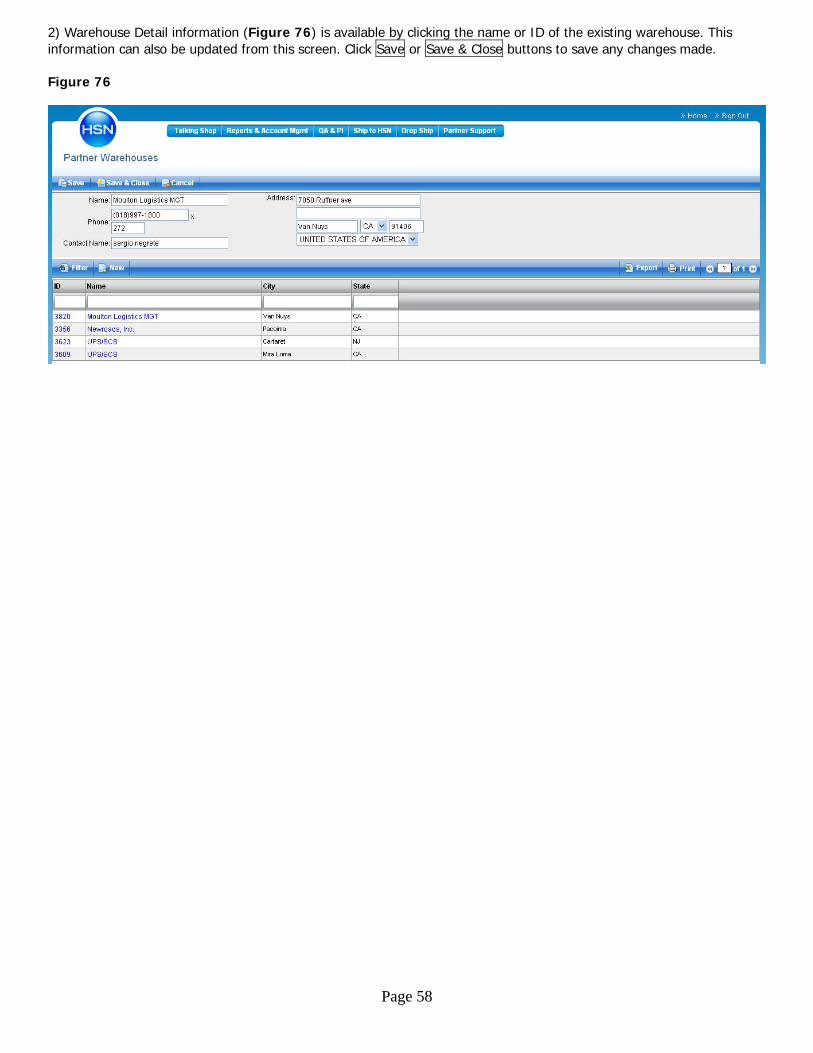
2) Warehouse Detail information (Figure 76) is available by clicking the name or ID of the existing warehouse. This information can also be updated from this screen. Click Save or Save & Close buttons to save any changes made. Figure 76
Page 58
User Accounts
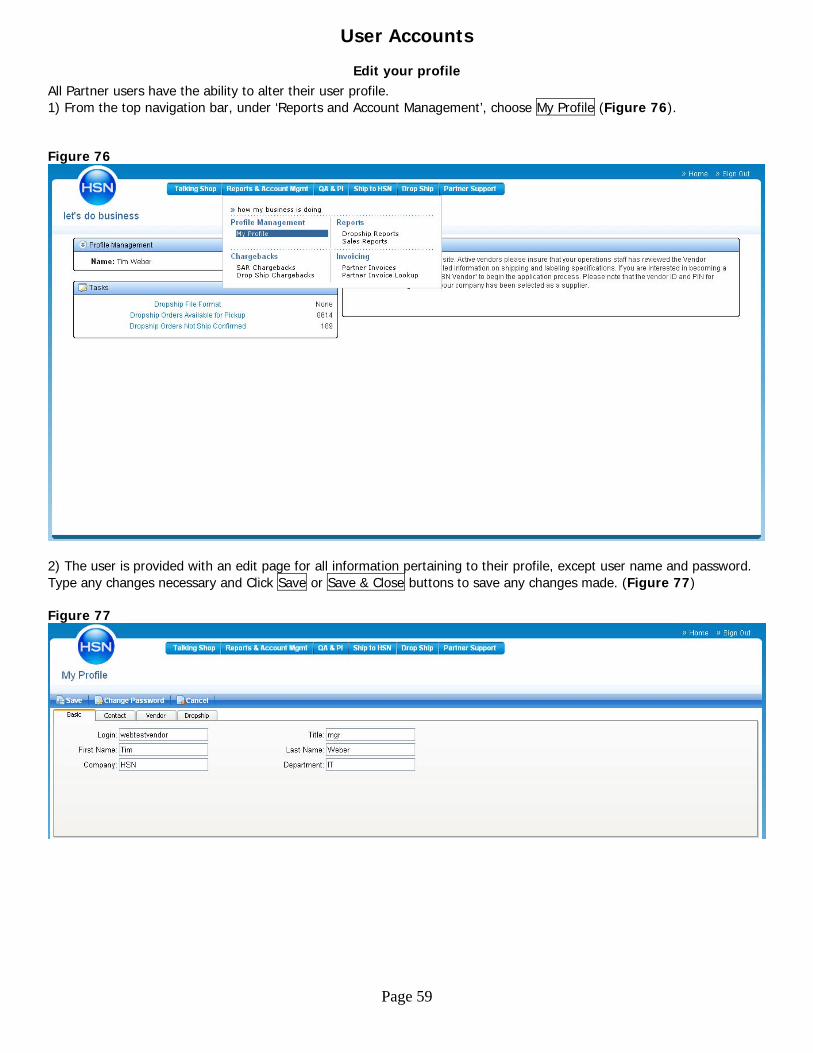
Edit your profile All Partner users have the ability to alter their user profile. 1) From the top navigation bar, under ‘Reports and Account Management’, choose My Profile (Figure 76). Figure 76
2) The user is provided with an edit page for all information pertaining to their profile, except user name and password. Type any changes necessary and Click Save or Save & Close buttons to save any changes made. (Figure 77) Figure 77
Page 59
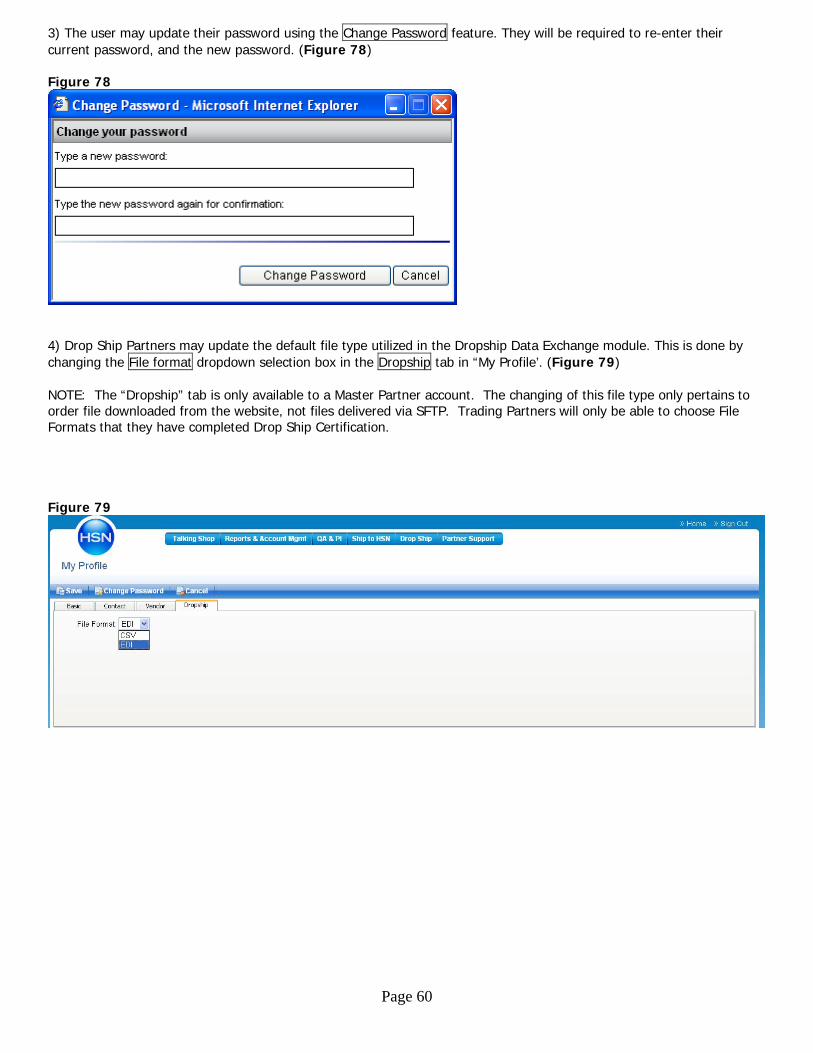
3) The user may update their password using the Change Password feature. They will be required to re-enter their current password, and the new password. (Figure 78) Figure 78
4) Drop Ship Partners may update the default file type utilized in the Dropship Data Exchange module. This is done by changing the File format dropdown selection box in the Dropship tab in “My Profile’. (Figure 79) NOTE: The “Dropship” tab is only available to a Master Partner account. The changing of this file type only pertains to order file downloaded from the website, not files delivered via SFTP. Trading Partners will only be able to choose File Formats that they have completed Drop Ship Certification. Figure 79
Page 60
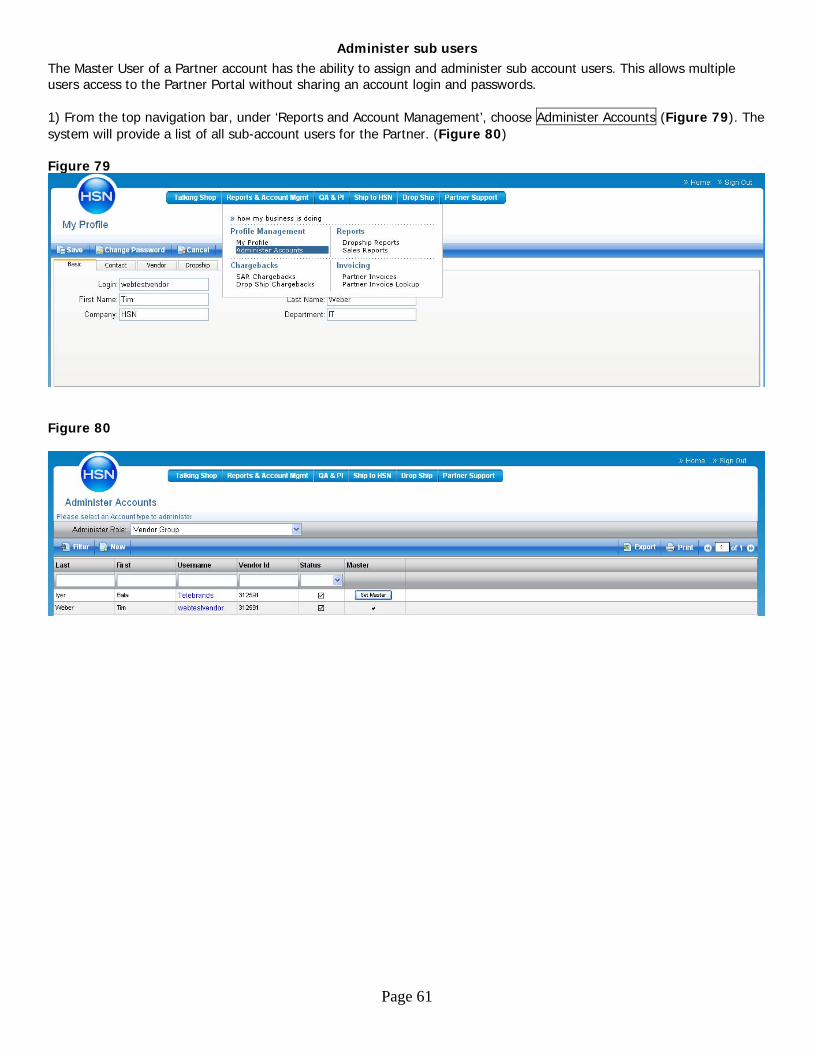
Administer sub users The Master User of a Partner account has the ability to assign and administer sub account users. This allows multiple users access to the Partner Portal without sharing an account login and passwords. 1) From the top navigation bar, under ‘Reports and Account Management’, choose Administer Accounts (Figure 79). The system will provide a list of all sub-account users for the Partner. (Figure 80) Figure 79
Figure 80
Page 61
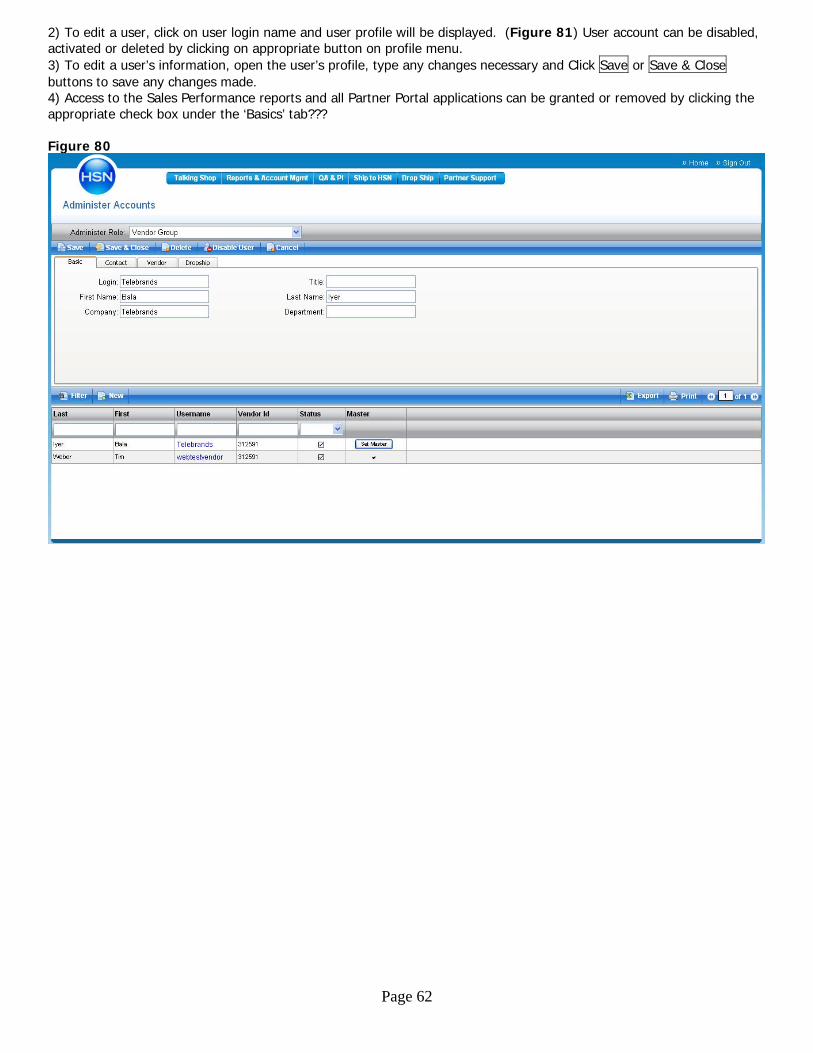
2) To edit a user, click on user login name and user profile will be displayed. (Figure 81) User account can be disabled, activated or deleted by clicking on appropriate button on profile menu. 3) To edit a user’s information, open the user’s profile, type any changes necessary and Click Save or Save & Close buttons to save any changes made. 4) Access to the Sales Performance reports and all Partner Portal applications can be granted or removed by clicking the appropriate check box under the ‘Basics’ tab??? Figure 80
Page 62
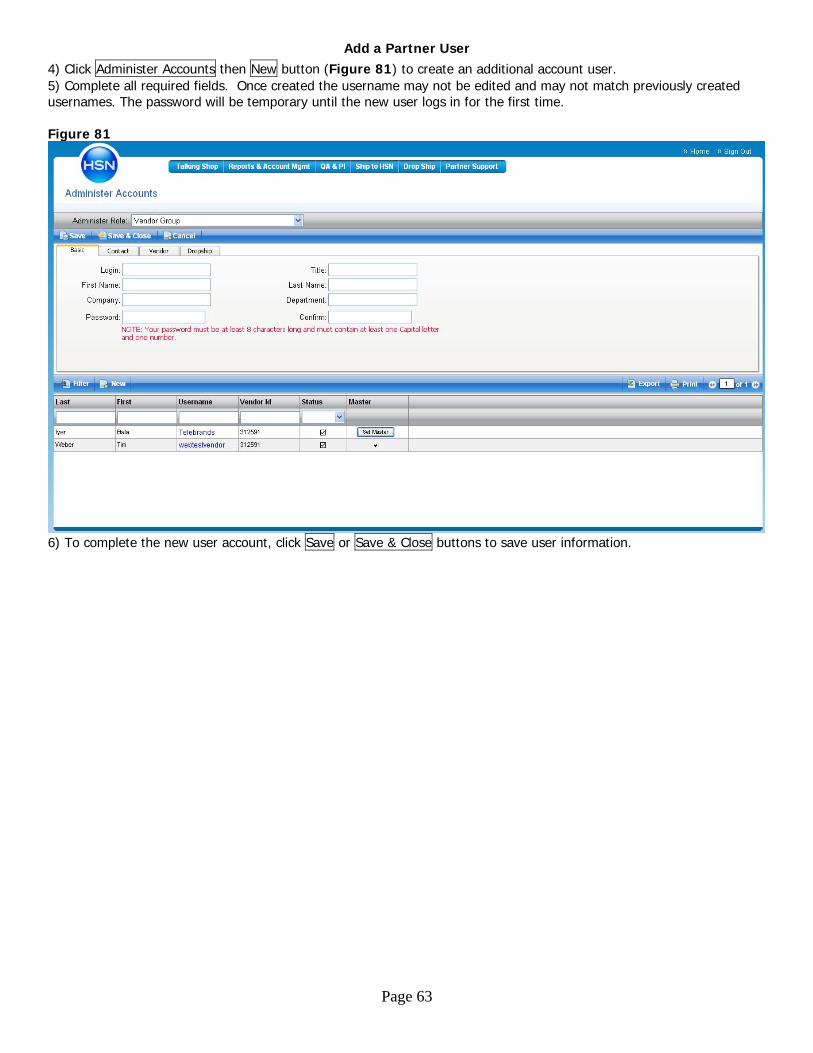
Add a Partner User 4) Click Administer Accounts then New button (Figure 81) to create an additional account user. 5) Complete all required fields. Once created the username may not be edited and may not match previously created usernames. The password will be temporary until the new user logs in for the first time. Figure 81
6) To complete the new user account, click Save or Save & Close buttons to save user information.
Page 63